Embed Size (px)
Citation preview
Department of Microbiology
Quality Manual
Policy # MI_PFGE
Page 1 of 57
Version: 1.4 CURRENT
Section: Bacteriology Procedures Subject Title: Infection Control Pulsed-field Gel
Electrophoresis Prepared by QA Committee
Issued by: Laboratory Manager Revision Date: 2/2/2022
Approved by Laboratory Director:
Microbiologist-in-Chief
Next Review Date: 2/2/2024
Uncontrolled When Printed
UNIVERSITY HEALTH NETWORK/MOUNT SINAI HOSPITAL, DEPARTMENT OF MICROBIOLOGY
NOTE: This document is Uncontrolled When Printed.
Any documents appearing in paper form that do not state "CONTROLLED COPY " in red print are not controlled and should be checked
against the document (titled as above) on the server prior to use. Management System\UHN_Mount Sinai Hospital Microbiology\Standard Operating Procedures\Bacteriology Procedures\
TABLE OF CONTENTS
I. Introduction ............................................................................................................... 3
Isolates for Referred-Out PFGE.............................................................................................. 3
II. Procedure ................................................................................................................... 4
Pulsed-field Bench Workflow .................................................................................................. 4
Testing schedule ........................................................................................................................ 5
Test ordering, broth labeling and inoculation in preparation for typing ............................ 5
Cell Extraction Preparation ..................................................................................................... 7
For MRSA, VRE, GNB, GAS, GBS, ..................................................................................... 7 For Serratia marcescens ....................................................................................................... 12
Settings for CHEF-DR II/III instruments ............................................................................ 16
CHEF-DR II/III Module ....................................................................................................... 17
Ethidium bromide for staining .............................................................................................. 18
Weekly Ethidium Bromide Disposal ..................................................................................... 18
Weekly Ethidium Bromide Preparation ............................................................................... 19
Staining Protocol ..................................................................................................................... 19
How To Use The Gel DOC XR+ Camera ............................................................................. 19
BioNumerics Gel Analysis ...................................................................................................... 22
BioNumerics Naming CMRSA .............................................................................................. 24
III. Reporting .............................................................................................................. 25
PFGE Reporting Phrases ....................................................................................................... 25
Verifying Bionumerics Results .............................................................................................. 26
IV. Processing a Comparison Request (In-house and for PHL) ............................ 28
Documenting Request ............................................................................................................. 28
Comparing and Interpreting a Cluster in Bionumerics ...................................................... 29
Interpretation Example .................................................................................................. 30

Department of Microbiology
Quality Manual
Policy # MI_PFGE
Page 2 of 57
Version: 1.4 CURRENT
Section: Bacteriology Procedures Subject Title: Infection Control Pulsed-field Gel
Electrophoresis
UNIVERSITY HEALTH NETWORK/MOUNT SINAI HOSPITAL, DEPARTMENT OF MICROBIOLOGY
NOTE: This document is Uncontrolled When Printed.
Any documents appearing in paper form that do not state "CONTROLLED COPY” in red print are not controlled and should be checked
against the document (titled as above) on the server prior to use. Management System\UHN_Mount Sinai Hospital Microbiology\Standard Operating Procedures\Bacteriology Procedures\
Sending a Report by E-mail ................................................................................................... 31
Appendix I – PFGE Record Sheet ................................................................................. 32
Appendix II - Documenting Comparison Requests in LIS ......................................... 34
Appendix III - Maintenance and Quality Control ....................................................... 35
Maintenance and QC CHEF PFGE Machines ..................................................................... 35
Before each run ..................................................................................................................... 35
Weekly .................................................................................................................................. 35 Monthly ................................................................................................................................. 35
Water flush and temperature check....................................................................................... 36 Maintenance of Gel Run Record........................................................................................... 36
Yearly .................................................................................................................................... 37
Appendix IV - Preparing PFGE Plugs of the Salmonella ser Branderup H9812 Standard
Strain ................................................................................................................................ 38
Appendix V - Preparing PFGE plugs for Serratia marcescens ................................... 39
Preparing the plugs ................................................................................................................. 40
Appendix VI - Reagents Preparation ............................................................................ 42
PFGE Reagents for Gram Positives ...................................................................................... 42
PFGE Reagents for Gram Negative Bacilli .......................................................................... 43
PFGE Reagents for Serratia marcescens ............................................................................... 44
Stock Reagents ........................................................................................................................ 45
TRIS Buffer Chart .................................................................................................................. 45
ENZYMES ............................................................................................................................... 46
Appendix VII - Calculations for Restriction Enzymes, MBI Fermentas Fast Digest enzyme/
buffer Chart ..................................................................................................................... 46
Appendix VIII - To Send Isolates To NML For: Spa typing ..................................... 52
Appendix IX – Reference Material .............................................................................. 53

Department of Microbiology
Quality Manual
Policy # MI_PFGE
Page 3 of 57
Version: 1.4 CURRENT
Section: Bacteriology Procedures Subject Title: Infection Control Pulsed-field Gel
Electrophoresis
UNIVERSITY HEALTH NETWORK/MOUNT SINAI HOSPITAL, DEPARTMENT OF MICROBIOLOGY
NOTE: This document is Uncontrolled When Printed.
Any documents appearing in paper form that do not state "CONTROLLED COPY” in red print are not controlled and should be checked
against the document (titled as above) on the server prior to use. Management System\UHN_Mount Sinai Hospital Microbiology\Standard Operating Procedures\Bacteriology Procedures\
I. Introduction
Pulsed field gel electrophoresis (PFGE) typing or macro-restriction of micro-organisms is
performed for epidemiological purposes to determine the relatedness between the chromosomal
DNA of two or more isolates.
PFGE assists the Infection Control department by:
1. Providing an understanding of the transmission of isolates between patients.
2. Providing evidence of transmission of isolates from the environment to patients.
3. Determining whether isolates involved in recurrent infections are the same clone or
are newly acquired.
II. Specimen Collection
Isolates for PFGE (Routinely Done) In-House
ISOLATES FOR PFGE IN-HOUSE UHN MSH
New MRSA No Yes1
New VRE No Yes2
New Group A Streptococcus No Yes3
Any organism as part of a cluster or upon ICP's request Yes Yes
1. MSH New = 1st time isolated and every 3months thereafter, if no other positive in
between isolates.
2. 1st time isolated and once a year there after.
3. In-patient only or if identified by infection control to be a nosocomial GAS.
Isolates for Referred-Out PFGE
ISOLATES FOR PFGE PHL Baycrest
New MRSA Yes1
Any organism as part of a cluster upon ICP's request Yes
1. 1st time isolated and every 3months thereafter if no other positive in between isolates.
Note: VRE not routinely sent out.
III. Reagents / Materials / Media
See Analytical Process – Bacteriology Reagents_Materials_Media List QPCMI10001

Department of Microbiology
Quality Manual
Policy # MI_PFGE
Page 4 of 57
Version: 1.4 CURRENT
Section: Bacteriology Procedures Subject Title: Infection Control Pulsed-field Gel
Electrophoresis Prepared by QA Committee
Issued by: Laboratory Manager Revision Date: 2/2/2022
Approved by Laboratory Director:
Microbiologist-in-Chief
Next Review Date: 2/2/2024
Uncontrolled When Printed
UNIVERSITY HEALTH NETWORK/MOUNT SINAI HOSPITAL, DEPARTMENT OF MICROBIOLOGY
NOTE: This document is Uncontrolled When Printed.
Any documents appearing in paper form that do not state "CONTROLLED COPY " in red print are not controlled and should be checked
against the document (titled as above) on the server prior to use. Management System\UHN_Mount Sinai Hospital Microbiology\Standard Operating Procedures\Bacteriology Procedures\
II. Procedure
Pulsed-field Bench Workflow
DAY 1 DAY 2 DAY 3 DAY 4
PFGE 1 1. Retrieve incubated PF BHIB isolates
from incubator.
2. Check Bionumerics database to see
if done previously. Refer to chart
above for testing frequency
3. Process isolates up until “wash
stage"( can be left washing
overnight)
4. Enter isolates in Bionumerics, LIS
(plug date and PF done in isolate
window)
5. Create gel legends for each type and
log into “Gel Run Record” (in T
drive)
6. Document incubator temperatures,
lot number and expiry dates for
enzymes on gel legends
7. Check for new queries Respond
ETA for results
8. Answer queries.
9. Retrieve any query isolates as
necessary.
1. Prepare isolates for digest
2. Prepare machines (drain,
rinse, clean, change buffer,
inspect for broken electrodes)
3. Make agarose for each gel,
load plugs onto combs, affix
with agarose, chill, pour gel,
chill and load
4. Document machine
maintenance
5. Wash glass wash containers
and prepare for autoclaving.
6. Send green caps for washing.
7. Send glassware for washing
8. Check for new queries
Respond ETA for results
9. Answer queries.
10. Retrieve any query isolates as
necessary.
1. Make fresh stain
2. Stain/ Destain and
photograph gels
3. File and export data
from images
photographed into
Bionumerics.
4. Normalize gels
5. Name MRSA’s.
6. Report in LIS.
7. Prepare green caps for
autoclaving
8. Answer queries.
9. Subculture send out
organisms as required
10. Check for new queries
Respond ETA for results
11. Answer queries.
12. Retrieve any query
isolates as necessary. 13. Verifiy results
1. Make reagents
2. Prepare aliquots of
enzymes
3. Check inventory
4. Order enzymes,
supplies
5. Restock supplies
6. Prepare H9812 plugs
as required
7. Discard plugs > 3
months old
8. Update Bionumerics
database (Cleaning)
9. Retrieve any query
isolates as necessary.
10. Monthly-
temperature check;
Flow rate check and
adjustment

Department of Microbiology
Quality Manual
Policy # MI_PFGE
Page 5 of 57
Version: 1.4 CURRENT
Section: Bacteriology Procedures Subject Title: Infection Control Pulsed-field Gel
Electrophoresis
UNIVERSITY HEALTH NETWORK/MOUNT SINAI HOSPITAL, DEPARTMENT OF MICROBIOLOGY
NOTE: This document is Uncontrolled When Printed.
Any documents appearing in paper form that do not state "CONTROLLED COPY” in red print are not controlled and should be checked
against the document (titled as above) on the server prior to use. Management System\UHN_Mount Sinai Hospital Microbiology\Standard Operating Procedures\Bacteriology Procedures\
Testing schedule
PFGE is run weekly in-house according to schedule, refrigerate pre-inoculated broths.
Incubate broths in 37ºC incubator @ 4:00p.m on day before for PFGE processing.
The run from incubated the broth to finish will take 3-4 days.
Test ordering, broth labeling and inoculation in preparation for typing
Isolates for typing come from different benches, but are handled in the same manner.
Routine Benches
When an isolate qualifies for PFGE:-
1. Order ^BHIB and ^PF in LIS.
2. From PF, select isolate type from keypad (i.e. MRSA, VRE, GNB etc).
3. Attach one large label to 10ml BHI broth for gram positive organisms. Alternately, a
Mueller Hinton plate can be used for gram negative organisms. Write organism name (i.e.
MRSA, VRE, etc) and any other relevant information e.g. (ESBL Class A-LF) on the
label.
4. Touch 1-3 colonies (dependent on colony size) of pure growth with a loop and inoculate
the broth/plate.
5. Put inoculated broth/plate into rack in PFGE fridge for batch testing.
6. The MRSA bench technologist is responsible for placing the BHIB rack into the 37oC
incubating shaker on the date before PFGE setting up. The only exceptions to this
protocol are:
a. Streptococcus pneumoniae - must be inoculated just prior to incubation onto 2 BA
plates (CO2).
PFGE Bench
1. Retrieve isolates for PFGE from shaker and plate rack
2. Put Brain heart infusion tubes / plates in order (alphabetical) within groups
3. Print required labels.
4. Put labels in the same order within groups.
5. Match labels to isolates
6. Place cultures @4oC until ready for processing.
7. Using labels check appropriate Bionumerics database MRSA, VRE, and GNB MSH for
repeats (right click on Last Name column and choose arrange by field for alphabetical
order).
Department of Microbiology
Quality Manual
Policy # MI_PFGE
Page 6 of 57
Version: 1.4 CURRENT
Section: Bacteriology Procedures Subject Title: Infection Control Pulsed-field Gel
Electrophoresis
UNIVERSITY HEALTH NETWORK/MOUNT SINAI HOSPITAL, DEPARTMENT OF MICROBIOLOGY
NOTE: This document is Uncontrolled When Printed.
Any documents appearing in paper form that do not state "CONTROLLED COPY” in red print are not controlled and should be checked
against the document (titled as above) on the server prior to use. Management System\UHN_Mount Sinai Hospital Microbiology\Standard Operating Procedures\Bacteriology Procedures\
If an unwarranted repeat, document in LIS (Prev see LIS#........) at back of workcard.
8. Assign processing numbers to isolates. Write processing numbers on labels (1 large label
3 small labels) and on matching BHI tubes. Affix a small barcode label on the PFGE
record sheet (see Appendix I).
IN LIS
1. Document plug date under PF
(If isolate not on work list order PF)
2. Go to individual isolates and add isolate letter and pfdone in isolate window.
3. Ensure that the appropriate organism has been ordered in the PF window in LIS.
i.e.`MRSA`
IN BIONUMERICS
1. Add new entries
N.B:
a. Copy and paste demographics from LIS to avoid transcription errors.
b. Choose Organism name and comment (ESBL class A…etc.) from drop down menu for
consistency.

Department of Microbiology
Quality Manual
Policy # MI_PFGE
Page 7 of 57
Version: 1.4 CURRENT
Section: Bacteriology Procedures Subject Title: Infection Control Pulsed-field Gel
Electrophoresis
UNIVERSITY HEALTH NETWORK/MOUNT SINAI HOSPITAL, DEPARTMENT OF MICROBIOLOGY
NOTE: This document is Uncontrolled When Printed.
Any documents appearing in paper form that do not state "CONTROLLED COPY” in red print are not controlled and should be checked
against the document (titled as above) on the server prior to use. Management System\UHN_Mount Sinai Hospital Microbiology\Standard Operating Procedures\Bacteriology Procedures\
Cell Extraction Preparation
For MRSA, VRE, GNB, GAS, GBS,
Step 1 Preparation:
1. Turn on 60ºC, 37 ºC water-bath and adjust the water levels as appropriate.
2. Ensure incubator/shaker on at 55 ºC.
3. Calculate how much of each enzyme is necessary for lysis (see Table 1).
TABLE 1: LYSIS ENZYME TABLE
Lysozyme L10
(10mg/mL)
Lysostaphin
1mg/mL (Sigma)
Lysozyme L100
(100mg/mL)
Mutanolysin
5U/µL (Sigma)
Proteinase K
20mg/mL (Roche)
MRSA 50µL per tube 10µL per tube 40µL per tube
VRE 40µL per tube 15 µL per tube 40µL per tube
GNB 40µL per tube
GAS / GBS 50µL per tube 50µL per tube 20µL per tube
4. Remove enzymes from freezer and allow them to thaw. Keep @4 ºC until ready for use.
5. Alphabetize labels for VRE, MRSA, etc and check Bionumerics for previous. Discard
repeats. See chart above to determine testing frequency.
6. Put labels in numerical order and BHIB to match.
7. Label BHIB lids and labels 1, 2 etc.
8. Label 2 sets of 1.5ml microfuge tube with the assigned number for each sample to be
sub-typed. (i.e. 1, 2,3 etc) (blue for MRSA, black for VRE, red for GNB).
9. Label 1 Vk. Tube for each (1, 2 etc.) (colour coded as above).
10. Aliquot 1.5 mls PIV Buffer (GP) into each tube Vitek tube. (SE buffer for GNB)
11. Label white-capped tubes for each isolate. (colour coded as above) (1, 2 etc.)
12. Label disposable plug molds 2 spots per isolate. (colour coded as above)
NB: If unable to proceed with making plugs this is a good place to break off.
13. Prepare 1% Seakem Gold Agarose(SKG) in Sterile de-ionized water(SDH2O) for making
all plugs.(0.1gm SKG in 10 mL SDH2O or .2gm SKG in 20mL SDH2O). Use 50mL tube.
14. Place tube in beaker with water and dissolve agarose in microwave for 30 secs to 1 min
(check at 30 sections). Keep in 58 ºC water-bath until ready for use.

Department of Microbiology
Quality Manual
Policy # MI_PFGE
Page 8 of 57
Version: 1.4 CURRENT
Section: Bacteriology Procedures Subject Title: Infection Control Pulsed-field Gel
Electrophoresis
UNIVERSITY HEALTH NETWORK/MOUNT SINAI HOSPITAL, DEPARTMENT OF MICROBIOLOGY
NOTE: This document is Uncontrolled When Printed.
Any documents appearing in paper form that do not state "CONTROLLED COPY” in red print are not controlled and should be checked
against the document (titled as above) on the server prior to use. Management System\UHN_Mount Sinai Hospital Microbiology\Standard Operating Procedures\Bacteriology Procedures\
Step 2 Standardization:
1. Transfer broth from BHIB’s using transfer pipette into labeled microfuge tubes,
centrifuge @ 14,000 rpm for 1 minute to pellet.
2. Pipette off supernatant. Change pipette.
3. Calibrate Vitek colorimeter.
4. Re-suspend pellet with small amount of PIV buffer from the pre-labelled Vk. tube and
make 20% transmittance suspension for each isolate (SE buffer for Gram negatives)
Vortex to make a smooth suspension.
5. Add 200 uls (using 1000 ls pipette) of bacterial cell suspension to each labelled
microfuge tube.
6. Add 200 uls (using 200 ls pipette) 1% SeaKem Gold agarose. Mix and fill two plug
mold spots. (Make sure that there are no bubbles and that the molds have not been
overfilled).
7. Do this for each isolate. Solidify at 4C 5-10 minutes.
Step 3 Lysis & Preparation:
MRSA Lysis Enzymes
Make a master mix for lysis in 50 ml conical tube
2 mL EC Lysis Buffer per test plus 1
50 uls L10 (lysozyme) per test plus 1
10 uL Lysostaphin 1 mg/mL per test plus 1
Document lot # on gel legend sheet.
Aliquot 2mls EC Lysis Buffer/L10 mixture to labeled white-capped tubes for each
isolate
VRE Lysis Enzymes
Make a master mix for lysis in 50 ml conical tube
2 mL EC Lysis Buffer per test plus 1
40 uls L100 (lysozyme) per test plus 1
15 uL Mutanolysin(50000 U/mL) per test plus 1
Document lot # on gel legend sheet.
Aliquot 2mls EC Lysis Buffer/L10 mixture to labeled white-capped tubes for each
isolate
Immerse the plugs into the lysis buffer
1. Remove caps from tubes containing lysis buffer.
2. Break off plungers from disposable plug molds. Clean with alcohol and dry with Kim
wipe. Remove tape from bottom of wells and dispense plugs into the appropriate tubes by

Department of Microbiology
Quality Manual
Policy # MI_PFGE
Page 9 of 57
Version: 1.4 CURRENT
Section: Bacteriology Procedures Subject Title: Infection Control Pulsed-field Gel
Electrophoresis
UNIVERSITY HEALTH NETWORK/MOUNT SINAI HOSPITAL, DEPARTMENT OF MICROBIOLOGY
NOTE: This document is Uncontrolled When Printed.
Any documents appearing in paper form that do not state "CONTROLLED COPY” in red print are not controlled and should be checked
against the document (titled as above) on the server prior to use. Management System\UHN_Mount Sinai Hospital Microbiology\Standard Operating Procedures\Bacteriology Procedures\
inserting plunger into well and tapping the top to remove plugs. Ensure plugs are
immersed in buffer!
3. Incubate 3 hrs at 37C on shaker.
TABLE 2:
ORGANISM LYSIS BUFFER PK BUFFER
Incubation
Temperature
Incubation
Time
Incubation
Temperature Incubation Time
MRSA 37ºC for 3hrs
minimum 55ºC 1hr
VRE and GAS 37ºC for 3hrs
minimum 55ºC 1hr
Enterobacteriacae and
Other gram negative bacilli N/A N/A 55ºC 3hrs minimum
4. Make gel legends. (7 tests for 10 well gel and 11 for 15 well) Use small label with
barcode for legend
5. Assign GEL ID # T:\Microbiology\BioNumerics\Gel run record
6. Make sure that there is 1 ladder every 5-6 wells. Record date made and date digested.
7. Write organism names on the legends.
8. Label 6-well storage plate for each isolate.
9. Dispense adequate amount (2.5mls per isolate) of Gram +ve Wash Buffer (TE buffer)
and Gram –ve Wash buffer into two 50 ml. conical tubes.
10. Pipette 2.5mls Gram +ve Wash Buffer (TE buffer) or 2.5mls Gram –ve Wash buffer
into each well of 6-well storage plate.
11. Pre-warm bottle of SDH2O @ 55C.
12. Pre-warm adequate Wash Buffers (Gram +ve and Gram negative) in 55C incubator.
13. Assemble the required amount of numbered green screen caps for wash step (put in
ascending order, lowest numbers on bottom).
14. Label microfuge tubes according to gel legend positions for restriction digest.Include
tubes for standards (H9812) also.
15. Aliquot 750 uL SDH2O into prelabeled microtubes. 16. Enter plug date and PF in isolate window in LIS and enter into Bionumerics.
* NOTE: NO LYSIS STEP FOR GRAM NEGATIVES! (Proceed to step 4.)

Department of Microbiology
Quality Manual
Policy # MI_PFGE
Page 10 of
57
Version: 1.4 CURRENT
Section: Bacteriology Procedures Subject Title: Infection Control Pulsed-field Gel
Electrophoresis
UNIVERSITY HEALTH NETWORK/MOUNT SINAI HOSPITAL, DEPARTMENT OF MICROBIOLOGY
NOTE: This document is Uncontrolled When Printed.
Any documents appearing in paper form that do not state "CONTROLLED COPY” in red print are not controlled and should be checked
against the document (titled as above) on the server prior to use. Management System\UHN_Mount Sinai Hospital Microbiology\Standard Operating Procedures\Bacteriology Procedures\
Step 4 Removal Of Interfering Proteins
1. Calculate PK Buffer needed for each tube (2.0ml PKB and 40ul PK 50) and dispense
into pre-labelled white-capped tubes.
2. Document Lot # for PK.
For Gram negatives:
3. Break off plungers from disposable plug molds. Clean with alcohol and dry with Kim
wipe. Remove tape from bottom of wells and dispense plugs into the appropriate tubes by
inserting plunger into well and tapping the top to remove plugs. Ensure plugs are
immersed in PK solution! Incubate on shaker 55C 3 hours.
For Gram positives:
4. Decant lysis buffer into petri dish, using spatula.
5. Pipette 2 mls PK buffer mixture into each tube. Ensure plugs are immersed in PK
solution! Incubate on shaker 55C 30 min.
Step 5 Plug Washing:
1. Retrieve tubes from incubator
2. Put green appropriately labeled screw-cap on a 50 ml centrifuge tube labeled “Discard”
and decant P K buffer solution for each isolate, stacking one on top of the other as you
go. (Don’t exceed 6 caps, before starting a new stack)
3. Place green cap on top of each stack.
4. Remove stack from discard centrifuge tube.
5. Discard decanted PK buffer.
6. Return stack to the centrifuge tube.
7. Pour 50.0ml pre-warmed SDH2O in a sterile centrifuge tube labeled “SDH2O” and pour
through the assembled screw caps to rinse.
8. Place blue cap of a clean 50ml tube on the last cap sealing the top of the last green cap on
top of the stack.
9. Invert sideways to rinse through. (3 times).
10. Decant. Repeat steps 7-9, 2 more times.
11. Load assembled screw caps into glass wash dishes.
12. Pour enough TE buffer (or Gram –ve Wash buffer for Gram negatives) to fully
submerge green caps. Seal dishes tightly and wash for a minimum 60 minutes @ 55C
on shaker and then decant. (You can wash overnight at this point.)
Department of Microbiology
Quality Manual
Policy # MI_PFGE
Page 11 of
57
Version: 1.4 CURRENT
Section: Bacteriology Procedures Subject Title: Infection Control Pulsed-field Gel
Electrophoresis
UNIVERSITY HEALTH NETWORK/MOUNT SINAI HOSPITAL, DEPARTMENT OF MICROBIOLOGY
NOTE: This document is Uncontrolled When Printed.
Any documents appearing in paper form that do not state "CONTROLLED COPY” in red print are not controlled and should be checked
against the document (titled as above) on the server prior to use. Management System\UHN_Mount Sinai Hospital Microbiology\Standard Operating Procedures\Bacteriology Procedures\
After wash is complete:
1. Pour pre-warmed 50.0ml SDH2O in a sterile centrifuge tube and pour through the
assembled screw caps to rinse.
2. Discard wash buffer in sink
3. Tap green caps on desk to shake plugs into bottom of cap.
4. Transfer plugs from green caps into corresponding 6 well storage plate.
N.B. OPTIONAL: Store plugs overnight or proceed to next step
Step 6 Restriction Enzyme Digestion of Plugs:
1. Calculate the amount of SDH2O, digest buffer and digest enzyme needed for the digest
mixture (see chart) (SeeT:\Microbiology\BioNumerics\Protocols\Calculation for Enzyme
and buffer chart.doc
2. Put plugs into to pre-labeled 6-well plate (plugs can be stored at 4C at this point).
3. Retrieve 1/2 plug with spatula and place it into the appropriate pre-labeled microfuge
tube with 250ul of SDH2O. Rotate for 15 minutes @ RT (25C) to equilibrate plug.
4. Pipette off all of the SDH2O from each tube.
TABLE 3.
ENZYME Fast digest
Sma 1 MBI
Fast digest
Xba 1
Fast digest Bcu 1
for Pseudomonas /
Stenotrophomonas
Fast digest Sfi1
Acinetobacter
QUANTITY per
sample
10µL 5 µL 5 µL 10 µL
INCUBATION
TIME
3hrs-O/N 3hrs- 3hrs-O/N 3hrs-O/N
INCUBATION
TEMPERATURE
37ºC 37ºC 37ºC 50 ºC
Buffer FD buffer FD buffer FD buffer FD buffer
5. Aliquot 200ls of the Enzyme/10x buffer mixture into each tube.
6. Digest plugs for a minimum of 3 hrs See Table 3.
7. Document Lot #s on Gel Legend sheet.
Restriction Enzyme Digestion of Standards (S.branderup)
8. Calculate how many standards needed for gels. There are 10 in each tube and they should
be cut in half for use (6 per tube).

Department of Microbiology
Quality Manual
Policy # MI_PFGE
Page 12 of
57
Version: 1.4 CURRENT
Section: Bacteriology Procedures Subject Title: Infection Control Pulsed-field Gel
Electrophoresis
UNIVERSITY HEALTH NETWORK/MOUNT SINAI HOSPITAL, DEPARTMENT OF MICROBIOLOGY
NOTE: This document is Uncontrolled When Printed.
Any documents appearing in paper form that do not state "CONTROLLED COPY” in red print are not controlled and should be checked
against the document (titled as above) on the server prior to use. Management System\UHN_Mount Sinai Hospital Microbiology\Standard Operating Procedures\Bacteriology Procedures\
9. Proceed as in STEP 6.
10. Document date standard was made and date it was digested on Gel Legend sheet.
11. NOTE: IF USING PREDIGESTED PLUGS MAKE SURE YOU WASH THEM IN
WATER FIRST! (15 minutes in SDH2O @ RT (25C) to equilibrate plug.
Refrigerate digested plugs until ready for use
For Serratia marcescens
Step 1 Preparation:
1. Turn on 60ºC, 37 ºC water-bath and adjust the water levels as appropriate.
2. Turn on Incubator and Shaker oven to 55 ºC
3. Calculate how much of each enzyme is necessary for Lysis (see Table 1)
TABLE 1: LYSIS ENZYME TABLE
Proteinase K 20mg/mL(Roche)
Serratia marcescens 10 µL per plug
4. Remove PK from freezer and allow them to thaw. Keep @4 ºC until ready for use.
5. Alphabetize labels for Serratia and check Bionumerics for previous. Discard repeats. See
chart above to determine testing frequency.
6. Put labels in numerical order and BHIB to match.
7. Label BHIB lids and labels 1, 2 etc.
8. Label 2 sets of 1.5ml microfuge tube with the assigned number for each sample to be sub-
typed. (i.e. 1, 2,3 etc).
9. Add 10 µL PK to one set of the microfuge tubes.
10. Label 1 Vk. Tube for each (1, 2 etc.).
11. Aliquot 1.5 ml Serratia Cell Suspension Buffer (SCSB) into each tube Vitek tube.
12. Label white-capped tubes for each isolate. (1, 2 etc.).
13. Label disposable plug molds 2 spots per isolate. (Keep at 4 ºC until ready to use).
14. Prepare 1% Seakem Gold Agarose (SKG) in SCSB for making all plugs.(0.1gm SKG in
10 mL SCSB ). Use 50mL tube.
15. Place tube in beaker with water and dissolve agarose in microwave for 30 secs to 1 min
Keep in 58 ºC water-bath until ready for use.

Department of Microbiology
Quality Manual
Policy # MI_PFGE
Page 13 of
57
Version: 1.4 CURRENT
Section: Bacteriology Procedures Subject Title: Infection Control Pulsed-field Gel
Electrophoresis
UNIVERSITY HEALTH NETWORK/MOUNT SINAI HOSPITAL, DEPARTMENT OF MICROBIOLOGY
NOTE: This document is Uncontrolled When Printed.
Any documents appearing in paper form that do not state "CONTROLLED COPY” in red print are not controlled and should be checked
against the document (titled as above) on the server prior to use. Management System\UHN_Mount Sinai Hospital Microbiology\Standard Operating Procedures\Bacteriology Procedures\
Step 2 Standardization & Plug Making
1. Transfer broth from BHIB’s using transfer pipette into labeled microfuge tubes (without the
PK), centrifuge @ 14,000 rpm for 1 minute to pellet.
2. Pipette off supernatant. Change pipette.
3. Calibrate Vitek colorimeter.
4. Re-suspend pellet with small amount of SCSB from the pre-labelled Vk. tube and make 20%
transmittance suspension for each isolate .Vortex to make a smooth suspension.
5. Add 200 uls (using 1000 ls pipette) of bacterial cell suspension to each labelled microfuge
tube (with pre-aliqoted 10 ls PK).
6. Add 200 uls (using 200 ls pipette) 1% SeaKem Gold agarose. Mix and fill two plug mold
spots. (Make sure that there are no bubbles and that the molds have not been overfilled).
7. Do this for each isolate. Solidify at 4C 5-10 minutes.
Step 3 Removal Of Interfering Proteins
1. Calculate PK Buffer needed for each tube (2.0ml Serratia Lysis/PK buffer (SLPK) and
40ul PK 50) and dispense into pre-labelled white-capped tubes.
2. Document Lot # for PK.
3. Break off plungers from disposable plug molds. Clean with alcohol and dry with Kim-wipe.
Remove tape from bottom of wells and dispense plugs into the appropriate tubes by inserting
plunger into well and tapping the top to remove plugs. Ensure plugs are immersed in PK
solution! Incubate on shaker 55C 3 hours.
Step 4 Preparation
1. Turn on incubator/shaker and bring to 55C.
2. Make gel legends. (7 tests for 10 well gel and 11 for 15 well) Use small label with barcode
for legend.
3. Assign GEL ID # T:\Microbiology\BioNumerics\Gel run record
4. Make sure that there is 1 ladder every 5-6 wells. Record date made and date digested.
5. Write organism names on the legends.
6. Label 6-well storage plate for each isolate.
7. Dispense adequate amount (2.5mls per isolate) of Gram –ve Wash buffer into two 50 ml.
conical tubes.
8. Pipette 2.5mls Gram –ve Wash buffer into each well of 6-well storage plate.
9. Pre-warm bottle of SDH2O @ 50C.
10. Pre-warm adequate Wash Buffer in 55C incubator.

Department of Microbiology
Quality Manual
Policy # MI_PFGE
Page 14 of
57
Version: 1.4 CURRENT
Section: Bacteriology Procedures Subject Title: Infection Control Pulsed-field Gel
Electrophoresis
UNIVERSITY HEALTH NETWORK/MOUNT SINAI HOSPITAL, DEPARTMENT OF MICROBIOLOGY
NOTE: This document is Uncontrolled When Printed.
Any documents appearing in paper form that do not state "CONTROLLED COPY” in red print are not controlled and should be checked
against the document (titled as above) on the server prior to use. Management System\UHN_Mount Sinai Hospital Microbiology\Standard Operating Procedures\Bacteriology Procedures\
11. Assemble the required amount of numbered green screen caps for wash step (put in
ascending order, lowest numbers on bottom).
12. Label microfuge tubes according to gel legend positions for restriction digest.Include tubes
for standards (H9812) also.
13. Aliquot 750 uL SDH2O into prelabeled microtubes. 14. Enter plug date and PF in isolate window in LIS and enter into Bionumerics.
Step 5 Plug Washing:
1. Retrieve tubes from incubator.
2. Put green appropriately labeled screw-cap on a 50 ml centrifuge tube labeled “Discard” and
decant P K buffer solution for each isolate, stacking one on top of the other as you go. (Don’t
exceed 6 caps, before starting a new stack).
3. Place green cap on top of each stack.
4. Remove stack from discard centrifuge tube.
5. Discard decanted PK buffer.
6. Return stack to the centrifuge tube.
7. Pour 50.0ml pre-warmed SDH2O in a sterile centrifuge tube labeled “SDH2O” and pour
through the assembled screw caps to rinse.
8. Place blue cap of a clean 50ml tube on the last cap sealing the top of the last green cap on top
of the stack.
9. Invert sideways to rinse through. (3 times).
10. Decant.
11. Load assembled screw caps into glass wash dishes.
12. Pour enough Gram –ve Wash buffer for Gram negatives to fully submerge green caps.
Seal dishes tightly and wash for a minimum 60 minutes @ 55C on shaker and then decant.
(You can wash overnight at this point.)
After wash is complete:
1. Pour pre-warmed 50.0ml SDH2O in a sterile centrifuge tube and pour through the assembled
screw caps to rinse.
2. Discard wash buffer in sink.
3. Tap green caps on desk to shake plugs into bottom of cap.
4. Transfer plugs from green caps into corresponding 6 well storage plate.
N.B. OPTIONAL: Store plugs overnight or proceed to next step

Department of Microbiology
Quality Manual
Policy # MI_PFGE
Page 15 of
57
Version: 1.4 CURRENT
Section: Bacteriology Procedures Subject Title: Infection Control Pulsed-field Gel
Electrophoresis
UNIVERSITY HEALTH NETWORK/MOUNT SINAI HOSPITAL, DEPARTMENT OF MICROBIOLOGY
NOTE: This document is Uncontrolled When Printed.
Any documents appearing in paper form that do not state "CONTROLLED COPY” in red print are not controlled and should be checked
against the document (titled as above) on the server prior to use. Management System\UHN_Mount Sinai Hospital Microbiology\Standard Operating Procedures\Bacteriology Procedures\
Step 6 Restriction Enzyme Digestion of Plugs:
1. Calculate the amount of digest buffer needed for the digest (see chart)
(SeeT:\Microbiology\BioNumerics\Protocols\Calculation for Enzyme and buffer chart.doc
2. Put plugs into to 6-well plate (or store plugs at 4C).
3. Retrieve 1/2 plug with spatula and place it into the appropriate tube with 750ul of SDH2O.
Rotate for 15 minutes @ RT (25C) to equilibrate plug.
4. Pipette off all of the SDH2O from each tube.
5. Aliquot 200ls of the Enzyme/10x buffer mixture into each tube.
6. Digest plugs for a minimum of 3 hrs @ 37oC with Xba 1.
7. Document Lot #s on Gel Legend sheet.
Restriction Enzyme Digestion of Standards (S.branderup).
8. Calculate how many standards needed for gels. There are 3 in each tube and they should be
cut in half for use (6 per tube).
9. Proceed as in STEP 6.
10. Document date standard was made and date it was digested on Gel Legend sheet.
11. NOTE: IF USING PREDIGESTED PLUGS MAKE SURE YOU WASH THEM IN
WATER FIRST!
Refrigerate digested plugs until ready for use
Step 7 Gel Preparation and Loading:
1. Turn on the 60C waterbath
2. Prepare Electrophoresis machines (clean and add new buffer)
Drain existing buffer NOTE: Buffer used only once.
Rinse gel box with de-ionized water
Check drain with syringe by placing syringe in each hole and moving the plunger up
and down blowing in air to make drain is clear.
Check electrodes and change if broken.(please document on QC sheet that electrodes
have been changed)
Clean lid and insides of gel box and check that gel boxes are level
Make fresh 0.5xTBE for running and casting gels. (600mls 10x TBE +11400mls
de-ionized water in designated carboy). Instructions for making 0.5xTBE also on
front of carboy.
Fill gel boxes (2000mls 0.5xTBE per box).
Turn on machine and watch to make sure that there are no bubbles in the line.
Document QC in Maintenance Log for each machine being used.
Department of Microbiology
Quality Manual
Policy # MI_PFGE
Page 16 of
57
Version: 1.4 CURRENT
Section: Bacteriology Procedures Subject Title: Infection Control Pulsed-field Gel
Electrophoresis
UNIVERSITY HEALTH NETWORK/MOUNT SINAI HOSPITAL, DEPARTMENT OF MICROBIOLOGY
NOTE: This document is Uncontrolled When Printed.
Any documents appearing in paper form that do not state "CONTROLLED COPY” in red print are not controlled and should be checked
against the document (titled as above) on the server prior to use. Management System\UHN_Mount Sinai Hospital Microbiology\Standard Operating Procedures\Bacteriology Procedures\
3. Clean and assemble the appropriate gel casting form and comb. Place a 10 or 15-well
0.75 mm comb into the tray, making sure to adjust comb height using a glass slide.
Note:Make sure screws are tight. 4. Place comb holder on it’s back with comb on the underside (furthest away from you).
5. Place sticker on each casting stand to identify gel.
6. Prepare 130ml of 1% Seakem Gold agarose (1.3g) using 0.5X TBE (130 mls) and
microwave to melt the agarose. Boil 1% SKG mixture (1 min 30 secs –swirl, return to
microwave.) Boil ~ 1 minute more until bubbling rapidly and completely dissolved.
7. For 15 well gels use 190ml 0.5 TBE andand 1.9 gms Seakem gold. Boil as above.
8. Allow agarose to cool to 60C in water bath.
9. Retrieve restricted plugs and standards and position at the bottom edge of comb
according to gel legend Note: Be sure to remove excess digest fluid from plug with
Kim-wipe. 10. Take out 0.5ml agarose with transfer pipette and dispense 1 drop on each plug to fix to
comb.
11. Allow to solidify 10 minutes.
12. Gently place comb upright in stand and pull as far forward as possible.
13. Pour agarose into casting stand (avoiding bubbles) and allow it to solidify10 minutes.
14. Refrigerate at 4C for 10 minutes.
15. Remove comb.
16. Load machines making sure to identify gels and document machine number, initial
current in mA, run date, and person loading for each machine on Gel Legend sheet.
Settings for CHEF-DR II/III instruments
Please note: there are 2 different power supply control modules.
1. Turn on power. Set temperature of cooling module to 12C. Ensure that no large bubbles
are caught in tubing. Pump setting should be between 80-100.
2. Press gel firmly in place and ensure the level of 0.5 x TBE buffer covers the top of the
gel. Ensure the orientation of gel corresponds to direction indicated on top of lid.
3. Close lid.

Department of Microbiology
Quality Manual
Policy # MI_PFGE
Page 17 of
57
Version: 1.4 CURRENT
Section: Bacteriology Procedures Subject Title: Infection Control Pulsed-field Gel
Electrophoresis
UNIVERSITY HEALTH NETWORK/MOUNT SINAI HOSPITAL, DEPARTMENT OF MICROBIOLOGY
NOTE: This document is Uncontrolled When Printed.
Any documents appearing in paper form that do not state "CONTROLLED COPY” in red print are not controlled and should be checked
against the document (titled as above) on the server prior to use. Management System\UHN_Mount Sinai Hospital Microbiology\Standard Operating Procedures\Bacteriology Procedures\
CHEF-DR II/III Module
` Staph Entero GAS Gm –ve S. marces
To set:
Initial time = press Block + Volts 5.3 sec 5.0 sec 5.0 sec 5.0 sec
Final time = press Volts + Run 34.9 sec 25 sec 35.0 sec 35.0 sec
Volts 6 6 6 6
Run Time 20 hrs 22 hrs 20 hrs 20 hrs
Press Start.
Press Run Time to display run time countdown.
Department of Microbiology
Quality Manual
Policy # MI_PFGE
Page 18 of
57
Version: 1.4 CURRENT
Section: Bacteriology Procedures Subject Title: Infection Control Pulsed-field Gel
Electrophoresis
UNIVERSITY HEALTH NETWORK/MOUNT SINAI HOSPITAL, DEPARTMENT OF MICROBIOLOGY
NOTE: This document is Uncontrolled When Printed.
Any documents appearing in paper form that do not state "CONTROLLED COPY” in red print are not controlled and should be checked
against the document (titled as above) on the server prior to use. Management System\UHN_Mount Sinai Hospital Microbiology\Standard Operating Procedures\Bacteriology Procedures\
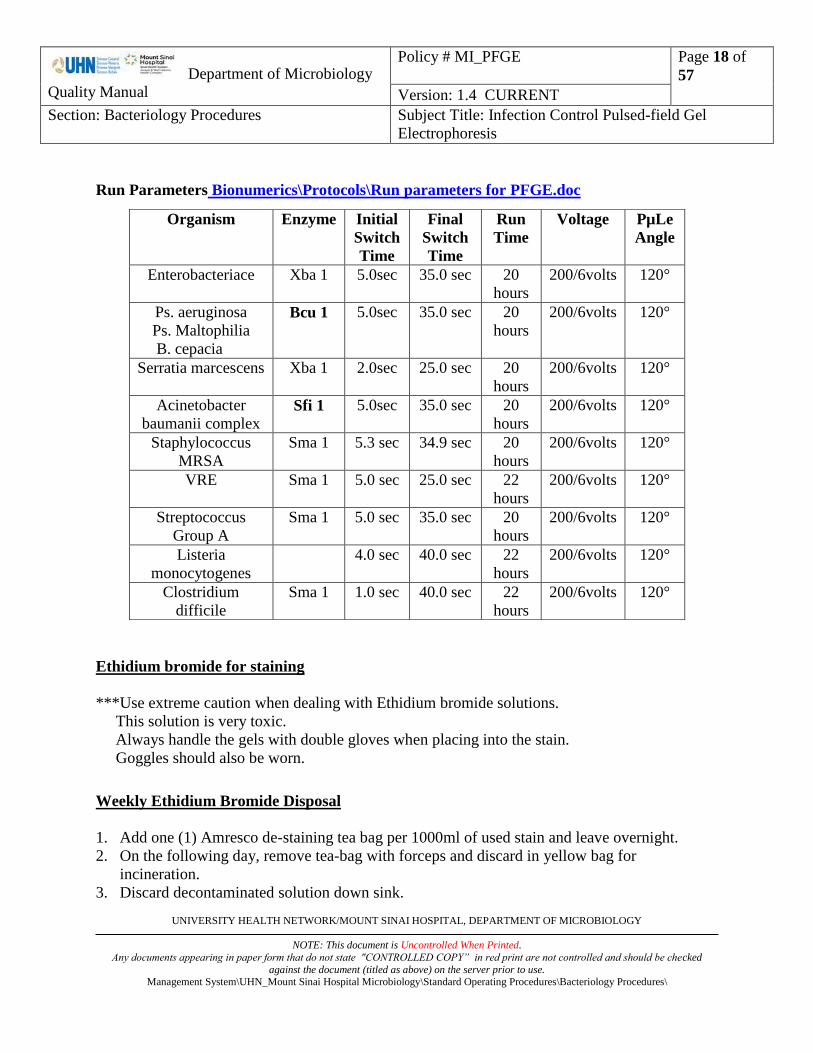
Run Parameters Bionumerics\Protocols\Run parameters for PFGE.doc
Ethidium bromide for staining
***Use extreme caution when dealing with Ethidium bromide solutions.
This solution is very toxic.
Always handle the gels with double gloves when placing into the stain.
Goggles should also be worn.
Weekly Ethidium Bromide Disposal
1. Add one (1) Amresco de-staining tea bag per 1000ml of used stain and leave overnight.
2. On the following day, remove tea-bag with forceps and discard in yellow bag for
incineration.
3. Discard decontaminated solution down sink.
Organism Enzyme Initial
Switch
Time
Final
Switch
Time
Run
Time
Voltage PµLe
Angle
Enterobacteriace Xba 1 5.0sec 35.0 sec 20
hours
200/6volts 120°
Ps. aeruginosa
Ps. Maltophilia
B. cepacia
Bcu 1 5.0sec 35.0 sec 20
hours
200/6volts 120°
Serratia marcescens Xba 1 2.0sec 25.0 sec 20
hours
200/6volts 120°
Acinetobacter
baumanii complex Sfi 1 5.0sec 35.0 sec 20
hours
200/6volts 120°
Staphylococcus
MRSA
Sma 1 5.3 sec 34.9 sec 20
hours
200/6volts 120°
VRE Sma 1 5.0 sec 25.0 sec 22
hours
200/6volts 120°
Streptococcus
Group A
Sma 1 5.0 sec 35.0 sec 20
hours
200/6volts 120°
Listeria
monocytogenes
4.0 sec 40.0 sec 22
hours
200/6volts 120°
Clostridium
difficile
Sma 1 1.0 sec 40.0 sec 22
hours
200/6volts 120°
Department of Microbiology
Quality Manual
Policy # MI_PFGE
Page 19 of
57
Version: 1.4 CURRENT
Section: Bacteriology Procedures Subject Title: Infection Control Pulsed-field Gel
Electrophoresis
UNIVERSITY HEALTH NETWORK/MOUNT SINAI HOSPITAL, DEPARTMENT OF MICROBIOLOGY
NOTE: This document is Uncontrolled When Printed.
Any documents appearing in paper form that do not state "CONTROLLED COPY” in red print are not controlled and should be checked
against the document (titled as above) on the server prior to use. Management System\UHN_Mount Sinai Hospital Microbiology\Standard Operating Procedures\Bacteriology Procedures\
Weekly Ethidium Bromide Preparation
1. Fill a 1000ml glass cylinder with de-ionized water.
2. Pour into ethidium bromide green top stain container (STAINING SOLUTION).
3. Add 50µl of ethidium bromide (ETBR) 10 mg/ml for a final concentration of 0.5µg/ml.
Staining Protocol
N.B. Remove excess buffer from gels before putting them into staining solution so that stain is
not further diluted.
1. Freshly made stain: Stain for 30 minutes and de-stain in de-ionized water for 30 minute
washes x 2.
2. Previously used stain: Stain for 45 minutes and de-stain in de-ionized water for 30 minute
washes x 2.
How To Use The Gel DOC XR+ Camera
DO NOT USE DIRTY GLOVES WHEN TOUCHING THE COMPUTER.
1. Load the gel into the camera chamber.
2. Double click on Image lab icon.
3. Under Protocol click “New”
4. Click Select under application.
5. Go to nucleic acids and select ethidium bromide.
6. Load the gel into the camera chamber.
7. Click on “Position gel”.
8. Click OK to “Filter 1”.
9. Go to imaging area and click on the “Enter image area” button to adjust the Camera Zoom
for gel size (for a 10well gel enter 15.7in the first box; 15well gel enter 20.1) and adjust as
needed.
10. Center the gel with lanes at very top so that the bottom of the gel is also visible.
11. Go to Image exposure and select intense bands for first picture. If bands are too difficult to
see also take a second picture (-1) using the faint band setting.
12. Go to “Display options” and de-select “Highlight saturated pixels”.
13. Click on “Position gel” to do final adjustments of gel position.
14. Click OK to “Filter 1”.
Department of Microbiology
Quality Manual
Policy # MI_PFGE
Page 20 of
57
Version: 1.4 CURRENT
Section: Bacteriology Procedures Subject Title: Infection Control Pulsed-field Gel
Electrophoresis
UNIVERSITY HEALTH NETWORK/MOUNT SINAI HOSPITAL, DEPARTMENT OF MICROBIOLOGY
NOTE: This document is Uncontrolled When Printed.
Any documents appearing in paper form that do not state "CONTROLLED COPY” in red print are not controlled and should be checked
against the document (titled as above) on the server prior to use. Management System\UHN_Mount Sinai Hospital Microbiology\Standard Operating Procedures\Bacteriology Procedures\
15. Click on Run Protocol.
16. Wait for second picture.
17. Adjust the contrast of the picture by using the contrast icon.
18. Go to File and choose Save as in V:\drive\Bionumerics\Gel pictures\Image lab files.
19. Name file by choosing previous file and changing number and date. Gel 20XX-month-day
MRSA/MRSA/GNB-gel number i.e. 2021-04-06 MRSA-22.
20. Click on Save.
21. Go to File and Click on Export….Export for Pulsenet Save in V:\drive/Bionumerics/Gel
pictures/20XX gel pictures in appropriate folder. (File is now ready for import into
Bionumerics database).
22. Go to File and choose print.
23. In the Image Preview toolbar click on print. Make sure that Mitsubishi P93D printer is
highlighted.
24. Settings for printing are set as defaults. (Landscape; paper size 1280x1920; Option- enlarge
Image to fit; high density paper).
25. Click on print.
26. Close Image Lab window.
27. Clean the camera chamber with Deionized water and Kim-wipes

Department of Microbiology
Quality Manual
Policy # MI_PFGE
Page 21 of
57
Version: 1.4 CURRENT
Section: Bacteriology Procedures Subject Title: Infection Control Pulsed-field Gel
Electrophoresis
UNIVERSITY HEALTH NETWORK/MOUNT SINAI HOSPITAL, DEPARTMENT OF MICROBIOLOGY
NOTE: This document is Uncontrolled When Printed.
Any documents appearing in paper form that do not state "CONTROLLED COPY” in red print are not controlled and should be checked
against the document (titled as above) on the server prior to use. Management System\UHN_Mount Sinai Hospital Microbiology\Standard Operating Procedures\Bacteriology Procedures\
Assessing Gel Quality
1. After taking picture go to Gel –Run record
2. Fill out No. of lanes that have failed if any
3. Choose reason for failure and corrective action
Gel Status Corrective action
Lanes skewed Possibly broken electrode
Ladders did not work degraded Re-digest new ladder and run QC gel
Ladders did not work – no DNA Re-digest new ladder with right enzyme
All DNA lanes too short Re-digest and re-run, power interruption
Bottom lanes of ladder missing Possible chiller failure. Check temperature
Gel broke Re-make gel with right agarose concentration
Lane Status Corrective action
Only one top band of DNA Failed enzyme digest, re-digest and re-run
No DNA Subculture for purity. Reprocess with longer lysis
Failed repeat lysis Send to NML? Livestock strain
Faint (ghost) bands Rule out mixed culture
Broken band Re-digest plug and re-run
Plug fallen off comb Re-process re-run

Department of Microbiology
Quality Manual
Policy # MI_PFGE
Page 22 of
57
Version: 1.4 CURRENT
Section: Bacteriology Procedures Subject Title: Infection Control Pulsed-field Gel
Electrophoresis
UNIVERSITY HEALTH NETWORK/MOUNT SINAI HOSPITAL, DEPARTMENT OF MICROBIOLOGY
NOTE: This document is Uncontrolled When Printed.
Any documents appearing in paper form that do not state "CONTROLLED COPY” in red print are not controlled and should be checked
against the document (titled as above) on the server prior to use. Management System\UHN_Mount Sinai Hospital Microbiology\Standard Operating Procedures\Bacteriology Procedures\
BioNumerics Gel Analysis
1. Double click BioNumerics icon.
2. Choose the correct database for analyzing/saving gel results:
Database Organism Experiment Type
UHN-MSH MRSA MRSA, SA, CNST PFGE Sma1
UHN-MSH VRE Enterococcus species
(including VRE)
PFGE Sma1 5:25-22 hrs
ESBL-PSEUDO-SERR-
ACINETO
Enterobacteriaciae,
Pseudomonas
Acinetobacter
Serratia
PFGE 5:35 (20) in use
Serratia 2:25 in use
UHN-MSH OTHERS
(NOT Others_conn)
GBS, GAS,
Haemophilus,
Leptotrichia
Listeria,
Strep pneumo
PFGE Sma1
3. Click Experiment types and highlight the correct experiment type.
4. Check for File name in the Fingerprint files field. If the File name is not there, then click
Create new fingerprint file . Browse: V: Bionumerics: Gel pictures: Gel pictures: 20XX
Gel pictures: MRSA or VRE or GNB….
5. Double click the fingerprint file to open.
6. Choose OK.
7. File should appear as new (N) in the Fingerprint files.
8. Highlight and check mark the new file in the Fingerprint files.
9. Click Open the fingerprint data symbol to load the image
10. Highlight the correct Experiment Type
11. Click OK
12. Enlarge the picture.
13. Strips should be highlighted
14. Click Lanes.
15. Choose Auto search lanes.
16. Enter the number of the lanes, click OK.
17. Adjust the width of strip by using the make strip larger or smaller symbols if necessary.
18. Click Edit.
19. Choose Edit tone curve.

Department of Microbiology
Quality Manual
Policy # MI_PFGE
Page 23 of
57
Version: 1.4 CURRENT
Section: Bacteriology Procedures Subject Title: Infection Control Pulsed-field Gel
Electrophoresis
UNIVERSITY HEALTH NETWORK/MOUNT SINAI HOSPITAL, DEPARTMENT OF MICROBIOLOGY
NOTE: This document is Uncontrolled When Printed.
Any documents appearing in paper form that do not state "CONTROLLED COPY” in red print are not controlled and should be checked
against the document (titled as above) on the server prior to use. Management System\UHN_Mount Sinai Hospital Microbiology\Standard Operating Procedures\Bacteriology Procedures\
20. Choose Linear and Enhance weak bands, click OK.
21. Left click on middle green node at the top of the box, and drag to just above the ladders. Left
click on middle green node at the bottom of the box, and drag to just below the ladders.
22. Click Curves at the bottom left on toolbar.
23. Click Edit settings symbol.
24. Remove check mark from background subtraction and least square filtering, click OK.
25. Click Curves.
26. Choose Spectral analysis.
27. Click Edit.
28. Choose Edit settings.
29. Click Apply from background subtraction field, and enter the number from background scale.
Click Apply least square filtering from Filtering field, and enter the number from cutoff
scale. Click OK.
30. Close Spectral analysis window.
31. Click Normalization on bottom toolbar.
32. Click H9812, attach Use selected lane as reference lane symbol to H9812. (two or three)
33. Click auto assign reference position symbol.
34. Choose Using bands, click OK.
35. Check appropriate assignment of bands on H9812 only.
36. Add new band by pressing ctrl + left click on specific position, or to manually move cursor
by pressing Tab key + left click and press Tab key + right click to choose assign reference
position.
37. Click Show normalized view symbol.
38. Click Bands on bottom toolbar
39. Click Bands on top.
40. Choose Auto search bands.
41. Choose Search all lanes.
42. Remove lanes from H9812 by pressing shift + left click and drag from top to bottom of the
bands, press Delete key.
43. Check the rest bands and make sure the bands are assigned correctly with original gel picture.
44. Click show normalized view symbol.
45. Save the fingerprint file.
46. Close the window, Click No.
47. Under Database entries, select the patient either by last name or Lab No and check mark the
selected patient.
48. Bring selected entries to the TOP: select Database -> Entries -> Move selection to top
49. Right click the File name under Fingerprint files field.
50. Choose Open highlighted fingerprint file.
Department of Microbiology
Quality Manual
Policy # MI_PFGE
Page 24 of
57
Version: 1.4 CURRENT
Section: Bacteriology Procedures Subject Title: Infection Control Pulsed-field Gel
Electrophoresis
UNIVERSITY HEALTH NETWORK/MOUNT SINAI HOSPITAL, DEPARTMENT OF MICROBIOLOGY
NOTE: This document is Uncontrolled When Printed.
Any documents appearing in paper form that do not state "CONTROLLED COPY” in red print are not controlled and should be checked
against the document (titled as above) on the server prior to use. Management System\UHN_Mount Sinai Hospital Microbiology\Standard Operating Procedures\Bacteriology Procedures\
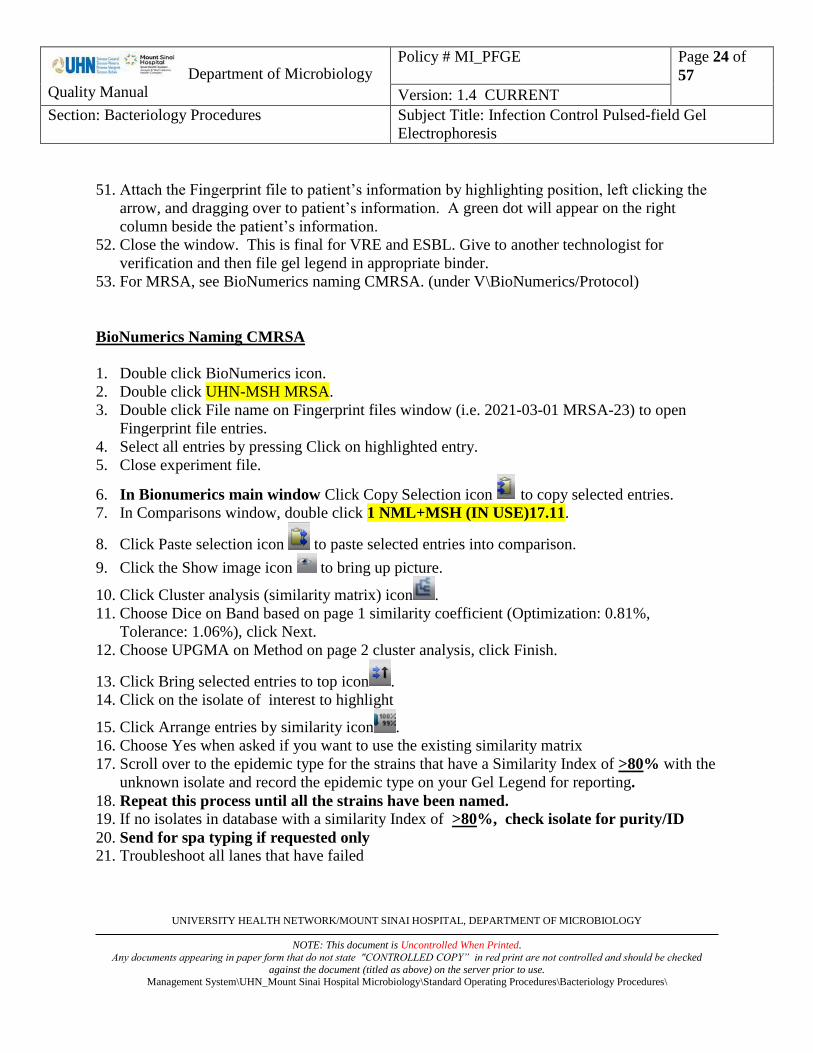
51. Attach the Fingerprint file to patient’s information by highlighting position, left clicking the
arrow, and dragging over to patient’s information. A green dot will appear on the right
column beside the patient’s information.
52. Close the window. This is final for VRE and ESBL. Give to another technologist for
verification and then file gel legend in appropriate binder.
53. For MRSA, see BioNumerics naming CMRSA. (under V\BioNumerics/Protocol)
BioNumerics Naming CMRSA
1. Double click BioNumerics icon.
2. Double click UHN-MSH MRSA.
3. Double click File name on Fingerprint files window (i.e. 2021-03-01 MRSA-23) to open
Fingerprint file entries.
4. Select all entries by pressing Click on highlighted entry.
5. Close experiment file.
6. In Bionumerics main window Click Copy Selection icon to copy selected entries.
7. In Comparisons window, double click 1 NML+MSH (IN USE)17.11.
8. Click Paste selection icon to paste selected entries into comparison.
9. Click the Show image icon to bring up picture.
10. Click Cluster analysis (similarity matrix) icon .
11. Choose Dice on Band based on page 1 similarity coefficient (Optimization: 0.81%,
Tolerance: 1.06%), click Next.
12. Choose UPGMA on Method on page 2 cluster analysis, click Finish.
13. Click Bring selected entries to top icon .
14. Click on the isolate of interest to highlight
15. Click Arrange entries by similarity icon .
16. Choose Yes when asked if you want to use the existing similarity matrix
17. Scroll over to the epidemic type for the strains that have a Similarity Index of >80% with the
unknown isolate and record the epidemic type on your Gel Legend for reporting.
18. Repeat this process until all the strains have been named.
19. If no isolates in database with a similarity Index of >80%, check isolate for purity/ID
20. Send for spa typing if requested only 21. Troubleshoot all lanes that have failed

Department of Microbiology
Quality Manual
Policy # MI_PFGE
Page 25 of
57
Version: 1.4 CURRENT
Section: Bacteriology Procedures Subject Title: Infection Control Pulsed-field Gel
Electrophoresis
UNIVERSITY HEALTH NETWORK/MOUNT SINAI HOSPITAL, DEPARTMENT OF MICROBIOLOGY
NOTE: This document is Uncontrolled When Printed.
Any documents appearing in paper form that do not state "CONTROLLED COPY” in red print are not controlled and should be checked
against the document (titled as above) on the server prior to use. Management System\UHN_Mount Sinai Hospital Microbiology\Standard Operating Procedures\Bacteriology Procedures\
Naming CMRSA -10:
On Gel Run record, document:
a. Gel, ladder or lane failures
b. Proposed corrective action
c. Fill in outcome
III. Reporting
PFGE Reporting Phrases
A. Standard MRSA PFGE Report
“SmaI Pulsed field pattern:” CMRSA-2
“Based on the closest pattern match using the National Microbiology Laboratory (NML) MRSA
Database and a similarity index of at least 80%.”
H9812
CM
RS
A 2
*
CM
RS
A 1
0
H9812
CM
RS
A 2
Key Bands are highlighted in Pink
For CMRSA 2, that band is closer to 216.9, while the
CMRSA 10 band is between 244.4 and 216.9
* This was a 92% match with CMRSA 10 in bionumerics but it
did not have the key band when that band is missing, send the
organism to Sunnybrook for sccmec and PVL if needed.
CMRSA-10 is PVL positive.
OR
Send organism to NML for testing.
Department of Microbiology
Quality Manual
Policy # MI_PFGE
Page 26 of
57
Version: 1.4 CURRENT
Section: Bacteriology Procedures Subject Title: Infection Control Pulsed-field Gel
Electrophoresis
UNIVERSITY HEALTH NETWORK/MOUNT SINAI HOSPITAL, DEPARTMENT OF MICROBIOLOGY
NOTE: This document is Uncontrolled When Printed.
Any documents appearing in paper form that do not state "CONTROLLED COPY” in red print are not controlled and should be checked
against the document (titled as above) on the server prior to use. Management System\UHN_Mount Sinai Hospital Microbiology\Standard Operating Procedures\Bacteriology Procedures\
Confirmation to follow from NML. (to add this comment when isolate possibly more than one
epidemic type).
If not requested to send to NML report as “Other than..”
When typing report is available then an updated report will be issued which will replace the
PFGE results above with the following:
“Updated Report::
“SmaI Pulsed field pattern:” CMRSA-2………ETC
“As reported by the National Microbiology Laboratory,
1015 Arlington St., Winnipeg, MB, Canada, R3E 3R2
NML Specimen No. Nxx-xxxxx”
B. Standard Organisms-other-than-MRSA PFGE Report
Pulsed-field gel electrophoresis (PFGE) has been completed on this isolate. For results, please
contact the microbiology laboratory
Verifying Bionumerics Results
1. Open appropriate database.
2. Go to File name window.
3. Check mark and highlight the Gel ID.
4. Right click on Gel ID.
5. Click the Open the fingerprint data symbol on top the Fingerprint files bar.
6. Go to normalization window and check band assignments and alignment of ladders (top band
assignment =668.9. Must have 5 bands below the double bands173.4/167.1 the lowest
molecular wt=33.3). N.B. For VRE top band sometimes differentiates into 2 bands.
7. Move to Bands and make sure all the bands are correct.
8. Close data file.
9. Right click to Open highlighted fingerprint file.
10. Check gel legend with linked entries.
11. FOR VRE/GNB Initial and return to PFGE tech for filing.
12. For CMRSA
13. Open fingerprint file.
14. Select all entries.
15. Close window
16. In Bionumerics main window

Department of Microbiology
Quality Manual
Policy # MI_PFGE
Page 27 of
57
Version: 1.4 CURRENT
Section: Bacteriology Procedures Subject Title: Infection Control Pulsed-field Gel
Electrophoresis
UNIVERSITY HEALTH NETWORK/MOUNT SINAI HOSPITAL, DEPARTMENT OF MICROBIOLOGY
NOTE: This document is Uncontrolled When Printed.
Any documents appearing in paper form that do not state "CONTROLLED COPY” in red print are not controlled and should be checked
against the document (titled as above) on the server prior to use. Management System\UHN_Mount Sinai Hospital Microbiology\Standard Operating Procedures\Bacteriology Procedures\
17. Copy selection and paste into 1 NML+MSH (IN USE)17.11
18. Click the Show image icon to bring up the picture.
19. Click the Cluster analysis icon, chose Dice and UPGMA, click Finish.
20. Click Bring selected entries to top icon .
21. Highlight the top entry.
22. Click Arrange entries by similarity icon to do Cluster analysis to confirm the epidemic
group, chose Yes
23. Similarity index has to be >= 80%.
24. Initial Gel legend if you agree with name given.
25. If you do not agree, consult with PFGE tech. to come to a consensus.
26. If unable to agree, the isolate must be re-run to check reproducibility of differences.
27. Arrange entries by last name and check for previous isolate to see if the result matches.
28. Go to LIS and check resulting for each isolate on front and back of card. If any reportable
discrepancies a corrected report must be sent.
29. Return Gel legend to PFGE tech for filing.
Department of Microbiology
Quality Manual
Policy # MI_PFGE
Page 28 of
57
Version: 1.4 CURRENT
Section: Bacteriology Procedures Subject Title: Infection Control Pulsed-field Gel
Electrophoresis
UNIVERSITY HEALTH NETWORK/MOUNT SINAI HOSPITAL, DEPARTMENT OF MICROBIOLOGY
NOTE: This document is Uncontrolled When Printed.
Any documents appearing in paper form that do not state "CONTROLLED COPY” in red print are not controlled and should be checked
against the document (titled as above) on the server prior to use. Management System\UHN_Mount Sinai Hospital Microbiology\Standard Operating Procedures\Bacteriology Procedures\
IV. Processing a Comparison Request (In-house and for PHL)
Documenting Request
Comparison requests can be received via e-mail with FORM.
a. E-mail requests should come with a completed PFGE comparison request form
1. Give request form a file name(Date /Organism/requestor)
2. Print both e-mail and request form
3. Check status of isolates that need to be compared i.e. previously done/ in progress/ not
yet processed/ not yet received. (If inadequate picture in database please re-run)
4. Check that comparison requests are for the same organism and phenotypes and not mixed
organisms/phenotypes without a good explanation.
5. Check urgency of request i.e. ASAP or next week’s run
6. Respond to e-mail with projected completion date of comparison. (If urgency not stated,
ask if next week’s run will be O.K.)
7. Document request in LIS for each isolate if PFGE not yet done. See
T:\Microbiology\BioNumerics\Protocols\Documenting Comparison requests in LIS.doc
Appendix 1
8. Fill in information in the Query Log and document as requested for units.
See.\..\..\BioNumerics\PFGE FORMS\Query Log.xls
b. Telephone requests
1. Fill out PFGE comparison request form PFGE COMPARISON REQUEST FORM and
proceed as above for an e-mail request
c. Faxed requests from Baycrest
1. Faxed requests may come with a completed PFGE comparison request form. Some
requests may be for in-house PFGE or for send out to PHL.
2. For in-house PFGE proceed as above (Steps 1-8). Copy of completed comparison report
must be submitted for billing.
3. For PHL send-out
Check Soft to determine if isolates were previously sent to PHL or if it is
necessary to pull from freezer .Print labels/note freezer # and PHL PF#s
Enter code for PFGE at PHL (phlpf) in isolate window for VRE (should already
be there for MRSA if previously sent)
Subculture necessary isolates and print PHL forms for each isolate that is being
sent.

Department of Microbiology
Quality Manual
Policy # MI_PFGE
Page 29 of
57
Version: 1.4 CURRENT
Section: Bacteriology Procedures Subject Title: Infection Control Pulsed-field Gel
Electrophoresis
UNIVERSITY HEALTH NETWORK/MOUNT SINAI HOSPITAL, DEPARTMENT OF MICROBIOLOGY
NOTE: This document is Uncontrolled When Printed.
Any documents appearing in paper form that do not state "CONTROLLED COPY” in red print are not controlled and should be checked
against the document (titled as above) on the server prior to use. Management System\UHN_Mount Sinai Hospital Microbiology\Standard Operating Procedures\Bacteriology Procedures\
On the PHL form for the reference strain put a small label for each of the other
strains in the comparison and fill out the information showing PF #s for those
already sent for PFGE.
Attach a copy of the hospital request form to the PHL request forms to go with the
isolates.
Send a faxed response to requestor of the comparison with the date isolates were
sent to PHL.
Give request form a file name(Date of request /Organism/Hospital) e.g.
2011.11.17 VRE CHC
Fill in information in the Query Log Including date sent to PHL and document as
requested for units. See T:\Microbiology\BioNumerics\PFGE FORMS\Query
Log.xls
File request in Binder on PFGE shelf “ÓTHER HOSPITAL QUERIES. PHL”
PHL will send comparison report directly to the hospital requesting it.
Comparing and Interpreting a Cluster in Bionumerics
1. Select all entries requested and create a new comparison in comparison window.
2. Save comparison giving an appropriate name (Date Org Requester)
Example: “2015.06.03 MRSA Wong”
3. When Gels have been processed Open comparison
4. Show images by choosing the Show image icon for the appropriate experiment.
5. Choose Cluster analysis icon using DICE and UPGMA
Note: make sure the Optimization is 0.81 and Tolerance is 1.06, click Next and click Finish
6. Click the Dendrogram display setting icon
7. Check mark Show node information, click OK, % similarity indices will appear.
8. Compare two entries by choosing Analysis (on top of the tool bar), pick compare two entries
9. PFGE pattern comparison is based on Tenover’s criteria using the reference strain (s) as
indicated (J.Clin. Microbiol. 1995 33:2233-2239). Interpretation is as follows:
Indistinguishable: same number and size of fragments as reference strain
Closely related: differs from reference strain by 1-3 fragments
Possible related: differs from reference strain by 4-6 fragments
Unrelated: differs from reference strain by >6 fragments
DNA relatedness based on the DICE co-efficient using Bionumerics software is also
shown. In general, a Dice co-efficient of correlation that is <75% correlates with
Tenover’s criteria for relatedness.
Department of Microbiology
Quality Manual
Policy # MI_PFGE
Page 30 of
57
Version: 1.4 CURRENT
Section: Bacteriology Procedures Subject Title: Infection Control Pulsed-field Gel
Electrophoresis
UNIVERSITY HEALTH NETWORK/MOUNT SINAI HOSPITAL, DEPARTMENT OF MICROBIOLOGY
NOTE: This document is Uncontrolled When Printed.
Any documents appearing in paper form that do not state "CONTROLLED COPY” in red print are not controlled and should be checked
against the document (titled as above) on the server prior to use. Management System\UHN_Mount Sinai Hospital Microbiology\Standard Operating Procedures\Bacteriology Procedures\
Note: all results from PFGE analysis must be analyzed in the light of epidemiologic
data. PFGE types have been assigned for use in this comparison only.
Indistinguishable patterns have been given the same type name. Related patterns
share the same letter in their type name.
10. If given a reference, i.e. an isolate against which all other strains should be compared, then
call that isolate PFGE Query type “A” and place it at the top of the dendogram. If given more
than one reference, then label the next “B” etc. Using Tenover criteria assign types to other
entries as follows:
Indistinguishable strains should have the same designation.
Closely or possibly related patterns should be labeled with the same letter as the
reference but would be given a number to suggest they are related but are not
identical i.e. A1. A2, A3 etc.
Unrelated patterns should be labelled with different letters following alphamerical
order.
Patterns with indistinguishable patterns should be given the same letter/number
11. If no organism is designated as reference, then choose an arbitrary reference or if there is a
cluster(s), call the organisms in the largest cluster “A”, then the next cluster “B” etc. and
different strains C; D; E; etc.
12. Fill out the Interpretation field as appropriate according to Tenover’s criteria. Remember that
all isolates should be compared to the reference strain(s) if present (see example below).
13. Save comparison.
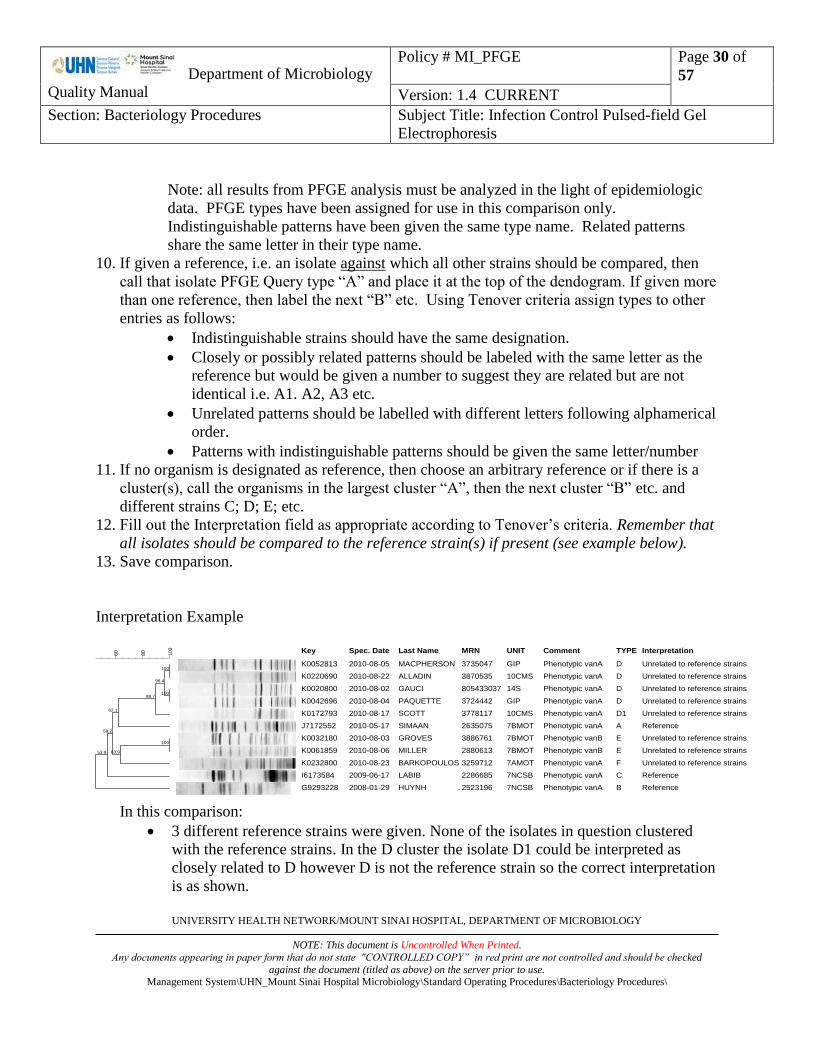
Interpretation Example
In this comparison:
3 different reference strains were given. None of the isolates in question clustered
with the reference strains. In the D cluster the isolate D1 could be interpreted as
closely related to D however D is not the reference strain so the correct interpretation
is as shown.
Dice (Opt:1.00%) (Tol 1.0%-1.0%) (H>0.0% S>0.0%) [0.0%-100.0%]
PFGE - Sma 1 5:25-22hrs
100
80
60
100
100
96.4
89.7
62.1
100
63.9
58.2
53.9
45.6
PFGE - Sma 1 5:25-22hrs
Key
K0052813
K0220690
K0020800
K0042696
K0172793
J7172552
K0032180
K0061859
K0232800
I6173584
G9293228
Spec. Date
2010-08-05
2010-08-22
2010-08-02
2010-08-04
2010-08-17
2010-05-17
2010-08-03
2010-08-06
2010-08-23
2009-06-17
2008-01-29
Last Name
MACPHERSON
ALLADIN
GAUCI
PAQUETTE
SCOTT
SIMAAN
GROVES
MILLER
BARKOPOULOS
LABIB
HUYNH .
MRN
3735047
3870535
805433037
3724442
3778117
2635075
3886761
2880613
3259712
2286685
2523196
UNIT
GIP
10CMS
14S
GIP
10CMS
7BMOT
7BMOT
7BMOT
7AMOT
7NCSB
7NCSB
Comment
Phenotypic vanA
Phenotypic vanA
Phenotypic vanA
Phenotypic vanA
Phenotypic vanA
Phenotypic vanA
Phenotypic vanB
Phenotypic vanB
Phenotypic vanA
Phenotypic vanA
Phenotypic vanA
TYPE
D
D
D
D
D1
A
E
E
F
C
B
Interpretation
Unrelated to reference strains
Unrelated to reference strains
Unrelated to reference strains
Unrelated to reference strains
Unrelated to reference strains
Reference
Unrelated to reference strains
Unrelated to reference strains
Unrelated to reference strains
Reference
Reference

Department of Microbiology
Quality Manual
Policy # MI_PFGE
Page 31 of
57
Version: 1.4 CURRENT
Section: Bacteriology Procedures Subject Title: Infection Control Pulsed-field Gel
Electrophoresis
UNIVERSITY HEALTH NETWORK/MOUNT SINAI HOSPITAL, DEPARTMENT OF MICROBIOLOGY
NOTE: This document is Uncontrolled When Printed.
Any documents appearing in paper form that do not state "CONTROLLED COPY” in red print are not controlled and should be checked
against the document (titled as above) on the server prior to use. Management System\UHN_Mount Sinai Hospital Microbiology\Standard Operating Procedures\Bacteriology Procedures\
Both E. faecium phenotypic vanA and vanB strains were requested in the same
comparison so it was necessary to include a comment field
Sending a Report by E-mail
1. Open Comparison
2. Arrange information fields as per reporting form. See...\PFGE FORMS\UHN-MSH
Report Template.doc
3. From the comparison window click on the printer icon for a print preview then go to File:
Printer set -up to change orientation of page to Landscape.
4. Maximize window and arrange display on one page by dragging the yellow bars to the
left or right as necessary.
5. Go to “Layout” show field names click once.
6. When satisfied with the display go to File: copy page to clipboard. Under preferred
clipboard format choose “ENHANCED METAFILE”
7. Go to START on bottom toolbar choose programs/Microsoft Office/Microsoft Word
double click for a blank new document
8. Right click, choose paste to add file.
9. Left click on the comparison, a border will appear
10. Click Picture Tools on top bar, click the crop icon and tidy up the picture.
11. Right click and choose copy.
12. Go to T:\Microbiology\BioNumerics\PFGE FORMS\UHN-MSH Report Template.doc
13. Delete both highlighted instruction and existing picture.
14. Paste new picture into form by right click, choose paste.
15. Fill out the top right hand corner of the form using drop down boxes where applicable
which include Date Ordered, Date of Report, and Status.
16. Choose the right organism and enzyme from the drop down boxes.
17. Click Review on top the bar, choose Restrict editing.
18. Click Stop Protection on bottom right corner, Restrict Permission appear. Edit the fields
of Ordering physician, Requested by, and Technologist’s Initials
19. Please make a final check of report before saving see
T:\Microbiology\BioNumerics\PFGE FORMS\UHN-MSH Report Form check list.doc
20. Save the report in V/Bionumerics/PFGE 20XX in appropriate folder; giving the file a
name as follows “Date/Organism/Requester” ex. 2015.06.03VREWong
21. Print a copy of the report for filing with the original e-mail.
22. Go to File: Send to: Mail recipient (as attachment) Add e-mail address

Department of Microbiology
Quality Manual
Policy # MI_PFGE
Page 32 of
57
Version: 1.4 CURRENT
Section: Bacteriology Procedures Subject Title: Infection Control Pulsed-field Gel
Electrophoresis
UNIVERSITY HEALTH NETWORK/MOUNT SINAI HOSPITAL, DEPARTMENT OF MICROBIOLOGY
NOTE: This document is Uncontrolled When Printed.
Any documents appearing in paper form that do not state "CONTROLLED COPY” in red print are not controlled and should be checked
against the document (titled as above) on the server prior to use. Management System\UHN_Mount Sinai Hospital Microbiology\Standard Operating Procedures\Bacteriology Procedures\
o MSH: requesting ICP cc. Infection Control Team and Lab-PFGE team
o UHN requesting ICP cc. UHN IC and Dr. Hota
23. Document date report sent in LIS under Call.
24. Document date report sent in Query Log.
25. File report with original e-mail in Completed Queries book.
Appendix I – PFGE Record Sheet
See Next Page

Department of Microbiology
Quality Manual
Policy # MI_PFGE
Page 33 of
57
Version: 1.4 CURRENT
Section: Bacteriology Procedures Subject Title: Infection Control Pulsed-field Gel
Electrophoresis
UNIVERSITY HEALTH NETWORK/MOUNT SINAI HOSPITAL, DEPARTMENT OF MICROBIOLOGY
NOTE: This document is Uncontrolled When Printed.
Any documents appearing in paper form that do not state "CONTROLLED COPY” in red print are not controlled and should be checked
against the document (titled as above) on the server prior to use. Management System\UHN_Mount Sinai Hospital Microbiology\Standard Operating Procedures\Bacteriology Procedures\
UHN/MSH MICROBIOLOGY PFGE RECORD _____________GEL ID: 2016-_________ Lane Patient ID Ward Organism Comment Lane Patient ID Ward Organism Comment
1 H9812 S. branderup
Made: Digested
11
2 12
3 13
4 14
5 15
6
7
8
9
10 H9812 S. branderup
Made:
Digested
ENZYMES:
Lysostaphin/Mutanolysin
Manufacturer: Sigma
Lot#:_____________
Lysozyme
Manufacturer: Sigma
Lot#:_____________
Proteinase K 20mg/ml
Manufacturer: Roche
Lot#:_____________
RESTRICTION
Enzyme:____________
Manufacturer: Thermo
Lot#________________
Exp. Date: __________
Buffer _FDB Thermo
Lot#________________
MACHINE
Number______
Current______ma
Run Date: ________
Loaded by: ________
Normalized by: _______
Reported by: _______
Verified by: _______
LIS report checked by: ___
Enter in Gel Run Record:___
TEMPERATURES: MIWM2 Water Bath Temp (58
0C + 2.0):_____
MIACM12-10 Incubator (55oC + 2.0):______
MIACM12-11 Incubator (37C+ 2.0):______
MIWM10 Water Bath/Shaker(37C+ 2.0):____ Plugs Made by: _______ on 2016.______

Department of Microbiology
Quality Manual
Policy # MI_PFGE
Page 34 of
57
Version: 1.4 CURRENT
Section: Bacteriology Procedures Subject Title: Infection Control Pulsed-field Gel
Electrophoresis
UNIVERSITY HEALTH NETWORK/MOUNT SINAI HOSPITAL, DEPARTMENT OF MICROBIOLOGY
NOTE: This document is Uncontrolled When Printed.
Any documents appearing in paper form that do not state "CONTROLLED COPY” in red print are not controlled and should be checked
against the document (titled as above) on the server prior to use. Management System\UHN_Mount Sinai Hospital Microbiology\Standard Operating Procedures\Bacteriology Procedures\
Appendix II - Documenting Comparison Requests in LIS
Find Patient in LIS
PFGE already begun:
Go to back of work-card under PF
Add PFQ from keypad
Choose “F” for IC query and “E” for Call
Choose 3 IN:`RQUST`for results add date of e-mail
When comparison is complete and results sent
Go to back of work-card
Add Call
Choose 2 OUT:Manual`FAX`results and change Fax to E-mail.
Add date of report.
Work-card should look as below:
5. BHIB PF
6. PF PFQ
7. PFQ IC query CALL
8. CALL IN:`RQUST`for results E-mail
9. CALL OUT:Manual`E-mail`results
If necessary to retrieve isolate from Freezer
Add Pull and SUBBA

Department of Microbiology
Quality Manual
Policy # MI_PFGE
Page 35 of
57
Version: 1.4 CURRENT
Section: Bacteriology Procedures Subject Title: Infection Control Pulsed-field Gel
Electrophoresis
UNIVERSITY HEALTH NETWORK/MOUNT SINAI HOSPITAL, DEPARTMENT OF MICROBIOLOGY
NOTE: This document is Uncontrolled When Printed.
Any documents appearing in paper form that do not state "CONTROLLED COPY” in red print are not controlled and should be checked
against the document (titled as above) on the server prior to use. Management System\UHN_Mount Sinai Hospital Microbiology\Standard Operating Procedures\Bacteriology Procedures\
Appendix III - Maintenance and Quality Control
Maintenance and QC CHEF PFGE Machines
Before each run:
Agarose removal
1. With the gel-box full of buffer remove the flat rectangular plastic trap at front of gel box
2. Attach a syringe to a front port of the gel-box
3. Draw back the syringe so that it fills with buffer.
4. Quickly depress the syringe so that the buffer rapidly flows back into the gel-box
pushing any small pieces of agarose out of the drainage holes
5. Remove agarose with a swab
6. Drain old buffer by removing clamps and allowing buffer to run into 2L cylinder provided.
7. Turn on pump for 30 secs to flush the tubing and drain.
8. Pour approximately 500ml of de-ionized water into gel box to rinse.
9. Wipe sides and cover of gel box with a wet and then dry kim-wipe.
10. Check that gel- box is level.
11. Fill gel-box with fresh buffer
12. Fill out QC sheets.
Weekly
1. Check electrodes with gloves on, gently wriggle each electrode to see if it is loose.
(The electrode will usually break if it is loose or thin)
2. If the electrode breaks or is thinner at the ends replace electrodes and document change on QC
sheet
Monthly
Flow rate (Goal 1L per/min)
With gel-box full of buffer, disconnect the tubing at the back of box and put the end into a 1L
graduated cylinder (top at desk height).
1. Set timer for 1 min
2. Turn on the pump and simultaneously start timer
3. Shut off pump when the minute is up.
The amount of buffer in the cylinder is the flow rate per min.
4. Adjust the dial on the pump and retest the flow rate until you get 1L per min or as close to it
as you can.
5. Document flow rate for each machine making sure that they are all within the same 50ml
radius.
6. Fill out QC sheets
Department of Microbiology
Quality Manual
Policy # MI_PFGE
Page 36 of
57
Version: 1.4 CURRENT
Section: Bacteriology Procedures Subject Title: Infection Control Pulsed-field Gel
Electrophoresis
UNIVERSITY HEALTH NETWORK/MOUNT SINAI HOSPITAL, DEPARTMENT OF MICROBIOLOGY
NOTE: This document is Uncontrolled When Printed.
Any documents appearing in paper form that do not state "CONTROLLED COPY” in red print are not controlled and should be checked
against the document (titled as above) on the server prior to use. Management System\UHN_Mount Sinai Hospital Microbiology\Standard Operating Procedures\Bacteriology Procedures\
N.B.: If an adjustment is made make a note of setting change on pump.
Water flush and temperature check.
Temperature goal 12°C
1. Fill the gel-box with 2L of de-ionized water
2. Turn on the pump and chiller.
3. Set chiller temperature to 12°C and press actual reading button
4. When the actual temperature is achieved, place a thermometer in the centre of the gel-box
and close lid.
5. Check the thermometer reading.
6. Adjust temperature of chiller to get desired reading if necessary.
7. Empty the gel-box and the tubing of water and re-fill with buffer.
8. Fill out QC sheets.
N.B.: If an adjustment is made make a note of setting to be used to achieve the desired
temperature on chiller.
Please make note of any unscheduled maintenance on the back of QC sheets
Maintenance of Gel Run Record
This record is for
1. Documenting all incidents that might occur during gel processing
2. Gathering statistics as a quality indicator for PFGE processing.
At the end of each run Fill in:
No. of pictures
No. of test lanes
Failed lanes
No. of control lanes
No. of failed control lanes
At the end of each month
Under Gels fill in totals for:
a. No. of Gels
b. No. of pictures
c. No. of test lanes
d. Failed lanes
Under Molecular Marker fill in totals for:-
a. No. of control lanes
b. Failed lanes

Department of Microbiology
Quality Manual
Policy # MI_PFGE
Page 37 of
57
Version: 1.4 CURRENT
Section: Bacteriology Procedures Subject Title: Infection Control Pulsed-field Gel
Electrophoresis
UNIVERSITY HEALTH NETWORK/MOUNT SINAI HOSPITAL, DEPARTMENT OF MICROBIOLOGY
NOTE: This document is Uncontrolled When Printed.
Any documents appearing in paper form that do not state "CONTROLLED COPY” in red print are not controlled and should be checked
against the document (titled as above) on the server prior to use. Management System\UHN_Mount Sinai Hospital Microbiology\Standard Operating Procedures\Bacteriology Procedures\
Yearly
Clean procedure of PFGE gel box with CLR solution
1. Make up 1% CLR dilute solution: add 20mL of CLR into 1980mL of dH2O.
2. Empty the PFGE gel box first and then fill the gel box with 2000mL of 1% CLR dilute
solution and run for 4 hours with the temperature setting at 25C.
3. Discard the 1% CLR dilute solution, replace with 2000mL of dH2O and flush 5 times
with new dH2O each time until bubble disappear.
4. Refill the PFGE gel box with 2000mL of another new dH2O and run overnight.
5. On next day, replace with 2000mL of freshly made TSB buffer solution, flush 3 times,
and run overnight with new TSB buffer solution.
6. Repeat this procedure yearly or as needed if the gel picture background is blurry.

Department of Microbiology
Quality Manual
Policy # MI_PFGE
Page 38 of
57
Version: 1.4 CURRENT
Section: Bacteriology Procedures Subject Title: Infection Control Pulsed-field Gel
Electrophoresis
UNIVERSITY HEALTH NETWORK/MOUNT SINAI HOSPITAL, DEPARTMENT OF MICROBIOLOGY
NOTE: This document is Uncontrolled When Printed.
Any documents appearing in paper form that do not state "CONTROLLED COPY” in red print are not controlled and should be checked
against the document (titled as above) on the server prior to use. Management System\UHN_Mount Sinai Hospital Microbiology\Standard Operating Procedures\Bacteriology Procedures\
Appendix IV - Preparing PFGE Plugs of the Salmonella ser Branderup H9812 Standard
Strain
This protocol used is same for Gram negative bacilli.
1. Labels for H9812 S. branderup can be found in the PFGE QC record
2. Go to Lis order entry and edit date made for each new batch.
3. Print labels one large label per tube, each tube containing 3 plugs
4. Make as many plugs as are feasible on a Wednesday run
Process according to the protocol for gram negative bacilli.
5. Store plugs in glass tubes with 2.5-5mls of Gram negative wash buffer
6. QC new plugs by running on a gel along with old plugs for comparison
7. Plugs can be cut into 3 pieces, pre-digested with Xba1 and stored in 50mM EDTA @
4°C until needed (2 weeks).

Department of Microbiology
Quality Manual
Policy # MI_PFGE
Page 39 of
57
Version: 1.4 CURRENT
Section: Bacteriology Procedures Subject Title: Infection Control Pulsed-field Gel
Electrophoresis
UNIVERSITY HEALTH NETWORK/MOUNT SINAI HOSPITAL, DEPARTMENT OF MICROBIOLOGY
NOTE: This document is Uncontrolled When Printed.
Any documents appearing in paper form that do not state "CONTROLLED COPY” in red print are not controlled and should be checked
against the document (titled as above) on the server prior to use. Management System\UHN_Mount Sinai Hospital Microbiology\Standard Operating Procedures\Bacteriology Procedures\
Appendix V - Preparing PFGE plugs for Serratia marcescens
Subcultures from overnight growth on MH plates or 10ml BHI broth
1. Keep subcultures @4ºC until ready for use
2. Prepare all that is needed for processing before beginning
3. Work through until plugs are in lysis buffer.
Preparation
1. Turn on 58ºC water-bath
2. Turn on incubator/shaker oven to 55 ºC
3. Calculate how much Proteinase K (PK) is necessary for each plug and Serratia Lysis/PK
buffer (10ul PK per plug and 40ul PK per 2ml aliquot Serratia lysis/PK buffer).
4. Remove Proteinase K from freezer and allow it to thaw. Keep @4 ºC until ready for use
5. Aliquot 10uL PK to eppendorf tubes for making plugs
6. Make up SL/PK buffer with PK and dispense 2 mLs for each isolate. Keep @4 ºC
7. Keep plug molds @4 ºC
8. Prepare 1% Seakem Gold Agarose (SKG) in Sterile Serratia cell suspension buffer
(SCSB) for making all plugs.(0.1gm SKG in 10 mL SCSB or .2gm SKG in 20mL SCSB).
Use 50mL tube.
9. Place tube in beaker with water and dissolve agarose in microwave for 30 secs to 1 min
Keep in 58 ºC water-bath until ready for use
Standardization
1. Calibrate Vitek colorimeter.
2. From broth spin 1.5mL @ 14,000 rpm and discard supernatant using a transfer pipette.
3. Re-suspend cell button with 250uL of suspension buffer (Serratia Cell suspension buffer-
SCSB)
4. Add to pre-labelled tube (1.5mL of SCSB)
5. Vortex to make a smooth suspension
6. Add organism until equivalent to 20% transmittance.
7. From plate, add organism to pre-labelled tube (1.5mL of SCSB) until equivalent to 20%
transmittance.
N.B. Keep cell suspensions on ice while making plugs.

Department of Microbiology
Quality Manual
Policy # MI_PFGE
Page 40 of
57
Version: 1.4 CURRENT
Section: Bacteriology Procedures Subject Title: Infection Control Pulsed-field Gel
Electrophoresis
UNIVERSITY HEALTH NETWORK/MOUNT SINAI HOSPITAL, DEPARTMENT OF MICROBIOLOGY
NOTE: This document is Uncontrolled When Printed.
Any documents appearing in paper form that do not state "CONTROLLED COPY” in red print are not controlled and should be checked
against the document (titled as above) on the server prior to use. Management System\UHN_Mount Sinai Hospital Microbiology\Standard Operating Procedures\Bacteriology Procedures\
Preparing the plugs
Plug Making
Working with one specimen at a time.
1. Aliquot 200µls of bacterial cell suspension into a micro-fuge tube containing 10ul PK
and mix gently
2. Add 200µls of 1% Seakem gold agarose in SCSB. Mix gently.
3. Immediately fill two plug molds making sure that there are no bubbles and that the molds
have not been overfilled.
4. Allow plugs to solidify @4ºC for 5-10 minutes
5. Remove caps from tubes containing SL/PK buffer
6. Clean plungers for plugs with alcohol and dry with Kim wipe.
7. Remove tape from bottom of wells and dispense plugs into the appropriate tubes by
inserting plunger into well and tapping the top to remove plugs.
Make sure that plugs are immersed in the buffer. 8. Incubate Serratia plugs @ 55°C for 3 hrs. to overnight
Plug Washing
1. Pre-warm sterile de-ionized water, Gram positive wash buffer and Gram negative wash
buffer @ 55ºC
2. Arrange green caps in order according to processing numbers with a cap at end of row
3. Using a 50ml tube as a discard container, place each green cap over 50ml tube and decant
plugs from SL/PK buffer tube into appropriate cap.
4. Mount caps one on the other with the lowest number at the bottom.
5. Screw the blue cover of a clean 50ml tube on the last cap sealing the top of the last green
cap.
6. Add 50ml of pre-warmed sterile distilled water to a clean 50ml tube
7. Screw bottom cap of row onto tube and up-end, allowing water to run through caps and
wash all plugs
8. Discard water and repeat step 8.
9. Remove blue cap and replace with green cap as new cover.
10. Put row of caps into the glass container. Add 500ml of Gram positive/negative wash
buffer.
11. Incubate @ 55ºC for 1 hr. with a spin speed of 66 in incubator/shaker.(Wash can be left
overnight)

Department of Microbiology
Quality Manual
Policy # MI_PFGE
Page 41 of
57
Version: 1.4 CURRENT
Section: Bacteriology Procedures Subject Title: Infection Control Pulsed-field Gel
Electrophoresis
UNIVERSITY HEALTH NETWORK/MOUNT SINAI HOSPITAL, DEPARTMENT OF MICROBIOLOGY
NOTE: This document is Uncontrolled When Printed.
Any documents appearing in paper form that do not state "CONTROLLED COPY” in red print are not controlled and should be checked
against the document (titled as above) on the server prior to use. Management System\UHN_Mount Sinai Hospital Microbiology\Standard Operating Procedures\Bacteriology Procedures\
After wash is complete:
12. Discard wash buffer
13. Tap green caps on desk to shake plugs into bottom of cap.
14. Transfer plugs from green caps into corresponding wells
N.B. OPTIONAL: Store plugs overnight or proceed to restriction digest with Xba1.

Department of Microbiology
Quality Manual
Policy # MI_PFGE
Page 42 of
57
Version: 1.4 CURRENT
Section: Bacteriology Procedures Subject Title: Infection Control Pulsed-field Gel
Electrophoresis
UNIVERSITY HEALTH NETWORK/MOUNT SINAI HOSPITAL, DEPARTMENT OF MICROBIOLOGY
NOTE: This document is Uncontrolled When Printed.
Any documents appearing in paper form that do not state "CONTROLLED COPY” in red print are not controlled and should be checked
against the document (titled as above) on the server prior to use. Management System\UHN_Mount Sinai Hospital Microbiology\Standard Operating Procedures\Bacteriology Procedures\
Appendix VI - Reagents Preparation
PFGE Reagents for Gram Positives
Gram Positive PK Buffer (500 mL)
450 mL 0.5M EDTA pH 9.0-9.5
50 mL 10% Sarkosyl (SLS) *
Mix together. Do NOT Autoclave
TE Buffer (1L)
(Gram Positive Wash Buffer) 2 mL 0.5M EDTA pH 9.0-9.5
10 mL 1 M Tris HCl pH 7.6
Make up to 1L with DdH20 and autoclave.
Gram Positive PIV Buffer (500 mL)
5 mL 1M Tris HCl pH 7.6
100 mL 5M NaCl
395 mL DdH2O
Mix together and autoclave.
EC Lysis Buffer (500 mL)
3 mL 1M Tris HCl pH 7.6
100 mL 5M NaCl
100 mL 0.5M EDTA pH 9.0
2.5 mL 10% NP40 *
10 mL 10% Deoxycholate *
25 mL 10% Sarkosyl *
Make up to 500 mL using sterilized DdH2O.
*Do NOT autoclave reagents containing Sarkosyl, Deoxycholate or NP40.
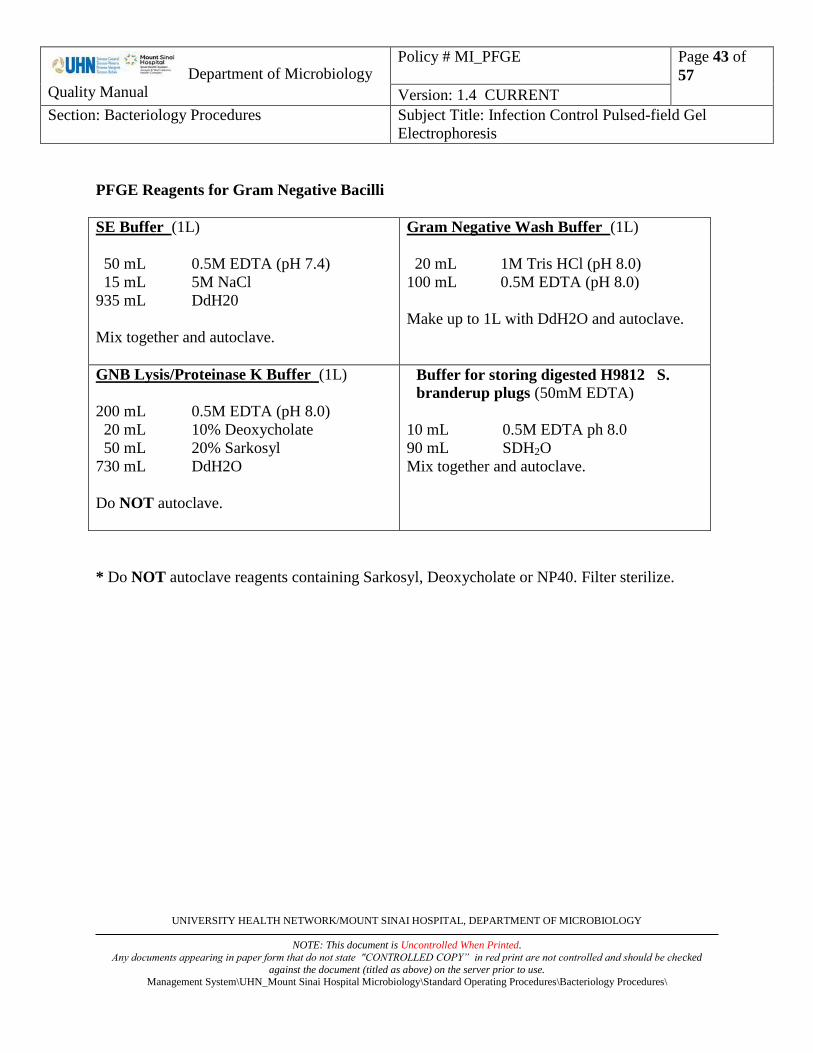
Department of Microbiology
Quality Manual
Policy # MI_PFGE
Page 43 of
57
Version: 1.4 CURRENT
Section: Bacteriology Procedures Subject Title: Infection Control Pulsed-field Gel
Electrophoresis
UNIVERSITY HEALTH NETWORK/MOUNT SINAI HOSPITAL, DEPARTMENT OF MICROBIOLOGY
NOTE: This document is Uncontrolled When Printed.
Any documents appearing in paper form that do not state "CONTROLLED COPY” in red print are not controlled and should be checked
against the document (titled as above) on the server prior to use. Management System\UHN_Mount Sinai Hospital Microbiology\Standard Operating Procedures\Bacteriology Procedures\
PFGE Reagents for Gram Negative Bacilli
SE Buffer (1L)
50 mL 0.5M EDTA (pH 7.4)
15 mL 5M NaCl
935 mL DdH20
Mix together and autoclave.
Gram Negative Wash Buffer (1L)
20 mL 1M Tris HCl (pH 8.0)
100 mL 0.5M EDTA (pH 8.0)
Make up to 1L with DdH2O and autoclave.
GNB Lysis/Proteinase K Buffer (1L)
200 mL 0.5M EDTA (pH 8.0)
20 mL 10% Deoxycholate
50 mL 20% Sarkosyl
730 mL DdH2O
Do NOT autoclave.
Buffer for storing digested H9812 S.
branderup plugs (50mM EDTA)
10 mL 0.5M EDTA ph 8.0
90 mL SDH2O
Mix together and autoclave.
* Do NOT autoclave reagents containing Sarkosyl, Deoxycholate or NP40. Filter sterilize.

Department of Microbiology
Quality Manual
Policy # MI_PFGE
Page 44 of
57
Version: 1.4 CURRENT
Section: Bacteriology Procedures Subject Title: Infection Control Pulsed-field Gel
Electrophoresis
UNIVERSITY HEALTH NETWORK/MOUNT SINAI HOSPITAL, DEPARTMENT OF MICROBIOLOGY
NOTE: This document is Uncontrolled When Printed.
Any documents appearing in paper form that do not state "CONTROLLED COPY” in red print are not controlled and should be checked
against the document (titled as above) on the server prior to use. Management System\UHN_Mount Sinai Hospital Microbiology\Standard Operating Procedures\Bacteriology Procedures\
PFGE Reagents for Serratia marcescens
Cell Suspension Buffer (SCSB):
10ml of 1M Tris pH 8.0
20ml of 0.5M EDTA pH 8.0
Dilute to 100 ml using ddH2O
10% Deoxycholic acid
10g Deoxychoclic acid poswer
100ml DH20
Cell Lysis Buffer (SCLB):
0.5M EDTA 93.05gms
1% Sarkosyl, Sodium salt
(N-Laurylsarcosine) 5.0gms
NaOH pellets 20.0gms
Add 400mls of DH20 to dissolve
Adjust ph to 9-9.5
Bring volume to 500ml
Store @4ºC

Department of Microbiology
Quality Manual
Policy # MI_PFGE
Page 45 of
57
Version: 1.4 CURRENT
Section: Bacteriology Procedures Subject Title: Infection Control Pulsed-field Gel
Electrophoresis
UNIVERSITY HEALTH NETWORK/MOUNT SINAI HOSPITAL, DEPARTMENT OF MICROBIOLOGY
NOTE: This document is Uncontrolled When Printed.
Any documents appearing in paper form that do not state "CONTROLLED COPY” in red print are not controlled and should be checked
against the document (titled as above) on the server prior to use. Management System\UHN_Mount Sinai Hospital Microbiology\Standard Operating Procedures\Bacteriology Procedures\
Stock Reagents
5M NaCl
292.2 g NaCl
Dissolve in 1 Litre of DdH2O and autoclave.
0.5M EDTA
20 g NaOH pellets
Dissolve in 800 mL DdH2O
(put flask on stirrer and can add small amount of
heat to dissolve)
Add 186.1 g EDTA
When dissolved, put in cylinder and top up to
1L with DdH2O
Test pH and add more NaOH pellets until desired
pH of 8 or 9 is reached.
Divide into 2 x 500 mL bottles and autoclave.
Sarkosyl (L. Laural sarcosine)
10% solution = 10 grams/ 100mL
20% solution = 20 grams/ 100mL
TRIS Buffer Chart
pH at Temperature g/L for 1.0 M Solution
5 °C 25 °C 37 °C Trizma HCL Trizma Base
7.76 7.20 6.91 140.4 13.4
7.97 7.40 7.12 132.2 19.4
8.07 7.50 7.22 127.0 23.6
8.18 7.60 7.30 121.2 27.8
8.58 8.00 7.71 88.8 53.0

Department of Microbiology
Quality Manual
Policy # MI_PFGE
Page 46 of
57
Version: 1.4 CURRENT
Section: Bacteriology Procedures Subject Title: Infection Control Pulsed-field Gel
Electrophoresis
UNIVERSITY HEALTH NETWORK/MOUNT SINAI HOSPITAL, DEPARTMENT OF MICROBIOLOGY
NOTE: This document is Uncontrolled When Printed.
Any documents appearing in paper form that do not state "CONTROLLED COPY” in red print are not controlled and should be checked
against the document (titled as above) on the server prior to use. Management System\UHN_Mount Sinai Hospital Microbiology\Standard Operating Procedures\Bacteriology Procedures\
ENZYMES
Lysostaphin
5mg powder rehydrate in 5mls of
SDH2O
Final conc: 1mg/ml
Aliquot: 100uls
Lysozyme 10mg/ml
50mg powder in 5ml SDH2O
Aliquot: 1 ml
Lysozyme 100mg/ml
500mg in 5 ml
Aliquot: 500uls
Mutanolysin
Rehydrate in SDH2O
Final conc: 5U/ul
10,000U(powder) in 2mls SDH2O
Aliquot: 200uls
ProteinaseK
Rehydrate in SDH2O
Final conc: 20 mg/ml
Add 5 mls SDH2O to 1 vial of
powder
Aliquot: 1 ml.

Department of Microbiology
Quality Manual
Policy # MI_PFGE
Page 47 of
57
Version: 1.4 CURRENT
Section: Bacteriology Procedures Subject Title: Infection Control Pulsed-field Gel
Electrophoresis
UNIVERSITY HEALTH NETWORK/MOUNT SINAI HOSPITAL, DEPARTMENT OF MICROBIOLOGY
NOTE: This document is Uncontrolled When Printed.
Any documents appearing in paper form that do not state "CONTROLLED COPY” in red print are not controlled and should be checked
against the document (titled as above) on the server prior to use. Management System\UHN_Mount Sinai Hospital Microbiology\Standard Operating Procedures\Bacteriology Procedures\
Appendix VII - Calculations for Restriction Enzymes, MBI Fermentas Fast Digest enzyme/
buffer Chart
N.B Use 1/3 of plug for Ladder and ½ for VRE, MRSA and GNB
No. of
samples
Pre-restriction
Wash all plugs
( patients and ladder) in
750uls of SDH2O
@RT for 15-20min
Gram Positive
-Restriction
@ 37ºC 2hrs to
overnight
Gram Negative
-Restriction
@ 37ºC 2hrs to
overnight
1 Total mix=200uls ddH2O 170 uL
FD buffer 20 uL
FD Sma1 10 uL
ddH2O 175 uL
FD buffer 20 uL
FD Xba1 5 uL
2 Total mix=400uls ddH2O 340 uL
FD Buffer 40 uL
Sma1 20 uL
ddH2O 350 uL
FD Buffer 40 uL
Xba1 10 uL
3 Total mix=600uls ddH2O 510
FD Buffer 60
Sma1 30
ddH2O 525
FD Buffer 60
Xba1 15
4 Total mix=800uls ddH2O 680
FD Buffer 80
Sma1 40
ddH2O 700
FD Buffer 80
Xba1 20
5 Total mix=1000uls ddH2O 850
FD Buffer 100
Sma1 50
ddH2O 875
FD buffer 100
Xba1 25
6 Total mix =1200uls ddH2O 1020
FD buffer 120
Sma1 60
ddH2O 1050
FD buffer 120
Xba1 30
7 Total mix =1400uls ddH2O 1190
FD buffer 140
Sma1 70
ddH2O 1225
FD buffer 140
Xba1 35

Department of Microbiology
Quality Manual
Policy # MI_PFGE
Page 48 of
57
Version: 1.4 CURRENT
Section: Bacteriology Procedures Subject Title: Infection Control Pulsed-field Gel
Electrophoresis
UNIVERSITY HEALTH NETWORK/MOUNT SINAI HOSPITAL, DEPARTMENT OF MICROBIOLOGY
NOTE: This document is Uncontrolled When Printed.
Any documents appearing in paper form that do not state "CONTROLLED COPY” in red print are not controlled and should be checked
against the document (titled as above) on the server prior to use. Management System\UHN_Mount Sinai Hospital Microbiology\Standard Operating Procedures\Bacteriology Procedures\
N.B Use 1/3 of plug for Ladder and ½ for VRE, MRSA and GNB
No. of
samples
Pre-restriction
Wash all plugs
( patients and ladder) in
750uls of SDH2O
@RT for 15-20min
Gram Positive
-Restriction
@ 37ºC 2hrs to
overnight
Gram Negative
-Restriction
@ 37ºC 2hrs to
overnight
8 Total mix =1600uls ddH2O 1360
FD buffer 160
FD Sma1 80
ddH2O 1400
FD buffer 160
FD Xba1 40
9 Total mix =1800uls ddH2O 1530 uL
FD buffer 180 uL
FD Sma1 90 uL
ddH2O 1575 uL
FD buffer 180 uL
FD Xba1 45 uL
10 Total mix =2000uls ddH2O 1700 uL
FD buffer 200 uL
FD Sma1 100 uL
ddH2O 1750 uL
FD buffer 200 uL
FD Xba1 50 uL
11 Total mix =2200uls ddH2O 1870 uL
FD buffer 220 uL
FD Sma1 110 uL
ddH2O 1925 uL
FD buffer 220 uL
FD Xba1 55 uL
12 Total mix =2400uls ddH2O 2040 uL
FD buffer 240 uL
FD Sma1 120 uL
ddH2O 2100 uL
FD buffer 240 uL
FD Xba1 60 uL
13 Total mix =2600uls ddH2O 2210 uL
FD buffer 260 uL
FD Sma1 130 uL
ddH2O 2275 uL
FD buffer 260 uL
FD Xba1 65 uL
14 Total mix =2800uls ddH2O 2380 uL
FD buffer 280 uL
FD Sma1 140 uL
ddH2O 2450 uL
FD buffer 280 uL
FD Xba1 70 uL
15 Total mix =3000uls ddH2O 2550 uL
FD buffer 300 uL
FD Sma1 150 uL
ddH2O 2625 uL
FD buffer 300 uL
FD Xba1 75 uL
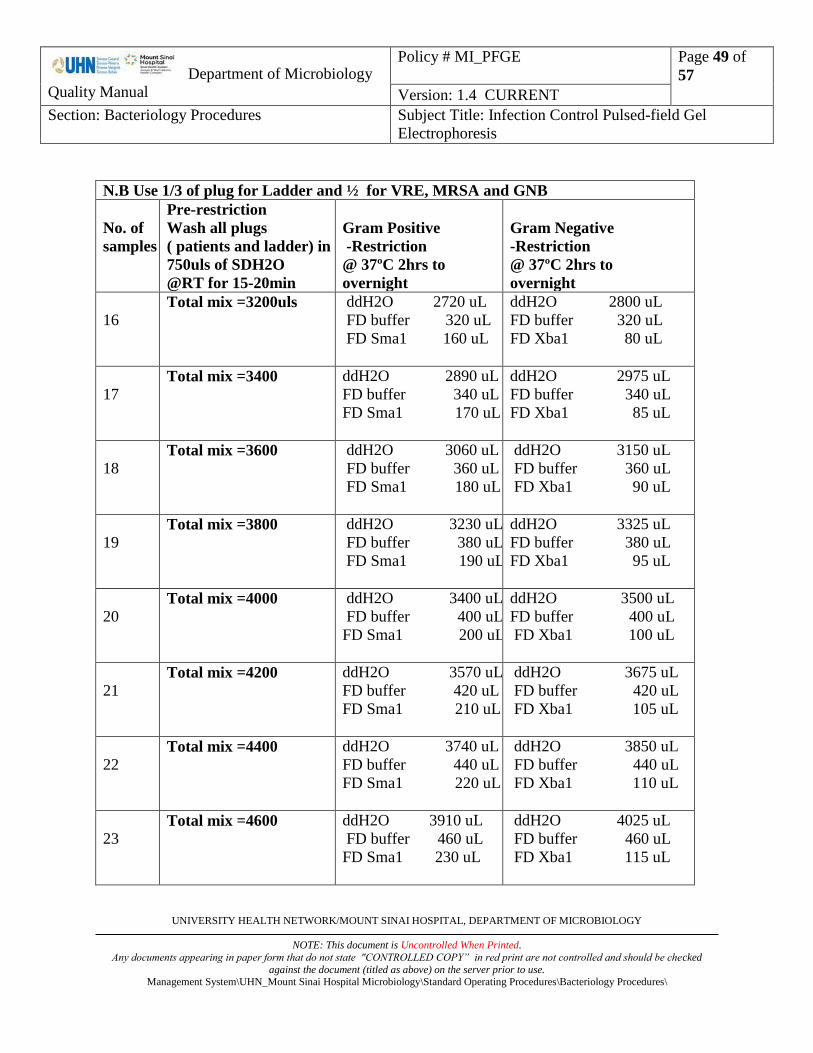
Department of Microbiology
Quality Manual
Policy # MI_PFGE
Page 49 of
57
Version: 1.4 CURRENT
Section: Bacteriology Procedures Subject Title: Infection Control Pulsed-field Gel
Electrophoresis
UNIVERSITY HEALTH NETWORK/MOUNT SINAI HOSPITAL, DEPARTMENT OF MICROBIOLOGY
NOTE: This document is Uncontrolled When Printed.
Any documents appearing in paper form that do not state "CONTROLLED COPY” in red print are not controlled and should be checked
against the document (titled as above) on the server prior to use. Management System\UHN_Mount Sinai Hospital Microbiology\Standard Operating Procedures\Bacteriology Procedures\
N.B Use 1/3 of plug for Ladder and ½ for VRE, MRSA and GNB
No. of
samples
Pre-restriction
Wash all plugs
( patients and ladder) in
750uls of SDH2O
@RT for 15-20min
Gram Positive
-Restriction
@ 37ºC 2hrs to
overnight
Gram Negative
-Restriction
@ 37ºC 2hrs to
overnight
16 Total mix =3200uls ddH2O 2720 uL
FD buffer 320 uL
FD Sma1 160 uL
ddH2O 2800 uL
FD buffer 320 uL
FD Xba1 80 uL
17 Total mix =3400 ddH2O 2890 uL
FD buffer 340 uL
FD Sma1 170 uL
ddH2O 2975 uL
FD buffer 340 uL
FD Xba1 85 uL
18 Total mix =3600 ddH2O 3060 uL
FD buffer 360 uL
FD Sma1 180 uL
ddH2O 3150 uL
FD buffer 360 uL
FD Xba1 90 uL
19 Total mix =3800 ddH2O 3230 uL
FD buffer 380 uL
FD Sma1 190 uL
ddH2O 3325 uL
FD buffer 380 uL
FD Xba1 95 uL
20 Total mix =4000 ddH2O 3400 uL
FD buffer 400 uL
FD Sma1 200 uL
ddH2O 3500 uL
FD buffer 400 uL
FD Xba1 100 uL
21 Total mix =4200 ddH2O 3570 uL
FD buffer 420 uL
FD Sma1 210 uL
ddH2O 3675 uL
FD buffer 420 uL
FD Xba1 105 uL
22 Total mix =4400 ddH2O 3740 uL
FD buffer 440 uL
FD Sma1 220 uL
ddH2O 3850 uL
FD buffer 440 uL
FD Xba1 110 uL
23 Total mix =4600 ddH2O 3910 uL
FD buffer 460 uL
FD Sma1 230 uL
ddH2O 4025 uL
FD buffer 460 uL
FD Xba1 115 uL

Department of Microbiology
Quality Manual
Policy # MI_PFGE
Page 50 of
57
Version: 1.4 CURRENT
Section: Bacteriology Procedures Subject Title: Infection Control Pulsed-field Gel
Electrophoresis
UNIVERSITY HEALTH NETWORK/MOUNT SINAI HOSPITAL, DEPARTMENT OF MICROBIOLOGY
NOTE: This document is Uncontrolled When Printed.
Any documents appearing in paper form that do not state "CONTROLLED COPY” in red print are not controlled and should be checked
against the document (titled as above) on the server prior to use. Management System\UHN_Mount Sinai Hospital Microbiology\Standard Operating Procedures\Bacteriology Procedures\
N.B Use 1/3 of plug for Ladder and ½ for VRE, MRSA and GNB
No. of
samples
Pre-restriction
Wash all plugs
( patients and ladder) in
750uls of SDH2O
@RT for 15-20min
Gram Positive
-Restriction
@ 37ºC 2hrs to
overnight
Gram Negative
-Restriction
@ 37ºC 2hrs to
overnight
24 Total mix =4800 ddH2O 4080 uL
FD buffer 480 uL
FD Sma1 240 uL
ddH2O 4200 uL
FD buffer 480 uL
FD Xba1 120 uL
25 Total mix =5000uls ddH2O 4250 uL
FD buffer 500 uL
FD Sma1 250 uL
ddH2O 4375 uL
FD buffer 500 uL
FD Xba1 125 uL
26 Total mix =5200uls ddH2O 4420 uL
FD buffer 520 uL
FD Sma1 260 uL
ddH2O 4550 uL
FD buffer 520 uL
FD Xba1 130 uL
27 Total mix =5400uls ddH2O 4590 uL
FD buffer 540 uL
FD Sma1 270 uL
ddH2O 4725 uL
FD buffer 540 uL
FD Xba1 135 uL
28 Total mix =5600uls ddH2O 4760 uL
FD buffer 560 uL
FD Sma1 280 uL
ddH2O 4900 uL
FD buffer 560 uL
FD Xba1 140 uL
29 Total mix =5800 uls ddH2O 4930 uL
FD buffer 580 uL
FD Sma1 290 uL
ddH2O 5075 uL
FD buffer 580 uL
FD Xba1 145 uL
30 Total mix =6000uls ddH2O 5100 uL
FD buffer 600 uL
FD Sma1 300 uL
ddH2O 5250 uL
FD buffer 600 uL
FD Xba1 150 uL
31 Total mix =6200uls ddH2O 5270 uL
FD buffer 620 uL
FD Sma1 310 uL
ddH2O 5425 uL
FD buffer 620 uL
FD Xba1 155 uL

Department of Microbiology
Quality Manual
Policy # MI_PFGE
Page 51 of
57
Version: 1.4 CURRENT
Section: Bacteriology Procedures Subject Title: Infection Control Pulsed-field Gel
Electrophoresis
UNIVERSITY HEALTH NETWORK/MOUNT SINAI HOSPITAL, DEPARTMENT OF MICROBIOLOGY
NOTE: This document is Uncontrolled When Printed.
Any documents appearing in paper form that do not state "CONTROLLED COPY” in red print are not controlled and should be checked
against the document (titled as above) on the server prior to use. Management System\UHN_Mount Sinai Hospital Microbiology\Standard Operating Procedures\Bacteriology Procedures\
N.B Use 1/3 of plug for Ladder and ½ for VRE, MRSA and GNB
No. of
samples
Pre-restriction
Wash all plugs
( patients and ladder) in
750uls of SDH2O
@RT for 15-20min
Gram Positive
-Restriction
@ 37ºC 2hrs to
overnight
Gram Negative
-Restriction
@ 37ºC 2hrs to
overnight
32 Total mix =6400uls ddH2O 5440 uL
FD buffer 640 uL
FD Sma 1 320 uL
ddH2O 5600 uL
FD buffer 640 uL
FD Xba1 160 uL

Department of Microbiology
Quality Manual
Policy # MI_PFGE
Page 52 of
57
Version: 1.4 CURRENT
Section: Bacteriology Procedures Subject Title: Infection Control Pulsed-field Gel
Electrophoresis
UNIVERSITY HEALTH NETWORK/MOUNT SINAI HOSPITAL, DEPARTMENT OF MICROBIOLOGY
NOTE: This document is Uncontrolled When Printed.
Any documents appearing in paper form that do not state "CONTROLLED COPY” in red print are not controlled and should be checked
against the document (titled as above) on the server prior to use. Management System\UHN_Mount Sinai Hospital Microbiology\Standard Operating Procedures\Bacteriology Procedures\
Appendix VIII - To Send Isolates To NML For: Spa typing
1. Refer to Sendout Manual FEDEX section for instructions on preparing specimens for
shipping.
2. Ensure to send To NML attn: Dr. Michael Mulvey
3. Please use the MicrobiologyNML Requisition.
Department of Microbiology
Quality Manual
Policy # MI_PFGE
Page 53 of
57
Version: 1.4 CURRENT
Section: Bacteriology Procedures Subject Title: Infection Control Pulsed-field Gel
Electrophoresis
UNIVERSITY HEALTH NETWORK/MOUNT SINAI HOSPITAL, DEPARTMENT OF MICROBIOLOGY
NOTE: This document is Uncontrolled When Printed.
Any documents appearing in paper form that do not state "CONTROLLED COPY” in red print are not controlled and should be checked
against the document (titled as above) on the server prior to use. Management System\UHN_Mount Sinai Hospital Microbiology\Standard Operating Procedures\Bacteriology Procedures\
Appendix IX – Reference Material
Reference Material:
PFGE Reference Material
Troubleshooting links:
PGFE Tips and Tricks to Success and Interpretation of Results
PFGE Troubleshooting Tips
PFGE comparison request form:
PFGE COMPARISON REQUEST FORM

Department of Microbiology
Quality Manual
Policy # MI_PFGE
Page 54 of
57
Version: 1.4 CURRENT
Section: Bacteriology Procedures Subject Title: Infection Control Pulsed-field Gel
Electrophoresis
UNIVERSITY HEALTH NETWORK/MOUNT SINAI HOSPITAL, DEPARTMENT OF MICROBIOLOGY
NOTE: This document is Uncontrolled When Printed.
Any documents appearing in paper form that do not state "CONTROLLED COPY” in red print are not controlled and should be checked
against the document (titled as above) on the server prior to use. Management System\UHN_Mount Sinai Hospital Microbiology\Standard Operating Procedures\Bacteriology Procedures\
Record of Edited Revisions
Manual Section Name: Infection Control Pulsed-field Gel Electrophoresis
Page Number / Item Date of Revision Signature of
Approval Annual Review May 30, 2007 Dr. T. Mazzulli
Annual Review September 20, 2008 Dr. T. Mazzulli
Annual Review April 12, 2009
Added Reporting section October 15, 2010 Dr. T. Mazzulli
Annual Review October 15, 2010 Dr. T. Mazzulli
Reviewed and Updated May 15, 2011 Dr. T. Mazzulli
Added comparison request for Rouge Valley and other
hospitals
December 15, 2011 Dr. T. Mazzulli
Annual Review December 15, 2011 Dr. T. Mazzulli
Changed UHN new MRSA and VRE to not routinely set
up
March 21, 2012 Dr. T. Mazzulli
Updated Comparing a cluster May 14, 2012 Dr. T. Mazzulli
Updated workflow August 14, 2012 Dr. T. Mazzulli
Annual Review August 14, 2012 Dr. T. Mazzulli
Added Serratia marcescens procedure December 18, 2012 Dr. T. Mazzulli
Annual Review August 27, 2013 Dr. T. Mazzulli
PFGE comparison request form May 16, 2014 Dr. T. Mazzulli
Add on organisms on PFGE Bionumerics Run Parameters
Annual Review
Updated headers/footers
November 06, 2014 Dr. T. Mazzulli
p.9 Lysis Enzyme table added: GAS / GBS row with 50ul
Lysozyme L100 100mg/mL, 50 ul Mytanolysin 5U/uL
(Sigma) and 20ul Proteinase K 20mg/mL (Roche)
February 03, 2015 Dr. T. Mazzulli
Appendix VIII – Trouble shooting web link February 08, 2015 Dr. T. Mazzulli
P.4 GAS from MSH note 3 added: if identified by
infection control to be a nosocomial GAS
May 16, 2015 Dr. T. Mazzulli
Appendix VIII – Reference Material: added folder of
reference material PDFs
May 16, 2015 Dr. T. Mazzulli
Annual Review:
Removed New ESBL and p.aeruginosa from work.
Removed link for “PFGE set up preprocessing”
p.7 PFGE bench: #3 Changed to print labels, removed link
June 04, 2015 Dr. T. Mazzulli
Department of Microbiology
Quality Manual
Policy # MI_PFGE
Page 55 of
57
Version: 1.4 CURRENT
Section: Bacteriology Procedures Subject Title: Infection Control Pulsed-field Gel
Electrophoresis
UNIVERSITY HEALTH NETWORK/MOUNT SINAI HOSPITAL, DEPARTMENT OF MICROBIOLOGY
NOTE: This document is Uncontrolled When Printed.
Any documents appearing in paper form that do not state "CONTROLLED COPY” in red print are not controlled and should be checked
against the document (titled as above) on the server prior to use. Management System\UHN_Mount Sinai Hospital Microbiology\Standard Operating Procedures\Bacteriology Procedures\
Page Number / Item Date of Revision Signature of
Approval from #7 “isolates for inhouse pfge”
Changed hybridization oven to incubator/shaker through
manual
p.11 PK BUFFER changed to 1hr for MRSA/VRE/GAS
p.13 Step 6 #3 added put 250ulSDH2O in mirofuge tube
p.17 Step 6 #3 added: add 750ul SDH2O to tube
p.17 Removed Note “plugs can be digested and stored in
50mM EDTA until ready for use”
Removed reference to PULSE WAVE 760 Module
p.21 removed Ethidium bromide stain removal bath section
Updated save file names
p.23 updated Bionumerics Gel analysis procedure
p.26 Removed standard reporting phrase when PFGE is in
progress section.
p.31 updated Sending a report by Email section added
MSh and UHN cc to (MSH)lab-PFGE team, (UHN) Dr.
Hota, Dr. Gardam, Dr. Lemieux
p.35 Weekly QC (removed Note marker H9812S)
Appendix IV, removed #4 Print QC for making molecular
marker/fill in information
Appendix V: Plug Washing, step 11, add 500ml gram
pos/meg wash buffer12: changed speed to 66
Appendix VI: added 10%deoxychoclic acid box
Made Calculations for Restriction Enzymes its own
appendix.
p.3 Isolates for Referred-Out PFGE: remove Rouge valley
p.5 procedure added #11 destain
Remove Appendix II - Thiourea Use for PFGE protocol
Appendix VIII refer to Send out Manual Fedex section.
Insert on Page 23 of 51, #2 - Choosing the Correct
Database for Analyzing/Saving Gel Results Table
October 30, 2015 Dr. T. Mazzulli
In section: Comparing and Interpreting a Cluster in
Bionumerics added to step 5:
Note: make sure the Optimization is 0.81 and Position
tolerance is 1.06
Click Position tolerances
Check the Optimization (0.81) and Position tolerance
April 08, 2016 Dr. T. Mazzulli

Department of Microbiology
Quality Manual
Policy # MI_PFGE
Page 56 of
57
Version: 1.4 CURRENT
Section: Bacteriology Procedures Subject Title: Infection Control Pulsed-field Gel
Electrophoresis
UNIVERSITY HEALTH NETWORK/MOUNT SINAI HOSPITAL, DEPARTMENT OF MICROBIOLOGY
NOTE: This document is Uncontrolled When Printed.
Any documents appearing in paper form that do not state "CONTROLLED COPY” in red print are not controlled and should be checked
against the document (titled as above) on the server prior to use. Management System\UHN_Mount Sinai Hospital Microbiology\Standard Operating Procedures\Bacteriology Procedures\
Page Number / Item Date of Revision Signature of
Approval (1.06) setting
Click OK
Table 3 for Pseudomonas / Stenotrophomonas changed to
fast digest Bcu 1 from Spel and on run parameters (p.20)
May 02, 2016 Dr. T. Mazzulli
Annual Review June 04, 2016 Dr. T. Mazzulli
In Naming CMRSA section, added paragraph “Naming
CMRSA-10)”
Added new appendix 1 (further appendices renumbered)
10 and 15 lane recording sheets.
Appendix VI: Gram positive PK buffer updated:
450 EDTA (from 475),
50ml 10% Sarkosyl from (25ml 1%)
June 04, 2016 Dr. T. Mazzulli
In Naming CMRSA section, added paragraph “Naming
CMRSA-10)”
Added new appendix 1 (further appendices renumbered)
10 and 15 lane recording sheets.
Appendix VI: Gram positive PK buffer updated:
450 EDTA (from 475),
50ml 10% Sarkosyl from (25ml 1%)
October 08, 2016 Dr. T. Mazzulli
Annual Review
Added yearly PFGE to VRE from UHN
June 01, 2017 Dr. T. Mazzulli
Annual Review May 30, 2018 Dr. T. Mazzulli
Minor format change September 14, 2018 Dr. T. Mazzulli
Annual Review September 16, 2019 Dr. T. Mazzulli
Annual Review September 14, 2020 Dr. T. Mazzulli
Full document review included in all updates. Bi-annual review conducted when no revision had
been made within 2 years.
Page Number / Item Date of Revision Edited by:
Minor formatting change April 11, 2021 Jessica Bourke
Updated procedure May 13, 2021 Wayne Chiu
Updated send report by email section Nov 26, 2021 Wayne Chiu
Added yearly maintenance section Feb 2, 2022 Wayne Chiu
Department of Microbiology
Quality Manual
Policy # MI_PFGE
Page 57 of
57
Version: 1.4 CURRENT
Section: Bacteriology Procedures Subject Title: Infection Control Pulsed-field Gel
Electrophoresis
UNIVERSITY HEALTH NETWORK/MOUNT SINAI HOSPITAL, DEPARTMENT OF MICROBIOLOGY
NOTE: This document is Uncontrolled When Printed.
Any documents appearing in paper form that do not state "CONTROLLED COPY” in red print are not controlled and should be checked
against the document (titled as above) on the server prior to use. Management System\UHN_Mount Sinai Hospital Microbiology\Standard Operating Procedures\Bacteriology Procedures\
Page Number / Item Date of Revision Edited by:


