Embed Size (px)
Citation preview

ULTRA STATIONJUD500
QUICK INSTALLATION GUIDEGUÍA DE INSTALACIÓN RÁPIDAKURZANLEITUNG FÜR INSTALLATIONGUIDE D'INSTALLATION RAPIDE
快速安裝
EN :
ES :
DE :
FR :
日本語 : 繁中文 :
2 3
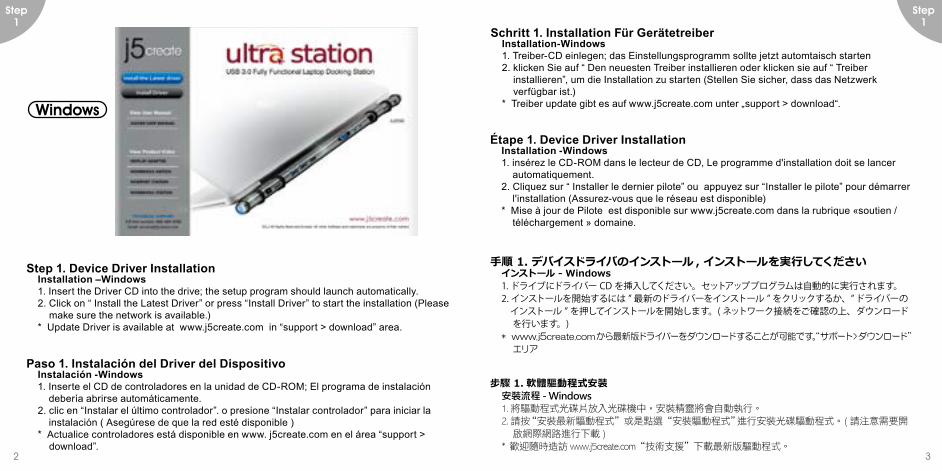
Step 1. Device Driver InstallationInstallation –Windows1. Insert the Driver CD into the drive; the setup program should launch automatically. 2. Click on “ Install the Latest Driver” or press “Install Driver” to start the installation (Please
make sure the network is available.)* Update Driver is available at www.j5create.com in “support > download” area.
Schritt 1. Installation Für GerätetreiberInstallation-Windows1. Treiber-CD einlegen; das Einstellungsprogramm sollte jetzt automtaisch starten2. klicken Sie auf “ Den neuesten Treiber installieren oder klicken sie auf “ Treiber
installieren”, um die Installation zu starten (Stellen Sie sicher, dass das Netzwerk verfügbar ist.)
* Treiber update gibt es auf www.j5create.com unter „support > download“.
Étape 1. Device Driver InstallationInstallation -Windows1. insérez le CD-ROM dans le lecteur de CD, Le programme d'installation doit se lancer automatiquement. 2. Cliquez sur “ Installer le dernier pilote” ou appuyez sur “Installer le pilote” pour démarrer l'installation (Assurez-vous que le réseau est disponible)* Mise à jour de Pilote est disponible sur www.j5create.com dans la rubrique «soutien / téléchargement » domaine.
Paso 1. Instalación del Driver del DispositivoInstalación -Windows1. Inserte el CD de controladores en la unidad de CD-ROM; El programa de instalación debería abrirse automáticamente. 2. clic en “Instalar el último controlador”. o presione “Instalar controlador” para iniciar la instalación ( Asegúrese de que la red esté disponible )* Actualice controladores está disponible en www. j5create.com en el área “support >
download”.
步驟 1. 軟體驅動程式安裝安裝流程 - Windows1. 將驅動程式光碟片放入光碟機中,安裝精靈將會自動執行。2. 請按 “安裝最新驅動程式”或是點選“安裝驅動程式” 進行安裝光碟驅動程式。( 請注意需要開
啟網際網路進行下載 )* 歡迎隨時造訪 www.j5create.com“技術支援”下載最新版驅動程式。
Windows
Step 1
Step 1
4 5
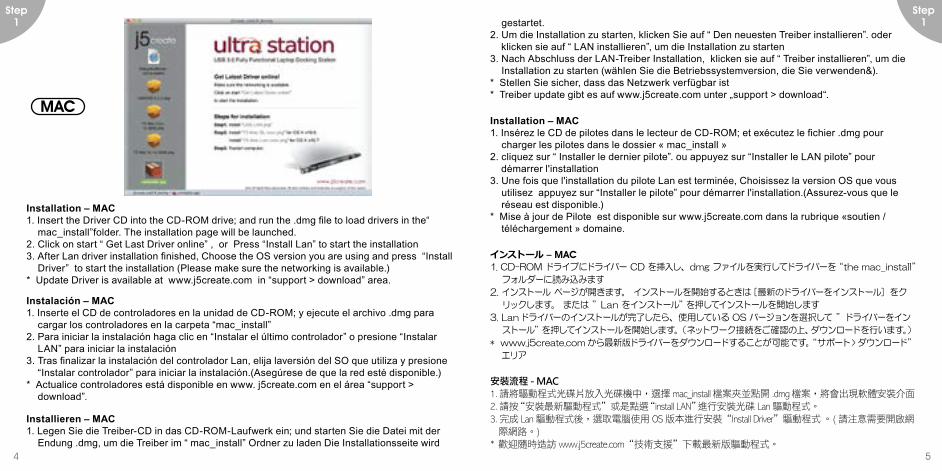
Installation – MAC1. Insert the Driver CD into the CD-ROM drive; and run the .dmg file to load drivers in the“
mac_install”folder. The installation page will be launched.2. Click on start “ Get Last Driver online” , or Press “Install Lan” to start the installation3. After Lan driver installation finished, Choose the OS version you are using and press “Install
Driver” to start the installation (Please make sure the networking is available.)* Update Driver is available at www.j5create.com in “support > download” area.
Installieren – MAC1. Legen Sie die Treiber-CD in das CD-ROM-Laufwerk ein; und starten Sie die Datei mit der
Endung .dmg, um die Treiber im “ mac_install” Ordner zu laden Die Installationsseite wird
Installation – MAC1. Insérez le CD de pilotes dans le lecteur de CD-ROM; et exécutez le fichier .dmg pour
charger les pilotes dans le dossier « mac_install »2. cliquez sur “ Installer le dernier pilote”. ou appuyez sur “Installer le LAN pilote” pour démarrer l'installation3. Une fois que l'installation du pilote Lan est terminée, Choisissez la version OS que vous
utilisez appuyez sur “Installer le pilote” pour démarrer l'installation.(Assurez-vous que le réseau est disponible.)
* Mise à jour de Pilote est disponible sur www.j5create.com dans la rubrique «soutien /téléchargement » domaine.
安裝流程 - MAC1. 請將驅動程式光碟片放入光碟機中,選擇 mac_install 檔案夾並點開 .dmg 檔案,將會出現軟體安裝介面2. 請按 “安裝最新驅動程式”或是點選 “install LAN” 進行安裝光碟 Lan 驅動程式。3. 完成 Lan 驅動程式後,選取電腦使用 OS 版本進行安裝“Install Driver”驅動程式 。( 請注意需要開啟網 際網路。)* 歡迎隨時造訪 www.j5create.com“技術支援”下載最新版驅動程式。
Instalación – MAC1. Inserte el CD de controladores en la unidad de CD-ROM; y ejecute el archivo .dmg para
cargar los controladores en la carpeta “mac_install”2. Para iniciar la instalación haga clic en “Instalar el último controlador” o presione “Instalar
LAN” para iniciar la instalación 3. Tras finalizar la instalación del controlador Lan, elija laversión del SO que utiliza y presione
“Instalar controlador” para iniciar la instalación.(Asegúrese de que la red esté disponible.)* Actualice controladores está disponible en www. j5create.com en el área “support >
download”.
MAC
gestartet. 2. Um die Installation zu starten, klicken Sie auf “ Den neuesten Treiber installieren”. oder klicken sie auf “ LAN installieren”, um die Installation zu starten3. Nach Abschluss der LAN-Treiber Installation, klicken sie auf “ Treiber installieren”, um die
Installation zu starten (wählen Sie die Betriebssystemversion, die Sie verwenden&).* Stellen Sie sicher, dass das Netzwerk verfügbar ist* Treiber update gibt es auf www.j5create.com unter „support > download“.
Step 1
Step 1

6 7
1 2 3 4 5 6 7 8 9 10 11
VGAHDMIHOST
Step 2. Device Hardware Installation1. Plug the Power Adapter to Port ①, For best results j5create strongly recommends you use the 5V power adapter included with your device.2. Connect USB 3.0 Cable Micro-B connector to Port ②, type A to host laptop. 3. Push the “j5” power button , The red indicator light lets you know when the incorrect power adapter is plugged in.4. Connect USB 2.0 Cable Micro-B connector to Port ⑪, and Type-A connector to the USB
port of the second computer. To Start the Wormhole Switch Function.
Paso 2. Instalación Del Hardware Del Dispositivo1. Conecte el adaptador de corriente al puerto ①, Para obtener los mejores resultados j5create recomienda encarecidamente que utilice el adaptador de alimentación de 5V incluido con el dispositivo.2. Conecte el cable con conector USB 3.0 Micro-B al conector del puerto ②, tipo A y luego al
portátil anfitrión.3. Presione el botón de encendido de la “j5”, La luz roja del indicador le permite saber cuando el adaptador de alimentación incorrecta está enchufado.4. Conecte el conector Micro-B del cable USB 2.0 al Puerto ⑪ y el conector tipo A al puerto USB del segundo ordenador. Para iniciar la función Wormhole Switch, consulte la instalación de Wormhole
Schritt 2. Installation Von Gerätehardware1. Schließen Sie den Netzadapter an Anschluss ① an, Für beste Ergebnisse empfiehlt dringend j5create Sie das 5V-Netzadapter mit Ihrem Gerät verwenden.2. Schließen Sie den Micro-B-Stecker des USB 3.0-Kabels an Anschluss ② und den Typ-A
Stecker an das Laptop an.3. Drücken Sie auf die Ein/Aus-Taste “j5”, Die rote Kontrollleuchte zeigt an, wenn das falsche Netzteil eingesteckt ist.4. Schließen Sie den Micro-B Stecker des USB 2.0 Kabels an Port ⑪ an, sowie den Typ A
Stecker an den USB Port des zweiten Computers. Um die Wormhole Switch Funktion zu aktivieren, lesen Sie bitte Installieren bei Wormhole.
Étape 2. Installation Du Matériel Dispositif1. Branchez l'adaptateur sur le Port ①, Pour de meilleurs résultats j5create recommande fortement que vous utilisez l'adaptateur d'alimentation de 5V inclus avec votre appareil.2. Connectez le connecteur du câble USB 3.0 Micro-B au Port ②, connecteur de Type-A à
l'ordinateur portable hôte3. Appuyez sur le bouton d'alimentation « j5 », Le voyant rouge vous permet de savoir quand l'adaptateur d'alimentation incorrecte est branché.4. Raccordez le connecteur Micro-B du câble USB 2.0 au Port ⑪, et le connecteur de Type-A au port USB du deuxième ordinateur. Pour démarrer la fonction Wormhole Switch, veuillez vous référer à l'installation pour Wormhole
步驟 2. 硬體安裝1. 連接電源充電器至 ①號埠,請務必使用產品附的 5V 電源適配器。2. 連接 USB 3.0 線的 Micro-B 端至 ②號埠,連接 Type-A 端至電腦3. 壓按開啟“j5” 電源,當燈號顯示為紅色時,表示使用不正確的電源適配器。4. USB 2.0 線的 Micro-B 頭至⑪號埠,另外一端 Type-A 頭至第二台電腦的 USB 埠 。安裝 Wormhole
Switch 功能,參考 Wormhole 安裝流程
** 添付されている AC アダプターが不良であったり、他の AC アダプターを使って不具合が出た場合 は、パワーボタンの LED が赤色に点灯します。JUD500 に同梱されている AC アダプターを必ず ご使用いただきますようお願いいたします。
Step 2
Step 2
8 9
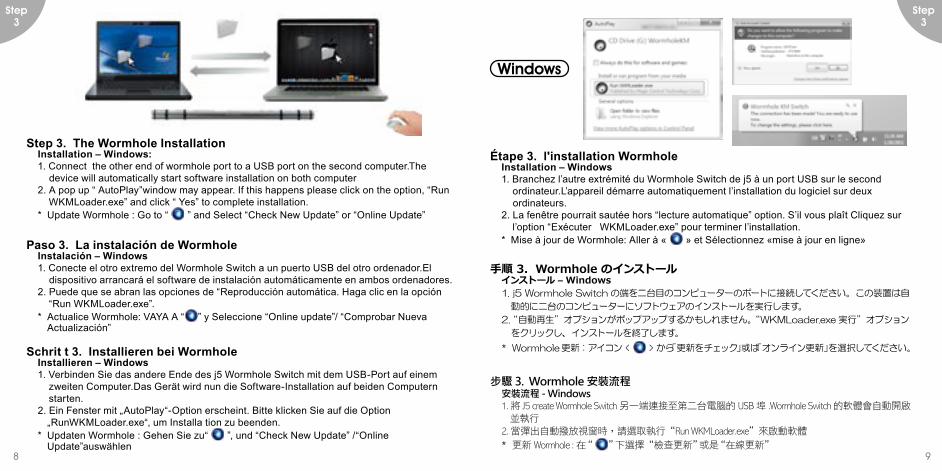
Step 3. The Wormhole InstallationInstallation – Windows:1. Connect the other end of wormhole port to a USB port on the second computer.The
device will automatically start software installation on both computer2. A pop up “ AutoPlay”window may appear. If this happens please click on the option, “Run WKMLoader.exe” and click “ Yes” to complete installation.* Update Wormhole : Go to “ ” and Select “Check New Update” or “Online Update”
Paso 3. La instalación de WormholeInstalación – Windows1. Conecte el otro extremo del Wormhole Switch a un puerto USB del otro ordenador.El
dispositivo arrancará el software de instalación automáticamente en ambos ordenadores.2. Puede que se abran las opciones de “Reproducción automática. Haga clic en la opción “Run WKMLoader.exe”.* Actualice Wormhole: VAYA A “ ” y Seleccione “Online update”/ “Comprobar Nueva
Actualización”
Schrit t 3. Installieren bei WormholeInstallieren – Windows1. Verbinden Sie das andere Ende des j5 Wormhole Switch mit dem USB-Port auf einem zweiten Computer.Das Gerät wird nun die Software-Installation auf beiden Computern starten.2. Ein Fenster mit „AutoPlay“-Option erscheint. Bitte klicken Sie auf die Option
„RunWKMLoader.exe“, um Installa tion zu beenden.* Updaten Wormhole : Gehen Sie zu“ ”, und “Check New Update” /“Online
Update”auswählen
Étape 3. l'installation WormholeInstallation – Windows1. Branchez l’autre extrémité du Wormhole Switch de j5 à un port USB sur le second ordinateur.L’appareil démarre automatiquement l’installation du logiciel sur deux
ordinateurs.2. La fenêtre pourrait sautée hors “lecture automatique” option. S’il vous plaît Cliquez sur l’option “Exécuter WKMLoader.exe” pour terminer l’installation.* Mise à jour de Wormhole: Aller à « » et Sélectionnez «mise à jour en ligne»
步驟 3. Wormhole 安裝流程安裝流程 - Windows1. 將 J5 create Wormhole Switch 另一端連接至第二台電腦的 USB 埠 .Wormhole Switch 的軟體會自動開啟 並執行2. 當彈出自動撥放視窗時,請選取執行“Run WKMLoader.exe”來啟動軟體
* 更新 Wormhole : 在 “ ” 下選擇“檢查更新” 或是 “在線更新”
Step 3
Step 3
Windows
10 11
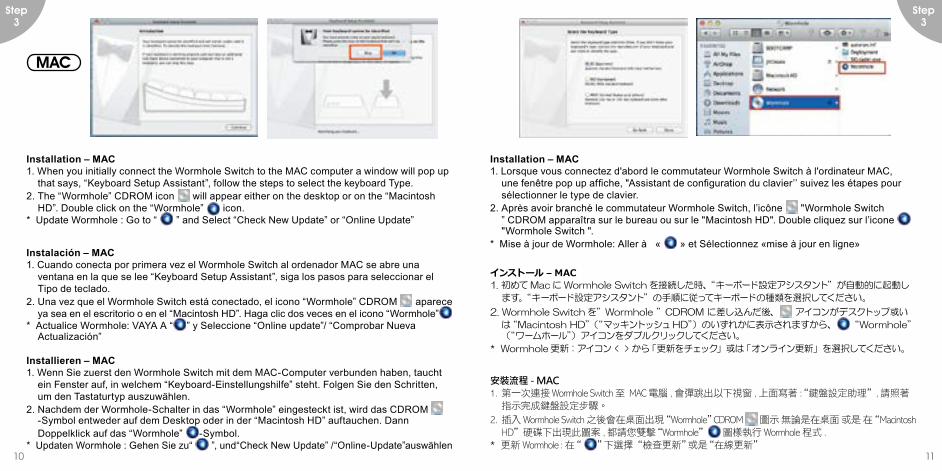
Installation – MAC1. When you initially connect the Wormhole Switch to the MAC computer a window will pop up
that says, “Keyboard Setup Assistant”, follow the steps to select the keyboard Type. 2. The “Wormhole” CDROM icon will appear either on the desktop or on the “Macintosh
HD”. Double click on the “Wormhole” icon.* Update Wormhole : Go to “ ” and Select “Check New Update” or “Online Update”
Instalación – MAC1. Cuando conecta por primera vez el Wormhole Switch al ordenador MAC se abre una
ventana en la que se lee “Keyboard Setup Assistant”, siga los pasos para seleccionar el Tipo de teclado.
2. Una vez que el Wormhole Switch está conectado, el icono “Wormhole” CDROM aparece ya sea en el escritorio o en el “Macintosh HD”. Haga clic dos veces en el icono “Wormhole”
* Actualice Wormhole: VAYA A “ ” y Seleccione “Online update”/ “Comprobar Nueva Actualización”
Installation – MAC1. Lorsque vous connectez d'abord le commutateur Wormhole Switch à l'ordinateur MAC,
une fenêtre pop up affiche, "Assistant de configuration du clavier’’ suivez les étapes pour sélectionner le type de clavier.
2. Après avoir branché le commutateur Wormhole Switch, l’icône "Wormhole Switch ” CDROM apparaîtra sur le bureau ou sur le "Macintosh HD". Double cliquez sur l’icone "Wormhole Switch ".
* Mise à jour de Wormhole: Aller à « » et Sélectionnez «mise à jour en ligne»
安裝流程 - MAC1. 第一次連接 Wormhole Switch 至 MAC 電腦 , 會彈跳出以下視窗 , 上面寫著 : “鍵盤設定助理”, 請照著
指示完成鍵盤設定步驟。
2. 插入 Wormhole Switch 之後會在桌面出現“Wormhole” CDROM 圖示 無論是在桌面 或是 在“Macintosh HD”硬碟下出現此圖案 , 都請您雙擊 “Wormhole” 圖樣執行 Wormhole 程式 .
* 更新 Wormhole : 在 “ ” 下選擇“檢查更新” 或是 “在線更新”
Step 3
Step 3
MAC
Installieren – MAC1. Wenn Sie zuerst den Wormhole Switch mit dem MAC-Computer verbunden haben, taucht
ein Fenster auf, in welchem “Keyboard-Einstellungshilfe” steht. Folgen Sie den Schritten, um den Tastaturtyp auszuwählen.
2. Nachdem der Wormhole-Schalter in das “Wormhole” eingesteckt ist, wird das CDROM -Symbol entweder auf dem Desktop oder in der “Macintosh HD” auftauchen. Dann Doppelklick auf das “Wormhole” -Symbol.
* Updaten Wormhole : Gehen Sie zu“ ”, und“Check New Update” /“Online-Update”auswählen
12 13
PowerAdapter
WormholeSwitch
Monitor(HDMI/VGA)
Notebook
PowerButton
USB 3.0USB 3.0With B.C1.1
USB 2.0
Mac/Desktop/Tablet
EthernetSpeaker
WormholeSwitch
1 2 3 4 5 6 7 8 9 10 11
Microphone
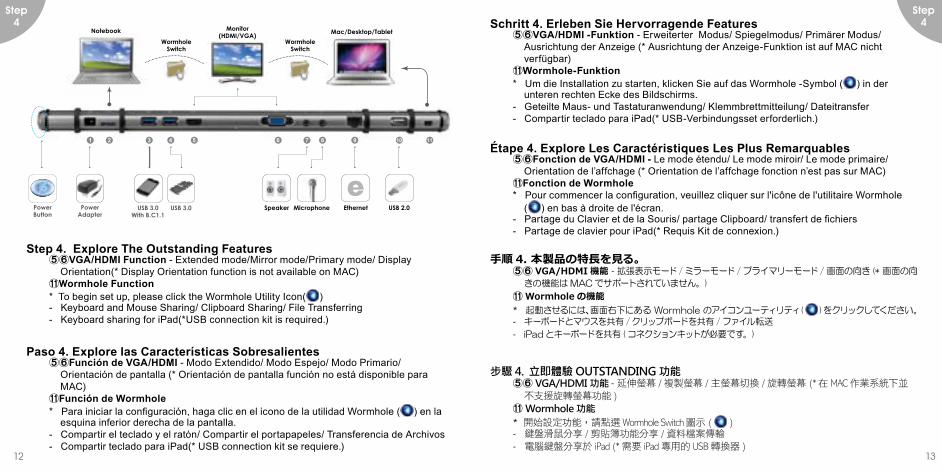
Step 4. Explore The Outstanding Features⑤⑥VGA/HDMI Function - Extended mode/Mirror mode/Primary mode/ Display
Orientation(* Display Orientation function is not available on MAC)⑪Wormhole Function* To begin set up, please click the Wormhole Utility Icon( )- Keyboard and Mouse Sharing/ Clipboard Sharing/ File Transferring- Keyboard sharing for iPad(*USB connection kit is required.)
Paso 4. Explore las Características Sobresalientes⑤⑥Función de VGA/HDMI - Modo Extendido/ Modo Espejo/ Modo Primario/
Orientación de pantalla (* Orientación de pantalla función no está disponible para MAC)
⑪Función de Wormhole* Para iniciar la configuración, haga clic en el icono de la utilidad Wormhole ( ) en la
esquina inferior derecha de la pantalla.- Compartir el teclado y el ratón/ Compartir el portapapeles/ Transferencia de Archivos- Compartir teclado para iPad(* USB connection kit se requiere.)
Schritt 4. Erleben Sie Hervorragende Features⑤⑥VGA/HDMI -Funktion - Erweiterter Modus/ Spiegelmodus/ Primärer Modus/
Ausrichtung der Anzeige (* Ausrichtung der Anzeige-Funktion ist auf MAC nicht verfügbar)
⑪Wormhole-Funktion* Um die Installation zu starten, klicken Sie auf das Wormhole -Symbol ( ) in der
unteren rechten Ecke des Bildschirms.- Geteilte Maus- und Tastaturanwendung/ Klemmbrettmitteilung/ Dateitransfer- Compartir teclado para iPad(* USB-Verbindungsset erforderlich.)
Étape 4. Explore Les Caractéristiques Les Plus Remarquables⑤⑥Fonction de VGA/HDMI - Le mode étendu/ Le mode miroir/ Le mode primaire/
Orientation de l’affchage (* Orientation de l’affchage fonction n’est pas sur MAC)⑪Fonction de Wormhole * Pour commencer la configuration, veuillez cliquer sur l'icône de l'utilitaire Wormhole
( ) en bas à droite de l'écran.- Partage du Clavier et de la Souris/ partage Clipboard/ transfert de fichiers- Partage de clavier pour iPad(* Requis Kit de connexion.)
步驟 4. 立即體驗 OUTSTANDING 功能⑤⑥ VGA/HDMI 功能 - 延伸螢幕 / 複製螢幕 / 主螢幕切換 / 旋轉螢幕 (* 在 MAC 作業系統下並
不支援旋轉螢幕功能 )⑪ Wormhole 功能* 開始設定功能,請點選 Wormhole Switch 圖示 ( )- 鍵盤滑鼠分享 / 剪貼簿功能分享 / 資料檔案傳輸- 電腦鍵盤分享於 iPad (* 需要 iPad 專用的 USB 轉換器 )
Step 4
Step 4
14 15
Required Environments
♦ Microsoft Windows 10 /7/XP (32-bit or 64-bit) ♦ Mac OS X 10.6 Snow Leopard / 10.7 Lion ♦ Available USB port(USB 3.0 is
recommended)♦ Minimum System Requirements CPU: Intel 2 core Quad 2.33 GHz RAM: 2 GB DDR2 ♦ iPad: *USB connection kit* Windows XP user: “Windows Media
Player” is recommended * Suggest Windows XP & MAC USB2.0 for
Entorno requerido
♦ Microsoft Windows 10/ 7, XP (32 bits o 64 bits) ♦ Mac OS X 10.10 / 10.6 Snow Leopard / 10.7 Lion ♦ Un puerto USB disponible (USB 3.0
recomendado)♦ Requisitos mínimos del sistema CPU: Intel Core 2 Quad 2.33 GHz RAM: 2 GB DDR 2♦ iPad: USB connection kit* Usuario Windows XP: “Windows Media
Player” es recomendado * Sugerimos el uso de Windows XP &
Systemanforderungen
♦ Microsoft Windows 10 / 7, XP (32-bit oder 64-
bit)♦ Mac OS X 10.10 / 10.6 Snow Leopard / 10.7 Lion ♦ Freier USB -Anschluss(USB 3.0
empfohlen)♦ Systemvoraussetzungen (mindestens) CPU: Intel 2 core Quad 2.33 GHz RAM: 2 GB DDR2♦ iPad: USB-Verbindungsset* Windows XP-Nutzer: “Windows Media
Player” Empfohlen
Environnement requis
♦ Microsoft Windows 10/ 7, XP (32 bits ou 64 bits)
♦ Mac OS X 10.10 / 10.6 Snow Leopard /10.7 Lion♦ Un Port USB disponible (USB 3.0 est
recommandé)♦ Configuration minimale requise CPU: Intel 2 core Quad 2.33 GHz RAM: 2 Go DDR2♦ iPad: Kit de connexion USB* Windows XP utilisateur :“Windows Media
Player” est recommandé* Suggérons Windows XP & Mac USB 2.0
使用環境需求
♦ 支援 Microsoft Windows 10 / 7, XP (32-bit or 64-bit)♦ 支援 Mac OS 10.10 / 10.6 Snow Leopard / 10.7 Lion♦ USB 埠 ( 建議 USB 3.0 )♦ 系統規格需求 CPU 處理器 : Intel 2 core Quad 2.33 GHz RAM 記憶體 : 2 GB DDR2 ♦ iPad: 需要 iPad 的 “USB connection kit”( 轉換器 )* Windows XP 使用者 : 建議使用 “Windows
Media Player”* 建議 Windows XP & MAC USB 2.0 使用在 " 文
技術支援資訊美國客服專線:+1-888-689-4088台灣客服專線:+886-2-2269-5533#19客服時間:星期一至星期五 9:30 AM -6:00 PM ( 台灣時間 )Email 信箱:[email protected]
SUPPORT TECHNIQUENuméro gratuit: +1-888-689-4088Heures d’ouverture: lun. - Ven. 10:00 a.m - 06:00 U.S.A-E.S.TEmail: [email protected]
TECHNISCHER SUPPORTKostenloser Anruf bei:+1-888-689-4088Sprechstunden: Mon. – Frei. 10.00-18.00 U.S.A-E.S.TE-mail:[email protected]
SOPORTE TÉCNICONúmero gratuito: +1-888-689-4088Horario de atención: Lun-Vier. 10:00 a.m – 6:00 U.S.A-E.S.TEmail: [email protected]
10 /

16
STOP!!If you have any issue using this product,please try the following instructions below before returning this product to the store.
1. The User ManualContains detailed instructions and a troubleshooting section, many common issues can be easily resolved by reading the user manual.
2. Online SupportPlease visit the j5 create website (www.j5create.com) to find the latest software for your device. If you still experience issues, you can submit a trouble ticket through j5 web support. Your ticket will be handled within 24 hours. We stand behind our products and it is our goal to provide you world class support.
3. Telephone SupportPlease call us @ +1-888-689-4088 and one of our support technicians will be very happy to assist you.
TECHNICAL SUPPORTToll free number: +1-888-689-4088Business Hours: Mon. – Fri. 10:00 a.m – 6:00 p.m E.S.TEmail: [email protected]