Embed Size (px)
Citation preview


- 2 -
ABOUT THIS GUIDE
The 2-Port USB KVM Switch Kit lets you manage 2 computers with just one set of keyboard, monitor and mouse, no additional equipment required. The USB console port provides support for the latest USB keyboard and mouse. Popular hardware platforms such as PC and Mac operating system are supported. Users can switch between computers by using push button switch, hot-key or KVM Switcher Software. The KVM Switcher software support both Windows & Mac (10.4~10.6) operation system. It provide a client application to let the KVM switching operations such computer selection, hotkey sequence programming, auto scanning, auto scan delay time programming, etc. The TK-217i offers USB 2.0 interface technology for Plug and Play and hot-pluggability. In addition to connect to mouse or keyboard, the two USB 2.0 ports can also be connected to other high-speed USB devices.

- 3 -
Package Contents Unpack the package and check all the items carefully, and be certain that you have: 1 x TK-217i KVM Switch 1 x Utility CD-ROM Multi-Language Quick Installation Guide If any item is damaged or missing, please contact your local dealer for replacement. Please also keep the original packaging material in case you need to ship the unit in the future.
System Requirements Operating System:
Microsoft Windows 7/Vista/2003 Server/XP/2000/ME/98SE and Linux, Mac OS
Type A USB keyboard Type A USB mouse VGA Compatible Monitor

- 4 -
General Features Use one keyboard, monitor, and mouse to control two computers
Works with most USB mouse and keyboard devices
Supports HD video quality of up to 2048 x 1536 pixel resolution
Plug and Play with no software download required
Windows and Mac ready
One-touch button between computers
No power required, this device is powered by the computer’s USB
port
2-Year limited warranty
- 5 -
Operate the KVM Switch
Hardware Installation 1. Connects the shared USB keyboard, monitor and mouse to your
KVM Switch 2. Connects one USB/VGA KVM cable to 1st computer and connect
another USB/VGA KVM cable to the 2nd computer. After you have connected the KVM and computers properly, the KVM Switch is ready to use.
NOTE:
Some computers with USB interface may require you to manually enable the USB option in the BIOS setting before using any USB device. If your USB interface does not work, please check the USB Status option in BIOS.
If you are using the Windows 98(SE) and have not installed a USB mouse yet, it is highly recommend that you connect the USB mouse directly to computer first before it connects to KVM Switch.
KVM Switch Operation There are three methods to select the computers
(1) One-touch push button switch
(2) Keyboards hot key commands
(3) KVM Switcher Software

- 6 -
Push Button Switch The one-touch push button switch allows you to switch to another computer by click the button. Keyboard hot key commands User-definable hot key for computer selection:
Hotkey sequence = Ctrl + Alt + [command key]* Universal hotkey for computer toggle-switching:
* Please refer to next section for keys that are qualified to be used as a command key
NOTE:
Both the universal hotkey, Scroll Lock + Scroll Lock and the user-definable hotkey, Ctrl + Alt + [command key] WILL NOT allow you to switch to an empty port that is not connected to any computer. To force your KVM to switch to an empty port, just press the push button switch to switch.
Universal Hotkey sequence = Scroll Lock + Scroll Lock * For other operating systems such as Linux, you can still use this
special hotkey to facilitate computer switching. This special hotkey is not available for Mac. However, you can press push button switch to switch to another computer.
Each keystroke within a hotkey sequence should be pressed
within 2 seconds. Otherwise, the hotkey sequence will not be
validated.

- 7 -
After perform port switching, you have to wait till the KVM
Switch icon shows forth the target port before you can perform
next switching again. The KVM Switch icon could be found on
the system tray of your Windows desktop after its installation.
All the hotkeys are only functional after your computers are
booting into the OS. If you want to switch computer in the
BIOS/preboot stage, press the push button switch.
KVM Switcher Software In addition to one-touch push button switch or hotkey command, the
KVM switcher software provides the additional switching method. The
detail is described in next section.
KVM Switcher Operation Reference For Windows User
1. Insert the Installation CD-ROM into your computer’s CD-
ROM drive to initiate the Auto-Run program, and the menu
screen will appear as below.

- 8 -
2. Click Install Utility from the Auto-Run menu screen. The welcome screen appears as below. Click Next >.
3. When completed, click Finish.
- 9 -
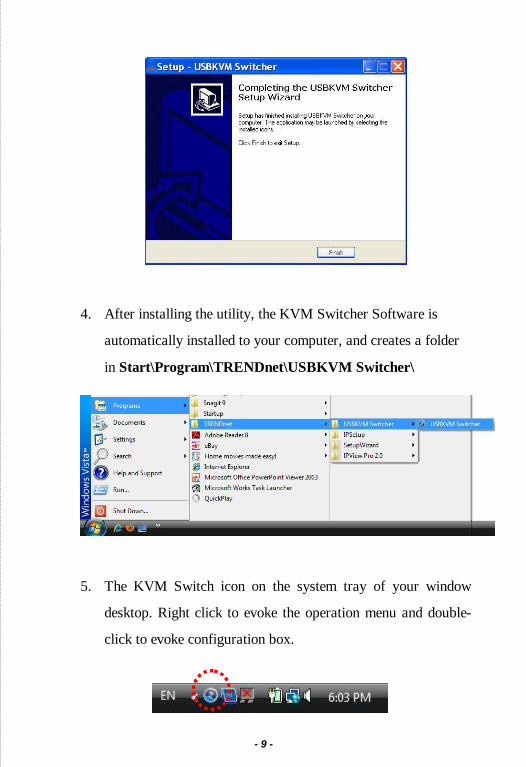
4. After installing the utility, the KVM Switcher Software is
automatically installed to your computer, and creates a folder
in Start\Program\TRENDnet\USBKVM Switcher\
5. The KVM Switch icon on the system tray of your window
desktop. Right click to evoke the operation menu and double-
click to evoke configuration box.

- 10 -
: No live connection detected
: Current active computer channel is on port 1
: Current active computer channel is on port 2
For Mac User
1. Insert the Installation CD-ROM into your computer’s CD-ROM
drive.
2. Double-click TK-217i CD-ROM icon on the desktop
3. Double-click on the Macintosh folder, then select
TrendnetUSBKVMSwitcher.pkg”.
4. Follow the instruction to finish the installation.
5. The KVM Switch icon on the system tray of your window desktop.
Right click to evoke the operation menu and double-click to evoke
configuration box.
: No live Connection detected
: Current active computer channel is on port 1
: : Current active computer channel is on port 2

- 11 -
NOTE:
For Mac user, the KVM Switcher Software only supports Mac OS 10.4 (tiger) or higher. For older Mac operating system users, please use push button switch to switch between computers. Mac does not support universal keyboard hotkey command.
For Linux user, please use push button switch or universal keyboard hotkey “Scroll Lock + Scroll Lock” to switch between computers.
Some computers with USB interface might be need to manual enable the USB option in the BIOS setting before using any USB device. If your USB interface does not work, please check the USB option Status in BIOS.
If you are using the Windows 98(SE) and has not installed a USB mouse yet, it is highly recommend that you connect the USB mouse directly to computer first before it connects to KVM Switch.
Using KVM Switcher Software Right-click the KVM Switcher icon from the system tray to evoke the
operation menu, then select the available computer for switching. Once
the computer channel (e.g. PC1 or PC2) has been selected, it will
immediately switch to that computer. Note: the unconnected port(s) or
the inactive port will be grayed-out and non-selectable.

- 12 -
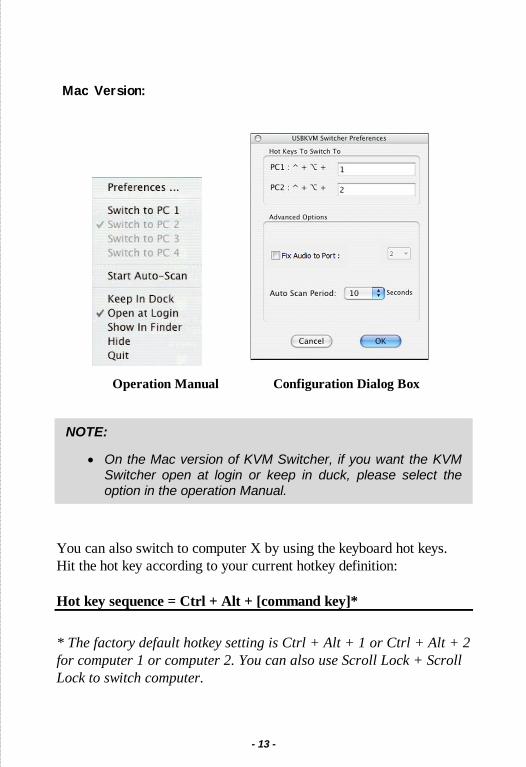
Operation Manual Configuration Dialog Box
Windows Version:
- 13 -
NOTE:
On the Mac version of KVM Switcher, if you want the KVM Switcher open at login or keep in duck, please select the option in the operation Manual.
You can also switch to computer X by using the keyboard hot keys. Hit the hot key according to your current hotkey definition: Hot key sequence = Ctrl + Alt + [command key]*
* The factory default hotkey setting is Ctrl + Alt + 1 or Ctrl + Alt + 2 for computer 1 or computer 2. You can also use Scroll Lock + Scroll Lock to switch computer.
Operation Manual Configuration Dialog Box
Mac Version:
- 14 -
Start Auto-scan
Right-click the KVM Switcher icon to evoke the operation menu, then
select Start Auto-Scan to activate auto-scanning.
Stop Auto-scan While it is on the auto scanning mode, right-click the KVM Switcher
icon to evoke the operation menu, then select Stop Auto-Scan to de-
activate auto-scanning.
KVM Switcher configuration
Right-click the KVM Switcher icon and select Settings or double-click
the icon to bring up the configuration dialog box.
Define Hotkey commands
You can specify the command key as you like by typing it in. For
example, you can specify the hot key for switching to PC 1 as CTRL +
ALT + A by typing an A (not case-sensitive) in the editable field.
Hotkey Sequence = CTRL + ALT + [command key]* * The command key is user-definable via the configuration dialog box
Except those control keys such as Alt, Ctrl, Shift, CAPS, Tab, Esc and those functions keys and edit keys, all other keys on the keyboard, including those number keys on the number pad are all qualified to be used a hotkey command key. In addition to the software KVM Switching by the operation menu and the

- 15 -
user-defined hotkeys, you can always use the universal hotkey for PC switching – Scroll Lock + Scroll Lock
Fixed Audio Port at Computer X
Check this option and then select the computer to fix the
audio/microphone channel to the selected computer. Once this option is
checked, the audio/microphone channel will be fixed and become non-
switchable.
Auto Scan Period
Select the Auto Scan Period from 10 ~ 60 seconds with an increment of
5 seconds. The Auto-scan period is the time your KVM Switch will
wait to switch to next computer.

- 16 -
Limited Warranty TRENDnet warrants its products against defects in material and workmanship, under normal use and service, for the following lengths of time from the date of purchase.
TK-217i – 2 Years Limited Warranty
Camera’s motor, AC/DC Power Adapter, Cooling Fan, and Power Supply carry 1 year warranty.
If a product does not operate as warranted during the applicable warranty period, TRENDnet shall reserve the right, at its expense, to repair or replace the defective product or part and deliver an equivalent product or part to the customer. The repair/replacement unit’s warranty continues from the original date of purchase. All products that are replaced become the property of TRENDnet. Replacement products may be new or reconditioned. TRENDnet does not issue refunds or credit. Please contact the point-of-purchase for their return policies. TRENDnet shall not be responsible for any software, firmware, information, or memory data of customer contained in, stored on, or integrated with any products returned to TRENDnet pursuant to any warranty. There are no user serviceable parts inside the product. Do not remove or attempt to service the product by any unauthorized service center. This warranty is voided if (i) the product has been modified or repaired by any unauthorized service center, (ii) the product was subject to accident, abuse, or improper use (iii) the product was subject to conditions more severe than those specified in the manual. Warranty service may be obtained by contacting TRENDnet within the applicable warranty period and providing a copy of the dated proof of the purchase. Upon proper submission of required documentation a Return Material Authorization (RMA) number will be issued. An RMA number is required in order to initiate warranty service support for all TRENDnet products. Products that are sent to TRENDnet for RMA service must have the RMA number marked on the outside of return packages and sent to TRENDnet prepaid, insured and packaged appropriately for safe shipment. Customers shipping from outside of the USA and Canada are responsible for return shipping fees. Customers shipping from outside of the USA are responsible for custom charges, including but not limited to, duty, tax, and other fees. WARRANTIES EXCLUSIVE: IF THE TRENDNET PRODUCT DOES NOT OPERATE AS WARRANTED ABOVE, THE CUSTOMER’S SOLE REMEDY SHALL BE, AT TRENDNET’S OPTION, REPAIR OR REPLACE. THE FOREGOING WARRANTIES AND REMEDIES ARE EXCLUSIVE AND ARE IN LIEU OF ALL OTHER WARRANTIES, EXPRESSED OR IMPLIED, EITHER IN FACT OR BY OPERATION OF LAW, STATUTORY OR OTHERWISE, INCLUDING WARRANTIES OF MERCHANTABILITY AND FITNESS FOR A PARTICULAR PURPOSE. TRENDNET NEITHER ASSUMES NOR AUTHORIZES ANY OTHER PERSON TO ASSUME FOR IT ANY OTHER LIABILITY IN CONNECTION WITH THE SALE, INSTALLATION MAINTENANCE OR USE OF TRENDNET’S PRODUCTS.

- 17 -
TRENDNET SHALL NOT BE LIABLE UNDER THIS WARRANTY IF ITS TESTING AND EXAMINATION DISCLOSE THAT THE ALLEGED DEFECT IN THE PRODUCT DOES NOT EXIST OR WAS CAUSED BY CUSTOMER’S OR ANY THIRD PERSON’S MISUSE, NEGLECT, IMPROPER INSTALLATION OR TESTING, UNAUTHORIZED ATTEMPTS TO REPAIR OR MODIFY, OR ANY OTHER CAUSE BEYOND THE RANGE OF THE INTENDED USE, OR BY ACCIDENT, FIRE, LIGHTNING, OR OTHER HAZARD. LIMITATION OF LIABILITY: TO THE FULL EXTENT ALLOWED BY LAW TRENDNET ALSO EXCLUDES FOR ITSELF AND ITS SUPPLIERS ANY LIABILITY, WHETHER BASED IN CONTRACT OR TORT (INCLUDING NEGLIGENCE), FOR INCIDENTAL, CONSEQUENTIAL, INDIRECT, SPECIAL, OR PUNITIVE DAMAGES OF ANY KIND, OR FOR LOSS OF REVENUE OR PROFITS, LOSS OF BUSINESS, LOSS OF INFORMATION OR DATE, OR OTHER FINANCIAL LOSS ARISING OUT OF OR IN CONNECTION WITH THE SALE, INSTALLATION, MAINTENANCE, USE, PERFORMANCE, FAILURE, OR INTERRUPTION OF THE POSSIBILITY OF SUCH DAMAGES, AND LIMITS ITS LIABILITY TO REPAIR, REPLACEMENT, OR REFUND OF THE PURCHASE PRICE PAID, AT TRENDNET’S OPTION. THIS DISCLAIMER OF LIABILITY FOR DAMAGES WILL NOT BE AFFECTED IF ANY REMEDY PROVIDED HEREIN SHALL FAIL OF ITS ESSENTIAL PURPOSE. Governing Law: This Limited Warranty shall be governed by the laws of the state of California.
Some TRENDnet products include software code written by third party developers. These codes are subject to the GNU General Public License ("GPL") or GNU Lesser General Public License ("LGPL"). Go to http://www.trendnet.com/gpl or http://www.trendnet.com Download section and look for the desired TRENDnet product to access to the GPL Code or LGPL Code. These codes are distributed WITHOUT WARRANTY and are subject to the copyrights of the developers. TRENDnet does not provide technical support for these codes. Please go to http://www.gnu.org/licenses/gpl.txt or http://www.gnu.org/licenses/lgpl.txt for specific terms of each license.