Embed Size (px)
Citation preview

Types of Weave: Introductory Instruction Part TwoLevel: Intermediate
By Nicole Hanna
Materials
2-6 Pieces 16-18 Gauge Round Wire, 5-10 cm1 Piece 26-28 Gauge Round Wire, 50 cm
Wire Cutters
Gauges are recommended due to malleability and manageability and may be substituted as skills increase. Keep in mind, as base wires increase or decrease in size, so should weaving wires. For instance, a 22 gauge base wire would warp under the pressure of a 26 gauge weaving wire, so 8-10 gauge differential between both base and weaving wires is preferred.
Note: Tutorial does not detail the design elements of the image depicted. Steps showcase only types of weave and not ways in which they may be used or combined to form a finished piece or product.

Two-Wire Weave A
Next to the one-wire coil, two-wire work is the base around which wire-wrapping evolves, and from which wire-weaving, specifically, is born. It involves two base wires, a single weaving wire, and requires no tools at all besides wire cutters, a little persistence and a lot of imagination. The weaves depicted are in no way all-inclusive, but are simply a foundation upon which you can build your skills. I encourage you to experiment with coil rotations for the look that best suits your projects individually, and your style in general.
Step 1
Gather two 16-18 gauge round wires. These will be your base wires.
Using a 26 or 28 gauge round wire (called weaving wire), leave a small 1cm tail, and coil twice around base wire 1. Pinching the tail and two base wires between your fingers will secure the weave in place while you work.
Step 2
Wrap your weaving wire around both base wires 1 and 2 twice.
Though depicted twice, you may wrap your weaving wire as many or as few times as you find aesthetically pleasing, though typically five wraps or more will begin to bundle your base wires, and you'll lose the ability to further manage the look of your weave.

Step 3
Coil your weaving wire five times around base wire 1.
This completes one rotation of the weave.
For a more geometric pattern, you may wrap and coil an even number of times. For a fuller look, wrap both wires more times than you coil the single wire.
Step 4
Complete several more rotations, beginning each with the two-wire wrap, as depicted in Step 2, then finish with the one-wire coil.

Two-Wire Weave B
Step 1
Gather two 16-18 gauge round wires. These will be your base wires. Using a 26 or 28 gauge round wire (called weaving wire), leave a small 1cm tail, and coil twice around base wire 1. Pinching the tail and two base wires between your fingers will secure the weave in place while you work.
Wrap your weaving wire over base wires 1 and 2, behind 2, then between 2 and 1.
Step 2
Wrap your weaving wire up over base wire 2, then down behind both base wires 2 and 1.
Step 3
Wrap your weaving wire up over base wire 2, between base wires 1 and 2, then down behind base wire 1.
This completes one rotation of the two-wire weave.
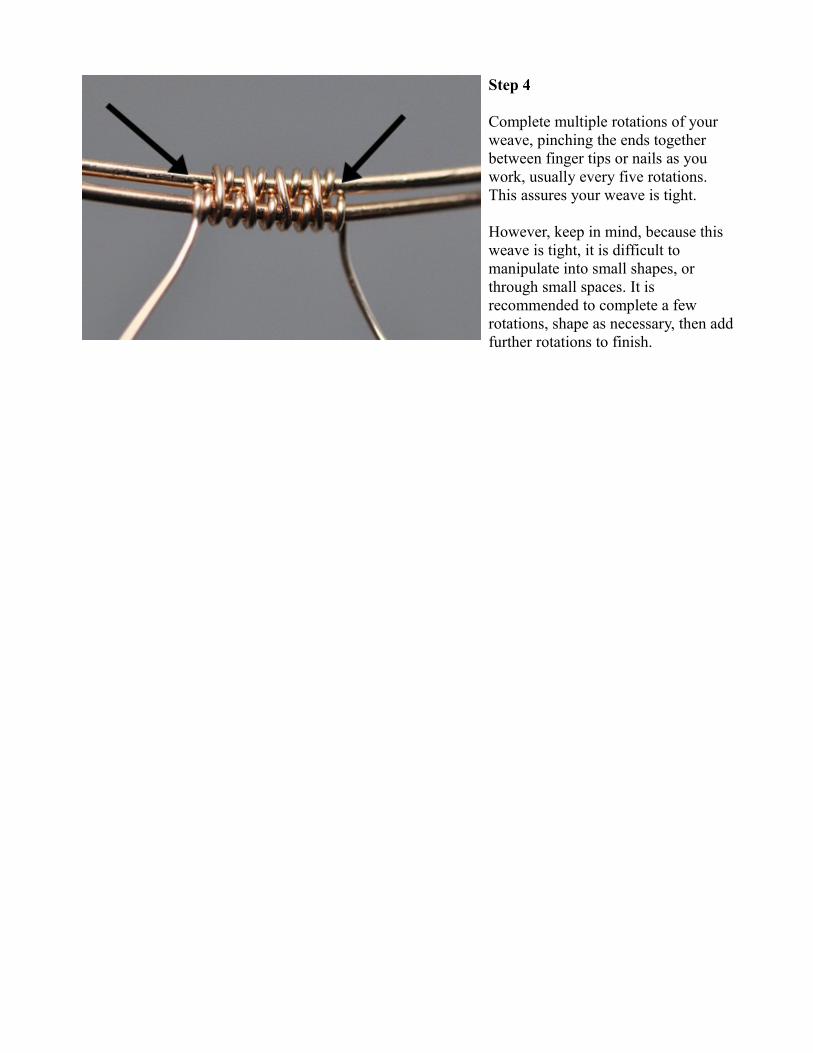
Step 4
Complete multiple rotations of your weave, pinching the ends together between finger tips or nails as you work, usually every five rotations. This assures your weave is tight.
However, keep in mind, because this weave is tight, it is difficult to manipulate into small shapes, or through small spaces. It is recommended to complete a few rotations, shape as necessary, then add further rotations to finish.
Two-Wire Weave C
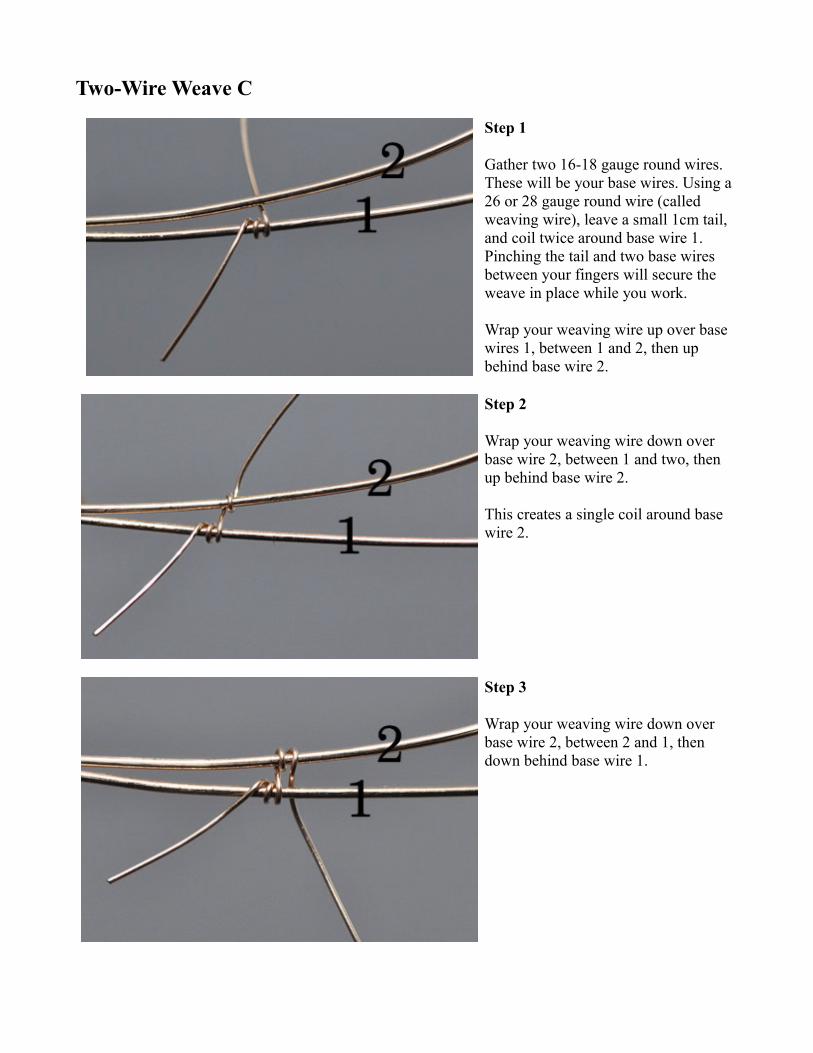
Step 1
Gather two 16-18 gauge round wires. These will be your base wires. Using a 26 or 28 gauge round wire (called weaving wire), leave a small 1cm tail, and coil twice around base wire 1. Pinching the tail and two base wires between your fingers will secure the weave in place while you work.
Wrap your weaving wire up over base wires 1, between 1 and 2, then up behind base wire 2.
Step 2
Wrap your weaving wire down over base wire 2, between 1 and two, then up behind base wire 2.
This creates a single coil around base wire 2.
Step 3
Wrap your weaving wire down over base wire 2, between 2 and 1, then down behind base wire 1.

Step 4
Wrap your weaving wire up over base wire 1, between 1 and 2, then down behind base wire 1.
This creates a single coil around base wire 1.
Step 5
Wrap your base wire up over base wire 1, between 1 and 2, then up behind base wire 2.
Step 6
Wrap your weaving wire down over base wire 2, between 2 and 1, then up behind base wire 2.
This creates another single coil around base wire 2.

Step 7
Wrap your weaving wire down over base wire 2, between 1 and 2, then down behind base wire 1.
Step 8
Continue repeating the steps, creating individual coils, with a criss-cross pattern between the two base wires.
These images depict the steps loosely for clarity, though is recommended you pinch the ends of the weaves together as you work for a tighter finish, and apply some tension while wrapping.
Step 9
This weave requires you shape your base wires as you work, and adjust your pattern accordingly. Otherwise gaps will appear between rotations of the weave.
To prevent gaps between your wires when rounded or curved, it may be necessary to add an additional coil to the outer curved base wire between each criss-cross. (Note the arrows.)

Three-Wire Weave
Step 1
Gather two 16-18 gauge round wires. These will be your base wires. Using a 26 or 28 gauge round wire (called weaving wire), leave a small 1cm tail, and coil twice around base wire 1.
Wrap your weaving wire up over base wire 1 and 2, between 2 and 3, then down behind 2 and 1. Again wrap your weaving wire up over base wires 1 and 2, between 2 and 3, down behind 2, then between 1 and 2.
Step 2
Wrap your weaving wire up over base wire 2 and 3, behind 2 and 3, between 1 and 2. Again wrap your weaving wire up over base wires 2 and 3, then behind all three base wires.
This completes a single rotation of this three-wire weave.
Step 3
Complete several rotations of the weave (between 4-7) and pinch the ends of the weave together between fingers or nails to create a consistently tight look.

Four- Wire Weave
Step 1
Gather four 16-18 gauge round wires (called base wires). Pinch them between your thumb and forefinger. Separate the wires into two groups of two, spreading them outwards slightly the further from your fingers they get.
Step 2
Using a 26 or 28 gauge round wire (called weaving wire), leave a small 1cm tail, and coil twice around base wire 1. Pinching the tail and four base wires between your fingers will secure the weave in place while you work.
Step 3
Wrap your weaving wire up over base wires 1 and 2, between 2 and 3, then up behind 3 and 4.

Step 4
Pull your weaving wire between base wires 3 and 4, then wrap it down and over 3, between 2 and 3, then up behind base wires 3 and 4.
Step 5
Wrap your weaving wire down over base wire 4, between 3 and 4, then back up behind 4.
You should now have a single coil around both base wires 3 and 4.
Step 6
Wrap your weaving wire down over base wires 4 and 3, between 3 and 2, behind 2, then between 2 and 1.
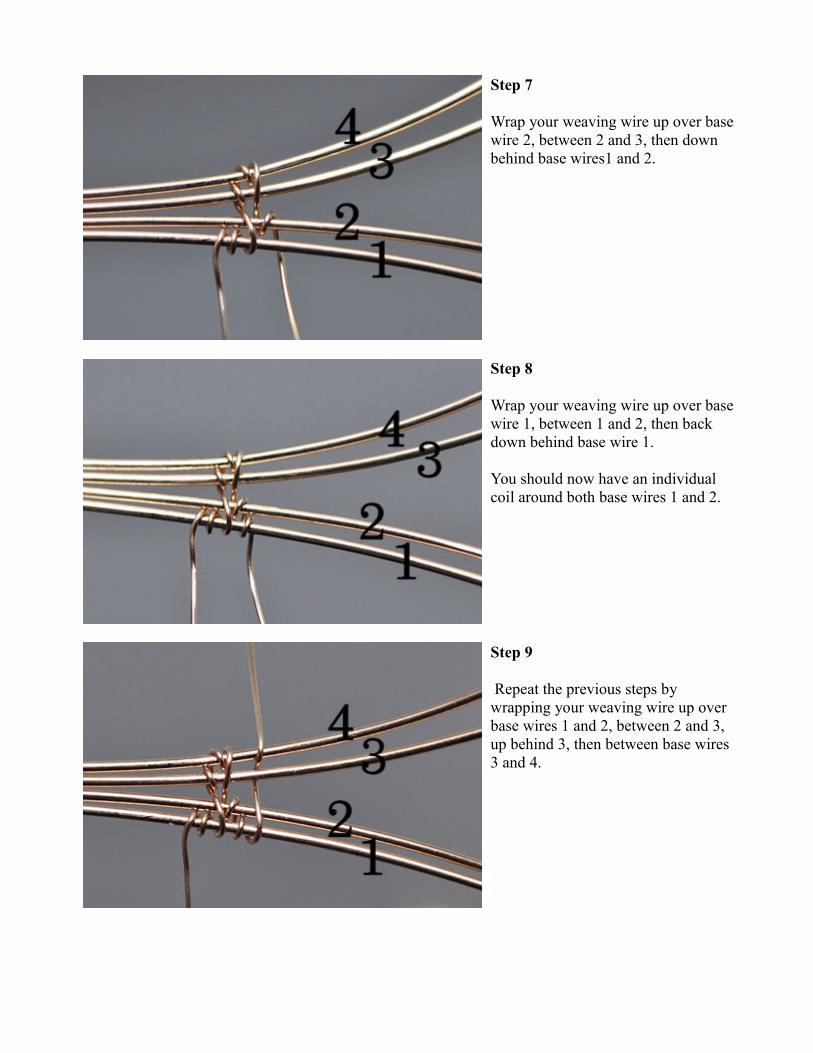
Step 7
Wrap your weaving wire up over base wire 2, between 2 and 3, then down behind base wires1 and 2.
Step 8
Wrap your weaving wire up over base wire 1, between 1 and 2, then back down behind base wire 1.
You should now have an individual coil around both base wires 1 and 2.
Step 9
Repeat the previous steps by wrapping your weaving wire up over base wires 1 and 2, between 2 and 3, up behind 3, then between base wires 3 and 4.

Step 10
Wrap your weaving wire down over base wire 3, between 2 and 3, then back up behind base wires 3 and 4.
Step 11
Wrap your weaving wire down over base wire 4, between 3 and 4, then back up behind 4.
You should again have individual coils around both base wires 3 and 4.
Step 12
Wrap your weaving wire down over base wires 4 and 3, between 3 and 2, and continue as dictated by the previous steps.
The pattern should follow the basic principle: two individual coils, then single long wrap, two individual coils, then single long wrap. Repeat.

Step 13
Though these images depict the wires wrapped loosely for the purpose of clarity, you will want to practice this weave until you can achieve a nice tight wrap without pulling so hard you pull together your two groups of base wires.
Remember to pinch the ends of the weaves together with fingers or nails to keep the look tight.
This weave is particularly good for ring shanks because it offers a great degree of stability and strength, but with a look of delicacy to compliment. To complete a shank, you can start with the four base wires close together, then work wider for an asymmetrical look, or weave half the ring from center out, flip the work over, then work the other half from center out for the symmetrical version. You will need to leave a longer tail at the beginning of your work for the symmetrical look to prevent the necessity for adding wire as you work.
This weave also works well for decorative bails, especially around stone donuts.

Five-Wire Weave
Step 1
Gather five pieces of 16-18 gauge wire (called base wires). Fan slightly for easy weaving and pinch ends between fingers with a firm grip.
Using a 26 or 28 gauge round wire (called weaving wire), leave a small 1cm tail, and coil twice around base wire 1. Pinching the tail and five base wires between your fingers will secure the weave in place while you work.
Step 2
Wrap your weaving wire up over base wires 1 and 2, between 2 and 3, down behind 2, then between base wires 2 and 1.
Step 3
Wrap your weaving wire up over base wires 2 and 3, between 3 and 4, down behind 3, then between base wires 3 and 2.

Step 4
Wrap your weaving wire up over base wires 3 and 4, between 4 and 5, down behind 4, then between base wires 4 and 3.
Step 5
Wrap your weaving wire up over base wires 4 and 5, down behind 5 and 4, then between base wires 4 and 3.
Step 6
Wrap your weaving wire up over base wire 4, between 4 and 5, down behind 4 and 3, then between base wires 3 and 2.

Step 7
Wrap your weaving wire up over base wire 3, between 3 and 4, down behind 3 and 2, then between base wires 2 and 1.
Step 8
Wrap your weaving wire up over base wire 2, between 2 and 3, then down behind base wires 2 and 1.
This completes one rotation of the five-wire weave.
Step 9
Complete 3-5 rotations, then pinch the ends of the weaves together with finger tips or nails to keep your weave tight.
Continue to add rotations and pinch as you work.
This weave is not very malleable, so consider shaping as you work. Slight curves only are manageable post-weave.


![JURY INSTRUCTION 1 DAMAGES – INTRODUCTORY INSTRUCTION 1 DAMAGES – INTRODUCTORY If you decide that defendant’s Fault Legally Caused damages to [name of plaintiff] ... BAJI No](https://img.dokumen.tips/doc/110x75/5ad3c1317f8b9aff738e70ca/jury-instruction-1-damages-instruction-1-damages-introductory-if-you-decide.jpg)