Embed Size (px)
Citation preview

Towing and Road Service Guide
for Porsche Vehicles
Quality and Education Services AAA Automotive 1000 AAA Drive
Heathrow, FL 32746
April 29, 2002

Index Equipment Availability Page 1 General Towing Information, All Models Special Precautions Page 2 Car Carrier Loading and Transporting Page 3 General Road Service Information, All Models
Jacking Page 6 Tire Changing Page 7 Out of Fuel Page 7 Convertible Top Inoperative Page 8
Road Service Information, Specific Models Tool Kit Locations Page 9 Jump-Start Procedures Page 10

EQUIPMENT AVAILABILITY:
• To eliminate the need for removing the eyebolt from the vehicle’s tool kit when loading Porsche vehicles, a universal Porsche screw-in eyebolt is available from any authorized Porsche dealer. The part number is 996-721-151-00. Current price is $14.76 plus tax.
• A double-male cigarette lighter adapter with a heavy, 12-foot coiled connecting
cord is available through Snap-On Tools, catalog number TL 1212. Current pricing is $34.50. It is available online at www.snapon.com.
• Most of the equipment mentioned and pictured in this guide including charging
adapters, straps, wheel jacks, and portable jumper units, is available through AW Direct, a preferred AAA supplier. Contact your local AAA Club representative for special offers available to AAA contractors.
1
AAA Towing And Roadside Assistance Guide for Porsche Vehicles April 29, 2002
GENERAL TOWING INFORMATION, ALL MODELS SPECIAL PRECAUTIONS:
• NEVER MOVE AN ALL-WHEEL-DRIVE MODEL WITH ONLY TWO WHEELS ON THE GROUND. THE TRANSFER CASE HAS NO “TRUE NEUTRAL” POSITION.
• CONVENTIONAL WHEEL-LIFT AND SELF-LOADING DOLLY
EQUIPMENT DO NOT PROVIDE ADEQUATE UNDERCARRIAGE CLEARANCE FOR TOWING OR MOVING THE VEHICLE. CAR CARRIER EQUIPMENT IS THE ONLY APPROVED TRANSPORTING METHOD FOR ALL PORSCHE MODELS.
• In an emergency situation where the vehicle must be moved without car carrier
equipment, such as moving from an enclosed parking garage, wheel-jacking equipment, such as Go-Jacks, are recommended. NOTE: If the vehicle is an All-Wheel-Drive model, all four wheels must be raised before moving. If the use of wheel jacks is not possible due to safety concerns, (for example, moving the vehicle down the ramps of a multi-story parking garage,) a wheel-lift may be used only to move the vehicle clear of the building using the following procedure: 1. Jack the vehicle at the approved jacking points located inboard of the rocker
panels (see service information below) and place blocks under the tires to increase ground clearance.
2. Capture the tires on the wheel lift tightly, so that adequate stinger and crossbar clearance is maintained to prevent contact with the undercarriage as the vehicle is moved. NOTE: On all-wheel-drive models, a dolly must be installed under the trailing wheels using this same technique. Conventional dolly installation will cause the dolly crossbar to contact the undercarriage and could cause damage!
3. Install wheel tie-down straps and raise the wheel-lift just far enough to allow vehicle movement. Pay careful attention to ground clearance at the trailing end of the vehicle.
These emergency procedures must be used only to move a vehicle far enough so that it may be loaded onto a car carrier. Porsche vehicles are not approved for transport in this manner!
2
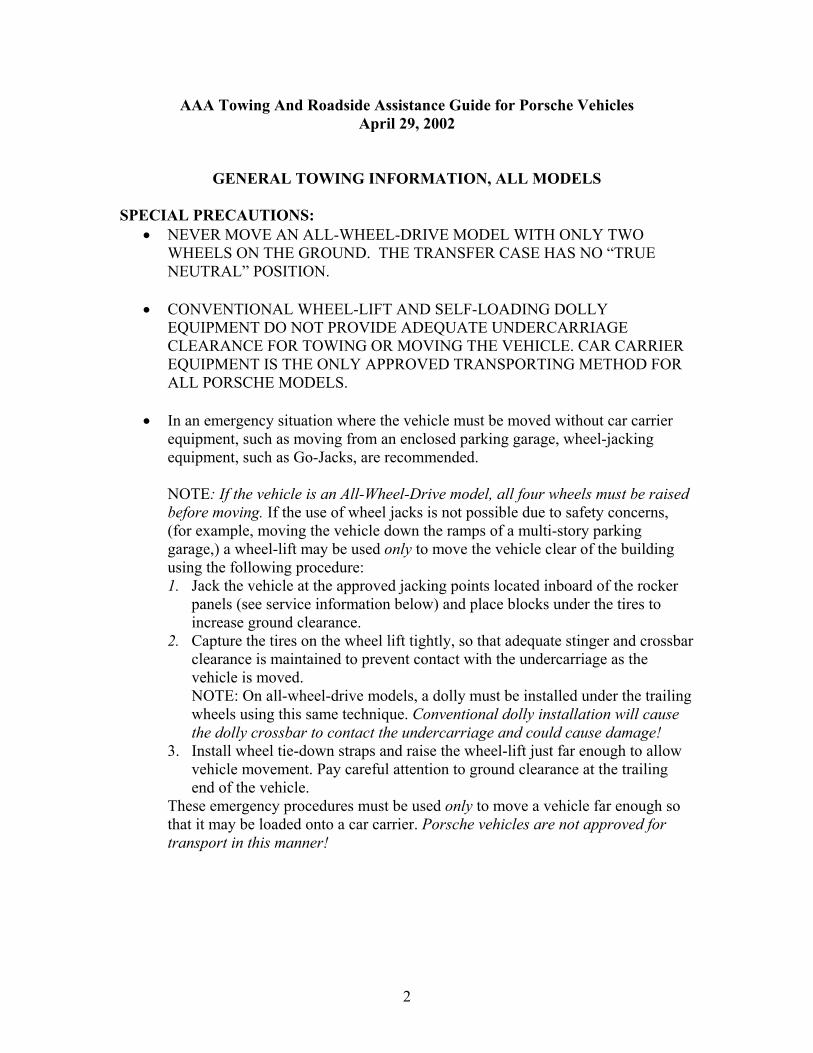
CAR CARRIER LOADING AND TRANSPORTING: A minimum of 3 inches of ramping height is required to load most models onto a conventional car carrier. (See figure 1.) Some models, such as the 911Turbo and GT2, may have as little as 2 inches of ground clearance at the front valance, which will require more graduated layers of ramping and extreme caution while loading. In all cases, check for previous damage to the valances and/or undercarriage and note any concerns before loading the vehicle.
figure 1
The only approved method for front or rear loading is to attach the winch wire rope to the screw-in eyebolt installed in the front or rear vehicle pull point. (See figure 2.) The eyebolt is found in the factory-supplied vehicle tool kit. Refer to tool kit locations under Road Service Information, Specific Models below.
figure 2
NOTE: Before loading, ensure that the transmission is in “Neutral” and the ignition key is in the “unlock” position, but not in the “run” position. In “run,” the instrument panel warning lights will be illuminated. Loading the vehicle with the ignition switched to “run” on convertible models could cause the automatic roll bar to deploy due to the necessary vehicle tilt during loading. If this occurs, the rear hatch window could be damaged and it is recommended that only a Porsche dealer service department reset the roll bar.
3

When loading from the front, nearly all models have the pull point located toward the passenger side and fairly high on the front bumper fascia or grille. (See figure 3.)
figure 3
The rear pull point is located behind the license plate holder on most models, which requires removal of the license plate and may require removal of the license plate holder as well before loading. (See figure 4.)
figure 4
4
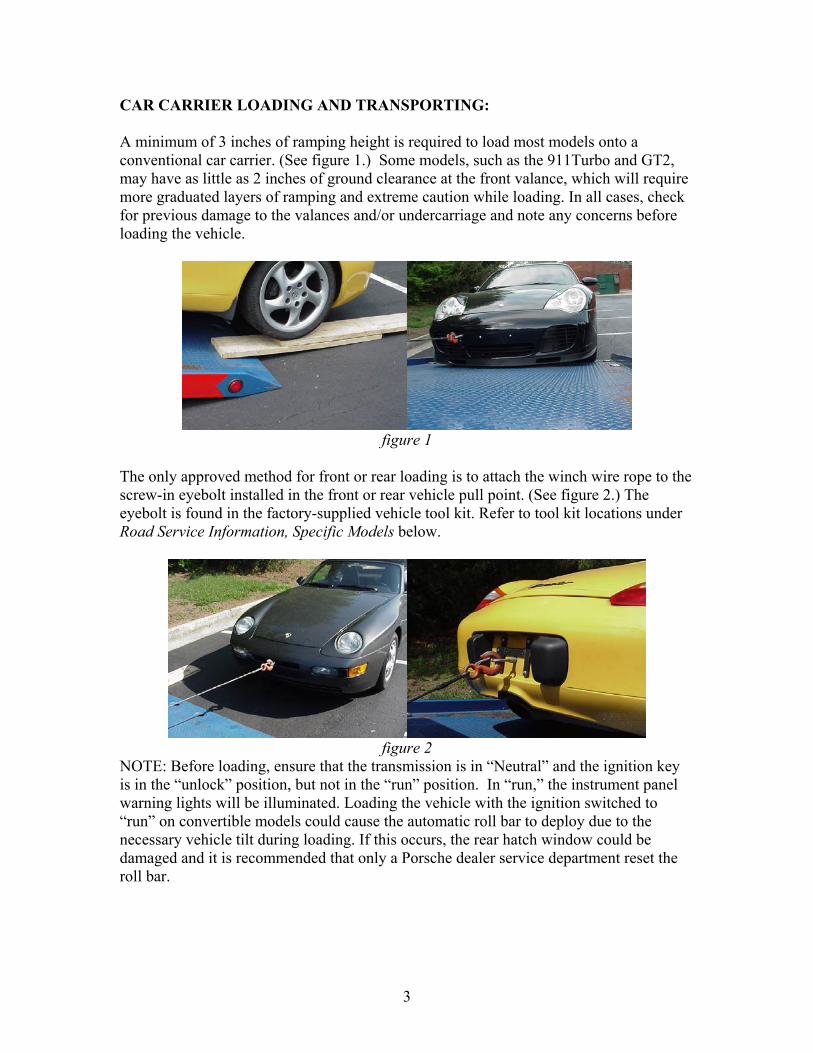
On 928 models, a hex key (Allen) wrench, included in the tool kit, is needed to remove the plugs covering the eyebolt attachment points. (See figure 5.)
figure 5
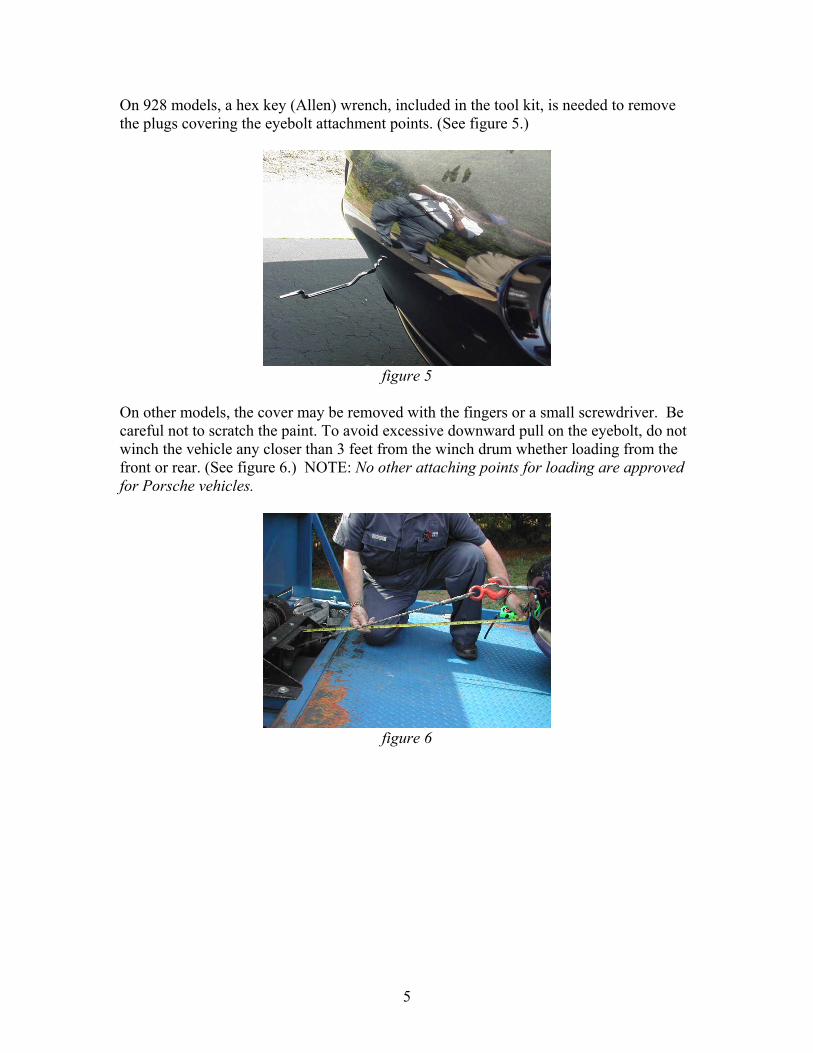
On other models, the cover may be removed with the fingers or a small screwdriver. Be careful not to scratch the paint. To avoid excessive downward pull on the eyebolt, do not winch the vehicle any closer than 3 feet from the winch drum whether loading from the front or rear. (See figure 6.) NOTE: No other attaching points for loading are approved for Porsche vehicles.
figure 6
5
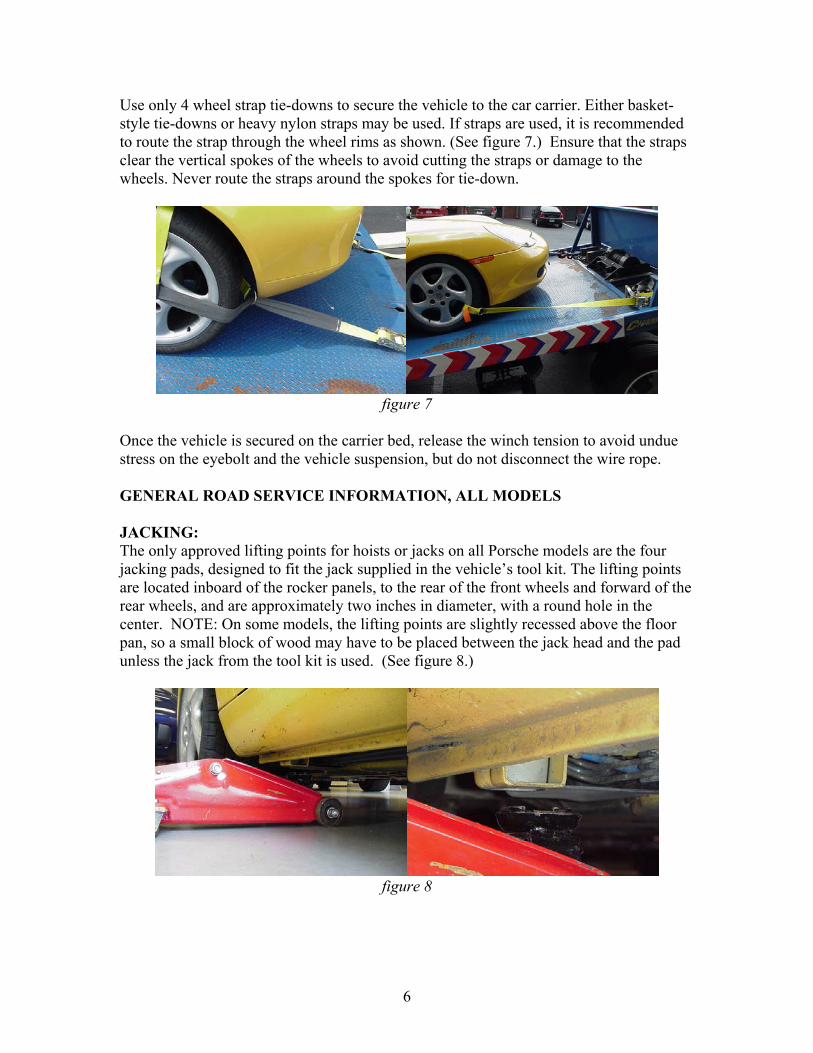
Use only 4 wheel strap tie-downs to secure the vehicle to the car carrier. Either basket-style tie-downs or heavy nylon straps may be used. If straps are used, it is recommended to route the strap through the wheel rims as shown. (See figure 7.) Ensure that the straps clear the vertical spokes of the wheels to avoid cutting the straps or damage to the wheels. Never route the straps around the spokes for tie-down.
figure 7
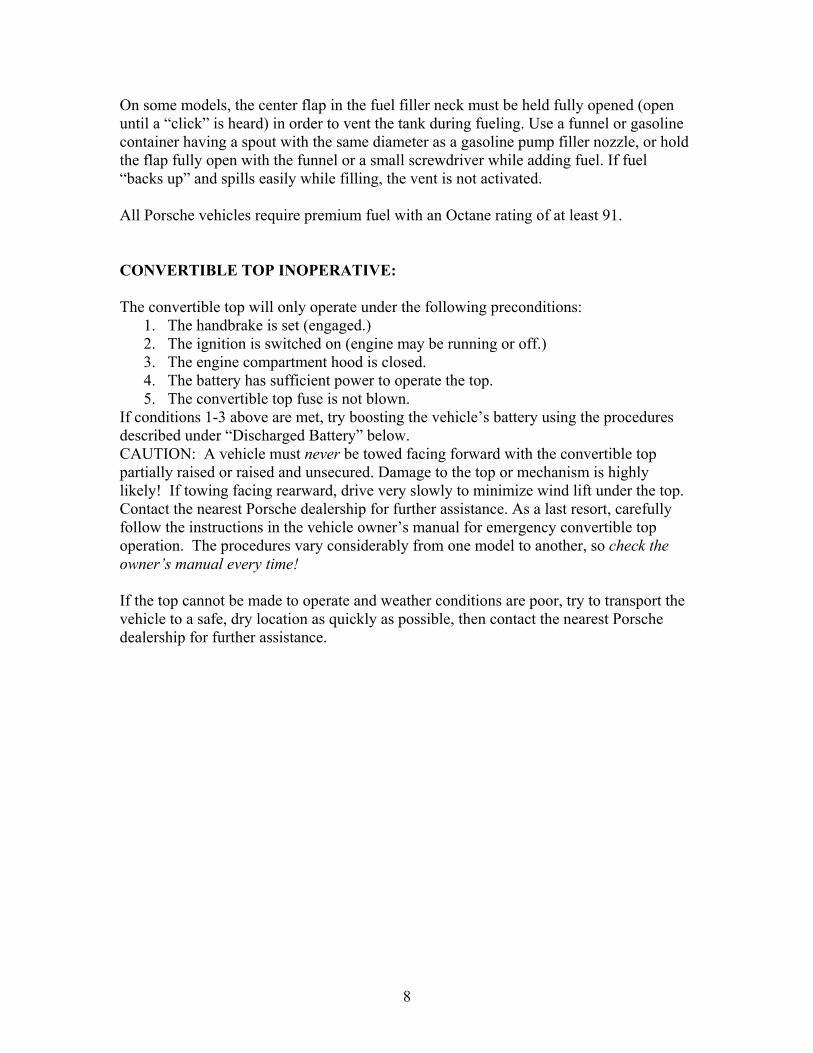
Once the vehicle is secured on the carrier bed, release the winch tension to avoid undue stress on the eyebolt and the vehicle suspension, but do not disconnect the wire rope. GENERAL ROAD SERVICE INFORMATION, ALL MODELS JACKING: The only approved lifting points for hoists or jacks on all Porsche models are the four jacking pads, designed to fit the jack supplied in the vehicle’s tool kit. The lifting points are located inboard of the rocker panels, to the rear of the front wheels and forward of the rear wheels, and are approximately two inches in diameter, with a round hole in the center. NOTE: On some models, the lifting points are slightly recessed above the floor pan, so a small block of wood may have to be placed between the jack head and the pad unless the jack from the tool kit is used. (See figure 8.)
figure 8
6

TIRE CHANGING: AAA’s Roadside Assistance policy for Porsche vehicles is to tow the vehicle rather than install the spare tire on the roadside. If the vehicle cannot be loaded onto a car carrier with a flat tire, first attempt to inflate the tire. Mount the spare tire only as a last resort. If the spare tire must be mounted in order to load the vehicle onto a car carrier, carefully follow the specific instructions for jacking and spare tire installation in the vehicle owner’s manual. On some models, the removed service tire cannot be stored in the luggage compartment. (See figure 9.) On these vehicles, it may be necessary to store the removed tire and wheel in the passenger compartment. NOTE: Porsche vehicles are equipped with tires having a “z” rating and “n” designation. Leaks are not considered repairable. It is recommended that replacement tires be obtained through a Porsche dealership.
figure 9
OUT OF FUEL: If the fuel filler door appears to be stuck, it may be locked by the electronic Central Locking System anytime the vehicle is locked. If the Central Locking System does not unlock the fuel filler door when the vehicle is unlocked, open the passenger door and pull the filler door release cable located just below the top of the fender. (See figure 10.)
figure 10
7
On some models, the center flap in the fuel filler neck must be held fully opened (open until a “click” is heard) in order to vent the tank during fueling. Use a funnel or gasoline container having a spout with the same diameter as a gasoline pump filler nozzle, or hold the flap fully open with the funnel or a small screwdriver while adding fuel. If fuel “backs up” and spills easily while filling, the vent is not activated. All Porsche vehicles require premium fuel with an Octane rating of at least 91. CONVERTIBLE TOP INOPERATIVE: The convertible top will only operate under the following preconditions:
1. The handbrake is set (engaged.) 2. The ignition is switched on (engine may be running or off.) 3. The engine compartment hood is closed. 4. The battery has sufficient power to operate the top. 5. The convertible top fuse is not blown.
If conditions 1-3 above are met, try boosting the vehicle’s battery using the procedures described under “Discharged Battery” below. CAUTION: A vehicle must never be towed facing forward with the convertible top partially raised or raised and unsecured. Damage to the top or mechanism is highly likely! If towing facing rearward, drive very slowly to minimize wind lift under the top. Contact the nearest Porsche dealership for further assistance. As a last resort, carefully follow the instructions in the vehicle owner’s manual for emergency convertible top operation. The procedures vary considerably from one model to another, so check the owner’s manual every time! If the top cannot be made to operate and weather conditions are poor, try to transport the vehicle to a safe, dry location as quickly as possible, then contact the nearest Porsche dealership for further assistance.
8

ROAD SERVICE INFORMATION, SPECIFIC MODELS TOOL KIT LOCATIONS: Boxster, Boxster S, 911 Carrera, Carrera 4, GT2, and Turbo: The tool kit is located in the front luggage compartment, inside or next to the spare tire. (See figure 11.)
figure 11
928: The tool kit is located behind the rear panel in the rear luggage compartment. The panel is released by unscrewing the two plastic knobs at the ends of the panel. (See figure 12.)
figure 12
968: The tool kit is located in the rear luggage compartment, underneath the floor mat.
9

JUMP-START PROCEDURES: If a Porsche vehicle with a discharged battery is encountered, battery access must be accomplished before the vehicle can be boost started with jumper cables. Refer to the following information for specific models: 2001-2003 Boxster and Boxster S, 911 Carrera, Carrera 4, GT2, and Turbo:
The switch to release the front hood is located along the left rocker panel, next to the driver’s seat. If the switch does not release the hood, the battery is probably very discharged. To provide power to open the hood, use either of the following procedures: Procedure 1: Use a double-male cigarette lighter adapter to connect the vehicle’s cigarette lighter receptacle to a portable jumper unit or to jumper cables using a pigtail. Procedure 2: Remove the vehicle’s fuse panel cover located on the left kick panel. Pull out the retractable positive terminal “A” located in the fuse block near the lower rear corner. Connect a positive jumper cable to the terminal. Then connect the negative jumper cable to a good ground, such as the door latch striker. (See figure 13.)
figure 13
10

The battery is located in the center area of the cowl at the rear of the front luggage compartment. Once the hood is open, remove the battery cover by turning the two retainer clips 90 degrees counter-clockwise, so that the knobs are facing left to right across the vehicle. (See figure 14.)
figure 14
Before connecting the jumper cables, check the fluid level in the battery cells if possible, and ensure that the battery is not frozen, swollen, or otherwise defective in appearance. Do not attempt to jump-start a battery that is known to be defective. Connect jumper cables to the Porsche battery terminals first, then connect them to the boost vehicle, positive first, then negative. If using a portable jumper unit, connect positive first then negative. If accessible, the spare tire retaining bolt/stud may be used to provide the ground (negative) connection on the Porsche. After jump-starting, reinstall the battery cover. Gently close the front hood by lowering it over the lock and pressing it down along the front edge at the lock area. Do not press down on the hood along the sides or anywhere in the center area behind the hood emblem, or damage to the hood may result. (See figure 15.)
figure 15
11
1997-2000 Boxster and Boxster S 1999-2000 Carerra and Carerra 4 1999-2000 996 1994-1998 964, 993:
The handle to release the front hood is located along the left rocker panel, next to the driver’s seat. Although the release handle looks like a mechanical unit, it operates an electric solenoid to open the hood. If the switch does not release the hood, the battery is probably very discharged. To provide power to open the hood, use a double-male cigarette lighter adapter and connect the vehicle’s cigarette lighter receptacle to a portable jumper unit or to jumper cables using a pigtail. The battery is located in the center area of the cowl at the rear of the front luggage compartment. (See figure 14 above.) Once the hood is open, remove the battery cover by turning the two retainer clips 90 degrees counter-clockwise, so that the knobs are facing left to right across the vehicle. Before connecting the jumper cables, check the fluid level in the battery cells if possible and ensure that the battery is not frozen, swollen, or otherwise defective in appearance. Do not attempt to jump-start a battery that is known to be defective. Connect jumper cables to the Porsche battery terminals first, then connect them to the boost vehicle, positive first, then negative. If using a portable jumper unit, connect positive first then negative. If accessible, the spare tire retaining bolt/stud may be used to provide the ground (negative) connection on the Porsche.
After jump-starting, reinstall the battery cover. Gently close the front hood by lowering it over the lock and pressing it down along the front edge at the lock area. Do not press down on the hood along the sides or anywhere in the center area behind the hood emblem or damage to the hood may result. (See figure 15 above.)
12

1994-98 911 Carrera, Turbo:
The front hood release handle is located at the rear of the left (driver’s side) kick panel. On Cabriolet models, the control handle is lockable. The release mechanism is operated mechanically, so battery power is not needed to open the hood. If the hood will not release, the vehicle must be towed to the nearest Porsche dealer for assistance. No override mechanism is available for field use.
The battery is located under the front luggage compartment floor panel, in the left (driver’s side) front corner, next to the inflatable spare tire. (See figure 16.)
figure 16
Once the hood is open, remove the luggage compartment floor panel to expose the spare tire and battery. Before connecting the jumper cables, check the fluid level in the battery cells if possible, and ensure that the battery is not frozen, swollen, or otherwise defective in appearance. Do not attempt to jump-start a battery that is known to be defective. Connect jumper cables to the Porsche battery terminals first, then connect them to the boost vehicle, positive first, then negative. If using a portable jumper unit, connect positive first then negative. The spare tire retaining bolt/stud may be used to provide the ground (negative) connection on the Porsche. After jump-starting, reinstall the luggage compartment floor panel. Gently close the front hood by lowering it over the lock and pressing it down along the front edge at the lock area. Do not press down on the hood along the sides or anywhere in the center area behind the hood emblem or damage to the hood may result.
13
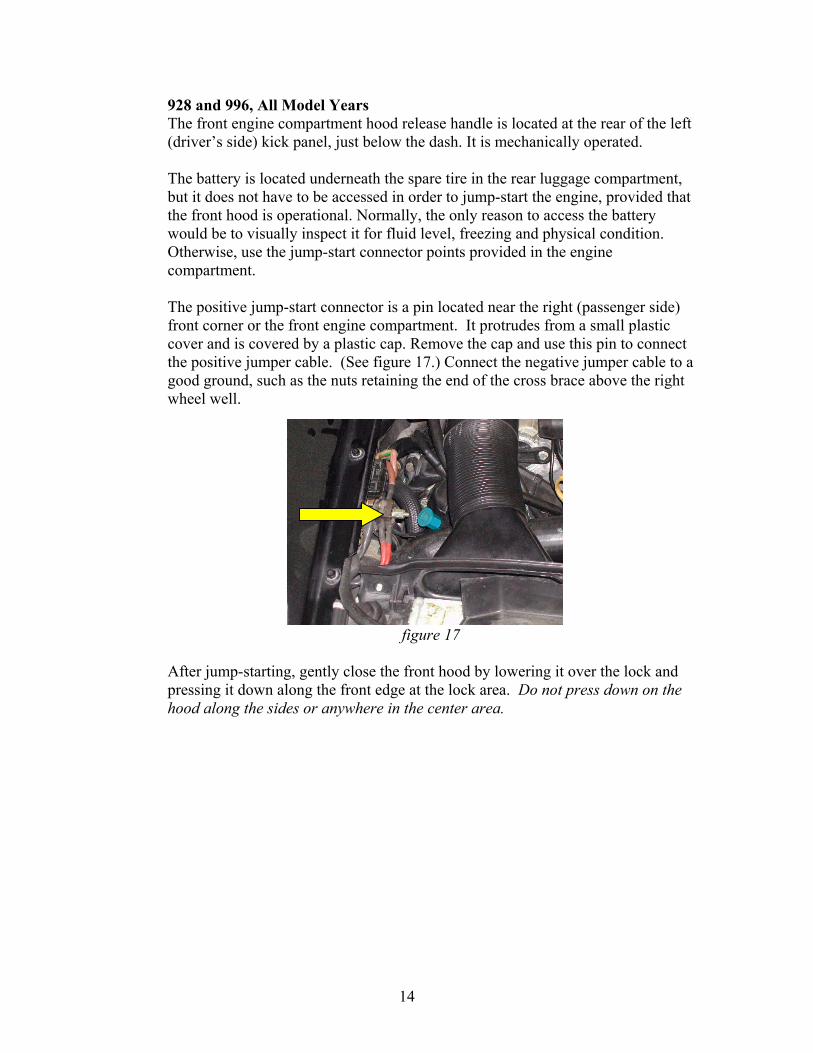
928 and 996, All Model Years The front engine compartment hood release handle is located at the rear of the left (driver’s side) kick panel, just below the dash. It is mechanically operated. The battery is located underneath the spare tire in the rear luggage compartment, but it does not have to be accessed in order to jump-start the engine, provided that the front hood is operational. Normally, the only reason to access the battery would be to visually inspect it for fluid level, freezing and physical condition. Otherwise, use the jump-start connector points provided in the engine compartment. The positive jump-start connector is a pin located near the right (passenger side) front corner or the front engine compartment. It protrudes from a small plastic cover and is covered by a plastic cap. Remove the cap and use this pin to connect the positive jumper cable. (See figure 17.) Connect the negative jumper cable to a good ground, such as the nuts retaining the end of the cross brace above the right wheel well.
figure 17 After jump-starting, gently close the front hood by lowering it over the lock and pressing it down along the front edge at the lock area. Do not press down on the hood along the sides or anywhere in the center area.
14
15
968, All Model Years: The front engine compartment hood release handle is located at the rear of the left (driver’s side) kick panel, just below the dash. It is mechanically operated. The battery is located beneath a cover at the right (passenger side) rear corner of the front engine compartment at the cowl. To jump-start, remove the battery cover. Before connecting the jumper cables, check the fluid level in the battery cells if possible, and ensure that the battery is not frozen, swollen, or otherwise defective in appearance. Do not attempt to jump-start a battery that is known to be defective. Connect jumper cables to the Porsche battery terminals first, then connect them to the boost vehicle, positive first, then negative. If using a portable jumper unit, connect positive first then negative. After jump-starting, reinstall the battery cover. Gently close the front hood by lowering it over the lock and pressing it down along the front edge at the lock area. Do not press down on the hood along the sides or anywhere in the center area behind the hood emblem.