Embed Size (px)
Citation preview

No part of this publication may be reproduced without written permission.
This publication includes the latest production information available before printing.Honda Motor Co., Ltd. reserves the right to make changes at any time without notice and withoutincurring any obligation.
This manual should be considered a permanent part of the motorcycle and should remain with themotorcycle when it is resold.
Honda Motor Co., Ltd. 2003
03/06/18 10:51:29 31KSJ600_001

2004Honda CRF100FOWNER’S MANUAL
03/06/18 10:51:32 31KSJ600_002

Safety Messages
A Few Words About Safety
Safety Labels
Safety MessagesDANGER, WARNING, CAUTION.
Your safety, and the safety of others, is very important. And operating this motorcycle safely is animportant responsibility.
To help you make informed decisions about safety, we have provided operating procedures andother information on labels and in this manual. This information alerts you to potential hazards thatcould hurt you or others.
Of course, it is not practical or possible to warn you about all hazards associated with operating ormaintaining a motorcycle. You must use your own good judgment.
You will find important safety information in a variety of forms, including:
These signal words mean:
–– on the motorcycle.
–– preceded by a safety alert symbol and one of three signal words:or
03/06/18 10:51:39 31KSJ600_003

You WILL be KILLED or SERIOUSLY HURT if you don’t followinstructions.
You CAN be KILLED or SERIOUSLY HURT if you don’t followinstructions.
You CAN be HURT if you don’t follow instructions.
Safety Messages
A Few Words About Safety
Safety Headings
Safety Section
Instructions
–– such as Important Safety Reminders or Important Safety Precautions.
–– such as Motorcycle Safety.
–– how to use this motorcycle correctly and safely.
This entire book is filled with important safety information –– please read it carefully.
03/06/18 10:51:46 31KSJ600_004

Contents
Contents
..................................Operating Controls .
...........................................Before Riding .
Introduction
....................................Motorcycle Safety ..............................Servicing Your Honda .
.......................Basic Operation & Riding .
1
13
23
29
41
These pages give an overview of the contentsof your owner’s manual. The first page of eachsection lists the topics covered in that section.
Important safety information, a specialmessage for parents, precautions aboutloading, accessories, and modifications,and the location of safety labels.
The location, function, and operation ofthe throttle, brakes, clutch, and otherbasic controls.
The importance of wearing a helmetand other protective gear, plus how tomake sure you and your motorcycle areready to ride.
How to start and stop the engine, shiftgears, and brake. Also, ridingprecautions.
Why your motorcycle needs regularmaintenance, what you need to knowbefore servicing your Honda, amaintenance schedule, and instructionsfor specific maintenance items.
03/06/18 10:52:00 31KSJ600_005

Contents
Contents
..........................................................Index .............................................................Tips .
..............Taking Care of the Unexpected .
.............................Technical Information .
...........................Consumer Information .
.....................................Table of Contents .
Quick Reference
109
119
127
143
152
156How to transport and store yourmotorcycle, and how to be anenvironmentally-responsible rider.
What to do if you have a flat tire, yourengine won’t start, etc.
ID numbers, technical specifications, andother technical facts.
Information on warranties and how to getHonda service manuals.
Sequential listing of topics in this owner’smanual.
Handy facts about fuel, engine oil, tire sizes,and air pressures.
03/06/18 10:52:12 31KSJ600_006

-
Introduction
Introduction
Congratulations on choosing your Honda off-road motorcycle.
When you own a Honda, you’re part of aworldwide family of satisfied customerspeople who appreciate Honda’s reputation forbuilding quality into every product.
Your Honda was designed as a recreationalmotorcycle for off-road use by one rider only.It’s an ideal bike for younger, beginning riders,but one that is also suitable for many adultriders.
We also recommend that you read the owner’smanual before you ride. It’s full of facts,instructions, safety information, and helpfultips. To make it easy to use, the manualcontains a table of contents, a detailed list oftopics at the beginning of each section, and anindex at the back of the book.
Before riding, take time to get acquainted withyour motorcycle and how it works. To protectyour investment, we urge you to takeresponsibility for keeping your motorcycle wellmaintained. Scheduled service is a must, ofcourse. But it’s just as important to observe thebreak-in guidelines, and perform all the
pre-ride and other periodic checks detailed inthis manual.
As you read this manual, you will findinformation that is preceded by a
symbol. This information is intendedto help you avoid damage to your Honda, otherproperty, or the environment.
Read the Warranties Booklet (page )thoroughly so you understand the coveragesthat protect your new Honda and are aware ofyour rights and responsibilities.
147
03/06/18 10:52:20 31KSJ600_007
Introduction
Introduction
Whenever you ride, tread lightly. By staying onestablished trails and riding only in approvedareas, you help protect the environment andkeep off-road riding areas open for the future.
If you have any questions, or if you ever need aspecial service or repairs, remember that yourHonda dealer knows your motorcycle best andis dedicated to your complete satisfaction.
Please report any change of address orownership to your Honda dealer so we will beable to contact you concerning importantproduction information.
You may also want to visit our website atwww.honda.com.
Happy riding!
03/06/18 10:52:26 31KSJ600_008

03/06/18 10:52:28 31KSJ600_009

1
Motorcycle Safety
Motorcycle Safety
This section presents some of the mostimportant information and recommendations tohelp you ride your motorcycle safely. Pleasetake a few moments to read these pages. Thissection also includes a special message forparents and location information for the safetylabels on your motorcycle.
..........................Important Safety Information .2
..........................Important Message to Parents .5...........Loading, Accessories & Modifications .8
........................................................Loading .8.....................Accessories & Modifications .10
..................................................Safety Labels .12
03/06/18 10:52:32 31KSJ600_010

-
-
2
Always Wear a Helmet
Never Carry a Passenger
Important Safety Information
Motorcycle Safety
Important Messageto Parents Parents,Youngsters and Of f -Highway Motorcycles
Your motorcycle can provide many years ofservice and pleasure if you take responsibilityfor your own safety and understand thechallenges you can meet while riding.
There is much that you can do to protectyourself when you ride. You’ll find manyhelpful recommendations throughout thismanual. The following are a few that weconsider most important.
This motorcycle has been designed for youngerriders, as well as for smaller adults. However,not all youngsters are physically or emotionallyready to ride. Therefore, before parents allowany youngster to ride this motorcycle, we urgethem to carefully read the
beginning on page and the
booklet that came with the motorcycle (USAonly).
It’s a proven fact: helmets significantly reducethe number and severity of head injuries. Soalways wear an approved motorcycle helmet.We also recommend that you wear eyeprotection, sturdy boots, gloves, and otherprotective gear (page ).
Your motorcycle is designed for one persononly. There are no handholds, footrests, or seatfor a second person so never carry apassenger. A passenger could interfere withyour ability to move around to maintain yourbalance and control of the motorcycle.
5
24
03/06/18 10:52:39 31KSJ600_011

3
Ride Off-Road Only
Take Time to Learn and Practice
Be Alert for Off-Road Hazards
Ride within Your Limits
Motorcycle Safety
Important Safety Information
Tips & Practice Guidef or the Of f -Highway Motorcyclist
Your motorcycle is designed and manufacturedfor off-road use only. The tires are not madefor pavement, and the motorcycle does nothave turn signals and other features requiredfor use on public roads. If you need to cross apaved or public road, get off and walk yourmotorcycle across.
Developing off-road riding skills is a gradual,step-by-step process. Start by practicing at lowspeeds in a safe area and slowly build yourskills. Personal instruction from an experiencedrider can also be valuable.
If you need assistance, ask your dealer aboutriding groups in your area.
Also be sure to read thebooklet that
came with your motorcycle (USA only).
The terrain can present a variety of challengeswhen you ride off-road. Continually ‘‘read’’the terrain for unexpected turns, drop-offs,rocks, ruts, and other hazards. Always keepyour speed low enough to allow time to see andreact to hazards.
Pushing limits is another major cause ofmotorcycle accidents. Never ride beyond yourpersonal abilities or faster than conditionswarrant. Remember that alcohol, drugs, fatigue,and inattention can significantly reduce yourability to make good judgments and ride safely.
03/06/18 10:52:44 31KSJ600_012

4
Don’t Drink and Ride
Keep Your Honda in Safe Condition
Important Safety Information
Motorcycle Safety
Alcohol and riding don’t mix. Even one drinkcan reduce your ability to respond to changingconditions, and your reaction time gets worsewith every additional drink. So don’t drink andride, and don’t let your friends drink and rideeither.
It’s important to keep your motorcycle properlymaintained and in safe riding condition.Having a breakdown can be difficult,especially if you are stranded off-road far fromyour base. To help avoid problems, inspectyour motorcycle before every ride and performall recommended maintenance.
03/06/18 10:52:50 31KSJ600_013

5
Important Message to Parents
Motorcycle Safety
Riding Readiness
Your child’s safety is very important to Honda.That’s why we urge you to read this messagebefore you let any young person ride thismotorcycle. Off-road riding can be fun. But, aswith riding a bicycle, bad judgment can resultin injury, and we don’t want that to happen! Asa parent, you can help prevent accidents bymaking good decisions about if, when, andhow your youngster rides this motorcycle.
The first decision you’ll need to make iswhether your youngster is ready to ride. Ridingreadiness varies widely from one person toanother, and age and size are not the onlyfactors.
PHYSICAL ABILITY is an importantconsideration. For example, riders must be bigenough to hold the motorcycle up, get on, andcomfortably sit on the seat with both feettouching the ground. They should also be ableto easily reach and work the brakes, throttle,and all other controls.
ATHLETIC ABILITY is necessary for riding amotorcycle. Generally speaking, youryoungster should be good at riding a bicyclebefore getting on a motorcycle. Can youryoungster judge speeds and distances whileriding a bicycle and react with proper hand andfoot actions? Anyone who does not have goodcoordination, balance, and agility is not readyto ride this motorcycle.
03/06/18 10:52:57 31KSJ600_014

-
6
Important Message to Parents
Motorcycle Safety
Instruction and Supervision
MENTAL AND EMOTIONAL MATURITYare requirements for safe riding. Does youryoungster think through problems and come tological solutions? On a bicycle, does youryoungster obey safe riding rules? Be honest!Young people who take unnecessary risks,make bad judgments, and don’t obey rules arenot ready to ride this motorcycle.
If you decide that your youngster is ready tosafely operate this motorcycle, make sure bothof you carefully read and understand theowner’s manual before riding. Also be sure thatyour youngster has a helmet and otherappropriate riding equipment and always wearsit when operating the vehicle or sitting on it.
GOOD INSTRUCTION is an important part ofhands-on training. The teacher can either beyou or another responsible adult who hasexperience with off-road motorcycle riding.(For help in finding a qualified instructor, talkwith your Honda dealer.) Even if you’re not themain teacher, it’s up to you to ensure youryoungster’s safety. Remember, learning to ridea motorcycle is a gradual, step-by-step process.It takes time, patience, and practice manyhours over a period of weeks or months.
03/06/18 10:53:03 31KSJ600_015

-
7Motorcycle Safety
Important Message to Parents
SUPERVISION is another important obligationof parents. Even after youngsters have becomeskilled off-road riders, they should always ridewith adult supervision. It helps to regularlyremind young riders of basic safety rules andprecautions. And remember, it’s yourresponsibility to see that the motorcycle isproperly maintained and kept in safe operatingcondition.
SAFE AND RESPONSIBLE RIDING must bean on-going commitment by you and youryoungster. When you both put safety first, youcan enjoy more peace of mind, and youryoungster can enjoy more hours of safe off-road riding.
For your convenience, this comeswith an ignition switch and key. Remove thekey when the motorcycle is parked to helpprevent unauthorized use.
CRF100F
03/06/18 10:53:08 31KSJ600_016

Overloading or carrying a passengercan cause a crash and you can beseriously hurt or killed.
Follow all load limits and other loadingguidelines in this manual.
8
Loading, Accessories & Modifications
Motorcycle Safety
Loading
More specific information on load limits,accessories, and modifications follows.
In addition, exceeding the weight limits orcarrying an unbalanced load can seriouslyaffect your motorcycle’s handling, braking,and stability. Adding accessories or makingmodifications that change this motorcycle’sdesign and performance can also make itunsafe. Also, the weight of any accessories willreduce the maximum load the motorcycle cancarry.
How much weight you put on your motorcycle,and how you load it, are important to yoursafety. If you decide to carry cargo, you shouldbe aware of the following information.
Your Honda was designed as a rider-onlymotorcycle. It was not designed to carry apassenger or cargo. A passenger or cargo couldinterfere with your ability to move around tomaintain your balance and control of themotorcycle.
03/06/18 10:53:15 31KSJ600_017

220 lbs (100 kg)
9
Load Limits
Maximum weight capacity=
Loading Guidelines
Loading, Accessories & Modifications
Motorcycle Safety
Following are the load limits for yourmotorcycle:
Includes the weight of the rider and anyaccessories.
Keep cargo small and light. Make sure itcannot easily be caught on brush or otherobjects, and that it does not interfere withyour ability to shift position to maintainbalance and stability.
Place weight as close to the center of themotorcycle as possible.Do not attach large or heavy items (such as asleeping bag or tent) to the handlebar, fork,or front fender.Make sure that all cargo is tied downsecurely.Never exceed the maximum weight limit.Check that both tires are inflated properly.
As discussed on page , we recommend thatyou do not carry any cargo on this motorcycle.However, if you decide to carry cargo, ride atreduced speeds and follow these common-sense guidelines:
8
03/06/18 10:53:27 31KSJ600_018

Improper accessories or modificationscan cause a crash in which you can beseriously hurt or killed.
Follow all instructions in this owner’smanual regarding modifications andaccessories.
10
Accessories
Loading, Accessories & Modifications
Motorcycle Safety
Accessories & Modifications
Modifying your motorcycle or using non-Honda accessories can make your motorcycleunsafe.
Before you consider making any modificationsor adding an accessory, be sure to read thefollowing information.
We strongly recommend that you use onlygenuine Honda accessories that have beenspecifically designed and tested for yourmotorcycle. Because Honda cannot test allother accessories, you must be personallyresponsible for proper selection, installation,and use of non-Honda accessories. Check withyour dealer for assistance and always followthis guideline:
Make sure the accessory does not reduceground clearance and lean angle, limitsuspension travel or steering travel, alteryour riding position, or interfere withoperating any controls.
03/06/18 10:53:36 31KSJ600_019

11
Modifications
Loading, Accessories & Modifications
Motorcycle Safety
We strongly advise you not to remove anyoriginal equipment or modify your motorcyclein any way that would change its design oroperation. Such changes could seriously impairyour motorcycle’s handling, stability, andbraking, making it unsafe to ride.
We also advise you not to make anymodifications or remove any equipment (suchas the USDA qualified spark arrester oremission control system components) thatwould make the motorcycle illegal in your area.
03/06/18 10:53:42 31KSJ600_020

12
Safety Labels
Motorcycle Safety
This page shows the locations of safety labels on your motorcycle. Some labels warn you ofpotential hazards that could cause serious injury. Others provide important safety information. Readthese labels carefully and don’t remove them.
If a label comes off or becomes hard to read, contact your Honda dealer for a replacement.
03/06/18 10:53:52 31KSJ600_021

13
Operating Controls
Operating Controls
When you ride off-road, you need to operatethe throttle, clutch, brakes, and other controlswithout stopping to look at them. Read thissection carefully before you ride. It describesthe location, function, and operation of all thebasic controls on your motorcycle.
....................................Component Locations .14......................................................Fuel Valve .17
...................................................Choke Lever .18...............................................Ignition Switch .19
........................................Engine Stop Button .20..........................................Front Brake Lever .20
...........................................................Throttle .20...................................................Clutch Lever .20
.....................................................Shift Lever .21............................................Rear Brake Pedal .21
......................................................Kickstarter .21
......................................................Side Stand .21
03/06/18 10:53:56 31KSJ600_022

clutch lever
engine stopbutton
front brake lever
throttle
14
Component Locations
Operating Controls
03/06/18 10:54:01 31KSJ600_023

fuel valvechoke lever
shift lever
side stand
15
Component Locations
Operating Controls
03/06/18 10:54:06 31KSJ600_024

kickstarter
rear brake pedal
16
Component Locations
Operating Controls
03/06/18 10:54:11 31KSJ600_025

ON RESOFF
17
Operating Controls
Operating Controls
Fuel Valve
The three-way fuel valve is used to control theflow of fuel from the fuel tank to thecarburetor.
Turning the fuel valve ON before attempting tostart the engine allows fuel to flow from thefuel tank to the carburetor.
Turning the fuel valve OFF after stopping theengine prevents the flow of fuel from the fueltank to the carburetor.
Turning the fuel valve to RES allows fuel toflow from the reserve fuel supply to thecarburetor.
ON
OFF
RES
03/06/18 10:54:20 31KSJ600_026

○○○○○○
AA
BB
CC
0.29 US gal (1.1 )
(1) choke lever
LEFTSIDE
(1)
(A) fully ON(B) detent position(C) fully OFF
18
Operating Controls
Operating Controls
Choke Lever
The reserve fuel supply is:
The tank should be refilled as soon as possibleafter switching to reserve, and the fuel valveshould be returned to the ON position afterrefueling to avoid running out of fuel with noreserve.
The choke lever is used for starting the engine(page ). The choke increases the percentageof fuel in the fuel/air mixture delivered to theengine.
Used to start a cold engine with air temperaturebelow 35°C (95°F).
Used to warm a cold engine immediately afterstarting with air temperature below 35°C(95°F).
Used for normal operation, for restarting awarm engine, or starting a cold engine with airtemperature above 35°C (95°F).
ON
OFF
DETENT
36
03/06/18 10:54:30 31KSJ600_027

Key
Position
Key RemovalFunction
OFF
ON
The key canbe removed.The keycannot beremoved.
The engine cannot beoperated.With the transmissionin neutral, the enginecan be started.
(1)
ON
OFF
(1) ignition switch
LEFT SIDE (under fuel tank)
ONOFF
19
Operating Controls
Operating Controls
Ignition Switch
The ignition switch is used to preventunauthorized use of the motorcycle.
Before riding, insert the key and turn it to theON position.
After parking the motorcycle, remove the key.
03/06/18 10:54:40 31KSJ600_028

20
Engine Stop Button
Front Brake Lever
Throttle
Clutch Lever
Operating Controls
Operating Controls
The engine stop button is used to turn theengine off during normal riding situations. Tooperate, push the button in and hold it in untilthe engine stops completely.
The throttle controls engine rpm (speed). Toincrease engine rpm, rotate the grip toward you.To reduce engine rpm, rotate the grip awayfrom you. The throttle will automatically returnto the closed position (engine idle) when youremove your hand.
The clutch lever is used to disengage the clutchwhenever you shift gears. To operate, pull theclutch lever in all the way before shifting, thenslowly release it after shifting.
The front brake lever is used to slow or stopyour motorcycle. To operate, pull the lever. Forinformation on braking techniques, seepage .37
03/06/18 10:54:50 31KSJ600_029

21
Shift Lever
Rear Brake Pedal
Kickstarter
Side Stand
Operating Controls
Operating Controls
Shif ting Gears,
Starting Procedure,
The shift lever is used to select the next higheror lower gear in the transmission. To operate,raise the shift lever (after pulling in the clutchlever) to engage the next higher gear or depressthe shift lever to engage the next lower gear.See page .
The rear brake pedal is used to slow or stopyour motorcycle. To operate, depress the pedal.For information on braking techniques, seepage .
The side stand is used to support yourmotorcycle while parked (page ). To operate,use your foot to lower the stand. Before riding,raise the stand.
The kickstarter is used to start the engine. Tooperate, swing the kickstarter out from itsstored position and depress it through its entirestroke. See page .
35
37
31
39
03/06/18 10:54:59 31KSJ600_030

22 Operating Controls
03/06/18 10:55:01 31KSJ600_031

?
?
23
Before Riding
Before Riding
Important Message to Parents
Before each ride, you need to make sure youand your Honda are both ready to ride. To helpget you prepared, this section discusses how toevaluate your riding readiness, and how toperform the recommended pre-ride inspectionof your Honda. If you’re a parent, be sure youalso read the onpage .
..............................Are You Ready to Ride .24.....................................Protective Apparel .24
............Is Your Motorcycle Ready to Ride .26.....................................Pre-ride Inspection .27
5
03/06/18 10:55:05 31KSJ600_032

24
Are You Ready to Ride?
Before Riding
Protective ApparelBefore you ride your motorcycle for the firsttime, we strongly recommend that you:
For your safety, we strongly recommend thatyou always wear an approved motorcyclehelmet, eye protection, boots, gloves, longpants, and a long-sleeved jersey, shirt, or jacketwhenever you ride. Although completeprotection is not possible, wearing the propergear can reduce the chance of injury when youride. Following are suggestions to help youchoose the proper gear.
read this owner’s manualmake sure you understand all the safetymessagesknow how to operate all the controls
Before each ride, we also suggest that youmake sure you:
are in good physical and mental conditionare free of alcohol and drugsare wearing an approved motorcycle helmet(with chin strap tightened securely), eyeprotection, and other protective clothing
03/06/18 10:55:16 31KSJ600_033

Not wearing a helmet increases thechance of serious injury or death in acrash.
Be sure you always wear a helmet,eye protection and other protectiveapparel when you ride.
25
Helmets and Eye Protection
Additional Riding Gear
Are You Ready to Ride?
Before Riding
Your helmet is your most important piece ofriding gear because it offers the best protectionagainst head injuries. A helmet should fit yourhead comfortably and have a chin strap that canbe tightened securely.
An open-face helmet offers some protection,but a full-face helmet offers more. Regardlessof the style, look for a DOT (Department ofTransportation) sticker in any helmet you buy
(USA only). Always wear a face shield orgoggles to protect your eyes and help yourvision.
In addition to a helmet and eye protection, wealso recommend:
Riding pants with knee and hip pads, a ridingjersey with padded elbows, and a chest/shoulder protector.
Off-road motorcycle gloves to help protectyour hands.
Sturdy off-road motorcycle boots to helpprotect your feet, ankles, and lower legs.
03/06/18 10:55:25 31KSJ600_034

Improperly maintaining this motorcycleor failing to correct a problem beforeriding can cause a crash in which youcan be seriously hurt or killed.
Always perform a pre-ride inspectionbefore every ride and correct anyproblems.
26
Is Your Motorcycle Ready to Ride?
Before Riding
Note to Parents:If a youngster will be perf orming any of thef ollowing pre-ride inspection procedures, it’syour responsibility to provide caref ulsupervision and make sure they are perf ormedsaf ely.
Before each ride, it’s important to inspect yourmotorcycle and make sure any problem youfind is corrected. A pre-ride inspection is amust because off-road riding can be tough on amotorcycle and you don’t want to have abreakdown far from help.
03/06/18 10:55:32 31KSJ600_035

27
Is Your Motorcycle Ready to Ride?
Before Riding
Pre-ride InspectionFuel
Tires
Spokes &Rims
Leaks
Engine Oil
Nuts &Bolts
Cables
Drive Chain
Check the following items before you get onthe motorcycle:
Make sure the spokes and rimlocks are tight. Also check therims for damage (page ).
Look under the motorcycle forsigns of leaking fluids (fuel,engine oil).
Check the level and add oil ifneeded (page ).
Check the level and add fuel(page ) if needed. Also makesure the fuel fill cap is securelyfastened.
Use a wrench to make sure allaccessible nuts, bolts, andfasteners are tight.
Check the cable housings forwear. Check the fittings forlooseness. Replace or tighten asneeded.
Check the condition and slack.Adjust and lubricate if needed.Also check the chain slider forwear and replace if needed(page ).
Use a gauge to check the airpressure. Adjust if needed. Alsolook for signs of damage orexcessive wear (page ).
56
93
88
98
62
03/06/18 10:55:49 31KSJ600_036

28
Is Your Motorcycle Ready to Ride?
Before Riding
ClutchLever
Spark Plug& Cap
Throttle
Brakes
Check for smooth operation andadjust if needed (page ).
Check for looseness (page ).
Check these items after you get on themotorcycle:
Check the freeplay and adjust ifneeded. Rotate the throttle tomake sure it moves smoothlywithout sticking, and snaps shutautomatically when it is released,in all steering positions(page ).
Squeeze the front brake leverand step on the rear brake pedalto check that the controlsoperate normally (page ).Adjust freeplay, if necessary.(pages , ).
Remember, be sure to take care of any problemyou find or have your Honda dealer correct itbefore you ride.
75
68
82
82 84
70
03/06/18 10:56:00 31KSJ600_037

-
29
Basic Operation & Riding
Basic Operation & Riding
Tips & PracticeGuide f or the Of f -Highway Motorcyclist
This section gives basic information on how tobegin riding your motorcycle. It includes howto start and stop your engine, how to use thethrottle, clutch, and brakes, and what to dowhen you’re through riding.
For more advanced information how to maketurns, ride on hills, etc., see the
booklet that came with your Honda (USA only).
To protect your new engine and enjoy optimumperformance and service life, refer to Break-inGuidelines (page ).
For information about carburetor adjustmentfor riding at high altitude, see page .
.................................Safe Riding Precautions .30.....................Starting & Stopping the Engine .31
.................................................Preparation .31......................................Starting Procedure .31
..........................................Flooded Engine .33.............................How to Stop the Engine .34
................................................Shifting Gears .35...........................................................Braking .37...........................................................Parking .39
.......................................Post-ride Inspection .40
135
136
03/06/18 10:56:07 31KSJ600_038

30
Safe Riding Precautions
Basic Operation & Riding
Basic Operation & Riding
Important Saf etyInf ormation
Bef ore Riding.
Before riding your motorcycle for the first time,please review the
beginning on page and theprevious section, titled
Even if you have ridden other motorcycles,take time to become familiar with how thismotorcycle works and handles. Practice in asafe area until you build up your skills and getaccustomed to your motorcycle’s size andweight.
For your safety, avoid starting or operating theengine in an enclosed area such as a garage.Your motorcycle’s exhaust contains poisonouscarbon monoxide gas which can collect rapidlyin an enclosed area and cause illness or death.
Your motorcycle is not equipped with lights.Do not ride at night.
2
03/06/18 10:56:14 31KSJ600_039

- -
○○○○
○○
AA
BB
CC
(1) choke lever
LEFTSIDE (1)
(A) fully ON(B) detent position(C) fully OFF
31
Starting Procedure
Preparation
Starting & Stopping the Engine
Basic Operation & Riding
High Air Temperature.To restart a warm engine, follow the procedurefor
Normal Air Temperature10° 35°C (50° 95°F)
Pull the choke lever ( ) up all the way tofully ON ( ).
Your motorcycle can be kickstarted with thetransmission in gear by pulling in the clutchlever before operating the kickstarter.
Always follow the proper starting proceduredescribed below.
Before starting, insert the key and turn theignition switch ON.
Make sure that the transmission is in neutral.Turn the fuel valve ON.
1. 1A
03/06/18 10:56:24 31KSJ600_040

-
32
Starting & Stopping the Engine
Basic Operation & Riding
Normal Air Temperature.
Normal AirTemperature.
Allowing the kickstarter to snap back f reelyagainst the pedal stop can damage the enginecase.
Extended use of the choke may impair pistonand cylinder wall lubrication and damage theengine.
High Air Temperature35°C (95°F) or above
Start the engine following step under
Low Air Temperature10°C (50°F) or belowFollow steps under
Warm up the engine by opening and closingthe throttle slightly.
Keep the throttle fully closed.Operate the kickstarter to start the engine.Starting from the top of the stroke, kickthrough to the bottom with a rapid,continuous motion. Do not operate thethrottle.
Immediately after the engine starts, push thechoke lever down to the detent position ( ).Warm up the engine by opening and closingthe throttle slightly.About a quarter-minute after the enginestarts, push the choke lever down all the wayto fully OFF ( ).If idling is unstable, open the throttle slightly.
Do not use the choke.Keep the throttle fully closed.
Continue warming up the engine until it runssmoothly and responds to the throttle whenthe choke lever ( ) is pushed down all theway to fully OFF ( ).
2.3.
4.
5.
1.
2.
3.
1
1
B
C7.
6.
3
C
1.2.3. 3
03/06/18 10:56:38 31KSJ600_041

33
Flooded Engine
Starting & Stopping the Engine
Basic Operation & Riding
High Air Temperature
Push the choke lever down all the way toOFF.Open the throttle fully.While pushing the engine stop button, crankthe engine several times with the kickstarter.Release the engine stop button.
If the engine fails to start after repeatedattempts, it may be flooded with excess fuel.To clear a flooded engine:
Follow the startingprocedure (page ).
2.3.
1.
4.5.
32
03/06/18 10:56:48 31KSJ600_042

34
How to Stop the Engine
Starting & Stopping the Engine
Basic Operation & Riding
To stop the engine, shift into neutral, push theengine stop button in, and hold it in until theengine stops.
03/06/18 10:56:53 31KSJ600_043

2 3 4 5
1
35
Shifting Gears
Basic Operation & Riding
When you attain a moderate speed, close thethrottle, pull the clutch lever in, and raise theshift lever. After shifting, release the clutchlever and apply the throttle.
If engine rpm (speed) is too low when yourelease the clutch lever, the engine will stall.If engine rpm is too high or you release theclutch lever too quickly, your motorcyclemay lurch forward.
Release the front brake. Gradually open thethrottle while you slowly release the clutchlever.
Depress the shift lever from neutral down tofirst gear.
Your motorcycle has five forward gears.
To start riding, after the engine has beenwarmed and the side stand raised:
Close the throttle and pull the front brakelever in.Pull the clutch lever all the way in.
(cont’d)2.
3.
1.
4.
5.
03/06/18 10:57:04 31KSJ600_044

36
Shifting Gears
Basic Operation & Riding
Improper shif ting may damage the engine,transmission, and drive train.
To shift down to a lower gear, close thethrottle, pull the clutch lever in, and depressthe shift lever. After shifting, release theclutch lever and apply the throttle.
To continue shifting up to each higher gear,repeat step .
Remember to close the throttle and pull theclutch lever in completely before shifting.
Downshifting can help slow your motorcycle,especially on downhills. However,downshifting when engine rpm is too high cancause engine damage.
To prevent transmission damage, do not coastor tow the motorcycle for long distances withthe engine off.
Learning when to shift gears comes withexperience. Upshift to a higher gear or reducethrottle before engine rpm (speed) gets too high.Downshift to a lower gear before you feel theengine laboring (lugging) at low rpm.
6.
7.5
03/06/18 10:57:13 31KSJ600_045

37
Braking
Basic Operation & Riding
To slow or stop, apply the front brake and rearbrake smoothly, while downshifting to matchyour speed. Gradually increase braking as youfeel the brakes slowing your speed. To preventstalling the engine, pull the clutch lever inbefore coming to a complete stop. For support,put your left foot down first, then your rightfoot when you are through using the rear brake.
Generally, reduce your speed or completebraking before beginning a turn. Avoid brakingor closing the throttle quickly while turning.Either action may cause one or both wheels toslip. Any wheel slip will reduce your control ofyour motorcycle.
(cont’d)
When riding in wet or raining conditions, or onloose surfaces, the ability to maneuver and stopwill be reduced. All of your actions should besmooth under these conditions. Rapidacceleration, braking, or turning may cause lossof control. For your safety, exercise extremecaution when braking, accelerating, or turning.
For maximum braking, close the throttle andfirmly apply the brake lever and pedal controls.
Applying the brakes too hard may cause thewheels to lock and slide, reducing control ofyour motorcycle. If this happens, release thebrake controls, steer straight ahead until youregain control, then reapply the brakes moregently.
03/06/18 10:57:21 31KSJ600_046

38
Braking
Basic Operation & Riding
When descending a long, steep grade, useengine compression braking by downshifting,with intermittent use of both brakes.
When you brake to a stop, pull the clutch leverin before stopping completely to preventstalling the engine. For support, put your leftfoot on the ground first, then your right footwhen you’re through braking.
03/06/18 10:57:25 31KSJ600_047

39
Parking
Basic Operation & Riding
Lower the side stand to support yourmotorcycle. Turn the ignition switch OFF andremove the key. If you’re through riding forthe day, also turn the fuel valve OFF. Alwayschoose a level place to park.
03/06/18 10:57:29 31KSJ600_048

40
Post-ride Inspection
Basic Operation & Riding
When you return home after riding, thoroughlyclean your motorcycle and remove any dirt,mud, brush, rocks or other objects you mayhave picked up along the way.
After cleaning, carefully inspect yourmotorcycle for leaks or damage.
Be sure to lubricate the drive chain (page )to prevent rusting.
102
03/06/18 10:57:34 31KSJ600_049

41
Servicing Your Honda
Servicing Your Honda
Bef ore You Service Your HondaKeeping your motorcycle well maintained isabsolutely essential to your safety. It’s also agood way to protect your investment, getmaximum performance, avoid breakdowns, andhave more fun.
To help keep your motorcycle in good shape,this section includes a Maintenance Schedulefor required servicing and step-by-stepinstructions for specific maintenance tasks.You’ll also find important safety precautions,information on oils, and tips for keeping yourHonda looking good.
(cont’d)
For information about the exhaust emission andnoise emission requirements of the U.S.Environmental Protection Agency (EPA) andthe California Air Resources Board (CARB),see page .
....................The Importance of Maintenance .43........................................Maintenance Safety .45
.....................Important Safety Precautions .45...................................Maintenance Schedule .47
......................................Maintenance Record .51
137
03/06/18 10:57:41 31KSJ600_050

42
Servicing Your Honda
Servicing Your Honda
Service Preparations
Service Procedures
....................................Component Locations .52...............................................................Tools .54
......................................Side Cover Removal .55
Fluids & Filters.................................................................Fuel .56
......................................................Engine Oil .59.....................................................Air Cleaner .65
Engine...........................................................Throttle .68
................................................Clutch System .70..........................................Engine Idle Speed .74
......................................................Spark Plug .75................................................Spark Arrester .77
Chassis.....................................................Suspension .79
.............................................................Brakes .82............................................................Wheels .88
.................................................Tires & Tubes .93......................................................Side Stand .97....................................................Drive Chain .98
..........................................Appearance Care .105
03/06/18 10:57:45 31KSJ600_051

Improperly maintaining this motorcycleor failing to correct a problem beforeyou ride can cause a crash in whichyou can be seriously hurt or killed.
Always follow the inspection andmaintenance recommendations andschedules in this owner’s manual.
43
The Importance of Maintenance
Servicing Your Honda
Frequent servicing of the air cleaner isespecially important to help you avoid apossible costly engine repair.
If your motorcycle overturns or is involved in acrash, be sure your Honda dealer inspects allmajor parts, even if you are able to make somerepairs.
A well-maintained motorcycle is essential forsafe, economical, and trouble-free riding. Itwill also help reduce air pollution. Careful pre-ride inspections and good maintenance areespecially important because your motorcycleis designed to be ridden over rough off-roadterrain.
More frequent service is needed if you subjectyour motorcycle to severe use (such ascompetition) or ride in unusually wet or dustyareas.
To help you properly care for your motorcycle,this section of the manual provides aMaintenance Schedule. The service intervals inthis schedule are based on average ridingconditions.
03/06/18 10:57:53 31KSJ600_052

44
The Importance of Maintenance
Servicing Your Honda
Note to Parents:As a parent, it’s up to you to make sure thatthis motorcycle is properly maintained andkept in saf e operating condition. Foryoungsters, learning how to take care of amotorcycle and perf orm basic maintenancecan be an important part of their ridingexperience. However, if you allow a youngsterto perf orm or assist in any maintenance task,such as f illing the tank with gasoline, youshould provide close supervision to make surethat it is perf ormed saf ely.
Remember, proper maintenance is the owner’sresponsibility. Be sure to inspect yourmotorcycle before each ride and follow theMaintenance Schedule in this section.
03/06/18 10:57:58 31KSJ600_053

Failure to properly follow maintenanceinstructions and precautions cancause you to be seriously hurt or killed.
Always follow the procedures andprecautions in this owner’s manual.
45
Carbon monoxide poisoning from engineexhaust.
Burns from hot motorcycle parts.
Injury from moving parts.
Maintenance Safety
Important Safety Precautions
Servicing Your Honda
The maintenance section includes instructionson how to perform some importantmaintenance tasks. Some of the most importantsafety precautions follow. However, we cannotwarn you of every conceivable hazard that canarise in performing maintenance. Only you candecide whether or not you should perform agiven task.
(cont’d)
Make sure the engine is off before you beginany maintenance or repairs.This will help eliminate several potentialhazards:
Be sure there is adequateventilation whenever you operate the engine.
Let theengine and exhaust system cool beforetouching.
Do not run theengine unless instructed to do so.
03/06/18 10:58:05 31KSJ600_054

--
46
Maintenance Safety
Servicing Your Honda
Read the instructions before you begin, andmake sure you have the tools and skillsrequired.To help prevent the motorcycle from fallingover, park it on a firm, level surface, usingthe side stand or a maintenance stand toprovide support.To reduce the possibility of a fire orexplosion, be careful when working aroundgasoline. Use only a non-flammable (highflash point) solvent such as kerosene notgasoline to clean parts. Keep cigarettes,sparks, and flames away from all fuel-related parts.
03/06/18 10:58:10 31KSJ600_055

47
Maintenance Schedule
Servicing Your Honda
To maintain the safety and reliability of yourmotorcycle, regular inspection and service isrequired as shown in the Maintenance Schedulethat follows.
Because your motorcycle does not have anodometer, service intervals in the maintenanceschedules are expressed in terms of riding daysas well as miles. To avoid overlooking requiredservice, we urge you to develop a convenientway to record the number of days and/or milesyou ride.
The Maintenance Schedule lists items that canbe performed with basic mechanical skills andhand tools. Procedures for these items areprovided in this manual.
The Maintenance Schedule also includes itemsthat involve more extensive procedures andmay require special training, tools, andequipment. Therefore, we recommend that youhave your Honda dealer perform these tasksunless you have advanced mechanical skillsand the required tools. Procedures for items inthis schedule are provided in a service manualavailable for purchase from your dealer(page ).
If you do not feel capable of performing agiven task or need assistance, remember thatyour Honda dealer knows your motorcycle bestand is fully equipped to maintain and repair it.If you decide to do your own maintenance, useonly genuine Honda parts or their equivalentsfor repair or replacement to ensure the bestquality and reliability.
144
03/06/18 10:58:17 31KSJ600_056

* **
**
*
48
Maintenance Schedule
Servicing Your Honda
Summary of Maintenance Schedule Notes andProcedures:
Perform the pre-ride inspection (page ) ateach scheduled maintenance period.
Service more frequently when ridden in wetor dusty conditions.
Each item on the maintenance schedulerequires some mechanical knowledge. Certainitems (particularly those marked and ) mayrequire more technical information and tools.Consult your Honda dealer.
Should be serviced by your Honda dealer,unless the owner has the proper tools andservice data and is mechanically qualified.Refer to the official Honda Service Manual(page ).In the interest of safety, we recommendthese items be serviced only by your Hondadealer.
inspect and clean, adjust, lubricate, orreplace, if necessarycleanadjustlubricatereplace
Maintenance Procedures:
California type only.
1.NOTE:
2.
27
I:
C:A:L:R:
144
03/06/18 10:58:27 31KSJ600_057

--
-
--
*
**
49
Maintenance Schedule
Servicing Your Honda
Referto
page:1001501
6001,000
6
1,2002,000
12
1,8003,000
18
2,4004,000
24Items
FrequencyWhicheverComes First
InitialMaint.
Regular Maint. Interval
Note
mikm
MonthFuel LineFuel Strainer ScreenThrottle OperationAir CleanerSpark PlugValve ClearanceEngine OilEngine Oil Strainer ScreenCam Chain TensionEngine Idle Speed
Note 1 CIIR
AI
ICICIIRCAI
IR
AI
CIIR
AI
ICICIIRCAI
In the interest of safety, we recommend these items be serviced only by your Honda dealer.
686575
59
74
Should be serviced by your Honda dealer, unless the owner has the proper tools and service data and is mechanically qualified.Refer to the official Honda Service Manual (page ).148
EM
ISSION
RE
LA
TE
DIT
EM
S
03/06/18 10:58:48 31KSJ600_058

-
-
*
**
-
50
Maintenance Schedule
Servicing Your Honda
Referto
page:1001501
6001,000
6
1,2002,000
12
1,8003,000
18
2,4004,000
24Items
FrequencyWhicheverComes First
InitialMaint.
Regular Maint. Interval
NoteNote 1
mikm
Month
In the interest of safety, we recommend these items be serviced only by your Honda dealer.
Should be serviced by your Honda dealer, unless the owner has the proper tools and service data and is mechanically qualified.Refer to the official Honda Service Manual (page ).
Drive ChainDrive Chain SliderBrake Shoe WearBrake SystemClutch SystemSide StandSuspensionSpark Arrester
Nuts, Bolts, FastenersWheels/TiresSteering Head Bearings
I, L
II
III
IIII
I
IIIIII
III
IIII
I
IIIIII
III
9899858270977977
88, 93
148
I, L: every 300 mi (500 km) or 3 months
C: every 1,000 mi (1,600 km) orevery 100 operating hours
NO
NE
MISSIO
NR
EL
AT
ED
ITE
MS
03/06/18 10:59:08 31KSJ600_059

51
Date Performed By: NotesMiles (km) orMonths
Servicing Your Honda
Maintenance Record
Keeping an accurate maintenance record will help ensure that your motorcycle is properlymaintained. Use the space under Notes to record anything you want to remind yourself about ormention to your dealer. Of course, if you find any problem while servicing your motorcycle, be sureit is corrected as soon as possible.
600 (1,000) or 61,200 (2,000) or 121,800 (3,000) or 182,400 (4,000) or 243,000 (5,000) or 303,600 (6,000) or 364,200 (7,000) or 424,800 (8,000) or 485,400 (9,000) or 54
03/06/18 10:59:16 31KSJ600_060

clutch lever
steering head
front suspension
fuel tank
rear suspensionair cleaner
drive chainside stand
front brake cable
chainslider
left sidecover
adjusting nut(drive chain)
front axle shaft
rear axle shaft
52
Component Locations
Servicing Your Honda
03/06/18 10:59:22 31KSJ600_061

throttlefront brake lever
spark plug
rim lock
spark arrester
clutch cable lower adjusting nut
engine oildrain bolt(under engine)
clutchadjuster
rear brake rod
rearbrakeadjuster
rim lock
carburetor
rear brakepedal
engine oil filler cap/dipstick
adjusting nut(drive chain)
53
Component Locations
Servicing Your Honda
03/06/18 10:59:29 31KSJ600_062

(1)
(2)
(3)
(1) spark plug wrench(2) handle(3) tool bag
54
Tools
Servicing Your Honda
Saf ety PrecautionsRefer to on page . The spark plug wrench ( ) and its handle ( )are stored in the tool bag ( ) delivered withyour motorcycle.
You will need to provide your own tools toperform any owner maintenance other thanremoving the spark plug.
45 213
03/06/18 10:59:35 31KSJ600_063

LEFT SIDE
(1)(2)
(3)
(1) bolt(2) prongs(3) rubber grommets
55
Side Cover Removal
Servicing Your Honda
Saf ety PrecautionsRefer to on page . RemovalUse a screwdriver to remove the (slot head)bolt ( ).Pull both side cover prongs ( ) out of therubber grommets ( ).
InstallationSlide the top of the side cover under thebottom edge of the seat.Align the side cover prongs with the rubbergrommets. Press the side cover into position.Install the securing bolt and tighten it.
1.
1.
2.
2.1
23
3.
45
03/06/18 10:59:46 31KSJ600_064

unleaded86 (or higher)
TypePump OctaneNumber
56
Fuel Recommendation
Fuel
Servicing Your Honda
Saf ety PrecautionsRefer to on page .
Your engine is designed to use any gasolinethat has a pump octane number of 86 or higher.Gasoline pumps at service stations normallydisplay the pump octane number. Forinformation on the use of oxygenated fuels, seepage .
Use of lower octane gasoline can causepersistent ‘‘pinging’’ or ‘‘spark knock’’ (alouder rapping noise) which, if severe, can leadto engine damage. (Light pinging experiencedwhile operating under a heavy load, such asclimbing a hill, is no cause for concern.)
If pinging or spark knock occurs at a steadyengine speed under normal load, change brandsof gasoline. If pinging or spark knock persists,consult your Honda dealer.
We recommend that you use unleaded fuelbecause it produces fewer engine deposits andextends the life of exhaust system components.
Never use stale or contaminated gasoline or anoil/gasoline mixture. Avoid getting dirt, dust,or water in the fuel tank.
45
141
03/06/18 10:59:55 31KSJ600_065

1.45 US gal (5.5 )
0.29 US gal (1.1 )
Gasoline is highly flammable andexplosive. You can be burned orseriously injured when handling fuel.
Stop the engine and keep heat,sparks and flame away.Handle fuel only outdoors.Wipe up spills immediately.
(1)
(2)
(1) fuel fill cap(2) breather tube
(3) front number plate(4) filler neck
(4)
(3)
57
Refueling Procedure
Fuel
Servicing Your Honda
Reserve Capacity:
Add fuel until the level reaches the bottomof the filler neck ( ). Avoid overfilling thetank. There should be no fuel in the fillerneck.
To open the fuel fill cap ( ), pull thebreather tube ( ) away from the frontnumber plate ( ). Turn the fuel fill capcounterclockwise and remove it.Fuel Tank Capacity, including reserve:
(cont’d)
1.
2.
23
1
4
03/06/18 11:00:06 31KSJ600_066
58
Fuel
Servicing Your Honda
After refueling, turn the fuel fill capclockwise until it is secure.Check that the breather tube is properlyseated in the front number plate.
If you replace the fuel fill cap, use only agenuine Honda replacement part.
3.
4.
03/06/18 11:00:16 31KSJ600_067

**
*
SG or higher exceptoils labeled asenergy conservingon the circular APIservice labelSAE 10W-40MAPro Honda GN4 orHP4 (withoutmolybdenumadditives) 4-strokeoil (USA & Canada),or Honda 4-stroke oil(Canada only), or anequivalentmotorcycle oil
API classification
viscosity (weight)JASO T 903 standardsuggested oil
59
Oil Recommendation
Engine Oil
Servicing Your Honda
Saf ety PrecautionsRefer to on page .
Using the proper oil, and regularly checking,adding, and changing oil will help extend yourengine’s life. Even the best oil wears out.Changing oil helps get rid of dirt and depositsheld in the engine. Operating the engine withold or dirty oil can damage your engine.Running the engine with insufficient oil cancause serious damage to the engine andtransmission.
45
03/06/18 11:00:26 31KSJ600_068

**
*
OKNOT RECOMMENDED
60
Engine Oil
Servicing Your Honda
For normal air temperatures. See next pagefor additional temperature/viscosityinformation.Suggested oils are equal in performance toSJ oils that are not labeled as energyconserving on the circular API service label.
Your motorcycle does not need oil additives.Use the recommended oil.Do not use oils with graphite ormolybdenum additives. They may adverselyaffect clutch operation.Do not use API SH or higher oils displayinga circular API ‘‘energy conserving’’ servicelabel on the container. They may affectlubrication and clutch performance.
Do not use non-detergent, vegetable, orcastor based racing oils.
03/06/18 11:00:36 31KSJ600_069

(1) code number of the sales company of the oil(2) oil classification
(1)
(2)
61
Engine Oil
Servicing Your Honda
Other viscosities shown in the following chartmay be used when the average temperature inyour riding area is within the indicated range.
JASO T 903 standardThe JASO T 903 standard is an index to chooseengine oils for 4-stroke motorcycle engines.There are two classes: MA and MB.Oil conforming to the standard has thefollowing classification on the oil container.
03/06/18 11:00:45 31KSJ600_070

(2)
(3)
(1)
(1) oil filler cap/dipstick(2) upper level mark(3) lower level mark
RIGHT SIDE
62
Checking & Adding Oil
Engine Oil
Servicing Your Honda
Park your motorcycle on a firm, levelsurface.Clean around the oil filler cap/dipstick ( )and nearby surfaces.
Start the engine and let it idle for a fewminutes. Stop the engine. Wait a fewminutes.
Hold the motorcycle upright.
Immediately unscrew and remove the oilfiller cap/dipstick. Wipe it clean.
Insert the oil filler cap/dipstick until it seats,but do not screw it in.Remove the oil filler cap/dipstick and checkthe oil level.
If the oil is at or near the upper level mark( ), you do not have to add oil.If the oil is below or near the lower levelmark ( ), add the recommended oil untilit reaches the upper level mark. (Do notoverfill.)
1.
2. 1
3.
4.
5.6.
7.
2
3
03/06/18 11:00:56 31KSJ600_071

UNDER(2)
(1)
(1) oil drain bolt(2) sealing washer
63
Changing Engine Oil
Engine Oil
Servicing Your Honda
Improper disposal of drained f luids is harmf ulto the environment.
Check for oil leaks.
If the engine is cold, start it and let it idle for3-5 minutes. Turn the engine off. Wait 2-3minutes for the oil to settle.Park your motorcycle on a firm, levelsurface.Remove the oil filler cap/dipstick.Place a drain pan under the crankcase.Unscrew and remove the oil drain bolt.After most of the oil is drained, gently tiltthe motorcycle from side to side to drain theremaining oil.Pour the drained oil into a suitable containerand dispose of it in an approved manner(page ).
Insert the oil filler cap/dipstick and screw itin tightly.
(cont’d)
8.
9.
1.
2.
3.4.5.6.
7.
117
03/06/18 11:01:09 31KSJ600_072

18 lbf·ft (25 N·m , 2.5 kgf·m)
1.0 US qt (0.9 )
64
Engine Oil
Servicing Your Honda
Remove the old sealing washer ( ) andinstall a new sealing washer on the drain bolt.
Install the oil filler cap/dipstick securely.Start the engine. Let it idle 3-5 minutes, thenturn it off.
With the motorcycle held upright on levelground, check the oil level.If needed, add oil (page ) until it reachesthe upper level mark. (Do not overfill.)Check for oil leaks.
Pour the recommended oil into the crankcase,approximately:
Install the oil drain bolt and tighten to thespecified torque:
8.
9.
10.
11.12.
13.
14.
2
62
03/06/18 11:01:19 31KSJ600_073

65
Air Cleaner
Servicing Your Honda
Saf ety Precautions
Using the wrong air cleaner can result inpremature engine damage.
Improper or lack of proper air cleanermaintenance can cause poor perf ormance andpremature engine wear.
Refer to on page .
Proper air cleaner maintenance is veryimportant for off-road vehicles. A dirty, water-soaked, worn-out, or defective air cleaner willallow dirt, dust, mud, and other impurities topass into the engine.
Service the air cleaner more frequently if youride in unusually wet or dusty areas. YourHonda dealer can help you determine thecorrect service interval for your ridingconditions.
Your motorcycle’s air cleaner has very specificperformance requirements. Use a new genuineHonda air cleaner specified for your model oran air cleaner of equal quality.
Proper air cleaner maintenance can preventpremature engine wear or damage, expensiverepairs, low engine power, poor gas mileage,and spark plug fouling.
45
03/06/18 11:01:28 31KSJ600_074

-(2)
LEFT SIDE
(1) rubber band(2) hooks(3) air cleaner housing cover
(4) retainer(5) air cleaner
(1)
(3)
(4)
(5)
66
Cleaning
Air Cleaner
Servicing Your Honda
Allow the air cleaner to dry thoroughlybefore applying oil. A wet air cleaner willnot fully absorb the oil.
Inspect for tears or cracks in the foam orseams of the air cleaner. Replace the aircleaner if it is damaged.
Gently wash the air cleaner in clean, non-flammable (high flash point) solvent such askerosene not gasoline. After cleaning,gently squeeze out the remaining solvent.Avoid twisting or wringing the air cleaner.This can tear the foam.
Remove the left side cover (page ).Remove the rubber band ( ) from the hooks( ) and remove the air cleaner housing cover( ).Unhook the retainer ( ) and remove the aircleaner assembly ( ).Remove the air cleaner from its support.Wipe the support clean.
4.
7.
5.
6.
1.2.
3.
1
45
23
55
03/06/18 11:01:40 31KSJ600_075

67
Air Cleaner
Servicing Your Honda
Pour clean Pro Honda Foam Filter Oil or anequivalent (Canada: Honda Foam Filter Oilor an equivalent) over the entire surface ofthe air cleaner. Use both hands to evenlyspread the oil into the air cleaner. Gentlysqueeze out any excess oil. (To keep yourhands dry, place the air cleaner in a cleanplastic bag before spreading the oil into theair cleaner.)
Install the left side cover (page ).
Attach the air cleaner to its support.
Apply a thin coat of grease to the sealingsurface of the air cleaner assembly.
Clean the inside of the air cleaner housing.
Install the air cleaner assembly.Install the air cleaner housing cover.
9.
8.
10.
14.
11.
12.13.
55
03/06/18 11:01:48 31KSJ600_076

- -
+-
--
++
1/16 1/4 in (2 6 mm)
RIGHT SIDE
(1) freeplay
(2)(3)
(4)
(1)
(2) dust cover(3) lock nut(4) adjuster
( ) increase freeplay( ) decrease freeplay
(( ))
(( ))
68
Throttle Freeplay
Throttle
Servicing Your Honda
Saf ety PrecautionsRefer to on page . InspectionCheck freeplay ( ).Freeplay:
If necessary, adjust to the specified range.
AdjustmentPull the rubber dust cover ( ) back.Loosen the lock nut ( ) on the throttle cablemechanism.Turn the adjuster ( ).Tighten the lock nut. Return the dust coverto its normal position.After adjustment, check for smooth rotationof the throttle grip from fully closed to fullyopen in all steering positions.
If you can’t get the freeplay within thespecified range, contact your Honda dealer.
1.2.
3.
1
4.
5.
23
4
45
03/06/18 11:02:02 31KSJ600_077

(2) (1)
(1) throttle(2) throttle cable
69
Throttle Inspection
Throttle
Servicing Your Honda
Check for smooth rotation of the throttle ( )from fully open to fully closed in all steeringpositions. If there is a problem, see yourHonda dealer.
Check that the throttle assembly ispositioned properly and the securing boltsare tight.
Inspect the condition of the throttle cable ( )from the throttle grip down to the carburetor.If the cable is kinked or chafed, have itreplaced.Check the cable for tension or stress in allsteering positions.Lubricate the cable with a commercially-available cable lubricant to preventpremature rust and corrosion.
1.
2. 1
3.
4.
5.
2
03/06/18 11:02:11 31KSJ600_078

- -
+-
-
+
3/8 13/16 in (10 20 mm)
(2)
( ) increase freeplay( ) decrease freeplay
(1)
( )
( )
(4)
(3)
LEFT SIDELEFT SIDE
(2) dust cover(3) lock nut(4) upper clutch cable adjuster
(1) clutch lever
70
Clutch Freeplay
Clutch System
Servicing Your Honda
Saf ety PrecautionsRefer to on page . Upper AdjustmentMinor adjustments are generally made with theupper clutch cable adjuster.
Pull the rubber dust cover ( ) back.Loosen the upper lock nut ( ).Turn the upper clutch cable adjuster ( ) toobtain the specified freeplay.
InspectionCheck freeplay.Freeplay:
If necessary, adjust to the specified range.Improper freeplay adjustment can causepremature clutch wear.
1.2.3. 4
23
45
03/06/18 11:02:24 31KSJ600_079

-
+-
++
--
(5)
(6)
(5) lower adjusting nut(6) lower lock nut( ) increase freeplay( ) decrease freeplay
(( ))
(( ))
RIGHT SIDE
71
Clutch System
Servicing Your Honda
Loosen the upper lock nut ( ) and turn theupper clutch cable adjuster ( ) all the way in(to provide maximum freeplay).Tighten the upper lock nut and pull the dustcover ( ) back to its normal position.Hold the lower adjusting nut ( ) and loosenthe lower lock nut ( ) at the lower end of thecable.Turn the lower adjusting nut to obtain thespecified freeplay.Hold the lower adjusting nut and tighten thelower lock nut. Check the adjustment.
Tighten the lock nut and check the freeplayagain.
Lower AdjustmentThe lower clutch cable adjuster is used if theupper clutch cable adjuster is threaded out nearits limit or the correct freeplay cannot beobtained.
1.
2.
3.
4.
5.
34
25
6
4.
03/06/18 11:02:35 31KSJ600_080

RIGHT SIDE
(8)
(7)
(7) clutch lock nut(8) clutch adjuster
72
Clutch System
Servicing Your Honda
Clutch Adjuster (on clutch housing)Major adjustments can be made with the clutchadjuster on the clutch housing.
Loosen the lock nut ( ) and turn the upperclutch cable adjuster ( ) all the way in (toprovide maximum freeplay).Loosen the clutch lock nut ( ) and turn theclutch adjuster ( ) counterclockwise until aslight resistance is felt.
Readjust the lower cable adjuster for properfreeplay, using the lower lock nut ( ) andlower adjusting nut ( ).Start the engine, pull the clutch lever in, andshift into gear. Make sure the engine doesnot stall and the motorcycle does not creep.Gradually release the clutch lever and openthe throttle. Your motorcycle should movesmoothly and accelerate gradually.
Turn the clutch adjuster back in clockwise1/8 to 1/4 turn and tighten the clutch lock nut.
1.
2.
3.
4.
5.
56
34
78
03/06/18 11:02:46 31KSJ600_081

73
Other Inspections & Lubrication
Clutch System
Servicing Your Honda
Check that the clutch lever assembly ispositioned properly and the securing boltsare tight.
Lubricate the clutch cable with acommercially-available cable lubricant toprevent premature wear and corrosion.
If you can’t get proper adjustment, or the clutchdoes not work properly, the cable may bekinked or worn, or the clutch discs may beworn. See your Honda dealer or refer to theofficial Honda Service Manual (page ).
Check the clutch cable for kinks or signs ofwear. If necessary, have it replaced.
144
03/06/18 11:02:53 31KSJ600_082

±
+-
- ++
1,400 100 rpm
( ) increase rpm( ) decrease rpm
( )
RIGHT SIDE
(1)
(1) throttle stop screw
(( ))
74
Engine Idle Speed
Servicing Your Honda
Saf ety PrecautionsRefer to on page . The engine must be at normal operatingtemperature for accurate idle speed adjustment.Ten minutes of stop-and-go riding is sufficient.
Do not attempt to compensate for faults inother systems by adjusting idle speed. See yourHonda dealer for regularly scheduledcarburetor adjustments.
Warm up the engine, shift to neutral andplace the motorcycle on its stand.Connect a tachometer, following thetachometer manufacturer’s instructions.Adjust idle speed with the throttle stop screw( ).
1.
2.
3.1
Idle Speed:
45
03/06/18 11:03:02 31KSJ600_083

U22FSR-U (DENSO)CR7HSA (NGK)
CR6HSA (NGK)U20FSR-U (DENSO)CR8HSA (NGK)U24FSR-U (DENSO)
or
or
or
Standard
For cold climate(below 5°C, 41°F)For extended highspeed riding (1) center electrode
(2) side electrode(3) spark plug gap
(2)
(1)
(3)
75
Spark Plug Recommendation
Spark Plug
Servicing Your Honda
Saf ety Precautions
Using spark plugs with an improper heat rangecan cause engine damage.
Refer to on page . Use only the recommended type of spark plugsin the recommended heat range.
The recommended standard spark plug issatisfactory for most riding conditions.However, if you plan to ride for extendedperiods at high speeds or near maximum power(high engine rpm) in hot climates, or planextended riding in cold climates, a differentplug may be recommended.
45
03/06/18 11:03:13 31KSJ600_084

- -0.02 0.03 in (0.6 0.7 mm)
76
Spark Plug
Servicing Your Honda
Improperly tightened spark plugs can damagethe engine. Too loose, you can burn a piston.Too tight, you can damage the threads.
Tighten the spark plug:
Disconnect the spark plug cap.
Clean any dirt from around the spark plugbase.
Remove the spark plug with a plug wrench.Inspect the spark plug electrodes for wear.The center electrode ( ) should have squareedges. The side electrode ( ) should not beeroded. The insulator should not be crackedor chipped.Check the spark plug gap ( ), using a wire-type feeler gauge. If adjustment is necessary,bend the side electrode carefully. The gapshould be:
Make sure the plug washer is in goodcondition.If you have to install a new plug, first checkthe gap.With the plug washer attached, thread thespark plug in by hand (to prevent cross-threading).
about 1/8-1/4 turn after it seats (if the oldplug is good).about 1/2 turn after it seats (if installing anew plug).
2.3.4.
5.
6.
7.
3
1
1.
2
03/06/18 11:03:26 31KSJ600_085

(1)
(2)
(4)RIGHT REAR
(1) spark arrester(2) bolts
(3) gasket(4) muffler
(3)
77
Spark Arrester
Servicing Your Honda
Saf ety PrecautionsRefer to on page .
The spark arrester must be serviced every 100operating hours to maintain its efficiency.
Regular servicing prevents carbon buildup(which can diminish engine performance) andalso complies with USDA regulations forregular maintenance to assure proper function.The spark arrester prevents random sparksfrom the combustion process in your enginefrom reaching the environment.
Remove the three bolts ( ), the sparkarrester ( ), and the gasket ( ) from themuffler ( ).
Allow the engine and muffler to cool.1.2. 2
14
3
45
03/06/18 11:03:35 31KSJ600_086

78
Spark Arrester
Servicing Your Honda
Use a brush to remove carbon deposits fromthe spark arrester screen. Be careful to avoiddamaging the spark arrester screen. Thespark arrester must be free of breaks andholes. Replace, if necessary. Check thegasket. Replace, if necessary.
Install the spark arrester and the gasket in themuffler and tighten the three bolts securely.
3. 4.
03/06/18 11:03:40 31KSJ600_087

(1) mounting bolts
(1)
(1)
79
Front Suspension Inspection
Suspension
Servicing Your Honda
Saf ety PrecautionsRefer to on page .
Loose, worn, or damaged suspensioncomponents may adversely affect the handlingand stability of your motorcycle. If anysuspension components appear worn ordamaged, see your Honda dealer for furtherinspection. Your dealer is qualified todetermine whether or not replacement parts orrepairs are needed.
Check fork operation. Pull the front brakelever in, to lock the brake. Then pump upand down on the fork legs several times. Thesuspension should function smoothly. Thereshould be no oil leakage.
1.
45
03/06/18 11:03:47 31KSJ600_088

(1)
(1)
(3)
LEFT SIDE
RIGHT SIDE
(1) swingarm bushing
(1) swingarm bushing(2) shock absorber attachment points(3) suspension linkage attachment points
(2)
80
Rear Suspension Inspection
Suspension
Servicing Your Honda
(cont’d)
Check the security of all handlebar and forkmounting bolts ( ). If any front suspensioncomponents appear worn or damaged, seeyour Honda dealer for further inspection.
Place the motorcycle on a maintenance stand.Push hard against the side of the rear wheeland feel for any freeplay which indicatesworn swingarm bushings ( ).
1.
12.
1
03/06/18 11:03:55 31KSJ600_089

81
Suspension
Servicing Your Honda
Check that the fasteners for the shockabsorber attachment points ( ) and rearsuspension linkage attachment points ( ) aresecure.Check for oil leaks in the shock absorber. Ifany rear suspension components appearworn or damaged, see your Honda dealer forfurther inspection.
2.
3.
32
03/06/18 11:04:00 31KSJ600_090

- -
+-
+
-
13/16 1 3/16 in (20 30 mm)RIGHTSIDE
(1) front brake lever
(2) dust cover(3) lock nut(4) front brake cable adjuster
( ) increase freeplay( ) decrease freeplay
(1)
(2)(3)
(4)
RIGHTSIDE ( )
( )
82
Front Brake Lever Freeplay
Brakes
Servicing Your Honda
Saf ety PrecautionsRefer to on page . InspectionCheck freeplay by pulling in slowly on thefront brake lever ( ) until the brake starts toengage.
If necessary, adjust to the specified range.
AdjustmentPull the rubber dust cover ( ) back.Loosen the lock nut ( ) and turn the frontbrake cable adjuster ( ).Tighten the lock nut. Return the dust coverto its normal position.Apply the brake, release it, then spin thewheel and check that it rotates freely. Repeatthis procedure several times.
Freeplay:
1.2.
3.
4.
1
234
45
03/06/18 11:04:14 31KSJ600_091

+-
--
++
(6) lower lock nut(7) lower adjusting nut
( ) increase freeplay( ) decrease freeplay
(5)
(5) cable guide bolt
(6)
(7)
LEFT FRONT
LEFT FRONT
(( ))
(( ))
83
Brakes
Servicing Your Honda
If the cable adjuster is threaded out near itslimit or if the correct f reeplay cannot beobtained using the cable adjuster:
Check the freeplay.
At the lower end of the cable, loosen thelower lock nut ( ). Turn the lower adjustingnut ( ) to obtain the specified freeplay.Tighten the lower lock nut.
Loosen the front brake cable guide bolt ( ).
Loosen the lock nut and turn the cableadjuster all the way in.
Tighten the lock nut and return the rubberdust cover to its normal position.
(cont’d)
5.
1.
2.
4.
76
53.
03/06/18 11:04:25 31KSJ600_092

- -
+-
--
++
13/16 1 3/16 in (20 30 mm)
(1) rear brake pedal( ) increase freeplay( ) decrease freeplay
(1)(2)(3)
(4)
RIGHT SIDERIGHT REAR
(2) brake rod(3) adjusting nut(4) brake arm pin
(( ))
(( ))
84
Rear Brake Pedal Freeplay
Brakes
Servicing Your Honda
Tighten the front brake cable guide bolt.Apply the brake, release it, then spin thewheel and check that it rotates freely. Repeatthis procedure several times.Check the freeplay. If you cannot adjust thefreeplay properly, see your Honda dealer.
InspectionPlace your motorcycle on its side stand.Check freeplay by slowly depressing thebrake pedal ( ) until the brake starts toengage.
If necessary, adjust to the specified range.
Adjustment
5.1.2.
6.
7.Freeplay:
1
03/06/18 11:04:39 31KSJ600_093

LEFTFRONT (4)
(2)
(3)(1)
(1) arrow(2) brake arm
(3) reference mark(4) brake panel
85
Brake Shoe Wear
Brakes
Servicing Your Honda
Turn the rear brake adjusting nut ( ). Makesure the cut-out on the adjusting nut is seatedon the brake arm pin ( ).Apply the brake, release it, and then spin thewheel and check that it rotates freely. Repeatthis procedure several times.Check the freeplay. If you can’t adjust thefreeplay properly, see your Honda dealer.
The front and rear brakes are equipped withexternal brake wear indicators that let youcheck brake wear without disassembly.Application of the brake control (lever orpedal) causes the arrow on the brake arm tomove toward a reference mark on the brakepanel.
1.
2.
3.
3
4
03/06/18 11:04:49 31KSJ600_094

RIGHTREAR
(2)
(3)
(1) (4)
(1) arrow(2) brake arm
(3) reference mark(4) brake panel
86
Other Inspections & Lubrication
Brakes
Servicing Your Honda
Apply the brake control (lever or pedal) andcheck the movement of the arrow ( ) on thebrake arm ( ). Replace the brake shoes if thearrow aligns with the reference mark ( ) onthe brake panel ( ) upon full application ofthe brake. If replacement is necessary, seeyour Honda dealer.
Place your motorcycle on its side stand.
Check that the front lever and rear pedalassemblies are positioned properly and thesecuring bolts are tight.Check the front brake cable for kinks orsigns of wear that could cause sticking orfailure.Lubricate the front brake cable with acommercially-available cable lubricant toprevent premature wear and corrosion.
1.2.
1
32
4
03/06/18 11:04:57 31KSJ600_095

RIGHTSIDE
(1) lock nut(2) stopper bolt
(3) rear brake pedal
(1)
(2) (3)
87
Rear Brake Pedal Height Adjustment
Brakes
Servicing Your Honda
Front: Make sure the brake arm, spring, andfasteners are in good condition.Rear: Make sure the brake rod, brake arm,spring, and fasteners are in good condition.
Check the freeplay (page ).Tighten the lock nut.
Loosen the lock nut ( ) and turn the stopperbolt ( ).
1.
2.3.
12
84
03/06/18 11:05:04 31KSJ600_096

(1)
(2)
(3)
(1) wheel rim(2) spoke(3) rim lock
REAR
88
Wheel Rims & Spokes
Wheels
Servicing Your Honda
Saf ety PrecautionsRefer to on page .
It is not necessary to remove the wheels toperform the recommended service in theMaintenance Schedule. However, informationfor wheel removal is provided for emergencysituations.
Inspect the wheel rims ( ) and spokes ( )for damage.Tighten any loose spokes or rim locks ( ).
Maintenance of spoke tension and wheeltrueness (roundness) is critical to safemotorcycle operation. During the first 100miles (150 km), spokes will loosen morerapidly due to the initial seating of the parts.Excessively loose spokes may result ininstability at high speeds and the possible lossof control. It’s also important that the rim locksare secure to prevent tire slippage.
1 2
3
1.
2.
45
03/06/18 11:05:13 31KSJ600_097

(2)(1)
(3)
(4)
(1) cable guide bolt(2) front brake cable(3) brake arm
(4) front axle nut(5) lug(6) slot
(6)
(5)
89
Front Wheel Removal
Wheels
Servicing Your Honda
Rotate the wheel slowly to see if it appearsto ‘‘wobble.’’ If it does, the rim is out ofround or not ‘‘true.’’ If the wobble isnoticeable, see your Honda dealer forinspection.
RemovalRaise the front wheel off the ground byplacing a maintenance stand or support blockunder the engine. Secure the rear of themotorcycle with tie-down straps.Loosen the cable guide bolt ( ) on the forkleg.Disconnect the front brake cable ( ) fromthe brake arm ( ).Remove the front axle nut ( ) and front axleshaft.
Pull the brake assembly out carefully.Remove the wheel.
1.
2.
3.
3.
4.
5.6.
4
1
23
03/06/18 11:05:23 31KSJ600_098

46 lbf·ft (62 N·m , 6.3 kgf·m)
90
Wheels
Servicing Your Honda
Take care to prevent getting grease, oil, or dirton the brake shoe surfaces. This can cause poorbrake performance or rapid brake shoe wearafter reassembly.
InstallationReverse the removal procedure. Make surethe lug ( ) on the fork leg is located in theslot ( ) in the brake panel.
Check front brake adjustment (page ).
If a torque wrench was not used to install thewheel, see your Honda dealer as soon aspossible to verify proper assembly. Improperassembly may lead to loss of braking capacity.
Torque the front axle shaft to:2.
1.5
3.
6
82
03/06/18 11:05:32 31KSJ600_099

RIGHT REAR
(1) adjuster(2) brake rod(3) brake arm
(1)
(5)
(3)
(2)
(4)
(4) adjusting nut(5) rear axle nut
91
Rear Wheel Removal
Wheels
Servicing Your Honda
RemovalRaise the rear wheel off the ground byplacing a maintenance stand or support blockunder the engine. Secure the front of themotorcycle with tie-down straps.Unscrew the rear brake adjuster ( ). Pressthe rear brake pedal and disconnect the brakerod ( ) from the brake arm ( ).Loosen the adjusting nut ( ) on the chainadjuster on both sides.
Take care to prevent getting grease, oil, ordirt on the brake shoe surfaces. This cancause poor brake performance or rapid brakeshoe wear after reassembly.
Unscrew the rear axle nut ( ). Pull the rearaxle shaft out. Push the wheel forward andderail the drive chain from the rear sprocket.Remove the wheel.
1.
2.
3.
4.
1
324
5
03/06/18 11:05:41 31KSJ600_100

46 lbf·ft (62 N·m , 6.3 kgf·m)
RIGHTREAR
(6)
(7)
(8)
(6) lug(7) slot(8) brake panel
92
Wheels
Servicing Your Honda
InstallationReverse the removal procedure. Make surethe lug ( ) on the swingarm is located in theslot ( ) in the brake panel ( ). Check thatthe chain adjusters are installed properly.Adjust the drive chain (page ).
Adjust the rear brake (page ).Apply the rear brake, release it, then spin thewheel and check that it rotates freely. Repeatthis procedure several times.
If a torque wrench was not used to install thewheel, see your Honda dealer as soon aspossible to verify proper assembly. Improperassembly may lead to loss of braking capacity.
Torque the rear axle shaft nut to:2.3.
4.
1
5
67 8
84
101
03/06/18 11:05:51 31KSJ600_101

Using tires that are excessively wornor improperly inflated can cause acrash in which you can be seriouslyhurt or killed.
Follow all instructions in this owner’smanual regarding tire inflation andmaintenance.
93
Air Pressure
Tires & Tubes
Servicing Your Honda
Saf ety Precautions
To safely operate your motorcycle, the tiresmust be the proper type (off-road) and size, ingood condition with adequate tread, andcorrectly inflated.
Refer to on page .
The following pages give detailed informationon how and when to check your air pressure,how to inspect your tires for wear and damage,
and our recommendations on tire repair andreplacement.
Make sure the valve stem caps are secure. Ifnecessary, install a new cap.
Properly inflated tires provide the bestcombination of handling, tread life, and ridingcomfort. Generally, underinflated tires wearunevenly, adversely affect handling, and aremore likely to fail from being overheated.Underinflated tires can also cause wheeldamage in rocky terrain. Overinflated tiresmake your motorcycle ride more harshly, aremore prone to damage from surface hazards,and wear unevenly.
45
03/06/18 11:05:58 31KSJ600_102

--
15 psi (100 kPa , 1.0 kgf/cm )15 psi (100 kPa , 1.0 kgf/cm )
FrontRear
(1)
(2)
(3)
(1) tire tread depth(2) spoke nut(3) rim lock nut
94
Inspection
Tires & Tubes
Servicing Your Honda
Always check air pressure when your tires are‘‘cold.’’ If you check air pressure when yourtires are ‘‘warm’’ even if your motorcyclehas only been ridden for a few miles thereadings will be higher. If you let air out ofwarm tires to match the recommended coldpressures, the tires will be underinflated.The correct ‘‘cold’’ tire pressures are:
A flat tire or blowout is inconvenient and mayeven cause an accident. Take time to inspectyour tires and wheels before you ride. For moreinformation about handling flat tires, seepage .
If you decide to adjust tire pressures for aparticular riding condition, make changes alittle at a time.
122
03/06/18 11:06:06 31KSJ600_103

95
Tube Replacement
Tires & Tubes
Servicing Your Honda
If a tube is punctured or damaged, you shouldreplace it as soon as possible. A repaired tubemay not have the same reliability as a new one,and it may fail while you are riding. Forinformation on making a temporary repair, seepage .
Use a replacement tube equivalent to theoriginal.
We recommend that tubes be replaced by yourHonda dealer. Replacing a tube requiresremoving and reinstalling the wheel. Any timea tube is replaced, carefully inspect the tire asdescribed on page .
Inspect carefully for bumps or bulges in theside of the tire or the tread. Replace any tirethat has a bump or bulge.Look closely for cuts, slits, or cracks in thetires. Replace a tire if you can see fabric orcord.Check for rocks or other objects embeddedin the tire or tread. Remove any objects.
Check the position of both valve stems. Atilted valve stem indicates the tube isslipping inside the tire or the tire is slippingon the rim. See your Honda dealer.
Measure tread depth ( ). Replace the tirebefore depth at the center reaches 0.12 in (3mm), or any time you notice a reduction intraction.
1 122
94
03/06/18 11:06:15 31KSJ600_104

--
70/100 19M/C 42M90/100 16M/C 51M
FrontRear
Installing improper tires on yourmotorcycle can affect handling andstability. This can cause a crash inwhich you can be seriously hurt orkilled.
Always use the size and type of tiresrecommended in this owner’s manual.
96
Tire Replacement
Tires & Tubes
Servicing Your Honda
The tires that came on your motorcycle weredesigned to provide a good combination ofhandling, braking, durability, and comfortacross a broad range of riding conditions.
Use a replacement tire equivalent to theoriginal.Replace the tube any time you replace a tire.The old tube will probably be stretched and,if installed in a new tire, could fail.Have the wheel balanced after a new tire isinstalled.We recommend that tires be replaced byyour Honda dealer.
03/06/18 11:06:23 31KSJ600_105

(1)
LEFT SIDE
(1) side stand spring
97
Side Stand
Servicing Your Honda
Saf ety PrecautionsRefer to on page . Check the side stand spring ( ) for damageand loss of tension.Check the side stand assembly for freedomof movement.
If the side stand is stiff or squeaky, clean thepivot area and lubricate the pivot bolt withclean engine oil.
1.
2.
145
03/06/18 11:06:29 31KSJ600_106

- -1 1 3/8 in (25 35 mm)
(1)
(1) drive chain
LEFT SIDE
98
Inspection
Drive Chain
Servicing Your Honda
Saf ety PrecautionsRefer to on page .
The service life of the chain depends on properlubrication and adjustment. Poor maintenancecan cause premature wear or damage to thedrive chain or sprockets.
Under severe usage, or when the motorcycle isridden in unusually dusty or muddy areas, morefrequent maintenance will be necessary.
Before servicing your drive chain, turn theengine OFF, lower the side stand, and checkthat your transmission is in neutral.
It is not necessary to remove or replace thedrive chain to perform the recommendedservice in the Maintenance Schedule. Check slack in the lower drive chain ( ) run
midway between the sprockets. Drive chainslack should allow the following verticalmovement by hand:
1. 1
45
03/06/18 11:06:40 31KSJ600_107

0.2 in (6 mm)
(3)
(2)
(4)
(2) chain slider(3) upper slider
(4) lower slider
LEFT SIDE
99
Drive Chain
Servicing Your Honda
Excessive chain slack may allow the drivechain to damage the engine cases.
Check drive chain slack at several pointsalong the chain. The slack should remainconstant. If it isn’t, some links may bekinked and binding. Lubricating the chainwill often eliminate binding and kinking.
Replace the drive chain (page ) if it hasdamaged rollers, loose pins, or kinks thatcannot be freed. Lubricate the drive chain(page ) if it appears dry or shows signs
of rust. Lubricate any kinked or bindinglinks and work them free. Adjust chain slackif needed.
damaged rollersloose pinsdry or rusted linkskinked or binding linksexcessive wear
Inspect the drive chain for:
Check the chain slider ( ) for wear. If thedepth of the groove in the slider exceeds thedepth limit, have your Honda dealer replacethe chain slider.Chain slider depth limit:
2.
3.
4. 2
103
102
03/06/18 11:06:51 31KSJ600_108

58.5 in (1,486 mm)59.7 in (1,516 mm)
Measure a span of 117 pins
100
Drive Chain
Servicing Your Honda
Replace the drive chain if chain slack isexcessive when the rear axle is moved to thefarthest limit of adjustment. Excessive slackindicates the chain is worn beyond its servicelimit.To check the chain’s service limit, removethe drive chain (page ). Then measurethe distance between a span of pins,from pin center to pin center. If the distanceexceeds the service limit, the drive chain isworn out and should be replaced.
5.
New Chain:Service Limit:
117103
03/06/18 11:06:58 31KSJ600_109

(3)
(4)
(1)
Damaged SprocketTeeth
Worn SprocketTeeth
REPLACE
Normal Sprocket TeethGOOD
REPLACE
LEFT SIDE
(2)
(1) rear axle nut(2) adjusting nut(3) adjuster index mark(4) graduated scale
101
Adjustment
Drive Chain
Servicing Your Honda
Use of a new chain with worn sprockets willcause rapid chain wear.
Inspect the front and rear sprocket teeth forexcessive wear or damage. If necessary, haveyour Honda dealer replace a worn sprocket.
Loosen the rear axle nut ( ).Turn the adjusting nuts ( ) on the right andleft chain adjusters an equal number of turnsto increase or decrease chain slack.
1.2.
6.
12
03/06/18 11:07:08 31KSJ600_110

46 lbf·ft (62 N·m , 6.3 kgf·m)
102
Lubrication
Drive Chain
Servicing Your Honda
Lubricate every 300 miles (500 km) or soonerif chain appears dry.
Align the chain adjuster index marks ( )with the graduated scales ( ) on both sidesof the swingarm.Torque the rear axle nut to:
Turn the rear wheel by hand. Saturate eachchain link joint so that the lubricant penetratesbetween the link plates, pins, bushings, androllers.
Recheck drive chain slack.Check rear brake pedal freeplay and adjustas necessary (page ). Freeplay is affectedwhen repositioning the rear wheel to adjustdrive chain slack.
If a torque wrench is not used for thisinstallation, see your Honda dealer as soon aspossible to verify proper assembly.
3.
4.
5.6.
43
84
03/06/18 11:07:20 31KSJ600_111

--
(1)
(1) master link retaining clip
LEFT SIDE
103
Removal, Cleaning & Replacement
Drive Chain
Servicing Your Honda
When the drive chain becomes extremely dirty,it should be removed and cleaned prior tolubrication.
Remove the master link retaining clip ( )with pliers. Do not bend or twist the clip.Remove the master link. Remove the drivechain.
Inspect the drive chain for possible wear ordamage. Replace the drive chain if it hasdamaged rollers, loose fitting links, orotherwise appears unserviceable.
Clean the drive chain with a non-flammable(high flash point) solvent such as kerosenenot gasoline and allow it to dry.
2.
1.
3.
1
03/06/18 11:07:29 31KSJ600_112

104
More About: Drive Chain
Drive Chain
Servicing Your Honda
The master link is the most critical elementof drive chain security. Master links arereusable, as long as they remain in excellentcondition. We recommend installing a newmaster link retaining clip when the drivechain is reassembled.You may find it easier to install a new chainby connecting it to the old chain with amaster link and pulling the old chain toposition the new chain on the sprockets.
Inspect the sprocket teeth for wear ordamage. We recommend replacing thesprocket whenever a new chain is installed.Lubricate the drive chain.Pass the chain over the sprockets and join theends of the chain with the master link. Forease of assembly, hold the chain ends againstadjacent rear sprocket teeth while insertingthe master link. Install the master linkretaining clip so that the closed end of theretaining clip will face the direction offorward wheel rotation.
4.
5.6.
03/06/18 11:07:37 31KSJ600_113

----
105
General Recommendations
Appearance Care
Servicing Your Honda
Saf ety PrecautionsRefer to on page .
Frequent cleaning and polishing will keep yourHonda looking newer longer. Frequentcleaning also identifies you as an owner whovalues your motorcycle. A clean motorcycle isalso easier to inspect and service.
While you’re cleaning, be sure to look fordamage, wear, and gasoline or oil leaks.
To clean your motorcycle, you may use:watera mild, neutral detergent and watera mild spray and wipe cleaner/polishera mild spray and rinse cleaner/degreaserand water
Avoid products that contain harsh detergentsor chemical solvents that could damage themetal, paint, and plastic on your motorcycle.If your motorcycle is still warm from recentoperation, give the engine and exhaustsystem time to cool off.
45
03/06/18 11:07:45 31KSJ600_114

106
Washing Your Motorcycle with a MildDetergent
Appearance Care
Servicing Your Honda
High pressure water (or air) can damagecertain parts of your motorcycle.
We recommend the use of a garden hose towash your motorcycle. High pressurewashers (like those at coin-operated carwashes) can damage certain parts of yourmotorcycle. If you use a high pressurewasher, avoid spraying the following areas:
wheel hubsmuffler outletarea under seatengine stop buttonunder fuel tankdrive chaincarburetor
Rinse your motorcycle thoroughly with coolwater to remove loose dirt.Fill a bucket with cool water. Mix in a mild,neutral detergent, such as dish washingliquid or a product made especially forwashing motorcycles or automobiles.Wash your motorcycle with a sponge or asoft towel. As you wash, check for heavygrime. If necessary, use a mild cleaner/degreaser to remove the grime.After washing, rinse your motorcyclethoroughly with plenty of clean water toremove any residue.Dry your motorcycle with a chamois or asoft towel.
1.
2.
3.
4.
5.
03/06/18 11:07:59 31KSJ600_115

107
Appearance Care
Servicing Your Honda
Lubricate the drive chain to prevent rusting.Start the engine and let it idle for severalminutes. The engine heat will help dry moistareas.As a precaution, ride at a slow speed andapply the brakes several times. This will helpdry the brakes and restore normal brakingperformance.
6.7.
8.
03/06/18 11:08:05 31KSJ600_116

108 Servicing Your Honda
03/06/18 11:08:08 31KSJ600_117

109Tips
Tips
Here’s helpful advice on how to prepare for anoff-road adventure, how to transport and storeyour Honda, and how to be an environmentallyresponsible motorcycle owner.
.....................................Preparing for a Ride .110............................Transporting Your Honda .112
.....................................Storing Your Honda .114...............................You & the Environment .117
03/06/18 11:08:12 31KSJ600_118

110
Preparing for a Ride
Tips
What to Take to the Riding Area
TakingCare of the Unexpected,
A safe and enjoyable ride begins with goodplanning and preparation. Always ride with atleast one other person in case you have trouble,and let someone know where you’re going andwhen you expect to return.
Before riding in an unfamiliar area, find out inadvance if you need special permits, get mapsso you can study the terrain, and talk to otherriders who know the area. The Forest Serviceand the Bureau of Land Management (USAonly), the Ministry of Natural Resources(Canada only), riding clubs, and off-roadmagazines are good sources of information.
We recommend that you always take water,food, a first aid kit, and your owner’s manual.Other items you should consider loading onyour truck or trailer include:
a tool kittire repair supplies and tools, tubes, and tiresextra parts, such as a drive chain and masterlinks, control levers, cables, and spark plugswire, duct tape, and ropeextra gasoline
Along with your motorcycle and riding gear,you should take along some tools and suppliesin case you have a problem. For some of thedifficulties you might encounter, see
which begins on page.119
03/06/18 11:08:22 31KSJ600_119

111
Preparing for a Ride
Tips
What to Take on the Trail
For safety, all refueling should be done at a gasstation on the way to the riding area or at yourbase camp.
What you take with you during a ride dependson the kind of terrain, how long you expect toride, how far you might go from your basecamp or help, and how experienced you or yourcompanions are in making repairs.
If you decide to take some tools, spare parts, orother supplies on the trail, be sure you cancarry them safely and know how to use them.Also, be sure to follow the loading guidelinesand weight limit (page ).9
03/06/18 11:08:28 31KSJ600_120

112
Transporting Your Honda
Tips
If you use a truck or motorcycle trailer totransport your Honda, we recommend that youfollow these guidelines:
To secure your motorcycle, brace the frontwheel against the front of the truck bed ortrailer rail. Attach the lower ends of two strapsto the tie-down hooks on your vehicle. Attachthe upper ends of the straps to the handlebar(one on the right side, the other on the left),close to the fork.
Use a loading ramp.Make sure the fuel valve is off.Secure the motorcycle in an upright position,using motorcycle tie-down straps. Avoidusing rope, which can loosen and allow themotorcycle to fall over.
03/06/18 11:08:36 31KSJ600_121

113
Transporting Your Honda
Tips
Check that the tie-down straps do not contactany control cables or electrical wiring.
Tighten both straps until the front suspension iscompressed about half-way. Too muchpressure is unnecessary and could damage thefork seals.
Use another tie-down strap to keep the rear ofthe motorcycle from moving.
We recommend that you do not transport yourmotorcycle on its side. This can damage themotorcycle, and leaking gasoline could be ahazard.
03/06/18 11:08:42 31KSJ600_122

114
Storing Your Honda
Tips
Honda Motorcycle Winter Storage Guide,If you won’t be riding for an extended period,such as during the winter, thoroughly inspectyour motorcycle and correct any problembefore storing it. That way, needed repairswon’t be forgotten and it will be easier to getyour motorcycle running again.
For more information about storage, refer totheavailable from your Honda dealer (USA only).
We suggest you perform the followingprocedures to keep your motorcycle in topcondition. These storage procedures will reducethe deterioration that can occur during storage.
03/06/18 11:08:47 31KSJ600_123

Gasoline is highly flammable andexplosive. You can be burned orseriously injured when handling fuel.
Stop the engine and keep heat,sparks and flame away.Handle fuel only outdoors.Wipe up spills immediately.
115
Preparation for Storage
Storing Your Honda
Tips
Change the engine oil (page ).
Drain the carburetor into an approvedgasoline container and dispose of it in anapproved manner (page ). If storage willlast longer than one month, carburetordraining is important, to assure properperformance after storage.
Check that the fuel valve is OFF.
Fill the fuel tank. Make sure the fuel fill capis properly installed.
1.2.
3.
4.
11763
03/06/18 11:08:54 31KSJ600_124

-
-
116
Removal from Storage
Storing Your Honda
Tips
Uncover and clean your motorcycle.
If your motorcycle has been stored for morethan two months drain and replace the fuel.
If your motorcycle has been stored for morethan four months change the engine oil(page ).
Lubricate the drive chain.Perform a pre-ride inspection (page ),then test-ride your motorcycle at low speeds.
Cover your motorcycle with a porousmaterial. Avoid using plastic or similar non-breathing, coated materials that restrict airflow and allow heat and moisture toaccumulate.
Store your motorcycle in an unheated area,free of dampness, away from sunlight, witha minimum of daily temperature variation.
Inflate the tires to their recommendedpressures (page ).
Lubricate the drive chain.Wash and dry your motorcycle.
6.7.
8.
9.
1.2.
3.
4.5.
5.
27
94
63
03/06/18 11:09:06 31KSJ600_125

117
Tread Lightly.
Keep the Noise Down.
Choose Sensible Cleaners.
You & the Environment
Tips
Owning and riding a motorcycle can beenjoyable, but you must do your part to protectnature. When you show respect for the land,wildlife, and other people, you also helppreserve the sport of off-road riding.
Following are tips on how you can be anenvironmentally-responsible motorcycle owner.
Stay on existing roads andtrails, avoid surfaces that are easily damaged,and ride only in areas approved for off-roadvehicles.
Loud motorcyclescan be offensive. Ride as quietly as possible,don’t remove your spark arrester, and don’tmodify the muffler or any other part of yourair intake and exhaust systems. Suchmodifications not only increase noise, theyalso reduce engine performance and may beillegal.
Use abiodegradeable detergent when you washyour motorcycle. Avoid aerosol spraycleaners that contain chloroflurocarbons(CFCs) which damage the atmosphere’sprotective ozone layer. Don’t throw cleaningsolvents away; see the following guidelinesfor proper disposal.
03/06/18 11:09:12 31KSJ600_126

118
Recycle Wastes.
You & the Environment
Tips
It’s illegal and thoughtlessto put used engine oil in the trash, down adrain, or on the ground. Used oil, gasoline,and cleaning solvents contain poisons thatcan hurt refuse workers and contaminate ourdrinking water, lakes, rivers, and oceans.Before changing your oil, make sure youhave the proper containers. Put oil and othertoxic wastes in separate sealed containersand take them to a recycling center. Callyour local or state office of public works orenvironmental services to find a recyclingcenter in your area and get instructions onhow to dispose of non-recyclable wastes.
03/06/18 11:09:17 31KSJ600_127

119
Taking Care of the Unexpected
Taking Care of the Unexpected
Preparing f ora Ride
With all the challenges you can encounter off-road, there’s a chance that sometime somethingmay go wrong. This section gives practicaladvice to help you deal with a wide range ofproblems. Take time to read this section beforeyou ride. Also review the tips in
(page ).
.......................................General Guidelines .120...........If Your Engine Quits or Won’t Start .121
................................If You Have a Flat Tire .122.................................................If You Crash .123
.................................If You Lose Your Key .124...................................If a Component Fails .125
110
03/06/18 11:09:22 31KSJ600_128

-
-
120
General Guidelines
Taking Care of the Unexpected
Taking Care of the Unexpected
If something goes wrong during a ride, the firstthing to do is stop as soon as you safely can.Do not continue riding if you have a flat tire, oryou hear an unusual noise, or your motorcyclejust doesn’t feel right. If you continue riding,you could cause more damage and endangeryour own safety.
After a stop, take time to assess the situation.Carefully inspect your motorcycle to identifythe problem, then consider your options beforeyou decide what to do.
Whatever the problem, the most important rulesare:
If a problem is relatively minor and you havethe tools, supplies, and skills to make apermanent repair, you may be able to fix it onthe trail and continue riding. Or, you may beable to make a temporary repair that allows youto slowly ride back to your base where you canmake a permanent repair or get help.
When a problem is more serious or you don’thave the tools, supplies, experience, or time todeal with it you need to choose the safest wayto get yourself and your motorcycle back tobase. For example, if you are close enough,you (or you and another person) might be ableto push it back.
Always put personal safety first.
03/06/18 11:09:30 31KSJ600_129
121
If Your Engine Quits or Won’t Start
Taking Care of the Unexpected
Taking Care of the Unexpected
The next area to check is the fuel system:If the problem is relatively minor and youhave the tools, supplies, and skills to make atemporary repair, be sure to have permanentrepairs made as soon as possible.Do not continue riding if you are hurt oryour motorcycle is not in safe ridingcondition.
Additional recommendations for specificproblems follow.
If the engine wasn’t making any unusual noisesbefore it quit running, and it feels normal whenyou operate the kickstarter, you can probablyrule out a major mechanical problem.
Make sure there is enough gas in the tankand the fuel valve is at the ON or RESERVEposition.Check the fuel fill cap vent tube to see if it ispinched or obstructed.Turn the fuel valve OFF, disconnect the fuelline that goes from the fuel valve to thecarburetor, then momentarily turn the fuelvalve ON. If fuel does not flow out, there isan obstruction in the fuel tank or the fuelvalve.
03/06/18 11:09:38 31KSJ600_130

122
If You Have a Flat Tire
Taking Care of the Unexpected
Taking Care of the Unexpected
How you handle a flat tire on the trail dependson how serious the tube or tire damage is, andwhat tools and supplies you have with you.
If you have a slow leak or a minor puncture,there are two ways to try making a temporaryrepair:
Use a tube patch kit to repair the puncture.(This requires removing the tire.)
Use an aerosol tire sealer to seal the punctureand inflate the tube. (This can be donewithout removing the tire or wheel.)
If the fuel system appears to be okay, check theignition system (this requires a spark plugwrench):
If you cannot identify or correct the problem,you will have to push your motorcycle back toyour base or get some help.
Operate the kickstarter while you watch thespark plug. If it sparks, the ignition system isprobably working. If there is no spark, installa new spark plug, if you have one with you.If there is still no spark, there is a problem inthe ignition system.
Disconnect the spark plug cap and removethe spark plug. Connect the spark plug cap tothe spark plug and ground the threadedportion of the spark plug on the cylinderhead.
Check that the spark plug cap isn’t loose ordisconnected.
03/06/18 11:09:48 31KSJ600_131

123
If You Crash
Taking Care of the Unexpected
Taking Care of the Unexpected
If you are unable to repair a flat tire on the trail,you will need to push the motorcycle back toyour base or send for help. We stronglyrecommend that you do not try to ride with aflat tire. The motorcycle will be hard to handle,and if the tire comes off the rim, it may lock upthe wheel and cause you to crash.
Personal safety is your first priority after anaccident. If you or anyone else has been injured,take time to assess the severity of the injuriesand whether it is safe to continue riding. If youcannot ride safely, send someone for help. Donot ride if you will risk further injury.
If you decide you are capable of riding safely,carefully inspect your motorcycle for damageand determine if it is safe to ride. Check thetightness of critical nuts and bolts securingsuch parts as the handlebar, control levers,brakes, and wheels.
(cont’d)
If the leak is more serious, or a temporaryrepair doesn’t hold, the tube must be replaced.The tire will also need to be replaced if it isdamaged (page ). Replacing a tube or tireinvolves removing and re-installing the wheel(pages , ).
95
89 91
03/06/18 11:09:55 31KSJ600_132

124
Taking Care of the Unexpected
Taking Care of the Unexpected
If You Lose Your Key
QuickRef erence
If there is minor damage, or you are unsureabout possible damage but decide to try ridingthe motorcycle back to your base, ride slowlyand cautiously.
Sometimes, crash damage is hidden or notimmediately apparent. When you get home,thoroughly check your motorcycle and correctany problems you find. Also, be sure to haveyour Honda dealer check the frame andsuspension after any serious crash.
Be sure to record your key number in thesection at the rear of the manual.
You’ll need this number to have a duplicatekey made.
If you lose your key and aren’t carrying aduplicate, either get your spare or have onemade. If you don’t know your key number, callthe dealer you purchased your Honda from.They may have it listed in their records. If theydon’t, transport your motorcycle to them or thenearest Honda dealer. The dealer will probablyhave to remove the ignition switch assembly tofind the key number so they can make a key foryou.
03/06/18 11:10:01 31KSJ600_133

125
If a Component Fails
Taking Care of the Unexpected
Taking Care of the Unexpected
If you damage a throttle cable or othercritical component, your motorcycle may beunsafe to ride. Carefully assess the damageand make any repairs that you can. But ifthere is any doubt, it’s best to beconservative and safe.
If the clutch lever breaks, you may be able totemporarily switch the front brake lever tothe clutch side, then ride carefully back tobase using the rear brake for slowing orstopping.
If any component of the front brake systemis damaged, you may be able to ridecarefully back to your base using the rearbrake for slowing or stopping.The drive chain, master link, brake lever or
pedal, control cables, and other componentscan be damaged as you ride in dense brush orover rocky terrain. Making a trailside repairdepends on how serious the damage is andwhat tools and supplies you have with you.
If the drive chain comes off because themaster link clip gets knocked off, you maybe able to put the chain back on with a newmaster link. However, if the chain breaks ordoes other damage when it comes off, youmay not be able to make a trailside repair.
03/06/18 11:10:08 31KSJ600_134

126 Taking Care of the Unexpected
03/06/18 11:10:10 31KSJ600_135

127
Technical Information
Technical Information
This section contains dimensions, capacities,and other technical data, plus information ongovernment requirements and how to break-inyour motorcycle.
..................................Vehicle Identification .128...............................................Specifications .130
.....................................Break-in Guidelines .135.........High Altitude Carburetor Adjustment .136
...........................Emission Control Systems .137.........................................Oxygenated Fuels .141
03/06/18 11:10:15 31KSJ600_136

(2) engine number
(1)
(2)
(1) frame number
128
Vehicle Identification
Serial Numbers
Technical Information
Quick Ref erence
The frame and engine serial numbers arerequired when you register your motorcycle.They may also be required when orderingreplacement parts. You may record thesenumbers in the section at therear of the manual.
The engine number ( ) is stamped on the leftside of the engine.
The frame number ( ) is stamped on the leftside of the steering head.
1
2
03/06/18 11:10:22 31KSJ600_137

(1)
(1) color label
129
Vehicle Identification
Color Label & Code
Technical Information
Quick Ref erence
The color code is helpful when orderingreplacement parts. You may record the colorand code in the section at therear of the manual.
The color label ( ) is attached to the framebehind the left side cover (page ).
155
03/06/18 11:10:28 31KSJ600_138

after draining:
after disassembly:
including reserve
unleaded gasoline,pump octanenumber of 86 orhigher
73.0 in (1,853 mm)30.9 in (786 mm)41.2 in (1,046 mm)49.2 in (1,249 mm)
165 lbs (75 kg)
1.45 US gal (5.5 )
0.29 US gal (1.1 )
1.0 US qt (0.9 )
1.2 US qt (1.1 )
Fuel tank capacity
Fuel tank reserve
Fuelrecommendation
Engine oil capacity
Overall lengthOverall widthOverall heightWheelbase
Dry weight
Dimensions
Weight
Fuel & Lubricants
130
Specifications
Technical Information
03/06/18 11:10:41 31KSJ600_139

××
Pro Honda ChainLube or anequivalent, or SAE80 or 90 gear oil
9.4 : 1
2.09 1.77 in(53 45 mm)
6.05 cu-in (99.2 cm )
none
220 lbs (100 kg)
operator only;no passenger
Pro Honda (USAonly) or Honda(Canada only) FoamFilter Oil or anequivalent
API ServiceClassification SG orhigher except oilslabeled as energyconserving on thecircular API servicelabel, SAE 10W-40,JASO T 903 standardMA,Pro Honda GN4 or HP4(without molybdenumadditives) 4-stroke oil(USA & Canada) orHonda 4-stroke oil(Canada only), or anequivalent motorcycleoil
Air cleaner oil
DisplacementBore & stroke
Compression ratio
PassengercapacityMaximum weightcapacityCargo capacity
Engine oilrecommendation
Drive chainlubricant
Fuel & Lubricants
Engine Specifications
Capacities
Fuel & Lubricants
131
Specifications
Technical Information
03/06/18 11:10:52 31KSJ600_140

±
--
CR7HSA (NGK)
4.4373.0831.8821.4001.1300.9233.571
U22FSR-U (DENSO)
U20FSR-U (DENSO)
CR8HSA (NGK)U24FSR-U (DENSO)
1,400 100 rpm
CR6HSA (NGK) chain
0.002 in(0.05 mm)0.002 in(0.05 mm)
0.02 0.03 in(0.6 0.7 mm)
or
or
Intake:
Exhaust:
or
Valve clearance(cold)
Spark plug(standard)
Spark plug(cold climate;below 5°C, 41°F)Spark plug(extended highspeed riding)Spark plug gap
Idle speed
Primary reductionGear ratio, 1st2nd3rd4th5thFinal reductionFinal drive
Power TransmissionEngine Specifications
132
Specifications
Technical Information
03/06/18 11:11:05 31KSJ600_141

--
- - 28° 50’
70/100 19M/C 42M90/100 16M/C 51Mdistance between a
span of 117 pins
axle travel
distance between aspan of 117 pins
58.5 in (1,486 mm)
59.7 in (1,516 mm)
3.9 in (99 mm)
15 psi (100 kPa , 1.0kgf/cm )15 psi (100 kPa , 1.0 kgf/cm )5.2 in (132 mm)
5.8 in (148 mm)
1 1 3/8 in (25 35mm)
axle travel
CasterTrailTire size, frontTire size, rearTire pressure, front(cold)Tire pressure, rear(cold)Suspension, front
Suspension, rear
Drive chainfreeplayNew chain length
Used chain servicelimit length
Power Transmission Chassis & Suspension
133
Specifications
Technical Information
03/06/18 11:11:18 31KSJ600_142

18 lbf·ft (25 N·m , 2.5kgf·m)
46 lbf·ft (62 N·m , 6.3kgf·m)
Oil drain bolt
Wheel axles
Torque Specifications
134
Specifications
Technical Information
03/06/18 11:11:22 31KSJ600_143

135
Break-in Guidelines
Technical Information
Help assure your motorcycle’s future reliabilityand performance by paying extra attention tohow you ride during the first operating day or15 miles (25 km).During this period, avoid full-throttle starts andrapid acceleration.
03/06/18 11:11:26 31KSJ600_144

136
High Altitude Carburetor Adjustment
Technical Information
Sustained operation at altitudes below 5,000f eet (1,500 m) with high altitude carburetormodif ications may cause engine overheatingand damage.
When operating this motorcycle at high altitude,the air-fuel mixture becomes overly rich.Above 6,500 feet (2,000 m), driveability andperformance may be reduced and fuelconsumption increased. The carburetor can bemodified to compensate for this high altituderichness.However, the carburetor must be returned tostandard factory specifications when loweraltitude riding is desired. See your Hondadealer for high altitude modification.
03/06/18 11:11:31 31KSJ600_145

(1)
(1) vehicle emission controlinformation label
137
Exhaust Emission Requirements
Noise Emission Requirements
Warranty Compliance
Emission Control Systems
Technical Information
The California Air Resources Board (CARB)requires that your motorcycle comply withapplicable exhaust emissions standards duringits useful life, when operated and maintainedaccording to the instructions provided.(California only)
The EPA also requires that motorcycles builtafter January 1, 1983 comply with applicablenoise emission standards for one year or 1,865miles (3,000 km) after the time of sale to theultimate purchaser, when operated andmaintained according to the instructionsprovided. (USA only)
Compliance with the terms of the Distributor’sWarranties for Honda Motorcycle EmissionControl Systems is necessary in order to keep
the emissions system warranty in effect. (USAonly)
The Vehicle Emission Control InformationLabel ( ) is attached to the inside of the leftfuel tank shroud.
1
03/06/18 11:11:37 31KSJ600_146

138
Source of Emissions
Exhaust Emission Control System
Crankcase Emission Control System
Emission Control Systems
Technical Information
The combustion process produces carbonmonoxide and hydrocarbons. Control ofhydrocarbons is very important because undercertain conditions, they react to formphotochemical smog when subjected tosunlight. Carbon monoxide does not react inthe same way, but it is toxic.Honda Motor Co., Ltd. utilizes lean carburetorsettings and other systems to reduce carbonmonoxide and hydrocarbons.
The exhaust emission control system iscomposed of lean carburetor settings, and noadjustments should be made except idle speedadjustment with the throttle stop screw.The exhaust emission control system is separatefrom the crankcase emission control system.
The engine is equipped with a closed crankcasesystem to prevent discharging crankcaseemissions into the atmosphere.Blow-by gas is returned to the combustionchamber through the air cleaner and thecarburetor.
03/06/18 11:11:43 31KSJ600_147

139
Noise Emission Control System
Emission Control Systems
Technical Information
TAMPERING WITH THE NOISE CONTROLSYSTEM IS PROHIBITED: U. S. federal lawprohibits, or Canadian provincial laws mayprohibit the following acts or the causingthereof: (1) The removal or renderinginoperative by any person, other than forpurposes of maintenance, repair or replacement,of any device or element of designincorporated into any new vehicle for thepurpose of noise control prior to its sale ordelivery to the ultimate purchaser or while it isin use; or (2) the use of the vehicle after suchdevice or element of design has been removedor rendered inoperative by any person.
Removal of, or puncturing the muffler,baffles, header pipes, or any othercomponent which conducts exhaust gases.Removal of, or puncturing of any part of theintake system.Lack of proper maintenance.Replacing any moving parts of the vehicle,or parts of the exhaust or intake system, withparts other than those specified by themanufacturer.
AMONG THOSE ACTS PRESUMED TOCONSTITUTE TAMPERING ARE THEACTS LISTED BELOW:1.
2.
3.4.
03/06/18 11:11:48 31KSJ600_148

140
Problems that May Affect MotorcycleEmissions
Emission Control Systems
Technical Information
If you are aware of any of the followingsymptoms, have the vehicle inspected andrepaired by your Honda Motorcycle Dealer:
Hard starting or stalling after startingRough idleMisfiring or backfiring during accelerationAfter-burning (backfiring)Poor performance (driveability) and poorfuel economy
1.2.3.4.5.
03/06/18 11:11:52 31KSJ600_149
141
Oxygenated Fuels
Technical Information
Some conventional gasolines are being blendedwith alcohol or an ether compound. Thesegasolines are collectively referred to asoxygenated fuels. To meet clean air standards,some areas of the United States and Canada useoxygenated fuels to help reduce emissions.
ETHANOL (ethyl or grain alcohol) 10% byVolumeYou may use gasoline containing up to 10%ethanol by volume. Gasoline containing ethanolmay be marketed under the name ‘‘Gasohol’’.
If you use an oxygenated fuel, be sure it isunleaded and meets the minimum octane ratingrequirement.
Before using an oxygenated fuel, try toconfirm the fuel’s contents. Some states/provinces require this information to be postedon the pump.
The following are the EPA-approvedpercentages of oxygenates:
MTBE (Methyl Tertiary Butyl Ether) 15% byVolumeYou may use gasoline containing up to 15%MTBE by volume.
METHANOL (methyl or wood alcohol) 5% byVolumeYou may use gasoline containing methanolcontaining up to 5% methanol by volume aslong as it contains cosolvents and corrosioninhibitors to protect the fuel system. Gasolinecontaining more than 5% methanol by volumemay cause starting and/or performanceproblems. It may also damage metal, rubber,and plastic parts of your fuel system.
03/06/18 11:12:00 31KSJ600_150

142
Oxygenated Fuels
Technical Information
Oxygenated f uels can damage paint andplastic. Damage caused by spilled f uel is notcovered under warranty.
If you notice any undesirable operatingsymptoms, try another service station or switchto another brand of gasoline.
Fuel system damage or performance problemsresulting from the use of an oxygenated fuelcontaining more than the percentages ofoxygenates mentioned above are not coveredunder warranty.
Oxygenated fuels can damage paint and plastic.Be careful not to spill fuel when filling the fueltank. Wipe up any spills immediately.
03/06/18 11:12:06 31KSJ600_151

143
Consumer Information
Consumer Information
This section contains information on yourwarranty and how to get an official Hondaservice manual.
.....................................Authorized Manuals .144......................................Warranty Coverage .147
..........................................Warranty Service .148........................................Contacting Honda .149
..........The Honda Rider’s Club (USA only) .150......................................Your Honda Dealer .151
03/06/18 11:12:11 31KSJ600_152

*
*
$38.00$48.00$16.00
61KSJ0061CM00131KSJ600
2004 CRF80F/CRF100F Service ManualCommon Service Manual2004 CRF100F Owner’s Manual
Price EachDescriptionPublication Item No.
Prices are subject to change without notice and without incurr ing obligation.
144
Authorized Manuals
Consumer Information
The Service Manual (Publication Item No. ) used by your authorized Honda dealer isavailable from Helm, Inc. (USA only, Canada: See your Honda dealer to order authorized manuals.)
Also available, but not necessary, to service your model is the Honda Common Service Manual(Publication No. ), which explains theory of operation and basic service information forvarious systems common to all Honda motorcycles, motor scooters and ATVs.
These Honda manuals are written for the professional technician, but most mechanically-capableowners should find them easy to use if they have the proper tools and observe proper safetystandards. Special Honda tools are necessary for some procedures.
61CM001
61KSJ00
03/06/18 11:12:19 31KSJ600_153

*
*
- -
Prices are subject to change without notice and without incurringobligation.
Orders are mailed within 10 days. Please allow adequate time fordelivery.
PublicationItem No.
Item Description Qty. PriceEach
TotalPrice
Sub TotalMich. PurchasersAdd 6 % Sales TaxHandling ChargeGrand Total
$4.00
145
Order On-Line: www.helminc.com
Order Toll Free: 1-888-CYCLE93
OR
Consumer Information
(NOTE: For Credit Card Orders Only)
(1-888-292-5393)
Monday Friday 8:00 AM 6:00 PM EST
By completing this form you can order the materials desired. You can pay by check or money order,or charge to your credit card. Mail to Helm, Inc. at the address shown on the back of this order form(USA only).
Canada: See your Honda dealer to order authorized manuals.
03/06/18 11:12:29 31KSJ600_154

-
NOTE: Dealers and Companies please provide dealer or company name, and also the name of the person towhose attention the shipment should be sent.
AttentionCustomer Name
Apartment NumberStreet Address - No P. O. Box Number
Zip CodeStateCity
Daytime Telephone Number
Check or money order enclosed payable to Helm Inc.U.S. funds only. Do not send cash.
MasterCard
VISA
Discover
DateCustomer Signature
These Publications cannot be returned for credit without receiving advance authorization within 14 days of delivery. Onreturns, a restocking fee may be applied against the original order.
Check here if your billing address is differentfrom the shipping address shown above.
Expiration: Mo. Yr.Account Number
( )
P.O. BOX 07280, DETROIT, MICHIGAN 48207HELM
SHIP
TO
PAYMENT
146 Consumer Information
SHIP
TO
PAYMENT
03/06/18 11:12:44 31KSJ600_155

147
Warranty Coverage
Consumer Information
Your new Honda is covered by thesewarranties:
Your warranty coverage will not be voided ifyou choose to perform your own maintenance.However, you should have the proper tools andservice information and be mechanicallyqualified. Failures that occur due directly toimproper maintenance or lack of maintenanceare not covered.
Almost all of your warranty coverage can beextended through the Honda Protection Plan(USA only). For more information, see yourHonda dealer.
There are responsibilities, restrictions, andexclusions which apply to these warranties.Please read the Honda Motorcycle WarrantiesBooklet given to you by your Honda dealer atthe time of purchase. Be sure to keep yourHonda owner’s card (USA only) with yourWarranties Booklet.
Motorcycle Limited WarrantyNoise Control Warranty (USA only)
It is important to realize that your warranty foryour Honda applies to defects in material orfactory workmanship. Your warranty coveragedoes not apply to normal wear or deteriorationassociated with using the motorcycle.
03/06/18 11:12:51 31KSJ600_156

148
Warranty Service
Consumer Information
Please remember that recommendedmaintenance interval servicing is not includedin your warranty coverage. Additionally, yourwarranty does not apply to the normal wear ofitems (such as brakes, tires, etc.).
If you believe you have a problem with yourHonda, call the service department of yourHonda dealer. Make an appointment for aninspection and diagnosis. Remember, as theowner of the motorcycle, you will be asked toauthorize that inspection. Your dealer will giveyou the results of the inspection. If the problemis covered under warranty, your dealer willperform the warranty repairs for you.
If you have questions about warranty coverageor the nature of the repair, it is best to talk tothe service manager of your Honda dealer.
Sometimes, in spite of the best intentions of allconcerned, a misunderstanding may occur. Ifyou aren’t satisfied with your dealer’s handlingof the situation, we suggest you discuss yourproblem with the appropriate member of thedealership’s management team. If the problemhas already been reviewed with the ServiceManager, Parts Manager, Sales Manager, etc.,contact the Owner of the dealership or hisdesignated representative.
03/06/18 11:12:57 31KSJ600_157

149
Contacting Honda
Consumer Information
Your owner’s manual was written to covermost of the questions you might ask about yourHonda. Any questions not answered in theowner’s manual can be answered by yourHonda dealer. If he doesn’t have the answerright away, he will get it for you.
If you have a difference of opinion with yourdealer, please remember that each dealership isindependently owned and operated. That’s whyit’s important to work to resolve anydifferences at the dealership level.
If you wish to comment on your experienceswith your Honda or with your dealer, pleasesend your comments to the following address(USA only):
Motorcycle Division, American Honda MotorCo., Inc., P.O. Box 2220, Torrance, CA 90509-2220, mailstop: 100-4W-5B, telephone: (310)532-9811.
Canada: Refer to the warranty booklet that wassupplied with your vehicle.
Please include the following information inyour letter:
name, address, and telephone numberproduct model, year, and frame/VIN serialnumberdate of purchasedealer name and address
We will likely ask your Honda dealer torespond, or possibly acknowledge yourcomments directly.
03/06/18 11:13:05 31KSJ600_158

150
The Honda Rider’s Club (USA only)
Consumer Information
Honda Red Rider,
24-hr. emergency roadside assistance foryour Honda or transport vehicle.Transportation for your Honda or transportvehicle to the nearest Honda dealer orservice facility if roadside assistance can’tget you going again.Reimbursement (to $75) for motorcycle andscooter rider training from the MotorcycleSafety Foundation. Free ATV rider trainingis available from the Specialty VehicleInstitute of America with the purchase of anew Honda ATV.
A subscription to a bi-monthly insider’s magazine for all members.Special members-only HRCA website.Discounts from HRCA partners for both onand off-road riding schools and adventurepackages.Hospitality at national events.Optional insurance, club pin, patch, etc.Red Rider (MX) contingency and off-roadsupport at selected events.Computerized trip routing, color maps, andspecial travel packages.
Contact your Honda dealer for moreinformation or call: 1-800-847-HRCA. For acomplete list of all HRCA benefits and services,refer to your HRCA membership benefitsmanual or visit our website atwww.honda.com.
One of the best ways to get the most enjoymentfrom owning and riding your Honda is to jointhe Honda Rider’s Club of America (HRCA).Your purchase of a new motorcycle, scooter orATV from a participating Honda dealer entitlesyou to a complimentary one-year membership.The HRCA has hundreds of dealer-sponsoredchapters throughout the USA. Some of theHRCA membership benefits include:
03/06/18 11:13:16 31KSJ600_159

151
Your Honda Dealer
Consumer Information
Once you purchase your new Honda, getfamiliar with the organization of your Hondadealer so you can utilize the full range ofservices available.
The service department is there to performregular maintenance and unexpected repairs. Ithas the latest available service informationfrom Honda. The service department will alsohandle warranty inspections and repairs.
The parts department offers Genuine Hondaparts, Pro Honda products, Hondalineaccessories (USA only), and Honda accessoriesand products (Canada only). The same qualitythat went into your Honda can be found inGenuine Honda replacement parts. You’ll alsofind comparable quality in the accessories andproducts available from the parts department.
We’re sure you’ll be as pleased with the serviceyour Honda dealer continues to provide afterthe sale as you are with the quality anddependability of your Honda.
The sales department offers the HondaProtection Plan to extend almost all of yourwarranty coverage (USA only).
Your dealer can inform you about competitionand other riding events in your area. You’ll alsofind that your dealer is a source of information(USA only) about American Honda’s RiderEducation Centers and the Honda Rider’s Clubof America.
03/06/18 11:13:23 31KSJ600_160

?
?
152
...........................MOTORCYCLE SAFETY .1
........................OPERATING CONTROLS .13
.......................................BEFORE RIDING .23
..............BASIC OPERATION & RIDING .29
Table of Contents
Table of Contents
The following presents the contents of eachsection of your owner’s manual.
..........................Important Safety Information .2
..........................Important Message to Parents .5...........Loading, Accessories & Modifications .8
........................................................Loading .8.....................Accessories & Modifications .10
..................................................Safety Labels .12
....................................Component Locations .14......................................................Fuel Valve .17
...................................................Choke Lever .18...............................................Ignition Switch .19
........................................Engine Stop Button .20..........................................Front Brake Lever .20
...........................................................Throttle .20...................................................Clutch Lever .20
.....................................................Shift Lever .21............................................Rear Brake Pedal .21
......................................................Kickstarter .21
......................................................Side Stand .21
..............................Are You Ready to Ride .24.....................................Protective Apparel .24
............Is Your Motorcycle Ready to Ride .26.....................................Pre-ride Inspection .27
.................................Safe Riding Precautions .30.....................Starting & Stopping the Engine .31
.................................................Preparation .31......................................Starting Procedure .31
..........................................Flooded Engine .33.............................How to Stop the Engine .34
................................................Shifting Gears .35...........................................................Braking .37...........................................................Parking .39
.......................................Post-ride Inspection .40
03/06/18 11:13:28 31KSJ600_161

153
....................SERVICING YOUR HONDA .41
Table of Contents
Table of Contents
Bef ore You Service Your Honda
Service Preparations
Service Procedures
....................The Importance of Maintenance .43........................................Maintenance Safety .45
.....................Important Safety Precautions .45...................................Maintenance Schedule .47
......................................Maintenance Record .51
....................................Component Locations .52...............................................................Tools .54
......................................Side Cover Removal .55
Fluids & Filters.................................................................Fuel .56
......................................................Engine Oil .59.....................................................Air Cleaner .65
Engine...........................................................Throttle .68
................................................Clutch System .70..........................................Engine Idle Speed .74
......................................................Spark Plug .75................................................Spark Arrester .77
Chassis.....................................................Suspension .79
.............................................................Brakes .82............................................................Wheels .88
.................................................Tires & Tubes .93......................................................Side Stand .97....................................................Drive Chain .98
..........................................Appearance Care .105
03/06/18 11:13:32 31KSJ600_162
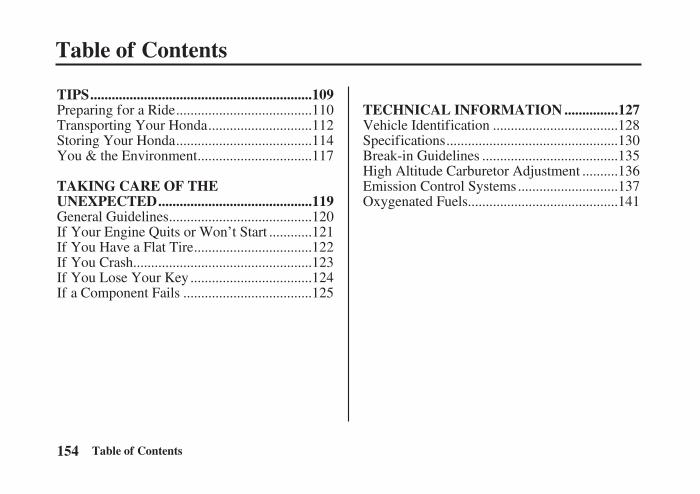
154
.............................................................TIPS .109
TAKING CARE OF THE..........................................UNEXPECTED .119
..............TECHNICAL INFORMATION .127
Table of Contents
Table of Contents
.....................................Preparing for a Ride .110............................Transporting Your Honda .112
.....................................Storing Your Honda .114...............................You & the Environment .117
.......................................General Guidelines .120...........If Your Engine Quits or Won’t Start .121
................................If You Have a Flat Tire .122.................................................If You Crash .123
.................................If You Lose Your Key .124...................................If a Component Fails .125
..................................Vehicle Identification .128...............................................Specifications .130
.....................................Break-in Guidelines .135.........High Altitude Carburetor Adjustment .136
...........................Emission Control Systems .137.........................................Oxygenated Fuels .141
03/06/18 11:13:36 31KSJ600_163

155
...............CONSUMER INFORMATION .143 ..........................TABLE OF CONTENTS .152
.........................................................INDEX .156
QUICK REFERENCE
Table of Contents
Table of Contents
.....................................Authorized Manuals .144......................................Warranty Coverage .147
..........................................Warranty Service .148........................................Contacting Honda .149
..........The Honda Rider’s Club (USA only) .150......................................Your Honda Dealer .151
03/06/18 11:13:41 31KSJ600_164

156
Index
Index
A
B
C
......................................................accessories .10.......................................................air cleaner .65
............................................air pressure, tires .93................................altering your motorcycle .11
.................................................arrester, spark .77
brakes,.......................cable inspection/lubrication .86
..................................................lever, front .20...................................................pedal, rear .21....................................................shoe wear .85
...........................................................braking .37.......................................break-in guidelines .135.........................................button, engine stop .20
..................................................capacity, fuel .57carburetor,
...........................high altitude adjustment .136....................................................idle speed .74.....................................................choke lever .18......................................................cleaner, air .65
............................cleaning, appearance care .105clutch system,
..................................................adjustment .70............................................................lever .20
.....................................................color label .129..................................consumer information .143
..........................................controls, operating .13........................................cover removal, side .55
...........................................customer service .149
03/06/18 11:13:46 31KSJ600_165
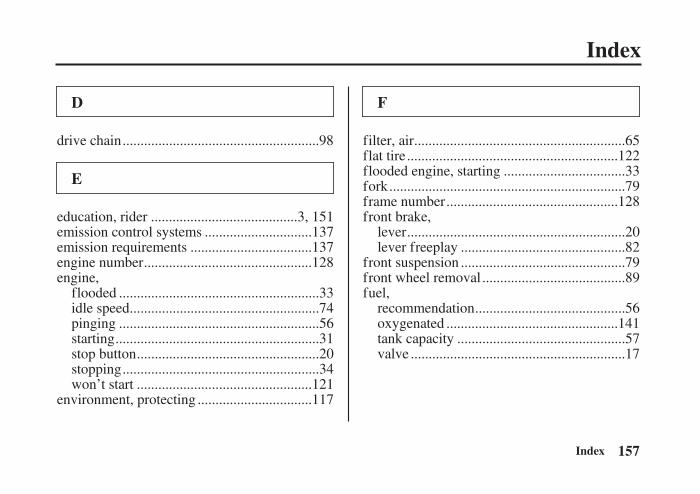
157
Index
Index
D
E
F
......................................................drive chain .98 ..........................................................filter, air .65..........................................................flat tire .122
.................................flooded engine, starting .33.................................................................fork .79
...............................................frame number .128front brake,
............................................................lever .20.............................................lever freeplay .82.............................................front suspension .79
.......................................front wheel removal .89fuel,
.........................................recommendation .56...............................................oxygenated .141
..............................................tank capacity .57...........................................................valve .17
........................................education, rider .3, 151.............................emission control systems .137
.................................emission requirements .137..............................................engine number .128
engine,.......................................................flooded .33
....................................................idle speed .74.......................................................pinging .56........................................................starting .31
..................................................stop button .20......................................................stopping .34
................................................won’t start .121...............................environment, protecting .117
03/06/18 11:13:51 31KSJ600_166

158
Index
Index
G
H
I
K
L
.......................................................kickstarter .21
lever,..........................................................clutch .20
..................................................front brake .20............................................................shift .21
.....................................................limit, weight .9..............................................................loading .8
...............................................gap, spark plug .76.........................................................gasohol .141..........................................................gasoline .56
.................................................gears, shifting .35
...............................high altitude adjustment .136........................................Honda, contacting .149
..................................Honda service manual .144
...........................................idle speed, engine .74inspection,
.....................................................post-ride .40.......................................................pre-ride .27
03/06/18 11:13:59 31KSJ600_167

159
Index
Index
M
O
P
R
maintenance,.........................................................record .51..........................................................safety .45
......................................................schedule .47.............................................manual, service .144
.................................................modifications .11
.......................................................oil, engine .59...........................................operating controls .13
..........................................oxygenated fuels .141
...........................................................parking .39.............................................pedal, rear brake .21
...............................................pinging, engine .56......................................................plug, spark .75
........................................post-ride inspection .40..........................................pre-ride inspection .27
.............................reserve capacity, fuel tank .57.............................................rider training .3, 150
riding,...........................................basic operation .29
.........................................................before .23.......................................................clothing .24
.................................................precautions .30............................................................safety .2..........................................................rim lock .88
03/06/18 11:14:05 31KSJ600_168
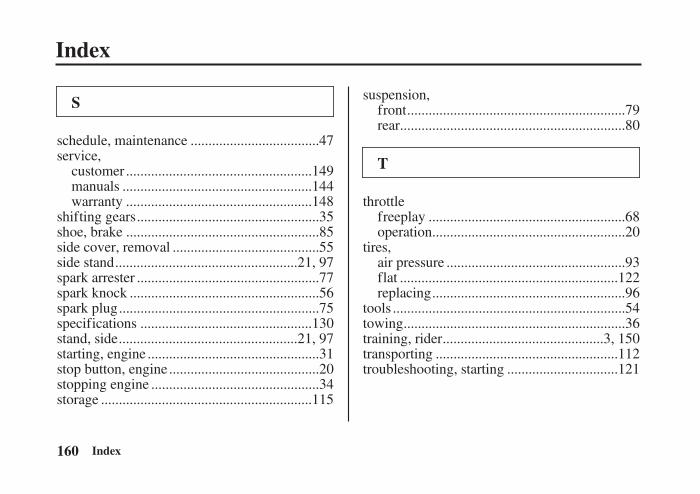
160
Index
Index
S
T
...................................schedule, maintenance .47service,
...................................................customer .149....................................................manuals .144...................................................warranty .148
..................................................shifting gears .35.....................................................shoe, brake .85
........................................side cover, removal .55..................................................side stand .21, 97
..................................................spark arrester .77....................................................spark knock .56
.......................................................spark plug .75...............................................specifications .130
.................................................stand, side .21, 97...............................................starting, engine .31
.........................................stop button, engine .20..............................................stopping engine .34
..........................................................storage .115
suspension,............................................................front .79
..............................................................rear .80
throttle......................................................freeplay .68.....................................................operation .20
tires,.................................................air pressure .93
............................................................flat .122.....................................................replacing .96
................................................................tools .54.............................................................towing .36
............................................training, rider .3, 150..................................................transporting .112
..............................troubleshooting, starting .121
03/06/18 11:14:10 31KSJ600_169

161
Index
Index
WV
.......................................................valve, fuel .17...................................vehicle identification .128
warranty,...................................................coverage .147...................................................extended .147
......................................................service .148.............................washing your motorcycle .106
......................................................weight limit .9.............................................................wheels .88
03/06/18 11:14:15 31KSJ600_170

Quick Reference
Quick Reference
How To Avoid Costly RepairsThe following is a brief, but importantcollection of information you need to knowabout your Honda. You’ll also find space torecord important notes. The engine of your Honda can be the most
expensive component to repair. Propermaintenance, especially the use of therecommended fluids and filters, preventspremature wear and damage.
Frequent causes of costly engine repairs are:
Engine oil: insufficient quantity, improperoil.Air cleaner: dirty, leaking because ofimproper installation (poor seal).
03/06/18 11:14:22 31KSJ600_171

Quick Reference
Quick Reference
Record important information here:
Frame No.Engine No.Ignition Key No.Color LabelOwner’s:
NameAddressCity/StatePhone
Dealer’s:NameAddressCity/StatePhoneService Mgr.
03/06/18 11:14:26 31KSJ600_172

- -
1.45 US gal (5.5 )0.29 US gal (1.1 )
220 lbs (100 kg)
70/100 19M/C 42M15 psi (100 kPa , 1.0 kgf/cm )15 psi (100 kPa , 1.0 kgf/cm )
CR7HSA (NGK) U22FSR-U (DENSO)
90/100 16M/C 51M
or
Quick Reference
Quick Reference
Initial Maintenance about 100 miles (150 km) or one month.about every 600 miles (1,000 km) or six months.
unleaded gasoline, pump octane number of 86 or highertank:reserve:
RegularMaintenancePre-ride Inspection
Fuel/Capacity
Engine Oil API Service Classification SG or higher except oils labeled as energy conserving on thecircular API service label, SAE 10W-40, JASO T 903 standard MA,Pro Honda GN4 or HP4 (without molybdenum additives) 4-stroke oil or equivalent
rider only (no passenger or cargo) and any accessoriesMaximum WeightCapacityTiresTire Pressure (cold)
Spark Plug
Check the following items each time before you ride (page ): tires, spokes & rims, leaks,engine oil, fuel, drive chain, cables, nuts & bolts, throttle, and brakes.
Front:Front:Rear:
, Rear:
25
03/06/18 11:14:42 31KSJ600_173