Embed Size (px)
Citation preview

ThinkSpace | Seasons Curriculum
Table of Contents
Learning Objectives: Why do we experience seasons? 2
Materials 3
Video Links 4
Activity Sheets 5
Seasons Day-by-Day Curriculum 6
Session 1: Modeling the Earth-Sun System 7
Session 2: The Apparent Path of the Sun in Our Sky (Part 1) 12
Session 3: The Apparent Path of the Sun in Our Sky (Part 2) 16
Session 4: How Does Sun Angle Affect the Temperature? 20
Session 5: Earth’s Tilted Axis and Sun Angle 24
Session 6: Sun Angle and Your Location on Earth 28
Session 7: Students Explore Hours of Daylight in WWT 33
Session 8: Does Distance Affect Seasons? 37
ThinkSpace Team Contact Information 41
wwtambassadors.org | worldwidetelescope.org
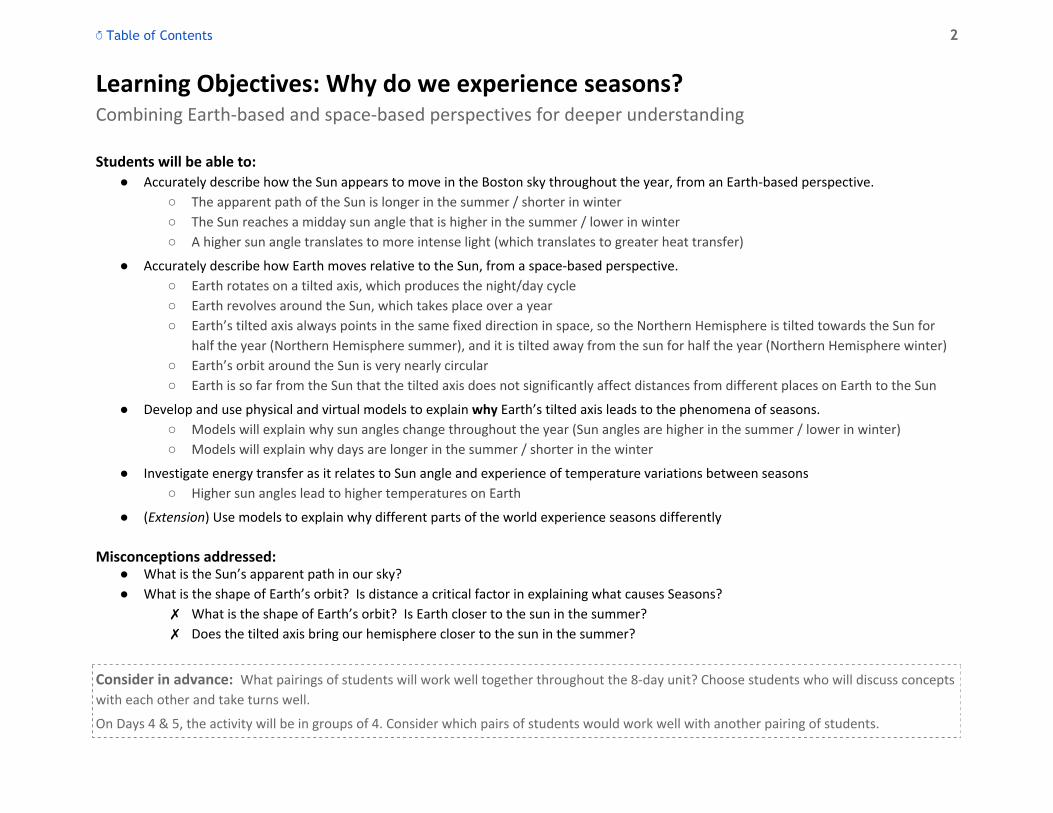
↺ Table of Contents 2
Learning Objectives: Why do we experience seasons? Combining Earth-based and space-based perspectives for deeper understanding
Students will be able to: ● Accurately describe how the Sun appears to move in the Boston sky throughout the year, from an Earth-based perspective.
○ The apparent path of the Sun is longer in the summer / shorter in winter
○ The Sun reaches a midday sun angle that is higher in the summer / lower in winter
○ A higher sun angle translates to more intense light (which translates to greater heat transfer)
● Accurately describe how Earth moves relative to the Sun, from a space-based perspective.
○ Earth rotates on a tilted axis, which produces the night/day cycle
○ Earth revolves around the Sun, which takes place over a year
○ Earth’s tilted axis always points in the same fixed direction in space, so the Northern Hemisphere is tilted towards the Sun for
half the year (Northern Hemisphere summer), and it is tilted away from the sun for half the year (Northern Hemisphere winter)
○ Earth’s orbit around the Sun is very nearly circular
○ Earth is so far from the Sun that the tilted axis does not significantly affect distances from different places on Earth to the Sun
● Develop and use physical and virtual models to explain why Earth’s tilted axis leads to the phenomena of seasons.
○ Models will explain why sun angles change throughout the year (Sun angles are higher in the summer / lower in winter)
○ Models will explain why days are longer in the summer / shorter in the winter
● Investigate energy transfer as it relates to Sun angle and experience of temperature variations between seasons
○ Higher sun angles lead to higher temperatures on Earth
● (Extension) Use models to explain why different parts of the world experience seasons differently
Misconceptions addressed:
● What is the Sun’s apparent path in our sky?
● What is the shape of Earth’s orbit? Is distance a critical factor in explaining what causes Seasons?
✗ What is the shape of Earth’s orbit? Is Earth closer to the sun in the summer?
✗ Does the tilted axis bring our hemisphere closer to the sun in the summer?
Consider in advance: What pairings of students will work well together throughout the 8-day unit? Choose students who will discuss concepts
with each other and take turns well.
On Days 4 & 5, the activity will be in groups of 4. Consider which pairs of students would work well with another pairing of students.

↺ Table of Contents 3
Materials Daily materials lists also appear in each header of the Day-by-Day Curriculum below. This list includes the full list of materials needed throughout the 8-day curriculum.
All Days:
Instructor’s computer ● Projector ● Speakers
Day 1 (for instructor):
● Lantern or lamp
● Earth globe
● Vicky (Lego figure)
● Glue dot (to attach “Sticky Vicky” to globe)
(per pair of students):
● 3-inch Foam Earth speared with a dowel
● Small yellow ball (to represent the Sun)
Day 5 (per group of 4 students):
● Foam Earth speared with a dowel
● Small yellow ball (to represent the Sun)
● A ring (to keep the Sun from rolling)
● Stack of books (to raise the Sun to a height just below
students’ sternum when they are standing up)
● Vicky (Lego figure)
● Glue dots (to attach Sticky Vicky to foam Earth)
Days 2 & 3 (per pair of students):
● 1 SunTracker (Plastic Hemisphere)
● 1 Vicky (Lego figure)
● 4 colors of dry-erase markers
● Tissues or paper towels (to clean SunTrackers)
Day 6:
No additional materials needed
Day 7 (per pair of students):
● 1 device (laptop, chromebook, etc.)
Day 4 (per group of 4 students):
● Flashlight, with paper tube taped around end
● Meter stick
● Square-gridded paper
Day 8:
No additional materials needed

↺ Table of Contents 4
Video Links Each video link also appears in the day-by-day curriculum below. This list consolidates all videos throughout the 8-day unit.
Session WWT Lesson Videos Instructional Demonstrations (to show in class) (for teacher preparation)
Session 1 Rotation & Revolution Modeling Guide for Teachers - Day & Night
Sessions 2 & 3 SunTracker Setup No Instructional Demos for Sessions 2 & 3
Sun on March 21 Sun on June 21 Sun on September 21 Sun on December 21
Comparisons of Sun Paths
Session 4 Little Bits setup (not WWT) No Instructional Demos for Session 4
Session 5 Earth’s Tilted Axis Modeling Guide for Teachers - Earth’s Tilted Axis Modeling Guide for Teachers - Common Modeling Mistakes
Session 6 Models No Instructional Demos for Session 6
Session 7 Daylight and the Earth No instructional Demos for Session 7
Session 8 Distance from the Sun No Instructional Demos for Session 8

↺ Table of Contents 5
Activity Sheets All activity sheets also appear in the corresponding sessions below. This list consolidates all activity sheets throughout the 8-day unit.
Session Activity Sheets Supporting Materials
Full Unit Complete Set (Sessions 1-8) Answer Key ( color | black & white )
Session 1 Space-Based Perspectives Key Terms and Key Ideas
Sessions 2 & 3 Apparent Path of the Sun in the Sky Cardinal Directions Signs
Session 4 Sun Angle and Energy
Session 5 Earth’s Tilted Axis Placemat for Model Seasons Signs
Session 6 Tilted Axis and Sun Angle Bonus Questions
Session 7 Tilt & Day Length
Session 8 Earth’s Orbit Key Terms and Key Ideas

↺ Table of Contents 6
Seasons Day-by-Day Curriculum
Color Code Key
Activity Sheets
Models, Materials, Hands-on Activity
Videos and other links
Instructor Suggestions and Answers

↺ Table of Contents 7
SESSION 1: Modeling the Earth-Sun System Total Class time: 45-50 minutes
Activity Sheets (for each student) : Space-Based Perspectives
Lesson Goals 1. Introduce unit on Seasons
2. Discuss value of models in science and possible pitfalls to be aware of when using models
3. Explore physical model of Earth-Sun (Rotation → day/night | Revolution → year)
4. View virtual model of Earth-Sun in WorldWide Telescope
Addressing Misconceptions ● Rotation vs. Revolution: focus on the outcome of the motion, rather than trying to memorize the two similar “R” words
● Which motion causes night/day? Which motion takes a year to complete?
Materials Physical Model
● Toy helicopter or doll
● Various objects that would be visible to everyone in the room (a beaker, a water bottle, etc)
● An object that has words only on the top, but not the sides. (In a pinch, you could write something on a piece of paper and put that on top of an
object with no writing on it).
● Lantern or lamp (to represent Sun, placed in middle of room)
● Earth globe
● Vicky (Lego figure)
● Glue dots (to attach “Sticky Vicky” to globe) ● Per pair of students:
○ A 3-inch foam Earth speared with a dowel ○ A foam Sun
Virtual Model ● Computer to project Session 1 WWT instructional video ● Projector ● Speakers
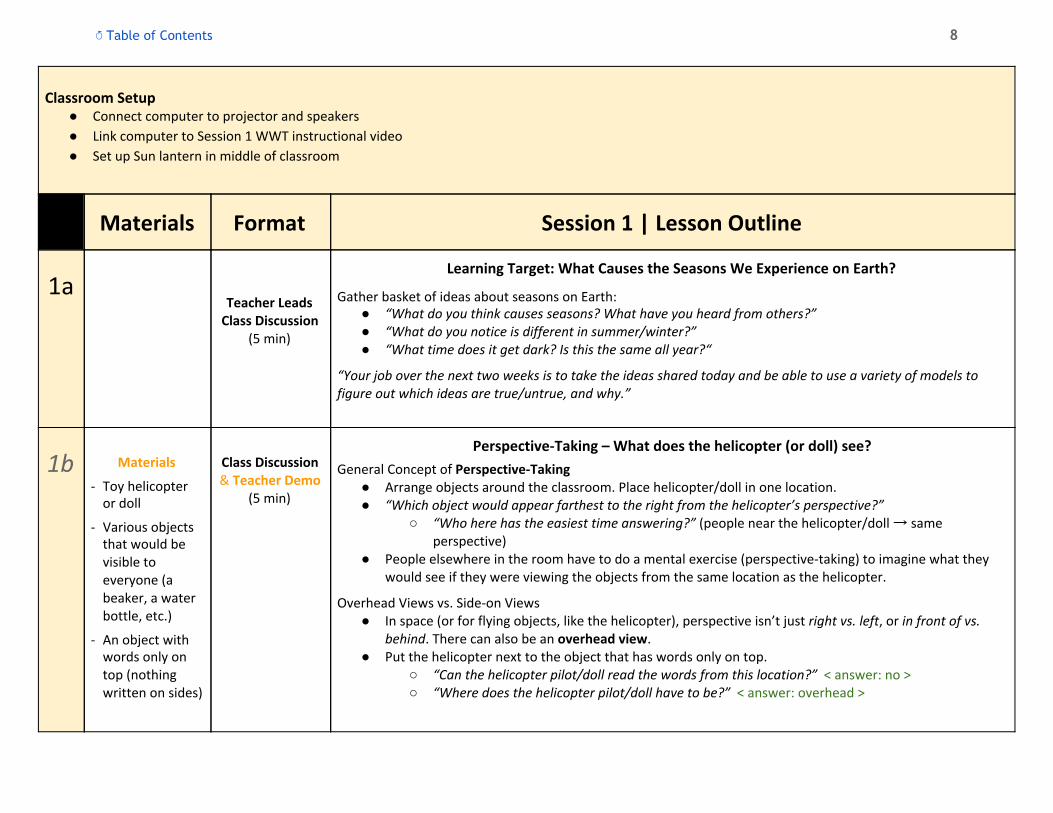
↺ Table of Contents 8
Classroom Setup ● Connect computer to projector and speakers
● Link computer to Session 1 WWT instructional video
● Set up Sun lantern in middle of classroom
Materials Format Session 1 | Lesson Outline
1a
Teacher Leads
Class Discussion (5 min)
Learning Target: What Causes the Seasons We Experience on Earth?
Gather basket of ideas about seasons on Earth: ● “What do you think causes seasons? What have you heard from others?” ● “What do you notice is different in summer/winter?” ● “What time does it get dark? Is this the same all year?“
“Your job over the next two weeks is to take the ideas shared today and be able to use a variety of models to figure out which ideas are true/untrue, and why.”
1b
Materials
- Toy helicopter or doll
- Various objects that would be visible to everyone (a beaker, a water bottle, etc.)
- An object with words only on top (nothing written on sides)
Class Discussion & Teacher Demo
(5 min)
Perspective-Taking – What does the helicopter (or doll) see?
General Concept of Perspective-Taking ● Arrange objects around the classroom. Place helicopter/doll in one location. ● “Which object would appear farthest to the right from the helicopter’s perspective?”
○ “Who here has the easiest time answering?” (people near the helicopter/doll → same perspective)
● People elsewhere in the room have to do a mental exercise (perspective-taking) to imagine what they would see if they were viewing the objects from the same location as the helicopter.
Overhead Views vs. Side-on Views ● In space (or for flying objects, like the helicopter), perspective isn’t just right vs. left, or in front of vs.
behind. There can also be an overhead view. ● Put the helicopter next to the object that has words only on top.
○ “Can the helicopter pilot/doll read the words from this location?” < answer: no > ○ “Where does the helicopter pilot/doll have to be?” < answer: overhead >

↺ Table of Contents 9
Materials
- Lantern or lamp
- Foam Earth speared with dowel
Teacher Demo
Relevance of Perspective-Taking to Seasons ● Students need to be able to connect the Earth-based perspective and space-based perspective of the
Sun & Earth in order to understand what causes seasons on Earth. (Lantern should be in the middle of the room)
● Start moving the Earth globe in a big circle around the lantern. Earth goes around the Sun, and its position around the Sun changes at different times of year. Ask a student to hold the Earth at a particular moment during the year. Put the helicopter/doll on one side, looking at Sun-Earth together.
○ “Which object appears on the right to the helicopter/doll?” < students answer > ● Keep the Earth-Sun model frozen, and put the helicopter on the opposite side.
○ “Now which object is on the right?” < answer: it switches > ● “Sometimes you are looking at the Earth-Sun from different perspectives, which changes which object
appears to your right or left, but that doesn’t necessarily mean the time of year has changed. This will be very important for the second half of the Seasons unit.”
1c
Teacher Leads
Class Discussion (5 min)
Discussion: Modeling Night and Day
Introduction to Models ● “From a science perspective, what is a model? Why do scientists use models?” ● “What are some of the strengths and limitations of models?”
○ Example strengths: ■ you can physically manipulate a model of the Earth/Sun (unlike the real thing) ■ you can model many different times of year (but you can’t change the real time of year)
○ Example limitations: ■ The scale of the model is wrong. Earth and the Sun are much, much farther apart in real
life than the model would indicate. (To get the Earth-Sun distance scale to fit in a classroom, Earth and Sun would be tiny specks, and impossible to see with any detail.)
● “We’ll be using a few different models to understand all the factors that cause us to experience seasons. Be aware of where a model’s inaccuracies might accidentally lead us astray.”
○ This lesson plan will call those out throughout the activity descriptions.
Discussion | Night & Day ● “Why do we experience night and day on Earth?”
< answer: As Earth rotates, when your side of the Earth faces toward the Sun, you experience daytime. When your side of the Earth faces away from the Sun, you experience nighttime. >

↺ Table of Contents 10
1d
Materials
- Lantern or lamp
- Foam Earth
- Vicky (Lego figure)
- Glue dot
Materials (per pair)
- 3-inch foam Earths on a dowel
- Foam Suns
Teacher Leads Class Discussion
(3 min)
Physical Model Teacher-guided
(10 min)
Physical Model Student
hands-on (10 min)
Physical Model Teacher-guided
(5 min)
Modeling: The Basic Earth-Sun Model
Discussion | What are the features of the Earth-Sun Model ● “What can we use in our physical model to represent the Sun and Earth?”
○ Lamp/Lantern in middle of room = the Sun ○ Globe = Earth
● How does Earth move? ○ Rotates on Axis → One Night & Day ○ Revolves around the Sun → One Year
Teacher Modeling | Explore Rotation / Day & Night
(Watch this instructor video for a reminder how to demonstrate rotation / day & night for your students.)
(Lantern should be in middle of the room to represent the Sun). ● Attach Sticky Vicky with a glue dot to Massachusetts on a globe. ● Face Vicky / Massachusetts toward the Sun.
○ “What time is Vicky experiencing?” < answer: midday > ● Face Vicky / MA away from the Sun.
○ “What time is Vicky experiencing?” < answer: midnight > ● “Which direction does Earth rotate?”
Student Modeling | Explore the Question: “Which direction does Earth rotate?” ● Give each pair of students a 3-inch foam Earth on a dowel and a foam Sun. (They don’t need Vicky for
this part). ● Task students with figuring out which direction Earth rotates?
○ “If viewed from above, does the Earth rotate clockwise, or counterclockwise?” ○ Hint: “Do you know someone who lives somewhere else on Earth? What time is it there
compared to MA? For example, will someone in MA see the Sun rise before or after someone in California?” < answer: counterclockwise, if looking down from above North Pole >
Teacher Modeling | Explore Time of Day ● “Now that we know which way Earth rotates, let’s explore what time of day Vicky experiences in more
detail.” ● Turn Earth so Vicky is on the day/night line (so that she is about to pass from the nighttime side into the
daytime side). ○ “What time is Vicky experiencing?” < answer: sunrise > ○ Optional Perspective-Taking
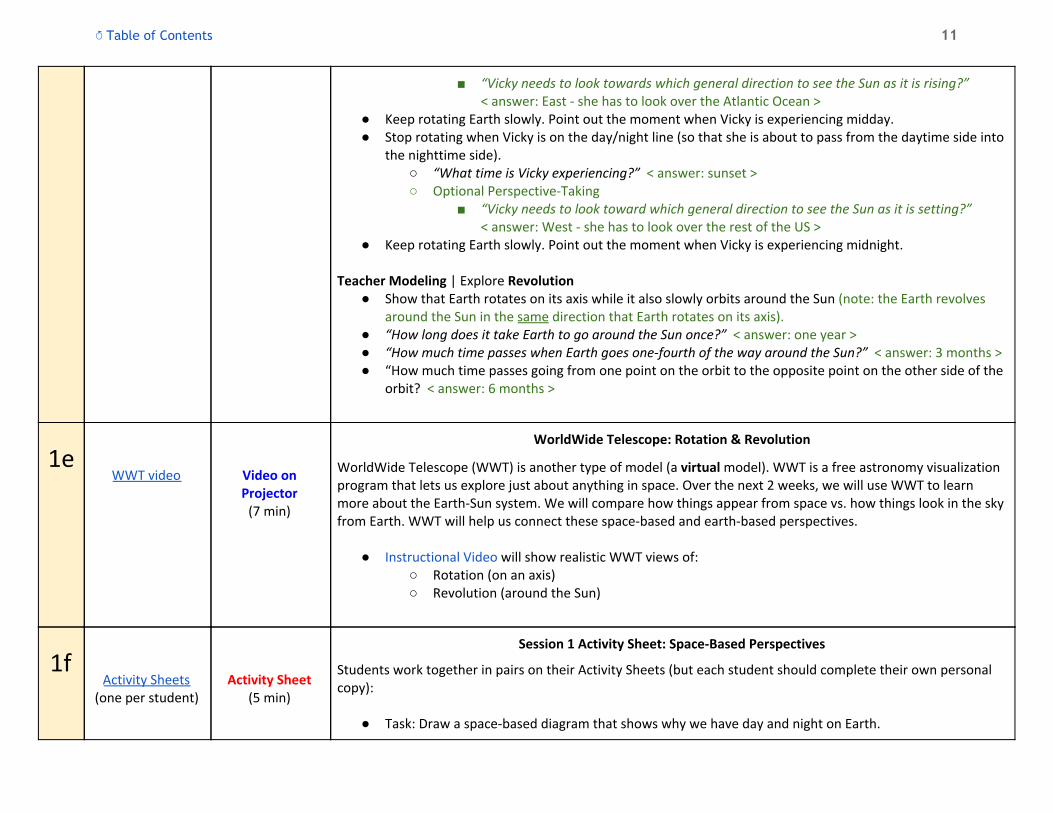
↺ Table of Contents 11
■ “Vicky needs to look towards which general direction to see the Sun as it is rising?” < answer: East - she has to look over the Atlantic Ocean >
● Keep rotating Earth slowly. Point out the moment when Vicky is experiencing midday. ● Stop rotating when Vicky is on the day/night line (so that she is about to pass from the daytime side into
the nighttime side). ○ “What time is Vicky experiencing?” < answer: sunset > ○ Optional Perspective-Taking
■ “Vicky needs to look toward which general direction to see the Sun as it is setting?” < answer: West - she has to look over the rest of the US >
● Keep rotating Earth slowly. Point out the moment when Vicky is experiencing midnight. Teacher Modeling | Explore Revolution
● Show that Earth rotates on its axis while it also slowly orbits around the Sun (note: the Earth revolves around the Sun in the same direction that Earth rotates on its axis).
● “How long does it take Earth to go around the Sun once?” < answer: one year > ● “How much time passes when Earth goes one-fourth of the way around the Sun?” < answer: 3 months > ● “How much time passes going from one point on the orbit to the opposite point on the other side of the
orbit? < answer: 6 months >
1e
WWT video
Video on Projector
(7 min)
WorldWide Telescope: Rotation & Revolution
WorldWide Telescope (WWT) is another type of model (a virtual model). WWT is a free astronomy visualization program that lets us explore just about anything in space. Over the next 2 weeks, we will use WWT to learn more about the Earth-Sun system. We will compare how things appear from space vs. how things look in the sky from Earth. WWT will help us connect these space-based and earth-based perspectives.
● Instructional Video will show realistic WWT views of: ○ Rotation (on an axis) ○ Revolution (around the Sun)
1f
Activity Sheets (one per student)
Activity Sheet (5 min)
Session 1 Activity Sheet: Space-Based Perspectives
Students work together in pairs on their Activity Sheets (but each student should complete their own personal copy):
● Task: Draw a space-based diagram that shows why we have day and night on Earth.

↺ Table of Contents 12
SESSION 2: The Apparent Path of the Sun in Our Sky (Part 1) Total Class time: 45-50 minutes
Activity Sheets (for each student) : Apparent Path of the Sun in the Sky
Lesson Goals 1. Lay out vocabulary needed to describe the location of the Sun in our sky (Cardinal Directions, Sky Angle)
2. Predict what the path of the Sun in our sky will be today
3. Predict whether the path of the Sun will be the same or different on other days
4. Learn how the Sun actually appears to move in our sky on a day close to today
Addressing Misconceptions ● We say “sunrise” and “sunset” when the Sun appears to move above or below the Horizon. What is the object that is actually moving? < answer: Earth >
● What is the apparent path of the sun in our sky, and does it change from day to day?
✗ Some students are aware that the Sun’s path changes, but if you challenge them to describe what the Sun’s path looks like in the sky, most
students imagine that the Sun rises due East, sets due West, and is directly overhead at midday.
Materials (for the classroom)
● Cardinal Directions signs Physical Model (1 set of materials per pair of students)
● Plastic half-dome SunTracker ● Vicky (Lego figure, to place under the SunTracker) ● Set of 4-color dry-erase markers (to write on the SunTracker) ● Tissues or paper towels (for erasing the marks off the SunTracker)
Virtual Model ● Computer to project Session 2 WWT instructional videos ● Projector ● Speakers
Classroom Setup 1. Connect computer to projector and speakers
2. Link computer to Session 2 WWT instructional videos
3. Tape Cardinal Directions signs (available in Materials list) around the room, as closely to the correct orientations as possible
4. Write the North-East-South-West (NESW) cardinal directions in Sharpie on all the SunTrackers

↺ Table of Contents 13
Materials Format Session 2 | Lesson Outline
2a
Materials - Cardinal
Directions signs (taped around classroom)
Teacher Leads Class Discussion
(10 min)
Learning Target: Understanding Earth-Based Perspectives
Review | Yesterday we focused mostly on space-based perspectives. Today we will switch to a more familiar, Earth-based perspective. (Make sure you have already taped the Cardinal Directions signs around the classroom before class.)
● “How would you describe where you see the Sun at different times of day?” ○ We need consistent terminology. What are some concepts that would help you describe the
location of something in the sky? ■ Which way should we look?
● Cardinal Direction – East / West / North / South ○ “We’ve labeled the directions inside our classroom.”
■ How how up should we look? ● Horizon
○ The imaginary line that divides the ground and the sky ● Sky Angle
○ Sky angle describes how high above the horizon an object is. The horizon has a sky angle of 0 degrees. The point above your head has a sky angle of 90 degrees. Halfway between the horizon and overhead is 45 degrees. One third of the way up is 30 degrees.
○ Imagine you see the Moon in the sky. How would you describe to someone else where you see it?
■ You need to indicate the cardinal direction to look (for example, southeast) ■ You need to indicate how high up in the sky to look - sky angle (for example, 30 degrees
above the horizon).
Now that we have this terminology established,
Think on Your Own | “Can you imagine the path of the Sun in our sky today?” ● Where was the Sun at sunrise this morning? ● Where is the Sun at midday? ● Where will the Sun be at sunset? ● Can you point to those places in the room (relative to the Cardinal Direction signs) and connect the path
that the Sun traces out between them?

↺ Table of Contents 14
Student-Partner
Discussion (5 min)
● Important note: Saying the Sun rises and sets are misnomers because the Sun is not actually moving.
Earth is.
Discuss with a Partner | What does the path of the Sun look like?
● “Does your partner agree with you about the path of the Sun in our sky today? Why/why not?”
2b
Activity Sheets (one per student)
Activity Sheet (5 min)
Session 2 Activity Sheet: Space-Based Perspectives
Students complete part A on their Activity Sheets (each student should complete their own personal copy):
● Task: Predict if you think the Sun’s path in the sky will appear to be the same throughout the year. If you think it will be different, describe how it will be different.
2c
Materials (per pair)
- SunTrackers
- Vickies (Lego figures)
- 4 different colors of dry erase markers
- Tissue or paper towel
WWT Video
Physical Model Student
hands-on &
Video on Projector
(8 min)
WorldWide Telescope: SunTracker Setup
Now let’s add another model that can help us be more specific about describing the Sun’s location as it appears to viewers on Earth (like us).
● “Astronomers sometimes think of our sky as a large half-dome over our location on Earth (like a planetarium).”
● Introduce Vicky (Lego figure, who represents an observer on Earth) ● Introduce the SunTrackers (Earth-based perspective of the sky, from Vicky’s point of view).
SunTrackers | Distribute materials to students ● For each pair of students, pass out:
○ One SunTracker ○ One Vicky ○ A set of dry erase markers ○ Tissues or paper towel, to erase markings on SunTracker when needed
WWT | SunTracker Setup ● Instructional video will direct students how to mark the following on their SunTrackers:
○ Cardinal Directions (students should make sure their SunTracker is labeled North-South-East-West, and should have their Vicky face South).
○ Horizon (students should identify where horizon line is on their SunTracker. But don’t mark it, it’s very hard to clean off).
○ Directly Overhead (90°) (students should label in black marker). ○ Sky Angles (30°/60°/45°) (students should label in black marker).

↺ Table of Contents 15
NOTE: Make sure students mark their sky angles on the South side of their SunTrackers.
2d
Physical Model
Student hands-on
(5 min)
Predictions with SunTrackers and Markers
Prediction | What does Lego Vicky see as the path of the Sun through her sky today? ● Students complete the following predictions using a red marker on their SunTrackers:
○ Draw an X where you think the Sun was at sunrise today in Vicky’s sky. ○ Draw an X where you think the Sun is at midday. ○ Draw an X where you think the Sun will be at sunset. ○ Connect the 3 X’s to show what you think Vicky would see as the Sun’s path across her sky.
Instructor should walk around and observe what students’ predictions look like. If anyone does something noteworthy (different than a path that goes directly overhead from East to West), ask a few students to share their predictions.
2e
March 21 Sun Path June 21 Sun Path Sept 21 Sun Path Dec 21 Sun Path
Video on Projector
(7 min)
Physical Model
Student hands-on
(5 min)
WorldWide Telescope: Observe Path of “today’s” Sun
Reminder to students: Do NOT erase predicted path. You will need to compare the predicted and observed paths.
To show the apparent path of the Sun in our sky for “today,” choose the date closest to the current date: March 21, June 21, September 21, or December 21.
● “What we see in WWT will help us to assess how we did with predicting the Sun’s path in the sky on our SunTrackers.”
Show the sunpath in Boston on this date, and have students mark their SunTrackers in GREEN at the video pause-points.
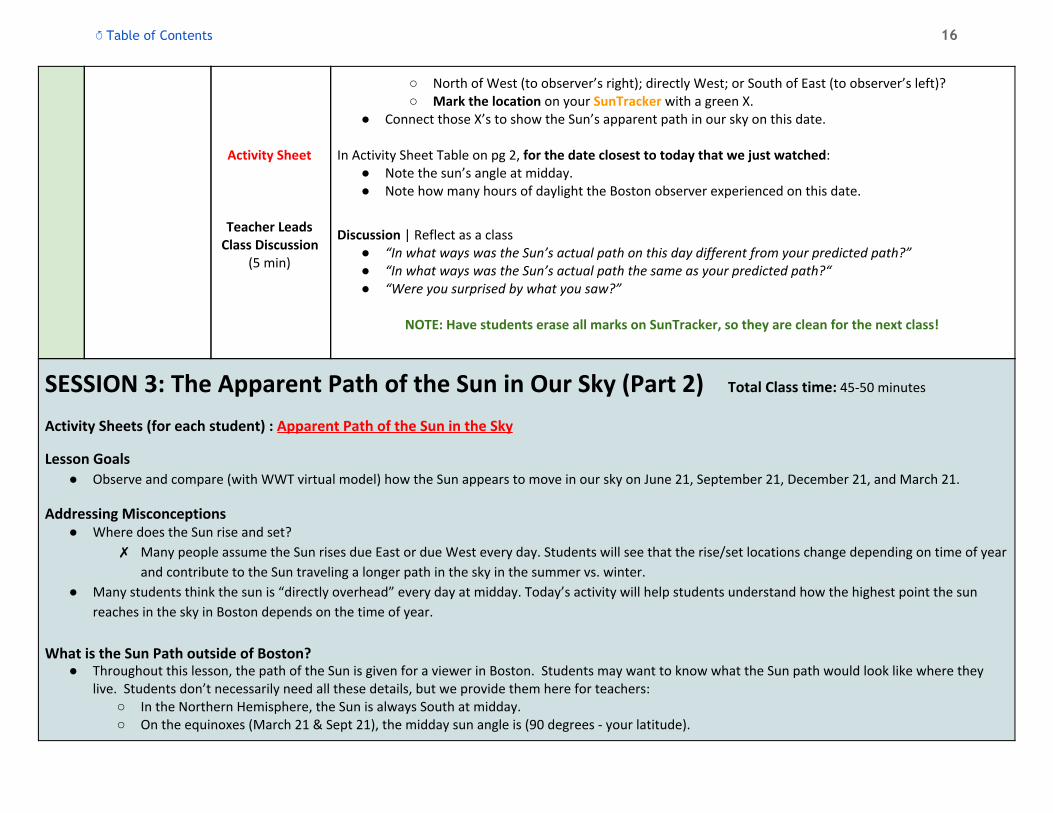
● “Where does Sun rise compared to East?” ○ North of East (to observer’s left); directly East; or South of East (to observer’s right)? ○ How many degrees is it different from East?
■ TIP: Tick marks on the screen in WWT are 10 degrees each. Tick marks on the suntracker are 15 degrees each. If the Sun is 30 degrees south of east, that corresponds to 2 tick marks on the suntracker.
○ Mark the location on your SunTracker with a green X. ● “What sky angle is the Sun at when it is at its highest point? Which direction does Vicky have to look to
see the Sun at its highest point?” <SOUTH> ○ Mark the location on your SunTracker with a green X.
● “Where does Sun set compared to West?”
↺ Table of Contents 16
Activity Sheet
Teacher Leads Class Discussion
(5 min)
○ North of West (to observer’s right); directly West; or South of East (to observer’s left)? ○ Mark the location on your SunTracker with a green X.
● Connect those X’s to show the Sun’s apparent path in our sky on this date. In Activity Sheet Table on pg 2, for the date closest to today that we just watched:
● Note the sun’s angle at midday. ● Note how many hours of daylight the Boston observer experienced on this date.
Discussion | Reflect as a class ● “In what ways was the Sun’s actual path on this day different from your predicted path?” ● “In what ways was the Sun’s actual path the same as your predicted path?“ ● “Were you surprised by what you saw?”
NOTE: Have students erase all marks on SunTracker, so they are clean for the next class!
SESSION 3: The Apparent Path of the Sun in Our Sky (Part 2) Total Class time: 45-50 minutes
Activity Sheets (for each student) : Apparent Path of the Sun in the Sky
Lesson Goals ● Observe and compare (with WWT virtual model) how the Sun appears to move in our sky on June 21, September 21, December 21, and March 21.
Addressing Misconceptions ● Where does the Sun rise and set?
✗ Many people assume the Sun rises due East or due West every day. Students will see that the rise/set locations change depending on time of year
and contribute to the Sun traveling a longer path in the sky in the summer vs. winter.
● Many students think the sun is “directly overhead” every day at midday. Today’s activity will help students understand how the highest point the sun
reaches in the sky in Boston depends on the time of year.
What is the Sun Path outside of Boston? ● Throughout this lesson, the path of the Sun is given for a viewer in Boston. Students may want to know what the Sun path would look like where they
live. Students don’t necessarily need all these details, but we provide them here for teachers: ○ In the Northern Hemisphere, the Sun is always South at midday. ○ On the equinoxes (March 21 & Sept 21), the midday sun angle is (90 degrees - your latitude).
↺ Table of Contents 17
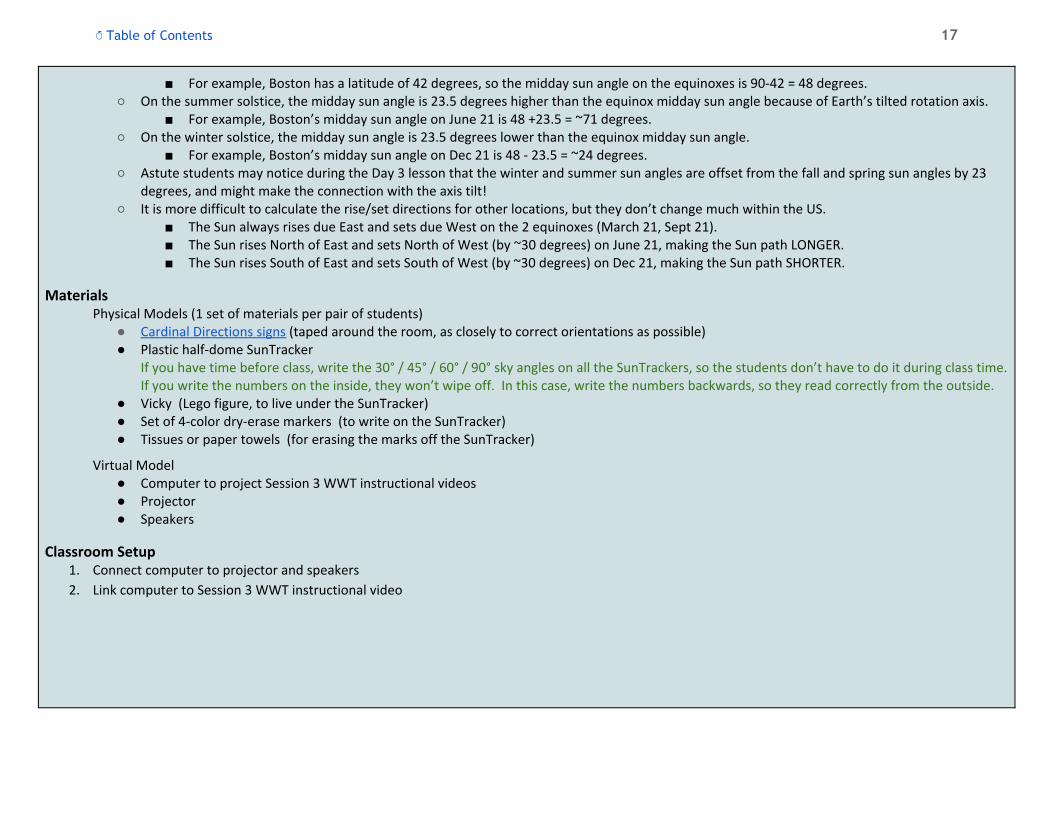
■ For example, Boston has a latitude of 42 degrees, so the midday sun angle on the equinoxes is 90-42 = 48 degrees. ○ On the summer solstice, the midday sun angle is 23.5 degrees higher than the equinox midday sun angle because of Earth’s tilted rotation axis.
■ For example, Boston’s midday sun angle on June 21 is 48 +23.5 = ~71 degrees. ○ On the winter solstice, the midday sun angle is 23.5 degrees lower than the equinox midday sun angle.
■ For example, Boston’s midday sun angle on Dec 21 is 48 - 23.5 = ~24 degrees. ○ Astute students may notice during the Day 3 lesson that the winter and summer sun angles are offset from the fall and spring sun angles by 23
degrees, and might make the connection with the axis tilt! ○ It is more difficult to calculate the rise/set directions for other locations, but they don’t change much within the US.
■ The Sun always rises due East and sets due West on the 2 equinoxes (March 21, Sept 21). ■ The Sun rises North of East and sets North of West (by ~30 degrees) on June 21, making the Sun path LONGER. ■ The Sun rises South of East and sets South of West (by ~30 degrees) on Dec 21, making the Sun path SHORTER.
Materials Physical Models (1 set of materials per pair of students)
● Cardinal Directions signs (taped around the room, as closely to correct orientations as possible) ● Plastic half-dome SunTracker
If you have time before class, write the 30° / 45° / 60° / 90° sky angles on all the SunTrackers, so the students don’t have to do it during class time. If you write the numbers on the inside, they won’t wipe off. In this case, write the numbers backwards, so they read correctly from the outside.
● Vicky (Lego figure, to live under the SunTracker) ● Set of 4-color dry-erase markers (to write on the SunTracker) ● Tissues or paper towels (for erasing the marks off the SunTracker)
Virtual Model ● Computer to project Session 3 WWT instructional videos ● Projector ● Speakers
Classroom Setup 1. Connect computer to projector and speakers
2. Link computer to Session 3 WWT instructional video

↺ Table of Contents 18
Materials Format Session 3 | Lesson Outline
3a
Teacher Leads
Class Discussion (5 min)
Learning Target: The Different Paths of the Sun
Review | In the previous session you made a prediction about the path that the Sun appears to travel to an observer on Earth (Vicky). You also made a prediction about whether other days will be the same or different.
● “Who said yesterday that they think the paths of the Sun will be the same on different days of the year?” ● “Who thinks the paths of the Sun will be different?”
3b
Activity Sheets (use same sheets from Session 2)
Materials (per pair)
- SunTrackers
- Vicky (Lego figure)
- Dry erase markers
- Tissue or paper towel
Activity Sheet
Physical Model Student
hands-on (5 min)
**Repeat for 3 remaining
dates (25 min)
WorldWide Telescope: Comparing Sun Paths on Different Days
We’ll test out our predictions using WWT. Students will look at paths of Sun on different days in WWT and mark them on their SunTrackers, like they did in the previous class.
Activity Sheets | Have students take out their copy of the Activity Sheet from Session 2 SunTrackers | Set the SunTrackers back up
● Hand out SunTrackers that already have cardinal directions and sun angles marked, if possible. If you write the numbers on the inside, they won’t wipe off. If you do, remember to write the numbers backwards, so they read correctly from the outside.
● Using the marker color indicated in the table on pg 2 of the Activity Sheet, have students review the sun path for the date we observed in the previous lesson:
○ Mark where the Sun rose. ○ Mark the highest point of the Sun at midday, along the South side of the SunTracker. ○ Mark where the Sun set.
Repeat the following prediction + view WWT + mark SunTracker sequence for the remaining 3 dates. Use the marker color specified in the Activity Sheet table.

↺ Table of Contents 19
March 21 Sun Path June 21 Sun Path Sept 21 Sun Path Dec 21 Sun Path
Teacher Leads Class Discussion
Video on Projector
& Physical Model
Activity Sheet
Predictions | What will the path of the Sun look like 3 months later? (For example, if you just did Sept 21, ask about December 21st now)
● “Who thinks it will be different than on <date we just looked at>? Who thinks it will be the same?” ● “Where will the Sun rise? How high will it reach in the sky? Where will the Sun set?” ● “Will the hours of daylight be longer, shorter, or the same as on <date we just looked at>?”
WWT + SunTrackers | “We’ll watch the path of the Sun for each season together. For each season’s path, mark the following items on your SunTracker using the color specified in your Activity Sheet”
○ Mark an X on the SunTracker for Sunrise: ■ Which direction is the Sun relative to East on this day? (e.g. North of East / South of
East / due East) ● TIP: Look at the sunrise on-screen. Is the Sun to the right or to the left of the
label East? Now consider Vicky’s perspective from inside the SunTracker. Have Vicky face East. From her perspective, is the Sun rising to the right or to the left of East? Is that toward North or toward South?
■ How many degrees away from East is the sunrise? ● NOTE: WWT uses a 10° grid, but tick marks on the SunTrackers are each divided
by 15°. That means that if the Sun is 30° South of East, that corresponds to 2 tick marks South of East on the SunTracker.
○ Mark an X on the SunTracker for Midday: ■ Toward which cardinal direction will you see the Sun? < answer: south > ■ What is the sky angle of the Sun at midday?
○ Mark an X on the SunTracker for Sunset: ■ Which direction is the Sun relative to East on this day? ■ How many degrees away from East is the sunrise?
● (See same Notes for Sunrise.) ○ Connect all the X’s to show the Sun’s path during each season.
Walk around and check that students have marked SunTrackers correctly.
● “For each season’s path, fill out the table in part B your Activity Sheet.” ○ Sun angle at midday in degrees. ○ Length of the day in hours.

↺ Table of Contents 20
3c
Comparisons of Sun Paths
Video on Projector
(5 min)
Teacher Leads Class Discussion
(5 min)
WWT Comparison paths | How does the sun path change at different times of year? ● Observe in WWT what it would look like if you could watch the March vs. June, and the December vs.
March Sun paths at the same time.
Discussion | How did your predictions compare to the observed Sun paths? ● “What surprised you the most about the real paths of the Sun throughout the year?” ● “What do you think the path of the Sun would look like on August 1st?”
3d
Activity Sheet
(5 min)
Session 3 Activity Sheet: Parts C & D
Students should complete parts C & D (Compare and Analyze Data, and Record Your Ideas) on their Activity Sheets. If there’s not enough time, have students complete these sections for homework.
NOTE: Have students erase all marks on SunTracker, so they are clean for the next class!
SESSION 4: How Does Sun Angle Affect the Temperature? Total Class time: 45-50 minutes
Activity Sheets (for each student) : Sun Angle and Energy
Lesson Goals 1. Use Little Bits light sensor model to measure how different Sun angles impact intensity of light received at a location on Earth
2. Understand why a higher sun angle leads to more intense light, and a lower sun angle leads to less intense light
Materials Physical Models (1 set of materials per group of 4 students)
● SunTracker cut in half (with angles pre-marked) ● Flashlight taped to meter stick (so “distance” from Sun to ground can’t change) ● littleBits Light sensor (set up directions in our teacher guide document and setup video)
○ Please emphasize to students to treat these materials with care, so they continue to work well throughout the day for all their classmates.
○ Power Bit ■ 9-volt battery
○ Light Sensor Bit ○ Number Readout Bit ○ 2 Wire Bits

↺ Table of Contents 21
Instructional video ● Computer to project Session 4 instructional videos ● Projector ● Speakers
Classroom Setup: ● Close curtains/blinds or cover windows with black trash bags or large poster boards if necessary. With the lights switched off, the room needs to be dark
enough that the primary source of light striking the Little Bits sensor is the flashlight.
Materials Format Session 4 | Lesson Outline
4a
Teacher Leads Class Discussion
(8-10 min)
Learning Target: How Sun Angle Affects Temperature
Review | Discuss concepts from previous classes ● “Over the past two days, we saw that the apparent path of the Sun changes over the course of the year.
How does it change?” 1. The highest Sun angle reached (at midday) is higher in the summer, lower in the winter 2. The total hours of daylight are greater in the summer, fewer in the winter (because the path the
Sun travels in the sky is longer in the summer and shorter in the winter) ● “How does this connect with the changing temperatures we experience on Earth (specifically in Boston)?
What effect does sun angle have on temperature?”
Predictions | Gather ideas from the class ● Will the intensity / brightness / energy provided by the Sun change as the sun angle changes?
○ If so, how? (i.e. which sun angles will have more intensity?) ○ If not, why not?
4b
littleBits Sensor setup video
Video on Projector
Modeling: Comparing Sun Paths on Different Days
“Let’s test these predictions with a model.” Show students one of the littleBits setups, but don’t distribute them yet.
Preparation | Teacher to do the following: ● Show littleBits sensor video
↺ Table of Contents 22
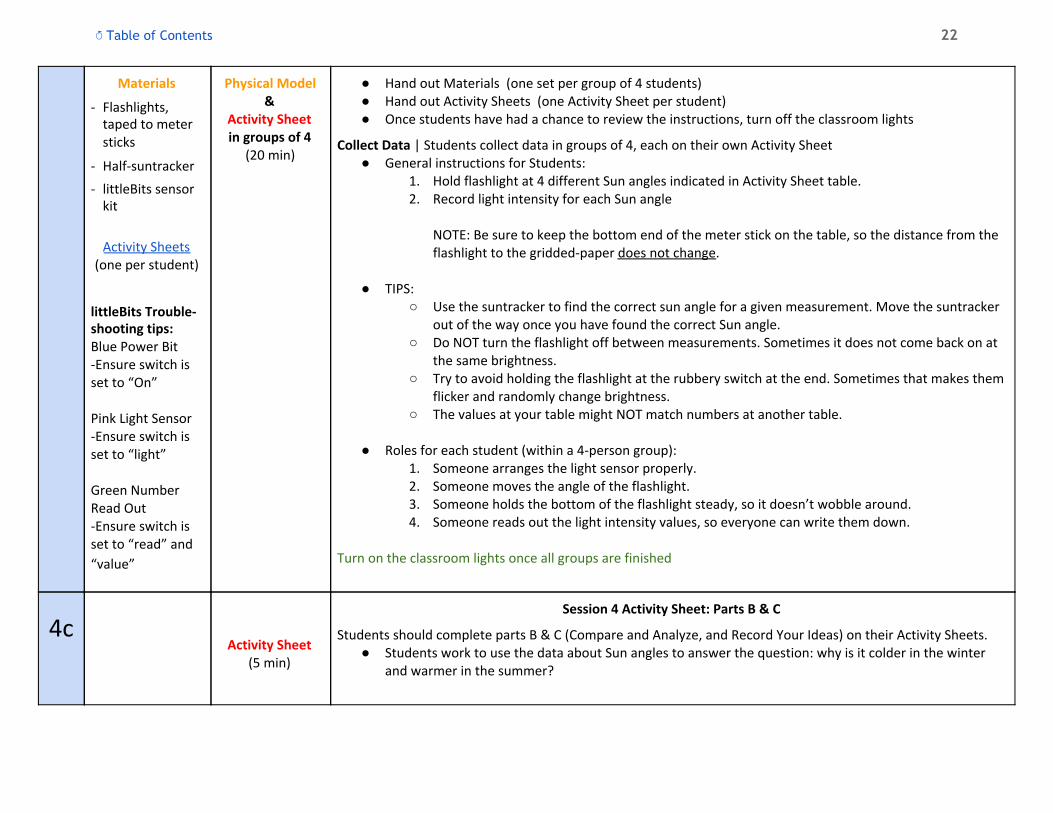
Materials
- Flashlights, taped to meter sticks
- Half-suntracker
- littleBits sensor kit
Activity Sheets
(one per student)
littleBits Trouble- shooting tips: Blue Power Bit -Ensure switch is set to “On” Pink Light Sensor -Ensure switch is set to “light” Green Number Read Out -Ensure switch is set to “read” and
“value”
Physical Model &
Activity Sheet in groups of 4
(20 min)
● Hand out Materials (one set per group of 4 students) ● Hand out Activity Sheets (one Activity Sheet per student) ● Once students have had a chance to review the instructions, turn off the classroom lights
Collect Data | Students collect data in groups of 4, each on their own Activity Sheet ● General instructions for Students:
1. Hold flashlight at 4 different Sun angles indicated in Activity Sheet table. 2. Record light intensity for each Sun angle
NOTE: Be sure to keep the bottom end of the meter stick on the table, so the distance from the flashlight to the gridded-paper does not change.
● TIPS:
○ Use the suntracker to find the correct sun angle for a given measurement. Move the suntracker out of the way once you have found the correct Sun angle.
○ Do NOT turn the flashlight off between measurements. Sometimes it does not come back on at the same brightness.
○ Try to avoid holding the flashlight at the rubbery switch at the end. Sometimes that makes them flicker and randomly change brightness.
○ The values at your table might NOT match numbers at another table.
● Roles for each student (within a 4-person group): 1. Someone arranges the light sensor properly. 2. Someone moves the angle of the flashlight. 3. Someone holds the bottom of the flashlight steady, so it doesn’t wobble around. 4. Someone reads out the light intensity values, so everyone can write them down.
Turn on the classroom lights once all groups are finished
4c
Activity Sheet
(5 min)
Session 4 Activity Sheet: Parts B & C
Students should complete parts B & C (Compare and Analyze, and Record Your Ideas) on their Activity Sheets. ● Students work to use the data about Sun angles to answer the question: why is it colder in the winter
and warmer in the summer?

↺ Table of Contents 23
4d
Teacher Leads
Class Discussion (5 min)
Discussion: How Does Sun Angle Impact Temperature?
Discussion | As a class, discuss the ideas that students came up with for section C of their Activity Sheets. After students share their ideas, draw the following diagram on the board:
● Using a protractor, draw a sunbeam at an angle of about 71 degrees (the June 21 midday sun angle in Boston), by drawing a line on both sides of a ruler. Put two people in that sunbeam.
● Draw a second sunbeam at an angle of about 24 degrees (the Dec 21 midday sun angle in Boston), using the same ruler, so the widths of the sunbeams are the same. Draw 5 people in that sunbeam.
● Ask students: “If instead of light, there were $100 falling from the sunbeam, how much money does
each person get in June? How much money does each person get in December? Why are they different?”
Here is an accurate interpretation of the data:
● At a high sun angle, a fixed amount of light is concentrated over a smaller area. Each patch of ground experiences more intense sunlight.
● At a low sun angle, the same fixed amount of light is spread out over a larger area. Each patch of ground experiences less intense sunlight.

↺ Table of Contents 24
SESSION 5: Earth’s Tilted Axis and Sun Angle Total Class time: 45-50 minutes
Activity Sheets (for each student) : Earth’s Tilted Axis
Lesson Goals 1. Use virtual and physical models to understand how Earth’s rotation axis is tilted. The direction of Earth’s tilt is fixed relative to a very distant point in
space (the North Pole always points roughly towards Polaris).
2. Use a physical model to understand how Earth’s tilted axis leads to higher midday Sun angles in the summer and lower midday Sun angles in the winter.
Addressing Misconceptions ● When modeling Earth’s tilted axis, students have trouble understanding what we mean when we say “the direction of the tilt is fixed relative to a very
distant point in space (Polaris).” Many students imagine Polaris as a specific point in the room, for example a sprinkler on the ceiling. This interpretation
leads to trouble because Polaris is much farther away than can be modeled within a classroom. Even if the Earth-Sun distance were scaled down to 1
meter, Polaris would still be roughly a distance of ~27,000 km away. So if a student imagines Polaris to be inside the classroom, the result is that the
North Pole (in the student’s model) will still gyrate to some degree, when it ought to be completely fixed in one direction.
○ The instructions we give for the model (i.e. always tilt the northern axis toward a specific wall, not a point in the room) alleviates this issue.
✗ The most common misconception students hold is that the Earth’s tilt is fixed relative to the Sun. This diagram shows the incorrect interpretation
(compared with the correct model).
Materials For the classroom
● Seasons signs (to tape on four walls of the classroom)
Physical Models (1 set of materials per group of 4 students) ● Stack of books (to keep Sun at correct height relative to Earth, roughly just below student’s sternum when standing) ● Seasons placemat (to place on their stack of books) ● Yellow foam Sun, with ring (to place in the center of their placemat; ring keeps the Sun from rolling off) ● A foam Earth, speared through with a dowel (without Vicky attached; dowel represents the Rotation Axis)

↺ Table of Contents 25
● Vicky (Lego figure, to attach to Earth at Boston) ● A second foam Earth, speared through with a dowel (with Vicky attached)
Virtual Model ● Computer to project Session 5 WWT lesson ● Projector ● Speakers
Classroom Setup 1. Print Seasons signs and tape them up in correct order around the room (according to the orbit of Earth around the Sun – Earth orbits counterclockwise
around the Sun when viewed from above) around room a. Winter should be on a wall with a unique feature (e.g. a flag or a whiteboard)
2. Connect computer to projector and speakers 3. Link computer to Session 5 WWT instructional video
Materials Format Session 5 | Lesson Outline
5a
Teacher Leads Class Discussion
(5 min)
Learning Target: Earth’s Tilted Axis from a Space-Based Perspective
Review | Go over the major concepts from the past few classes ● Sessions 2-3:
○ Sun angle at midday changes – higher in summer, lower in winter ○ Longer days/longer sunpath in summer ○ Shorter days/shorter sunpath in winter
● Session 4: ○ higher sun angle
→ sunlight gets concentrated on a smaller area of ground → more intense sunlight → warmer temperature
“Today we will introduce a new component to our model, in order to start thinking about why the Sun is higher in summer, and lower in winter.”

↺ Table of Contents 26
5b
WWT Video
WWT on Projector (10 min)
WorldWide Telescope: Earth’s Tilted Axis
Most people have heard that the Earth’s rotation axis is tilted. What does that mean?
WWT | Earth’s Tilted Axis - topics addressed: ● What does it mean that the Earth’s axis is tilted? ● Which direction does the Earth’s axis point throughout the year? ● How does the tilt look to observers on different sides of the solar system?
Materials (per group fo 4)
- Stack of books
- Seasons placemat
- 6-inch yellow foam Sun
- Plastic ring
- Foam Earth, speared through with dowel rod
- Second foam Earth with rod, with Vicky attached
Activity Sheets (one per student)
Physical Model &
Activity Sheet in groups (15 min)
Modeling: Earth’s Tilted Axis at Each Season
Preparation | Teacher to do the following: ● Hand out Materials (one set per group of 4 students)
○ NOTE: At first, only give students Earth without Vicky attached ● Hand out Session 5 Activity Sheets (1 Activity Sheet per student)
(Watch this instructor video for a demonstration of how students should model this activity correctly.)
(Watch this instructor video for a demonstration of common mistakes students make, and some tips.) Student Modeling | Table-top Earth and Sun:
1. Students orient their Seasons placemat on their stack of books to match the order of the Seasons signs around the room (i.e. the side of the paper that says Winter should face the wall that says Winter).
Instructor should note a particular feature of the Winter wall (e.g. it might have a flag on it) 2. Instructor indicates that the Northern Axis of Earth must always be tilted to face the wall with that
particular feature on it (e.g. the wall with the flag). NOTE: Don’t say “point the axis toward the Winter wall”, because that may confuse students. The axis simply always points in one particular direction, and inside your room, that happens to be the direction of the wall with the flag.)
3. Student groups will stand around their Sun at all four sides, each representing a different Earth season. 4. Students should follow the instructions on their Activity Sheets, and check the boxes off as they go.
○ Students will take turns moving Earth in its orbit around the Sun, before passing it to the next teammate in order, as Earth approaches the next season. Students should be responsible for monitoring how their teammates orient Earth’s axis as it orbits the Sun. Many students will start changing the direction of the tilt of the axis. If they get it wrong, their teammates should alert them to correct the orientation before passing it on.
5. Once a group demonstrates they can complete a revolution accurately, switch their Earth to one with Vicky attached.
○ Students add day/night component to their model at each time of year.
↺ Table of Contents 27
** This is where common confusions about night and day and summer and winter come in. If a group starts their Earth in summer with their Lego Vicky experiencing midday, when they move the Earth halfway around the orbit to winter without rotating the Earth, their Lego Vicky will be experiencing nighttime. Some students will interpret that the person is in winter because the Sun is not shining on them. Make sure they know to rotate the Earth (with the axis keeping the correct orientation), so their Lego Vicky experiences daytime during the winter. **Students will often tilt the rotation axis into the wrong orientation when trying to figure out how to move Lego Vicky from day to night. There are a lot of model components that the students have to attend to, so the teacher should walk around and make sure every group does this step correctly.
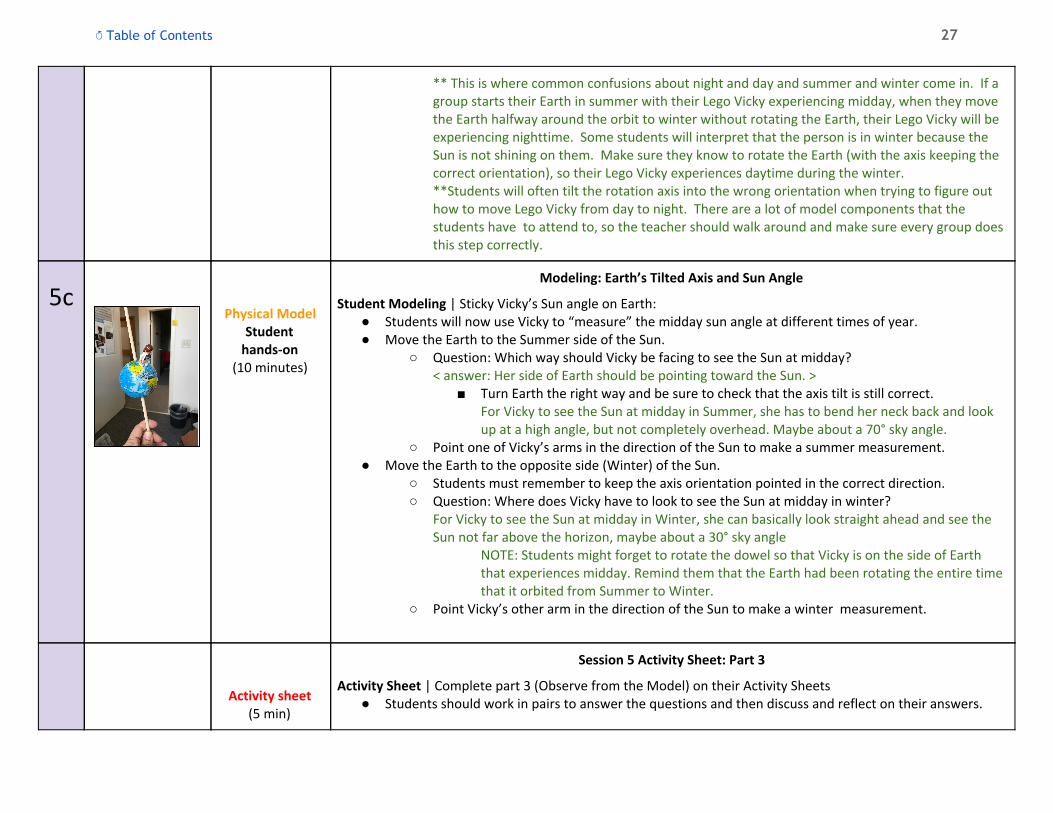
5c
Physical Model Student
hands-on (10 minutes)
Modeling: Earth’s Tilted Axis and Sun Angle
Student Modeling | Sticky Vicky’s Sun angle on Earth: ● Students will now use Vicky to “measure” the midday sun angle at different times of year. ● Move the Earth to the Summer side of the Sun.
○ Question: Which way should Vicky be facing to see the Sun at midday? < answer: Her side of Earth should be pointing toward the Sun. >
■ Turn Earth the right way and be sure to check that the axis tilt is still correct. For Vicky to see the Sun at midday in Summer, she has to bend her neck back and look up at a high angle, but not completely overhead. Maybe about a 70° sky angle.
○ Point one of Vicky’s arms in the direction of the Sun to make a summer measurement. ● Move the Earth to the opposite side (Winter) of the Sun.
○ Students must remember to keep the axis orientation pointed in the correct direction. ○ Question: Where does Vicky have to look to see the Sun at midday in winter?
For Vicky to see the Sun at midday in Winter, she can basically look straight ahead and see the Sun not far above the horizon, maybe about a 30° sky angle
NOTE: Students might forget to rotate the dowel so that Vicky is on the side of Earth that experiences midday. Remind them that the Earth had been rotating the entire time that it orbited from Summer to Winter.
○ Point Vicky’s other arm in the direction of the Sun to make a winter measurement.
Activity sheet
(5 min)
Session 5 Activity Sheet: Part 3
Activity Sheet | Complete part 3 (Observe from the Model) on their Activity Sheets ● Students should work in pairs to answer the questions and then discuss and reflect on their answers.
↺ Table of Contents 28
Student-Partner
Discussion (5 min)
Discussion | Students reflect on the following questions in pairs ● Based on the model, how did Vicky’s midday Sun angle change in Summer vs. Winter? ● Why do you think the midday Sun angle changed between these two seasons?
In the summer, Vicky’s hemisphere is tilted toward the Sun. (It helps to demonstrate this, showing an Earth going from an untilted position to the summer tilt). This pushes Vicky’s part of the Earth lower down compared to where the Sun is, so she has to look UP to see the Sun. In the winter, Vicky’s hemisphere is tilted away from the Sun. (Again, demonstrate going from no tilt to the winter tilt). This pushes Vicky’s part of the Earth higher up compared to where the Sun is, so she has to look DOWN to see the Sun.
SESSION 6: Sun Angle and Your Location on Earth Total Class time: 45-50 minutes
Activity Sheets (for each student) : Tilted Axis and Sun Angle
Lesson Goals 1. Use a physical model (Vicky on a globe) to reinforce how Earth’s tilted axis leads to (1) higher midday Sun angles in the summer (and therefore more
intense light and higher temperatures), and (2) lower midday Sun angles in the winter (and therefore less intense light and lower temperatures).
2. Learn how to interpret 2-dimensional side-view diagrams of the tilted Earth, and be able to determine what season is depicted.
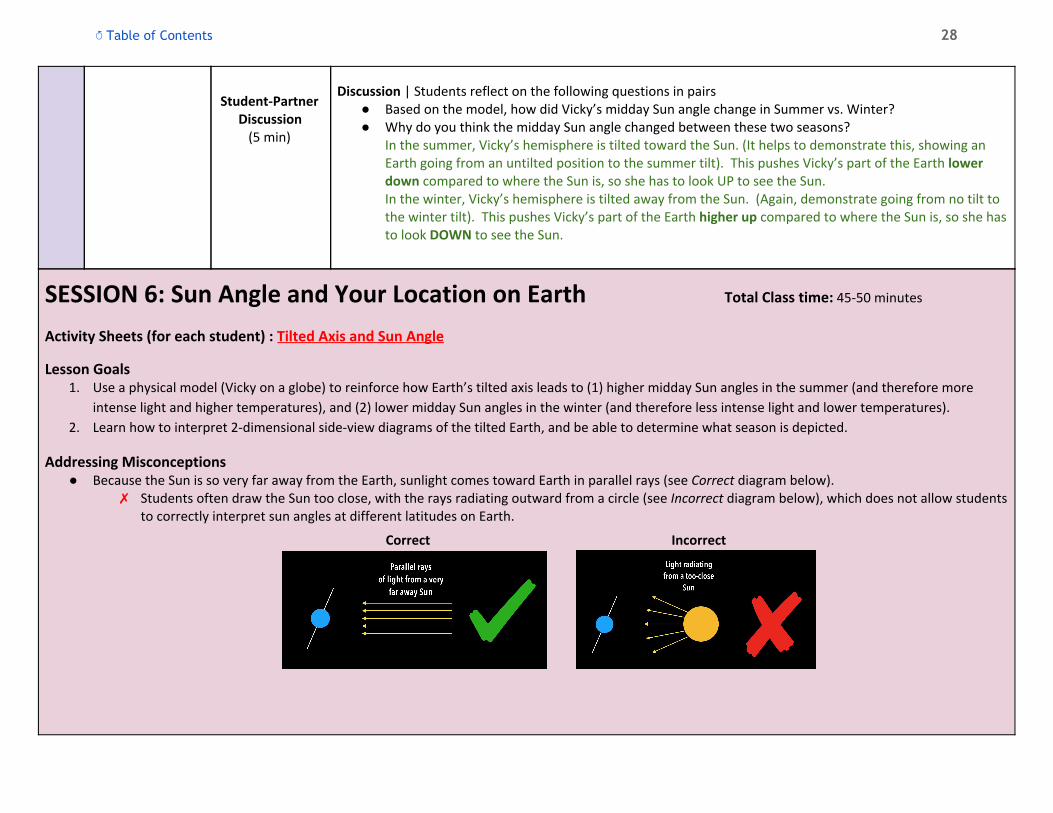
Addressing Misconceptions ● Because the Sun is so very far away from the Earth, sunlight comes toward Earth in parallel rays (see Correct diagram below).
✗ Students often draw the Sun too close, with the rays radiating outward from a circle (see Incorrect diagram below), which does not allow students to correctly interpret sun angles at different latitudes on Earth.
Correct Incorrect

↺ Table of Contents 29
● Earth’s Day/Night Line (a.k.a. the Terminator Line) is always aligned perpendicular to the incoming sunlight, appearing as a vertical dividing line from a side-view of Earth (i.e. the Day/Night Line does not tilt along with Earth’s axis). It is critical for students to get this concept right, in order to understand Day 7 content about why length of day changes from season to season. Students are asked to shade diagrams on Day 6, so be sure they do it correctly. A good Do Now activity would be for students to critique the diagrams below (without the checkmark or X), and figure out which one is wrong and why.
Correct Incorrect
● Interpreting time of day in a side-view diagram of Earth is difficult for students (and anyone, really). Some students see that the person is depicted close to the Day/Night Line, so they incorrectly interpret the time of day as late evening. Around the 4:40 (minute) mark of the WWT video, we show Earth from this side view, then rotate to a view of the entire daylit side of the Earth, to help students see that this person has rotated halfway through the daytime side of Earth, which makes it midday. Make sure to address this misconception when this video segment occurs in this lesson.

↺ Table of Contents 30
Materials Physical Models (1 set for teacher to use, for review and demonstration)
● A foam Earth, speared through with a dowel (dowel represents the Rotation Axis) ● Vicky (Lego figure, to attach to Earth at Boston)
Virtual Model ● Computer to project Session 6 WWT lesson ● Projector ● Speakers
Classroom Setup 1. Set up Sun in the middle of the classroom
2. Connect computer to projector and speakers
3. Link computer to Session 6 WWT instructional video
Materials Format Session 6 | Lesson Outline
6a
Materials (for the teacher)
- 6-inch yellow foam Sun
- Plastic ring
- Foam Earth, speared through with dowel rod
Physical Model Teacher-guided
(5 min)
Learning Target: Earth’s Tilted Axis from a Space-Based Perspective
Review | Go over the models from Session 5 ● Put Sun in middle or room. ● Have a student volunteer to demonstrate the following:
○ How does Earth move around the Sun? (Make sure axis tilts correctly throughout orbit) ● Have a new volunteer demonstrate the following:
○ How is Earth oriented when it is summer in Boston? ○ Attach Vicky to Boston (if she isn’t attached already) What sun angle does Vicky see?
< answer : high sun angle > ○ Place a SunTracker over Vicky’s head. The SunTracker represents the sky the way she
experiences it from her location on the globe. Show the connection between her midday summer sun angle (71°, facing South), and what it looks like from the space-based perspective.
● Have a new volunteer demonstrate the following: ○ How is Earth oriented when it is winter in Boston?

↺ Table of Contents 31
○ What sun angle does Vicky see? < answer : low sun angle >
○ Place a SunTracker over Vicky’s head again. Show the connection between her midday winter sun angle (24°, facing South), and what it looks like from the space-based perspective.
6b
WWT Video
Activity Sheet (one per student)
Video on Projector
(5 min)
Activity Sheet (5 min)
Video on Projector
(5 min)
Activity Sheet (3 min)
Video on Projector
(3 min)
WorldWide Telescope: How Sunlight Travels
The first part of today’s WWT instructional video demonstrates how the Sun emits light, and how sunlight travels to Earth. The representation of sunlight as parallel beams is an important element of learning how to interpret sun angles, relative to a viewing location on the curve of the Earth.
● Move on to the Activity Sheets activity when the prompt comes up on screen. Leave the video on.
Activity Sheets | First 3 questions ● Hand out Activity Sheets to every student (1 per student)
● Students answer the first 3 questions (up through the step, Shade the diagram to show which part of the
Earth is dark). They may work in pairs if they would like.
WWT | Continue the video ● In this sequence students will learn to interpret 2-dimensional side-view diagrams of Earth, like the one
on page 1 of their Activity Sheet (these diagrams appear frequently on standardized tests).
○ There will be several pause points during this sequence where you will discuss what the
different elements of the 2D diagram from the Activity Sheet represent in 3 dimensions.
● Move on to the next Activity Sheets activity when the next Activity Sheet prompt comes up on screen. Leave the video on.
Activity Sheets | Question #4 ● Students answer the Question #4 on their Activity Sheet. They may work in pairs if they would like.
WWT | Continue the video ● In this sequence, students will observe how a space-based view of a person on Earth at midday relates
to an Earth-based view of a person observing the incoming sunlight.

↺ Table of Contents 32
Bonus Questions
Activity Sheet (3 min)
Video on Projector
(3 min)
Activity Sheet (5 min)
Video on Projector
& Activity Sheet
(7 min)
● Move on to the next Activity Sheets activity when the next Activity Sheet prompt comes up on screen. Leave the video on.
Activity Sheets | Finish page 1 ● Students answer the rest of Page 1 (questions #5 and #6) on their Activity Sheet. They may work in pairs
if they would like.
WWT | Continue the video ● In this sequence, students will compare a tilted version of an Earth observer’s horizon to an untilted
version, in order to understand how the incoming sunlight against the angle of the location on Earth
produces the Sun Angle that observers see in their sky.
● Move on to the next Activity Sheets activity when the next Activity Sheet prompt comes up on screen. Leave the video on.
Activity Sheets | Complete page 2 ● Students answer all of Page 2 of their Activity Sheet. They may work in pairs if they would like.
WWT | Continue the video ● In this sequence, students will see how a side-view perspective of an observer on Earth compares
between Summer and Winter. They will see these observers/seasons presented with the horizon both
tilted and then untilted.
● Students should update their responses to questions on Page 1 and Page 2 as appropriate.
● Students can work on bonus questions if they finish early.
6c
Teacher Leads Class Discussion
(5 min)
Recap: What Did You Learn?
Discussion | Understanding Sun Angles from space ● Discuss the key ideas of today’s lesson as a class. ● “Why does the summer have a high sun angle and winter a low sun angle?”
< answer: Summer – your hemisphere is tilted toward sun. This tilted axis lowers your position relative to the Sun, so the Sun looks like it’s high in your sky. >

↺ Table of Contents 33
< answer: Winter – your hemisphere is tilted AWAY from sun. This tilted axis raises your position relative to the Sun, so the Sun looks like it’s low in your sky. >
SESSION 7: Students Explore Hours of Daylight in WWT Total Class time: 45-50 minutes
Activity Sheets (for each student) : Tilt and Day Length
Lesson Goals 1. Use virtual and physical models to understand how the Earth’s tilted axis affects the length of day at different times of year. 2. Make virtual observations, collect data, and compare the number of day/night hours experienced at different locations on Earth using WWT models.
Addressing Misconceptions ● Some students have trouble distinguishing the Axis from the Day/Night Line (Terminator. Half of Earth is always lit, and half is always dark. From a
side-view perspective, these two halves are always divided vertically; not along the axis of rotation. (Note that if the Day/Night Line aligned perfectly with the Rotation Axis, there would be 12 hours of daylight and 12 hours of nighttime all year long. This phenomenon only happens two days a year though (at the fall and spring Equinoxes.)
Correct Incorrect
● Students sometimes think that there are always 12 hours of daylight and 12 hours of darkness. Using the virtual model (WWT), students will observe locations on Earth that spend very different amounts of time in daylight/darkness. Guide students in connecting that when the location is closer to the equator, there is less of a variation in the number of daylight/darkness hours as compared to a location closer to either pole.
● Students sometimes fail to recognize the length of daylight hours as a seasonal mechanism that impacts seasonal warmth on Earth.
○ You can use a cookie-baking analogy to help students see how sunlight intensity and hours of daylight independently impact seasons
■ Sun angle → affects the temperature of the oven. Imagine baking cookies at 250 degrees (less intense, like the winter sun angle) vs. 450
degrees (more intense, like the summer sun angle).

↺ Table of Contents 34
■ Hours of daylight → how long cookies are in oven. Imagine baking cookies for 9 minutes (shorter time, like the winter days) vs. 15
minutes (longer time, like the summer days).
Materials Physical Models (1 set for teacher to use, for review and demonstration)
● Vicky on Earth Globe (for review segment)
Virtual Models ● Computer to project Session 7 WWT lesson ● Projector ● Speakers ● One laptop or chromebook (per pair – or trio if needed – of students to use WWT) ● A Link to Session 7 virtual content for students (should be in an easy-to-access location)
Classroom Setup ● Connect computer to projector and speakers
● Link computer to Session 7 WWT instructional video
● Have chromebooks/laptops ready for distribution to each pair of students for segment 7c
Materials Format Session 7 | Lesson Outline
7a
Teacher Leads
Class discussion (7-8 min)
Learning Target: Earth’s Tilted Axis from a Space-Based Perspective
Review | Go over connections between all previous sessions thus far ● Ask students to consider all the components that affect the seasons they experience in Massachusetts
(or wherever you are located). What things have we determined make a difference so far?
< answers: How high/low the Sun is (Sun angle); tilt of the Earth’s axis with regard to the Sun’s location;
hours of daylight in the summer vs. the winter >
● “Why are there more hours of daylight in summer than in winter? Who has an idea?”
○ Gather your students’ ideas, but you don’t need to share the correct answer just yet.
● Draw the diagram on the left below on the whiteboard.
Have one student shade it in (half lit/half dark).
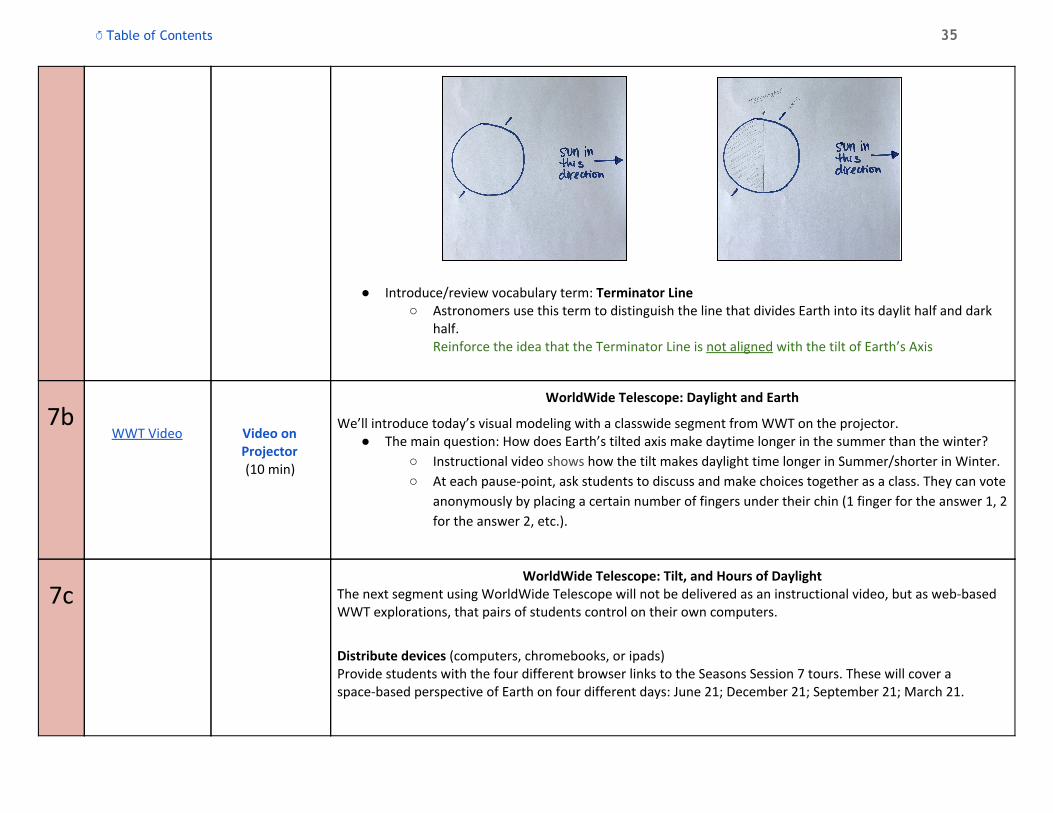
↺ Table of Contents 35
● Introduce/review vocabulary term: Terminator Line ○ Astronomers use this term to distinguish the line that divides Earth into its daylit half and dark
half. Reinforce the idea that the Terminator Line is not aligned with the tilt of Earth’s Axis
7b
WWT Video
Video on Projector (10 min)
WorldWide Telescope: Daylight and Earth
We’ll introduce today’s visual modeling with a classwide segment from WWT on the projector. ● The main question: How does Earth’s tilted axis make daytime longer in the summer than the winter?
○ Instructional video shows how the tilt makes daylight time longer in Summer/shorter in Winter.
○ At each pause-point, ask students to discuss and make choices together as a class. They can vote
anonymously by placing a certain number of fingers under their chin (1 finger for the answer 1, 2
for the answer 2, etc.).
7c
WorldWide Telescope: Tilt, and Hours of Daylight The next segment using WorldWide Telescope will not be delivered as an instructional video, but as web-based WWT explorations, that pairs of students control on their own computers.
Distribute devices (computers, chromebooks, or ipads) Provide students with the four different browser links to the Seasons Session 7 tours. These will cover a space-based perspective of Earth on four different days: June 21; December 21; September 21; March 21.

↺ Table of Contents 36
WWT Interactive
June 21
Activity Sheet
(one per student)
WWT Interactive December 21 September 21
March 21
WWT on
Computers in pairs (10 min)
Activity Sheet (5 min)
WWT on Computers
in pairs &
Activity Sheet (10 min)
Explore | Examine locations on Earth on four different days of the year ● Have students open the first link, for June 21. ● Students will see a screen that says “Activity Sheet Predictions.” They will see a view of Earth on June 21,
and several cities that are marked on the globe in different-colored triangles. ● Students can left-click and drag the mouse to move around, above and below the globe. They can zoom
in and out with their scroll wheel (or by pinching and zooming). ● The goal of this activity is to compare how cities experience different amounts of daylight and darkness
on each date.
Activity Sheets | June 21 ● Students use information they’ve collected from WWT about day and night to answer questions about
June 21 on the Activity Sheet. ● Once they have finished, they can close this page in their browser, and open the next WWT link in the
list.
WWT & Activity Sheets | December 21 & September 21 ● Students should repeat their exploration from June 21 for the next two days listed on their Activity
Sheet: December 21 and September 21. ● As students explore Earth on these two days, they should answer the questions for each day on their
Activity Sheets. ● When they have finished answering questions for September 21, they should answer all of the
Reflection Questions on Page 2 of their Activity Sheet. ● If students finish early (or if they specifically ask what happens on March 21), they can explore Earth on
March 21.
7d
Teacher Leads
Class Discussion (7-8 min)
Recap: What Did You Learn?
Discussion | Understanding how daytime and nighttime changes for different locations on Earth ● “Why does a tilted axis lead to different amounts of daytime/nighttime at different times of year?”
< answer: When the Northern Hemisphere is tilted towards the Sun, the Northern Hemisphere is tipped
into the daylight half of the Terminator Line. As a result, the Northern Hemisphere spends more of the
24-hour rotation on the side of Earth getting direct light from Sun. >
DON’T FORGET: The Rotation Axis is not aligned with the Terminator Line.
● “How does having more hours of daylight impact temperature in Boston?
How does having a higher sun angle impact temperature in Boston?”

↺ Table of Contents 37
○ Remember the cookie-baking analogy:
■ Sun angle → affects the temperature of the oven. Imagine baking cookies at 250
degrees (less intense, like the winter sun angle) vs. 450 degrees (more intense, like the
summer sun angle).
■ Hours of daylight → how long cookies are in oven. Imagine baking cookies for 9 minutes
(shorter time, like the winter days) vs. 15 minutes (longer time, like the summer days).
SESSION 8: Does Distance Affect Seasons? Total Class time: 45-50 minutes
Activity Sheets (for each student) : Earth’s Orbit
Lesson Goals 1. Learn that the shape of Earth’s orbit is almost completely circular (not perfectly circular, but still, so close that you might as well assume it is).
✗ Many students believe Earth is closer to the Sun in its orbit during Summer than it is during Winter. 2. Recognize that the Earth’s tilt does NOT move your location on the Earth significantly closer to the Sun in Summer than in Winter.
✗ A few students believe their location on Earth moves closer to the Sun in Summer because of the tilt of the axis. (It does, but it is not by enough to make a difference)
3. Recap what does cause Seasons on Earth: Earth’s tilt. ○ Higher sun angle in Summer → more intense light; more hours of daylight ○ Lower sun angle in Winter → less intense light; fewer hours of daylight ○ Medium sun angle in fall/spring → medium-intensity light; 12 hours of both daylight/nighttime on the equinoxes
Misconceptions Addressed ● Earth’s orbit is elliptical, but the eccentricity (amount of ellipticity) is so small that it is essentially circular. Why, then, do so many people think the shape
of Earth’s orbit is highly elliptical? This popular misconception is the result of attempts to depict a 3-dimensional orbit from a side-view in a two-dimensional diagram (see representation on the right in the image below). People don’t realize that they are looking at Earth’s orbit around the Sun from the side, not overhead.

↺ Table of Contents 38
● Students often don’t recognize that the representation on the right in the image above is a tilted side-view. As a result, they incorrectly assume that Earth is really close to the Sun at some times of the year, and much farther away at others.
● Students who understand that Earth’s orbit is essentially circular sometimes have a different misconception about distance. They think that we experience summer because our location on Earth is tilted toward the Sun, making our position closer to the Sun. While this is technically true (Boston tilts closer by 3,400 km during Summer), the distance between Earth and Sun is so large (150,000,000 km on average), that the comparative change in distance resulting from the tilt is insignificant in affecting the seasonal variation.
Materials
Virtual Models ● Computer to project Session 8 WWT lesson ● Projector ● Speakers ● Key Terms and Key Ideas sheet
Classroom Setup
● Connect computer to projector and speakers
● Link computer to Session 8 WWT instructional video
↺ Table of Contents 39
Materials Format Session 8 | Lesson Outline
8a
Activity Sheet (one per student)
Activity Sheet (7-8 min)
Session 8 Activity Sheet: What Shape is Earth’s Orbit?
Students should work in pairs complete the first two questions (What Shape Is Earth’s Orbit? and Distance from Earth to Sun) on Page 1 of their Activity Sheet.
● What Shape Is Earth’s Orbit? ○ Students should sketch what they think Earth’s orbit around the Sun looks like from overhead.
(Do not prompt or tell them that it is circular! Let them draw whatever they think it is coming into class.)
○ Complete steps A-C on Activity Sheet ● Distance from Earth to Sun
○ Predict: At what time of year (if any) do you think Earth is closest to the Sun?
8b
WWT Video
Video on Projector (7-8 min)
Activity Sheet (7-8 min)
WorldWide Telescope: The Shape of Earth’s Orbit
In this segment of the instructional video, we’ll address the first of the most common misconceptions relating to Seasons: the shape of Earth’s orbit.
● The first pause-point asks students to identify which is the correct shape of Earth’s orbit. Have students vote as a class, then let the video continue.
● “Why do so many people think the Earth’s orbit is elliptical?” < answer: they don’t realize that 2D representations depict a tilted side-view perspective >
● Video eventually will depict Earth-Sun distances at different times of the year. ● When the video pauses at the first distance around the Sun, have the class vote:
● “What time of year do you think it is in Boston when Earth is closest to Sun?” Many students will be surprised. It’s actually Winter in Boston’s when Earth is closest to Sun.
Activity Sheet | Data Table, Compare and Analyze, and Reflect ● Have students work in pairs to complete the following on their Activity Sheets:
○ Fill in data in the Data Table on page 1, recording information from the WWT instructional video showing different distances in Earth’s orbit around the Sun.
○ Complete the Compare and Analyze questions on page 2, using information from the data table on page 1.
○ Write an answer to the Reflect question, after deciding whether to agree or disagree with the prompt. Be sure to explain your decision.
↺ Table of Contents 40
Class Discussion
(5 min)
Discussion | 147,000,000 km vs. 151,000,000 km
○ These distances are as close or far as Earth ever gets from the Sun. ■ “Is this a difference that matters?” ■ The difference in distance is less than 3%. Does that seem important?
○ Distances from the Sun can affect how warm/cold a planet is, but the differences in distance have to be big enough to make a difference in the temperature. Consider the different distances to the Sun for each planet in our Solar System.
■ Mercury is 60,000,000 km from Sun. Is it hotter or colder there than on Earth? ■ Pluto is 4,000,000,000 km from Sun. Is it hotter or colder there than on Earth?
Discussion | Does Tilt Affect Distance?
● Earth’s Tilt during a Northern Hemisphere summer brings Boston roughly 3,400 km closer to the Sun compared to winter.
● Compared to the changing distances between Earth and the Sun (147,000,000 km to 151,000,000 km), does this distance matter? Does it have any impact on the Seasons, or the temperature you feel on Earth?
8d
Key Terms Sheet (one per student)
Teacher Leads Class Discussion
(10 min)
Activity Sheet (5 min)
Recap: What Did You Learn?
Discussion | Connecting all the pieces together, across the 8 sessions ● Hand out the key terms and key ideas sheet to each student for review. ● “What are seasonal differences do you observe during different times of year?”
○ Summer – higher midday sun angle; longer days ○ Winter – lower midday sun angle; shorter days ○ Fall/Spring – medium midday sun angle; day and night are both 12 hours on the Equinoxes
● “What causes the midday Sun angle to change through the year?” ○ Earth’s tilted rotational axis
● “How does changing the Sun angle impact temperature?” ○ Higher sun angle → more direct/intense sunlight → warmer temperatures ○ Lower sun angle → less direct/intense sunlight → cooler temperatures
● “What causes the length of daylight hours to change through the year?” ○ Earth’s tilted rotational axis
Activity Sheet | Recap Questions
● Students should work in pairs to complete the Recap Questions on page 2 of their Activity Sheets (or they should finish for homework if there isn’t enough time to finish in class.)
↺ Table of Contents 41
ThinkSpace Team Contact Information
Pat Udomprasert, Project Director | [email protected] | 617.495.7832
Harry Houghton | [email protected] Sue Sunbury | [email protected] Erika Wright | [email protected]
ThinkSpace was developed in collaboration with the Center for Astrophysics | Harvard & Smithsonian and Penn State University. This material is based upon work supported by the National Science Foundation under Grant No. DRL-1503395 & DRL-1502798. Any opinions, findings, and conclusions or recommendations expressed in this material are those of the authors and do not necessarily reflect the views of the National Science Foundation.