Embed Size (px)
Citation preview

TheFinancialEdge™
Converting to Payroll 7

101811
©2011 Blackbaud, Inc. This publication, or any part thereof, may not be reproduced or transmitted in any form or by any means, electronic, or mechanical, including photocopying, recording, storage in an information retrieval system, or otherwise, without the prior written permission of Blackbaud, Inc.
The information in this manual has been carefully checked and is believed to be accurate. Blackbaud, Inc., assumes no responsibility for any inaccuracies, errors, or omissions in this manual. In no event will Blackbaud, Inc., be liable for direct, indirect, special, incidental, or consequential damages resulting from any defect or omission in this manual, even if advised of the possibility of damages.
In the interest of continuing product development, Blackbaud, Inc., reserves the right to make improvements in this manual and the products it describes at any time, without notice or obligation.
All Blackbaud product names appearing herein are trademarks or registered trademarks of Blackbaud, Inc.
All other products and company names mentioned herein are trademarks of their respective holder.
FE-ConvertingToPayroll7-101811

Contents
WELCOME . . . . . . . . . . . . . . . . . . . . . . . . . . . . . . . . . . . . . . . . . . . . . . . . . . . . . . . . . 1
Payroll 7 New Features and Benefits . . . . . . . . . . . . . . . . . . . . . . . . . . . . . . . . . . . . . . . . . . . . . . . . . . . . . 3Advanced Payroll Budgeting . . . . . . . . . . . . . . . . . . . . . . . . . . . . . . . . . . . . . . . . . . . . . . . . . . . . . . . . . . . . 3Attendance Plans . . . . . . . . . . . . . . . . . . . . . . . . . . . . . . . . . . . . . . . . . . . . . . . . . . . . . . . . . . . . . . . . . . . . 3Attendance Types . . . . . . . . . . . . . . . . . . . . . . . . . . . . . . . . . . . . . . . . . . . . . . . . . . . . . . . . . . . . . . . . . . . . 3Banks, Checks, and EFT Notices . . . . . . . . . . . . . . . . . . . . . . . . . . . . . . . . . . . . . . . . . . . . . . . . . . . . . . . . . 4Benefit Records . . . . . . . . . . . . . . . . . . . . . . . . . . . . . . . . . . . . . . . . . . . . . . . . . . . . . . . . . . . . . . . . . . . . . . 4Dashboard . . . . . . . . . . . . . . . . . . . . . . . . . . . . . . . . . . . . . . . . . . . . . . . . . . . . . . . . . . . . . . . . . . . . . . . . . . 4Deductions . . . . . . . . . . . . . . . . . . . . . . . . . . . . . . . . . . . . . . . . . . . . . . . . . . . . . . . . . . . . . . . . . . . . . . . . . . 4Departments . . . . . . . . . . . . . . . . . . . . . . . . . . . . . . . . . . . . . . . . . . . . . . . . . . . . . . . . . . . . . . . . . . . . . . . . 5Employee Records . . . . . . . . . . . . . . . . . . . . . . . . . . . . . . . . . . . . . . . . . . . . . . . . . . . . . . . . . . . . . . . . . . . . 5Employment and Pay History . . . . . . . . . . . . . . . . . . . . . . . . . . . . . . . . . . . . . . . . . . . . . . . . . . . . . . . . . . . 5Events . . . . . . . . . . . . . . . . . . . . . . . . . . . . . . . . . . . . . . . . . . . . . . . . . . . . . . . . . . . . . . . . . . . . . . . . . . . . . . 5Expense and Liability Distributions . . . . . . . . . . . . . . . . . . . . . . . . . . . . . . . . . . . . . . . . . . . . . . . . . . . . . . 6GL Distributions and Account Masking . . . . . . . . . . . . . . . . . . . . . . . . . . . . . . . . . . . . . . . . . . . . . . . . . . . 6Integration with The Financial Edge . . . . . . . . . . . . . . . . . . . . . . . . . . . . . . . . . . . . . . . . . . . . . . . . . . . . . 6Payroll Processing Page . . . . . . . . . . . . . . . . . . . . . . . . . . . . . . . . . . . . . . . . . . . . . . . . . . . . . . . . . . . . . . . 6Pay Types . . . . . . . . . . . . . . . . . . . . . . . . . . . . . . . . . . . . . . . . . . . . . . . . . . . . . . . . . . . . . . . . . . . . . . . . . . . 7Positions . . . . . . . . . . . . . . . . . . . . . . . . . . . . . . . . . . . . . . . . . . . . . . . . . . . . . . . . . . . . . . . . . . . . . . . . . . . 7Reports . . . . . . . . . . . . . . . . . . . . . . . . . . . . . . . . . . . . . . . . . . . . . . . . . . . . . . . . . . . . . . . . . . . . . . . . . . . . . 7Schedules . . . . . . . . . . . . . . . . . . . . . . . . . . . . . . . . . . . . . . . . . . . . . . . . . . . . . . . . . . . . . . . . . . . . . . . . . . . 8Streamlined Time Entry . . . . . . . . . . . . . . . . . . . . . . . . . . . . . . . . . . . . . . . . . . . . . . . . . . . . . . . . . . . . . . . 8Time Tracking . . . . . . . . . . . . . . . . . . . . . . . . . . . . . . . . . . . . . . . . . . . . . . . . . . . . . . . . . . . . . . . . . . . . . . . 8Tracks and Checklists . . . . . . . . . . . . . . . . . . . . . . . . . . . . . . . . . . . . . . . . . . . . . . . . . . . . . . . . . . . . . . . . . 8
Differences Between Payroll 6.4 and Version 7 . . . . . . . . . . . . . . . . . . . . . . . . . . . . . . . . . . . . . . . . . . . . 9Expense and Liability Distributions . . . . . . . . . . . . . . . . . . . . . . . . . . . . . . . . . . . . . . . . . . . . . . . . . . . . . . 9Benefits . . . . . . . . . . . . . . . . . . . . . . . . . . . . . . . . . . . . . . . . . . . . . . . . . . . . . . . . . . . . . . . . . . . . . . . . . . . . 9Track Employment and Pay History . . . . . . . . . . . . . . . . . . . . . . . . . . . . . . . . . . . . . . . . . . . . . . . . . . . . . . 9Employee Records . . . . . . . . . . . . . . . . . . . . . . . . . . . . . . . . . . . . . . . . . . . . . . . . . . . . . . . . . . . . . . . . . . . 10Time Tracking . . . . . . . . . . . . . . . . . . . . . . . . . . . . . . . . . . . . . . . . . . . . . . . . . . . . . . . . . . . . . . . . . . . . . . 10Deductions . . . . . . . . . . . . . . . . . . . . . . . . . . . . . . . . . . . . . . . . . . . . . . . . . . . . . . . . . . . . . . . . . . . . . . . . . 10Pay Types . . . . . . . . . . . . . . . . . . . . . . . . . . . . . . . . . . . . . . . . . . . . . . . . . . . . . . . . . . . . . . . . . . . . . . . . . . 11Attendance Types . . . . . . . . . . . . . . . . . . . . . . . . . . . . . . . . . . . . . . . . . . . . . . . . . . . . . . . . . . . . . . . . . . . 11Attendance Plans . . . . . . . . . . . . . . . . . . . . . . . . . . . . . . . . . . . . . . . . . . . . . . . . . . . . . . . . . . . . . . . . . . . 11Schedules . . . . . . . . . . . . . . . . . . . . . . . . . . . . . . . . . . . . . . . . . . . . . . . . . . . . . . . . . . . . . . . . . . . . . . . . . . 12Departments . . . . . . . . . . . . . . . . . . . . . . . . . . . . . . . . . . . . . . . . . . . . . . . . . . . . . . . . . . . . . . . . . . . . . . . 12Positions . . . . . . . . . . . . . . . . . . . . . . . . . . . . . . . . . . . . . . . . . . . . . . . . . . . . . . . . . . . . . . . . . . . . . . . . . . 12Payroll Processing Page . . . . . . . . . . . . . . . . . . . . . . . . . . . . . . . . . . . . . . . . . . . . . . . . . . . . . . . . . . . . . . 12
Payroll Forms, Checks, and EFT Notes . . . . . . . . . . . . . . . . . . . . . . . . . . . . . . . . . . . . . . . . . . . . . . . . . . . 13Payroll Budgeting . . . . . . . . . . . . . . . . . . . . . . . . . . . . . . . . . . . . . . . . . . . . . . . . . . . . . . . . . . . . . . . . . . . 13Administration . . . . . . . . . . . . . . . . . . . . . . . . . . . . . . . . . . . . . . . . . . . . . . . . . . . . . . . . . . . . . . . . . . . . . 13Banks . . . . . . . . . . . . . . . . . . . . . . . . . . . . . . . . . . . . . . . . . . . . . . . . . . . . . . . . . . . . . . . . . . . . . . . . . . . . . 13Payroll Reports . . . . . . . . . . . . . . . . . . . . . . . . . . . . . . . . . . . . . . . . . . . . . . . . . . . . . . . . . . . . . . . . . . . . . 13Tax Reports . . . . . . . . . . . . . . . . . . . . . . . . . . . . . . . . . . . . . . . . . . . . . . . . . . . . . . . . . . . . . . . . . . . . . . . . 13New Reports . . . . . . . . . . . . . . . . . . . . . . . . . . . . . . . . . . . . . . . . . . . . . . . . . . . . . . . . . . . . . . . . . . . . . . . 14Removed or Renamed Reports . . . . . . . . . . . . . . . . . . . . . . . . . . . . . . . . . . . . . . . . . . . . . . . . . . . . . . . . 14Comparing Report Categories in Payroll 6.4 and Version 7 . . . . . . . . . . . . . . . . . . . . . . . . . . . . . . . . . . 16
PAYROLL 7 CONVERSION. . . . . . . . . . . . . . . . . . . . . . . . . . . . . . . . . . . . . . . . . . . . . . 19
Recommended Steps . . . . . . . . . . . . . . . . . . . . . . . . . . . . . . . . . . . . . . . . . . . . . . . . . . . . . . . . . . . . . . . . 20Backing Up Your Database . . . . . . . . . . . . . . . . . . . . . . . . . . . . . . . . . . . . . . . . . . . . . . . . . . . . . . . . . . . . 20Updating Your Software . . . . . . . . . . . . . . . . . . . . . . . . . . . . . . . . . . . . . . . . . . . . . . . . . . . . . . . . . . . . . . 22Pre-conversion Considerations . . . . . . . . . . . . . . . . . . . . . . . . . . . . . . . . . . . . . . . . . . . . . . . . . . . . . . . . 22
Attendance Tracking . . . . . . . . . . . . . . . . . . . . . . . . . . . . . . . . . . . . . . . . . . . . . . . . . . . . . . . . . . . . . . . . . 22Calculations . . . . . . . . . . . . . . . . . . . . . . . . . . . . . . . . . . . . . . . . . . . . . . . . . . . . . . . . . . . . . . . . . . . . . . . . 23Checks . . . . . . . . . . . . . . . . . . . . . . . . . . . . . . . . . . . . . . . . . . . . . . . . . . . . . . . . . . . . . . . . . . . . . . . . . . . . 23Departments . . . . . . . . . . . . . . . . . . . . . . . . . . . . . . . . . . . . . . . . . . . . . . . . . . . . . . . . . . . . . . . . . . . . . . . 23Existing Time Sheets . . . . . . . . . . . . . . . . . . . . . . . . . . . . . . . . . . . . . . . . . . . . . . . . . . . . . . . . . . . . . . . . . 24GL Distributions . . . . . . . . . . . . . . . . . . . . . . . . . . . . . . . . . . . . . . . . . . . . . . . . . . . . . . . . . . . . . . . . . . . . 24Employee Hire Dates . . . . . . . . . . . . . . . . . . . . . . . . . . . . . . . . . . . . . . . . . . . . . . . . . . . . . . . . . . . . . . . . 24Historic Entry . . . . . . . . . . . . . . . . . . . . . . . . . . . . . . . . . . . . . . . . . . . . . . . . . . . . . . . . . . . . . . . . . . . . . . . 24Interfund Sets . . . . . . . . . . . . . . . . . . . . . . . . . . . . . . . . . . . . . . . . . . . . . . . . . . . . . . . . . . . . . . . . . . . . . . 25Multiple Payrolls . . . . . . . . . . . . . . . . . . . . . . . . . . . . . . . . . . . . . . . . . . . . . . . . . . . . . . . . . . . . . . . . . . . . 25Other Pay and Reduction/Deduction Records . . . . . . . . . . . . . . . . . . . . . . . . . . . . . . . . . . . . . . . . . . . . 25Positions . . . . . . . . . . . . . . . . . . . . . . . . . . . . . . . . . . . . . . . . . . . . . . . . . . . . . . . . . . . . . . . . . . . . . . . . . . 25Posting in Detail . . . . . . . . . . . . . . . . . . . . . . . . . . . . . . . . . . . . . . . . . . . . . . . . . . . . . . . . . . . . . . . . . . . . 26Regular Pay . . . . . . . . . . . . . . . . . . . . . . . . . . . . . . . . . . . . . . . . . . . . . . . . . . . . . . . . . . . . . . . . . . . . . . . . 26Reports . . . . . . . . . . . . . . . . . . . . . . . . . . . . . . . . . . . . . . . . . . . . . . . . . . . . . . . . . . . . . . . . . . . . . . . . . . . 26Tax Settings . . . . . . . . . . . . . . . . . . . . . . . . . . . . . . . . . . . . . . . . . . . . . . . . . . . . . . . . . . . . . . . . . . . . . . . . 26Terminology Changes . . . . . . . . . . . . . . . . . . . . . . . . . . . . . . . . . . . . . . . . . . . . . . . . . . . . . . . . . . . . . . . . 27Time Entry . . . . . . . . . . . . . . . . . . . . . . . . . . . . . . . . . . . . . . . . . . . . . . . . . . . . . . . . . . . . . . . . . . . . . . . . . 27Schedules . . . . . . . . . . . . . . . . . . . . . . . . . . . . . . . . . . . . . . . . . . . . . . . . . . . . . . . . . . . . . . . . . . . . . . . . . 27System Preferences . . . . . . . . . . . . . . . . . . . . . . . . . . . . . . . . . . . . . . . . . . . . . . . . . . . . . . . . . . . . . . . . . 29Update Accounts . . . . . . . . . . . . . . . . . . . . . . . . . . . . . . . . . . . . . . . . . . . . . . . . . . . . . . . . . . . . . . . . . . . . 29
Installing the Payroll Conversion Utility . . . . . . . . . . . . . . . . . . . . . . . . . . . . . . . . . . . . . . . . . . . . . . . . . 29Converting Your Payroll 6.4 Data . . . . . . . . . . . . . . . . . . . . . . . . . . . . . . . . . . . . . . . . . . . . . . . . . . . . . . . 30Understanding the Exception Report . . . . . . . . . . . . . . . . . . . . . . . . . . . . . . . . . . . . . . . . . . . . . . . . . . . 35Post-Conversion Tasks . . . . . . . . . . . . . . . . . . . . . . . . . . . . . . . . . . . . . . . . . . . . . . . . . . . . . . . . . . . . . . . 36Accessing Additional Documentation . . . . . . . . . . . . . . . . . . . . . . . . . . . . . . . . . . . . . . . . . . . . . . . . . . . 37
SAMPLE PAYROLL CONVERSION PLAN. . . . . . . . . . . . . . . . . . . . . . . . . . . . . . . . . . . . . 41
Implementation . . . . . . . . . . . . . . . . . . . . . . . . . . . . . . . . . . . . . . . . . . . . . . . . . . . . . . . . . . . . . . . . . . . . 43

Project Planning . . . . . . . . . . . . . . . . . . . . . . . . . . . . . . . . . . . . . . . . . . . . . . . . . . . . . . . . . . . . . . . . . . . . 43Hardware and Technical Services . . . . . . . . . . . . . . . . . . . . . . . . . . . . . . . . . . . . . . . . . . . . . . . . . . . . . . . 45Training . . . . . . . . . . . . . . . . . . . . . . . . . . . . . . . . . . . . . . . . . . . . . . . . . . . . . . . . . . . . . . . . . . . . . . . . . . . 46Data Preparation . . . . . . . . . . . . . . . . . . . . . . . . . . . . . . . . . . . . . . . . . . . . . . . . . . . . . . . . . . . . . . . . . . . . 46Data Cleanup . . . . . . . . . . . . . . . . . . . . . . . . . . . . . . . . . . . . . . . . . . . . . . . . . . . . . . . . . . . . . . . . . . . . . . . 47Implementation Sign-off . . . . . . . . . . . . . . . . . . . . . . . . . . . . . . . . . . . . . . . . . . . . . . . . . . . . . . . . . . . . . 47

1chapter
Welcome
Payroll 7 New Features and Benefits . . . . . . . . . . . . . . . . . . . . . . . . . . . . . . . . . . . . . . . . . . . . . . . . . . . . . . . . . . . . . 3Advanced Payroll Budgeting. . . . . . . . . . . . . . . . . . . . . . . . . . . . . . . . . . . . . . . . . . . . . . . . . . . . . . . . . . . . . . . . . . . . . . . 3Attendance Plans . . . . . . . . . . . . . . . . . . . . . . . . . . . . . . . . . . . . . . . . . . . . . . . . . . . . . . . . . . . . . . . . . . . . . . . . . . . . . . . 3Attendance Types . . . . . . . . . . . . . . . . . . . . . . . . . . . . . . . . . . . . . . . . . . . . . . . . . . . . . . . . . . . . . . . . . . . . . . . . . . . . . . . 3Banks, Checks, and EFT Notices . . . . . . . . . . . . . . . . . . . . . . . . . . . . . . . . . . . . . . . . . . . . . . . . . . . . . . . . . . . . . . . . . . . . 4Benefit Records . . . . . . . . . . . . . . . . . . . . . . . . . . . . . . . . . . . . . . . . . . . . . . . . . . . . . . . . . . . . . . . . . . . . . . . . . . . . . . . . . 4Dashboard . . . . . . . . . . . . . . . . . . . . . . . . . . . . . . . . . . . . . . . . . . . . . . . . . . . . . . . . . . . . . . . . . . . . . . . . . . . . . . . . . . . . . 4Deductions. . . . . . . . . . . . . . . . . . . . . . . . . . . . . . . . . . . . . . . . . . . . . . . . . . . . . . . . . . . . . . . . . . . . . . . . . . . . . . . . . . . . . 4Departments . . . . . . . . . . . . . . . . . . . . . . . . . . . . . . . . . . . . . . . . . . . . . . . . . . . . . . . . . . . . . . . . . . . . . . . . . . . . . . . . . . . 5Employee Records. . . . . . . . . . . . . . . . . . . . . . . . . . . . . . . . . . . . . . . . . . . . . . . . . . . . . . . . . . . . . . . . . . . . . . . . . . . . . . . 5Employment and Pay History . . . . . . . . . . . . . . . . . . . . . . . . . . . . . . . . . . . . . . . . . . . . . . . . . . . . . . . . . . . . . . . . . . . . . . 5Events. . . . . . . . . . . . . . . . . . . . . . . . . . . . . . . . . . . . . . . . . . . . . . . . . . . . . . . . . . . . . . . . . . . . . . . . . . . . . . . . . . . . . . . . . 5Expense and Liability Distributions . . . . . . . . . . . . . . . . . . . . . . . . . . . . . . . . . . . . . . . . . . . . . . . . . . . . . . . . . . . . . . . . . 6GL Distributions and Account Masking . . . . . . . . . . . . . . . . . . . . . . . . . . . . . . . . . . . . . . . . . . . . . . . . . . . . . . . . . . . . . . 6Integration with The Financial Edge . . . . . . . . . . . . . . . . . . . . . . . . . . . . . . . . . . . . . . . . . . . . . . . . . . . . . . . . . . . . . . . . 6Payroll Processing Page. . . . . . . . . . . . . . . . . . . . . . . . . . . . . . . . . . . . . . . . . . . . . . . . . . . . . . . . . . . . . . . . . . . . . . . . . . . 6Pay Types . . . . . . . . . . . . . . . . . . . . . . . . . . . . . . . . . . . . . . . . . . . . . . . . . . . . . . . . . . . . . . . . . . . . . . . . . . . . . . . . . . . . . . 7Positions. . . . . . . . . . . . . . . . . . . . . . . . . . . . . . . . . . . . . . . . . . . . . . . . . . . . . . . . . . . . . . . . . . . . . . . . . . . . . . . . . . . . . . . 7Reports. . . . . . . . . . . . . . . . . . . . . . . . . . . . . . . . . . . . . . . . . . . . . . . . . . . . . . . . . . . . . . . . . . . . . . . . . . . . . . . . . . . . . . . . 7Schedules . . . . . . . . . . . . . . . . . . . . . . . . . . . . . . . . . . . . . . . . . . . . . . . . . . . . . . . . . . . . . . . . . . . . . . . . . . . . . . . . . . . . . . 8Streamlined Time Entry . . . . . . . . . . . . . . . . . . . . . . . . . . . . . . . . . . . . . . . . . . . . . . . . . . . . . . . . . . . . . . . . . . . . . . . . . . 8Time Tracking . . . . . . . . . . . . . . . . . . . . . . . . . . . . . . . . . . . . . . . . . . . . . . . . . . . . . . . . . . . . . . . . . . . . . . . . . . . . . . . . . . 8Tracks and Checklists. . . . . . . . . . . . . . . . . . . . . . . . . . . . . . . . . . . . . . . . . . . . . . . . . . . . . . . . . . . . . . . . . . . . . . . . . . . . . 8Differences Between Payroll 6.4 and Version 7. . . . . . . . . . . . . . . . . . . . . . . . . . . . . . . . . . . . . . . . . . . . . . . . . . . . . 9Expense and Liability Distributions . . . . . . . . . . . . . . . . . . . . . . . . . . . . . . . . . . . . . . . . . . . . . . . . . . . . . . . . . . . . . . . . . 9Benefits . . . . . . . . . . . . . . . . . . . . . . . . . . . . . . . . . . . . . . . . . . . . . . . . . . . . . . . . . . . . . . . . . . . . . . . . . . . . . . . . . . . . . . . 9Track Employment and Pay History . . . . . . . . . . . . . . . . . . . . . . . . . . . . . . . . . . . . . . . . . . . . . . . . . . . . . . . . . . . . . . . . . 9Employee Records. . . . . . . . . . . . . . . . . . . . . . . . . . . . . . . . . . . . . . . . . . . . . . . . . . . . . . . . . . . . . . . . . . . . . . . . . . . . . . 10Time Tracking . . . . . . . . . . . . . . . . . . . . . . . . . . . . . . . . . . . . . . . . . . . . . . . . . . . . . . . . . . . . . . . . . . . . . . . . . . . . . . . . . 10Deductions. . . . . . . . . . . . . . . . . . . . . . . . . . . . . . . . . . . . . . . . . . . . . . . . . . . . . . . . . . . . . . . . . . . . . . . . . . . . . . . . . . . . 10Pay Types . . . . . . . . . . . . . . . . . . . . . . . . . . . . . . . . . . . . . . . . . . . . . . . . . . . . . . . . . . . . . . . . . . . . . . . . . . . . . . . . . . . . . 11Attendance Types . . . . . . . . . . . . . . . . . . . . . . . . . . . . . . . . . . . . . . . . . . . . . . . . . . . . . . . . . . . . . . . . . . . . . . . . . . . . . . 11Attendance Plans . . . . . . . . . . . . . . . . . . . . . . . . . . . . . . . . . . . . . . . . . . . . . . . . . . . . . . . . . . . . . . . . . . . . . . . . . . . . . . 11Schedules . . . . . . . . . . . . . . . . . . . . . . . . . . . . . . . . . . . . . . . . . . . . . . . . . . . . . . . . . . . . . . . . . . . . . . . . . . . . . . . . . . . . . 12Departments . . . . . . . . . . . . . . . . . . . . . . . . . . . . . . . . . . . . . . . . . . . . . . . . . . . . . . . . . . . . . . . . . . . . . . . . . . . . . . . . . . 12Positions. . . . . . . . . . . . . . . . . . . . . . . . . . . . . . . . . . . . . . . . . . . . . . . . . . . . . . . . . . . . . . . . . . . . . . . . . . . . . . . . . . . . . . 12Payroll Processing Page. . . . . . . . . . . . . . . . . . . . . . . . . . . . . . . . . . . . . . . . . . . . . . . . . . . . . . . . . . . . . . . . . . . . . . . . . . 12Payroll Forms, Checks, and EFT Notes . . . . . . . . . . . . . . . . . . . . . . . . . . . . . . . . . . . . . . . . . . . . . . . . . . . . . . . . . . . . . . 13Payroll Budgeting . . . . . . . . . . . . . . . . . . . . . . . . . . . . . . . . . . . . . . . . . . . . . . . . . . . . . . . . . . . . . . . . . . . . . . . . . . . . . . 13Administration. . . . . . . . . . . . . . . . . . . . . . . . . . . . . . . . . . . . . . . . . . . . . . . . . . . . . . . . . . . . . . . . . . . . . . . . . . . . . . . . . 13Banks . . . . . . . . . . . . . . . . . . . . . . . . . . . . . . . . . . . . . . . . . . . . . . . . . . . . . . . . . . . . . . . . . . . . . . . . . . . . . . . . . . . . . . . . 13Payroll Reports . . . . . . . . . . . . . . . . . . . . . . . . . . . . . . . . . . . . . . . . . . . . . . . . . . . . . . . . . . . . . . . . . . . . . . . . . . . . . . . . 13Tax Reports . . . . . . . . . . . . . . . . . . . . . . . . . . . . . . . . . . . . . . . . . . . . . . . . . . . . . . . . . . . . . . . . . . . . . . . . . . . . . . . . . . . 13

2 CH A PT E R
New Reports . . . . . . . . . . . . . . . . . . . . . . . . . . . . . . . . . . . . . . . . . . . . . . . . . . . . . . . . . . . . . . . . . . . . . . . . . . . . . . . . . . 14Removed or Renamed Reports . . . . . . . . . . . . . . . . . . . . . . . . . . . . . . . . . . . . . . . . . . . . . . . . . . . . . . . . . . . . . . . . . . . 14Comparing Report Categories in Payroll 6.4 and Version 7 . . . . . . . . . . . . . . . . . . . . . . . . . . . . . . . . . . . . . . . . . . . . . 16
WE L C O M E 3
Welcome to Converting to Payroll 7. This guide was written to help you convert your Payroll 6.4 data to Payroll 7. The following list contains the title of each chapter and a summary of the information you can find in each.
Chapter 1: Welcome. This chapter is an introduction to Converting to Payroll 7 and includes a section detailing the new features and benefits of Payroll 7 and a comparison of the differences between both versions of Payroll.
Chapter 2: Student Billing Conversion. This chapter provides a list of pre-conversion considerations you should review before converting, a procedure guiding you through the actual conversion process, and a list of post-conversion tasks that should be completed before beginning to use Payroll 7.
Chapter 3: Sample Conversion Plan. This chapter provides a sample conversion plan to use as a guideline when planning your organization’s conversion to Payroll 7.
Payroll 7 New Features and BenefitsPayroll 7 includes a number of new features and enhancements that improve efficiency and help your organization track and manage payroll and human resources information.New features include improved distribution handling for allocating expenses and liabilities, a new employer contribution benefit that helps streamline complicated compensation plans, and enhanced tracking of employment history. Payroll 7 also includes new time tracking features such as an improved interface for entering time worked for hourly employees and pay schedules that improve time tracking for salaried employees.
Advanced Payroll Budgeting
With Payroll 7 and the optional module Advanced Budget Management, you can save time and gather more detailed budget information with powerful budgeting capabilities that you can use to budget by employee, position, and department, as well as by hourly or dollar expenses.
Attendance Plans
With attendance plans in Payroll 7, which are created in Configuration, you have more flexibility when defining the accrual methods and carryover levels for attendance types. When setting accrual methods, you define whether the attendance type accrues an annual or monthly cycle, accrual start and end dates, and how attendance is earned (by period of time, hours worked, or pay period). When setting the carryover levels, you define the rate at which hours accrue, the maximum hours an employee can earn within a cycle, and the amount of hours an employee can carry over from one cycle to the next.
Attendance Types
On the Attendance Types page in Configuration, you create attendance types and define the short description, long description, and status of each attendance code. You can also associate an attendance code with a payment type. For example, you can add a “Personal” attendance type with an “Unpaid Leave of Absence” attendance code. Using the time sheet options, you can assign the “Unpaid Leave of Absence” attendance code a status of “Do not pay”.
Note: Information in this guide is subject to change. Please visit our website at www.blackbaud.com to view the most current information.
Note: To access our system recommendations, select System Recommendations from the Support menu on our website.
4 CH A PT E R
Banks, Checks, and EFT Notices
Banks are now shared, and you can now access the Banks page from within multiple Financial Edge or Education Edge programs, including Payroll. The Banks page is the central location for all standard bank tasks, as well as specific payroll bank tasks. From this page, you can print checks and EFT notices and create manual payroll checks.Checks and EFT notices in Payroll 7 have been improved so you can print more detailed information on the stub.
Benefit Records
In Payroll 7, you use new benefit records to assign and track employee benefits. With these records, you can efficiently provide cash and non-cash compensation, as well as employer contribution benefits to your organization’s employees.The employer contribution benefit streamlines the tracking of complex benefits such as matching 401K contributions. For employees with deductions related to benefits, the uniform premiums defined by the IRS are used to calculate the benefit when calculations are created.On benefit records, we also provide the ability to enter a vendor for remittance that streamlines creating invoices for payroll liabilities. This is available only if you have Accounts Payable.
Dashboard
Dashboard organizes information in your database into a “snapshot” you can easily view with the click of a mouse. Quickly and effortlessly, Dashboard summarizes your organization’s most valuable information.A dashboard contains panels of summaries, lists, and graphs that efficiently compare and analyze information. On the Dashboard page, you can create a variety of panels. From most panels, you can open a record in The Financial Edge or The Education Edge and view or edit information in the actual record.For Payroll 7, Dashboard includes new panels that provide specific payroll information, including high-level measurement and statistical information about your employees and employee payments.Benefit Usage and Cost Analysis. The Benefits Usage and Cost Analysis panel calculates how many active
employees are eligible for benefits, the number and percentage of employees to whom the benefit is assigned, and the projected annual cost to your organization for the benefit. You can rank the benefits by employee assignment levels or cost.
Compensation and Employer Expense. The Compensation and Employer Expense panel shows you actual employee costs for a range of payment dates. You can summarize compensation by employee group or by the GL distribution for compensation and expense.
Time Entry Analysis. The Time Entry Analysis panel provides a summary of time entry hours and dollars for a range of batch dates. You can summarize hours and dollars by department, position, employee, or GL distribution.
Payroll Query. The Payroll Query displays a panel you can customize based on a query.For more information about using Dashboard, see the Dashboard Guide.
Deductions
In Payroll 7, you use deduction records to enter and track employee deductions. You can use these records for employee benefit deductions, such as 401K and health insurance. You can also use these records for specific employee-only deductions, such as flexible spending and garnishments.When setting up deductions in Configuration, you can establish default settings, including those for deduction rate, amount, and, if you have Accounts Payable, vendor for remittance.
WE L C O M E 5
Departments
Departments are set up in Configuration and provide basic information about each department within your organization. They also contain default information, such as default earnings and tax distributions, which are added to employees when they are assigned to a department.Departments defined in Payroll 7 can include a supervisor, which you designate by selecting an employee in the program. The employee record selected will then be linked to this department. With a business rule, you can change the title of “Supervisor” to a different title your organization uses.
Employee Records
In Payroll 7, employee records have many new features, including the capability to handle multiple pay types and I-9 information, as well as track multiple state income tax settings. Compensation/Deductions tab. In this tab, you have a central location for adding all pays, benefits, and
deductions.Compensation effective dates. Compensation items have effective dates so you can add a salary for this
year, and when the employee gets a raise, enter an expiration date for the old pay type and add a new one. This enables you to maintain a pay history and view compensation items both past and present.
HR Info tab. In Payroll 7, the employee record also has a new HR Info tab, which provides an efficient way to maintain human resources information for each employee. On this tab, you can define multiple employee events for occurrences like hiring and termination. You are not longer limited to a single hire and termination date. Using Payroll 7, you can enter multiple hire and termination dates, which is helpful when rehiring seasonal workers.You can also assign employees to multiple departments and positions and define the amount of time the employee spends on each, which is handled with a full-time equivalency (FTE) calculation.
History of changes. In Payroll 7, a history of changes log is maintained on employee records. This log records information about changes made, including the user name of the person making the change, the date changed, and the item changed.
Masked GL default distributions. In Payroll 7, when assigning GL default distributions, the account code segment of the DR account is masked, which enables the account codes to be specified on the individual pay types, benefits, deductions, and taxes to follow the employee’s gross pay distribution.
Employment and Pay History
In Payroll 7, you can view and report on past calculations and recorded time entry at any time. If a promotion is earned, a new pay type is assigned. However, the previous pay type information for the employee is not lost. Instead, it is essentially archived and made inactive for the employee by entering a closing effective date. In addition, event records are used to record important employee events.
Events
In Payroll 7, event records have been improved to provide a much more useful event tracking system. Using Payroll 7, you can add specific events to an employee record to track the following events:• Performance reviews• Training sessions• Certifications• Hires
6 CH A PT E R
• Property assignments• Promotions• Contract start and end dates• Any events your organization recordsYou add events on the HR Info tab of an employee record.
Expense and Liability Distributions
Using Payroll 7, you can distribute expenses and liabilities for all pay, taxes, benefits, and deductions to the employee’s funding sources for gross pay. This is an effective and accurate way to track payroll expenses back to grants. To take advantage of this new functionality, after converting or importing your data, access Configuration and designate an account code on the GL distribution for pay types, deductions, and taxes. Once designated, fund, project, and other transaction characteristics will default from each employee’s main funding source when calculations are created.
GL Distributions and Account Masking
Using Payroll 7, you can enter default GL distribution on employee records to spread payroll expenses across funding sources and cost centers. These distributions provide an efficient way to track employee wages, benefits, and taxes back to departments, projects, locations, and any other account code segment for which you want to track expenses.When you add a GL distribution to an employee, the account code segment is always masked. By masking the account code, the program can combine an employee’s GL distribution, which can consist of account number segments, such as fund, department, or location, with account codes that you assign to your organization’s pay types, benefits, and taxes. When you set up debit accounts for compensation items with an account code and then create payments for employees, the payment postings will distribute expenses for employees to each employee’s unique set of funds, departments, or projects.For example, if your organization expenses employee costs by department, you can define a default account distribution on each department record. When a new employee is assigned to a department, the corresponding distribution defaults onto the GL Distribution tab of the employee record. When calculations are created for pay types, benefits, deductions, and taxes, the account code assigned to those records combines with the employee’s distribution and the expenses are tracked back to the employee’s department.
Integration with The Financial Edge
Because Payroll 7 is now fully integrated with The Financial Edge, you have increased functionality. You can print disbursement checks to benefit managers, deduction collection agencies, and tax collection agencies (including electronic submission of taxes compliant with federal and state regulations).Using projects and transaction codes in General Ledger, you can track payroll activity. You can also post directly from Payroll to General Ledger and view payroll transactions from General Ledger.Another benefit of integration is that banks are now shared across the system, and you can quickly access the Banks page from within the shell, along with other optional modules in Payroll 7.
Payroll Processing Page
With the Payroll Processing page, you have a central location to efficiently accomplish common and recurring payroll tasks. Once the system is set up and configured properly, the Payroll Processing page is where you visit most often to do the following:• Add benefits, pay types, and deductions to multiple employees
WE L C O M E 7
• Enter time worked• Create calculations• Print checks and EFT noticesOn the Payroll Processing page, you will find payroll processes organized into a cycle: Create Group Assignments, Enter Time Worked, Create Calculations, and Print Checks and EFT Notices. You can access any of the processes at any time and are not restricted to starting with creating group assignments and ending with printing checks.Create Group Assignments. You can click Create Group Assignments to assign certain changes for groups of
employees, such as:• New employees being paid for the first time• Current employees receiving pay raises, promotions, or training• Terminating employees
Enter Time Worked. You can click Enter Time Worked to record time and attendance for employees for the pay period, including paid time off such as vacation and holidays.
Create Calculations. You can click Create Calculations to calculate the entire payroll for the period, and define the batch dates, pay date, and bank from which you are paying.
Print Checks and EFT Notices. You can click Print Checks and EFT Notices to pay your employees via paychecks or direct deposit.
Pay Types
In Payroll 7, you use pay type records to define pay types for employees. Using pay type records, an employee can have both hourly and salary pay types. These records are defined in Configuration and assigned to employees. You can create pay types for many varieties of employee compensation, including salary, hourly, overtime, and bonus pay. Pay type records define the pay rate or amount for regular, overtime, special, and other pay types.
Positions
In Payroll 7, you use position records to configure and assign positions within your organization. With position records, you have greater flexibility in entering and tracking positions within your organization. When creating positions, you can include a variety of useful information, including EEOC job category, employment type, a default salary range, and a number limiting hires for the position. You can also define a valid date range, which is helpful for seasonal or volunteer positions.
Reports
We have made a number of improvements to the reports available in Payroll 7, including the addition of integrated tax form functionality that streamlines tax reporting. These changes improve the usability of the program, while still enabling you to retrieve the same information you did in Payroll 6.4.In Payroll 7, tax reporting is a more efficient process that includes automatically updating tax reports and e-filing using the included integrated tax reporting application, State and Federal Payroll Reports. For federal tax reports, you can print wage and tax information return, including the 941 quarterly return and 945 annual return. For state tax reports, you can print wage and tax information returns, including state withholding returns, unemployment returns, and new hire reports.You also have electronic wage reporting using standard MMREF or ICESA formats for every state.We also provide a number of new reports to help your organization assess and track human resources information, including the Position Profile Report and Employee Event Report.

8 CH A PT E R
In addition, we have enhanced many reports, including the Payroll Register, which can now show both paid and unpaid calculations, and the Payroll Journal, which can now include account and project distributions for unpaid calculations.
Schedules
In Payroll 7, we have improved the process and interface for creating schedules. You can now create schedules and define pay frequency on the same screen. Employees have schedules that are in effect for a calendar year. Regular calculations must follow the employee’s pay schedule, which controls duplicate calculations for a pay period.Compensation settings, such as pay types, benefits, and deductions, on an employee record can follow the employee’s default schedule, or a separate schedule may be attached to each compensation setting. The combination of the effective dates for compensation and the schedule determine when each is calculated.We have also improved the entry grid for defining pay dates. You can designate the pay date to always occur on the first or last day of the month and then automatically populate the schedule grid with the corresponding pay dates. You can also enter information such as a start date, number of periods, hours per day, and days per week.For consistency when setting up a schedule for a calendar year, you can now use the same schedule ID across calendar years. We recommend setting up subsequent schedules using the same schedule ID, as long as the schedule characteristics are the same.
Streamlined Time Entry
You can enter time worked for hourly employees in a streamlined, user-friendly spreadsheet interface for multiple employees at once. You simply enter the employee’s time worked across each pay type for the total pay period and easily distribute the pay across multiple projects, departments, and other transaction characteristics.
Time Tracking
In Payroll 7, we have improved the processes and features for recording time worked for hourly and salaried employees.Time Sheet Batches. Time sheet batches are new in Payroll 7, and you can use them to enter time worked for
hourly employees in a user-friendly interface similar to a spreadsheet. During entry, you can save time by entering time for multiple employees at once, and you are not limited by entering time worked by day. Instead, you can efficiently enter an employee’s time worked across each pay type for the total pay period and easily distribute this pay across multiple projects, departments, or other transaction characteristics.
Pay Schedules. Setting up schedules in Configuration is an efficient way to track time and ensure accurate payment for salaried employees. Using the new schedules, you can set up hours, weeks, and days worked for salaried employees, as well as pay frequency and number of periods per calendar year. You can then assign the schedules to employee, pay type, benefit, and deduction records to determine when to calculate those items.
Tracks and Checklists
In Payroll 7, you can create tracks to help organize and automate processes related to employees. Tracks are created in Configuration by defining groups or items and actions that are added automatically to records.Consider a track a process made up of steps. For each step in the process, you can define a checklist item. For example, the new hire process requires that new employees complete several payroll forms. You can define a New Hire Payroll track with checklist times for Complete W-4 form, Complete I-9 form, and Complete Direct Deposit Form.

WE L C O M E 9
You can designate when to add a track to an employee and when to add each checklist item within the track. You can set up a track to automatically update an employee’s status information and add another track upon completion of the track. You can also associate actions with each checklist item and track.For more information about tracks, see the Configuration Guide for Payroll.
Differences Between Payroll 6.4 and Version 7Payroll 7 is a new software product providing a complete payroll processing system integrated with The Financial Edge or The Education Edge. It was developed specifically for nonprofit organizations, and much of the new functionality is based on client suggestions and feedback.Using Payroll 7, you can accomplish much more than in previous versions. You can successfully enter and process payroll, allocate and track multiple grants that fund employee pay and associated expenses, and perform many human resource tasks.The items in this section highlight differences between Payroll 6.4 and Payroll 7. We recommend you and your staff become familiar with the differences and prepare for them as you plan your conversion.
Expense and Liability Distributions
You can now distribute expenses and liabilities for all pay types, taxes, benefits, and deductions to employee funding sources for gross pay. This is an effective and accurate way to track payroll expenses back to grants. To use this functionality, after converting or importing your data, access Configuration and designate an account code on the GL distribution for pay types, deductions, and taxes. Once designated, fund, project, and other transaction characteristics will default from each employee’s main funding source and combine with the account code when calculations are created.
Benefits
In Payroll 6.4, it was common to use other pay records to record and track compensation benefits. In Payroll 7, we have improved benefit tracking by adding actual benefit records, which you use to provide cash, non-cash, and employer contribution benefits to employees. In Payroll 7, other pay records no longer exist.The employer contribution benefit provides a much more efficient way of recording this type of benefit, including 401K. Previously, tracking employer contribution benefits was a cumbersome task that required using a local tax.For employees with deductions related to benefits, such as a 401K plan involving an employer match, the benefit can be linked to the employee deduction and the employer contribution rate can be established as a percentage of that deduction.If specifying a non-cash compensation benefit, an additional option appears for Group Term Life Insurance. If this option is selected, the uniform premiums defined by the IRS are used to calculate the benefit when calculations are created.Another new feature is the ability to enter a vendor for remittance that streamlines creating invoices for payroll liabilities. This is available only if you have Accounts Payable.
Track Employment and Pay History
In Payroll 7, you can view and run reports on past calculations and recorded time entry at any time. Unlike Payroll 6.4, employee pay and employment history can be saved and maintained in the program. If a promotion is earned, a new pay type is assigned. However, the previous pay type information for the employee is not lost. Instead, it is essentially archived and made inactive for the employee by entering a closing effective date. In addition, you can use event records to record important employee events.
10 CH A PT E R
Employee Records
In Payroll 7, employee records have been improved in many ways, including the capability to handle multiple pay types and I-9 information, as well as track multiple state income tax settings. The new functionality and enhanced features provide much more comprehensive employee records. You can review key differences between the versions in this section.Compensation/Deductions tab. On the Compensation/Deduction tab, you have a central location for adding
all pays, benefits, and deductions. Previously, wages, benefits, and deductions were entered in different places on multiple tabs.
Compensation effective dates. Compensation items have effective dates so you can add a salary for this year, and when the employee gets a raise, enter an expiration date for the old pay type and add a new one. Using compensation effective dates, you can maintain a pay history and view compensation items both past and present.
HR Info tab. In Payroll 7, the employee record has a new HR Info tab, which provides an efficient way to maintain human resource information for each employee. On this tab, you can define multiple employee events for occurrences like hiring and termination. You are no longer limited to a single hire and termination date. You can now enter multiple hire and termination dates, which is helpful when rehiring seasonal workers.You can also assign employees to multiple departments and positions and define the amount of time employees spend on each, which is handled with a full-time equivalency (FTE) calculation.
History of changes. In Payroll 7, employee records maintain a history of changes log that records information about changes made to a record. It provides information including the user name of the person making the change, the date changed, and the item changed.
Masked GL default distributions. In Payroll 7, when you assign GL default distributions, the account code segment of the DR account is masked, which enables the account codes to be specified on the individual pay types, benefits, and deductions that follow the gross pay distribution.
Time Tracking
In Payroll 7, we have improved the processes and features for recording time worked for hourly and salaried employees.Time Sheet Batches. The time sheet batch functionality in Payroll 6.4 has been replaced with time and
attendance batch functionality in Payroll 7. With time and attendance batches, you enter time worked for hourly employees in a user-friendly interface similar to a spreadsheet. During entry, you can save time by entering time for multiple employees at once, and you are not limited by entering time worked by day. Instead, you can efficiently enter an employee’s time worked across each pay type for the total pay period and easily distribute this pay across multiple projects, departments, or other transaction characteristics.
Pay Schedules. Setting up schedules in Configuration is an efficient way to track time and ensure accurate payment for salaried employees. Using the new schedule, you can set up hours, weeks, and days worked for salaried employees, as well as pay frequency and number of periods per calendar year. You can then assign the schedules to employee, pay type, benefit, and deduction records to determine when to calculate those items.
Deductions
In Payroll 6.4, you used reduction/deduction (red/ded) records to enter and track employee deductions. However, to track deductions in Payroll 7, red/ded records have been removed and replaced with deduction records. You use these records for employee benefit deductions such as 401K and health insurance. You can also use them for specific employee-only deductions, including flexible spending and garnishments.
WE L C O M E 11
When setting up deductions in Configuration, you can establish default settings, including those for deduction rate, amount, and, if you have Accounts Payable, a vendor for remittance. With deductions, you can designate tax settings to determine whether a calculation should reduce gross pay, as well as set restrictions on which employees can be assigned the deduction. In addition, you can specify deduction limits to stop withholding at a specific point. You can also link employee deductions to employer contribution benefits.
Pay Types
In Payroll 6.4, you used other pay records to define pay types for employees. In Payroll 7, other pay records have been replaced with pay type records. These records are defined in Configuration and assigned to employees. You can create pay types for many varieties of employee compensation, including salary, hourly, overtime, and bonus pay. Pay type records define the pay rate or amount for regular, overtime, special, and other pay types. You can assign both hourly and salary pay types to employees.In Payroll 6.4, the Wages tab on employee records was used to designate an employee as hourly or salary and to enter specific salary or hourly amounts. In Payroll 7, the Wages tab has been removed and information on pay type records determines the wage information.Non-cash compensation, which was another pay type in Payroll 6.4, is no longer a feature of a pay. Instead, you can use a benefit record to assign employees a non-cash compensation benefit.In Payroll 6.4, the program divided the total salary by the number of periods for each employee and paid that amount each period. This resulted in possible different amounts for each paycheck. In Payroll 7, when a total salary amount is designated, the system distributes the entire amount across the employee’s pay periods.
Attendance Types
On the Attendance Types page in Configuration, you create attendance types and define the short description, long description, and status of each attendance code. You can also associate an attendance code with a payment type. For example, you can add a “Personal” attendance type with an “Unpaid Leave of Absence” attendance code. Using the time sheet options, you can assign the “Unpaid Leave of Absence” attendance code a status of “Do not pay”.
Attendance Plans
With attendance plans in Payroll 7, which are created in Configuration, you have more flexibility when defining the accrual methods and carryover levels for attendance types. When setting accrual methods, you define whether the attendance type accrues using an annual or monthly cycle, accrual start and end dates, and how attendance is earned (by period of time, hours worked, or pay period). When setting carryover levels, you define the rate at which hours accrue, the maximum hours an employee can earn within a cycle, and the amount of hours an employee can carry over from one cycle to the next.In Payroll 7, when your employees meet their maximum time available, their accrual will stop. Once an employee reaches the maximum, then uses some attendance, the accrual picks up on the day that the attendance was used. In Payroll 6.4, when an employee meets the maximum time available, the accrual begins again on the next day. Please be aware that any employees you have in this situation from Payroll 6.4 will have different attendance balances after the conversion.
12 CH A PT E R
Schedules
In Payroll 6.4, you created pay schedules in Configuration and entered the pay frequency on the Wages tab of an employee record. You also manually entered the pay schedule dates one by one. In Payroll 7, we improved the process and the interface for creating schedules. You can create schedules and define pay frequency on the same screen, and employees have schedules that are in effect for a calendar year. Regular calculations must follow the employee’s pay schedule, which controls duplicate calculations for a pay period. In Payroll 7, the schedules ensure that calculations are run once per pay period, per employee.Compensation settings, such as pay types, benefits, and deductions, on an employee record can follow the employee’s default schedule or a separate schedule may be attached to each compensation setting. The combination of the effective dates for compensation and the schedule determine when each is calculated. Running calculations for employee compensation can occur only if the compensation items are scheduled and assigned to an employee. This will avoid multiple calculations being run for compensation for the same pay period.We have also improved the entry grid for defining pay dates. You can designate the pay date to always occur on the first or last day of the month and then automatically populate the schedule grid with the corresponding pay dates. You can also enter information such as a start date, number of periods, hours per day, and days per week.For consistency when setting up a schedule for a calendar year, you can now use the same schedule ID across calendar years. We recommend setting up subsequent schedules using the same schedule ID, as long as the schedule characteristics are the same.
Departments
Departments are set up in Configuration and provide basic information about each department within your organization. They also contain default information, including default earnings and tax distributions, which are added to employees when they are assigned to a department.Departments defined in Payroll 7 can include a supervisor, which you designate by selecting an employee in the program. The employee record selected is then linked to this department. With a business rule, you can change the title of “Supervisor” to a different title your organization uses. In Payroll 6.4, you could also enter a supervisor, but it was not linked to the employee record, and the title “Supervisor” could not be changed. In Payroll 7, you can also designate a specific location for the department, which was not possible in Payroll 6.4.
Positions
In Payroll 6.4, you used the Positions tab to configure and assign positions within your organization. In Payroll 7, position records replace the Positions table. With position records, you have greater flexibility in entering and tracking positions within your organization. When creating positions, you can include a variety of useful information, including EEOC job category, employment type, a default salary range, and a number limiting hires for the position. You can also define a valid date range, which is helpful for seasonal or volunteer positions.
Payroll Processing Page
The Payroll Processing page is new to Payroll 7. It provides a central location for common payroll tasks and, once the system is set up, is your Home page. This provides a more efficient work flow than Payroll 6.4, where common payroll processes were accessed in multiple locations.On the Payroll Processing page, you will find payroll processes organized into a cycle: Create Group Assignments, Enter Time Worked, Create Calculations, and Print Checks and EFT Notices. You can access any of the processes at any time and are not restricted to starting with creating group assignments and ending with printing checks.
WE L C O M E 13
Payroll Forms, Checks, and EFT Notes
Continuous (dot matrix) check stock and forms, which were compatible with Payroll 6.4, are no longer supported. Payroll 7 continues to support current Payroll 6.4 pre-printed laser check stock, blank laser check stock, and laser W-2 forms.In Payroll 7, check and EFT notices have been improved so you can print more detailed information on the stub.
Payroll Budgeting
If you have the optional module Advanced Budget Management along with Payroll 7, you can save time and gather more information with budgeting capabilities not available in Payroll 6.4. Using Payroll 7, you can budget by employee, position, and department, as well as by hourly or dollar expenses.
Administration
In Payroll 7, the Administration page provides a central location for administrative tasks.Posting to an Export File. In Payroll 6.4, you had the option to post transactions to an export file instead of
directly to General Ledger. In Payroll 7, however, you must post directly to General Ledger 7. To create an export file at the same time you post to General Ledger, mark the corresponding checkbox. This is required to maintain accuracy and control between General Ledger and the subsidiary ledgers, which is even more important now that each General Ledger transaction includes a link to the source record.
Employee Level Security. With employee level security in Payroll 7, you can assign users to security groups that allow access to all employees, a specific range of employees, individual employees, or no employees. In Payroll 6.4, you were only able to give users access to all employees or no employees.
Banks
In Payroll 6.4, you accessed the optional module Banks on the program menu of Windows, separately from other optional modules. In Payroll 7, you access Banks from the shell along with other optional modules in Payroll 7. The Banks page is the central location for all standard bank tasks, as well as specific payroll bank tasks. From this page, you can print checks and EFT notices and create manual payroll checks.
Payroll Reports
We have made a number of changes to the reports available in Payroll, including the addition of an integrated tax form application that streamlines tax reporting. These changes improve the usability of the program, while still enabling you to retrieve the same information you always have.
Tax Reports
To provide improved tax reporting, we have integrated Payroll 7 with State and Federal Tax Payroll Reports, which is a tax reporting application. You can access federal and state tax reports from the Mail page. With State and Federal Tax Payroll Reports, you can create, view, edit, print, and submit federal and state tax forms and reports. For federal tax reports, you can print wage and tax information returns, including the 941 quarterly return and 945 annual return. For state tax reports, you can print wage and tax information returns, such as state withholding returns, unemployment returns, and new hire reports. You also have electronic wage reporting using standard MMREF or ICESA formats for every state.
14 CH A PT E R
New Reports
This section lists new reports available in Payroll 7 and explains the information your organization can gather using each.Bank Profile. This Bank Account Report presents a profile for a designated bank and provides basic bank
account information, including account number, routing number, and address information. The profile report shows the total debits and credits associated with each account. You can also include adjustment transactions to further facilitate the reconciliation process.
Bank Register Report. The Bank Register Report presents the transactions in the register of a bank account, provides a summary statement, and can be filtered to display specific information. For example, you can filter the report to display only outstanding deposits that have been posted to a specific subsidiary ledger. In summary format, the report includes total deposits, total checks, and grand totals. The amounts for each type of check are also listed.
Benefit Profile Report. The Benefit Profile Report, accessed from the Profile and Statistical Reports category, provides a detailed listing of deduction characteristics including rate, amount, tax settings, distribution, and schedule information as set up in Configuration.
Deduction Profile Report. The Deduction Profile Report, accessed from the Profile and Statistical Reports category, provides a detailed listing of deduction characteristics including rate, amount, tax settings, distribution, and schedule information as set up in Configuration.
Employee Event Report. The Employee Event Report replaces both the Event Report and Event Tickler Report. The Employee Event Report, accessed from the Transaction Reports category, provides a detailed listing of employee event records for a specified date range.
Employee Attendance Summary Report. The Employee Attendance Summary Report replaces both the Attendance Status Report and Employee Attendance Ranking Report. The Employee Attendance Summary Report, accessed from the Time and Attendance Reports category, provides attendance balance and activity for employees by attendance type.
Payroll Expense Report. The Payroll Expense Report replaces the Departmental Expense Report. The Payroll Expense Report, accessed from the Transaction Reports category, provides a listing of employer expenses by department or an element of the general ledger distribution over a specified date range. These elements include account segments and account characteristics. You can also include optional employer benefits and local taxes in the report, which can be run in detail or summary.
Pay Type Profile Report. The Pay Type Profile Report, accessed from the Profile and Statistical Reports category, provides a detailed listing of pay type characteristics including rate, amount, distribution, and schedule information as set up in Configuration.
Position Profile Report. The Position Profile Report, accessed from the Profile and Statistical Reports category, provides a detailed listing of the positions set up and defined in Configuration.
Time Entry Batch Report. The Time Entry Batch Report replaces the Time Sheet Batch Report. The Time Entry Batch Report, accessed from the Time and Attendance Reports category, provides a listing of time entry batch information for a specific range of time entry start and end dates. This report includes paid amounts only. Running this report in summary provides total hours and dollars per employee per time entry batch. If you run the detail version, the report includes total hours and dollars per employee per time entry batch, as well as account and transaction distribution information.
Removed or Renamed Reports
This section lists each report from Payroll 6.4 we removed and explains how you can gather the same information more efficiently in Payroll 7.Attendance Status Report. The Attendance Status Report has been replaced with the Employee Attendance
Summary, which is accessed from the Time and Attendance Reports category.
WE L C O M E 15
Batch Reconciliation Report. In Payroll 7, the Batch Reconciliation Report has been renamed the Bank Reconciliation Report. It is available in the Bank Accounts category.
Departmental Expense Report. The Departmental Expense Report has been replaced with the Payroll Expense Report, which is accessed from the Transaction Reports category.
Earnings Register. The Earnings Register has been removed. In Payroll 7, you gather the same information by running the Payroll Expense Report, which is accessed from the Transaction Reports category.
Employee Attendance Ranking Report. The Employee Attendance Ranking Report has been replaced with the Employee Attendance Summary, which is accessed from the Time and Attendance Reports category.
Employee Payroll History. The Employee Payroll History report has been removed. In Payroll 7, you gather the same information by running the Payroll Register and/or Payroll Expense Report, which are both accessed from the Transaction Reports category.
Event Report. The Event Report has been replaced with the Employee Event Report, which is access through the Transaction Reports category.
Event Tickler Report. The Event Tickler report has been replaced with the Employee Event Report, which is access through the Transaction Reports category.
Other Pay Profile. The Other Pay Profile report has been removed. In Payroll 7, you can gather the same information by running the Benefit Profile Report, which is accessed from the Profile and Statistical Reports category.
Payroll Report. The Payroll Report has been removed. In Payroll 7, you gather the same information by running the Payroll Register, which is accessed from the Transaction Reports category.
Reduction/Deduction Profile. The Reduction/Deduction Profile report has been removed. In Payroll 7, you gather the same information by running the Detection Profile Report, which is accessed from the Profile and Statistical Reports category.
Time Sheet Batch Report. In Payroll 7, the Time Sheet Batch Report has been renamed the Time Entry Batch. It is available in the Time and Attendance Reports category.
Tax Reports. Tax reports, previously accessed from the Activity Reports category, are now accessed using State and Federal Payroll Reports, which is a tax reporting software product integrated with Payroll and available from the Mail page. The following tax reports are now accessed through State and Federal Payroll Reports:
• 941 Report• Federal Unemployment Report• Local Tax Report• State Disability Insurance Report• State Industrial Insurance/Workers’ Compensation Report• State Tax Report• State Unemployment Report
16 CH A PT E R
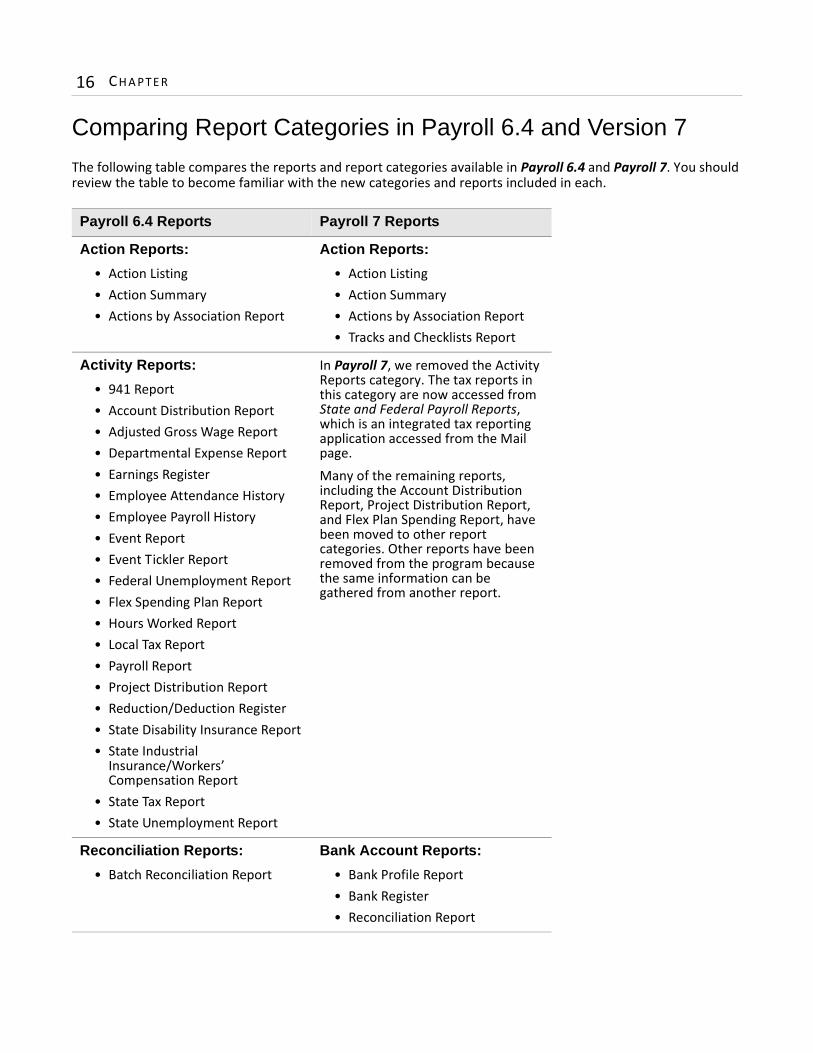
Comparing Report Categories in Payroll 6.4 and Version 7
The following table compares the reports and report categories available in Payroll 6.4 and Payroll 7. You should review the table to become familiar with the new categories and reports included in each.
Payroll 6.4 Reports Payroll 7 Reports
Action Reports:
• Action Listing• Action Summary• Actions by Association Report
Action Reports:
• Action Listing• Action Summary• Actions by Association Report• Tracks and Checklists Report
Activity Reports:
• 941 Report• Account Distribution Report• Adjusted Gross Wage Report• Departmental Expense Report• Earnings Register• Employee Attendance History• Employee Payroll History• Event Report• Event Tickler Report• Federal Unemployment Report• Flex Spending Plan Report• Hours Worked Report• Local Tax Report• Payroll Report• Project Distribution Report• Reduction/Deduction Register• State Disability Insurance Report• State Industrial
Insurance/Workers’ Compensation Report
• State Tax Report• State Unemployment Report
In Payroll 7, we removed the Activity Reports category. The tax reports in this category are now accessed from State and Federal Payroll Reports, which is an integrated tax reporting application accessed from the Mail page.Many of the remaining reports, including the Account Distribution Report, Project Distribution Report, and Flex Plan Spending Report, have been moved to other report categories. Other reports have been removed from the program because the same information can be gathered from another report.
Reconciliation Reports:
• Batch Reconciliation Report
Bank Account Reports:
• Bank Profile Report• Bank Register• Reconciliation Report
WE L C O M E 17
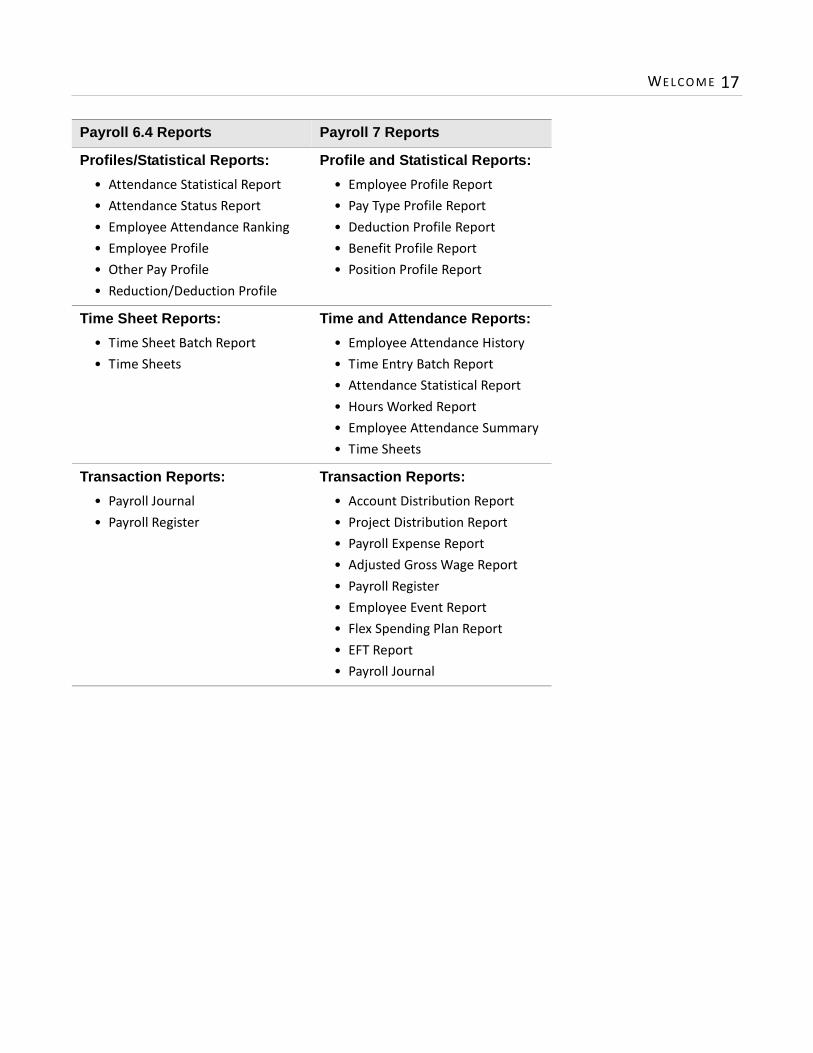
Profiles/Statistical Reports:
• Attendance Statistical Report• Attendance Status Report• Employee Attendance Ranking• Employee Profile• Other Pay Profile• Reduction/Deduction Profile
Profile and Statistical Reports:
• Employee Profile Report• Pay Type Profile Report• Deduction Profile Report• Benefit Profile Report• Position Profile Report
Time Sheet Reports:
• Time Sheet Batch Report• Time Sheets
Time and Attendance Reports:
• Employee Attendance History• Time Entry Batch Report• Attendance Statistical Report• Hours Worked Report• Employee Attendance Summary• Time Sheets
Transaction Reports:
• Payroll Journal• Payroll Register
Transaction Reports:
• Account Distribution Report• Project Distribution Report• Payroll Expense Report• Adjusted Gross Wage Report• Payroll Register• Employee Event Report• Flex Spending Plan Report• EFT Report• Payroll Journal
Payroll 6.4 Reports Payroll 7 Reports

18 CH A PT E R
2chapter
Payroll 7 Conversion
Recommended Steps . . . . . . . . . . . . . . . . . . . . . . . . . . . . . . . . . . . . . . . . . . . . . . . . . . . . . . . . . . . . . . . . . . . . . . . . . 20Backing Up Your Database . . . . . . . . . . . . . . . . . . . . . . . . . . . . . . . . . . . . . . . . . . . . . . . . . . . . . . . . . . . . . . . . . . . . 20Updating Your Software . . . . . . . . . . . . . . . . . . . . . . . . . . . . . . . . . . . . . . . . . . . . . . . . . . . . . . . . . . . . . . . . . . . . . . 22Pre-conversion Considerations . . . . . . . . . . . . . . . . . . . . . . . . . . . . . . . . . . . . . . . . . . . . . . . . . . . . . . . . . . . . . . . . . 22Attendance Tracking . . . . . . . . . . . . . . . . . . . . . . . . . . . . . . . . . . . . . . . . . . . . . . . . . . . . . . . . . . . . . . . . . . . . . . . . . . . . 22Calculations . . . . . . . . . . . . . . . . . . . . . . . . . . . . . . . . . . . . . . . . . . . . . . . . . . . . . . . . . . . . . . . . . . . . . . . . . . . . . . . . . . . 23Checks . . . . . . . . . . . . . . . . . . . . . . . . . . . . . . . . . . . . . . . . . . . . . . . . . . . . . . . . . . . . . . . . . . . . . . . . . . . . . . . . . . . . . . . 23Departments . . . . . . . . . . . . . . . . . . . . . . . . . . . . . . . . . . . . . . . . . . . . . . . . . . . . . . . . . . . . . . . . . . . . . . . . . . . . . . . . . . 23Existing Time Sheets . . . . . . . . . . . . . . . . . . . . . . . . . . . . . . . . . . . . . . . . . . . . . . . . . . . . . . . . . . . . . . . . . . . . . . . . . . . . 24GL Distributions. . . . . . . . . . . . . . . . . . . . . . . . . . . . . . . . . . . . . . . . . . . . . . . . . . . . . . . . . . . . . . . . . . . . . . . . . . . . . . . . 24Employee Hire Dates . . . . . . . . . . . . . . . . . . . . . . . . . . . . . . . . . . . . . . . . . . . . . . . . . . . . . . . . . . . . . . . . . . . . . . . . . . . 24Historic Entry . . . . . . . . . . . . . . . . . . . . . . . . . . . . . . . . . . . . . . . . . . . . . . . . . . . . . . . . . . . . . . . . . . . . . . . . . . . . . . . . . . 24Interfund Sets . . . . . . . . . . . . . . . . . . . . . . . . . . . . . . . . . . . . . . . . . . . . . . . . . . . . . . . . . . . . . . . . . . . . . . . . . . . . . . . . . 25Multiple Payrolls . . . . . . . . . . . . . . . . . . . . . . . . . . . . . . . . . . . . . . . . . . . . . . . . . . . . . . . . . . . . . . . . . . . . . . . . . . . . . . . 25Other Pay and Reduction/Deduction Records . . . . . . . . . . . . . . . . . . . . . . . . . . . . . . . . . . . . . . . . . . . . . . . . . . . . . . . 25Positions. . . . . . . . . . . . . . . . . . . . . . . . . . . . . . . . . . . . . . . . . . . . . . . . . . . . . . . . . . . . . . . . . . . . . . . . . . . . . . . . . . . . . . 25Posting in Detail . . . . . . . . . . . . . . . . . . . . . . . . . . . . . . . . . . . . . . . . . . . . . . . . . . . . . . . . . . . . . . . . . . . . . . . . . . . . . . . 26Regular Pay . . . . . . . . . . . . . . . . . . . . . . . . . . . . . . . . . . . . . . . . . . . . . . . . . . . . . . . . . . . . . . . . . . . . . . . . . . . . . . . . . . . 26Reports. . . . . . . . . . . . . . . . . . . . . . . . . . . . . . . . . . . . . . . . . . . . . . . . . . . . . . . . . . . . . . . . . . . . . . . . . . . . . . . . . . . . . . . 26Tax Settings . . . . . . . . . . . . . . . . . . . . . . . . . . . . . . . . . . . . . . . . . . . . . . . . . . . . . . . . . . . . . . . . . . . . . . . . . . . . . . . . . . . 26Terminology Changes . . . . . . . . . . . . . . . . . . . . . . . . . . . . . . . . . . . . . . . . . . . . . . . . . . . . . . . . . . . . . . . . . . . . . . . . . . . 27Time Entry . . . . . . . . . . . . . . . . . . . . . . . . . . . . . . . . . . . . . . . . . . . . . . . . . . . . . . . . . . . . . . . . . . . . . . . . . . . . . . . . . . . . 27Schedules . . . . . . . . . . . . . . . . . . . . . . . . . . . . . . . . . . . . . . . . . . . . . . . . . . . . . . . . . . . . . . . . . . . . . . . . . . . . . . . . . . . . . 27System Preferences . . . . . . . . . . . . . . . . . . . . . . . . . . . . . . . . . . . . . . . . . . . . . . . . . . . . . . . . . . . . . . . . . . . . . . . . . . . . . 29Update Accounts . . . . . . . . . . . . . . . . . . . . . . . . . . . . . . . . . . . . . . . . . . . . . . . . . . . . . . . . . . . . . . . . . . . . . . . . . . . . . . . 29Installing the Payroll Conversion Utility . . . . . . . . . . . . . . . . . . . . . . . . . . . . . . . . . . . . . . . . . . . . . . . . . . . . . . . . . . 29Converting Your Payroll 6.4 Data . . . . . . . . . . . . . . . . . . . . . . . . . . . . . . . . . . . . . . . . . . . . . . . . . . . . . . . . . . . . . . . 30Understanding the Exception Report . . . . . . . . . . . . . . . . . . . . . . . . . . . . . . . . . . . . . . . . . . . . . . . . . . . . . . . . . . . . 35Post-Conversion Tasks . . . . . . . . . . . . . . . . . . . . . . . . . . . . . . . . . . . . . . . . . . . . . . . . . . . . . . . . . . . . . . . . . . . . . . . . 36Accessing Additional Documentation. . . . . . . . . . . . . . . . . . . . . . . . . . . . . . . . . . . . . . . . . . . . . . . . . . . . . . . . . . . . 37
20 CH A PT E R
Converting your Payroll 6.4 data to Payroll 7 is a multiple step process that is vital to the success of your implementation. Before you begin the conversion process, read this chapter completely and follow the recommendations that apply to your organization. We provide a checklist of recommended steps and procedures to guide you through the necessary processes.
Recommended StepsThis section provides the recommended steps to follow for successfully upgrading from Payroll 6 to Payroll 7. We recommend using this checklist to help guide you through each process. As you complete each task in the list, place a mark in the corresponding checkbox.
Prepare for the update by reviewing the new features available in Payroll 7. For more information, see “Payroll 7 New Features and Benefits” on page 3.
Consider how your organization can use these features to improve your operations. For more information, see “Differences Between Payroll 6.4 and Version 7” on page 9.
Update your system by installing the latest version of The Financial Edge or The Education Edge. For more information, see the The Financial Edge Update Guide or The Education Edge Update Guide.
Prepare your Payroll 6.4 data to be converted to Payroll 7. Preparing before the conversion is extremely important because during the conversion process, you will make decisions that directly impact your Payroll data. For more information, see “Pre-conversion Considerations” on page 22.
In the test environment, install the Payroll conversion utility, which is on the update CD. For more information, see “Installing the Payroll Conversion Utility” on page 29.
In the test environment, launch the latest version of The Financial Edge or The Education Edge, and then convert your Payroll 6.4 data using the utility accessed on the Plug-Ins page of the shell. The conversion of your Payroll 6.4 data does NOT occur automatically. You must manually convert your data after installing the latest version of The Financial Edge or The Education Edge. For step-by-step procedures, see “Converting Your Payroll 6.4 Data” on page 30. Prior to the conversion, make sure you have reviewed the pre-conversion considerations.
In the live environment, install the Payroll conversion utility, which is on the update CD. For more information, see “Installing the Payroll Conversion Utility” on page 29.
In the live environment, launch the latest version of The Financial Edge or The Education Edge, and then convert your Payroll 6.4 data using the utility accessed on the Plug-Ins page of the shell. The conversion of your Payroll 6.4 data does NOT occur automatically. You must manually convert your data after installing the latest version of The Financial Edge or The Education Edge. For step-by-step procedures, see “Converting Your Payroll 6.4 Data” on page 30. Prior to the conversion, make sure you have reviewed the pre-conversion considerations.
Perform the recommended post-conversion tasks. You must complete the tasks that apply to your organization before beginning to use Payroll 7. For more information, see “Post-Conversion Tasks” on page 36.
Backing Up Your Database
Note: The backup through the Blackbaud Management Console copies your database to the hard drive of the server running the database. We recommend you also make proper backups to removable media in order to have a secure backup strategy.
PAY RO L L 7 CO NVE RS I O N 21
Before converting your data, we recommend making a backup of your current database. You can run a full or compressed backup of your database while users continue working in the program. The full backup saves a complete copy of your database in a directory you specify. The compressed backup option copies your data files, compresses the copies into a single WinZip file, and then deletes the copies. However, if your database contains a single file larger than 4GB, you cannot run the compressed backup.
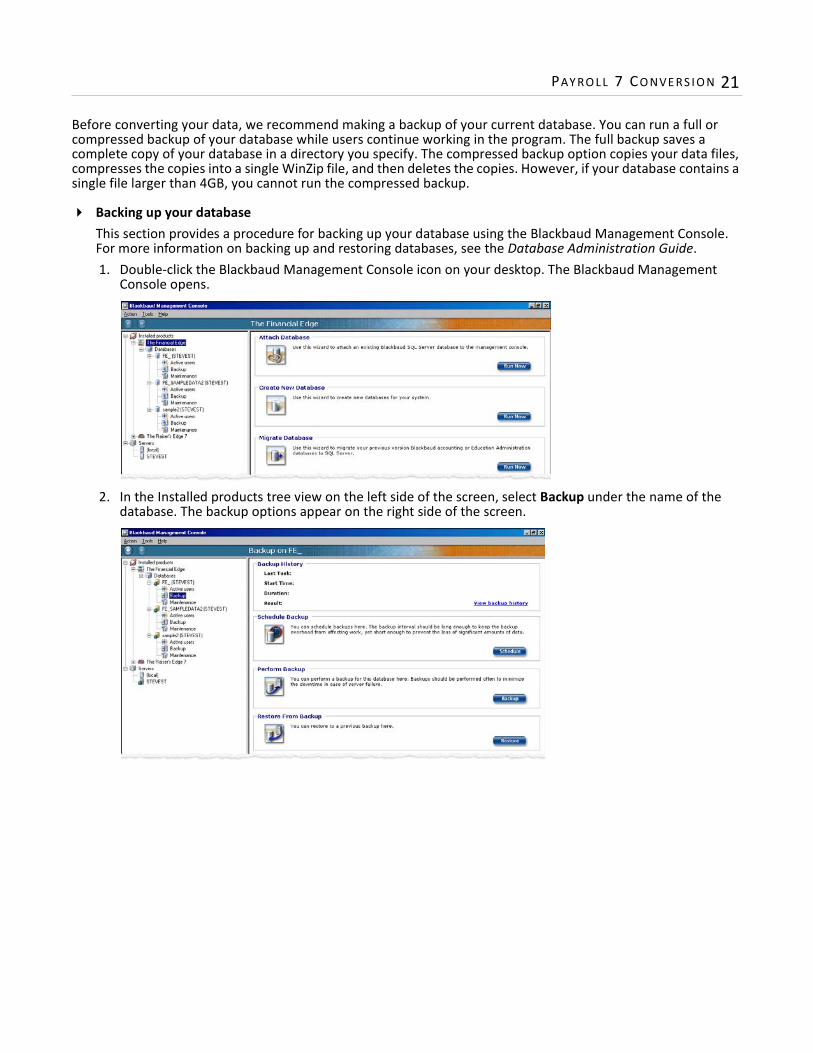
Backing up your databaseThis section provides a procedure for backing up your database using the Blackbaud Management Console. For more information on backing up and restoring databases, see the Database Administration Guide.1. Double-click the Blackbaud Management Console icon on your desktop. The Blackbaud Management
Console opens.
2. In the Installed products tree view on the left side of the screen, select Backup under the name of the database. The backup options appear on the right side of the screen.

22 CH A PT E R
3. In the Perform Backup frame, click Backup. The Backup Database screen appears.
4. In the Backup path field, select a location to save the backup. To map to the location, click the browse button.
5. To have the files zipped after the backup process, mark Compress files after backup. If you mark Compress files after backup, the Send data to Blackbaud option is enabled. Unless you have been directed to do so by Blackbaud technical support, do NOT mark Send data to Blackbaud.
6. To notify a specified workstation when the backup is finished, mark Net Send notification when backup is finished and then enter the name of the workstation or user you want to notify.
7. To generate a text file that details the backup process, mark Output File and then select a location where to generate the output file. To map to the location, click the browse button.
8. To start the backup process, click Backup. You return to the Blackbaud Management Console.
Updating Your SoftwareUpdate your system by installing the latest version of The Financial Edge or The Education Edge. For more information, see the The Financial Edge Update Guide or The Education Edge Update Guide.
Pre-conversion ConsiderationsUnderstanding the information in this section is vital to the success of your conversion and implementation of Payroll 7. We recommend that you read this section in preparation for converting your Payroll 6.4 data and complete any suggested tasks that apply to your organization. Once you run the conversion utility, Payroll 6.4 will no longer be available in The Financial Edge.
Attendance Tracking
In Payroll 7, we improved attendance tracking by adding more flexibility when defining accrual methods and carryover levels on attendance plans. When setting accrual methods, you define whether the attendance type accrues using an annual or monthly cycle, accrual start and end dates, and how attendance is earned, such as by period of time, hours worked, or pay period. When setting carryover levels, you define the rate at which hours accrue, the maximum hours an employee can earn within a cycle, and the amount of hours an employee can carry over from one cycle to the next.
PAY RO L L 7 CO NVE RS I O N 23
We also changed the option for displaying attendance in either hours or equivalent days. In Payroll 7, equivalent days is calculated according to the hours per day setting on each employee schedule, not by a system-wide hours per day designation as in Payroll 6.4. Because of this change, attendance plans in Configuration display attendance accrual and balance factors in hours only.In preparation for converting, we recommend that you review the new options available for defining accrual methods and carryover levels. You should consider if your organization can use these new options to improve attendance tracking and then, after the conversion is complete, make changes to the attendance plans.
Calculations
The calculations created in Payroll 6.4 convert to Payroll 7. However, once the conversion is complete, we recommend you review the calculations in Payroll 7 and compare them to Payroll 6.4 to verify that the other pays and reductions/deductions converted as pay types, benefits, and deductions. Also, make sure the new pay types, benefits, deductions, and taxes calculated correctly. To make these comparisons, run a Payroll Register in Payroll 6.4 that includes all calculations. Before converting your data, print this report, and then use it to compare the calculations created in Payroll 7. In Payroll 7, GL distributions are required for pay types, benefits, and deductions set up in Configuration. These were not required in Payroll 6.4. As a result, any compensation record that converts without a GL distribution is inactive until a distribution is defined. Before inactive compensation records can be included in new calculations, they must be made active. To avoid this, make sure your compensation items have GL distributions before converting.In Payroll 7, the paid/deducted amounts for pay types, benefits, and deductions are based on calculations only. Before converting, if you have summarized payments in Payroll 6.4, the history on compensation items after the conversion may not be comparable between Payroll 6.4 other pays and reductions/deductions and Payroll 7 pay types, benefits, and deductions.
Checks
Checks from Payroll 6.4 convert to Payroll 7. However, once the conversion is complete, we recommend you verify the checks and all related distributions. To prepare for comparing checks, we recommend you run and print a Payroll Journal with your Payroll 6.4 data. After the conversion, you should run another Payroll Journal with the converted data and compare both reports.
Departments
Because of new distribution functionality in Payroll 7, including the capability to assign split default distributions to employees who work in multiple departments, there is no longer a department column in the distribution grid when defining account distributions. To account for this change, you need to select a method for converting department designations in your Payroll 6.4 account distributions when running the plug-in for initializing your payroll system, which is part of the Payroll 6.4 data conversion process. The following three options are available for converting department designations on account distributions.Do not convert the department used in the distributions in Payroll 6. Choose this option to track
departments using a segment in your account structure when you do not need to track department expenses outside of the account number.
Create a transaction attribute for each department in Payroll 7. Choose this option to track department expenses separately from the account number in Payroll 7 by creating a transaction attribute for each department in Payroll 6.
Convert departments used in the distributions in Payroll 6 as a transaction code in Payroll 7. This option is available only if you have the optional module Projects and Grants. Choose this option to track departments using transaction codes in The Financial Edge or The Education Edge. If you select this option, you must also map all Payroll 6.4 departments to transaction codes using the corresponding grid.
24 CH A PT E R
Existing Time Sheets
To help prevent previously-used time sheets from accidentally being run again, all existing time sheets in Payroll 6.4 are converted with a status of “Calculated” in Payroll 7. Before converting your data, take note of time sheets in Payroll 6.4 that are entered but not used in calculations. After the conversion, if you have time sheet batches that have not yet been calculated but now have a “Calculated” status, you can copy the batch to create a new time and attendance batch in Payroll 7, which you can use to run the calculations. By copying that batch, which is accomplished from the Time and Attendance page, you can avoid manually recreating it. For more information, see the Processing Guide for Payroll.
GL Distributions
In Payroll 6.4, you defined a debit distribution for other pays, reductions/deductions, and taxes that went to a single expense account for all employees. In Payroll 7, you have advanced distribution capabilities that you can use only if you properly configure the distributions and corresponding accounts. Before converting your data, make sure your compensation records have GL distributions. After converting or importing your data, you can distribute expenses and liabilities for all pay types, taxes, benefits, and deductions to employee funding sources for gross pay. To use this functionality, access Configuration and designate an account code on the GL distribution for pay types, benefits, deductions, and taxes. Any compensation record that converts without a GL distribution is inactive until a distribution is defined. Once designated, fund, project, and other transaction characteristics will default from each employee’s main funding source when calculations are created.
Employee Hire Dates
Before you convert, please ensure all employee records have start dates. Payroll 7 requires employees to have a “Hire Event” entered on the HR Info tab of the employee record. The conversion process will create a “Hire Event” based on the employee’s start date. If you do not enter a start date prior to converting, employees without start dates will be listed as exceptions. If you convert and some employees do not have “Hire Events”, you can add the event to employee record from the HR Info tab, or use the Create Group Assignments link on the Payroll Processing page to add “Hire Events” to multiple employees at once.
Historic Entry
In Payroll 7, you can add historical employee information to employee records. You can utilize this feature if you convert from another program or need to enter previous payroll information for an employee. Adding historic entries can ensure that employee W-2 and tax information is correct for the entire year. Before adding an historic entry, you must create the employee record and add appropriate tax information on the Taxes tab. After you add the historical data, Payroll creates a check record on the Activities tab of the employee record. However, Payroll does not add the check record to the bank register.When running reports, historic entry information appears on all reports except for the Account Distribution Report, Payroll Journal Report, and Project Distribution Report.
Note: Historic time sheet batches can add significant time to the conversion process. Before you convert to Payroll 7, we recommend you delete any unwanted time sheet batches.
PAY RO L L 7 CO NVE RS I O N 25
Interfund Sets
It is possible that your Payroll 6.4 data may not convert to Payroll 7 because interfund sets are not configured properly. They must be set up to allow the creation of interfund entries for payment GL distributions when checks are converted. To avoid problems, make sure that any interfund set needed for payroll transactions is set up and active. If the conversion process encounters a check with distributions that require an interfund set that is unavailable, the conversion process fails. If this occurs, you can review the exceptions generated during the conversion, which will list the payment numbers and debit and credit accounts from the payment distribution that requires an interfund set.
Multiple Payrolls
Multiple payrolls are not supported in Payroll 7. If you currently have multiple payrolls in Payroll 6.4, when you convert, they are consolidated. The first payroll will convert as the primary system. Once that converts, each additional payroll is converted in sequence. During the conversion, attributes with each payroll name are added to employee records for identification. These system attributes can be maintained to provide the same granularity of data that you achieved with multiple payrolls.
Other Pay and Reduction/Deduction Records
Other pay and reduction/deduction records from Payroll 6.4 have been replaced in Payroll 7 with pay type, benefit, and deduction records. In Payroll 7, GL distributions are required for pay types, benefits, and deductions set up in Configuration. In Payroll 6.4, these were not required. As a result, any compensation record that converts without a GL distribution is inactive until a distribution is defined. Before inactive compensation records can be included in new calculations, they must be made active. For more information about how compensation and deduction records have been improved, see “Differences Between Payroll 6.4 and Version 7” on page 9.Other pay records in Payroll 6.4 will convert as either pay type or benefit records in Payroll 7. Other pay records classified as non-cash compensation or those that report in box 9, 10, 11, or 12 on the W2 convert as benefits in Payroll 7. Other pay records not included on the W2 or those that report in box 14 on the W2 convert as pay type records in Payroll 7. After the conversion, review the pay types and compensation records and make changes as needed. For example, a “PY6” designation will be part of the description and ID for converted pay types. You can edit these to remove this designation.
Positions
In Payroll 6.4, positions were table entries defined in Configuration. In Payroll 7, the Positions table is replaced with position records that provide greater flexibility in entering and tracking job positions within your organization. You create and use position records to configure and assign positions to employees. When creating positions, you can include a variety of useful information, including EEOC job category, employment type, a default salary range, and a number limiting hires for the position. You can also define a valid date range, which is helpful for seasonal or volunteer positions.
Note: In Payroll 7, employee pay is no longer assigned on the Wages tab on an employee record. Instead, it is assigned on the Compensation/Deductions tab.
26 CH A PT E R
When you convert your data, a position record is created in Payroll 7 for each position table entry defined Payroll 6.4. In preparation for this, we recommend that you write down or print screens of your position table entries. After the conversion, you should review each position record created and make sure the IDs and descriptions are correct. During the conversion, any position table entry greater than 20 characters are truncated. When reviewing your new position records, edit any truncated position IDs to verify each position record has a meaningful ID.
Posting in Detail
In The Financial Edge, subsidiary ledgers post to General Ledger in detail, which improves the reconciliation process. You can still summarize using control accounts. For more information about control accounts, see the Configuration Guide for General Ledger.
Regular Pay
In Payroll 6.4, regular pay for employees was entered as a single wage amount. In Payroll 7, you create pay type records for regular pay and then assign those to employees. With this functionality, you can assign multiple regular wages to employees if needed. During the conversion, the wage amounts defined in Payroll 6 are converted as pay types in Payroll 7.
Reports
We have made a number of changes and enhancements to the reports available in Payroll. In some cases we have improved usability by combining multiple Payroll 6.4 reports into single Payroll 7 reports. The new single reports make it easier to gather the information previously only available by running multiple reports. For example, the Payroll Register, Earnings Register, and Reductions/Deductions Register from Payroll 6.4 have been combined into the single Payroll Register Report in Payroll 7. We have also added an integrated tax form application to Payroll 7 that streamlines tax reporting. For more information, see the “Payroll Reports” on page 13.Because report parameters do not convert, we recommend you write down or print screens of the report parameters you defined in Payroll 6.4 before the conversion so you can recreate reports including the same information in Payroll 7.
Tax Settings
In Payroll 6.4, the tax settings for an employee’s regular pay hourly, regular pay salary, overtime, and special pay were designated on the Wages tab of the employee record. For any “other pays” on the employee record, the tax setting defaults from the actual corresponding other pay set up in Configuration. During the conversion, new pay type records are created for the regular pay salary, regular pay hourly, overtime, and special pay items that exist on the Wages tab. By default, these new pay types ALL have the default tax setting of “Withhold.” However, if the Use these [ ] tax settings on other pays and red/deds checkbox is marked on the Taxes tab of the employee record in Payroll 6.4, the employee record converts with the tax setting of “Use settings on pay types assigned to employees.” If this is the case, the tax settings specified on the pay types, benefits, and deductions are used in calculations instead of a default tax setting from the employee.
PAY RO L L 7 CO NVE RS I O N 27
To summarize, if your organization has employee tax settings that are different from the default setting of “Withhold” and you did not mark Use these [ ] tax settings on other pays and red/deds, then some of your Payroll 7 tax settings could be different than what was set up in Payroll 6.4. Before converting your data, run a query in Payroll 6.4 to identify employees who do not have a tax setting of “Withhold”. After the conversion, review the tax settings on the pay type records created during the conversion to make sure the settings are correct. These records are identified with a “PY6” naming convention, for example “PY6 regular salary.” You should also review the tax settings for each employee with a classification other than “Withhold” in Payroll 6.4.
Terminology Changes
In converting from Payroll 6.4 to Payroll 7, we have made various changes in terminology to improve usability. For example, in Records, other pay and reduction/deduction records from Payroll 6.4 have been replaced in Payroll 7 with pay type, benefit, and deduction records. Another terminology change we made reflects improved functionality that provides additional options on deductions. For example, in Payroll 6.4, if a deduction had a fixed amount rate type, it meant fixed amount per period. However, in Payroll 7, a fixed amount does not only mean per period, but can be further defined as an amount per period or as a total amount, which is divided between the scheduled pay periods.
Time Entry
In Payroll 7, we improved the processes and features for recording time worked for hourly and salaried employees. We added time sheet batches you can use to enter time worked for hourly employees in a user-friendly interface similar to a spreadsheet. In Payroll 6.4, you entered hours worked information for each employee on one time sheet. In Payroll 7, you can enter time for multiple employees at once and are not limited by entering time worked by day. Instead, you can efficiently enter an employee’s time worked across each pay type for the total pay period and easily distribute this pay across multiple projects, departments, or other transaction characteristics. When entering time worked in Payroll 6.4, you could use a time in/time out format and include a shift differential. These options are not available in Payroll 7. In Payroll 7, you can manually enter hours worked only as total hours instead of time in/time out. However, import is still compatible with the time in/time out format. To pay employees a shift differential in Payroll 7, you must add additional hourly pay types for the various differential rates you pay. For information about adding pay types, see the Configuration Guide for Payroll.
Schedules
Schedules in Payroll 7 are different from those in Payroll 6.4. To avoid overpaying or paying on the wrong dates, the new schedule functionality helps you control the timing and accuracy of payments. To provide this increased accuracy and control, we removed the capability to create calculations for employees for any date. In Payroll 7, employees must have scheduled pay types on their record for the period end dates to be calculated. After a calculation is run, the employee’s pay type schedule status becomes “Calculated” and Payroll 7 will not calculate that pay item a second time for that schedule date.To further increase accuracy, we changed the process for running one-time calculations. The method used in Payroll 6.4, while efficient, left room for inaccuracy. In Payroll 7, you can still run one-time calculations, however, to do so you must add a one-time item to the employee record as you would any other pay type. The one-time pay type must also have a date for which it is scheduled. To streamline this process, you can use the group assignment tool to add and schedule a one-time pay to a group of employees. For more information about running one-time calculations in Payroll 7, see the Process Guide for Payroll.
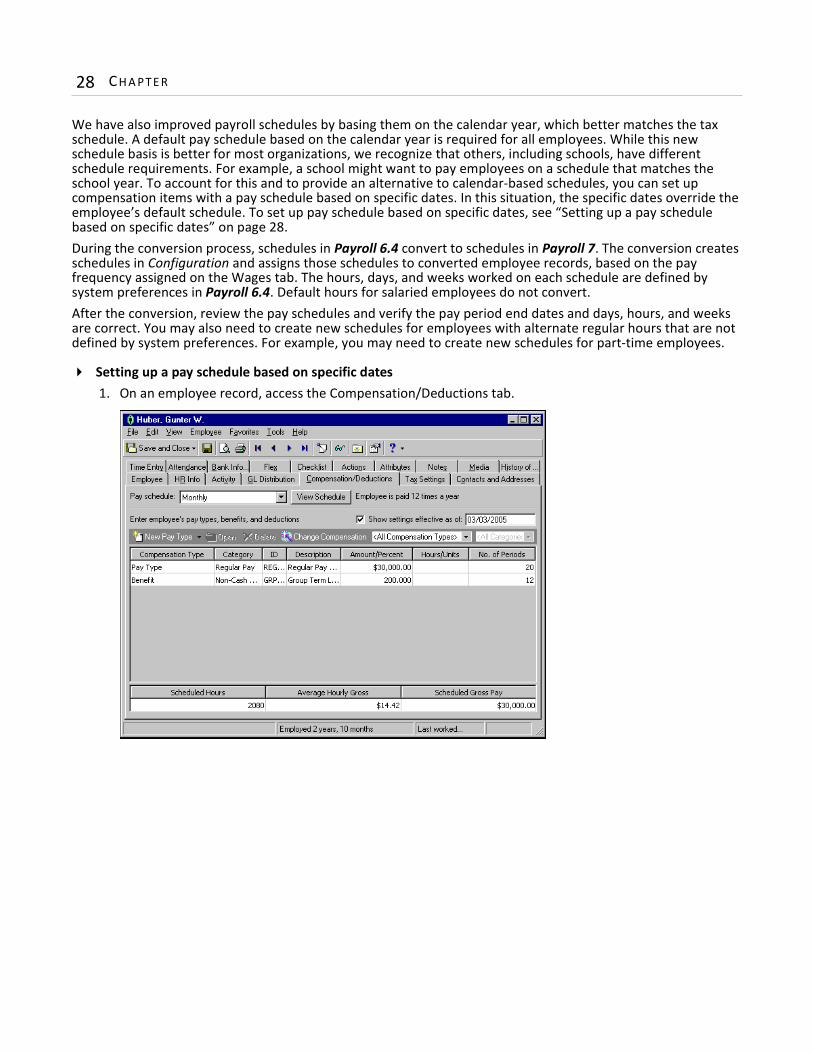
28 CH A PT E R
We have also improved payroll schedules by basing them on the calendar year, which better matches the tax schedule. A default pay schedule based on the calendar year is required for all employees. While this new schedule basis is better for most organizations, we recognize that others, including schools, have different schedule requirements. For example, a school might want to pay employees on a schedule that matches the school year. To account for this and to provide an alternative to calendar-based schedules, you can set up compensation items with a pay schedule based on specific dates. In this situation, the specific dates override the employee’s default schedule. To set up pay schedule based on specific dates, see “Setting up a pay schedule based on specific dates” on page 28.During the conversion process, schedules in Payroll 6.4 convert to schedules in Payroll 7. The conversion creates schedules in Configuration and assigns those schedules to converted employee records, based on the pay frequency assigned on the Wages tab. The hours, days, and weeks worked on each schedule are defined by system preferences in Payroll 6.4. Default hours for salaried employees do not convert. After the conversion, review the pay schedules and verify the pay period end dates and days, hours, and weeks are correct. You may also need to create new schedules for employees with alternate regular hours that are not defined by system preferences. For example, you may need to create new schedules for part-time employees.
Setting up a pay schedule based on specific dates1. On an employee record, access the Compensation/Deductions tab.
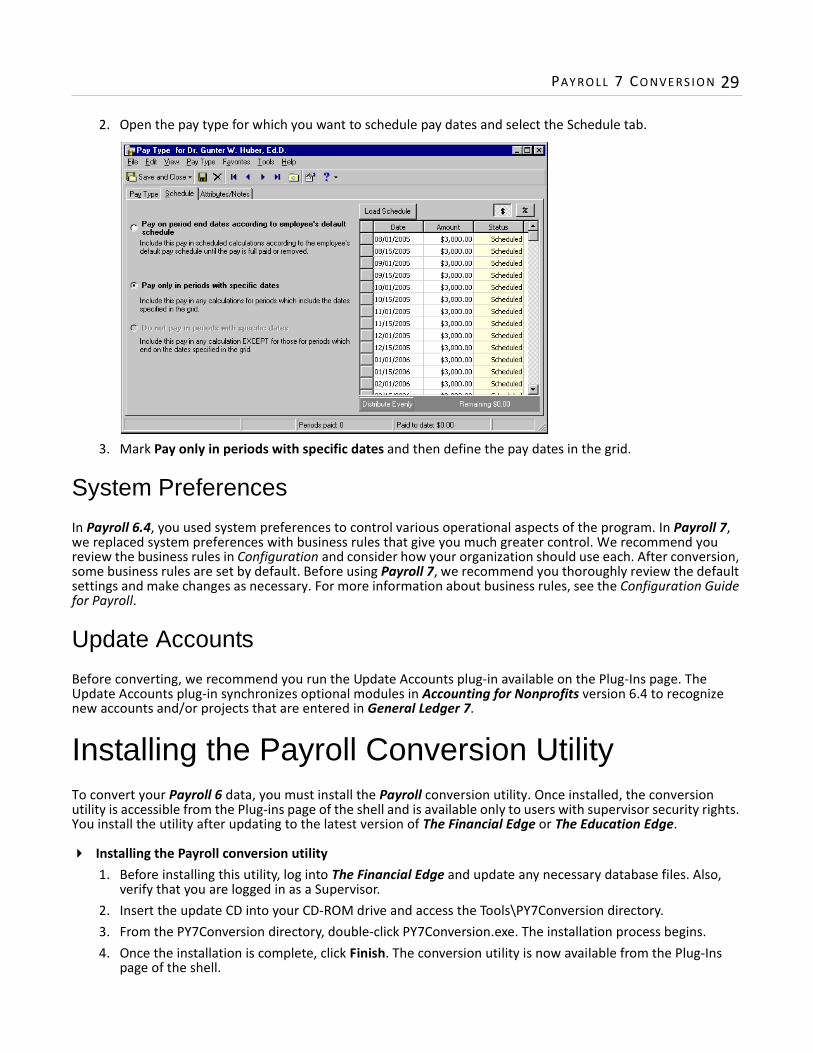
PAY RO L L 7 CO NVE RS I O N 29
2. Open the pay type for which you want to schedule pay dates and select the Schedule tab.
3. Mark Pay only in periods with specific dates and then define the pay dates in the grid.
System Preferences
In Payroll 6.4, you used system preferences to control various operational aspects of the program. In Payroll 7, we replaced system preferences with business rules that give you much greater control. We recommend you review the business rules in Configuration and consider how your organization should use each. After conversion, some business rules are set by default. Before using Payroll 7, we recommend you thoroughly review the default settings and make changes as necessary. For more information about business rules, see the Configuration Guide for Payroll.
Update Accounts
Before converting, we recommend you run the Update Accounts plug-in available on the Plug-Ins page. The Update Accounts plug-in synchronizes optional modules in Accounting for Nonprofits version 6.4 to recognize new accounts and/or projects that are entered in General Ledger 7.
Installing the Payroll Conversion UtilityTo convert your Payroll 6 data, you must install the Payroll conversion utility. Once installed, the conversion utility is accessible from the Plug-ins page of the shell and is available only to users with supervisor security rights. You install the utility after updating to the latest version of The Financial Edge or The Education Edge.
Installing the Payroll conversion utility1. Before installing this utility, log into The Financial Edge and update any necessary database files. Also,
verify that you are logged in as a Supervisor.2. Insert the update CD into your CD-ROM drive and access the Tools\PY7Conversion directory.3. From the PY7Conversion directory, double-click PY7Conversion.exe. The installation process begins.4. Once the installation is complete, click Finish. The conversion utility is now available from the Plug-Ins
page of the shell.
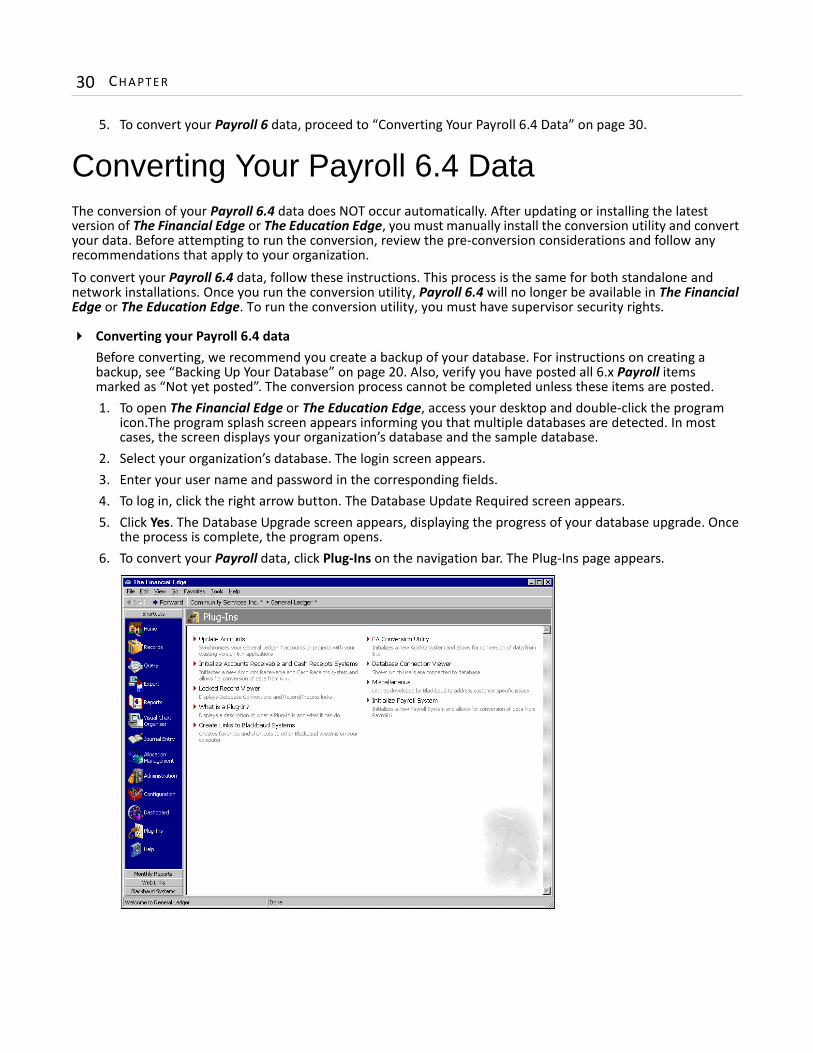
30 CH A PT E R
5. To convert your Payroll 6 data, proceed to “Converting Your Payroll 6.4 Data” on page 30.
Converting Your Payroll 6.4 DataThe conversion of your Payroll 6.4 data does NOT occur automatically. After updating or installing the latest version of The Financial Edge or The Education Edge, you must manually install the conversion utility and convert your data. Before attempting to run the conversion, review the pre-conversion considerations and follow any recommendations that apply to your organization. To convert your Payroll 6.4 data, follow these instructions. This process is the same for both standalone and network installations. Once you run the conversion utility, Payroll 6.4 will no longer be available in The Financial Edge or The Education Edge. To run the conversion utility, you must have supervisor security rights.
Converting your Payroll 6.4 dataBefore converting, we recommend you create a backup of your database. For instructions on creating a backup, see “Backing Up Your Database” on page 20. Also, verify you have posted all 6.x Payroll items marked as “Not yet posted”. The conversion process cannot be completed unless these items are posted.1. To open The Financial Edge or The Education Edge, access your desktop and double-click the program
icon.The program splash screen appears informing you that multiple databases are detected. In most cases, the screen displays your organization’s database and the sample database.
2. Select your organization’s database. The login screen appears.3. Enter your user name and password in the corresponding fields.4. To log in, click the right arrow button. The Database Update Required screen appears.5. Click Yes. The Database Upgrade screen appears, displaying the progress of your database upgrade. Once
the process is complete, the program opens. 6. To convert your Payroll data, click Plug-Ins on the navigation bar. The Plug-Ins page appears.
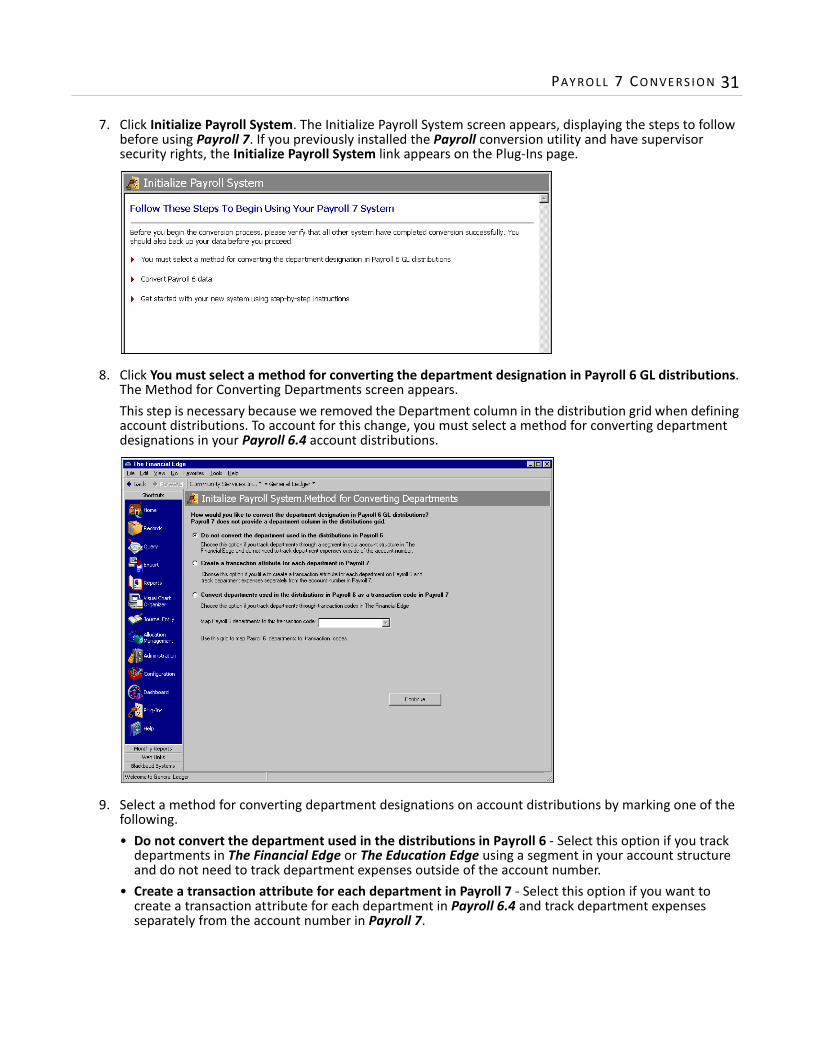
PAY RO L L 7 CO NVE RS I O N 31
7. Click Initialize Payroll System. The Initialize Payroll System screen appears, displaying the steps to follow before using Payroll 7. If you previously installed the Payroll conversion utility and have supervisor security rights, the Initialize Payroll System link appears on the Plug-Ins page.
8. Click You must select a method for converting the department designation in Payroll 6 GL distributions. The Method for Converting Departments screen appears.This step is necessary because we removed the Department column in the distribution grid when defining account distributions. To account for this change, you must select a method for converting department designations in your Payroll 6.4 account distributions.
9. Select a method for converting department designations on account distributions by marking one of the following.• Do not convert the department used in the distributions in Payroll 6 - Select this option if you track
departments in The Financial Edge or The Education Edge using a segment in your account structure and do not need to track department expenses outside of the account number.
• Create a transaction attribute for each department in Payroll 7 - Select this option if you want to create a transaction attribute for each department in Payroll 6.4 and track department expenses separately from the account number in Payroll 7.
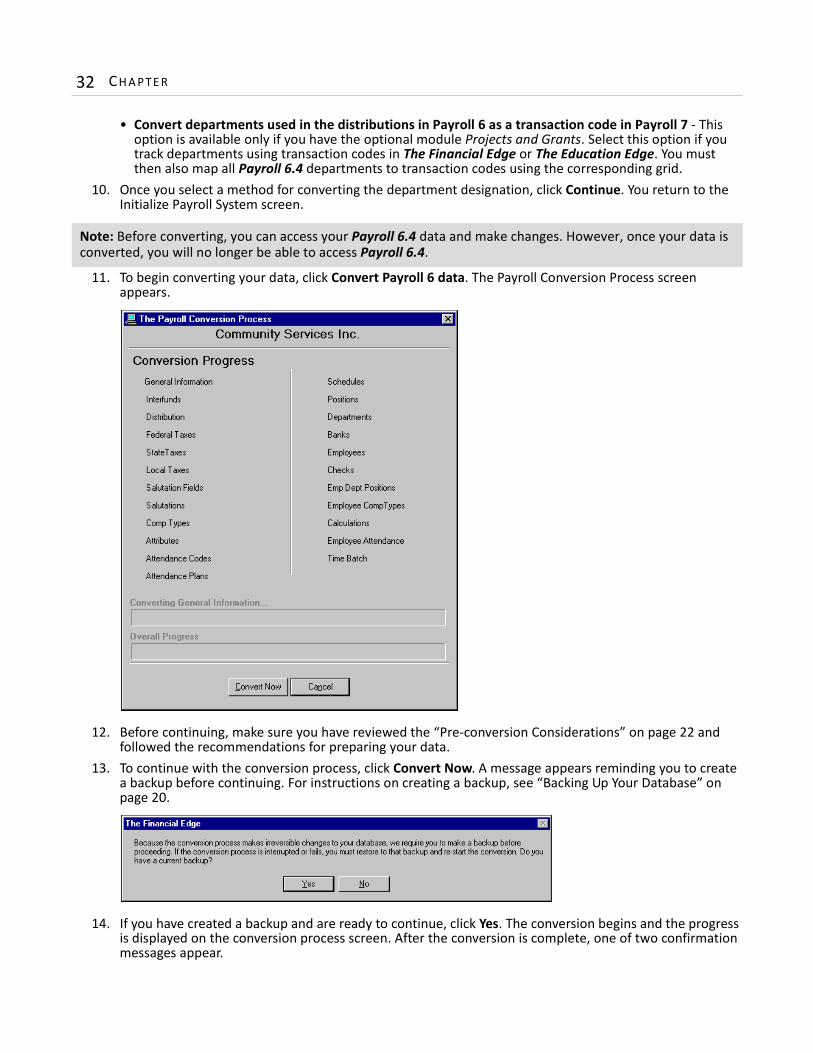
32 CH A PT E R
• Convert departments used in the distributions in Payroll 6 as a transaction code in Payroll 7 - This option is available only if you have the optional module Projects and Grants. Select this option if you track departments using transaction codes in The Financial Edge or The Education Edge. You must then also map all Payroll 6.4 departments to transaction codes using the corresponding grid.
10. Once you select a method for converting the department designation, click Continue. You return to the Initialize Payroll System screen.
11. To begin converting your data, click Convert Payroll 6 data. The Payroll Conversion Process screen appears.
12. Before continuing, make sure you have reviewed the “Pre-conversion Considerations” on page 22 and followed the recommendations for preparing your data.
13. To continue with the conversion process, click Convert Now. A message appears reminding you to create a backup before continuing. For instructions on creating a backup, see “Backing Up Your Database” on page 20.
14. If you have created a backup and are ready to continue, click Yes. The conversion begins and the progress is displayed on the conversion process screen. After the conversion is complete, one of two confirmation messages appear.
Note: Before converting, you can access your Payroll 6.4 data and make changes. However, once your data is converted, you will no longer be able to access Payroll 6.4.
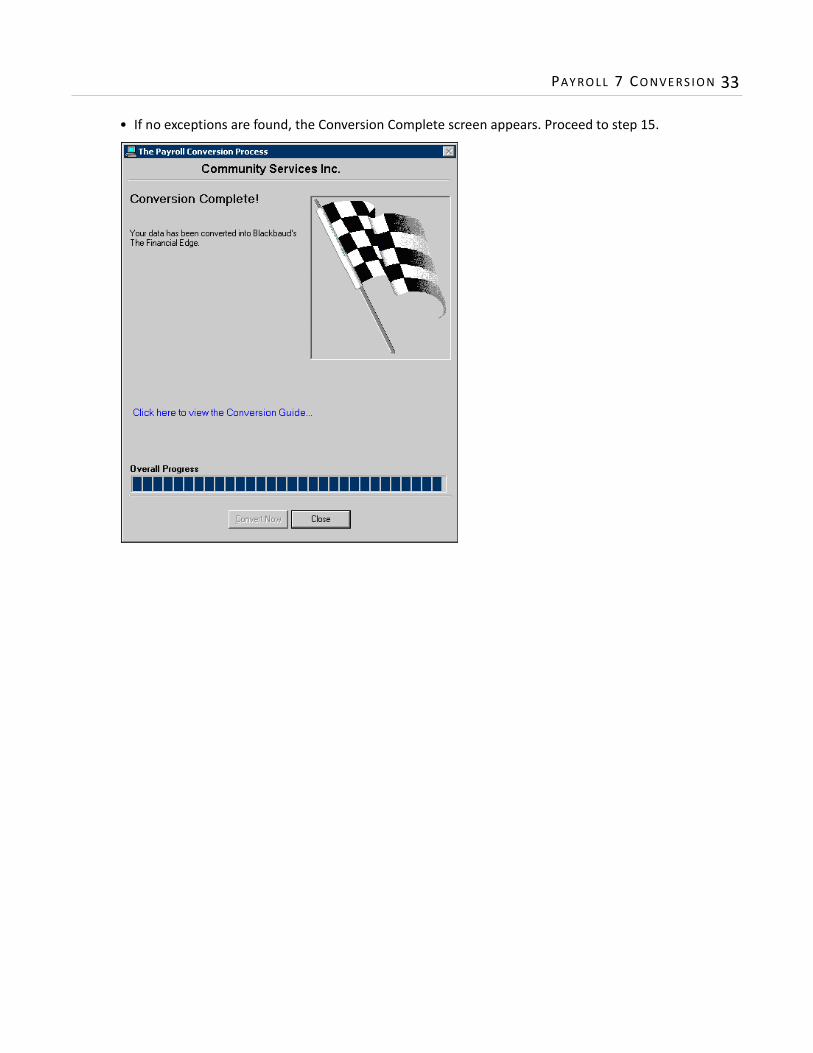
PAY RO L L 7 CO NVE RS I O N 33
• If no exceptions are found, the Conversion Complete screen appears. Proceed to step 15.
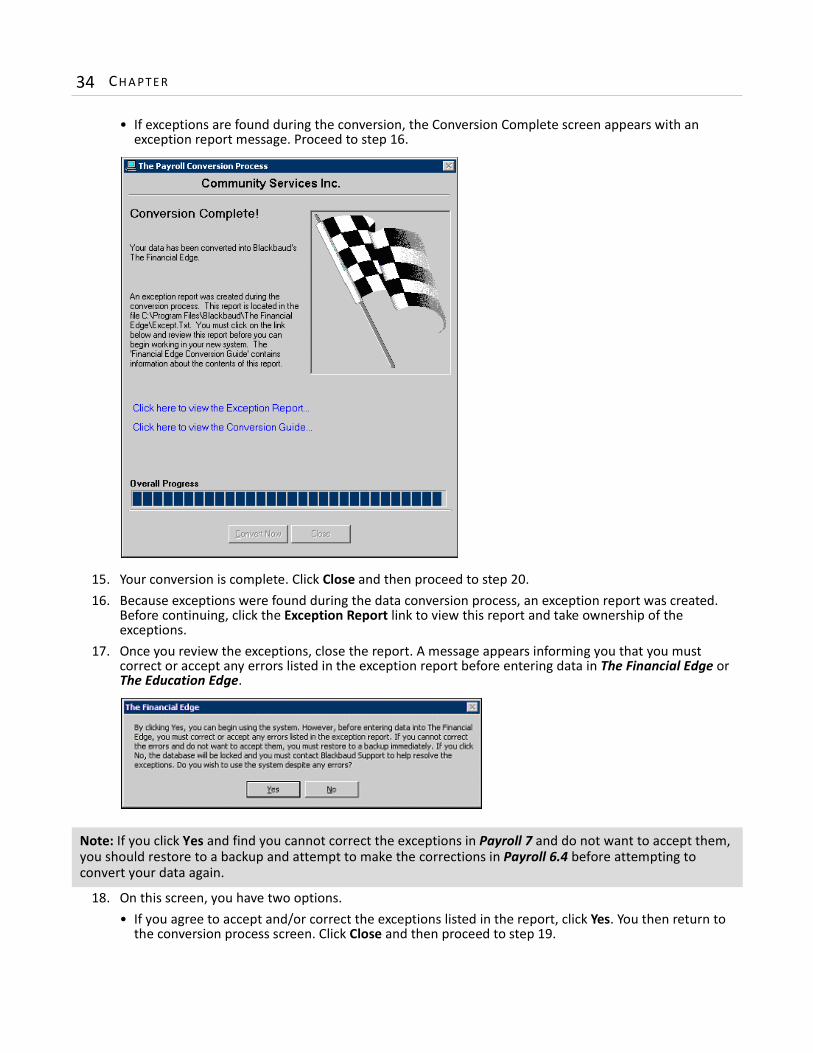
34 CH A PT E R
• If exceptions are found during the conversion, the Conversion Complete screen appears with an exception report message. Proceed to step 16.
15. Your conversion is complete. Click Close and then proceed to step 20.16. Because exceptions were found during the data conversion process, an exception report was created.
Before continuing, click the Exception Report link to view this report and take ownership of the exceptions.
17. Once you review the exceptions, close the report. A message appears informing you that you must correct or accept any errors listed in the exception report before entering data in The Financial Edge or The Education Edge.
18. On this screen, you have two options. • If you agree to accept and/or correct the exceptions listed in the report, click Yes. You then return to
the conversion process screen. Click Close and then proceed to step 19.
Note: If you click Yes and find you cannot correct the exceptions in Payroll 7 and do not want to accept them, you should restore to a backup and attempt to make the corrections in Payroll 6.4 before attempting to convert your data again.
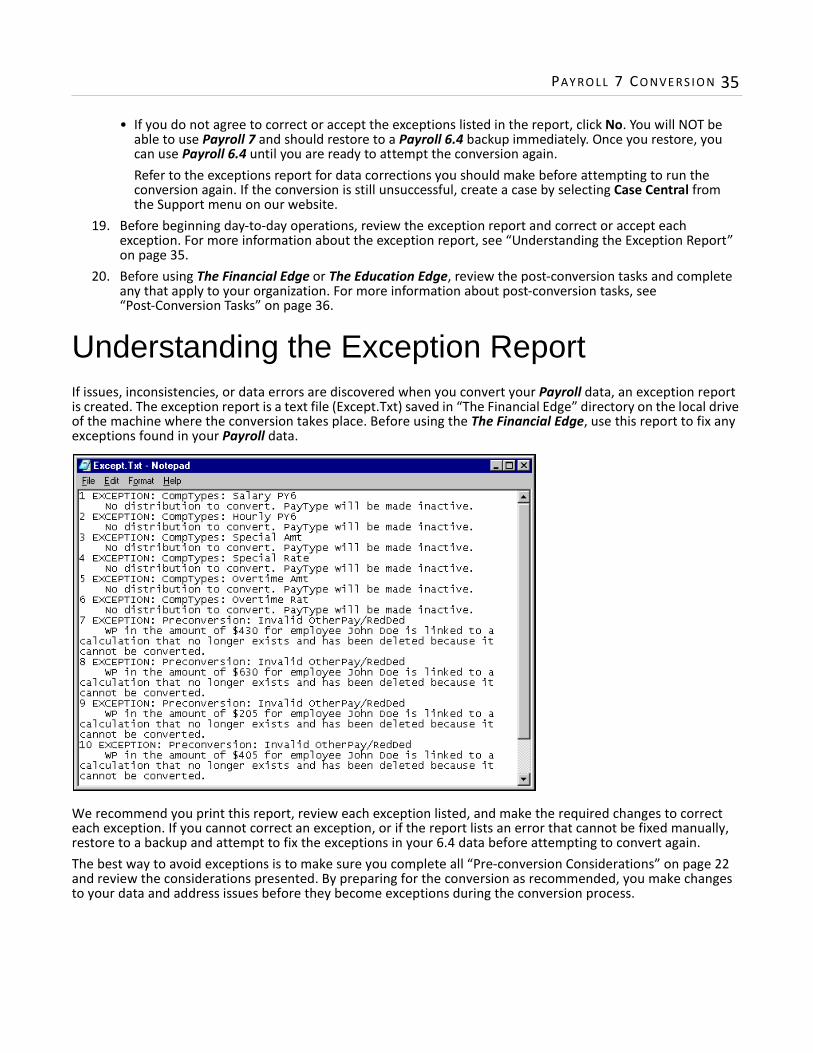
PAY RO L L 7 CO NVE RS I O N 35
• If you do not agree to correct or accept the exceptions listed in the report, click No. You will NOT be able to use Payroll 7 and should restore to a Payroll 6.4 backup immediately. Once you restore, you can use Payroll 6.4 until you are ready to attempt the conversion again. Refer to the exceptions report for data corrections you should make before attempting to run the conversion again. If the conversion is still unsuccessful, create a case by selecting Case Central from the Support menu on our website.
19. Before beginning day-to-day operations, review the exception report and correct or accept each exception. For more information about the exception report, see “Understanding the Exception Report” on page 35.
20. Before using The Financial Edge or The Education Edge, review the post-conversion tasks and complete any that apply to your organization. For more information about post-conversion tasks, see “Post-Conversion Tasks” on page 36.
Understanding the Exception ReportIf issues, inconsistencies, or data errors are discovered when you convert your Payroll data, an exception report is created. The exception report is a text file (Except.Txt) saved in “The Financial Edge” directory on the local drive of the machine where the conversion takes place. Before using the The Financial Edge, use this report to fix any exceptions found in your Payroll data.
We recommend you print this report, review each exception listed, and make the required changes to correct each exception. If you cannot correct an exception, or if the report lists an error that cannot be fixed manually, restore to a backup and attempt to fix the exceptions in your 6.4 data before attempting to convert again. The best way to avoid exceptions is to make sure you complete all “Pre-conversion Considerations” on page 22 and review the considerations presented. By preparing for the conversion as recommended, you make changes to your data and address issues before they become exceptions during the conversion process.
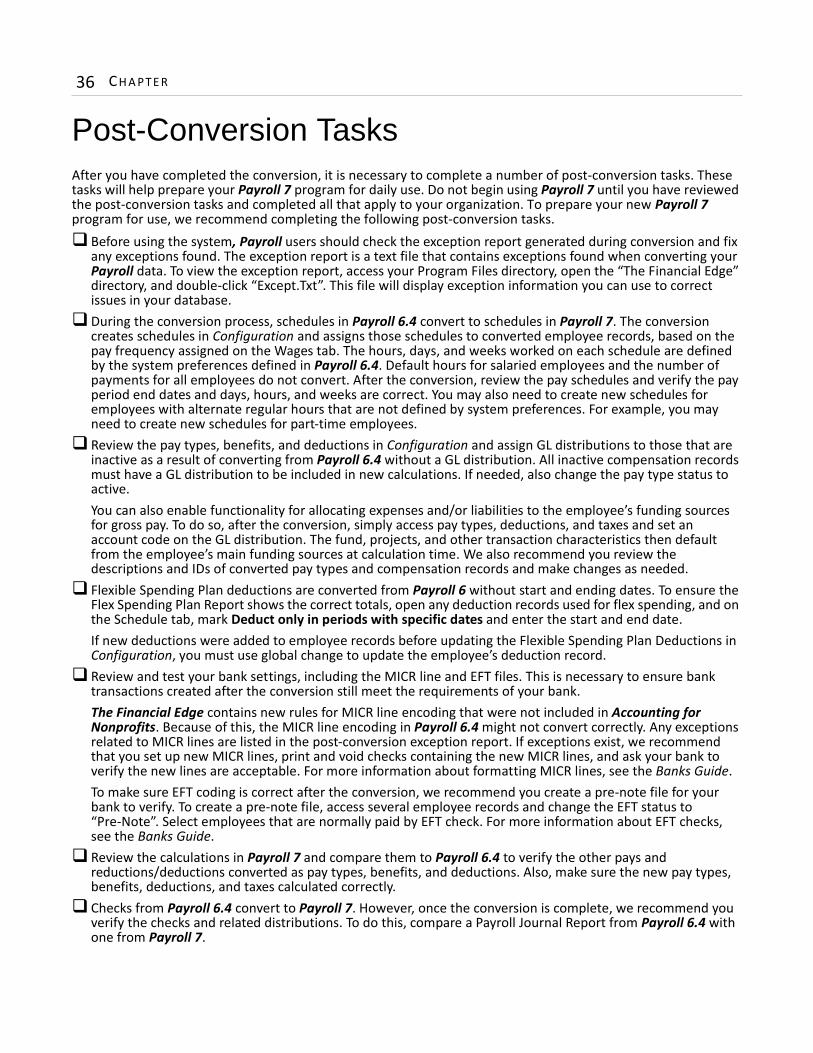
36 CH A PT E R
Post-Conversion TasksAfter you have completed the conversion, it is necessary to complete a number of post-conversion tasks. These tasks will help prepare your Payroll 7 program for daily use. Do not begin using Payroll 7 until you have reviewed the post-conversion tasks and completed all that apply to your organization. To prepare your new Payroll 7 program for use, we recommend completing the following post-conversion tasks.
Before using the system, Payroll users should check the exception report generated during conversion and fix any exceptions found. The exception report is a text file that contains exceptions found when converting your Payroll data. To view the exception report, access your Program Files directory, open the “The Financial Edge” directory, and double-click “Except.Txt”. This file will display exception information you can use to correct issues in your database.During the conversion process, schedules in Payroll 6.4 convert to schedules in Payroll 7. The conversion creates schedules in Configuration and assigns those schedules to converted employee records, based on the pay frequency assigned on the Wages tab. The hours, days, and weeks worked on each schedule are defined by the system preferences defined in Payroll 6.4. Default hours for salaried employees and the number of payments for all employees do not convert. After the conversion, review the pay schedules and verify the pay period end dates and days, hours, and weeks are correct. You may also need to create new schedules for employees with alternate regular hours that are not defined by system preferences. For example, you may need to create new schedules for part-time employees.Review the pay types, benefits, and deductions in Configuration and assign GL distributions to those that are inactive as a result of converting from Payroll 6.4 without a GL distribution. All inactive compensation records must have a GL distribution to be included in new calculations. If needed, also change the pay type status to active. You can also enable functionality for allocating expenses and/or liabilities to the employee’s funding sources for gross pay. To do so, after the conversion, simply access pay types, deductions, and taxes and set an account code on the GL distribution. The fund, projects, and other transaction characteristics then default from the employee’s main funding sources at calculation time. We also recommend you review the descriptions and IDs of converted pay types and compensation records and make changes as needed.Flexible Spending Plan deductions are converted from Payroll 6 without start and ending dates. To ensure the Flex Spending Plan Report shows the correct totals, open any deduction records used for flex spending, and on the Schedule tab, mark Deduct only in periods with specific dates and enter the start and end date.If new deductions were added to employee records before updating the Flexible Spending Plan Deductions in Configuration, you must use global change to update the employee’s deduction record.Review and test your bank settings, including the MICR line and EFT files. This is necessary to ensure bank transactions created after the conversion still meet the requirements of your bank. The Financial Edge contains new rules for MICR line encoding that were not included in Accounting for Nonprofits. Because of this, the MICR line encoding in Payroll 6.4 might not convert correctly. Any exceptions related to MICR lines are listed in the post-conversion exception report. If exceptions exist, we recommend that you set up new MICR lines, print and void checks containing the new MICR lines, and ask your bank to verify the new lines are acceptable. For more information about formatting MICR lines, see the Banks Guide.To make sure EFT coding is correct after the conversion, we recommend you create a pre-note file for your bank to verify. To create a pre-note file, access several employee records and change the EFT status to “Pre-Note”. Select employees that are normally paid by EFT check. For more information about EFT checks, see the Banks Guide.Review the calculations in Payroll 7 and compare them to Payroll 6.4 to verify the other pays and reductions/deductions converted as pay types, benefits, and deductions. Also, make sure the new pay types, benefits, deductions, and taxes calculated correctly. Checks from Payroll 6.4 convert to Payroll 7. However, once the conversion is complete, we recommend you verify the checks and related distributions. To do this, compare a Payroll Journal Report from Payroll 6.4 with one from Payroll 7.
PAY RO L L 7 CO NVE RS I O N 37
To help prevent previously-used time sheets from accidentally being run again, all existing time sheets in Payroll 6 convert with a status of “Calculated” in Payroll 7. After the conversion, if you have time sheet batches that have not yet been calculated but now have a “Calculated” status, you can copy the batch to create a new time and attendance batch in Payroll 7, which you can then use to run the calculations. For more information, see the Processing Guide for Payroll.If you paid shift differentials to employees in Payroll 6.4, recreate them as pay types in Payroll 7. To pay employees a shift differential in Payroll 7, add additional hourly pay types for the various differential rates you pay. For information about adding pay types, see the Configuration Guide for Payroll.Because report parameters do not convert, we recommend you write down or print screens of the report parameters you defined in Payroll 6.4 before the conversion so you can recreate reports including the same information in Payroll 7.In Payroll 7, you can set up employer contribution benefits. However, in Payroll 6.4, you may have used local taxes to create employer contribution benefits. If so, these convert as local taxes in Payroll 7, not as employer contribution benefit records. You must manually delete these local taxes and recreate them as employer contribution benefits. Once you create the new benefits, you can save time by using the new Group Assignment tool to assign the benefits to multiple employees at once.Review the tax settings on the pay type records created during the conversion. These records will be identified with a “PY6...” naming convention, for example “PY6 regular salary.” Also, review the tax settings for each employee with a classification other than “Withhold” in Payroll 6.4.Review your attendance plans and consider the new options available for defining accrual methods and carryover levels. If your organization can benefit from the new options, make changes to the attendance plans in Configuration. For more information, see the Configuration Guide for Payroll. If you change attendance plans, you can save time by using the new Group Assignment tool to assign the plans to multiple employees at once. For more information about Group assignment, see the Processing Guide for Payroll.When you convert your data, a position record is created in Payroll 7 for each position table entry defined in Payroll 6.4. After the conversion, review each position record created and make sure the IDs and descriptions are correct. During the conversion, any position table entry greater than 20 characters is truncated. When reviewing your new position records, edit any truncated position IDs to ensure that each position record has a meaningful ID.Once you review and complete all post-conversion tasks that apply to your organization, you are ready to set up Payroll 7. To help with this process, we provide an interactive Getting Started page in the program that guides you through each step. To access the Getting Started page, return to the Initialize Payroll System page and click Get started with your new system using step-by-step instructions. Then, follow the steps provided to set up Payroll 7. For more information about setting up Payroll, see the Getting Started Guide.
Accessing Additional Documentation
Each user’s guide for The Financial Edge and The Education Edge is in a portable document format (PDF), which requires Adobe Acrobat Reader to view. If you do not have Adobe Acrobat Reader, you must install it before you can view the user guides. A free copy of Adobe Acrobat Reader is on your installation CD. If you experience inconsistencies when printing PDF files from Acrobat Reader, including abnormal spacing or fuzzy graphics, you may need to update your printer drivers. To temporarily correct the issue, mark Print as image on your Print settings screen.
Note: Visit our website at www.blackbaud.com for the latest documentation and information.
Note: For more information about accessing and using Financial Edge user guides and documentation, see the “Finding Help” chapter of the Program Basics Guide for The Financial Edge.

38 CH A PT E R
Accessing user guides from the installation CD1. Put the installation CD into your CD-ROM drive. If your system is set to automatically run CDs when
inserted, an AutoPlay Menu screen appears.If the AutoPlay Menu screen does not appear automatically, select Start, Run from your Windows operating system. Browse to the CD-ROM drive, click Open on the Browse screen, and click OK on the Run screen.
2. Click Read User Guides. The User Guides page appears with links to guides containing information about updating, installing, converting, and end-of-year processes.
3. Click the user guide you want to read. The user guide opens in Adobe Acrobat Reader.
Opening user guides from the navigation bar1. From the navigation bar, click Help.
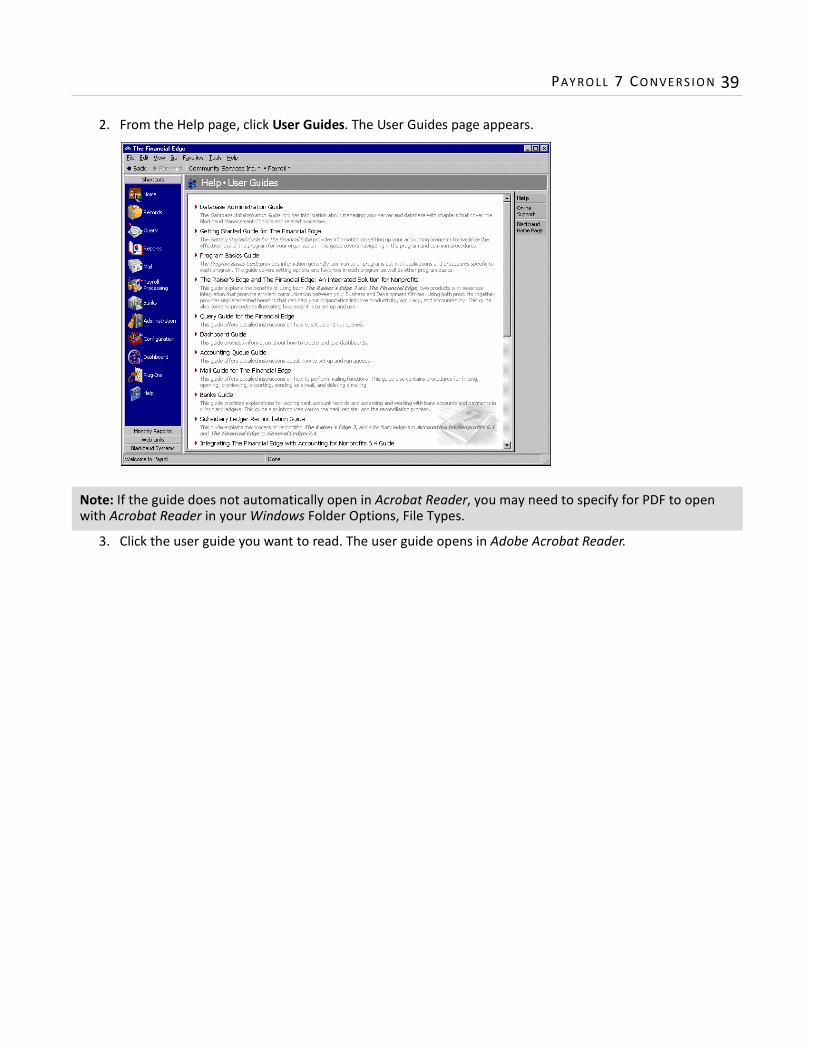
PAY RO L L 7 CO NVE RS I O N 39
2. From the Help page, click User Guides. The User Guides page appears.
3. Click the user guide you want to read. The user guide opens in Adobe Acrobat Reader.
Note: If the guide does not automatically open in Acrobat Reader, you may need to specify for PDF to open with Acrobat Reader in your Windows Folder Options, File Types.

40 CH A PT E R
3chapter
Sample Payroll Conversion Plan
Implementation . . . . . . . . . . . . . . . . . . . . . . . . . . . . . . . . . . . . . . . . . . . . . . . . . . . . . . . . . . . . . . . . . . . . . . . . . . . . . 43Project Planning . . . . . . . . . . . . . . . . . . . . . . . . . . . . . . . . . . . . . . . . . . . . . . . . . . . . . . . . . . . . . . . . . . . . . . . . . . . . . 43Hardware and Technical Services . . . . . . . . . . . . . . . . . . . . . . . . . . . . . . . . . . . . . . . . . . . . . . . . . . . . . . . . . . . . . . . 45Training. . . . . . . . . . . . . . . . . . . . . . . . . . . . . . . . . . . . . . . . . . . . . . . . . . . . . . . . . . . . . . . . . . . . . . . . . . . . . . . . . . . . 46Data Preparation . . . . . . . . . . . . . . . . . . . . . . . . . . . . . . . . . . . . . . . . . . . . . . . . . . . . . . . . . . . . . . . . . . . . . . . . . . . . 46Data Cleanup . . . . . . . . . . . . . . . . . . . . . . . . . . . . . . . . . . . . . . . . . . . . . . . . . . . . . . . . . . . . . . . . . . . . . . . . . . . . . . . 47Implementation Sign-off . . . . . . . . . . . . . . . . . . . . . . . . . . . . . . . . . . . . . . . . . . . . . . . . . . . . . . . . . . . . . . . . . . . . . . 47

C H A P T E R 42
To help prepare for a successful conversion to Payroll 7, we have created a sample conversion plan for a fictional organization. Using this plan, you can gain a better understanding of the tasks and amount of time needed for the conversion.Because the sample plan outlined in this section is for a fictional organization, your plan’s action items and dates may vary greatly. Please do not consider this sample plan a strict guideline. It is simply a sample timeline to help you prepare your conversion plan. In this sample plan, today’s date is January 31. The amount in the percent column is considered to be the percentage complete as of today’s date. For example, in the Payroll 6.4 to Payroll 7 Implementation row, as of January 31, 50% of the task is complete. The conversion plan began on January 1 and the conversion deadline is March 16.Be aware that the tasks in the sample plan are split into categories, such as Data Preparation and Data Cleanup. Each category of tasks has its own timeline, so there are certain tasks in different categories that should happen simultaneously. For example, in this sample plan, while you are planning your implementation (Implementation category table), you should be ordering new hardware (Hardware and Technical services category table).Organization – Fictional Academy, Charleston, SCProject Start – January 1Today’s date – January 31Project Finish – March 16
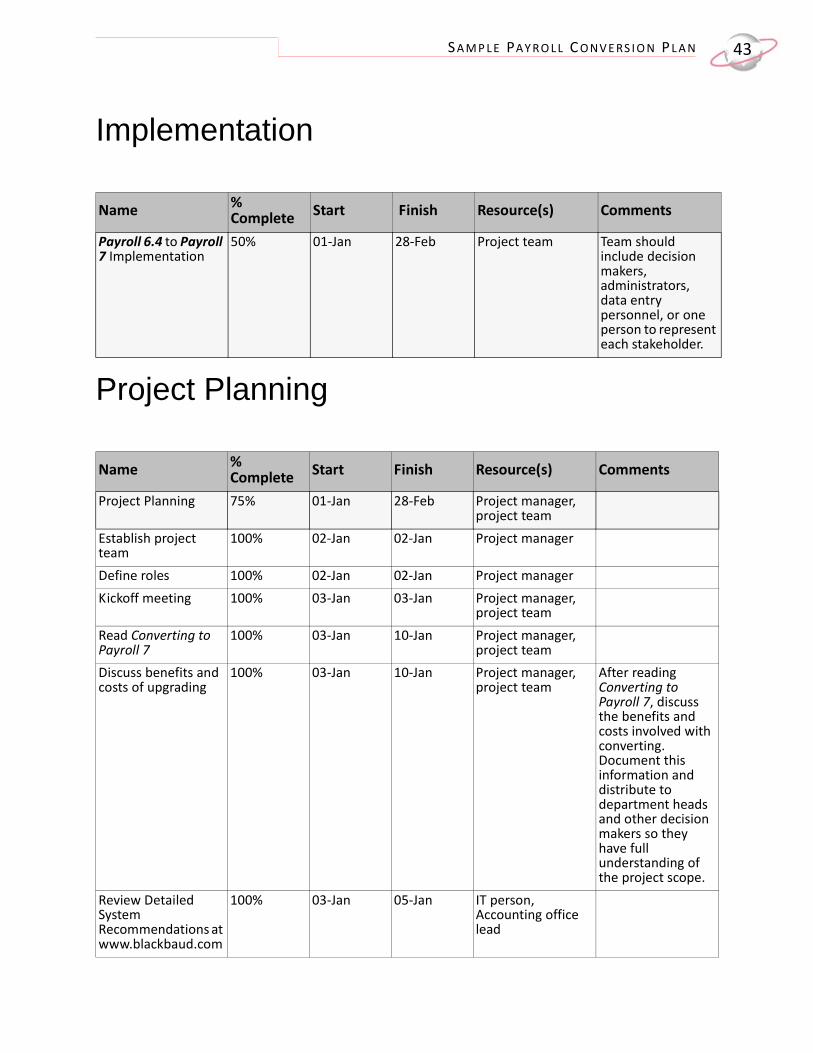
S A M P L E PAY RO L L C O NV E RS I O N P L A N 43
Implementation
Project Planning
Name % Complete Start Finish Resource(s) Comments
Payroll 6.4 to Payroll 7 Implementation
50% 01-Jan 28-Feb Project team Team should include decision makers, administrators, data entry personnel, or one person to represent each stakeholder.
Name % Complete Start Finish Resource(s) Comments
Project Planning 75% 01-Jan 28-Feb Project manager, project team
Establish project team
100% 02-Jan 02-Jan Project manager
Define roles 100% 02-Jan 02-Jan Project managerKickoff meeting 100% 03-Jan 03-Jan Project manager,
project teamRead Converting to Payroll 7
100% 03-Jan 10-Jan Project manager, project team
Discuss benefits and costs of upgrading
100% 03-Jan 10-Jan Project manager, project team
After reading Converting to Payroll 7, discuss the benefits and costs involved with converting. Document this information and distribute to department heads and other decision makers so they have full understanding of the project scope.
Review Detailed System Recommendations at www.blackbaud.com
100% 03-Jan 05-Jan IT person, Accounting office lead
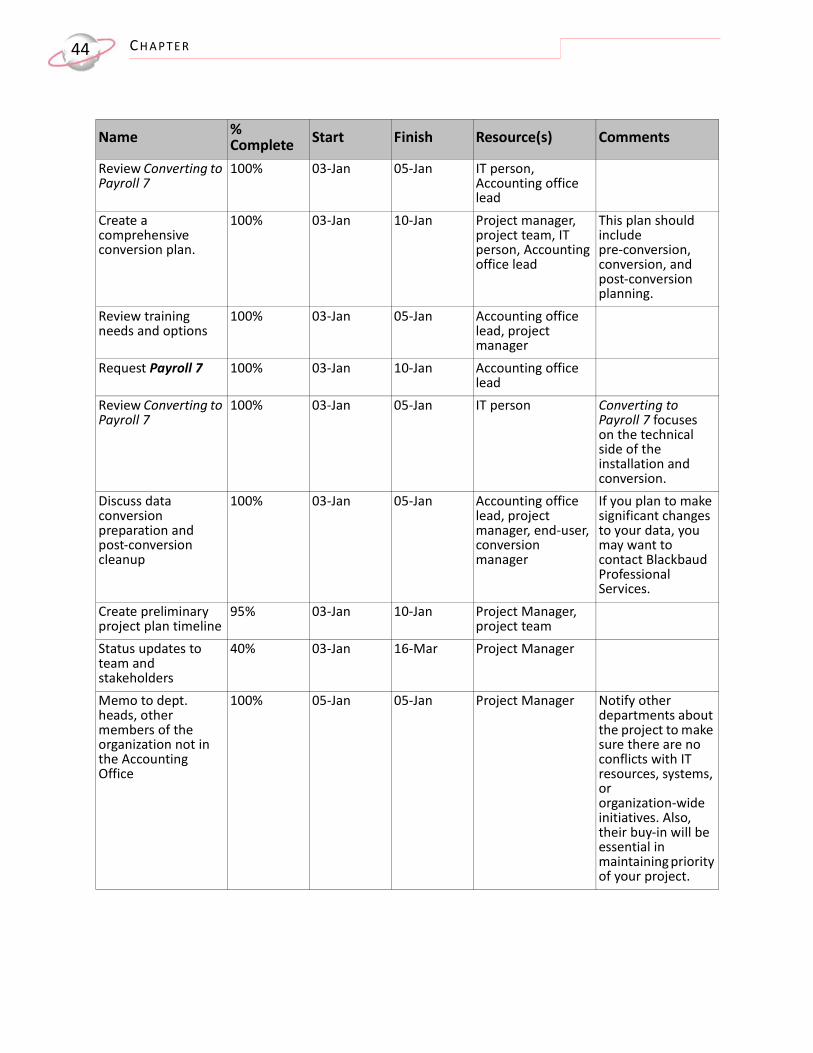
C H A P T E R 44
Review Converting to Payroll 7
100% 03-Jan 05-Jan IT person, Accounting office lead
Create a comprehensive conversion plan.
100% 03-Jan 10-Jan Project manager, project team, IT person, Accounting office lead
This plan should include pre-conversion, conversion, and post-conversion planning.
Review training needs and options
100% 03-Jan 05-Jan Accounting office lead, project manager
Request Payroll 7 100% 03-Jan 10-Jan Accounting office lead
Review Converting to Payroll 7
100% 03-Jan 05-Jan IT person Converting to Payroll 7 focuses on the technical side of the installation and conversion.
Discuss data conversion preparation and post-conversion cleanup
100% 03-Jan 05-Jan Accounting office lead, project manager, end-user, conversion manager
If you plan to make significant changes to your data, you may want to contact Blackbaud Professional Services.
Create preliminary project plan timeline
95% 03-Jan 10-Jan Project Manager, project team
Status updates to team and stakeholders
40% 03-Jan 16-Mar Project Manager
Memo to dept. heads, other members of the organization not in the Accounting Office
100% 05-Jan 05-Jan Project Manager Notify other departments about the project to make sure there are no conflicts with IT resources, systems, or organization-wide initiatives. Also, their buy-in will be essential in maintaining priority of your project.
Name % Complete Start Finish Resource(s) Comments

S A M P L E PAY RO L L C O NV E RS I O N P L A N 45
Hardware and Technical Services
Name % Complete Start Finish Resource(s) Comments
Hardware and Technical Services
90% 05-Jan 31-Jan IT person For information about Blackbaud’s Technical Services, e-mail [email protected].
Order new hardware 100% 10-Jan 10-Jan IT person If applicable. See Detailed System Recommendations document at www.blackbaud.com.
Install new server 100% 24-Jan 24-Jan IT personInstall new workstations
100% 25-Jan 25-Jan IT person
Backup Payroll 6.4 and systems.
0% 26-Jan 26-Jan IT person, Accounting office lead
Install the Payroll conversion utility in a test environment.
100% 26-Jan 26-Jan IT person This can be on a standalone machine for the person who is testing.
Convert Payroll data in a test environment.
100% 26-Jan 26-Jan IT person, conversion manager
This can be on a standalone machine for the person who is testing.
Test converted data 35% 29-Jan 28-Feb Person who most often works with the data (SME).
Test a random sampling across all complexities of Payroll calculations and attendance.
Install the Payroll conversion utility in a live environment
0% 26-Feb 28-Feb IT person Weekend as buffer.
Convert Payroll data in a live environment.
0% 26-Feb 5-March IT person Weekend.
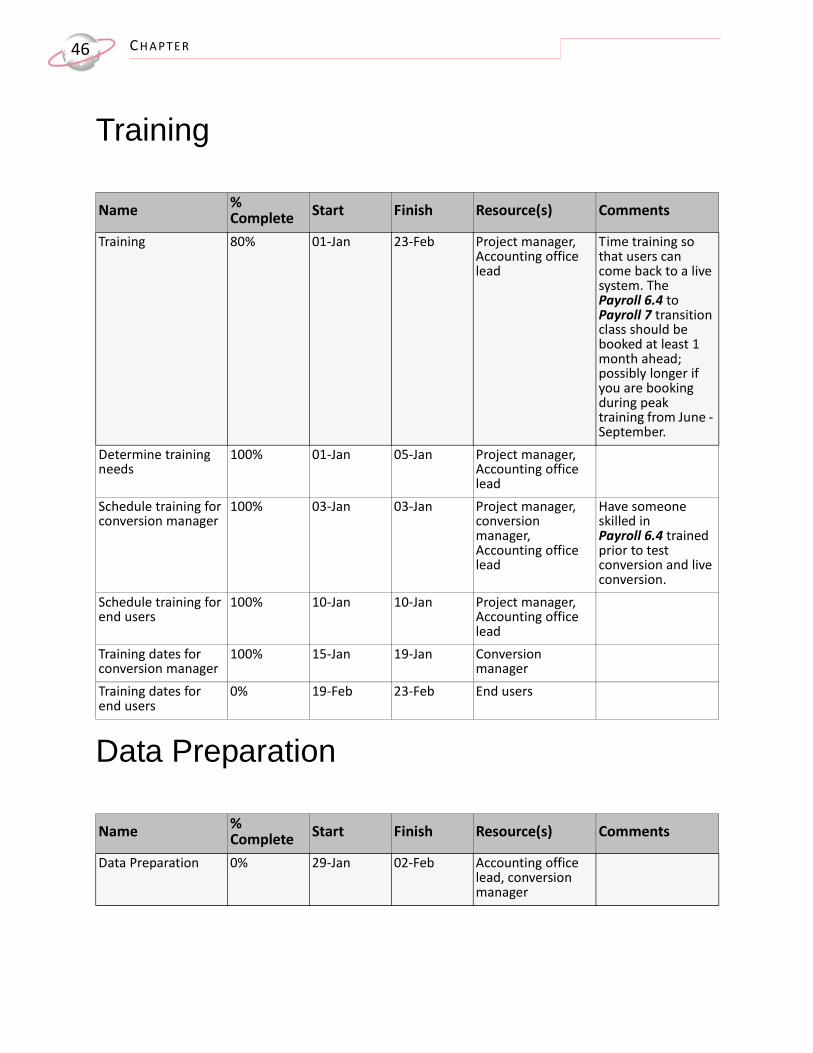
C H A P T E R 46
Training
Data Preparation
Name % Complete Start Finish Resource(s) Comments
Training 80% 01-Jan 23-Feb Project manager, Accounting office lead
Time training so that users can come back to a live system. The Payroll 6.4 to Payroll 7 transition class should be booked at least 1 month ahead; possibly longer if you are booking during peak training from June - September.
Determine training needs
100% 01-Jan 05-Jan Project manager, Accounting office lead
Schedule training for conversion manager
100% 03-Jan 03-Jan Project manager, conversion manager, Accounting office lead
Have someone skilled in Payroll 6.4 trained prior to test conversion and live conversion.
Schedule training for end users
100% 10-Jan 10-Jan Project manager, Accounting office lead
Training dates for conversion manager
100% 15-Jan 19-Jan Conversion manager
Training dates for end users
0% 19-Feb 23-Feb End users
Name % Complete Start Finish Resource(s) Comments
Data Preparation 0% 29-Jan 02-Feb Accounting office lead, conversion manager
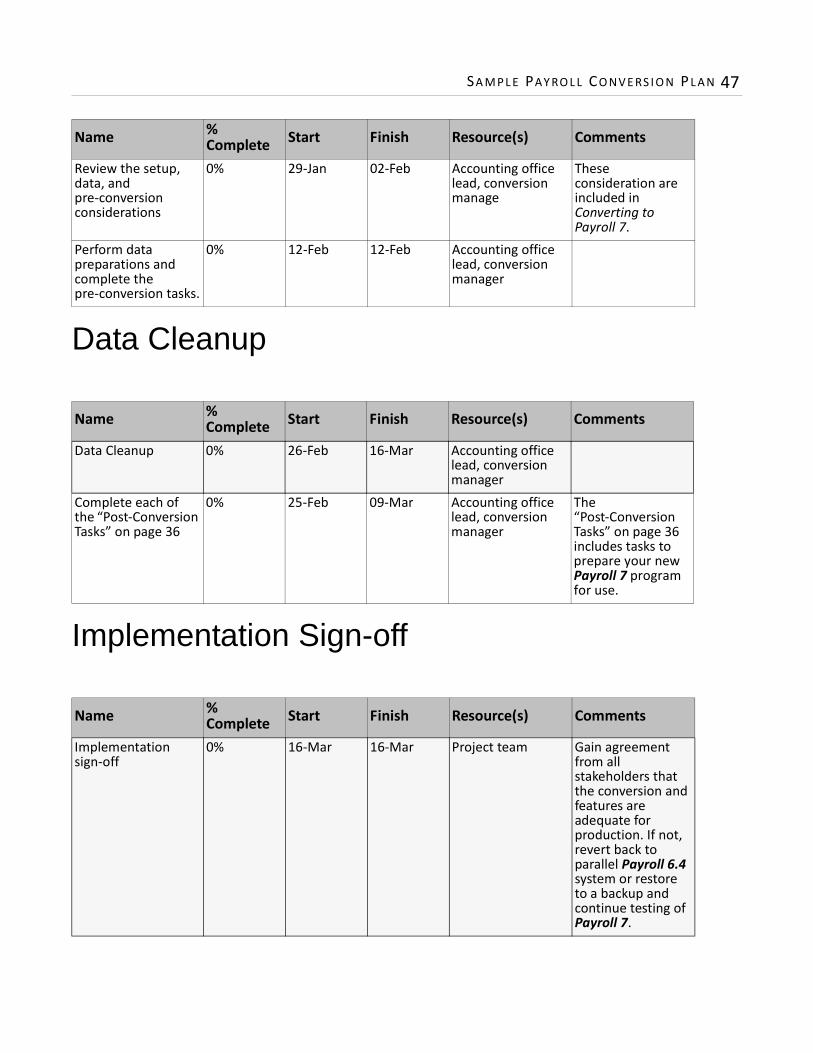
SA M P L E PAY RO L L CO NV E RS I O N P L A N 47
Data Cleanup
Implementation Sign-off
Review the setup, data, and pre-conversion considerations
0% 29-Jan 02-Feb Accounting office lead, conversion manage
These consideration are included in Converting to Payroll 7.
Perform data preparations and complete the pre-conversion tasks.
0% 12-Feb 12-Feb Accounting office lead, conversion manager
Name % Complete Start Finish Resource(s) Comments
Data Cleanup 0% 26-Feb 16-Mar Accounting office lead, conversion manager
Complete each of the “Post-Conversion Tasks” on page 36
0% 25-Feb 09-Mar Accounting office lead, conversion manager
The “Post-Conversion Tasks” on page 36 includes tasks to prepare your new Payroll 7 program for use.
Name % Complete Start Finish Resource(s) Comments
Implementation sign-off
0% 16-Mar 16-Mar Project team Gain agreement from all stakeholders that the conversion and features are adequate for production. If not, revert back to parallel Payroll 6.4 system or restore to a backup and continue testing of Payroll 7.
Name % Complete Start Finish Resource(s) Comments

48 CH A PT E R