Embed Size (px)
Citation preview

THE TWIN BLOCK MANUAL
If removable appliances are already a familiar part of your practice, you'll quickly see the benefits of using the Twin Block Technique® If not, you now have the opportunity to begin with the most advanced removable appliance available to your profession.
The Twin Block Technique® was developed by Qr. William Clark of Scotland during the early 1980's. Dr. Clark lectured and displayed the Technique at the European Orthodontic Meetings throughout this decade. Also, the Technique was shown at the AAO in the late 80's. In 1986, Dr. Clark lectured to many of Johns Dental customers and we have been making the appliance since.
Twin Block is an uncomplicated system that incorporates the use of upper and lower bite blocks. These blocks reposition the mandible and redirect occlusal forces to achieve rapid correction of malocclusions. They are also comfortable and the patients wear them full-time—including eating time. The features of Twin Block mean easier and quicker treatment.
This manual is designed to introduce you to the Technique, to help you get your first case started and to be a reference for future cases. Contact Joe'Moody or John Neuenschwander at our toll free number to clarify any questions you may have about Twin Block or any of our other products and services.

Overview of Treatment
There are two phases of treatment with the Twin Block Technique, the active phase and the support phase. To help you visualize the appliance designs and functions during the overview, we will be referring to figures in this manual. The key components of the Technique are the upper and lower appliances, the 70 degree interface ramps where the upper and lower appliances occlude and the occlusal pads.
During the active phase, intra arch changes are made such as widening and/or lengthening. Also included in the active phase are inter-arch changes such as Class II correction and vertical development.
Figure A Presents the upper and lower appliances at the first appointment. This buccal view shows the 70 degree interface, the upper pad covering the second bicuspid and the molars, and the lower pad covering.the bicuspids. Note that 5 mm of space is required between the upper and lower bicuspids at the interface ramps. This space is needed to maintain the protrusive mandibular position. The occlusal inclined plane changes the function from Class II to Class I during correction. Figure B Presents the upper and lower appliances as they are used for posterior vertical development. This buccal view shows that the upper pad has been gradually relieved to create space - approximately 1/2 to 1 mm per appointment. This is done gradually to keep the tongue from expanding laterally and impeding vertical development of the molars. The lower appliance is the keystone for maintaining the vertical during treatment and should not be relieved. Also, during the acrylic relieving process, the 70 degree interface ramps should not be altered; alteration will interfere with their function.
Fig.B This illustration does not show the appliance screws. Since vertical takes longer to achieve during treatment than arch width and A-P development, it is important to watch the progress of all three of these factors. Although treatment begins with screw activation and pad relief, arch width and A-P will usually be achieved before vertical development. Consequently, screw activation may stop before all the vertical development has been achieved. Figure C Presents the upper and lower appliances during the final stages of the active treatment phase. This buccal view shows the upper appliance fully relieved; its only function now is to maintain the forward mandibular position. The lower molars are developing the needed vertical and the pads on the lower appliance are functioning as the keystone for maintaining the vertical. The active phase ends when there is no further need for the upper and lower appliances. This determination is made with the appliances removed. At that time, observe the anterior segment with the molars in contact. Has enough vertical been developed so that the overbite will be maintained at a desirable depth? Some overcorrection is required to insure that .the molars will be in solid contact. (If not, continue treatment until has been done.) The occlusion presented in figure D shows the support phase appliance maintaining the overbite and overjet.
Fig. A
Fig-C this ideal

During the support phase, an inclined anterior bite plane appliance is used to maintain the Class II correction. The support phase appliance is designed to allow buccal segment development.
Figure D Presents the upper support phase appliance when it is first seated. This buccal view shows the anterior ramp which maintains the mandibular class II correction; the molars now maintain the vertical development. The lower bicuspids and cuspid are free to erupt into occlusion with the upper arch.
Figure E Presents the upper support appliance after the patients teeth have settled into full occlusion. The class II correction is complete; the patient has developed into a Class I. The support phase appliance is worn as a retainer for stability.
Comparison with other Functional Appliances
As you can see from the overview, the Twin Block Technique is both simple and effective. Compared to other functional appliances, the Technique stands up as the premier functional treatment modality available.
Esthetics and comfort - patients maintain normal function and appearance because there are no lip, cheek or tongue pads. The patient's appearance is noticeably improved when the appliances are fitted. They look better and feel better about themselves during treatment.
Full time wear - unlike some functional appliances, the Twin Block appliances are not bulky. They are comfortable when sleeping, eating, playing (except swimming) and working. Continuous wear equals continuous application of light physiological forces, the forces that stimulate maximum growth response to correct the skeletal relationship.
All Age Groups - comfort, esthetics, and full-time wear means rapid correction of malocclusions for all age groups. Mixed, transitional and permanent dentition, the Twin Block technique meets the treatment challenges for all ages.
Arch control - with the Twin Block appliances you have the advantage of independent control of the upper and lower arch. The benefit is shorter treatment time.
Integrating treatment - integration with conventional fixed braces is simpler than with any other functional appliance.
Fig. D
Fig. E
Selecting the First Case
Like anything new, it takes some time to adjust to Twin Block. It doesn't take long, however, to make the Twin Block Technique one of the most important treatment modalities in your practice. The Twin Block technique is suitable for correction of most Class II malocclusions. To avoid complications, however, the practitioner beginning with this technique may first want to consider an ideally suited case. The Basic Twin Block may be used in this instance.
During initial case selection look for the following: 1. Permanent dentition and an active grower 2. Uncrowded Class II, Division I malocclusion with well developed arches 3. 10 mm or less of overjet with normal to deep overbtte - deep overbite is common in these
cases 4. During the clinical exam look for improved facial esthetics when the mandible is brought
forward to a Class I molar relationship and opened to a normal overbite -this is a clinical indication that the Class II arch relationship is skeletal
5. Growth direction is normal - neither clockwise nor counterclockwise 6. Normal or slightly deep skeletal vertical
Indications
Variations of the basic design are available for a variety of clinical indications. Please refer to the figures in the appliance design section of this manual.
The Basic Twin Block is indicated for treatment of uncrowded permanent dentition with Class II. Division I malocclusions. It is designed to correct a Class II skeletal relationship, to correct molar relationship and to correct overjet. The function of the appliance brings the lower arch forward. The upper arch is expanded during treatment to accommodate the lower in its new forward position. (See fig. 1)
The Expansion Twin Block is indicated for treatment of deep bite Class II, Division 1 malocclusions where both arches are narrow. Arch widths can be simultaneously expanded with this design. (See fig. 2)
The Sagittal Twin Block is indicated for treatment of Class II, Division II malocclusions. Correction is made by advancing retroclined anteriors and lengthening the arches. Expansion during treatment can also be accomplished with midline screws. (See figs. 3 & 4)
The Mixed Dentition Expansion is indicated for treatment of Class II correction and arch width development -« vertical development is not normally required at this stage. Case design accommodates changes in dentition. (See fig. 5)
The Twin Block to Close the Bite is indicated for treatment of Class II correction and anterior open bite. The appliance is designed to allow the anteriors to extrude and to move lingually. Tongue wires are fabricated into this appliance to restrict tongue thrust. The pads are not relieved because posterior vertical development is contraindicated. (See fig. 6)
The Twin Block for Class III is indicated for treatment of Class III cases. We have designs for both sagittal and expansion of the upper arch. In Class III cases it is important to avoid distalizing the condyle in the fossa. Otherwise, TMJ problems may develop. (See figs. 9, 10 & 11)

Laboratory Requirements
Please provide a prescription outlining your design and treatment goals. The information in this manual describes standard designs and options. Depending on the case requirements, it may be necessary to combine different appliances and components in your designs for either the upper, lower or both arches. We need upper and lower models free of distortion. Also, please include a construction bite (see below). In transitional cases or in permanent dentition cases, the first bicuspids should be fully erupted on both arches. In mixed dentition cases, the D's should have solid roots because they will be used as retention for approximately six months.
X Our toll free number is available if you have questions about our laboratory procedures.
Bite Registration
To insure proper fabrication of the appliance, the laboratory needs a construction bite. The following questions are considered when registering Class I and Class II bites:
1. Can the patient move forward into a comfortable Class I position? The ideal is Class I or slightly beyond. Patient comfort is important during treatment; it encourages the patient to wear the appliances full time.
2. How much overjet needs to be corrected? An overjet of 10 mm may be corrected without reactivating the Twin Blocks. Overjets greater than 10 mm normally require increased activation. This is done by the adding cold cure acrylic halfway through treatment.*
3. is there enough space to construct adequate interface ramps? The laboratory needs 5 mm of opening between the upper and lower bicuspids to correctly fabricate the appliances. The success of the 70 degree interface is dependent on this natural freeway space that maintains the interface contact.
4. Where are the midlines? The skeletal midlines should be aligned.
5. How does the facial profile look? This may be taken into consideration when reviewing the above factors.
6. In Class 111 construction bites, the mandible should be hinged open to create 5 mm of vertical space between upper and lower bicuspids. Align the skeletal midlines.
* See special "Mini-Bite" section

Delivering the Appliance
It is important to get treatment started on the right foot. A few minutes used at delivery will prove valuable during the treatment process. Well educated patients and family members can follow progress and appreciate what you have helped them receive as a benefit of your services. Some possible approaches to this educational process include:
1. Fully explain the components and the function of the appliance. Point out the 70 degree inclined planes and " how when inserted the appliance immediately improves the esthetic appearance of the patients face.
2. It should be explained that Twin Blocks achieve correction through the forces of occlusion. It is very important for the patient to wear the appliances full time and to leam how to eat with the appliances in the mouth. Patient hygiene should be explained so that the patient knows how to clean the appliances after each meal.
3. Prior to insertion, tell the patient about the improved facial esthetics they'll notice when the appliances are fitted. After fitting, tell the patient that to permanently achieve the facial esthetics, they will need to wear the appliances full-time throughout treatment. It is helpful for the patient to see Polaroid photography of the profile prior to and after fitting the appliance.
4. Although the appliances will feel bulky initially to the patient, they will feel comfortable in a few days. 5. Adjust the clasps to secure the appliance without impinging on the gingival tissue. If a labial bow is present it
should be out of contact with the upper incisors. The patient should be able to bite comfortably in the prelusive position and the teeth should contact evenly on the pads. The next appointment time is in 1 week.
Adjustment Guidelines
The purpose of adjustments is to maintain the function of the appliances and to insure patient comfort. Both are essential for effective treatment results. If you have questions about appliance adjustments after reading the following information, please contact Protec Dental Laboratories Ltd. 800.663.5488
The first visit Adjust the clasps to hold the appliances securely in position without impinging on the gingival tissue. If a labial bow is present, it should not be contacting the upper incisors. Is the patient comfortable in the protrusive position? If not, adjust accordingly.
The second visit By now, it's normal for the patient to be wearing the appliances comfortably full time including when eating. Compliment the patient for becoming accustomed to the appliance so quickly and give reassurance if there are any difficulties. Now is the time to inform the patient and parent about the procedures for turning appliance screws (See information in this manual). When the appliance is worn full time, improved facial muscle balance is evident during early stages of treatment. Help the patient and parent see this as an encouraging sign of early progress. Possible other adjustments for the second visit are: In cases with deep overbite, the posterior section of the upper block should be trimmed to leave the lower molars 1/2 to 1 mm clear of the occlusion. This will allow molar eruption for vertical development. In anterior open bite cases it is very important that no trimming be done on the blocks. All posterior teeth must then remain in contact with the blocks to prevent eruption of posterior teeth.

In skeletal open bite cases molar contact must be maintained. At each visit check to make sure the patient is not opening beyond the freeway space. The bite blocks will ride on occlusal surfaces instead of the 70 degree interface, the mandible will retrude and excess vertical will develop. In TMJ cases where posterior support is important and vertical development is needed, relieving the second molar contact to achieve vertical development is not advisable. Instead, relieve contact for the first molar and allow it to come into contact and give support at the desired vertical. Some acrylic may need to be added in the first molar area to provide stability as it functions as the vertical posterior stop. Relieve the second molar afterward until it also reaches the desired vertical. This procedure allows you to maintain the needed posterior support during treatment to avoid TMJ complications.
The third visit Positive progress should now be noted in facial muscle balance and this should be confirmed in a reduction in overjet measured intraorally with the mandible fully retracted. Minor adjustment is necessary to keep the labial bow out of contact with the upper incisors, and to ensure that the lower molars are not in contact with the upper block in cases with deep overbite. Check that the screws are operating correctly and adjust the clasps if necessary.
Other visits After the third visit, the following items should be monitored whenever the patient is scheduled in the office. Common treatment time for Phase I is 4-9 months.
Verify arch width and A-P development. This usually takes 2-6 months. When desired results are achieved the screws need not be activated and acrylic may be added to the screw area to avoid further changes.
The time period for vertical development is usually 2-3 months longer than arch width and A-P development
Pads must be added to the second molars as they erupt on mixed dentition cases if vertical development needs to be restrained.
Phase II begins after the desired vertical has been achieved.
When Phase I treatment is completed, a centric bite is used to construct the Phase II appliance. With the bite in place verify that you have the overbite and overjet you want (usually a slightly overcorrected overbite). Upper and lower models are needed to construct the Phase II appliance. To maintain Phase I correction, the Twin Block appliances should remain in the patients mouth until the Phase II appliance is constructed and delivered.
After seating of the Phase II appliance verify that the tissue is not impinged and the anterior guide plane is in contact with all anteriors. The length of the guide plane needs to be sufficient to maintain the Class I bite and not so long as to effect speech. The settling in of occlusion usually takes 4-6 months. The arches need support for 3-6 months following to allow reorientation of the muscular system before the position is naturally retained.
Once the adaptation of the musculature is complete the Phase II appliance can gradually become a night time appliance.

Treatment Adjustments
Mini-Bite: Twin Block Inclined Plane Modification
If needed, you may alter the inclined planes during Twin Block treatment to: A. advance the mandible B. correct the midline • C. accommodate TMJ needs
Proceed as follows:
1. Determine what correction is needed
2. Relieve any acrylic interferences from the bite blocks that would impede the correction
3. A credible lower plane is required to construct the upper inclined plane. If adjustments to the lower are not required continue to step 4
4. Warm one-half sheet of wax in a water bath at 139 degrees
5. Fold the half sheet of wax over twice from both sides to achieve four thicknesses
6. Fold the ends of the wax over to fit the arch form and to achieve eight thicknesses
7. With both bite blocks in the mouth, take the 'Mini-Bite' wax registration. Place the folded warm wax wafer on the lower posterior teeth and away from the anteriors so that they —- may
be seen dearly when taking the construction bite. Ask the patient to gently close the mandible forward and upward to the desired position.
8. Remove, chill and trim the "Mini-Bite" so that the wax between the inclined planes is removed. This creates a space for adding acrylic to the upper plane. 9. Now, place the wax bite in the patient's mouth. Check the midline. facial asymmetry, bitet opening, and the jaw position. ;
10. Place Vaseline on the lower bite block inclined plane
11. Add acrylic to the upper bite block inclined plane with cold cure or light bond acrylic
12. Place the upper bite block in the patients mouth
13. Place the "Mini-Bite" over the lower bite block. Ask the patient to close into the "Mini-Bite"
14. Cure the acrylic
15. Trim the acrylic
16. Deliver the modified Twin Block

Standard Designs
The standard designs in this section have been included to help you understand appliance design and function. References are made to these figures in the indications section previously discussed.
Twin Block, Basic Appliance Class II, Division I with Deep Bite
Indication: Look for an uncrowded and well developed lower arch. Develop the upper arch about two millimeters to accommodate the lower arch when the occlusion is placed in Class I position.
Features: Twin Block pads for Class II correction and vertical development and an upper midline expansion screw to develop the arch.
Adjustments: Create vertical space for the lower molars to erupt by relieving the molar pads 1/2 mm each appointment. Expand the upper arch by opening the screw one turn each week until the upper is compatible with the lower (One turn equals 90 degrees or 1/4 revolution. Four turns equal 360 degrees or one revolution.)
Options: Consolidate the anteriors by adding a labial arch wire. Individual tooth movement may be achieved by including springs in the design. Bio-finisher wires may be attached to the appliance.
Twin Block, Expansion Class II, Division I with Deep Bite and Narrow Arches
Indication: Look for a case that needs both upper and lower arch width.
Features: Twin Block pads for Class II correction and vertical development. Upper midline expansion screws and lower midline, expansion screw for arch development.
Adjustments: Create vertical space for the molars to erupt by relieving the molar pads 1/2 mm at each appointment. Both upper and lower midline screws may be opened one turn each week -twice each week is possible with younger patients - until the desired arch width is achieved.
Options: Consolidate the anteriors by adding a labial arch wire. Individual tooth movement may be achieved by including springs in the design. Bio-finisher wires may be attached to the appliance.
Fig. 1

Twin Block, Two Screw Sagittal Class II, Division II or Anterior Crowding
Indication: Look for a case that needs arch length development These are usually but not always Class II cases.
Features: This appliance features Twin Block pads for Class II correction and vertical development. Two sagittal screws for arch length development.
Adjustments: Create vertical space for the molars to erupt by relieving the molar pads 1/2 mm at each appointment. Gain arch length by opening the two sagittal screws one turn every four days.
Options: Bio-finisher wires may be attached to the appliance.
Twin Block, Three Screw Sagittal Class II, Division II or Anterior Crowding and Narrow Arches . .
Indication: Look for a case that needs arch length and arch width.
Features: Twin Block pads for Class II correction and vertical development. Three screws allow for development in both arch length and arch width; in some cases the upper arch requires four screws for maximum arch development.
Adjustments: Create vertical space for the molars to erupt by relieving the molar pads 1/2 mm at each appointment. Depending on your treatment objectives with this case, you may want to open all screws one turn each week to develop the complete arch. An alternative to this is to first open only the midline screw one turn each week; sufficient anchorage can be achieved this way to support more sagittal advancement.
Options: Bio-finisher wires may be attached to the appliance.
Fig. 3
Fig. 4

Mixed Dentition, Expansion Class II Correction and Arch Width
Indication: Look for a mixed dentition case that needs Class II correction, arch width development and no vertical development.
Features: Twin Block pads for Class II correction with both upper and lower midline expansion screws. Since retention is desirable on the D's in mixed dentition cases, you may create an undercut for retention in the office by bonding a bead of composite to the buccal of the patient's D's before taking impressions. The bead will then appear on your models when we receive them and C clasps can be constructed for the D's.
Adjustments: Even out the occlusal contact by equilibrating the Twin Block occlusal pads at insertion of the appliance. Since vertical development is not needed, do not relieve pads. Gain arch width by opening the midline screws one turn each week - twice each week if preferred.
Twin Block, To Close the Bite Class II Correction and Anterior Open Bite
In using the Twin Block for open bite cases, it is important to be certain that the upper and lower bite blocks are interfacing at the 70 degree angle when the patient is wearing the appliance. Otherwise, the lower molars may over erupt and will open the bite further. To avoid this problem, review the options section below. Please note that when taking the construction bite, the patient's comfort should be considered as you reposition the mandible.
Indication: Look for anterior open bite cases where the upper needs some expansion to match the lower.
Features: Twin Block pads for Class II correction and a labial arch wire to guide anteriors into position. A crib keeps the tongue away from the anteriors and an upper midline expansion screw is included to widen the upper arch to accommodate the lower.
Adjustments: Even out the occlusal contact by equilibrating the Twin Block occlusal pads at insertion of the appliance. Since vertical development is not needed, do not relieve pads. Open the upper midline screw one turn each week until the upper arch accommodates the lower. Maintain the upper labial arch wire at the gingival of the upper incisors. If the second molars erupt during treatment, occlusal pads should be used to establish the desired vertical limit to eruption.
Options: If the bite blocks are not interfacing properly, the lower molars may over erupt. To avoid this problem. Class II elastics may be used full time to guide the patient into proper biting. A chin strap may also be used for night time wear.
Fig-5
11

Phase II, Basic Removable
Indication: Phase II appliances are indicated only after you have treated the case to the point where the centrals have the proper overjet/overbite and the molars are in contact You may want to overcorrect to allow for settling. This test should be made with the Twin Block removed from the patient's mouth. The Phase II appliance maintains the upper arch correction, Class II correction and vertical development while allowing the lower bicuspids to move into contact with the upper arch.
Features: An anterior inclined plane to support Class II correction and vertical development. Delta clasps are used for anchorage on first molars.
Adjustments: Be certain that the patient is biting evenly on the inclined plane and that the molars are in contact.
Options: Labial arch wire, individual tooth springs and/or a Bio-finisher wire attached to the appliance.
Phase II Fixed and Fixed Removable (Wilson 3-D)
Indication: Phase II appliances are indicated only after you have treated the case to the point where the centrals have the proper overjet/overbite and the molars are in contact. You may want to over correct to allow for settling. This test should be made with the Twin Block removed from the patient's mouth. The Phase II appliance maintains the upper arch correction. Class II correction and vertical development while allowing the lower bicuspids to move into contact with the upper arch. Features: An anterior inclined plane to support Class II correction and vertical development. The fixed and fixed removable appliances have features that are of benefit to the clinician working with an uncooperative patient or where less bulk is desirable. These appliances require more attention to patient hygiene because they are not as easily cleaned as are removable appliances.
Adjustments: Be certain that the patient is biting evenly on the inclined plane and that the molars are in contact. To eliminate appliance breakage caused by the patient's tongue moving the appliance up and down in the mouth, a small spot of composite may be bonded incisal to the bite plane of the appliance or occlusal to the wires along the bicuspids.
•
Fig. 7b

Class III In all Class III cases it is important to avoid distalizing the condyle in the fossa. Otherwise, TMJ problems may develop.
Twin Block, Expansion Class III
Indication: Look for Class III cases where additional upper arch width is needed and/or where vertical correction is desired.
Features: Class III Twin Block occlusal pads for vertical development, upper expansion screw to widen the upper arch, lower labial arch wire and reverse headgear (RHG) hooks.
Adjustments: Create vertical space for the upper molars to erupt by relieving the molar pads 1/2 mm each appointment. Expand the upper arch by opening the screw one turn week until the upper is compatible with the lower. Use RHG if the maxilla needs to come forward. The lower labial arch wire may be used to consolidate the anteriors.
Twin Block, Sagittal Class III
Indication: Look for Class III cases with short arch length, crowded cuspids and/or where vertical correction is desired.
Features: Class III Twin Block occlusal pads for vertical development. Two sagittal screws are used to lengthen the arch. RHG hooks. Lower labial arch wire.
Adjustments: If the maxilla needs to come forward, the RHG may be used. If vertical is needed, relieve the occlusion on the lower pads 1/2 mm each appointment to allow for vertical development. Arch length development can be achieved by opening the sagittal screws one turn each week. The lower labial arch wire may be used to consolidate the anteriors.
Options: Three or four upper screws may be used in this design.
Fig- 9
Fin. 10
13

Twin Block, Expansion and No Vertical Class III
Indication: Look for Class III cases needing additional upper arch width and no vertical development.
Features: Class III Twin Block occlusal pads and an upper expansion screw for upper arch development. RHG hooks. Lower labial arch wire.
Adjustments: Even out the occlusal contact by equilibrating the Twin Block occlusal pads at insertion of the appliance. Since vertical development is not needed, do not relieve pads. Open the upper arch expansion screw one turn each week until the upper arch is compatible with the lower. The clasping in the appliance provides additional retention for the RHG and consequently restricts vertical development. The lower labial arch wire may be used to consolidate the anteriors.
Fig. 11
14
Options
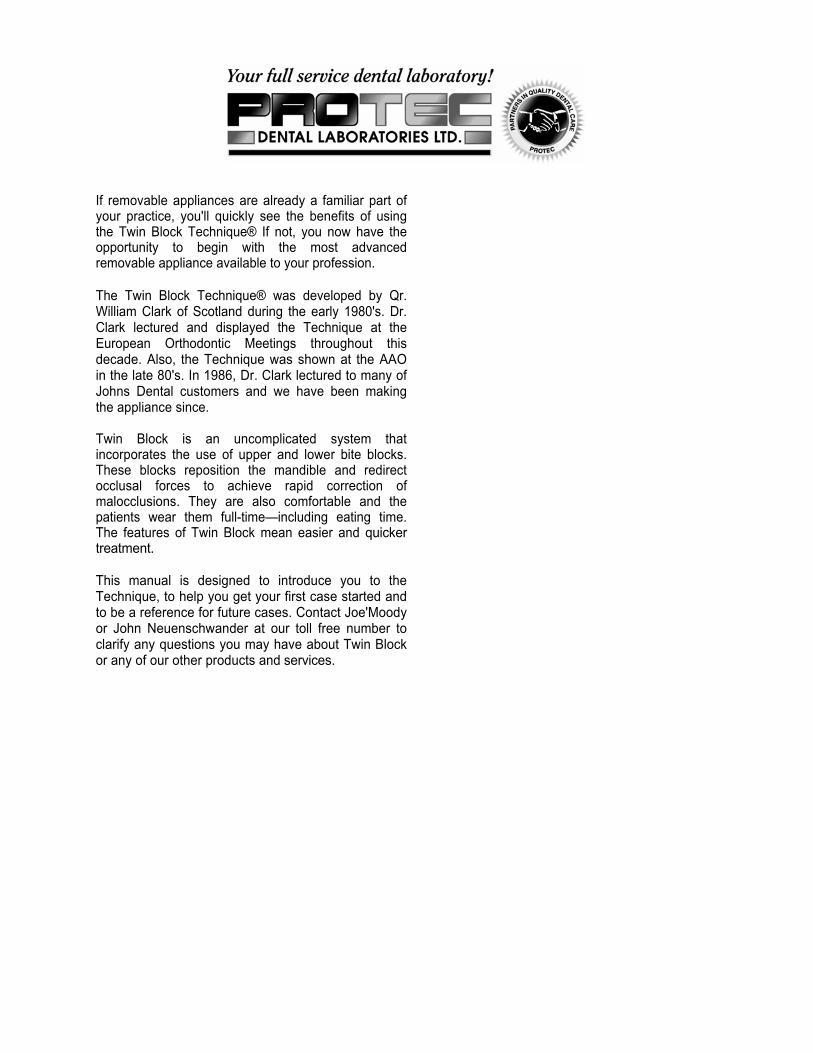
This section includes options to the standard designs previously presented.
Labial arch wires can be used to consolidate and/or control anterior teeth if desired. Lapped lingual springs may be used to round out the arches. Individual tooth springs may be used to move or rotate individual teeth.
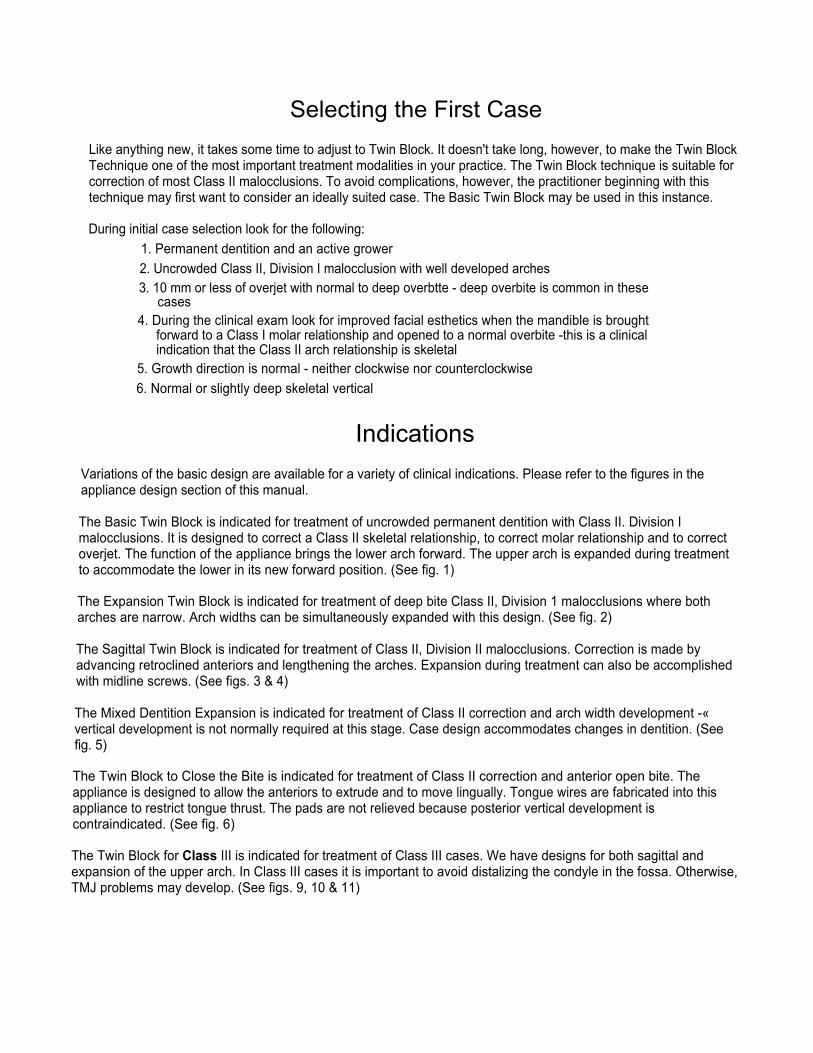
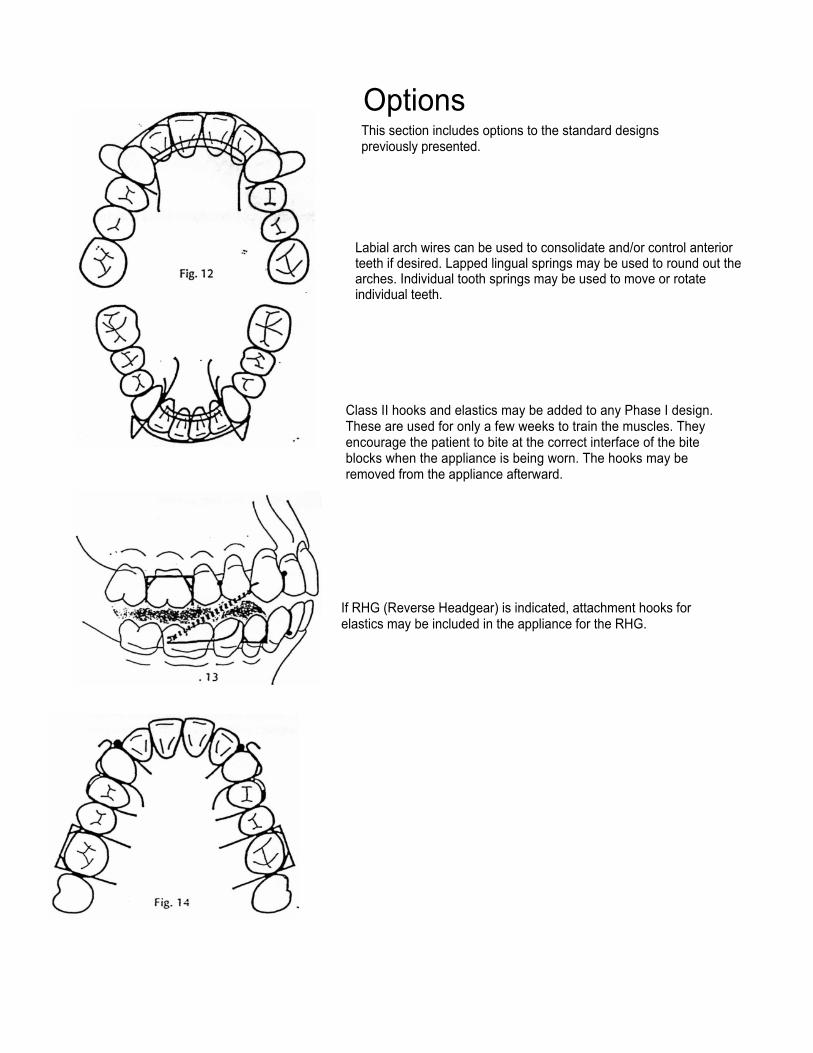
Class II hooks and elastics may be added to any Phase I design. These are used for only a few weeks to train the muscles. They encourage the patient to bite at the correct interface of the bite blocks when the appliance is being worn. The hooks may be removed from the appliance afterward.
If RHG (Reverse Headgear) is indicated, attachment hooks for elastics may be included in the appliance for the RHG.
Fig

If you feel a headgear is indicated, buccal headgear tubes may be included. - .
The Bio-finisher option on the Phase I appliance for faster vertical development of the lower molars. This option is of special value in adult cases. The wire is usually made removable so patients can wear the appliance during the day without the buccal wire.
The Bio-finisher option on the Phase II appliance for faster vertical development of the bicuspids. Tubes can be placed in the acrylic so the wires may be easily removed or the wires can be cured into the plastic.
16
Fig. 16
Fig. 17

An option to traditional retention.
A new alternative to traditional wire clasping is now available for the Twin Block and other removable appliances. The Truax Clasp-Less Appliance System ™ (Patent Pending) was developed by Dr. Lloyd Truax.
The System is wireless, comfortable, holds tight and it works with almost every type of removable appliance. The benefits of the system are:
1. No more loose appliances. Cases are retained by the Clasp-Less System when wire appliances aren't.
2. Treatment can start earlier. The Clasp-Less System works well in all types of dentition cases.
3. Appliances are comfortable to wear. Clasp-Less cases snap in. The retention is crisp, comfortable and transparent.
4. Patients look good wearing Clasp-Less appliances. This means more cooperation and quicker treatment results.
5. Your patients will be happier and so will you.
17