Embed Size (px)
Citation preview

1 | TOC | 3 | 4 | 5 | 6 | 7 | 8 | 9 | 10 | 11 | 12 | 13 | 14 | 15 | 16 | 17 | 18 | 19 | 20 | 21
Home | Products | News | Support | Store
SnapShot Studio™ Photo Booth User Guide: Table of Contents
The Professional's choice for Photo Booth Software
Table of Contents
Installation Requirements ..............................3Installing SnapShot Studio™ Photo Booth ................3Features Overview ......................................4Quick-Start Guide ......................................5
Activation ..........................................5Global Settings .....................................5Camera Setup (Webcam, DSLR) .........................6Page Template/Graphic Elements ......................7Other Setup Details/Printer Setup ...................8Setup Wizard Summary ................................9
Running SnapShot Studio™ Photo Booth ..................10 Start Window.......................................10Welcome Page ......................................10
Photo Capture Page ................................10 Thank You Page ....................................10
User Controls and Options .............................11 Keyboard .......................................11 Mouse ..........................................11 Touch Screen ...................................11 Griffin Powermate ..............................11
Lead Capture/Access Screens ...........................12 Email Address .....................................12Barcode Scan ......................................12
Card Swipe ........................................12 RFID ..............................................12
Advanced Control of SnapShot Studio™ ..................13 General Preferences ...............................13 Page Editor .......................................14 Custom Graphics ................................15 Chroma Key .....................................16 Color Adjustment ...............................16
Slide Show Module .................................17Display Grid Controls ..........................17 Slide Show Custom Graphics .....................18
Facebook Integration in SnapShot Studio™ ..............19 Granting SnapShot Studio™ Account Access ..........19 Create/Use Existing Albums ........................20 Posting to Your Fan Pages .........................20
Advanced Facebook Controls ........................21 Real-Time Posting .................................22 User Opt-In/Out Setting ...........................22 Batch Post to Facebook ............................22
1 | TOC | 3 | 4 | 5 | 6 | 7 | 8 | 9 | 10 | 11 | 12 | 13 | 14 | 15 | 16 | 17 | 18 | 19 | 20 | 21
1 | TOC | 3 | 4 | 5 | 6 | 7 | 8 | 9 | 10 | 11 | 12 | 13 | 14 | 15 | 16 | 17 | 18 | 19 | 20 | 21
Home | Products | News | Support | Store
SnapShot Studio™ Photo Booth User Guide: Installation
Installation Requirements
Minimal Windows™ System Requirements• Windows™ Vista™ or Windows 7™; 32 or 64-bit• 1GHz Atom™ processor or higher (1.6 GHz Intel Core Duo™ or higher Recommended)• 512 MB RAM (1 GB Recommended)• 30 MB free hard disk space for installation
Minimal Mac OS System Requirements• Mac™ OS X™ 10.5 or higher• Administrator rights for installation• Intel Processor (1.6 GHz Intel Core Duo™ or higher Recommended)• 512 MB RAM (1 GB Recommended)• 30 MB free hard disk space for installation
Installing SnapShot Studio™ Photo Booth
Windows™ Installation• Download the latest installer from the Allen Christopher website(http://www.AllenChristopher.com/downloads/snapshotstudiopbwin.zip)• Unpack and run the installer, SnapShot Studio Photo Booth Installer.exe• Follow the installer directions, step by step.Do not modify the installer's default settings.
Mac OS™ Installation• Download the latest installer from the Allen Christopher website(http://www.AllenChristopher.com/downloads/snapshotstudiopbmac.zip)• Unpack and and open the disk image, SnapShot Studio Photo Booth Installer.dmg• Run the installer• Follow the installer directions, step by step. • After SnapShot Studio™ Photo Booth is installed, the installer will open the application's folder in the finderfor you.
Should you run into any difficulties with your installation, visit the Allen Christopher Support website or contactus at [email protected].
1 | TOC | 3 | 4 | 5 | 6 | 7 | 8 | 9 | 10 | 11 | 12 | 13 | 14 | 15 | 16 | 17 | 18 | 19 | 20 | 21
1 | TOC | 3 | 4 | 5 | 6 | 7 | 8 | 9 | 10 | 11 | 12 | 13 | 14 | 15 | 16 | 17 | 18 | 19 | 20 | 21
Home | Products | News | Support | Store
SnapShot Studio™ Photo Booth User Guide: Features Overview
SnapShot Studio™ Photo Booth Software
Powerful. Flexible. Simple.
Imagine a Photo Booth that is simple for your users to operate... Imagine a Photo Booth as easy to configurewithout compromising flexibility.
Powerful Features at your Command:
Global Settings
DSLR PTP Remote Capture.Webcam Support.Fully customizable Slide Show module (dual monitor setups only).Customizable themes for user interface with built-in Theme Editor..Built-in Griffin PowerMate support.Lead Capture methods:
Email addressRFID tagBarcodeSwipe card
Set shutter count down interval.Set "Ready" message Delay interval.Show/Hide cursor.Play/Mute countdown and shutter sounds.Toggle Setup Wizard On/Off.Set Administrator Password to protect from unauthorized access to preferences or quitting application.Toggle available print layouts on/off.Create, Delete, and Edit Print Layouts.Print Counter.
Page Settings
Create your own custom layouts with:Up to ten photos and two banners.Custom backgrounds.Custom overlay graphics, with transparency.Full control over image placement and rotation.
Over one dozen presets to choose from.Save your layout designs as templates for repeated use.Does not require a printer. You can operate and save images to disk.Automatically saves composite and individual images.Duplicate printing.Use your own custom thumbnail for print layout display.Apply green screen masking to individual images.Apply color adjustment and effects like sepia, black/white, auto-levels adjust, duo tones.
1 | TOC | 3 | 4 | 5 | 6 | 7 | 8 | 9 | 10 | 11 | 12 | 13 | 14 | 15 | 16 | 17 | 18 | 19 | 20 | 21

1 | TOC | 3 | 4 | 5 | 6 | 7 | 8 | 9 | 10 | 11 | 12 | 13 | 14 | 15 | 16 | 17 | 18 | 19 | 20 | 21
Home | Products | News | Support | Store
SnapShot Studio™ Photo Booth User Guide: Quick-Start
SnapShot Studio™ Photo Booth Quick-Start
Setting up SnapShot Studio™ Photo Booth is simple. Let's get started and launch the application.
SnapShot Studio™ Photo Booth is nearly identical between platforms. We will use screen shots from bothMacintosh and Windows systems throughout this guide. If there is an element that is platform specific, it will benoted specifically according to the platform it pertains to.
Launch SnapShot Studio™ Photo BoothDouble-click the SnapShot Studio™ Photo Booth icon on your desktop (Windows) or in yourApplications folder (Mac).
At this point, you should see the application's splash screen. Loadingtime will vary depending on your settings, memory, and the processingpower of your computer.
Activate SnapShot Studio™ Photo BoothIf you haven’t activatedSnapShot Studio™ PhotoBooth, the first windowyou will see is theActivation Window.
If you purchased alicense, your activationwill have been sent viaemail. Be sure to enterthe activation informationEXACTLY AS IT ISSHOWN IN YOUREMAIL, otherwise you willreceive an Invalid Serial Number message. Enter your information and click the Validate button.
If you need to buy a license, clicking the Purchase button will take your browser to the SnapShot Studio™Photo Booth purchase page.
If you wish to use SnapShot Studio™ Photo Booth in demonstration mode, click the Demo button. SnapShotStudio™ Photo Booth’s features are fully functional in demo mode; a watermark will be placed on all outputuntil SnapShot Studio™ Photo Booth is activated.
Running SnapShot Studio™ for the First TimeIf this is the first time you're running SnapShot Studio™ Photo Booth, you'll be taken directly to the SetupWizard window. The wizard will walk you through the basic setup. For advanced settings, you'll want to exitthe wizard and use the main Preferences window.
The first page of the Setup Wizard gives you a brief overview of what you'll set up.You are given theopportunity to exit the wizard and go to the main preferences window. Otherwise,click the continue button to
proceed.
Global Settings forYour Photo Booth
Ready Delay: Allows for a delay(seconds) before the countdown begins.maximum setting is 10 seconds, minimumis 0.
Countdown Timer: Specify how manyseconds the countdown will run before aphoto is taken .Maximum setting is 10seconds.

Administrator Password: Sets apassword that protects the running PhotoBooth from quitting or unauthorizedaccess to its settings.
Hide Cursor: Will hide the cursor fromview during photo booth use.
Play Sounds: Uses audio cues duringcapture process- Ready. Countdown,Shutter, and Smile.
Click the "Next" button to proceed.
1 | TOC | 3 | 4 | 5 | 6 | 7 | 8 | 9 | 10 | 11 | 12 | 13 | 14 | 15 | 16 | 17 | 18 | 19 | 20 | 21

1 | TOC | 3 | 4 | 5 | 6 | 7 | 8 | 9 | 10 | 11 | 12 | 13 | 14 | 15 | 16 | 17 | 18 | 19 | 20 | 21
Home | Products | News | Support | Store
SnapShot Studio™ Photo Booth User Guide: Quick-Start-Camera Setup
Setting Up Cameras
Webcam:Using a webcam is needed inorder to provide an on-screenpreview, even if you wish to use aDSLR camera with your photobooth.If your webcam is not showing alive preview, click the WebcamConnect button to initiate thecamera. Be sure that it isconnected and functional.
DSLR:SnapShot Studio™ Photo Boothallows you to use a PTP Remotecapable camera. Most DSLRcameras have this capability. Please refer to your camera's User Guide if you do not know if it is PTP Remote
capable.
If you haven't already, connect your camera and power it on. It isprobably a good idea to turn off any power saving features yourcamera may have.
When you select the PTP Camera Capture setting, a connectionwindow and camera setup window will appear.
Macintosh: A small window will show a pop-up menu, listing anycameras it may find. If the pop-up menu reads "Searching...", itmeans SnapShot Studio™ has not found a camera.
Windows: You should see a standard device connectwindow, listing any available cameras to your system.
It may take as long as ten seconds before a camera canbe found. If your camera can't be found, check yourconnections and be sure that your camera is set to PTPmode.
Both Mac OS and Windows systems are designed todetect and take action when a camera is discovered. Thiscan be problematic when running a Photo Booth becauseyou do not want any other applications to take control of
your camera except, of course, the Photo Booth.
Windows: Disable Auto-PlayYou can disable Auto-Play from taking control of yourcamera when it is plugged in. If not, you'll be promptedeach and every time your camera is attached or poweredon. To disable Auto-Play from doing this, Plug in yourcamera and turn it on. The Auto-Play will show a dialogand ask what you wish to do. There is a link to the Auto-Play control panel at the bottom of the window- click onthe link.Once you are in the Auto-Play control panel, you shouldsee your camera listed at the very bottom of the list.
Macintosh: Disable Other Photo Programs from Using Your CameraConnect your camera and open the Image Capture application located in your Applications folder. Yourcamera should appear in the upper-left hand corner and your applications options should appear at the bottom

of the left panel. Be sure that you select "NoApplication" for the camera connection.This is often overlooked but a common issuewhen it seems your camera is not workingwith SnapShot Studio Photo Booth- anotherapplication has taken control of your camera.
1 | TOC | 3 | 4 | 5 | 6 | 7 | 8 | 9 | 10 | 11 | 12 | 13 | 14 | 15 | 16 | 17 | 18 | 19 | 20 | 21

1 | TOC | 3 | 4 | 5 | 6 | 7 | 8 | 9 | 10 | 11 | 12 | 13 | 14 | 15 | 16 | 17 | 18 | 19 | 20 | 21
Home | Products | News | Support | Store
SnapShot Studio™ Photo Booth User Guide: Quick-Start- Select a Template
Page TemplateYou'll need to set up at least one Page Template in order to start your Photo Booth. Step 3 of the SetupWizard allows you to previewand select the layout of yourchoice. If you have created acustom layout, it will appear inthe list.Each template will displayinformation that will be helpful inyour selection: the width andheight of the page, how manyphotos will be taken for thetemplate, and how manybanners you have to add yourown graphics
You can have up to ten photos ina template and up to twobanners. Banners are places onyour template where you canadd custom graphics like "Joeand Mary's Wedding 2011" or "Holly's Sweet Sixteen".
All templates can have a custom background and overlay graphic added.
Setting Page GraphicsAdding graphics to a layout can completely transform your photo booth prints and custom tailor your prints fora specific event. Adding elements like background graphics and overlays can be easily done with the help ofyour favorite image editing program.
In this example, this template willaccept only page overlay andpage background graphics. Thetext shown is part of thebackground image, but couldhave easily been incorporatedinto a banner. If it were used as abanner, it would make it veryeasy to reuse the backgroundimage for other events.
We wanted to give the impressionof the images being recessed intothe page, so our overlay graphicis no more than a transparentPNG containing the neededshadows to achieve the effect weare looking to produce.
In order to create truly stunning prints, our suggestion to you is to experiment as much as possible. We'vegiven you the needed options to create prints like no other Photo Booth.
1 | TOC | 3 | 4 | 5 | 6 | 7 | 8 | 9 | 10 | 11 | 12 | 13 | 14 | 15 | 16 | 17 | 18 | 19 | 20 | 21
1 | TOC | 3 | 4 | 5 | 6 | 7 | 8 | 9 | 10 | 11 | 12 | 13 | 14 | 15 | 16 | 17 | 18 | 19 | 20 | 21
Home | Products | News | Support | Store
SnapShot Studio™ Photo Booth User Guide: Quick-Start- Other Setup Details
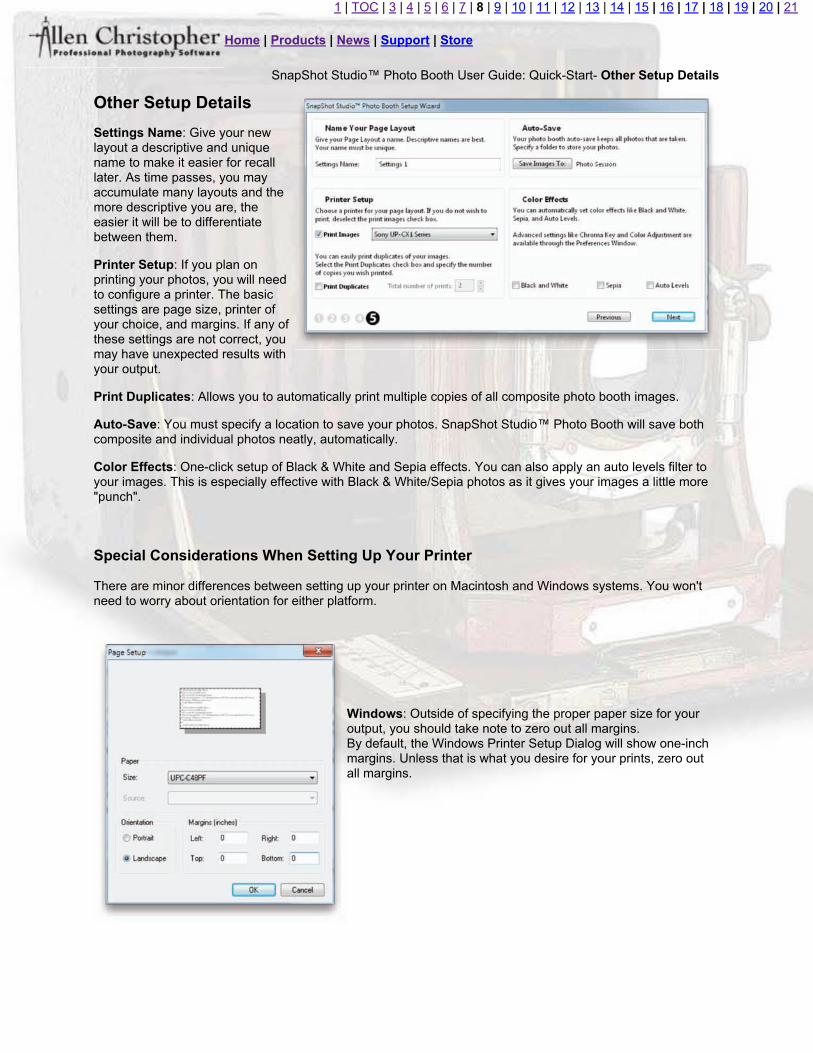
Other Setup DetailsSettings Name: Give your newlayout a descriptive and uniquename to make it easier for recalllater. As time passes, you mayaccumulate many layouts and themore descriptive you are, theeasier it will be to differentiatebetween them.
Printer Setup: If you plan onprinting your photos, you will needto configure a printer. The basicsettings are page size, printer ofyour choice, and margins. If any ofthese settings are not correct, youmay have unexpected results withyour output.
Print Duplicates: Allows you to automatically print multiple copies of all composite photo booth images.
Auto-Save: You must specify a location to save your photos. SnapShot Studio™ Photo Booth will save bothcomposite and individual photos neatly, automatically.
Color Effects: One-click setup of Black & White and Sepia effects. You can also apply an auto levels filter toyour images. This is especially effective with Black & White/Sepia photos as it gives your images a little more"punch".
Special Considerations When Setting Up Your Printer
There are minor differences between setting up your printer on Macintosh and Windows systems. You won'tneed to worry about orientation for either platform.
Windows: Outside of specifying the proper paper size for youroutput, you should take note to zero out all margins.By default, the Windows Printer Setup Dialog will show one-inchmargins. Unless that is what you desire for your prints, zero outall margins.
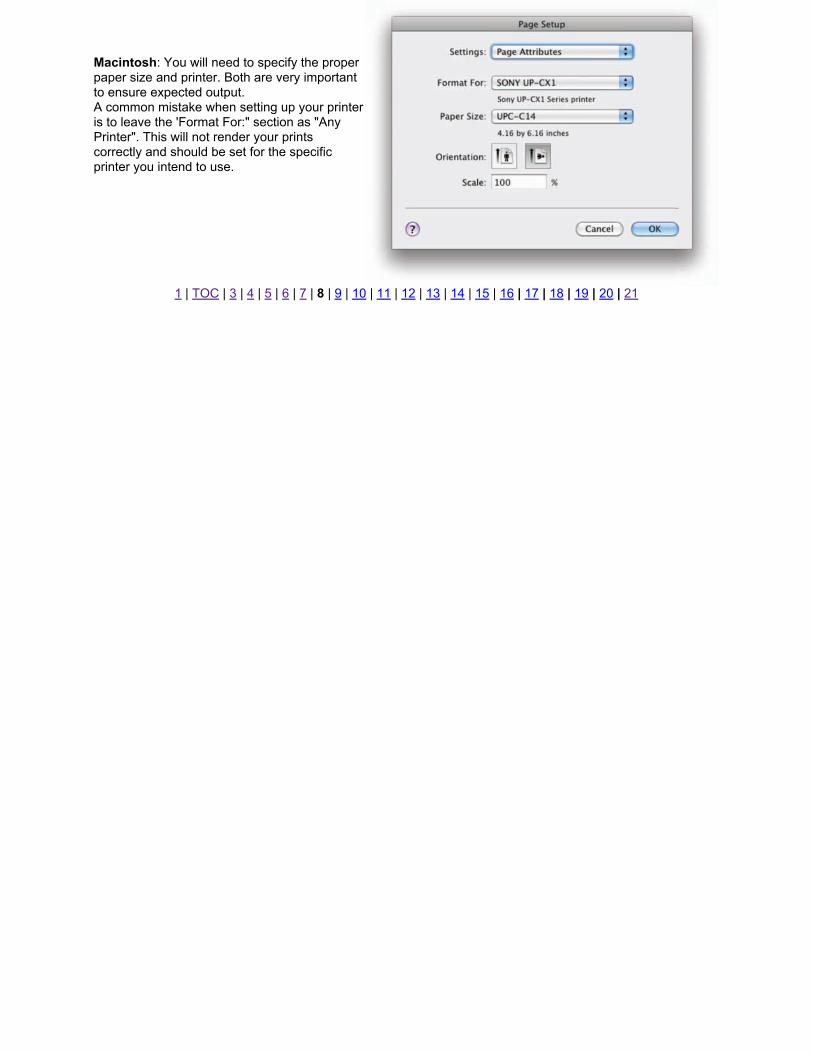
Macintosh: You will need to specify the properpaper size and printer. Both are very importantto ensure expected output.A common mistake when setting up your printeris to leave the 'Format For:" section as "AnyPrinter". This will not render your printscorrectly and should be set for the specificprinter you intend to use.
1 | TOC | 3 | 4 | 5 | 6 | 7 | 8 | 9 | 10 | 11 | 12 | 13 | 14 | 15 | 16 | 17 | 18 | 19 | 20 | 21

1 | TOC | 3 | 4 | 5 | 6 | 7 | 8 | 9 | 10 | 11 | 12 | 13 | 14 | 15 | 16 | 17 | 18 | 19 | 20 | 21
Home | Products | News | Support | Store
SnapShot Studio™ Photo Booth User Guide: Quick-Start- Final Summary
Final Summary
Upon completion, you are shown your template and given a few helpful tips to operate your booth.
Click the Finish button tosave your settings and beginyour photo booth session.
1 | TOC | 3 | 4 | 5 | 6 | 7 | 8 | 9 | 10 | 11 | 12 | 13 | 14 | 15 | 16 | 17 | 18 | 19 | 20 | 21

1 | TOC | 3 | 4 | 5 | 6 | 7 | 8 | 9 | 10 | 11 | 12 | 13 | 14 | 15 | 16 | 17 | 18 | 19 | 20 | 21
Home | Products | News | Support | Store
SnapShot Studio™ Photo Booth User Guide: Running a Photo Booth Session
Running a Photo Booth Session
Start PageOnce your photo booth settings are stored, you canbegin a session. SnapShot Studio's start page will allowyou to start a session or return to your preferencessettings.
If you have more than one layout available for yoursession, pressing the "Start Photo Booth" button willbring you to the Welcome Page. If only one layout isavailable, SnapShot Studio will bring you straight to thePhoto Capture Page.
Welcome PageIf more than one layout is available to your users,the Welcome Page will be their default startingpoint. If only one layout is available, the defaultpage will be the Photo Capture Page.
This page allows your users to browse andselect all layouts you have made available tothem. The process is straight-forward: Browse,select, and begin the session.
Also built into the welcome page is the ability toquit SnapShot Studio™ and to gain access to the
photo booth's settings; both are password protected in order to avoid a user from gaining unauthorized accessto your system.
Photo Capture PageSnapShot Studio's Photo CapturePage is where the user starts thecapture process.The main section of the window showsa live view from your webcam.
The visual countdown is shownabove the webcam's live view. It willgive a "Ready" message, thenproceed with a numerical countdown.
Below the live view area is the startbutton. This begins the captureprocess.
The Preferences button is located in the lower-right of the screen. This allows an administrator to stop thesession and return to the photo booth's Preferences window.
Thumbnails are displayed on the left side of the screen, showing photos that have already been taken.

Thank You PageSnapShot Studio will show a ThankYou page immediately afterprocessing the captured photos.
This page displays your thank youmessage (or instructions) to theuser, along with a preview of thecomposite image.
The Thank You Page will stay visiblefor about ten seconds beforereturning back to the Welcome orPhoto Capture pages..
1 | TOC | 3 | 4 | 5 | 6 | 7 | 8 | 9 | 10 | 11 | 12 | 13 | 14 | 15 | 16 | 17 | 18 | 19 | 20 | 21
1 | TOC | 3 | 4 | 5 | 6 | 7 | 8 | 9 | 10 | 11 | 12 | 13 | 14 | 15 | 16 | 17 | 18 | 19 | 20 | 21
Home | Products | News | Support | Store
SnapShot Studio™Photo Booth User Guide: User Controls and Options
User Controls and OptionsSnapShot Studio™ Photo Booth is designed to work with your touch screen display, Griffin's PowerMate,yourkeyboard or mouse without any special configuration.
Touch ScreenIf you have a touch screen connected and functioning with yourcomputer, you won't need to do anything unusual to use your touchscreen with SnapShot Studio™. If your touch screen works with yourcomputer, it will work with SnapShot Studio™.
Griffin's PowerMateUsing a PowerMate is a great option if you do not have a touch screen available. Your users can control allaspects of the Photo Booth's user interface with a PowerMate. Use thedial feature to scroll through available layouts, Use the pushbuttonfeature to select a layout and start the photo booth session.
Do Not install any of the software Griffin ships with the PowerMate. Wehave built-in support and installing or using Griffin's software will interferewith your photo booth.
Keyboard ControlsYou can control your photo booth with nothing butyour keyboard.
ESC Key- Allows you to exit the photo booth andreturn to your preferences. You will need a passwordin order to authenticate this command.
Arrow Left/Right- Allows users to browse anylayouts available. Arrow keys are only usable with theWelcome Page.
Space Bar- Allows users to select a layout. Also begins the photo booth session.
The user interface can also be controlled with a mouse.
1 | TOC | 3 | 4 | 5 | 6 | 7 | 8 | 9 | 10 | 11 | 12 | 13 | 14 | 15 | 16 | 17 | 18 | 19 | 20 | 21

1 | TOC | 3 | 4 | 5 | 6 | 7 | 8 | 9 | 10 | 11 | 12 | 13 | 14 | 15 | 16 | 17 | 18 | 19 | 20 | 21
Home | Products | News | Support | Store
SnapShot Studio™Photo Booth User Guide: Lead Capture/Access Options
Lead Capture/Access OptionsSnapShot Studio™ Photo Booth is equipped with several ways to capture specific user information for thepurpose of billing or lead generation. Configuring SnapShot Studio™ to accept email, barcode, swipe card andRFID input is very straight-forward.With any lead capture option active, the user will not be able to begin a photo session until they provide theinformation you need to obtain.
Email AddressYou can require your users to enter their email address. Entry can be done via SnapShot Studio's on-screenkeyboard or a keyboard attached to your computer.
BarcodeRequire your users to scan a barcode from a receipt, ID card, wristband, etc. Just aboutany USB barcode scanner can be used.
Swipe CardRequires your users to swipe their magnetic striped card. SnapShot Studio™ willrecord any tracks read by your swipe card reader and is limited to the capabilitiesof the reader.
RFIDAny RFID capable of keyboard emulation can be used with SnapShot Studio™.
Captured data from all methods is saved in CSV format. This file will be stored inthe same directory as your saved images.
1 | TOC | 3 | 4 | 5 | 6 | 7 | 8 | 9 | 10 | 11 | 12 | 13 | 14 | 15 | 16 | 17 | 18 | 19 | 20 | 21
1 | TOC | 3 | 4 | 5 | 6 | 7 | 8 | 9 | 10 | 11 | 12 | 13 | 14 | 15 | 16 | 17 | 18 | 19 | 20 | 21
Home | Products | News | Support | Store
SnapShot Studio™Photo Booth User Guide: Advanced Controls and Setup
SnapShot Studio™ Photo Booth Advanced Controls and Setup
Even though SnapShot Studio™ Photo Booth is easy to get started, it offers extensive customization and avery robust feature set. In this section, we will cover every aspect of SnapShot Studio's preferences.
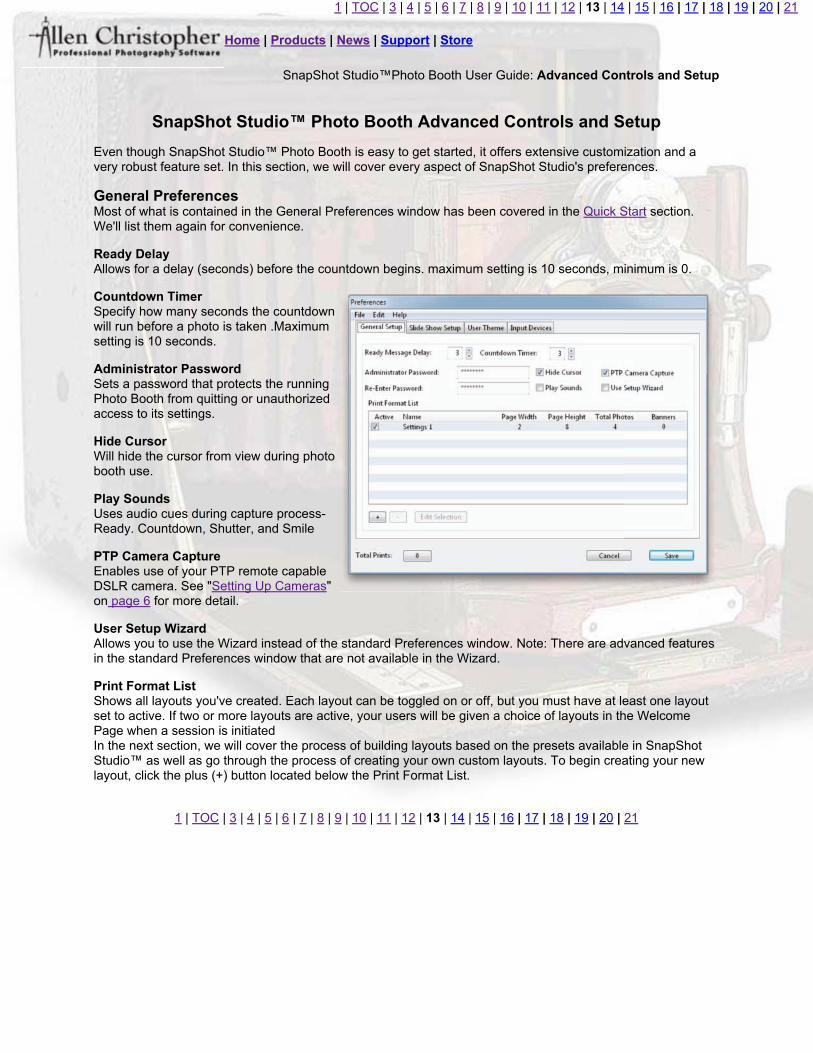
General PreferencesMost of what is contained in the General Preferences window has been covered in the Quick Start section.We'll list them again for convenience.
Ready DelayAllows for a delay (seconds) before the countdown begins. maximum setting is 10 seconds, minimum is 0.
Countdown TimerSpecify how many seconds the countdownwill run before a photo is taken .Maximumsetting is 10 seconds.
Administrator PasswordSets a password that protects the runningPhoto Booth from quitting or unauthorizedaccess to its settings.
Hide CursorWill hide the cursor from view during photobooth use.
Play SoundsUses audio cues during capture process-Ready. Countdown, Shutter, and Smile
PTP Camera CaptureEnables use of your PTP remote capableDSLR camera. See "Setting Up Cameras"on page 6 for more detail.
User Setup WizardAllows you to use the Wizard instead of the standard Preferences window. Note: There are advanced featuresin the standard Preferences window that are not available in the Wizard.
Print Format ListShows all layouts you've created. Each layout can be toggled on or off, but you must have at least one layoutset to active. If two or more layouts are active, your users will be given a choice of layouts in the WelcomePage when a session is initiatedIn the next section, we will cover the process of building layouts based on the presets available in SnapShotStudio™ as well as go through the process of creating your own custom layouts. To begin creating your newlayout, click the plus (+) button located below the Print Format List.
1 | TOC | 3 | 4 | 5 | 6 | 7 | 8 | 9 | 10 | 11 | 12 | 13 | 14 | 15 | 16 | 17 | 18 | 19 | 20 | 21
1 | TOC | 3 | 4 | 5 | 6 | 7 | 8 | 9 | 10 | 11 | 12 | 13 | 14 | 15 | 16 | 17 | 18 | 19 | 20 | 21
Home | Products | News | Support | Store
SnapShot Studio™Photo Booth User Guide:The Page Editor
The Page Editor
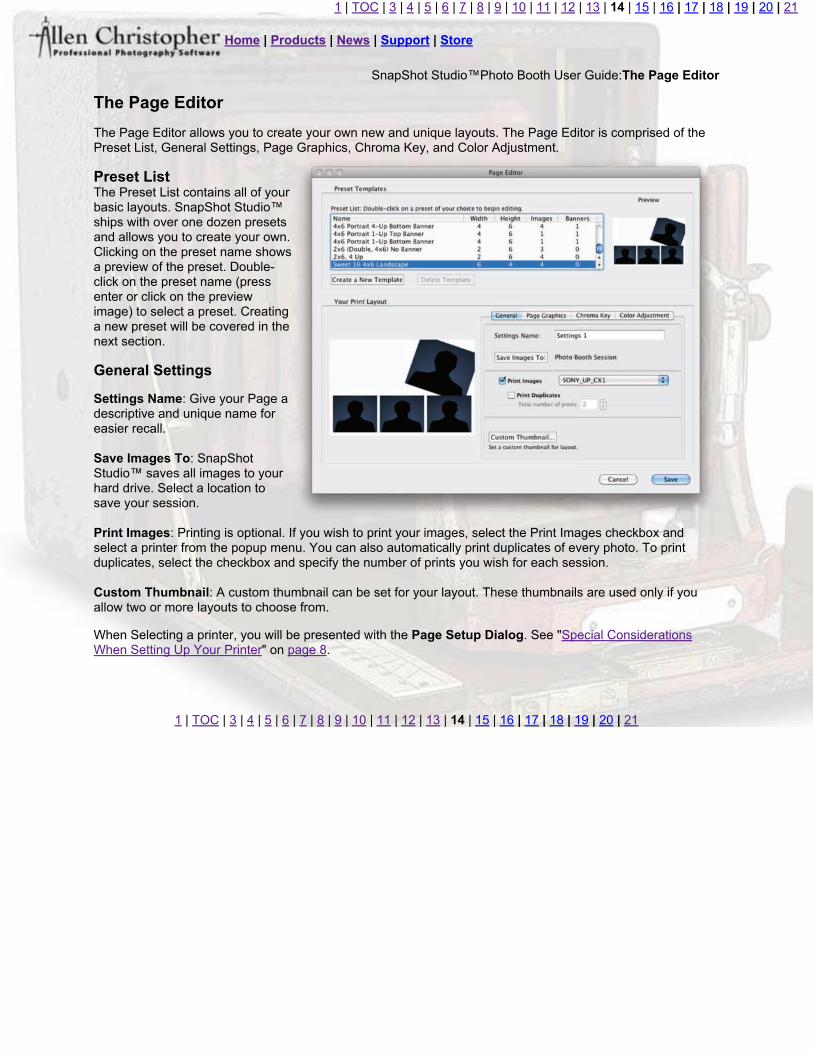
The Page Editor allows you to create your own new and unique layouts. The Page Editor is comprised of thePreset List, General Settings, Page Graphics, Chroma Key, and Color Adjustment.
Preset ListThe Preset List contains all of yourbasic layouts. SnapShot Studio™ships with over one dozen presetsand allows you to create your own.Clicking on the preset name showsa preview of the preset. Double-click on the preset name (pressenter or click on the previewimage) to select a preset. Creatinga new preset will be covered in thenext section.
General Settings
Settings Name: Give your Page adescriptive and unique name foreasier recall.
Save Images To: SnapShotStudio™ saves all images to yourhard drive. Select a location tosave your session.
Print Images: Printing is optional. If you wish to print your images, select the Print Images checkbox andselect a printer from the popup menu. You can also automatically print duplicates of every photo. To printduplicates, select the checkbox and specify the number of prints you wish for each session.
Custom Thumbnail: A custom thumbnail can be set for your layout. These thumbnails are used only if youallow two or more layouts to choose from.
When Selecting a printer, you will be presented with the Page Setup Dialog. See "Special ConsiderationsWhen Setting Up Your Printer" on page 8.
1 | TOC | 3 | 4 | 5 | 6 | 7 | 8 | 9 | 10 | 11 | 12 | 13 | 14 | 15 | 16 | 17 | 18 | 19 | 20 | 21

1 | TOC | 3 | 4 | 5 | 6 | 7 | 8 | 9 | 10 | 11 | 12 | 13 | 14 | 15 | 16 | 17 | 18 | 19 | 20 | 21
Home | Products | News | Support | Store
SnapShot Studio™Photo Booth User Guide:The Page Editor- Page Graphics
Page GraphicsSnapShot Studio™ Photo Boothallows overlay, background, andbanner graphics to be easily addedto your layout. The size of thegraphic is determined by the layoutand is shown below thecorresponding button.All dimensions are shown ininches and all graphics must bePNG images.
Page Overlay: Use the pageoverlay feature to place an imageon top of the layout. Overlayimages can take advantage of thePNG format's transparency tocreate gorgeous effects.
Page Background: sets thebackground image to the pagelayout.
Banner Images: SnapShotStudio™ Photo Booth layouts canaccommodate up to two banners. Banner availability is determined by the layout and can utilize the PNGformat's transparency capabilities.
Page layouts do not require these graphic elements. You can utilize whatever element you like. To remove anelement, click on the gray circle marked with an "x" on the right side of the image's thumbnail.
1 | TOC | 3 | 4 | 5 | 6 | 7 | 8 | 9 | 10 | 11 | 12 | 13 | 14 | 15 | 16 | 17 | 18 | 19 | 20 | 21
1 | TOC | 3 | 4 | 5 | 6 | 7 | 8 | 9 | 10 | 11 | 12 | 13 | 14 | 15 |16 | 17 | 18 | 19 | 20 | 21
Home | Products | News | Support | Store
SnapShot Studio™Photo Booth User Guide:The Page Editor- Chroma Key and Color Adjustment
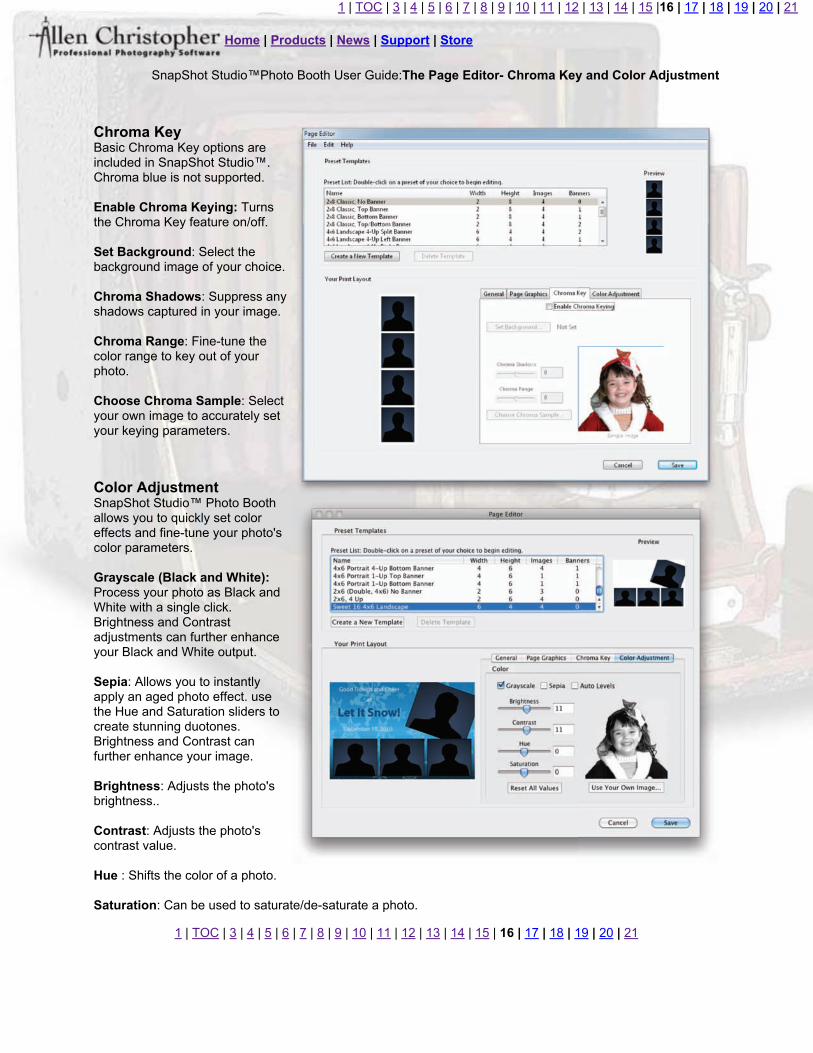
Chroma KeyBasic Chroma Key options areincluded in SnapShot Studio™.Chroma blue is not supported.
Enable Chroma Keying: Turnsthe Chroma Key feature on/off.
Set Background: Select thebackground image of your choice.
Chroma Shadows: Suppress anyshadows captured in your image.
Chroma Range: Fine-tune thecolor range to key out of yourphoto.
Choose Chroma Sample: Selectyour own image to accurately setyour keying parameters.
Color AdjustmentSnapShot Studio™ Photo Boothallows you to quickly set coloreffects and fine-tune your photo'scolor parameters.
Grayscale (Black and White):Process your photo as Black andWhite with a single click.Brightness and Contrastadjustments can further enhanceyour Black and White output.
Sepia: Allows you to instantlyapply an aged photo effect. usethe Hue and Saturation sliders tocreate stunning duotones.Brightness and Contrast canfurther enhance your image.
Brightness: Adjusts the photo'sbrightness..
Contrast: Adjusts the photo'scontrast value.
Hue : Shifts the color of a photo.
Saturation: Can be used to saturate/de-saturate a photo.
1 | TOC | 3 | 4 | 5 | 6 | 7 | 8 | 9 | 10 | 11 | 12 | 13 | 14 | 15 | 16 | 17 | 18 | 19 | 20 | 21
1 | TOC | 3 | 4 | 5 | 6 | 7 | 8 | 9 | 10 | 11 | 12 | 13 | 14 | 15 | 16 | 17 | 18 | 19 | 20 | 21
Home | Products | News | Support | Store
SnapShot Studio™Photo Booth User Guide:Slide Show Controls
SnapShot Studio™ Photo Booth Slide Show Controls
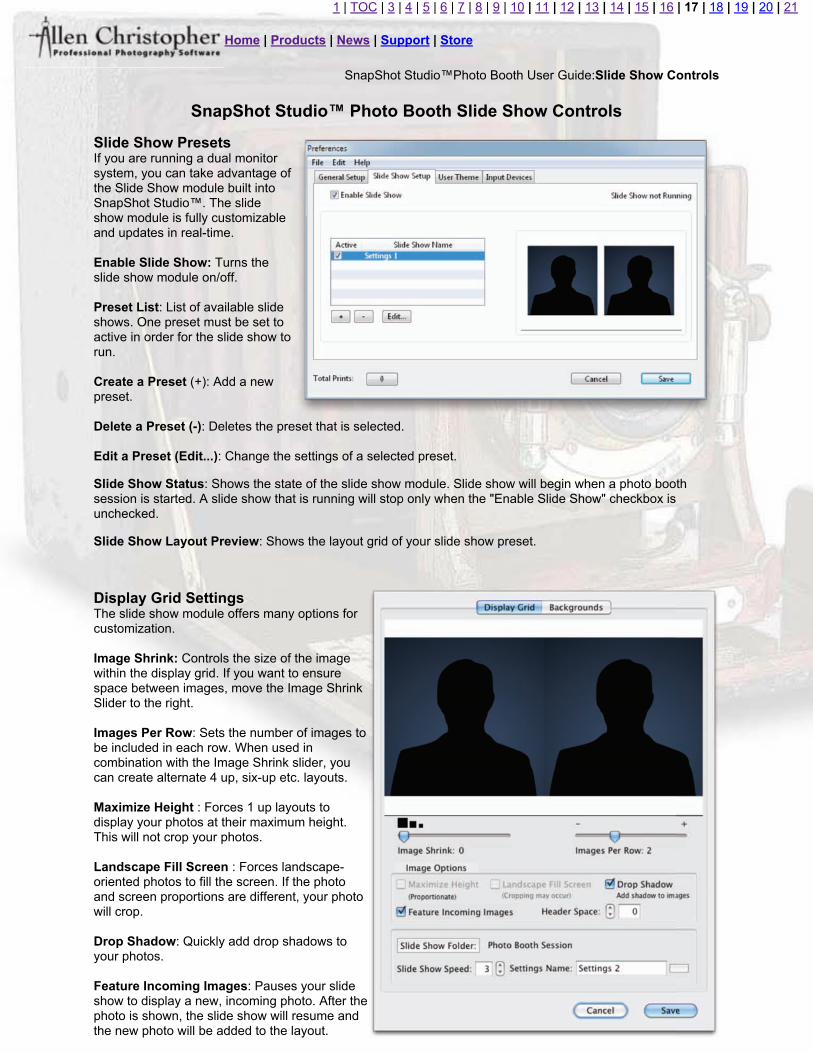
Slide Show PresetsIf you are running a dual monitorsystem, you can take advantage ofthe Slide Show module built intoSnapShot Studio™. The slideshow module is fully customizableand updates in real-time.
Enable Slide Show: Turns theslide show module on/off.
Preset List: List of available slideshows. One preset must be set toactive in order for the slide show torun.
Create a Preset (+): Add a newpreset.
Delete a Preset (-): Deletes the preset that is selected.
Edit a Preset (Edit...): Change the settings of a selected preset.
Slide Show Status: Shows the state of the slide show module. Slide show will begin when a photo boothsession is started. A slide show that is running will stop only when the "Enable Slide Show" checkbox isunchecked.
Slide Show Layout Preview: Shows the layout grid of your slide show preset.
Display Grid SettingsThe slide show module offers many options forcustomization.
Image Shrink: Controls the size of the imagewithin the display grid. If you want to ensurespace between images, move the Image ShrinkSlider to the right.
Images Per Row: Sets the number of images tobe included in each row. When used incombination with the Image Shrink slider, youcan create alternate 4 up, six-up etc. layouts.
Maximize Height : Forces 1 up layouts todisplay your photos at their maximum height.This will not crop your photos.
Landscape Fill Screen : Forces landscape-oriented photos to fill the screen. If the photoand screen proportions are different, your photowill crop.
Drop Shadow: Quickly add drop shadows toyour photos.
Feature Incoming Images: Pauses your slideshow to display a new, incoming photo. After thephoto is shown, the slide show will resume andthe new photo will be added to the layout.

Header Space: Ensures that your grid will not obscure your logo/ branding.
Slide Show Folder: The source of your slide show photos. This should be set to the same folder that yourphoto booth layout is saving session photos into.
Slide Show Speed: The duration of each page (in seconds).
1 | TOC | 3 | 4 | 5 | 6 | 7 | 8 | 9 | 10 | 11 | 12 | 13 | 14 | 15 | 16 | 17 | 18 | 19 | 20 | 21
1 | TOC | 3 | 4 | 5 | 6 | 7 | 8 | 9 | 10 | 11 | 12 | 13 | 14 | 15 | 16 | 17 | 18 | 19 | 20 | 21
Home | Products | News | Support | Store
SnapShot Studio™Photo Booth User Guide:Slide Show Background Images
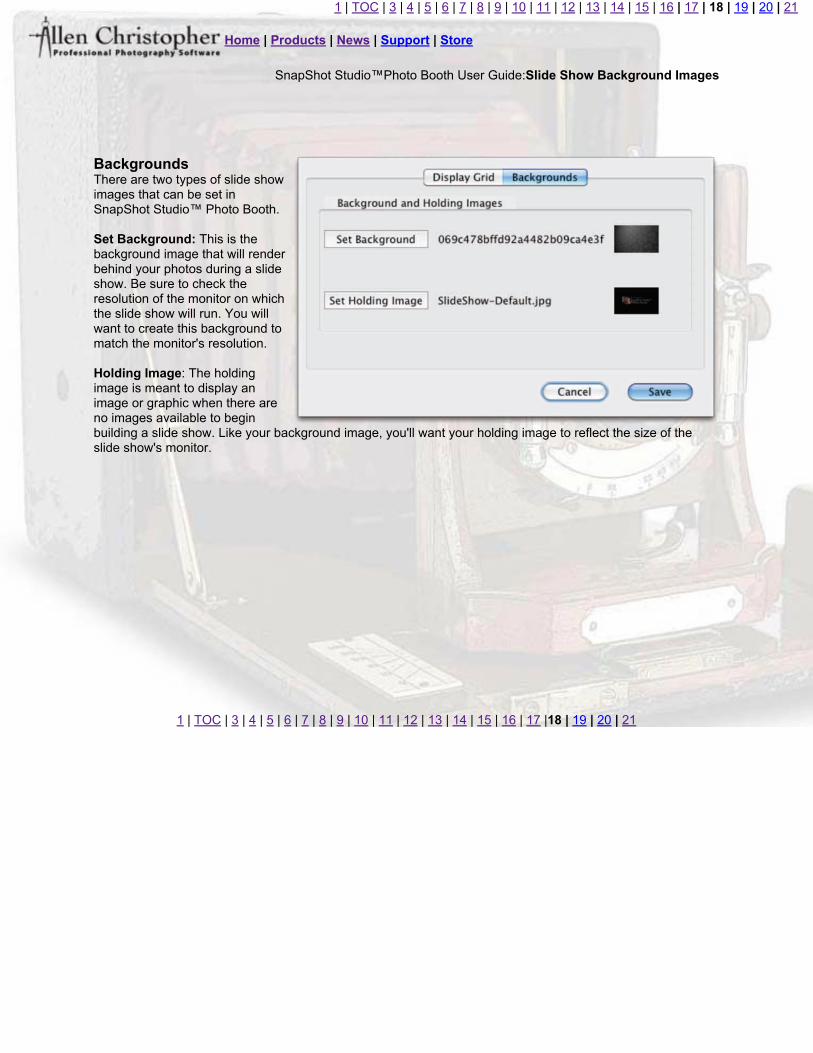
BackgroundsThere are two types of slide showimages that can be set inSnapShot Studio™ Photo Booth.
Set Background: This is thebackground image that will renderbehind your photos during a slideshow. Be sure to check theresolution of the monitor on whichthe slide show will run. You willwant to create this background tomatch the monitor's resolution.
Holding Image: The holdingimage is meant to display animage or graphic when there areno images available to beginbuilding a slide show. Like your background image, you'll want your holding image to reflect the size of theslide show's monitor.
1 | TOC | 3 | 4 | 5 | 6 | 7 | 8 | 9 | 10 | 11 | 12 | 13 | 14 | 15 | 16 | 17 |18 | 19 | 20 | 21

1 | TOC | 3 | 4 | 5 | 6 | 7 | 8 | 9 | 10 | 11 | 12 | 13 | 14 | 15 | 16 | 17 | 18 | 19 | 20 | 21
Home | Products | News | Support | Store
SnapShot Studio™ Photo Booth User Guide:Facebook Integration
Facebook Integration
With SnapShot Studio™ Photo Booth, you can automatically post your event's photos directly to Facebook- inreal time or as a batch process at another time. With little effort, you can use the SnapShot Studio™ PhotoBooth Facebook app to start posting within minutes.
Post Photos to FacebookTo get started, you'll first need toselect the Post Photos ToFacebook checkbox. If you havenot authorized an account, you willbe prompted to do so.
WARNING: If you have/are loggedinto a Facebook account in yourweb browser, SnapShot Studio™will look to that account forauthorization.
Authorizing Your AccountFacebook requires a secure connection fromapplications, but the authorization certificatefrom Facebook is not readily available.You may get a message from SnapShotStudio™stating that "Revocation Informationis not available".Click "yes" to proceed.
Log Into Your Facebook AccountNext, you'll be prompted to log into your Facebook accout forthe sole purpose of approving SnapShot Studio™ to post onyour behalf.
Under no circumstances does SnapShot Studio™ PhotoBooth save or retain your Facebook user name orpassword.
SnapShot Studio™ will receive an authorization token, whichit does retain for posting.

Granting Account AccessIf you are familiar with Facebook and approving apps, thenyou'll be familiar with the next screen that appears after asuccessful login. SnapShot Studio™ will ask for access toyour account and any Fan Pages associated with youraccount.
If you deny access, SnapShot Studio™ will not be able topost photos and/or albums to your account or its Fan Pages.
1 | TOC | 3 | 4 | 5 | 6 | 7 | 8 | 9 | 10 | 11 | 12 | 13 | 14 | 15 | 16 | 17 | 18 | 19 | 20 | 21

1 | TOC | 3 | 4 | 5 | 6 | 7 | 8 | 9 | 10 | 11 | 12 | 13 | 14 | 15 | 16 | 17 | 18 | 19 | 20 | 21
Home | Products | News | Support | Store
SnapShot Studio™ Photo Booth User Guide:Facebook Integration
Create an AlbumOnce you've granted SnapShot Studio™ access to youraccount, you can create an album to post your photos into.To create a new album, click the "Yes" button to continue.
If you know an existing Album ID you wish to post into, click"No". You will be asked for the Album ID in the next screen.
Clicking "Yes"To create a new album, enter your album name and description.
Clicking "No"To use an existing album, you will need to know the album'sID.
Posting to Fan PagesIf you have a Fan Page, you can choose to post your images toit instead of posting to your main Facebook account. You cannotpost to both.Any Fan Page or application that is available will show in theFan Page Window list. Select the one you wish to post to andclick the "Ok" button.
1 | TOC | 3 | 4 | 5 | 6 | 7 | 8 | 9 | 10 | 11 | 12 | 13 | 14 | 15 | 16 | 17 | 18 | 19 | 20 | 21
1 | TOC | 3 | 4 | 5 | 6 | 7 | 8 | 9 | 10 | 11 | 12 | 13 | 14 | 15 | 16 | 17 | 18 | 19 | 20 | 21
Home | Products | News | Support | Store
SnapShot Studio™ Photo Booth User Guide:Facebook Integration
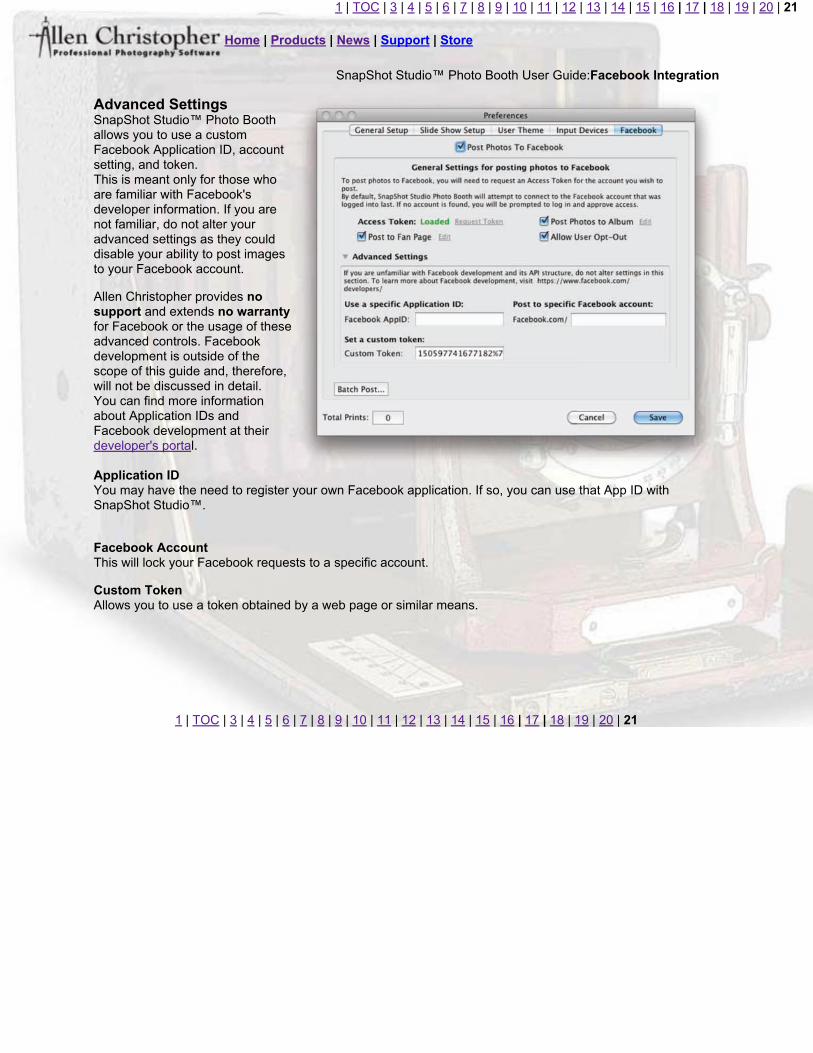
Advanced SettingsSnapShot Studio™ Photo Boothallows you to use a customFacebook Application ID, accountsetting, and token.This is meant only for those whoare familiar with Facebook'sdeveloper information. If you arenot familiar, do not alter youradvanced settings as they coulddisable your ability to post imagesto your Facebook account.
Allen Christopher provides nosupport and extends no warrantyfor Facebook or the usage of theseadvanced controls. Facebookdevelopment is outside of thescope of this guide and, therefore,will not be discussed in detail. You can find more informationabout Application IDs andFacebook development at theirdeveloper's portal.
Application IDYou may have the need to register your own Facebook application. If so, you can use that App ID withSnapShot Studio™.
Facebook AccountThis will lock your Facebook requests to a specific account.
Custom TokenAllows you to use a token obtained by a web page or similar means.
1 | TOC | 3 | 4 | 5 | 6 | 7 | 8 | 9 | 10 | 11 | 12 | 13 | 14 | 15 | 16 | 17 | 18 | 19 | 20 | 21