Embed Size (px)
Citation preview
For more information, visit www.MynaMagnet.com.au
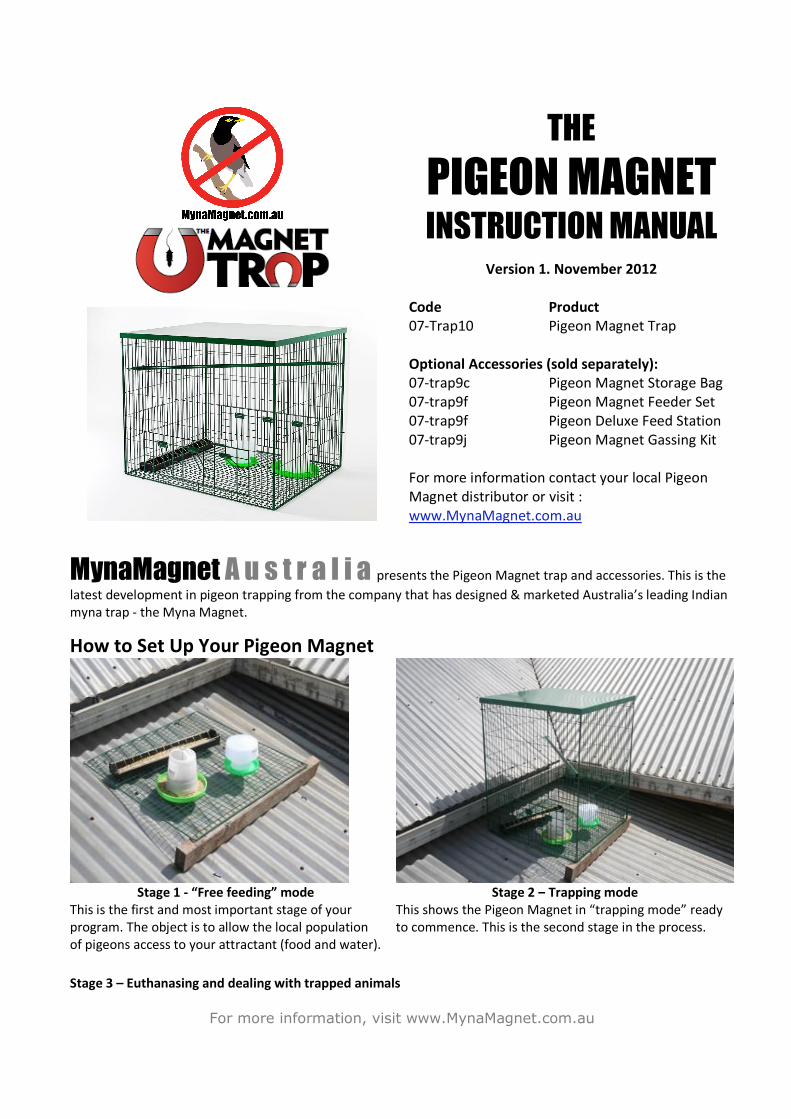
THE
PIGEON MAGNET INSTRUCTION MANUAL
Version 1. November 2012
Code Product
07-Trap10 Pigeon Magnet Trap
Optional Accessories (sold separately):
07-trap9c Pigeon Magnet Storage Bag
07-trap9f Pigeon Magnet Feeder Set
07-trap9f Pigeon Deluxe Feed Station
07-trap9j Pigeon Magnet Gassing Kit
For more information contact your local Pigeon
Magnet distributor or visit :
www.MynaMagnet.com.au
MynaMagnet A u s t r a l i a presents the Pigeon Magnet trap and accessories. This is the
latest development in pigeon trapping from the company that has designed & marketed Australia’s leading Indian
myna trap - the Myna Magnet.
How to Set Up Your Pigeon Magnet
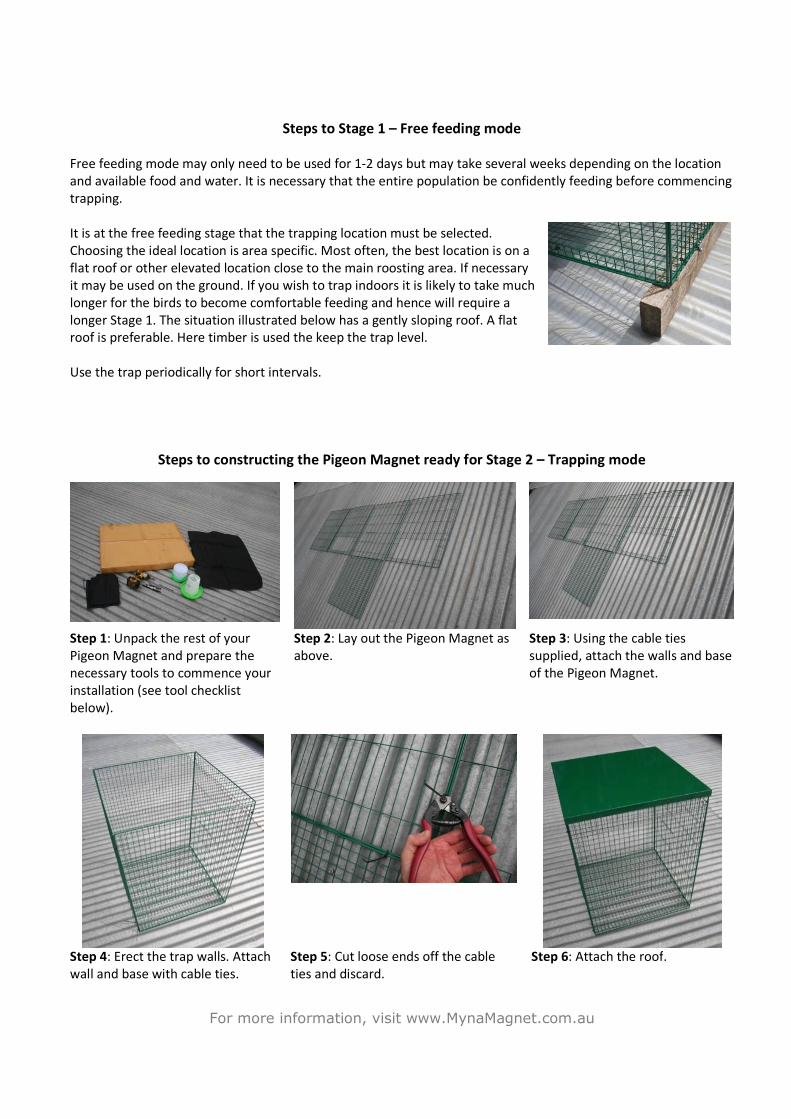
Stage 1 - “Free feeding” mode
This is the first and most important stage of your
program. The object is to allow the local population
of pigeons access to your attractant (food and water).
Stage 2 – Trapping mode
This shows the Pigeon Magnet in “trapping mode” ready
to commence. This is the second stage in the process.
Stage 3 – Euthanasing and dealing with trapped animals
For more information, visit www.MynaMagnet.com.au
Steps to Stage 1 – Free feeding mode
Free feeding mode may only need to be used for 1-2 days but may take several weeks depending on the location
and available food and water. It is necessary that the entire population be confidently feeding before commencing
trapping.
It is at the free feeding stage that the trapping location must be selected.
Choosing the ideal location is area specific. Most often, the best location is on a
flat roof or other elevated location close to the main roosting area. If necessary
it may be used on the ground. If you wish to trap indoors it is likely to take much
longer for the birds to become comfortable feeding and hence will require a
longer Stage 1. The situation illustrated below has a gently sloping roof. A flat
roof is preferable. Here timber is used the keep the trap level.
Use the trap periodically for short intervals.
Steps to constructing the Pigeon Magnet ready for Stage 2 – Trapping mode
Step 1: Unpack the rest of your
Pigeon Magnet and prepare the
necessary tools to commence your
installation (see tool checklist
below).
Step 2: Lay out the Pigeon Magnet as
above.
Step 3: Using the cable ties
supplied, attach the walls and base
of the Pigeon Magnet.
Step 4: Erect the trap walls. Attach
wall and base with cable ties.
Step 5: Cut loose ends off the cable
ties and discard.
Step 6: Attach the roof.

For more information, visit www.MynaMagnet.com.au
Step 7: Secure the roof. Attach the
stainless steel screws supplied into the
roof on both sides and tighten in place.
Step 8: Move the Pigeon Magnet
to the trapping location.
Step 9: Secure the pigeon Magnet
to the roof. In this case Bird
Barrier multi-purpose clips and
cable ties are used to prevent it
from blowing off the roof.
Step 10: Return the attractant food
and water to the Pigeon Magnet.
Allow free feeding to take place for
another 1 – 2 days to allow the
pigeons to enter and leave the trap
confidently.
Step 11: Attach the perch
diagonally across the trap, from
corner to corner.
Step 12: Lubricate the door hinges
to ensure they move freely and to
protect from corrosion.
Step 13: Attach each door using the
cable ties provided.
Step 14: Trapping mode. Your
Pigeon Magnet is now ready for
trapping.
Step 15: Select the appropriate
inspection interval and prepare for
the euthanasing process.

For more information, visit www.MynaMagnet.com.au
Above shows the Pigeon Magnet in an
ideal location – flat roof, secured and
close to the external roosting area.
Ensure that you inspect your trap regularly to ensure that the birds
are not left without adequate food and water. Inspection intervals
vary from state to state. See animal welfare considerations below.
Steps to Stage 3 – Euthanasing and dealing with trapped animals
Steps to Using the Gassing Kit
Step 1: Take your CO2 to your trapping
location.
Step 1: The gassing kit is used to
euthanase the captured pigeons.
Introduce carbon dioxide (CO2) from a
compressed gas cylinder (see below for
details). If not available, car exhaust
may be sufficient. Keep in mind that
this must be the first “cold” (at the start
of the day) and not a diesel engine.
Step 2: Ensure that the top
of the gassing bag is taped
but leave a space for air to
be purged and to reduce
CO2 pressure build-up.
For more information, visit www.MynaMagnet.com.au
Step 3: When your trapping
program is complete , cut the cable
ties on one wall and three sides of
the base only. This allows you to
quickly fold down and re-deploy
your Pigeon Magnet next time.
Step 3: When complete, return your
Pigeon Magnet to the optional
storage bag for transport and
storage.
Dealing with Trapped Animals
In the rare event that non-target species are trapped – simply release them by removing the bird(s) via the release
doors (there are two) or by removing the roof.
Releasing exotic pest birds however, is not legal and will continue to impact on the ecology of threatened native
species. The only solution is to remove them permanently from the environment.
Euthanasia, a painless death, is best undertaken with industrial grade carbon dioxide (available from BOC Australia
www.boc.com.au).
Enclose the Pigeon Magnet containing your trapped pigeons in the gassing bag (optional extra to your original
purchase) see pictures above.
Tape the top of the bag to the trap roof and make sure the end of the hose goes to the bottom of the bag. This
allows the carbon dioxide to displace the air in the bag. Then simply run the pipe from the carbon dioxide gas
cylinder (with appropriate pressure regulator) between the inside of the bag and the outside of the cage and allow
a constant flow of gas for five minutes. Allow for air to escape where the hose enters the gassing bag which will
displace the air and release the pressure of gas entering the bag.
It is also possible to use carbon monoxide gas from a petrol engine exhaust. Diesel engines are NOT suitable. The
gas should be run through a long enough hose to ensure that it is completely cooled when it reaches the birds and
the trap. The vehicle engine should be cold when started (first start of the day) and the engine should run for 6 to
8 minutes.
It should be noted that the preferred method of euthanasing the trapped birds is using carbon dioxide gas.
Tool check list:
Few tools are needed to assemble your Pigeon Magnet. A cordless drill/driver will assist in securing the trap roof
as well as securing the trap to the building to prevent damage or being blow away. Tape is needed at the gassing
stage. Scissors or cutting tool for cable ties. Lubricant spray (I.E WD-40 or oil) for entry doors.
Looking after your trap:
Cleaning the trap may be necessary between trapping programs. The trap is a high quality, powder coated steel
trap. When scratched is advisable to use touch up paint to protect from corrosion. Lubricate the door hinges to
ensure they move freely.

For more information, visit www.MynaMagnet.com.au
Attractant bait:
In most situations, wheat or grain will be sufficient. However, in commercial situations where abundant food is
available you may need to try pigeon racing mix, bread, chicken layer mash or similar. Use of a variety of
attractants may assist to entice the birds to enter the trap. You must always have fresh water in the trap to entice
birds to enter and to maintain the health and moisture requirement of the birds while in the trap.
How many Pigeon Magnet traps should you use?
This is dependent on the size of the pigeon population
and the total area of land, roof size and/or facility size.
When designing a trapping program, you may need
several traps per roof or location. This will increase the
number birds caught (shown here there are approx 12
pigeons each trap) per inspection interval.
Multiple traps will also reduce the number of overall
visits to the site during an extended program and
therefore reduce the labour investment in your
program.
For assistance and trapping program advice, contact
your local Pigeon Magnet distributor or visit
www.MynaMagnet.com.au
Local legislation and Animal welfare considerations:
Cruelty to animals is a major issue for professional pest managers, industry and the public. Follow the below link
from the Australian Government in relation to animal welfare considerations.
The carbon dioxide method of euthanasia is widely viewed by animal welfare agencies in Australia and
elsewhere to be humane and accords with the National Health and Medical Research Council of Australia's Code
of Practice for the Care and Use of Animals for Scientific Purposes. It is our recommended and preferred method.
Each state and territory has its own animal welfare legislation that enables prosecution of persons who subject
animals to unnecessary cruelty these apply equally to native and invasive pest animals such as pigeons:
ACT - Animal Welfare Act 1992
NT - Animal Welfare Act 1999
NSW - Prevention of Cruelty to Animals Act 1979
QLD - Animal Care and Protection Act 2001
SA - Prevention of Cruelty to Animals Act 1985
TAS - Animal Welfare Act 1993
VIC - Prevention of Cruelty to Animals Act 1986
WA- Animal Welfare Act2002
For more information, visit www.MynaMagnet.com.au
Further information:
Trapping of Pest Birds - Department of Sustainability, Environment ...
www.environment.gov.au/.../pubs/bir002-trapping-of-pest-birds.pdf
http://www.nhmrc.gov.au
http://www.rspca.org.au
Policy of the Royal Society for the Prevention of Cruelty to Animals on the Control and Use of Feral Animals
Because of the nature and variables involved in trapping, no guarantees as to the performance of the trap can be
given. If you operate the trap by these instructions carefully and diligently you should be able to trap Pigeons
successfully.
Unit 5, 74-76 Oak Road,
Kirrawee, NSW, Australia, 2232
Web: www.mynamagnet.com.au
Phone: +612 8539 7055
Fax: +612 8539 7154
Email: [email protected]
Australia


![INDEX [manoa.hawaii.edu]manoa.hawaii.edu/hpicesu/book/1992_chap/46.pdfINDEX aali (Dodonaea, ... Acridotheres tistis (common myna, Indian myna) 227,281,412 ... big-headed ant (Pheidole](https://img.dokumen.tips/doc/110x75/5add5ec67f8b9a595f8cc472/index-manoa-manoa-aali-dodonaea-acridotheres-tistis-common-myna-indian.jpg)