Embed Size (px)
Citation preview

1
The menu choices on this screen enable the CFL property manger to allocate and transfer computer equipment to requesting schools.
The reporting agency logs onto the GSAXcess® web site. Select Menu and under theCFL Functions Menu, choose “View/Allocate Request Items”.
CFL View/Allocate Requested Items Screen
Clicking the View/Allocate Request link takes you to the CFL View/Allocate Requested Items screen.

2
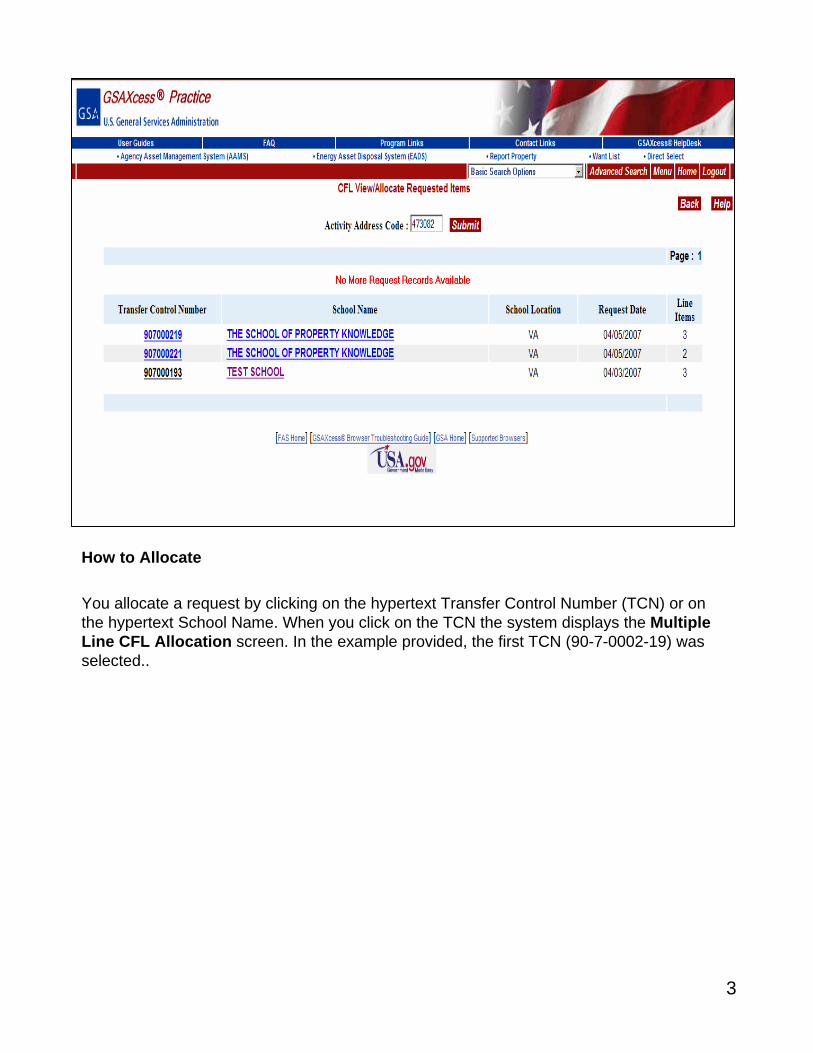
CFL View/Allocate Requested Items screen which displays the Transfer Control Number(s), requesting School(s) Name, School Location, and Request Date that are associated with your Activity Address Code (AAC).
DATA CATEGORIESActivity Address Code - The Activity Address Code of the Agency that reported the CFL property.
Transfer Control Number - Nine-Digit Transfer Control Number (TCN) system-assigned to the requested items during checkout of requested items.
School Location - The state where the school is located.
Request Date - The date the school submitted selected property.
Line Items - Shows the number of line items (Item Control Numbers) checked out under the particular Transfer Control Number.
3
How to Allocate
You allocate a request by clicking on the hypertext Transfer Control Number (TCN) or on the hypertext School Name. When you click on the TCN the system displays the Multiple Line CFL Allocation screen. In the example provided, the first TCN (90-7-0002-19) was selected..

4
Note the “CFL Multiple Line Allocation” at the top of the screen. In the CFL Module this means that one organization has applied for several items.
The selected TCN is shown at the top of the screen while the school that requested the item is shown on the left side. The “Error/Message” field on the rightmost column aids the allocating official to know at a glance whether there are competing requests for the ICN listed on the leftmost side. If there are no competing requests for the item, you may then allocate it to the requesting school by clicking the “Allocate” button. If there are competing requests, as in the example, click on the hypertext ICN to view the CFL Competing Requestsfor an Item screen.
If there are competing requests, the allocating property manager will have to choose which organization is most qualified to receive the property.
On the CFL Requester Information – Allocation/Confirmation page you can view the organization’s responses to the questions the CFL module provides to help you make your decision when there are competing requests. These questions are based on the organization’s need, such as number of students per computer, number of students eligible for government lunches, etc.
Click on the ICN to find out who is requesting the equipment (see next page)..
5
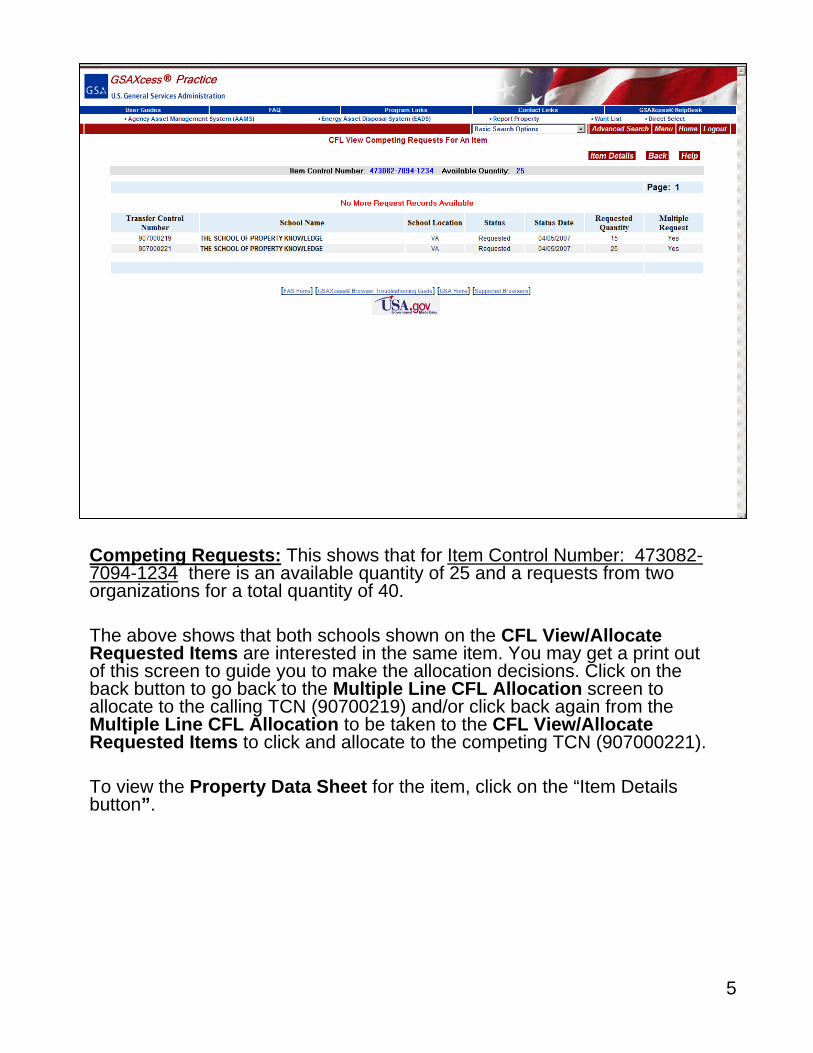
Competing Requests: This shows that for Item Control Number: 473082-7094-1234 there is an available quantity of 25 and a requests from two organizations for a total quantity of 40.
The above shows that both schools shown on the CFL View/Allocate Requested Items are interested in the same item. You may get a print out of this screen to guide you to make the allocation decisions. Click on the back button to go back to the Multiple Line CFL Allocation screen to allocate to the calling TCN (90700219) and/or click back again from the Multiple Line CFL Allocation to be taken to the CFL View/Allocate Requested Items to click and allocate to the competing TCN (907000221).
To view the Property Data Sheet for the item, click on the “Item Details button”.

6
CFL Property Data Sheet
Click on the “back” button to be taken back to the Multiple Line CFL Allocation. When you are ready to allocate, click on the allocate button on the screen.
7
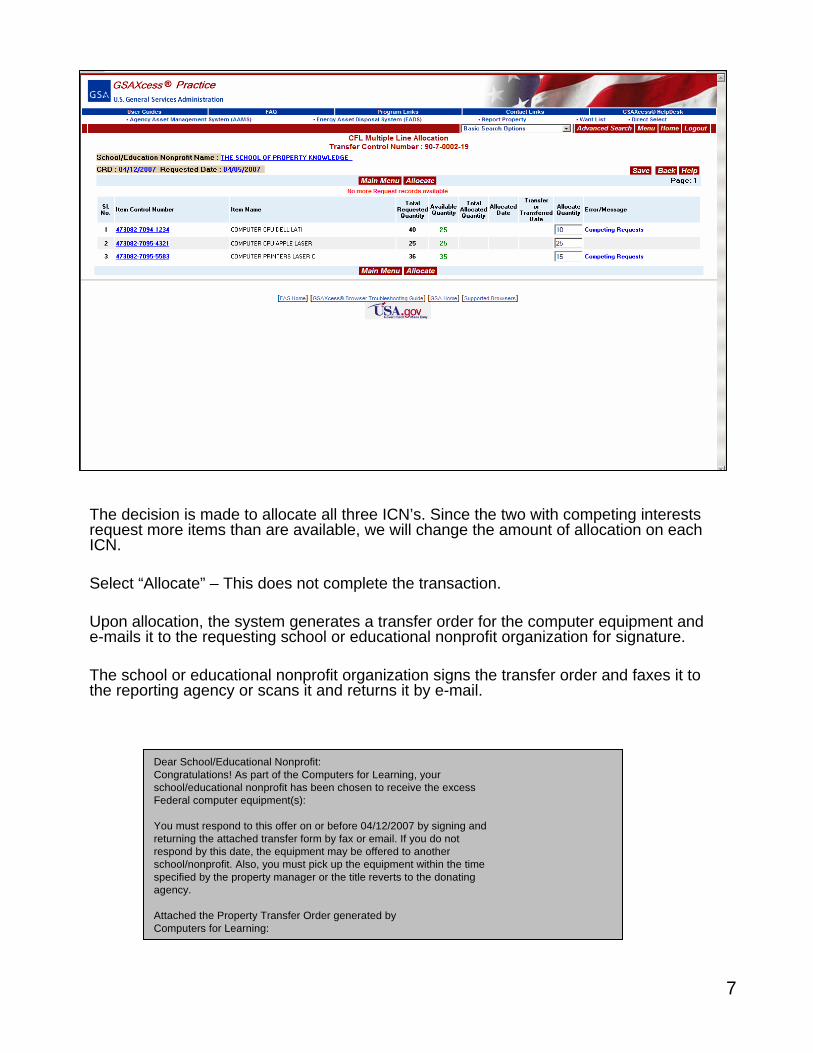
The decision is made to allocate all three ICN’s. Since the two with competing interests request more items than are available, we will change the amount of allocation on each ICN.
Select “Allocate” – This does not complete the transaction.
Upon allocation, the system generates a transfer order for the computer equipment and e-mails it to the requesting school or educational nonprofit organization for signature.
The school or educational nonprofit organization signs the transfer order and faxes it to the reporting agency or scans it and returns it by e-mail.
Dear School/Educational Nonprofit:Congratulations! As part of the Computers for Learning, yourschool/educational nonprofit has been chosen to receive the excessFederal computer equipment(s):
You must respond to this offer on or before 04/12/2007 by signing andreturning the attached transfer form by fax or email. If you do notrespond by this date, the equipment may be offered to anotherschool/nonprofit. Also, you must pick up the equipment within the timespecified by the property manager or the title reverts to the donatingagency.
Attached the Property Transfer Order generated byComputers for Learning:

8
This example shows that all three ICN’s have been allocated. Though the items have been allocated, you must still “Confirm” the allocation or if you want to change the quantity you must select allocate again to update the quantity.
To confirm the allocation and create a transfer, click on the Confirmation button. You will receive a system message stating, “TCN: 907000193 -- Allocation Confirmation Successful.” A blank Requester Information – Allocation/Confirmation screen will appear. If you wish to allocate another TCN, you will input it on this screen and click the “Submit” button. If you click the “Back” button, you will be taken back to the CFL View/Allocate Requested Items where you will make more allocation decisions on the remaining TCNs. When you confirm the allocation the system sends an electronic Transfer Form (SF-122) to the requesting school. After the approving official of the school signs and sends back the SF-122 to you, you will then complete the transfer using the Transfer module (discussed later). You may defer confirming your allocation; in that case you will use the Confirm Allocations module (discussed later) confirm it to initiate sending the transfer form, or you may use the Change Allocation/Transfer module (discussed later) to cancel the allocation.

9
Allocation the Property
To “Allocate” by clicking on the School Name, the system displays the “CFL Requestor Information – Allocation/Confirmation” screen which allows you to allocate and confirm the property. The screen displays all the pertinent Screen, Approval, Allocation, and Shipping information.

10
Confirm Allocations Module
If you did not confirm your allocation on the CFL Multiple Allocation/Confirmationscreen, you can use this option to confirm the allocation at a later date. Clicking the Confirm Allocation option from the Main Menu displays the CFL Confirm Allocations screen which displays the TCN’s that you allocated but did not confirm for transfer.
The screen displays the Transfer Control Numbers, Schools, School Locations, and Allocation or Denial Dates, and any System Messages that are associated with your Activity Address Code (AAC). If there are no pending allocations, the system will display a message stating so. If there are pending allocations, as in the example above, click on the check box next to the TCN you wish to confirm and click on the “Confirm Allocation”button. A system message will appear in the Message column that states, “Allocation Confirmation Successful”.

11
Transfer Module
All TCNs of your confirmed allocations will show on the Transfer module awaiting completion of transfer. After you receive a signed transfer form, click on the Transfer option from the Main Menu screen. The system will display the CFL Transfer screen and show all your confirmed allocations that have not been transferred.
To complete the transfer of a particular TCN, e.g., 907000221, click on the TCN. The system displays the Multiple Line CFL Transfer screen. You can also click on the hypertext school name to display the Requester Information – Transfer screen. You can complete the transfer from either screen by clicking in “Transfer” button.
12
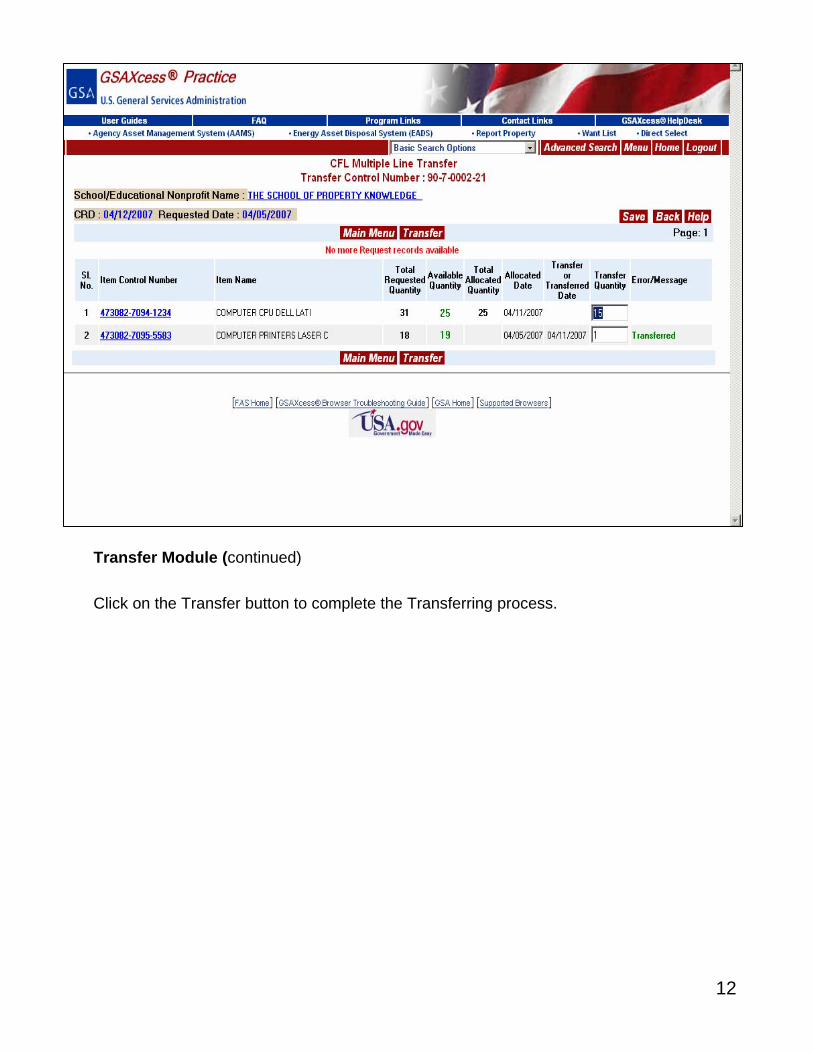
Transfer Module (continued)
Click on the Transfer button to complete the Transferring process.

13
The above screen shot shows that the first ICN is denied while the second is allocated.
Denial Notice Page: 1
DATE: 04/05/07 PLEASE DISREGARD - TEST ONLY - TEST ONLY - TEST ONLY - TEST ONLY - TEST ONLY
TO: UGBAJA,MONICA THE SCHOOL OF PROPERTY KNOWLEDGE(Fax) 703-605-9888
FROM: Federal Acquisition Service / FB
Dear School/Nonprofit:
The following items(s) on Transfer Order 90-7-0001-89 have been denied.
1. 473082-7009-CL01
In the event there is no response from the activity or activities receiving the allocation, your request will be reconsidered.

14
All line items listed for this particular organization are listed here. Select “Transfer”

15
Change/Allocation/Transfer Module
This module is used to change already allocated or transferred ICNs. When you click on this option from the CFL Main Menu choices, the system displays Requester Information – Transfer screen. Enter the Transfer Control Number in the appropriate blocks and click “Submit”. The Requestor Information will appear.

16
The system displays all the pertinent information about the requester. Click “Transfer” or “Change Transfer” button for allocated and transferred ICN respectively. The system displays Multiple Line Change Transfer screen where you can modified allocated or transferred quantity. After you have adjusted the quantity, click on the “Change Transfer”button again to effect the change.

17
The Multiple Line Change Transfer screen where you can modify allocated or transferred quantity. After you have adjusted the quantity, click on the “Allocate” button again to effect the change.
In the above case, the one transferred quantity was deleted and “Change Transfer”selected. Total of two items transferred.
Note: Allocate quantity can not be greater than available quantity minus total allocated quantity.
18
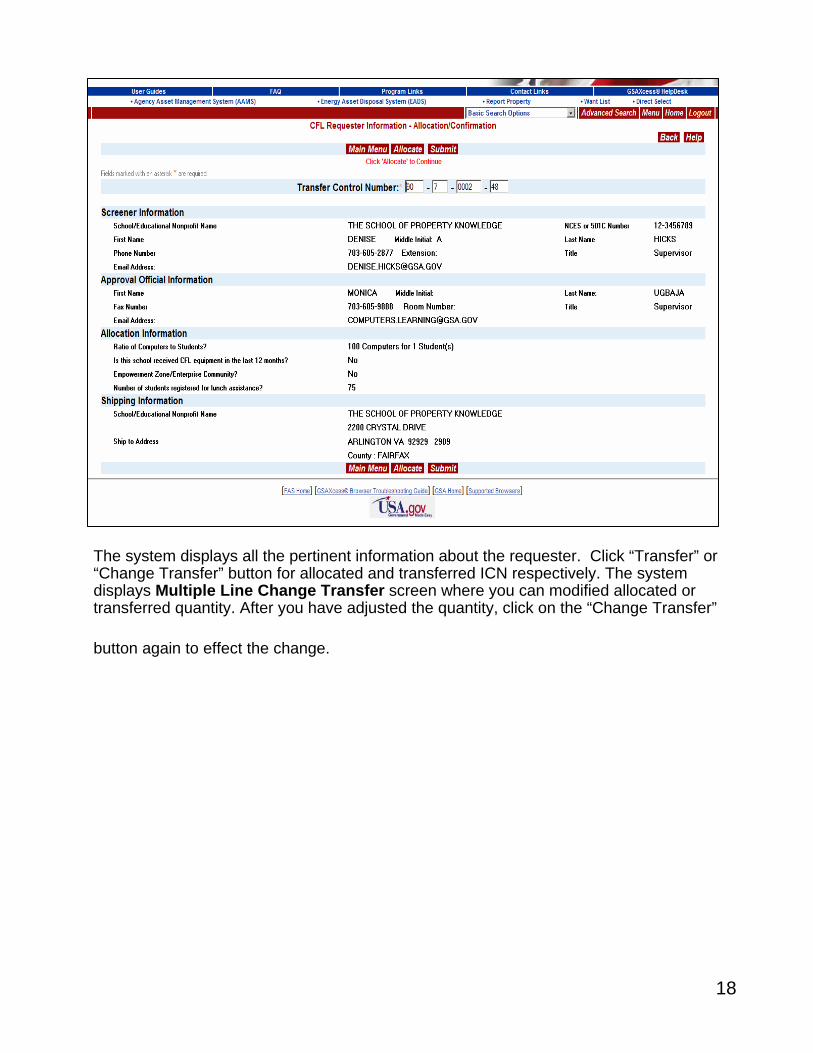
The system displays all the pertinent information about the requester. Click “Transfer” or “Change Transfer” button for allocated and transferred ICN respectively. The system displays Multiple Line Change Transfer screen where you can modified allocated or transferred quantity. After you have adjusted the quantity, click on the “Change Transfer”
button again to effect the change.