Embed Size (px)
Citation preview

The essential toolkit for
e�ective AD management:
The Integrations Handbook
www.admanagerplus.com

Introduction IT management becomes unwieldy when technicians work with too many
applications, even if they're just executing simple tasks. Instead of deploying
applications that work in silos, ADManager Plus integrates with IT service
management (ITSM) tools such as ServiceDesk Plus and ServiceNow, allowing your
technicians to perform their IT management tasks from a single tool.
While ADManager Plus helps manage all aspects of Active Directory (AD), ITSM tools
provide help desks with greater visibility and centralized control. ADManager Plus
also integrates with HR application databases like Oracle and MS SQL to help
manage employee details in your organization. These integrations help technicians
perform various AD user management tasks, from user onboarding to
deprovisioning. In addition, ADManager Plus also sends logs to a syslog server,
which can be utilized by SIEM applications to audit AD management activities.
Benefits of ADManager Plus' integrationsBy implementing ADManager Plus' integrations in your organization, you can:
Make onboarding fast, e�cient, user-friendly, and employee-centric.
Ensure demands for employee role changes, transfers, promotions, and
relocations are processed seamlessly.
Drive standardization to improve e�ciency, compliance, and productivity.
Reduce onboarding backlogs.
Enable employees to make smarter requests for password resets and
instant account unlocks.
0 Ensure error-free documentation and data entry.
1 www.admanagerplus.com

Integrating with help desk applicationsIntegrating help desk applications like ServiceDesk Plus and ServiceNow with
ADManager Plus makes it easy for you to:
Simultaneously provision user accounts in O�ce 365, G Suite, and Skype
for Business.
Save time and e�ort by performing routine activities from a single console.
You'll no longer need to copy data from service requests to the native AD
management tool.
Customize user details during onboarding with the help of ADManager Plus'
user templates.
Standardize your user naming format and prevent the creation of duplicate
user accounts in AD.
Resolve password reset requests quickly, reducing employee idle time and
increasing your organization's net productivity.
This integration also enables end users to create requests for any of the available
AD management activities through the Service Catalog.
ManageEngine ServiceDesk PlusServiceDesk Plus helps admins manage IT tickets, hardware, and software
e�ciently. After integrating ADManager Plus with ServiceDesk Plus, administrators
can create, delete, unlock, and enable or disable users, as well as reset user
passwords from the ServiceDesk Plus console. This helps admins easily perform all
aspects of user provisioning.
2 www.admanagerplus.com

Steps to configure ServiceDesk Plus settings in ADManager Plus:
1. Click the Admin tab.
2. Select Integrations, located under Personalize.
3. Click ServiceDesk Plus, located under Third-party Integrations.
4. In the Service Desk Settings page, configure the following:
Server where ServiceDesk Plus is running: Enter the ServiceDesk Plus
server name .
ServiceDesk Plus server port number: Enter the port number.
Protocol settings: Select the protocol for data transmission . If you
select HTTPS, apply the SSL certificate from ServiceDesk Plus using
Choose File.
5. Click Enable tight integration with ServiceDesk Plus to perform AD and
exchange-related tasks from the ServiceDesk Plus console.
6. Click Test Connection and Save to establish a connection and save your
settings.
ServiceNowServiceNow is an ITSM tool that makes it easy for users to submit and track IT
requests. The ADManager Plus-ServiceNow integration helps you simplify user
onboarding as well as scale onboarding to an enterprise level. It also supports more
e�cient identity management, and more accurate o�boarding processes. This
integration also helps enable, disable, or unlock user accounts, reset AD users'
passwords, alter group membership details by adding or removing user accounts
from groups, and more.
Redefine employee productivity, lower operating costs, and improve overall
administration through a consistent system of engagement. You can even carry out
AD management activities while handling IT issues. With this integration, end users
create requests for any of the available AD management activities under the Service
Catalog. Technicians can view their requests under the Incidents tab and perform
AD management tasks through the form context menu.
3 www.admanagerplus.com

Steps to configure ADManager Plus in ServiceNow:
1. Download the ADManager Plus app from the ServiceNow store .
2. From the ServiceNow console, go to Application.
3. Select the downloaded app and click Install.
4. Type ADManager Plus in the search box on the left-hand side of the page.
You will be able to view ADManager Plus' di�erent modules.
5. Select Setup and go through the wizard to configure it as per your
requirements.
6. If you've already downloaded ADManager Plus, click Next.
7. Enter your ADManager Plus server name and port number, as well as your
ServiceNow MID server URL .
Note: The MID Server ensures communication between ServiceNow and
ADManager Plus when ADManager Plus is hosted on a private network. If
your instance of ADManager Plus is accessible via a public IP, you don't
need to specify a MID server URL.
8. Enter your ADManager Plus administrator's credentials to complete the
integration.
Steps to configure ServiceNow in ADManager Plus:
1. Click the Admin tab in ADManager Plus.
2. Select Integrations.
3. Click ServiceNow under Third-party Integrations.
4. In the ServiceNow URL field, enter the URL where your ServiceNow
instance is hosted.
5. Click Test Connection and Save to establish a connection and save your
settings.
4 www.admanagerplus.com

Integrating with HR databasesHR databases are the back-end storage that enable HR applications to run
smoothly. Oracle and MS SQL are two of the most widely-used databases across
organizations today. Using ADManager Plus, IT admins can schedule automation
tasks, which can help with identity provisioning. An Oracle or MS SQL database can
be configured as the data source for user information in ADManager Plus, enabling
it to fetch user information from these databases and create user accounts at a
scheduled time.
Using ADManager Plus' user creation templates
Identity provisioning is one of the most important processes for an organization, as
it's often the first impression new employees get while being onboarded . This
integration o�ers the best platform to welcome an employee into your organization
without experiencing any hiccups, as it doesn't stop simply with user creation. The
user creation templates in ADManager Plus help you:
Create user accounts in Active Directory, Exchange, O�ce 365, G Suite, and
Skype for Business.
Configure Exchange-related properties for new users such as storage limits,
delivery restrictions, and more.
Manage group memberships.
Eliminate duplication of users.
Streamline naming formats.
Customize password formats and allow new users to set random
passwords.
5 www.admanagerplus.com
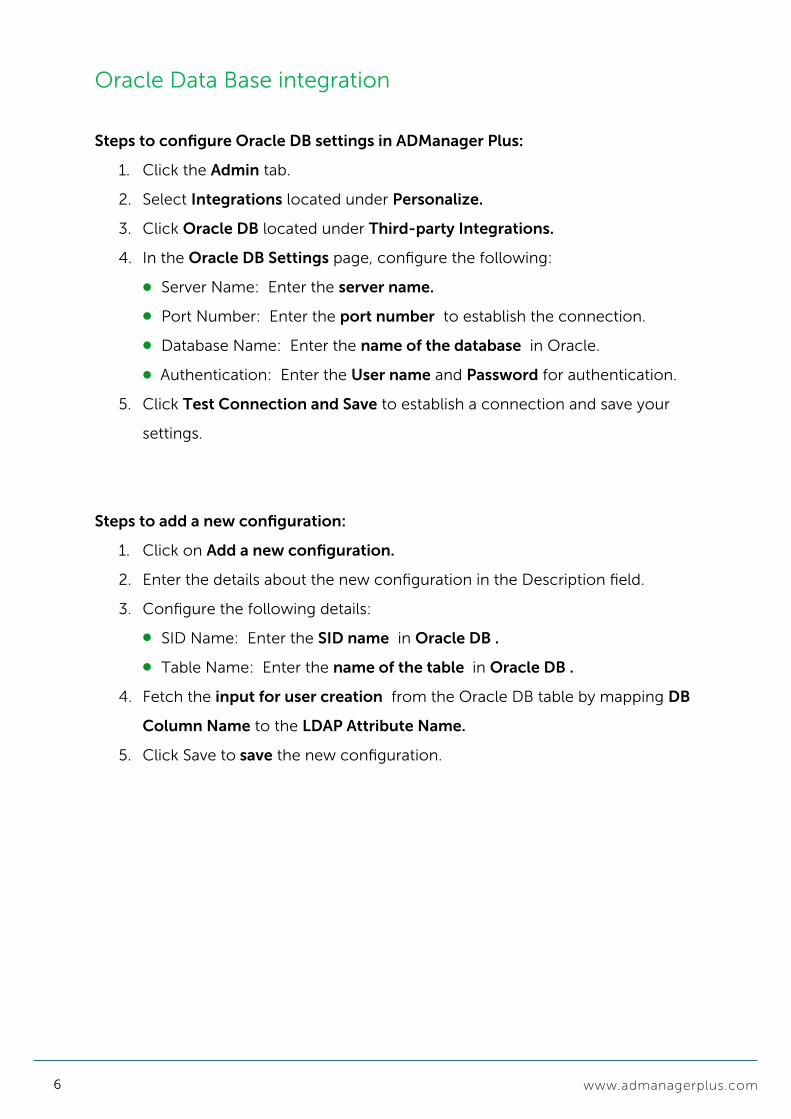
Oracle Data Base integration
Steps to configure Oracle DB settings in ADManager Plus:
1. Click the Admin tab.
2. Select Integrations located under Personalize.
3. Click Oracle DB located under Third-party Integrations.
4. In the Oracle DB Settings page, configure the following:
Server Name: Enter the server name.
Port Number: Enter the port number to establish the connection.
Database Name: Enter the name of the database in Oracle.
Authentication: Enter the User name and Password for authentication.
5. Click Test Connection and Save to establish a connection and save your
settings.
Steps to add a new configuration:
1. Click on Add a new configuration.
2. Enter the details about the new configuration in the Description field.
3. Configure the following details:
SID Name: Enter the SID name in Oracle DB .
Table Name: Enter the name of the table in Oracle DB .
4. Fetch the input for user creation from the Oracle DB table by mapping DB
Column Name to the LDAP Attribute Name.
5. Click Save to save the new configuration.
6 www.admanagerplus.com

Steps to automate user creation:
1. Click on the Automation tab.
2. Select Automation from the left pane.
3. Click on Create New Automation and configure the following:
Automation Name: Enter a name for the automation.
Description: Add a brief note about the automation.
Automation Category: Choose User Automation from the menu.
Select Domain: Select the domain/OUs where the automation should
run. Child OUs can be eliminated by selecting Exclude Child OU(s).
Automation Task/Policy: Select Create Users from the menu.
Template to be applied: Select the template to be applied for user
creation.
Select Data Source: Click on More Options beside the Location of CSV
option. Select Oracle DB from the menu. Enable Ignore current records
in DB to ignore the already processed records and consider only the
unprocessed records in the Oracle table for user creation.
Select Configuration: Select a configuration from the menu. Or click
on Add New Configuration to add new settings.
Implement Business Workflow: Select Implement Business Workflow if
the automation has to be executed through a workflow.
Execution Time: Configure the automation execution time and repeat
the execution using the Hourly, Daily, Weekly, Monthly, or More
options.
4. Click Save to save your settings or Save & Run to save the settings and run
the automation instantly.
7 www.admanagerplus.com
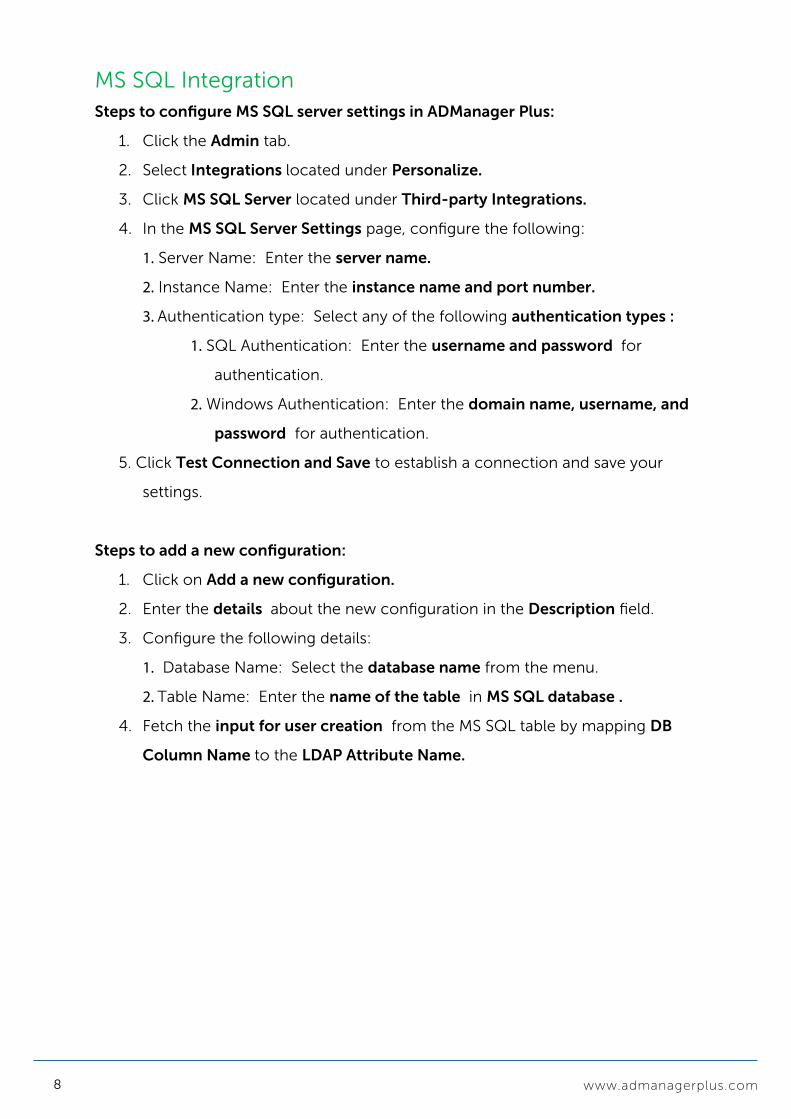
MS SQL IntegrationSteps to configure MS SQL server settings in ADManager Plus:
1. Click the Admin tab.
2. Select Integrations located under Personalize.
3. Click MS SQL Server located under Third-party Integrations.
4. In the MS SQL Server Settings page, configure the following:
1. Server Name: Enter the server name.
2. Instance Name: Enter the instance name and port number.
3. Authentication type: Select any of the following authentication types :
1. SQL Authentication: Enter the username and password for
authentication.
2. Windows Authentication: Enter the domain name, username, and
password for authentication.
5. Click Test Connection and Save to establish a connection and save your
settings.
Steps to add a new configuration:
1. Click on Add a new configuration.
2. Enter the details about the new configuration in the Description field.
3. Configure the following details:
1. Database Name: Select the database name from the menu.
2. Table Name: Enter the name of the table in MS SQL database .
4. Fetch the input for user creation from the MS SQL table by mapping DB
Column Name to the LDAP Attribute Name.
8 www.admanagerplus.com

Steps to automate user creation:
1. Click on Automation.
2. Select Automation from the left pane.
3. Click on Create New Automation and configure the following:
Automation Name: Enter a name for the automation.
Description: Add a brief note about the automation.
Automation Category: Choose User Automation from the menu.
Select Domain: Select the domain/OUs where the automation should
run. Child OUs can be eliminated by selecting Exclude Child OU(s).
Automation Task/Policy: Select Create Users from the menu.
Template to be applied: Select the template to be applied for user
creation.
Select Data Source: Click on More Options beside the Location of CSV
option. Select MS SQL Server from the menu. Enable Ignore current
records in DB to ignore the already processed records and consider only
the unprocessed records in the MS SQL table for user creation.
Select Configuration: Select a configuration from the menu. Or click
on Add New Configuration to add new settings.
Implement Business Workflow: Select this option if the automation has
to be executed through a workflow.
Execution Time: Configure the automation execution time and repeat
the execution using the Hourly, Daily, Weekly, Monthly, or More
options.
4. Click Save to save the settings or Save & Run to save the settings and run
9 www.admanagerplus.com

Integrating with SIEM applicationsSIEM applications collect data from various sources and monitor this data for
security purposes. Logs are one of the most important sources of data for any SIEM
tool. By analyzing these logs, admins can troubleshoot, ensure compliance with
regulations, investigate security incidents, and more. With this integration, SIEM
applications will receive real-time records of technicians' activity performed using
ADManager Plus.
ManageEngine ADSelfService PlusManageEngine ADSelfService Plus is a secure, web-based, end-user password
reset management program. This software helps domain users update account
information on their own in Microsoft Windows Active Directory.
Steps to configure Syslog settings in ADManager Plus:
1. Click the Admin tab.
2. Select Integrations located under Personalize.
3. Click SYSLOG located under Log Forwarding.
4. Click on the Enable forwarding of ADManager Plus Data check box to
enable sending of logs to syslog server.
5. Configure the following:
Syslog Server: Enter the syslog server name .
Port: Enter the port number .
Protocol: Select the appropriate protocol from the menu, i.e. UDP or
TCP.
Syslog Standard: Select the appropriate standard from the menu,
i.e. RFC 3164 or RFC 5424.
Data Format: Enter the data format.
6. Click Save to save the settings.
10 www.admanagerplus.com

Self-service prerequisites
Help Desk Assisted Self-Service with ADSelfService Plus mandates the following
prerequisites:
Self-service approval workflow
By enabling the self-service approval workflow feature, you can route self-service
requests from end users through your IT help desk for approval. After approval from
the IT help desk, the self-service requests will be updated in Active Directory. This
feature will help you take hold of users' self-service operations and maintain control
over what details get updated in Active Directory. Refer to the image below to see
how this process works.
Steps to integrate ADSelfService Plus with ADManager Plus:
The requests created by users from ADSelfService Plus can be managed and
executed by your IT help desk sta� using ADManager Plus.
1. Download, install, and launch ADManager Plus .
2. Launch ADSelfService Plus and log in as an administrator.
3. Go to Admin > Product Settings > Connection. Under Configure Other
ManageEngine Products, select ManageEngine ADManager Plus as the
Application Name.
4. Enter the Server Name, IP Address, and Port number of ADSelfService Plus.
5. Select the protocol (http or https) that is being used in ADManager Plus
from the drop-down menu.
6. Enter the username and password of the ADManager Plus administrator
account.
7. Click Test Connection and Save.
Once integrated, you can enable the Approval Workflow in ADSelfService Plus
11 www.admanagerplus.com

Steps to configure a self-service approval workflow:
Launch ADSelfService Plus and log in as an administrator.
Navigate to Configuration > Administrative Tools > Approval Workflow.
Select Enable Approval Workflow.
Select which self-service actions should come under the approval workflow
process from the available actions.
Select the policies for which you want to enable the approval workflow.
Click Save.
Steps to configure an approval workflow for password resets and account unlocks:
If you've enabled an approval workflow for password resets and account
unlocks, then you have to configure security questions.
This will be used by the help desk technicians to verify end-users' identities
before approving their actions.
Follow the steps given below:
Launch ADSelfService Plus and log in as an admin.
Navigate to Configuration > Administrative Tools > Approval Workflow.
Select Enable Approval Workflow.
Enable the Reset Password/Unlock Account option. Click Configure.
In the dialog box that opens, you will see a list of security questions
already configured by default.
You can add, delete, edit, enable, and disable the security questions as
you wish.
To add a new security question, click Add Question at the bottom of the
dialog box.
Enter the security question and select the corresponding LDAP attribute.
The value of the selected attribute will serve as the answer to the security
question.
Once you have configured the security questions, close the dialog box
and click Save.
From the ADManager Plus console, the administrator may set assigning rules and
notification rules as per one's requirement.
12 www.admanagerplus.com

SummaryDespite varying IT architectures, every enterprise has a help desk that serves their
employees. The ADManager Plus integrations can redefine employee productivity,
lower operating costs, and improve overall administration through a consistent
system of engagement and decentralized Active Directory management. Some of
the key tasks technicians can perform with this integration include:
1. Provisioning AD, Exchange, O�ce 365, G Suite, and Skype for Business
accounts simultaneously using ADManager Plus' User Creation Templates.
2. Deprovisioning or deleting AD user accounts.
3. Enabling, disabling, or unlocking user accounts.
4. Resetting AD users' passwords.
5. Empowering end users with self service.
6. Altering group membership details by adding or removing user accounts
from groups.
7. Saving time and cutting costs by connecting the applications used by
di�erent departments across your organization.
8. Enhancing security.
9. Improving user experience and sustaining productivity through quicker
resolution of user issues.
13 www.admanagerplus.com

www.admanagerplus.com
About ADManager Plus
ADManager Plus is a web-based Windows Active Directory management and reporting solution that helps Active
Directory administrators and help desk technicians accomplish their day-to-day activities. With an intuitive,
easy-to-use interface, ADManager Plus handles a variety of complex tasks and generates an exhaustive list of
Active Directory reports, some of which are essential requirements to satisfy compliance audits. It also helps
administrators manage and report on their Exchange Server, Office 365, and Google Apps environments, in
addition to Active Directory, all from a single console.
For more information on ManageEngine ADManager Plus, visit https://www.manageengine.com/ad-manager/
30-day trial and try this feature now.