Embed Size (px)
Citation preview

Managing Exchange With ADManager v1.2a
Table of Contents
Logging In ........................................................................................................ Page 2
Create a Single User ........................................................................................ Page 3
Modify a Single User ....................................................................................... Page 7
Create a Single Group ................................................................................... Page 13
Modify a Single Group .................................................................................. Page 17
Create a Single Contact ................................................................................. Page 23
Modify a Single Contact ................................................................................ Page 24
Reporting ...................................................................................................... Page 29
Advanced Bulk Modifications ........................................................................ Page 31

Managing Exchange with ADManager Page 1
Using ADManager Plus to Manage Exchange Accounts
For several years, HCCA has been able to provide custom “Snap-ins”, using standard Microsoft management consoles, to
allow our Exchange clients to self-manage their district’s email enabled clients. Combining some complex custom role
based permissions allow a client district to be completely segregated from others. The downside of this approach was
that locally installed third party software was required to open the management tools.
With the advent of Exchange 2013, Microsoft has removed all Graphical management consoles from their product and
all management must now be done from a web interface. The only problem with this web interface is that Microsoft did
not include any way to filter or limit the content seen by a delegated administrator. This forces all entities similar to
HCCA, who share services with member districts, to find an alternative management tool. There are several such
products designed for large scale ISPs and hosting companies that come with a steep price tag. To help contain costs
we’re using a software product we already have in-house to provide these same needs.
This product is ADManager Plus Professional. To use this interface, open a web browser to https://adm.hccanet.org and
then authenticate with the username and password provided.
Because each unique user of this system represents an expense in licensing, we will be creating one account for each of
our client districts, to keep costs under control.

Managing Exchange with ADManager Page 2
Creating a Single User – pg1
Once you’ve successfully logged into the site, you are presented with the “home” screen. You can always get back to this
position by clicking the “AD Mgmt” tab just below the logo. This tutorial will walk through the basic steps of creating and
editing individual users, distribution groups, and contacts.
To create a new user, click the “Create Single User” link. This will open a form to input info.

Managing Exchange with ADManager Page 3
Creating a Single User – pg2
The data entry screen will default to the “General” tab.
To simplify the process, as much of the entry as possible has been automated. Once you enter the first and last name of
the users, most of the other required info is automatically updated. You must be careful to insure that there are no
other accounts with the same login name.
By entering an existing user name in the “Copy User Attributes” field in the upper right of the screen you can create a
new account with the same group membership and data as the original. When this page is complete, click the “Account”
tab.

Managing Exchange with ADManager Page 4
Creating a Single User – pg3
The “Exchange” tab will rarely be needed. Everything for the Exchange mailbox will be automatically added based on the
custom Address List Policy and the value of Custom Attribute 1, both of which are automatically entered when you click
“Create”. The mailbox will be set to the default 2 GB size. You can adjust that size here but you will probably make that
kind of change in the modify user options that will be covered later.
Notice in the upper right area, some groups are already designated to which any new account will become a member.
This list can be customized by HCCA for each district. During account creation, you can click the pencil icon to add more
groups. You will only be able to see groups in your Active Directory Organization.
Once these options are set, click the “Contact” tab.

Managing Exchange with ADManager Page 5
Creating a Single User – pg4
After clicking “Create” you will soon see the message “Successfully created the user”, as shown above. If you, instead,
get an error, double check to be sure the username for the account is unique. This applies to all users for all districts on
our system. Any error message should help track the issue and if it is not clear, please open a ticket with the HCCA
helpdesk to get back on track.
Once the account is created, you can click the “AD Mgmt” tab to return to the start screen.

Managing Exchange with ADManager Page 6
Modifying a Single User – pg1
Next, we’ll step through the process of making changes to an existing user. To begin, just click “Modify Single User” from
the home screen.

Managing Exchange with ADManager Page 7
Modifying a Single User – pg2
Next you will see a listing of accounts you can manage. From this screen you can:
Copy a user to a new user from the drop down on the right
Delete a user from the drop down on the right
Modify a user by clicking the words “Modify User” in the yellow shaded area

Managing Exchange with ADManager Page 8
Modifying a Single User – pg3
When you click “Modify User” you will be brought to the same two tabs you saw during account creation. The difference
is that now fields will be populated with information already stored in Active Directory for that user. You can modify
data on any tab.
One common task may be to reset a user’s password. This can best be achieved on this tab.

Managing Exchange with ADManager Page 9
Modifying a Single User – pg4
From the “Account” tab you can easily change a user’s password. Just enter and confirm a new password. The password
will need to meet password complexity rules which require three of the four following types of characters:
Uppercase
Lowercase
Numbers
Special Characters
An example that would meet this need would be: Mountain12#
You can create one that your user can remember and then always tick the box “User must change password at next
logon”. This insures that the user will have a private password and that your temporary password can only be used once.
If this is all you need to edit for this user, you can click the “Update Account” button. If not click on the “Exchange” tab,
as shown on the next page, and proceed further.
In the “Additional E-mail Addresses” area you can add a new address as an alias. This can be used to have webmaster
email delivered to a specific user without creating or checking a dedicated account. When you add an alias e-mail
address, you must preface the address with a lower case “smtp:” as shown on the next page.
If you desire to change the default e-mail address for an account, you must untick the “Automatically update e-mail
addresses based on recipient policy” box. This will allow you to delete the default address, designated by the uppercase
“SMTP:” and replace it with something else. If your district ever wishes to change their domain name, the change will
not automatically apply if this box is unchecked.

Managing Exchange with ADManager Page 10

Managing Exchange with ADManager Page 11
Modifying a Single User – pg8
Once you have verified that you will be updating what you wanted to update, click the “Update User” button and you
will receive a message that the user was successfully modified. Click the “Close” button in the upper right and then close
the pop-up window.

Managing Exchange with ADManager Page 12
Creating a Single Group – pg1
To add a new distribution group, from the home screen click “Group Management” from the left and then “Create Single
Group” from the center area.
Managing Exchange with ADManager Page 13
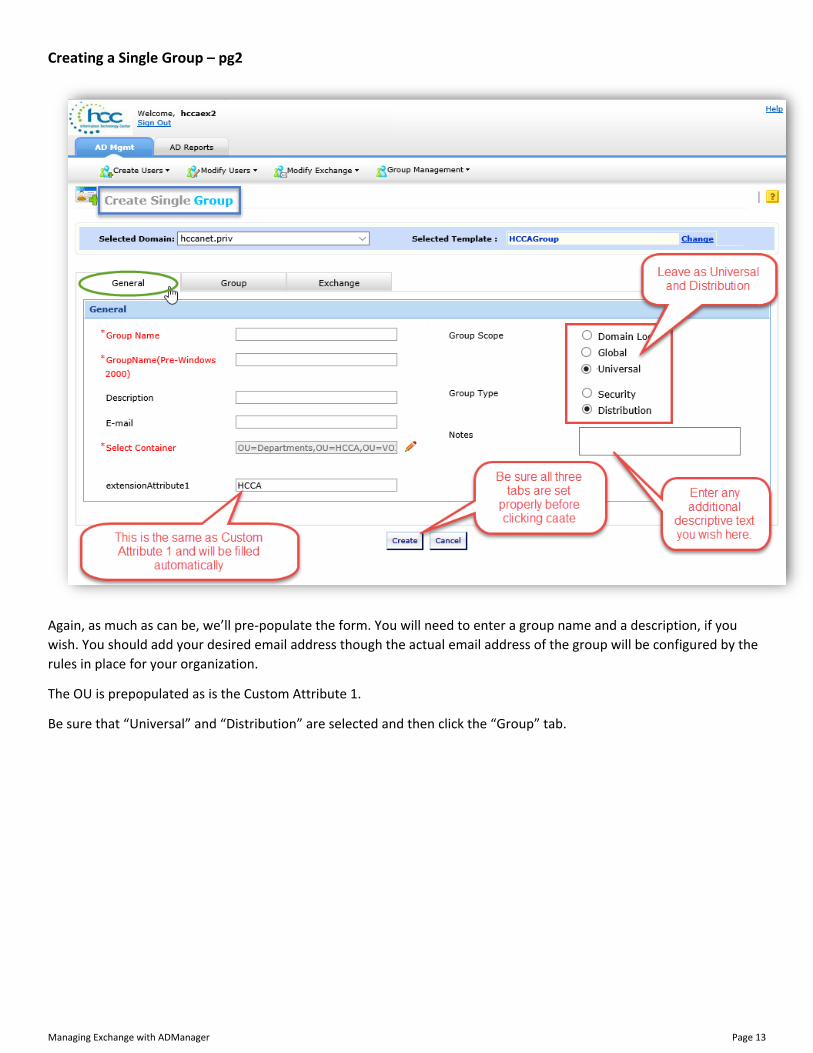
Creating a Single Group – pg2
Again, as much as can be, we’ll pre-populate the form. You will need to enter a group name and a description, if you
wish. You should add your desired email address though the actual email address of the group will be configured by the
rules in place for your organization.
The OU is prepopulated as is the Custom Attribute 1.
Be sure that “Universal” and “Distribution” are selected and then click the “Group” tab.

Managing Exchange with ADManager Page 14
Creating a Single Group – pg3
On the “Group” tab you can click the pencil icon to select existing users to be members of the new group. If you make a
mistake and add more accounts than you should, you can select the extra account and click the red X to delete it.
You can make this group a member of another group if you wish. For example, if this were a group consisting of
accounts and contacts for elementary aides, you may want to make this group a member of the elementary staff group.
This way the aides would receive email for the entire school without adding them individually to multiple distribution
lists.
If you want the membership of the list restricted, you can add a manager that would be required to handle all adds and
deletes from the group.
When all entries are complete, click the “Exchange” tab.

Managing Exchange with ADManager Page 15
Creating a Single Group – pg4
Usually this screen will not need much tweaking as the key values are auto-generated. However, you do have options to
restrict who can send email to the new distribution group. CAUTION: often when a groups seems to be failing, it will be
due to having the “Requires all senders are authenticated” box ticked. If non-Exchange users need to send to the group,
be sure this option is not checked.
By default, the box “Automatically update e-mail addresses based on e-mail policy”, is ticked and will create an email
address for the group in your domain. You can manually add “alias” addresses here by using the format
smtp:newaddress. You can change the default (uppercase SMTP) by unticking the “Automatically update e-mail
addresses based on e-mail policy” box and specifying the new in the format: SMTP:newaddress.

Managing Exchange with ADManager Page 16
Modify a Single Group – pg1
To modify an existing group, select “Group Management” from the left and then click “Modify Single Group” from the
center. This will open a list of existing distribution groups.

Managing Exchange with ADManager Page 17
Modify a Single Group – pg2
You can find the group you wish to modify by scrolling through the list or you can search for the group in the “Search
Group” box near the top of the screen. You can also filter the list by clicking on the letter of the alphabet that matches
the first letter of the group name.
When you find the correct group, click the words “Modify Group” in the yellow box.
In this case, I am modifying a group called “ATeam”.

Managing Exchange with ADManager Page 18
Modify a Single Group – pg3
From the “General” tab you can edit the name of the group or add a description and/or notes to the group. When done
click the “Group” tab.

Managing Exchange with ADManager Page 19
Modify a Single Group – pg4
From the “Group” tab you can modify the list membership, add the group to another list, or, add a manager for the list.
When finished, click the “Exchange” tab.

Managing Exchange with ADManager Page 20
Modify a Single Group – pg5
From the “Exchange” tab you can modify addresses or modify any delivery restrictions on the group.
If you are editing a group created in this tool, you may find that your new group did not inherit any email addresses from
your default policy. If this is the case, uncheck the box “Automatically update e-mail addresses based on e-mail policy”,
click “Update Group”, then edit again and re-enable to the option and click “Update Group” again. This should get all
appropriate addresses in place.
If you’ve made many changes to the group, you may want to preview your changes by clicking “Preview”.

Managing Exchange with ADManager Page 21
Modify a Single Group – pg6
Here, on the update summary page, we can see that my only change to the group is to add text to the note field. When
you are satisfied all is well with these changes, click “Update Group”.

Managing Exchange with ADManager Page 22
Create a Single Contact – pg1
To create a new contact, from the “home” screen, click “Contact Management” from the left, and then “Create Single
Contact” in the middle.
A contact is not a user account. A contact cannot be used to log in to anything. However, a contact can have an external
email address assigned to it so that the contact can be made a member of a distribution list. Additionally, the contact
will be added to the Address Book so that all users from your district can find and send an email to the contact from
within Outlook or Outlook Web Access.
Contacts are often used to facilitate communications with members of the board of education who may not have an
Exchange account or with vendors or outside technical staff.

Managing Exchange with ADManager Page 23
Create a Single Contact – pg2
Creating a contact is similar to creating a user account. You can add as much or as little info as you want to the contact
but you must click the “Exchange” tab to enter the external email address for the contact.
From the “Exchange” tab shown on the next page, in addition to the email address, you can add other controls:
Prevent the contact from showing in the address book
Control who can send email to the contact
List addresses that cannot send email to the contact
When you have all the info set as you desire, click the “Create” button to complete the process.

Managing Exchange with ADManager Page 24
Create a Single Contact – pg3

Managing Exchange with ADManager Page 25
Modify a Single Contact – pg1
You can also modify an existing or newly created contact by, from the home screen, clicking “Contact Management” on
the left and “Modify Single Contact” from the center.

Managing Exchange with ADManager Page 26
Modify a Single Contact – pg2
This presents a list of the contacts already created in your organization. You can search and filter here as you can
throughout the tool.
Click “Modify Contact” for the contact you wish to edit. Here I am editing the “Kelley Gmail” contact.

Managing Exchange with ADManager Page 27
Modify a Single Contact – pg3
You can modify any of the fields available and when finished, click “Update Contact” to write the changes to Active
Directory.”

Managing Exchange with ADManager Page 28
Reporting – pg1
One of the nicest things this tool brings to the table is the ability for you to generate some nice reports on the fly. Most
of the reports are similar in the way you interact with them.
Reports on users, passwords, groups, Exchange, contacts, and compliance are included. To demonstrate, I’ve clicked on
the “Inactive Users” report to find 82 inactive users. Most of these are special purpose accounts but I may be able to use
the report to week out unused accounts that represent a potential security concern if left active.
On the next page you will see an exploded view of the many options I have to tailor the report to my needs.
I can:
Choose which columns I want in my report
Choose the format I want to export the report
Select the length of time I want to include in the report
Perform a “Quick Search” to filter the report
Click an item in the report to edit
I encourage you to experiment with the reporting feature. You will probably be able to find several bits of useful
information.

Managing Exchange with ADManager Page 29
Reporting – pg2

Managing Exchange with ADManager Page 30
Advanced Bulk Modifications – pg1
Content coming soon…