Embed Size (px)
Citation preview
1
THE EFFICIENT SAW MILL
Instructions for Checking a Saw Mill
It is not at all uncommon for a man to buy a new saw or have his present saw hammered and to find that the saw will not run right. There are many cases where the new saw will not cut a straight line at all but will: A – lead into the log B – lead out of the log C – run hot on the rim D – run hot in the body E – flutter F – dodge knots or lead with the grain … or do any number of things a new saw is not supposed to do. It is our purpose to lay out a simple procedure for checking a mill to isolate the causes of these troubles and to tell how to remedy them. The reason an old saw will cut while a new one may not is that the old saw has over a period of time conditioned itself to one or more defects in the mill. As these mill conditions have become progressively worse, the saw has taken on a permanent dish or tension adjustment to compensate for these conditions. After properly adjusting the mill, the new saw, in most cases, will cut perfectly, while the old one will need hammering. IMPORTANT – Until the mill has been checked, you must assume that the new saw is correctly manufactured in all respects. If you do this, you will be right most of the time. It certainly is reasonable to assume that a new saw is more likely to be correct than a saw that has been used for months or even years.
2
The Care of the Mill. The successful operation of an Inserted Tooth Head Saw depends on the condition of the mill. No matter how good a saw you have, best results cannot be secured unless the mill is solid and level. It is for this reason that the first part of this booklet deals with the care of the mill. It is highly important in setting up a mill that the foundation should be solid enough to support the mill without sagging or shifting from its original position. The Husk Frame. The husk frame carries the mandrel, pulleys and the head saw and therefore should be bolted firmly to the mud sills or bed timbers which should be set in the ground about half their thickness. They should be about 6” x 8”. In some cases it is advisable to brace the back of the husk frame to offset the pull of the belt. The Mandrel. The husk frame and mandrel should be absolutely level. The mandrel should run steady and true, with as little play as possible. Do not run a hot box or bearing. If it is sprung or the pulley or balance wheel is not true, it will shake and run out of true, and in this condition the saw will not run right, especially at a high speed. The saw should fit the mandrel, but should not be forced on, as this will cup or dish the saw so that it will not run right. Lug Pins. The lug pins must have a good bearing and must not be grooved or worn. Lug pins are inexpensive so they should be changed often. Be sure the saw is pulled back against them when the collar is tightened. This will prevent shearing them off. Be careful that there is no burr on the pins. Use a wrench to tighten the nut on the mandrel. The use of a hammer is not recommended. Collars. The saw collar basically holds the saw on the mandrel, but more importantly is also gives support to the saw blade. Most eastern mills now use 6” collars while most West Coast mills use 8” collars. The larger the collars are, the better the saw will be supported and the better the saw will run.

3
Some mills are furnished with flat collars and some with one collar flat and the other slightly concave. We recommend machining both collars with a slight concave (.002 or .003” from the periphery, or outer edge of the collar, to the edge of the recess). See Fig. 1.
When the collars are placed against the saw blade they should have their heaviest bearing on the outside edge. See Fig. 2.

4
When the nut is tightened the collars will very likely spring enough so that the clearance shown in Figs. 1 and 2 will disappear. Collar trouble is the most common of all mill troubles. A quick method of checking collars is as follows: (1) Keeping the saw in a stationary position, loosen the guide pins; (2) Loosen the nut on the arbor; (3) Tighten the nut by hand so that the loose collar is snug against the saw; (4) Re-set the guide pins so that there is approximately 1/16” clearance on each side; (5) Tighten the nut with a wrench in the usual manner, being careful not to turn the saw; (6) Check the clearance between the guide pins and the saw. If the saw is closer to one pin than the other, the saw has become dished, due to a faulty collar, which should be repaired or replaced. When refacing collars, always recommend that the cutting tool be started at the recess and worked toward the periphery. If this is done, any cutter wear experienced will result in additional concavity. On the other hand, if the cutter is started from the outside and the cutter dulls .003” or .004”, it will result in the collar being flat or even convex. It is possible to rectify collar trouble temporarily by using paper washers. When you have determined which collar is bad, cut a paper washer about half the width of the collar lip from a medium weight sheet of paper. A manila envelope is usually about right. The outside diameter of the paper washer should be the same as the outside diameter of the collar. Attach the paper washer to the collar with cup grease. See Fig.3. If the saw is being dished toward the husk, the paper washer should be attached to the fast collar. If the saw is being dished toward the log, the paper washer should be attached to the loose collar. On badly worn collars it is often necessary to use paper washers on both the fast and loose collars in order to get the saw to stand up between the guides. Plumb the Saw. In order to cut good lumber, the carriage head blocks should be level and the saw plumb. If the carriage is level and the saw is not plumb, the last board will be wedge-shaped from edge to edge. Some sawyers try to correct this by holding

5
the saw with the guide. This is not a good practice as any undue guide pressure will, of course, heat the rim of the saw causing the saw to weave or snake in the cut.
If the saw is out of plumb and leans toward the carriage, the saw will tend to lead into the log. If, on the other hand, the saw leans toward the husk, the saw will tend to lead out of the cut. See Fig. 4. A simple way to check this is to drop a plumb line and plumb bob along the face of the saw, missing the collar, hooking the line over the top of the saw at a shoulder. The line should not touch a shank, tooth or the collar. See Fig. 5. The saw can be plumbed by adjusting the mandrel boxes with wedges to level the mandrel or by leveling the entire husk. Regardless of which method is used, the saw should be checked with a plumb line and not with a level. Lead. Improper lead is the cause of a great deal of saw trouble. To overcome the tendency of the saw to run out of the log in slabbing and to give clearance to the back of the saw on the gig back (carriage return), the mandrel should be adjusted slightly so that the saw will lead into the log.

6
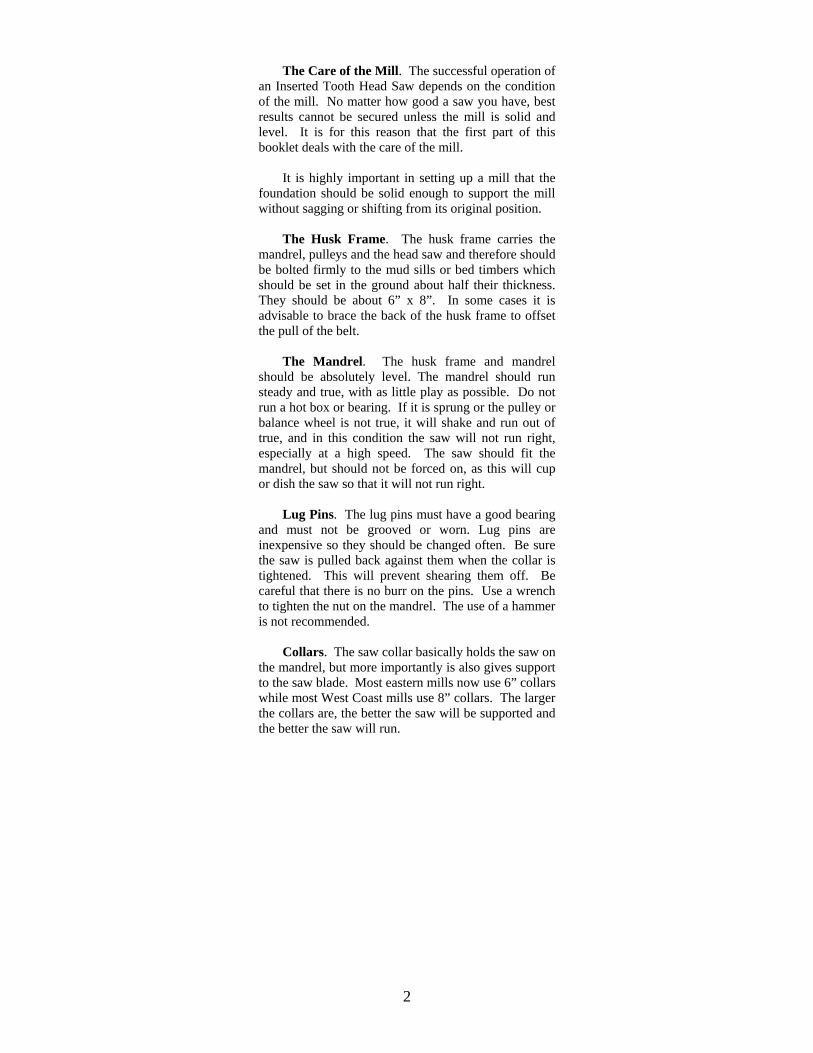
Incorrect lead is one of the main causes of trouble in the small saw mill. Many times a saw will heat and dodge in the cut or generally behave like one in need of hammering because of improper lead. A simple method of checking the lead is as follows: Mark a tooth and measure the distance between this tooth and the end of the head block of the carriage. Move the carriage ahead and rotate the saw until the marked tooth is in exactly the same relative position to the end of the same block. Now, measure again. About 1/32” is the correct amount of lead (in a 48” saw) for most mills. (See Fig. 6) Adjust the lead by moving the saw end of the mandrel slightly to the left or right. This is called “sluing the mandrel.” Never attempt to change the lead by adjusting the guide pins. If too much lead is put into the saw, the boards will rub on the blade before the spreader wheel is engaged. This may heat the rim of the saw, causing it
7
to dodge, even when sawing small cants. This condition can sometimes be detected by a shiny rim on the saw. Too little lead will create heat in the body of the blade and cause the blade to lead in or out. This condition can sometimes be detected by a shiny body to the saw. When changing the lead, it is extremely important to loosen all of the mandrel boxes in order to prevent generation of heat by a distorted mandrel.

8
The Guide. The guide should be set as high as possible and still clear the ends of the headblocks. It is a mistake to lower the guide to clear knots because even then a great many would not be cleared anyway. Every inch that a guide is raised may allow the saw to cut as much as 10% more lumber. Use a guide that has pins which will not clog with splinters or bark and thus heat the saw. The pins should clear the bottom of the shanks by approximately 1/4”. A long straight-edge along the face of the fast collar should line up exactly with the board pin and there should be absolutely no loose or end motion. The guide should never be used to lead the saw, but is used merely to steady the saw (the reason for having it as high as possible). However, the board guide is usually moved in a trifle as the saw begins to dull. It is moved back after the teeth have been sharpened. Do not attempt to hold a saw out of the log with the guide. It will do better work held in a trifle by the board guide. Adjust the guide while the saw is in motion. Spread Wheel. The spread wheel should be about 1-inch behind the teeth, set so that it is flush with the log side of the saw. It should be bolted securely to the husk frame. Speed. It is very important that a saw is not run too fast for the amount of power available. Run a speed which you can come close to maintaining in the cut. A saw is hammered for the speed at which it does its work – the speed in the cut. Use as large a pulley as possible on the mandrel. This will give the greatest leverage on the saw. There should not be a difference of more than 100 R.P.M. between the speed in the cut and out of the cut. A speed indicator on the saw mandrel is the best method of measuring the R.P.M. of the saw. If you do not have a speed indicator, multiply the engine R.P.M. by the diameter in inches of the drive pulley and divide that by the diameter in inches of the pulley on the mandrel. Be sure to advise whether mandrel runs warm or cool in ordering a new saw or having a saw hammered.

9
Track. On most mills one of the tracks is flat while the other is shaped to fit a groove in the carriage wheels. The shaped track is called the guide rail. Some mills may have two guide rails. The guide rail must be straight. If it is bowed, the carriage will travel in an arc instead of a straight line. See Fig. 7. On a mill with a bowed rail, an old saw that has become dished will cut after a fashion, but a new saw will not operate at all. Checking for a bow can be done quickly by stretching a line alongside the guide rail. It is advisable wherever possible to stretch the line approximately 1/4” from the guide rail near the top. Then measure the distance from the line to the rail at different points on the track. The line stretched tightly will also show if the track has any hump on it which will cause the carriage to raise and lower while traveling past the saw. The guide rail must be straight.

10
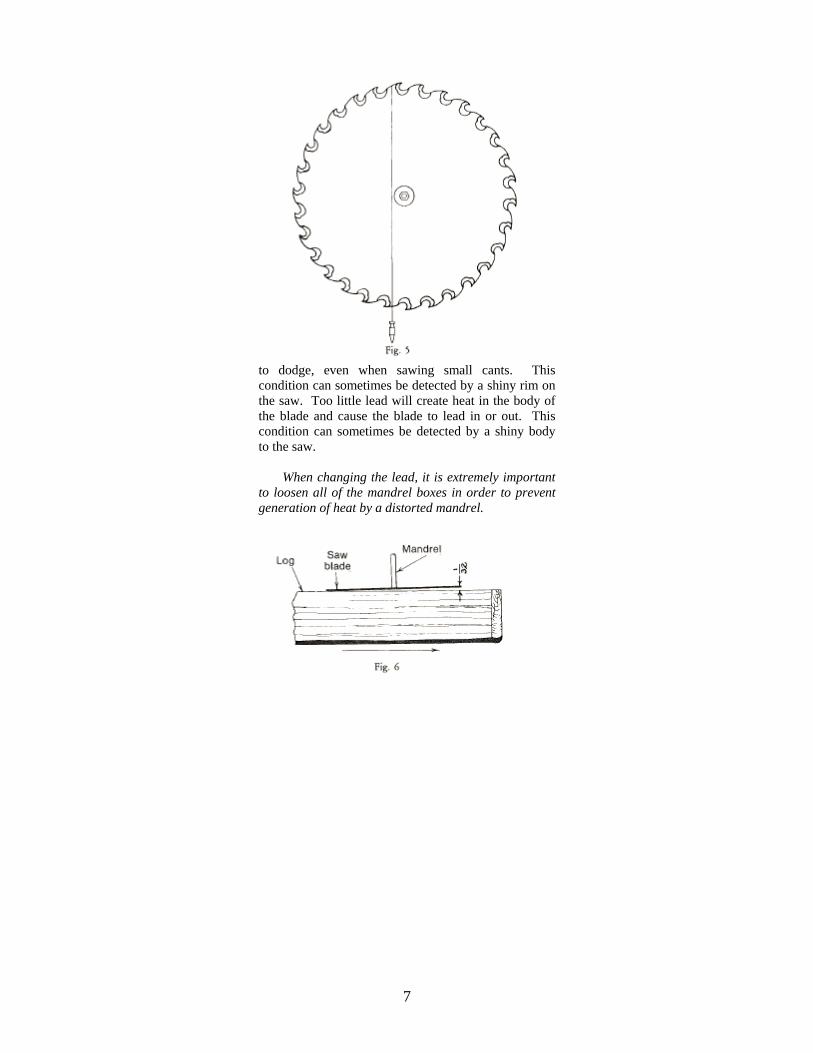
Even though a track may be perfectly straight and level when checked with a line, it is wise to recheck the track and foundations under load. It is not at all uncommon for a mill to be able to do a good job cutting small or medium sized logs but have difficulty with the saw heating and laying over when cutting large logs. This is usually caused by a weak spot in the foundation which will not support the weight of a heavier log. A sure way to check this is to put a large log on the carriage, place a spirit level on the carriage and then move the carriage down the track. If there is a sag or weak spot in the foundation, the level will show it very readily. Unless this condition is rectified, it will surely be a constant source of trouble. Carriage Trucks. Be sure there is no end play in the carriage trucks. It is inconsistent to have the tracks perfectly straight and level and then to have side slap in the carriage trucks which allows the carriage to move in and out, to and from the saw. This will give the same results as a crooked carriage track. Hand. Hand is determined by the side of the saw on which the log passes. If standing in front of the saw ( with the saw revolving toward you ) the log passes to the right of the saw, it is a right hand saw; if to the left it is a left hand saw.
11
12
SELECTING THE RIGHT SAW FOR YOUR MILL
This is very important in getting the most out of your mill and your power. A saw with an insufficient number of teeth is wasteful on a mill with good power because it is unable to take full advantage of this power. On the other hand, light power is overburdened by a saw with too many teeth. A fast feed, backed up by ample power, requires a fine-toothed saw, especially in small logs where large gullet capacity is not required. A fast feed requires enough teeth to do the cutting. A slow feed does not require as many teeth. Too many teeth, at a slow feed, do not get a large enough “bite” and cut too fine dust. Extra teeth in the cut simply consume more power. The speed should not be much higher than can be maintained in the cut. The following chart is designed to give you an approximate idea as to the number of teeth in the saw best adapted to varying amounts of power. If the chart does not seem to fit your particular case, we are always glad to send you our recommendation upon receipt of your power and speed. In ordering, be sure to specify your speed in and out of the cut. When the feed in inches per revolution is known, it is also a good method for selecting a saw. There are cases where sawmill operators are using 100 horsepower and yet have a very slow feed on the carriage, the saw being fed not more than 3” or 4” per revolution. If the power only were given in cases of this kind it would be deceptive. A standard rule that holds true in most cases is as follows: About 8 teeth for every inch of feed in soft wood. About 10 teeth for every inch of feed in a hard or frozen wood. Bits for both 8 gauge saws and 9 gauge saws are furnished with either 17/64” or 9/32” kerf so there is no savings in kerf by running a 9 gauge saw.

13

14
We do not recommend thin saws. A 7-8 gauge saw is naturally able to stand more crowding and abuse, as well as being a longer wearing saw, than an 8-9 gauge. A 7-8 gauge saw should be used in frozen timber and on mills where the power is over 60 h.p. Diesel or 40 h.p. Electric. West Coast mills, cutting large logs on heavy equipment naturally need heavier and stronger saws than those used in the East. The lightest saw normally used in cutting West Coast timber is 7 gauge on the rim using bits with 11/32” kerf. Many mills use saws 5 gauge on the rim with 13/32” kerf.
THE CARE OF THE SAW Inserting New Bits. Before inserting new bits the vee in the plate and shanks should be wiped perfectly clean and well oiled. After dipping the bit in oil, hold it in the left hand in position with the shank, keeping it even with the sides of the shank. Be careful that the bit and shank are in line. This will make better, smoother lumber and make the saw run better. After pulling
15
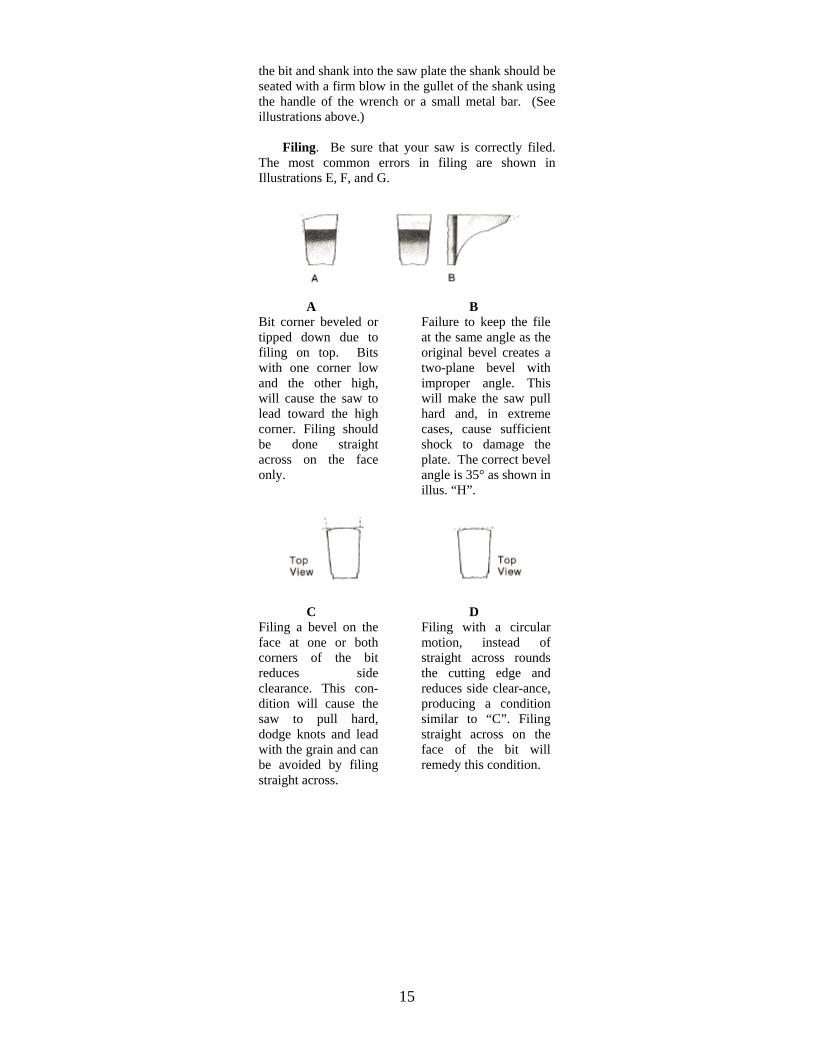
the bit and shank into the saw plate the shank should be seated with a firm blow in the gullet of the shank using the handle of the wrench or a small metal bar. (See illustrations above.) Filing. Be sure that your saw is correctly filed. The most common errors in filing are shown in Illustrations E, F, and G.
A Bit corner beveled or tipped down due to filing on top. Bits with one corner low and the other high, will cause the saw to lead toward the high corner. Filing should be done straight across on the face only.
B Failure to keep the file at the same angle as the original bevel creates a two-plane bevel with improper angle. This will make the saw pull hard and, in extreme cases, cause sufficient shock to damage the plate. The correct bevel angle is 35° as shown in illus. “H”.
C Filing a bevel on the face at one or both corners of the bit reduces side clearance. This con- dition will cause the saw to pull hard, dodge knots and lead with the grain and can be avoided by filing straight across.
D Filing with a circular motion, instead of straight across rounds the cutting edge and reduces side clear-ance, producing a condition similar to “C”. Filing straight across on the face of the bit will remedy this condition.
16
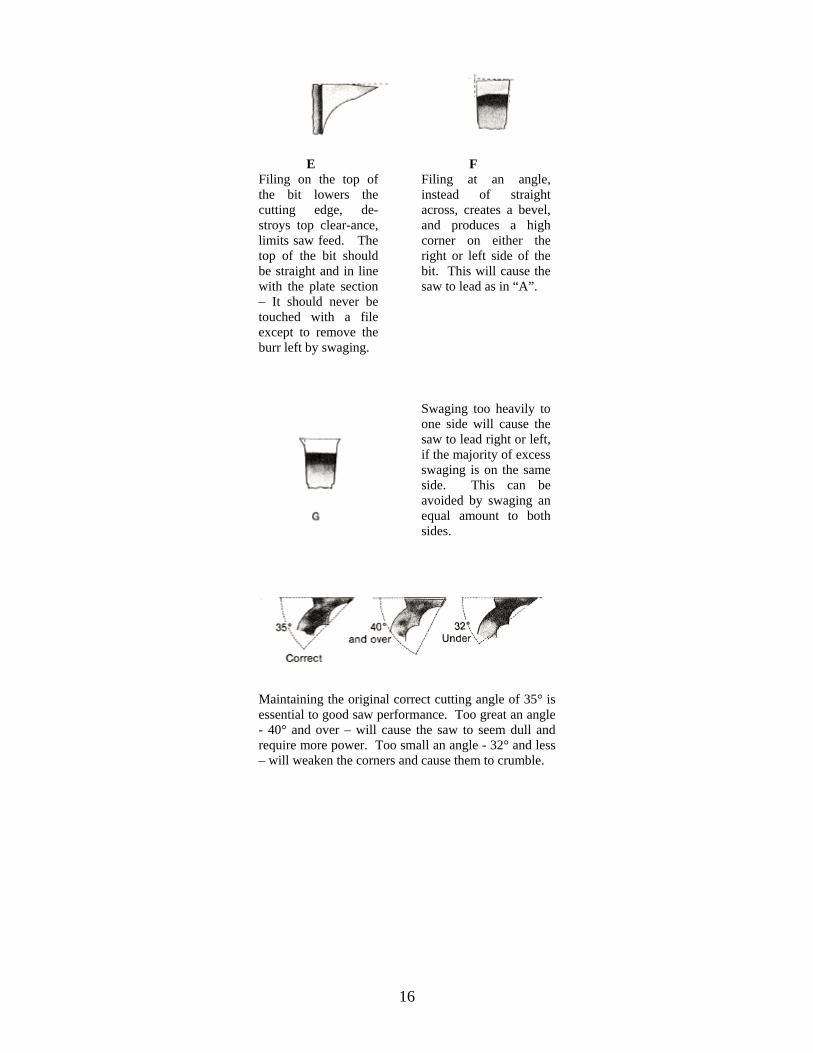
E Filing on the top of the bit lowers the cutting edge, de-stroys top clear-ance, limits saw feed. The top of the bit should be straight and in line with the plate section – It should never be touched with a file except to remove the burr left by swaging.
F Filing at an angle, instead of straight across, creates a bevel, and produces a high corner on either the right or left side of the bit. This will cause the saw to lead as in “A”.
Swaging too heavily to one side will cause the saw to lead right or left, if the majority of excess swaging is on the same side. This can be avoided by swaging an equal amount to both sides.
Maintaining the original correct cutting angle of 35° is essential to good saw performance. Too great an angle - 40° and over – will cause the saw to seem dull and require more power. Too small an angle - 32° and less – will weaken the corners and cause them to crumble.
17
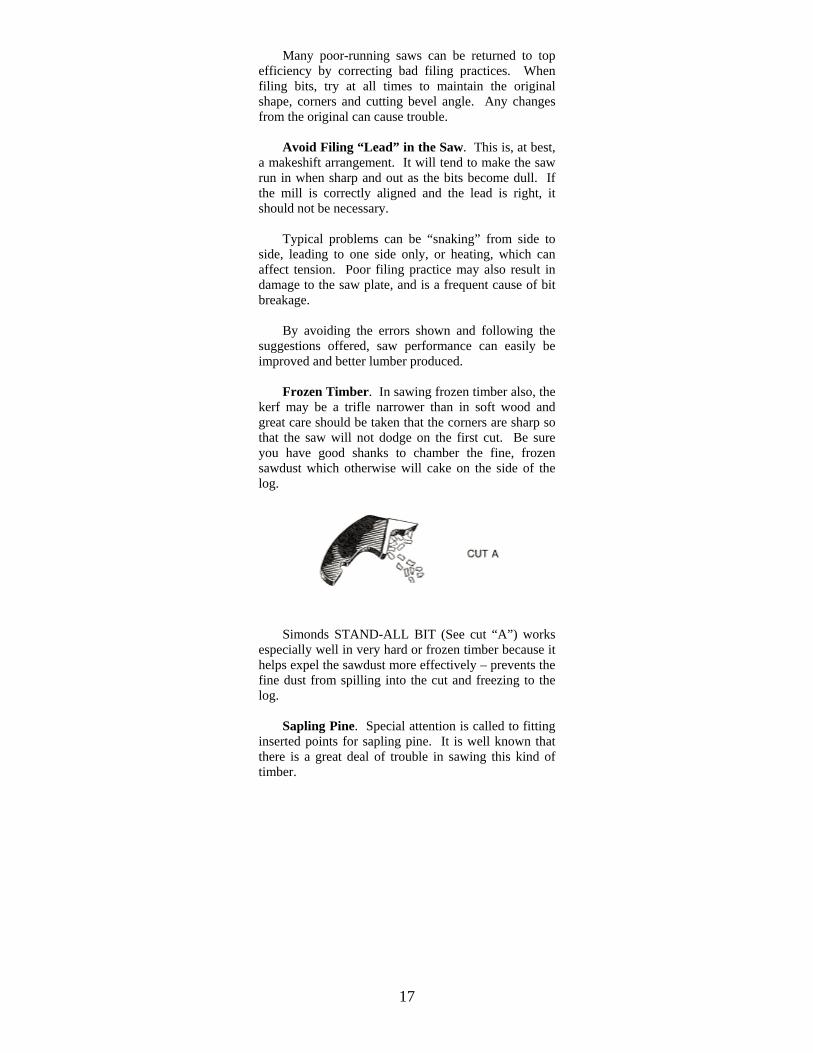
Many poor-running saws can be returned to top efficiency by correcting bad filing practices. When filing bits, try at all times to maintain the original shape, corners and cutting bevel angle. Any changes from the original can cause trouble. Avoid Filing “Lead” in the Saw. This is, at best, a makeshift arrangement. It will tend to make the saw run in when sharp and out as the bits become dull. If the mill is correctly aligned and the lead is right, it should not be necessary. Typical problems can be “snaking” from side to side, leading to one side only, or heating, which can affect tension. Poor filing practice may also result in damage to the saw plate, and is a frequent cause of bit breakage. By avoiding the errors shown and following the suggestions offered, saw performance can easily be improved and better lumber produced. Frozen Timber. In sawing frozen timber also, the kerf may be a trifle narrower than in soft wood and great care should be taken that the corners are sharp so that the saw will not dodge on the first cut. Be sure you have good shanks to chamber the fine, frozen sawdust which otherwise will cake on the side of the log.
Simonds STAND-ALL BIT (See cut “A”) works especially well in very hard or frozen timber because it helps expel the sawdust more effectively – prevents the fine dust from spilling into the cut and freezing to the log. Sapling Pine. Special attention is called to fitting inserted points for sapling pine. It is well known that there is a great deal of trouble in sawing this kind of timber.
18
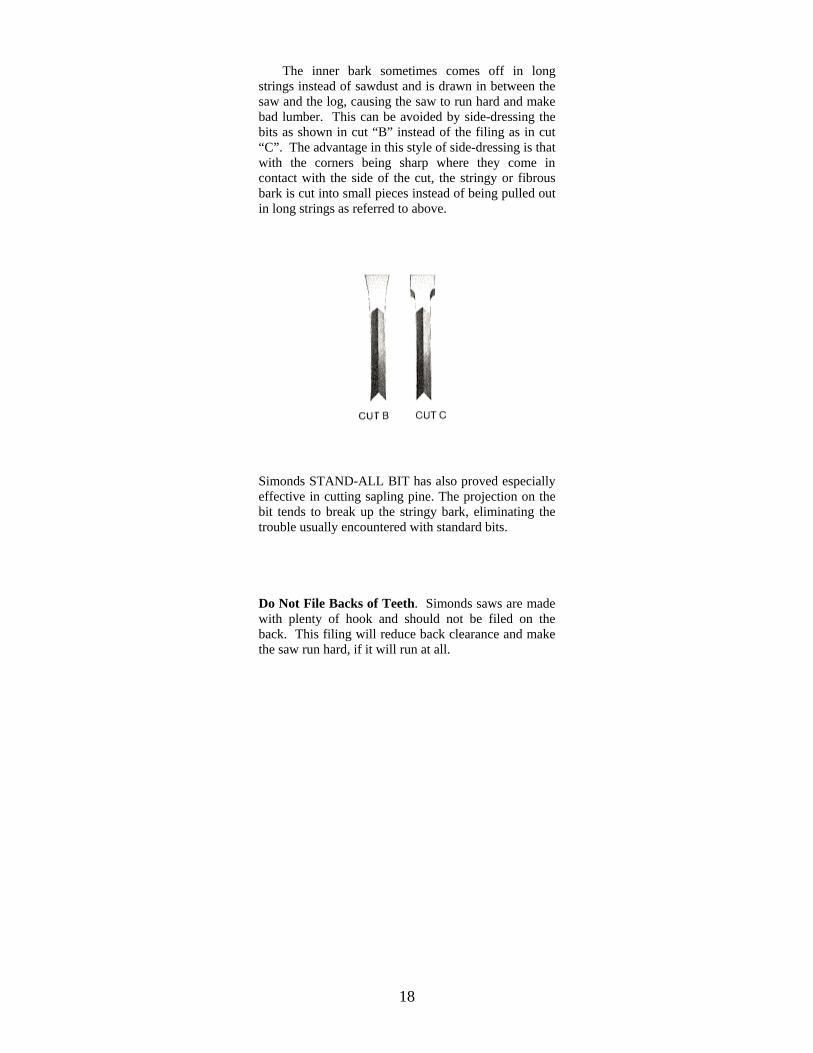
The inner bark sometimes comes off in long strings instead of sawdust and is drawn in between the saw and the log, causing the saw to run hard and make bad lumber. This can be avoided by side-dressing the bits as shown in cut “B” instead of the filing as in cut “C”. The advantage in this style of side-dressing is that with the corners being sharp where they come in contact with the side of the cut, the stringy or fibrous bark is cut into small pieces instead of being pulled out in long strings as referred to above.
Simonds STAND-ALL BIT has also proved especially effective in cutting sapling pine. The projection on the bit tends to break up the stringy bark, eliminating the trouble usually encountered with standard bits. Do Not File Backs of Teeth. Simonds saws are made with plenty of hook and should not be filed on the back. This filing will reduce back clearance and make the saw run hard, if it will run at all.

19
Swaging Bits. Bits can be swaged in the plate. Use a two-round edge Simonds Mill File and file thin on the face as in cut “D”. Do not swage the center, but only each corner (cut “E”). Then level the tooth with the straight throat of the swage. (See cut “F”.) Be sure to hold the upset so that the back of the tooth remains straight. Do not attempt to swage a thick tooth. It will loosen the shanks and ruin the saw.
Dominator® Carbide Tipped Saw Bits. Many a sawyer has found he can get good economy with the latest development in bits, the carbide tipped saw bit. Simonds’ Dominator® brand carbide tip bit combines the toughness of a forged steel bit body with the edge holding ability of carbide. Dominator® bits can be very economical in many applications. The most success has been seen in cutting hardwoods. Carbide tipped bits can hold a sharp edge as much as 5 to 1 versus steel bits. Relatively clean logs which have been debarked are also good candidates for carbide tipped bits. Dominator® carbide bits are not advised for logs with much sand or grit on the surface as the carbide can chip and require extensive sharpening or disposal. One advantage to Dominator® carbide tipped bits is they do not require swaging to maintain side clearance. The wrap around design of the Dominator® provides optimal clearance without swaging or side grinding. Dominator® carbide tipped bits must be sharpened with a diamond file or diamond wheel.
20
Check Your Shanks
Shanks have two important jobs to do: (1) hold the saw bits in place and (2) chamber and hold the sawdust until each tooth leaves the cut. When shanks become worn, they permit bits to “work” or vibrate and allow sawdust to slip into the cut generating excessive heat. Shanks worn thin seriously affect tension by allowing the saw rim to contract. Many common saw troubles can be traced to worn out shanks. Hammering or tensioning may be necessary on occasion, but is not a cure-all for poor saw performance. Too frequent hammering seriously shortens the life of the saw plate and can usually be avoided by simply changing the shanks…a fact that too many mill men fail to realize. A generally accepted practice is to replace worn shanks with new ones in every other gullet, and some time later insert new shanks in the remaining gullets. This will not affect tension and the saw will run better and cut better quality lumber. It is not always necessary to replace shanks if they still have enough swage as well as sufficient body and spring not to affect saw tension. Be sure, however, that the throat edges are kept square. Three illustrations of worn shanks follow with a brief explanation of their effect on saw performance. By recognizing these conditions and following the suggestions here offered, saw performance can be greatly improved and many common troubles eliminated. Keep Shanks Tight. This is very important. Sawdust wear and the constant changing of teeth will “set” or “crimp” the shanks. They should be kept as tight as when new. This can be determined by the feel of the wrench when bits are changed. Peen the loose shanks with a sharp hammer on the inside edge of the gullet. (See cut “G”.) This will retain the tension in your saw the same as when new and perhaps save you a hammering job.
21
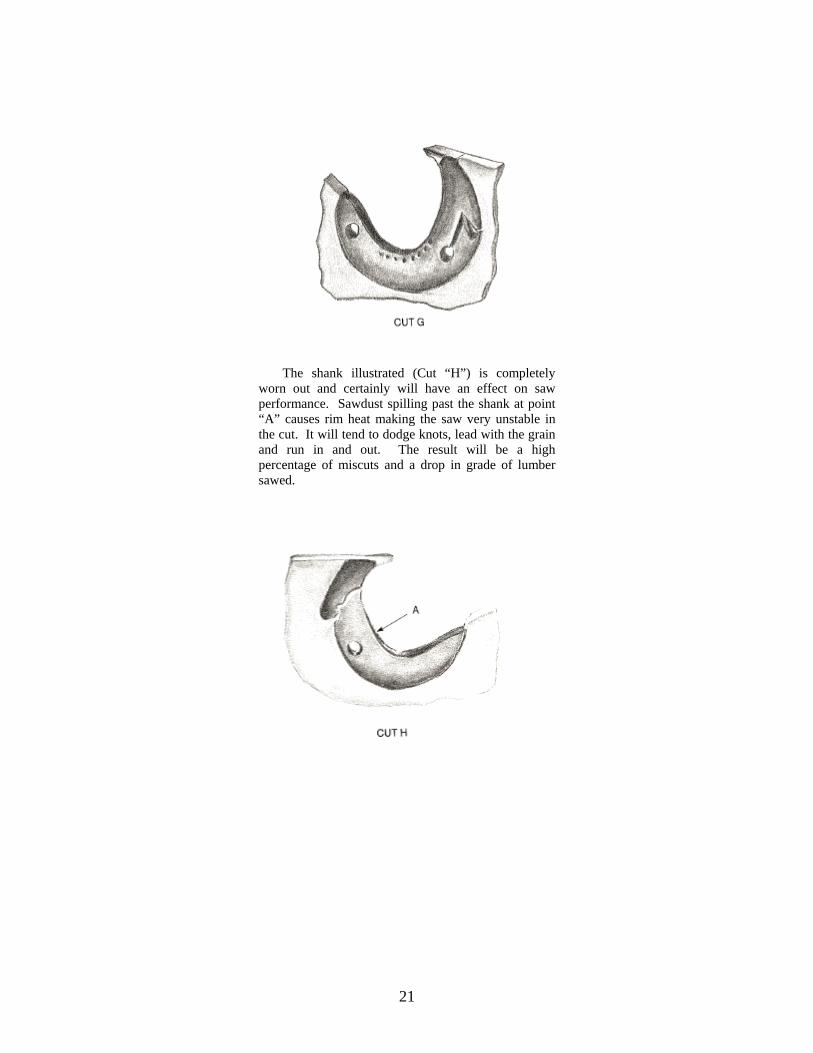
The shank illustrated (Cut “H”) is completely worn out and certainly will have an effect on saw performance. Sawdust spilling past the shank at point “A” causes rim heat making the saw very unstable in the cut. It will tend to dodge knots, lead with the grain and run in and out. The result will be a high percentage of miscuts and a drop in grade of lumber sawed.

22
The shoulder driven back by wear or accident does not support the bit at the top ( see cut “I” ). The fulcrum developed at point “A” allows the bit to pivot and vibration either breaks the shank at point “B” or the bit. This condition can be readily detected by checking the heel of the bit for a shiny spot. A shiny section at the base of the shank (see cut “J”) indicates guide is rubbing on shank and may cause case hardening. Resulting brittleness is often the reason for shank breakage at point “A” and danger that bits and shanks may be thrown from the saw. Remove a few shanks from around the full rim and check the hardness with a file. If too hard to file, discard at once, replace with new shanks and re-position guide.
23
Speed – Feed - Power What is an efficient saw operation? How fast should an inserted tooth saw be fed? What determines the proper number of teeth in an inserted tooth saw? What is the most efficient speed to run an inserted tooth wood saw? These questions have been asked many times and it is impossible to answer one without becoming involved in the others. The key to the entire matter is the thickness of the chip each tooth removes. Many operators express the efficiency of their saw mill operation by stating their production in board feet per hour – others by their carriage travel in feet per minute. Both of these ratings are inadequate, however, because they do not take into consideration either the cost or efficiency of actual saw operation. As the saw is the focal point in the entire saw mill, the manner in which it is run usually determines whether the mill will be a profitable venture or just another “woodpecker” operation. There are several factors which have a bearing on the costs of operating an inserted tooth saw. These include the following:
1. Saw tooth life – between sharpenings and in total board feet cut.
2. Efficient use of available power. 3. Saw maintenance costs and saw mill upkeep. 4. Percentage of miscuts.
These factors like the original questions listed, are all closely related. The life of the saw teeth between sharpenings is governed by the number of times they contact the wood. Lumber production from a set of teeth is determined by the number of times they pass through the cut and also the thickness of the chips each tooth removes.

24
We know that a tooth dulls just as rapidly cutting a thin chip as it does a thick one. Therefore, the thicker the chip removed, the greater the production between filings and the greater the production of lumber per set of teeth. In other words, if it were possible to double the chip load per tooth it would be possible to reduce tooth replacement costs by 50%. It has been determined through innumerable tests that the most efficient size chip per tooth is between 1/10” x 1/8” in thickness. The softer woods can be fed at the higher 1/8” rate and hard or frozen woods should be fed at approximately the 1/10” rate. The principles of cutting apply regardless of the size of the mill or the particular species of wood cut, i.e., the 1/8” chip applies whether the timber being cut is White Pine in Vermont or Redwood in California. Regardless of the type of wood being cut, it is advisable to have each tooth cut the thickest chip possible up to 1/8”, consistent, of course, with the quality of finish desired. It is the natural texture of wood and the established tooth shape being presented to the wood that has resulted in the 1/10” to 1/8” chip as being the most efficient. It is understandable then that whether a saw has 10 teeth or 50 teeth, each tooth should remove the correct size chip for the saw to operate efficiently. Hence, the greater the number of teeth, the farther the carriage must travel per revolution of the saw and the more power required. The amount of power being transmitted to the saw determines the number of teeth in the saw and also the rate of carriage travel. The amount of power being transmitted to the saw can be judged by the maximum rate at which the saw can be fed through the wood, with the saw speed remaining constant. The feed must be measured on a board of average size (usually 8” to 10” depending on the size of the Mill). Measure between the scratch lines at a point approximately 6 feet from the end of a board. If a 40 tooth saw is being run, the carriage travel would be at least 4” per revolution; a 50 tooth saw, at least 5”; etc.
25
In a great many cases sawmill operators cannot feed their saws heavily enough because they are not utilizing their power efficiently. The trend over the past several years has been toward faster and faster mandrel speeds without increasing the carriage travel proportionately. Tests have proven that there is approximately a 20% loss in horse power when mandrel speeds are increased from 400 to 700 R.P.M. A 25% increase in power can be realized by decreasing the mandrel speed from 700 to 400 R.P.M. Obviously then, it is poor economy to attempt to increase production by increasing mandrel speeds unless the power unit is of ample capacity to efficiently handle the increased feed and also absorb the normal heavier demand placed upon it by the increased speed. Where mandrel speeds are high (over 600 R.P.M.) and feed rates are below those specified (1/10” per tooth), more efficient operating conditions can be achieved by decreasing the mandrel speed and using the gain in power to increase the feed. This should always be done by changing pulley sizes and never by changing the speed of the power unit. Increased speeds usually mean increased operating costs. High speeds generally result in shorter belt life and more friction and heat in all moving parts. Tension in the saw also becomes more and more critical as speeds advance. Therefore, saws operating at high speeds usually require more frequent hammering than those operating at low or moderate speeds. High mandrel speeds and slow feeds result in the chip per tooth being less than 1/10”. The finer the saw dust being cut the greater the chance it will spill past the shank causing excess rim heat on the saw. This is probably the cause of more miscuts than any other condition other than poor or improperly aligned saw mill equipment. The secret of success in a mill is this – don’t cut saw dust – cut chips!

26


![STONE - Janssen-Steintechnik€¦ · Equipamentos para Rochas Ornamentais [5] StoneJET® MILL COMBINED CNC MACHINE WITH SAW, MILL AND WATERJET WITH …](https://img.dokumen.tips/doc/110x75/5b156a357f8b9a8b288bff1d/stone-janssen-equipamentos-para-rochas-ornamentais-5-stonejet-mill-combined.jpg)


