Embed Size (px)
Citation preview

the
Composter
December,
2018
Volume 67, No. 4
In this Issue: (Click on title below to scroll to item) Gardening Tips, Late December thru Mid-January December Meeting Potluck Q and A Lasagna Composting, by Rich Johnson Keeping Herbs, by Morgan Goldberg
Gardening Information mid- November through mid-December
Our TOG planting guide does not recommend you plant vegetables in December as the soil is too cool. The seeds of some native wildflowers, most notably
TOG BOARD
2016-2017 Mohyeddin (Mohye) AbdulazizPresident Vacant position Vice President Secretary Vacant position Mary Jane Schumacher Treasurer Melody Peters Editor

penstemon, can be planted at this time. If you are planting wildflower seed other than the easy-to-grow mixes (which you generally sow from mid-October through Mid-November), follow directions provided by the seed distributor or look up that information online. Many native wildflowers have specific cold-stratification needs and will not germinate in less than ideal conditions. Mid-December is an ideal time to start tomato seeds indoors. If you intend to grow your own tomato starts and haven't already bought tomato seeds, do so it now! Our December 19 TOG talk will focus on growing tomatoes in Tucson. For next few months prepare to cover any frost tender plants you would be sorry to lose. Frost tender varieties include, but are not limited to: basil, lettuce, milkweeds, nasturtium, all nightshade vegetables (eggplant, peppers, and tomatoes) and stevia. Be sure to observe whether temperatures in your neighborhood tend to run cooler or warmer than the official Tucson temperature so you know how to interpret frost warnings. Unless very cold temperatures are forecast, you do not have to cover brassicas or even well-established citrus, Local gardeners differ in opinion about whether it is worthwhile trying to keep tomatoes, eggplants and peppers going. Cherished pepper plants can be dug up and kept in five gallon buckets in a warm spot to overwinter, or even overwintered in the ground with the aid of mulch and frost blankets. But since you lose the disease killing benefits of frost by keeping pathogenic microbes and insect pests alive along with your plants, you might not be better off in the long run. And if your plants aren't producing ripe fruit, at some point you might as well clear out space for spring planting. January is not only the start of a new year, but also a time when you can resume vegetable planting. Artichoke plants will be available in nurseries and ready for planting as will dahlia, bearded iris and gladiolas. Start planning space for those varieties and refer the TOG planting guide to see the range of cool season vegetables you can plant between January 1 and February 15:
Morgan Goldberg Membership Barbara Ho Volunteer Coordinator Vacant posiiton Education and Outreach Brandon Merchant Events Coordinator Beth McCullough Member at Large Board Meetings are open to all members and are held the first Tuesday of the month. Our next Board meeting is on January 2, 2018 at 5:30 pm. Please contact Mohye through our Facebook page for venue if you would like to attend
TOG SHOP
Frost cloth -12' wide
$1 per foot Home
Composting DVDs $5
20 years of TheComposter
Archived on CD -
available for a donation to
TOG
Spin diggers $6
Compost
cranks $40 (Heavy-
duty tool to mix
compost)
CompostBioBin $40
http://www.tucsonorganicgardeners.org/wp-content/uploads/2016/05/TOG_Planting_Guide.pdf
Don't forget TOG sells good quality frost cloth at a good price. Come to our December meeting if you would like
to buy some!
Planting Guides $7
(laminated)
Shop by appointment
or at
the monthly meetings.
Tucson Organic Gardeners Meeting
Tuesday, December 19
St. Mark's Church, 3802 E. 3rd Street
(1 block west of Alvernon Way, 2 blocks south of Speedway)
TOG Meetings are free and open to the public.
Meeting Schedule 6:45 pm -- Doors open 7:00 to 7:30 pm --TOG announcements and gardening question and answer session 7:30 pm -- Panel presentation and audience exchange of garden tips for "Pursuing the Perfect Tomato."
TOG Board members,Barbara Ho, Beth McCullough and Melody
Peters, will be leading a gardening community discussion we are
calling "Pursuing the Perfect Tomato."
We are also inviting you to send photos of your most beautiful plants, biggest harvest, unusual varieties, companion plants or anything that illustrates some of your own tomato growing methods.
We would particularly like to hear which varieties you recommend for Tucson's climate. If you would like your tips and photos to be included in the presentation please email them by December 17 to [email protected]
Panel of Experts Answer Gardeners' Questions at TOG's November Potluck
Our November 21 Potluck was well attended and the food spectacular, while the floral arrangements on each table, crafted by Joy Holdread, added to the festive spirit. During dessert a panel of gardening experts, Tom Pew, Robin Roche and Lorien Tersey fielded questions. Here are a few of the questions and answers. Q. What is causing leaf damage that includes pale spots accompanied by some fine insect web? A. This sounds like Red Spider Mite. Spray with soapy water or diluted neem oil. (Spider mites are actually resistant to chemical sprays.) To make your own soap spray add one tablespoon of Safer soap concentrate to a quart of water. A common cheaper option is to use dish washing detergent, however, some say that is too harsh for your plants and recommend using liquid castile soap. You can find many DYI recipes online such as this one: http://www.care2.com/greenliving/homemade-insecticidal-soap.html
Q. How to deal with an invasion of grasshoppers and/or crickets? A. Try using fungal spores of Nosema locustae, available in OMRI listed products like Nolo Bait or Semaspore. Apply spores as soon as grasshoppers or crickets appear. The spores lodge in the insects' guts and they become lethargic and stop feeding. Grasshoppers that cannibalize infected grasshoppers will also die. Freezing weather will kill grasshoppers and crickets.

Q. Is there anything to be gained by adding inoculant for legumes when brewing compost tea? A. No, the bacteria in root inoculants need contact with roots in order live and multiply. Different species of root bacteria partner with different species of legumes, so bear that in mind when buying your inoculant. If you repeatedly plant legumes in your garden your soil may already have all the mycorrhizal bacteria your legume seeds need to get established and to form those nitrogen fixing root nodes. Also take into consideration the wood chips you may be using in your garden. Although wood chips are usually considered high-carbon plant matter, Dr. Elaine Ingram discovered that wood chips derived from leguminous trees (e.g. acacia mesquite, palo verde) are high in nitrogen content. (Dr. Ingram is renowned in organic gardening circles as the developer of Actively Aerated Compost Tea, ACCT) Tom Pew came forward with a large Detroit red beet with leaves attached, that he had planted 12 months ago and had just harvested. He finds beets easy to grow (he produces

and uses lots of organic compost). You can keep beets going for a long time if you continue harvesting their edible greens; just remember to pick the outside leaves if you are trying to keep the beet alive. Tom is currently harvesting lettuce spinach, basil, peppers and tomatoes and cautions us to keep plants producing by giving them adequate water. Q. What is ailing peas planted where they get 6-8 hours of sun? The leaves at the bottom of the plants are turning yellow. A. Possibly the wrong pea variety for Tucson. Try pulling them out and start over again.
Alternative answer: Given the unusually hot weather the peas could have been started too soon. Peas, like parsnips, require cool soil for germination. Also be aware that Fava beans often have a negative effect on other legumes planted nearby. If you plant Fava beans, locate other legumes further away.
Timely public announcement to Pima County Gardeners! An introduced pest insect is currently spreading throughout California and Arizona, and we should all be on the lookout for it, especially on our brassica plants. This is the Bragada Bug (Bagrada hilaris), an invasive, non-native stink bug with markings similar to the much larger and unrelated Harlequin bug. To identify this bug and learn more about it go to: http://ipm.ucanr.edu/pestalert/pabagradabug.html or: https://cals.arizona.edu/backyards/sites/cals.arizona.edu.backyards/files/b13winter_pp8-9.pdf

The adult Bagrada Bug has the shield shape characteristic of other stink bugs. The young nymph has a round red abdomen and the older nymph is mostly black with a few red markings on its abdomen. Q. What to do about Grapevine Skeletonizers? A. To control this voracious caterpillar use BT consistently throughout the season. Applying beneficial nematodes to the soil in late fall or early spring helps kill any pupae overwintering in the soil. Since the caterpillars sting, birds avoid eating them.
Grapevine Skeletonizer moths mating
Grapevine Skeletonizer caterpillar
LASAGNA COMPOSTING
by Rich Johnson Greetings fellow TOGGERS; this is Rich Johnson reporting from Payson, AZ. Many of you have heard me speak on the topic of composting and some of you have followed my recommendations and had success with your own
compost piles. Well, today I am sharing some how-to info on yet another type of composting: lasagna composting. Although I have mentioned lasagna composting in previous compost talks, I have finally gotten around to actually building this kind of a compost pile. Its main claim to fame is that it is the LAZY-MAN'S way to get black gold from your compostable scraps. By lazy I'm talking about building the pile and then walking away from it for the next 5-6 months. When you return you will have finished compost ready to go in your garden. What could be simpler than that? Before I jump into the step-by-step process let me say that getting started with this method of composting has the same drawback as traditional composting which is that you really should have ALL your compostable materials on hand on day-one. Although this method will be much more forgiving to later additions of brown materials, vis-a-vis the traditional method, the pile really should be built all at once. OK, with that caveat mentioned, let's get started. Materials list:
1. Enough cardboard to cover the ground where your pile will be. 2. Lots of newspaper. Omit the shiny paper ads that come in the
newspaper. 3. Lots of green compostable material, i.e. High nitrogen stuff like
vegetable scraps, green leaves, manure from vegetarian animals, recently cut grass, coffee grounds, etc.
4. Lots of brown compostable materials, i.e. Dead dry leaves, shredded newspaper, shredded cardboard, dead dry grass, etc.
5. Water from a garden hose. 6. Plastic sheeting to cover the pile once it is built.
For the most part you can see that the main ingredients are the same as for conventional composting: browns, greens, water, air, volume. In fact, the processes are practically the same. The only real difference is that lasagna composting will take much longer but with less work. Step 1

Step 2
Put a layer of cardboard on the ground. The ground doesn't have to be free of weeds or grass. Wet the cardboard with your hose. Flip the cardboard over and wet this side also.

Spread a layer of greens on the cardboard. The ratio of browns to greens is not critical with lasagna composting so don't worry about that. You will be making several layers-like a lasagna-so don't use all your greens on the first layer. If your greens are dry, as with sheep manure, then dampen them thoroughly. Step 3
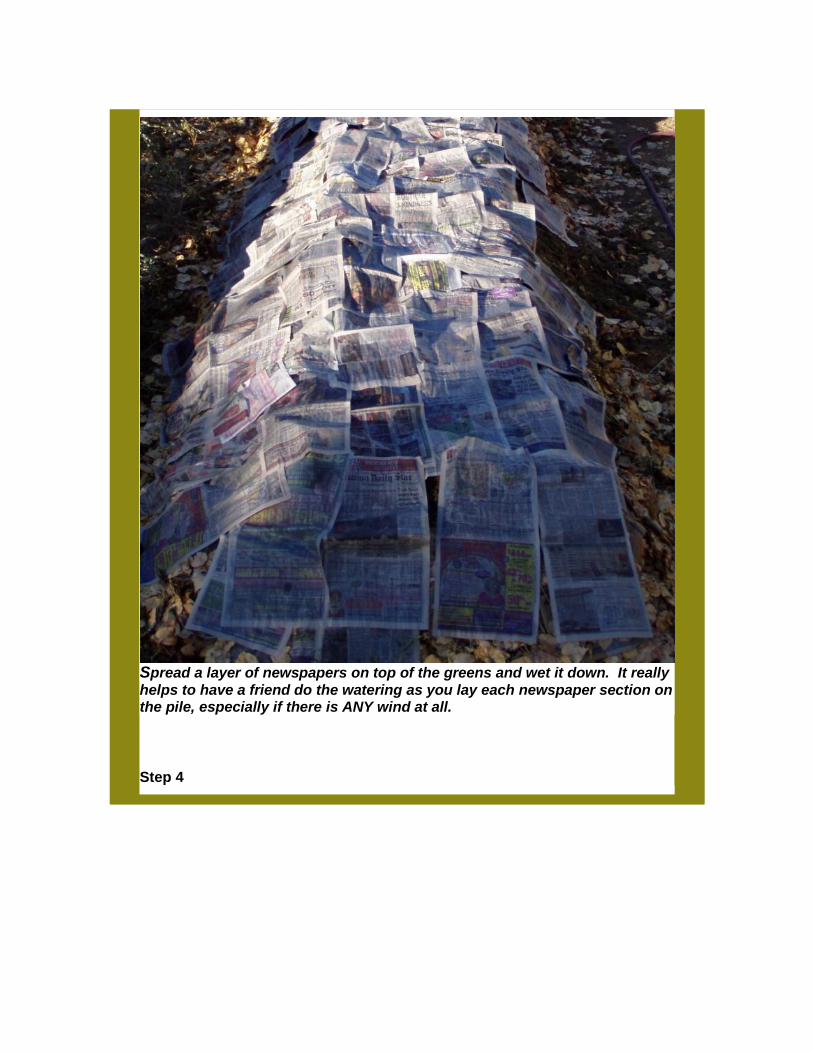
Spread a layer of newspapers on top of the greens and wet it down. It really
helps to have a friend do the watering as you lay each newspaper section on the pile, especially if there is ANY wind at all. Step 4
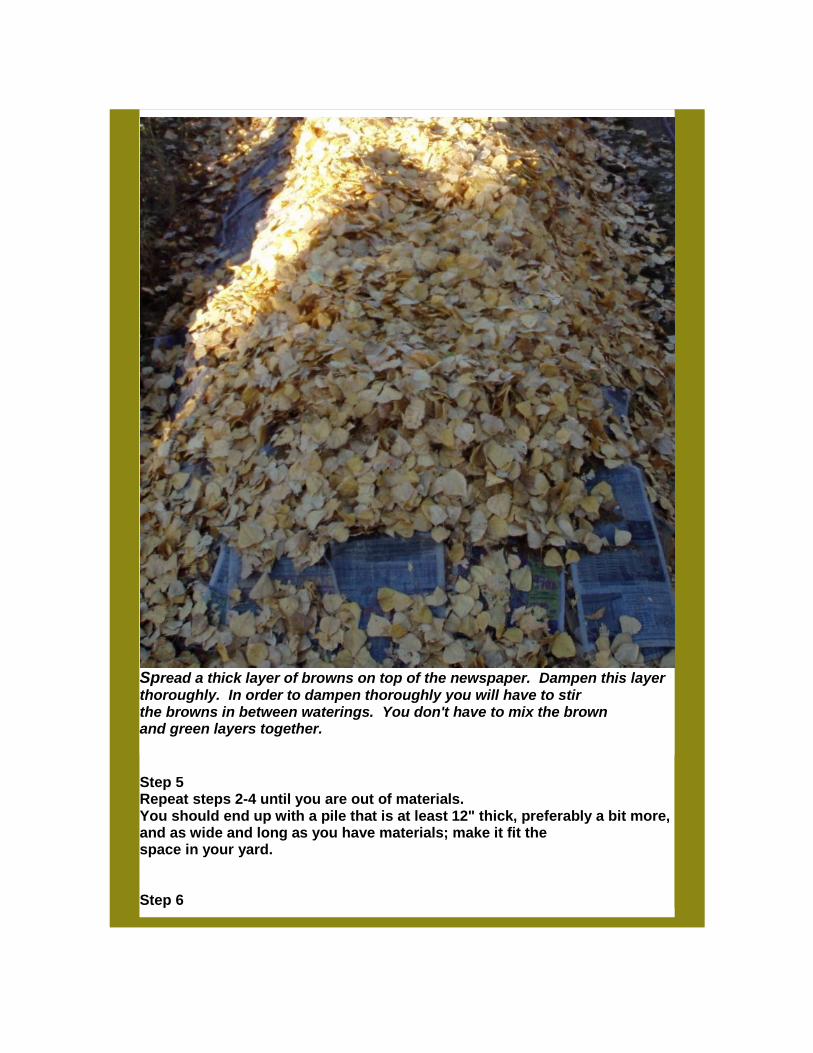
Spread a thick layer of browns on top of the newspaper. Dampen this layer thoroughly. In order to dampen thoroughly you will have to stir the browns in between waterings. You don't have to mix the brown and green layers together.
Step 5 Repeat steps 2-4 until you are out of materials. You should end up with a pile that is at least 12" thick, preferably a bit more, and as wide and long as you have materials; make it fit the space in your yard. Step 6

Now spread a plastic sheet over the whole pile and weight it down along the edges so that it will stay in place for the next several months. Some people use clear plastic and some use black plastic. I used black for this, my first attempt. That's it!! Let the bugs go to work and decompose your pile for you. There's no stirring, no watering, no fuss. The pile WONT heat up nearly as much as a conventional pile so don't worry about that. After 5-6 months you will have first rate, homemade compost to add to your garden and grow great organic vegetables. A good time to start such a pile is at the beginning of a season that you don't plant much of a garden. That way you will be ready to go for your next busy planting season. I will be sending you an update before next summer to let you know how it worked for me. And I would like to hear how it worked for you if you try this method. Questions or comments will reach me through your TOG board.
Happy composting and organic gardening!!
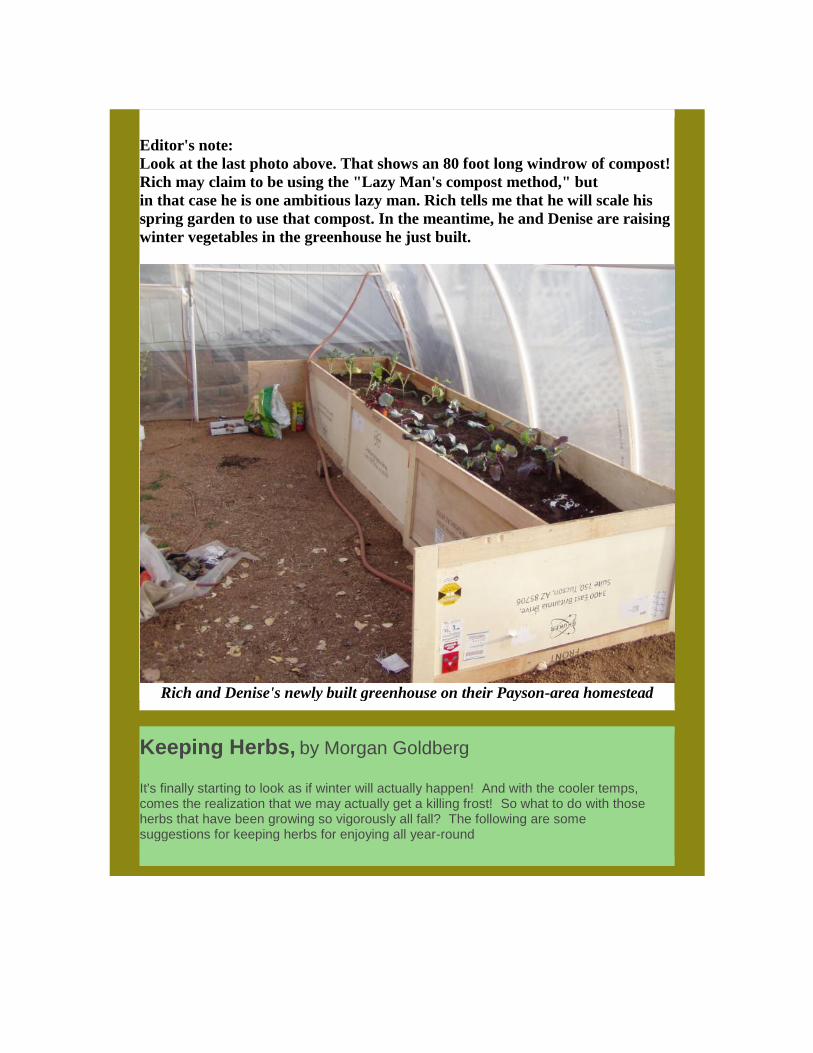
Editor's note:
Look at the last photo above. That shows an 80 foot long windrow of compost!
Rich may claim to be using the "Lazy Man's compost method," but
in that case he is one ambitious lazy man. Rich tells me that he will scale his
spring garden to use that compost. In the meantime, he and Denise are raising
winter vegetables in the greenhouse he just built.
Rich and Denise's newly built greenhouse on their Payson-area homestead
Keeping Herbs, by Morgan Goldberg
It's finally starting to look as if winter will actually happen! And with the cooler temps, comes the realization that we may actually get a killing frost! So what to do with those herbs that have been growing so vigorously all fall? The following are some suggestions for keeping herbs for enjoying all year-round

Cuttings stored in water or oil. Basil is for many of us the primary can't-do-without fresh herb; for others it is mint. As a cold snap approaches, cut the healthiest, non-blooming sprigs off your basil or mint plants and put them in a jar of water indoors. They can last a few weeks this way and if they root you may keep them even longer. You can also submerge basil in virgin olive oil and keep it for about two weeks in the refrigerator. Freezing works for a variety of herbs. Rinse herbs and dry them on a towel. Remove the leaves from the stems and place them on a tray in a single layer. Freeze for about thirty minutes, place in small labeled airtight containers and return to freezer. The color may darken a bit, but the flavor will remain. Take out the leaves as needed and crush immediately while still frozen to add to soups, sauces etc. as needed. Butter or oil: This takes a bit more work, but the color and flavor are much better. Add 1 ½ to 2 cups clean, dry leaves to food processor. Pulse to chop coarsely. Drizzle in ½ cup extra virgin olive oil or one stick butter (8 tbsp.), cut into chunks. Process, scraping bowl frequently. You can also add garlic or lemon juice to taste. You should have a thick paste that is relatively smooth. Add more oil or herbs to make the consistency you prefer. You can freeze small amounts for cooking in plastic containers or ice cube trays. Pesto (traditionally for basil, but worth experimenting with cilantro and parsley): Rinse and remove leaves from the stem. Allow to air dry. Put 2 or 3 garlic cloves and ¼ cup pine nuts into a food processor or blender and whirl until coarsely chopped. Add 4 cups lightly packed basil leaves and 1 cup grated parmesan cheese and ¾ cup extra virgin olive oil to the garlic mixture. Whirl until smooth. (If you're using a blender, stop to push basil down into the blades as needed). Makes about 1 ½ cups. This can be frozen in ice cube trays and the frozen cubes stored in freezer baggies in the freezer.
Melody's large colander full of basil harvested for pesto
December 7, just before our first night of frost

Desert Ruellia (Ruellia peninsularis) still blooming in December
Happy Holidays and Best Wishes for Your New Year!
STAY CONNECTED
Tucson Organic Gardeners, PO Box 41703, Tucson, AZ 85717
SafeUnsubscribe™ [email protected]
Forward this email | Update Profile | About our service provider
Sent by [email protected] in collaboration with
Try it free today