Embed Size (px)
DESCRIPTION
Knitting
Citation preview

KNITTINGH A N D B O O K
THE 4-H
By Debra Proctor & Susan Haws
4H/Sewing&Textiles/2012/02pr

TABLE OF CONTENTS1
2
3
5
6
8
9
22
32
33
34
35
36
• Teaching Your Love of Knitting to Kids . . . . . . . . . . . . . . . . . . . . . . . . . . . . . . . . . . . . . . . . . . . . . .
• Knitting Project . . . . . . . . . . . . . . . . . . . . . . . . . . . . . . . . . . . . . . . . . . . . . . . . . . . . . . . . . . . . . . . . . . . . . . . . . . .
• Knitting Tools . . . . . . . . . . . . . . . . . . . . . . . . . . . . . . . . . . . . . . . . . . . . . . . . . . . . . . . . . . . . . . . . . . . . . . . . . . . . .
• Yarn & Gauge . . . . . . . . . . . . . . . . . . . . . . . . . . . . . . . . . . . . . . . . . . . . . . . . . . . . . . . . . . . . . . . . . . . . . . . . . . . . .
• Rolling Yarn into a Ball That Pulls from Center . . . . . . . . . . . . . . . . . . . . . . . . . . . . . . . . . . . . . .
• Working on a Pattern . . . . . . . . . . . . . . . . . . . . . . . . . . . . . . . . . . . . . . . . . . . . . . . . . . . . . . . . . . . . . . . . . . . . .
• Learn to Knit . . . . . . . . . . . . . . . . . . . . . . . . . . . . . . . . . . . . . . . . . . . . . . . . . . . . . . . . . . . . . . . . . . . . . . . . . . . . .
• Patterns . . . . . . . . . . . . . . . . . . . . . . . . . . . . . . . . . . . . . . . . . . . . . . . . . . . . . . . . . . . . . . . . . . . . . . . . . . . . . . . . . . . . . .
• Judging Scoresheet . . . . . . . . . . . . . . . . . . . . . . . . . . . . . . . . . . . . . . . . . . . . . . . . . . . . . . . . . . . . . . . . . . . . . . .
• Service Project Ideas . . . . . . . . . . . . . . . . . . . . . . . . . . . . . . . . . . . . . . . . . . . . . . . . . . . . . . . . . . . . . . . . . . . . .
• Acknowledgments . . . . . . . . . . . . . . . . . . . . . . . . . . . . . . . . . . . . . . . . . . . . . . . . . . . . . . . . . . . . . . . . . . . . . . .
• Smart Phone Tags . . . . . . . . . . . . . . . . . . . . . . . . . . . . . . . . . . . . . . . . . . . . . . . . . . . . . . . . . . . . . . . . . . . . . . . .
• Notes . . . . . . . . . . . . . . . . . . . . . . . . . . . . . . . . . . . . . . . . . . . . . . . . . . . . . . . . . . . . . . . . . . . . . . . . . . . . . . . . . . . . . . .
(Slip Knot, Cast On, Long-Tail Cast On, Backwards Loop Cast On, Knit Stitch, Purl Stitch, Knit Increases, Increasing 1 Stitch, Eyelet Increase or Yarn Overs,Make 1 Stitch, Decreases, Knit 2 Together, Slip, Slip Knit, Bind Off, Joining New Yarn, Assembly, Mattress Stitch Seam, Weave in Ends)
(Knitted Nesting Pincushion, Pot Holder/Hotpad, Double Yarn Knit Slippers, Diagonal Knit Dishcloth, Holes and Ridges Knitted Dishcloth, Knitted Stocking Cap, Garter Stitch Scarf, Mittens, Pompoms)
Microsoft Tags® throughout this booklet are connected to instructional crocheting videos. It will require you to download the App to use these tags. To download app, go to: http://gettag.mobi
Get the free mobile app athttp:/ /gettag.mobi

1
INTRODUCTION
Helping 4-H members learn a skill such as knitting can be a real challenge as well as a gratifying experience. Some members will master the skill easily, while others will struggle. Youth who are taught to knit learn so much more than just “stitches.” They learn problem solving and math skills. Their reading, motor skills and eye-hand coordination are enhanced. It is an opportunity to develop decision making abilities and learn skills that can give pleasure throughout a lifetime. They find an outlet for their creativity which builds self-confidence and self-esteem.
TEN TIPS FROM THE PROS
1. KEEP IT FUN. Youth must enjoy what they are doing. Let them see that you are having fun.
2. Have a model to display of a project so your students can see what they will be making.
3. Select simple projects that will interest youth.
• Projects that can be completed quickly • Use brightly colored yarns • Have extra supplies on hand
4. Keep the lessons short to accommodate the short attention span.
5. Don’t expect perfection. They are trying. That is what is important. Praise them! Find something to compliment:
• “I like that yarn color!” • “You have been a good listener today!” • “I like the way you are holding your knitting needles.”
6. Showing is better than telling. Demonstrate the skill that you want them to learn.
7. Put something in their hands as soon as possible. Many teachers have found it easier to begin by giving youth needles with a few rows of knitting completed. Students learn the basics more easily and then go back and learn foundation cast-on, which can be tricky for beginners because of the tension.
8. Youth need a sense of accomplishment. Provide them with frequent progress reports.
9. When a youth is having difficulty with a skill, show an alternative, if possible.
10. When teaching teenagers:
• Do not “dumb down” your instructions, but recognize their interests are different • Treat them as adults not like “large children” • Choose projects that match their interests • Consider current fashion trends
TEACHING YOUR LOVE OF KNITTING TO KIDS
2
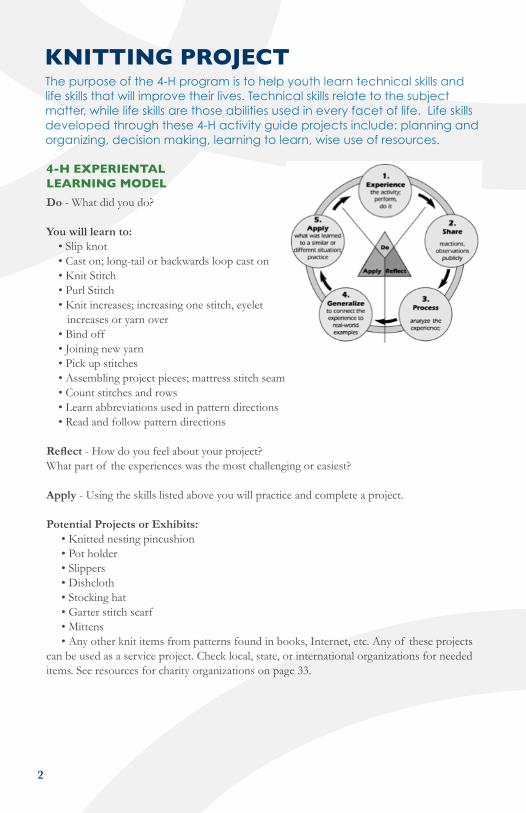
4-H EXPERIENTAL LEARNING MODEL
Do - What did you do?
You will learn to: • Slip knot • Cast on; long-tail or backwards loop cast on • Knit Stitch • Purl Stitch • Knit increases; increasing one stitch, eyelet increases or yarn over • Bind off • Joining new yarn • Pick up stitches • Assembling project pieces; mattress stitch seam • Count stitches and rows • Learn abbreviations used in pattern directions • Read and follow pattern directions
Reflect - How do you feel about your project?What part of the experiences was the most challenging or easiest?
Apply - Using the skills listed above you will practice and complete a project.
Potential Projects or Exhibits: • Knitted nesting pincushion • Pot holder • Slippers • Dishcloth • Stocking hat • Garter stitch scarf • Mittens • Any other knit items from patterns found in books, Internet, etc. Any of these projects can be used as a service project. Check local, state, or international organizations for needed items. See resources for charity organizations on page 33.
KNITTING PROJECTThe purpose of the 4-H program is to help youth learn technical skills and life skills that will improve their lives. Technical skills relate to the subject matter, while life skills are those abilities used in every facet of life. Life skills developed through these 4-H activity guide projects include: planning and organizing, decision making, learning to learn, wise use of resources.

3
NEEDLES
Knitting needles are the first tools required. Knitting patterns tell the size of needles to use. Your leader will help you decide what needles to use for your first project.
Single-pointed needles come in pairs 7 to 14 inches long and in sizes 000 to 16. They are made of plastic, aluminum, or wood. Only very large sizes come in wood. These needles are for flat work in which rows are knitted back and forth and the work is reversed each time.
CROCHET HOOK
You will need a crochet hook to pick up dropped stitches and to correct mistakes. Size 0 is a good one for beginners.
TIPS OR CORKS
Knitting needles are strong and have sharp points. Be careful with them and learn to use them properly. It is a good idea to put protectors on the tips when you put your work down. Protectors keep the points from sticking people and prevent stitches from slipping off the needles. Use rubber tips made for this purpose or small corks.
Proper tools are necessary in knitting. Learn about the tools before you buy so you will select good equipment.
KNITTING TOOLS

4
MEASURING TOOLS
For measuring you will need a ruler (either 6 or 12 inch), a measuring tape, or a metal-measuring gauge.
SCISSORS
Keep a small pair of scissors or shears handy for cutting yarn, trimming pom poms, etc. Be sure to keep scissors in a case for safety.
TAPESTRY NEEDLE
A blunt-pointed tapestry needle is used for sewing seams. A straight, steel needle is best. Some tapestry needles have a “hump” around the eye. They are not good for joining seams in knitting as the hump catches on stitches and makes it hard to pull the yarn through.
KNIT CHECK
There is also a “knit check” made especially for knitting. The open “L” is for measuring the gauge —the number of stitches and rows per square inch. The holes along the top are for measuring needle size.

5
YARN & GAUGEYARN
Yarns are available in a variety of weights (thickness of the strands) and fiber contents. For best results, use the yarn specified in the instructions. Be sure to purchase all the yarn you need for a project at the same time because, dye lots may vary a little in shading and this will show on the finished project. If you are combining different types of yarn in the same project, make sure they have similar washing instructions. Care instructions are found on the product label—follow them carefully. Always make sure to make a swatch to measure the gauge.
GAUGE
Gauge is the number of stitches (and spaces) per inch and the number of rows (or rounds) per inch. In many patterns, gauge is specified over 4 inches. Your gauge and the gauge specified in the pattern must be the same so that your project will be the correct size. This is especially crucial for projects that must fit. Before starting your project, take the time to make a gauge swatch.
To check gauge, use the same yarn, needles and pattern stitch specified in the instructions. Make a swatch that is approximately 6 inches square. Work in pattern for about 6 inches, then bind off. Let the swatch relax for a bit, and then flatten it without stretching to measure.
Using pins, mark off a section of stitches in the center of the swatch that measures 4 inches square. Count the number of stitches and rows in this 4 inch section. If they match the gauge, you can start right in on your pattern.
If you have too few stitches, you are working too loosely—change to smaller needles and make another swatch. If you have too many stitches, you are working too tightly—change to larger needles. Keep making swatches and experimenting with needle sizes until you obtain the specified gauge. Everyone knits differently, this will help you be able to make a project that fits.
When the stitch gauge is correct, most likely the row gauge will also be correct. Slight variations in row gauge can be acceptable since the lengthwise proportions of a garment are usually given as a measurement in the instructions.

6
INSTRUCTIONS
Step #1:
If you are rolling a ball from a hank of yarn, carefully untie the hank, keeping it in the large loop. Have someone hold it for you, or drape the loop over the back of a chair or over your knees.
SUPPLIES NEEDED:
Hank of yarn or loose yarn
Step #2:
Holding the loose end of yarn firm with your thumb, roll the yarn around three fingers very loosely 10-12 times.
Step #3:
Slip the yarn off your fingers and hold it firmly in the center with the free end of the yarn hanging loose.
Step #4:
Now very loosely wrap the yarn around the part you rolled on your fingers about 10-12 times. If you pull the yarn too tightly, it will not pull free from the center of the ball when you are ready to knit or crochet, and it may also take some of the stretch out of the yarn. Be sure not to catch the free end while wrapping the yarn.
Some yarns come in hanks, some are pre-wound and pull from the center. Rolling a ball that pulls from the center is a good skill to have.
ROLLING YARN INTO A BALL THAT PULLS FROM CENTER

7
Step #5:
Now that you have formed the base for your ball, hold your thumb on the spot where the free end of yarn is coming out and your fingers on the opposite side. (We will call the side with your thumb the top and the other side the bottom.) Hold the free end of yarn in the palm of your hand with your little finger.
Step #6:
Now, gently wind yarn from the bottom, toward you, across top of ball, keeping the yarn close to your thumb. Keep turning the ball slowly counter-clockwise. Be very careful to keep your thumb in the hole you form as you wind, and keep the free end of yarn free. Be sure you wind the ball loosely. Always wind from bottom across top, never around sides. If the ball becomes too pointed on the bottom, squeeze it more tightly between thumb and fingers.
Step #7:
When the yarn is all wound, tuck the end under several loops of yarn. When you are ready to knit, the free end you hold in the palm of your hand will pull out easily and the ball will not roll away.
8
Before picking up needles and yarn, sit down and read through the pattern. Patterns are written in a language of their own, and this will help you become familiar with special stitches and abbreviations. Although not all publications use the same abbreviations, the terminology will become familiar with a read-through.
ABBREVIATIONS
These are standard abbreviations that may appear in this booklet. Any abbreviations specific to a pattern will be given at the beginning of the pattern.
beg - begin(ning)
CA, CB, CC, etc - Color A, B, C, etc.
dec - decrease
inc - increase
K - knit
P - purl
pat - pattern
psso - pass slipped stitch over
rem - remaining
rep - repeat
rnd(s) - round(s)
RS - right side
sk - skip
sl - slip
st - stitch(es)
St st - stockinette stitch (knit RS rows, Purl WS rows)
tog - together
WS - wrong side
yo - yarn over
*, **, + or ++ - repeat whatever followsthe *, **, + or ++ as indicated
[ ] - work instructions in brackets the number of times indicated.
WORKING FROM A PATTERN

9
INSTRUCTIONS
Step #1:
Make a circle with yarn, about 12” from end.
Step #2:
Pull a loop through the circle.
Step #3:
Insert the needle into the loop.
Step #4:
Pull the loop gently and evenly to tighten and slide the knot up to the needle.
LEARN TO KNIT - SLIP KNOTA slip knot is the starting point of everything you do in knitting and is the basis for the cast on.

10
INSTRUCTIONS
Broken down in very simple terms, knitting is just a matter of transferring loops from one needle to another. To get started, you’ll need to put loops on one needle, and that process of creating loops is called casting on.
There are several methods of casting on. Each has a unique purpose and produces a different edge. Try different methods to find the one most comfortable and suitable to your project.
INSTRUCTIONS
Step #1:
Place slip knot on needle (counts as first stitch) and hold needle in right hand with the skein end of the yarn over your first finger. Wind the tail end of the yarn around your left thumb from front to back.
Step #2:
Bring needle down in front of thumb.
Step #3:
Insert point under loop in front of thumb.
LEARN TO KNIT - CAST ON
This method of casting on produces a very elastic edge, which is particularly useful when followed by garter stitch or stockinette stitch.
Measure approximately 1” of yarn for each stitch needed and make a slip knot at this point.
LEARN TO KNIT - LONG-TAIL CAST ON

11
Step #4:
Bring tip of needle under loop in index finger, following direction of arrow.
Step #5:
Pull needle down through loop on thumb, following direction of arrow.
Step #6:
This forms a stitch on needle.
Step #7:
Repeat instructions for each stitch to be cast on, counting each loop on needle (including the slip knot) as a stitch.

12
INSTRUCTIONS
Step #1:
With the slip knot on the needle, wrap yarn around your right index finger.
Step #2:
Insert tip of needle under loop.
Step #3:
Remove finger and pull yarn gently to snug loop around needle.
Step #4:
If loops on needle are too tight, you will not be able to knit into these stitches, so practice until loops are consistent.
LEARN TO KNIT - BACKWARDS LOOP CAST ONThis is the easiest way to cast on, but the resulting edge might not be suitable for all projects.

13
INSTRUCTIONS
Step #1:
With the working yarn at the back, insert right-hand needle into first stitch left-hand needle, from front to back.
Step #2:
Wrap yarn around right-hand needle, from left to right over the point of the needle.
Step #3:
Pull wrap through the stitch, forming a loop on the right-hand needle.
Step #4:
Slip the stitch off the left-hand needle.
When all the stitches on the left-hand needle have been transferred to the right-hand needle, turn the work and place the needle with the stitches on it to the left hand to start the next row.
When knitting every row (also knows as garter stitch), both sides of the knitting will have raised horizontal ridges.
LEARN TO KNIT - KNIT STITCH

14
INSTRUCTIONS
Step #1:
With the working yarn at the front, insert right-hand needle into first stitch on left-hand needle, from back to front.
Step #2:
Wrap yarn around right-hand needle, from right to left over the point of the needle.
Step #3:
Pull wrap through the stitch.
Step #4:
Forming a loop on the right-hand needle, slip the stitch off the left-hand needle.
When all the stitches on the left-hand needle have been transferred to the right-hand needle, turn the work and place the needle with the stitches on it to the left hand to start the next row.
LEARN TO KNIT - PURL STITCH

15
INSTRUCTIONS
There are several ways to increase, and each method adds extra stitches to the row unless they are paired with compensating decreases. Increasing is used whenever a knitted piece needs to be wider, such as sleeve shaping. Unless the pattern specifies otherwise, knit into the front and back of a stitch to increase, as both Make 1 Stitch and Yarn Over methods of increasing can leave small holes in the work.
LEARN TO KNIT - KNIT INCREASES
INSTRUCTIONS
On a knit row, work into the front and back of the next stitch: knit into the stitch and before slipping it off the left needle, twist the right needle behind the left and knit the same stitch again through the back loop. Slide the original stitch off the left needle—there are now 2 stitches on the right needle made from the original one.
On a purl row, the method of increasing is similar. Purl into the front of the next stitch, then purl into the back of it before sliding it off the left needle.
INCREASING 1 STITCH
An extra stitch can also be formed by making a loop wrapped around the right needle between two stitches which is then knitted or purled on subsequent rows. This wrap forms a small hole that is used as a decorative touch, a small buttonhole and in knitted lace.
EYELET INCREASE OR YARN OVERS
INSTRUCTIONS
To yarn over between two knit stitches: Bring the yarn forward as if to purl a stitch, then wrap the yarn over the top of the needle and knit the next stitch.
To yarn over between two purl stitches: Take the yarn over the top of the right needle, then between the two needles to the front again; purl the next stitch.

16
MAKE 1 STITCH (M1)INSTRUCTIONS
Another form of increasing is to work into the strand between two stitches.
1) To make a new stitch, insert the right needle from front to back under the horizontal strand that runs between the stitch on the right needle and the stitch on the left needle.
3) Knit through the back of the strand to twist the new stitch and prevent a hole.
2) Insert the left needle under this strand from back to front.

17
SLIP, SLIP, KNIT (SSK) - LEFT-SLANTING DECREASE
INSTRUCTIONS
Slip the next two stitches from the left-hand needle onto the right-hand needle as if to knit. Place them back on the left-hand needle without twisting them. Knit these 2 stitches together through the back of the stitches. SSKs are used when a left-slanting decrease is desired, such as decreases on socks, raglan shaping, and lace patterns.
LEARN TO KNIT - DECREASESDecreasing stitches makes your knitted piece narrower. Decreases are used for sleeve caps, neckline shaping, shaping the crown of a hat, etc., and are paired with yarn over increases in lace knitting.
INSTRUCTIONS
Insert right-hand needle into 2 stitches on left-hand needle, following direction of arrow. Knit these 2 stitches together as 1 to decrease 1 stitch. When a pattern tells you to decrease without specifying the type of decrease, use K2tog.
KNIT 2 TOGETHER (K2TOG) - RIGHT-SLANTING DECREASE

18
INSTRUCTIONS
When your knitted piece is finished, binding off closes the stitches so that they do not unravel when taken off the needles.
From beginning of row, knit 2 stitches, insert tip of left-hand needle into first stitch on right-hand needle and pull this stitch up, over the second stitch and completely off the needle. Knit another stitch and repeat process.
Cut the yarn, leaving an 8” end for weaving in. Pull the end of the yarn through the last stitch on the right needle and tug it gently to fasten off the last stitch.
LEARN TO KNIT - BIND OFF

19
INSTRUCTIONS
To prevent unsightly knots, join new yarn at the beginning of a row wherever possible. To make a perfect join at the end of a row, simply drop the old yarn, tie the new yarn around it and start the next row with the new yarn (see illustration). Untie the knot and securely weave in the yarn ends at finishing. If it is impossible to avoid joining new yarn in the middle of a row, try one of these methods.
Drop the old yarn when 6” remain. Start work with the new yarn, leaving a 6” end. After a few more inches of knitting have been completed, individually thread the ends through a yarn needle and weave them back and forth for a few inches to secure.Another method to join yarn is the splice method. When 4” of the old yarn remains, untwist the plies of yarn. Untwist the plies of 4” of the new yarn and retwist them with the untwisted plies of the old yarn. Work with this doubled length until you are working entirely with the new yarn.
When working with thinner yarns, it may not be necessary to unply the yarns and retwist them. When 4” of the old yarn remains, simply pick up the new yarn and work with both yarns until the old yarn runs out. When working the next row, work these doubled stitches as one.
LEARN TO KNIT - JOINING NEW YARN

20
INSTRUCTIONS
When assembling finished project pieces, use a large-eye, blunt-tip yarn needle and the same yarn you have used for knitting the project to sew the seams. If the yarn is very bulky or textured, use a finer, smooth yarn in a matching color for sewing. The Mattress Stitch is perfect for joining seams. The Kitchener Stitch (grafting) is used to join the toe of a sock to avoid a seam
LEARN TO KNIT - ASSEMBLY
Mattress stitch is worked with the right side side up and becomes invisible from the right side when finished.
With the right sides facing you, lay the pieces to be sewn flat with edges next to each other, lining up rows and stripes as much as possible. Insert the needle between the first and second stitches on the first row. Slide the needle under two rows, then bring it back to the front between the first and second stitch of the row.
The secret to the Mattress Stitch is to keep the seam elastic without allowing it to stretch too much. The best way to do this is to work very loosely for a few inches, and then pull the sewing yarn so that the stitches pull together. Give the seam a little tug from the top and bottom to add a bit of stretch back in.
LEARN TO KNIT - MATTRESS STITCH SEAM
INSTRUCTIONS
Step #1: Return to the opposite side and, working under two rows throughout, repeat this zig-zag process, always taking the needle under the strands that correspond exactly to the other side and going into the hole that the last stitch on that side came of, being careful not to miss any rows.

21
When joining two ribbed sections, work into the center of the first stitch of the row instead of between the first and second stitches. When the seam is pulled closed, one complete knit stitch will be formed and the seam will be nearly invisible.
Step #2:
When joining garter stitch, work into the center of the first stitch of the row instead of between the first and second stitches. When the seam is pulled closed, the garter stitch ridges will line up correctly.
INSTRUCTIONS
The first step of finishing is weaving in the yarn ends. Securely woven ends will not unravel during washing and pop out on the front of your project. You will always have at least two ends to weave in—the excess yarn at the beginning cast on edge and the excess yarn after the bind off. If your project uses many colors or combines different types of yarn, you will have more ends to weave in.
To securely weave in an end, thread the end through the eye of a blunt yarn needle and work from the wrong side of the piece. Weave the needle through a few of the stitches, turning the piece over to be sure the needle isn’t visible from the front. Pull the needle to pull the excess yarn through the stitches. Repeat this for an inch or so, and then turn and weave in the opposite direction. Trim the end close to the work. Some people prefer to weave diagonally, some horizontally or vertically—do whatever makes the most sense for the project, making sure the yarn does not peek through the front of the piece.
Bulky yarn will need to be woven more than an inch to prevent the end from unraveling.
LEARN TO KNIT - WEAVE IN ENDS

22
PATTERNS: KNITTED NESTING PINCUSHION This is a fun and simple beginning knitting project. Learn to knit, purl, cast-on, cast-off and seam. The pincushion is a bright, colorful and fun gift for your sewing friends.
MATERIALS
• Scraps of 3 colors of worsted weight yarn • Knitting needles size 8 or size needed for gauge
MEASUREMENTS
• Gauge: 8 sts = 2”
INSTRUCTIONS
• Cast on 11 sts.
• Row 1: K5, P1, K5• Row 2: K11
• Repeat rows 1 and 2 until piece measures 3” long. Bind off and sew bound off and cast on edge together. Fold in half, outside edges together. Make the second piece the same except 5” long and of second color. Make the third piece the same except 7” long and of a third color. Weave in all ends. Fit each piece inside the next larger circle. A thimble can be inserted in the center.
*Simple alternative: Knit every row. Finish same as above.

23
MATERIALS
• 760-158 cotton yarn • Knitting needles Size 7 or size needed for gauge • Crochet hook, Size F-5
MEASUREMENTS
• Gauge: 11 sts = 3”; 6 rows = 1”
Notes:Potholder is worked with 3 strands of yarn held together throughout. To use one ball, re-roll yarn into three separate balls. (If you are making more than one potholder, you may find it easier to get three balls of cotton yarn to eliminate the need to re-roll.)
KNITTED POTHOLDER:With three strands of yarn held together, cast on 28 sts. Work in garter st (= k every row) until 8” from beg. Bind off until one stitch remains. Knit that st, remove needle, insert crochet hook (ch 10. sl st to base st of ch) for loop. Fasten off.
PATTERNS: POT HOLDER/HOTPADThe double strands of yarn make this easy hot pad sturdy and durable.

24
PATTERNS: DOUBLE YARN KNIT SLIPPERSThis is a simple basic slipper that works well when just learning how to knit. Two strands of worsted weight yarn are used to make the slipper more durable (and warm).
MATERIALS
• 4 oz., 4-ply worsted weight yarn (two colors) • Knitting needles size 8 or size needed for gauge
MEASUREMENTS
• Gauge: 8 sts = 2”
INSTRUCTIONS
Sole and sides: • Cast on 29 sts with 2 strands of yarn. (Use double yarn throughout)• Row 1: (wrong side) K9, P1, K9, P1, K9.• Row 2: K across row.• Repeat these two rows for 5” or 2 1/2” less than length of foot, ending on the wrong side.
Toe:• Row 1: (right side) P1, *K1, P1. Repeat from * to end of row.• Row 2: K1, P1 to end of row.• Repeat ribbing for 2 1/2 or 3”. Break yarn leaving a 12” end. Thread yarn onto tapestry needle and slip stitches from knitting needle onto tapestry needle. Pull stitches up very tightly and fasten securely. Sew edges together for 3-5 inches from toe to instep. Fasten securely. Weave end of thread into slipper on wrong side. Sew up heel. Trim with pompom.
• Variation: Felted slipper: Knit slipper with two strands of worsted weight 100% wool yarn (do not use super washed wool yarn) using size 13 needles. Follow instructions making sole the length of foot and, ribbing (P1 K1) 4 inches longer than foot. To felt: Place slippers in a lingerie bag. The bag protects the knitting and prevents too much wool fuzz from clogging your washing machine. You will need to check your felting during the process and the lingerie bag with a zipper will make this easier. Set the washing machine to the hottest water temperature and the lowest water level. Add 2 tablespoons of mild laundry soap. This will soften the fibers. The key to successful felting is agitation. Set the machine for heavy duty. You want a longer cycle so the project has time to felt before the spin and rinse cycles. Agitate for 10 minutes. Do not spin. Remove slippers and check for size. If more felting is required, return to washing machine and agitate for additional 2-3 minutes. Check for size again. Continue the process until the desired size is reached. Rinse the felted pieces in cool to warm water. Squeeze out excess water with a towel. Fill with clean dry paper towels and hand mold to the desired shape. Let air dry.

25
PATTERNS: DIAGONAL KNIT DISHCLOTHCotton yarn is a good choice to use for a dishcloth. It is absorbent, stronger wet than dry, machine washable and can be bleached if needed. This dishcloth teaches skills of increasing and decreasing stitches.
MATERIALS
• 1-2 oz. skein of worsted weight cotton yarn • Knitting needles size 8 or size needed for gauge
MEASUREMENTS
• Gauge: 8 sts = 2”
INSTRUCTIONS
• Cast on 2 sts.
• Row 1: K2.• Row 2: K1, in., (3 sts).• Row 3: K1, inc, K1. (4 sts).• Row 4: K2, inc, K1. (5 sts).• Row 5: K2, K2 (6 sts).• Row 6: K3, yo, K3 Continue working in this manner (inc. 1 st each row with yo) until you have 50 sts on needle.
• 1st decrease Row: K2, K2 tog, yo, K2 tog, K to end of row.• Repeat this row; decreasing 2 sts each row and forming eyelet by yo until 6 sts remain.• Next row: K2, K2 tog, K2 (5 sts).• Next row: K2, K2 tog K1 (4 sts).• Next row: K1, K2 tog, K1 (3 sts).• Next row: K2 tog, K1 (2 sts).• Next row: K2 tog, pull yarn through last st to fasten off. Weave in the ends.
26
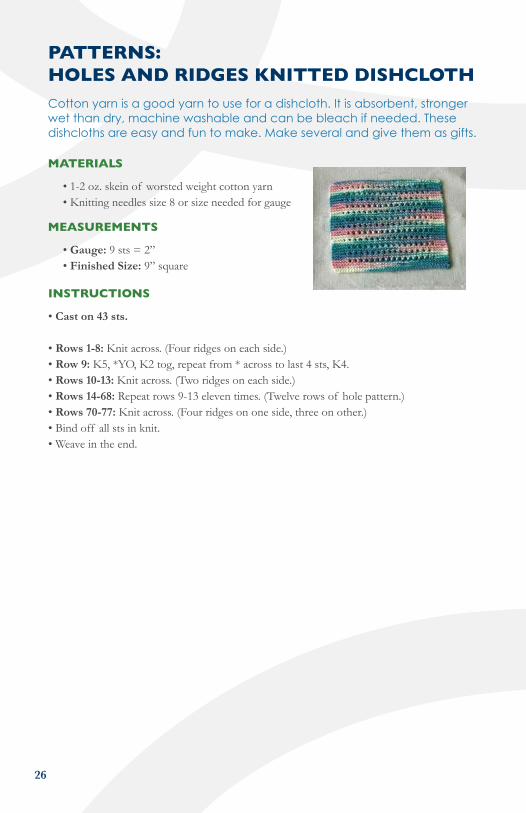
PATTERNS: HOLES AND RIDGES KNITTED DISHCLOTHCotton yarn is a good yarn to use for a dishcloth. It is absorbent, stronger wet than dry, machine washable and can be bleach if needed. These dishcloths are easy and fun to make. Make several and give them as gifts.
MATERIALS
• 1-2 oz. skein of worsted weight cotton yarn • Knitting needles size 8 or size needed for gauge
MEASUREMENTS
• Gauge: 9 sts = 2” • Finished Size: 9” square
INSTRUCTIONS
• Cast on 43 sts.
• Rows 1-8: Knit across. (Four ridges on each side.)• Row 9: K5, *YO, K2 tog, repeat from * across to last 4 sts, K4.• Rows 10-13: Knit across. (Two ridges on each side.)• Rows 14-68: Repeat rows 9-13 eleven times. (Twelve rows of hole pattern.)• Rows 70-77: Knit across. (Four ridges on one side, three on other.)• Bind off all sts in knit.• Weave in the end.
27
MATERIALS
• 2 oz. 4-ply worsted weight yarn • Knitting needles size 9 or size needed for gauge
MEASUREMENTS
• Head circumference: 18 [21 3/4]”/45.5 [55] cm • Length: 7 1/2” [8 1/2”] • Gauge: 20 sts and 24 rounds = 4”/10 cm
INSTRUCTIONS
Cast on 90 sts. Work in K2, P2 ribbing for 1 ½ inches. Change to stockinette st (knit one row, purl one row) for 4 ½” [5 1/2”].
• Shape top • For size Medium/Large only - Next row (RS) *k5, k2 tog*, repeat from * P 1 rowFor both sizes: • Next row: *K4, K2 tog*, repeat from * • Next row: Purl • Next row: *K3, K2 tog*, repeat from * • Next row: Purl • Next row: K2, K2 tog*, repeat from * • Next row: Purl • Next row: *K1, K2 tog*, repeat from * • Next row: Purl • Last row: K2 tog, across row (15 sts.)
Cut yarn leaving a 24” length. Thread onto a tapestry needle, thread through remaining 15 sts on needle,
draw together. Fasten securely on wrong side. Sew side seam using mattress stitch. (See Page 23.)
Optional: Make a pompom and attach it to the top. Hook for loop. Fasten off. (See Page 35.)
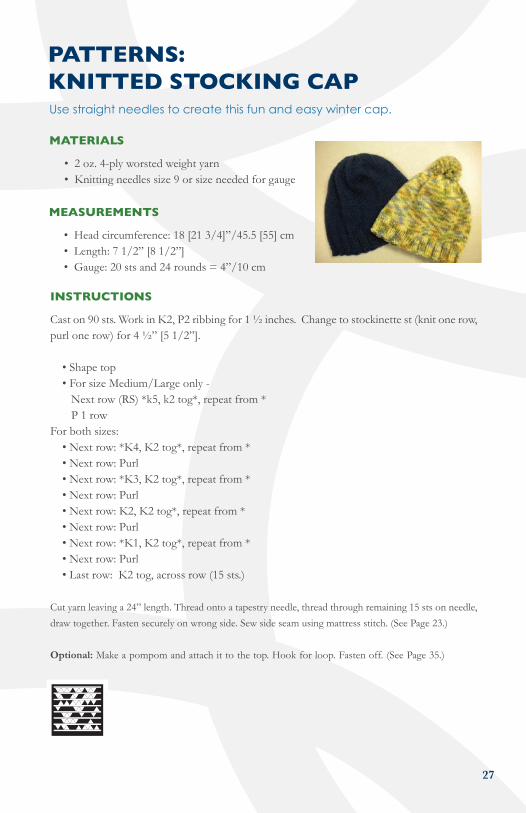
PATTERNS: KNITTED STOCKING CAPUse straight needles to create this fun and easy winter cap.

28
MEASUREMENTS
• Size: About 5 1/2” X 72” (14 cm X 183 cm) • Gauge: 16 sts = 4”
MATERIALS
• 4 oz. 4-ply worsted weight yarn • Knitting needles size 9 or size needed for gauge • Crochet hook size G
INSTRUCTIONS
Cast on 22 stitches. Work in Garter stitch (knit every row) until piece measures 72 in. (183 cm) from beginning. Bind off.
Fringe:
Step #1:Cut 90 strands of yarn 12” long. Hold 4 strands together and fold them in half to form a loop. Working along the narrow edge, insert a crochet hook from back to front into the first stitch.
Step #2:Draw a loop through the stitch.
Step #3:Draw the loose ends through the loop and pull them tightly to form a knot. Add fringe to every other stitch across the row, beginning with the first stitch and ending with the last stitch.
Step #4:Repeat along the other narrow edge with remaining strands of yarn. Trim the fringe evenly.
PATTERNS: GARTER STITCH SCARFCreate a warm winter scarf using the garter from one skein of yarn.

29
MITTEN SIZEExtra Small SmallMedium Large
14 cm to 15 cm (5 1/2 to 6 inches)15 cm to 19 cm (6 to 7 1/2 inches)19 cm to 23 cm (7 1/2 to 9 inches)23 cm or larger (9 inches or larger)
MATERIALS
• Hand knitting yarn, 4-ply -2½ oz of main color (MC) • Contrasting color (CC) yarn - 1/2 oz for all sizes • Knitting needles - 1 pair, size 8 • Yarn needle • 2 stitch holders • 2 stitch markers
MEASUREMENTS
• Gauge: Stockinette stitch - 9 sts = 5 cm or 2 inches; 6 rows = 2.5 cm or 1 inch
INSTRUCTIONS
Follow the same instructions for both the right and left mitten.
• Cast on 25, 30, 36, 45 sts with MC, using #8 needles• Row 1: *K1, p1. Repeat from * across.• Rows 2-11: Repeat Row 1• Following rows-Work in stockinette stitch (k1 row, p1 row) for 4 (4, 6, 6) rows, ending with a p row.• Thumb Gore: Row 1: K 13, (14, 17, 22) place a marker on the needle. Increase as follows: k into front and back of the following 2 sts. This results in 2 sts increased. Place a marker on the needle and k to the end of the row. • Row 2: P across; slip markers from one needle to the other when you come to them.• Row 3: K across to the first marker; inc one st in the next st; k to one st before the next marker; inc one st in the next st; k to the end of the row. There are now 6 sts between markers.• Repeat rows 2 and 3: Work even in stockinette stitch.
PATTERNS: MITTENSThe pattern is designed for striped mittens. You may choose to make yours in a solid color rather than striped. Note: Be sure to check your gauge before starting each project. Use any size needle that will obtain the stitch gauge.
APPROXIMATE PALM SIZE
Directions are given for extra small. Changes for small, medium, and large are in parentheses.

30
• Following 2 rows: Work even in stockinette stitch.• Thumb Row 1: K across to the second marker; remove the marker; place the remaining 13, (14,17, 22) sts on a stitch holder; cast on 2 sts on the right hand needle for the base of the thumb.• Following rows: P the 2 cast-on sts; p the next 8 (8, 12, 12) sts; remove the other marker; place the remaining 13 (14, 17, 22) sts on another stitch holder to be used later for the hand. Turn. Starting with a k row, continue in stockinette stitch over the 10 (10, 12, 12) sts on the needle only for 6 (6, 8, 8) more rows, ending with a p row.• To shape tip: Row 1: *K the next 2 sts tog. Knit across the remaining stitches. This results in one st decreased. Repeat from * across.• Row 2: P across. Leaving a 30-cm or 12-inch yarn end, cut the yarn. Thread the yarn needle and draw it through the remaining sts. Pull it up tightly and secure it with slip stitches. Sew the thumb seam using the same yarn.• Hand: Row 1: With the right side facing you, attach the CC to the first st on the stitch holder to the right of thumb, k across the sts on the stitch holder; pick up and k one st on each side of the thumb base. Place the sts from the other holder onto the free needle and k across these sts. There are now 27 (32, 38, 47) sts on the needle. • Row 2: P across. Drop the CC. Do not cut the yarn. Attach the MC.• Rows 3-4: With the MC, work in stockinette stitch. Drop the MC; pick up the CC.• Following rows-Continuing in stockinette stitch, work in the color stripe pattern as follows: 4 rows CC, 2 rows MC, and 2 tows CC. Cut the CC yarn. Tie it to the MC yarn. With the MC only, work even in stockinette stitch until the length of the entire mitten measures 19 cm (22 cm. 25 cm, 25 cm) or 7 ½ inches (8 ¾ inches, 9 ¾ inches, 9 ¾ inches), ending with a p row. • To shape the tip: Row 1: *K 2 tog. Repeat from * across. There are now 14 (15, 18, 23) sts on the needle.• Row 2: P across• Row 3: *K 2 tog. Repeat from * 5 (6, 7, 8) times, ending with k 1 for extra small size only. There are now 6 (6, 7, 8) sts on the needle. Leaving a 76 cm or 30 inch yarn end, cut the yarn. Thread a yarn needle with the yarn end and draw it through the remaining sts. Pull it up tightly and secure it with whip stitches. Using the same yarn, sew the seam. Match the stripes using a backstitch seam. Weave in all yarn ends.
PATTERNS: MITTENS (cont’d)

31
Step #1:
Cut two 2” circles out of lightweight cardboard. Cut a ½” opening and then cut a 3/4” circle out of the center of each. (This will look like a ‘C’.)
Pompoms are fun to make and use to finish a project. Use leftover yarn from the project to match. Some have used this method of making pom-poms using cardboard from a cereal box.
Step #2:
Place two 12” lengths of yarn between cardboard.
Step #3:
Wrap yarn around cardboard starting at one end of opening and wrapping evenly to the other side and continue back and forth until desired thickness (density) of pompom.
Step #4:
Tie 12” lengths of yarn once to hold wrapped yarn together. With shears, cut yarn between cardboard all the way around.
Step #5:
Tie 12” lengths of yarn tightly with a square knot to hold cut yarn firmly.
Step #6:
Trim pompom evenly and to desired size. The pompom is ready to be added to project.
PATTERNS:POMPOMS
POMPOMSDirections are given to make pompoms.
MATERIALS
• 4 oz., 4-ply worsted weight yarn (two colors) • lightweight cardboard (from a cereal box) • paper scissors • shears
32
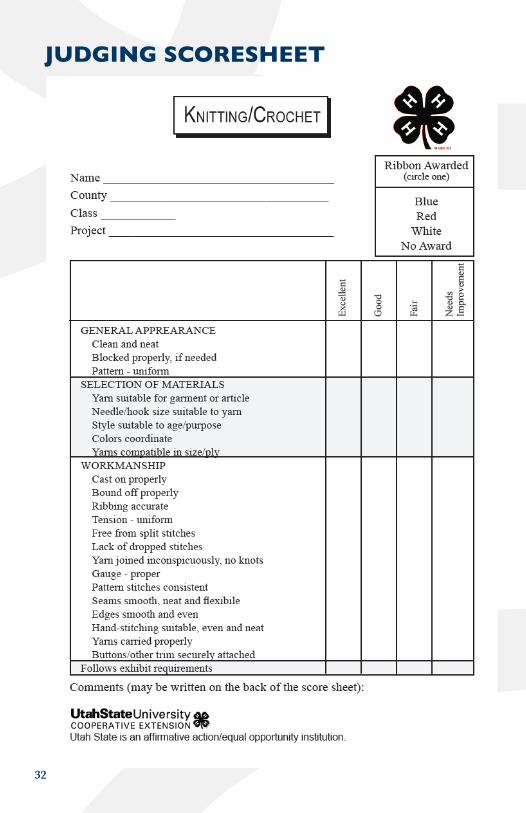
JUDGING SCORESHEET
33
Now that the youth know how to crochet or knit, put the knowledge to use by making crochet or knit donations to charity. Here are four of the most well-known charities so that you can visit their websites, or write for information. Crochet or knit 7” or 9” squares to be put together to make an afghan.It’s all about keeping people warm!Warm Up America!2500 Lowell RoadGastonia, NC 28054www.craftyarncouncil.com/warmup.html Crochet or knit items for preemies, such as hats, booties, blankets, and gowns.TLC for Angels850 Fort Plains RoadHowell, NJ 07731-1190www.tlcforangels.tripod.com Provide needy children with cozy hats to keep them warm.Caps for kids–CYCAc/o Bonnie Greene30113 Echo Blue DrivePenn Valley, CA 95946-9422http://www.craftyarncouncil.com/caps.html Crochet or knit slippers to send to U.S. TroopsOperation Toasty Toes-Slipper Projectwww.operationtoastytoes8.gobot.com Crochet or knit a blanket for a seriously ill or traumatized child or young adult.Project LinusP.O. Box 5621Bloomington, IL 61702-5621www.projectlinus.org
SERVICE PROJECT IDEAS

34
ACKNOWLEDGMENTS
The following sections and illustrations were referenced from www.redheart.com. Used with permission.
This section is referenced from Craft Yarn Council of America - www.craftyarncouncil.com.
The following sections and illustrations were referenced from “4-H Knitting Skills, Oregon State University Extension Service, May 1973.”
The following sections and patterns were created by the author.
• Page 5 - Yarn & Gauge• Page 8 - Working from a Pattern• Page 9 - Slip Knot• Page 10 - Cast On• Page 11 - Long Tail Cast On• Page 12 - Backwards Loop Cast On• Page 13 - Knit Stitch• Page 14 - Purl Stitch• Page 15 - Knit Increases• Page 15 - Increasing 1 Stitch• Page 15 - Eyelet Increase or Yarn
• Page 1 - Teaching Your Love of Knitting to Kids (“Ten Tips from the Pros”)
• Page 2 - Knitting Tools• Page 22 - Patterns: Knitted Nesting Pincushion• Page 24 - Patterns: Double Yarn Knit Slippers
• Page 6 - Rolling Yarn into a Ball that Pulls from Center• Page 23 - Patterns: Pot Holder/Hotpad• Page 25 - Patterns: Diagonal Knit Dishcloth• Page 26 - Patterns: Holes and Ridges Knitted Dishcloth• Page 27 - Patterns: Knitted Stocking Cap• Page 28 - Patterns: Garter Stitch Scarf• Page 29 - Patterns: Mittens• Page 31 - Patterns: Pompoms
• Page 16 - Make 1 Stitch• Page 17 - Decreases• Page 17 - Knit 2 Together• Page 17 - Slip, Slip Knit• Page 18 - Bind Off• Page 19 - Joining New Yarn• Page 20 - Assembly• Page 20 - Mattress Stitch Seam• Page 21 - Weave In Ends
The following section is referenced from www.utah4-h.org
• Page 32 - Judging Scoresheet
Utah State University is committed to providing an environment free from harassment and other forms of illegal discrimination based on race, color, religion, sex, national origin, age (40 and older), disability, and veteran’s status. USU’s policy also prohibits discrimination on the basis of sexual orientation in employment and academic related practices and decisions. Utah State University employees and students cannot, because of race, color, religion, sex, national origin, age, disability, or veteran’s status, refuse to hire; discharge; promote; demote; terminate; discriminate in compensation; or discriminate regarding terms, privileges, or conditions of employment, against any person otherwise qualified. Employees and students also cannot discriminate in the classroom, residence halls, or in on/off campus, USU-sponsored events and activities. This publication is issued in furtherance of Cooperative Extension work, acts of May 8 and June 30, 1914, in cooperation with the U.S. Department of Agriculture, Noelle E. Cockett, Vice President for Extension and Agriculture, Utah State University.

35
SMART PHONE TAGSHere are the website addresses to the Microsoft Tags®.
• Page 5 - Yarn & Gauge Measuring Knit Gauge - http://bit.ly/HqoTKK • Page 8 - Working from a Pattern Learn How to Read Multiples in Knit - http://bit.ly/Ifd9uv Reading a Knit Pattern - http://bit.ly/HuVfD1 • Page 9 - Slip Knot Knit Getting Started - http://bit.ly/Hvxxvk • Page 10 - Cast On Casting on Methods - http://bit.ly/Hvxxvk• Page 13 - Knit Stitch Learn How to Knit Stitch - http://bit.ly/HxG4Jl • Page 14 - Purl Stitch Purl Stitch - http://bit.ly/HvDymH • Page 17 - Decreases Learn How to Make a Slip, Slip Knit (ssk) Decrease - http://bit.ly/I5y9l7 • Page 18 - Bind Off Learn Four Ways of Binding Off - http://bit.ly/IhiO3c • Page 20 - Mattress Stitch Seam Seaming Knitting - http://bit.ly/HvDL9r • Page 21 - Weave in Ends Weaving in Ends - Knit - http://bit.ly/m2VdIY • Page 27 - Patterns: Knitted Stocking Cap Knit Ribbing - http://bit.ly/HBtV9R

36
NOTES

37
NOTES

KNITTINGH A N D B O O K
THE 4-H
By Debra Proctor & Susan Haws
4H/Sewing&Textiles/2012/02pr