Embed Size (px)
Citation preview
1
ROUGH COPY
Teo’s small book of grafting cacti
Figure 1: Work in progress, Lophophora to Opuntia graft .
2
This is a small book containing what I believe to be the keys to grafting cacti. My
experience is generally with Lophophora sp as the scions and so unless otherwise
stated this is what I am referring to. There is no ‘correct’ way of grafting just a way
that works for you, what is mentioned here is what works for me in my climate. I live
in Tropical North Queensland, Australia, where the weather is generally hot and
humid. My setup is explained further into the book but I will start now by saying that
I grow under lights. So the key to grafting as far as I’m concerned is practise and
experimentation, there are few boundaries on what can be done and I suggest people
just do it rather then sit around discussing it all day, more can be learned through
experimentation than I can share in this book. Using the methods I describe here and
those obtained through your own experimentation, you will hopefully have a near
endless supply of Lophophora plants.
This book is free to distribute to all. All photos in this book are my own unless stated,
please ask my permission before using them elsewhere. Throughout this book I have
used the old nomenclature Trichocereus, this genus is now included in Echinopsis.
The sections covered in this book are:
Why Graft?
Grafting Basics
Choice of Stock
Growing Pereskiopsis
Sowing Seed
Grafting to Pereskiopsis
Pollination
Re-grafting to Other Stock
De-grafting/ Taking Cuttings

3
Why Graft?
The reasons for grafting are personal and can widely vary, here are some reasons why
one might decide to graft:
1) Increased seed production
2) Vegetative propagation
3) To make plant more hardy to particular conditions
4) Preservation of albino or other mutations
5) Because one likes the look of grafted plants
6) Because you can
Some people graft in order to shorten the length of time required from seed to
ingestion of psychoactive plants such as peyote and san pedro, this I believe is not a
good reason as there is no evidence to suggest that increased growth correlates with
increased alkaloid content, that said there is no evidence to suggest the opposite is
true, just popular opinion. Many people also like to graft seedlings of fast growing
species such as Trichocereus sp, this to me seems pointless as they are so fast anyway,
as before grafting these for increased alkaloid content seems silly to me. I do however
see value in grafting a few to see what the younger seedlings will look like when
older, thus allowing one a better identification earlier, likewise they could be used for
practise grafts or grafted for the hell of it. If one wants to grow mescaline containing
Trichocereus for ingestion my advice is find a clone of already known high potency
and buy as many cuttings as you can afford and propagate ruthlessly, in no time 10
cuttings can be turned into 50+ plants.
Now that that has been cleared up I will
discuss how reasons 1,2,3 and 4 above could
be of use to you. By grafting plants the time
between germination and flowering is
drastically reduced, therefore giving
increased seed production and concurrently
increased propagation by seed, your very
own seed factories. Grafting also initiates a
lot of pupping even in plants normally of
solitary nature. The reason for the pupping is
that that scion is slower growing then the
stock, this causes a build up of hormones
responsible for shoot production (similar to
when you pinch the tip of a plant and it
produces axillary buds). This excessive
pupping can be put to good use as it provides
excellent material for further grafts or for
cuttings to be rooted, this allows for an
increase in vegetative propagation.
The cultivation requirements of grafted
plants are mostly those of the stocks,
therefore it is possible to tune plants to your
own growing requirements by selecting the
appropriate grafting stock.
Figure 2: Lophophora williamsii solitary
form pupping like crazy
Figure 3: Caespitose Lophophora
williamsii pupping like crazy
(Photo from Gerbil)

4
Some cacti are albino, meaning they lack chlorophyll,
and will die after all their food reserves have been
consumed as they are unable to photosynthesise. Such
plants can be kept alive by grafting as the stock
photosynthesises and nutrients are passed onto the albino
scion. Like the albino plants, variegated plants lack
chlorophyll but only in certain areas leading to a speckled
appearance. Some plants are so highly variegated that
they cannot survive on their own and like albino plants
require grafting. A note on cristate plants, I had a cristate
Trichocereus pachanoi which reverted to normal growth
under lights so its possible that the light spectrum was the
culprit.
Whilst some people do not like the look of grafted plants I still highly recommend
that people graft as it allows one to become self sufficient in seed production. It also
adds an element of forgiveness to the plants and even the most experienced growers
lose plants to rot.
Figure 4: Variegated
Trichocereus cuzcoensis

5
Grafting Basics
Grafting in horticulture is defined as the joining of two separate structures so that
tissue regeneration occurs forming a union and the united pieces grows as one plant.
Some common terminologies encountered include:
Scion: The material taken from one plant and placed on top of the rootstock.
Rootstock: The base of the graft upon which the scion is placed. Sometimes
shortened to stock.
Vascular tissue: The tissue responsible for conduction of water and nutrients
in plants. In cacti this tissue takes the form of rings.
Cambium: Meristematic tissue in the stems of plants which divides to
produces xylem on the inside and phloem on the outside, responsible for
increase in girth. Is situated inside vascular tissue.
The process of grafting involved cutting the rootstock and the
scion in a way that they fit together like pieces of a jigsaw
puzzle. The cambium layer of each component must overlap as
it is this layer that is capable of healing the connecting wounds
and forming conductive vascular tissue. As the cambium is
inside the vascular tissue overlap of the vascular rings is
sufficient enough to provide a union.
Figure 6: Left is the cut stock, note the circular vascular tissue near the centre of the cactus.
Middle shows the cut scion with vascular tissue. Right shows the subsequent union.
The scion may experience significant water loss as the vascular tissue is not yet
conductive therefore it is advisable to place the graft into an area of high humidity.
Pressure may have to be exerted on the graft in order for the surfaces to stay in
contact as the plants dehydrate. As it is the scion you wish to grow, any shoots
produced from the rootstock should be removed as soon as possible as these shoots
decrease the available nutrients for the scion.
Figure 5: Schematic of
overlapping vascular tissue

6
Figure 7 shows a number of ways that the scion and rootstock can be cut and
arranged. The possibilities are only limited by the presence of vascular tissue and the
imagination of the grafter.
Figure 7: Possible grafting arrangements.

7
Choice of Stock1
Figure 8: Some Trichocereus sp to be used as stock plants
Practically any other cactus can be used as a stock for grafting, some common types
will be listed with their properties below, but I would like to outline a few parameters
that I believe are important to consider in choosing stock:
1) Growth rate
2) Cultivation requirements
3) Life time
4) Availability
5) Other
The first one is obvious, why graft a plant onto a slower growing plant apart from
doing it for the hell of it, or for some sort of gene transfer from stock to scion. The
growth rate of the stock should be fast to maximise to growth of the scion. Factors
that affect growth rate of scion include the size and type of the scion. Unlike grafting
woody vascular plants with leaves cacti are essentially large photosynthetic columns
or blobs. When grafting with normal plants all branches produced by the stock are
removed therefore the stock only plays a sequestering role where as the scions role is
completely photosynthetic. As cacti have photosynthetic bodies the stocks act as the
roots but also photosynthesise therefore providing added benefits not found in other
plants. The larger the cactus the larger the photosynthetic area therefore the more
growth could be expected from the scion. Many people say that it is the size of the
root ball that counts - and they are not wrong - as size of root ball will correlate to the
amount of photosynthetic area it is providing for.
The cultivation requirements of the stock must be considered, no point using a cold
susceptible stock plant in a cold climate. Some stocks also require a lot of water to be
kept at grafting prime and therefore would not do well in a drought.
The different stock plants have different lifetimes, by lifetimes I mean the length of
time the stock is able to support the scion before it goes woody.
1 Note I use the word stock in two contexts, one as was defined above; as the bottom part of a graft or
root stock; and the other refers to stock plants; which are generally large plants from which cuttings or
seed are taken to maintain plant numbers.
8
Availability is more important than you think, if you have 1000000 plants to graft
(could I be so lucky) then the last thing you want to do is have to pay the excessive
prices charged for Trichocereus in order to obtain enough stocks. Around this area we
have a lot of Opuntia and Cereus growing wild, both of these are great stocks and as
they are readily available and free they quickly become a contender when I choose my
stocks. Another thing contributing to availability is how fast can they be propagated,
the faster they can be propagated the easier it is to maintain numbers yourself.
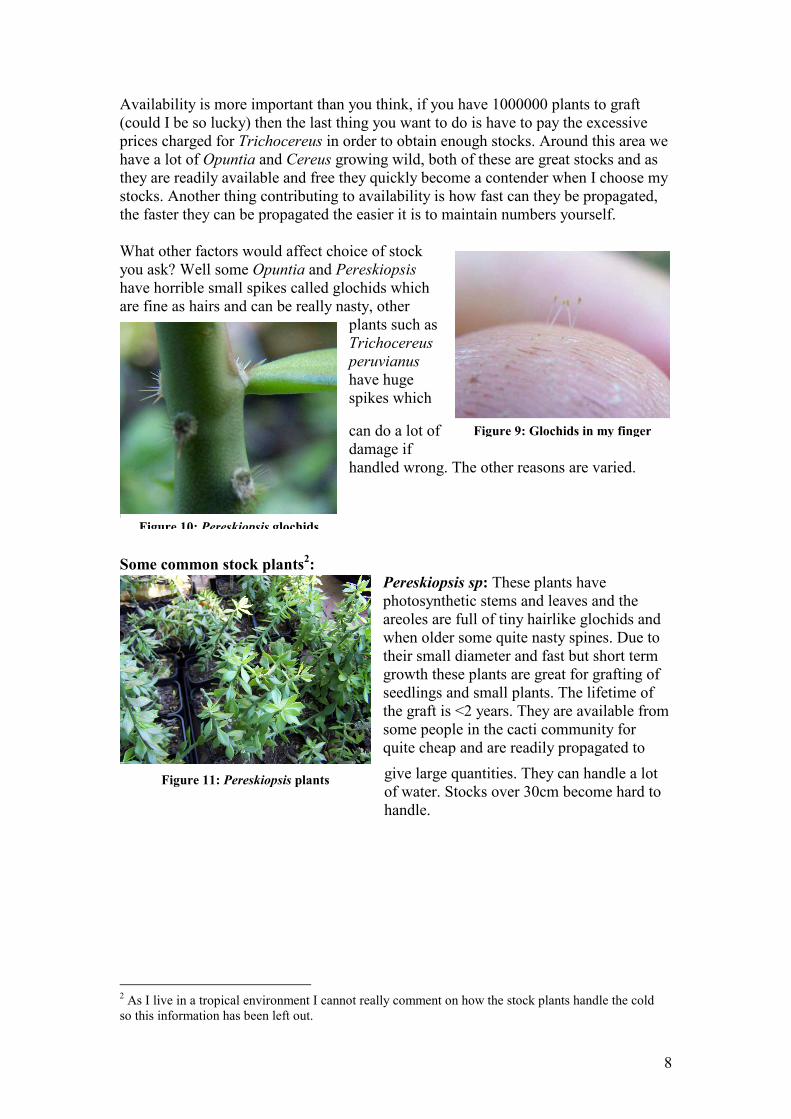
What other factors would affect choice of stock
you ask? Well some Opuntia and Pereskiopsis
have horrible small spikes called glochids which
are fine as hairs and can be really nasty, other
plants such as
Trichocereus
peruvianus
have huge
spikes which
can do a lot of
damage if
handled wrong. The other reasons are varied.
Some common stock plants2:
Pereskiopsis sp: These plants have
photosynthetic stems and leaves and the
areoles are full of tiny hairlike glochids and
when older some quite nasty spines. Due to
their small diameter and fast but short term
growth these plants are great for grafting of
seedlings and small plants. The lifetime of
the graft is <2 years. They are available from
some people in the cacti community for
quite cheap and are readily propagated to
give large quantities. They can handle a lot
of water. Stocks over 30cm become hard to
handle.
2 As I live in a tropical environment I cannot really comment on how the stock plants handle the cold
so this information has been left out.
Figure 9: Glochids in my finger
Figure 10: Pereskiopsis glochids
Figure 11: Pereskiopsis plants

9
Trichocereus sp: Large columner cacti which have
plants with small to no spines, T. pachanoi and T.
scopulicola, to plants with large fierce spines, T.
peruvianus and T. bridgesii. The diameter ranges
with age and growing conditions but T. scopulicola
is renound for its large diameter. The entirety of my
original seedling grafts onto Trichocereus failed and
none have been attempted since, there are people that
graft seedlings onto these plants with success. These
plants do not mind water. They are reasonable quick
to propagate and growth up to 1cm a week when
watered and fertilised regularly is common. These
stocks seem to have an unlimited lifetime as I have
yet to hear of anyone whose plants went corky and
have not experience this myself. There is essentially
unlimited stock height.
Opuntia sp: The pad like structures of opuntia can be
covered in glochids making them hard to handle and
the vascular tissue in these pads is located quite close
to the edge of the pad meaning a good overlap on a
large scion would be hard to get. Seedlings have taken
ok to grafting onto
Opuntia. They don’t
mind water at all. Stock
height is essentially
unlimited but generally only one pad is removed
therefore limiting height to the size of the pads. They
are fast growers and as they use to be a nasty weed in
Australia they are readily found in the wild. I’m unsure
of the lifetime of these grafts as I do not frequently use
them.
Hylocereus sp: Triangular stems with small
manageable spines, the plant has a vine like
habit. Commonly encountered as the stocks
on the novelty lollipop cactus with the albino
Gymnocalycium sp scions. Easy to grow and
propagate and can handle lots of water.
Supposedly good for grafting seedlings,
results so far are not good. Lifetime of the
graft is not long term. As the plants grow
their girth increases and decreases and so the
size of the stocks is limited to the length
between sections of small girth.
Figure 12: Trichocereus
pachanoi plant
Figure 14: Opuntia plant
Figure 13: Opuntia with
grafted Trichocereus seedlings
Figure 15: Hylocereus plant

10
Cereus: Similar to Trichocereus except that the
diameter is much less. Very common garden cactus.
In my opinion Pereskiopsis represents the best choice for seedling grafts as it provides
rapid seedling growth on par or better then the others but the plants are much more
easily propagated and grow a lot faster therefore its easy to be self sufficient.
Figure 16: Cereus plant

11
Growing Pereskiopsis
Figure 17: Pereskiopsis stock plants
With any grafted plant you should treat the graft as you would the stock plant,
therefore it becomes vital to know the how to cultivate the stocks. This section is
purely on Pereskiopsis as much has been written about growing the other stocks. This
is only what I myself has found works well under my conditions and I cannot stress
how important it is for you to experiment rather then taking what I say as gospel.
Pereskiopsis are easily propagated by cuttings, they do grow from seed but I have
never seen seed offered and as I already said they
grow so easily from cuttings. There are two methods
of vegetative propagation that I have used for
Pereskiopsis and the change from the first to the
second was only due to my laziness of not wanting to
double handle the plants, once for rooting then again
for re-potting. In both methods and anytime when
taking cuttings of any plant use a sharp blade to make
the cuts, the sharper it is the less tissue damage.
The first method I use requires a container filled with clean coarse sand and water into
which the fresh cuttings were placed, sometimes I did not even use the sand just
placed the cuttings in the water. I would use enough water to cover the sand and it is
important that the water be replaced frequently. During the first day mucilaginous
material was exuded from the cuts so I would replace this water with fresh water two
times during the first day if I were not lazy.
For the second method I would just place the cuttings into some premium potting mix
in the pots I wanted them in (5cm tubes) and then watered from the bottom.
Figure 18: Razor blade for
small plants

12
In both cases I rooted them under cool white fluoro lights but both techniques would
work equally well outside under shade cloth. Roots took less then a week to form and
the temperature was between 25-45oC. Remember EXPERIMENT!!!!!
A method that I used to increase my plant numbers involved cutting above and below
every node whilst leaving the leaf attached, these tiny stumps were placed in the soil
with only the leaf showing and then kept moist. It takes a while be eventually the
node roots and pups producing a new shoot.
Figure 19: Left, single node cutting note areole. Right, single node cutting planted with leaf
exposed.
Now down to cultivation requirements, probably the main point (other then
temperature which is always hot here) is that these plants love water. I use bottom
watering as its easier for lots of plants and I never let it dry out. I also grow them in
shady environment or under lights. Plants grown with little water and in sunny
position will have super mega spines and are very nasty to deal with, as well as that
the nodes are close together and leaves are small and thick. Therefore by growing
them with lots of water and in shady/under lights environment they are much easier to
handle and it makes the whole experience much more pleasant. After they hit about
15 cm there is a distinct preference to lean so to overcome this I plant them close
together thereby providing each other with support.
So lets put this all together as I explain to you my process from before cutting to
ready to graft.
The first thing is building up a collection of stock plants, the job these plants play is to
provide the vegetative material for cuttings. The number of stock plants you need will
correlate with how many cuttings you wish to take at a time. Unused stock plants will
get really crappy after a while so throw them out or place them elsewhere to grow
really big, or even give them away.

13
So I like to pick straight vertical growth about 10-20cm long, remember use sharp
blade for cuttings. I then remove about 10cm worth of leaves and place this treat this
section as per cuttings above burying the cutting up to where the leaves start. The
reason for removing so much leaf material is to provide a deep rooted cutting with
lots of stability, this is more important than you think.
Figure 20: Left, straight 15cm cutting. Middle, leaves removed. Right, plant cutting up to leaves.
I grow the cuttings out under lights where they grow nice and supple and non spiky. I
think it is important to grow the cuttings out under the conditions where you are going
to have them after grafting as leaves are produced adapted to particular environmental
factors and when you change conditions there is only some degree to which the leaves
can adapt, any new leaves grown under the new conditions will be adapted to these
conditions but the stock plant of a graft is not expected to produce any new leaves. I
like to keep my stocks to 20cm, I have tried bigger and they were too unstable to be
worth it.
My light setup for grafts consists of 60cm X 150cm shelves with 4x36watt cool white
fluoro lights, the outside is covered with panda film to reflect the light. I run 18:6 day:
night cycles. See Figure 21 on following page.

14
Figure 21: My light setup
15
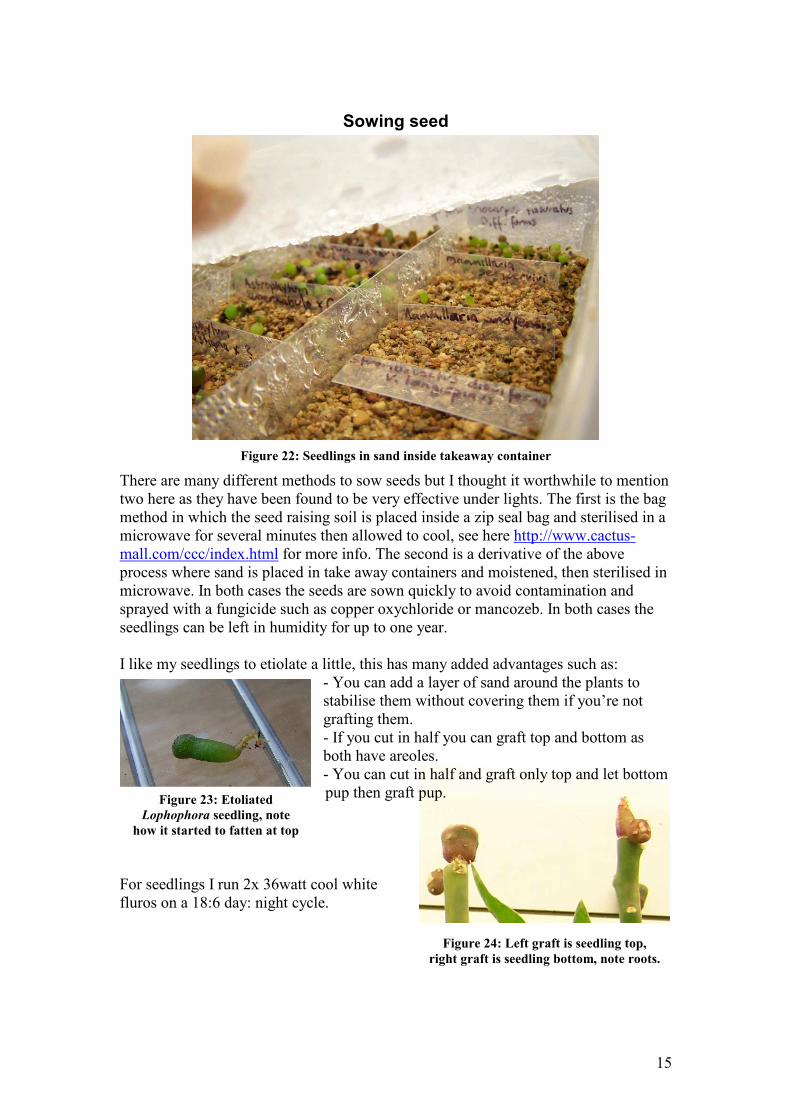
Sowing seed
Figure 22: Seedlings in sand inside takeaway container
There are many different methods to sow seeds but I thought it worthwhile to mention
two here as they have been found to be very effective under lights. The first is the bag
method in which the seed raising soil is placed inside a zip seal bag and sterilised in a
microwave for several minutes then allowed to cool, see here http://www.cactus-
mall.com/ccc/index.html for more info. The second is a derivative of the above
process where sand is placed in take away containers and moistened, then sterilised in
microwave. In both cases the seeds are sown quickly to avoid contamination and
sprayed with a fungicide such as copper oxychloride or mancozeb. In both cases the
seedlings can be left in humidity for up to one year.
I like my seedlings to etiolate a little, this has many added advantages such as:
- You can add a layer of sand around the plants to
stabilise them without covering them if you’re not
grafting them.
- If you cut in half you can graft top and bottom as
both have areoles.
- You can cut in half and graft only top and let bottom
pup then graft pup.
For seedlings I run 2x 36watt cool white
fluros on a 18:6 day: night cycle.
Figure 23: Etoliated
Lophophora seedling, note
how it started to fatten at top
Figure 24: Left graft is seedling top,
right graft is seedling bottom, note roots.

16
Grafting to Pereskiopsis
Figure 25: Some 6 month old Lophophora williamsii grafts
Pereskiopsis have found a niche in the area of seedling grafting. These plants allow
for very rapid growth of seedlings and encourage early flowering and profuse
pupping. So by now you should be aware of how to grow Pereskiopsis successfully
and how to sow seeds. If you have not yet grown and propagated any Pereskiopsis
then I suggest you read no further and master the cultivation of Pereskiopsis before
moving on.
The process of grafting is simple and one only requires five
things, a sharp blade (I prefer a fresh razor blade), a humid low
light place to allow the grafts to take, some stock Pereskiopsis,
some seedlings (preferably healthy and less then 8mm) and a
reasonably steady hand.
In my experience humidity is more important when dealing with seedlings then with
older scions as the seedlings have never experienced low humidity conditions and so
dehydration is rapid. My humidity setup involves a large foam box covered with
plastic, the plants are placed inside with a dish of water and misted when ever I feel
like it. The container is not in any direct light but receives some very diffuse light.
Figure 26: The five things needed for grafting

17
In my opinion the health of the seedlings is more important than their age. A small
note on sterility, feel free to sterilise the instruments before and during the session but
I don’t and have any problems. The only time I sterilise a blade is when it has been in
direct contact with rotting tissue and I plan on taking more cuttings with the same
blade, I normally wash with clean water and soap. Be careful when using alcohol or
swabs to sterilise equipment, especially blades or cutting tools, as un-evaporated
residue will damage plant tissue.
There is much discussion about whether to water or not to water before grafting, I do
not find there is any direct correlation and I have not had any grafts pushed off
because I have watered. Feel free to experiment as it may be something to do with the
environment.
First step is to cut the stock plant, where you cut is a matter of experience so
experiment and practise as much as you can. I like to cut so that the scion is a little
smaller then the diameter of the stock and I always cut just below an areole, this
means when the Pereskiopsis form shoots these shoots will be far enough away from
the scion that they wont interfere with it and can be easily removed.
I then remove the top few leaves as this allows easy access to the top areoles for shoot
removal when required. The seedling is then cut, this cut must be clean and straight so
I do it by drawing the blade back towards me whilst applying downward pressure on
the seedling. Pluck the bit to be grafted off the top of the razor blade and place it on
top of the stock and apply a gentle downward force to expel and air. Some people say
you must slide the scion off the razor onto the stock with one movement so as to not
allow air to get caught, I say this really does not may a difference and is a lot harder
than what I do.
Now stand back and admire your work, too easy yeah? Yes that’s all there is to it!
Now go and place it in some humidity for about a week to allow the graft to take,
during this time leave it and do not poke, prod, take out, or stare at it in an
inappropriate way or the graft may fail. Take the graft out of the humidity and place it
into the growing conditions, treat like a Pereskiopsis and growth of the scions should
be noticeable within 2 weeks. The initial growth is likely just a bloating or swelling of
the scion, after about 4 weeks the graft will start to grow.
Housekeeping of your grafts is simple, every so often remove the
shoots that the Pereskiopsis produces, initially a lot of shoots
will be produced but as the scions starts to grow more rapidly the
frequency will decrease. This is because the initially there is a
build up of hormones as the scion is not growing as fast as the
stock would like, these hormones cause the stock to pup, as the
scion starts to get bigger and grow faster it uses more of the
hormones and so less re-shooting occurs. I advise that you wait
for a shoot to be fully developed ie. having a visible stem before
you remove the shoot, as before this it is possible to just damage
the meristem and many more shoots can appear.
Figure 27: Grafted
stock re-shooting

18
If your grafts did not take then you have just obtained a new stock plant that you can
use in the future to obtain more plants for grafting. If they do fail do not be
disheartened just keep trying and keep experimenting until you find what works for
you. You may find grafting at midnight after five days sleep deprivation, naked, with
a monkey may increase your success rate, though it may not as well.
For seedlings above 8mm it is still possible to graft onto Pereskiopsis albeit a little
trickier. The process I use is that of wedge grafting. The first step in doing a wedge
graft is cutting the stock at an appropriate height, I cut mine lower then when doing
seedlings as the scions are much heavier and prone to falling off if the stock wobbles,
shall we say 10cm high. Two cuts are then made to the stock to form a point, the
angle of the cuts should be such that they are about 1-1.5cm long. The scion is then
chosen and the bottom most section of root is
removed and a cut is made along the vascular
tissue (perpendicular to initial cut). The scion is
then pushed down onto the stock with the stock
causing the scion to flare out as the pieces of the
puzzle fit together. Remember to overlap the
vascular tissue, I do this by tilting the scion to the
right or left a little. A weight can be placed on top
of the scion or it can be left as is. Humidity is not
required but may be advisable if the growing
conditions are harsh.
These grafts take longer to show signs of taking, again look for bloating.
Figure 28: Wedge graft
19
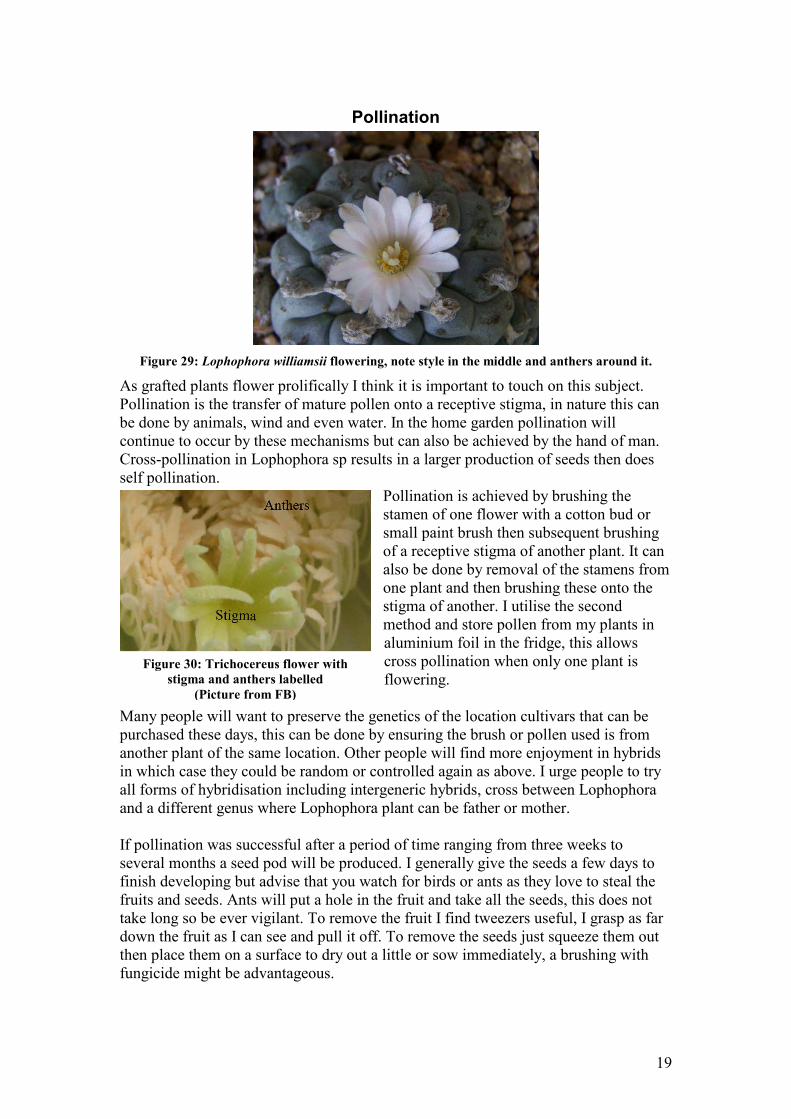
Pollination
Figure 29: Lophophora williamsii flowering, note style in the middle and anthers around it.
As grafted plants flower prolifically I think it is important to touch on this subject.
Pollination is the transfer of mature pollen onto a receptive stigma, in nature this can
be done by animals, wind and even water. In the home garden pollination will
continue to occur by these mechanisms but can also be achieved by the hand of man.
Cross-pollination in Lophophora sp results in a larger production of seeds then does
self pollination.
Pollination is achieved by brushing the
stamen of one flower with a cotton bud or
small paint brush then subsequent brushing
of a receptive stigma of another plant. It can
also be done by removal of the stamens from
one plant and then brushing these onto the
stigma of another. I utilise the second
method and store pollen from my plants in
aluminium foil in the fridge, this allows
cross pollination when only one plant is
flowering.
Many people will want to preserve the genetics of the location cultivars that can be
purchased these days, this can be done by ensuring the brush or pollen used is from
another plant of the same location. Other people will find more enjoyment in hybrids
in which case they could be random or controlled again as above. I urge people to try
all forms of hybridisation including intergeneric hybrids, cross between Lophophora
and a different genus where Lophophora plant can be father or mother.
If pollination was successful after a period of time ranging from three weeks to
several months a seed pod will be produced. I generally give the seeds a few days to
finish developing but advise that you watch for birds or ants as they love to steal the
fruits and seeds. Ants will put a hole in the fruit and take all the seeds, this does not
take long so be ever vigilant. To remove the fruit I find tweezers useful, I grasp as far
down the fruit as I can see and pull it off. To remove the seeds just squeeze them out
then place them on a surface to dry out a little or sow immediately, a brushing with
fungicide might be advantageous.
Figure 30: Trichocereus flower with
stigma and anthers labelled
(Picture from FB)

20
Re-grafting to other stock
As I mentioned in the grafting stocks section different stocks have different
properties, perhaps the most important long-term property is that of lifetime.
Pereskiopsis grafts have a short lifetime before the graft becomes corky and the scion
is deprived of nutrients. That is why I recommend re-grafting from the Pereskiopsis to
a more suitable stock such as Trichocereus after an appropriate time.
Step 1: Get plant to be
regrafted and cut
Pereskiopsis just below
the scion.
Step 2: Remove large pups and regraft these onto
some stock. You do not need to do this. Graft the
pups then cut the main button in half and graft the top
and bottom onto different stocks.
Step 3: Secure scions to stocks,
I use grafting tape, and place
them in a cool shaded location
to heal.
Figure 31: Lophophora
graft
Figure 32: Bottom of ex-graft
showing Pereskiopsis join
Figure 33: Pups removed
Figure 34: Ex-graft cut into two,
bottom and top.
Figure 35: Some re-grafted
Lophophora
21
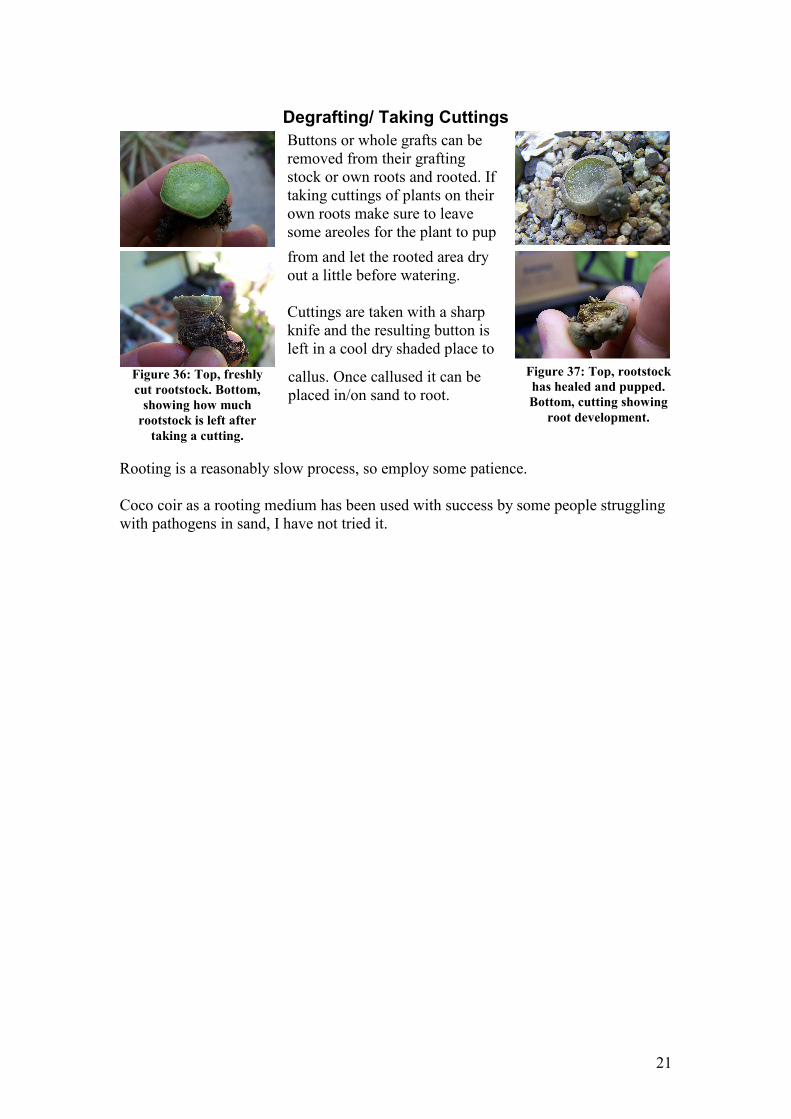
Degrafting/ Taking Cuttings
Buttons or whole grafts can be
removed from their grafting
stock or own roots and rooted. If
taking cuttings of plants on their
own roots make sure to leave
some areoles for the plant to pup
from and let the rooted area dry
out a little before watering.
Cuttings are taken with a sharp
knife and the resulting button is
left in a cool dry shaded place to
callus. Once callused it can be
placed in/on sand to root.
Rooting is a reasonably slow process, so employ some patience.
Coco coir as a rooting medium has been used with success by some people struggling
with pathogens in sand, I have not tried it.
Figure 36: Top, freshly
cut rootstock. Bottom,
showing how much
rootstock is left after
taking a cutting.
Figure 37: Top, rootstock
has healed and pupped.
Bottom, cutting showing
root development.

22
Final thoughts:
For a long time now in Australia Lophophora plants and seeds prices have been
excessive, though of late the prices have come down a little. Grafting allows mass
seed and plant production and provides good plants for the trial of hybridisation, both
intra and intergeneric, and general experimentation. Through the sharing of pollen,
seed and plant material the price of these plants will hopefully become more
reasonable, and as the price becomes reasonable and the number of plants in peoples
collections increase so to will the ability to use this sacrament as it was intended. If
we work together with grafting and generosity I believe this dream could become a
reality in the near future.
I would like to thank those crazy fellows at the nook who
brought Pereskiopsis grafting to my attention and
Phillistine for doing all the Opuntia seedling grafts and
stuff and Indy for guarding my laboratory from pirates
and aliens.
Remember EXPERIMENT!!!
Teonanacatl
I can be contacted via
Figure 38: Indy aka
K. Cactus (Keeper of
the Cactus)

23
PICTURES to TAKE
Step by step
- Stock plant tip
- Cut tip below areole
- Remove leaves
- Seedling
- Seedling cutting
- Seedling cut
- Placing on stock
- Push to expel air
- Done graft
Wedge grafting step by step
- Larger seedling
- Cutting stock
- Cutting seedling
- Push on
- Finished.
Seedpod