Embed Size (px)
Citation preview

Technology Education DepartmentRhode Island College
Spring 2008
Candidate 1 EXEMPLARY
FEINSTEIN SCHOOL OF EDUCATION AND HUMAN DEVELOPMENT
EXIT PORTFOLIO RUBRIC COVER SHEET
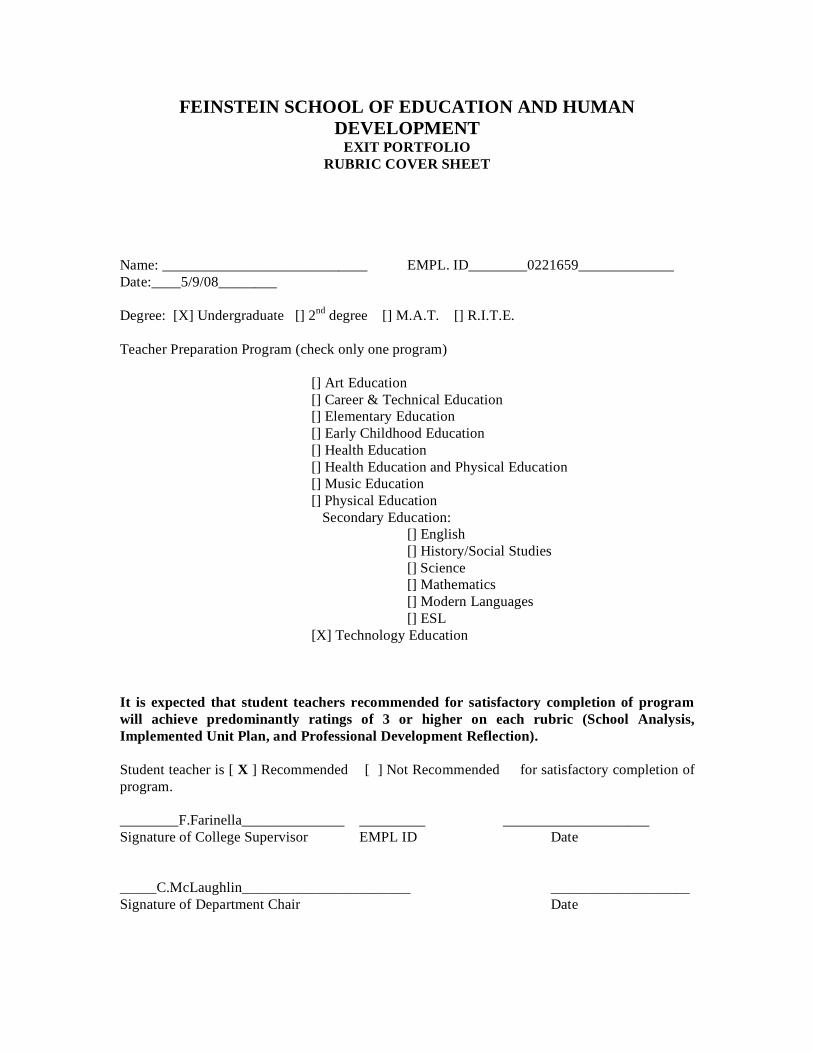
Name: ____________________________ EMPL. ID________0221659_____________ Date:____5/9/08________ Degree: [X] Undergraduate [] 2nd degree [] M.A.T. [] R.I.T.E. Teacher Preparation Program (check only one program)
[] Art Education [] Career & Technical Education [] Elementary Education [] Early Childhood Education
[] Health Education [] Health Education and Physical Education [] Music Education [] Physical Education Secondary Education: [] English [] History/Social Studies [] Science [] Mathematics [] Modern Languages [] ESL [X] Technology Education It is expected that student teachers recommended for satisfactory completion of program will achieve predominantly ratings of 3 or higher on each rubric (School Analysis, Implemented Unit Plan, and Professional Development Reflection). Student teacher is [ X ] Recommended [ ] Not Recommended for satisfactory completion of program. ________F.Farinella______________ _________ ____________________ Signature of College Supervisor EMPL ID Date _____C.McLaughlin_______________________ ___________________ Signature of Department Chair Date
2
SECTION ISCHOOL ANALYSIS . . . . . . . . . . . . . . . . . . . . . . . . . . . . . . . . . . . . .4
School HandbookSALT ReportInfo Works Report
A. Student Teaching Classrooms . . . . . . . . . . . . . . . . . . . . . . . . . . . . 7
B. Administrative Structure . . . . . . . . . . . . . . . . . . . . . . . . . . . . . . . . 8
C. Student Teaching Policies . . . . . . . . . . . . . . . . . . . . . . . . . . . . . . . 11
SECTION II UNIT PLAN . . . . . . . . . . . . . . . . . . . . . . . . . . . . . . . . . . . . . . . . . . . . 12
A. Unit Description/Abstract . . . . . . . . . . . . . . . . . . . . . . . . . . . . . . 13
B. Unit Table of Contents. . . . . . . . . . . . . . . . . . . . . . . . . . . . . . . . . . . . . . . 14
C. Unit Goal . . . . . . . . . . . . . . . . . . . . . . . . . . . . . . . . . . . . . . . . . . . . . . . . . . . 15
D. Unit Structure . . . . . . . . . . . . . . . . . . . . . . . . . . . . . . . . . . . . . . . . . . . . . . .15
Lesson One - DEVELOPING A BASIC TITLE BLOCK
Lesson Two – BASIC ORTHOGRAPHIC VIEW DRAWING TECHNIQUES
Lesson Three – BASIC ISOMETRIC VIEW DRAWING TECHNIQUES
Lesson Four – BASIC SECTIONAL 3-VIEW DRAWING TECHNIQUES
Lesson Five – BASIC SECTIONAL ISOMETRIC DRAWING TECHNIQUES
Lesson Six – EXPLODED ASSEMBLY DRAWINGS
C. Central Ideas . . . . . . . . . . . . . . . . . . . . . . . . . . . . . . . . . . . . . . . . . . . . . . . . . 16
a. Central Question of the Study . . . . . . . . . . . . . . . . . . . . . . . . . . . . . . . . 16
b. Content Outline . . . . . . . . . . . . . . . . . . . . . . . . . . . . . . . . . . . . . . . . . . . 17
c. Semantic Map . . . . . . . . . . . . . . . . . . . . . . . . . . . . . . . . . . . . . . . . . . . . 18
3
d. Appropriate Standards Achieved . . . . . . . . . . . . . . . . . . . . . . . . . . . . . . 19 D. Learning Objectives . . . . . . . . . . . . . . . . . . . . . . . . . . . . . . . . . . . . . . . . . 20 E. Sequence and Timeline . . . . . . . . . . . . . . . . . . . . . . . . . . . . . . . . . . . . . . 21 F. Assessment . . . . . . . . . . . . . . . . . . . . . . . . . . . . . . . . . . . . . . . . . . . . . . . . . . 23
G. Resources . . . . . . . . . . . . . . . . . . . . . . . . . . . . . . . . . . . . . . . . . . . . . . . . . . . 24
H. Individual daily lesson plans for the unit . . . . . . . . . . . . . . . . . . . . . 25 (Six lesson plans following the department format provided)
I. Appendix . . . . . . . . . . . . . . . . . . . . . . . . . . . . . . . . . . . . . . . . . . . . . . . . . . . . . 25
(PPT Presentations, Drawings, Handouts, Tests)
SECTION III – CASE STUDY . . . . . . . . . . . . . . . . . . . . . . . . . . . . . . . . . 26
A. Description of Students . . . . . . . . . . . . . . . . . . . . . . . . . . . . . . . . 26 B. Overview of Instructional Goals . . . . . . . . . . . . . . . . . . . . . . . . . .28
C. Portfolio of Students’ Work . . . . . . . . . . . . . . . . . . . . . . . . . . . . .30
D. Assessment . . . . . . . . . . . . . . . . . . . . . . . . . . . . . . . . . . . . . . . . . .31
E. Commentary . . . . . . . . . . . . . . . . . . . . . . . . . . . . . . . . . . . . . . . . .33
SECTION IV – CLASSROOM MANAGEMENT PLAN . . . . . . . . . . . . 35
A. Philosophy Statement . . . . . . . . . . . . . . . . . . . . . . . . . . . . . . . . . 35 B. Management of Materials . . . . . . . . . . . . . . . . . . . . . . . . . . . . . . 35 C. Classroom Rules . . . . . . . . . . . . . . . . . . . . . . . . . . . . . . . . . . . . . 36
SECTION V – REFLECTIVE ESSAY . . . . . . . . . . . . . . . . . . . . . . . . . . . 39
PLEASE NOTE: Underlined colored text appearing throughout this document represents hyperlinks. Please “control-click” these links in order to access the documents to which they refer. You will need Adobe Acrobat Reader 8.1 or higher in order to open these files.
4
exit portfolio\school analysis scoring rubric.doc12/09/05
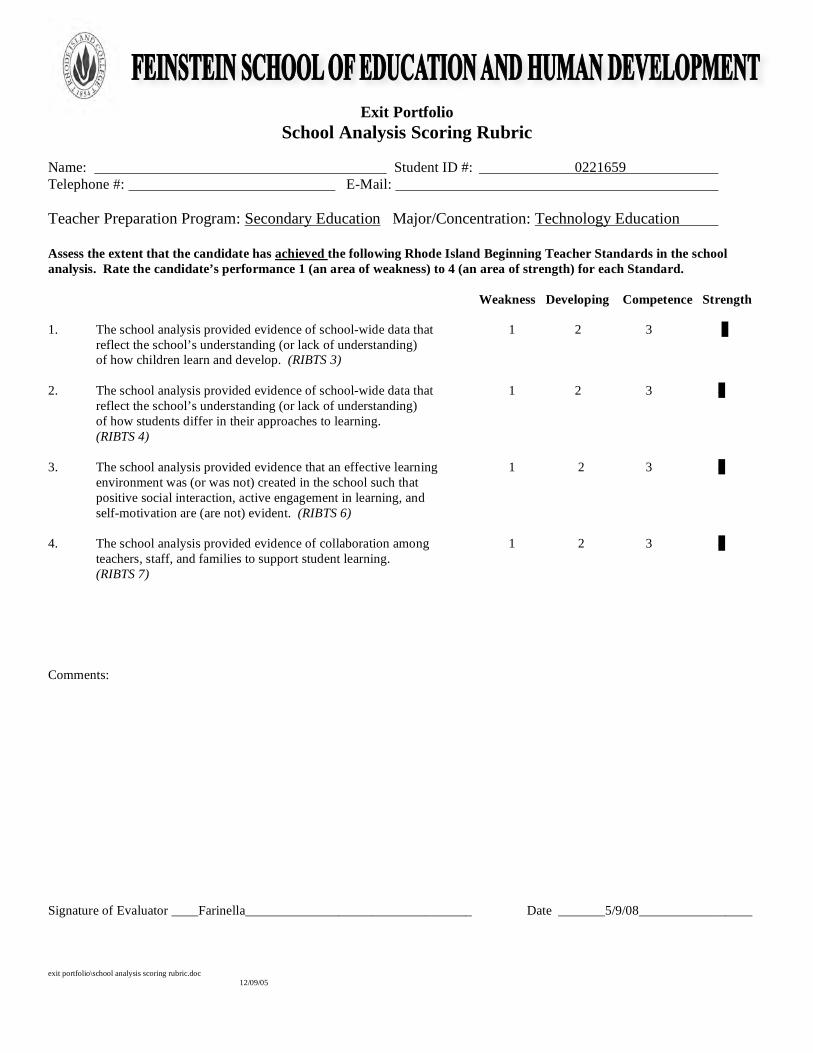
Exit PortfolioSchool Analysis Scoring Rubric
Name: Student ID #: 0221659Telephone #: E-Mail:
Teacher Preparation Program: Secondary Education Major/Concentration: Technology Education
Assess the extent that the candidate has achieved the following Rhode Island Beginning Teacher Standards in the school analysis. Rate the candidate’s performance 1 (an area of weakness) to 4 (an area of strength) for each Standard.
Weakness Developing Competence Strength
1. The school analysis provided evidence of school-wide data that 1 2 3 4reflect the school’s understanding (or lack of understanding) of how children learn and develop. (RIBTS 3)
2. The school analysis provided evidence of school-wide data that 1 2 3 4reflect the school’s understanding (or lack of understanding) of how students differ in their approaches to learning.(RIBTS 4)
3. The school analysis provided evidence that an effective learning 1 2 3 4
environment was (or was not) created in the school such that positive social interaction, active engagement in learning, and self-motivation are (are not) evident. (RIBTS 6)
4. The school analysis provided evidence of collaboration among 1 2 3 4teachers, staff, and families to support student learning.(RIBTS 7)
Comments:
Signature of Evaluator ____Farinella__________________________________ Date _______5/9/08_________________
exit portfolio\school analysis scoring rubric.doc 12/09/05
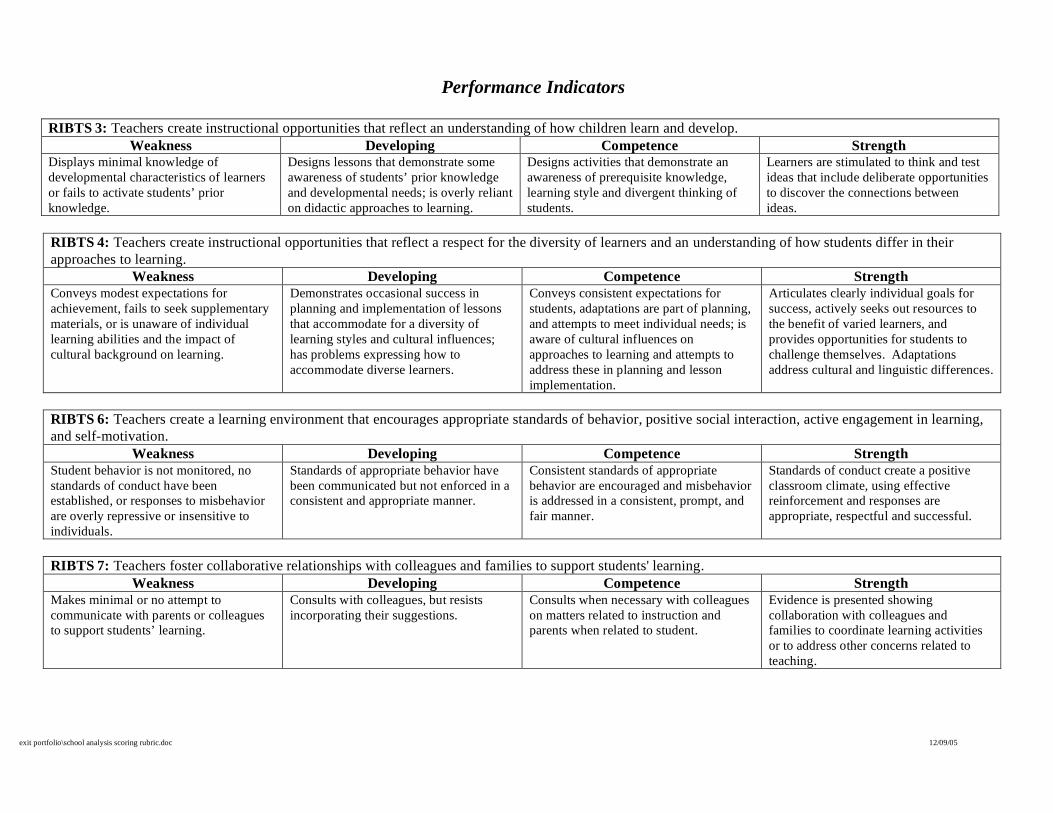
Performance Indicators
RIBTS 3: Teachers create instructional opportunities that reflect an understanding of how children learn and develop.
Weakness Developing Competence Strength Displays minimal knowledge of developmental characteristics of learners or fails to activate students’ prior knowledge.
Designs lessons that demonstrate some awareness of students’ prior knowledge and developmental needs; is overly reliant on didactic approaches to learning.
Designs activities that demonstrate an awareness of prerequisite knowledge, learning style and divergent thinking of students.
Learners are stimulated to think and test ideas that include deliberate opportunities to discover the connections between ideas.
RIBTS 4: Teachers create instructional opportunities that reflect a respect for the diversity of learners and an understanding of how students differ in their approaches to learning.
Weakness Developing Competence Strength Conveys modest expectations for achievement, fails to seek supplementary materials, or is unaware of individual learning abilities and the impact of cultural background on learning.
Demonstrates occasional success in planning and implementation of lessons that accommodate for a diversity of learning styles and cultural influences; has problems expressing how to accommodate diverse learners.
Conveys consistent expectations for students, adaptations are part of planning, and attempts to meet individual needs; is aware of cultural influences on approaches to learning and attempts to address these in planning and lesson implementation.
Articulates clearly individual goals for success, actively seeks out resources to the benefit of varied learners, and provides opportunities for students to challenge themselves. Adaptations address cultural and linguistic differences.
RIBTS 6: Teachers create a learning environment that encourages appropriate standards of behavior, positive social interaction, active engagement in learning, and self-motivation.
Weakness Developing Competence Strength Student behavior is not monitored, no standards of conduct have been established, or responses to misbehavior are overly repressive or insensitive to individuals.
Standards of appropriate behavior have been communicated but not enforced in a consistent and appropriate manner.
Consistent standards of appropriate behavior are encouraged and misbehavior is addressed in a consistent, prompt, and fair manner.
Standards of conduct create a positive classroom climate, using effective reinforcement and responses are appropriate, respectful and successful.
RIBTS 7: Teachers foster collaborative relationships with colleagues and families to support students' learning.
Weakness Developing Competence Strength Makes minimal or no attempt to communicate with parents or colleagues to support students’ learning.
Consults with colleagues, but resists incorporating their suggestions.
Consults when necessary with colleagues on matters related to instruction and parents when related to student.
Evidence is presented showing collaboration with colleagues and families to coordinate learning activities or to address other concerns related to teaching.
5
After spending a great deal of time student teaching at North Smithfield Junior Senior
High School this past semester, I am very impressed with what I have observed, and pleased to
say that my experience here has been a very positive one indeed. Last year I had the opportunity
to volunteer at Del Sesto High School in the Providence School System, and while it was an
enjoyable experience, I noticed a vast difference in the learning climate at each school.
Although North Smithfield High School was built in 1966 and Del Sesto was built in 2002, both
schools are in remarkably good physical condition, both offer free breakfast programs, and both
are rife with the latest technology. Perhaps the major differences between the two schools, and
the probable factors in the difference in learning climate, are the differences in location and
demographics. While it is not the intent of this paper to analyze Del Sesto High School, it is
worth noting these differences when examining the North Smithfield reports.
According to the 2006 Rhode Island School Report Card and the 2005 SALT Report,
North Smithfield High School is classified as “High Performing and Commended.” Upon closer
examination of the SALT and Info Works Reports, and after student teaching at the school on a
daily basis, it comes as no surprise that this school has attained such high standards of
achievement. Unlike Providence, North Smithfield is a fairly affluent, upper-middle-class, rural
community and the student population reflects these demographics. According to the Info
Works Report only 8% of the students are eligible for free lunch; 97% of the students are white;
0% of the students receive ESL/Bilingual services; 82% of the students do not receive special
education services; and 59% of the students’ parents are college graduates. According to the
6
Info Works Connectedness Report, 80% of parents feel that “the school views the parents as
important partners.”
While teaching classes at North Smithfield High School, I noticed how well-behaved and
attentive the students are. After several classes, I mentioned this observation to my cooperating
teacher and he stated that, “One of the things I really appreciate about working here is that you
can teach. I do not have to spend much time at all each day on discipline. I can concentrate
more on teaching.” The students at this school really pay attention and seem very focused and
on-task. My observations and experience here certainly corroborate this teacher’s statement and
the Info Works and SALT Reports indicate that this population of students is very well
positioned and suited to learn at this school. The North Smithfield students have many
“advantages” over their Providence counterparts, the three biggest being income, language,
educational expectations, and educational levels of parents.
Both reports are quite glowing in their accolades for North Smithfield High School. The
only real negative factor made note of in the SALT Report is that North Smithfield Middle
School should be moved to its own separate building, rather than sharing the same facilities with
the high school. In the spring of 2007, North Smithfield broke ground for a new middle school
which will result in more room for both high school and middle school students. In February I
was very fortunate to take a tour of the new middle school with the high school construction
class. The tour was given by the project manager for Gilbane Corporation, the contractor for the
project. This tour was an eye-opening experience which demonstrated that the new school is
going to be an aesthetically pleasing, state-of-the-art facility. The new North Smithfield Middle
School will open in September, 2008. Working in the North Smithfield School system may be
considered by many to be an “ideal” teaching situation and, although there are no “ideal”
situations, it probably is very close to “ideal” in many respects. The SALT team will be
7
visiting North Smithfield this coming year and I look forward to reviewing this new report as
well. By all indications, the school should fare quite well once again.
Room 99, the fabrication lab on the first floor of the school, is a combination wood lab
and classroom. The lab has four separate, large (four feet by four feet) work benches arranged
in two rows forming a large square area. Each table is located in a numbered “work zone” which
has bright yellow lines painted on the floor around the perimeter of each zone. In the back and
along the perimeter of the room, are located several large machine stations such as: shaper,
surface planer, band saw, table saw, three wood lathes, two router/shaper tables, two radial arm
saws, two grinding wheels, jointer, disc sander, spindle sander, and two belt sanders.
The lab is large, spacious, and well stocked with machinery and lumber. The room is
logically laid out and sensibly set up with safety in mind. Each work station area has yellow
safety lines painted around its perimeter as well as a non-slip gripping surface on the floor where
the student operator stands. At every machine tool station there are rules posted for using that
particular tool, as well as the general safety rules such as wearing safety goggles, proper
footwear, proper attire, and proper conduct in the lab. The room also has a very impressive and
substantial ventilation and central dust collection system with intake ports located at each
machine tool station. There is also a projection screen hanging in the lab which is used for
computer and video presentations. At the back of the lab there is a magazine rack that contains
various technical periodicals and manuals. Also, there is a bulletin board with some photographs
of students and their projects.
The CADD class and Web Design class share Room 219 (although not simultaneously). The
classroom is a computer lab located on the second floor of the building and it is fairly large,
spacious, well-lit, and well stocked with the latest technology. Room 219 is logically laid out
8
and sensibly set up. The room is comprised of computer work station areas with thirty-two
brand new Dell computers and three printers (one laser jet, one ink jet, and one large format ink
jet plotter) arranged on long lab benches. The room also has a very impressive smart board and
projection screen setup that is linked to the computers. The high school students sit at their own
workstation computers. All of the work stations have comfortable, wheeled office chairs upon
which the students sit. The students can easily see each other, the smart board, and the
instructor, and they have sufficient work space available at each desk for writing notes. There
are several bookcases and cabinets which are used to store drafting books, and the students’
drawing portfolios. The rules and expectations are posted on the walls along with the school’s
mission statement (please see page 11 for the mission statement). All around the lab there are
colorful posters and magazine clippings on the bulletin board.
The administrative structure of North Smithfield Junior Senior High School is
one which would be considered “traditional,” consisting of a principal, vice-principal as
well as other administrators, teachers, and support staff. The following pages are an
alphabetical listing and outline of the administrative and departmental structure at
North Smithfield Junior Senior High School:
9
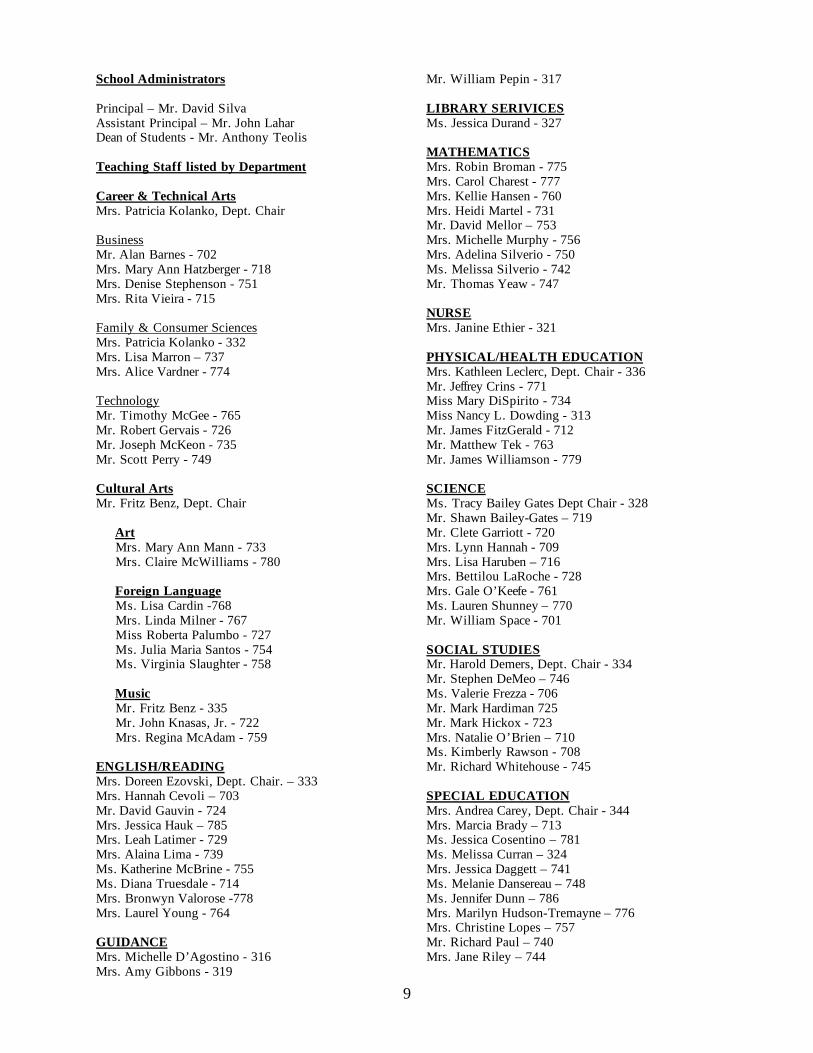
School Administrators Principal – Mr. David Silva Assistant Principal – Mr. John Lahar Dean of Students - Mr. Anthony Teolis Teaching Staff listed by Department Career & Technical Arts Mrs. Patricia Kolanko, Dept. Chair Business Mr. Alan Barnes - 702 Mrs. Mary Ann Hatzberger - 718 Mrs. Denise Stephenson - 751 Mrs. Rita Vieira - 715 Family & Consumer Sciences Mrs. Patricia Kolanko - 332 Mrs. Lisa Marron – 737 Mrs. Alice Vardner - 774 Technology Mr. Timothy McGee - 765 Mr. Robert Gervais - 726 Mr. Joseph McKeon - 735 Mr. Scott Perry - 749
Cultural Arts Mr. Fritz Benz, Dept. Chair
Art Mrs. Mary Ann Mann - 733 Mrs. Claire McWilliams - 780 Foreign Language Ms. Lisa Cardin -768 Mrs. Linda Milner - 767 Miss Roberta Palumbo - 727 Ms. Julia Maria Santos - 754 Ms. Virginia Slaughter - 758
Music Mr. Fritz Benz - 335 Mr. John Knasas, Jr. - 722 Mrs. Regina McAdam - 759 ENGLISH/READING Mrs. Doreen Ezovski, Dept. Chair. – 333 Mrs. Hannah Cevoli – 703 Mr. David Gauvin - 724 Mrs. Jessica Hauk – 785 Mrs. Leah Latimer - 729 Mrs. Alaina Lima - 739 Ms. Katherine McBrine - 755 Ms. Diana Truesdale - 714 Mrs. Bronwyn Valorose -778 Mrs. Laurel Young - 764 GUIDANCE Mrs. Michelle D’Agostino - 316 Mrs. Amy Gibbons - 319
Mr. William Pepin - 317 LIBRARY SERIVICES Ms. Jessica Durand - 327 MATHEMATICS Mrs. Robin Broman - 775 Mrs. Carol Charest - 777 Mrs. Kellie Hansen - 760 Mrs. Heidi Martel - 731 Mr. David Mellor – 753 Mrs. Michelle Murphy - 756 Mrs. Adelina Silverio - 750 Ms. Melissa Silverio - 742 Mr. Thomas Yeaw - 747 NURSE Mrs. Janine Ethier - 321 PHYSICAL/HEALTH EDUCATION Mrs. Kathleen Leclerc, Dept. Chair - 336 Mr. Jeffrey Crins - 771 Miss Mary DiSpirito - 734 Miss Nancy L. Dowding - 313 Mr. James FitzGerald - 712 Mr. Matthew Tek - 763 Mr. James Williamson - 779 SCIENCE Ms. Tracy Bailey Gates Dept Chair - 328 Mr. Shawn Bailey-Gates – 719 Mr. Clete Garriott - 720 Mrs. Lynn Hannah - 709 Mrs. Lisa Haruben – 716 Mrs. Bettilou LaRoche - 728 Mrs. Gale O’Keefe - 761 Ms. Lauren Shunney – 770 Mr. William Space - 701 SOCIAL STUDIES Mr. Harold Demers, Dept. Chair - 334 Mr. Stephen DeMeo – 746 Ms. Valerie Frezza - 706 Mr. Mark Hardiman 725 Mr. Mark Hickox - 723 Mrs. Natalie O’Brien – 710 Ms. Kimberly Rawson - 708 Mr. Richard Whitehouse - 745 SPECIAL EDUCATION Mrs. Andrea Carey, Dept. Chair - 344 Mrs. Marcia Brady – 713 Ms. Jessica Cosentino – 781 Ms. Melissa Curran – 324 Mrs. Jessica Daggett – 741 Ms. Melanie Dansereau – 748 Ms. Jennifer Dunn – 786 Mrs. Marilyn Hudson-Tremayne – 776 Mrs. Christine Lopes – 757 Mr. Richard Paul – 740 Mrs. Jane Riley – 744

10
Superintendent and School Committee Mr. Stephen Lindberg (Superintendent) Robert E. Lafleur (Chair) Christine A. Bonas (Vice Chair) Jean B. Meo (Secretary) Paul E. Vadenais Melissa Flaherty

11
Student and Teacher Policies
In every classroom at North Smithfield Junior Senior High School the school’s Mission
Statement is posted in a highly visible area (usually located) above the classroom white board.
The mission statement of North Smithfield Junior Senior High School is:
The mission of North Smithfield School Jr. Sr. High School is to challenge ALL students to meet high academic and ethical standards within a supportive and safe environment. Students will acquire the skill and knowledge necessary to become self-directed, life-long learners and responsible citizens who demonstrate moral consciousness, personal integrity, and global awareness. At North Smithfield Junior Senior High School, each student receives a Student Handbook
which they must carry on their person at all times. The Student Handbook serves as a student
passbook as well as a school policy handbook covering topics such as:
a) General Information b) Attendance c) Behavior Expectations d) Transportation e) Academics f) School Services g) Athletics
12
Introduction to Computer Aided Drafting and DesignNorth Smithfield High School
Spring 2008
Thomas E. PetterutiRhode Island College
02/08/08
Exit Portfolio.Implemented Unit Plan Scoring Rubric.doc 2/23/2011
Exit Portfolio
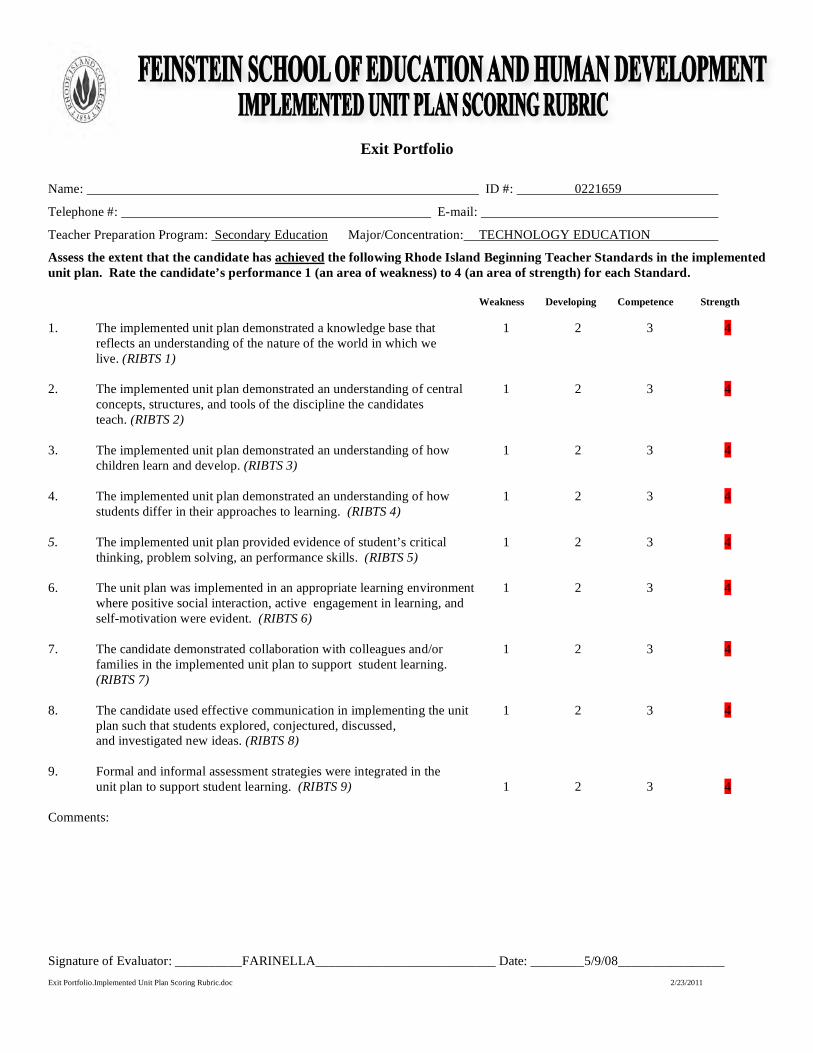
Name: ID #: 0221659
Telephone #: E-mail:
Teacher Preparation Program: Secondary Education Major/Concentration: TECHNOLOGY EDUCATION
Assess the extent that the candidate has achieved the following Rhode Island Beginning Teacher Standards in the implemented unit plan. Rate the candidate’s performance 1 (an area of weakness) to 4 (an area of strength) for each Standard.
Weakness Developing Competence Strength
1. The implemented unit plan demonstrated a knowledge base that 1 2 3 4reflects an understanding of the nature of the world in which we live. (RIBTS 1)
2. The implemented unit plan demonstrated an understanding of central 1 2 3 4concepts, structures, and tools of the discipline the candidates teach. (RIBTS 2)
3. The implemented unit plan demonstrated an understanding of how 1 2 3 4
children learn and develop. (RIBTS 3)
4. The implemented unit plan demonstrated an understanding of how 1 2 3 4students differ in their approaches to learning. (RIBTS 4)
5. The implemented unit plan provided evidence of student’s critical 1 2 3 4thinking, problem solving, an performance skills. (RIBTS 5)
6. The unit plan was implemented in an appropriate learning environment 1 2 3 4where positive social interaction, active engagement in learning, andself-motivation were evident. (RIBTS 6)
7. The candidate demonstrated collaboration with colleagues and/or 1 2 3 4families in the implemented unit plan to support student learning. (RIBTS 7)
8. The candidate used effective communication in implementing the unit 1 2 3 4plan such that students explored, conjectured, discussed, and investigated new ideas. (RIBTS 8)
9. Formal and informal assessment strategies were integrated in the unit plan to support student learning. (RIBTS 9) 1 2 3 4
Comments:
Signature of Evaluator: __________FARINELLA___________________________ Date: ________5/9/08________________
Exit Portfolio.Implemented Unit Plan Scoring Rubric.doc 2/23/2011
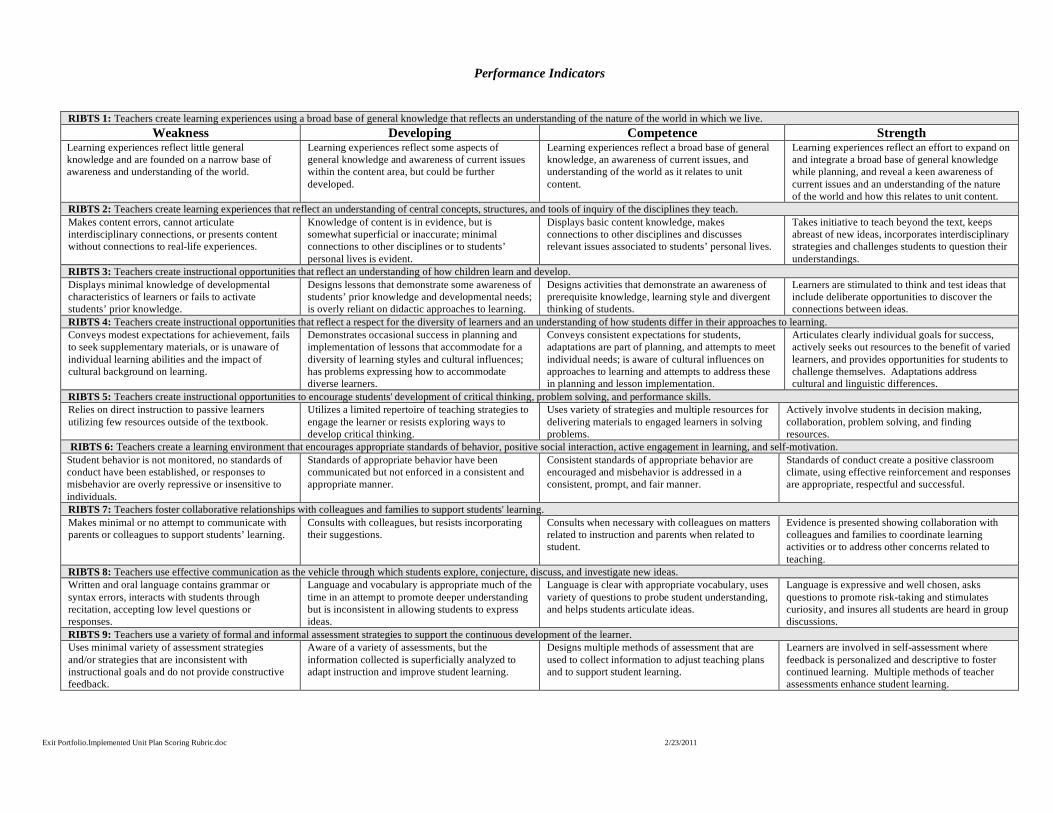
Performance Indicators
RIBTS 1: Teachers create learning experiences using a broad base of general knowledge that reflects an understanding of the nature of the world in which we live. Weakness Developing Competence Strength
Learning experiences reflect little general knowledge and are founded on a narrow base of awareness and understanding of the world.
Learning experiences reflect some aspects of general knowledge and awareness of current issues within the content area, but could be further developed.
Learning experiences reflect a broad base of general knowledge, an awareness of current issues, and understanding of the world as it relates to unit content.
Learning experiences reflect an effort to expand on and integrate a broad base of general knowledge while planning, and reveal a keen awareness of current issues and an understanding of the nature of the world and how this relates to unit content.
RIBTS 2: Teachers create learning experiences that reflect an understanding of central concepts, structures, and tools of inquiry of the disciplines they teach. Makes content errors, cannot articulate interdisciplinary connections, or presents content without connections to real-life experiences.
Knowledge of content is in evidence, but is somewhat superficial or inaccurate; minimal connections to other disciplines or to students’ personal lives is evident.
Displays basic content knowledge, makes connections to other disciplines and discusses relevant issues associated to students’ personal lives.
Takes initiative to teach beyond the text, keeps abreast of new ideas, incorporates interdisciplinary strategies and challenges students to question their understandings.
RIBTS 3: Teachers create instructional opportunities that reflect an understanding of how children learn and develop. Displays minimal knowledge of developmental characteristics of learners or fails to activate students’ prior knowledge.
Designs lessons that demonstrate some awareness of students’ prior knowledge and developmental needs; is overly reliant on didactic approaches to learning.
Designs activities that demonstrate an awareness of prerequisite knowledge, learning style and divergent thinking of students.
Learners are stimulated to think and test ideas that include deliberate opportunities to discover the connections between ideas.
RIBTS 4: Teachers create instructional opportunities that reflect a respect for the diversity of learners and an understanding of how students differ in their approaches to learning. Conveys modest expectations for achievement, fails to seek supplementary materials, or is unaware of individual learning abilities and the impact of cultural background on learning.
Demonstrates occasional success in planning and implementation of lessons that accommodate for a diversity of learning styles and cultural influences; has problems expressing how to accommodate diverse learners.
Conveys consistent expectations for students, adaptations are part of planning, and attempts to meet individual needs; is aware of cultural influences on approaches to learning and attempts to address these in planning and lesson implementation.
Articulates clearly individual goals for success, actively seeks out resources to the benefit of varied learners, and provides opportunities for students to challenge themselves. Adaptations address cultural and linguistic differences.
RIBTS 5: Teachers create instructional opportunities to encourage students' development of critical thinking, problem solving, and performance skills. Relies on direct instruction to passive learners utilizing few resources outside of the textbook.
Utilizes a limited repertoire of teaching strategies to engage the learner or resists exploring ways to develop critical thinking.
Uses variety of strategies and multiple resources for delivering materials to engaged learners in solving problems.
Actively involve students in decision making, collaboration, problem solving, and finding resources.
RIBTS 6: Teachers create a learning environment that encourages appropriate standards of behavior, positive social interaction, active engagement in learning, and self-motivation. Student behavior is not monitored, no standards of conduct have been established, or responses to misbehavior are overly repressive or insensitive to individuals.
Standards of appropriate behavior have been communicated but not enforced in a consistent and appropriate manner.
Consistent standards of appropriate behavior are encouraged and misbehavior is addressed in a consistent, prompt, and fair manner.
Standards of conduct create a positive classroom climate, using effective reinforcement and responses are appropriate, respectful and successful.
RIBTS 7: Teachers foster collaborative relationships with colleagues and families to support students' learning. Makes minimal or no attempt to communicate with parents or colleagues to support students’ learning.
Consults with colleagues, but resists incorporating their suggestions.
Consults when necessary with colleagues on matters related to instruction and parents when related to student.
Evidence is presented showing collaboration with colleagues and families to coordinate learning activities or to address other concerns related to teaching.
RIBTS 8: Teachers use effective communication as the vehicle through which students explore, conjecture, discuss, and investigate new ideas. Written and oral language contains grammar or syntax errors, interacts with students through recitation, accepting low level questions or responses.
Language and vocabulary is appropriate much of the time in an attempt to promote deeper understanding but is inconsistent in allowing students to express ideas.
Language is clear with appropriate vocabulary, uses variety of questions to probe student understanding, and helps students articulate ideas.
Language is expressive and well chosen, asks questions to promote risk-taking and stimulates curiosity, and insures all students are heard in group discussions.
RIBTS 9: Teachers use a variety of formal and informal assessment strategies to support the continuous development of the learner. Uses minimal variety of assessment strategies and/or strategies that are inconsistent with instructional goals and do not provide constructive feedback.
Aware of a variety of assessments, but the information collected is superficially analyzed to adapt instruction and improve student learning.
Designs multiple methods of assessment that are used to collect information to adjust teaching plans and to support student learning.
Learners are involved in self-assessment where feedback is personalized and descriptive to foster continued learning. Multiple methods of teacher assessments enhance student learning.

13
Unit Description/Abstract
The Introduction to CADD course at North Smithfield Senior High School is the first
course of three CADD courses offered in the Technical Education Department as part of the
school’s Program of Studies. In this Introduction to CADD unit, students study the technology
used to create and print orthographic two-dimensional (2-D) and isometric three-dimensional (3-
D) technical drawings using the Computer Aided Design and Drafting program known as
AutoCAD LT 2002. Students will be provided with the necessary computer workstation
hardware and AutoCAD LT 2002 software, and given information about the types of drawing
environments, tools, menus, and icons employed by this software program. In this class,
students learn to draw and dimension 2-D and 3-D technical objects and structures where they
examine and produce straight lines, curved lines, angled lines, geometric shapes, 2-D
orthographic three-view drawings, and 3-D isometric drawings. Students also have the
opportunity to produce separate layout tabs in AutoCAD in order to print hardcopies of their
work using the appropriate ANSI type paper sheet sizes. Students are responsible for
maintaining both softcopy (on flash drives) and hardcopy portfolios (in three-ring binders) of
their work. In addition, this introductory unit is designed to help students acquire a basic
understanding and appreciation of the potential advantages and uses of the technological
information and communication system known as Computer Aided Drafting and Design
(CADD), especially as compared to the previously used method of hand-drawing (aka
“mechanical drawing”).
14
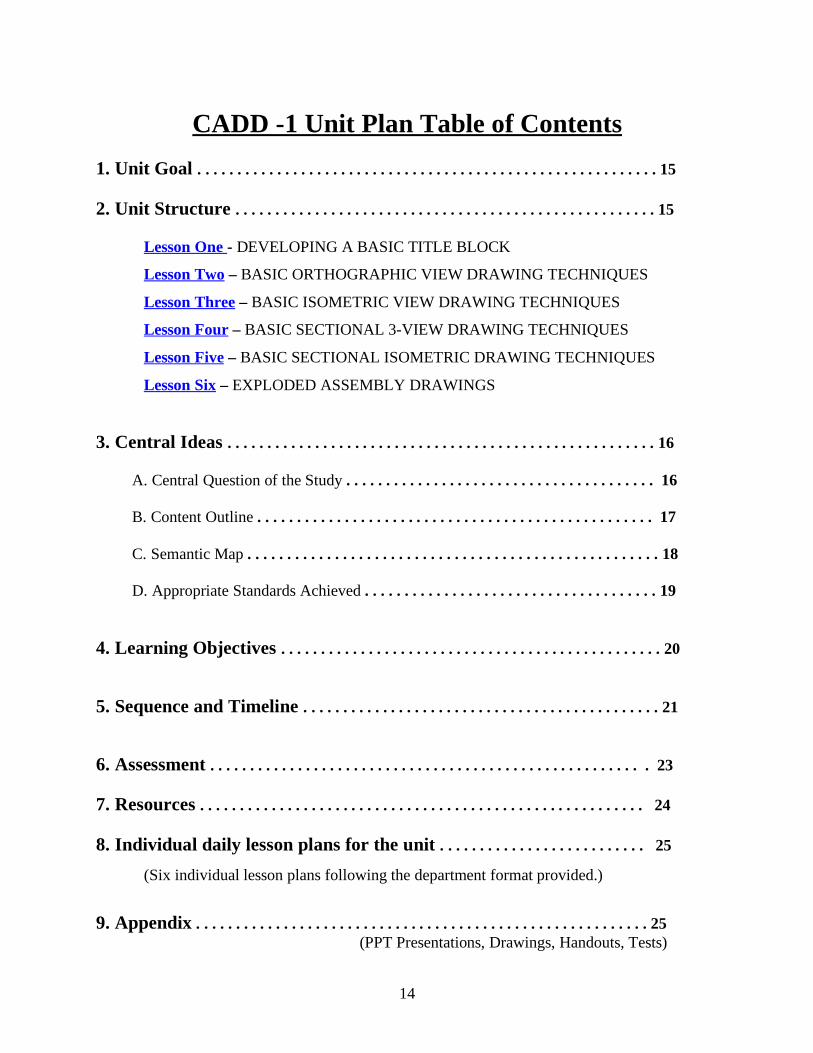
CADD -1 Unit Plan Table of Contents 1. Unit Goal . . . . . . . . . . . . . . . . . . . . . . . . . . . . . . . . . . . . . . . . . . . . . . . . . . . . . . . . . . 15 2. Unit Structure . . . . . . . . . . . . . . . . . . . . . . . . . . . . . . . . . . . . . . . . . . . . . . . . . . . . . 15
Lesson One - DEVELOPING A BASIC TITLE BLOCK
Lesson Two – BASIC ORTHOGRAPHIC VIEW DRAWING TECHNIQUES
Lesson Three – BASIC ISOMETRIC VIEW DRAWING TECHNIQUES
Lesson Four – BASIC SECTIONAL 3-VIEW DRAWING TECHNIQUES
Lesson Five – BASIC SECTIONAL ISOMETRIC DRAWING TECHNIQUES
Lesson Six – EXPLODED ASSEMBLY DRAWINGS
3. Central Ideas . . . . . . . . . . . . . . . . . . . . . . . . . . . . . . . . . . . . . . . . . . . . . . . . . . . . . . 16
A. Central Question of the Study . . . . . . . . . . . . . . . . . . . . . . . . . . . . . . . . . . . . . . . 16 B. Content Outline . . . . . . . . . . . . . . . . . . . . . . . . . . . . . . . . . . . . . . . . . . . . . . . . . . 17 C. Semantic Map . . . . . . . . . . . . . . . . . . . . . . . . . . . . . . . . . . . . . . . . . . . . . . . . . . . . 18 D. Appropriate Standards Achieved . . . . . . . . . . . . . . . . . . . . . . . . . . . . . . . . . . . . . 19
4. Learning Objectives . . . . . . . . . . . . . . . . . . . . . . . . . . . . . . . . . . . . . . . . . . . . . . . . 20 5. Sequence and Timeline . . . . . . . . . . . . . . . . . . . . . . . . . . . . . . . . . . . . . . . . . . . . . 21 6. Assessment . . . . . . . . . . . . . . . . . . . . . . . . . . . . . . . . . . . . . . . . . . . . . . . . . . . . . . . 23 7. Resources . . . . . . . . . . . . . . . . . . . . . . . . . . . . . . . . . . . . . . . . . . . . . . . . . . . . . . . . 24 8. Individual daily lesson plans for the unit . . . . . . . . . . . . . . . . . . . . . . . . . . 25
(Six individual lesson plans following the department format provided.)
9. Appendix . . . . . . . . . . . . . . . . . . . . . . . . . . . . . . . . . . . . . . . . . . . . . . . . . . . . . . . . . 25
(PPT Presentations, Drawings, Handouts, Tests)
15
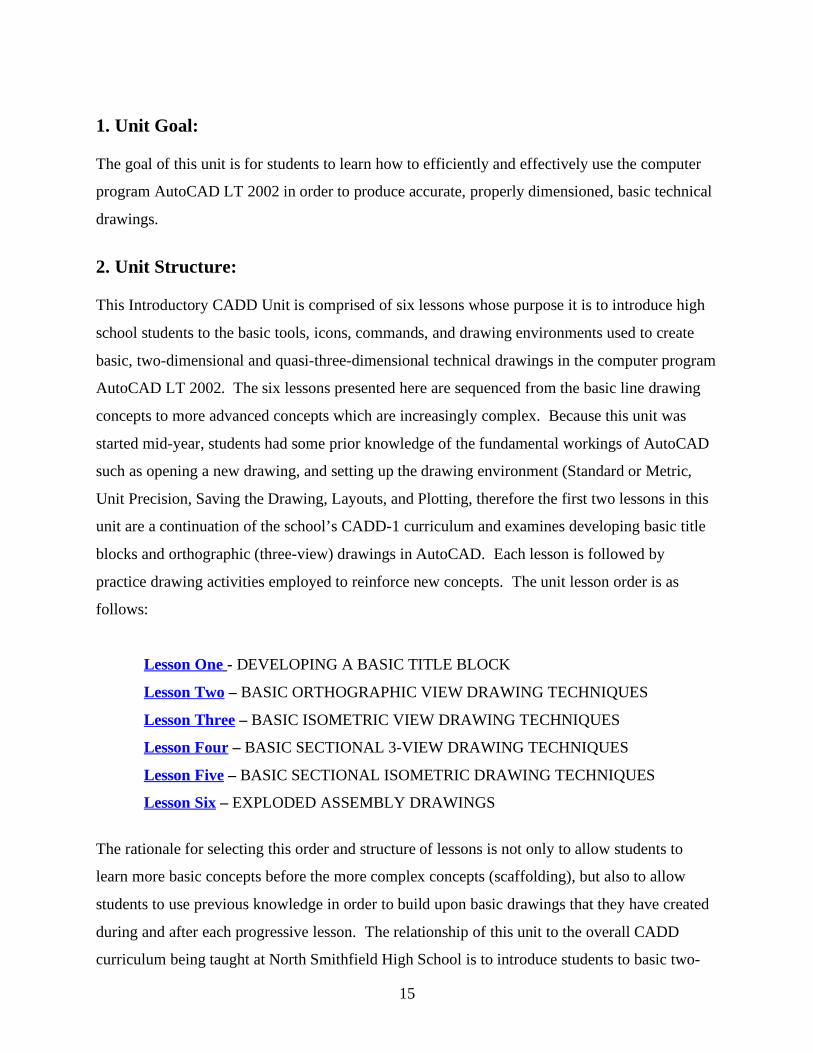
1. Unit Goal:
The goal of this unit is for students to learn how to efficiently and effectively use the computer
program AutoCAD LT 2002 in order to produce accurate, properly dimensioned, basic technical
drawings.
2. Unit Structure:
This Introductory CADD Unit is comprised of six lessons whose purpose it is to introduce high
school students to the basic tools, icons, commands, and drawing environments used to create
basic, two-dimensional and quasi-three-dimensional technical drawings in the computer program
AutoCAD LT 2002. The six lessons presented here are sequenced from the basic line drawing
concepts to more advanced concepts which are increasingly complex. Because this unit was
started mid-year, students had some prior knowledge of the fundamental workings of AutoCAD
such as opening a new drawing, and setting up the drawing environment (Standard or Metric,
Unit Precision, Saving the Drawing, Layouts, and Plotting, therefore the first two lessons in this
unit are a continuation of the school’s CADD-1 curriculum and examines developing basic title
blocks and orthographic (three-view) drawings in AutoCAD. Each lesson is followed by
practice drawing activities employed to reinforce new concepts. The unit lesson order is as
follows:
Lesson One - DEVELOPING A BASIC TITLE BLOCK
Lesson Two – BASIC ORTHOGRAPHIC VIEW DRAWING TECHNIQUES
Lesson Three – BASIC ISOMETRIC VIEW DRAWING TECHNIQUES
Lesson Four – BASIC SECTIONAL 3-VIEW DRAWING TECHNIQUES
Lesson Five – BASIC SECTIONAL ISOMETRIC DRAWING TECHNIQUES
Lesson Six – EXPLODED ASSEMBLY DRAWINGS
The rationale for selecting this order and structure of lessons is not only to allow students to
learn more basic concepts before the more complex concepts (scaffolding), but also to allow
students to use previous knowledge in order to build upon basic drawings that they have created
during and after each progressive lesson. The relationship of this unit to the overall CADD
curriculum being taught at North Smithfield High School is to introduce students to basic two-
16
dimensional computer aided drafting so that they may later move on to advanced computer aided
drafting and/or basic three-dimensional computer-aided drafting using the SolidWorks program.
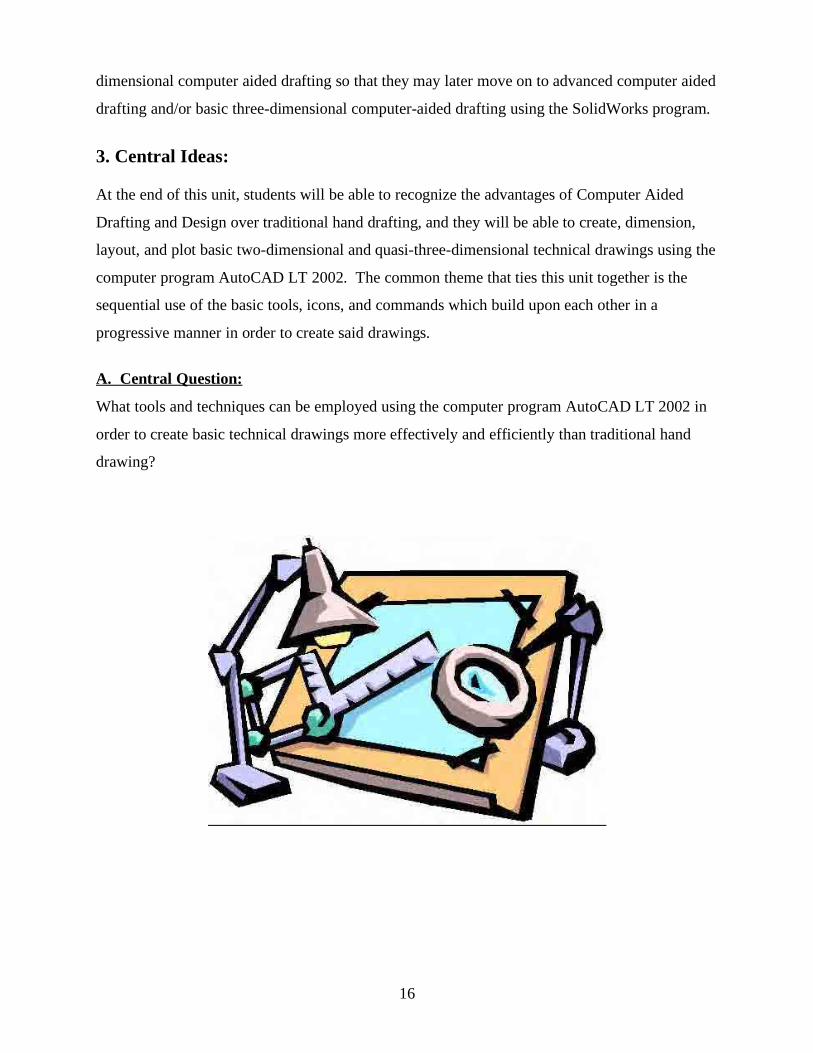
3. Central Ideas:
At the end of this unit, students will be able to recognize the advantages of Computer Aided
Drafting and Design over traditional hand drafting, and they will be able to create, dimension,
layout, and plot basic two-dimensional and quasi-three-dimensional technical drawings using the
computer program AutoCAD LT 2002. The common theme that ties this unit together is the
sequential use of the basic tools, icons, and commands which build upon each other in a
progressive manner in order to create said drawings.
A. Central Question:
What tools and techniques can be employed using the computer program AutoCAD LT 2002 in
order to create basic technical drawings more effectively and efficiently than traditional hand
drawing?
17
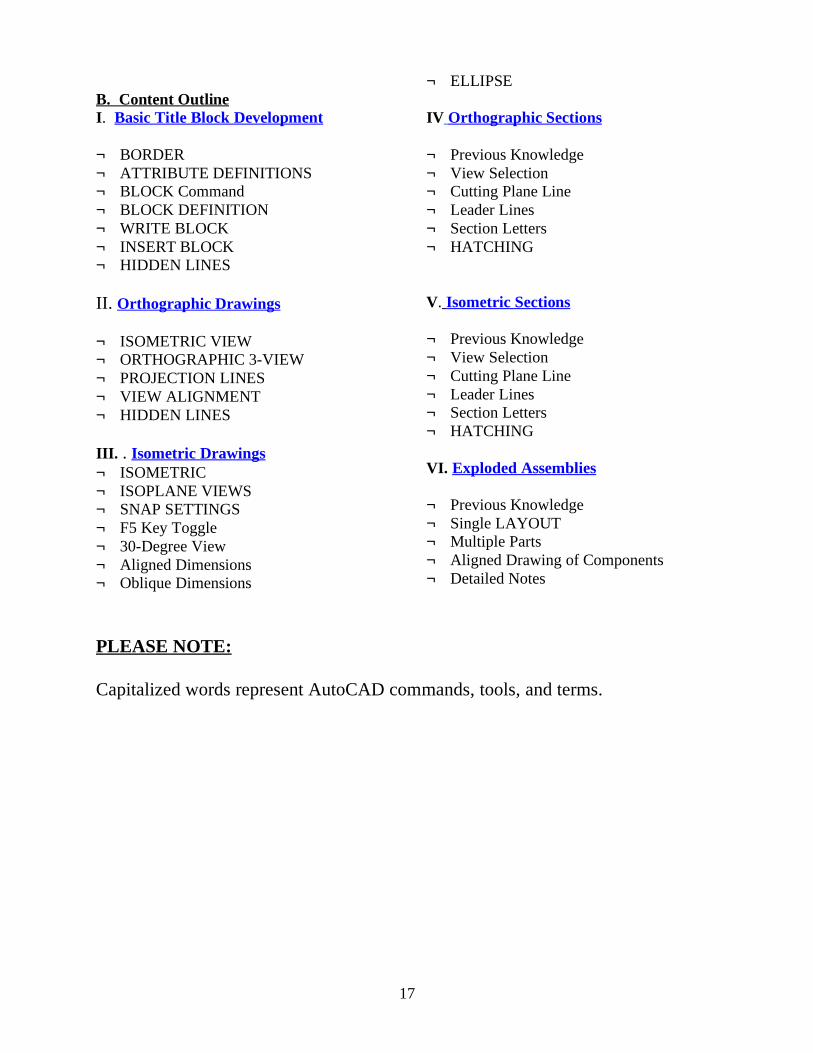
B. Content Outline I. Basic Title Block Development ¬ BORDER ¬ ATTRIBUTE DEFINITIONS ¬ BLOCK Command ¬ BLOCK DEFINITION ¬ WRITE BLOCK ¬ INSERT BLOCK ¬ HIDDEN LINES II. Orthographic Drawings ¬ ISOMETRIC VIEW ¬ ORTHOGRAPHIC 3-VIEW ¬ PROJECTION LINES ¬ VIEW ALIGNMENT ¬ HIDDEN LINES III. . Isometric Drawings ¬ ISOMETRIC ¬ ISOPLANE VIEWS ¬ SNAP SETTINGS ¬ F5 Key Toggle ¬ 30-Degree View ¬ Aligned Dimensions ¬ Oblique Dimensions
¬ ELLIPSE IV Orthographic Sections ¬ Previous Knowledge ¬ View Selection ¬ Cutting Plane Line ¬ Leader Lines ¬ Section Letters ¬ HATCHING V. Isometric Sections ¬ Previous Knowledge ¬ View Selection ¬ Cutting Plane Line ¬ Leader Lines ¬ Section Letters ¬ HATCHING VI. Exploded Assemblies ¬ Previous Knowledge ¬ Single LAYOUT ¬ Multiple Parts ¬ Aligned Drawing of Components ¬ Detailed Notes
PLEASE NOTE: Capitalized words represent AutoCAD commands, tools, and terms.
18
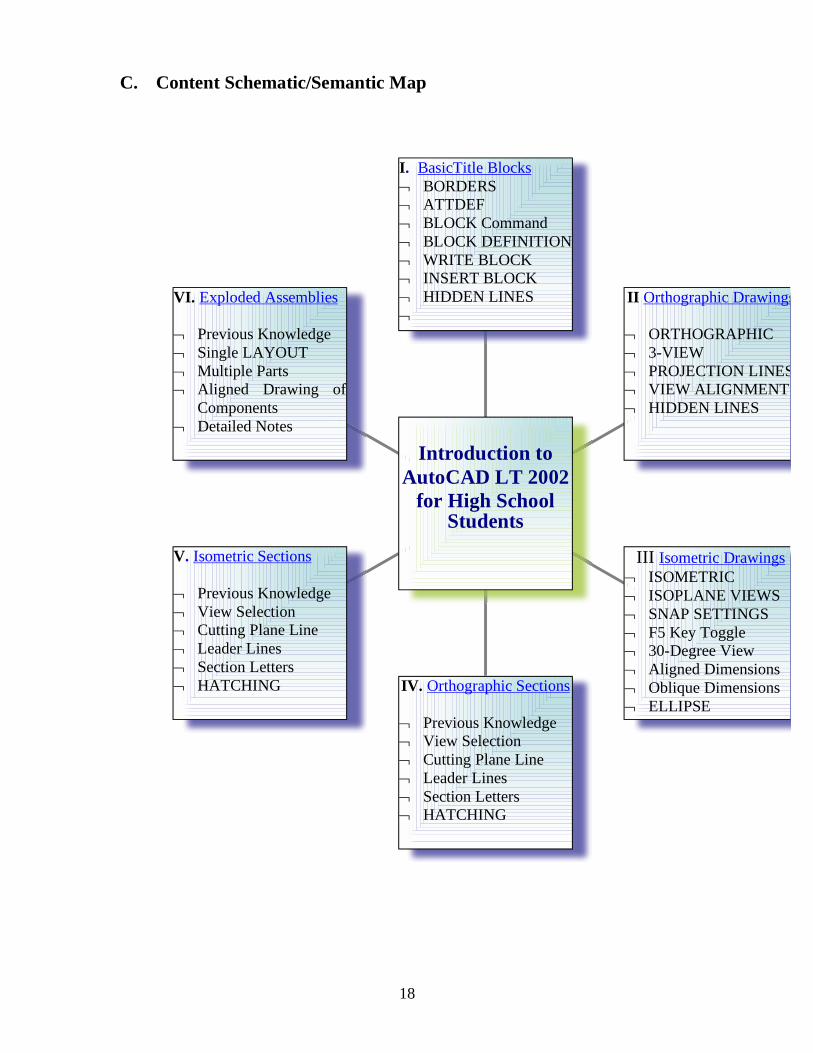
C. Content Schematic/Semantic Map
VI. Exploded Assemblies
¬ Previous Knowledge¬ Single LAYOUT¬ Multiple Parts¬ Aligned Drawing of
Components¬ Detailed Notes
V. Isometric Sections
¬ Previous Knowledge¬ View Selection¬ Cutting Plane Line¬ Leader Lines¬ Section Letters¬ HATCHING IV. Orthographic Sections
¬ Previous Knowledge¬ View Selection¬ Cutting Plane Line¬ Leader Lines¬ Section Letters¬ HATCHING
III Isometric Drawings¬ ISOMETRIC¬ ISOPLANE VIEWS ¬ SNAP SETTINGS¬ F5 Key Toggle¬ 30-Degree View¬ Aligned Dimensions¬ Oblique Dimensions¬ ELLIPSE
II Orthographic Drawings
¬ ORTHOGRAPHIC ¬ 3-VIEW¬ PROJECTION LINES¬ VIEW ALIGNMENT¬ HIDDEN LINES
I. BasicTitle Blocks¬ BORDERS¬ ATTDEF¬ BLOCK Command¬ BLOCK DEFINITION¬ WRITE BLOCK¬ INSERT BLOCK¬ HIDDEN LINES¬
Introduction to AutoCAD LT 2002
for High School Students
19
D. Appropriate Standards Achieved: Standards for Technology Literacy (STL) set forth by the International Technology Education Association (ITEA): Standard Eight – Students will develop an understanding of the Attributes of Design. Requirements for a design include such factors as the desired elements and feature of a product or system or the limits that are placed on the design. Standard Nine – Students will develop an understanding of Engineering Design. Expressing ideas to others verbally and through sketches and models is an important part of the design process. Standard Twelve – Students will develop the ability to use and maintain technological products and systems: Use computers and calculators to access, retrieve, organize process, maintain, interpret, and evaluate data and information in order to communicate. Standard Seventeen – Students will develop an understanding of and be able to select and use information and communication technologies: The use of symbols, measurements, and drawings promotes a clear communication by providing a common language to express ideas. Rhode Island Teacher Standards (RIBTS): RIBTS 5.3 – Make instructional decisions about when to provide information, when to clarify, when to pose a question, and when to let a student struggle to solve a problem. RIBTS 5.5 – Use tasks that engage students in exploration, discovery, and hands-on activities
20
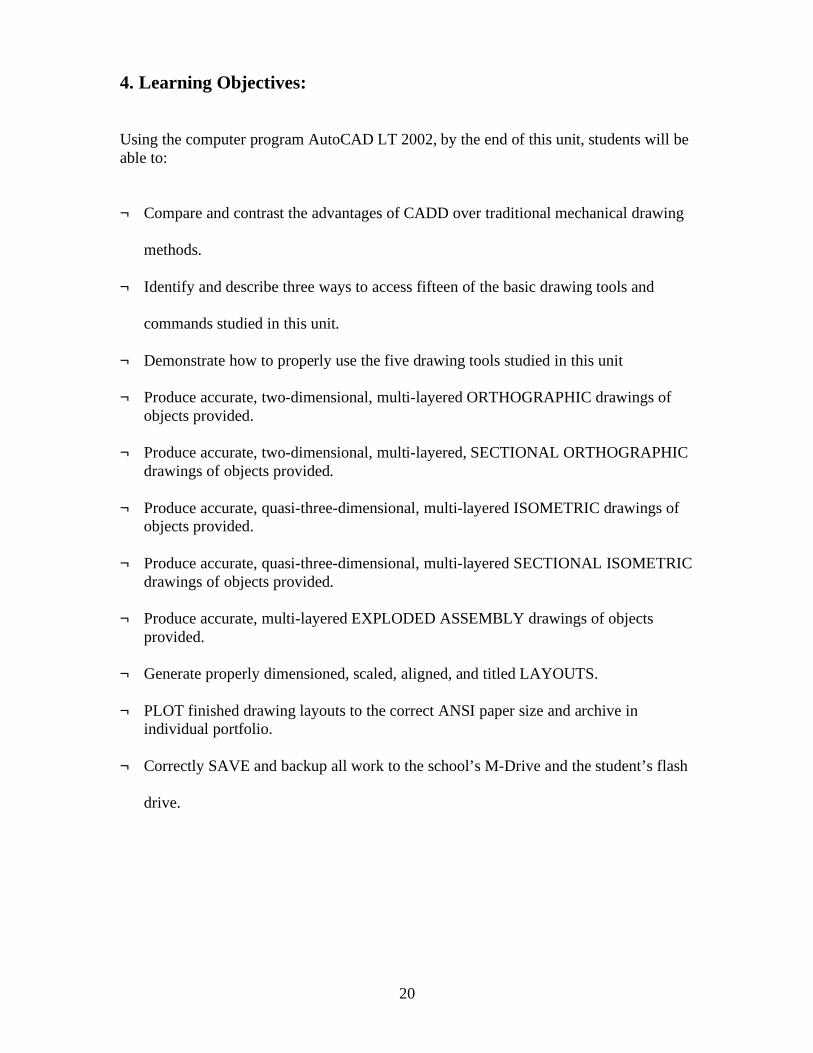
4. Learning Objectives: Using the computer program AutoCAD LT 2002, by the end of this unit, students will be able to: ¬ Compare and contrast the advantages of CADD over traditional mechanical drawing
methods.
¬ Identify and describe three ways to access fifteen of the basic drawing tools and
commands studied in this unit.
¬ Demonstrate how to properly use the five drawing tools studied in this unit
¬ Produce accurate, two-dimensional, multi-layered ORTHOGRAPHIC drawings of objects provided.
¬ Produce accurate, two-dimensional, multi-layered, SECTIONAL ORTHOGRAPHIC
drawings of objects provided. ¬ Produce accurate, quasi-three-dimensional, multi-layered ISOMETRIC drawings of
objects provided.
¬ Produce accurate, quasi-three-dimensional, multi-layered SECTIONAL ISOMETRIC drawings of objects provided.
¬ Produce accurate, multi-layered EXPLODED ASSEMBLY drawings of objects
provided.
¬ Generate properly dimensioned, scaled, aligned, and titled LAYOUTS.
¬ PLOT finished drawing layouts to the correct ANSI paper size and archive in individual portfolio.
¬ Correctly SAVE and backup all work to the school’s M-Drive and the student’s flash
drive.
21
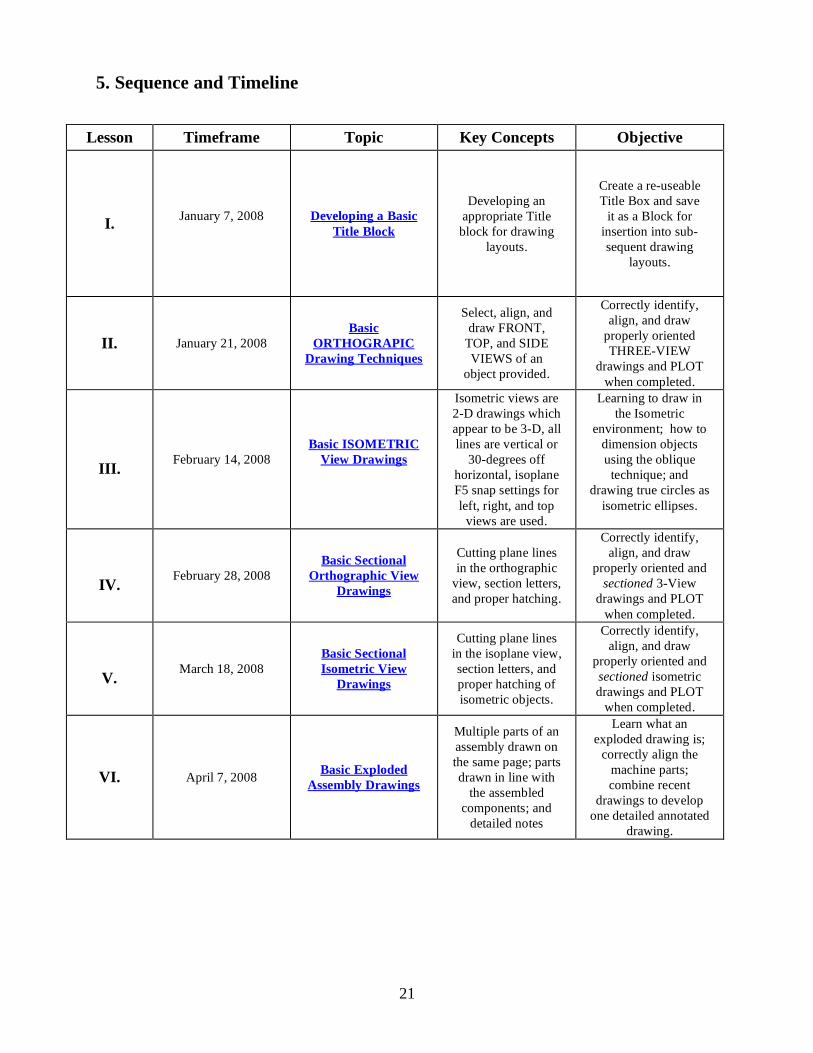
5. Sequence and Timeline
Lesson Timeframe Topic Key Concepts Objective
I.
January 7, 2008
Developing a Basic Title Block
Developing an
appropriate Title block for drawing
layouts.
Create a re-useable Title Box and save
it as a Block for insertion into sub- sequent drawing
layouts.
II.
January 21, 2008
Basic ORTHOGRAPIC
Drawing Techniques
Select, align, and draw FRONT,
TOP, and SIDE VIEWS of an
object provided.
Correctly identify, align, and draw
properly oriented THREE-VIEW
drawings and PLOT when completed.
III.
February 14, 2008
Basic ISOMETRIC View Drawings
Isometric views are 2-D drawings which appear to be 3-D, all lines are vertical or
30-degrees off horizontal, isoplane F5 snap settings for left, right, and top
views are used.
Learning to draw in the Isometric
environment; how to dimension objects using the oblique
technique; and drawing true circles as
isometric ellipses.
IV.
February 28, 2008
Basic Sectional Orthographic View
Drawings
Cutting plane lines in the orthographic
view, section letters, and proper hatching.
Correctly identify, align, and draw
properly oriented and sectioned 3-View
drawings and PLOT when completed.
V. March 18, 2008
Basic Sectional Isometric View
Drawings
Cutting plane lines in the isoplane view, section letters, and proper hatching of isometric objects.
Correctly identify, align, and draw
properly oriented and sectioned isometric drawings and PLOT
when completed.
VI. April 7, 2008 Basic Exploded Assembly Drawings
Multiple parts of an assembly drawn on the same page; parts drawn in line with
the assembled components; and
detailed notes
Learn what an exploded drawing is;
correctly align the machine parts; combine recent
drawings to develop one detailed annotated
drawing.
22
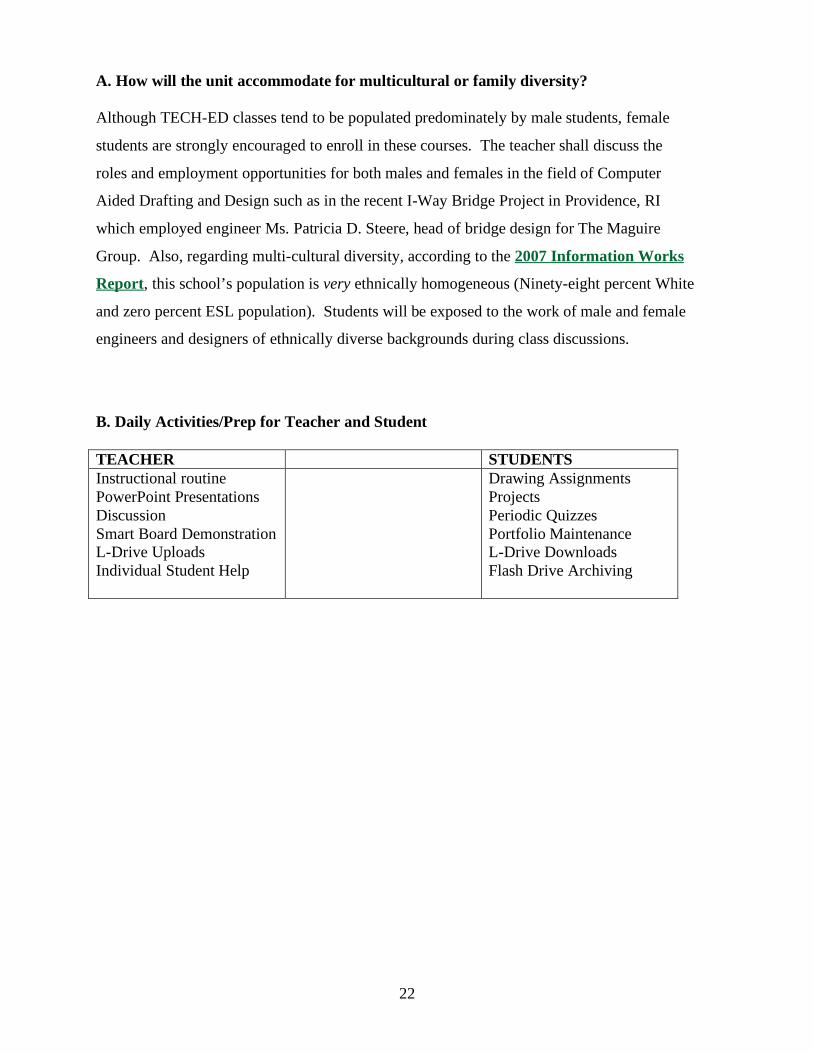
A. How will the unit accommodate for multicultural or family diversity? Although TECH-ED classes tend to be populated predominately by male students, female
students are strongly encouraged to enroll in these courses. The teacher shall discuss the
roles and employment opportunities for both males and females in the field of Computer
Aided Drafting and Design such as in the recent I-Way Bridge Project in Providence, RI
which employed engineer Ms. Patricia D. Steere, head of bridge design for The Maguire
Group. Also, regarding multi-cultural diversity, according to the 2007 Information Works
Report, this school’s population is very ethnically homogeneous (Ninety-eight percent White
and zero percent ESL population). Students will be exposed to the work of male and female
engineers and designers of ethnically diverse backgrounds during class discussions.
B. Daily Activities/Prep for Teacher and Student
TEACHER STUDENTS Instructional routine PowerPoint Presentations Discussion Smart Board Demonstration L-Drive Uploads Individual Student Help
Drawing Assignments Projects Periodic Quizzes Portfolio Maintenance L-Drive Downloads Flash Drive Archiving
23
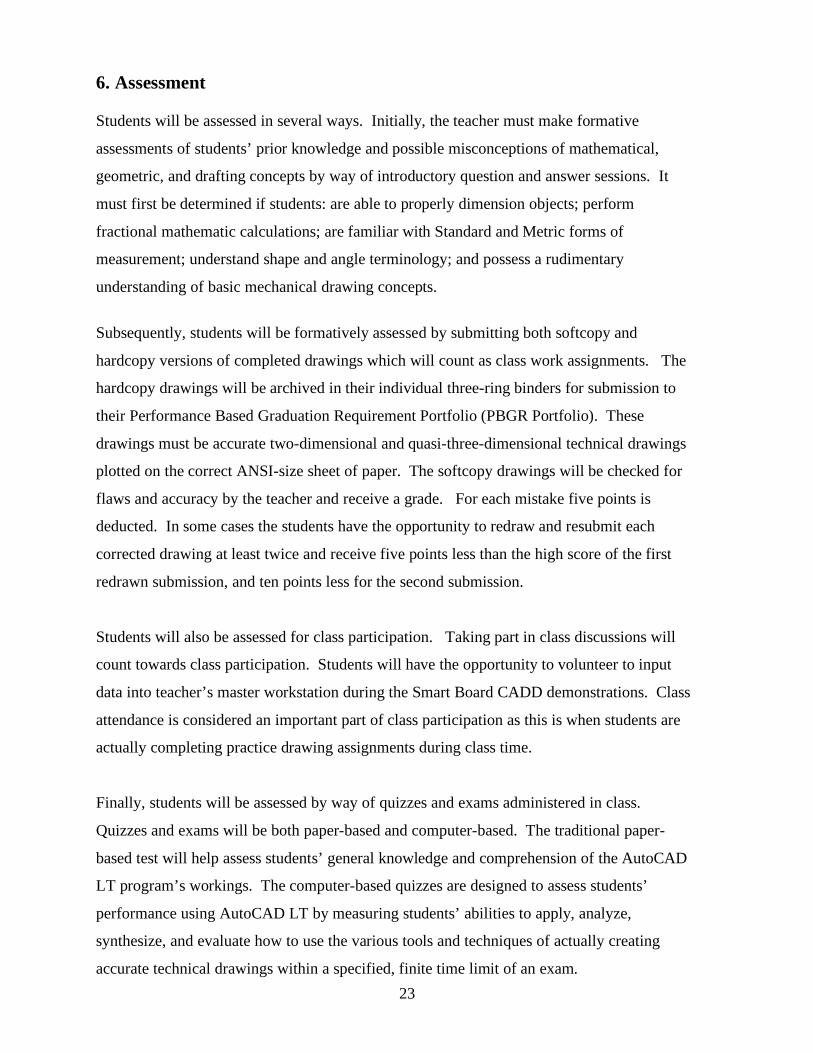
6. Assessment Students will be assessed in several ways. Initially, the teacher must make formative
assessments of students’ prior knowledge and possible misconceptions of mathematical,
geometric, and drafting concepts by way of introductory question and answer sessions. It
must first be determined if students: are able to properly dimension objects; perform
fractional mathematic calculations; are familiar with Standard and Metric forms of
measurement; understand shape and angle terminology; and possess a rudimentary
understanding of basic mechanical drawing concepts.
Subsequently, students will be formatively assessed by submitting both softcopy and
hardcopy versions of completed drawings which will count as class work assignments. The
hardcopy drawings will be archived in their individual three-ring binders for submission to
their Performance Based Graduation Requirement Portfolio (PBGR Portfolio). These
drawings must be accurate two-dimensional and quasi-three-dimensional technical drawings
plotted on the correct ANSI-size sheet of paper. The softcopy drawings will be checked for
flaws and accuracy by the teacher and receive a grade. For each mistake five points is
deducted. In some cases the students have the opportunity to redraw and resubmit each
corrected drawing at least twice and receive five points less than the high score of the first
redrawn submission, and ten points less for the second submission.
Students will also be assessed for class participation. Taking part in class discussions will
count towards class participation. Students will have the opportunity to volunteer to input
data into teacher’s master workstation during the Smart Board CADD demonstrations. Class
attendance is considered an important part of class participation as this is when students are
actually completing practice drawing assignments during class time.
Finally, students will be assessed by way of quizzes and exams administered in class.
Quizzes and exams will be both paper-based and computer-based. The traditional paper-
based test will help assess students’ general knowledge and comprehension of the AutoCAD
LT program’s workings. The computer-based quizzes are designed to assess students’
performance using AutoCAD LT by measuring students’ abilities to apply, analyze,
synthesize, and evaluate how to use the various tools and techniques of actually creating
accurate technical drawings within a specified, finite time limit of an exam.
24
7. Resources Teacher Resources AutoCAD LT 2002 Software loaded on Workstation server
Computer Workstations for each student
Flash Drive on which to save CAD files
Handouts with isometric drawing models
Interactive Smart Board
L-Drive for uploading files
Laser Jet or Inkjet Printer
PowerPoint Presentations
Wooden 3-D Isometric Object Models
Texts:
AutoCAD LT 2002: Autodesk Getting Started (San Rafael, CA Autodesk, Inc. 2002), original owner’s manual for AutoCAD LT 2002 software package. Cheryl R. Schrock, AutoCAD Pocket Reference 2007 (New York: Industrial Press, 2007). David Byrnes and M. Middlebrook, AutoCAD 2007 for Dummies, (New Jersey: Wiley Pub 2006). Ted Saufley and Paul B. Schreiner, AutoCAD LT 2002: Fundamentals and Applications, Tinley Park, IL: Goodheart-Wilcox Publications, 2002). Randy H. Shih, AutoCAD LT 2002 Tutorial with Multi-Media CD (Kansas: Schroff Development Corporation Publications, 2002). Standards for Technological Literacy: Content for the Study of Technology (Reston, VA International Technology Educator’s Association, 2000). Student Resources
Flash Drive on which to save CADD files
Handouts with isometric drawing models
L-Drive Access
Three-ring Portfolio Binder
25
8. Individual daily lesson plans for the unit The following six lesson plans listed below are saved as PDF files which may be viewed by control-clicking on each link.
Lesson One - DEVELOPING A BASIC TITLE BLOCK
Lesson Two – BASIC ORTHOGRAPHIC VIEW DRAWING TECHNIQUES
Lesson Three – BASIC ISOMETRIC VIEW DRAWING TECHNIQUES
Lesson Four – BASIC SECTIONAL 3-VIEW DRAWING TECHNIQUES
Lesson Five – BASIC SECTIONAL ISOMETRIC DRAWING TECHNIQUES
Lesson Six – EXPLODED ASSEMBLY DRAWINGS
9. Appendix PLEASE NOTE: Assigned Worksheets, Drawings, Rubrics, PowerPoint Presentations, and Tests are saved as PDF files which may be viewed by control-clicking each link listed below: CADD-1 Quiz One CADD-1 Quiz Two CADD-1 Test One CADD-1 Test Two Isometric Rubric Orthographic Rubric Plotting PowerPoint Presentation Title Block PowerPoint Presentation Title Block Example Adjustable Fork – Isometric View Blade Holder Bookend Bracket 5-69 Clamp Block – Isometric View Cutter Holder Shoe – Orthographic Section View Cutter Holder Shoe – Isometric Section View
Fixture Base – Orthographic Section View Fixture Base – Isometric Section View Guide Block – Orthographic Section View Guide Block – Isometric View Keeper – Isometric View ND Application – Isometric Cutting Plane Line View ND Application – Isometric Section View No 3 Orthographic Section View No 3 Isometric Section View No 5 Orthographic Section View No 5 Isometric Section View Technique A Orthographic Section View Technique A Isometric Section View Vertical Bracket Isometric View
Spring 2008
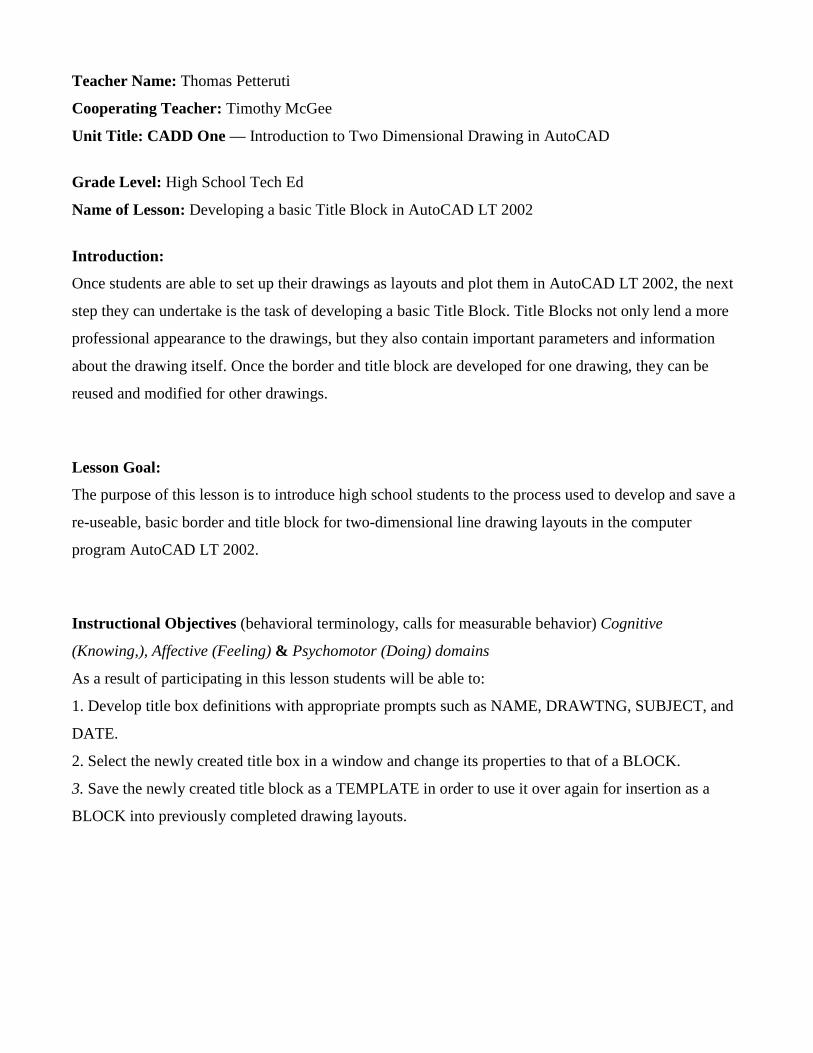
Teacher Name: Thomas Petteruti
Cooperating Teacher: Timothy McGee
Unit Title: CADD One — Introduction to Two Dimensional Drawing in AutoCAD
Grade Level: High School Tech Ed
Name of Lesson: Developing a basic Title Block in AutoCAD LT 2002
Introduction:
Once students are able to set up their drawings as layouts and plot them in AutoCAD LT 2002, the next
step they can undertake is the task of developing a basic Title Block. Title Blocks not only lend a more
professional appearance to the drawings, but they also contain important parameters and information
about the drawing itself. Once the border and title block are developed for one drawing, they can be
reused and modified for other drawings.
Lesson Goal:
The purpose of this lesson is to introduce high school students to the process used to develop and save a
re-useable, basic border and title block for two-dimensional line drawing layouts in the computer
program AutoCAD LT 2002.
Instructional Objectives (behavioral terminology, calls for measurable behavior) Cognitive
(Knowing,), Affective (Feeling) & Psychomotor (Doing) domains
As a result of participating in this lesson students will be able to:
1. Develop title box definitions with appropriate prompts such as NAME, DRAWTNG, SUBJECT, and
DATE.
2. Select the newly created title box in a window and change its properties to that of a BLOCK.
3. Save the newly created title block as a TEMPLATE in order to use it over again for insertion as a
BLOCK into previously completed drawing layouts.
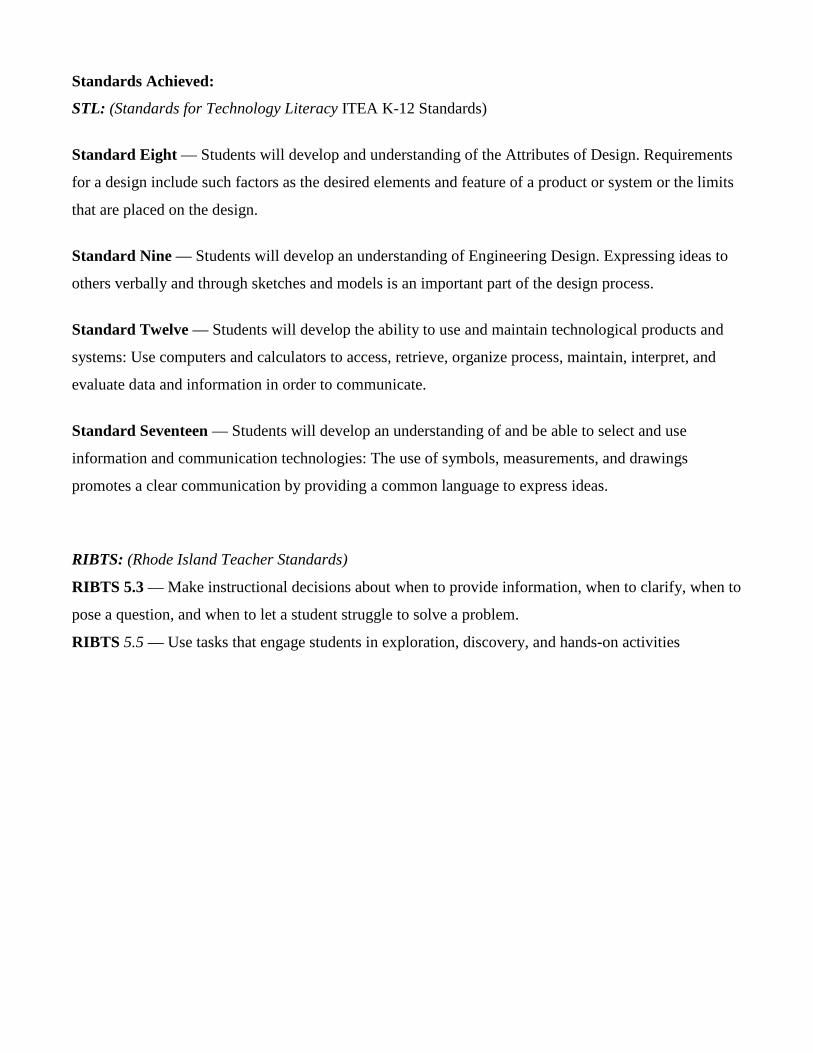
Standards Achieved:
STL: (Standards for Technology Literacy ITEA K-12 Standards)
Standard Eight — Students will develop and understanding of the Attributes of Design. Requirements
for a design include such factors as the desired elements and feature of a product or system or the limits
that are placed on the design.
Standard Nine — Students will develop an understanding of Engineering Design. Expressing ideas to
others verbally and through sketches and models is an important part of the design process.
Standard Twelve — Students will develop the ability to use and maintain technological products and
systems: Use computers and calculators to access, retrieve, organize process, maintain, interpret, and
evaluate data and information in order to communicate.
Standard Seventeen — Students will develop an understanding of and be able to select and use
information and communication technologies: The use of symbols, measurements, and drawings
promotes a clear communication by providing a common language to express ideas.
RIBTS: (Rhode Island Teacher Standards)
RIBTS 5.3 — Make instructional decisions about when to provide information, when to clarify, when to
pose a question, and when to let a student struggle to solve a problem.
RIBTS 5.5 — Use tasks that engage students in exploration, discovery, and hands-on activities
LESSON PLANNING:
Focus Questions:
(Guiding questions that help YOU, the teacher, concentrate on the main points of the lesson)
� What is the advantage of setting up a TITLE BLOCK in PAPER SPACE? (It is re-useable. It contains important information about the drawing)
� What related commands/tools need to be used to complete these drawing tasks? (Previous knowledge of RECTANGLE, LINE, OFFSET)
� What are the menu differences between AutoCAD LT 2002 (the school’s software version) and AutoCAD LT 2007 (my version of AutoCAD) when using the TITLE BLOCK functions?
Foundation Questions: (These are the “what is . . . “questions that provide the facts for the student inquiry)
� How is the TITLE BLOCK function useful in drawing layouts? (It allows for easy re-use, insertion, and modification of drawing title block).
� How is the ATTRIBUTE DEFINITIONS dialogue box accessed? (From the Command Line using the ATTDEF command).
� How can different font styles and sizes be chosen? (Format> Text Style drop down menu).
� How is the new title block drawing saved as a re-useable TEMPLATE? (At the Command Line using the WBLOCK command). How is the title block inserted into a new layout? (Insert> Block> Browse> OK)
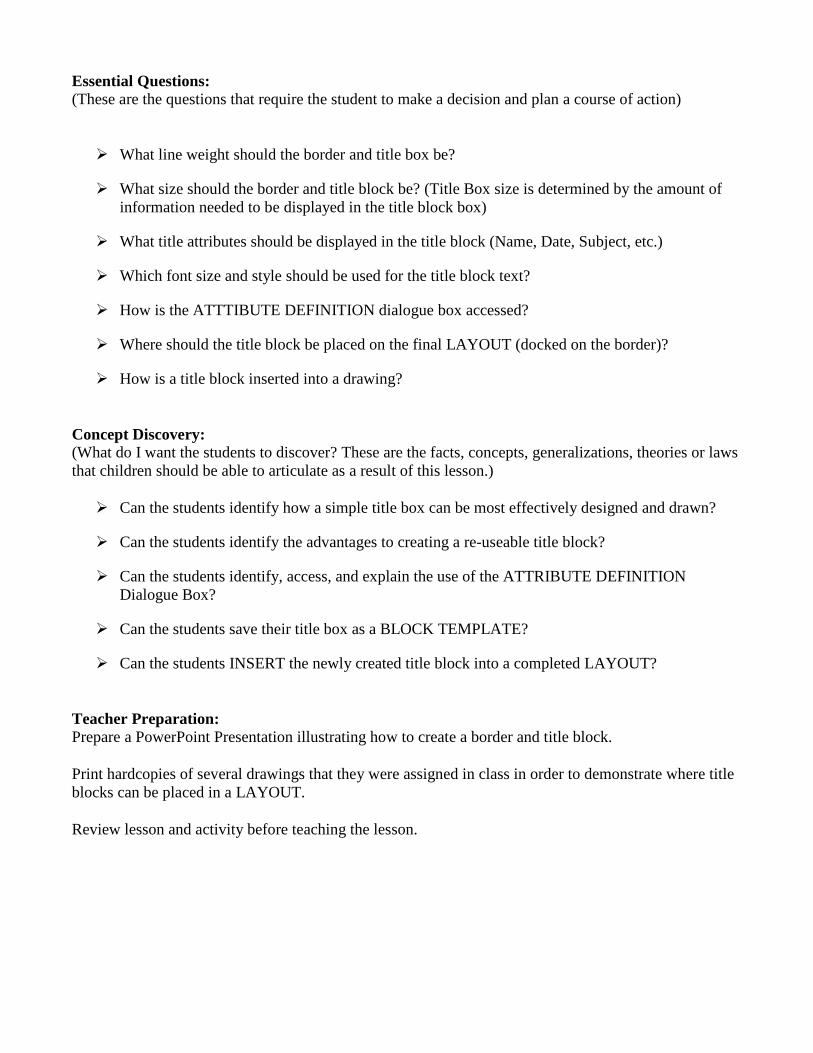
Essential Questions: (These are the questions that require the student to make a decision and plan a course of action)
� What line weight should the border and title box be?
� What size should the border and title block be? (Title Box size is determined by the amount of information needed to be displayed in the title block box)
� What title attributes should be displayed in the title block (Name, Date, Subject, etc.)
� Which font size and style should be used for the title block text?
� How is the ATTTIBUTE DEFINITION dialogue box accessed?
� Where should the title block be placed on the final LAYOUT (docked on the border)?
� How is a title block inserted into a drawing?
Concept Discovery: (What do I want the students to discover? These are the facts, concepts, generalizations, theories or laws that children should be able to articulate as a result of this lesson.)
� Can the students identify how a simple title box can be most effectively designed and drawn?
� Can the students identify the advantages to creating a re-useable title block?
� Can the students identify, access, and explain the use of the ATTRIBUTE DEFINITION Dialogue Box?
� Can the students save their title box as a BLOCK TEMPLATE?
� Can the students INSERT the newly created title block into a completed LAYOUT?
Teacher Preparation: Prepare a PowerPoint Presentation illustrating how to create a border and title block.
Print hardcopies of several drawings that they were assigned in class in order to demonstrate where title blocks can be placed in a LAYOUT.
Review lesson and activity before teaching the lesson.
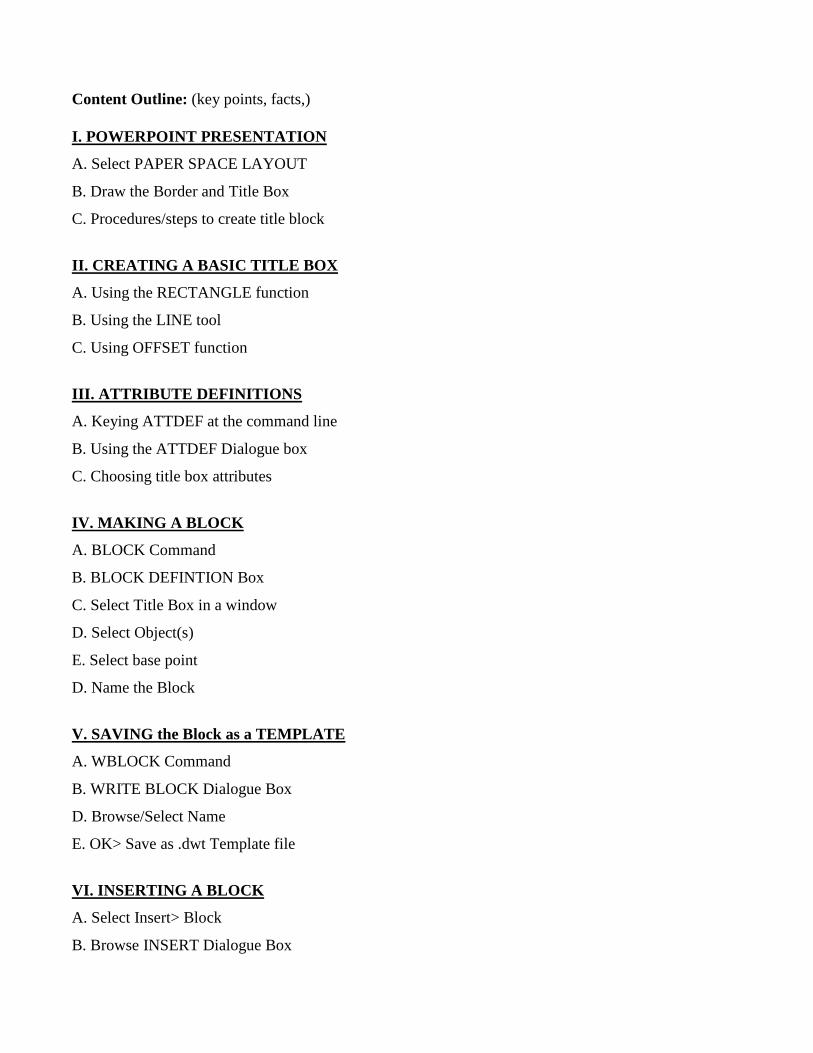
Content Outline: (key points, facts,)
I. POWERPOINT PRESENTATION
A. Select PAPER SPACE LAYOUT
B. Draw the Border and Title Box
C. Procedures/steps to create title block
II. CREATING A BASIC TITLE BOX
A. Using the RECTANGLE function
B. Using the LINE tool
C. Using OFFSET function
III. ATTRIBUTE DEFINITIONS
A. Keying ATTDEF at the command line
B. Using the ATTDEF Dialogue box
C. Choosing title box attributes
IV. MAKING A BLOCK
A. BLOCK Command
B. BLOCK DEFINTION Box
C. Select Title Box in a window
D. Select Object(s)
E. Select base point
D. Name the Block
V. SAVING the Block as a TEMPLATE
A. WBLOCK Command
B. WRITE BLOCK Dialogue Box
D. Browse/Select Name
E. OK> Save as .dwt Template file
VI. INSERTING A BLOCK
A. Select Insert> Block
B. Browse INSERT Dialogue Box
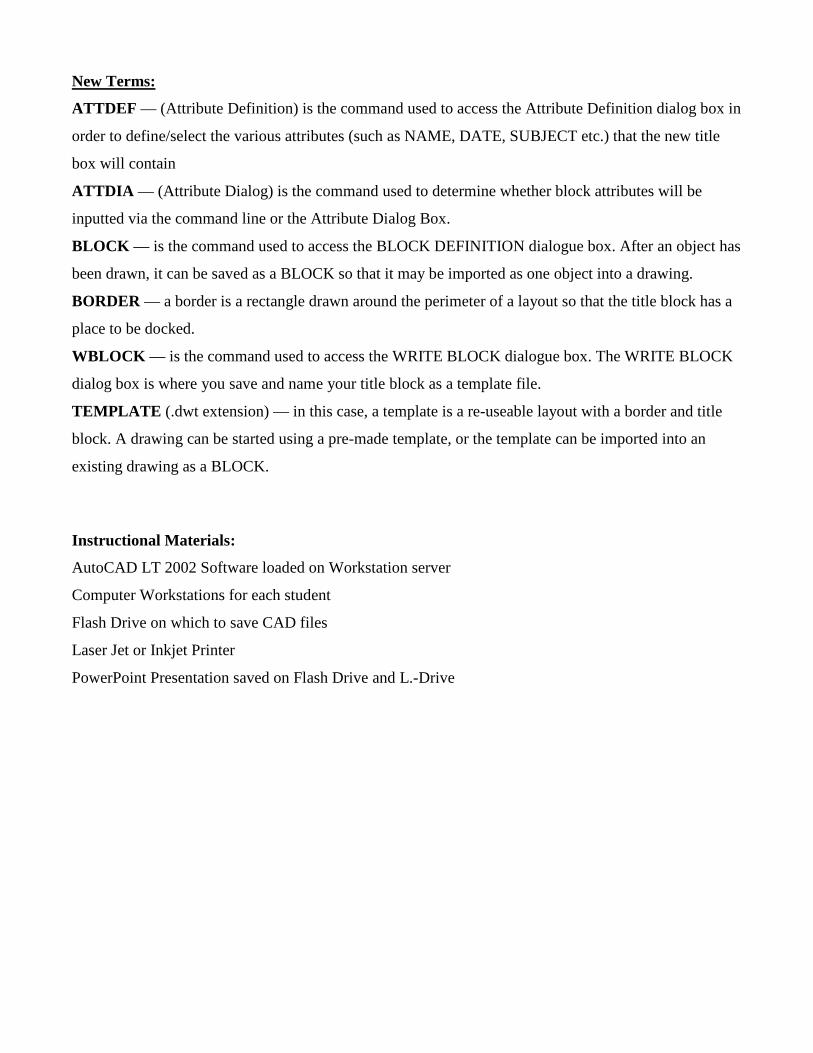
New Terms:
ATTDEF — (Attribute Definition) is the command used to access the Attribute Definition dialog box in
order to define/select the various attributes (such as NAME, DATE, SUBJECT etc.) that the new title
box will contain
ATTDIA — (Attribute Dialog) is the command used to determine whether block attributes will be
inputted via the command line or the Attribute Dialog Box.
BLOCK — is the command used to access the BLOCK DEFINITION dialogue box. After an object has
been drawn, it can be saved as a BLOCK so that it may be imported as one object into a drawing.
BORDER — a border is a rectangle drawn around the perimeter of a layout so that the title block has a
place to be docked.
WBLOCK — is the command used to access the WRITE BLOCK dialogue box. The WRITE BLOCK
dialog box is where you save and name your title block as a template file.
TEMPLATE (.dwt extension) — in this case, a template is a re-useable layout with a border and title
block. A drawing can be started using a pre-made template, or the template can be imported into an
existing drawing as a BLOCK.
Instructional Materials:
AutoCAD LT 2002 Software loaded on Workstation server
Computer Workstations for each student
Flash Drive on which to save CAD files
Laser Jet or Inkjet Printer
PowerPoint Presentation saved on Flash Drive and L.-Drive
LESSON DELIVERY:
Lesson Body: (Information students need to perform task & meet objectives)
OPENING:
Set Induction (Get attention, prior knowledge, state objectives, orient to topic)
1. Ask students how they have been putting their names on their plotted drawings. (Wait for a show of
hands and answers)
2. Ask the students if they know what a TITLE BLOCK is? (Wait for show of hands and answers)
3. Explain and show what a TITLE BLOCK is, and discuss some of the advantages of using TITLE
BLOCKS (they contain important information about the drawing, and they are re-useable).
4. Ask the students if they would like to know how to make their own TITLE BLOCKS in which to
write their names and drawing information (Wait for show of hand and answers).
MIDDLE (FIRST HALF): BACKGROUND INFORMATION
1. Tell the students that we will first watch a PowerPoint Presentation illustrating the process of how to
make a TITLE BLOCK in AutoCAD LT 2002.
2. Ask the students to watch the presentation and refrain from using their workstations for the time
being.
3. Show the TITLE BLOCK PowerPoint Presentation and pause after each slide in order to ask the
students if they understand each step of the process (wait for show of hands and answers).
4. Explain to the students that this PowerPoint Presentation is located on the L-Drive of the NSHS server
so that they can access it and download it if they need to review the step-b-step process.
MIDDLE - SECOND HALF: PLOTTING in AutoCAD LT 2002
1. Explain to the students that the class will now create a title box in real time using the AutoCAD LT
2002 program.
2. Ask the students to open a new drawing in AutoCAD LT 2002 on their workstations and accept the
defaults for quick setup.
3. Walk around the room and ask if everyone has successfully opened a new drawing.
4. Once everyone has opened a new drawing, we may now proceed, as a class, through the step-by-step
process of creating a title block.
5. Ask for a student to volunteer to operate the master computer in order to type in commands at the
command line while the teacher uses the Smart Board.
6. Select the MODEL button at the bottom of the screen in order to change the working environment to
PAPER SPACE. Check to see if everyone is in PAPER SPACE.
7. Once in PAPER SPACE, from the LINE WEIGHT Properties drop-down menu, change the selection
from BY LAYER to .40mm. Check to see if everyone was able to change the line weight.
8. Now select the RECTANGLE icon, place the cursor crosshair in the upper left-hand corner, and left-
click as close to the dotted line as possible without touching it. The dotted line represents the plotting
limits (on the paper) of the plotter.
9. Drag the cursor to the lower right-hand corner, as close to the dotted line as possible without touching
it, then left-click. You should now have a .40mm line weight border around the PAPER SPACE layout.
Check to see if everyone has a .40mm border around their PAPER SPACE layout.
10. Now that everyone has a border in place, ask the students to select their choice of TEXT STYLE by
accessing the FORMAT> STYLE > TEXT pull-down menu. When the appropriate font style and sizes
are chosen, click OK. Check to see if all of the students are able to change the font style and size of the
text.
11. Next, have the students draw a 4” x 2” rectangle using the RECTANGLE command, icon, or
dropdown menu. Select the RECTANGLE tool and type @4, 2 in order to draw the correct size box.
Check to see if everyone was able to draw a rectangle.
12. Now, the rectangle must be divided into four horizontal segments. To do this, first select the LINE
tool via the command line, icon, or dropdown menu. Next, find the midpoint on the vertical line on the
left side of the box by placing the crosshairs at this line’s midpoint. Check to see if everyone is able find
the midpoint.
13. Left click on the midpoint and drag the crosshair to the midpoint on the right-hand vertical line and
then left-click this midpoint in order to horizontally bisect the rectangle. Check to see if everyone was
able to successfully bisect their rectangles.
14. Next, you will need to again perform a horizontal bisect, this time bisecting the top and bottom
halves of the box. The OFFSET tool will be used to perform this function.
15. Select OFFSET via the command line, dropdown menu, or icon. Enter 1 for offset distance. Left-
click on the center line of the box to select object to be offset. Left click above the center line and a new
line should appear one inch above the center line. Now, left click the center line again to select object to
offset, and then left click below it to create another line below the center line. Check to see if everyone
now has a four segment box that is divided horizontally.
16. Now that we have a title box drawn, the next step is to enter information in the box by way of a
process known in AutoCAD as Attribute Definition (ATTDEF). This is how we select what information
the box will contain such as, Name, Date, Subject, Drawing, etc. Check with students to see if they
understand the purpose of ATTDEF.
17. At the command prompt type in: ATTDIA which is the command which determines whether the
INSERT command uses a dialog box (or the command line) for attribute value entry. In other words, if
you want to entry the title box’s attribute by way of the command line (difficult). or by vas of a dialog
box that prompts you for pertinent information (much easier). Ask the students if they understand which
entry method is easier and which one they would choose. We want to enter the attributes via a dialog
box because it is easier for beginners.
18. The default value of ATTDIA is “0” (command line entry) and should be changed to 1 in order to
change to attribute entry via dialog box. After entering 1, press ENTER. Check to see if everyone was
successful at entering the information.
19. Now that the program is set accept attribute data via the Attribute Dialog Box, we must begin this
procedure.
20. At the command prompt type in ATTDEF, then press ENTER. Check that students are on track.
21. An Attribute Definition Box will appear with the label Attribute and a box labeled Tag. Left- click
into that box and type NAME. Check that students are on track.
22. Nov left-click in the box marked Prompt and type in what you want the computer to prompt you to
do (in this space, you want the computer to prompt you to: Enter Your Name). Check with the students
to see if they have completed and understand the function of this step.
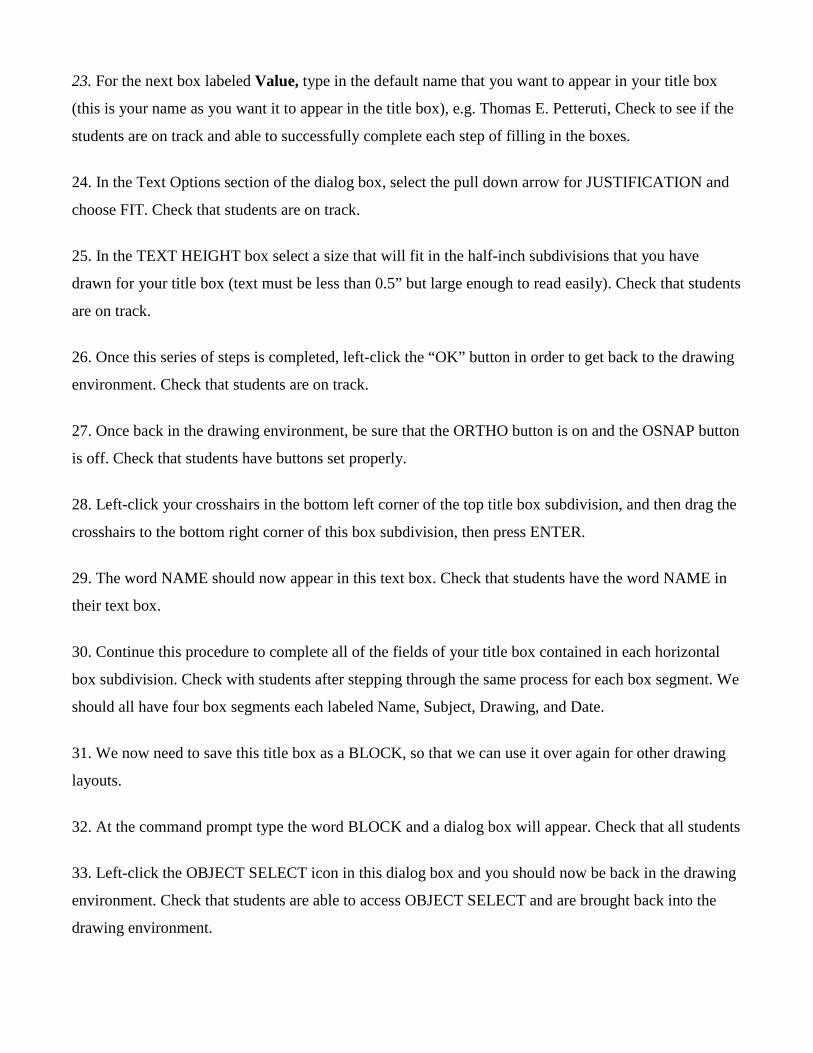
23. For the next box labeled Value, type in the default name that you want to appear in your title box
(this is your name as you want it to appear in the title box), e.g. Thomas E. Petteruti, Check to see if the
students are on track and able to successfully complete each step of filling in the boxes.
24. In the Text Options section of the dialog box, select the pull down arrow for JUSTIFICATION and
choose FIT. Check that students are on track.
25. In the TEXT HEIGHT box select a size that will fit in the half-inch subdivisions that you have
drawn for your title box (text must be less than 0.5” but large enough to read easily). Check that students
are on track.
26. Once this series of steps is completed, left-click the “OK” button in order to get back to the drawing
environment. Check that students are on track.
27. Once back in the drawing environment, be sure that the ORTHO button is on and the OSNAP button
is off. Check that students have buttons set properly.
28. Left-click your crosshairs in the bottom left corner of the top title box subdivision, and then drag the
crosshairs to the bottom right corner of this box subdivision, then press ENTER.
29. The word NAME should now appear in this text box. Check that students have the word NAME in
their text box.
30. Continue this procedure to complete all of the fields of your title box contained in each horizontal
box subdivision. Check with students after stepping through the same process for each box segment. We
should all have four box segments each labeled Name, Subject, Drawing, and Date.
31. We now need to save this title box as a BLOCK, so that we can use it over again for other drawing
layouts.
32. At the command prompt type the word BLOCK and a dialog box will appear. Check that all students
33. Left-click the OBJECT SELECT icon in this dialog box and you should now be back in the drawing
environment. Check that students are able to access OBJECT SELECT and are brought back into the
drawing environment.
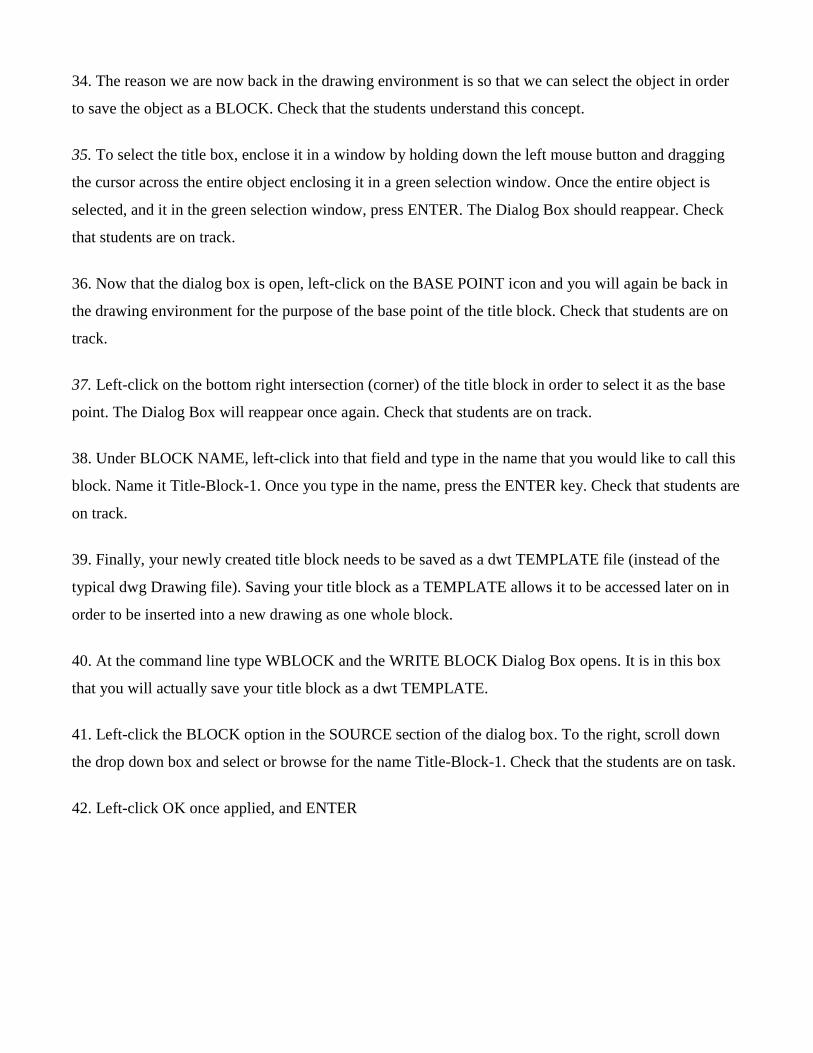
34. The reason we are now back in the drawing environment is so that we can select the object in order
to save the object as a BLOCK. Check that the students understand this concept.
35. To select the title box, enclose it in a window by holding down the left mouse button and dragging
the cursor across the entire object enclosing it in a green selection window. Once the entire object is
selected, and it in the green selection window, press ENTER. The Dialog Box should reappear. Check
that students are on track.
36. Now that the dialog box is open, left-click on the BASE POINT icon and you will again be back in
the drawing environment for the purpose of the base point of the title block. Check that students are on
track.
37. Left-click on the bottom right intersection (corner) of the title block in order to select it as the base
point. The Dialog Box will reappear once again. Check that students are on track.
38. Under BLOCK NAME, left-click into that field and type in the name that you would like to call this
block. Name it Title-Block-1. Once you type in the name, press the ENTER key. Check that students are
on track.
39. Finally, your newly created title block needs to be saved as a dwt TEMPLATE file (instead of the
typical dwg Drawing file). Saving your title block as a TEMPLATE allows it to be accessed later on in
order to be inserted into a new drawing as one whole block.
40. At the command line type WBLOCK and the WRITE BLOCK Dialog Box opens. It is in this box
that you will actually save your title block as a dwt TEMPLATE.
41. Left-click the BLOCK option in the SOURCE section of the dialog box. To the right, scroll down
the drop down box and select or browse for the name Title-Block-1. Check that the students are on task.
42. Left-click OK once applied, and ENTER
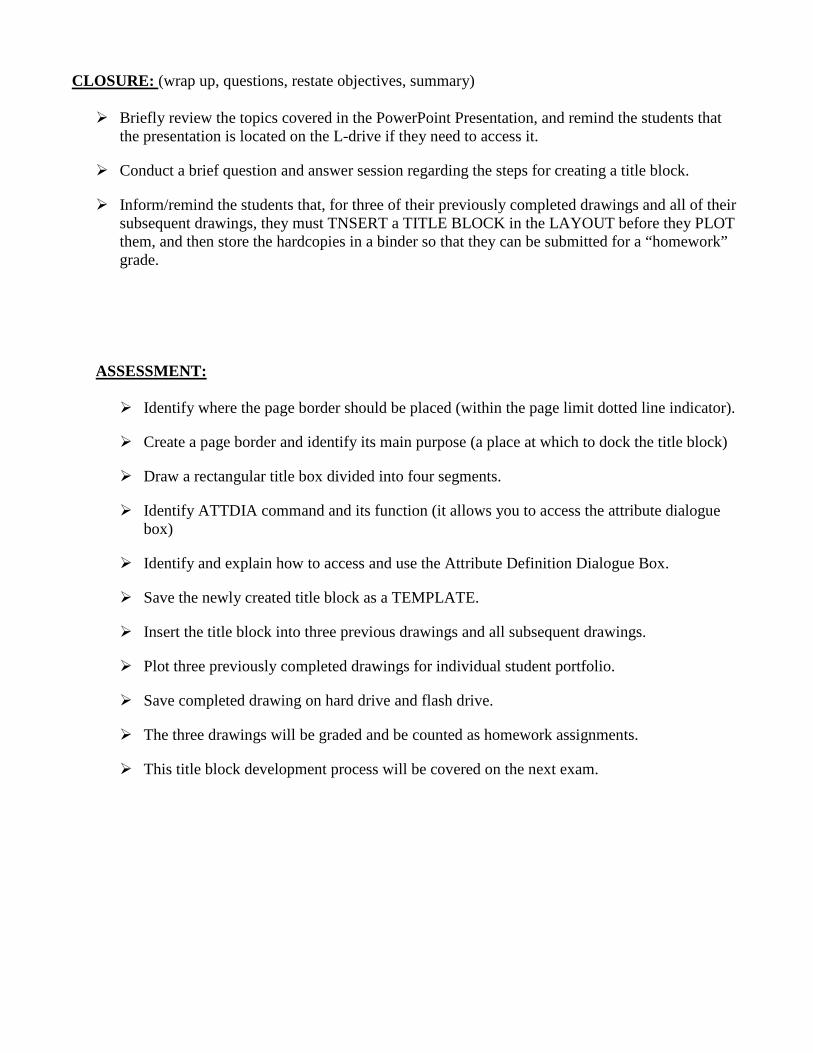
CLOSURE: (wrap up, questions, restate objectives, summary)
� Briefly review the topics covered in the PowerPoint Presentation, and remind the students that the presentation is located on the L-drive if they need to access it.
� Conduct a brief question and answer session regarding the steps for creating a title block.
� Inform/remind the students that, for three of their previously completed drawings and all of their subsequent drawings, they must TNSERT a TITLE BLOCK in the LAYOUT before they PLOT them, and then store the hardcopies in a binder so that they can be submitted for a “homework” grade.
ASSESSMENT:
� Identify where the page border should be placed (within the page limit dotted line indicator).
� Create a page border and identify its main purpose (a place at which to dock the title block)
� Draw a rectangular title box divided into four segments.
� Identify ATTDIA command and its function (it allows you to access the attribute dialogue box)
� Identify and explain how to access and use the Attribute Definition Dialogue Box.
� Save the newly created title block as a TEMPLATE.
� Insert the title block into three previous drawings and all subsequent drawings.
� Plot three previously completed drawings for individual student portfolio.
� Save completed drawing on hard drive and flash drive.
� The three drawings will be graded and be counted as homework assignments.
� This title block development process will be covered on the next exam.
Follow-up, Future Investigation, & Reference
Sources: AutoCAD LT 2002: Autodesk Getting Started (San Rafael, CA Autodesk, Inc 2002), original manual that comes with the AutoCAD LT 2002 software package.
Cheryl R. Schrock, AutoCAD Pocket Reference 2007 (New York: Industrial Press, 2007), 6-2 to 6-12.
David Byrnes and Mark Middlebrook, AutoCAD 2007 for Dummies, (New Jersey: Wiley Publishing 2006) 105-116.
Randy H. Shih, AutoCAD LT 2002 Tutorial with Multi-Media CD, (Kansas: Schroff Development Corporation Publications, 2002).
Cooperating Teacher(s) Approval:
Name: ____________________________ Date: ____________
Name: ____________________________ Date: ____________
1
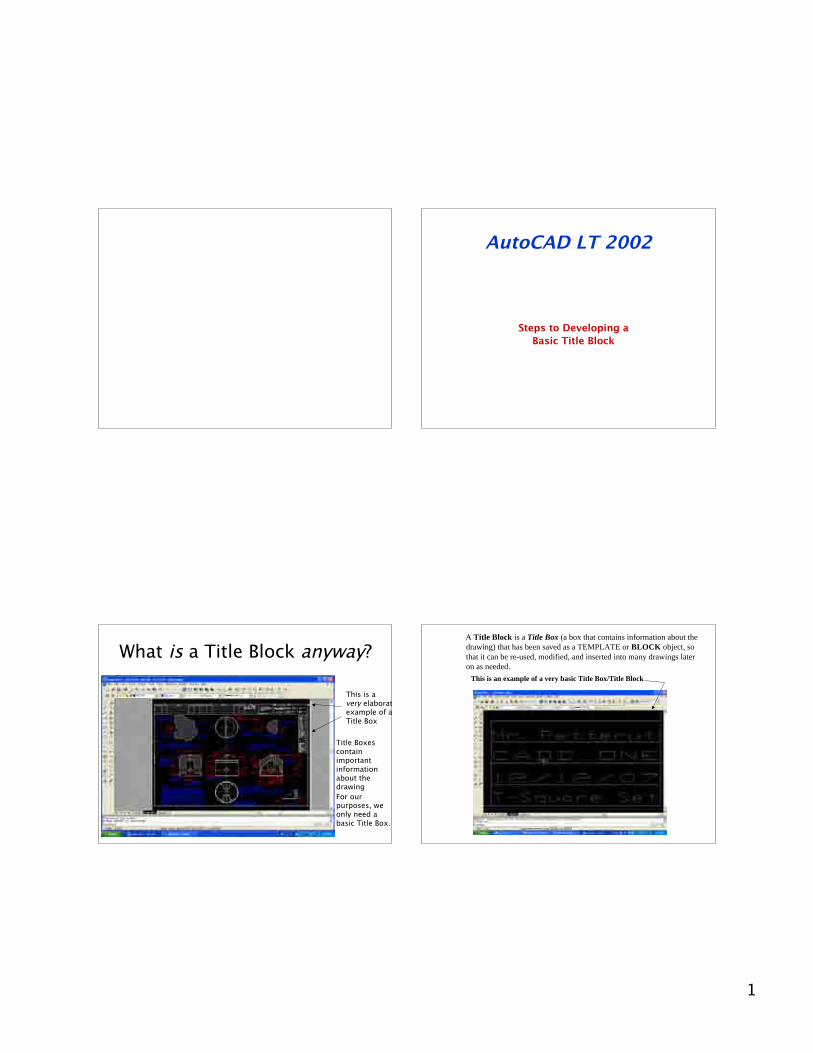
AutoCAD LT 2002
Steps to Developing aBasic Title Block
What is a Title Block anyway?
This is avery elaborateexample of aTitle Box
Title Boxescontainimportantinformationabout thedrawingFor ourpurposes, weonly need abasic Title Box.
A Title Block is a Title Box (a box that contains information about thedrawing) that has been saved as a TEMPLATE or BLOCK object, sothat it can be re-used, modified, and inserted into many drawings lateron as needed.
This is an example of a very basic Title Box/Title Block
2
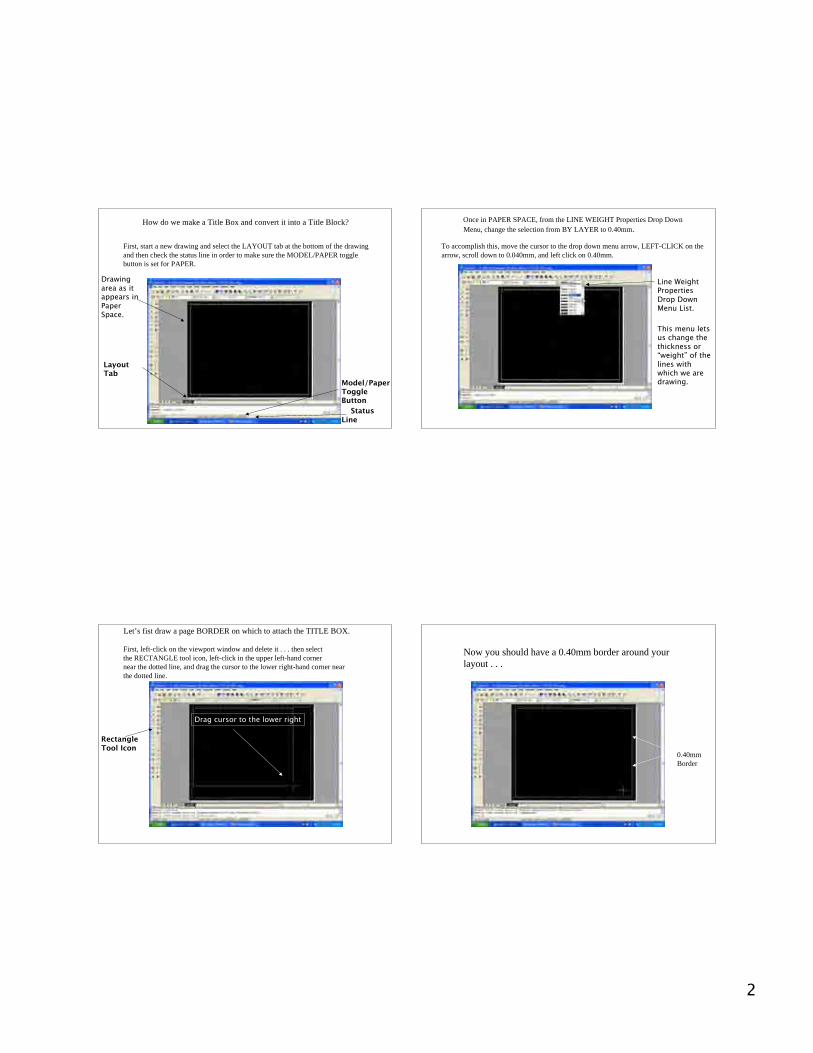
How do we make a Title Box and convert it into a Title Block?
LayoutTab
Model/PaperToggleButton
Drawingarea as itappears inPaperSpace.
First, start a new drawing and select the LAYOUT tab at the bottom of the drawingand then check the status line in order to make sure the MODEL/PAPER toggle button is set for PAPER.
StatusLine
Once in PAPER SPACE, from the LINE WEIGHT Properties Drop DownMenu, change the selection from BY LAYER to 0.40mm.
Line Weight PropertiesDrop Down Menu List.
This menu lets us change the thickness or “weight” of the lines with which we aredrawing.
To accomplish this, move the cursor to the drop down menu arrow, LEFT-CLICK on thearrow, scroll down to 0.040mm, and left click on 0.40mm.
Let’s fist draw a page BORDER on which to attach the TITLE BOX.
First, left-click on the viewport window and delete it . . . then selectthe RECTANGLE tool icon, left-click in the upper left-hand cornernear the dotted line, and drag the cursor to the lower right-hand corner near the dotted line.
RectangleTool Icon
Drag cursor to the lower right
Now you should have a 0.40mm border around yourlayout . . .
0.40mmBorder
3
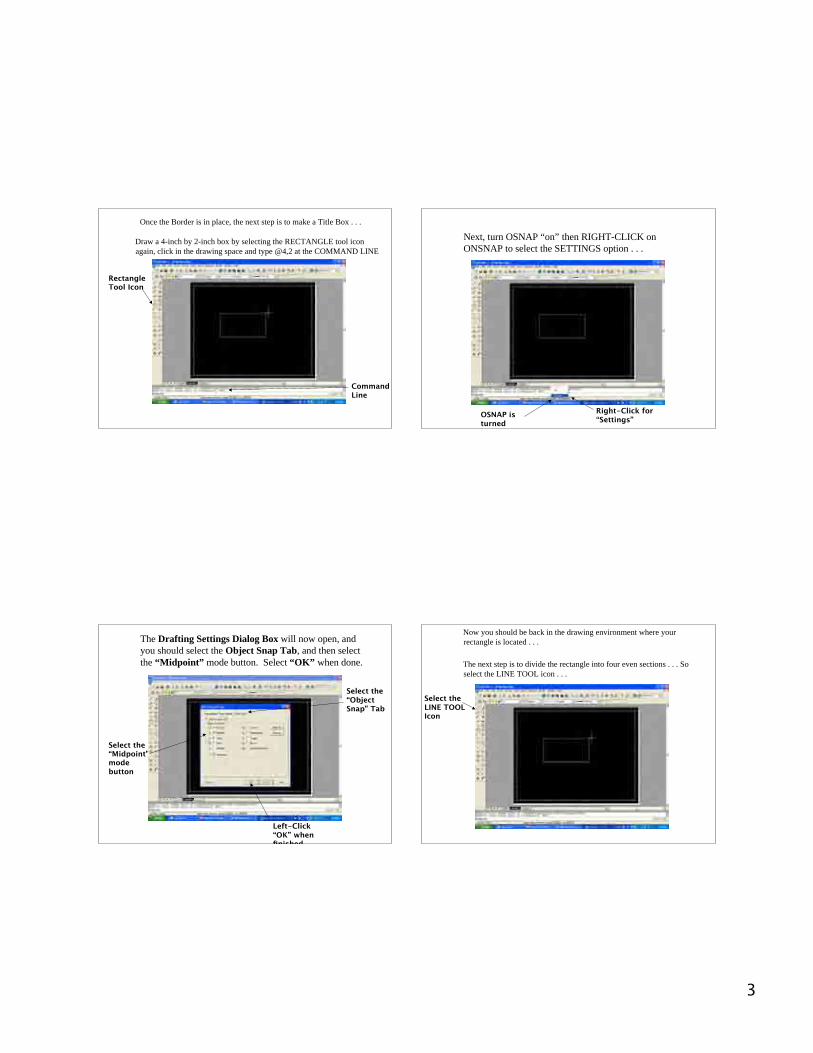
Once the Border is in place, the next step is to make a Title Box . . .
RectangleTool Icon
Draw a 4-inch by 2-inch box by selecting the RECTANGLE tool iconagain, click in the drawing space and type @4,2 at the COMMAND LINE
CommandLine
Next, turn OSNAP “on” then RIGHT-CLICK onONSNAP to select the SETTINGS option . . .
OSNAP isturned“on”
Right-Click for“Settings”
The Drafting Settings Dialog Box will now open, andyou should select the Object Snap Tab, and then selectthe “Midpoint” mode button. Select “OK” when done.
Select the“Midpoint”modebutton
Left-Click“OK” whenfinished
Select the“ObjectSnap” Tab
Now you should be back in the drawing environment where yourrectangle is located . . .
The next step is to divide the rectangle into four even sections . . . Soselect the LINE TOOL icon . . .
Select theLINE TOOLIcon
4
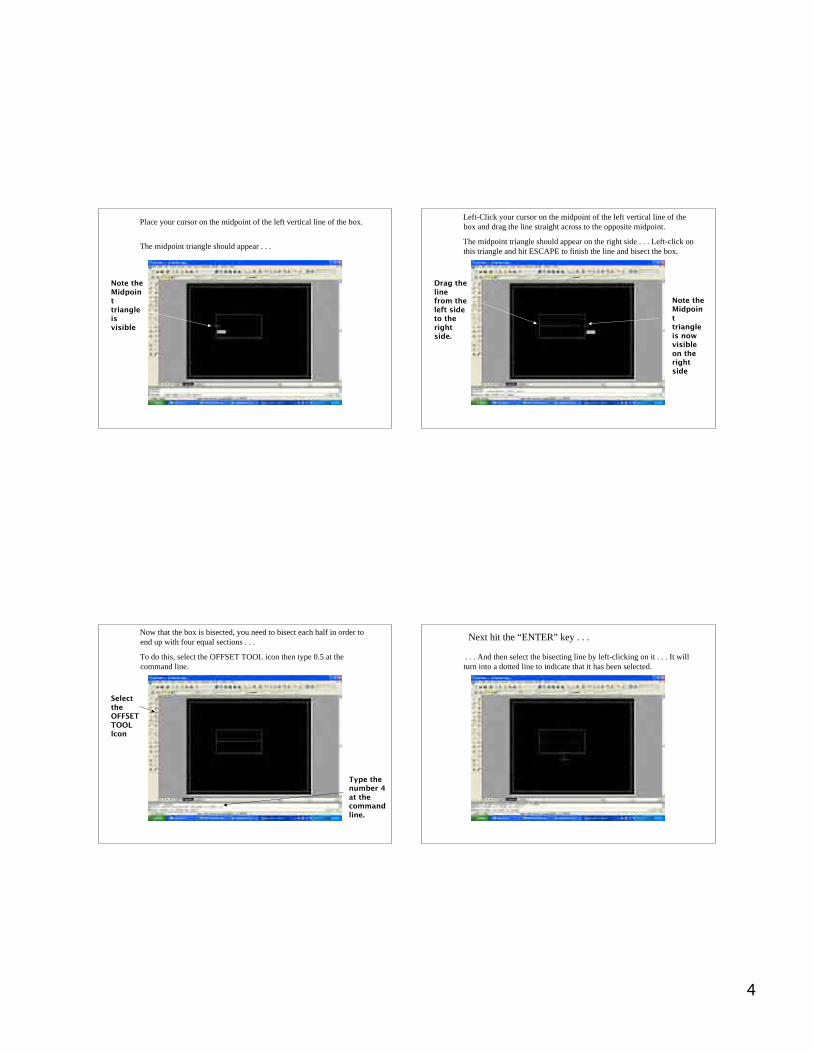
Place your cursor on the midpoint of the left vertical line of the box.
The midpoint triangle should appear . . .
Note theMidpointtriangleisvisible
Left-Click your cursor on the midpoint of the left vertical line of thebox and drag the line straight across to the opposite midpoint.
The midpoint triangle should appear on the right side . . . Left-click onthis triangle and hit ESCAPE to finish the line and bisect the box.
Note theMidpointtriangleis nowvisibleon therightside
Drag thelinefrom theleft sideto therightside.
Now that the box is bisected, you need to bisect each half in order toend up with four equal sections . . .
To do this, select the OFFSET TOOL icon then type 0.5 at thecommand line.
Type thenumber 4at thecommandline.
SelecttheOFFSETTOOLIcon
Next hit the “ENTER” key . . .
. . . And then select the bisecting line by left-clicking on it . . . It willturn into a dotted line to indicate that it has been selected.
5
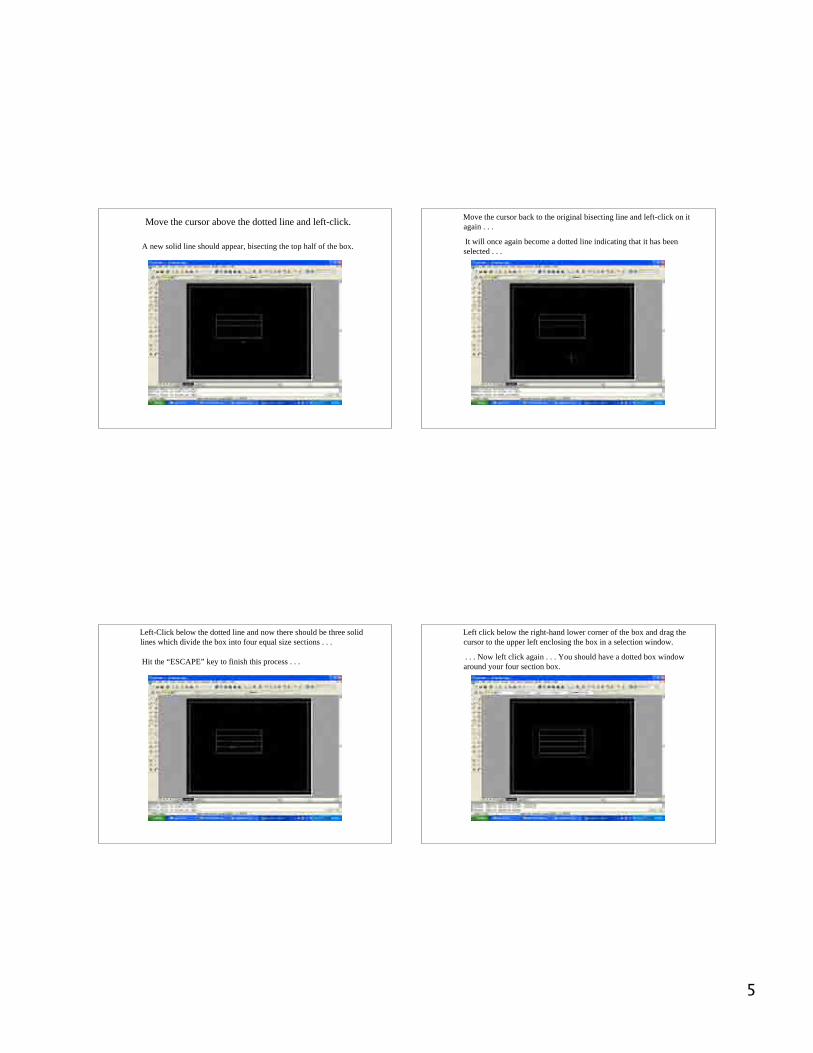
Move the cursor above the dotted line and left-click.
A new solid line should appear, bisecting the top half of the box.
Move the cursor back to the original bisecting line and left-click on itagain . . .
It will once again become a dotted line indicating that it has beenselected . . .
Left-Click below the dotted line and now there should be three solidlines which divide the box into four equal size sections . . .
Hit the “ESCAPE” key to finish this process . . .
Left click below the right-hand lower corner of the box and drag thecursor to the upper left enclosing the box in a selection window.
. . . Now left click again . . . You should have a dotted box windowaround your four section box.
6
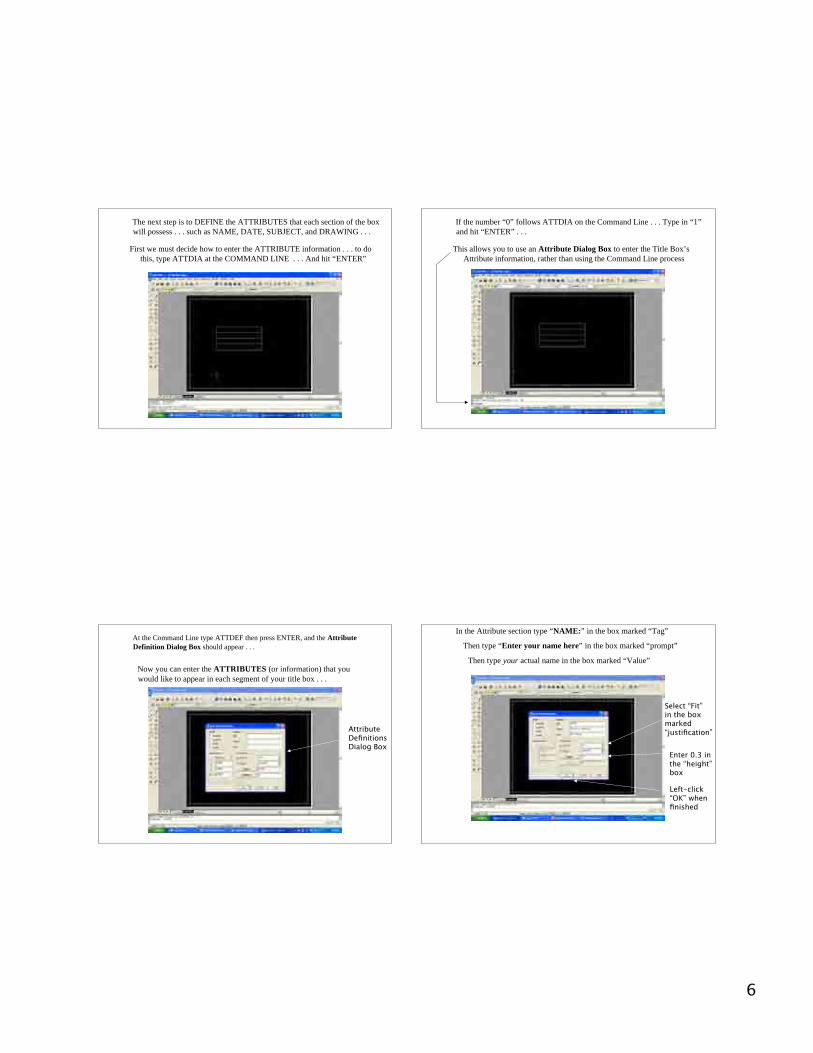
The next step is to DEFINE the ATTRIBUTES that each section of the boxwill possess . . . such as NAME, DATE, SUBJECT, and DRAWING . . .
First we must decide how to enter the ATTRIBUTE information . . . to dothis, type ATTDIA at the COMMAND LINE . . . And hit “ENTER”
If the number “0” follows ATTDIA on the Command Line . . . Type in “1”and hit “ENTER” . . .
This allows you to use an Attribute Dialog Box to enter the Title Box’sAttribute information, rather than using the Command Line process
At the Command Line type ATTDEF then press ENTER, and the AttributeDefinition Dialog Box should appear . . .
Now you can enter the ATTRIBUTES (or information) that youwould like to appear in each segment of your title box . . .
AttributeDefinitions Dialog Box
In the Attribute section type “NAME:” in the box marked “Tag”
Then type “Enter your name here” in the box marked “prompt”
Then type your actual name in the box marked “Value”
Select “Fit”in the boxmarked“justification”
Enter 0.3 inthe “height”box
Left-click“OK” whenfinished
7
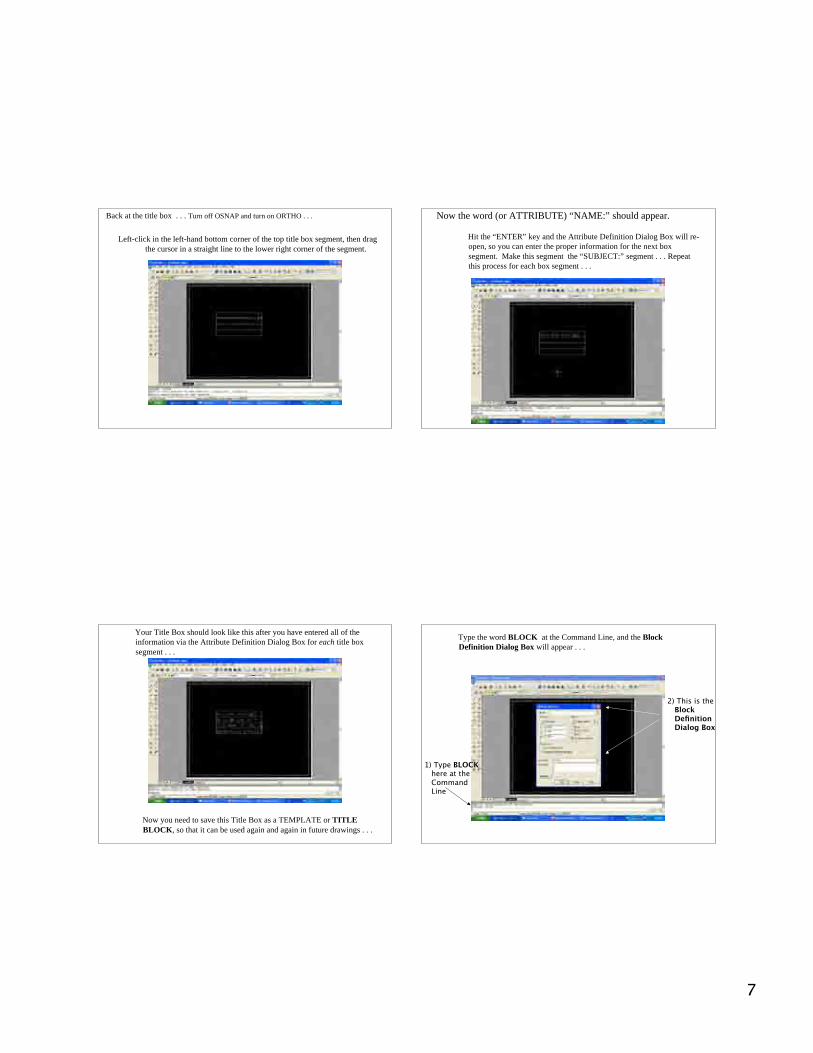
Back at the title box . . . Turn off OSNAP and turn on ORTHO . . .
Left-click in the left-hand bottom corner of the top title box segment, then dragthe cursor in a straight line to the lower right corner of the segment.
Now the word (or ATTRIBUTE) “NAME:” should appear.
Hit the “ENTER” key and the Attribute Definition Dialog Box will re-open, so you can enter the proper information for the next boxsegment. Make this segment the “SUBJECT:” segment . . . Repeatthis process for each box segment . . .
Your Title Box should look like this after you have entered all of theinformation via the Attribute Definition Dialog Box for each title boxsegment . . .
Now you need to save this Title Box as a TEMPLATE or TITLEBLOCK, so that it can be used again and again in future drawings . . .
Type the word BLOCK at the Command Line, and the BlockDefinition Dialog Box will appear . . .
1) Type BLOCK here at the Command Line
2) This is the Block Definition Dialog Box
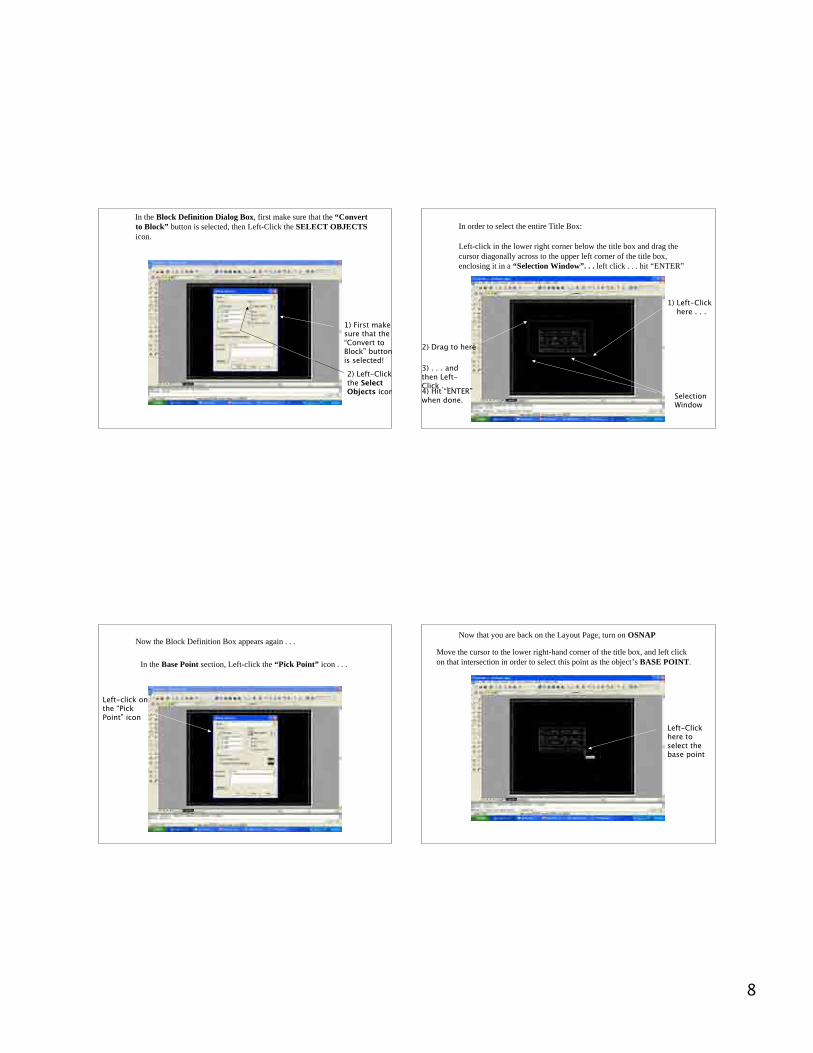
8
In the Block Definition Dialog Box, first make sure that the “Convertto Block” button is selected, then Left-Click the SELECT OBJECTSicon.
2) Left-Clickthe SelectObjects icon
1) First make sure that the “Convert toBlock” buttonis selected!
Left-click in the lower right corner below the title box and drag thecursor diagonally across to the upper left corner of the title box,enclosing it in a “Selection Window”. . . left click . . . hit “ENTER”
1) Left-Click here . . .
2) Drag to here
In order to select the entire Title Box:
SelectionWindow
4) Hit “ENTER”when done.
3) . . . andthen Left-Click . . .
Now the Block Definition Box appears again . . .
In the Base Point section, Left-click the “Pick Point” icon . . .
Left-click onthe “PickPoint” icon
Now that you are back on the Layout Page, turn on OSNAP
Move the cursor to the lower right-hand corner of the title box, and left clickon that intersection in order to select this point as the object’s BASE POINT.
Left-Clickhere toselect thebase point
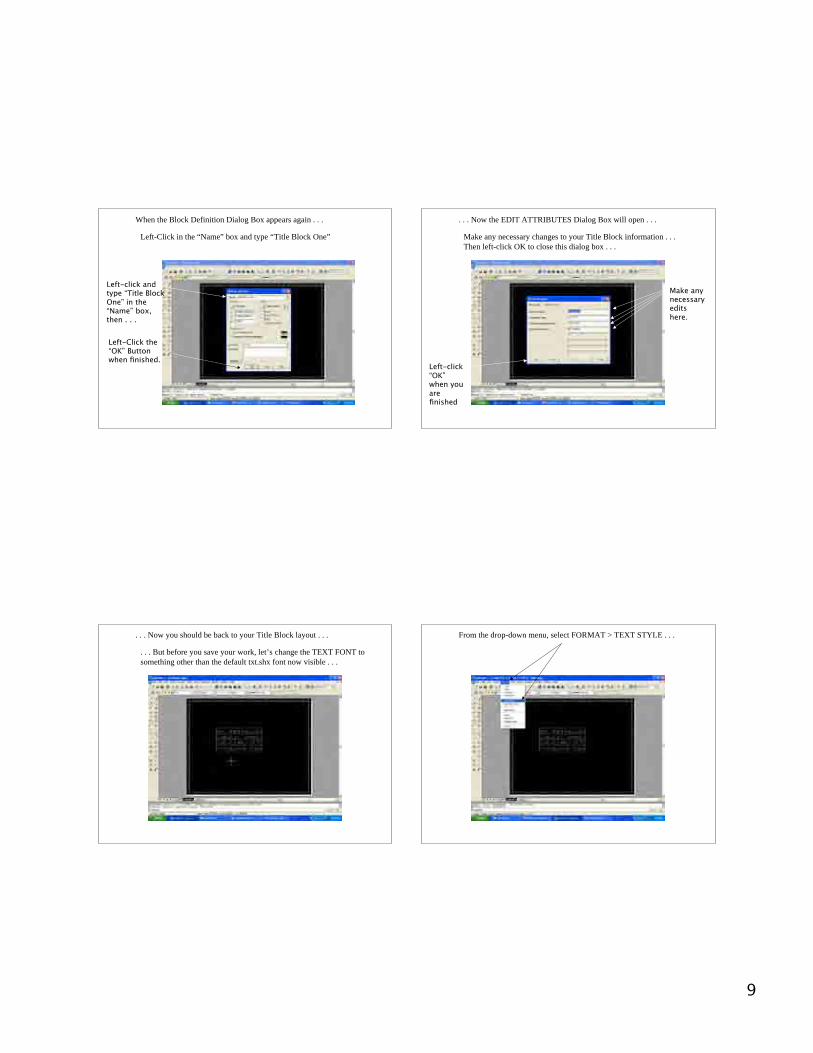
9
When the Block Definition Dialog Box appears again . . .
Left-Click in the “Name” box and type “Title Block One”
Left-click and type “Title BlockOne” in the “Name” box, then . . .
Left-Click the“OK” Buttonwhen finished.
. . . Now the EDIT ATTRIBUTES Dialog Box will open . . .
Make any necessary changes to your Title Block information . . .Then left-click OK to close this dialog box . . .
Make anynecessaryeditshere.
Left-click“OK”when youarefinished
. . . Now you should be back to your Title Block layout . . .
. . . But before you save your work, let’s change the TEXT FONT tosomething other than the default txt.shx font now visible . . .
From the drop-down menu, select FORMAT > TEXT STYLE . . .
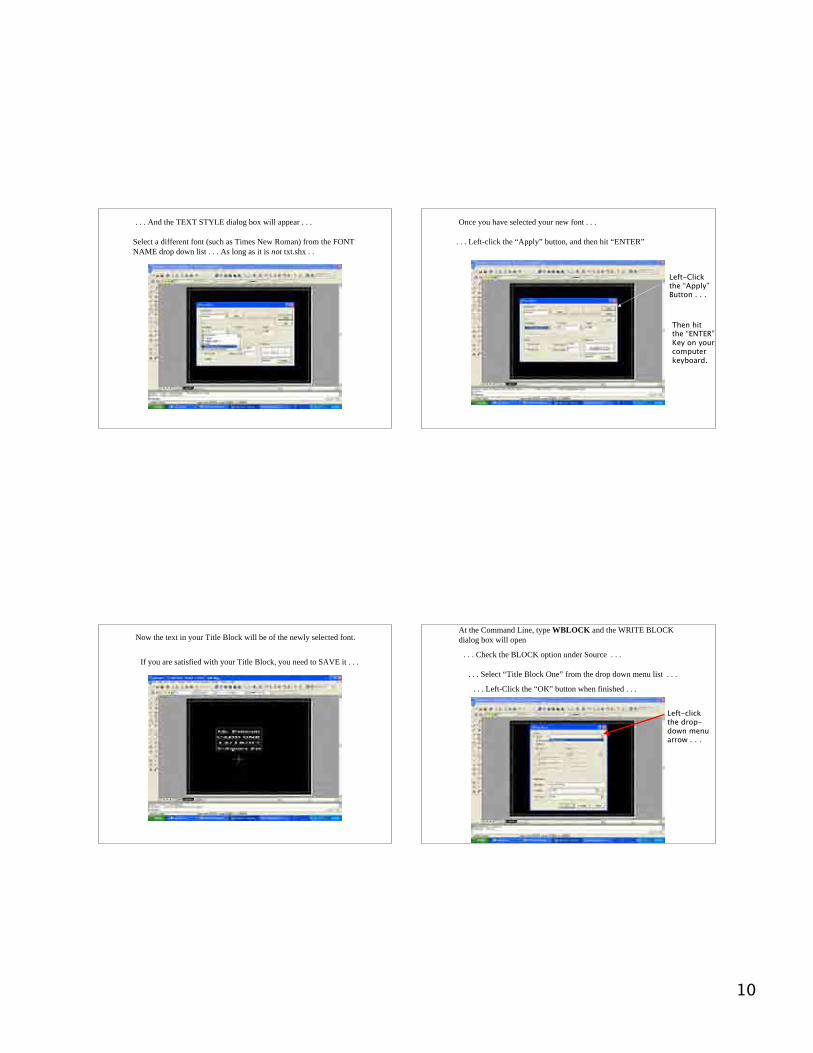
10
. . . And the TEXT STYLE dialog box will appear . . .
Select a different font (such as Times New Roman) from the FONTNAME drop down list . . . As long as it is not txt.shx . .
Once you have selected your new font . . .
. . . Left-click the “Apply” button, and then hit “ENTER”
Left-Clickthe “Apply”Button . . .
Then hitthe “ENTER”Key on yourcomputerkeyboard.
Now the text in your Title Block will be of the newly selected font.
If you are satisfied with your Title Block, you need to SAVE it . . .
At the Command Line, type WBLOCK and the WRITE BLOCKdialog box will open
. . . Check the BLOCK option under Source . . .
. . . Select “Title Block One” from the drop down menu list . . .
. . . Left-Click the “OK” button when finished . . .
Left-clickthe drop-down menuarrow . . .
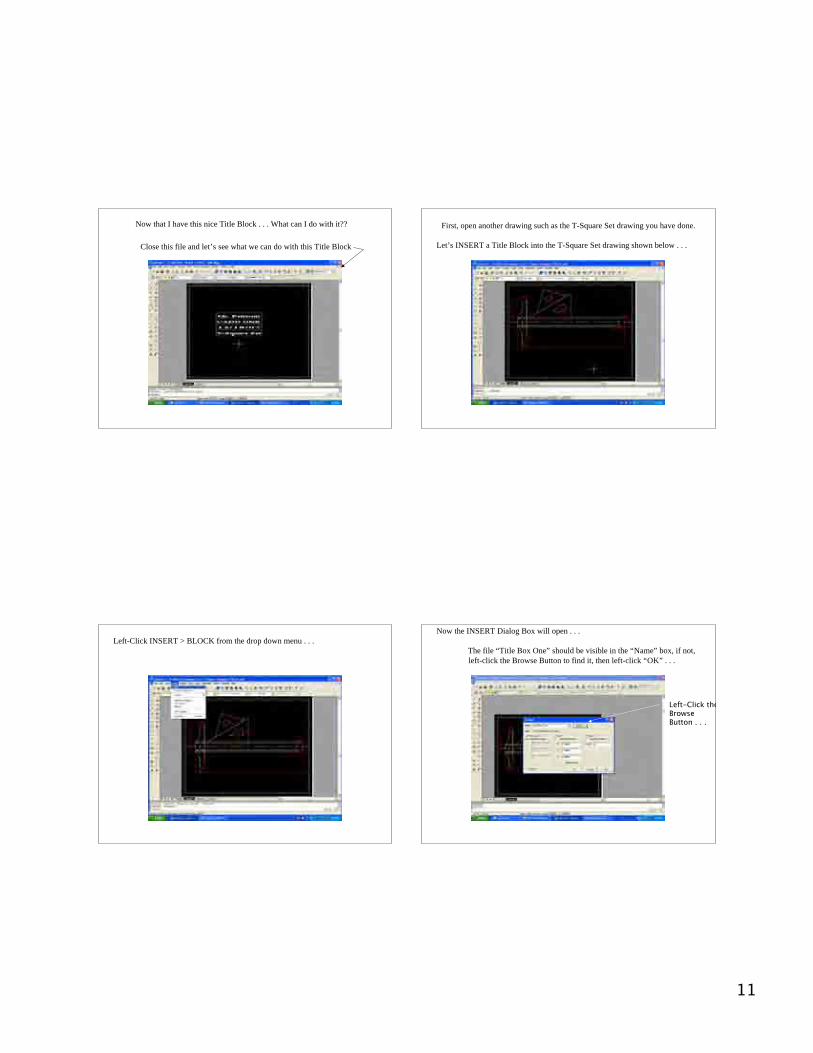
11
Now that I have this nice Title Block . . . What can I do with it??
Close this file and let’s see what we can do with this Title Block Let’s INSERT a Title Block into the T-Square Set drawing shown below . . .
First, open another drawing such as the T-Square Set drawing you have done.
Left-Click INSERT > BLOCK from the drop down menu . . .Now the INSERT Dialog Box will open . . .
The file “Title Box One” should be visible in the “Name” box, if not,left-click the Browse Button to find it, then left-click “OK” . . .
Left-Click theBrowse Button . . .
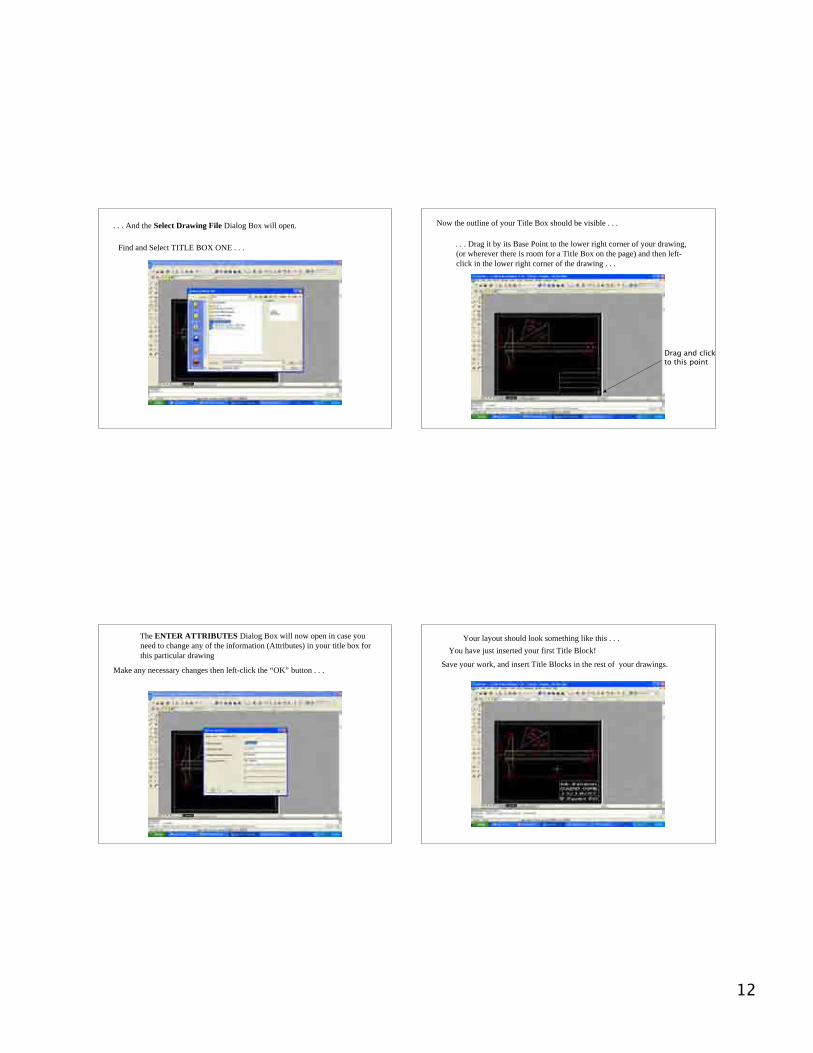
12
. . . And the Select Drawing File Dialog Box will open.
Find and Select TITLE BOX ONE . . .
Now the outline of your Title Box should be visible . . .
. . . Drag it by its Base Point to the lower right corner of your drawing,(or wherever there is room for a Title Box on the page) and then left-click in the lower right corner of the drawing . . .
Drag and clickto this point
The ENTER ATTRIBUTES Dialog Box will now open in case youneed to change any of the information (Attributes) in your title box forthis particular drawing
Make any necessary changes then left-click the “OK” button . . .
Your layout should look something like this . . .You have just inserted your first Title Block!
Save your work, and insert Title Blocks in the rest of your drawings.
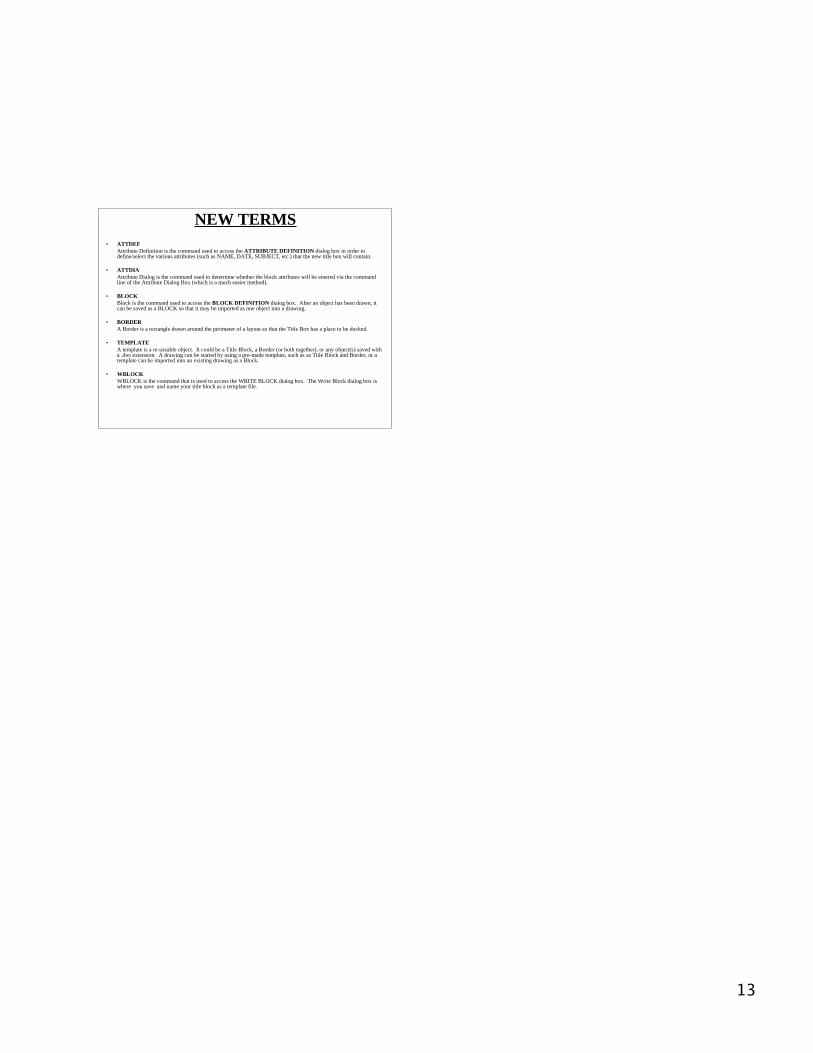
13
NEW TERMS• ATTDEF
Attribute Definition is the command used to access the ATTRIBUTE DEFINITION dialog box in order todefine/select the various attributes (such as NAME, DATE, SUBJECT, etc.) that the new title box will contain.
• ATTDIAAttribute Dialog is the command used to determine whether the block attributes will be entered via the commandline of the Attribute Dialog Box (which is a much easier method).
• BLOCKBlock is the command used to access the BLOCK DEFINITION dialog box. After an object has been drawn, itcan be saved as a BLOCK so that it may be imported as one object into a drawing.
• BORDERA Border is a rectangle drawn around the perimeter of a layout so that the Title Box has a place to be docked.
• TEMPLATEA template is a re-useable object. It could be a Title Block, a Border (or both together), or any object(s) saved witha .dwt extension. A drawing can be started by using a pre-made template, such as as Title Block and Border, or atemplate can be imported into an existing drawing as a Block.
• WBLOCKWBLOCK is the command that is used to access the WRITE BLOCK dialog box. The Write Block dialog box iswhere you save and name your title block as a template file.
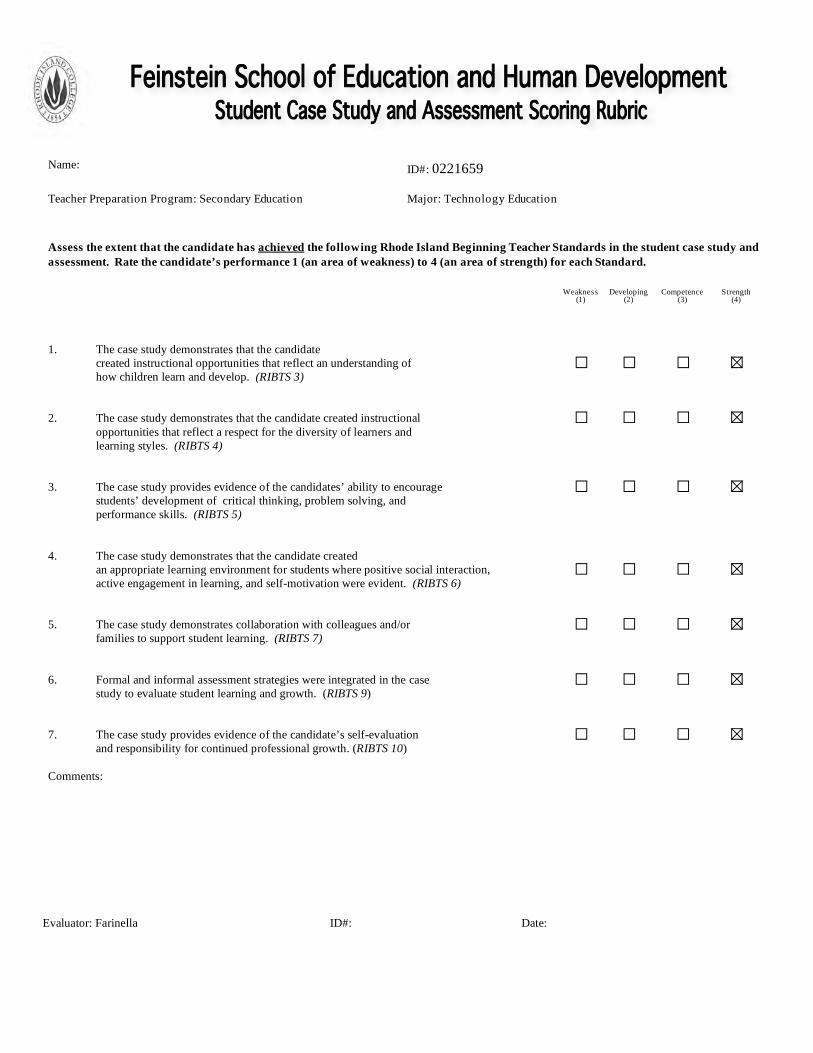
Assess the extent that the candidate has achieved the following Rhode Island Beginning Teacher Standards in the student case study and assessment. Rate the candidate’s performance 1 (an area of weakness) to 4 (an area of strength) for each Standard.
1. The case study demonstrates that the candidatecreated instructional opportunities that reflect an understanding of how children learn and develop. (RIBTS 3)
2. The case study demonstrates that the candidate created instructional
opportunities that reflect a respect for the diversity of learners andlearning styles. (RIBTS 4)
3. The case study provides evidence of the candidates’ ability to encourage
students’ development of critical thinking, problem solving, and performance skills. (RIBTS 5)
4. The case study demonstrates that the candidate createdan appropriate learning environment for students where positive social interaction, active engagement in learning, and self-motivation were evident. (RIBTS 6)
5. The case study demonstrates collaboration with colleagues and/or families to support student learning. (RIBTS 7)
6. Formal and informal assessment strategies were integrated in the case study to evaluate student learning and growth. (RIBTS 9)
7. The case study provides evidence of the candidate’s self-evaluation and responsibility for continued professional growth. (RIBTS 10)
Comments:
Name:
Teacher Preparation Program: Secondary Education Major: Technology Education
ID#: 0221659
Evaluator: Farinella ID#: Date:
Weakness(1)
Developing(2)
Competence(3)
Strength(4)
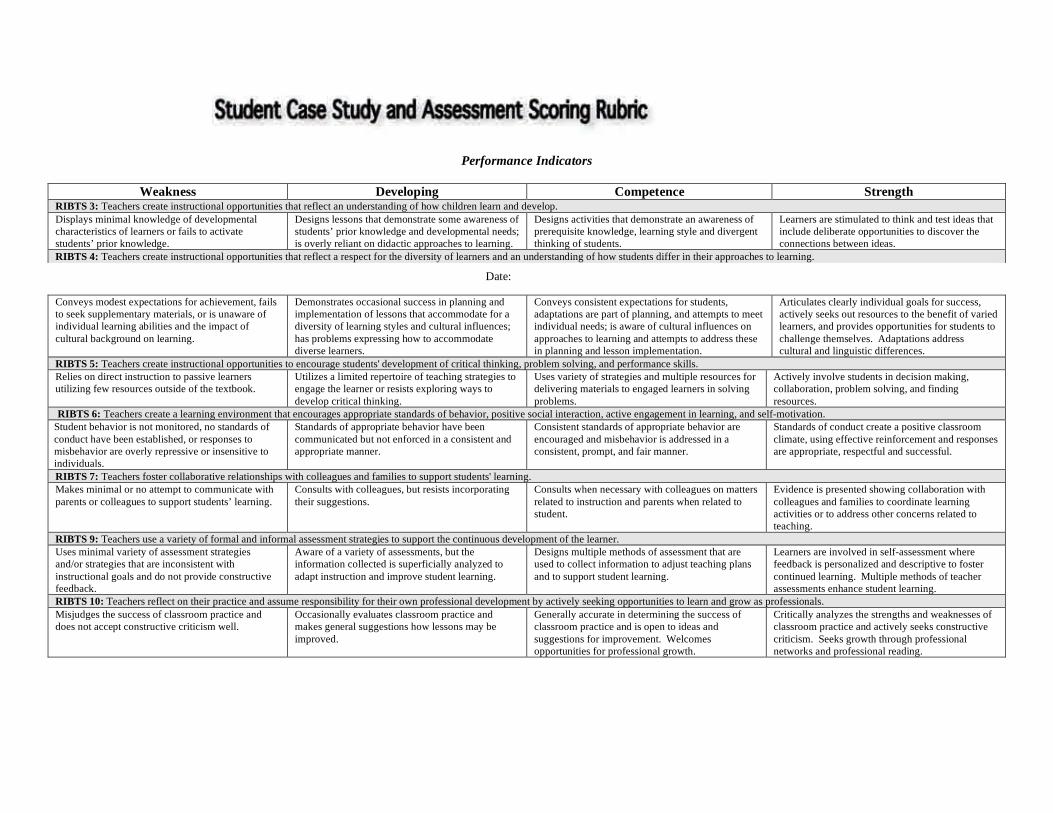
Performance Indicators
Weakness Developing Competence StrengthRIBTS 3: Teachers create instructional opportunities that reflect an understanding of how children learn and develop.Displays minimal knowledge of developmental characteristics of learners or fails to activate students’ prior knowledge.
Designs lessons that demonstrate some awareness of students’ prior knowledge and developmental needs; is overly reliant on didactic approaches to learning.
Designs activities that demonstrate an awareness of prerequisite knowledge, learning style and divergent thinking of students.
Learners are stimulated to think and test ideas that include deliberate opportunities to discover the connections between ideas.
RIBTS 4: Teachers create instructional opportunities that reflect a respect for the diversity of learners and an understanding of how students differ in their approaches to learning.
Conveys modest expectations for achievement, fails to seek supplementary materials, or is unaware of individual learning abilities and the impact of cultural background on learning.
Demonstrates occasional success in planning and implementation of lessons that accommodate for a diversity of learning styles and cultural influences; has problems expressing how to accommodate diverse learners.
Conveys consistent expectations for students, adaptations are part of planning, and attempts to meet individual needs; is aware of cultural influences on approaches to learning and attempts to address these in planning and lesson implementation.
Articulates clearly individual goals for success, actively seeks out resources to the benefit of varied learners, and provides opportunities for students to challenge themselves. Adaptations address cultural and linguistic differences.
RIBTS 5: Teachers create instructional opportunities to encourage students' development of critical thinking, problem solving, and performance skills.Relies on direct instruction to passive learners utilizing few resources outside of the textbook.
Utilizes a limited repertoire of teaching strategies to engage the learner or resists exploring ways to develop critical thinking.
Uses variety of strategies and multiple resources for delivering materials to engaged learners in solving problems.
Actively involve students in decision making, collaboration, problem solving, and finding resources.
RIBTS 6: Teachers create a learning environment that encourages appropriate standards of behavior, positive social interaction, active engagement in learning, and self-motivation.Student behavior is not monitored, no standards of conduct have been established, or responses to misbehavior are overly repressive or insensitive to individuals.
Standards of appropriate behavior have been communicated but not enforced in a consistent and appropriate manner.
Consistent standards of appropriate behavior are encouraged and misbehavior is addressed in a consistent, prompt, and fair manner.
Standards of conduct create a positive classroom climate, using effective reinforcement and responses are appropriate, respectful and successful.
RIBTS 7: Teachers foster collaborative relationships with colleagues and families to support students' learning.Makes minimal or no attempt to communicate with parents or colleagues to support students’ learning.
Consults with colleagues, but resists incorporating their suggestions.
Consults when necessary with colleagues on matters related to instruction and parents when related to student.
Evidence is presented showing collaboration with colleagues and families to coordinate learning activities or to address other concerns related to teaching.
RIBTS 9: Teachers use a variety of formal and informal assessment strategies to support the continuous development of the learner.Uses minimal variety of assessment strategies and/or strategies that are inconsistent with instructional goals and do not provide constructive feedback.
Aware of a variety of assessments, but the information collected is superficially analyzed to adapt instruction and improve student learning.
Designs multiple methods of assessment that are used to collect information to adjust teaching plans and to support student learning.
Learners are involved in self-assessment where feedback is personalized and descriptive to foster continued learning. Multiple methods of teacher assessments enhance student learning.
RIBTS 10: Teachers reflect on their practice and assume responsibility for their own professional development by actively seeking opportunities to learn and grow as professionals.Misjudges the success of classroom practice and does not accept constructive criticism well.
Occasionally evaluates classroom practice and makes general suggestions how lessons may be improved.
Generally accurate in determining the success of classroom practice and is open to ideas and suggestions for improvement. Welcomes opportunities for professional growth.
Critically analyzes the strengths and weaknesses of classroom practice and actively seeks constructive criticism. Seeks growth through professional networks and professional reading.
Date:
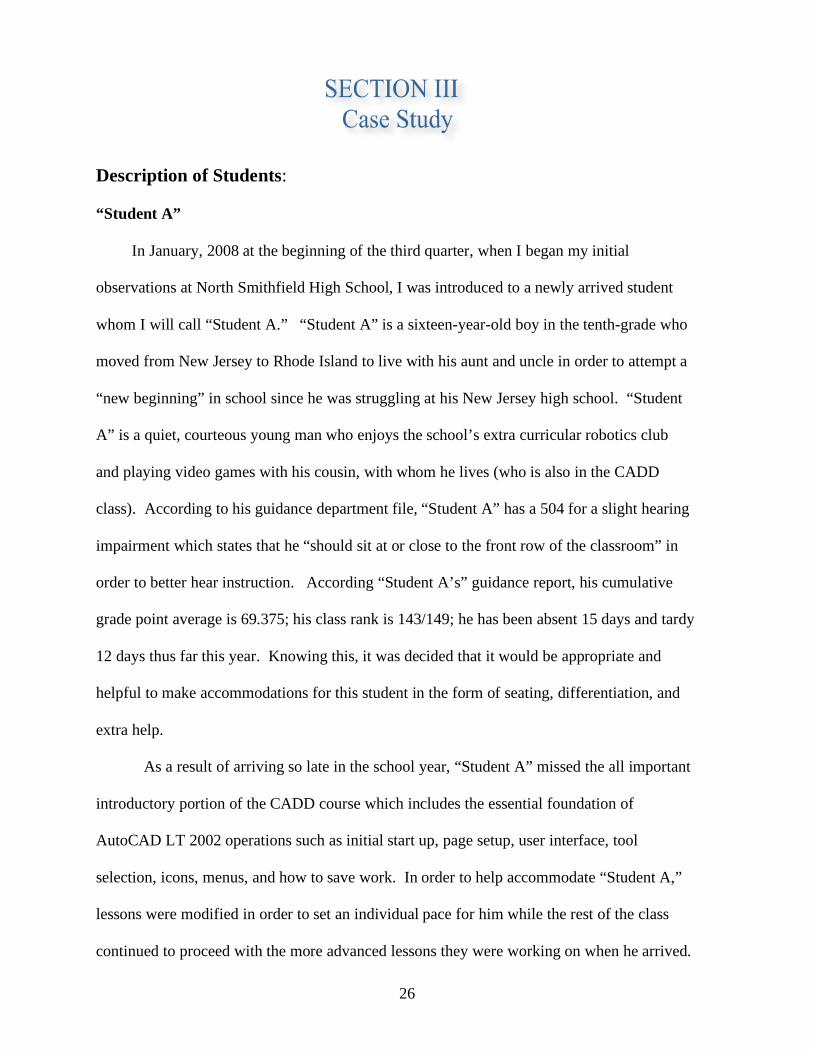
26
Description of Students:
“Student A”
In January, 2008 at the beginning of the third quarter, when I began my initial
observations at North Smithfield High School, I was introduced to a newly arrived student
whom I will call “Student A.” “Student A” is a sixteen-year-old boy in the tenth-grade who
moved from New Jersey to Rhode Island to live with his aunt and uncle in order to attempt a
“new beginning” in school since he was struggling at his New Jersey high school. “Student
A” is a quiet, courteous young man who enjoys the school’s extra curricular robotics club
and playing video games with his cousin, with whom he lives (who is also in the CADD
class). According to his guidance department file, “Student A” has a 504 for a slight hearing
impairment which states that he “should sit at or close to the front row of the classroom” in
order to better hear instruction. According “Student A’s” guidance report, his cumulative
grade point average is 69.375; his class rank is 143/149; he has been absent 15 days and tardy
12 days thus far this year. Knowing this, it was decided that it would be appropriate and
helpful to make accommodations for this student in the form of seating, differentiation, and
extra help.
As a result of arriving so late in the school year, “Student A” missed the all important
introductory portion of the CADD course which includes the essential foundation of
AutoCAD LT 2002 operations such as initial start up, page setup, user interface, tool
selection, icons, menus, and how to save work. In order to help accommodate “Student A,”
lessons were modified in order to set an individual pace for him while the rest of the class
continued to proceed with the more advanced lessons they were working on when he arrived.

27
Specifically, during my initial observation period, “Student A” received one-on-one help
from me while the cooperating teacher taught the rest of the class. We started at the very
beginning of the course in order to learn the essential foundations of AutoCAD LT 2002 by
working on drawings that the rest of the class had already completed. “Student A” welcomed
this extra help, and was not afraid to ask questions.
Like many students his age, “Student A” is comfortable with computers and the Windows
Operating System environment, however he struggles with mathematical concepts such as
fractions and geometric concepts such as degrees and angles. After becoming familiar with
the AutoCAD work environment, we reviewed these basic mathematical concepts in order to
help draw the assigned geometric shapes often used in AutoCAD.
Student “B”
In addition to meeting “Student A” at the beginning of the third quarter, I was also
introduced to another student whom I will call “Student B.” “Student B” is a seventeen-
year-old boy in the eleventh-grade who is a native of North Smithfield, Rhode Island and
lives with his single mother. “Student B” is an outgoing, gregarious, courteous young man
who plays guitar and drums, and enjoys playing in a band with friends. According to his
guidance department file, “Student B” does not have an IEP; his cumulative grade point
average is 87.590; his class rank is 38/147; he has not been tardy; and he has seven absences.
Upon discovery of this information, I was not surprised at how rapidly “Student B” had been
progressing with his assigned drawings in class. “Student B” is an independent learner who
enjoys a challenge. Because he progressed so rapidly, it would also be appropriate and
helpful to make accommodations for “Student B” as well in the form of differentiation and
extra assignments in order to hold his interest and continue to challenge him.
He is extremely comfortable with computers and the Windows Operating System

28
environment and he excels with mathematical concepts such as fractions and geometry as he
is taking Pre-Calculus and Honors Physics. After becoming familiar with the AutoCAD
work environment, “Student B” quickly applied himself and consistently finished his
assignments before his classmates. Frequently he would help his neighbors with any
questions that they had regarding the program. Oftentimes, I would assign extra drawing
assignments to “Student B” so that he would have something important and meaningful to do
(not simply “busy work”) once he completed his assigned drawings. Being a more advanced
and very eager learner, “Student B” welcomed the extra assignments, and was not afraid of
new challenges. “Student B” would be assigned drawings derived from subsequent lessons
as well, and this was very helpful in allowing him to assist me at the master workstation
keying in information as I demonstrated new lessons and concepts on the Smart Board.
Overview of Instructional Goals for a Four Week Period
The instructional goals for the period from March 6 to April 3 include lessons and
drawing assignments for Orthographic Views, Isometric Views, and Sectional Views. The
following are the key concepts and objectives of the instructional goals for each lesson:
Orthographic and Orthographic Sectional Views Select, align, and draw FRONT, TOP, and SIDE VIEWS of an object provided
Correctly identify, align, and draw properly oriented and sectioned 3-View Orthographic drawings and PLOT when completed
Cutting plane lines in the orthographic view, section letters, and proper hatching
Isometric and Isometric Sectional Views
Isometric views are 2-D drawings which appear to be 3-D, all lines are vertical or 30-degrees off horizontal, Isoplane F5 snap settings for left, right, and top views are used.
Learning to draw in the Isometric environment; how to dimension objects using the oblique technique; and drawing true circles as isometric ellipses.
Cutting plane lines, section letters, and proper hatching of isometric objects.
29
Correctly identify, align, and draw properly oriented and sectioned isometric drawings
and PLOT when completed.
In order to accommodate both “Student A” and “Student B,” some modifications
were made to the instructional goals. Each student had the opportunity to redraw and
resubmit corrected drawings at least once in order to learn from their mistakes and attempt to
earn a higher grade. “Student A,” was allowed to redraw and resubmit three times. In
addition, he was provided with as much one-to-one help that I could provide during class. I
also sent home a progress report and deficiency to his guardians as school policy requires
that all students with a 70 or below average receive one. His guardians signed the deficiency
and wrote a note encouraging extra, after-school help. I stayed after school with him several
times in order to help him with any particularly troublesome areas. “Student A” had most
difficulty with some of the isometric sectional view assignments, and he certainly benefited
from his extra efforts and the extra help he received, as reflected in the improvement he made
in his drawing assignments. “Student B” also received differentiation and modifications, but
they were in the form of extra, more advanced assignments that counted as extra credit
toward his grade. “Student B” enjoyed the challenge of the extra assignments and was
actually able to help his classmates with the new concepts when they “caught up” with him.
The following is a Portfolio of Student work comprised of drawings completed by
“Student A” and “Student B.” The name of each student has been intentionally blacked out
in the title block and from any comments on each drawing in order to ensure anonymity and
privacy. The drawings are scans of photocopies of the original drawings complete with
corrections, comments, and grades. The original drawings were corrected with colored pens
so that the corrections could be easily distinguished from the CADD drawing. Unfortunately
these scanned copies are black and white.
30
Portfolio of Student Work The following is a list of work completed by “Student A” and “Student B” in March, 2008: “Student A” Work Examples – Fifteen Completed Drawings saved as PDF files Bookend Orthographic View Bookend Isometric View Bookend Orthographic Sectional View Bookend Isometric Sectional View Bracket Orthographic View Bracket Isometric View Bracket Isometric Sectional View Bracket Orthographic Sectional View Cutter Holder Orthographic View Cutter Holder Isometric View Cutter Holder Orthographic Sectional View Cutter Holder Isometric Sectional View Vertical Bracket Orthographic View Vertical Bracket Isometric View Vertical Bracket Isometric Sectional View “Student B” Work Examples – Twenty-Seven Completed Drawings saved as PDF files Bookend Orthographic View Bookend Isometric View Bookend Orthographic Sectional View Bookend Isometric Sectional View Bracket Orthographic View Bracket Isometric View Bracket Orthographic Sectional View Bracket Isometric Sectional View Clamp Plate Orthographic View Clamp Plate Isometric View Clamp Plate Orthographic Sectional View Clamp Plate Isometric Sectional View Cutter Holder Orthographic View Cutter Holder Isometric View Cutter Holder Orthographic Sectional View Cutter Holder Isometric Sectional View Exploded Box Exploded Bracket Fixture Base Orthographic View Fixture Base Isometric View Fixture Base Orthographic Sectional View Fixture Base Isometric Sectional View Vertical Bracket Orthographic View Vertical Bracket Isometric View
31
Vertical Bracket Orthographic Sectional View Vertical Bracket Isometric Sectional View Assessment:
Both students were assessed in several ways. Initially, a formative assessment of
each student’s prior knowledge and possible misconceptions of mathematical, geometric, and
drafting concepts was made by way of introductory question and answer sessions. It first had
to be determined if students: were able operate a Windows Platform computer; to properly
dimension objects; perform fractional mathematic calculations; were familiar with Standard
and Metric forms of measurement; understood shape and angle terminology; and possess a
rudimentary understanding of basic mechanical drawing concepts.
Subsequently, students are then formatively assessed by submitting both softcopy and
hardcopy versions of completed drawings which count as class work assignments. The
hardcopy drawings are archived in their individual three-ring binders for submission to their
Performance Based Graduation Requirement Portfolio (PBGR Portfolio) and are included as
PDF files as mentioned in the previous Overview Section of this document. These drawings
must be accurate two-dimensional and quasi-three-dimensional technical drawings plotted on
the correct ANSI-size sheet of paper. The softcopy drawings are checked for flaws and
accuracy that may not be readily perceptible on the hardcopy, and then receive a grade. For
each mistake five points is deducted. The students have the opportunity to redraw and
resubmit each corrected drawing at least twice and receive five points less than his high score
the first redrawn submission, and ten points less for the second submission. In the case of
“Student A,” he may submit the drawing three times, and he is able to receive his highest
score with no deductions. As previously mentioned, any extra drawings completed by
“Student B” earn him extra credit toward his final grade.
Students are also assessed for class participation so taking part in class discussions
32
counts toward class participation. Students have the opportunity to volunteer to input data
into teacher’s master workstation during Teacher Smart Board CADD demonstrations, and to
also help their neighbors. Students, such as “Student A,” who ask for extra help during class
or stay after school for help earn credit toward participation because they are viewed as
making extra effort as a form of participation. Class attendance is considered an important
part of class participation as this is when students are actually completing practice drawing
assignments during class time.
Finally, students are assessed by way of quizzes administered in class. Quizzes and
exams are both paper-based and computer-based. The traditional paper-based quizzes help
assess students’ general knowledge and comprehension of the AutoCAD LT program’s
workings. The computer-based quizzes are designed to assess students’ performance using
AutoCAD LT by measuring students’ abilities to apply, analyze, synthesize, and evaluate
how to use the various tools and techniques of actually creating accurate technical drawings
within a specified, finite time limit of a quiz. Since not all students are good “test takers”
(for example “Student A” has difficulty with tests), the evaluation process places more
emphasis on completed classroom drawings than on tests. Because there are many more
assigned classroom drawings than tests, students have a better opportunity to not only
practice their skills, but also achieve a better grade by learning from mistakes and having the
opportunity to correct those mistakes.
33
Commentary:
While student teaching at North Smithfield High School, much experience and
information was gained, and a great deal was learned about the teaching and learning
processes. Working with an excellent cooperating teacher, staff, and the students in this
CADD class, particularly “Student A” and “Student B,” I learned a great deal about
differentiation, which is what inspired me offer extra help to “Student A,” assign extra
drawings to “Student B,” and develop the PowerPoint Presentations as a form of
“scaffolding” for “visual learners,” and also to accommodate learners with different levels of
readiness. It was gratifying to observe several students, who had previously sought a great
deal of individual help (particularly “Student A”), download the PowerPoint Presentations
from the student resource folder to their flash drives (or network folders) so that they could
use them for future reference. The PowerPoint Presentations helped “Student A” and others
grasp key concepts that they needed to know, and allowed me to move about the room in
order to offer individual help in other areas. “Student A” appears to be a very “concrete”
visual learner, whereas “Student B” is at a level of readiness wherein he is able to think more
in the abstract domain. “Student B” progressed far enough ahead of the rest of the class
where he was able to begin the introduction to a three-dimension modeling program known
as Solid Works (which will not be introduced until the third week of the fourth quarter).
Reflecting upon my experiences in the classroom with students, I was able to re-
adjust and improve upon both the implemented and subsequent lessons by employing the
previously mentioned differentiation techniques. It was interesting to note how students
responded to different methods of lesson delivery and individual help, especially “Student A”
and “Student B.” While some of the lessons I taught used no technology assistance such as
34
PowerPoint, for the lessons that did used technology, it was extremely beneficial – especially
the Smart Board. After reflecting upon the technologically assisted lessons, it occurred to me
that an “audio-visual” presentation might help to convey some of the lengthy step-by-step
procedures more easily. Here was the PAR model (Plan, Act, Reflect) being used to good
effect. I planned the lessons, acted upon (implemented) the lessons, and subsequently
reflected upon each lesson in order to improve upon not only the lesson but also my own
approach and performance. I found certain areas to which I needed to pay more attention –
especially in regards to classroom management. Certainly the students in this class are very
respectful and well-behaved, however as I mentioned earlier I did find that I needed to move
around the room quite a bit in order to observe them to ensure that they were on task and not
“surfing the web” or using their workstations for anything other than the tasks at hand. This
is something important that I discovered and needed to make accommodations for after
teaching the first two lessons in order to help effectively guide future lessons (please see the
next section, “Classroom Management Plan,” for more information).
35
Philosophy Statement
In order to be successful in teaching and learning, teachers must develop a practical,
positive approach to classroom management. Of course, coming in halfway through the
school year as a student teacher, the tone has already been set by the cooperating teacher who
has established his own classroom management plan and teaching style. That being said, the
student teacher must still establish his own classroom management plan and teaching style as
well in order to be successful in the classroom. Upon first teaching at North Smithfield High
School, my initial approach was firm but relaxed – much like the approach taken by my
cooperating teacher. This approach worked well with these students. I made sure that I
really knew the subject matter in order to instill confidence and respect in my students, and I
spoke in an authoritative not authoritarian voice when addressing the class. Part of my
classroom management also included arriving early for class in order to properly prepare
lessons; keeping a plan book and grade book; taking daily attendance; and promptly
correcting, grading, and handing back assignments so that students receive useful feedback
quickly.
Management of Materials: Room arrangement, student resources, displays, etc.
As previously discussed, Room 219 (control click for floor plan map) is the lab in
which the CADD class takes place. It is fairly large, spacious, well-lit, and well stocked with
the latest technology. The room is logically laid out and sensibly set up. The room is
36
comprised of a networked computer work station area with thirty-two brand new Dell
computers and three printers (one laser jet, one ink jet, and one large format ink jet plotter)
arranged on long lab benches. The room also has a very impressive smart board and
projection screen setup that is linked to the computers. The high school students sit at their
own computer workstations. All of the work stations have comfortable, wheeled office
chairs upon which the students sit. The students can easily see each other, the smart board,
and the instructor, and they have sufficient work space available to them at each desk for
writing notes. There are several bookcases and cabinets which are used to store drafting
books, and the students’ drawing portfolios. The rules and expectations are posted along
with the school’s mission statement. All around the lab there are colorful posters and
magazine clippings on the bulletin board.
If students so desire they are welcome to post on the bulletin board any completed
drawings of which they may be particularly proud. What is nice about this is that it offers
students a place to display their work, and it also affords other students the opportunity to
view completed drawings in order to ascertain if they are “on the right track” with their own
individual drawings. It offers students the opportunity to examine correctly completed
assignments as these drawings can be difficult to visualize in their early stages of completion.
Posted drawings help illustrate “the big picture.”
Classroom Rules
Classroom rules are necessary for a successful learning and teaching environment.
Both the school and the cooperating teacher had rules in place before I arrived of course, but
I still had to decide what rules I would employ, especially since many students may tend to
take advantage of having a student teacher so that they can “bend” the rules a bit. It is very
important to take attendance in order to ensure that students arrive to class on time. Late
37
arrivals are only allowed with a pass from the office or another teacher. Each day teachers
must check their attendance book against the office’s daily attendance bulletin in order to
ensure that students are not “cutting” class. Each student must keep the North Smithfield
High School handbook/passbook on his person in order to go to the lavatory or another
destination. Upon entering the CADD lab, each student must take a seat at a workstation and
sit properly in the chair. Students can help each other and converse about assignments, but
they are not permitted to simply socialize during class.
Class participation is also an important component of class. Students are asked to
raise their hands rather than speak out in class and they are also expected to remain quiet and
attentive during lesson presentations. Students must also bring a pen, pencil, and notebook to
class in order to take notes. All students are assigned space on the school’s network where
they each have an electronic “folder” to store digital files. Each student must save their work
in his folder on the “M-Drive” and is encouraged to also save the work on a personal flash
drive in the event that the network fails. In addition to saving a “soft copy” of work on the
M-Drive, students must print paper hard copies which are submitted for grades. Students
must avoid all printing at the same time in order to prevent overloading the printer. Once the
graded hardcopy is returned to the student, it must be three-hole punched and archived in a
three-ring binder as part of the student’s portfolio.
One problem often encountered in a networked computer lab such as this CADD lab
is that of students “surfing the web,” playing computer games, or doing homework for other
classes. In order to prevent such activity the network is equipped with Vision Software
which provides the teacher with an “Internet Lock” and also allows the teacher the ability to
observe the computer activity of each student if need be. As I walked about the room I
observed several students surfing the net, playing games, and doing homework for other
classes the very first day of my student teaching assignment. This is very natural behavior as
38
kids are very comfortable with and enjoy computer technology a great deal. However, they
are here to get work done, and when I asked them to stop these activities they did, but then I
would notice the behavior would begin again once I was away from their computer screens.
I eventually employed the Vision internet lock in order to prevent web surfing and then
explained that the consequence for game playing and doing homework for other classes
during CADD class would be the loss of CADD privileges. Another point to be aware of is
that of students using cell phones and wearing personal mp3 music players such as iPods.
The school handbook clearly outlines policy regarding such devices and students who do
not comply must turn in their devices to the teacher and “risk disciplinary action or
confiscation.” Students who repeatedly do not comply with the school rules, are informed
that they would subsequently have to use drafting boards, paper, and pencils, instead of
AutoCAD LT in order to complete their assignments. Most students readily comply with
school rules regarding these devices and only require gentle, periodic reminders.
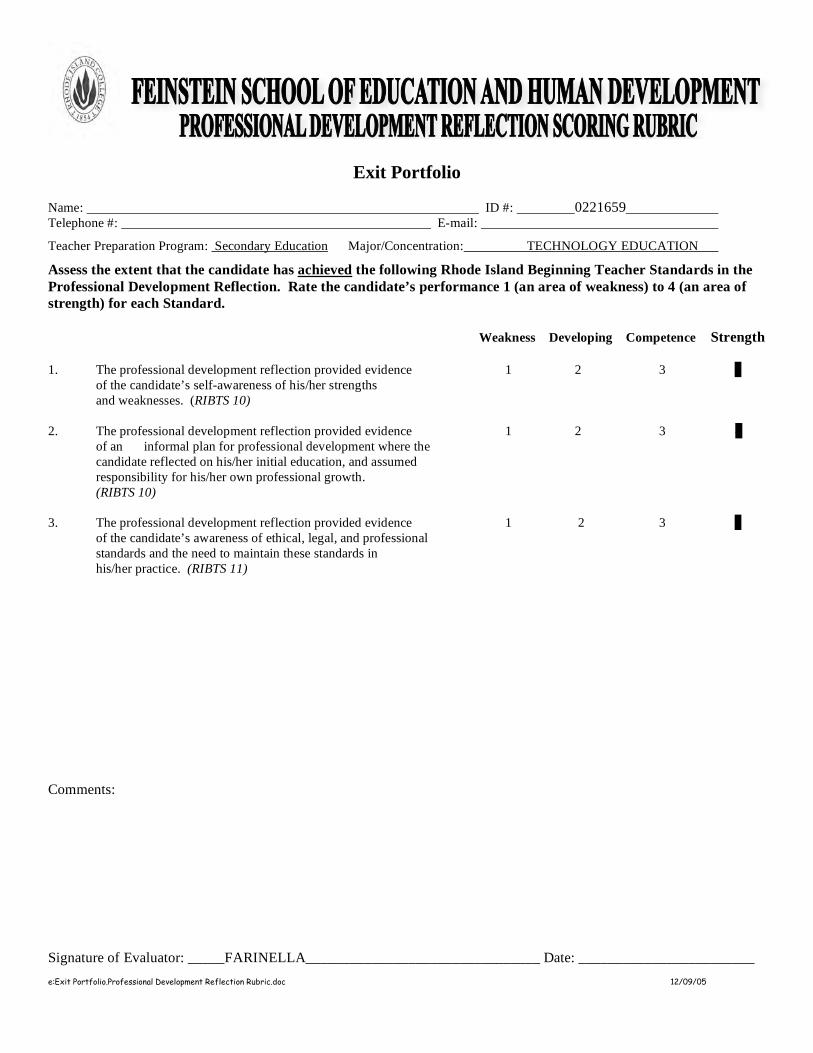
e:Exit Portfolio.Professional Development Reflection Rubric.doc 12/09/05
Exit Portfolio
Name: ID #: 0221659 Telephone #: E-mail:
Teacher Preparation Program: Secondary Education Major/Concentration: TECHNOLOGY EDUCATION
Assess the extent that the candidate has achieved the following Rhode Island Beginning Teacher Standards in the Professional Development Reflection. Rate the candidate’s performance 1 (an area of weakness) to 4 (an area of strength) for each Standard.
Weakness Developing Competence Strength
1. The professional development reflection provided evidence 1 2 3 4of the candidate’s self-awareness of his/her strengthsand weaknesses. (RIBTS 10)
2. The professional development reflection provided evidence 1 2 3 4
of an informal plan for professional development where thecandidate reflected on his/her initial education, and assumed responsibility for his/her own professional growth. (RIBTS 10)
3. The professional development reflection provided evidence 1 2 3 4
of the candidate’s awareness of ethical, legal, and professionalstandards and the need to maintain these standards in his/her practice. (RIBTS 11)
Comments:
Signature of Evaluator: _____FARINELLA________________________________ Date: ________________________
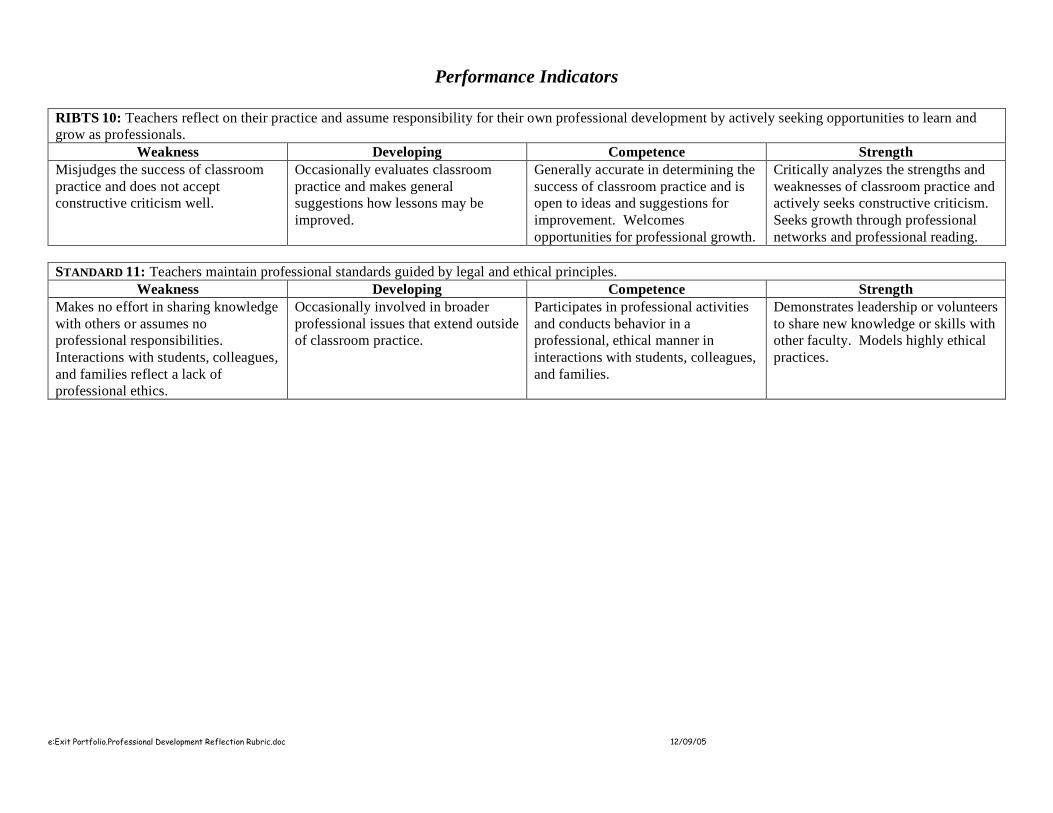
e:Exit Portfolio.Professional Development Reflection Rubric.doc 12/09/05
Performance Indicators
RIBTS 10: Teachers reflect on their practice and assume responsibility for their own professional development by actively seeking opportunities to learn and grow as professionals.
Weakness Developing Competence Strength Misjudges the success of classroom practice and does not accept constructive criticism well.
Occasionally evaluates classroom practice and makes general suggestions how lessons may be improved.
Generally accurate in determining the success of classroom practice and is open to ideas and suggestions for improvement. Welcomes opportunities for professional growth.
Critically analyzes the strengths and weaknesses of classroom practice and actively seeks constructive criticism. Seeks growth through professional networks and professional reading.
STANDARD 11: Teachers maintain professional standards guided by legal and ethical principles.
Weakness Developing Competence Strength Makes no effort in sharing knowledge with others or assumes no professional responsibilities. Interactions with students, colleagues, and families reflect a lack of professional ethics.
Occasionally involved in broader professional issues that extend outside of classroom practice.
Participates in professional activities and conducts behavior in a professional, ethical manner in interactions with students, colleagues, and families.
Demonstrates leadership or volunteers to share new knowledge or skills with other faculty. Models highly ethical practices.
39
The attached (hyperlinked), implemented lesson plans and artifacts are part of the
“Introduction to CADD Unit Plan for High School Students” which was implemented at
North Smithfield High School in North Smithfield, Rhode Island between January and May,
2008. All materials were developed, generated, and organized during the last weeks of
December, 2007 and the aforementioned time period during which I student taught. Class
work assignments were developed from drafting text drawings, and quizzes were developed
from class lectures and drawing experiences. The rather elaborate PowerPoint Presentations
were developed by compiling “print screen shots” of drawings which I completed in
AutoCAD LT 2002, while actually going through the step-by-step process of plotting and
developing title blocks, and then organizing the shots into cohesive, animated presentations.
These presentations were posted on the “Lab Drive” in the Student Resource Folder, so that
students have access to them as a resource for study.
In order to develop the artifacts presented here, it was invaluable to be able to draw
upon what I have learned during my in-school student teaching experiences, as well as from
key courses taken at Rhode Island College such as Foundations of Education, Special
Education, Methods for Teaching, and Counseling and Educational Psychology. These
courses stress the importance of Rhode Island Beginning Teachers Standards (RIBTS),

40
the Four Themes Conceptual Framework, and the PAR Model (Plan, Act, and Reflect).
Through close examination and study of these concepts, I have certainly gained greater
appreciation and insight into the many ways in which children learn, as well as the
importance of becoming a reflective practitioner.
Considering the first Four Themes concept, “knowledge of content, context, and
human development,” it is important to first recognize and address RIBTS Two which states
that beginning teachers must “know their discipline and understand how knowledge in their
discipline is created, organized, and linked to other disciplines.” Essentially, what this means
is that the instructor must not only know the content area, but also recognize how the
particular discipline is related to the other subjects studied by his students. I spent several
hours per day working with the AutoCAD program in order to become more acclimated and
comfortable with its many features, tools, and commands so that I may better help students
learn the program. In addition, it was crucial for me to recognize the connections that CADD
has to other disciplines such as math, and geometry so that I could ascertain the students’
level of readiness in these other disciplines. The importance of recognizing these
connections became readily apparent when conducting a formative assessment of previous
mathematical knowledge that would be needed to measure, dimension, and scale objects
drawn in AutoCAD. I discovered that many of the students had difficulty remembering how
to divide fractions in half. It was therefore necessary to review this concept. We applied the
basic rule of thumb that when you need to divide a fraction in half, you simply keep the
numerator the same and double the denominator. For example, half of ½ is ¼. The students
were surprised and delighted with the simplicity of this concept and were able to apply it
quite readily when needed.
Courses such as SPED-433 and CEP-315 were quite instrumental in helping me to
recognize that children do not all learn at the same pace or in the same way. From SPED-
41
433 I learned a great deal about differentiation, which inspired me to develop the PowerPoint
Presentations for “visual learners,” and also to accommodate learners with different levels of
readiness. I informed the students that the presentations were uploaded to the student
resource folder on the CADD lab server (the L-Drive), and was there for them to use if
needed. It was quite gratifying to observe several students, who had previously sought a
great deal of individual help (particularly “Student A”), download the PowerPoint
Presentations from the student resource folder to their flash drives (or network folders) so
that they could use them for future reference! Each student was able to review at his own
pace the Plotting Procedure Presentation and Title Block Presentation, both complex
lessons, in order to master the steps of each process. While developing these PowerPoint
Presentations was certainly quite involved and very time-consuming, in the end it was really
worthwhile because it helped the students grasp key concepts that they needed to know, and
allowed me to move about the room in order to offer individual help in other areas.
Another very important concept, which I initially learned about in CEP-315 and then
witnessed firsthand while student teaching, is how children construct knowledge. According
to the social-constructivist Vygotsky, children are able to co-construct knowledge, when they
are operating within their Zone of Proximal Development (ZPD). The ZPD is the area in
which a student is not yet quite able to accomplish a task independently but can do so via
scaffolding and with the help of a more experienced/knowledgeable adult or peer. We
discussed this concept a great deal in CEP-315 and I was able to apply this theory to “real-
life” situations in the classroom with several students. I conferred with my co-operating
teacher, who is most knowledgeable and helpful, and inquired if there were any students that
might benefit from some extra help. He informed me that there was one student in particular
who had recently transferred to the high school from New Jersey. This student arrived to the
CADD class four weeks into the school year and needed to “catch up.” While the rest of the

42
class was occupied with independent practice, I was able to provide much needed individual
help to this student. Of course the key to scaffolding is not to give the answers to the student,
but rather it is to help the student develop the critical thinking and problem-solving skills
necessary to solve the problems himself. I would prompt the student with leading questions
in order to get him to think and then arrive at the answer himself. He was very pleased each
time he attained success. With each success came bolstered confidence and he was
eventually solving more and more problems on his own with little help at all.
Reflecting upon my experiences in the classroom with students, I was able to re-
adjust and improve upon both the implemented and subsequent lessons. It was interesting to
note how students responded to different methods of lesson delivery. While some of the
lessons I taught used no technology assistance such as PowerPoint, for the lessons that did, it
was extremely beneficial. After reflecting upon the first two lessons, it occurred to me that
an “audio-visual” presentation might help to convey the lengthy step-by-step procedures
more easily. Here was the PAR model being used to good effect. I planned the lessons,
acted upon (implemented) the lessons, and subsequently reflected upon each lesson in order
to improve upon not only the lesson but also my own approach and performance. I found
certain areas to which I needed to pay more attention – especially in regards to classroom
management. Certainly the students in this class are very respectful and well-behaved,
however I did find that I needed to move around the room quite a bit in order to observe them
to make sure that they were on task and not “surfing the web” or using their workstations for
anything other than the tasks at hand. This is something important that I discovered and
needed to make accommodations for after teaching the first two lessons in order to help
effectively guide future practice.
During the first weeks of student teaching, my assigned task was to observe my
cooperating teacher Mr. McGee. Having the opportunity to observe him teach was of
43
enormous benefit as I was able to observe how an excellent teacher approaches teaching a
highly technical, in-depth subject. He possesses mastery of the content area and of teaching.
Mr. McGee not only provided an excellent model for me to observe, he also provided a great
deal of insight and feedback both during my lesson planning and preparation phases, and
again upon my subsequent completion of lessons. His input was invaluable and quite
instrumental while I was reflecting upon lessons and seeking to improve my teaching. He
would ask questions of me in order to prompt me to think about how to better approach
teaching this highly complex subject matter. Because AutoCAD is such a complex program,
I needed to use the program every day in order to keep my skills sharp so that I was better
able to explain concepts and assist students. I learned a great deal about CADD and about
teaching from Mr. McGee. It was a great experience!
Assessing students’ work proved to be relatively straight forward. Because one of the
outcomes of this class is for students to plot (print) layouts of their completed drawings, I
was able to examine the hardcopies printed on the correct sheet sizes and view the softcopy
file in the students file located on the workstations’ M-Drive. The hardcopy output
illustrated whether or not the drawing layout was properly set up on the correct ANSI sheet
size of paper. The students archive these hardcopies in a three-ring binder portfolio and
submit them for a class work grade, plus they become part of each student’s PBGR Portfolio
(Performance Based Graduation Requirement Portfolio). Additionally, the students’
“softcopy” AutoCAD drawing files were also necessary to view in order to have the
opportunity to zoom-in to more closely examine proper line intersections, tangents,
dimensions, and angles. Providing grades and feedback for each drawing helps each student
correct and learn from mistakes in order to prepare for upcoming quizzes and to build upon
new concepts in subsequent lessons. Students are also encouraged to redraw and resubmit
44
corrected drawings in order to not only learn from their mistakes, but also to have the
opportunity to increase their scores.
As previously mentioned in the lesson assessment, several of the Standards of
Technological Literacy (STL) addressed in these lessons are Standards Nine, Twelve, and
Seventeen. Standard Nine is addressed by examining the importance of sketching and
drawing in the field of technology, especially in the area of engineering and design. By this
point in the CADD Unit students have already acquired previous knowledge of hand
(mechanical) drawing methods, and they are then able to compare, contrast, and appreciate
the many advantages of Computer Aided Drafting and Design, such as accuracy, precision,
repeatability, dimensioning, ease of editing, and plotting (printing) to various layout sizes.
Standard Twelve requires students to be able to “use computers to access, retrieve, organize
process, maintain, interpret, and evaluate data and information in order to communicate.”
Through both guided and independent practice, students are able to verify the
aforementioned advantages that a computer program such as AutoCAD LT 2002 brings to
the designing and drafting processes. Through hands-on drawing experience with the
computer hardware and software, students are able to gain a much higher level of control and
precision in the drawing process, and are able to communicate design ideas more efficiently
and effectively as a result of using the computer aided process. Standard Seventeen
addresses the “use of symbols, measurements, and drawings” in order to “promote clear
communication by providing a common language to express ideas.” All students using the
AutoCAD program are required to make connections to and draw upon previous knowledge
of symbols, measurement, and drawing gained in other disciplines such as math, science, art,
and drafting. When called upon to dimension and create scaled layouts of objects they are
drawing (in order to ready them for plotting), students need to know how to add, subtract,
and divide fractions with different denominators (mathematical concept); they must be able

45
to recognize the various standard and metric symbols of measurement and angles (previous
knowledge); and they must also adhere to the drawing conventions used in drafting and
technical drawing. Use of this knowledge and skill set is what allows students to not only
communicate with the computer program, but also with others who may view their drawings.
In my experiences at the college and in the classroom, a great deal has been learned
about educational theory from my experiences in the aforementioned Rhode Island College
education courses, and much opportunity to apply learned theories has been provided during
the student teaching experience in order to improve and build upon professional development
as a beginning teacher. Taking SPED-433 and CEP-315 during my elementary and
secondary experiences was essential in being able to consistently, immediately, and
successfully apply much of the educational theory and make “real-world” connections to
these courses. Indeed, along with working with my cooperating teacher it was invaluable
experience. While I still have a great deal of experience to gain and much to learn about
content area and human development knowledge, pedagogy, diversity, and professionalism,
thus far my positive experiences in the Rhode Island College Education Program and at
North Smithfield High School with Mr. McGee and the entire Tech Ed staff have helped
equip me with the necessary tools to become an effective practitioner who can reflect upon
and improve plans and actions in order to continually grow as a teacher and as a person.
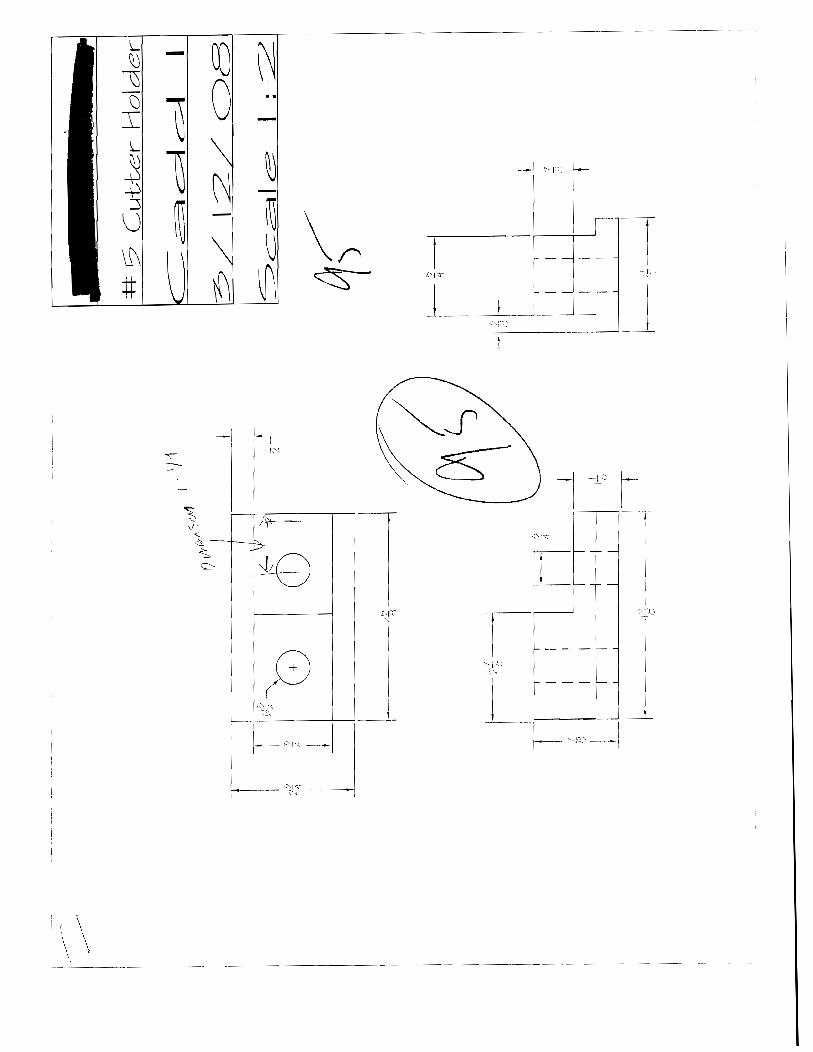
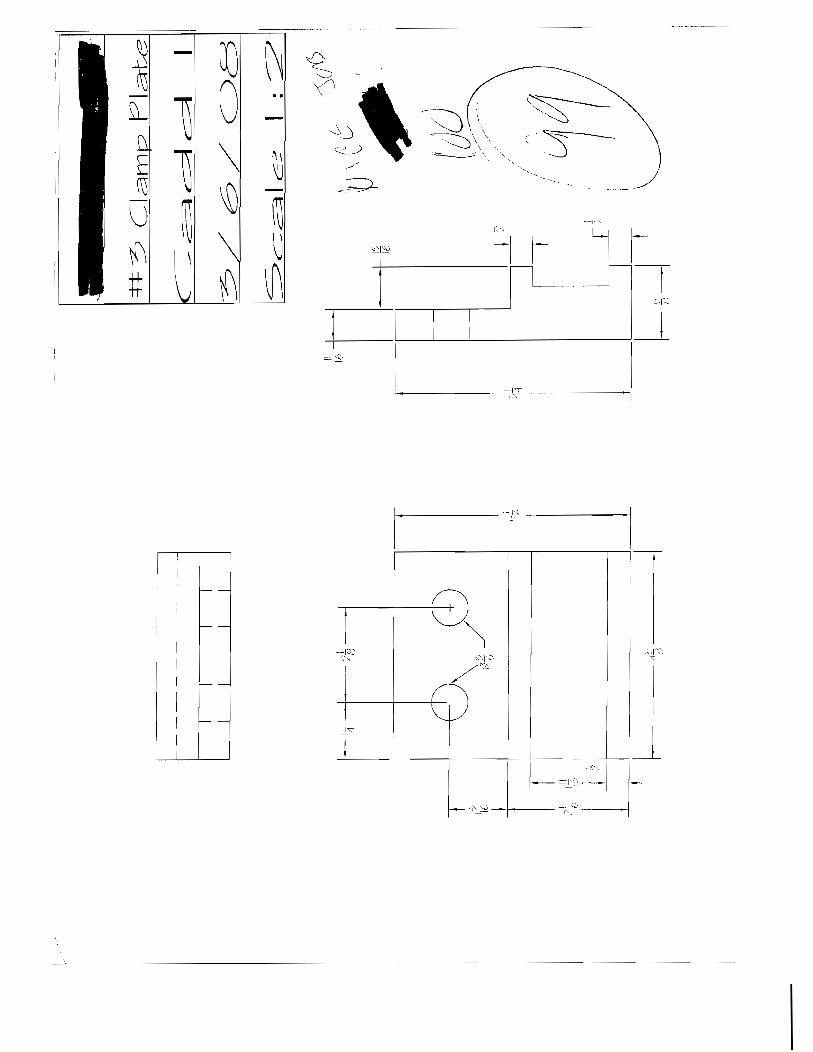


![Package ‘SGP’ - cran.microsoft.com fileR topics documented: 3 Jason Becker [ctb] (Rhode Island Department of Education), Jessica Bailey [ctb] (Rhode Island Department of Education),](https://img.dokumen.tips/doc/110x75/5ac298257f8b9aae1b8b4e56/package-sgp-cran-topics-documented-3-jason-becker-ctb-rhode-island.jpg)