Embed Size (px)
Citation preview

Technical Academy: Intelligent Business Operations Exercise – Process Visibility

TECHNICAL ACADEMY: INTELLIGENT BUSINESS OPERATIONS
2
TABLE OF CONTENTS
1 PROCESS VISIBILITY ...................................................................................................................... 3 1.1 Configure HANA Studio .................................................................................................................. 3 1.2 Create Business Scenario .............................................................................................................. 9 1.3 Define measures and indicators .................................................................................................. 25 1.4 Generate and run the Business Scenario ................................................................................... 36
2 MULTIPLE SCENARIO PARTICPANTS ........................................................................................ 44 2.1 Add another process model ......................................................................................................... 44
TECHNICAL ACADEMY: INTELLIGENT BUSINESS OPERATIONS
3
1 PROCESS VISIBILITY
This exercise builds a business scenario using SAP Operational Process Intelligence powered by SAP HANA. A master data quality process modelled in SAP NetWeaver Business Process management will be imported to HANA studio and build the scenario, important phases and respective cycle time and various count and duration measures relevant to the scenario. 1.1 Configure HANA Studio In this Chapter you will add a HANA system and define a BPM destination system as the provider System.
Explanation Screenshot
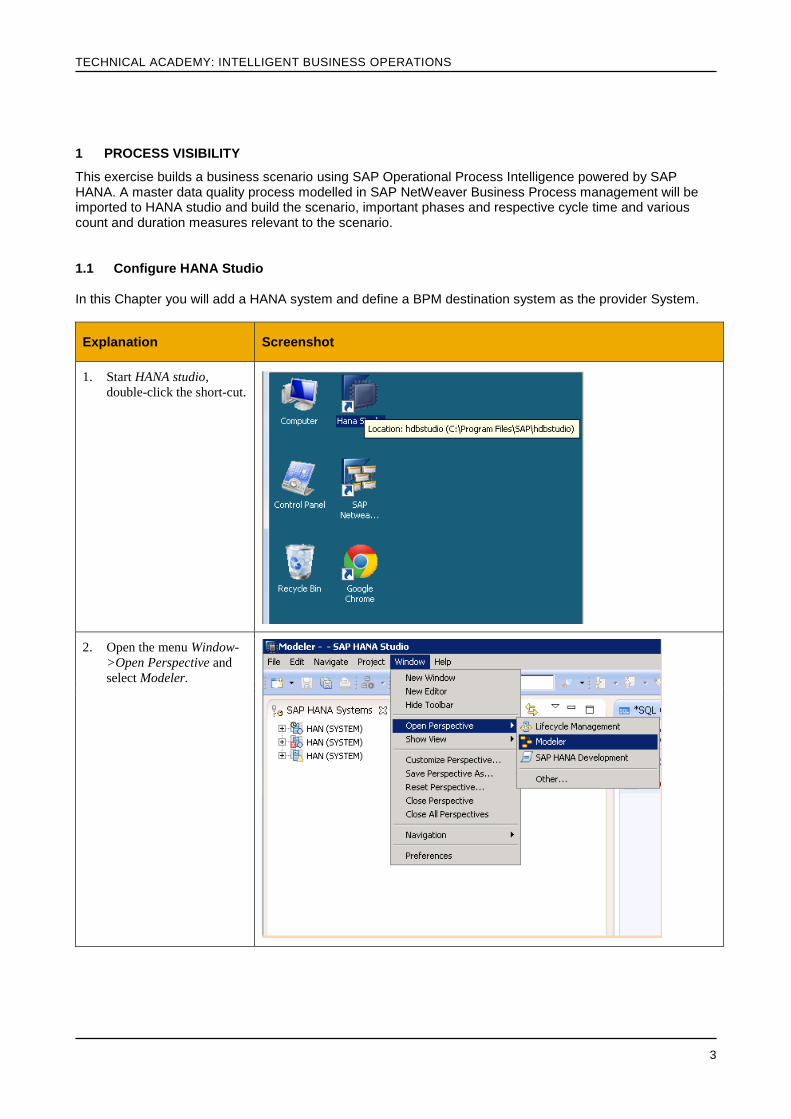
1. Start HANA studio,
double-click the short-cut.
2. Open the menu Window-
>Open Perspective and
select Modeler.

TECHNICAL ACADEMY: INTELLIGENT BUSINESS OPERATIONS
4
Explanation Screenshot
3. Right click to open the
context menu and select
Add System.
4. Enter the Hostname:
<You have to enter the IP
address of your HANA
instance.>
Enter the instance
Number: 00
Click Next pushbutton.
TECHNICAL ACADEMY: INTELLIGENT BUSINESS OPERATIONS
5
Explanation Screenshot
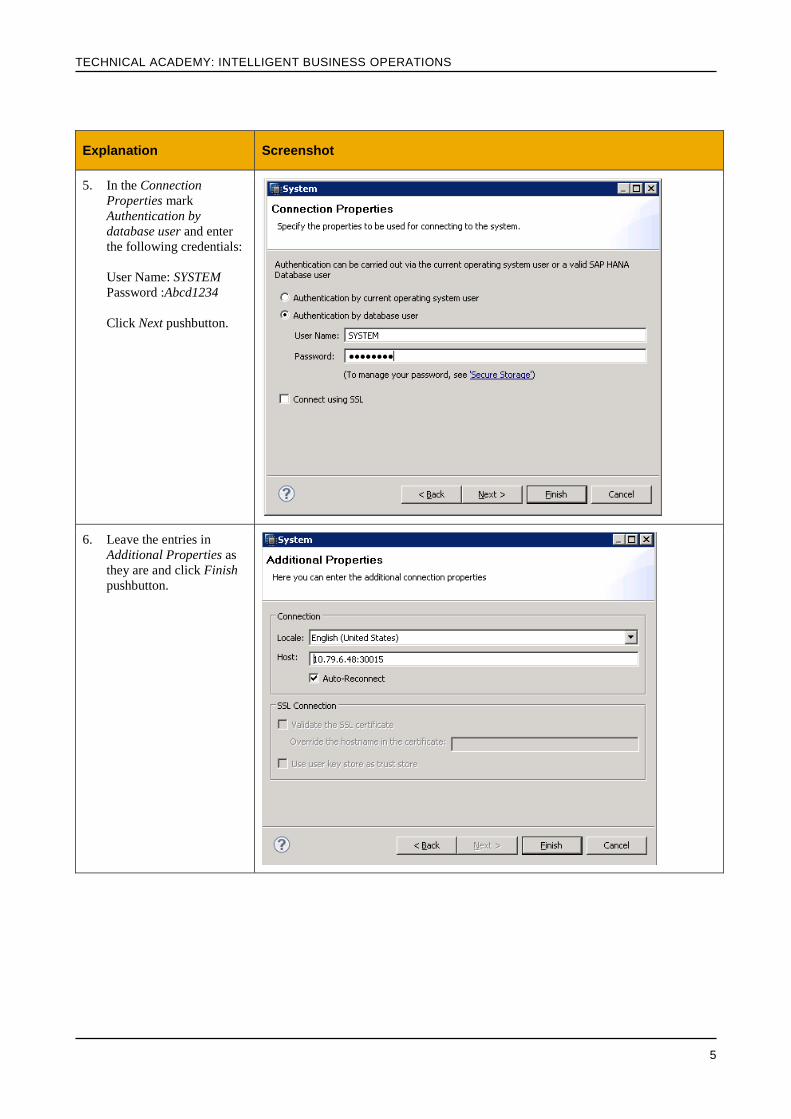
5. In the Connection
Properties mark
Authentication by
database user and enter
the following credentials:
User Name: SYSTEM
Password :Abcd1234
Click Next pushbutton.
6. Leave the entries in
Additional Properties as
they are and click Finish
pushbutton.
TECHNICAL ACADEMY: INTELLIGENT BUSINESS OPERATIONS
6
Explanation Screenshot
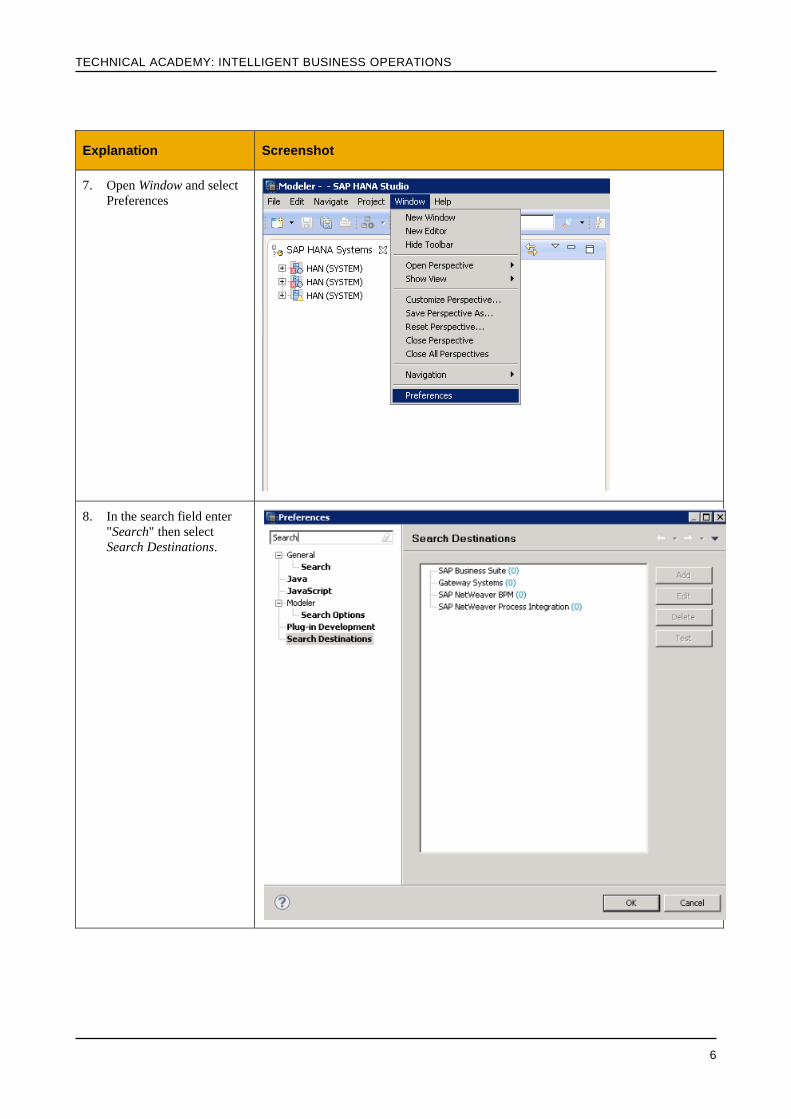
7. Open Window and select
Preferences
8. In the search field enter
"Search" then select
Search Destinations.
TECHNICAL ACADEMY: INTELLIGENT BUSINESS OPERATIONS
7
Explanation Screenshot
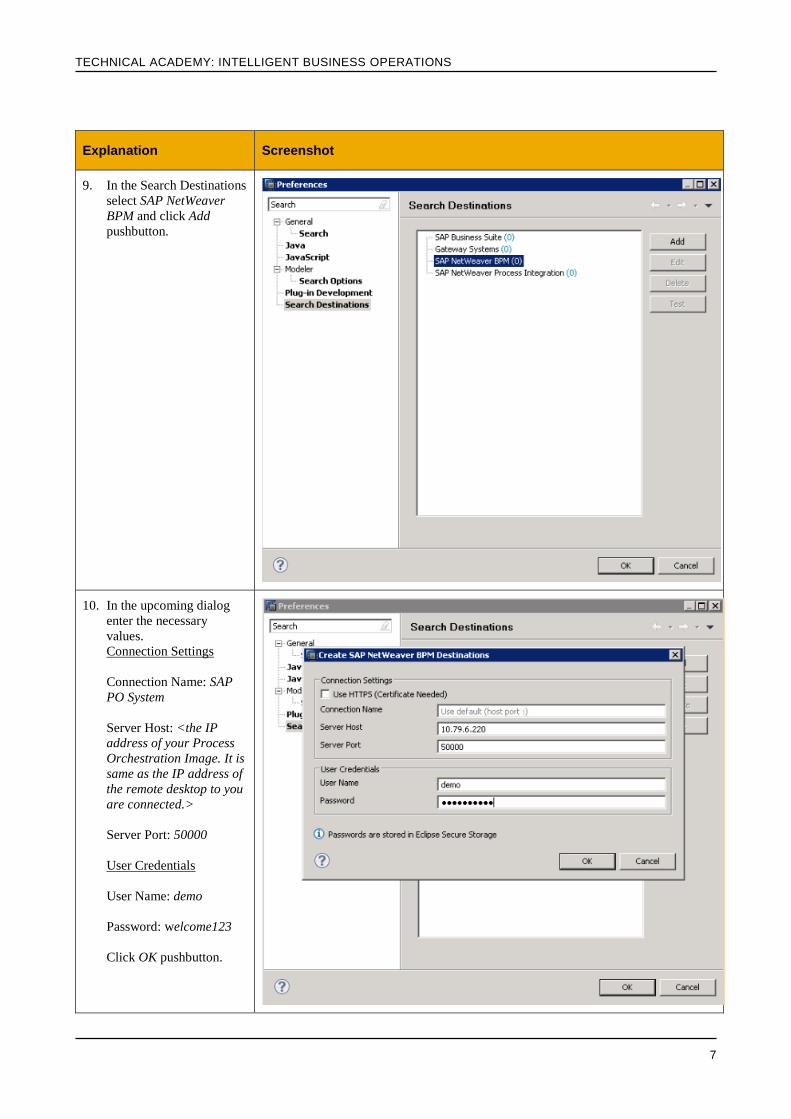
9. In the Search Destinations
select SAP NetWeaver
BPM and click Add
pushbutton.
10. In the upcoming dialog
enter the necessary
values.
Connection Settings
Connection Name: SAP
PO System
Server Host: <the IP
address of your Process
Orchestration Image. It is
same as the IP address of
the remote desktop to you
are connected.>
Server Port: 50000
User Credentials
User Name: demo
Password: welcome123
Click OK pushbutton.

TECHNICAL ACADEMY: INTELLIGENT BUSINESS OPERATIONS
8
Explanation Screenshot
11. Open the folder SAP
NetWeaver BPM and
select your BPM System
Then click Test
pushbutton to make sure
that the connection
information is correct and
the system is reachable.
Finally click OK
pushbutton.
TECHNICAL ACADEMY: INTELLIGENT BUSINESS OPERATIONS
9
1.2 Create Business Scenario In this chapter you will create a scenario and import a process from the BPM provider system. You will define the key phases of the process and the respective cycle time to complete the individual phases.
Explanation Screenshot
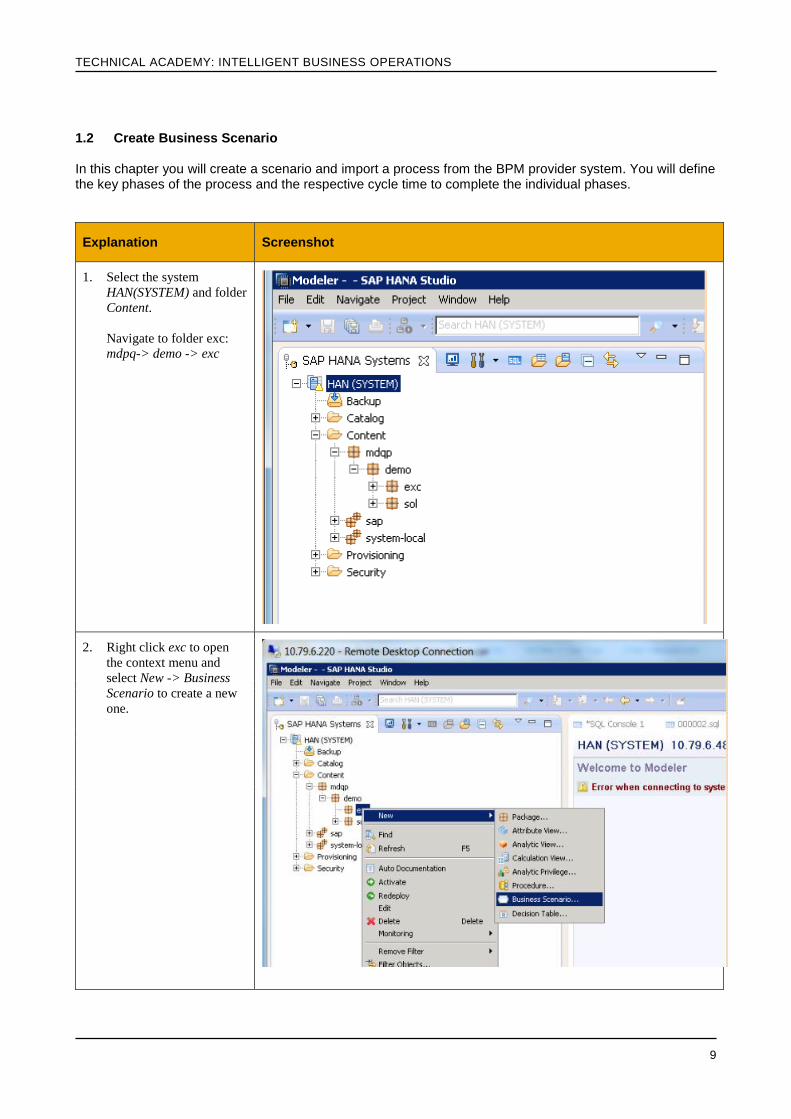
1. Select the system
HAN(SYSTEM) and folder
Content.
Navigate to folder exc:
mdpq-> demo -> exc
2. Right click exc to open
the context menu and
select New -> Business
Scenario to create a new
one.
TECHNICAL ACADEMY: INTELLIGENT BUSINESS OPERATIONS
10
Explanation Screenshot
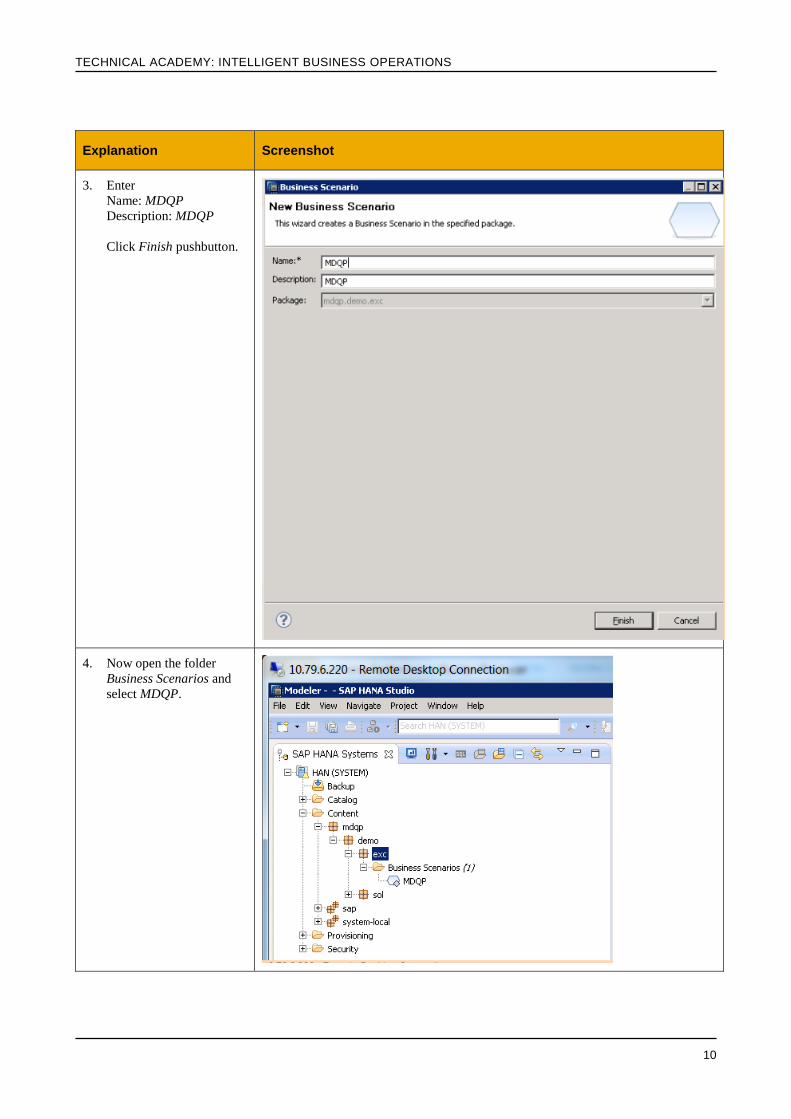
3. Enter
Name: MDQP
Description: MDQP
Click Finish pushbutton.
4. Now open the folder
Business Scenarios and
select MDQP.
TECHNICAL ACADEMY: INTELLIGENT BUSINESS OPERATIONS
11
Explanation Screenshot
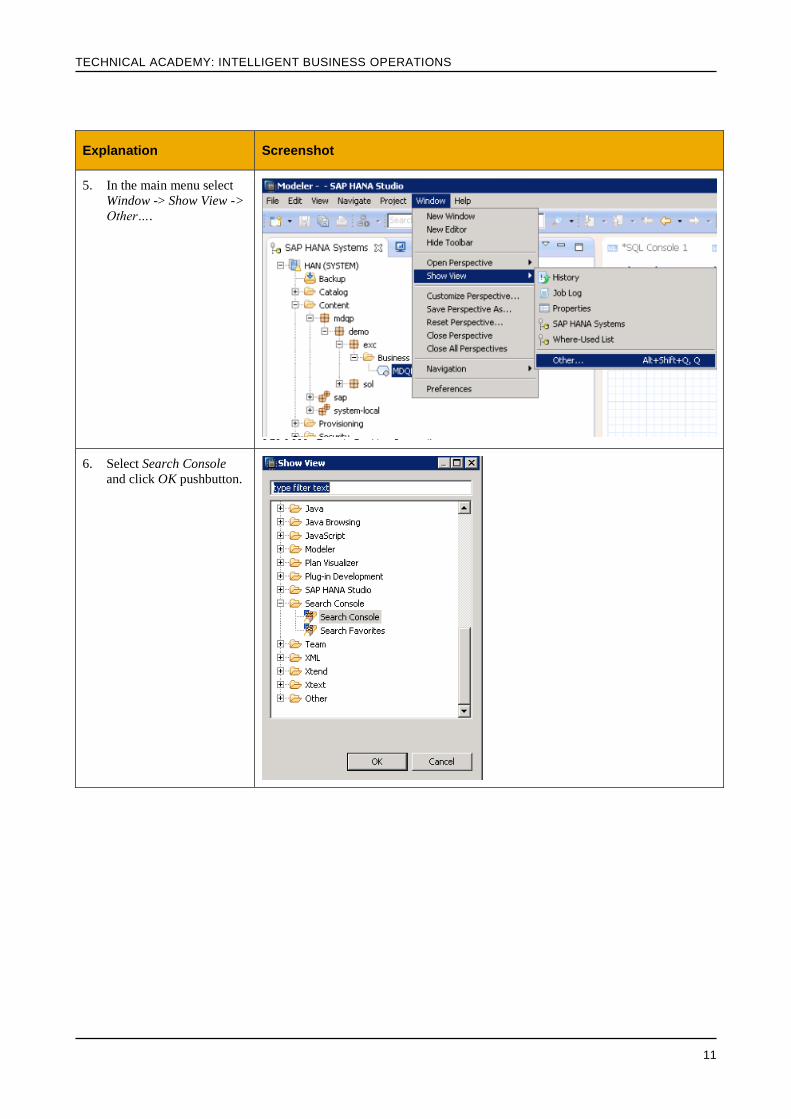
5. In the main menu select
Window -> Show View ->
Other….
6. Select Search Console
and click OK pushbutton.
TECHNICAL ACADEMY: INTELLIGENT BUSINESS OPERATIONS
12
Explanation Screenshot
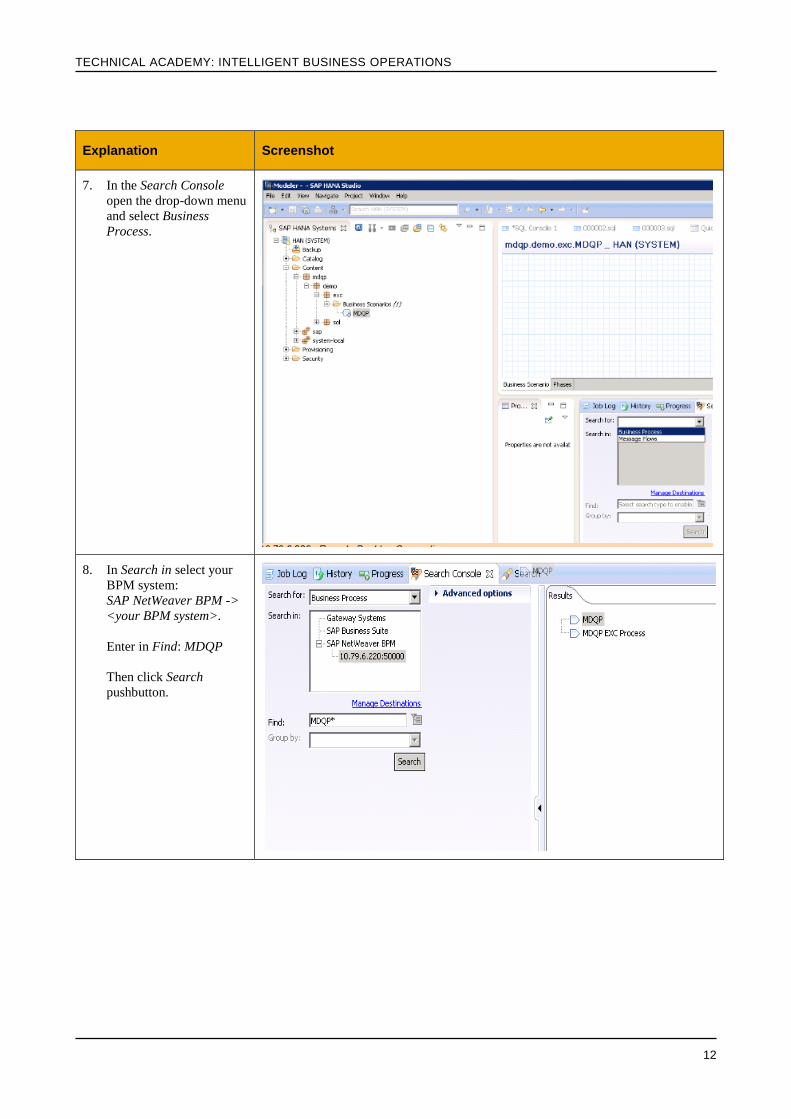
7. In the Search Console
open the drop-down menu
and select Business
Process.
8. In Search in select your
BPM system:
SAP NetWeaver BPM ->
<your BPM system>.
Enter in Find: MDQP
Then click Search
pushbutton.

TECHNICAL ACADEMY: INTELLIGENT BUSINESS OPERATIONS
13
Explanation Screenshot
9. From the upcoming
Results drag and drop
MDQP Process into the
modeling canvas.
Make sure to select this
one and NOT MDQP
EXC Process!
10. Your MDQP Process has
been imported and you
can see process which has
been modelled in SAP
NetWeaver Business
Process Management.
At the bottom click tab
Phases.
TECHNICAL ACADEMY: INTELLIGENT BUSINESS OPERATIONS
14
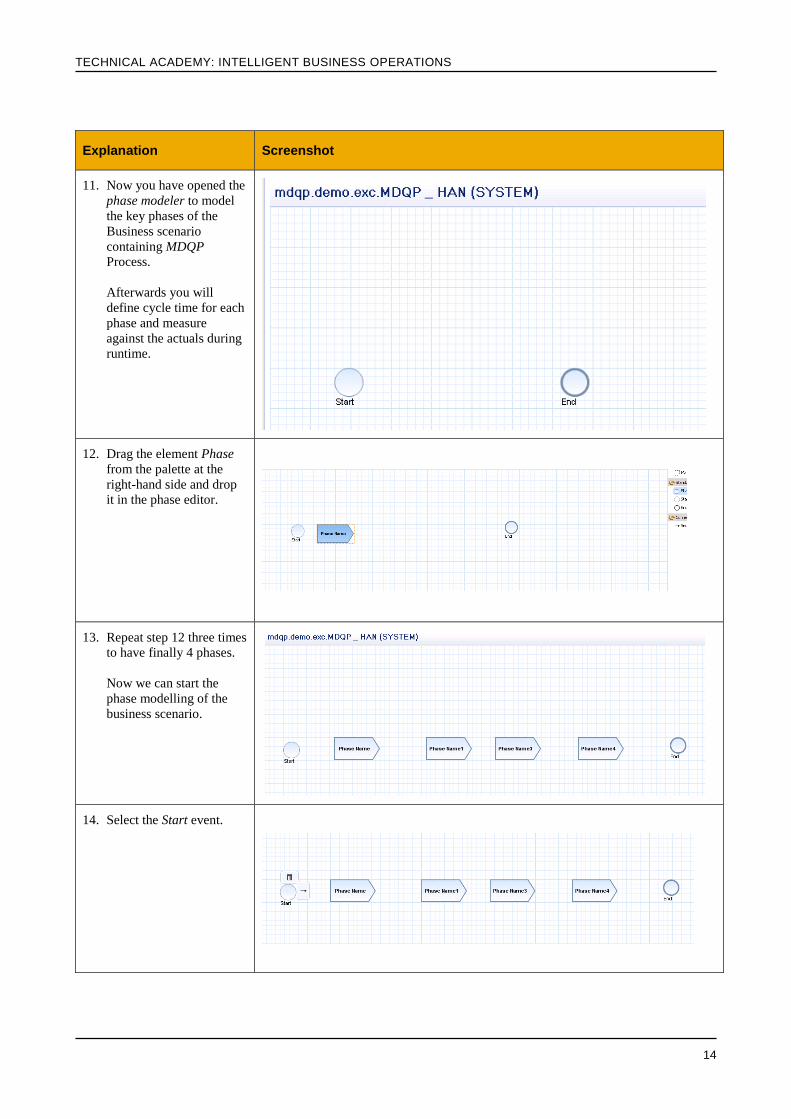
Explanation Screenshot
11. Now you have opened the
phase modeler to model
the key phases of the
Business scenario
containing MDQP
Process.
Afterwards you will
define cycle time for each
phase and measure
against the actuals during
runtime.
12. Drag the element Phase
from the palette at the
right-hand side and drop
it in the phase editor.
13. Repeat step 12 three times
to have finally 4 phases.
Now we can start the
phase modelling of the
business scenario.
14. Select the Start event.
TECHNICAL ACADEMY: INTELLIGENT BUSINESS OPERATIONS
15
Explanation Screenshot
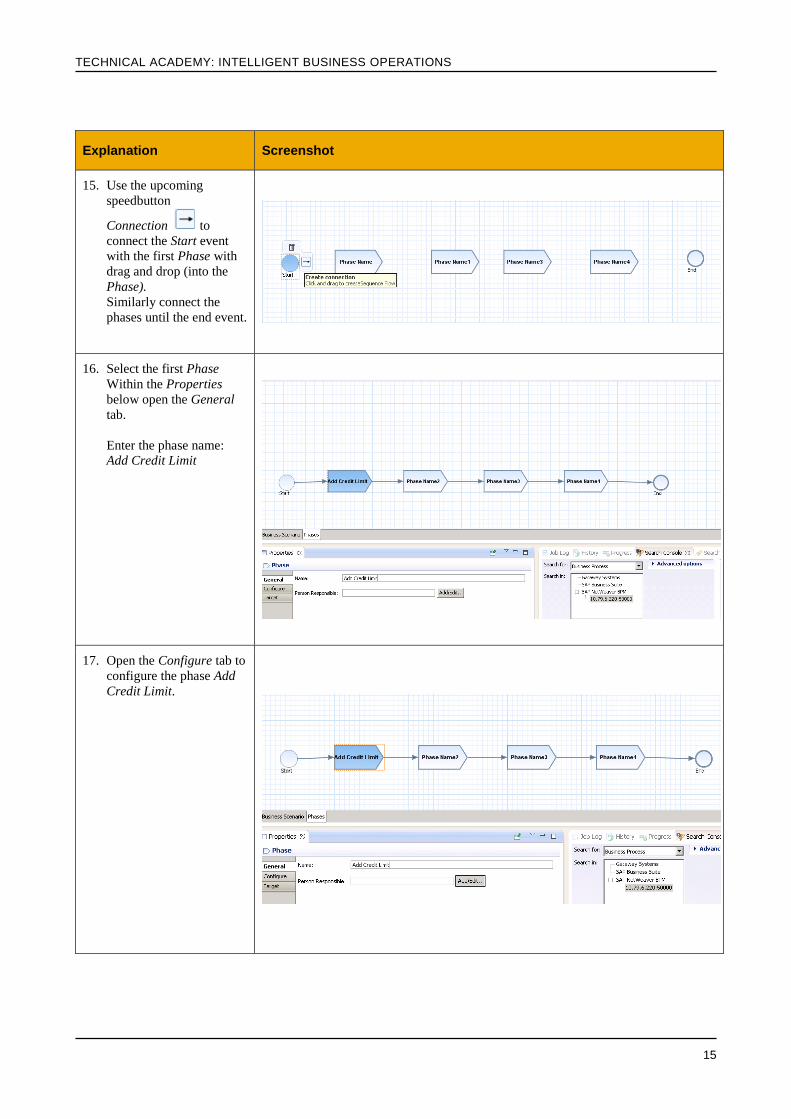
15. Use the upcoming
speedbutton
Connection to
connect the Start event
with the first Phase with
drag and drop (into the
Phase).
Similarly connect the
phases until the end event.
16. Select the first Phase
Within the Properties
below open the General
tab.
Enter the phase name:
Add Credit Limit
17. Open the Configure tab to
configure the phase Add
Credit Limit.
TECHNICAL ACADEMY: INTELLIGENT BUSINESS OPERATIONS
16
Explanation Screenshot
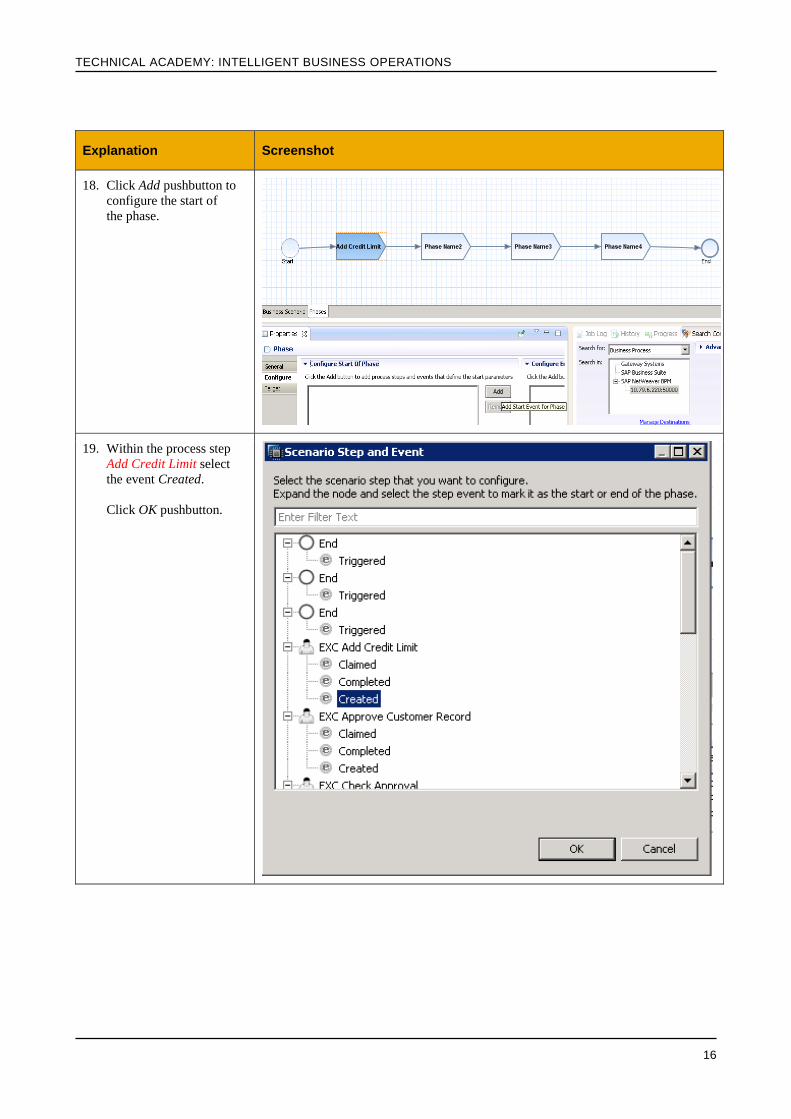
18. Click Add pushbutton to
configure the start of
the phase.
19. Within the process step
Add Credit Limit select
the event Created.
Click OK pushbutton.
TECHNICAL ACADEMY: INTELLIGENT BUSINESS OPERATIONS
17
Explanation Screenshot
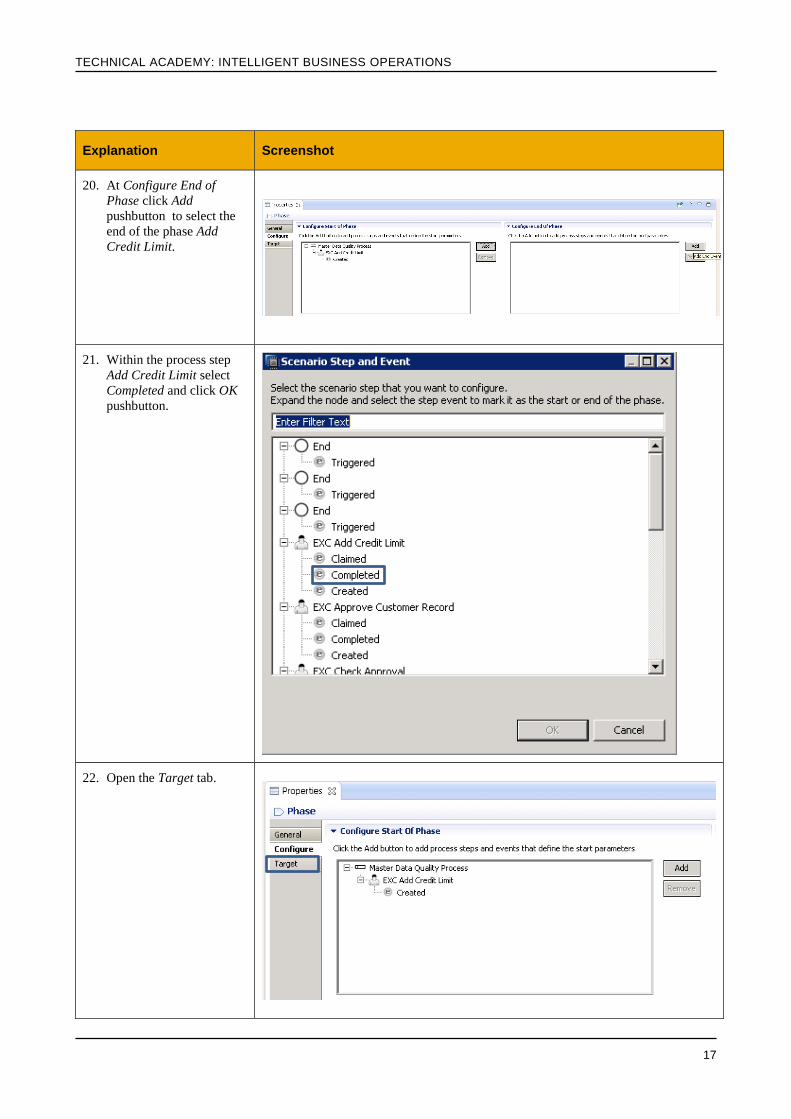
20. At Configure End of
Phase click Add
pushbutton to select the
end of the phase Add
Credit Limit.
21. Within the process step
Add Credit Limit select
Completed and click OK
pushbutton.
22. Open the Target tab.
TECHNICAL ACADEMY: INTELLIGENT BUSINESS OPERATIONS
18
Explanation Screenshot
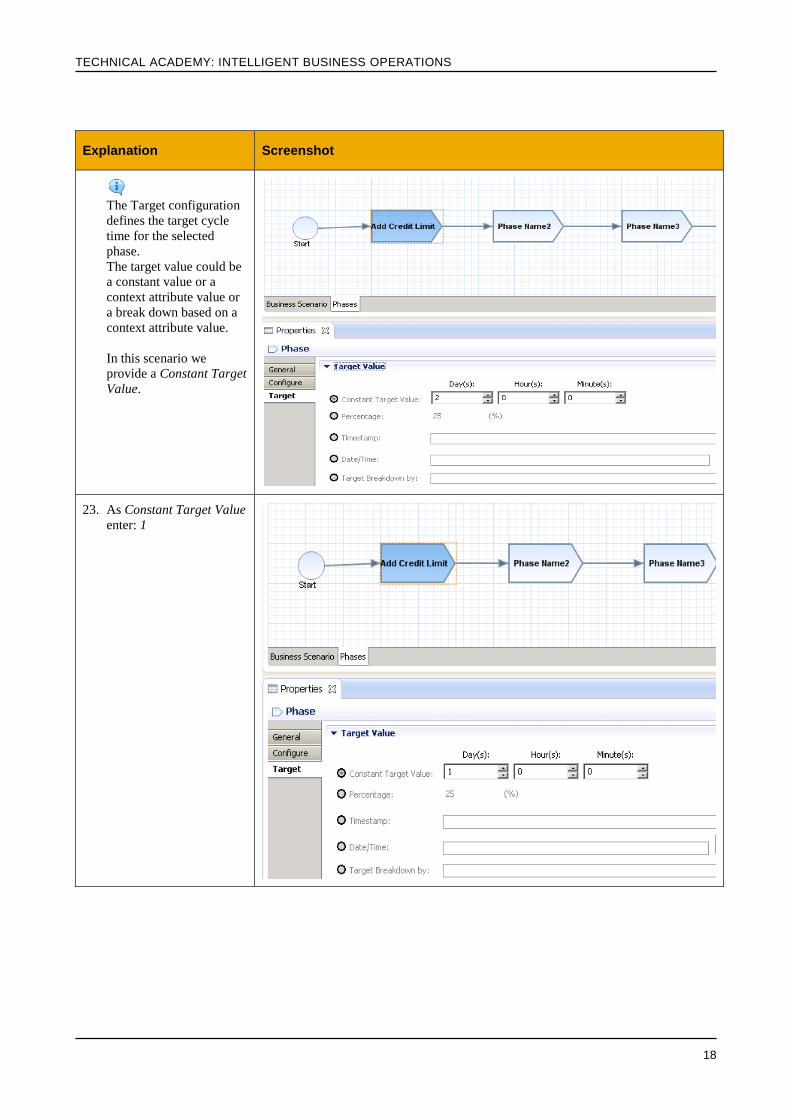
The Target configuration
defines the target cycle
time for the selected
phase.
The target value could be
a constant value or a
context attribute value or
a break down based on a
context attribute value.
In this scenario we
provide a Constant Target
Value.
23. As Constant Target Value
enter: 1
TECHNICAL ACADEMY: INTELLIGENT BUSINESS OPERATIONS
19
Explanation Screenshot
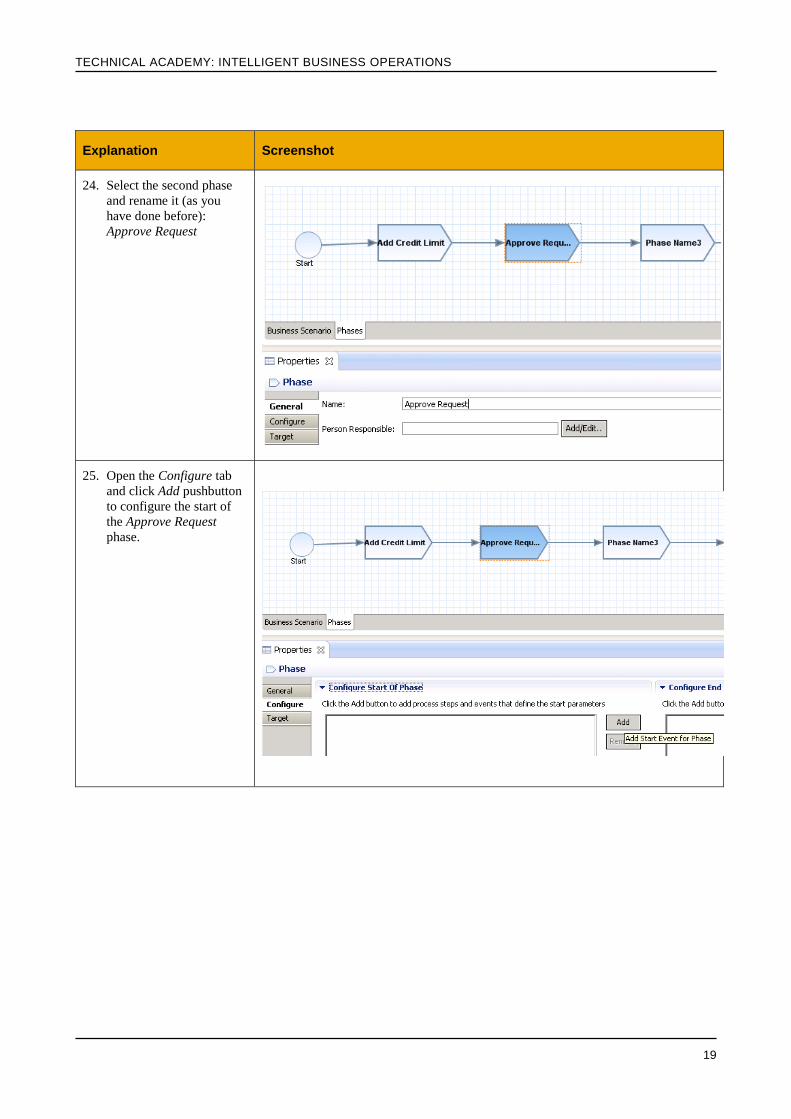
24. Select the second phase
and rename it (as you
have done before):
Approve Request
25. Open the Configure tab
and click Add pushbutton
to configure the start of
the Approve Request
phase.
TECHNICAL ACADEMY: INTELLIGENT BUSINESS OPERATIONS
20
Explanation Screenshot
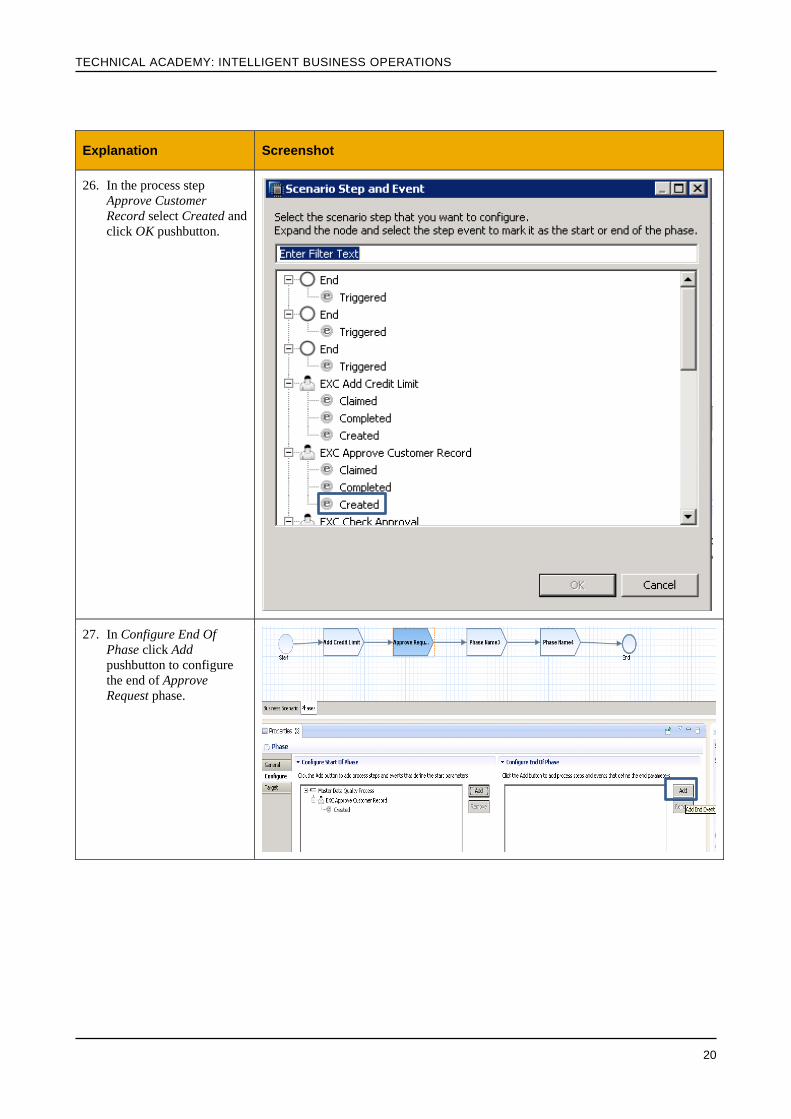
26. In the process step
Approve Customer
Record select Created and
click OK pushbutton.
27. In Configure End Of
Phase click Add
pushbutton to configure
the end of Approve
Request phase.

TECHNICAL ACADEMY: INTELLIGENT BUSINESS OPERATIONS
21
Explanation Screenshot
28. In the process step
Approve Customer
Record select event
Completed and click OK
pushbutton.
29. Open the Target tab.
TECHNICAL ACADEMY: INTELLIGENT BUSINESS OPERATIONS
22
Explanation Screenshot
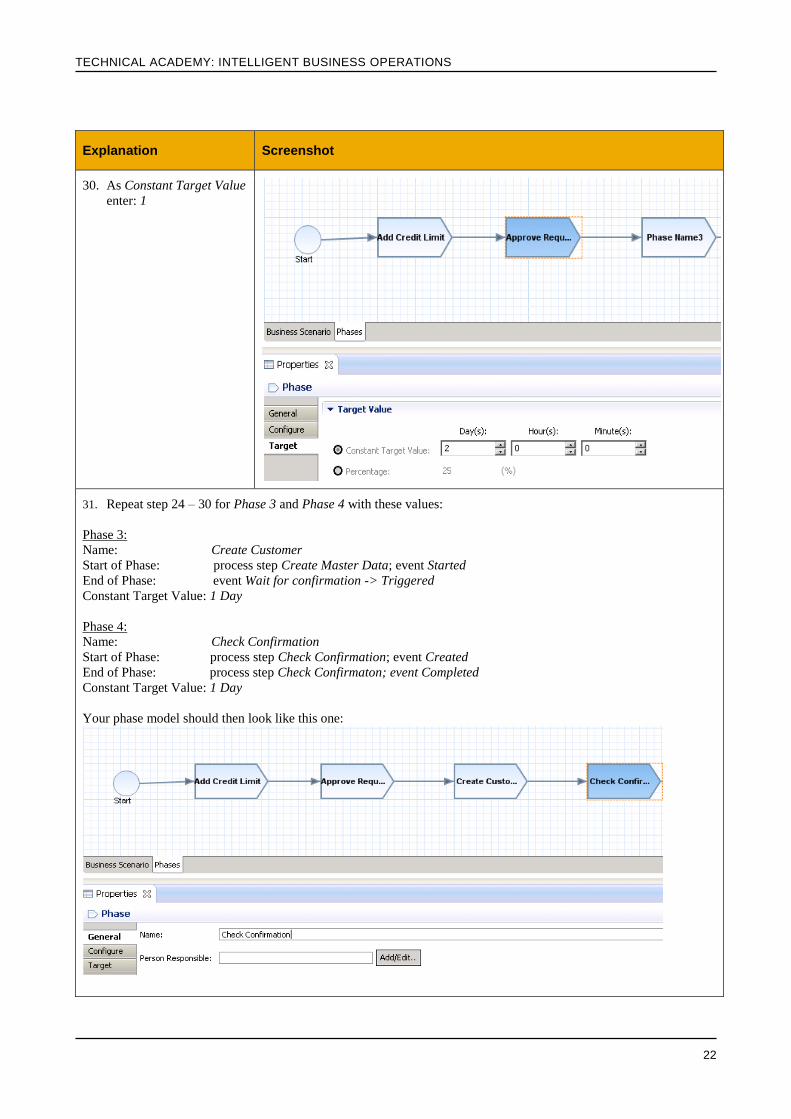
30. As Constant Target Value
enter: 1
31. Repeat step 24 – 30 for Phase 3 and Phase 4 with these values:
Phase 3:
Name: Create Customer
Start of Phase: process step Create Master Data; event Started
End of Phase: event Wait for confirmation -> Triggered
Constant Target Value: 1 Day
Phase 4:
Name: Check Confirmation
Start of Phase: process step Check Confirmation; event Created
End of Phase: process step Check Confirmaton; event Completed
Constant Target Value: 1 Day
Your phase model should then look like this one:
TECHNICAL ACADEMY: INTELLIGENT BUSINESS OPERATIONS
23
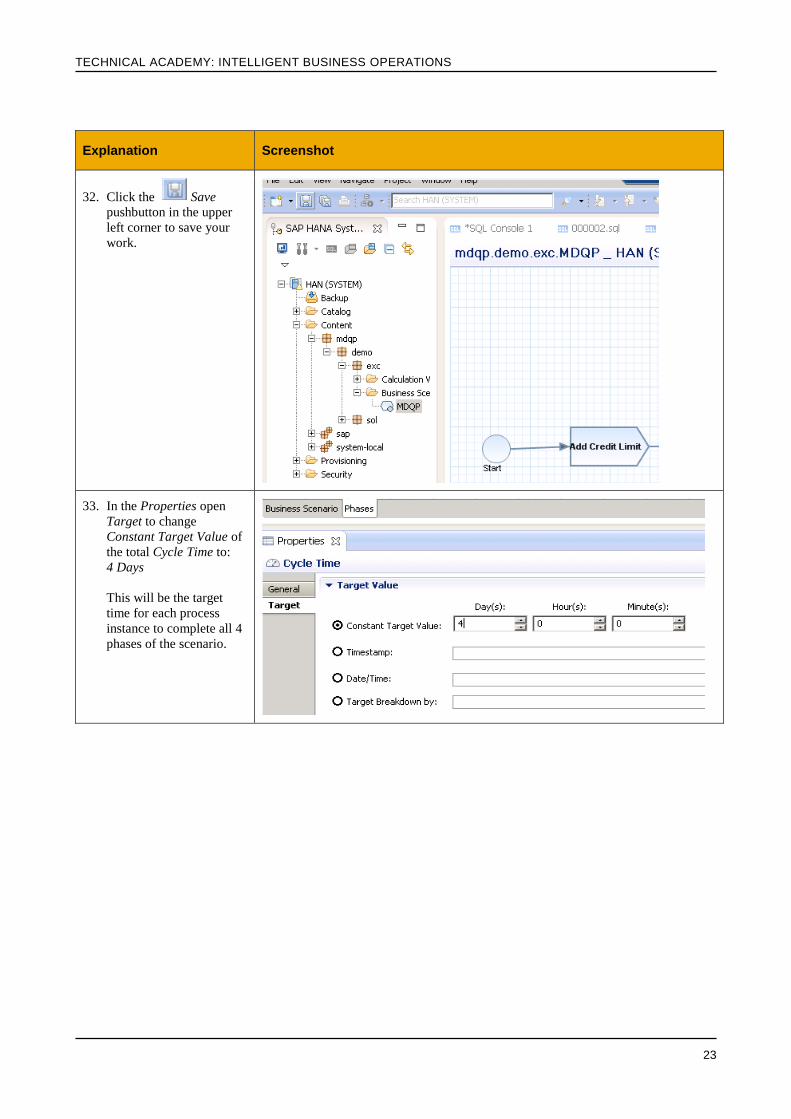
Explanation Screenshot
32. Click the Save
pushbutton in the upper
left corner to save your
work.
33. In the Properties open
Target to change
Constant Target Value of
the total Cycle Time to:
4 Days
This will be the target
time for each process
instance to complete all 4
phases of the scenario.

TECHNICAL ACADEMY: INTELLIGENT BUSINESS OPERATIONS
24
Explanation Screenshot
34. Click the Save
pushbutton in the upper
left corner to save your
work.
TECHNICAL ACADEMY: INTELLIGENT BUSINESS OPERATIONS
25
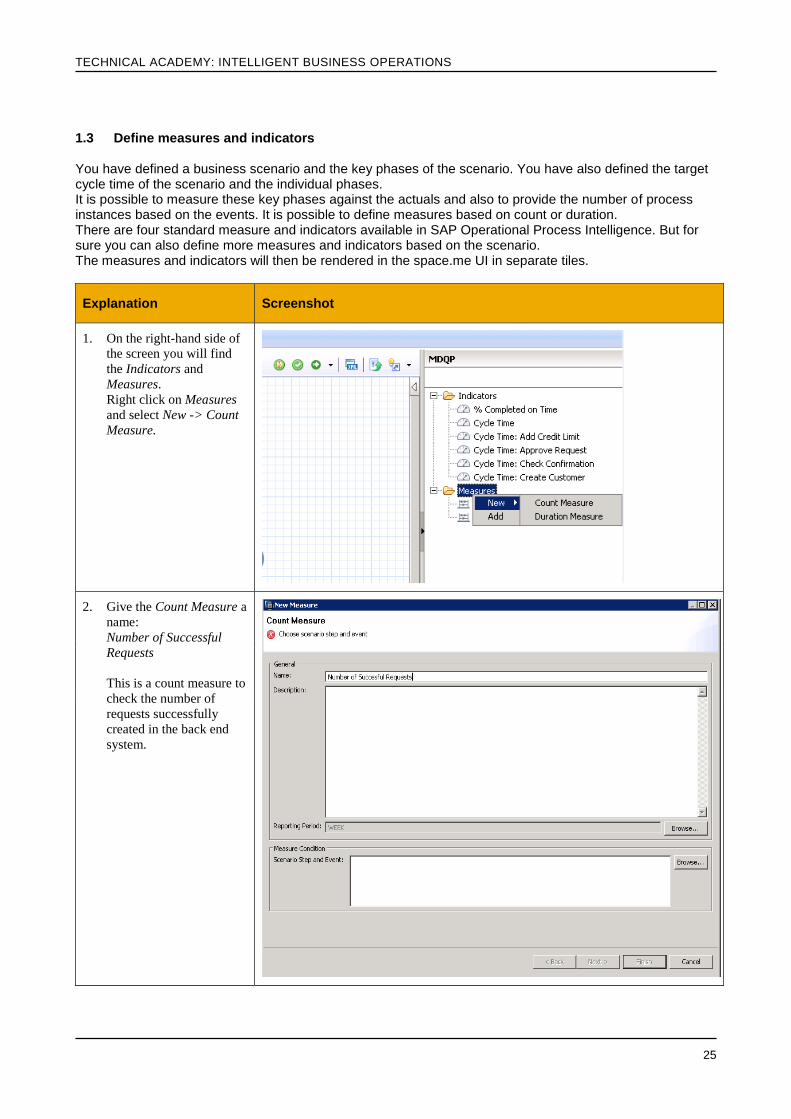
1.3 Define measures and indicators You have defined a business scenario and the key phases of the scenario. You have also defined the target cycle time of the scenario and the individual phases. It is possible to measure these key phases against the actuals and also to provide the number of process instances based on the events. It is possible to define measures based on count or duration. There are four standard measure and indicators available in SAP Operational Process Intelligence. But for sure you can also define more measures and indicators based on the scenario. The measures and indicators will then be rendered in the space.me UI in separate tiles.
Explanation Screenshot
1. On the right-hand side of
the screen you will find
the Indicators and
Measures.
Right click on Measures
and select New -> Count
Measure.
2. Give the Count Measure a
name:
Number of Successful
Requests
This is a count measure to
check the number of
requests successfully
created in the back end
system.
TECHNICAL ACADEMY: INTELLIGENT BUSINESS OPERATIONS
26
Explanation Screenshot
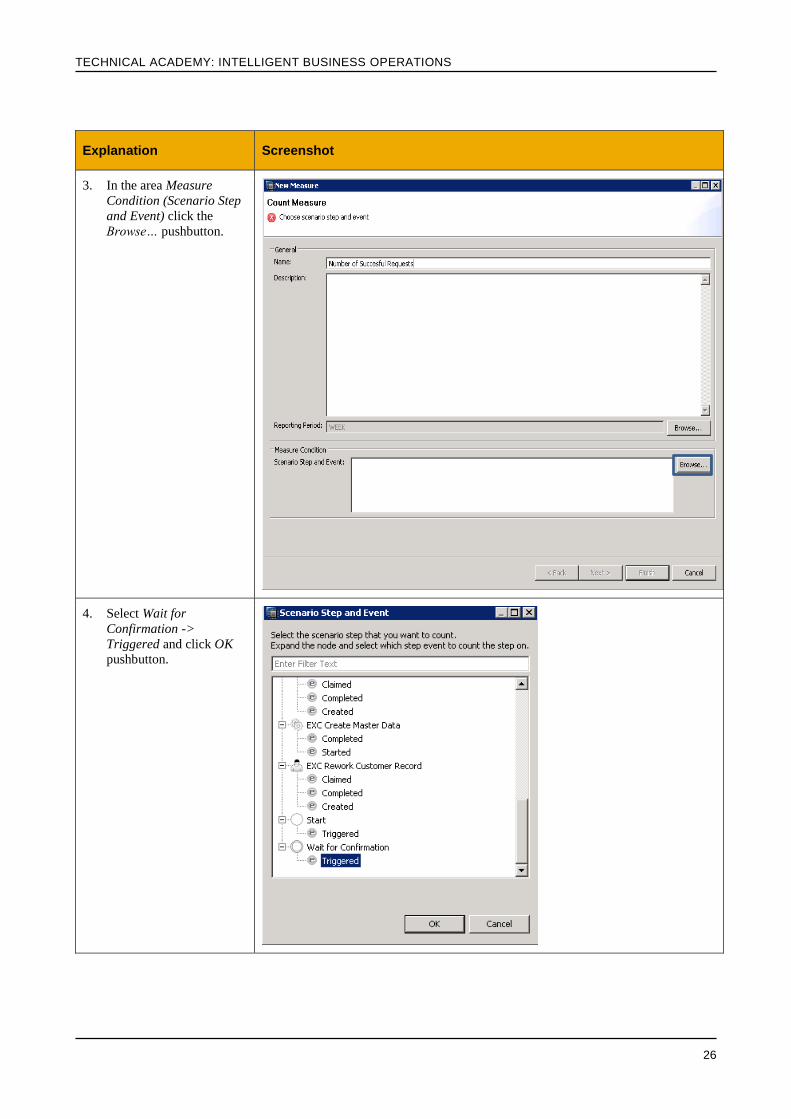
3. In the area Measure
Condition (Scenario Step
and Event) click the
Browse… pushbutton.
4. Select Wait for
Confirmation ->
Triggered and click OK
pushbutton.
TECHNICAL ACADEMY: INTELLIGENT BUSINESS OPERATIONS
27
Explanation Screenshot
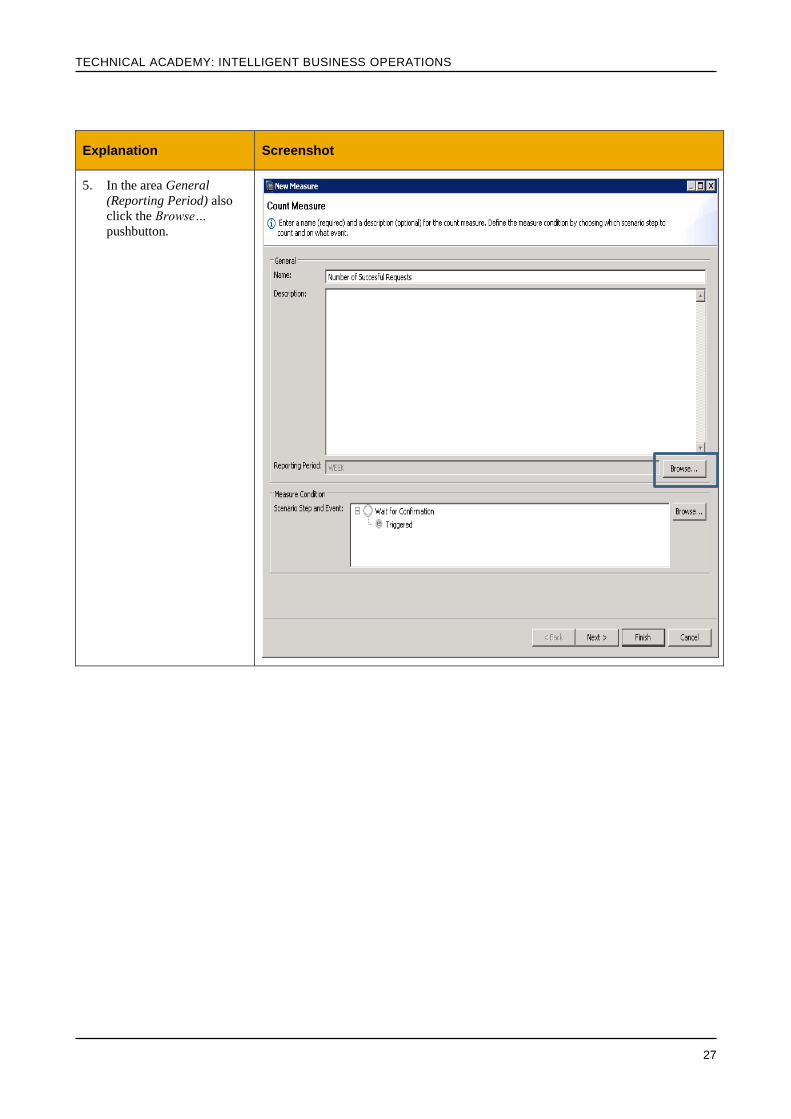
5. In the area General
(Reporting Period) also
click the Browse…
pushbutton.

TECHNICAL ACADEMY: INTELLIGENT BUSINESS OPERATIONS
28
Explanation Screenshot
6. Select Day as Reporting
Period and click OK
pushbutton.
TECHNICAL ACADEMY: INTELLIGENT BUSINESS OPERATIONS
29
Explanation Screenshot
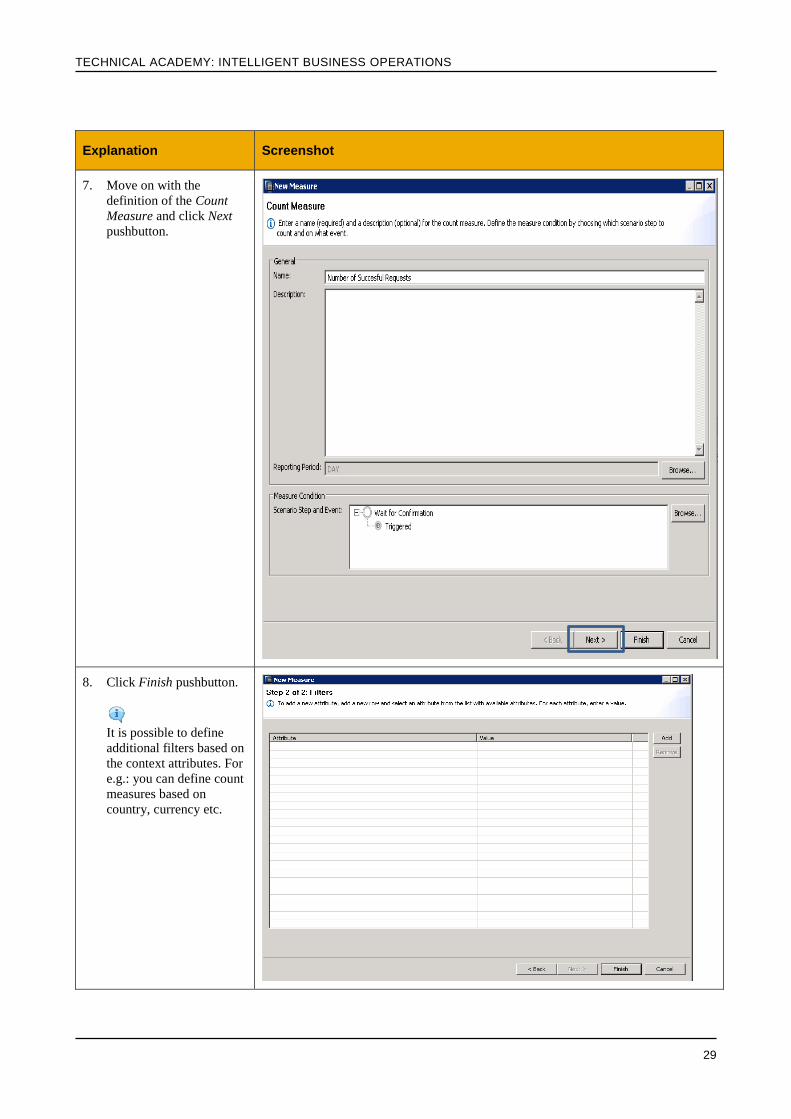
7. Move on with the
definition of the Count
Measure and click Next
pushbutton.
8. Click Finish pushbutton.
It is possible to define
additional filters based on
the context attributes. For
e.g.: you can define count
measures based on
country, currency etc.

TECHNICAL ACADEMY: INTELLIGENT BUSINESS OPERATIONS
30
Explanation Screenshot
9. Repeat step 1 – 9 to create
a second count measure.
Name: Number of Rejections
Scenario Step and Event:
Check Rejection -> Completed
Reporting Period: WEEK
10. Repeat step 1 – 9 to create
a third count measure.
Name: Number of Reworks
Scenario Step and Event:
Rework Customer Record ->
Completed
Reporting Period: WEEK

TECHNICAL ACADEMY: INTELLIGENT BUSINESS OPERATIONS
31
Explanation Screenshot
11. Right click on Measures
and select New ->
Duration Measure to
create a new one.
12. Enter the name and
description.
Name: Average Approval
Time
Description: average time
to approve a request
In the area Start Tracking
Duration click Browse
pushbutton.

TECHNICAL ACADEMY: INTELLIGENT BUSINESS OPERATIONS
32
Explanation Screenshot
13. In the step Approve
Customer Record select
Created.
Then click OK
pushbutton.
14. In the area Stop Tracking
Duration click Browse
pushbutton.

TECHNICAL ACADEMY: INTELLIGENT BUSINESS OPERATIONS
33
Explanation Screenshot
15. In the step Approve
Customer Record select
Completed.
Then click OK
pushbutton.
16. Click Next pushbutton.
TECHNICAL ACADEMY: INTELLIGENT BUSINESS OPERATIONS
34
Explanation Screenshot
17. Click Finish pushbutton.
18. Repeat step 11 – 17 to
create a second Duration
Measure.
Name: Average Time Add
Credit Limit
Description: average time
taken to add credit limit to a
request
Start Tracking Duration
(Scenario Start and Event):
Add Credit Limit -> created
Stop Tracking Duration
(Scenario Step and Event):
Add Credit Limit ->
Completed
TECHNICAL ACADEMY: INTELLIGENT BUSINESS OPERATIONS
35
Explanation Screenshot
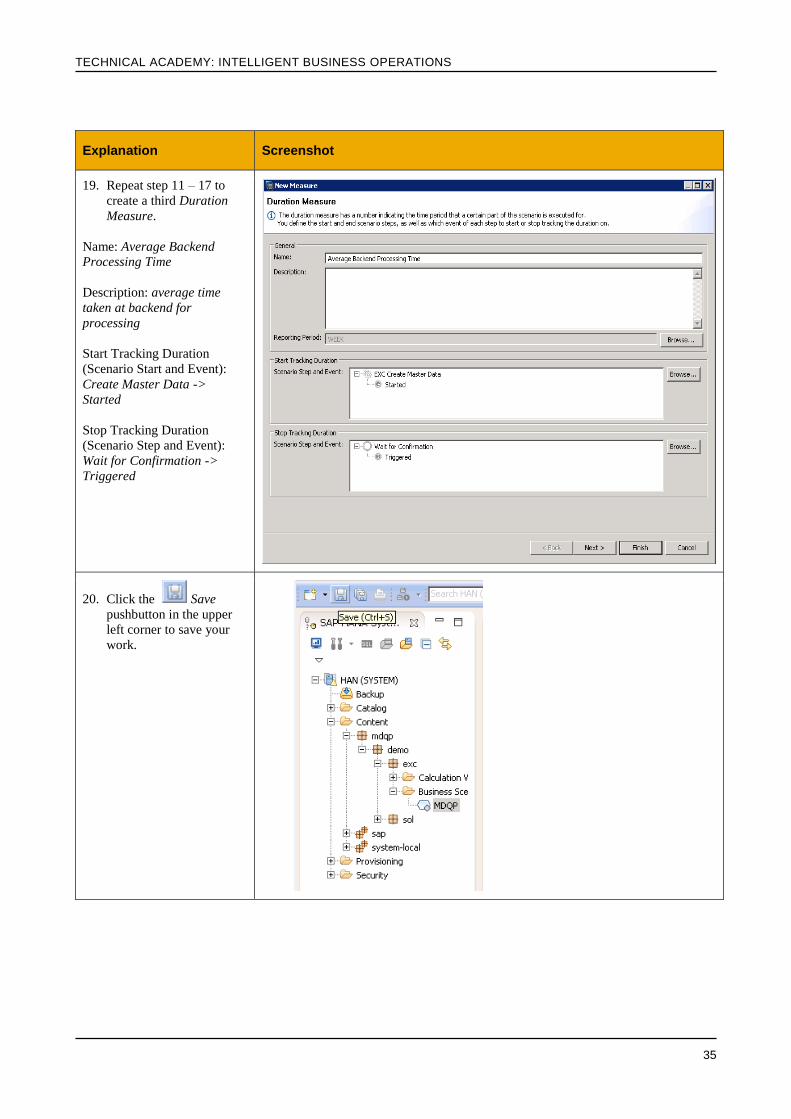
19. Repeat step 11 – 17 to
create a third Duration
Measure.
Name: Average Backend
Processing Time
Description: average time
taken at backend for
processing
Start Tracking Duration
(Scenario Start and Event):
Create Master Data ->
Started
Stop Tracking Duration
(Scenario Step and Event):
Wait for Confirmation ->
Triggered
20. Click the Save
pushbutton in the upper
left corner to save your
work.
TECHNICAL ACADEMY: INTELLIGENT BUSINESS OPERATIONS
36
1.4 Generate and run the Business Scenario You have completed the business scenario modelling and key KPI definitions. Now it is time to generate your models and run the application.
Explanation Screenshot
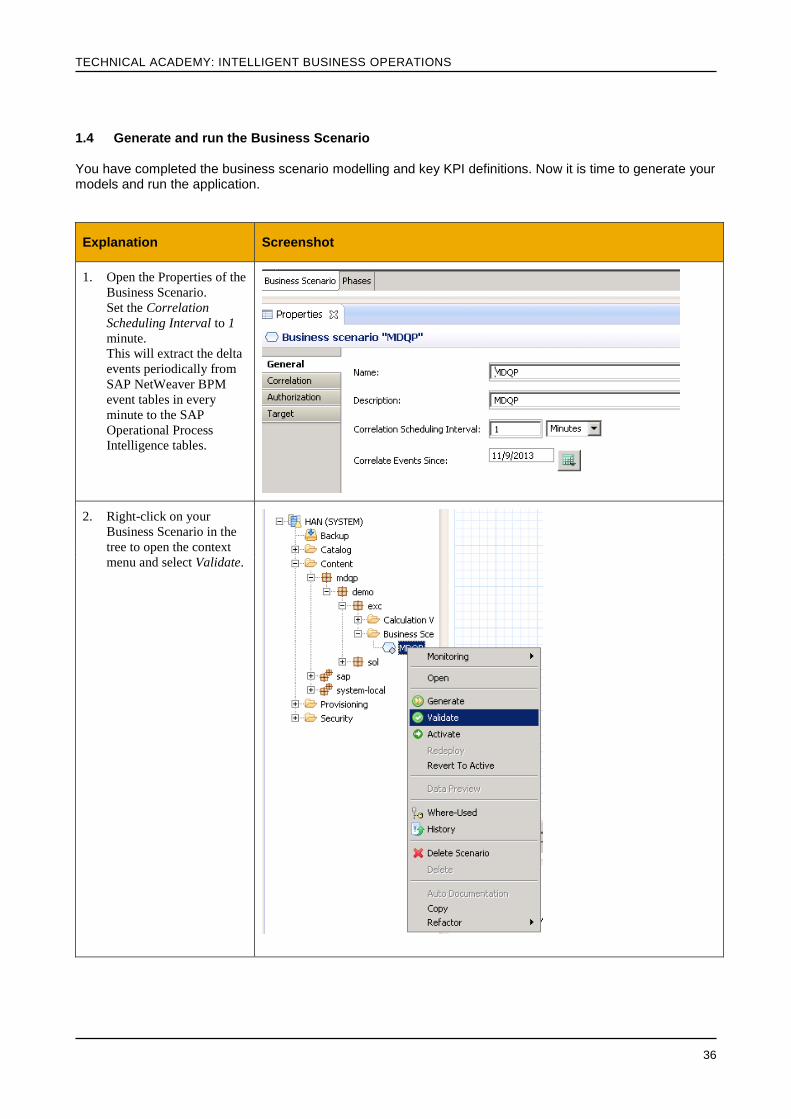
1. Open the Properties of the
Business Scenario.
Set the Correlation
Scheduling Interval to 1
minute.
This will extract the delta
events periodically from
SAP NetWeaver BPM
event tables in every
minute to the SAP
Operational Process
Intelligence tables.
2. Right-click on your
Business Scenario in the
tree to open the context
menu and select Validate.
TECHNICAL ACADEMY: INTELLIGENT BUSINESS OPERATIONS
37
Explanation Screenshot
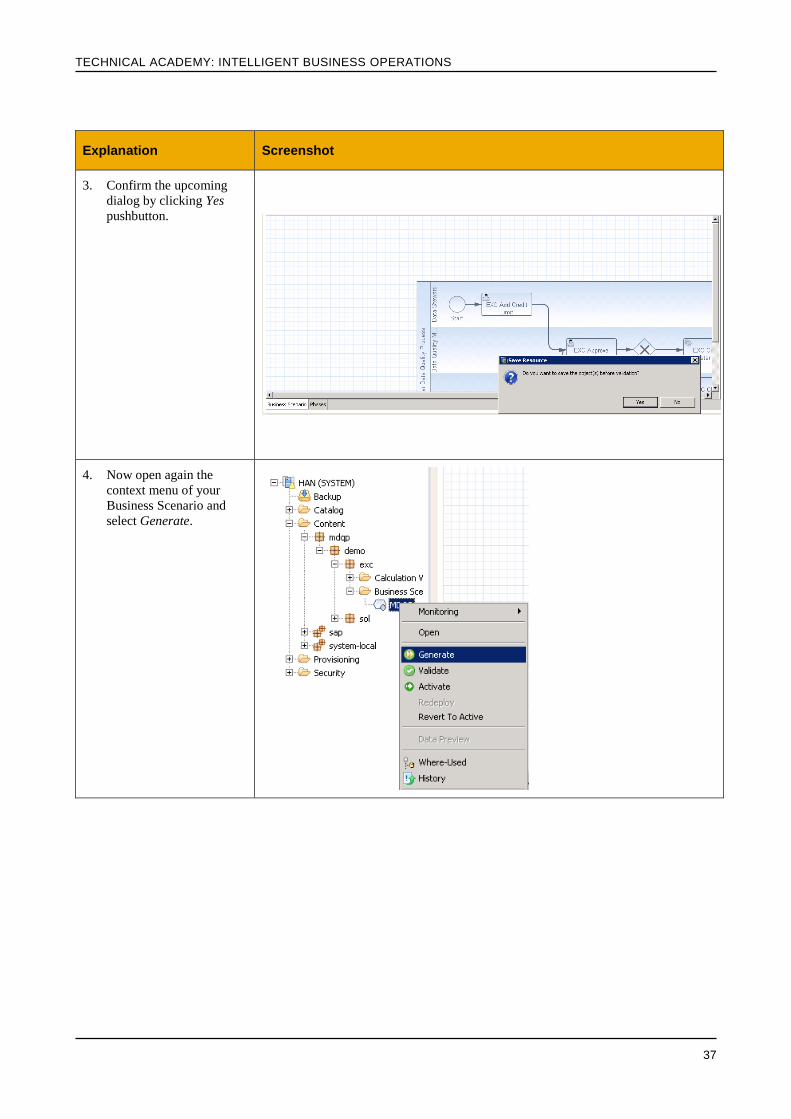
3. Confirm the upcoming
dialog by clicking Yes
pushbutton.
4. Now open again the
context menu of your
Business Scenario and
select Generate.
TECHNICAL ACADEMY: INTELLIGENT BUSINESS OPERATIONS
38
Explanation Screenshot
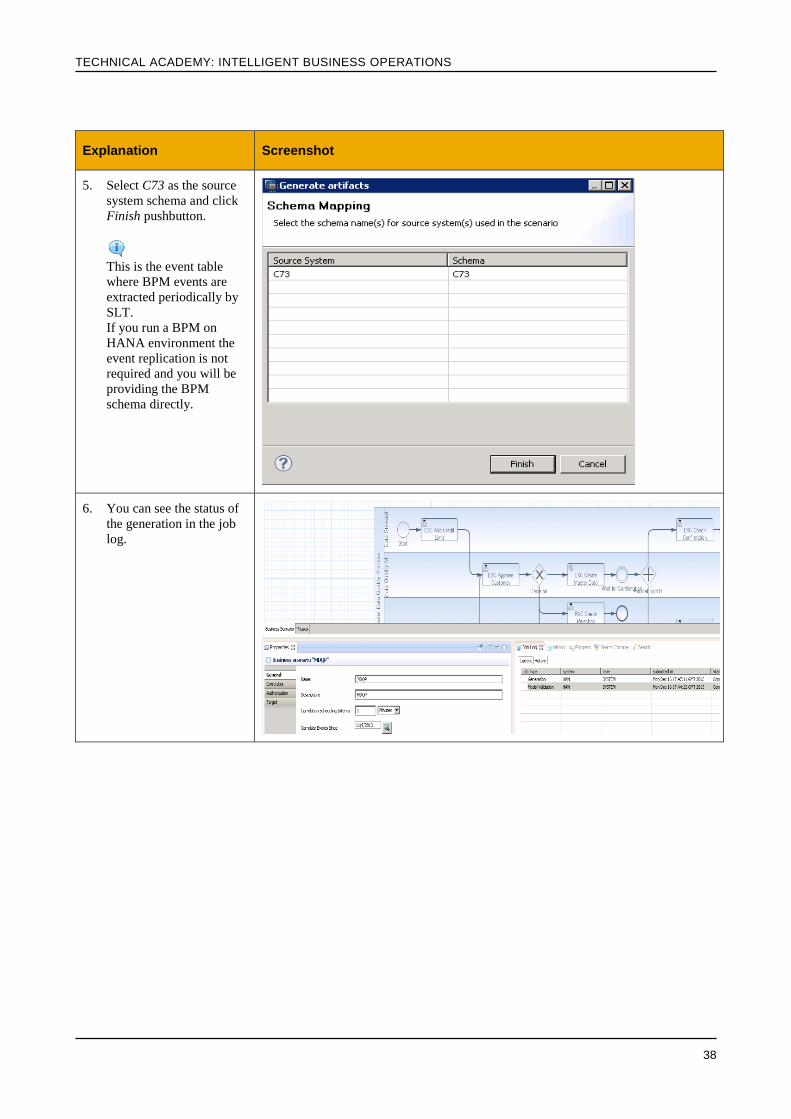
5. Select C73 as the source
system schema and click
Finish pushbutton.
This is the event table
where BPM events are
extracted periodically by
SLT.
If you run a BPM on
HANA environment the
event replication is not
required and you will be
providing the BPM
schema directly.
6. You can see the status of
the generation in the job
log.
TECHNICAL ACADEMY: INTELLIGENT BUSINESS OPERATIONS
39
Explanation Screenshot
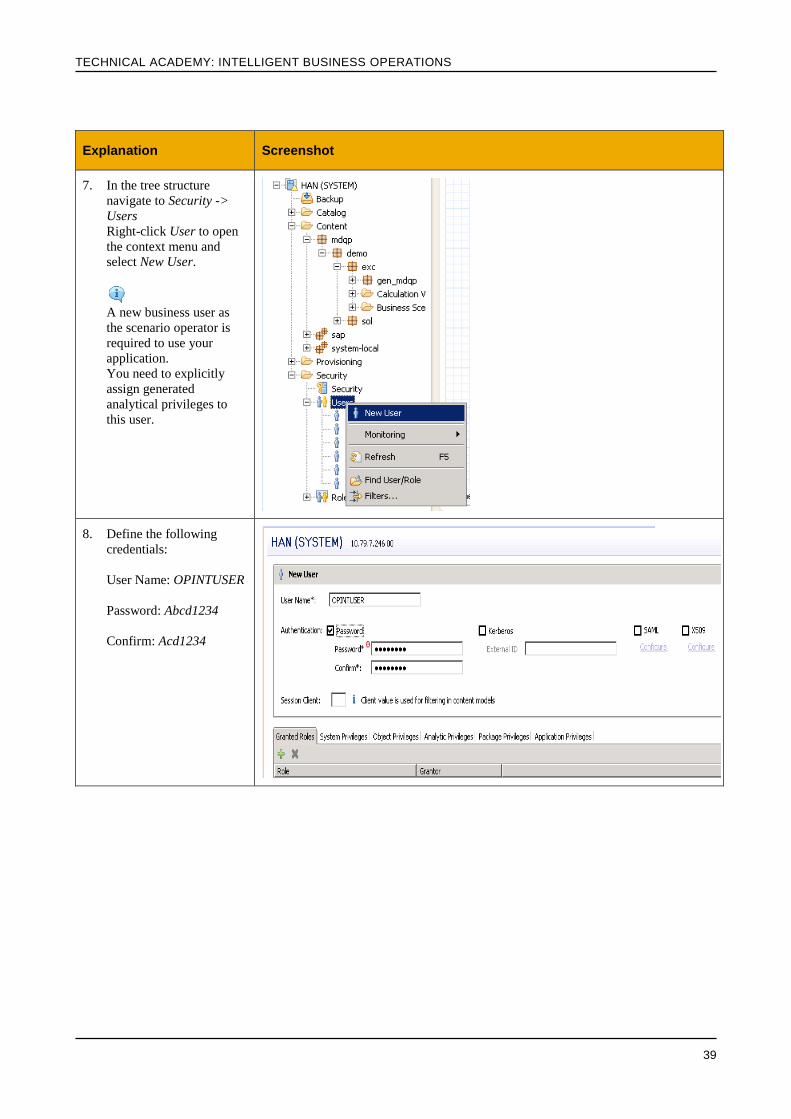
7. In the tree structure
navigate to Security ->
Users
Right-click User to open
the context menu and
select New User.
A new business user as
the scenario operator is
required to use your
application.
You need to explicitly
assign generated
analytical privileges to
this user.
8. Define the following
credentials:
User Name: OPINTUSER
Password: Abcd1234
Confirm: Acd1234

TECHNICAL ACADEMY: INTELLIGENT BUSINESS OPERATIONS
40
Explanation Screenshot
9. In the tab Granted Roles
click the plus sign to
add roles to
OPINTUSER.
10. Filter the roles and enter
opint
Select the role
sap.opi.pv.roles::OPINT
USER
Then click OK
pushbutton.
TECHNICAL ACADEMY: INTELLIGENT BUSINESS OPERATIONS
41
Explanation Screenshot
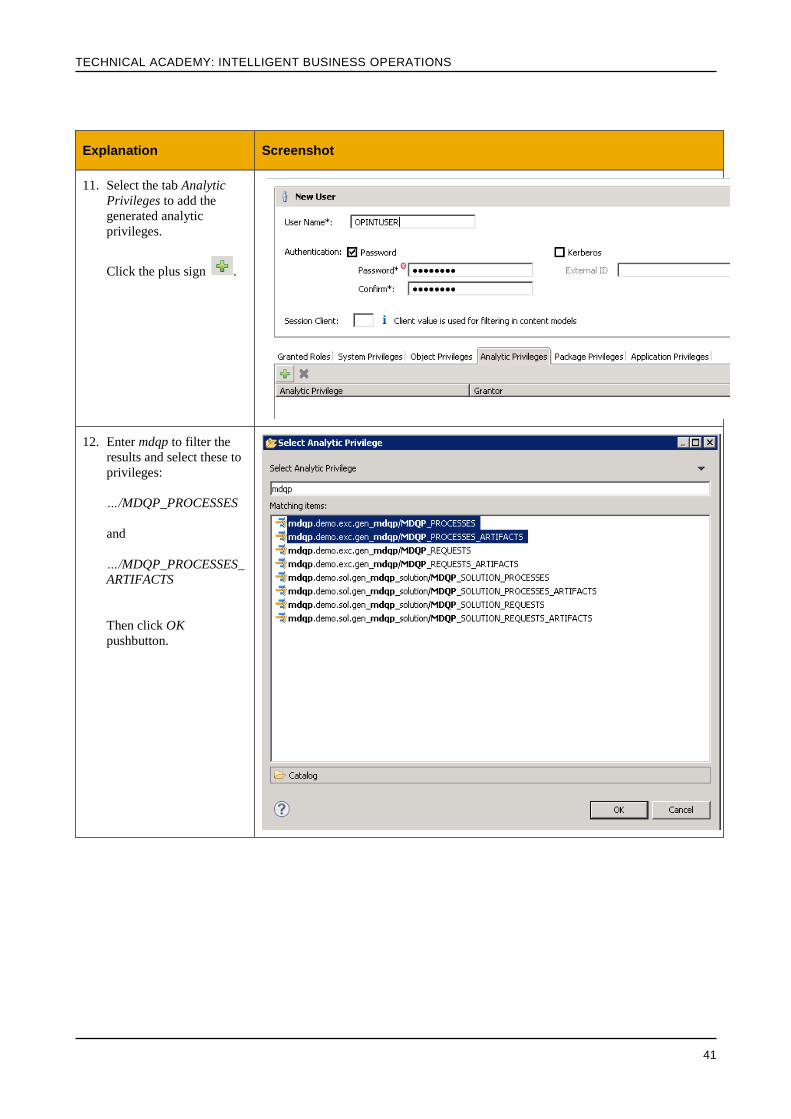
11. Select the tab Analytic
Privileges to add the
generated analytic
privileges.
Click the plus sign .
12. Enter mdqp to filter the
results and select these to
privileges:
…/MDQP_PROCESSES
and
…/MDQP_PROCESSES_
ARTIFACTS
Then click OK
pushbutton.
TECHNICAL ACADEMY: INTELLIGENT BUSINESS OPERATIONS
42
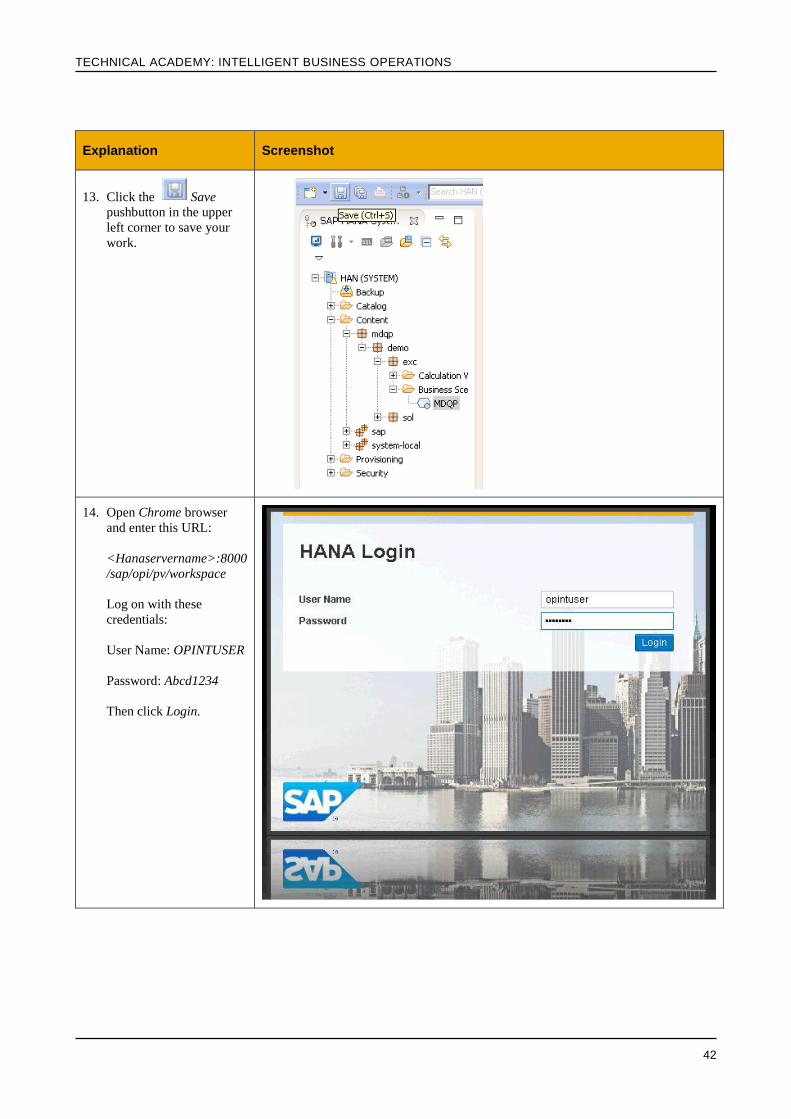
Explanation Screenshot
13. Click the Save
pushbutton in the upper
left corner to save your
work.
14. Open Chrome browser
and enter this URL:
<Hanaservername>:8000
/sap/opi/pv/workspace
Log on with these
credentials:
User Name: OPINTUSER
Password: Abcd1234
Then click Login.
TECHNICAL ACADEMY: INTELLIGENT BUSINESS OPERATIONS
43
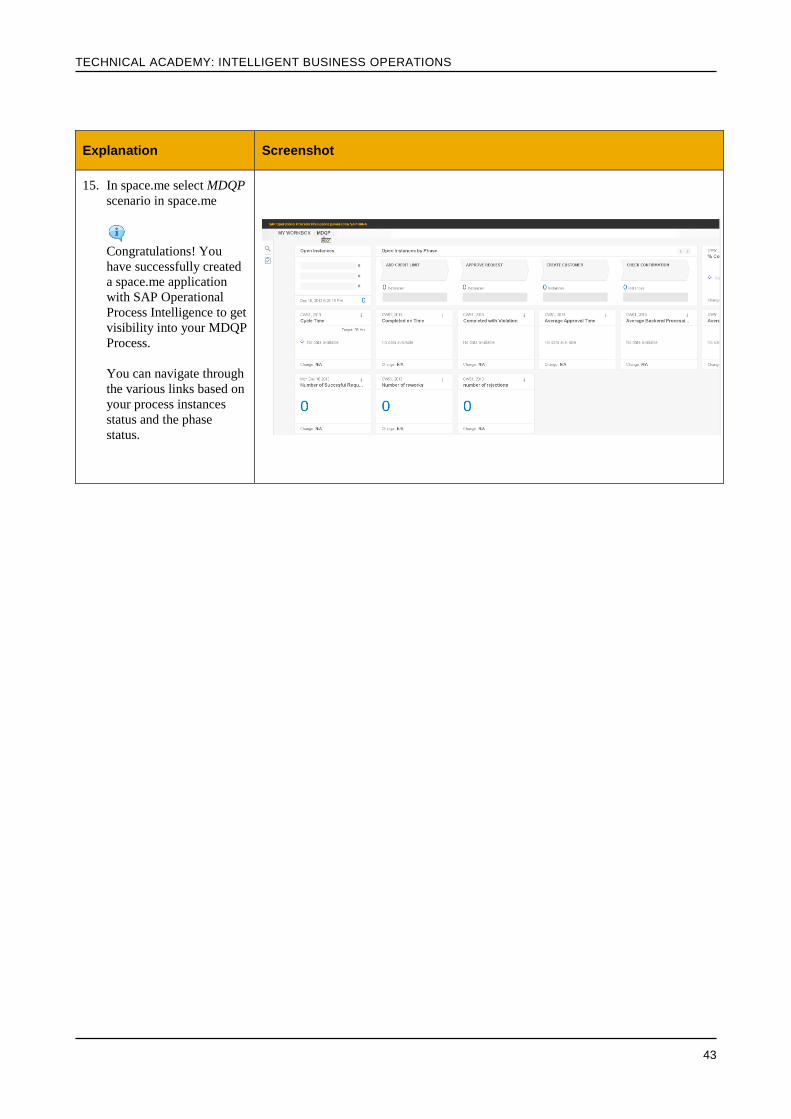
Explanation Screenshot
15. In space.me select MDQP
scenario in space.me
Congratulations! You
have successfully created
a space.me application
with SAP Operational
Process Intelligence to get
visibility into your MDQP
Process.
You can navigate through
the various links based on
your process instances
status and the phase
status.
TECHNICAL ACADEMY: INTELLIGENT BUSINESS OPERATIONS
44
2 MULTIPLE SCENARIO PARTICPANTS
Until now we have just used one process within our Business Scenario. But to get a comprehensive view most likely we would also further processes. This we will add now. 2.1 Add another process model In this chapter you will add one more business process into the scenario and define a correlation between these two processes. In MDQP scenario there is a MDQP process and an ICP process which takes care of the integration centric aspects. These two process models are used while create a customer master data request. A correlation between two or more process models are defined based on a key context attribute. For e.g.: in this scenario we use the process instance ID of the MDQP process itself.
Explanation Screenshot
1. Open the Search Console,
select the SAP
NetWeaver BPM system
and select your
integration centric
process:
ICP Process
Ensure NOT to select ICP
EXC Process!!!
2. Drag and drop ICP to the
Business Scenario editor.
Now there are two related
processes which are used
in the MDQP scenario. In
the next step you will
configure the scenario by
correlating these two
processes.
.
TECHNICAL ACADEMY: INTELLIGENT BUSINESS OPERATIONS
45
Explanation Screenshot
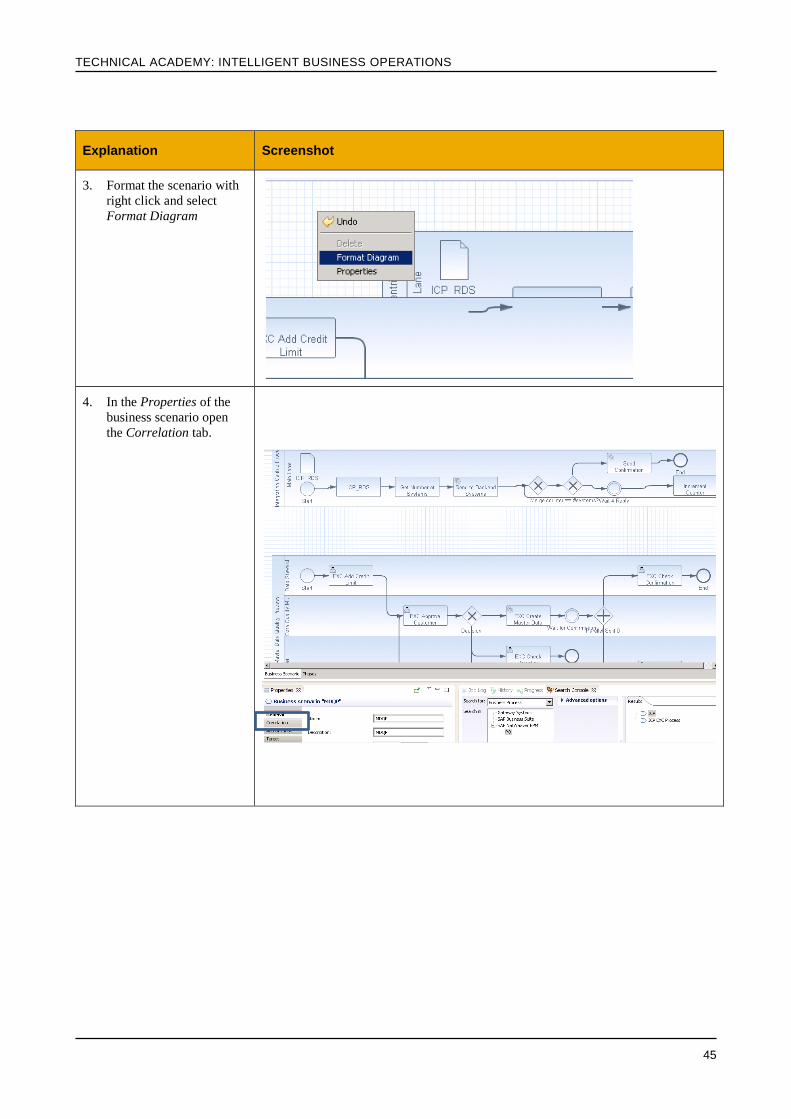
3. Format the scenario with
right click and select
Format Diagram
4. In the Properties of the
business scenario open
the Correlation tab.
TECHNICAL ACADEMY: INTELLIGENT BUSINESS OPERATIONS
46
Explanation Screenshot
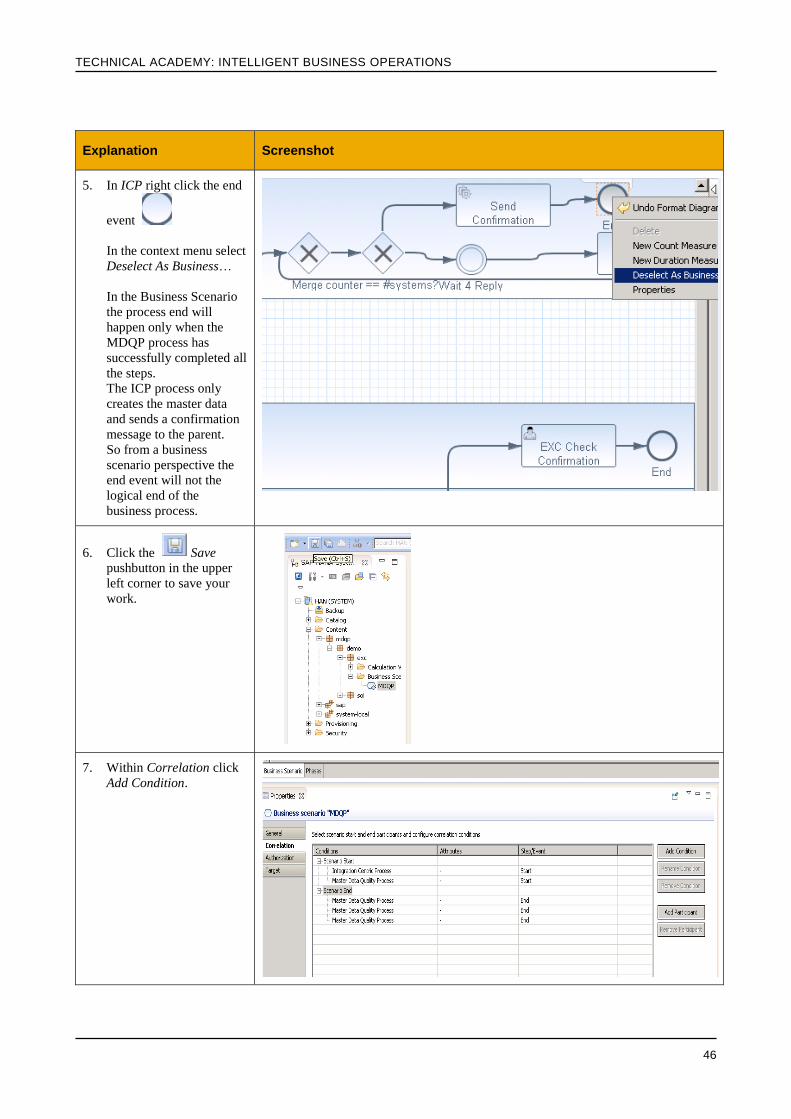
5. In ICP right click the end
event
In the context menu select
Deselect As Business…
In the Business Scenario
the process end will
happen only when the
MDQP process has
successfully completed all
the steps.
The ICP process only
creates the master data
and sends a confirmation
message to the parent.
So from a business
scenario perspective the
end event will not the
logical end of the
business process.
6. Click the Save
pushbutton in the upper
left corner to save your
work.
7. Within Correlation click
Add Condition.
TECHNICAL ACADEMY: INTELLIGENT BUSINESS OPERATIONS
47
Explanation Screenshot
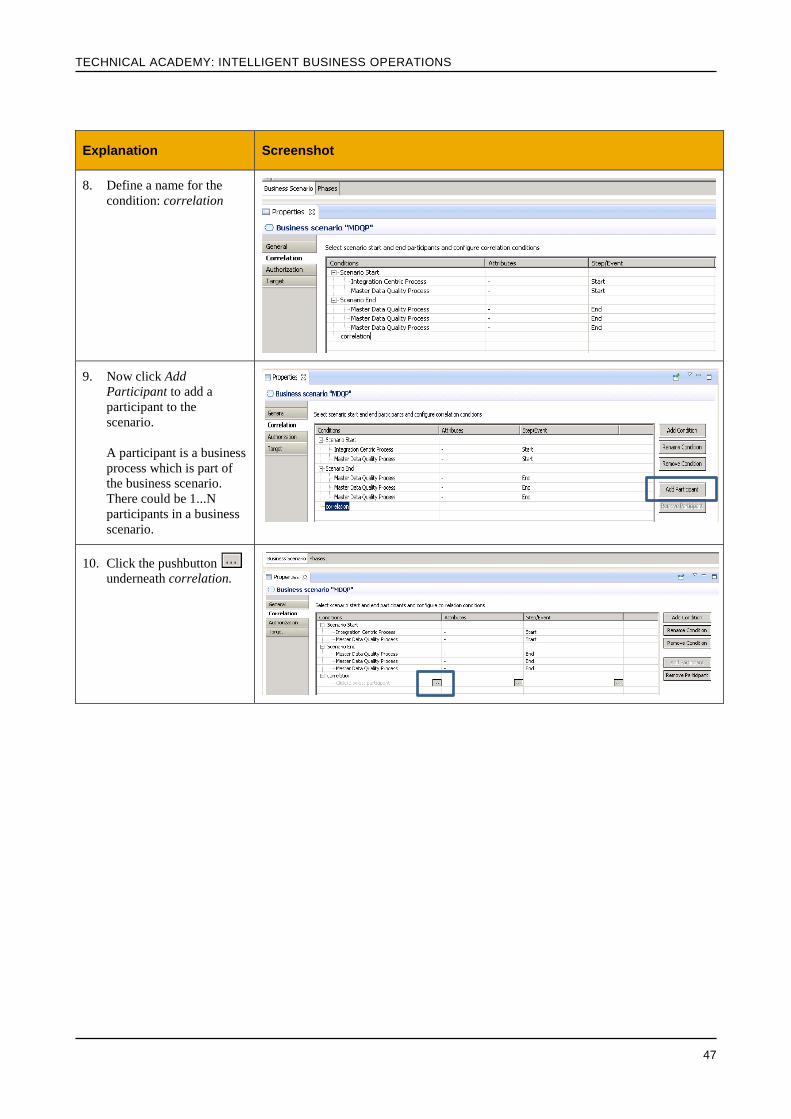
8. Define a name for the
condition: correlation
9. Now click Add
Participant to add a
participant to the
scenario.
A participant is a business
process which is part of
the business scenario.
There could be 1...N
participants in a business
scenario.
10. Click the pushbutton
underneath correlation.
TECHNICAL ACADEMY: INTELLIGENT BUSINESS OPERATIONS
48
Explanation Screenshot
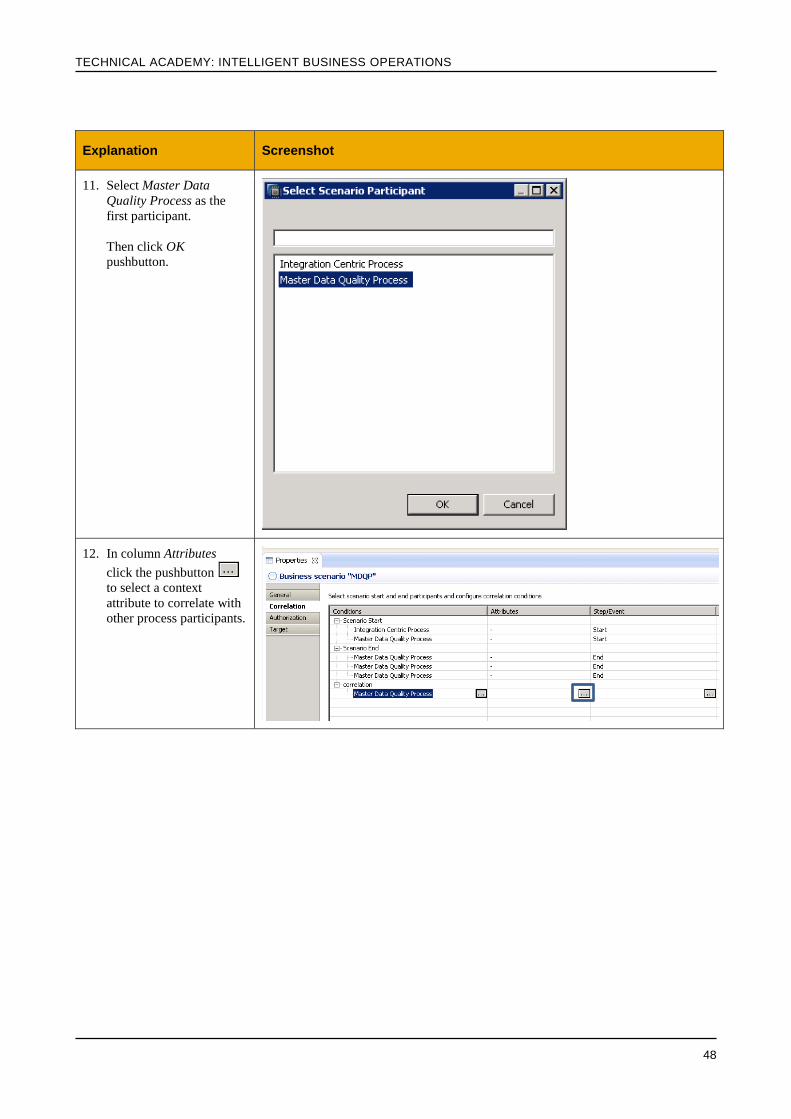
11. Select Master Data
Quality Process as the
first participant.
Then click OK
pushbutton.
12. In column Attributes
click the pushbutton
to select a context
attribute to correlate with
other process participants.
TECHNICAL ACADEMY: INTELLIGENT BUSINESS OPERATIONS
49
Explanation Screenshot
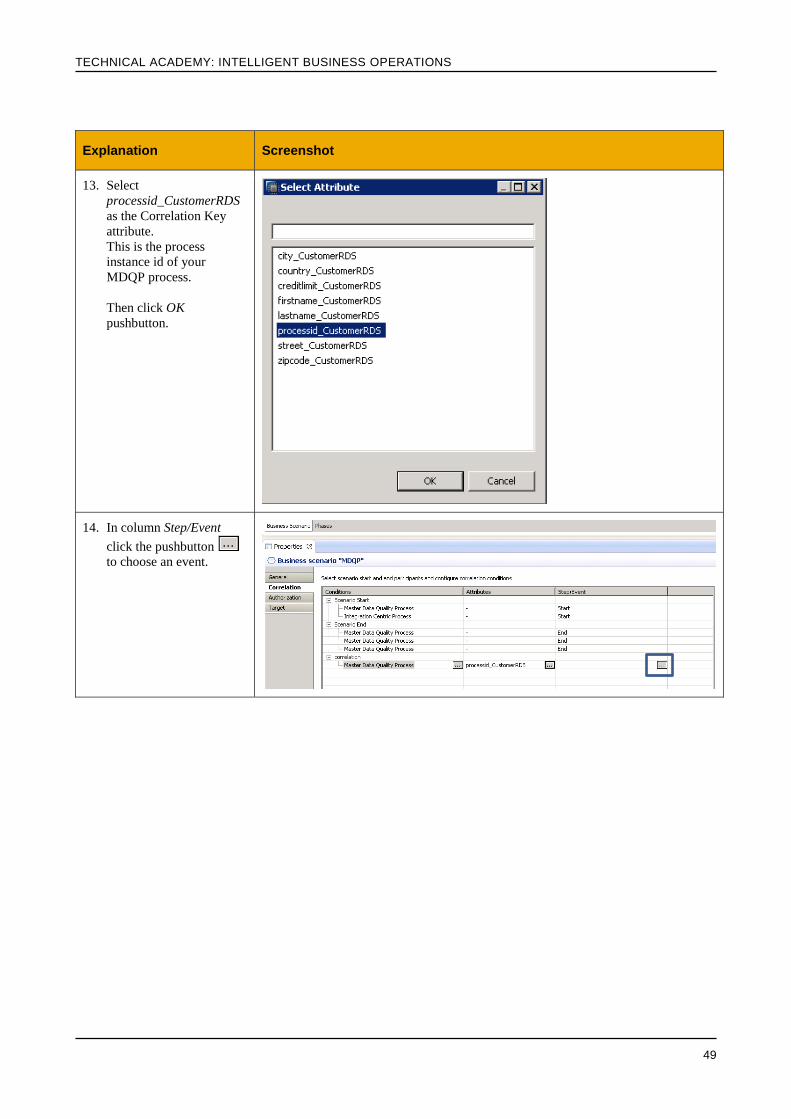
13. Select
processid_CustomerRDS
as the Correlation Key
attribute.
This is the process
instance id of your
MDQP process.
Then click OK
pushbutton.
14. In column Step/Event
click the pushbutton
to choose an event.
TECHNICAL ACADEMY: INTELLIGENT BUSINESS OPERATIONS
50
Explanation Screenshot
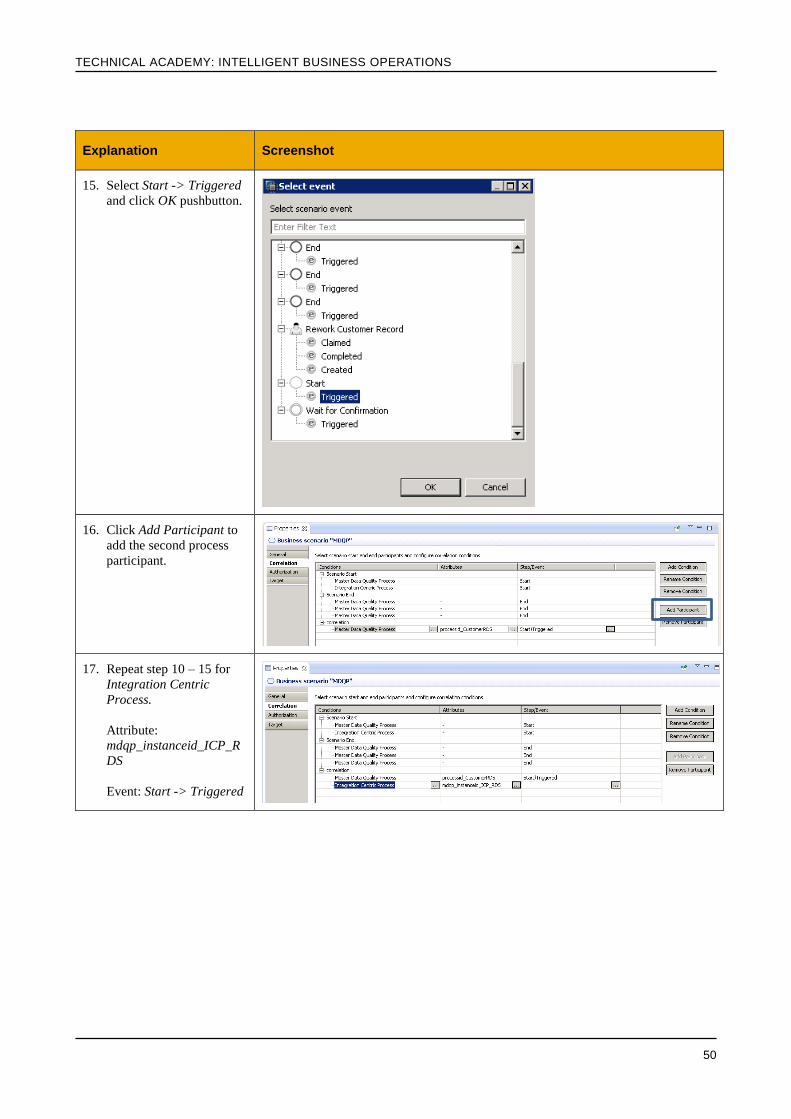
15. Select Start -> Triggered
and click OK pushbutton.
16. Click Add Participant to
add the second process
participant.
17. Repeat step 10 – 15 for
Integration Centric
Process.
Attribute:
mdqp_instanceid_ICP_R
DS
Event: Start -> Triggered

TECHNICAL ACADEMY: INTELLIGENT BUSINESS OPERATIONS
51
Explanation Screenshot
18. Click the Save
pushbutton in the upper
left corner to save your
work.
19. Now we want to add a
new phase.
Go to the Phases editor
and drag and drop a
new Phase .
20. Right click and Delete the
link between phase
Create Customer and
Check Confirmation.
TECHNICAL ACADEMY: INTELLIGENT BUSINESS OPERATIONS
52
Explanation Screenshot
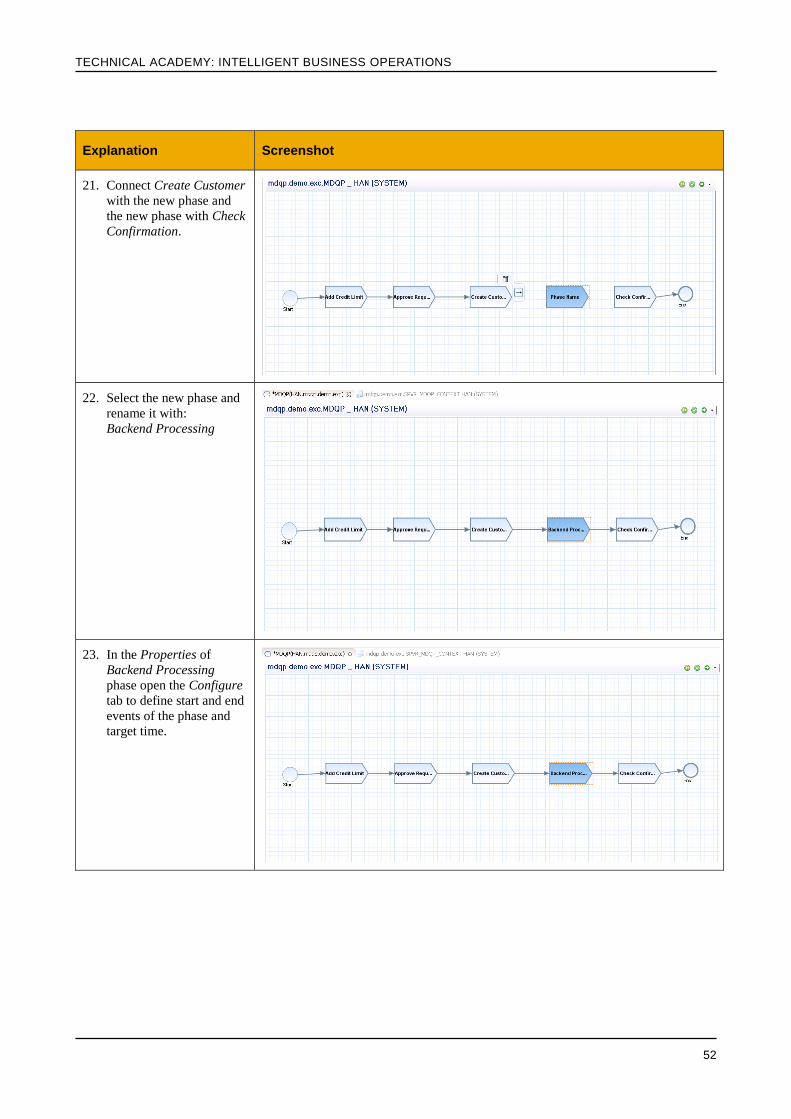
21. Connect Create Customer
with the new phase and
the new phase with Check
Confirmation.
22. Select the new phase and
rename it with:
Backend Processing
23. In the Properties of
Backend Processing
phase open the Configure
tab to define start and end
events of the phase and
target time.
TECHNICAL ACADEMY: INTELLIGENT BUSINESS OPERATIONS
53
Explanation Screenshot
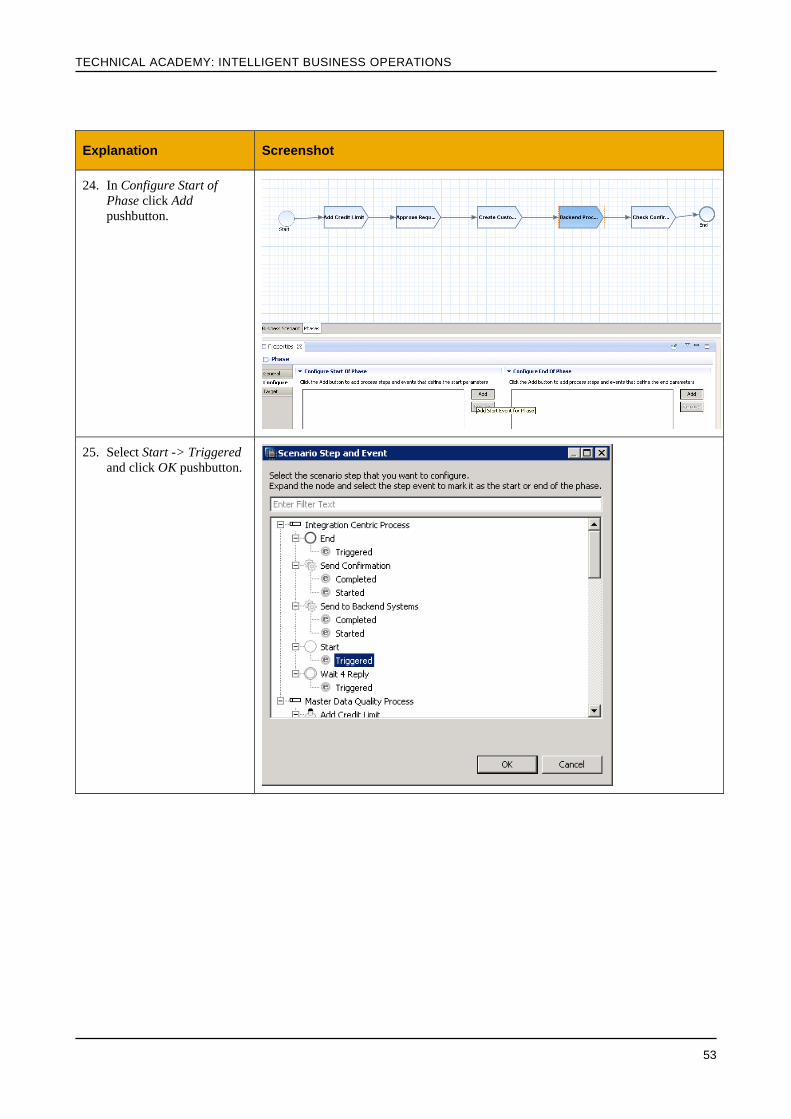
24. In Configure Start of
Phase click Add
pushbutton.
25. Select Start -> Triggered
and click OK pushbutton.
TECHNICAL ACADEMY: INTELLIGENT BUSINESS OPERATIONS
54
Explanation Screenshot
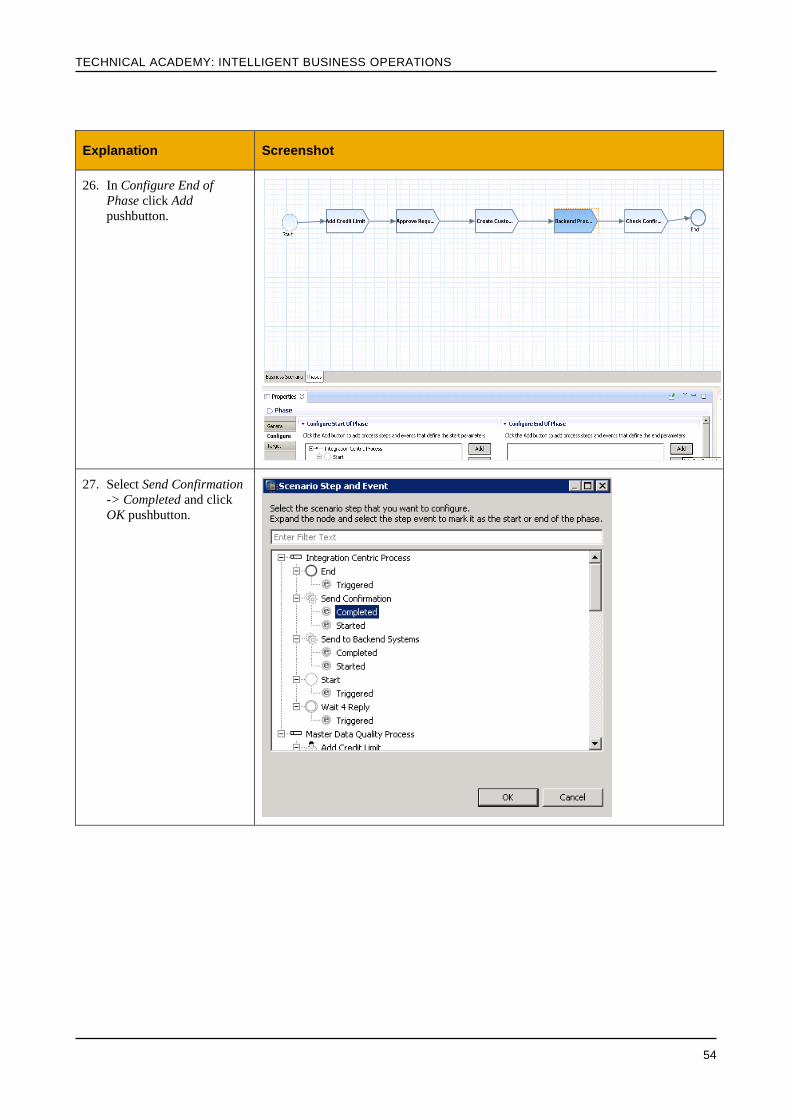
26. In Configure End of
Phase click Add
pushbutton.
27. Select Send Confirmation
-> Completed and click
OK pushbutton.

TECHNICAL ACADEMY: INTELLIGENT BUSINESS OPERATIONS
55
Explanation Screenshot
28. Open the Target tab and
set Constant Target Value
to 1 Day.
29. Now select the measure
Cycle Time and change
the Constant Target Value
to 5 days.
This will be the target
time for each process
instance to complete all 5
phases of the scenario.
30. Click the Save
pushbutton in the upper
left corner to save your
work.

TECHNICAL ACADEMY: INTELLIGENT BUSINESS OPERATIONS
56
Explanation Screenshot
31. Right click on your
Business Scenario in the
tree structure and select
Validate.
32. Confirm the upcoming
dialog and click Yes
pushbutton.

TECHNICAL ACADEMY: INTELLIGENT BUSINESS OPERATIONS
57
Explanation Screenshot
33. Right click on your
Business Scenario in the
tree structure again and
select Generate.
16. Select C73 as the source
system schema and click
Finish pushbutton.
This is the event table
where BPM events are
extracted periodically by
SLT.
If you run a BPM on
HANA environment the
event replication is not
required and you will be
providing the BPM
schema directly.
34. You can see the status of
the generation in the job
log.

TECHNICAL ACADEMY: INTELLIGENT BUSINESS OPERATIONS
58
Explanation Screenshot
35. Open Chrome browser
and enter this URL:
<Hanaservername>:8000
/sap/opi/pv/workspace
Log on with these
credentials:
User Name: OPINTUSER
Password: Abcd1234
Then click Login.
36. Select MDQP scenario in
space.me
Now you can see the
regenerated scenario with
an additional phase.

© 2013 SAP AG or an SAP affiliate company. All rights reserved.
No part of this publication may be reproduced or transmitted in any
form or for any purpose without the express permission of SAP AG.
The information contained herein may be changed without prior notice.
Some software products marketed by SAP AG and its distributors contain
proprietary software components of other software vendors. National product
specifications may vary.
These materials are provided by SAP AG and its affiliated companies (“SAP
Group”) for informational purposes only, without representation or warranty of
any kind, and SAP Group shall not be liable for errors or omissions with
respect to the materials. The only warranties for SAP Group products and
services are those that are set forth in the express warranty statements
accompanying such products and services, if any. Nothing herein should be
construed as constituting an additional warranty.
SAP and other SAP products and services mentioned herein as well as their
respective logos are trademarks or registered trademarks of SAP AG in
Germany and other countries.
Please see
http://www.sap.com/corporate-en/legal/copyright/index.epx#trademark
for additional trademark information and notices.
www.sap.com