Embed Size (px)
Citation preview
Version 3 02_2021
TAG Kit for ChIPmentation
USER GUIDE
Cat. No. C01011030 (24 rxns)
Please read this manual carefully before starting your experiment

3
ContentsIntroduction 4
Kit method overview & time table 5
Kit materials 6
Required materials not provided 7
Remarks before starting 8
Protocol 11
ChIP-seq data analysis recommendations 21
Example of results 23
Additional protocols
Protocol for manual size selection 25
Protocol for size selection on the IP-Star Compact 27
FAQs 30
Related products 33
4 TAG KIT FOR CHIPMENTATION MANUAL
IntroductionChromatin Immunoprecipitation (ChIP) is a powerful technique to analyze the association of proteins with specific genomic regions in intact cells, by using a specific antibody that targets the protein of interest. In addition, Next-Generation Sequencing (NGS) makes it possible to analyze DNA-protein interactions at a genome-wide level.
In traditional ChIP-seq library preparation, the ligation of adaptors is performed after chromatin immunoprecipitation and prior to library preparation. This process requires three additional steps that include the adaptor ligation that may introduce artifacts and the need for greater hands-on time.
The Diagenode ChIPmentation technology solves this problem. ChIPmentation is based on tagmentation which enables the integration of the library preparation during the ChIP itself using transposase and sequencing-compatible adaptors. Unlike standard library preparation techniques that require multi-step ligation, ChIPmentation incorporates a much easier and shorter protocol.
Diagenode’s new TAG Kit for ChIPmentation in combination with the set of indexes (24 SI for ChIPmentation, Cat. No. C01011031 or 24 UDI for tagmented libraries, Cat. No. C01011034) contains all reagents needed for library preparation using a transposase. This kit can be combined with any ChIP protocol based on magnetic beads prior to library preparation for NGS.
Benefits of the ChIPmentation system for optimal ChIP-seq
• Ensure high quality data • Save one full day from standard protocols in generating ChIP-seq
libraries• Benefit from the elimination of sequencing adaptor dimers• Enjoy an easier protocol for library prep• Automate on the IP-Star to support standardization and
reproducibility ChIPmentation was developped in collaboration with CeMM in Vienna.

5
Kit method overview & time table
Cell collection and DNA-protein cross-linking
Magnetic immunoprecipitation
Tagmentation: one step adaptor insertion into chromatin
Cell lysis and chromatin shearing
ChIPmentation
Clean-up
Quality control
Sequencing
Library amplification
Stripping, end-repairand reverse cross-linking
Universal Primer
Primer Index
Tagmentation Enzyme loaded with adaptors
Magnet
Magnetic bead
Antibody
DNA
Other protein
Protein of interest
LIB
RA
RY
PR
OC
ESSI
NG
CH
RO
MAT
IN P
REP
AR
ATIO
N
STEP2
STEP3
STEP4
STEP5
TAG
MEN
TATI
ON
IPTime
CU
STO
MER
CH
IP P
RO
TOC
OL
TAG
KIT
FO
R C
HIP
MEN
TATI
ON
+ 2
4 SI
FO
R C
HIP
MEN
TATI
ON
STEP1
1 hour
1 hour
2,5 hours
45 minutes
1,5 hours
6 TAG KIT FOR CHIPMENTATION MANUAL
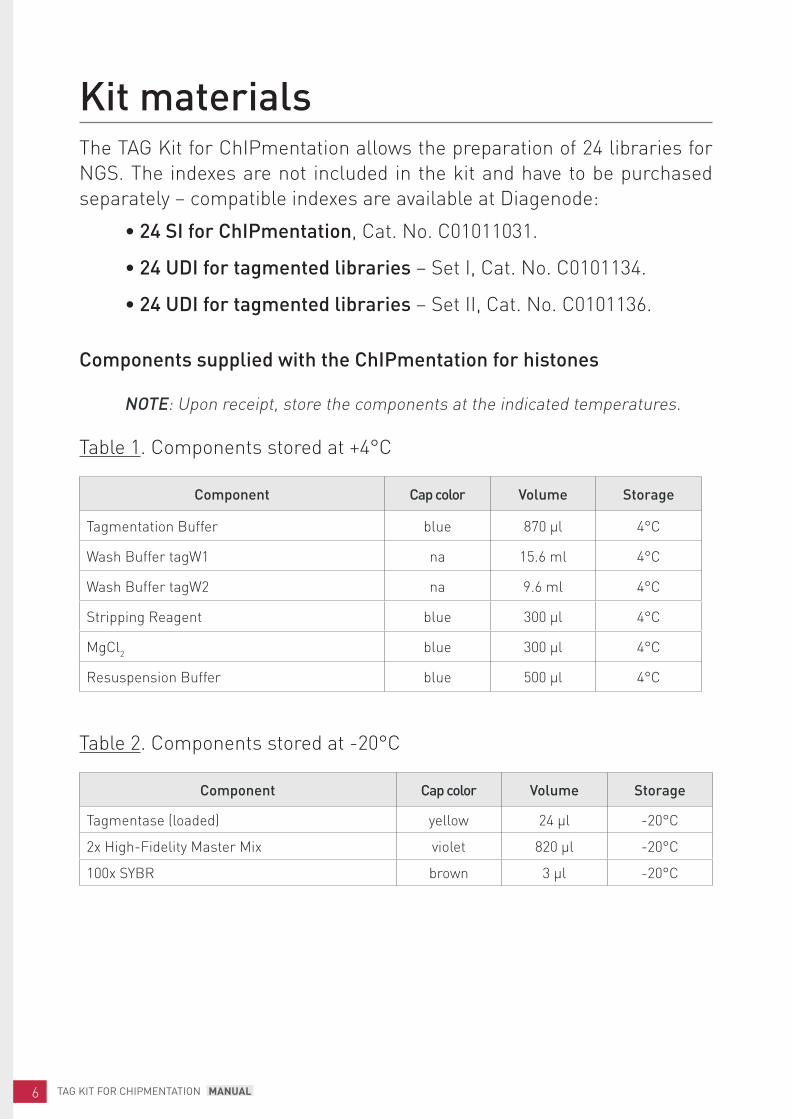
Kit materialsThe TAG Kit for ChIPmentation allows the preparation of 24 libraries for NGS. The indexes are not included in the kit and have to be purchased separately – compatible indexes are available at Diagenode:
• 24 SI for ChIPmentation, Cat. No. C01011031.
• 24 UDI for tagmented libraries – Set I, Cat. No. C0101134.
• 24 UDI for tagmented libraries – Set II, Cat. No. C0101136.
Components supplied with the ChIPmentation for histones
NOTE: Upon receipt, store the components at the indicated temperatures.
Table 1. Components stored at +4°C
Component Cap color Volume Storage
Tagmentation Buffer blue 870 µl 4°C
Wash Buffer tagW1 na 15.6 ml 4°C
Wash Buffer tagW2 na 9.6 ml 4°C
Stripping Reagent blue 300 µl 4°C
MgCl2 blue 300 µl 4°C
Resuspension Buffer blue 500 µl 4°C
Table 2. Components stored at -20°C
Component Cap color Volume Storage
Tagmentase (loaded) yellow 24 µl -20°C
2x High-Fidelity Master Mix violet 820 µl -20°C
100x SYBR brown 3 µl -20°C
7
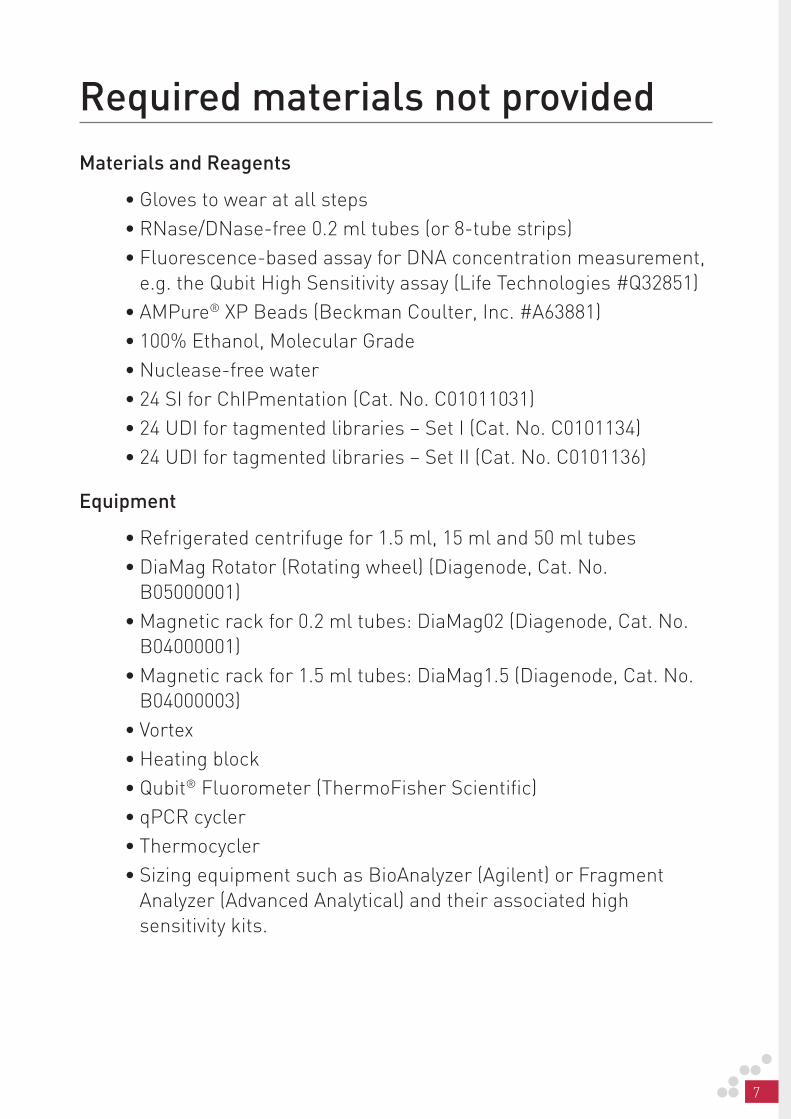
Required materials not providedMaterials and Reagents
• Gloves to wear at all steps• RNase/DNase-free 0.2 ml tubes (or 8-tube strips)• Fluorescence-based assay for DNA concentration measurement,
e.g. the Qubit High Sensitivity assay (Life Technologies #Q32851)• AMPure® XP Beads (Beckman Coulter, Inc. #A63881)• 100% Ethanol, Molecular Grade• Nuclease-free water• 24 SI for ChIPmentation (Cat. No. C01011031)• 24 UDI for tagmented libraries – Set I (Cat. No. C0101134)• 24 UDI for tagmented libraries – Set II (Cat. No. C0101136)
Equipment
• Refrigerated centrifuge for 1.5 ml, 15 ml and 50 ml tubes• DiaMag Rotator (Rotating wheel) (Diagenode, Cat. No.
B05000001)• Magnetic rack for 0.2 ml tubes: DiaMag02 (Diagenode, Cat. No.
B04000001)• Magnetic rack for 1.5 ml tubes: DiaMag1.5 (Diagenode, Cat. No.
B04000003)• Vortex• Heating block • Qubit® Fluorometer (ThermoFisher Scientific)• qPCR cycler• Thermocycler• Sizing equipment such as BioAnalyzer (Agilent) or Fragment
Analyzer (Advanced Analytical) and their associated high sensitivity kits.
8 TAG KIT FOR CHIPMENTATION MANUAL
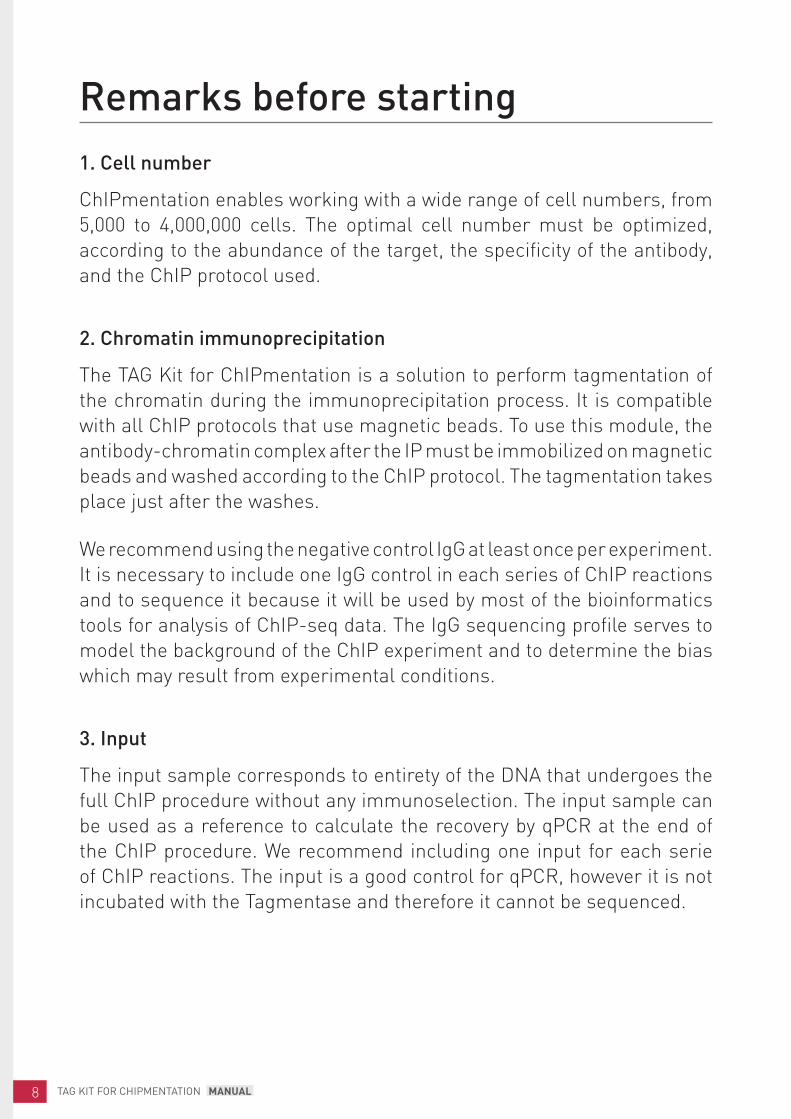
Remarks before starting1. Cell number
ChIPmentation enables working with a wide range of cell numbers, from 5,000 to 4,000,000 cells. The optimal cell number must be optimized, according to the abundance of the target, the specificity of the antibody, and the ChIP protocol used.
2. Chromatin immunoprecipitation
The TAG Kit for ChIPmentation is a solution to perform tagmentation of the chromatin during the immunoprecipitation process. It is compatible with all ChIP protocols that use magnetic beads. To use this module, the antibody-chromatin complex after the IP must be immobilized on magnetic beads and washed according to the ChIP protocol. The tagmentation takes place just after the washes.
We recommend using the negative control IgG at least once per experiment. It is necessary to include one IgG control in each series of ChIP reactions and to sequence it because it will be used by most of the bioinformatics tools for analysis of ChIP-seq data. The IgG sequencing profile serves to model the background of the ChIP experiment and to determine the bias which may result from experimental conditions.
3. Input
The input sample corresponds to entirety of the DNA that undergoes the full ChIP procedure without any immunoselection. The input sample can be used as a reference to calculate the recovery by qPCR at the end of the ChIP procedure. We recommend including one input for each serie of ChIP reactions. The input is a good control for qPCR, however it is not incubated with the Tagmentase and therefore it cannot be sequenced.
9
4. Tagmentation time
The optimal tagmentation time can vary between 1 and 30 minutes depending on several factors like the abundance of the target, the cell number and the affinity of the antibody for the target. The recommended 10 minutes have been validated on multiple histone marks and cell numbers, and therefore it should be suitable for a large range of conditions. Nevertheless if the Ct values obtained at step 3.5 are too high, resulting in a needed number of amplification cycles superior to 17, the tagmentation time may be increased in order to improve the library preparation efficiency. On the other hand, if the percentage of recovery after the immunoprecipitation is not satisfying, the tagmentation time may be decreased in order to increase signal-to-noise ratio.
5. Quantification
After ChIPmentation, determine the concentration of the libraries with a highly sensitive method such as the dsDNA HS Assay Kit on the Qubit® system from ThermoFisher Scientific. PicoGreen® is also suitable but UV spectrophotometric methods such as the NanoDrop are usually not sufficiently sensitive.
There are several approaches available for library quantification including real-time PCR, UV absorption, fluorescence detection, or sizing and quantification using the Agilent Bioanalyzer or Fragment Analyzer (Advanced Analytical). It is important to understand the benefits and limitations of each approach.
Real-time PCR-based approaches such as the KAPA Library Quantification Kit from Kapa Biosystems) quantify the library molecules that carry the Illumina adapter sequences on both ends and, therefore reflect the quantity of the clustering competent library molecules. This approach assumes a relatively uniform size of sheared or fragmented starting gDNA inserts used for library construction. Quantification by PCR can be done on unpurified libraries.
The Agilent Bioanalyzer system or Fragment Analyzer (Advanced Analytical) provide sizing and quantification information about the library analysed, but not about the clustering competency. Quantification can be done both on unpurified or purified samples. In a case of unpurified samples, a region corresponding to libraries should be limited in order to discriminate between primers/adaptors and a library itself.
10 TAG KIT FOR CHIPMENTATION MANUAL
UV absorption/fluorescence detection-based methods (i.e., Nanodrop® (Thermo Scientific), Qubit®2.0 Fluorometer (Life Technologies), or Quant- iT™ PicoGreen® dsDNA Assay Kit (Life Technologies) simply quantify total nucleic acid concentration. These methods do not discriminate adapter presence and offer no information about the size of the library molecules. They can be used only on purified libraries. We recommend fluorescence-based assays than spectrophotometric measurements (e.g. NanoDrop) due to higher specificity and sensitivity.
STEP 1 - Tagmentation 12
STEP 2 - Stripping, end repair, reverse crosslinking 14
STEP 3 A - Library amplification 15
STEP 3 B - Library amplification with UDIs 17
STEP 4 - Clean-up 19
STEP 5 - Quality control 20
PR
OT
OC
OL
12 TAG KIT FOR CHIPMENTATION MANUAL
STEP 1Tagmentation
Day 1 1 hour
1.1 Perform ChIP with a protocol using magnetic beads, such as Diagenode iDeal ChIP-seq kits, in 1.5 ml tubes.
NOTE: To use the TAG Kit for ChIPmentation, the antibody-chromatin complex after the IP must be immobilized on magnetic beads and washed according to the ChIP protocol. The tagmentation takes place just after the washes.
1.2 After removing the last wash buffer, add 350 µl of Wash Buffer tagW1 to the beads; gently shake the tubes to resuspend the beads and incubate for 5 minutes on the DiaMag Rotator at 4°C.
1.3 Remove the supernatant and add 150 µl of Wash Buffer tagW1 to the beads. Resuspend the beads pellet and transfer to a new 0.2 ml tube.
1.4 Prepare the ChIPmentation mix as described in the table below for the desired number of reactions. Mix thoroughly with a pipette. Keep on ice until used.
ChIPmentation mix Volume per reaction
Tagmentation Buffer (blue cap) 29 µl
Tagmentase (loaded) (yellow cap) 1 µl
1.5 Put the tubes from step 3.3 on the DiaMag02. Wait until supernatant is clear and discard the supernatant.
1.6 Add 30 µl of ChIPmentation mix to each tube and gently resuspend the beads by pipetting.
1.7 Incubate for 10 minutes at 37°C in the pre-heated thermocycler. After 5 minutes of incubation, briefly mix the tubes to resuspend the beads.
NOTE: The recommended tagmentation time is 10 minutes, but the optimal time can vary depending on the cell number and the antibody used. See “Remarks before starting” section for more details.
13
PR
OTO
CO
L
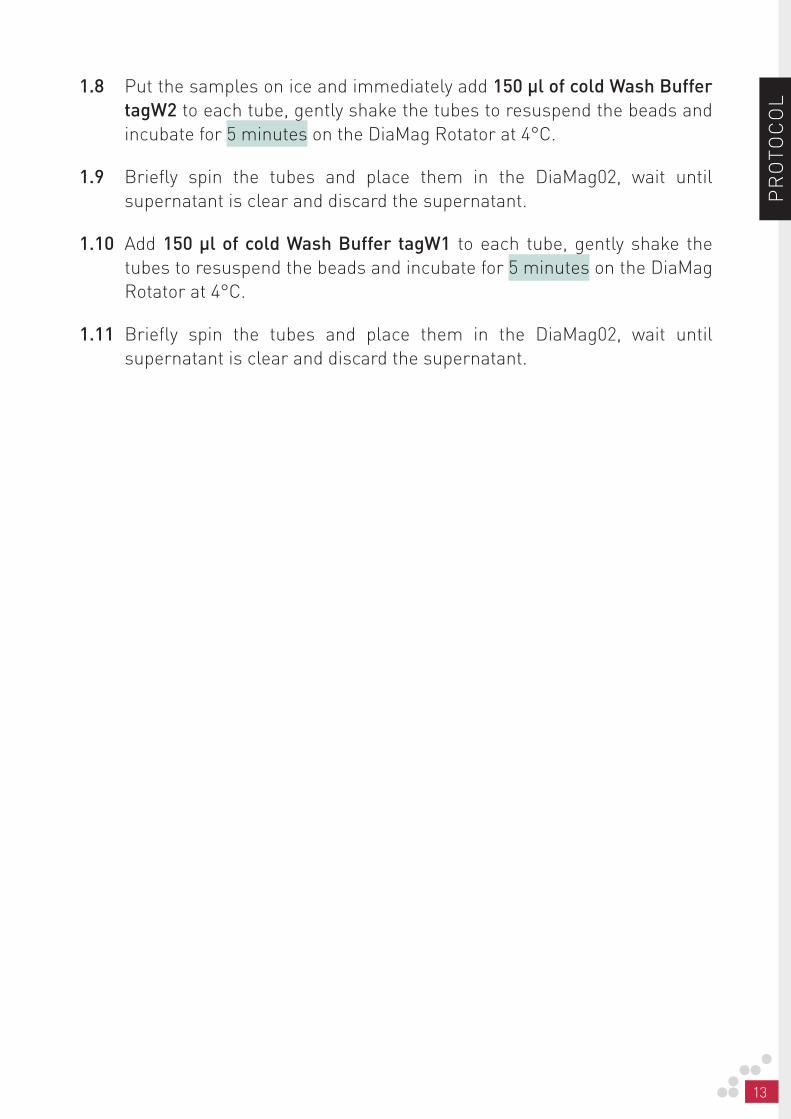
1.8 Put the samples on ice and immediately add 150 µl of cold Wash Buffer tagW2 to each tube, gently shake the tubes to resuspend the beads and incubate for 5 minutes on the DiaMag Rotator at 4°C.
1.9 Briefly spin the tubes and place them in the DiaMag02, wait until supernatant is clear and discard the supernatant.
1.10 Add 150 µl of cold Wash Buffer tagW1 to each tube, gently shake the tubes to resuspend the beads and incubate for 5 minutes on the DiaMag Rotator at 4°C.
1.11 Briefly spin the tubes and place them in the DiaMag02, wait until supernatant is clear and discard the supernatant.
14 TAG KIT FOR CHIPMENTATION MANUAL
STEP 2Stripping, end repair, reverse cross-linking
Day 1 1 hour
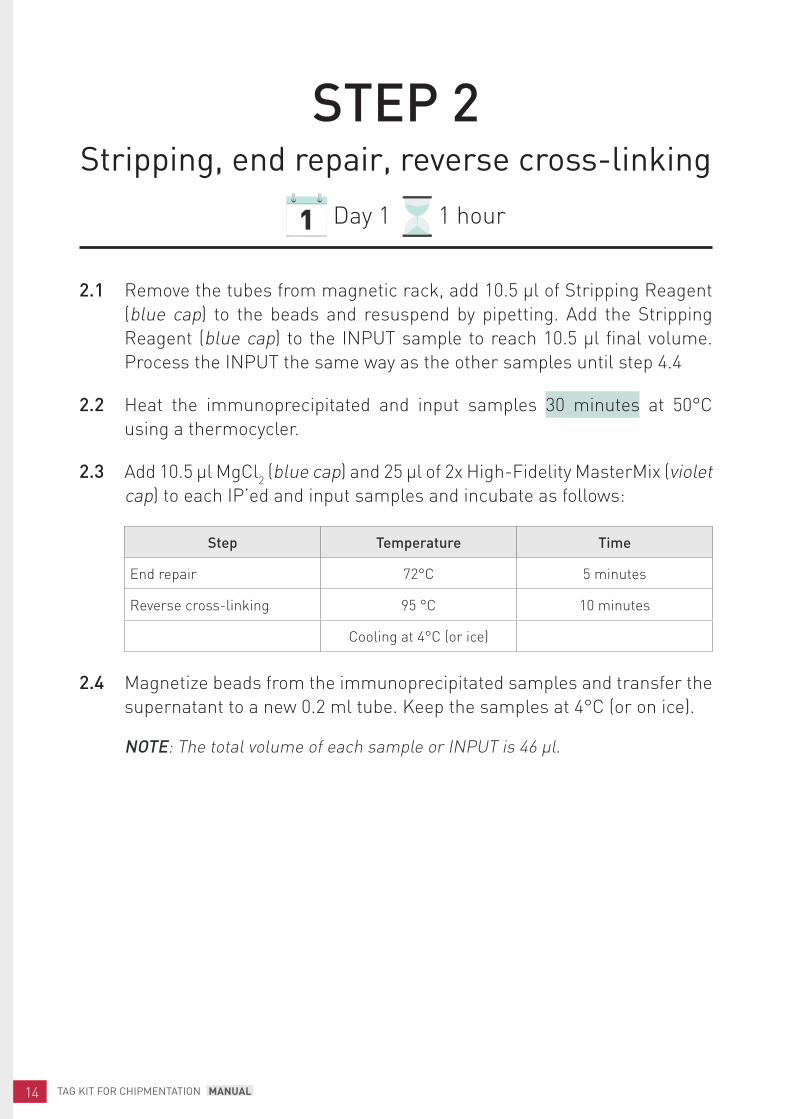
2.1 Remove the tubes from magnetic rack, add 10.5 µl of Stripping Reagent (blue cap) to the beads and resuspend by pipetting. Add the Stripping Reagent (blue cap) to the INPUT sample to reach 10.5 µl final volume. Process the INPUT the same way as the other samples until step 4.4
2.2 Heat the immunoprecipitated and input samples 30 minutes at 50°C using a thermocycler.
2.3 Add 10.5 µl MgCl2 (blue cap) and 25 µl of 2x High-Fidelity MasterMix (violet cap) to each IP’ed and input samples and incubate as follows:
Step Temperature Time
End repair 72°C 5 minutes
Reverse cross-linking 95 °C 10 minutes
Cooling at 4°C (or ice)
2.4 Magnetize beads from the immunoprecipitated samples and transfer the supernatant to a new 0.2 ml tube. Keep the samples at 4°C (or on ice).
NOTE: The total volume of each sample or INPUT is 46 µl.
15
PR
OTO
CO
LSTEP 3 ALibrary amplification
Day 1 2.5 hours
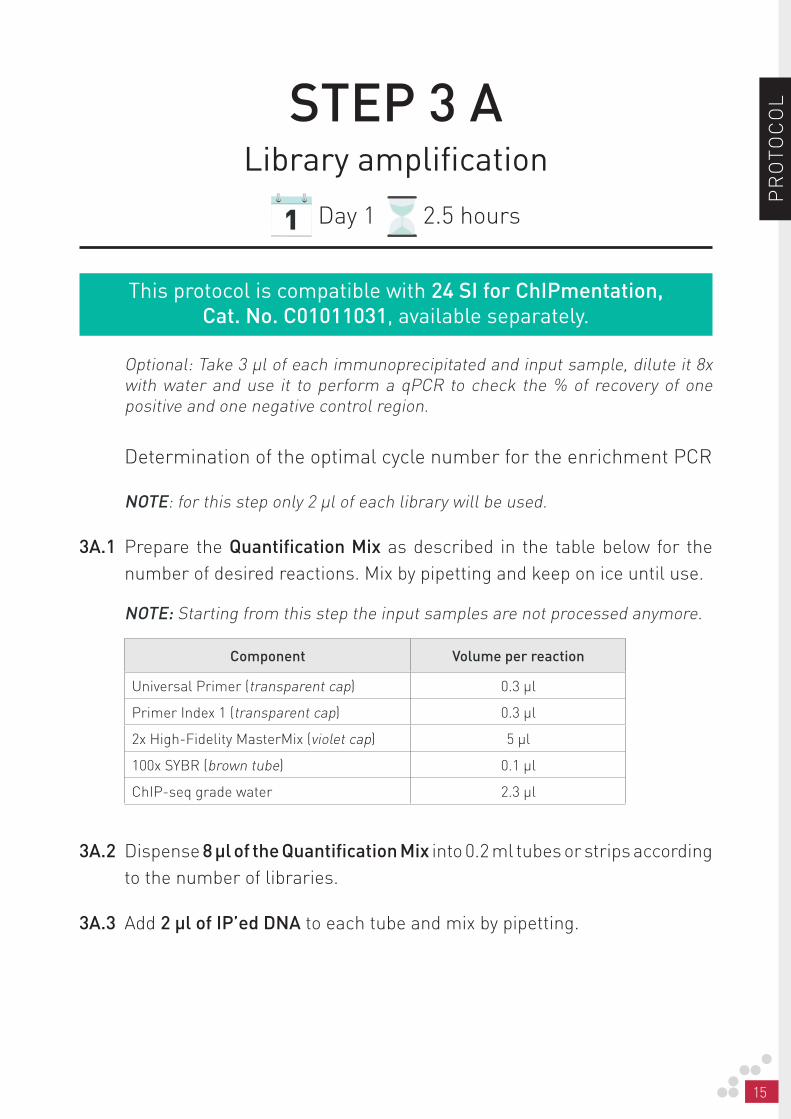
This protocol is compatible with 24 SI for ChIPmentation, Cat. No. C01011031, available separately.
Optional: Take 3 µl of each immunoprecipitated and input sample, dilute it 8x with water and use it to perform a qPCR to check the % of recovery of one positive and one negative control region.
Determination of the optimal cycle number for the enrichment PCR
NOTE: for this step only 2 µl of each library will be used.
3A.1 Prepare the Quantification Mix as described in the table below for the number of desired reactions. Mix by pipetting and keep on ice until use.
NOTE: Starting from this step the input samples are not processed anymore.
Component Volume per reaction
Universal Primer (transparent cap) 0.3 µl
Primer Index 1 (transparent cap) 0.3 µl
2x High-Fidelity MasterMix (violet cap) 5 µl
100x SYBR (brown tube) 0.1 µl
ChIP-seq grade water 2.3 µl
3A.2 Dispense 8 µl of the Quantification Mix into 0.2 ml tubes or strips according to the number of libraries.
3A.3 Add 2 µl of IP’ed DNA to each tube and mix by pipetting.
16 TAG KIT FOR CHIPMENTATION MANUAL
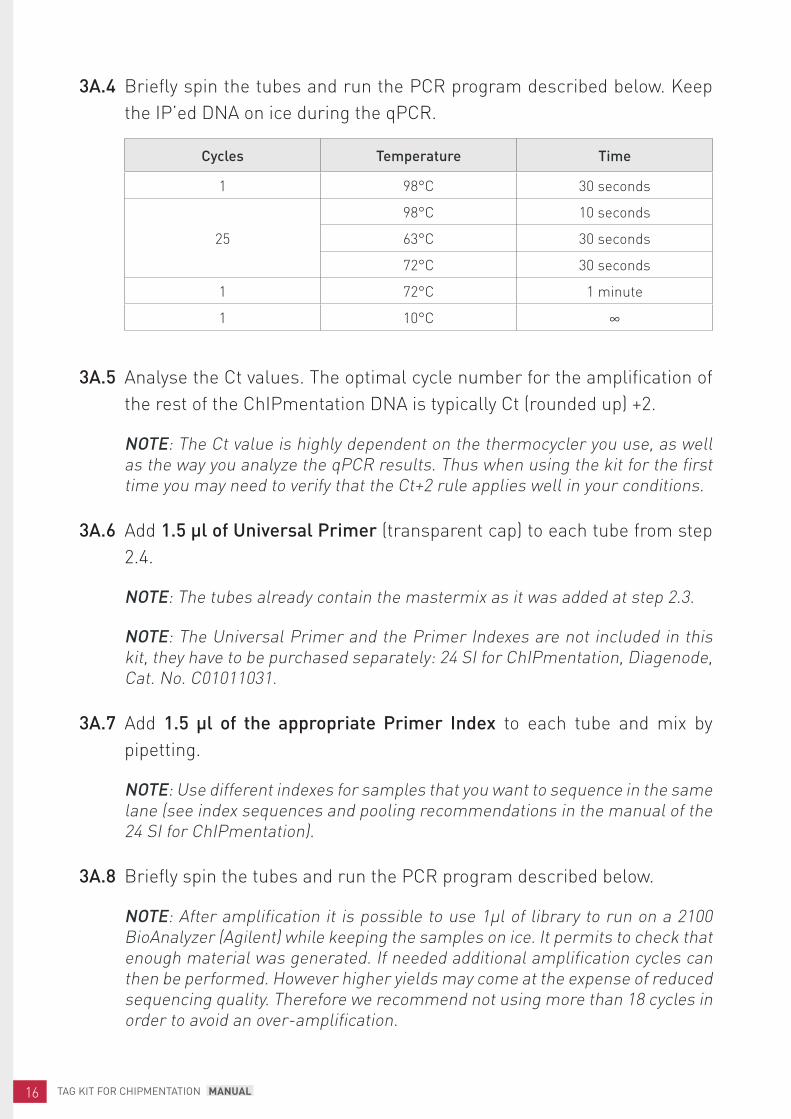
3A.4 Briefly spin the tubes and run the PCR program described below. Keep the IP’ed DNA on ice during the qPCR.
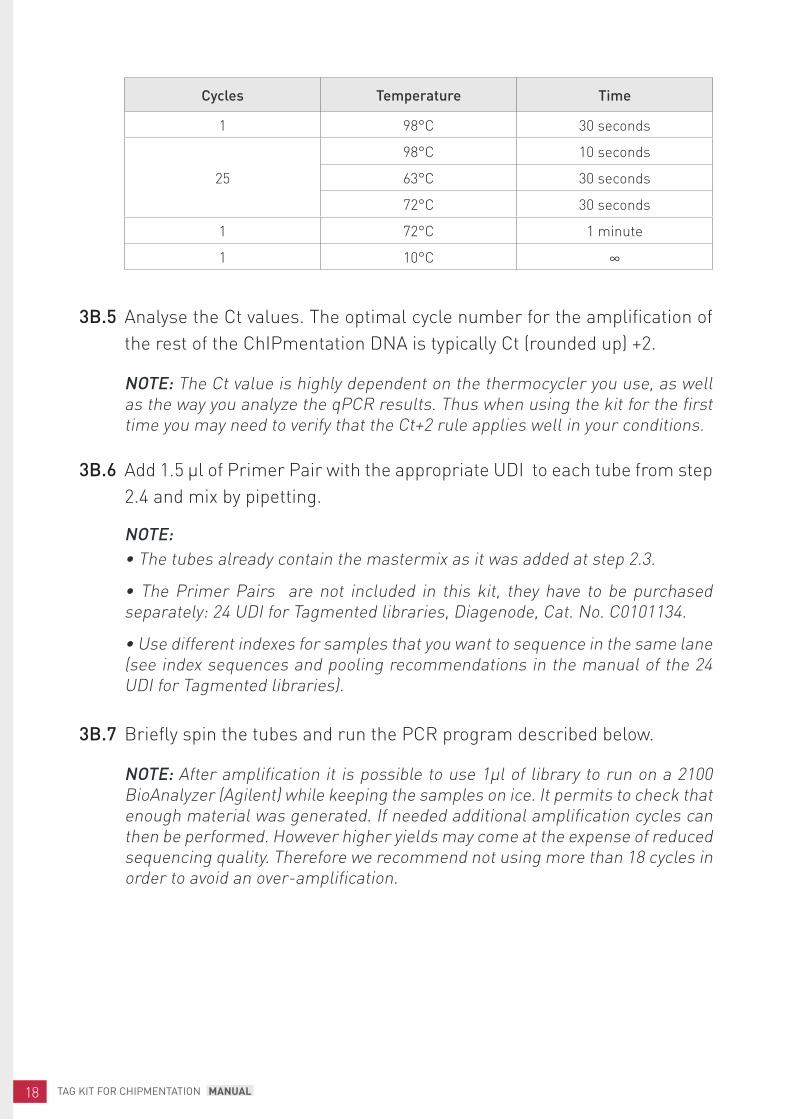
Cycles Temperature Time
1 98°C 30 seconds
25
98°C 10 seconds
63°C 30 seconds
72°C 30 seconds
1 72°C 1 minute
1 10°C ∞
3A.5 Analyse the Ct values. The optimal cycle number for the amplification of the rest of the ChIPmentation DNA is typically Ct (rounded up) +2.
NOTE: The Ct value is highly dependent on the thermocycler you use, as well as the way you analyze the qPCR results. Thus when using the kit for the first time you may need to verify that the Ct+2 rule applies well in your conditions.
3A.6 Add 1.5 µl of Universal Primer (transparent cap) to each tube from step 2.4.
NOTE: The tubes already contain the mastermix as it was added at step 2.3.
NOTE: The Universal Primer and the Primer Indexes are not included in this kit, they have to be purchased separately: 24 SI for ChIPmentation, Diagenode, Cat. No. C01011031.
3A.7 Add 1.5 µl of the appropriate Primer Index to each tube and mix by pipetting.
NOTE: Use different indexes for samples that you want to sequence in the same lane (see index sequences and pooling recommendations in the manual of the 24 SI for ChIPmentation).
3A.8 Briefly spin the tubes and run the PCR program described below.
NOTE: After amplification it is possible to use 1µl of library to run on a 2100 BioAnalyzer (Agilent) while keeping the samples on ice. It permits to check that enough material was generated. If needed additional amplification cycles can then be performed. However higher yields may come at the expense of reduced sequencing quality. Therefore we recommend not using more than 18 cycles in order to avoid an over-amplification.

17
PR
OTO
CO
LSTEP 3 BLibrary amplification with UDIs
Day 2.5 hours
This protocol is compatible with 24 UDI for tagmented libraries, Cat. No. C01011034 and C0101136, available separately.
Optional: Take 3 µl of each immunoprecipitated and input sample, dilute it 8x with water and use it to perform a qPCR to check the % of recovery of one positive and one negative control region.
Determination of the optimal cycle number for the enrichment PCR
NOTE: for this step only 2 µl of each library will be used.
3B.1 Prepare the Quantification Mix as described in the table below for the number of desired reactions. Mix by pipetting and keep on ice until use.
NOTE: Starting from this step the input samples are not processed anymore.
Component Volume per reaction
Primer pair UDI 1 (transparent cap) 0.3 µl
2x High-Fidelity MasterMix (violet cap) 5 µl
100x SYBR (brown tube) 0.1 µl
ChIP-seq grade water 2.6 µl
3B.2 Dispense 8 µl of the Quantification Mix into 0.2 ml tubes or strips according to the number of libraries.
3B.3 Add 2 µl of IP’ed DNA to each tube and mix by pipetting.
3B.4 Briefly spin the tubes and run the PCR program described below. Keep the IP’ed DNA on ice during the qPCR.
18 TAG KIT FOR CHIPMENTATION MANUAL
Cycles Temperature Time
1 98°C 30 seconds
25
98°C 10 seconds
63°C 30 seconds
72°C 30 seconds
1 72°C 1 minute
1 10°C ∞
3B.5 Analyse the Ct values. The optimal cycle number for the amplification of the rest of the ChIPmentation DNA is typically Ct (rounded up) +2.
NOTE: The Ct value is highly dependent on the thermocycler you use, as well as the way you analyze the qPCR results. Thus when using the kit for the first time you may need to verify that the Ct+2 rule applies well in your conditions.
3B.6 Add 1.5 µl of Primer Pair with the appropriate UDI to each tube from step 2.4 and mix by pipetting.
NOTE:• The tubes already contain the mastermix as it was added at step 2.3.
• The Primer Pairs are not included in this kit, they have to be purchased separately: 24 UDI for Tagmented libraries, Diagenode, Cat. No. C0101134.
• Use different indexes for samples that you want to sequence in the same lane (see index sequences and pooling recommendations in the manual of the 24 UDI for Tagmented libraries).
3B.7 Briefly spin the tubes and run the PCR program described below.
NOTE: After amplification it is possible to use 1µl of library to run on a 2100 BioAnalyzer (Agilent) while keeping the samples on ice. It permits to check that enough material was generated. If needed additional amplification cycles can then be performed. However higher yields may come at the expense of reduced sequencing quality. Therefore we recommend not using more than 18 cycles in order to avoid an over-amplification.
19
PR
OTO
CO
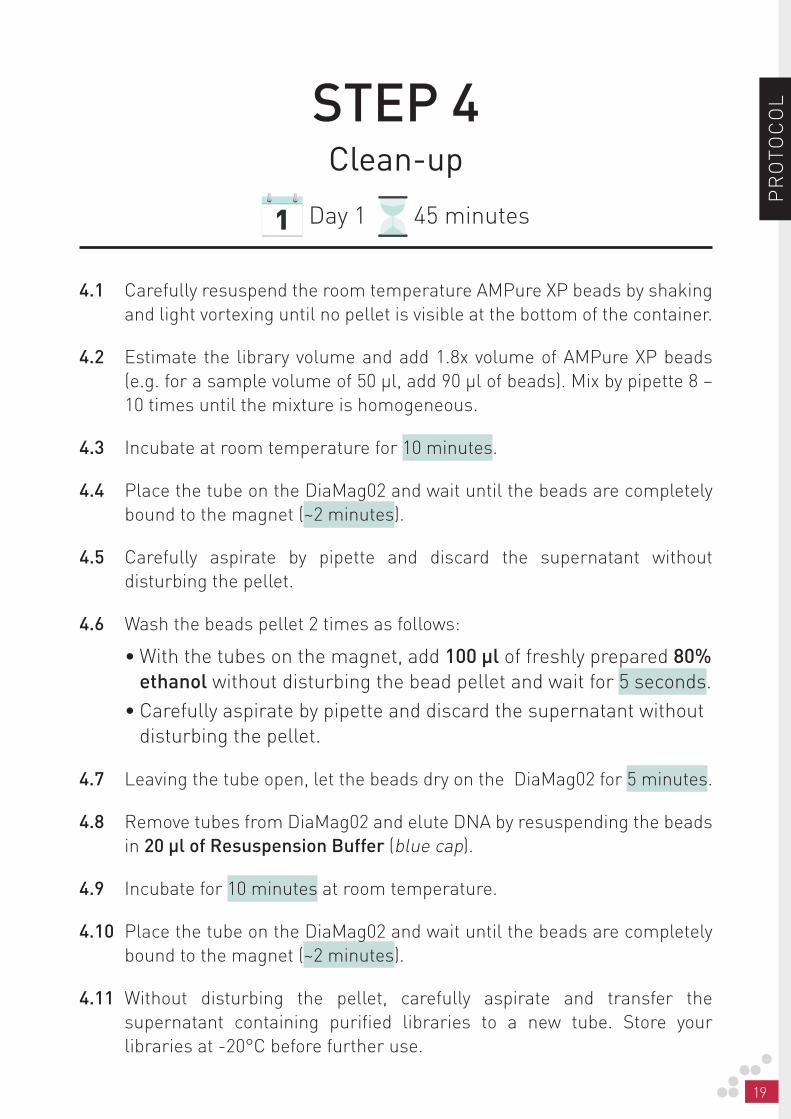
LSTEP 4Clean-up
Day 1 45 minutes
4.1 Carefully resuspend the room temperature AMPure XP beads by shaking and light vortexing until no pellet is visible at the bottom of the container.
4.2 Estimate the library volume and add 1.8x volume of AMPure XP beads (e.g. for a sample volume of 50 µl, add 90 µl of beads). Mix by pipette 8 – 10 times until the mixture is homogeneous.
4.3 Incubate at room temperature for 10 minutes.
4.4 Place the tube on the DiaMag02 and wait until the beads are completely bound to the magnet (~2 minutes).
4.5 Carefully aspirate by pipette and discard the supernatant without disturbing the pellet.
4.6 Wash the beads pellet 2 times as follows:
• With the tubes on the magnet, add 100 µl of freshly prepared 80% ethanol without disturbing the bead pellet and wait for 5 seconds.
• Carefully aspirate by pipette and discard the supernatant without disturbing the pellet.
4.7 Leaving the tube open, let the beads dry on the DiaMag02 for 5 minutes.
4.8 Remove tubes from DiaMag02 and elute DNA by resuspending the beads in 20 µl of Resuspension Buffer (blue cap).
4.9 Incubate for 10 minutes at room temperature.
4.10 Place the tube on the DiaMag02 and wait until the beads are completely bound to the magnet (~2 minutes).
4.11 Without disturbing the pellet, carefully aspirate and transfer the supernatant containing purified libraries to a new tube. Store your libraries at -20°C before further use.
20 TAG KIT FOR CHIPMENTATION MANUAL
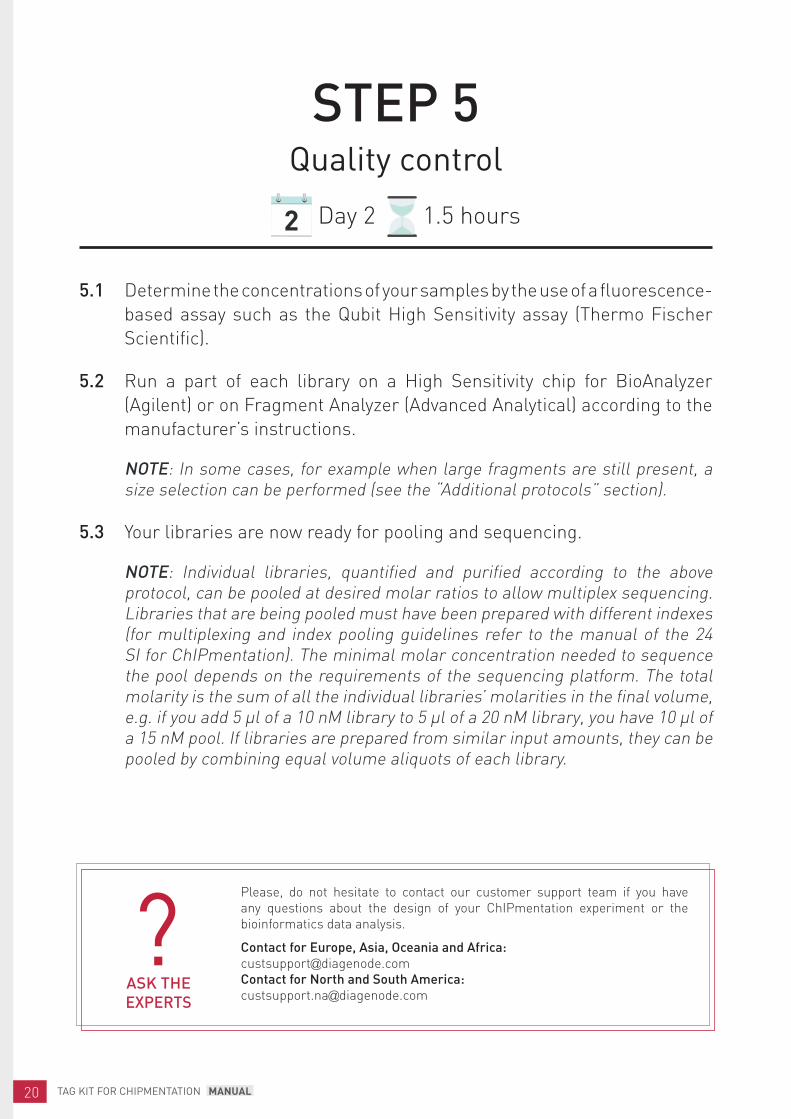
STEP 5Quality control
Day 2 1.5 hours
5.1 Determine the concentrations of your samples by the use of a fluorescence-based assay such as the Qubit High Sensitivity assay (Thermo Fischer Scientific).
5.2 Run a part of each library on a High Sensitivity chip for BioAnalyzer (Agilent) or on Fragment Analyzer (Advanced Analytical) according to the manufacturer’s instructions.
NOTE: In some cases, for example when large fragments are still present, a size selection can be performed (see the “Additional protocols” section).
5.3 Your libraries are now ready for pooling and sequencing.
NOTE: Individual libraries, quantified and purified according to the above protocol, can be pooled at desired molar ratios to allow multiplex sequencing. Libraries that are being pooled must have been prepared with different indexes (for multiplexing and index pooling guidelines refer to the manual of the 24 SI for ChIPmentation). The minimal molar concentration needed to sequence the pool depends on the requirements of the sequencing platform. The total molarity is the sum of all the individual libraries’ molarities in the final volume, e.g. if you add 5 µl of a 10 nM library to 5 µl of a 20 nM library, you have 10 µl of a 15 nM pool. If libraries are prepared from similar input amounts, they can be pooled by combining equal volume aliquots of each library.
Please, do not hesitate to contact our customer support team if you have any questions about the design of your ChIPmentation experiment or the bioinformatics data analysis.
Contact for Europe, Asia, Oceania and Africa: [email protected] for North and South America: [email protected]
ASK THE EXPERTS
21
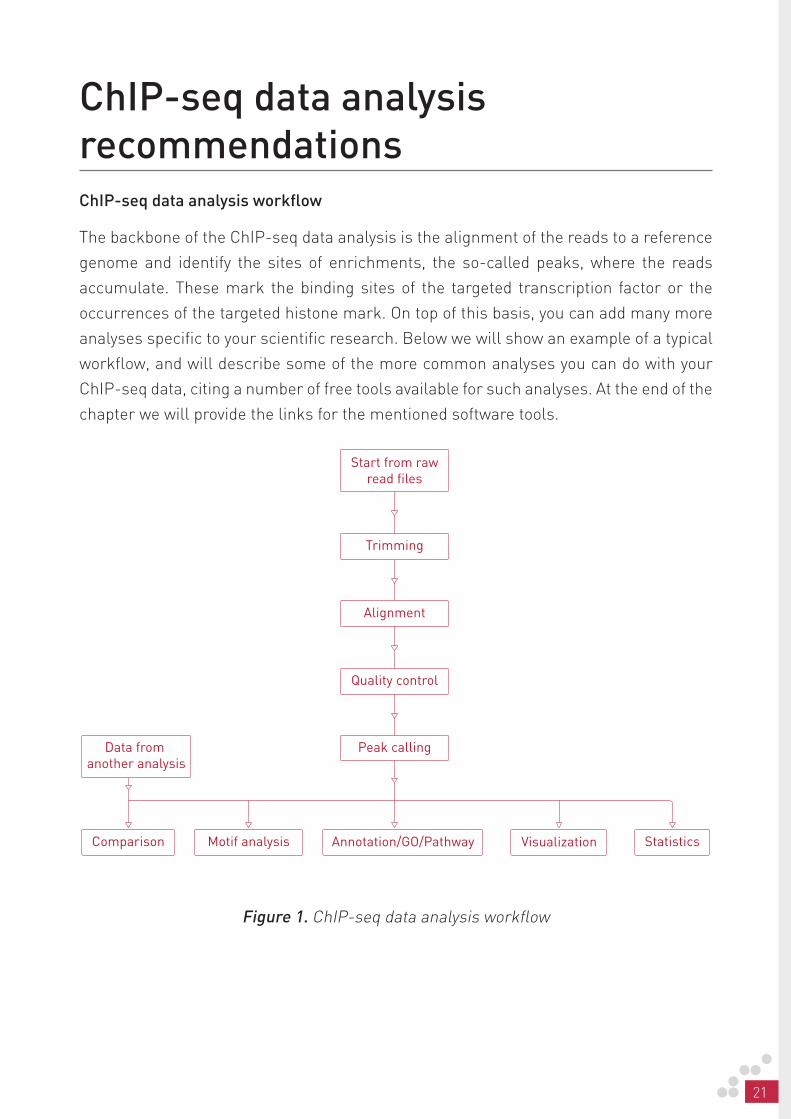
ChIP-seq data analysis recommendationsChIP-seq data analysis workflow
The backbone of the ChIP-seq data analysis is the alignment of the reads to a reference
genome and identify the sites of enrichments, the so-called peaks, where the reads
accumulate. These mark the binding sites of the targeted transcription factor or the
occurrences of the targeted histone mark. On top of this basis, you can add many more
analyses specific to your scientific research. Below we will show an example of a typical
workflow, and will describe some of the more common analyses you can do with your
ChIP-seq data, citing a number of free tools available for such analyses. At the end of the
chapter we will provide the links for the mentioned software tools.
Figure 1. ChIP-seq data analysis workflow
Start from rawread files
Alignment
Data from another analysis
Peak calling
Comparison StatisticsVisualizationMotif analysis Annotation/GO/Pathway
Trimming
Quality control
22 TAG KIT FOR CHIPMENTATION MANUAL
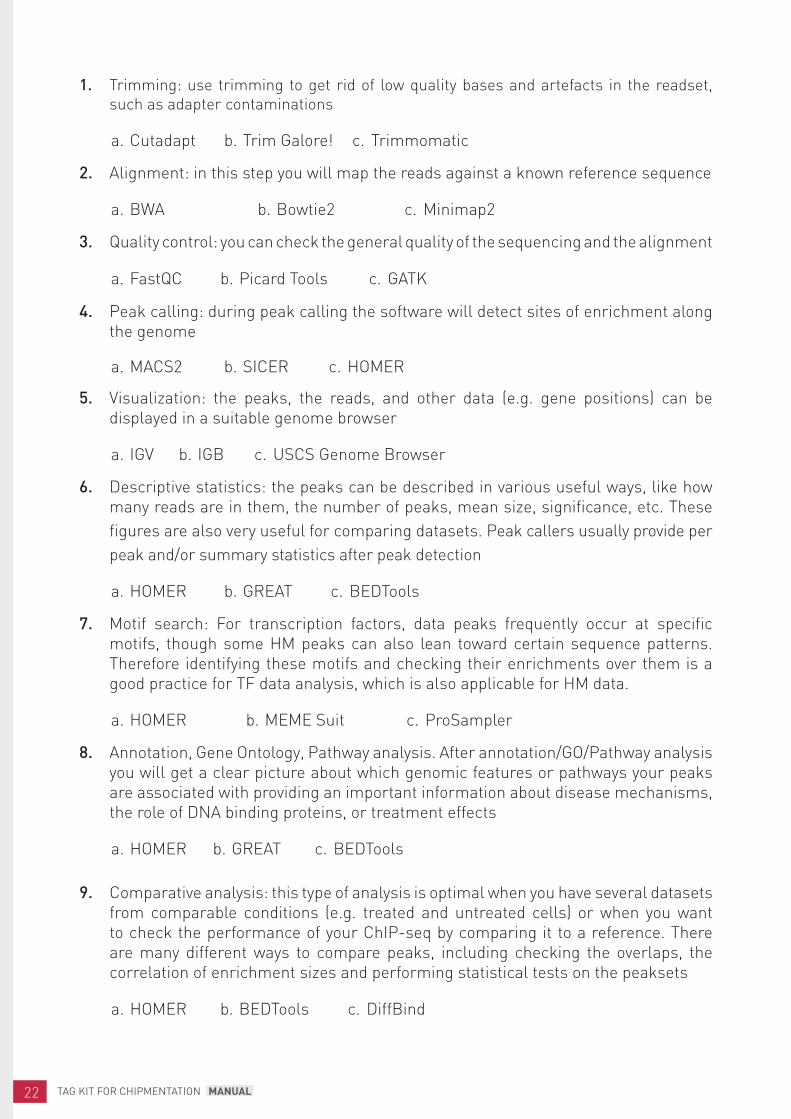
1. Trimming: use trimming to get rid of low quality bases and artefacts in the readset, such as adapter contaminations
a. Cutadapt b. Trim Galore! c. Trimmomatic
2. Alignment: in this step you will map the reads against a known reference sequence
a. BWA b. Bowtie2 c. Minimap2
3. Quality control: you can check the general quality of the sequencing and the alignment
a. FastQC b. Picard Tools c. GATK
4. Peak calling: during peak calling the software will detect sites of enrichment along the genome
a. MACS2 b. SICER c. HOMER
5. Visualization: the peaks, the reads, and other data (e.g. gene positions) can be displayed in a suitable genome browser
a. IGV b. IGB c. USCS Genome Browser
6. Descriptive statistics: the peaks can be described in various useful ways, like how many reads are in them, the number of peaks, mean size, significance, etc. These figures are also very useful for comparing datasets. Peak callers usually provide per peak and/or summary statistics after peak detection
a. HOMER b. GREAT c. BEDTools
7. Motif search: For transcription factors, data peaks frequently occur at specific motifs, though some HM peaks can also lean toward certain sequence patterns. Therefore identifying these motifs and checking their enrichments over them is a good practice for TF data analysis, which is also applicable for HM data.
a. HOMER b. MEME Suit c. ProSampler
8. Annotation, Gene Ontology, Pathway analysis. After annotation/GO/Pathway analysis you will get a clear picture about which genomic features or pathways your peaks are associated with providing an important information about disease mechanisms, the role of DNA binding proteins, or treatment effects
a. HOMER b. GREAT c. BEDTools
9. Comparative analysis: this type of analysis is optimal when you have several datasets from comparable conditions (e.g. treated and untreated cells) or when you want to check the performance of your ChIP-seq by comparing it to a reference. There are many different ways to compare peaks, including checking the overlaps, the correlation of enrichment sizes and performing statistical tests on the peaksets
a. HOMER b. BEDTools c. DiffBind
23
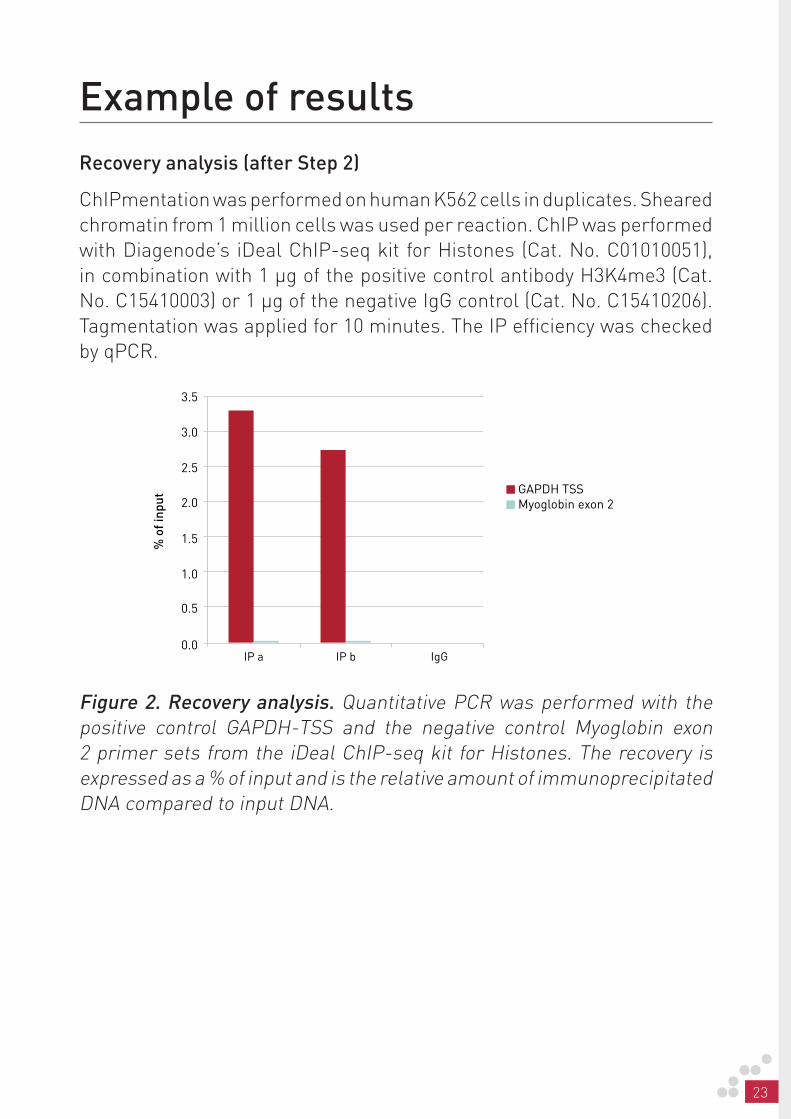
Example of resultsRecovery analysis (after Step 2)
ChIPmentation was performed on human K562 cells in duplicates. Sheared chromatin from 1 million cells was used per reaction. ChIP was performed with Diagenode’s iDeal ChIP-seq kit for Histones (Cat. No. C01010051), in combination with 1 µg of the positive control antibody H3K4me3 (Cat. No. C15410003) or 1 µg of the negative IgG control (Cat. No. C15410206). Tagmentation was applied for 10 minutes. The IP efficiency was checked by qPCR.
Figure 2. Recovery analysis. Quantitative PCR was performed with the positive control GAPDH-TSS and the negative control Myoglobin exon 2 primer sets from the iDeal ChIP-seq kit for Histones. The recovery is expressed as a % of input and is the relative amount of immunoprecipitated DNA compared to input DNA.
3.5
3.0
2.5
2.0
1.5
1.0
0.5
0.0IP a IP b IgG
GAPDH TSSMyoglobin exon 2
24 TAG KIT FOR CHIPMENTATION MANUAL
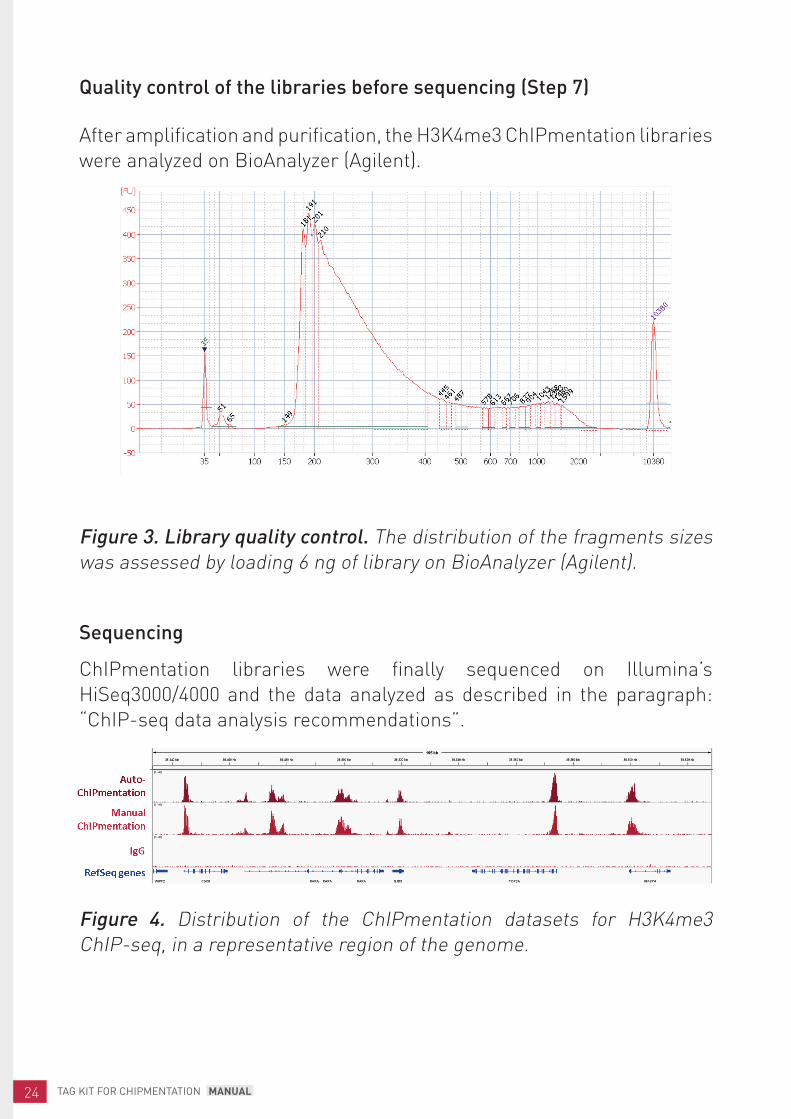
Quality control of the libraries before sequencing (Step 7)
After amplification and purification, the H3K4me3 ChIPmentation libraries were analyzed on BioAnalyzer (Agilent).
Figure 3. Library quality control. The distribution of the fragments sizes was assessed by loading 6 ng of library on BioAnalyzer (Agilent).
Sequencing
ChIPmentation libraries were finally sequenced on Illumina’s HiSeq3000/4000 and the data analyzed as described in the paragraph: “ChIP-seq data analysis recommendations”.
Figure 4. Distribution of the ChIPmentation datasets for H3K4me3 ChIP-seq, in a representative region of the genome.
25
Protocol for manual size selection
1 hour
1. Add 30 µl of ChIP-seq grade water to each sample to have a final volume of 50 µl.
2. Carefully resuspend the room temperature AMPure XP beads by shaking and light vortexing until no pellet is visible at the bottom of the container.
3. Add 32.5 µl of AMPure XP beads (corresponding to a 0.65x ratio). Mix by pipette 8 – 10 times until the mixture is homogeneous.
4. Incubate at room temperature for 10 minutes.
5. Place the tube on the DiaMag02 and wait until the beads are completely bound to the magnet (~2 minutes).
6. Without disturbing the pellet, carefully aspirate and transfer the supernatant to a new tube.
7. Add 12.5 µl of AMPure XP beads. Mix by pipette 8 – 10 times until the mixture is homogeneous.
8. Incubate at room temperature for 10 minutes.
9. Place the tube on the DiaMag02 and wait until the beads are completely bound to the magnet (~2 minutes).
10. Carefully aspirate by pipette and discard the supernatant without disturbing the pellet.
11. Wash the beads pellet 2 times as follows:
12. With the tubes on the magnet, add 100 µl of freshly prepared 80% ethanol without disturbing the bead pellet and wait for 5 seconds.
13. Carefully aspirate by pipette and discard the supernatant without disturbing the pellet.
26 TAG KIT FOR CHIPMENTATION MANUAL
14. Leaving the tube open, let dry the beads on the DiaMag02 for 3 minutes.
15. Remove tubes from DiaMag02 and elute DNA by resuspending the beads in 20 µl of Resuspension Buffer (blue cap).
16. Incubate for 10 minutes at room temperature.
17. Place the tube on the DiaMag02 and wait until the beads are completely bound to the magnet (~2 minutes).
18. Without disturbing the pellet, carefully aspirate and transfer the supernatant containing size selected libraries to a new tube.
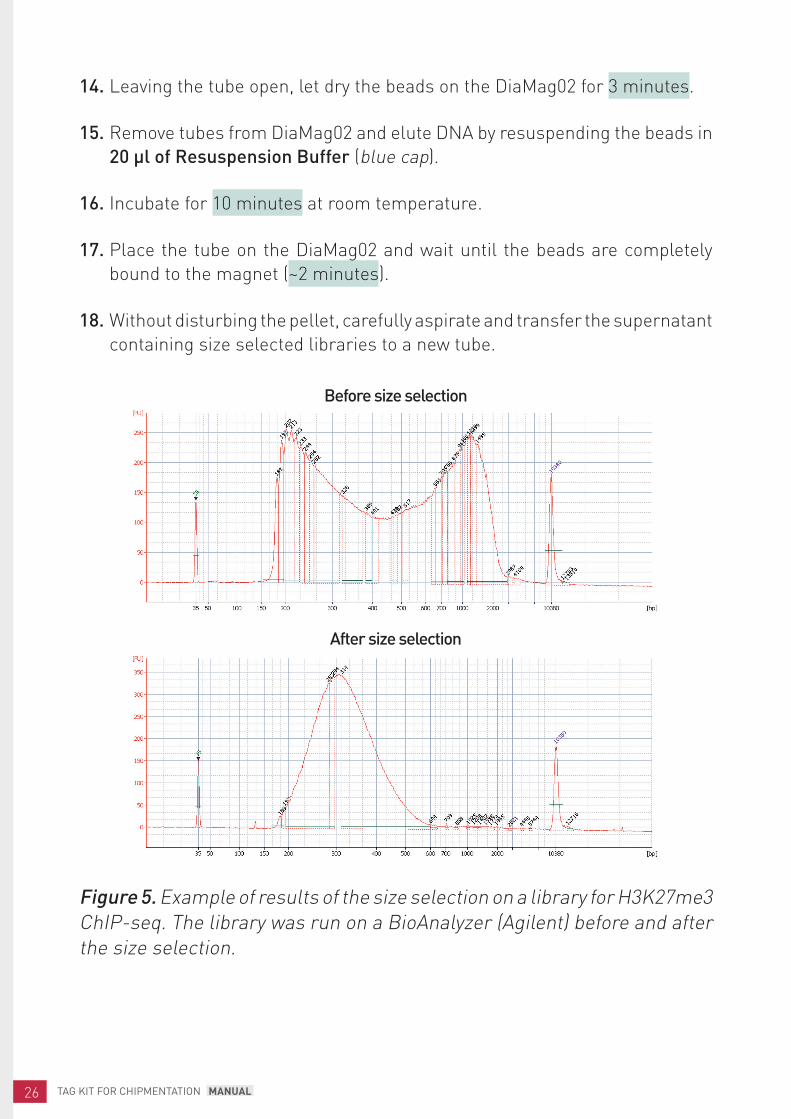
Figure 5. Example of results of the size selection on a library for H3K27me3 ChIP-seq. The library was run on a BioAnalyzer (Agilent) before and after the size selection.
Before size selection
After size selection
27
AU
TO P
RO
TOC
OLProtocol for size selection
on the IP-Star Compact
30 min hands on time
1h10 run for each series of 8 samples
NOTE: Use the IP-Star and room temperature AMPure XP beads for the size selection.
1. Switch on the IP-Star and select “Protocols” icon and then “ChIPmentation” category.
2. Select “ChIPmentation_Size_Selection_08” if you plan to run between 1 and 8 samples, or “ChIPmentation_Size_Selection_16” if you plan to run between 9 and 16 samples.
3. Setup the exact number of samples that you want to process by pressing the black box.
NOTE: The Peltier Block 1 is now cooling down to 4°C to keep your samples cold.
4. Setup all the plastics on the platform according to the screen layout.
• Fill TIP Rack 1 (and 2 if processing more than 8 samples) with tips according to the screen.
• Fill Reagent Rack 1 & 2 with reagent containers according to the screen.
Protocols
IPure Library prep.
ChIP ChIPmentation MagBisulfite RNA IP
Sample prep. MeDIP hMeDIP MethylCap
Top menu
Protocols Maintenance Information
28 TAG KIT FOR CHIPMENTATION MANUAL
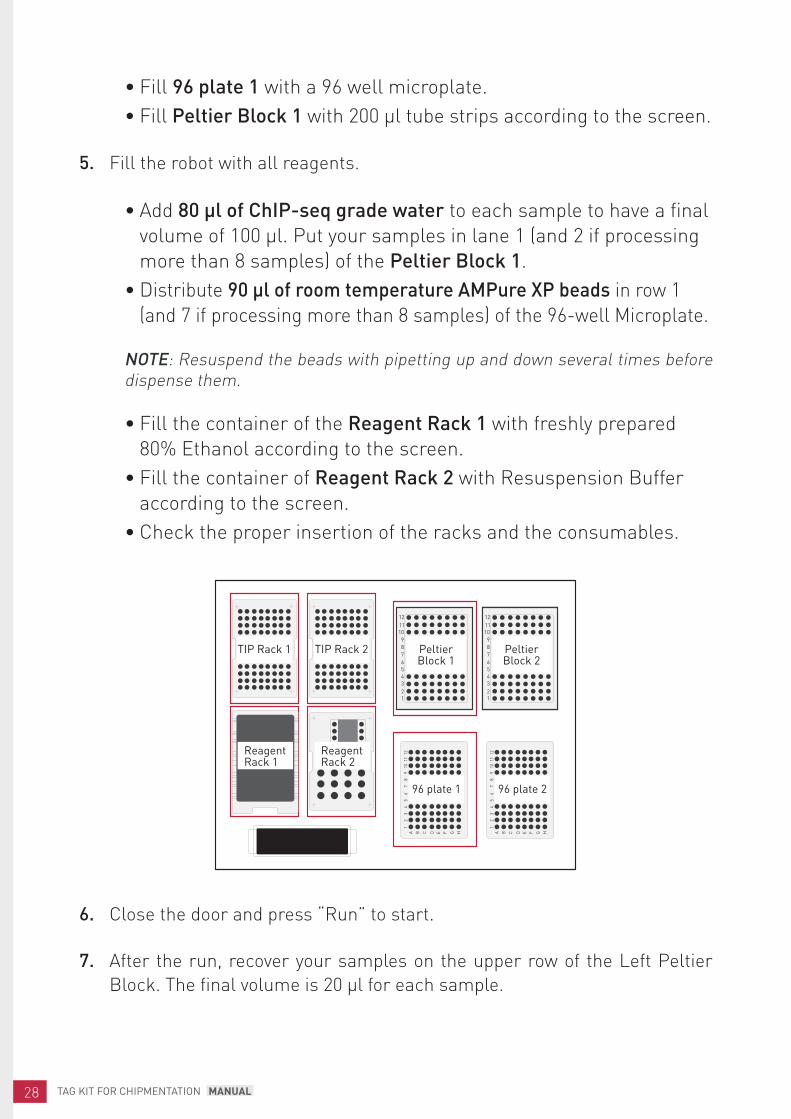
• Fill 96 plate 1 with a 96 well microplate.• Fill Peltier Block 1 with 200 µl tube strips according to the screen.
5. Fill the robot with all reagents.
• Add 80 µl of ChIP-seq grade water to each sample to have a final volume of 100 µl. Put your samples in lane 1 (and 2 if processing more than 8 samples) of the Peltier Block 1.
• Distribute 90 µl of room temperature AMPure XP beads in row 1 (and 7 if processing more than 8 samples) of the 96-well Microplate.
NOTE: Resuspend the beads with pipetting up and down several times before dispense them.
• Fill the container of the Reagent Rack 1 with freshly prepared 80% Ethanol according to the screen.
• Fill the container of Reagent Rack 2 with Resuspension Buffer according to the screen.
• Check the proper insertion of the racks and the consumables.
6. Close the door and press “Run” to start.
7. After the run, recover your samples on the upper row of the Left Peltier Block. The final volume is 20 µl for each sample.
PeltierBlock 1
123456789
101112
123456789
101112
12
34
56
78
910
1112
96 plate 1
A B C D E F G H
12
34
56
78
910
1112
96 plate 2
A B C D E F G H
TIP Rack 1 TIP Rack 2
ReagentRack 2
ReagentRack 1
PeltierBlock 2
29
AU
TO P
RO
TOC
OL
Before size selection
After size selection
8. Press “OK” and “Back” until the homepage appears on the screen. Press “Shutdown” and wait until the screen is black before switching off the IP-Star.
NOTE: Remove all the plastics from the platform, empty the waste shuttle and clean the inner side of the IP-Star with 70% ethanol.
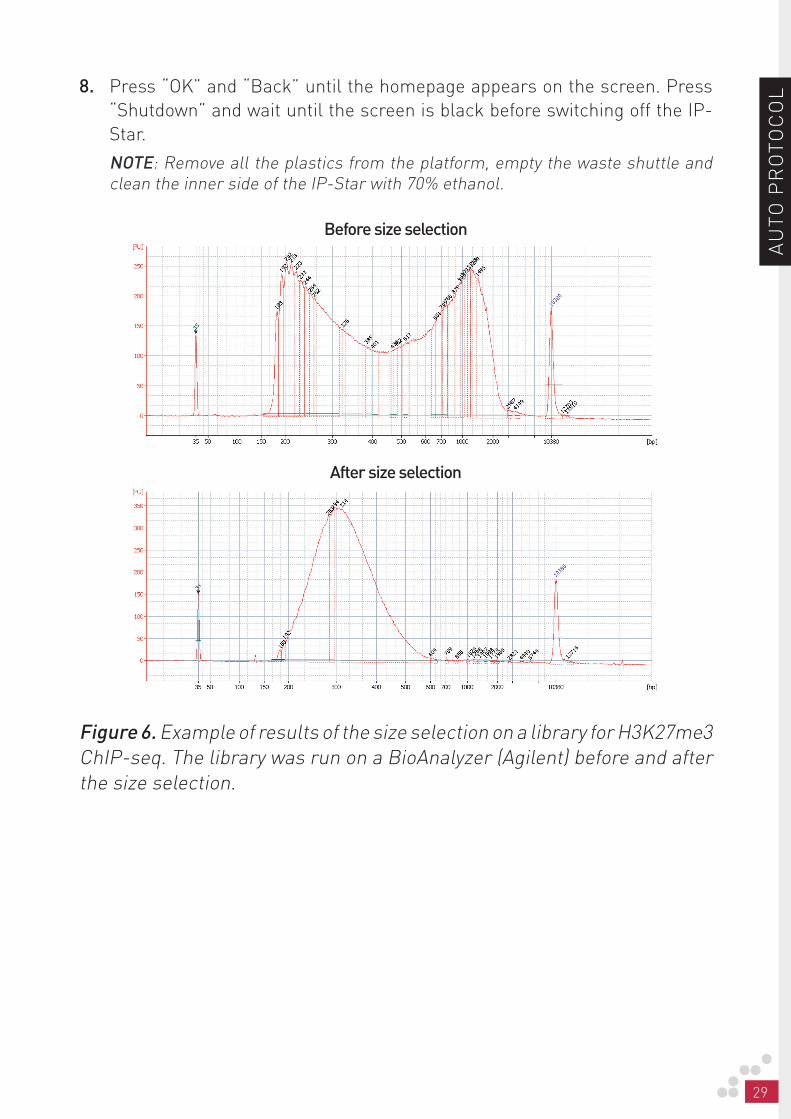
Figure 6. Example of results of the size selection on a library for H3K27me3 ChIP-seq. The library was run on a BioAnalyzer (Agilent) before and after the size selection.
30 TAG KIT FOR CHIPMENTATION MANUAL
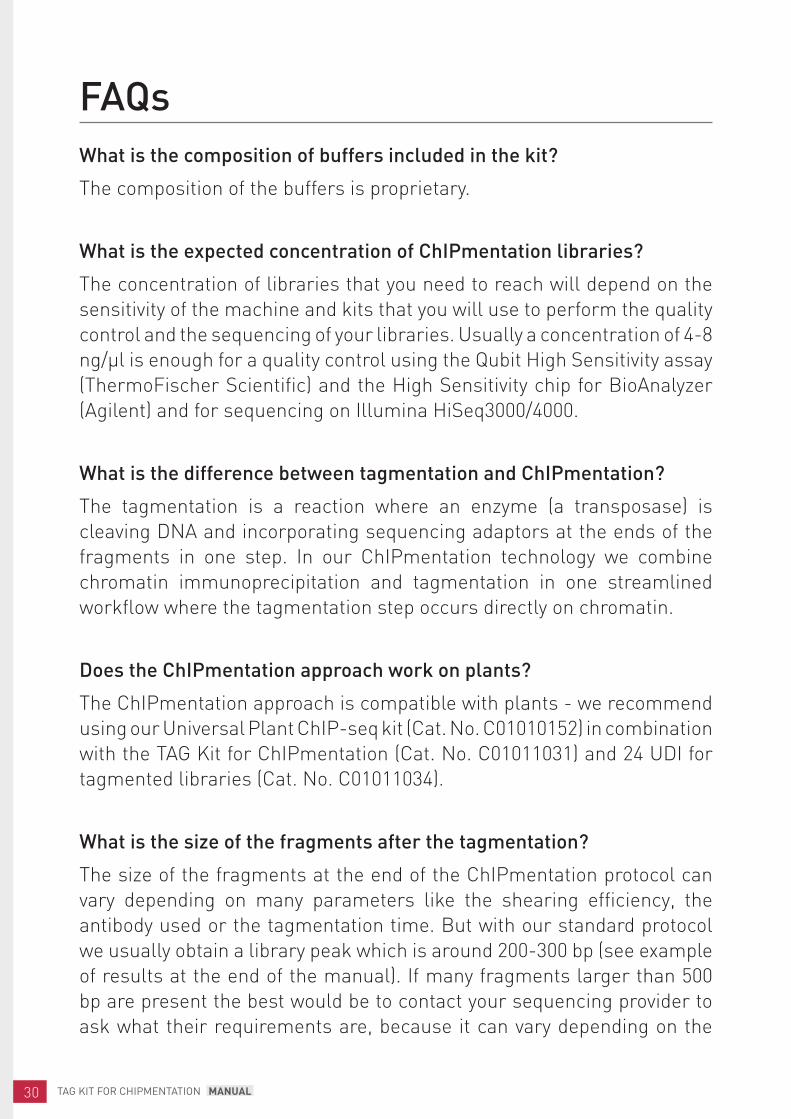
FAQsWhat is the composition of buffers included in the kit?
The composition of the buffers is proprietary.
What is the expected concentration of ChIPmentation libraries?
The concentration of libraries that you need to reach will depend on the sensitivity of the machine and kits that you will use to perform the quality control and the sequencing of your libraries. Usually a concentration of 4-8 ng/µl is enough for a quality control using the Qubit High Sensitivity assay (ThermoFischer Scientific) and the High Sensitivity chip for BioAnalyzer (Agilent) and for sequencing on Illumina HiSeq3000/4000.
What is the difference between tagmentation and ChIPmentation?
The tagmentation is a reaction where an enzyme (a transposase) is cleaving DNA and incorporating sequencing adaptors at the ends of the fragments in one step. In our ChIPmentation technology we combine chromatin immunoprecipitation and tagmentation in one streamlined workflow where the tagmentation step occurs directly on chromatin.
Does the ChIPmentation approach work on plants?
The ChIPmentation approach is compatible with plants - we recommend using our Universal Plant ChIP-seq kit (Cat. No. C01010152) in combination with the TAG Kit for ChIPmentation (Cat. No. C01011031) and 24 UDI for tagmented libraries (Cat. No. C01011034).
What is the size of the fragments after the tagmentation?
The size of the fragments at the end of the ChIPmentation protocol can vary depending on many parameters like the shearing efficiency, the antibody used or the tagmentation time. But with our standard protocol we usually obtain a library peak which is around 200-300 bp (see example of results at the end of the manual). If many fragments larger than 500 bp are present the best would be to contact your sequencing provider to ask what their requirements are, because it can vary depending on the
31
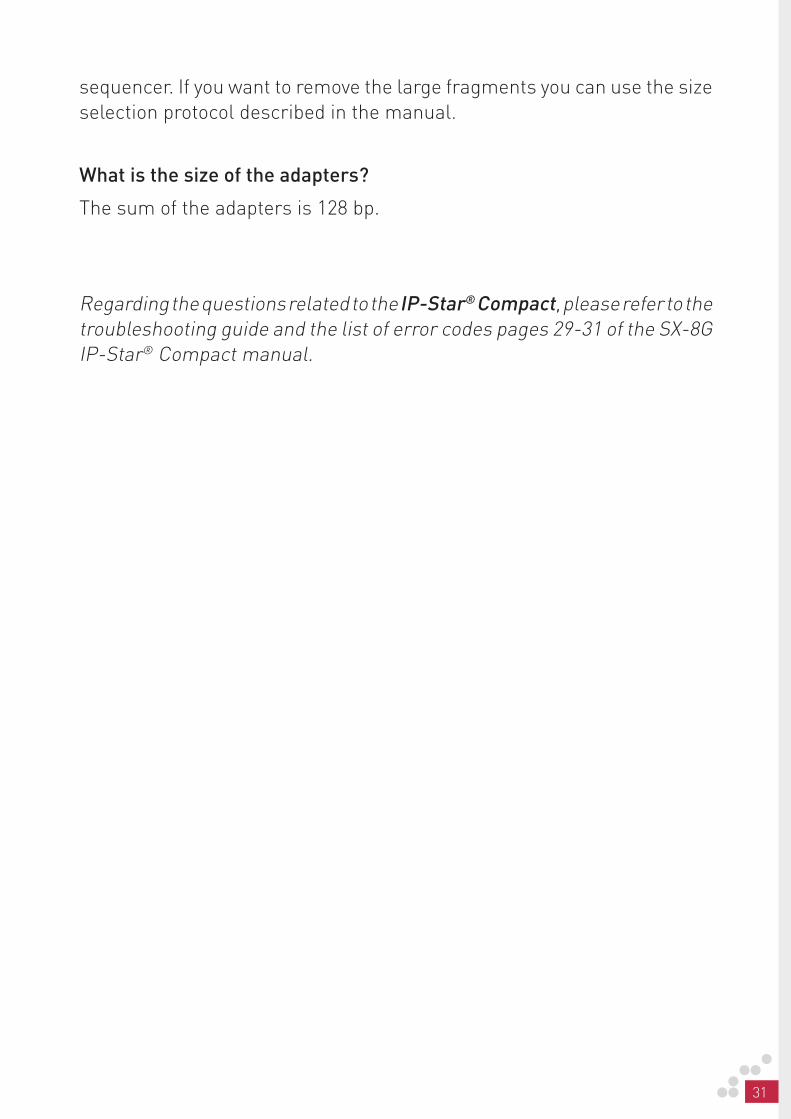
sequencer. If you want to remove the large fragments you can use the size selection protocol described in the manual.
What is the size of the adapters?
The sum of the adapters is 128 bp.
Regarding the questions related to the IP-Star® Compact, please refer to the troubleshooting guide and the list of error codes pages 29-31 of the SX-8G IP-Star® Compact manual.

32 TAG KIT FOR CHIPMENTATION MANUAL
33
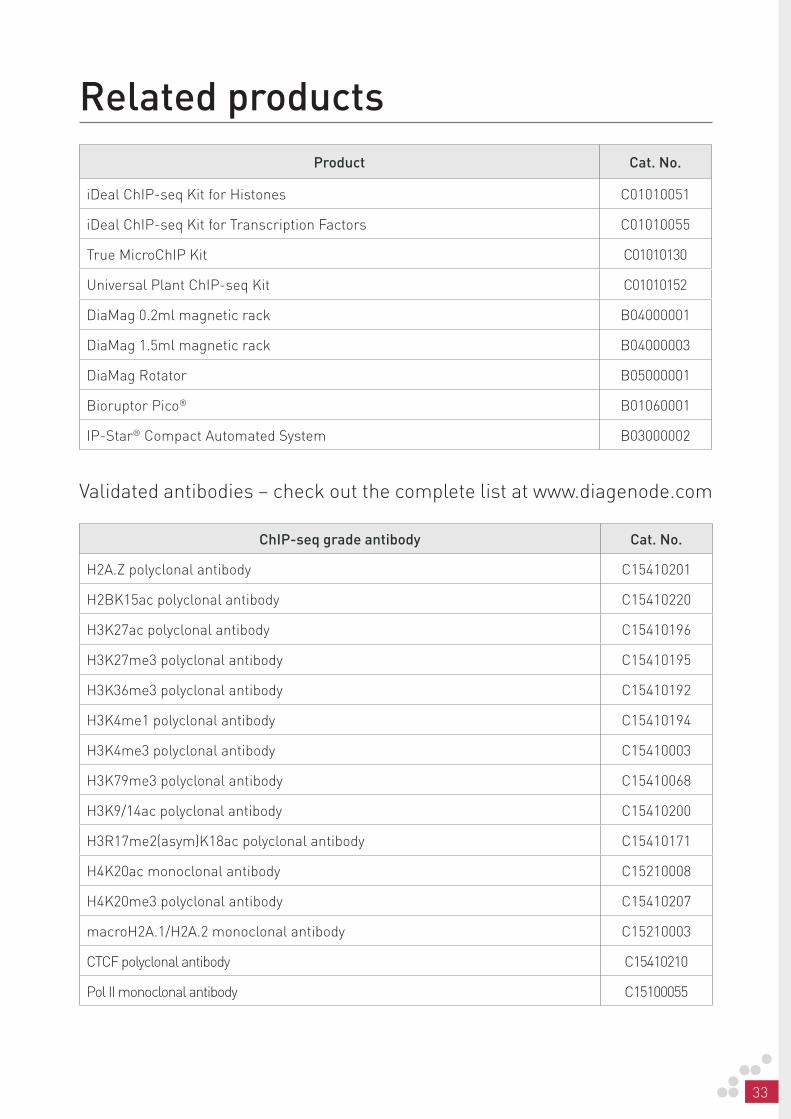
Related productsProduct Cat. No.
iDeal ChIP-seq Kit for Histones C01010051
iDeal ChIP-seq Kit for Transcription Factors C01010055
True MicroChIP Kit C01010130
Universal Plant ChIP-seq Kit C01010152
DiaMag 0.2ml magnetic rack B04000001
DiaMag 1.5ml magnetic rack B04000003
DiaMag Rotator B05000001
Bioruptor Pico® B01060001
IP-Star® Compact Automated System B03000002
Validated antibodies – check out the complete list at www.diagenode.com
ChIP-seq grade antibody Cat. No.
H2A.Z polyclonal antibody C15410201
H2BK15ac polyclonal antibody C15410220
H3K27ac polyclonal antibody C15410196
H3K27me3 polyclonal antibody C15410195
H3K36me3 polyclonal antibody C15410192
H3K4me1 polyclonal antibody C15410194
H3K4me3 polyclonal antibody C15410003
H3K79me3 polyclonal antibody C15410068
H3K9/14ac polyclonal antibody C15410200
H3R17me2(asym)K18ac polyclonal antibody C15410171
H4K20ac monoclonal antibody C15210008
H4K20me3 polyclonal antibody C15410207
macroH2A.1/H2A.2 monoclonal antibody C15210003
CTCF polyclonal antibody C15410210
Pol II monoclonal antibody C15100055

34 TAG KIT FOR CHIPMENTATION MANUAL
35
FOR RESEARCH USE ONLY.
Not intended for any animal or human therapeutic or diagnostic use.
© 2021 Diagenode SA. All rights reserved. No part of this publication may be reproduced, transmitted,
transcribed, stored in retrieval systems, or translated into any language or computer language, in any
form or by any means: electronic, mechanical, magnetic, optical, chemical, manual, or otherwise,
without prior written permission from Diagenode SA (hereinafter, “Diagenode”) . The information
in this guide is subject to change without notice. Diagenode and/or its affiliates reserve the right
to change products and services at any time to incorporate the latest technological developments.
Although this guide has been prepared with every precaution to ensure accuracy, Diagenode
and/or its affiliates assume no liability for any errors or omissions, nor for any damages resulting
from the application or use ofthis information. Diagenode welcomes customer input on corrections
and suggestions for improvement.
NOTICE TO PURCHASER LIMITED LICENSE
The information provided herein is owned by Diagenode and/or its affiliates. Subject to the terms and
conditions that govern your use of such products and information, Diagenode and/or its affiliates
grant you a nonexclusive, nontransferable, non-sublicensable license to use such products and
information only in accordance with the manuals and written instructions provided by Diagenode
and/or its affiliates. You understand and agree that exceptas expressly set forth in the terms and
conditions governing your use of such products, that no right or license to any patent or other
intellectual property owned or licensable by Diagenode and/or its affiliates is conveyed or implied
by providing these products. In particular, no right or license is conveyed or implied to use these
products in combination with any product not provided or licensed to you by Diagenode and/or its
affiliates for such use. Limited Use Label License: Research Use Only The purchase of this product
conveys to the purchaser the limited, non-transferable right to use the product only to perform
internal research for the sole benefit of the purchaser. No right to resell this product or any of
its components is conveyed expressly, by implication, or by estoppel. This productis for internal
research purposes only and is not for use in commercial applications of any kind, including, without
limitation, quality control and commercial services such as reporting the results of purchaser’s
activities for a fee or other form of consideration. For information on obtaining additional rights,
please contact [email protected].
TRADEMARKS
The trademarks mentioned herein are the property of Diagenode or their respective owners.
Bioanalyzer is a trademark of Agilent Technologies, Inc. Agencourt and AMPure® are registered
trademarks of Beckman Coulter, Inc. Illumina® is a registered trademark of Illumina®Inc; Qubit is a
registered trademark of Life Technologies Corporation.

www.diagenode.com