Embed Size (px)
Citation preview

Team Sports HQ – Affinity Sports 1
Table of Contents
Welcome to Affinity Sports ......................................................................................... 2
About this Guide .......................................................................................................................................... 2
Resources ..................................................................................................................................................... 2
Accessing the Affinity Sports Platform ........................................................................ 3
Navigating the Affinity Sports Platform ...................................................................... 4
User Profiles and Roles ................................................................................................ 6
Creating a User Profile ................................................................................................................................. 7
Dashboards & Widgets ................................................................................................ 8
My Account ................................................................................................................ 12
Club Representative Functions ................................................................................. 13
Setting up a Season .................................................................................................................................... 13
Creating & Managing Teams ...................................................................................................................... 16
Managing Players ....................................................................................................................................... 19
Managing Admins ...................................................................................................................................... 22
Manually entering players and admins ..................................................................................................... 26
Uploading Players and Admins .................................................................................................................. 27
Emailing Players or Admins ........................................................................................................................ 28
Submitting a Team to Assigned League Registrar ..................................................................................... 31
Printing ID Cards ......................................................................................................................................... 32
Printing Rosters .......................................................................................................................................... 34
Assigned League Registrar Functions ........................................................................ 36
Checking your Team Queue ....................................................................................................................... 36
Verify Players and Admins ......................................................................................................................... 37
Activating Teams ........................................................................................................................................ 38
Notes .......................................................................................................................... 39

Team Sports HQ – Affinity Sports 2
Welcome to Affinity Sports Welcome to the Team Sports HQ – Affinity Sports Platform. As a part of DICK’S Sporting Goods, family of businesses, sports is at the heart of our business. We believe that “Sports Matter” and providing access to sports is a key priority for us. We are delighted to partner with Virginia Youth Soccer Association (VYSA) and provide our technology solutions to support your mission.
About Us Team Sports HQ – Affinity Sports is a wholly owned subsidiary of DICK’S Sporting Goods. In business since 2002, Affinity Sports joined DICK’S Sporting Goods in August 2016 and together with Blue Sombrero, a leader in online registration for youth sports, and Game Changer, a sports statistics and gaming app developer, makes up the Team Sports HQ Technology Division. Team Sports HQ currently has approximately 300 employees with offices in Atlanta, GA, New York, NY, Pittsburgh, PA, and San Diego, CA.
About this Guide This Getting Started Guide provides Club Representatives and Assigned League Registrars with an overview of various functions of the Affinity Sports Platform. This guide focuses on general system use and sections specific to the Club Representative and the Assigned League Registrar. We outline season configurations, how to manage players, administrators and teams, and compliance requirements. We also provide TIPS and NOTES throughout this guide, to assist you in the use of the Affinity Sports Platform.
Resources Technical Support Phone: 855-703-2564 Technical Support Hours:* Monday - Friday 7:00 AM - 6:00 PM PT Saturday and Sunday 7:00 AM - 3:30 PM PT * Holiday or Special Event Hours may apply VYSA – Affinity Sports Help Center Find answers to your questions or submit a help ticket https://virginia-affinity-sports.zendesk.com
Team Sports HQ – Affinity Sports 3
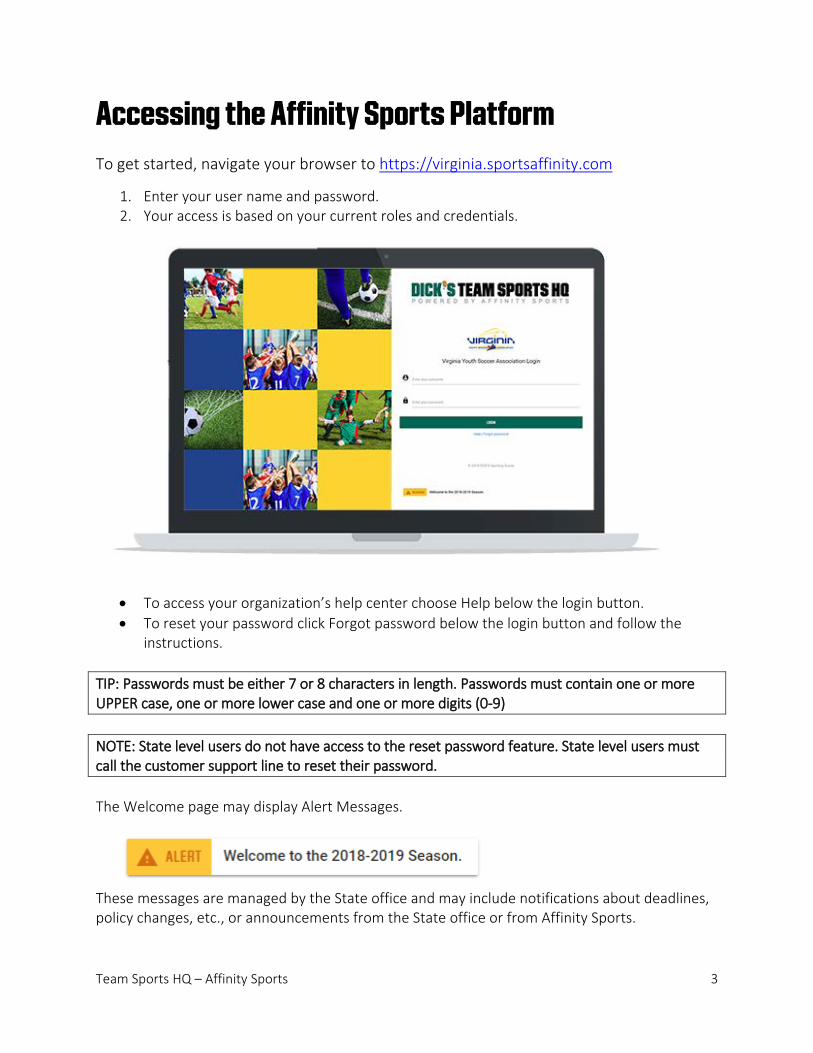
Accessing the Affinity Sports Platform To get started, navigate your browser to https://virginia.sportsaffinity.com
1. Enter your user name and password. 2. Your access is based on your current roles and credentials.
• To access your organization’s help center choose Help below the login button. • To reset your password click Forgot password below the login button and follow the
instructions.
TIP: Passwords must be either 7 or 8 characters in length. Passwords must contain one or more UPPER case, one or more lower case and one or more digits (0-9) NOTE: State level users do not have access to the reset password feature. State level users must call the customer support line to reset their password. The Welcome page may display Alert Messages.
These messages are managed by the State office and may include notifications about deadlines, policy changes, etc., or announcements from the State office or from Affinity Sports.
Team Sports HQ – Affinity Sports 4
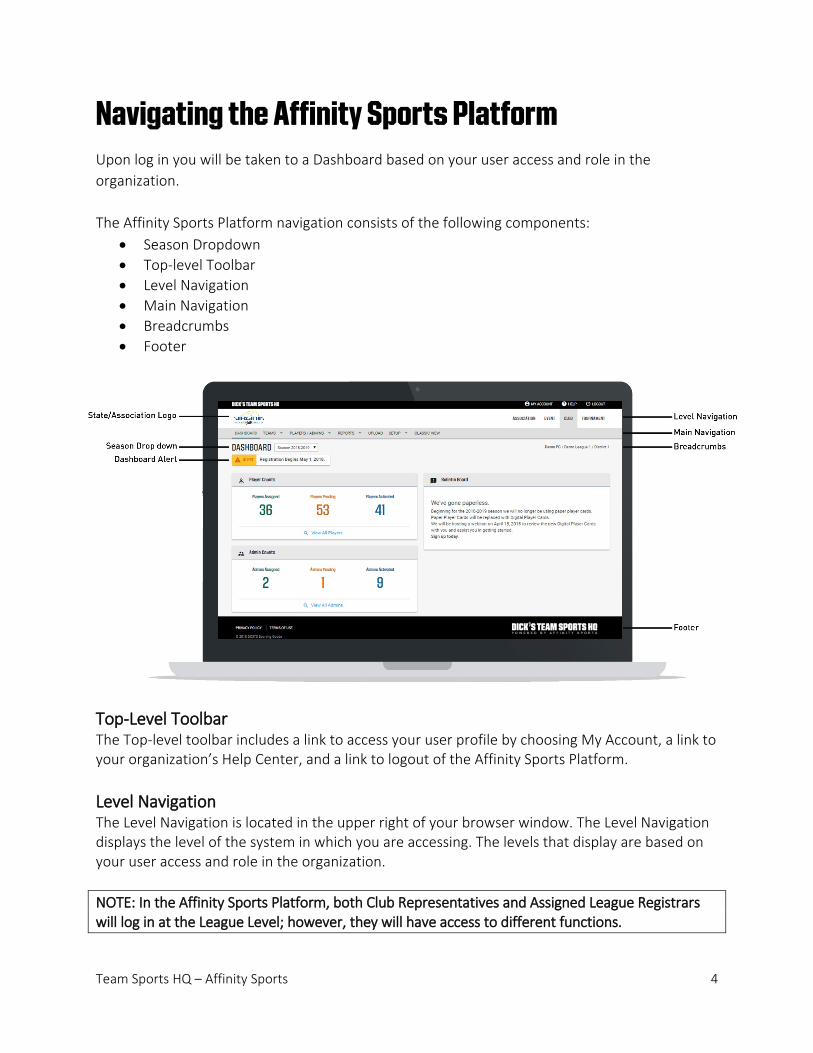
Navigating the Affinity Sports Platform Upon log in you will be taken to a Dashboard based on your user access and role in the organization. The Affinity Sports Platform navigation consists of the following components:
• Season Dropdown • Top-level Toolbar • Level Navigation • Main Navigation • Breadcrumbs • Footer
Top-Level Toolbar The Top-level toolbar includes a link to access your user profile by choosing My Account, a link to your organization’s Help Center, and a link to logout of the Affinity Sports Platform. Level Navigation The Level Navigation is located in the upper right of your browser window. The Level Navigation displays the level of the system in which you are accessing. The levels that display are based on your user access and role in the organization. NOTE: In the Affinity Sports Platform, both Club Representatives and Assigned League Registrars will log in at the League Level; however, they will have access to different functions.

Team Sports HQ – Affinity Sports 5
Season Dropdown The Season Dropdown allows you to toggle between seasons. If your league is coordinating more than one season at a time, make sure that the correct season is selected from the dropdown menu on the left side of your screen.
Breadcrumbs Breadcrumbs are located in the upper right of your browser window and serve as a wayfinding tool by indicating the dashboard being visited and its corresponding hierarchy.
Main Navigation The Main Navigation provides access to the core functions and actions within the Affinity Sports Platform. This navigation is based on your user access and role in the organization.
Dashboard Dashboard will take you back to your main dashboard based on your user access and role in the organization. Teams Teams provides you with the ability to complete Team Lookup, Create Teams, Access the Team Creation Matrix, Travel Requests and Core Checking. Assigned League Registrars will find their Team Queue here. Players/Admins Players/Admins provides access to Player Lookup, Admin Lookup, and Parent Lookup, and the ability to add a Player/Admin, manage player applications and payments and access ID Cards. Reports Reports provide Club Representatives with access to the various reports in the Affinity Sports Platform. Setup Setup allows you to configure your club and set up your season by choosing Config from the drop down menu. Classic View Classic View takes you to the classic Affinity Sports Platform look and feel.
Footer The footer provides access to our Privacy Policy and Terms of Use.
Team Sports HQ – Affinity Sports 6
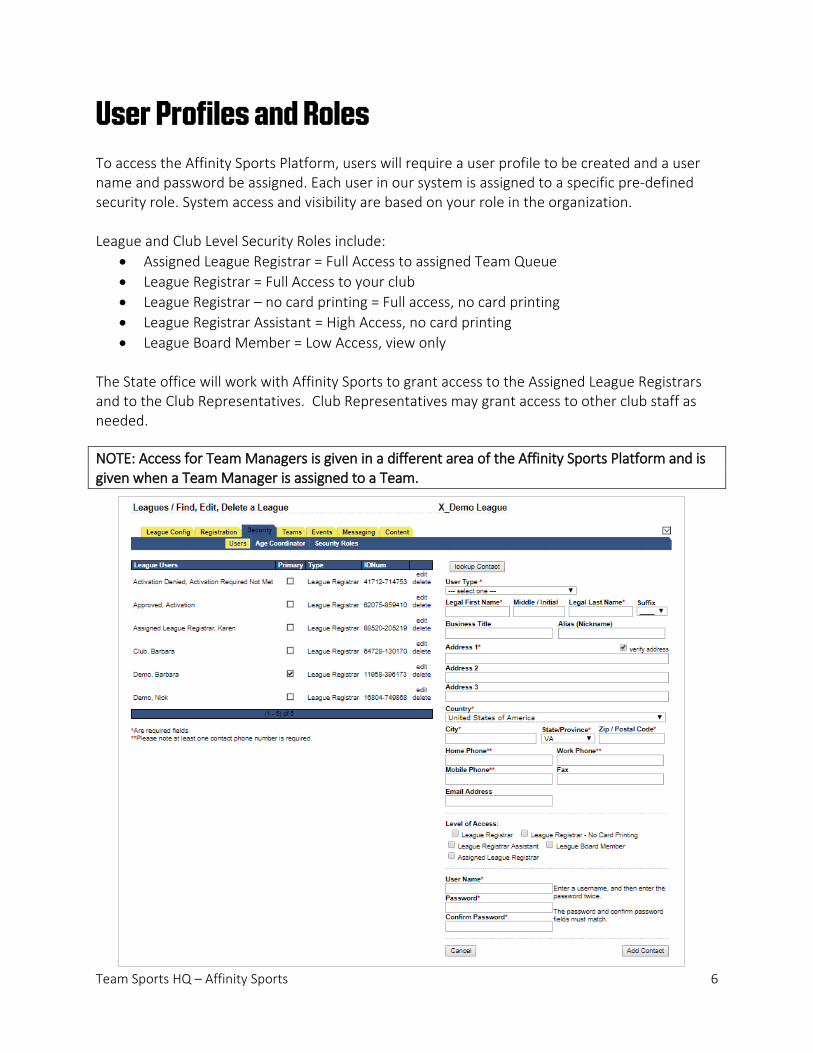
User Profiles and Roles To access the Affinity Sports Platform, users will require a user profile to be created and a user name and password be assigned. Each user in our system is assigned to a specific pre-defined security role. System access and visibility are based on your role in the organization. League and Club Level Security Roles include:
• Assigned League Registrar = Full Access to assigned Team Queue • League Registrar = Full Access to your club • League Registrar – no card printing = Full access, no card printing • League Registrar Assistant = High Access, no card printing • League Board Member = Low Access, view only
The State office will work with Affinity Sports to grant access to the Assigned League Registrars and to the Club Representatives. Club Representatives may grant access to other club staff as needed.
NOTE: Access for Team Managers is given in a different area of the Affinity Sports Platform and is given when a Team Manager is assigned to a Team.
Team Sports HQ – Affinity Sports 7
Creating a User Profile 1. To create a user profile for a Club Representative or club staff member, from the main
navigation at the League level, choose Setup and then Config. 2. Choose the Security tab. 3. The Users screen displays. 4. To add a new user, you will first want to look up the user in the platform. 5. To look up a user, choose Lookup Contact from the top of the form to open a pop-up
search window. 6. Enter the user’s last name and first name in the pop-up search window. 7. If the user exists in the platform, the user profile will display. If this is the correct user,
choose Select beside their name and their information will be pre-populated in the form. 8. If no results are found, choose Close to exit out of the pop-up search window. 9. Enter the users information in the form including:
• User Type – This field is used for pulling reports. This does not determine user access. For VYSA choose League Registrar as the user type for Club Representatives.
• First and Last Name • Business Title (if applicable) • Address, Country, City, State, and Zip Code • At least one phone number • Valid email address • Choose a Level of Access – This will assign a user’s level of permission and system
access. For Club Representatives, check League Registrar for the Level of Access • Create a user name and password and share it with the user • Choose Add Contact
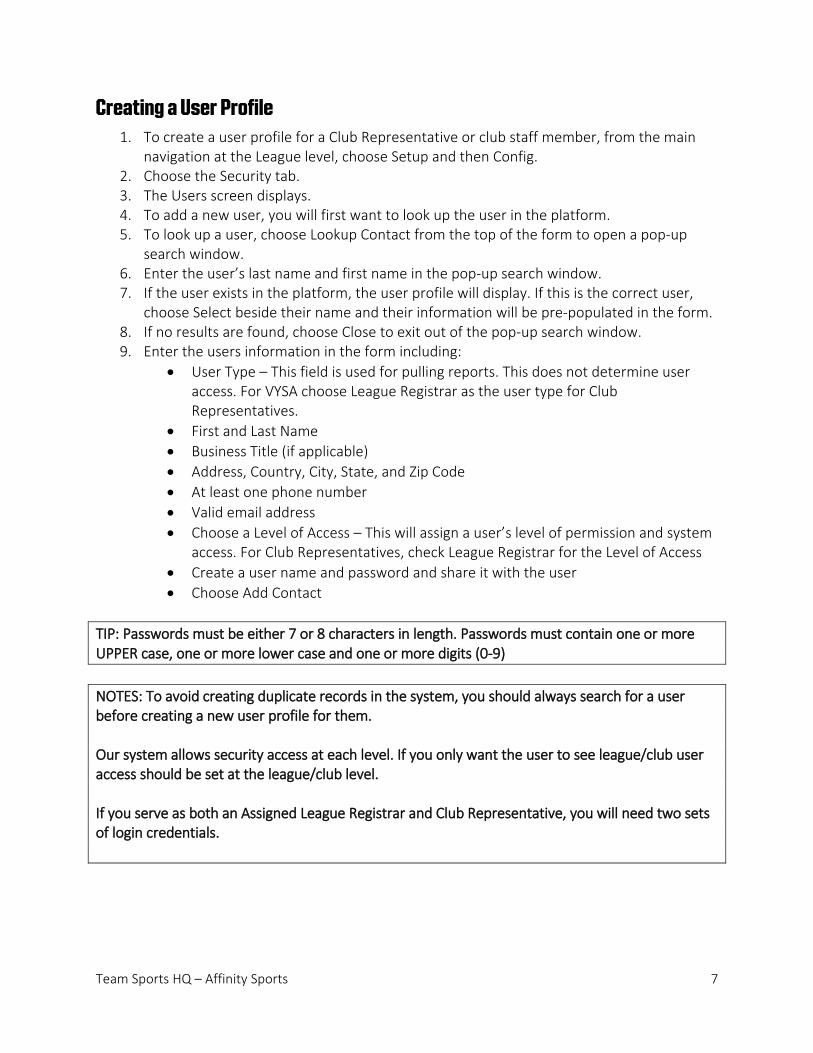
TIP: Passwords must be either 7 or 8 characters in length. Passwords must contain one or more UPPER case, one or more lower case and one or more digits (0-9) NOTES: To avoid creating duplicate records in the system, you should always search for a user before creating a new user profile for them. Our system allows security access at each level. If you only want the user to see league/club user access should be set at the league/club level. If you serve as both an Assigned League Registrar and Club Representative, you will need two sets of login credentials.

Team Sports HQ – Affinity Sports 8
Dashboards & Widgets Based on the system hierarchy and the VYSA business rules, both the Assigned League Registrar and the Club Representative will log into the League Dashboard, however they will have access to different functions based on their role. Club Representatives will have access to the League in which their club is affiliated and any clubs they manage.

Team Sports HQ – Affinity Sports 9
Assigned League Registrars may bypass the Dashboard and move into the main navigation to manage their work however, they will want to check the dashboard for any alerts and the Bulletin Board for any announcements from the State office or Affinity Sports. Club Representatives will use the Dashboard features to view alerts and announcements as well as view and track players, admins and teams through various widgets that provide a quick snapshot of your club(s). Additional Dashboard Features: Toggle between seasons View any alert messages from the State office or Affinity Sports (if in use) View other announcements from the State office or Affinity Sports on the Bulletin Board The ability to Visit your Club’s Dashboard/Configuration tab
Dashboard Alert The Dashboard will include any alert messages from the State office or Affinity Sports.
Player Counts Widget The Player Counts Widget provides a quick snapshot of Players Assigned to a team, Players Pending; that are not on a team, and Players on an activated team.
To view each of these player groups in more detail, mouse over the number in the widget, and then choose More Details and you will be taken to the Player Lookup screen that will display a full list of players that meet the selected criteria. To drill down further, you may click on the name of the player to view that player’s record. To view all players, regardless of status, you can choose View All Players and be taken to the Player Lookup screen.

Team Sports HQ – Affinity Sports 10
Admin Counts Widget The Admin Counts Widget provides a quick snapshot of Admins Assigned to a team, Admins Pending; that are not on a team, and Admins on an activated team.
To view each of these admin groups in more detail, mouse over the number in the widget, and then choose More Details and you will be taken to the Admin Lookup screen and a full list of admins that meet the selected criteria. To drill down further, you may click on the name of the admin to view that admin’s record. To view all admins regardless of status, you can choose View All Admins and be taken to the Admin Lookup screen. Team Counts Widget The Team Counts Widget provides a quick snapshot of total teams, inactive teams and active teams.
To view the team groups in more detail, mouse over the number in the widget, and then choose More Details and you will be taken to the Team Lookup screen and a full list of teams that meet the selected criteria. To drill down further, you may click on the name of the team to view and manage that team.

Team Sports HQ – Affinity Sports 11
You may also filter this criteria by Play Type and then corresponding Age Groups.
To view all teams regardless of status, you can choose View All Teams and be taken to the Team Lookup screen. Bulletin Board Widget The Bulletin Board Widget is managed by the State office and includes updates and news from the State office or from Affinity Sports.
Visit Club Dashboards You also have the ability to view the Dashboards of the Clubs you manage. You may access club dashboards by scrolling to the bottom of your dashboard and choose Visit beside the name of the Club Dashboard you wish to view.
Choosing Visit will open the dashboard for the club selected. To return to the main League Dashboard, choose League from the Level Navigation in the upper right of your browser window.

Team Sports HQ – Affinity Sports 12
My Account My Account located in the top toolbar is used to access your personal information. You can update your contact information, username and password from My Account. There is also a Message Center where you will be able to view all emails sent through the Affinity Sports Platform to you. Emails will also go to your email address included in your user profile.
To return to the Dashboard from My Account, choose Leagues and Teams from the top set of tabs and then click dashboard on the next screen from the main navigation.

Team Sports HQ – Affinity Sports 13
Club Representative Functions Setting up a Season Once the Association has opened the Season, the season needs to be configured at the League and Club level by the Club Representative. This must be done at both the League and Club Level.
Configure Season at the League Level 1. To configure the season from the League Level, choose Setup and then Config from the
main navigation. 2. Choose the Registration tab to display the season screen, which lists all the active
seasons created by the Association.
3. Choose the + plus sign next to the season you wish to configure and to open the season
configuration options. 4. Check the Play Level and Ages that you allow to register for a specific play type. In the
Affinity Sports Platform, the play type represents the Leagues for VYSA.

Team Sports HQ – Affinity Sports 14
Play Level = Leagues • ADSL – Advanced Development Soccer League • BRSL – Blue Ridge Soccer League • CCL- Club Champions League • ERL – Region 1 Eastern Regional League • MSL- Metro Soccer League • NCSL- National Capital Soccer League • NLCT – VA Non-League Cup Teams • ODSL – Old Dominion Soccer League • SCSL – Skyline Club Soccer League • VSLI – Virginia Soccer League Inc. • Recreational – general rec play level (all rec players will use this definition) • Travel – general competitive play level – all travel teams must change the play level of the
team to the league in which they will participate
5. Choose Yes for “Show on Public Registration” 6. Choose Yes for “Requires Payment” 7. Choose No for “Automatically Accept Registration” 8. Choose No for “Allow System to Automatically Charge Credit Card” 9. Leave “Activate Pub Reg. On” blank 10. Leave “Deactivate Pub Reg. On” blank 11. Leave “Charge Reg. Late Fee From” blank 12. Check both “Coach/Admin and Player Application Types” 13. Leave “My Account Button Text” blank 14. Do not check “Add to My Account Across Association” 15. Click Update – when you have completed the above steps for all play types (leagues) and
age groups.
NOTE: The age groups in the season grid are player seasonal ages not Team Age Groups. You will need to check any age accepted by your club. Example: U8 is a 7 year old; however, your club may only have U9 and up Teams but you allow 7 year olds to be rostered to a U9 team.
Configure Season at the Club Level 1. From the League Level, choose Setup and then Config from the main navigation. 2. Choose the Registration tab to display the season screen, which lists all the active
seasons created by the Association. 3. Choose the + plus sign next to the season at the League that you wish to configure. 4. Click the down arrow displayed in the upper right corner of the tabs window to navigate
to the corresponding club.

Team Sports HQ – Affinity Sports 15
5. The screen title will change to “Clubs/Find, Edit, Delete a Club” and the club name will display.
6. Choose the + plus sign next to the season you wish to configure at the Club Level.
7. The Play Level and Age Groups selected at the League Level will display. If they are not checked, check the play levels and age groups at the club level as well.
8. Choose Yes for “Show on Public Registration” Checking yes, will allow users to sign-up for a background check with their appropriate club.
9. Choose Yes for “Requires Payment.” 10. Choose Yes for “Automatically Accept Registration.” 11. Choose No for “Allow System to Automatically Charge Credit Card.”

Team Sports HQ – Affinity Sports 16
12. Leave “Activate Pub Reg. On” blank. 13. Leave “Deactivate Pub Reg. On” blank 14. Leave “Charge Reg. Late Fee From” blank 15. Check “Coach/Admin Application Types” 16. Leave “My Account Button Text” blank 17. Do not check “Add to My Account Across Association” 18. Click Update – when you have completed the above steps for all play types (leagues) and
age groups. 19. Click the up arrow in the upper right corner of the tab window to go back up to the
league level. NOTE: If configuring a new season, you must log out and log back in for the season to show in your Season drop down.
Creating & Managing Teams The Affinity Sports Platform offers multiple ways to create teams. Create Individual Teams
1. To create Teams individually, choose Teams and Create from the main navigation. 2. The District and League will be selected. 3. Choose your Club from the drop down menu. 4. Select Team Level, Gender and Age. 5. Enter a Team Name. 6. The system will automatically create a Team Number – the last four digits of this number
are editable. 7. Enter Home and Away Uniform colors. 8. Enter the Team Sponsor (if applicable). 9. Choose Add Team.
NOTE: Once a team has been created you can create duplicate teams for the same age group.
Creating Multiple Teams The Affinity Sports Platform allows users to create several teams for different age groups at one time.
1. To create multiple Teams, choose Teams and Team Creation Matrix from the main navigation.
2. The District and League will be selected. 3. Choose your Club from the drop down menu.
Team Sports HQ – Affinity Sports 17
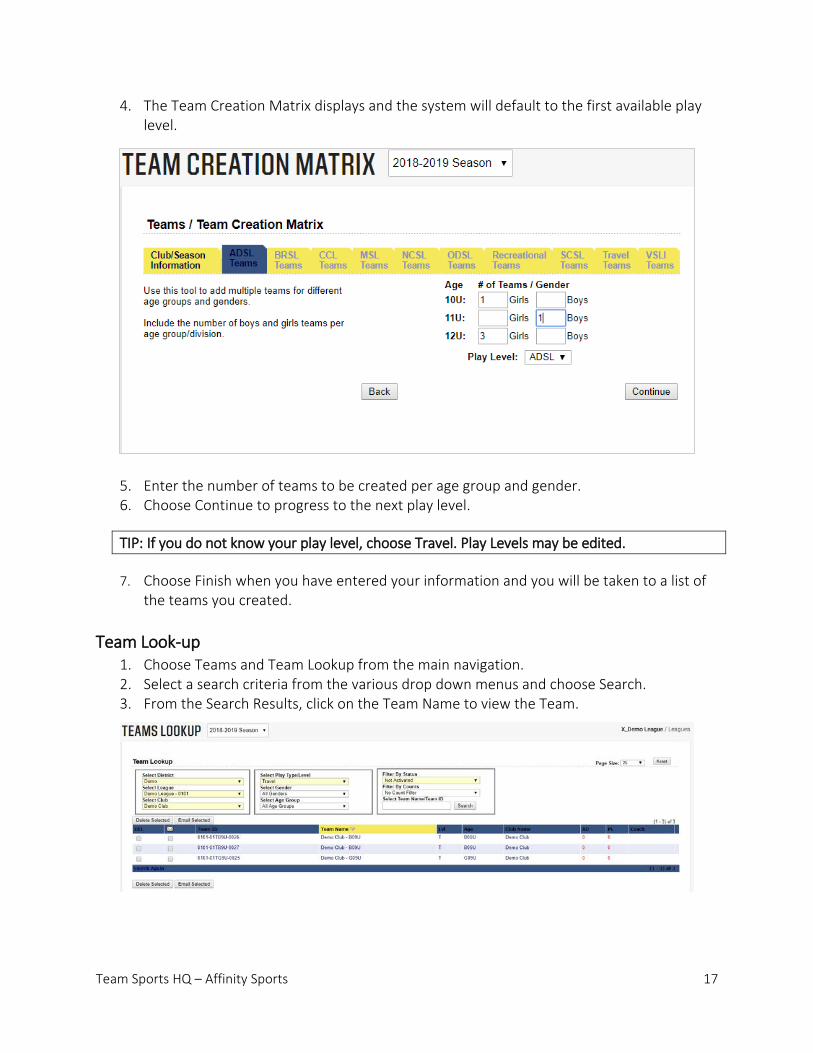
4. The Team Creation Matrix displays and the system will default to the first available play level.
5. Enter the number of teams to be created per age group and gender. 6. Choose Continue to progress to the next play level.
TIP: If you do not know your play level, choose Travel. Play Levels may be edited.
7. Choose Finish when you have entered your information and you will be taken to a list of the teams you created.
Team Look-up 1. Choose Teams and Team Lookup from the main navigation. 2. Select a search criteria from the various drop down menus and choose Search. 3. From the Search Results, click on the Team Name to view the Team.
Team Sports HQ – Affinity Sports 18
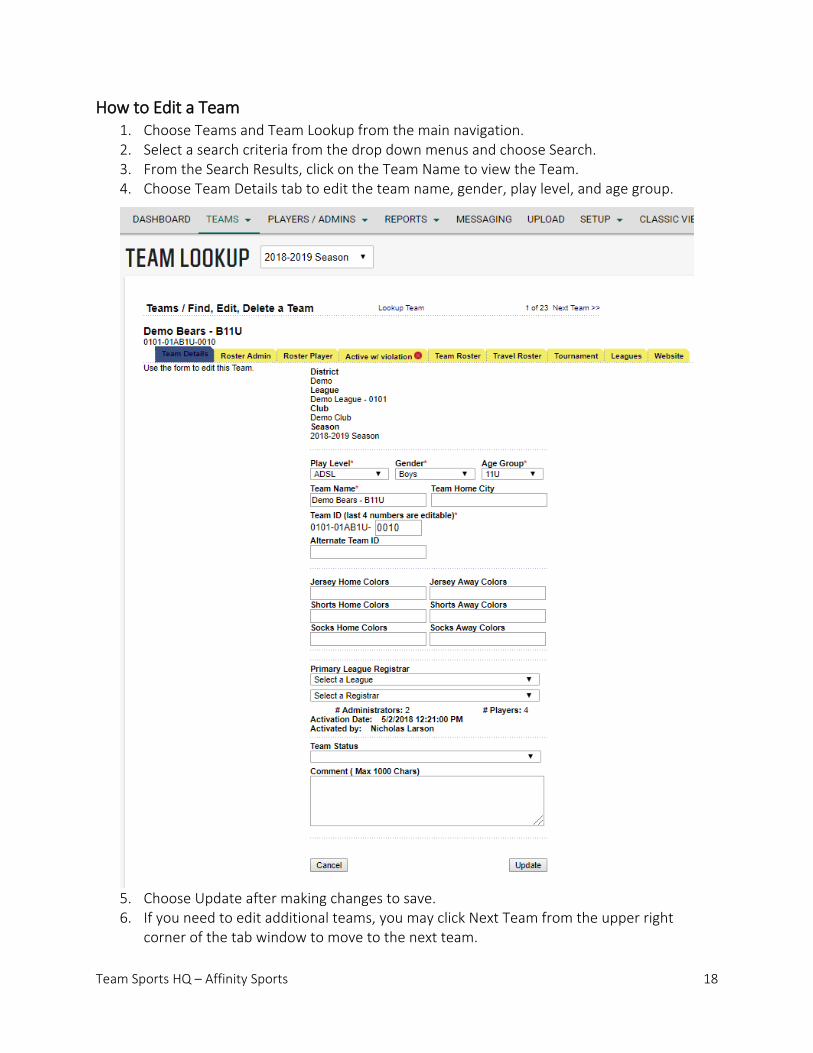
How to Edit a Team 1. Choose Teams and Team Lookup from the main navigation. 2. Select a search criteria from the drop down menus and choose Search. 3. From the Search Results, click on the Team Name to view the Team. 4. Choose Team Details tab to edit the team name, gender, play level, and age group.
5. Choose Update after making changes to save. 6. If you need to edit additional teams, you may click Next Team from the upper right
corner of the tab window to move to the next team.

Team Sports HQ – Affinity Sports 19
Managing Players
Player Lookup The Affinity Sports Platform provides users with the ability to search for players by league, club, play type, gender, age group, application status, or disciplinary action, season, or name. Users have the option to perform a full or limited search depending on the criteria and search parameters selected.
1. Choose Players/Admin and Player Lookup from the main navigation. 2. Select a search criteria from the various drop down menus and choose Search. 3. From the Search Results, click on the Player Name to view the Player Profile.
Player Profile There are multiple tabs under the players profile or record that perform different functions and allow different information to be updated.

Team Sports HQ – Affinity Sports 20
• Player Information – Player name, date of birth, gender, medical information, etc. • Preferences – An optional tab used for entering the player’s administrator, volunteer
or teammate requests. • Applications – Shows the details of current and historical applications for the player,
provides the ability to edit and/or cancel the application • Transfer – Shows release/transfer history and provides the ability to perform or
initiate a release/transfer. The player must be assigned to an activated team in order to begin the release/transfer process.
• Parents – Lists parents/guardians and provides an edit link to open and edit the parent/guardian information
• Disciplinary – Provides the ability to track disciplinary items on the player • Events – Displays any events the player has signed up for through the Affinity Sports
Event Manager.
Editing Player Information 1. Choose Players/Admin and Player Lookup from the main navigation. 2. Select a search criteria from the various drop down menus and choose Search. 3. From the Search Results, click on the Player Name to view the Player Profile. 4. Select the tab where you need to add or update information. 5. Choose Update after making changes to save.
Verifying Players Before rostering a player, the Club Representative will need to accept the player and verify the admin details align with business rules and for competitive players that there is a valid birth certificate and appropriate player photo. The Assigned League Registrar will complete the final approval and verification.
1. Choose Players/Admin and Player Lookup from the main navigation. 2. Select any filters and choose Search.
NOTE: We recommend using the filter of application status of Pending All Applications to find new player applications that need to be rostered.
3. The list of players matching the criteria will display. If you used the status of Pending
Applications. The names will display with four options. a. First is an option to email this player’s parent b. Second shows if this player has paid c. Third indicates if the player has been accepted d. Fourth (Age Legal) if the Birth Certificate has been verified. To verify a Birth
Certificate, click the player’s name to see the player details, and view the Birth Certificate on file.
Team Sports HQ – Affinity Sports 21
4. The Club Representative will view the player’s profile and confirm that a Birth Certificate has been uploaded and the photo is proper.
5. If yes, the Club Representative will check Accepted and Age/Legal to accept and verify the player name, gender, date of birth match their birth certificate and a certificate is uploaded, and that the player will be playing with your club from the Player Search Results screen, when Pending All Applications Status is selected.
6. Once your players have been accepted and verified, they may be rostered to a team.
Player Status Terms • Accepted – confirmation that the player will be playing with your club, triggers player to
appear in billing reports. One of two steps necessary in order for player to be rostered to a team.
• Age Legal – confirmation that the vital data (name, gender, date of birth) entered into the system for the player matches the information on their birth certificate. One of two steps necessary in order for player to be rostered to a team.
• Pending – player has an application but is not assigned to a team. • Assigned - player is rostered and assigned to a team. • Activated - player is on an activated team. • Cancelled - player’s application has been cancelled. • Rejected - player’s application has been rejected. • Pending Release or Transfer - player’s application is pending approved release or
transfer. • Approved Release or Transfer - player’s application has been approved for release or
transfer. • Rejected Release or Transfer - player’s applications has been rejected for release or
transfer.
Rostering Players
1. Choose Teams and Team Lookup from the main navigation. 2. Select any filters and choose Search. 3. From the Search Results, click on the Team Name to view the Team Details. 4. Choose the team in which you wish to roster a player by clicking on the name of the team
to display the team details. 5. Choose Roster Player tab. 6. You will see a list of players available to roster to this team on the left side of the screen.

Team Sports HQ – Affinity Sports 22
7. Click the name of the player to select and choose Add Player to move the player to the team roster.
8. Choose Save Players to save your work.
Managing Admins
Admin Lookup The Affinity Sports Platform provides users with the ability to search for admins by league, club, play type, gender, age group, admin type, certification, application status, or disciplinary action, risk expiration date, season, or name.
1. Choose Players/Admin and Admin Lookup from the main navigation. 2. Select any search criteria from the various drop down menus and choose Search. 3. From the Search Results, click on the Admin Name to view the Admin Profile. 4. Choose the Administrator Info tab to view or edit admin information. You will also be
able to view the admin’s photo and Driver’s License (if applicable). 5. Choose Update after making changes to save.

Team Sports HQ – Affinity Sports 23
Admin Profile • There are multiple tabs under the admin profile or record that perform different
functions and allow different information to be updated.
Team Sports HQ – Affinity Sports 24
• Administrator Information – Admin name, address, contact information, Level of play, Driver’s License, preferred role, coaching license, and risk status
• Additional Info – Residence information, and criminal background • Applications – Shows the details of current and historical applications for the admin,
provides the ability to edit and/or cancel the application • Disciplinary – Provides the ability to track disciplinary items on the admin • Children – Shows any children of the Admin registered in the platform • Events – Displays any events the admin has signed up for through the Affinity Sports
Event Manager
Editing Admin Information 1. Choose Players/Admin and Admin Lookup from the main navigation. 2. Select any search criteria from the various drop down menus and choose Search. 3. From the Search Results, click on the Admin Name to view the Admin Profile. 4. Select the tab where you need to add or update information. 5. Choose Update after making changes to save.
Verifying Admins Before rostering an admin, the Club Representative will need to verify the admin details align with business rules, the record includes a photo, and they have completed and passed a background check. The Assigned League Registrar will complete the final approval and verification.
1. Choose Players/Admin and Player Lookup from the main navigation. 2. Select any filters and choose Search.
NOTE: We recommend using the filter of Pending Applications to find new admin applications that need to be rostered.
3. The list of admins matching the criteria will display. 4. The Club Representative will view the admin’s profile and confirm that background check
has been passed and completed and a proper photo has been uploaded. 5. If criteria has been met and your admins have been verified, they may be rostered to a
team.
Rostering Admins 1. Choose Teams and Team Lookup from the main navigation. 2. Select any filters and choose Search. 3. From the Search Results, click on the Team Name to view the Team Details. 4. Choose Roster Admin tab. 5. You will see a list of admins available to roster to this team on the left side of the screen.
You may also search for an Admin.
Team Sports HQ – Affinity Sports 25
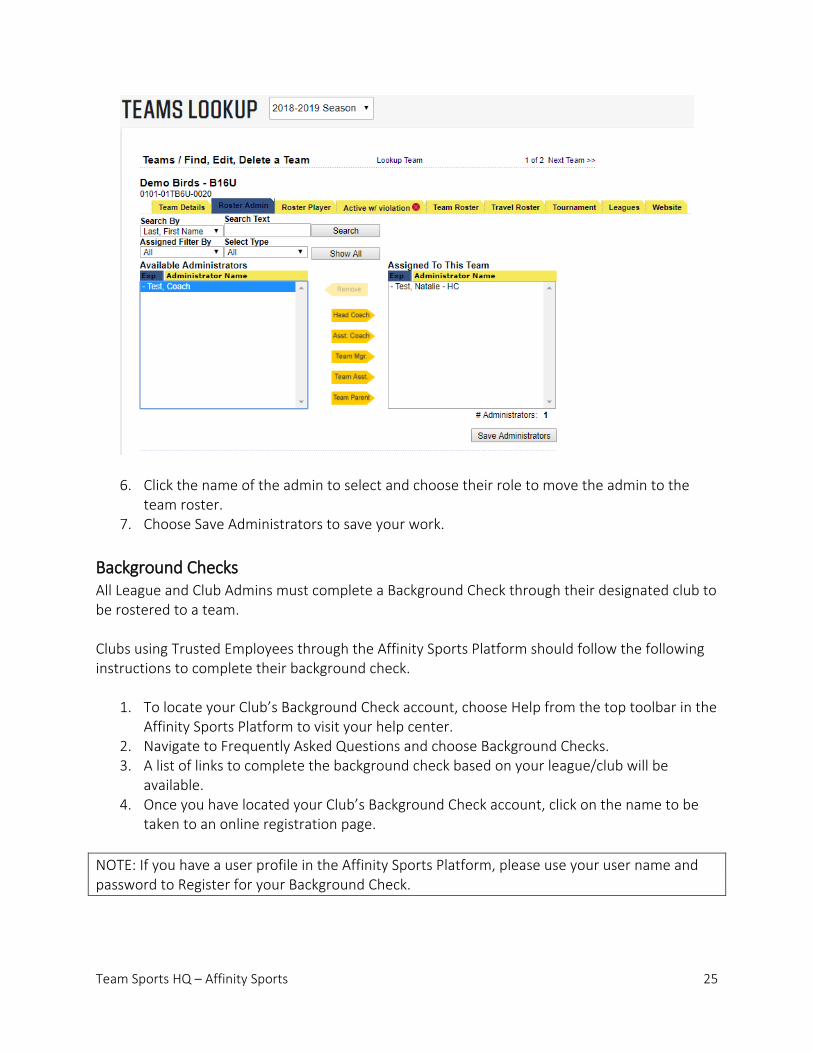
6. Click the name of the admin to select and choose their role to move the admin to the
team roster. 7. Choose Save Administrators to save your work.
Background Checks All League and Club Admins must complete a Background Check through their designated club to be rostered to a team. Clubs using Trusted Employees through the Affinity Sports Platform should follow the following instructions to complete their background check.
1. To locate your Club’s Background Check account, choose Help from the top toolbar in the Affinity Sports Platform to visit your help center.
2. Navigate to Frequently Asked Questions and choose Background Checks. 3. A list of links to complete the background check based on your league/club will be
available. 4. Once you have located your Club’s Background Check account, click on the name to be
taken to an online registration page. NOTE: If you have a user profile in the Affinity Sports Platform, please use your user name and password to Register for your Background Check.

Team Sports HQ – Affinity Sports 26
Manually entering players and admins As a Club Representative you can manually add players, families and admins to the platform.
1. Choose Players/Admin and Add Player/Admin from the main navigation. 2. Before adding a new player or admin, you will want to verify if this player or admin is
already in the system. 3. Enter the player/admin first name, last name, and Date of Birth. 4. If the user exists, the user profile will display. If the correct user, choose Select beside
their name and choose the action you wish to perform (Create Player Application or Create New Coach/Admin Application).
5. If no results are found, choose the action you wish to perform (Create New Youth Player, Create New Coach/Admin).
6. Enter the user’s information in the form, and for players include information for at least one parent or guardian.
7. Choose Continue. 8. Select a District, League, Club and Play Level from the drop downs. 9. Indicate if a payment was received, if the player is accepted and if the player is age legal. 10. If applicable, choose the team in which you wish to roster the player and choose
Continue. 11. Enter the required Player/Admin information and choose Save. 12. Agree to the ELA by choosing Agree. 13. If you have additional family members to add, choose Add Other Family Member and
follow the same process. 14. To view the player’s profile choose Detail. 15. Choose Add Player/Admin to add additional players or admins.
Adding Player or Admin Photos 1. Choose Players/Admin and Player Lookup or Admin Lookup from the main navigation. 2. Select the filters you would like to use and choose Search. 3. A list of players or admins based on your criteria displays. 4. Click on the player or admin name to display their profile. 5. Navigate to the Player Information tab or the Administrator Information tab and click on
the Upload Photo icon. 6. Click Choose File to locate the photo on your computer. 7. The image will display and you will have the option to crop, resize or rotate the image. 8. Choose Upload Image to add the photo to the player or admin profile.
TIP: Photos should be headshots that are clear, centered and a front view of the player’s face with eyes open. Please no sunglasses or hats that hide the player’s face.
Team Sports HQ – Affinity Sports 27
Adding Player Birth Certificates 1. Choose Players/Admin and Player Lookup from the main navigation. 2. Select the filters you would like to use and choose Search. 3. A list of players based on your criteria displays. 4. Click on the player name to display their profile. 5. Navigate to the Player Information tab and click on the Upload Birth Certificate icon. 6. Click Choose File to locate the Birth Certificate on your computer. 7. The image will display and you will have the option to crop, resize or rotate the image. 8. Choose Upload Image to add the Birth Certificate to the player profile.
Uploading Players and Admins For Clubs using a provider other than Blue Sombrero for online registration, they will need to manually add players or admins to the Affinity Sports Platform or they may submit an upload through our support center. To learn more about the upload process and to download the upload template, please visit the VYSA – Affinity Sports Help Center and navigate to the Uploading Players and Admin section.

Team Sports HQ – Affinity Sports 28
Emailing Players or Admins The Affinity Sports Platform allows Club Representatives and Assigned League Registrars to email player’s parents and admins from the player, administrator and parent lookup functions. Additionally emails can be sent from the Team Roster screens. When you perform a lookup for a particular subset of your members, you will notice an icon in the shape of an envelope at the top far left of the search results and a column under this icon next to each name. This is the icon for sending emails. Email by Team
1. Choose Teams and Team Lookup from the main navigation. 2. Select any filters and choose Search. 3. From the Search Results, click on the Team Name to view the Team Details. 4. Choose the Team Roster tab. 5. Click the top envelope icon to select all players or all administrators for the team or check
only the individuals you wish to email.
6. Choose the Email Selected button. 7. You will be taken to a content editor screen where you can compose your email.
Team Sports HQ – Affinity Sports 29
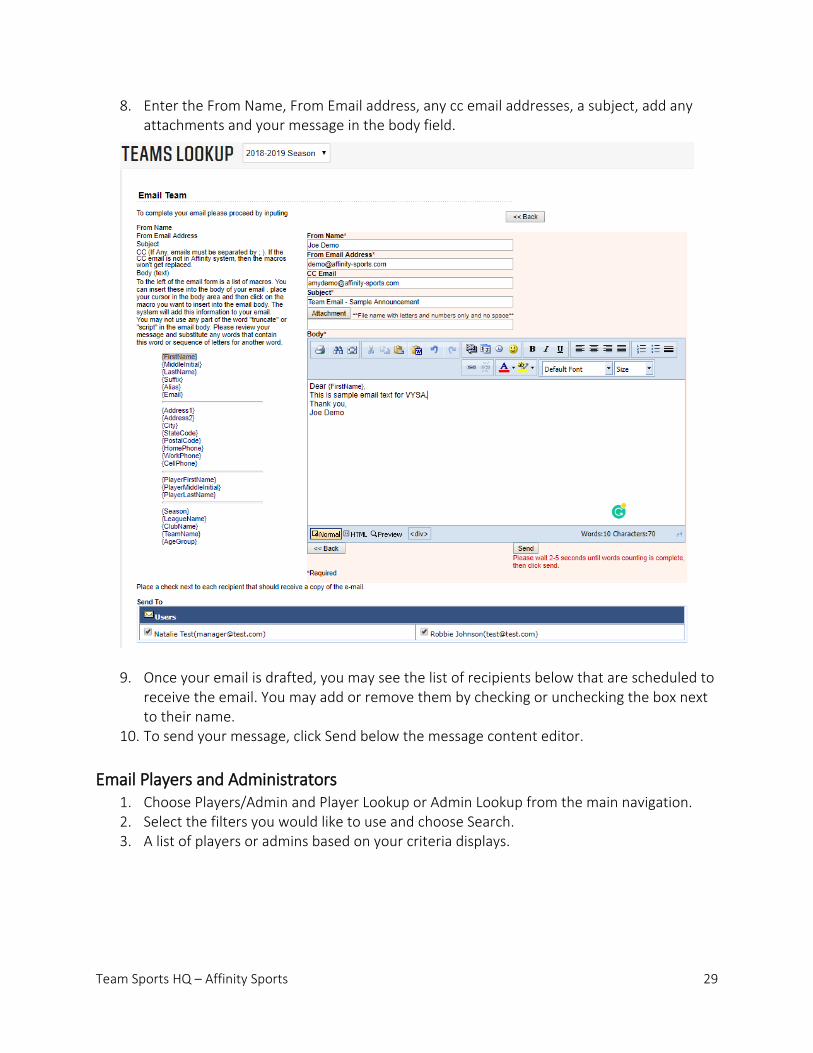
8. Enter the From Name, From Email address, any cc email addresses, a subject, add any attachments and your message in the body field.
9. Once your email is drafted, you may see the list of recipients below that are scheduled to
receive the email. You may add or remove them by checking or unchecking the box next to their name.
10. To send your message, click Send below the message content editor.
Email Players and Administrators 1. Choose Players/Admin and Player Lookup or Admin Lookup from the main navigation. 2. Select the filters you would like to use and choose Search. 3. A list of players or admins based on your criteria displays.
Team Sports HQ – Affinity Sports 30
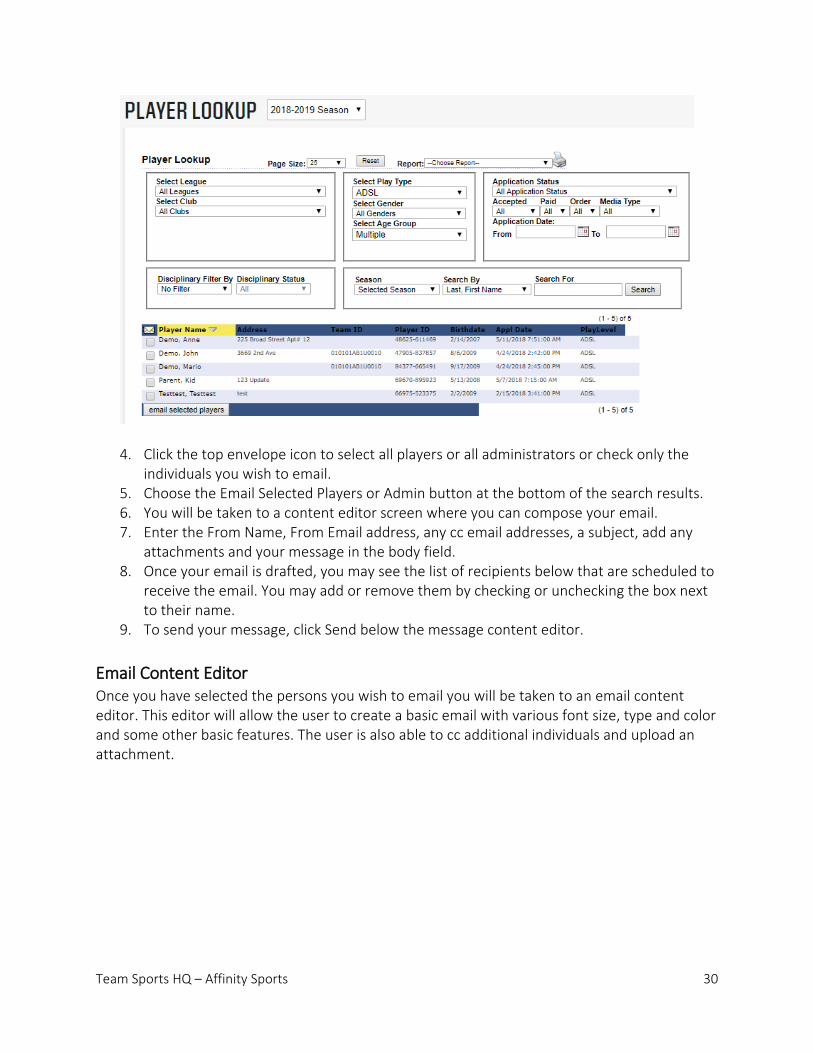
4. Click the top envelope icon to select all players or all administrators or check only the
individuals you wish to email. 5. Choose the Email Selected Players or Admin button at the bottom of the search results. 6. You will be taken to a content editor screen where you can compose your email. 7. Enter the From Name, From Email address, any cc email addresses, a subject, add any
attachments and your message in the body field. 8. Once your email is drafted, you may see the list of recipients below that are scheduled to
receive the email. You may add or remove them by checking or unchecking the box next to their name.
9. To send your message, click Send below the message content editor.
Email Content Editor Once you have selected the persons you wish to email you will be taken to an email content editor. This editor will allow the user to create a basic email with various font size, type and color and some other basic features. The user is also able to cc additional individuals and upload an attachment.
Team Sports HQ – Affinity Sports 31
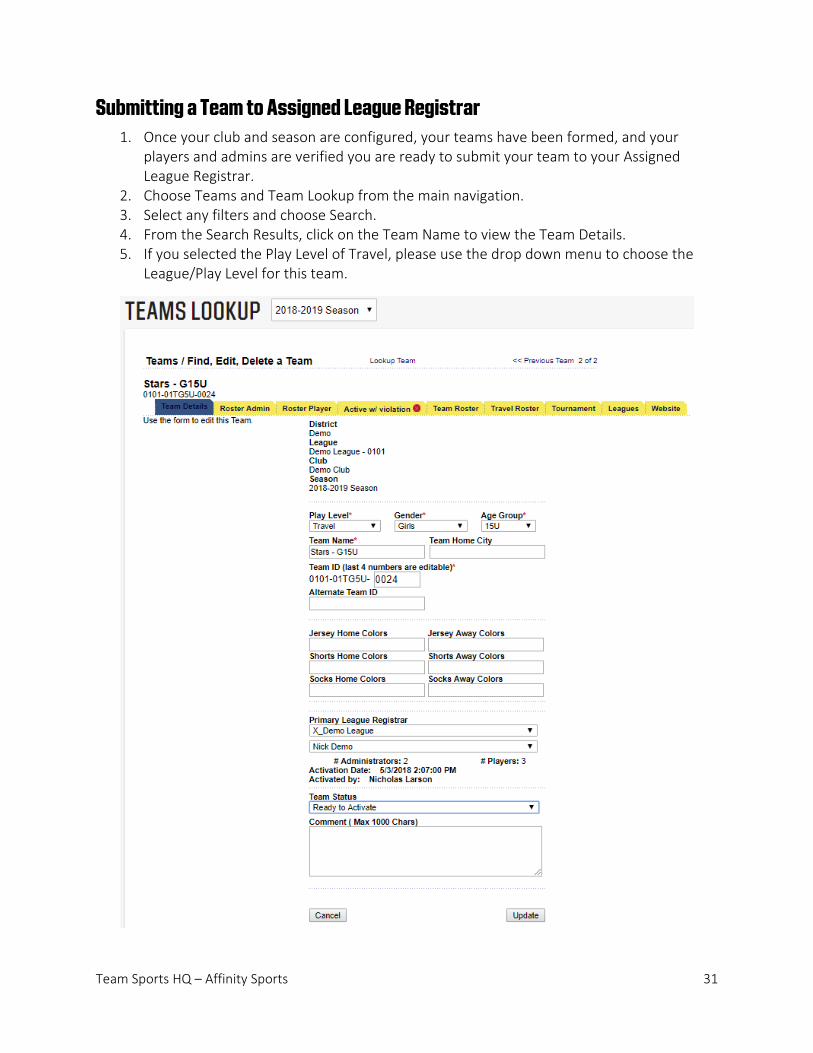
Submitting a Team to Assigned League Registrar 1. Once your club and season are configured, your teams have been formed, and your
players and admins are verified you are ready to submit your team to your Assigned League Registrar.
2. Choose Teams and Team Lookup from the main navigation. 3. Select any filters and choose Search. 4. From the Search Results, click on the Team Name to view the Team Details. 5. If you selected the Play Level of Travel, please use the drop down menu to choose the
League/Play Level for this team.

Team Sports HQ – Affinity Sports 32
6. Choose your League and the Assigned League Registrar from the Primary League Registrar drop downs.
7. Update the Team Status drop down to Ready to Activate. 8. You will also want to send an email to your Assigned League Registrar to notify them that
there is a team in their Team Queue for review.
Printing ID Cards Cards (Player and Admin Passes) can be printed from either the Team Roster screen or from ID Cards under the Players/Admins main navigation.
Team Roster Card Printing
1. To print cards from the Team Roster, choose Teams and Team Lookup from the main navigation.
2. Select any filters and choose Search. 3. From the Search Results, click on the Team Name to view the Team Details. 4. Choose the Team Roster tab.
5. Choose Print ID Card PDF from below the list of players. 6. The ID Card PDF opens in a new tab and displays. 7. Choose print by clicking on the printer icon displayed in your ID Cards. 8. Once printed, return to the Team Roster page and indicate if your cards printed correctly.
Team Sports HQ – Affinity Sports 33
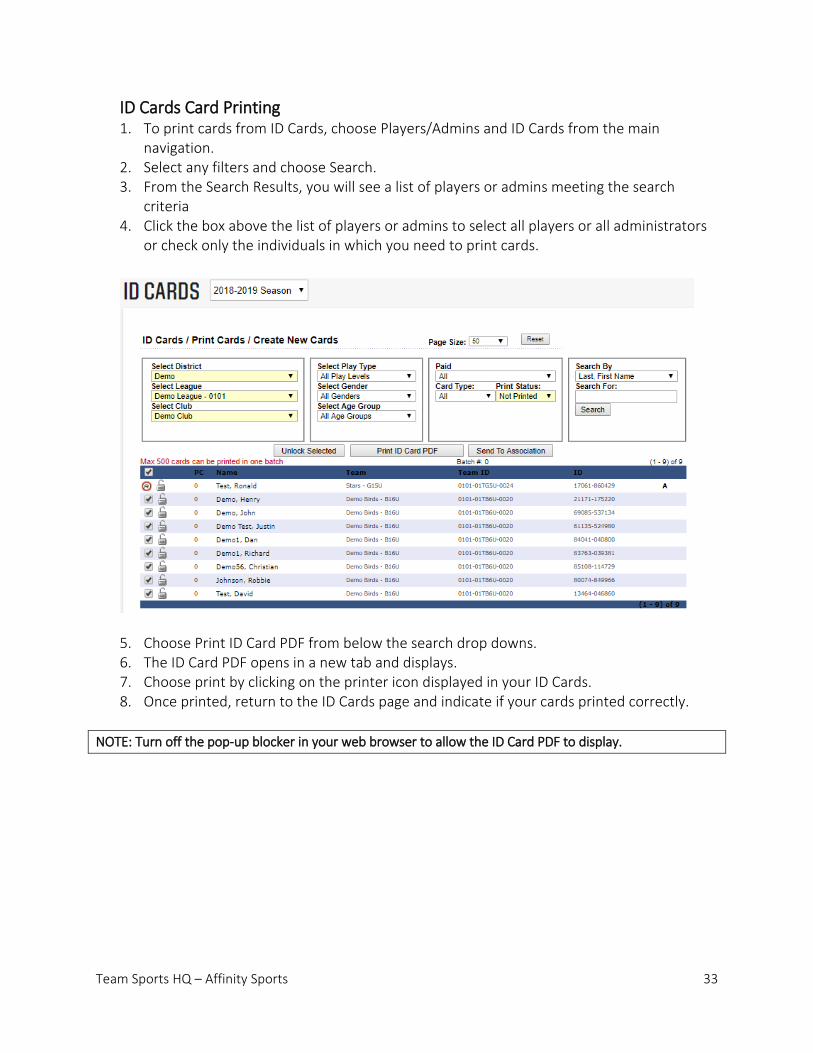
ID Cards Card Printing 1. To print cards from ID Cards, choose Players/Admins and ID Cards from the main
navigation. 2. Select any filters and choose Search. 3. From the Search Results, you will see a list of players or admins meeting the search
criteria 4. Click the box above the list of players or admins to select all players or all administrators
or check only the individuals in which you need to print cards.
5. Choose Print ID Card PDF from below the search drop downs. 6. The ID Card PDF opens in a new tab and displays. 7. Choose print by clicking on the printer icon displayed in your ID Cards. 8. Once printed, return to the ID Cards page and indicate if your cards printed correctly.
NOTE: Turn off the pop-up blocker in your web browser to allow the ID Card PDF to display.
Team Sports HQ – Affinity Sports 34
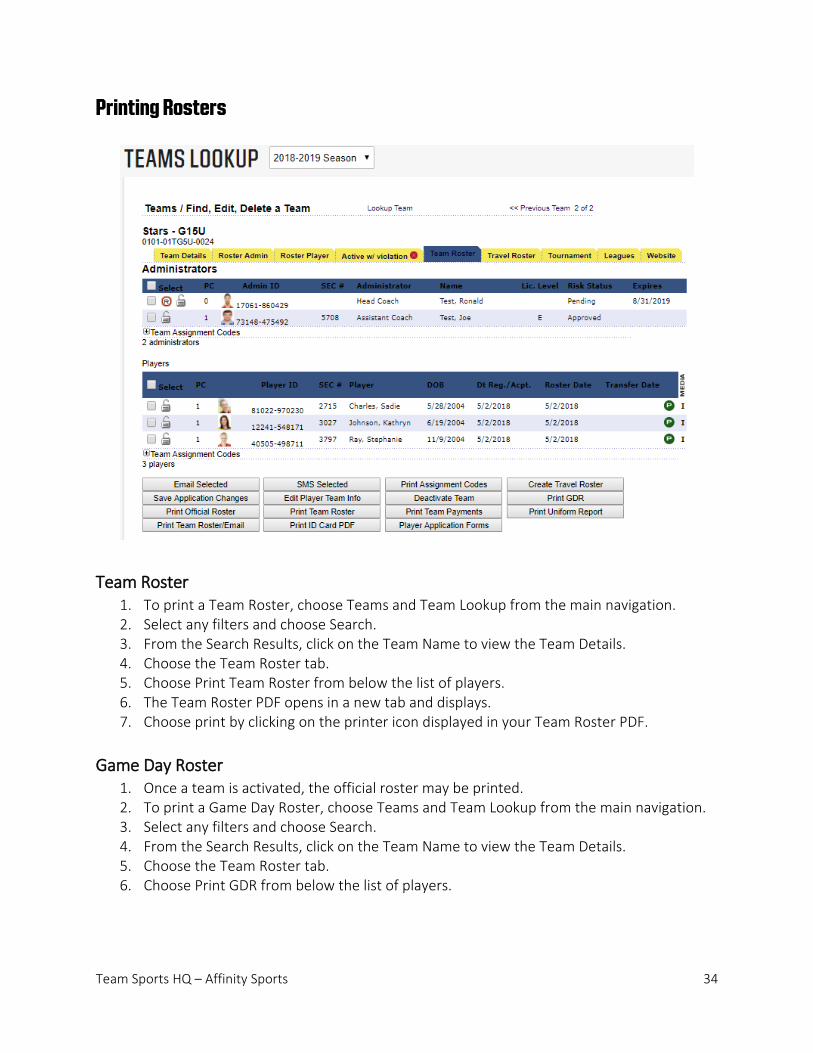
Printing Rosters
Team Roster 1. To print a Team Roster, choose Teams and Team Lookup from the main navigation. 2. Select any filters and choose Search. 3. From the Search Results, click on the Team Name to view the Team Details. 4. Choose the Team Roster tab. 5. Choose Print Team Roster from below the list of players. 6. The Team Roster PDF opens in a new tab and displays. 7. Choose print by clicking on the printer icon displayed in your Team Roster PDF.
Game Day Roster 1. Once a team is activated, the official roster may be printed. 2. To print a Game Day Roster, choose Teams and Team Lookup from the main navigation. 3. Select any filters and choose Search. 4. From the Search Results, click on the Team Name to view the Team Details. 5. Choose the Team Roster tab. 6. Choose Print GDR from below the list of players.

Team Sports HQ – Affinity Sports 35
7. The GDR Roster opens in a new tab and displays.
8. Choose print by clicking on the printer icon displayed in your GDR Roster PDF.
Official Roster 1. Once a team is activated, the official roster may be printed. 2. To print an Official Roster, choose Teams and Team Lookup from the main navigation. 3. Select any filters and choose Search. 4. From the Search Results, click on the Team Name to view the Team Details. 5. Choose the Team Roster tab. 6. Choose Print Official Roster from below the list of players. 7. The Official Roster opens in a new tab and displays. 8. Choose print by clicking on the printer icon displayed in your Official Roster PDF.
NOTE: Turn off the pop-up blocker in your web browser to allow Rosters to display.
Team Sports HQ – Affinity Sports 36
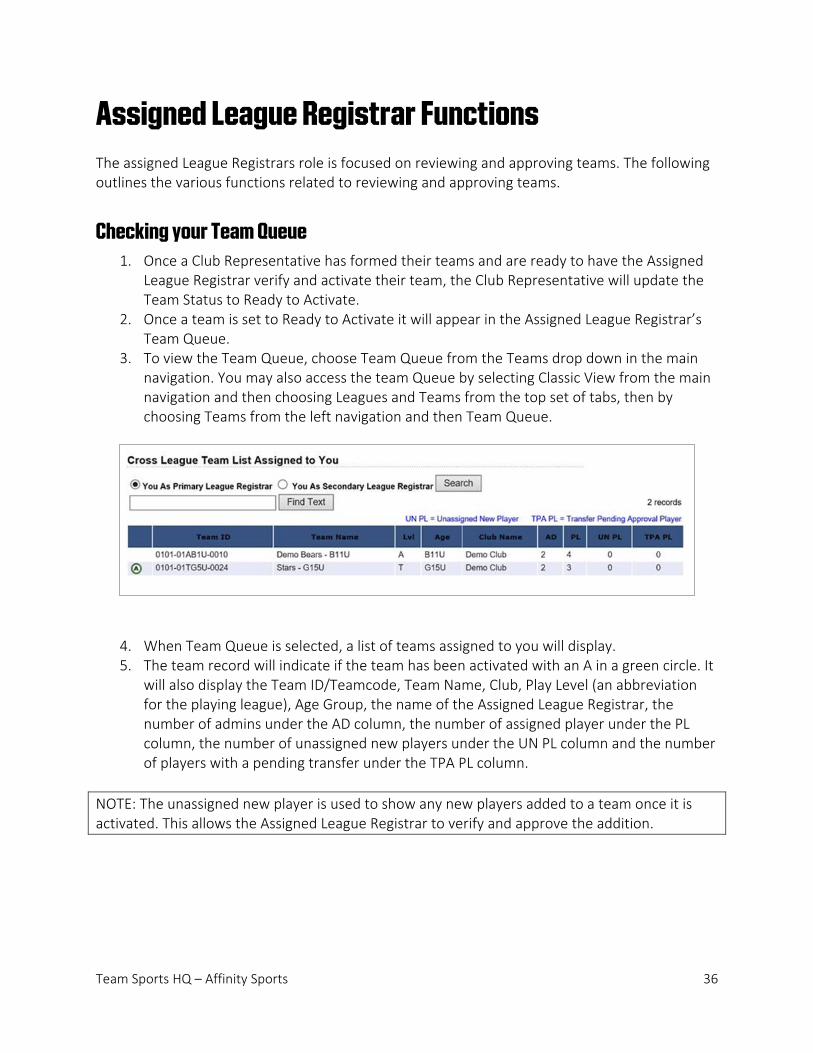
Assigned League Registrar Functions The assigned League Registrars role is focused on reviewing and approving teams. The following outlines the various functions related to reviewing and approving teams.
Checking your Team Queue 1. Once a Club Representative has formed their teams and are ready to have the Assigned
League Registrar verify and activate their team, the Club Representative will update the Team Status to Ready to Activate.
2. Once a team is set to Ready to Activate it will appear in the Assigned League Registrar’s Team Queue.
3. To view the Team Queue, choose Team Queue from the Teams drop down in the main navigation. You may also access the team Queue by selecting Classic View from the main navigation and then choosing Leagues and Teams from the top set of tabs, then by choosing Teams from the left navigation and then Team Queue.
4. When Team Queue is selected, a list of teams assigned to you will display. 5. The team record will indicate if the team has been activated with an A in a green circle. It
will also display the Team ID/Teamcode, Team Name, Club, Play Level (an abbreviation for the playing league), Age Group, the name of the Assigned League Registrar, the number of admins under the AD column, the number of assigned player under the PL column, the number of unassigned new players under the UN PL column and the number of players with a pending transfer under the TPA PL column.
NOTE: The unassigned new player is used to show any new players added to a team once it is activated. This allows the Assigned League Registrar to verify and approve the addition.

Team Sports HQ – Affinity Sports 37
Verify Players and Admins 1. Click on the name of the team from your Team Queue to view the Team Details and to
verify all rules have been met. 2. Choose Team Roster to view a list of all players and admins rostered the team. 3. View each player or admin record by clicking on their name. 4. For Players, you will want to verify that they have a proper photo, and they have a birth
certificate on file and the name, gender, date of birth match their birth certificate. 5. Once you have verified the Birth Certificate, check the Birth Certificate Verified check box
below the player’s photo and choose Update. Once verified, the Birth Certificate will be removed from the platform and a Proof of Age image. A blue check mark with a green B will display next to the players name on the Team Roster screen.
6. For Admins, you will want to verify that they have a proper photo, and they have a completed and approved risk status.
7. Once you have verified the players and admins are compliant with the rules you are ready to activate the team.
NOTE: A legend of player and admin statuses can be viewed on the Team Roster tab.

Team Sports HQ – Affinity Sports 38
Activating Teams 1. Choose the Activation tab to activate the team.
2. If a green check mark displays on the Activation tab the team and its players and admins are compliant and the team can be activated.
3. If a red x displays in the Activation tab, the team and its players and admins are not compliant, the team should be sent back to the Club Representative to fix any rules violations. For some clubs, the Assigned League Registrar may fix the rules violations on behalf of the club.
4. To activate the team, choose Activate Team from the Activation screen. 5. Click on the Team Details tab and change the Team Status to Approved.
6. To return a team to a Club Representative to fix rules violations, click the Team Details
tab and change the Assigned League Registrar’s name to Activation Requirements Not Met with the drop downs in the Primary League Registrar section of Team Details page.
7. Update Team Status to Activation Requirements Not Met.
NOTE: A legend of rules violations can be viewed on the Activation tab.

Team Sports HQ – Affinity Sports 39
Notes