Embed Size (px)
Citation preview
A Software Defined Radio
Expert Electronics2015
V1.0
SunSDR2DUC/DDC HF/6M/VHF SDR Transceiver
PRO
DUC/DDC HF/6M/VHF SDR Transceiver
PHONES MIC1 MIC2PWR
EExpert ElectronicsSunSDR2
PRO
Getting Started

1
Introduction ..................................................................................................................... 2
1. Connection .................................................................................................................. 3
2. Ethernet-connection setting ......................................................................................... 4
3. Network Settings ......................................................................................................... 5
4. Transceiver's IP address changing .............................................................................. 6
5. ExpertSDR2 software installation ................................................................................ 7
6. Software interface description ................................................................................... 10
Conclusion .................................................................................................................... 14
2
Introduction
If you’ll spend just 15 minutes to read this guide, you will be able to easily begin operating the SunSDR2
PRO transceiver and enjoy a modern way of listening the air. This guide will answer most of the first
questions; which users might have when start working with the SDR transceiver.
You’ve got one of the most advanced HAM radio equipment which can be imagined today. This is a
Software Defined Radio transceiver, it provides high quality of signal processing for both RX and TX
modes by modern digital techniques. A PC used with the transceiver allows to use the HAM LOGs and
DIGI software without wires.
Quick and efficient mastering of the SunSDR2 PRO transceiver requires a basic PC knowledge. We hope
that the Windows terms, which are used in this guide are familiar to the user and won’t cause any
difficulties. To make this guide more user-friendly, we used screenshots of dialogue windows; necessary
functions are highlighted with colored contour.
Since the SunSDR2 PRO is an SDR, it means that you will need a PC or laptop to use the transceiver.
You control your transceiver via the ExpertSDR2 software installed on your PC, thus you can switch
RX/TX modes, bands and data rate processing. The main feature of this transceiver is the new way of
radio signals processing.
There is no signal processing path, in its classical meaning, in this transceiver. The signal is digitized
from the antenna and all the other signal processing happens in the software. The same with the
transmitting. The signals are generated digitally, with the certain mode type, already on the required
frequency. Of all the classical hardware there are only the preselector, power amplifier and low pass filter.
3
1. Connection
The following components are required to operate
the SunSDR2 PRO transceiver:
• Transceiver power supply unit;
• PC;
• CW key (if it’s required);
• PTT microphone or telephone headset;
• Computer net LAN – cable;
• Antenna tuned on the HAM bands.
Let’s have a look at each component.
Power Supply unit should have at least 75 W,
provide constant voltage of 15 V output with 5 A
load current. With 15 V supply, transceiver has
max output power - 20 W.
PC or notebook might be any modern
configuration, produced in the last 2-3 years.
Recommended configuration:
• 2 or 4 core processor Intel Core i3, Core i5 or
Core i7;
• 4 GB or more RAM;
• 40 GB hard disk free space for the ExpertSDR2
software and the accompanied programs;
• 17 – 27" monitor;
• video card supporting OpenGL 1.5 and higher.
ExpertSDR2 software will work on less powerful
PCs with processors Core2Duo and Dual-Core,
but it will lead to higher level of CPU load. The
more powerful the PC, the less resources the
program requires to display colorful "waterfall" and
panorama.
Operating system: Windows XP 32/64 bit,
Windows 7 32/64 bit, Windows 8/8.1 32/64 bit
Windows 10 32/64 bit. The latest versions are
preferable.
Microphone or Telephone headset can be either
the cheapest, as for example, by Genius, or
developed specially for radio amateurs by Heil
Sounds.
There is a standard 6,3 mm jack for electret
microphone on the transceiver's front panel. Also
there is a jack, compatible with Yaesu PTT-
microphones like MH-31.
Control of the RX/TX modes can be managed by
pressing the PTT-footswitch, connected to the
PTT connector on the rear panel of the
transceiver.
LAN – cable connects the transceiver with a PC
by Ethernet-connection. PC connection is also
possible “by air”, via wireless net. The easiest and
the quickest connection between the transceiver
and a PC is by the LAN-cable, which supplied with
the transceiver.
Antenna tuned on the HAM bands should have
an impedance close to 50 Ohm on the bands
where you plan to operate.
4
2. Ethernet-connection setting
There are two ways to connect the transceiver and
a PC via the LAN-cable: direct connection to PC
via Ethernet (LAN) interface and connection to an
existing local net via router.
The first way:
• Connect your transceiver a to PC via the LAN-
cable, supplied with transceiver.
• Switch on the transceiver.
• Set an IP address in Windows settings as it is
shown in Section 3.
• Launch the ExpertSDR2 software for SunSDR2
PRO transceiver.
• Open Options-> press Search button, you
should see a new window with your transceiver-
> press Use button.
• Press the Start button in the program
If everything was set correctly, you will see the
spectrum in the program's window and hear the air
noise. You may start operating.
The second way:
If you already have a local network with an IP
address not 192.168.16.ххх and you need to
change the IP address in SunSDR2 PRO:
• Connect your transceiver a to PC via the LAN-
cable, supplied with transceiver.
• Switch on the transceiver.
• Set an IP address in Windows settings as it is
shown in Section 3.
• Launch the ExpertSDR2 software for SunSDR2
PRO transceiver.
• Open Options-> press Search button, you
should see a new window with your transceiver-
> press Use button.
• Change IP address in SunSDR2 PRO as it is
shown in Section 4.
• Connect the transceiver by the LAN-cable to a
local net.
Now you can launch the ExpertSDR2 software
with connected SunSDR2 PRO on any PC in the
local network.
If everything was set correctly, you will see the
spectrum in the program's window and hear the air
noise. You may start operating.
5
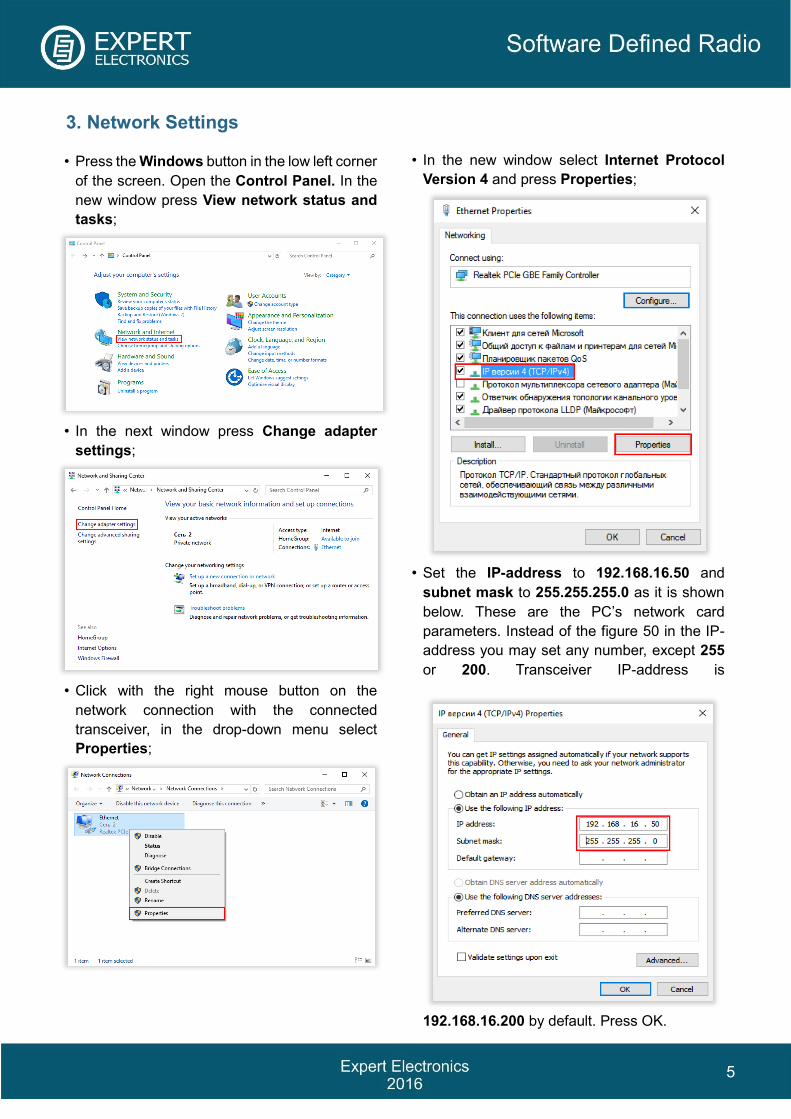
3. Network Settings
• Press the Windows button in the low left corner
of the screen. Open the Control Panel. In the
new window press View network status and
tasks;
• In the next window press Change adapter
settings;
• Click with the right mouse button on the
network connection with the connected
transceiver, in the drop-down menu select
Properties;
• In the new window select Internet Protocol
Version 4 and press Properties;
• Set the IP-address to 192.168.16.50 and
subnet mask to 255.255.255.0 as it is shown
below. These are the PC’s network card
parameters. Instead of the figure 50 in the IP-
address you may set any number, except 255
or 200. Transceiver IP-address is
192.168.16.200 by default. Press OK.
6
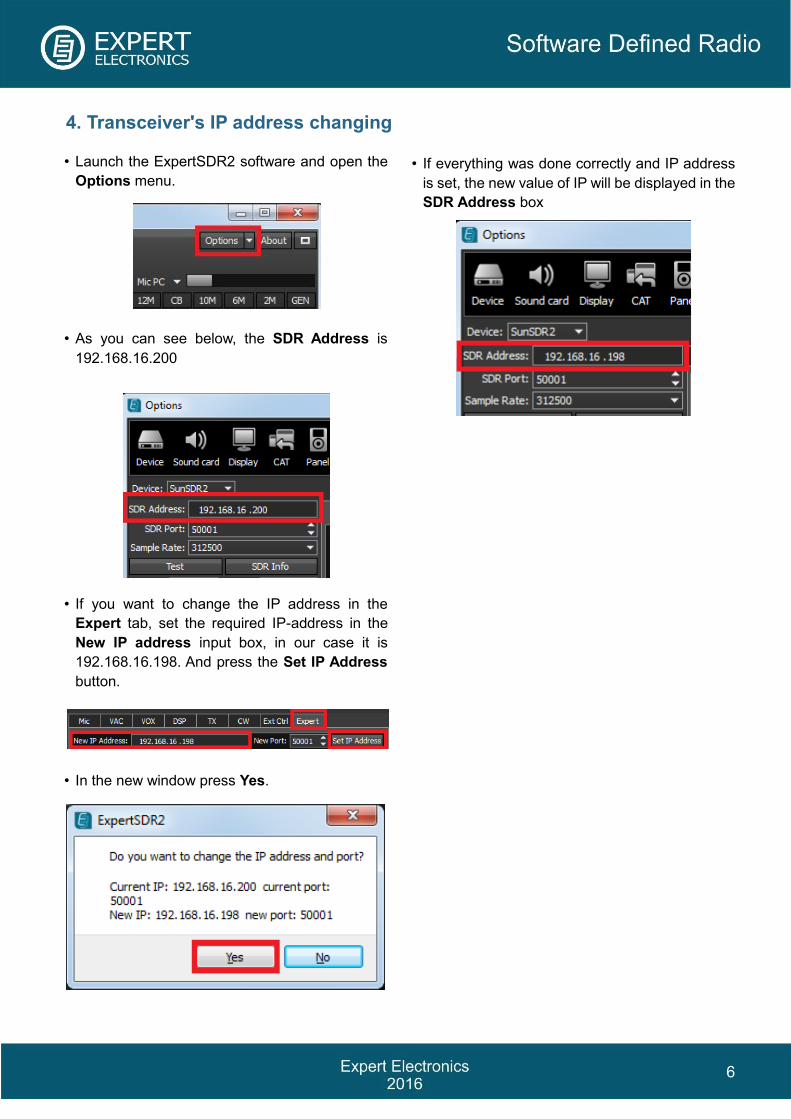
4. Transceiver's IP address changing
• Launch the ExpertSDR2 software and open the
Options menu.
• As you can see below, the SDR Address is
192.168.16.200
• If you want to change the IP address in the
Expert tab, set the required IP-address in the
New IP address input box, in our case it is
192.168.16.198. And press the Set IP Address
button.
• In the new window press Yes.
• If everything was done correctly and IP address
is set, the new value of IP will be displayed in the
SDR Address box
7
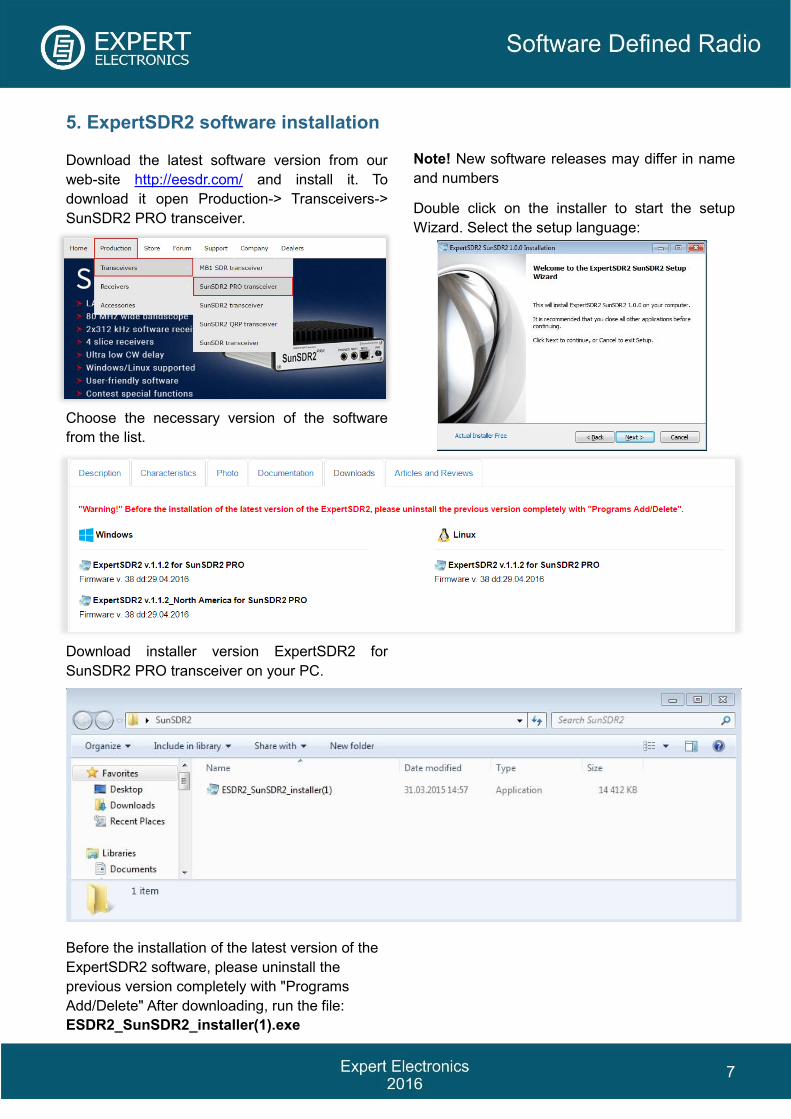
5. ExpertSDR2 software installation
Download the latest software version from our
web-site http://eesdr.com/ and install it. To
download it open Production-> Transceivers->
SunSDR2 PRO transceiver.
Choose the necessary version of the software
from the list.
Download installer version ExpertSDR2 for
SunSDR2 PRO transceiver on your PC.
Before the installation of the latest version of the
ExpertSDR2 software, please uninstall the
previous version completely with "Programs
Add/Delete" After downloading, run the file:
ESDR2_SunSDR2_installer(1).еxe
Note! New software releases may differ in name
and numbers
Double click on the installer to start the setup
Wizard. Select the setup language:
8
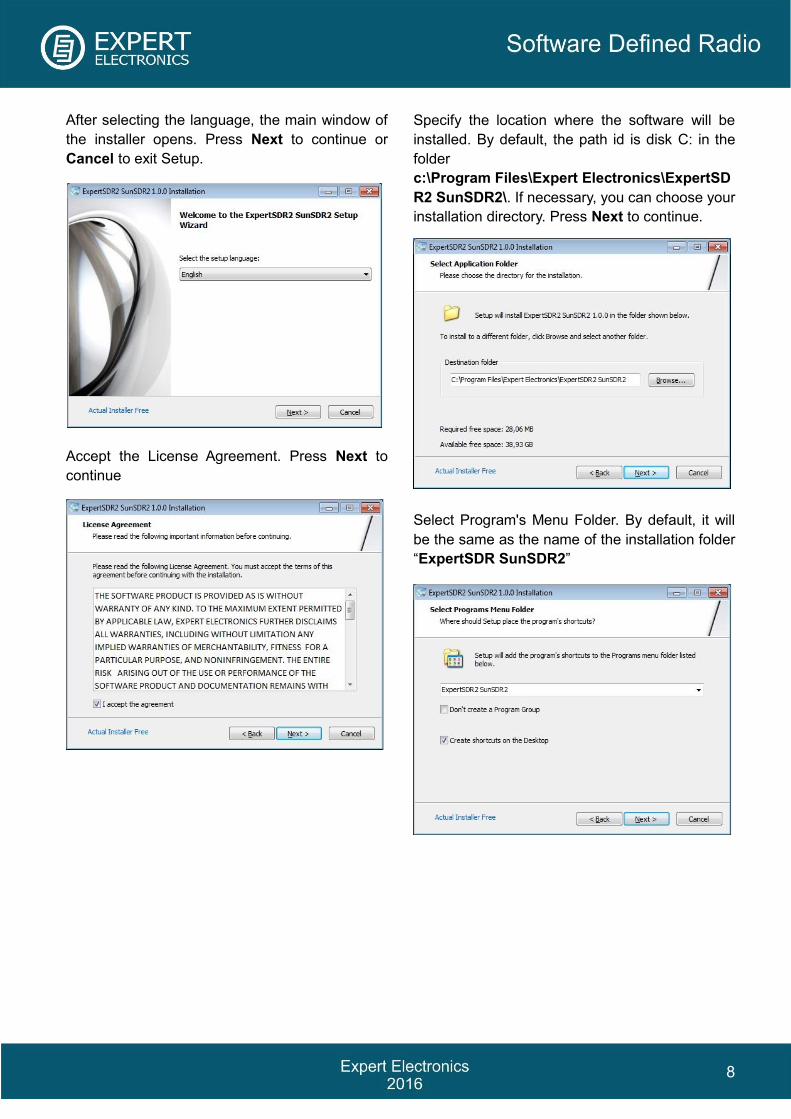
After selecting the language, the main window of
the installer opens. Press Next to continue or
Cancel to exit Setup.
Accept the License Agreement. Press Next to
continue
Specify the location where the software will be
installed. By default, the path id is disk C: in the
folder
c:\Program Files\Expert Electronics\ExpertSD
R2 SunSDR2\. If necessary, you can choose your
installation directory. Press Next to continue.
Select Program's Menu Folder. By default, it will
be the same as the name of the installation folder
“ExpertSDR SunSDR2”
9
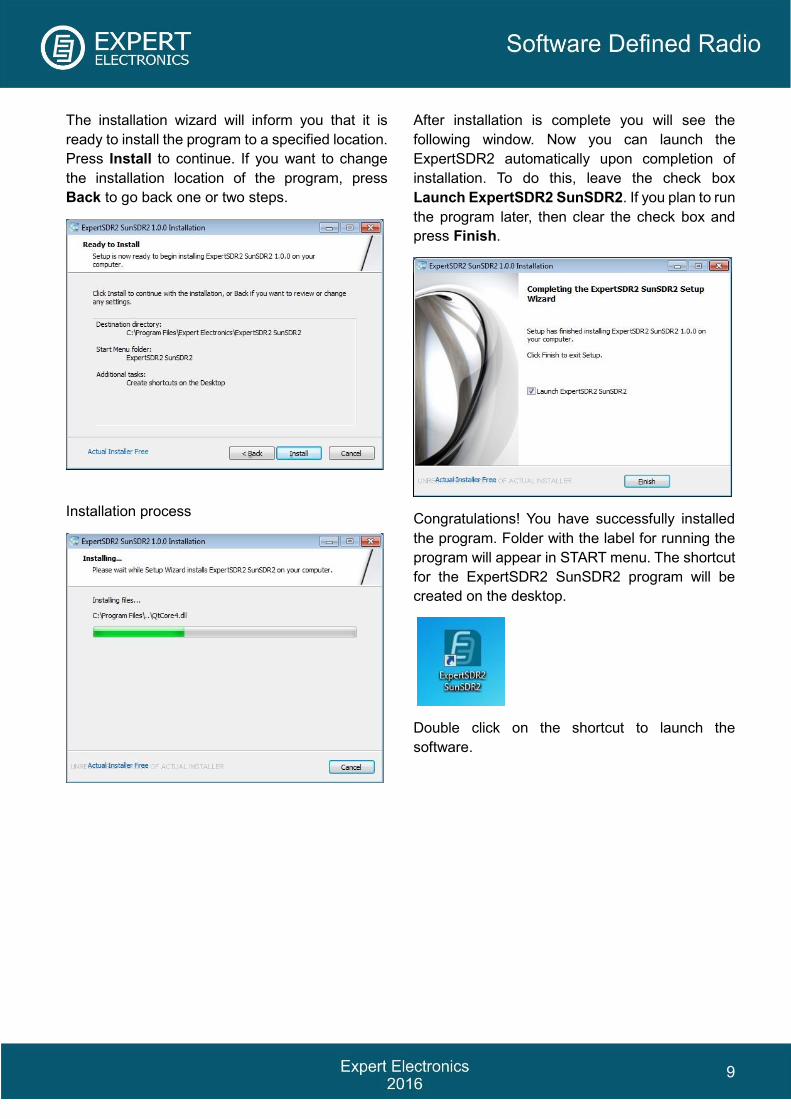
The installation wizard will inform you that it is
ready to install the program to a specified location.
Press Install to continue. If you want to change
the installation location of the program, press
Back to go back one or two steps.
Installation process
After installation is complete you will see the
following window. Now you can launch the
ExpertSDR2 automatically upon completion of
installation. To do this, leave the check box
Launch ExpertSDR2 SunSDR2. If you plan to run
the program later, then clear the check box and
press Finish.
Congratulations! You have successfully installed
the program. Folder with the label for running the
program will appear in START menu. The shortcut
for the ExpertSDR2 SunSDR2 program will be
created on the desktop.
Double click on the shortcut to launch the
software.
10
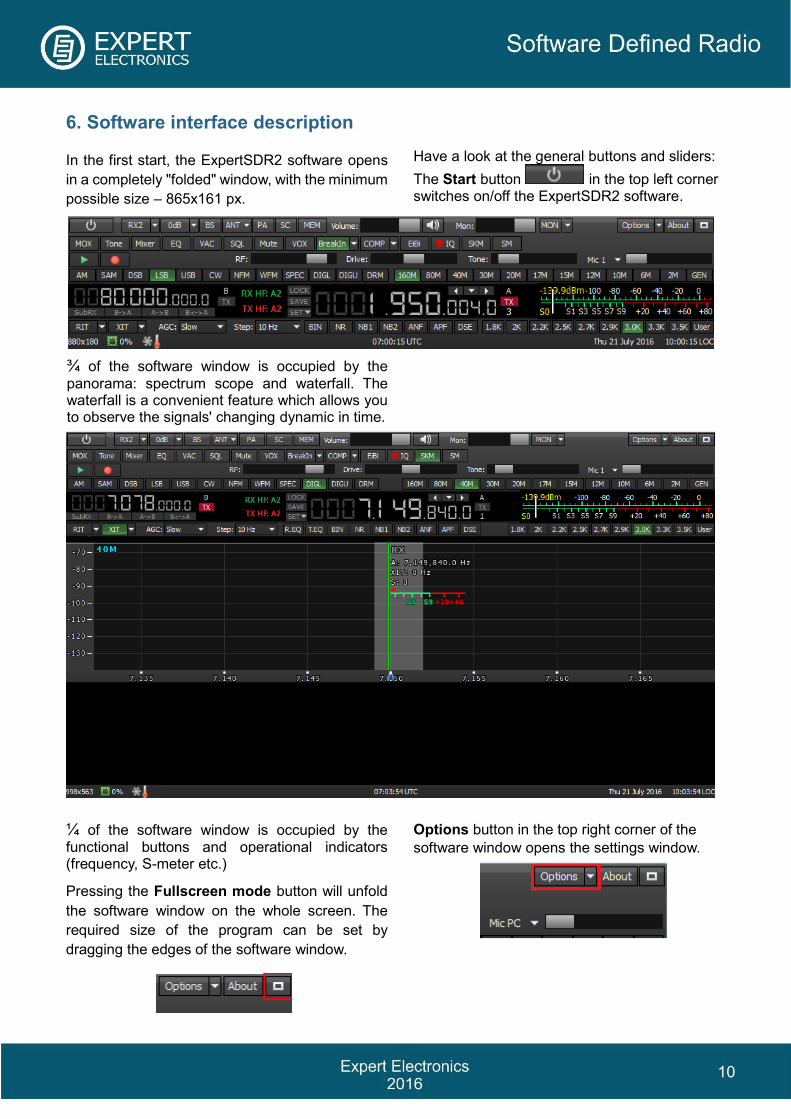
6. Software interface description
In the first start, the ExpertSDR2 software opens
in a completely "folded" window, with the minimum
possible size – 865x161 px.
¾ of the software window is occupied by the
panorama: spectrum scope and waterfall. The waterfall is a convenient feature which allows you to observe the signals' changing dynamic in time.
¼ of the software window is occupied by the functional buttons and operational indicators (frequency, S-meter etc.)
Pressing the Fullscreen mode button will unfold
the software window on the whole screen. The
required size of the program can be set by
dragging the edges of the software window.
Have a look at the general buttons and sliders:
The Start button in the top left corner switches on/off the ExpertSDR2 software.
Options button in the top right corner of the
software window opens the settings window.
11
Tuning frequencies are displayed in the middle (for the VFO A) and on the left side (for the VFO B) of the control panel. Slightly below them, you can select the frequency tuning step.
On the picture below you can see the band buttons. There is also a possibility to open general coverage - GEN button.
Below are the mode type buttons.
The RX filter bandwidth buttons (for DIGL as an example). For each mode type you can select the preset RX bandwidth or tune your own with the User button.
DSP buttons: R.EQ and T.EQ buttons enable equalizer for RX/TX; BIN – binaural audio, pseudo stereo reception; NR – noise reduction; NB1 and NB2 – impulse interference noise blankers, each has its own algorithm; ANF – automatic notch filter for narrowband interference; APF – analog peak-filter creates the triangle filter's AFC in the filter bandpass; DSE – digital surround effect for CW signals.
For operating control, you may use the following drivers: Volume - volume control level; Mon – monitoring control level; RF - AGC gain level;
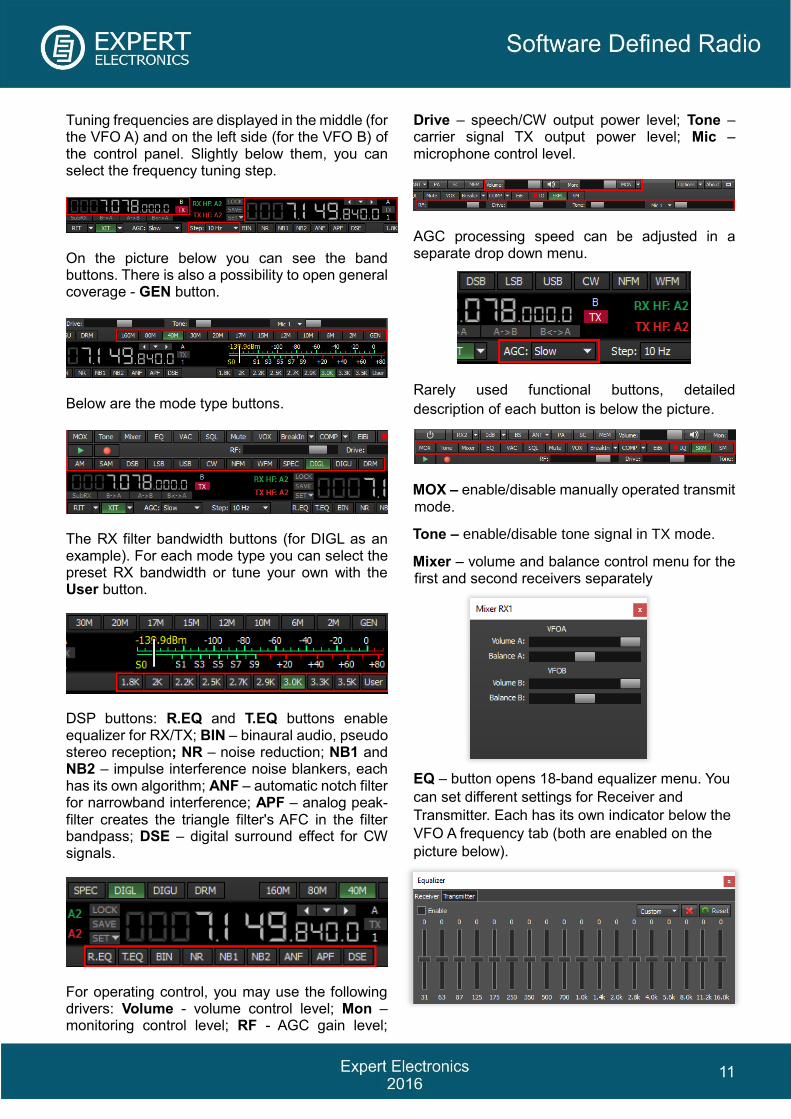
Drive – speech/CW output power level; Tone – carrier signal TX output power level; Mic – microphone control level.
AGC processing speed can be adjusted in a separate drop down menu.
Rarely used functional buttons, detailed
description of each button is below the picture.
MOX – enable/disable manually operated transmit mode.
Tone – enable/disable tone signal in TX mode.
Mixer – volume and balance control menu for the first and second receivers separately
EQ – button opens 18-band equalizer menu. You
can set different settings for Receiver and
Transmitter. Each has its own indicator below the
VFO A frequency tab (both are enabled on the
picture below).
12
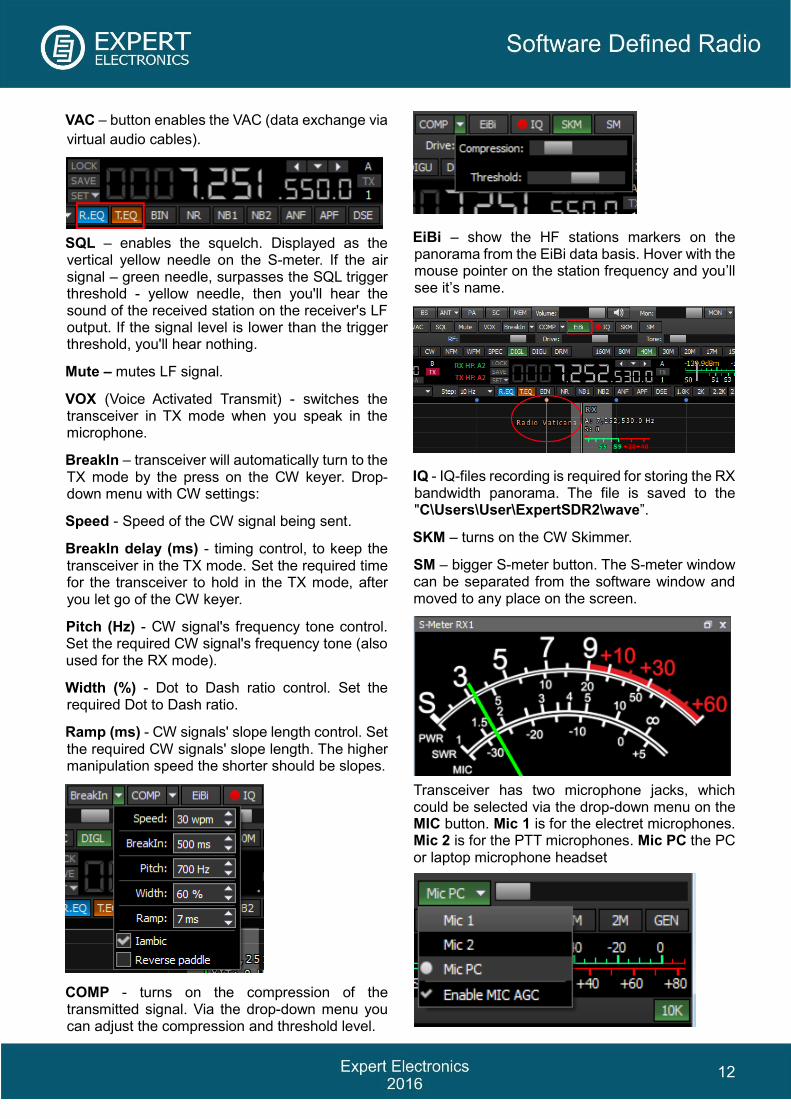
VAC – button enables the VAC (data exchange via
virtual audio cables).
SQL – enables the squelch. Displayed as the vertical yellow needle on the S-meter. If the air signal – green needle, surpasses the SQL trigger threshold - yellow needle, then you'll hear the sound of the received station on the receiver's LF output. If the signal level is lower than the trigger threshold, you'll hear nothing.
Mute – mutes LF signal.
VOX (Voice Activated Transmit) - switches the transceiver in TX mode when you speak in the microphone.
BreakIn – transceiver will automatically turn to the TX mode by the press on the CW keyer. Drop-down menu with CW settings:
Speed - Speed of the CW signal being sent.
BreakIn delay (ms) - timing control, to keep the transceiver in the TX mode. Set the required time for the transceiver to hold in the TX mode, after you let go of the CW keyer.
Pitch (Hz) - CW signal's frequency tone control. Set the required CW signal's frequency tone (also used for the RX mode).
Width (%) - Dot to Dash ratio control. Set the required Dot to Dash ratio.
Ramp (ms) - CW signals' slope length control. Set the required CW signals' slope length. The higher manipulation speed the shorter should be slopes.
COMP - turns on the compression of the transmitted signal. Via the drop-down menu you can adjust the compression and threshold level.
EiBi – show the HF stations markers on the panorama from the EiBi data basis. Hover with the mouse pointer on the station frequency and you’ll see it’s name.
IQ - IQ-files recording is required for storing the RX bandwidth panorama. The file is saved to the "C\Users\User\ExpertSDR2\wave”.
SKM – turns on the CW Skimmer.
SM – bigger S-meter button. The S-meter window can be separated from the software window and moved to any place on the screen.
Transceiver has two microphone jacks, which could be selected via the drop-down menu on the MIC button. Mic 1 is for the electret microphones. Mic 2 is for the PTT microphones. Mic PC the PC or laptop microphone headset
13
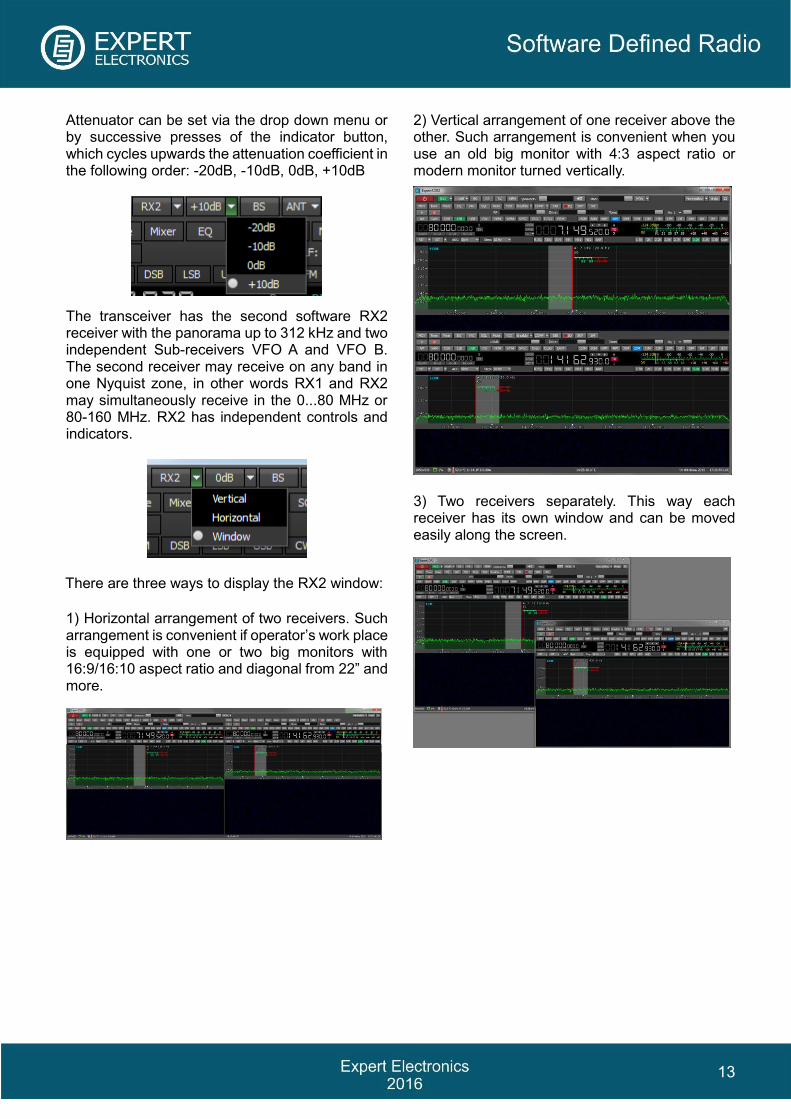
Attenuator can be set via the drop down menu or by successive presses of the indicator button, which cycles upwards the attenuation coefficient in the following order: -20dB, -10dB, 0dB, +10dB
The transceiver has the second software RX2 receiver with the panorama up to 312 kHz and two independent Sub-receivers VFO A and VFO B. The second receiver may receive on any band in one Nyquist zone, in other words RX1 and RX2 may simultaneously receive in the 0...80 MHz or 80-160 MHz. RX2 has independent controls and indicators.
There are three ways to display the RX2 window:
1) Horizontal arrangement of two receivers. Such arrangement is convenient if operator’s work place is equipped with one or two big monitors with 16:9/16:10 aspect ratio and diagonal from 22” and more.
2) Vertical arrangement of one receiver above the other. Such arrangement is convenient when you use an old big monitor with 4:3 aspect ratio or modern monitor turned vertically.
3) Two receivers separately. This way each receiver has its own window and can be moved easily along the screen.
14
Conclusion
This brief description of the SunSDR2 PRO operation will allow you to quickly master this modern transceiver. Detailed description of all settings and capabilities is described in the ExpertSDR2 user manual. Good luck mastering SDR\DDC-radio! 26.07.2016 Expert Electronics

Expert Electronics2015
© Copyright 2015, Expert Electronics LLC. All Rights Reserved.
DUC DDC SDR Series, SunSDR2 PRO Transceiver. Specifications are subject to change without notice or obligation and specifications are only guaranteed within the amateur radio bands.
V1.0 - 11.06.2015
www.eesdr.com