Embed Size (px)
Citation preview

Student Registration in SIS via One.IU
© 2019 Indiana University Page: 1 Revised 01/17/19 No portion of this document may be reproduced or distributed externally without the express written permission of Indiana University.
Contents Overview ................................................................................................................................................. 1 Steps ....................................................................................................................................................... 1
Using the Enrollment Shopping Cart ..................................................................................................... 1 Using the Class Registration task via One.IU...................................................................................... 14 Waitlist Information............................................................................................................................. 14 Drop a Class ...................................................................................................................................... 17 Using Edit .......................................................................................................................................... 19 Using Swap........................................................................................................................................ 19 Using the Planner .............................................................................................................................. 22
Course History in the Planner ......................................................................................................... 22
Overview You have multiple ways you can register for classes. All of the options for registration are located in the Student Center, which you can access via One.IU. Prior to your registration appointment, you can add classes you wish to take to the Enrollment Shopping Cart, and when it is time to register, you can enroll directly from classes stored in your Enrollment Shopping Cart. Also, when it’s your time to register, you may select and enroll in classes using the Class Registration task in One.IU or the Register & Drop/Add link in Student Center. If you have classes in your Planner, you may also select them for enrollment via My Planner. Shopping Cart
• When you find classes that interest you, you can add them to your Shopping Cart. • Classes will remain in your Shopping Cart through the end of this semester. • You can use the Shopping Cart as a wish list. Put classes into your cart, then return later and
either delete the classes you don’t want, or quickly enroll in the classes you want from your cart. My Planner
• A planning tool that allows you to do both short-term and long-term course planning. • You can assign planned classes to current, future, or undecided semesters. • When you add classes to your Planner, they are saved for later enrollment. You will then be able
to add them directly to your Shopping Cart during registration.
Steps NOTE: To Drop or Add classes for a future term or during the first week of the term, follow the
instructions later in this document. To add or drop any other time, click eDrop/eAdd within Student Center or use the Late Drop / Add Classes (after 1st week of classes) task in One.IU.
Using the Enrollment Shopping Cart
Let’s start by registering from the Enrollment Shopping Cart. 1. Navigate to: one.iu.edu.

Student Registration in SIS via One.IU
© 2019 Indiana University Page: 2 Revised 01/17/19 No portion of this document may be reproduced or distributed externally without the express written permission of Indiana University.
2. Under All Categories on the left, click Enrollment. You may also use the One.IU Search field by typing “enrollment.”
3. Click on the Enrollment Shopping Cart task. (If you are not already logged in, you will be prompted to do so.)
The Shopping Cart: Select Term page will display.
4. If you are prompted to select a term, select the Term for which you want to register and click
.
The following page with important information may display.
5. Read the information carefully. If you agree, check the I Agree checkbox and click Next.

Student Registration in SIS via One.IU
© 2019 Indiana University Page: 3 Revised 01/17/19 No portion of this document may be reproduced or distributed externally without the express written permission of Indiana University.
The Addresses page will display.
6. Review your addresses on file. You may make any necessary address changes by clicking the
Edit pencil icon, or add a new address by clicking .
7. Click .
The Emergency Contacts page will display.
8. If you have an emergency contact on file, the information will display. You may edit or delete existing information.
If you do not have an emergency contact listed, you are required to either add someone or check the box that you choose not to provide information for your emergency contacts. This information is separate from IU Notify and will be used to contact someone in the event of a personal emergency on campus.

Student Registration in SIS via One.IU
© 2019 Indiana University Page: 4 Revised 01/17/19 No portion of this document may be reproduced or distributed externally without the express written permission of Indiana University.
NOTE: If you check this box, you are not opting out of a University official contacting someone on your behalf. The university will try to identify contact information for your emergency contact through other means. Therefore, it is best for you to provide the most accurate information in case of emergency.
9. Click .
The Optional Services page will display.
10. The Optional Services page may be different for each campus. Review the available Optional Services and select any that are of interest to you by clicking the checkbox next to that option.

Student Registration in SIS via One.IU
© 2019 Indiana University Page: 5 Revised 01/17/19 No portion of this document may be reproduced or distributed externally without the express written permission of Indiana University.
11. Click .
The Shopping Cart: Add Classes to Shopping Cart page will display.
12. In the Add to Cart box, click the Class Search radio button.
Student Registration in SIS via One.IU
© 2019 Indiana University Page: 6 Revised 01/17/19 No portion of this document may be reproduced or distributed externally without the express written permission of Indiana University.
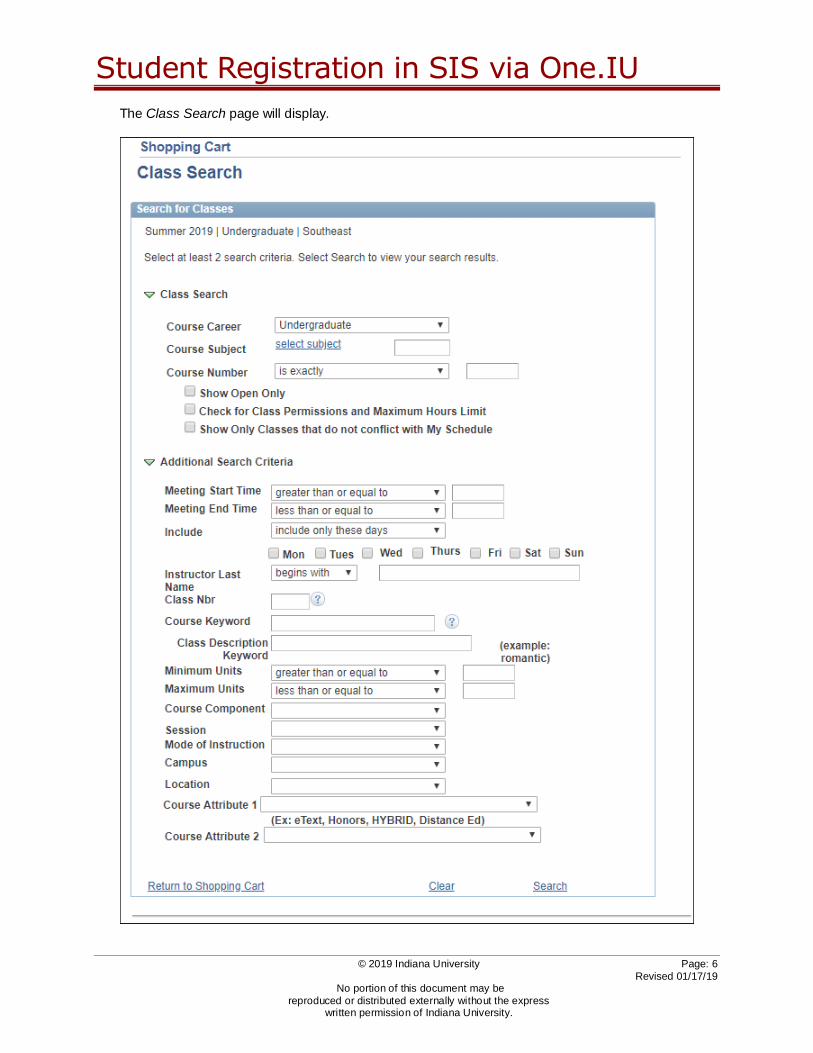
The Class Search page will display.

Student Registration in SIS via One.IU
© 2019 Indiana University Page: 7 Revised 01/17/19 No portion of this document may be reproduced or distributed externally without the express written permission of Indiana University.
13. Enter the Course Subject (for example, ENG-W) or click select subject to search for the subject in an alphabetical list.
14. Enter the Course Number, (for example, 131), or you may search without a course number.
15. Select the Show Open Only checkbox if you would like to view only open classes. If you wish to further limit your search, you can select the Check for Class Permissions and Maximum Hours Limit checkbox or the Show Only Classes that do not conflict with My Schedule checkbox. You may enter more search options in the Additional Search Criteria section to further narrow your search results.
16. Click Search.
The search results will display.
17. For more information about a specific class, click Details.
18. When you find the class that fits your schedule, click Select Class.

Student Registration in SIS via One.IU
© 2019 Indiana University Page: 8 Revised 01/17/19 No portion of this document may be reproduced or distributed externally without the express written permission of Indiana University.
The Shopping Cart: Enrollment Preview page will display.
If your campus uses waitlists, the WaitList? checkbox will display. The WaitList? box is not needed unless the class you want is closed and you have searched for closed classes.
The Waitlist Time Restrictions button will display whether you have a waitlist or not. You can use this button to set up times you are unavailable for classes or import them from iGPS.
For a waitlisted class, if there is a class you wish to drop if you successfully add this class, click in the Drop if Enroll column (which will display if you selected the WaitList? checkbox) and simply select the class from your schedule.
For more information on waitlists, see page 15 of this document.
19. If you would like to add this class to your Shopping Cart, click ADD TO SHOPPING CART.

Student Registration in SIS via One.IU
© 2019 Indiana University Page: 9 Revised 01/17/19 No portion of this document may be reproduced or distributed externally without the express written permission of Indiana University.
The added class is now displayed in the Shopping Cart.
20. To add more classes, click the Class Search button in the Add to Cart box. Repeat the process of adding classes until you have added all the classes you want to your Shopping Cart.
Classes will remain in your Shopping Cart through the end of this semester unless used to register. The Status column updates dynamically every time you view your Shopping Cart showing you if the class is open or closed.
21. Prior to your enrollment time, you can check to see if these classes have time conflicts, unmet requisites, or require a class permission to enroll. Select the classes in which you want to enroll
by clicking the checkbox next to that class, then click .

Student Registration in SIS via One.IU
© 2019 Indiana University Page: 10 Revised 01/17/19 No portion of this document may be reproduced or distributed externally without the express written permission of Indiana University.
The Shopping Cart: Add Classes to Shopping Cart page will display detailing the validation results.
22. Review the validation results. If there are potential problems, they will be listed on this page.
NOTE: Courses with errors will be automatically placed in your Enrollment Shopping Cart. You may take action to correct and enroll later, if desired.
23. Click .
The following screen will display.
24. If you are ready to register for these classes and your enrollment appointment time has arrived,

Student Registration in SIS via One.IU
© 2019 Indiana University Page: 11 Revised 01/17/19 No portion of this document may be reproduced or distributed externally without the express written permission of Indiana University.
select the classes in which you want to enroll and click to complete the registration process for these classes. You will be taken to the Confirm classes page.
If you are not able to register now, once you are permitted to do so you may use the Enrollment Shopping Cart link or the Register & Drop/Add link from the Student Center, or you can click on the Class Registration task in One.IU (see page 14 for more information). After clicking the enroll button, the following message will be displayed.
25. Click .
NOTE: Registration Eligibility Checking will be performed when enrolling in classes. This check will determine if you are currently eligible to register for classes.
Your registration attempt will be blocked if you have any of the following conditions:
There are active holds on your record. You are attempting to register prior to your registration appointment. You are attempting to register after Self-Service Enrollment is closed.
If you have a hold on your record with an impact that prevents enrollment, you will receive the message: In order to register, first resolve all holds on your record. Follow the instructions associated with each hold item. Use the Enrollment Shopping Cart to plan your Class Schedule until holds are resolved. There is a link to the Enrollment Shopping Cart so you can continue enrollment planning while you wait for the hold to clear.
If today’s date is prior to your registration appointment, you will receive the message: You are attempting to register prior to your Appointment time. Use the Enrollment Shopping Cart to plan your Class Schedule. There is a link to the Enrollment Shopping Cart so you can continue enrollment planning while you wait for your enrollment appointment.
If today’s date is after Self-Service Drop and Add is closed you will receive the message: Self Service Drop and Add is no longer available for this term. Use eDrop/eAdd to change your schedule. A link to eDrop and eAdd will be available.

Student Registration in SIS via One.IU
© 2019 Indiana University Page: 12 Revised 01/17/19 No portion of this document may be reproduced or distributed externally without the express written permission of Indiana University.
The Shopping Cart: Confirm classes page will display. Note the icons in the Status column.
26. Click .
The Shopping Cart: View Results page will display.
27. Note the “Success” message and the green check mark in the Status column.
28. To add another class, click and repeat the steps for adding a class.
29. To view your class schedule, click .

Student Registration in SIS via One.IU
© 2019 Indiana University Page: 13 Revised 01/17/19 No portion of this document may be reproduced or distributed externally without the express written permission of Indiana University.
The My Class Schedule page will display.
You will now see your class schedule with the status of Enrolled.
30. To add additional classes after you’ve enrolled, click to return to the Student Center and then click Register & Drop/Add.
31. Select a Term, if prompted, then click the Class Search button and continue to repeat the steps above for adding a class.

Student Registration in SIS via One.IU
© 2019 Indiana University Page: 14 Revised 01/17/19 No portion of this document may be reproduced or distributed externally without the express written permission of Indiana University.
Using the Class Registration task via One.IU If your Registration Appointment has arrived, you may enroll in classes using the Class Registration task via One.IU. (If you are already in Student Center, you may also click the Register & Drop/Add link.) Note that the process of enrolling in classes is similar to many of steps outlined in the above section. 1. Navigate to: one.iu.edu. 2. Under Browse Categories, click Enrollment. 3. Click on the Class Registration task. (You will need to log in if you haven’t done so already.)
4. Once at the Add Classes page, you may search for classes using the Class Search or My Planner radio buttons, or select from those classes you previously added to your Shopping Cart for the enrolling term. Follow the on-screen instructions to complete the class enrollment process.
Waitlist Information If your campus uses waitlists, you can enroll in a class that is full and get placed on the waitlist. Depending on the method of enrolling you are using, once you have selected your courses, you will be taken to a screen similar to the following page.
1. To add yourself to the waitlist for a class, click in the WaitList? checkbox for that class.
Clicking on the Waitlist? checkbox expands the row to include the Waitlist Type dropdown and the Drop if Enrolled? field. At this point you have the opportunity to specify the type of waitlist you want and a different class that you want to drop if you are taken off the waitlist and placed into the requested class.
Selecting an Option from the Waitlist Type Field
NOTE: “Only This Class” means this waitlist will attempt to place you in an available seat in the specified class number (day, time, room, instructor).
“Any Class in this course” means you are willing to take a seat in any available class of this course (different days, times, rooms, instructors). Check the schedule of classes to see which other classes are offered. New classes can be added at any time and your “any” waitlist includes newly added classes as well.

Student Registration in SIS via One.IU
© 2019 Indiana University Page: 15 Revised 01/17/19 No portion of this document may be reproduced or distributed externally without the express written permission of Indiana University.
You will not be placed into a time conflict with your existing schedule. You have the option to place Waitlist Time Restrictions for times you are unavailable to take classes (see the next page).
The default waitlist option is “Only This Class.” If the class is setup as an “any” waitlist by the department, you will see two options: “Only This Class” or “Any Class in this course”. Selecting an “Any Class in this course” waitlist type will display a warning message explaining that you may be enrolled in any class in this course where waitlist any is available. An “any” waitlist allows you to be placed into any seat in any class of the course (i.e. COMM-C 180) that opens. This gives you a greater chance of getting into the course.
Click OK in the message pop-up to continue.
To specify when you are unavailable to take classes for this term, select WAITLIST TIME RESTRICTIONS. Your waitlist/s will not be fulfilled by classes meeting during these days/times. You can click All Day to block out the entire day from 12:00 AM to 11:59 PM or specify days and hours to restrict.
NOTE: If you have restrictions in the iGPS Planner/Schedule Builder, you can import those here. When you enter the Waitlist Time Restrictions page, you will be prompted with a box asking if you want to import.

Student Registration in SIS via One.IU
© 2019 Indiana University Page: 16 Revised 01/17/19 No portion of this document may be reproduced or distributed externally without the express written permission of Indiana University.
If you just setup your restrictions in iGPS in the past five minutes, you need to wait ten minutes before you can import.
If you import restrictions from iGPS, the From iGPS box will be checked.
Using the Drop if Enrolled? Field 1. To update the class you want to drop if your waitlist is fulfilled, click in the Drop if Enrolled?
column.
The Look Up Drop if Enrolled? page will display.
2. Select the class you want to drop.

Student Registration in SIS via One.IU
© 2019 Indiana University Page: 17 Revised 01/17/19 No portion of this document may be reproduced or distributed externally without the express written permission of Indiana University.
This Class Number will be placed in the Drop if Enrolled? box.
If you are removed from the waitlist and placed in the class during the waitlist processing period, you will automatically be dropped from the class specified.
Drop a Class
1. Navigate to: one.iu.edu. 2. Under the All Categories on the left, click Enrollment. 3. Click on the Drop or Add Classes (through 1st week of classes) task. (You will need to log in if
you have not done so already.)
Note that if you are already on the Student Center main page, click Register & Drop/Add to drop a class for a future term or during the first week of the term. If you are trying to drop a class any other time, a message will display saying, “Self Service Drop and Add is no longer available for this term. Use eDrop/eAdd to change your schedule.” You will then need to select the eDrop/eAdd link or use the One.IU task, Late Drop / Add Classes (after 1st week of classes). 4. From the Add Classes page, click drop at the top of the displayed page.

Student Registration in SIS via One.IU
© 2019 Indiana University Page: 18 Revised 01/17/19 No portion of this document may be reproduced or distributed externally without the express written permission of Indiana University.
5. Select the class you want to drop.
6. Click .
The Drop Classes: Confirm your selection page will display.
7. If the confirmation page is correct, click .

Student Registration in SIS via One.IU
© 2019 Indiana University Page: 19 Revised 01/17/19 No portion of this document may be reproduced or distributed externally without the express written permission of Indiana University.
The Drop Classes: View results page will display.
8. Note the Message and Status column to be sure this was successful.
9. To view your schedule after dropping the class, click . Dropped classes will be indicated by the word “Withdrawn” in the Status field.
Using Edit
1. If you have enrolled in a Variable Credit Hour course and need to adjust the enrolled hours click Register & Drop/Add from the Student Center page. From the Add Classes page, click the edit tab.
2. Courses with hours eligible to be adjusted will have a Select link. Select the course of interest. 3. Select the desired hours from the drop-down box, then select Finish Editing.
Using Swap
When you do not want to drop an enrolled class until you are safely enrolled in a new class, when you are changing sections of the same course, or if you are already at or near your maximum number of units (credits) you may want to use Swap.
1. To swap a class, click Register & Drop/Add from the Student Center main page. From the Add
Classes page, click swap.

Student Registration in SIS via One.IU
© 2019 Indiana University Page: 20 Revised 01/17/19 No portion of this document may be reproduced or distributed externally without the express written permission of Indiana University.
The Swap a Class: Select a class to swap page will display.
2. Select the class you want to remove from your schedule and either select a replacement from your Shopping Cart or use Class Search or My Planner to choose a replacement.

Student Registration in SIS via One.IU
© 2019 Indiana University Page: 21 Revised 01/17/19 No portion of this document may be reproduced or distributed externally without the express written permission of Indiana University.
The Swap a Class: Confirm your selection page will display.
3. If these are the classes you wish to swap, click . The Swap a Class: View results page will display.
4. The class swap is now complete. Click to view your class schedule.

Student Registration in SIS via One.IU
© 2019 Indiana University Page: 22 Revised 01/17/19 No portion of this document may be reproduced or distributed externally without the express written permission of Indiana University.
Using the Planner
The Planner is a tool for you to use in building a list of classes that will meet your academic objectives. Only you may add or edit the information in your Planner. Academic Advisors and Administrators have the ability to view what is in your Planner.
Your Planner will remain there for you to use, with the information you have placed there, for as long as you are an active student in the IU system. You may plan for a few courses or for a complete degree. Using information from your Academic Advisor or Academic Unit, determine what courses you should plan to take and use the Course Catalog Search button in the Planner to find them and add them to your Planner. You may then assign courses to a given term or leave them unassigned. You may add and remove courses as often as you wish. Note that the availability of a course during any given term is controlled by the academic unit and subject to change. While the Planner can be a useful tool, be sure to check course availability as the desired term approaches as you may need to make alternate plans if it is not offered.
NOTE: You will have a separate planner for undergraduate and graduate work and you can select which career planner to use.
For more information on the Academic Planner, visit the KB article: Build a list of classes using the SIS Academic Planner. For more information on the iGPS Planner, visit the KB article: Use the iGPS Plan to guide your academic path.
Course History in the Planner
1. If you want to view your course history while in the Planner, click the course history tab.
2. If you also want to see the courses that are in your Planner and your Shopping Cart, select the appropriate choices under Select Display Option.
Courses in your course Shopping Cart will display a as the Status icon.
Courses in your Planner will display a as the Status icon.