Embed Size (px)
Citation preview

1© 2020 VIEWRAIL All Rights Reserved · (866) 261-8013 · viewrail.com · For Helpful Tutorials go to www.youtube.com/viewrail
Visit our YouTube channel towatch helpful installation videos
youtube.com/viewrail
Things to Know Before You Get Started
• Read over the provided material prior to the start of your installation
• Ensure to apply the supplied Threadlocker to all mechanical connections
Other Tools and Supplies Not Included in the Installation Kit
• Drill/Hammer Drill
• Impact Driver/Socket Wrench
• Pencil
• Level
• T-Square
• 3/8" Wood Drill Bit (Wood Install Only)
• 9/16" Concrete Drill Bit (Concrete Install Only)
• 11/16" Forstner Bit (Wood Install Only)
• Wood Glue
• Concrete Epoxy (Concrete Install Only)
Tools Needed from the Installation Kit
5/16" Hex Bit Socket
3M DualLock(Included with Optional Tread Bracket Covers)
3/4" Socket
ThreadLocker
1/2" to 3/8" Reducer
T-10 & T-30 Torx Bits
Torque Wrench
5/16" Hanger Bolt Driver
Straight StringerInstallation Guide
2© 2020 VIEWRAIL All Rights Reserved · (866) 261-8013 · viewrail.com · For Helpful Tutorials go to www.youtube.com/viewrail
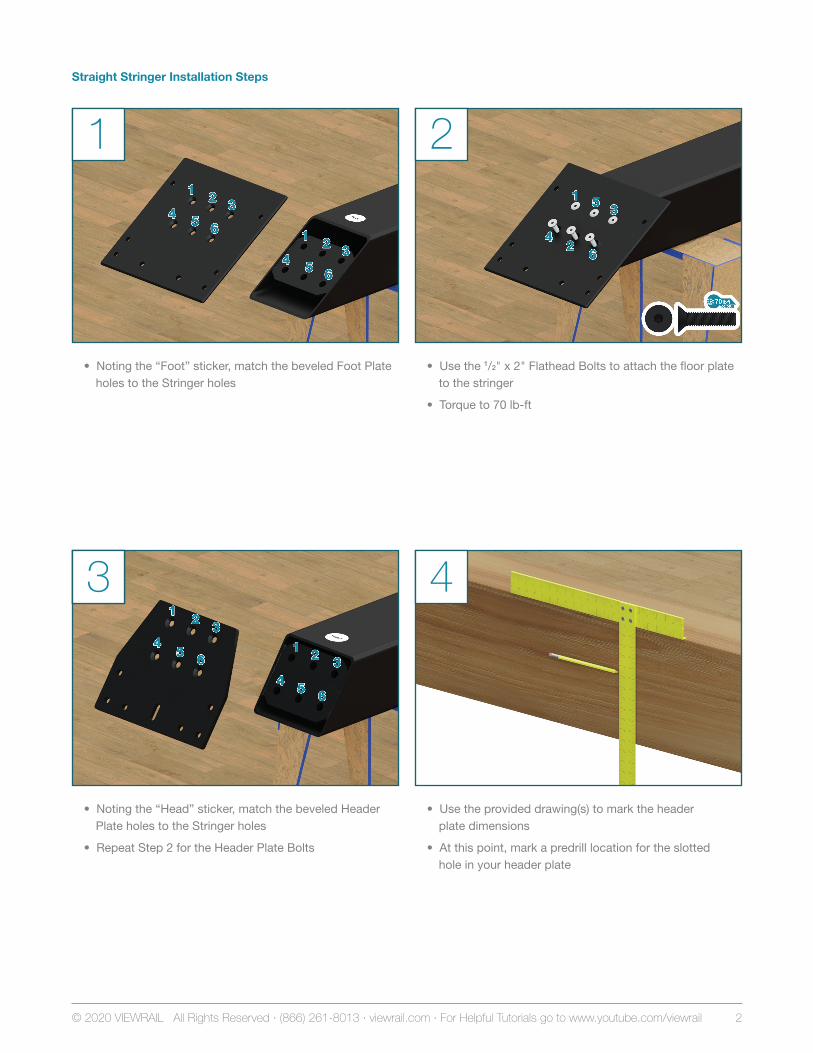
• Use the provided drawing(s) to mark the header plate dimensions
• At this point, mark a predrill location for the slotted hole in your header plate
43
21
Straight Stringer Installation Steps
• Noting the “Head” sticker, match the beveled Header Plate holes to the Stringer holes
• Repeat Step 2 for the Header Plate Bolts
• Use the 1/2" x 2" Flathead Bolts to attach the floor plate to the stringer
• Torque to 70 lb-ft
• Noting the “Foot” sticker, match the beveled Foot Plate holes to the Stringer holes
3

3© 2020 VIEWRAIL All Rights Reserved · (866) 261-8013 · viewrail.com · For Helpful Tutorials go to www.youtube.com/viewrail
• Place all tread brackets on the stringer
• Insert locator pins to hold the tread brackets in place
• Fasten the 1/2" x 31/2" Hex Lag through the middle slotted hole in the header plate to hold the stringer in place
• Lift the stringer into place, lining up the hole• Predrill with a 3/8" drill bit
87
65
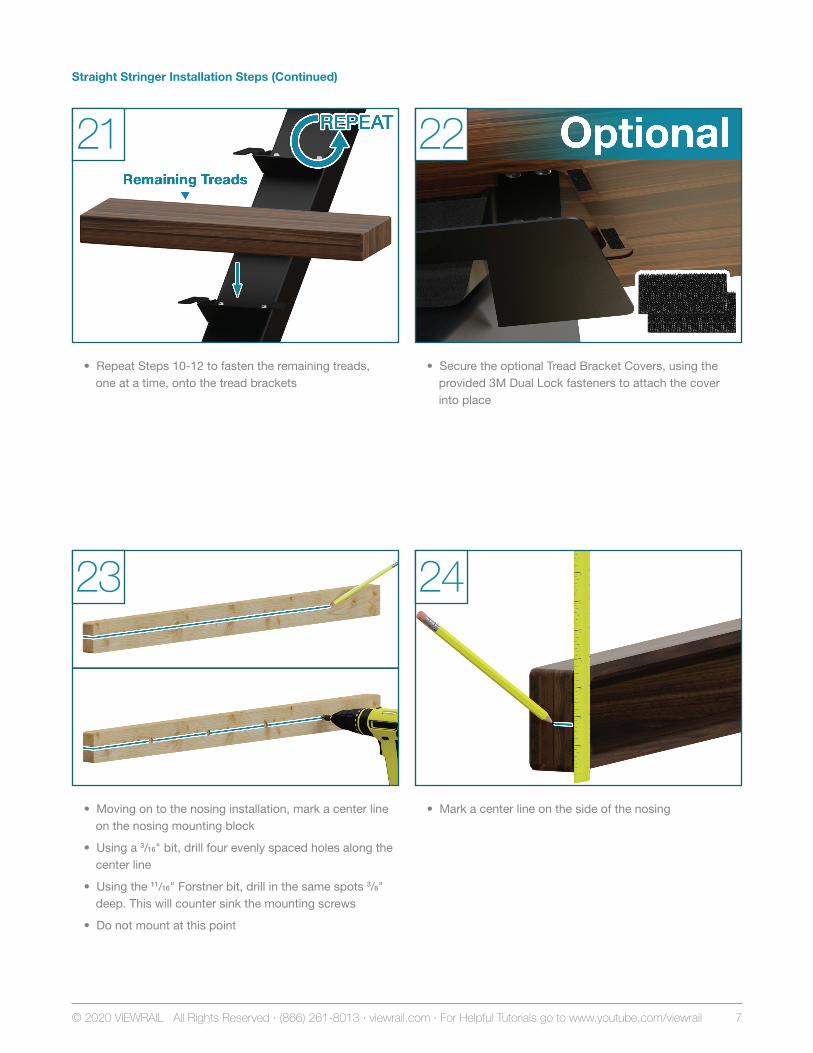
Straight Stringer Installation Steps (Continued)

4© 2020 VIEWRAIL All Rights Reserved · (866) 261-8013 · viewrail.com · For Helpful Tutorials go to www.youtube.com/viewrail
• Ensure the tread is level on the tread bracket both front to back and left to right
• Using the 5/16" x 21/2" RSS Screws, attach the tread to the tread bracket
• During this step, alternate sides of the bracket when fastening screws. This will prevent the tread from pulling unevenly
• Place a single tread on to one of the tread brackets about half-way up the stringer
• Thread the 1/2" x 1" flange bolts through the tread bracket and into the stringer in the marked order, so they are finger tight
• Torque to 70 lb-ft
1211
109
Straight Stringer Installation Steps (Continued)

5© 2020 VIEWRAIL All Rights Reserved · (866) 261-8013 · viewrail.com · For Helpful Tutorials go to www.youtube.com/viewrail
• Refer to the recommendation of the brand of epoxy you are using and predrill the correct sized holes for these 1/2" threaded studs
• Apply concrete epoxy in to the holes
• Insert the threaded studs into each hole
• Predrill your footer plate holes with a 3/8" drill bit
• Thread the 1/2" x 5" head lags into place
• Thread the 1/2" x 8" hex head bolts into place, so they are finger tight
• Torque to 70 lb-ft
• If not level left to right, shim the header plate to adjust
• If not level front to back, shim the footer plate to adjust
• Cut the excess shim away
• Predrill through the header plate holes with a 3/8" drill bit
• At this point, predrill all your header plate holes using a 1/2" bit
1615
1413
Straight Stringer Installation Steps (Continued)

6© 2020 VIEWRAIL All Rights Reserved · (866) 261-8013 · viewrail.com · For Helpful Tutorials go to www.youtube.com/viewrail
• Using a nut & washer, tighten the tread to the tread bracket
• Mount the first tread on to its tread plate
• The first tread mounts differently to the tread bracket than the rest of the treads
• Using the 5/16" x 21/2" hanger bolts, populate the first tread holes
• Drill 1/2" holes for the concrete wedge anchors
• Insert a concrete wedge anchor into each hole
2019
1817
Straight Stringer Installation Steps (Continued)
7© 2020 VIEWRAIL All Rights Reserved · (866) 261-8013 · viewrail.com · For Helpful Tutorials go to www.youtube.com/viewrail
• Mark a center line on the side of the nosing• Moving on to the nosing installation, mark a center line on the nosing mounting block
• Using a 3/16" bit, drill four evenly spaced holes along the center line
• Using the 11/16" Forstner bit, drill in the same spots 3/8" deep. This will counter sink the mounting screws
• Do not mount at this point
• Secure the optional Tread Bracket Covers, using the provided 3M Dual Lock fasteners to attach the cover into place
• Repeat Steps 10-12 to fasten the remaining treads, one at a time, onto the tread brackets
2423
2221
Straight Stringer Installation Steps (Continued)

8© 2020 VIEWRAIL All Rights Reserved · (866) 261-8013 · viewrail.com · For Helpful Tutorials go to www.youtube.com/viewrail
• Mount the nosing blocking using a single provided 5/16" x 6" RSS screw in one of the two center holes
• Align the mounting block center line with the center line mark you drew in the previous step
• Transfer the center line to the headboard• Position, level & hold the nosing in the desired location
2827
2625
Straight Stringer Installation Steps (Continued)

9© 2020 VIEWRAIL All Rights Reserved · (866) 261-8013 · viewrail.com · For Helpful Tutorials go to www.youtube.com/viewrail
• Press the nosing firmly into place and use the T-10 bit to fasten #8 x 2" trim screws, holding the nosing cover in place
• Apply wood glue to both the Mounting Block and the inside cavity of the Nosing
• Adjust until level
• Carefully remove the Nosing as to not bump the Mounting Block
• Fasten the remaining 5/16" x 6" RSS screws
31
3029
Straight Stringer Installation Steps (Continued)
Congratulations!You’re done. We’d love to see your work! Snap a few pics with your phone and send them to [email protected]. Thanks for choosing Viewrail. Enjoy your new installation!