Embed Size (px)
Citation preview
Objectives
• Hands-on workshop to show you the steps needed to
quickly get up and running with the STM32 PMSM FOC
SDK using the ST MC Workbench with the final purpose
of running a PM synchronous motor with STEVAL boards.
• Know where to go for documentation, firmware libraries
and application notes and additional ecosystem support
• Know where to obtain additional technical support
2

Systems Check
• Everyone should have • A Windows Laptop (XP, Vista or Win 7, Win 8)
• A ST-LINK dongle (optional)
• USB to RS232 dongle and a null modem cable (optional)
• The permanent magnet motor you want to run
• A multimeter
• An oscilloscope with current probe
• An Insulated DC and or AC power supply
• Ready to begin?
3

Step #1 – Hardware setup
• It is possible to choose one of the following offers:
• Complete Motor Control Kit.
• One of the complete inverters present at stock.
• Any STM32 evaluation board combined with one of the ST evaluation
power stages both including the MC connector.
• The following slides report all available boards present in
the ST stock that can be used to arrange a motor control
system.
• Follow the instructions in the related UM to setup each board.
5

MC boards offer 6
Kit: from isolated debug probe to motor
Inverters MC kit
Control
board Power
board

Motor control kits 7
STM32100B-MCKIT
STM3210B-MCKIT
Motor control kits
Part Number Description ST Link
onboard Type
STM32100B-MCKIT Motor control starter kit for STM32F100 (128KB
Flash) Value Line MCUs Yes Single drive
STM3210B-MCKIT Motor control starter kit for STM32 (128KB flash)
Performance and Access Line microcontrollers No Single drive
Serial communication RS232
The motor control kit connections represented below can also be applied when combining
STM32 control boards and evaluation power boards.
MC kit

STEVAL-IHM042V1 STEVAL-IHM043V1 STEVAL-IFN003V1
ST complete inverters
Part Number Description ST Link
onboard Type
STEVAL-IHM034V2 Dual motor control and PFC demonstration board featuring the
STM32F103 and STGIPS20C60 No
Single/Dual
drive
STEVAL-IHM036V1 Low power motor control board featuring the SLLIMM™
STGIPN3H60 and MCU STM32F100C6T6B No Single drive
STEVAL-IHM038V1 BLDC ceiling fan controller based on STM32 and SLLIMM-nano No Single drive
STEVAL-IHM040V1 BLDC/PMSM driver demonstration board based on STM32 and the
SLLIMM nano™ No Single drive
STEVAL-IHM042V1 Compact, low-voltage dual motor control board based on the
STM32F303 and L6230 Yes
Single/Dual
drive
STEVAL-IHM043V1 6-Step BLDC sensorless driver board based on the STM32F051
and L6234 No Single drive
STEVAL-IFN003V1 DC PMSM FOC motor drive No Single drive
8
STEVAL-IHM034V2 STEVAL-IHM036V1
STEVAL-IHM038V1 STEVAL-IHM040V1
Inverters

STM32 evaluation boards
with MC connector
Part Number Description ST Link
onboard(1) Type
STM3210E-EVAL Evaluation board for STM32 F1 series - with STM32F103 MCU No Single drive
STM3220G-EVAL Evaluation board for STM32 F2 series - with STM32F207IG MCU Yes Single drive
STM32303C-EVAL Evaluation board for STM32F303xx microcontrollers Yes Single/Dual drive
STM3240G-EVAL Evaluation board for STM32F407 line - with STM32F407IG MCU Yes Single drive
STEVAL-IHM022V1 High density dual motor control demonstration board based on the
STM32F103ZE microcontroller No Single/Dual drive
STEVAL-IHM039V1 Dual motor drive control stage based on the STM32F415ZG
microcontroller No Single/Dual drive
9
STM3210E-EVAL STEVAL-IHM022V1 STEVAL-IHM039V1 STM32303C-EVAL STM3220G-EVAL STM3240G-EVAL
In-circuit debugger/programmer..
ST-LINK/V2
ST-LINK/V2-ISOL (2500 VRMS high isolation voltage)
Control
board
(1) Only necessary for high-voltage applications or if not included with the evaluation board:

Part Number Description
STEVAL-IHM021V2 100 W, 3-phase inverter based on L6390 and UltraFASTmesh™ MOSFET for speed FOC of 3-phase
PMSM motor drive
STEVAL-IHM023V3 1 kW 3-phase motor control evaluation board featuring L6390 drivers and new IGBT STGP10H60DF
STEVAL-IHM025V1 1 kW 3-phase motor control demonstration board featuring the IGBT SLLIMM™ STGIPL14K60
STEVAL-IHM028V2 2 kW 3-phase motor control demonstration board featuring the IGBT intelligent power module
STGIPS20C60
STEVAL-IHM032V1 150 W inverter featuring the L639x and STGD3HF60HD for 1-shunt based sinusoidal vector control
and trapezoidal scalar control
STEVAL-IHM035V2 3-phase high voltage inverter power board for FOC and scalar motor control based on the
STGIPN3H60 (SLLIMM™-nano)
STEVAL-IHM045V1 3-phase high voltage inverter power board for FOC based on the STGIPN3H60A (SLLIMM™-nano)
ST evaluation power boards
with MC connector 10
STEVAL-IHM021V2 1KW
STEVAL-IHM023V3 1000W STEVAL-IHM025V1
150W
STEVAL-IHM032V1
100W STEVAL-IHM035V2
100W STEVAL-IHM045V1
2000W STEVAL-IHM028V2
Power
board

HW key features 1/2
Reference /
Bundle Voltage Power
Motor Type /
Control Type * ST Parts Application focus
STEVAL-IHM034V2 230VAC Nominal Up to 1.3kW
PMSM,
Dual Motor (FOC) +
digital PFC
• 1x STM32F103C8T6
• 1x STGIPS20C60
• 1x Viper16L
Complete drive: Compressors,
room air conditioning,
STEVAL-IHM036V1 90VAC - 285VAC
125VDC - 400VDC Up to 100W
PMSM,
FOC
• 1x STM32F100C6
• 1x STGIPN3H60
• 1x Viper16
Water pumps, dish washers,
washing machines
STEVAL-IHM038V1 90VAC - 265VAC Up to 40W
PMSM,
FOC
• 1x STM32100
• 1x STGIPN3H60
• 1x L6562A
Complete drive: Fans, ceiling
fans, pumps.
STEVAL-IHM040V1 120/230 VAC
nominal (60/50Hz) Up to 100W
PMSM/BLDC
FOC/Six step
• 1x STGIPN3H60
• 1x STM32F100C8T6
• 1x VIPer16 Complete drive: Pumps, fans
STEVAL-IHM042V1 8 V - 48 V Up to 10W
PMSM,
FOC
Single/3 shunt
• 2x L6230
• 1x STM32F303
• 1x ST1S14
Complete drive: Fans,
blowers, toys
STEVAL-IHM043V1 7 to 42 Vdc Up to 35W BLDC
Six step
• 1x L6234
• 1x STM32F051C6T6
• 1x L78L33ACD
Complete drive: Pumps,
security systems, ATMs.
STEVAL-IFN003V1 8 V - 48 V Up to 45W PMSM,
FOC
• 1x STM32F103C
• 1x L6230PD Complete drive: Pumps,
security systems, ATMs
STEVAL-IFN004V1 8 V - 48 V Up to 35W BLDC
Six-step motor control
• 1x STM8S
• 1x L6230Q Complete drive: Pumps,
security systems, ATMs
11

HW key features 2/2 Reference /
Bundle Voltage Power
Motor Type /
Control Type * ST Parts
Application
focus
STEVAL-IHM021V2 120/230 VAC nominal
(60/50Hz) Up to 100W
PMSM/BLDC
FOC/Six step
3shunts
• 3x L6390
• 1x Viper12
• 6x STD5N52U
Power Board: Water pumps,
fans, dish washers, washing
machines
STEVAL-IHM023V3 90VAC - 285VAC
125VDC - 400VDC Up to 1kW
PMSM/BLDC
FOC/Six step
Single/3 shunts
• 3x L6390
• 1x Viper16
• 7x STGP10H60DF
Power Board: Pumps,
compressors, washing
machines and more
STEVAL-IHM025V1 90VAC - 285VAC
125VDC - 400VDC Up to 1kW
PMSM/BLDC
FOC/Six step
• 1x STGIPL14K60
• 1x Viper16
• 1x STGP10NC60KD
Power Board: Pumps,
compressors, washing
machines and more
STEVAL-IHM028V2 90VAC - 285VAC
125VDC - 400VDC Up to 2 kW
PMSM/BLDC
FOC/Six step
single/3-shunt
•1x STGIPS20C60
• 1x VIPer26LD
• 1x STGW35NB60SD
Power Board: Pumps,
compressors, air conditioning
and more
STEVAL-IHM032V1 230VAC nominal
86 to 260 VAC Up to 150W
PMSM/BLDC
FOC/Six step
single/3-shunt
• 2x L6392D
• 1x L6391D
• 1x Viper12
• 6 x STGD3HF60HD
Power Board: Pumps,
compressors, fans, dish
washers and more
STEVAL-IHM035V2 120/230 VAC nominal Up to 100W
PMSM/BLDC
FOC/Six step
single-shunt
• 1x STGIPN3H60
• 1x VIPer16L
Power Board: Pumps,
compressors, fans, dish
washers and more
STEVAL-IHM045V1 30VAC - 270VAC
40VDC - 400VDC Up to 100W
PMSM
FOC
Single/3-shunt
• 1x STGIPN3H60A
• 1x VIPer06L
• 1x TSV994
Power Board: Pumps,
compressors, fans, dish
washers and more
12

SDK workflow
• Parameter files, generated by the ST MC Workbench GUI, are used to configure the SDK.
• The IDE builds the projects, links and creates the executable.
• The ST-LINK dongle (or equivalent) is used to download and debug the executable into the
MCU.
• Serial communication between the ST MC Workbench and the FW can be established to
send commands or get feedback.
User project
MC library
project
1010010.. .OBJ
110010010101000101001010010101001.. .LIB
1110010.. .OBJ 1000010..
.OBJ
Linker
110111010101001011110001101010101..
.EXE
.h Parameter
files
SDK IDE
ST MC Workbench
ST-LINK
(Source code)
Serial communication for "run-time" feedback
14

Step #2 – Software setup
• Download and install the STM32 PMSM FOC SDK
• You can find it at www.st.com and searching for part number STSW-STM32100
15
• It contains both the firmware package and the ST MC Workbench (PC GUI)
• After installation, you will have the following new folders:
ST MC Workbench FW package

Step #3 – IDE setup
• An IDE (Integrated development environment) is required to compile,
flash and debug the application.
• Two IDEs are supported: IAR EWARM and KEIL µVision.
• They are available at the following addresses:
• IAR Embedded Workbench for ARM - IAR Systems (http://www.iar.com/)
• Keil Embedded Development Tools for ARM, Cortex-M ... (http://www.keil.com/)
• Ask for assistance if you have an issue.
16

Step #4 – ST-LINK installation
• If the control board or the complete system doesn’t embed the ST-LINK, a
stand-alone dongle is required.
• In any case, you must install the ST-LINK driver that can be found in the ST
website searching for part number ST-LINK/V2 or ST-LINK/V2-ISO
17
• Click on Design Resources, download and install the STSW-LINK003
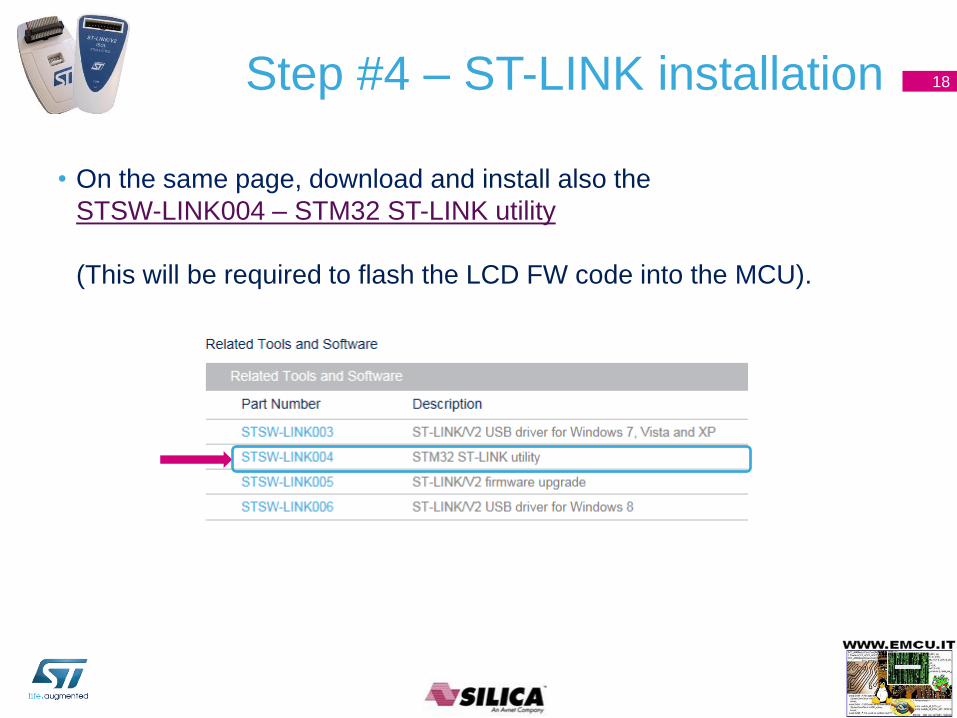
Step #4 – ST-LINK installation
• On the same page, download and install also the
STSW-LINK004 – STM32 ST-LINK utility
(This will be required to flash the LCD FW code into the MCU).
18

Step #5 – Connect ST-LINK
• Using the USB cable, connect the control board with ST-LINK embedded
(or the ST-LINK dongle) to the A male connector into your Laptop.
19
• Wait for Windows to recognize
the ST-Link device and follow
any step required to install the
driver.
• Upon successful driver
recognition, the ST-Link device
should be fully enumerated in
the Windows Device Manager
as shown:
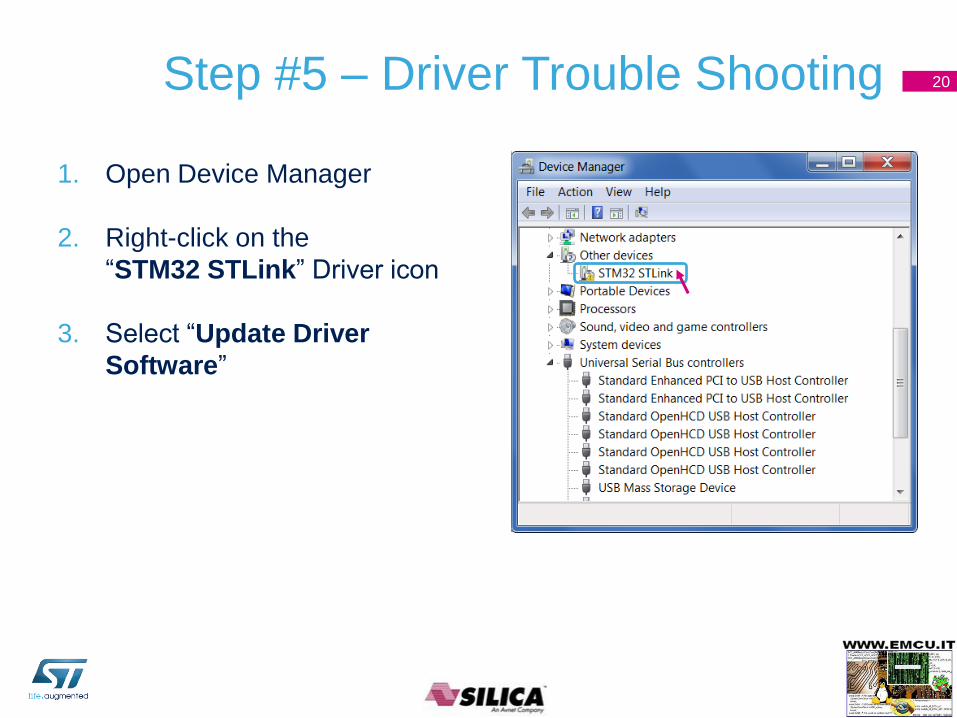
Step #5 – Driver Trouble Shooting 20
1. Open Device Manager
2. Right-click on the
“STM32 STLink” Driver icon
3. Select “Update Driver
Software”
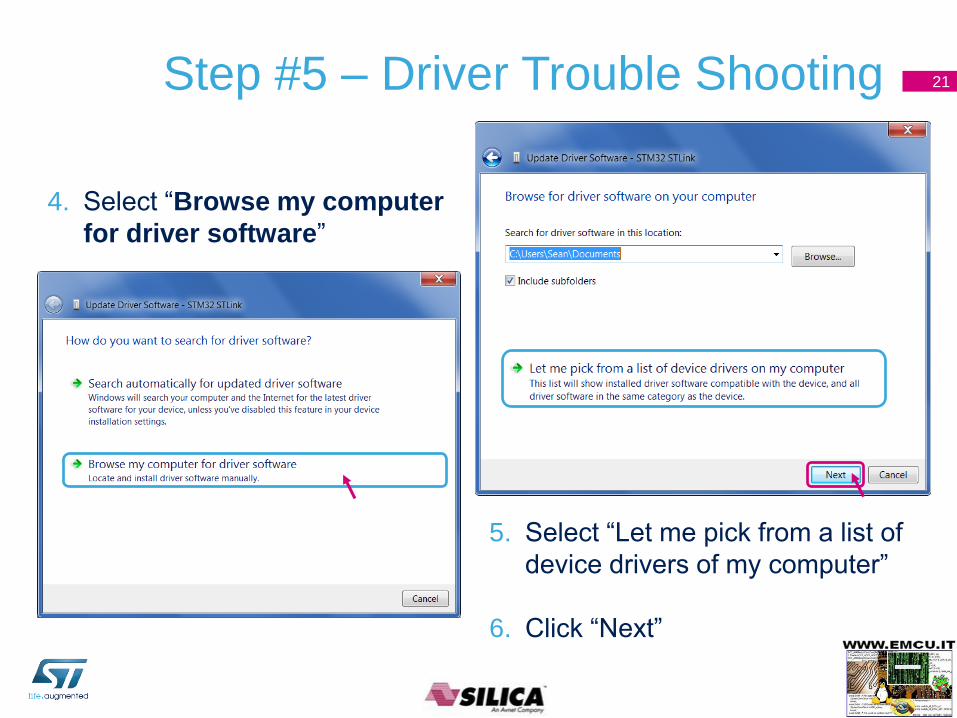
Step #5 – Driver Trouble Shooting 21
5. Select “Let me pick from a list of
device drivers of my computer”
6. Click “Next”
4. Select “Browse my computer
for driver software”

Step #5 – Driver Trouble Shooting 22
• The “STMicroelectronics ST-Link dongle” should be listed
7. Click “Next”

Step #5 – Driver Trouble Shooting 23
• A warning message may appear
8. Select “Install this driver software anyway”

Step #5 – Driver Trouble Shooting 24
• You should receive a message:
“Windows has successfully
updated your driver software”
• Re-check Device Manager to
ensure “STMicroelectronics
STLink dongle” is functioning
normally

Step #6 – Create a new WB project based on the ST
evaluation board 26
• Starting point of new design is to create the WB project.
• Execute the STMCWB 4.0.0
• Choose the WB example project that best fits your need. • Choose the one with the same name of the ST evaluation board you are using, or
• Choose the one with the same microcontroller you are using
Microcontroller
family WB project
Single drive
STM32F0x SDK40x-STM320518-EVAL-MB459-Shinano.stmc
STM32F100 SDK40x-STM32100B-EVAL-MB459-Shinano.stmc
STM32F103 LD/MD SDK40x-STM3210B-EVAL-MB459-Shinano.stmc
STM32F103 HD SDK40x-STM3210E-EVAL-MB459-Shinano.stmc
STM32F2x SDK40x-STM322xG-EVAL-MB459-Shinano.stmc
STM32F3x SDK40x-STM32303C-EVAL-MB459-Shinano-SINGLE-DRIVE.stmc
STM32F4x SDK40x-STM324xG-EVAL-MB459-Shinano.stmc
Dual drive
STM32F103 HD SDK40x-STEVAL-IHM022V1-MB459-Shinano-DUAL-DRIVE.stmc
STM32F2x No board available at stock
STM32F3x SDK40x-STM32303C-EVAL-MB459-Shinano-DUAL-DRIVE.stmc
STM32F4x SDK40x-STEVAL-IHM039V1-MB459-Shinano-DUAL-DRIVE.stmc

Step #6 – Create a new WB project
• You will be asked to choose where to save the new project.
• Save in a working folder and rename it accordingly.
• This way, all the control stage parameters will be populated with the
correct values.
27
STM32303C-EVAL

Step #7 – Setup power stage 28
• Setup the power stage parameters according to schematic, data
sheet, UM, and/or measurements.
(1) User can refer to tables of slides 11-12 for direct link on st.com.

Step #7 – Setup power stage 29
• What are the power stage parameters?
• Inverter power devices: max switching frequency, min dead time.
• Gate drivers: signal polarity, enabling signal
• Current sensing and protection: topology, Rshunt, AOP, noise parameters
• Bus voltage sensing: partitioning, range
• Temperature sensing: V/T curve, range
• AC input & PFC

Step #7 – Setup power stage 30
• Some power stages are already present in the WB examples, open them,
create a dummy project and copy the power stage parameters from it.
Power stage Picture
STEVAL-IFN003V1
STEVAL-IHM034V2
STEVAL-IHM042V1
STEVAL-IHM045V1
MB459

Step #7 – Setup power stage 31
• Other power stage data can be found here
IHM021v2 IHM032v1 IHM025v1
Rated Bus Voltage Info
Min rated voltage (V) 60 60 45
Max rated voltage (V) 380 450 450
Nominal voltage (V) 325 325
Bus voltage sensing
Bus voltage divider 1/... 125 125 136
Dissipative brake W3 Rbrake
W3 OCPoff
Polarity Active high
Driving signals
Phases U, V, W High side polarity Active high Active hgh Active high
Phases U, V, W Low side polarity Active low Active low Active low
Temperature sensing
V0 (mV) 1055 1055 1020
T0 (°C) 25 25 25
ΔV/ΔT (mV/°C) 22 22 23.6
Max working temperature on sensor (°C) 70 70 70

Step #7 – Setup power stage 32
Over current protection IHM021v2 IHM032V1 IHM025v1
Comparator threshold (V) 0.5 0.55 0.5
Over-current network gain (V/A) 0.45 0.45 0.075
Expected over-current threshold (A) 1.11 1.22 6.25
Over-current feedback signal polarity Active low Active low Active low
Over-current protection disabling network
Over-current protection disabling network polarity Active high Active low
Current sensing
Current reading topology Three shunt One shunt Configurable
Shunt resistor(s) value (ohm) 0.45 0.45 0.15
Amplifying network gain 2.9 2.92 1.7
T-noise (ns) 1250 -
T-rise (ns) 1250 1000
Power switches
Min dead-time 500 500
Max switching frequency 50kHz 50kHz

Step #7 – Setup power stage
• Other parameters can be found in the user manual of the relative power boards.
• Search the ST website for the part number of the board(1) (ex. STEVAL-IHM035V2)
33
(1) User can refer to tables of slides 11-12 for direct link on st.com.

Step #8 – Setup motor parameters
• ST MC Workbench – Motor section contains:
• Electrical motor parameters
• Motor sensor parameters
• In this hands-on session we will configure the system for sensor-less
control using a motor with a surface-mounted magnet.
34

Step #8 – Setup motor parameters
• Select Surface Mounted PMSM in Motor → Electrical parameters →
Magnetic structure
35

Step #8 – Setup motor parameters • Set Max Rated Speed with max speed of the motor according the specs of the
application.
• Set Nominal Current with max peak current provided to each of the motor phases
according the specs of the motor.
• Set Nominal DC Voltage with value of DC bus provided to the inverter or the rectified
value of AC input.
• Keep checked "Auto" button near Demagnetizing Current.
36

Step #8 – Setup motor parameters 37
• The number of pole pairs is usually provided by the motor supplier,
but in case it’s not or if you’d like to double check it:
• Connect a DC power supply between two (of the three) motor phases and provide
up to 5% of the expected nominal DC bus voltage. (You may also set current
protection to nominal motor current.)
• Rotate the motor with your hands, you should notice a little resistance, otherwise:
• if you are not able to rotate the motor, decrease the applied voltage,
• if the motor does not generate any resistance, gradually increase the applied voltage.
• The number of rotor stable positions in one mechanical turn represents the number
of pole pairs.
Pole pairs number
+
-
DC voltage source

Step #8 – Setup motor parameters 38
• Using the multimeter, measure the DC stator resistance phase-to-
phase (Rs) and divide it by two.
• Connect DC voltage between two motor phases.
• Connect oscilloscope voltage and current probes as shown in the
figure.
• Increase the voltage up to the value where the current equals the
nominal value, rotor with align.
• Don’t move the rotor anymore.
Stator resistance and inductance
V
+
-
DC voltage source
I

Step #8 – Setup motor parameters 39
• Disable the current protection of DC voltage source.
• Unplug one terminal of the voltage source cable without switching it off.
• Plug the voltage source rapidly and monitor on the scope the voltage and
current waveform until you get something like the one shown in the figure.
• The measurement is good if the voltage can be assimilated to a step and the
current increase like I∞ * (1-e- t *L/R).
• Measure the time required to current waveform to rise up to 63%.
• This time is Ld/Rs constant. Multiply it by Rs and you’ll get Ld value.
Stator resistance and inductance
V I∞
τ = L/R
0.63*I∞

Step #8 – Setup motor parameters 40
• The B-emf constant represents the proportionality constant between
the mechanical motor speed and the amplitude of the B-emf induced
into the motor phases:
• To measure Ke, it usually suffices to turn the motor with your hands
(or using a drill or another motor mechanically coupled) and use an
oscilloscope to look for the phase-to-phase induced voltage (VBemf )
BEMF constant Ke
VBemf = Ke · ωmec
+
-

Step #8 – Setup motor parameters 41
• Measure the VBemf frequency (fBemf) and the peak-to-peak amplitude
(VBemf –A)
• Compute Ke in Vrms / Krpm:
BEMF constant Ke
[ ] 1000
2 2 [ ] 60
Bemf A
e
Bemf
V V peak to peak pole pairs numberK
f Hz

Step #9 – Setup drive parameters
• In Drive settings, decrease Cut-off frequency of torque and flux regulator down to 2000
rad/s if power stage → current reading topology is single shunt.
• In Sensing enabling and FW protections, uncheck those sensing not supported by
power stage and check any “Set intervention threshold to power stage xxx” buttons.
• In Drive settings, initially set default target speed to at least 20% of maximum
application speed.
• In additional features, start without any additional method (possible to add them later).
43

Step #9 – Setup drive parameters
• In start-up parameters, check the basic profile.
• Set current ramp initial and final values equal to motor
nominal current value / 2 (if load is low at low speed,
otherwise it can be set up to 0.8-1.0 times nominal
current value).
• Set speed ramp final value to around 30% of maximum
application speed.
• According to motor inertia it may be required to
increase the speed ramp duration.
• Set minimum start-up output speed to 15% of
maximum application speed (if required, decreased it
later).
• Set estimated speed band tolerance lower limit to
93.75%
• Enable the alignment at the beginning of your
development (duration 2000 ms, final current ramp
value from 0.5 to 1 times motor nominal current
according to load)
44
Basic

Step #10 – Parameter generation
• Once all the parameters have been entered in the ST MC Workbench, select
the output path in the option form and choose ‘SystemDriveParams’ present
in the FW working folder.
• Click on the ‘Generation’ button to configure the project.
46

Step #11 – Compile and program the micro
• Run the IAR Embedded Workbench.
• Open the IAR workspace (located in Project\EWARM) folder according to the
microcontroller family (e.g. STM32F10x_Workspace.eww for STM32F1).
• Select the correct user project from the drop-down menu according to the control stage
used (e.g. STM32F10x_UserProject - STM3210B-EVAL).
• Compile and download.
47
compile
& program
select
project

Step #11 – Compile and program the micro • Optionally, run Keil uVision.
• Open the Keil workspace (located in Project\MDK-ARM) folder according to the
microcontroller family (e.g. STM32F10x_Workspace.uvmpw for STM32F1).
• Select the proper user project from the drop-down menu according to the control stage
used (e.g. STM3210B-EVAL).
• Compile and download.
48
select
project
compile
program

Step #12 – Program LCD FW
• Run the ST-LINK Utility.
• File → Open file… and select the .hex file (located in LCDProject\hex) according to the
control stage used (e.g. STM3210B-EVAL.hex).
• Target → Program…
49

Step #13 – Run the motor • Arrange the system for the run:
• Connect the control board with the power board using the MC Cable.
• Connect the motor to the power board.
• Connect the power supply to the power board and turn on the bus.
• If the board is equipped with the LCD:
• Press joystick center on Fault Ack button to reset the faults.
• Press joystick right until the Speed controller page is reached.
• The press joystick down to reach the Start/Stop button.
• Press the center of the joystick to run the motor.
50

Step #13 – Run the motor • Optionally you can start the motor using the ST MC Workbench.
• Connect the PC to the control board with the USB to RS232 dongle (and a null modem
cable).
• Open the Workbench project used to configure the FW and click on Monitor button.
• Select the COM port and click Connect button. This establish the communication with
the firmware.
• To clear the fault, click Fault Ack and then Start Motor button to run the motor.
51
Monitor
Select COM
port
Connect
Fault Ack
Start

Releasing your creativity
with the STM32 52
STM32
STM32 Motor Control
/STM32 @ST_World st.com/e2e