Embed Size (px)
Citation preview

OWNERS MANUALFOR
STERLING CONTROLLERSINCLUDING MISTING APPLICATIONS
23201 NORMANDIE AVE., TORRANCE, CA 90501
PHONE (800) 221-2525 FAX (800) 221-2306

TABLE OF CONTENTSSelecting the Location for the Controller ..................................................................3Mounting the Controller ..............................................................................................3Wiring..............................................................................................................................4 Remote Control Interface ............................................................................................5How the Backup System Works..................................................................................5
Changing the Battery...............................................................................................5Electronic Circuit Breaker............................................................................................6Features List ...................................................................................................................8Erasing Current Programs .........................................................................................10Basic Programming Instructions ..............................................................................11
Set Current Time ...................................................................................................11Set Today.................................................................................................................11Set Water Days .......................................................................................................12Set Station Water Time .........................................................................................12Set Cycle Start Times ............................................................................................13Incomplete Program Alert ...................................................................................14
Operating the Controller Manually...........................................................................14Station Advance .....................................................................................................15Terminating a Watering Cycle..............................................................................15Manually Turning a Station On and Off............................................................15Manually Turning Master Valve/Pump Start Station On and Off ................15Activating a Station for its Programmed Time .................................................16Activating a Watering Cycle .................................................................................16System Check Cycle ..............................................................................................16Rain-Off ..................................................................................................................17Programmable Rain-Off.......................................................................................17
Programming a Block of Stations with a Single Entry .........................................18Displaying Current Program Settings ......................................................................19Water Budgeting ..........................................................................................................20Programmable Watering Calendar............................................................................21Loop Watering .............................................................................................................22
Delay Between Loop Cycles ................................................................................23Manually Starting the Loop Cycle.......................................................................24
Programmable Delay Between Stations...................................................................25Option 0: Single Program ..........................................................................................26Option 1-6: Seconds Mode........................................................................................26Option 7: Seconds Mode in System Check.............................................................27Option 8: Frost Override Cycle ................................................................................27Option 11-16: Disable Master Valve/Pump Start Circuit.....................................28Sensor Activation of Program 6...............................................................................28Programming Instructions for Misting Applications ............................................29Manually starting Loop cycle.....................................................................................34Program Review ..........................................................................................................35
Page3
SELECTING THE PROPER LOCATION FORYOUR CONTROLLER
Indoor Wall MountIf possible, always select an indoor location for your controller where you areassured of maximum protection from environmental hazards, accidents, and van-dalism. Mount the controller on a solid, smooth surface shoulder high so theoperator can easily see the display and read the faceplate graphics.
Outdoor Wall MountThe most desirable location is shoulder high on the shady side of a suitable wall.Avoid concealing the controller behind a shrub or near ground level where it willbe in the direct path of a sprinkler head.
MOUNTING THE CONTROLLER
Wall MountSelect suitable fasteners such as molly bolts in plaster board, wood screws inwood, etc. Check to see that the head of the screw will pass through the keyholeslot in the rear of the case. Use the enclosed template to locate mounting screwholes.
If additional support is desired, remove lower plate on the enclosure by removingthe screws that hold each side and mount one additional fastener through thelower hole in rear of housing.
Pedestal MountIf the unit is to be mounted on a pedestal, follow instructions supplied with thepedestal.

Page4
WIRING1. Screw a 1/2” condulet to the threaded transformer mounting at bottom ofcase feeding transformer leads into condulet. Install and secure rigid conduit orarmored cable as may be required by local electrical codes.
2. Route two wires from 110 VAC source through condulet and connect oneto black transformer lead and the other to the white transformer lead usingapproved wire nuts.
To ground the controller, connect the green lead from the transformer (which isslightly shorter than the black and white leads) to a grounding wire. Groundingcan also be achieved by securing metal conduit to the1/2” condulet.
3. Route the 24 VAC wiring from the valves through the large hole in thebottom of the case. (NOTE: Check local code for approved method).
Sterling 4, 8, and 12:One wire is routed from each valve to the correspondingly numbered stationterminal. Valve #1 corresponds with station terminal #1, valve #2 with stationterminal #2, and so on. One common wire is connected in parallel with eachvalve and then to the “Common” terminal.
If a master valve or pump start circuit is required, connect one wire to the“Common” terminal and the other to the terminal marked “Master Valve orPump Start”.
Sterling 18, 24, 30, and 36Route the 24 VAC wiring from the field valves through the large hole in thebottom of the case. (NOTE: Check the local code for approved method.) Onewire is routed from each valve to the correspondingly numbered pigtail. Valve#1 corresponds with pigtail #1, valve #2 with pigtail #2, and so on. One com-mon wire is connected in parallel with each valve and to the pigtail labeled “Com”.
If a master valve or pump start circuit is required, connect one wire to pigtail la-beled “Com” and the other to pigtail labeled “Master Valve or Pump Start”.

Page5
REMOTE CONTROL INTERFACE
The Sterling is designed for direct interface with TRC2 remote control systemfrom Remote Control Technology, Redmond, Washington. The DC1-1 cable in-cluded with TRC2 connects directly to the six pin connector labeled Remote onthe Sterling for quick and easy installation.
When using the TRC2, set the dial on the Sterling at the Rain-Off position. Thecontroller will disallow operation if the dial is set at any other position.
HOW THE BACKUP SYSTEM WORKS
The Sterling is equipped with a non-volatile memory that retains programmedinformation during power outages of any length. There is no need to reprogramwhen power is restored.
The controller is also equipped with a time-keeping circuit. A lithium battery en-ables the time-keeping circuit to maintain accurate time during power outages ofany length.
If the power is restored during the time a watering cycle is normally under-way,the controller will resume operation at the station normally running at the timeof power restoration.
Changing the BatteryAlthough the lithium battery has a potential life of 10 years, a high temperatureenvironment may necessitate that it be replaced more frequently. If the controllerfails to maintain current time during a power outage, the battery should be re-placed.
Page6
The battery is kept in a clip holder that is mounted to the rear side of the circuitboard and is easily replaced as follows:
1. Shut off the power supply to the controller.2.
3.
4.
5. Re-fasten the main panel and the lower plate to the enclosure.6. Re-apply power to the controller7. Enter current time and day.
ELECTRONIC CIRCUIT BREAKER
The Sterling is equipped with an electronic circuit breaker. If the controller de-tects a short circuit at a station (valve), it will shut the station off and the dis-play will alternately flash “FUSE” and the station number or “0” for the mastervalve. The controller will continue automatic operation at the other stations.During future watering cycles, the controller will skip over the short¬ed stationuntil the short is repaired.
To clear the electronic circuit breaker, press the CLEAR key after you have in-vestigated and corrected the cause of the short.
Remove the lower plate by removing the two screws that fasten it to thecontroller enclosure.Remove the four screws that fasten the main panel to the enclosure. Then,maintaining a grasp on the panel, lower it about one inch and tilt the toptoward you to gain access to the battery holder on the rear side.Remove the battery from the clip holder and replace it with a Panasonic 3MBR2325, or equivalent.

Page7
Common conditions of the electronic circuit breaker include:
CONDITION:
CONDITION:.
CONDITION:
Fuse and one or more stations alternately flash.
Cause: Shorted solenoid coil and/or a short in the valvewires.
Cause: Too many valves are operating at the same time.No more than three valves (including master valve) shouldoperate simultaneously.
Fuse displays without any station numbers.
Cause: A transient surge has spiked the line. PressCLEAR.
Cause: An overload has occurred for too short a dura-tion for controller to determine the station number. PressCLEAR. If condition repeats during future cycles,activate a System Check short duration cycle and mon-itor display to determine which station is energized whenFuse appears on the display. Carefully check valve wiringfor broken insulation and other conditions that may causeintermittent short.
Fuse is alternately displayed with 0 and none of thestations are operating automatically.
Cause: Short in master valve or pump start circuit. Checksolenoid coil of master valve, pump start relay, and/orwiring. Press CLEAR after repair is made.
Page8
FEATURES LISTIn order to take full advantage of the Sterling’s versatility and programmingflexibility, we recommend that you become familiar with the features listed below.
• Six independent programs that can run concurrently.
•
• Any station can be assigned to more than one program (all six if desired).
•
• .
•
• .
•
Up to nine cycle starts per day in all six programs; or loop watering optionalin all six programs for unlimited cycles.
Station timing adjustable from 1 minute to 24 hours in one minute incre-ments. Seconds/minutes time base optional in all six programs.
Watering calendar factory set at 7 days. For “skip day” scheduling (everyother day, every third day, etc.) the watering calendar can be changed to anylength between 1 and 32 days.
Single program option that gives you the flexibility of having two or moreprograms scheduled, but limiting automatic operation to only that programat which the dial is set.
Programmable delay of 1 sec. to 59 sec. between the time one station turnsoff and the next one turns on during a watering cycle
System Check function programmable from 1 to 15 min. per station (or, op-tionally, 1 to 15 sec. per station). The controller will advance through all sta-tions beginning with the one chosen to initiate the cycle.

Page9
•
•
•
•
•
•
•
•
•
Percentage function to simultaneously increase or decrease the stationwater time of all stations within a program.
Programmable Rain Off up to 14 days. The controller will resume auto-matic operation on the day following the last programmed “Off" day.
Sensor feature that allows Program 6 to be activated by a “normally open"sensor switch such as a thermostat. Optional Frost Override feature dis-ables programs 1 thru 5 during operation of Program 6.
Loop watering in which a program’s watering cycle is continuously re-peated for a desired period. Cycles can repeat immediately or after a pro-grammable delay of 1 min. to 4 hours, 15 min.
Program-erase feature that allows existing programs to be erased individ-ually or all at once.
For simplified program review, the following information can be scrolledon the display: 1) watering duration of each station, 2) watering days, 3)skip days, 4) cycle start/stop times, and 5) status of options (“On” or“Of ”).
Single entry procedure for entering the same watering time in a block ofconsecutive stations.
Master valve/pump start circuit can be disabled during operation of anyprogram.
Manual valve/pump start station can be turned on manually without an-other station turning on.

Page10
ERASING CURRENT PROGRAMSAll settings within each program (except for current day and current time) can beerased with a single entry. Programs can be erased individually or all at once:
1. To Erase An Individual Program:
a. Turn dial to desired program.b. Press the following keys in sequence:
Display will show a flashing “PE” to indicate that the program has beenerased.
2. To Erase All Programs At Once:
a. Turn dial to Program Erase/Calendar position.b. Press the following keys in sequence:
Display will show a flashing “PE” to indicate that all programs have beenerased.
1SUN
3TUE
7SAT
9 ENTER
1SUN
3TUE
7SAT
9 ENTER

For misting applications, see instructions beginning in on page 29.
If you make a mistake while programming, the controller displays an error mes-sage. Press the Clear key, then repeat correctly the last programming step.
Follow the instructions below to set your program(s); or to make changes, dele-tions, or additions to the current program(s). Any program setting can be changedwithout affecting the rest of the program. To erase existing pro-gram(s), followinstructions on page 10.
To begin programming, turn the dial to a program (e.g., Program 1).
1. Set Current Time: Using the numbered keys, key in the current time. If it isp.m., the next step is to press the PM/% key (the p.m. indicator will show up onthe upper left side of the display window). Next, press the Time key.EXAMPLE A: Time is 11:38 a.m., press:
EXAMPLE B: Time is 4:35 p.m., press:
Note: Midnight is 12 00 am, Noon is 12:00 p.m.
2. Set Today: Key in the number corresponding to the current day of the week,then press Today key.
EXAMPLE: Today is Tuesday, press:
Time and Today functions need only be entered once and will automatically applyto all six programs. The remaining functions, covered in steps 3, 4, and 5 below,apply only to the program indicated by the program dial and must be entered ineach program that is intended to operate automatically.
Page11
BASIC PROGRAMMING INSTRUCTIONS
1SUN
1SUN
3TUE
8 TIME
4WED
3TUE
3TUE
TIME
5THU
PM%
TIME

Page12
3. Set Water Days: Key in a day of the week that watering is to occur and thenpress the Water Day key. Repeat for all selected watering days.
EXAMPLE: Selected watering days are Sunday, Monday, and Wednesday. Toprogram, press:
To delete a programmed Water Day, key in that day and press Skip Day key.When programming a Water Day, display will show “On” and the number cor-responding to the appropriate day of the week (Sun. = 1, Mon. = 2, Tues. = 3,etc.). To indicate a Skip Day, display will show “Of" and the day number.
Note: To Schedule watering to occur on other than specific days of the week,such as every other day, every 3rd day, every 4th day, etc., refer to instructions onpage 21.
4. Set Station Water Time: To set the watering duration of each station to beincluded in program:
a. Key in station number.b. Press Stn. Water Time key.c. Key in watering duration.d. Press Enter key.e. Repeat for all stations to be included in this program.
EXAMPLE A: Station 4 to water for 24 minutes, press:
EXAMPLE B: Station 12 to water for 1 hour 40 minutes, press:
To change the watering duration of a station, follow steps a thru d above enter-ing the new duration at step c. To delete a programmed station, enter “0” at stepc.
Controller will skip unprogrammed stations.
WATERDAY
1SUN
2MON
WATERDAY
4WED
WATERDAY
4WED
STNWATERTIME
2MON
4WED
ENTER
2MON
1SUN
STNWATERTIME
1SUN
4WED
0 ENTER

Page13
5. Set Cycle Start Time(s): The cycle start time is the time of day a programwill begin watering. For each cycle start time that is set (up to 9), all stations as-signed to the program will water in sequence beginning with the lowest num-bered station. To set the time a program will begin watering:
a. Key in the cycle number (1= cycle start 1, 2 = cycle start 2, etc.)b. Press Cycle Start key.c. Key in time of day that cycle is to start.d. If cycle start is during p.m. period, press the PM/% keye. Press Enter key.f. Follow the same procedure for each additional cycle start. Up to 9 cycle
start times may be scheduled in each program.
EXAMPLE: Controller is to initiate two watering cycles on the scheduledwatering days. The first cycle is to start at 6:15 a.m.; second cycle to startat 2:00 p.m., press:
To change a cycle start time, follow steps a through e above entering the newtime at step c. To delete a cycle start, enter “0” at step c.
Do not schedule a watering cycle to start prior to completion of the previouscycle within the same program. The controller will ignore the subsequent over-lapping cycle. To determine the end time of a cycle, key in the cycle number (1=cycle start 1, 2= cycle start 2, etc.), then press the Cycle Start key twice.
To scroll through the start and stop times of all scheduled cycle starts, press theClear key, then the Cycle Start key.
CYCLESTART
1SUN
6FRI
1SUN
5THU
ENTER
CYCLESTART
2mon
2mon
0 0 PM%
ENTER

Page14
OPERATING THE CONTROLLER MANUALLY
INCOMPLETE PROGRAM ALERT: To check if programming is complete,move the program dial out of its current position. A long beep signals that theprogramming is incomplete and the program will not run automatically. Movethe program dial back to the position it was in to complete programming.
To continue programming, turn the dial to the next desired program and followsteps 3 through 5 above. Repeat for all other programs to be scheduled.
After programming has been completed, move the dial to the Auto position. Thiswill lock the keyboard so that no unintentional program entries can be made. Thisdisplay will show the current time of day.
Manual operation allows you to perform a watering function without affecting theprogrammed watering schedule. This section includes instructions for the fol-lowing manual operations:
• Advancing to another station during a watering cycle.
• Terminating a watering cycle.
• Manually turning a station on and off.
• Manually turning master valve/pump start station on and off.
• Activating one station to water for its programmed duration.
• Activating a watering cycle.
• Activating a System Check cycle.
• Rain Off.
• Programmable Rain Off.

Page15
Advancing To Another Station During A Watering CycleTo advance to another station, first turn dial to program in operation:
a. Key in station to which advancement is desired.b. Press Manual On/Off key.c. Return dial to Auto position.
Terminating a Watering CycleTurn dial to program in operation and press Manual On/Off key Return dial toAuto position.
Manually Turning A Station On And OffTo turn station on:
a. Turn dial to Manual position.b. Key in station numberc. Press Manual On/Off key.
To turn station off, do one of the following:a. Press Manual On/Off key; ORb. Move dial out of Manual position; ORc. Select another station for manual operation.
Note: A station turned on manually will automatically shut off at midnight.
Beep Alert: While a station is on manually, the controller will sound two shortbeeps every 30 seconds.
Manually Turning Master Valve Pump Start StationOn and OffTo turn on the master valve/pump start station without other stationsturning on:
a. Turn dial to Manual position.b. Key in 0.c. Press Manual On/Off key.
To turn off master valve/pump start station, press Manual On/Off key, or movedial out of Manual position.

Page16
Activating One Station To Water For Its Programmed DurationTo activate station:
a. Turn dial to program in which station is included.b. Key in station number.c. Press Stn. Water Time key.d. Press Manual On/Off key.e. Return dial to Auto position.
After watering, controller will not advance to the next programmed wateringstation.
Activating A Watering CycleTo activate the watering cycle of a program at a time other than its scheduledstart time(s), do the following:
a. Turn the dial to desired program.b. Key in the first station intended to turn on.c. Press Manual On/Off key (Display will alternately flash station number
and remaining water time.)d. Return dial to Auto position.
Activating A System Check CycleThis feature activates a watering cycle for a walk-thru check of the irrigation sys-tem. The controller will advance through all stations in sequence beginning withthe station chosen to initiate the cycle. Station run time (same for all stations) isprogrammable from 1 to 15 minutes.
To initiate watering at Station 1:a. Turn the dial to System Check position.b. Key in station run time (1 to 15).c. Press Manual On/Off key.d. Return the dial to Auto position.
To initiate watering at a station other than # 1:a. Turn the dial to System Check position.b. Key in station run time (1 to 15).

Page17
c. Press Stn. Water Time key.d. Key in number of station selected to initiate watering cycle.e. Press Manual On/Off key.f. Return the dial to Auto position.
To terminate cycle prior to completion, press Manual On/Off key while the dialis in System Check position.Note:1. Cycle will include stations with no programmed watering time.2. Station run times can be changed from minutes to seconds (1-15 sec.) by ac-tivating Option 7 (see page 27).
Rain OffTo discontinue automatic operation without affecting the program(s), turn thedial to Rain Off position.To resume automatic operation, turn the dial to Auto position.
Programmable Rain OffUse this feature to suspend watering for a specific number of days (1 to 14). Thecontroller will resume automatic operation on the day following the last Off day.
a. Turn the dial to Rain Off position.b. Key in the number of Off days.c. Press Enter.d. Return the dial to Auto position.
In the Auto position, the display will indicate Off and the number of remainingdays to be off.
To cancel programmable Rain Off:
a. Turn the dial to Rain Off position.b. Press 0.c. Press Enter.d. Return the dial to Auto position.

Page18
PROGRAMMING WATER TIMES OFCONSECUTIVE STATIONS USING ONEENTRYThis feature is a short-cut method for programming station water time of con-secutive stations with the same watering duration. This procedure replaces step4 of Basic Programming Instructions. With dial at desired program:
a. Key in number 99.b. Press Stn. Water Time key. (“b” will appear on display.)c. Key in number of the first station in the series.d. Press Enter. (“E” will appear on display.)e. Key in the number of the last station in the series.f. Press Enter. (“D” will appear on display.)g. Key in watering duration.h. Press Enter. The number entered for watering duration will flash to indi-
cate that the entry has been accepted.
EXAMPLE: Stations 4 through 12 are each to water for 8 minutes inProgram 2. With the dial in Program 2 position, press:
4WED
STNWATERTIME
99 ENTER 1SUN
2MON
ENTER
8 ENTER

Page19
DISPLAYING CURRENT PROGRAM SETTINGSAny program setting can be recalled without affecting the program. To display anyof the following settings, turn the dial to the desired program.
TIME
TODAY
WATER DAYS
SKIP DAYS
STATION WATER TIME
Press Time key and the display will show current time. (Thecurrent time is also displayed when the dial is in Auto position.)
Press Today key and the display will show the current calendarday. Unless the calendar has been set at other than a 7 day cal-endar, the number shown will correspond to current day ofweek (Sun. = 1, Mon.= 2, Tues. = 3, etc.).
Press Water Day key and the display will scroll the water daysas On days.
Press Skip Day key and the display will scroll the days water-ing will not occur.
Displaying Total Water Time For Program: Press Clear keythen press Stn. Water Time key. Note: Total water time showntakes into account water budget percentage.
Displaying Individual Station Water Time:1. Press Clear key.2. Key in station number.3. Press Stn. Water Time key.Note: Water time shown takes in account water budget per-centage.
Scrolling All Stations Included In Program And TheirWater Times: Press Clear key, then press Stn. Water Timekey twice. The controller will display each programmed stationin sequence with its watering time.
Note: Water times shown take into account water budget per-centage.
Page20
ADDITIONAL FEATURES
CYCLESTART/END
OPTIONS
Scrolling Cycle Start And End Times Of AllProgrammed Cycle Starts: Press Cycle Start key and thecontroller will display in sequence all programmed cycle starts,first showing the cycle start number, then the cycle start time,and then the cycle end time.Note: Cycle end time will take into account the water budgetpercentage.
If a loop cycle is programmed, “LOOP” is displayed as thecycle end time.
To display the status of all 9 options, first turn the dial to Op-tions position, then press Enter. The controller will scrollthrough the options in sequence showing each as “On” or“Of ” (Of = OFF).
Using Water BudgetingThis feature allows you to simultaneously change the watering time of all stationswithin a program. The current settings can be increased or decreased within arange of 1% to 255%, with 100% representing the programmed time.For example, in the winter you may wish to water only 50% of the programmedtime.
To use Water Budgeting:
I. Turn dial to desired program.2. Press the PM/% key. The controller displays the current water budget-ing
% (e.g. 100 for 100%).3. Key in the new percent value.4. Press Enter key. The controller flashes the new percent value and an LED
located to the left of the display window illuminates to indicate that thewater budget percentage is other than 100.

Page21
EXAMPLE A: The new watering duration of each station in Program 1 to be75% of programmed settings. Turn dial to Program 1, then press:
EXAMPLE B: The new watering duration of each station in Program 2 to be150% (50% increase) of programmed settings. Turn dial to Program 2, then press:
Note: Station water times may be returned to their original value by followingsteps 1 to 4 above, entering 100 at step 3.
Note: Watering times displayed take into account water budget percentage ad-justments.
Changing The Length Of The Watering CalendarFor greater flexibility, the watering calendar may be changed from its factory set-ting of 7 days to any other length from 1 to 32 days. This change affects all pro-grams.
The calendar setting is the number the controller counts to, advancing one num-ber each day, before resetting to 1. Watering occurs on all days set as water days.
To simplify programming, you may wish to shorten the calendar A 2 day calen-dar, for example, will permit watering to occur every day (with days 1 and 2 bothset as water days) or every other day (with either day 1 or day 2 set as a waterday).
A longer calendar may also be programmed. For skip day programming, a 12 daycalendar allows watering to be scheduled at any of the following intervals: everyday, every 2nd day, every 3rd day, every 4th day, every 6th day, or every 12th day.
PM%
1SUN
5THU
0 ENTER
PM%
7SAT
5THU
ENTER
Page22
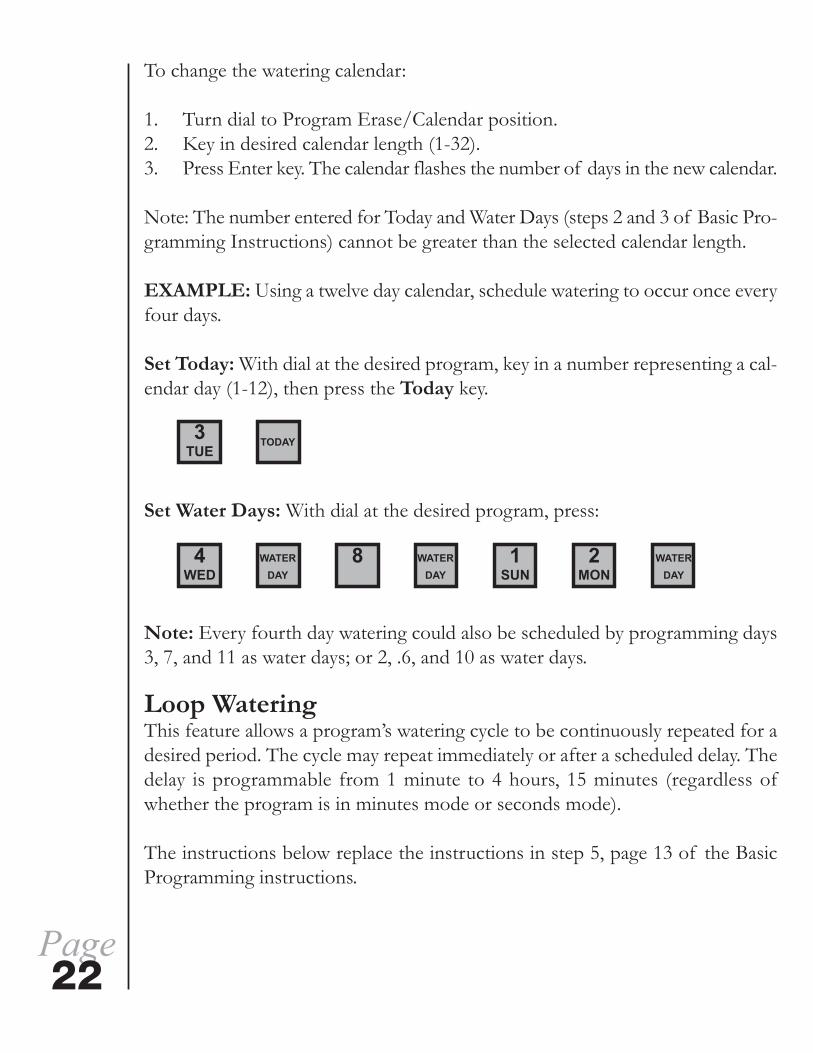
To change the watering calendar:
1. Turn dial to Program Erase/Calendar position.2. Key in desired calendar length (1-32).3. Press Enter key. The calendar flashes the number of days in the new calendar.
Note: The number entered for Today and Water Days (steps 2 and 3 of Basic Pro-gramming Instructions) cannot be greater than the selected calendar length.
EXAMPLE: Using a twelve day calendar, schedule watering to occur once everyfour days.
Set Today: With dial at the desired program, key in a number representing a cal-endar day (1-12), then press the Today key.
Set Water Days: With dial at the desired program, press:
Note: Every fourth day watering could also be scheduled by programming days3, 7, and 11 as water days; or 2, .6, and 10 as water days.
Loop WateringThis feature allows a program’s watering cycle to be continuously repeated for adesired period. The cycle may repeat immediately or after a scheduled delay. Thedelay is programmable from 1 minute to 4 hours, 15 minutes (regardless ofwhether the program is in minutes mode or seconds mode).
The instructions below replace the instructions in step 5, page 13 of the BasicProgramming instructions.
84WED
WATERDAY
1SUN
2MON
WATERDAY
TODAY
WATERDAY
3TUE

5THU
0 0 0 PM%
ENTER
CYCLESTART
CYCLESTART
9 9 0 0 ENTER
Page23
To set the time that watering will start (beginning of loop), turn dial to desiredprogram.
a. Press 9 key.b. Press Cycle Start key.c. Key in the time of day that watering is to start. If during p.m., the next step
is to press the PM/% Key.d. Press Enter key.
To program the time that watering will stop (end of loop):
a. Press 0 key.b. Press Cycle Start key.c. Key in time of day watering is to end. If during p.m., the next step is to press
the PM/% key.d. Press Enter key.
EXAMPLE: To program a loop beginning at 9:00 a.m. and continuing until 5:00p.m., press the following keys to program beginning of loop:
Press the following keys to program end of loop:
To change the beginning of the loop and/or the end of the loop, repeat eitheror both of steps a thru d above, entering the new time at step c. To delete theloop, enter 0 at step c for both the beginning and end times.
Delay:To schedule a delay between cycles:
a. Key in number 90.b. Press Stn. Water Time keyc. Key in delay time (1 minute to 4 hours, 15 minutes).Note: The delay time is the period between the end of one cycle and the startof the next.d. Press Enter key.
Page24
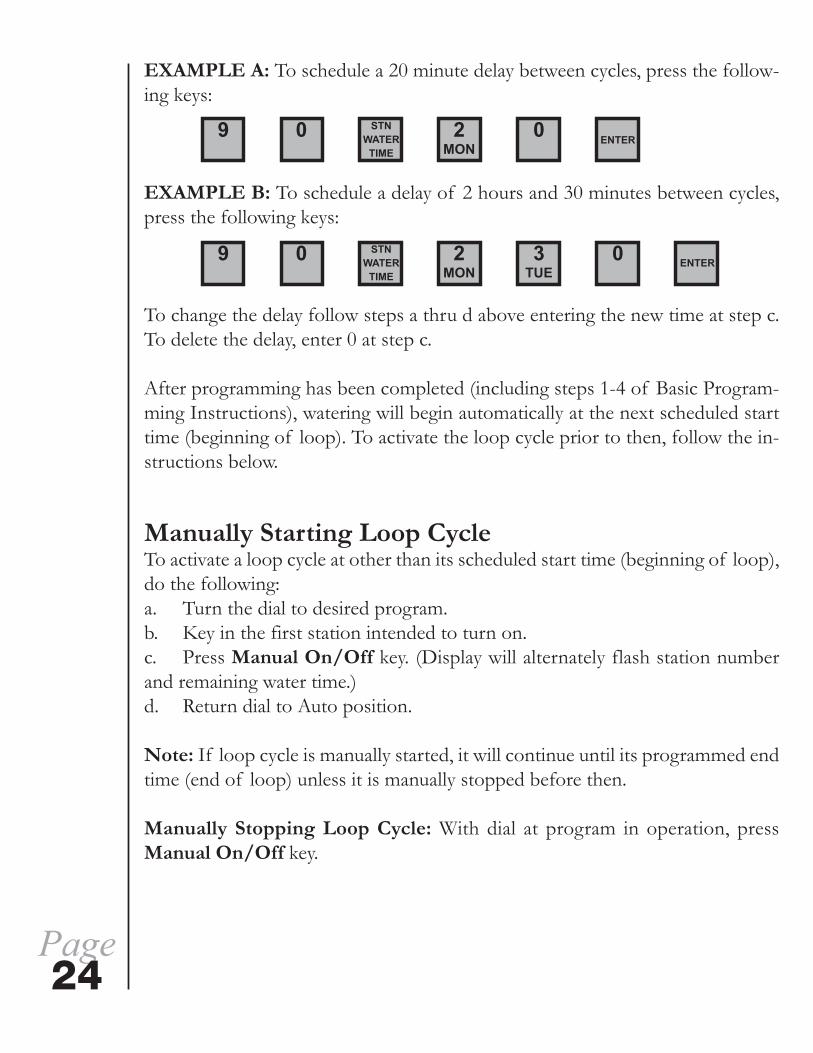
EXAMPLE A: To schedule a 20 minute delay between cycles, press the follow-ing keys:
EXAMPLE B: To schedule a delay of 2 hours and 30 minutes between cycles,press the following keys:
To change the delay follow steps a thru d above entering the new time at step c.To delete the delay, enter 0 at step c.
After programming has been completed (including steps 1-4 of Basic Program-ming Instructions), watering will begin automatically at the next scheduled starttime (beginning of loop). To activate the loop cycle prior to then, follow the in-structions below.
Manually Starting Loop CycleTo activate a loop cycle at other than its scheduled start time (beginning of loop),do the following:a. Turn the dial to desired program.b. Key in the first station intended to turn on.c. Press Manual On/Off key. (Display will alternately flash station numberand remaining water time.)d. Return dial to Auto position.
Note: If loop cycle is manually started, it will continue until its programmed endtime (end of loop) unless it is manually stopped before then.
Manually Stopping Loop Cycle: With dial at program in operation, pressManual On/Off key.
STNWATERTIME
9 2MON
3TUE
0 ENTER0
STNWATERTIME
9 2MON
0 ENTER0

Page25
Programming A Delay Between StationsThis feature allows for a delay of 1 to 59 seconds between the time one stationturns off and the next one turns on during a watering cycle. The delay time is de-ducted from the previous station’s programmed watering time. For example, astation with 5 minutes of programmed watering time will turn off after 4 min-utes, 50 seconds if a 10 second delay is set.
To program a delay, first turn dial to desired program:
a. Press 0 key.b. Press Stn. Water Time key.c. Key in delay time (1 to 59).d. Press Enter.
Repeat procedure for any other programs in which a delay is desired.
Note: Master Valve/Pump Start station will stay on during delay
To change delay time, follow steps a thru d, entering new time at step c. To deletedelay, enter 0 at step c.
EXAMPLE: To program a delay of 6 seconds in Program 2, turn dial to Program2, then press:
0 STNWATERTIME
6FRI
ENTER

Page26
USING THE OPTIONSAdding to the versatility of the Sterling are nine options, described below, thatare used to make certain changes in operation of the controller.
Option 0: Single ProgramThis option gives you the flexibility of having two or more programs set, butlimiting automatic operation to only that program at which the dial is set. If thedial is moved to a position other than a program position (e.g. Auto), then allprograms are allowed to operate automatically.
To activate Option 0:
1. Turn dial to Options position.2. Press 0 key.3. Press Manual On/Off key. Display will indicate “On: 0”.
To cancel Option 0, repeat steps 1, 2, and 3. Display will indicate “OF:0” (Of= OFF).
Options 1 thru 6: Seconds ModeOptions 1 thru 6 are used to change the time base in programs 1 thru 6 fromminutes/hours to seconds/minutes. (Option numbers correspond to programnumbers.) Each program is set separately. Once set, the station run timeswithin that program are adjustable from 1 second to 24 minutes in 1 second in-crements.
To activate the seconds mode option in a program:
I. Turn dial to Options position.2. Key in the program number (1-6).3. Press Manual On/Off key. The display will indicate “On” followed bythe program number.
To cancel the seconds mode option in the program, follow steps 1, 2, and 3.Display will indicate “Of ” followed by the program number (Of = OFF).

Page27
Note: To determine the status of all 17 options (On or Off), turn dial to Optionsand press Enter key. The controller will scroll thru all options showing each as“On” or “Of ” (Of = OFF).
Note: If the dial is turned to a program in which the seconds mode option is ac-tivated, an LED labeled “sec/min mode” located to the left of the display willilluminate.
Option 7: Seconds Mode In System Check FeatureOption 7 is used to change the programmable station run time in the SystemCheck feature from 1-15 minutes to 1-15 seconds.
To activate Option 7:
1. Turn dial to Options position.2. Press 7 key.3. Press Manual On/Off key The display will indicate “On:7”.
To cancel Option 7, repeat steps 1, 2, and 3. The display will indicate “Of:7” (Of= OFF).
Option 8: Frost Override CycleOption 8 is used to alter the operation of the controller when Program 6 is acti-vated by a sensor switch (see Using A Sensor To Activate Program 6, page 28).With Option 8 enabled, Program 6 starts immediately upon closure of the sen-sor switch and all other programs are disabled. If the sensor switch remains closedat the end of the cycle, the cycle is repeated immediately. When the sensor switchopens, Program 6 immediately stops operating and all other programs are allowedto resume automatic operation.
To Activate Option 8:
1. Turn dial to Options position.2. Press 8 key.3. Press Manual On/Off key The display will indicate “On:8”.
To cancel Option 8, repeat steps 1, 2, and 3. The display will indicate “Of:8” (Of= OFF).

Page28
Options 11 thru 16: Disable Master Valve/Pump Start CircuitOptions 11 thru 16 are used to disable the master valve/pump start circuit dur-ing operation of a program. Option numbers correspond to program numberswith option #11 corresponding to program 1, option #12 corresponding to pro-gram 2, and so on.To disable the master valve/pump start circuit during operation of a program:
1. Turn dial to Options position.2. Key in option number that corresponds to desired program.3. Press Manual On/Off key. The display will indicate “On" followed by the
option number
To cancel the option, repeat steps 1, 2, and 3. Display will indicate “Of" followedby the option number (Of = OFF).
Using A Sensor To Activate Program 6A “normally open” sensor device such as thermostat, can be used to activatewatering in Program 6.
To use this feature, connect the sensor device to the sensor terminals of the con-troller. The only programming required is to set the station watering times of thestations to be included in Program 6 (step 4 of Basic Programming Instructions).When the sensor switch closes, a watering cycle is initiated in Program 6 after theswitch has remained closed for 30 seconds. If the sensor contacts open beforecompletion of the cycle, the controller will finish the cycle in progress. If, at theend of the cycle, the sensor switch remains closed for an additional 30 seconds,the cycle is repeated.
Optional Frost Override Cycle: Option 8 is used to alter the operation of thecontroller when Program 6 is activated by a sensor switch. (See instructions foractivating Option 8, page 27.) With Option 8 activated, Program 6 starts imme-diately upon closure of the sensor switch and all other programs are disabled.
Page29
MISTING APPLICATIONSDesigned with the greenhouse grower in mind, the Sterling is a highly flexiblemisting controller in addition to being an ideal controller for virtually all otherirrigation applications. The following instructions are for misting applicationsonly. For other watering applications, follow the instructions beginning on page11.
Programming Features Include:
• Individual station timing adjustable from 1 second to 24 minutes in 1second increments.
• “OFF” time between misting cycles adjustable from 1 minute to 255minutes in 1 minute increments.
• Cycling can be scheduled to begin and end automatically (built-in 24-hourclock)
• Cycling can be started and stopped manually as well as automatically.
• Period of time each day that cycling will occur is adjustable from 1 minuteto 23 hours 59 minutes
• Six independent programs that can run concurrently.
• Programmable pause of 1 second to 59 seconds between stations to allowfull valve closure before advancement to the next station.
• No limit on the number of programs to which a station can be assigned.
PROGRAMMING INSTRUCTIONS FOR MISTING APPLICATIONS
If you make a mistake while programming, the controller displays an error mes-
sage. Press the Clear key, then repeat correctly the last programming step.
Follow the instructions below to set your program(s); or to make changes, dele-tions, or additions to the current program(s). Any program setting can be changedwithout affecting the rest of the program. To erase existing program(s), follow in-structions on page 10.
To begin programming, turn the dial to a program (e.g., Program 1).
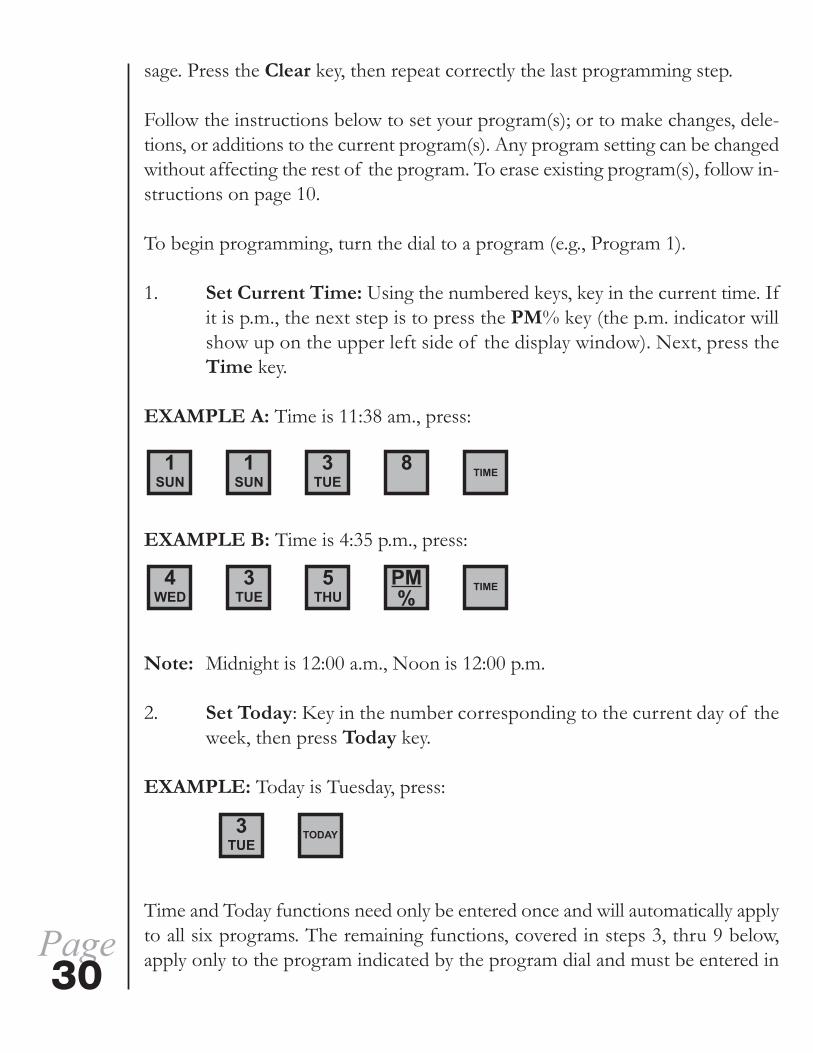
1. Set Current Time: Using the numbered keys, key in the current time. Ifit is p.m., the next step is to press the PM% key (the p.m. indicator willshow up on the upper left side of the display window). Next, press theTime key.
EXAMPLE A: Time is 11:38 am., press:
EXAMPLE B: Time is 4:35 p.m., press:
Note: Midnight is 12:00 a.m., Noon is 12:00 p.m.
2. Set Today: Key in the number corresponding to the current day of theweek, then press Today key.
EXAMPLE: Today is Tuesday, press:
Time and Today functions need only be entered once and will automatically applyto all six programs. The remaining functions, covered in steps 3, thru 9 below,apply only to the program indicated by the program dial and must be entered inPage
30
5THU
4WED
PM%
TIME
1SUN
3TUE
1SUN
3TUE
8 TIME
3TUE
TODAY

each program that is intended to operate automatically.
3. Set Water Days: Key in a day of the week that watering is to occur andthen press the Water Day key. Repeat for all selected watering days.
EXAMPLE: Selected watering days are Sunday, Monday, and Wednesday. Toprogram, press:
To delete a programmed Water Day, key in that day and press Skip Day key.When programming a Water Day, display will show “On” and the number cor-responding to the appropriate day of the week (Sun. = 1, Mon. = 2, Tues. = 3,etc.). To indicate a Skip Day, display will show “Of" and the day number.
4. Activate “Seconds” Mode: Options 1 thru 6 are used to change the timebase in programs 1 thru 6 from minutes/hours to seconds/minutes.(Option numbers correspond to program numbers.) Each program is setseparately. Once set, the station run times within that program areadjustable from 1 second to 24 minutes in 1 second increments.
To activate the seconds mode option in a program:
a. Turn dial to Options position.b. Key in the program number (1-6).c. Press Manual On/Off key. The display will indicate “On”
followed by the program number.d. Return dial to previous position to continue programming.
5. Set Station Water Time: To set the watering duration of each station tobe included in program:
a. Key in station number.b. Press Stn. Water Time key.c. Key in watering duration.d. Press Enter key.e. Repeat for all stations to be included in this program. Page
31
1SUN
2MON
4WED
WATERDAY
WATERDAY
WATERDAY

EXAMPLE A: Station 4 to water for 24 seconds, press:
EXAMPLE B: Station 12 to water for 1 minute 40 seconds, press:
To change the watering duration of a station, follow steps a thru d above enter-ing the new duration at step c To delete a programmed station, enter “0’ at stepc.
Controller will skip unprogrammed stations.
6. Set Start-of- Cycling Time: To set the time that watering will start(beginning of loop):
a. Press 9 key.b. Press Cycle Start key.c. Key in the time of day that watering is to start. If during p.m., the
next step is to press the PM/% key.d. Press Enter key.
EXAMPLE: If cycling is to begin at 9:00 a.m., press:
7. Set End-of-Cycling Time: To program the time of day that cycling willstop (end of loop):
a. Press 0 key.b. Press Cycle Start key.c Key in time of day watering is to end. If during p.m., the next
step is to press the PM/% key.d. Press Enter key.
Page32
4WED
2MON ENTER
4WED
STAWATERTIME
1SUN
2MON
4WED
1SUN
0ENTER
STAWATERTIME
9 9 0ENTER
0CYCLESTART
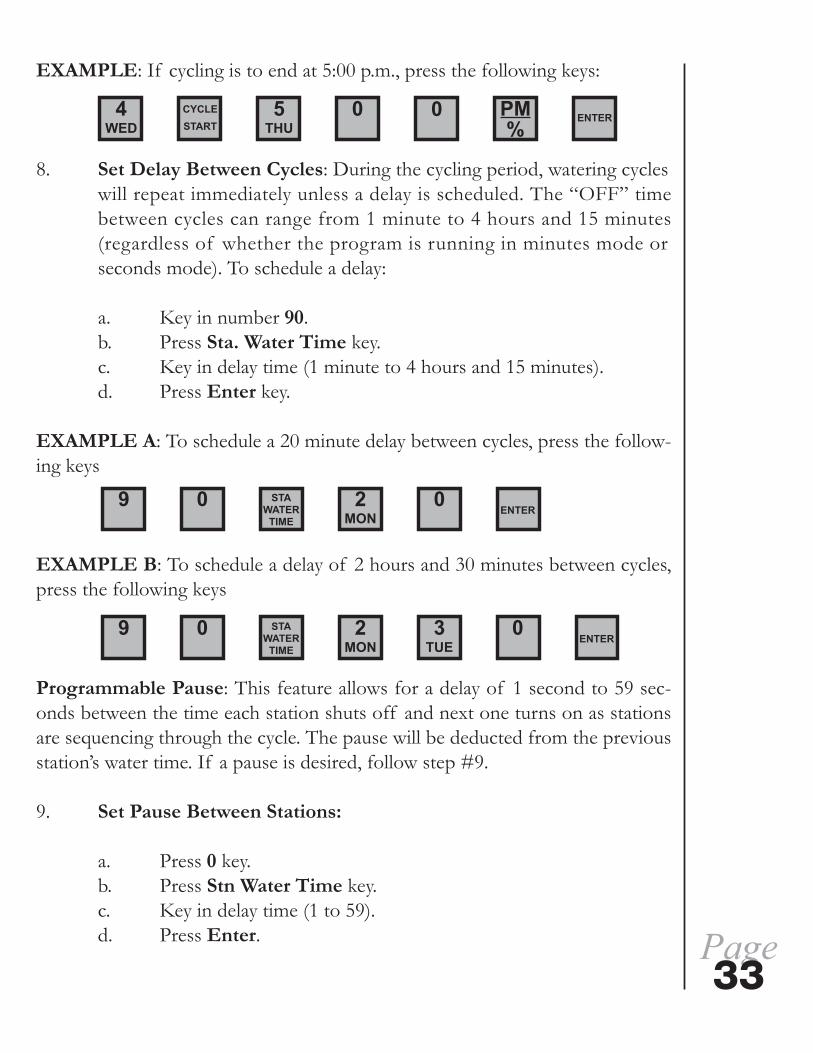
EXAMPLE: If cycling is to end at 5:00 p.m., press the following keys:
8. Set Delay Between Cycles: During the cycling period, watering cycleswill repeat immediately unless a delay is scheduled. The “OFF” timebetween cycles can range from 1 minute to 4 hours and 15 minutes(regardless of whether the program is running in minutes mode orseconds mode). To schedule a delay:
a. Key in number 90.b. Press Sta. Water Time key.c. Key in delay time (1 minute to 4 hours and 15 minutes).d. Press Enter key.
EXAMPLE A: To schedule a 20 minute delay between cycles, press the follow-ing keys
EXAMPLE B: To schedule a delay of 2 hours and 30 minutes between cycles,press the following keys
Programmable Pause: This feature allows for a delay of 1 second to 59 sec-onds between the time each station shuts off and next one turns on as stationsare sequencing through the cycle. The pause will be deducted from the previousstation’s water time. If a pause is desired, follow step #9.
9. Set Pause Between Stations:
a. Press 0 key.b. Press Stn Water Time key.c. Key in delay time (1 to 59).d. Press Enter. Page
33
5THU
4WED
0 PM%0 ENTER
CYCLESTART
PM%
9 0 02MON ENTER
STAWATERTIME
9 0 3TUE
2MON
0ENTER
STAWATERTIME

Page34
EXAMPLE To program a pause of 6 seconds, press:
To delete pause, follow steps a through d above, entering “0” at step c.
After programming has been completed, watering will begin automatically at thenext scheduled start time (beginning of loop). To activate the loop cycle prior tothen, follow the instructions below.
MANUALLY STARTING LOOP CYCLE
To activate a loop cycle at other than its scheduled start time (beginning of loop),do the following:
a. Turn the dial to desired program.b. Key in the first station intended to turn on.c. Press Manual On/Off key. (Display will alternately flash station
number and remaining water time.)d. Return dial to Auto position.
Note: If loop cycle is manually started, it will continue until its programmed endtime (end of loop) unless it is manually stopped before then.
Manually Stopping Loop Cycle: With dial at program in operation, press Man-ual On/Off key.
0 6FRI ENTER
STAWATERTIME

Page35
PROGRAM REVIEW
To recall any of the following functions without affecting the Program, turn Pro-gram Knob to the program to be reviewed.
TIME Press Time key and display will show current time.
TODAY Press Today key. The number shown will correspond tocurrent day of week (Sun. = 1, Mon. = 2, Tues. = 3, etc.)
WATER DAYS Press Water Day key and display will scroll the Water Days
STATION WATER TIME a. Individual Station Water Time: Key in station
number, then press Stn. Water Time key.b. Combined Water Time Of All Stations
Included In Program: Press Clear key, thenpress Stn. Water Time key.
c. Scrolling Of Water Times Of StationsIncluded In Program: Press Clear key, thenpress Stn. Water Time key two times. Thedisplay will alternately flash station number andwatering time for each programmed station.
LOOP START/END Press Cycle Start key. Display will show “Loop” followedby start of loop time, then end of loop time.