Embed Size (px)
Citation preview

www.acti.com
ACTi Knowledge Base
Category: Troubleshooting Note
Sub-category: Integration
Model: N/A
Firmware: N/A
Software: NVR2.2.47 (SP2) Author: Ando.Meritee
Published: 2009/10/26 Reviewed: 2009/12/07
1
SQL Troubleshooting
Contents
Introduction
SQL Errors during NVR Installation Process
Problem Definition
Solution Overview
Check Windows Version
Remove Existing SQL
Download SQL 2005 Express SP3
Install SQL 2005 Express SP3
Check SQL Services
Resume Installing NVR Server
Introduction
Although NVR Installation process is simple and problem-free in most cases, there may be
some cases where a customer gets SQL-related error messages during installation of NVR.
This document contains the needed information for SQL troubleshooting, using Windows
Vista as an example.

www.acti.com
2
SQL Errors during NVR Installation Process
There may be several kinds of SQL
errors occurring during NVR
installation process.
This document will provide a simple,
safe, and all-purpose solution that
works for all error types.
Problem Definition
ACTi NVR 2.x requires Microsoft SQL Server 2005 Express Edition Service Pack 3 be properly
installed in the computer.
There may be possible reasons causing errors:
Wrong Windows version
Windows version not updated to latest SP
Wrong SQL version
SQL 2005 not updated to SP3
SQL wrong settings or permissions
SQL is missing from the computer or has been removed
With a single procedure, it is possible to cover all possible scenarios!

www.acti.com
3
Solution Overview
The following procedure can be used for any error type:
Check the Windows version and make sure it is correct
Remove existing SQL from computer if exists
Download the latest SQL from Microsoft website
Install the latest SQL
Make sure it is running properly
Resume Installing NVR Server
Check Windows Version
Make sure that the Windows is one of the following 32-bit operating systems:
Windows Server 2003
Windows Server 2008
Windows Vista Business, Enterprise, Ultimate – SP1
Windows XP Professional – SP3
To check your Windows’ version, right-click on “Computer” and choose “Properties”. In this
example, windows version check was successful – Windows Vista Business is a correct
version, and it a 32-bit system as required.
Finally, check the Service
Pack number, it is correct too.
It is also highly recommended
to make sure that this
computer has the latest
windows updates installed.
www.acti.com
4
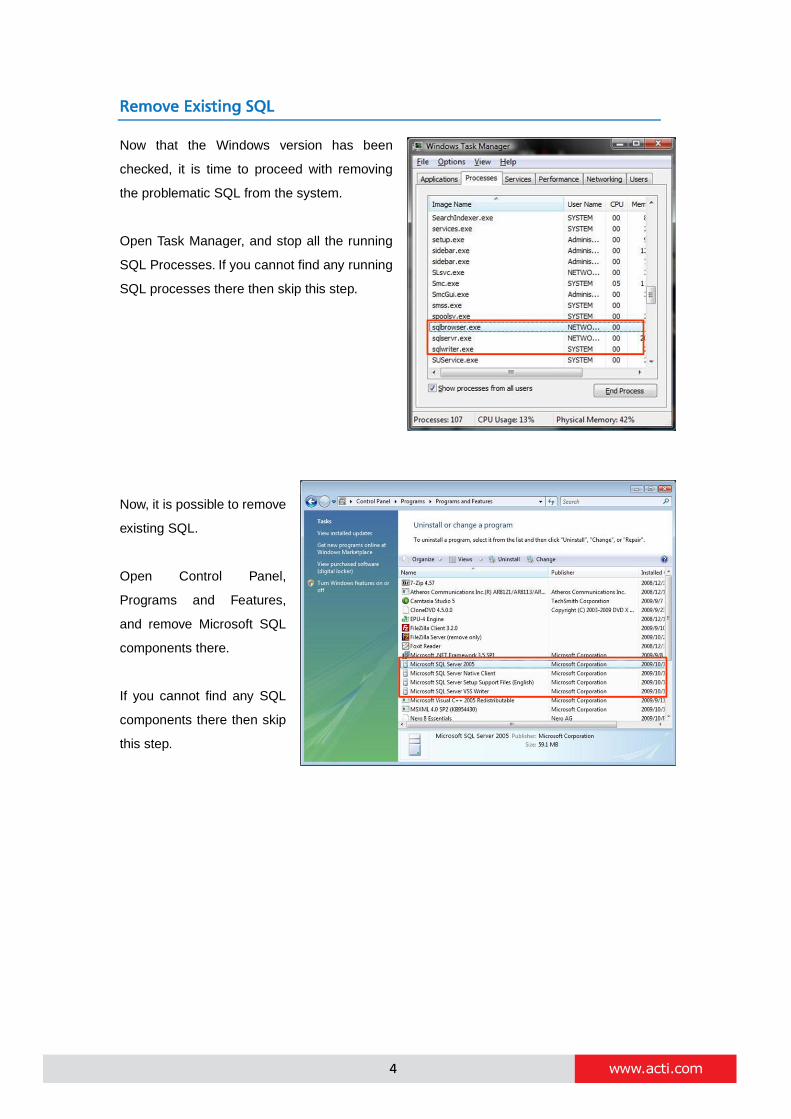
Remove Existing SQL
Now that the Windows version has been
checked, it is time to proceed with removing
the problematic SQL from the system.
Open Task Manager, and stop all the running
SQL Processes. If you cannot find any running
SQL processes there then skip this step.
Now, it is possible to remove
existing SQL.
Open Control Panel,
Programs and Features,
and remove Microsoft SQL
components there.
If you cannot find any SQL
components there then skip
this step.

www.acti.com
5
Download SQL 2005 Express SP3
After successfully removing SQL from the system, you can download the SQL server 2005
Express Edition Service Pack 3 from Microsoft website. In order to find it very fast, I
recommend to google for “download SQL 2005 express sp3”, and then first search result you
get is the correct place.
You have entered the Microsoft SQL Server 2005 Express Edition Service Pack 3 web page.
Scroll down to find the link for downloading SQL Express.
Choose the SQLEXPR32.EXE for downloading. You can save it to the
desktop of your computer. It will look like this.

www.acti.com
6
Install SQL 2005 Express SP3
You are ready to install the SQL now. Make
sure you have administrative rights on the
computer to install SQL Server Express.
Run the exe file you just downloaded.
Accept the licensing terms and press next.
Press install.
Then press next.

www.acti.com
7
You will see the SQL Server Installation Wizard. Press next.
After successful system configuration check, press Next.
You can fill your name and company and press next.
On the feature selection page, keep it as it is and press next. On the authentication mode
selection page, just keep the windows authentication mode for simplicity and press next.
www.acti.com
8
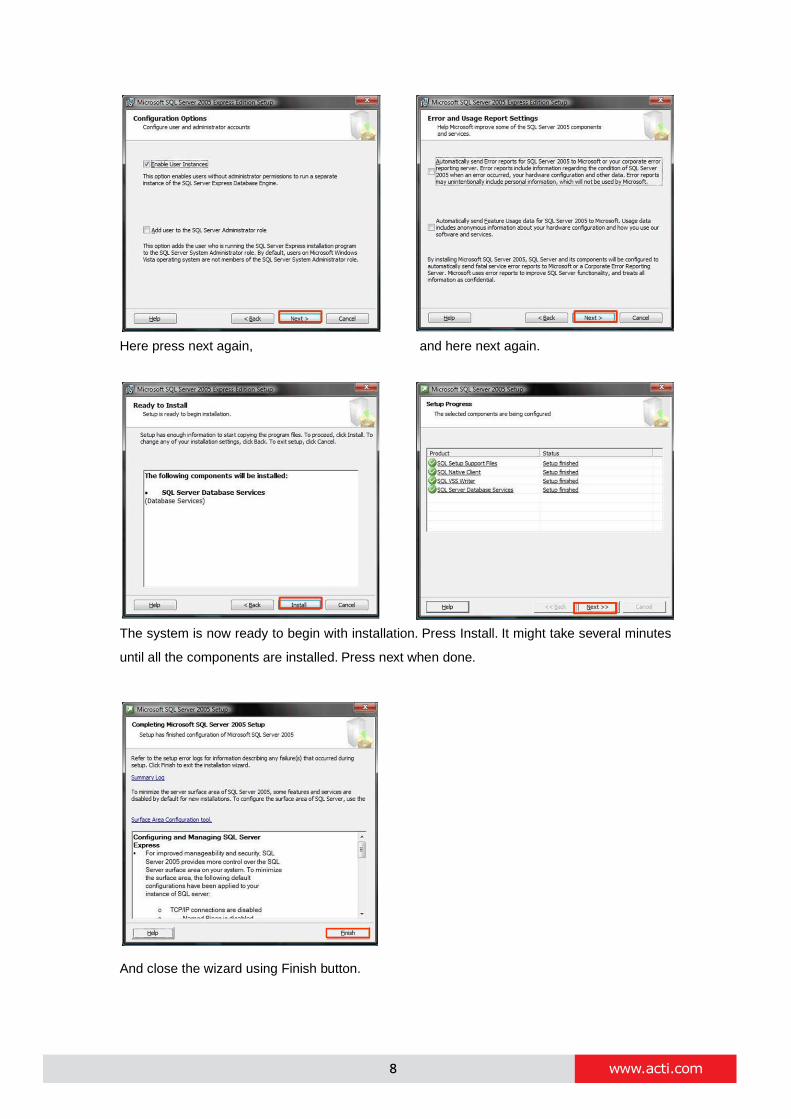
Here press next again, and here next again.
The system is now ready to begin with installation. Press Install. It might take several minutes
until all the components are installed. Press next when done.
And close the wizard using Finish button.

www.acti.com
9
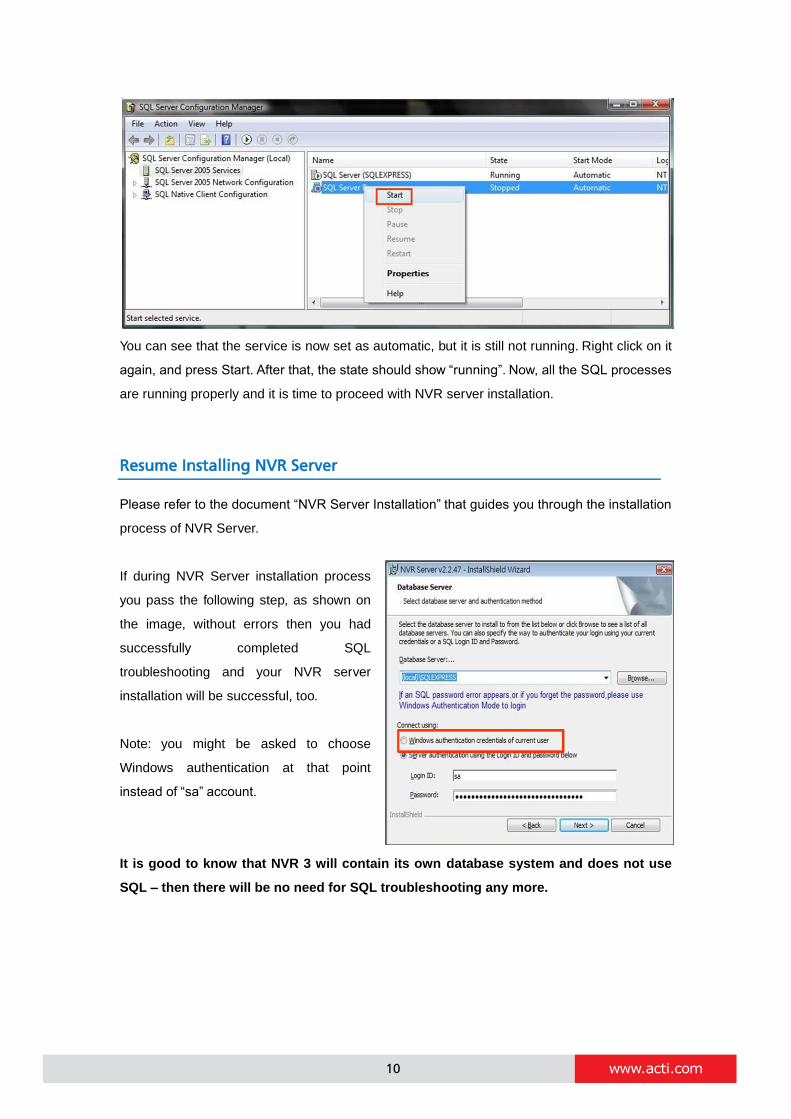
Check SQL Services
Before starting with NVR server installation, it is
recommended to check if SQL services are running
properly.
Press Start button, Programs and open SQL Server
Configuration Manager.
Open SQL Server 2005 Services. Make sure both SQL Server and SQL Server Browser are
set as “Automatic” start mode and in “Running” state. If there is a stopped service, right click on
it, and choose “Properties”. In this example, you can notice that SQL server browser is not
automatic, and it is stopped, too. So, right click on SQL server browser and choose properties.
On Properties page, choose “Service”, then in
Start Mode choose “Automatic”.
Press Apply.
www.acti.com
10
You can see that the service is now set as automatic, but it is still not running. Right click on it
again, and press Start. After that, the state should show “running”. Now, all the SQL processes
are running properly and it is time to proceed with NVR server installation.
Resume Installing NVR Server
Please refer to the document “NVR Server Installation” that guides you through the installation
process of NVR Server.
If during NVR Server installation process
you pass the following step, as shown on
the image, without errors then you had
successfully completed SQL
troubleshooting and your NVR server
installation will be successful, too.
Note: you might be asked to choose
Windows authentication at that point
instead of “sa” account.
It is good to know that NVR 3 will contain its own database system and does not use
SQL – then there will be no need for SQL troubleshooting any more.


![Troubleshooting SQL Server com Extended Events [EX] · 4 Considerações Extended Events Introduced in SQL Server 2008 Improved in SQL Server 2012 SQL Trace Deprecated in SQL Server](https://img.dokumen.tips/doc/110x75/5b3c057d7f8b9a5e1f8d1d07/troubleshooting-sql-server-com-extended-events-ex-4-consideracoes-extended.jpg)