Embed Size (px)
Citation preview

SnugRide® Click Connect™35
©2013 Graco PD261465A 10/13 US

2
1.0 Warning to Parents and Other Users .........................................4-52.0 Registration Information ..............................................................6-7 2.1 Register Your Infant Restraint ...................................................6 2.2 For Recall Information ...............................................................6 2.3 If You Need Help .......................................................................7 2.4 Child Restraint/Base Useful Life ................................................73.0 Important Information ................................................................8-12 3.1 Warnings for Use as an Infant Restraint ..............................8-10 3.2 Warnings for Use With a Stroller .............................................10 3.3 Additional Warnings for Use as a Carrier ................................11 3.4 Height and Weight Limits ........................................................124.0 Choosing an Appropriate Vehicle Seat Location ..................13-19 4.1 Vehicle Seat Requirements ................................................13-14 4.2 Vehicle Seat Belt Requirements ..............................................14 4.2.1 UNSAFE Vehicle Belt Systems ......................................15 4.2.2 SAFE Vehicle Belt Systems ......................................16-18 4.3 LATCH Locations ....................................................................19

3
5.0 Features and Components ......................................................20-25 5.1 Adjusting Handle .....................................................................23 5.2 Removing and Attaching Infant Restraint ................................23 5.3 Cold Weather Boot (on certain models, styles vary) ...............24 5.4 Canopy Attachment .................................................................24 5.5 Head Support, Body Support and Harness Covers (on certain models) ..................................................................256.0 How to Install the Infant Restraint/Base ................................26-34 6.1 Installing the Infant Restraint Without Base Using Vehicle Belt ..............................................................26-27 6.2 Installing the Infant Restraint and Base Using Vehicle Belt ..............................................................28-29 6.3 Using LATCH to Install Base .............................................30-31 6.4 Reclining Infant Restraint/Base ..........................................32-347.0 Using Infant Restraint .........................................................................35-41 7.1 Positioning Harness Straps ................................................35-37 7.2 Changing the Crotch Strap Position ...........................................38 7.3 Securing Child in the Infant Restraint .................................39-428.0 Additional Information .............................................................43-46 8.1 Airplane Use ............................................................................43 8.2 Storing LATCH ........................................................................43 8.3 Cleaning and Maintenance .................................................44-45 8.4 Buckle Cleaning Process .........................................................469.0 Replacement Parts ..........................................................................48

4
DO NOT PLACE THIS INFANT RESTRAINT IN A VEHICLE SEATING LOCATION THAT HAS A FRONT AIR BAG. If the air bag inflates, it can hit the infant restraint with great force and cause serious injury or death of your child. Check vehicle owner’s manual for information about side air bags and infant restraint installation. No infant restraint can guarantee protection from injury in every situation. However, proper use of this infant restraint reduces the risk of serious injury or death to your child.
1.0 Warnings to Parents and Other Users
5
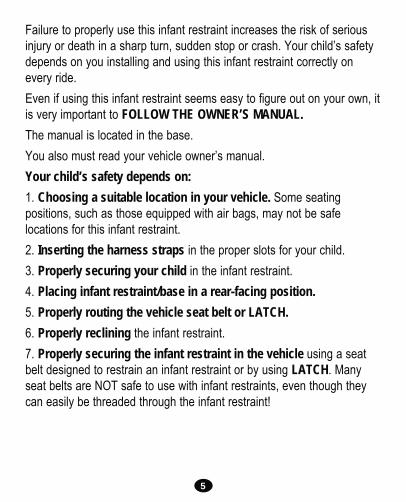
Failure to properly use this infant restraint increases the risk of serious injury or death in a sharp turn, sudden stop or crash. Your child’s safety depends on you installing and using this infant restraint correctly on every ride.Even if using this infant restraint seems easy to figure out on your own, it is very important to FOLLOW THE OWNER’S MANUAL.The manual is located in the base. You also must read your vehicle owner’s manual.Your child’s safety depends on:1. Choosing a suitable location in your vehicle. Some seating positions, such as those equipped with air bags, may not be safe locations for this infant restraint.2. Inserting the harness straps in the proper slots for your child.3. Properly securing your child in the infant restraint.4. Placing infant restraint/base in a rear-facing position.5. Properly routing the vehicle seat belt or LATCH.6. Properly reclining the infant restraint.7. Properly securing the infant restraint in the vehicle using a seat belt designed to restrain an infant restraint or by using LATCH. Many seat belts are NOT safe to use with infant restraints, even though they can easily be threaded through the infant restraint!
6
2.2 For Recall Information
2.1 Register Your Infant Restraint
Model Number:
Date of Manufacture:
Purchase Date:
Please fill in the above information. The model number and date of manufacture can be found on a label on the bottom of your infant restraint. Fill out the prepaid registration postcard attached to the seat pad and mail it today.Child restraints could be recalled for safety reasons. You must register this restraint to be reached in a recall. Send your name, address and the restraints’ model number and date of manufacture to: Graco Children’s Products Inc. Attn: Customer Service 3 Glenlake Parkway Atlanta, GA 30328 or call 1-800-345-4109 or register online at: http://www.gracobaby.com/carseatregistration
Call the U.S. Government’s Vehicle Safety Hotline at 1-888-327-4236 (TTY:1-800-424-9153), or go to http://www.NHTSA.gov
Graco: 1-800-345-4109 or www.gracobaby.com
2.0 Registration Information
7
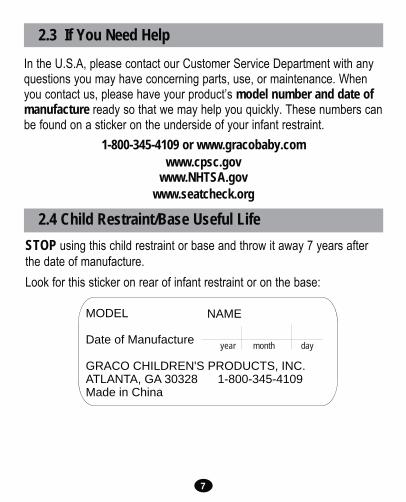
STOP using this child restraint or base and throw it away 7 years after the date of manufacture.Look for this sticker on rear of infant restraint or on the base:
In the U.S.A, please contact our Customer Service Department with any questions you may have concerning parts, use, or maintenance. When you contact us, please have your product’s model number and date of manufacture ready so that we may help you quickly. These numbers can be found on a sticker on the underside of your infant restraint.
1-800-345-4109 or www.gracobaby.comwww.cpsc.gov
www.NHTSA.gov www.seatcheck.org
2.3 If You Need Help
2.4 Child Restraint/Base Useful Life
MODEL
Date of Manufacture
GRACO CHILDREN'S PRODUCTS, INC.ATLANTA, GA 30328 1-800-345-4109Made in China
PD
2069
38A
NAME
year month day

8
DO NOT INSTALL OR USE THIS INFANT RESTRAINT AND BASE UNTIL YOU READ AND UNDERSTAND THE INSTRUCTIONS IN THIS MANUAL AND IN YOUR VEHICLE OWNER’S MANUAL. DO NOT let others install or use the infant restraint unless they understand how to use it.
FAILURE TO PROPERLY USE THIS INFANT RESTRAINT AND BASE INCREASES THE RISK OF SERIOUS INJURY OR DEATH IN A SUDDEN STOP OR CRASH. Your child can be injured in a vehicle even if you are not in a crash. Sudden braking and sharp turns can injure your child if the infant restraint is not properly installed or if your child is not properly secured in the infant restraint.
PLACE THIS INFANT RESTRAINT ONLY IN A REAR-FACING POSITION when using it in the vehicle.
SOME CHILDREN WITH SPECIAL NEEDS, such as pre-term babies or those who have tested positive for positional apnea, may be at increased risk of suffering breathing or other difficulties in an infant restraint. If your child has special needs, we recommend that you have your physician or hospital staff evaluate your child and recommend the proper infant restraint or car bed before using this product.
3.1 Warnings for Use as an Infant Restraint3.0 Important Information
9
According to crash statistics, CHILDREN ARE SAFER WHEN PROPERLY RESTRAINED IN REAR VEHICLE SEATING POSITIONS, RATHER THAN FRONT SEATING POSITIONS. For a vehicle with a front passenger air bag, refer to your vehicle owner’s manual as well as these instructions for infant restraint installation.
NEVER LEAVE YOUR CHILD UNATTENDED. NEVER LEAVE AN INFANT RESTRAINT AND BASE UNSECURED
IN YOUR VEHICLE. An unsecured infant restraint or base can be thrown around and may injure occupants in a sharp turn, sudden stop or crash. Remove it or make sure that it is securely belted in the vehicle. If not using LATCH, make sure unsecured LATCH connectors are properly stored in base.
REPLACE THE INFANT RESTRAINT AND BASE AFTER A CRASH OF ANY KIND EVEN IF INFANT RESTRAINT WAS UNOCCUPIED. A crash can cause damage to the infant restraint that you may not be able to see.
DO NOT MODIFY YOUR INFANT RESTRAINT AND BASE or use any accessories or parts supplied by other manufacturers.
NEVER USE INFANT RESTRAINT AND BASE IF IT HAS DAMAGED OR MISSING PARTS. DO NOT use a cut, frayed or damaged infant restraint harness, vehicle seat belt or LATCH belt.
THE INFANT RESTRAINT CAN BECOME VERY HOT IF LEFT IN THE SUN. Always touch the surface of any metal or plastic parts before putting your child in the infant restraint.
THIS INFANT RESTRAINT CONFORMS to all applicable Federal Motor Vehicle Safety Standards and is certified for use in motor vehicles and aircraft.

10
3.2 Warnings for Use With a Stroller
USE ONLY WITH STROLLERS THAT ARE PART OF THE GRACO CLICK CONNECT TM TRAVEL SYSTEM. Refer to stroller owner’s manual for details about how to attach the infant restraint to your stroller. If you do not have an owner’s manual, please call toll-free, 1-800-345-4109 to obtain one, or visit our website at www.gracobaby.com.
Never use a Graco infant restraint with other manufacturer’s strollers, as this may result in serious injury or death.
NEVER give this infant restraint and base to someone else without also giving them this manual.
NEVER use a second-hand infant restraint and base or a infant restraint whose history you do not know.

11
FALL HAZARD: Child’s movements also can move carrier. NEVER place carrier on edges of countertops, tables or other
high surfaces. Always stay within arms reach whenever carrier is not on floor/ground.
BE SURE handle locks into position before lifting carrier. NEVER place carrier on the top of a shopping cart. SUFFOCATION HAZARD: Infant carrier can roll over on soft
surfaces and suffocate child. Never place carrier on beds, sofas or other soft surfaces.
STRANGULATION HAZARD: Children have STRANGLED in loose or partially buckled harness straps. Fully restrain the child even when carrier is used outside the vehicle.
KEEP STRINGS AND CORDS AWAY FROM CHILD. Strings and cords can cause strangulation.
DO NOT place carrier near a window where cords from blinds or drapes can strangle a child.DO NOT hang strings on or over the carrier.DO NOT place items with a string around a child’s neck, such as hood strings, pacifier cords, etc.DO NOT attach strings to toys.
3.3 Additional Warnings for Use as a Carrier

12
Your child MUST meet the following requirements: WEIGHT: 4-35 lbs. (1.8 kg-15.87 kg) AND HEIGHT: 32 inches (81 cm) or less in height.
IMPORTANT: MAKE SURE the top of the childs' head is at least 1" below the top of the infant restraint.
TO AVOID SERIOUS INJURY OR DEATH, DO NOT USE THE INFANT RESTRAINT WITH A CHILD LARGER OR SMALLER THAN THE WEIGHT AND HEIGHT RANGE LISTED BELOW.
3.4 Height and Weight Limits
13
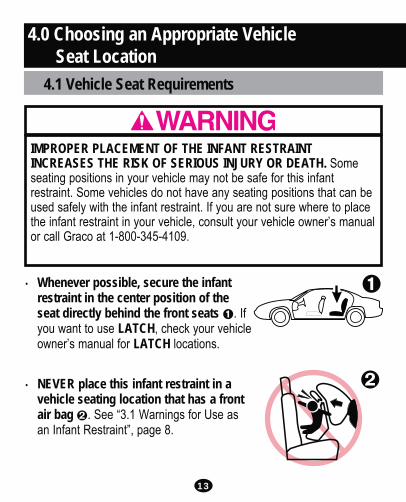
IMPROPER PLACEMENT OF THE INFANT RESTRAINT INCREASES THE RISK OF SERIOUS INJURY OR DEATH. Some seating positions in your vehicle may not be safe for this infant restraint. Some vehicles do not have any seating positions that can be used safely with the infant restraint. If you are not sure where to place the infant restraint in your vehicle, consult your vehicle owner’s manual or call Graco at 1-800-345-4109.
Whenever possible, secure the infant restraint in the center position of the seat directly behind the front seats . If you want to use LATCH, check your vehicle owner’s manual for LATCH locations.
NEVER place this infant restraint in a vehicle seating location that has a front air bag . See “3.1 Warnings for Use as an Infant Restraint”, page 8.
4.0 Choosing an Appropriate Vehicle Seat Location
4.1 Vehicle Seat Requirements

14
The VEHICLE seat must face forward.
DO NOT use infant restraint on vehicle seats with seat backs that will not lock in an upright position. DO NOT use seats that can fold down without having to release a lock or latch of some kind. These seats can fly forward and strike the child in a sudden stop or crash.
A FEW SEAT BELT SYSTEMS ARE NOT SAFE TO USE WITH THE INFANT RESTRAINT. THE VEHICLE SEAT BELT MUST BE DESIGNED TO HOLD THE INFANT RESTRAINT TIGHTLY AT ALL TIMES.Pay careful attention to these systems; some of the seat belts that are not safe to use look very much like seat belts that are safe to use. If you are unsure, consult your vehicle owner’s manual or call Graco at 1-800-345-4109.
4.2 Vehicle Seat Belt Requirements
15
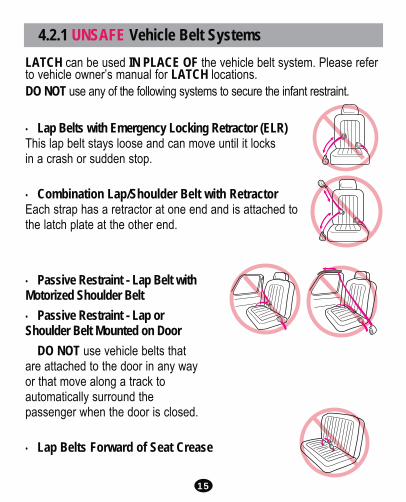
LATCH can be used IN PLACE OF the vehicle belt system. Please refer to vehicle owner’s manual for LATCH locations.DO NOT use any of the following systems to secure the infant restraint.
Lap Belts with Emergency Locking Retractor (ELR) This lap belt stays loose and can move until it locks in a crash or sudden stop.
Combination Lap/Shoulder Belt with Retractor Each strap has a retractor at one end and is attached to the latch plate at the other end.
Passive Restraint - Lap Belt with Motorized Shoulder Belt Passive Restraint - Lap or Shoulder Belt Mounted on Door DO NOT use vehicle belts that are attached to the door in any way or that move along a track to automatically surround the passenger when the door is closed.
Lap Belts Forward of Seat Crease
4.2.1 UNSAFE Vehicle Belt Systems

16
THE FOLLOWING BELT SYSTEMS CAN BE USED WITH YOUR INFANT RESTRAINT, IF the seat location meets all other requirements of these instructions and those in your vehicle owner’s manual. LATCH can be used in place of the vehicle belt system in designated locations. Please refer to vehicle owner’s manual for LATCH locations. When using infant restraint without the base, adjust the belt as described in this section for these types of vehicle seat belts. Some vehicle lap/shoulder seat belts have a plastic button on the belt. Do not allow the button to interfere with the belt routing through the vehicle belt path when installing the seat alone.
Lap Belts - Manually Adjusted When buckled, the belt is tightened manually by pulling on the belt tail while pushing down hard on the infant restraint.
4.2.2 SAFE Vehicle Belt Systems
Belt tail

17
Combination Lap/Shoulder Belt with Locking Latch Plate
Lap Belts with Automatic Locking Retractor (ALR)
The automatic locking retractor will not permit the lap belt to lengthen once it is buckled. Tighten the belt by feeding the belt back into the retractor while pushing down hard on the infant restraint.
Once it is buckled, this type of belt has a latch plate that will not allow the lap portion of the belt to loosen. Belt is tightened by pulling hard on the shoulder portion of the vehicle belt while pushing down hard on the infant restraint.

18
To Install Locking Clip: 1. Tighten the buckled belt by pushing down
hard on the infant restraint and pulling hard on the shoulder belt.
2. While pushing down on the infant restraint, pinch the two straps together behind the buckle tongue. Unbuckle the belt without allowing it to slip.
3. Connect lap and shoulder belts with locking clip as shown and .
4. Rebuckle belt. Check that lap belt does not move by pulling and push-ing hard on the infant restraint. If belt loosens or lengthens, repeat procedure.
Locking clip
Combination Lap/Shoulder Belt with Sliding Latch Plate
This belt has a latch plate that slides freely along the belt.This belt MUST be converted to prevent movement of the lap portion of the belt. You must use a locking clip (provided with the infant restraint) when using the infant restraint without the base unless your vehicle’s seat belt can be converted in another way as described in your vehicle owner’s manual.
1/2 inch (1 cm)
Locking clip goes here, 1/2 inch (1 cm) from the buckle
19
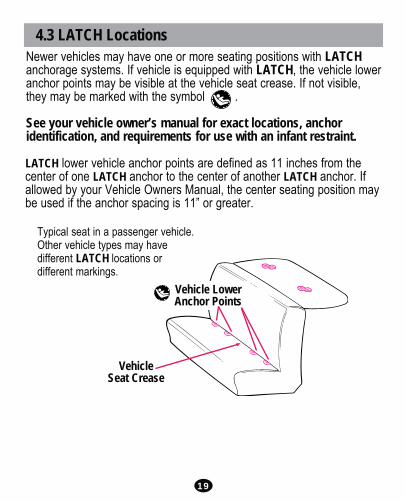
Newer vehicles may have one or more seating positions with LATCH anchorage systems. If vehicle is equipped with LATCH, the vehicle lower anchor points may be visible at the vehicle seat crease. If not visible, they may be marked with the symbol . See your vehicle owner’s manual for exact locations, anchor identification, and requirements for use with an infant restraint.
Vehicle Lower Anchor Points
VehicleSeat Crease
Typical seat in a passenger vehicle. Other vehicle types may have different LATCH locations or different markings.
LATCH lower vehicle anchor points are defined as 11 inches from the center of one LATCH anchor to the center of another LATCH anchor. If allowed by your Vehicle Owners Manual, the center seating position may be used if the anchor spacing is 11” or greater.
4.3 LATCH Locations

20
FRONT VIEWHandle
Vehicle belt
hook
Handleadjustment
button
Harness buckle tongues
Chest clip
Harness buckleHarness
adjustment button
Harness adjustment
strap
Harness straps
Handleadjustment
button
Hip slots
5.0 Features and Components
Crotch strap slots
Harness slots

21
Release handle
Locking clip storage*
*Locking Clip
The locking clip is stored on the bottom of the infant restraint. You will need to use it with certain types of vehicle lap/shoulder seat belts.
REAR VIEW
Harness adjustment strap
Canopy
Crotch strap clip
Click Connect™ attachment
Harness slots
Attachment hook
Hip strap pins
Harness straps
Metal junction plate

22
LATCH Connector *
LATCH Storage
United States Federal Motor Vehicle Safety Standards have defined a system for installing car seats in vehicles. The system is called LATCH.
* LATCH may be used IN PLACE of vehicle belt ONLY if vehicle is equipped with LATCH anchor points. Please refer to vehicle owner’s manual for LATCH locations.
BASE
LATCH Adjustment
Belt Level indicator **
**Level Indicator
The level indicator is attached to the side of the base and indicates whether or not the infant restraint is properly reclined.
Instruction manual storage
Knob for Adjustable Foot
Adjustable Foot

23
To remove, squeeze release handle at back of infant restraint and lift out of base as shown .To put infant restraint in base, push infant restraint down until it clicks into base. Pull up on infant restraint to be sure it is latched firmly into base.
1. Press handle adjustment buttons on both sides of handle .2. Rotate handle until it clicks into any of the
4 positions: Position A: MUST be used
when carrying by handle, Position A,B,C,D: may be used in vehicle. BOTH handle adjustment
buttons must pop out to lock handle in place .
3. Push and pull on the handle to be sure it is locked firmly in position.
Carrying
Sitting
A
C
D
5.1 Adjusting Handle
5.2 Removing and Attaching Infant Restraint
B
24
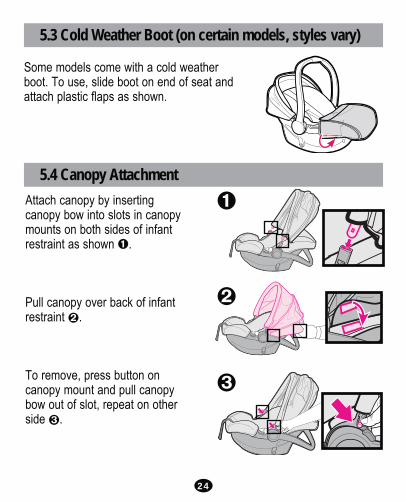
5.3 Cold Weather Boot (on certain models, styles vary)
5.4 Canopy AttachmentAttach canopy by inserting canopy bow into slots in canopy mounts on both sides of infant restraint as shown .
Pull canopy over back of infant restraint .
To remove, press button on canopy mount and pull canopy bow out of slot, repeat on other side .
Some models come with a cold weather boot. To use, slide boot on end of seat and attach plastic flaps as shown.

25
Some infants may need extra support to keep their head and body in a comfortable position. Thread the harness through the openings in the head and body support as shown and .MAKE SURE THAT NOTHING INTERFERES WITH THE HARNESS. Harness must still be flat and snug against your child’ s shoulders.If your model does not include a body support, you can use a rolled towel as shown .
To prevent ejection in sudden stop or crash: Always make sure shoulder straps are
threaded through slots and properlypositioned on shoulders. Never allow body support to bunch or fold
behind child. Only use head support with bottom 2 sets
of harness slots. Make sure that harness covers do not
interfere with placement of the chest clip at armpit level.
5.5 Head Support, Body Support and Harness Covers (on certain models, styles vary)

26
6.1 Installing the Infant Restraint Without Base Using Vehicle Belt
6.0 How to Install the Infant Restraint/Base
You must carefully follow the instructions provided by your vehicle manufacturer, in addition to the information in this manual. Before proceeding be sure you have read and understood section 4, “Choosing an Appropriate Vehicle Seat Location” on pages 13-19. Make sure the buckle tongue goes into the correct buckle . The seat belt should not be twisted or turned.Make sure vehicle is on level ground so that the level indicator can be used to properly recline the infant restraint.Refer to your vehicle owner’s manual and the instructions in “4.2.2 SAFE Vehicle Belt Systems”, page 16-18, on tightening your vehicle belt when using the infant restraint without base.If a front passenger seat is used (see air bag warning, page 4), slide the vehicle seat rearward as far as possible from the dashboard. If a rear seat is used, make sure the seat in front of it is moved forward enough and is upright enough to allow room for the infant restraint.

27
1. Place the infant restraint without base in a rear-facing position in a vehicle seat.
2. Thread the lap belt or lap portion of a lap/shoulder belt under both vehicle belt hooks:
3. Buckle the vehicle belt. 4. Tighten the vehicle seat belt.
To create a secure installation, push down hard with your free hand on the infant restraint and pull and tighten the vehicle belt.
5. Check infant restraint is level: Red level line on the warning label MUST be level with the ground .
6. Test infant restraint for secure installation as described in infant restraint “Final Safety Check” page 42.
Lap Belt Lap/Shoulder Belt

28
1. Make sure vehicle is on level ground in order to get the correct recline position.
2. Place the base in a rear-facing position on a forward-facing vehicle seat.
6.2 Installing the Infant Restraint and Base Using Vehicle Belt
Lap Belt Lap/Shoulder Belt
3. Buckle the seat belt. Make sure the buckle tongue goes into the correct buckle . The seat belt should not be twisted or turned.

29
4. To create a secure installation, while pushing down on the base, pull the free end of the lap belt or the shoulder portion of the lap/shoulder belt to tighten .
5. Check that belt does not move by pulling and pushing hard on base with hands near the vehicle belt path. If belt loosens or lengthens, repeat procedure.
6. Push the infant restraint down into the base and make sure that you hear a “click” . Pull up on the infant restraint to be sure it is latched securely into the base.
If the infant restraint does not securely latch into the base, the infant restraint provides NO protection for your child. DO NOT use the infant restraint/base if the infant restraint does not securely latch into the base.
7. Test infant restraint for secure installation as described in infant restraint “Final Safety Check” page 42.

30
1. MAKE SURE vehicle is on level ground. Make sure to check your vehicle owner's manual for LATCH seating positions.
2. For ease of installation, press button to extend LATCH to its MAXIMUM LENGTH .
3. Position base in vehicle seat as shown.4. Make sure LATCH is through vehicle/LATCH belt path normally used for vehicle seat belt. . Belt must lie flat and not be twisted.
5. Attach connectors to vehicle lower anchors. Pull firmly on connectors to be sure they are attached .
6. Tighten LATCH by pushing down hard on base and pulling the adjustment belt back through belt path .
6.3 Using LATCH to Install Base
CLICK!

31
7. NEVER put two LATCH connectors on one vehicle LATCH anchor . 8. Test infant restraint for secure installation as described in infant restraint “Final Safety Check” page 42.9. Check that the LATCH stays tight and does not slip from the tightened position. If it does not stay tight, try another seating position or contact Graco at 1-800-345-4109.10. To remove LATCH, push button while pulling on the LATCH belt as shown .
11. Press and hold LATCH release hinge .
12. Push connector in, lift connector up and pull out (away from anchor point) . 13. Repeat steps 11 and 12 for other connector.

32
Failure to properly recline the infant restraint on the vehicle seat increases the risk of serious injury or death.If the infant restraint is too upright, a child’s head may drop forward and cause breathing problems.If the infant restraint is too reclined, a crash could put too much force on a child’s neck and shoulders.The infant restraint must be properly reclined according to the following instructions.Infant restraint must be properly reclined. Too upright can result in breathing difficulties.
For your child’s safety, it is important that your infant restraint/base be properly reclined. Attached to the side of your infant restraint is a level indicator to help properly recline the infant restraint/base on the vehicle seat.
6.4 Reclining Infant Restraint/Base
USING INFANT RESTRAINT ONLY:1) Red level line on warning label on infant restraint MUST be level with the ground.

33
USING INFANT RESTRAINT AND BASE TOGETHER:1) Vehicle MUST be level with ground to get correct recline position.2) Use level indicator on base. When reading the level indicator on base, view it directly from side of the indicator.Check the level indicator. You must look straight on at the indicator.
WHEN READING THE LEVEL INDICATOR,
- If the indicator shows light blue in the window, the restraint is level for infants 0+ months in age.
- If the indicator shows light blue and dark blue in the window, the restraint is level for a child 3+ months in age.
- If any RED is showing, child restraint is NOT level. You must adjust your recline position.
3+ months (meses)
Use corrected age for preemies.

34
To Adjust Recline on Base:Turn the knob counter clockwise to the desired setting to lower the foot .Turn the knob clockwise to raise the foot . If there is still red in the level indicator when the foot is completely extended then raise the foot and place a rolled towel under the foot until ONLY blue shows.
When using only the infant restraint without the base, CHECK infant restraint is level with the ground. Red level line on the warning label (see step on pg 27) MUST be level with the ground.If the infant restraint is resting on the vehicle seat and is still not level then place a rolled towel under the infant restraint .Re-adjust the vehicle seat belt as necessary to secure the infant restraint firmly in the vehicle seat.

35
1. Remove infant restraint from base and rotate handle down to sitting position. See “5.1 Adjusting Handle” and “5.2 Removing and Attaching Infant Restraint”, page. 23.
2. Place child in seat as shown .3. Determine which pair of harness slots are even
with or just below your child’s shoulders . 4. If the harness straps must be
adjusted: remove child from infant restraint and move harness straps to the proper harness slots by doing the following:
FAILURE TO PROPERLY ADJUST THE HARNESS STRAPS FOR YOUR CHILD INCREASES THE RISK OF SERIOUS INJURY OR DEATH IN THE EVENT OF A SHARP TURN, SUDDEN STOP, OR CRASH. The harness straps must be properly adjusted to fit your child according to the following instructions.
7.0 Using Infant Restraint7.1 Positioning Harness Straps
Use harness slots even with or just below
child’s shoulders

36
A. Push the harness adjustment button under the seat flap. Pull the shoulder straps out to loosen the harness .
B. From behind seat, remove the ends of the two shoulder straps from the metal junction plate .
C. From front, pull straps through the harness slots and then reinsert them through the appropriate slots. Both harness straps must be through the same set of slots in the seat and pad.
D. Depending on the size of your child, you may need to adjust the harness straps as shown on page 37. Reassemble the strap ends onto the metal junction plate .
5. SAFETY CHECK: a) CHECK that straps are not twisted in front
or back; b) CHECK that straps are secure by pulling
on harness straps from the front of the seat.Metal junction
plate
Harness adjustment button

37
Shoulder Straps for a SMALLER Baby: Use the lower 2 sets of harness slots (if they are even with or just
below your child’s shoulders) and the upper strap loops . The ends of the straps must hang in front of the metal junction plate as shown in , not as shown in .
CHECK that the loops are completely within junction plate slots .
CHECK that straps are secure by pulling on them.
Shoulder Straps for a LARGER Baby: Use top 2 sets of harness slots and the end strap loops (if they
are even with or just below your child’s shoulders). CHECK that the loops are
completely within junction plate slots .
CHECK that straps are secure by pulling on them.

38
FOR SMALLER BABIES:Turn infant restraint over and push crotch strap clip through the front crotch slot and seat pad. Re-insert clip through the front of seat pad into the rear crotch slot and seat as shown. Crotch strap clip should remain flat against seat.
FOR LOW BIRTH WEIGHT INFANTS (MINIMUM WEIGHT IS 4LB.), shoulder straps should be in the lowest set of harness slots and the upper strap loops (see page 37).
FOR LARGER BABIES:Turn infant restraint over and remove crotch strap clip by pushing clip through the rear crotch slot and seat pad . Re-insert it through the front of seat pad into the front crotch slot and the seat.Crotch strap clip should remain flat against seat.
REAR OF SEAT
7.2 Changing the Crotch Strap Position
Rear slot
Front slot
REAR FRONT
FRONT
REAR

39
Failure to properly secure your child in the infant restraint/carrier increases the risk of serious injury or death from suffocation or falls, or in the event of a sudden stop or crash. Even when used only as a carrier, make sure the harness straps are properly secured.
7.3 Securing Child in the Infant Restraint
1. Move infant restraint handle to sitting position (see page 23).
2. Press button on front of infant restraint and pull the harness to loosen .
3. Open chest clip by squeezing both sides and unbuckle as shown .

40
4. Place your child in the infant restraint as shown in , not . Place the harness straps around your child.
5. Insert the two buckle tongues into the harness buckle on the crotch strap. Make sure that you hear each tongue click into the buckle .
DO NOT use the infant restraint if the buckle tongues do not latch in place. Call Graco at 1-800-345-4109.

41
6. Snap chest clip pieces together .
7. Pull on harness adjustment strap to tighten straps as shown . CHECK that both straps are flat and snug on shoulders and thighs.
8. Position chest clip in middle of chest, level with armpits and away from the neck .
9. SAFETY CHECK: a) CHECK that harness straps are not
twisted. b) CHECK that the harness is snug.
You should not be able to pinch the harness strap if it is snug. A snug strap should not allow any slack. It lies in a relatively straight line without sagging. It does not press on the child’s flesh or push the child’s body into an unnatural position .

42
Final Safety Check: Every time you drive with your child,
PUSH DOWN on the top of the infant restraint slowly but firmly to make sure the vehicle belt does not lengthen at all and that the vehicle belt or LATCH is fastened securely around the infant restraint/base .
Holding the infant restraint or base near the vehicle belt path, TURN AND PULL the infant restraint forward and to both sides to make sure the vehicle belt or LATCH does not lengthen or loosen and the infant restraint does not easily move. The infant restraint should not move side to side or front to back more than 1 inch (2.5 cm).

43
1. For ease of storing, extend LATCH to its maximum length .
2. LATCH storage should look like this when complete .
8.0 Additional Information
8.2 Storing LATCH
When installing in an airplane using the base, install the same way as in an automobile with a lap only belt. If using the infant restraint only, install following the same instructions as in an automobile. Notify the airline ahead of time that you intend to bring the seat on board.Use only in forward-facing aircraft seats. Follow the flight attendants instructions about infant restraint placement. Do not use this infant restraint if the airplane seat belt does not hold the infant restraint securely.
8.1 Airplane Use

44
TO CLEAN SEAT PAD: 1. Unfasten hook and loop patches and plastic flaps from infant restraint.
2. Pull out plastic flaps from under infant restraint lip and .
3. Unfasten hook and loop tape in seat area of pad and pull out from around harness hip straps.
4. Refer to your care tag on your seat pad for washing instructions. NO BLEACH.
Reverse steps to reinstall seat pad. Check that harness system is not twisted, and pull on harness system to be sure harness is securely reinstalled.
8.3 Cleaning and Maintenance
45
INFANT RESTRAINT METAL AND PLASTIC PARTS may be cleaned by wiping with a mild soap and water solution. DO NOT USE BLEACH OR DETERGENT which may weaken plastic parts.
HARNESS STRAPS may be spot cleaned or replaced. DO NOT IMMERSE THE HARNESS STRAPS IN WATER. Doing so may weaken the harness straps. NEVER iron the harness straps.
IF HARNESS STRAPS have cuts, fraying or become badly twisted, you MUST replace the straps.
DO NOT USE INFANT RESTRAINT without seat pad.
CONTINUOUS USE OF INFANT RESTRAINT MAY CAUSE DAMAGE TO VEHICLE SEAT. Use an infant restraint mat, towel or thin blanket to protect upholstery.

46
1. Turn restraint over, push clip through crotch strap slot .
2. To clean buckle - place in a cup of warm water and gently agitate the buckle, press the red button several times while in the water . DO NOT SUBMERGE THE HARNESS WEBBING. DO NOT USE SOAPS or LUBRICANTS. DO NOT use household detergents. Never lubricate buckle.
3. Shake out excess water and allow to air dry, harness webbing should be dry before use . 4. Repeat Step 2 and 3 as needed.
5. Re-attach buckle into the desired slot. Buckle should fasten with a “click” Re-check harness for correct installation before use.
8.4 Buckle Cleaning Process
Prevent serious injury or death: Buckle must be properly latched. Periodically inspect and clean buckle to remove objects or debris
that could prevent latching.

47
Notes

48
To purchase parts or accessories or for warranty information in the United States, please contact us at the following:
www.gracobaby.comor
1-800-345-4109
9.0 Replacement Parts
Bottom of Base

SnugRide® Click Connect™35
©2013 Graco PD261465A 10/13 US

2
1.0 Advertencia a padres y otros usuarios ..................................................4-52.0 Información sobre el registro ..................................................................6-7 2.1 Registro de su sistema de seguridad para niños .................................6 2.2 Para obtener información sobre los retiros del mercado ......................6 2.3 Si necesita ayuda .................................................................................7 2.4 Vida útil del Sistema de seguridad para niños/base ............................73.0 Información importante..........................................................................8-12 3.1 Advertencias sobre el uso como sistema de seguridad
para niños ........................................................................................8-10 3.2 Advertencias sobre el uso con un cochecito ......................................10 3.3 Advertencias adicionales sobre el uso como transportador ...............11 3.4 Limitaciones de peso y altura .............................................................124.0 Cómo elegir un lugar apropiado en el asiento del vehículo .................................................................................................13-19 4.1 Requisitos del asiento del vehículo ...............................................13-14 4.2 Requisitos del cinturón de seguridad del vehículo .............................14 4.2.1 Sistemas PELIGROSOS de cinturones de vehículos ...............15 4.2.2 Sistemas SEGUROS de cinturones de vehículos ................16-18 4.3 Lugares del LATCH ............................................................................19

3
5.0 Características y componentes ..........................................................20-25 5.1 Cómo ajustar la manija .......................................................................23 5.2 Sacar y asegurar el sistema de seguridad para niños .......................23 5.3 Bota para tiempo frío (en ciertos modelos) ........................................24 5.4 Instalación de la capota ......................................................................24 5.5 El soporte del apoyacabeza, soporte del cuerpo y fundas del arnés (en ciertos modelos) ...........................................................................256.0 Cómo instalar el Sistema de seguridad para niños/base.................26-34 6.1 Instalación del sistema de seguridad para niños sin la base usando el cinturón del vehículo .....................................................26-27 6.2 Instalación del sistema de seguridad para niños y la base usando el cinturón del vehículo .....................................................28-29 6.3 Utilización del LATCH para instalar la base ..................................30-31 6.4 Reclinación de la base/sistema de seguridad para niños .............32-347.0 Uso del sistema de seguridad para niños ...................................................35-41 7.1 Posicionamiento de las correas del arnés .....................................35-37 7.2 Cambiar la posición de la correa de la entrepierna ............................38 7.3 Asegurar al niño en el sistema de seguridad ................................39-428.0 Información adicional...........................................................................43-46 8.1 Uso en aviones ...................................................................................43 8.2 Almacenamiento del LATCH ..............................................................43 8.3 Limpieza y mantenimiento .............................................................44-46 8.4 Proceso de limpieza de la hebilla .......................................................469.0 Piezas de repuesto ....................................................................................48

4
NO PONGA ESTE SISTEMA DE SEGURIDAD PARA NIÑOS EN UN LUGAR DEL ASIENTO DEL VEHÍCULO EQUIPADO CON UNA BOLSA DE AIRE DELANTERA. Si la bolsa de aire se infla, puede golpear al sistema de seguridad para niños con mucha fuerza y causar lesiones serias o la muerte a su niño. Consulte el manual del dueño del vehículo para obtener información sobre las bolsas de aire laterales y la instalación del sistema de seguridad para niños. Ningún sistema de seguridad para niños puede garantizar la protección contra las lesiones en todas las situaciones. Sin embargo, el uso apropiado de este sistema de seguridad para niños reduce el riesgo de lesiones serias o la muerte a su niño.
1.0 Advertencias a padres y otros usuarios
5
No usar debidamente este sistema de seguridad para niños aumenta el riesgo de lesiones serias o la muerte en una curva cerrada, parada repentina o accidente. La seguridad de su niño depende de que usted instale y use este sistema de seguridad para niños correctamente en cada viaje.A pesar de que el uso de este sistema de seguridad para niños parezca fácil de descifrar, es muy importante SEGUIR EL MANUAL DEL DUEÑO.El manual se encuentra en la base. También debe leer el manual del dueño de su vehículo.La seguridad de su niño depende de que:1. Elija un lugar apropiado en su vehículo. Algunas posiciones del asiento, tales como aquellas equipadas con bolsas de aire, podrían ser lugares peligrosos para este sistema de seguridad para niños.2. Introduzca las correas de arnés en las ranuras adecuadas para su niño.3. Asegure debidamente a su niño en el sistema de seguridad para niños.4. Ponga el sistema de seguridad para niños/base en la posición mirando
hacia atrás.5. Pase debidamente el cinturón de seguridad del vehículo o LATCH. 6. Recline debidamente el sistema de seguridad para niños.7. Asegure debidamente el sistema de seguridad para niños en el vehículo
usando un cinturón de seguridad diseñado para asegurar el sistema de seguridad para niños o usando el LATCH. Varios cinturones de seguridad NO son seguros para usar con sistemas de seguridad para niños, ¡a pesar de que se pueden colocar fácilmente a través del sistema de seguridad para niños!
6
2.2 Para obtener información sobre el retiro de productos del mercado
2.1 Registro de su sistema de seguridad para niños
Número de modelo:
Fecha de fabricación:
Fecha de compra:
Por favor, complete la información que se solicita más arriba. El número de modelo y la fecha de fabricación se pueden encontrar en una etiqueta en el fondo de su sistema de seguridad para niños. Llene la tarjeta postal de registro prepagada que se encuentra en la almohadilla del asiento y envíela hoy mismo.Los sistemas de seguridad para niños pueden ser retirados del mercado por problemas de seguridad. Debe registrar este sistema para que lo podamos contactar en dicho caso. Envíe su nombre, dirección, el número del modelo y la fecha de fabricación del sistema de seguridad a: Graco Children’s Products Inc. Attn: Customer Service 3 Glenlake Parkway Atlanta, GA 30328 o llame al 1-800-345-4109 o regístrelo en línea en: http://www.gracobaby.com/carseatregistration
Llame a la Línea gratuita de información de seguridad del vehículo automotor del Gobierno de EE.UU. al 1-888-327-4236 (TTY: 1-800-424-9153) o visite http://www.NHTSA.gov
Graco: 1-800-345-4109 o www.gracobaby.com
2.0 Información sobre el registro

7
DEJE de usar este sistema de seguridad para niños o la base y tírelo a la basura 7 años después de la fecha de fabricación.Busque esta etiqueta en la parte de atrás del sistema de seguridad para niños o en la base:
En los EE.UU., por favor, comuníquese con nuestro Departamento de Servicio al Cliente con cualquier pregunta que pudiera tener sobre piezas, uso o mantenimiento. Cuando se ponga en contacto con nosotros, por favor tenga listo el número de modelo y la fecha de fabricación para que lo podamos ayudar más rápidamente. Los números se pueden encontrar en una etiqueta ubicada en la parte inferior de su sistema de seguridad para niños.
1-800-345-4109 o www.gracobaby.com www.cpsc.gov
www.NHTSA.gov www.seatcheck.org
2.3 Si necesita ayuda
2.4 Vida útil del Sistema de seguridad para niños/base
MODEL
Date of Manufacture
GRACO CHILDREN'S PRODUCTS, INC.ATLANTA, GA 30328 1-800-345-4109Made in China
PD
2069
38A
NAME
year month day

8
NO INSTALE O USE ESTE SISTEMA DE SEGURIDAD PARA NIÑOS Y BASE HASTA QUE HAYA LEÍDO Y ENTENDIDO LAS INSTRUCCIONES EN ESTE MANUAL Y EN EL MANUAL DEL DUEÑO DE SU VEHÍCULO. NO deje que otros instalen o usen el sistema de seguridad para niños a menos que entiendan cómo usarlo.
NO USAR DEBIDAMENTE ESTE SISTEMA DE SEGURIDAD PARA NIÑOS Y LA BASE AUMENTA EL RIESGO DE LESIONES SERIAS O LA MUERTE EN UNA PARADA REPENTINA O ACCIDENTE. Su niño puede sufrir una lesión en un vehículo aunque no sufra un accidente. Una parada repentina y curvas cerradas pueden lesionar a su niño si el sistema de seguridad para niños no está debidamente instalado o si el niño no está debidamente sujetado en el sistema de seguridad para niños.
PONGA ESTE SISTEMA DE SEGURIDAD PARA NIÑOS EN LA POSICIÓN MIRANDO HACIA ATRÁS SOLAMENTE cuando lo usa en el vehículo.
ALGUNOS NIÑOS CON NECESIDADES ESPECIALES, tales como bebés que nacen antes de tiempo o quienes sufren de apnea de posición, podrían sufrir más riesgo de sufrir problemas respiratorios u otras dificultades en un sistema de seguridad para niños. Si su niño tiene necesidades especiales, recomendamos que su médico o personal del hospital evalúe a su niño y recomiende el sistema de seguridad para niños o cama para automóvil adecuado para su bebé antes de usar este producto.
3.1 Advertencias sobre el uso como sistema de seguridad para niños
3.0 Información importante

9
Según las estadísticas de accidentes, LOS NIÑOS ESTÁN MÁS SEGUROS CUANDO ESTÁN DEBIDAMENTE SUJETADOS A LOS ASIENTOS TRASEROS DEL VEHÍCULO EN LUGAR DE LOS ASIENTOS DELANTEROS. En el caso de un vehículo con una bolsa de aire para el pasajero delantero, consulte el manual del dueño de su vehículo así como estas instrucciones para la instalación del sistema de seguridad para niños.
NUNCA DEJE A SU NIÑO SIN ATENDER. NUNCA DEJE UN SISTEMA DE SEGURIDAD PARA NIÑOS Y LA BASE
SIN SUJETAR EN SU VEHÍCULO. Un sistema de seguridad para niños o una base sin sujetar pueden ser arrojados y podrían lesionar a los ocupantes en una curva cerrada, parada repentina o accidente. Sáquelo o asegúrese de que esté debidamente sujetado en el vehículo. Si no usa el LATCH, asegúrese que los conectores del LATCH que no estén enganchados estén debidamente almacenados en la base.
REEMPLACE EL SISTEMA DE SEGURIDAD PARA NIÑOS Y LA BASE LUEGO DE UN ACCIDENTE DE CUALQUIER TIPO INCLUSO SI NADIE OCUPABA EL SISTEMA DE SEGURIDAD PARA NIÑOS. Un accidente puede causar daño al sistema de seguridad para niños que podría ser imposible de ver.
NO MODIFIQUE SU SISTEMA DE SEGURIDAD PARA NIÑOS Y LA BASE ni use ningún accesorio o repuesto provisto por otro fabricante.
NUNCA USE EL SISTEMA DE SEGURIDAD PARA NIÑOS Y LA BASE SI HAN RESULTADO DAÑADOS O LE FALTAN PIEZAS. NO use un arnés de sistema de seguridad para niños, cinturón de seguridad del vehículo o cinturón del LATCH rotos, deshilachados o dañados.
10
3.2 Advertencias para el uso con un cochecito
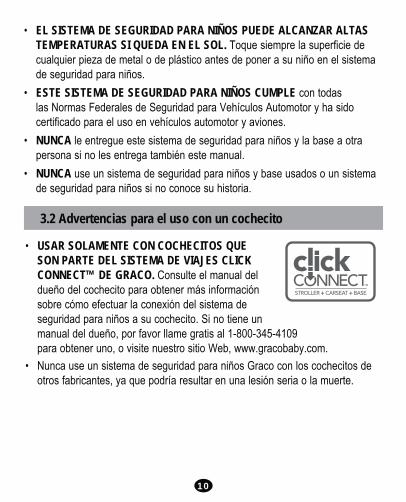
USAR SOLAMENTE CON COCHECITOS QUE SON PARTE DEL SISTEMA DE VIAJES CLICK CONNECT™ DE GRACO. Consulte el manual del dueño del cochecito para obtener más información sobre cómo efectuar la conexión del sistema de seguridad para niños a su cochecito. Si no tiene un manual del dueño, por favor llame gratis al 1-800-345-4109 para obtener uno, o visite nuestro sitio Web, www.gracobaby.com.
Nunca use un sistema de seguridad para niños Graco con los cochecitos de otros fabricantes, ya que podría resultar en una lesión seria o la muerte.
EL SISTEMA DE SEGURIDAD PARA NIÑOS PUEDE ALCANZAR ALTAS TEMPERATURAS SI QUEDA EN EL SOL. Toque siempre la superficie de cualquier pieza de metal o de plástico antes de poner a su niño en el sistema de seguridad para niños.
ESTE SISTEMA DE SEGURIDAD PARA NIÑOS CUMPLE con todas las Normas Federales de Seguridad para Vehículos Automotor y ha sido certificado para el uso en vehículos automotor y aviones.
NUNCA le entregue este sistema de seguridad para niños y la base a otra persona si no les entrega también este manual.
NUNCA use un sistema de seguridad para niños y base usados o un sistema de seguridad para niños si no conoce su historia.

11
PELIGRO DE CAÍDA: Los movimientos del niño también pueden mover el transportador.
NUNCA ponga el transportador en los bordes de mesadas, mesas u otras superficies altas. Manténgase siempre cerca cuando el transportador no esté en el piso/tierra.
Antes de levantar el transportador, ASEGÚRESE que las manijas estén trabadas en posición.
No ponga NUNCA el transportador arriba de un carrito de compras.En superficies blandas, el transportador para bebé
puede darse la vuelta y asfixiar al niño. Nunca ponga el transportador sobre una cama, sofá u otra superficie blanda.
Niños se han ESTRANGULADO con correas del arnés sueltas o parcialmente trabadas. Refrene completamente al niño, incluso cuando use el transportador fuera del vehículo.
GUARDE LOS CORDONES Y CUERDAS FUERA DEL ALCANCE DEL NIÑO. Los cordones y cuerdas pueden causar el estrangulamiento.
NO coloque el transportador cerca de una ventana donde los cordones de las cortinas o persianas puedan estrangular al niño.NO cuelgue cordones sobre o encima del transportador.NO coloque artículos con un cordón alrededor del cuello del niño, tales como cordones de capucha, cordón del chupete, etc.NO ponga cordones a los juguetes.
3.3 Advertencias adicionales para el uso como transportador

12
Su niño DEBE cumplir los siguientes requisitos: PESO: de 1,8 kg a 15.87 kg (4 a 35 libras)
Y ALTURA: 81 cm (32 pulgadas) o menos de altura.
IMPORTANTE: TENGA LA SEGURIDAD de que la parte de arriba de la cabeza del niño esté por lo menos 1 pulgada por debajo de la parte de arriba del sistema de seguridad para bebé.
PARA EVITAR SERIAS LESIONES O LA MUERTE NO USE EL SISTEMA DE SEGURIDAD PARA NIÑOS CON UN NIÑO MÁS GRANDE O MÁS ALTO QUE LA ALTURA Y PESO QUE SE LISTAN A CONTINUACIÓN.
3.4 Limitaciones de peso y altura

13
LA COLOCACIÓN INADECUADA DEL SISTEMA DE SEGURIDAD PARA NIÑOS AUMENTA EL RIESGO DE SUFRIR LESIONES SERIAS O LA MUERTE. Algunas posiciones del asiento en su vehículo podrían no ser seguras para este sistema de seguridad para niños. Algunos vehículos no tienen posiciones del asiento que puedan usarse sin peligro con el sistema de seguridad para niños. Si no está seguro dónde colocar el sistema de seguridad para niños en su vehículo, consulte su manual del dueño del vehículo o llame a Graco al 1-800-345-4109.
Cuando sea posible, asegure el sistema de seguridad para niños en la posición central del asiento directamente atrás de los asientos delanteros . Si desea usar el LATCH, consulte el manual del dueño de su vehículo para determinar los lugares del LATCH.
NUNCA ponga este sistema de seguridad para niños en un asiento del vehículo que tenga instalado una bolsa de aire delantera . Vea “3.1 Advertencias sobre el uso como sistema de seguridad para niños”, página 8.
4.0 Cómo elegir un lugar apropiado en el asiento del vehículo
4.1 Requisitos del asiento del vehículo

14
El asiento del VEHÍCULO debe estar orientado hacia adelante.
NO use el sistema de seguridad para niños en asientos del vehículo con respaldos que no traben en la posición vertical. NO use asientos que se puedan plegar sin tener que liberar una traba o dispositivo de algún tipo. Estos asientos pueden desplazarse hacia adelante y golpear al niño en un accidente o parada repentina.
ALGUNOS SISTEMAS DE CINTURONES DE SEGURIDAD NO SON SEGUROS PARA USAR CON EL SISTEMA DE SEGURIDAD PARA NIÑOS. EL CINTURÓN DE SEGURIDAD DEL VEHÍCULO DEBE HABER SIDO DISEÑADO PARA RETENER AL SISTEMA DE SEGURIDAD PARA NIÑOS APRETADAMENTE EN TODO MOMENTO.Preste mucha atención a estos sistemas ya que muchos de los sistemas de cinturones de seguridad que no son seguros se parecen mucho a los que no presentan peligro. Si no está seguro, consulte su manual del dueño del vehículo o llame a Graco al 1-800-345-4109.
4.2 Requisitos del cinturón de seguridad del vehículo

15
El LATCH puede usarse EN LUGAR DEL sistema de cinturones del vehículo. Por favor, consulte el manual del dueño del vehículo para identificar las ubicaciones del LATCH. NO USE ninguno de los siguientes sistemas para sujetar el sistema de seguridad para niños.
Cinturones para la falda con retractor de seguridad para emergencias (ELR) - Este cinturón para la falda se mantiene suelto y puede moverse hasta que se traba en un accidente o parada repentina.
Combinación de cinturón para la falda y el hombro con retractor - Cada correa tiene un retractor en una punta y está conectada a la placa de seguridad en la otra punta.
Cinturón pasivo – Cinturón para la falda con cinturón para el hombro motorizado
Cinturón pasivo – Cinturón para la falda o el hombro montado en la puerta
NO use los cinturones del vehículo que estén conectados a la puerta de manera alguna o que se muevan a través de un carril para rodear automáticamente al pasajero cuando se cierra la puerta.
Cinturones para la falda que están más adelante del pliegue del asiento
4.2.1 Sistemas PELIGROSOS de cinturones de vehículos

16
LOS SIGUIENTES SISTEMAS DE CINTURONES PUEDEN USARSE CON SU SISTEMA DE SEGURIDAD PARA NIÑOS, SI la ubicación del asiento cumple todos los otros requisitos de estas instrucciones y las del manual del dueño del vehículo. El LATCH puede usarse en lugar del sistema de cinturones del vehículo en los lugares indicados. Por favor, consulte el manual del dueño del vehículo para identificar las ubicaciones del LATCH. Cuando usa el sistema de seguridad para niños sin la base, ajuste el cinturón como se describe en esta sección para estos tipos de cinturones del asiento del vehículo. Algunos cinturones de seguridad de los hombros/falda de ciertos vehículos tienen un botón de plástico en el cinturón. No deje que el botón interfiera con el paso del cinturón a través de la vía del cinturón cuando instala el asiento solo.
Cinturones para la falda – ajustado manualmente
Cuando está trabado, se tensiona manualmente el cinturón tirando del exceso de la cola del cinturón mientras se empuja con fuerza hacia abajo sobre el sistema de seguridad para niños.
4.2.2 Sistemas SEGUROS de cinturones de vehículos
Cola del cinturón

17
Combinación cinturón para la falda y el hombro con placa de unión con traba
Cinturones para la falda con retractor de seguridad automático (ALR)
El retractor de seguridad automático no permitirá que el cinturón de seguridad para la falda se extienda una vez que está sujetado en la hebilla. Ajuste el cinturón pasando el cinturón por el retractor mientras empuja con fuerza el sistema de seguridad para niños hacia abajo.
Una vez que esté trabado en la hebilla, este tipo de cinturón tiene una placa de seguridad que no permitirá que la parte del cinturón para la falda se afloje. El cinturón se ajusta tirando con fuerza de la parte del hombro del cinturón del vehículo mientras empuja con fuerza el sistema de seguridad para niños hacia abajo.

18
Para instalar la traba de seguridad: 1. Ajuste el cinturón trabado empujando con fuerza
el sistema de seguridad para niños hacia abajo y tirando con fuerza el cinturón para el hombro.
2. Mientras empuja el sistema de seguridad para niños hacia abajo, apriete las dos correas juntas detrás de la lengua de la hebilla. Destrabe el cinturón sin permitir que se mueva.
3. Conecte el cinturón de seguridad para la falda y para el hombro con la traba de seguridad como se indica y .
4. Vuelva a poner el cinturón en la hebilla. Verifique que el cinturón de seguridad para la falda no se mueve tirando y empujando con fuerza el sistema de seguridad para niños. Si el cinturón se afloja o se alarga, repita el procedimiento.
Traba de seguridad
falda y el hombro con placa de unión deslizante
Este cinturón tiene una placa de seguridad que se mueve libremente a lo largo del cinturón.Este cinturón DEBE convertirse para prevenir el movimiento de la parte de la falda del cinturón. Debe usar la traba de seguridad (provista con el sistema de seguridad para niños), cuando usa el sistema de seguridad para niños sin la base a menos que el cinturón de seguridad del asiento de su vehículo pueda convertirse de otra manera como se describe en el manual del dueño del vehículo.
1 cm (1/2 pulgada)
La traba de seguridad va aquí, a 1 cm (1/2 pulgada) de la hebilla

19
Los vehículos nuevos tienen uno o varios asientos equipados con sistemas de anclaje LATCH. Si el vehículo viene equipado con el sistema LATCH, se podrían ver los puntos de anclaje inferiores en el pliegue del asiento del vehículo. Si no están visibles, pueden estar marcados con el símbolo . Vea el manual del dueño de su vehículo para informarse sobre las ubicaciones exactas, la identificación de los anclajes y los requisitos para su uso con un sistema de seguridad para niños.
Puntos de anclaje inferiores del vehículo
Pliegue del asiento del
vehículo
Un asiento típico de un vehículo de pasajeros. Otros tipos de vehículos pueden tener otras ubicaciones del sistema LATCH o marcas diferentes.
Los puntos de anclaje LATCH inferiores del vehículo se definen como a 11 pulgadas desde el centro de un anclaje LATCH al centro de otro anclaje LATCH. Si lo permite el manual del dueño de su vehículo, la posición de sentado en el centro se puede usar si el espacio del anclaje es 27.9 cm (11 pulgadas) o más.
4.3 Ubicación del LATCH

20
VISTA DELANTERA5.0 Funciones y componentes
Manija
Gancho del cinturón del
vehículo
Botón de ajuste de la
manija
Lenguas de la hebilla del arnés
Presilla para
el pecho
Hebilla del arnésBotón de
ajuste del arnés
Correa de ajuste del
arnés
Correas del arnés
Botón de ajuste de la manija
Ranuras de la cadera
Ranuras de la
correa de la entrepierna
Ranuras para el arnés

21
*Traba de seguridad
La traba de seguridad se guarda en la parte de abajo del sistema de seguridad para niños. Necesitará usarla con algunos tipos de cinturones para la falda/hombro del vehículo.
VISTA TRASERA
Manija de liberación
Almacenamiento de la traba de
seguridad*
Correa de ajuste del arnés
Capota
Presillas de la correa
de la entrepierna
Instalación Click Connect™
Ranuras para el arnés
Gancho de seguridad
Presilla de las correas
de la cadera
Correas del
arnés
Placa unión de
metal

22
BASE
Conexiones del LATCH *
Almacenamiento del sistema
LATCH Las Normas Federales para Seguridad de Automóviles de Estados Unidos han definido un sistema para la instalación de asientos de seguridad en los vehículos. El sistema se denomina LATCH.
* LATCH debe usarse SOLAMENTE EN LUGAR del cinturón del vehículo si el vehículo está equipado con puntos de anclaje LATCH. Por favor, consulte el manual del dueño del vehículo para identificar las ubicaciones del LATCH.
Correa de ajuste del LATCH Indicador del nivel **
**Indicador del nivel
El indicador de nivel está conectado al costado de la base e indica si el sistema de seguridad para niños está debidamente reclinado.
Almacenamiento del manual de instrucciones
Perilla para pie ajustable
Pie ajustable

23
Para sacarlo, apriete la manija de liberación en la parte trasera del sistema de seguridad para niños y levántelo de la base como se indica .Para poner el sistema de seguridad para niños en la base, empuje el sistema de seguridad para niños hacia abajo hasta que se trabe en la base. Tire hacia arriba del sistema de seguridad para niños para asegurarse que esté trabado firmemente en la base.
1. Apriete los botones de ajuste de la manija en ambos costados de la manija .
2. Gire la manija hasta que se trabe en una de las 4 posiciones:
Posición A: DEBE usarla cuando lo transporta agarrado de la manija,
Posición A,B,C,D: se puede usar en el vehículo.
AMBOS botones de ajuste de la manija deben saltar para trabar la manija en su lugar .
3. Empuje y tire de la manija para asegurarse que esté firmemente trabada en su lugar.
Transporte
Sentado
A
C
D
5.1 Ajuste de la manija
5.2 Sacar y asegurar el sistema de seguridad para niños
B

24
5.3 Bota para tiempo frío (en ciertos modelos)
5.4 Instalación de la capotaInstale la capota colocando el arco en las ranuras en los montantes de la capota en ambos lados del sistema de seguridad para niños como se indica en .
Tire la capota sobre la parte de atrás del sistema de seguridad para niños .
Para sacarla, oprima el botón en el montante de la capota y tire el arco de la capota de la ranura y repita el procedimiento del otro lado .
Algunos modelos vienen con una bota para tiempo frío. Para usarlo deslice la bota en el extremo del asiento y sujete las aletas de plástico como se indica.

25
Algunos bebés necesitan apoyo adicional para mantener la cabeza y el cuerpo en una posición cómoda. Pase el arnés a través de las aberturas en el soporte del apoyacabeza y del cuerpo como se indica and .ASEGÚRESE QUE NADA INTERFIERA CON EL ARNÉS. El arnés debe quedar plano y ajustado sobre los hombros de su niño.Si su modelo no incluye un soporte para el cuerpo, puede usar una toalla enrollada como se indica .
Para prevenir la eyección en un accidente o parada repentina: Asegúrese siempre que las correas del hombro pasan por las ranuras y están debidamente instaladas en los hombros.
Nunca deje que el soporte del cuerpo se apile o pliegue detrás del niño.
Solamente use el apoyacabeza con los dos pares de ranuras inferiores del arnés. Asegúrese de que las fundas del arnés no interfieran con la colocación de la presilla para el pecho a la altura de las axilas.
5.5 El soporte del apoyacabeza, soporte del cuerpo y fundas del arnés (en ciertos modelos, los estilos varían)

26
6.1 Instalación del sistema de seguridad para niños sin la base usando el cinturón del vehículo
6.0 Cómo instalar el Sistema de seguridad para niños/base
Debe seguir detenidamente las instrucciones provistas por el fabricante de su vehículo, además de la información de este manual. Antes de seguir, asegúrese de haber leído y entendido la sección 4, “Cómo elegir un lugar apropiado en el asiento del vehículo” en las páginas 13 a 19. Asegúrese que la lengua de la hebilla pase por la hebilla correcta . El cinturón del vehículo no deberá estar doblado ni dar vuelta.Asegúrese de que el vehículo esté sobre piso nivelado para que el indicador del nivel se pueda usar para reclinar debidamente el sistema de seguridad para niños.Consulte su manual del dueño del vehículo y las instrucciones en “4.2.2 Sistemas SEGUROS de cinturones de vehículos”, páginas 16 a 18 sobre cómo tensionar el cinturón del vehículo cuando usa el sistema de seguridad para niños sin la base.Si va a usar el asiento delantero del pasajero (vea la advertencia de la bolsa de aire, página 4), mueva el asiento del vehículo para atrás todo lo posible desde el tablero. Si usa un asiento trasero, asegúrese que el asiento de adelante esté lo suficientemente adelante y en posición vertical para que haya suficiente espacio para el sistema de seguridad para niños.

27
Cinturón para la falda
1. Coloque el sistema de seguridad para niños sin la base orientado hacia atrás en un asiento del vehículo.
2. Pase el cinturón de la falda o parte de la falda de un cinturón para la falda y el hombre debajo de ambos ganchos del cinturón del vehículo:
3. Trabe el cinturón de vehículo. 4. Ajuste el cinturón de seguridad del
vehículo. Para crear una instalación segura, apriete hacia abajo con fuerza con su mano en el sistema de seguridad para niños y tire y apriete el cinturón de seguridad del vehículo.
5. Verifique que el asiento para automóvil esté nivelado: La línea de nivel roja en la etiqueta de advertencia DEBE estar nivelada con el piso .
6. Pruebe el sistema de seguridad para niños para determinar si la instalación está segura como se describe en la sección “Verificación final de seguridad” en la página 42.
Cinturón para la falda y el hombro

28
1. Asegúrese de que el vehículo esté sobre piso nivelado para poder obtener la posición correcta de reclinación .
2. Coloque la base orientada hacia atrás en un asiento del vehículo orientado hacia adelante
.
6.2 Instalación del sistema de seguridad para niños y la base usando el cinturón del vehículo
Cinturón de la falda
Cinturón del hombro/falda
3. Trabe el cinturón del asiento. Asegúrese que la lengua de la hebilla pase por la hebilla correcta . El cinturón del vehículo no deberá estar doblado ni dar vuelta.

29
4. Para crear una instalación segura, mientras empuja a la base hacia abajo, tire la punta libre del cinturón para la falda o la parte del hombro del cinturón para el hombro/falda para apretarlo .
5. Verifique que el cinturón no se mueve tirando y empujando con fuerza con las manos sobre la base cerca de la vía del cinturón del vehículo. Si el cinturón se afloja o se alarga, repita el procedimiento.
6. Empuje el sistema de seguridad para niños hacia abajo en la base y asegúrese de que escucha un “clic” . Tire hacia arriba del sistema de seguridad para niños para asegurarse que esté trabado apretadamente en la base.
Si el sistema de seguridad para niños no se traba apretadamente en la base, el sistema de seguridad para niños NO proporciona ninguna protección a su niño. NO use la base/sistema de seguridad si el sistema de seguridad para niños no está debidamente trabado en la base.
7. Pruebe el sistema de seguridad para niños para determinar si la instalación está segura como se describe en la sección “Verificación final de seguridad” en la página 42.

30
1. ASEGÚRESE de que el vehículo esté en un piso nivelado. Asegúrese de verificar el manual del dueño de su vehículo para obtener las posiciones del asiento con LATCH.
2. Para facilitar la instalación, oprima el botón para extender el LATCH hasta su
.3. Ponga la base en el asiento del vehículo como se
indica.4. Asegúrese de que el LATCH pase por la vía del
cinturón del vehículo/LATCH que normalmente se usa para el cinturón de seguridad del vehículo . El cinturón debe mantenerse en posición plana sin doblarse.
5. Sujete los conectores a los anclajes inferiores del vehículo.
Tire firmemente de los conectores para asegurarse de que estén enganchados .
6. Ajuste el LATCH empujando con fuerza hacia abajo sobre la base y tirando el cinturón de ajuste a través de la vía del cinturón .
6.3 Utilización del LATCH para instalar la base
¡CLIC!

31
7. NUNCA ponga dos conectores LATCH en un anclaje LATCH del vehículo .
8. Pruebe el sistema de seguridad para niños para determinar si la instalación está segura como se describe en la sección “Verificación final de seguridad” del sistema de seguridad para niños en la página 42.
9. Verifique que el LATCH se mantiene apretado y no se suelta de la posición apretada. De no mantenerse apretado, colóquelo en otro lugar en el asiento o póngase en contacto con Graco llamando al 1-800-345-4109.
10. Para sacar el LATCH, oprima el botón mientras tira del cinturón LATCH como se indica .
11. Oprima y sujete la bisagra LATCH .
12. Empuje el conector hacia dentro, levante el conector y jálelo (en el sentido opuesto al punto de anclaje) . 13. Repita los pasos 11 y 12 para el otro conector.

32
No reclinar debidamente el sistema de seguridad para niños en el asiento del vehículo aumenta el riesgo de lesiones serias o la muerte.Si el sistema de seguridad para niños está demasiado vertical, la cabeza del niño podría caer hacia adelante y causar problemas a la respiración.Si el sistema de seguridad para niños está demasiado reclinado, un accidente podría ejercer demasiada fuerza en el cuello y hombros del niño.El sistema de seguridad para niños debe estar debidamente reclinado según las siguientes instrucciones.El sistema de seguridad para niños debe estar debidamente reclinado. Una posición demasiado vertical podría causar dificultad respiratoria.
Es importante que su sistema de seguridad para niños/base esté debidamente reclinado para mayor seguridad de su niño. En el costado de su sistema de seguridad para niños hay un indicador del nivel para ayudar a reclinar debidamente el sistema de seguridad para niños/base en el asiento del vehículo.
6.4 Reclinación del Sistema de seguridad para niños/base
USAR SOLAMENTE EL SISTEMA DE SEGURIDAD PARA NIÑOS:1) La línea de nivel roja en la etiqueta de
advertencia del sistema de seguridad para niños DEBE estar nivelada con el piso.

33
USAR JUNTOS LA BASE Y EL SISTEMA DE SEGURIDAD PARA NIÑOS:
1) El vehículo DEBE estar nivelado con el piso para obtener la posición correcta de reclinación.
2) Use el indicador del nivel en la base. Cuando lee el indicador del nivel en la base, véalo directamente desde el costado del indicador.
Verifique el indicador del nivel. Debe mirar de frente al indicador.
CUANDO LEE EL INDICADOR DEL NIVEL,
- Si el indicador aparece azul claro en la ventana, el sistema de seguridad está nivelado para recién nacidos.
- Si el indicador aparece azul claro y oscuro en la ventana, el sistema de seguridad está nivelado para niños de 3 meses de edad y más.
- Si aparece el color ROJO el sistema de seguridad para niños NO está nivelado. Debe ajustar su posición de reclinación.
3+ months (meses)
Use la edad corregida para prematuros.

34
Para ajustar la inclinación sobre la base:Gire la perilla en el sentido contrario a las agujas del reloj hasta alcanzar el valor deseado para bajar el pie .Gire la perilla en el sentido de las agujas del reloj para levantar el pie .Si todavía aparece la zona de color roja en el indicador de nivel cuando el pie está completamente extendido, levante el pie y coloque una toalla enrollada debajo del pie SOLAMENTE hasta que aparezca la zona de color azul.
Cuando solamente usa el sistema de seguridad para niños sin la base, VERIFIQUE que el sistema de seguridad para niños esté nivelado con el piso. La línea de nivel roja en la etiqueta de advertencia (vea el paso en la página 27) DEBE estar nivelada con el piso.Si el sistema de seguridad para niños descansa en el asiento del vehículo y todavía no está nivelado, ponga una toalla enrollada debajo del sistema de seguridad para niños .Vuelva a ajustar el cinturón de seguridad del vehículo lo necesario para sujetar firmemente el sistema de seguridad para niños al asiento del vehículo.
35
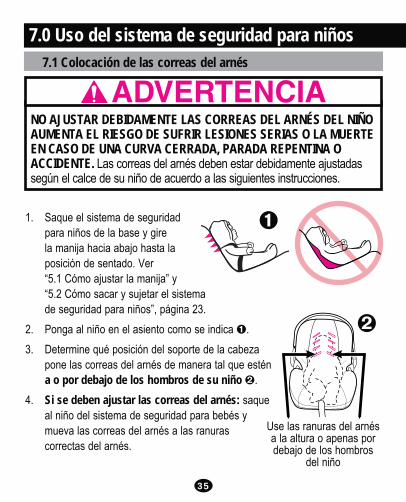
1. Saque el sistema de seguridad para niños de la base y gire la manija hacia abajo hasta la posición de sentado. Ver “5.1 Cómo ajustar la manija” y “5.2 Cómo sacar y sujetar el sistema de seguridad para niños”, página 23.
2. Ponga al niño en el asiento como se indica .3. Determine qué posición del soporte de la cabeza
pone las correas del arnés de manera tal que estén a o por debajo de los hombros de su niño .
4. Si se deben ajustar las correas del arnés: saque al niño del sistema de seguridad para bebés y mueva las correas del arnés a las ranuras correctas del arnés.
NO AJUSTAR DEBIDAMENTE LAS CORREAS DEL ARNÉS DEL NIÑO AUMENTA EL RIESGO DE SUFRIR LESIONES SERIAS O LA MUERTE EN CASO DE UNA CURVA CERRADA, PARADA REPENTINA O ACCIDENTE. Las correas del arnés deben estar debidamente ajustadas según el calce de su niño de acuerdo a las siguientes instrucciones.
7.0 Uso del sistema de seguridad para niños7.1 Colocación de las correas del arnés
Use las ranuras del arnés a la altura o apenas por debajo de los hombros
del niño

36
A. Empuje el botón de ajuste del arnés debajo de la aleta del asiento. Tire las correas de los hombros para aflojar el arnés .
B. Desde detrás del asiento, saque los extremos de las dos correas de los hombros de la placa de unión de metal .
C. Desde adelante, pase las correas a través de las ranuras del arnés y luego vuelva a colocarlas a través de las ranuras apropiadas. Las dos correas del arnés deben pasar a través del mismo juego de ranuras en el asiento y almohadilla.
D. Según el tamaño de su niño, podría ser necesario ajustar las correas del arnés, la hebilla de la correa de la entrepierna o las correas de la cintura como se indica en las página 37 para lograr un calce ajustado en su niño.
Vuelva a armar los extremos de las correas sobre la placa de unión de metal .
5. VERIFICACIÓN DE SEGURIDAD: a) VERIFIQUE que las correas del arnés no estén
dobladas adelante o atrás; b) VERIFIQUE que las correas estén aseguradas tirando de las
correas del arnés desde el frente del asiento.
Botón de ajuste del arnés
Placa de unión de metal

37
Correas para los hombros para un bebé MÁS PEQUEÑO: Use los 2 juegos de ranuras inferiores del arnés (si están parejas o
apenas debajo de los hombros de su niño) y los nudos superiores de la correa . Los extremos de las correas deben quedar al frente de la placa de unión de metal como se indica en , no como se indica en .
VERIFIQUE que los nudos estén completamente dentro de las ranuras de la placa de unión .
VERIFIQUE que las correas están aseguradas tirando de las mismas.
Correas para los hombros para un bebé MÁS GRANDE: Use los 2 juegos de ranuras superiores del arnés y los nudos del
extremo de la correa (si están parejas o apenas debajo de los hombros de su niño).
VERIFIQUE que los nudos estén completamente dentro de las ranuras de la placa de unión .
VERIFIQUE que las correas están aseguradas tirando de las mismas.

38
PARA BEBÉS MÁS PEQUEÑOS:De vuelta el sistema de seguridad para niños y pase la correa de la entrepierna por la ranura delantera de la entrepierna y la almohadilla del asiento. Vuelva a pasar la presilla a través del frente de la almohadilla del asiento hacia la ranura trasera de la entrepierna y el asiento como se indica. La presilla de la correa de la entrepierna debe permanecer plana contra el asiento.
PARA BEBÉS CON PESO BAJO AL NACER (EL PESO MÍNIMO ES 1.8 KG [4 LIBRAS]): las correas de los hombros deberán estar en el juego más bajo de las ranuras del arnés y los nudos superiores de la correa (vea página 37).
PARA BEBÉS MÁS GRANDES:De vuelta el sistema de seguridad para niños y saque la presilla de la correa de la entrepierna empujando la presilla por la ranura trasera de la entrepierna y la almohadilla del asiento . Vuelva a insertarla a través del frente de la almohadilla del asiento por la ranura delantera de la entrepierna y el asiento.La presilla de la correa de la entrepierna debe permanecer plana contra el asiento.
PARTE TRASERA DEL ASIENTO
7.2 Cambiar la posición de la correa de la entrepierna
Ranura trasera
Ranura delantera
ATRÁS ADELANTE
ADELANTE
ATRÁS

39
No ajustar debidamente a su niño en el sistema de seguridad para niños/transportador aumenta el riesgo de lesiones serias o la muerte por asfixia o caídas, o en caso de una parada repentina o accidente. Inclusive cuando lo usa solamente como transportador, asegúrese que las correas del arnés estén debidamente ajustadas.
1. Mueva la manija del sistema de seguridad para niños a la posición de sentado (vea la página 23).
2. Oprima el botón del frente del sistema de seguridad para niños y tire el arnés para aflojarlo .
3. Abra la traba del pecho apretando ambos costados y destrabe la hebilla como se indica .
7.3 Asegurar al niño en el sistema de seguridad

40
5. Coloque a su niño en el sistema de seguridad para niños como se indica en , no en . Ponga las correas del arnés alrededor de su niño.
6. Inserte las dos lenguas de la hebilla en la hebilla del arnés en la correa de la entrepierna. Asegúrese que escucha el clic de cada lengua en la hebilla .
NO use el sistema de seguridad para niños si las lengüetas de la hebilla no se traban en su lugar. Llame a Graco al 1-800-345-4109.

41
7. Trabe las partes de la traba del pecho juntas .
8. Tire de la correa de ajuste del arnés para ajustar las correas como se indica ASEGÚRESE que ambas correas estén planas y ajustadas sobre los hombros y los muslos.
9. Coloque la traba del pecho en el medio del pecho, a nivel con la axila y lejos del cuello .
10. VERIFICACIÓN DE SEGURIDAD: a) VERIFIQUE que las correas del arnés
no estén dobladas. b) VERIFIQUE que el arnés esté
tensionado. No debería poder apretar la correa el arnés si está tensa. Una correa tensa no deberá permitir que quede floja. Se mantiene en una línea casi recta sin doblarse. No aprieta la carne del niño ni empuja el cuerpo del niño en una posición que no sea natural .

42
Verificación final de seguridad: Cada vez que sale en automóvil con su niño,
EMPUJE HACIA ABAJO lenta pero firmemente la parte de arriba del sistema de seguridad para niños para asegurarse que el cinturón del vehículo no se alarga y que el cinturón del vehículo o el LATCH esté sujetado apretadamente alrededor de la base/sistema de seguridad para niños .
Mientras agarra el sistema de seguridad para niños o la base cerca de la vía del cinturón, GIRE Y TIRE el sistema de seguridad para niños hacia adelante y en ambos costados para asegurarse que el cinturón del vehículo o LATCH no se alargue ni se afloje y que no se pueda mover el sistema de seguridad para niños con facilidad. El sistema de seguridad para niños no deberá moverse de un lado a otro ni de atrás hacia adelante más de 2.5 cm (1 pulgada).

43
1. Para facilitar el almacenamiento, extienda el LATCH hasta su máxima longitud .
2. El almacenamiento del LATCH debería tener este aspecto cuando esté terminado .
Cuando la instala en una avión usando la base, instálela de la misma manera que en un automóvil con el cinturón de la falda solamente. Si solamente usa el armazón, instálela siguiendo las mismas instrucciones que para un automóvil. Notifique a la aerolínea con anticipación que piensa transportar una silla a bordo.Úsela solamente en un asiento de la avión orientado hacia adelante. Cumpla las instrucciones del personal a bordo sobre la colocación del sistema de seguridad para niños. No use este sistema de seguridad para niños si el cinturón de seguridad de la avión no sujeta apretadamente al sistema.
8.1 Uso en aviones
8.0 Información adicional
8.2 Almacenamiento del LATCH

44
PARA LIMPIAR LA ALMOHADILLA DEL ASIENTO: 1. Desabroche los parches de gancho y nudo y aletas
plásticas del sistema de seguridad para niños.2. Tire las aletas de plástico de abajo del borde del
sistema de seguridad para niños y .3. Desabroche la cinta de gancho y nudo en el lugar del
asiento de la almohadilla y tire de las correas de la cadera del arnés.
4. Consulte la etiqueta de cuidado de la almohadilla del asiento para obtener las instrucciones de limpieza. NO USE BLANQUEADOR.
Invierta los pasos para volver a instalar la almohadilla del asiento. Verifique que el sistema del arnés no esté doblado, y tire del sistema de arnés para asegurarse que esté debidamente instalado.
8.3 Limpieza y mantenimiento

45
LAS PIEZAS DE METAL Y DE PLÁSTICO DEL SISTEMA DE SEGURIDAD PARA NIÑOS pueden limpiarse con una solución de jabón suave y agua. NO USE BLANQUEADOR O DETERGENTE porque podría debilitar a las piezas de plástico.
LAS CORREAS DEL ARNÉS pueden limpiarse a mano o cambiarse. NO SUMERJA LAS CORREAS DEL ARNÉS EN AGUA. Hacerlo podría debilitar las correas del arnés. NUNCA planche las correas del arnés.
SI LAS CORREAS DEL ARNÉS tienen cortes, están muy dobladas o deshilachadas DEBE cambiarlas.
NO USE EL SISTEMA DE SEGURIDAD PARA NIÑOS sin la almohadilla del asiento.
EL USO CONTINUO DEL SISTEMA DE SEGURIDAD PARA NIÑOS PODRÍA CAUSAR DAÑOS AL ASIENTO DEL VEHÍCULO. Use una estera para sistemas de seguridad para niños, toalla o frazada fina para proteger el tapizado.

46
1. De vuelta el sistema de seguridad, pase la presilla por la ranura de la correa de la entrepierna .
2. Para limpiar la hebilla, póngala en una taza de agua tibia y agite suavemente la hebilla, oprima el botón rojo varias veces mientras esté sumergida en el agua . NO SUMERJA LAS CORREAS DEL ARNÉS. NO USE JABONES ni LUBRICANTES. NO use detergentes para uso doméstico. Nunca lubrique la hebilla.
3. Elimine el exceso de agua y deje que se seque el aire, la correa del arnés debe estar seca antes del uso .
4. Repita los pasos 2 y 3 según sea necesario. 5. Vuelva a colocar la hebilla en la ranura
deseada. La hebilla debe trabarse haciendo un “clic”. Vuelva a inspeccionar el arnés para determinar si la instalación es la correcta antes de usarlo.
8.4 Proceso de limpieza de la hebilla
Prevenga lesiones graves o la muerte: La hebilla debe abrocharse correctamente. Inspeccione y limpie la hebilla periódicamente para quitar objetos o desechos que podrían impedir que se trabe.

47
Notas

48
Para comprar piezas o accesorios o para obtener información sobre la garantía en los Estados Unidos,
por favor comuníquese con nosotros en:
www.gracobaby.como
1-800-345-4109
9.0 Piezas de repuesto
El lado inferior de la base