Embed Size (px)
Citation preview

SMART Response™connector for eduphoria!Windows® operating systemsUser’s guide

FCC warningThis equipment has been tested and found to comply with the limits for a Class A digital device, pursuant to Part 15 of the FCC Rules. These limits are designed to providereasonable protection against harmful interference when the equipment is operated in a commercial environment. This equipment generates, uses and can radiate radiofrequency energy and, if not installed and used in accordance with themanufacturer’s instructions, may cause harmful interference to radio communications. Operation ofthis equipment in a residential area is likely to cause harmful interference in which case the user will be required to correct the interference at his own expense.
Trademark noticeSMART Response, Senteo, smarttech, the SMART logo and all SMART taglines are trademarks or registered trademarks of SMART Technologies ULC in the U.S. and/orother countries. SchoolObjects:aware and eduphoria! are trademarks or registered trademarks of eduphoria! Incorporated. All other third-party product and company namesmay be trademarks of their respective owners.
Copyright notice© 2012 SMART Technologies ULC. All rights reserved. No part of this publicationmay be reproduced, transmitted, transcribed, stored in a retrieval system or translatedinto any language in any form by any means without the prior written consent of SMART Technologies ULC. Information in this manual is subject to change without noticeand does not represent a commitment on the part of SMART.One or more of the following patents: US6320597; US6326954; US6741267; US7151533; US7757001; USD612396; USD616462; USD617332; and USD636784; Otherpatents pending.07/2012

ContentsChapter 1: Getting started 1
Introduction 1About your connector software 1What you need 2Features 3
Chapter 2: Installing your connector software 5Introduction 5SMART Response assessment software requirements 6Computer requirements 6Installing your connector software 6Selecting how students answer questions 7Assessment format considerations 7
Chapter 3: Using your connector software 11Introduction 11Starting your connector software 12Administering an assessment 12Viewing upload status 18
Chapter 4: Troubleshooting 21
i

Chapter 1: Getting startedIntroduction 1About your connector software 1What you need 2Features 3
IntroductionThis section introduces you to your connector software and explains system requirements,installation and assessment format considerations.
About your connector softwareThe SMART Response™ connector for eduphoria! is a classroom assessment tool that connectsthree SMART Response interactive response systems with eduphoria! Incorporated’sSchoolObjects:aware™ assessment management system.
The SchoolObjects:aware assessment management system is a student data analysis applicationthat simplifies benchmark testing for teachers.
Teachers access the eduphoria! website to develop benchmark tests and then assign assessmentsto a class list of students. Teachers can then download the assessments to their computer and usethe SMART Response connector for eduphoria! to administer the assessment. Students can usecertain SMART Response clickers to answer assessment questions.
As an assessment progresses, the SMART Response connector for eduphoria! displays studentprogress as they answer the questions. Information on how each student performed during theassessment is given once the completed assessment is stopped and is uploaded to the eduphoria!website for processing.
Chapter 1
1

What you needTo use the SMART Response connector for eduphoria! you need the following:
l SMART Response assessment software installed on your computer (seeSMART Responseassessment software requirements on page 6) and a SMART Response receiver connected toyour computer.
NOTES
o You don’t need a receiver if you’re using SMART Response VE software.
o Support for SMART Response VE software is scheduled for the autumn 2012 updateof SMART Response 2012 software.
o Students answer questions using SMART Response clickers (seeSelecting howstudents answer questions on page 7 for more information on whichSMART Response clickers are supported).
o Your choice of SMART Responsemode determines themaximum number of studentclickers that can be used during an assessment (seeAssessment formatconsiderations on page 7).
o For evaluation purposes you can use the SMART Response clicker simulator and noreceiver device. However, the clicker simulator is available only on the computer thathas SMART Response assessment software installed on it. Youmust also use theSMART Response Set Up Tool to set themode toSMART Response / Senteo.
l An active subscription to the SchoolObjects:aware assessment management system.
I MPORTANT
A subscription to the SchoolObjects:aware assessment management systemmust bepurchased separately.
CHA PT ER 1
Getting started
2

FeaturesFeature Description
Integration with theSchoolObjects:awareassessment managementsystem
Teachers can access and download SchoolObjects:awareassessments to administer to their class.
Integration with theSMART Response system
l Students can use their SMART Response PE, XE or Senteo™clickers, or their SMART Response VE Internet-enableddevices to answer assessment questions.
NOTE
Support for SMART Response VE software is scheduled forthe autumn 2012 update of SMART Response 2012software.
l The Senteo interactive response system is no longer availablefor purchase, but it is supported.
Efficient assessmentadministration
l Students use their SMART Response or Senteo clickers ratherthan computers to take online assessments, which frees up ormakes computers available for other classes.
l Using SMART Response clickers to submit answers is moreefficient than using bubble sheets, because the assessmentdata is immediately available after you upload results to theSchoolObjects:aware assessment management system foranalysis and report generation.
l Save time andmoney by not having to print, barcode,distribute, collect and scan answer sheets.
Registrationmonitoring Teachers canmonitor students as they register for an assessmentand quickly see which students haven’t registered.
Instant feedback Teachers canmonitor student progress by seeing how manyquestions each student has attempted.
Review student performancedata from completedassessments
Once an assessment is stopped, teachers can quickly upload it to theeduphoria! website to confirm whether the students’ answers werecorrect or incorrect and to view other student performance data.
View the upload status ofsubmitted assessmentresults
You can quickly and easily view the upload status of submittedassessment results. Results that failed to be submitted can beresubmitted.
CHA PT ER 1
Getting started
3


Chapter 2: Installing your connectorsoftwareIntroduction 5SMART Response assessment software requirements 6Computer requirements 6Installing your connector software 6Selecting how students answer questions 7Assessment format considerations 7
Supported question formats 8Supported question formats 8Question format restrictions 9
Assessment format and class-size considerations 9Receivers and class-size considerations 9
IntroductionThis section provides the software and computer requirements for the SMART Response connectorfor eduphoria! software.
Also provided is information on formatting assessments and on selecting how your students answerassessment questions.
I MPORTANT
Before you install this software, ensure that SMART Response software is installed on yourcomputer.
Chapter 2
5

SMART Response assessment softwarerequirementsYoumust have SMART Response 2012 (or later) assessment software installed on your computer touse the SMART Response connector for eduphoria!.
Computer requirementsFor a complete list of computer requirements, refer to the release notes for SMART Responseassessment software. Go to smarttech.com/downloads to access the release notes for your versionof SMART Response assessment software.
I MPORTANT
The SMART Response connector for eduphoria! is available only forWindows® computers.
Installing your connector softwareUse the following procedure to download the software. You can then use the installation wizard toinstall the software on your computer.
g To install the software on your computer
1. Go to smarttech.com/software.
2. Scroll toSMART Response interactive response system, and then select theSMART Response connector for eduphoria! from the drop-downmenu.
3. Click Download the SMART Response connector for eduphoria!, select Download, andthen follow the on-screen instructions to download the executable file.
4. Browse to the file on your computer and double-click it.
5. Follow the on-screen instructions to complete the installation.
CHA PT ER 2
Installing your connector software
6
Selecting how students answer questionsStudents can answer questions using one of these options:
l SMART Response PE clickers
l SMART Response XE clickers
l SMART Response VE using Internet-enabled devices
NOTE
Support for SMART Response VE software is scheduled for the autumn 2012 update ofSMART Response 2012 software.
l SMART Response/Senteo clickers
NOTE
The Senteo interactive response system is no longer available for purchase, but it issupported.
Eachmodel of clicker has a correspondingmode in SMART Response assessment software. Youcan also operate the SMART Response system inMixedmode, in which your class cansimultaneously use a combination of the SMART Response clickers listed above.
You can change the clicker operationmode after installation using the SMART Response Setup Tool.See the SMART Response software online Help for information on using the SMART ResponseSetup Tool.
Assessment format considerationsYou can use the SMART Response connector for eduphoria! to select and administerSchoolObjects:aware assessments. However, the SMART Response connector for eduphoria!supports specific question formats and has amaximum number of students who can register for anassessment. This section provides further information on the assessment format and class sizeconsiderations that must bemade before you download a SchoolObjects:aware assessment.
CHA PT ER 2
Installing your connector software
7
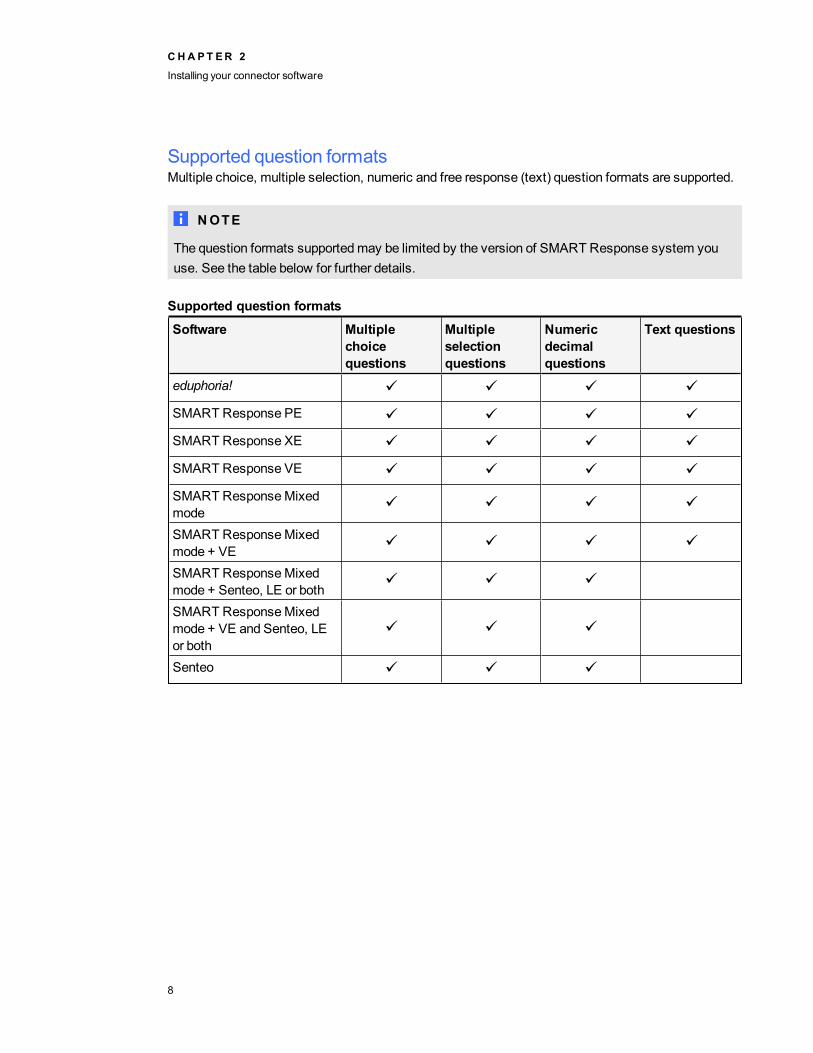
Supported question formatsMultiple choice, multiple selection, numeric and free response (text) question formats are supported.
NOTE
The question formats supportedmay be limited by the version of SMART Response system youuse. See the table below for further details.
Supported question formats
Software Multiplechoicequestions
Multipleselectionquestions
Numericdecimalquestions
Text questions
eduphoria!
SMART Response PE
SMART Response XE
SMART Response VE
SMART ResponseMixedmodeSMART ResponseMixedmode + VESMART ResponseMixedmode + Senteo, LE or bothSMART ResponseMixedmode + VE and Senteo, LEor bothSenteo
CHA PT ER 2
Installing your connector software
8

Question format restrictionsSoftware Maximum No.
of choices formultiplechoice andmultipleselection
Maximum No.of choices thatcan be part ofthe correctanswer formultipleselection
Maximum No.of charactersfor text
Maximum No.of questions inassssment
eduphoria! 20 20 Unlimited UnlimitedSMART Response PE 8 6 20 UnlimitedSMART Response XE 8 8 140 UnlimitedSMART Response VE 10 10 140 120SMART ResponseMixedmode 8 6
20 (PE)140 (XE)
Unlimited
SMART ResponseMixedmode + VE 8 6
20 (PE)140 (XE, VE)
40
SMART ResponseMixedmode + Senteo, LE or both 8 6 0 Unlimited
SMART ResponseMixedmode + VE and Senteo, LEor both
8 6 0 40
Senteo 8 6 0 Unlimited
Assessment format and class-size considerationsThemaximum number of students who can register for an assessment depends on the number ofquestions in the assessment. The number of clickers that can participate in an assessment sessiondecrease as the number of questions in the assignment increase. SeeDetermining how manySMART Response or Senteo clickers you can use for an assessment (smarttech.com/kb/170235)for more information.
Receivers and class-size considerationsThe SMART Response connector for eduphoria! supports the SMART Response and Senteoreceivers. Both types of receiver have amaximum number of clickers they can support. Therefore,the type of receiver connected to your computer determines themaximum number of student clickersthat you can use during an assessment.
Type of receiver Maximum number of clickers
SMART Response 100
Senteo 60
CHA PT ER 2
Installing your connector software
9


Chapter 3: Using your connector softwareIntroduction 11Starting your connector software 12Administering an assessment 12
Before you start 13Starting an assessment 14Registering students 14Running an assessment 15
Information available during an assessment 16Stopping an assessment 16Uploading assessment results 17Manually configuring proxy settings 18
Viewing upload status 18Viewing the upload status of an assessment 18Information available from the View Upload Status screen 19Deleting an assessment 19
IntroductionWhen you start the SMART Response connector for eduphoria! software, you can select andadminister assessments you previously downloaded from the eduphoria! website. During anassessment, student progress is displayed. Once you stop an assessment, you can upload theresults to the eduphoria! website for analysis and report generation. You can also view the uploadstatus of completed assessment results and resubmit results that didn’t transmit.
Chapter 3
11

I MPORTANT
Before starting your software, ensure the following:
l Your SMART Response software is correctly configured to operate with your studentclickers (seeSelecting how students answer questions on page 7).
l A SMART Response receiver is connected to an available USB interface on your computerunless you’re using SMART Response VE.
l You have an active subscription to the SchoolObjects:aware assessment managementsystem.
Starting your connector softwareFollow the instructions below to start the SMART Response connector for eduphoria! software.
g To start the software
Double-click the SMART Response connector for eduphoria! desktop icon.
TheHome screen appears. You have the option toAdminister a Test orView the Upload Status ofcompleted assessment results.
Administering an assessmentUse theAdminister a Test feature to select assessments previously downloaded to your computerfrom the eduphoria! website. You can then start an assessment and begin testing your students.Your students’ progress can bemonitored as they attempt assessment questions. Completedassessments are uploaded to the eduphoria! website for scoring.
A print-out is available showing all the students who were listed for an assessment and whichstudents actually registered by signing in with their SMART Response clicker.
I MPORTANT
Assessments and student lists are not created using the SMART Response connector foreduphoria!. All assessments and student lists are stored andmanaged from the eduphoria!website. The assignment of assessments to specific student lists is also performed on theeduphoria! website.
CHA PT ER 3
Using your connector software
12

Before you startBefore administering an assessment to your students, ensure the following:
l The assessment you’re going to administer is available on the eduphoria! website andassigned to your student class list.
l The assessment is downloaded to your computer.
l You have provided a copy of the assessment questions to your students.
l The clicker mode selected in SMART Response assessment software corresponds with thetype of clickers your students are using. See the SMART Response 2012 online Help for moreinformation on selecting clicker modes.
NOTES
The clicker mode you select in the SMART Response Setup Tool (seeSelecting howstudents answer questions on page 7) determines how questions are administered to yourstudent clickers.
o When you operate SMART Response in PE, Senteo or Mixedmode, assessmentsthat contain more than 40 questions are administered in parts.
EXAMPLE
An assessment contains a total of 50 questions and your students are usingSMART Response PE clickers to submit their responses. The question numbersdisplayed on their clickers match for the first 40 questions, but when youmove tothe second part of the assessment (final 10 questions), your students’ clickersdisplay question 1 for assessment question 41, question 2 for assessment question42, etc.
o When you select XE mode in SMART Response, assessments that contain more than100 questions are administered in parts.
o When you select VE mode in SMART Response, assessments are limited to 120questions.
CHA PT ER 3
Using your connector software
13

Starting an assessmentUse the following procedure to open and start an assessment.
I MPORTANT
Ensure that all stored assessment data is current and assigned to the appropriate student list andthat the assessment has been downloaded from the eduphoria! website.
g To open an assessment
1. Click Administer a Test on theHome screen.
TheSelect Test to Administer screen appears.
2. Click Browse.
TheOpen dialog box appears.
3. Browse to the assessment on your computer, and then click Open.
4. Click Next.
The details of your assessment appear.
NOTE
Click Select Another Test to cancel this assessment and open a different assessment.
5. Click Start Test.
The Test in Progress screen appears.
Registering studentsIn the Test in Progress screen, you can see a list of all students who are allowed to take theassessment. As students use their SMART Response clickers to register, a check mark appearsnext to their name in theConnected column. For more information on the operation ofSMART Response clickers, refer to the SMART Response 2012 online Help.
I MPORTANT
SMART Response clickers recognize numeric student IDs only. If a student list contains one ormore students with an alphanumeric ID, the SMART Response connector for eduphoria! generatesa corresponding list of temporary numeric clicker IDs. Students with an alphanumeric ID thenregister with their temporary numeric ID, which appears in an additional Clicker ID column.
CHA PT ER 3
Using your connector software
14

g To register students
1. Instruct your students to turn on their clickers, then find and connect to the class you’readministering.
NOTE
Only the first eight characters of a Test name are shown on your students’SMART Response clicker displays.
2. Students enter either theirStudent ID orClicker ID.
NOTES
o If you click the heading of each column in the Test in Progress window, you can sortstudent names by their first or last name in ascending or descending order. Click Printto print a list of students registering.
o If a student attempts to sign in using an ID that another student is already using, amessage appears indicating that he or she is unable to sign in and lets them retry.
A check mark appears in theConnected column next to each student as they register.
Running an assessmentStudents use their SMART Response clickers to submit answers to assessment questions. Forexample, your students’ clickers display 1 for question 1. Your students then use the clicker key padto enter and submit the correct answer. This is repeated for all questions until the assessment iscomplete.
The Test in Progress screen enables you tomonitor your students’ progress as they attemptassessment questions.
CHA PT ER 3
Using your connector software
15

Information available during an assessmentThis table summarizes the information available from the Test in Progress screen during anassessment.
Column Information displayed
Connected As students use their SMART Response clickers to register, a checkmark appears next to their name in theConnected column.
Last Name A student’s last name
First Name A student’s first name
Student ID The student ID of students registered for the assessment. Studentstype this ID on their clickers to register for an assessment.
Clicker ID A temporary ID students use to register if they have an alphanumericstudent ID
Answered The number of questions each student answered during anassessment
Unanswered The number of questions each student hasn’t answered during anassessment
Progress Displays your students’ progress as they attempt each part of theassessment
The time elapsed and the total number of students who have completed the assessment is displayedin the bottom-right corner of the Test in Progress screen.
Stopping an assessmentWhen your assessment is complete, you can stop the assessment.
I MPORTANT
Ensure that the assessment has been completed to your satisfaction before you stop the test.Students cannot answer skipped questions or enter further data after you have stopped theassessment.
g To stop an assessment
1. Click Stop Test in the Test in Progress window.
A message appears asking if you want to continue.
2. Click OK.
The test stops and students can no longer answer questions.
CHA PT ER 3
Using your connector software
16

3. Click Next on the Test in Progress window to upload student responses to the eduphoria!website.
TheUpload Responses screen appears.
Uploading assessment resultsYoumust upload your assessment results to the eduphoria! website to view them. You can uploadassessment results immediately after running an assessment or you can upload them later.
g To upload assessment results immediately after an assessment
1. Type your eduphoria! server address, user name and password in the appropriate boxes in theUpload Responses screen.
2. Optionally, select Remember me on this computer to have this information saved foruploading future assessments.
3. Optionally, click Proxy Settings to manually configure these settings (seeManuallyconfiguring proxy settings on the next page).
4. Click Upload Now.
TheUpload Completed screen appears once your students’ responses are successfullyuploaded.
5. Log on to the eduphoria! website to view the assessment results.
g To upload assessment results later
1. Click View Upload Status.
TheUpload Status screen appears.
2. Select the assessment you want to upload, and then click Upload.
The eduphoria! Login dialog box appears.
3. Type your eduphoria! server address, user name and password in the appropriate boxes.
4. Optionally, select Remember me on this computer to have this information saved foruploading future assessments.
5. Optionally, click Proxy Settings to manually configure these settings (seeManuallyconfiguring proxy settings on the next page).
6. Click OK.
A confirmationmessage appears once your students’ responses are successfully uploaded.
7. Log on to the eduphoria! website to view the assessment results.
CHA PT ER 3
Using your connector software
17

Manually configuring proxy settingsBy default the software is configured to automatically detect proxy settings, but you can alsomanually configure them.
I MPORTANT
Consult your system administrator before changing any proxy settings.
g To manually configure proxy server settings
1. Click Proxy Settings in theUpload Responses screen or the eduphoria! Login dialog box.
TheProxy Settings dialog box appears.
2. Select theConnect to Internet using a proxy check box.
3. SelectManually configure proxy settings.
4. Type the required proxy server information.
5. Click Apply.
Your software will now use your proxy settings to connect to the eduphoria! server.
Viewing upload statusUse theView Upload Status screen to determine the transmission status of assessment results yousubmitted to the eduphoria! website for processing. You can also delete specific assessment resultsfrom the list of submitted results.
Viewing the upload status of an assessmentUse the following procedure to view the upload status of assessment results sent to eduphoria! forprocessing.
g To view the upload status of an assessment
1. Start the SMART Response connector for eduphoria! (seeStarting your connector software onpage 12).
TheHome screen appears.
2. Click View Upload Status.
TheView Upload Status screen appears.
CHA PT ER 3
Using your connector software
18
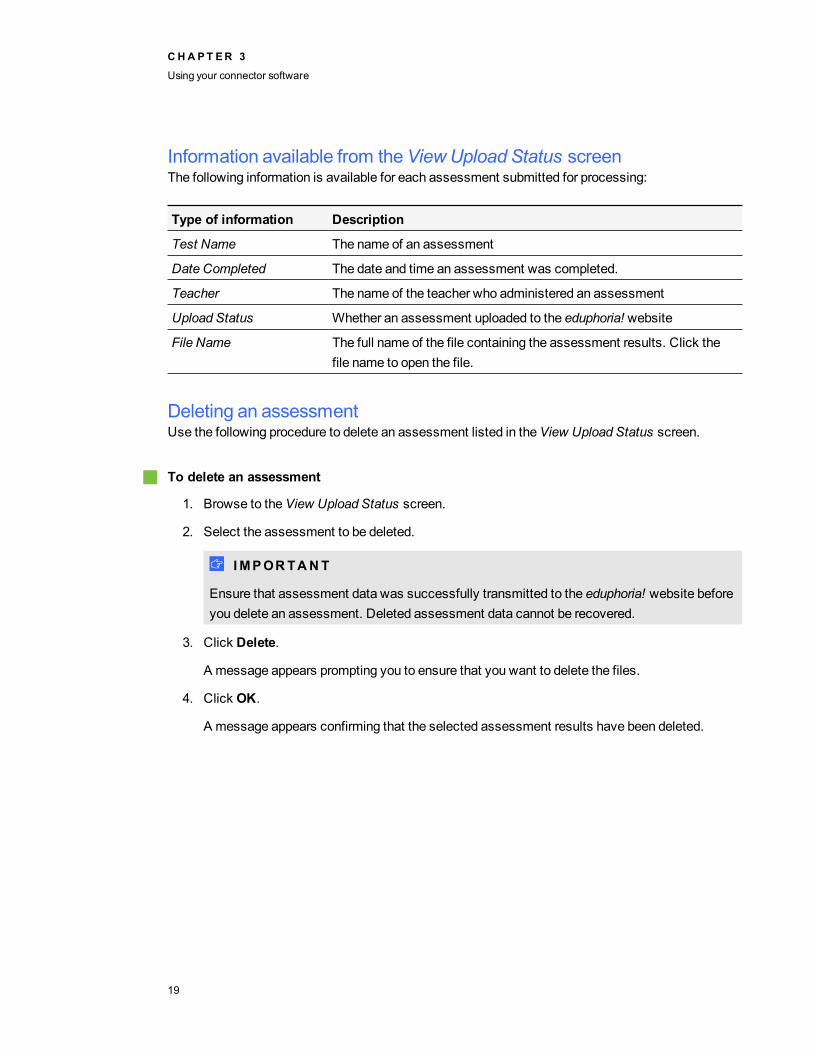
Information available from theViewUpload Status screenThe following information is available for each assessment submitted for processing:
Type of information Description
Test Name The name of an assessment
Date Completed The date and time an assessment was completed.
Teacher The name of the teacher who administered an assessment
Upload Status Whether an assessment uploaded to the eduphoria! website
File Name The full name of the file containing the assessment results. Click thefile name to open the file.
Deleting an assessmentUse the following procedure to delete an assessment listed in theView Upload Status screen.
g To delete an assessment
1. Browse to theView Upload Status screen.
2. Select the assessment to be deleted.
I MPORTANT
Ensure that assessment data was successfully transmitted to the eduphoria! website beforeyou delete an assessment. Deleted assessment data cannot be recovered.
3. Click Delete.
A message appears prompting you to ensure that you want to delete the files.
4. Click OK.
A message appears confirming that the selected assessment results have been deleted.
CHA PT ER 3
Using your connector software
19


Chapter 4: TroubleshootingThis section includes troubleshooting information.
Issue Cause Solution
You’re unable to start theconnector software.
SMART Response 2012software isn’t installed.
Install SMART Response 2012software.
Students’ clickers don’t findor connect to a class or anassessment.
You haven’t started the testyet.
Start the test.
SMART Response receiverisn’t connected to anavailable USB interface onyour computer.
Connect the SMART Responsereceiver to your computer.
The SMART Responsesystem isn’t configuredcorrectly for your students’clickers.
Close the SMART Responseconnector for eduphoria!, then selectthe appropriate SMART Responsemode for your students’ clickers.See your SMART Response 2012user’s guide or online Help.
There’s an issue with yourcomputer’s Internetconnection.
See your system administrator.
Chapter 4
21

Issue Cause SolutionYou’re unable to log on to theeduphoria! server.
There’s an issue with yourcomputer’s Internetconnection.
See your system administrator.
Your computer or network isprotected by a firewall orproxy.
See your system administrator.
Your eduphoria! login detailsare incorrect.
Confirm eduphoria! login details andretry.
Your network configurationrequires that your computeruse a proxy server toconnect to the eduphoria!server.
Enable or check theSMART Response connector foreduphoria! proxy setting (seeManuallyconfiguring proxy settings on page 18).
You’re unexpectedlyprompted to close the theSMART Responseconnector for eduphoria!.
Your SMART Responsereceiver is disconnectedfrom your computer.
Close the connector. Reconnect yourSMART Response receiver and thenrestart the assessment that wasrunning when the SMART Responseconnector for eduphoria! closed.
Your computer lost Internetconnectivity.
Re-establish your computer’s Internetconnectivity, and then restart theassessment that was running whenthe SMART Response connector foreduphoria! closed.
CHA PT ER 4
Troubleshooting
22

Issue Cause SolutionAssessment results don’tupload successfully to theeduphoria! website.
There’s an issue with yourcomputer’s Internetconnection.
See your system administrator.
Your eduphoria! login detailsare incorrect.
Confirm eduphoria! login details andretry.
The question numbers onyour students’SMART Response clickerdisplays don’t match theequivalent assessmentquestion number.
The assessment question’snumber exceeds themaximum value that can bedisplayed on your students’SMART Response clickers.
See the information about multi-partassessments in the Note inBefore youstart on page 13.
An “Unable to start question”message appears and you’reunable to start anassessment.
The SMART Responsemode selected isn’tappropriate for yourstudents’ clickers.
SeeSelecting how students answerquestions on page 7 for information onselecting the appropriate SMARTResponsemode for your students’clickers.
An “Unsupported questions”message appears and you’reunable to start anassessment.
The SMART Responsemode you’re using doesn’tsupport one or more questionformats used in yourassessment.
SeeAssessment formatconsiderations on page 7 to find outwhich question formats eachSMART Responsemode supports,and then use one of the followingoptions:
l Log onto the eduphoria! websiteand then remove theunsupported questions from theassessment.
l Use the SMART Response SetUp Tool to change your mode,and then try again (see yourSMART Response system’sonline Help for moreinformation).
CHA PT ER 4
Troubleshooting
23


SMART Technologies
smarttech.com/support
smarttech.com/contactsupport