Embed Size (px)
Citation preview

GLOBAL CONSTRUCTION SOFTWARE AND SERVICES
Version: 2019.0
CONFIGURATION USER GUIDE

Configuration user guide
Copyright 2017 © Computer and Design Services Limited
Contents Introduction ............................................................................................................................................ 1 Create a new project ............................................................................................................................... 2
Open the configuration ........................................................................................................................... 3 Create a new scaffolding system configuration ...................................................................................... 4
Changing the view ................................................................................................................................... 5
Configure your scaffolding components ................................................................................................. 6 Configure the available sizes ............................................................................................................... 6
Set the component names .................................................................................................................. 7 Set the component product codes ..................................................................................................... 8
Set the component weight ................................................................................................................. 9 Configure your component prices ........................................................................................................ 10
Set which components will be sold ................................................................................................... 11 Set the stock value ............................................................................................................................ 12
Set the hire and extra hire prices ...................................................................................................... 13
Set the Pricing Method ..................................................................................................................... 14 Finding components ............................................................................................................................. 15
Sorting the list of components .......................................................................................................... 15 Show and hide component groups ............................................................................................... 15
Sort the components .................................................................................................................... 16 Search for a component .................................................................................................................... 16
Set the display name for your scaffolding system ................................................................................ 17
Remove a scaffolding system configuration ......................................................................................... 18 Create scaffolds using your new system ............................................................................................... 18
Advanced configuration ........................................................................................................................ 19 Configuring preferred roles .............................................................................................................. 19
Feedback ............................................................................................................................................... 23

Configuration user guide
1 Copyright 2017 © Computer and Design Services Limited
Introduction Thank you for choosing SMART Estimator.
The SMART Scaffolder Configuration is used to set the which scaffolding components are available to be used for your scaffolding projects.
From the configuration you can create new scaffolding systems, set the available bay sizes, control how every component will be priced and set the weight of every scaffolding component. You can also set how each component will be used. All of this information is used throughout the SMART Scaffolder suite, so the 3D model, price, quote, material list and drawings all meet your business needs.

Configuration user guide
2 Copyright 2017 © Computer and Design Services Limited
Create a new project
When you first launch the application, you will see the New screen. You can also open this screen by pressing the File menu button and selecting the New option.
To create a new project, press New Enterprise Server Project.
New Enterprise Server Project (Recommended) New Project
This option unlocks additional functionality later. Using this option is recommended.
Use this option only if the server is not available, or if you are testing.
You are given a chance to select the Customer Address and Site Address for this new project. It is recommended that you enter the Customer Address now, if you know it. This will appear on the quotation (if you have Quote IT). If you know the Site Address please enter it now as well. This will be used for pricing transport, importing a site satellite photo and for the TG20 check (if you have Price IT, BIM Toolbox or Check IT TG20:13).
Press Create Project to create the project file.
If you entered a new address, you will be asked if you want to save it.
Please read the Getting Started Guide first. It will help you customise SMART Estimator before continuing to read this guide.

Configuration user guide
3 Copyright 2017 © Computer and Design Services Limited
Open the configuration To view all of the scaffolding components available, select the Configuration tab.
If you can’t see the Configuration tab, please close the File menu first, by selecting the Back arrow.

Configuration user guide
4 Copyright 2017 © Computer and Design Services Limited
Create a new scaffolding system configuration The first thing we will do is create a new configuration. To do this, select the Save Configuration menu:
In the New box at the bottom, type the name of your new configuration. You can use any name you like, but for this example, we will use “My System”.
Now press the Save button to create your new configuration.
If you are connected to the SMART Scaffolder Enterprise Server, you will get a message similar to this:
If so, select Yes to continue.
You can check that your new configuration has been created by pressing the Select Configuration menu:
You have successfully copied the existing configuration with a new name, so we can start making changes.
Depending on the scaffolding systems you have licenced, the options in this list may appear different for you.
Configuration user guide
5 Copyright 2017 © Computer and Design Services Limited
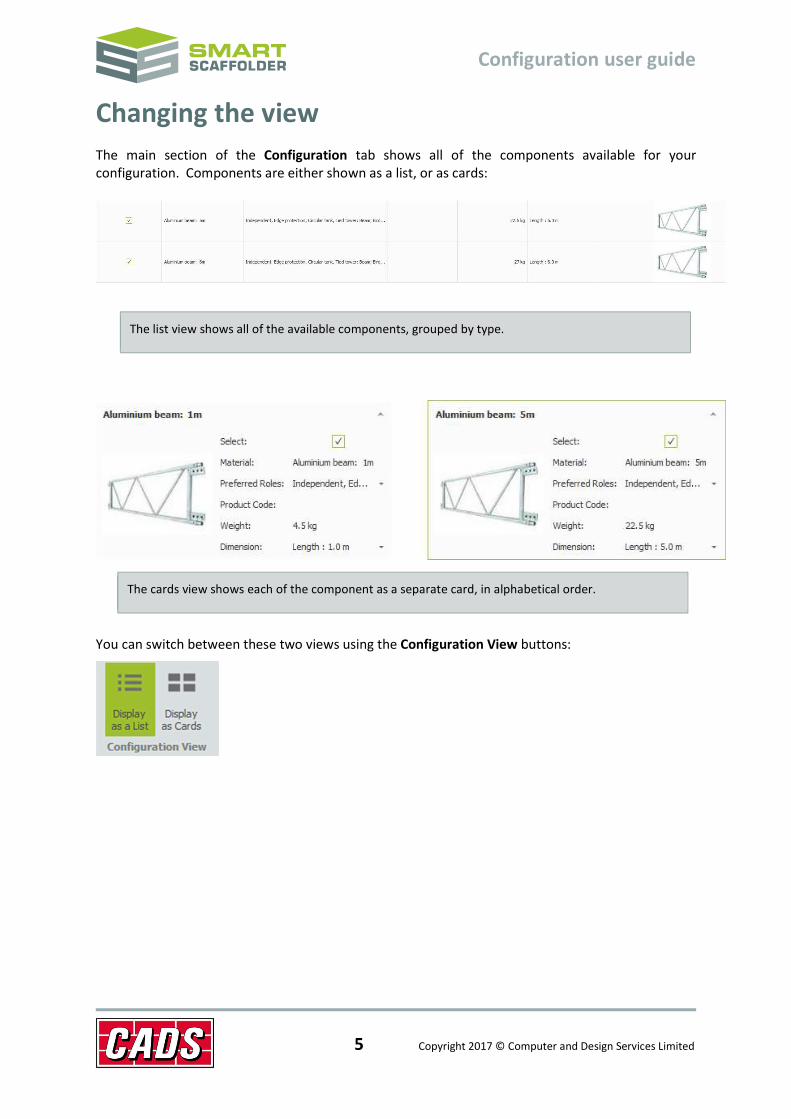
Changing the view The main section of the Configuration tab shows all of the components available for your configuration. Components are either shown as a list, or as cards:
You can switch between these two views using the Configuration View buttons:
The cards view shows each of the component as a separate card, in alphabetical order.
The list view shows all of the available components, grouped by type.

Configuration user guide
6 Copyright 2017 © Computer and Design Services Limited
Configure your scaffolding components The following can be set from the Show Details view in the Configuration tab. To select the Show Details view, please select the Show Details button in the top left corner of the Ribbon.
Depending on your available licences, these buttons may be hidden. If they are, you are in the Show Details view already.
Configure the available sizes You can select components by checking the checkbox in the Select column or card row.
SMART Scaffolder will create scaffolds using only components which are selected in the configuration.
It is possible to select too few components, so that SMART Scaffolder cannot create scaffolds at all!
Please make sure that you always have a minimum of one of each component type selected that you might wish to use when scaffolding.
Configuration user guide
7 Copyright 2017 © Computer and Design Services Limited
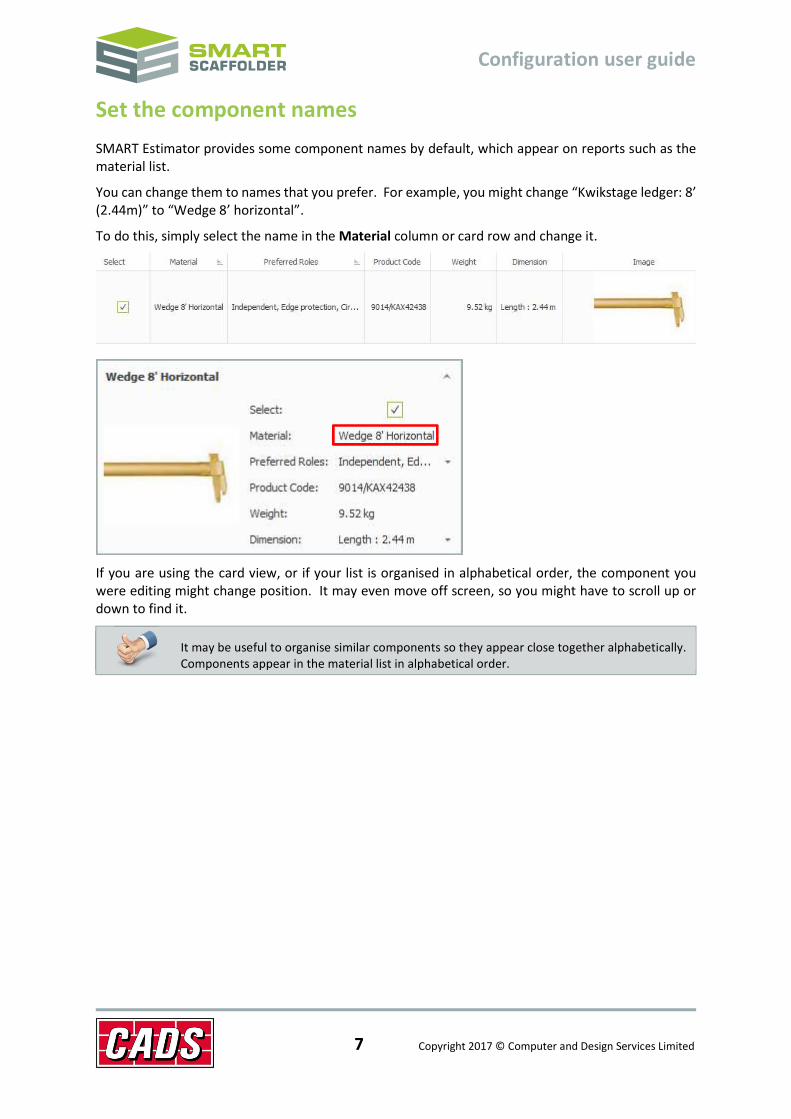
Set the component names SMART Estimator provides some component names by default, which appear on reports such as the material list.
You can change them to names that you prefer. For example, you might change “Kwikstage ledger: 8’ (2.44m)” to “Wedge 8’ horizontal”.
To do this, simply select the name in the Material column or card row and change it.
If you are using the card view, or if your list is organised in alphabetical order, the component you were editing might change position. It may even move off screen, so you might have to scroll up or down to find it.
It may be useful to organise similar components so they appear close together alphabetically. Components appear in the material list in alphabetical order.

Configuration user guide
8 Copyright 2017 © Computer and Design Services Limited
Set the component product codes Some components have product codes, which appear on reports such as the material list. These are generally taken from the manufacturer’s guides, at the time that component was added to SMART Scaffolder.
If you want to add or change a component’s product code, simply select the Product Code in the column or card row and change it. It is usually a good idea to keep the product code quite short. Long product codes may affect the layout of the material list report.
If you are in the list view, with the list organised by product code, the component you were editing might change position. It may even move off screen, so you might have to scroll up or down to find it.

Configuration user guide
9 Copyright 2017 © Computer and Design Services Limited
Set the component weight Every component has a weight, which appears in reports such as the material list. It can also be used for pricing the materials or transport.
If you want to change a component’s weight, simply select the Weight in the column or card row and change it. It is not usually a good idea to set the weight to 0, since any component will have a significant weight if there are enough of them in the list.
If you are in the list view, with the list organised by weight, the component you were editing might change position. It may even move off screen, so you might have to scroll up or down to find it.

Configuration user guide
10 Copyright 2017 © Computer and Design Services Limited
Configure your component prices The following can be set from the Show Pricing view in the Configuration tab. To select the Show Pricing view, please select the Show Pricing button in the top left corner of the Ribbon.
You can only set pricing if you have the Cost Analysis module licenced on your hardware key. If you do not have this licence, the buttons above will be hidden. In this case, please skip this section.
If you do not have permission to access the pricing view, you will see an error message when you press the Show Pricing button.
Please see your own IT team to gain the required permissions.

Configuration user guide
11 Copyright 2017 © Computer and Design Services Limited
Set which components will be sold There are two ways of pricing components in SMART Scaffolder:
Sale Item
Some components, such as plastic sheeting, may not be returned in a condition where they can be used again for the next scaffolding project. Such components are usually sold, rather than hired out.
Hire Item
Unless you are selling the scaffold to your client, most components will be hire components. This means that a set weekly rate is charged over the hire period, and the components are returned to you at the end of the project.
To set whether a component is a Sale Item or Hire Item, set the Sale Item column or card row.

Configuration user guide
12 Copyright 2017 © Computer and Design Services Limited
Set the stock value For scaffold components which are Sale Items (see the Set which components will be sold section above), the Stock Value can be set. This is the base value that the scaffolding component will be sold for, before any modifications are applied in Cost Analysis.
To change the Stock Value, select the Stock Value list column or card row, and change it. If you cannot select the Stock Value, please ensure that this component is set as a Sale Item.
Please note that this value is linked to the Pricing Method. Please see the Set the Pricing Method section below.
Configuration user guide
13 Copyright 2017 © Computer and Design Services Limited
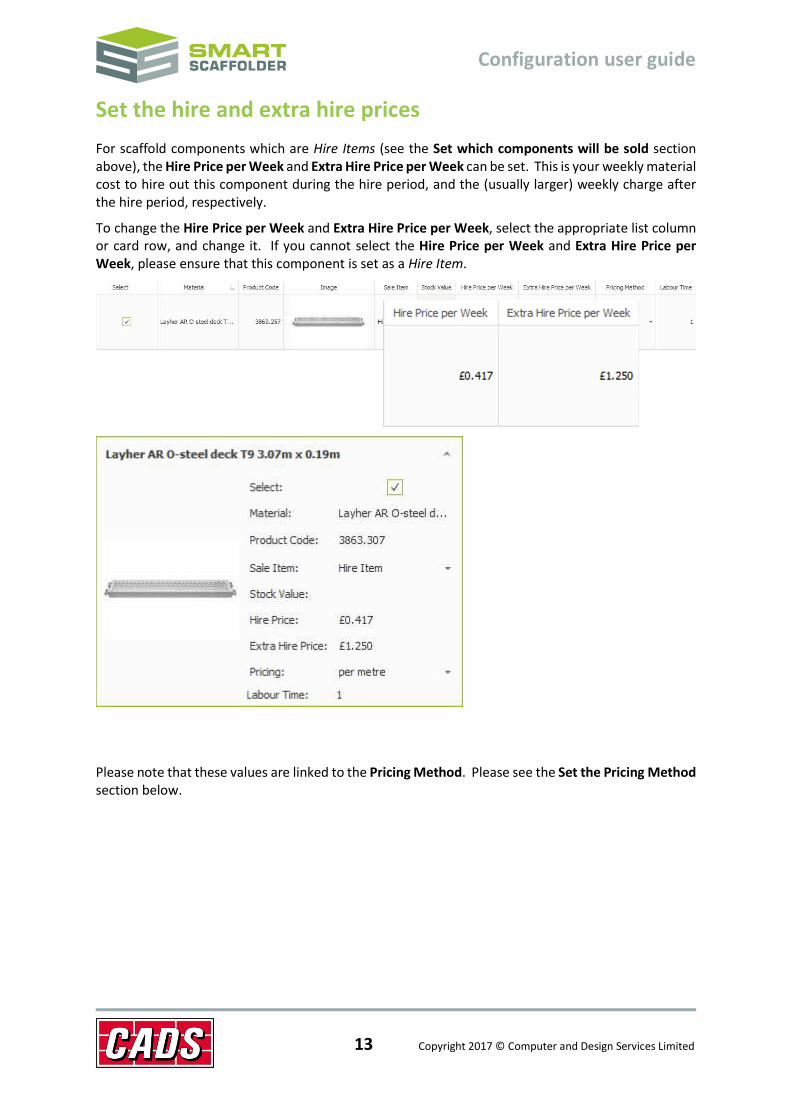
Set the hire and extra hire prices For scaffold components which are Hire Items (see the Set which components will be sold section above), the Hire Price per Week and Extra Hire Price per Week can be set. This is your weekly material cost to hire out this component during the hire period, and the (usually larger) weekly charge after the hire period, respectively.
To change the Hire Price per Week and Extra Hire Price per Week, select the appropriate list column or card row, and change it. If you cannot select the Hire Price per Week and Extra Hire Price per Week, please ensure that this component is set as a Hire Item.
Please note that these values are linked to the Pricing Method. Please see the Set the Pricing Method section below.
Configuration user guide
14 Copyright 2017 © Computer and Design Services Limited
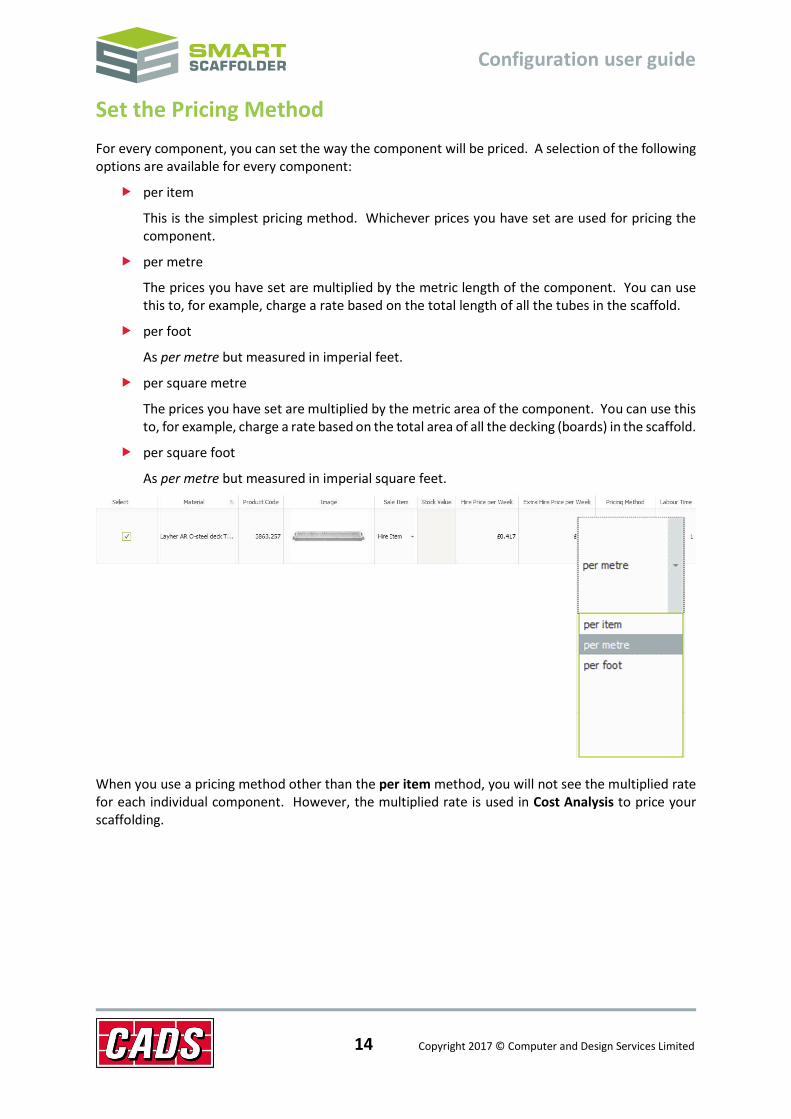
Set the Pricing Method For every component, you can set the way the component will be priced. A selection of the following options are available for every component:
per item
This is the simplest pricing method. Whichever prices you have set are used for pricing the component.
per metre
The prices you have set are multiplied by the metric length of the component. You can use this to, for example, charge a rate based on the total length of all the tubes in the scaffold.
per foot
As per metre but measured in imperial feet.
per square metre
The prices you have set are multiplied by the metric area of the component. You can use this to, for example, charge a rate based on the total area of all the decking (boards) in the scaffold.
per square foot
As per metre but measured in imperial square feet.
When you use a pricing method other than the per item method, you will not see the multiplied rate for each individual component. However, the multiplied rate is used in Cost Analysis to price your scaffolding.

Configuration user guide
15 Copyright 2017 © Computer and Design Services Limited
Finding components Each component has some sizes, which are shown in the Dimension list column or card row.
These can’t be changed, but you can use this to check whether the component sizes you use are available in the configuration.
Sorting the list of components
Show and hide component groups The list of components is automatically grouped into similar types of components, such as tubes, decking, brackets, etc.
You can hide the components in a group by clicking on the arrow to shrink the group. Click the arrow again to show the components in the group.

Configuration user guide
16 Copyright 2017 © Computer and Design Services Limited
Sort the components You can sort the list of components, to make it easier to find the right ones. To sort the list using a column, click on that column header bar. A small symbol appears on the right side on the column header, to show that it is being used for sorting. The list is sorted into ascending order, based on the column you selected. To sort in descending order instead, click the column header again.
Search for a component It is possible to search the component list, using the search bar. To show the search bar press the Ctrl and the F key at the same time.
If the search bar does not appear when you press Ctrl + F, try clicking in the grid and press the keys again. The image column is a good one to click on.

Configuration user guide
17 Copyright 2017 © Computer and Design Services Limited
Set the display name for your scaffolding system The Display Name for your configuration is the name which will appear in the quotation (if you have Quote IT).
Multiple configurations with the same display name are grouped together in the selection menus. Configurations with different display names are shown separately.
Configurations with the same Display Name are grouped together in the menu.
Configurations with different Display Names are listed separately.

Configuration user guide
18 Copyright 2017 © Computer and Design Services Limited
Remove a scaffolding system configuration You may decide that some of your scaffolding system configurations are no longer required.
To remove a configuration, select it from the Delete Configuration drop-down menu.
Create scaffolds using your new system If you have the Reporting or Modelling licences, you will be able to see and use your new configurations from the Change Scaffolding System menu.
It is not possible to remove the last configuration for a single type of scaffolding. For example, it is not possible to remove the only remaining ring-type scaffolding configuration.
A scaffold built with the Cuplok system.
An equivalent tube-and-fitting scaffold.
Configuration user guide
19 Copyright 2017 © Computer and Design Services Limited
Advanced configuration This section describes some advanced settings. These should only be used by expert users. When these settings are set incorrectly, components will be used incorrectly or missed from the scaffolding.
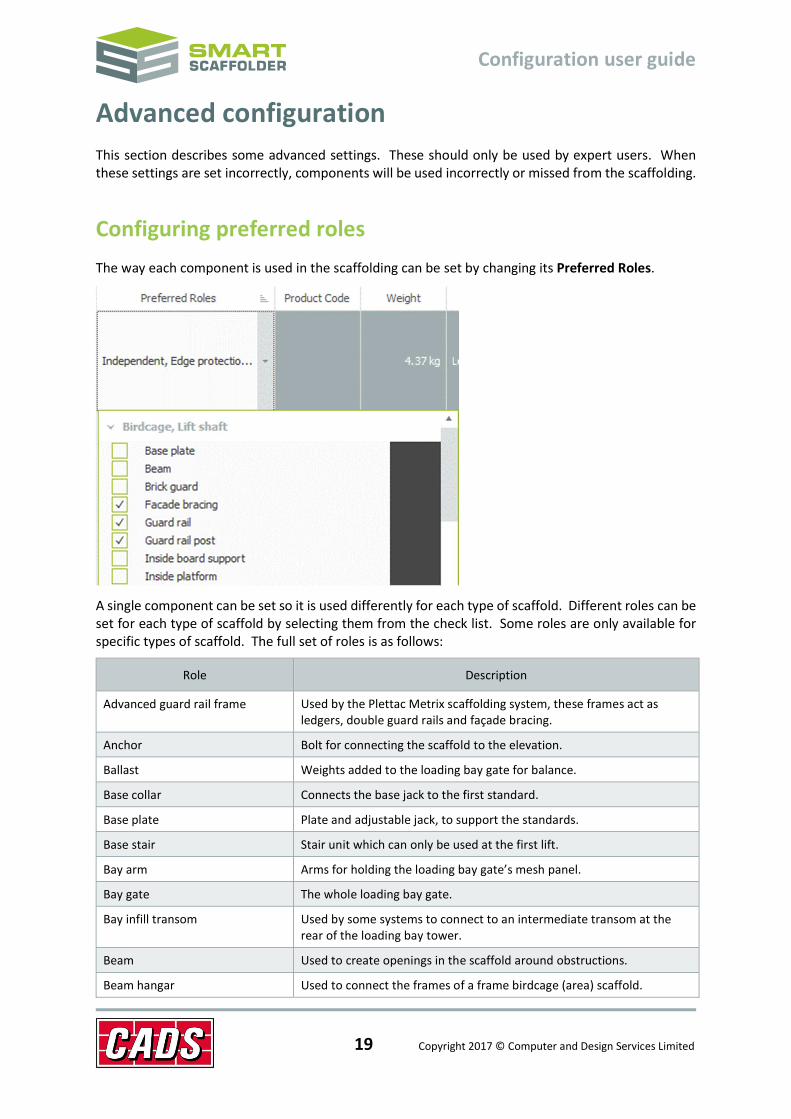
Configuring preferred roles The way each component is used in the scaffolding can be set by changing its Preferred Roles.
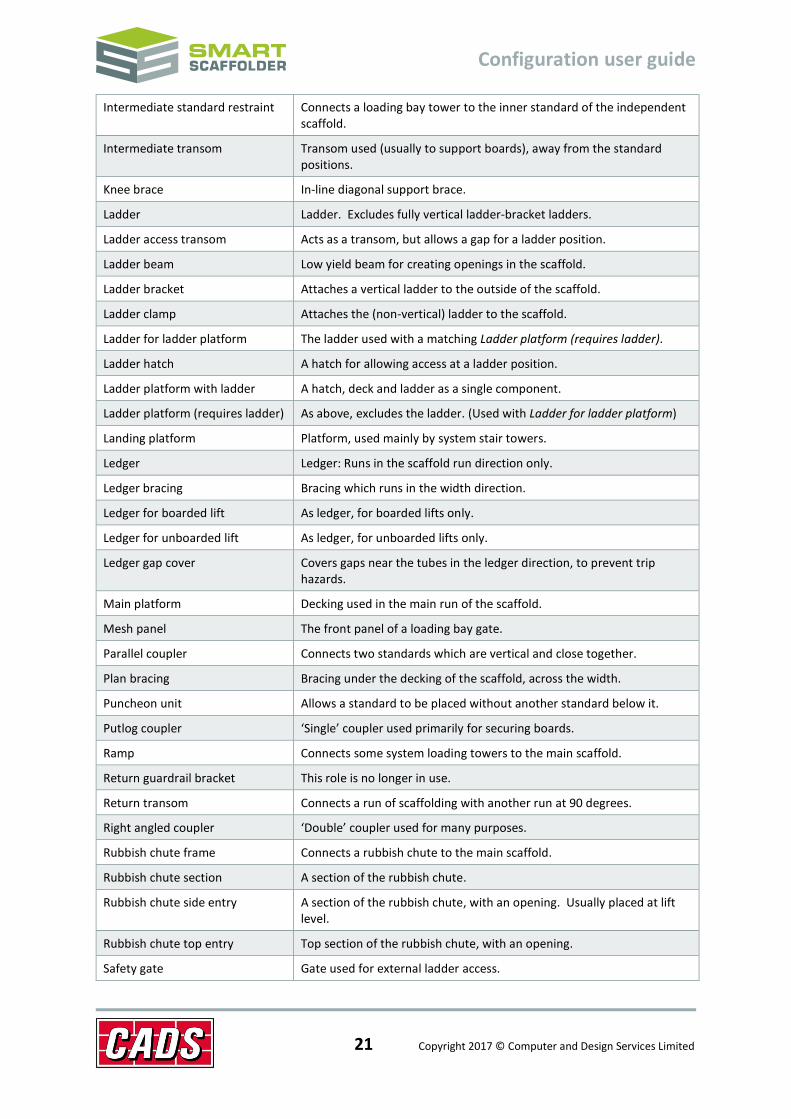
A single component can be set so it is used differently for each type of scaffold. Different roles can be set for each type of scaffold by selecting them from the check list. Some roles are only available for specific types of scaffold. The full set of roles is as follows:
Role Description
Advanced guard rail frame Used by the Plettac Metrix scaffolding system, these frames act as ledgers, double guard rails and façade bracing.
Anchor Bolt for connecting the scaffold to the elevation.
Ballast Weights added to the loading bay gate for balance.
Base collar Connects the base jack to the first standard.
Base plate Plate and adjustable jack, to support the standards.
Base stair Stair unit which can only be used at the first lift.
Bay arm Arms for holding the loading bay gate’s mesh panel.
Bay gate The whole loading bay gate.
Bay infill transom Used by some systems to connect to an intermediate transom at the rear of the loading bay tower.
Beam Used to create openings in the scaffold around obstructions.
Beam hangar Used to connect the frames of a frame birdcage (area) scaffold.

Configuration user guide
20 Copyright 2017 © Computer and Design Services Limited
Beam rider Clips onto the beam to makes 90 degree connections.
Board clamp Holds down the decking boards.
Bracing guardrail Used by the Turner OCTO scaffolding system, these beams act as guardrails, foot lift ledgers and façade bracing.
Bracket brace Supports inside platforms.
Brick guard Mesh panel cladding.
Castor Castors used for moving small scaffolds.
Cladding Used for enclosing the scaffold.
Corner filler Decking platform connected to a single standard at an inside corner.
Corrugated sheet Corrugated sheeting used by cantilever fans.
Cross brace Cross bracing used to connect the frames of a frame scaffold.
Diagonal corner filler Decking platform connected to two standards at an inside corner.
Double beam rider As beam rider, but allows connections to two lifts.
End frame Used to create the final frame of a frame scaffold run. Usually used in place of a ladder.
End standard Standard which has a shortened top, to prevent creating a trip hazard at the top level.
End toe board clip As toe board clip, but used at the end of a scaffold run only.
Entrance step A step up onto the first lift of a stair tower.
Façade bracing Diagonal bracing around the outer face of the scaffolding.
Fan bracket Supports a cantilever fan.
Footlift guardrail A special guardrail used by some system stair towers at the first lift only.
Gate arm Arms for holding the loading bay gate’s mesh panel.
Guard rail Guard rail.
Guard rail frame Frame to create double guard rails.
Guard rail post Supports the guardrail. Usually used with an attached stair tower.
Handrail post Supports the inner guardrails. Usually used with a stair tower.
H-Frame Acts as two standards plus a transom connecting the two.
Hoist Hoist or gin wheel and rope.
Horizontal end coupler Connects two tubes horizontally. Sometimes known as a sleeve coupler.
Inside board bay transom A transom which includes a cut-out, so it can support both the main boards and inside boards at the standard position.
Inside board support Transom which only supports inside boards.
Inside board transom Transom which supports the main platform and inside boards.
Inside platform Decking used for inside boards.
Inside platform tie Connects multiple cantilever (hop-up) brackets together to act as an inside ledger.
Intermediate standard Connects two lifts vertically by hanging in the air between them.
Configuration user guide
21 Copyright 2017 © Computer and Design Services Limited
Intermediate standard restraint Connects a loading bay tower to the inner standard of the independent scaffold.
Intermediate transom Transom used (usually to support boards), away from the standard positions.
Knee brace In-line diagonal support brace.
Ladder Ladder. Excludes fully vertical ladder-bracket ladders.
Ladder access transom Acts as a transom, but allows a gap for a ladder position.
Ladder beam Low yield beam for creating openings in the scaffold.
Ladder bracket Attaches a vertical ladder to the outside of the scaffold.
Ladder clamp Attaches the (non-vertical) ladder to the scaffold.
Ladder for ladder platform The ladder used with a matching Ladder platform (requires ladder).
Ladder hatch A hatch for allowing access at a ladder position.
Ladder platform with ladder A hatch, deck and ladder as a single component.
Ladder platform (requires ladder) As above, excludes the ladder. (Used with Ladder for ladder platform)
Landing platform Platform, used mainly by system stair towers.
Ledger Ledger: Runs in the scaffold run direction only.
Ledger bracing Bracing which runs in the width direction.
Ledger for boarded lift As ledger, for boarded lifts only.
Ledger for unboarded lift As ledger, for unboarded lifts only.
Ledger gap cover Covers gaps near the tubes in the ledger direction, to prevent trip hazards.
Main platform Decking used in the main run of the scaffold.
Mesh panel The front panel of a loading bay gate.
Parallel coupler Connects two standards which are vertical and close together.
Plan bracing Bracing under the decking of the scaffold, across the width.
Puncheon unit Allows a standard to be placed without another standard below it.
Putlog coupler ‘Single’ coupler used primarily for securing boards.
Ramp Connects some system loading towers to the main scaffold.
Return guardrail bracket This role is no longer in use.
Return transom Connects a run of scaffolding with another run at 90 degrees.
Right angled coupler ‘Double’ coupler used for many purposes.
Rubbish chute frame Connects a rubbish chute to the main scaffold.
Rubbish chute section A section of the rubbish chute.
Rubbish chute side entry A section of the rubbish chute, with an opening. Usually placed at lift level.
Rubbish chute top entry Top section of the rubbish chute, with an opening.
Safety gate Gate used for external ladder access.

Configuration user guide
22 Copyright 2017 © Computer and Design Services Limited
Safety gate guardrail post Post for connecting the safety gate.
Safety lamp Safety light.
Safety tape High visibility tape, foam or sleeve.
Sole board A board placed under multiple standards to spread the loading.
Sliding bracket Cantilever platform bracket used away from the standard positions.
Spacer bar Reinforces the connection between two frame scaffolding frames.
Staircase handrail Outer handrails for a system stair tower.
Staircase inner handrail Inner handrails for a system stair tower.
Staircase unit Includes the steps and stringers for a system stair tower.
Stairway starter bar Used for the first lift connection of a frame scaffolding stair tower.
Standard Vertical leg of the scaffold.
Standard frame Basic frame of a frame scaffold. Usually includes a built-in ladder.
Swivel coupler As double coupler, but for non-90-degree connections.
Tie tube Used to create the connection between the scaffold and the elevation, together with the anchor.
Timber batten shoe Allows a basic board to act as a system deck for some scaffolding systems.
Toe board Vertical edge protection decking.
Toe board clip Connects the toe board to the scaffold.
Top guardrail A special guardrail used at the top lift for some system stair towers.
Transom for boarded lift As ledger, but runs in the width direction of the scaffold, at boarded lifts only.
Transom for unboarded lift As ledger, but runs in the width direction of the scaffold, at unboarded lifts only.
Transom gap cover Covers gaps near the tubes in the transom direction, to prevent trip hazards.
Vertical end coupler Connects two tubes vertically. Sometimes known as a sleeve coupler.
Vertical ladder Fully vertical ladder, not legal in all countries.
Walk-thru frame A Frame Scaffolding frame with space to allow access along the lift.
Wing bracing As plan bracing, but external. Used primarily for attached tower scaffolds.

Configuration user guide
23 Copyright 2017 © Computer and Design Services Limited
Feedback Thank you for choosing SMART Estimator.
We are always striving to improve the product so please contact us with your feedback. We are always keen to hear new ideas and if you experience any problems with the software we want to hear about them so that they can be resolved.
You can contact us via:
Our website support centre at www.smartscaffolder.com/support.html;
Email on [email protected];
Telephone on +44 (0)1202 603733 from Monday to Friday between 09:30 and 17:00.