Embed Size (px)
Citation preview

USER'S MANUALSiemensEnergy & Automation
UMSITRPDS3-1 Rev. 4 September 2004 Supersedes Rev. 3
SITRANS P, Series DSIII Transmitter for
Pressure, Differential Pressure, Flanged Level, and Absolute Pressure
Model 7MF4*33-...
IMPORTANT
MODEL 275 HART COMMUNICATOR AND
MODEL 375 FIELD COMMUNICATOR Many procedures, screens, and wiring diagrams shown in this manual feature the Model 275 HART Communicator. The Model 375 Field Communicator is now available. Procedures and screens are similar to those for the Model 275, however, there are significant differences and an online Configuration Map for use with the Model 375 is provided at the back of this manual. Transmitter model and firmware version can affect the displays, display options, and Configuration Maps. Whether using the Model 275 or the Model 375, be sure to read the manual supplied by the manufacturer before installing or using the device. Refer to the devices nameplate for hazardous are certifications and approvals and other important information.
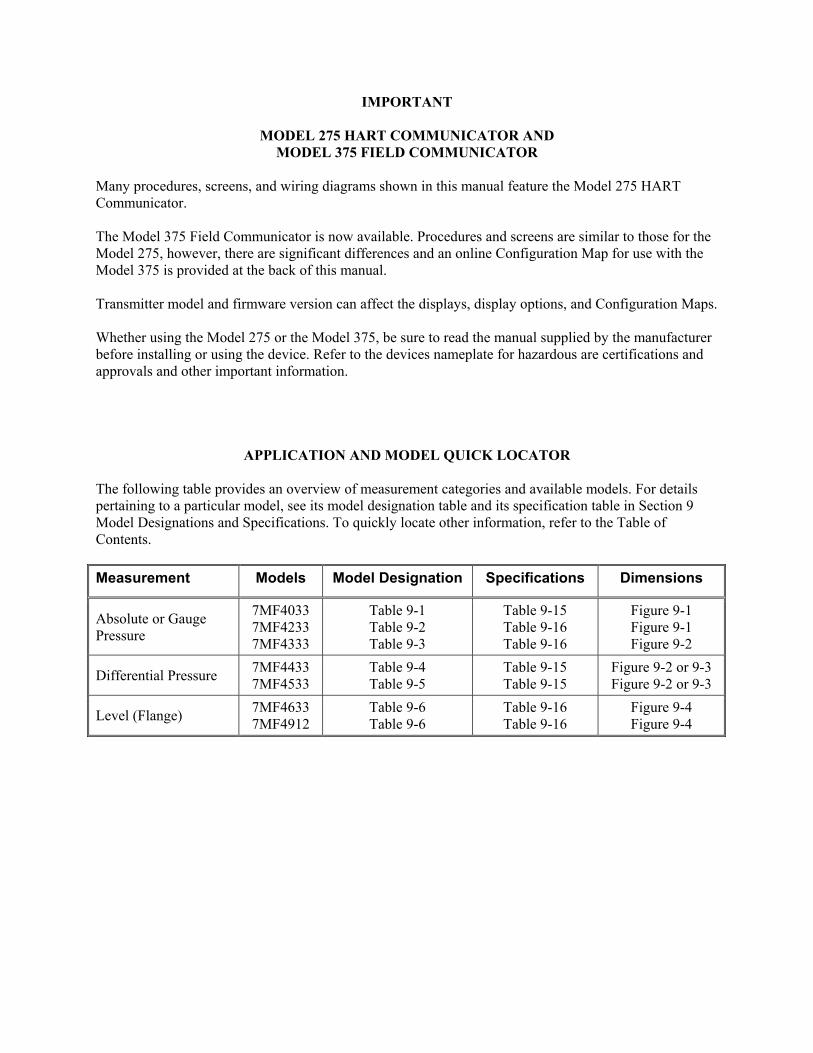
APPLICATION AND MODEL QUICK LOCATOR The following table provides an overview of measurement categories and available models. For details pertaining to a particular model, see its model designation table and its specification table in Section 9 Model Designations and Specifications. To quickly locate other information, refer to the Table of Contents. Measurement Models Model Designation Specifications Dimensions
Absolute or Gauge Pressure
7MF4033 7MF4233 7MF4333
Table 9-1 Table 9-2 Table 9-3
Table 9-15 Table 9-16 Table 9-16
Figure 9-1 Figure 9-1 Figure 9-2
Differential Pressure 7MF4433 7MF4533
Table 9-4 Table 9-5
Table 9-15 Table 9-15
Figure 9-2 or 9-3 Figure 9-2 or 9-3
Level (Flange) 7MF4633 7MF4912
Table 9-6 Table 9-6
Table 9-16 Table 9-16
Figure 9-4 Figure 9-4

UMSITRPDS3-1 Contents
September 2004 i
TABLE OF CONTENTS SECTION AND TITLE PAGE
1.0 INTRODUCTION.............................................................................................................................1-1 1.1 CONTENTS ...................................................................................................................................1-1 1.2 PRODUCT DESCRIPTION...........................................................................................................1-2 1.3 RATING, APPROVAL, AND TAG PLATES...............................................................................1-9 1.4 CONFIGURATION .......................................................................................................................1-9 1.5 PRODUCT SUPPORT .................................................................................................................1-10
2.0 MODEL 275 UNIVERSAL HART COMMUNICATOR .............................................................2-1 2.1 INTRODUCTION ..........................................................................................................................2-1 2.2 COMMUNICATOR CONNECTIONS..........................................................................................2-1 2.3 CONTROLS OVERVIEW.............................................................................................................2-4
2.3.1 Liquid Crystal Display ...........................................................................................................2-4 2.3.2 Software-Defined Function Keys ...........................................................................................2-4 2.3.3 Action Keys ............................................................................................................................2-6 2.3.4 Alphanumeric and Shift Keys.................................................................................................2-7
2.3.4.1 Rapid Selection of Menu Options ..................................................................................2-7 2.3.4.2 Data Entry ......................................................................................................................2-7
2.4 GETTING TO KNOW THE COMMUNICATOR ........................................................................2-8 2.4.1 Display Icons ..........................................................................................................................2-8 2.4.2 Menu Structure .......................................................................................................................2-9 2.4.3 Reviewing Installed Devices ..................................................................................................2-9
2.5 MAIN MENU...............................................................................................................................2-11 2.5.1 Offline Menu ........................................................................................................................2-12
2.5.1.1 New Configuration .......................................................................................................2-13 2.5.1.2 Saved Configuration.....................................................................................................2-16
2.5.2 Online Menu.........................................................................................................................2-18 2.5.3 Frequency Device Menu.......................................................................................................2-21 2.5.4 Utility Menu .........................................................................................................................2-21
2.5.4.1 Configure Communicator.............................................................................................2-21 2.5.4.2 System Information ......................................................................................................2-22 2.5.4.3 Listen for PC ................................................................................................................2-22 2.5.4.4 Storage Location ..........................................................................................................2-22 2.5.4.5 Simulation ....................................................................................................................2-22 2.5.4.6 Selftest ..........................................................................................................................2-22
2.6 USING THE QUICK ACCESS KEY ..........................................................................................2-23 2.6.1 Adding Quick Access Key Options......................................................................................2-24 2.6.2 Deleting Quick Access Key Options ....................................................................................2-25
3.0 PRE-INSTALLATION TEST .........................................................................................................3-1 3.1 PROCEDURE.................................................................................................................................3-1
3.1.1 Test Equipment.......................................................................................................................3-2 3.2 ESTABLISHING COMMUNICATION........................................................................................3-3 3.3 TESTING THE TRANSMITTER ..................................................................................................3-3 3.4 REVIEWING CONFIGURATION DATA....................................................................................3-4 3.5 CHECKING TRANSMITTER OUTPUT ......................................................................................3-4
4.0 INSTALLATION..............................................................................................................................4-1 4.1 EQUIPMENT DELIVERY AND HANDLING.............................................................................4-1

Contents UMSITRPDS3-1
September 2004 ii
4.1.1 Receipt of Shipment ...............................................................................................................4-1 4.1.2 Storage....................................................................................................................................4-1
4.2 ENVIRONMENTAL CONSIDERATIONS ..................................................................................4-2 4.3 PRE-INSTALLATION CONSIDERATIONS AND CALCULATIONS......................................4-2
4.3.1 Mechanical .............................................................................................................................4-2 4.3.2 Electrical.................................................................................................................................4-3 4.3.3 Impulse Piping for Absolute and Differential Models ...........................................................4-4 4.3.4 Transmitter Operating Mode and Network Type .................................................................4-10
4.3.4.1 Analog Mode................................................................................................................4-10 4.3.4.2 Digital Mode ................................................................................................................4-14
4.3.5 Power Supply Requirements ................................................................................................4-14 4.3.5.1 Point-to-Point Network ................................................................................................4-16 4.3.5.2 Multi-Drop Network.....................................................................................................4-16
4.3.6 Determining Network (Loop) Length...................................................................................4-17 4.3.6.1 Cable Capacitance ........................................................................................................4-17 4.3.6.2 Maximum Cable Length Calculation ...........................................................................4-17
4.3.7 Network Junctions ................................................................................................................4-18 4.3.8 Safety Barriers ......................................................................................................................4-19 4.3.9 Connection of Miscellaneous Hardware...............................................................................4-19 4.3.10 Shielding and Grounding....................................................................................................4-20
4.4 MECHANICAL INSTALLATION..............................................................................................4-21 4.4.1 Pipe Mounting, Differential and Gauge Construction..........................................................4-21 4.4.2 Direct Mounting to Process, Model 7MF4433 or 7MF4533................................................4-23 4.4.3 Flange Mounting, Model 7MF4633/7MF4912.....................................................................4-24
4.5 MECHANICAL INSTALLATION, ALL MODELS...................................................................4-26 4.5.1 Enclosure Rotation ...............................................................................................................4-26 4.5.2 Display Orientation ..............................................................................................................4-27 4.5.3 Electrical Conduit and Cable Installation .............................................................................4-28
4.5.3.1 Conduit .........................................................................................................................4-28 4.5.3.2 Cables ...........................................................................................................................4-29 4.5.3.3 Access to Transmitter Terminal Compartment ............................................................4-29
4.6 ELECTRICAL INSTALLATION................................................................................................4-30 4.7 HAZARDOUS AREA INSTALLATION....................................................................................4-32
5.0 POST-INSTALLATION TEST.......................................................................................................5-1 5.1 TEST EQUIPMENT.......................................................................................................................5-1 5.2 INSTALLATION REVIEW...........................................................................................................5-1 5.3 EQUIPMENT CONNECTION ......................................................................................................5-2 5.4 VERIFICATION ............................................................................................................................5-3
5.4.1 Communication Test ..............................................................................................................5-3 5.4.2 Transmitter Selftest ................................................................................................................5-3 5.4.3 Loop Test................................................................................................................................5-4
5.5 TRANSMITTER ZERO AND SHUTOFF VALVE MANIPULATION.......................................5-5 5.5.1 Absolute Pressure ...................................................................................................................5-5
5.5.1.1 Measuring Gases ............................................................................................................5-6 5.5.1.2 Measuring Vapor and Liquid .........................................................................................5-7
5.5.2 Differential Pressure and Flow...............................................................................................5-8 5.5.2.1 Measuring Gases ............................................................................................................5-8 5.5.2.2 Measuring Liquids..........................................................................................................5-9
5.5.3 Measuring Vapor ..................................................................................................................5-11

UMSITRPDS3-1 Contents
September 2004 iii
6.0 ON-LINE CONFIGURATION AND OPERATION.....................................................................6-1 6.1 LOCAL OPERATION AND DISPLAY ........................................................................................6-1
6.1.1 Digital Display........................................................................................................................6-1 6.1.2 Numeric Display.....................................................................................................................6-2 6.1.3 Unit/Bargraph Display............................................................................................................6-3 6.1.4 Error Message.........................................................................................................................6-3 6.1.5 Output Signal Range...............................................................................................................6-3 6.1.6 Mode Display ..........................................................................................................................6-4
6.2 LOCAL OPERATION WITH THE MAGNETIC PUSHBUTTONS............................................6-5 6.2.1 Cancel Pushbutton Disable and Write Protection...................................................................6-7 6.2.2 Set/Adjust Zero and Full Scale...............................................................................................6-7
6.2.2.1 Theoretical Relationships ...............................................................................................6-7 6.2.2.2 Practical Applications ....................................................................................................6-9
6.2.3 Electric Damping..................................................................................................................6-10 6.2.4 Blind Setting of Zero and Full Scale ....................................................................................6-10
6.2.4.1 Theoretical Relationships .............................................................................................6-10 6.2.4.2 Practical Applications ..................................................................................................6-11
6.2.5 Zero Adjustment (Position Correction) ................................................................................6-12 6.2.5.1 Zero-Point Alignment at Absolute Pressure.................................................................6-12
6.2.6 Fixed Current Output............................................................................................................6-13 6.2.7 Failure Current......................................................................................................................6-13 6.2.8 Pushbutton and Function Disable .........................................................................................6-14 6.2.9 Flow Measurement (Differential Pressure only) ..................................................................6-14 6.2.10 Select Measured Value to be Displayed .............................................................................6-16 6.2.11 Select the Displayed Input Pressure Engineering Unit.......................................................6-16
6.3 LOCAL OPERATION WITHOUT A DISPLAY OR WITH ACTIVATED KEYLOCK ..........6-18 6.3.1 Set Zero and Full Scale.........................................................................................................6-18
6.4 REMOTE CONFIGURATION AND OPERATION BY HART ................................................6-20 6.4.1 Process Data .........................................................................................................................6-20 6.4.2 Setting Zero and Full Scale ..................................................................................................6-21 6.4.3 Blind Setting of Zero and Full Scale ....................................................................................6-21 6.4.4 Zero Adjustment for Position Correction .............................................................................6-21 6.4.5 Electric Damping..................................................................................................................6-22 6.4.6 Fast Measured Value Acquisition (fast response mode) ......................................................6-22 6.4.7 Fixed Current Output............................................................................................................6-23 6.4.8 Fault Current.........................................................................................................................6-23 6.4.9 Disabling the Transmitter Magnetic Pushbuttons and Write Protection ..............................6-24 6.4.10 Measured Value Display ....................................................................................................6-25 6.4.11 Select Pressure Engineering Units......................................................................................6-25 6.4.12 Display/Bargraph................................................................................................................6-25 6.4.13 Sensor Trim ........................................................................................................................6-26
6.4.13.1 Trimming the Lower Sensor Adjustment Point..........................................................6-26 6.4.13.2 Trimming the Upper Sensor Adjustment Point ..........................................................6-27
6.4.14 D/A Trim ............................................................................................................................6-28 6.4.15 Transmitter Current Adjustment.........................................................................................6-28 6.4.16 Factory Calibration (Manufacturer Trims) .........................................................................6-29 6.4.17 Device Information.............................................................................................................6-30 6.4.18 Flow Measurement (Differential Pressure) ........................................................................6-30 6.4.19 Diagnostic Functions ..........................................................................................................6-30
6.4.19.1 Operating Hours Counter ...........................................................................................6-31 6.4.19.2 Calibration Timer and Service Timer.........................................................................6-31 6.4.19.3 Min/Max Pointer ........................................................................................................6-32

Contents UMSITRPDS3-1
September 2004 iv
6.4.19.4 Monitoring the Saturation Current .............................................................................6-32 6.4.20 Simulation...........................................................................................................................6-33 6.4.21 Self Test and Master Reset .................................................................................................6-35
7.0 CALIBRATION AND MAINTENANCE.......................................................................................7-1 7.1 CALIBRATION .............................................................................................................................7-2 7.2 PREVENTIVE MAINTENANCE .................................................................................................7-3
7.2.1 Transmitter Exterior Inspection..............................................................................................7-3 7.2.2 Transmitter Exterior Cleaning ................................................................................................7-3 7.2.3 Transmitter Enclosure Interior Inspection ..............................................................................7-4 7.2.4 Transmitter Calibration...........................................................................................................7-4 7.2.5 Impulse Piping........................................................................................................................7-4
7.3 TROUBLESHOOTING .................................................................................................................7-5 7.3.1 Analog Output ........................................................................................................................7-5 7.3.2 Digital Output (Communication)............................................................................................7-8
7.4 ASSEMBLY REMOVAL AND REPLACEMENT.......................................................................7-9 7.4.1 Display Assembly.................................................................................................................7-11 7.4.2 Replacing the Electronics Module........................................................................................7-12 7.4.3 Measuring Cell Assembly Removal and Replacement ........................................................7-13 7.4.4 Terminal Board Assembly Removal and Replacement........................................................7-16
7.5 NON-FIELD-REPLACEABLE ITEMS.......................................................................................7-16 7.6 TRANSMITTER REPLACEMENT ............................................................................................7-17 7.7 MAINTENANCE RECORDS......................................................................................................7-18 7.8 RECOMMENDED SPARE AND REPLACEMENT PARTS.....................................................7-18 7.9 COMPATIBILITY, REVISION NUMBERS ..............................................................................7-19
8.0 CIRCUIT DESCRIPTION ..............................................................................................................8-1 8.1 OVERALL OPERATION ..............................................................................................................8-2 8.2 PRESSURE.....................................................................................................................................8-2 8.3 DIFFERENTIAL PRESSURE AND FLOW .................................................................................8-3 8.4 FLANGED LEVEL ........................................................................................................................8-3 8.5 ABSOLUTE PRESSURE (DIFFERENTIAL CONSTRUCTION) ...............................................8-4 8.6 ABSOLUTE PRESSURE (GAUGE CONSTRUCTION) .............................................................8-4 8.7 COMMUNICATION FORMAT....................................................................................................8-5
9.0 MODEL DESIGNATIONS AND SPECIFICATIONS .................................................................9-1 9.1 MODEL DESIGNATIONS............................................................................................................9-1 9.2 ACCESSORIES............................................................................................................................9-20 9.3 SPECIFICATIONS.......................................................................................................................9-21 9.4 MEASURING SPANS AND OVERLOAD LIMITS ..................................................................9-29 9.5 NETWORK TOPOLOGY............................................................................................................9-35
9.5.1 Two-Wire Cable ...................................................................................................................9-35 9.6 HAZARDOUS AREA CLASSIFICATIONS ..............................................................................9-35
9.6.1 CSA Hazardous Locations Precautions ................................................................................9-36
10. 0 GLOSSARY..................................................................................................................................10-1
A.0 APPENDIX A - ONLINE CONFIGURATION MAP .................................................................A-1
B.0 APPENDIX B - HAZARDOUS AREA INSTALLATION.......................................................... B-1

UMSITRPDS3-1 Contents
September 2004 v
C.0 APPENDIX C - ELEVATION AND SUPPRESSION CORRECTIONS ..................................C-1 C.1 HOW ADJUSTMENT IS MADE......................................................................................... C-1 C.2 ELEVATION CALCULATION EXAMPLE ....................................................................... C-2 C.3 SUPPRESSION CALCULATION EXAMPLE.................................................................... C-2 C.4 RECOMMENDED METHOD.............................................................................................. C-3
WARRANTY........................................................................................................................................... W1 ONLINE CONFIGURATION MAPS..........................................................................At back of manual When using the Model 275 Universal HART Communicator When using the Model 375 Field Communicator
LIST OF ILLUSTRATIONS
FIGURE AND TITLE PAGE 1-1 Gauge Construction, Pressure and Absolute Models..........................................................................1-3 1-2 Differential Construction; Differential, Flow, and Absolute Models .................................................1-4 1-3 Differential Pressure and Flow Models with H03 Option ..................................................................1-5 1-4 Flanged Liquid Level Models.............................................................................................................1-6 1-5 Traditional Application.......................................................................................................................1-7 1-6 Display................................................................................................................................................1-8 1-7 Field Terminals...................................................................................................................................1-8 2-1 Model 275 Universal HART Communicator......................................................................................2-2 2-2 HART Communicator Connections to a Transmitter Loop................................................................2-3 2-3 HART Communicator Display Icons .................................................................................................2-8 2-4 Offline Menu Map ............................................................................................................................2-12 2-5 SITRANS P Online Menu Map........................................................................................................2-19 2-6 Generic Online Menu Map ...............................................................................................................2-20 3-1 Bench Test Connections .....................................................................................................................3-1 3-2 Field Test Connections .......................................................................................................................3-2 4-1 Differential Flow Measurement Piping for Gas and Liquid ...............................................................4-5 4-2 Differential Liquid Measurement Piping............................................................................................4-6 4-3 Absolute or Gauge Pressure Measurement Piping .............................................................................4-7 4-4 Steam Service, Below the Line Mounting..........................................................................................4-8 4-5 Open and Closed Tank Level Measurement, Flange Mounted Transmitters .....................................4-9 4-6 Point-To-Point Network (Analog Mode)..........................................................................................4-11 4-7 Procidia to Transmitter Connections (Analog Mode).......................................................................4-12 4-8 Model 353/354 to Transmitter Connections (Analog Mode) ...........................................................4-13 4-9 Multi-Drop Network (Digital Mode)................................................................................................4-15 4-10 Pipe Mounting, Gauge Construction ..............................................................................................4-22 4-11 Pipe Mounting, Differential Construction ......................................................................................4-22 4-12 Differential Construction, Position Options ...................................................................................4-23 4-13 Enclosure Rotation Considerations.................................................................................................4-26 4-14 Display Removal and Repositioning ..............................................................................................4-27 4-15 Conduit Drain and Explosion Proof Installations ...........................................................................4-28 4-16 Network Conductor Terminations ..................................................................................................4-31 5-1 Equipment Connection for System Checkout.....................................................................................5-2 5-2 Measuring Gases.................................................................................................................................5-6

Contents UMSITRPDS3-1
September 2004 vi
5-3 Measuring Vapor and Liquid..............................................................................................................5-7 5-4 Measuring Gases.................................................................................................................................5-9 5-5 Measuring Liquids............................................................................................................................5-10 5-6 Measuring Vapor ..............................................................................................................................5-11 6-1 Digital Display....................................................................................................................................6-1 6-2 Switch Point of the Square Root Characteristic................................................................................6-15 6-3 Displayable Engineering Units .........................................................................................................6-17 6-4 Sensor (Measuring Cell) Trim..........................................................................................................6-27 6-5 Pressure Min/Max Pointer Example .................................................................................................6-32 6-6 Saturation Monitoring Examples......................................................................................................6-33 6-7 Simulation Circuit Diagram..............................................................................................................6-34 7-1 Transmitter Exploded View................................................................................................................7-9 7-2 Display Assembly Installed and Partially Removed.........................................................................7-11 7-3 Electronics Module Removal and Installation..................................................................................7-12 7-4 Measuring Cell Alignment and Insertion Depth...............................................................................7-15 8-1 Transmitter Block Diagram ................................................................................................................8-1 8-2 Pressure Measuring Cell .....................................................................................................................8-2 8-3 Differential Pressure and Flow Measuring Cell .................................................................................8-3 8-4 Flanged Level Measuring Cell............................................................................................................8-4 8-5 Absolute Pressure Measuring Cell, Differential Construction ...........................................................8-4 8-6 Absolute Pressure Measuring Cell, Gauge Construction....................................................................8-5 9-1 Dimensions, Gauge Construction, Pressure and Absolute Models...................................................9-31 9-2 Dimensions, Differential Construction, Differential, Flow, and Absolute Pressure Models............9-32 9-3 Dimensions, Differential Pressure and Flow Models with H03 Option ...........................................9-33 9-4 Dimensions, Flange Level Models ...................................................................................................9-34 9-5 Declaration of Conformity................................................................................................................9-38 9-6 Certificate of NACE Compliance.....................................................................................................9-39 A-1 Online Configuration Map................................................................................................................A-2 B-1 Control Drawing for Sitrans P DSIII Transmitter............................................................................. B-2 C-1 Elevated Span Example .................................................................................................................... C-1 C-2 Suppressed Span Example ................................................................................................................ C-1 C-3 Elevation Calculation Example......................................................................................................... C-2 C-4 Suppression Calculation Example .................................................................................................... C-2
LIST OF TABLES TABLE AND TITLE PAGE 1-1 Measurement and Model vs. Figure References.................................................................................1-2 1-2 Contact Information..........................................................................................................................1-11 2-1 Function Keys with Their Labels and Actions Performed .................................................................2-5 2-2 Communicator Firmware Device Descriptions, Rev. F2.2...............................................................2-10 2-3 Offline Menu Map Continued, “Edit Individually” Options ............................................................2-12 4-1 Operating Mode and Network ..........................................................................................................4-10
UMSITRPDS3-1 Contents
September 2004 vii
4-2 Flange and Extension Dimensions....................................................................................................4-25 6-1 Operating Mode and Status Arrows ...................................................................................................6-2 6-2 Parameters Accessible Using the Magnetic Pushbuttons ...................................................................6-6 6-3 Pushbutton and Function Disable Options .......................................................................................6-14 6-4 Pushbutton and Function Disable Options .......................................................................................6-24 9-1 Model 7MF4033, Model Designation ................................................................................................9-2 9-2 Model 7MF4233, Model Designation ................................................................................................9-4 9-3 Model 7MF4333, Model Designation ................................................................................................9-6 9-4 Model 7MF4433, Model Designation ................................................................................................9-8 9-5 Model 7MF4533, Model Designation ..............................................................................................9-10 9-6 Model 7MF4633 and 7MF4912, Model Designation.......................................................................9-12 9-7 Measuring Cells for Pressure, Service Parts.....................................................................................9-15 9-8 Measuring Cells for Absolute Pressure, Gauge Construction, Service Parts ...................................9-15 9-9 Measuring Cells for Absolute Pressure, Differential Construction, Service Parts ...........................9-16 9-10 Measuring Cells for Pressure and Flow, Differential Construction, Service Parts.........................9-17 9-11 Measuring Cells for Differential Pressure and Flow, Service Parts ...............................................9-18 9-12 Measuring Cell for Filling Level, Service Parts .............................................................................9-19 9-13 Electronics and Connecting Boards, Service Parts .........................................................................9-19 9-14 Accessories .....................................................................................................................................9-20 9-15 Specifications, Pressure and Differential Pressure Models ............................................................9-21 9-16 Specifications, Absolute Pressure and Filling Level Models .........................................................9-25 9-17 Pressure Transmitter, Model 7MF4033..........................................................................................9-29 9-18 Differential Pressure and Flow Transmitters, 7MF4433 & 7MF4533 ...........................................9-29 9-19 Absolute Pressure, Gauge Construction, 7MF4233........................................................................9-29 9-20 Absolute Pressure, Differential Construction, 7MF4333 ...............................................................9-30 9-21 Flanged Level, 7MF4633/7MF4912...............................................................................................9-30
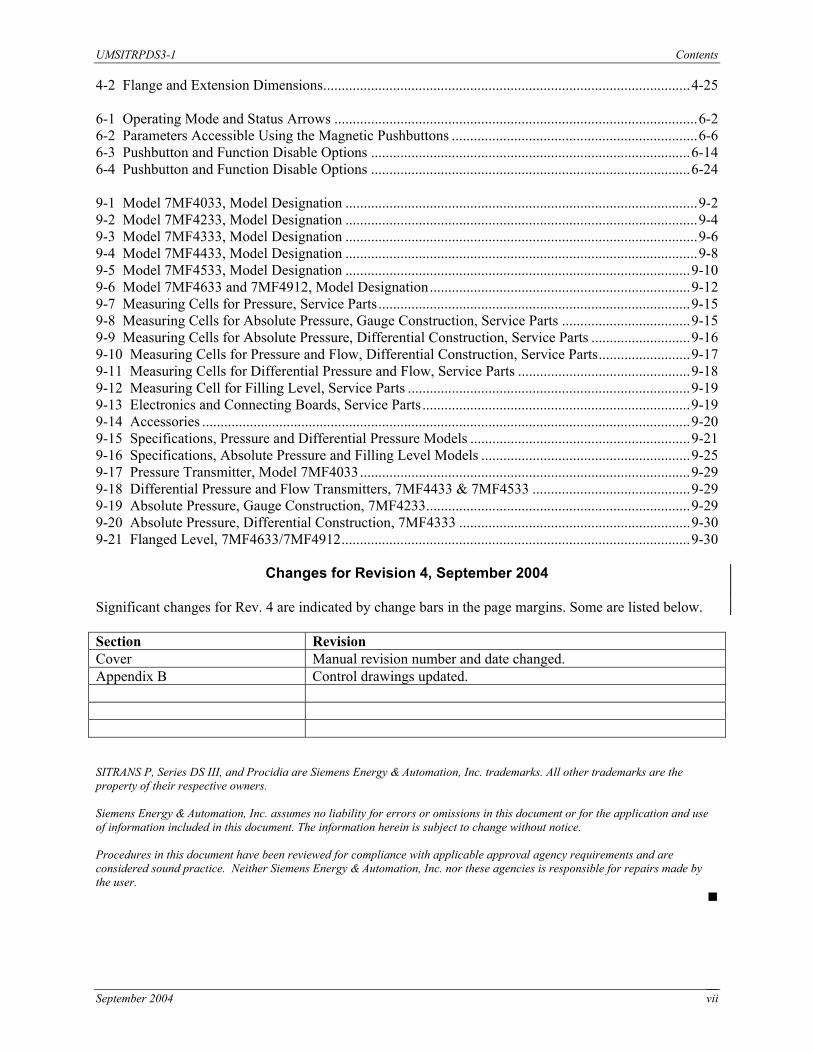
Changes for Revision 4, September 2004
Significant changes for Rev. 4 are indicated by change bars in the page margins. Some are listed below. Section Revision Cover Manual revision number and date changed. Appendix B Control drawings updated. SITRANS P, Series DS III, and Procidia are Siemens Energy & Automation, Inc. trademarks. All other trademarks are the property of their respective owners. Siemens Energy & Automation, Inc. assumes no liability for errors or omissions in this document or for the application and use of information included in this document. The information herein is subject to change without notice. Procedures in this document have been reviewed for compliance with applicable approval agency requirements and are considered sound practice. Neither Siemens Energy & Automation, Inc. nor these agencies is responsible for repairs made by the user.

Conventions, Symbols, and General Information UMSITRPDS3-1
September 2004 viii
Conventions, Symbols, and General Information Conventions and Symbols The following symbols may be used in this manual and may appear on the equipment. The reader should become familiar with the symbols and their meaning. Symbols are provided to quickly alert the reader to safety related text. Symbol Meaning
DANGER
Indicates an immediate hazardous situation which, if not avoided, will result in death or serious injury.
WARNING
Indicates a potentially hazardous situation which, if not avoided, could result in death or serious injury.
CAUTION
Indicates a potentially hazardous situation which, if not avoided, may result in minor or moderate injury.
CAUTION
Indicates a potentially hazardous situation which, if not avoided, may result in property damage.
NOTICE
Indicates a potential situation which, if not avoided, may result in an undesirable result or state.
Important Identifies an action that should be taken to avoid an undesirable result or state. Note Identifies additional information that should be read.
Electrical shock hazard. The included Warning text states that the danger of electrical shock is present.
Electrical shock hazard. Indicated that the danger of electrical shock is present.
Explosion hazard. Indicates that the danger of an explosion hazard exists.
Electrostatic discharge. The presence of this symbol indicates that electrostatic discharge can damage the electronic assembly.
Qualified Persons The described equipment should be installed, configured, operated, and serviced only by qualified persons thoroughly familiar with this User’s Manual. A copy of this manual accompanies the equipment. The current version of the manual, in Portable Document Format (PDF), can be downloaded from www.sea.siemens.com/ia/.
UMSITRPDS3-1 Conventions, Symbols, and General Information
September 2004 ix
For the purpose of this manual and product labels, a qualified person is one who is familiar with the installation, assembly, commissioning, and operation of the product, and who has the appropriate qualifications for their activities such as:
• Training, instruction, or authorization to operate and maintain devices/systems according to the safety standards for electrical circuits, high pressures, and corrosive, as well as, critical media.
• For devices with explosion protection: training, instruction or authorization to work on electrical circuits for systems that could cause explosions.
• Training or instruction according to the safety standards in the care and use of suitable safety equipment.
Scope This manual does not purport to cover all details or variations in equipment, nor to provide for every possible contingency to be met in connection with installation, operation, or maintenance. Should further information be desired or should particular problems arise which are not covered sufficiently for the purchaser’s purposes, the matter should be referred to one of the support groups listed in the Product Support section of this manual. The contents of this manual shall not become part of or modify any prior or existing agreement, commitment or relationship. The sales contract contains the entire obligation of Siemens. The warranty contained in the contract between the parties is the sole warranty of Siemens. Any statements continued herein do not create new warranties or modify the existing warranty. General Warnings and Cautions
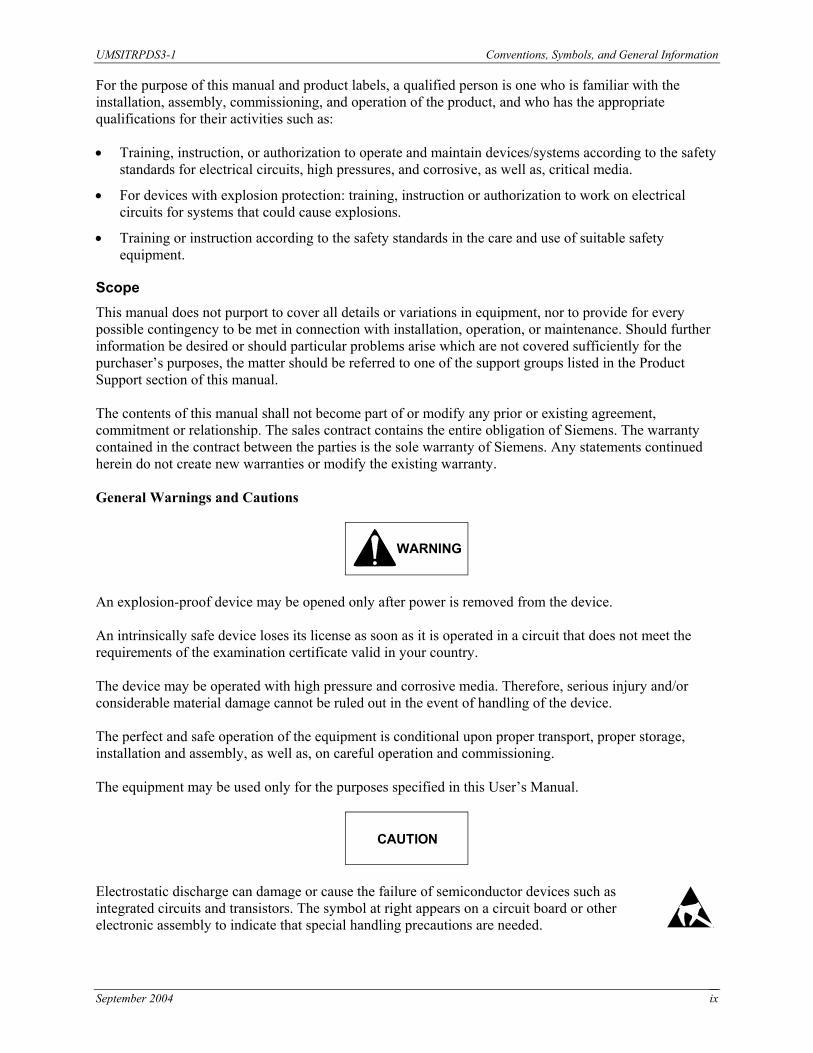
WARNING
An explosion-proof device may be opened only after power is removed from the device. An intrinsically safe device loses its license as soon as it is operated in a circuit that does not meet the requirements of the examination certificate valid in your country. The device may be operated with high pressure and corrosive media. Therefore, serious injury and/or considerable material damage cannot be ruled out in the event of handling of the device. The perfect and safe operation of the equipment is conditional upon proper transport, proper storage, installation and assembly, as well as, on careful operation and commissioning. The equipment may be used only for the purposes specified in this User’s Manual.
CAUTION
Electrostatic discharge can damage or cause the failure of semiconductor devices such as integrated circuits and transistors. The symbol at right appears on a circuit board or other electronic assembly to indicate that special handling precautions are needed.

Conventions, Symbols, and General Information UMSITRPDS3-1
September 2004 x
• A properly grounded conductive wrist strap must be worn whenever an electronics module or circuit board is handled or touched. A service kit with a wrist strap and static dissipative mat is available from Siemens (PN15545-110). Equivalent kits are available from both mail order and local electronic supply companies.
• Electronic assemblies must be stored in static protective bags when not installed in equipment.

UMSITRPDS3-1 Introduction
1.0 INTRODUCTION
This user’s manual is for the Siemens Energy & Automation SITRANS P Series DSIII Pressure Transmitters. All information needed to bench test, install, configure, calibrate, and service a transmitter is included in this user’s manual.
IMPORTANT
Save this user’s manual. It should be available to those installing, configuring, operating, and servicing the described pressure transmitters.
1.1 CONTENTS
The user’s manual consists of a table of contents, ten sections, and three appendices. Following the table of contents is a subsection that contains important information about the symbols that can appear in this user’s manual and on the transmitter. The subsection also has statements about installing and servicing the transmitter. A brief description of each major section and appendices follows. Section 1, Introduction, describes each section in the manual and provides a brief description of the SITRANS P Series DSIII Pressure Transmitter line. A product support section has telephone, fax, E-mail, and Internet contact information. Section 2, Model 275 Universal HART Communicator, describes use of the HART Communicator to test, configure, and calibrate a transmitter. Section 3, Pre-Installation Test, provides procedures to perform a bench test of the transmitter to ensure proper operation of all transmitter functions. Start-up configuration is described here. Section 4, Installation, furnishes specific information for mechanical and electrical installation of the transmitter. Section 5, Post-Installation Test, describes how to confirm that the transmitter has been installed correctly - sometimes referred to as commissioning. Section 6, On-Line Configuration and Operation, details local configuration using the magnetic pushbuttons and remote configuration using the HART Communicator. Local operation and remote operation of the transmitter are described. Section 7, Calibration and Maintenance, provides references to calibration procedures for analog and digital modes and to a zeroing procedure for mounting position. It also furnishes preventive maintenance, troubleshooting, and assembly replacement procedures. Section 8, Circuit Description, contains an assembly-level circuit description to support transmitter servicing. Section 9, Model Designations and Specifications, has tables that correlate rating plate model numbers to transmitter physical configurations. This section also contains an accessory list and several service parts lists. Detailed mechanical, functional, performance, and environmental specifications are provided, as are dimension drawings of the transmitter. Hazardous area certifications are listed.
September 2004 1-1

Introduction UMSITRPDS3-1
Section 10, Glossary, contains definitions of various transmitter-related terms. Appendix A, Online Configuration Map, is used to help navigate HART/transmitter menus during remote configuration and operation of the transmitter. Appendix B, Hazardous Area Installations, contains control drawings and other information needed for installation in a hazardous area. Appendix C, Elevation and Suppression Corrections, explains how to perform elevation and suppression calculations necessary for certain liquid level gauging applications. Warranty contains the product warranty statements and information concerning servicing of the product during the warranty period.
1.2 PRODUCT DESCRIPTION
SITRANS P Series DSIII transmitters provide reliable, accurate, stable, and cost-effective measurement of differential, absolute, and gauge pressure and liquid level. The transmitter is a microcontroller-based, self-contained pressure-to-current transducer. A measuring cell senses the applied process pressure and provides an analog output signal that is proportional to applied pressure. An analog-to-digital converter produces a digital signal for the microcontroller. The microcontroller modifies and corrects the signal for linearity and temperature, and a digital-to-analog converter produces a 4-20 milliampere output signal for the loop. The transmitter can be installed quickly and easily using one of the optional mounting brackets. Illustrations showing mounting hardware and dimensions are provided in this manual. Measuring cell construction determines a transmitter’s physical dimensions and mechanical installation. Note that a given sensor construction can involve one or more measurement methods, as shown in Table 1-1.
TABLE 1-1 Measurements, Models and Figure References
Measurement Model And Measuring Cell Construction Refer To
Absolute or Gauge Pressure 7MF4033, Gauge Construction
7MF4233, Gauge Construction
7MF4333, Differential Construction
Figures 1-1, 4-3, 4-4, 4-10, 4-12, 9-1 and 9-2
Differential Pressure 7MF4433, Differential Construction
7MF4533, Differential Construction
Figures 1-2, 1-3, 4-1, 4-2, 4-11, 4-12, 9-2, and 9-3
Liquid Level (Flange) 7MF4633, Flange Construction
7MF4912, Flange
Figures 1-4, 4-5, and 9-4
Figures 1-1 through 1-4 show the various transmitter models and constructions. They also show common transmitter mounting methods. The mounting brackets shown are optional.
September 2004 1-2

UMSITRPDS3-1 Introduction
1 2 3 4 5
Process connection: 1/2-NPT, connection shank G1/2A Oval flange Blanking plug Electrical connection: Screwed gland M20 x 1.5 Screwed gland 1/2-14NPT Field terminals; remove enclosure cap for access Electronics module and display; remove enclosure cap for access
6 7 8 9 10111213
Hinged access cover over magnetic pushbuttons Mounting bracket, optional Tag plate Approval plate; Rating plate on other side Enclosure ground screw Enclosure setscrew Enclosure rotation limits Enclosure rotation reference arrow; see Section 4 for details This Figure is for Models 7MF4033 and 7MF4233
FIGURE 1-1 Gauge Construction, Pressure and Absolute Pressure Models
September 2004 1-3

Introduction UMSITRPDS3-1
1 2 3 4 5 6 7 8 9
Process Connection 1/4-18NPT for absolute pressure + side Mounting thread M10, M12 or 7/16-20UNF Blanking plug Electrical connection: Screwed gland M20 x 1.5 Screwed gland 1/2-14NPT Field terminals; remove enclosure cap for access Electronics module and display; remove enclosure cap for access Hinged access cover over magnetic pushbuttons Sealing screw Side vent for measuring liquid
10 11 12 13 14 15 16 17
Side vent for measuring gas (supplement H02) Mounting bracket, optional Enclosure setscrew Enclosure rotation limits (see 14 reference arrow) Enclosure rotation reference arrow; see Section 4 for details Tag plate Approval plate; Rating plate on other side Enclosure ground screw This Figure is for Models 7MF4333, 7MF4433, and 7MF4533.
FIGURE 1-2 Differential Construction; Differential, Flow, and Absolute Models
September 2004 1-4

UMSITRPDS3-1 Introduction
1 2 3 4 5 6 7
Process connection 1/4-18NPT Mounting thread M10 or 7/16-20UMF Field terminals; remove enclosure cap for access Electronics module and display; remove enclosure cap for access Sealing screw Enclosure setscrew Enclosure rotation limits; enclosure rotation reference arrow on neck (see Section 4 for details)
10 11 12 13 14 15
Blanking plug Access cover over magnetic pushbuttons Electrical connection: M20 x 1.5 1/2-14NPT Tag plate Approval plate; Rating plate on other side Enclosure ground screw This Figure is for Models 7MF4433 and 7MF4533 with H03 option.
FIGURE 1-3 Differential Pressure and Flow Models with H03 Option
September 2004 1-5

Introduction UMSITRPDS3-1
1 2 3 4 5 6
Process connection at low side 1/4-18NPT Mounting thread M10, M12, or 7/16-20UNF Blanking plug Electrical connection: M20 x1.5 1/2-14NPT Field terminals; remove enclosure cap for access Electronics module and display; remove enclosure cap for access
7 8 9 10 11 12 13
Access cover to magnetic pushbuttons Sealing screw with valve Enclosure setscrew Enclosure rotation limits Enclosure rotation reference arrow (not shown; see Section 4 for details) Tag plate Rating plate; approval plate on other side This Figure is for Models 7MF4633 and 7MF4912
FIGURE 1-4 Flanged Liquid Level Models
September 2004 1-6

UMSITRPDS3-1 Introduction
A transmitter can operate in either analog mode or digital mode, as discussed in the following paragraphs. Analog Mode A single transmitter is connected to a controller, recorder, or other field device. A loop known as a Point-to-Point network interconnects the instruments. Figure 1-5shows a traditional application.
MG
0036
9b
2-Wire4-20 mA
Model 353
I/PModel 773
2-Wire4-20 mA
Flow
Process Automation Controller
DifferentialTransmitter
FIGURE 1-5 Traditional Application The HART® (Highway Addressable Remote Transducer) protocol is used for communication between the transmitter and a HART Communicator, a personal computer running configuration software, or another remote device. This is done by superimposing the HART digital signal on the analog current. HART communications can be used to transfer a new or edited configuration, remotely monitor the process variable, or service a transmitter. Digital Mode Up to 15 transmitters can be parallel connected to a Multi-Drop network using only shielded, twisted-pair cable. The HART protocol provides communication between the transmitters and a HART-compatible controller, recorder, or other device. Each transmitter is identified by a unique network address that is selected during configuration. Display, Magnetic Pushbuttons, and Loop Connections The optional display (Figure 1-6) permits local viewing of input and output variables and status messages, and it simplifies local configuration. Local configuration is performed using three magnetic pushbuttons that are found beneath an access cover in the transmitter housing. Section 6 On-Line Configuration and Operation describes use of the display and magnetic pushbuttons. Loop connections are made to a terminal assembly with three screw terminals (Figure 1-7). The assembly is located within the transmitter enclosure and is accessed by removing the enclosure cap adjacent to FIELD TERMINALS on the enclosure. The terminal assembly also has terminals to connect an external digital milliammeter for loop troubleshooting and transmitter calibration. Loop wiring is shown in Section 4 Installation. An enclosure ground connection is located on the housing beneath the field terminal enclosure cap. The enclosure should always be grounded by a wire connected from this terminal to an earth ground, even when a ground may be provided by metal conduit protecting the loop wiring.
September 2004 1-7

Introduction UMSITRPDS3-1
++
MG
0036
4b
1
2
3
MG
0036
4b
-4-20mA+
_+
1
2
3
44
1 2 3
Digital display, optional Magnetic pushbutton access cover Enclosure cap
1 2 3 4
Field terminals for analog output External digital milliammeter terminals Enclosure ground Electrical entrances; plug unused entrance
FIGURE 1-6 Display FIGURE 1-7 Field Terminals
Transmitters have an intrinsically safe, explosion proof, NEMA 4x (IP67/68), field mountable, hardened enclosure. Electrical conduit connections are 1/2-14 NPT or M20 x 1.5. All process wetted materials are 316 stainless steel or better. The flush-mount process connection of the liquid level model is compatible with standard ANSI and metric flange sizes for tanks and pipes.
September 2004 1-8
UMSITRPDS3-1 Introduction
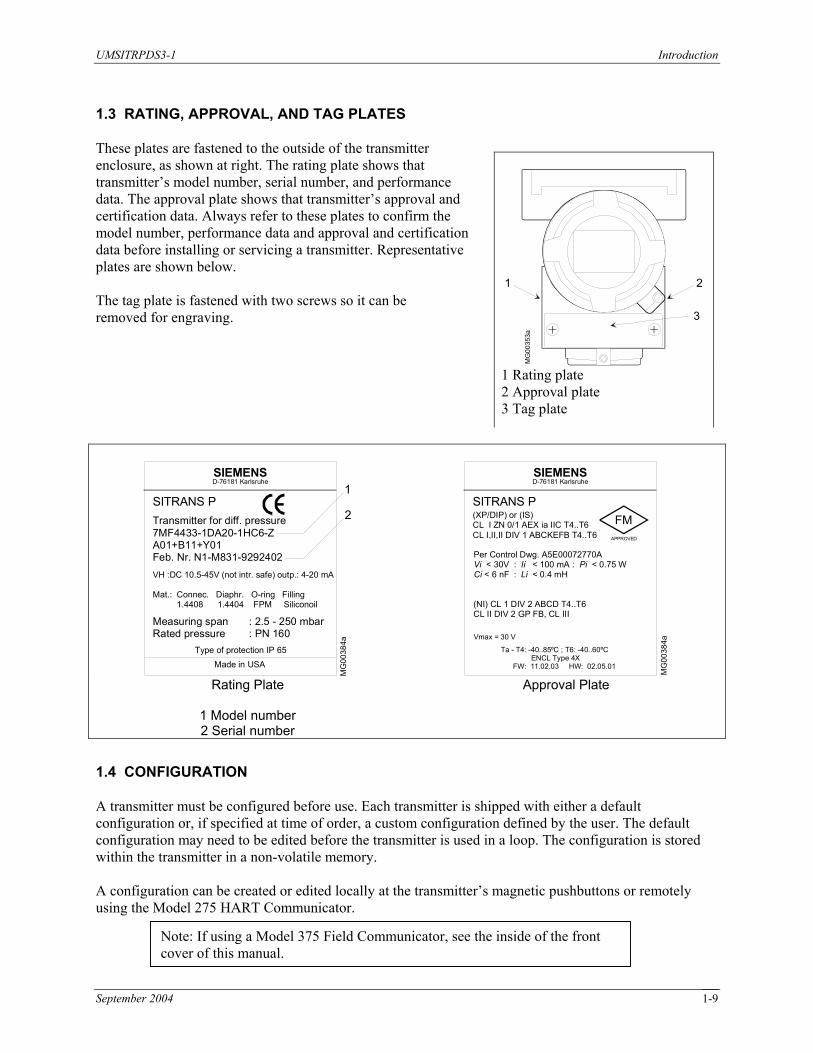
1.3 RATING, APPROVAL, AND TAG PLATES
These plates are fastened to the outside of the transmitter enclosure, as shown at right. The rating plate shows that transmitter’s model number, serial number, and performance data. The approval plate shows that transmitter’s approval and certification data. Always refer to these plates to confirm the model number, performance data and approval and certification data before installing or servicing a transmitter. Representative plates are shown below. The tag plate is fastened with two screws so it can be removed for engraving.
SIEMENSD-76181 Karlsruhe
SITRANS PTransmitter for diff. pressure7MF4433-1DA20-1HC6-ZA01+B11+Y01Feb. Nr. N1-M831-9292402VH :DC 10.5-45V (not intr. safe) outp.: 4-20 mA
Mat.: Connec. Diaphr. O-ring Filling 1.4408 1.4404 FPM Siliconoil
Measuring span : 2.5 - 250 mbarRated pressure : PN 160
Type of protection IP 65
Made in USA
MG
0038
4a
1
2
SIEMENSD-76181 Karlsruhe
SITRANS P(XP/DIP) or (IS)CL I ZN 0/1 AEX ia IIC T4..T6CL I,II,II DIV 1 ABCKEFB T4..T6
Per Control Dwg. A5E00072770AVi < 30V : Ii < 100 mA : Pi < 0.75 WCi < 6 nF : Li < 0.4 mH
(NI) CL 1 DIV 2 ABCD T4..T6CL II DIV 2 GP FB, CL III
Vmax = 30 V
Ta - T4: -40..85ºC ; T6: -40..60ºC ENCL Type 4X FW: 11.02.03 HW: 02.05.01
FMAPPROVED
MG
0038
4a
Rating Plate
1 Model number 2 Serial number
Approval Plate
1.4 CONFIGURATION
A transmitter must be configured before use. Each transmitter is shipped with either a default configuration or, if specified at time of order, a custom configuration defined by the user. The default configuration may need to be edited before the transmitter is used in a loop. The configuration is stored within the transmitter in a non-volatile memory. A configuration can be created or edited locally at the transmitter’s magnetic pushbuttons or remotely using the Model 275 HART Communicator.
1 2
++
MG
0035
3a
3
1 Rating plate 2 Approval plate 3 Tag plate
Note: If using a Model 375 Field Communicator, see the inside of the front cover of this manual.
September 2004 1-9

Introduction UMSITRPDS3-1
September 2004 1-10
1.5 PRODUCT SUPPORT
This section provides the Internet site addresses, e-mail addresses, telephone numbers, and related information for customers to access Siemens product support. When contacting Siemens for support:
• Please have complete product information at hand:
• For hardware, this information is provided on the product nameplate (part number or model number, serial number, and/or version).
• For most software, this information is given in the Help > About screen.
• If there is a problem with product operation:
• Is the problem intermittent or repeatable? What symptoms have been observed?
• What steps, configuration changes, loop modifications, etc. were performed before the problem occurred?
• What status messages, error messages, or LED indications are displayed?
• What troubleshooting steps have been performed?
• Is the installation environment (e.g. temperature, humidity) within the product’s specified operating parameters? For software, does the PC meet or exceed the minimum requirements (e.g. processor, memory, operating system)?
• A copy of the product Service Instruction, User’s Manual, or other technical literature should be at hand. The Siemens public Internet site (see the table) has current revisions of technical literature, in Portable Document Format, for downloading.
• To send an instrument to Siemens for repair, request a Return Material Authorization (RMA).
IMPORTANT
An instrument must be thoroughly cleaned (decontaminated) to remove any process materials, hazardous materials, or blood born pathogens prior to return for repair. Read and complete the Siemens RMA form(s).
TABLE 1.1 Contact Information
Telephone +1 800 569 2132, option 2 for Siemens-Moore brand instruments
Fax +1 215 283 6358 E-mail [email protected] Hours of Operation 8 a.m. to 6 p.m. eastern time
Monday – Friday (except holidays) Public Internet Site www.sea.siemens.com/ia/
NORTH AMERICA
Repair Service +1 215 646 7400 extension 4993 For contact information outside North America, visit the Siemens public Internet site (see the table), locate Customer Support, and click on Siemens & Moore Brand Instrumentation.

UMSITRPDS3-1 Model 275 Universal Hart Communicator
2.0 MODEL 275 UNIVERSAL HART COMMUNICATOR
The Model 275 Universal HART Communicator is a handheld interface that provides a common communication link to SITRANS P transmitters and other HART-compatible instruments. This section describes HART Communicator connections, liquid crystal display, keypad, and on-line and off-line menus. It also provides overviews of many Communicator functions. The Communicator is shown in Figure 2-1. For information about the Communicator’s battery pack, Memory Module, Data Pack, and maintenance procedures, refer to the manual supplied with the Communicator.
2.1 INTRODUCTION
The HART Communicator connects to and communicates with a transmitter or other HART device using a 4-20 mA loop, provided a minimum load resistance of 250Ω is present between the Communicator and the power supply. The Communicator uses Bell 202 frequency-shift keying (FSK) to impose high-frequency digital signals on a standard 4-20 mA current loop. Because no net energy is added to the loop, HART communication does not disturb the 4-20 mA signal. The Communicator can be used in hazardous and non-hazardous locations.
WARNING
Explosion can cause death or serious injury. Before connecting the HART Communicator in an explosive atmosphere, be sure that the instruments in the loop are installed in accordance with intrinsically safe or non-incendive field wiring practices. Refer to the Communicator nameplate and the supplied manual for certifications and approvals before connecting, or making a connection to the serial port or NiCad charger port on the Communicator.
2.2 COMMUNICATOR CONNECTIONS
The Communicator can interface with a transmitter from the control room, the instrument site, or any wiring termination point in the loop. Connections are made through a supplied 40" (1m) cable (dual banana plug to mini-hook test clips). The connection panel also may have a jack for the optional NiCad charger, and it has a serial port for a future connection to a personal computer (PC). To interface with a transmitter or other HART device, connect the HART Communicator in parallel with the instrument or load resistor. The connections are non-polar. For intrinsically safe FM and CSA wiring connections, see the manual supplied with the Communicator. Figure 2-2 illustrates typical wiring connections between the HART Communicator and a loop with a transmitter or other HART-compatible device in a loop. The Communicator is quickly connected into a transmitter loop.
September 2004 2-1

Model 275 Universal Hart Communicator UMSITRPDS3-1
MG
0036
0a
HART Communicator
IO
F1 F2 F3 F4
1 3
4 5 6
7 8 9
0# % &
S T U
J K L
A B C D E F G H I
M N O P Q R
V W X Y Z /
< >. *_
2
: +
1
2
3
4
5
6
7
8
9 10
11
12
1 2 3 4 5 6 7 8 9
10 11 12
Model 275 Universal HART Communicator Liquid Crystal Display (LCD), 8 lines, 21 characters per line Function Keys (softkeys), software defined Action Keys – ON/OFF (I/O), Up Arrow, Quick Access Key (>>>), Previous Menu (Back, left arrow), Down Arrow, Select (Forward, right arrow) Alphanumeric Keys (keypad number sequence may be different from that shown) Shift Keys – Use to select alphabetic and other characters above a number, period, or dash. Communicator Nameplate – On back of device. See nameplate for certifications and approvals before connecting in a hazardous location. Communicator model number and serial number on back Connection panel. Non-polar loop connection; dual banana plug Serial port for PC connection; DB9 NiCad Charger Jack, optional
FIGURE 2-1 Model 275 Universal HART Communicator
Note: If using a Model 375 Field Communicator, see the inside of the front cover of this manual.
September 2004 2-2

UMSITRPDS3-1 Model 275 Universal Hart Communicator
+ _
- +4-20 mA
Current SenseResistor 250 to1100; See Note 3
Controller,Recorder, orOther 1-5 VdcDevice; SeeNote 2
HazardousLocation
Non-HazardousLocation
See Note 4
SeeNote 1
+
_
Range Resistor250, typical
IO
IO
IO
IO
IO
TransmitterTerminals
SeeNote 1
CircuitJunction
MG
0035
9a
Notes:
1 HART Communicator Connections: Non-hazardous location – Connect as shown above. Hazardous location – Refer to Communicator nameplate and the manual supplied with the Communicator for certifications and approvals before connecting. The HART Communicator is a non-polar device.
2 The System Power Supply may be part of the host input device or a separate device. 3 Network resistance equals the sum of the barrier resistances and the current sense resistor.
Minimum value is 250Ω; maximum value is 1100Ω. 4 Supply and return barriers are shown. Interconnect all cable shields and ground only at the barriers.
FIGURE 2-2 HART Communicator Connections to a Transmitter Loop
September 2004 2-3

Model 275 Universal Hart Communicator UMSITRPDS3-1
2.3 CONTROLS OVERVIEW
As shown in Figure 2-1, the front of the HART Communicator has five major functional areas: liquid crystal display (LCD), function keys, action keys, alphanumeric keys, and shift keys. The next five sections describe how each of these functional areas is used to enter commands and display data.
2.3.1 Liquid Crystal Display
The liquid crystal display (LCD) is an 8-line by 21-character display that provides communication between the user and a connected device. When the HART Communicator is connected to a SITRANS P transmitter or other HART-compatible device, the top line of the Online menu displays the model name of the device and its tag. A typical display is shown below. The actual display content can vary with the device type and manufacturer.
SITRANS P Online 1->Pres 2 Type 3 Device setup HELP |SAVE
Note: If using a Model 375 Field Communicator, see the inside of the front cover of this manual.
The bottom line of each menu is reserved for dynamic labels for the software-defined function keys, F1-F4, which are found directly below the display. More information on software-defined function keys is given in the next section.
2.3.2 Software-Defined Function Keys
The four software-defined function keys (softkeys), located below the LCD and marked F1 through F4, are used to perform software functions as indicated by the dynamic labels. Pressing the function key immediately beneath a label activates the displayed function. The label appearing above a function key indicates the function of that key for the current menu. For example, in menus providing access to on-line help, the HELP label appears above the F1 key. In menus providing access to the Online menu, the HOME label appears above the F3 key. Table 2-1 lists these labels and describes what happens when each function key is pressed.
September 2004 2-4

UMSITRPDS3-1 Model 275 Universal Hart Communicator
TABLE 2-1 Function Keys with Their Labels and Actions Performed
F1 F2 F3 F4
HELP
Access on-line help
ON/OFF
Activate or deactivate a bit-enumerated binary
variable
ABORT
Terminate current task
OK
Acknowledge information on the
LCD
RETRY
Try to reestablish communication
DEL
Delete current character or Quick
Access Key menu item
ESC
Leave a value unchanged
ENTER
Accept user-entered data
EXIT
Leave the current menu
SEND
Send configuration data to device
QUIT
Terminate session because of a
communication error
EXIT
Leave the current menu
YES
Answer to yes/no question
PGUP
Move up one help screen
PGDN
Move down one help screen
NO
Answer to yes/no question
ALL
Include current Quick Access Key item on Quick Access Key
menu for all devices
PREV
Go to previous message in a list of
messages
NEXT
Go to next message in a list of messages
ONE
Include Quick Access Key item for one
device
NEXT
Go to the next variable in off-line edit
SAVE
Save information to Communicator
HOME
Go the top menu in the device description
FILTR
Open customization menu to sort
configurations
MARK
Toggle marked variable in
configuration to be sent to a field device
BACK
Go back to the menu from which HOME
was pressed
XPAND
Opens detailed configuration information
EDIT
Edit a variable value
CMPRS
Closes detailed configuration information
ADD
Add current item to Quick Access Key
menu
September 2004 2-5
Model 275 Universal Hart Communicator UMSITRPDS3-1
2.3.3 Action Keys
Directly beneath the LCD and software-defined function keys are six blue, white, and black action keys. Each has a specific function as described below:
ON/OFF KEY – Use to power-up the Communicator. When the Communicator is turned on, it automatically searches for a HART-compatible device on the 4-20 mA loop. If no device is found, the Communicator displays the Main menu:
IO
HART Communicator 1 Offline 2 Online 3 Frequency device 4 Utility
If a SITRANS P transmitter is found, the Communicator displays the Online menu:
SITRANS P Online 1 Pres 2 Type 3 Device setup HELP |SAVE
UP ARROW KEY – Use to move the cursor up through a menu or list of options or to scroll through lists of available characters when editing fields that accept both alpha and numeric data. DOWN ARROW KEY – Use to move the cursor through a menu or a list of options or to scroll through lists of available characters when editing fields that accept alpha and numeric data. LEFT ARROW/PREVIOUS MENU KEY – Use to move the cursor to the left or back to the previous menu.
RIGHT ARROW/SELECT KEY – Use to move the cursor to the right or to select a menu option. QUICK ACCESS KEY (HOT KEY) – When the Communicator is on and connected to a HART-compatible device, pressing the Quick Access Key instantly displays the Quick Access Key menu of user-defined options. When the Communicator is off and the Quick Access Key is pressed, the Communicator automatically powers-up and displays the Quick Access Key menu. See Section 2.6 for more information on using the Quick Access Key.
September 2004 2-6

UMSITRPDS3-1 Model 275 Universal Hart Communicator
Important
When performing certain operations, the message “OFF KEY DISABLED” indicates that the Communicator cannot be turned off. This feature helps prevent accidental shutoff of the Communicator while the output of a device is fixed or a device variable is being edited.
2.3.4 Alphanumeric and Shift Keys
The alphanumeric keys perform two functions: (1) rapid selection of menu options and (2) data entry. The shift keys located below the alphanumeric keys on the keypad are used during data entry to select from among the characters available above each number.
2.3.4.1 Rapid Selection of Menu Options
From any menu, use the keypad to select available options in two ways. First, use the UP or DOWN arrow keys, followed by the RIGHT ARROW/SELECT key, to access available options displayed on the LCD. As an alternative, use the rapid select feature. Simply press the number on the alphanumeric keypad that corresponds to the desired menu option. For example, to quickly access the Utility menu from the Main menu, simply press “4” on the keypad.
2.3.4.2 Data Entry
Some menus require data entry. Use the alphanumeric and shift keys to enter all alphanumeric information into the HART Communicator. Pressing an alphanumeric key alone while editing causes the large character in the center of the key (number 0-9, decimal point, or dash) to be entered. Pressing and releasing a shift key activates shift and causes the appropriate arrow icon ( , , or ) to appear in the upper right-hand corner of the LCD. When shift is activated, the indicated alpha characters or symbols are entered when the keypad is used. Example To enter a number, such as “7,” simply press the number key. To enter one of the small characters appearing above the large numeral (i.e., a letter, space, or mathematical symbol), first press and release the corresponding shift key at the bottom of the keypad, then press the desired alphanumeric key. To enter the letter “E,” press and release the middle shift key, then press the number “2” key. To deactivate a shift key without entering a letter, space, or mathematical symbol, simply press that shift key again.
September 2004 2-7

Model 275 Universal Hart Communicator UMSITRPDS3-1
2.4 GETTING TO KNOW THE COMMUNICATOR
The HART Communicator operates either on-line or off-line. Off-line operation is used to create or edit a configuration that can then be downloaded to a HART device, such as a transmitter. On-line operation is used to download a configuration to a HART device, upload a configuration, edit HART device operating parameters, and monitor process values. For off-line operation, the Communicator need not be connected to a HART device. On-line operation requires a connection to a powered HART device. The menu that appears first when the Communicator is turned on depends on whether the Communicator is connected to a powered HART device.
• Communicator not connected - Main menu (off-line operation)
• Communicator connected - Online menu (on-line operation) To work off-line when connected to a powered loop, access the Main menu from the Online menu by pressing the LEFT ARROW/PREVIOUS MENU key.
Note
Communicator internal operation is controlled by firmware. Consequently, operation will depend upon the firmware version and the installed device drivers, as discussed in this section.
2.4.1 Display Icons
Several different symbols (icons) appear on the LCD to show the state of the Communicator and provide visible response to actions of the user. Figure 2-3 shows the display icons and how they relate to keypad functions.
Low Battery
HART Communication( indicates connecteddevice is configured inthe burst mode)
Access AdditionalMenu Items
AccessPreviousMenu
HART CommunicatorDevice Info
6 Write Protect Yes
X03
034S
1
2 Dev Type3 Dev ID 04 Tag5 MM/DD/YY 10/10/10
FIGURE 2-3 HART Communicator Display Icons
September 2004 2-8

UMSITRPDS3-1 Model 275 Universal Hart Communicator
2.4.2 Menu Structure
The HART Communicator uses a hierarchical menu structure. That is, high-level menus are accessed first, and they provide access to lower-level menus. This structure groups related functions together and minimizes the number of options displayed at once. To become familiar with the menu structure, perform the following actions:
1. With the Communicator off-line (not attached to any devices), press the ON/OFF key to turn the Communicator on. The Communicator will perform a self-test routine and display the firmware revision level installed in the Communicator. It will then display a “Polling?” query. Press NO (F4) to go to the Main menu.
2. The cursor ( ) will be positioned at “1 Offline” on the Main menu. Access the Utility menu by pressing the DOWN arrow key three times, then pressing the RIGHT ARROW/SELECT key. The display changes to show the Utility menu.
3. Access the Configure Communicator menu from the Utility menu by pressing the RIGHT ARROW/SELECT key. The display changes to show the Configure Communicator menu.
4. Access the Contrast menu by pressing the DOWN arrow once, then pressing the RIGHT ARROW/SELECT key. The display shows a message explaining how to adjust the LCD contrast.
5. Press ESC (F3) to return to the Configure Communicator menu.
6. Press the LEFT ARROW/PREVIOUS MENU key two times to return to the Main menu.
7. Press the ON/OFF key to turn the Communicator off.
2.4.3 Reviewing Installed Devices
For the HART Communicator to recognize a specific HART-compatible device, it must contain a description for that device. Communicator device descriptions for Moore and Siemens products are listed in Table 2-2. Device descriptions for many other HART-compatible devices from leading manufacturers are included but not listed in the table. Communicator firmware also contains a “generic” device description, which allows limited access to most HART devices when no device description for that specific product is included. To review the currently installed device descriptions:
1. Turn on the Communicator (off-line) to display the Main Menu.
2. In the Main menu, press “4 Utility” on the keypad.
3. In the Utility menu, press “5 Simulation” on the keypad. The LCD shows the Manufacturer menu, which contains a list of manufacturers whose device descriptions are installed in the Communicator.
4. Press the DOWN arrow to highlight SIEMENS (or other manufacturer). Press the RIGHT ARROW/SELECT key to reveal the Model menu, which lists the device descriptions currently installed in the Communicator (see Table 2-2).
5. To end the review of devices, press the LEFT ARROW/PREVIOUS MENU key three times.
6. Turn off the Communicator or proceed to the next section.
September 2004 2-9

Model 275 Universal Hart Communicator UMSITRPDS3-1
TABLE 2-2 Communicator Firmware Device Descriptions, Rev. F2.2
MODEL FIELD DEVICE REVISION
DESCRIPTION APPROXIMATE VINTAGE1
(Siemens) Moore Menu2
760D Dev V2, DD V1 760D Valve Positioner ---
340A Dev V1, DD V1 340 Transmitter (pushbutton design) 8/90 - 8/94, Model #s 340__A…
Dev V1, DD V1 340 Transmitter (pushbutton design) 8/94 - 8/96, Model #s 340__A… 340A Type 6
Dev V2, DD V1 340 Transmitter (magnetic switch design)
Present, Model #s 340__B…
340B Dev V1, DD V1 340 Transmitter-Controllers (pushbutton design)
8/90 - 8/96, Model #s 340__B…
340S Dev V1, DD V1 340 Transmitter ---
341 Type 5 Dev V1, DD V1 341 Transmitter 8/94 - Present, Model #s 341…
343 Dev V1, DD V1 343 Temperature Transmitter ---
344 Dev V1, DD V1 344 Transmitter-Controller 8/90 - 8/94 Model #s 344…
Dev V2, DD V1 344 Transmitter-Controller 8/90 - Present, Model #s 344…
345 Dev V1, DD V1 345 Transmitter-Controller 8/99 - Present
Siemens Menu
SITRANS P DS3 Dev V2, DD V1 Siemens DS3 Pressure Transmitter 12/00 - Present
Rosemount
Generic Dev V5, DD V4 Generic ---
Notes: 1 Always verify the model and field device revision for the device at hand. For the device model, refer to the Rating Plate (Nameplate). Refer to Appendix A Online Configuration Map to access the “Revision Numbers” menu using the HART Communicator.
2 Menu refers to the HART Communicator’s “Manufacturer” screen.
September 2004 2-10

UMSITRPDS3-1 Model 275 Universal Hart Communicator
2.5 MAIN MENU
The Main menu is shown at right. To access the Main menu: HART Communicator 1->Offline 2 Online 3 Frequency Device 4 Utility
Communicator not connected to a HART device – Press the Communicator’s ON/OFF key, the first menu to appear after powering up is a “Poll?” query. Since a device is not connected, press NO (F4). The Main menu (at right) will then appear. Communicator connected to a powered HART device – Press the Communicator’s ON/OFF key, the Online menu appears. To access the Main menu, press the LEFT ARROW/PREVIOUS MENU key until the Main menu appears. Alternatively, press HOME (F3) to display the Online menu, followed by the LEFT ARROW/PREVIOUS MENU key to display the Main menu. In the Main menu, access an additional menu by either:
• Moving the cursor to the selection using the UP or DOWN arrow key, followed by pressing the RIGHT ARROW/SELECT key
• Pressing the appropriate number (1-4) on the alphanumeric keypad.
September 2004 2-11

Model 275 Universal Hart Communicator UMSITRPDS3-1
2.5.1 Offline Menu
The Offline menu provides access to two other menus: New Configuration and Saved Configuration. These two configuration menus can be used without connecting to a HART-compatible device, but it is not possible to send saved data to a device if no device is connected. In the Main menu, press “1 Offline” on the keypad or the RIGHT ARROW/SELECT key to access the Offline menu. The complete menu tree for the Offline Menu is shown in Figure 2-4. Main Menu 1 New 1 Moore Products List of Models Field Device From a Blank 1 Offline Configuration 2 Rosemount Revision Template 3 Siemens 1 Mark all 2 Unmark all 3 Edit individually > 4 Save as... 1 Location 2 Name 3 Data type 2 Save 1 Module Contents List of 1 Edit 1 Mark all Configuration 2 Data Pack Configurations 2 Unmark all Contents 3 Edit individually > 3 PC 4 Save as... 1 Location 2 Copy to... 2 Name 3 Send 3 Data type 4 Print 5 Delete 6 Rename 7 Compare 2 Online 3 Frequency Device
Note: > = See Table 2-3 for additional menu options
4 Utility
FIGURE 2-4 Offline Menu Map
TABLE 2-3 Offline Menu Map Continued, “Edit individually” Options1
Tag (type)2 Alarm URV (type) Flange type (select) Extension length (select) Descriptor (type) Pres xfer function (select) Flange material (select) Electrical connection (select) Date (type) Pressure damp (type) O ring material (select) Local keys ctrl mod (select) Pressure unit (select) AO alarm type (select) Process flange bolt (select) Bargraph (select) Pressure LRV (type) Alarm LRV (type) DrainVent / plug mat (select) Unit tracking (select) Pressure URV (type) Alarm URV (type) DrainVent / plug POS (select) Local display unit (select) Pres transfer function (select) Upper AO limit (type) RS type (select) Measuring speed (select) Pressure damp (type) Lower AO limit (type) RS isoltr material (select) Final assembly num (type) AO alarm type (select) Meter type (select) RS fill fluid (select) Alarm LRV (type) Process connection (select) Num remote seal (select) Notes: 1. Menu sequence is read top to bottom, left to right. 2. (type) = type a value or text; (select) = select from the list offered.
September 2004 2-12

UMSITRPDS3-1 Model 275 Universal Hart Communicator
2.5.1.1 New Configuration
This option is used to compile a custom set of device configuration data for downloading later to one or more HART-compatible devices. Downloading the same data to multiple devices ensures that they all store identical configuration data. Use the following steps to compile off-line, new device configuration data:
HART Communicator Offline 1->New configuration 2 Saved configuration HELP
1. From the Main menu, press “1” to access the Offline menu.
2. Press “1” to enter a new configuration. The Manufacturer menu appears.
3. Choose a manufacturer by scrolling to the manufacturer name with the DOWN arrow, then pressing RIGHT ARROW/SELECT. For a SITRANS P transmitter, choose Siemens. The Model menu appears.
4. From the Model menu, choose a device by scrolling through the list, then pressing RIGHT ARROW/SELECT. The Field Device Revision (Fld dev rev) menu appears. The Field Device Revision menu contains the currently installed software revisions for the field device and device descriptions (DD) for the model selected from the Model menu. Select the software revision (RIGHT ARROW/SELECT or number) to access the Blank Template menu (at right). To display the software revision for a particular device, connect the Communicator to the device and follow instructions given in the device manual.
Unnamed From Blank Template 1->Mark all 2 Unmark all 3 Edit individually 4 Save as... HELP |SAVE
To find the field device revision (compatible device description) for a SITRANS P transmitter: 1. Connect the Communicator to the transmitter. 2. Apply power to the transmitter. 3. Turn on the Communicator. 4. In the Online menu, select “3 Device Setup.” 5. In the Device Setup menu, select “4 Detailed Setup.” 6. In the Detailed setup menu, select “4 Device
Information.” 7. In the Device Information menu, select “6 Revision
numbers.” Revision numbers for the Communicator and the transmitter will be listed.
September 2004 2-13

Model 275 Universal Hart Communicator UMSITRPDS3-1
5. With the Blank Template menu displayed, choose from the options available, as follows: Mark All – Flags (selects) all configurable variables for sending to a connected HART-compatible device. Unmark All – Remove the flags from all configurable variables in the configuration. Unmarked configuration variables are not sent to a connected device. Edit Individually – Open the Edit individually menu (at right).
Unnamed Edit individually Tag ******** Not marked to send NEXT |MARK |EDIT |EXIT
Example The Edit individually menu permits the user to type or change a configuration parameter. For example, to add a tag, press the EDIT function key (F3) to and type the tagname. Then press NEXT to move to the next configurable parameter. Save As. . . Selecting the Save As option allows a new configuration to be saved to either the Memory Module or the Data Pack. The Memory Module holds up to 10 typical configurations, and contains the operating system software and device application software in non-volatile memory. The Data Pack stores up to 100 typical configurations in nonvolatile, removable memory. Example From the Offline menu, choose 1 New configuration. This displays the Manufacturer menu. Choose a device, then choose a model from the Model menu. Choose a software revision from the Fld dev rev menu. The Communicator creates a configuration and displays the Blank Template menu. Choose Save as... to display the Save as... menu (at right). With the Location highlighted, press the SAVE (F2) function key to save the configuration.
Unnamed Save as... 1->Location Module 2 Name 3 Data Type Standard HELP|SAVE
If the location highlighted is the Module, but the configuration is to be stored in the Data Pack, or vice versa, press the RIGHT ARROW/SELECT key to display the Location menu. Choose either Module or Data Pack by pressing ENTER (F4). This displays the Save as... menu again. Press SAVE (F2) to save the configuration in the desired location.
September 2004 2-14

UMSITRPDS3-1 Model 275 Universal Hart Communicator
Unnamed Name UNNAMED MYNAME#1 HELP|SAVE
The Save As... menu also is used to enter or edit the configuration Name and Data Type. To name a configuration, simply choose option 2, then use the keypad with shift keys to enter the name as shown at right. When the Save As... menu is displayed, one of the options – Standard, Partial, or Full – will be shown. To change the option, move the cursor to the Data Type ______ line of the Save As... menu and press the RIGHT ARROW/SELECT key to display the Data Type menu (below right).
Unnamed Data Type Standard Standard Partial Full HELP ESC|ENTER
Data Type Standard refers to all user-editable variables in a device configuration. Data Type Partial refers to only the marked editable variables. Data Type Full refers to a all device variables, whether user-editable or not. In general, it is best to save as Data Type Standard. Saving as Data Type Full preserves a complete configuration for future reference. When all changes have been made, save the new configuration to either the Memory Module or the Data Pack and return to the Offline menu.
September 2004 2-15

Model 275 Universal Hart Communicator UMSITRPDS3-1
2.5.1.2 Saved Configuration
The second option on the Offline menu is the Saved Configuration menu, which permits access to previously stored configuration data.
HART Communicator Saved Configuration 1->Module Contents 2 Data Pack Contents 3 PC HELP
1. Press “2” from the Offline Menu to display the Saved Configuration menu (at right).
2. Select either Module Contents or Data Pack Contents to open stored configurations. Both storage locations list all saved configurations by assigned Tag. See XPAND (below) for more configuration identification details. (Note: The PC option shown on the menu is not operational with firmware release 1.6.)
The Module Contents menu, which lists the configurations currently stored in the Memory Module, is shown at right. The Data Pack menu is similar. Both give the user several options for handling and viewing configuration data, as explained below.
HART Communicator Data Pack Contents ->PT101 PT102 PT103S PT104 FILTR|XPAND
FILTR
The FILTR function key (F1) opens a menu that provides both Sort and Filter options. These options select only the chosen configurations from all those stored. This is particularly valuable for the Data Pack, which stores up to 100 configurations. Sort allows unique device configurations to be grouped and displayed by Tag, Descriptor, or user-assigned Name.
Use Filter to group and display configurations according to certain characters within the chosen device identifier (Tag, Descriptor, or Name). Filter is useful for selecting all the tags from a certain area of the process or plant.
When setting up a Filter (see display at right), two wildcard characters, the period (.) and the asterisk (*) are used. The period replaces a single character of any value. The asterisk replaces one or more alphanumeric characters of any value.
HART Communicator Tag Filter * A-*-1 HELP|DEL |ESC |ENTER
For example, if A-*-.1 is entered as the filter, the configurations displayed will be all those with device tags starting with A-, followed by any combination of characters (e.g., XYZ, S2, 3R) followed by a dash, followed by any single character (e.g., 1, D, M), and ending with a 1. Tags A-M1-B1, A-N2-Z1, and A-SF-X1 would display, whereas the tags BA53, PT101, and ATT48 would not.
September 2004 2-16

UMSITRPDS3-1 Model 275 Universal Hart Communicator
XPAND The XPAND function key allows a user to view the Tag, Descriptor, and Name for the configuration being edited or viewed. Selecting Compress restores the previous compressed display, which shows only the current Tag, Descriptor, or Name.
PT118 Saved Configuration 1->Edit 2 Copy to... 3 Send 4 Print 5 Delete HELP
3. With the Module Contents or Data Pack Contents menu displayed, press the RIGHT ARROW/SELECT key to open the Saved Configuration menu for a device that was highlighted (at right). Edit – displays the Edit menu, providing the same functions as described under “Edit individually” in Section 2.5.1.1. When editing off-line, only stored data may be edited. Moreover, data stored as a Partial configuration must be converted to a Standard configuration, then saved, prior to editing. Copy To... – specifies the storage location for a copy of the configuration. Copy To... also provides a way to change the configuration name. Send – sends a saved configuration to a connected device. Print – not implemented with firmware release 1.6. Delete – removes a saved configuration from memory. A confirmation message appears. Press Yes or No to complete the function. Rename – provides access to the configuration name editing menu. After making name changes, enter and save the data to return to the previous storage location menu. Compare – compares a selected device configuration from a stored location with other device configurations. The HART Communicator can compare device types, variables, marked lists, and other configuration parameters. Messages appear indicating if the configurations compared are the same or different.
September 2004 2-17

Model 275 Universal Hart Communicator UMSITRPDS3-1
2.5.2 Online Menu
An operating transmitter can be tested and configured from the Online menu. Options available through the SITRANS P Online menu are summarized in Figure 2-5 (Appendix A contains a more detailed menu map). The Online menu is displayed when the Communicator contains a device description for the connected HART device. If not, the Generic Online menu is displayed (see Figure 2-6). The Online menu can also be accessed from the Main menu by pressing “2 Online.” Online Menu When the Communicator is connected to a powered transmitter, it will poll the device to obtain: type, address, configuration, and process data. The Online menu shows the device type at the top of the display, if it is a supported device. SITRANS P-specific menu options are described in detail in Sections 3 and 6.
SITRANS P Online 1->Press 2 Type 3 Device Setup HELP |SAVE
If a device description for the connected device is not in the Communicator, contact the device manufacturer. The Com-municator provides a generic interface so that functions common to all HART-compatible devices can be accessed. Generic Menu The Generic Online menu (at right) is the first menu in the generic interface. It displays critical, up-to-date device information. Configuration parameters for the connected device may be accessed using the Device setup option. Figure 2-6 shows the complete Generic Online menu tree.
1151:GENERIC ♥ Online 1->Device setup 2 PV 50.0000 inH2O 3 AO 12.000 mA 4 LRV 0.0000 in H2O 5 URV 100.0000 in H2O
SAVE
From the Online menu, use the options below to change device configurations. Device setup – provides access to the Device Setup menu. Configurable device parameters common to all HART-compatible devices can be accessed from this menu. Primary Variable (PV) – the dynamic primary variable and the related engineering unit. When the primary variable contains too many characters to display on the Online menu, access the PV menu to view the primary variable and related engineering units by pressing “1.” Analog Output (AO) – the dynamic output and the related engineering units. The analog output is a signal on the 4-20 mA scale that corresponds to the primary variable. When analog output contains too many characters to display on the Online menu, access the PV AO Menu to view the analog output and related engineering unit by pressing “3.”
September 2004 2-18

UMSITRPDS3-1 Model 275 Universal Hart Communicator
1 Device setup* 1 Process variables 1 Pressure + 2 Percent range + 3 Analog output + 4 Sensor temperature + 2 Diagnostics and 1 Diagnosis 1 Min / max pointer > service 2 Operating hours > 3 Warnings / alarms > 4 Status > 2 Simulation / Test 1 Simulation 1 Loop Test 2 Inputs > 2 Test 1 Self Test 2 Master reset 3 Control modes 1 Local keys ctrl mode 2 Write protect (status) 3 Set write protect 4 Trim 1 Position correction 2 Sensor trim > 3 Trim analog output > 5 Restore manufacturers 1 All trims trims 2 DAC trims 3 Position correction 4 Sensor trim > 6 All measured values 1 Pressure + 2 Raw value 3 Sensor Temp + 4 El Temp + 5 AO + 3 Basic setup 1 Tag 2 Unit 3 Position correction 4 LRV 5 URV 6 Damp 7 Transfer function 4 Detailed setup 1 Sensors 1 Pressure sensor 1 Pressure + 2 Unit 2 Temperature sensor 1 Sensor temperature + 2 El temperature + 2 Signal condition 1 Process variables > 2 Position correction 3 Zero / span set > 4 Damping 5 Transfer function 6 Measuring speed 3 Output condition 1 Analog output + 2 HART output > Polling address and number of preambs 4 Device information 1 Ranges and limits > Module range, pressure USL and LSL,
and minimum span 2 Common device
information > Manufacturer, model, measurement type, etc.
3 Sensor information > Process connection, flange type, etc. 4 Remote seal > Seal type, material, fill, etc. 5 Local meter > Type, engineering units, bargraph
activation. 6 Revision numbers > Universal; field device DD,
software/firmware, and hardware. 5 Reviews > Step thru configuration 2 PV Notes: * = Reached from the Online menu by pressing 3 Device setup 3 AO > = Press to access lower level menu(s) not shown 4 LRV + = Active data displayed 5 URV HART Communicator, Rev 5
FIGURE 2-5 SITRANS P Online Menu Map
September 2004 2-19

Model 275 Universal Hart Communicator UMSITRPDS3-1
1 Device setup 1 Process variables 1 Preset variable 2 Percent range 3 Analog output 2 Diagnostics and 1 Test device 1 Self test service 2 Status 2 Loop test 3 Calibration 1 Rerange 1 Keypad input 2 Apply values 2 Trim analog output 1 D/A trim 2 Scaled D/A trim 3 Sensor trim 3 Basic setup 1 Tag 2 Unit 3 Range values 4 Device information 1 Date 2 Descriptor 3 Message 4 Write protect 5 Meter type 5 Transfer function 6 Damping 4 Detailed setup 1 Sensors 1 Process variables 2 Sensor service 1 Sensor trim 2 Characterize 3 Unit 2 Signal condition 1 Process variables 2 Range values 3 Unit 4 Transfer Function 5 Damping 3 Output condition 1 Process variables 1 Loop test 2 D/A trim 3 Scaled D/A trim 2 Analog output 3 AO alarm type 4 HART output 1 Poll address 2 Number of request preams 3 Burst mode 4 Burst option 4 Device Information 1 Field device info 1 Tag 2 Date 3 Descriptor 4 Message 5 Model 6 Write protect 7 Revision #’s 8 Final assembly # 9 Device ID 10 Distributor 2 Sensor information 3 Meter type 4 Self test 5 Review 2 PV 3 AO 4 LRV 5 URV
FIGURE 2-6 Generic Online Menu Map
September 2004 2-20

UMSITRPDS3-1 Model 275 Universal Hart Communicator
Lower Range Value (LRV) – the current lower range value and the related engineering unit. When the lower range value contains too many characters to display on the Online menu, access the PV LRV Menu to view the lower range value and related engineering unit by pressing “4.” Upper Range Value (URV) – the current upper range value and the related engineering unit. When the lower range value contains too many characters to display on the Online menu, access the PV URV Menu to view the upper range value and related engineering unit by pressing “5.”
2.5.3 Frequency Device Menu
From the Main menu, press “3” to access the Frequency Device menu. This menu displays the frequency output and corresponding pressure output for current-to-pressure devices. For SITRANS P transmitters, the display frequency and pressure values are both “none.”
2.5.4 Utility Menu
From the Main menu, press “4” to access the Utility menu (at right). This menu provide functions that affect the operation of the Communicator, not the connected devices.
HART Communicator Utility 1->Configure Communic 2 System Information 3 Listen for PC 4 Storage Location 5 Simulation 6 Selftest
2.5.4.1 Configure Communicator
From the Utility Menu, press “1” to access the Configure Communicator menu (below right). Use this menu to set the polling, adjust the contrast of the LCD, set the Communicator shutoff time, or set how many diagnostics messages to ignore before a warning message is displayed.
HART Communicator Configure Communica 1->Polling 2 Contrast 3 Off Time 4 Ignore diagnostics 5 Delete configs HELP
Use the Polling option to direct the HART Communicator to search for a connected device. The Communicator finds every device in the loop and lists them by tag number. If Polling is Never Poll, then the Communicator will not find a connected device. The Contrast menu is used to change the LCD contrast. Contrast returns to the default value when the Communicator is turned off. Off Time is used to set the Communicator to turn off automatically when not in use to conserve battery power. The Communicator normally displays diagnostic messages from a connected device. The Ignore Diagnostics option permits the user to specify the number of messages to ignore so that messages will not be displayed as often, extending the time between displayed messages. The message count defaults to a nominal count of 50 each time the Communicator is turned on.
September 2004 2-21

Model 275 Universal Hart Communicator UMSITRPDS3-1
The Delete Configs option is used to delete all configurations stored in the Module, data pack, or Hotkey menu.
2.5.4.2 System Information
From the Utility menu, press “2” to access the System Information menu (at right). This menu can be used to provide information on the motherboard (e.g., firmware revision number), the module hardware and software characteristics, and the Data Pack EEPROM.
HART Communicator System Information 1->Motherboard 2 Module 3 Data Pack HELP|DEL |ESC |ENTER
2.5.4.3 Listen for PC
Not implemented in firmware release 1.6.
2.5.4.4 Storage Location
From the Utility menu, the Storage Location menu (at right) provides access to data concerning the Memory Module or the Data Pack. Information available through this menu includes a label for the Memory Module or Data Pack, a feature that displays the total storage used (bytes) and the storage remaining (“free” bytes). The PC selection is not implemented in firmware release 1.6.
HART Communicator Storage location 1->Module 2 Data Pack 3 PC HELP|DEL |ESC |ENTER
2.5.4.5 Simulation
The HART Communicator provides a mode that allows users to simulate an on-line connection to a HART-compatible device without connecting to the device. The simulation mode is a training tool that allows users to become familiar with different devices before configuring them in a critical environment. Simulation of an on-line connection is done by selecting a manufacturer from the Manufacturer menu, then selecting a device from the Model menu, just as is done when on-line. After selecting a software revision, the Online menu for the simulated device is displayed. Functions are the same as those available when on-line.
2.5.4.6 Selftest
Selftest performs a test of the Communicator.
September 2004 2-22

UMSITRPDS3-1 Model 275 Universal Hart Communicator
2.6 USING THE QUICK ACCESS KEY
Pressing the Quick Access Key (Hot Key) while on-line displays the Quick Access Key menu, a user-definable menu that provides immediate access to up to 20 frequently performed tasks. The Quick Access Key menu is accessible when the Communicator is powered and on-line, or when the Communicator is off, by simply pressing the Quick Access Key. For the Quick Access Key to be active, the Communicator must be connected properly to a HART-compatible device. From the factory, the Quick Access Key menu includes (for SITRANS P only):
Zero/Span set – View variables such as percent range, process value, set point, and valve. Use of this function is described in Section 6.1.3. More options can be added to provide rapid access to frequently performed tasks. User-defined options can be deleted later, but the factory option is permanent. To use the Quick Access Key:
1. Connect the Communicator to a powered HART-compatible device.
SITRANS P Hotkey configuration 1->Zero/span set SAVE
2. Press the Quick Access Key (upper right-hand key in the action keys group). The Communicator will power-up and display the Quick Access Key menu (at right). Before any custom options have been installed, the Quick Access Key menu displays only the five factory-installed options. To add options, see Section 2.6.1.
3. Use the UP and DOWN arrows followed by the RIGHT ARROW/SELECT key to choose an option, or press the option’s number on the keypad. The menu for the chosen option displays.
4. Follow the instructions given in Section 6.1.3 to use the option selected.
5. When finished, press the Quick Access Key to return to the previous menu.
September 2004 2-23

Model 275 Universal Hart Communicator UMSITRPDS3-1
2.6.1 Adding Quick Access Key Options
The Quick Access Key menu contains space for up to 20 on-line options. For example, if device tags and damping must be changed often, simply add both of them to the menu. The Communicator automatically saves them so they can be accessed quickly by pressing the Quick Access Key. From one of the menus or submenus reached via the Online menu, use the following steps to add customized options to the Quick Access Key Menu:
1. Using the UP or DOWN arrow keys, move the menu bar to highlight the option to be added to the Quick Access Key menu (e.g., Damping, under the Configure Xmtr\Sensor Input menu).
SITRANS P Hotkey Configuration ADD: Pres Zero/span set ADD|EXIT
2. Press any shift key, release it, then press the Quick Access Key. The Hotkey Configuration menu displays (at right). The Hotkey Configuration menu displays the new topic being added to the list of current Quick Access Key options. For example, in the figure at right, Damping is being added.
3. Press ADD (F3) to add the option. Pressing EXIT (F4) terminates the procedure and displays the menu that was displayed when “Shift,” Quick Access Key was pressed.
4. After pressing ADD (F3), either press ALL (F1) to add the new option to the Quick Access Key menu for all the HART-compatible devices supported by the Communicator or press ONE (F4) to add the option to the Quick Access Key Menu only for the type of device that is currently connected.
5. Next, the question “Mark as read-only variable on Quick Access Key menu?” may appear. Press YES (F1) to mark the variable for this option as read-only. Press NO (F4) to mark the variable as read/write. Marking a parameter for a device as read-only allows users to view, but not change, the parameter using the Quick Access Key Menu. Marking it as read/write permits the value to be changed from the Quick Access Key menu.
SITRANS P Hotkey Configuration Zero/span set Pres EXIT
Finally, “Display value of variable on hotkey menu?” is displayed. Press YES (F1) to display the current variable associated with the option next to the option on the Quick Access Key menu as shown at right for Damping and Tag. Press NO (F2) not to display the variable on the Quick Access Key menu.
6. When finished adding options, press EXIT (F4) to exit the Hotkey Configuration menu and return to the menu of the last option deleted.
September 2004 2-24

UMSITRPDS3-1 Model 275 Universal Hart Communicator
2.6.2 Deleting Quick Access Key Options
Use the following steps to delete an option from the Quick Access Key menu:
1. From any on-line menu, press any shift key, release it, then press the Quick Access Key.
SITRANS P Hotkey Configuration ADD: Descriptor
Range Xmtr Damping Tag DEL |ADD |EXIT
2. The Hotkey Configuration menu displays (at right).
3. Using the UP or DOWN arrow key, move the menu bar to highlight the option to be deleted and press DEL (F2). Factory-provided options cannot be deleted.
4. When finished deleting options, press EXIT (F4) to exit the Hotkey Configuration menu and return to the menu of the last option deleted.
September 2004 2-25

Model 275 Universal Hart Communicator UMSITRPDS3-1
September 2004 2-26

UMSITRPDS3-1 Pre-Installation Test
3.0 PRE-INSTALLATION TEST
Prior to installation, the transmitter can be tested and operated from the HART Communicator. This test consists of checking that the transmitter is operational and that all configuration information is correct. Section 5 Post-Installation Test provides an on-line test procedure. For an in-depth discussion of transmitter configuration, refer to Section 6 On-Line Configuration and Operation.
Important
Transmitter orientation will affect the analog output zero. Refer to Section 7.1 Calibration for details.
3.1 PROCEDURE
A complete transmitter functional test can be performed and configuration procedures can be practiced. To operate the transmitter on a test bench, make the connections shown in Figure 3-1. Figure 3-2 shows the connections if these tests are to be performed after transmitter installation. A pressure source can also be connected.
+ _
- +4-20 mA
+_
IO
MG
0035
7a
_
+
250
mA
Vdc1
2
3
4
5
1 Transmitter field terminals 2 Analog output test terminals 3 Digital milliammeter 4 DC power supply 5 HART Communicator
Notes: 1.
2.
Loop current can be shown on the optional transmitter display in 0-100%. Alternatively, the milliammeter can be connected to the transmitter’s analog output test terminals and the power supply positive (+) terminal connected to the transmitter’s positive (+) terminal.
FIGURE 3-1 Bench Test Connections
Note: If using a Model 375 Field Communicator, see the inside of the front cover of this manual.
September 2004 3-1

Pre-Installation Test UMSITRAPDS3-1
_
+mA
+ _
- +4-20 mA
+
IO
250
+
_
_
MG
0035
8b
Vdc
1
2
3
4
5
6
1 Transmitter field terminals 2 Analog output terminals 3 Digital milliammeter 4 HART Communicator
5 Controller, recorder, indicator, or other 1-5 Vdc device 6 DC power supply Note: Loop current can also be shown on the optional transmitter display in 0-100%.
FIGURE 3-2 Field Test Connections
3.1.1 Test Equipment
TEST EQUIPMENT DESCRIPTION (see Specifications, Section 9.3)
Power Supply 10.5 to 45 Vdc, see Power Supply Requirements, Section 4.3.5
Multimeter:
Current Range: 4 to 20 mA to measure loop current
Voltage Range: 0-50 Vdc to measure power supply and loop voltage
Current Sense Resistor 250 to 1100Ω to support HART digital communications
Configuration Device Model 275 HART Communicator or Model 375 Field Communicator
Pressure Source Dead Weight Tester or similar device.
Note
Test equipment should be 2 to 10 times more accurate than the transmitter accuracy.
September 2004 3-2
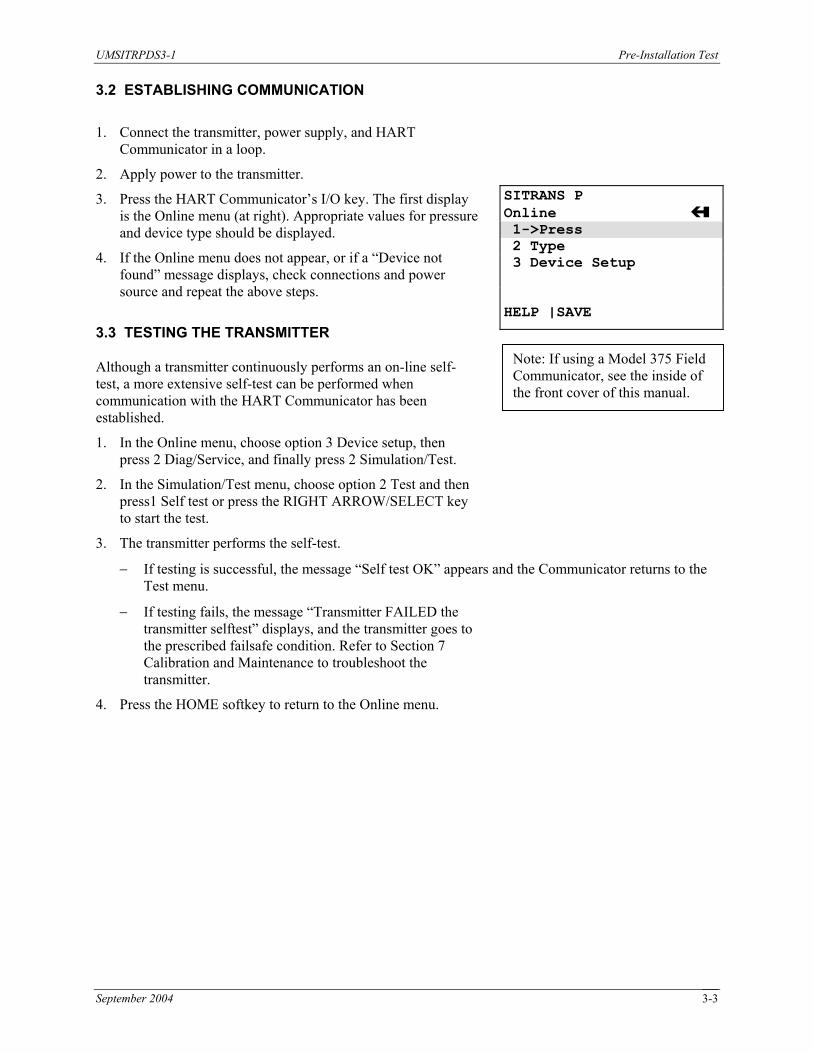
UMSITRPDS3-1 Pre-Installation Test
3.2 ESTABLISHING COMMUNICATION
1. Connect the transmitter, power supply, and HART Communicator in a loop.
2. Apply power to the transmitter. SITRANS P Online 1->Press 2 Type 3 Device Setup HELP |SAVE
Note: If using a Model 375 Field Communicator, see the inside of the front cover of this manual.
3. Press the HART Communicator’s I/O key. The first display is the Online menu (at right). Appropriate values for pressure and device type should be displayed.
4. If the Online menu does not appear, or if a “Device not found” message displays, check connections and power source and repeat the above steps.
3.3 TESTING THE TRANSMITTER
Although a transmitter continuously performs an on-line self-test, a more extensive self-test can be performed when communication with the HART Communicator has been established.
1. In the Online menu, choose option 3 Device setup, then press 2 Diag/Service, and finally press 2 Simulation/Test.
2. In the Simulation/Test menu, choose option 2 Test and then press1 Self test or press the RIGHT ARROW/SELECT key to start the test.
3. The transmitter performs the self-test.
− If testing is successful, the message “Self test OK” appears and the Communicator returns to the Test menu.
− If testing fails, the message “Transmitter FAILED the transmitter selftest” displays, and the transmitter goes to the prescribed failsafe condition. Refer to Section 7 Calibration and Maintenance to troubleshoot the transmitter.
4. Press the HOME softkey to return to the Online menu.
September 2004 3-3

Pre-Installation Test UMSITRAPDS3-1
September 2004 3-4
3.4 REVIEWING CONFIGURATION DATA
Review the configuration before placing a transmitter in service to ensure that the proper data has been stored.
SITRANS P Review Pressure unit inH2O HELP |PREV |NEXT |EXIT
1. Establish communication as described in Section 3.2.
2. In the Online menu, press 3 Device Setup, then 5 Review.
3. Press NEXT to review configuration parameters. See the screen at right. To return to the Device setup menu, press EXIT. Parameters cannot be changed in the Review mode. Exit the Review mode and enter either Basic Setup or Detailed Setup to change parameters.
4. If configuration parameters have been changed, save the configuration. Note the filename and location.
5. To send the configuration to a transmitter:
1) Press the LEFT ARROW/PREVIOUS key until the Main Menu is reached.
2) Press 1 Offline, then press 2 Saved Configuration.
3) Select the location of the configuration and then select the desired configuration from the list of stored configurations.
4) Press 3 Send to download the configuration to the transmitter. If the configuration is incompatible with the transmitter, a warning message will appear.
3.5 CHECKING TRANSMITTER OUTPUT
To be sure that the transmitter is reading the proper pressure in the proper units, use a dead weight tester or other acceptable pressure standard to apply 0, 25, 50, 75, and 100% of input values to the transmitter. Check that the corresponding outputs are 4, 8, 12, 16, and 20 mA. With the transmitter configured and powered, and with the test equipment in place, perform the following steps:
1. Connect the HART Communicator and press the I/O Key.
2. In the Online menu, press 3 Device setup, then 1 Process variables. View applied pressure and transmitter output. SITRANS P: ♥
Process Variables 1->Press 0.000 inH2O 2 % rnge 1.00% 3 AO 4.000 mA 4 Snsr Temp 24.8°C
HELP |SAVE |HOME
3. Apply pressure representing 0% of the configured range. Wait at least 5 seconds.
4. The current should read 4.00 mA.
5. Repeat steps 3 and 4 for pressures representing 25, 50, 75, and 100% of the configured range. Check for the corresponding pressure readings and current values.
This completes the pre-installation test of the transmitter.

UMSITRPDS3-1 Installation
4.0 INSTALLATION
Transmitter installation is discussed in this section. Topics include: equipment delivery and handling, environmental and installation considerations, and mechanical and electrical installation.
IMPORTANT
Before installing or servicing the transmitter:
• Read the information on the transmitter’s rating and approval plates and ensure that the correct model is at hand and that the correct procedures in this manual are followed. See Section 9.1 Model Designations for an explanation of the model designation alphanumeric sequence shown on the rating plate.
• The installation must conform to the National Electrical Code and all other applicable construction and electrical codes. Refer to the installation drawings in Appendix B when locating a transmitter in a hazardous area.
• Refer to Section 9.6 Hazardous Area Classifications for approval agency requirements that affect installation and use of the instrument and for additional statements concerning installation in a hazardous environment.
4.1 EQUIPMENT DELIVERY AND HANDLING
Prior to shipment, a transmitter is fully tested and inspected to ensure proper operation. It is then packaged for shipment. Most accessories are shipped separately. The contents of a box are listed on a packing slip.
4.1.1 Receipt of Shipment
Each carton should be inspected at the time of delivery for possible external damage. Any visible damage should be recorded immediately on the carrier’s copy of the delivery slip. Each carton should be unpacked carefully and its contents checked against the enclosed packing list. At the same time, each item should be inspected for any hidden damage that may or may not have been accompanied by exterior carton damage. If it is found that some items have been damaged or are missing, notify Siemens immediately and provide full details. In addition, damage must be reported to the carrier with a request for their on-site inspection of the damaged item and its shipping carton.
4.1.2 Storage
If a transmitter is to be stored for a period prior to installation, review the environmental requirements in Section 9.3 Specifications.
September 2004 4-1

Installation UMSITRPDS3-1
4.2 ENVIRONMENTAL CONSIDERATIONS
Many industrial processes create severe environmental conditions. The conditions at each transmitter location must be within the specifications stated in Section 9.3 Specifications. Although the transmitter is designed to perform in harsh conditions, it is prudent to choose a location that minimizes the effects of heat, vibration, shock, and electrical interference.
CAUTION
Exceeding the specified operating temperature limits can adversely affect performance and may damage the instrument. See the rating plate and Section 9 Model Designations and Specifications for temperature and other environmental ratings.
4.3 PRE-INSTALLATION CONSIDERATIONS AND CALCULATIONS
These sub-sections provide pre-installation considerations and calculations that are needed to ensure successful mechanical and electrical installations.
4.3.1 Mechanical
• Select the application. Series DSIII transmitters are suitable for, but not limited to:
− Flow measurement
− Gauge pressure measurement
− Level measurement
− Draft pressure measurement
− Absolute pressure measurement
− High differential pressure measurement
− Hydrostatic tank gauging measurement
• Determine the physical mounting of the transmitter. Consider:
− Optional brackets for pipe mounting or surface mounting
− Pipe or tank wall thickness, diameter, rigidity, and freedom from vibration
− Clearance for transmitter installation and maintenance
− Need to rotate the enclosure and display for viewing ease Refer to Figures 9-1 through 9-4 for transmitter dimensions and to the figures in Sections 4.4 and 4.5 for typical mechanical installations. Refer to Section 9.3 for mechanical and environmental specifications.
September 2004 4-2

UMSITRPDS3-1 Installation
• Determine if an explosion-proof or intrinsically safe installation is required. Refer to the transmitter’s rating plate for electrical classifications and to Section 4.7 and Section 9. Hazardous area information for specific approval agencies can be found in Section 9.6 and Appendix B. An intrinsically safe installation requires user-supplied intrinsic safety barriers that must be installed in accordance with barrier manufacturer’s instructions for the specific barriers used. Transmitter certification is based on the “entity” concept in which the user selects barriers that permit the system to meet the entity parameters.
• Absolute and Differential Models – Consider pressure piping recommendations. Refer to Section 4.3.3.
• Determine conduit routing. Refer to Section 4.5.3.
• Consider bolting a transmitter to a two- or three-valve manifold. Differential Construction Model – Install a three-valve manifold because this device provides both an equalizing valve and high and low pressure block valves. Use the equalizing valve to equalize pressure between inputs before calibrating or servicing the transmitter. Use block valves to isolate the transmitter from the process for servicing or removal. Gauge Construction Model – Install a two-valve manifold for similar purposes to those listed above. Flange Model – Consider using flushing rings to flush and clean the process connection without removing the flange.
Prepare installation site drawings showing the following:
− Location of the Master Device (e.g., HART Communicator or controller), location and identification of each transmitter, and location of any signal cable junctions for connecting the HART Communicator
− Routing plan for signal cable(s) and for power cable(s)
4.3.2 Electrical
• Determine transmitter operating mode (analog or digital) and type of network needed; refer to Section 4.3.4.
• Determine minimum power supply requirements. Refer to Section 4.3.5.
• Select twinaxial cable (shielded twisted pair wire) and determine maximum network cable length. Refer to Sections 4.3.6 and 9.5.
• Develop the cable route and method of support and protection (e.g. conduit, cable tray). To improve immunity to interference, keep cable separated from cables with voltage greater than 60V and away from large electrical equipment.
• Determine the need for network junctions. Refer to Section 4.3.7.
• Intrinsically Safe installations will need barriers. Refer to Section 4.3.8.
• Consider the effect of connecting additional equipment (e.g., recorder, loop powered display) to the network. Refer to Section 4.3.9.
• Read Section 4.3.10 for shielding and grounding recommendations.
September 2004 4-3

Installation UMSITRPDS3-1
4.3.3 Impulse Piping for Absolute and Differential Models
Impulse piping is the piping to be connected to the transmitter’s process connection(s). For suggested flow and level measurement piping arrangements, refer to:
• Differential Model - Figures 4-1 and 4-2
• Absolute Model - Figures 4-3 and 4-4
• Flange Model - Figure 4-5 Note the following when planning and installing piping.
• Install impulse piping in accordance with ANSI Code B31.1.0.
• Make impulse piping length as short as possible to reduce frictional loss and temperature-induced pressure variations. However, when using impulse lines on a high temperature process, locate the transmitter far enough away from the heat source to keep it within temperature specifications [28°C (50ºF) per foot cooling to a normal ambient is assumed for uninsulated impulse lines].
• For lines between the process and transmitter, use impulse piping of 3/8" OD or larger to avoid friction effects (causes lagging) and blockage.
• Use the least number of fittings and valves possible to minimize leakage problems. Teflon® tape is the recommended thread sealant for process connections at the transmitter.
• Valves used in pressure service should be either globe or gate type. Valves used in gas service should be of a type that does not permit condensate to build up behind the valve.
• Install sediment chambers with drain valves to collect solids suspended in process liquids or moisture carried with non-condensing gases.
• Install air chambers with vent valves at high point in piping to vent gas entrained in process liquid.
• Remote diaphragm seals can be used to keep corrosive liquid or gas from the transmitter pressure inlets and isolation diaphragm.
• Alternatively, use sealing fluid to isolate the process from the transmitter. Sealing fluid must be of greater density than process fluid and non-miscible.
• For transmitters located above the process, slope piping from the transmitter at least 1 inch/foot (83 mm/M) down toward process. For transmitters below the process, slope piping at least 1 inch/foot (83 mm/M) up to process.
• Protect pressure lines (by shielding if necessary) from objects or equipment that may bend or kink the line causing fluid flow restriction.
• Protect the pressure lines from extreme temperature ranges. Lines should be protected from freezing by installing a heat trace.
• A three-valve manifold should be used with a differential transmitter model. A two-valve manifold can be used with an absolute model to permit servicing and zero checks.
September 2004 4-4
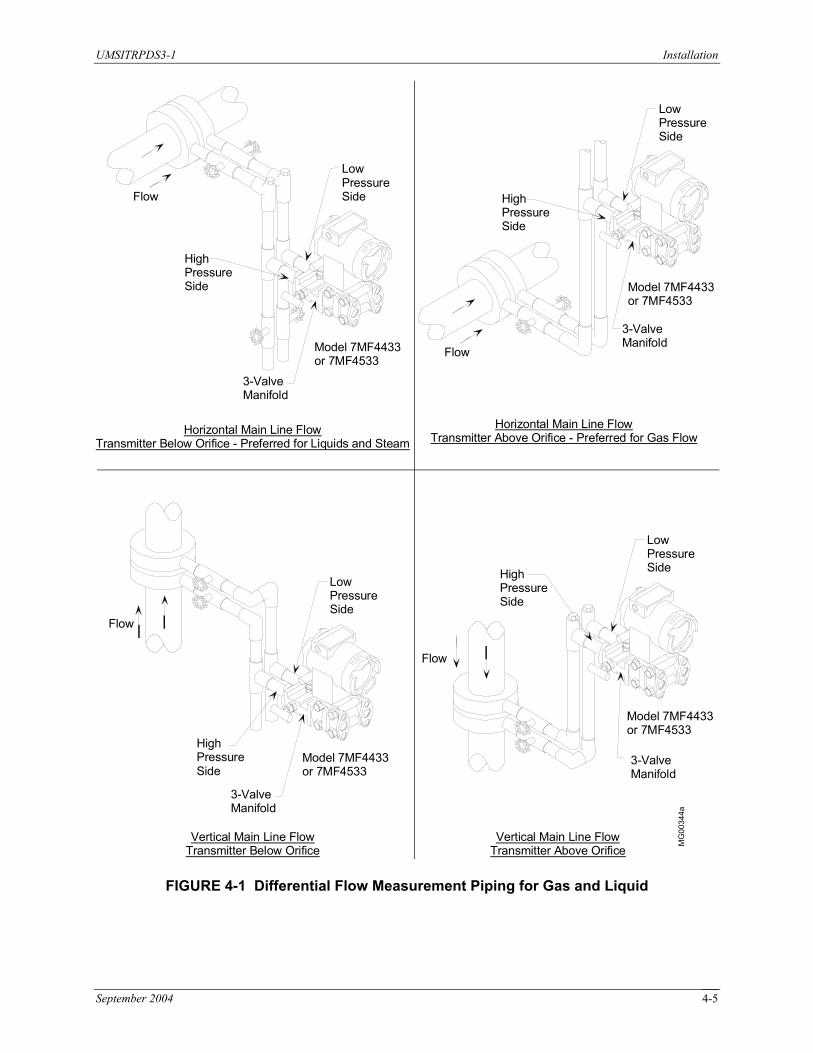
UMSITRPDS3-1 Installation
MG
0034
4a
Flow
3-ValveManifold
HighPressureSide
LowPressureSide
Model 7MF4433or 7MF4533
Horizontal Main Line FlowTransmitter Below Orifice - Preferred for Liquids and Steam
Horizontal Main Line FlowTransmitter Above Orifice - Preferred for Gas Flow
Flow
HighPressureSide
LowPressureSide
3-ValveManifold
Vertical Main Line FlowTransmitter Below Orifice
Flow
3-ValveManifold
HighPressureSide
LowPressureSide
Vertical Main Line FlowTransmitter Above Orifice
Flow
LowPressureSide
3-ValveManifold
HighPressureSide
Model 7MF4433or 7MF4533
Model 7MF4433or 7MF4533
Model 7MF4433or 7MF4533
FIGURE 4-1 Differential Flow Measurement Piping for Gas and Liquid
September 2004 4-5

Installation UMSITRPDS3-1
A. Pressurized (Closed) Vessel Installation:Non-Condensable Fluid
B. Pressurized (Closed) Vessel Installation:Condensable Fluid
C. Open Vessel Installation
MG
0034
6b
Max. Range
Min. Range
LP Shut-OffValve
HP Shut-OffValve
LPHP
Note 3Note 1
Dripleg and Drain Valve
LP lineempty -not filledwith con-densate.Suppressed-Zero: To
calculate maximumdistance, subtractactual span settingfrom range limit givenin specification.
Notes:
1. Transmitter may be mounted at or below the minimum level to be measured.
2. Open or vented vessels require only a high pressure (HP) connection.
3. High pressure line senses static pressure plus level. Low pressure line senses pressure only. The two pressures oppose each other, canceling the effect of static pressure.
4. Distance "X" can be any distance since both high and low pressure lines have equal and opposite forces which cancel the forces created by this distance.
5. Entire length of low pressure pipe is kept full of condensate to act as a reference.
6. See Appendix C for information on calculating suppressed and elevated zero ranges.
Max. Range
Min. Range
HP Shut-OffValve
LPHP
VentSpan
Suppressed-Zero: Tocalculate maximumdistance, subtractactual span settingfrom range limit givenin specification.
Vent
Span
Fill Connection
SeeSection 9Specifi-cationsfor rangelimit.
LP linefilled withcondensate
Max. Range
Min. Range
LP Shut-OffValve
HP Shut-OffValve
LPHP
Note 3
Span
Distance XSee Note 4
Elevated-Zero,Distance Y,Note 5
FIGURE 4-2 Differential Liquid Measurement Piping
September 2004 4-6

UMSITRPDS3-1 Installation
MG
0034
5a
Suppressed-Zero RangeNon-Corrosive Dry Gases and Liquids
SafetyShut-OffValve(Gas)
Safety Shut-OffValve (Steam orLiquid)
Shut-OffValve
Union
For liquids andsteam, mountingbelow the lineis preferred.
OR
Elevated Zero-RangeNon-Corrosive Dry Gases and Liquids
SafetyShut-OffValve(Gas)
Safety Shut-OffValve (Liquid)
Shut-OffValve
Union
For gases,mountingabove the lineis preferred.
Air Chamberwith Vent Valve.Install at highpoint to collectair entrainedin liquids.
OR
Model 7MF4033*,7MF4233*,
or 7MF4333**
SafetyShut-OffValve(Gas)
Safety Shut-OffValve (Liquid)
Shut-OffValve
Union
Sediment Chamberand Drain Valve.Used to collect solidsin liquid suspensionor moisture carriedwith non-condensinggas.
OR
Elevated Zero-Range Wet Gases (Non-Condensing)and Liquids with Solids in Suspension
Suppressed Zero-Range Wet Gases (Non-Condensing)and Liquids with Solids in Suspension
SafetyShut-OffValve(Gas)
Safety Shut-OffValve (Liquid)
Union
OR
Dripleg with Drain Valve,Used to collect solids inliquid suspension ormoisture carried withnon-condensing gases.
Shut-OffValve
Model 7MF4033*,7MF4233*,
or 7MF4333**
Model 7MF4033*,7MF4233*,
or 7MF4333**
Model 7MF4033*,7MF4233*,
or 7MF4333**
* Gauge Construction, Shown** Differential Construction
* Gauge Construction, Shown** Differential Construction
FIGURE 4-3 Absolute or Gauge Pressure Measurement Piping
September 2004 4-7

Installation UMSITRPDS3-1
MG
0034
7a
SafetyShut-OffValve
Shut-OffValve
DrainValve
Filling Tee withHex Plug
To Drain
Model 7MF4033 or 7MF4233, GaugeConstruction, or Model 7MF4333,Differential Construction
FIGURE 4-4 Steam Service, Below the Line Mounting
September 2004 4-8

UMSITRPDS3-1 Installation
MG
0034
8b
Closed Tank, Non-Condensing Atmosphere, Level Measurement
BlowdownValve
Non-CondensingAtmosphere
Dry Line Leg
Open Tank, Level Measurement
SpanH1
Low PressureSide Vented toAtmosphere
Flange on HighPressure Side
Closed Tank, Condensing Atmosphere, Level Measurement
BlowdownValve
CondensingAtmosphere
Flange on HighPressure Side Low Pressure
Side
H1
PluggedFilling "T"
FilledReference
Line
Max. Level
Min. Level
SpanH1
Max. Level
Min. Level
SpanH2
Min. Level
Max. Level
Notes:
1. Transmitter may be mounted at or below the minimum level to be measured.
2. Open or vented vessels require only a high pressure (HP) connection.
3. High pressure line senses static pressure plus level. Low pressure line senses pressure only. The two pressures oppose each other, canceling the effect of static pressure.
4. Distance "X" can be any distance since both high and low pressure lines have equal and opposite forces which cancel the forces created by this distance.
5. Entire length of low pressure pipe is kept full of condensate to act as a reference.
6. See Appendix C for information on calculating suppressed and elevated zero ranges.
FIGURE 4-5 Open and Closed Tank Level Measurement, Flange Mounted Transmitters
September 2004 4-9

Installation UMSITRPDS3-1
4.3.4 Transmitter Operating Mode and Network Type
A transmitter outputs either an analog current or an equivalent digital signal, depending upon the selected operating mode. The operating mode also determines the type of network (Point-to-Point or Multi-Drop) to be installed, as shown in Table 4-1 and the following subsections.
TABLE 4-1 Operating Mode and Network
OPERATING MODE NETWORK TYPE NETWORK FIGURE(S)
Analog Point-to-Point 4-6, 4-7, and 4-8
Digital Multi-Drop 4-9
Note: If using a Model 375 Field Communicator, see the inside of the front cover of this manual.
4.3.4.1 Analog Mode
When a transmitter is configured for analog mode operation, the following statements apply.
• The transmitter outputs a 4-20 mA signal for input to devices such as controllers and recorders.
• A Point-to-Point network is used comprising a transmitter, Primary/Secondary Master, and other non-signaling devices. The transmitter polling address is 0 (zero).
Point-to-Point networks are shown in Figures 4-6, 4-7, and 4-8.
• The optional display can be used for local indication of transmitter output.
• Each transmitter is factory configured for analog mode unless otherwise ordered. The polling address is set to zero (0).
• A Model 275 HART Communicator is used for configuration, diagnostics, and reporting the current process variable.
September 2004 4-10

UMSITRPDS3-1 Installation
+ _
- +4-20 mA
+ _
- +4-20 mA
MG
0034
9a
Controller,Recorder,Indicator, orother 1-5 VdcDeviceSee Note 1
+
IO
TransmitterTerminalsSee Note 5250
See Note 2
System PowerSupply
_
+
NetworkJunction
See Note 3
See Note 6
Network for Non-Hazardous Locations
_
Network for Hazardous Locations
HazardousLocation
Non-HazardousLocation
Controller,Recorder,Indicator, orother 1-5 VdcDeviceSee Note 1
+
_I
O
TransmitterTerminalsSee Note 5
250See Note 2
System PowerSupply
+_
See Note 3
See Note 6
See Note 4
1. The system power supply is shown separate from the host input device. In practice, it may be part of the host input device. This device can be a HART or non-HART signaling device, a Primary Master, or a Secondary Master.
2. Network resistance equals the sum of the barrier resistances and the current sense resistor. Minimum value is 250 Ohms; maximum value is 1100 Ohms.
3. Connect the HART Communicator as shown in Figure 2-2 for hazardous and non-hazardous locations. The HART Communicator is a non-polar device.
4. Supply and return barriers are shown. Interconnect all cable shields and ground only at the barriers.
5. For access to transmitter field terminals, remove the enclosure cap.
6. Maximum loop cable length is as calculated using the formula in Section 4.3.6.
FIGURE 4-6 Point-To-Point Network (Analog Mode)
September 2004 4-11

Installation UMSITRPDS3-1
M
G00
350a
+ _
- +4-20 mA
HazardousLocation
Non-HazardousLocation
ProcidiaTerminalsAIN1See Note 4
34
IO
TransmitterTerminalsSee Note 5
250See Note 1
See Note 2
See Note 6
See Note 3
35
18GND
33
Common Ground Bus
1. Minimum network resistance equals the sum of the barrier resistances and the current sense resistor. Minimum value is 250 Ohms; maximum value is 1100 Ohms.
2. Connect the HART Communicator as shown in Figure 2-2 for hazardous and non-hazardous locations. The HART Communicator is a non-polar device.
3. Supply and return barriers are shown. Interconnect all cable shields and ground only at the barriers.
4. Procidia terminal assignments are:
− 34 – Analog Input 1 +
− 35 – Analog Input 1 Common
− 33 – 24 Vdc
− 18 – Station Common
5. For access to transmitter field terminals, remove the enclosure cap.
6. Maximum cable length is as calculated using the formula in Section 4.3.6.
FIGURE 4-7 Procidia to Transmitter Connections (Analog Mode)
September 2004 4-12

UMSITRPDS3-1 Installation
+ _
- +4-20 mA
HazardousLocation
Non-HazardousLocation
Model 353/354TerminalsAIN1See Note 4
20
IO
TransmitterTerminalsSee Note 5
250See Note 1
See Note 2
See Note 6
See Note 3
21
6GND
5
Common Ground BusMG
0035
0a
1. Minimum network resistance equals the sum of the barrier resistances and the current sense resistor. Minimum value is 250 Ohms; maximum value is 1100 Ohms.
2. Connect the HART Communicator as shown in Figure 2-2 for hazardous and non-hazardous locations. The HART Communicator is a non-polar device.
3. Supply and return barriers are shown. Interconnect all cable shields and ground only at the barriers.
4. Controller terminal assignments are:
− 20 – Analog Input 1 +
− 21 – Analog Input 1 Common
− 5 – +24 Vdc
− 6 – Station Common
5. For access to transmitter field terminals, remove the enclosure cap.
6. Maximum cable length is as calculated using the formula in Section 4.3.6.
FIGURE 4-8 Model 353/354 to Transmitter Connections (Analog Mode)
September 2004 4-13

Installation UMSITRPDS3-1
4.3.4.2 Digital Mode
When a transmitter is configured for digital mode operation, the following statements apply.
• Process and configuration data are transmitted digitally. The analog output of each transmitter is “parked” at 4 mA.
• Employs a Multi-Drop network. See Figure 4-9.
• The optional display can be used for local indication of transmitter output.
The number of allowable network elements is:
– Primary and Secondary Masters - 1 each – Transmitters - 1 to 15
• The HART communication source can be a Primary or Secondary Master. A Primary Master can be used for data acquisition, maintenance, or control purposes. A Secondary Master, the HART Communicator, for example, may be used for configuration, diagnostics, and reporting current process variable.
• Place the transmitter in the digital mode by assigning it a polling address (1 to 15) with the HART Communicator (see Section 6).
• Each transmitter connected to a network must have a unique address.
4.3.5 Power Supply Requirements
A power supply1 is needed to power the transmitter(s). The power supply can be:
• A separate stand-alone supply capable of powering several transmitters. It can be mounted in a control room or in the field. Follow the power supply manufacturer’s recommendations with regard to mounting and environmental considerations.
• Located in a controller (such as a Primary Master) or other station able to safely provide additional operating current and meet the power supply specifications of Section 9.3.
Determine needed power supply output voltage by calculating the Network Resistance and consulting the adjacent figure. It shows the minimum power supply voltage needed for the calculated Network Resistance.
10.5 15 30 45
0
250
500
750
1100
Net
wor
k R
esis
tanc
e, O
hms
Power Supply, Vdc
X03
047S
1
OperatingRegion
The total Network Resistance is the sum of the Current Sense Resistance, end-to-end Barrier Resistance (if used), wire resistance, and any other resistances in the loop. The minimum Network Resistance (see Section 10 Glossary) required to support HART communications is 250Ω. The maximum resistance is 1100Ω. Refer to Section 4.3.5.1 or 4.3.5.2 for calculations.
September 2004 4-14
1 An SELV (Separated Extra-Low Voltage) power supply is suggested; see IEC 364-1 and IEC 536.

UMSITRPDS3-1 Installation
+ _
- +4-20 mA
MG
0035
1aHazardousLocation
Non-HazardousLocation
NetworkPrimaryMasterSee Note 1
+
IO
Transmitter 1See Notes 3 & 6
250See Note 2
See Note 4
See Note 5
_
+_
SystemPower Supply
Transmitter 2See Notes 3 & 6
Transmitter 15See Notes 3 & 6
+ _
- +4-20 mA
+ _
- +4-20 mA
1. The system power supply is shown separate from the host input device. In practice, it may be part of the host input device. The host input device can be a HART or non-HART signaling device, a Primary Master or a Secondary Master.
2. Network resistance equals the sum of the barrier resistances and the current sense resistor. Minimum value is 250 Ohms; maximum value is 1100 Ohms.
3. A maximum of 15 transmitters may be connected. All must be configured for digital mode.
4. Connect the HART Communicator as shown in Figure 2-2 for hazardous or non-hazardous locations. The HART Communicator is a non-polar device.
5. Supply and return barriers are shown. Interconnect all cable shields and ground only at the barriers.
6. For access to transmitter field terminals, remove the enclosure cap.
FIGURE 4-9 Multi-Drop Network (Digital Mode)
September 2004 4-15

Installation UMSITRPDS3-1
4.3.5.1 Point-to-Point Network
The graph in Section 4.3.5 defines an analog mode transmitter’s operating region for the allowable ranges of supply voltage and network resistance. Perform the following calculations to ensure that the power supply output voltage permits the transmitter to remain within the indicated operating range.
1. Calculate the minimum power supply output voltage.
The minimum network power supply voltage requirement is a function of Network Resistance and full scale current (20 mA), and is calculated by the following formula: Minimum Power Supply Output Voltage = 10.5 volts + (0.02 × Network Resistance in ohms) Power supply output voltage must be greater than the calculated value. The minimum voltage across the input terminals of a transmitter is 10.5 volts.
2. Calculate the maximum power supply output voltage.
The maximum network power supply voltage is a function of Network Resistance and zero scale current (4 mA), and is calculated by the following formula: Maximum Power Supply Output Voltage = Vmax + (0.004 × Network Resistance in ohms) Power supply output voltage must be less than the calculated value. The maximum voltage (Vmax) permitted across the input terminals is:
− Non-intrinsically safe transmitter: 45 volts
− Intrinsically safe transmitter: 30 volts
4.3.5.2 Multi-Drop Network
Perform the following simple calculations to ensure that the power supply output voltage permits the Transmitter to remain within its operating range.
1. Calculate the minimum power supply output voltage.
Minimum network power supply voltage is a function of Network Resistance and the total current draw of all transmitters in the network, and is calculated by the following formula: Minimum Supply Output Voltage = 10.5 volts + [(0.004 × number of transmitters on Network) × (Network Resistance)] Power supply output voltage must be greater than the calculated value. The minimum voltage across the input terminals of a transmitter is 10 volts.
2. Calculate the maximum power supply output voltage.
Maximum network power supply voltage is a function of Network Resistance and total current draw of all the transmitters in the network, and is calculated by the following formula: Maximum Supply Output Voltage = Vmax + [(0.004 × number of transmitters on Network) x (Network Resistance)] Power supply output voltage must be less than the calculated value. The maximum voltage (Vmax) permitted across the input terminals of a transmitter is:
− Non-intrinsically safe transmitter: 45 volts
− Intrinsically safe transmitter: 30 volts
September 2004 4-16
UMSITRPDS3-1 Installation
The maximum number of transmitters that can be connected to a Multi-Drop Network is 15. Each transmitter is “parked” in a low current draw mode (4 mA) to conserve power. Ensure that the network power supply is capable of sourcing the total current consumed by the number of transmitters on the network.
4.3.6 Determining Network (Loop) Length
A cable length calculation is necessary when HART communication is to be employed. Cable capacitance directly affects maximum network length.
4.3.6.1 Cable Capacitance
Cable type, conductor size, and recommended cable model numbers are stated in Section 9.5.1 Two-Wire Cable. Cable capacitance is a parameter used in the calculation of the maximum length of cable that can be used to construct the network. The lower the cable capacitance the longer the network can be. Manufacturers typically list two capacitance values for an instrumentation cable:
1. Capacitance between the two conductors.
2. Capacitance between one conductor and the other conductor(s) connected to shield. This capacitance is the worst case value and is to be used in the cable length formula.
4.3.6.2 Maximum Cable Length Calculation
The maximum permissible single-pair cable length is 10,000 feet (3000 meters) or less as determined by the following formula: L = (65,000,000 / R x C) – (Cf + 10,000 / C)
Formula Definitions: L: The maximum total length of cable permitted to construct the network. L = feet when C is in pF/ft;
L = meters when C is in pF/meter. R: The Network Resistance which is the ohmic sum of the current sense resistance and barrier
resistance (both return and supply), if any, in the network and the resistance of the wire. C: Cable capacitance per unit length between one conductor and the other conductor connected to the
shield. C may be in pF/ft or pF/meter. Cf: Total input terminal capacitance of field instruments; the Primary Master is excluded. Cf is given
by the following formula: Cf = (sum of all Cn values) x (5000)
Where Cn is an integer (e.g., 1, 2, 3) corresponding to the input terminal capacitance of a Field Instrument. Cn values are determined as follows:
September 2004 4-17

Installation UMSITRPDS3-1
FIELD INSTRUMENT CAPACITANCE Cn VALUE
Less than 5000 pF 1
5000 pF to less than 10000 pF 2
10000 pF to less than 15000 pF 3
15000 pF to less than 20000 pF 4
20000 pF to less than 25000 pF 5 For field instruments without Cn values, use Cn = 1
WARNING
For an intrinsically safe installation, refer to the Control Drawing(s) in Appendix B for entity parameters, which include Ci transmitter input capacitance, and other installation data.
Example Calculation: Assume a network consists of two field instruments (both Cn = 1). Let R = 250Ω, C = 40 pF/ft, Cf = (1 + 1) x 5000 = 10,000
Then L = (65,000,000 / (250 x 40)) – ((10,000 + 10,000) / 40) = 6000 feet (1800 meters)
4.3.7 Network Junctions
A network junction is shown in Figure 4-6. It is a wiring junction installed at a convenient point in the loop to facilitate wiring, testing, and troubleshooting. Typically the junction is a conventional terminal block mounted on a panel with a protective cover, cabinet, or junction box to enclose and protect wiring terminals. Multiple junctions can be installed to provide field access terminals for the connection of a HART Communicator. Note the following:
• Network with barriers – Locate a junction anywhere along the network in the non-hazardous area.
• Network without barriers – A junction may be located anywhere along the network between the power supply and transmitter.
• A junction should be a simple electrical series connection containing NO repeaters or other devices (active or passive) that can degrade HART communications.
September 2004 4-18

UMSITRPDS3-1 Installation
4.3.8 Safety Barriers
Installed safety barriers must comply with the following:
• Locate intrinsic safety barriers between the system power supply (e.g., Primary Master, if used) residing in the non-hazardous area and the transmitter(s) in the hazardous area.
• Combined or separate supply and return barriers may be used.
• For an intrinsically safe application, the DC voltage applied to the safe side of the barrier must be 0.6 Vdc less than the rated barrier working voltage.
• An active supply barrier must be operated within its specified input working voltage.
• Barrier shunt impedance to ground to the HART range of frequencies (500 Hz to 2500 Hz) shall not be less than 5000Ω.
• Barrier end-to-end resistance, stated by the manufacturer, is used in calculating the maximum Network cable length and minimum and maximum network voltages.
• The barrier shall be installed and wired in accordance with the manufacturers instructions.
4.3.9 Connection of Miscellaneous Hardware
Miscellaneous non-signaling hardware (e.g., recorders, current meters) may be connected to a Point-to-Point network in accordance with the following list.
Important
No non-signaling hardware (meters or measuring devices) may be connected to a Multi-Drop network since the transmitters, in this mode, do not output an analog process variable.
• Miscellaneous hardware may be series or parallel connected to the network according to its function.
• Miscellaneous hardware must be passive two-terminal devices.
• Miscellaneous hardware may not generate any type of noise or signals, other than noise that is inherent in resistive components.
• Individual miscellaneous hardware must meet the following requirements: – Capacitance to ground..........................50 pF maximum
– Resistance to ground ............................1 MΩ minimum
– Impedance if series connected ................Less than 10Ω – Impedance if parallel connected ......Greater than 50kΩ
September 2004 4-19

Installation UMSITRPDS3-1
The maximum number of miscellaneous devices per network is 16. The combined electrical characteristics may not exceed the following:
– Maximum capacitance to ground........................800 pF
– Minimum resistance to ground ..........................62.5kΩ
– Maximum series impedance..................................160Ω – Minimum parallel impedance .............................3125Ω
4.3.10 Shielding and Grounding
GROUNDING Ground the transmitter’s enclosure through a 16 AWG (1.3 mm2) or larger copper wire to a low resistance ground, such as a nearby metal cold water pipe. A grounding screw for this purpose is provided on the outside of the enclosure beneath the field terminals cap (Figure 1-7). The ground wire should be installed even though the enclosure is often grounded through the electrical conduit or, in some transmitter models, through the process connections and piping. SHIELDING Shielded loop cable is recommended. The preferred method of grounding that shield is shown in Figures 4-6 through 4-9. Ground the cable shield at one point. Multiple grounds can cause signal error and poor HART performance. The location of the ground connection is often determined by the installation environment (hazardous or non-hazardous) or by the requirements of a regulating agency. The following grounding practices are field proven and will reduce magnetically coupled interference. Select the appropriate option from the three bulleted items below for the installation at hand.
• Hazardous location - ground the shield(s) only at the barrier(s) or as recommended on the appropriate control (installation) drawing and by the certifying agency.
• Non-hazardous location - ground the shield at the network power supply.
− Ground the cable shield to the power supply ground terminal. Do not connect the cable shield at the transmitter.
− If a network junction box is used, splice the input and output cable shields and isolate them from ground.
• Non-hazardous location - ground the shield at the Transmitter
− Ground the cable shield at the ground screw inside the transmitter’s signal terminal compartment.
− Power supply (+) and (-) connections must be floated.
− If a network junction box is used, splice input and output shields and isolate them from ground.
September 2004 4-20

UMSITRPDS3-1 Installation
4.4 MECHANICAL INSTALLATION
This section describes the mechanical installation of a transmitter and the installation of electrical conduit for wiring. Transmitter dimensions are given in Figures 9-1 through 9-4. Related mounting information for optional mounting bracket kits is provided in Figures 4-10, 4-11, and 4-12. Table 1-1 correlates measurement, model number, measuring cell, and figure number. Mount a transmitter in any position (orientation). The mounting position can cause a zero shift, however, any zero shift is simply calibrated out with the transmitter installed in its final mounting position. Refer to Section 7 Calibration and Maintenance for details. The transmitter enclosure can be rotated relative to the measuring cell to clear an obstruction or to allow viewing the optional display. The display can then be rotated in 90° increments for ease of reading. Refer to Section 4.5 for details. Be sure to allow sufficient clearance for:
• Connection to impulse piping and installation of conduit
• Removal of the enclosure end caps
• Wiring, cleaning, and servicing of the transmitter
• Viewing of the optional display
• Access to the configuration pushbuttons
4.4.1 Pipe Mounting, Differential and Gauge Construction
A differential or absolute transmitter can be mounted to a vertical or horizontal 2-inch pipe using an optional mounting bracket kit; kit part numbers are given in Section 9.2 Accessories.
1. Refer to the appropriate figure and determine orientation of bracket and transmitter on selected pipe.
− See Figure 4-10 for Absolute Pressure Models 7MF4033 and 7MF4233, gauge construction.
− See Figure 4-11 for Absolute Pressure Model 7MF4333, differential construction.
− See Figure 4-11 or 4-12 for Differential Pressure Models 7MF4433 and 7MF4533.
2. As shown in the appropriate figure, fasten the transmitter to the mounting bracket with the supplied hardware.
3. Fasten the mounting bracket to the pipe using the supplied hardware.
1) At the selected location on the pipe and in the desired orientation, place the pipe groove side of the mounting bracket against the desired part of the pipe surface.
2) Slip the U-bolt around the pipe and through one of the two pairs of mounting holes in the bracket.
4. Place a supplied washer and hex nut on each end of the U-bolt and hand tighten the nuts. Rotate the bracket around the pipe to place the transmitter in the desired position and secure the bracket to the pipe. Tighten mounting hardware:
• Models 7MF4033 and 7MF4233 - 275 in/lbs (31.1 Nm)
• Models 7MF4333, 7MF4433, and 7MF4533 - 400 in/lbs (45.2 Nm)
5. Rotate the enclosure or reposition the optional display as necessary. Refer to Section 4.5.
September 2004 4-21

Installation UMSITRPDS3-1
Models 7MF4033 and 7MF4233
920-07010-XXX-1.pcx
FIGURE 4-10 Pipe Mounting, Gauge Construction
MG
0040
2a
LowPressureSide
HighPressureSide
Models 7MF4033, 7MF4433, and 7MF4533
920-07011-XXX-1.pdf
Labels, Low and High Pressure Sides
FIGURE 4-11 Pipe Mounting, Differential Construction
September 2004 4-22

UMSITRPDS3-1 Installation
Models 7MF4333, 7MF4433, and 7MF4533
920-07012-XXX-1.pdf
FIGURE 4-12 Differential Construction, Position Options
4.4.2 Direct Mounting to Process, Model 7MF4433 or 7MF4533
A differential transmitter can be interfaced to the process through a two- or three-valve manifold and supported by the piping connections (3-inch nipples) if mounted directly at the point of measurement.
MG
0035
2b
Nipple Mount forLiquid Service
3-ValveManifold
HighPressureSide
LowPressureSide
Flow
OrificeFlanges
End Cap
Transmitter process connections are on 2.13-inch (54 mm) centers to allow direct mounting (bolting) to a manifold with the same spacing. Each transmitter process connection (end cap) has two tapped 7/16-20 mounting holes and a 1/4 NPT tapped pressure inlet. High pressure (+) and low pressure (-) sides of the transmitter are marked by labels (see Figure 4-11) and engraved on the capsule between the end caps. Process orifice flanges with standard 2.13-inch spacing permit a transmitter and two- or three-valve manifold combination to be direct mounted. The procedure for mounting a transmitter to a two- or three-valve manifold, and the manifold to the orifice flanges, is covered by the installation instructions supplied by the manifold manufacturer. The following is a guide and may need to be modified for some installations. Teflon® tape is the recommended thread sealant for process connections at the transmitter.
1. If installed, remove process connection blocks from the transmitter’s end caps (process manifold).
2. Press the supplied O-ring seals into the grooves in the face of the two- or three-valve manifold and bolt the transmitter end caps to the transmitter side of the two- or three-valve manifold. Tighten mounting bolts to 400 in/lbs (45.2 Nm).
September 2004 4-23
Installation UMSITRPDS3-1
3. Thread ½" nipples, 3 inches (or less) in length, into the high- and low-pressure ports of the orifice flanges. Thread sealant must be used.
4. Thread the process connection blocks directly onto the nipples. Thread sealant must be used. The 1/2 NPT tapped hole in a process connection block is off center to accommodate 2-inch or 2.25-inch centers. For 2.13" pipe centers, the tapped holes should be offset to the right side.
5. Place the supplied Teflon gaskets on the connection blocks and bolt them to the manifold. Tighten the mounting bolts according to the manifold manufacturer’s recommendations.
6. Rotate the enclosure or reposition the optional display as necessary. Refer to Section 4.5.
4.4.3 Flange Mounting, Model 7MF4633/7MF4912
A liquid level transmitter can be flange mounted directly to the point of measurement on a vessel. The flange-mounted diaphragm is factory assembled to the high-pressure side of the transmitter measuring cell. Figure 9-4 shows a typical flanged level transmitter. Table 4-2 includes the following mounting information: • Flange thickness
• Flange diameter and pressure rating
• Number of flange mounting holes
• Flange mounting hole diameter • Flange bolt circle diameter Refer to Figure 9-4 and Table 4-2 when performing the following procedure:
1. Determine needed bolt length. The user must supply mounting bolts, nuts, and washers. Bolt length is determined by the combined thickness of the flange mounted on the vessel and the transmitter’s flange.
2. As necessary, loosen the enclosure rotation set screw and rotate the enclosure for clearance and best viewing of the optional display.
3. Bolt the transmitter’s flange to the vessel’s flange. Four mounting positions (90° increments) are possible with 2-inch flanges and eight positions (45° increments) are possible with 4-inch flanges.
4. Rotate the enclosure or reposition the optional display as necessary. Refer to Section 4.5.
September 2004 4-24

UMSITRPDS3-1 Installation
TABLE 4-2 Flange And Extension Dimensions
A. Flange Dimensions SIZE DIM
“D” DIM “BC”
DIM “T”
DIM “ED”
DIM “RF”
BOLT DIA
NO. OF BOLTS
FLANGE PER
2" – 150# 6.00 (152.40)
4.75 (120.65)
0.75 (19.05)
1.95 (49.53)
5/8 4
2" – 300# 6.50 (165.10)
5.00 (127.00)
0.88 (22.23)
1.95 (49.53)
5/8 8
3" – 150# 7.50 (190.50)
6.00 (152.40)
0.94 (23.81)
2.81 (71.37)
0.06 (1.58)
5/8 4
3" – 300# 8.25 (209.55)
6.625 (168.28)
1.13 (28.58)
2.81 (71.37)
3/4 8 ANSI B16.5
4" – 150# 9.00 (228.60)
7.50 (190.50)
0.94 (23.81)
3.70 (93.98)
5/8 8
4" – 300# 10.00 (254.00)
7.875 (200.03)
1.25 (31.75)
3.70 (93.98)
3/4 8
50MM – 10/16 BAR
6.50 (165.00)
4.92 (125.00)
0.71 (18.00)
M16 4
50MM – 25/40 BAR
6.50 (165.00)
4.92 (125.00)
0.79 (20.00)
M16 4
80MM – 10/16 BAR
7.87 (200.00)
6.30 (160.00)
0.79 (20.00)
Consult Factory
0.12 (3.00)
M16 8 DIN 2526
80MM – 25/40 BAR
7.87 (200.00)
6.30 (160.00)
0.94 (24.00)
M16 8 TYPE C
100MM – 10/16 BAR
8.66 (220.00)
7.09 (180.00)
0.79 (20.00)
M16 8
100MM – 25/40 BAR
9.25 (235.00)
7.48 (190.00)
0.94 (24.00)
M20 8
B. Extension Length
DIM “L”
0 (0.00)
2.00 (50.80)
4.00 (101.60)
6.00 (152.40)
Notes: 1. Dimensions are in inches (millimeters). 2. End cap can be rotated 180º for top or bottom vent/drain, side vent option only.
September 2004 4-25
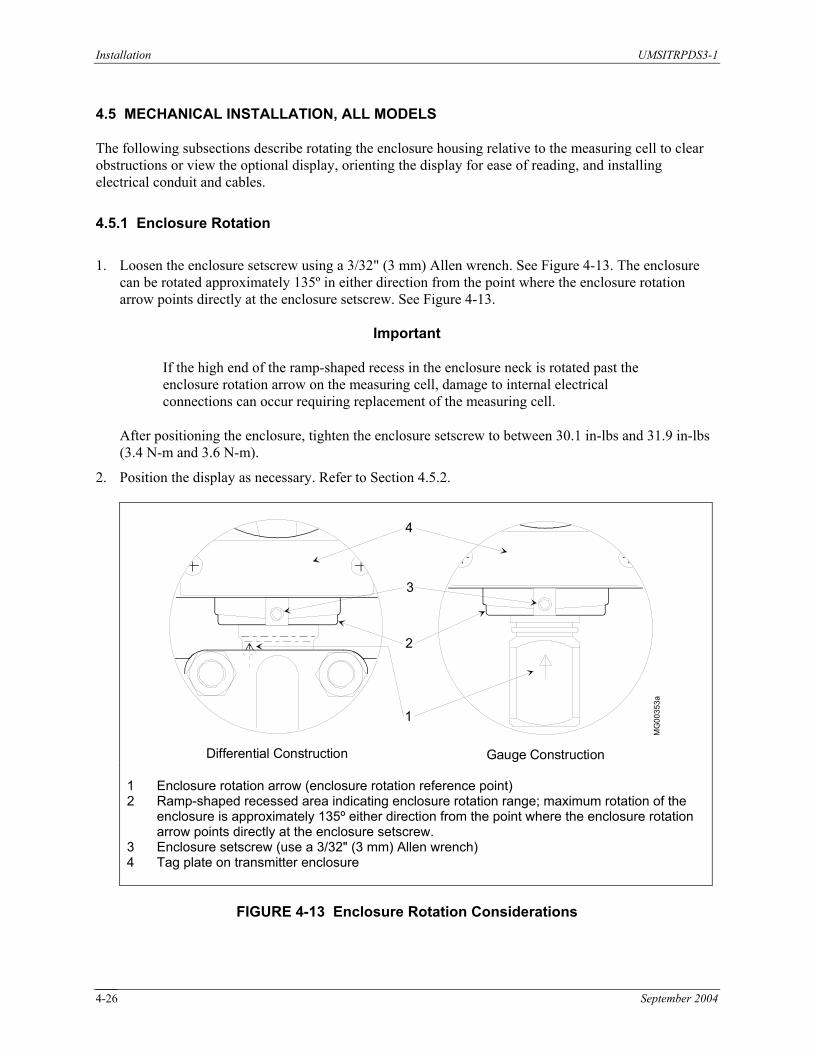
Installation UMSITRPDS3-1
4.5 MECHANICAL INSTALLATION, ALL MODELS
The following subsections describe rotating the enclosure housing relative to the measuring cell to clear obstructions or view the optional display, orienting the display for ease of reading, and installing electrical conduit and cables.
4.5.1 Enclosure Rotation
1. Loosen the enclosure setscrew using a 3/32" (3 mm) Allen wrench. See Figure 4-13. The enclosure can be rotated approximately 135º in either direction from the point where the enclosure rotation arrow points directly at the enclosure setscrew. See Figure 4-13.
Important
If the high end of the ramp-shaped recess in the enclosure neck is rotated past the enclosure rotation arrow on the measuring cell, damage to internal electrical connections can occur requiring replacement of the measuring cell.
After positioning the enclosure, tighten the enclosure setscrew to between 30.1 in-lbs and 31.9 in-lbs (3.4 N-m and 3.6 N-m).
2. Position the display as necessary. Refer to Section 4.5.2.
MG
0035
3a
Differential Construction Gauge Construction
1
2
3
4
1 2 3 4
Enclosure rotation arrow (enclosure rotation reference point) Ramp-shaped recessed area indicating enclosure rotation range; maximum rotation of the enclosure is approximately 135º either direction from the point where the enclosure rotation arrow points directly at the enclosure setscrew. Enclosure setscrew (use a 3/32" (3 mm) Allen wrench) Tag plate on transmitter enclosure
FIGURE 4-13 Enclosure Rotation Considerations
September 2004 4-26

UMSITRPDS3-1 Installation
4.5.2 Display Orientation
As supplied the display is oriented for viewing with the transmitter installed vertically, as shown below and by most of the illustrations in this manual. When the transmitter is installed in another orientation, perform the following steps to reorient the display for ease of reading.
1. Turn off power to the transmitter.
2. Remove the enclosure cap that has the sightglass by rotating the cap counterclockwise.
3. Fasten an anti-static wrist strap on your wrist and ground it to the transmitter ground screw.
4. Use a Phillips blade screwdriver to remove the two screws holding the display. The display is electrically connected to the transmitter electronics by the display cable. Refer to Figure 4-14.
5. Hold the display just in front of the transmitter enclosure and rotate it in quarter turns to find the viewing position where reading is easiest. Four positions, 90° apart, are provided. Do not rotate the display more than 180° in a clockwise or counterclockwise direction.
6. Align the two holes in the display circuit board with the hex standoffs in the enclosure and install the two screws removed above.
7. Install the enclosure cap and remove the anti-static wrist strap.
1
2
MG
0035
3a
3
1. Display Mounting Screw 2. Display Assembly 3. Enclosure Setscrew Note: Shown with enclosure cap removed.
FIGURE 4-14 Display Removal and Repositioning
September 2004 4-27

Installation UMSITRPDS3-1
4.5.3 Electrical Conduit and Cable Installation
All electrical conduit and all signal wires must be supplied by the user. Access to electrical terminals is described in Section 4.5.2.3. For conduit and cable routing, refer to user’s installation drawings. Installation of conduit and cabling should follow the guidelines given below.
4.5.3.1 Conduit
• Transmitter conduit inlets accept male conduit fittings. Refer to the transmitter’s rating plate and Section 9.1 to determine whether conduit threads are 1/2-14 NPT or M20 x 1.5. Seal NPT fittings with Teflon tape; seal M20 fittings with a soft-setting sealing compound rated for at least 105°C (221°F).
• When routing conduit, avoid areas that might subject the conduit to chemical or physical abuse or areas with high electromagnetic interference/radio frequency interference (EMI/RFI) conditions.
• Install conduit for field wiring.
• If a high humidity environment can exist and the transmitter is located at a low point in the conduit run, install drain seals at the transmitter’s conduit inlets to prevent condensation from entering the transmitter. See Figure 4-15.
• Remove all sharp edges or burrs from conduit that may damage wires. 18 inches of flex conduit is recommended at each transmitter.
MG
0035
4a
Conduit Drain Explosion Proof
++
++
++
++
1
23 3
4
4
1 2
Drain seal in conduit coupling Install conduit seal: Crouse-Hinds Type EYS or equivalent
3 4.
Plug unused electrical entrance Electrical conduit
FIGURE 4-15 Conduit Drain and Explosion Proof Installations
September 2004 4-28

UMSITRPDS3-1 Installation
4.5.3.2 Cables
• Mark or tag each cable conductor as either LOOP (+) or LOOP (-) to ensure correct connection at the transmitter.
• Use pulling grips and cable lubricants for easier cable pulling. Pull cable through conduit into transmitter terminal compartment.
• Do not exceed the maximum permitted pulling tension on the cables. Maximum tension is normally specified as 40% of the cable’s breaking strength.
• Do not exceed the maximum conduit fill specified by the National Electric Code.
4.5.3.3 Access to Transmitter Terminal Compartment
1. Remove the enclosure cap closest to the electrical entrance by turning it counterclockwise.
2. Install the enclosure cap by turning it clockwise until the O-ring contact the enclosure. Tighten the cap one additional turn to compress the O-ring.
September 2004 4-29

Installation UMSITRPDS3-1
4.6 ELECTRICAL INSTALLATION
This section describes loop wiring for Point-to-Point and Multi-Drop networks. Refer also to Section 4.8 for installation in hazardous locations. Figure 4-16 shows typical conductor terminations.
WARNING
Hazardous voltage can cause death or serious injury. Remove power from all wires and terminals before working on this equipment.
CAUTION
Use supply wires suitable for 5°C (10°F) above ambient temperature.
Before wiring the loop, the following should already have been completed:
• Selection of either analog or digital operating mode and corresponding Point-to-Point or Multi-Drop network; Section 4.3.4.
• Selection of a power supply; Section 4.3.5.
• Mechanical installation of transmitter(s) installed; Section 4.4.
• Pulling of loop cable through conduit and into terminal compartment; Section 4.5.3. To connect the transmitter to the loop, perform the following steps.
1. Remove power from all involved wires and terminals.
2. Access the transmitter signal terminals by removing the enclosure cap nearest to the electrical entrance. Turn the cap counterclockwise.
3. Determine method of connection to transmitter signal terminals; see Figure 4-16 for typical connection methods.
4. Strip loop cable and conductors. Install ring tongue or spring spade terminals for #8 screws and the cable conductor gauge. If terminals will not be used, tin conductor ends and form a loop.
5. Connect the loop cable to the LOOP (+) and (-) terminals inside the transmitter’s enclosure. Refer to Figures 4-6 through 4-9 for the needed connections for the type of network. Terminals will accommodate wire sizes up to 16 AWG (1.3 mm2).
6. Install the enclosure cap by turning it clockwise until the O-ring contacts the enclosure, Tighten the cap one additional turn to compress the O-ring.
7. If one of the two electrical conduit entrances in the housing is not used, it should be plugged. Refer to the transmitter’s rating plate and Section 9 to determine whether entrance holes accept 1/2-NPT or M20 x 1.5 fittings. Seal 1/2-NPT fitting with Teflon tape; seal M20 fitting with a soft setting sealing compound rated for at least 105ºC (221ºF).
September 2004 4-30

UMSITRPDS3-1 Installation
8. Ground the enclosure by installing a 16 AWG (1.3 mm2) or larger copper wire between the enclosure ground screw and a low resistance ground, such as a nearby metal cold water pipe.
1
23
4
5
6
MG
0035
5a
1. Solid conductor with loop formed in end of lead 2. Stranded conductor with spring spade terminal 3. Stranded conductor with ring tongue terminal 4. One of three terminals in the electrical enclosure. Remove end cap to access terminals. 5. Terminal screw 6. Pressure plate
FIGURE 4-16 Network Conductor Terminations
September 2004 4-31

Installation UMSITRPDS3-1
September 2004 4-32
4.7 HAZARDOUS AREA INSTALLATION
Drawings providing transmitter installation data for hazardous areas are located in Appendix B Hazardous Area Installation. Entity parameters, barrier selection, and important wiring information are specified on these drawings. The appendix also contains a list of tested barriers.
WARNING
Explosion can cause death or serious injury. In a Division 1 area, where an explosion-proof rating is required, remove power from the transmitter before removing either enclosure cap. When replacing an enclosure cap, it must be screwed onto the enclosure until the O-ring is sufficiently compressed to prevent leakage into the enclosure. Cap locks may be required. All pertinent regulations regarding installation in a hazardous area must be observed.
Before installing a transmitter in a hazardous area, check the rating and approval plates on the transmitter and Section 9 Model Designation and Specifications for required approvals or certifications. Explosion-Proof Installation If the installation is required to be explosion-proof as defined by the National Electrical Code, refer to a current copy of the Code and the following:
• User-supplied explosion-proof conduit seals (glands) are required on transmitter housing conduit outlets and any installed junction boxes. See Figure 4-15.
• Explosion-proof glands must provide a good seal. Apply a sealing compound around the sealing surface if necessary.
• Power wiring conduit entries at the transmitter must have a minimum of five threads fully engaged.
• The enclosure cap must be installed and have a minimum of eight threads fully engaged with no damaged threads permitted.
• Go to Section 4.6 for wiring connections to the transmitter’s terminals. Refer to Appendix B for hazardous area installation.
This completes the physical installation.

UMSITRPDS3-1 Post-Installation Test
5.0 POST-INSTALLATION TEST This section provides guidelines for performing a post-installation test or commissioning. These steps include:
• Performing an installation review to verify that the proper transmitter is installed and that it is installed correctly. See Section 5.2.
• Testing HART communications and performing a transmitter self test. Exercising the transmitter over its configured range and checking analog output accuracy. See Sections 5.3 and 5.4.
• Adjusting shutoff valves to set transmitter zero and prepare for on-line operation with live process pressures. See Section 5.5.
WARNING
Explosion can cause death or serious injury. Only a certified ammeter may be used in intrinsically safe circuits. In a Division 1 area, where an explosion-proof rating is required, remove power from the transmitter before removing either enclosure cap.
If a pre-installation test of the transmitter was not performed, review Section 3 Pre-Installation Test as the described tests can be performed after installation.
5.1 TEST EQUIPMENT
• User configuration data for the transmitter(s)
• HART Communicator (see Section 2 of this manual)
• Laboratory grade digital multimeter (DMM); for calibrating the 4 to 20 mA output signal; a meter certified for use in intrinsically safe circuits must be used in an intrinsically safe installation
Voltmeter Section Accuracy ±0.01% of reading
Resolution 1.0 mV
Input impedance 10 MΩ Ammeter Section Accuracy ±0.1% of reading
Resolution ±1 µA
Shunt resistance 15Ω or less
5.2 INSTALLATION REVIEW
1. To ensure the correct transmitter model has been installed, note the model designation and certifications on the transmitter’s rating and approval plates. Compare this information to the model specified in user’s documentation (P&I drawing).
September 2004 5-1

Post-Installation test UMSITRPDS3-1
Refer to Section 9 Model Designations and Specifications to confirm that the correct model with the correct certifications has been installed. Confirm that any needed hazardous area barriers have been installed and that all other installation requirements have been met.
2. Check that the transmitter is securely mounted. Check transmitter piping. Be sure that all needed shutoff valves and related equipment have been installed.
3. Check all wiring for correct and secure connection. Refer to Section 4 Installation and to user’s documentation for wiring diagrams.
4. Check wire runs to be sure that wires are protected from abrasion or other damage, correctly supported, and physically separated from other signal or power wiring that may cause interference.
5. Check that a current sense resistor of the correct value has been installed.
6. Apply power to the power supply or other loop power source (e.g., controller). Use the DMM to check power supply output voltage. Note that the transmitter is on whenever power is applied.
5.3 EQUIPMENT CONNECTION
1. Connect the equipment as shown in Section 4 Installation, in the user’s documentation, or as shown below. The HART Communicator is a non-polar device.
2. Set the DMM to read 4-20 mA.
_
+mA
+ _
- +4-20 mA
+
IO
250
+
_
_
MG
0035
8c
Vdc
1
2
3
4
5
6
1 2 3
Transmitter terminals Analog output test terminals Digital milliammeter; loop current can also be shown on the optional transmitter display in 0-100%.
4 5 6
HART Communicator; Communicator can be connected across the 250Ω range resistor. Controller, recorder, indicator, or other 1-5 Vdc signal input device (e.g. Model 353) DC power supply
FIGURE 5-1 Equipment Connection for System Checkout
September 2004 5-2
UMSITRPDS3-1 Post-Installation Test
5.4 VERIFICATION This section describes the communication test, communication error check, analog output verification, and configuration verification. It also contains subsections that involve manipulation of the process pressures applied to the transmitter.
5.4.1 Communication Test This test verifies that the HART Communicator and transmitter(s) can communicate properly. From user configuration documentation, obtain transmitter IDs, addresses, and tags. 1. Turn on the HART Communicator by pressing the I/O key.
− If the Communicator finds a transmitter on a Point-To-Point Network, the Online menu with the transmitter’s type and tag name is displayed. Go to Section 5.4.2.
− If the Communicator displays: No device found at address 0. Poll?, go to either step 2 or 3, depending upon the type of network installed.
2. POINT-TO-POINT NETWORK
Check the following: Communicator connections, all other loop connections, power to transmitter, transmitter address (0), transmitter model number. Repair as necessary and repeat step 1.
3. MULTI-DROP NETWORK Press Yes (F1) to enter digital mode and search for devices with polling addresses of 1-15.
− If the Communicator finds a transmitter on a Multi-Drop Network, the Online menu with the transmitter’s type and tag name is displayed. Each transmitter connected to the loop can be interrogated in sequence. Go to the next Section.
− If the Communicator displays: No device found. Press OK, check all loop connections, power to transmitters, transmitter addresses (1-15), transmitter model numbers, etc. Repair as necessary and repeat step 1.
5.4.2 Transmitter Selftest To test the transmitter’s electronics, perform the following:
1. Establish communication; the Online menu displays. In the Online menu, Press 3 Device Setup.
2. In sequence, press 2 Diagnostics/Service, 2 Simulation/Test, 2 Test and finally 1 Selftest.
3. The message Selftest OK will be shown when the transmitter passes its selftest. If it does not pass, an error message will be shown.
− If the transmitter passes, go to Section 5.4.3.
− If an error message is displayed, troubleshoot as necessary. Refer to Section 7 Calibration and Maintenance as needed.
September 2004 5-3
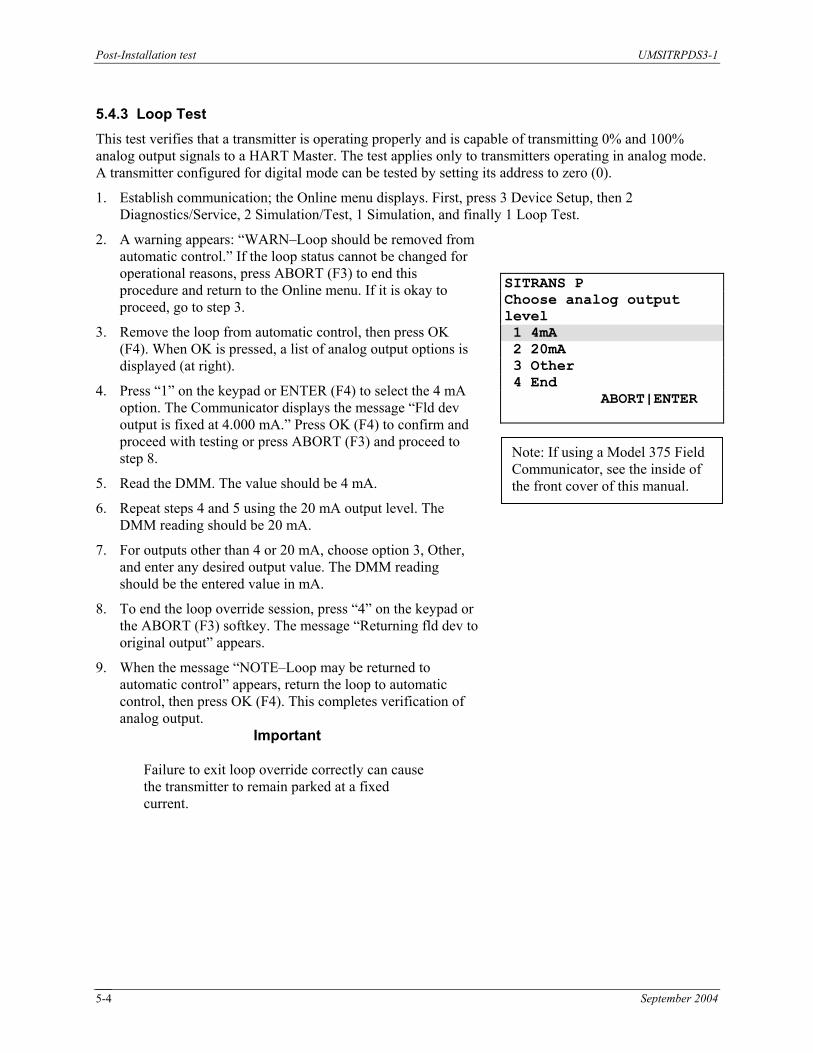
Post-Installation test UMSITRPDS3-1
5.4.3 Loop Test This test verifies that a transmitter is operating properly and is capable of transmitting 0% and 100% analog output signals to a HART Master. The test applies only to transmitters operating in analog mode. A transmitter configured for digital mode can be tested by setting its address to zero (0).
1. Establish communication; the Online menu displays. First, press 3 Device Setup, then 2 Diagnostics/Service, 2 Simulation/Test, 1 Simulation, and finally 1 Loop Test.
2. A warning appears: “WARN–Loop should be removed from automatic control.” If the loop status cannot be changed for operational reasons, press ABORT (F3) to end this procedure and return to the Online menu. If it is okay to proceed, go to step 3.
SITRANS P Choose analog output level 1 4mA 2 20mA 3 Other 4 End ABORT|ENTER
Note: If using a Model 375 Field Communicator, see the inside of the front cover of this manual.
3. Remove the loop from automatic control, then press OK (F4). When OK is pressed, a list of analog output options is displayed (at right).
4. Press “1” on the keypad or ENTER (F4) to select the 4 mA option. The Communicator displays the message “Fld dev output is fixed at 4.000 mA.” Press OK (F4) to confirm and proceed with testing or press ABORT (F3) and proceed to step 8.
5. Read the DMM. The value should be 4 mA.
6. Repeat steps 4 and 5 using the 20 mA output level. The DMM reading should be 20 mA.
7. For outputs other than 4 or 20 mA, choose option 3, Other, and enter any desired output value. The DMM reading should be the entered value in mA.
8. To end the loop override session, press “4” on the keypad or the ABORT (F3) softkey. The message “Returning fld dev to original output” appears.
9. When the message “NOTE–Loop may be returned to automatic control” appears, return the loop to automatic control, then press OK (F4). This completes verification of analog output.
Important
Failure to exit loop override correctly can cause the transmitter to remain parked at a fixed current.
September 2004 5-4

UMSITRPDS3-1 Post-Installation Test
5.5 TRANSMITTER ZERO AND SHUTOFF VALVE MANIPULATION This section describes setting transmitter zero and adjusting shutoff valves for use with live process pressures. The following commissioning cases are typical examples. Different arrangements may be advisable depending on the system configuration.
WARNING
Improper operation of the valves can result in serious injury or considerable material damage. Read and understand the complete procedure before starting a post-installation test.
5.5.1 Absolute Pressure Absolute pressure transmitters with gauge construction or with differential construction can be commissioned using the following methods.
WARNING
Process material can be hazardous to people and harmful to equipment. Be sure all process connections are firm and tight. When using a male thread G 1/2 A and installing in zone 0, a flat metal seal e.g. DIN 16258 must be used. The width of the seal (material strength) must be at least 3 mm.
September 2004 5-5

Post-Installation test UMSITRPDS3-1
5.5.1.1 Measuring Gases
Operate the shutoff fittings as described below. Refer to Figure 5-2 to identify the valve being manipulated.
1. Close all valves.
2. Open the test connection shutoff valve (2B).
3. Apply to the transmitter, through the test connection shutoff fitting (2), a pressure corresponding to zero.
4. Check zero and correct if necessary.
5. Close the test connection shutoff valve (2B).
6. Open the shutoff valve (4) on the pressure tap.
7. Open process shutoff valve 2A.
Transmitter above the pressure tapping point (normal arrangement)
Transmitter below the pressure tapping point (exception)
1 2 3
Transmitter Shutoff fitting A - Shutoff valve to the process B - Shutoff valve for test connection or venting screw Pressure pipe
4 5 6 7
Shutoff valve Shutoff valve (optional) Condensation vessel (optional) Drain valve
FIGURE 5-2 Measuring Gases
September 2004 5-6

UMSITRPDS3-1 Post-Installation Test
5.5.1.2 Measuring Vapor and Liquid
Operate the shutoff valves in the following order. Refer to Figure 5-3 to identify the valves used in the procedure.
1. Close all valves.
2. Open shutoff valve 2B.
3. Apply to the transmitter, through the test connection shutoff fitting (2), a pressure corresponding to zero.
4. Check zero and correct if necessary.
5. Close shutoff valve 2B.
6. Open shutoff valve (4) on the pressure tap.
7. Open process shutoff valve 2A.
1 Transmitter 2 Shutoff fitting A - Shutoff valve to the process B - Shutoff valve for test connection or venting screw 3 Pressure pipe 4 Shutoff valve 5 Drain valve 6 Compensation vessel (for vapor only)
FIGURE 5-3 Measuring Vapor and Liquid
September 2004 5-7

Post-Installation test UMSITRPDS3-1
5.5.2 Differential Pressure and Flow Differential pressure and flow transmitters can be commissioned using the following methods.
WARNING
Process material can be hazardous to people and harmful to equipment. Serious injury or considerable material damage may result if: •
•
the vent valve and/or the sealing screw are missing or are not sufficiently tight.
the valves are operated wrongly or improperly.
In the case of hot process liquid or gas, the individual operating steps must be performed in rapid succession. Otherwise, the valves and the transmitter may be over heated leading to damage.
5.5.2.1 Measuring Gases
Operate the shutoff valves in the following order. Refer to Figure 5-4 to identify the valves used in the procedure.
1. Close all valves.
2. Open both shutoff valves (5) at the pressure taps.
3. Open the compensation valve (2).
4. Open one active pressure valve (3A or 3B).
5. Check and correct zero (4 mA) if necessary at zero mbar.
6. Close the compensation valve (2).
7. Open the other active pressure valve (3A or 3B).
September 2004 5-8

UMSITRPDS3-1 Post-Installation Test
Transmitter above the active pressure taps (normal arrangement)
Transmitter below the active pressure taps (exception)
1 2 3 4 5
Transmitter Compensation valve Active pressure valves Active pressure lines Shutoff valves
7 9 10
Blowout valve Condensation vessels (optional) Active pressure taps
FIGURE 5-4 Measuring Gases
5.5.2.2 Measuring Liquids
Operate the shutoff valves in the following order. Refer to Figure 5-5 to identify the valves used in the procedure.
1. Close all valves.
2. Open both shutoff valves (5) at the pressure taps.
3. Perform one of the following depending upon transmitter location:
− “Transmitter below the active pressure tap” - Open both blowout valves (7) one after the other.
− “Transmitter above the active pressure tap” - Open both vent valves (8) slightly until air-free liquid emerges.
4. Close both blowout valves (7) or vent valves (8).
5. Open the active pressure valve (3A) and the vent valve at the high-pressure chamber of the transmitter (1) slightly until air-free liquid emerges.
6. Close the vent valve.
7. Open the vent valve at the low-pressure chamber of the transmitter (1) slightly until air-free liquid emerges.
September 2004 5-9

Post-Installation test UMSITRPDS3-1
8. Close the active pressure valve (2).
9. Open the active pressure valve (3B) slightly until air-free liquid emerges, then close it.
10. Close the vent valve at the low-pressure chamber (1).
11. Open the active pressure valve (3A) by 1/2 turn.
12. Check and correct zero (4 mA) if necessary at zero bar.
13. Close the compensation valve (2).
14. Open the active pressure valves (3A and 3B) fully.
Transmitter above the active pressure taps (normal arrangement)
Transmitter below the active pressure taps (exception)
1 2 3 4
Transmitter Compensation valve Active pressure valves Active pressure lines
5 7 10 12
Shutoff valves Blowout valves Active pressure taps Gas collectors (optional)
FIGURE 5-5 Measuring Liquids
September 2004 5-10

UMSITRPDS3-1 Post-Installation Test
5.5.3 Measuring Vapor Operate the shutoff valves in the following order. Refer to Figure 5-6 to identify the valves used in the procedure.
Caution
The measuring result is error-free only when the active pressure lines (4) contain equal columns of condensate that are at the same temperature. Repeat the zero adjustment when these conditions are satisfied.
If the compensation valve (2) is opened when the shutoff valves (5) and active pressure valves (3) are both open, the transmitter (1) may be damaged by flowing vapors.
1. Open both shutoff valves (5) at the pressure taps.
2. Open the compensation valve (2).
3. Wait until the vapor in the active pressure lines (4) and in the compensation vessels (13) has condensed.
4. Open the active pressure valve (3A) and the vent valve at the high-pressure chamber of the transmitter (1) slightly until air-free condensate emerges.
5. Close the vent valve.
6. Open the vent valve at the low-pressure chamber of the transmitter (1) slightly until air-free condensate emerges.
7. Close the active pressure valve (3A).
1 Transmitter 2 Compensation valve 3 Active pressure valves 4 Active pressure lines 5 Shutoff valves 7 Blowout valves 10 Active pressure taps 13 Compensation vessels 14 Insulation
FIGURE 5-6 Measuring Vapor
8. Open the active pressure valve (3B) slightly until air-free condensate emerges, then close it.
9. Close the vent valve at the low-pressure chamber (1).
September 2004 5-11

Post-Installation test UMSITRPDS3-1
September 2004 5-12
10. Open the active pressure valve (3A) by 1/2 turn.
11. Check and correct zero (4 mA) if necessary at zero bar.
12. Close the compensation valve (2).
13. Open the active pressure valves (3A and 3B) fully. This completes the post-installation testing. Disconnect test equipment, connect any disconnected wires, and restore any removed protective covers on the transmitter or other devices.

UMSITRPDS3-1 On-Line Operation
6.0 ON-LINE CONFIGURATION AND OPERATION A transmitter is shipped with default data in its memory. Some of this data controls communication and transmitter operation and cannot be altered. Other data is used by the transmitter to respond to changes in pressure with a change in output current or HART digital output and is alterable by the user. This data includes configuration parameters that set up the transmitter for use in a specific process environment. On-line operation includes local configuration using the magnetic pushbuttons on the transmitter enclosure and remote configuration and monitoring involving communication between the HART Communicator (host device) and transmitter. There are four major subsections. Section 6.1 introduces the local digital display and the local magnetic pushbuttons. Section 6.2 provides details about configuring and using the transmitter locally; the optional display must be installed. Section 6.3 describes use of a transmitter that does not have a display. Finally, Section 6.4 provides the steps to configure and monitor a transmitter from a HART Communicator.
++
MG
0036
4b
1
2
3
1 2 3
Optional digital display Magnetic pushbutton (keyboard) access cover Enclosure cap
6.1 LOCAL OPERATION AND DISPLAY Local configuration and operation make use of built-in magnetic pushbuttons and an optional digital display. As shown in the adjacent figure, the display (1) is behind the enclosure cap. The magnetic pushbuttons are under the hinged cover (2). There are three magnetic pushbuttons or keys:
M = Mode Select = Increase = Decrease
Use the display and the magnetic pushbuttons as described in this section.
6.1.1 Digital Display The local display can show the measured value and engineering unit, sign, status, mode, and output current; see Figure 6-1. The root sign appears when a square root characteristic is used for differential pressure or flow. HART communications is indicated by flashing of the communication indicator.
1 Numeric display 2 Unit/bargraph display 3 Root display (flow) 4 Mode/pushbutton disable 5 Status -lower current limit reached 6 Sign for measured value 7 Status - upper current limit reached 8 HART communication indicator
FIGURE 6-1 Digital Display
September 2004 6-1

On-Line Operation UMSITRPDS3-1
6.1.2 Numeric Display The 5-digit numeric display can be configured to show one of the following.
• Transmitter current output (4-20 mA or %, selection shown in the unit/bargraph display)
• Pressure value, in percent, relative to the set range
• Measured value in a selectable engineering unit (shown on the unit/bargraph display) Sign for the Measured Value When the measured value is a negative number, the minus sign is lighted. Status Arrows Table 6-1 shows the modes in which the status arrows are active, as well as the meaning of each arrow for each mode.
TABLE 6-1 Operating Mode and Status Arrows
Operating Mode1 Status (Display) Status (Display) Mode 2 (set zero2) Upper current limit exceeded Lower current limit exceeded Mode 3 (set full scale3) Upper current limit exceeded Lower current limit exceeded Mode 4 (set damping) Upper damping value exceeded Lower damping value exceeded Mode 5 (set zero blind2) Upper sensor limit exceeded Lower sensor limit exceeded Mode 6 (set full scale blind3) Upper sensor limit exceeded Lower sensor limit exceeded. Mode 7 (set zero position correction)
Maximum span exceeded by more than 5%
-----
Mode 12 (set root switch point) Square root switch point exceeded by more than 15%
Dropped 5% below the square root switch point
Magnetic Pushbutton Operation (Mode 2, 3, 5, or 6)
Span to be set exceeds the maximum span
Span to be set is less than the minimum span
Normal Operation Output current exceeds the upper saturation limit or Input pressure exceeds the upper sensor limit
Output current is below the lower saturation limit or Input pressure is below the lower sensor limit
1 Operating Mode selected by pressing the M pushbutton. 2 pmin = minimum operating input pressure; 3 pmax = maximum operating input pressure Communication Indicator
= HART communication is active when the circle is flashing.
September 2004 6-2

UMSITRPDS3-1 On-Line Operation
6.1.3 Unit/Bargraph Display This alphanumeric display has five 14-segment fields in the lower right quadrant of the display; see below. It shows the selected engineering unit as a percentage, engineering unit, or current value. If desired, a bargraph which represents the percentage pressure value in the range from 0-100% can alternate with the engineering unit. The bargraph function is turned off in the default setting.
Engineering Unit Bargraph The unit/bargraph display is also used to display a scrolling error, warning, or alarm message.
6.1.4 Error Message The message “Error” will be displayed in the Numeric display should a transmitter hardware or software problem occur. A message describing the error will scroll horizontally through the unit/bargraph display. This information is also available at the HART Communicator.
6.1.5 Output Signal Range The output signal is divided into defined areas. The transmitter converts the measured pressure into an output current that is normally in the range of 4-20 mA. Measured values below and above the range limits are also displayed. The UNDER message or OVER message for the selected unit appears alternately in place of the engineering unit or bargraph. The overflow range, shown in the following figure, can be set using the HART Communicator. When an upper or lower range limit is exceeded, the output current remains linear and a status arrow appears on the transmitter display; see Table 6-1.
September 2004 6-3

On-Line Operation UMSITRPDS3-1
1 2 3 4 5 6 7
Linear modulation range Lower limit of the modulation range (default value) Upper limit of the modulation range (default value) Lower fault current value (default value) Upper fault current value (default value) Recommended setting range for lower fault current range and lower modulation range limit Recommended setting range for upper fault current range and upper modulation range limit
6.1.6 Mode Display An operating mode is selected by pressing the M pushbutton. The selected mode is shown in the lower left quadrant of the digital display. In the example at right, mode 4 Electric Damping has been selected and a damping value of 0.2 has been set.
September 2004 6-4

UMSITRPDS3-1 On-Line Operation
6.2 LOCAL OPERATION WITH THE MAGNETIC PUSHBUTTONS The transmitter can be configured locally using the magnetic pushbuttons, shown below. Table 6-2 shows the operating modes and configuration parameters accessed by pressing the M pushbutton. These configuration parameters are also available using the HART Communicator.
Note
A selected mode will time out after about 2 minutes of pushbutton inactivity and the displayed parameter value will be stored.
A polling address of zero (0) must be stored for the magnetic pushbuttons to function. The magnetic pushbuttons will be disabled if a polling address of 1-15 has been stored, as indicated by a C in the lower left quadrant of the display.
September 2004 6-5

On-Line Operation UMSITRPDS3-1
TABLE 6-2 Parameters Accessible Using the Magnetic Pushbuttons Configuration Mode Increase/Decrease Pushbuttons (Keys) Description See Parameter M 1 Increase Decrease and 3 Section Measured value --- --- --- --- Output current in mA or %
or input pressure in selected engineering units
6.2.10
Error display --- --- --- --- Error 6.2.7 Zero 2 Increase current Decrease current Set to 4 mA Output current in mA 6.2.2 Full scale 3 Increase current Decrease current Set to 20 mA Output current in mA 6.2.2 Electric damping 4 Increase damping Decrease damping --- Range 0.0 to 100.0 seconds 6.2.3 Zero “blind setting”
5 Increase pressure Decrease pressure Set to start of scale 0
Zero in the selected engineering unit
6.2.4
Full scale “blind setting”
6 Increase pressure Decrease pressure Set to upper measuring limit
Full scale in the selected engineering unit
6.2.4
Zero for position correction 2
7 --- --- Press both pushbuttons simultaneously
Re-zero when oriented from vertical
6.2.5
Output Current 8 Increase current Decrease current Switch on/off Constant output current 6.2.6 Failsafe output current
9 --- --- Select Failsafe output current; limits set by user
6.2.7
Pushbutton enable/disable
10 --- --- Select 0 = None LA = All disabled LO = All disabled except zero LS = All disabled except zero and full scale L = Write protect; HART operation disabled
6.2.8
Characteristic, DP only
11 --- --- Select lin = linear srlin = square root (linear to switch point) sroff = square root (switched off up to switch point)
6.2.9
Set square root switch point
12 Increase Decrease --- Parameter range 5 to 15% of flow
6.2.9
Measured value display
13 --- --- Select Unit of pressure (input value) or output current in either mA or 0-100%
6.2.10
Unit of pressure 14 --- --- Select See Figure 6-3 for engineering units
6.2.11
Notes: 1. Press the M pushbutton to change the mode. 2. IMPORTANT: Absolute pressure transmitters - the zero is established in a vacuum! A zero adjustment to a ventilated absolute transmitter will cause an error! 3. Press both pushbuttons simultaneously. DP = differential pressure
September 2004 6-6

UMSITRPDS3-1 On-Line Operation
6.2.1 Cancel Pushbutton Disable and Write Protection A pushbutton disable (LA, LO, LS, or L) can be entered locally or from the HART Communicator. To enable the pushbuttons, press and hold the M pushbutton for at least 5 seconds. Another pushbutton disable (LL) can be entered from the Communicator. This disable must be canceled using HART. See Section 6.4.9 to cancel the LL disable.
6.2.2 Set/Adjust Zero and Full Scale Zero and full scale can be set or adjusted from the magnetic pushbuttons. Modes 2 and 3 provide access. Both forward and reverse acting characteristics are accommodated.
6.2.2.1 Theoretical Relationships Setting Zero and Full Scale First, specify the desired zero and full scale analog output currents, typically 4 mA and 20 mA respectively. Operating process pressures are then specified: pmin and pmax, for minimum and maximum operating pressures. When specifying these input pressures, always refer to the rating plate for model number, measuring span, and other performance related information. Apply the input pressures and set the output currents using the local magnetic pushbuttons or the HART Communicator. Input pressures can be supplied by the process or by test equipment. Set zero first and then set full scale, since setting zero does not affect the span and setting full scale does not affect zero. The relationship between the measured pressure and the resulting current output is linear, except when a square root output characteristic is selected. The output current for a linear relationship can be calculated using the following equation.
I = output current p = input pressure for I pmin = minimum operating input pressure (MA in leporello) pmax = maximum operating input pressure (ME in leporello)
mAmApp
ppI 416
minmax
min +∗−
−=
An example of the use of this equation is given below.
1. Given: a transmitter with a measuring range of 0 to 232 psi. The operating range is to be 29 to 203 psi.
2. Apply 29 psi to the transmitter. Press the M (mode) pushbutton to set the transmitter to mode 2. Set the zero by pressing the and pushbuttons simultaneously for about 2 seconds. An output current of 4 mA is then set.
3. Apply 203 psi. Press the M pushbutton to set the transmitter to mode 3. Set the full scale by pressing the and pushbuttons simultaneously for about 2 seconds. An output current of 20 mA is then set.
4. Calculate the output current for other input pressures. Apply the desired pressure and check the output current against the calculated value.
September 2004 6-7

On-Line Operation UMSITRPDS3-1
Given Set Zero Set Full Scale Calculate Output Current
Adjusting Zero and Full Scale from a Single Reference Zero and full scale can be adjusted to any desired current using only one reference pressure. This is particularly useful if the pressures necessary for zero and full scale are unavailable. Note that after the adjustment is completed, the measuring range on the rating plate may not match the new range. Required to be known: The reference pressure, present zero value, and present full scale value. Calculate the current to be set at pzn using the first formula. Then calculate the current to be set at pfsn using the second formula.
pzn mAmApppp
Izofso
znref 416 +∗−−
= I = output current pref = applied reference pressure pfso = old full scale (MEact in leporello) pzo = old start of scale (MAact in leporello) pfsn = new full scale (MEnom in leporello) pzn = new start of scale (MAnom in leporello)
pfsn mAmApppp
Iznfsn
znref 416 +∗−−
=
An example of the use of these equations is given below. The figure following the example illustrates these steps.
1. Given: A transmitter with a measuring range of 0 to 160 psi. Change the span to 20 to 140 psi. A reference pressure of 110 psi is available.
2. Apply the reference pressure.
3. Calculate zero (20 psi) using the first formula.
4. Press the transmitter’s M pushbutton to go the mode 2. Set the output current to 13 mA.
5. Calculate full scale (140 psi) using the second formula.
6. Press the transmitter’s M pushbutton to go to mode 3. Set the output current to 16 mA.
September 2004 6-8

UMSITRPDS3-1 On-Line Operation
Given Set Zero Set Full Scale
6.2.2.2 Practical Applications Set Zero and Full Scale The steps below should be followed to set the transmitter zero output current to 4 mA and the full scale current to 20 mA.
1. Apply a pressure representing zero.
2. Press the M pushbutton until mode 2 appears.
3. Set zero by pressing the or pushbutton to set the display to 4 mA.
4. Press the M pushbutton to save the setting and go to mode 3.
5. Apply a pressure representing full scale.
6. Set full scale by pressing the or pushbutton to set the full scale output current value in the display.
7. Press the M pushbutton to save the setting.
September 2004 6-9

On-Line Operation UMSITRPDS3-1
Adjust Zero and Full Scale If only a single reference pressure is available, calculate the currents to be adjusted using the formulas and procedure in Section 6.2.2.1 subsection Adjusting Zero and Full Scale from a Single Reference.
1. If the transmitter does not have a display and an external milliammeter must be connected to read analog output current, remove the field terminals enclosure cap and connect the milliammeter.
WARNING
Explosion can cause death or serious injury. Only a certified ammeter may be used in intrinsically safe circuits. In a Division 1 area, where an explosion-proof rating is required, remove power from the transmitter before removing either enclosure cap.
2. Apply a known reference pressure.
3. Press the M pushbutton until mode 2 appears.
4. Set zero by pressing the or pushbutton.
5. Press the M pushbutton to save the setting and go to mode 3.
6. Set full scale by pressing the or pushbutton.
7. Press the M pushbutton to save the setting.
6.2.3 Electric Damping Set the electronic damping time constant to between 0-100 seconds, in steps of 0.1 seconds, using the magnetic pushbuttons.
1. Press the M pushbutton until mode 4 appears.
2. Press the or pushbutton to set the damping to the desired value.
3. Save the setting by pressing the M pushbutton.
6.2.4 Blind Setting of Zero and Full Scale Modes 5 and 6 are used to set or adjust zero and full scale respectively with no input pressure applied to the transmitter. It is also possible to change between forward acting and reverse acting characteristics here.
6.2.4.1 Theoretical Relationships To adjust zero and full scale:
1. Select the desired engineering unit.
2. Select mode 5 and press and press the or pushbutton to adjust the lower pressure value that is to be equivalent to a 4 mA output. (Note that the pressure adjustment will not go below zero even if the lower sensor limit (LSL) is below zero.)
September 2004 6-10

UMSITRPDS3-1 On-Line Operation
3. Select mode 6 and press the or pushbutton adjust the upper pressure value that is to be equivalent to a 20 mA output. (The assumed pressure will be the upper sensor limit.)
After adjusting, the measuring span specified on the rating plate may no longer match the new span. A turn-down up to a maximum 1:100 (span ratio = r, turn-down) can be reached depending on the series and the measuring range. The relationship between the measured pressure and the generated output current is linear, except for the square root characteristic in differential pressure transmitters. Example:
1. Given: a transmitter with a measuring span of 0 to 232 psi. Adjust it to a measuring span of 29 to 203 psi without applying a reference pressure. (The assumed pressure will be zero psi or the lower sensor limit whichever is greater.)
2. Press the M pushbutton to select mode 5.
3. Adjust zero to 29 psi by pressing the or pushbutton.
4. Press the M pushbutton to save the value and select mode 6.
5. Adjust full scale to 203 psi by pressing the or pushbutton.
6. Press the M pushbutton to save the value.
6.2.4.2 Practical Applications Set zero and full scale (blind):
1. Select the pressure input engineering unit.
2. Press the M pushbutton to select mode 5.
3. Press the and pushbuttons simultaneously and hold for 2 seconds. Zero is set to lower sensor limit.
4. Press the M pushbutton to save the value and select mode 6.
5. Press the or pushbuttons and hold for 2 seconds. Full scale is set to the upper sensor limit.
6. Press the M pushbutton to save the value. Adjust zero and full scale (blind):
1. Select the pressure input engineering unit.
2. Press the M pushbutton to select mode 5.
3. Adjust zero by pressing the or pushbutton. This value will produce 4 mA.
4. Press the M pushbutton to save the input pressure value and select mode 6.
5. Adjust full scale by pressing the or pushbutton. This value will produce 20 mA.
6. Press the M pushbutton to save the input pressure value.
September 2004 6-11

On-Line Operation UMSITRPDS3-1
6.2.5 Zero Adjustment (Position Correction) The zero error resulting from a non-vertical installation position can be easily corrected. This procedure can be performed locally using the magnetic pushbuttons or remotely using the HART Communicator. Section 7 Calibration and Maintenance discusses the cause of this zero error.
Important
To zero an absolute pressure transmitter, a vacuum must be applied! The zero adjustment of a ventilated absolute pressure transmitter will cause an erroneous zero set.
1. Ventilate or evacuate the transmitter.
− Ventilate for pressure, differential pressure, flow, and flanged level transmitters.
− Evacuate for absolute transmitters to <0.1% of the measuring span.
2. Select mode 7 by pressing the mode pushbutton.
3. Set zero by simultaneously pressing the and pushbuttons for 2 seconds; 0.000 will appear in the display.
4. Press the M pushbutton until no mode number is shown. An output current of 4 mA is generated.
6.2.5.1 Zero-Point Alignment at Absolute Pressure Performing a position correction to an absolute pressure transmitters may not properly calibrate zero if a vacuum is not available as the reference pressure. In this case, the three options below are available.
• Perform a lower sensor alignment using the Communicator. Carry out a lower sensor alignment at an applied, known and sufficiently stable reference pressure.1 With this type of alignment, the digital displayed measured value is adjusted. The output current is relative to this displayed value.
• Set the current in mode 2 of local operation. Use the formula below to calculate the current to be set for a known, sufficiently stable reference pressure. (See the footnote below.)
mAmApp
ppI
zofso
setptref 416)()(
+∗−
−=
In model 2, enter this current with the and pushbuttons and save the value by pressing the M pushbutton. With this setting, the digital displayed value is not changed.
• Change the value of the start of measurement in mode 5 of local operation:
1 If the applied process pressure is known and sufficiently stable, it can be used instead of the reference pressure. Enter mode 4, when necessary, and enter an appropriate damping value.
September 2004 6-12

UMSITRPDS3-1 On-Line Operation
Change the display, when necessary, by use of mode 13, so that the physical unit selected in mode 14 is in display mode. Calculate the difference between the measured pressure and the known and sufficiently stable reference pressure. (See the footnote on the previous page.) Change to mode 5. Add the calculated difference with the correct sign to the displayed measured start position. Enter this calculated value using the and pushbuttons and save the value by pressing the M pushbutton.
6.2.6 Fixed Current Output The transmitter can be switched to a fixed current output mode for loop troubleshooting. Here, the analog output current will not vary with process pressure or level variations. The fixed current output can be set locally or remotely to 3.6 mA, 4.0 mA, 12.0 mA, 20 mA, or 22.8 mA. Other values can be set using the HART Communicator.
1. Press the M pushbutton until mode 8 is shown on the transmitter display.
2. Set zero by simultaneously pressing the and pushbuttons for 2 seconds; the selected current will appear in the display.
3. Select the desired current by pressing the or pushbutton.
4. To cancel the fixed current mode, press the M pushbutton.
6.2.7 Failure Current The failure current is the current that is to be output in the event of a fault or alarm. The default values are 3.6 mA and 22.8 mA. These values can be changed using the HART Communicator.
1. Press the M pushbutton to display mode 9.
2. Select the desired fault current by pressing the or pushbutton.
3. Press the M pushbutton to save the selection and exit mode 9.
September 2004 6-13

On-Line Operation UMSITRPDS3-1
6.2.8 Pushbutton and Function Disable Mode 10 is used to disable some or all magnetic pushbutton functions. In addition, a write protect function can be activated to prevent changing of saved parameters. There are five options as shown in Table 6.3.
TABLE 6-3 Pushbutton and Function Disable Options
Symbol Explanation no symbol No disable. LA Input pushbuttons disabled. Operation via HART is enabled. LO Zero can be set; all other functions are disabled. Operation via HART is enabled. LS Only zero and full scale can be set (see Section 6.3); all other functions are disabled.
Operation via HART is enabled. L Write protect enabled. Operation by HART disabled. LL is another pushbutton disable that is available in HART; see Section 6.4.9. The disable option symbol will appear in the lower left quadrant of the digital display. To cancel a disable option, see Section 6.2.1. To select a pushbutton or function disable option:
1. If LO or LS is to be selected, first press the M pushbutton to go to mode 13. Select either Current in mA or Current in %. Otherwise, a change in the output variable will not be detected when an arrow pushbutton is pressed.
2. Press the M pushbutton to go the mode 10. Select a disable option by pressing either arrow pushbutton.
3. Press the M pushbutton to save the selection. Note
When a transmitter is delivered without a display, disable option LS is active. If the transmitter is to be permanently operated without a display, be sure option LS remains active.
6.2.9 Flow Measurement (Differential Pressure only) Select the characteristic of the output current as follows:
• Linear - proportional to the differential pressure
• Square Root - proportional to the flow Below the square root function’s switch point the output current can have a linear characteristic or be switched off. See Figure 6-2. To select the characteristics:
1. Press the M pushbutton to enable mode 11.
2. Press either arrow pushbutton to select the desired characteristic.
3. Press the M pushbutton to save the selection.
4. Press the M pushbutton to enable mode 12.
September 2004 6-14

UMSITRPDS3-1 On-Line Operation
5. Press either arrow pushbutton to select an switch point between 5 and 15%.
6. Save the selection by pressing the M pushbutton.
Note
If the input pressure is selected for display in mode 13 and the square root characteristic in mode 11, the differential pressure corresponding to the flow and the root sign are displayed.
FIGURE 6-2 Switch Point of the Square Root Characteristic
September 2004 6-15
On-Line Operation UMSITRPDS3-1
6.2.10 Select Measured Value to be Displayed Mode 13 has three options:
• Display output current in mA
• Display output current in % (of the set measured range)
• Display input pressure in engineering units selected in mode 14 To make a selection:
1. Press the M pushbutton to enable mode 13.
2. Press either arrow pushbutton to select the desired option.
3. Press the M pushbutton to save the selection.
6.2.11 Select the Displayed Input Pressure Engineering Unit Mode 14 selects the engineering units that are to be assigned to the displayed input pressure (selected in mode 13). Available selections are shown in Figure 6-3. The engineering unit set using HART (Section 6.4.11) has no effect on this local setting.
1. To select the engineering unit:
2. Press the M pushbutton to enable mode 14.
3. Press either arrow pushbutton to step through the available engineering units list.
4. Press the M pushbutton to save the selection. If the capacity of the digital display is exceeded, 9.9.9.9.9 will appear.
September 2004 6-16

UMSITRPDS3-1 On-Line Operation
mm water column (20°C/68°F)
Inch water column (20°C/68°F)
Feet water column (20°C/68°F)
mm mercury column
Inch mercury column
bar
mbar
psi
Pa
KPa
MPa
g/cm2
kg/cm2
Torr
ATM
Inch water column (4°C/39°F)
mm water column (4°C/39°F)
Calculated and displayed according to the dimensionset with HART.
MG
0036
1a
FIGURE 6-3 Displayable Engineering Units
September 2004 6-17

On-Line Operation UMSITRPDS3-1
6.3 LOCAL OPERATION WITHOUT A DISPLAY OR WITH ACTIVATED KEYLOCK When a transmitter is ordered without a display, pushbutton disable mode LS is the default setting. Limited operation from the magnetic pushbuttons is available. This section describes local operation when the display is not present or when the magnetic pushbuttons or several modes have been disabled. Refer to Section 6.2.8 for the pushbutton and function disable options. To cancel magnetic pushbuttons disable, refer to Section 6.2.1. In most instances, it will be possible to set zero and full scale, as described in the section below.
6.3.1 Set Zero and Full Scale The differences between set and adjust were discussed in Section 6.2.2.1. The same conditions and mathematical relationships apply whether operating with or without a display. Use the following procedure to set the output current for zero to 4 mA and the full scale to 20 mA.
1. Apply a reference pressure corresponding to zero.
2. Press both arrow pushbuttons simultaneously so that the output is set to 4 mA.
3. Press the M pushbutton to save the setting.
4. Apply a reference pressure corresponding to full scale.
5. Press both arrow pushbuttons simultaneously so the output is set to 20 mA.
6. Press the M pushbutton to save the setting. If the output current is not set but adjusted continuously, the currents will need to be calculated; refer to Section 6.2.2.1 as needed. It is possible to make an adjustment for zero, full scale, or for both values. To set zero and full scale:
1. Clean the enclosure to prevent dirt from entering.
2. Unscrew the end cap covering the electrical terminals.
WARNING
Explosion can cause death or serious injury. Only a certified ammeter may be used in intrinsically safe circuits. In a Division 1 area, where an explosion-proof rating is required, remove power from the transmitter before removing either enclosure cap.
September 2004 6-18

UMSITRPDS3-1 On-Line Operation
3. Connect a DC ammeter to the test terminals in the field terminal assembly.
4. Apply a reference pressure.
5. Set the zero output using the arrow pushbuttons. The set value is saved when the pushbutton is released.
6. Apply a reference pressure.
7. Press and hold the M pushbutton.
8. Set the output current by pressing either arrow pushbutton. The set value is saved when the pushbutton is released.
September 2004 6-19

On-Line Operation UMSITRPDS3-1
6.4 REMOTE CONFIGURATION AND OPERATION BY HART This section describes operation of the transmitter using the Model 275 HART Communicator. Alternatively, PC software such as SIMATIC PDM can be used. Refer to the operating instructions or on-line help provided with the software. Refer to Section 2 for details concerning use of the Communicator. Appendix A has the complete On-Line Configuration Map (an on-line Map for the Model 375 Field Communicator is at the back of this manual). Refer to the map as necessary to navigate the menus. The HART command set is constantly being enhanced and the specific commands available with the HART Communicator at hand may be different from those described here. Most procedures in this section begin at the Online menu, which is shown here. The pulsing heart in the upper right corner of the display indicates that the HART Communicator and transmitter are communicating with each other.
SITRANS P: ♥ Online 1 Pres 0.004 inH2O2 Type Diff PN160 3 Device setup HELP | SAVE
In most of the procedures, text will appear above the function keys. These keys are immediately below the Communicator display. Refer to the table in Section 2 for function key (softkey) descriptions.
Note: If using a Model 375 Field Communicator, see the inside of the front cover of this manual.
Write Protect If an L is present in the lower left quadrant of the transmitter’s display, write protect is enabled. Operating or configuring the transmitter from a remote HART device will not be possible. To allow the HART device to operate or configure the transmitter:
1. Open the pushbutton access cover on the transmitter.
2. Press and hold the M pushbutton for at least 5 seconds. The letter L will extinguish and commands from the HART device will be accepted.
Write protect can be enabled either from the transmitter magnetic pushbuttons or from the HART Communicator. There are several levels of write protect. Refer to Section 6.2.8 or 6.4.9 for an explanation of write protect levels and methods of enabling.
6.4.1 Process Data The Online menu displays pressure and transmitter type information. By pressing 3 on the HART Communicator keyboard, the Device Setup menu can be displayed and several other screens displaying process data can be accessed. For example:
1. In the Online menu, press 3 Device Setup.
2. In the Device Setup menu, press 1 Process Variables.
3. The Process Variables display appears. It shows active data for pressure, % range, analog output, and sensor temperature.
Refer to the Online Configuration Map in Appendix A; the display of active data is indicated by a plus sign (+) following the menu text.
September 2004 6-20

UMSITRPDS3-1 On-Line Operation
6.4.2 Setting Zero and Full Scale Zero and full scale can be set or adjusted from the HART Communicator. Following are the steps to set zero and full scale. To adjust zero and full scale locally, refer to Section 6.2.2. Zero and full scale can also be set or adjusted in the Detailed Setup menu. See the Online Configuration Map in Appendix A for the path.
1. Apply a reference pressure that represents zero.
2. In the Online menu, press 3 Device Setup.
3. In the Device Setup menu, press 3 Basic Setup.
4. Press 4 in the Basic Setup menu and type a value for zero. Press the ENTER softkey to enter the zero value and return to the Basic Setup menu or press ESC to return to the Basic Setup menu without changing the zero value.
5. Apply a reference pressure representing full scale.
6. Press 5 in the Basic Setup menu and type a value for full scale. Press the ENTER softkey to enter the full scale value and return to the Basic Setup menu or press ESC to return to the Basic Setup menu without changing the zero value.
6.4.3 Blind Setting of Zero and Full Scale Zero and full scale can be set without applying a reference pressure. Both values are freely selectable, within sensor limits, as described above. The maximum turn down is 100:1, depending upon the transmitter series and measuring range. Section 6.2.4 contains a discussion of the theoretical relationships and an example.
6.4.4 Zero Adjustment for Position Correction The zero error resulting from a non-vertical installation position (electrical enclosure directly over the sensor) can be easily corrected. This procedure can be performed locally using the magnetic pushbuttons or remotely using the HART Communicator. This procedure should be performed after transmitter installation. If necessary, it can be performed on the test bench if the transmitter is exactly oriented as it will be when installed.
Important
To zero an absolute pressure transmitter, a vacuum must be applied! The zero adjustment of a ventilated absolute pressure transmitter will cause an erroneous zero to be set.
Note
The useful measuring range is reduced by the pre-pressure. For example, at a pre-pressure of 40 inH2O (1.45 psi), the useful measuring range of a 14.5 psi transmitter is reduced to 0 to 13.05 psi.
September 2004 6-21

On-Line Operation UMSITRPDS3-1
1. Install and pipe the transmitter. Ventilate or evacuate the transmitter.
− Ventilate for pressure, differential pressure, flow, and flanged level transmitters.
− Evacuate for absolute transmitters to <0.1% of the measuring span.
2. In the Online menu, press 3 Device Setup on the HART Communicator.
3. Press 3 Basic Setup in the Device Setup menu.
4. In the Basic Setup menu, press 3 Position Correction. A warning will appear: “Loop should be removed from automatic control.” Press the ABORT or OK softkey as appropriate.
5. A second warning will appear: “This will affect sensor calibration.”
6. The message “Apply 0 input [atmospheric pressure] the sensor” will appear. Press ABORT or OK as appropriate.
7. A “correction successful” message will appear followed by a Loop may be returned to automatic control message.
6.4.5 Electric Damping Electric damping can be adjusted within the range of 0 to 100 seconds.
1. Press 3 Device Setup in the Online menu.
2. Press 3 Basic Setup in the Device Setup menu.
3. Press 6 Damping in the Basic Setup menu or cursor down, using the down arrow, to 6 Damp. Type a new damping value and press ENTER. Press ESC to exit the display without making any changes.
6.4.6 Fast Measured Value Acquisition (fast response mode) This mode is designed exclusively for special applications such as fast acquisition of pressure spikes, such as a compressor surge. Here, the internal measured value acquisition is accelerated at the cost of accuracy. There is an increase in low-frequency noise in the measured value. For best accuracy, configure the transmitter for use at its maximum measuring span.
1. Press 3 Device Setup in the Online menu.
2. Press 4 Detailed Setup in the Device Setup menu.
3. Press 2 Signal Condition in the Detailed Setup menu.
4. Press 6 Measuring Speed in the Signal Condition menu.
5. Use the arrow pushbuttons to select: Fast, Medium, or Slow.
6. Press the ENTER softkey to save the selection and return to the Signal Condition menu.
September 2004 6-22

UMSITRPDS3-1 On-Line Operation
6.4.7 Fixed Current Output To aid in loop troubleshooting, the transmitter can be placed in a constant current mode. To enable fixed current operation:
1. Press 3 Device Setup in the Online menu.
2. In the Device Setup menu, press 2 Diagnostics/Service.
3. In the Diagnostics/Service menu, press 2 Simulation.
4. Press 1 Simulation in the Simulation Test menu.
5. Press 1 Loop Test in the Simulation menu. A Warning message will appear: “Loop should be removed from automatic control.” Press OK or ABORT as appropriate.
6. In the Choose Analog Output Level display, select: 4 mA, 20 mA, other, or End by pressing the appropriate number key. A message will appear confirming that the output is fixed at the selected value and a “C” will appear at the lower left of the transmitter display. Press OK or ABORT as appropriate.
To discontinue fixed current operation:
1. Navigate to the Choose Analog Output Level display as described above
2. Select option 4 End. A message will appear stating that the loop can be returned to control and the transmitter display will no long contain the “C.”
6.4.8 Fault Current The lower and upper fault currents can be set in this procedure. Both indicate a hardware or firmware failure, a sensor break, or reaching an alarm limit (diagnostic alarm). In the case of a diagnostic alarm, ERROR will appear in the transmitter display, as described in Section 6.1.4. (Refer to the HART Communicator manual or NE 43, Standardization of the Signal Level for Fault Information from Digital Transmitters with Analog Output Signals, dated 18.01.94 for a detailed error list.)
1. In the Online menu, press 3 Device Setup.
2. In the Device Setup menu, press 4 Detailed Setup.
3. In the Detailed Setup menu, press 3 Output Condition.
4. In the Output Condition menu, press 1 Analog Output.
5. In the Analog Output menu, press 3 Alarms.
6. In the Alarms menu, select: 1 AO alarm type, 2 Alarm LRV, or 3 Alarm URV.
7. Type the new value and press ENTER or press ESC to return to the previous menu without storing a changed value.
September 2004 6-23

On-Line Operation UMSITRPDS3-1
6.4.9 Disabling the Transmitter Magnetic Pushbuttons and Write Protection The table below correlates a symbol that appears in the lower left quadrant of the transmitter display with the type of pushbutton disabling.
TABLE 6-4 Pushbutton and Function Disable Options
Symbol Explanation no symbol No disable. LA Transmitter magnetic pushbuttons disabled; operation via HART is enabled. At the
transmitter, press the M pushbutton for 5 or more seconds to release. LO Zero can be set; all other functions are disabled. At the transmitter, press the M
pushbutton for 5 or more seconds to release. LS Only zero and full scale can be set (see Section 6.3); all other functions are disabled. At
the transmitter, press the M pushbutton for 5 or more seconds to release. L Write protect enabled; operation by HART disabled. At the transmitter, press the M
pushbutton for 5 or more seconds to release. LL Input pushbuttons fully disabled. The disable can be released only via HART. Magnetic pushbuttons operation is as described in Section 6.3 when option LS or LO is active. LL is a pushbutton disable that is available in HART. To select a disable option or to disable a previous selection:
1. In the Online menu, press 3 Device Setup.
2. In the Device Setup menu, press 2 Diag/Service.
3. In the Diag/Service menu, press 3 Control Modes.
4. In the Control Modes menu, press 1 Local Keys Control Mode. The following options appear:
− Enabled (transmitter magnetic pushbuttons is fully enabled)
− Disabled (local reset) LA
− Zero only enabled LO
− Zero and Span enabled LS
− Disabled (HART) LL
5. Cursor to the desired selection; press ENTER to save the selection and return to the previous menu.
6. Press SEND to immediately send the selection to the transmitter. Confirm the selection by noting the 2-letter display in the lower left of the transmitter’s display.
To select write protection:
1. In the Online menu, press 3 Device Setup.
2. In the Device Setup menu, press 2 Diag/Service.
3. In the Diag/Service menu, press 3 Control Modes.
4. In the Control Modes menu, press 3 Set Write Protect.
5. In the Protection menu, press either 1 No or 2 Yes. Press ENTER to save the selection and return to the previous menu. Press ABORT to return to the previous menu without saving any changes.
September 2004 6-24

UMSITRPDS3-1 On-Line Operation
6.4.10 Measured Value Display The transmitter display can show the output current in mA, the output current in 0-100%, or the input pressure in a selected engineering unit. To select the displayed parameter and, if input pressure is desired, the engineering unit:
1. In the Online menu, press 3 Device Setup.
2. In the Device Setup menu, press 4 Detailed Setup.
3. In the Detailed Setup menu, press 4 Device Information
4. In the Detailed Information menu, press 5 Local Meter.
5. In the Local Meter menu, press 3 Local Display Units.
6. Cursor to the desired display unit. The current selection is shown at the top of the list and slightly offset to the left.
6.4.11 Select Pressure Engineering Units This selection is used to choose the engineering unit assigned to the input pressure.
1. In the Online menu, press 3 Device Setup.
2. In the Device Setup menu, press 3 Basic Setup.
3. In the Basic Setup menu, press 2 (Engineering) Unit.
4. The presently selected unit is shown at the top of the list and slightly offset to the left. Cursor to the desired engineering unit using the Communicator’s Up and Down Arrow keys. Press ENTER to save the selection and return to the previous menu. Press ESC to return to the previous menu without saving a new selection.
6.4.12 Display/Bargraph In the display mode, the selection made in Section 6.4.10 will appear in the lower right quadrant of the display. The factory setting of the bargraph function is “off.”
1. In the Online menu, press 3 Device Setup.
2. In the Device Setup menu, press 4 Detailed Setup.
3. In the Detailed Setup menu, press 4 Device Information.
4. In the Detailed Information menu, press 5 Local Meter.
5. In the Local Meter menu, press 4 Bargraph.
6. The current status of the bargraph is shown at the top of the list and slightly offset to the left. Cursor to the desired status: Not Active or Active. Press ENTER to save the selection and return to the previous display. Press ESC to return to the previous menu without saving a new selection.
September 2004 6-25

On-Line Operation UMSITRPDS3-1
6.4.13 Sensor Trim Using sensor trim it is possible to set the characteristic of the transmitter at two adjustment points. This has the effect of improving the measurement accuracy by setting the sensor’s upper and lower values close to the range of process pressure values. The adjustment points are freely selectable within the sensor’s nominal range. Transmitters not turned down at the factory are adjusted at 0 psi and the nominal upper range limit. Those turned down at the factory are adjusted at the lower and upper limits of the set measuring range. Application Examples:
• If the desired span is 725 psi for a transmitter with a maximum pressure of 925 psi, then to achieve the greatest possible accuracy for this value, make the upper sensor adjustment at 725 psi.
• A 925 psi transmitter is turned down to 58 to 101.5 psi. To achieve the greatest possible accuracy, make the lower sensor adjustment point at 58 psi and the upper adjustment point 101.5 psi.
Note
Pressure sources must be sufficiently accurate. Either of the trimming procedures below can be cancelled without storing a new trim setting by pressing ABORT. The factory trims can be restored in the Diagnostics/Service menu. Refer to the Online Configuration Map in Appendix A.
6.4.13.1 Trimming the Lower Sensor Adjustment Point In this procedure, the reference pressure representing the lower sensor adjustment point is applied and the transmitter is instructed to accept this pressure. This represents an offset shift of the characteristic, as shown in Figure 6-4.
1. Apply a reference pressure representing the lower sensor adjustment point.
2. In the Online menu, press 3 Device Setup.
3. In the Device Setup menu, press 2 Diagnostics/Service.
4. In the Diagnostics/Service menu, press 4 Trim.
5. In the Trim menu press, 2 Sensor Trim.
6. In the Sensor Trim menu, press 3 Lower Sensor Trim. A warning message will appear: “Loop should be removed from automatic control.” Take the appropriate action and press OK to continue. A second warning will appear: “This will affect sensor calibration.” Again, press OK to continue.
7. The “Apply low pressure” message will appear. Press OK to continue. A “Pressure OK when pressure is stable” message will appear. Press OK to continue.
8. The applied value is displayed next. The value can be changed from the Communicator’s keyboard. Press ENTER to store the value or press ABORT to exit the procedure without storing a value.
9. Remove the reference pressure or go to the next section to set the upper sensor adjustment point.
September 2004 6-26

UMSITRPDS3-1 On-Line Operation
6.4.13.2 Trimming the Upper Sensor Adjustment Point A pressure representing the upper sensor pressure is applied and the transmitter is instructed to accept this press. This corrects the characteristic slope; see Figure 6-4. Adjusting the upper sensor adjusting point will not affect the lower sensor adjusting point. The upper point must be greater than the lower point.
1. Apply a reference pressure representing the lower sensor adjustment point.
2. In the Online menu, press 3 Device Setup.
3. In the Device Setup menu, press 2 Diagnostics/Service.
4. In the Diagnostics/Service menu, press 4 Trim.
5. In the Trim menu press, 2 Sensor Trim.
6. In the Sensor Trim menu, press 4 Upper Sensor Trim. A warning message will appear: “Loop should be removed from automatic control.” Take the appropriate action and press OK to continue. A second warning will appear: “This will affect sensor calibration.” Again, press OK to continue.
7. The “Apply hi pressure” message will appear. Press OK to continue. A “Pressure OK when pressure is stable” message will appear. Press OK to continue.
8. The applied value is displayed next. The value can be changed from the Communicator’s keyboard. Press ENTER to store the value or press ABORT to exit the procedure without storing a value.
9. Remove the reference pressure.
A B C
Output characteristic Characteristic after lower sensor adjustment Characteristic after upper sensor adjustment
FIGURE 6-4 Sensor Trim
September 2004 6-27
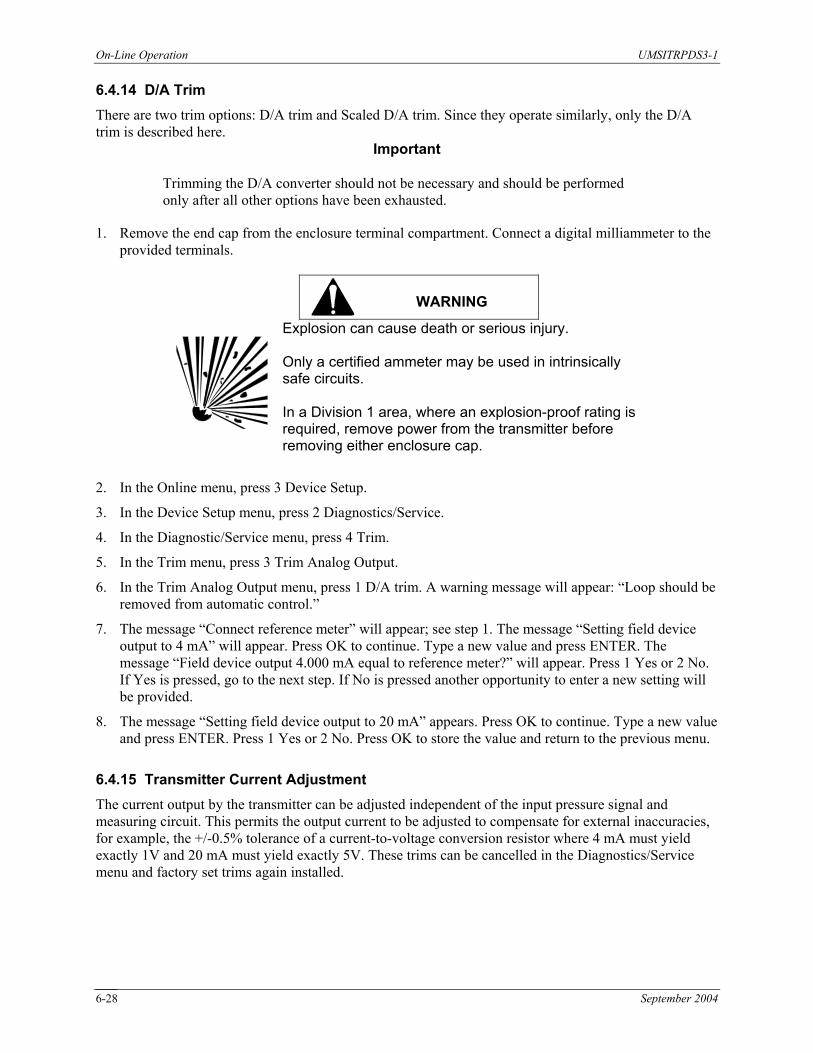
On-Line Operation UMSITRPDS3-1
6.4.14 D/A Trim There are two trim options: D/A trim and Scaled D/A trim. Since they operate similarly, only the D/A trim is described here.
Important
Trimming the D/A converter should not be necessary and should be performed only after all other options have been exhausted.
1. Remove the end cap from the enclosure terminal compartment. Connect a digital milliammeter to the provided terminals.
WARNING
Explosion can cause death or serious injury. Only a certified ammeter may be used in intrinsically safe circuits. In a Division 1 area, where an explosion-proof rating is required, remove power from the transmitter before removing either enclosure cap.
2. In the Online menu, press 3 Device Setup.
3. In the Device Setup menu, press 2 Diagnostics/Service.
4. In the Diagnostic/Service menu, press 4 Trim.
5. In the Trim menu, press 3 Trim Analog Output.
6. In the Trim Analog Output menu, press 1 D/A trim. A warning message will appear: “Loop should be removed from automatic control.”
7. The message “Connect reference meter” will appear; see step 1. The message “Setting field device output to 4 mA” will appear. Press OK to continue. Type a new value and press ENTER. The message “Field device output 4.000 mA equal to reference meter?” will appear. Press 1 Yes or 2 No. If Yes is pressed, go to the next step. If No is pressed another opportunity to enter a new setting will be provided.
8. The message “Setting field device output to 20 mA” appears. Press OK to continue. Type a new value and press ENTER. Press 1 Yes or 2 No. Press OK to store the value and return to the previous menu.
6.4.15 Transmitter Current Adjustment The current output by the transmitter can be adjusted independent of the input pressure signal and measuring circuit. This permits the output current to be adjusted to compensate for external inaccuracies, for example, the +/-0.5% tolerance of a current-to-voltage conversion resistor where 4 mA must yield exactly 1V and 20 mA must yield exactly 5V. These trims can be cancelled in the Diagnostics/Service menu and factory set trims again installed.
September 2004 6-28

UMSITRPDS3-1 On-Line Operation
1. Determine the output currents required to compensate for the external inaccuracy.
2. Connect a reference milliammeter to the current terminals.
WARNING
Explosion can cause death or serious injury. Only a certified ammeter may be used in intrinsically safe circuits. In a Division 1 area, where an explosion-proof rating is required, remove power from the transmitter before removing either enclosure cap.
3. In the Online menu, press 3 Device Setup.
4. In the Device Setup menu, press 2 Diagnostics/Service.
5. In the Diagnostics/Service menu, press 4 Trim.
6. In the Trim menu, press 3 Trim Analog Output.
7. In the Trim Analog Output menu, press 1 D/A Trim. A warning will be displayed: Loop should be removed from automatic control. Press OK to continue.
8. Connect a reference digital milliammeter to the transmitter current terminals and press OK.
9. A “Setting field device output to 4 mA” message will appear. Press OK to continue.
10. Type a new current output value that corrects for the external inaccuracy (e.g. 4.001). Press ENTER to continue. A query “Field device output 4.001 mA equal to reference device?” Press 1 Yes or 2 No as appropriate.
11. A “Setting field device output to 20 mA” message is displayed. Press OK to continue.
12. Type a new current output value that corrects for the external inaccuracy. Press ENTER to continue.
13. A query “Field device output 20.000 mA equal to reference meter” appears? Press ENTER to continue. A confirming message displays followed by a “Loop may be returned to automatic control” message. Press OK to return to the Trim Analog Output menu.
6.4.16 Factory Calibration (Manufacturer Trims) The factory calibration can be recalled (restored) in four steps.
• Restore the field current adjustment.
• Restore the field sensor zero adjustment (position correction)
• Restore the field pressure corrections (zero adjustment and sensor adjustment)
• Restore field selected parameters relevant to measured value processing, such as zero full scale, electric damping, display unit, current adjustment, zero adjustment (position correction, sensor adjustment, measuring speed, alarm current limits, alarm setting, and overflow current ranges.
September 2004 6-29

On-Line Operation UMSITRPDS3-1
To restore manufacturer trims:
1. In the Online menu, press 3 Device Setup.
2. In the Device Setup menu, press 2 Diagnostics/Service.
3. In the Diagnostic/Service menu, press 5 Restore Manufacturer Trims.
4. Select from the menu the desired trims to be restored and press ENTER.
6.4.17 Device Information In the Device Information menu, the transmitter’s physical configuration and materials and its software and hardware revision numbers can be recorded. Most of this information is included in the factory configuration; however, it can be edited as needed.
• Ranges and limits
• Common device information
• Sensor information such as flange type, O-ring material, fill fluid, and diaphragm material
• Remote seal specifics such as type and fill
• Local meter selections such as type and local display units
• Hardware and software revision numbers Refer to the Online Configuration Map in Appendix A for details.
6.4.18 Flow Measurement (Differential Pressure) The output current characteristic can be set to linear, proportional to differential pressure, or square root, proportional to flow. There are two square root settings that affect the current output characteristic from zero to the switch point (i.e. switch point). Figure 6-2 illustrates the three possible settings.
1. In the Online menu, press 3 Device Setup.
2. In the Device Setup menu, press 3 Basic Setup.
3. In the Basic Setup menu, press 7 Transfer Function.
4. In the Pressure Transfer Function menu, use an arrow key to cursor to the needed characteristic and press ENTER to save the selection and return to the previous menu.
6.4.19 Diagnostic Functions Communication with the HART Communicator enables activation and evaluation of numerous diagnostic functions. The simulation of pressure and temperature measured values is possible, in addition to calibration and service timers, min/max pointers, and limit value monitoring components. A diagnostic warning or alarm can be configured to monitor limit values (e.g. monitoring of current saturation). Diagnostic Warning: The transmitter in which the diagnostic event has occurred notifies the HART Communicator of the warning. The moving text “Diagnostic Warning” scrolls across the transmitter display, alternating with the unit/bargraph display.
September 2004 6-30

UMSITRPDS3-1 On-Line Operation
Diagnostic Alarm: The transmitter goes into a fault state. The message ERROR will appear and either “Diagnostic Warning” or “Diagnostic Alarm” will scroll across the transmitter display, alternating with the unit/bargraph display. The default setting for all warnings and alarms is OFF. To set and enable:
1. In the Online menu, press 3 Device Setup.
2. In the Device Setup menu, press 2 Diagnostics/Service.
3. In the Diagnostics/Service menu, press 1 Diagnosis
4. In the Diagnosis menu, press 3 Warnings/Alarms. Refer to the Online Configuration Map in Appendix A and to the HART Communicator’s help screens.
6.4.19.1 Operating Hours Counter Two operating hours counters with non-volatile memories are provided for the electronics and the sensor. These counters are not re-settable. If power is removed and later reapplied, the counters begin counting from the previous time. To read the operating hours counters:
1. In the Online menu, press 3 Device Setup
2. In the Device Setup menu, press 2 Diagnosis/Service
3. In the Diagnosis/Service menu, press1 Diagnosis
4. In the Diagnosis menu, press 2 Operating Hours
5. In the Operating Hours menu, press 1 Operating Hours Electronics or 2 Operating Hours Sensor. The total operating hours will be displayed.
6.4.19.2 Calibration Timer and Service Timer A two-stage time can be set to ensure regular calibration of the electronics and servicing of the transmitter. A calibration or service warning appears after the first time expires. On expiration of a second time, set as a time difference, a diagnostic alarm is signaled and a fault current is output. A warning or alarm must be acknowledged before work can be performed on the transmitter. Timers can then be reset and switched off temporarily. For operating/acknowledging warnings and alarms in the HART Communicator, the following applies: As long as the warning/alarm limit has not been reached:
• “Reset” resets the timer and begins again with the counter at 0. Monitoring is still active.
• “Acknowledge” has no effect, the timer continues running and the monitoring is still active.
• “Reset and deactivate” stops the timer, resets it, and deactivates the monitoring.
September 2004 6-31

On-Line Operation UMSITRPDS3-1
When the warning/alarm limit has been reached:
• “Acknowledge” resets the warning/alarm message but the timer continues to run. In this state, no new alarm or warning is possible since the time limits will still have to be exceeded.
• “Reset” resets the warning/alarm message the timer. At the same time, the alarm or warning is acknowledged. The timer runs again immediately from zero and will respond again when the warning/alarm limit is exceeded. The next calibration interval is therefore immediately activated.
• “Reset and ActivateW/A” resets the arning/alarm message and resets and deactivated the timer.
6.4.19.3 Min/Max Pointer The maximum positive and negative excursions of the input pressure, sensor temperature, and electronics temperature are stored in non-volatile memory for later recall. Min/Max pointers are updated during simulation. Stored values can be reset. Refer to the Online Configuration Map in Appendix for the path to the min/max pointer and to Figure 6-5 for an example.
FIGURE 6-5 Pressure Min/Max Pointer Example
6.4.19.4 Monitoring the Saturation Current Transmitter current output in the saturation range can be monitored with a simple limit value component. This component is configured and activated using the HART Communicator. Two times need to be configured: response time and hold time. The response time represents the length of time the current output may remain saturated before an alarm is triggered and the transmitter outputs its set fault current. The hold time is the duration of the alarm. In example 1 in Figure 6-6, the response time begins at t1 when the output current, due to an increase in input pressure, reaches the configured saturation limit. At t2, the response time ends, the hold time begins, and the transmitter outputs the fault current. At t3, the hold time expires and the alarm is cancelled even
September 2004 6-32

UMSITRPDS3-1 On-Line Operation
though the current has not dropped below the saturation limit. When the input pressure finally drops, the transmitter output current decreases from the fault current, through the saturation current and then begins to follow the input pressure. In the second example, the duration of the input pressure spike that drives the current output to the saturation limit is shorter than the configured response time. Consequently, the transmitter will output the saturation current but not output a fault current. In the third example, the input spikes below minimum pressure. At t2 the response time expires and the hold time begins. The transmitter outputs the fault current at t2 and holds that output until the hold time expires at t3.
FIGURE 6-6 Saturation Monitoring Examples
6.4.20 Simulation In the simulation mode, pressure and temperature values can be simulated within the transmitter without the need for an external input signal. Transmitter circuitry can be exercised and the resulting values output to an I/O module, controller, or other device to test the loop. Simulation values are entered at the HART Communicator keyboard as described below. A pressure simulation can employ either a “fixed value” or a “fixed ramp,” with the number of steps configurable.
September 2004 6-33

On-Line Operation UMSITRPDS3-1
Simulation data is stored in RAM only. Consequently, when a simulation is ended, simulation values are deleted. Note that changing the temperatures by simulation has no effect on the measured pressure value. Also, as long as the simulation is active, the transmitter will not react to changes in process pressure. Figure 6-7 is a block diagram of a transmitter showing the measuring and simulation blocks. Simulation (Pressure and Temperature)
1. In the Online menu, press 3 Device Setup.
2. In the Device Setup menu, press 2 Diagnostics/Service.
3. In the Diagnostics/Service menu, press 2 Simulation Test.
4. In the Simulation Test menu, press 1 Simulation to display the Select menu. Choose one of the following.
1 Loop Test: To test the loop, press 1. A warning message will appear: “Loop should be removed
from automatic control.” Press OK to continue. Then select either 4 ma, 20 mA, or a user-entered value and press ENTER. Select End or ABORT to exit and return to the previous menu. Press OK to return to the previous menu with the selected current sustained. To end the simulation, press either 4 End or ABORT and return to the previous menu.
2 Inputs: From the menu that appears, select the pressure and/or temperature to be simulated.
Pressure simulation can employ either a fixed value or ramped values (specify starting value, end value, step duration, and number of steps). Follow the on-screen prompts. End the simulation and return to the previous menu by pressing ABORT.
FIGURE 6-7 Simulation Circuit Diagram
September 2004 6-34

UMSITRPDS3-1 On-Line Operation
6.4.21 Self Test and Master Reset A transmitter self test or master reset can be initiated from the HART Communicator.
1. In the Online menu, press 3 Device Setup.
2. In the Device Setup menu, press 2 Diagnostics/Service.
3. In the Diagnostics/Service menu, press 2 Simulation Test.
4. In the Simulation/Test menu, press 2 Test
5. In the Test menu, press 1 Self Test to direct the transmitter to perform a self test of its internal circuitry or press 2 Master Reset to direct the transmitter to reset its internal circuitry. Follow the on-screen prompts. “Init” will momentarily flash in the display.
September 2004 6-35

On-Line Operation UMSITRPDS3-1
September 2004 6-36

UMSITRPDS3-1 Calibration And Maintenance
7.0 CALIBRATION AND MAINTENANCE This section discusses calibration, preventive maintenance, troubleshooting, assembly replacement, software compatibility, and return shipments. The Calibration section contains a brief discussion of the cause of position induced zero shift and it provides references to needed calibration procedures. The Preventive Maintenance portion has procedures that are employed to protect the reliability of the transmitter. Should a malfunction occur, procedures in the Troubleshooting section can help minimize downtime. The Assembly Removal and Replacement section provides step-by-step assembly replacement procedures. Later sections discuss recommended spare and replacement parts, software compatibility, and return shipments.
WARNING
Explosion can cause death or serious injury. In a Division 1 area, where an explosion-proof rating is required, remove power from the transmitter before removing either enclosure cap.
Tools and Equipment Required The procedures in this section can require the following equipment. See the Note below.
• Model 275 HART Communicator or Model 375 Field Communicator Note: If using a Model 375 Field Communicator, see the inside
of the front cover of this manual.
• Laboratory grade digital multimeter (DMM) for troubleshooting and calibrating the 4 to 20 mA output signal; a meter certified for use in intrinsically safe circuits must be used in an intrinsically safe installation
Voltmeter Section Accuracy ±0.01% of reading
Resolution 1.0 mV
Input impedance 10 MΩ
Ammeter Section Accuracy ±0.1% of reading
Resolution ±1 µA
Shunt resistance 15Ω or less
• 24 Vdc power supply; for bench setup
• Resistor 250Ω ±1%, carbon, ¼ watt; for bench setup
• Set of Phillips and flat-blade screwdrivers
• Set of open-end or box-end wrenches
• Larger tweezers, 4" to 6"
September 2004 7-1

Calibration and Maintenance UMSITRPSD3-1
7.1 CALIBRATION Calibration can involve adjusting zero to eliminate any position-induced zero shift, setting zero on-line, and trimming the digital to analog converter. Transmitter calibration should be checked annually and a calibration performed only if the transmitter is found to be out of tolerance. Trimming the D/A converter should not be necessary and should be performed only after all other options have been exhausted. Zero Shift Explanation Zero shift can be predicted. Transmitters are calibrated at the factory in a vertical position (enclosure directly over sensor). If a transmitter is installed (or will be installed) in another orientation, it may need re-zeroing to eliminate position-induced zero shift, depending upon transmitter type and direction of rotation. Maximum zero shift is 1.2 inches H2O (299 Pa). • There is no zero shift with transmitter rotation as long as diaphragm orientation with respect to the
earth does not change. For example, in the drawings below, rotating the transmitter from the vertical (center drawing) either 90° clockwise (right drawing) or counterclockwise (left drawing) will not cause a zero shift because diaphragm orientation with respect to earth has not changed.
++
++ +
+
Diaphragm Plane forthese three orientations
MG00362a
• Maximum zero shift occurs when rotating the transmitter causes diaphragm orientation with respect to the earth to be changed 90°. For example, in the drawings below, rotating the transmitter from the vertical (center drawing) either 90° clockwise (right drawing) or counterclockwise (left drawing) will cause maximum zero shift because the diaphragm orientation changes from vertical to horizontal.
Diaphragm Plane
Diaphragm Plane
Diaphragm PlaneMG00362a
September 2004 7-2
UMSITRPDS3-1 Calibration And Maintenance
Calibration Procedure Section References Calibration Needed Local (Pushbutton) HART Communicator Position-induced zero Section 6.2.5 Section 6.4.4 On-line zero Section 6.2.2 Section 6.4.2 Calibrate DAC --- Section 6.4.14 This completes calibration of the transmitter.
7.2 PREVENTIVE MAINTENANCE Preventive maintenance consists of periodic inspection of the transmitter, cleaning the external surface of the transmitter enclosure, draining condensate from conduit, and blowing-down or purging impulse piping to keep them free of sediment. Perform preventive maintenance at regularly scheduled intervals.
7.2.1 Transmitter Exterior Inspection The frequency of the inspection will depend on the severity of the transmitter’s environment.
1. Inspect the exterior of the transmitter enclosure for accumulated oil, dust, dirt, and especially any corrosive process over-spray.
2. Check that both enclosure caps are fully threaded onto the enclosure, compressing the O-ring between the cap and the enclosure. The O-ring must not be cracked, broken, or otherwise damaged.
3. Inspect the display viewing glass for cleanliness and damage. Replace the enclosure cap assembly if the glass is damaged or missing.
4. Inspect both enclosure electrical conduit entrances for possible moisture leaks. An unused conduit entrance must be plugged and sealed. Inspect the cable clamps of all watertight cable conduits for loose clamps and deteriorated sealing material. Tighten clamps and reseal as necessary.
5. Inspect conduit drain seals for obstructions.
6. Inspect transmitter and mounting bracket hardware for tightness. Tighten loose hardware as necessary. Consider steps to reduce vibration.
7. Inspect process connection blocks for evidence of leakage at the impulse pipe connections and at the block interface to the transmitter end caps. As necessary, add sealant to pipe threads, tighten block bolts, and replace block Teflon® seals.
7.2.2 Transmitter Exterior Cleaning After an exterior inspection of the transmitter, the enclosure can be cleaned with the transmitter operating.
1. Clean the enclosure (except enclosure cap glass) and process manifold with a mild, nonabrasive liquid detergent, and a soft bristle brush, sponge, or cloth. Rinse the weatherproof enclosure with a gentle spray of water.
Remove an excessive accumulation of process residue. Hot water or air may be used to flush away process residue if the temperature of the cleaning medium does not exceed the operating temperatures of the transmitter as listed in Section 9.3 Specifications.
2. Clean enclosure cap glass with a mild, nonabrasive liquid cleaner and a soft, lint-free cloth.
September 2004 7-3

Calibration and Maintenance UMSITRPSD3-1
7.2.3 Transmitter Enclosure Interior Inspection Remove the two enclosure caps periodically to inspect the interior of the transmitter enclosure.
WARNING
Explosion can cause death or serious injury. In a Division 1 area, where an explosion-proof rating is required, remove power from the transmitter before removing either enclosure cap.
Important
Do not remove a transmitter enclosure cap in an area where the environmental substances can contaminate the transmitter interior.
• No accumulation of dust, dirt, or water (condensate) should be present inside the enclosure. If condensate is present, either install a conduit drain or repair the installed drain (see Figure 4-15).
• Check that all wire connections are tight.
7.2.4 Transmitter Calibration An annual calibration check should be performed to ensure that the transmitter is within specifications. Refer to Section 7.1 for details.
7.2.5 Impulse Piping To ensure accuracy and continued satisfactory performance, impulse piping must be kept clean and inspected for damage. Sediment or other particles must not clog or collect in piping or the pressure chamber of the process manifold’s process connection blocks. A build up of residue can cause faulty measurement.
1. Inspect impulse piping for loose, bent, or cracked piping. Replace damaged piping.
2. At regular intervals, blow down the piping without passing line fluids containing suspended solids through the process manifold’s process connection blocks. The time interval between blowdowns is determined by the user’s previous experience with such systems or determined by evaluating system performance only after the transmitter has been in operation for a period.
September 2004 7-4

UMSITRPDS3-1 Calibration And Maintenance
7.3 TROUBLESHOOTING This section provides guidance and procedures to assist in identifying and correcting a malfunctioning transmitter. Section 7.0 lists needed tools and equipment. It is recommended that all documentation associated with the transmitter, including piping and loop wiring diagrams and configuration documentation, be obtained and made available to maintenance personnel to facilitate troubleshooting. The most common symptom of a malfunctioning transmitter is incorrect, erratic, or no output. A malfunction can affect the transmitter’s analog output (4-20 mA) or its digital (HART) output. Furthermore, a malfunction can be the result of external forces and not a transmitter fault at all. Section 7.3.1 discusses troubleshooting techniques for the analog output. Section 7.3.2 discusses troubleshooting techniques for the digital output. General transmitter troubleshooting steps:
• Record all failure symptoms. Record the values and messages on the transmitter display. The display is discussed in Section 6 On-Line Calibration and Operation.
• Confirm the values and messages recorded above by connecting a HART Communicator (or DMM) and recording the values and messages shown by the Communicator. Navigate to those displays that show active data. Refer to Appendix A Online Configuration Maps to roam the Communicator’s menus.
• Test the suspect unit by performing a transmitter self test or transmitter reset and again note the values and messages on the transmitter display and on the Communicator.
• Apply a known pressure (or level) and note all values and readings on the transmitter display and Communicator. See Section 5 Post Installation Tests for sample procedures.
• Check impulse piping, loop wiring, power supply, and related connections and equipment.
• Check the transmitter configuration.
7.3.1 Analog Output An analog output problem can appear as one of the following:
• No output or very low output – There is no transmitter output or the output remains low despite changes in the process.
• High output – Transmitter output remains high despite changes in the process.
• Erratic output – Transmitter output varies when process does not.
• Sluggish response – Transmitter seems to respond to process changes very slowly. Often an analog output problem is caused by incorrect transmitter configuration or by something external to the transmitter.
September 2004 7-5

Calibration and Maintenance UMSITRPSD3-1
Transmitter Troubleshooting Steps Several troubleshooting avenues are presented below. Select the appropriate path for the encountered symptoms.
• Record the readings in the numeric display, status arrows, and sign. Note the reading(s) in the unit/bargraph display, particularly any static or scrolling message. The display is discussed in Section 6 On-Line Calibration and Operation.
− If the display is blank or partial characters appear, connect the HART Communicator in the loop. If the Communicator shows correct data, replace the display. If the problem remains, replace the electronics module. If the Communicator does not show correct data, use a voltmeter to confirm that power is applied to the transmitter. If power is applied, replace the electronics module.
− ERROR appears on the display – There is a hardware or software malfunction. Replace the electronics module. If the problem remains, replace the measuring cell.
− A static or scrolling message appears in the unit/bargraph display - This is a notice of a malfunction or a change in a status, warning, or alarm. Read the message and respond accordingly. Check the transmitter configuration and process conditions.
− Warning/Alarm indication - Check the configuration of: Calibrate interval, Service interval, and AO saturation. The warning/alarm may be an indication that a configured time has elapsed or that the analog output has saturated. Check transmitter configuration and process conditions.
• Perform a transmitter self test or reset. Refer to Section 6.4.21 Self Test and Master Reset. Again check data and messages and repair as indicated. Initially the numeric display will momentarily show “Init” and then display the current output (unless the display is set to read another parameter or ERROR appears). The unit/bargraph display will show the engineering unit (unless a fixed message or scrolling message appears or the unit/bargraph display is set to the bargraph mode). If a failed test message appears, repair as necessary.
• Check the pressure to current conversion. Connect a pressure source to the transmitter and connect the HART Communicator in the loop. Set the pressure source to produce a 4 mA transmitter output current. In the Online menu, press 3 Device Setup and then press 1 Process Variables to observe the active data. Refer to Appendix A Online Configuration Map as needed. Change the pressure to produce a 20 mA output current. If a display is not installed, a milliammeter can be connected after removing the enclosure cap for access to the 4-20 mA test terminals.
• Place the transmitter in the simulation mode to apply a fixed or ramping current to the loop. Refer to Section 6.4.20 Simulation. Troubleshoot the controller or device receiving the transmitter output signal. Check the loop wiring at all loop-connected devices. If selected loop currents are significantly out of tolerance, or loop current cannot be set, replace the electronics module (see Section 7.4). If the transmitter passes the fixed current (loop override) test, continue troubleshooting.
DSIII electronic modules are interchangeable. If troubleshooting points to a failed display or electronics module, substitute a known good assembly for another transmitter or from spare parts stock. See Section 7.4 for assembly replacement steps. Replacing the electronics module will necessitate reconfiguration of the transmitter since configuration data are stored in the module. Check Impulse Piping
September 2004 7-6

UMSITRPDS3-1 Calibration And Maintenance
• Check that high and low pressure pipe connections are not reversed.
• Check for leaks or blockage.
• Check for entrapped gas in liquid lines or for liquid in dry lines.
• Check for sediment in transmitter’s process connection blocks.
• Check that blocking valves are fully open and that bypass valves are tightly closed.
• Check that the density of the fluid in piping is unchanged. Check Loop Power Supply/Wiring
• Check loop power supply for blown fuse or tripped circuit breaker.
• Check for 10.5 Vdc minimum across loop +/- terminals in transmitter terminal compartment.
• Check power supply output voltage: 15 Vdc minimum; 45 Vdc maximum (30 Vdc in an intrinsically safe circuit).
• Check polarity of loop wiring at both power supply and transmitter.
• Check for loose or broken loop wiring at power supply terminals, supply barriers (if used), junction boxes, and transmitter terminal compartment.
• Check for disconnected or broken current sense resistor.
• Check for short between shield and loop + wire.
• Check for accumulation of moisture in transmitter terminal compartment.
• Check loop cable for proper type and length.
• Check for electrical interference between the loop cable and any adjacent cables in a cable tray or conduit.
Check Transmitter Configuration
• Check for proper operating mode: analog, address 0; digital, address 1-15.
• Check for appropriate transfer function (linear or square root).
• Check the switch point if the square root output current characteristic (i.e. transfer function) is configured.
Check for a Transmitter Stuck in Fixed Current (Loop Override) Mode
• Re-enter Fixed Current mode from HART Communicator Online menu and properly exit the mode. Check for Variable Process Fluid Flow
• Install mechanical dampers in process pressure piping.
• Select a higher damping value (software filter time constant). Check Primary Element
• Check that primary element is correctly installed.
• Check element for damage and leaks.
• Note any changes in process fluid properties that can affect output.
September 2004 7-7

Calibration and Maintenance UMSITRPSD3-1
7.3.2 Digital Output (Communication) A malfunctioning digital output can indicate a defective communication circuit. More commonly, however, these problems are caused by an incorrect or poor installation. It is possible to install a transmitter such that the 4-20 mA signal is correct, yet the digital HART signal is not. The most common symptom of a communication problem is the inability to locate a transmitter on the loop using a HART Master Device, such as the HART Communicator. Typical messages from the HART Communicator include: device disconnected, no device found, or communication error. If communication problems occur, check the following. Refer to the specifications in Section 9 and to Section 4 Installation as necessary.
• Check that loop resistance is between 250Ω and 1100Ω.
• Check that electrical noise on the loop is not excessive: power supply ripple should not exceed 12 mVp-p.
• Check that there are no high inductance devices in the loop (I/P for example). Install a HART communication filter across such a device.
• Check that the power supply voltage is high enough for the installed total loop resistance. Refer to Section 4 Installation.
• Refer to Section 4 Installation and confirm that loop cable length is not excessive.
• Check that the HART Master is connected across a load.
September 2004 7-8

UMSITRPDS3-1 Calibration And Maintenance
7.4 ASSEMBLY REMOVAL AND REPLACEMENT The display, electronics module, measuring cell, and terminal board assemblies are not user-serviceable; however, they may be replaced. This section describes removal and replacement of these assemblies. Refer to Section 7.0 for a list of tools. Figure 7-1 shows transmitter major assemblies.
WARNING
Explosion can cause death or serious injury. In a Division 1 area, where an explosion-proof rating is required, remove power from the transmitter before removing either enclosure cap. This device has a modular structure. Use only Siemens authorized assemblies. When servicing, refer to the instructions enclosed with replacement parts.
1 2 3 4 5 6
Enclosure cap with/without viewing glass Digital Display Threaded hex standoff Electronics Module and display cable Measuring Cell board Enclosure
7 --
Measuring Cell (gauge construction shown; includes measuring cell cable and measuring cell board) Terminal Board assembly (inside enclosure cap adjacent to Field Terminals)
FIGURE 7-1 Transmitter Exploded View
The transmitter configuration must be reviewed after replacing either the electronics module (4) or the measuring cell (7). The following table identifies the parameters that are stored and those that will need to be entered.
September 2004 7-9

Calibration and Maintenance UMSITRPSD3-1
Device Parameters After Replacing Electronics Module or Measuring Cell
Parameter Description Stored Not Stored (2)
Configuration Dependent (1)
Damping x AO alarm type x Alarm LRV/URV x Saturation alarm activation x Transmission functions x Square root switch point x Pressure units x Polling address x Tag x Mechanical construction: electronics/sensor
x
Min/max pointer x Zero calibration x Upper/lower sensor calibration points x Service interval x Minimum span x Measurement limits Sensor limits Explosion protection x Sensor serial number x Working hour meter, sensor x Working hour meter, electronics x Firmware/Software revision x Min/max pointer, electronics x Calibration interval, electronics x Saturation alarm duration x Local display unit x Current calibration Message x Descriptor x Date x Final assembly number x Bargraph activation x Write protection mode x Hardware revision x Device revision x Unit tracking x
Notes: (1) Column specifies sensor data that remains after changing electronics or sensor. (2) Dependent on electronics module version. Check the parameters and configure as needed.
September 2004 7-10

UMSITRPDS3-1 Calibration And Maintenance
7.4.1 Display Assembly Removal
1. Remove power from the transmitter.
2. Place an anti-static wrist strap on your wrist and connect its ground lead to the transmitter enclosure ground screw.
3. Unscrew the enclosure cap nearest the tag plate.
4. While holding the display assembly, loosen and remove the two Phillips-head screws securing the display circuit board to two hex stand-offs. See Figure 7.2.
5. Grasp the keyed display cable connector at the electronics module and disconnect it. Do not pull on the display cable. See the figure below.
Installation
1. Plug the keyed display cable into the connector in the electronics module.
2. Orient the display for best viewing (see Section 4.5 Installation as needed) and install the two Phillips-head screws. Tighten the screws to 5 in lbs (0.55 N-m).
3. Install the enclosure cap by turning it clockwise until the O-ring contacts the enclosure. Turn the cap one additional turn to compress the O-ring.
4. Remove the wrist strap.
1
2
MG
0035
3a
MG
0035
3a
C73451-A407-B300ES: 008
FW: 11.02.03
4
5
678
3
1 Display mounting screws, qty 2 2 Display assembly Note: Enclosure cap removed.
3 Electronics Module 4 Display assembly, circuit board side 5 Display cable connector and ribbon cable 6 Pull tab to remove Electronics Module 7 Hex stand-offs securing Module, qty 2 8 Label with firmware (FW) level
FIGURE 7-2 Display Assembly Installed and Partially Removed
September 2004 7-11

Calibration and Maintenance UMSITRPSD3-1
7.4.2 Replacing the Electronics Module A larger tweezers (4"-6") is very useful in the procedure below. Removal
1. Fasten an anti-static wrist strap on your wrist and connect its ground lead to the transmitter enclosure ground screw.
2. If present, remove the display as described in the previous section.
3. Refer to Figure 7-2 and remove the two hex standoffs (7) using a 3/32" (7 mm) hex wrench. Grasp the pull tab (6) and withdraw the electronics module (3) from the enclosure. As shown in Figure 7-3, the measuring cell cable (4) is several inches long. Fold the module down so the back of the assembly is visible, as shown.
Important
Do not allow the electronics module to hang on the measuring cell cable. The measuring cell board and the cable are part of the measuring cell assembly. Damaging the board or cable will require replacement of the entire measuring cell.
4. On the back of the electronics module, locate the measuring cell board (2) and the measuring cell cable (4). The measuring cell board plugs into the electronics module and two flexible clips (3) secure the board. Grasp the board by inserting tweezers between the clips and the board. Slightly rock the board while applying outward pressure to ease the connectors apart.
5. Set the electronics module aside in an anti-static bag.
MG
0035
3a
5
6
4
3
2
1
1 2 3 4 5 6
Electronics Module, rear view; module shown pulled out of transmitter enclosure and folded down Measuring cell board Flexible clips securing measuring cell board, qty 2 Measuring cell cable, loop between feed-thru pins Feed-thru pins, qty 2, in transmitter enclosure Feed-thru pin receptacles, qty 2
FIGURE 7-3 Electronics Module Removal and Installation
September 2004 7-12

UMSITRPDS3-1 Calibration And Maintenance
Installation
1. Remove the new electronics module from its anti-static bag.
2. Carefully align the connector on the measuring cell board with the connector on the back of the new electronics module. Press the board onto the electronics module until the board is seated fully and the flexible clips grip the board.
3. Move the electronics assembly close to the housing. Guide the measuring cell cable so that it folds between the two long feed-thru pins (5). Align the mounting holes in the electronics module with the holes in the casting. Press the electronics module into the enclosure. The two long pins must enter the two single pin receptacles (6) on the back of the module. Press the module in while gently rocking the module until it can be pressed in no farther.
4. Install the two hex standoffs. Tighten the standoffs securely but do not over tighten and damage the electronics module.
5. Install the display as described in the previous section.
6. Install the enclosure cap by turning it clockwise until the O-ring contacts the enclosure. Turn the cap one additional turn to compress the O-ring.
7. Apply power to the transmitter. Refer to the table in Section 7.4 and to Section 6 On-Line Configuration and Operation and configure the transmitter.
7.4.3 Measuring Cell Assembly Removal and Replacement The measuring cell assembly is not field repairable. It must be replaced if defective. The transmitter must be removed to a workbench to accomplish removal and replacement. A measuring cell assembly consists of the cell, process flanges (differential construction, as specified), measuring cell cable, measuring cell board and an O-ring. Removal
1. Refer to Section 7.6 Transmitter Replacement and disconnect and remove the transmitter from service. Move transmitter to service shop.
2. Remove the enclosure cap for access to the display and electronics module.
3. If an optional display is installed, remove it as described in Section 7.4.1. Store the display in a static protective bag.
4. Remove the electronics module as described in Section 7.4.2.
5. Use a 3/32" (2.5mm) Allen wrench to loosen the enclosure rotation screw, located below the tag plate.
September 2004 7-13
Calibration and Maintenance UMSITRPSD3-1
6. Separate the measuring cell from the enclosure.
− Differential construction - Clamp the end cap portion of the measuring cell in a bench vise with the transmitter in an upright position. Use wood blocks to protect the end caps from damage by the vise. Rotate the enclosure clockwise while watching the measuring board and cable to be sure that they rotate freely.
− Gauge construction - Use an open-end wrench to rotate the cell counterclockwise while watching the measuring board and cable to be sure that they rotate freely. Wrench size will depend upon the type of process connection.
7. As the measuring cell and enclosure separate, guide the measuring cell board through the neck of the enclosure and set the enclosure aside.
8. Clean all process material and other contamination from the entire assembly and pack the assembly for return or disposal. Include applicable MSDSs (Material Safety Data Sheets).
Installation
1. Unpack the replacement measuring cell. If a greased O-ring is packed separately, go to step 2. If the O-ring is installed on the measuring cell tube, in a groove next to the threaded portion of the tube, go to step 3. Keep the greased O-ring clean and be careful not to wipe away the grease.
2. Pass the measuring cell board and measuring cell cable through the O-ring. Seat the O-ring in the groove in the measuring cell neck adjacent to the threaded portion of the neck. Keep the greased O-ring clean and be careful not to wipe away the grease.
3. Differential Construction only - Position the measuring cell in a bench vise with the measuring cell’s tube pointing up. Use wood blocks to protect the end caps from damage.
4. Carefully pass the measuring cell board and cable through the enclosure neck and into the enclosure.
5. Screw the measuring cell into the enclosure. As the assembly is rotated, be certain that the measuring cell cable and board rotate freely.
− Differential construction - Rotate the enclosure clockwise until the following conditions are met. • the enclosure setscrew should be in-line with the raised area in the center of the process
flange; see Figure 7-4 • the enclosure rotation arrow should be to the left of the enclosure setscrew • the neck dimension shown in Figure 7-4 is correct
− Gauge construction - Using an open-end wrench, rotate the measuring cell until the following conditions are met. • the enclosure setscrew should be in-line with the enclosure rotation arrow • the neck dimension shown in Figure 7-4 is correct
September 2004 7-14

UMSITRPDS3-1 Calibration And Maintenance
MG
0035
3a
Differential Construction Gauge Construction
1
2
3
4
Dimension A = 0.1" +/- 0.03 (2.6 mm +/- 0.75)
AA
1 2 3 4
Enclosure rotation arrow (enclosure rotation reference point) Ramp-shaped recessed area indicating enclosure rotation range Enclosure setscrew, use 3/32 (2.5 mm) Allen screw Tag plate
FIGURE 7-4 Measuring Cell Alignment and Insertion Depth
6. Tighten the enclosure setscrew to 30.1 to 30.9 in lbs (3.4 to 3.6 Nm).
7. Get the electronics module and connect the measuring cell board as described in Section 7.4.2.
8. Install the electronics module as described in Section 7.4.2.
9. Install the display as described in Section 7.4.1.
10. Install the end cap by turning it clockwise until the O-ring contacts the enclosure. Turn the cap one additional turn to compress the O-ring.
11. Apply power to the transmitter; see Section 3 for wiring diagrams. Refer to the table in Section 7.4 and to Section 6 On-Line Configuration and Operation and configure the transmitter.
12. Reinstall transmitter as described in Section 7.6 Transmitter Replacement.
September 2004 7-15

Calibration and Maintenance UMSITRPSD3-1
7.4.4 Terminal Board Assembly Removal and Replacement Perform this procedure to replace the terminal board assembly. The terminal board assembly usually can be replaced at the installation site; if not, remove the transmitter for bench servicing. Removal
1. Use the proper procedures to shut down the process.
2. Remove power from the transmitter and remove the enclosure cap at the “Field Terminals” end of the enclosure to access the terminal board.
3. Retrieve the wrist strap from the maintenance kit and snap it on your wrist. Connect the ground clip to the transmitter ground screw.
4. Mark and then disconnect the loop wiring using a medium-size Phillips blade screwdriver, disconnect the wiring.
5. Remove two terminal board mounting screws and external tooth lockwashers.
6. Pull the terminal board straight out of the compartment.
7. Discard the defective board. Installation
1. Retrieve the wrist strap from the maintenance kit and snap it on your wrist. Connect the ground clip to the transmitter ground screw.
2. Remove the replacement terminal board assembly from its packaging.
3. Note the two long feed-thru pins in the transmitter enclosure. These two pins must enter two receptacles on the circuit board side of the terminal board assembly. Carefully align the two mounting holes in the terminal board with the threaded holes in the enclosure casting and gently press the terminal board into place until it seats inside the enclosure. Do not use excessive force; do not bend the two long feed-thru pins!
4. Insert two terminal board mounting screws and lockwashers and tighten to 12 in-lbs (1.4 Nm).
5. Connect loop wiring.
6. Install the enclosure cap by turning it clockwise until the O-ring contacts the enclosure. Turn the cap one additional turn to compress the O-ring.
7. As necessary, reinstall the transmitter in the field.
8. Restore power to the transmitter. Calibration is not required.
7.5 NON-FIELD-REPLACEABLE ITEMS Certain components are not replaceable except at the factory. These are:
• Enclosure cap display viewing glass:
Agency regulations do not permit field replacement of a broken or damaged glass as this would invalidate the enclosure’s explosion proof rating. Replace the entire damaged enclosure cap assembly.
• RFI feed-thrus Potted
September 2004 7-16

UMSITRPDS3-1 Calibration And Maintenance
7.6 TRANSMITTER REPLACEMENT To replace a transmitter, refer to the procedure below and one or more of the following Sections in the Installation section of this Manual: • 4.4 Mechanical Installation
• 4.5 Mechanical Installation, All Models
• 4.6 Electrical Installation
• 4.7 Hazardous Area Installation WARNING
Disconnecting the transmitter from the loop must not release process material that is hazardous to people or can damage equipment. Depressurize the transmitter and drain process material as necessary.
Removal
1. Perform proper plant shut down procedures.
2. Remove power from transmitter. Open by-pass valves and close shut-off valves.
3. Remove the enclosure cap for access to the terminal board. Tag and disconnect loop wiring.
4. Disconnect the electrical conduit. Refer to Section 4.6 Electrical Installation. Replace the enclosure cap.
5. Disconnect the transmitter from the process. Depressurize and drain impulse piping. Refer to the Mechanical Installation section for the transmitter at hand; see above list.
− Pressure or Flow Transmitter – Disconnect all process piping (e.g., impulse piping or 3-valve manifold). Then remove the transmitter from its mounting bracket.
− Level Transmitter – Remove the transmitter from the mating flange.
Important
Before returning a transmitter, remove all process material. Material Safety Data Sheets for all hazardous process materials in contact with the transmitter and the potential consequences of exposure must be enclosed with the transmitter.
Installation
1. Fasten transmitter to mounting bracket. Refer to Mechanical Installation section for transmitter at hand.
2. Connect transmitter to process.
3. Connect conduit and loop wiring. Refer to Sections 4.5 Mechanical Installation, All Models and 4.6 Electrical Installation.
4. Orient display and enclosure for best viewing of the display. Refer to Section 4.5 Mechanical Installation, All Models.
5. Apply power to transmitter and configure. Refer to Section 6 Online Configuration and Operation.
6. Check all connections, then open shut-off valves and close by-pass valves. As needed, refer to Section 5 Post Installation Test.
September 2004 7-17

Calibration and Maintenance UMSITRPSD3-1
Caution
Do not exceed the Maximum Overrange ratings when placing the transmitter into service. Properly operate all shut-off and equalizing valves. Ratings are listed on the rating plate and in Section 9 Model Designation and Specifications.
7. Check transmitter configuration as described in Section 3.4 Reviewing Configuration Data and Section 6 Online Configuration and Operation.
8. If needed, perform mounting induced zero shift calibration (see Section 7.1).
7.7 MAINTENANCE RECORDS An accurate record keeping system for tracking maintenance operations should be established and kept up to date. Data extracted from the record may serve as a base for ordering maintenance supplies, including spare parts. The record may also be useful as a troubleshooting tool. In addition, maintenance records may be required to provide documentary information in association with a service contract. It is suggested that, as appropriate, the following information be recorded:
1. Date of service incident 2. Name or initials of service person 3. Brief description of incident symptoms and repairs performed 4. Replacement part or assembly number 5. Software compatibility code of original part 6. Software code of replacement part 7. Serial number of original part 8. Serial number of replacement part 9. Issue number of original circuit module 10. Issue number of replacement circuit module 11. Date of completion
7.8 RECOMMENDED SPARE AND REPLACEMENT PARTS The quantity and variety of spare parts is determined by how much time a transmitter can be permitted to remain out of service or off line. Replaceable parts are listed in Section 9 Model Designations and Specifications (Tables 9-7 to 9-13). Contact the factory if assistance is needed in determining quantity and selection of spare parts. When ordering a part, provide the following information for the item, module or assembly to be replaced or spared. This information will help ensure that a repair addresses the observed problem, and that a compatible part is supplied.
1. Complete part number from Section 9 or from a label on the assembly
2. The single-digit software revision level
3. Model and serial number from the transmitter’s nameplate
4. User purchase order number of original order, available from user records
5. New user purchase order number for the assembly to be replaced or spared
6. Reason for return for repair; include system failure symptoms, station failure symptoms, and error codes displayed.
September 2004 7-18

UMSITRPDS3-1 Calibration And Maintenance
Returns should be packaged in original shipping materials if possible. Otherwise, package item for safe shipment or contact factory for shipping recommendations. Refer to Section 1.4 Product Support to obtain a Return Material Authorization (RMA) number.
Important
The electronics module and display must be placed in static shielding bags to protect them from electrostatic discharge.
7.9 COMPATIBILITY, REVISION NUMBERS From the HART Communicator, the transmitter can be asked to display four revision numbers.
• Universal Revision - This revision of the universal device description software enables communication between the transmitter and an external device, such as a HART Communicator.
• Field Device Revision - This Device Description is needed for detailed communication between the transmitter and other HART devices.
• Software (i.e. firmware) Revision - Since software controls the transmitter’s operating routines and its HART communications with loop-connected stations and gateways. When requesting technical information or during troubleshooting, it often is necessary to know the transmitter’s software revision level. A single digit identifies the transmitter software revision level.
• Hardware Revision - This is the revision number of the transmitter’s hardware. To view the revision numbers:
1. Establish communication with the transmitter (see Section 3.2).
2. In the Online menu, press 3 Device Setup.
3. In the Device Setup menu, press 4 Detailed Setup.
4. In the Detailed Setup menu, press 4 Device Information.
5. In the Device Information menu, press 6 Revision Numbers.
6. Read and note the revision number of interest.
September 2004 7-19

Calibration and Maintenance UMSITRPSD3-1
September 2004 7-20

UMSITRAPDS3-1 Circuit Description
8.0 CIRCUIT DESCRIPTION This section provides a basic circuit description of the SITRANS P DSIII Pressure Transmitter. Figure 8-1 shows the functional block diagram. Basically the transmitter consists of two active components: a measuring cell and an electronics module. Input pressure is piped to the measuring cell (1) that includes diaphragms, fill fluid, and related components. The output signal from the measuring cell goes to the electronics module that consists of the microcontroller (4), A/D (3) and D/A (5) converters, HART modem (7), and related components. The magnetic pushbuttons (8) and display (9) connect to the electronics module. The transmitter family consists of four model types: flow, differential pressure, absolute pressure, and flange-mounted liquid level. All models use the same interchangeable electronics module, display, enclosure, and magnetic pushbuttons. The major difference between models is the measuring cell. The transmitters can communicate with a Model 275 HART Communicator, Model 375 Field Communicator, or a Primary Master controller using the HART protocol.
1 2 3 4 5 6
Measuring cell sensor Instrument amplifier Analog-digital converter Microcontroller Digital-analog converter Two non-volatile memories in the measuring cell and electronics
7 8 9 10 IA UH
HART modem Magnetic pushbuttons for local operation Digital display Connections to external milliammeter Output current Power supply
FIGURE 8-1 Transmitter Block Diagram
September 2004 8-1

Circuit Description UMSITRPDS3-1
8.1 Overall Operation The measuring cell sensor (1) detects the applied process pressure. The sensor’s analog output signal is amplified by an instrument amplifier (2) and converted into a digital signal in an analog-digital converter (3). This data is evaluated by a microcontroller (4) that corrects the signal and temperature characteristics. Microcontroller output is converted to a 4-20 mA output current by the digital-analog converter (5). A diode circuit (10) provides reverse polarity protection in the event of reversed loop connections. An external digital milliammeter can be connected across the diode. The diode and the electronics discussed in the previous paragraph are housed in an assembly named the electronics module. Measuring cell-specific data (e.g. measuring range, measuring cell material, oil fill) are stored in a non-volatile memory (6) located in the measuring cell assembly. Transmitter configuration data (e.g. turn-down, electric damping) are stored in a second non-volatile memory (6) in the electronics module. The transmitter can be configured locally using three built-in magnetic pushbuttons (8) or remotely, via the HART modem (7), using the HART Communicator. The digital display (9) shows input pressure, output current, error messages, modes of operation, or other data as determined by the configuration and by user commands via the magnetic pushbuttons or HART Communicator. In the following sections, individual measuring cell types will be explained.
8.2 Pressure As shown in Figure 8-2, process pressure pe is applied to the measuring cell (2) through the process connection (3). This pressure is applied to the seal diaphragm which flexes to transfer the pressure to the fill fluid (5) which in turn transfers the pressure to the silicon pressure sensor (6). The silicon pressure sensor consists of four piezo-resistors in a bridge circuit grown on the measuring diaphragm. The applied pressure causes a change in the bridge resistance that is proportion to the input pressure. A transmitter with a measuring span of up to 925 psi will measure the input pressure compared to atmospheric pressure. A transmitter with a measuring span of 2320 psi compares input pressure to a vacuum. 1 2 3 4 5 6 pe
Reference pressure Measuring cell Process connection Seal diaphragm Filling fluid Silicon pressure sensor Input variable pressure
FIGURE 8-2 Pressure Measuring Cell
September 2004 8-2

UMSITRAPDS3-1 Circuit Description
8.3 Differential Pressure and Flow Differential pressure is applied to the silicon pressure sensor (4), a seal diaphragm (7) on either side of the measuring cell body, and the fill fluid (8). See Figure 8-3. When measuring limits are exceeded, the overload diaphragm (5) deflects until one of the seal diaphragms (7) comes into contact with the measuring cell body (4) to protect the silicon pressure sensor (3). Four piezo-resistors in a bridge circuit are grown on the measuring cell diaphragm. The bridge change resistance in response to a change in input pressure. The change in resistance causes a bridge output voltage that is proportional to differential pressure. 1 2 3 4 5 6 7 8 9
Input pressure P+ Process Flange (qty. 2) O-ring (qty. 2) Measuring cell body Silicon pressure sensor Overload diaphragm Seal diaphragm (qty. 2) Fill fluid Input pressure P-
FIGURE 8-3 Differential Pressure and Flow Measuring Cell
8.4 Flanged Level Input pressure (hydrostatic pressure) acts on the high pressure (+) side of the measuring cell through the seal diaphragm (10) at the mounting flange, the fluid filled capillary tube (8), the fluid filled cavity in the process flange, a seal diaphragm, and the fill fluid in the measuring cell body (4). See Figure 8-4. A differential pressure is applied to the low pressure (-) side of the measuring cell via the seal diaphragm (6) and fill fluid (7) to the silicon pressure sensor (3). When measuring limits are exceeded, the overload diaphragm (5) deflects until one of the seal diaphragms (6) comes into contact with the body of the measuring cell (4) to protect the silicon pressure sensor (3). The measuring diaphragm is flexed by the differential pressure. Four piezo-resistors in a bridge circuit are grown on the measuring diaphragm. Bridge resistance varies with pressure changes causing the bridge output voltage to vary in proportion to the change in applied differential pressure.
September 2004 8-3

Circuit Description UMSITRPDS3-1
1 2 3 4 5 6 7 8 9 10
Process flange (qty. 2) O-ring (qty. 2) Silicon pressure sensor Measuring cell body Overload diaphragm Seal diaphragm at the measuring cell (qty. 2) Fill fluid Capillary tube with fill fluid Mounting flange with capillary tube Seal diaphragm at the mounting flange
FIGURE 8-4 Flanged Level Measuring Cell
8.5 Absolute Pressure (Differential Construction) Absolute pressure pe is transferred via the seal diaphragm (2) and the fill fluid (7) to the silicon pressure sensor (5). The pressure difference between the input pressure (pe) and the reference pressure (8) on the low pressure side of the measuring cell flexes the measuring diaphragm. Four piezo-resistors in a bridge circuit grown on the measuring diaphragm change their resistances in response to the change in applied pressure. The change in resistance causes a bridge output voltage change that is proportional to the absolute pressure. If measuring limits are exceeded, the overload diaphragm (5) will deflect until the seal diaphragm comes into contact with the body of the measuring cell (4) protecting the silicon pressure sensor (5) against the overload. 1 2 3 4 5 6 7 8 pe
Process flange (qty. 2) Seal diaphragm at the measuring cell (qty. 2) O-ring (qty. 2) Measuring cell body Silicon pressure sensor Overload diaphragm Fill fluid Reference pressure Input variable pressure
FIGURE 8-5 Absolute Pressure Measuring Cell, Differential Construction
8.6 Absolute Pressure (Gauge Construction) Pressure pe is applied via the seal diaphragm (3) and full fluid (4) to the absolute pressure sensor (5). See Figure 8-6. This flexes the measuring diaphragm on which four piezo-resistors in a bridge circuit have been grown. Bridge resistance will vary with the applied pressure to generate a bridge output voltage that is proportional to the input pressure.
September 2004 8-4

UMSITRAPDS3-1 Circuit Description
1 2 3 4 5 pe
Measuring cell Pressure connection Seal diaphragm Oil fill Absolute pressure sensor Input variable pressure
FIGURE 8-6 Absolute Pressure Measuring Cell, Gauge Construction
8.7 Communication Format The transmitter communicates, via the HART protocol, with a HART Communicator and any HART capable Primary Master controller connected to the network. HART communication uses phase-continuous frequency-shift-keying (FSK) at 1200 bits/sec and frequencies of 1200 Hz (logic 1) and 2200 Hz (logic 0). HART communication is superimposed (AC coupled) on the analog 4-20 mA signal. Because the digital signaling is high frequency AC, its DC average is zero and does not interfere with analog signaling. An active filter connected to the loop input receives HART transmissions. The filter effectively rejects low frequency analog signaling and other out-of-band interference, preventing a compromise of the digital reception. The filtered signal is applied to a zero crossing detector, which converts the filtered information into clean pulses of uniform amplitude before introduction to the Bell 202 modem. The modem receives and processes (e.g., demodulates) the serial FSK signal and outputs a signal to the microcontroller where serial to parallel conversion is performed. In response to the received signal, the microcontroller outputs a signal to the modem where it is modulated and fed into the feedback circuit of a voltage-to-current converter for transmission over the loop.
September 2004 8-5

Circuit Description UMSITRPDS3-1
September 2004 8-6

UMSITRPDS3-1 Model Designations And Specifications
9.0 MODEL DESIGNATIONS AND SPECIFICATIONS
This section contains the model designation tables, a comprehensive accessory list, functional and performance specifications, and hazardous area classifications for SITRANS P Series DSIII Pressure Transmitters.
Important
Before installing, calibrating, troubleshooting or servicing a transmitter, review this section carefully for applicable specifications and hazardous area classifications.
9.1 MODEL DESIGNATIONS
1 2
++
MG
0035
3a
3
Tables 9-1 through 9-6 identify each entry on a transmitter’s rating and approval plates. These plates carry important transmitter information: • Model number and serial number (Rating Plate) • Materials of construction (Rating Plate) • Span and rated pressure (Rating Plate) • Certifications (Approval Plate) • User-supplied Tag (Tag Plate) Service Parts Tables 9-7 through 9-13 identify service parts.
1. Rating Plate
2. Approval Plate 3. Tag Plate
Important
Before installing, applying or removing power, configuring, or servicing, confirm transmitter model by referring to the transmitter’s model designation on its rating plate and in Tables 9-1 through 9-6.
The table below is an overview of measurement categories and available models. For details pertaining to a model, see its model designation table and its specification table later in this section. Measurement Models Model Designation Specifications Dimensions
Absolute or Gauge Pressure
7MF4033 7MF4233 7MF4333
Table 9-1 Table 9-2 Table 9-3
Table 9-15 Table 9-16 Table 9-16
Figure 9-1 Figure 9-1 Figure 9-2
Differential Pressure 7MF4433 7MF4533
Table 9-4 Table 9-5
Table 9-15 Table 9-15
Figure 9-2 or 9-3 Figure 9-2 or 9-3
Level (Flange) 7MF4633 7MF4912
Table 9-6 Table 9-6
Table 9-16 Table 9-16
Figure 9-4 Figure 9-4
September 2004 9-1

Model Designations And Specifications UMSITRPDS3-1
TABLE 9-1 Model 7MF4033, Model Designation Pressure transmitter, two-wire, series DSIII, 7MF4033- -
Measuring cell filling Measuring cell cleaning Silicone oil Normal 1 Inert Grease-free 3 Span PN
0.15 To 15 psi 87 psi B 0.60 To 60 psi 145 psi C
2.3 To 230 psi 460 psi D 9.25 To 925 psi 1450 psi E
23 To 2320 psi 3625 psi F 58 To 5800 psi 8700 psi G
Material of wetted parts Process diaphragm Connection shank Stainless steel Stainless steel A Hastelloy Stainless steel B Hastelloy Hastelloy C Version for diaphragm remote process Y 0 Process connection Connection shank G1/2 A 0 Female thread 1/2-14 NPT 1 Oval flange and connection shank, stainless steel, maximum span: 2320 psi: - Mounting thread 7/16-20 UNF 2 - Mounting thread M10 3 Material of non-wetted parts Housing diecast aluminum 0 Housing stainless steel precision casting 3 Version Standard version 1 International version (in preparation) English plate description and documentation in 5 languages on CD 2 Explosion protection without explosion protection A with explosion protection (CENELEC): - Degree of protection "Intrinsic safety" (EEx ia) 3) B - Degree of protection "Explosion proof" (EEx d) 1) 3) D - Degree of protection "Intrinsic safety and explosion proof" (EEx ia + EEx d) 1) 3) P Application in Zone 2 n (TÜV) 3) E with explosion protection (FM intrinsic safety and explosion proof) 1) H C with explosion protection (CSA intrinsic safety and explosion proof) 1) L C with explosion protection (FM + CSA for IS + XP) N Electrical connection / cable inlet Screwed gland PG 13.5 2) 3) (Adapter) A Female thread M 20 x 1.5 B Female thread 1/2-14 NPT C Han 7D plug 2) 3) D Housing cover / display without window (digital display covered, setting: mA) 1with window (digital display, visible, setting: mA) 6with window (digital display visible, setting: as specified in Y20 7 Notes and “Other versions” on next page.
September 2004 9-2

UMSITRPDS3-1 Model Designations And Specifications
Other versions
Add "-Z" to order number and add short spec… 7MF4033 - . . . . . - . . . . - Z Transmitter with mounting bracket of: - steel A01
- stainless steel A02
Han 7D plug (metal, gray) 3) A30
Han 8U plug (instead of Han 7D) 3) A31
Labeling of rating plate (instead of German): - English B11 - French B12 - Spanish B13
- Italian B14
Manufacturer test certificate M acc. to DIN 55 350, part 18, and according to ISO 8402 C11 Acceptance test certificate B acc. to DIN 50 049 / EN 10 204-3.1 B C12
Works certificate according to DIN 50 049-2.2 / EN 10 204-2.2 C14
Setting upper output signal limit to 22.0 mA D05
Acid gas version according to NACE; only with Hastelloy
process diaphragm D07
IP 68 (not with Han 7D/Han 8U plug, cable screwed gland Pg13.5 and
measuring cells < 914 psi) D12
Application in zone 0 (basic device EEx ia) 3) E02
Oxygen application (in oxygen measurement and Inert filling liquid: 2325 psi maximum) E10 Range to be set, specify in clear text:
Y01: ... to ... mbar, psi, kPa, MPa, ... (27 characters maximum) Y01
Tag number / description (16 characters maximum) specify in clear text: Y15 Tag message (27 characters maximum) specify in clear text: Y16 Setting digital display, specify in clear text: mbar, psi, kPa, MPa, ... Y20 Factory pre-settings other than "Y01", "Y20" and "D05" are not possible.
Notes: 1) Without cable screwed gland 3) Not FM approved 2) Not for "explosion proof" protection
Scope of delivery: Transmitter as ordered, 1 brief instruction (Leporello) Ordering example: Position line: 7MF4033-1EA00-1AA6-Z B-line: A01+Y01+Y20 C-line: Y01: 145 to 290 psi C-line: Y20+D100+D36: psi
September 2004 9-3

Model Designations And Specifications UMSITRPDS3-1
TABLE 9-2 Model 7MF4233, Model Designation Absolute pressure, gauge construction, two-wire, series DSIII, 7MF4233- - Measuring cell filling Measuring cell cleaning Silicone oil Normal 1 Inert Grease-free 3 Span PN
3.3 inH2Oa To 100 inH2Oa 87 psi D 20 inH2Oa To 525 inH2Oa 145 psi F
2.3 psia To 72 psia 435 psi G 14.4 psia To 435 psia 1450 psi H
Material of the wetted parts) Process diaphragm Parts of measuring cell Stainless steel Stainless steel A Stainless steel Hastelloy B Hastelloy Hastelloy C Version for diaphragm remote seal 1) Y 0 Process connection Connection shank G 1/2 A 0 Female thread ½-14 NPT 1 Oval flange and connection shank stainless steel - Mounting thread 7/16-20 UNF 2 Oval flange and connection shank stainless steel - Mounting thread M10 3 Material of the non-wetted parts Housing diecast aluminum 0 Housing stainless steel precision casting 3 Version Standard version 1 International version (in preparation) plate label in English and documentation in 5 languages on CD 2 Explosion protection without explosion protection A with explosion protection (CENELEC): - Degree of protection "Intrinsic safety" (EEx ia) 4) B - Degree of protection "Explosion proof" (EEx d) 1) 4) D - Degree of protection "Intrinsic safety and explosion proof" (EEx ia + EEx d) 1) 4) P Application in zone 2 n (TÜV) 4) E with explosion protection (FM intrinsic safety and explosion proof) 1) H C with explosion protection (CSA intrinsic safety and explosion proof) 1) L C with explosion protection (FM + CSA for IS + XP) N Electrical connection / cable inlet Screwed gland Pg 13.5 3) 4) (Adapter) A Female thread M 20 x 1.5 B Female thread ½-14 NPT C Han 7D plug 3) 4) D Housing cover / display without window (digital display covered, setting: mA) 1with window (digital display visible, setting: mA) 6with window (digital display visible, setting: as specified in Y20) 7 Notes and “Other versions” on next page.
September 2004 9-4

UMSITRPDS3-1 Model Designations And Specifications
Other versions
Add "-Z" to order number and add short spec. 7MF4233 - . . . . . - . . . . - Z Transmitter with mounting bracket of: - steel A01 - stainless steel A02
Han 7D plug (metal, gray) 4) A30 Han 8U plug (instead of Han 7D) 4) A31
Labeling of the rating plate (instead of German): - English B11 - French B12 - Spanish B13 - Italian B14
Manufacturer test certificate M according to DIN 55 350, Part 18, and according to ISO 8402: C11 Acceptance test certificate B according to DIN 50 049 / EN 10 204-3.1 B C12 Works certificate according to DIN 50 049-2.2 / EN 10 204-2.2 C14
Setting of upper output signal limit to 22.0 mA D05
Acid gas version according to NACE Only with Hastelloy process diaphragm D07 IP 68 (not with Han 7D/Han 8U plug or cable screwed gland Pg 13.5) D12
Application in zone 0 (basic device EEx ia) 4) E02
Oxygen application (for oxygen measurement and
inert filling liquid: 2325 psi maximum E10
Measuring range to be set, specify in clear text: Y01: 0 to ... mbar, psi, kPa, Mpa, ... (27 characters maximum) Y01
Tag number / description (16 characters maximum) specify in clear text: Y15 Tag message (27 characters maximum) specify in clear text: Y16 Setting digital display, specify in clear text: mbar, psi, kPa, MPa, ... Y20 Factory pre-settings other than "Y01", "Y20" and "D05" are not possible.
Notes: 1) Version 7MF4333-1DY - Only up to a maximum span of 80 inH2O 3) Not for "explosion proof" degree of protection 2) Without cable screwed gland 4) Not FM approved
September 2004 9-5

Model Designations And Specifications UMSITRPDS3-1
TABLE 9-3 Model 7MF4333, Model Designation Absolute pressure, differential pressure construction, two-wire, series DSIII, 7MF4333- - Measuring cell filling
Normal Inert Grease-free 3 Span
Measuring cell cleaning
Silicone oil 1
PN 3.3 inH2Oa To 100 inH2Oa 460 psi D 20 inH2Oa To 525 inH2Oa 460 psi F 2.3 psia To 72 psia 460 psi G
14.5 psia To 435 psia 460 psi H 77 psia To 2320 psia 3625 psi K E
Material of the wetted parts (stainless steel process flanges) Process diaphragm Parts of the measuring cell Stainless steel Stainless steel A Hastelloy Stainless steel B Hastelloy Hastelloy C Tantalum Tantalum E Monel Monel H Gold 1) Gold L Version for diaphragm remote seal 2) Y Process connection Female thread 1/4-18 NPT with flange connection DIN 19213 with venting opposite process connection - Mounting thread M 10 7) 0 7/16-20 UNF 2 Venting on side of process flange 3) - Mounting thread M 10 4 7/16-20 UNF 6 Material of the non-wetted parts Process flange screws Electronics housing Steel Diecast aluminum 0 Stainless steel Diecast aluminum 2 Stainless steel Stainless steel precision casting 3 Version Standard version 1 International version (in preparation) plate label in English and documentation in 5 languages on CD 2 Explosion protection without explosion protection A with explosion protection (CENELEC): - Degree of protection "Intrinsic safety" (EEx ia) 6) B - Degree of protection "Explosion proof" (EEx d) 4) 6) D - Degree of protection "Intrinsic safety and explosion proof" (EEx ia + EEx d) 3) 4) 6) P Application in zone 2 n (TÜV) 6) E with explosion protection (FM intrinsic safety and explosion proof) 3) 4) H C with explosion protection (CSA intrinsic safety and explosion proof) 3) 4) L C with explosion protection (FM +CSA for IS + XP) N Electrical connection / cable inlet Screwed gland PG 13.5 5) 6) (Adapter) A Female thread M 20 x 1,5 B Female thread 1/2-14 NPT C Han 7D plug 5) 6) D Housing cover / display without window (digital display covered, setting: mA) 1with window (digital display visible, setting: mA) 6with window (digital display visible, setting: as specified in Y20) 7 Notes and “Other versions” on next page.
September 2004 9-6
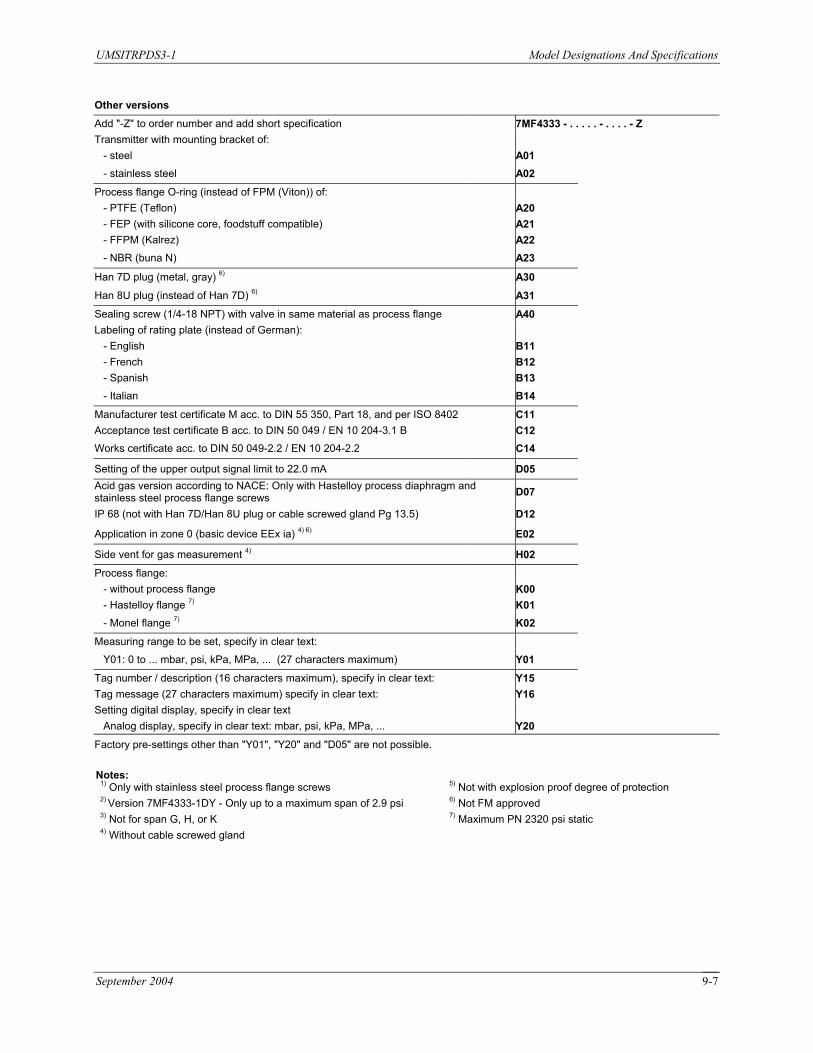
UMSITRPDS3-1 Model Designations And Specifications
Other versions
Add "-Z" to order number and add short specification 7MF4333 - . . . . . - . . . . - Z Transmitter with mounting bracket of: - steel A01
- stainless steel A02
Process flange O-ring (instead of FPM (Viton)) of: - PTFE (Teflon) A20 - FEP (with silicone core, foodstuff compatible) A21 - FFPM (Kalrez) A22
- NBR (buna N) A23
Han 7D plug (metal, gray) 6) A30
Han 8U plug (instead of Han 7D) 6) A31
Sealing screw (1/4-18 NPT) with valve in same material as process flange A40 Labeling of rating plate (instead of German): - English B11 - French B12 - Spanish B13
- Italian B14
Manufacturer test certificate M acc. to DIN 55 350, Part 18, and per ISO 8402 C11 Acceptance test certificate B acc. to DIN 50 049 / EN 10 204-3.1 B C12
Works certificate acc. to DIN 50 049-2.2 / EN 10 204-2.2 C14
Setting of the upper output signal limit to 22.0 mA D05 Acid gas version according to NACE: Only with Hastelloy process diaphragm and stainless steel process flange screws D07
IP 68 (not with Han 7D/Han 8U plug or cable screwed gland Pg 13.5) D12
Application in zone 0 (basic device EEx ia) 4) 6) E02
Side vent for gas measurement 4) H02
Process flange: - without process flange K00 - Hastelloy flange 7) K01
- Monel flange 7) K02
Measuring range to be set, specify in clear text:
Y01: 0 to ... mbar, psi, kPa, MPa, ... (27 characters maximum) Y01
Tag number / description (16 characters maximum), specify in clear text: Y15 Tag message (27 characters maximum) specify in clear text: Y16 Setting digital display, specify in clear text Analog display, specify in clear text: mbar, psi, kPa, MPa, ... Y20
Factory pre-settings other than "Y01", "Y20" and "D05" are not possible. Notes:
1) Only with stainless steel process flange screws 5) Not with explosion proof degree of protection 2) Version 7MF4333-1DY - Only up to a maximum span of 2.9 psi 6) Not FM approved
3) Not for span G, H, or K 7) Maximum PN 2320 psi static 4) Without cable screwed gland
September 2004 9-7

Model Designations And Specifications UMSITRPDS3-1
TABLE 9-4 Model 7MF4433, Model Designation Differential pressure and flow transmitters, two-wire, series DSIII, PN 470/2325, 7MF4433- - Measuring cell filling Measuring cell cleaning Silicone oil Normal 1 Inert Grease-free 3 PN 460 psi, static Span 0.4 To 8 inH2O 1) B PN 2320 psi, static Span 0.4 To 24 inH2O C 1 To 100 inH2O D 2.4 To 240 inH2O E 6.4 To 640 inH2O F 20 To 2000 inH2O G 4.3 To 435 psi H Material of the wetted parts (stainless steel process flanges) Process diaphragm Parts of the measuring cell Stainless steel Stainless steel A Hastelloy Stainless steel B Hastelloy Hastelloy C Tantalum 2) Tantalum E Monel 2) Monel H Gold 2), 3) Gold L Version for diaphragm remote seal Y Process connection Female thread 1/4-18 NPT and flange connection acc. to DIN 19 213 Venting opposite process connection: - Mounting thread M 10 0 - Mounting thread 7/16-20 UNF 2 Venting on side of process flanges: - Mounting thread M 10 7) 4 - Mounting thread 7/16-20 UNF 7) 6 Material of the non-wetted parts Process flange screws Electronics housing Steel Diecast aluminum 0 Stainless steel Diecast aluminum 2 Stainless steel Stainless steel precision casting 3 Version Standard version 1 International version (in preparation) plate label in English and documentation in 5 languages on CD 2 Explosion protection without explosion protection A with explosion protection (CENELEC): - Degree of protection "Intrinsic safety" (EEx ia) 6) B - Degree of protection "Explosion proof" (EEx d) 1) 6) D - Degree of protection "Intrinsic safety and explosion proof" (EEx ia + EEx d) 1) 6) P Application in zone 2 n (TÜV) 6) E with explosion protection (FM intrinsic safety and explosion proof) 1) H C with explosion protection (CSA intrinsic safety and explosion proof) 1) L C with explosion protection (FM + CSA for IS + XP) N Electrical connection / cable inlet Screwed gland PG 13.5 5) 6) (Adapter) A Female thread M 20 x 1.5 B Female thread 1/2-14 NPT C Han 7D plug 5) 6) D Housing cover / display without window (digital display covered, setting: mA) 1with window (digital display visible, setting: mA) 6with window: digital display visible, setting: as specified in Y20 7 Notes and “Other versions” on next page.
September 2004 9-8

UMSITRPDS3-1 Model Designations And Specifications
Other versions Add "-Z" to order number and add short spec. 7MF4433 - . . . . . - . . . . – Z Transmitter with mounting bracket of: - steel A01 - stainless steel A02 Process flange O-ring (instead of FPM (Viton)) of: - PTFE (Teflon) A20 - FEP (with silicone core, foodstuff compatible) A21 - FFPM (Kalrez) A22 - NBR (buna N) A23
6) A30 Han 8U plug (instead of Han 7D) 6) A31 Sealing screws (1/4-18 NPT) with valve in same material as process flanges A40 Labeling of rating plate (instead of German):
B11 - French B12 - Spanish B13 - Italian B14 Manufacturer test certificate M acc. To DIN 55350, Part 18, and acc. to ISO 8402 C11 Acceptance test certificate B acc. to DIN 50 049 / EN 10 204-3.1 B Works certificate acc. To DIN 50 049-2.2 / EN 10 204-2.2 C14 Setting the upper output current limit to 22.0 mA D05 Acid gas version acc. To NACE only with Hastelloy process diaphragm and stainless steel process flange screws D07 IP 68 (not with Han 7D/Han 8U plug and cable screwed gland Pg 13.5) D12 Application in zone 0 (basic device EEx ia) 6) E02 Overfill protection for combustible and non-combustible liquids
Han 7D plug
- English
C12
(PN 470 psi maximum) (basic device EEx ia) E08 Oxygen application (for oxygen measurement and inert liquid: 2325 psi maximum) E10 Switching the process connection side (HP side: left, LP side: right) H01 Lateral vent for gas measurement H02 Stainless steel process flanges for vertical active pressure lines (not with supplements K01 or K02) H03
Process flanges: - without process flanges K00 - Hastelloy flanges K01 - Monel flanges K02 Measuring range to be set, specify in clear text, For linear characteristic: ... to ... mbar, psi, kPa, MPa, ... (27 characters maximum) Y01 For square root characteristic: 0 to ... mbar, psi, kPa, MPa, ... (27 characters maximum) Y02 Tag number / description (16 characters maximum) specify in clear text: Y15 Tag message (27 characters maximum) specify in clear text: Y16 Setting digital display specify in clear text: mbar, psi, kPa, MPa, … Y20 Factory presettings other than "Y01" or "Y02", "Y20" and "D05" are not possible.
Notes:
1) Not suitable for remote process mounting 5) Not for “explosion proof” degree of protection 2) Only with span D, F, G, or H 6) Not FM approved 3) For stainless steel process flange screws 7) Not with K01 or K02 4) Without cable screwed gland Ordering example: Scope of delivery: Position line: 7MF9933-1DA00-1AA1-Z Transmitter as ordered, 1 brief instruction (Leporello) B-line: A01+B11+C14+Y01+Y15 2 sealing screws (same material as process flange) C-line: Y01: 50…150 inH2O C-line: Y15: PIC 1758
September 2004 9-9

Model Designations And Specifications UMSITRPDS3-1
TABLE 9-5 Model 7MF4533, Model Designation Differential pressure and flow transmitter, two-wire, series DSIII, Model 7MF4533- 1 - PN 6090 psi Span
1.0 To 100 InH2O D 2.4 To 240 InH2O E 6.4 To 640 InH2O F 20 To 2000 InH2O G 4.3 To 435 psi H
Material of the wetted parts (stainless steel process flanges) Process diaphragm Parts of the meas. cell Stainless steel Stainless steel A Hastelloy Stainless steel B Gold 1) Gold L Process connection Female thread 1/4-18 NPT and flange connection, DIN 19 213, Venting opposite process connection: - Mounting thread M12 1 - Mounting thread 7/16-20 UNF 3 Material of the non-wetted parts Process flange screws Electronics housing Steel Diecast aluminum 0 Stainless steel (≤ PN 4569 psi) Diecast aluminum 2 Stainless steel (≤ PN 4569 psi) Stainless steel precision casting 3 Version Standard version 1 International version (in preparation) plate label in English and documentation in 5 languages on CD
2
Explosion protection without explosion protection A with explosion protection (CENELEC) Degree of protection "Intrinsic safety" (EEx ia) 4) B Degree of protection "Explosion proof" (EEx d) 2) 4) D Degree of protection "Intrinsic safety and explosion proof" (EEx ia + EEx d) 2) 4) P Application in zone 2 n (TÜV) 4) E with explosion protection (FM intrinsic safety and explosion proof) 2) H C with explosion protection (CSA intrinsic safety and explosion proof) 2) L C with explosion protection (FM + CSA for IS + XP) N Electrical connection / cable inlet Screwed gland PG 13.5 3) 4) (Adapter) A Female thread M 20 x 1.5 B Female thread ½-14 NPT C Han 7D plug 3) 4) D Housing cover / Display without window (digital display covered, setting: mA) 1with window (digital display visible, setting: mA) 6with window (digital display visible, setting: as specified in Y20) 7 Notes on next page; “Other versions” below and continued on next page.
September 2004 9-10
Other versions Add "-Z" to order number and add short spec. 7MF4533 - . . . . . - . . . . -Z Transmitter with mounting bracket of: - steel A01 - stainless steel A02 Process flange O-ring (instead of FPM (Viton)) of:

UMSITRPDS3-1 Model Designations And Specifications
Other versions - PTFE (Teflon) A20 - FEP (with silicone core, foodstuff compatible) A21 - FFPM (Kalrez) A22 - NBR (buna N) A23 Han 7D plug (metal, gray) 4) A30 Han 8U plug (instead of Han 7D) 4) A31 Sealing screw (1/4-18 NPT) with valve in the same material as the process flanges A40 Labeling of the rating plate (instead of German): - English B11 - French B12 - Spanish B13 - Italian B14 Manufacturer test certificate M according to DIN 55350, Part 18, and according to ISO 8402 C11 Acceptance test certificate B according to DIN 50 049 / EN 10 204-3.1 B C12 Works certificate according to DIN 50 049-2.2 / EN 10 204-2.2 C14
Setting the upper output signal limit to 22.0 mA D05 Acid gas version according to NACE, only with Hastelloy process diaphragm and stainless steel process flanges, PN 4569 psi maximum D07 Stainless steel process flange screws, PN 6090 psi, basic device with machined stainless steel process flange screws D09 IP 68 (not with Han 7D/Han 8U plug and cable screwed gland Pg 13.5) D12
Application in zone 0 (basic device EEx ia) 4) E02 Switching the process connection side H01 Lateral vent for gas measurement H02
Stainless steel process flanges for vertical active pressure lines H03 Measuring range to be set, specify in clear text, For linear characteristic: ... to ... mbar, psi, kPa, MPa, ... (27 characters maximum) Y01
For square root characteristic: 0 to ... mbar, psi, kPa, MPa, ..(27 characters
maximum) Y02 Tag number / description (16 characters maximum) specify in clear text: Y15 Tag message (27 characters maximum) specify in clear text: Y16 Setting digital display, specify in clear text: mbar, psi, kPa, MPa, ... Y20 Factory pre-settings other than "Y01" or "Y02", "Y20" or "D05" are not possible.
Notes:
1) Only with span D, F, G, or H; maximum PN 4569 psi and only with stainless steel process flange screws 2) Without cable screwed gland 3) Not with "explosion proof" degree of protection 4) Not FM approved Scope of delivery: Transmitter as ordered, 1 brief instruction (Leporello) 2 sealing screws (same material as process flanges) Ordering example: Position line: 7MF4533-1DA10-1AA1-Z B-line: Y01 C-line: Y01: 36.1… 57.4 inH2O
September 2004 9-11

Model Designations And Specifications UMSITRPDS3-1
TABLE 9-6 Models 7MF4633 and 7MF4912, Model Designation 1 Y Flanged level transmitter, two-wire, series DSIII, 7MF4633- -
Span 100 inH2O 240 inH2O 640 inH2O
Material of the non-wetted parts Process flange screws Electronics
Version
Explosion protection
- Degree of protection "Intrinsic safety" (EEx ia) 3)
1) 3)
1
10.0 D To 10.0 To E
20 To F 64 To 2000 inH2O G
Process connection of low pressure side Female thread 1/4-18 NPT and flange connection DIN 19 213 with mounting thread: - M 10 0 - 7/16-20 UNF 2
housing
Steel Diecast aluminum 0 Stainless steel Diecast aluminum 2 Stainless steel 3 Fine precision stainless steel
Standard version 1 International version (in preparation) plate label in English and documentation in 5 languages on CD 2
without explosion protection A with explosion protection (CENELEC):
B - Degree of protection "Explosion proof" (EEx d) 1) 3) D - Degree of protection "Intrinsic safety and explosion proof" (EEx ia + EEx d)
P
Application in zone 2 n (TÜV) 3) E C
L C
Electrical connection / Cable inlet Screwed gland PG 13.5 2) 3) (Adapter) A Female thread M 20 x 1,5 B
C 2) 3) D
Housing cover / Display
with window (digital display, setting: mA) 6 with window (digital display visible, setting: as specified in Y20 7 Notes, “Other versions,” and Model 7MF4912 on next two pages.
th explosion protection (FM intrinsic safety and explosion proof) 1) H th explosion protection (CSA intrinsic safety and explosion proof) 1) th explosion protection (FM + CSA for IS + XP) N
wiwiwi
Female thread ½-14 NPT Han 7D plug
without window (digital display covered, setting: mA)
September 2004 9-12

UMSITRPDS3-1 Model Designations And Specifications
Other versions
Add "-Z" to order number and add short spec. 7MF4633 - . . . . . - . . . . -Z
A30
Sealing screw (1/4-18 NPT) with valve A40
Labeling of rating plate (instead of German): - English B11
B12 B13
- Italian B14
Manufacturer test certificate M acc. To DIN 55350, Part 18, and C11
C12 Works certificate acc. to DIN 50 049-2.2 / EN 10 204-2.2 C14
IP 68 (not with Han 7D/Han 8U plug and cable screwed gland Pg 13.5) D12
Application in zone 0 (basic device EEx ia) 3) E02 Overfill protection for combustible and non-combustible liquids
E08
Specify meas. range to be set in clear text,
(16 characters maximum) in clear text: Y15 Specify tag message (27 characters maximum) in clear text: Y16 Specify setting digital display in clear text: mbar, bar, kPa, MPa, ... Y20
Factory presettings other than "Y01", "Y20" and "D05" are not possible.
Han 7D plug (metal, gray) 3) Han 8U plug (instead of Han 7D) 3) A31
in same material as process flanges
- French - Spanish
ISO 8402 Acceptance test certificate B acc. to DIN 50 049 / EN 10 204-3.1 B
Setting the upper limit of the output signal to 22.0 mA D05
(maximum PN 32 psi) (basic device EEx ia)
Switching the process connection side (HP side: left, LP side: right) H01
Y01: ... to ... mbar, bar, kPa, Mpa, ... (27 characters maximum) Y01
Specify tag number / description
Notes: 1) Without cable screwed gland
ith "explosion proof” degree of protection
3) Not FM approved
2) Not w
Scope of delivery: Transmitter as ordered, 1 brief instruction (Leporello)
Order example: Pos. 1 Position line: 7MF4633-1DY10-1AA1-Z B-line: Y01 C-line: Y01: 1.3 to 2.1 inH2O Pos. 2 Position line: 7MF4912-3DA11
1 sealing screw (same material as process flange)
September 2004 9-13

Model Designations And Specifications UMSITRPDS3-1
Flanged Level Transmitter Accessories Order number
Mounting flange, mounted directly on transmitter, two-wire, 7MF4912- 3 Flange Nominal diameter Nominal pressure
DN 80 PN 40 psi D PN 16 psi G
PN 40 psi H Connection per 3 inch Q 150 lb/sq. in. ANSI B 16.5 300 lb/sq. in. R 4 inch 150 lb/sq. in. T 300 lb/sq. in. U
J1YMaterial of wetted parts
Without foil, uncoated A
With PTFE foil 1) E With ECTFE coating 1) F With PFA coating 1) D Monel 400, W.-No. 2.4360 G Hastelloy B2, W.-No. 2.4617 H
J Tantalum K Hastelloy C4, W.-No. 2.4610 U Special version to customer specifications Z K1YSmooth processing face according to DIN 2526, Form D:
Tube length 2) Flush mount 0 2” / 50 mm 1
2 6” / 150 mm 3 8” / 200 mm 4 Filling liquid
Silicone oil M5 1 Special version to customer specifications 9 M1Y
Other versions for mounting flange 7MF4912 - . . . . . -Z
With flame barrier for mounting in zone 0 (with documentation) A01 Manufacturer test certificate M acc. to DIN 55 350, Part 18, and ISO 8402 (not with supplement "P01") C11
C12 V04
Y05
1) For vacuum on request
Prices for other materials are available upon request.
Connection per DIN 2501 DN 100
Special version according to customer specifications Z
Stainless steel M.-No. 1.4571:
Hastelloy C276, W.-No. 2.4819
4” / 100 mm
Add "-Z" to the order number and add short spec.
Acceptance test certificate B according to DIN 50 049; see Section 3.1 and EN 10 204 Vacuum-proof version (use in vacuum pressure range) Calculation of span of the corresponding transmitter, enclose completed questionnaire! (Not with supplement “P01.”)
Notes:
2) Prices for the stated tube lengths are based on the material of the wetted part: stainless steel M. No. 1.4571.
September 2004 9-14

UMSITRPDS3-1 Model Designations And Specifications
TABLE 9-7 Measuring Cells for Pressure, Service Parts
0
DS III and DS III PA series, 7MF4990- Measuring cell filling Measuring cell cleaning Silicon oil Normal 1 Inert Grease-free 3
PN 0.15 To 15 psi 87 psi B 0.60 To 60 psi 145 psi C
9.25 To 925 psi 1450 psi E
23 To 2320 psi 3625 psi F 58 To 5800 psi 8700 psi G
Wetted parts materials Seal diaphragm Connection
Stainless steel Stainless steel A Hastelloy Stainless steel B Hastelloy Hastelloy C Process connection
0 1
Oval flange and stainless steel connection shank, maximum span: 2320 psi - Mounting thread 7/16-20 UNF 2 - Mounting thread M10
Nominal measuring range
2.3 To 230 psi 460 psi D
shank
Connection shank G1/2 A Female thread 1/2-14 NPT
3
TABLE 9-8 Measuring Cells for Absolute Pressure, Gauge Construction, Service Parts
0
DS III and DS III PA series, Gauge Construction, 7MF4992- Measuring cell filling Silicon oil Normal 1 Inert Grease-free 3 Nominal measuring range PN
3.3 inH2Oa To 100 inH psi D 2Oa 87 20 inH2Oa To 525 inH2Oa 145 psi F
2.3 psia To 72 psia 435 psi G 14.4 psia To 435 psia 1450 psi H
Wetted parts materials shank
Stainless steel Stainless steel A
Hastelloy Hastelloy C Process connection Connection shank G1/2 A 0 Female thread 1/2-14 NPT 1 Oval flange and stainless steel connection shank, maximum 2320 psia - Mounting thread 7/16-20 UNF 2 - Mounting thread M10 3
Measuring cell cleaning
Seal diaphragm Connection
Hastelloy Stainless steel B
September 2004 9-15

Model Designations And Specifications UMSITRPDS3-1
TABLE 9-9 Measuring Cells for Absolute Pressure, Differential Const., Service Parts
DS III and DS III PA series, Differential Construction, 7MF4993- Measuring cell filling Measuring cell cleaning Silicon oil Normal 1 Inert Grease-free 3 Nominal measuring range PN
3.3 inH2Oa To 100 inH2Oa 460 psi D 2Oa 460 F
72 psia 460 psi G 14.4 psia To 435 psia H 460 psi
77 psia To 2320 psia 3625 psi K E Wetted parts materials (stainless steel process flanges) Seal diaphragm Parts of measuring cell Stainless steel Stainless steel A
B Hastelloy
Tantalum Tantalum E Monel Monel H Gold 1) Gold L
Female thread 1/4-18 NPT with flange connection to DIN 19213 with:
- Mounting thread M10 2) 0 - Mounting thread 7/16-20 UNF 2 Sealing screw on side of process flange 3) - Mounting thread M10 4 - Mounting thread 7/16-20 UNF 6 Non-wetted parts materials Process flange screws Steel 0 Stainless steel 2
2) Maximum PN 2320 psi static 3) Not for spans G, H, or K
20 inH2Oa To 525 inH psi 2.3 psia To
Hastelloy Stainless steel Hastelloy C
Process connection
Sealing screw opposite process connection
1) Only with stainless steel process flange screws
Other versions
Add "Z" to the order number and the specify order code 7MF4993-............- Z Process flange O-ring (instead of FPM (Viton)) made of: - PTFE (Teflon) A20 - FEP (with silicone core, approved for foodstuffs A21
A22 - NBR (Buna N) A23 Remote seals; not with K01, K02 or K04 D20 Vent on side for gas measurements H02 Without process flange K00 Process flange made of: - Hastelloy K01 - Monel K02 - Stainless steel with PVDF insert K04
- FFPM (Kalrez)
September 2004 9-16

UMSITRPDS3-1 Model Designations And Specifications
TABLE 9-10 Measuring Cells for Pressure and Flow, Differential Const., Service Parts
DS III and DS III PA series, differential construction, 7MF4994- Measuring cell filling Measuring cell cleaning Silicon oil Normal 1 Inert Grease-free 3 Nominal measuring range PN 460 psi, static span 0.4 To 8 inH2O 1) B PN 2320 psi, static span 0.4 To 24 inH2O C
1 To 100 inH2O D 2.4 To 240 inH2O E 6.4 To 640 inH2O
2000 inH2O G
Seal diaphragm Parts of measuring cell
Hastelloy Stainless steel B
Tantalum 2) Tantalum E
Process connection
Sealing screw opposite process connection
2
4 4)
Process flange screws Steel
1) Not for remote seal connection 2) Only with span D, F, G, or H
with stainless steel process flange screws 3) Only4) Not with K01 or K02
F 20 To
4.3 To 435 psi H Wetted parts materials (stainless steel process flanges)
Stainless steel Stainless steel A
Hastelloy Hastelloy C
Monel 2) Monel H Gold 2) 3) Gold L
Female thread 1/4-18 NPT with flange connection to DIN 19213 with:
- Mounting thread M10 0 - Mounting thread 7/16-20 UNF Sealing screw on side of process flange - Mounting thread M10 4) - Mounting thread 7/16-20 UNF 6 Non-wetted parts materials
0 Stainless steel 2
Other versions
Add "Z" to the order number and the specify order code 7MF4994-............- Z
- PTFE (Teflon) A20 - FEP (with silicone core, approved for foodstuffs A21 - FFPM (Kalrez) A22 - NBR (Buna N)
D20
Process flanges of stainless steel for vertical differential lines; not with K01, K02 or K04 H03 K02
K04
Process flange O-ring (instead of FPM (Viton)) made of:
A23 Remote seals; not with K01, K02 or K04 Vent on side for gas measurements H02
Process flanges: - without process flanges K00 - Hastelloy flanges K01 - Monel flanges - Stainless steel, with PVDF insert, flanges
September 2004 9-17

Model Designations And Specifications UMSITRPDS3-1
TABLE 9-11 Measuring Cells for Differential Pressure and Flow, Service Parts
DS III and DS III PA series, differential construction, 7MF4995 1 Nominal measuring range PN
1.0 To 100 inH2O 6090 psi D 240 inH2O
6.4 To 640 inH F 2O 6090 psi
4.3 To 435 psi 6090 psi
Seal diaphragm Parts of measuring cell Stainless steel Stainless steel A
Gold
Process connection
- Mounting thread M12 3
Process flange screws Steel 0 Stainless steel (<PN 4569 psi) 2
2.4 To 6090 psi E
20 To 2000 inH2O 6090 psi G H
Wetted parts materials
Hastelloy Stainless steel B Gold 1) L
Female thread 1/4-18 NPT with flange connection to DIN 19213 with: Sealing screw opposite process connection
1 - Mounting thread 7/16-20 UNF Non-wetted parts materials
1) Only with span D, F, G, or H. Maximum PN 4569 psi only with stainless steel process flange screws
Other versions
7MF4995-............- Z
Add "Z" to the order number and the specify order code
- FEP (with silicone core, approved for foodstuffs A21
- NBR (Buna N) A23
Process flanges of stainless steel for vertical differential lines H03
Process flange O-ring (instead of FPM (Viton)) made of: - PTFE (Teflon) A20
- FFPM (Kalrez) A22
Process flange screws machined from stainless steel for PN 6090 psi D09 Vent on side for gas measurements H02
Without process flange K00
September 2004 9-18

UMSITRPDS3-1 Model Designations And Specifications
TABLE 9-12 Measuring Cells for Filling Level, Service Parts
DS III and DS III PA series, 7MF4996 1
100 inH2O D
640 inH2O 2O G
Wetted parts materials (stainless steel process flanges) Parts of measuring cell Stainless steel
Process connection, minus side
- Mounting thread 7/16-20 UNF
2
Nominal measuring range 10.0 To 10.0 To 240 inH2O E
20 To F 64 To 2000 inH
Seal diaphragm Stainless steel A
Female thread 1/4-18 NPT with flange connection to DIN 19213 with: - Mounting thread M10 0
2 Non-wetted parts materials Process flange screws Steel 0 Stainless steel
Other versions
Add "Z" to order number and specify order code 7MF4996-............- Z Process flange O-ring (instead of FPM (Viton)) made of: - PTFE (Teflon) A20
A21
A23
- FEP (with silicone core, approved for foodstuffs - FFPM (Kalrez) A22 - NBR (Buna N)
TABLE 9-13 Electronics and Connecting Boards, Service Parts
Product description Order Number SITRANS P DS III electronics module 7MF4997-1DK SITRANS P DS III terminal board (for field terminal connections)
7MF4997-1BQ
7MF4997-1DN SITRANS P DS III digital display
September 2004 9-19
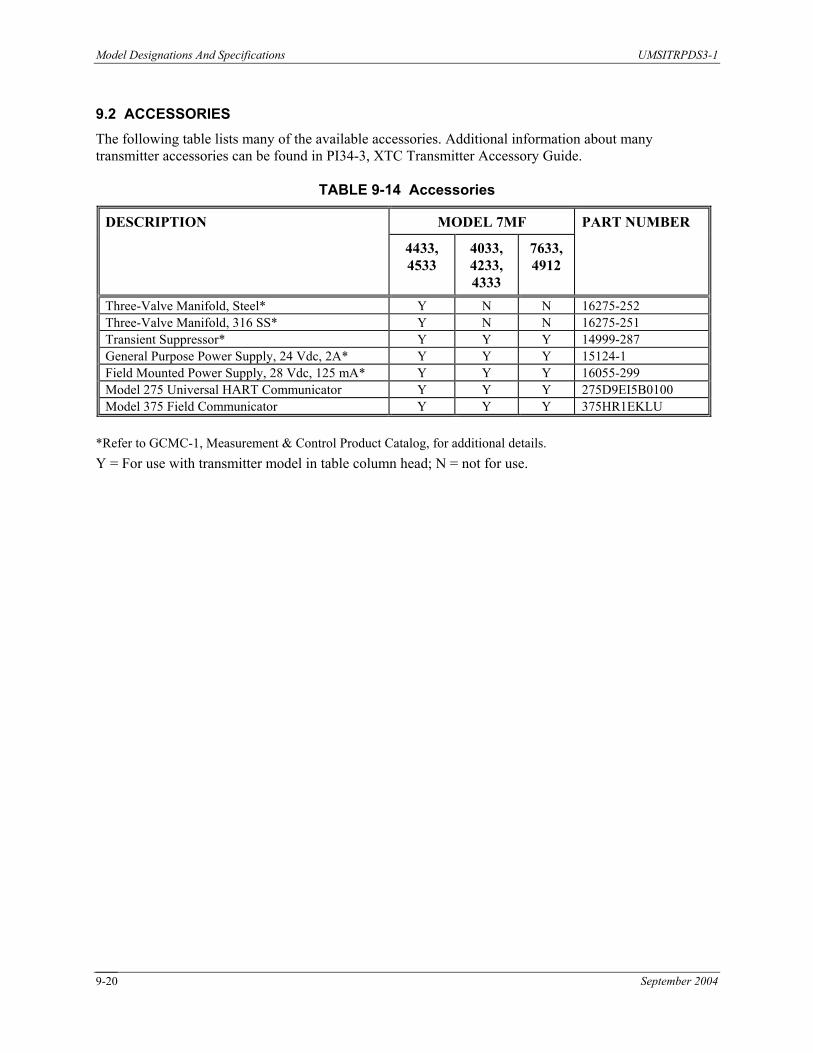
Model Designations And Specifications UMSITRPDS3-1
9.2 ACCESSORIES The following table lists many of the available accessories. Additional information about many transmitter accessories can be found in PI34-3, XTC Transmitter Accessory Guide.
TABLE 9-14 Accessories
DESCRIPTION MODEL 7MF PART NUMBER
7633, 4912
Three-Valve Manifold, Steel* Y 16275-252 N N N N 16275-251
Transient Suppressor* Y Y Y Y Y Y Y Y Y Y Y 275D9EI5B0100
Model 375 Field Communicator Y Y Y
4433, 4533
4033, 4233, 4333
Three-Valve Manifold, 316 SS* Y 14999-287
General Purpose Power Supply, 24 Vdc, 2A* Y 15124-1 Field Mounted Power Supply, 28 Vdc, 125 mA* 16055-299 Model 275 Universal HART Communicator
375HR1EKLU *Refer to GCMC-1, Measurement & Control Product Catalog, for additional details. Y = For use with transmitter model in table column head; N = not for use.
September 2004 9-20

UMSITRPDS3-1 Model Designations And Specifications
9.3 SPECIFICATIONS The following specifications are for all transmitter models except as noted. Table 9-15 is for Pressure and Differential Pressure models. Table 9-16 is for Absolute Pressure and Filling Level models.
TABLE 9-15 Specifications, Pressure and Differential Pressure Models Device type:
See Table 9-17
Piezoresistive
Measurement variable Pressure Differential pressure and flow Measurement range
Nominal pressure (PN) 6090 psi
Lower measurement limit -100% of maximum span - 435 psi measuring cell -33 % of maximum span
for process temp. -20 °C < ϑ < 60 °C for process temp. +60 °C < ϑ < 100 °C (maximum +85°C for 435 psi meas. cell)
Upper measurement limit +100 % of maximum span, (maximum 2325 psi in oxygen measurement and inert filling liquid 2325 psi)
Start of scale (continuously adjustable) Between the measuring limits
Output Output signal 4 to 20 mA Lower limit (continuously adjustable) 3.55 mA, factory set to 3.84 mA Upper limit (continuously adjustable) 23.0 mA, factory set 20.5 mA or optionally 22.0 mA
Ipp ≤ 0.5% of maximum output current Electric damping
- adjustable time constants (T 66) 0 to 100 s, in steps of 0.1 s, factory set to 0.1 s Current transmitter Adjustable 3.55 to 23 mA Failure signal Adjustable 3.55 to 23 mA Load
RB ≤ (UH - 10.5 V) / 0.023 A in Ω, UH: power supply in V
with HART communication RB = 230 to 500Ω (HART-Communicator) or RB = 1100Ω (HART-Communicator)
Characteristic Linear forward or reverse acting or square root forward
Measuring accuracy
Reference conditions Forward acting, zero based, process diaphragm stainless steel; for flange level flush mount, silicone oil filling and room temperature 25 °C
r = maximum span / set span = span ratio
Pressure Differential pressure 7MF4033 7MF4433 / 7MF4533
Application range See Table 9-18 Function Measurement principle
Input
Span (continuously adjustable) 0.15 to 5800 psi (6 ranges) Nominal pressure (PN) 470 psi 0.4 to 8 inH O (1 range) 2
Nominal pressure (PN) 2325 psi 0.4 inH O to 435 psi (6 ranges) 2
1 inH O to 435 psi (5 ranges) 2
- Measuring cell with silicone oil filling 12 inH2O (absolute) 12 inH2O (absolute) - Measuring cell with inert filling liquid
12 inH O (absolute) 2
12 inH O (abs) + 8 inH O (abs) · ((ϑ - 60 °C) / °C) 2 2
Ripple (without HART communication)
without HART communication
September 2004 9-21

Model Designations And Specifications UMSITRPDS3-1
Device type: Pressure Differential pressure 7MF4033 7MF4433 / 7MF4533 Measurement error (limit point setting, including hysteresis and repetitive accuracy)
linear characteristic r ≤ 10 ≤ 0.1 %
10 < r ≤ 30 ≤ 0.2 % ≤ (0.005 · r + 0.05) %
Square root characteristic Flow > 50% ≤ 0.1 % at r ≤ 10
≤ 0.2 % at 10 < r ≤ 30
Flow 25 to 50% ≤ 0.2 % at r ≤ 10
≤ 0.4 % at 10 < r ≤ 30
Repetitive accuracy Contained in measuring error Hysteresis Contained in measuring error
Transient time (T63, without electrical damping) About 0.2 s About 0.2 s, about 0.3 s with 8 and 24 inH2O meas. cell
Long-term drift over 12 months
2O meas. cell: ≤ ( 0.2 · r) %
Influence of ambient temperature at -10 to +60 °C ≤ (0.1 · r + 0.2) % 1)
ith 8 inH 1) double value w 2O measuring cell
at -40 to -10 °C and +60 to +85 °C ≤ (0.1 · r + 0.15) % / 10 K 1) 1) double value with 8 inH2O measuring cell
on zero ≤ (0.15 · r) % per 1450 psi
8 inH2O meas. cell ≤ (0.15 · r) % per 464 psi on the span ≤ 0.2% per 1450 psi
8 inH2O meas. cell ≤ 0.2% per 464 psi
2O per 10° angle ≤ 0.28 inH2O per 10° angle
Influence of power supply 0.005 % per 1V change in voltage
Installation conditions
Installation note Process connection vertically downwards Any
- Measuring cell with silicon oil fill. -40 to +85 °C (-40 to +185°F) Span 435 psi at PN 6174 psi
-20 to +85 °C (-4 to +185°F) - Digital display -50 to +85 °C(-58 to +185°F)
Ambient temperature limit see ambient temperature
Permissible
Degree of protection (EN 60 529) IP 65 EMC
- Spurious emission EN 50 081-1 EN 50 082-2 and NAMUR NE 21
30 < r ≤100
≤ ( 0.1 · r) %
8 inH
Influence of static pressure
Influence of installation position ≤ 0.2 inH
Operating conditions
Ambient conditions Ambient temperature (in hazardous
zones note temperature class) measuring cell
-20 to +85 °C (-4 to +185°F) - Meas. cell with inert filling liquid
Storage temperature -30 to +85 °C (-22 to +185°F) Climate class
- Condensation
- Interference resistance
September 2004 9-22

UMSITRPDS3-1 Model Designations And Specifications
Device type: Pressure Differential pressure 7MF4033 7MF4433 / 7MF4533
Process conditions Process temperature
-40 to +100 °C (-40 to +212°F)
- Measuring cell with inert filling liquid -20 to +100 °C (-4 to +212°F) Span 435 psi -20 to +85°C (-4 to +185°F)
see process temperature see Table 9-10
Constructional design About 3.3 lbs (1.5 kg) About 8.8 lbs (4 kg)
Transmitter with mounting flange without tube
Dimensions see Figure 9-1 see Figures 9-2 and 9-3 Material Material of wetted parts
- Connection shank Stainless steel, M.-No. 1.4401 or
- Oval flange Stainless steel, M.-No. 1.4401 - Process diaphragm Stainless steel, M.-No. 1.4404 or Hastelloy C276, M.- No. 2.4819
Monel, M.-No. 2.4360 Tantalum or gold
- Process flanges and sealing screw Stainless steel, W.-No. 1.4408,
- O-ring FPM (Viton) or optionally:
PTFE, FEP, FFPM and NBR
- Electronics housing Low copper diecast aluminum GD-ALSi 12, polyester-based varnish or stainless steel precision casting, stainless steel rating plate
- Process flange screws Steel, galvanized, yellow-
Steel, galvanized and yellow-chromed or stainless steel
Meas. cell filling Silicone oil filling or inert liquid (maximum pressure 2325 psi for oxygen measurement)
Connection shank G½A Female thread 1/4 - 18 NPT and DIN 16 288, female thread
½ -14NPT or oval flange
with mounting thread M10 / M10 (PN 2325 psi) M12 or 7/16 –20 UNF M12 or 7/16 -20 UNF
Electrical connection Screw terminals, cable inlet or screwed gland Pg 13.5 (adapter), M20 x 1.5 or ½ - 14 NPT, or Han 7D/Han 8U plug
Display and user interface
Installed, cover with window (optional) Power supply (UH) Terminal voltage at the transmitter DC 10.5V to 45V or
- Measuring cell with silicon oil fill. Span 435 psi at PN 6174 psi
-20 to +85 °C (-4 to +185°F)
Process temperature limit Process pressure limit Nominal pressure (PN); see Table 9-11
Weight (without options)
Hastelloy C4, M.- No. 2.4610
Hastelloy C4, W.-No. 2.4610 or Monel, W.-No. 2.4360
Material of non-wetted parts
chromed or stainless steel - Mounting bracket (optional)
Process connection Flange connection DIN
19213 with mounting thread maximum range 2325 psi
Input keys 3 pushbuttons on the device for local programming Digital display
September 2004 9-23
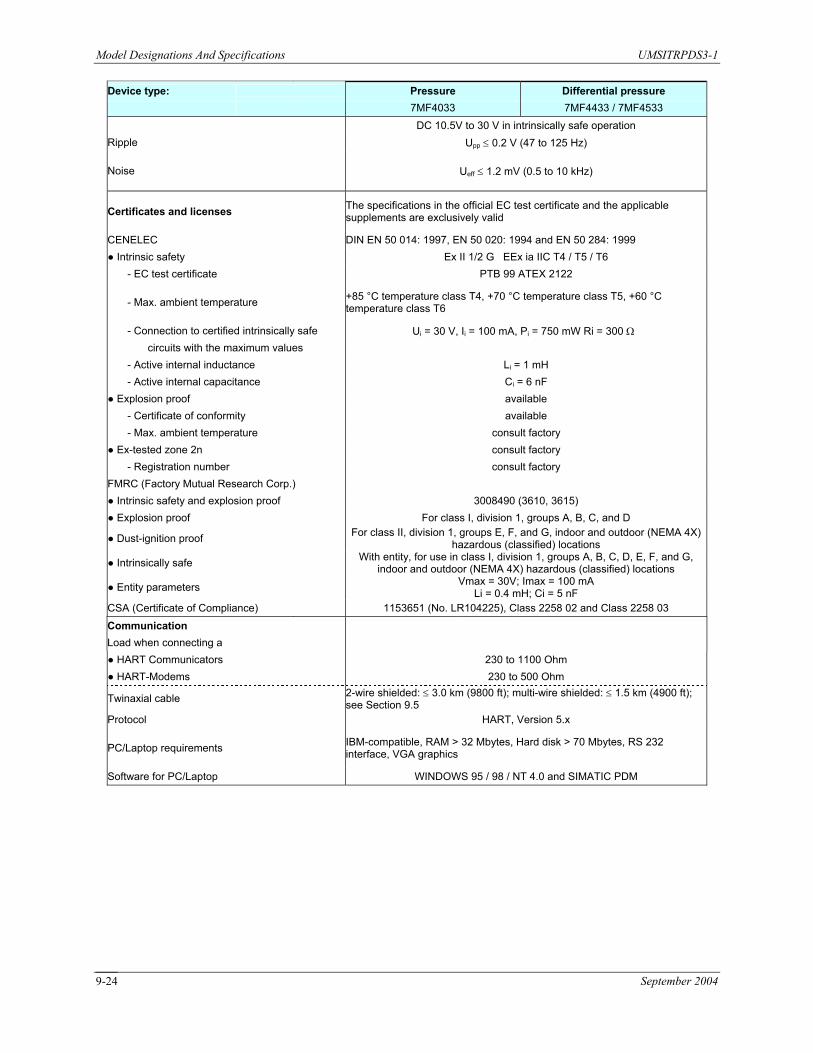
Model Designations And Specifications UMSITRPDS3-1
Device type: Pressure Differential pressure 7MF4033 7MF4433 / 7MF4533 DC 10.5V to 30 V in intrinsically safe operation
Upp ≤ 0.2 V (47 to 125 Hz)
Noise U ≤ 1.2 mV (0.5 to 10 kHz) eff
The specifications in the official EC test certificate and the applicable supplements are exclusively valid
DIN EN 50 014: 1997, EN 50 020: 1994 and EN 50 284: 1999 Ex II 1/2 G EEx ia IIC T4 / T5 / T6
PTB 99 ATEX 2122
+85 °C temperature class T4, +70 °C temperature class T5, +60 °C temperature class T6
i = 30 V, Icircuits with the maximum values
Ci = 6 nF Explosion proof available
- Certificate of conformity
Ex-tested zone 2n consult factory - Registration number consult factory
FMRC (Factory Mutual Research Corp.)
Dust-ignition proof For class II, division 1, groups E, F, and G, indoor and outdoor (NEMA 4X) hazardous (classified) locations
Intrinsically safe With entity, for use in class I, division 1, groups A, B, C, D, E, F, and G, indoor and outdoor (NEMA 4X) hazardous (classified) locations
Entity parameters Vmax = 30V; Imax = 100 mA Li = 0.4 mH; Ci = 5 nF
CSA (Certificate of Compliance) 1153651 (No. LR104225), Class 2258 02 and Class 2258 03
Communication
HART Communicators 230 to 1100 Ohm HART-Modems 230 to 500 Ohm
Protocol HART, Version 5.x
PC/Laptop requirements IBM-compatible, RAM > 32 Mbytes, Hard disk > 70 Mbytes, RS 232 interface, VGA graphics
Software for PC/Laptop WINDOWS 95 / 98 / NT 4.0 and SIMATIC PDM
Ripple
Certificates and licenses
CENELEC Intrinsic safety
- EC test certificate
- Max. ambient temperature
- Connection to certified intrinsically safe U i = 100 mA, Pi = 750 mW Ri = 300 Ω
- Active internal inductance Li = 1 mH - Active internal capacitance
available - Max. ambient temperature consult factory
Intrinsic safety and explosion proof 3008490 (3610, 3615) Explosion proof For class I, division 1, groups A, B, C, and D
Load when connecting a
Twinaxial cable 2-wire shielded: ≤ 3.0 km (9800 ft); multi-wire shielded: ≤ 1.5 km (4900 ft); see Section 9.5
September 2004 9-24
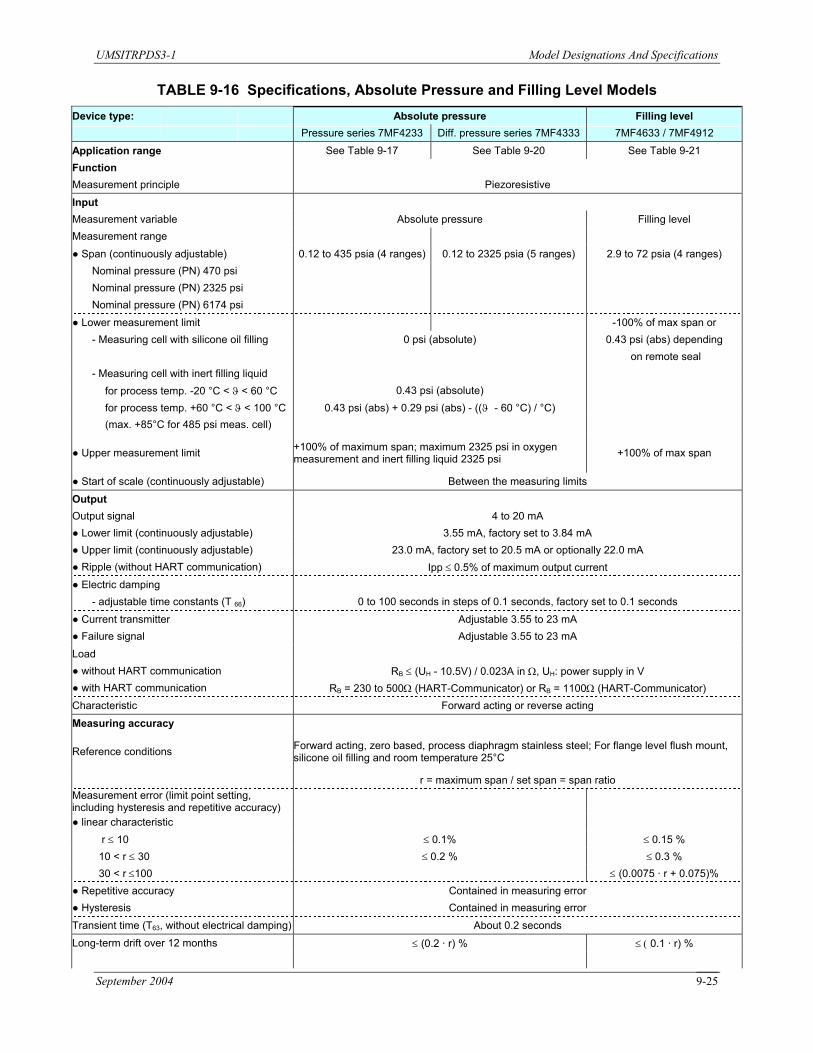
UMSITRPDS3-1 Model Designations And Specifications
TABLE 9-16 Specifications, Absolute Pressure and Filling Level Models Device type: Absolute pressure Filling level Pressure series 7MF4233 Diff. pressure series 7MF4333 7MF4633 / 7MF4912
Application range See Table 9-17 See Table 9-20 See Table 9-21 Function
Piezoresistive
Input Measurement variable Absolute pressure Filling level Measurement range Span (continuously adjustable) 0.12 to 435 psia (4 ranges) 0.12 to 2325 psia (5 ranges) 2.9 to 72 psia (4 ranges)
Nominal pressure (PN) 2325 psi Nominal pressure (PN) 6174 psi
Lower measurement limit -100% of max span or - Measuring cell with silicone oil filling 0 psi (absolute) 0.43 psi (abs) depending
on remote seal - Measuring cell with inert filling liquid
(max. +85°C for 485 psi meas. cell)
Upper measurement limit +100% of maximum span; maximum 2325 psi in oxygen measurement and inert filling liquid 2325 psi +100% of max span
Start of scale (continuously adjustable) Between the measuring limits
Output Output signal 4 to 20 mA Lower limit (continuously adjustable) 3.55 mA, factory set to 3.84 mA Upper limit (continuously adjustable) 23.0 mA, factory set to 20.5 mA or optionally 22.0 mA
Electric damping - adjustable time constants (T 66) 0 to 100 seconds in steps of 0.1 seconds, factory set to 0.1 seconds
Adjustable 3.55 to 23 mA
Load without HART communication RB ≤ (UH - 10.5V) / 0.023A in Ω, UH: power supply in V with HART communication RB = 230 to 500Ω (HART-Communicator) or RB = 1100Ω (HART-Communicator) Characteristic Forward acting or reverse acting
Measuring accuracy
Reference conditions Forward acting, zero based, process diaphragm stainless steel; For flange level flush mount, silicone oil filling and room temperature 25°C
r = maximum span / set span = span ratio
r ≤ 10 ≤ 0.1% ≤ 0.15 %
Repetitive accuracy Contained in measuring error Hysteresis Contained in measuring error Transient time (T63, without electrical damping) About 0.2 seconds Long-term drift over 12 months ≤ (0.2 · r) % ≤ ( 0.1 · r) %
Measurement principle
Nominal pressure (PN) 470 psi
for process temp. -20 °C < ϑ < 60 °C 0.43 psi (absolute) for process temp. +60 °C < ϑ < 100 °C 0.43 psi (abs) + 0.29 psi (abs) - ((ϑ - 60 °C) / °C)
Ripple (without HART communication) Ipp ≤ 0.5% of maximum output current
Current transmitter Failure signal Adjustable 3.55 to 23 mA
Measurement error (limit point setting, including hysteresis and repetitive accuracy)
linear characteristic
10 < r ≤ 30 ≤ 0.2 % ≤ 0.3 %
30 < r ≤100 ≤ (0.0075 · r + 0.075)%
September 2004 9-25
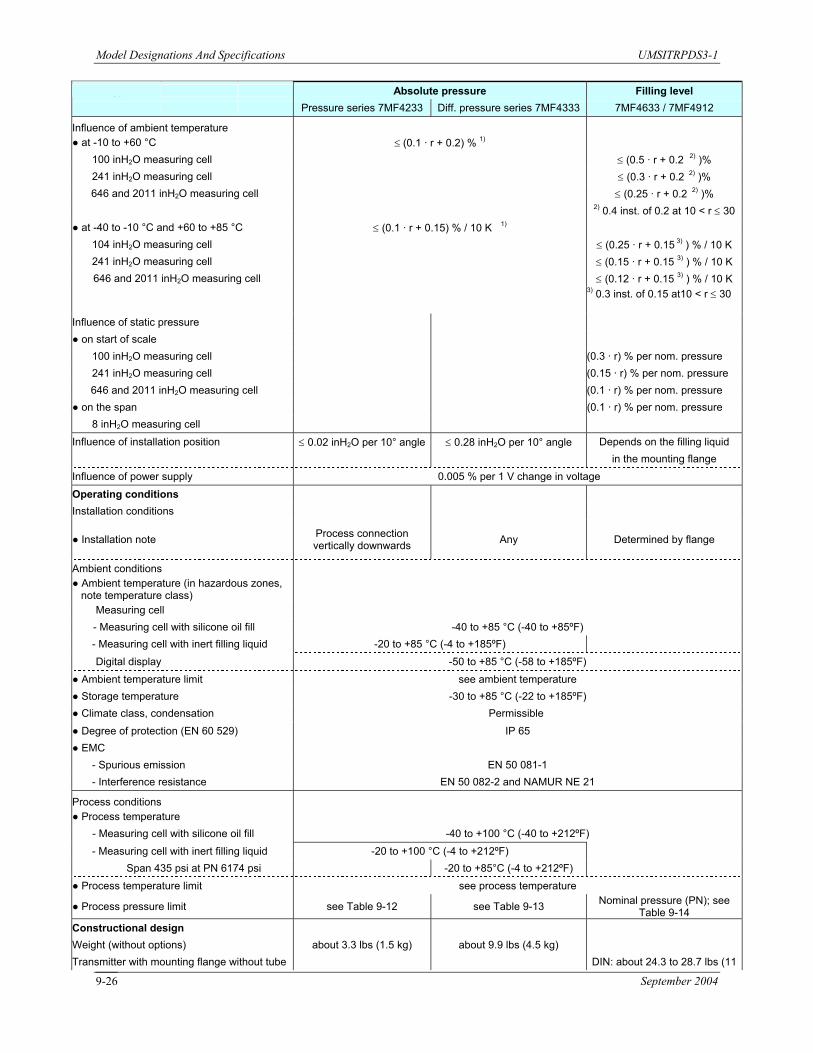
Model Designations And Specifications UMSITRPDS3-1
September 2004
Device type: Absolute pressure Filling level Pressure series 7MF4233 Diff. pressure series 7MF4333 7MF4633 / 7MF4912
Influence of ambient temperature at -10 to +60 °C
2O measuring cell ≤ (0.5 · r + 0.2 2) )%
241 inH2O measuring cell ≤ (0.3 · r + 0.2 2) )%
≤ (0.25 · r + 0.2 2) )% 2) 0.4 inst. of 0.2 at 10 < r ≤ 30
at -40 to -10 °C and +60 to +85 °C ≤ (0.1 · r + 0.15) % / 10 K 1) 104 inH2O measuring cell ≤ (0.25 · r + 0.15 3) ) % / 10 K 241 inH2O measuring cell ≤ (0.15 · r + 0.15 3) ) % / 10 K
646 and 2011 inH2O measuring cell ≤ (0.12 · r + 0.15 3) ) % / 10 K
3) 0.3 inst. of 0.15 at10 < r ≤ 30
Influence of static pressure on start of scale
241 inH2O measuring cell
on the span (0.1 · r) % per nom. pressure
Influence of installation position ≤ 0.02 inH2O per 10° angle ≤ 0.28 inH2O per 10° angle Depends on the filling liquid in the mounting flange Influence of power supply 0.005 % per 1 V change in voltage
Operating conditions Installation conditions
Installation note Process connection vertically downwards Any Determined by flange
Ambient conditions
note temperature class)
Measuring cell
- Measuring cell with inert filling liquid -20 to +85 °C (-4 to +185ºF) Digital display -50 to +85 °C (-58 to +185ºF)
Ambient temperature limit see ambient temperature -30 to +85 °C (-22 to +185ºF)
Permissible Degree of protection (EN 60 529) IP 65 EMC
EN 50 081-1 - Interference resistance
Process temperature
- Measuring cell with silicone oil fill -40 to +100 °C (-40 to +212ºF)
Span 435 psi at PN 6174 psi -20 to +85°C (-4 to +212ºF) Process temperature limit
see Table 9-13
Constructional design about 3.3 lbs (1.5 kg) about 9.9 lbs (4.5 kg)
Transmitter with mounting flange without tube DIN: about 24.3 to 28.7 lbs (11 t 13 k )9-26
see process temperature
Process pressure limit see Table 9-12 Nominal pressure (PN); see Table 9-14
Weight (without options)
- Measuring cell with inert filling liquid -20 to +100 °C (-4 to +212ºF)
EN 50 082-2 and NAMUR NE 21
Process conditions
- Spurious emission
Storage temperature Climate class, condensation
- Measuring cell with silicone oil fill -40 to +85 °C (-40 to +85ºF)
Ambient temperature (in hazardous zones,
8 inH2O measuring cell
(0.15 · r) % per nom. pressure 646 and 2011 inH2O measuring cell (0.1 · r) % per nom. pressure
100 inH2O measuring cell (0.3 · r) % per nom. pressure
646 and 2011 inH2O measuring cell
≤ (0.1 · r + 0.2) % 1)
100 inH

UMSITRPDS3-1 Model Designations And Specifications
Device type: Absolute pressure Filling level Pressure series 7MF4233 Diff. pressure series 7MF4333 7MF4633 / 7MF4912
to 13 kg)
ANSI: about 24.3 to 39.7 lbs (11 to 18 kg)
Dimensions see Figure 9-1 see Figure 9-2 see Figure 9-4 Material Material of wetted parts
- Connection shank Stainless steel W.-No. 1.4401 or
Hastelloy C4, W.-No. 2.4610
- Oval flange Stainless steel, W.-No. 1.4401
Stainless steel, W.-No. 1.4404 or Hastelloy C276, W.- No. 2.4819 Monel, W.-No. 2.4360 Tantalum or gold
Hastelloy C4, W.-No. 2.4610 or
FPM (Viton) or optionally:
for standard applications FPM (Viton) Copper
- High pressure side Stainless steel, W.-No. 1.4571,
Hastelloy B2 W.-No. 2.4617, Hastelloy C276, W.-No. 2.4819,
Smooth DIN 2526, Form D or ANSI B16.5 RF for stainless steel M.-No. 1.4571, DIN 2526 Form E or ANSI B16.5 RSFS for other materials.
Stainless steel W.- No 1.4408
Connection shank Stainless steel W.- No 1.4401
- Electronics housing
Steel, galvanized, yellow-chromed or stainless steel
Silicone oil or other version
DIN 16 288, female thread Flange connection DIN ½-14NPT or oval flange 19213 with mounting thread
- Process diaphragm
- Process flanges and sealing screw Stainless Steel, W.-No. 1.4408 Monel, W.-No. 2.4360
- O-ring PTFE, FEP, FFPM and NBR
Process material (O-ring) for mounting flange in the process flanges
for vacuum applications
Process diaphragm at mtg. Flange Monel 400 W.-No. 2.4360,
Hastelloy C4, W.-No. 2.4610, Tantalum, PTFE, ECTFE
Processing face
- Low pressure side Process diaphragm Stainless steel W.- No 1.4404 Process flanges and sealing screw
O-ring FPM (Viton) Material of non-wetted parts
Low copper diecast aluminum GD-ALSi 12, polyester-based varnish or stainless steel precision casting, stainless steel rating plate
- Process flange screws - Mounting bracket (optional) Steel, galvanized and yellow-chromed or stainless steel
Measuring cell filling Silicone oil filling or inert liquid (maximum pressure 2325 psi for oxygen measurement) Silicone oil
Filling liquid mounting flange Process connection Connection shank G½A Female thread 1/4 - 18 NPT and
September 2004 9-27

Model Designations And Specifications UMSITRPDS3-1
Device type: Absolute pressure Filling level Pressure series 7MF4233 Diff. pressure series 7MF4333 7MF4633 / 7MF4912 maximum range 2325 inH 20
M12 or 7/16-20 UNF
DIN and ANSI flange
with mounting thread M10 / M10 or 7/16 - 20 UNF
High pressure side Low pressure side Female thread 1/4 - 18 NPT and Flange connection DIN 19213 with mounting thread M10 or 7/16 - 20 UNF
Display and user interface Input keys
Terminal voltage at the transmitter
Noise Ueff ≤ 1.2 mV (0.5 to 10 kHz)
Certificates and licenses The specifications in the official EC test certificate and the applicable supplements are exclusively valid
CENELEC DIN EN 50 014: 1997, EN 50 020: 1994 and EN 50 284: 1999 Intrinsic safety Ex II 1/2 G EEx ia IIC T4 / T5 / T6
- EC test certificate +85 °C temperature class T4, +70 °C temperature class T5, +60 °C temperature class T6
- Active internal inductance Li = 1 mH Ci = 6 nF
consult factory consult factory
3008490 (3610, 3615) Explosion proof
Intrinsically safe
Load when connecting a: HART Communicator 230 to 1100 Ohm HART Modem
2-wire shielded: ≤ 3.0 km (9800 ft); multi-wire shielded: ≤ 1.5 km (4900 ft); see Section 9.5 Protocol HART, Version 5.x
Electrical connection Screw terminals, cable inlet or screwed gland Pg 13.5 (adapter), M20 x 1.5 or ½ - 14 NPT, or Han 7D/Han 8U plug
3 pushbuttons for local programming at the device Digital display Installed, cover with window (optional)
Power supply (UH) DC 10.5V to 45V or
DC 10.5V to 30V in intrinsically safe operation Ripple Upp ≤ 0.2V (47 to 125 Hz)
TÜV 99 ATEX 1494 - Maximum ambient temperature - Connection to certified intrinsically safe
circuits with the maximum values Ui = 30 V, Ii = 100 mA, Pi = 750 mW Ri = 300Ω
- Active internal capacitance Explosion proof available
- Certificate of conformity available - Maximum ambient temperature
Ex-tested zone 2n
- Registration number consult factory FMRC (Factory Mutual Research Corp.) Intrinsic safety and explosion proof
For class I, division 1, groups A, B, C, and D
Dust-ignition proof For class II, division 1, groups E, F, and G, indoor and outdoor (NEMA 4X) hazardous (classified) locations
With entity, for use in class I, division 1, groups A, B, C, D, E, F, and G, indoor and outdoor (NEMA 4X) hazardous (classified) locations
Entity parameters Vmax = 30V; Imax = 100 mA; Li = 0.4 mH; Ci = 5 nF CSA (Certificate of Compliance) 1153651 (LR104225), Class 2258 02 and Class 2258 03
Communication
230 to 500 Ohm Twinaxial cable
PC/Laptop requirements IBM-compatible, RAM > 32 Mbytes, Hard disk > 70 Mbytes, RS 232 interface, VGA graphics Software for PC/Laptop WINDOWS 95 / 98 / NT 4.0 and SIMATIC PDM
September 2004 9-28

UMSITRPDS3-1 Model Designations And Specifications
9.4 MEASURING SPANS AND OVERLOAD LIMITS
Process Pressure Limits
This section provides tables that contain the measuring spans and overload limits for each series DSIII transmitter.
TABLE 9-17 Pressure Transmitter, 7MF4033
Lower Upper
0.58 To 60 psi 145 psi 2.3 To 230 psi -14.5 psi
To 925 psi 23 To 2325 psi -14.5 psi 3625 psi 1)
5800 psi 1)
TABLE 9-18 Differential Pressure and Flow Transmitters, 7MF4433 & 7MF4533
Maximum Working Pressure Measuring Span, Continuously Adjustable 7MF4433 7MF4533
psi 4) 0.4 To 24 inH 2300 psi 2O 2300 psi
Measuring Span, Continuously Adjustable
0.15 14.5 psi -14.5 psi 87 psi To -14.5 psi
464 psi 9.1 -14.5 psi 1450 psi
58 To -14.5 psi 8700 psi 1) 1) For oxygen measurement, maximum is 2325 psi.
0.4 To 8 inH2O 470 psi 4) 470
1 To 100 inH2O 6090 psi 2300 psi 2.4 To 2300 psi 6090 psi 240 inH O 2
6090 psi 435 psi 2300 psi 6090 psi 1), 2), 3)
3.3 To 100 inH2O see Note 87 psi
2000 inH O 2 435 psi 400 To 2 1450 psi
This measuring cell is designed for operation within the measuring limits of 0 inH2O (absolute) to 100 inH2O (absolute). When stored in the normal ambient pressure of about of about 14.7 psi (absolute), the measuring cell is in the overload state. An overload error of up to 0.8 inH2O may occur. The overload disappears in normal operation within the measuring limits and the transmitter operates within specifications.
When performing accurate continuous pressure measurements within the measuring limits, a readjustment of the transmitter zero for absolute pressure must be performed after approximately one day (refer to Section 6.2.5).
6.4 To 640 inH2O 2300 psi 4.3 To
1) For oxygen measurement, maximum is 2325 psi 2) Silicon measuring cell fill only 3) MWP 4568 psi with stainless steel process flange screw 4) Not suitable for remote process mounting
TABLE 9-19 Absolute Pressure, Gauge Construction, 7MF4233
Measuring Span, Continuously Adjustable Process Pressure Limit
18 To 525 inH2O 145 psi 64 To
12,000 inH O
Note, 100 inH2O Cell
September 2004 9-29

Model Designations And Specifications UMSITRPDS3-1
If pressure measurements exceed the measuring limits repeatedly (e.g. batch processes with transitions between vacuum and ventilation), a measuring cell with a maximum range of 525 inH2O should be selected to avoid overloading.
TABLE 9-20 Absolute Pressure, Differential Construction, 7MF4333
Measuring Span, Continuously Adjustable Process Pressure Limits To 100 inH2O see Note 464 psi
525 inH2O 64 To 2000 inH2O 464
To 12,000 inH2O
* 2325 psi at M10 process connection.
When performing accurate continuous pressure measurements within the measuring limits, a readjustment of the transmitter zero for absolute pressure must be performed after approximately one day (refer to Section 6.2.5).
If pressure measurements exceed the measuring limits repeatedly (e.g. batch processes with transitions between vacuum and ventilation), a measuring cell with a maximum range of 525 inH2O should be selected to avoid overloading.
TABLE 9-21 Flanged Level, 7MF4633 / 7MF4912
Note, 100 inH O Cell 2
This measuring cell is designed for operation within the measuring limits of 0 inH2O (absolute) to 100 inH2O (absolute). When stored in the normal ambient pressure of about of about 14.7 psi (absolute), the measuring cell is in the overload state. An overload error of up to 0.8 inH2O may occur. The overload disappears in normal operation within the measuring limits and the transmitter operates within specifications.
Measuring Span, Continuously Adjustable Maximum Working Pressure 10
240 inH2O
2O
3.3 18 To 464 psi
psi 400 2320 psi 77 To 2325 psi 3625 psi
To 100 inH2O consult factory 10 To consult factory 20 To 640 inH2O consult factory 64 To 2000 inH consult factory
September 2004 9-30

UMSITRPDS3-1 Model Designations And Specifications
1 2 3
Process connection, ½ -14NPT, connection shank G1/2A or oval flange Blanking plug Electrical connection:
Electronics side, digital display (greater length for cover with window)
Screwed gland Pg 13.5 (adapter) Screwed gland M20 x 1.5 or Screwed gland ½ -14NPT or
4 5
6 7
Access cover over magnetic pushbuttons Mounting bracket (optional) This Figure is for Models 7MF4033 and 7MF4233.
Connector side
Han 7D/Han 8 U-plug
FIGURE 9-1 Dimensions, Gauge Construction, Pressure and Absolute Models
September 2004 9-31

Model Designations And Specifications UMSITRPDS3-1
2 3
Process connection ¼-18NPT for absolute pressure (+) side
1
4 5
Mounting thread M10, M12 or 7/16-20UNF Dummy plug Electrical connection: Screwed gland PG 13.5 (adapter)
9 10 11
Electronics side, digital display (greater length for cover with window)
Side vent for measuring liquid
Mounting bracket (optional) This Figure is for Models 7MF4333, 7MF4433, and 7MF4533.
6
8
Access cover over magnetic pushbuttons
Side vent for measuring gas (supplement H02)
7 Sealing screw
M20 x 1.5 or ½ -14NPT or Han 7D/Han 8 U plug Connection side
FIGURE 9-2 Dimensions, Differential Construction, Diff., Flow and Absolute Models
September 2004 9-32

UMSITRPDS3-1 Model Designations And Specifications
5
Process connection ¼ -18NPT Mounting thread M10 or 7/16 –20 UNF Connection side
Sealing screw Blanking plug (only for PG 13.5 and Han 7D)
Electrical connection: Cable gland Pg 13.51, 2 M20 x 1.5 or Han 7D plug
1 2 3 4
10 11
Electronics side, digital display
Access cover over magnetic pushbuttons
12
2 or ½ - 14 NPT 1, 2
2 – not in FM exp/CSA degree of protection This Figure is for Models 7MF4433 and 7MF4533 with H03 option.
1 – not for explosion proof degree of protection
FIGURE 9-3 Dimensions, Differential Pressure and Flow Models with H03 Option
September 2004 9-33

Model Designations And Specifications UMSITRPDS3-1
4
Process connection of low pressure side ¼ -18NPT
Cable gland Pg 13.5 (with adapter) M20 x 1.5 or ½ - 14 NPT or Han 7D/Han 8 U Plug
6 7 8
1 2 3
Mounting thread M10, M12 or 7/16 –20 UNF Blanking plug Electrical connections:
Access cover over magnetic pushbuttons Sealing screw with valve This Figure is for Models 7MF4633 and 7MF4912.
Connection side 5 Electronics side, digital display (greater length for cover with window)
FIGURE 9-4 Dimensions, Flanged Level Models
September 2004 9-34

UMSITRPDS3-1 Model Designations And Specifications
9.5 NETWORK TOPOLOGY
Network Signal and Connection .............Analog 4-20 mA, single current loop, see Figures 4-6, 4-7, and 4-8
Network Resistance ................................See Section 4.3.5 Multi-Drop
Transmitter Quantity...............................1-15
Network Resistance ................................See Section 4.3.5
9.5.1 Two-Wire Cable Type .....................................................................Twisted single-pair, shielded, copper
More than 5000 feet (1524 m).......................20 AWG (0.56 mm2) minimum, 16 AWG (1.3 mm2) maximum
Cable Capacitance................................................Refer to Section 4.3.6 Recommendation .................................................Belden 8641, 24 AWG (0.23 mm2)
Length, Maximum................................................Refer to Section 4.3.6
9.6 HAZARDOUS AREA CLASSIFICATIONS Tables 9-8 and 9-9 list the hazardous area classifications available at the time this manual was printed. Contact your local Siemens representative or the factory for the latest classifications.
CE Approval - A Declaration of Conformity can be found on a later page in this section.
Point-to-Point Transmitter Quantity...............................1
Network Signal and Connection .............Digital, parallel connected, see Figure 4-9
Conductor Size for Network Length Less than 5000 feet (1524 m) ........................24 AWG (0.23 mm2) minimum
Belden 8762, 20 AWG (0.56 mm ) 2
Intrinsically Safe Operation in a Hazardous Area Operation is permitted only with circuits that are certified as intrinsically safe. The transmitter complies with Category 1/2 and it may be installed in zone 0. The EU type examination certificate applies to installation on the walls of containers and pipes that may contain explosive gas/air or vapor/air mixtures only under atmospheric conditions (pressure: 12 psi to 16 psi, temperature: -20°C to +60°C (-4°F to +140°F)). The permissible ambient temperature range is -40°C to +85°C (-40°F to +185°F), in explosion hazard areas (for T4) -40°C to +85°C (-40°F to +185°F).
The user may also apply the device in non-atmospheric conditions outside the limits set in the EC-Type Examination Certificate, according to the conditions for use (explosive mixture) and if the required additional security measures have been met. The limit values stated earlier in this section must be observed in any case.
September 2004 9-35
Model Designations And Specifications UMSITRPDS3-1
Installation in Zone 0 The installation must be adequately sealed (IP67 to EN 60 529). An industry standard (e.g. DIN, NPT) threaded joint is suitable, for example. When operating with intrinsically safe power supply units of the “ia” category, the explosion protection does not depend on the chemical resistance of the seal diaphragm. When operating with intrinsically safe power supply units of the “ib” category or for units with explosion proof protection “Ex d” and simultaneous use in zone 0, the explosion protection of the transmitter depends on chemical resistance of the diaphragm. Under these operating conditions, the transmitter may be used only for those inflammable gases and liquids to which the diaphragms are adequately chemically resistant to avoid corrosion.
WARNING
Explosion can cause death or serious injury. Failure to observe the following precautions could result in an explosion hazard.
9.6.1 CSA Hazardous Locations Precautions This section provides CSA hazardous location precautions that should be observed by the user when installing or servicing the equipment described in this manual. These statements supplement those given in the preceding section.
Comply with the specifications of the examination certificate valid in your country. Comply with your country’s laws and regulations that apply to electrical installation in an explosive environment. Be sure that the available power supply complies with the specifications on the transmitter rating plate and statements in the examination certificate in your country. Dust-proof protection caps in the cable inlets must be replaced by suitable screw-type gland or dummy plugs that must be appropriately certified for transmitters with explosion proof type of protection.
WARNING
Explosion can cause death or serious injury. Failure to observe the following precautions could result in an explosion hazard.
September 2004 9-36

UMSITRPDS3-1 Model Designations And Specifications
Precautions - English
For Class I, Division 1 and Class I, Division 2 hazardous locations: • Use only factory-authorized replacement parts. Substitution of components can impair the suitability
of this equipment for hazardous locations.
When the equipment described in this Instruction in installed without safety barriers, the following precautions should be observed. Switch off electrical power at its source (in non-hazardous location) before connecting or disconnecting power, signal, or other wiring.
Emplacements dangereux de classe I, division 1 et classe I, division 2: • Les pièces de rechange doivent être autorisées par l’usine. Les substitutions peuvent rendre cet
appareil impropre à l’utilisation dans les emplacements dangereux. Emplacement dangereux de division 2:
For Division 2 hazardous locations:
Précautions - Français
Lorsque l’appareil décrit dans la notice ci-jointe est installé sans barrières de sécurité, on doit couper l’alimentation électrique a la source (hors de l’emplacement dangereux) avant d’effectuer les opérations suivantes branchment ou débranchement d’un circuit de puissance, de signalisation ou autre.
September 2004 9-37

Model Designations And Specifications UMSITRPDS3-1
FIGURE 9-5 Declaration of Conformity
September 2004 9-38

UMSITRPDS3-1 Model Designations And Specifications
DP Non-Wetted Materials Code 2 (stainless steel bolts with aluminum housing) DP Non-Wetted Materials Code 3 (stainless steel bolts and housing)
is in compliance with NACE MR0175-96.
Director of Process Instrumentation
CERTIFICATE OF NACE COMPLIANCE Siemens Energy & Automation, Inc. 1201 Sumneytown Pike Spring House, PA 19477 certifies under its sole responsibility that a SITRANS DSIII Pressure Transmitter with one of the following factory configured options
Wetted Parts Materials Code B (Hastelloy diaphragm with 316 stainless steel flanges)
Gauge Non-Wetted Materials Code 0 or 3 (aluminum or stainless steel housing)
March 16, 2001 Christopher J. O’Brien
Siemens Energy & Automation Process Industries Division Spring House, PA 19477
FIGURE 9-6 Certificate of NACE Compliance
September 2004 9-39

Model Designations And Specifications UMSITRPDS3-1
September 2004 9-40
UMSITRPDS-1 Glossary
10.0 GLOSSARY
Defined below are terms relevant to the SITRANS P DSIII transmitter, this User’s Manual, pressure measurement technology, and HART networks. Absolute (abs) Pressure – A pressure measured against absolute zero or a total vacuum as a reference. The units of measurement are called absolute pressure units. For example: psia = pounds per square inch absolute. Adjust - Zero and full scale are adjusted using a single reference pressure. See Set. Analog Signaling – A low-current signal of 4 to 20 mAdc from a field instrument to a primary master or non-signaling hardware. ANSI – American National Standards Institute Application Point or Switch Point - The point at which the output current characteristic changes from linear to square root when a square root output characteristic is selected (Modes 11 and 12). AWG – American Wire Gauge Barrier – A device designed to limit the voltage and current in a hazardous area even if certain types of faults occur on the non-hazardous side of the barrier. Barrier Resistance – The maximum end-to-end resistance of a barrier, as specified by the barrier manufacturer. If both supply and return barriers are used in a network, the barrier resistance is the sum of the end-to-end resistance of both barriers. For active barriers that use resistance to limit current, the barrier resistance is the internal resistance between the hazardous area terminal and the barrier internal node where voltage is regulated. Blind - No reference pressure is applied. Commissioning – Testing of a transmitter and associated loop to verify transmitter configuration and loop operation (piping, valving, wiring, control algorithm, data logging, etc.). Configuration – A database (or archive) created using a HART Communicator and downloaded to a transmitter to define transmitter operation. Configure/Configuring – The entering of specific parameter data into a HART Communicator to be downloaded to a transmitter to define that transmitter’s operating characteristics. Current Sense Resistor – The resistor in a network across which the field instrument (transmitter) signal voltages are developed. Damping – A user-selectable output characteristic that increases the response time of a transmitter to smooth the output when the input signal contains rapid variations. Digital Signaling – The high frequency HART signal.
September 2004 10-1
Glossary UMSITRPDS3-1
Explosion-Proof Enclosure – An enclosure that can withstand the explosion of gases within it and prevent the explosion of gases surrounding it due to sparks, flashes, or the explosion of the container itself, and maintain an external temperature that will not ignite the surrounding gases. Field Instrument – A network element that uses current variation for digital signaling or digital plus analog signaling. Gauge Pressure – A pressure measured against atmospheric or barometric pressure as a reference. The units of measurement are called gauge pressure units. For example: psig = pounds per square inch gauge. HART – Highway Addressable Remote Transducer – A communication protocol that provides simultaneous analog and digital signaling between master and slave devices. It is supported by the HART Communications Foundation. HART Network – A single pair of cabled wires and the attached communicating HART elements. Intrinsically Safe Instrument – An instrument that will not produce any spark or thermal effects under normal or abnormal conditions that will ignite a specified gas mixture. Keyboard or Magnetic Pushbuttons - Three pushbuttons or keys, located under a cover on the electrical entrance portion of the transmitter enclosure and used for local configuration of the transmitter. Leporello - The condensed transmitter user’s manual found inside the field terminals enclosure cap. A book that unfolds in accordion fashion. Lower Range Limit (LRL) – The lowest value of the measured variable that a transmitter or other measurement device can be configured to measure. Lower Range Value (LRV) – Representing the 4 mA point in the transmitter’s output, the LRV is the lowest value of the measured value that the transmitter can be configured to measure. MA or pmin- Minimum operating input pressure. Magnetic Pushbuttons - See Keyboard. Maximum Overrange – The maximum pressure (static + differential) that can be applied safely to a transmitter. ME or pmax - Maximum operating input pressure. Measuring Cell - Sensor. Multi-Drop Network – A HART network having from 1 to 15 field instruments that are parallel connected on a single 2-wire cable. This network uses digital signaling only. Network – A network includes the following items:
• Transmitter(s)
• Network element (controller, recorder, passive non-signaling element, or other device)
• Cabling interconnecting these devices
September 2004 10-2

UMSITRPDS-1 Glossary
• Barriers for intrinsic safety, if installed • Current sense resistor Network Element – Any field instrument or primary or secondary master. Network Resistance – The sum of the current sense resistance, barrier resistance, if any, and any other resistance on the network. NPT – National Pipe Thread Point-To-Point Network – A network having a single field instrument and primary master. Analog signaling or analog plus digital signaling is possible. Polling Address – A unique number assigned during configuration that identifies a transmitter connected to a network. An address between 1 and 15 assigned to a transmitter connected to a Multi-Drop network. A transmitter connected to a Point-to-Point network has 0 as an address. Primary Master – The single controlling network element that communicates with one or more field instruments, such as a Model 353 Process Automation Controller. Reranging – Changing a transmitter’s 4 and 20 mA settings (i.e., setting LRV and URV); this is a configuration function. Secondary Master – An occasional user of a network, such as the HART Communicator. Sediment – Solid material that settles in a liquid or gas and can cause blockage that may affect pressure measurement. Sensor - Measuring cell Set - Zero and full scale are set using two reference pressures. See Adjust. Span – Algebraic difference between the upper and lower range values (URV and LRV). Switch Point - See Application Point. Transducer – A device that accepts an input, such as pressure, and converts that input into an output of some other form, such as a voltage. Upper Range Limit (URL) – The highest value of the measured variable that a transmitter can be configured to measure. Upper Range Value (URV) – Representing the 20 mA point in a transmitter’s output, this is the highest value of the measured variable that the transmitter is currently configured to measure.
September 2004 10-3

Glossary UMSITRPDS3-1
September 2004 10-4

UMSITRPDS3-1 Appendix A - Online Configuration Map
September 2004 A-1
A.0 APPENDIX A - ONLINE CONFIGURATION MAP This Appendix contains a detailed configuration map showing the available online configuration options when using the Model 275 HART Communicator – see the Note below. To use the map:
1. Connect the Model 275 HART Communicator to a powered SITRANS P DSIII transmitter. See Section 2 Model 275 HART Communicator and Section 4 Installation.
2. Press the Communicator's I/O key to turn it on. A Communicator self-test routine will be initiated and, upon successful completion, the Communicator will poll the connected transmitter(s).
3. When the Online menu appears, press 3 to access the Device Setup menu, if configuring or servicing the transmitter. Note that 5 items appear in the Device Setup menu. The first three: 1 Process Variables, 2 Diagnostics/Service, and 3 Basic Setup are mapped in Figure A-1 Part 1. The last two: 4 Detailed Setup and 5 Review are mapped in Figure A-1 Part 2. The figures are on facing pages for ease of use.
Note: The Configuration Map for the Model 375 Field Communicator is shown at the back of this manual. Be sure to read the manual supplied with the Model 375 before installing or using the device.

Appendix A - Online Configuration Map UMSITRPDS3-1
A-2 September 2004
1 Pressure + 2 Type + 3 Device setup 1 Process variables 1 Pressure + 2 % range + 3 Analog output + 4 Sensor temperature + 2 Diagnostics/service 1 Diagnosis 1 Min/max pointer 1 Pressure pointer 1 Pressure maximum 2 Pressure minimum 3 Reset pointer 2 El Temperature pointer 1 E1 Temperature max 2 E1 Temperature min 3 Reset pointer 3 Sensor Temperature pointer 1 Sensor Temperature max 2 Sensor Temperature min 3 Reset pointer 2 Operating hours 1 Operating hours E1 2 Operating hours S 3 Warnings/alarms 1 W/A time unit 2 Calibrate interval 1 Calibrate status 2 W/A acknowledge 3 Calibration timer > 4 Calibration warning 5 Calibration alarm 6 W/A activation 3 Service interval 1 Service status 2 W/A acknowledge 3 Service timer 4 Service warning 5 Service alarm 6 W/A activation 4 AO saturation 1 Saturation alarm 2 Alarm duration 3 Alarm activation 4 Status 1 Status summary 2 Hardware/Firmware status 3 Diagnostic alarm status 4 Diagnostic warning status 5 Simulation status 2 Simulation/Test 1 Simulation 1 Loop Test 2 Inputs > 2 Test 1 Self Test 2 Master reset 3 Control modes 1 Local keys control mode 2 Write protect (status) 3 Set write protect (enable) 4 Trim 1 Position correction 2 Sensor trim 1 Sensor trim points 2 Zero trim 3 Lower sensor trim 4 Upper sensor trim 3 Trim analog output 1 D/A trim 2 Scaled D/A trim 5 Restore manufacturer 1 All trims trims 2 DAC trims 3 Position correction 4 Sensor trim 6 All measured values 1 Pressure + 2 Raw value 3 Sensor Temperature + 4 El Temperature + Continued in 5 AO + Figure A-1 3 Basic setup 1 Tag Part 2 2 (Engineering) Units 3 Position correction Notes: 1. + = Active data displayed 4 LRV 2. HART Communicator, Rev 5; firmware Rev 2.2 5 URV 3. > = To additional menu(s) 6 Damping 7 Transfer function
FIGURE A-1 Online Configuration Map, Part 1 of 2

UMSITRPDS3-1 Appendix A - Online Configuration Map
September 2004 A-3
4 Detailed setup 1 Sensors 1 Pressure sensor 1 Pressure + See Note 4 2 (Engineering) Units 2 Temperature sensor 1 Sensor temperature + 3 Device setup, 2 El temperature + continued in 2 Signal condition 1 Process variables 1 Pressure + Figure A-1, 2 % range + Part 1 3 AO + 4 Sensor Temperature + 2 Position correction 3 Zero/span set 1 Keypad input 1 LRV 2 URV 3 Pressure (Eng.) Units 4 LSL 5 USL 2 Apply values 4 Damping 5 Transfer function 6 Measuring speed 3 Output condition 1 Analog output 1 AO + 2 Pressure 3 Alarms > 4 Lower AO limit 5 Upper AO limit 2 HART output 1 Poll address 2 Num request preambles 3 Num response preambles 4 Device information 1 Ranges and limits 1 Module range 2 Pressure USL 3 Pressure LSL 4 Pressure minimum span 2 Common device 1 Manufacturer information 2 Model 3 Measurement type 4 Device order number 5 Explosion protection 6 Device ID 7 Pressure sensor S/N 8 Final assembly number 9 Electrical connector Electrical housing material Write protect Tag Date Descriptor Message 3 Sensor information 1 Process connection 2 Flange type 3 Flange material 4 Process flange bolt 5 Isolator material 6 Fill fluid 7 O-ring material 8 Drain & vent/plug material 9 Drain & vent/plug position 4 Remote seal 1 RS type 2 RS isolator material 3 RS fill fluid 4 Number of remote seal 5 Extension length 5 Local meter 1 Meter type 2 Unit tracking 3 Local display units 4 Bargraph 6 Revision numbers 1 Universal rev. 2 Field device revision 3 Software revision 4 Hardware revision 5 Reviews Step through configuration
FIGURE A-1 Online Configuration Map, Part 2 of 2

Appendix A - Online Configuration Map UMSITRPDS3-1
A-4 September 2004

UMSITRPDS3-1 Appendix B - Hazardous Area Installation
September 2004 B-1
B.0 APPENDIX B - HAZARDOUS AREA INSTALLATION This Appendix presents wiring and barrier selection information for installation of the transmitter in a hazardous location. The installer should carefully select barriers based on the required protection, loop wiring, manufacturer’s barrier performance data, and the data in the control drawings on the next two pages.

Appendix B - Hazardous Area Installation UMSITRPDS3-1
B-2 September 2004

UMSITRPDS3-1 Appendix B - Hazardous Area Installation
September 2004 B-3

Appendix B - Hazardous Area Installation UMSITRPDS3-1
B-4 September 2004

UMSITRPDS3-1 Appendix C - Elevation and Suppression Corrections
September 2004 C-1
C.0 APPENDIX C - ELEVATION AND SUPPRESSION CORRECTIONS When installing a transmitter to measure liquid level, configuration of the Sensor Input Block often must include an adjustment for one of two conditions introduced by the mounting arrangement: • Elevated Span - The Lower Range Value (LRV) of the transmitter needs to be configured above “0.”
See Figure C-1. • Suppressed Span - The LRV of the transmitter needs to be configured below “0.” See Figure C-2.
Max. Range
Min. Range
HP Shut-OffValve
LPHP
VentSpan
Elevated Span: Tocalculate maximumdistance, subtractactual span settingfrom range limit givenin specification. Vent
MG00363b
Fill Connection
SeeSection 9Specifi-cationsfor rangelimit.
LP linefilled withcondensate
Max. Range
Min. Range
LP Shut-OffValve
HP Shut-OffValve
LPHP
Span
Distance X
SuppressedSpan
MG00363b
FIGURE C-1 Elevated Span
FIGURE C-2 Suppressed Span
A brief discussion of how to make adjustments for elevation and suppression follows. Then two examples of the calculations needed to determine configuration parameters are given. Finally, a brief procedure that does not involve calculations is provided. C.1 HOW ADJUSTMENT IS MADE Because the transmitter can handle elevation and suppression simply by setting parameters, it is not necessary to introduce mechanical measures, such as installing piping backwards or adding additional hardware.
The range of the transmitter can be set anywhere, forward or reverse acting, as long as the following criteria are met:
LRL ≤ LRV ≤ URL
LRL ≤ URV ≤ URL Span = [URV - LRV] ≥ Min Span
Note that the URL (Upper Range Limit), LRL (Lower Range Limit), and Min Span are transmitter dependent.

Appendix C - Elevation and Suppression Correction UMSITRPDS3-1
C-2 September 2004
C.2 ELEVATION CALCULATION EXAMPLE Figure C-3 shows a sample transmitter installation. 1. Calculate the differential pressure as follows.
Pressure@DP = (H × SpG)High Side - (H × SpG)Low Side
where H = Height 2. Calculate the LRV when the tank is empty.
LRV = (120 × 1.0)High Side - (0 × 1.0)Low Side
LRV = +120 inH2O
3. Calculate the URV.
URV = LRV + Span
URV = +120 + 100
URV = 220 inH2O
Therefore, transmitter range should be 120 to 220 inH2O. C.3 SUPPRESSION CALCULATION EXAMPLE Figure C-4 shows a sample transmitter installation. 1. Calculate the differential pressure as follows.
Pressure@DP = (H × SpG)High Side - (H × SpG)Low Side
where H = Height 2. Calculate the LRV when the tank is empty.
LRV = (0 × 1.0)High Side - (100 × 1.0)Low Side
LRV = -100 inH2O
3. Calculate the URV.
URV = LRV + Span
URV = -100 + 100
URV = 0 inH2O
Therefore, transmitter range should be -100 to 0 inH2O.
Max. Range
Min. Range
LPHP
100"
Vent
H2OSpG=1.0
120"
MG00363b
FIGURE C-3 Elevation Calculation
Max. Range
Min. Range
LPHP
Span
100"H2O
SpG=1.0
MG00363b
LP LineFilled with
Condensate FIGURE C-4 Suppression Calculation

UMSITRPDS3-1 Appendix C - Elevation and Suppression Corrections
September 2004 C-3
C.4 RECOMMENDED METHOD An alternative to making the above calculations and entering derived values is to shift the span directly using the HART Communicator while adjusting the process levels.
1. Range the transmitter using the HART Communicator as for a zero-based span (e.g., 0-100 inH2O).
2. Install the transmitter on the process.
3. Fill the impulse pipe (wet legs) to the transmitter, but maintain the process at 0 (e.g., empty tank).
4. Perform one of the following: • HART Communicator - From the Online menu, press 3 Device Setup, 3 Basic Setup, and then 4
LRV. Press ENTER to set the current pressure as the LRV. The configured span will be retained. • Local Pushbuttons - Use the M pushbutton to select Mode 7. Set zero by simultaneously pressing
the and pushbuttons for 2 seconds; the selected current will appear in the display. The configured span will be retained.
This completes the procedure.

Appendix C - Elevation and Suppression Correction UMSITRPDS3-1
C-4 September 2004

UMSITRPDS3-1 Warranty
September 2004 W-1
WARRANTY
(a) Seller warrants that on the date of shipment the goods are of the kind and quality described herein and are free of non-conformities in workmanship and material. This warranty does not apply to goods delivered by Seller but manufactured by others. (b) Buyer's exclusive remedy for a nonconformity in any item of the goods shall be the repair or the replacement (at Seller's option) of the item and any affected part of the goods. Seller’s obligation to repair or replace shall be in effect for a period of one (1) year from initial operation of the goods but not more than eighteen (18) months from Seller’s shipment of the goods, provided Buyer has sent written notice within that period of time to Seller that the goods do not conform to the above warranty. Repaired and replacement parts shall be warranted for the remainder of the original period of notification set forth above, but in no event less than 12 months from repair or replacement. At its expense, Buyer shall remove and ship to Seller any such nonconforming items and shall reinstall the repaired or replaced parts. Buyer shall grant Seller access to the goods at all reasonable times in order for Seller to determine any nonconformity in the goods. Seller shall have the right of disposal of items replaced by it. If Seller is unable or unwilling to repair or replace, or if repair or replacement does not remedy the nonconformity, Seller and Buyer shall negotiate an equitable adjustment in the contract price, which may include a full refund of the contract price for the nonconforming goods. (c) SELLER HEREBY DISCLAIMS ALL OTHER WARRANTIES, EXPRESS OR IMPLIED, EXCEPT THAT OF TITLE. SPECIFICALLY, IT DISCLAIMS THE IMPLIED WARRANTIES OF MERCHANTABILITY, FITNESS FOR A PARTICULAR PURPOSE, COURSE OF DEALING AND USAGE OF TRADE. (d) Buyer and successors of Buyer are limited to the remedies specified in this article and shall have no others for a nonconformity in the goods. Buyer agrees that these remedies provide Buyer and its successors with a minimum adequate remedy and are their exclusive remedies, whether Buyer's or its successors’ remedies are based on contract, warranty, tort (including negligence), strict liability, indemnity, or any other legal theory, and whether arising out of warranties, representations, instructions, installations, or non-conformities from any cause. (e) Note: This article does not apply to any software which may be furnished by Seller. In such cases, the attached Software License Addendum applies.

Warranty UMSITRPDS3-1
W-2 September 2004

Online Configuration Map for Siemens SITRANS P DSIII Pressure Transmitters (with Model 275 HART COMMUNICATOR)
1 Pressure + 2 Type + 3 Device setup 1 Process variables 1 Pressure + 2 % range + 3 Analog output + 4 Sensor temperature + 2 Diagnostics/service 1 Diagnosis 1 Min/max pointer 1 Pressure pointer 1 Pressure maximum 2 Pressure minimum 3 Reset pointer 2 El Temperature pointer 1 E1 Temperature max 2 E1 Temperature min 3 Reset pointer 3 Sensor temperature pointer 1 Sensor temperature max 2 Sensor temperature min 3 Reset pointer 2 Operating hours 1 Operating hours E1 2 Operating hours S 3 Warnings/alarms 1 W/A time unit 2 Calibrate interval 1 Calibrate status 2 W/A acknowledge 3 Calibration timer > 4 Calibration warning 5 Calibration alarm 6 W/A activation 3 Service interval 1 Service status 2 W/A acknowledge 3 Service timer 4 Service warning 5 Service alarm 6 W/A activation 4 AO saturation 1 Saturation alarm 2 Alarm duration 3 Alarm activation 4 Status 1 Status summary 2 Hardware/Firmware status 3 Diagnostic alarm status 4 Diagnostic warning status 5 Simulation status 2 Simulation/Test 1 Simulation 1 Loop test 2 Inputs > 2 Test 1 Self test 2 Master reset 3 Control modes 1 Local keys control mode 2 Write protect (status) 3 Set write protect (enable) 4 Trim 1 Position correction 2 Sensor trim 1 Sensor trim points 2 Zero trim 3 Lower sensor trim 4 Upper sensor trim 3 Trim analog output 1 D/A trim 2 Scaled D/A trim 5 Restore manufacturer 1 All trims trims 2 DAC trims 3 Position correction 4 Sensor trim 6 All measured values 1 Pressure + 2 Raw value 3 Sensor temperature + 4 El Temperature + Continued in 5 AO + Figure A-1 3 Basic setup 1 Tag Part 2 2 (Engineering) units 3 Position correction Notes: 1. + = Active data displayed 4 LRV 2. HART Communicator, Rev 5; firmware Rev 2.2 5 URV 3. > = To additional menu(s) 6 Damping 7 Transfer function
Continued on other side. Siemens Energy & Automation, Inc.
Rev. 1, March 2001
1

Online Configuration Map for Siemens SITRANS P DSIII, Continued 4 Detailed setup 1 Sensors 1 Pressure sensor 1 Pressure + See Note 4 2 (Engineering) Units 2 Temperature sensor 1 Sensor temperature + 3 Device setup, 2 El temperature + continued in 2 Signal condition 1 Process variables 1 Pressure + Figure A-1, 2 % range + Part 1 3 AO + 4 Sensor Temperature + 2 Position correction 3 Zero/span set 1 Keypad input 1 LRV 2 URV 3 Pressure (Eng.) Units 4 LSL 5 USL 2 Apply values 4 Damping 5 Transfer function 6 Measuring speed 3 Output condition 1 Analog output 1 AO + 2 Pressure 3 Alarms > 4 Lower AO limit 5 Upper AO limit 2 HART output 1 Poll address 2 Num request preambles 3 Num response preambles 4 Device information 1 Ranges and limits 1 Module range 2 Pressure USL 3 Pressure LSL 4 Pressure minimum span 2 Common device 1 Manufacturer information 2 Model 3 Measurement type 4 Device order number 5 Explosion protection 6 Device ID 7 Pressure sensor S/N 8 Final assembly number 9 Electrical connector Electrical housing material Write protect Tag Date Descriptor Message 3 Sensor information 1 Process connection 2 Flange type 3 Flange material 4 Process flange bolt 5 Isolator material 6 Fill fluid 7 O-ring material 8 Drain & vent/plug material 9 Drain & vent/plug position 4 Remote seal 1 RS type 2 RS isolator material 3 RS fill fluid 4 Number of remote seal 5 Extension length 5 Local meter 1 Meter type 2 Unit tracking 3 Local display units 4 Bargraph 6 Revision numbers 1 Universal rev. 2 Field device revision 3 Software revision 4 Hardware revision 5 Reviews Step through configuration
2

Online Configuration Map forSiemens SITRANS P DSIII Pressure Transmitter with
Model 375 Field Communicator
Notes:
1 Model 375 Field Communicator Firmware Rev. F1.6 2 Online 1 Pressure (PV) +
2 PV status 2 + = active data (measurement) display3 Module type M = method (i.e. short procedure)4 Identification 1 Operation Unit 1 Tag
2 Ext (Long) Tag --> M3 Descriptor4 Message5 Date
2 Device 1 Manufacturer2 Model3 Device identification4 Distributor5 MLFB Order Number 1 MLFB Order No --> M6 Measurement type7 Fabrication-No8 Final asembly number9 Sensor serial number
10 Revisions 1 Universal rev.2 Field device rev.3 Software rev.4 Hardware rev.
3 Basic Parameters 1 Pressure unit2 LSL (Lower Sensor Limit)3 USL (Upper Sensor Limit)4 Minimum Span5 LRV (Lower Range Value)6 URV (Upper Range Value)7 Pressure damping8 Pressure xfer function xfer = transfer
5 Config Inp/Outp 1 Quick-Setup & Meas. 1 PV, Current, Status 1 PV +2 AO (analogue output) +3 PV % range +4 Status see ---> 6 Diagnosis/Service5 Measurement type
2 Meas.Val. & Status 1 Pressure Values 1 Pressure +2 Pres status3 Untrimmed pressure +4 Untrimmed pres status
2 Temperature Values 1 Sens-Temp +2 Sens-Temp status3 Electr-Temp +4 Electr-Temp status
3 Level, Vol, Mass Values 1 Level +(shown if valid items) 2 Level status
3 Volume +4 Volume status5 Mass flow +6 Mass status
4 Vol-, Mass- & Flow Values 1 Vol-Flow +(shown if valid items) 2 Vol-Flow status
3 Mass-Flow +4 Mass-Flow status
5 Appl & Stat 1 Customer Defined(shown if valid items) 2 Customer Defined Status
3 Quick-Setup 1 Tag2 Ext TAG --> M3 PV is4 PV unit5 Position correction 1 Position corr --> M6 LRV7 URV8 Pressure damping9 Pressure xfer function
2 Input 1 Config Pres/Temp 1 Pressure sensor 1 Pressure +2 Untrimmed pres +3 Pressure units 1 Pres abs/rel
2 Pressure unit3 Untrimmed pres unit
2 Temperature sensor 1 Sens-Temp +2 Electr-Temp +3 Temp units 1 Sens-Temp unit
2 Electr-Temp unit3 Pres units see --> 1 Pressure sensor4 Temp units see --> 1 Temperature sensor
Continued on pg 2 2 Display Process Variables 1 Process variables 1 PV measurement +2 PV % range3 AO4 S Temperature +5 El Temperature +6 Untrimmed pressure +
Page 1

Online Configuration Map forSiemens SITRANS P DSIII Pressure Transmitter with
Model 375 Field Communicator5 Config Inp/Outp, 2 Input, Continued 3 Meas Switch/Mapper 1 measurement
Continued 2 PV is3 SV is4 TV is5 QV is6 (measurement) config 1 Input scaling 1 Pres abs/rel
e.g. Level 2 Pressure unit3 Input LRV4 Input URV
2 Level scaling 1 Level unite.g. Level scaling 2 Level LRV
3 Level URV3 Volume scaling 1 Volume unit
2 Vol LRV3 Vol URV2 Density unit3 Density3 Mass unit
6 (measurement) config 1 Input scaling 1 Pres abs/rele.g. Flow 2 Pressure unit
3 Input LRV4 Input URV
2 Flow scaling 1 Vol flow unit2 Vol flow LRV3 Vol flow URV2 Density unit3 Density3 Mass flow unit
6 (measurement) config 1 Input scaling 1 Pres abs/rele.g. Customer 2 Pressure unit
3 Input LRV4 Input URV
3 Customer scaling 1 Cust unit (5 Ch)2 Cust LRV3 Cust URV
7 User linearization 1 Special Curve status --> only if meas not presif Level, Flow or Customer 2 No curve pointsthis is valid - otherwise not 3 Setup special char --> M
4 Display special char --> M4 Meas.Limits & Span 1 Module range
2 Active Device Variables 1 Pressure 1 Pressure unit2 Pres USL3 Pres LSL4 min span5 Trimpoint sum
2 Sens-Temp 1 Sens-Temp unit2 Sens-Temp USL3 Sens-Temp LSL4 Sens-Temp min.span
3 Electr-Temp 1 Electr-Temp unit2 Electr-Temp USL3 Electr-Temp LSL4 Electr-Temp min.span
4 Untrimmed Pres 1 Untrimmed Pres unit2 Untrimmed Pres USL3 Untrimmed Pres LSL4 Untr Pres min.span
additional if measurement 5 Level 1 Level unitis mapped to level 2 Level USL
3 Level LSL4 Level min.span
additional if measurement 6 Volume 1 Volume unitis mapped to level 2 Volume USL
3 Volume LSL4 Volume min.span
additional if measurement 7 Mass 1 Mass unitis mapped to level 2 Mass USL
3 Mass LSL4 Mass min.span
additional if measurement 5 Vol-Flow 1 Vol-Flow unitis mapped to flow 2 Vol-Flow USL
3 Vol-Flow LSL4 Vol-Flow min.span
additional if measurement 6 Mass-Flow 1 Mass-Flow unitContinued on pg 3 is mapped to flow 2 Mass-Flow USL
3 Mass-Flow LSL4 Mass-Flow min.span
additional if measurement 5 Customer 1 (PV) unitis mapped to customer 2 Customer USL
3 Customer LSL4 Customer min. span
Page 2

Online Configuration Map forSiemens SITRANS P DSIII Pressure Transmitter with
Model 375 Field Communicator5 Config inp/outp, 3 Output 1 Analog output 1 Analog output +
Continued 2 Percent range +3 Pres xfer function Linear
Sq Rt, lin to StrtptSq Rt, 4 mA to StrtptSq Rt, 2 steps lin to Startpt
NA/4 Startpoint square root4/5 Zero and Span 1 Zero/Span set 1 Out Scaling PV >1
2 Apply values >25/6 Current Limits 1 Lower AO Limit
2 Upper AO Limit6/7 Alarms 1 AO Alarm Type
2 Alarm LRV3 Alarm URV
2 Sensor trim points 1 Lower sensor trim point2 Upper sensor trim point
3 HART output 1 Polling address2 Num request preambles3 Num response preambles
4 Local meter 1 Meter type2 Unit tracking3 Local Display unit4 LCD Settings 1 LCD Scaling, if On: 2 LCD Unit5 Bargraph 3 LCD LRV
4 LCD URV6 Access Control 1 Local keys control mode
2 Write protect3 Set write protect --> M
5 Mech. Construction 1 No of electronic changesMech = mechanical 2 Design 1 Sensor 1 Fill fluid
2 Isolation material (diaphr)3 O ring material4 Module range
2 Remote Seal 1 Number remote seal (RS)2 RS type3 RS isolator material4 RS fill fluid5 Extension length6 Extension type7 Capillary length
3 Process Connection 1 Process Connection2 DrainVent / plug mat3 DrainVent / plug pos4 Process flange bolt5 Flange type6 Flange material
4 Electronic Connection 1 Electr housing material2 Electr connection
6 Diagnosis/Service 1 Status 1 Status summary2 Extended device status3 Hardw/Firmw status 1 RAM failure
2 ROM failure OFF = OK3 Electronic EEPROM ON = Problem# List continues
4 Diag Alarm Status 1 Calibration Alarm2 Service Alarm# List continues
5 Diag Warn Status 1 Calibration Warning2 Service warning# List continues
6 Simulation status 1 Pressure simulation2 El simulation3 Sensor temp simulation
2 Device 1 Selftest/Reset 1 Selftest --> M2 Display Test --> M3 Master reset --> M4 Changes Config 1 Config changed counter
2 Sensor trim 1 Restore mfgr trims --> M mfgr = manufacturer2 Sensor trim 1 Sensor trim points 1 Lower sensor trim point
2 Upper sensor trim point2 Sensor trim 1 Pres zero trim--> M
2 Lower sensor trim --> M3 Upper sensor trim --> M
3 Trimpoint summary3 Trim analog output 1 D/A trim --> M
Continued on pg 4 2 Scaled D/A trim --> M4 Position correction 1 Position corr --> M
3 Simulation/Test 1 Loop test --> M Simulation AO2 Inputs --> M Simulation Fixed / Ramp
4 Access Control 1 Local keys control mode2 Write protect3 Set write protect --> M
Page 3

Online Configuration Map forSiemens SITRANS P DSIII Pressure Transmitter with
Model 375 Field Communicator6 Diagnosis/Service, 3 Diagnostic settings 1 W/A time unit W/A = warning/alarm
Continued 2 Calib interval 1 Calib status2 W/A acknowledge --> M3 Calib timer 1 Calib time
2 Reset timer --> M4 Calib warning5 Calib alarm6 W/A activation
3 Service interval 1 Service status2 W/A acknowledge --> M3 Service timer 1 Service time
2 Reset timer --> M4 Service warning5 Service alarm6 W/A activation
4 AO saturation 1 AO alarm type2 Saturation alarm3 Alarm duration4 Alarm activation
5 Limiter setup 1 Display limiter --> M2 Setup limiter --> M3 Limiter status --> M4 Limiter: Ack W/A --> M Ack = acknowledge5 CmpCnt: Ack W/A --> M CmpCnt = Comparation Counter6 Reset counter. --> M
4 View 1 Operating hours 1 Operating hours Electr2 Operating hours Sensor
3 Min/Max pointer 1 Pressure pointer 1 Pres max2 Pres min3 Reset pointer --> M
2 Electr-Temp pointer 1 Electr-Temp max2 Electr- Temp min3 Reset pointer --> M
3 Sens-Temp pointer 1 Sens-Temp max2 Sens-Temp min3 Reset pointer --> M
7 Certif & Approv 1 Explos. ProtectionCertif=Certification Explos = ExplosionApprov=Approval
Page 4