Embed Size (px)
Citation preview

Sitecore Email Experience Manager 3.3 Rev: September 13, 2018
Sitecore Email Experience Manager 3.3
All the official documentation for Sitecore EXM 3.3.

Configure a message setting You can configure message settings either on a specific message or on a message type level.
To configure a specific message:
1. In the Content Editor, click Sitecore/Content/Email Campaign/Messages.2. In the Messages folder, select the specific message that you want to configure and then click the Content tab on the right.
3. Edit the relevant settings and save the message.
These settings apply to the selected message only.
To apply general settings to all messages of a particular type, set up the default parameters for a particular message type.
Send feedback about the documentation to [email protected].
Change the details for selecting a winner of a started A/B test message In the Content Editor, administrators can change the expiration time of an A/B test message and the data that the winning message is based on while the test is still running.
For example, if you have already started an A/B test of a message but want to extend or shorten the specified time until the winning message is chosen, you can change the time on the relevant task item in the Content Editor.
To change the details of when and how you want the winning message to be selected:
1. Open the Content Editor and navigate to Sitecore/System/Modules/E-mail Campaign Manager/Tasks/.2. Click the relevant task, and in the Data section, in the Items field, specify how and when you want the winning message chosen.
For example, the field value, {549ACA65-FC3D-481C-862D-9B88F18EC9F2}|ValuePerVisit|1|12, specifies that you want the winning message chosen based on the best value per visit after 12 hours.
Value Description
{549ACA65-FC3D-481C-862D-9B88F18EC9F2} The item ID of the message.
|ValuePerVisit|
The value that the selection of the winning message should be based on:
|ValuePerVisit| – Best value per visit
|OpenRate| – Highest open rate
|1| The time unit. 1=hours, 2=days, 3=weeks, 4=months
Page 1 of 98

|12| The number of time units.
3. In the Schedule field, specify when you want the A/B test to start.
The time is specified in UTC, and you can change the first part of the field value, for example, 20151120T000646Z|.
4. Save your changes.
In the Email Experience Manager, for the A/B test message, you can see the updated changes on the Delivery tab.
Send feedback about the documentation to [email protected].
Detecting an EXM request For the message body, you can use a different layout than for your usual webpages. To display the appropriate layout, you need to determine whether the EXM is requesting the message body or if this is a normal page request.
To detect EXM requests, use the following Boolean method in your layout:
Sitecore.Modules.EmailCampaign.Util.IsMessageBodyRequest()
If the method returns true, the EXM is requesting the message body, otherwise it is a normal page request.
Send feedback about the documentation to [email protected].
Online message versions In an email campaign, you may want to have an online version of your newsletter to let people view it in a browser or share a link to it.
The header of the Newsletter message template contains the Destination field. In this field, you can insert a link to the online message version. You can use either a relative path that points to a Sitecore item or an absolute path of any webpage.
If you have filled in the Destination field, the email message to subscribers contains a link that lets them view the online version of the newsletter:
When subscribers receive the message and click this link, they are redirected to the online copy of the newsletter.
Page 2 of 98

The online copy:
• Is created automatically when the message is created.• Is personalized – all the tokens in the message are replaced with the relevant values.
Note
Ensure that the Process personalization tokens sublayout is added to the layout details of the template to replace the tokens.
• Does not contain a link to the online message version or a footer with links to opt-out pages. The EXM recognizes an online copy automatically and does not render controls that are not relevant.
Send feedback about the documentation to [email protected].
Configure insert options for message types You can change the message templates that marketers can choose from when they create a new email campaign.
To change message templates available for the Regular email campaign or the Automated email campaign:
1. In the Content Editor, select the Default item of the relevant message type:◦ Regular email campaign – /sitecore/content/Home/Email Campaign/Message Types/One Time Message/Default◦ Automated email campaign – /sitecore/content/Home/Email Campaign/Message Types/Triggered Message/Default
2. On the ribbon, in the Configure tab, click Assign.3. In the Insert Options dialog box, change the range of message templates and then click OK to assign the new insert options.
Send feedback about the documentation to [email protected].
Create a custom message type class The Email Experience Manager module lets developers create and use custom types of message items. The default EXM message types are mapped to the appropriate class in the code by the TypeResolver class. To use a custom message type class, you must also create a custom type resolver to map your message type correctly.
To create a custom message type class:
1. Derive a custom message type class from either the MessageItem class or one of its descendants:◦ The TextMail class◦ The HtmlMail class◦ The WebPageMail class◦ The ABTestMessage class
2. Define a message template for the new message type. 3. Implement the Clone() method on your custom type, even when it does not derive from the message Item class.4. Derive a custom type resolver class from the TypeResolver class.5. Override the GetCorrectMessageObject method in the class that you derived from the TypeResolver class.
Example:
public class NewMail : MessageItem
{
public static bool IsCorrectMessageItem(Item item)
Page 3 of 98

{
return ItemUtilExt.IsTemplateDescendant(item, TemplateIds.NewMessageTemplate);
}
...
}
public class NewTypeResolver : TypeResolver
{
public override MessageItem GetCorrectMessageObject(Item item)
{
var result = NewMail.FromItem(item);
return result != null ? result : base.GetCorrectMessageObject(item);
}
...
}
Send feedback about the documentation to [email protected].
Retrieving insert options for message types In a manager root, you can configure insert options for the EXM message types that affect the range of message templates available for each type. However, you may also need to configure more advanced settings that define how those insert options are retrieved by the module and represented in the UI.
To access the advanced insert options settings, switch to the Core database and in the Content Editor, navigate to /sitecore/client/Applications/ECM/Component/Create.
The Create folder contains folders that provide configuration options for each message type:
• One Time• Subscription• Triggered
The Provider section of the Templates item in each message type folder contains the configuration settings of the default insert options provider. You can replace the default provider with a custom one and customize these options:
Setting Description
TypeThe names of the provider data type and of the namespace in which the data type is defined, separated by a comma.
You can replace the default insert options provider with a custom one.
Method The method that retrieves the insert options for the message type.
For the One Time message type, you can also customize advanced settings for creating messages using the Import From HTML or Import From Design template.
The Import From HTML and Import From Design items are located in the Import folder (/sitecore/client/Applications/ECM/Component/Create/One Time/Import) and provide the following settings:
Setting Description
IconURL The path to the icon of the message template.
Page 4 of 98

Parameters Contains the following parameters in the JSON format:
• messageTemplateId - the ID of the message template item in the Master database.• messageTypeTemplateId - the ID of the message type template in the Master database.
URL The path to the dedicated page for the message template. When a user selects the Import From HTML or Import From Designtemplate, EXM redirects the user to the page defined in this setting.
Visible Controls whether the template is visible to users. The template is visible by default. Clear the check box to hide the template.
SectionIndex Defines the display order of the template.
Send feedback about the documentation to [email protected].
The general settings for an email campaign type In the Content Editor, you can specify the Campaigns Position and Standard Message Plan for a particular email campaign type. These settings apply to all the email campaigns of that email campaign type.
The EXM module provides two message types:
• Regular email campaign (One Time Message) • Automated email campaign (Triggered Message)
The email campaign types are located in /sitecore/content/Home/Email Campaign/Message Types.
To configure the general settings of the email campaign types, edit the Default item in the corresponding folder.
The Default items contain the following settings:
Setting name Sample value Description
Campaigns Position EmailsThe default campaign category that stores campaigns related to the message type.
Marketers can change this value in the EXM UI.
Standard Message Plan Standard/Message PlanThe default engagement plan for the message type.
Marketers cannot choose another engagement plan in the EXM UI; they can only edit the default one.
Send feedback about the documentation to [email protected].
The TypeResolver class The Email Experience Manager (EXM) module enables users to create different types of messages. To map a message type to the appropriate class in code, the module uses the TypeResolver class.
The EXM module provides the following message type classes that are derived from the MessageItem base abstract class:
• TextMail• HtmlMail• WebPageMail• ABTestMessage
For customization purposes, you can create a custom message type class to be used in EXM or delete any of the existing classes.
Depending on the item type, the GetCorrectMessageObject method of the TypeResolver class returns:
• For not a message item, the method returns null.• For a message item, the method returns one of the following types – text mail, HTML mail, webpage mail, or A/B test message.
Page 5 of 98

The following table shows how EXM message templates correspond to the message type classes:
Message template Message type class
HTML file The ABTestMessage class
Newsletter Message The ABTestMessage class
Two-Column Message The ABTestMessage class
One-Column Message The ABTestMessage class
Simple HTML Message The HtmlMail class
Plain Text Message The TextMail class
Existing Page The WebPageMail class
Note
The ABTestMessage class is a descendant of the WebPageMail class. It is generally used for messages that contain two or more testable variations, except for the HTML file template, which doesn't support A/B testing. A/B tests also cannot be performed on the message types that are mapped to the other classes: Simple HTML Message, Plain Text Message, and Existing Page.
Send feedback about the documentation to [email protected].
Walkthrough: Building a custom message template In the Content Editor, you can build a custom message template that you can use for email campaigns in the Email Experience Manager (EXM).
To build a custom message template, you create a branch template, a message template, and a layout, and then bind these together.
Tip
Before you begin, make sure you have the HTML code that you want to use as the layout for your custom message template.
This topic outlines how to:
• Create a branch template• Create template• Create the layout• Bind the layout and the message template• Make the message template available in EXM
Create a branch templateThe custom message template is based on the Branch data template that consists of a branch template definition item and the $name item.
To create a branch template:
1. In the Content Editor, in the Messages folder (Templates/Branches/Email Campaign/Messages), insert a new branch folder, for example, Custom newsletter, and then click OK.
2. In the new branch folder, insert a new branch and in the Create a new branch dialog, navigate to System/Branches/Branch, and then click Create.
Page 6 of 98

3. Rename the branch, for example, to Monthly newsletter, and on the Content tab, click the icon to change it. The icon is used for your message template when users create a new email campaign in EXM.
4. To be able to perform an AB test on an email campaign that is based on your message template, the $name item must be based on the AB Testable Messagetemplate. Click the $name item, and on the Configure tab, in the Template group, click Change.
5. In the Select the Template dialog, navigate to Templates/Email Campaign/Messages/AB Testable Message, and click Next.
6. To be able to bind your message template with the content layout, you must insert a message root under the $name item. Click the $name item, on the Home tab, in the Insert group, click Insert from template.
7. In the Insert from Template dialog, navigate to Templates/Email Campaign/Messages/ Inner content/Message Root, and in the Item name field, enter a name, for example, Message root, and click Insert.
Page 7 of 98

8. To connect the message root with the $name item, click the $name item, and in the Message section, in the Body field, click the drop-down arrow and navigate to the message root.
Your new branch template should look like this:
Create templateCreate a new template to specify the standard values that you want to use as the default message content, for example, the text in the header and footer.
To create a template:
1. In the Content Editor, navigate to /Sitecore/Templates/Email Campaign/Messages/Inner Content and insert a new template folder, for example Custom newsletter. Click OK.
2. In the template folder, insert a new template, for example, Custom newsletter content.
Page 8 of 98

3. For your new template, click the Builder tab, and then add the relevant data template fields in the Add a new section field, for example, header text and footer text.
4. Save your changes.
Create the layoutTo create the layout of your message template:
1. In the Content Editor, navigate to /sitecore/Layout/Layouts/Email Campaign/ and insert a new layout, for example, Monthly Newsletter.
Page 9 of 98

2. In the webroot file structure of your Sitecore installation, navigate to where you placed the new layout file, for example, /Website/layouts/EmailCampaign/Sitecore Newsletter.
3. Open the relevant file and insert the custom HTML code that you want to use for the layout.
For example, for a newsletter layout:
<%@ Register TagPrefix="sc" Namespace="Sitecore.Web.UI.WebControls" Assembly="Sitecore.Kernel" %>
<%@ Register TagPrefix="sc" Namespace="Sitecore.Web.UI.WebControls" Assembly="Sitecore.Analytics" %>
<%@ OutputCache Location="None" VaryByParam="none" %>
<html>
<head>
<!-- Used for storing title of the email -->
<sc:Placeholder Key="mn-title" runat="server" />
<!-- The VisitorIdentification control ensures that people viewing this page
with a traditional web browser will be classified as humans not bots.
This control is not required if people only view messages using Email clients -->
<sc:VisitorIdentification runat="server" />
</head>
<body style="background-color:#1C1C1C">
<form method="post" runat="server" id="mainform">
<table width="100%">
<tr>
<td width="100%" colspan="2" style="background-color:#1C1C1C;color:#FFFFFF">
<!-- Used for storing the title of the newsletter in h1 -->
<sc:Placeholder runat="server" Key="mn-header" />
</td>
</tr>
<tr>
<td width="100%" style="background-color:#E6E6E6;color:#00000">
<!-- Used for storing the content blocks of the newsletter in h2 and paragraphs -->
<sc:Placeholder runat="server" Key="mn-content" />
</td>
</tr>
<tr>
<td width="100%" colspan="2" style="background-color:#1C1C1C;color:#FFFFFF">
<!-- Used for storing the footer e.g. the unsubscribe link -->
<sc:Placeholder runat="server" Key="mn-footer" />
</td>
</tr>
</table>
</form>
</body>
</html>
Page 10 of 98

Bind the layout and the message templateTo bind the layout to the message template:
1. Navigate to the message root of the branch template that you created, for example, /sitecore/Templates/Branches/Email Campaign/Messages/Custom newsletter/Monthly newsletter/$name/Message root.
2. On the Presentation tab, in the Layout group, click Details. 3. In the Layout Details dialog, for the Default device, click the [No layout specified] link.
4. In the Device Editor dialog, on the Layout tab, click the drop-down list and navigate to the layout that you created, for example, Monthly newsletter.
5. On the Controls tab, add the relevant controls.
Important
As a minimum, in /Renderings/Email Campaign, add the control Set Page Title. Specify mn-title as the placeholder.
Page 11 of 98

6. Click OK.
Make the message template available in EXMTo make the template available for your users in EXM:
1. In the Content Editor, navigate to sitecore/Content/Home/E-mail Campaign/Message Types.2. Expand the message type where you want to add the new message template and click the Default item.3. On the Configure tab, in the Insert Option group, click Assign.4. In the Insert Options dialog, navigate to your message template, for example, /Templates/Branches/Email Campaign/Messages/Custom Newsletter/Monthly
Newsletter and add it to the Selected pane.
5. Click OK and save your changes.
In EXM, your users can now choose your message template from the list of templates when they create a new message.
Send feedback about the documentation to [email protected].
Page 12 of 98

The error handling strategy in the sending process The dispatch process in EXM includes queuing, sending, and publishing messages and related items. Sending is the key part of this process and the most time consuming. Therefore, EXM implements a specific error-handling strategy during the sending stage of the dispatch process.
This diagram depicts the steps in the sending process of the dispatch pipeline and the error-handling strategy that is used in it.
Send feedback about the documentation to [email protected].
The EXM extensibility points You can extend the logic of EXM processing pipelines and message events with your own implementation.
The EXM module has the following possible extensibility points:
• SubscribeEvent pipeline• UnsubscribeEvent pipeline• UnsubscribeFromAllEvent pipeline• reDirectUrl pipeline• EmailOpenHandler.EmailOpened event
SubscribeEvent pipeline
The SubscribeEvent pipeline is activated when a contact subscribes to any recipient list.
Processors should be derived from SubscribeEventProcessor:
Namespace: Sitecore.Modules.EmailCampaign.Core.Pipelines
Assembly: Sitecore.EmailCampaign (Sitecore.EmailCampaign.dll)
UnsubscribeEvent pipeline
The UnsubscribeEvent pipeline is activated when a contact unsubscribes from any recipient list.
Processors should be derived from UnsubscribeEventProcessor:
Namespace: Sitecore.Modules.EmailCampaign.Core.Pipelines
Assembly: Sitecore.EmailCampaign (Sitecore.EmailCampaign.dll)
UnsubscribeFromAllEvent pipeline
The UnsubscribeFromAllEvent pipeline is activated when a contact unsubscribes from all of the recipient lists.
Processors should be derived from UnsubscribeFromAllEventProcessor:
Namespace: Sitecore.Modules.EmailCampaign.Core.Pipelines
Page 13 of 98

Assembly: Sitecore.EmailCampaign (Sitecore.EmailCampaign.dll)
reDirectUrl pipeline
During the dispatch process, all the links in the message body are replaced with a link to RedirectUrlPage.aspx including additional query string parameters such as contact identifier and message id. The RedirectUrlPage.aspx file runs the reDirectUrl pipeline that, for example, adds click events based on the query string parameters. After running the pipeline, the RedirectUrlPage.aspx file redirects the contacts to the actual link.
EmailOpenHandler.EmailOpened event
The EmailOpenHandler.EmailOpened event occurs when a recipient opens a message.
Namespace: Sitecore.Modules.EmailCampaign.Core
Assembly: Sitecore.EmailCampaign (Sitecore.EmailCampaign.dll)
Send feedback about the documentation to [email protected].
The EXM pipelines The Email Experience Manager uses two main pipelines to generate and send messages:
• DispatchNewsletter pipeline• SendEmail pipeline
The pipelines are defined in the EXM configuration files. You can extend and customize the pipelines by adding custom processors or replacing the default ones.
Understanding how the EXM pipelines – and the processors that they include – work gives you an insight into the whole message generation and sending process. Different message types may require the utilization of different processors.
DispatchNewsletter pipelineThe DispatchNewsletter pipeline is defined in the Sitecore.EmailExperience.ContentManagementPrimary.config file. This pipeline includes the following processors:
Processor name Description
CheckPreconditions Checks whether all the conditions required to start sending the email campaign are met.
MoveToQueuing Moves the email campaign to the Queuing state.
DeployAnalytics Changes the workflow state of the analytics definitions that are related to the email campaign (engagement plan, campaign, subject MV test) to Deployed.
PublishDispatchItems Publishes the message item, message campaign item, and message engagement plan item.
QueueMessage The master server queues recipients to a separate collection in the EXM dispatch database.
MoveToProcessing Changes the state of the email campaign to Sending.
LaunchDedicatedServersThe master server launches the DispatchNewsletter pipeline on the dedicated servers. This is a simplified version of the pipeline and does not include processors that are only appropriate for the master server. The master server and the dedicated servers share the same databases.
SendMessage
The master server and the dedicated servers generate and send email campaigns.
The processor gets a contact from the EXM dispatch database. Each server accesses the list of recipients and takes one of the remaining recipients to generate the email campaign for. The process continues as long as there are recipients left in the list.
For every recipient, the processor:
• Assigns the appropriate automation state to the message.• Assigns the recipient – either the Sitecore user or the xDB contact.• Raises the subscriber:assigned event.• Requests the page that corresponds to the message. • Sets the user as the context user for the requested page. Security restrictions are applied. • Adds the “message opened” image.• Starts the SendEmail pipeline.
MoveToSent Changes the state of the email campaign to Sent.
Note
Page 14 of 98

If a NoSQL database becomes inaccessible during the dispatch, the dispatch is aborted, but the email campaign is moved to the Sent state anyway. To change this behavior, you can customize the MoveToSent processor.
If a SQL database becomes inaccessible during the dispatch, the dispatch is aborted. The MoveToSent processor does not change the state and the email campaign remains in the Paused state.
NotifyDispatchFinished Sends the notification when the dispatch process is finished.
FinalizeDispatch Cleans up the internal variables of the round-robin MV test process and closes the remaining connections to the SMTP server.
DispatchNewsletter pipeline for dedicated servers
A simplified version of the DispatchNewsletter pipeline that is tailored for dedicated dispatch servers is defined in the Sitecore.EmailExperience.EmailProcessing.config file. This version of the pipeline only includes the following processors:
• CheckPreconditions• SendMessage• FinalizeDispatch
SendEmail PipelineThe SendMessage processor starts the SendEmail pipeline for every email message to be sent.
The SendEmail pipeline is defined in the Sitecore.EmailExperience.ContentManagement.config file. This pipeline includes the following processors:
Processor name Description
FillEmail Generates the message using the personalized recipient data.
SendEmail Sends the email campaign to the MTA defined in the Sitecore.EmailExperience.ContentManagement.configfile.
CreateTask Creates a task that adds an interaction with the Email Sent page event.
Sleep
Controls for how long EXM pauses on the current server after sending each email message. Specified in milliseconds (ms).
In a multiserver setup, you can use this processor to balance the load between the servers. For example, if you want the dedicated server to send 4 times as many email messages as the primary CM server, specify the following values on the sleep setting:
• 200 on the primary CM server. The server pauses for 200 ms after sending each email message. • 50 on the dedicated server. The server pauses for 50 ms after sending each email message.
Then, if you send 1000 email messages, the primary CM server sends approximately 200 email messages (20%) and the dedicated server sends approximately 800 emails (80%).
Send feedback about the documentation to [email protected].
The interactions created in XDB by EXM When you send an email campaign, the Email Experience Manager (EXM) creates an interaction in the Sitecore Experience Database (xDB) for each of the following email events:
• Sent – one interaction for every sent email message.• Opened – one interaction when a contact opens an email message. • Clicked – one interaction when a contact clicks a link in the email message.• Bounced – one interaction when an email message bounces.• Unsubscribed – one interaction when a contact unsubscribes from an email message.• Spam – one interaction when a contact marks the email message as spam.
Note
To avoid duplicate interactions in xDB, only one interaction is created if a contact opens an email message more than once within a short interval. The interval is specified in the EXM.DuplicateProtectionInterval setting in the Sitecore.EmailExperience.ContentDelivery.config file. The default value is 300 seconds.
Send feedback about the documentation to [email protected].
Configure a dedicated email dispatch server
Page 15 of 98

Dedicated EXM servers generate messages in the same way as the master server does. This allows you to speed up the message generation and sending process. You can install one or more dedicated email dispatch servers depending on your typical dispatch scenario and deployment environment. All servers share the same databases.
To configure a dedicated server:
1. On the dedicated server, install Sitecore Experience Platform and configure it as a basic Content Management server. You can combine it with other server roles as needed.
Important
To avoid installation issues, you should start configuring a dedicated server with a clean Sitecore installation without EXM-related files or settings.
2. On the dedicated server, set the folder permissions required for Sitecore to run.3. On the dedicated server, in the Sitecore.config file, edit the absolute paths so that they point to correct locations. For example, in the dataFolder setting.4. On the dedicated server, in the \App_Config\ConnectionStrings.config file:
◦ Ensure the connections point to the same databases as the master server uses.◦ Add the exm.master connection string:
<add name="exm.master" connectionString="user id=user;password=password;Data Source=(server);Database=Sitecore_EXM" />
5. Extract the relevant Email Experience Manager - Email processing package to your website root folder on the dedicated server.6. On the master server, in the Sitecore.EmailExperience.ContentManagementPrimary.config file, in the <DedicatedServers> section, enter the address
of the dedicated server. For example:
<DedicatedServers>
<address value="http://dedicated.server" />
</DedicatedServers>
Note
If you enter the IP address of the dedicated server in the address setting (for instance: <address value="http://10.38.41.24" />), then on the dedicated server, Sitecore must run on the default web site.
You have now configured the dedicated server. You can configure several dedicated servers using this procedure.
When you start the dispatch process on the master server, the same process starts on the dedicated servers. As long as there are subscribers left in the list in the EXM dispatch database, each server accesses the list, takes one of the remaining subscribers, generates the message for them, and passes the message to the message transfer agent configured for this server.
Tip
You can use the Sleep setting to balance the load between the primary CM server and the dedicated servers.
Send feedback about the documentation to [email protected].
Dedicated email dispatch servers To speed up the message generation and sending process, you can use dedicated EXM servers.
There are multiple factors that may affect EXM performance. You can use the following recommendations to decide how many dedicated servers you need to get the most out of your EXM installation.
We recommend that you install one dedicated email dispatch server for your environment if you meet at least one of the following criteria:
• You dispatch more than 100,000 emails per week.• Your emails are sometimes lightly personalized with xDB or third-party data.• Your content management server regularly has five or more concurrent users.• You do not have a dedicated xDB processing instance.• You have a low-powered SQL Server, or all your SQL databases are on one server.• You have MongoDB and SQL on the same physical or virtual hardware.• You are not using fast/SSD-based disks on any of your servers.
We also recommend that you install more than one dedicated email dispatch server if you meet at least one of the following criteria:
• You dispatch more than 1,000,000 emails per week.• Your emails are regularly heavily personalized with xDB or third-party data.• Your content management server regularly has more than 10 concurrent users.• You do not have a dedicated xDB processing instance.• You are performing regular analytics reporting lookups.• You have moderate-to-large customizations on xDB Analytics & Reporting.
Important
For high-volume environments – more than 1,000,000 emails per week – Sitecore recommends that you place the SQL dispatch database on its own SQL instance (8core CPU, 8GB RAM).
Send feedback about the documentation to [email protected].
Emails that bounce A bounce email is an email message that is returned to the sender because it cannot be delivered.
There are two kinds of bounce email:
Page 16 of 98

• A soft bounce is a temporary failure and there is a chance that the recipient will receive the message eventually. A soft bounce means that the recipient's mail server recognizes the email address but the message is returned to the sender, for example, if the recipient's email box is full, the mail server is temporarily unavailable, or the recipient no longer has an email account at that address.
• A hard bounce is a permanent failure. A hard bounce means that the email message is permanently bounced back to the sender because the address is invalid.
In EXM, when a soft bounce is registered for a recipient:
• If the recipient is a Sitecore user, the UndeliveredCount property in the recipient's profile is incremented by one.• If the recipient is an xDB contact, the BounceCount field of the Email property in the recipient's profile is incremented by one.
On the manager root item, in the Subscription Control section, the Undelivered Max field defines the number of soft bounces and the value of the UndeliveredCountproperty. When this number is met, no more email messages can be sent to the recipient.
If a hard bounce is registered for a recipient, the undelivered count is set equal to the value in the Undelivered Max field. In this case, EXM also removes the email address from the relevant contact lists and adds it to the global opt-out list.
If a recipient clicks a link in an email message that was sent using EXM, their UndeliveredCount property is set to zero.
Note
When you receive spam complaints from a recipient, EXM also removes their email address from the relevant contact lists and adds it to the global opt-out list to make sure you do not send more email messages to them.
Send feedback about the documentation to [email protected].
Set up the message transfer agent (MTA) For email delivery, you can choose to use the Sitecore MTA or the Custom SMTP. The default provider is Sitecore MTA.
Use the Sitecore MTAYou can switch to the Sitecore MTA by disabling the CustomSmtp configurations and then enabling the Dyn configurations.
Before you switch to using the Sitecore MTA:
• Make sure the firewall on your server does not block the following URL's:◦ https://apps.sitecore.net◦ smtp.dynect.net◦ https://emailapi.dynect.net
• Open the ports 587 and 443 for the following URL's:◦ https://sitecore.smtp.e.sparkpost.com◦ https://sitecore.api.e.sparkpost.com
• If you want to enable the Transport Layer Security (TLS), in the App_Config\Include\EmailExperience\Sitecore.EDS.Providers.Dyn.config file, in the section sitecore/exm/eds/smtpSettings:
◦ In the setting <port> specify the relevant port. You can use port 25 or port 587.◦ Add the setting <startTls>true</startTls>.
To switch to use the Sitecore MTA:
1. Verify your App Center subscription for Email Delivery. 2. In the Website\App_Config\Include\EmailExperience folder, add the suffix .disabled to the following files:
◦ Sitecore.EDS.Providers.CustomSmtp.config◦ Sitecore.EDS.Providers.CustomSmtp.Sync.config
3. In the Website\App_Config\Include\EmailExperience folder, remove the suffix .disabled from the following files:◦ Sitecore.EDS.Providers.Dyn.config.disabled ◦ Sitecore.EDS.Providers.Dyn.Sync.config.disabled
Use a Custom SMTPTo switch from using the Sitecore MTA to using the Custom SMTP, you must disable the Dyn configurations and then enable the CustomSmtp configurations:
1. In the Website\App_Config\Include\EmailExperience folder, add the suffix .disabled to the end of the following file names:◦ Sitecore.EDS.Providers.Dyn.config ◦ Sitecore.EDS.Providers.Dyn.Sync.config
2. In the Website\App_Config\Include\EmailExperience folder, remove the suffix .disabled from the following file names: ◦ Sitecore.EDS.Providers.CustomSmtp.config.disabled
Page 17 of 98

◦ Sitecore.EDS.Providers.CustomSmtp.Sync.config.disabled 3. Open the enabled configuration files and configure your SMTP and POP3 servers.
Send feedback about the documentation to [email protected].
Test the connection between the EXM and the MTA If you use the Sitecore message transfer agent (MTA) or if you have configured a custom MTA server, you can verify the connection between the MTA and EXM.
To test the connection between EXM and the MTA:
1. In the Content Editor, select the Email Campaign root item.2. On the Email tab, in the Server group, click Test Connection.
3. If the test is not successful, an error message appears with information to help you troubleshoot the problem.
Send feedback about the documentation to [email protected].
The Sitecore MTA compared to the Custom SMTP In the Email Experience Manager, you can choose between using the Sitecore MTA or a Custom SMTP to send your email campaigns.
Sitecore MTA
The Sitecore MTA handles the complexity of email delivery for you and ensures that your email campaigns avoid getting blocked by your recipients’ Junk, SPAM, and Clutter folders but instead arrive quickly in their inbox.
Note
For configuration support and email dispatch troubleshooting, refer to the standard Sitecore support channels. We also provide reactive support to all subscription holders focusing on any misconfigured accounts and high bounce- or spam-rate email campaigns.
Custom SMTP
The custom SMTP is an unmanaged service that suits low-volume (< 10k per month), low-complexity, or internal deployments. It is ideal for SMTP-only setups like MailServer, Exchange Server, AWS Email, SendGrid, or custom Port 25 deployments.
You can also use the Custom SMTP for testing before you deploy on the live Sitecore MTA or connect to another established SMTP service.
Note
Sitecore will continue to support and maintain the Custom SMTP provider in its current state.
An overview of the features supported by Sitecore MTA and Custom SMTP:
Sitecore MTA Custom SMTP
Dispatch
Send via SMTP
Send attachments <7mb
Send attachments >7mb
SSL and TLS protocols Ports 443 and 25 *
Page 18 of 98

Subscription management in EXM
Approved domains
Approved senders
Suppression list
Data collection
Collect bounces **
Collect SPAM complaints
Visual overview in EXM
Opens, clicks, and viewed pages
Bounces **
Complaints
Device type
Location
Other
Integration with xProfile
IP address management ***
Sender reputation ***
ISP relationship management ***
SPF ****
DKIM ****
DMARC ****
* The customer is responsible for securing the SMTP endpoint, implementing SSL, and testing.
** The customer is responsible for configuring the DSN processor. The DSN processor provides less than 80% in accuracy because it relies on SMTP-based responses. In addition, using the DSN processor adds minor processing overhead on the server resources.
*** The customer is responsible for the sender reputation, greylisting and blacklisting, and any issues with the ISP.
**** The customer is responsible for configuring the sender reputation.
Send feedback about the documentation to [email protected].
Performance tuning and the EXM performance measurement tool The speed that emails are sent and delivered depends on a complex set of factors and dependencies. To ensure that your EXM module works efficiently, you should run a test and get measurable results. These results are also helpful if further performance tuning is needed.
Page 19 of 98

To easily measure the most important performance indicators, the EXM Performance Measurement Tool, also known as the Dispatch Summary, is designed to give an insight into the performance of an email campaign, based on current configuration settings.
Launching the EXM Performance Measurement ToolThe EXM Performance Measurement Tool runs in a web browser. It is located at http://host_name/sitecore/admin/dispatchsummary.aspx, where host_name is the name of the server that you use to dispatch email campaigns.
Note
To open the tool in German, add the ?sc_lang=de-de parameter to the end of this URL. For Japanese, add the ?sc_lang=ja-jp parameter.
Using the EXM Performance Measurement ToolWhen the EXM Performance Measurement Tool is running, you can start dispatching an email campaign in a separate browser window to measure the performance.
The tool shows EXM performance at the specific moment in time that you refresh the page. While the email campaign is being dispatched, remember to refresh the page and to capture screen shots with the results, because the Measurement Tool will not show any results after all the email campaigns have been sent.
Send feedback about the documentation to [email protected].
Testing EXM performance in emulation mode The EXM module enables you to test campaign throughput by emulating a message transfer agent (MTA). MTA emulation lets you mimic the round-trip time required to send an email from the Sitecore CMS to the MTA.
Emulation can be configured in two modes:
• Emulation for a single message• Emulation for the server-level dispatch
Emulation for a single messageIn the Content Editor, you can select this mode for a specific message on the Content tab, in the Options section.
You can also select the emulation mode for a single message using the Delivery Options dialog in the EXM user interface:
Page 20 of 98
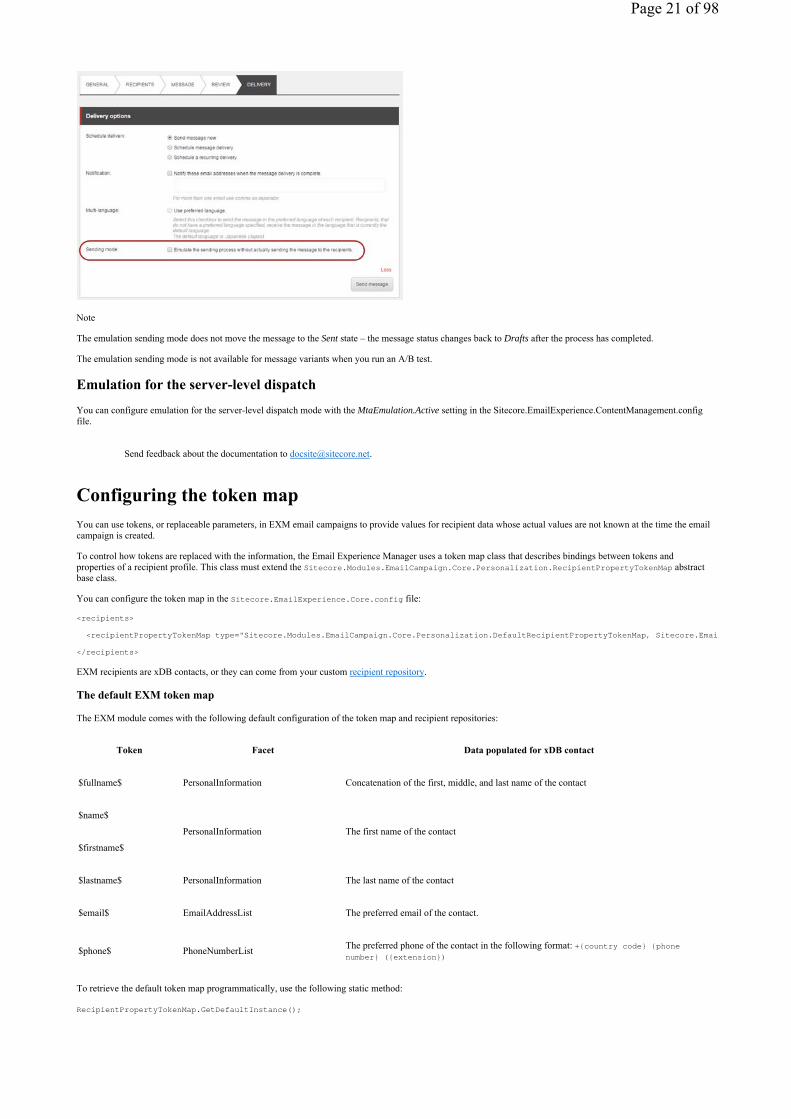
Note
The emulation sending mode does not move the message to the Sent state – the message status changes back to Drafts after the process has completed.
The emulation sending mode is not available for message variants when you run an A/B test.
Emulation for the server-level dispatchYou can configure emulation for the server-level dispatch mode with the MtaEmulation.Active setting in the Sitecore.EmailExperience.ContentManagement.config file.
Send feedback about the documentation to [email protected].
Configuring the token map You can use tokens, or replaceable parameters, in EXM email campaigns to provide values for recipient data whose actual values are not known at the time the email campaign is created.
To control how tokens are replaced with the information, the Email Experience Manager uses a token map class that describes bindings between tokens and properties of a recipient profile. This class must extend the Sitecore.Modules.EmailCampaign.Core.Personalization.RecipientPropertyTokenMap abstract base class.
You can configure the token map in the Sitecore.EmailExperience.Core.config file:
<recipients>
<recipientPropertyTokenMap type="Sitecore.Modules.EmailCampaign.Core.Personalization.DefaultRecipientPropertyTokenMap, Sitecore.Email
</recipients>
EXM recipients are xDB contacts, or they can come from your custom recipient repository.
The default EXM token map
The EXM module comes with the following default configuration of the token map and recipient repositories:
Token Facet Data populated for xDB contact
$fullname$ PersonalInformation Concatenation of the first, middle, and last name of the contact
$name$
PersonalInformation The first name of the contact
$firstname$
$lastname$ PersonalInformation The last name of the contact
$email$ EmailAddressList The preferred email of the contact.
$phone$ PhoneNumberList The preferred phone of the contact in the following format: +{country code} {phone number} ({extension})
To retrieve the default token map programmatically, use the following static method:
RecipientPropertyTokenMap.GetDefaultInstance();
Page 21 of 98

Send feedback about the documentation to [email protected].
Create a custom personalization token The Email Experience Manager (EXM), you can use tokens to personalize your email campaign messages. For example, in the beginning of a message, you can use the token $name$ in the greeting so that when you send your email campaign, the token is replaced with the name in the contact.
If you want to use tokens that are not available by default, you can create a custom token that you can use for your email campaigns.
To create a custom token, you must:
• Create a custom facet• Create a property for the custom facet• Add a new processor• Override the default token map
Create a custom contact facetIn the Sitecore Experience Database, you can extend the contact with your own custom data by creating a new custom contact facet.
To create a custom contact facet:
• Create the custom contact facet, for example, the Salutation facet, with the Title property that you want your custom personalization token to be replaced with.
Create a property for the custom facetYou must create a property class to represent your custom facet. You use this property in the new processor that you create in the next section.
For example, to create a Salutation property:
namespace Sitecore.Support.Modules.EmailCampaign.Recipients
{
using Sitecore.Modules.EmailCampaign.Recipients;
public class Salutation : Property
{
public string Title { get; set; }
}
}
Add a new processorIn the <getXdbContactRecipient> pipeline, add a new processor to assign a value to the new property. For example, for the Salutation property, the value is pulled from the Salutation facet.
To add a new processor:
1. Add the following configuration file in the /Include folder:
<configuration xmlns:patch="http://www.sitecore.net/xmlconfig/">
<sitecore>
<pipelines>
<getXdbContactRecipient>
<processor type="Sitecore.Support.Modules.EmailCampaign.Core.Pipelines.GetXdbContactRecipient.AssignSalutationProperty, Si
<SalutationFacetName ref="model/entities/contact/facets/facet[@name='Salutation']/@name" />
</processor>
</getXdbContactRecipient>
</pipelines>
</sitecore>
</configuration>
2. Compile the following to a custom DLL:
namespace Sitecore.Support.Modules.EmailCampaign.Core.Pipelines.GetXdbContactRecipient
{
using Sitecore.Analytics.Model.Entities;
using Sitecore.Analytics.Model.Framework;
using Sitecore.Diagnostics;
using Sitecore.Modules.EmailCampaign.Core.Pipelines.GetXdbContactRecipient;
using Sitecore.Modules.EmailCampaign.Recipients;
using Sitecore.Support.Modules.EmailCampaign.Recipients;
using Support.Testing.ContactFacets.Model;
public class AssignSalutationProperty
Page 22 of 98

{
public void Process(GetXdbContactRecipientPipelineArgs args)
{
Assert.ArgumentNotNull(args, "args");
if (args.IsPropertyRequested<Salutation>())
{
try
{
var facet = args.SourceContact.GetFacet<ISalutation>(this.SalutationFacetName);
if (facet != null)
{
Salutation info = new Salutation();
info.Title = facet.Title;
if (!string.IsNullOrEmpty(info.Title))
{
args.TargetRecipient.GetProperties<Salutation>().DefaultProperty = info;
}
}
}
catch (FacetNotAvailableException)
{
}
}
}
public string SalutationFacetName { get; set; }
}
}
Override the default token map Override the default implementation of the recipientPropertyTokenMap token map class that describes the bindings between tokens and properties of a contact.
To override the recipientPropertyTokenMap token map class and bind the Title token to the Salutation property:
1. Add the following configuration file in the /Include folder:
<configuration xmlns:patch="http://www.sitecore.net/xmlconfig/">
<sitecore>
<recipients>
<recipientPropertyTokenMap type="Sitecore.Modules.EmailCampaign.Core.Personalization.DefaultRecipientPropertyTokenMap, Sitec
<patch:attribute name="type" value="Sitecore.Support.Modules.EmailCampaign.Core.Personalization.DefaultRecipientPropertyTo
</recipientPropertyTokenMap>
</recipients>
</sitecore>
</configuration>
2. Compile the following code to a custom DLL:
namespace Sitecore.Support.Modules.EmailCampaign.Core.Personalization
{
using Sitecore.Diagnostics;
using Sitecore.Modules.EmailCampaign.Core.Personalization;
using Sitecore.Modules.EmailCampaign.Recipients;
using Sitecore.Support.Modules.EmailCampaign.Recipients;
using System;
using System.Collections.Generic;
using System.Linq;
public class DefaultRecipientPropertyTokenMap : RecipientPropertyTokenMap
{
private static readonly Dictionary<Token, RecipientPropertyTokenBinding> TokenBindings;
static DefaultRecipientPropertyTokenMap()
{
RecipientPropertyTokenBinding[] bindingArray = new RecipientPropertyTokenBinding[] {
Page 23 of 98

RecipientPropertyTokenBinding.Build<PersonalInfo>(new Token("fullname"), personalInfo => personalInfo.FullName),
RecipientPropertyTokenBinding.Build<PersonalInfo>(new Token("name"), personalInfo => personalInfo.FirstName),
RecipientPropertyTokenBinding.Build<PersonalInfo>(new Token("firstname"), personalInfo => personalInfo.FirstName),
RecipientPropertyTokenBinding.Build<PersonalInfo>(new Token("lastname"), personalInfo => personalInfo.LastName),
RecipientPropertyTokenBinding.Build<Email>(new Token("email"), email => email.EmailAddress),
RecipientPropertyTokenBinding.Build<Phone>(new Token("phone"), phone => phone.PhoneNumber),
RecipientPropertyTokenBinding.Build<Salutation>(new Token("title"), salutation => salutation.Title)
};
TokenBindings = (from b in bindingArray
orderby b.Token.Key
select b).ToDictionary<RecipientPropertyTokenBinding, Token, RecipientPropertyTokenBinding>(b => b.Token, t => t);
}
public override RecipientPropertyTokenBinding GetTokenBinding(Token token)
{
RecipientPropertyTokenBinding binding;
Assert.ArgumentNotNull(token, "token");
TokenBindings.TryGetValue(token, out binding);
return binding;
}
public override IList<RecipientPropertyTokenBinding> GetTokenBindings()
{
return TokenBindings.Values.ToList<RecipientPropertyTokenBinding>();
}
}
}
Now, you can use the $title$ token in email messages and it will be replaced with the value that is stored for the relevant contact in the Analytics database.
Note
If you want to import the new custom facet from a file, you can extend the Import contacts wizard to include the custom contact facet as a new mapping field.
Send feedback about the documentation to [email protected].
Enable the multilanguage message functionality The Email Experience Manager lets you send messages to recipients in their preferred language.
Note
The preferred language of the recipient is defined by the Preferences facet of a contact.
You must add the languages that you want your marketers to be able to choose from when they create a new language version of a message.
• To change the range of available languages, edit the list of master languages in the /sitecore/System/Languages folder.
When the marketer creates or edits a message, they can create a new language version of a message from the Message languages drop-down menu.
Page 24 of 98

Send feedback about the documentation to [email protected].
EXM recipient profiles You can use various sources of recipients to send email campaigns to, including both those provided by Sitecore and your own sources.
The Email Experience Manager represents a recipient as a basic entity containing the recipient ID only. The recipient entity is implemented by the Sitecore.Modules.EmailCampaign.Recipients.Recipient class.
The recipient ID
The recipient ID is a class that identifies a recipient in the source. Depending on the source, the type of the recipient ID may vary, which is why the recipient ID is represented by the abstract Sitecore.Modules.EmailCampaign.Recipients.RecipientId base class. This lets you avoid specifying the source and type of the recipient when it is not necessary.
Each recipient source must have a corresponding class that extends the RecipientID class and defines the type and behavior of the ID.
EXM can use the recipient ID as a key in hash-based collections. To ensure that these types of collections can work properly, you must provide custom implementations of the Equals() and GetHashCode() methods.
If the recipient ID is stored in plain text, for example, in a database, EXM invokes the ToString() method to get a string representation of the ID. This means that the ToString() method must return a string that identifies the type of the recipient ID and can be used to create an instance of the recipient ID class.
EXM uses the prefixes xdb: , for example, xdb:12345678-abcd-1234-abcd-000123456789 for xDB contacts.
Recipients come from the Sitecore Experience Database (xDB) or your custom source. By default, EXM provides the following implementation of RecipientID:
• To identify an xDB contact by the contact ID, use the Sitecore.Modules.EmailCampaign.Xdb.XdbContactId class.
For example: xdb:12345678-abcd-1234-abcd-000123456789.
Properties
To specify additional information about the recipient, you can add custom properties to the basic entity. The recipient profile in EXM has the following default properties:
• PersonalInfo { First name, Last name, Full name } contains personal details of the recipient.• Email { Email address, Undelivered count } contains an email address and the number of temporary delivery failures, also known as soft bounces, for the
address. This property is required for the EXM to be able to send an email.• XdbRelation { Contact id, Identifier } describes how the recipient is related to xDB via an xDB contact. The DispatchNewsletter pipeline uses this property
to queue message recipients. For this reason, the XdbRecipientRepository recipient repository adds this property to recipients.• Phone { Phone number } contains the recipient phone number.• CommunicationSettings { Is communication suspended, Preferred language } contains details about whether the recipient can be contacted and their
preferred communication language.
ContactListAssociations { Contact list ids } contains the IDs of the contact lists that the recipient is associated with. This property is only relevant to xDB contacts, because it's the only recipient type that can be associated with contact lists. You can create new properties by creating new classes that extend the abstract Property class.
A recipient can have multiple properties of the same type, each of which is assigned a tag. When using multiple properties, the first property of each type that you add to the recipient is automatically set as the default.
Send feedback about the documentation to [email protected].
Recipient repositories The Email Experience Manager can use various sources of recipients to send email campaigns, including both the sources provided by Sitecore and your own sources.
The EXM has two recipient repositories:
• XdbRecipientRepository is connected to xDB contacts.• MultiRecipientRepository aggregates multiple internal repositories and enables the requesting of a recipient without specifying their location. This
repository sends the request to internal repositories in a given order, until it retrieves the recipient.
A recipient repository implements the abstract base class RecipientRepository.
Page 25 of 98

Retrieving a recipient
The RecipientRepository class provides the following methods to retrieve recipients:
• To retrieve a full recipient profile with all the properties, use the GetRecipient method:
GetRecipient([NotNull] RecipientId recipientId)
• To retrieve a specific set or recipient properties, use the GetRecipientSpecific method and specify the properties that you need:
GetRecipientSpecific([NotNull] RecipientId recipientId, [NotNull] IEnumerable<Type> propertyTypes)
Creating certain types of properties requires an additional search in a database, which is time consuming and resource intensive. When you retrieve only the necessary properties, this lets you save time and repository resources.
A recipient repository can recognize a recipient ID of the corresponding type by its string representation and convert it into an instance of the RecipientId type. You must ensure that each type of recipient IDs has its unique and unambiguous string representation. To distinguish the default types of recipient IDs, EXM uses the following prefix:
• xdb: – for xDB contacts.
xdb:12345678-abcd-1234-abcd-000123456789.
The following method parses an input string and returns a RecipientId instance when it is parsed successfully:
ResolveRecipientId([CanBeNull] string input)
The default recipient repository
You can configure the default repository for the EXM module in the Sitecore.EmailExperience.Core.config file:
<recipients>
<recipientRepository type="Sitecore.Modules.EmailCampaign.Recipients.MultiRecipientRepository, Sitecore.EmailCampaign" singleInstance
<Repositories hint="list:AddRepository">
<xdbContacts type="Sitecore.Modules.EmailCampaign.Recipients.XdbRecipientRepository, Sitecore.EmailCampaign" singleInstance="true
</Repositories>
</recipientRepository>
</recipients>
To retrieve the default repository programmatically, use the following static method:
RecipientRepository.GetDefaultInstance();
Send feedback about the documentation to [email protected].
Add an approved sender To make sure that your email campaigns do not end up in the recipients' spam folder, you must add the From email addresses that you want to use for your email campaigns to the list of approved senders.
Note
The default local MTA provider does not support this functionality. To use this functionality, you must use a provider that supports it.
You can only add email addresses to the approved senders list if the domain has already been added.
To add an approved sender:
1. In the EXM menu, under the Administrator section, expand Email Delivery Service and click Approved senders.
2. Click Actions , and then click Add.3. In the Add approved sender dialog box, enter the relevant email address and then click OK.
Note
Page 26 of 98

If you send an email message with a From email address that has not been added to the list of approved senders but the domain of the From email address has been registered, EXM adds the email address automatically to the list of approved senders. The email message is sent after approximately 15 minutes when the newly created approved sender is ready.
To delete an email address from the approved senders list, click the relevant email address, click Actions , and then click Delete.
Send feedback about the documentation to [email protected].
Add an email address to the suppression list To keep your bounce rate and spam complaint rate as low as possible, you can ensure that you do not send email messages, for example, to contacts that have reported your email campaign as spam or to email addresses that do not exist.
Note
The default local MTA provider does not support this functionality. To use this functionality, you must use a provider that supports it.
All email addresses that bounce (soft bounce or hard bounce) are automatically added to the Suppression list and they will not receive another email message again even if their email address is included in an email campaign.
An email address is automatically added to the Suppression list when:
• An email message sent to the email address soft bounces more than 3 times• An email message sent to the email address hard bounces once
Important
The suppression list synchronizes with Dyn by default every hour. This means that the suppression list in EXM does not always include the latest updates from Dyn. However, when you send an email campaign, EXM verifies with Dyn to make sure that none of the recipients are on the Dyn suppression list.
If necessary, you can add or remove email addresses from the Suppression list manually.
To add an email address to the Suppression list:
1. In the EXM menu, under the Administrator section, expand Email Delivery Service and click Suppression list.
2. Click Actions , and then click Add.3. In the Add email to suppression list dialog box, enter the relevant email address and click Add.
To remove an email address from the list, click the relevant email address, click Actions , and then click Remove.
Send feedback about the documentation to [email protected].
Add or edit a domain In the Email Experience Manager (EXM), you can authorize the domains that you want to use to send email campaigns. This enables the Internet Service Providers (ISP) that receive your email campaigns to verify their authenticity by comparing the sender domain against the authorized list of domains. This helps to keep email campaigns out of spam folders and ensures others cannot use your domain without permission.
Note
The default local MTA provider does not support this functionality. To use this functionality, you must use a provider that supports it.
This topic outlines how to:
• Add a new domain• Edit or delete a domain
Add a new domainTo add a new domain:
1. In the Email Experience Manager menu, under the Administrator section, expand Email Delivery Service and click Domains. 2. Click Actions , and then click Add.
Page 27 of 98

3. In the Add Domain dialog box, enter the name of the domain and click Next.
The system validates the domain's SPF and DKIM records. If the domain does not have an SPF or DKIM record or if they are set up incorrectly, a warning appears. The warning includes instructions for how to set up the records correctly.
Note
For more details on SPF and DKIM records setup, please refer to Dyn's Help Center.
4. Click Finish.
Edit or delete a domainBefore you can edit or delete a domain, you must delete any approved senders associated with the domain.
To edit or delete domain:
1. In the list of domains, click the relevant domain.2. Click Actions and then click:
◦ Edit – edit the domain name and click Next. The new domain name is validated.◦ Delete – delete the domain from the list.
Send feedback about the documentation to [email protected].
Export the suppression list When an email message bounces (soft bounce or hard bounce) or when a contact reports your email message as spam, the contact's email address is added to the Suppression list. When an email address is in the Suppression list, EXM will never send another email message to that email address again even if it is included in an email campaign.
To analyze why and when email addresses were added to the Suppression list, you can export the list to a .csv file.
Note
The default local MTA provider does not support this functionality. To use this functionality, you must use a provider that supports it.
The exported list contains information about when an email address was added to the suppression list and if it was added manually from the Email Experience Manager (EXM), or automatically, for example, in the case of a hard bounce.
To export the Suppression list:
1. In EXM, in the Suppression list, click Actions , and then click Export.
2. In the Export to a CSV file dialog box, click:◦ Complete list to export all email addresses in the list.◦ Date/time range to export email addresses that were added to the Suppression list in a specific time range. In the To and From fields, specify the relevant
dates and times.
Note
If you leave the To field empty, you export all the email addresses that were added from the date you specify in the From field and up until the current date. If you leave the From field empty, you export all the email addresses that were added up until the date you specify in the To field.
Page 28 of 98

3. Click OK, and the list exports to your local machine.
Send feedback about the documentation to [email protected].
Introducing the Email Experience Manager Use the Email Experience Manager (EXM) to create highly customizable email campaigns and make them both personal and relevant to your customers.
Note
EXM is built in SPEAK and as a consequence of that, developers must use Sitecore Rocks to develop or edit the EXM components
In EXM, you can:
• Create and manage email campaigns.• Use A/B testing to find the best email content and design.• Send email campaigns with multi-language support.• Create and manage recipient lists.• View detailed analytics reports for your sent email campaigns.• Manage your suppression list and your lists of approved senders and domains.
Note
EXM does not support CMS live mode.
When you have installed the EXM module, you can open it from the Sitecore Launchpad.
The EXM Dashboard gives you an overview of the performance of the whole email channel. From the menu, you can create new email campaigns, create recipient lists, or you can click the menu items to find and open an existing email campaigns and reports.
When you create a new email campaign, EXM guides you through the process of creating and sending your email campaign. You are not obligated to follow the process from start to finish, for example, when you have created an email campaign, you can start by editing the content and then add recipients at a later stage.
Page 29 of 98
Send feedback about the documentation to [email protected].
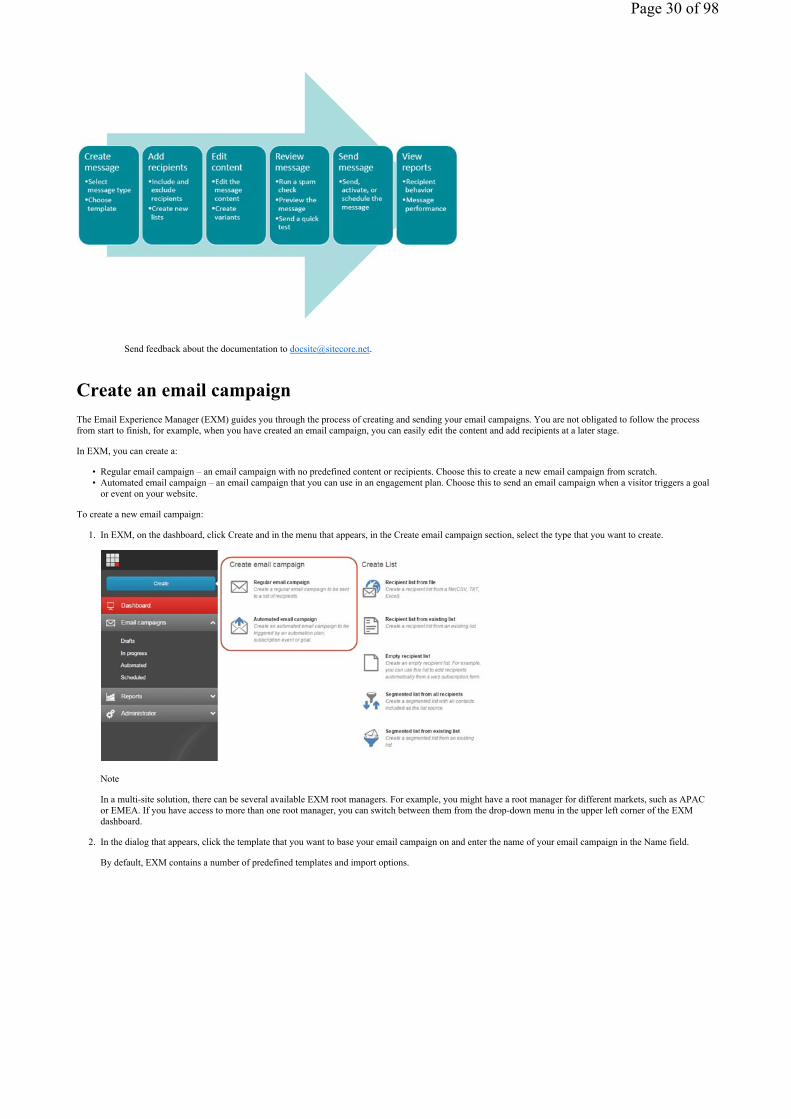
Create an email campaign The Email Experience Manager (EXM) guides you through the process of creating and sending your email campaigns. You are not obligated to follow the process from start to finish, for example, when you have created an email campaign, you can easily edit the content and add recipients at a later stage.
In EXM, you can create a:
• Regular email campaign – an email campaign with no predefined content or recipients. Choose this to create a new email campaign from scratch.• Automated email campaign – an email campaign that you can use in an engagement plan. Choose this to send an email campaign when a visitor triggers a goal
or event on your website.
To create a new email campaign:
1. In EXM, on the dashboard, click Create and in the menu that appears, in the Create email campaign section, select the type that you want to create.
Note
In a multi-site solution, there can be several available EXM root managers. For example, you might have a root manager for different markets, such as APAC or EMEA. If you have access to more than one root manager, you can switch between them from the drop-down menu in the upper left corner of the EXM dashboard.
2. In the dialog that appears, click the template that you want to base your email campaign on and enter the name of your email campaign in the Name field.
By default, EXM contains a number of predefined templates and import options.
Page 30 of 98

3. The new email campaign opens. On the General tab, in the General information section and in the Sender details section, edit the relevant fields.◦ To change the location of the email campaign, in the Location field, click the browse button , and in the Specify location dialog that appears, navigate
to the relevant location and click OK.◦ To associate the email campaign with a campaign, in the Campaign group field, click the browse button , and in the Select campaign group dialog that
appears, navigate to the relevant campaign and click OK. There is no campaign associated with your email campaign by default.◦ To assign the email campaign layout to another device, in the Target device drop-down menu, click the relevant device. The devices listed in the drop-
down menu are the devices that are available in your system.
Note
This is useful, if you have imported a design or used an existing page to create the email campaign, and you may want to reduce the layout complexity and remove any UI controls, such as JavaScript with buttons or check boxes. This functionality is available to Sitecore administrators only.
Now that you have created the email campaign, you can start to edit the content and layout.
Send feedback about the documentation to [email protected].
Duplicate an email campaign to create a new one In the Email Experience Manager (EXM), you can reuse an existing email campaign to create a new one. In this way, you can reuse the layout, content, and the list of contacts of an existing email campaign.
To duplicate an existing message:
1. In EXM, locate and open the email campaign that you want to duplicate.2. In the top ribbon of the email campaign, click Actions and then click Duplicate email campaign.
Page 31 of 98

3. In the prompt dialog, enter the name of the new email campaign and click OK.
The new email campaign opens on the General tab and is ready for editing.
Send feedback about the documentation to [email protected].
The email campaign templates In a default installation, the Email Experience Manager (EXM) contains a number of predefined templates and import options. Depending on the email campaign type, you can choose between the following templates.
Template Description
HTML file An email campaign based on imported HTML code for the message body. You can import any HTML file.
Newsletter A template with a header containing a link to the online version of the email campaign and a footer with links to opt-out pages.
Two-column A template with a two-column layout and a footer with links to opt-out pages.
One-column A template with a one-column layout and a footer with links to opt-out pages.
Simple HTML An HTML template without a predefined layout.
Plain text A plain text template without a predefined layout.
Existing page
A template based on a Sitecore webpage.
Select a page on your Sitecore website and use it as the message body.
Pages in Sitecore XP can be complex and security restrictions may apply to certain elements on the page. For example, a page may contain a section that only registered users can see if they open this page on the website.
EXM enables you to define how email campaigns are created from webpages. There are two options:
• EXM respects the security settings. In this case, recipients with different security privileges will receive different email campaigns (if the source page has security restrictions).
• EXM ignores the security settings. In this case, EXM renders all elements on the page and all recipients receive the same email campaign.
Send feedback about the documentation to [email protected].
Types of email campaigns There are two types of email campaigns in Sitecore Email Experience Manager (EXM) and each has a set of templates that contain default content and layout. This makes it easy to create new email campaigns and enables you to focus on creating the best content for your email campaign.
If you need more flexibility or influence on the final layout of your email campaign, you can create your own templates or import and use a design from an existing webpage.
When you create a new email campaign, you first need to decide which type best serves the purpose of your email campaign. The type defines how you can use the email campaign, how it is configured, and how it is sent.
The two types are:
Page 32 of 98

• Regular email campaign – this type does not have any predefined content or recipients, so you create this type of email campaign from scratch. Use this, for example, if your company releases a new product in a specific country and you want to send an email campaign to all your contacts in that country to let them know that the product is now available for purchase.
• Automated email campaign – this type is only used in relation to email engagement plans and is only sent automatically to one contact at a time when that specific contact triggers an event or goal in an engagement plan. Therefore, you cannot add a list of contacts to this type of email campaign.
You can use the automated email campaign when, for example, you want to send a confirmation to every contact who signs up for a newsletter, or if you want to send a special campaign offer to every contact who has visited your website but has not returned to the website in three weeks.
Send feedback about the documentation to [email protected].
Add or remove an attachment When you add an attachment to your email campaign, you can add the same attachment to all the different language versions or just a single language version.
This topic outlines how to:
• Add an attachment• Remove an attachment
Add an attachmentTo add an attachment to a message:
1. Open a message and in the Email campaign info pane to the right, click View.
2. In the Attachments dialog box, click Add attachment .
3. In the Add Attachment dialog box, click Browse for files, click the file that you want to add and then click Open.
Tip
You can upload multiple attachments at the same time. The total size of all the attachments must not exceed 7Mb.
4. When you have added all the relevant attachments, in the Add Attachment dialog box, click Upload.
Note
If you have multiple variants of your message, the attachment is added to all the variants in the same language and to every new variant that you create.
5. If there are multiple language versions of the message, a notification appears asking you if you want to add the attachment to all the language versions.
Page 33 of 98

6. Close the Add Attachment dialog box.
Remove an attachmentWhen you remove an attachment from a message with multiple language versions, the attachment is only removed from the currently selected language version. When you remove an attachment from a message with multiple variants, the attachment is removed from all variants.
To remove an attachment from a message:
1. Open the relevant message. If the message has multiple language versions, click the Language button and click the relevant language version.2. In the Message Info pane on the right, click View.3. In the Add Attachments dialog box, select the attachments that you want to delete and click Remove attachment .4. Click Close.
Send feedback about the documentation to [email protected].
Create a list in EXM You can create lists of your recipients from the Email Experience Manager (EXM) or the List Manager (LM). When you create lists in EXM, you are using LM functionality. In this way, lists in EXM and LM are stored in the same place and they are all available from both applications.
To create a list in EXM:
• On the EXM dashboard, click Create, and then in the menu that appears, in the Create lists section, click the type of list that you want to create:◦ Recipient list from file – create a contact list and import the recipients from a CSV file. ◦ Recipient list from existing list – create a contact list that is based on an existing contact list. ◦ Empty recipient list – create an empty contact list that you can use to add recipients to automatically, for example, from a subscription form.◦ Segmented list from all recipients – create a segmented list with all contacts included as the list source.◦ Segmented list from existing list – create a segmented list that is based on an existing contact list.
When your list is created, you can add or exclude the list on the Recipients tab of a specific email campaign.
Send feedback about the documentation to [email protected].
Create a new language version of a message You can create and send versions of your email campaigns in multiple languages so that your recipients can read the message in their preferred language. In addition, you can target your recipients better by adjusting the type of links, landing pages, or images for each language version of the email campaign.
Page 34 of 98

Note
To create the message in multiple languages, the relevant languages must be available in your Sitecore installation. If you need to add a new language to Sitecore, you must contact your Sitecore administrator.
Create a language version of a messageTo create a new language version of a message:
1. In the Email Experience Manager, open the email campaign that you want to create a new language version for.2. Click the Message language button .
The letters on the Message language button indicate the language of the message version that is currently displayed. This language version is also the default message version. The drop-down menu displays all the languages that are available in your Sitecore installation and the check mark next to the language, means that a version of the message in that language is created.
Important
The letters on the Message language button is a language code and not a country code.
3. In the Message languages drop-down menu, click the language that you want create a version of the message in.
The new language version opens and a notification appears, telling you that a new language version has been created.
Note
Any attachments that are attached to the original language version is copied automatically to all new language versions. You can delete these attachments or add new attachments to the new language version.
4. Save your changes.5. Edit and translate the new language version of the email campaign. Use the Message language drop-down menu to switch between the available language
versions.
Note
When you are ready to send the email campaign, on the Delivery tab, select the Multi-language check box to send your email campaign in the preferred language of each recipient.
Send feedback about the documentation to [email protected].
Edit the message content and layout When you have created an email campaign, you can open and edit the message content and layout in the Experience Editor.
You can:
• Edit body text• Add or remove components• Change layout details
Page 35 of 98

To edit the content and layout of an email campaign:
1. To edit the content of your email campaign, in EXM find and open the relevant email campaign.2. Click the Message tab and then click the message body. This opens the message body in edit mode.
Depending on the template that you have chosen for the email campaign, some layout and content may already be added to the message body – most of which you can still edit. Any changes that you make to the default content and layout do not affect the original template.
3. To edit the layout of your message, in the ribbon, on the Email tab:◦ Click Component to add a new component to the message and for the relevant location, click Add here to choose the rendering for the new component.
◦ Click Details to edit the presentation details of your message or chose a different layout.
Note
You can also make changes to your message layout from the Content Editor.
4. When you are finished editing the content, click Save and close.5. In the Alternative text field, edit the default alternative text.
Note
The alternative text is the plain text version of the message. For example, if the recipient's email client cannot read the HTML version of the message, the alternative text is used instead. There is a default message in the field, but you can enter any text that you want, for example, the full email in plain text.
6. Save your changes.
Send feedback about the documentation to [email protected].
Engagement plans for email campaigns When you create a new email campaign in the Email Experience Manager (EXM), a default engagement plan is automatically created for the email campaign as well.
The engagement plan is the link between the email campaign, the recipient, and your website. It offers you valuable insight into the effect that each email campaign has on your website. For example, the engagement plan can show you which recipients opened your email campaign and which ones clicked on a link, and whether they generated any value or activated any goals on your website.
This type of information helps you focus on engaging with your customers and increasing relevancy. The key benefits are:
• An insight into the effect of each specific email campaign.
Page 36 of 98

• An ability to segment your visitors based on how they respond to your email campaign.
The default engagement plan for email campaigns consists of a number of states that your recipients move through depending on how they respond to your email campaign and what they do on your website. This provides you with an overview of:
• How many of your recipients have opened the email campaign.• How many clicked a link and produced value on the website.• How many recipients that have unsubscribed (opted out) from the recipient list.
This information is updated continuously, which means that you always have the latest information about how your email campaign is performing.
Note
By default, the engagement plan does not include any actions that trigger new events from EXM. However, if you want to use the engagement plan to further engage with your recipients, you can edit and extend the engagement plan by adding new states, conditions, and actions.
This topic describes:
• The Engagement Plan Monitor• The Engagement Plan groups
The Engagement Plan MonitorIn the Engagement Plan Monitor you get an overview of the performance of your email campaign from when you send the email campaign until the last recipient ends their last visit to your website.
The Engagement Plan Monitor monitors:
• The delivery of the email campaign – if the recipients received the email campaign.• The response – which recipients who opened the email message and of those, which ones clicked the link to your website.• The behavior of each individual recipient on your website – which goals, events, pages, and so on did the recipient trigger during their visit to your website.
To view the Engagement Plan Monitor for a specific email campaign:
• In the Marketing Control Panel, click Engagement Plans and then navigate to the relevant email campaign. On the Engagement Plan tab, click Monitor.
The Monitor dialog box gives you an overview of the Engagement Plan for the selected email campaign and its recipients. The data in the Engagement Plan Monitor is continuously updated to reflect the recipients’ actions in the email message or on the website.
Page 37 of 98

From the Home tab, you can:
• Export the content area of the engagement plan monitor to an image file. Click Refresh to get the most recent data.
Note
If you need a specific refresh rate for the Engagement Plan Monitor, your Sitecore developer can help you with that.
• View a list of visitors and detailed reports for visitors in a specific state. Select a state and on the Home tab, click View. In the Visitors dialog you can:◦ Export a list of visitors in a specific state to Microsoft Excel. The list includes each visitor’s full name, email address, and number of visits on the
website.◦ View a Visitor Overview report for a single visitor that tells you the value that the specific visitor has accumulated and how active the visitor has been on
your website.◦ View a full report that lists all the known data on all the users in a particular state, how long they have been in that state, and how active they have been
on your website.
The Engagement Plan groupsFor a better overview of the engagement plan and its different states, the Engagement Plan Monitor is divided into the following color-coded recipient groups:
• Inactive Recipients - this group contains recipients who have received the email message and have either opened or not opened the email message.• Send Failed - this group contains recipients to whom the email message could not be delivered.• Active Recipients - this group contains recipients who opened the email message and subsequently performed some related actions.• Unsubscribed Recipients - this group contains recipients who have unsubscribed to the email message.
Inactive Recipients
This group contains recipients that have received the email message successfully, but who have not performed any other actions, such as opening it or clicking a link in the email message.
The recipients in the Inactive Recipients group are divided into two states:
• Message Unopened - contains the recipients that EXM has sent the email message to, but who have not yet performed any actions. • Message Opened - contains recipients who opened the email message but did not click links in it.
If the visitor clicks a link in the email message, the module moves that visitor to the Clicked Through Message state.
If the module receives an error response from the recipient’s email server, it moves the recipient to a state in the Send Failed group.
Send Failed Recipients
This group contains recipients that EXM could not deliver the email message to.
Page 38 of 98

It includes the following states:
• Invalid Address – this means that the email address does not match the regular expression or formula that EXM uses to check whether the recipient’s email address is valid. If the address does not match the regular expression, the module moves the recipient to this state.
• Soft Bounce – this means that the email message is returned to the sender because it cannot be delivered for some reason. A soft bounce is a temporary failure where there is still a chance that the recipient can eventually receive the email message.
• Hard Bounce – this means that the email message is permanently bounced back to the sender because of a failure from the mail server. A hard bounce is a permanent failure.
If a recipient appears in the Hard Bounce state, the module stops sending email messages to this recipient from any target audience. If at a later stage, the recipient clicks a link in a email message that has been sent to them, the module moves this recipient to the Clicked Through Message state.
Active Recipients
This group contains recipients who have opened the email message and who have subsequently performed some related actions.
The Active Recipient group contains the following states:
• Clicked Through Message – if the visitor clicks a link in the email message, EXM puts that visitor in this state. When a browser session of a visitor in this state ends, EXM evaluates the conditions associated with this state for the visitor. The associated conditions are:
◦ Is not email click handler session – this condition ensures that the user did not just open the email message without clicking a link. If the visitor clicked a link in the email message and started a browser session, EXM evaluates the visitor against the next condition.
◦ Valuable Visit – if the visitor achieves any value points after clicking a link in the email message, the visitor is moved to the Productive Visitors state◦ Visited One Page – if the visitor only visits one page, the visitor is moved to the Visitor Bounced state. Otherwise, the module checks the Visit had no
Value condition.◦ Visit had no Value - if the visitor visits more than one page but does not achieve any value points, the visitor is moved to the Unproductive Visitors state.
• Visitor Bounced – if the visitor only visits one page after clicking a link in the email message, the visitor is moved to this state. When a browser session ends for a visitor in this state, EXM evaluates the visitor based on the conditions associated with this state. The associated conditions are:
◦ Is email open session – this condition ensures that the user did not just open the email message without clicking a link. If the visitor clicked a link in the email message and started a browser session, EXM evaluates the visitor against the next conditions.
◦ Valuable Visit – if the visitor achieves any value points, this condition moves the visitor to the Productive Visitors state. Otherwise, the module checks the Visited One Page condition.
◦ Visited One Page – if the visitor visits only one page after clicking a link in the email message, the visitor is moved to the Visitor Bounced state. Otherwise, the module checks the Visit had no Value condition.
◦ Visit had no Value – if the visitor visits more than one page, but does not achieve any value points, the visitor is moved to the Unproductive Visitors state.
Page 39 of 98

• Unproductive Visitors – if the recipient visits the site and views multiple pages, but does not generate any value, EXM moves the recipient to this state. When a browser session ends for a visitor in this state, Sitecore evaluates the conditions associated with this state for that visitor. The associated condition is:
◦ Valuable Visit – if the visitor achieves any engagement value points, this condition moves the visitor in the Productive Visitors state. Otherwise, the visitor remains in the Unproductive Visitors state.
• Productive Visitors – this is the final state of the engagement plan monitor and it contains all the recipients that have generated any value on the website.
Unsubscribed Recipients
This group contains recipients who opted out from the email campaign.
The Unscubscribed Recipients group contains two states:
• Unsubscribed – contains recipients who opted out from the recipient list related to this email campaign.• Unsubscribed From All – contains recipients who opted out from all recipient lists on your website.
Send feedback about the documentation to [email protected].
Find and open an email campaign You can use the navigation menu in the Email Experience Manager (EXM) to find and open an existing email campaign.
The available lists of email campaigns are located in:
• The Email campaigns section:◦ Drafts – a list of email campaigns that have not yet been sent.◦ In progress – a list of all email campaigns that are currently being A/B tested and email campaigns that have been sent, but where the send process has
not completed. For example, email campaigns that has been paused.◦ Automated – a list of all automated email campaigns that have been activated and that are now ready to be used in an engagement plan.◦ Scheduled – a list of email campaigns that are scheduled to be sent later.
• The Reports section:◦ Sent email campaigns – a list of all email campaigns that have been sent. Email campaigns that are in the process of being A/B tested do not appear in
this list until the winner has been selected and sent to all recipients.
Find and open an email campaignTo find and open an existing email campaign:
1. In the navigation menu, under the Email campaign or Reports section, click a link to see the relevant list of email campaigns.
Page 40 of 98

◦ To sort the email campaigns by the column values in ascending or descending order, click the arrow next to the column header. You can only sort the columns where there is an arrow available.
◦ To search for an email campaign, in the section search field, enter the search word.2. To open and view an email campaign, click the name link.
Send feedback about the documentation to [email protected].
Include or exclude recipients of an email campaign The Email Experience Manager (EXM) integrates closely with the List Manager (LM). This enables you to use the lists of contacts that you create in LM as the recipient lists for your email campaigns in EXM. In this way, when you make a change to a list in LM, the corresponding recipient list in EXM is updated accordingly.
In addition, when you work on an email campaign and, for example, need to include a new list of recipients, you can create a new contact list or segmented lists directly from the menu in EXM.
When you create an email campaign, you must both include and exclude at least one recipient list for the message before you can send it:
• Included recipient lists – contains all the contacts that you want to send the email campaign to and all the contacts that subscribe to your email campaign. At least one of the included lists must contain at least one contact.
• Excluded recipient lists – contains all the contacts that should not receive your email campaign and all the recipients that unsubscribe from your email campaign. The excluded list can be an empty list.
Note
You can include as many lists as you want. Even if the same contact appears multiple times in the included lists, EXM makes sure that the contact (if the contact identifier is the same) only receives your email campaign once.
The default list
If you include or exclude more than one list, you must specify one list as the default list. The default list is the list that collects the recipients that either subscribe or unsubscribe from your email campaign.
For example, when a recipient subscribes to your email campaign, the recipient is added to the default included list. Similarly, when a recipient unsubscribes from your email campaign, the recipient is added to the default excluded list but not removed from the list of included recipients.
Therefore, even if there are no contacts that you want to exclude from your message, you must add an empty list to the excluded recipients lists.
Note
The default list can only be a Contact list.
Include or exclude lists for a message To include or exclude a list of recipients of your email campaign:
1. Create or open the email campaign that you want to include or exclude recipients from.2. Click the Recipients tab:
◦ Click the Include Recipients tab to include a list.◦ Click the Exclude Recipients tab to exclude a list.
3. To include or exclude a list, you can choose to either use an existing list or create a new list from a CSV file and then use it for your email campaign:◦ To use an existing list, click Existing list and in the Select List dialog box, navigate to the list that you want to add to your email campaign, and click OK.
Note
You can create a new Contact list or a Segmented list directly from EXM, you do not have to first open LM. In EXM, on the Dashboard, click Create and in the Create List section, click the list that you want to create. If you choose a Segmented list, the list opens in LM where you can add the conditions for the segmentation.
◦ To create a new list from a CSV file and use it for your email campaign, click File. In the Import Contacts Wizard, follow the steps to import the contacts in your CSV file. When the import has completed, the list is added to your email campaign and available in LM as well.
The recipient list that you included or excluded is listed in the Included Recipient Lists section or the Excluded Recipient Lists section. All the individual contacts in the list are listed in the Included and Opted-in Recipients section or in the Excluded and Opted-out Recipients section.
Page 41 of 98

You can include or exclude as many lists as you want. If you include or exclude multiple lists for your email campaign, you must specify which list is your default list.
4. To specify a list as the default list, in the Included Recipient Lists section or the Excluded Recipient Lists section, click the list that you want as the default list, click Actions , and in the drop-down menu, click Set as default.
5. Save your changes.
Send feedback about the documentation to [email protected].
Insert a token in a message The Email Experience Manager (EXM) supports tokens that you can use to personalize your email campaign messages. For example, in the beginning of a message, you can use the token $name$ in the greeting so that when you send your email campaign, the token is replaced with the name in the contact.
Note
If the value in the contact is not available, the recipient will see the actual token.
The following tokens are by default available in EXM:
• $email$• $fullname$• $firstname$• $lastname$• $name$• $phone$
Note
If you would like to use other information from the contact as a token in EXM, your Sitecore developer can add them for you.
This topic outlines how to:
• Insert a token in the message Subject field or the Alternative text field• Preview the token for different recipients
Insert a token in the Subject field or the Alternative text fieldTo insert a token:
1. Open the relevant email campaign and click the Message tab.2. In the Subject field or in the Alternative text field, place the cursor where you want to insert the token.3. Click Actions and then click Insert token.
Page 42 of 98

4. In the Insert Token dialog, click the relevant token to insert it in the relevant field.
Tip
If you know the name of the token you can type the token directly in the field, for example, $lastname$.
5. Save your changes.
Preview the token for different recipientsYou can preview every token for a specific recipient:
1. On the Message tab, in the Details section, click Actions and then click Preview for recipient.
2. In the Preview the email campaign dialog box, click the recipient that you want to preview the message for and click OK.
The Message tab now displays the message with the appropriate contact values instead of the tokens.
Page 43 of 98

Send feedback about the documentation to [email protected].
Personalize an email campaign message In the Email Experience Manager (EXM), personalization is a technique that you can use to deliver targeted content to specific segments of recipients and, as a result, improve their trust and interest in your company. When you use personalization, you increase the content relevancy and timeliness of your email campaign for each of your customers.
Personalization is a very useful tool when you have identified the specific types of recipients that you want to target your email campaign to. For example, you can create email campaigns that only display the content that each recipient previously has shown an interest in, or content based on accumulated profile values or the pattern card that they match the best.
Scenario
You send a monthly newsletter to a list of subscribers that each include a special offer that is available only for the subscribers and for a limited period. You decide to increase the relevancy of these special offers to the subscribers by changing the offer in the email campaign according to the subscribers’ individual interests. To accomplish this, you personalize the component in the newsletter with the special offer so that subscribers that have previously shown an interest in beach vacations only see offers for these types of destinations, and subscribers that have shown an interest in urban vacations, only see offers for city breaks.
To personalize a component in an email campaign:
1. Open the email campaign that you want to personalize, click the Message tab and then click the message body.2. In the dialog box that opens, click the component that you want to personalize, and in the floating toolbar that appears, click Personalize the component.
3. To add personalized content, in the Personalize the Component dialog box, click New Condition and give the new condition an appropriate name.
Page 44 of 98

Note
Sitecore evaluates the personalization rules in the order that they appear in the Personalize the Component dialog box. If the recipient does not satisfy the rule specified in a condition, Sitecore moves on to the next condition, and so on, until the recipient meets one of the conditions. The default condition is used if a recipient meets none of the other conditions.
4. To add and edit the conditions for when you want the new personalized content and layout displayed, click Edit.
This opens the Rule Set Editor, where you can specify the conditions and actions for when to display the new content, for example, when the recipient has generated a lead score of 50 or more.
5. In the Personalize the Component dialog box, for each condition that you add, in the Personalize Content field, select the personalized content that you want displayed when the recipients meet the specified conditions.
6. When you have finished setting up the personalization, click OK.7. To preview the personalization, in the message body, click the component that you added personalization to, and in the floating menu that appears, use the
arrows to switch between the two types of content that you have set up for the component.
8. Save your changes.
Send feedback about the documentation to [email protected].
The email campaign lists In the Email Experience Manager (EXM), all email campaigns are stored in one repository. A quick way to find exactly the email campaign you need, is to use the lists that are available in the navigation menu.
For example, if you want to find an email campaign that you have scheduled to send later, in the navigation menu, you click the Scheduled link and you will see a list with all your scheduled email campaigns. If you need to sort the list of email campaigns further, you can click some of the column headers, and sort the list by name, date, type, etc. in ascending or descending order.
The available lists of email campaigns:
• Drafts – shows all the email campaigns that are in the status Draft.• In progress – shows all the email campaigns that are in the process of being sent or being A/B tested.• Automated – shows all the email campaigns of the type Automated that are activated and available to be used in engagement plans.• Scheduled – shows the email campaigns that have been scheduled to send later.• Sent email campaigns – shows the email campaigns that have been sent. Click an email campaign to get the reports for the individual email campaign.
Column Description
A/B test Specifies whether an A/B test is configured for the email campaign.
Recipients The number of recipients that have received the message.
Open rate The percentage of recipients who received and opened the message.
Value per email The average value that the email campaign has generated.
Value per visit The average value per visit that the email campaign has generated.
Page 45 of 98

Send feedback about the documentation to [email protected].
Walkthrough: Editing message engagement plans In the Email Experience Manager (EXM), you can edit the message engagement plan to create automated marketing flows or nurture plans based on the states and actions of the individual recipients.
For example, using the message engagement plan, you can separate your website visitors into specific groups depending on which set of rules they fulfill. Then, for these groups of visitors, you can perform a wide range of actions including moving the visitors to another engagement plan, adding a new field to the visitors’ user profiles, or adding them to a specific recipient list.
Before you start editing the engagement plan for an email campaign, you should set up clear goals for the engagement plan and develop a complete scenario that you want to implement into the plan. In addition, if you plan to trigger a new email campaign from the message engagement plan, you should have that email campaign ready as well.
When you have a clear idea of what you want to accomplish by extending the message engagement plan, it is a straightforward process.
This walkthrough outlines how to:
• Add a trigger and a condition to the Productive Visitors state.• Add a visitor to a recipient list using actions.• Add a trigger to a state to send an email.
Example
The following procedures show how you can collect the recipients that watch a demo on your website in a list of recipients. You can use that recipient list to follow up on the recipients’ interest in your demo by sending a new email campaign to every visitor 5 days after they have watched the demo. All of this, you can set up in the message engagement plan by extending it with new conditions, states, and actions:
Add a trigger and a condition to the Productive Visitors stateYou can add a trigger and a condition to the Productive Visitors state. For example, you can determine which visitors have watched a demo on your website.
To add a trigger to the Productive Visitors state:
1. Open the email campaign you want to edit the engagement plan for.2. In the top ribbon of the email campaign, click Actions and then Edit engagement plan.
3. In design mode of the engagement plan, click the state that you want to edit, and then click the link Trigger that appears above the state.
4. In the State Evaluation Triggers dialog box, select the goal that you want to be the trigger for the state and click OK.
Page 46 of 98

Now that you have added a trigger to the Productive Visitors state, you must add a condition item that visitors who trigger the selected goal are evaluated against before they can be moved to the next state.
1. Click the Productive Visitors state and then click the icon below the Productive Visitors state to create a new condition.
2. Click the new condition and then click the Edit link that appears.
3. In the Data dialog box, enter the display name and description for the condition and in the Evaluate drop-down list, click Only Evaluate for Subscribed Eventsto make sure that the condition is only evaluated if a user triggers the goal.
Page 47 of 98

Note
Name the states, rules, and conditions carefully, so that they make sense to everyone who might be working on the plan.
4. In the Rule section, click Edit Rule to set the rule for the condition in the Rule Set Editor. If there are no conditions that the visitor must fulfill in order to be move to the next state, you can select the rule where true (actions always execute).
Add a visitor to a recipient list using actionsNow that you know which of your visitors that have seen the demo, in order to add them to a specific recipient list, you need to add an action to the new condition.
To add visitors to a recipient list using the Edit Email Audience action:
1. To add a state that contains the visitors that fulfill the condition you just created, click the condition and then the icon to the right of the condition.2. Click the Edit link that appears over the new state to specify a name and a description for this state.3. To add an action to the condition, click the square box between the condition and the state and in the dialog box that appears, click Add.
4. In the list of actions, double-click the Edit Email Audience action.
5. Click Edit.6. In the Change Recipient List Subscriptions dialog box, select the recipient list that you want to add the visitors to, and move it from the Recipient Lists section
to the Subscribe To section and click OK.
Page 48 of 98

Tip
Change the manager root, if you do not see the list you want to use.
7. In the Engagement Plan Designer dialog box, save your changes.
Add a trigger to a stateNow you have separated all the visitors that have seen the demo, added them to a specific recipient list, and collected them all in a new state. The next step is to send a new email campaign to each visitor a specific number of days after the visitor triggers the goal.
To send a new email campaign to the segmented visitors after a specific number of days:
1. Click the state that you want to add the trigger to and in the lower-right corner of the state, click the drop-down menu.2. In the dialog box that appears, specify the relevant number of days, hours, and minutes for the trigger.
3. To create a new condition, click the condition icon after the Interested Visitors state, and then click Edit to set the rule. In this example, the visitor does not need to fulfill any specific rule so you can select the rule where true (actions always execute).
4. To add the final state in the message engagement plan and collect all the visitors that receive your follow-up email campaign, click the previous condition and then the state icon .
5. Enter a relevant name for the final state.6. Click the square box between the condition and the final state and click Add.7. In the list of actions, double-click the action Send Email Campaign Message.8. Click Edit to configure the action.9. In the Triggered Message dialog box, select the email campaign that you want to send using this action. Note that only activated email campaigns of the
automated type are available in this list.
Page 49 of 98

Note
Keep in mind that the email campaign you select to send to the segmented visitors also has an engagement plan that these recipients will also be added to once you send the new email campaign.
You have now extended the default engagement plan for a email campaign. When you send the email campaign, the recipients will move through the engagement plan and be segmented according to the conditions and actions that you have added.
Send feedback about the documentation to [email protected].
Send an email campaign When you have finished creating your email campaign, you can choose to send it immediately or schedule to send it later. For automated email campaigns, you can choose to activate it immediately or schedule to activate it later.
To send or activate an email campaign:
1. Select the email campaign you want to send or activate and click the Delivery tab. Depending on the type of email campaign, the delivery options are a little different:
For regular email campaigns For automated email campaigns
2. In the Delivery section, select either to:◦ Send or activate the message now◦ Schedule the message delivery or activation for a later date and enter the relevant date and time.◦ Schedule a recurring delivery to send the same message multiple times in the specified interval and enter the relevant details in the fields that appear
Note
If you schedule to activate an automated message later, you can specify the start date only or you can specify a start and end date for when the automated message must be active.
3. To send a notification to yourself or others when the send or activation process is complete, in the Notification section, select the check box and enter the appropriate email addresses using a comma to separate them.
4. To send the message with multi-language support or to emulate the sending process, click the More link in the lower right corner of the Delivery options:◦ In the Multi-language section, select the Use preferred language check box to send the message with multi-language support.
This means that if a message has two or more language versions, the message is delivered to all the recipients in their preferred language.
Page 50 of 98

◦ If you want to emulate the sending process without actually sending the email campaign, select the Emulate the sending process check box.5. To send or schedule the message, depending on the message and the delivery method you have chosen, click:
◦ Send to send the message now.◦ Schedule to complete the message scheduling.◦ Activate to activate the automated message.
Note
If you want to edit an activated email campaign, you must first deactivate it. You can deactivate an email campaign from the Delivery tab.
6. If you selected to send with multi-language support, the Message delivery confirmation prompt appears:◦ Click Yes, to confirm that you want recipients with no specified language to receive the message in the default language. ◦ Click No, if you want to change the default language. To change the default language click the Message language button .
Send feedback about the documentation to [email protected].
Preview a message in different email clients Depending on the email clients that your recipients use, the email campaign that you send can look very different. In EXM, you can preview your message in different email clients before you send it. In this way, if something does not look right in the preview, you can make some last minute changes to the email campaign before you send it to all your recipients.
Note
To use this functionality, you must sign up for the Email Preview service in the Sitecore App Center.
This topic outlines how to:
• Run an email preview on a message• Review past email previews
Run an email preview on a messageTo preview your message in different email clients:
1. Open an email campaign and on the Review tab, click Email preview.2. If there are more than one message variant, click the variant that you want to run the preview for.3. Click Options and select the email clients that you want to preview your email message in.
Note
To generate previews for all the available email clients takes a considerable amount of time. If you know what email clients the majority of your recipients use, you should only preview those.
4. Click Run email preview.5. When the previews start appearing, you can click an image to view it in full size.
Review past email previews
Page 51 of 98
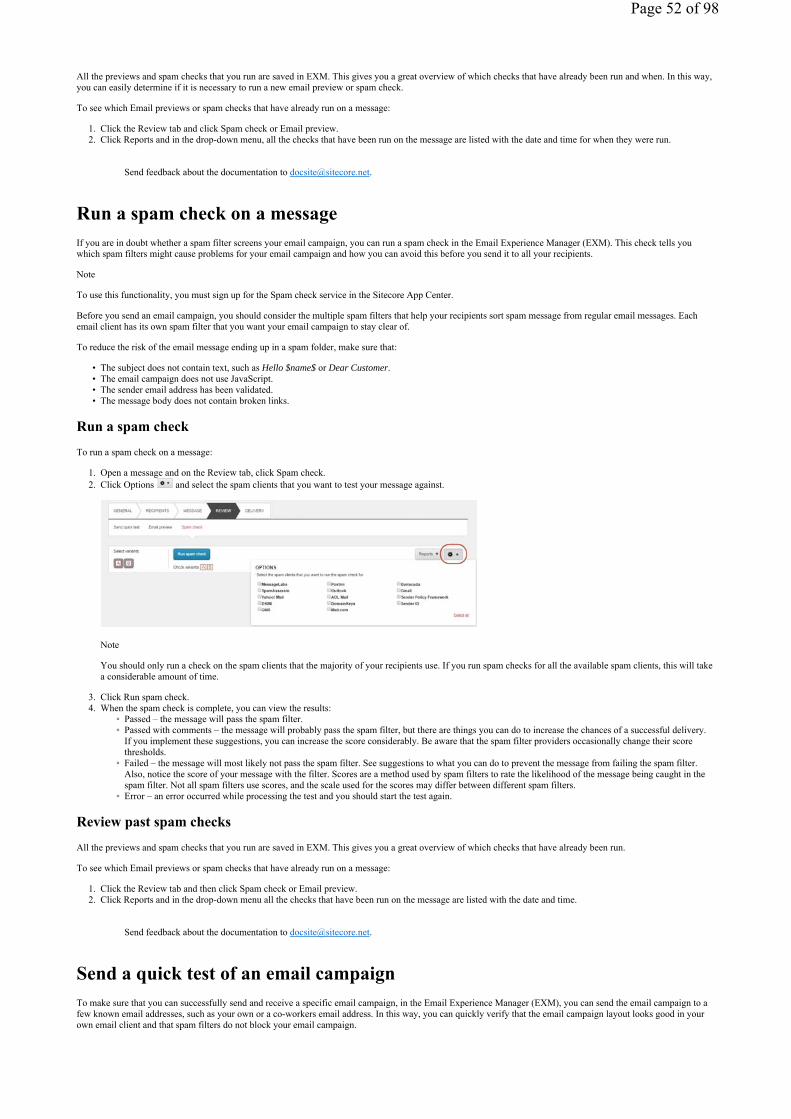
All the previews and spam checks that you run are saved in EXM. This gives you a great overview of which checks that have already been run and when. In this way, you can easily determine if it is necessary to run a new email preview or spam check.
To see which Email previews or spam checks that have already run on a message:
1. Click the Review tab and click Spam check or Email preview.2. Click Reports and in the drop-down menu, all the checks that have been run on the message are listed with the date and time for when they were run.
Send feedback about the documentation to [email protected].
Run a spam check on a message If you are in doubt whether a spam filter screens your email campaign, you can run a spam check in the Email Experience Manager (EXM). This check tells you which spam filters might cause problems for your email campaign and how you can avoid this before you send it to all your recipients.
Note
To use this functionality, you must sign up for the Spam check service in the Sitecore App Center.
Before you send an email campaign, you should consider the multiple spam filters that help your recipients sort spam message from regular email messages. Each email client has its own spam filter that you want your email campaign to stay clear of.
To reduce the risk of the email message ending up in a spam folder, make sure that:
• The subject does not contain text, such as Hello $name$ or Dear Customer.• The email campaign does not use JavaScript.• The sender email address has been validated.• The message body does not contain broken links.
Run a spam checkTo run a spam check on a message:
1. Open a message and on the Review tab, click Spam check.2. Click Options and select the spam clients that you want to test your message against.
Note
You should only run a check on the spam clients that the majority of your recipients use. If you run spam checks for all the available spam clients, this will take a considerable amount of time.
3. Click Run spam check.4. When the spam check is complete, you can view the results:
◦ Passed – the message will pass the spam filter.◦ Passed with comments – the message will probably pass the spam filter, but there are things you can do to increase the chances of a successful delivery.
If you implement these suggestions, you can increase the score considerably. Be aware that the spam filter providers occasionally change their score thresholds.
◦ Failed – the message will most likely not pass the spam filter. See suggestions to what you can do to prevent the message from failing the spam filter. Also, notice the score of your message with the filter. Scores are a method used by spam filters to rate the likelihood of the message being caught in the spam filter. Not all spam filters use scores, and the scale used for the scores may differ between different spam filters.
◦ Error – an error occurred while processing the test and you should start the test again.
Review past spam checksAll the previews and spam checks that you run are saved in EXM. This gives you a great overview of which checks that have already been run.
To see which Email previews or spam checks that have already run on a message:
1. Click the Review tab and then click Spam check or Email preview.2. Click Reports and in the drop-down menu all the checks that have been run on the message are listed with the date and time.
Send feedback about the documentation to [email protected].
Send a quick test of an email campaign To make sure that you can successfully send and receive a specific email campaign, in the Email Experience Manager (EXM), you can send the email campaign to a few known email addresses, such as your own or a co-workers email address. In this way, you can quickly verify that the email campaign layout looks good in your own email client and that spam filters do not block your email campaign.
Page 52 of 98

To send a quick test of an email campaign:
1. In EXM, open the relevant email campaign and click the Review tab. 2. Click Send quick test and enter one or more email addresses in the field. Separate the email addresses with a comma.
3. If your email message has multiple variants, you must first select the variants that you want to send in the quick test.
4. Click Send and review the email message in the relevant email inbox.
Send feedback about the documentation to [email protected].
Walkthrough: Performing A/B tests on an email campaign message Creating successful email campaigns is highly dependent on how well you know your customers. When you create an email campaign, you base the content and layout of the message on an assumption of what appeals to your customers. However, your assumptions might not be accurate, and your recipients might not respond to your campaign in the way you expect them to.
With A/B testing, you can test and validate your assumptions on a small group of your customers before you send the final email campaign to the rest. This ensures that you always send the most appealing and relevant email campaigns to your customers.
The A/B testing functionality allows you to create two or more variations of the same email campaign and test which one receives the best response from the recipients. You run the test on a limited set of recipients and once the test result is clear, you can send the most successful variant to the rest of your recipients. This ensures that you always send the email campaign that statistically attracts the most customers and generates the most value for your business.
This walkthrough outlines how to:
• Plan the A/B test• Create a message variant• Start an A/B test• Select and send the winning message
Plan the A/B testThe Sitecore Email Experience Manager (EXM) guides you through the process of A/B testing, but it is a good idea to have a few things in place before you begin. Once you know what you want to test and under which circumstances, the rest is straightforward.
How many recipients do you want to include in the test?
You can best determine the number of recipients to include in the A/B test based on your previous experiences with sending email campaigns. To get an indication of the number of your recipients who generally open and read your email messages, you can view reports from previous campaigns.
Two factors indicate the number of recipients to include.
• The total number of recipients. If you have a small pool of recipients (for example, 2000), you should include up to 10 or 15 percent (200–300) of the recipients in the test to get a reliable result. If the total number of recipients is higher (for example, 50,000), you only need to include five percent or less to get good results.
• Your confidence in your messaging. If you are confident in your email campaign messaging and just interested in quickly verifying it, you only need to include a small percentage of recipients in the A/B test.
Which part of the message do you want to test?
You can run an A/B test on either the subject line or any of the components in the content area of the message, for example, the background, text, links, or images. However, you should keep the tests simple and only test one or two elements of a message. This helps you to achieve clearer test results and to understand your recipients’ reactions to your message.
How many variants of the message do you want to include in the test?
You can include as many message variants as you like in an A/B test, but be aware that the results of the test might be less obvious, the more variants you add.
For example, if you test two variants of a message, each variant is sent to 50 percent of the test recipients. If, on the other hand, you include four variants, each variant is only sent to 25 percent of the test recipients, and this can result in less clear results. If you want to test more than two or three variants, you need to consider the number of recipients carefully and include more recipients proportionally to the number of variants.
Page 53 of 98

What time of day/week do you want to run the test?
Specify the day and time where you know from experience that your recipients are most likely to open and read your messages. Also, take into consideration the time it takes to dispatch an email campaign. For example, if you dispatch an email campaign to 500,000 recipients, it can take several hours before the dispatch is completed.
How much time should pass before you decide which variant is the most successful?
Use your experience with email campaigns to determine how much time your recipients need to respond to supply you with reliable test results. Depending on how confident you are in your campaign, you can give the recipients more or less time to react to the messages.
For example, if you need a quick reassurance of a an A/B test with simple variants, and assuming that your customers usually react quickly to your campaigns, you might give your customers six hours to respond. On the other hand, if you have doubts about which message variant is the most successful, you may want to give your customers up to 24 hours to respond and thereby achieve broader and more reliable results.
Do you want to select the more successful variant manually or automatically?
Selecting the most successful message variant automatically is the easiest option and often makes most sense. With an automatic selection, you decide by which parameter that you want the variant selected (the best value per visit or the highest open rate), and the successful message variant is automatically sent to the rest of the recipients at the specified time.
You can also select your preferred message variant manually. This gives you full control and lets you select the best message variant based on other parameters, for example, the click rate.
Create a message variantWhen you run an A/B test, you test different variations of the same message. For each variation in the message that you want to test, you need to create a new variant of the original message. The original message is the first variant (Variant A), and any new message variants that you create are named Variant B, Variant C, and so on.
To create a new variant of a message:
1. Open the message that you want to perform an A/B test on.
Important
A/B tests cannot be performed on automated messages or on these message types: Simple HTML message, Plain text message, or Existing page.
2. You can choose to add a new variant or duplicate the original variant and all its content:◦ To add a new variant, on the Message tab, click Add variant . This creates a new message variant based on the same template as the original message
but where no content is replicated. Choose this option if you want to test comprehensive differences between the message variations, such as larger components or the layout of the message.
◦ To duplicate the original variant, click Actions and then Duplicate this variant. This creates a new variant of the original message by duplicating it and all of its content. Choose this option if you want to test minor differences between the variants, such as the subject line, images, or the name of a button.
The message variants are displayed on individual tabs where you can easily toggle between the variants.
Page 54 of 98

Note
You can create as many variants of the message as you like, but be aware that when you add more variants, you need a larger pool of recipients for the test results still to be clear and reliable. You should test a maximum of two to three variants.
3. Make the necessary changes to the new message variant, for example, you can change the message layout, change the images, or add new components.
Note
If you base your A/B test message on an imported HTML template, only the Variant A contains the layout. For the other variants, you have to add the message layout manually.
4. When you have created all the message variants for the test, click Save.
Before you send the A/B test, you can choose to run an email preview and a spam check on each variant of the message.
Start an A/B testAfter creating the message variants for the A/B test, you need to determine how you want to send the messages.
To send an A/B test:
1. Open the relevant message and on the Delivery tab, click the variants that you want to include in the delivery. In this example, the variants A and B are selected.
2. In the Size of the test drop-down menu, select the percentage of recipients that you want to include in this test. This set of recipients is randomly generated from the full list of recipients.
3. Under Select winner, specify how you want the winner to be chosen. Select one of the following options:◦ Automatic – the system selects the winning variant for you, based on either best value per visit or highest open rate. In the Automatically select winner
after fields, specify how long you want the test to run before the winner is selected.
If you click Best value per visit, the winning variant is the one generates the most value on the website per visitor.. The value is calculated according to the engagement value points that are set up on your website.
If you click Highest open rate, the winning variant is the one that was opened most often.
◦ Manual – you review the reports of the A/B test and select the winner variant based on your own criteria.4. Under Schedule delivery, select:
◦ Send message now to start the A/B test immediately.◦ Schedule message delivery to schedule the delivery of the A/B test message for a later time. Specify the date and time for when you want to start the A/B
test.◦ Schedule a recurring delivery to schedule the A/B test message to send recurrently at a certain interval. Specify the interval, the date, and time for when
you want to send the recurring A/B test.
Note
Page 55 of 98
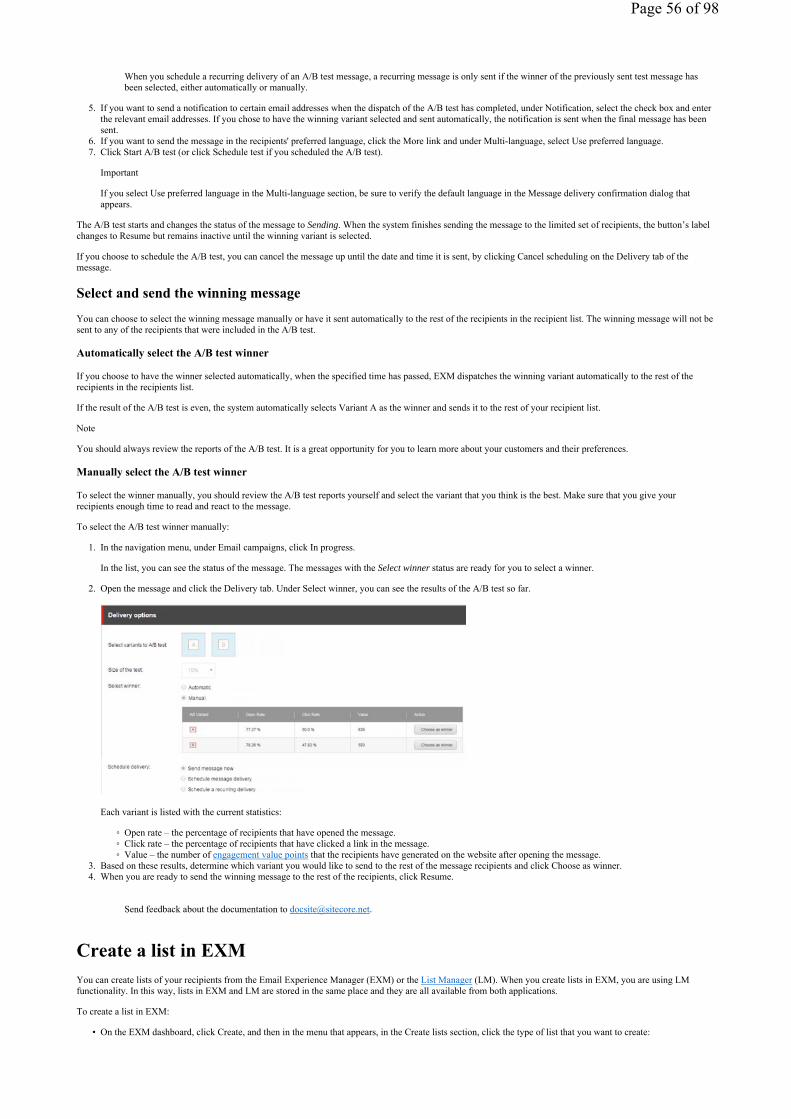
When you schedule a recurring delivery of an A/B test message, a recurring message is only sent if the winner of the previously sent test message has been selected, either automatically or manually.
5. If you want to send a notification to certain email addresses when the dispatch of the A/B test has completed, under Notification, select the check box and enter the relevant email addresses. If you chose to have the winning variant selected and sent automatically, the notification is sent when the final message has been sent.
6. If you want to send the message in the recipients' preferred language, click the More link and under Multi-language, select Use preferred language.7. Click Start A/B test (or click Schedule test if you scheduled the A/B test).
Important
If you select Use preferred language in the Multi-language section, be sure to verify the default language in the Message delivery confirmation dialog that appears.
The A/B test starts and changes the status of the message to Sending. When the system finishes sending the message to the limited set of recipients, the button’s label changes to Resume but remains inactive until the winning variant is selected.
If you choose to schedule the A/B test, you can cancel the message up until the date and time it is sent, by clicking Cancel scheduling on the Delivery tab of the message.
Select and send the winning messageYou can choose to select the winning message manually or have it sent automatically to the rest of the recipients in the recipient list. The winning message will not be sent to any of the recipients that were included in the A/B test.
Automatically select the A/B test winner
If you choose to have the winner selected automatically, when the specified time has passed, EXM dispatches the winning variant automatically to the rest of the recipients in the recipients list.
If the result of the A/B test is even, the system automatically selects Variant A as the winner and sends it to the rest of your recipient list.
Note
You should always review the reports of the A/B test. It is a great opportunity for you to learn more about your customers and their preferences.
Manually select the A/B test winner
To select the winner manually, you should review the A/B test reports yourself and select the variant that you think is the best. Make sure that you give your recipients enough time to read and react to the message.
To select the A/B test winner manually:
1. In the navigation menu, under Email campaigns, click In progress.
In the list, you can see the status of the message. The messages with the Select winner status are ready for you to select a winner.
2. Open the message and click the Delivery tab. Under Select winner, you can see the results of the A/B test so far.
Each variant is listed with the current statistics:
◦ Open rate – the percentage of recipients that have opened the message.◦ Click rate – the percentage of recipients that have clicked a link in the message.◦ Value – the number of engagement value points that the recipients have generated on the website after opening the message.
3. Based on these results, determine which variant you would like to send to the rest of the message recipients and click Choose as winner.4. When you are ready to send the winning message to the rest of the recipients, click Resume.
Send feedback about the documentation to [email protected].
Create a list in EXM You can create lists of your recipients from the Email Experience Manager (EXM) or the List Manager (LM). When you create lists in EXM, you are using LM functionality. In this way, lists in EXM and LM are stored in the same place and they are all available from both applications.
To create a list in EXM:
• On the EXM dashboard, click Create, and then in the menu that appears, in the Create lists section, click the type of list that you want to create:
Page 56 of 98

◦ Recipient list from file – create a contact list and import the recipients from a CSV file. ◦ Recipient list from existing list – create a contact list that is based on an existing contact list. ◦ Empty recipient list – create an empty contact list that you can use to add recipients to automatically, for example, from a subscription form.◦ Segmented list from all recipients – create a segmented list with all contacts included as the list source.◦ Segmented list from existing list – create a segmented list that is based on an existing contact list.
When your list is created, you can add or exclude the list on the Recipients tab of a specific email campaign.
Send feedback about the documentation to [email protected].
Introducing the Email Experience Manager Use the Email Experience Manager (EXM) to create highly customizable email campaigns and make them both personal and relevant to your customers.
Note
EXM is built in SPEAK and as a consequence of that, developers must use Sitecore Rocks to develop or edit the EXM components
In EXM, you can:
• Create and manage email campaigns.• Use A/B testing to find the best email content and design.• Send email campaigns with multi-language support.• Create and manage recipient lists.• View detailed analytics reports for your sent email campaigns.• Manage your suppression list and your lists of approved senders and domains.
Note
EXM does not support CMS live mode.
When you have installed the EXM module, you can open it from the Sitecore Launchpad.
The EXM Dashboard gives you an overview of the performance of the whole email channel. From the menu, you can create new email campaigns, create recipient lists, or you can click the menu items to find and open an existing email campaigns and reports.
Page 57 of 98

When you create a new email campaign, EXM guides you through the process of creating and sending your email campaign. You are not obligated to follow the process from start to finish, for example, when you have created an email campaign, you can start by editing the content and then add recipients at a later stage.
Send feedback about the documentation to [email protected].
Create an email campaign The Email Experience Manager (EXM) guides you through the process of creating and sending your email campaigns. You are not obligated to follow the process from start to finish, for example, when you have created an email campaign, you can easily edit the content and add recipients at a later stage.
In EXM, you can create a:
• Regular email campaign – an email campaign with no predefined content or recipients. Choose this to create a new email campaign from scratch.• Automated email campaign – an email campaign that you can use in an engagement plan. Choose this to send an email campaign when a visitor triggers a goal
or event on your website.
To create a new email campaign:
1. In EXM, on the dashboard, click Create and in the menu that appears, in the Create email campaign section, select the type that you want to create.
Note
In a multi-site solution, there can be several available EXM root managers. For example, you might have a root manager for different markets, such as APAC or EMEA. If you have access to more than one root manager, you can switch between them from the drop-down menu in the upper left corner of the EXM dashboard.
2. In the dialog that appears, click the template that you want to base your email campaign on and enter the name of your email campaign in the Name field.
By default, EXM contains a number of predefined templates and import options.
Page 58 of 98

3. The new email campaign opens. On the General tab, in the General information section and in the Sender details section, edit the relevant fields.◦ To change the location of the email campaign, in the Location field, click the browse button , and in the Specify location dialog that appears, navigate
to the relevant location and click OK.◦ To associate the email campaign with a campaign, in the Campaign group field, click the browse button , and in the Select campaign group dialog that
appears, navigate to the relevant campaign and click OK. There is no campaign associated with your email campaign by default.◦ To assign the email campaign layout to another device, in the Target device drop-down menu, click the relevant device. The devices listed in the drop-
down menu are the devices that are available in your system.
Note
This is useful, if you have imported a design or used an existing page to create the email campaign, and you may want to reduce the layout complexity and remove any UI controls, such as JavaScript with buttons or check boxes. This functionality is available to Sitecore administrators only.
Now that you have created the email campaign, you can start to edit the content and layout.
Send feedback about the documentation to [email protected].
Email channel performance The analytics and reporting capabilities of the Email Experience Manager (EXM) enable you to evaluate your sent email campaigns and optimize future email campaigns. On the EXM dashboard, a set of reports give you an overview of the performance and analytics of the entire email channel:
• Recipient activity• Value and visits• Top campaigns• Landing pages• Location• Technology
Page 59 of 98

Note
The reporting data on the EXM Dashboard and for an individual campaign have two separate caches that do not run simultaneously. This means that in some situations there may be a 15-minute discrepancy in the reporting data displayed on the Dashboard and the reporting data for an individual email campaign.
Specify the date range
The default date range is the past three months.
• To see the reports for a specific date range, click the date drop-down menu and specify the relevant From and To dates or use one of the predefined date ranges, for example, Last week or Last month, and then click Apply.
Recipient activityThis report gives you a quick overview of the relevancy of your email campaigns by showing how your contacts have reacted to them.
The report shows how many contacts have opened an email campaign or clicked a link in the email message, how many did not receive your email campaign because the message bounced, and how many unsubscribed from an email campaign.
The Recipient activity report
Click-to-open rate
The relevancy of an email campaign calculated by how many of the contacts who opened the email message also clicked a link.
(Total clicks / Total opens) * 100
Unique open rate
The percentage of contacts who opened one of your email messages, where contacts that open the same email campaign twice, only count as one.
(Total unique opens / total sent ) * 100
Page 60 of 98

Unique click rate
The percentage of contacts who opened and clicked a link in one of your email campaigns, where contacts that click more than one link in the same email campaign only count as one.
(Total unique clicks / total sent) * 100
BouncedThe percentage of contacts who did not receive an email campaign as intended because it bounced. This could be either a soft bounce or a hard bounce.
(Total bounces / total sent) * 100
Unsubscribed The percentage of contacts who have unsubscribed from one of your email campaigns by clicking the Unsubscribe link in an email message.
(Total unsubscribed / total sent) * 100
Value and visitsThis report gives you an overview of the value and visits that your email channel has generated.
• The Value over time tab – shows the value, the number of visits, and the value per visit that all your email campaigns have generated each month in the past three months. To see the graphs individually, click the labels, Visits, Value, and Value per visit to switch between the graphs.
• The Value and visits tab – gives you an overview of total value and visits that your email campaigns have generated.
The Value and visits tab
Total sent The number of email campaigns that have been sent from the current manager root.
Visits The number of contacts that visited your website by clicking a link in an email message.
Browsed The number of contacts who viewed more than one webpage after coming to your website via the link in an email message.
Value The total value that has been generated on your website by visits from your email campaigns.
Value per visit The average value per visit that visits from your email campaigns have generated.
Value per email The average value per email campaign that visits from your email campaigns have generated.
Visits per email The average number of visits per email campaign.
Top campaignsThis report shows a list of the most successful email campaigns based on either the click or open rate or on the value and value per visit that the email campaign has generated:
Page 61 of 98

• The Recipient activity tab lists the five most successful email campaigns based on the click rate and/or the open rate. To switch between the views, click the Clicks and Opens links.
• The Value and visits tab lists the most successful email campaigns based on either Value or Value per visit. Click the columns headers to sort the list accordingly.
Landing pagesThis report lists the most successful landing pages according to:
• Most valuable – the landing page that has generated the most value per visit.• Most relevant – the landing page that has generated the most value.• Most clicked – the landing page where most contacts have clicked a link.
Location This report displays the reporting data for the top five countries, regions, and cities.
The Countries tab displays:
• The number of opened email messages grouped by country.• The country with the highest click rate.• The country with the highest value per visit.
The Top regions tab and the Top cities tab display the number of opened email campaigns and the number of clicks grouped by region and city.
TechnologyThis displays the reporting data according to device, operating system, and browser.
• The Device category tab displays the number of opened email campaigns and the number of clicks grouped by the type of device that the contacts have used.• The OS tab displays the reporting data according to the operating system that the contacts have used:
◦ Opens – the number and percentage of opened email campaigns according to the operating system that the contacts have used.◦ Clicks – the number and percentage of clicks in your email campaigns according to the operating system that the contacts have used.◦ Value – the value and the percentage of the value that your email campaigns have generated according to the operating system that the contacts have
used.• The Browser tab displays the number of opened email campaigns, clicks, and value generated from the email campaign according to the browser that the
contacts have used.
Page 62 of 98

Send feedback about the documentation to [email protected].
Find and open an email campaign You can use the navigation menu in the Email Experience Manager (EXM) to find and open an existing email campaign.
The available lists of email campaigns are located in:
• The Email campaigns section:◦ Drafts – a list of email campaigns that have not yet been sent.◦ In progress – a list of all email campaigns that are currently being A/B tested and email campaigns that have been sent, but where the send process has
not completed. For example, email campaigns that has been paused.◦ Automated – a list of all automated email campaigns that have been activated and that are now ready to be used in an engagement plan.◦ Scheduled – a list of email campaigns that are scheduled to be sent later.
• The Reports section:◦ Sent email campaigns – a list of all email campaigns that have been sent. Email campaigns that are in the process of being A/B tested do not appear in
this list until the winner has been selected and sent to all recipients.
Find and open an email campaignTo find and open an existing email campaign:
1. In the navigation menu, under the Email campaign or Reports section, click a link to see the relevant list of email campaigns.
◦ To sort the email campaigns by the column values in ascending or descending order, click the arrow next to the column header. You can only sort the columns where there is an arrow available.
◦ To search for an email campaign, in the section search field, enter the search word.2. To open and view an email campaign, click the name link.
Send feedback about the documentation to [email protected].
Page 63 of 98

Include or exclude recipients of an email campaign The Email Experience Manager (EXM) integrates closely with the List Manager (LM). This enables you to use the lists of contacts that you create in LM as the recipient lists for your email campaigns in EXM. In this way, when you make a change to a list in LM, the corresponding recipient list in EXM is updated accordingly.
In addition, when you work on an email campaign and, for example, need to include a new list of recipients, you can create a new contact list or segmented lists directly from the menu in EXM.
When you create an email campaign, you must both include and exclude at least one recipient list for the message before you can send it:
• Included recipient lists – contains all the contacts that you want to send the email campaign to and all the contacts that subscribe to your email campaign. At least one of the included lists must contain at least one contact.
• Excluded recipient lists – contains all the contacts that should not receive your email campaign and all the recipients that unsubscribe from your email campaign. The excluded list can be an empty list.
Note
You can include as many lists as you want. Even if the same contact appears multiple times in the included lists, EXM makes sure that the contact (if the contact identifier is the same) only receives your email campaign once.
The default list
If you include or exclude more than one list, you must specify one list as the default list. The default list is the list that collects the recipients that either subscribe or unsubscribe from your email campaign.
For example, when a recipient subscribes to your email campaign, the recipient is added to the default included list. Similarly, when a recipient unsubscribes from your email campaign, the recipient is added to the default excluded list but not removed from the list of included recipients.
Therefore, even if there are no contacts that you want to exclude from your message, you must add an empty list to the excluded recipients lists.
Note
The default list can only be a Contact list.
Include or exclude lists for a message To include or exclude a list of recipients of your email campaign:
1. Create or open the email campaign that you want to include or exclude recipients from.2. Click the Recipients tab:
◦ Click the Include Recipients tab to include a list.◦ Click the Exclude Recipients tab to exclude a list.
3. To include or exclude a list, you can choose to either use an existing list or create a new list from a CSV file and then use it for your email campaign:◦ To use an existing list, click Existing list and in the Select List dialog box, navigate to the list that you want to add to your email campaign, and click OK.
Note
You can create a new Contact list or a Segmented list directly from EXM, you do not have to first open LM. In EXM, on the Dashboard, click Create and in the Create List section, click the list that you want to create. If you choose a Segmented list, the list opens in LM where you can add the conditions for the segmentation.
◦ To create a new list from a CSV file and use it for your email campaign, click File. In the Import Contacts Wizard, follow the steps to import the contacts in your CSV file. When the import has completed, the list is added to your email campaign and available in LM as well.
The recipient list that you included or excluded is listed in the Included Recipient Lists section or the Excluded Recipient Lists section. All the individual contacts in the list are listed in the Included and Opted-in Recipients section or in the Excluded and Opted-out Recipients section.
Page 64 of 98

You can include or exclude as many lists as you want. If you include or exclude multiple lists for your email campaign, you must specify which list is your default list.
4. To specify a list as the default list, in the Included Recipient Lists section or the Excluded Recipient Lists section, click the list that you want as the default list, click Actions , and in the drop-down menu, click Set as default.
5. Save your changes.
Send feedback about the documentation to [email protected].
Send an email campaign When you have finished creating your email campaign, you can choose to send it immediately or schedule to send it later. For automated email campaigns, you can choose to activate it immediately or schedule to activate it later.
To send or activate an email campaign:
1. Select the email campaign you want to send or activate and click the Delivery tab. Depending on the type of email campaign, the delivery options are a little different:
For regular email campaigns For automated email campaigns
2. In the Delivery section, select either to:◦ Send or activate the message now◦ Schedule the message delivery or activation for a later date and enter the relevant date and time.◦ Schedule a recurring delivery to send the same message multiple times in the specified interval and enter the relevant details in the fields that appear
Note
If you schedule to activate an automated message later, you can specify the start date only or you can specify a start and end date for when the automated message must be active.
3. To send a notification to yourself or others when the send or activation process is complete, in the Notification section, select the check box and enter the appropriate email addresses using a comma to separate them.
4. To send the message with multi-language support or to emulate the sending process, click the More link in the lower right corner of the Delivery options:◦ In the Multi-language section, select the Use preferred language check box to send the message with multi-language support.
This means that if a message has two or more language versions, the message is delivered to all the recipients in their preferred language.
◦ If you want to emulate the sending process without actually sending the email campaign, select the Emulate the sending process check box.
Page 65 of 98

5. To send or schedule the message, depending on the message and the delivery method you have chosen, click:◦ Send to send the message now.◦ Schedule to complete the message scheduling.◦ Activate to activate the automated message.
Note
If you want to edit an activated email campaign, you must first deactivate it. You can deactivate an email campaign from the Delivery tab.
6. If you selected to send with multi-language support, the Message delivery confirmation prompt appears:◦ Click Yes, to confirm that you want recipients with no specified language to receive the message in the default language. ◦ Click No, if you want to change the default language. To change the default language click the Message language button .
Send feedback about the documentation to [email protected].
The email campaign reports For each email campaign that you have sent with the Email Experience Manager (EXM), you get a range of reports that can show you how the email campaign has performed and how your recipients have reacted.
To see the reports for a specific:
• One-time message, open the relevant email campaign from the EXM menu under the Reports section.• Triggered message, open the relevant email campaign from the EXM menu under the Triggered section.
You can find detailed information about how the recipients have responded to your email campaign in the Engagement Plan Monitor. The Engagement Plan Monitor gives you an overview of how the recipients have moved through the different stages of the message engagement plan.
Note
The reporting data on the Dashboard and for an individual campaign has two separate caches that do not run simultaneously. This means that in some situations there may be a 15-minute discrepancy in the reporting data displayed on the Dashboard and the reporting data for an individual email campaign.
The reports that are available for an email campaign are:
The Recipient activity report
The Landing pages report
The Value and visits report
The Location report
The Technology report
Note
For multilanguage email campaigns, there are no reports available for a single language version of the email campaign. The reports for multilanguage email campaigns display information about all the available language versions together.
The Recipient activity report
This report gives you a quick overview of the relevance of your email campaign by showing how the recipients have reacted to it.
Recipient activities Description
Click-to-open rateThe relevance of the email campaign calculated by how many of the contacts who opened the email message also clicked a link.
(Total clicks / total opens) * 100
Unique open rate
Page 66 of 98

The percentage of the contacts who opened one of your email messages. Contacts that have opened the same email campaign twice only count as one open.
(Total unique opens / total sent ) * 100
Unique click rateThe percentage of the contacts who opened and clicked a link in the email campaign. Contacts that have clicked more than one link in the same email campaign only count as one click.
(Total unique clicks / total sent) * 100
Open rate The number of times that the email message in the email campaign has been opened. Regardless of how many times a contact opens the email message, every time is counted.
Click rate The number of times that a link in the email message has been clicked. Regardless of how many times a contact clicks a link in an email message, every time is counted.
Total sent The total number of email messages that were sent.
Delivered The number of email messages that were delivered successfully.
BouncedThe percentage of contacts who did not receive the email campaign as intended because it bounced. This can be either a soft bounce or a hard bounce.
(Total bounces / total sent) * 100
Unsubscribed The percentage of contacts who have unsubscribed from the email campaign by clicking the Unsubscribe link in the email message.
(Total unsubscribed / total sent) * 100
Spam complaints The number of contacts that have marked the email message as spam.
The Landing pages report
This report lists the most successful landing pages that your email campaign leads to. The landing pages are evaluated according to:
• Most valuable – the landing page that has generated the highest value per visit.• Most relevant – the landing page that has generated the highest value.• Most clicked – the landing page where the highest number of contacts have clicked a link.
The Value and visits report
This report shows how effective the email campaign is in generating value and visits to your website. In this report, there are two tabs:
• Value over time shows the value, the number of visits, and the value per visit that all of your email campaign have generated each month in the past three months.
Click one of the labels, Visits, Value, or Value per visit, to display only one graph at a time.
• Value and visits gives you an overview of the total value and the total number of visits that your email campaign has generated.
Page 67 of 98

Value and visits Description
Total sent The number of email messages that have been sent in the email campaign.
Visits The number of recipients that visited your website by clicking a link in the email message.
Browsed The number of recipients who viewed more than one page after coming to your website through a link in the email message.
Value The total value that recipients have generated on your website through visits from your email campaign.
Value per visit The average value per visit that visits from your email campaign have generated.
Value per email The average value per email message that visits from your email campaign have generated.
Visits per email The average number of visits per email campaign.
The Location report
This report displays data about your email campaign according to country, region, and city.
The Countries tab displays:
• The number of opened email messages grouped by country• The country with the highest click rate• The country with the highest value per visit
The Top regions tab and the Top cities tab display the number of opened email campaigns and the number of clicks grouped by region and city.
The Technology report
This report displays data according to device, operating system, and browser.
• The Device category tab displays the number of opened email campaigns and the number of clicks grouped by the type of device that the contacts have used. In addition, you can see:
◦ Highest open rate – the device type from which the highest number of contacts have opened the email message.◦ Highest click rate – the device type from which the highest number of contacts have clicked a link in the email message.◦ Most valuable – the device type from which contacts have generated the highest value to your website.◦ Most value per visit – the device type from which contacts have generated the highest value per visit on your website.
• The OS tab displays the reporting data according to the operating system that the contacts have used:◦ Opens – the number and percentage of opened email messages. ◦ Clicks – the number and percentage of clicks in your email message.◦ Value – the value and the percentage of the value that your email campaign have generated.
• The Browser tab displays the number of opened email messages, clicks, and the value generated from the email campaign according to the recipient's browser.
Page 68 of 98

Send feedback about the documentation to [email protected].
The email campaign templates In a default installation, the Email Experience Manager (EXM) contains a number of predefined templates and import options. Depending on the email campaign type, you can choose between the following templates.
Template Description
HTML file An email campaign based on imported HTML code for the message body. You can import any HTML file.
Newsletter A template with a header containing a link to the online version of the email campaign and a footer with links to opt-out pages.
Two-column A template with a two-column layout and a footer with links to opt-out pages.
One-column A template with a one-column layout and a footer with links to opt-out pages.
Simple HTML An HTML template without a predefined layout.
Plain text A plain text template without a predefined layout.
Existing page
A template based on a Sitecore webpage.
Select a page on your Sitecore website and use it as the message body.
Pages in Sitecore XP can be complex and security restrictions may apply to certain elements on the page. For example, a page may contain a section that only registered users can see if they open this page on the website.
EXM enables you to define how email campaigns are created from webpages. There are two options:
• EXM respects the security settings. In this case, recipients with different security privileges will receive different email campaigns (if the source page has security restrictions).
• EXM ignores the security settings. In this case, EXM renders all elements on the page and all recipients receive the same email campaign.
Send feedback about the documentation to [email protected].
Types of email campaigns There are two types of email campaigns in Sitecore Email Experience Manager (EXM) and each has a set of templates that contain default content and layout. This makes it easy to create new email campaigns and enables you to focus on creating the best content for your email campaign.
If you need more flexibility or influence on the final layout of your email campaign, you can create your own templates or import and use a design from an existing webpage.
When you create a new email campaign, you first need to decide which type best serves the purpose of your email campaign. The type defines how you can use the email campaign, how it is configured, and how it is sent.
The two types are:
• Regular email campaign – this type does not have any predefined content or recipients, so you create this type of email campaign from scratch. Use this, for example, if your company releases a new product in a specific country and you want to send an email campaign to all your contacts in that country to let them know that the product is now available for purchase.
• Automated email campaign – this type is only used in relation to email engagement plans and is only sent automatically to one contact at a time when that specific contact triggers an event or goal in an engagement plan. Therefore, you cannot add a list of contacts to this type of email campaign.
You can use the automated email campaign when, for example, you want to send a confirmation to every contact who signs up for a newsletter, or if you want to send a special campaign offer to every contact who has visited your website but has not returned to the website in three weeks.
Page 69 of 98

Send feedback about the documentation to [email protected].
Extract data from earlier versions of EXM to create historical reports The Email Experience Manager (EXM) generates the email campaign reports based on the email channel interactions that are stored in the Sitecore xDB Interactions registry.
However, to extract the data manually for historical reports using the analytics data from earlier versions of EXM, where the data was not stored in the xDB Interactions registry:
1. Create a copy of the following tables located in the Reporting database and move them to a separate database.◦ LandingPageDetails◦ Fact_LandingPages◦ Fact_VisitsByMessage◦ Fact_AbnVisitsByMessage◦ Fact_AutomationStatesStatisticsByMessage◦ Fact_AutomationStatesStatisticsByAbnMessage
2. Extract the data from these tables to use in your own third-party business intelligence tool.
Note
The accuracy of the EXM analytics data that is collected in Sitecore xDB is considerably greater than the historical data collected in the Email Engagement Plan.
Send feedback about the documentation to [email protected].
Email channel performance The analytics and reporting capabilities of the Email Experience Manager (EXM) enable you to evaluate your sent email campaigns and optimize future email campaigns. On the EXM dashboard, a set of reports give you an overview of the performance and analytics of the entire email channel:
• Recipient activity• Value and visits• Top campaigns• Landing pages• Location• Technology
Note
The reporting data on the EXM Dashboard and for an individual campaign have two separate caches that do not run simultaneously. This means that in some situations there may be a 15-minute discrepancy in the reporting data displayed on the Dashboard and the reporting data for an individual email campaign.
Specify the date range
The default date range is the past three months.
• To see the reports for a specific date range, click the date drop-down menu and specify the relevant From and To dates or use one of the predefined date ranges, for example, Last week or Last month, and then click Apply.
Page 70 of 98

Recipient activityThis report gives you a quick overview of the relevancy of your email campaigns by showing how your contacts have reacted to them.
The report shows how many contacts have opened an email campaign or clicked a link in the email message, how many did not receive your email campaign because the message bounced, and how many unsubscribed from an email campaign.
The Recipient activity report
Click-to-open rate
The relevancy of an email campaign calculated by how many of the contacts who opened the email message also clicked a link.
(Total clicks / Total opens) * 100
Unique open rate
The percentage of contacts who opened one of your email messages, where contacts that open the same email campaign twice, only count as one.
(Total unique opens / total sent ) * 100
Unique click rate
The percentage of contacts who opened and clicked a link in one of your email campaigns, where contacts that click more than one link in the same email campaign only count as one.
(Total unique clicks / total sent) * 100
BouncedThe percentage of contacts who did not receive an email campaign as intended because it bounced. This could be either a soft bounce or a hard bounce.
(Total bounces / total sent) * 100
Unsubscribed The percentage of contacts who have unsubscribed from one of your email campaigns by clicking the Unsubscribe link in an email message.
(Total unsubscribed / total sent) * 100
Value and visitsThis report gives you an overview of the value and visits that your email channel has generated.
• The Value over time tab – shows the value, the number of visits, and the value per visit that all your email campaigns have generated each month in the past three months. To see the graphs individually, click the labels, Visits, Value, and Value per visit to switch between the graphs.
• The Value and visits tab – gives you an overview of total value and visits that your email campaigns have generated.
Page 71 of 98

The Value and visits tab
Total sent The number of email campaigns that have been sent from the current manager root.
Visits The number of contacts that visited your website by clicking a link in an email message.
Browsed The number of contacts who viewed more than one webpage after coming to your website via the link in an email message.
Value The total value that has been generated on your website by visits from your email campaigns.
Value per visit The average value per visit that visits from your email campaigns have generated.
Value per email The average value per email campaign that visits from your email campaigns have generated.
Visits per email The average number of visits per email campaign.
Top campaignsThis report shows a list of the most successful email campaigns based on either the click or open rate or on the value and value per visit that the email campaign has generated:
• The Recipient activity tab lists the five most successful email campaigns based on the click rate and/or the open rate. To switch between the views, click the Clicks and Opens links.
• The Value and visits tab lists the most successful email campaigns based on either Value or Value per visit. Click the columns headers to sort the list accordingly.
Landing pagesThis report lists the most successful landing pages according to:
• Most valuable – the landing page that has generated the most value per visit.• Most relevant – the landing page that has generated the most value.• Most clicked – the landing page where most contacts have clicked a link.
Page 72 of 98

Location This report displays the reporting data for the top five countries, regions, and cities.
The Countries tab displays:
• The number of opened email messages grouped by country.• The country with the highest click rate.• The country with the highest value per visit.
The Top regions tab and the Top cities tab display the number of opened email campaigns and the number of clicks grouped by region and city.
TechnologyThis displays the reporting data according to device, operating system, and browser.
• The Device category tab displays the number of opened email campaigns and the number of clicks grouped by the type of device that the contacts have used.• The OS tab displays the reporting data according to the operating system that the contacts have used:
◦ Opens – the number and percentage of opened email campaigns according to the operating system that the contacts have used.◦ Clicks – the number and percentage of clicks in your email campaigns according to the operating system that the contacts have used.◦ Value – the value and the percentage of the value that your email campaigns have generated according to the operating system that the contacts have
used.• The Browser tab displays the number of opened email campaigns, clicks, and value generated from the email campaign according to the browser that the
contacts have used.
Send feedback about the documentation to [email protected].
The email campaign reports For each email campaign that you have sent with the Email Experience Manager (EXM), you get a range of reports that can show you how the email campaign has performed and how your recipients have reacted.
To see the reports for a specific:
• One-time message, open the relevant email campaign from the EXM menu under the Reports section.• Triggered message, open the relevant email campaign from the EXM menu under the Triggered section.
You can find detailed information about how the recipients have responded to your email campaign in the Engagement Plan Monitor. The Engagement Plan Monitor gives you an overview of how the recipients have moved through the different stages of the message engagement plan.
Note
The reporting data on the Dashboard and for an individual campaign has two separate caches that do not run simultaneously. This means that in some situations there may be a 15-minute discrepancy in the reporting data displayed on the Dashboard and the reporting data for an individual email campaign.
The reports that are available for an email campaign are:
The Recipient activity report
The Landing pages report
The Value and visits report
The Location report
Page 73 of 98

The Technology report
Note
For multilanguage email campaigns, there are no reports available for a single language version of the email campaign. The reports for multilanguage email campaigns display information about all the available language versions together.
The Recipient activity report
This report gives you a quick overview of the relevance of your email campaign by showing how the recipients have reacted to it.
Recipient activities Description
Click-to-open rateThe relevance of the email campaign calculated by how many of the contacts who opened the email message also clicked a link.
(Total clicks / total opens) * 100
Unique open rate The percentage of the contacts who opened one of your email messages. Contacts that have opened the same email campaign twice only count as one open.
(Total unique opens / total sent ) * 100
Unique click rateThe percentage of the contacts who opened and clicked a link in the email campaign. Contacts that have clicked more than one link in the same email campaign only count as one click.
(Total unique clicks / total sent) * 100
Open rate The number of times that the email message in the email campaign has been opened. Regardless of how many times a contact opens the email message, every time is counted.
Click rate The number of times that a link in the email message has been clicked. Regardless of how many times a contact clicks a link in an email message, every time is counted.
Total sent The total number of email messages that were sent.
Delivered The number of email messages that were delivered successfully.
BouncedThe percentage of contacts who did not receive the email campaign as intended because it bounced. This can be either a soft bounce or a hard bounce.
(Total bounces / total sent) * 100
Unsubscribed The percentage of contacts who have unsubscribed from the email campaign by clicking the Unsubscribe link in the email message.
(Total unsubscribed / total sent) * 100
Spam complaints The number of contacts that have marked the email message as spam.
The Landing pages report
This report lists the most successful landing pages that your email campaign leads to. The landing pages are evaluated according to:
• Most valuable – the landing page that has generated the highest value per visit.• Most relevant – the landing page that has generated the highest value.• Most clicked – the landing page where the highest number of contacts have clicked a link.
Page 74 of 98
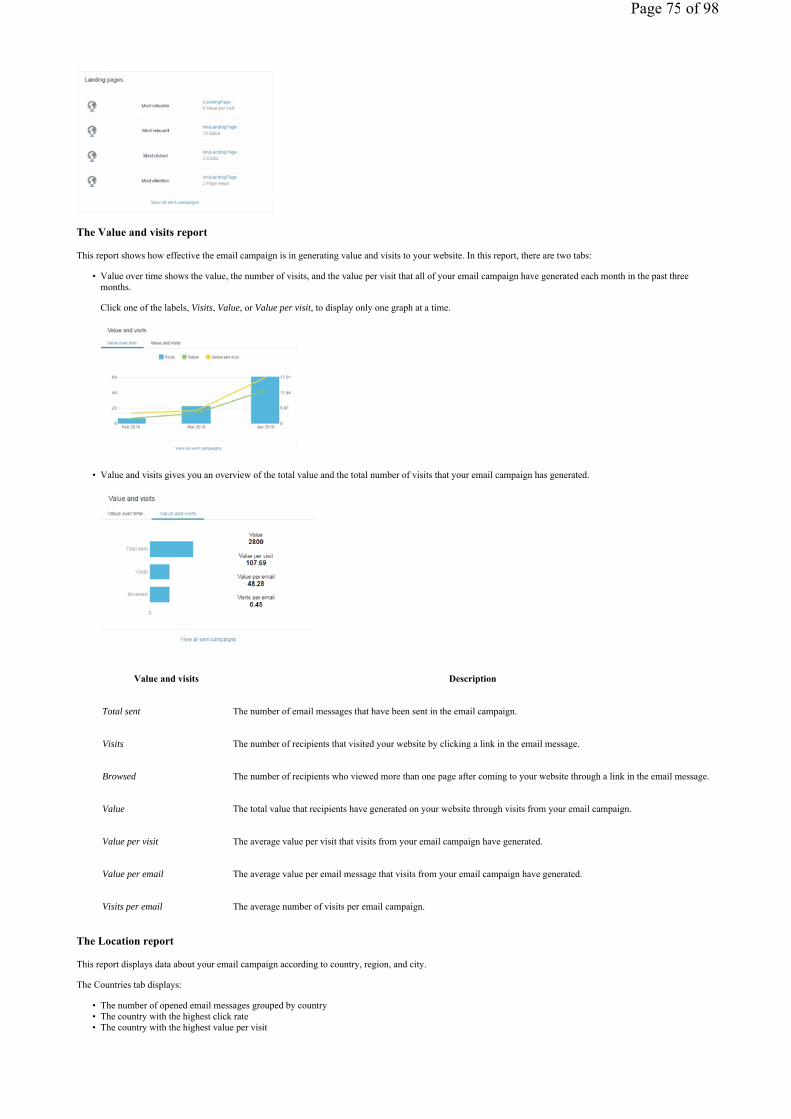
The Value and visits report
This report shows how effective the email campaign is in generating value and visits to your website. In this report, there are two tabs:
• Value over time shows the value, the number of visits, and the value per visit that all of your email campaign have generated each month in the past three months.
Click one of the labels, Visits, Value, or Value per visit, to display only one graph at a time.
• Value and visits gives you an overview of the total value and the total number of visits that your email campaign has generated.
Value and visits Description
Total sent The number of email messages that have been sent in the email campaign.
Visits The number of recipients that visited your website by clicking a link in the email message.
Browsed The number of recipients who viewed more than one page after coming to your website through a link in the email message.
Value The total value that recipients have generated on your website through visits from your email campaign.
Value per visit The average value per visit that visits from your email campaign have generated.
Value per email The average value per email message that visits from your email campaign have generated.
Visits per email The average number of visits per email campaign.
The Location report
This report displays data about your email campaign according to country, region, and city.
The Countries tab displays:
• The number of opened email messages grouped by country• The country with the highest click rate• The country with the highest value per visit
Page 75 of 98

The Top regions tab and the Top cities tab display the number of opened email campaigns and the number of clicks grouped by region and city.
The Technology report
This report displays data according to device, operating system, and browser.
• The Device category tab displays the number of opened email campaigns and the number of clicks grouped by the type of device that the contacts have used. In addition, you can see:
◦ Highest open rate – the device type from which the highest number of contacts have opened the email message.◦ Highest click rate – the device type from which the highest number of contacts have clicked a link in the email message.◦ Most valuable – the device type from which contacts have generated the highest value to your website.◦ Most value per visit – the device type from which contacts have generated the highest value per visit on your website.
• The OS tab displays the reporting data according to the operating system that the contacts have used:◦ Opens – the number and percentage of opened email messages. ◦ Clicks – the number and percentage of clicks in your email message.◦ Value – the value and the percentage of the value that your email campaign have generated.
• The Browser tab displays the number of opened email messages, clicks, and the value generated from the email campaign according to the recipient's browser.
Send feedback about the documentation to [email protected].
Edit EXM default settings You must specify the EXM default settings on the first launch of the EXM application. You can later edit these default settings, either in the EXM application or in the Content Editor.
This topic describes how to:
• Edit EXM default settings in the EXM application• Edit EXM default settings in the Content Editor
Edit EXM default settings in the EXM application
To edit EXM default settings in the EXM application:
1. On the EXM Dashboard, on the top ribbon, click Default Settings.
2. In the Default Settings dialog box, edit the default settings. The Base URL and From email fields are required. Click OK to save the changes.
Page 76 of 98

Note
If your EXM solution has more than one manager root, changes to the default settings apply to the currently selected one. Use the root switcher to change the current manager root, if necessary.
Edit EXM default settings in the Content Editor
To edit EXM default settings in the Content Editor:
1. Expand the Content item and select the manager root item that you want to edit.2. On the Content tab, edit the default settings:
◦ In the Message Generation section, edit the Base URL and Preview base URL fields. The Base URL field is required.◦ In the Default Message Header section, edit the From Name, From Address and Reply To fields. The From Address field is required.
Send feedback about the documentation to [email protected].
EXM security roles Security roles give Sitecore users different access rights to different areas of a site. To use the EXM application, marketers should be assigned necessary access rights through one of the following security roles:
Role Description
EXM Users role
This role gives users access to all the functionality of the EXM application, except for the following:
• Changing default settings• Deleting messages• Editing engagement plans• Opening the Engagement Plan Monitor• Expanding the General tab:
◦ Modify the target device◦ Modify the Reply To value
EXM Advanced Users role This role provides the user with access rights to all the functionality of the EXM application. Only assign this role to users if you are sure you want to grant them full access to EXM.
Roles can also be assigned additional roles (‘roles in roles’). However, if this feature (the rolesInRolesManager parameter), is disabled in the Sitecore.configfile, you must assign these three additional Sitecore roles to enable users to edit the content of messages:
sitecore\Sitecore Client Users role – provides access to the Sitecore user interfaces.
• sitecore\Sitecore Client Authoring role – provides access to basic item editing features and applications.• sitecore\Sitecore Client Designing role – provides access to the Experience Editor Design Pane features that allow a user to set layout details associated with
items.
Page 77 of 98
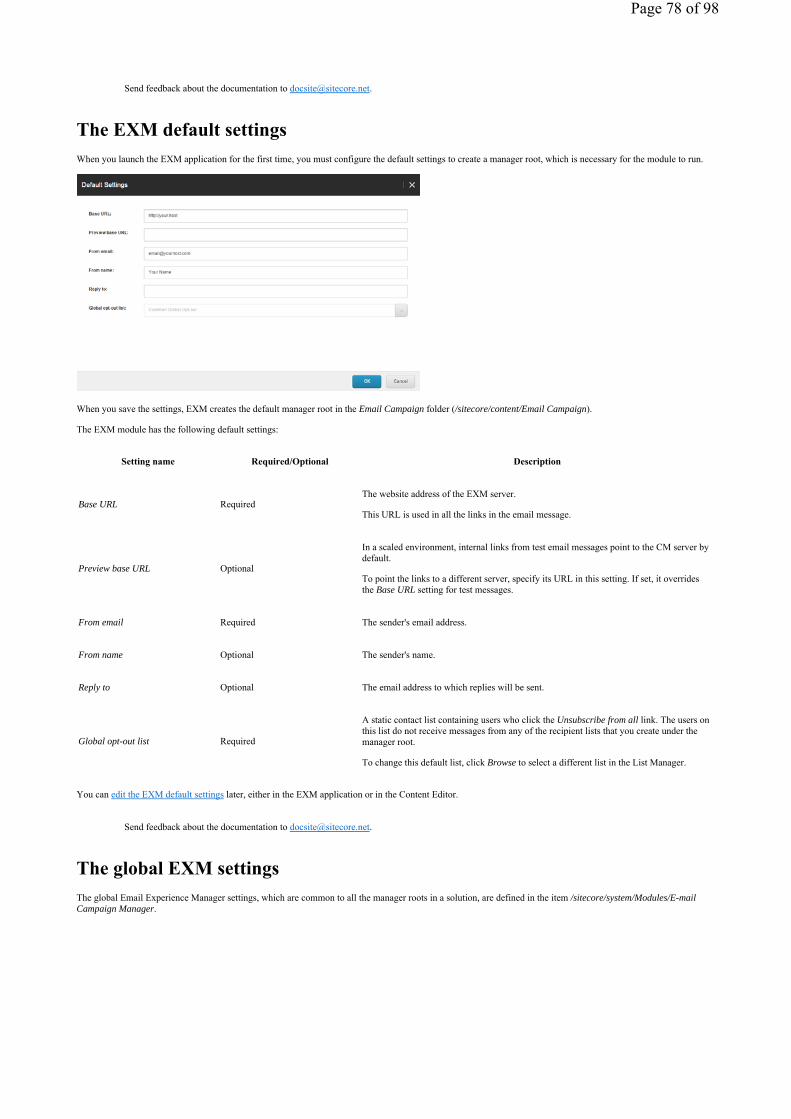
Send feedback about the documentation to [email protected].
The EXM default settings When you launch the EXM application for the first time, you must configure the default settings to create a manager root, which is necessary for the module to run.
When you save the settings, EXM creates the default manager root in the Email Campaign folder (/sitecore/content/Email Campaign).
The EXM module has the following default settings:
Setting name Required/Optional Description
Base URL Required The website address of the EXM server.
This URL is used in all the links in the email message.
Preview base URL Optional
In a scaled environment, internal links from test email messages point to the CM server by default.
To point the links to a different server, specify its URL in this setting. If set, it overrides the Base URL setting for test messages.
From email Required The sender's email address.
From name Optional The sender's name.
Reply to Optional The email address to which replies will be sent.
Global opt-out list Required
A static contact list containing users who click the Unsubscribe from all link. The users on this list do not receive messages from any of the recipient lists that you create under the manager root.
To change this default list, click Browse to select a different list in the List Manager.
You can edit the EXM default settings later, either in the EXM application or in the Content Editor.
Send feedback about the documentation to [email protected].
The global EXM settings The global Email Experience Manager settings, which are common to all the manager roots in a solution, are defined in the item /sitecore/system/Modules/E-mail Campaign Manager.
Page 78 of 98

You can also access this item by selecting Sitecore > All Applications > Email Campaign > Settings on the Sitecore Desktop.
This item contains the following settings:
Setting name Sample value Description
Default Root Parent <path to item> The parent item of the manager root.
No Send false When selected, the actual access to the SMTP server is suppressed and you receive the “Sending Disabled” message when you try to dispatch messages.
This item has three subfolders, which let you manage global module settings:
• Common Text• Tasks• System
Common TextThis folder contains various labels and messages that are used throughout the module.
TasksThis folder contains tasks for scheduled dispatches. The appropriate task is created automatically when you schedule a message dispatch for a specific time.
SystemThis folder contains the following system items:
• The App Center item – stores settings for the Sitecore Application Center in the EXM application.• The Root List item – contains the list of manager roots available in the root switcher. This item is updated automatically.• The Security Key item – contains the private system key used during the message generation. This key is generated automatically during the module
installation.
Send feedback about the documentation to [email protected].
Configuring the EXM UI representation According to the latest SPEAK guidelines, you should store all the user interface (UI) representation information of EXM in the Core database.
To access the Email Experience Manager folder, switch to the Core database and in the Content Editor, navigate to /sitecore/client/Applications/ECM.
Page 79 of 98

Items in the ECM folder provide configuration options related to the UI representation of every control and component of the EXM module, including but not limited to the following:
Folder path Details
ECM/Assets Contains the media resources used in EXM, such as icons and thumbnails
ECM/Component Contains the UI controls that are used on most of the module pages, such as buttons and tabs
ECM/Component/Navigation Contains navigation elements, including primary navigation links and the start page link
ECM/Component/Create Contains settings for retrieving the insert options for each message type - One-time, Subscription, and Triggered message
ECM/Dialog Renderings Contains the renderings for dialog boxes
ECM/Pages Contains all the major pages of the EXM module, including the home page and various message lists
ECM/Pages/Messages Contains the dedicated pages for creating new messages and the task pages for created messages
ECM/Pages/*/PageSettings Contains the UI controls that are specific for the selected page item
ECM/Renderings Contains the renderings for page elements that don't have a visual representation in the UI
ECM/Temp Contains the temporary files that are used, for example, to create message variants for A/B testing
ECM/Templates Contains the templates that are used for creating UI elements
Send feedback about the documentation to [email protected].
Engagement automation actions The EXM module provides two engagement automation actions in the default installation:
• Send Email Campaign Message• Edit Email Audience
The Engagement Plan Monitor performs these actions on the visitors who meet the conditions that you specify in the engagement plan. The items of both actions are stored in the Actions folder at:
/sitecore/system/settings/analytics/engagement automation/predefined items/actions
Page 80 of 98
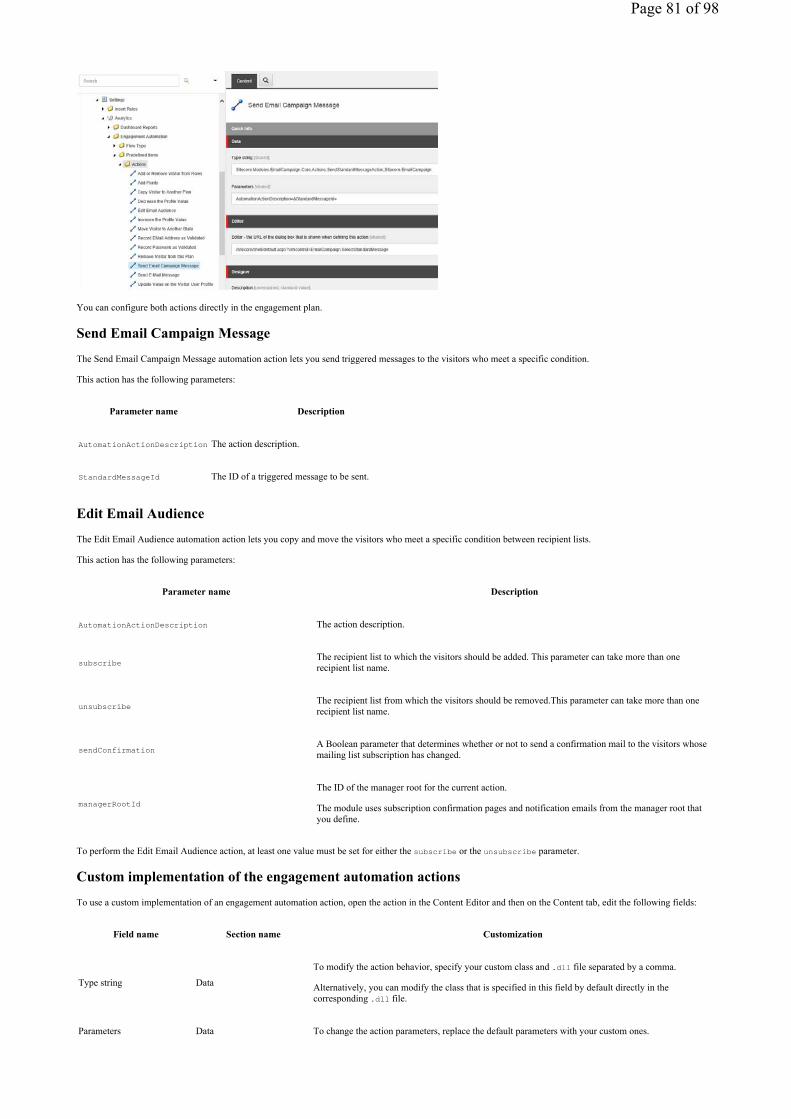
You can configure both actions directly in the engagement plan.
Send Email Campaign MessageThe Send Email Campaign Message automation action lets you send triggered messages to the visitors who meet a specific condition.
This action has the following parameters:
Parameter name Description
AutomationActionDescription The action description.
StandardMessageId The ID of a triggered message to be sent.
Edit Email AudienceThe Edit Email Audience automation action lets you copy and move the visitors who meet a specific condition between recipient lists.
This action has the following parameters:
Parameter name Description
AutomationActionDescription The action description.
subscribe The recipient list to which the visitors should be added. This parameter can take more than one recipient list name.
unsubscribe The recipient list from which the visitors should be removed.This parameter can take more than one recipient list name.
sendConfirmation A Boolean parameter that determines whether or not to send a confirmation mail to the visitors whose mailing list subscription has changed.
managerRootIdThe ID of the manager root for the current action.
The module uses subscription confirmation pages and notification emails from the manager root that you define.
To perform the Edit Email Audience action, at least one value must be set for either the subscribe or the unsubscribe parameter.
Custom implementation of the engagement automation actionsTo use a custom implementation of an engagement automation action, open the action in the Content Editor and then on the Content tab, edit the following fields:
Field name Section name Customization
Type string DataTo modify the action behavior, specify your custom class and .dll file separated by a comma.
Alternatively, you can modify the class that is specified in this field by default directly in the corresponding .dll file.
Parameters Data To change the action parameters, replace the default parameters with your custom ones.
Page 81 of 98

Editor Editor To show a custom dialog box when defining the action in the engagement plan, specify its URL.
Send feedback about the documentation to [email protected].
EXM logging The Email Experience Manager (EXM) has its own dedicated log file that is stored in the data/logs folder. The name of the log file is generated automatically in this format: Exm.log.<date>.<time>.txt.
Note
Any exceptions that EXM does not catch appear in the Sitecore log file, which is also located in the data/logs folder.
You can configure EXM logging, for example the format of the log file name, in the Sitecore.EmailExperience.Core.config file, in the log4net section:
<log4net>
<logger name="Sitecore.EXM" additivity="false">
<level value="INFO" />
<appender-ref ref="ExmLogFileAppender" />
</logger>
<appender name="ExmLogFileAppender" type="log4net.Appender.SitecoreLogFileAppender, Sitecore.Logging">
<file value="$(dataFolder)/logs/Exm.log.{date}.txt" />
<appendToFile value="true" />
<layout type="log4net.Layout.PatternLayout">
<conversionPattern value="%4t %d{ABSOLUTE} %-5p %m%n" />
</layout>
<encoding value="utf-8" />
</appender>
</log4net>
Send feedback about the documentation to [email protected].
IIS access If your website requires authentication on IIS level, you can specify the appropriate IIS user credentials in the following settings in the Sitecore.EmailExperience.Core.config file.
Setting name Sample value Description
IIS.User serviceuser If anonymous access is disabled, log in with this user name.
IIS.Password 12345 If anonymous access is disabled, log in with this password.
If anonymous access in IIS is enabled, you can leave these settings blank.
Send feedback about the documentation to [email protected].
The default channel ID of new email campaign items When you send an email campaign, the Email Experience Manager creates a new email campaign item and adds a channel ID to the campaign item.
By default, the channel is Email Marketing. You can change the default channel ID in the CampaignClassification.Channel setting in the Sitecore.EmailExperience.Core.config file.
<!--The Channel Id associated with the campaign-->
<setting name="CampaignClassification.Channel" value="{DDAFB85B-1511-48B8-9374-2A8A1F371645}" />
For the value of this setting, use the item ID of the channel item that you want to use as the default.
Page 82 of 98

When a recipient clicks a link in an email, Sitecore uses the channel ID in the campaign item to track the campaign.
You can read the channel ID in a campaign item using the Sitecore Taxonomy API:
var campaignActivity = DefinitionManagerFactory.Default.GetDefinitionManager<ICampaignActivityDefinition>().Get(campaignId, CultureInfo
var channelId = campaignActivity.ChannelUri.TaxonId.ToGuid();
Send feedback about the documentation to [email protected].
The EmailValidation setting When a user submits an email address, Email Experience Manager uses the EmailValidation setting to verify that the string is in valid email format.
The EmailValidation setting takes a regular expression for email validation as a value.
The default regex is not RFC compliant and does not cater for all cases. To address specific regional use cases or business needs, you should use a custom regular expression.
The EmailValidation setting is located in the <sitecore>/<settings> section of the EXM configuration file:
\files\App_Config\Include\EmailExperience\Sitecore.EmailExperience.Core.config
You can replace the default value with your custom regex:
<setting name="EmailValidation" value="^[a-zA-Z0-9_-]+(?:\.[a-zA-Z0-9_-]+)*@(?:[a-zA-Z0-9](?:[a-zA-Z0-9-]*[a-zA-Z0-9])?\.)+[a-zA-Z0-9](
The recommended way to modify the setting is to comment out the default value or to override the configuration file to keep a record of the initial value.
Send feedback about the documentation to [email protected].
The EXM configuration files An overview of the configurations files in EXM and the servers where you must deploy them:
Configuration file CM (Primary) CM CD Processing Reporting xDB
Cloud
Sitecore.EDS.Core.config
Sitecore.EDS.Dyn.Client.config
Sitecore.EDS.Providers.Dyn.config.disabled
Sitecore.EDS.Providers.Dyn.Sync.config.disabled
Page 83 of 98

Sitecore.EDS.Providers.CustomSmtp.config
Sitecore.EDS.Providers.CustomSmtp.Sync.config
Sitecore.EmailExperience.AnalyticsProcessing.config
Sitecore.EmailExperience.ContentDelivery.config
Sitecore.EmailExperience.ContentManagement.config
Sitecore.EmailExperience.ContentManagementPrimary.config
Sitecore.EmailExperience.Core.config
Sitecore.EmailExperience.ExperienceAnalytics.Api.config
Sitecore.EmailExperience.ExperienceAnalytics.Client.config
Sitecore.EmailExperience.ExperienceAnalytics.Aggregation.config
Sitecore.EmailExperience.ExperienceAnalytics.Reduce.config
Sitecore.EmailExperience.MessageHandling.config
Sitecore.EmailExperience.Reporting.config
Sitecore.EmailExperience.UI.config
Sitecore.ExM.Framework.config
Sitecore.ExM.Framework.ContentDelivery.config
Sitecore.ExM.Framework.ContentManagement.config
Sitecore.ExperienceProfile.Reporting.Sitecore.EmailExperience.ExperienceProfile.config
Send feedback about the documentation to [email protected].
The EXM configuration settings To configure the Email Experience Manager and to change the default settings shipped with EXM, you can edit the EXM configuration files on the Content Management and Content Delivery instance located in \App_Config\Include\EmailExperience\:
• Sitecore.EmailExperience.ContentManagement.config• Sitecore.EmailExperience.ContentDelivery.config• Sitecore.EmailExperience.Core.config• Sitecore.ExM.Framework.config• Sitecore.EmailExperience.ContentSearch.Solr.config
In all the files, the settings are located in the <sitecore>/<settings> section.
Sitecore.EmailExperience.ContentManagement.configThe Sitecore.EmailExperience.ContentManagement.config file contains the following settings:
Setting Example Description
NumberThreads 4
Page 84 of 98

Specify how many threads you want to use for sending messages. Use this setting for performance tuning.
The number must be equal to the exm/eds/connectionPoolSettings/maxPoolSize setting.
MaxGenerationThreads 8 Specify how many sending threads that can generate messages at the same time. The default value is Environment.ProcessorCount * 2.
DispatchEnqueueBatchSize 300 Specify the number of recipients in each batch that is added to the dispatch queue.
DispatchEnqueueThreadsNumber 2 Specify the number of threads that must add recipient batches to the dispatch queue.
CheckContactSubscriptionAfterDispatchPause false Set to true to check the contact subscription when resuming a dispatch that was paused.
ConfirmationPeriod 10Specify the number of days after which Sitecore should delete a contact who used a subscription control to subscribe to a mailing list, but did not confirm the subscription.
EXM.AttachmentTotalSizeInBytes 7340032 Specify the maximum size in bytes of all the attachments for a message. The default value is 7340032.
MtaEmulation.Active false Set to true to enable MTA emulation mode.
MtaEmulation.MinSendTime 200
Specify the minimum amount of time in milliseconds spent to emulate the sending of a single email. Use this in conjunction with MtaEmulation.MaxSendTime to mimic the behavior of Sitecore XP to MTA round-trip time.
MtaEmulation.MaxSendTime 400 Specify the maximum amount of time in milliseconds spent to emulate the sending of a single email.
MtaEmulation.FailProbability 0.01 Specifies the probability of connection failure into your emulation.
ResetTimeout 3600 Specify the period in seconds after which the module considers an automated message as failed and tries to resend it.
StandardMessages.DefaultGlobalOptOutList <relative path to the item> Specify the path of the default global opt-out contact list that should be used for a new manager root.
StandardMessages. SubscriptionConfirmation <relative path to the item>Specify the path to the message that a contact should receive after subscribing to a mailing list. This message contains the subscription confirmation link.
StandardMessages. SubscriptionNotification <relative path to the item>Specify the path to the message that a contact should receive after clicking the confirmation link in the subscription confirmation message.
StandardMessages. UnsubscribeNotification <relative path to the item> Specify the path to the message that a contact should receive after opting out of a mailing list.
StandardMessages.UnsubscribeFromAllNotification <relative path to the item> Specify the path to the message that a contact should receive after opting out of all mailing lists.
StandardMessages. DispatchCompleted <relative path to the item>Specify the path to the message that should be sent to the email address specified in the Dispatch Process Notifications section when the dispatch process is finished.
StandardMessages. TriggeredNotification <relative path to the item> Specify the path to the activation status message of an automated message.
AutomationStatesHandler.RequestScheme http Specify the scheme that should be used for requests to automation states handler.
ContactListsHandler.RequestScheme http Specify the scheme that should be used for requests to the contact lists handler.
Page 85 of 98

Sitecore.EmailExperience.ContentDelivery.configThe Sitecore.EmailExperience.ContentDelivery.config file contains the following setting:
Setting Example Description
EXM.DuplicateProtectionInterval 300
For two email events that relate to the same message and contact, specify the maximum interval (in seconds) between the events for them to be considered as duplicate events. If the two events occur within this time frame, only the first email event is stored.
This value is specified in seconds.
Sitecore.EmailExperience.Core.configThe Sitecore.EmailExperience.Core.config file contains the following settings:
Setting Example Description
PrivateKey ECM_Key
Specify the private key for data encrypting or decrypting of contact_id.
Note
This is only used if you enable encryption for legacy links.
DispatchUserAgent ECM Dispatch Specify the name of the UserAgent that you want to use to request pages for rendering emails in the dispatch process.
EXM.DefaultEventSiteName exmSpecify the name of the website that email events, such as Message sent and Message undelivered, should be associated with in Experience Analytics.
EXM.OpenHandlerPath /sitecore/RegisterEmailOpened.ashx Specify the path to the handler that processes the email open events.
EmailValidation Any valid regex Specify the regular expression that you want to use for email validation.
MaxMessageFolderSize 50
Specify the maximum number of messages or message-related campaigns, tests, etc. that EXM can create in a single folder. If there are more messages than this number, a new folder is created.
PhoneFieldName Phone number
Specify the contact phone number of a Sitecore user profile. This property was added to the Sitecore.EmailExperience.Core.config file because a corresponding field does not exist in the default user profile in Sitecore XP. You should change the value of this setting if you already have the phone number field in your custom user profile.
LanguageFieldName ContentLanguage Specify the name of the property in a user profile that you want to use as the preferred language for the contact.
ShellSiteName shell Specify the name of the Shell website. It must correspond to the one in your Sitecore.config file.
IIS.User serviceuser Specify the user name that you can log in with if anonymous access is disabled.
IIS.Password 12345 Specify the password that you can log in with if anonymous access is disabled.
QueryStringKey.AnalyticsContactId ec_contact_id Used by the module to build query strings for generating messages.
QueryStringKey.EcmId ec_id
QueryStringKey.Recipient ec_recipient
Page 86 of 98

QueryStringKey.Subscription ec_subscr
QueryStringKey.MessageId ec_message_id
QueryStringKey.Campaign ec_camp Specify the key for identifying email campaign on the query string.
QueryStringKey.ExmEncryptedQuery ec_eq Specify the key for identifying the module's page requests.
QueryStringKey.RedirectUrl ec_url Specify the key for identifying the target URL in a redirect request.
UrlValidation Any valid regex Specify the regular expression that you want to use for URL validation in places where users enter URLs.
ContentSearch.MasterIndexName sitecore_master_index Specify the name of the Master database index that you want to use for message search in EXM.
CampaignClassification.Channel {DDAFB85B-1511-48B8-9374-2A8A1F371645}
Specify the channel ID that you want to add to the email campaign item when a new email campaign is created. The channel ID is used to track the email campaign when a recipient clicks a link in a message.
Sitecore.ExM.Framework.configThe Sitecore.ExM.Framework.config file contains the following setting:
Setting Example Description
EXM.Debug false Set this to true to enable verbose logging in Sitecore log files. Use to troubleshoot EXM problems.
Sitecore.EmailExperience.ContentSearch.Solr.configThis configuration file is disabled by default (Sitecore.EmailExperience.ContentSearch.Solr.config.disabled) and EXM is set up to use the Lucene search engine.
To use the Solr search engine, for example when you configure EXM in a scaled environment, you must enable the Sitecore.EmailExperience.ContentSearch.Solr.config file.
Sitecore.EDS.Providers.CustomSmtp.configThe Sitecore.EDS.Providers.CustomSmtp.config file contains the following settings:
Element Settings Description
proxySettings
enabled Set to true, to request the SMTP server via a proxy server.
hostName Specify the proxy server IP address or the DNS name.
authMethod Specify the HTTP authentication method of the proxy server. The valid values are Basic and NTLM.
password Specify the password to use when logging into the proxy server. For the SOCKS4 proxy type, this value is ignored.
username Specify the user name to use when logging into the proxy server.
port Specify the proxy server port.
connectionType
Specify the type of the proxy server. The valid values are:
• None• HTTP• SOCKS4• SOCKS5
Page 87 of 98

smtpSettings server Specify the SMTP server address or the IP address.
port Specify the port number of the SMTP server.
loginDomain Specify the domain to use when logging into the SMTP server.
userName Specify the user name to use when logging into the SMTP server.
password Specify the password for accessing the SMTP server.
authenticationMethod
Specify the SMTP authentication method. The valid values are:
• NONE• LOGIN• PLAIN• CRAM-MD5• NTLM
startTls Set to true to enable the use of the SSL/TLS connection prior to authenticating and sending email.
proxySetting Specify the proxy settings to request the SMTP server via a proxy server.
connectionPoolSettings maxPoolSizeSpecify the number of connections that can be created in the connection pool.
The number must be equal to the NumberThreads setting in the Sitecore.EmailExperience.ContentManagement.config file.
maxConnectionRetriesSpecify the maximum number of retries allowed for obtaining a connection from the pool.
If a connection is not obtained within the specified number of retries, a connection timeout exception is logged in the log file.
maxConnectionIdleTime Specify the time from the last connection usage after which a connection is removed from the pool.
maxConnectionWaitTime
Specify the maximum time that the connection pool should spend trying to obtain a specific connection if it failed the previous attempt.
If a connection pool exceeds the specified time, a connection timeout exception is logged in the log file.
delayBetweenConnectionRetries Specify the time that the connection pool should delay between retrying to obtain a connection.
Sitecore.EDS.Providers.CustomSmtp.Sync.configThe Sitecore.EDS.Providers.CustomSmtp.Sync.config file contains the following settings:
Element Settings Description
pop3Setting server Specify the POP3 server IP address or the DNS name.
port Specify the POP3 server port.
userName Specify the user name to use when logging into the POP3 server.
password Specify the password to use when logging into the POP3 server.
useSsl Specify whether the POP3 server uses SSL for transferring messages.
startTls Set to true to use the TLS connection prior to authenticating and retrieving of bounces.
proxySettings Specify the proxy settings to request the POP3 server via a proxy server.
receiversCollection settings Specify the POP3 settings collection.
Page 88 of 98

bounceInspector Specify an inspector that verifies a message mime as a bounce and determines the type of bounce.
environmentIdentifier Specify the environment identifier to use to identify the Sitecore instance.
Scheduling agent Specify the agent for synchronizing POP3 bounces.
method Specify the name of the method in the agent class to that must be executed.
interval Specify the interval that the agent must be is executed as a TimeSpan.
receviersCollection Specify a receivers collection by providing multiple Pop3 accounts for bounces collection.
Send feedback about the documentation to [email protected].
The EXM connection pool settings Use the connectionPoolSettings to improve the performance of delivery output.
Specify the connection pool settings in the <eds><connectionPoolSettings> element under the <eds> element in the Sitecore.EDS.Providers.Dyn.configfile.
Setting Default value Description
maxPoolSize 10Specify the number of connections that can be created in the connection pool.
The number must be equal to the NumberThreads setting in the Sitecore.EmailExperience.ContentManagement.config file.
maxConnectionRetries 3
Specify the maximum number of retries allowed for obtaining a connection from the pool.
If a connection is not obtained within the specified number of retries, a connection timeout exception is logged in the log file.
maxConnectionIdleTime 00:10:00:000 Specify the time from the last connection usage after which a connection is removed from the pool.
maxConnectionWaitTime 00:00:30:000
Specify the maximum time that the connection pool should spend trying to obtain a specific connection if it failed the previous attempt.
If a connection pool exceeds the specified time, a connection timeout exception is logged in the log file.
delayBetweenConnectionRetries 00:00:10:000 Specify the time that the connection pool should delay between retrying to obtain a connection.
The default values may not be apply to your setup of EXM, so you should adjust the connectionPoolSettings if you see any ConnectionTimeoutExceptions in the log file. Use the following calculation method as a guide for specifying the values:
delayBetweenConnectionRetries * maxConnectionRetries = maxConnectionWaitTime
For example, 10 seconds * 3 = 30 seconds.
Send feedback about the documentation to [email protected].
Walkthrough: Configuring EXM in a scaled environment If your Sitecore solution works in a scaled environment, you must configure the Email Experience Manager (EXM) module to work in this environment.
A scaled environment usually consists of one content management server, and one or more content delivery server(s). You can configure servers for a specific purpose (for example, content management, content delivery, or processing) by enabling or disabling the relevant configuration files on each Sitecore instance.
In the standard multiserver Sitecore environment, all the content management and content delivery instances share the Core and Web databases, and all the content management instances share the Master database. This means that you have to use the same connection strings to the databases for the configuration file of each server.
The following diagram illustrates the connections between the servers and the content databases in a standard multiserver Sitecore setup:
Page 89 of 98

A multiserver environment also shares the collection database (MongoDB) and the reporting SQL Server database.
This walkthrough outlines how to:
• Configure a content management server• Configure a content delivery server• Configure a processing server• Configure a reporting server
Note
Make sure you also configure the List Manager for the scaled environment.
Configure a content management serverTo configure a content management server:
Install Sitecore Experience Platform and configure it according to the Sitecore scaling recommendations for content management servers.
Note
If you run Sitecore 8.1 update 3 or later updates, make sure to enable the interaction registry on your content management servers.
1. Install the EXM module according to the EXM installation guide.
Important
The EXM installation package that you download from dev.sitecore.net includes five zip packages – the Email Experience Manager and four zip files that match specific server roles. Do not use the files intended for other servers on the content management server.
2. In the \App_Config\Include\EmailExperience\ folder, enable the Sitecore.EmailExperience.ContentSearch.Solr.config file.
Configure a content delivery serverTo configure a content delivery server:
1. Install Sitecore Experience Platform and configure it according to the Sitecore scaling recommendations for content delivery servers.
Important
In the Sitecore.Analytics.Tracking.config file, ensure that the value of the Analytics.ClusterName setting is the hostname of the content delivery server. This is required for a scaled environment to avoid contacts being locked when running EXM. If there is more than one content delivery server in your environment, use the same value for each server.
In addition, make sure that the content management server can reach the content delivery server through HTTP using the hostname that you have specified in the Analytics.ClusterName setting of the content delivery server.
2. Add a connection string to the EmailCampaignClientService web service, for example:
<add name="EmailCampaignClientService" connectionString="url=http://<CMServerHost>/sitecore%20modules/web/emailcampaign/ecmclients
3. In the \App_Config\ConnectionStrings.config file:◦ Add the exm.web connection string, for example:
<add name="exm.web" connectionString="user id=user;password=password;Data Source=(server);Database=Sitecore_EXM_WEB" />
◦ Add the two connection strings EXM.CryptographicKey and EXM.AuthenticationKey. The keys must be represented in hexadecimal format by 64 characters.
4. Extract the relevant Email Experience Manager – Content Delivery package to your website root folder on the content delivery server.5. If you no longer want to use the primary CM server as a content delivery server, disable the Sitecore.EmailExperience.ContentDelivery.config
configuration file and remove any Sitecore.EmailCampagin.Cd*.dll assemblies from the bin folder.
Configure a processing serverTo configure a processing server for Analytics data processing and aggregation:
1. Install Sitecore Experience Platform and configure it according to the Sitecore scaling recommendations for processing servers.2. Extract the relevant Email Experience Manager - Analytics Processing package to your website root folder on the processing server.3. Disable the Sitecore.EmailExperience.AnalyticsProcessing.config configuration file on the primary CM server to stop processing Analytics data.
Configure a reporting serverTo configure a reporting server:
1. Install Sitecore Experience Platform and configure it according to the Sitecore scaling recommendations for reporting servers.2. Extract the relevant Email Experience Manager - Reporting package to your website root folder on the reporting server.
Page 90 of 98

3. Disable the Sitecore.EmailExperience.Reporting.config configuration file on the primary CM server to deactivate configuration that is only relevant for reporting servers.
Send feedback about the documentation to [email protected].
Create a new manager root A manager root contains all the settings that control how users work with the Email Experience Manager module.
The module creates a manager root when you configure the EXM default settings for the first time after installation. If you need more than one manager root, for example, in a multisite environment, you can create a manager root manually.
To create a new manager root:
1. In the content tree, right-click the Content item, click Insert, and then click Insert from Template.
2. In the Insert from Template dialog box, select the Manager Root template at /sitecore/templates/Branches/Email Campaign/Manager Root. If necessary, modify the default item name. Click Insert.
3. Open the new manager root item and on the Content tab, configure the manager root settings.
Now you can use the newly created manager root in your solution.
Page 91 of 98

Send feedback about the documentation to [email protected].
The manager root settings To access the manager root settings, select the manager root item and then select the Content tab on the right.
The manager root item contains the following sections:
• Message Generation• Subscription Control• Delivery Status Notifications• Default Message Header
Message GenerationThis section contains the following fields:
Field Sample value Description
Base URL http://your.host Specify the website address for links in email messages and for images that are hosted on the website.
Preview base URL http://localhost Specify a website address for links in test email messages if you want to override the Base URL setting for test messages.
Encoding utf-8 Specify the encoding of the outgoing email messages.
Embed Images true Select to embed images in the email message or to insert links to images.
Track Message Open true Select to embed a one-pixel image in the email message to track whether a recipient opens it.
Website Site Configuration Name websiteSpecify the name of the site configuration that should be used as the context site for generating the message body.
By default, website is specified, for example, <site name="website" ..>
Subscription ControlThis section contains the following fields:
Field Sample value Description
Already Unsubscribed <path to item> Specify the page to display when a recipient, who is already unsubscribed, clicks the unsubscribe link.
E-mail Sent Confirmation Page <path to item>Specify the confirmation page that you want recipients redirected to after they have submitted a subscription form. Specify the relative path to your custom page item.
By default, this field is empty which means that the recipient stays on the same page.
Final Confirmation Page <path to item>
Page 92 of 98

Specify the confirmation page, that you want recipients redirected to after they have changed the mailing list subscriptions, for example, if they cancel a subscription for a specific mailing list.
By default, this field is empty which means that the recipient stays on the same page.
Global opt-out listAll Lists/E-mail Campaign Manager/System/Common Global Opt-out
Specify the path to the contact list that you want recipients who click the Unsubscribe from all link added to.
The recipients on this list do not receive messages from any of the recipient lists under this manager root.
Default Subscriber Profile Profiles/Subscriber Specify the user profile for all the recipients of this manager root.
Undelivered Max 10 Specify the maximum number of temporary delivery failures per recipient.
Subscription Page <path to item> The page that is displayed if an unidentified visitor wants to change their subscription.
Delivery Status NotificationsYou can configure the DSN settings in this section only if you use a custom message transfer agent (MTA). If you use the Sitecore MTA, you can ignore this section.
This section contains the following fields:
Field Sample value Description
Collect Notifications cleared
Specify whether to collect DSNs from the email message box used by the module for sending email messages.
If this check box is cleared, the module ignores the rest of the configurations in the Delivery Status Notifications section and behaves as though all the messages are delivered successfully.
If this check box is selected, but some of the fields in the Delivery Status Notifications section are empty, these fields will be inherited from the manager root.
Return Address [email protected]
Specify the email address for collecting the DSNs. The MTA service sends DSNs to this address. The module gets DSNs from this address for analysis using POP3 protocol.
The following setting defines how frequently the module checks the Return Address email for DSNs:/sitecore/system/Tasks/Schedules/Email Campaign/Check DSN Messages
The module collects DSNs once a day by default.
POP3 Server pop.server.com Specify the POP3 server address/name.
POP3 SSL default Specify whether the POP3 server uses SSL for transferring messages.
POP3 Port 110 Specify the port for transferring messages from the POP3 server.
POP3 User Name serveruser Specify the POP3 server user name.
POP3 Password 12345 Specify the POP3 server user password.
Default Message HeaderIn this section, you can specify the From Name, From Address and Reply To fields for all the messages. The From Address field is required.
Send feedback about the documentation to [email protected].
Using EXM in multisite environments When you use the Email Experience Manager in multisite environments, you must differentiate between the sites and their manager roots. A manager root contains all the settings that control the user experience of the module. You can create additional manager roots manually.
By default, the module searches for the manager root under the item defined in the Default Root Parent setting of the /sitecore/system/Modules/E-mail Campaign Manager item.
Page 93 of 98

The location of the manager roots is defined in the /sitecore/system/Modules/E-mail Campaign Manager/System/Root List item. The module updates this item automatically.
In a multisite solution, the manager roots that relate to different sites can be located in different places in the content tree.
A user can have access to several manager roots. You can use standard Sitecore security applications to grant users permissions to specific manager roots.
Send feedback about the documentation to [email protected].
The configuration settings for collecting bounces If an error occurs during email delivery, the sender receives a bounce from the sender's mail server or from the recipient's mail server. When a server accepts a message for delivery, it also delivers a bounce if the delivery fails.
Depending on whether you use the Sitecore message transfer agent (MTA), EXM uses one of the following methods to collect the bounces.
Collect bounces using Sitecore MTABy default, EXM collects the bounced email campaigns on a scheduled interval using the Sitecore.EDS.Providers.Dyn.Tasks.PullBouncesAgent setting in the <scheduling> section in the Sitecore.EDS.Providers.Dyn.Sync.config file.
<agent type="Sitecore.EDS.Providers.Dyn.Tasks.PullBouncesAgent, Sitecore.EDS.Providers.Dyn" method="Run" interval="01:00:00">
…
<runInterval>01:00:00</runInterval>
<bouncesCount>500</bouncesCount>
</agent>
Setting Default value Description
interval 01:00:00 Specify the interval for when you want the Sitecore MTA to collect the bounces.
runInterval 01:00:00 Specify how far back from when you start the Sitecore MTA provider that you want EXM to collect bounces.
bouncesCount 500
Specify the default page size for the Dyn API. By default, 500 is the maximum number of records that is returned by Dyn.
Important
This setting must correspond to the limit that is set in the Dyn API.
Page 94 of 98

Collect bounces using a custom MTAIf you use a custom MTA, you can configure the bounce settings on the manager root, on the Content tab, in the Delivery Status Notifications section.
Setting Example Description
Collect Notifications cleared
Select this check box to collect bounces from the email address that is used to send your email campaigns. Any blank fields will inherit the values from the manager root.
If you clear this check box, the system ignores the delivery notification settings and behave as though all messages have been delivered successfully.
Return Address [email protected] Specify the email address that you want the MTA service to send bounces to.
POP3 Server pop.server.com Specify the POP3 server address/name. (mandatory)
POP3 SSL default Select if you want to the POP3 server to use SSL for transferring email campaigns.
POP3 Port 110 Specify the port for transferring messages from the POP3 server. (mandatory)
POP3 User Name serveruser Specify the POP3 server user name.
POP3 Password 12345 Specify the POP3 server user password.
The bounces are collected on a scheduled interval using the setting Sitecore.EDS.Providers.LocalMTA.Tasks.PullPop3BouncesAgent in the <scheduling>section of the Sitecore.EDS.Providers.LocalMTA.Sync.config file.
<agent type="Sitecore.EDS.Providers.LocalMTA.Tasks.PullPop3BouncesAgent, Sitecore.EDS.Providers.LocalMTA" method="Run" interval="00:01:
<param ref="exm/eds/receiversCollection" />
</agent>
Setting Default value Description
interval 01:00:00 Specify the interval during which you want the custom MTA to collect the bounces.
Send feedback about the documentation to [email protected].
Configuring the global opt-out list In an email, when a recipient clicks the Unsubscribe from all link, or a custom link with similar functionality, they are added to the global opt-out list and excluded from future mailings.
Page 95 of 98

You must define a global opt-out list for each manager root in the Email Experience Manager. You can choose a list in the Default Settings dialog box. The global opt-out list must be a static contact list and not a dynamic segmented list. Therefore, you can only choose from contact lists when you browse the List Manager.
When you create a new manager root, for example, at the first launch of the EXM module after installation, the default Common Global Opt-out list is selected. The EXM also uses this default list if the manager root is misconfigured when the global opt-out list is requested, for example, when you open the Default Settings dialog, or when a recipient unsubscribes from all messages.
You can configure the default common opt-out list in the StandardMessages.DefaultGlobalOptOutList setting in the Sitecore.EmailExperience.ContentManagement.config file:
<!--Specifies the path of the default global opt-out contact list.-->
<setting name="StandardMessages.DefaultGlobalOptOutList" value="/sitecore/system/List Manager/All Lists/E-mail Campaign Manager/System/
If this list does not exist when it is requested, the EXM module creates it automatically. However, the module does not create the whole path. If you want to change the configuration settings, ensure that the folder structure that you specify exists in the content tree.
Implementation Details
The ManagerRoot class has the GlobalSubscription property that contains an object of the IGlobalSubscription type. This object can interact with the global opt-out list using the following methods:
• AddToDefaultExcludeCollection() – adds recipients to the default global opt-out list.• RemoveFromDefaultExcludeCollection() – removes recipients from the default global opt-out list.• IsInDefaultExcludeCollection() – checks whether a recipient is in the default global opt-out list.• IsInAnyExcludeCollection() – checks whether a recipient is in any of the global opt-out lists.• GetAllExcludeCollections() – retrieves a collection of all the global opt-out lists.
Note
The IsInAnyExcludeCollection() and GetAllExcludeCollections() methods are intended for processing multiple global opt-out lists. EXM 3.1 supports a single global opt-out list. Therefore, in this version of the module, the methods only read the default global opt-out list.
Send feedback about the documentation to [email protected].
The EXM double opt-in process The Email Experience Manager provides a series of controls and messages that help you to set up and customize a double opt-in subscription process.
The EXM double opt-in process consists of:
1. Signing up via the self-service subscription control. EXM provides a default subscription form control.2. Redirecting to a confirmation page (optional). 3. Sending a confirmation email message with a subscription confirmation link. 4. Adding a subscriber to the database. After clicking the subscription confirmation link, a new subscriber is assigned a unique ID and is added to the database.5. Sending a subscription notification message.
By default, subscribers stay on the same page after changing the mailing list subscriptions. However, you can create custom confirmation pages and provide the module with the paths to start redirecting subscribers. You can also customize email campaigns that the module sends to subscribers during the subscription process.
You cannot disable the subscription confirmation or otherwise switch to single opt-in.
Customizable settings of the double opt-in processThe EXM double opt-in process provides the following customizable settings:
Setting name Setting location Description
E-mail Sent ConfirmationPage Manager root item > Subscription control
Redirect subscribers to a confirmation page after submitting the subscription form. You specify the relative path to your custom page item. By default, this field is empty which means that the visitor stays on the same page.
StandardMessages.SubscriptionConfirmation Sitecore.EmailExperience.ContentManagement.config
Use a custom subscription confirmation message. You replace the default value with the relative path to your custom message item.
The default value is: Service Messages/Self-Service Subscription/Subscription Confirmation
Final Confirmation Page Manager root item > Subscription control
Redirect subscribers to a final confirmation page after clicking the subscription confirmation link. You specify the relative path to your custom page item. By default, this field is empty which means that the visitor stays on the same page.
StandardMessages.SubscriptionNotification Sitecore.EmailExperience.ContentManagement.config
Use a custom subscription notification message. You replace the default value with the relative path to your custom message item.
The default value is: Service Messages/Self-Service Subscription/Subscription Notification
Page 96 of 98

ConfirmationPeriod Sitecore.EmailExperience.ContentManagement.configSet a custom confirmation period in days. You specify how many days the subscription confirmation link expires.
The default value is 10 (days).
Send feedback about the documentation to [email protected].
The Subscription Form control The EXM module contains the Subscription Form control that you can add to webpages:
/sitecore/layout/Sublayouts/Email Campaign/Subscription Form.
When you add the Subscription Form control to a page, in the Control Properties dialog box, in the Control Options group, you can change the properties that are specific to the control.
The Subscription Form control has the following module-specific properties:
Property Description
Show List
When this check box is selected, recipient lists specified in the Recipient Lists field of the control are displayed on the website. When users click Subscribe on the website, they are added to the selected mailing lists and excluded from the rest of the lists.
Otherwise, recipient lists are not displayed on the website and the user is subscribed to all the recipient lists specified in the Recipient Lists field.
Manager rootSpecify the manager root for the current subscription form control.
The module uses subscription confirmation pages and notification emails from the manager root that you select.
Recipient ListsSpecify the recipient lists to collect the recipients that opt-in to your mailings.
You can choose from the Contact lists that are available in the /sitecore/system/List Manager/All Lists folder.
Page 97 of 98
Exclude Lists Specify the recipient lists to collect the recipients that opt-out from your mailing list.
You can choose from the Contact lists that are available in the /sitecore/system/List Manager/All Lists folder.
Important
The number of exclude lists must be equal to the number of recipient lists that you select. The first exclude list corresponds to the first recipient list, the second exclude list corresponds to the second recipient list, and so on.
The Subscription Form control doesn't require visitors to authenticate before using the form to subscribe. Depending on the visitor status, EXM uses one of the following scenarios:
• If an authenticated visitor subscribes to a mailing list, the associated xDB contact is added to the corresponding recipient list.• If an authenticated visitor tries to subscribe to a mailing list that they are already included in using the same email address, the module requires them to submit
another email address.• If an authenticated visitor subscribes to a mailing using a new email address:
◦ The email address and contact identifier are updated in the database.◦ The contact is added to the corresponding recipient list.
• If an anonymous visitor subscribes to a mailing list:◦ A new xDB contact is created. The email address submitted by the visitor is used as the contact identifier.◦ The contact is added to the corresponding recipient list.
Important
Ensure that in the Sitecore.Analytics.Tracking.config file, the Analytics.ClusterName setting does not have an empty value to avoid contact locking while using the Subscription Form control. You can use the host name as the value of this setting.
Send feedback about the documentation to [email protected].
Page 98 of 98