Embed Size (px)
Citation preview

SIR-GTRC1 STREAMER GTRSIRIUS Satellite Radio Plug and Play
User and Installation Guide

SIR-GTRC1 Streamer GTR User and Installation Guide2
Safety Precautions ............................................................4FCC Warning .....................................................................5Cleaning the Receiver .......................................................5Package Contents .............................................................6Installation ........................................................................7 Location ........................................................................7 Mounting the Receiver .................................................7 Installing the Magnetic Antenna ...................................9 Connecting the Receiver ............................................12 Activating your SIRIUS Subscription ..........................13Optional Installation Kits ..................................................14 Custom Vehicle Installation Kit (SIR-GTRV1) ............14 Home Kit (SIR-GTRH1) ..............................................15SIR-GTRC1 Streamer GTR Receiver Operation ..........16 Controls and Features ................................................17 Remote Control ..........................................................18 Installing Batteries in the Remote Control ...............18 Changing Channels ....................................................19
CONGRATULATIONS! Your new Brix Labs SIR-GTRC1 Streamer GTR Plug and Play lets you enjoy SIRIUS Satellite Radio’s digital entertainment in your vehicle or home (Home Docking Kit SIR-GTRH1 sold separately). Use this guide to familiarize yourself with all of SIR-GTRC1’s features and capabilities.
Table of Contents
Display Button (DISP) ................................................20 Selecting Channels Directly .......................................21Advanced Features .......................................................21 Channel Presets (BAND) ...........................................21 Storing Channel Presets ..........................................21 Using Channel Presets ............................................22 Searching for a Channel Preset (P.TUNE Mode) ....22 Memory (MEMO) and Song Seek (S-Seek) Functions ..................................................23 Storing Artist Names, Song Titles, and Sports Teams to Memory ..............................24 Viewing Stored Alerts Stored in Memory ....................27 Deleting an Alert Stored into Memory ......................27 Activating the S-Seek Alert ......................................28 Jump Button ...............................................................29 Game Alert .................................................................31 Instant Replay ............................................................31 Using Instant Replay ...............................................33

SIR-GTRC1 Streamer GTR User and Installation Guide 3
Table of Contents (continued)
© 2005 SIRIUS Satellite Radio Inc. ® “SIRIUS,” the SIRIUS dog logo, channel names and logos are trademarks of Sirius Satellite Radio Inc. “NFL” and the NFL Shield logo, and the NFL Sunday Drive name and logo are registered trademarks of the National Football League. “NHL” and the NHL Shield are registered trademarks of the National Hockey League. “NBA” and the NBA silhouette logo are registered trademarks of NBA Properties Inc. Velcro is a registered trademark of Velcro Industries B.V. All other trademarks, service marks and logos are the property of their respective owners. All Rights Reserved.
FM Preset Button .......................................................37Menu Options .................................................................37 FM Transmitter ...........................................................38 FM Presets ..............................................................38 FM On/Off ................................................................39 Game Alert .................................................................39 Settings ......................................................................40 Jump Settings .............................................................41 Traffic .......................................................................41 JumpSet ..................................................................42 Display Options ..........................................................42 Memory Options .........................................................43 Automatic Memory Search ......................................43 Clear All Memory .....................................................43 Auto Select .................................................................44 Audio Level .................................................................44 Confirmation Tone ......................................................45 Parental Control .........................................................45 Lock/Unlock .............................................................45 Edit Code .................................................................46 Time Based Features .................................................48 Clock ........................................................................48 Format .....................................................................49
Time Zone ................................................................49 Daylight Savings Time .............................................49 Alarm ..........................................................................50 Set Alarm .................................................................50 Alarm Time ..............................................................50 Program Alert .............................................................50 Program Time/Day ...................................................51 Channel Number .....................................................52 Program Alert On/Off ...............................................52 Auto Shutdown ...........................................................52 Sleep Mode ................................................................53 Signal Indicator ...........................................................53 Factory Default ...........................................................54Troubleshooting ...............................................................56Specifications ..................................................................5712 MONTH LIMITED WARRANTY ..................................58
SIR-GTRC1 Streamer GTR User and Installation Guide4
damaged or broken, do not touch the liquid crystal fluid. The fluid can be dangerous to your health. If the liquid crystal fluid contacts your body or clothing, immediately wash it off with soap and water.
CautionTake the following precautions to keep the Receiver in proper working order:
• Do not open the Receiver.• When replacing a fuse, use only a new one with
the proper rating. Using a fuse with the wrong rating may cause the Receiver to malfunction.
• To prevent a short circuit when replacing a fuse, first disconnect the wiring harness.
Note:If the Receiver doesn’t seem to be working properly, turn the Receiver’s power off, wait 5 10 seconds, then turn the power on again.
Safety Precautions
WarningTake the following precautions to prevent fire and avoid personal injury:
• Be sure the Receiver is installed as described in the Installation Guide.
• The use suggestions contained in this User Guide are subject to any restrictions or limitations that may be imposed by applicable law the purchaser should check applicable law for any restrictions or limitations before installing and/or operating this Receiver.
• Failure to follow these safety instructions and warnings may result in a serious accident.
• To avoid short circuits, never put or leave any metallic objects (coins, tools, etc.) inside the Receiver.
• If the Receiver emits smoke or unusual odors, turn the power off immediately.
• Do not drop the Receiver, or subject it to strong shocks.
• If the LCD display on the Receiver becomes
!
!

SIR-GTRC1 Streamer GTR User and Installation Guide 5
FCC WarningThis equipment may generate or use radio frequency energy. Changes or modifications to this equipment may cause harmful interference unless the modifications are expressly approved in this User Guide. The user could lose the authority to operate this equipment if an unauthorized change or modification is made.
Note:This equipment has been tested and found to comply with Part 15 of the FCC Rules. These rules are designed to provide reasonable protection against harmful interference. This equipment may cause harmful interference to radio communications if it is not installed and used in accordance with these instructions. However, there is no guarantee that interference will not occur in a particular installation. If this equipment does cause harmful interference to radio reception, which can be determined by turning the equipment off and on, the user is encouraged to try to correct the interference by one of more of the following measures:
• Reorient or relocate the receiving antenna.
• Increase the separation between the other equipment and the Receiver.
• Connect the other equipment to a different circuit from that to which the Receiver is connected.
• Consult the dealer or an experienced radio technician for help.
WarningDo not operate the Receiver in a way that might divert your attention from driving safely. As a driver, you alone are responsible for safely operating your vehicle in accordance with traffic safety laws at all times.
Cleaning the ReceiverIf the Receiver becomes dirty, turn its power off and wipe it clean with a soft dry cloth. Do not use hard cloths, paint thinner, alcohol, or other volatile solvents to clean the Receiver. These may cause damage to the plastic or remove indicator characters.
!

SIR-GTRC1 Streamer GTR User and Installation Guide6
Package Contents
MEMO
MENU
BAND
DISP
P. TUNE
S-SEEK
1 2 3 4 5 6 7 8 9 0
001 Sirius Hits 1 001 Sirius Hits 1
U2U2
VertigoVertigo
POP 12:00PPOP 12:00P AA
1
MUTE
2 3
4 5 6
7 8
0
9
+
–MEMOBAND
DISPMENU
Surf
ace P
repa
ratio
n
Clea
ning
Kit
(To c
lean
a sur
face
of an
y
know
n / u
nkno
wn em
ulsio
ns
prio
r to a
pply
ing a
dhes
ives
.)
Streamer GTR SIR-GTRC1 Receiver
Magnetic Antenna
Streamer GTR Remote Control
Rubber Antenna Cable Cover/Tail & Adhesive Strip
Alcohol Swab andVelcro® Strip
Suction Cup Mount
Mounting Plate
Cigarette LighterPower Cord
User and Installation Guide
The following items are packaged with the SIR-GTRC1 Streamer GTR. Check the package to be all of the items are included. If any of the items are missing, please contact the dealer where you purchased the product.
SIR-GTRC1 Streamer GTR

SIR-GTRC1 Streamer GTR User and Installation Guide 7
InstallationInstallation of your SIR-GTRC1 Streamer GTR Receiver is easy:
1. Choose a location in your vehicle where you will mount the Receiver.
2. Mount the Receiver to the suction cup mount and attach the suction cup portion of the mount to the vehicle window, or use the velcro strip to mount the Receiver.
3. Install the magnetic antenna on the roof of the vehicle, and route the antenna cable to the Receiver.
4. Connect the power cord for the Receiver to your vehicle’s cigarette lighter.
5. Subscribe to the SIRIUS service and begin enjoying the SIRIUS entertainment!
LocationChoose a location in your vehicle where the Receiver will not block your vision, interfere with the vehicle controls, or obstruct the air bag. The location should be suitable for using the suction cup mount, such as the windshield or other flat, smooth surface, or a surface suitable for using the velcro mounting.
The location should be easily reachable and provide good visibility of the Receiver.
Mounting the ReceiverThe Receiver may be attached to the vehicle by using the suction cup mount, or by using the velcro strips. If you are using the suction cup mount, attach the mounting plate to the suction cup mount by using the provided bolts and hex nuts as shown below.

SIR-GTRC1 Streamer GTR User and Installation Guide8
Be sure the large tab on the mounting plate is facing up.If you are using the velcro strip for mounting, attach the velcro strip to the back of the mounting plate.Route the cables through the mounting plate underneath the tabs as shown. The cables may be routed across the mounting plate, or routed down to exit at the bottom.
Place the Receiver into the mounting plate by first placing the bottom of the Receiver into the tabs at the bottom of the mounting plate (1), and then pivoting the top of the receiver into the mounting plate until it snaps into place (2).
1
2
If you are using the suction cup mount, attach the suction cup mount to the vehicle windshield, or 10.8

SIR-GTRC1 Streamer GTR User and Installation Guide 9
1. Clean the area where you are attaching the suction cup with an alcohol wipe.
2. Lift up the cam lever on the suction cup mount as shown.
3. Place the suction cup mount on the windshield, or other area, and press the cam lever straight down towards the suction cup to flatten the suction cup as shown.
4. Lock the cam lever down as shown.
Installing the Magnetic AntennaThe optimum mounting location for the antenna is on the roof of the vehicle, with a minimum unobstructed area of 12 inches by 12 inches, and exactly 6½ inches from the rear roof edge of the vehicle (the length of the rubber antenna cable cover/tail). It is important to avoid any obstructions that will block the SIRIUS signal, obstructions such as a roof rack, a sunroof, roof mounted cargo containers, or other antennas.The following illustrations show the recommended mounting locations of the antenna for several types of vehicles. Follow these recommendations for best performance from the antenna.

SIR-GTRC1 Streamer GTR User and Installation Guide10
Sedan/Coupe: Mount the antenna along the rear centerline of the vehicle roof, located at the rear of the roof near the rear window.
SUV/Mini-Van: Mount the antenna along the rear centerline of the vehicle roof, located at the rear of the roof near the rear door/hatch.
Pickup Truck: Mount the antenna along the rear centerline of the cab roof, located at the rear of the roof near the rear window.
Convertible: Mount the antenna along the centerline of the trunk lid, with the rubber antenna cable cover/tail directed toward the rear window.
Clean the area where the antenna and rubber antenna cable cover/tail will be mounted with the supplied alcohol swab.Connect the rubber antenna cable cover/tail to the antenna cable, making sure that the strain-relief on the antenna seats into the rubber antenna cable cover/tail groove. Route the antenna cable through the wire channel in the rubber antenna cable cover/tail. Do not yet attach the adhesive strip. Temporarily position the antenna and rubber antenna cable cover/tail in the selected mounting area and route the cable from the antenna to the vehicle’s interior by tucking it underneath the rubber
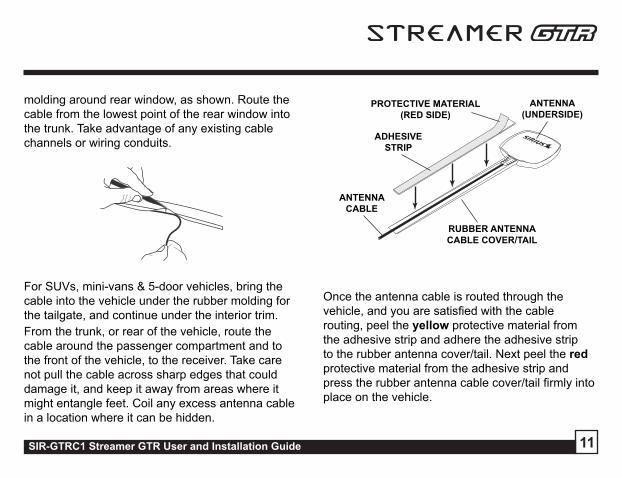
SIR-GTRC1 Streamer GTR User and Installation Guide 11
Once the antenna cable is routed through the vehicle, and you are satisfied with the cable routing, peel the yellow protective material from the adhesive strip and adhere the adhesive strip to the rubber antenna cover/tail. Next peel the red protective material from the adhesive strip and press the rubber antenna cable cover/tail firmly into place on the vehicle.
molding around rear window, as shown. Route the cable from the lowest point of the rear window into the trunk. Take advantage of any existing cable channels or wiring conduits.
For SUVs, mini-vans & 5-door vehicles, bring the cable into the vehicle under the rubber molding for the tailgate, and continue under the interior trim.From the trunk, or rear of the vehicle, route the cable around the passenger compartment and to the front of the vehicle, to the receiver. Take care not pull the cable across sharp edges that could damage it, and keep it away from areas where it might entangle feet. Coil any excess antenna cable in a location where it can be hidden.
RUBBER ANTENNA CABLE COVER/TAIL
ADHESIVE STRIP
ANTENNA CABLE
ANTENNA (UNDERSIDE)
PROTECTIVE MATERIAL (RED SIDE)

SIR-GTRC1 Streamer GTR User and Installation Guide12
Double check that the location of the antenna and rubber antenna cable cover/tail are correct, and continue to press firmly down on rubber antenna cable cover/tail for another 30 seconds.
Note: At room temperature (68 degrees), maximum adhesion usually occurs within 72 hours. During this period, avoid car washes and other contact with the antenna and rubber antenna cable cover/tail.
RUBBER ANTENNA CABLE COVER/TAIL
VEHICLEMOUNTING SURFACE
Connecting the ReceiverConnect the antenna and cigarette lighter power adapter to the Receiver to complete the installation. The illustration below shows the location of the antenna and power connectors on the Receiver.
ANTENNA
POWER
AUDIO OUT
FM OUT
Plug the cigarette lighter power adapter cord into your vehicle’s cigarette lighter, and turn the Receiver On by pressing the power button. Once you have verified that Receiver has powered on, you can proceed with activating your SIRIUS subscription.

SIR-GTRC1 Streamer GTR User and Installation Guide 13
You will not be able to tune to any other channels until you activate your SIRIUS subscription.
4. To listen to the audio from your Receiver, you will need to tune the FM radio in your vehicle and the FM transmitter in the Receiver to the same FM frequency. The FM transmitter in the Receiver defaults to 88.1 MHz, so you can begin by tuning your FM radio to 88.1 MHz. If there is an FM station broadcasting on that frequency, you will have to search for a quiet frequency to use. Refer to the section titled, FM Transmitter in this User Manual for instructions on how to tune the FM transmitter to other FM frequencies.
5. Use the channel up and down buttons to tune the Receiver to channel 000 to display the Receiver’s unique 12-digit SIRIUS ID Number (SID). You may also directly tune to channel
Activating your SIRIUS SubscriptionBefore you can listen to the SIRIUS service, you need to subscribe to the SIRIUS Satellite Radio service.
1. Be sure that the Receiver is correctly installed and that the antenna is oriented to receive the SIRIUS signal.
2. Press the power button to turn Receiver On. After displaying the SIRIUS logo, the Receiver will update the SIRIUS channel line up. The display will show, “UPDATING CHANNELS” and show the status of the update.
X% CompletedUpdating Channels
Wait until the channel updates have completed before pressing any buttons on the Receiver.
3. Once the channels have been updated, the display will change to “Call 1-888-539-SIRIUS to Subscribe” and will place you in SIRIUS Satellite Radio’s Preview Channel, channel 184.

SIR-GTRC1 Streamer GTR User and Installation Guide14
001
Category 12:00P A
Artist NameArtist Name
Song TitleSong TitleAny Key to Continue
Subscription Updated
Channel Name
The installation of your Receiver is now complete,and you are ready to begin enjoying SIRIUSSatellite Radio’s digital entertainment!
Optional Installation KitsThere are two optional installation kits which may be purchased for use with your SIR-GTRC1 Streamer GTR Receiver, a Custom Vehicle Installation Kit (SIR-GTRV1), and a Home Kit (SIR-GTRH1). These kits may be purchased from your dealer.
Custom Vehicle Installation Kit (SIR-GTRV1)The optional custom vehicle installation kit provides additional items for a more permanent installation in your vehicle. The kit consists of the following items:DIN-compatible Install Plate - for installing the Receiver in the dashboard of your car or boat.Power Harness - for connecting the power for the Receiver to the vehicle’s electrical system.
000 by pressing the Select button, pressing the 0 (zero) button, and pressing the Select button again. You may do this from either the Receiver or the remote control. (This SID number is also available on the SIR-GTRC1 packaging.) Write the SID number down in the space provided at the end of this manual.
000
SIDSID
012345678912012345678912
12:00P
SIRIUS ID
A
6. Have your credit card handy and contact SIRIUS on the Internet at: https://activate.siriusradio.com/
and follow the prompts to activate your subscription. You can also call SIRIUS toll-free at:
1-888-539-SIRIUS (1-888-539-7474)7. When you have successfully subscribed to the
SIRIUS service, and the Receiver has been updated with your subscription information, an alert will be displayed.
To continue, press any key on the Receiver.

SIR-GTRC1 Streamer GTR User and Installation Guide 15
FM Switching Box - for connecting the FM output of the Receiver into the FM antenna input of your vehicle’s radio. This box will automatically switch off the vehicle’s FM antenna when you turn on your SIRIUS Receiver.Audio Cables - For connecting the audio output of the Receiver into your vehicle’s audio system.
Home Kit (SIR-GTRH1)The optional home kit allows you to enjoy the SIRIUS Satellite Radio’s digital entertainment in your home, by allowing you to take your Receiver from your vehicle into your home. The kit consists of the following items:Stand - A stand into which to snap your Receiver while being used in your home.AC Adapter - A power adapter to power your Receiver in the home.Audio Cables - Cables to connect the Receiver to powered speakers, or your home entertainment system.Home Antenna - A SIRIUS antenna to connect to your Receiver while in your home.

SIR-GTRC1 Streamer GTR User and Installation Guide16
SIR-GTRC1 Streamer GTR Receiver Basic Operation
MEMO
MENU
BAND
DISP
P. TUNE
S-SEEK
1 2 3 4 5 6 7 8 9 0
001 Sirius Hits 1 001 Sirius Hits 1
U2U2
VertigoVertigo
POP 12:00PPOP 12:00P AA
13
5432 6 71
9
8
10
12
14
11

SIR-GTRC1 Streamer GTR User and Installation Guide 17
1. POWER Button :Turns the Receiver’s power On and Off.
2. Rewind Button: Used to rewind through a broadcast saved in Instant Replay.
3. Play/Pause Button: Pause Function: Used to pause a broadcast for Instant Replay. Play Function: Used to play a broadcast saved in Instant Replay.
4. Fast Forward Button: Used to fast forward through a broadcast saved in Instant Replay.
5. MEMO (Memory) Button (S-Seek Function): Saves and recalls artist names, song titles, and sports teams. Holding the button down enters the S-Seek mode.
6. DISP (Display) Button: Toggles display between the default display screen and large screen display mode. Holding the DISP button down switches the display to the channel list mode.
7. Select Button: Selects items highlighted on the display screen.
8. Channel Up/Down Buttons: Navigates through channels and display screens, and highlights items on the display.
9. Category Previous/Next Buttons: Navigates through the category list screen which displays SIRIUS channel categories.
10. Preset Number Buttons (0-9): Sets and selects preset channels. Also used to directly tune channels by entering the channel number.
11. BAND Button (P.Tune): Pressing and releasing switches between the five preset banks (A, B, C), which hold ten presets each. Pressing and holding enables “Preset Tune Mode”, which allows for viewing and listening of stored presets with the channel up/down buttons.
12. FM Preset Button: Selects between preset FM frequencies used for the built-in wireless transmitter.
13. Jump Button: Used to quickly switch between the current channel and a favorite channel.
14. MENU Button: Used to access menu options to make setup and feature changes.
Controls and Features

SIR-GTRC1 Streamer GTR User and Installation Guide18
Remote Control
1. Power Button : Turns the Receiver power On and Off.2. Category Previous/Next Buttons: Navigates through categories.3. MUTE Button: Mutes the audio.4. Channel Up/Down Buttons: Navigates through channels and display screens.5. Rewind Button: Used to rewind through a broadcast saved in Instant Replay.6. Play/Pause Button: Pause Function: Used to pause a broadcast for Instant
Replay. Play Function: Used to play a broadcast saved in Instant Replay.7. Fast Forward Button: Used to fast forward through a broadcast saved in
Instant Replay.8. +/- Volume Buttons: Adjusts the audio volume up & down.9. Number Buttons (0-9): Used for directly selecting channels and for presets.10. MEMO (Memory) Button: Saves and recalls artist names, song titles, and
sports teams. Holding this button down enters the S-Seek mode.11. BAND Button: Switches between preset bands A , B, and C.12. MENU Button: Used to access menu options to make setup and feature
changes.13. DISP Button: Toggles display between the default display screen and large
screen display mode. Holding this button down switches to the channel list mode.
14. Jump Button: Used to quickly switch between the current channel and a favorite channel.
15. FM Preset Button: Selects between preset FM frequencies used for the built-in wireless transmitter.
Installing Batteries in the Remote Control
1. Remove the battery cover.2. Install CR2025 battery. (+ positive side is up)3. Replace the battery cover.
1
MUTE
2 3
4 5 6
7 8
0
9
+
–MEMOBAND
DISPMENU
1
15
14131211
10
2 3
4
567
8
9
16

SIR-GTRC1 Streamer GTR User and Installation Guide 19
which you are currently tuned. Category
001 Channel Name001 Channel Name
002 Channel Name
003 Channel Name003 Channel Name
004 Channel Name004 Channel Name
Repeated momentary pressing of the DISP button while in the category list mode will cause the Receiver to sequence the display between listings of artist names, song titles, and back to channel names.
Category
001 Channel Name001 Channel Name
002 Channel Name
003 Channel Name003 Channel Name
004 Channel Name004 Channel Name
Category
001 Artist Name001 Artist Name
002 Artist Name
003 Artist Name003 Artist Name
004 Artist Name004 Artist Name
Category
001 Song Title001 Song Title
002 Song Title
003 Song Title003 Song Title
004 Song Title004 Song Title
Pressing the category previous or next button again will cause the Receiver to display a listing of the previous or next channel category.Use the channel up/down buttons to highlight a channel within a category and press the select button to tune to the highlighted channel.
After you have successfully activated your SIRIUS subscription, and the Receiver has received the subscription information from the SIRIUS signal, the default display screen will be displayed.
When the Receiver is powered On, the previously selected channel will automatically begin playing, and the artist name and song title of the currently playing song will be displayed.
Changing ChannelsPressing the channel up or down button will cause the Receiver to immediately tune to the next or previous channel.Pressing the category previous or next button will cause the receiver to display a list of the channels in the current category, highlighting the channel to
Clock
Channel Name
Band/Preset Bank Number
Auto Sizing/Scrolling Artist Name
Default Display Screen
Auto Sizing/Scrolling Song Title
Channel Number
001
Artist Name
Song Title
Category 12:00P A
Channel Name
Antenna Signal Strength
Channel Category
SIR-GTRC1 Streamer GTR User and Installation Guide20
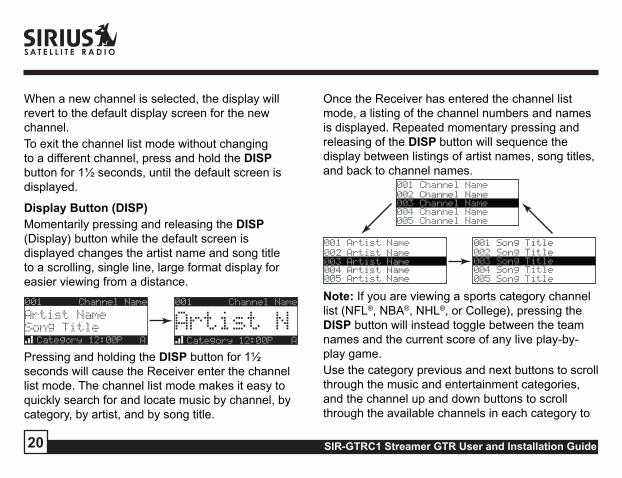
When a new channel is selected, the display will revert to the default display screen for the new channel.To exit the channel list mode without changing to a different channel, press and hold the DISP button for 1½ seconds, until the default screen is displayed.
Display Button (DISP)Momentarily pressing and releasing the DISP (Display) button while the default screen is displayed changes the artist name and song title to a scrolling, single line, large format display for easier viewing from a distance.
001
Category 12:00P A
Artist N
Channel Name001
Artist Name
Song Title
Category 12:00P A
Channel Name
Pressing and holding the DISP button for 1½ seconds will cause the Receiver enter the channel list mode. The channel list mode makes it easy to quickly search for and locate music by channel, by category, by artist, and by song title.
Once the Receiver has entered the channel list mode, a listing of the channel numbers and names is displayed. Repeated momentary pressing and releasing of the DISP button will sequence the display between listings of artist names, song titles, and back to channel names.
001 Channel Name001 Channel Name
003 Channel Name
005 Channel Name005 Channel Name
004 Channel Name004 Channel Name
002 Channel Name002 Channel Name
001 Artist Name001 Artist Name
003 Artist Name
005 Artist Name005 Artist Name
004 Artist Name004 Artist Name
002 Artist Name002 Artist Name
001 Song Title001 Song Title
003 Song Title
005 Song Title005 Song Title
004 Song Title004 Song Title
002 Song Title002 Song Title
Note: If you are viewing a sports category channel list (NFL®, NBA®, NHL®, or College), pressing the DISP button will instead toggle between the team names and the current score of any live play-by-play game.Use the category previous and next buttons to scroll through the music and entertainment categories, and the channel up and down buttons to scroll through the available channels in each category to

SIR-GTRC1 Streamer GTR User and Installation Guide 21
Advanced Features
Channel Presets (BAND)You can store up to 30 of your favorite channels as presets for quick recall access. The preset channels are stored in 3 bands, A, B, and C, each containing 10 channel presets, and are numbered 0 to 9. The 10 channel presets in each band are accessed by pressing the appropriate number (0 to 9) on the Receiver. A momentary press and release of the BAND button cycles through the 3 preset bands (A, B, and C).
Storing Channel PresetsTo store a favorite channel as a preset, do the following:
1. Momentarily press and release the BAND button until the desired preset band, A, B, or C, is displayed in the lower right corner of the default display screen.
2. Tune the Receiver to the channel you wish to store as a preset. (See the section, Basic Operation for specific instructions for tuning to a channel.)
3. Press and hold for 1½ seconds the numbered
find the channel to which you want to listen.When you have found the channel you wish to listen to, highlight the channel using the channel up and down buttons and press the select button
to tune to the channel. The new channel will begin playing and the display will revert to the default display screen for the new channel.To exit the channel list mode without changing to a different channel, press and hold the DISP button for 1½ seconds, until the default screen is displayed.
Selecting Channels DirectlyA channel may be directly selected by entering the channel number using the 0 - 9 buttons on the Receiver.To enter a channel number, momentarily press and release the select button. At the display prompt enter the three digit channel number.
001
Category 12:00P A
Artist NArtist N# ___
Enter Channel
Channel Name

SIR-GTRC1 Streamer GTR User and Installation Guide22
preset button in which you wish to store yourfavorite channel, until you hear a beep. The bandand preset number will then be displayed in thelower right corner of the display screen to confirmthat the channel has been stored.
001
Category 12:00P A1
Artist NameArtist Name
Song TitleSong Title
Channel Name
Preset Stored
Note: If the preset button already has a channel stored in it, the preset will be replaced by the newly stored channel.
Using Channel PresetsThe active band of presets is displayed in the lower right corner of the default display screen, A, B or C. To change the active band, momentarily press and release the BAND button to cycle between the preset bands. The 10 preset channels in the active band can then be selected by momentarily pressing and releasing the 0 through 9 buttons.When you have chosen a preset channel, the band and preset number will be displayed in the lower right corner of the default display screen.
001
Category 12:00P A3
Artist NameArtist Name
Song TitleSong Title
Channel Name
Searching for a Channel Preset (P.TUNE Mode)To quickly search through all of your presets in the P.TUNE mode, do the following:
1. Press and hold the BAND button for approximately 1 second to enter the P.TUNE mode. “Preset Tuning Mode” will momentarily be displayed and the top left and lower right corners of the display will invert to indicate the Receiver is in the Preset Tune Mode.
001
Category 12:00P A1
Artist Name
Song Title
Channel Name001
Artist NameArtist Name
Song TitleSong Title
Category 12:00P A
Preset Tune Mode
Channel Name
2. Use the channel up and down buttons to move up or down through your channel presets and immediately tune to each channel. Channel presets are grouped and displayed by bank and preset number, i.e., A-1, A-2...B-1, B-2, etc. Empty presets are not displayed.
SIR-GTRC1 Streamer GTR User and Installation Guide 23
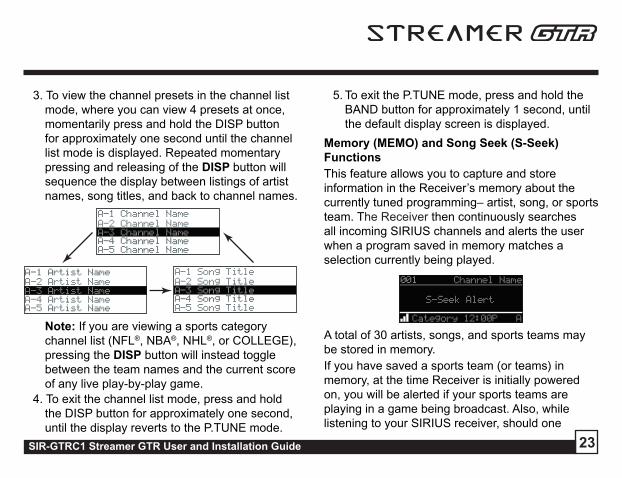
3. To view the channel presets in the channel list mode, where you can view 4 presets at once, momentarily press and hold the DISP button for approximately one second until the channel list mode is displayed. Repeated momentary pressing and releasing of the DISP button will sequence the display between listings of artist names, song titles, and back to channel names.
A-1 Channel NameA-1 Channel Name
A-3 Channel Name
A-5 Channel NameA-5 Channel Name
A-4 Channel NameA-4 Channel Name
A-2 Channel NameA-2 Channel Name
A-1 Artist NameA-1 Artist Name
A-3 Artist Name
A-5 Artist NameA-5 Artist Name
A-4 Artist NameA-4 Artist Name
A-2 Artist NameA-2 Artist Name
A-1 Song TitleA-1 Song Title
A-3 Song Title
A-5 Song TitleA-5 Song Title
A-4 Song TitleA-4 Song Title
A-2 Song TitleA-2 Song Title
Note: If you are viewing a sports category channel list (NFL®, NBA®, NHL®, or COLLEGE), pressing the DISP button will instead toggle between the team names and the current score of any live play-by-play game.
4. To exit the channel list mode, press and hold the DISP button for approximately one second, until the display reverts to the P.TUNE mode.
5. To exit the P.TUNE mode, press and hold the BAND button for approximately 1 second, until the default display screen is displayed.
Memory (MEMO) and Song Seek (S-Seek) FunctionsThis feature allows you to capture and store information in the Receiver’s memory about the currently tuned programming– artist, song, or sports team. The Receiver then continuously searches all incoming SIRIUS channels and alerts the user when a program saved in memory matches a selection currently being played.
001
Artist NameArtist Name
Song TitleSong Title
Category 12:00P A
S-Seek Alert
Channel Name
A total of 30 artists, songs, and sports teams may be stored in memory.If you have saved a sports team (or teams) in memory, at the time Receiver is initially powered on, you will be alerted if your sports teams are playing in a game being broadcast. Also, while listening to your SIRIUS receiver, should one

SIR-GTRC1 Streamer GTR User and Installation Guide24
of your teams begin to play a game, you will be alerted.
001
Artist NameArtist Name
Song TitleSong Title
Category 12:00P A
Game Alert
Channel Name
Storing Artist Names, Song Titles, and Sports Teams to MemoryIf you are listening to a song or other entertainment channel, or a sports team, and wish to save the artist, song, or sports team selection to memory for future S-Seek alerts, do the following:
1. For Artist Names or Song Titles: If the currently tuned channel is a music or entertainment channel, momentarily press and release the MEMO button. The Receiver will display a menu to choose to store the artist name or the song title.
100
Category 12:00P A
Artist NameArtist Name
Song TitleSong TitleStore Song?
Store Artist?Store Artist?
Channel Name
If either the artist name or song title is not
available to save, the choice will be displayed as unavailable.
100
Category 12:00P A
Artist NameArtist Name
Song TitleSong TitleSong Unavailable
Store Artist?Store Artist?
Channel Name 100
Category 12:00P A
Artist NameArtist Name
Song TitleSong Title
Artist Unavailable
Store Song?Store Song?
Channel Name
Using the channel up and down buttons, choose Store Artist or Store Song (when available) and press the select button to save the current selection to memory.
If both the artist and song are available to save, you will be prompted again to save whichever one you haven’t yet saved, song title or artist name. If you do not wish to save, press the MEMO button to exit.
100
Category 12:00P A
Artist NameArtist Name
Song TitleSong TitleSong Stored
Store Artist?Store Artist?
Channel Name100
Category 12:00P A
Artist NameArtist Name
Song TitleSong Title
Artist Stored
Store Song?Store Song?
Channel Name
2. For Sports Games: If the current tuned channel is an NFL, NBA, NHL, or College play-by-play sports broadcast, momentarily press and release the MEMO button. The Receiver will display a menu to choose which sports

SIR-GTRC1 Streamer GTR User and Installation Guide 25
team should be saved to memory.100
Category 12:00P A
Artist NameArtist Name
Song TitleSong TitleStore DAL?
Store NYG?Store NYG?
Channel Name
If either of the teams is not available to save, that team will be displayed as unavailable.
100
Category 12:00P A
Artist NameArtist Name
Song TitleSong TitleTeam2 Unavailable
Store NYG?Store NYG?
Channel Name
Using the channel up and down buttons, choose the desired sports team (when available) and press the select button to save the current selection to memory.
The next screen will ask which kind of alert you wish to have.
Alert Type
Initial Game Alert
All Score UpdatesAll Score Updates
“Initial Game Alert” will provide an alert when the team you have chosen is playing a game.
“All Score Updates” will provide an alert when the team you have chosen is playing a game, and also when the scores are updated for the team.
Using the channel up and down buttons, choose the desired alert and press the select button to save the selection to memory.
If both teams are available to save, you will be prompted again to save the other team. If you wish to save the team, follow the same procedure as when saving the first team. If you do not wish to save, press the MEMO button to exit.
100
Category 12:00P A
Artist NameArtist Name
Song TitleSong TitleNYG Stored
Store DAL?Store DAL?
Channel Name 100
Category 12:00P A
Artist NameArtist Name
Song TitleSong TitleDAL Stored
Store NYG?Store NYG?
Channel Name
3. To ensure that no duplicate entries are stored in memory, the Receiver will check the stored memory list to ensure that the alert about to be stored is not already stored in memory. If a duplicate entry is found, an “Unable to Store” screen will be displayed for 1 second.

SIR-GTRC1 Streamer GTR User and Installation Guide26
001
Category 12:00P
Artist NArtist NUnable to Store
A
Channel Name
The Receiver will then revert to the last active
display mode.4. If the new alert was successfully stored in
memory, a “Artist/Song/Game Stored” pop-up screen followed by an X Used/Y Empty screen will be displayed for 1 and 2 seconds respectively. X is the total number of listings stored in memory, and Y is the total number of memory listings still available for storage.
001
Artist NameArtist Name
Song TitleSong Title
Category 12:00P A
X Used/Y Empty
Channel Name001
Artist NameArtist Name
Song TitleSong Title
Category 12:00P A
Artist Stored
Channel Name
5. If the MEMO button is pressed and all of the memory spaces are full, an “S-Seek Full” screen will be displayed for 1 second.
001
Artist NameArtist Name
Song TitleSong Title
Category 12:00P A
Memory Full
Channel Name
A “Replace” or “Cancel” screen will then be displayed which will allow you to choose whether to replace an existing alert stored in memory, or to cancel storing the alert to memory.
001
Category 12:00P A
Artist NArtist NCancel
ReplaceReplace
Channel Name
Using the channel up and down buttons, choose whether to replace an existing alert or cancel saving the alert to memory. If you choose to cancel saving the alert, the Receiver will revert to the last active display mode.
If you have chosen to replace an existing alert, a listing of all the alerts stored in memory will be displayed.
Replace
Artist Name/ Song TitArtist Name/ Song Tit
Artist Name
Sports TeamSports Team
Artist Name/ Song TitArtist Name/ Song Tit
X/Y
Using the channel up and down buttons, highlight the alert that you would like to overwrite and press the select button to store

SIR-GTRC1 Streamer GTR User and Installation Guide 27
the new alert. If the new alert was successfully saved in memory, a “Artist/Song/Game Stored” pop-up screen followed by an X Used/Y Empty
screen will be displayed for 1 and 2 seconds respectively. X is the total number of listings stored in memory, and Y is the total number of memory listings still available for storage.
001
Artist NameArtist Name
Song TitleSong Title
Category 12:00P A
X Used/Y Empty
Channel Name001
Artist NameArtist Name
Song TitleSong Title
Category 12:00P A
Artist Stored
Channel Name
The Receiver will revert to the last active display mode.
Viewing Stored Alerts Stored in MemoryTo view the alerts which have been saved to memory, press and hold the MEMO button for 1½ seconds to enter S-Seek mode. The alerts stored in memory will be displayed one-at-a-time in page format. Use the channel up and down buttons to scroll through the listings. This function allows you to review previously stored program information.
Memory
Artist NameArtist Name
Song TitleSong Title
1/30
To exit this function, momentarily press and release the MEMO button.
Deleting an Alert Stored into MemoryTo delete an alert stored in memory, do the following:
1. Press and hold the MEMO button for 1½ seconds to enter S-Seek mode. The alerts stored in memory will be displayed one-at-a-time in page format.
2. Use the channel up and down buttons to find the alert which you wish to delete and press the select button.
3. A screen displaying “Delete”, “Seek On”, and “Seek Off” will be displayed.
Memory Recall
Delete
Seek OffSeek Off
Seek OnSeek On
4. Use the channel up and down buttons to
SIR-GTRC1 Streamer GTR User and Installation Guide28
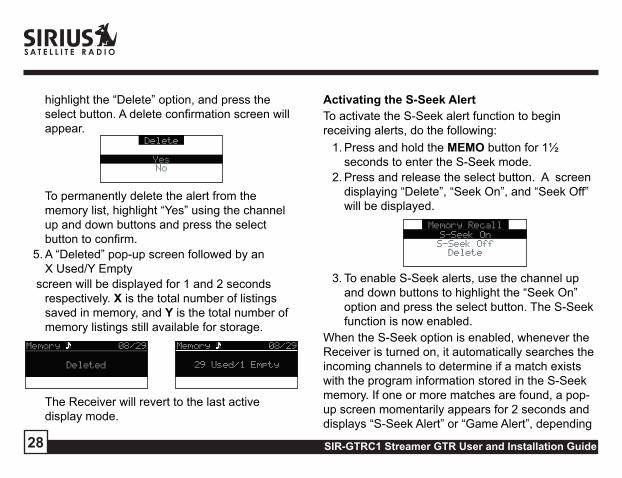
highlight the “Delete” option, and press the select button. A delete confirmation screen will appear.
Delete
Yes
NoNo
To permanently delete the alert from the memory list, highlight “Yes” using the channel up and down buttons and press the select button to confirm.
5. A “Deleted” pop-up screen followed by an X Used/Y Empty
screen will be displayed for 1 and 2 seconds respectively. X is the total number of listings saved in memory, and Y is the total number of memory listings still available for storage.
Memory
Artist NameArtist Name
Song TitleSong Title
08/29
29 Used/1 Empty
Memory
Artist NameArtist Name
Song TitleSong Title
08/29
Deleted
The Receiver will revert to the last active display mode.
Activating the S-Seek AlertTo activate the S-Seek alert function to begin receiving alerts, do the following:
1. Press and hold the MEMO button for 1½ seconds to enter the S-Seek mode.
2. Press and release the select button. A screen displaying “Delete”, “Seek On”, and “Seek Off” will be displayed.
Memory Recall
S-Seek On
S-Seek OffS-Seek Off
DeleteDelete
3. To enable S-Seek alerts, use the channel up and down buttons to highlight the “Seek On” option and press the select button. The S-Seek function is now enabled.
When the S-Seek option is enabled, whenever the Receiver is turned on, it automatically searches the incoming channels to determine if a match exists with the program information stored in the S-Seek memory. If one or more matches are found, a pop-up screen momentarily appears for 2 seconds and displays “S-Seek Alert” or “Game Alert”, depending
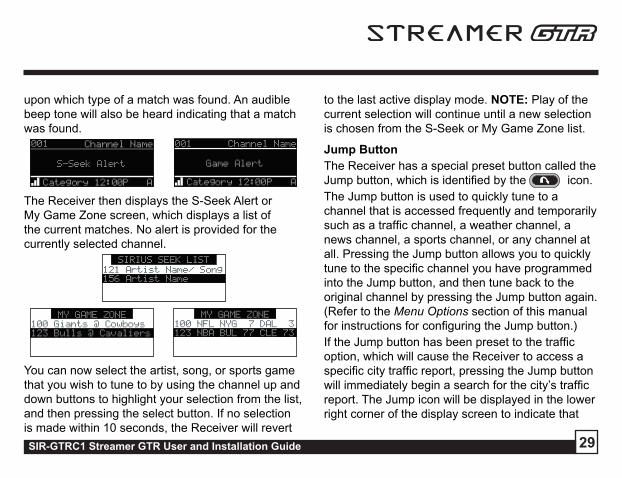
SIR-GTRC1 Streamer GTR User and Installation Guide 29
upon which type of a match was found. An audible beep tone will also be heard indicating that a match was found.001
Artist NameArtist Name
Song TitleSong Title
Category 12:00P A
S-Seek Alert
Channel Name 001
Artist NameArtist Name
Song TitleSong Title
Category 12:00P A
Game Alert
Channel Name
The Receiver then displays the S-Seek Alert or My Game Zone screen, which displays a list of the current matches. No alert is provided for the currently selected channel.
SIRIUS SEEK LIST
121 Artist Name/ Song121 Artist Name/ Song
156 Artist Name
MY GAME ZONE
100 Giants @ Cowboys100 Giants @ Cowboys
123 Bulls @ Cavaliers
MY GAME ZONE
100 NFL NYG 7 DAL 3100 NFL NYG 7 DAL 3
123 NBA BUL 77 CLE 73
You can now select the artist, song, or sports game that you wish to tune to by using the channel up and down buttons to highlight your selection from the list, and then pressing the select button. If no selection is made within 10 seconds, the Receiver will revert
to the last active display mode. NOTE: Play of the current selection will continue until a new selection is chosen from the S-Seek or My Game Zone list.
Jump ButtonThe Receiver has a special preset button called the Jump button, which is identified by the icon.The Jump button is used to quickly tune to a channel that is accessed frequently and temporarily such as a traffic channel, a weather channel, a news channel, a sports channel, or any channel at all. Pressing the Jump button allows you to quickly tune to the specific channel you have programmed into the Jump button, and then tune back to the original channel by pressing the Jump button again. (Refer to the Menu Options section of this manual for instructions for configuring the Jump button.)If the Jump button has been preset to the traffic option, which will cause the Receiver to access a specific city traffic report, pressing the Jump button will immediately begin a search for the city’s traffic report. The Jump icon will be displayed in the lower right corner of the display screen to indicate that

SIR-GTRC1 Streamer GTR User and Installation Guide30
a Jump search is active. The search process may take up to 4 minutes until the city’s traffic report found. The Receiver will automatically tune to the traffic report channel when the traffic report is found.
001
Artist NameArtist Name
Song TitleSong Title
Category 12:00P
NYC Pending
Channel Name
Pressing the Jump button again while the Receiver is actively searching will cancel the search.
001
Artist NameArtist Name
Song TitleSong Title
Category 12:00P A
Jump Canceled
Channel Name
Pressing the Jump button after the Receiver has tuned to the traffic report channel will return you to the previous channel.If the Jump button has been preset to the JumpSet option, pressing the Jump button will immediately tune to the channel preset into the JumpSet. The Jump icon will be displayed in the lower right corner of the display screen to indicate that the Jump
preset channel is currently tuned.
Category 12:00P
150
NYC WeatherNYC Weather
NYC WeatherNYC Weather
Channel Name
Pressing the Jump button again will return to the previous channel. Note: The channel preset for the Jump button remains the same regardless of which preset memory bank is currently selected.
Game AlertThe Receiver has a feature called Game Alert which can automatically alert you when your favorite sports team is playing a game. When a sports game involving one of your favorite sports teams is found, a Game Alert screen is displayed, followed by a screen displaying tuning information for the sports games.
MY GAME ZONE
100 Giants @ Cowboys100 Giants @ Cowboys
123 Bulls @ Cavaliers
001
Artist NameArtist Name
Song TitleSong Title
Category 12:00P A
Game Alert
Channel Name
You can then use the channel up and down buttons

SIR-GTRC1 Streamer GTR User and Installation Guide 31
to highlight your favorite sports team in the list, and then press the select button to tune to the channel where the game is being broadcast.Refer to the Game Alert section in the Menu Options section of this manual for instructions on programming your favorite sports teams into the Receiver. You can also use the S-Seek feature to add Game Alerts for sports teams. See the section, Storing Artist Names, Song Titles, and Sports Teams to Memory for more information.
Instant ReplayThe Receiver has a feature called Instant Replay which stores the audio of the channel to which you are listening for later playback. Approximately 30 to 60 minutes of audio depending upon the channel to which you are tuned is stored. As soon as you tune to a channel, the Receiver automatically begins storing the audio, enabling you to rewind at any time to replay the audio again. If you unable to continue listening to a channel, but do not want to miss the broadcast, pressing the Play/Pause button will cause the Receiver to mute the audio and mark the point in the broadcast so you can resume
listening at a later time.
• Pause/Play button. When pressed, this places the Receiver in the Instant Replay pause mode which mutes the audio.
Pressing and releasing the Pause/Play button causes the Receiver to begin playing the stored audio from the point at which the Receiver was paused. During playback, the Receiver will continue to store the channel audio until you exit the Instant Replay mode.
Pressing and holding the Play/Pause button changes the display to a listing of the artist’s names in the stored audio, from the most recent to the oldest, beginning with an entry called “Live”. (Pressing the DISP button will toggle the display between the artist name list and the song/program title list.) An item from the list may be chosen and the playback will commence from that point in the stored audio, or, “Live” may be chosen which will exit the Instant Replay mode, and the Receiver will resume playing the live broadcast.
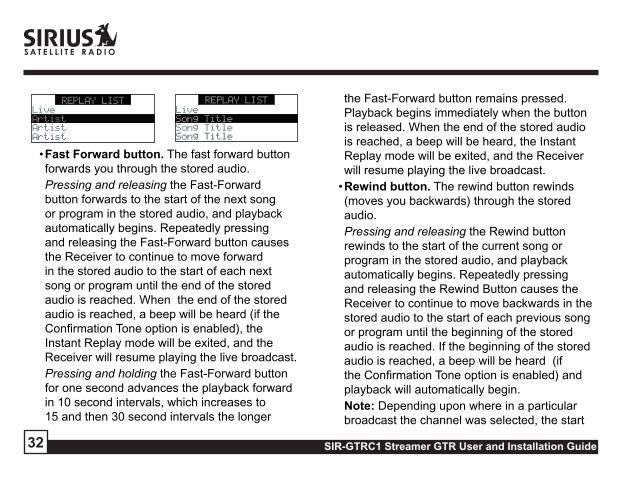
SIR-GTRC1 Streamer GTR User and Installation Guide32
REPLAY LIST
LiveLive
Artist
ArtistArtist
ArtistArtist
REPLAY LIST
LiveLive
Song Title
Song TitleSong Title
Song TitleSong Title
• Fast Forward button. The fast forward button forwards you through the stored audio.
Pressing and releasing the Fast-Forward button forwards to the start of the next song or program in the stored audio, and playback automatically begins. Repeatedly pressing and releasing the Fast-Forward button causes the Receiver to continue to move forward in the stored audio to the start of each next song or program until the end of the stored audio is reached. When the end of the stored audio is reached, a beep will be heard (if the Confirmation Tone option is enabled), the Instant Replay mode will be exited, and the Receiver will resume playing the live broadcast.
Pressing and holding the Fast-Forward button for one second advances the playback forward in 10 second intervals, which increases to 15 and then 30 second intervals the longer
the Fast-Forward button remains pressed. Playback begins immediately when the button is released. When the end of the stored audio is reached, a beep will be heard, the Instant Replay mode will be exited, and the Receiver will resume playing the live broadcast.
• Rewind button. The rewind button rewinds (moves you backwards) through the stored audio.
Pressing and releasing the Rewind button rewinds to the start of the current song or program in the stored audio, and playback automatically begins. Repeatedly pressing and releasing the Rewind Button causes the Receiver to continue to move backwards in the stored audio to the start of each previous song or program until the beginning of the stored audio is reached. If the beginning of the stored audio is reached, a beep will be heard (if the Confirmation Tone option is enabled) and playback will automatically begin.
Note: Depending upon where in a particular broadcast the channel was selected, the start
SIR-GTRC1 Streamer GTR User and Installation Guide 33
of a song or program may not be available in memory. If this occurs, the playback will start from where the audio began to be stored.
Pressing and holding the Rewind button for one second rewinds playback in 10 second intervals, which increase to 15 and then 30 second intervals the longer the Rewind button remains pressed. Playback begins immediately when the button is released. If the beginning of the stored audio is reached while rewinding, a beep will be heard and playback will automatically begin.
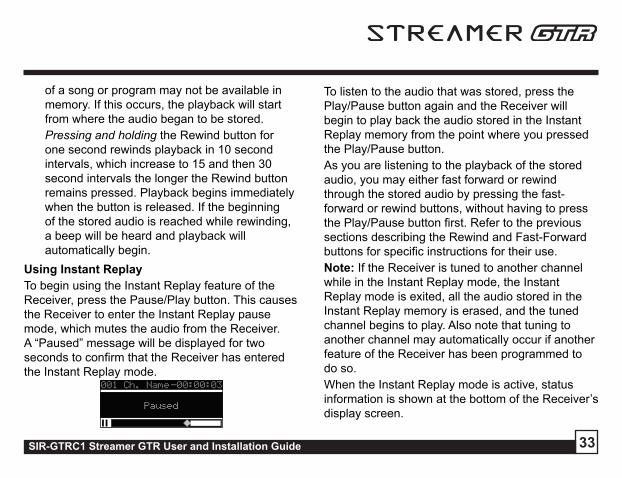
Using Instant ReplayTo begin using the Instant Replay feature of the Receiver, press the Pause/Play button. This causes the Receiver to enter the Instant Replay pause mode, which mutes the audio from the Receiver. A “Paused” message will be displayed for two seconds to confirm that the Receiver has entered the Instant Replay mode.
001 Ch. Name
Artist NameArtist Name
Song TitleSong TitlePaused
-00:00:03
To listen to the audio that was stored, press the Play/Pause button again and the Receiver will begin to play back the audio stored in the Instant Replay memory from the point where you pressed the Play/Pause button.As you are listening to the playback of the stored audio, you may either fast forward or rewind through the stored audio by pressing the fast-forward or rewind buttons, without having to press the Play/Pause button first. Refer to the previous sections describing the Rewind and Fast-Forward buttons for specific instructions for their use.Note: If the Receiver is tuned to another channel while in the Instant Replay mode, the Instant Replay mode is exited, all the audio stored in the Instant Replay memory is erased, and the tuned channel begins to play. Also note that tuning to another channel may automatically occur if another feature of the Receiver has been programmed to do so.When the Instant Replay mode is active, status information is shown at the bottom of the Receiver’s display screen.

SIR-GTRC1 Streamer GTR User and Installation Guide34
The Instant Replay mode icon that is displayed at the bottom left of the screen indicates the current mode.
Pause mode. This indicates that the Receiver is paused and muted.
Play mode. This indicates that you are in the Instant Replay playback mode, listening to stored audio.
Fast Forward mode. This indicates that you are fast forwarding through the stored Instant Replay audio.
Rewind mode. This indicates that you are rewinding, or moving backwards, through the stored Instant Replay audio.
The Progress Bar is a visual indicator of the status of the Instant Replay memory. As the memory
001 Ch. Name -00:00:00
Artist NameArtist Name
Song TitleSong Title
Instant Replay ModePlay Position Indicator
Progress Bar
Instant Replay Time Position
fills, Progress Bar begins to fill from the left side providing a visual indication of how much of the Instant Replay memory is filled. The end of the bar indicates the end of the stored audio, where the live broadcast begins. When all available memory hasbeen used, the bar will be completely filled.

SIR-GTRC1 Streamer GTR User and Installation Guide 35
Artist NameArtist Name
Song TitleSong Title
Progress Bar ShowingAmount of Memory Filled
001 Ch. Name -00:20:03
End of Stored AudioBeginning of Live Broadcast
A diamond-shaped Play Position indicator is superimposed over the Progress Bar which provides a visual indicator of the current playback position in the Instant Replay memory.
Play Position Indicator
Artist NameArtist Name
Song TitleSong Title
001 Ch. Name -00:20:03
The Play Position indicator shows your current listening position in the stored audio. When you press the Play/Pause button to begin playback of the stored audio, this indicator will begin to move to the right showing the progression of the playback through the Instant Replay memory, provided thatthe memory is not full.
Play Position Indicator
Artist NameArtist Name
Song TitleSong Title
001 Ch. Name -00:20:03
The portion of the Progress Bar behind the Play Position indicator shows how much you can rewind in the Instant Replay memory, while the filled portion ahead of the Play Indicator shows how much you can fast-forward in the memory.While you are in the playback mode, the Receiver continues to store the audio from the channel. Obviously, you will be unable to “catch up” to the live broadcast during playback, as new audio is

SIR-GTRC1 Streamer GTR User and Installation Guide36
being stored at the same rate at which you are playing back the stored audio. You can use the Fast-Forward button to skip ahead or exit the Instant Replay mode, and begin listening to the live broadcast again.Should you press the Play/Pause button to stop the playback, the play position indicator will stop moving and continue to provide a visual indication of your current position in the Instant Replay memory.When the Instant Replay memory is 10 seconds from becoming full, two beeps will be heard (if the Confirmation Tone option is enabled). When the memory is full, the Receiver will automatically begin playback, and will continue to store the channel audio, overwriting the oldest portion of the audio previously stored. When the memory is full, you will be unable to rewind through the stored audio.If you have partially played back the stored audio, and have paused the Receiver again, the Play Position indicator will begin to move left when the Instant Replay memory becomes full, as it begins overwriting the oldest portion of the audio
previously stored. When the Play Position indicator reaches the left-most position, indicating that the memory is full, the Receiver will automatically begin playback.
Artist NameArtist Name
Song TitleSong Title
Play Position Indicator
Time Position ofPlay Position Indicator
001 Ch. Name -00:00:00
The Instant Replay Time Position provides the exact amount of time the Play Position indicator is behind the live broadcast, expressed as Hours:Minutes:Seconds, and displayed as a negative number. For example, if -02:40 is displayed, this would indicate that the Play Position indicator is 2 minutes and 40 seconds behind the live broadcast.

SIR-GTRC1 Streamer GTR User and Installation Guide 37
FM Preset ButtonThe Receiver has a special button called the FM Preset button, which is identified by the icon.When the FM Preset button is pressed, the Receiver turns on the built-in FM transmitter and begins transmitting on the next frequency from the FM frequency preset list. A screen will be displayed for 3 seconds showing the currently selected FM frequency. When the FM transmitter is turned on, an FM radio tuned to the same FM frequency will receive the currently tuned SIRIUS broadcast. Each subsequent press of the FM Preset button advances to the next frequency in the FM frequency preset list. Using the FM Preset button, a quiet FM frequency may be quickly tuned.If no FM frequencies have been preset when the FM Preset button is pressed, the Receiver will default to a frequency of 88.1 MHz.Pressing and holding the FM Preset button will cause a list of the FM presets to be displayed.
FM Presets
FM1 88.1 MHz
FM2 <EMPTY>FM2 <EMPTY>
FM3 <EMPTY>FM3 <EMPTY>
FM4 <EMPTY>FM4 <EMPTY>
You can use the channel up and down buttons to scroll through the FM preset list and highlight the preset you wish to change, and press the Select button to choose the preset. Use the channel up and down buttons to highlight the frequency you wish to select for the preset and press the select button. The FM frequency will then be stored in the preset. To select the preset and exit, press the MENU button.You may also change the FM presets by using the FM Presets menu option of the Receiver. (Refer to the FM Transmitter section in the Menu Options section of this manual for instructions on programming the FM frequency preset list.)
Menu OptionsTo enter the Menu Options page of the Receiver, press the MENU button. The “Menu Options” list will be displayed.
Menu Options
FM Transmitter
Game AlertGame Alert
SettingsSettings
Time Based FeaturesTime Based Features
To select a menu option, use the channel up and

SIR-GTRC1 Streamer GTR User and Installation Guide38
down buttons to highlight the option you wish to adjust, and press the select button. If a selection is not made within 10 seconds, the Receiver will exit the menu options screen, and revert to the last active display mode.To exit the Menu Options screen, or any of the other menu option screens, repeatedly press and release the MENU key until you are returned to the default display screen.The following sections explain each of the menu options in the order in which they are displayed on the Menu Options screen.
FM TransmitterThe FM Transmitter feature allows you to create a preset list of 5 suitable FM frequencies which can then be accessed by using the FM Preset button. This option also allows you to turn the FM transmitter On and Off.
FM On/Off
FM OnFM OffFM Off
FM PresetsTo create or add to a list of FM Preset frequencies , do the following:
1. Using the channel up and down buttons, highlight the “FM Presets” menu item and press the select button. A list of the FM presets will be displayed. (You may also enter this list by pressing and holding the FM Preset button.)
FM Presets
FM1 88.1 MHz
FM2 <EMPTY>FM2 <EMPTY>
FM3 <EMPTY>FM3 <EMPTY>
FM4 <EMPTY>FM4 <EMPTY>
2. Using the channel up and down buttons, highlight the FM preset you wish to set (or change) and press the select button. A list of FM frequencies will be displayed, beginning with the currently selected FM frequency for the preset.
<EMPTY><EMPTY>
88.3 MHz
88.7 MHz88.7 MHz
88.5 MHz88.5 MHz
88.1 MHz88.1 MHz
3. Use your FM radio to locate quiet FM

SIR-GTRC1 Streamer GTR User and Installation Guide 39
frequencies where there is no interference from adjacent FM stations. These are the frequencies which should be added to the FM Presets list.
4. Using the channel up and down buttons, highlight the frequency you wish to select for the preset and press the select button. The FM frequency will then be stored in the preset. If you do not want a frequency for the preset, choose EMPTY from the menu and press the select button.
5. You may then continue to select FM frequencies for other presets using the same steps. To exit the FM Presets menu, press the MENU button.
FM On/OffTo turn the Receiver’s FM transmitter On or Off, use the channel up and down buttons to highlight the “FM On/Off” menu item and press the select button.
FM On/Off
FM OnFM OffFM Off
Use the channel up and down buttons to highlight “FM On” or “FM Off”, and press the select button.To exit the FM On/Off menu, press the MENU button.
Game AlertThe Game Alert feature allows you to store your favorite sports teams in memory. The Receiver will constantly scan the SIRIUS channels and will sound an alert when a sports team you had stored in memory is playing, or when there is a score update for a team, depending on which option you have chosen for the sports team.Sports teams which you have selected and which are currently playing will be displayed in a category called “My Game Zone”.You may select one sports team from each sports league and the college category using the Game Alert option, however, more teams may be chosen by using the Memory (MEMO) function. (See the section titled, Memory (MEMO) and Song Seek (S-Seek) Functions for more information about adding additional teams.)

SIR-GTRC1 Streamer GTR User and Installation Guide40
To choose sports teams to add for game alerts, do the following:
1. Use the channel up and down buttons to highlight “Game Alert” and press the select button.
2. Use the channel up and down buttons to highlight the sports league or college category of the sports team you wish to add, and press the select button.
Game Alert
NFL
NBANBA
NHLNHL
COLLEGECOLLEGE
3. Use the channel up and down buttons to highlight the league team name or college team name you wish to add, and press the select button.
NFL
None
Arizona CardinalsArizona Cardinals
Atlanta FalconsAtlanta Falcons
Baltimore RavensBaltimore Ravens
COLLEGE
None
AlabamaAlabama
AuburnAuburn
ColoradoColorado
Note that for college teams, you will receive an alert for all teams playing for that college.
4. Use the channel up and down buttons to highlight which type of an alert you want, and press the select button.
Alert Type
Initial Game Alert
All Score UpdatesAll Score Updates
When the Receiver is powered on, and while it is playing, “Initial Game Alert’ will sound an alert when the team you have chosen is playing a game. “All Score Updates” does the same but also sounds an alert when the scores are updated for the chosen team.
To exit the Game Alert menu, press the MENU button.
SettingsThe following sections explain each of settings menu options in the order in which they are displayed.
Settings
Jump Setting
Display OptionsDisplay Options
Memory OptionsMemory Options
Auto SelectAuto Select

SIR-GTRC1 Streamer GTR User and Installation Guide 41
To select a menu option, use the channel up and down buttons to highlight the option you wish to adjust, and press the select button.
Jump SettingsThe Jump setting controls the actions of the Jump button. The Jump setting menu may also be accessed by pressing and holding the Jump button.
Jump Setting
Traffic: ATL
Jump Set
Jump Setting
Choose one of theChoose one of the
following options
for button
following options
for button
Two options are available for the Jump setting, “Traffic” and “Jump Set’. The currently selected option is indicated by the Jump icon.The Traffic option sets the function of the Jump button to provide a traffic report for a selected city, while the JumpSet option assigns any channel to the Jump button.
TrafficTo set the Jump button to provide a traffic report when pressed, do the following:
1. Use the channel up and down buttons to
highlight the “Traffic” option, and press the select button.
2. A screen showing a list of cities will be displayed.
Traffic Market
Atlanta
BaltimoreBaltimore
BostonBoston
ChicagoChicago
Use the channel up and down buttons to highlight the city for which you wish to have a traffic report and press the select button.
3. If the city list has not yet been updated, a message will be displayed indicating that the city list is updating. Wait 10 minutes and then try again.
Traffic Market
Atlanta
BaltimoreBaltimore
BostonBostonUpdating City List
To exit the Jump Settings menu, press the MENU button.

SIR-GTRC1 Streamer GTR User and Installation Guide42
JumpSetTo set the Jump button to a specific channel (other than a traffic channel) when pressed, do the following:
1. Use the channel up and down buttons to highlight the “JumpSet” option, and press the select button.
2. The following screen will be displayed:
Jump Setting
Tune to desired Ch.Tune to desired Ch.
press & hold
the button
press & hold
the button
Use the channel up and down buttons to tune to the channel you want assigned to the Jump button. When the channel is tuned, press and hold the Jump button for 2 seconds until the following screen is displayed.
Jump Setting
Traffic: NONE
JumpSetJumpSet
The channel selected is now assigned to the Jump button.
To exit the Jump settings menu, press the MENU button.At any time while listening to a channel (other than a traffic channel), the channel may be assigned to the Jump button by simply pressing and holding the Jump button for 2 seconds.
Display OptionsThe Receiver’s display screen can be adjusted for brightness and contrast using the Display Options.
Display Options
Brightness
ContrastContrast
Use the channel up and down buttons to highlight the “Brightness” or “Contrast” option, and press the select button.Brightness adjusts the overall intensity of the LCD display to help with viewing in different lighting conditions. Contrast adjusts the relationship between the background and the text on the LCD display. Use the channel up and down buttons, to adjust the brightness/contrast. The bar graph will move to indicate the change.

SIR-GTRC1 Streamer GTR User and Installation Guide 43
- +- +
Brightness
- +- +
Contrast
To exit the Brightness/Contrast screen, press the MENU button.
Memory OptionsThe Memory Options feature allows you to set whether the automatic S-Seek feature is On or Off, and also provides the a way to clear (erase) all the stored S-Seek alerts from memory.
Memory Options
Auto Memory Search
Clear All MemoryClear All Memory
Automatic Memory SearchTo turn the automatic memory search On or Off, do the following:
1. Use the channel up and down buttons to highlight “Auto Memory Search”, and press the select button.
2. Use the channel up and down buttons to highlight either “On” or “Off”, and press the
select button.Auto Memory Search
On
OffOff
To exit the Memory Options menu, press the MENU button.
Clear All MemoryTo clear all the S-Seek alerts stored in memory, do the following:
1. Use the channel up and down buttons to highlight “Clear All Memory”, and press the select button.
2. At the confirmation screen, use the channel up and down buttons to highlight “Yes”, and press the select button.
Clear All Memory?
YesYes
No
The S-Seek memory is now erased.To exit the Memory Options menu, press the MENU button.

SIR-GTRC1 Streamer GTR User and Installation Guide44
Auto SelectAuto Select chooses whether the Receiver immediately tunes to a channel when a channel is highlighted, or whether you must first press the select button in order to tune to a highlighted channel in any of the list modes. Turn Auto Select On if you would like the Receiver to automatically tune to the highlighted channel without you having to press the select button. This will allow you to quickly listen to all the available programming in any displayed channel list.The default setting for Auto Select is Off, meaning that you must press the select button to tune to a channel in a listing. To change Auto Select setting to On or Off, use the channel up or down buttons to highlight “On” or “Off”, and press the select button.
Auto Select
On
OffOff
To exit the Auto Select menu, press the MENU button.
Audio LevelThe Audio Level setting adjusts the level of the audio output of the Receiver.To adjust the audio level, use the channel up and down buttons to change the audio level. The bar graph will move to indicate the change.
- +- +
Audio Level
To exit the Audio Level menu, press the MENU button.
SIR-GTRC1 Streamer GTR User and Installation Guide 45
Confirmation ToneThe Receiver will sound an audio tone alert when it is powered On or Off, as well as when an S-Seek alert is activated and other alerts. The default setting is On. To change the Confirmation Tone setting to On or Off, use the channel up or down buttons to highlight “On” or “Off”, and press the select button.
Confirm. Tone
OnOffOff
To exit the Confirmation Tone menu, press the MENU button.
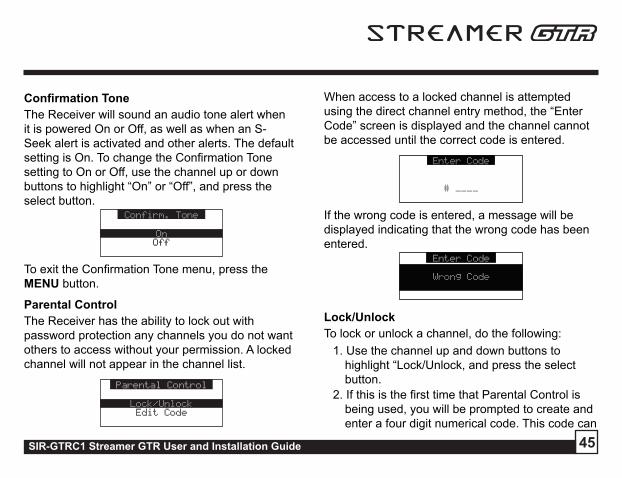
Parental ControlThe Receiver has the ability to lock out with password protection any channels you do not want others to access without your permission. A locked channel will not appear in the channel list.
Parental Control
Lock/Unlock
Edit CodeEdit Code
When access to a locked channel is attempted using the direct channel entry method, the “Enter Code” screen is displayed and the channel cannot be accessed until the correct code is entered.
Enter Code
# ____# ____
If the wrong code is entered, a message will be displayed indicating that the wrong code has been entered.
Enter Code
Wrong Code
Lock/UnlockTo lock or unlock a channel, do the following:
1. Use the channel up and down buttons to highlight “Lock/Unlock, and press the select button.
2. If this is the first time that Parental Control is being used, you will be prompted to create and enter a four digit numerical code. This code can

SIR-GTRC1 Streamer GTR User and Installation Guide46
001 Channel Name001 Channel Name
002 Channel Name
003 Channel Name Lock003 Channel Name Lock
004 Channel Name004 Channel Name
Lock/Unlock
5. To lock or unlock a channels, use the channel
up and down buttons to highlight a channel, and press the select button.
If you are locking a channel, the word “Lock” will be displayed to the right of the channel name. If you are unlocking a channel, the word “Lock” will be removed from the right of the channel name.
To exit the Parental Control menu, press the MENU button.
Edit CodeThis setting allows you to change a previously selected Parental Control code.The first time the Edit Code setting is accessed you will be prompted to enter a four digit code. This code can be any four digit number from 0000 to 9999.
be any four digit number from 0000 to 9999.
Enter Code
# ____# ____
If you should exit this prompt without entering a code, you will be prompted to set a code next time you enter the Lock/Unlock option.
3. If a code has been previously set, a “Enter Code” prompt will be displayed. Enter your four digit code and press the select button to continue.
Enter Code
# ____# ____
4. When the correct code has been entered, a listing of channels will be displayed. Use the channel up and down buttons to navigate to the channel you wish to lock or unlock, and press the select button. A previously locked channel will have the word “Lock” displayed to the right of the channel name.

SIR-GTRC1 Streamer GTR User and Installation Guide 47
Enter Code
# ____# ____
If you should exit this prompt without entering a code, you will be prompted to set a code the next time you enter the Edit Code option.To change the Parental Control code, do the following:
1. Use the channel up and down buttons to highlight “Edit Code”, and press the select button.
2. At the prompt, enter the four digit Parental Control code.
Enter Code
# ____# ____
3. If you did not enter the correct code, a message will be displayed alerting you that the wrong code was entered, and you will be prompted again to enter the code.
Enter Code
Wrong Code
4. If the correct code was entered, the New Code prompt will appear. Enter the new Parental Control code.
New Code
# ____# ____
5. You will then be prompted to confirm the new code by entering it again.
Confirm Code
# ____# ____
6. If you confirmed the correct code, the lock code is now changed and a confirmation screen is displayed. If you entered the wrong code at the confirmation prompt, a screen will be displayed to alert you that you have entered the wrong code, and you will have to repeat the process again.

SIR-GTRC1 Streamer GTR User and Installation Guide48
Confirm Code
Wrong Code
Confirm Code
Code Saved
To exit the Parental Control menu, press the MENU button.
If you have forgotten your Parental Control code, call SIRIUS Customer Service for help.
Time Based FeaturesThese settings allow for adjustment of the following features of the Receiver:
Clock - Sets the clock format, time zone, and daylight savings time function.Alarm - Sets an alarm for a specific time.Program Alert - Sets the Receiver to tune to a specific channel at a specified time.Auto Shutdown - Sets the Receiver to turn off at a specified time.Sleep Mode - Sets the Receiver to turn off after a designated period of time.
Time Features
Clock
AlarmAlarm
Program AlertProgram Alert
Auto ShutdownAuto Shutdown
To select a menu option, use the channel up and down buttons to highlight the option you wish to adjust, and press the select button.
ClockThe time data for the Receiver’s clock is provided via the SIRIUS signal, and will update based on the data received from the signal.You can configure the clock format for 12-hour or 24-hour display format, set the time zone for the clock for your location, and turn On or Off the automatic adjustment for Daylight Savings Time (DST).
Clock
Format
Time ZoneTime Zone
Daylight Savings TimeDaylight Savings Time

SIR-GTRC1 Streamer GTR User and Installation Guide 49
FormatTo change the clock display format of the Receiver to 12 hour or 24 hour format, do the following:
1. Use the channel up and down buttons to highlight “Clock” and press the select button.
2. Use the channel up and down buttons to highlight either “12 hour” or “24 Hour”, and press the select button.
Format
12 Hour12 Hour
24 Hour
To exit the Clock menu, press the MENU button.
Time ZoneTo change the time zone of the Receiver, do the following:
1. Use the channel up and down buttons to highlight “Time Zone”, and press the select button.
2. Use the channel up and down buttons to highlight the proper time zone for your location, and press the select button.
Time Zone
(GMT -6:00) Central(GMT -6:00) Central
(GMT -5:00) Eastern
(GMT -4:30) Atlantic (GMT -4:30) Atlantic
(GMT -3:30) Newfndlnd(GMT -3:30) Newfndlnd
To exit the Time Zone menu, press the MENU button.
Daylight Savings TimeTo turn the Daylight Savings Time feature On or Off, do the following:
1. Use the channel up and down buttons to highlight “Daylight Savings Time”, and press the select button.
2. Use the channel up and down buttons to highlight “DST Observed” or “DST Not Observed”, and press the select button.
Daylight Savings Time
DST Observed
DST Not ObservedDST Not Observed
To exit the Daylight Savings Time menu, press the MENU button.

SIR-GTRC1 Streamer GTR User and Installation Guide50
AlarmThis feature allows you to set an alarm to sound at a specific time each day, and to turn the alarm feature On or Off.
Alarm
Set Alarm
Alarm TimeAlarm Time
Set AlarmTo turn the alarm On or Off, do the following:
1. Use the channel up and down buttons to highlight “Set Alarm”, and press the select button.
2. Use the channel up and down buttons to highlight “Alarm On” or “Alarm Off”, and press the select button.
Set Alarm
OnOn
Off
To exit the Set Alarm menu, press the MENU button.
Alarm TimeTo set the time of the alarm, do the following:
1. Use the channel up and down buttons to highlight “Alarm Time”, and press the select button.
2. Use the channel up and down buttons to change the minutes, and the category previous and next buttons to change the hours, to select the desired alarm time.
Alarm Time
12:00 PM12:00 PM
3. When you have selected the desired alarm time, press the select button to set the alarm time and exit.
To exit the Alarm Time menu, press the MENU button.
Program AlertThe Program Alert feature allows you to program the Receiver to automatically tune to a specific channel at a specific time. The Receiver must be

SIR-GTRC1 Streamer GTR User and Installation Guide 51
powered on in order for this feature to function.
Program Alert
Program Time/Day
Channel NumberChannel Number
Program Alert On/OffProgram Alert On/Off
Program Time/DayTo program the time and day when the receiver will tune to the specified channel, do the following:
1. Use the channel up and down buttons to highlight “Program Time/Day”, and press the select button.
2. At the “Program Time/Day” screen, use the channel up and down buttons to highlight “Time”, and press the select button.
Program Time/Day
TimeDayDay
3. Use the channel up and down buttons to change the minutes, and the category previous and next buttons to change the hours, to select
the time you wish to tune to the specified channel.
Program Time
12:00 PM12:00 PM
4. When you have selected the desired time, press the select button to set the time and exit.
5. At the “Program Time/Day” screen, use the channel up and down buttons to highlight “Day”, and press the select button.
6. Using the channel up and down buttons, select the day of the week you wish to tune to the selected channel, i.e., Monday, Tuesday, etc., and press the select button.
Program Day
MondayMonday
To exit the Program Time/Day menu, press the MENU button.

SIR-GTRC1 Streamer GTR User and Installation Guide52
Channel NumberTo set the channel to which the receiver will tune when the Program Alert feature is On, do the following:
1. Use the channel up and down buttons to highlight “Channel Number”, and press the select button.
2. When the default display screen is displayed, use the channel up and down buttons to navigate to the channel which you wish to select for the Program Alert feature. Use the category previous and next buttons to navigate between categories. When the channel is displayed, press the select button.
A
001
Artist NameArtist Name
Song TitleSong Title
Category 12:00P
Channel Name
A
To exit the Channel Number menu, press the MENU button.
Program Alert On/OffTo turn the Program Alert feature is On or Off, do the following:
1. Use the channel up and down buttons to highlight “Program Alert On/Off”, and press the select button.
2. Use the channel up and down buttons to highlight “Program Alert On” or “Program Alert Off”, and press the select button.
Program Alert On/Off
OnOffOff
To exit the Program Alert On/Off menu, press the MENU button.
Auto ShutdownYou can set the Receiver to automatically power off after a 1 hour period of inactivity, that is, no buttons have been pressed for 1 hour.When the Auto Shutdown feature is enabled, after 59 minutes of inactivity, a beep tone will sound and a display prompt will appear on the screen, “Cancel Auto Shutdown”. At this point the auto shutdown can be reset to 1 hour of inactivity by pressing the select button. If the Auto Shutdown is not reset, the Receiver will automatically power off.

SIR-GTRC1 Streamer GTR User and Installation Guide 53
001
Artist NameArtist Name
Song TitleSong Title
Category 12:00P A
Cancel Auto Shutdown
Channel Name
To enable or disable the Auto Shutdown feature, do the following:
1. Use the channel up and down buttons to highlight “Auto Shutdown”, and press the select button.
2. Use the channel up and down buttons to highlight “Enabled” or “Disabled”, and press the select button.
Auto Shutdown
EnabledEnabled
Disabled
To exit the Auto Shutdown menu, press the MENU button.
Sleep ModeThe Receiver can be set to turn off automatically after a selected period of time, 15, 30, 45, or 60 minutes.To activate or deactivate the Sleep Mode feature,
do the following:
1. Use the channel up and down buttons to highlight “Sleep Mode”, and press the select button.
2. Use the channel up and down buttons to select the desired time, 15, 30, 45, or 60 minutes to activate the Sleep Mode feature, or choose “Off” to cancel the sleep feature, and press the select button.
Sleep Mode
Off
15 min15 min
30 min30 min
45 min45 min
To exit the Sleep Mode menu, press the MENU button.
Signal IndicatorThe Signal Indicator display screen provides a visual display of the strength of the SIRIUS signal from the satellite antenna and also from terrestrial (ground) transmitters.To display the Signal Indicator screen, do the following:
1. Use channel up and down buttons to highlight

SIR-GTRC1 Streamer GTR User and Installation Guide54
“Signal Indicator”, and press the select button.
Signal Indicator
SAT - +SAT - +
TER - +TER - +
2. Two 10 segment horizontal bar graphs will be displayed with a - sign to the left and a + sign to the right. SAT indicates the satellite signal strength while TER indicates the terrestrial signal strength, if a terrestrial signal is available.
To exit the Signal Indicator menu, press the MENU button.
Factory DefaultThe Factory Default option will restore most every feature of the Receiver to the original factory settings. The following is a list of all features affected by the Factory Default option:
• All Presets are cleared• All Game Alerts are cleared• Receiver set to Normal Tuning Mode• Display brightness set to 50%• Display Contrast set to 50%
• FM Transmitter set to On • FM Frequency set to 88.1 MHz• All S-Seek memory cleared• Clock set to 12-Hour Format• Time Zone set to Eastern Standard Time• Daylight Savings Time set to Observed• Auto Shutdown set to Off• Sleep Mode set to Off• Auto Select set to Off• Program Alert cleared
Note that the Parental Control feature is not affected by the Factory Default option. If a code has been set for the Parental Control feature, the code will not be reset by the Factory Default feature, preventing someone from circumventing the Parental Control feature. Channels which have been locked will remain locked.To activate the Factory Default feature, and restore the features of the Receiver to the factory defaults, do the following:
1. Use the channel up and down buttons to highlight “Factory Default”, and press the select button.

SIR-GTRC1 Streamer GTR User and Installation Guide 55
2. Use the channel up and down buttons to select “Yes” to restore all settings to the settings from the factory, or select “No” to leave them as-is and return to the Menu Options menu.
Restore Settings?
YesYes
No
3. If Yes is chosen, a confirmation is displayed. Use the channel up and down buttons to select “Yes” to restore all settings to the settings from the factory, or select “No” to leave them as-is and return to the Menu Options menu.
Are You Sure?
Yes
NoNo
4. If Yes is chosen, the Receiver will revert to the original factory settings.
Are You Sure?
Yes
NoNo
Restoring
Factory Defaults
5. When the Factory Default is complete, the Receiver will place you in Channel 184 the SIRIUS preview channel and display, “Call 1-888-539-SIRIUS to Subscribe”. The Receiver is still subscribed to the SIRIUS service.

SIR-GTRC1 Streamer GTR User and Installation Guide56
Receiver does not power on
Receiver displays:
“ANTENNA NOT DETECTED”
Audio static or loss of clarity
Receiver displays:“ACQUIRING SIGNAL”
No sound
Blown fuse, or the power cable is not properly connected. Check for a bad fuse and check power cable connection.
The satellite antenna is not connected to the Receiver. Check the satellite antenna connection to the Receiver.
FM frequency contains static. Locate a quiet FM frequency on your vehicle radio and set the Receiver’s FM transmitter frequency to match.
The vehicle antenna is not connected to radio. Check vehicle antenna cable to be sure it is connected.
Check for obstacles over or around satellite antenna. Change vehicle location to eliminate nearby obstacles (bridges, overpasses, etc.)
The audio cables are not connected, or the FM radio is set to the wrong frequency. Check the audio cables at the Receiver and the vehicle radio. Tune the vehicle FM radio to the same FM frequency the Receiver is tuned.
Problem Cause and Suggested Solution
TroubleshootingThis section lists several common problems and suggested solutions. If, after trying the suggested solutions listed here, you are still unable to resolve the problem you’re having with your Receiver, contact your installer, dealer, or retailer for more help.

SIR-GTRC1 Streamer GTR User and Installation Guide 57
SpecificationsSatellite Frequencies ............................................................................................2322.293/2330.207 MHzTerrestrial Frequencies ..........................................................................................................2326.250MHzPower Requirements ...............................................................................9-16 Volts, Negative Ground, DCAudio Output ................................................................................2V (normal) 2.8V (max.) (Peak-to-Peak)Total Harmonic Distortion (THD) .......................................................................................................<0.2%Signal-to-noise (S/N) ......................................................................................................Greater than 73dBFuse Requirement .......................................................................................................................... 2A ATC
Receiver Dimensions (Width x Length x Height) ..................................................128mm x 48mm x 19mm(5” x 1.9” x .75”)
Receiver Weight ....................................................................................................................... 112g (4 oz.)Antenna Type ............................................................................................................ Low Profile MagneticAntenna Cable Length ........................................................................................... 21’ (single micro-cable)Connector Type ...............................................................................................................SMB (right-angle)Audio Interface .................................................................................................... 1/8” / 3.5mm Stereo JackFM Out Interface ......................................................................................................................2.5mm Jack
Remote Control Dimensions (Width x Length x Height) .......................................41mm x 104mm x 15mm (1.61” x 4.09” x .59”)
Remote Control Battery Requirements .......................................................................................... CR2025
Note: Features and Specifications subject to change without notice.

SIR-GTRC1 Streamer GTR User and Installation Guide58
12 MONTH LIMITED WARRANTY
Brix Labs dba Pana-Pacific/American Wireless (the “Company”) warrants to the original retail purchaser of this product that should this product or any part thereof, under normal use and conditions, be proven defective in material or workmanship within 12 months from the date of original purchase, such defect(s) will be repaired or replaced with new or reconditioned product (at the Company’s option) without charge for parts and repair labor. To obtain repair or replacement within the terms of this Warranty, the product is to be delivered with proof of warranty coverage (e.g. dated bill of sale), specification of defect(s), transportation prepaid, to the location shown below under WARRANTY RETURN.
This Warranty does not extend to the elimination of externally generated static or noise, to correction of antenna problems, to costs incurred for installation, removal or reinstallation of the product, or to damage to tapes, compact discs, speakers, accessories, or vehicle electrical systems.
This Warranty does not apply to any product or part thereof which, in the opinion of the Company, has suffered or been damaged through alteration, improper installation, mishandling, misuse, neglect, accident, or by removal or defacement of the factory serial number/bar code label(s). THE EXTENT OF THE COMPANY’S LIABILITY UNDER THIS WARRANTY IS LIMITED TO THE REPAIR OR REPLACEMENT PROVIDED ABOVE AND, IN NO EVENT, SHALL THE COMPANY’S LIABILITY EXCEED THE PURCHASE PRICE PAID BY PURCHASER FOR THE PRODUCT. This warranty is only for this specified model and not for any other model of Sirius satellite radio.
WARRANTY RETURN: To obtain repair or replacement within the terms of this Warranty, please return product to an authorized Streamer GTR retailer or call Warranty Support at 1-800-848-6560; proof of purchase and description of defect are required. Products to be returned to an approved warranty station must be shipped freight prepaid.

SIR-GTRC1 Streamer GTR User and Installation Guide 59
SIRIUS ID:
Please record the SIRIUS ID (SID) in the space provided below:
Warranty Support: 1-800-848-6560
Technical Support: 1-866-253-7027

© 2005 Brix Labs
Brix Labs541 Division Street
Campbell, CA 95008(866) 253-7027
SIR-GTRC1 (Rev. 1, Aug 2005)