Embed Size (px)
Citation preview

SharpSchool User Manual
1

Overview of SharpSchool Manual
2
Items this manual will cover: Basic Edi<ng: • Page Content Tools • Document Uploading • Image Uploading
Managing Pages • Adding Subpages • Page Visibility • Archiving Pages Visit CustomerNet for Resources & Online Support • customernet.sharpschool.com (create account using your district username & password)
Tasks to complete during this training: q Set up your Teacher Page to meet the minimum requirements (See below) q Sign up for CustomerNet
District Required Teacher Page Minimum Requirements The district requires all licensed staff to have the following informaIon on their Teacher Pages:
Elementary Staff 1. Name 2. Email Address 3. Welcome Message
Secondary Staff 1. Name 2. Email Address 3. Welcome Message 4. Class Schedule
Op<onal for All Photo-‐Lifetouch preferred
Phone Number*
*This number should be the number for your site’s main office.
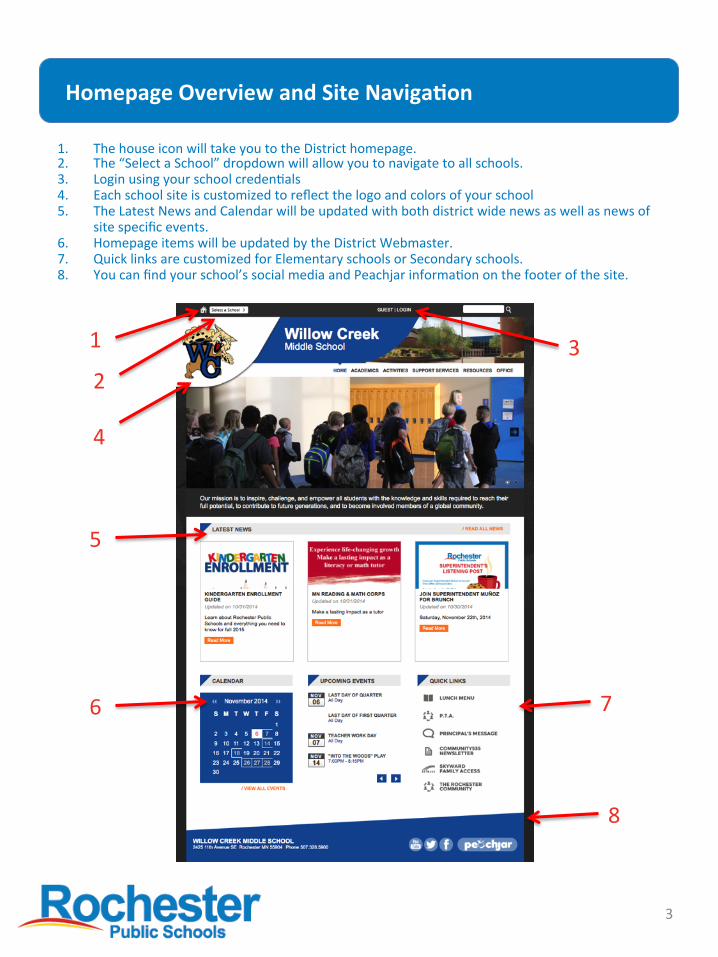
Homepage Overview and Site Naviga<on
1. The house icon will take you to the District homepage. 2. The “Select a School” dropdown will allow you to navigate to all schools. 3. Login using your school credenIals 4. Each school site is customized to reflect the logo and colors of your school 5. The Latest News and Calendar will be updated with both district wide news as well as news of
site specific events. 6. Homepage items will be updated by the District Webmaster. 7. Quick links are customized for Elementary schools or Secondary schools. 8. You can find your school’s social media and Peachjar informaIon on the footer of the site.
3
1
5
6 7
8
2 3
4
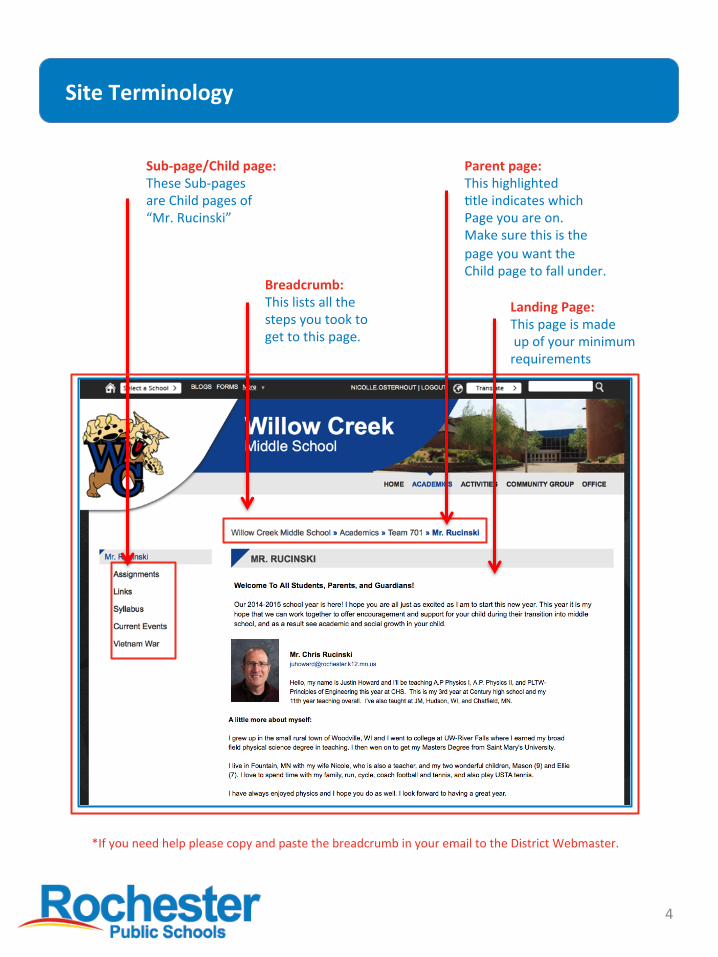
Site Terminology
4
Parent page: This highlighted Itle indicates which Page you are on. Make sure this is the page you want the Child page to fall under.
Sub-‐page/Child page: These Sub-‐pages are Child pages of “Mr. Rucinski”
Breadcrumb: This lists all the steps you took to get to this page.
*If you need help please copy and paste the breadcrumb in your email to the District Webmaster.
Landing Page: This page is made up of your minimum requirements
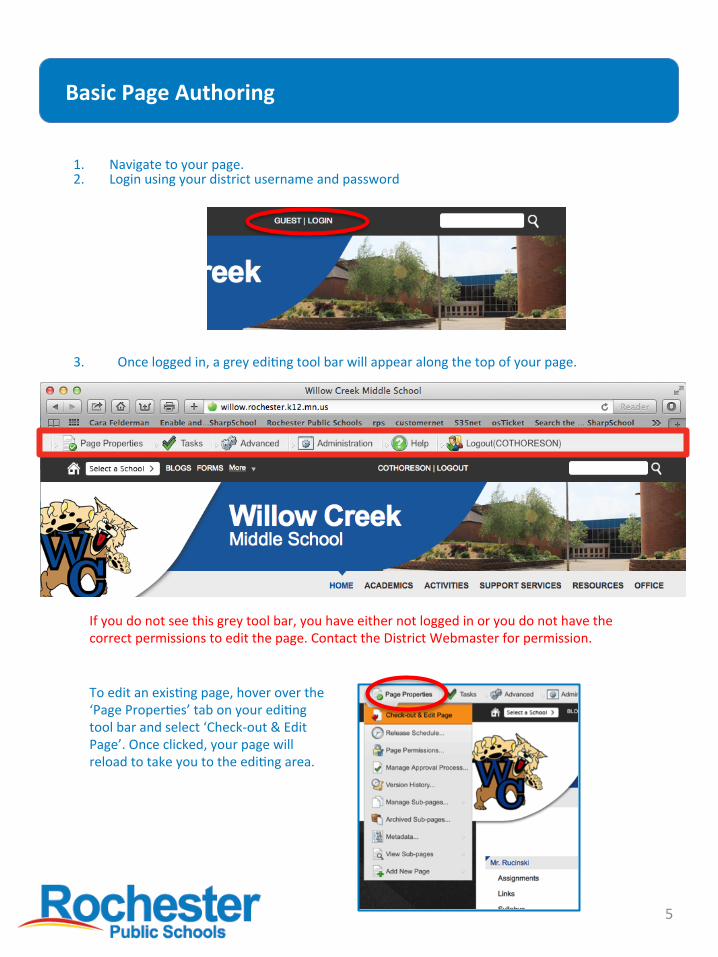
Basic Page Authoring
5
To edit an exisIng page, hover over the ‘Page ProperIes’ tab on your ediIng tool bar and select ‘Check-‐out & Edit Page’. Once clicked, your page will reload to take you to the ediIng area.
If you do not see this grey tool bar, you have either not logged in or you do not have the correct permissions to edit the page. Contact the District Webmaster for permission.
1. Navigate to your page. 2. Login using your district username and password
3. Once logged in, a grey ediIng tool bar will appear along the top of your page.

Edi<ng A Page
6
Save: This opIon will save your changes as a work in progress and will not make the changes live.
Cancel: This opIon will delete all your changes.
Publish: This opIon will make your changes live instantly on the site.
Title: This is the name that will appear on your site.
Always click the blue arrow Which will auto-‐fill “Name”
Do not type here
Landing Page: • Welcome Itle • Welcome message. • Name • Email • Short bio • Phone (work) • Photo (Lifetouch preferred)

Edi<ng a Page -‐ Adding Your Photo
7
Image Manager If you choose to have your photo on your page we encourage you to use your school Lifetouch photo. *Clip art is not allowed on the website as a way to maintain it’s professional quality.
Working with Folders *you will only need to do this once. It is very important to create folders for your Department and Staff to keep your files organized because you will not be able to move or delete files aher they have been uploaded.
1. Find your photo under the 2014-‐15 Lifetouch folder 2. Edit ProperIes tab
1
2

8
What is Alt Text? Also known as alternaIve text, it is used to provide images with a text descripIon in the event images are turned off in a web browser or a person is using assisIve technology.
4. Click ‘Insert’ once ediIng properIes are complete.
You can adjust the width and height of your photo here also. Click on the broken chain to make it a whole link. This will scale the photo proporIonately. (Photos should be scaled to
Width: 100px) You can also add space around your photo by adjusIng the margins.
Edi<ng a Page -‐ Adding Your Photo (con<nued)
3. Enter an image descripIon for ‘Alt Text’ in the ‘Proper<es’ tab
9
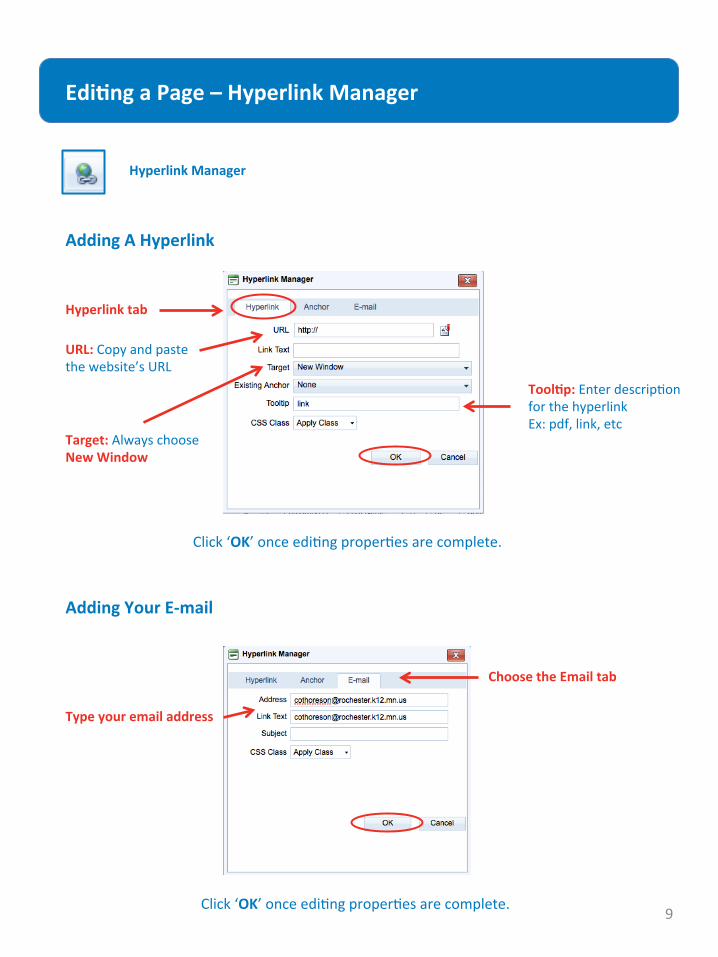
Adding Your E-‐mail
Hyperlink Manager
Adding A Hyperlink
Choose the Email tab
Type your email address
URL: Copy and paste the website’s URL
Target: Always choose New Window
Tool<p: Enter descripIon for the hyperlink Ex: pdf, link, etc
Edi<ng a Page – Hyperlink Manager
Hyperlink tab
Click ‘OK’ once ediIng properIes are complete.
Click ‘OK’ once ediIng properIes are complete.

10
Highlight the word(s) that you would like to be linked to the document, then click the ‘Document Manager’ icon.
Click the ‘Upload’ icon to add a file to your folder.
Edi<ng a Page – Hyperlinking a Document
Working with Folders (you will only need to do this once). It is very important to create folders for your Department and Staff to keep your files organized because you will not be able to move or delete files aher they have been uploaded.

11
Click ‘Select’ bumon to search for your document on your computer
Note: You will not be able to delete any documents that you upload to this folder. If for some reason you add a document that you did not intend to, don’t worry, we have unlimited storage.
Locate the file on you computer and click ’Open’.
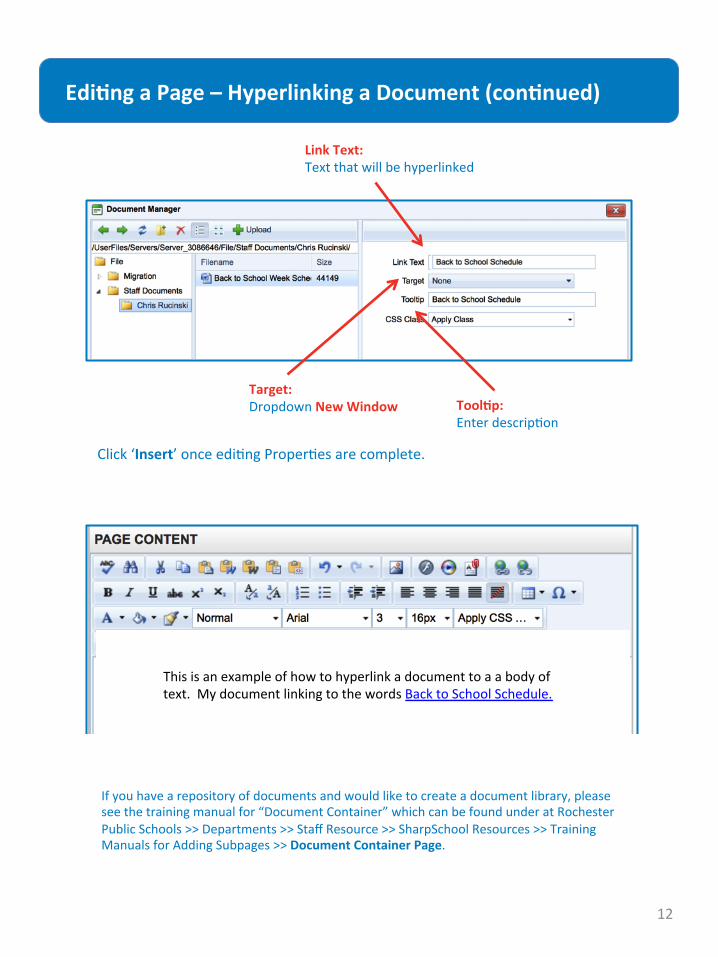
Edi<ng a Page – Hyperlinking a Document (con<nued)
Click ‘Upload’ once ediIng properIes are complete.
12
Click ‘Insert’ once ediIng ProperIes are complete.
This is an example of how to hyperlink a document to a a body of text. My document linking to the words Back to School Schedule.
If you have a repository of documents and would like to create a document library, please see the training manual for “Document Container” which can be found under at Rochester Public Schools >> Departments >> Staff Resource >> SharpSchool Resources >> Training Manuals for Adding Subpages >> Document Container Page.
Edi<ng a Page – Hyperlinking a Document (con<nued)
Target: Dropdown New Window
Link Text: Text that will be hyperlinked
Tool<p: Enter descripIon

Adding A New Page
13
1. Navigate to the Parent page (the page you want the subpage to fall under). 2. Hover over the ‘Page Proper<es’ along the grey tools bar, then move to ‘Add
New Page’, select page type and begin ediIng.
Blog Page – If you would like to create a blog for your class. Calendar Page – If you would like to add a personalized calendar to your page (different from the site calendar). Content Space – This is a blank webpage-‐most frequently used. Document Container – If you would like to create a page with a repository of documents. External Link – If you would like to link directly to an external website or to a document. Photo Gallery – To easily upload and display a gallery of approved photos.
NOTE: The pages listed here are the most common links for teachers. For a more complete descripIon of page types and tutorials, please our SharpSchool Resources page.
Adding Sub-‐pages to your Landing Page or Parent Sub-‐pages

Hyperlink Manager Is for linking to an outside website within a paragraph. Ex. You should visit MackinVia, it’s a great library resource.
Crea<ng Links
Document Manager Is for documents to be linked within a paragraph. Ex. Read the news arIcle and fill out the quesIonnaire.
External Link Page Page Proper<es >> Add New Page >> External Link Page This is a one-‐click op<on for users to be taken directly to a pdf or as a direct link to an outside website.
Document Container Page Page Proper<es >> Add New Page >> Document Container Page For example, this page can be used to house assignments, newslemers, or a repository of documents.
Content Space Page Page Proper<es >> Add New Page >> Content Space Page This is a blank page and is best suited for… 1. Hyperlinks to be embedded in a body of text. 2. So many links that a two-‐column table lisIng all of the links is needed. 3. With this page you would hyperlink documents and web link using…
NOTE: The Content Space Page, External Link Page, and Document Container Page are the three suggested pages to use when creaIng links to documents or websites. We want to strive to create websites that are informaIve and easy to navigate for both our parents and student using a variety of media devices.
14

15
*Hide Sec<on (recommended) allows you to hide your sub-‐pages along with the calendar, as well as hide the page from top menu bar and the side menu bar. If there is a calendar within your hidden secIon, it will not be visible from other calendars on your site. You will not be able to see any sub-‐pages of the page from the side menu bar. Hide Selec<on allows you to remove a page from the top menu bar and sidebar menu, without hiding the items that are contained within. The calendars under the hidden page will be visible to other calendars and the side menu bar will display any subpages of the current page.
Page Status: Offers you the opIon to ‘Show’ or ‘Hide’ Sub-‐pages as well as ‘Archive’ them if you are sure that you don’t want them anymore. Page Order (drag and drop to re-‐order your sub-‐pages)
Managing Sub-‐pages – Page Status
How to edit a page that has been “hidden”
View Sub-‐pages: This is where you can access your “hidden” Sub-‐pages and conInue ediIng them unIl you are ready to ‘Publish’ them. (Hidden) Sub-‐page Published Sub-‐page

16
3. To un-‐archive a page, click on the ‘Archived Sub Pages’ drop down. 4. Check the box of the Archived Sub-‐page then click ‘Un-‐Archive’.
1. To archive a page, click on the ‘Page Status’ dropdown. 2. Check the box to the leh of the Sub-‐Page. Click ‘Archive’ then click ‘Close’.
Managing Sub-‐pages – Archiving Pages

7. Working with Resources
17
The district is currently running Moodle 2.5. Moodle is a full featured online learning management system that is secured by your and your students district login and password. Legally online learning management system have almost idenIcal copyright and fair use protecIon as your brick and mortar classrooms; that means if you can use it legally in your classroom, you can use it in Moodle. Rochester Public Schools also offers Edmodo and Google pages as other opIons. If you have copy wrimen materials that you would like to have your students access and would like help with uIlizing one or more of these tools, please contact: Instruc<onal Technology: [email protected] Please do not put any copy wricen materials on SharpSchool.
Copy Wricen Materials & Moodle
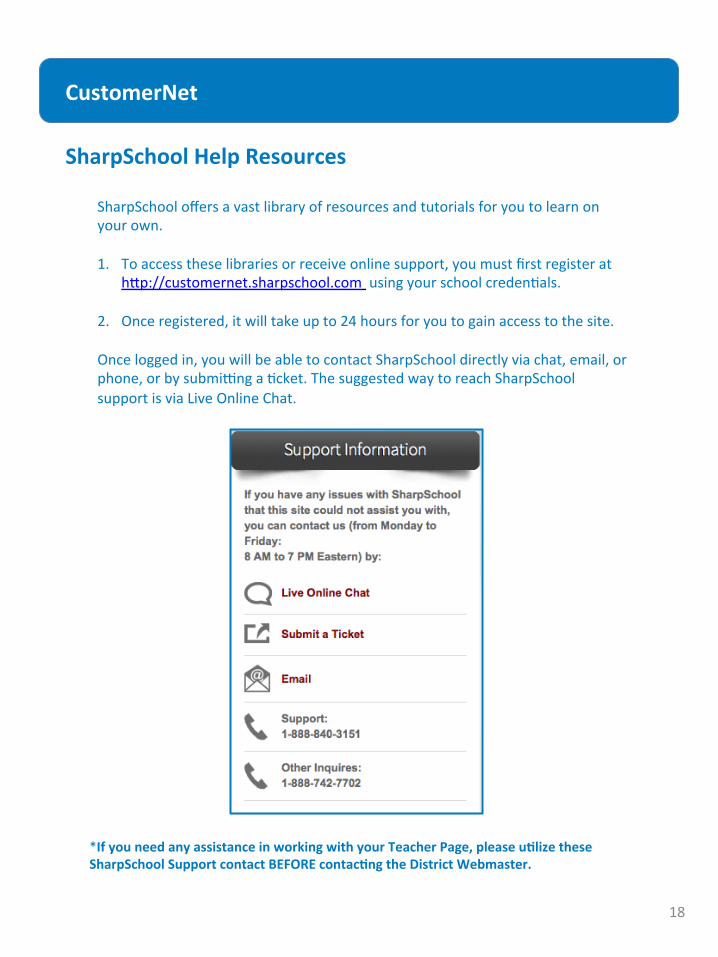
CustomerNet
18
SharpSchool offers a vast library of resources and tutorials for you to learn on your own. 1. To access these libraries or receive online support, you must first register at
hmp://customernet.sharpschool.com using your school credenIals. 2. Once registered, it will take up to 24 hours for you to gain access to the site. Once logged in, you will be able to contact SharpSchool directly via chat, email, or phone, or by submitng a Icket. The suggested way to reach SharpSchool support is via Live Online Chat.
*If you need any assistance in working with your Teacher Page, please u<lize these SharpSchool Support contact BEFORE contac<ng the District Webmaster.
SharpSchool Help Resources

19
You can find teacher training resources and videos under ‘Resources’
Here you can find Teacher Help Cards as well as video tutorials for Teachers.
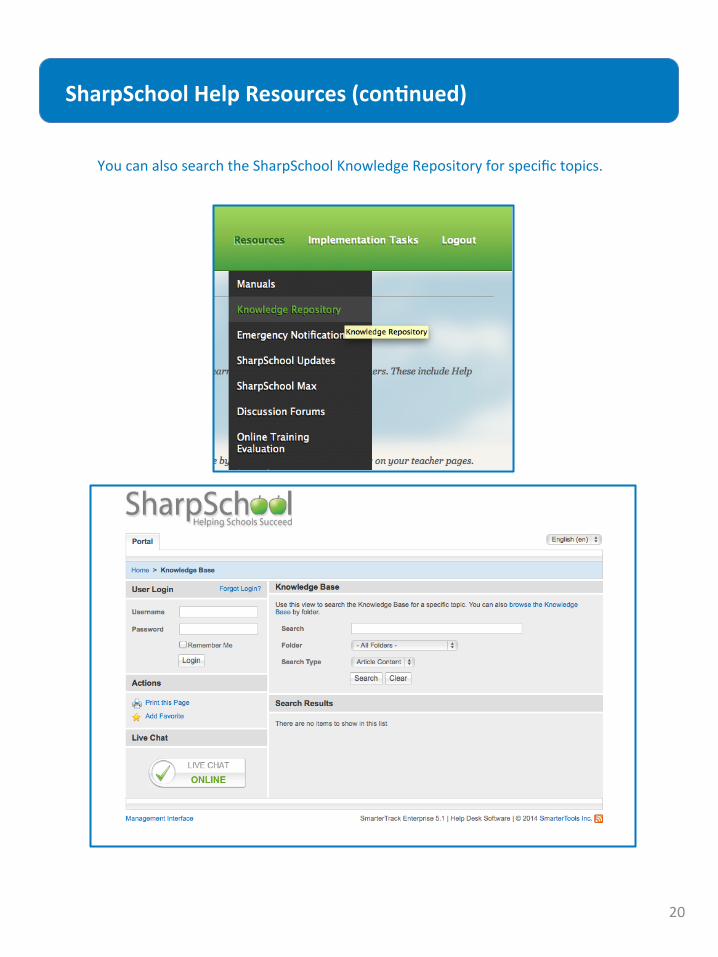
SharpSchool Help Resources (con<nued)
20
You can also search the SharpSchool Knowledge Repository for specific topics.
SharpSchool Help Resources (con<nued)

21
Contact SharpSchool If you need assistance please let the SharpSchool Support be your first stop. If SharpSchool cannot help you…
Contact the District Webmaster Courtney Thoreson
Direct | 507.328.4339 Cell | 507.884.1254
Communica<ons and Marke<ng Contact Info
We are here to support you and are very excited about the transiIon to our new website. This guide has highlighted a few areas that you may use frequently. Please take some Ime to discover and explore the new website. What should I do if I need Help? If you need any assistance in working with your Teacher Page, please uIlize Customernet-‐SharpSchool Support as your first stop before contacIng the District Webmaster as they will be able to give you immediate assistance.
Contact Guide
Courtney Thoreson District Webmaster [email protected] Direct | 507.328.4339 Nicolle Osterhout Graphic Design|CommunicaIons Specialist [email protected] Direct | 507.328.4313 Heather Nessler ExecuIve Director | CommunicaIons, MarkeIng, Technology [email protected] Office | 507.328.4500