Embed Size (px)
Citation preview
SERVER I
SLIDE: 1
Anders Dahl ValgreenData technician in Royal Danish AirforceIT Teacher at MercantecSystems administrator at Technical College, Skjern, DenmarkIT Teacher at Mercantec
Core skills:NetworkServer, Unix and WindowsFaultfindingDocumentationProject Management
Teacher – first part
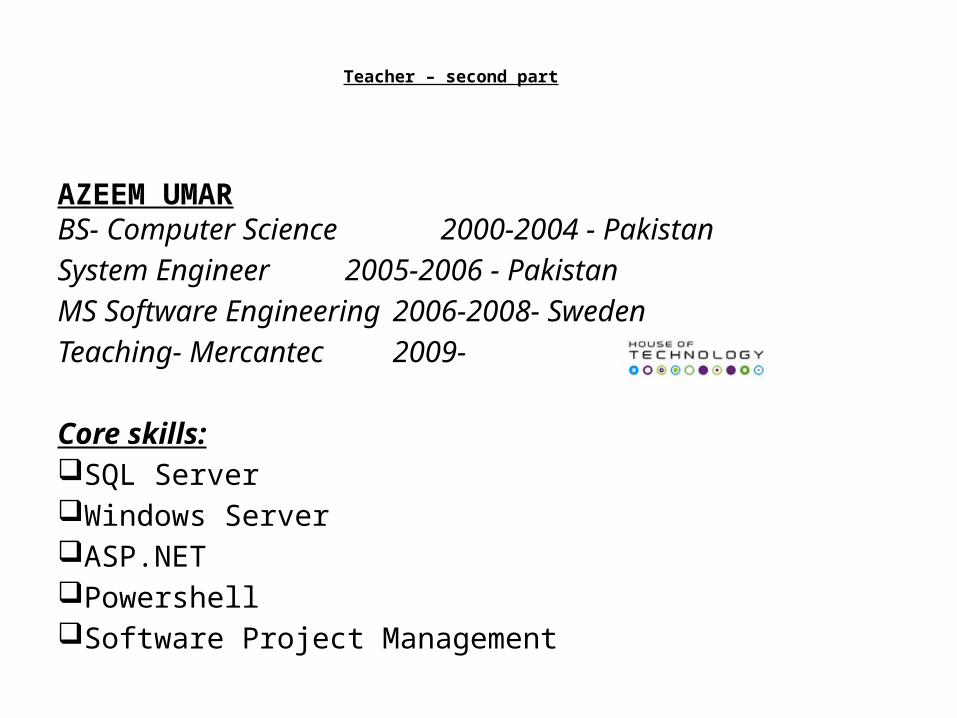
AZEEM UMARBS- Computer Science 2000-2004 - PakistanSystem Engineer 2005-2006 - PakistanMS Software Engineering 2006-2008- SwedenTeaching- Mercantec 2009-
Core skills:SQL ServerWindows ServerASP.NETPowershellSoftware Project Management
Teacher – second part
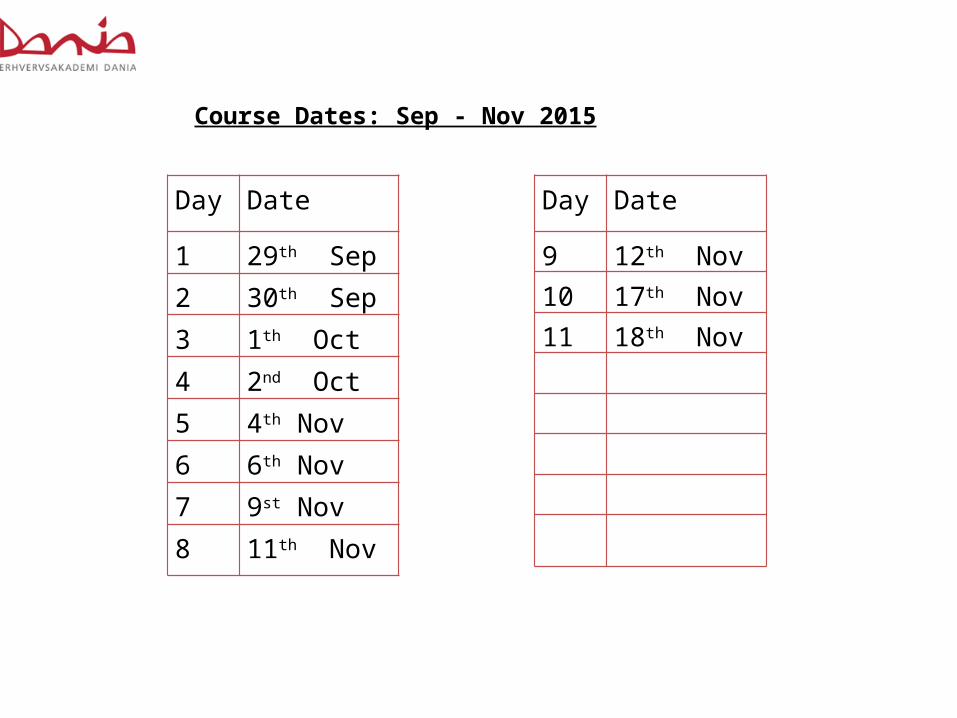
Day Date
1 29th Sep2 30th Sep 3 1th Oct4 2nd Oct5 4th Nov6 6th Nov7 9st Nov8 11th Nov
Course Dates: Sep - Nov 2015
Day Date
9 12th Nov10 17th Nov 11 18th Nov
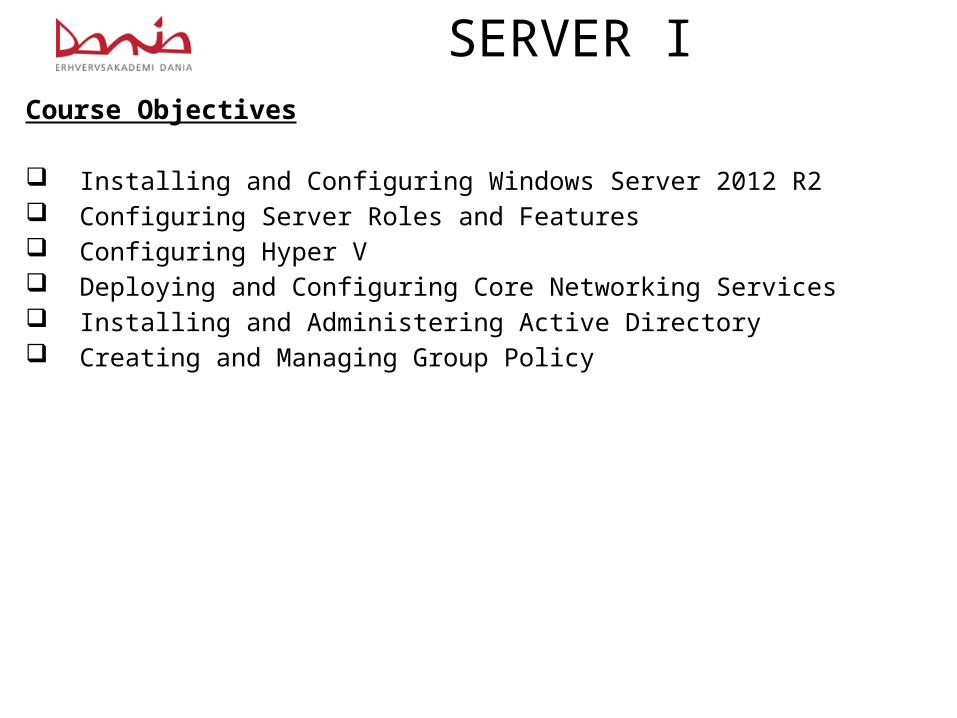
SERVER ICourse Objectives
Installing and Configuring Windows Server 2012 R2 Configuring Server Roles and Features Configuring Hyper V Deploying and Configuring Core Networking Services Installing and Administering Active Directory Creating and Managing Group Policy

SERVER ILesson Plan – part 1, with Anders Dahl Valgreen
Day 1: ■■ Objective 1.1: Install servers ■■ Objective 1.2: Configure servers ■■ Objective 1.3: Configure local storage
Day 2: ■■ Objective 2.1: Configure file and share access ■■ Objective 2.2: Configure print and document services ■■ Objective 2.3: Configure servers for remote management
Day 3: ■■ Objective 3.1: Create and configure virtual machine settings ■■ Objective 3.2: Create and configure virtual machine storage ■■ Objective 3.3: Create and configure virtual networks
Day 4: ■■ Objective 4.1: Configure IPv4 and IPv6 addressing ■■ Objective 4.2: Deploy and configure Dynamic Host Configuration Protocol (DHCP) ■■ Objective 4.3: Deploy and configure DNS service
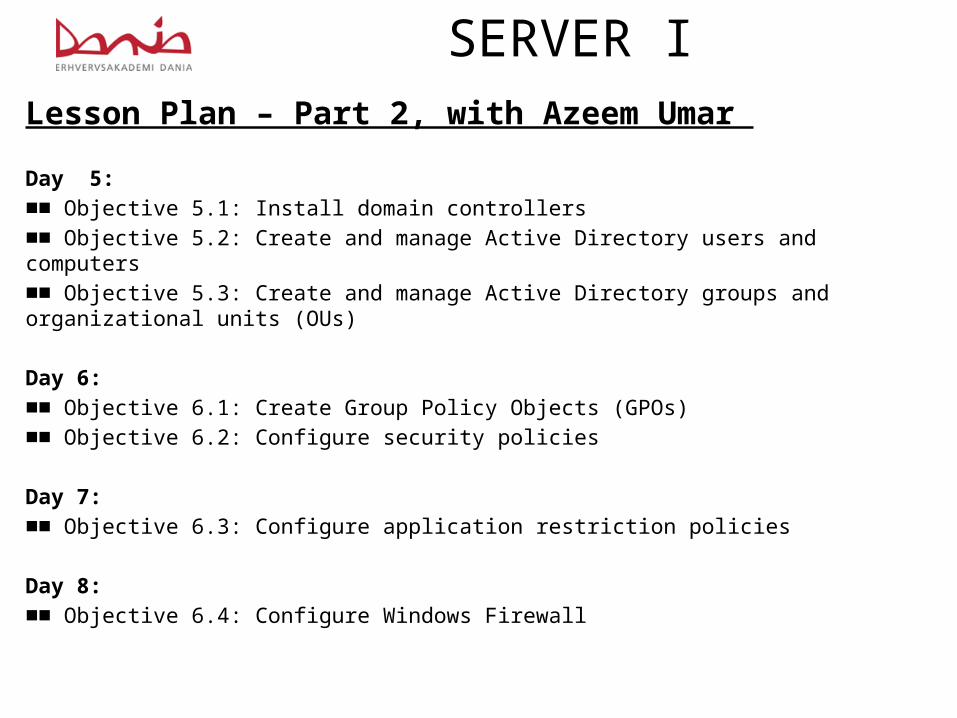
SERVER ILesson Plan – Part 2, with Azeem Umar
Day 5: ■■ Objective 5.1: Install domain controllers ■■ Objective 5.2: Create and manage Active Directory users and computers ■■ Objective 5.3: Create and manage Active Directory groups and organizational units (OUs)
Day 6: ■■ Objective 6.1: Create Group Policy Objects (GPOs) ■■ Objective 6.2: Configure security policies
Day 7: ■■ Objective 6.3: Configure application restriction policies
Day 8: ■■ Objective 6.4: Configure Windows Firewall

SERVER I
What is a SERVER?
SERVER I
Lesson Plan
Day 1: ■■ Objective 1.1: Install servers ■■ Objective 1.2: Configure servers ■■ Objective 1.3: Configure local storage
SERVER IObjective 1.1: Install servers
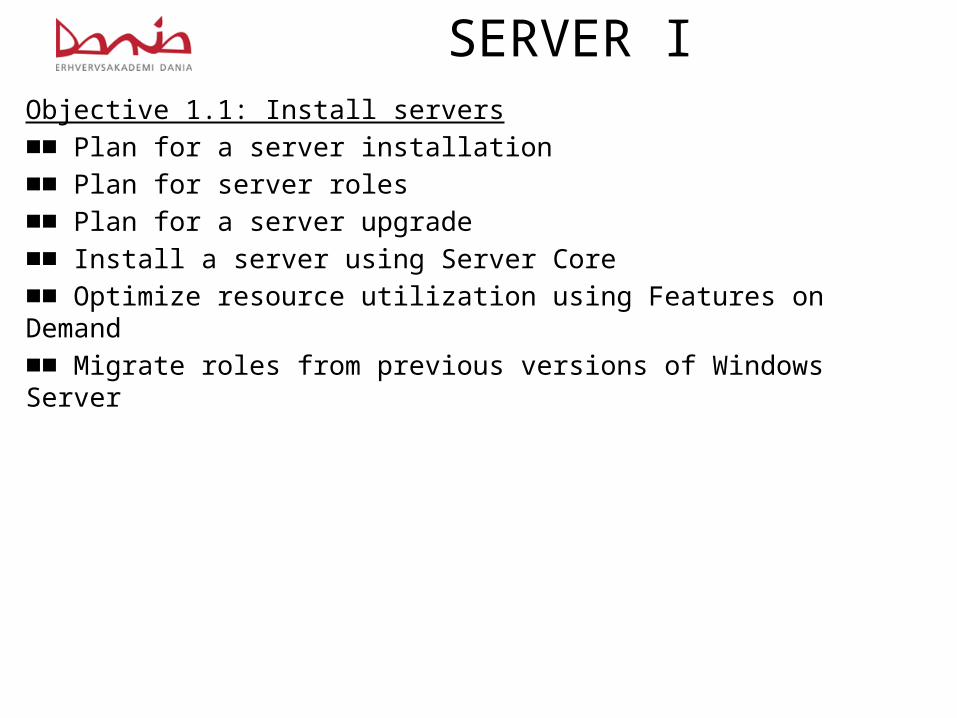
■■ Plan for a server installation ■■ Plan for server roles ■■ Plan for a server upgrade ■■ Install a server using Server Core ■■ Optimize resource utilization using Features on Demand ■■ Migrate roles from previous versions of Windows Server
SERVER IObjective 1.1: Install servers
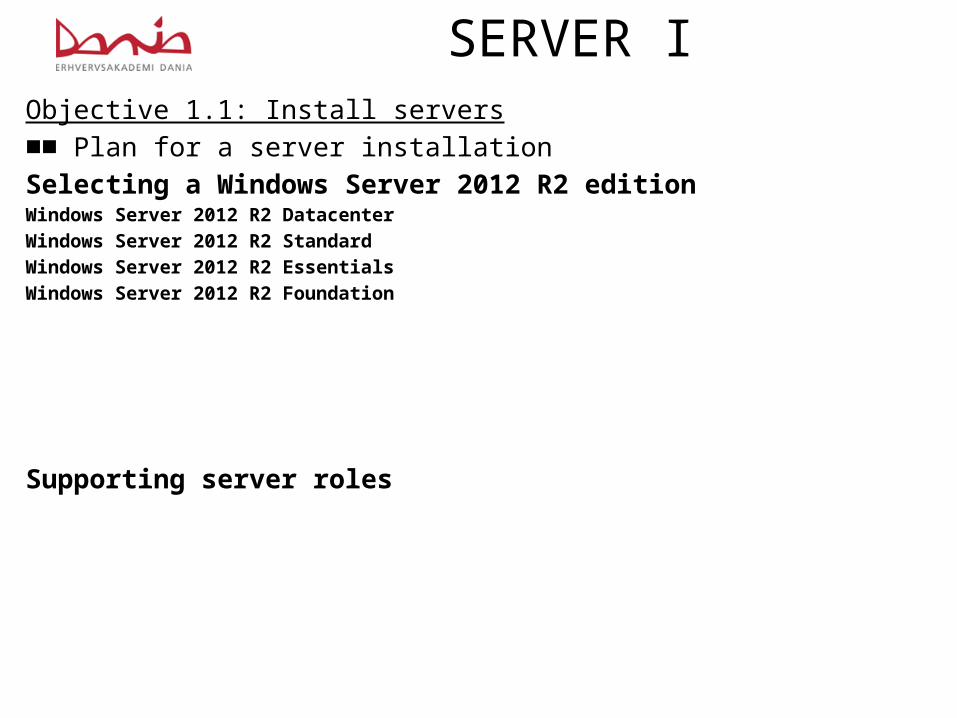
■■ Plan for a server installationSelecting a Windows Server 2012 R2 edition Windows Server 2012 R2 DatacenterWindows Server 2012 R2 StandardWindows Server 2012 R2 EssentialsWindows Server 2012 R2 Foundation
Supporting server roles
SERVER IObjective 1.1: Install servers
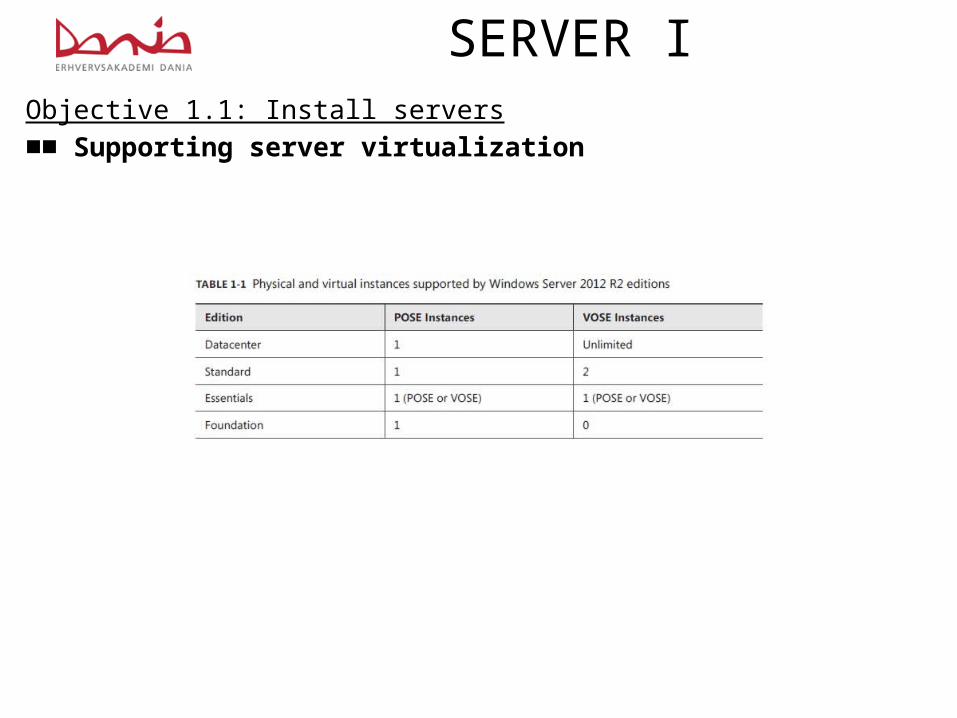
■■ Supporting server virtualization
SERVER IObjective 1.1: Install servers
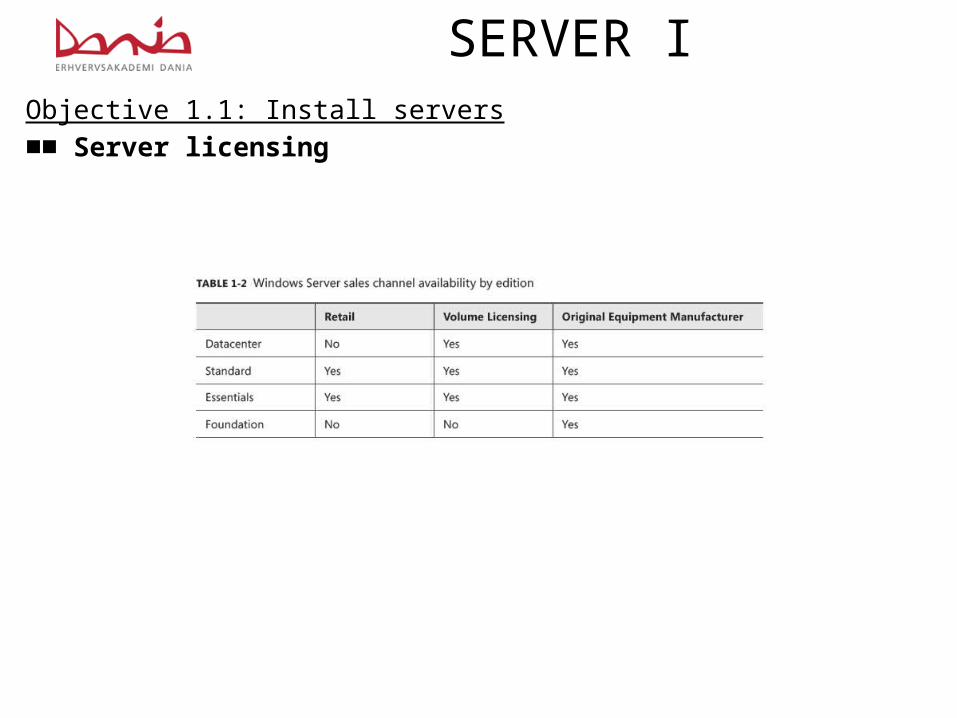
■■ Server licensing
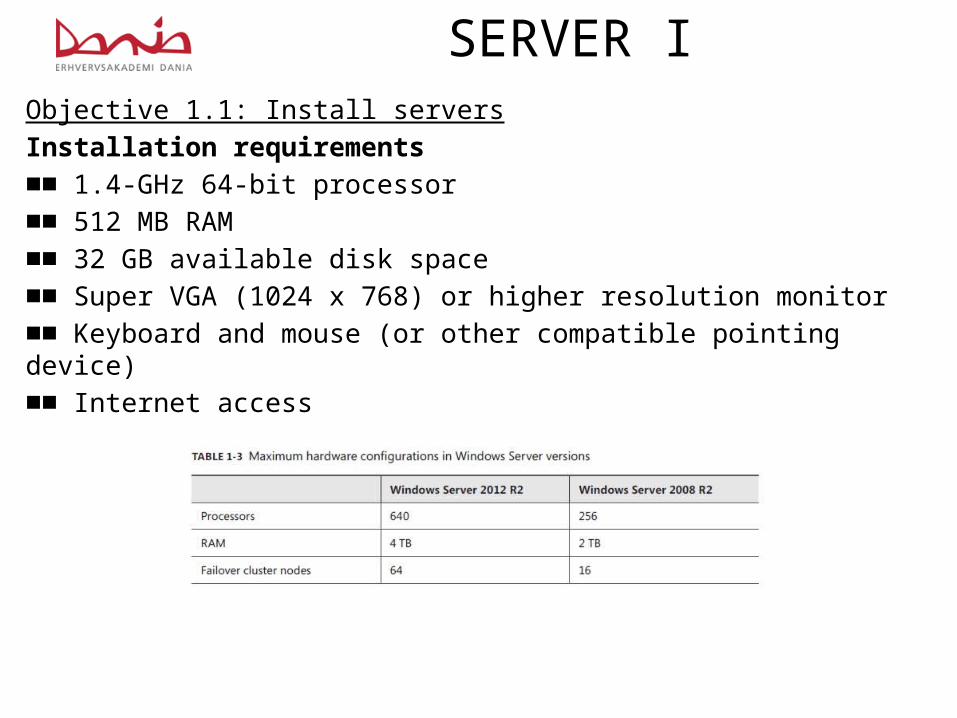
SERVER IObjective 1.1: Install serversInstallation requirements
■■ 1.4-GHz 64-bit processor ■■ 512 MB RAM ■■ 32 GB available disk space ■■ Super VGA (1024 x 768) or higher resolution monitor ■■ Keyboard and mouse (or other compatible pointing device) ■■ Internet access
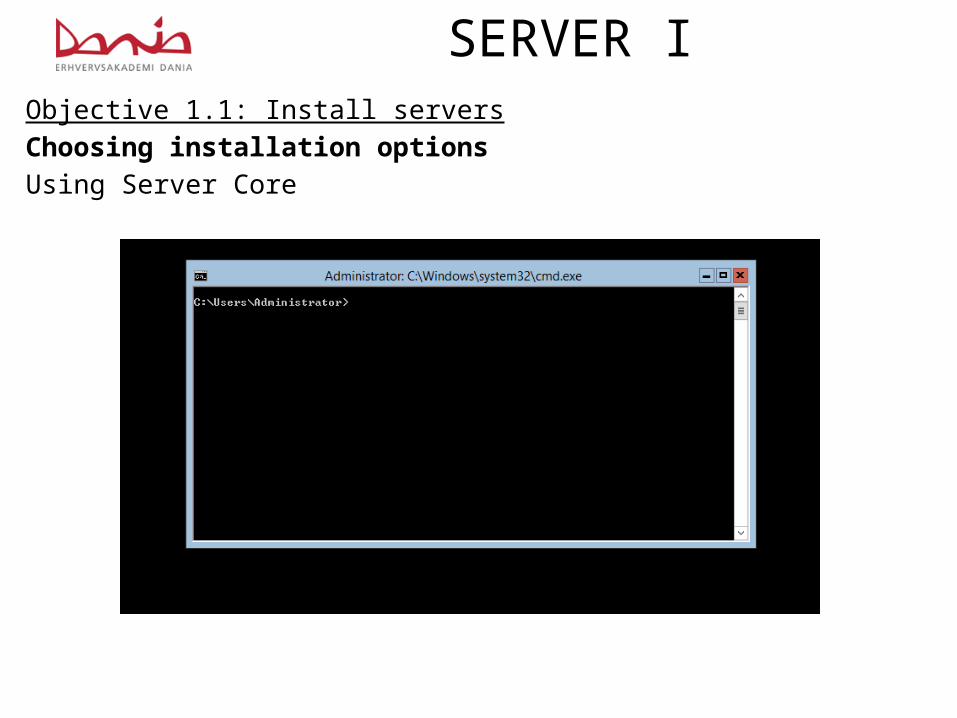
SERVER IObjective 1.1: Install serversChoosing installation optionsUsing Server Core
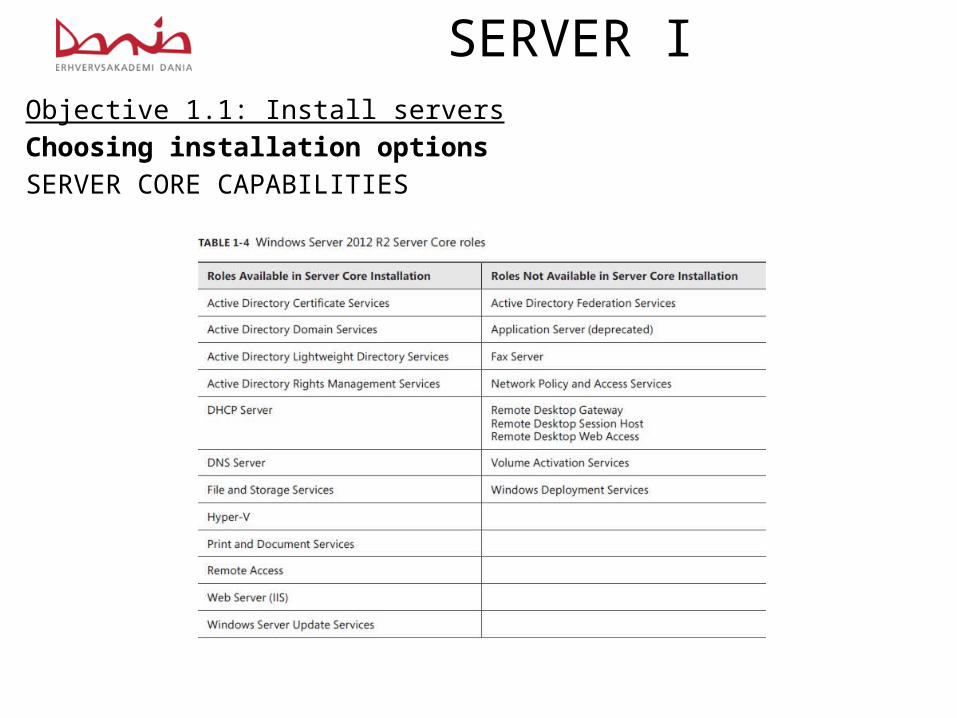
SERVER IObjective 1.1: Install serversChoosing installation optionsSERVER CORE CAPABILITIES
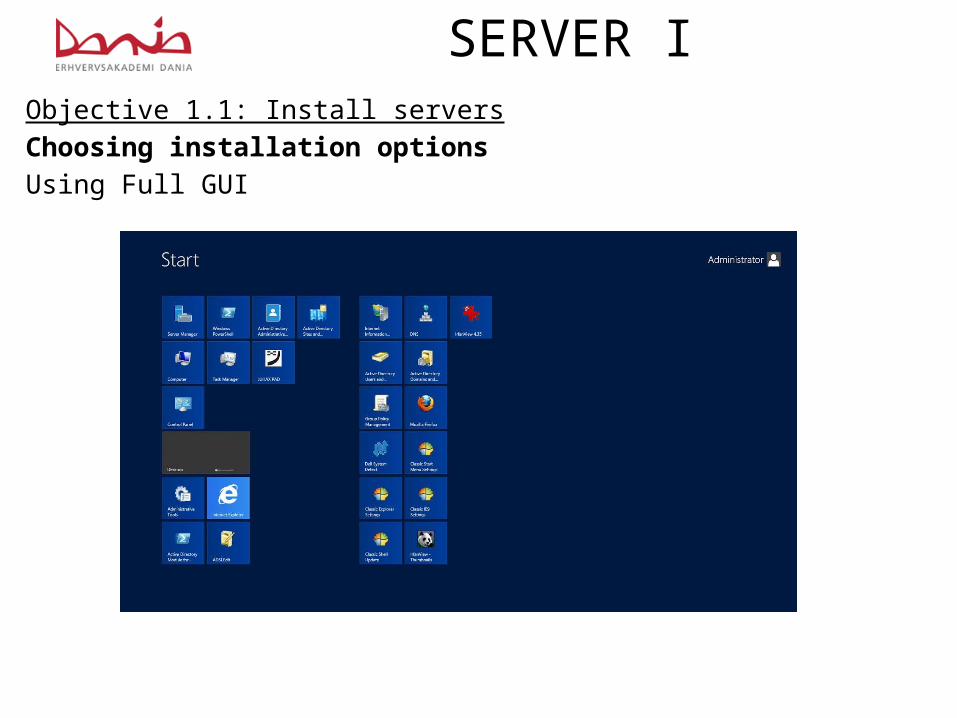
SERVER IObjective 1.1: Install serversChoosing installation optionsUsing Full GUI
SERVER I
SERVER IObjective 1.1: Install servers
Upgrading server
Upgrade pathsIf you have a 64-bit computer running Windows Server 2008 or Windows Server 2008 R2, you can upgrade it to Windows Server 2012 R2 as long as you use an appropriate operating system edition.
Windows Server 2012 R2 does not support the following: ■■ Upgrades from Windows Server versions prior to Windows Server 2008 ■■ Upgrades from pre-RTM editions of Windows Server 2012 R2 ■■ Upgrades from Windows workstation operating systems ■■ Cross-platform upgrades, such as 32-bit Windows Server 2008 to 64-bit Windows Server
2012 R2 ■■ Upgrades from any Itanium edition ■■ Cross-language upgrades, such as from Windows Server 2008, U.S. English to Windows
Server 2012 R2, French
SERVER IObjective 1.1: Install servers
Upgrading server
1. Check hardware compatibility2. Check disk space3. Confirm that software is signed4. Save mass storage drivers on removable media5. Check application compatibility6. Ensure computer functionality7. Perform a full backup8. Disable virus protection software9. Disconnect the UPS device10. Purchase the correct Windows Server 2012 R2 edition
SERVER IObjective 1.1: Install serversMigrating rolesUnlike an in-place upgrade, a migration copies vital information from an existing server to a clean Windows Server 2012 R2 installation.
By using the Windows Server Migration Tools and migration guides supplied with WindowsServer 2012 R2, you can migrate data between servers under any of the following conditions:
■■ Between versions You can migrate data from any Windows Server version from Windows Server 2003 SP2 to Windows Server 2012 R2. This includes migrations from one server running Windows Server 2012 R2 to another.
■■ Between platforms You can migrate data from a 32-bit or 64-bit server to a 64-bit server running Windows Server 2012 R2.
■■ Between editions You can migrate data between servers running different WindowsServer editions.
■■ Between physical and virtual instances You can migrate data from a physicalserver to a virtual one, or the reverse.
■■ Between installation options You can migrate data from one server to another, even when one server is using the Server Core installation option and the other is using the Server with a GUI option.

SERVER I
Break
SERVER IObjective 1.2: Configure servers
■■ Configure Server Core ■■ Delegate administration ■■ Add and remove features in offline images ■■ Deploy roles on remote servers ■■ Convert Server Core to and from full GUI ■■ Configure services ■■ Configure NIC teaming ■■ Install and configure Windows PowerShell Desired State Configuration (DSC)

SERVER IObjective 1.2: Configure servers
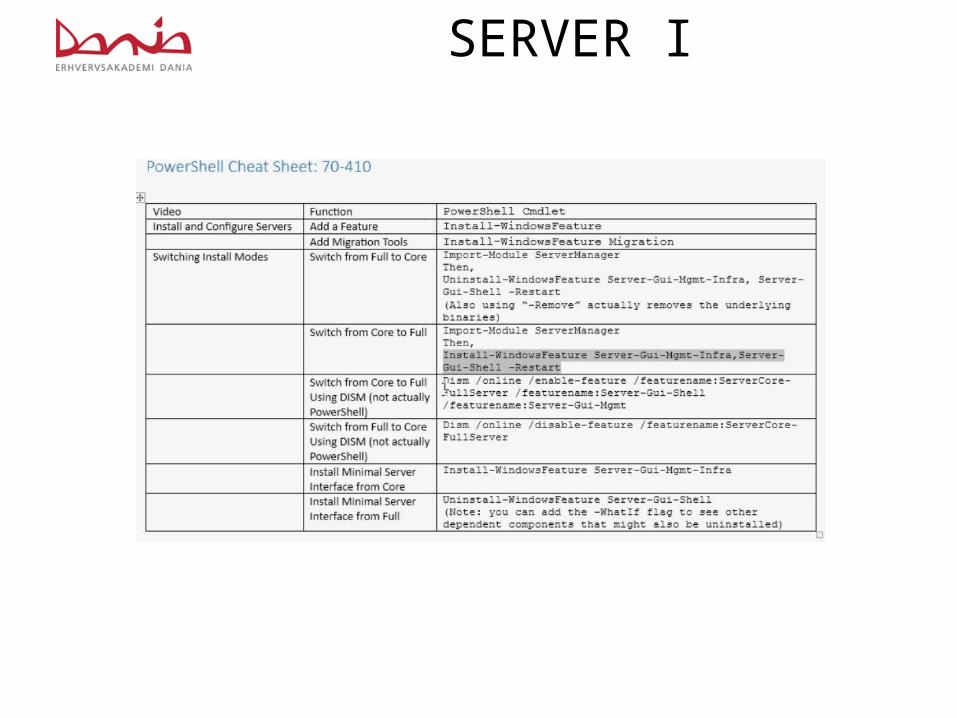
■■ Converting between GUI and Server Core
Install-WindowsFeature Server-Gui-Mgmt-Infra,Server-Gui-Shell –Restart
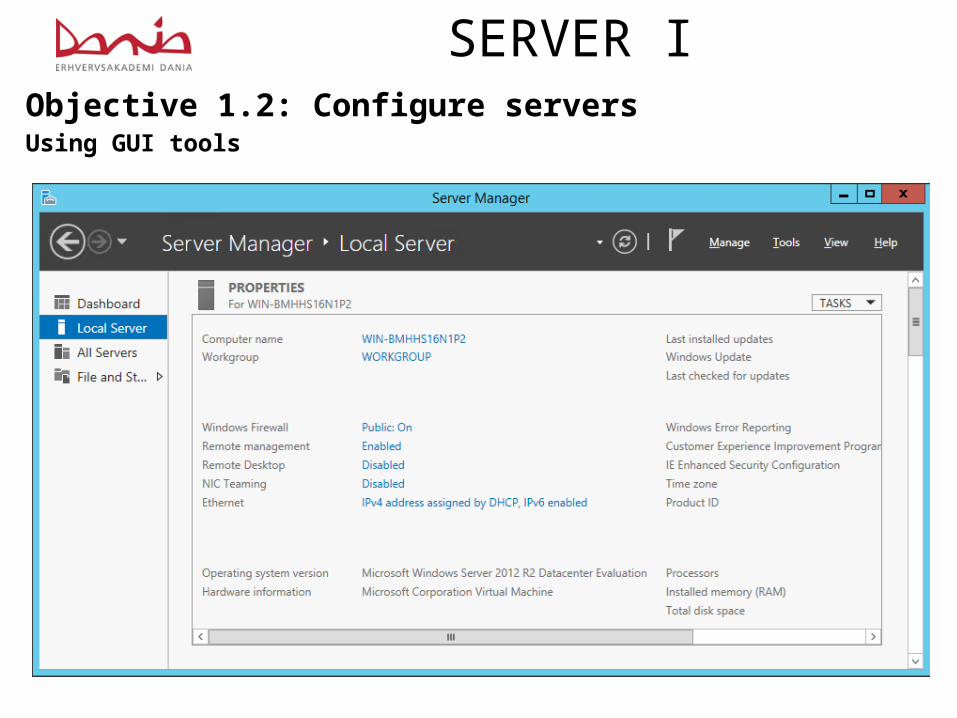
SERVER IObjective 1.2: Configure serversUsing GUI tools
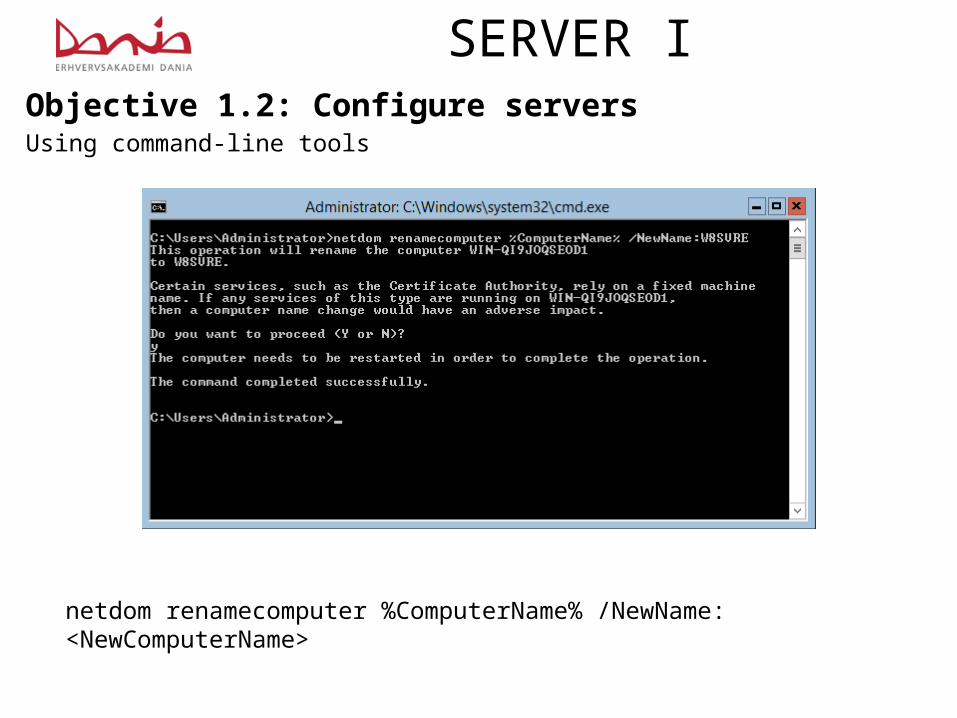
SERVER IObjective 1.2: Configure serversUsing command-line tools
netdom renamecomputer %ComputerName% /NewName: <NewComputerName>
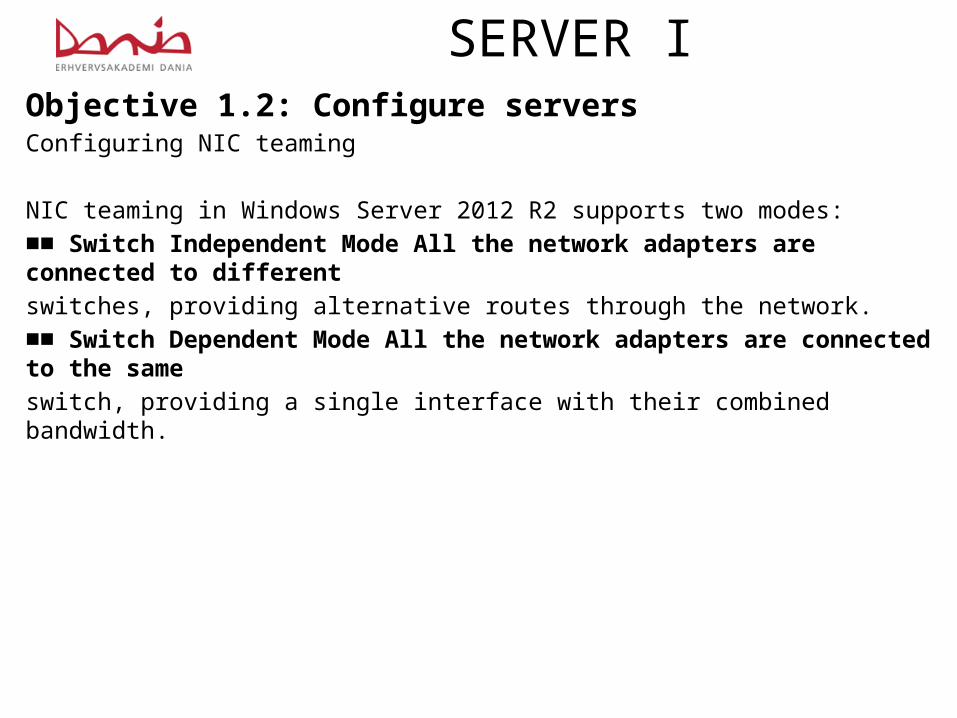
SERVER IObjective 1.2: Configure serversConfiguring NIC teaming
NIC teaming in Windows Server 2012 R2 supports two modes: ■■ Switch Independent Mode All the network adapters are connected to different
switches, providing alternative routes through the network. ■■ Switch Dependent Mode All the network adapters are connected to the same
switch, providing a single interface with their combined bandwidth.

SERVER IObjective 1.2: Configure serversConfiguring NIC teaming

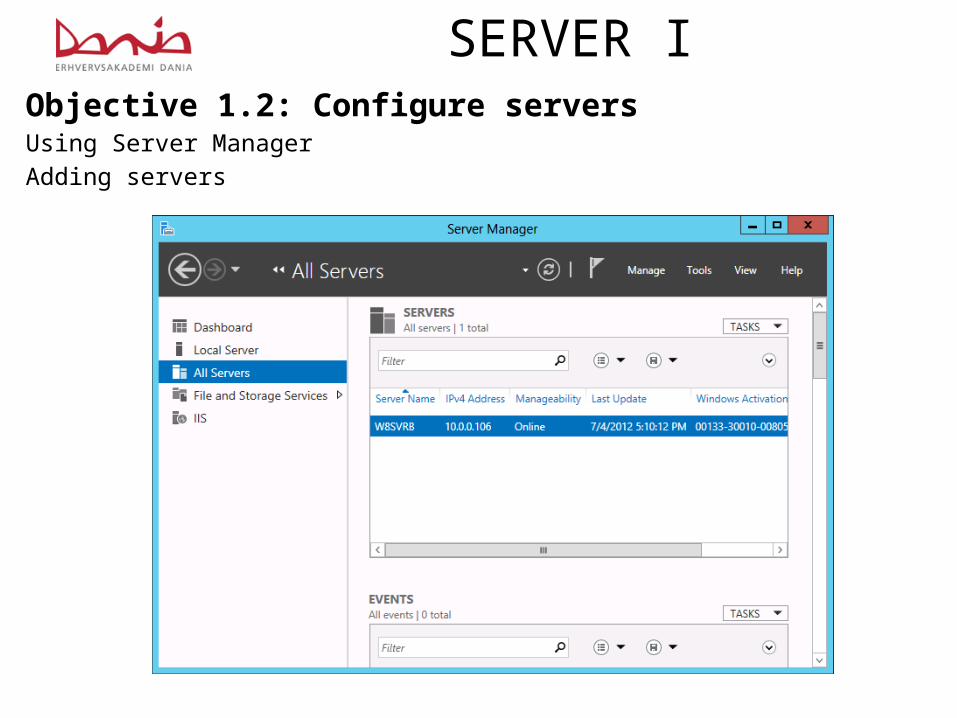
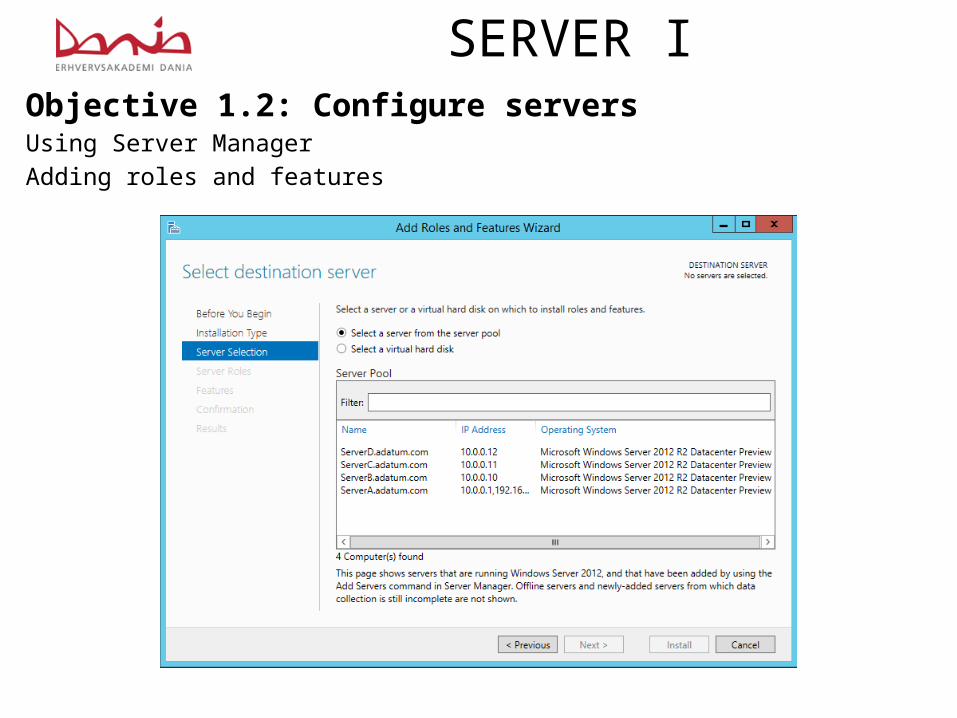
SERVER IObjective 1.2: Configure serversUsing Server ManagerAdding servers
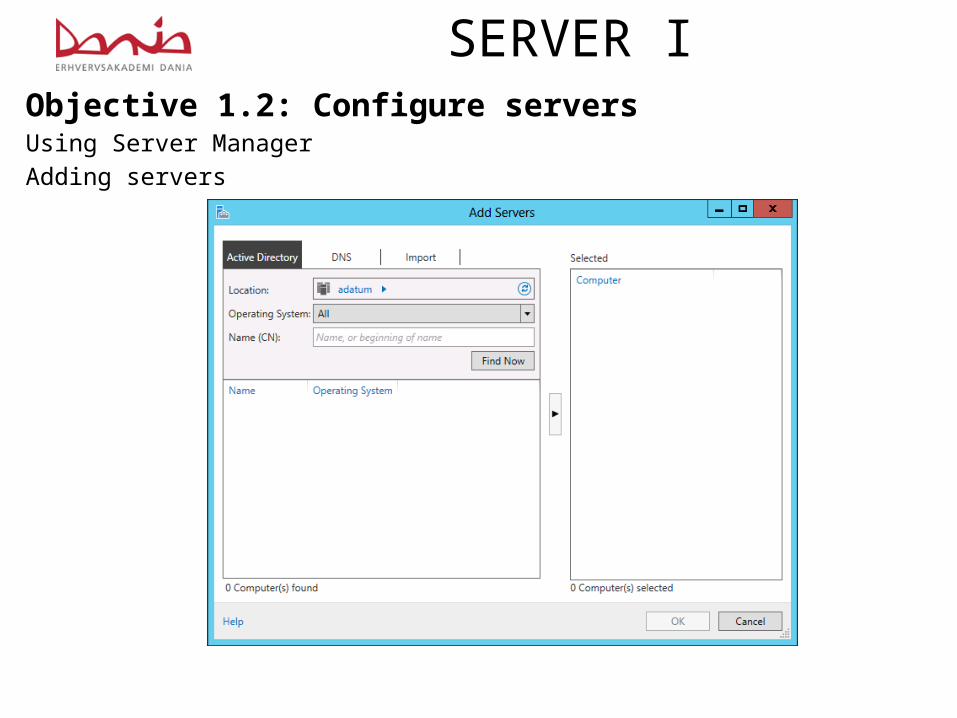
SERVER IObjective 1.2: Configure serversUsing Server ManagerAdding servers
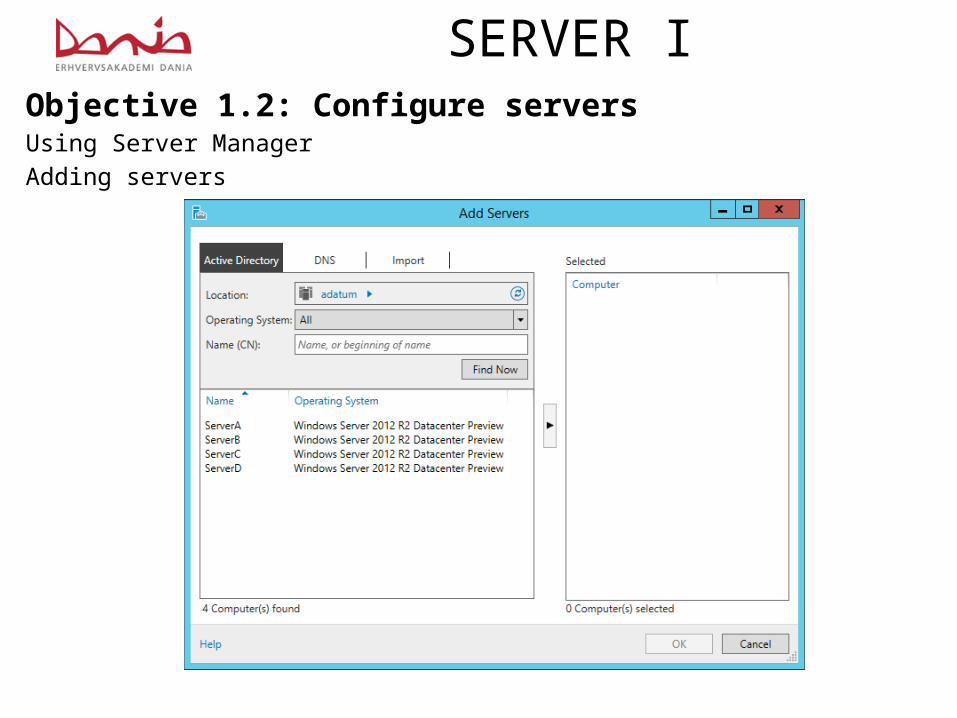
SERVER IObjective 1.2: Configure serversUsing Server ManagerAdding servers
SERVER IObjective 1.2: Configure serversUsing Server ManagerAdding servers

SERVER IObjective 1.2: Configure serversUsing Server ManagerAdding roles and features
SERVER IObjective 1.2: Configure serversUsing Server ManagerAdding roles and features
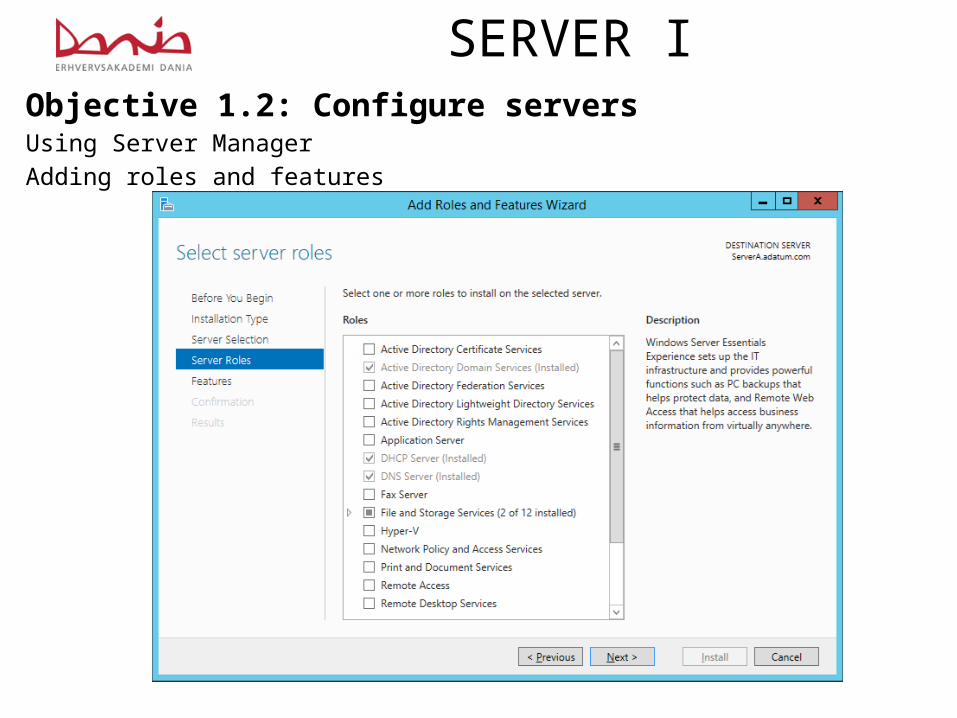
SERVER IObjective 1.2: Configure serversUsing Server ManagerAdding roles and features
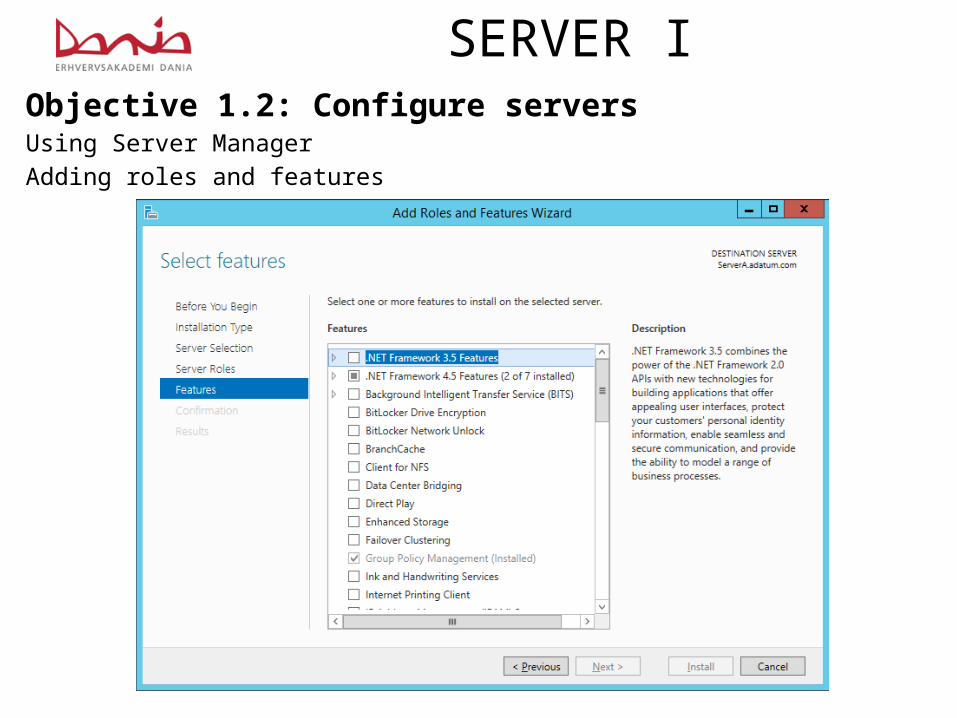
SERVER IObjective 1.2: Configure serversUsing Server ManagerAdding roles and features
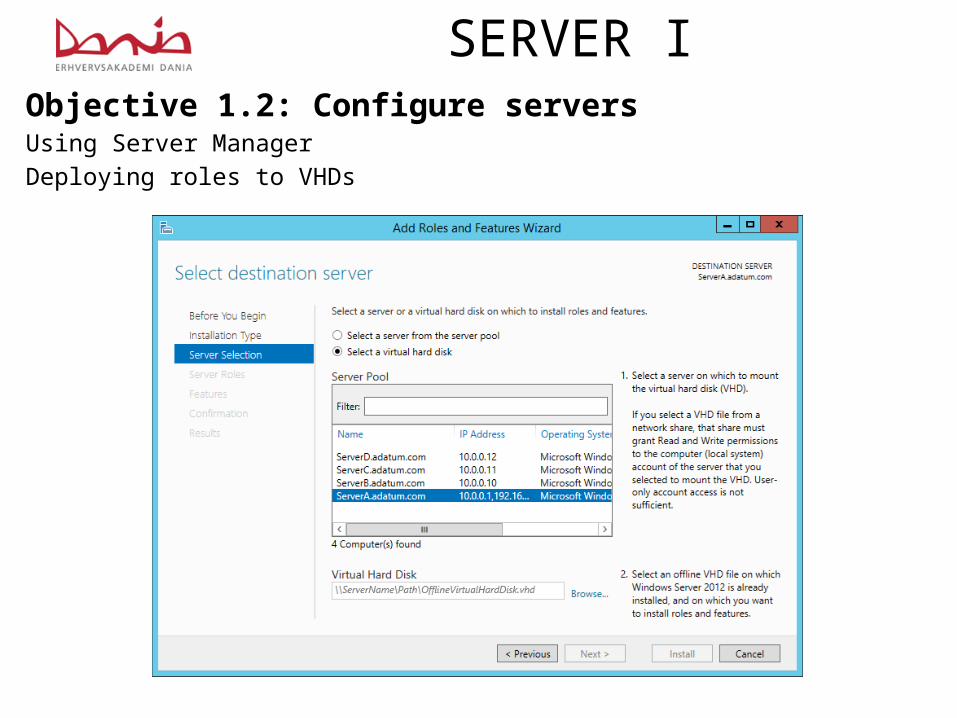
SERVER IObjective 1.2: Configure serversUsing Server ManagerDeploying roles to VHDs
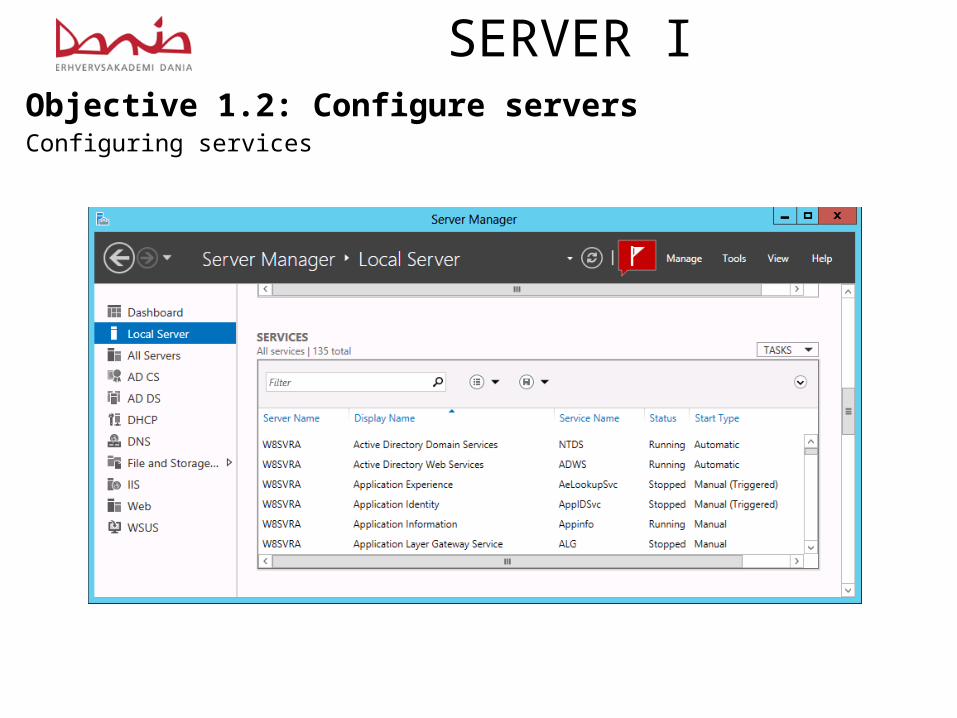
SERVER IObjective 1.2: Configure serversConfiguring services

SERVER IObjective 1.2: Configure serversDelegating server administration
Learn in detail Objective 2.2Configure print and document servicesObjective 5.3 Create and manage Active Directory groups and organizational

SERVER I
Break
SERVER IObjective 1.3: Configure local storage
■■ Design storage spaces ■■ Configure basic and dynamic disks ■■ Configure MBR and GPT disks ■■ Manage volumes ■■ Create and mount virtual hard disks (VHDs) ■■ Configure storage pools and disk pools ■■ Create storage pools by using disk enclosures

SERVER IObjective 1.3: Configure local storage
■■ Design storage spaces•Planning server storage•How many servers do I need?•Estimating storage requirements•Using Storage Spaces

SERVER IUnderstanding Windows disk settings
■■ Select a partitioning style Windows Server 2012 R2 supports two hard disk partitionstyles: the master boot record (MBR) partition style and the GUID (globally uniqueidentifier) partition table (GPT) partition style. You must choose one of these partitionstyles for a drive; you cannot use both.
■■ Select a disk type Windows Server 2012 R2 supports two disk types: the basic disktype and the dynamic disk type. You cannot use both types on the same disk drive, butyou can mix disk types in the same computer.
■■ Divide the disk into partitions or volumes Although many professionals use theterms partition and volume interchangeably, it is correct to refer to partitions on basicdisks and volumes on dynamic disks.
■■ Format the partitions or volumes with a file system Windows Server 2012 R2supports the NTFS file system, the FAT file system (including the FAT16, FAT32, andexFAT variants), and the new ReFS file system.
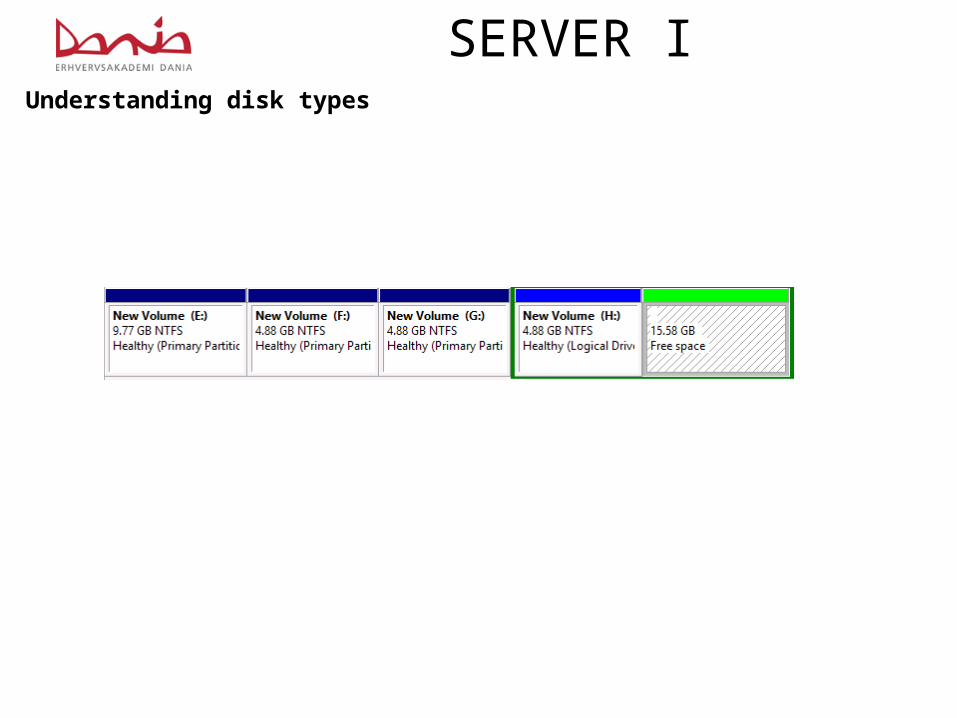
SERVER IUnderstanding disk types
SERVER IUnderstanding volume typesWhen you create a volume on a dynamic disk by using the Disk Management snap-in in Windows Server 2012 R2, you choose from the following five volume types:
■■ Simple volume Consists of space from a single disk.
■■ Spanned volume Consists of space from 2 to 32 physical disks
■■ Striped volume Consists of space from 2 to 32 physical disks
■■ Mirrored volume Consists of an identical amount of space on two physical disks
■■ RAID-5 volume Consists of space on three or more physical disks
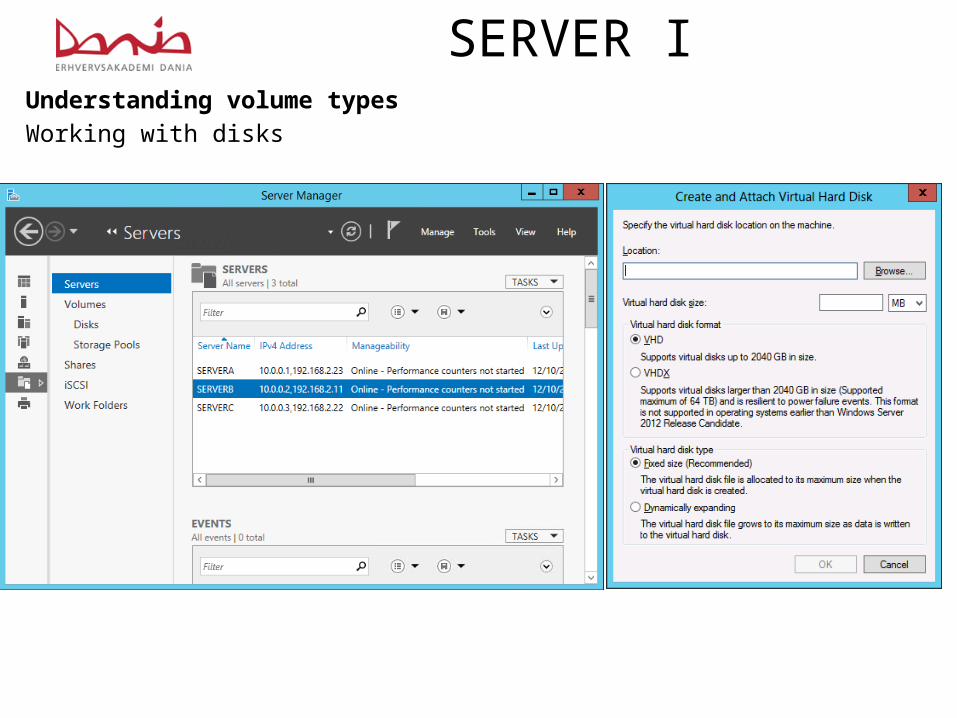
SERVER IUnderstanding volume typesWorking with disks

SERVER IUnderstanding volume typesCreating a RAID-5 volume
Task 1:
Download and Install VirtualBoxhttps://www.virtualbox.org/wiki/Downloads
Download and Install Windows Server 2012 R2 Standard (Full GUI)http://www.microsoft.com/en-us/evalcenter/evaluate-windows-server-2012-r2
Task 2:
Configure Server:• Name the Server• Converting between GUI and Server Core
Configure local storage (1 GB three volumes)• Creating a RAID-5 volume (pg. 61-62)