Embed Size (px)
Citation preview

Servant Keeper 7 Import Tool Documentation

iii
Table of Contents Getting Started ................................................................................................................ 1
Welcome to the Servant Keeper 7 Import Tool ............................................................ 1Getting Help while using the SK7 Import Tool ............................................................. 2When using the Servant Keeper 7 Import Tool if you have an trouble understanding what a certain section is used for find that sections help icon and put you cursor over it for a detailed explanation of what that section is used for. ........................................ 2Supported File Types ................................................................................................... 3Exporting Your Data From Another Database. ............................................................ 3Data Field List ............................................................................................................ 32
Using the Membership Import Tool ............................................................................... 35Opening the Import Tool ............................................................................................ 35Import Data into Another Servant Keeper Database .................................................. 35Step 1 - Choose your import file format options ......................................................... 37
Step 1 - Choose you import file format options ...................................................... 37Most files you will import will have a header row. A header row is the top row of your spreadsheet that has the name of each column. If you are importing a file from another program then you probably have a header row, and it will consist of the field names from that program. .............................................................................. 37Step 1 - Field Delimiter ........................................................................................... 38Step 1 - Text Qualifier ............................................................................................ 38
Step 2 - Choose your import date format, how to Join family members, family relationships and school grades ................................................................................ 39
Step 2 - Choose your import date format, how to Join family members, family relationships and school grades ............................................................................. 39Join Family Members Together .............................................................................. 40Unlisted Home Phone Numbers ............................................................................. 41Date Format ........................................................................................................... 42Family Relationships .............................................................................................. 43Gender ................................................................................................................... 44Grade School ......................................................................................................... 45
Step 3 Map your data fields ....................................................................................... 46Step 3 - Mapping Fields ......................................................................................... 46Mapping Fields sing the Mapped Data Field Drop Down Menu. ............................ 47Step 3 - Mapping Fields - Column Header Click .................................................... 48Using the Save and Restore Field Mappings Feature ............................................ 49
Confirm that the families and individuals have been processed correctly .................. 49Step 4 - Confirm Families and Individuals .............................................................. 49Duplicate Records .................................................................................................. 50


1
Getting Started Welcome to the Servant Keeper 7 Import Tool The Servant Keeper 7 Import Tool gives you the ability to easily import existing memberhsip data from an Excel, CSV or TXT file into Servant Keeper 7. You can import data into 60 fields in Servant Keeper 7. Servant Keeper 7 Import Tool field list: Title First Name Salutation Preferred Name Middle Name Last Name Address Address line 2 City State Zip Code Country Baptized Date Birth Date Confirmed Date Carrier Sort Home Phone Cell Phone Work Phone # Date Joined Email (up to 3) Employer Occupation Envelope # How Joined Gender Marital Status Member Status School Grade Sunday School Wedding Date Alt Address Alt City Alt State Alt Zip Code
Servant Keeper 7 Import Tool Documentation
2
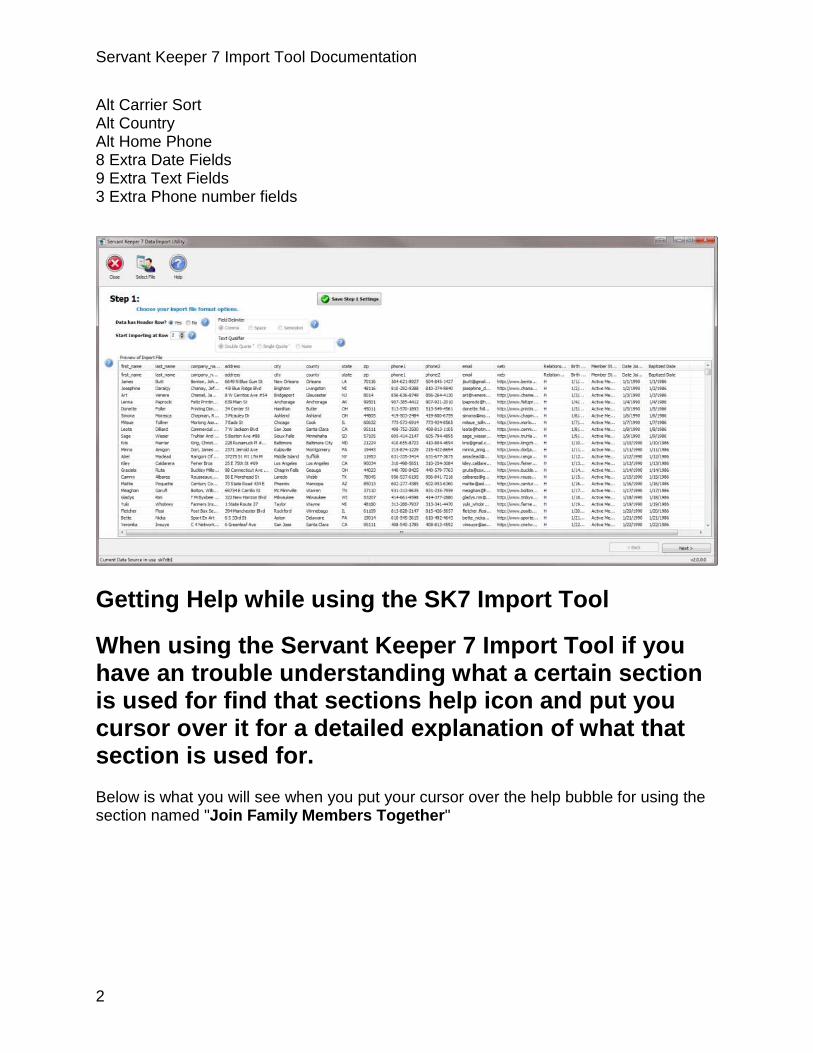
Alt Carrier Sort Alt Country Alt Home Phone 8 Extra Date Fields 9 Extra Text Fields 3 Extra Phone number fields
Getting Help while using the SK7 Import Tool
When using the Servant Keeper 7 Import Tool if you have an trouble understanding what a certain section is used for find that sections help icon and put you cursor over it for a detailed explanation of what that section is used for. Below is what you will see when you put your cursor over the help bubble for using the section named "Join Family Members Together"

Getting Started
3
Supported File Types The Data Import Utility can import data from the follow file types.
• Microsoft Excel file File types. (xls, xlsx)** • Comma, Semi-Colon, and Space Delimited text files. (csv, txt)
** Microsoft Excel is required to import from .xls and .xlsx files. Note: The import utility does not import data from a tab delimited file.
Exporting Your Data From Another Database. In order to import your data into Servant Keeper you must first export the data for an existing database into an excel, csv or txt file. This data needs to be individual data not family data. You can use the export instructions to export your data from one of the following programs. If you program is not listed below you may need to contact the program's support to get help with exporting. Servant PC Resources also has a White Glove export service available. For more information and pricing for the white glove service please contact the Servant Keeper Help Desk at 570.748.2800. File Maker Pro: How to export from File Maker Pro: I. Open File Maker Pro,

Servant Keeper 7 Import Tool Documentation
4
II. Bring up “All Records” III. File
A. Export as a .csv file. B. Open this file in Word Pad and see what the delimiter is (this is what separates one field of information from the next) and if it has a text qualifier (this could be “ “ around a field of text to specify this is a text field.) C. Open Excel
1. Click Data 2. Import External Data 3. Import Data 4. Find the exported file and open it. 5. This is where you tell excel what the delimiter and the text qualifiers are.
CDM+:
1. Open and Log In Exporting from CDM+:
2. Click on the “Membership” icon 3. From the window that opens, choose “Export” on the left. Double click “Individual
Export” on the right 4. On the “Individual Export” window, click “Advanced Search”

Getting Started
5
5. Select “Configure Advanced Search” 6. Choose “First Name”, “Does Not Contain”, “<blank> 7. Click the “Search” button and then “Close” 8. Make sure to “Show results that Match the Advanced Search only” 9. On the “Export List” tab, click the “Add button” 10. Name the export and click “OK” 11. 1On the next window, you should see the “Available Fields” on the left-hand side
and the “Fields in Set” on the right-hand side. Add all of the fields that can be

Servant Keeper 7 Import Tool Documentation
6
imported into SK to the right-hand side. Note: he “Envelope#” field is called code#. Relationship = Family Status. How Joined = Member Code.
12. When you are finished, click the “Close” button 13. Under the “General” tab, choose the proper date format 14. For “Export Format”, choose “Delimited (Text)” 15. Make sure to “Include Header Row” 16. Change the “Delimiter” to “Commas” 17. Click the “Export” button

Getting Started
7
18. Save the file somewhere on the computer (it will save as a .TXT file) After the txt file is saved, it can be Import the Text File into Excel
1. When everything has been exported, open Excel. 2. Choose the “Data” tab 3. Select “From Text” 4. The “Text Import Wizard” will open 5. In Step 1, choose “Delimited” 6. Start import at row 1 7. Click Next 8. In Step 2, uncheck “Tab” and choose “Comma” 9. For the “Text qualifier”, choose “None” 10. In Step 3, leave everything the same and select “Finish” 11. Leave the option of “Existing worksheet” selected and click “OK” 12. Save the file again as an .XLS file.
CDMS:
1. Click on Membership Menu Exporting data from CDMS:
2. Click on Reports 3. Click on Query Builder 4. Click New 5. Name the query 6. Select fields needed in top box on right 7. Choose Sort Order 8. Enter Query Last Name <> blank 9. Save 10. Click on Report 11. Click on Export to file. It will export as .txt
You will need to open and save as .csv and then convert to .xls. To Import the Text File into Excel
1. When everything has been exported, open Excel. 2. Choose the “Data” tab 3. Select “From Text” 4. The “Text Import Wizard” will open
Servant Keeper 7 Import Tool Documentation
8
5. In Step 1, choose “Delimited” 6. Start import at row 1 7. Click Next 8. In Step 2, uncheck “Tab” and choose “Comma” 9. For the “Text qualifier”, choose “None” 10. In Step 3, leave everything the same and select “Finish” 11. Leave the option of “Existing worksheet” selected and click “OK” 12. Save the file again as an .XLS file.
Church Help Mate:
1. Log into Church Help Mate Exporting Membership Data from Church Help Mate:
2. Click on Reports Menu 3. Click on Individual Reports 4. Click on Individual Output Configurator 5. Click on the Export Tab 6. Click on the option that includes All Data Fields. This will create a .csv file with all
of the data in your program. Membership Plus:
1. Log into Membership Plus
Exporting Membership Data from Membership Plus: With some versions of Membership Plus you can only export one date field to an export file.
2. Click on File | Export 3. Click Begin a new export 4. Click [Next]

Getting Started
9
5. Click on Individuals/Families/Organizations radio button. Click [Next]
7. Select the fields needed to import into Servant Keeper.

Servant Keeper 7 Import Tool Documentation
10
• The Family Role field is the Membership Plus field for Family Relationship. It will tell you each person’s role in that family (head of house, spouse, son, daughter, etc.). This data can be used in the import process and will make sure families are joined together properly.
• When you are selecting Date fields, be sure to use the option under each date that says “Displayed Date”.
• When choosing Home or Work Phone or emails you should choose the “Phone Number” option listed below each category.
8. Click [Next]
9. In the next screen be sure that the option for Parent/Guardian/Dependant is marked. Click [Next].

Getting Started
11
10. There is no need to choose a filter in Step 5. Click [Next].
11. Set the sort order to Last Name. Click [Next].

Servant Keeper 7 Import Tool Documentation
12
12. Choose the type of Export file. The Help Desk recommends Excel. Click [Next]
13. Click the 1st [Browse] button and choose a location to save the exported data. Name the file and click on [Export]. This step is saving your excel file to the location you chose.

Getting Started
13
Power Church:
1. Open your Power Church Plus software How to export data from Power Church Plus:
2. Click on the Membership menu option
Servant Keeper 7 Import Tool Documentation
14
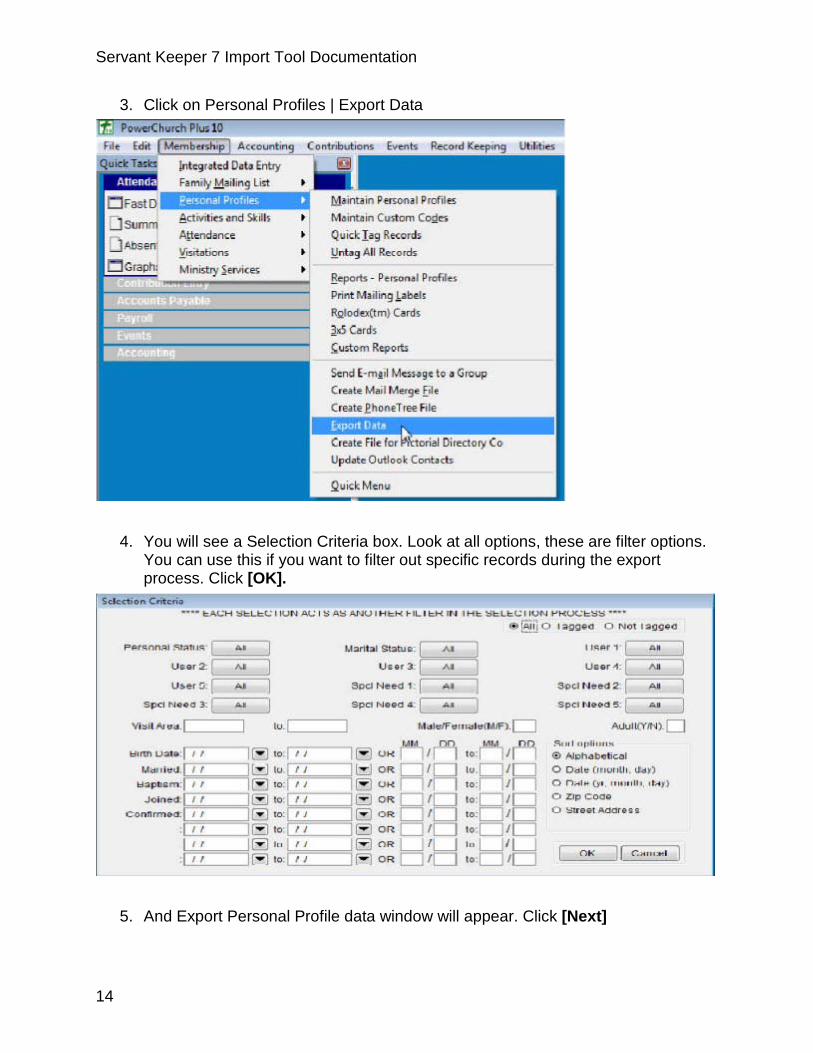
3. Click on Personal Profiles | Export Data
4. You will see a Selection Criteria box. Look at all options, these are filter options. You can use this if you want to filter out specific records during the export process. Click [OK].
5. And Export Personal Profile data window will appear. Click [Next]

Getting Started
15
6. Next you will see the Export Personal Profile Data wizard. Here you need to move the fields from the left to the right that you would like to import into Servant Keeper. Click [Next] when done with your selections
7. Next you need to tell the program what export file format you want to save the file in. Choose the Comma separated values (First row contains field names) option. Click [Next].

Servant Keeper 7 Import Tool Documentation
16
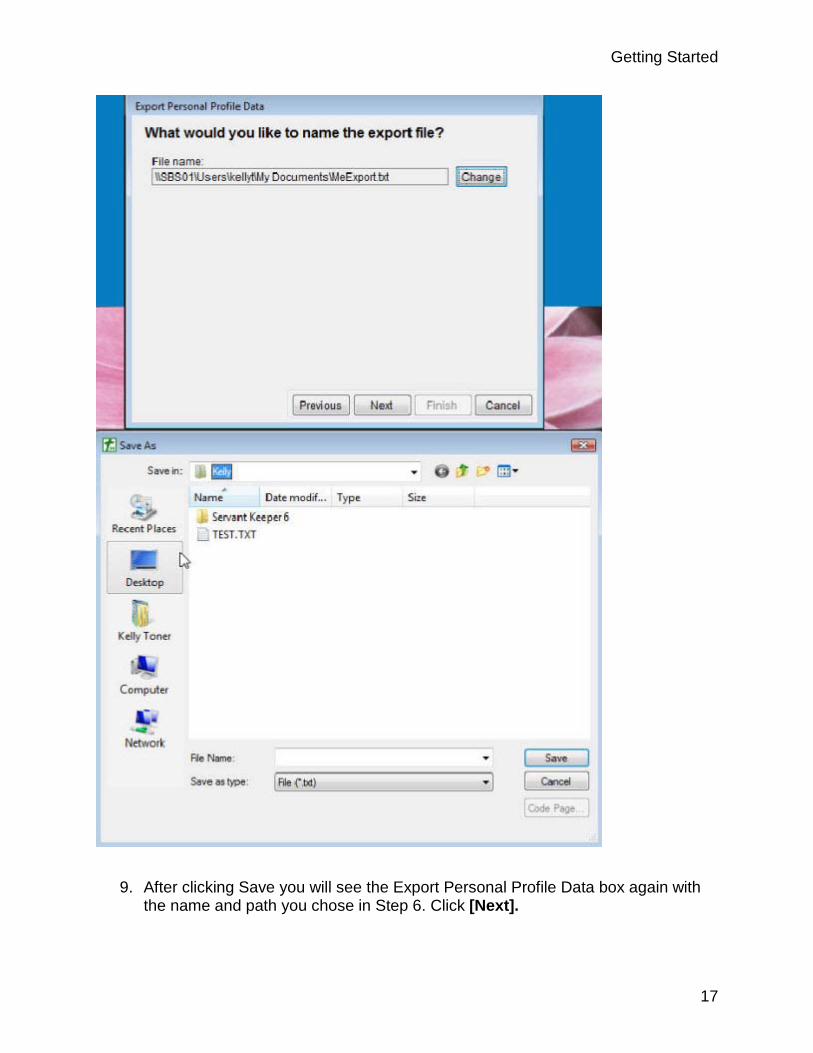
8. In this step you need to tell the program the name of the file and where you want to save the file. To change the default location click the Change button and you will see a Save As box as depicted below. Choose the location and name of the file and click [Save].
Getting Started
17
9. After clicking Save you will see the Export Personal Profile Data box again with the name and path you chose in Step 6. Click [Next].

Servant Keeper 7 Import Tool Documentation
18
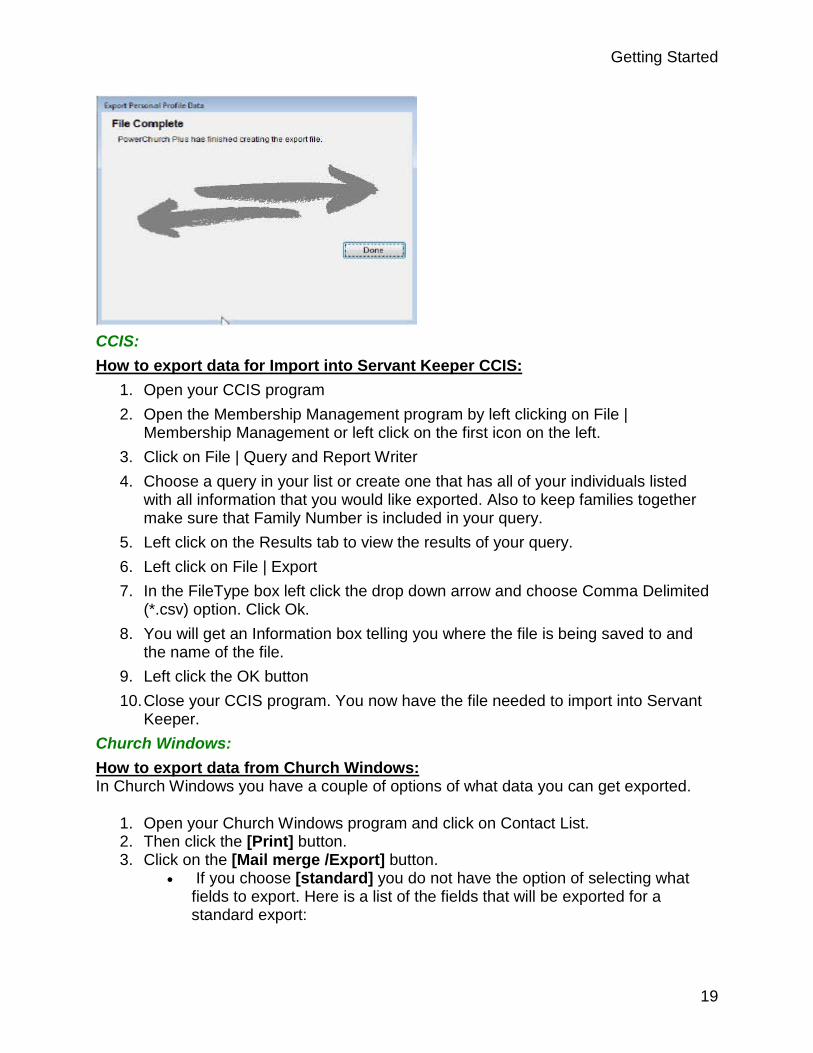
10. Now you will see a Finish window giving you all the information that you completed in steps 1 thru 7. Click [Finish] to complete the export and create your file.
11. In the last step of the export process simply click the [Done] button to exit the export process.
Getting Started
19
CCIS:
1. Open your CCIS program How to export data for Import into Servant Keeper CCIS:
2. Open the Membership Management program by left clicking on File | Membership Management or left click on the first icon on the left.
3. Click on File | Query and Report Writer 4. Choose a query in your list or create one that has all of your individuals listed
with all information that you would like exported. Also to keep families together make sure that Family Number is included in your query.
5. Left click on the Results tab to view the results of your query. 6. Left click on File | Export 7. In the FileType box left click the drop down arrow and choose Comma Delimited
(*.csv) option. Click Ok. 8. You will get an Information box telling you where the file is being saved to and
the name of the file. 9. Left click the OK button 10. Close your CCIS program. You now have the file needed to import into Servant
Keeper. Church Windows:
1. Open your Church Windows program and click on Contact List.
How to export data from Church Windows: In Church Windows you have a couple of options of what data you can get exported.
2. Then click the [Print] button. 3. Click on the [Mail merge /Export] button.
• If you choose [standard] you do not have the option of selecting what fields to export. Here is a list of the fields that will be exported for a standard export:

Servant Keeper 7 Import Tool Documentation
20
• Mailing Label First Name • Salutation Middle Name • Address1 Suffix • Address2 Last name • City State Title • Zip Code Carrier Route • Home Phone Mailing Code • Geographic Area
4. If you choose any other option on this list, you have the option of choosing what fields you can export.
5. Once you choose your fields to export, click the [Update] button to see what the export file name is. This file will be created and saved in your CW folder on your hard drive. For example this file is called merge.txt.
6. Click the [OK] button to create the merge.txt file. 7. Click the [Next] button to continue. The merge.txt file will be opened on your
screen. • You will notice that the city and state are in the same cell. These will need
to be parsed out and put in their own cells for the import into Servant Keeper to work properly. Please see the Help section in Excel to separate the contents of one cell into separate cells
8. Click the [Close] button to finish the export.
ACS:
1. In ACS under the People Tab, click on [Searches].
Exporting Data out of ACS:

Getting Started
21
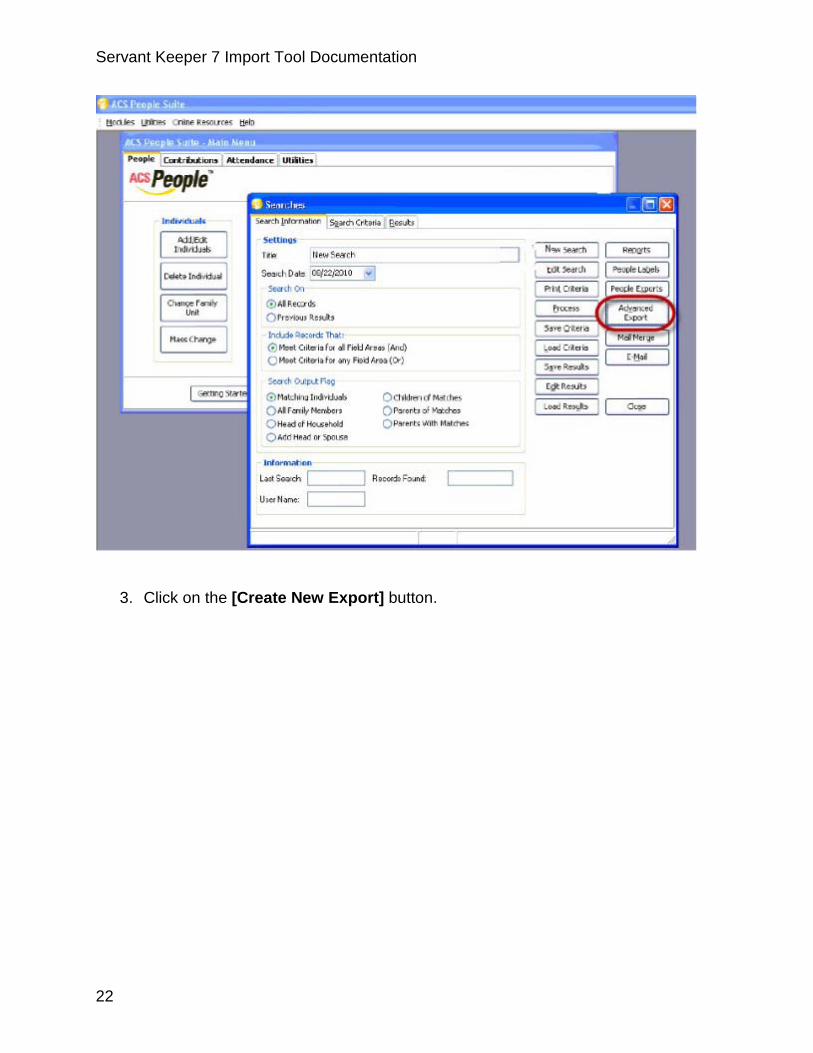
2. Click on [Advanced Export]
Servant Keeper 7 Import Tool Documentation
22
3. Click on the [Create New Export] button.
Getting Started
23
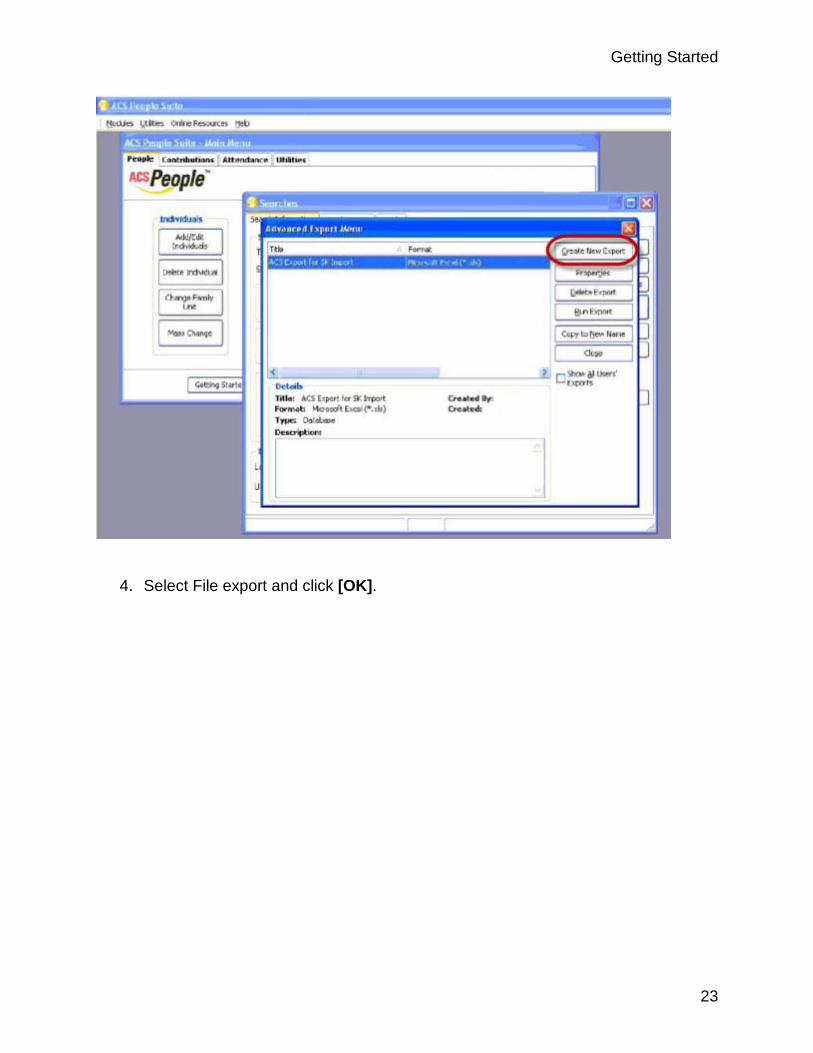
4. Select File export and click [OK].

Servant Keeper 7 Import Tool Documentation
24
5. Click on the Fields Tab, Expand the Special fields folder and then expand the Individual folder in the ACS Fields panel. You need to select the individual fields that you want to export. Click [Next].

Getting Started
25
6. Select the file format to export and click on the [FileName] button and choose where to save the file.

Servant Keeper 7 Import Tool Documentation
26
7. Click on [Run Export] and save file to your computer.

Getting Started
27
Nspire:
1. Log in to Nspire How to export from Nspire:
2. Select Individuals and in the quick ministry profiles box click Print next to All Individuals.

Servant Keeper 7 Import Tool Documentation
28
3. In the Print window click the [Export] button.
4. Click the Insert button to create a new export file.

Getting Started
29
5. Enter the export file name, check the Use Header record check box and click the [Modify List] button.
6. In the select token window choose the fields to include in the export. For the most comprehensive result select Tree (Legacy) for View.

Servant Keeper 7 Import Tool Documentation
30
7. Once all the desired export fields have been selected click the [OK] button. 8. Click [OK] again. 9. The file you created will be listed in the Export Template box. Click the [Export]
button to export the file.

Getting Started
31
10. Name the export file, choose where you want to save the file and click the [Save] button to complete the export process.
Shepherds Staff:
1. Log into shepherds Staff. How to export data out of Shepherds Staff:
2. Click on Membership. 3. Click on Reports Menu | Mail Merge. 4. Click on “By Person” radio button 5. Select the fields you need to export by double-clicking on each field. You will only
be able to choose 30 fields to export at a time. If you need more than 30 fields, you will want to do a separate export into another file. Just be sure to keep the First and Last Name fields in the second export and sort by last name so that the people are in the same order. This will allow you to copy and paste the additional information into the first spreadsheet.
6. On the right side you will see additional options. Be sure that you have marked to pull All Records
7. Click on Merge (upper right-hand corner) 8. Save the file as a .csv file to a location on your computer where you can easily
find it 9. again. It will default to a .doc file, so be sure to type in the file name with .csv at
the end of it. Shelby:
1. Open the Shelby Membership Module To Export data from Shelby:
2. Launch the Report Module • Select the Selections and Listings option. • Click on the New Report button. • Use the Default settings in the Applications Screen. GlobalFile and
Membership/Misc Name/Pros. 3. In the Report Information screen Name the report. 4. Select the Formatted (ALL) option in the reports box. 5. Select the Information you want to export from the available fields box. 6. Select the Print to File and Include Fields Names in First Record. 7. Check the Print Home Address on First Line 8. Check the Print Unlisted Phone Numbers. 9. Select the type of address you want to export 10. Select the phone number types you want to export 11. Save the Report and go back to the Report Information window. 12. Run the report and make sure to note where it has been save. 13. The File will be save as a text file that will need to be opened and converted to
an excel file using excel. To convert a Text file to an Excel file using Microsoft Excel.

Servant Keeper 7 Import Tool Documentation
32
1. When everything has been exported, open Excel. 2. Choose the “Data” tab 3. Select “From Text” 4. The “Text Import Wizard” will open 5. In Step 1, choose “Delimited” 6. Start import at row 1 7. Click Next 8. In Step 2, uncheck “Tab” and choose “Comma” 9. For the “Text qualifier”, choose “None” 10. In Step 3, leave everything the same and select “Finish” 11. Leave the option of “Existing worksheet” selected and click “OK” 12. Save the file again as an .XLS file.
Data Field List
You can import data into 60 Servant Keeper fields using the Import Utility. The list below is displayed by tab in the individual profile so you will know where each field is located in Servant Keeper. In the Profile tab
1. Title 2. Salutation 3. Last Name 4. First Name 5. Middle Name 6. Prefer Name 7. Address1 8. Address2 9. City 10. State 11. Zip 12. Carrier Sort 13. Country 14. Birth Date 15. Wedding Date 16. Marital Status 17. Date Baptized 18. Date Confirmed 19. Date Joined 20. How Joined

Getting Started
33
21. Member Status 22. Envelope Number 23. Sunday School 24. Home Phone 25. Work Phone 26. Cellular Phone 27. Email 1 28. Employer 29. Occupation 30. Extra Field 1 31. Extra Field 2 32. Extra Date 5 33. Extra Date 6 34. Extra Date 7 35. Extra Date 8
In the Alt Addr/Phone Number tab
36. Alt Address 37. Alt Address 2 38. Alt City 39. Alt State 40. Alt Zip 41. Alt Carsort 42. Alt Country 43. Alt Phone
44. FAX 45. Pager 46. Extra phone1 47. Extra phone2 48. Extra phone3 49. Email 2 50. Email 3 51. Website
More Info Tab
52. Extra Field 11 53. Extra Field 12 54. Extra field 13 55. Extra field 14 56. Extra field 15 57. Extra Date 1 58. Extra Date 2 59. Extra Date 3

Servant Keeper 7 Import Tool Documentation
34
60. Extra Date 4

35
Using the Membership Import Tool Opening the Import Tool
1. Once You have installed the servant Keeper 7 Import Tool, Click the Start button and select All Programs.
2. Browse to the Servant keeper 7 Folder and select it. 3. Click on the Servant Keeper 7 Import Utility. 4. Each time you launch the import tool a browse window will appear asking you to
select the file that you want to import. 5. Select the file you want to import and click the [Open] button. 6. Once the information from the file you selected has been processed you will be in
the import tool at Step 1.
Import Data into Another Servant Keeper Database By default when you open the import tool it will be set to import into your default Servant Keeper database. You can Import into another Servant Keeper database other than the default Servant Keeper database using the Open Servant Keeper file feature in Servant Keeper 7.

Servant Keeper 7 Import Tool Documentation
36
1. Create a new Servant Keeper Database. Importing Data into Another Servant Keeper Database:
• Log into the Administration Manager • Click the File menu and select Create New Servant Keeper Data File• Enter the name for the new database, choose where the new database
will be saved and click the [OK] button.
.
• A Message will appear saying "The ,database name> was successfully created in <database path>..." click the [OK] button.
2. Open and Log in to the database into which you want to import data. • Click the File and select Open Servant Keeper File• Select the database into which you want to import data and click the
[Open] button.
.
• A Log In screen will appear. Enter your User ID and Password and click the [Logon] button.
• Close Servant Keeper. 3. Open the Import tool, select the file that you want to import and click [Open].
• The name of Servant Keeper Database into which data will be imported is displayed, at the bottom left corner of the import tool window, in the Current Data Source area for verification purposes.

Using the Membership Import Tool
37
4. Once the import process has completed log into Servant Keeper.
• Click the File and select Open Servant Keeper File• Select the database into which you imported data and click the [Open]
button.
.
• Log In to view the imported data.
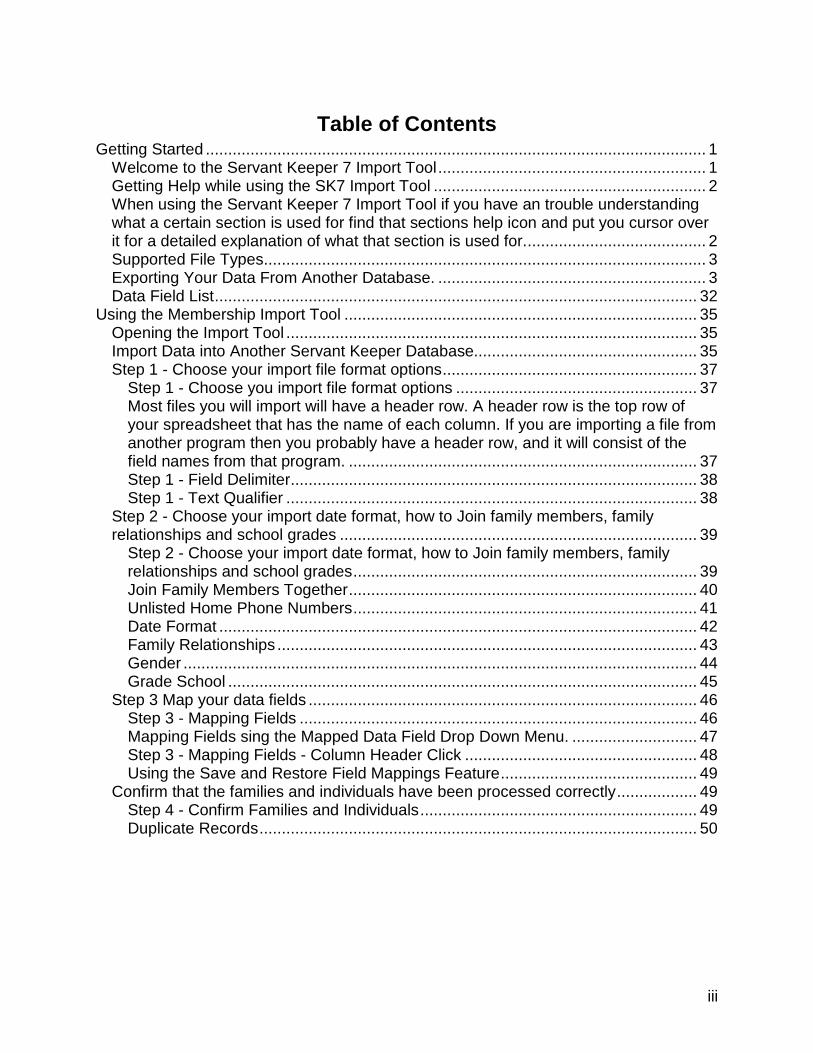
Step 1 - Choose your import file format options Step 1 - Choose you import file format options
Most files you will import will have a header row. A header row is the top row of your spreadsheet that has the name of each column. If you are importing a file from another program then you probably have a header row, and it will consist of the field names from that program.
The example data shown below has a header row. 1. If the data you are importing has a header row, select yes next to the Data has
Header Row option at the top of step 1 2. Change the Start importing at Row to 2.

Servant Keeper 7 Import Tool Documentation
38
3. If you are importing an excel file the Field delimiter and Text Qualifier options will be disabled. If you are importing a CSV or TXT file In most cases the Field delimiter will be Comma and the text Qualifier will be either Double Quote or None.
• If you are importing a CSV or TXT file you may need to play with the Field Delimiter and Text qualifier option until the data in the preview of Import file window is arranged in columns.
4. Once you have entered the necessary information in step 1 you have the option to click [Save Step 1 Settings] and/or click the [Next] button to continue to Step 2.
Step 1 - Field Delimiter
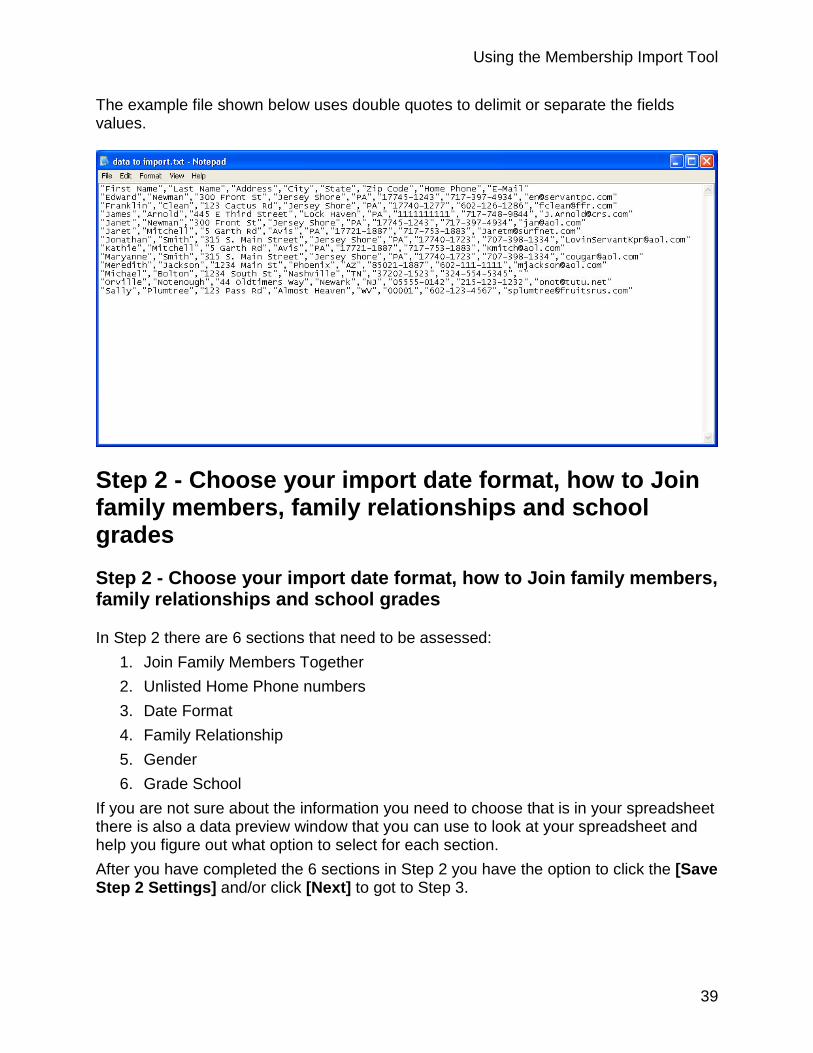
Field Delimiter Most files use commas as a field delimiter. This is the character in your import file that separates each value. If you are not sure, choose comma. The example import file shown below uses commas to delimit or separate the field values.
Step 1 - Text Qualifier
Most files use a double quote as a text qualifier. This is the character that tells the import tool where the value in the field begins and ends. If you are not sure, choose double quote.
Using the Membership Import Tool
39
The example file shown below uses double quotes to delimit or separate the fields values.
Step 2 - Choose your import date format, how to Join family members, family relationships and school grades Step 2 - Choose your import date format, how to Join family members, family relationships and school grades
In Step 2 there are 6 sections that need to be assessed: 1. Join Family Members Together 2. Unlisted Home Phone numbers 3. Date Format 4. Family Relationship 5. Gender 6. Grade School
If you are not sure about the information you need to choose that is in your spreadsheet there is also a data preview window that you can use to look at your spreadsheet and help you figure out what option to select for each section. After you have completed the 6 sections in Step 2 you have the option to click the [Save Step 2 Settings] and/or click [Next] to got to Step 3.

Servant Keeper 7 Import Tool Documentation
40
Join Family Members Together
In Step 2, the Join Family Member Together section tells the import utility that any individuals who have the same values in "First By" and "Then By" fields will be joined together in the same family. Select the fields you want to use to join family members together and move on to the Unlisted Home Phone Numbers options. You must select what fields the import utility should use to use to determine if the people are in the same family. If the data you are importing has a family number (sometimes called the family id, or record id) then use this field. Family ID numbers are normally used to uniquely identify a family in a database and each family will have their own unique number. If the data your are importing does not have a family id or your are not sure then you can use any 2 fields from the imported data but be sure that they are unique to the family. Servant PC Resources suggest using address for the First By field and City for the Then By field. Normally these fields will be the same for family members and the Import tool will use those field to put families together in your database. Once you have the Join Family Members together section filled in you can move on to the Unlisted Home Phone Numbers section.

Using the Membership Import Tool
41
Unlisted Home Phone Numbers
This is an optional section that allows you to specify the unlisted home phone number designation in your spreadsheet. If your import data has a field that tells you if someone’s home phone number is unlisted, you will use it here. The field could be called “Unlisted,” this would go in the “Unlisted Field” box and the value in that field maybe “Unlisted” or “Yes”. This value would go in the Unlisted Value box. If you do not have an unlisted phone number field then leave the Unlisted Field and Unlisted Value option empty. One you have filled in the Unlisted Home Phone Number Information you can move on to the Date Format section.

Servant Keeper 7 Import Tool Documentation
42
Date Format
This section will tell the import utility what format your dates are in. You will need to know the format of your import file dates. The check box at the bottom is used when you have dates that do not have the month and day information but do have the year and you want the year to be imported into Servant Keeper. Example: you have a joined date in this format:“ / /1987”. In order for that year to be imported into the Date Joined field in Servant Keeper, the blanks need to be filled in with something. If you check the box, the import utility will auto fill the day and month with “01/01” and the date will be imported. If you didn’t have that box checked, the date would not be imported at all. The import utility supports these date formats:
1. mm/dd/yyyy - 12/25/2013 2. mm-dd-yyyy - 12-25-2013 3. dd/mm/yyyy - 25/12/2013 4. dd-mm-yyyy - 25-12-2013 5. yyyymmdd - 20131225
If you are unsure about the date format you can use the preview of Import File windows at the bottom to scroll to a field that has date informations to verify the date format of the

Using the Membership Import Tool
43
import file. Once you have your Date Format options chosen you can move on to the Family Relationships section.
Family Relationships
This is the field in the data you are importing that tells the import utility what each family member's relationship field is, and from this field you can choose what values are used to describe the four most common family relationships in Servant Keeper. The family relationships section will help the import utility to determine who the Head of House is, who the Spouse is and who the children are (son or daughter) to enable Servant Keeper to put you families together in the proper order. -If there is a field in your import data that tells you who the Head of House and Spouse are, sometimes this field will be called “Relationship” or “Family Relationship”, this is the field that you will use for the “Family Relationship Field” drop down box.

Servant Keeper 7 Import Tool Documentation
44
-The “Head of Household”, “Spouse”, “Son” and “Daughter” boxes are for the values that correspond with the field name. Example above: Relationship is the field in the import data that tells the import who the Head of Household, spouse, son and daughter are. The values in that field are what go in the Head of Household,Spouse, Son and Daughter boxes. -If your data does not have a family relationship field, after the import is complete, Servant PC Resources recommends that you create a relationship column and use something like 1, 2, 3, and 4 to designate the heads of household, spouses, sons and daughters in your import file. Once you have the Family Relationship options chosen you can move on to the Gender section.
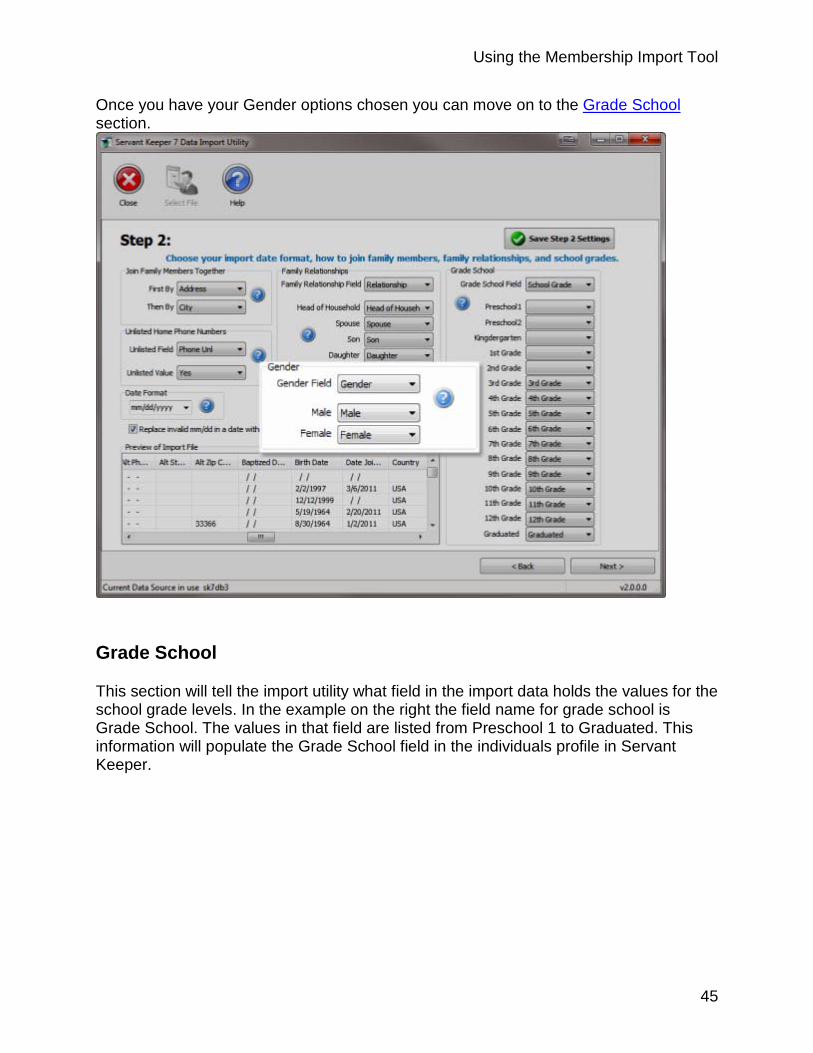
Gender
This section will tell the import utility what field from the import data holds the values for gender. In the example to the right, the field in the import data is called “Gender” and the values for that field are “Male”and “Female”. This information will populate the Gender field in the individuals profile in Servant Keeper.
Using the Membership Import Tool
45
Once you have your Gender options chosen you can move on to the Grade School section.
Grade School
This section will tell the import utility what field in the import data holds the values for the school grade levels. In the example on the right the field name for grade school is Grade School. The values in that field are listed from Preschool 1 to Graduated. This information will populate the Grade School field in the individuals profile in Servant Keeper.

Servant Keeper 7 Import Tool Documentation
46
Step 3 Map your data fields Step 3 - Mapping Fields
Once you have completed Step 1 and Step 2 you are ready to start with step 3. Please take note the in this step, the header row is gone. In this step you need to map the import data fields to the fields they’ll get imported into in Servant Keeper. The Import tool will automatically map fields that are an exact match to a filed in Servant Keeper. You can use the [Remove all Mapped Fields] button to clear the auto mapping so you can manually remap the fields. The [Remove Mapped Field] button will allows you to clear the mapping for the selected field. You can map the remaining fields in one of two ways.
• Click on the column heading and double- click next to the corresponding Servant Keeper field in the Link source field box
• Click in the Servant Keeper Fields box on the Right next to the field you want to map a drop down menu will appear with the list of fields from your data.
After you have completed mapping the fields in your import data to the Servant Keeper fields, you have the option to click the [Save Step 3 Settings] and/or click [Next] to go

Using the Membership Import Tool
47
to Step 4. A progress window will appear telling you how many records are being processed.
Mapping Fields sing the Mapped Data Field Drop Down Menu.
To use the Mapped Data Field Drop Down Menu to Map Field: 1. Click in the Mapped Data Field column of the Servant Keeper Fields box on the
Right next to the field you want to map. 2. A drop down menu will appear with the list of fields from your data. Select the
field name you want to map.

Servant Keeper 7 Import Tool Documentation
48
Step 3 - Mapping Fields - Column Header Click
If you prefer you can click a column header and select the SK Field Name to map to from the field list.
1. Click on the column header for the data field you want to map and a Link source field box will appear
To Map Fields using the Column Header click:
2. Locate the Servant Keeper field that you want to map the data field to and select it.
3. Click the [OK] button to map the field.
Using the Membership Import Tool
49
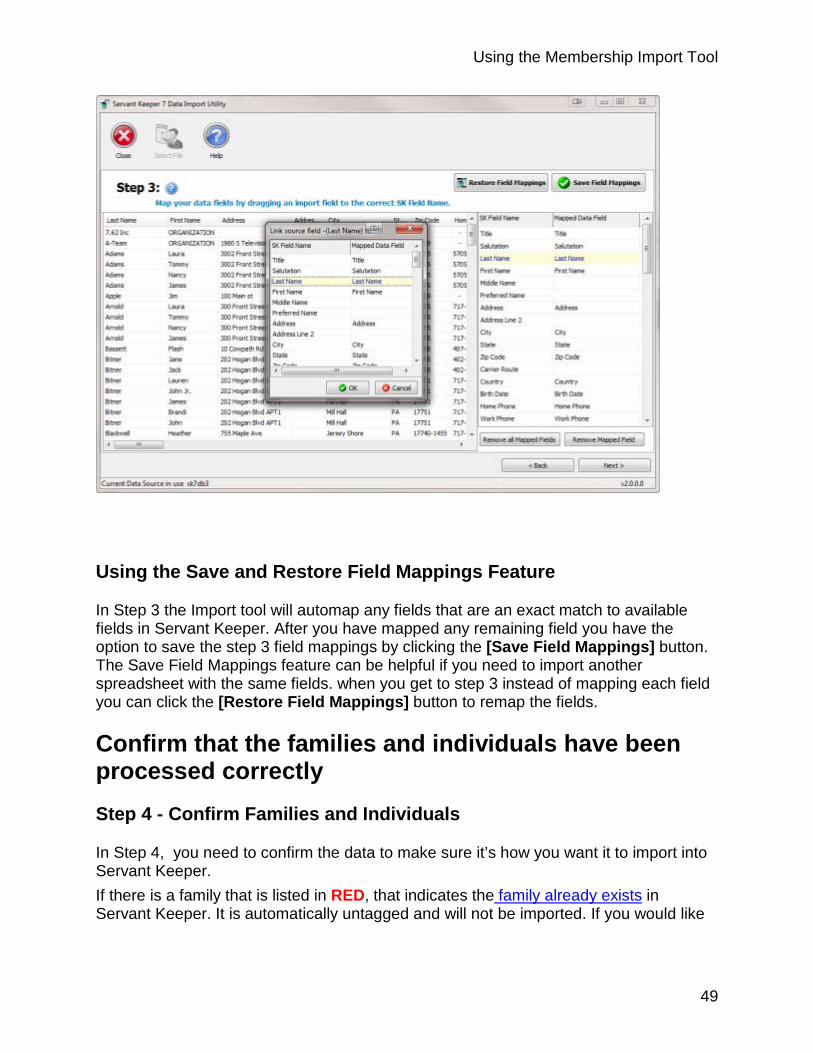
Using the Save and Restore Field Mappings Feature
In Step 3 the Import tool will automap any fields that are an exact match to available fields in Servant Keeper. After you have mapped any remaining field you have the option to save the step 3 field mappings by clicking the [Save Field Mappings] button. The Save Field Mappings feature can be helpful if you need to import another spreadsheet with the same fields. when you get to step 3 instead of mapping each field you can click the [Restore Field Mappings] button to remap the fields.
Confirm that the families and individuals have been processed correctly Step 4 - Confirm Families and Individuals
In Step 4, you need to confirm the data to make sure it’s how you want it to import into Servant Keeper. If there is a family that is listed in RED, that indicates the family already exists in Servant Keeper. It is automatically untagged and will not be imported. If you would like
Servant Keeper 7 Import Tool Documentation
50
to import that family anyway, put a check mark in the tag box to the left of the family name. The families that will be imported are listed on the left in the Directory Name panel. When you click on a family each individual in that family is listed on the right along with all the information processed from step 3. Servant PC Resources recommends review the information for a couple families that you know well to verify the information was processed correctly before you click the [Complete Import] button.
While reviewing the results if any problems are found be sure to click and return to steps 1 - 3 to change any import settings.
Once you have verified the results for a couple records click and the data you see in step 4 will be imported into Servant Keeper 7. When the data import process has completed you will have the option to open and log in to the Membership Manager.
Duplicate Records
In Step 4, you can click a family on the left to view what individuals are going to be import on the right. We suggest that you view a few families that you are familiar with to make sure they will import properly based on the options selected in steps1, 2, and 3. If any records being imported match an existing record in Servant Keeper 7 those duplicate records are shown with red text as shown below. If duplicate records are found be sure to double check your existing Servant Keeper database to decide if the records are truly duplicates or just a new people with the same names as other records in the Servant Keeper 7 database before completing the import process. Note: Duplicate checking is done using the first and last name fields only.

Using the Membership Import Tool
51


![Comunidad Inti Wara Yassi Reports/CIWY Annual Report... · Magali [•] Keeper Eugenia [•] Keeper Oso Antonio Keeper Monica Negrete Keeper Parque Jacj Cuisi Miriam Ríos Director](https://img.dokumen.tips/doc/110x75/5e1a843df3295425390e6116/comunidad-inti-wara-reportsciwy-annual-report-magali-a-keeper-eugenia.jpg)