Embed Size (px)
Citation preview

silabs.com | Building a more connected world. Rev. 0.1
Secure Firmware Upgrade using OTA
This lab procedure walks through the steps to use security keys for
creating signed images for OTA application updates. The first part
reviews how to create private and public keys with the Simplicity
Studio tools. The second part shows how to create a Bootloader
that supports secure updates. The final part introduces how to
securely sign application images for a device and use a mobile
device to perform a secure OTA update to a remote device.
KEY POINTS
Create security keys for an EFR32xG22
Flash public keys into an EFR32xG22
Create a Bootloader that enables Secure
OTA
Create signed Bootloader and Application
images
Use EFR Connect Mobile App to update
EFR32xG22 device with OTA

EFR32BG22 – Secure Firmware Upgrade using OTA Prerequisites
silabs.com | Building a more connected world. Rev. 9 | 1
1 Prerequisites
For this lab you will need the following:
Complete complementary labs:
o Lab 1 – Out of the Box Thunderboard Example
o Lab 2 – Optimizing your Battery Budget
EFR32BG22 Thunderboard (SLTB010A)
Micro-USB to USB Type-A cable (Not included with Thunderboard)
Simplicity Studio v5
o Bluetooth SDK 3.0.0.2 or later
o Gecko SDK Suite 3.0.0 or later
EFR Connect Mobile App
o Accept Location Access. “While using the App” will work. This is required for Traffic Browser
File storage solution for accesing OTA files on mobile device
o Install cloud storage app on your mobile device (i.e. iCloud, Google Drive, Dropbox or other cloud storage account)
o Have cloud storage account access ready to upload files from your computer/laptop
1.1 Prepare Windows OS to run Simplicity Commander
For simplicity’s sake add the path of Simplicity Commander (C:\SiliconLabs\SimplicityStudio\v5\developer\adapter_packs\commander) to
the path environment variable in your OS, so that the commander command can be called from any directory.
1. Use Search bar in Windows 10 to locate “Environment Variables” menu.
2. Select “Edit the system environment variables”.
3. Select “Environment Variables” in the System Properties window.
4. Select “Path” under System Variables. Click “Edit…”
1
2
3
4

EFR32BG22 – Secure Firmware Upgrade using OTA Prerequisites
silabs.com | Building a more connected world. Rev. 9 | 2
5. Click “New”.
Verify this is the valid path for your installation. C:\SiliconLabs\SimplicityStudio\v5\developer\adapter_packs\commander
Most default installations will have this path. It will be different if you modified the installation folder for Simplicity Studio.
6. Paste the verified location of Simplicity Commander
7. Click “OK” to accept addition to path and return to Environment Variables window
8. Under System variables Click “New”
Under Variable name enter “PATH_GCCARM”
Under Variable value enter “C:\SiliconLabs\SimplicityStudio\v5\developer\toolchains\gnu_arm\7.2_2017q4”
Click “OK” to accept new variable.
9. Under System variable Click “New”
Under Variable name enter “PATH_SCMD”
Under Variable value enter “C:\SiliconLabs\SimplicityStudio\v5\developer\adapter_packs\commander” (VERIFIED IN STEP 5)
Click “OK” to accept new variable.
10. Click “OK” 3 times to close the open windows
11. Computer will need to be restarted for new PATH variable to be updated
1.2 Prepare MacOS Catalina and Linux OS to run Simplicity Commander
The following section details how to set up Simplicity Commander to the path environment variable in a MacOS or Linux OS.
In MacOS Catalina:
1. open a terminal window
2. Return to the root folder by typing cd ~
3. Use an editor like nano to edit the .zshrc file. Type nano .zshrc 4. Add the following to an existing PATH command or else add it to the end of the file.
export PATH=$PATH: /Applications/Simplicity\ Studio.app/Contents/Eclipse/developer/adapter_packs/commander/Commander.app/Contents/MacOS
5. Exit and save the .zshrc file by hitting CTRL-X to exit, answer Y to save the file.
6. Now source the file to make it the active path:
Type . ~/.zshrc
For Mojave and Linux
1. Follow the same process above for both only editing the .bashrc file in step 3:
2. For Linux the path is also different that you add in step 4.
export PATH=$PATH:
~/SimplicityStudio_v5/developer/adapter_packs/commander
3. Now source the file to make it an active path in Mojave or Linux:
Type . ~/.bashrc
5
6
7

EFR32BG22 – Secure Firmware Upgrade using OTA Generating Developer Keys
silabs.com | Building a more connected world. Rev. 9 | 3
2 Generating Developer Keys
2.1 Keys used for Firmware Authentication
The firmware authentication implemented by Silicon Labs is based on asymmetric key cryptography.
Asymmetric key cryptography uses two keys: a private key to create a digital signature and a public key to verify the signature.
Private keys are kept secret and only used once to sign the firmware upgrade image. This is done outside of the chip.
Public keys are burned into the EFR so that uploaded images can be verified during upgrade and optionally at every reboot.
The EFR32BG22 products use two type of keys
Silicon Labs keys (a private key is stored securely at Silicon Labs, and a public key is burned into device in factory)
Developer keys (a private key is kept by the developer, and a public key is burned into the device by the developer)
This lab focuses on how a developer can create and use their own developer keys
2.2 Using the Private Keys
Establishing a full chain-of-trust requires these two type of keys. The Silicon Labs key is used to sign and verify the first stage bootloader
signature. The Developer keys are used to sign and verify everything else, namely the second stage bootloader, the apploader (if applied)
and the application.
The first stage bootloader is pre-signed by Silicon Labs, while all the other components have to be signed by the developer’s private key
before uploading to the device (either by flashing or by OTA firmware upgrade)

EFR32BG22 – Secure Firmware Upgrade using OTA Generating Developer Keys
silabs.com | Building a more connected world. Rev. 9 | 4
The Silicon Labs public key is used by the First Stage Bootloader Checker to verify the First Stage Bootloader
The Developer public key is used
By the First Stage Bootloader to verify the Second Stage Bootloader
By the Second Stage Bootloader to verify the Apploader – or directly the Application
By the Apploader to verify the Application
Note that the Developer public key can be stored in 2 different locations. The first location is an OTP location that is accessible only
during the Root Mode by the First Stage Bootloader Checker or the First Stage Bootloader. This OTP key storage provides a true Chain-
of-Trust through each stage of the device boot. The second location is a Flash location that is used by the Second Stage Bootloader, the
Apploader and the Application Code during User Mode.
Some customers may choose to only store their Developer keys in Flash, avoiding the finality of burning the key in OTP. This is referred
to as a Secure Upgrade solution, where the Apploader and Application Code are always verified to have correct signatures from the
Developer. However, note that changes to the Second Stage Bootloader can erase the developer keys introducing security implications
and mitigations that need to be considered.
2.3 Generate Developer Keys with Simplicity Commander
Note that the flow we are describing here, using Simplicity Commander for generating keys and performing signing operations, is suitable for development purposes to evaluate or test secure boot and secure upgrades. However, in a production environment, we recommend using a Hardware Security Module (HSM) for both key generation and storage as well as to sign images. HSM’s are much better at protecting sensitive keys than a laptop PC is. The signing process using an HSM is described in UG266: Gecko Bootloader User’s Guide.
1. Type “Command Prompt” in Windows search bar to quickly locate and open a Command Line Interface (CLI)
2. Create a directory to safely store your private and public key files. (i.e. mkdir c:\\keyfiles)
3. Change directory to a folder where you can safely store your keys (i.e. cd c:\\keyfiles)
4. Run the following command:
5. Close the Command Prompt window.
6. Open a File Explorer to this key folder where you stored your keys. It will help you copy/paste the output key files to other
folders in later sections.
Commander gbl keygen –-type ecc-p256 –-outfile signing-key

EFR32BG22 – Secure Firmware Upgrade using OTA Generating Developer Keys
silabs.com | Building a more connected world. Rev. 9 | 5
OPTIONAL INFORMATION BELOW. CAN SKIP TO SECTION 3
The following provides a brief description of the different output key files generated in the prior steps. Your keys will be different than
those displayed, but follow the same format.
First, the Signing-key-tokens.txt file is used by Commander to program a BG22 SoC during manufacturing by the developer. The
tokens are generated from the specific Private Developer keys, so there is no issue with outsiders using these public tokens to generate
malware. However, these tokens are used by the BG22 SoC to validate signed images for 2nd Stage Bootloader, Apploader and Appli-
cation images received in the future. The key tokens come in an X,Y pair as shown in the following file example:
Second, the Signing-key output file is in a Privacy Enhanced Mail (PEM) format. This is common for certificates in Web servers and
was used for storing these private keys. This is the Developer’s PRIVATE key. This cannot be discovered by other users. If others
gain access to the private key, they could generate images that the device would validate using the Public Keys generated by this private
key. This should be securely stored by any product Developer. The file format is shown below:
The final output file, Signing-key.pub, contains the public key that can be used to verify that the GBL files were generated by the correct
private key. If you were to verify the OTA upgrade on another platform, like a gateway or smartphone app, they would likely consume
this PEM-encoded public key file.
EFR32BG22 – Secure Firmware Upgrade using OTA Creating a Secure Bootloader
silabs.com | Building a more connected world. Rev. 9 | 6
3 Creating a Secure Bootloader
While the first stage bootloader is flashed into the device by Silicon Labs at the factory, the second stage bootloader has to be generated
and flashed by the developer. The developer can select from many different configuration options to best match the product, memory and
security requirements of their designs.
For the Thunderboard BG22, it is flexible because it has 512k of on chip flash memory. This allows developers the space to use a proven Apploader provided by Silicon Labs. The Apploader is a separate application that is initiated when an OTA is started. Alternatively customers could choose to integrate the OTA functionality into their application (i.e. no Apploader) to upload a new firmware image into the second half of the available flash. Typically Apploader is chosen when there isn’t sufficient on-chip space to store a second copy of the application. That is, it provides space optimization. However, it can also make the Application simpler because it offloads the OTA upgrade functions.
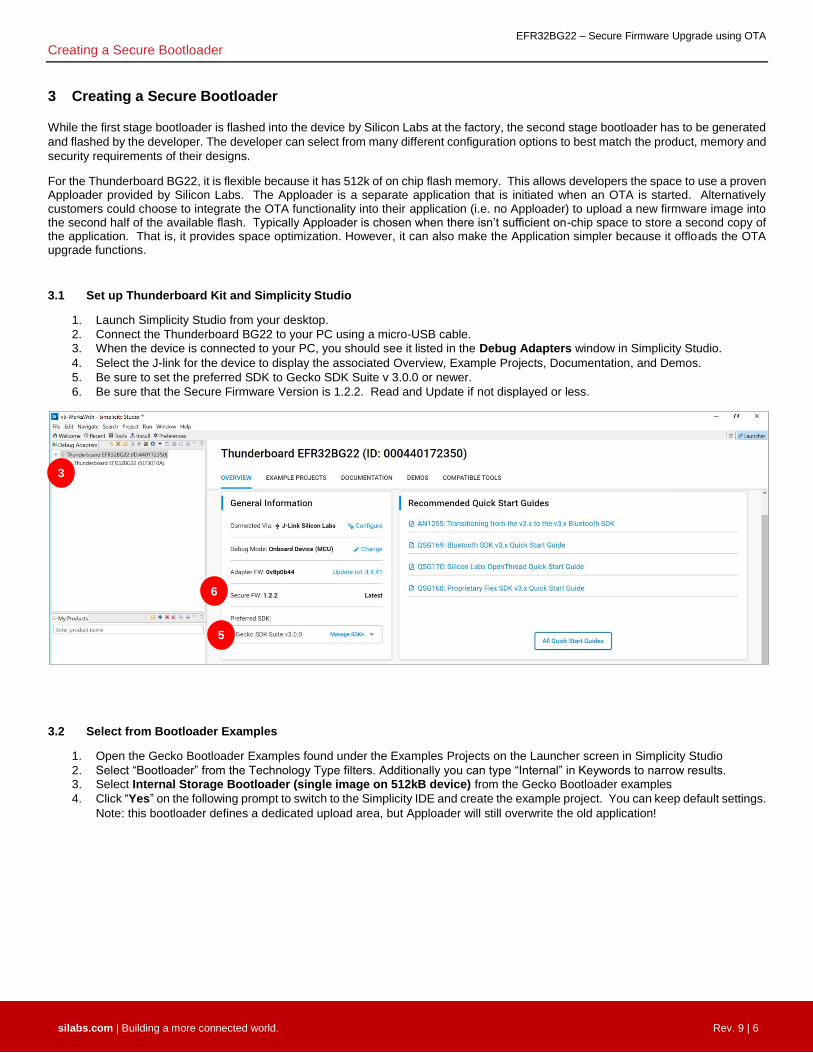
3.1 Set up Thunderboard Kit and Simplicity Studio
1. Launch Simplicity Studio from your desktop.
2. Connect the Thunderboard BG22 to your PC using a micro-USB cable.
3. When the device is connected to your PC, you should see it listed in the Debug Adapters window in Simplicity Studio.
4. Select the J-link for the device to display the associated Overview, Example Projects, Documentation, and Demos.
5. Be sure to set the preferred SDK to Gecko SDK Suite v 3.0.0 or newer.
6. Be sure that the Secure Firmware Version is 1.2.2. Read and Update if not displayed or less.
3.2 Select from Bootloader Examples
1. Open the Gecko Bootloader Examples found under the Examples Projects on the Launcher screen in Simplicity Studio
2. Select “Bootloader” from the Technology Type filters. Additionally you can type “Internal” in Keywords to narrow results. 3. Select Internal Storage Bootloader (single image on 512kB device) from the Gecko Bootloader examples
4. Click “Yes” on the following prompt to switch to the Simplicity IDE and create the example project. You can keep default settings.
Note: this bootloader defines a dedicated upload area, but Apploader will still overwrite the old application!
3
5
6

EFR32BG22 – Secure Firmware Upgrade using OTA Creating a Secure Bootloader
silabs.com | Building a more connected world. Rev. 9 | 7
3.3 Add Security Options to Bootloader Core
When the project is created, the bootloader-storage-internal-single-512.isc configuration tool is shown in the file window.
1. In the Plugins tab select the Bootloader Core plugin
2. In the Options pane on the right, Select “Require signed firmware upgrade files” and “Enable Secure Boot”
Selecting “Enable secure boot” makes the Second Stage Bootloader verify the signatures of new Apploader and Application
images. This does NOT enable secure boot of the 2nd Stage Bootloader itself. This is done in a different location.
3. Press Generate to create the files for your bootloader project
4. After the project files are generated click the Build icon.
You may need to select the project in the Project Explorer window for the Build icon to be enabled.
2
1
3

EFR32BG22 – Secure Firmware Upgrade using OTA Using Keys to Sign Images and Device
silabs.com | Building a more connected world. Rev. 9 | 8
4 Using Keys to Sign Images and Device
4.1 Signing the Bootloader image
1. Go to the compiler output folder (e.g. /GNU ARM v7.2.1 - Default) of your bootloader project
2. You can quickly get there by selecting the folder Binaries in the Simplicity Studio Project Explorer
Right click on the .s37 binary file and select “Browse Files Here”
3. Go to the File Explorer window you left open in step 2.3. This is where your security key files were stored.
4. Copy the file signing-key from your secure key folder
5. Paste the signing-key file into the Binary Output folder for your Bootloader opened in step 1
6. Open a Command Line CLI in the Binary Output folder for your Bootloader
Similar to step 1, you can quickly get there by using the Project Explorer view.
Right click on the .s37 Binary file and select “Open Command Line Here”
7. Run the following command:
8. Close the Command Prompt window
Commander convert bootloader-storage-internal-single-512k.s37 –-secureboot –-keyfile
signing-key –-outfile bootloader-storage-internal-single-512k-signed.s37
1
2
6

EFR32BG22 – Secure Firmware Upgrade using OTA Using Keys to Sign Images and Device
silabs.com | Building a more connected world. Rev. 9 | 9
4.2 Signing Bluetooth Application images
Follow shortcuts illustrated in section 4.1 to help complete the following. Using Simplicity Studio Project Explorer to quickly navigate.
1. Verify that your Low-Power-Lab Bluetooth project from Lab 2 is built. The output binaries are required.
2. Copy the signing-key file into the root folder of your Low-Power-Lab project from Lab 2.
i.e. C:\\...SimplicityStudio\v5_workspace\Low-Power-Lab. It must be in the same folder as the .bat file used in step 4.
3. Rename the signing-key file to app-sign-key.pem
The .bat file in the next step looks for this specific file name.
4. Use Simplicity Studio Project Explorer to find the create_bl_files.bat file at the bottom of your project
5. Right click create_bl_files.bat and select “Open”
6. This will create a signed version of a firmware upgrade file in the /output_gbl folder: application-signed.gbl
7. It also creates a signed version of the Apploader because it was included in the Lab 2 project. It will be: apploader-signed.gbl
8. Use Simplicity Studio Project Explorer to verify that these were created by opening the listed project folder /output_gbl
Differences for MacOS or Linux OS:
1. Right click create_bl_files.bat and select “Open Command Line Here”.
2. In the terminal window execute the script file by typing: ./create_bl_files.sh

EFR32BG22 – Secure Firmware Upgrade using OTA Using Keys to Sign Images and Device
silabs.com | Building a more connected world. Rev. 9 | 10
WARNING!!! THE FOLLOWING STEPS PERMANENTLY REQUIRE YOU TO SIGN PROJECT IMAGES. 4.3 & 4.4 ARE OPTIONAL
The First Stage Bootloader Checker needs the Silicon Labs public key to verify the First Stage Bootloader. This was already burned into
the ROM of the device at the Factory.
However, the First and Second Stage Bootloaders require the Developer’s public key to verify the signature of any signed firmware
images. This public key can be found in the files signing-key.pub and signing-key-tokens.txt generated in section 2.3. This key needs
to be flashed into the device by the developer.
The following command will permanently make your Thunderboard BG22 secure. However, it will ALWAYS require future software
updates to be signed by the exact same private signing-key. You may want to SKIP this step, knowing that you prevented the Thunder-
board from having a complete Chain-of-Trust. Without the key stored in OTP memory, the First Stage Bootloader WILL NOT check the
signature of future Second Stage Bootloaders. This will allow you to REUSE the Thunderboard with future projects by erasing the full-
device along with the Developer’s public key stored in flash.
If you choose to complete this section, you will need to reference sections 4.1 and 4.2 when you build other projects targeted for this
Thunderboard. You will need to use the same private key to sign future Bootloader, Apploader and Application images.
4.3 Flashing the Developer Public Key into the OTP of the Device
1. Type “Command Prompt” in Windows search bar to quickly locate and open a Command Line Interface (CLI)
2. Change directory to the folder where you decided to store your keys in section 2.3
3. Run the following command:
4. Type “Continue” to verify you want to associate the public key with this Thunderboard forever.
4.4 Enable First Stage Bootloader to use Secure Boot to authenticate Second Stage Bootloader
The next step is required for the First Stage bootloader to use Secure Boot when loading the Secondary Stage Bootloader. This step will
permanently blow a fuse that enables Secure Boot to use the OTP key. You will accomplish this in Simplicity Studio.
1. Open Simplicity Studio to the default Launcher view.
2. Select the J-Link of the Thunderboard listed under Debug Adapters
3. Click the Tool icon to open the “Device Configuration” window
4. Select the “Security Settings” tab in the window and click “Read from Device”
5. Click “Start Provisioning Wizard” to begin walking through steps enable secure boot with the First Stage Bootloader.
6. Click on the box to “Enable host image verification before booting host”.
7. Click “Yes” in the “Secure Boot Warning” window that reminds you that this change is permanent.
8. In the “Security Keys” window you will notice that the Sign Key is already filled in. This was done by the steps in Section 4.2.
9. Keep the default settings in the “Secure Locks” window. These are used to enable Secure Debug in the BG22.
10. Click “Provision” to continue. And then click “Yes” to complete changing the security settings.
11. Back at the “Security Settings” tab, you can verify success by reading “Secure Boot: Enabled”
END OF OPTIONAL SECTION. CONTINUE LAB BELOW IF YOU CHOSE TO SKIP BURNING PERMANENT KEY
Commander security writekey --sign signing-key.pub –device EFR32BG22C224F512
4 5
6
7
11
8

EFR32BG22 – Secure Firmware Upgrade using OTA Using Keys to Sign Images and Device
silabs.com | Building a more connected world. Rev. 9 | 11
4.5 Flashing the Developer Public Key into the Key Flash of the Device
Do the following to flash the Developer public key into the User Mode location in Thunderboard BG22 devices. On the BG22 device the
public keys are flashed into the topmost page of the main flash.
1. Type “Command Prompt” in Windows search bar to quickly locate and open a Command Line Interface (CLI)
2. Change directory to the folder where you decided to store your keys in section 2.3
3. Run the following command:
This command will flash the public keys in the file to the Thunderboard over the USB connection.
4.6 A Note about Protecting Public Keys
For strong security, Public keys need to be protected from accidental or intentional modification. This protection can be accomplished via hardware support, such as storing the keys in an immutable memory such as OTP or a locked flash page, or the key can be crypto-graphically authenticated prior to it being used.
By default, the Developer Public Key in the Commander command above is stored in the last page of main flash memory. In order to secure this key, the flash page containing the key must be locked in order to prevent software from being able to modify the key. Instruc-tions for write protecting this page can be found in the EFR32BG22 Reference Manual section 6.3.12.2. This flash page protection operation can be performed either in the Second Stage Bootloader or in the Application.
As an alternative to protecting the Developer Public Key via hardware, it can be protected using cryptographic authentication. The method using cryptographic authentication is described in Section 9.2.1 of UG266: Silicon Labs Gecko Bootloader User’s Guide, under “Secure Boot Using a Certificate”, and represents the strongest and most flexible security solution.
Commander flash –-tokengroup znet –-tokenfile signing-key-tokens.txt
EFR32BG22 – Secure Firmware Upgrade using OTA Program Thunderboard to Support Secure OTA
silabs.com | Building a more connected world. Rev. 9 | 12
5 Program Thunderboard to Support Secure OTA
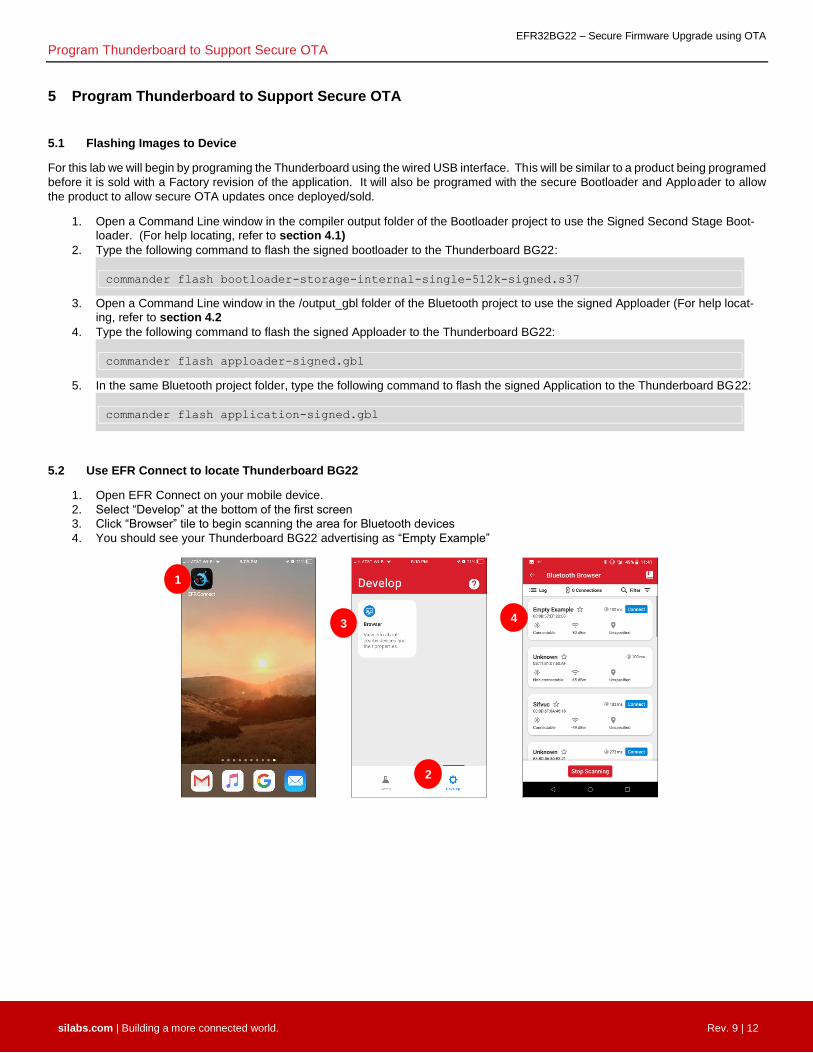
5.1 Flashing Images to Device
For this lab we will begin by programing the Thunderboard using the wired USB interface. This will be similar to a product being programed
before it is sold with a Factory revision of the application. It will also be programed with the secure Bootloader and Apploader to allow
the product to allow secure OTA updates once deployed/sold.
1. Open a Command Line window in the compiler output folder of the Bootloader project to use the Signed Second Stage Boot-
loader. (For help locating, refer to section 4.1)
2. Type the following command to flash the signed bootloader to the Thunderboard BG22:
3. Open a Command Line window in the /output_gbl folder of the Bluetooth project to use the signed Apploader (For help locat-
ing, refer to section 4.2
4. Type the following command to flash the signed Apploader to the Thunderboard BG22:
5. In the same Bluetooth project folder, type the following command to flash the signed Application to the Thunderboard BG22:
5.2 Use EFR Connect to locate Thunderboard BG22
1. Open EFR Connect on your mobile device.
2. Select “Develop” at the bottom of the first screen
3. Click “Browser” tile to begin scanning the area for Bluetooth devices
4. You should see your Thunderboard BG22 advertising as “Empty Example”
commander flash bootloader-storage-internal-single-512k-signed.s37
commander flash apploader-signed.gbl
commander flash application-signed.gbl
1
2
3 4

EFR32BG22 – Secure Firmware Upgrade using OTA Performing a Secure OTA Update of Firmware
silabs.com | Building a more connected world. Rev. 9 | 13
6 Performing a Secure OTA Update of Firmware
This section demonstrates how a company could use the BG22 features to provide Secure OTA firmware update to devices in the field.
The first steps will modify the existing project so that a change can be detected in the EFR Connect mobile app if the device is successfully
updated. The next steps show how to store the signed image to a cloud storage service that your mobile device can access. The final
steps will use EFR Connect to initiate an OTA update. Examples will show a successful and failed update based on the device receiving
an Authentic and Secure new firmware image.
6.1 Modify the Lab 2 Low Power Project
This section requires you to refer back to the steps used to create the Low Power Bluetooth project in Lab 2. The easiest modification is
to change the Device Name that your device advertises. This can be done quickly to provide a new image to use in a Secure OTA
update.
1. Change the Device Name in the GATT Configurator to something different i.e. “Updated Empty” and press generate
2. Rebuild the modified Low-Power-Lab project (Lab 2, Section 3.4 steps 2-5)
3. Be sure to sign the new Project binary file with your Developer signing keys. Re-run create_bl_files.bat (Refer to steps in
Section 4.2)
6.2 Place Application Images on Mobile Device Cloud Service
This step will load 2 images to a cloud based storage service that the EFR Connect app can access. You will upload the signed and
un-signed version of your new project. This will allow you to see the outcome of attempting an OTA with an unsigned and a properly
signed image.
1. Upload the application-signed.gbl to a cloud storage service you can access on your mobile phone (i.e. iCloud, Dropbox,
Google Drive)
2. Upload the application.gbl to the same cloud storage service. This will be the example of an improper unsigned image that will
not be accepted by your now secure Thunderboard BG22.
6.3 Use EFR Connect mobile App to connect and perform OTA
1. Start EFR Connect app on your phone
2. Start Bluetooth Browser
3. Connect to your device advertising as the name you chose in Lab 2 i.e. “Empty Example”
4. In the local menu find the OTA option
5. Select Partial method for the OTA. You will only be changing the Application. Full would allow you to load a new signed Ap-
ploader along with the Application.
6. Select “CHOOSE FILE” in the App
7. The mobile app will open a default folder view. Click Browse to view more cloud storage options
8. Select the cloud storage solution you used in Step 6.2. Locate and select your unsigned upgrade file application.gbl
9. Press OTA UPDATE to begin the partial update
The OTA will fail and the EFR Connect app will display Error: “Code 0x84: Invalid file format”. This refers to a “Not supported”
file format. The Apploader detected the file image did NOT include a signed signature. IF the image was signed with an incor-
rect key, the error would have returned 0x80 for CRC Error, or Signature failure. You can research the different Result Codes
in AN1086. A summary of their descriptions is included in the table below.
10. Repeat steps 1 – 9. This time select your signed image upgrade file application-signed-gbl and press OTA UPDATE
This OTA will succeed and your device will advertise your modified Device Name (i.e. “Updated Empty”)

EFR32BG22 – Secure Firmware Upgrade using OTA Performing a Secure OTA Update of Firmware
silabs.com | Building a more connected world. Rev. 9 | 14
4
5
6
7
8
9
8
8


![The BlueNRG-1, BlueNRG-2 BLE OTA (over-the-air) firmware ......2 OTA FW upgrade service description The OTA FW upgrade service is addressed through the files OTA_btl.[ch] provided](https://img.dokumen.tips/doc/110x75/60b03d72d45bea23e865c565/the-bluenrg-1-bluenrg-2-ble-ota-over-the-air-firmware-2-ota-fw-upgrade.jpg)