Embed Size (px)
Citation preview
Secure File Transfer
►Using SecureFiles
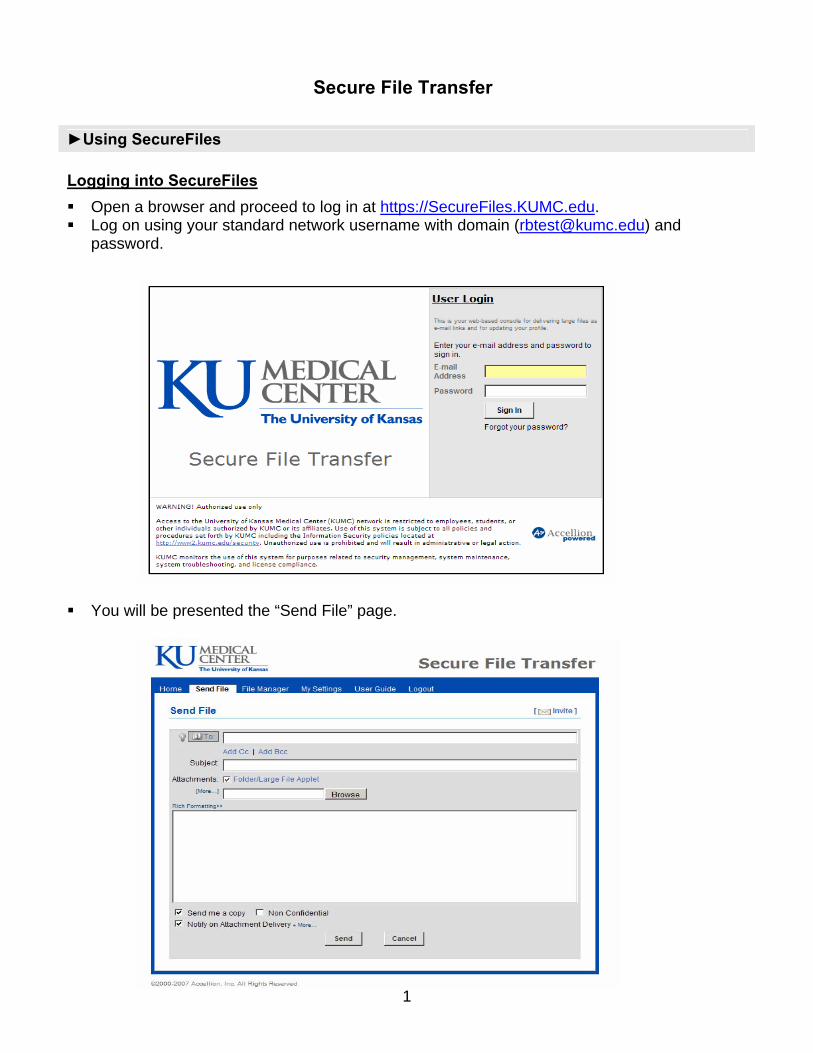
Logging into SecureFiles Open a browser and proceed to log in at https://SecureFiles.KUMC.edu. Log on using your standard network username with domain ([email protected]) and
password. You will be presented the “Send File” page.
1

Send File Complete the “Send File” form as follows:
1. To: enter the recipient e-mail address. Use comma or semicolon to separate multiple
recipients and maximum number of recipients should not exceed 40. Use auto complete feature to send to e-mail addresses that have already been sent files using SecureFiles. Click on “Add Cc” and/or “Add Bcc” to Cc and/or Bcc recipients.
2. Subject/Body Text: enter the subject and body text you want for the e-mail.
3. Attachments: The maximum number of attachments is 10 and can include a mix of new uploads and previously resend files. The total size of all new attachments upload should be less than 2 GB. (Alternatively you may upload individual large files at the File Manager tab using “Add to Cabinet” each up to 2 GB, and then send them using “Resend Files”.)
Click Browse to open the Choose File
dialog box for your local system: • Highlight the file to attach. • Click Open to attach
Click on Browse again if you wish to upload more files.
Click on Remove if you wish to remove a file.
2

4. “Send me a copy” and “Notify on Attachment Delivery” options may be toggled on and off.
Send me a copy: a copy of the e-mail will be sent to your e-mail address Notify on Attachment Delivery: when the recipient completely downloads those
files, you will be notified of such. Click on “More” to enter additional e-mail addresses who will also be notified on download of the files. You can enter multiple e-mail addresses, each separated by a comma.
Click “Send” to send the file. A progress bar will show up to show the uploaded progress.
A Sent Mail confirmation window will display.
3
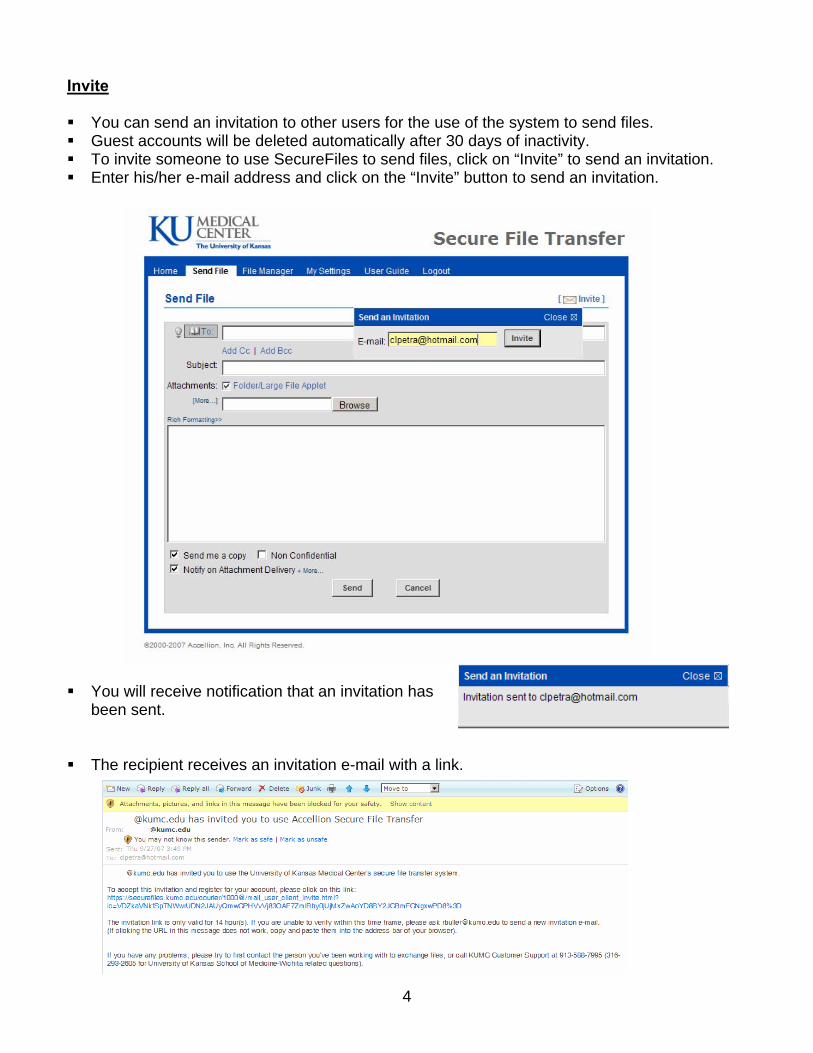
Invite You can send an invitation to other users for the use of the system to send files. Guest accounts will be deleted automatically after 30 days of inactivity. To invite someone to use SecureFiles to send files, click on “Invite” to send an invitation. Enter his/her e-mail address and click on the “Invite” button to send an invitation.
You will receive notification that an invitation has
been sent. The recipient receives an invitation e-mail with a link.
4

The recipient clicks on the link to complete the registration process. • Once the registration process is complete, the recipient can log in and send the large files
using SecureFiles. File Manager Select “File Manager” from the menu tabs to view your “Cabinet”, “Inbox” or “Send History”. The “Cabinet” lists files that have been sent to other people as well as files that were
uploaded using the “Add to Cabinet” button.
5
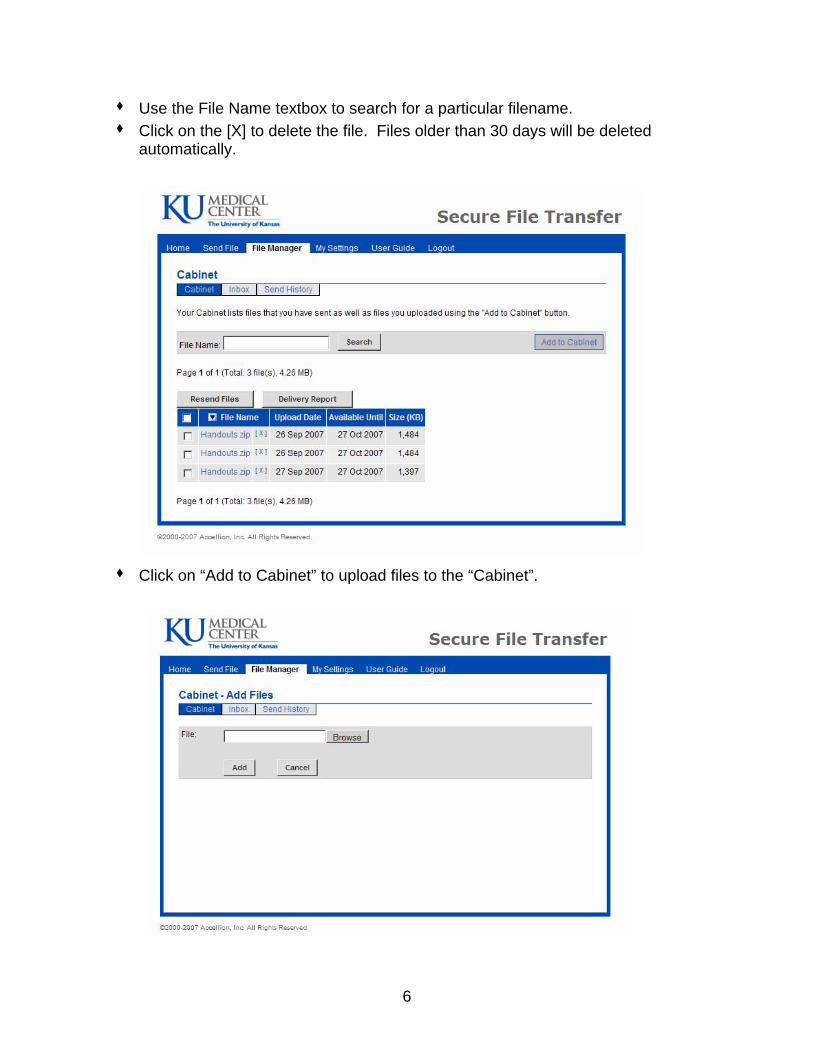
Use the File Name textbox to search for a particular filename. Click on the [X] to delete the file. Files older than 30 days will be deleted
automatically.
Click on “Add to Cabinet” to upload files to the “Cabinet”.
6
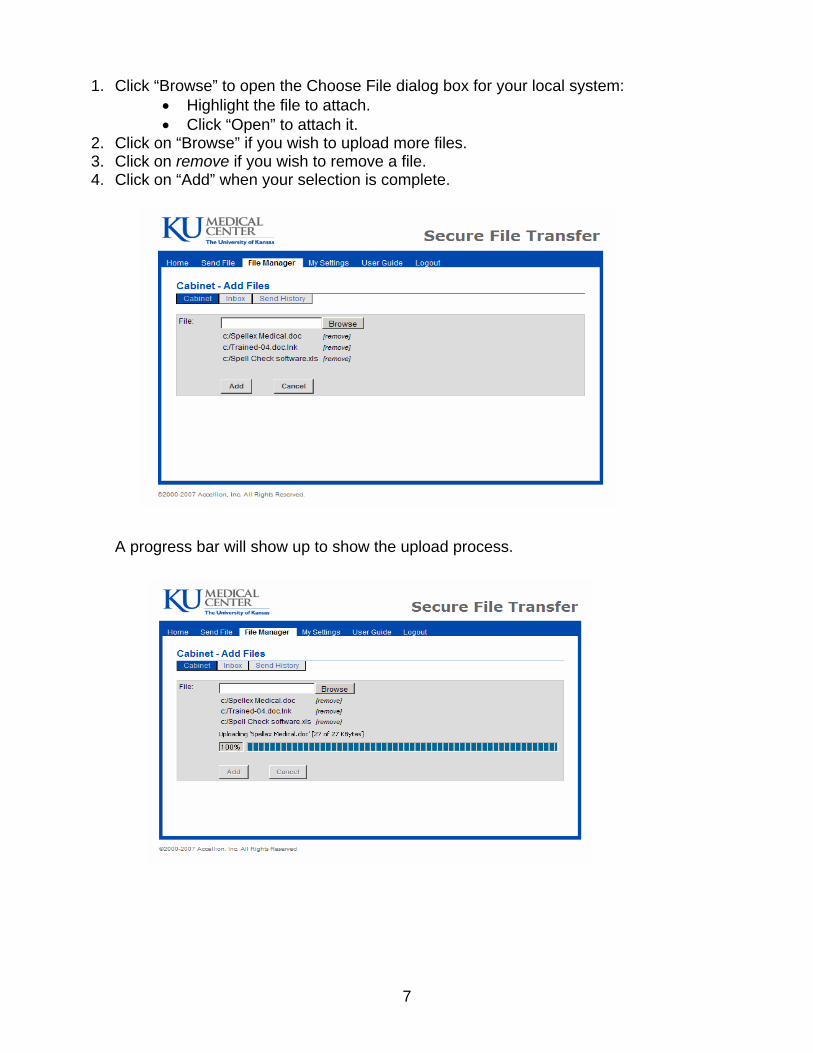
1. Click “Browse” to open the Choose File dialog box for your local system: • Highlight the file to attach. • Click “Open” to attach it.
2. Click on “Browse” if you wish to upload more files. 3. Click on remove if you wish to remove a file. 4. Click on “Add” when your selection is complete.
A progress bar will show up to show the upload process.
7

5. An Upload confirmation window will display.
6. Click on “OK” to return to the “File Manager” menu. • Click on the “Inbox” to view or forward the files that were sent to you. Use the File Name
textbox to search for a particular filename. • Click on “Send History” to view the report of files that have been sent to others.
a. To resend files from a particular send event, simply select it and click on “Resend Files”.
b. Click on the magnifying glass next to the “Sent Date” column to bring up the delivery report for that event.
8
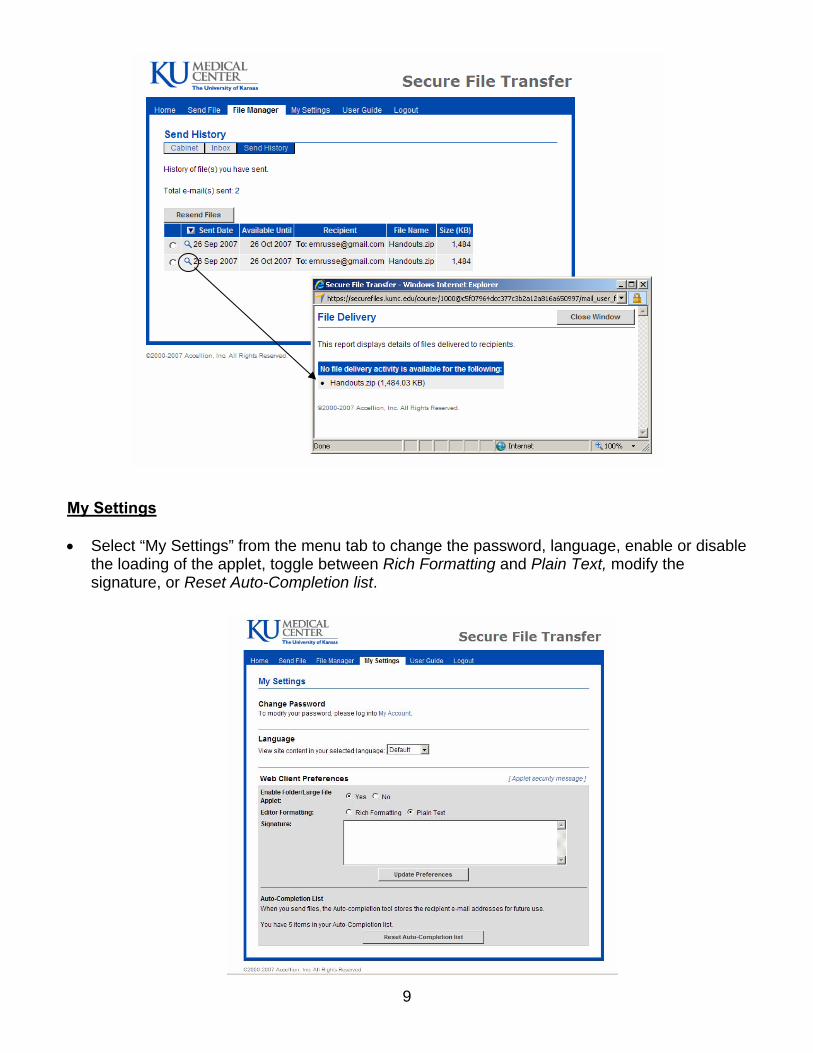
My Settings • Select “My Settings” from the menu tab to change the password, language, enable or disable
the loading of the applet, toggle between Rich Formatting and Plain Text, modify the signature, or Reset Auto-Completion list.
9
►Receiving File(s)
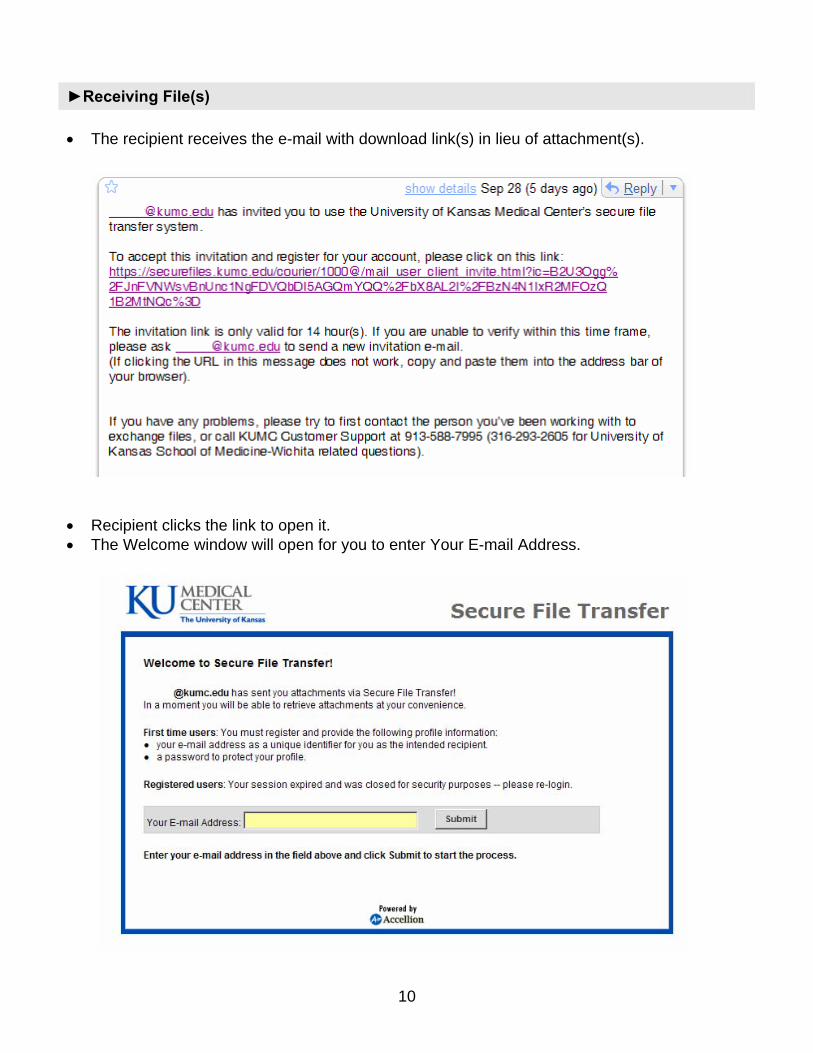
• The recipient receives the e-mail with download link(s) in lieu of attachment(s).
• Recipient clicks the link to open it. • The Welcome window will open for you to enter Your E-mail Address.
10

• If the recipient hasn’t registered before or if his/her profile hasn’t been set up, ownership of
the e-mail address needs to be confirmed before registering his/her profile. You would need to fill in the e-mail verification code and select a password to proceed. Click the option “I’m on a public computer” so that the profile will not be retained locally beyond this session.
• The download process will then begin.
11

• Once fully downloaded, the file can be opened and/or be saved. • For convenience, files that are sent in the same package can also be retrieved by clicking on
the appropriate filename to begin the download.
12