Embed Size (px)
Citation preview

1
“Plant a seed in tennessee”
second Grade curriculum
Draft
Tennessee Foundation for Agriculture in the ClassroomPO Box 313
Columbia, TN 38402

2
“Plant a Seed in Tennessee” Second Grade CurriculumDraft -- June 2010
PREFACE:The Tennessee Foundation for Agriculture in the Classroom was established to promote “agricultural literacy”, or a greater awareness, understanding, and appreciation of agriculture’s influence on our lives, to students throughout the state of Tennessee. The “Plant a Seed in Tennessee” Second Grade Curriculum is just one of the educational resource materials that is available to educators through the Foundation. This material is designed to enhance classroom studies and presentations and to supplement the basic school curriculum. In addition to these materials, training workshops for teachers and other programs are available through the Tennessee Agriculture in the Classroom program.
ABOUT THIS MATERIAL:This is the first draft of the new Second Grade “Plant a Seed in Tennessee” curriculum. These lessons contain an emphasis on all subject areas. Please keep in mind that it is ONLY a draft. There are many additions, corrections, etc... that have to be made.
Each lesson plan has been correlated to meet Tennessee Department of Education Curriculum Standards.
CONTACTS:If you have any questions regarding this material or any other material or programs sponsored by the Tennessee Foundation for Agriculture in the Classroom, please contact:
Tennessee Foundation for Agriculture in the ClassroomPO Box 313
Columbia, TN 38402Phone: 931.388.7872Fax: 931.388.5818
or visit our web site
www.tnfarmbureau.org

1
BRIEF DESCRIPTION:Plants are an important part of our everyday lives. We need them to make oxygen. They provide food to eat, fabric to wear, shelter, and even fuel for transportation. In some way, we use every part of the plant.
LEVEL:Second Grade
SUBJECT:Science, Language Arts, Reading, Health, Visual Arts
SKILLS:Describing, Investigating, Comparing, Identifying, Analyzing, Comprehending, Following Directions, Reasoning, Thinking Creatively
OBJECTIVES:The student will:
become acquainted with the • new food pyramid.read books related to the • subject matter.describe the benefits of eating • a variety of nutritious foods.investigate plants and plant • growth.determine which part of the • plant we eat.identify the difference • between a fruit and a vegetable. identify parts of a seed.•
ESTIMATED TEACHING TIME:60 minutes
Science: GLE 0207.2.1 GLE 0207.2.3 GLE 0207.3.1 GLE 0207.T/E.1 GLE 0207.4.1Visual Art: Standard 1.3Health: Standard 6 Level 1, 2, and 3
Reading: 2.1.07 2.1.08 2.1.09Language Arts: 0201.3.3 0201.5.3
Background:Plants are an important part of our everyday lives. We need them to make oxygen, and they provide food and fabric so that we can have something to eat and something to wear. They also provide shelter and can even be used to make fuel for transportation. In some way, we use every part of the plant. We eat the root of some plants, the leaves of other plants, and we eat the fruit. It is seldom that we eat the entire mature plant. Usually when we eat plants, we call them either fruits or vegetables.
The botanical definition for a fruit is the part of a plant that develops from the flower. The fruit contains the seeds of the plant. It covers and protects the seeds. A fruit may have fleshy or dry tissue. The botanical definition of a vegetable is any edible part of a plant that does not contain the seed. Vegetables are usually the roots, stems, or leaves of the plant. These definitions vary greatly from the cultural definitions of fruits and vegetables. Cultural definitions are based upon whether the edible portion of the plant is sweet (fruit) or not sweet (vegetable).
What we consider vegetables are vegetative parts of plants. For example, lettuce is leaves, carrots and beets are roots, and broccoli and cauliflower are immature flowers. Other plant parts are more difficult to identify. Potatoes are not roots; rather, they are swollen underground stems (tubers). Onion bulbs are composed of modified stems and swollen leaves. The roots (which
are not eaten) are attached at the base of the bulb.
Seeds are found inside a ripened ovary or the fruit of plants. Seeds develop when a flower is pollinated. A seed contains a hard outer coat (seed coat).
PLANTS!
!"#$%&'(')&&%!
Embryo: New plant
Radicle: Will become the root
Cotyledon: Food for embryo
Epicotyl: Will form stem and first true leavesSeed Coat

2
Inside a seed is a young plant (embryo) surrounded by its food supply (cotyledon). Sometimes we eat the seeds of a plant. Some examples include corn, peas and beans, rice, wheat, and nuts.
Seeds are important. They are the means by which plants reproduce. As a seed sprouts, the parts of the plant develop. The roots, the underground part of the plant, take up water and minerals (nutrients needed for growth). The stem supports the leaves and flowers. The leaves capture energy from the sun for the plant (photosynthesis) and contain tiny holes or pores that allow moisture and air in and out of the plant. Seeds come in a variety of sizes, shapes, and colors.
Source: Utah Agriculture in the Classroom
TOPS AND BOTTOMSActivity 1 - Getting to Know VegetablesMaterials:A variety of vegetables (i.e. carrots, radishes, broccoli, celery, corn, etc.)
Procedure:Bring in samples of vegetables. 1. Display the vegetable samples.2. Have students observe the vegetables. 3.
4. Discuss the differences they observed using their senses. (Differences in shape, texture, color, taste, etc.)
Activity 2 - ReadRead Tops and Bottoms by Janet Stevens (ISBN 0152928510)
Activity 3 - Cause/EffectMaterials:Cause/Effect worksheet
Procedure:Have students list causes and effects from the story 1. Tops and Bottoms.Have students draw an illustration of one cause/effect.2.

3
Activity 4 - Compare/ContrastMaterials:Compare/Contrast worksheet
Procedure:Provide students with the “Compare/Contrast” worksheet.1. Using the Venn diagram on the “Compare/Contrast” worksheet, compare Hare and 2. Bear. How are they different? How are they alike?
Activity 5 - Idea WebMaterials:Idea Web worksheet
Procedure:Read 1/2 to 3/4 of the book.1. Have students predict the end of the story using the “Idea Web” worksheet.2. After reading the story, have students create a new ending to the story.3.
Activity 6 - Food Guide PyramidMaterials:Food Guide Pyramid
Procedure:Using the Food Guide Pyramid, discuss what foods are good nutritionally and how 1. often we should eat them.
Activity 7 - Eat Which Part?Materials:Eat Which Part? worksheet
Procedure:Discuss the different parts of a vegetable we eat.1. Have students complete the “Eat Which Part?” worksheet.2.
Activity 8 - Tops and Bottoms Fold up GardenMaterials:Drawing paperCrayonsMarkers
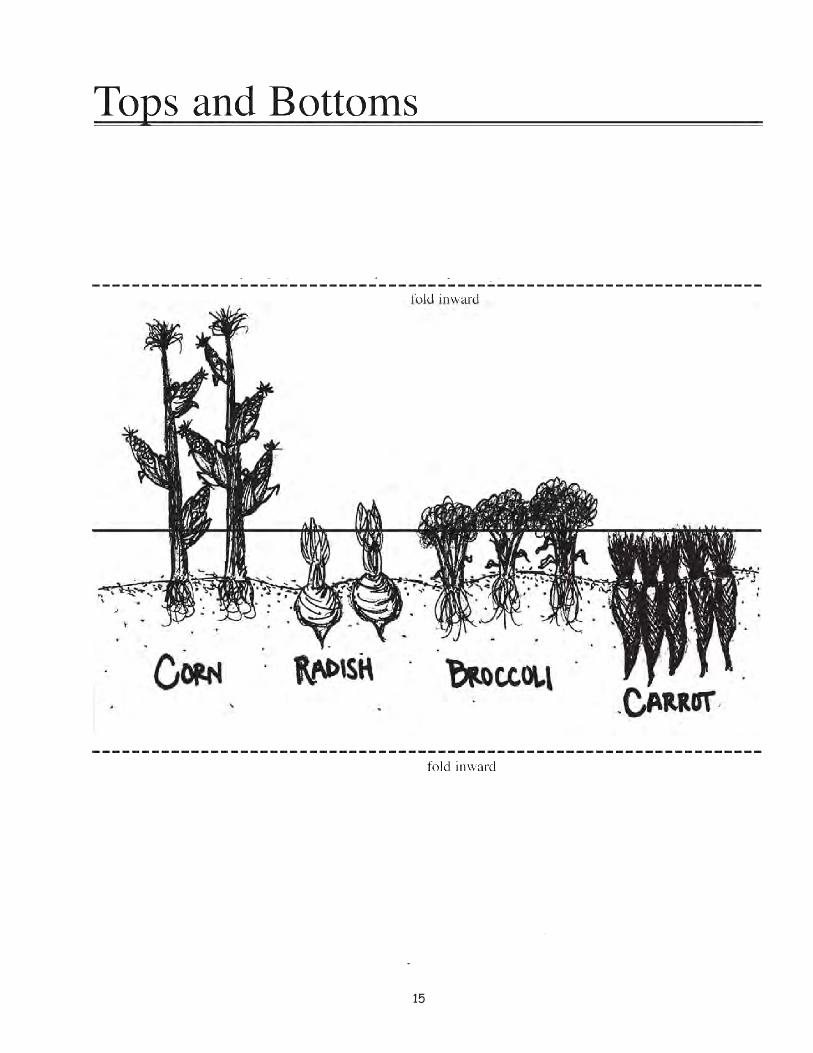
Procedure:Discuss the different vegetables grown in a garden.1. Show the example of a fold up garden provided.2. Have students fold their paper in half. Then, in half again. Unfold the paper.3. Have students draw a picture of a vegetable garden in the two center sections. 4. The center fold represents the ground level. Students should draw examples of vegetables that grow above and below the ground (i.e. corn, radish, carrots, broccoli, etc.)
4
After their pictures are complete, have students fold the top and bottom sections 5. of their paper toward the pictures so that the top section covers the plants growing above the ground level and the bottom section covers the plants growing below the ground level.Have students write “Tops” on the outside of the top flap and “Bottoms” on the 6. outside of the bottom flap.
Activity 9 - Salad PreparationMaterials:Various vegetables from Tops and Bottoms
Procedure:Discuss practices for safe food preparation. Ex. wash hands, clean food preparation 1. area, use clean utensils, wash vegetables, etc.Prepare vegetables to make a salad.2. Make salad, add dressing, serve to students.3.
Activity 10 - Mural of VegetablesMaterials:Art supplies
Procedure:Work with students to make a mural of vegetables.1.
Activity 11 - CookbookMaterials:Healthy recipes brought in from home
Procedure:Make a class cookbook of healthy recipes that students have brought from home.1.
Activity 12 - Colorful Fruits and VegetablesMaterials:Color Wheel worksheetFood-related magazines (to cut out pictures of fruits and vegetables)
Procedure:Provide students with magazines to cut out pictures of fruits and vegetables.1. Discuss the variety of colors of fruits and vegetables and the health benefits of 2. eating a variety of colors.Glue the pictures into the appropriate area of the color wheel on the worksheet.3.

5
Activity 13 - Burger SnacksMaterials:2 vanilla wafers1 chocolate cookieRed icingYellow icingGreen coconut
Procedure:The vanilla wafers represent the hamburger buns.1. The red and yellow icing represents ketchup and mustard. Simply put icing on each 2. vanilla wafer.Put the chocolate cookie on next in between the hamburger buns that now have icing 3. on them. The chocolate cookie represents the hamburger.Add green food coloring to coconut to represent lettuce. Add “lettuce” to the 4. burger.
Activity 14 - Carrot NecklaceMaterials:CarrotsKnifeHeavy duty needleDental floss
Procedure:Wash carrots and cut into 1/4-inch round slices.1. Use the disks for mathematical demonstrations, such as counting, addition, 2. subtraction, etc. Thread a heavy duty needle with dental floss. Push the needle through the core of 3. the slices.Once you have strung several slices, tie the ends together to make a necklace.4. Lay it on paper in a dark, well-ventilated place, making sure the slices don’t touch 5. each other.As they dry, they turn into wrinkled beads. Drying takes a couple of weeks.6. Have students write or draw a comparison of the necklaces before and after drying.7.
Activity 15 - Seed MatchMaterials (per student or pair of students):Peanuts (in the shell) Paper towelSmall squash Paper plateApple Seed Match worksheetBell pepperStrawberryKiwiWheatEdamame pod, edible soybean, (found most often in the freezer section at local grocers). Do not cut them open until the students have made their preliminary seed predictions.

6
Procedure:Give each student or pair of students a copy of “The Seed Match” worksheet.1. Have them examine their fruits and grain. Ask them to predict what the seeds will 2. look like on the inside. Some students will recognize that the strawberry and the wheat have seeds that are visible from the outside.Have students color the pictures of the fruits and grain and draw a picture of the 3. appearance of their “prediction” in the top right hand corner of the box.Have them guess how many seeds are on the inside/outside of the fruit or grain. 4. This question can be simplified for younger students by asking if there will be many or few seeds, or greater than or less than a certain number. The prediction number can be written either in the square or on a separate sheet of paper.When the predictions are complete, have the students remove the seeds. Allow 5. them to examine their findings and determine if their predictions were accurate. The seeds from their findings should be placed on the paper plate and labeled so that they can be dried.When the seeds are dry, instruct students to paste them in the box of the fruit 6. that matches the correct seed (The activity can be completed in one day if the instructor has already collected and dried enough seeds to be glued on the worksheet in advance).
Activity 16 - Where Do They Grow?Materials:Where Do They Grow worksheetCrayons/MarkersScissorsGlue
Procedure:Have students color the crops on the “Where Do They Grow” worksheet.1. Have them cut out the crops then glue them where they grow using the farmer’s soil 2. line as the marker for above and below the ground.
Activity 17 - Fruits and VegetablesMaterials:Fruits and Vegetables pictures included on pages 21-23Fruits and Vegetables worksheet
Procedure:Have students color the pictures of the fruits and vegetables and separate them by 1. cutting along the dotted lines.Using the botanical definition of fruit and vegetable, (Fruit - the part of the plant 2. that develops from the flower. The fruit contains the seed. Vegetable - any edible part of a plant that does not contain the seed.) classify each as a fruit or vegetable by gluing the pictures in the correct column on the “Fruits and Vegetables” worksheet.
Additional Activity - Grow a GardenInformation on gardens begins on page 24.Adapted from: Louisiana Agriculture in the Classroom, Oklahoma Agriculture in the Classroom, Project Food, Land & People and Utah Agriculture in the Classroom

7
Name
Cause/Effect
List four cause/effect from the story Tops and Bottoms. Then, draw a picture of one of your cause/effect.
Draw a picture of your cause/effect.
Cause Effect

8
Name Possible Cause/Effect
Cause/Effect
List four cause/effect from the story Tops and Bottoms. Then, draw a picture of one of your cause/effect.
Draw a picture of your cause/effect.
Cause Effect
Hare had lost a risky bet with a tortoise. Hare had to sell all of his land to Bear to pay off the debt.
Bear agreed to take the top part of the harvest, and Hare agreed to take the bottom part of the harvest.
Bear was outsmarted because Hare planted vegetables that grew underground.
9
Name
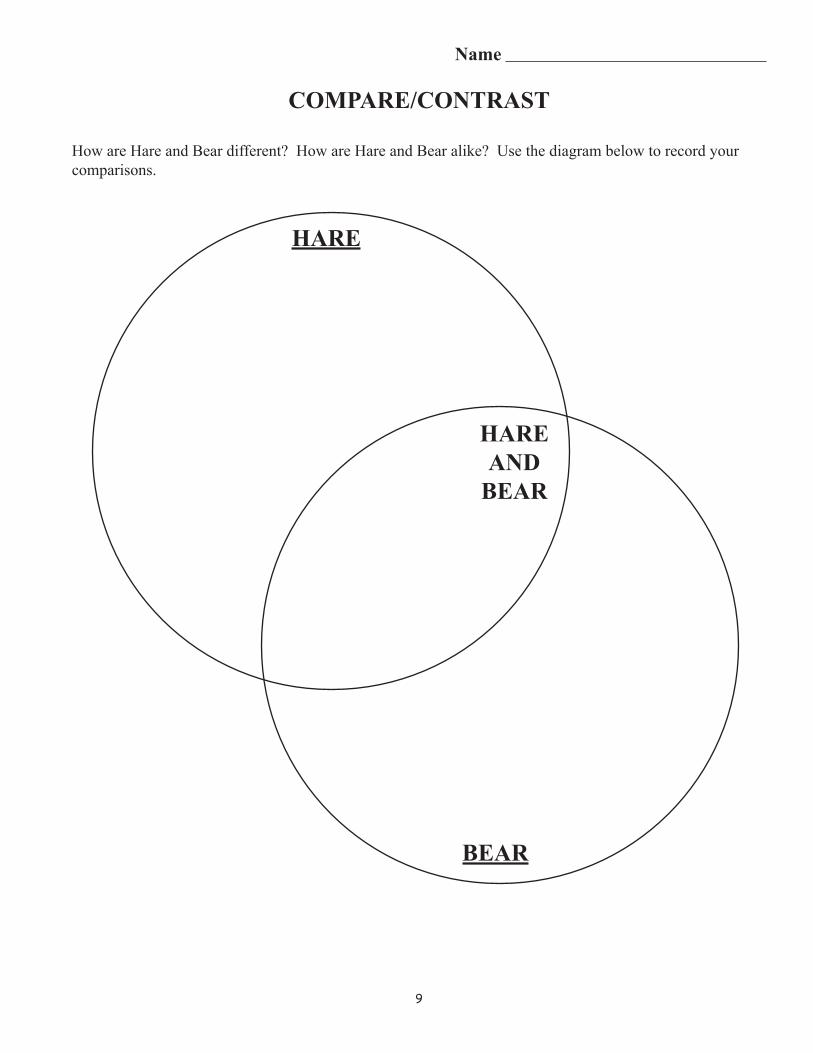
ComparE/CoNtrast
How are Hare and Bear different? How are Hare and Bear alike? Use the diagram below to record your comparisons.
HarE
BEar
HarE aNd
BEar

10
Name
Idea Web
tops and Bottoms
story ending

11
Sour
ce: w
ww.m
ypyr
amid
.gov

12
Sour
ce: w
ww.m
ypyr
amid
.gov

13
Nam
e
Eat
Whi
ch p
art?
Mar
k w
hich
par
t of t
he v
eget
able
you
eat
.
r
adis
hes
Bee
tsC
orn
Let
tuce
Cel
ery
oni
ons
Bro
ccol
i
You
eat
the
top
You
eat t
he
mid
dle
You
eat t
he
bott
om

14
N
ame
Ans
wer
Key
Eat
Whi
ch p
art?
Mar
k w
hich
par
t of t
he v
eget
able
you
eat
.
r
adis
hes
Bee
tsC
orn
Let
tuce
Cel
ery
oni
ons
Bro
ccol
i
You
eat
the
top
X(S
eeds
)X
(Lea
ves)
X(F
low
ers)
You
eat t
he
mid
dle
X(S
tem
s)
You
eat t
he
bott
om
X(R
oots
)X
(Roo
ts)
X(R
oots
)
15

16
CoLor WHEEL

17
Name

18

19
Pean
utO
nion
Pota
to
Cel
ery
Lettu
ce
Ans
wer
Key

20
Name
Fruits and Vegetables
Glue the pictures of fruits and vegetables in the correct column.
Fruits Vegetables

21

22

23

24
All subject areas can be integrated into school gardens. Gardens are also an excellent hands-on learning tool for students. The Tennessee Foundation for Agriculture in the Classroom has an Outdoor Classroom Garden Grant program to help schools who want to start and continue a school garden.
Raised Garden BedsA great garden literally starts from the ground up. Instead of trying to improve difficult school soil, just grow vegetables in topsoil.
Procedure to building a raised garden bed:Build raised beds using railroad ties or other boundary setting instrument. 1. Make a simple frame no wider than what the students can reach across (3’-4’). 2. Stack rails up to waist high. As an alternative cinder block or landscape blocks will 3. work.Add good soil. Fill beds with topsoil or black dirt. Bagged soil is slightly more 4. expensive than bulk soil, but hauling bags rather than wheelbarrows can be more practical, especially for smaller beds. NOTE: When you make raised beds, be sure the space between them are wide enough for a lawnmower to get through between the beds.
Tom
atoe
s
Snap Peas
Swis
s Ch
ard
& O
nion
sLettuce
Spinach
Carr
ots
& Tu
rnip
s
Beets
Spring Garden Sample Fall Garden Sample
Lettuce
Green Beans
Broccoli & Cauliflower
Brussel Sprouts & Squash

25
Self-Contained Garden TubProcedure to making a container garden: a. Find a container (any size storage tub with a lid). Drill a few holes at the bottom of the gravel level around the tub.
b. Add pea gravel (about 2-3 inches). c. Add a layer of foam insulation and cotton batting. You can find styrofoam construction board insulation at a building supply store and wrap in natural cotton batting found at a fabric store. d. Add garden soil (about 8-12 inches). e. Add a PVC pipe through the soil to the cotton batting. This will allow you to add water without disturbing the plants.
Credit: Louise Crowell, Franklin County, 2008 Tennessee Foundation for Agriculture in the Classroom Excellence in Teaching About Agriculture Award Winner

26
Cred
it: C
arol
e W
illis
, Cof
fee
Co.,
AIT
C Co
nsut
ant

27
BRIEF DESCRIPTION:Gathering and charting data on root and shoot growth is fun with these quick and easy seed germinators. Students will learn about germination by sprouting beans.
LEVEL:Second Grade
SUBJECT:Science, Language Arts, Reading, Math
SKILLS:Describing, Investigating, Comparing, Identifying, Analyzing, Comprehending, Measuring, Developing, Following Directions, Reasoning, Thinking Creatively
OBJECTIVES:The student will:
learn about germination.• determine the measurement of • plants’ roots.graph measurements.• demonstrate germination.•
ESTIMATED TEACHING TIME:30 minutes
Science: GLE 0207.1.1Math: 0206.5.1Reading: 2.1.07 2.1.09Language Arts: 0201.2.4 0201.5.2
Background:When a seed gets warmth, air and water, it starts to change. The stem and the root emerge from the seed. This is called germination. Germination occurs if the seed is in a warm place. We plant seeds in the spring, when the ground is warming up. The seed is the food for the baby plant until it can grow its own root system. A seed is germinated when it can grow without the food stored in the seed.
Activity 1 - Seed GerminationMaterials:CD casesRulerMarkerLima bean seedsTopsoilWater
Procedure:Using an old CD case, fill it with topsoil and three lima 1. bean seeds. Make sure the soil is damp.Each day measure the plants’ roots in centimeters.2. Using a bar graph, graph each day’s growth.3.
Activity 2 - SequenceMaterials:A Bean Is A Seed worksheet
Procedure:Give each student the “A Bean Is A Seed” worksheet.1. Have students number each picture in sequential order 2. of bean growth, beginning with the seed and ending with the bean.Have students cut apart the pictures and staple them in 3. order to make a booklet.Activity extension:4. complete the foldable booklet on
SEEDS & GERMINATION

28
page 30 and have students describe their bean plant in the space provided.
Activity 3 - ReadRead From Seed to Plant by Gail Gibbons (ISBN 978-0823410255)
Activity 4 - Garden in a GloveMaterials:Clear plastic gloves (can be found at a food service supply company)Cotton balls5 types of seeds, 3-4 seeds of each (Ex. lettuce, carrot, cucumber, tomato, broccoli, etc.)WaterMarker
Procedure:Give each student a clear plastic glove. Have them write their name on the palm of 1. the glove and the names of the seeds on the fingers of the glove. Wet five cotton balls (wring out excess water). 2. Place 3 to 4 seeds on each cotton ball and place one in each finger of the glove. Be 3. sure to place the seeds and cotton ball in the finger labeled with the correct seeds.Have students puff some air into the glove and close with a twist tie.4. Tape the completed gloves to a window (for warmth from the sun) or place in a warm 5. area of the room. The seeds will germinate in 3 to 5 days (you can check seed packets for germination 6. period). Have students keep a plant diary of their observations each day. Once seeds have germinated (1 1/2 to 2 weeks), transplant them into soil by cutting 7. the tips of the fingers off the glove. Transplant the cotton ball and plant into the soil. Provide them with the things they need to grow into strong plants! Continue to have students record their observations as the plant progresses through 8. its various life cycle phases.
Adapted from: Exploratorium’s Teacher Institute, Illinois Agriculture in the Classroom, Oklahoma Agriculture in the Classroom, and Virginia Agriculture in the Classroom

29

30
Bean plants grow from seeds.
Write three words that describe a beanplant.
Beans can begreen, red, yel-low, purple,brown or black.
Seedsneedsun,soil,waterandair.
Beansaregoodtoeat.
1.
2.
3.
fold
fold
foldfold
cut
cut
cut
cut
cut
cut
cut
cut

31

32
BRIEF DESCRIPTION:Animals are an integral part of agriculture. Not only do animals provide meat and milk, but also provide many other by-products.
LEVEL:Second Grade
SUBJECT:Science, Language Arts, Reading, Math, Social Studies
SKILLS:Graphing, Communicating, Listening, Describing, Investigating, Comparing, Identifying, Analyzing, Comprehending, Developing, Following Directions, Reasoning
OBJECTIVES:The student will:
create graphs.•interpret graphs.•distinguish between different •farm animals.investigate relationships •between animals and their environment.
ESTIMATED TEACHING TIME:45 minutes
Reading: 2.1.09Language Arts: 0201.3.3Science: GLE 0207.2.1 GLE 0207.2.2 GLE 0207.2.3 GLE 0207.3.1 GLE 0207.5.1
Math: GLE 0206.5.1Social Studies: 2.6.01 2.6.02
Background:Cows, pigs, sheep, and chickens provide us with meat products, but they also provide us with numerous non-food by-products to benefit us in our everyday lives. For example, beef by-products include china, shoes, cosmetics, etc. Pig by-products include floor wax, medicines, fertilizers, etc. Sheep provide wool, fertilizer, insulation, etc. Chickens provide us with feathers and waste for fertilizer.
Farmers provide food, water, shelter, and medical care for their animals. Cattle and sheep typically graze outside with little need for a barn for shelter. Pigs and chickens are housed in a climate-controlled barn for protection from weather, predators, and disease.
Just like humans, animals have certain dietary needs so that they grow strong and healthy. Farmers meet the dietary needs of their animals through proper feed mixtures.
Activity 1 - GraphingMaterials:A picture of a cow, a pig, a sheep, and a chickenA book of each of the above farm animalsIndex cards4 hula hoopsYarn
Procedure:Place a picture of a farm animal in the four corners of 1. the classroom.Have students go to the corner where their favorite 2. farm animal is displayed.Have students pair with a partner and share why he/she 3. chose that animal as his/her favorite farm animal.Have a student from each group read the book 4. representing their favorite farm animal out loud to the group.
FARM ANIMALS

33
Have each student write facts on an index card from the book about their favorite 5. farm animal.(Venn diagram)6. : place two sets of hula hoops in the center of the room to form two Venn diagrams. Each hula hoop will be labeled as one of the four farm animals from the corners of the room.Have students place their fact cards in the Venn diagram with the appropriate 7. animal.Within their groups have students work together to determine any facts that are 8. the same for the two animals depicted in the Venn diagram.(Bar graph)9. : Using the same animal groups, have one student in each group hold that group’sfavoriteanimalpicture.Have the other students in the group form a line behind the student holding 10. the animal picture. Explain that students have created a bar graph, and a graph represents facts.
(11. Line graph):Givethestudentholdingthepictureinthefirstrow,theendofapieceof yarn.Withthestudentinthefirstrowstillholdingtheendoftheyarn,passtheyarnto12. the next row, then the third row, and end with the student holding the picture in the fourth row. Explain that students have now formed a line graph and that the line graph and bar graph represent the same information.(Pie/Circle graph)13. : Have students in each line join hands. Formacirclebeginningwiththestudentsinthefirstline.Asthestudentsforma14. circle, the students in each line take the hand of the last person in the line ahead of them.Once all four groups (lines) are in a circle, have the 15. students drop their hands. Like groups should still be standing next to each other. Have the student holding thepictureplacethepictureonthefloorinthecenterof their group so that everyone can see the favorite animal.As the teacher, stand in the center of the circle with 16. four pieces of yarn.Havethefirststudentofeachgrouptaketheendofone17. piece of yarn and return to his/her place in the circle. Explain that this pie graph represents the same information as the above.
XXXX
XXXXXX
XXX
X
Sheep Cow Pig Chick
X
X
X
X X X X X
X X X X
X
X
T

34
Activity 2 - Name that animalMaterials:Strips of paper in two different colorsFarm Babies worksheet
Procedure:Read 1. Farm Animals by Marc Gave and Grace Goldberg (ISBN 978-1562938987).Discuss the mother, father, and baby names for animals.2. Write the names of mother and father animals on strips of paper in one color and 3. the names of baby animals on strips of paper in another color.Divide the class in half and distribute the mother/father strips to one half and the 4. baby strips to the other half.Have students scatter throughout the room. Designate one area of the room as the 5. barn.The object of the game is for all animals to safely make it to the barn. To safely 6. make it to the barn, students must say their mother/father or baby name correctly and match their baby name with the correct mother/father name.On the “Farm Babies” worksheet, have students match the baby with the correct 7. mother and father.
Activity 3 - Virtual Farm TourVisit Virginia Cooperative Extension Service (http://sites.ext.vt.edu/virtualfarm/) for a virtual farm tour to help students discover why farming is a part of their lives. Students canexplorehorse,fish,cattle,dairy,chicken,andwheatfarms.Source: USDA Agriculture in the Classroom
Adapted from: Iowa Agriculture in the Classroom and Oklahoma Agriculture in the Classroom

35

36

37
BRIEF DESCRIPTION:Through reading or listening to the story of Charlotte’sWeb, students will be introduced to the life cycle concept.
LEVEL:Second Grade
SUBJECT:Science, Language Arts, Reading
SKILLS:Describing, Investigating, Comparing, Identifying, Analyzing, Comprehending, Sequencing, Developing, Following Directions, Reasoning
OBJECTIVES:The student will:
compare life cycles.•sequence the life cycle of a •spider.investigate living things and •their habitats.
ESTIMATED TEACHING TIME:45 minutes
Science: GLE 0207.2.1 GLE 0207.2.2 GLE 0207.2.3 GLE 0207.3.1 GLE 0207.4.1 GLE 0207.4.2 Language Arts: 0201.5.4
Reading: 2.1.07 2.1.08 2.1.09
Background:This book is a good example of personification: attributing human traits to animals. Personification can lead to confusing messages about the purpose of animals.
A pig named Wilbur befriends a spider named Charlotte, who lives in the rafters above his pen. Wilbur is devastated when he learns that at the end of the season he will be slaughtered. Determined to save her friend, Charlotte spins a web that reads “Some Pig,” convincing the farmer and surrounding community that Wilbur is no ordinary animal and should be saved. This is a story of friendship, hardship, and the passing on into time.
Activity 1 - Life CyclesMaterials:Charlotte’sWeb by E.B. WhiteSpider Life Cycle cards
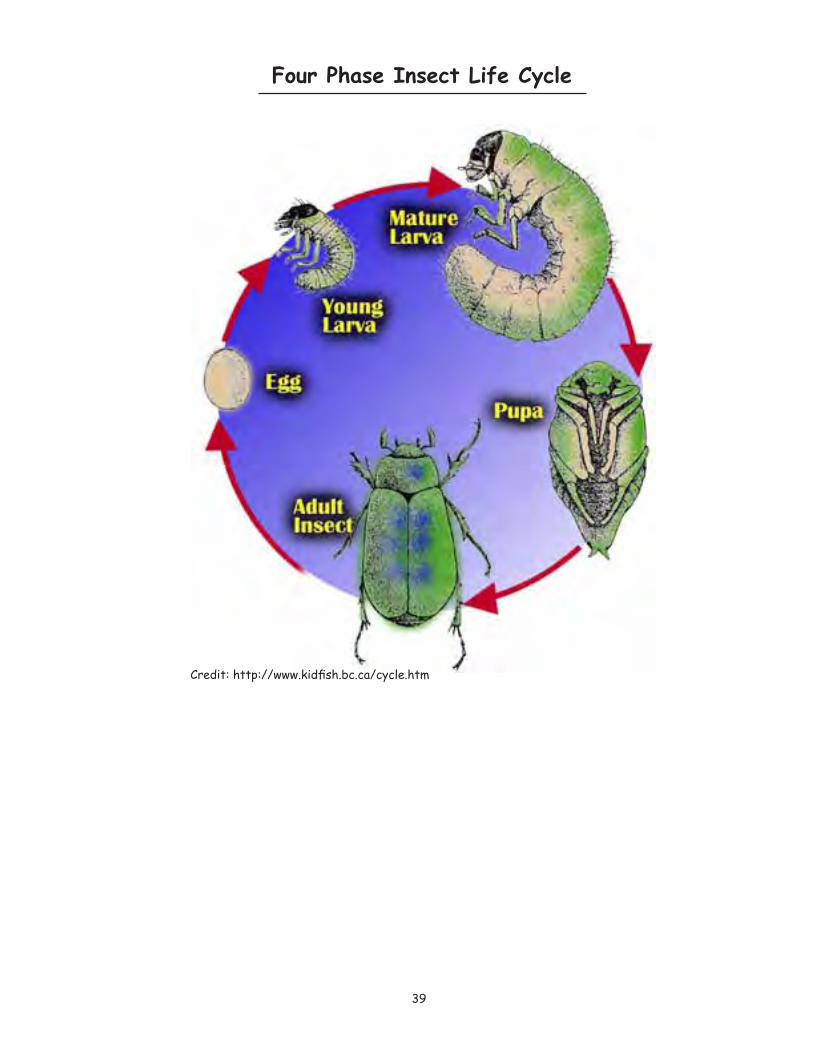
Procedure:Read 1. Charlotte’sWeb by E.B. White (ISBN 978-0064400558).Viewthespider’slifecyclevideoat2. http://www.spiderroom.info/lifecycles.html.Sequence the life cycle of a spider using the “Spider 3. Life Cycle” cards.Use the “Four Phase Insect Life Cycle” to compare its 4. life cycle with another insect, such as a beetle.Compare and contrast the life cycle of a mammal versus 5. a spider, which is an arachnid (has eight legs and two body segments).
Charlotte’s Web

38Adapted from spiderroom.info
39
Four Phase Insect Life Cycle
Credit:http://www.kidfish.bc.ca/cycle.htm

40
BRIEF DESCRIPTION:You may find it hard to believe, but the makings of a fantastic growing experience are probably in your kitchenrightnow.Don’tputthosecarrot tops in the compost or throw out the seeds in that apple core- try growing them instead. Turn a peanut into an unusual flower or a beet top into a leafy plant.
LEVEL:Second Grade
SUBJECT:Science
SKILLS:Describing, Investigating, Comparing, Identifying, Analyzing, Comprehending, Developing, Following Directions, Reasoning
OBJECTIVES:The student will:
investigate plant habitats.•identify parts of a plant and •their function.
ESTIMATED TEACHING TIME:60 minutes
Science: GLE 0207.1.1 GLE 0207.2.1 GLE 0207.2.3 GLE 0207.3.1
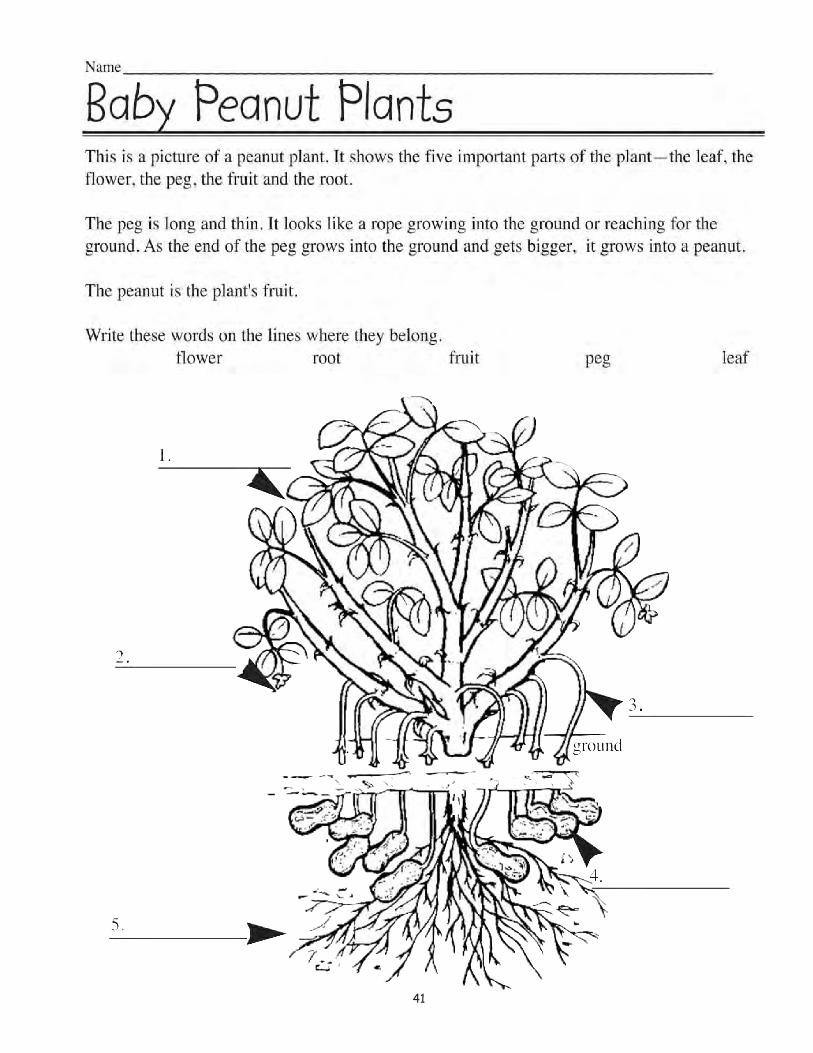
Activity 1 - Grow Materials:Grow It Again by Elizabeth MacLeodBaby Peanut Plants worksheetPeanuts in the shellAluminum panPaper towelsPlastic wrap
Procedure:Read aloud 1. Grow It Again by Elizabeth MacLeod (ISBN 978-1550745580).Discuss how seeds, beans, or tops of carrots and even eyes 2. of potatoes can be rooted either in water or topsoil.Shell several raw peanuts and spread them on paper 3. towels in an aluminum pan.Wet the paper towels and cover the pan with plastic 4. wrap. In a few days roots and stems will sprout from the peanuts. Explain that the peanut can get along without
soil for a while because of the food stored in the seed. As the water soaks into the seed, the food dissolves. It is broken into tiny bits that become part of the sap.Thesapflowsintothenewroots and stems, bringing them everything they need until the seed runs out of food.
On the “Baby Peanut 5. Plants” worksheet, label the correct part of the plant.
Adapted from Oklahoma Agriculture in the Classroom
GroW It aGaIn
Fruit—a usually usefulproduct of plant growth.
Peg—theflowerstalkofapeanut plant.
Petal—one of the oftenbrightlycoloredmodifiedleaves that make up thecorollaofaflower.
Stalk—a plant stem especially of a plant that is not woody.
Seedling—a young plantgrown from seed.
41

42
Answer Key
Flower
Leaf
Fruit
Peg
Root
43
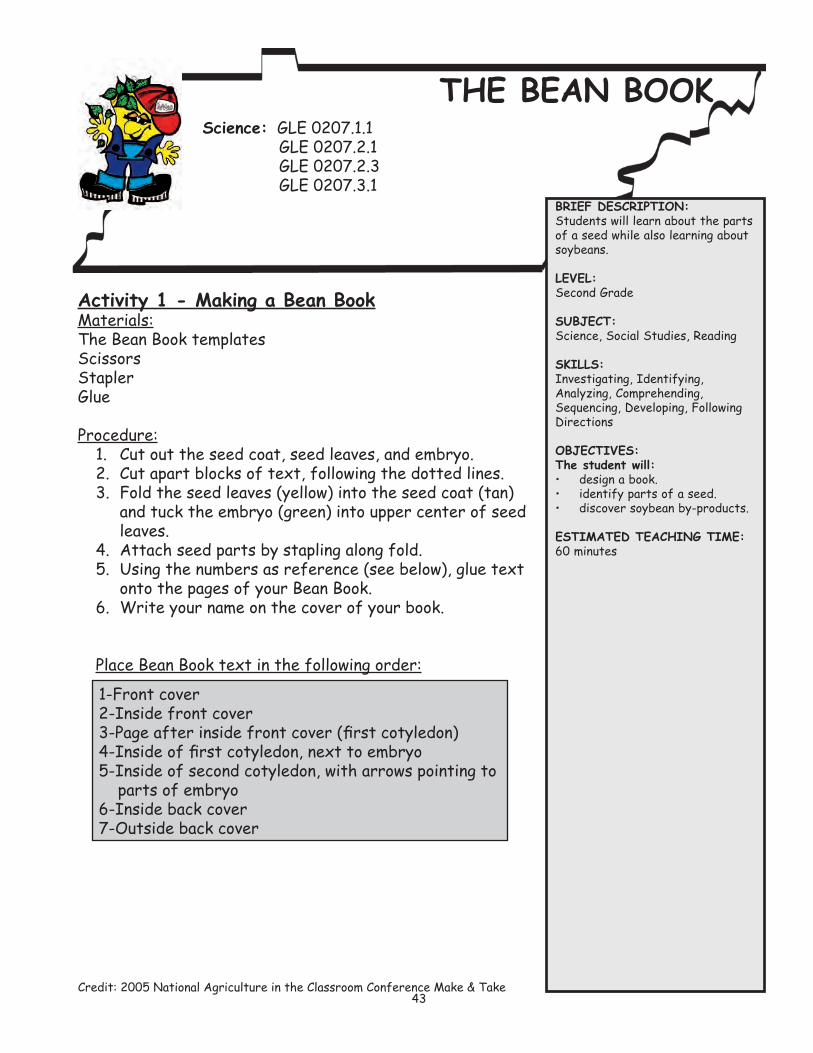
BRIEF DESCRIPTION:Students will learn about the parts of a seed while also learning about soybeans.
LEVEL:Second Grade
SUBJECT:Science, Social Studies, Reading
SKILLS:Investigating, Identifying, Analyzing, Comprehending, Sequencing, Developing, Following Directions
OBJECTIVES:The student will:
design a book.•identify parts of a seed.•discover soybean by-products.•
ESTIMATED TEACHING TIME:60 minutes
Science: GLE 0207.1.1 GLE 0207.2.1 GLE 0207.2.3 GLE 0207.3.1
Activity 1 - Making a Bean BookMaterials:The Bean Book templatesScissorsStaplerGlue
Procedure:Cut out the seed coat, seed leaves, and embryo.1. Cut apart blocks of text, following the dotted lines.2. Fold the seed leaves (yellow) into the seed coat (tan) 3. and tuck the embryo (green) into upper center of seed leaves.Attach seed parts by stapling along fold.4. Using the numbers as reference (see below), glue text 5. onto the pages of your Bean Book.Write your name on the cover of your book.6.
Place Bean Book text in the following order:
Credit: 2005 National Agriculture in the Classroom Conference Make & Take
THE BEAN BOOK
1-Front cover2-Inside front cover3-Pageafterinsidefrontcover(firstcotyledon)4-Insideoffirstcotyledon,nexttoembryo5-Inside of second cotyledon, with arrows pointing to parts of embryo6-Inside back cover7-Outside back cover

44
The
Be
an
Bo
ok
By:
____
____
____
____
__
Whe
re c
an y
ou fin
d s
oyb
ea
ns?
A
lmo
st e
very
whe
re!
So
ybe
ans
ca
n b
e fo
und
in a
ll o
f th
ese
p
rod
uc
ts...
pla
stic
ca
r w
ax
pa
int
tofu
cho
co
late
soa
pc
rayo
ns
insu
latio
nb
od
y lo
tion
glu
ec
oo
king
oil
ma
keup
ca
nd
les
ca
nd
yp
rintin
g in
kc
ere
al
bio
die
sel f
ue
lliv
est
oc
k fe
ed
...a
nd
so
muc
h m
ore
! C
he
ck
out th
e in
gre
die
nts
list
ed
on
pa
cka
ge
s a
round
the
ho
use
or
scho
ol a
nd
se
e w
ha
t e
lse
yo
u
ca
n fin
d!
A b
ab
y p
lant is
hid
ing
b
etw
ee
n the
se
ed
le
ave
s. It
is c
alle
d a
n
em
bry
o.
The
be
an h
as
a c
ove
r c
alle
d the
se
ed
co
at.
It
pro
tec
ts the
se
ed
.
Insi
de
the
se
ed
co
at
are
tw
o s
ee
d le
ave
s (c
oty
led
on
). Th
ey
ho
ld the
fo
od
the
ne
w
pla
nt ne
ed
s to
gro
w.
Leaves
Stem
Roots
Eve
ry k
ind
of se
ed
ha
s th
ree
pa
rts.
Th
ey
are
th
e e
mb
ryo
, st
ore
d
foo
d (
co
tyle
do
n),
a
nd
a s
ee
d c
oa
t.
1
2 3 4
5
6
7
Be
an
Bo
ok
In
str
uc
tio
ns
:
Cu
t o
ut
the
se
ed
co
at,
se
ed
le
av
es,
an
d e
mb
ryo
.
Cu
t a
pa
rt b
loc
ks
of
tex
t, f
oll
ow
ing
th
e d
ott
ed
lin
es
.
Fo
ld t
he
se
ed
le
av
es
(ye
llo
w)
into
th
e s
ee
d c
oa
t (t
an
) a
nd
tu
ck
th
e e
mb
ryo
(g
ree
n)
into
up
pe
r c
en
ter
of
se
ed
le
av
es.
A
tta
ch
se
ed
pa
rts
by
sta
pli
ng
alo
ng
fo
ld.
U
sin
g t
he
nu
mb
ers
as
re
fere
nc
e (
se
e b
elo
w),
glu
e
tex
t o
nto
th
e p
ag
es
of
yo
ur
Be
an
Bo
ok
.
Wri
te y
ou
r n
am
e o
n t
he
co
ve
r o
f y
ou
r b
oo
k.
Pla
ce
Be
an
Bo
ok
te
xt
in t
he
fo
llo
win
g o
rde
r:
Fro
nt
co
ve
r
In
sid
e f
ron
t c
ov
er
P
ag
e a
fte
r in
sid
e f
ron
t c
ov
er
(fir
st
co
tyle
do
n)
I
ns
ide
of
firs
t c
oty
led
on
, n
ex
t to
em
bry
o
1 2 3 4
5 6 7
I
ns
ide
of
se
co
nd
co
tyle
do
n,
wit
h a
rro
ws
po
inti
ng
t
o p
art
s o
f e
mb
ryo
I
ns
ide
ba
ck
co
ve
r
Ou
tsid
e b
ac
k c
ov
er
Pla
cin
g o
f s
ee
d p
art
s
em
bry
o
co
tyle
do
n se
ed
co
at
(fo
ld &
sta
ple
he
re)

45
se
ed
co
at
Fo
ld p
ag
e c
are
full
y
on
do
tte
d l
ine
. C
ut
alo
ng
so
lid
lin
e.
U
nfo
ld.

46
se
ed
le
av
es
(co
tyle
do
n)
Fo
ld p
ag
e c
are
full
y
on
do
tte
d l
ine
. C
ut
alo
ng
so
lid
lin
e.
U
nfo
ld.

47
em
bry
oC
ut
alo
ng
so
lid
o
uts
ide
lin
e.
em
bry
oC
ut
alo
ng
so
lid
o
uts
ide
lin
e.
em
bry
oC
ut
alo
ng
so
lid
o
uts
ide
lin
e.
em
bry
oC
ut
alo
ng
so
lid
o
uts
ide
lin
e.
em
bry
oC
ut
alo
ng
so
lid
o
uts
ide
lin
e.
em
bry
oC
ut
alo
ng
so
lid
o
uts
ide
lin
e.


