Embed Size (px)
Citation preview
Shipping & MailingPostage Meters
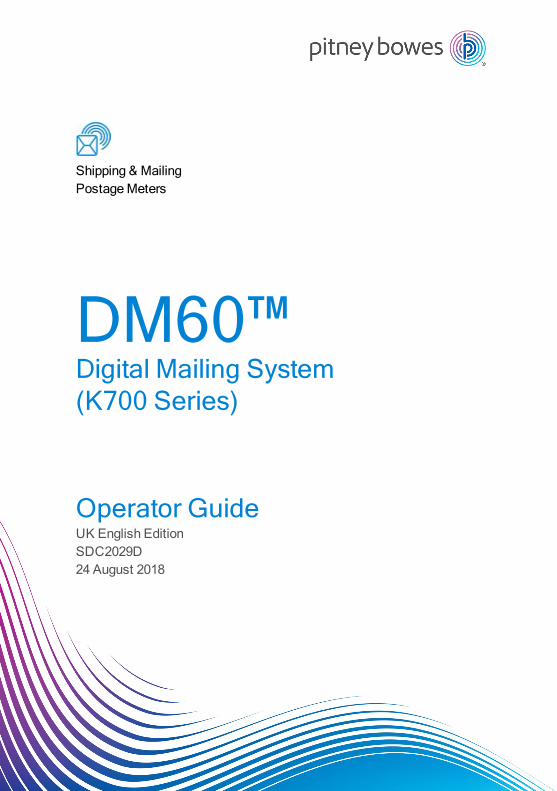
DM60™Digital Mailing System (K700 Series)
Operator GuideUK English EditionSDC2029D24 August 2018

©2018 Pitney Bowes Inc.
All rights reserved. This book may not be reproduced in whole or in part in any fashion or stored in a retrieval system of any type or transmitted by any means, electronically or mechanically, without the express written permission of Pitney Bowes.
The use of this information by the recipient or others for purposes other than the training of customers on Pitney Bowes equipment may constitute an infringement of intellectual property rights of Pitney Bowes, and Pitney Bowes assumes no responsibility for any such use of the information.
We have made every reasonable effort to ensure the accuracy and usefulness of this manual. However, we cannot assume responsibility for errors or omissions or liability for the misuse or misapplication of our products.
Except as provided in writing, duly signed by an officer of Pitney Bowes, no license either express or implied, under any Pitney Bowes or third party’s patent, copyright or other intellectual property rights is granted by providing this information.
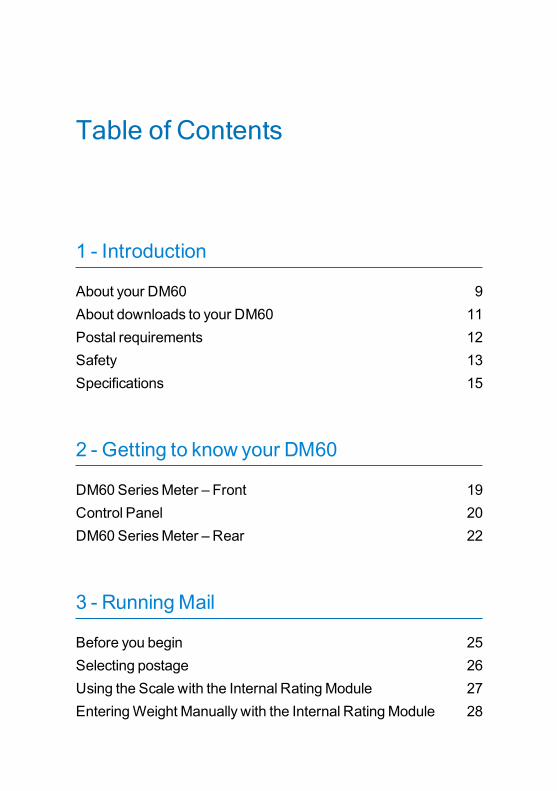
1 - Introduction
About your DM60 9About downloads to your DM60 11Postal requirements 12Safety 13Specifications 15
2 - Getting to know your DM60
DM60 Series Meter – Front 19Control Panel 20DM60 Series Meter – Rear 22
3 - Running Mail
Before you begin 25Selecting postage 26Using the Scale with the Internal Rating Module 27Entering Weight Manually with the Internal Rating Module 28
Table of Contents

Selecting an account to track postage 29Envelope Messaging 30Advancing the date print 31Checking and clearing the batch count 33Printing mail 35
4 - Printing Options
Printing Options 39Printing Envelope Messaging only 41
5 - Adding Postage / Connecting to Data Centre
Connecting your DM60 Series via SmartLink™ 45Connecting your DM60™ Series via PC Meter Connect™ 49Checking Funds / Postage available 50Adding postage 52Connecting your DM60 Series for other reasons 53Downloads from the Data Centre to your DM60 Series 54Download types 55
6 - Settings
Machine settings 59Using the Preset feature 60
Pitney Bowes Operator Guide August 2018

Turning the Preset feature on or off 61Storing a new Preset 62Viewing the Preset 63Setting / Disabling the Lock code 64Setting Sleep mode activation time 65Activating Sleep mode manually 66Setting the Low Funds warning 67Settings for the Scale 68Using the Text Ad option 69Viewing a Text Ad 71Edit a Text Ad 72Delete a Text Ad 73Other settings 74
7 - Ink Maintenance
Low ink warnings 77Replacing the ink cartridge 78Printing a test pattern 83Cleaning printer nozzles 84Replacing the print head 86Replacing the ink tray 88
8 - Reports
Reports / Funds Report 91
Pitney Bowes Operator Guide August 2018
Refill summary report 92Account reports 93Software version report 94View software versions (not printed) 95
9 - Accounting
Optional departmental accounting feature 97Turning the accounting feature on or off 98Creating an account 99Editing an account 100Viewing account totals 101Clearing all or some of the accounts 102Deleting an account 104
10 - Troubleshooting
Getting help 107Error messages 108Display issues 110Print is incomplete, streaked or poor quality 111Accidentally printing the wrong postage 112SmartLink™ connection problems 113PC Meter Connect™ connection problems 115
Pitney Bowes Operator Guide August 2018
11 - Supplies and options
How to order supplies 119How to order other options 120
12 - Text Entry
How to enter text 123Account names and Text ads 124Special characters 125
13 - Glossary
Glossary 129
Pitney Bowes Operator Guide August 2018
1 - Introduction
In this sectionAbout your DM60 9About downloads to your DM60 11Postal requirements 12Safety 13Specifications 15

About your DM60
Your DM60™ Series digital postage meter features include:
l Space-saving, compact footprint
l Easy-to-read display shows system status and prompts you through setup operations
l Automatic date advance
l Keyboard-selectable envelope messaging
l Convenient postage-adding via Postage By Phone® meter payment system (Using SmartLink™ which requires a network with internet availability or an internet enabled PC with PC Meter Connect™ software)
l Ink jet printer provides clear, crisp imprints
l Scale weighs mail pieces
l Rating feature calculates correct postage
l Optional date and time stamp for use on incoming mail or on sensitive documents
l Optional accounting feature tracks postage costs by department
l Optional user defined text message facility
l Password protection limits access to authorised personnel
l Full report printing capability provides hard-copy records of your postage transactions
l USB communication port
l Mailmark™ compliant
Pitney Bowes Operator Guide August 20189

Note: Although this guide describes all the features listed above, your DM60 Series is a configurable system and availability of the features will depend on your model and/or options purchased. Inclusion in this guide does not guarantee availability of a particular feature.
Mailmark™ is a trademark of the Royal Mail
Pitney Bowes Operator Guide August 201810
About downloads to your DM60
Your DM60 Series meter uses the IntelliLink® postage meter system, which allows you to download information directly into your machine. The IntelliLink® postage meter system technology gives you the ability to:
Add postage funds conveniently
You can add funds to your DM60 Series electronically via the Postage by Phone Data Centre.
Download postal rate updates
The latest postal rates can be purchased and downloaded precisely when you need them.
Add features on demand
You can download Envelope Messaging and optional product enhancements such as departmental accounting.
Keep your DM60 Series meter current
Software download capability means you'll always have the latest version of your DM60 Series meter's operating system.
Pitney Bowes Operator Guide August 201811
Postal requirements
The meter on your mailing machine is licensed by Royal Mail and you must follow some basic requirements.
l Mail must have the correct date and postage amount in the meter stamp.
l Always ensure that your meter stamp prints are clear and complete. Poor prints may result in Royal Mail being unable to offer the service you requested and if the prints are illegible the items may be rejected. If in doubt regarding the quality of your meter prints, refer to page 84 for further information.
l If you move to another address, you must update the Postal Authority records. Call your local machine supplier for advice.
l The label sheets for putting postage on larger items must conform to postal specifications. For best performance, obtain label sheets direct from your machine supplier.
l Your DM60 series is a Mailmark™ compliant system. At regular intervals defined by Royal Mail, it connects to the Pitney Bowes Data Centre to provide usage data to Royal Mail. The connection will normally happen in the background without you needing to do anything.
If the connection was not made for any reason, the display will show ‘Connection due Connect now? (y/n)’ and you should select Enter/yes.
If, for any reason, a connection has not been made within the ‘grace’ period allowed by Royal Mail, the display will show 'Connection required Connect - Press Enter' and you MUST make a connection before your franking machine will allow you to continue processing mail.
Pitney Bowes Operator Guide August 201812

Safety
Follow the normal safety precautions for all office equipment:
l Use only Pitney Bowes approved supplies, in particular aerosol dusters. Improper storage and use of aerosol dusters or flammable aerosol dusters can cause an explosive-like condition that could result in personal injury and/or property damage. Never use aerosol dusters labeled flammable and always read instructions and safety precautions on the duster label.
l To obtain supplies, please contact our Supply Line™ to place orders. Material Safety Data Sheets can be obtained on the web or from our Supply Line™. Refer to the Contact Information List for more information.
l Use the power cord supplied with the machine and plug it into a properly grounded wall outlet located near the machine and easily accessible. Failure to properly ground the machine can result in severe personal injury and/or fire.
l Avoid touching moving parts or materials while the machine is in use. Keep hands, loose clothing, jewellery and long hair away from all moving parts.
l Do not remove covers or defeat safety interlock switches. Covers enclose hazardous parts that should only be accessed by properly trained service personnel. Immediately report to service any damaged or non-functioning components that renders the unit unsafe.
l Place the unit in an accessible location to allow for proper venting of the equipment and to facilitate servicing.
l The power cord wall plug is the primary means of disconnecting the machine from the AC supply.
l Do not use an adapter plug on the line cord or wall outlet.
Pitney Bowes Operator Guide August 201813

l Do not remove the ground pin from the line cord.
l Avoid using wall outlets that are controlled by wall switches, or shared with other equipment.
l Do not route the power cord over sharp edges or trap between furniture.
l Ensure there is no strain on the power cord and that it does not become jammed between the equipment, walls or furniture.
l Be certain the area in front of the wall receptacle into which the machine is plugged is free from obstruction.
l Before clearing a stoppage, be sure machine mechanisms come to a stop.
l When removing stalled material, avoid using too much force to protect against minor personal injury and damaging equipment.
l To prevent overheating, do not cover any vent openings.
l Operation of this equipment without periodic maintenance will inhibit optimum operating performance and could cause the equipment to malfunction. Contact your machine supplier for required service schedule.
l Read all instructions before attempting to operate the equipment.
l Use this equipment only for its intended purpose.
l Always follow the specific occupational safety and health standards for your workplace.
l This device is not intended for use in the direct field of view at visual display workplaces. To avoid incommodating reflections at visual display workplaces this device must not be placed in the direct field of view.
Pitney Bowes Operator Guide August 201814
Specifications
Equipment
Size of Base Model:
213mm High x 351mm Long x 264mm Deep
Size of Base Model with Optional Scale:
231mm High x 351mm Long x 264mm Deep
Weight: 3.6kg without scale, 4.0kg with scale
Power Requirements: 220-240 VAC, 50/60Hz. 0.25A
Communications Ports: 1 USB; 1 RJ-11, 1 Serial
Operating Temperature: 14°C to 35°C
LCD Display: 2 lines, 20 characters long
Throughput: Up to 18 letters per minute
Actual throughput will vary, depending on the material used, graphic printed, machine environment, and the skill of the operator.
Print Resolution: 300 x 600 dpi
Maximum Print Image Area: 25.2mm x 140mm
Ink Cartridge Capacity: 18ml
Label Sheets: self-adhesive type (dual label sheets)
Internal Graphic Ad Storage: up to 15
Pitney Bowes Operator Guide August 201815
Internal Postal Inscription Storage: up to 15
Availability of inscriptions is based on country requirements.
Departmental Accounting (optional):
Number of accounts available is based on the amount purchased and model.
Material
Minimum Size: 127mm Wide x 89mm Deep
Thickness: 0.18mm to 8.0mm
Important: For best results, always make sure your material conforms to our published specifications.
Meter Specifications
Maximum Imprint: £99.99
Maximum Credit Setting: £9,990.00
Setting Increment: £10
Reset Type: Postage by Phone
Piece Count: Up to 8 digits (nonresettable)
Pitney Bowes Operator Guide August 201816

All Pitney Bowes postage meters are manufactured in accordance with An Post’s and Royal Mail’s Franking Machine Standards. This includes ascending register security, which will lock the ascending registers when the first frank takes the most significant digit of the ascending register to 9.
It is certified that the system complies with all applicable directives of the European Union.
For a formal Declaration of Conformity please contact Compliance Engineering. Contact information is given in the front of this guide or on a separate document supplied with your system.
Pitney Bowes Operator Guide August 201817
2 - Getting to know your DM60
In this sectionDM60 Series Meter – Front 19Control Panel 20DM60 Series Meter – Rear 22
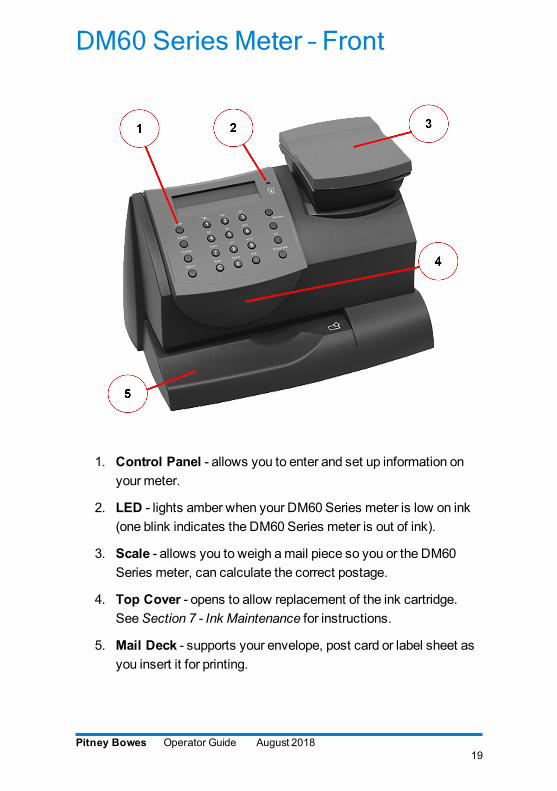
DM60 Series Meter – Front
1. Control Panel - allows you to enter and set up information on your meter.
2. LED - lights amber when your DM60 Series meter is low on ink (one blink indicates the DM60 Series meter is out of ink).
3. Scale - allows you to weigh a mail piece so you or the DM60 Series meter, can calculate the correct postage.
4. Top Cover - opens to allow replacement of the ink cartridge. See Section 7 - Ink Maintenance for instructions.
5. Mail Deck - supports your envelope, post card or label sheet as you insert it for printing.
Pitney Bowes Operator Guide August 201819

Control Panel
1. LCD Display - shows the current status of your DM60 Series meter and prompts you through all setup operations in a two-line LCD.
2. Lock Key - prevents unauthorised use of your DM60 Series meter if the lock feature is set up and the DM60 Series meter is in "sleep mode". Entering your four-digit password unlocks (wakes-up) the meter.
Pitney Bowes Operator Guide August 201820
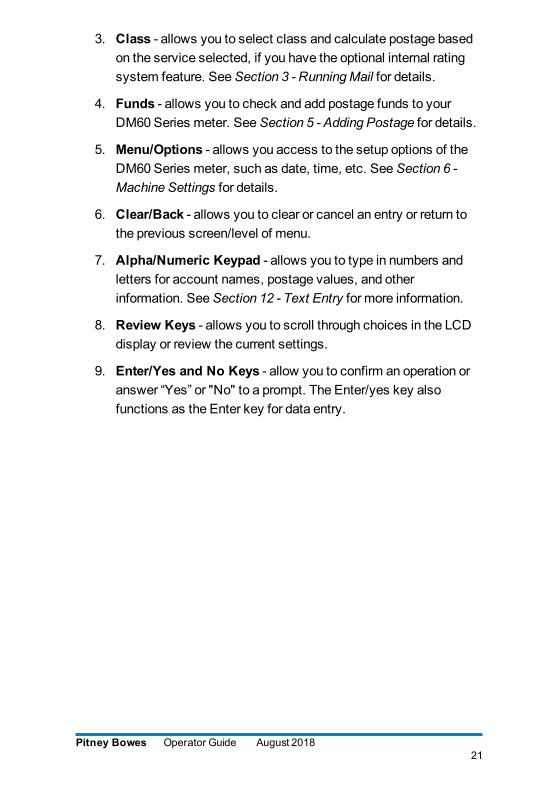
3. Class - allows you to select class and calculate postage based on the service selected, if you have the optional internal rating system feature. See Section 3 - Running Mail for details.
4. Funds - allows you to check and add postage funds to your DM60 Series meter. See Section 5 - Adding Postage for details.
5. Menu/Options - allows you access to the setup options of the DM60 Series meter, such as date, time, etc. See Section 6 - Machine Settings for details.
6. Clear/Back - allows you to clear or cancel an entry or return to the previous screen/level of menu.
7. Alpha/Numeric Keypad - allows you to type in numbers and letters for account names, postage values, and other information. See Section 12 - Text Entry for more information.
8. Review Keys - allows you to scroll through choices in the LCD display or review the current settings.
9. Enter/Yes and No Keys - allow you to confirm an operation or answer “Yes” or "No" to a prompt. The Enter/yes key also functions as the Enter key for data entry.
Pitney Bowes Operator Guide August 201821

DM60 Series Meter – Rear
1. Serial Port - allows you to connect the optional scale to weigh your mail piece.
2. USB Port - allows you to connect a USB cable and connect to IntelliLink® via your network using the supplied SmartLink device, or via an internet enabled PC using the free PC Meter Connect Software. See Section 5 - Adding Postage.
3. Power Receptacle - connects to AC power cord (supplied).
4. Ink Tray - holds excess ink that results from the printing process. See Section 7 - Ink Maintenance for further details.
5. Ink Tray Lever - by sliding lever, it allows you to remove the ink tray.
Pitney Bowes Operator Guide August 201822

This page intentionally left blank.
3 - Running Mail
In this sectionBefore you begin 25Selecting postage 26Using the Scale with the Internal Rating Module27Entering Weight Manually with the Internal Rating Module 28Selecting an account to track postage 29Envelope Messaging 30Advancing the date print 31Checking and clearing the batch count 33Printing mail 35
Before you begin
Before you run mail on your system, review the Checklist, Home Screen, and Selecting Postage sections below and on the next page.
Checklist
l Make sure your mailing system is plugged into a properly grounded power receptacle. Always follow the safety precautions in Section 1, Introduction.
l If you plan on printing label sheets, make sure you've got an adequate supply. See Section 11, Supplies and Options for ordering label sheets.
l Check that you have enough postage for your mail run. Press the Funds key to view your current balance (Unused).
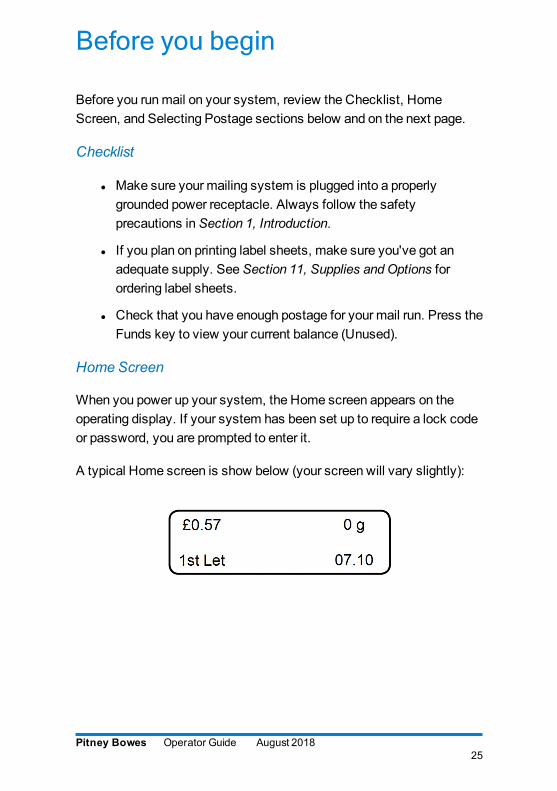
Home Screen
When you power up your system, the Home screen appears on the operating display. If your system has been set up to require a lock code or password, you are prompted to enter it.
A typical Home screen is show below (your screen will vary slightly):
Pitney Bowes Operator Guide August 201825

Selecting postage
There are two ways you can select postage using your mailing system:
l Place the mail piece on the optional scale and have the system calculate the weight and then postage amount using the system's internal rating feature.
l Enter the weight of the mail piece manually and have the system calculate the postage amount using the system's internal rating feature (if you have the optional rating feature).
Each method is described in its own section that follows.
Note:
l For applying postage, the DM60 Series does not have to be connected to your network/internet. However, when you need to add funds to your DM60 Series, it must be connected (see Section 5 - Adding Postage/Connecting to Data Centre for more information).
l The meter automatically advances the date at midnight.
l If you need to choose a country when selecting a class, you can either use the Review ▲▼ keys to scroll through the alphabetical country list, or you can type the initial letter of the country name to jump straight to that letter in the listing.
Pitney Bowes Operator Guide August 201826

Using the Scale with the Internal Rating Module
Use this procedure when you use the scale to automatically weigh and calculate the correct postage value.
1. Place the mail piece onto the integrated scale. The weight of the mail piece will appear on the display.
2. Press the Class key, and use either the numeric keys or the scroll keys to select the Carrier/Class required. Press the Enter key to confirm this and any further selections. Follow the prompts for the options and/or services available for the postal class required.
3. The display shows the final postage amount together with the selected class.
Weight Hold Mode
Use this mode when the size of the mail piece covers the display screen. The DM60 Series holds the weight in memory until you select a class and finish the rating process. When using this mode:
l "WH" displays when the weight is in memory.
l The weight remains for 10 seconds after the piece is removed.
l To extend the time, press Enter/yes.
l To clear the weight before the 10 seconds finish, press Clear/Back.
Instructions for activating the mode are given in Section 6 - Machine Settings.
Pitney Bowes Operator Guide August 201827

Entering Weight Manually with the Internal Rating Module
Use this procedure when you already know the weight of a mail piece and you are not using an integrated scale, or the mail piece exceeds the weighing capacity of the scale.
1. Press Menu/Options.
2. Use the Review ▲▼ keys to scroll to “Type in weight?”, then press Enter/yes to confirm.
3. Key in the weight in grams then press Enter/yes.
4. If If no class has been selected, the DM60 Series will automatically request that you choose a class now. Select the desired class and then follow the prompts for the options and/or services available for this postal class. If a class was already selected, the DM60 Series will retain the class selection.
5. The display shows the final postage amount and class chosen.
Surcharge Payment Carrier
Occasionally, Royal Mail may need an additional payment (underpayment, etc). To produce a Frank for payment, press Class, then select the "Surch Pymnt" Carrier, followed by the "Surch Pymnt" class. You can now enter the value of underpayment required. Press Enter/yes to confirm the amount and take a Frank in the normal way.
Pitney Bowes Operator Guide August 201828

Selecting an account to track postage
You can select an account to track postage if the optional departmental accounting feature is available on your machine and is turned on. Departmental accounting may not be available on some models. See Section 9, Departmental Accounting, for information on setting up this feature.
1. From the Home screen, press the down Review ▼ key until "Account:" displays, then press Enter/yes.
2. The "Select Account:" screen displays. To select an account, either:
a. Press the Review ▲▼ keys until you see the account required, then press Enter/yes. Or...
b. Key in the first digit of the account number if you know it and press Enter/yes.
3. If a password has been assigned to this account, you will be prompted to enter it now. Key in the 4-digit password if necessary then press Enter/yes.
4. You will now return to the Home screen with the new account selected.
Pitney Bowes Operator Guide August 201829

Envelope Messaging
When printing mail, you can also print Envelope Messaging alongside the postal frank. Envelope Messaging can consist of a Graphic Ad or a Text Ad.
Note:
l Graphic Ads are available on all models. Some are pre-installed on your system and additional custom Graphic Ads can be ordered from Pitney Bowes.
l Text Ads are an option only available on certain models.
l Graphic Ads and Text Ads print in the same location and so cannot be printed together on a postal impression.
l See Section 6, Machine Settings for more information on creating Text Ads.
l See Section 11, Supplies and Options for more information on Graphic Ads and Text Ads option availability.
1. From the Home screen, press the down Review ▼key and select “Ad:” to select a Graphic Ad or Text Ad, as required. Press Enter/yes.
2. Press the Review ▲▼ keys until you see the item required, then press Enter/yes.
3. You will now return to the Home screen with the new item selected for printing.
Pitney Bowes Operator Guide August 201830

Advancing the date print
The DM60 Series will automatically advance the date printed at midnight.
However, you may want to advance the date printed if it is after normal business hours and you want to prepare outgoing mail for a future business day's mailing.
Note: Please keep in mind the following when using this feature:
l Changing the printed date does not change the DM60 Series meter's internally held date.
l You can always return the printed date to the current date.
l You cannot change the printed date to a date earlier than the DM60 Series meter's internally held date (in an effort to "backdate" the mail).
l The number of days you can advance the print is limited to 30 days. This limit is set by Royal Mail.
1. Press Menu/Options.
2. Press the Review ▲▼ keys to scroll to “Change date and time settings?", then press Enter/yes.
3. Use the Review ▲▼ keys to scroll (if necessary) to "Change printed date?", then press Enter/yes.
Pitney Bowes Operator Guide August 201831

4. Use the Review ▲▼ keys to select a date. When the date required is displayed, press Enter/yes. A message confirms your choice and the Home screen displays showing the new date to be printed.
Note: When you want to restore the date print to today's date, at Step 4 above, then use the Review ▲▼ keys to return to today's date and finally press Enter/yes to confirm the change.
Pitney Bowes Operator Guide August 201832
Checking and clearing the batch count
You can view the accumulated postage value and piece count information from the batch register and print this for your records. You can also clear or reset the batch count to zero before starting the next batch of printing.
Checking the Batch Count
1. Press Funds.
2. Press the Review ▲▼ keys to scroll until the display shows the batch information.
3. Press Clear/Back to return to the Home screen.
Clearing the Batch Count
CAUTION: Make sure you really want to clear the batch register; once you do, you can't restore the data.
1. Press Funds.
2. Press the Review ▲▼ keys to scroll and select "Reset batch value and pieces?", then press Enter/yes.
3. At the prompt asking for confirmation to clear, press Enter/yes. batch value and batch piece registers return to zero.
4. Press Clear/Back to return to the Home screen.
Pitney Bowes Operator Guide August 201833

Printing a Record of the Batch Count information
The DM60 Series can print a Funds report containing the batch information, Refer to Section 8, Reports for more information.
Pitney Bowes Operator Guide August 201834
Printing mail
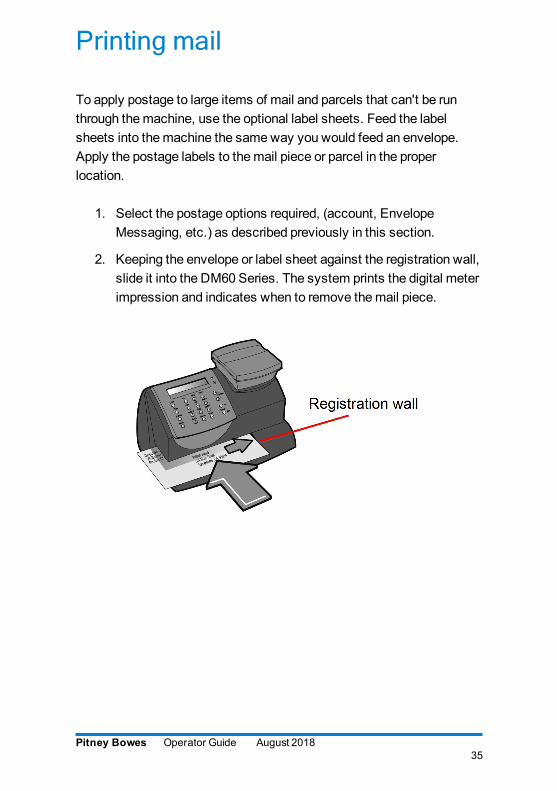
To apply postage to large items of mail and parcels that can't be run through the machine, use the optional label sheets. Feed the label sheets into the machine the same way you would feed an envelope. Apply the postage labels to the mail piece or parcel in the proper location.
1. Select the postage options required, (account, Envelope Messaging, etc.) as described previously in this section.
2. Keeping the envelope or label sheet against the registration wall, slide it into the DM60 Series. The system prints the digital meter impression and indicates when to remove the mail piece.
Pitney Bowes Operator Guide August 201835

IMPORTANT: Always ensure that your prints are clear and complete. Poor prints may be rejected by Royal Mail. If you notice missing lines in the print as shown in the illustration, clean the printer nozzles as described on page 84 of this guide.
The indicia above is a black and white representation of the approved Blue indicia. Only Blue Non-Fluorescent approved ink should be used in the machine.
Pitney Bowes Operator Guide August 201836

This page intentionally left blank.
4 - Printing Options
In this sectionPrinting Options 39Printing Envelope Messaging only 41
Printing Options
In addition to printing postage, your DM60 Series can print a Date and Time stamp or Envelope Messaging only onto incoming mail.
Note: These options may be an added cost option on your model or may not be available.
Printing Date and Time Only (no meter stamp)
1. Press Menu/Options.
2. Use the Review ▲▼ keys to scroll to "Change meter stamp type?”, then press Enter/yes to confirm.
3. Use the Review ▲▼ keys to scroll to "Print date and time only?", then press Enter/yes to confirm the Home screen displays the date and time which will print and the 'Date/Time Only' reminder.
4. Keeping the envelope against the registration wall, slide it into the DM60 Series. The system prints the date and time stamp and indicates when to remove the mail piece.
Pitney Bowes Operator Guide August 201839

Note: When you want to revert to normal printing, press Clear/Back and answer Enter/yes at the "Return to Printing Postage" prompt.
Pitney Bowes Operator Guide August 201840

Printing Envelope Messaging only
You may want to use this feature to add your company's message to incoming mail.
1. Press Menu/Options.
2. Use the Review ▲▼ keys to scroll to "Change meter stamp type?”, then press Enter/yes to confirm.
3. Use the Review ▲▼ keys to scroll to "Print ad only?", then press Enter/yes to confirm. If you have already selected Envelope Messaging for your normal meter stamp, that is used; otherwise, you are prompted to choose. When completed, the Home screen displays the name of the graphic or text ad selected and the 'ad only' reminder..
4. Keeping the envelope against the registration wall, slide it into the DM60 Series. The system prints the Envelope Messaging and indicates when to remove the mail piece.
Pitney Bowes Operator Guide August 201841

Note: When you want to revert to normal printing, press Clear/Back and answer Enter/yes at the "Return to Printing Postage" prompt.
Pitney Bowes Operator Guide August 201842

This page intentionally left blank.

5 - Adding Postage / Connecting to Data Centre
In this sectionConnecting your DM60 Series via SmartLink™ 45Connecting your DM60™ Series via PC Meter Connect™ 49Checking Funds / Postage available 50Adding postage 52Connecting your DM60 Series for other reasons 53Downloads from the Data Centre to your DM60 Series 54Download types 55

Connecting your DM60 Series via SmartLink™
Your meter has to connect to the Pitney Bowes Data Centre to add postage funds, get software updates, and carry out the required Postal Authority inspections.
Connection is made via the internet using a SmartLink device.
Please DO NOT connect power until instructed.
Follow the information below to connect your meter.
SmartLink device connection
Wired
Installation takes about 10 minutes.
Requires an available internet port and power socket.
Follow the instructions below to connect.
Or Wireless
Note: If you are installing your SmartLink using a wireless connection you should connect your power cord to the back of your franking machine and power up now before proceeding to the connection instructions below.
Pitney Bowes Operator Guide August 201845

Installation takes about 15 minutes and requires a computer and access to a wireless network.
For wireless connection please go to pitneybowes.com/uk/smartlinksetup and do not proceed with the below instructions.
Wired instructions
1. Connect the SmartLink device to either a wall internet port or a router with the included internet cable.
Note: Lights on the device will remain off.
2. Plug the power adapter into the into the SmartLink device. Now connect the power lead to the wall socket.
Pitney Bowes Operator Guide August 201846
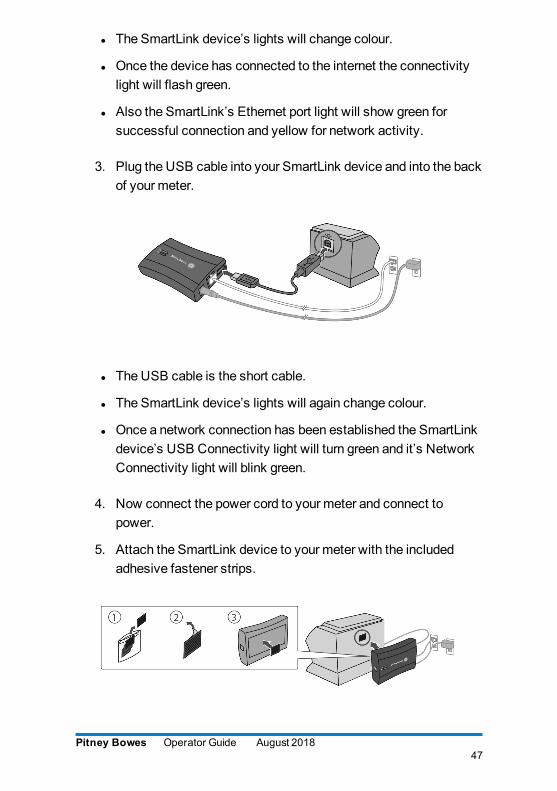
l The SmartLink device’s lights will change colour.
l Once the device has connected to the internet the connectivity light will flash green.
l Also the SmartLink’s Ethernet port light will show green for successful connection and yellow for network activity.
3. Plug the USB cable into your SmartLink device and into the back of your meter.
l The USB cable is the short cable.
l The SmartLink device’s lights will again change colour.
l Once a network connection has been established the SmartLink device’s USB Connectivity light will turn green and it’s Network Connectivity light will blink green.
4. Now connect the power cord to your meter and connect to power.
5. Attach the SmartLink device to your meter with the included adhesive fastener strips.
Pitney Bowes Operator Guide August 201847

As a backup and only if you cannot provide a direct connection to your network, you can use the free Pitney Bowes PC Meter Connect™ (PCMC) software to connect via any PC with an internet connection.
Pitney Bowes Operator Guide August 201848
Connecting your DM60™ Series via PC Meter Connect™
To use PC Meter Connect software must be installed onto your internet enabled PC. Details of how you can obtain the software are given in the Quick Installation Guide supplied with your system.
As you install PC Meter Connect software, you are prompted to connect your mailing system to your PC using a USB cable. PC Meter Connect then tests your internet connection and takes you through the software installation process.
Once installed, you will see a PC Meter Connect icon in your PC's system tray. Clicking this icon gives you access to PC Meter Connect's internet settings.
Pitney Bowes Operator Guide August 201849
Checking Funds / Postage available
Checking Funds (Postage) available in your DM60 Series meter.
1. Press Funds. The amount left (Unused) in the DM60 Series displays.
2. Press the Review ▲▼ keys for additional information on batch values.
3. Press Clear/Back to return to the Home screen.
Note: You can print a report of the funds available. See "Funds Report" in Section 8, Reports
Checking Your Account Balance in the Postage By Phone® System
To check your Postage By Phone® system account balance:
1. Connect your DM60 Series to SmartLink or via PC Meter Connect.
2. Press Funds. The amount left (Unused) in the DM60 Series displays.
3. Use the Review ▲▼ keys to scroll to "Check balance available?", then press Enter/yes.
Pitney Bowes Operator Guide August 201850

4. The DM60 Series connects to the Data Centre. When connected, the amount in your Postage By Phone® (PbP) account displays.
5. Press Clear/Back. The system asks if you wish to refill postage.
6. Press Clear/Back to return to the Home screen, or Enter/yes if you would like to add postage immediately.
Pitney Bowes Operator Guide August 201851
Adding postage
You can add postage to your DM60 Series as long as you have enough funds in your Postage By Phone® account.
1. Connect your DM60 Series to SmartLink or via PC Meter Connect.
2. Press Funds. The amount left (Unused) in the DM60 Series displays.
3. Press the Review ▲▼ keys to scroll to "Refill postage?", then press Enter/yes.
4. Key in the refill amount, then press Enter/yes. The amount of postage you add must be in increments of £10.
5. At the refill amount confirmation prompt, press Enter/yes.
6. The DM60 Series connects to the Data Centre. Various screens display, letting you know the status of the process. When complete, the refill successful message displays.
7. Press Enter/yes. You will be asked if you want to print a receipt. To print a receipt, insert an envelope/label sheet into the DM60 Series. Alternatively, press no to return to the Home screen without printing a receipt.
Pitney Bowes Operator Guide August 201852
Connecting your DM60 Series for other reasons
You can connect to the Data Centre to download a feature you ordered, comply with Postal Authority inspection regulations, etc.
1. Connect your DM60 Series to SmartLink or via PC Meter Connect.
2. Press Menu/Options.
3. Use the Review ▲▼ keys to scroll to "Connect to Pitney Bowes?", then press Enter/yes.
4. The DM60 Series connects to the Data Centre. When connected, you are told of any downloads available.
5. Follow the prompts to start the download(s) as necessary. Various screens display, letting you know the status of the process.
6. When finished, press Enter/yes to return to the Home screen.
Pitney Bowes Operator Guide August 201853
Downloads from the Data Centre to your DM60 Series
When you connect to the Data Centre to add postage or perform other transactions, the Data Centre may perform the following:
l Download required software updates to your machine.
l Download Envelope Messages you ordered.
l Perform a remote inspection of your machine as required by Royal Mail.
l Upload usage data required by Royal Mail.
Generally speaking, downloads are considered either mandatory (you must do them at the time you are prompted to on the screen), or non-mandatory (you may decide to download at a later time). However, even non-mandatory downloads can become mandatory if you wait too long to do the download.
Once a download is finished, you will either be prompted to select “Restart Now” to restart the machine or select “Continue” to return you to the screen that you started from, depending on the type of download performed.
Pitney Bowes Operator Guide August 201854

Download types
A description of the type of downloads that can occur in your machine are presented on the following pages.
System Update
If there has been a feature enhancement or other non-essential update to the software that runs your machine, you will be notified that a system update is available.
Envelope Messaging
If there are new envelope messages that you ordered available, you will be notified that you can perform a download to obtain these.
Software Update (mandatory)
If there has been an important update to the software that runs your machine, you will be notified that a required update is necessary.
Postal Inspection (mandatory)
Your DM60 Series is a Mailmark™ compliant system. At regular intervals defined by Royal Mail, it connects to the Pitney Bowes Data Centre to provide usage data to Royal Mail. The connection will normally happen in the background without you needing to do anything.
If the connection was not made for any reason, the display will show ‘Connection due Connect now? (y/n)’ and you should select Enter/yes.
If, for any reason, a connection has not been made within the ‘grace’ period allowed by Royal Mail, the display will show 'Connection required Connect - Press Enter' and you MUST make a connection before your franking machine will allow you to continue processing mail.
Pitney Bowes Operator Guide August 201855

Postal Rate Update (mandatory)
Postal rates change periodically as defined by Royal Mail. If new rates are available, you can download them quickly and easily directly from the Data Centre.
The new rates are normally available for download at least 7 days before the effective date. If you connect to the Data Centre and there is time before the effective date, you have a choice whether to download the new rates or not. Once the effective date has been reached (or passed), however, you will have to download the new rates.
The screens on your machine will give you information regarding the status of the rate update and the choices available to you.
If the rate for a normal letter has changed and is effective immediately, a screen displays showing the present preset postage and asks you if you want to reset the normal preset postage. Press Enter/yes. A screen displays for you to enter the new normal rate.
When a rate change update takes place it may also affect your preset if you have set it for a different class of mail. You should check your preset to ensure that it conforms to the new rates. See Section 6, Machine Settings for instructions on changing preset values.
The display tells you when a rate change update is complete. It also tells you if the update is immediate or takes effect at a later date by listing the new date.
Pitney Bowes Operator Guide August 201856

This page intentionally left blank.

6 - Settings
In this sectionMachine settings 59Using the Preset feature 60Turning the Preset feature on or off 61Storing a new Preset 62Viewing the Preset 63Setting / Disabling the Lock code 64Setting Sleep mode activation time 65Activating Sleep mode manually 66Setting the Low Funds warning 67Settings for the Scale 68Using the Text Ad option 69Viewing a Text Ad 71Edit a Text Ad 72Delete a Text Ad 73Other settings 74

Machine settings
Machine settings allow you to customise your DM60 Series for the way you run your mail and add security to those features that are sensitive to your organisation. These settings include:
l Setting display contrast
l Using the preset feature
l Setting/disabling lock code
l Setting sleep mode activation time
l Activating sleep mode manually
l Setting a high value warning
l Setting a low funds warning
l Settings for the scale
l Using the Text Ad option
l Other settings
Setting Contrast
You can adjust the LCD display contrast if necessary.
1. Press Menu/Options.
2. Use the Review ▲▼ keys to scroll to "Change set up", then press Enter/yes to confirm.
3. Use the Review ▲▼ keys to scroll to "Change display contrast?", then press Enter/yes to confirm.
4. Select the contrast you want using the numeric keypad and press Enter/yes.
5. At the "Stay in Setup?" prompt, reply yes or no as required.
Pitney Bowes Operator Guide August 201859

Using the Preset feature
The preset feature allows you to save pre-defined values such as postage, class, weight, Envelope Messaging, etc., within your DM60 Series that you can call up when necessary.
You don’t have to program the values that go into the preset in the traditional sense. Instead, the system takes a “snapshot” of the current values on your machine when you define the preset. For example, if the machine is set up to print Envelope Messaging, no class is selected, and a postage amount is already on the screen, these are the conditions that will be recorded by your DM60 Series when you define the preset feature.
If you need to change the values of the preset, just change the machine condition by entering the appropriate settings. The new settings will be recorded when you run the "Storing a New Preset" selection from the menu.
Notes:
l If you have stored a preset, the DM60 Series reverts to the preset values when it is first turned on or when it "wakes up" after sleep mode.
l When a postage rate change is announced, always check the postage value assigned to the preset to make sure it complies with the new rates.
Pitney Bowes Operator Guide August 201860

Turning the Preset feature on or off
1. Press Menu/Options.
2. Use the Review ▲▼ keys to scroll to "Change Setup?", then press Enter/yes to confirm.
3. Use the Review ▲▼ keys to scroll to "Use preset setup?", then press Enter/yes to confirm.
4. Turning ON Preset - Press Enter/yes at "Turn preset ON?" prompt. A message confirms your choice. You may view the preset values if you wish, using the Review ▲▼ keys. When finished, press Clear/Back repeatedly until you return to the Home screen.
5. Turning OFF Preset - Use the Review ▲▼ keys to scroll to "Turn preset Off?, then press Enter/yes to confirm. A message confirms your choice. Press No to return to the Home screen.
6. If you have turned on the preset feature, the Home screen reflects the preset settings. If you have turned off the preset feature, the normal Home screen displays.
Pitney Bowes Operator Guide August 201861
Storing a new Preset
1. Establish the proper settings on your DM60 Series meter that you want the preset to contain. Depending on the class and weight that is currently displayed on your machine and the options you have purchased, you may be able to store postage, class, weight, date and Envelope Messaging.
2. Press Menu/Options.
3. Use the Review ▲▼ keys to scroll to "Change Setup?", then press Enter/yes to confirm.
4. Use the Review ▲▼ keys to scroll to "Use preset setup?", then press Enter/yes to confirm.
5. Use the Review ▲▼ keys to scroll to "Store new preset?", then press Enter/yes to confirm. You can choose whether to review the settings of the new preset before you store it. Yes to Review Settings - Scroll to view the preset settings of class, account, etc. No to Review Settings - Skips the review.
6. When prompted, press Yes to confirm storing of the new preset. A message confirms the new preset has been stored.
7. When finished, follow prompts to return to the Home screen.
Pitney Bowes Operator Guide August 201862

Viewing the Preset
1. Press Menu/Options.
2. Use the Review ▲▼ keys to scroll to "Change Setup?", then press Enter/yes to confirm.
3. Use the Review ▲▼ keys to scroll to "Use preset setup?", then press Enter/yes to confirm.
4. Use the Review ▲▼ keys to scroll to "View stored preset?", then press Enter/yes to confirm.
5. Scroll through the preset values of class, postage amount, account, etc.
6. When finished, press Clear/Back repeatedly to return to the Home screen.
Recalling the Preset
You can call up the preset values at any time to use on your mail with this simple procedure.
1. Press Menu/Options.
2. Use the Review ▲▼ keys to scroll to "Recall Preset?", then press Enter/yes to confirm. You return to the Home screen with the preset values displayed.
Pitney Bowes Operator Guide August 201863

Setting / Disabling the Lock code
The lock code prevents unauthorised access to your DM60 Series after it has been powered up and/or has entered sleep mode.
1. Press Menu/Options.
2. Use the Review ▲▼ keys to scroll to "Change Setup?", then press Enter/yes to confirm.
3. Use the Review ▲▼ keys to scroll to "Use lock code setup?", then press Enter/yes to confirm.
4. Follow the prompts to:
l Change or enter the 4 digit lock code.
l Set/Turn Off the lock code feature (used when powering-up).
l Activate/disable the lock code feature during "sleep" mode.
Messages display confirming your choices.
5. When finished, follow prompts to return to the Home screen.
IMPORTANT: Your DM60 Series contains postal funds and if you opt to use the 4-digit Lock code to secure the funds, it is important that you do not allow your Lock Code to be compromised if the machine is used in an open area. If you believe your Lock code has been compromised, it should be changed immediately. Alternatively, you may wish to consider locking the machine in a secure area.
Pitney Bowes Operator Guide August 201864
Setting Sleep mode activation time
You can set the amount of time the DM60 Series meter waits until entering "sleep mode".
When the DM60 Series meter is in sleep mode, the display is blank (except for the time in the lower right corner of the display) and you can't process mail. You wake up the DM60 Series meter by pressing any button on the control panel or by placing an item on the scale.
1. Press Menu/Options.
2. Use the Review ▲▼ keys to scroll to "Change Setup?", then press Enter/yes to confirm.
3. Use the Review ▲▼ keys to scroll to "Change sleep timeout?", then press Enter/yes to confirm.
4. Key in the desired amount of time (in minutes, from 1 - 20) the DM60 Series meter should be idle before the sleep mode activates, then press Enter/yes to confirm. A message displays confirming your choices.
5. Press Clear/Back repeatedly to return to the Home screen.
Pitney Bowes Operator Guide August 201865
Activating Sleep mode manually
You can set put the DM60 Series meter into "sleep mode" at any time.
When the DM60 Series meter is in sleep mode, the display is blank (except for the time in the lower right corner of the display) and you can't process mail. You wake up the DM60 Series meter by pressing any button on the control panel or by placing an item on the scale.
1. Press Lock.
2. At the prompt to set system to sleep mode, press Enter/yes. The machine enters sleep mode.
Note: If you have enabled a lock code (see earlier topic), you will be prompted to enter the lock code to wake up the meter.
Pitney Bowes Operator Guide August 201866
Setting the Low Funds warning
The DM60 Series will warn you when your postage (funds) unused in the machine reaches an amount you specify. This warning acts as a reminder for you to add more postage to your DM60 Series (by connecting to the Data Centre and downloading funds).
1. Press Menu/Options.
2. Use the Review ▲▼ keys to scroll to "Change Setup", then press Enter/yes to confirm.
3. Use the Review ▲▼ keys to scroll to "Change low funds warning?", then press Enter/yes to confirm.
4. Key in the amount, then press Enter/yes to confirm. A confirming message displays.
5. When finished, follow prompts to return to the Home screen.
Pitney Bowes Operator Guide August 201867

Settings for the Scale
The settings described below affect the use of your scale.
Reset Scale to Zero
Use this setting to reset the scale to zero if any weight other than 0 g appears on the display with the scale platform empty.
1. Press Menu/Options.
2. Use the Review ▲▼ keys to scroll to "Reset the scale to zero?", then press Enter/yes to confirm. The weight on the display returns to 0g.
Activating/Disabling Weight Hold Mode
The Weight Hold mode is available in some countries only (see page 27 for details of this mode). It can be turned on or off as follows:
1. Press Menu/Options.
2. Use the Review ▲▼ keys to scroll to "Change Setup", then press Enter/yes to confirm.
3. Use the Review ▲▼ keys to scroll to "Change weight hold setup?", then press Enter/yes to confirm.
4. Follow the prompts to turn the feature ON or OFF.
5. When finished, follow prompts to return to the Home screen.
Pitney Bowes Operator Guide August 201868

Using the Text Ad option
What is a Text Ad?
A Text Ad is a user defined message typed in via the machine’s keyboard that can be printed on your digital meter impression. Text Ads are only available as an option on certain models of DM60 Series.
IMPORTANT:
In accordance with Postal and Advertising Standards requirements the Envelope Messaging (Ad-slogan) and Text must not be obscene, defamatory of any person or group, or deceptive, nor may it advocate unlawful action. The Envelope Messaging (Ad-slogan) must not emulate any form of valid indicia or payment for postage.
Creating a new Text Ad
1. Press Menu/Options.
2. Use the Review ▲▼ keys to scroll to "Change Setup?", then press Enter/yes to confirm.
3. Use the Review ▲▼ keys to scroll to "Use text Ad setup?", then press Enter/yes to confirm.
4. Use the Review ▲▼ keys to scroll to "Create Text Ad?", then press Enter/yes to confirm.
5. Follow the on screen prompts to enter the Text Ad name and each line of text. Each line can be up to 20 alpha/numeric characters long. To access alpha characters, repeatedly press the appropriate number key until the desired character displays (for more information see Section 12 - Text Entry).
Pitney Bowes Operator Guide August 201869

6. When the Text Ad is finished, select “Create another?” or press No if you are finished and the follow the prompts to return to the Home screen.
Pitney Bowes Operator Guide August 201870

Viewing a Text Ad
1. Press Menu/Options.
2. Use the Review ▲▼ keys to scroll to "Change Setup?", then press Enter/yes to confirm.
3. Use the Review ▲▼ keys to scroll to "Use Text Ad setup?", then press Enter/yes to confirm.
4. Use the Review ▲▼ keys to scroll to "View Text Ad?", then press Enter/yes to confirm.
5. Use the Review ▲▼ keys to scroll to select the Text Ad name you want to view. It will be displayed on the screen.
6. Use the Review ▲▼ keys to view each line of the Text Ad.
7. Press Clear/Back repeatedly to return to the Home screen.
Pitney Bowes Operator Guide August 201871
Edit a Text Ad
1. Press Menu/Options.
2. Use the Review ▲▼ keys to scroll to "Change Setup?", then press Enter/yes to confirm.
3. Use the Review ▲▼ keys to scroll to "Use Text Ad setup?", then press Enter/yes to confirm.
4. Use the Review ▲▼ keys to scroll to "Edit Text Ad?", then press Enter/yes to confirm.
5. Use the Review ▲▼ keys to scroll to the Text Ad you want to edit, then press Enter/yes to confirm. The name of the Text Ad will be displayed.
6. You can edit the name and/or text by using the Clear/Back key to delete existing text, the alpha/numeric keys to amend the text and Enter/yes to confirm at the end of each line.
7. Repeat this process until you reach the end of the message, at which time the display will show "Text Ad modified". You can now chose to edit another Text Ad, or press No and follow the screen prompts to return to the Home screen.
Pitney Bowes Operator Guide August 201872

Delete a Text Ad
1. Press Menu/Options.
2. Use the Review ▲▼ keys to scroll to "Change Setup?", then press Enter/yes to confirm.
3. Use the Review ▲▼ keys to scroll to "Use Text Ad setup?", then press Enter/yes to confirm.
4. Use the Review ▲▼ keys to scroll to "Delete a Text Ad?", then press Enter/yes to confirm.
5. Use the Review ▲▼ keys to scroll to select the Text Ad you want to delete.
6. You will be asked to confirm the deletion by pressing Enter/yes or cancel the deletion by pressing No. You can now chose to delete another Text Ad, or press No and follow the screen prompts to return to the Home screen.
Pitney Bowes Operator Guide August 201873
Other settings
Within the menus of your DM60 Series you will see some other settings available. These should only be changed under instruction of a representative of your machine supplier.
Incorrect configuration of some of these settings may cause your DM60 Series to misfunction.
The settings include:
l Entering the dialling prefix
l Entering the dialling method
l Change Location Code
l Remove funds from meter
l Change Local Access number
l Change Data Centre number
l Change number you call from
l Change Modem Initialisation
l Change Distributor Parameters
Pitney Bowes Operator Guide August 201874

This page intentionally left blank.

7 - Ink Maintenance
In this sectionLow ink warnings 77Replacing the ink cartridge 78Printing a test pattern 83Cleaning printer nozzles 84Replacing the print head 86Replacing the ink tray 88

Low ink warnings
Your actual ink usage will vary, based on how frequently you use your DM60 Series, the graphic printed and environmental conditions.
The DM60 Series display tells you when the ink supply is low or exhausted.
“Low Ink" and amber LED lit - Replace the ink cartridge soon. If you don’t have a replacement cartridge on hand, you should order one now (see Section 11 - Supplies, Options and Accessories).
IMPORTANT:
Order a replacement ink cartridge as soon as you see the “Low Ink” alert.
"Ink Out” and amber LED blinking once - Replace the ink cartridge immediately. The ink supply is out; you won't be able to print.
Pitney Bowes Operator Guide August 201877

Replacing the ink cartridge
Note:
We recommend that you keep a spare ink cartridge on hand at all times.
IMPORTANT:
Pitney Bowes recommends that you only use genuine replacement ink cartridges that are available from Pitney Bowes. If alternative cartridges or refills are obtained, the ink used must be approved by Royal Mail
1. Press Menu/Options.
2. Use the Review ▲▼ keys to scroll to "Use ink functions?", then press Enter/yes to confirm.
3. Use the Review ▲▼ keys to scroll to "Replace ink cartridge?", then press Enter/yes to confirm.
Pitney Bowes Operator Guide August 201878
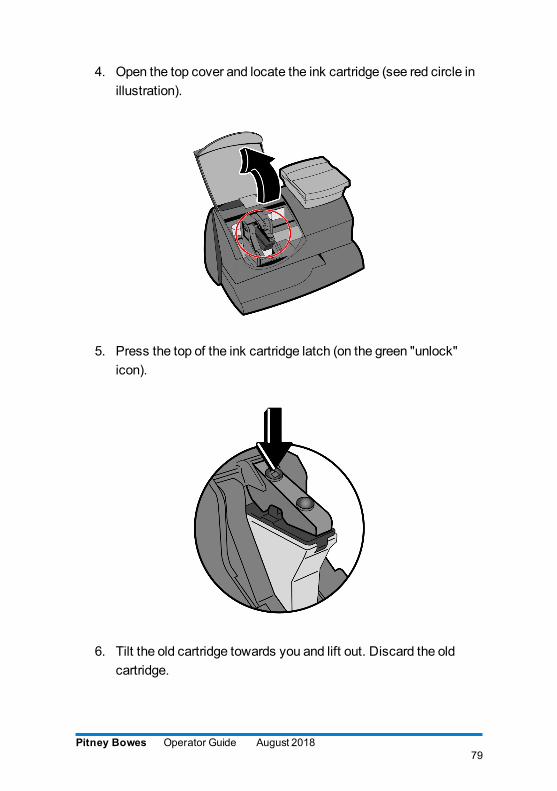
4. Open the top cover and locate the ink cartridge (see red circle in illustration).
5. Press the top of the ink cartridge latch (on the green "unlock" icon).
6. Tilt the old cartridge towards you and lift out. Discard the old cartridge.
Pitney Bowes Operator Guide August 201879
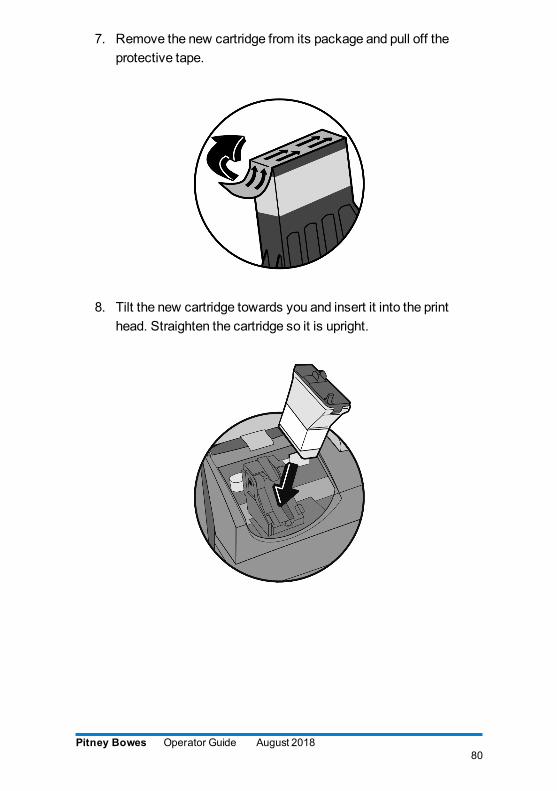
7. Remove the new cartridge from its package and pull off the protective tape.
8. Tilt the new cartridge towards you and insert it into the print head. Straighten the cartridge so it is upright.
Pitney Bowes Operator Guide August 201880
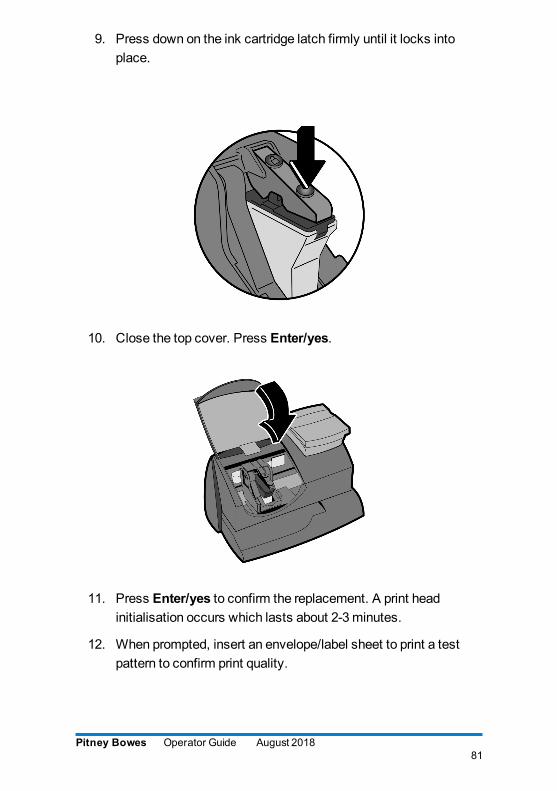
9. Press down on the ink cartridge latch firmly until it locks into place.
10. Close the top cover. Press Enter/yes.
11. Press Enter/yes to confirm the replacement. A print head initialisation occurs which lasts about 2-3 minutes.
12. When prompted, insert an envelope/label sheet to print a test pattern to confirm print quality.
Pitney Bowes Operator Guide August 201881

13. If the test pattern looks good (see illustrations below), press Enter/yes. If it looks poor, press No and continue at step 4 in the "Cleaning Printer Nozzle" procedure on page 84.
Pitney Bowes Operator Guide August 201882

Printing a test pattern
Running a print test may help you identify a printing problem.
1. Press Menu/Options.
2. Use the Review ▲▼ keys to scroll to "Use ink functions?", then press Enter/yes to confirm.
3. Use the Review ▲▼ keys to scroll to "Print test pattern?", then press Enter/yes to confirm.
4. When prompted, insert an envelope or label sheet into the DM60 Series. Remove the envelope/label when prompted.
5. At the "Is test pattern OK" prompt, either press Enter/yes if it looks good (you'll return to the Home screen), or press No and the DM60 Series will commence a cleaning cycle as described in step 4 of the "Cleaning Printer Nozzle" procedure on the next page.
Pitney Bowes Operator Guide August 201883

Cleaning printer nozzles
Cleaning the printer nozzles may help you fix a printing problem.
IMPORTANT: Always ensure that your prints are clear and complete. Poor prints may be rejected by your Postal Authority. If you notice missing lines in the print as shown in the illustration, clean the printer nozzles as described below.
The indicia above is a black and white representation of the approved Blue indicia. Only Blue Non-Fluorescent approved ink should be used in the machine.
1. Press Menu/Options.
2. Use the Review ▲▼ keys to scroll to "Use ink functions?", then press Enter/yes to confirm.
3. Use the Review ▲▼ keys to scroll to "Clean printer nozzles?", then press Enter/yes to confirm.
4. A "Preparing ink Please wait..." messages displays as the DM60 Series performs its cleaning.
Pitney Bowes Operator Guide August 201884
5. When prompted, insert an envelope or label sheet into the DM60 Series.
6. At the "Is test pattern OK" prompt...
l If the print is OK, press Enter/yes.
l If the print still has missing lines, press No and the DM60 Series will perform another cleaning cycle.
7. When finished, follow the prompts to return to the Home screen.
Pitney Bowes Operator Guide August 201885
Replacing the print head
IMPORTANT:
This procedure should only be done under the direction of or with the permission of a representative of your machine supplier.
1. Press Menu/Options.
2. Use the Review ▲▼ keys to scroll to "Use ink functions?", then press Enter/yes to confirm.
3. Use the Review ▲▼ keys to scroll to "Install new print head?", then press Enter/yes to confirm.
4. Open the top cover and locate the print head.
5. Refer to the instructions that came with the new print head to remove the old print head and install the new one.
6. Press Enter/yes to confirm the replacement. A print head initialisation occurs which lasts about 2-3 minutes.
7. When prompted, insert an envelope/label sheet to print a test pattern to confirm print quality.
Pitney Bowes Operator Guide August 201886
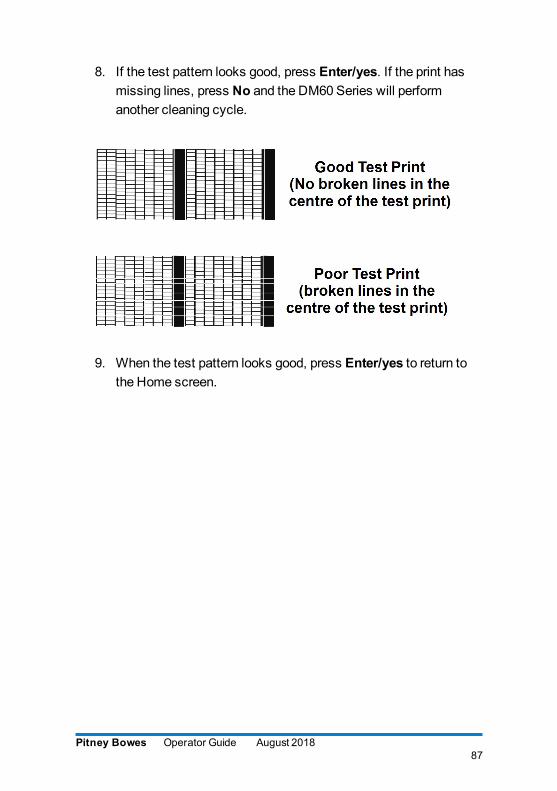
8. If the test pattern looks good, press Enter/yes. If the print has missing lines, press No and the DM60 Series will perform another cleaning cycle.
9. When the test pattern looks good, press Enter/yes to return to the Home screen.
Pitney Bowes Operator Guide August 201887
Replacing the ink tray
IMPORTANT:
This procedure should only be done under the direction of or with the permission of a representative of your machine supplier.
1. Press Menu/Options.
2. Use the Review ▲▼ keys to scroll to "Use ink functions?", then press Enter/yes to confirm.
3. Use the Review ▲▼ keys to scroll to ""Replace ink waste tray?", then press Enter/yes to confirm.
4. Refer to the instructions that came with the new ink tray to remove the old ink tray and install the new one
5. Press Enter/yes when completed. You will automatically return to the Home screen.
Pitney Bowes Operator Guide August 201888

This page intentionally left blank.

8 - Reports
In this sectionReports / Funds Report 91Refill summary report 92Account reports 93Software version report 94View software versions (not printed) 95
Reports / Funds Report
Your DM60 Series allows you to view and print reports for funds usage, postage refills, postage tracked by account, and other valuable data. The printable reports are printed directly from your DM60 Series onto an envelope or label sheet.
Funds Report
A funds report allows you to print a record of how much postage has been used and how much is remaining in the DM60 Series.
1. Press Menu/Options.
2. Use the Review ▲▼ keys to scroll to "Select a report?", then press Enter/yes to confirm.
3. Use the Review ▲▼ keys to scroll to "Print funds report?", then press Enter/yes to confirm.
4. When prompted, insert a label sheet or envelope into the DM60 Series.
5. The report is printed and you return back to the reports menu. Follow the prompts to return to the Home screen.
Pitney Bowes Operator Guide August 201891

Refill summary report
This report lists the last 5 postage refills.
1. Press Menu/Options.
2. Use the Review ▲▼ keys to scroll to "Select a report?", then press Enter/yes to confirm.
3. Use the Review ▲▼ keys to scroll to "Print refill summary?", then press Enter/yes to confirm.
4. When prompted, insert a label sheet or envelope into the DM60 Series.
5. The report is printed and you return back to the reports menu. Follow the prompts to return to the Home screen.
Pitney Bowes Operator Guide August 201892

Account reports
This report lists the last 5 postage refills. If you have the optional accounting feature on your DM60 Series, you can view and print your account totals at any time. You may want to do this before you clear or delete an account, such as at the end of a fiscal year.
1. Press Menu/Options.
2. Use the Review ▲▼ keys to scroll to "Use Accounting functions?", then press Enter/yes to confirm.
3. Use the Review ▲▼ keys to scroll to "Print an Account report", then press Enter/yes to confirm.
4. Select whether you wish to print a single or multiple account report.
l Print Single Report - Use the Review ▲▼ keys to scroll to the desired account, then press Enter/yes to confirm. When prompted, insert an envelope or label sheet.
l Print Multiple Report - All accounts will print. Insert an envelope or label sheet
Note: If it is a multi-page report, you will be prompted to insert further envelopes or label sheets
5. The report is printed. Follow the prompts to return to the Home screen or to print another report.
Pitney Bowes Operator Guide August 201893

Software version report
This report lists information about the software within your DM60 Series.
1. Press Menu/Options.
2. Use the Review ▲▼ keys to scroll to "Use Accounting functions?", then press Enter/yes to confirm.
3. Use the Review ▲▼ keys to scroll to "Print Software Version report", then press Enter/yes to confirm.
4. When prompted, insert a label sheet or envelope into the DM60 Series.
5. The report is printed. Follow the prompts to return to the Home screen or to print another report.
Pitney Bowes Operator Guide August 201894

View software versions (not printed)
This report lists software information about your DM60 Series meter on the display; it is not printed.
1. Press Menu/Options.
2. Use the Review ▲▼ keys to scroll to "Use Accounting functions?", then press Enter/yes to confirm.
3. Use the Review ▲▼ keys to scroll to "View software ver. report", then press Enter/yes to confirm.
4. Use the Review ▲▼ keys to scroll and view the screens of information.
5. Press Clear/Back to return back to the reports menu. Follow the prompts to return to the Home screen.
Pitney Bowes Operator Guide August 201895
9 - Accounting
In this sectionOptional departmental accounting feature 97Turning the accounting feature on or off 98Creating an account 99Editing an account 100Viewing account totals 101Clearing all or some of the accounts 102Deleting an account 104
Optional departmental accounting feature
When you purchase the optional accounting feature, you can set up your DM60 Series to track postage costs incurred by individuals or departments in your organisation (e.g., Tom, Jane, Sales, A/R, etc.). Your DM60 Series stores the following information for each account:
l An account name up to 14 alphanumeric characters long.
l An account number.
l The item total. This is the total number of pieces of mail charged to an account since it was last cleared.
l The value total. This is the total amount of postage charged to an account since it was last cleared.
l An account password (if you choose to use one).
Pitney Bowes Operator Guide August 201897
Turning the accounting feature on or off
1. Press Menu/Options.
2. Turning ON Accounting - Use the Review ▲▼ keys to scroll to "Turn Accounting On?", then press Enter/yes to confirm. Follow the prompts for either creating an account (if this is the first time using the feature) or selecting an account (see next page).
3. Turning OFF Accounting - Use the Review ▲▼ keys to scroll to "Use Accounting functions?", then press Enter/yes to confirm. Use the Review ▲▼ keys to scroll to "Turn off Accounting?", then press Enter/yes to confirm. A confirmation message displays.
4. Follow the prompts to add another account if turning ON accounting, or press Clear/Back to return to the Home screen.
Notes:
l You will not be tracking postage by account when this feature is turned off.
l When accounting is turned on, an account must be selected before you can print postage.
Pitney Bowes Operator Guide August 201898

Creating an account
You need to create an account before you can use the departmental accounting feature to track postage.
1. Press Menu/Options.
2. Use the Review ▲▼ keys to scroll to "Use Accounting functions?", then press Enter/yes to confirm.
3. Use the Review ▲▼ keys to scroll to "Create an account?", then press Enter/yes to confirm..
4. Enter the name of this account. It can be up to 14 alphanumeric characters long. To access alpha characters, repeatedly press the appropriate number key until the desired character displays. For more information on entering text, see Section 12, Text Entry.
5. Assign a password to this account (if you wish) of 4 digits.
6. Follow the prompts to either add another account or stay in the Accounting menu. Follow the prompts to return to the Home screen.
Pitney Bowes Operator Guide August 201899
Editing an account
You can edit an account name and password if you wish.
1. Press Menu/Options.
2. Use the Review ▲▼ keys to scroll to "Use Accounting functions?", then press Enter/yes to confirm.
3. Use the Review ▲▼ keys to scroll to "Edit an existing account?", then press Enter/yes to confirm.
4. Use the Review ▲▼ keys to scroll to the account you want to edit, then press Enter/yes to confirm.
Note: If a password has been assigned to this account, you will be prompted to enter it now. Key in the 4-digit password if necessary.
Depending on how the account is set up, you can:
l Edit Account Name - follow prompts to change the name.
l Assign a Password to Account (if none has yet been assigned) - follow prompts to assign a 4-digit password.
l Edit Account Password - follow prompts to change the password.
l Delete Account Password - follow prompts to delete the password.
5. Follow the prompts to edit another account or return to the Home screen.
Pitney Bowes Operator Guide August 2018100
Viewing account totals
You can view your account totals any time using this option.
1. Press Menu/Options.
2. Use the Review ▲▼ keys to scroll to "Use Accounting functions?", then press Enter/yes to confirm.
3. Use the Review ▲▼ keys to scroll to "View Account postage and pieces?", then press Enter/yes to confirm.
4. Use the Review ▲▼ keys to scroll to the desired account. The postage and number of pieces for this account displays.
5. Press Clear/Back and follow the prompts to return to the Home screen.
Pitney Bowes Operator Guide August 2018101

Clearing all or some of the accounts
You can clear the postage totals in an account when necessary (for example, at the end of a fiscal year).
IMPORTANT: Make sure your really want to clear an account. Once you do, the account information is gone forever. We suggest you print an accounting report first (see Section 8, Reports) before clearing.
1. Press Menu/Options.
2. Use the Review ▲▼ keys to scroll to "Use Accounting functions?", then press Enter/yes to confirm.
3. Use the Review ▲▼ keys to scroll to "Clear Account value and pieces?", then press Enter/yes to confirm.
4. Select all or one account to clear.
l Clearing All Accounts - Confirm clearing all when prompted.
l Clearing One Account - Use the Review ▲▼ keys to scroll and select the account to clear. Confirm clearing when prompted.
Pitney Bowes Operator Guide August 2018102
Notes: If a password has been assigned to an account, you will be prompted to enter it now. Key in the 4-digit password if necessary.
If passwords are being used with your accounts, you will not see the option to 'Clear All Accounts'. You must clear each account individually.
5. Follow the prompts to clear another account or return to the Accounting menu. Follow the prompts to return to the Home screen.
Pitney Bowes Operator Guide August 2018103
Deleting an account
You can delete an account when necessary.
IMPORTANT: Make sure your really want to delete an account. Once you do, the account information is gone forever. We suggest you print an accounting report first (see Section 8, Reports) before deleting.
1. Press Menu/Options.
2. Use the Review ▲▼ keys to scroll to "Use Accounting functions?", then press Enter/yes to confirm.
3. Use the Review ▲▼ keys to scroll to "Delete an account?", then press Enter/yes to confirm.
4. Use the Review ▲▼ keys to scroll to the account you want to delete, then press Enter/yes to confirm.
Note: If a password has been assigned to this account, you will be prompted to enter it now. Key in the 4-digit password if necessary.
Pitney Bowes Operator Guide August 2018104

5. Confirm deleting when prompted.
6. Follow the prompts to delete another account or return to the Accounting menu. Follow the prompts to return to the Home screen.
Pitney Bowes Operator Guide August 2018105

10 - Troubleshooting
In this sectionGetting help 107Error messages 108Display issues 110Print is incomplete, streaked or poor quality 111Accidentally printing the wrong postage 112SmartLink™ connection problems 113PC Meter Connect™ connection problems 115

Getting help
There may be times when you need help to solve a problem, or you may want more information about how your DM60 Series works. Please read the troubleshooting information in this section first. In many cases, it can help you resolve the problem.
If you need to contact us, please have the following information at hand:
l Product Model: DM60 Series.
l Serial number: See the back of the DM60 Series.
l Nature of problem: What happens and when does it happen? Did the DM60 Series display an error message?
l The steps you've already taken to solve the problem and the results.
Details of how to contact your machine supplier will be either in a separate document supplied with your DM60 Series, on the back cover of this guide, or on a sticker applied to your DM60 Series.
IMPORTANT INFORMATION: The DM60 Series has been approved for use in the UK by Royal Mail. Under the terms of your licence you are not allowed to tamper with or modify the machine in any way.
Pitney Bowes Operator Guide August 2018107

Error messages
From time-to-time your DM60 Series may display an alert or error message. An alert tells you that something needs attention; an error message usually tells you about a DM60 Series condition you can fix.
Message Description Action
Account Balance Low
Refill amount exceeds funds available or credit limit.
Perform refill procedures for smaller amount, make an advance payment or call your machine supplier for credit.
Cannot Reach Data Centre
Connection Lost
Trouble with a connection to the Data Centre.
See 'Problems connecting' later in this chapter.
Insufficient Funds
Insufficient funds in your DM60 Series. Postage amount selected exceeds maximum funds available in meter.
Select a lower postage amount. Perform a funds refill to add funds to the DM60 Series.
Refill Too High
Refill amount entered is more than the maximum DM60 Series will allow.
Press Clear/Back. Repeat refill procedure will a smaller refill amount.
Connection Due Connection Required
Your DM60 needs to connect to the Data Centre for postal inspection or data upload.
Connect to the Data Centre to allow your meter to automatically upload information to the Postal Authority.
Pitney Bowes Operator Guide August 2018108

If you encounter an error that has no accompanying message (such as "1103", "2215", etc.), press Clear/Back. If nothing happens in 5 seconds, turn off machine; wait 15 seconds, and then turn on machine. If problem persists, call your machine supplier.
Pitney Bowes Operator Guide August 2018109
Display issues
You can clear the postage totals in an account when necessary (for example, at the end of a fiscal year).
1. The DM60 Series meter may be in sleep mode. Press any key to wake it.
2. Is power cord plugged into both the DM60 Series meter and the wall outlet? Make sure the power cord is not connected to a switched wall outlet with the outlet turned off.
3. Try unplugging the power cord, wait 15 seconds, and reconnect the cord.
Display is difficult to read
You can adjust the LCD display contrast if necessary (see page 59).
Pitney Bowes Operator Guide August 2018110

Print is incomplete, streaked or poor quality
Cleaning the printer nozzles may help you fix a printing problem.
IMPORTANT: Always ensure that your prints are clear and complete. Poor prints may be rejected by Royal Mail. If you notice missing lines in the print as shown in the illustration, clean the printer nozzles as described on page 84 of this guide.
The indicia above is a black and white representation of the approved Blue indicia. Only Blue Non-Fluorescent approved ink should be used in the machine.
If printer maintenance fails to correct the problem, call your machine supplier. You may have to replace the printhead.
Pitney Bowes Operator Guide August 2018111
Accidentally printing the wrong postage
Once you have printed a meter stamp, the postage funds have been “used up” by the DM60 Series, even if the printing is illegible. That’s why it is so important to make sure the correct value is shown on the machine before inserting the envelope or label sheet, and that you do not let the ink level get too low. We recommend you always keep a spare ink cartridge on hand just for this reason.
Pitney Bowes Operator Guide August 2018112

SmartLink™ connection problems
Are you seeing problems like shown below whilst using the SmartLink device?
l The SmartLink device's network LED is not blinking green.
l The lights are correct, but the meter attempts to dial out and shows error No dial tone.
You may be able to resolve the problem by restarting your SmartLink device and meter.
1. Power down the meter by removing the power cable from the back of the machine.
2. Power down the SmartLink device by removing the power cable from the back of the box.
3. Remove the USB cable from the back of the meter.
4. Power up the meter by plugging the power cable into the back of the machine.
5. Power up the SmartLink device. After a few seconds, if the device finds an active connection, the bottom internet light will start blinking green:
6. Plug the USB cable into the SmartLink and into the back of your meter.
Pitney Bowes Operator Guide August 2018113

7. The device's lights will change colour. The USB light will show steady green and the internet light will be blinking green:
8. The meter should display the message Meter Controlled by PC. This indicates that the meter is able to make a connection to Pitney Bowes.
Pitney Bowes Operator Guide August 2018114
PC Meter Connect™ connection problems
Are you seeing problems like shown below whilst using the PC Meter Connect?
l Meter not detected.
l Internet not detected.
1. Ensure that the meter is fully booted up.
2. Ensure that the USB cable's flat end is plugged into the computer, the square end into the meter.
3. Try connecting the USB cable to a different USB port on your computer.
4. Try a different USB cable.
The PC Meter Connect program runs in the background on your computer. If it is left running for a long period of time, the program can become unresponsive when the meter is connected. A simple relaunch of the application can often resolve this issue.
1. Check if the PC Meter Connect program is running by either double clicking on the desktop icon or press the Start button and type PC Meter Connect.
2. If you see a message saying "PC Meter Connect Already Running", press OK.
Pitney Bowes Operator Guide August 2018115
3. You can find the PC Meter Connect icon in the bottom right-hand corner of the computer, near the clock. It is often hidden, click the up triangle on the taskbar.
a. When a meter is connected, the icon is an orange arrow.
b. When meter is not connected, the icon is a red cross. When you hover the mouse cursor over the icon it says "Meter not detected by PC" or "Internet Not Detected".
4. Exit the program by right-clicking the icon and left-clicking Exit.
5. Reopen the program (from the desktop icon, or via Start and search "PC Meter Connect").
6. Plug the flat end of the USB cable into a USB port on the computer, then plug the square end into the back of the meter.
7. The computer should immediately show a pop-up box, saying "Meter detected". This means the meter has been recognised, and you can proceed with attempting a connection on the meter.
Pitney Bowes Operator Guide August 2018116

This page intentionally left blank.

11 - Supplies and options
In this sectionHow to order supplies 119How to order other options 120
How to order supplies
All supplies, accessories and options are available from your machine supplier.
Contact details are given on a separate document supplied with your DM60 Series, on the rear page of this guide and/or on a sticker applied to the machine.
Your DM60 Series requires certain supplies to function properly. These include:
l Ink Cartridges
l Label Sheets
l Sealing Solution (to seal envelope flaps after processing)
Pitney Bowes Operator Guide August 2018119

How to order other options
A number of flexible options are available so you can tailor your DM60 Series to meet your exact needs today, and expand it as your business grows tomorrow. Contact your machine supplier who will advise you about the options available on your model.
Envelope Messaging (Ads)
Envelope Messages give your mail a professional appearance and can turn your mailings into a powerful promotional tool. You can purchase additional Envelope Messages if your needs require it. These are conveniently loaded into your machine via software downloads.
Departmental Accounting
The accounting feature tracks postage costs for departmental accounts. See Section 9, Departmental Accounting for details.
Extension Cable for Scale
The extension cable allows you to position the scale away from the DM60 Series should you prefer it not to be situated in the standard position.
Pitney Bowes Operator Guide August 2018120

This page intentionally left blank.

12 - Text Entry
In this sectionHow to enter text 123Account names and Text ads 124Special characters 125
How to enter text
Text is entered for these functions:
l Entering a Text Ad (optional feature)
l Naming an Account (with optional Departmental Accounting)
l International mail (selecting a country)
How is Text Entry completed?
Text entry is done via the numeric keypad in a fashion similar to mobile phone text entry. Each key, 2 to 9, has three or four letters displayed above it.
There is no dedicated key to switch between alpha and numeric mode. On those screens (and only those screens) where either an alpha or numeric character may be entered (e.g. account names), press a numeric key to cycle through the possibilities for that key. For example, pressing the “2” numeric key cycles through "2" - "A" - "B" - "C".
Extended character sets are provided for foreign markets on a country-by-country basis. In these cases, a numeric key may need to be pressed several times to cycle through the complete character set associated with that key.
Pitney Bowes Operator Guide August 2018123

Account names and Text ads
For Account names and Text Ads, the first letter of the first word automatically defaults to upper case.
If you wish to enter two consecutive alpha characters that are located on the same numeric key (such as “de”), you must wait for the cursor to automatically move right to the second character’s position before entering the second character. There is about a one second delay following an alpha entry before the cursor moves one position to the right.
Pitney Bowes Operator Guide August 2018124

Special characters
Special characters are accessed by repeatedly pressing the “1” key. Special characters include:
Symbol Name
, Comma
& Ampersand
* Asterisk
. Full stop
: Colon
£ Currency symbol
- Minus sign (dash)
? Question mark
/ Forward slash
\ Backward slash
( Open brackets
) Close brackets
! Exclamation mark
@ "at" sign
+ Plus sign
# Hash mark
Pitney Bowes Operator Guide August 2018125

Symbol Name
% Percentage
^ Upper carot
= Equal sign
The 0 (zero) key on the keypad functions as the space key.
The decimal point key also functions as the Shift key. On any screen that accepts alpha characters, this key toggles between “all upper case letters” and “all lower case letters.”
Pitney Bowes Operator Guide August 2018126

This page intentionally left blank.

13 - Glossary
In this sectionGlossary 129
Glossary
Account - A department (e.g., “Human Resources”) to which postage is charged when the optional Departmental Accounting feature is purchased. You can assign a unique name to each account. The DM60 Series stores the total postage used and the number of mail pieces processed for each account.
Ascending Register (Used) - The total amount of postage used since the machine was placed in service.
Batch Register - A part of the DM60 Series meter’s memory that stores the total postage spent and the number of pieces of mail processed. Your DM60 Series meter stores this information in memory for each account. You can clear the contents of the batch register if you want.
Default - A value or setting the DM60 Series meter automatically uses unless you change it. As delivered, your DM60 Series meter has factory-set defaults or “normal” settings. You may change these if you wish.
Descending Register (Unused) - The total amount of postage left in your DM60 Series which is available to use.
Digital Meter Stamp - The imprint produced by the machine. This may include:
l The postage amount.
l The date.
l The machine’s serial number.
l Information for Postal Authority use.
Pitney Bowes Operator Guide August 2018129

l Envelope Messaging. This is an optional part of the machine stamp that lets you convey your own special message to the mail recipient. An Envelope Message may consist of a Graphic Ad and/or a Text Message.
l A Graphic Ad can be purchased and downloaded into your system.
l A Text Message is text that you define which prints in place of the Graphic Ad. Text Messages are only available on certain models.
Envelope Messaging - An additional message that appears next to the meter's printed postal information. See "Digital Meter Stamp" above for more information.
Home Screen - The DM60 Series display that shows your current selections. It indicates that you're ready to print postage.
Inspection - The process of examining the postage usage through the DM60 Series to assure accurate postal funds accounting. Your DM60 Series is subject to remote inspection whenever you add postage to it. To do an inspection, simply connect to the Data Centre as explained in Section 5 - Adding Postage/Connecting to Data Centre.
IntelliLink® - A technology that allows you to download postage meter features, postal rates, and postage meter software updates via a telephone link.
Lock Code - A four-digit code that serves as a user password. It prevents unauthorised DM60 Series use.
Mailmark™ - A standard set by Royal Mail for postal franking machines. Your DM60 system is Mailmark™ compliant.
PC Meter Connect™ - Pitney Bowes software for your PC that allows your DM60 Series to access the Data Centre using your PC's internet connection.
Pitney Bowes Operator Guide August 2018130
Postage By Phone® - A service that allows you to buy postage and check account status by connecting to the Data Centre. It also permits convenient postal inspection.
Preset - A DM60 Series setting you can call up at the push of a button. The preset can hold a postage amount, account, Envelope Messaging, inscription and class of service.
Serial Number - The serial number found on the rear of the DM60 Series.
Sleep Mode - An energy-saving feature of your DM60 Series that clears the display after a certain period of idle time. Pressing any key wakes up the DM60 Series.
SmartLink™ - Your system can be connected to your SmartLink device to communicate with the Data Centre.
Tape/Label Sheets - A sheet of self-adhering paper which you print postage on and apply to a piece of mail or package that is too big to be processed through the DM60 Series.
Mailmark™ is a trademark of the Royal Mail
Pitney Bowes Operator Guide August 2018131

PB Form SDC2029D© Pitney Bowes Limited, 2018
We havemade every reasonable effort toassure the accuracy and usefulness of thisguide, however we cannot assumeresponsibility for errors or omissions or liabilityfor themisuse or misapplication of ourproducts.
3001 Summer StreetStamford, Connecticut 06926www.pitneybowes.com