Embed Size (px)
Citation preview

RTG Portale GmbH Karl-Zahn-Straße 11 44141 Dortmund Germany
Seite 1
Tel: +49(0) 231-226186-60 Fax: +49(0) 231-226186-69 E-Mail: [email protected]
Expertise. Software. Solutions.
Scrum Portlet Plus User manual
Date: July 14, 2017 Version: 1.2

RTG Portale GmbH Expertise. Software. Solutions. Page 1
1. Table of Contents
1. TABLE OF CONTENTS .................................................................... 12. INTRODUCTION ............................................................................ 23. FIRST STEPS ............................................................................... 3
3.1. PREPARING A SCRUM TEAM ........................................................................ 33.2. PORTLET CONFIGURATION ........................................................................ 43.3. PREPARE YOUR SCRUM BOARD ..................................................................... 43.4. USE THE PORTLET AS OFFICE SCRUM BOARD ...................................................... 5
4. PLANNING YOUR PROJECT .............................................................. 74.1. SCHEDULE SPRINTS ................................................................................ 74.2. ADD TASKS TO A SPRINT .......................................................................... 74.3. UPLOAD DOCUMENTS TO YOUR TASKS ............................................................. 8
5. DOING YOUR DAILY WORK .............................................................. 95.1. WORKING WITH THE SCRUM BOARD ............................................................... 95.2. REPORTING YOUR PROGRESS .................................................................... 105.3. SEARCHING AND FILTERING TASKS ............................................................... 105.4. DISCUSSING WITH YOUR TEAM ................................................................... 11
6. CHECKING PROJECT PROGRESS ...................................................... 126.1. QUICK OVERVIEW: THE BURNDOWN CHART ..................................................... 126.2. VIEW SPRINT STATUS ............................................................................ 126.3. DOWNLOAD SPRINT REPORTS .................................................................... 136.4. COPY OR MOVE TASKS TO NEW SPRINTS .......................................................... 13
7. TROUBLESHOOTING .................................................................... 14

RTG Portale GmbH Expertise. Software. Solutions. Page 2
2. Introduction
This is the “Plus” version of our established Scrum Portlet. It is addressed to Scrum teams that are looking for an application suiting their specific needs in project management and development. Since a comprehensive project documentation is often a key requirement, integrating software into the process is a common task. Derived from our personal experience, we aim at developing a portlet, that is adjusted specifically to the daily work of a Scrum team without slowing it down. Compared to the free version, Scrum Portlet Plus offers several improvements and new features including:
• Liferay DXP and 7.0 CE support • Scrum board optimization for high resolutions • Fast task creation directly on the board • Sprint reports in PDF and Excel format • Ability to mark a Liferay user group as Scrum team • Space for your project vision to always keep it in mind • … and many more to come in future
The general key features of our Scrum Portlet include:
• Fully customizable drag & drop Scrum Board • Versioned document management • Reports of sprint progress • Time tracking and discussions • Always up-to-date thanks to Ajax Push • Manage several Scrum teams in one portal instance • Individual color scheme per user • Available in English and German • Based on JSF 2.2 and PrimeFaces 6.1

RTG Portale GmbH Expertise. Software. Solutions. Page 3
3. First Steps Before you can start to work with this portlet, there are a few very simple steps to configure it. Mainly this concerns creating your Scrum team(s) in Liferay and adding portlet instances for them to work with.
3.1. Preparing a Scrum Team The Scrum Portlet uses Liferay user groups to manage Scrum teams. In order to start working, you first need to create a standard user group via the Liferay control panel and add all your team members to it. While creating the user group, you can optionally set the “Scrum Team” flag to true to make it easy to distinguish from normal user groups. This flag can later be used as filter for the portlet configuration.
Every member of your Scrum teams should have the “Preferences” permission for this portlet, since this enables them to use the Ajax Push functionalities and change the portlet’s theme. Additionally you need to give the “Manage projects” portlet permission to all users, who should be able to manage Sprints, view Sprint status, and configure the portlet instance.

RTG Portale GmbH Expertise. Software. Solutions. Page 4
3.2. Portlet Configuration
After setting up a Scrum team, it is time to add the Scrum portlet to a page in your portal instance. Using a one-column-layout is recommended, since the portlet needs some space. Make sure you have “Preferences” and “Manage projects” permissions on the portlet, as mentioned before, and then open the portlet preferences. In the “Scrum group” dropdown you can then select the user group you created. This configures the current portlet instance to show the progress of this Scrum team. To manage another team you just need to create a second portlet instance and configure it to use this team.
3.3. Prepare your Scrum Board
When configuring a Scrum team for the first time, the portlet automatically creates three default status values. You can always edit, delete and reorder these
RTG Portale GmbH Expertise. Software. Solutions. Page 5
status values or add new ones in the portlet preferences. Status values are used as the columns of your Scrum Board. Make sure you always have a status value marked as “Fixed”. This flag is used to identify tasks that have already been finished in order to calculate how accurate the evaluation was. Activating the “Show project vision” option in the preferences adds a tab to the portlet that let’s you write down your project vision or anything else your team should always have in reach.
3.4. Use the Portlet as Office Scrum Board Scrum teams are used to have a huge Scrum Board on a wall in their office, which makes changing to a software even harder. This portlet though has been designed to be displayed on a big monitor on the wall. Ajax Push makes sure that the board is always up-to-date. To activate the automatic updates you simply have to set the “Activate push” checkbox in the portlet preferences with the specific user that displays the Scrum Board. Hook a simple computer up to a large display, start up a browser and login to your portal. This setup has for example been tested in production with a Raspberry Pi.
3.5. Liferay 7/DXP: Prepare Push Functionality ToautomaticallyupdatetheScrumBoardforallusersassoonasanythingischanged,weutilizethenewLiferayWebSocketWhiteboardofLiferay7.SincethisisnotyetfullysupportedbyLiferayoutofthebox,afewpreparationsmightbenecessary.Firstofall,ifyouareusingLiferay7.0.2GA3orDXPFixPack7orearlier,pleaseaddthefollowinglinestoyourportal-ext.propertiesfile:
module.framework.system.packages.extra=\com.ibm.crypto.provider,\com.ibm.db2.jcc,\com.microsoft.sqlserver.jdbc,\com.mysql.jdbc,\com.p6spy.engine.spy,\com.sun.security.auth.module,\com.sybase.jdbc4.jdbc,\oracle.jdbc,\org.postgresql,\org.apache.naming.java,\org.hsqldb.jdbc,\org.mariadb.jdbc,\sun.misc,\sun.net.util,\sun.security.provider,\javax.websocket;version="1.1.0",\javax.websocket.server;version="1.1.0"

RTG Portale GmbH Expertise. Software. Solutions. Page 6
ForanyLiferayversionuptothistime,youalsohavetomanuallydeployLiferay’sWhiteboardmodule.YoucandownloadtheappropriateJARfilefromMavenCentral(https://search.maven.org/remotecontent?filepath=com/liferay/com.liferay.websocket.whiteboard/1.0.1/com.liferay.websocket.whiteboard-1.0.1.jar)andsimplycopyitintoyourportal’s“deploy”directory.ForthecorrespondingdocumentationbyLiferay,youcanvisitthedeveloperportal:https://dev.liferay.com/es/develop/tutorials/-/knowledge_base/7-0/liferay-websocket-whiteboardConcerningthisofficialdocumentation,youonlyhavetocareforthefirsttwoconfigurationsteps,sinceeverythingelseishandledbyScrumPortlet.Ifyouneedanyfurtherguidance,pleasefeelfreetocontactus.

RTG Portale GmbH Expertise. Software. Solutions. Page 7
4. Planning your Project Once your Scrum Board is ready, you can start working on your project. Plan your sprints, add tasks, and start working as you are used to it.
4.1. Schedule Sprints
Scheduling sprints is based on a very simple user interface. Just define the length of your sprint by adjusting the slider and create it. Afterwards you can always move and resize it by simply using drag & drop in the schedule. Move the whole sprint around or resize it by dragging it’s end. If you should need to delete a sprint, you can do so in it’s detail view by clicking on it. Sprints can only be deleted as long as they don’t have any tasks attached to them.
4.2. Add Tasks to a Sprint
Adding tasks is as simple as writing cards for a real Scrum Board. Give it a short description, optionally add it to a User Story and sprint and add all further

RTG Portale GmbH Expertise. Software. Solutions. Page 8
information via the WYSIWYG editor. You can always add a task to the Backlog instead of choosing a sprint, so you are able to create tasks in advance and fill them with more information later. In the same form you can also enter your evaluation of the task in hours, change it’s status and choose a team member, who is in charge of it. Team members are always represented with their Liferay screen name.
4.3. Upload Documents to your Tasks
Since tasks are often described by documents, design drafts and so on, you are able to upload all these files directly to your tasks. The files are saved in Liferay’s Document Library. Pictures as well as PDF files and all documents, that can be converted to PDF by Liferay, are available as online preview by clicking on their thumbnails. To enable PDF conversion you need to configure Open Office or Libre Office and optionally ImageMagick with Liferay. Instructions on doing so are available in the Liferay documentation. If you upload a file, that has already been uploaded with the same filename, the portlet will ask you for instructions. This enables you to replace an older version of the same file and makes sure the same document is only saved once, if you upload it for more than one task. If a file has more than one version, you can expand the view to show older versions. By deleting a file from a task, you only delete the mapping to this task and the file remains available in other tasks or directly via the Document Library.

RTG Portale GmbH Expertise. Software. Solutions. Page 9
5. Doing your Daily Work The Scrum Portlet has been designed to be fast and easy to use during a Scrum team’s daily work. The most important part is of course the virtual Scrum Board, but there are also features that help you find specific tasks as fast as possible and communicate with your team.
5.1. Working with the Scrum Board
While working on your tasks the Scrum Board will be used for most actions. In fact several comfort features have been added to it, that make changing to other views unnecessary. A simple example: As long as a task has not been assigned to a team member, you will automatically be assigned to it as soon as you drag & drop it to the next status column. To keep track of the hours you have worked on a task, you can use the clock icon on the task card, simply input the number of hours and an optional comment in the popup and you are done. To be able to distinguish different User Stories or tasks, you can change the color of all tasks as you like. The three color modes in the top right corner show all tasks with the standard color, let you color each task individually or set a color for each User Story. Just use the color picker icon on the task card to do so. In addition to the “Add task” button the Scrum Board also offers a small “Plus” icon in every column, that let’s you create new tasks without switching views. This allows you to quickly create new tasks that don’t need further information or just to add a bulk of tasks to the backlog while in a meeting.

RTG Portale GmbH Expertise. Software. Solutions. Page 10
5.2. Reporting your progress The Scrum Board allows you to quickly change a task’s status via drag & drop and to report your working hours within a few seconds. For the latter, just use the clock icon while hovering over a task, enter the amount of hours, an optional comment, and save it. The portlet will automatically add these hours to your current work day.
5.3. Searching and Filtering Tasks
RTG Portale GmbH Expertise. Software. Solutions. Page 11
If you need to get a simple overview of a sprint’s tasks, filter them or search for specific ones, you can use the task table next to the Scrum Board. It allows inline editing of the displayed information by clicking the pencil icon as well.
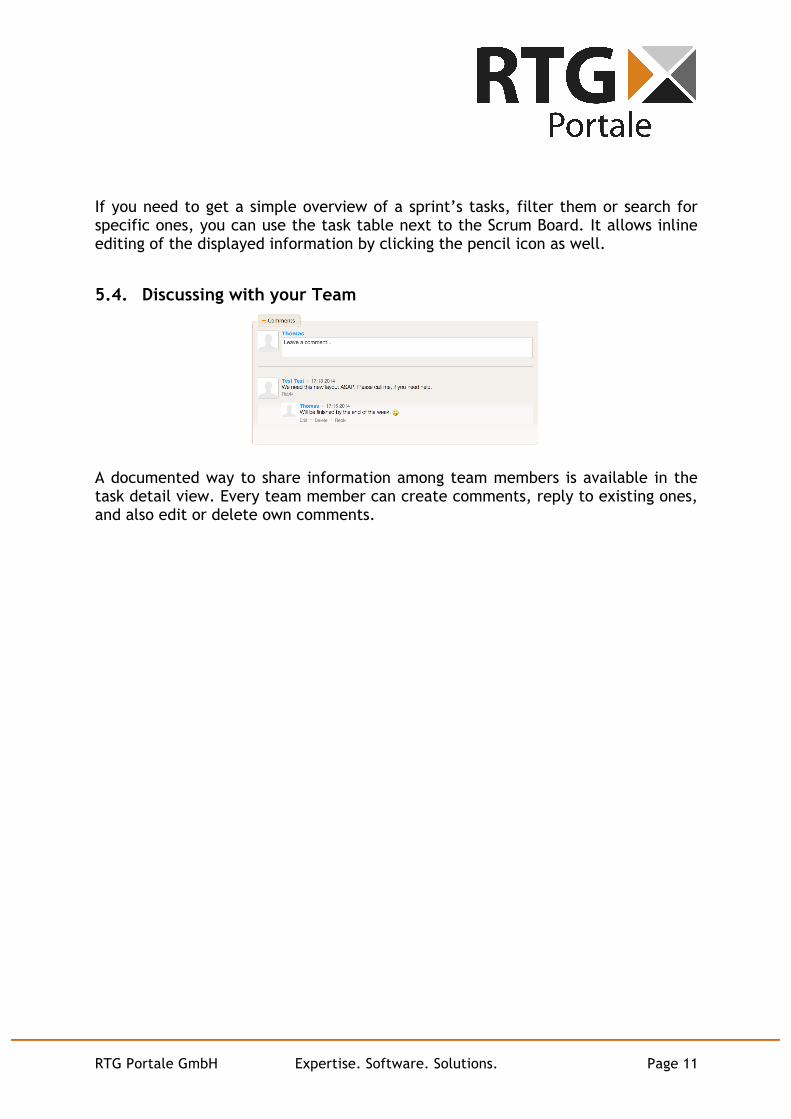
5.4. Discussing with your Team
A documented way to share information among team members is available in the task detail view. Every team member can create comments, reply to existing ones, and also edit or delete own comments.

RTG Portale GmbH Expertise. Software. Solutions. Page 12
6. Checking Project Progress Of course it is important to always keep an eye on a project’s progress. Scrum Portlet offers two specific views for this task in addition to the Scrum Board.
6.1. Quick overview: The Burndown Chart
Every team member is able to take a look at the sprint Burndown Chart. While you work on a sprint, it plots the remaining points at the beginning of each day. This allows the team to easily check how much work is still left during Daily Scrum.
6.2. View Sprint Status

RTG Portale GmbH Expertise. Software. Solutions. Page 13
A detailed sprint status view can be accessed by users with “Manage projects” permission by clicking on a sprint in the schedule. In addition to the Burndown Chart it has another two graphical representations of the current progress. To keep track of the accuracy of task evaluations, you just need to take a look at the table below the graphical indicators. It shows you the hours spent on every task and marks tasks that took more or less time to finish. This view can be used to easily check, if a sprint is currently in time.
6.3. Download sprint reports
The sprint status view described in the previous section also allows you to download sprint reports in PDF and Excel format. The generated Excel sheet consists of three sheets that include all tasks and working hours of the sprint with an additional pivot table as an overview. The PDF report contains similar tables and also includes a detailed report of each individual task.
6.4. Copy or move tasks to new sprints Below the sprint status there is a comfort feature called “Transfer tasks”. If you need to partially or completely take a task into a new sprint, this is the easy way to do it. Select all tasks you want to take into the currently visible sprint, optionally enter an evaluation and the work is done! If you leave the evaluation empty, the task is moved and otherwise a copy with the specified evaluation is created.
RTG Portale GmbH Expertise. Software. Solutions. Page 14
7. Troubleshooting
1. Why can’t I move tasks on the Scrum Board or save my working hours? While a task is part of the “Backlog”, it is not possible to change it’s status or save working hours on the Scrum Board. To start working on a task, you first need to move it into a Sprint.
2. Why does my Scrum Board not update automatically? In order for the automatic updates to take effect, you first have to activate “Ajax Push” in the portlet preferences. This preference is saved per user. If you are running Liferay 7, please check section 3.5 of this manual to enable push functionality.
3. Why can’t I create or modify Sprints or view Sprint status? Sprint management is restricted to users with the “Manage projects” permission for the Scrum Portlet.
4. Why does the Burndown Chart or sprint status not show my finished tasks? In order to identify tasks as finished they need to have a status with the “Finished” flag. Please make sure in the portlet preferences, that your fixed status has this flag set. The Burndown Chart works just like an analog one in your office: It is updated once per day to represent the amount of points (or hours in this case) left at the beginning of the day.
5. Why can’t I change a task’s color on the Scrum Board? As long as the “standard” color mode is active, every task is displayed using the standard color. If the “group” color mode is activated, you can only change the color of tasks, that belong to a User Story and the others are displayed using the standard color again.
6. Why can’t I see the use groups I created in the portlet preferences? If the flag “Only show Scrum teams” is enabled, the dropdown only shows user groups with the “Scrum team” flag. This makes configuration easier if you have a lot of user groups. You can either disable the filter in the configuration or update your user group with the flag to make it show up.