Embed Size (px)
Citation preview

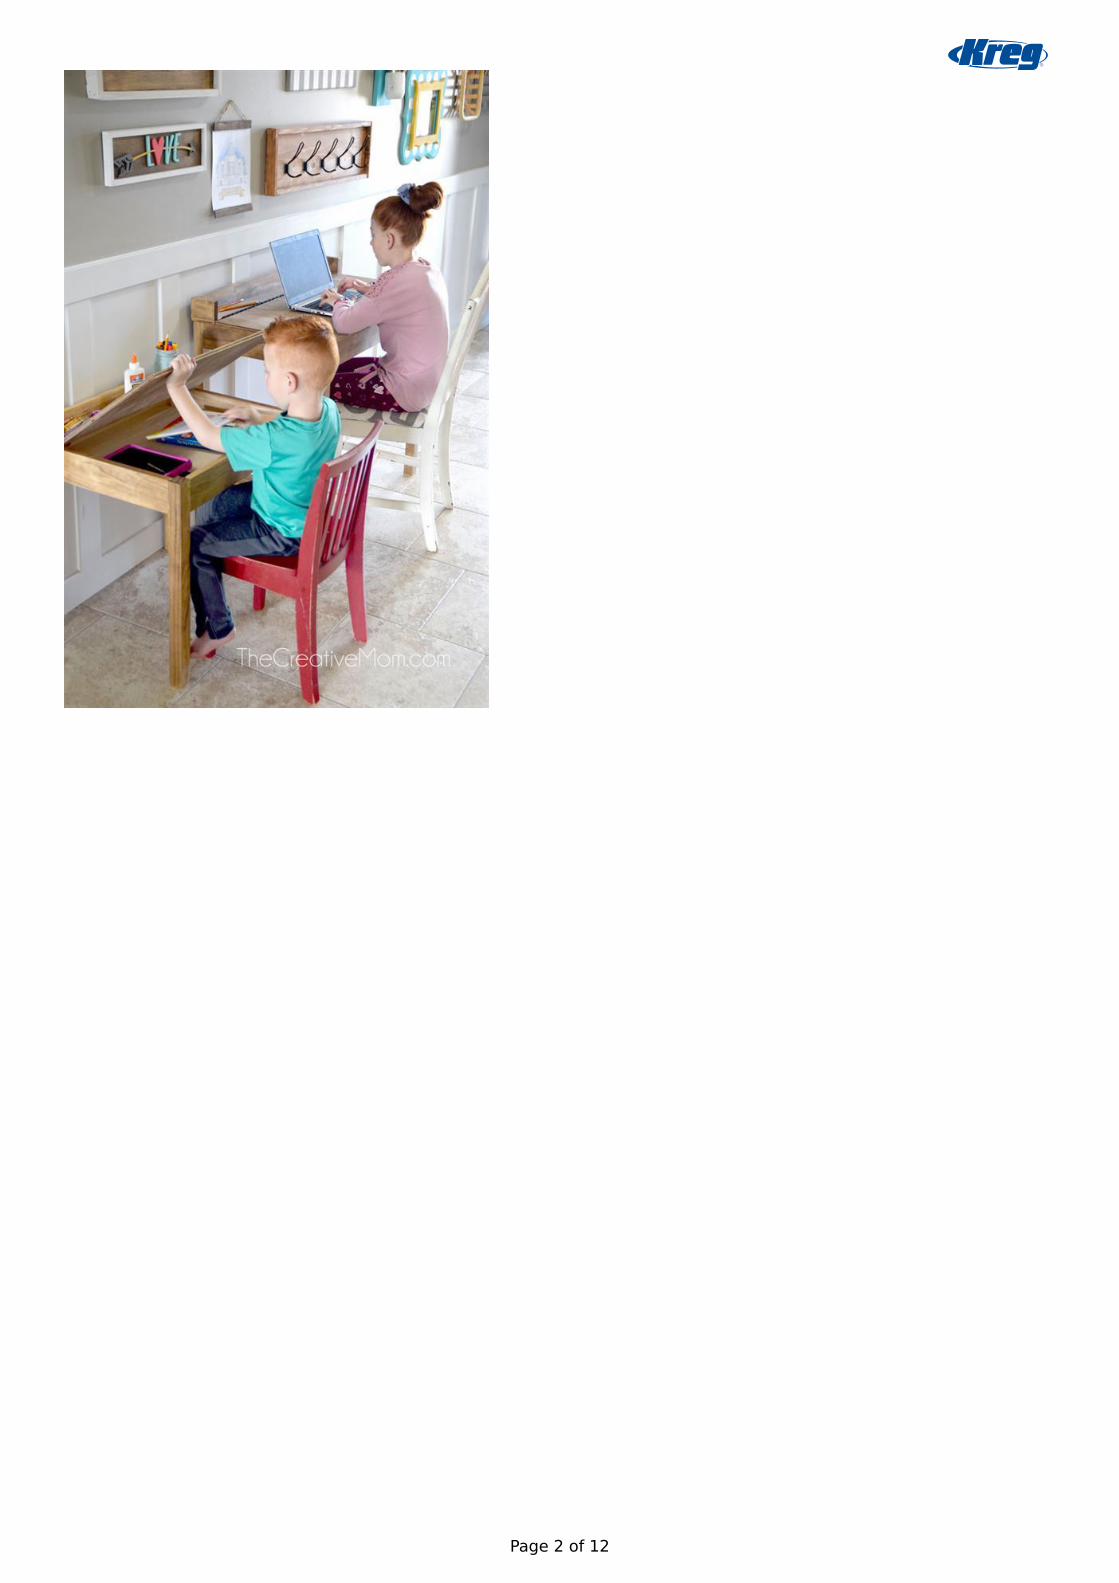
School Desk- small child size
This is a very simple build, built from off the shelf lumber. It can be built in just an afternoon with very basic tools. This desk
is a child sized desk, meant for smaller children, about 8 years old and younger. The desk has an lid that opens for easy
access to books, crayons, laptops, or tablets.
Difficulty
Easy
Page 1 of 12
Page 2 of 12
ToolsKreg Tools
Accu-Cut™
Kreg Pocket-Hole Jig® 720
Other Tools
Circular Saw (corded)
Jigsaw
Miter Saw
Tape Measure
Drill (cordless)
Sander
Tape Measure
MaterialsWood Products
Board , 2x2 , 96"1
Board , 1x4 , 96"1
Board , 1x2 , 96"1
Plywood , 1/2" Thick , Quarter Sheet1
Hardware & Supplies
Piano Hinge (12")1
1 1/4" Pocket Hole Screws50
Wood Glue1
Page 3 of 12
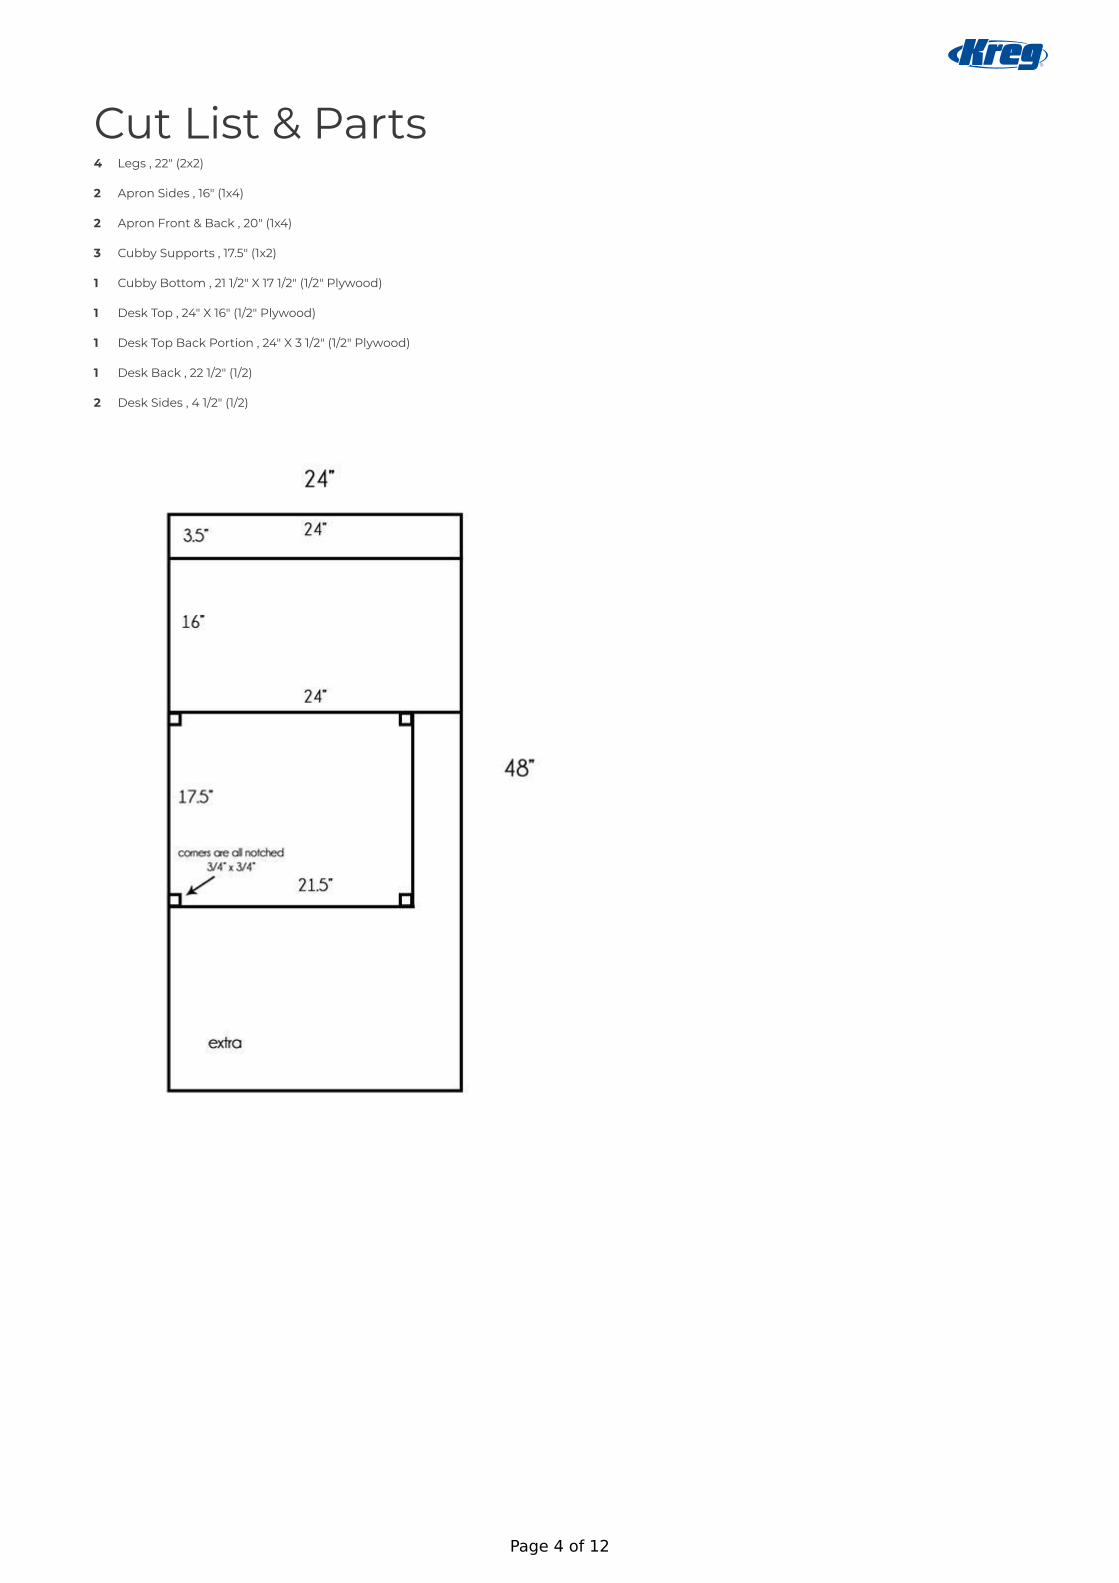
Cut List & PartsLegs , 22" (2x2)4
Apron Sides , 16" (1x4)2
Apron Front & Back , 20" (1x4)2
Cubby Supports , 17.5" (1x2)3
Cubby Bottom , 21 1/2" X 17 1/2" (1/2" Plywood)1
Desk Top , 24" X 16" (1/2" Plywood)1
Desk Top Back Portion , 24" X 3 1/2" (1/2" Plywood)1
Desk Back , 22 1/2" (1/2)1
Desk Sides , 4 1/2" (1/2)2
Page 4 of 12
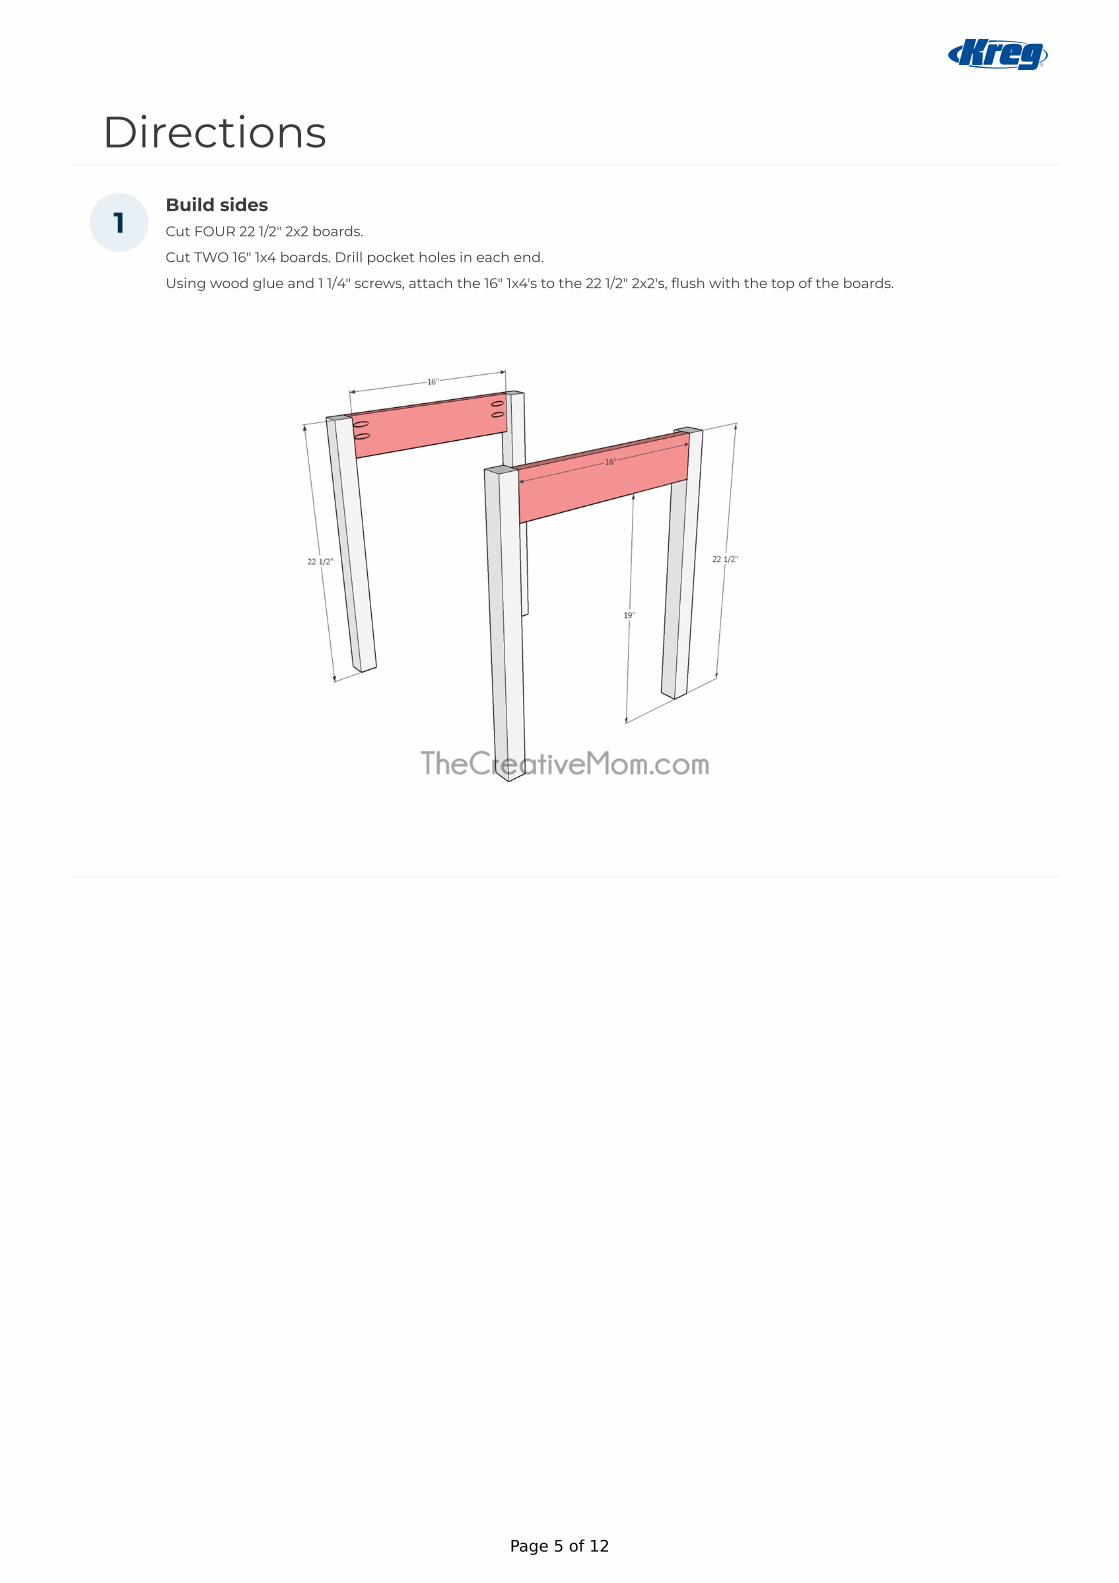
DirectionsBuild sidesCut FOUR 22 1/2" 2x2 boards.
Cut TWO 16" 1x4 boards. Drill pocket holes in each end.
Using wood glue and 1 1/4" screws, attach the 16" 1x4's to the 22 1/2" 2x2's, flush with the top of the boards.
1
Page 5 of 12

Prepare Apron BoardsCut TWO 20" 1x4 boards. Drill pocket holes in both ends of both boards.
Drill pocket holes on one side of one board.
Cut a notch out of the other board (see plans). This will create a space in order to open the lid of the desk later.
2
Page 6 of 12
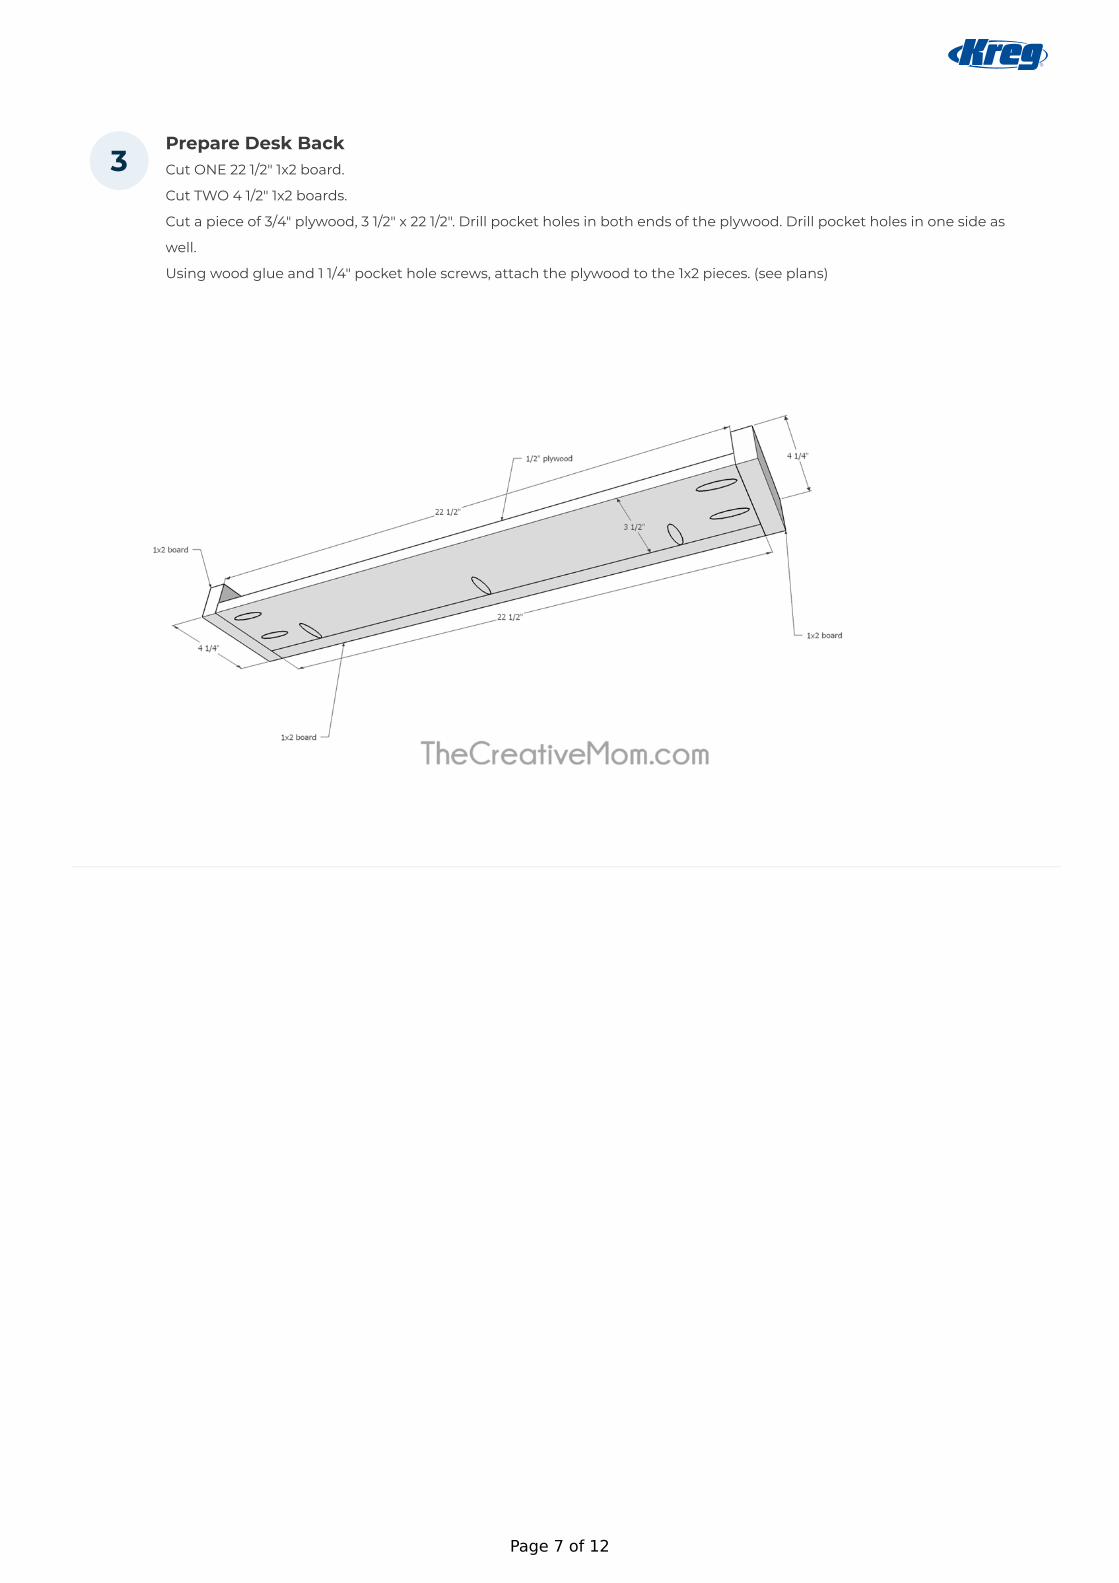
Prepare Desk BackCut ONE 22 1/2" 1x2 board.
Cut TWO 4 1/2" 1x2 boards.
Cut a piece of 3/4" plywood, 3 1/2" x 22 1/2". Drill pocket holes in both ends of the plywood. Drill pocket holes in one side as
well.
Using wood glue and 1 1/4" pocket hole screws, attach the plywood to the 1x2 pieces. (see plans)
3
Page 7 of 12

Attach Apron to Desk BackUsing wood glue and 1 1/4" pocket hole screws, attach the desk back to your 20" apron board you prepared earlier.
Attach Back ApronUsing wood glue and 1 1/4" pocket hole screws, attach the piece you just built to the side pieces from step 1.
4
5
Page 8 of 12
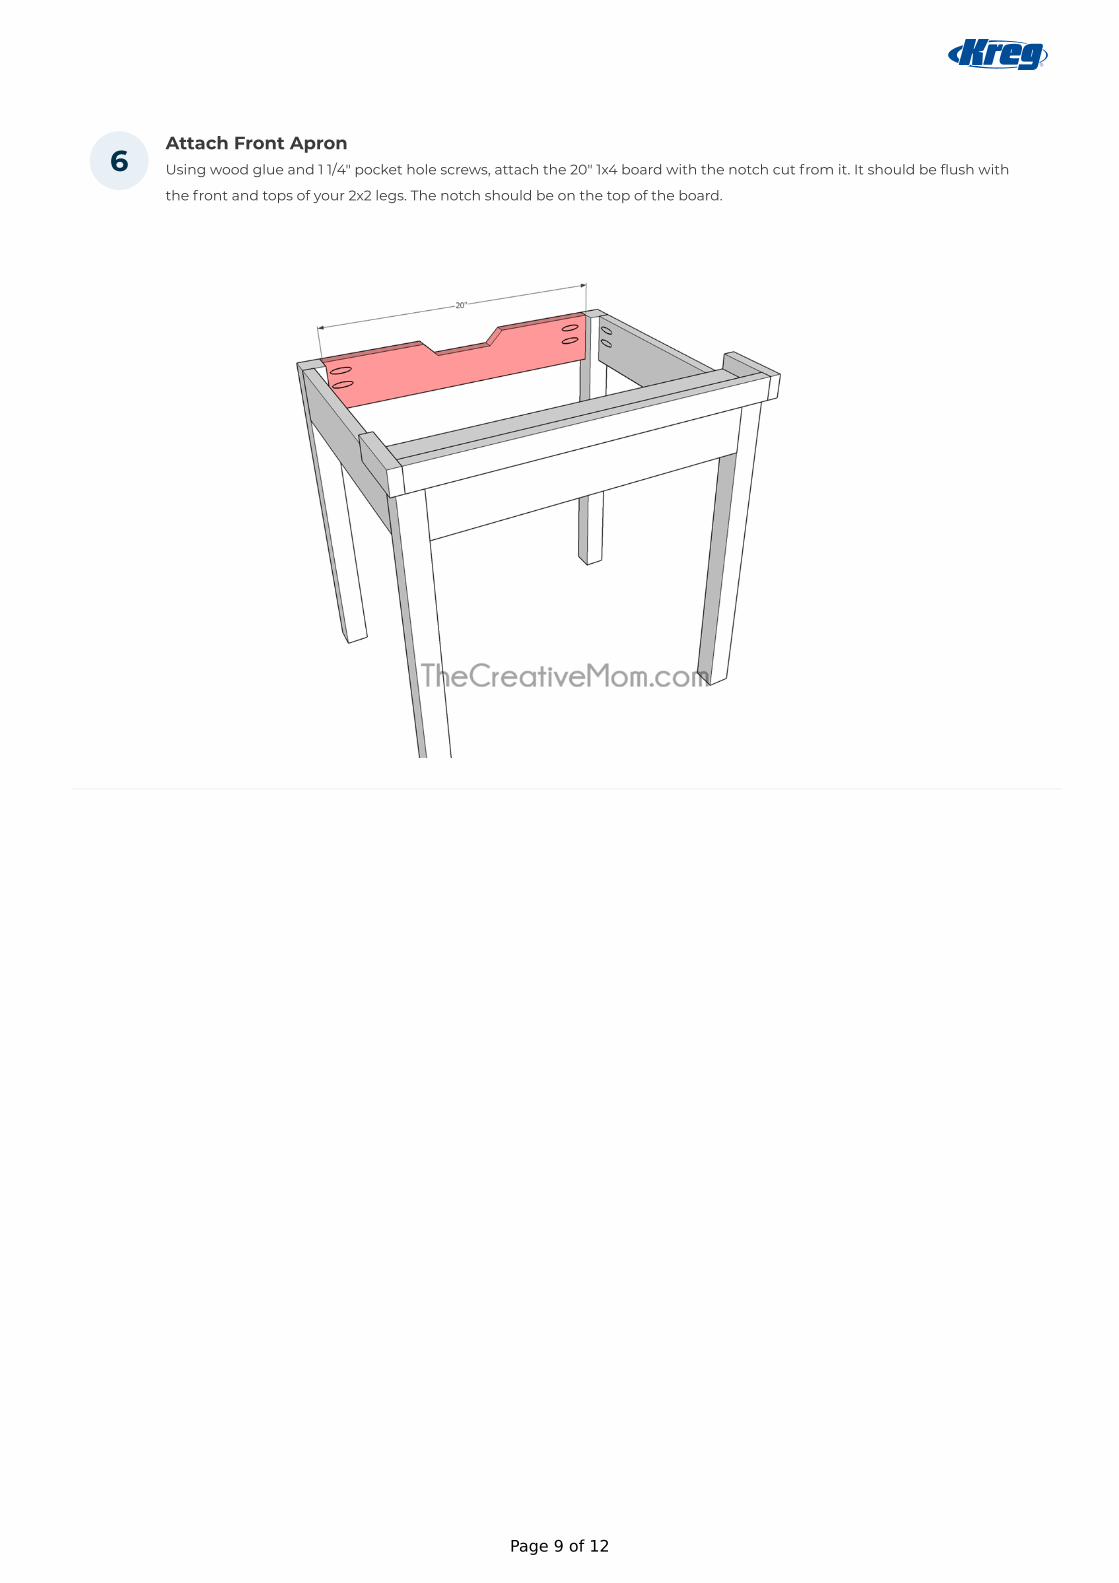
Attach Front ApronUsing wood glue and 1 1/4" pocket hole screws, attach the 20" 1x4 board with the notch cut from it. It should be flush with
the front and tops of your 2x2 legs. The notch should be on the top of the board.
6
Page 9 of 12
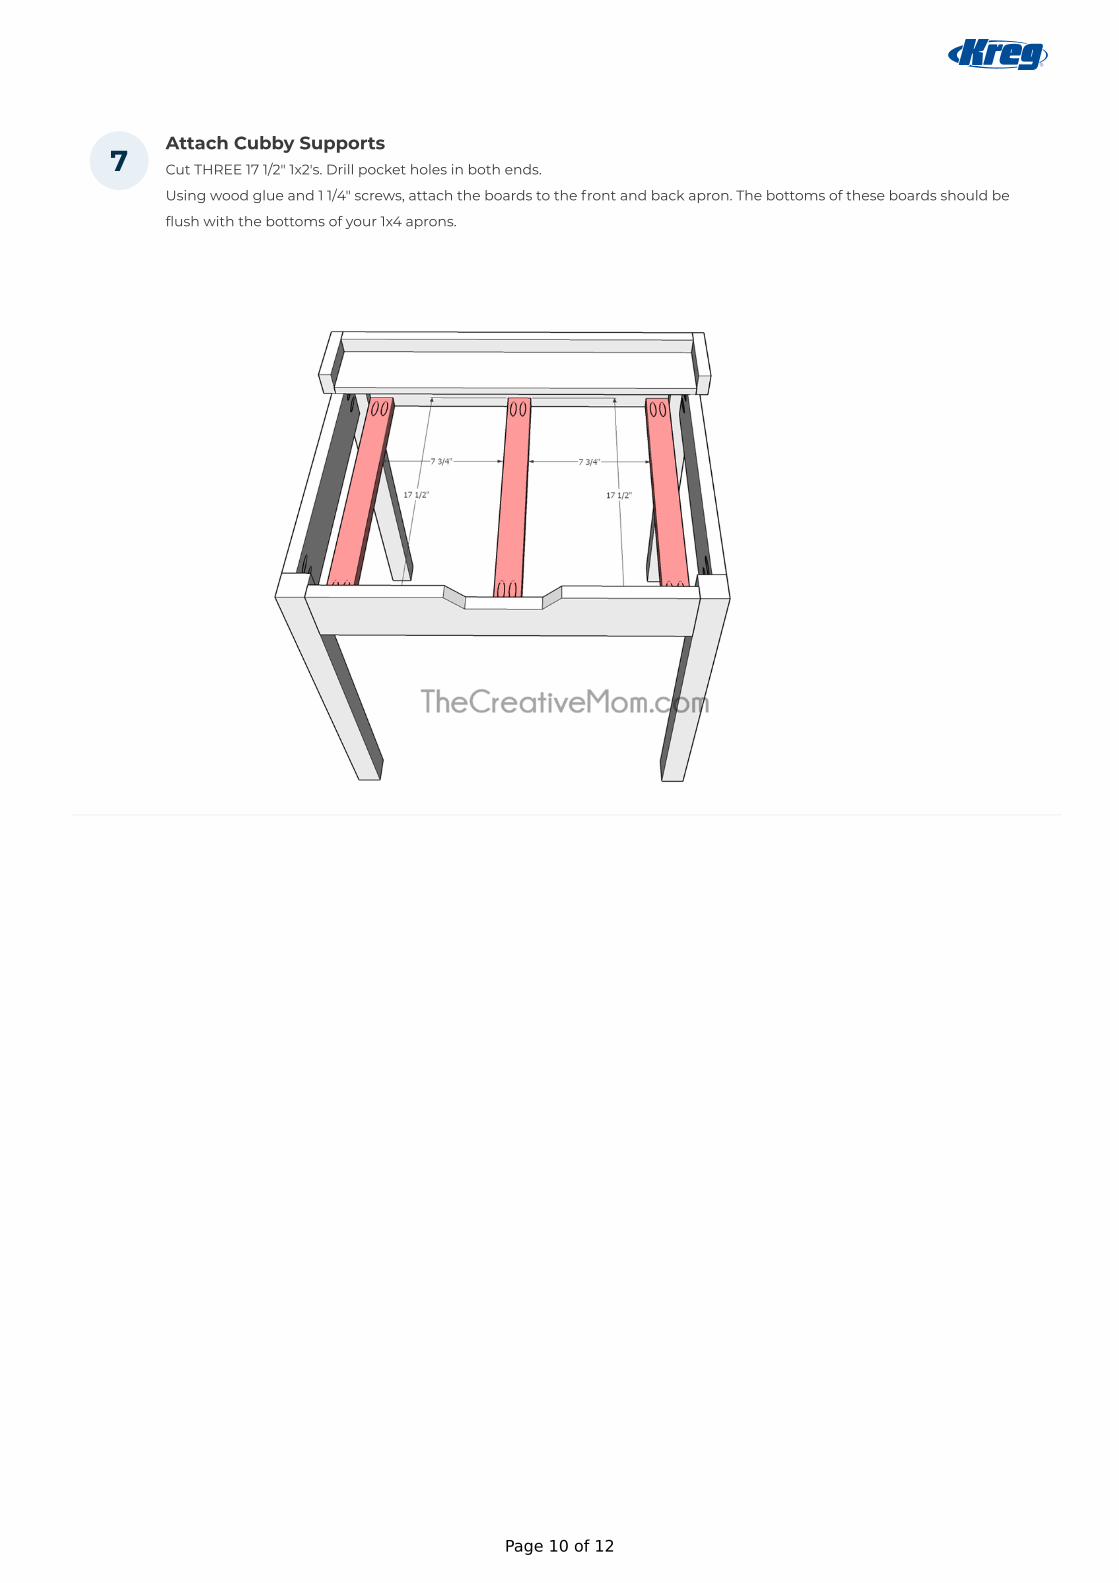
Attach Cubby SupportsCut THREE 17 1/2" 1x2's. Drill pocket holes in both ends.
Using wood glue and 1 1/4" screws, attach the boards to the front and back apron. The bottoms of these boards should be
flush with the bottoms of your 1x4 aprons.
7
Page 10 of 12
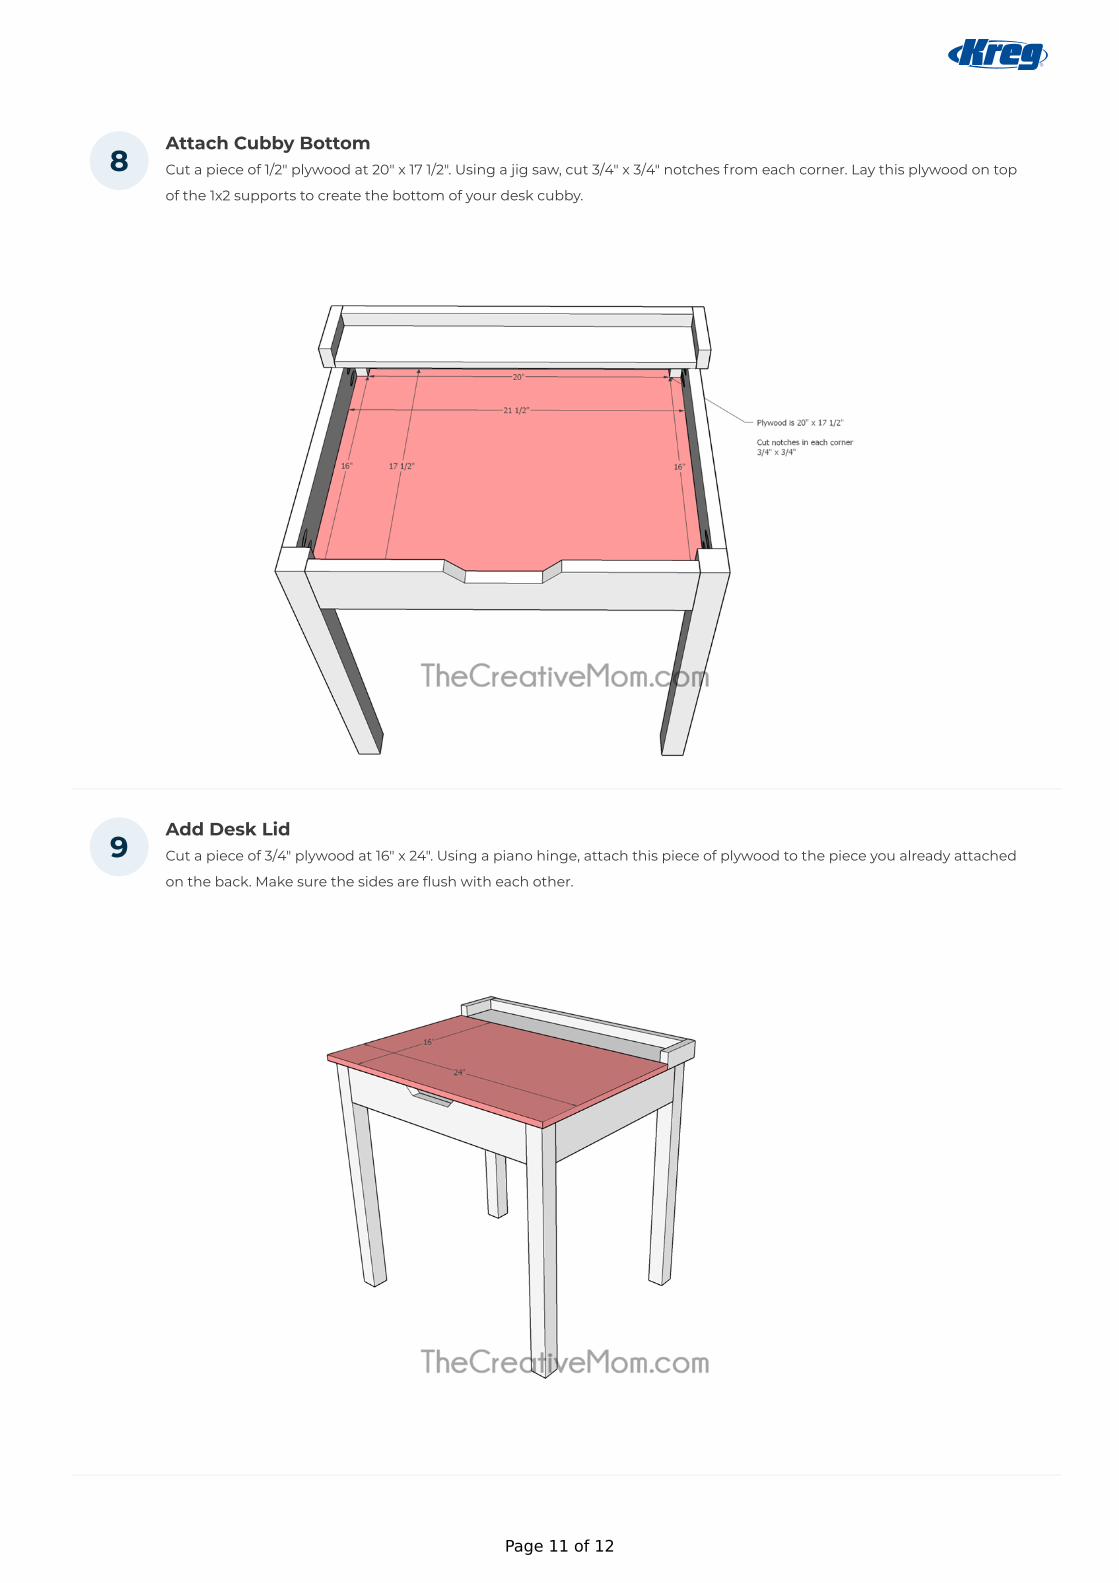
Attach Cubby BottomCut a piece of 1/2" plywood at 20" x 17 1/2". Using a jig saw, cut 3/4" x 3/4" notches from each corner. Lay this plywood on top
of the 1x2 supports to create the bottom of your desk cubby.
Add Desk LidCut a piece of 3/4" plywood at 16" x 24". Using a piano hinge, attach this piece of plywood to the piece you already attached
on the back. Make sure the sides are flush with each other.
8
9
Page 11 of 12

FinishStain or paint the desk. Seal with polyurethane.10
Page 12 of 12