Embed Size (px)
Citation preview
GH68_3XXXXA
S C H - R 4 8 0
P O R T A B L E M O B I L E P H O N E
User ManualPlease read this manual before operating your
phone and keep it for future reference.
USC_SCH-R480_UM_Eng_ME4_TN_052913_F4
Intellectual PropertyAll Intellectual Property, as defined below, owned by or which is otherwise the property of Samsung or its respective suppliersrelating to the SAMSUNG Phone, including but not limited to, accessories, parts, or software relating there to (the “PhoneSystem”), is proprietary to Samsung and protected under federal laws, state laws, and international treaty provisions. IntellectualProperty includes, but is not limited to, inventions (patentable or unpatentable), patents, trade secrets, copyrights, software,computer programs, and related documentation and other works of authorship. You may not infringe or otherwise violate therights secured by the Intellectual Property. Moreover, you agree that you will not (and will not attempt to) modify, preparederivative works of, reverse engineer, decompile, disassemble, or otherwise attempt to create source code from the software. Notitle to or ownership in the Intellectual Property is transferred to you. All applicable rights of the Intellectual Property shall remainwith SAMSUNG and its suppliers.
Open Source SoftwareSome software components of this product incorporate source code covered under GNU General Public License (GPL), GNU LesserGeneral Public License (LGPL), OpenSSL License, BSD License and other open source licenses. To obtain the source code coveredunder the open source licenses, please visit:
http://opensource.samsung.com.
Disclaimer of Warranties; Exclusion of LiabilityEXCEPT AS SET FORTH IN THE EXPRESS WARRANTY CONTAINED ON THE WARRANTY PAGE ENCLOSED WITH THE PRODUCT, THEPURCHASER TAKES THE PRODUCT "AS IS", AND SAMSUNG MAKES NO EXPRESS OR IMPLIED WARRANTY OF ANY KINDWHATSOEVER WITH RESPECT TO THE PRODUCT, INCLUDING BUT NOT LIMITED TO THE MERCHANTABILITY OF THE PRODUCT ORITS FITNESS FOR ANY PARTICULAR PURPOSE OR USE; THE DESIGN, CONDITION OR QUALITY OF THE PRODUCT; THEPERFORMANCE OF THE PRODUCT; THE WORKMANSHIP OF THE PRODUCT OR THE COMPONENTS CONTAINED THEREIN; ORCOMPLIANCE OF THE PRODUCT WITH THE REQUIREMENTS OF ANY LAW, RULE, SPECIFICATION OR CONTRACT PERTAINING
THERETO. NOTHING CONTAINED IN THE INSTRUCTION MANUAL SHALL BE CONSTRUED TO CREATE AN EXPRESS OR IMPLIEDWARRANTY OF ANY KIND WHATSOEVER WITH RESPECT TO THE PRODUCT. IN ADDITION, SAMSUNG SHALL NOT BE LIABLE FORANY DAMAGES OF ANY KIND RESULTING FROM THE PURCHASE OR USE OF THE PRODUCT OR ARISING FROM THE BREACH OFTHE EXPRESS WARRANTY, INCLUDING INCIDENTAL, SPECIAL OR CONSEQUENTIAL DAMAGES, OR LOSS OF ANTICIPATED PROFITSOR BENEFITS.
Modification of Software
SAMSUNG IS NOT LIABLE FOR PERFORMANCE ISSUES OR INCOMPATIBILITIES CAUSED BY YOUR EDITING OF REGISTRY SETTINGS,OR YOUR MODIFICATION OF OPERATING SYSTEM SOFTWARE.
USING CUSTOM OPERATING SYSTEM SOFTWARE MAY CAUSE YOUR DEVICE AND APPLICATIONS TO WORK IMPROPERLY. YOURCARRIER MAY NOT PERMIT USERS TO DOWNLOAD CERTAIN SOFTWARE, SUCH AS CUSTOM OS.
Samsung Telecommunications America (STA), LLC
Headquarters:
1301 E. Lookout Drive
Richardson, TX 75082
Customer Care Center:
1000 Klein Rd.
Plano, TX 75074
Toll Free Tel: 1.888.987.HELP (4357)
©2013 Samsung Telecommunications America, LLC. Samsung is a registered trademark of Samsung Electronics Co., Ltd.Do you have questions about your Samsung Mobile Device?For 24 hour information and assistance, we offer a new FAQ/ARS System (Automated Response System) at:www.samsung.com/us/support
Nuance®, VSuite™, T9® Text Input, and the Nuance logo are trademarks or registered trademarks of Nuance Communications,Inc. or its affiliates in the United States and/or other countries.
Openwave® is a registered Trademark of Openwave, Inc.
RSA® is a registered Trademark RSA Security, Inc.
The Bluetooth® word mark, figure mark (stylized “B Design”), and combination mark (Bluetooth word mark and “B Design”) areregistered trademarks and are wholly owned by the Bluetooth SIG.
microSD™ and the microSD logo are Trademarks of the SD Card Association.
Internet Address:http://www.samsung.com
1
Table of Contents
Section 1: Getting Started ............................. 4Understanding This User Manual . . . . . . . . . . . 4Battery . . . . . . . . . . . . . . . . . . . . . . . . . . . . . . . 5Activating Your Phone . . . . . . . . . . . . . . . . . . . 9Voicemail . . . . . . . . . . . . . . . . . . . . . . . . . . . . 10Memory Card . . . . . . . . . . . . . . . . . . . . . . . . . 10
Section 2: Understanding Your Phone ......... 12Your Phone’s Features . . . . . . . . . . . . . . . . . . 12Front View of Your Phone . . . . . . . . . . . . . . . . 13Keypad . . . . . . . . . . . . . . . . . . . . . . . . . . . . . 14Side Views of Your Phone . . . . . . . . . . . . . . . . 15Rear View of Your Phone . . . . . . . . . . . . . . . . 16Command Keys . . . . . . . . . . . . . . . . . . . . . . . 17Menu Navigation . . . . . . . . . . . . . . . . . . . . . . 21Understanding the Display Screen . . . . . . . . . 22
Section 3: Entering Text .............................. 24Entering Text . . . . . . . . . . . . . . . . . . . . . . . . . 24
Section 4: Call Functions ............................ 26Making a Call . . . . . . . . . . . . . . . . . . . . . . . . . 26
Answering a Call . . . . . . . . . . . . . . . . . . . . . . 29Call In Progress Options . . . . . . . . . . . . . . . . . 30Voice Commands . . . . . . . . . . . . . . . . . . . . . . 30Calls Logs . . . . . . . . . . . . . . . . . . . . . . . . . . . 34
Section 5: Messages .................................. 36Accessing Messages . . . . . . . . . . . . . . . . . . . 36Types of Messages . . . . . . . . . . . . . . . . . . . . . 36Creating and Sending Text Messages . . . . . . . 36Creating and Sending Multimedia Messages . 38Receiving Messages . . . . . . . . . . . . . . . . . . . . 40Message Folders . . . . . . . . . . . . . . . . . . . . . . 40Erase Messages . . . . . . . . . . . . . . . . . . . . . . . 45Messaging Settings . . . . . . . . . . . . . . . . . . . . 46
Section 6: Contacts .................................... 47Accessing Contacts . . . . . . . . . . . . . . . . . . . . 47Groups . . . . . . . . . . . . . . . . . . . . . . . . . . . . . . 52Speed Dials . . . . . . . . . . . . . . . . . . . . . . . . . . 56Favorites . . . . . . . . . . . . . . . . . . . . . . . . . . . . 57Memory Info . . . . . . . . . . . . . . . . . . . . . . . . . . 59
2
Section 7: Multimedia .................................60Accessing Multimedia . . . . . . . . . . . . . . . . . . . 60Camera . . . . . . . . . . . . . . . . . . . . . . . . . . . . . . 60Camcorder . . . . . . . . . . . . . . . . . . . . . . . . . . . 63Music Player . . . . . . . . . . . . . . . . . . . . . . . . . . 67My Images . . . . . . . . . . . . . . . . . . . . . . . . . . . 71My Ringtones . . . . . . . . . . . . . . . . . . . . . . . . . 72My Videos . . . . . . . . . . . . . . . . . . . . . . . . . . . . 73easyedge . . . . . . . . . . . . . . . . . . . . . . . . . . . . 73Tone Room Deluxe . . . . . . . . . . . . . . . . . . . . . 73
Section 8: Browser ......................................74Launching the Browser . . . . . . . . . . . . . . . . . . 74Using the Browser . . . . . . . . . . . . . . . . . . . . . . 74Using Links . . . . . . . . . . . . . . . . . . . . . . . . . . . 75How Browser Keys Work . . . . . . . . . . . . . . . . . 75
Section 9: Tools ..........................................76Accessing Tools . . . . . . . . . . . . . . . . . . . . . . . 76Bluetooth . . . . . . . . . . . . . . . . . . . . . . . . . . . . . 76Voice SVC . . . . . . . . . . . . . . . . . . . . . . . . . . . . 78Calculator . . . . . . . . . . . . . . . . . . . . . . . . . . . . 78Calendar . . . . . . . . . . . . . . . . . . . . . . . . . . . . . 78Alarm Clock . . . . . . . . . . . . . . . . . . . . . . . . . . . 79
Stopwatch . . . . . . . . . . . . . . . . . . . . . . . . . . . .79World Clock . . . . . . . . . . . . . . . . . . . . . . . . . . .79Memo Pad . . . . . . . . . . . . . . . . . . . . . . . . . . . .79USB Mass Storage . . . . . . . . . . . . . . . . . . . . . .79
Section 10: Settings ....................................80Accessing Your Phone’s Settings . . . . . . . . . . .80Location . . . . . . . . . . . . . . . . . . . . . . . . . . . . . .80Display Settings . . . . . . . . . . . . . . . . . . . . . . . .80Sounds Settings . . . . . . . . . . . . . . . . . . . . . . . .82Call Settings . . . . . . . . . . . . . . . . . . . . . . . . . .84Phone Settings . . . . . . . . . . . . . . . . . . . . . . . .86Phone Info . . . . . . . . . . . . . . . . . . . . . . . . . . . .91Memory . . . . . . . . . . . . . . . . . . . . . . . . . . . . . .91
Section 11: Health and SafetyInformation ..............................................92Exposure to Radio Frequency (RF) Signals . . . .92Specific Absorption Rate (SAR)
Certification Information . . . . . . . . . . . . . . . .97FCC Part 15 Information to User . . . . . . . . . . . .98Commercial Mobile Alerting System (CMAS) . .99Smart Practices While Driving . . . . . . . . . . . . .99Battery Use and Safety . . . . . . . . . . . . . . . . . .100
3
Samsung Mobile Products and Recycling . . . 102UL Certified Travel Charger . . . . . . . . . . . . . 103Display / Touch-Screen . . . . . . . . . . . . . . . . 104GPS . . . . . . . . . . . . . . . . . . . . . . . . . . . . . . . 104Emergency Calls . . . . . . . . . . . . . . . . . . . . . 105Care and Maintenance . . . . . . . . . . . . . . . . . 106Responsible Listening . . . . . . . . . . . . . . . . . 106Operating Environment . . . . . . . . . . . . . . . . 109FCC Hearing Aid Compatibility (HAC)
Regulations for Wireless Devices . . . . . . . 111Restricting Children's Access to
Your Mobile Device . . . . . . . . . . . . . . . . . . 112FCC Notice and Cautions . . . . . . . . . . . . . . . 112Other Important Safety Information . . . . . . . 113
Section 12: Warranty Information ............. 115Standard Limited Warranty . . . . . . . . . . . . . . 115End User License Agreement for Software . . 120
Index ......................................................... 128
4
Section 1: Getting Started
This section explains how to start using your phone byactivating your service, setting up your voicemail, or gettingan understanding of how this manual is put together.
Understanding This User ManualThe chapters of this guide generally follow the same order asthe menus and sub-menus in your phone. A robust index forquick reference to most features begins on page 128.
Also included is important safety information that you shouldknow before using your phone. Most of this information isnear the back of the guide, beginning on page 92.
Notes and TipsThroughout this guide, there is text that is set apart from therest. These are intended to point out important information,quick methods for activating features, to define terms, andmore. The definitions for these methods are as follows:• Notes: Explain alternative options within the current feature,
menu, or sub-menu.
• Tips: Provide quick or innovative methods for performingfunctions related to the subject at hand.
• Important: Points out important information about thecurrent feature that could affect performance, or even damageyour phone.

Getting Started 5
Text ConventionsThis manual provides condensed information about how touse your phone. To make this possible, the following termsand icon appear in place of repeatedly-used proceduralsteps:
Battery Your phone is powered by a rechargeable, standard Li-ionbattery. A travel adapter is included with the phone forcharging the battery.
Note: The battery comes partially charged. You must fullycharge the battery before using your phone for the firsttime. A fully discharged battery requires up to 4 hours ofcharge time.
After the first charge, you can use the phone whilecharging.
Warning!: Use only Samsung-approved charging devices andbatteries. Samsung accessories are designed tomaximize battery life. Using other accessories mayinvalidate your warranty and may cause damage.
highlight Use the Navigation Key ( ) to move ahighlighting effect onto a menu item or screenitem of interest.
select After “highlighting” a menu item or screen item,press the Center-Select key ( ) to launch,access, or save a highlighted menu item orscreen field of interest.
➔ Used in place of “select” in long “drill down”procedure steps.
Example: “...Settings ➔ Call Settings ➔
Auto Retry...”
6
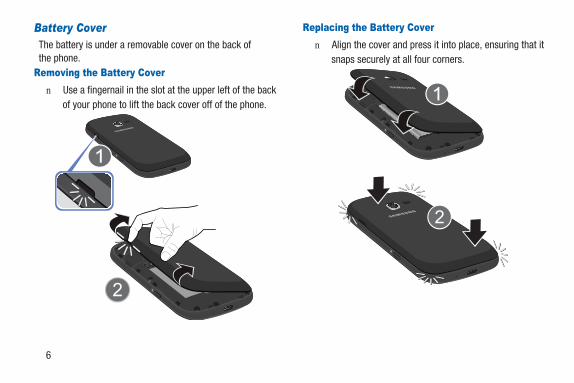
Battery CoverThe battery is under a removable cover on the back ofthe phone.
Removing the Battery Covern Use a fingernail in the slot at the upper left of the back
of your phone to lift the back cover off of the phone.
Replacing the Battery Covern Align the cover and press it into place, ensuring that it
snaps securely at all four corners.
Getting Started 7
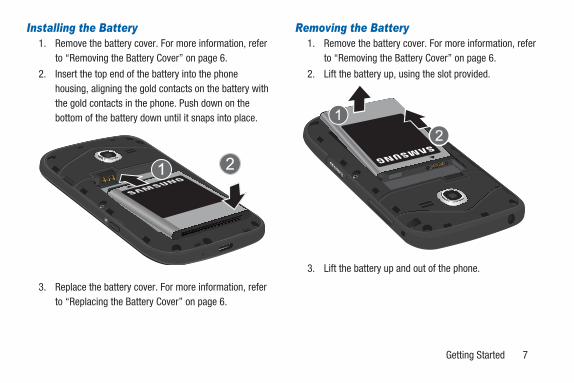
Installing the Battery1. Remove the battery cover. For more information, refer
to “Removing the Battery Cover” on page 6.
2. Insert the top end of the battery into the phonehousing, aligning the gold contacts on the battery withthe gold contacts in the phone. Push down on thebottom of the battery down until it snaps into place.
3. Replace the battery cover. For more information, referto “Replacing the Battery Cover” on page 6.
Removing the Battery1. Remove the battery cover. For more information, refer
to “Removing the Battery Cover” on page 6.
2. Lift the battery up, using the slot provided.
3. Lift the battery up and out of the phone.
8
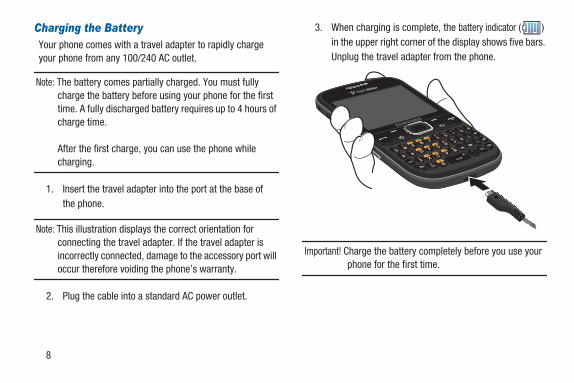
Charging the BatteryYour phone comes with a travel adapter to rapidly chargeyour phone from any 100/240 AC outlet.
Note: The battery comes partially charged. You must fullycharge the battery before using your phone for the firsttime. A fully discharged battery requires up to 4 hours ofcharge time.
After the first charge, you can use the phone whilecharging.
1. Insert the travel adapter into the port at the base ofthe phone.
Note: This illustration displays the correct orientation forconnecting the travel adapter. If the travel adapter isincorrectly connected, damage to the accessory port willoccur therefore voiding the phone’s warranty.
2. Plug the cable into a standard AC power outlet.
3. When charging is complete, the battery indicator ( )in the upper right corner of the display shows five bars.Unplug the travel adapter from the phone.
Important! Charge the battery completely before you use yourphone for the first time.
Getting Started 9
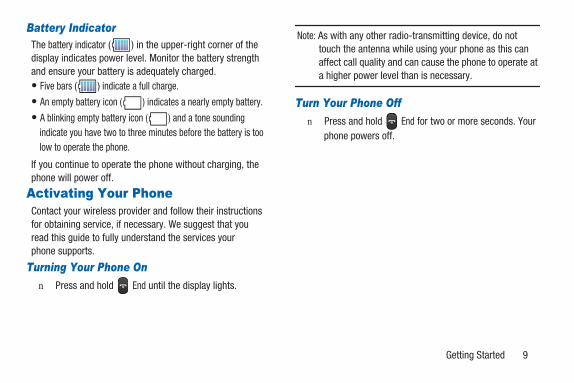
Battery IndicatorThe battery indicator ( ) in the upper-right corner of thedisplay indicates power level. Monitor the battery strengthand ensure your battery is adequately charged.• Five bars ( ) indicate a full charge.
• An empty battery icon ( ) indicates a nearly empty battery.
• A blinking empty battery icon ( ) and a tone soundingindicate you have two to three minutes before the battery is toolow to operate the phone.
If you continue to operate the phone without charging, thephone will power off.
Activating Your PhoneContact your wireless provider and follow their instructionsfor obtaining service, if necessary. We suggest that youread this guide to fully understand the services yourphone supports.
Turning Your Phone Onn Press and hold End until the display lights.
Note: As with any other radio-transmitting device, do nottouch the antenna while using your phone as this canaffect call quality and can cause the phone to operate ata higher power level than is necessary.
Turn Your Phone Offn Press and hold End for two or more seconds. Your
phone powers off.
10
VoicemailSetting Up Your VoicemailVoicemail allows callers to leave voice messages, which canbe retrieved any time.
Note: Once your Voicemail account has been set up, you canuse the Voicemail folder (under the Messaging menu) toview details of voice messages in your Voicemailaccount.
1. In standby mode, press and hold or dial your ownmobile number to dial your Voicemail account.
2. Follow the prompts in the new user tutorial to set upyour mail box.
Listen to Voicemail1. In standby mode, press and hold or dial your own
mobile number to dial Voicemail. After connecting, youwill hear your voice greeting.
2. You are prompted to enter your password.
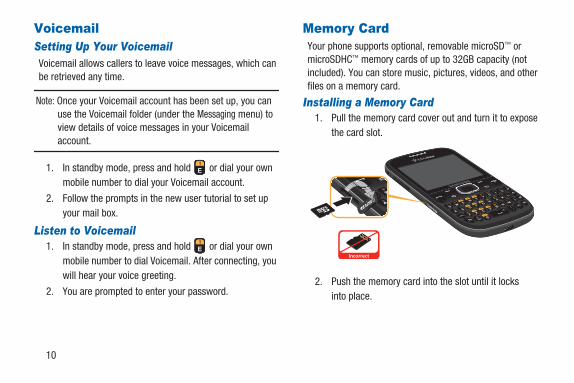
Memory CardYour phone supports optional, removable microSD™ ormicroSDHC™ memory cards of up to 32GB capacity (notincluded). You can store music, pictures, videos, and otherfiles on a memory card.
Installing a Memory Card1. Pull the memory card cover out and turn it to expose
the card slot.
2. Push the memory card into the slot until it locksinto place.
Incorrect
Getting Started 11
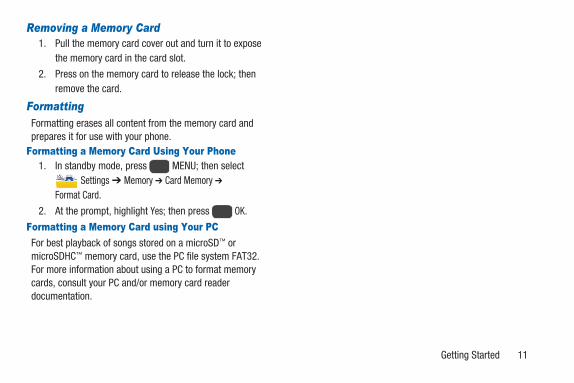
Removing a Memory Card1. Pull the memory card cover out and turn it to expose
the memory card in the card slot.
2. Press on the memory card to release the lock; thenremove the card.
FormattingFormatting erases all content from the memory card andprepares it for use with your phone.
Formatting a Memory Card Using Your Phone1. In standby mode, press MENU; then select
Settings ➔ Memory ➔ Card Memory ➔
Format Card.
2. At the prompt, highlight Yes; then press OK.
Formatting a Memory Card using Your PCFor best playback of songs stored on a microSD™ ormicroSDHC™ memory card, use the PC file system FAT32.For more information about using a PC to format memorycards, consult your PC and/or memory card readerdocumentation.
12
Section 2: Understanding Your Phone
This section outlines some key features of your SamsungSCH-R480 phone. It also describes the screen format.
Your Phone’s Features• Domestic and international voice and text messaging service
(available on participating networks).
• Large 2.4 inch (diagonally) color screen (320 x 240 pixelresolution)
• 3G EVDO support
• Bluetooth® Wireless Technology (see Note)
• Global Positioning System (GPS) Technology
• Digital Assistant Tools
• QWERTY Keypad
• Text (SMS), Picture/Video (MMS), Email, Commercial MobileAlerting System (CMAS), and Social Network (Facebook andTwitter) Messaging
• Built-in 2.0 Megapixel Digital Camera
• Voice Dial
• Music Player
• Memory Card Slot (microSD™ and microSDHC™ up to 32 GB)
Note: The SCH-R480 phone supports the wireless headset,hands-free, dial-up networking, stereo (A2DP),phonebook access, object push, and file transfer profilesfor Bluetooth® wireless technology.
Understanding Your Phone 13
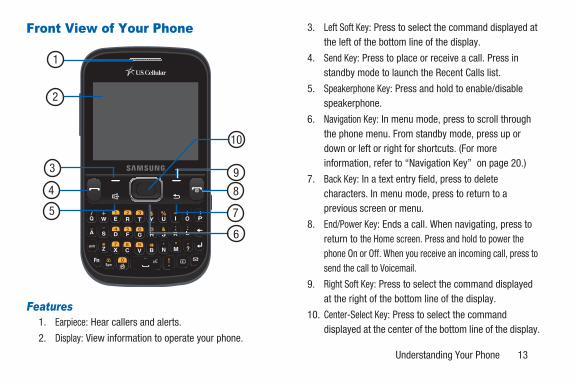
Front View of Your Phone
Features1. Earpiece: Hear callers and alerts.
2. Display: View information to operate your phone.
3. Left Soft Key: Press to select the command displayed atthe left of the bottom line of the display.
4. Send Key: Press to place or receive a call. Press instandby mode to launch the Recent Calls list.
5. Speakerphone Key: Press and hold to enable/disablespeakerphone.
6. Navigation Key: In menu mode, press to scroll throughthe phone menu. From standby mode, press up ordown or left or right for shortcuts. (For moreinformation, refer to “Navigation Key” on page 20.)
7. Back Key: In a text entry field, press to deletecharacters. In menu mode, press to return to aprevious screen or menu.
8. End/Power Key: Ends a call. When navigating, press toreturn to the Home screen. Press and hold to power thephone On or Off. When you receive an incoming call, press tosend the call to Voicemail.
9. Right Soft Key: Press to select the command displayedat the right of the bottom line of the display.
10. Center-Select Key: Press to select the commanddisplayed at the center of the bottom line of the display.
1
2
3
4
5
8
9
10
6
7
14
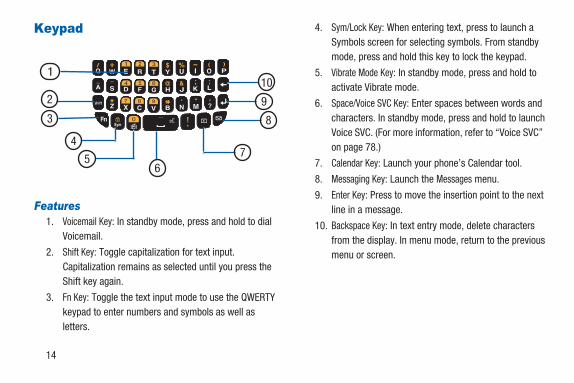
Keypad
Features1. Voicemail Key: In standby mode, press and hold to dial
Voicemail.
2. Shift Key: Toggle capitalization for text input.Capitalization remains as selected until you press theShift key again.
3. Fn Key: Toggle the text input mode to use the QWERTYkeypad to enter numbers and symbols as well asletters.
4. Sym/Lock Key: When entering text, press to launch aSymbols screen for selecting symbols. From standbymode, press and hold this key to lock the keypad.
5. Vibrate Mode Key: In standby mode, press and hold toactivate Vibrate mode.
6. Space/Voice SVC Key: Enter spaces between words andcharacters. In standby mode, press and hold to launchVoice SVC. (For more information, refer to “Voice SVC”on page 78.)
7. Calendar Key: Launch your phone’s Calendar tool.
8. Messaging Key: Launch the Messages menu.
9. Enter Key: Press to move the insertion point to the nextline in a message.
10. Backspace Key: In text entry mode, delete charactersfrom the display. In menu mode, return to the previousmenu or screen.
1
5
3
4
2
67
8
9
10
Understanding Your Phone 15
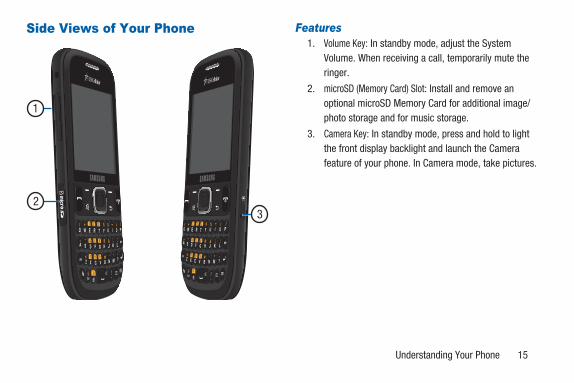
Side Views of Your Phone Features1. Volume Key: In standby mode, adjust the System
Volume. When receiving a call, temporarily mute theringer.
2. microSD (Memory Card) Slot: Install and remove anoptional microSD Memory Card for additional image/photo storage and for music storage.
3. Camera Key: In standby mode, press and hold to lightthe front display backlight and launch the Camerafeature of your phone. In Camera mode, take pictures.
1
23
16
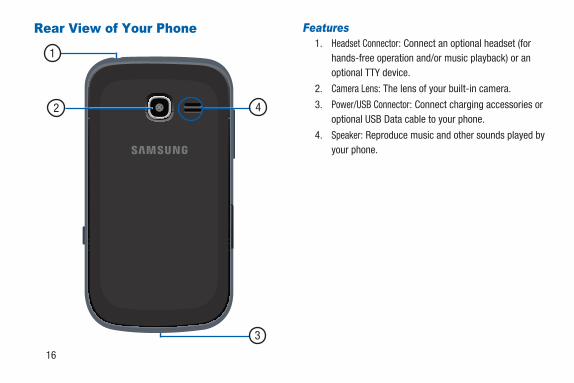
Rear View of Your Phone Features1. Headset Connector: Connect an optional headset (for
hands-free operation and/or music playback) or anoptional TTY device.
2. Camera Lens: The lens of your built-in camera.
3. Power/USB Connector: Connect charging accessories oroptional USB Data cable to your phone.
4. Speaker: Reproduce music and other sounds played byyour phone.
1
2 4
3

Understanding Your Phone 17
Command KeysLeft Soft KeySome functions of the Left Soft Key ( ) are as follows:• In standby mode, press the Left Soft Key to open the Messaging
menu.
• In text input fields, press the Left Soft Key to select the text inputmethod.
Right Soft KeySome functions of the Right Soft Key ( ) are as follows:• In standby mode, press the Right Soft Key function Contacts to
open your Contact List.
• When the Right Soft Key function is Options, press to chooseoptions for the current item.
Center-Select KeySome functions of the Center-Select Key ( ) are:• In standby mode, press the Center-Select Key to open the Main
Menu.
• In a list, press the Center-Select Key to view, select, launch, orplay a highlighted item.
• In a menu, press the Center-Select Key to accept the highlightedselection.
• In camera mode, press the Center-Select Key to take a photo.

18
Send KeyThe Send Key ( ) is used to answer calls, dial calls, and torecall the last number(s) dialed, received, or missed.• When receiving a call, press the Send Key once to answer the
call.
• In standby mode, enter a number and press the Send Key tomake a call.
• In standby mode, press the Send Key to display the ALL CALLSlist of calls to and from your phone.
• Press the Send Key twice in standby mode to call the most recentnumber.
• With two active calls, press the Send Key to pick up a waiting call.Press the Send Key again to switch back to the original call.
Volume KeyUse the Volume Key ( ) to adjust volume:• In standby mode, press the Volume Key to adjust Master Volume.
• In standby mode, press and hold the Volume Key to activateSounds Off.
• During calls, press the Volume Key to adjust voice volume.
• During music playback, press the Volume Key to adjust audiovolume.
• Press the Volume Key to mute the ringtone of an incoming call.
Understanding Your Phone 19
Back KeyThe Back Key ( ) is used to return to a previous menu orscreen. In some screens, you can also use the key to eraseor clear numbers, text, or symbols from the display.• Press the Back Key to back up one menu level.
Delete KeyThe Delete Key ( ) is used to erase or clear numbers, text,or symbols from the display.• If you enter an incorrect character, briefly press to backspace
(and delete) the character.
• To erase a word or sentence, press and hold .
End Key• Press and hold the End Key ( ) to turn your phone on or off.
• Briefly press to disconnect a call.
• Press to return to standby mode from any menu or to cancelthe last input.
Camera Keyn In standby mode, press and hold the Camera key
( ) on the right side of your phone.When in camera mode, pressing the Camera Key takesa picture.
Shift Keyn When in a text entry field, press the Shift Key ( ) to
switch between Abc (initial case), ABC (upper case),and abc (lower case) modes.
Fn KeyWhile in input mode, the Fn (Function) Key ( ) lets youtoggle text input modes between Abc and single-character123/Sym and locked 123/Sym.
20
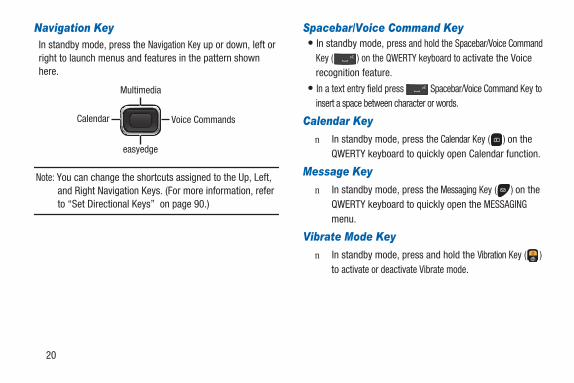
Navigation KeyIn standby mode, press the Navigation Key up or down, left orright to launch menus and features in the pattern shownhere.
Note: You can change the shortcuts assigned to the Up, Left,and Right Navigation Keys. (For more information, referto “Set Directional Keys” on page 90.)
Spacebar/Voice Command Key• In standby mode, press and hold the Spacebar/Voice Command
Key ( ) on the QWERTY keyboard to activate the Voicerecognition feature.
• In a text entry field press Spacebar/Voice Command Key toinsert a space between character or words.
Calendar Keyn In standby mode, press the Calendar Key ( ) on the
QWERTY keyboard to quickly open Calendar function.
Message Keyn In standby mode, press the Messaging Key ( ) on the
QWERTY keyboard to quickly open the MESSAGINGmenu.
Vibrate Mode Keyn In standby mode, press and hold the Vibration Key ( )
to activate or deactivate Vibrate mode.
Multimedia
easyedge
Calendar Voice Commands
Understanding Your Phone 21
Speakerphone Keyn In standby mode, press the Speakerphone Key ( ) to
switch between the earpiece and the speakerphone,before or during a call.
Lock/Symbol Key• In standby mode, press and hold the Lock/Symbol Key ( ) to
lock or unlock the keypad.
• When in a text entry field press the Lock/Symbol Key to entersymbols. Press the Navigation Key to scroll through the symbols.
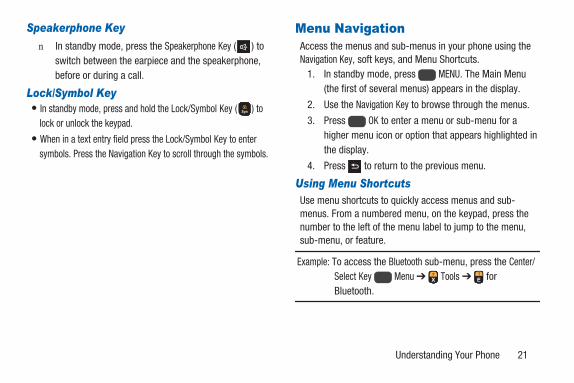
Menu NavigationAccess the menus and sub-menus in your phone using theNavigation Key, soft keys, and Menu Shortcuts.
1. In standby mode, press MENU. The Main Menu(the first of several menus) appears in the display.
2. Use the Navigation Key to browse through the menus.
3. Press OK to enter a menu or sub-menu for ahigher menu icon or option that appears highlighted inthe display.
4. Press to return to the previous menu.
Using Menu ShortcutsUse menu shortcuts to quickly access menus and sub-menus. From a numbered menu, on the keypad, press thenumber to the left of the menu label to jump to the menu,sub-menu, or feature.
Example: To access the Bluetooth sub-menu, press the Center/Select Key Menu ➔ Tools ➔ forBluetooth.
22
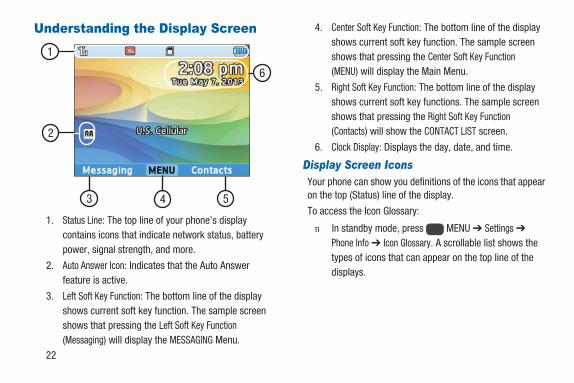
Understanding the Display Screen
1. Status Line: The top line of your phone’s displaycontains icons that indicate network status, batterypower, signal strength, and more.
2. Auto Answer Icon: Indicates that the Auto Answerfeature is active.
3. Left Soft Key Function: The bottom line of the displayshows current soft key function. The sample screenshows that pressing the Left Soft Key Function(Messaging) will display the MESSAGING Menu.
4. Center Soft Key Function: The bottom line of the displayshows current soft key function. The sample screenshows that pressing the Center Soft Key Function(MENU) will display the Main Menu.
5. Right Soft Key Function: The bottom line of the displayshows current soft key functions. The sample screenshows that pressing the Right Soft Key Function(Contacts) will show the CONTACT LIST screen.
6. Clock Display: Displays the day, date, and time.
Display Screen IconsYour phone can show you definitions of the icons that appearon the top (Status) line of the display.
To access the Icon Glossary:
n In standby mode, press MENU ➔ Settings ➔
Phone Info ➔ Icon Glossary. A scrollable list shows thetypes of icons that can appear on the top line of thedisplays.
1
3 54
6
2
Understanding Your Phone 23
Dialog BoxesDialog boxes prompt for action, inform you of status, or warnof situations such as low battery. Dialog boxes and theirdefinitions are outlined below.• Choice
– Example: “Save Message?”• Reconfirm
– Example: “Erase All Messages?”• Performing
– Example: “Sending...” “Connecting...”• Completed
– Example: “Message Saved”• Information
– Example: “New Message”• Error
– Example: “System Error!”• Warning
– Example: “Low Battery,” “Memory Full!”
24
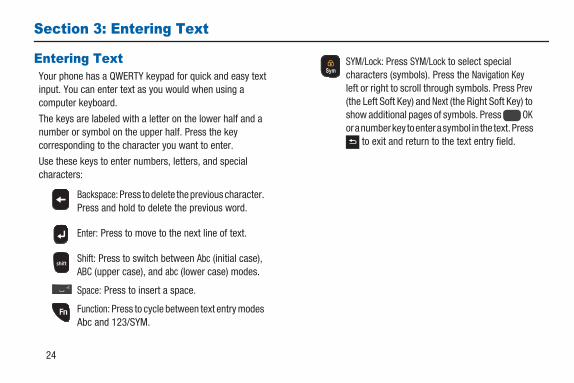
Section 3: Entering Text
Entering TextYour phone has a QWERTY keypad for quick and easy textinput. You can enter text as you would when using acomputer keyboard.
The keys are labeled with a letter on the lower half and anumber or symbol on the upper half. Press the keycorresponding to the character you want to enter.
Use these keys to enter numbers, letters, and specialcharacters:
Backspace: Press todelete theprevious character.Press and hold to delete the previous word.
Enter: Press to move to the next line of text.
Shift: Press to switch between Abc (initial case),ABC (upper case), and abc (lower case) modes.
Space: Press to insert a space.
Function: Press to cycle between text entry modesAbc and 123/SYM.
SYM/Lock: Press SYM/Lock to select specialcharacters (symbols). Press the Navigation Keyleft or right to scroll through symbols. Press Prev(the Left Soft Key) and Next (the Right Soft Key) toshow additional pages of symbols. Press OKoranumberkey toenterasymbol in the text.Press
to exit and return to the text entry field.
Entering Text 25
In a text entry field, press the Left Soft Key (entry mode)to display the Entry Mode menu:• Abc/ABC: Abc mode is standard text entry mode for mobile
telephones and is the default text entry mode of the externalkeypad.
• XT9 Word: XT9 Word is a predictive text entry mode thatrecognizes common words that match the sequence of your keypresses and inserts the most common word into your text.
• 123/Sym: Use 123 mode to enter numbers and symbols (asshown on the non-numeric keys) into a text field.
• XT9 Palabra: XT9 Palabra is a Spanish-language predictive textentry mode that recognizes common words that match thesequence of your key presses and inserts the most common wordinto your text.
• : is a Chinese-language predictive text entry modethat recognizes common words that match the sequence of yourkey presses and inserts the most common word into your text.
• Smileys: Select smiley symbols from a pop-up screen.
26
Section 4: Call Functions
This section provides procedures for making and answeringcalls. This section also describes features, such as call logsand call timers, that help you make calls and manage yourcall time.
Making a Call1. With the phone on, enter the number you wish to call
using the keypad.
2. Press Send to place the call.
Three-Way CallingCall two other numbers and connect them to your call usingthree-way calling.
1. In standby mode, enter the number for the first party inyour call. Press Send.
2. When connected, ask the other party to remain on theline.
3. Enter the second party’s phone number and pressSend.
4. When the second party answers, press Send toconnect all three parties.
Dialing International NumbersCall Another Country — Manual Method
1. In Standby mode, enter 011 (the three-digit exit codefor the United States).
2. Enter the country code for the country that you arecalling.
3. Enter the number that you wish to call and pressSend.
Note: Puerto Rico and Canada are on the North Americandialing plan. Making calls to Puerto Rico and Canada issimilar to making calls within the United States; nounique country codes are necessary.
Call Functions 27
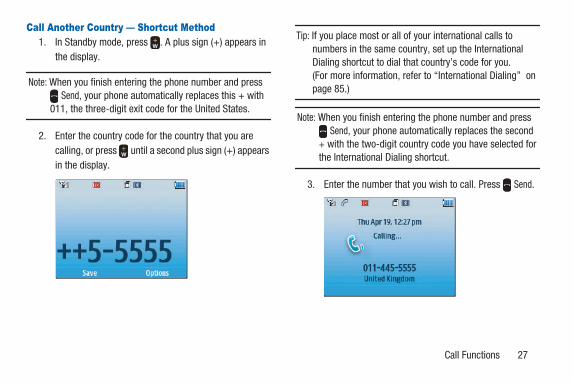
Call Another Country — Shortcut Method1. In Standby mode, press . A plus sign (+) appears in
the display.
Note: When you finish entering the phone number and pressSend, your phone automatically replaces this + with
011, the three-digit exit code for the United States.
2. Enter the country code for the country that you arecalling, or press until a second plus sign (+) appearsin the display.
Tip: If you place most or all of your international calls tonumbers in the same country, set up the InternationalDialing shortcut to dial that country’s code for you.(For more information, refer to “International Dialing” onpage 85.)
Note: When you finish entering the phone number and pressSend, your phone automatically replaces the second
+ with the two-digit country code you have selected forthe International Dialing shortcut.
3. Enter the number that you wish to call. Press Send.
28
Manual Pause CallingTo manually call a number with pause(s) without storing it inyour Contacts list:
1. In standby mode, enter the number you wish to call.
2. Press Options. The following options appear in thedisplay:• Add 2-Sec Pause: A 2-second pause, after which dialing
resumes.• Add Wait: A hard pause (waits for input from you).
3. Highlight and press OK to select the desired option.
4. Press Send to call the number.
Tip: Press Save to store the pauses along with the number ifyou plan to call the number frequently.
Speed DialingSpeed Dialing lets you place a call to any Contact stored inyour Contacts list by dialing the Contact’s Location number.(For more information, refer to “Speed Dials” on page 56.)
1-Touch DialingUse 1-touch dialing to speed dial Contacts from 1 (Voicemail)through 9.
n In standby mode, press and hold the number keycorresponding to the desired Contact’s speed dialnumber.
2-Touch DialingUse 2-touch dialing to speed dial Contacts from 10through 99.
1. In standby mode, press and release the number keyrepresenting the first digit of the desired Contact’sspeed dial number.
2. Press and hold the number key representing thesecond digit of the desired Contact’s speed dialnumber.
Call Functions 29
3-Touch DialingUse 3-touch dialing to speed dial Contacts from 100through 999.
1. In standby mode, press and release the number keyrepresenting the first digit of the desired Contact’sspeed dial number.
2. Press and release the number key representing thesecond digit of the desired Contact’s speed dialnumber.
3. Press and hold the number key representing the thirddigit of the desired Contact’s speed dial number.
Answering a Calln To answer an incoming call, press Send.
Note: To choose other options for answering calls, see“Answer Options” on page 84.
Sending Calls to Voicemailn To ignore a call and send it to voicemail, press Ignore.
Tip: To silence the ringer on an incoming call, press Quiet(Left Soft Key), or press the Volume key ( ).
Reject Call with Text MessageSend a text message to a caller instead of answering a call.(For more information, refer to “Creating and Sending TextMessages” on page 36.)
1. To ignore a call and send a text message instead,press TXT.
2. Select a preset message and press Send.– or –
Press New to create a new message.
– or –
Press View to edit an existing message.
Answering Call-Waiting CallsWhen you receive a call while on a call:
n To place the first call on hold and answer the new call,press Send.
n To return to the first call, press Send again.
30
Call In Progress OptionsAccess menus and features while in a call:
n Press Options for these options:• New Message: Display the NEW TEXT MSG screen. • Contact List: Display the CONTACT LIST screen. • Recent Calls: View the ALL CALLS log. • SendDTMF: Send your phone number as DTMF (touch) tones
to the other person on the call. • Bluetooth Menu: Display the BLUETOOTH MENU screen.• Memo Pad: Launch the Memo Pad to create or edit a text
Memo.• Voice Privacy: Choose Standard or Enhanced voice
encryption, where available.• Key Mute/Key Unmute: Mutes or unmutes keytones.
n To control whether the other caller can hear you, pressMute/Unmute.
Voice CommandsVoice Commands is advanced speech recognition softwarethat recognizes your spoken commands to dial phonenumbers, create messages, and launch phone features suchas Contacts, Calendar, and My Music.
To use Voice Commands, speak naturally into your phone, ata distance of 3-12 inches. There is no need to “train” VoiceCommands—it is designed to recognize natural speech.
n In standby mode, press and hold Spacebar/Voice Command Key.– or –
In standby mode, press MENU; then select Tools ➔
Voice SVC ➔ Voice Commands.
Note: At each step, Voice Commands displays a list ofavailable commands.
If Voice Commands does not recognize your command,it will prompt you to confirm.
Call Functions 31
Tip: Press Info at any time to display helpful tips for usingVoice Commands.
You can perform the following functions with VoiceCommands:• Call <Name or #>: Place a call to a saved contact, to a telephone
number, or to voicemail.
• Send Message <Name or #>: Create a Text/Picture/Videomessage to a saved contact or to a telephone number.
• Go To <Menu>: Open any application installed on your device.
• Check <Item>: View details about your phone’s status.
• Contacts <Name>: Display the named Contacts list entry.
• Redial: Redial the last number dialed.
• Help: Displays Voice Commands usage information.
Call <Name or #>Place a call by speaking a contact name or telephonenumber.
1. In standby mode, press and hold Spacebar/Voice Command Key. The audio prompt “Please say acommand” sounds and the Voice Commands display.
2. Say “Call,” followed by:• < AContactName>, to call the default telephone number for
a contact. Or say “Call,” followed by the type of number, Mobile 1, Home, or Business.
• <Telephone Number> to dial phone number. • “Voicemail” to access voicemail.
3. Follow the prompts to confirm your selection and placethe call.
32
Send Message <Name or #>Create a new message by speaking the type of message andthe recipient(s).
1. In standby mode, press and hold Spacebar/Voice Command Key. The audio prompt “Please say acommand” sounds and the Voice Commands display.
2. Say “Send Message.”
3. At the prompt, say the contact name, telephonenumber, or contact group.
4. The NEW TEXT MSG screen opens, with the To: fieldpopulated with your selection(s).
5. Continue creating the message.
Go To <Menu>Access a menu item by speaking the menu’s name.
1. In standby mode, press and hold Spacebar/Voice Command Key. The audio prompt “Please say acommand” sounds and the Voice Commands display.
2. Say “Go to,” followed by the name of a menu item, forexample, “Missed Calls,” “Messaging,” “Contacts,”“Tools,” “Multimedia,” or “Settings.” The item opens.
Check <Item>Access device information by speaking the command.
1. In standby mode, press and hold Spacebar/Voice Command Key. The audio prompt “Please say acommand” sounds and the Voice Commands display.
2. Say “Check,” followed by a command:• Status: Displays and announces all phone status indicators.• Voicemail: Accesses your voice mailbox.• Messages: Displays and announces the current Voicemail,
Text message, and Picture message statuses. • Missed calls: Displays any missed calls. • Time: Displays and announces the current time and date. • Signalstrength: Displays and announces the current 1x signal
strength level. • Battery level: Displays and announces the current battery
level. • Volume: Displays and announces the current Master Volume
setting. • Mynumber: Displays and announces your phone number.

Call Functions 33
Contacts <Name>Search for Contacts list entries on your phone by saying thename of the searched Contact.
1. In standby mode, press and hold Spacebar/Voice Command Key. The audio prompt “Please say acommand” sounds and the Voice Commands display.
2. Say "Contacts,” followed by a command:• Call: Dials a number you select for an existing Contact. • Create New: Displays the NEW CONTACT screen. • Modify: Displays the EDIT CONTACT screen populated with
information for a Contact you select. • Erase: Erases a Contact you select.
Voice Commands SettingsConfigure the Voice Commands feature of your phone.
1. In standby mode, press MENU; then select Tools ➔
Voice SVC ➔ Voice Settings.
2. Select a setting for customization:• ConfirmChoices: When voice recognition is not confident it
has recognized a name or number correctly, it will show you a list of up to three choices. Choose Automatic, Always Confirm, or Never Confirm.
• Sensitivity: Controls how voice recognition determines when a spoken word is a match. If you frequently experience the messages “Please repeat...” or “No Match Found,” adjust the sensitivity. Choose More Sensitive, Automatic, or Less Sensitive.
• Adapt Voice: Follow prompts to train digit dialing to better respond to your voice.
Tip: After using Adapt Voice, Voice Commands will no longerrespond well to other voices than yours. To restore thedefault voice recognition settings, select the Reset Voiceoption.
34
• Prompts: Choose how Voice Commands prompts you: – Choose the prompt Mode (Prompts or Tones Only). – Choose whether the Audio Playback will play in
Speakerphone mode or through the Earpiece. – Set Voice Commands to Timeout after 5 seconds or 10
seconds. • Key Setting: Select the method for launching Voice
Commands:– Choose VoiceKeyOnly to launch with the Voice Commands
key.– Choose Voice Key/Headset to launch with the Voice
Commands key or with headset controls when you attach an optional headset.
• About: View information about Voice Commands.
Calls LogsThe CALLS menu retains information about outgoing,incoming, and missed calls. You can also view times for yourlast call and the time totals for all calls.
Accessing Recent Callsn In standby mode, press MENU; then select Calls.
The CALLS menu appears in the display.
Making Calls Using Recent Calls 1. From the CALLS menu, select All, Missed, Incoming, or
Outgoing.
2. Highlight a call record; then press Send.
Creating or Updating Contacts Using Recent Calls
1. From the CALLS menu, select All, Missed, Incoming, orOutgoing.
2. Highlight a call record.
3. Press Options; then select Save to Contacts.
4. Select Add New Contact or Update Existing.
5. Continue entering Contact information, as needed.
Call Functions 35
Deleting Recent Calls Records1. From the CALLS menu, select Missed, Incoming,
Outgoing, All, or View Timers.
2. Highlight a call record.
3. Press Options; then select Erase.
4. At the Erase entry? prompt, select Yes.
Deleting All Recent Calls Records1. From the CALLS menu, select Missed, Incoming,
Outgoing, All, or View Timers.
2. Highlight a call record.
3. Press Options; then select Erase All.
4. At the Erase all? prompt, select Yes.
36
Section 5: Messages
This section explains how to send or receive different typesof messages. This section also describes the features andfunctionality associated with messaging.
Accessing MessagesTo launch the MESSAGING menu, do one of the following:
n In standby mode, press MENU; then selectMessaging.– or –
In standby mode, press Messaging.
– or –
In standby mode, press Messaging.The MESSAGING menu appears in the display.
Types of MessagesYour phone can send and receive:• Text messages
• Multimedia messages
Creating and Sending Text MessagesSend text messages to recipients with a compatible phone orother device.
Tip: You can send a text message to up to ten recipients. Entereach recipient’s address or phone number in a separateTo: field of NEW TEXT MSG screen.
1. From the MESSAGING menu, select New Message. TheNEW TEXT MSG screen appears in the display with thefirst addressee field highlighted.
2. Enter the phone number or e-mail address of therecipient or press Add to select recipients from:• From Contacts: Choose contacts from the ADD FROM
CONTACTS screen. • RecentCalls: Choose numbers from the ADDRECENTCALLS
screen. • Favorites: Choose contacts from your Favorites list.• Groups: Choose a contacts Group from the GROUPS screen.
Messages 37
3. Press OK. The Text field appears in the display.
4. Enter the text content of your message. (For moreinformation, refer to “Entering Text” on page 24.)
5. At any point while composing a message:• To change the text entry mode, press Abc and select the
desired text entry mode. (For more information, refer to “Entering Text” on page 24.)
• To complete the message text and set message send options, press Options. The following options appear in the display: – Attach: Attach a file to your message. Choose Picture, Take
Picture, Video, Record Video, Sound, Record Sound, Name Card, or Calendar Event.
– Save As Draft: Save the message to your Drafts folder. – Insert Quick Text: Insert pre-composed text into your
message. Press Options to create New pre-composed quick text, Edit existing quick text, or Move a quick text item to a different position in the list.
– AddSubject: Convert the message to a multimedia message and add a Subject line.
– Priority Level: Set the message’s priority to Urgent or Normal.
– ValidityPeriod: Enter the Date and Time when this message will expire and be discarded by the receiving messaging server if not delivered first.
– DeliveryAck: Control whether to receive an acknowledgement when your message is delivered. Choose On or Off.
– Deferred Delivery: Set a later date and time to deliver the message.
– Callback#: Control whether your callback number is displayed to the recipient of your message. Choose On or Offand set the callback number to display.
– CancelMessage: Cancel the message or save the message to the Drafts folder.
6. To send your finished message, press SEND.

38
Creating and Sending Multimedia MessagesSend multimedia messages to recipients with a compatiblephone or other device, and accompany the message with avoice memo, ringtone, or downloaded melody.
Tip: You can send a multimedia message to up to tenrecipients. Enter each recipient’s address or phonenumber in a separate To: field of the NEW TEXT MSGscreen.
1. Create a new message. For more information, refer to“Creating and Sending Text Messages” on page 36.
2. While entering the message text, press Options ➔
Attach.
3. Select one of the following options:• Picture: Send a picture that is already stored on your phone. • Take Picture: Take a picture to send with your message.• Video: Send a video that is already stored on your phone.• Record Video: Record a video to send with your message.• Sound: Send a sound file that is already stored on your phone.
• Record Sound Record sound to send with your message.• NameCard: Send a contact information with your message.• CalendarEvent: Send information about a meeting or other
event.4. Depending on the type of attachment you selected, the
following screens appear:• MYIMAGES: Use the navigation key to highlight the picture
that you want to send. Press OK.• Camera: Take a picture with your phone. (For more information,
refer to “Camera” on page 60.)• MYVIDEOS: Use the navigation key to highlight the video that
you want to send. Press OK.• Camcorder: Record a video with your phone. (For more
information, refer to “Camcorder” on page 63.)• MY RINGTONES: Use the navigation key to highlight the
ringtone that you want to send, or select RecordNew to create your own ringtone. (For more information, refer to “RecordingVoice Memos” on page 72.) Press OK.

Messages 39
• RECORD NEW: Press OK to start recording. Press STOP to finish recording.
• ATTACH NAME CARD: Choose My Name Card to send your own contact information, or choose FromContacts to send information about one of your contacts.
• Calendar: Use the navigation key to highlight an event. Press View. Press MARK to select the event. Press Done.
The phone displays Converted to multimedia messageand displays the NEW MULTIMEDIA MSG screen.
5. Use the navigation key to scroll through the message.To add another multimedia items, highlight thecorresponding field and press the Left Soft Key.
6. In the Subject field, enter a subject line for yourmessage.
7. Press Options to access the following options:• Preview: View your message before you send it.• Save As Draft: Save the message to finish it later.• Add Slide: Add another “page” to your message.• Priority Level: Set the message’s priority to Urgent or Normal.• ValidityPeriod: Enter the Date and Time when this message will
expire and be discarded by the receiving messaging server if not delivered first
• DeliveryAck: Control whether to receive an acknowledgement when your message is delivered. Choose On or Off.
• Remove Picture/Slide/Video/Subject/Sound/Name Card/CalendarEvent: Remove a multimedia attachment from the message.
• Cancel Message: Cancel the message or save the message to the Drafts folder.
8. Press SEND.
40
Receiving MessagesWhen you receive a message in standby mode or in a call,the ringer sounds (unless turned off) and New Messageappears in the display. The date and time of the messagealso appear in the display along with the following options:• View Now: Opens the message, where you have the option to
Forward, Reply w. Copy, Save as Quick Text, Lock, Add ToContacts, Extract Addresses, or Message Info.
• View Later: Saves the message to your Messages Folder, whereyou can view it later, and then returns your phone to standbymode.
Note: Your phone can still receive messages while in LockMode. The time and date of the message appear in thedisplay, but you cannot access the message until youenter the lock code.
Message FoldersYour phone stores messages using five folders: Messages,Drafts, CMAS, Voicemail, and Social Networks.
MessagesMessages of all types (except Voicemail and CMAS) arestored in Messages. All messages (both received and sent)are grouped together into “conversations” or messagethreads, allowing you to easily track messages to and from aspecific Contact.
1. From the MESSAGING menu, select Messages.
2. Highlight a message thread in the list and press OPEN.All messages sent and received between you and thisContact are listed.
3. Highlight an individual message and press Reply tosend a reply message to the sender.– or –
Highlight an individual message and press OPEN toview the message.
Messages 41
Message Viewing OptionsWhile viewing your message, press Options. The followingoptions may appear in the display (options vary based onmessage content):• Play Again (messages with sound files): Replay the sound file
attached to the message.
• Reply: Compose and send a reply message to the sender.
• Reply w. Copy: Compose and send a reply message to thesender and include a copy of the original message.
• Forward: Send a copy of this message to another recipient.
• Erase: Erase this message.
• Set As (messages with pictures or sound files): Set the attachedpicture as Wallpaper, Lock Screen wallpaper, or as a Picture ID.Set the attached sound file as a Ringtone, a Contact ID, or as AlertSounds.
• Save Picture (messages with pictures): Save the attached pictureto the My Images folder.
• Save Sound (messages with sound files): Save the attachedsound file to the My Ringtones folder.
• Save Video (messages with videos): Save the attached video tothe My Videos folder.
• Resend: Send another copy of the message to the originalrecipient.
• Lock/Unlock: Block/permit erasure of the message.
• Save As Quick Text: Save the text in this message as a newQuick Text.
• Add To Contacts: Save the sender’s number to your Contacts.
• Extract Addresses: View addresses of the message’s sender(s)and recepient(s). You can then call or message these addresses,or save these addresses to your Contacts.
• Message Info: Shows message delivery status, addressee, size,and so on.

42
Managing Messages and Message Threads1. From the MESSAGING menu, select Messages. A list of
all messages threads is displayed.
2. To manage message threads, highlight the messagethread in the list.– or –
To manage individual messages, highlight the messagethread and press OPEN. Then highlight the individualmessage in the list.
3. Press Options. The following options may appear inthe display (options vary based on message content):• Erase: Erase this message, or erase all messages for the
selected contact.• AddToContacts: Save the sender’s number to your Contacts.• New Message: Compose a new message.• ManageMessages: Choose to Erase messages, Lock/Unlock
messages (locked messages cannot be erased), or mark messages as Read/Unread.
• Sort Alphabetically/Sort by Time: List messages in order of Sender names, addresses, or numbers, or by time received.
• Messaging Menu: Return to the main Messaging menu.• SocialNetworks: Access social networks such as Facebook
and Twitter.DraftsMessages in the Drafts folder are those that have beencomposed but never sent. You can return to the Drafts folderat any time to view, edit, or send a draft message.
Create a Draft Message1. Begin to create a new message. For more information,
refer to “Creating and Sending Text Messages” onpage 36 and “Creating and Sending MultimediaMessages” on page 38.
2. From the Text field, press Options.
3. Select Save As Draft. Message saved appears in thedisplay and your message is saved to the Drafts folder.
Messages 43
View and Edit Draft Messages1. From the MESSAGING menu, select Drafts. A list of
draft messages appears in the display.
2. Use the navigation key to scroll through the list andhighlight a message. Press EDIT.
3. In the NEW TEXT MSG or NEW MULTIMEDIA MSG screen,continue composing your message. For moreinformation, refer to “Creating and Sending TextMessages” on page 36 and “Creating and SendingMultimedia Messages” on page 38.
4. When you have finished composing your message,press SEND to send it.
Managing Draft Messages1. From the MESSAGING menu, select Drafts. A list of
draft messages appears in the display.
2. Use the navigation key to scroll through the list andhighlight a message.
3. Press Options. The following options appear:• Send: Send the highlighted message to the number or e-mail
address currently included with the message.• AddToContacts: Save the recipient’s number and/or e-mail
address to your Contacts.• ManageDrafts: Choose to Erase one or more messages, to
Lock one or more messages from being erased, or to Unlock one or more messages to be erased.
• Sort by Recipient: Group messages by the recipient’s name/number.
• Sort by Type: List the messages in order of their message type.
• Sort by Time: Group messages by the time of the message’s creation.
4. To delete the draft message, press Erase.
44
CMASThe Commercial Mobile Alert System (CMAS) systemprovides the government the ability to send geographicallytargeted notifications of emergencies, such as threats topublic safety, severe weather events, a hazardous materialspill or a missing child in the phone user’s area.• Presidential Alert: Receive warnings in the event of a federal
emergency. (Presidential alerts cannot be disabled).
• Extreme Alert: Receive alerts with Extreme warning levels.
• Severe Alert: Receive alerts with Severe warning levels.
• Amber Alert: Receive alerts about child abductions and relevantdetails.
To view CMAS alerts:1. From the MESSAGING menu, select CMAS. A list of
CMAS alerts appears in the display.
2. Use the navigation key to scroll through the list andhighlight an alert. Press OPEN.
VoicemailMessages in your voice mailbox are logged in the Voicemailfolder of the MESSAGING menu. Open the Voicemail folder toview details of the Voicemail message.
When you’re notified of a new voicemail message by an alerttone and the new message icon, the following optionsappear:• Listen Now: Calls your voice mailbox and lets you listen to your
messages.
• Listen Later: Returns you to standby mode where you canchoose to call your mailbox and review your messages at alater time.
Tip: You can also access your voicemail from standbymode, by pressing and holding to speed dial yourvoice mailbox.
Messages 45
Social NetworksSocial Networks provides a single point for accessing onlinecommunities and content. You can save your user names(but not passwords) to allow faster sign-in to Facebook andTwitter.
1. From the MESSAGING menu, select Social Networks.
2. Follow the prompts to define your Facebook and/orTwitter account(s) to Messaging.
Erase MessagesYou can erase all of the messages in any or all of messagefolders using one convenient sub-menu.
Note: This function erases all messages in the selectedmessage folder. To delete a single message, go to therespective message folder, highlight the message, andpress Erase.
1. From the MESSAGING menu, press Options. Thefollowing options appear in the display:• EraseMessages: Delete all unlocked messages stored in the
Messaging folder. • Erase Drafts: Delete all unlocked messages stored in the
Drafts folder.• Erase CMAS: Delete all unlocked messages stored in the
CMAS folder.• Erase All: Delete all unlocked messages stored except
Voicemail.2. Select the option that will erase the messages you
want to erase and press OK. You’re prompted toconfirm the erasure of all messages in the selected boxor in all boxes.
3. Select Yes to delete the messages or select No tocancel deleting the messages.
46
Messaging Settingsn From the MESSAGING menu, press Settings. The
following options appear in the display:• MessageViewMode: Choose a message view. Choose Time
to list all messages in the order of the time they were received. Choose Contact to group messages first by recipient and then in the order of the time they were received.
• EntryMode: Choose the default method for entering text into messages. (For more information, refer to “EnteringText” on page 24.)
• AutoSaveSent: Choose whether your messages are saved automatically when you send them and whether to display a prompt before saving sent messages.
• Auto Erase Inbox: Choose to erase Inbox messages automatically or display a prompt before receiving a message when the Inbox is full.
• TXTAutoView: Choose whether to view the full content of a text message as the message is received.
• MultimediaAutoReceiveChoose whether to automatically receive multimedia messages.
• Quick Text: View preloaded messages or create new messages.
• CMASAlerts: Manage the receipt of Commercial Mobile Alert System (CMAS) alerts. Select Receive Alerts to choose whether to receive Extreme alerts, Severe alerts, and/or AMBER alerts. Select AudioAlert to turn alert sound on or off. Select AlertVibrate to turn alert vibration on or off. Select Alert Reminder to set the frequency of CMAS alert reminders to Once, Every 2 minutes, Every 15 minutes, or Off. Select Alert Volume to set the volume of the CMAS alert.
• Voicemail#: Edit or view your Voicemail number. Press Add to add a wait or 2-second pause to the voicemail number.
• Callback #: Choose whether to include a callback phone number with outgoing messages. Choose On to edit the callback number.
• Signature: Choose whether to include a text signature in outgoing messages. Choose Custom to create or edit the signature.

Contacts 47
Section 6: Contacts
This section details how you can manage your daily contactsby storing their names and numbers in your Contacts list. Youcan have your Contacts entries sorted by name.
Accessing Contactsn In standby mode, press MENU; then select
Contacts. The CONTACTS menu appears inthe display.– or –
In standby mode, press Contacts. The CONTACT LISTscreen appears in the display.
Adding a New ContactYou can use either of two methods to add an entirely newentry to the Contacts list.
Dial Method1. In standby mode, enter the number you wish to add to
your contacts.
2. Press Save; then select Add New Contact. The ADDNEW CONTACT screen shows the following options:• Mobile 1
• Home
• Business
• Mobile 2
• Fax
3. Select the number type that matches your new entry.
4. Enter the Name of the new Contact. (See “EnteringText” on page 24.)
5. Press SAVE to save the new entry.
48
Menu Method1. From the CONTACTS menu, select New Contact.
The NEW CONTACT screen appears in the display withthe Name field highlighted.
2. Enter the name of the new Contact. (See “EnteringText” on page 24.)
3. Highlight one of the following fields:• Mobile 1• Home• Business• Mobile 2• Fax• Personal• Business• Picture• Ringtone• Message Tone• Group
• Home Address– Street– City– State– Zip Code– Country
• Work Address– Street– City– State– Zip Code– Country
• Company• Title• Birthday• Notes
4. Enter information in the highlighted field.
5. Repeat steps 3 and 4 as needed.
6. Press SAVE to save the new entry.
Contacts 49
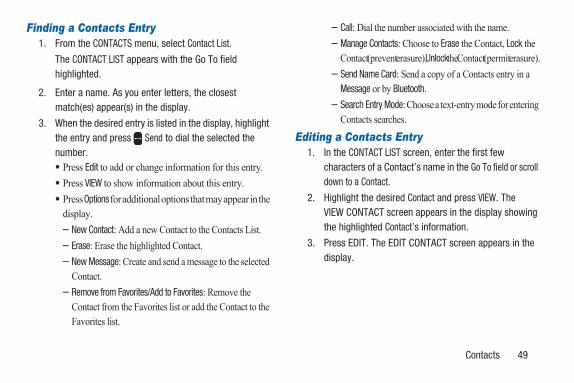
Finding a Contacts Entry1. From the CONTACTS menu, select Contact List.
The CONTACT LIST appears with the Go To fieldhighlighted.
2. Enter a name. As you enter letters, the closestmatch(es) appear(s) in the display.
3. When the desired entry is listed in the display, highlightthe entry and press Send to dial the selected thenumber.• Press Edit to add or change information for this entry.• Press VIEW to show information about this entry. • Press Optionsfor additional options that may appear in the
display. – New Contact: Add a new Contact to the Contacts List. – Erase: Erase the highlighted Contact. – New Message: Create and send a message to the selected
Contact.– Remove from Favorites/Add to Favorites: Remove the
Contact from the Favorites list or add the Contact to the Favorites list.
– Call: Dial the number associated with the name. – Manage Contacts: Choose to Erase the Contact, Lock the
Contact (prevent erasure), Unlock the Contact (permit erasure).– Send Name Card: Send a copy of a Contacts entry in a
Message or by Bluetooth.– Search Entry Mode: Choose a text-entry mode for entering
Contacts searches.
Editing a Contacts Entry1. In the CONTACT LIST screen, enter the first few
characters of a Contact’s name in the Go To field or scrolldown to a Contact.
2. Highlight the desired Contact and press VIEW. TheVIEW CONTACT screen appears in the display showingthe highlighted Contact’s information.
3. Press EDIT. The EDIT CONTACT screen appears in thedisplay.

50
4. Highlight the particular information you want to enteror change.• To backspace and delete numbers or letters, press . • To clear all numbers or letters in the highlighted field, press and
hold .• Press Options to access the following options:
– Set Speed Dial/Remove Speed Dial: Assign/remove a speed dial number. (For more information, refer to “SpeedDials” on page 56.)
– Set as Default: Set the number the phone will dial when Contacts dialing, speed dialing, or voice dialing.
– Add 2-Sec Pause: A 2-second pause, after which dialing resumes.
– Add Wait: A hard pause (waits for input from you).– Copy: Use the navigation key to highlight text to copy.– Paste: Paste the copied text into another field.– Cancel: Cancel your changes and close the Contact information
without saving.5. When you’re finished changing the information for this
Contact, press SAVE.
Saving a Number After a CallOnce you finish a call, you can store the caller’s number inyour Contacts list.
Note: If the call was incoming and Caller ID information wasunavailable, then the Save option is also unavailable.
1. Press End to end your call. The call time, length ofcall, phone number, and name of the party (if available)appear in the display.
2. Press Save. The Save screen appears in the displayshowing the following options:• Add New Contact: Lets you create a new Contacts entry. • UpdateExisting: Lets you add the number you entered to an
existing Contacts entry. 3. Select the desired option; then follow the instructions
in the upcoming sub-sections depending on whetherthe number is a new entry or you are adding it to anexisting entry.
Contacts 51
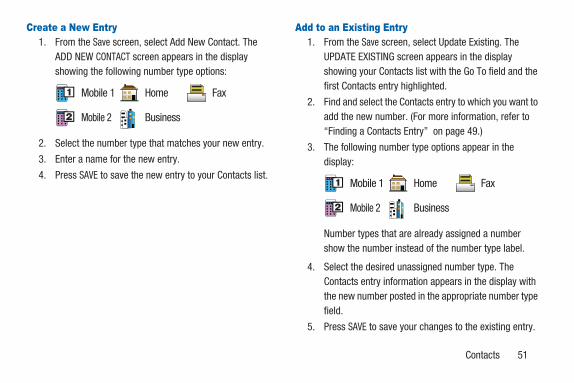
Create a New Entry1. From the Save screen, select Add New Contact. The
ADD NEW CONTACT screen appears in the displayshowing the following number type options:
2. Select the number type that matches your new entry.
3. Enter a name for the new entry.
4. Press SAVE to save the new entry to your Contacts list.
Add to an Existing Entry1. From the Save screen, select Update Existing. The
UPDATE EXISTING screen appears in the displayshowing your Contacts list with the Go To field and thefirst Contacts entry highlighted.
2. Find and select the Contacts entry to which you want toadd the new number. (For more information, refer to“Finding a Contacts Entry” on page 49.)
3. The following number type options appear in thedisplay:
Number types that are already assigned a numbershow the number instead of the number type label.
4. Select the desired unassigned number type. TheContacts entry information appears in the display withthe new number posted in the appropriate number typefield.
5. Press SAVE to save your changes to the existing entry.
Mobile 1 Home Fax
Mobile 2 Business
Mobile 1 Home Fax
Mobile 2 Business
52
Deleting ContactsDeleting a Contact
1. In the CONTACT LIST, find and highlight the Contact youwish to delete.
2. Press Options; then select Erase. You are prompted toconfirm the erasure.
3. Select Yes to confirm erasure of the selected Contact.Select No to retain the Contact.
Deleting Multiple Contacts1. From the CONTACT LIST, press Options; then select
Manage Contacts ➔ Erase. The ERASE CONTACTSscreen appears.
2. Do one of the following:• Highlight a Contacts entry you want to delete; then press
MARK. A checkmark appears in the entry’s checkbox.Repeat as needed to check all the Contacts to be deleted.
Note: To unmark a marked Contact, highlight the Contact andpress UNMARK to clear the checkmark.
3. Press Done. You are prompted to confirm the erasures.
4. Select Yes to confirm erasure of the selected Contacts.Select No to retain the Contacts.
GroupsGroups let you easily send messages to multiple selectedContacts. You can also use Groups to find Contact entries andto add/remove Contacts names in a Group or to create orrename a Group.
Viewing Groups1. From the CONTACTS menu, select Groups.
2. Available groups appear in the display. These groupsare available by default:• Business • Colleague • Family • Friends
3. Highlight a group; then press VIEW to display a list ofgroup members.
Contacts 53
Add Contacts Entry to a GroupUsing Add New/Edit Contact OptionTo add a Contact to a Group using either the Add NewContact option or the Edit Contact option, do the following:
1. In the CONTACT LIST screen, find an existing Contactand press Edit, or press Options ➔ New Contact.
2. Highlight the Group field; then press Set.
The GROUPS menu appears in the display, showinggroups such as the following:
• Business • Colleague • Family • Friends
3. Highlight the Group to which you want to assign theContact. Press MARK. A checkmark appears in theGroup’s checkbox.
4. Press Done.
You are returned to the NEW CONTACT / EDITCONTACT screen and the selected Group namepopulates the Group field.
5. Press SAVE to save your changes.
Using Group Add OptionThe Add option lets you add one or more existing Contacts toa Group.
1. From the CONTACTS menu, select Groups.
The GROUPS menu appears in the display, showinggroups such as the following:
• Business • Colleague • Family • Friends
2. Highlight a Group; then press Options and select Add.The ADD TO <Group> screen appears in the display,showing all Contacts entries. Do one of the following:• Highlight a Contacts entry you want to add to the group; then
press MARK. A checkmark appears in the entry’s checkbox. Repeat as needed to check all the desired Contacts.
Note: To unmark a marked Contact, highlight the Contact andpress UNMARK to clear the checkmark.

54
3. When you have marked the Contacts you want to addto the group, press Done. CONTACT ADDED TO<Group> appears in the display, followed by theselected Group list including the added Contacts.
Send a Message to a Group1. From the CONTACTS menu, select Groups.
The GROUPS menu appears in the display, showinggroups such as the following:
• Business • Colleague • Family • Friends
2. Highlight a Group; then press Options and select NewMessage.
3. Highlight each Contact you want to add as a recepient,then press MARK. When finished, touch Done.
The NEW TEXT MSG screen appears in the display, withthe selected Contacts in the To field.
4. Compose and send your message. (For moreinformation, refer to “Messages” on page 36.)
Rename a GroupThe Rename option lets you change the name any of theGroups.
1. From the CONTACTS menu, select Groups. TheGROUPS screen appears in the display.
2. Highlight a Group name that you wish to change; thenpress Options and select Rename.
The RENAME GROUP screen appears in the display.
3. Enter changes to the group name. (For moreinformation, refer to “Entering Text” on page 24.)
4. When you have completed your changes to the Groupname, press SAVE.
Group Renamed appears in the display, followed bythe GROUPS screen showing your renamed Group.
Contacts 55
Add a New Group1. From the CONTACTS menu, select Groups. The
GROUPS screen appears in the display.
2. Press New. The NEW GROUP screen appears in thedisplay.
3. Enter a new group name. (For more information, referto “Entering Text” on page 24.)
4. Press SAVE. Group saved appears in the display,followed by the GROUPS screen showing your newGroup.
Erase a GroupThe Erase option lets you delete a Group, thus freeing you toreassign the Contacts formerly in the Group.
1. From the CONTACTS menu, select Groups. TheGROUPS screen appears in the display.
2. Highlight the Group you wish to delete; then pressOptions and select Erase Group.
You are prompted to confirm the Group erasure.
3. Select Yes to confirm erasure of the highlighted Group.Select No to retain the Group.
Note: The deleted Group link is removed from the memberContacts.

56
Speed DialsSpeed Dials are 1-, 2-, or 3-digit shortcuts you assign tocontacts, to allow you to quickly call the contact.
Note: Some Speed Dials are reserved by default and cannot beassigned: Speed Dial 1 is reserved for Voicemail. SpeedDial 211 is reserved for information about health andhuman services, 311 for non-emergency municipalservices; 411 for directory assistance; 611 for customerservice access; and 911 for emergencies.
• To speed dial the Contacts entry assigned to Location 5, pressand hold , (1-touch dialing).
• To speed dial the Contacts entry assigned to Location 35, pressand then press and hold , (2-touch dialing).
• To speed dial the Contacts entry assigned to Location 235, press, press , and then press and hold , (3-touch dialing).
Assigning a Speed Dial LocationTo assign a Speed Call number to a new Contacts entrynumber, do the following:
1. In the CONTACT LIST screen, find and highlight theContact you wish to add to your Speed Dial list.
2. Press Edit.
3. Highlight a number field and press Options.
4. Press Set Speed Dial.
5. Highlight a speed dial location, or enter the speed dialdigits into the Go To field; then press SET.
6. At the SET SPEED DIAL screen, highlight a contact orenter the first few characters into the Go To field. If theselected Contact has more than one number, select thedesired number.
7. Press SET.
8. At the Assign speed dial to contact? prompt, select Yes.
Contacts 57
Removing a Speed Dial Location1. In the CONTACT LIST screen, find and highlight the
Contact you wish to remove from your Speed Dial list.(For more information, refer to “Finding a ContactsEntry” on page 49.)
2. Press Edit.
3. Highlight the number field marked by the Speed Dialicon ( ).
4. Press Options ➔ Remove Speed Dial. Remove Speeddial? prompts you to confirm your desire to remove theentry.
5. Select Yes to remove the Speed Dial assignment.Speed dial removed pops up in the display, and youare returned to the EDIT CONTACT screen.
6. Press SAVE to save your changes to the Contact.
FavoritesSet contacts or contact groups as Favorites to quickly find acontact or group to view, send a message, or call.
Assigning Favorites1. From the CONTACTS menu, select Favorites.
The FAVORITES screen appears.
2. Highlight an EMPTY item in the list. Press ADD. TheADD FAVORITES screen appears. The following optionsare available:• FromContacts: Highlight and mark contact(s) to assign as
favorites. You can mark multiple contacts at once to create a Favorite for each.
• From Groups: Choose a group to assign as a Favorite.3. When you have finished marking Contacts or Groups,
press Done to automatically assign them to succeedingFavorite numbers.
4. To assign a contact or group to a particular Favoritenumber, from the ADD FAVORITES screen press . TheFAVORITES list appears. Highlight the desired Favoritenumber; then perform step 2.

58
Removing Favorites1. From the CONTACTS menu, select Favorites. The
FAVORITES list appears.
2. Highlight the desired Favorite; then press Options. Thefollowing options are available:• New Message: Send a message to the selected Contact.• Remove: Erase the selected Favorites assignment. • Remove All: Erase all Favorites assignments from the list.
3. Select the desired option. You are prompted to confirmyour selected removal.
4. Select Yes to confirm the removal(s).Select No to retain the current Favorites.
Using FavoritesUse Favorites to quickly view a favorite’s contact record orgroup list, send a message to a favorite, or view messages toand from a favorite.
1. From the CONTACTS menu, select Favorites. TheFavorites list appears.
2. Highlight a favorite to use these options:
• To view all messages to and from the favorite, press Messages. For information about viewing and managing messages, see “Messages” on page 36.
• To view the favorite’s contact record, press VIEW. For information about creating and editing contacts, see “Addinga New Contact” on page 47 or see “Editing a ContactsEntry” on page 49. – To call the favorite, highlight the desired number and press
Options ➔ Call.– To send a message, press Options ➔ New Message. For
information about creating and sending messages, see “Messages” on page 36.
Contacts 59
Memory InfoThe Memory Info menu option lets you see how manyContacts you’ve stored on your phone and the number ofadditional Contacts you can still store.
n From the CONTACTS menu, select Memory Info.
The MEMORY INFO screen appears in the display,showing the Total number of Contacts you can store,the number of Contact spaces Used, and remainingnumber of spaces Free to store additional Contacts.
60
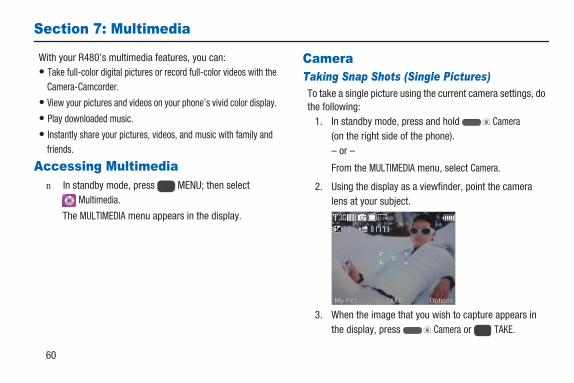
Section 7: Multimedia
With your R480’s multimedia features, you can:• Take full-color digital pictures or record full-color videos with the
Camera-Camcorder.
• View your pictures and videos on your phone’s vivid color display.
• Play downloaded music.
• Instantly share your pictures, videos, and music with family andfriends.
Accessing Multimedian In standby mode, press MENU; then select
Multimedia.
The MULTIMEDIA menu appears in the display.
CameraTaking Snap Shots (Single Pictures)To take a single picture using the current camera settings, dothe following:
1. In standby mode, press and hold Camera(on the right side of the phone).– or –
From the MULTIMEDIA menu, select Camera.
2. Using the display as a viewfinder, point the cameralens at your subject.
3. When the image that you wish to capture appears inthe display, press Camera or TAKE.
Multimedia 61
Point, Click, and Send Pictures1. In standby mode, press and hold Camera (on
the right side of the phone).
2. Take a photo by pressing Camera or TAKE.
The new photo appears in the display.
3. Press SEND.
The picture is saved and the NEW MULTIMEDIA MSGscreen appears in the display, with your new photopopulating the Picture field.
4. Address, compose, and send your Picture message.(For more information, refer to “Creating and SendingMultimedia Messages” on page 38.)
Camera Optionsn In standby mode, press and hold Camera
(on the right side of the phone). The following controlsare available:• Press My Pics to display the MY IMAGES gallery.• Press TAKE to take a picture.• Press Options to access the following Camera options:
Mode indicates/changes the type of file to becaptured: Camera (still pictures) or Camcorder(video).
Shooting Mode indicates/changes Camera shootingmode to take Single pictures or multiple pictures, inContinuous succession or in Mosaic shot mode.
Resolution indicates/changes resolution for newphotos: 3.2M, 2M, 1.3M, or 0.3M.
Brightness indicates/changes the brightness of thepicture, from 1 (darkest) to 9 (brightest).
White Balance indicates/changes the setting for thelight source. Choose Auto, Daylight, Incandescent,Fluorescent, or Cloudy.
62
After taking a picture, the following options appear inthe display:• Save: Press to save the photo.
• SEND: Press to save and send the photo in aMultimedia message.
• Erase: Press to delete the photo.
Exposure metering indicates/changes the way thecamera determines the exposure. Choose Matrix,Center-weighted, or Spot.
Effectsindicates/changes the replacement of photo colors with None (normal colors), Black&White, Sepia, Negative, or Aqua.
Night Shot indicates/changes the low light exposureto Off, to use available light, or On, to enable infraredlight sensing for low light conditions.
Timer indicates/changes timer delay betweenpressing Camera and taking a photo. Set timerto (Off), 2 Sec, 5 Sec, or 10 Sec.
Viewfinder Mode indicates/changes whether theCamera displays Icons, No Icons, or a Guideline grid.
Settings:• Photo Quality: Set image quality. Choose
Superfine, Fine, or Normal.
• Auto Save: Set the Camera to let you manually savephotos (Off) or to automatically save them (On).
• Shutter Sound: Set the Camera’s shutter sound toOn or Off.
• Memory: Set the Camera to save photos to Phone orCard memory.
• Shortcuts: Show shortcuts for the settings that youuse the most.
•ResetSettings: Reset all Camera settings to default values. Choose Yes or No.
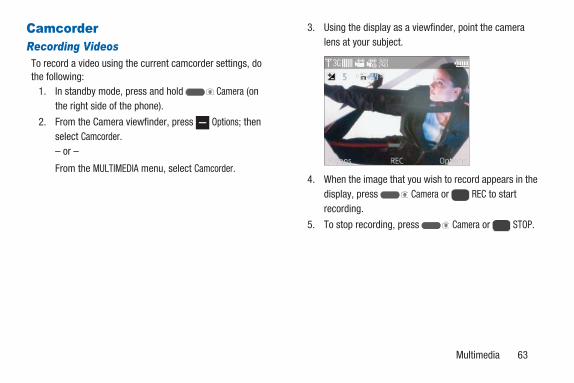
Multimedia 63
CamcorderRecording VideosTo record a video using the current camcorder settings, dothe following:
1. In standby mode, press and hold Camera (onthe right side of the phone).
2. From the Camera viewfinder, press Options; thenselect Camcorder.– or –
From the MULTIMEDIA menu, select Camcorder.
3. Using the display as a viewfinder, point the cameralens at your subject.
4. When the image that you wish to record appears in thedisplay, press Camera or REC to startrecording.
5. To stop recording, press Camera or STOP.

64
Point, Click, and Send Videos1. In standby mode, press and hold Camera
(on the right side of the phone).
2. From the Camera viewfinder, press Options; thenselect Camcorder.
The Camcorder viewfinder appears in the display.
3. Record a video by pressing Camera or RECto begin; then press Camera or STOP toend recording.
The new video appears in the display.
4. Press Save.
5. Press Videos.
6. Select the video. Press Options.
7. Select Send.
8. In the SEND menu, select Multimedia Message.
9. Address, compose, and send your Video message. (Formore information, refer to “Creating and SendingMultimedia Messages” on page 38.)
Camcorder Options1. In standby mode, press and hold Camera
(on the right side of the phone).
2. From the Camera viewfinder, press Options; thenselect Camcorder. The following controls are available:• Press Videos to display the MY VIDEOS gallery.• Press REC to record a video.• Press Options to access the following Camcorder options:
Mode: Set the type of file to be captured: Camera (stillpictures) or Camcorder (video).
Recording Mode: Set Camcorder’s recording mode.Choose For Send (176x144) or For Save (320x240).
Brightness: Set the brightness of the video, from 1(darkest) to 9 (brightest).
White Balance: Set the light source. Choose Auto,Daylight, Incandescent, Fluorescent, or Cloudy.
Effects: Set the Camcorder to replace video colors with None(normal colors), Black&White, Sepia, Negative, or Aqua. Timer: Set the delay between pressing
Camera and recording a video. Set timerto (Off), 2 Sec, 5 Sec, or 10 Sec.
Multimedia 65
After you record a video, the following options appearin the display:• Save: Press to save the video.
• PLAY: Press to play the video.
• Erase: Press to delete the video.
Viewfinder Mode: Control whether the Camcorderdisplays Icons, No Icons, or a Guideline grid.
Settings:• Video Quality: Set video quality. Choose
Superfine, Fine, or Normal.• Auto Save: Set the Camcorder to let you manually
save videos when recorded (Off) or to automaticallysave them (On).
• Start Sound: Choose On to play a sound when youstart recording.
• Stop Sound: Choose On to play a sound when youstop recording.
• Audio Recording: Choose On to record audio whenyou record video.
• Memory: Set the Camcorder to save videos toPhone or Card memory.
• Shortcuts: Show shortcuts for the settings that youuse the most.
• Reset Settings: Reset all Camcorder settings to default values. Choose Yes or No.
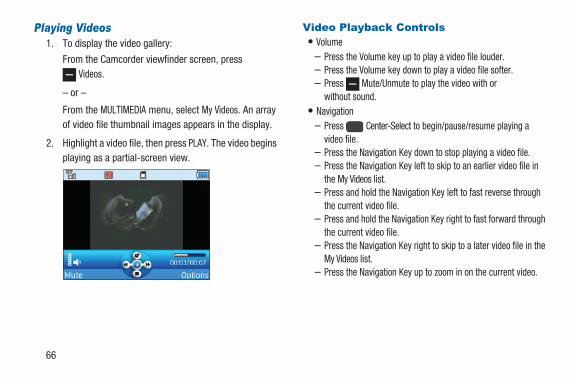
66
Playing Videos1. To display the video gallery:
From the Camcorder viewfinder screen, pressVideos.
– or –
From the MULTIMEDIA menu, select My Videos. An arrayof video file thumbnail images appears in the display.
2. Highlight a video file, then press PLAY. The video beginsplaying as a partial-screen view.
Video Playback Controls• Volume
– Press the Volume key up to play a video file louder.– Press the Volume key down to play a video file softer.– Press Mute/Unmute to play the video with or
without sound.• Navigation
– Press Center-Select to begin/pause/resume playing avideo file.
– Press the Navigation Key down to stop playing a video file.– Press the Navigation Key left to skip to an earlier video file in
the My Videos list.– Press and hold the Navigation Key left to fast reverse through
the current video file.– Press and hold the Navigation Key right to fast forward through
the current video file.– Press the Navigation Key right to skip to a later video file in the
My Videos list.– Press the Navigation Key up to zoom in on the current video.
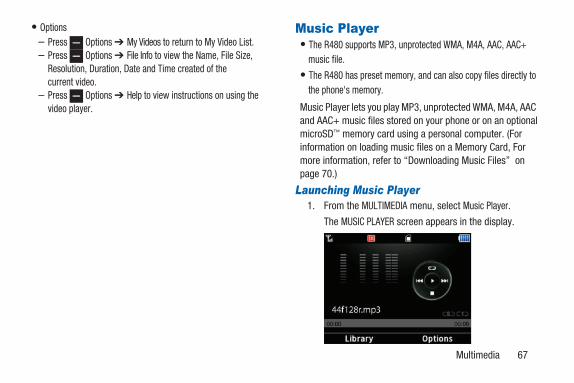
Multimedia 67
• Options– Press Options ➔ My Videos to return to My Video List.– Press Options ➔ File Info to view the Name, File Size,
Resolution, Duration, Date and Time created of thecurrent video.
– Press Options ➔ Help to view instructions on using thevideo player.
Music Player• The R480 supports MP3, unprotected WMA, M4A, AAC, AAC+
music file.
• The R480 has preset memory, and can also copy files directly tothe phone's memory.
Music Player lets you play MP3, unprotected WMA, M4A, AACand AAC+ music files stored on your phone or on an optionalmicroSD™ memory card using a personal computer. (Forinformation on loading music files on a Memory Card, Formore information, refer to “Downloading Music Files” onpage 70.)
Launching Music Player1. From the MULTIMEDIA menu, select Music Player.
The MUSIC PLAYER screen appears in the display.

68
Accessing the Music Library Menu1. From the MULTIMEDIA menu, select Music Player. The
following options appear in the display:• PlayAllSongs (when music is not currently playing): Begins
playing all music. • Now PlayingList (when playing music): Indicates number of
music files currently playing. Select this option (or press Back) to return to the Music Player screen.
• AllSongs: Lists all music files on the phone and memory card.• Playlists: Lists any playlists you have saved and lets you
create, save, and manage playlists. • Artists: Lists artist names for music files on the phone and
memory card.• Genres: Lists genres for music files on the phone and
memory card.• Albums: Lists album titles for music files on the phone and
memory card.• Manage My Music: Erase Songs, Lock songs so that they
cannot be erased, or Unlock songs. Choose Move To Phone/MoveToCardto move songs to the phone’s memory or to an optional memory card.
• Music Settings: Choose Repeat or Shuffle.
2. Highlight the desired option and press VIEW. A listof music files, playlists, artists, genres, or albumsappears in the display.
3. Highlight a music file, playlist, artist, genre, or album.Highlight a selection and press View. The followingoptions are available:• Press Multi to play one or more music files.• Press PLAYto play the files in the highlighted music file,
playlist, artist, genre, or album.• Press Options to display the following options:
– AddToPlaylist: Add one or more highlighted music files to an existing playlist.
– Erase Songs: Delete one or more music file(s).– MoveToPhone/MoveToCard: Move songs to the phone’s
memory or to an optional memory card.– Song Info: Lists the Title, Artist, Album, Genre, File name,
Size, Length, and Bit Rate of the highlighted music file.– Search Entry Mode: Choose a text entry mode for entering
searches. For more information, refer to “EnteringText” on page 24.
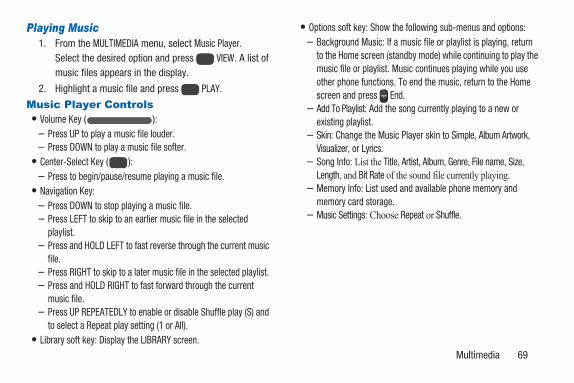
Multimedia 69
Playing Music1. From the MULTIMEDIA menu, select Music Player.
Select the desired option and press VIEW. A list ofmusic files appears in the display.
2. Highlight a music file and press PLAY.
Music Player Controls• Volume Key ( ):
– Press UP to play a music file louder.– Press DOWN to play a music file softer.
• Center-Select Key ( ):– Press to begin/pause/resume playing a music file.
• Navigation Key:– Press DOWN to stop playing a music file.– Press LEFT to skip to an earlier music file in the selected
playlist.– Press and HOLD LEFT to fast reverse through the current music
file.– Press RIGHT to skip to a later music file in the selected playlist.– Press and HOLD RIGHT to fast forward through the current
music file.– Press UP REPEATEDLY to enable or disable Shuffle play (S) and
to select a Repeat play setting (1 or All).• Library soft key: Display the LIBRARY screen.
• Options soft key: Show the following sub-menus and options:– Background Music: If a music file or playlist is playing, return
to the Home screen (standby mode) while continuing to play themusic file or playlist. Music continues playing while you useother phone functions. To end the music, return to the Homescreen and press End.
– Add To Playlist: Add the song currently playing to a new orexisting playlist.
– Skin: Change the Music Player skin to Simple, Album Artwork,Visualizer, or Lyrics.
– Song Info: List the Title, Artist, Album, Genre, File name, Size, Length, and Bit Rate of the sound file currently playing.
– Memory Info: List used and available phone memory andmemory card storage.
– Music Settings: Choose Repeat or Shuffle.

70
Downloading Music FilesIn addition to downloading music to your phone, you can alsotransfer (“sideload”) music from a personal computer to anoptional memory card in your phone.
1. Install a microSD™ or microSDHC™ memory card intoyour phone. (For more information, refer to “Installing aMemory Card” on page 10.)
2. Connect the micro USB end of the USB data cable tothe power-accessory connector on your phone.
3. Check that the USB Mode setting is set to USB MassStorage. (For more information, refer to “USB Mode”on page 90.)
4. Connect the USB end of the USB data cable to amatching connector on your personal computer. TheUSB MASS STORAGE screen appears in your phone’sdisplay, and an Removable Disk window should open onyour computer screen.
5. In the Removable Disk window, select the Open folder toview files option. A new Windows Explorer windowshould open on your computer screen.
6. Drag or download music (MP3, AAC, AAC+, WMA, andM4A) files into the “media/my_music” folder, or asub-folder, if any.
Note: You can also insert the memory card into a compatiblecard reader. Card readers vary, so follow the installationinstructions included with your card reader and personalcomputer.

Multimedia 71
My ImagesMy Images lets you manage your photos you take with theCamera and pictures you download and lets you choose thepictures that appear in your phone’s display while in standbymode (wallpaper) and as image IDs for your contacts.
1. From the MULTIMEDIA menu, select My Images.
2. Highlight an image or photo.• Press Erase (Left Soft Key) to delete the image.• Press VIEW to expand a highlighted image to fill
the screen.
• Press Options(Right Soft Key) to display the following options:– Send: Send the currently highlighted or displayed image as part
of a Multimedia Message, To Online Album, Via Bluetooth, or To Facebook.
– SetAs: Assign the currently highlighted or displayed image as the main Wallpaper, as the LockScreen wallpaper, or as the Picture ID for a Contact.
– Camera: Take a picture.– Manage Pictures: Erase pictures, Lock a picture from being
erased, or Unlock a picture. Choose Move To Phone or Move To Card to change the storage location of the picture.
– Rename: Change the name of the picture file.– Full View: Display the picture expanded to fill the screen.– Slide Show: View all of your images in sequence as a slide
show. – View by Location: View All images or only those images
stored in Phone memory or Card memory. – File Info: View the Name, File Size, Resolution, and Date
and Time created of the currently highlighted or displayed image.
72
My RingtonesMy Ringtones lets you record voice memos and assign themor ringtones, melodies, or music files as ringtones for calls,alarms, and other alerts.
Recording Voice Memosn From the MULTIMEDIA menu, select My Ringtones.
The following options appear in the display:• Record New: Record voice memos using your phone’s
microphone and the following controls.– Press RecTimeto limit the file size of the recording. Choose
Limit for Send (small) or For Save (large). – Press OK to start recording a voice memo. – Press Pause/Resume to pause/resume recording.– Press STOPto stop recording and save the voice memo.
• A list of recorded voice memos, ringtones, melodies, and music files is displayed.
Assigning Ringtones1. From the MULTIMEDIA menu, select My Ringtones.
2. Highlight a file. You have the following options:• Press Set As (Left Soft Key) to assign the highlighted as a
Ringtone, Contact ID, or Alert Sounds.• Press PLAY to play back the highlighted file.• Press Options(Right Soft Key) to display the following options:
– Send: Send the currently highlighted ringtone, music, or recorded voice memo file as part of a MultimediaMessage or Via Bluetooth.
– Rename: Change the name of the highlighted file.– Move: Relocate the currently highlighted file from phone
memory to a memory card or from a memory card to phone memory.
– Lock/Unlock: Block or permit erasure of the ringtone, music, or recorded voice memo file.
– Erase: Erase the highlighted file. – Erase Ringtones: Erase one or more marked files.– File Info: View the Name, File Size, File Type, and Date and
Time created of the currently selected file.
Multimedia 73
My VideosMy Videos lets you manage the videos you record with yourphone’s Camcorder and videos you download and lets youplay and manage your videos.
1. From the MULTIMEDIA menu, select My Videos. Anarray of thumbnail images appears in the display.
2. Highlight a video file.• Press Erase (Left Soft Key) to delete the video.• Press PLAY to play a highlighted video. • Press Options(Right Soft Key) to display the following options:
– Send: Send the currently highlighted video as part of a Multimedia Message or Via Bluetooth.
– Camcorder: Record a video.– Manage Videos: Erase videos, Lock a video from being
erased, or Unlock a video. Choose Move To Phone or Move to Card to change the storage location of the video.
– Rename: Change the name of the video file. – View by Location: Lets you view All videos or only those
videos stored in Phone memory or Card memory.– File Info: View the Name, File Size, Resolution, Duration,
and Date and Time created of the currently selected video.
easyedgeWith easyedge, you can download full featured applicationsover the air including games, personalized ring tones,pictures, and more.
n In standby mode, press MENU; then selecteasyedge.
Tone Room DeluxeExpress yourself by subscribing to Tone Room Deluxe todownload ringtones from your favorite artists and setringback tones for your friends and family to hear when theycall you.
n In standby mode, press MENU; then selectTone Room.
74
Section 8: Browser
This section outlines how to launch the browser and navigateto other pages within the browser, and how the keys on theQWERTY keypad are used with web application. Additionally,links to other sites are briefly discussed.
Launching the Browser1. In standby mode, press MENU; then select
Browser. A message concerning data chargesappears in the display.
2. To prevent the data charges message from appearing,press OK ➔ Yes.– or –
To clear the message, press Yes. (Pressing No returnsyou to the Main Menu.)
Your wireless provider’s portal web page appears in thedisplay.
Exiting the Browsern Press End.
Using the BrowserWhen you use the browser, some of the keys operatedifferently than during a normal phone call. Browser presentson-screen items in any of the following ways:• Text or numeric input.
• Links (embedded in content).
• Numbered options (some may not be numbered).
• Simple text.
You can act upon options or links by using the soft keys.
Browser Soft KeysAt the bottom of the browser display is a bar that containsbrowser commands. The Left and Right Soft Keys ( ) onthe keypad are used to execute the commands that appear intheir respective corners of the display. These are called “softkeys” because their functions change depending on theapplication.

Browser 75
Using LinksLinks have several purposes, such as jumping to a differentpage, to a different site, or even initiating a phone call. Linksare shown underlined. You can normally use the Left Soft Key( ) to select a link when it is highlighted.
How Browser Keys WorkThe following table lists browser keys and their functions.
Navigation Key: Use to browse lists and options.
Back Key: Press once to back up one page. Pressonce to clear the last number, letter, or symbol entered.Press and hold to completely clear the entry.
SHIFT Key: Press before entering text to enableuppercase characters.
Spacebar: Press to insert a space when enteringtext.
Numbers 1 thru 0: Use the number keys to selectitems in a menu, if they are numbered.
End Key: Press to exit the browser and return thephone to standby mode.
Left Soft Key: Press to activate the command thatappears above it in the display.
Right Soft Key: Press to activate the command thatappears above it in the display.

76
Section 9: Tools
This section explains how you can use your phone'sproductivity tools to view today’s calendar, scheduleappointments, set an alarm, perform simple mathcalculations, and more.
Accessing Toolsn In standby mode, press MENU; then select
Tools. The TOOLS menu appears in the display.
BluetoothBluetooth is a short-range wireless communicationstechnology capable of exchanging information over adistance of about 30 feet without requiring a physicalconnection.
n From the TOOLS menu, select Bluetooth Menu. TheBLUETOOTH MENU appears in the display.
Turn Bluetooth On/Offn In the BLUETOOTH MENU, press Turn On. The Bluetooth
icon ( ) appears in the Status bar.
Add New Device1. In the BLUETOOTH MENU, select Add New Device.
Note: If prompted with “Turn bluetooth on?,” press Yes.
PLACE DEVICE YOU ARE CONNECTING TO INDISCOVERABLE MODE appears in the display.
2. Place the new Bluetooth device in discovery mode.
3. On your phone, press OK. Your phone will search fordiscoverable devices and display them.
4. Select the device you want to pair with your phone. Thephone attempts to automatically pair with the selecteddevice.
If automatic pairing fails, you are prompted to enter thepasskey or PIN for the selected device. (For otherwireless handsets, choose a passkey or PIN and enterthe same one on both devices. For more information onheadsets and hands-free units, refer to the usermanual for the other device.)
Tools 77
5. Except for other wireless handsets, you are promptedto confirm whether you want to connect your phonewith the other device. To connect with the other device,press Yes.
Paired ListThe Paired List contains Bluetooth devices that have pairedwith your phone, and allows you to connect/disconnect froma device or modify settings for these devices.
Bluetooth OptionsBluetooth Options allow you to set your phone’s Bluetoothavailability and view and set information about your phone’sBluetooth capabilities.
n In the BLUETOOTH MENU, press Options. The followingoptions are available.• My Phone Info: Lists and sets the Bluetooth Name. Lists the
Bluetooth Type, Status, and Address of your phone.• Discovery Mode: Makes your phone “visible” to other
Bluetooth devices for pairing and connecting.• Supported Profiles: Lists and describes the Bluetooth profiles
your phone supports (Headset, Hands free, Stereo, Phonebook Access, Object Push, File Transfer, Serial Port, and Dial Up Networking).
• Search Setting: Indicate the type of Bluetooth devices you want to include in searches.Choose All, Audio Device, PC, or Phone.
• Auto Pairing: Lets you select to enable (On) or disable (Off) Auto Pairing. If you disable Auto Pairing, you will be prompted to enter a password to pair with another Bluetooth device.
78
Voice SVCYour device includes Nuance Vsuite, state-of-the-art voicerecognition software that lets you use your voice to dialnumbers, access your Contacts list, and open Tools. Thefollowing options are available:
n From the TOOLS menu, select Voice SVC. TheVOICE SVC menu appears in the display. The followingoptions are available:• Voice Commands: Lets you place calls, access your Contacts
List, review your appointments, and more by speaking commands into your phone.
• Voice Settings: Lets you tailor Nuance Vsuite to better respond to your voice and your phone use preferences.
CalculatorYou can perform calculations, including addition, subtraction,multiplication, and division, using your phone.
n From the TOOLS menu, select Calculator. TheCALCULATOR menu appears in the display. Thefollowing options are available:• Normal: Performs addition, subtraction, multiplication, and
division. • Tip: Calculates the tip amount to be paid for a meal, and can
calculate the part of the tip to be paid by each member of a dining party.
• Eco: Calculates vehicle fuel economy.• Converter: Coverts measures or quantities of Temperature,
Length, Weight, Area, Volume, and Currency.
CalendarCalendar allows you to view the current, past, or futuremonth in calendar format, and schedule events. Whileviewing the calendar, the current date is highlighted, anddays with scheduled events are surrounded by a box.
n From the TOOLS menu, select Calendar.
Tools 79
Alarm ClockSet up to 10 alarm clocks for various times, days of theweek, or ringers. You can turn these alarm clocks on and offwithout affecting their settings.
n From the TOOLS menu, select Alarm Clock.
StopwatchStopwatch provides a timer that you can use to record eventtimes and/or to record lap times.
n From the TOOLS menu, select Stopwatch.
World ClockWorld Clock lets you view the time of day or night in any twoof the 24 different time zones around the world you choose.You select your time zones by city and/or country name.
Note: World Clock requires your wireless provider’s digitalservice.
n From the TOOLS menu, select World Clock.
Memo PadCreate notes and store them in Memo Pad. Return to MemoPad anytime to review and edit your notes.
n From the TOOLS menu, select Memo Pad.
USB Mass StorageLets you access your phone’s memory from a personalcomputer to transfer files to and/or from your phone.
n From the TOOLS menu, select USB Mass Storage. Youare prompted to connect the USB data cable betweenyour phone and personal computer.
80
Section 10: Settings
This section explains how to configure your phone’slanguage, network preferences, security options, and othersettings.
Accessing Your Phone’s Settingsn In standby mode, press MENU; then select
Settings. The SETTINGS menu appears inthe display.
LocationChoose whether your phone’s GPS (Global PositioningSystem) location is available to the network at all times, oronly when you’ve dialed an Emergency Number, suchas 911.
1. From the SETTINGS menu, select Location.
2. Select On or E911 Only.
Note: Check with your wireless carrier to determine if/when/where location-based services are available.
Display SettingsDisplay settings let you change your phone’s menuappearance, display brightness, and display content to bettermeet your needs.
n From the SETTINGS menu, select Display Settings. TheDISPLAY SETTINGS menu appears in the display.
WallpaperWallpaper lets you choose an image to appear in thebackground on your phone’s main display while in standbymode.
n From the DISPLAY SETTINGS menu, select Wallpaper.Select the screen you want to assign a new wallpaper(Home Screen or Lock Screen). Select from a list ofphotos captured with the Camera, downloaded images,and preloaded images.
Settings 81
Clock FormatClock Format lets you choose in what format your phonedisplays the current time.
n From the DISPLAY SETTINGS menu, selectClock Format. Select Analog, Large Analog, Digital 12,Large Digital 12, Digital 24, Large Digital 24, or Off.
Display ThemesDisplay Themes lets you choose the appearance of yourphone’s menus.
n From the DISPLAY SETTINGS menu, selectDisplay Themes. Select from Neon Light or Pond(default).
Fonts SizeFonts Size lets you choose the size of the digits you dial, thecharacters that compose your phone’s menu items, and thefont size using in messaging.
1. From the DISPLAY SETTINGS menu, select Fonts Size.The following options are available:• Dial Font Size
• Menu Font Size
• Messaging Font Size
2. Choose Normal, Small, Large, or Large Only.
Personal BannerPersonal Banner lets you change the banner text thatappears on the Home screen.
1. From the DISPLAY SETTINGS menu, selectPersonal Banner. The PERSONAL BANNER screenappears in the display.
2. Change or replace the text, then press SET. (For moreinformation, refer to “Entering Text” on page 24.)
82
BacklightYou can set the brightness of the backlight for your display orkeypad.
1. From the DISPLAY SETTINGS menu, select Backlight.
2. Select Display or Keypad backlight to remain on for 10,15 or 30 seconds, to be Always On, or to be Always Off.
3. Set the Brightness of the display by pressing theNavigation Key left or right, then press SET.
Note: Prolonged backlight use drains your battery faster.
Sounds SettingsSounds Settings let you customize your phone’s audioproperties, such as ringers, keypad tones, alerts, start upmelody, and more.
n From the SETTINGS menu, select Sounds Settings. TheSOUNDS SETTINGS menu appears in the display.
Master VolumeSet the Master Volume for all the sounds on your phone.
n From the SOUNDS SETTINGS menu, selectMaster Volume; then press Volume up or downand press SET.
Call SoundsYou can select the ringtones your phone will play to notifyyou of incoming calls. You can also set your phone to vibrateas well as ring for incoming calls, and/or whether to display acalling number or Contact name.
1. From the SOUNDS SETTINGS menu, select Call Sounds.
2. Select Call Ringtone, Call Vibrate, or Caller ID Readout.• For Call Ringtone, select a ringtone and press SET.• For Call Vibrate, select On or Off; then press SET.• For Caller ID Readout, select Ring Only, Caller ID + Ring, or
Name Repeat (Contacts only); then press SET.

Settings 83
Alert SoundsYou can select an individual tone to play for each type of Alertyour phone can sound.
1. From the SOUNDS SETTINGS menu, select Alert Sounds.
2. When you select TXT Message, Multimedia Message,Voicemail, Emergency Tone (On or Off only), Missed Call,Device Connect, or CMAS Message, you can choose anAlert Tone to play, choose Alert Vibrate, and choosewhether and how often your phone should repeat aReminder of any of these alerts.
3. When you select Device Connect, you can turn this alertOn or Off.
Keypad SoundsYou can select one of two sounds for your phone to producewhen you press a key.
n From the SOUNDS SETTINGS menu, selectKeypad Sounds; then select Default or Lucid.
Keypad VolumeYou can select the volume at which your phone producesKeypad Sounds.
n From the SOUNDS SETTINGS menu, selectKeypad Volume; then press the Navigation Key down todecrease the volume, or up to increase the volume.
CMAS VolumeYou can select the volume at which your phone producesCMAS Alerts.
n From the SOUNDS SETTINGS menu, selectCMAS Volume; then press the Navigation Key down todecrease the volume, or up to increase the volume.
Digit Dial ReadoutDigit Dial Readout causes your phone to vocally playbackphone number digits as you enter them.
n From the SOUNDS SETTINGS menu, selectDigit Dial Readout ➔ On to enable Digit Dial Readout.
84
Service AlertsService Alerts lets you enable playback of the alert tonewhen you Roam or lose service, for each minute a phone calllasts, or each time a call connects.
n From the SOUNDS SETTINGS menu, selectService Alerts; then select any of the following toenable a service alert tone occurrence:• Roam/SVC Alert ➔ On.• Minute Beep ➔ On.• Call Connect ➔ On.
Power On AlertPower On Alert lets you choose whether your phone plays amelody when you power it on. Select On to play the melody,and select Off to disable the melody.
n From the SOUNDS SETTINGS menu, selectPower On Alert.
Call SettingsThe Call Settings sub-menu lets you set call options such asAuto Retry, Data rates for data calls, and more.
n From the SETTINGS menu, select Call Settings. TheCALL SETTINGS menu appears in the display.
Answer OptionsYou can set your phone to answer incoming calls only when:• You press Send, or
• You press any key on the keypad except End.
n From the CALL SETTINGS menu, select Answer Options.
Auto AnswerAuto Answer lets you set your phone to automatically answercalls after 1, 3, or 5 seconds.
n From the CALL SETTINGS menu, select Auto Answer.
Settings 85
Auto RetryAuto Retry automatically redials a number at an interval youselect, when there is no answer or the dialed party is busy.Depending upon your location, the number of times yourphone redials a number may vary.
n From the CALL SETTINGS menu, select Auto Retry.
TTY ModeYour phone is fully TTY-compatible, allowing you to connect aTTY device to the phone’s headset jack. Before you can useyour phone with a TTY device, you’ll need to enable TTYMode.
1. From the CALL SETTINGS menu, select TTY Mode.
2. Read the prompt and select Yes.
3. Select TTY Full, TTY + Talk (VCO), TTY + Hear (HCO), orTTY Off.
Note: TTY Mode must be enabled before you can use yourphone with TTY/TDD equipment.
When you select TTY Full, the TTY Mode option has noeffect on the phone’s earpiece, microphone, or speaker.All currently enabled sound functions remain enabled.
Voice PrivacyVoice Privacy you choose what level of voice security(Standard or Enhanced) your phone will use.
Note: If Enhanced voice security is unavailable at a particularlocation, your phone reverts temporarily to Standardvoice security.
n From the CALL SETTINGS menu, select Voice Privacy.
International DialingInternational Dialing lets you choose a frequently-dialedcountry code for dialing by the International Dialing shortcut.(For more information on using the International Dialingshortcut, see “Dialing International Numbers” on page 26.)
n From the CALL SETTINGS menu, selectInternational Dialing.
86
DTMF TonesDTMF Tones let you select the length of the tone (Normal orLong) that the keypad generates each time you press a key.
Note: The Long setting can be useful with automated systems.
n From the CALL SETTINGS menu, select DTMF Tones.
Phone SettingsYou can set or reset the operating characteristics of yourphone to suit your location and/or to limit access to yourphone.
n From the SETTINGS menu, select Phone Settings. ThePHONE SETTINGS menu appears in the display.
Airplane ModeWhen set to On, Airplane Mode disables all radio functions ofyour phone. This blocks you from making or receiving callsother than Emergency (911) calls, but allows you to use otherfeatures (such as the camera and the Tools) safely insensitive environments, such as on board an aircraft.
n From the PHONE SETTINGS menu, select Airplane Mode.
Tip: If you need to make an emergency call with Airplanemode enabled, just dial the emergency number and press
Send.
LanguageChoose the language for the phone’s operation and displays.
n From the PHONE SETTINGS menu, select Language; thenselect English, Español, or .
Settings 87
SecurityUse the Security sub-menu to lock your phone, setrestrictions, and other security options.
To access the Security sub-menu, you are prompted to enteryour phone’s four-digit lock code.
n From the PHONE SETTINGS menu, select Security.
Note: The default lock code is “0000.”
Lock Phone NowThe Lock Phone Now option lets you lock or unlock yourphone immediately.
Locking the device blocks all outgoing calls except those to911. You can lock the phone manually or set the phone tolock automatically when turned on. In Lock mode, you cananswer calls, but you must unlock the phone to place calls(except to 911).
Edit CodesThe Edit Codes option lets you replace your phone’s defaultlock code (the default lock code is “0000”) with one of yourown choosing.
It is advisable to change the default lock code to a secretcode for security purposes.
When you select Edit Codes, you are prompted to enter yournew lock code, and then re-enter it for verification.
Note: Your phone does not allow you to view the lock code forsecurity reasons. If you change the lock code, be sure towrite down or memorize the new code.
Phone Lock SettingPhone Lock Setting lets you choose whether your phonepowers up unlocked or locked.
n From the SECURITY menu, select Phone Lock Setting;then select Unlocked or On Power Up.

88
Reset PhoneThe Reset Phone option returns all settings on your phone(except for Contacts entries) to their factory default values.
Caution! Before selecting Reset Phone, contact your WirelessCarrier. Invoking Reset Phone may erase settingsmade by your Wireless Carrier from your phone,resulting in loss of service.
n From the SECURITY menu, select Reset Phone; thenselect No or Yes.
RestrictionsThe Restrictions option settings let you set restrictions oncalls, messages, and data calls:
n Incoming/Outgoing Calls: Select Allow All, ContactsOnly, or Block All.
n Incoming/Outgoing SMS (Text) Messages: Select AllowAll, Contacts Only, or Block All.
n Incoming/Outgoing MMS (Multimedia) Messages: SelectAllow All, Contacts Only, or Block All.
n Data Calls: Select Allow All or Block All.
Note: All default restriction settings are Allow All(unrestricted).
Factory Data ResetFactory Data Reset deletes all entries from the Contacts list.
n From the SECURITY menu, select Factory Data Reset;then select No or Yes.
Settings 89
NAM SelectNAM Selection lets you select your preferred numberassignment module (NAM 1 or NAM 2), provided your phonehas a NAM 2 number programmed into it. (For moreinformation, contact your Wireless Provider.)
Important! If, after setting your phone to Lock itself On PowerUp, you change the NAM Selection setting fromNAM 1 to NAM 2, but there is no numberprogramed into NAM 2, you won’t be able toaccess your phone. You must call your wirelessprovider’s service center to unlock your phone.
n From the PHONE SETTINGS menu, select NAM Select;then select NAM1 or NAM2.
System SelectSystem Select allows you to set system selections forroaming.
n From the PHONE SETTINGS menu, select System Select.Select one of the following:• Home Only: Your phone is active only in your home network’s
coverage area. When outside the coverage area, your phone will not roam, and call functions and other features will not be available.
• Automatic: Your phone automatically acquires service based on default settings, using the USCC network and the networks of roaming partners.
Speed DialSpeed Dial lets you choose whether to enable (On) or disable(Off) speed dialing on your phone.
n From the PHONE SETTINGS menu, select Speed Dial;then select On or Off.
90
Quick SearchQuick Search allows easy searching for contacts and menusin standby mode, by pressing keys on the QWERTY keyboard
n From the PHONE SETTINGS menu, select Quick Search.Select On or Off.
In standby mode, just enter the first few letters of aContact name; then press the Navigation Key Up to finda matching Contact.
Set Directional KeysYou can change the shortcuts assigned to the up, left, andright directional keys.
1. From the PHONE SETTINGS menu, select Set DirectionalKeys.
2. Select Up Directional Key, Left Directional Key, orRight Directional Key.
3. Select Alarm Clock, Bluetooth Menu, Bluetooth On/Off,Calculator, Calendar, Call Settings, Contact List,Display Settings, Messaging, Messaging Inbox, Browser,Multimedia, My Music, My Images, My Ringtones,New Contact, New Message, Memo pad, Phone Settings,Settings, Sounds Settings, Stopwatch, Tools,USB Mass Storage, or Voice SVC.
USB ModeThe USB Mode option lets you enable the phone’s ability toact as a USB flash drive, provided you have installed anoptional microSD or microSDHC memory card and the USBdata cable.
n From the PHONE SETTINGS menu, select USB Mode.
Choose USB Mass Storage, Modem Mode, orCharging Only. If you select USB Mass Storage, you cantransfer music, sound, ringtone, and image files to andfrom a microSD or microSDHC memory card.
Settings 91
Auto Key LockThe Auto Key Lock setting controls whether the externalkeypad locks automatically when the backlight goes out.
n From the PHONE SETTINGS menu, select Auto Key Lock.Select On or Off.
With Auto Key Lock set to On, your phone automaticallydisables its keys when the screen backlight goes outwith the phone closed.
Press a key to turn the screen backlight on; then pressUnlock ➔ Spacebar/Voice Command Key.
Phone InfoPhone Info allow you to view information about your device.
n From the SETTINGS menu, select Phone Info. Choosefrom the following options:• My Number: View your phone number.• SW/HWVersion: View your software and hardware version.• Icon Glossary: View explanations of your phone’s icons.• Software Update: Check for software updates and
update status.
Memoryn From the SETTINGS menu, select Memory. The following
options are available:• Save Options: Allow you to select a default storage location for
images taken with your phone’s Camera. • Phone Memory: Lets you review and manage the amount of
available and used phone memory. • Card Memory: Lets you review and manage the amount of
available and used card memory (if installed). Also lets you format used memory cards.
Note: This option prepares used microSD™ or microSDHC™
Memory Cards for use with your phone. Repeatedformatting of a Memory Card can shorten its service life.Erase files rather that format the Memory Card.
92
Section 11: Health and Safety Information
This section outlines the safety precautions associated withusing your phone. The terms “mobile device” or “cell phone”are used in this section to refer to your phone. Read thisinformation before using your mobile device.
Exposure to Radio Frequency (RF) SignalsThe U.S. Food and Drug Administration (FDA) has publishedinformation for consumers relating to Radio Frequency (RF)exposure from wireless phones. The FDA publicationincludes the following information:
Do cell phones pose a health hazard?Many people are concerned that cell phone radiation willcause cancer or other serious health hazards. The weight ofscientific evidence has not linked cell phones with any healthproblems.
Cell phones emit low levels of Radio Frequency (RF) energy.Over the past 15 years, scientists have conducted hundredsof studies looking at the biological effects of the radiofrequency energy emitted by cell phones. While someresearchers have reported biological changes associated
with RF energy, these studies have failed to be replicated.The majority of studies published have failed to show anassociation between exposure to radio frequency from a cellphone and health problems.
The low levels of RF cell phones emit while in use are in themicrowave frequency range. They also emit RF atsubstantially reduced time intervals when in the stand-bymode. Whereas high levels of RF can produce health effects(by heating tissue), exposure to low level RF that does notproduce heating effects causes no known adverse healtheffects.
The biological effects of radio frequency energy should notbe confused with the effects from other types ofelectromagnetic energy.
Very high levels of electromagnetic energy, such as is foundin X-rays and gamma rays, can ionize biological tissues.Ionization is a process where electrons are stripped awayfrom their normal locations in atoms and molecules. It canpermanently damage biological tissues including DNA, thegenetic material.
Health and Safety Information 93
The energy levels associated with radio frequency energy,including both radio waves and microwaves, are not greatenough to cause ionization of atoms and molecules.Therefore, RF energy is a type of non-ionizing radiation.Other types of non-ionizing radiation include visible light,infrared radiation (heat), and other forms of electromagneticradiation with relatively low frequencies.
While RF energy does not ionize particles, large amounts canincrease body temperatures and cause tissue damage. Twoareas of the body, the eyes and the testes, are particularlyvulnerable to RF heating because there is relatively littleblood flow in them to carry away excess heat.
Research Results to Date: Is there a connection between RF and certain health problems?The results of most studies conducted to date say no. Inaddition, attempts to replicate and confirm the few studiesthat have shown a connection have failed.
The scientific community at large therefore believes that theweight of scientific evidence does not show an associationbetween exposure to Radio Frequency (RF) from cell phonesand adverse health outcomes. Still the scientific communityhas supported additional research to address gaps inknowledge. Some of these studies are described below.
Interphone StudyInterphone is a large international study designed todetermine whether cell phones increase the risk of head andneck cancer. A report published in the International Journalof Epidemiology (June, 2010) compared cell phone usage formore than 5,000 people with brain tumors (glioma andmeningioma) and a similar number of healthy controls.
Results of this study did NOT show that cell phones causedbrain cancer. In this study, most people had no increased riskof brain cancer from using cell phones. For people with theheaviest use of cell phones (an average of more than ½ hourper day, every day, for over 10 years) the study suggested aslight increase in brain cancer. However, the authorsdetermined that biases and errors prevented any conclusionsbeing drawn from this data. Additional information aboutInterphone can be found athttp://www.iarc.fr/en/media-centre/pr/2010/pdfs/pr200_E.pdf.
Interphone is the largest cell phone study to date, but it didnot answer all questions about cell phone safety. Additionalresearch is being conducted around the world, and the FDAcontinues to monitor developments in this field.
94
International Cohort Study on Mobile Phone Users (COSMOS)The COSMOS study aims to conduct long-term healthmonitoring of a large group of people to determine if thereare any health issues linked to long-term exposure to radiofrequency energy from cell phone use. The COSMOS studywill follow approximately 300,000 adult cell phone users inEurope for 20 to 30 years. Additional information about theCOSMOS study can be found athttp://www.ukcosmos.org/index.html.
Risk of Brain Cancer from Exposure to Radio Frequency Fields in Childhood and Adolescence (MOBI-KIDS)MOBI-KIDS is an international study investigating therelationship between exposure to radio frequency energyfrom communication technologies including cell phones andbrain cancer in young people. This is an internationalmulti-center study involving 14 European and non-Europeancountries. Additional information about MOBI-KIDS can befound athttp://www.creal.cat/programes-recerca/en_projectes-creal/view.php?ID=39.
Surveillance, Epidemiology, and End Results (SEER) Program of the National Cancer InstituteThe National Cancer Institute (NCI) actively follows cancerstatistics in the United States to detect any change in rates ofnew cases for brain cancer. If cell phones play a role in riskfor brain cancer, rates should go up, because heavy cellphone use has been common for quite some time in the U.S.Between 1987 and 2005, the overall age-adjusted incidenceof brain cancer did not increase. Additional information aboutSEER can be found athttp://seer.cancer.gov/.
Cell Phone Industry ActionsAlthough the existing scientific data do not justify FDAregulatory actions, the FDA has urged the cell phone industryto take a number of steps, including the following:
• Support-needed research on possible biological effects of RF for the type of signal emitted by cell phones;
• Design cell phones in a way that minimizes any RF exposure to the user; and
• Cooperate in providing users of cell phones with the current information on cell phone use and human health concerns.
Health and Safety Information 95
The FDA also is working with voluntary standard-settingbodies such as the Institute of Electrical and ElectronicsEngineers (IEEE), the International Commission onNon-Ionizing Radiation Protection (ICNIRP), and others toassure that safety standards continue to adequately protectthe public.
Reducing Exposure: Hands-Free Kits and Other AccessoriesSteps to Reduce Exposure to Radio Frequency EnergyIf there is a risk from being exposed to radio frequencyenergy (RF) from cell phones - and at this point we do notknow that there is - it is probably very small. But, if you areconcerned about avoiding even potential risks, you can takea few simple steps to minimize your RF exposure.• Reduce the amount of time spent using your cell phone;
• Use speaker mode or a headset to place more distance betweenyour head and the cell phone.
Hands-Free KitsHands-free kits may include audio or Bluetooth® headsetsand various types of body-worn accessories such asbelt-clips and holsters. Combinations of these can be used toreduce RF energy absorption from cell phones.
Headsets can substantially reduce exposure because thephone is held away from the head in the user's hand or inapproved body-worn accessories. Cell phones marketed inthe U.S. are required to meet RF exposure compliancerequirements when used against the head and against thebody.
Because there are no known risks from exposure to RFemissions from cell phones, there is no reason to believe thathands-free kits reduce risks. Hands-free kits can be used forconvenience and comfort. They are also required by law inmany states if you want to use your phone while driving.
Cell Phone Accessories that Claim to Shield the Head from RF RadiationBecause there are no known risks from exposure to RFemissions from cell phones, there is no reason to believe thataccessories which claim to shield the head from thoseemissions reduce risks. Some products that claim to shieldthe user from RF absorption use special phone cases, whileothers involve nothing more than a metallic accessoryattached to the phone.
96
Studies have shown that these products generally do notwork as advertised. Unlike “hands-free” kits, these so-called“shields” may interfere with proper operation of the phone.The phone may be forced to boost its power to compensate,leading to an increase in RF absorption.
Children and Cell PhonesThe scientific evidence does not show a danger to any usersof cell phones from RF exposure, including children andteenagers. The steps adults can take to reduce RF exposureapply to children and teenagers as well.• Reduce the amount of time spent on the cell phone;
• Use speaker mode or a headset to place more distance betweenthe head and the cell phone.
Some groups sponsored by other national governments haveadvised that children be discouraged from using cell phonesat all. For example, The Stewart Report from the UnitedKingdom made such a recommendation in December 2000.In this report, a group of independent experts noted that noevidence exists that using a cell phone causes brain tumorsor other ill effects. Their recommendation to limit cell phoneuse by children was strictly precautionary; it was not basedon scientific evidence that any health hazard exists.
Additional information on the safety of RF exposures fromvarious sources can be obtained from the followingorganizations (updated 10/1/2010):• FCC RF Safety Program:
http://www.fcc.gov/oet/rfsafety/.
• Environmental Protection Agency (EPA):http://www.epa.gov/radtown/wireless-tech.html.
• Occupational Safety and Health Administration (OSHA):http://www.osha.gov/SLTC/radiofrequencyradiation/.(Note: This web address is case sensitive.)
• National Institute for Occupational Safety and Health (NIOSH):http://www.cdc.gov/niosh/.
• World Health Organization (WHO):http://www.who.int/peh-emf/en/.
• International Commission on Non-Ionizing Radiation Protection:http://www.icnirp.de.
• Health Protection Agency:http://www.hpa.org.uk/Topics/Radiation/.
Health and Safety Information 97
• US Food and Drug Administration:http://www.fda.gov/Radiation-EmittingProducts/RadiationEmittingProductsandProcedures/HomeBusinessandEntertainment/CellPhones/default.htm.
Specific Absorption Rate (SAR) Certification InformationYour wireless phone is a radio transmitter and receiver. It isdesigned and manufactured not to exceed the exposurelimits for Radio Frequency (RF) energy set by the FederalCommunications Commission (FCC) of the U.S. Government.
These FCC RF exposure limits are derived from therecommendations of two expert organizations: the NationalCouncil on Radiation Protection and Measurement (NCRP)and the Institute of Electrical and Electronics Engineers(IEEE). In both cases, the recommendations were developedby scientific and engineering experts drawn from industry,government, and academia after extensive reviews of thescientific literature related to the biological effects of RFenergy.
The RF exposure limit set by the FCC for wireless mobilephones employs a unit of measurement known as theSpecific Absorption Rate (SAR). The SAR is a measure of therate of absorption of RF energy by the human body
expressed in units of watts per kilogram (W/kg). The FCCrequires wireless phones to comply with a safety limit of 1.6watts per kilogram (1.6 W/kg).
The FCC SAR limit incorporates a substantial margin of safetyto give additional protection to the public and to account forany variations in measurements.
SAR tests are conducted using standard operating positionsaccepted by the FCC with the phone transmitting at itshighest certified power level in all tested frequency bands.Although the SAR is determined at the highest certifiedpower level, the actual SAR level of the phone whileoperating can be well below the maximum reported value.This is because the phone is designed to operate at multiplepower levels so as to use only the power required to reachthe network. In general, the closer you are to a wireless basestation antenna, the lower the power output of the phone.
Before a new model phone is available for sale to the public,it must be tested and certified to the FCC that it does notexceed the SAR limit established by the FCC. Tests for eachmodel phone are performed in positions and locations (e.g. atthe ear and worn on the body) as required by the FCC. Forbody-worn operation, this phone has been tested and meets
98
FCC RF exposure guidelines when used with an accessorythat contains no metal and that positions the mobile device aminimum of 1.5 cm from the body.
Use of other accessories may not ensure compliance withFCC RF exposure guidelines. The FCC has granted anEquipment Authorization for this mobile device with allreported SAR levels evaluated as in compliance with the FCCRF exposure guidelines. This [mobile phone/tablet/device]has a FCC ID number: A3LSCHR480 [Model Number: SCH-R480] and the specific SAR levels for this mobile phone canbe found at the following FCC website:http://www.fcc.gov/oet/ea/.
The SAR information for this device can also be found onSamsung’s website:http://www.samsung.com/sar.
SAR information on this and other model phones can beaccessed online on the FCC's website through http://transition.fcc.gov/oet/rfsafety/sar.html. To find information thatpertains to a particular model phone, this site uses the phoneFCC ID number which is usually printed somewhere on thecase of the phone. Sometimes it may be necessary toremove the battery pack to find the number. Once you havethe FCC ID number for a particular phone, follow the
instructions on the website and it should provide values fortypical or maximum SAR for a particular phone. AdditionalSAR information can also be obtained athttp://www.fcc.gov/encyclopedia/specific-absorption-rate-sar-cellular-telephones.
FCC Part 15 Information to UserPursuant to part 15.21 of the FCC Rules, you are cautionedthat changes or modifications not expressly approved bySamsung could void your authority to operate the device.
This device complies with part 15 of the FCC Rules.Operation is subject to the following two conditions: (1) Thisdevice may not cause harmful interference, and (2) thisdevice must accept any interference received, includinginterference that may cause undesired operation.
Note: This equipment has been tested and found to complywith the limits for a Class B digital device, pursuant to part15 of the FCC Rules. These limits are designed to providereasonable protection against harmful interference in aresidential installation. This equipment generates, uses andcan radiate radio frequency energy and, if not installed andused in accordance with the instructions, may cause harmfulinterference to radio communications.
Health and Safety Information 99
However, there is no guarantee that interference will notoccur in a particular installation. If this equipment doescause harmful interference to radio or television reception,which can be determined by turning the equipment off andon, the user is encouraged to try to correct the interferenceby one or more of the following measures:• Reorient or relocate the receiving antenna.
• Increase the separation between the equipment and receiver.
• Connect the equipment into an outlet on a circuit different fromthat to which the receiver is connected.
• Consult the dealer or an experienced radio/TV technician for help.
Commercial Mobile Alerting System (CMAS)This device is designed to receive wireless emergency alertsfrom the Commercial Mobile Alerting System ("CMAS";which may also be known as the Personal Localized AlertingNetwork ("PLAN")). If your wireless provider has chosen toparticipate in CMAS/PLAN, alerts are available while in theprovider's coverage area. If you travel outside your provider'scoverage area, wireless emergency alerts may not beavailable. For more information, please contact your wirelessprovider.
Smart Practices While DrivingOn the Road - Off the PhoneThe primary responsibility of every driver is the safeoperation of his or her vehicle.
Responsible drivers understand that no secondary taskshould be performed while driving whether it be eating,drinking, talking to passengers, or talking on a mobile phone- unless the driver has assessed the driving conditions and isconfident that the secondary task will not interfere with theirprimary responsibility. Do not engage in any activity whiledriving a moving vehicle which may cause you to take youreyes off the road or become so absorbed in the activity thatyour ability to concentrate on the act of driving becomesimpaired. Samsung is committed to promoting responsibledriving and giving drivers the tools they need to understandand address distractions.
Check the laws and regulations on the use of mobile devicesand their accessories in the areas where you drive. Alwaysobey them. The use of these devices may be prohibited orrestricted in certain areas. For example, only hands-free usemay be permitted in certain areas.

100
Before answering calls, consider your circumstances. Let thecall go to voicemail when driving conditions require.Remember, driving comes first, not the call!
If you consider a call necessary and appropriate, follow thesetips:• Use a hands-free device;
• Secure your phone within easy reach;
• Place calls when you are not moving;
• Plan calls when your car will be stationary;
• Do not engage in stressful or emotional conversations;
• Let the person with whom you are speaking know that you aredriving and will suspend the call if necessary;
• Do not take notes or look up phone numbers while driving;
Notice regarding legal restrictions on mounting this device inan automobile:
Laws in some states may prohibit mounting this device on ornear the windshield of an automobile. In other states, the lawmay permit mounting this device only in specific locations inthe automobile. Be sure to consult the state and local laws orordinances where you drive before mounting this device inan automobile. Failure to comply with these restrictions couldresult in fines, penalties, or other damages.
Never mount this device in a manner that will obstruct thedriver's clear view of the street and traffic.
Never use wireless data services such as text messaging, Webbrowsing, or e-mail while operating a vehicle.
Never watch videos, such as a movie or clip, or play videogames while operating a vehicle.
For more information, go to http://www.ctia.org.
Battery Use and Safety
Important! Handle and store batteries properly to avoid injury ordamage. Most battery issues arise from improperhandling of batteries and, particularly, from thecontinued use of damaged batteries.
• Do not disassemble, crush, puncture, shred, or otherwiseattempt to change the form of your battery. Do not put a highdegree of pressure on the battery. This can cause leakage or aninternal short-circuit, resulting in overheating.
Health and Safety Information 101
• Do not let the phone or battery come in contact with liquids.Liquids can get into the phone's circuits, leading to corrosion.Even when the phone appears to be dry and appears to operatenormally, the circuitry could slowly corrode and pose a safetyhazard. If the phone and/or battery get wet, have them checkedby your service provider or contact Samsung, even if they appearto be working properly.
• Do not place your battery in or near a heat source. Excessiveheating can damage the phone or the battery and could cause thephone or the battery to explode. Do not dry a wet or damp batterywith an appliance or heat source such as a microwave oven, hairdryer, iron, or radiator. Avoid leaving your phone in your car inhigh temperatures.
• Do not dispose of the phone or the battery in a fire. The phoneor the battery may explode when overheated.
• Do not handle a damaged or leaking battery. Do not let leakingbattery fluid come in contact with your eyes, skin or clothing. Forsafe disposal options, contact your nearest Samsung-authorizedservice center.
• Avoid dropping the cell phone. Dropping the phone or thebattery, especially on a hard surface, can potentially causedamage to the phone and battery. If you suspect damage to thephone or battery, take it to a service center for inspection.
• Never use any charger or battery that is damaged in any way.
• Do not allow the battery to touch metal objects. Accidentalshort-circuiting can occur when a metallic object (coin, key,jewelry, clip, or pen) causes a direct connection between the +and - terminals of the battery (metal strips on the battery), forexample when you carry a spare battery in a pocket or bag.Short-circuiting the terminals may damage the battery or theobject causing the short-circuiting.
Important! Use only Samsung-approved batteries, andrecharge your battery only withSamsung-approved chargers which arespecifically designed for your phone.
102
WARNING!
Use of a non-Samsung-approved battery or charger maypresent a risk of fire, explosion, leakage, or other hazard.Samsung's warranty does not cover damage to the phonecaused by non-Samsung-approved batteries and/orchargers.• Do not use incompatible cell phone batteries and chargers.
Some websites and second-hand dealers not associated withreputable manufacturers and carriers, might be sellingincompatible or even counterfeit batteries and chargers.Consumers should purchase manufacturer orcarrier-recommended products and accessories. If unsure aboutwhether a replacement battery or charger is compatible, contactthe manufacturer of the battery or charger.
• Misuse or use of incompatible phones, batteries, andcharging devices could result in damage to the equipmentand a possible risk of fire, explosion, or leakage, leading toserious injuries, damages to your phone, or other serioushazard.
Samsung Mobile Products and RecyclingSamsung cares for the environment and encourages itscustomers to recycle Samsung mobile devices and genuineSamsung accessories.
Proper disposal of your mobile device and its battery is notonly important for safety, it benefits the environment.Batteries must be recycled or disposed of properly.
Recycling programs for your mobile device, batteries, andaccessories may not be available in your area.
We've made it easy for you to recycle your old Samsungmobile device by working with respected take-backcompanies in every state in the country.
Drop It Off
You can drop off your Samsung-branded mobile deviceand batteries for recycling at one of our numerousSamsung Recycling Direct (SM) locations. A list of theselocations may be found at:http://pages.samsung.com/us/recyclingdirect/
usactivities_environment_samsungrecyclingdirect_locations.jsp.
Health and Safety Information 103
Samsung-branded devices and batteries will be acceptedat these locations for no fee.
Consumers may also recycle their used mobile device orbatteries at many retail or carrier-provided locationswhere mobile devices and batteries are sold. Additionalinformation regarding specific locations may be found at:http://www.epa.gov/epawaste/partnerships/plugin/cellphone/index.htm or at http://www.call2recycle.org/.
Mail It In
The Samsung Mobile Take-Back Program will provideSamsung customers with a free recycling mailing label.Just go tohttp://www.samsung.com/us/aboutsamsung/citizenship/
usactivities_environment_samsungrecyclingdirect.html?INT=STA_recyle_your_phone_page and follow the instructions toprint out a free pre-paid postage label and then send yourold mobile device or battery to the address listed, via U.S.Mail, for recycling.
Dispose of unwanted electronics through an approvedrecycler.
To find the nearest recycling location, go to our website:
www.samsung.com/recyclingdirectOr call, (877) 278-0799.
Follow local regulations regarding disposal of mobile devices and batteriesDispose of your mobile device and batteries in accordancewith local regulations. In some areas, the disposal of theseitems in household or business trash may be prohibited. Helpus protect the environment - recycle!
Warning! Never dispose of batteries in a fire because they mayexplode.
UL Certified Travel ChargerThe Travel Charger for this phone has met applicable ULsafety requirements. Please adhere to the following safetyinstructions per UL guidelines:
FAILURE TO FOLLOW THE INSTRUCTIONS OUTLINED MAYLEAD TO SERIOUS PERSONAL INJURY AND POSSIBLEPROPERTY DAMAGE.
IMPORTANT SAFETY INSTRUCTIONS - SAVE THESEINSTRUCTIONS.
DANGER - TO REDUCE THE RISK OF FIRE ORELECTRIC SHOCK, CAREFULLY FOLLOW THESEINSTRUCTIONS.
104
FOR CONNECTION TO A SUPPLY NOT IN NORTHAMERICA, USE AN ATTACHMENT PLUG ADAPTOROF THE PROPER CONFIGURATION FOR THEPOWER OUTLET.
THIS POWER UNIT IS INTENDED TO BECORRECTLY ORIENTED IN A VERTICAL ORHORIZONTAL OR FLOOR MOUNT POSITION.
Display / Touch-ScreenPlease note the following information when using yourmobile device:
WARNING REGARDING DISPLAY
The display on your mobile device is made of glass oracrylic and could break if your mobile device isdropped or if it receives significant impact. Do not useif screen is broken or cracked as this could causeinjury to you.
WARRANTY DISCLAIMER: PROPER USE OF ATOUCH-SCREEN MOBILE DEVICE
If your mobile device has a touch-screen display,please note that a touch-screen responds best to alight touch from the pad of your finger or a non-metallicstylus. Using excessive force or a metallic object whenpressing on the touch-screen may damage thetempered glass surface and void the warranty. Formore information, please refer to the “StandardLimited Warranty”.
GPSCertain Samsung mobile devices can use a Global PositioningSystem (GPS) signal for location-based applications. A GPSuses satellites controlled by the U.S. Government that aresubject to changes implemented in accordance with theDepartment of Defense policy and the 2008 Federal Radionavigation Plan (FRP). Changes may affect the performanceof location-based technology on your mobile device.
Even with GPS, when you make an emergency call:• Always tell the emergency responder your location to the best of
your ability; and
Health and Safety Information 105
• Remain on the mobile device for as long as the emergencyresponder instructs you.
NavigationMaps, directions, and other navigation-data, including datarelating to your current location, may contain inaccurate orincomplete data, and circumstances can and do change overtime. In some areas, complete information may not beavailable. Therefore, you should always visually confirm thatthe navigational instructions are consistent with what you seebefore following them. All users should pay attention to roadconditions, closures, traffic, and all other factors that mayimpact safe driving or walking. Always obey posted road signs.
Emergency CallsThis mobile device, like any wireless mobile device, operatesusing radio signals, wireless and landline networks, as wellas user-programmed functions, which cannot guaranteeconnection in all conditions, areas, or circumstances.
Therefore, you should never rely solely on any wirelessmobile device for essential communications (medicalemergencies, for example). Before traveling in remote orunderdeveloped areas, plan an alternate method ofcontacting emergency services personnel. Remember, to
make or receive any calls, the mobile device must beswitched on and in a service area with adequate signalstrength.
Emergency calls may not be possible on all wireless mobiledevice networks or when certain network services and/ormobile device features are in use. Check with local serviceproviders.
To make an emergency call:1. If the mobile device is not on, switch it on.
2. Key in the emergency number for your present location(for example, 911 or other official emergency number).Emergency numbers vary by location.
3. Press the “Send” key.
If certain features are in use (call blocking, for example), youmay first need to deactivate those features before you canmake an emergency call. Consult your User Manual and yourlocal cellular service provider. When making an emergencycall, remember to give all the necessary information asaccurately as possible. Remember that your mobile devicemay be the only means of communication at the scene of anaccident; do not cut off the call until given permission to doso.

106
Care and MaintenanceYour mobile device is a product of superior design andcraftsmanship and should be treated with care. Thesuggestions below will help you fulfill any warrantyobligations and allow you to enjoy this product for manyyears:
Keep your Samsung Mobile Device away from:
Liquids of any kind
Keep the mobile device dry. Precipitation, humidity, andliquids contain minerals that will corrode electroniccircuits. If the mobile device does get wet, do notaccelerate drying with the use of an oven, microwave, ordryer, because this may damage the mobile device andcould cause a fire or explosion.
Do not use the mobile device with a wet hand. Doing somay cause an electric shock to you or damage to themobile device.
Extreme heat or cold
Avoid temperatures below 0°C / 32°F or above 45°C /113°F.
Microwaves
Do not try to dry your mobile device in a microwave oven.Doing so may cause a fire or explosion.
Dust and dirt
Do not expose your mobile device to dust, dirt, or sand.
Cleaning solutions
Do not use harsh chemicals, cleaning solvents, or strongdetergents to clean the mobile device. Wipe it with a softcloth slightly dampened in a mild soap-and-watersolution.
Shock or vibration
Do not drop, knock, or shake the mobile device. Roughhandling can break internal circuit boards.
Paint
Do not paint the mobile device. Paint can clog thedevice’s moving parts or ventilation openings and preventproper operation.
Responsible Listening
Caution! Avoid potential hearing loss.
Health and Safety Information 107
Damage to hearing occurs when a person is exposed to loudsounds over time. The risk of hearing loss increases assound is played louder and for longer durations. Prolongedexposure to loud sounds (including music) is the mostcommon cause of preventable hearing loss. Some scientificresearch suggests that using portable audio devices, such asportable music players and cell phones, at high volumesettings for long durations may lead to permanentnoise-induced hearing loss.
This includes the use of headphones (including headsets,earbuds, and Bluetooth® or other wireless devices).Exposure to very loud sound has also been associated insome studies with tinnitus (a ringing in the ear),hypersensitivity to sound, and distorted hearing. Individualsusceptibility to noise-induced hearing loss and potentialhearing problem varies. Additionally, the amount of soundproduced by a portable audio device varies depending on thenature of the sound, the device settings, and the headphonesthat are used. As a result, there is no single volume settingthat is appropriate for everyone or for every combination ofsound, settings, and equipment.
You should follow some common sense recommendationswhen using any portable audio device:
• Always turn the volume down before plugging the earphones intoan audio source.
• Set the volume in a quiet environment and select the lowestvolume at which you can hear adequately.
• Be aware that you can adapt to higher volume settings over time,not realizing that the higher volume may be harmful to yourhearing.
• When using headphones, turn the volume down if you cannothear the people speaking near you or if the person sitting next toyou can hear what you are listening to.
• Do not turn the volume up to block out noisy surroundings. If youchoose to listen to your portable device in a noisy environment,use noise-cancelling headphones to block out backgroundenvironmental noise. By blocking background environment noise,noise cancelling headphones should allow you to hear the musicat lower volumes than when using earbuds.
• Limit the amount of time you listen. As the volume increases, lesstime is required before you hearing could be affected.
108
• Avoid using headphones after exposure to extremely loud noises,such as rock concerts, that might cause temporary hearing loss.Temporary hearing loss might cause unsafe volumes to soundnormal.
• Do not listen at any volume that causes you discomfort. If youexperience ringing in your ears, hear muffled speech, orexperience any temporary hearing difficulty after listening to yourportable audio device, discontinue use and consult your doctor.
You can obtain additional information on this subject from thefollowing sources:
American Academy of Audiology
11730 Plaza American Drive, Suite 300Reston, VA 20190
Voice: (800) 222-2336Email: [email protected]
Internet:http://www.audiology.org/Pages/
default.aspx
National Institute on Deafness and OtherCommunication Disorders
National Institutes of Health31 Center Drive, MSC 2320Bethesda, MD 20892-2320
Email: [email protected]
Internet:http://www.nidcd.nih.gov/
National Institute for Occupational Safetyand Health (NIOSH)
395 E Street, S.W., Suite 9200Patriots Plaza BuildingWashington, DC 20201
Voice: 1-800-35-NIOSH(1-800-356-4674)1-800-CDC-INFO (1-800-232-4636)Outside the U.S. 513-533-8328
Health and Safety Information 109
Operating EnvironmentRemember to follow any special regulations in force in anyarea, and always switch your mobile device off whenever it isforbidden to use it, or when it may cause interference ordanger. When connecting the mobile device or any accessoryto another device, read its user's guide for detailed safetyinstructions. Do not connect incompatible products.
Using Your Mobile Device Near Other Electronic DevicesMost modern electronic equipment is shielded from RadioFrequency (RF) signals. However, certain electronicequipment may not be shielded against the RF signals fromyour wireless mobile device. Consult the manufacturer todiscuss alternatives.
Implantable Medical DevicesA minimum separation of six (6) inches should be maintainedbetween a handheld wireless mobile device and animplantable medical device, such as a pacemaker orimplantable cardioverter defibrillator, to avoid potentialinterference with the device.
Persons who have such devices:• Should ALWAYS keep the mobile device more than six (6) inches
from their implantable medical device when the mobile device isturned ON;
• Should not carry the mobile device in a breast pocket;
• Should use the ear opposite the implantable medical device tominimize the potential for interference;
• Should turn the mobile device OFF immediately if there is anyreason to suspect that interference is taking place;
• Should read and follow the directions from the manufacturer ofyour implantable medical device. If you have any questions aboutusing your wireless mobile device with an implantable medicaldevice, consult your health care provider.
For more information see: http://www.fcc.gov/oet/rfsafety/rf-faqs.html#.
Email: [email protected]
Internet:http://www.cdc.gov/niosh/topics/noise/default.html
1-888-232-6348 TTY
110
Other Medical DevicesIf you use any other personal medical devices, consult themanufacturer of your device to determine if it is adequatelyshielded from external RF energy. Your physician may be ableto assist you in obtaining this information. Switch yourmobile device off in health care facilities when anyregulations posted in these areas instruct you to do so.Hospitals or health care facilities may be using equipmentthat could be sensitive to external RF energy.
VehiclesRF signals may affect improperly installed or inadequatelyshielded electronic systems in motor vehicles. Check withthe manufacturer or its representative regarding your vehiclebefore using your mobile device in a motor vehicle. Youshould also consult the manufacturer of any equipment thathas been added to your vehicle.
Posted FacilitiesSwitch your mobile device off in any facility where postednotices require you to do so.
Potentially Explosive EnvironmentsSwitch your mobile device off when in any area with apotentially explosive atmosphere and obey all signs andinstructions. Sparks in such areas could cause an explosion
or fire resulting in bodily injury or even death. Users areadvised to switch the mobile device off while at a refuelingpoint (service station).
Users are reminded of the need to observe restrictions on theuse of radio equipment in fuel depots (fuel storage anddistribution areas), chemical plants, or where blastingoperations are in progress. Areas with a potentially explosiveatmosphere are often, but not always, clearly marked. Theyinclude below deck on boats, chemical transfer or storagefacilities, vehicles using liquefied petroleum gas (such aspropane or butane), areas where the air contains chemicalsor particles, such as grain, dust, or metal powders, and anyother area where you would normally be advised to turn offyour vehicle engine.
When your Device is WetDo not turn on your device if it is wet. If your device isalready on, turn it off and remove the battery immediately (ifthe device will not turn off or you cannot remove the battery,leave it as-is). Then, dry the device with a towel and take itto a service center.
Health and Safety Information 111
FCC Hearing Aid Compatibility (HAC) Regulations for Wireless DevicesThe U.S. Federal Communications Commission (FCC) hasestablished requirements for digital wireless mobile devicesto be compatible with hearing aids and other assistivehearing devices.
When individuals employing some assistive hearing devices(hearing aids and cochlear implants) use wireless mobiledevices, they may detect a buzzing, humming, or whiningnoise. Some hearing devices are more immune than othersto this interference noise, and mobile devices also vary in theamount of interference they generate.
The wireless telephone industry has developed a ratingsystem for wireless mobile devices to assist hearing deviceusers find mobile devices that may be compatible with theirhearing devices. Not all mobile devices have been rated.Mobile devices that are rated have the rating on their box ora label located on the box.
The ratings are not guarantees. Results will vary dependingon the user's hearing device and hearing loss. If your hearingdevice happens to be vulnerable to interference, you may not
be able to use a rated mobile device successfully. Trying outthe mobile device with your hearing device is the best way toevaluate it for your personal needs.
M-Ratings: Wireless mobile devices rated M3 or M4 meetFCC requirements and are likely to generate less interferenceto hearing devices than mobile devices that are not labeled.M4 is the better/higher of the two ratings. M-ratings refer toenabling acoustic coupling with hearing aids that do notoperate in telecoil mode.
T-Ratings: Mobile devices rated T3 or T4 meet FCCrequirements and are likely to generate less interference tohearing devices than mobile devices that are not labeled. T4is the better/higher of the two ratings. T-ratings refer toenabling inductive coupling with hearing aids operating intelecoil mode.
Hearing devices may also be rated. Your hearing aidmanufacturer or hearing health professional may help youfind this rating. Higher ratings mean that the hearing deviceis relatively immune to interference noise.
Under the current industry standard, American NationalStandards Institute (ANSI) C63.19, the hearing aid andwireless mobile device rating values are added together toindicate how usable they are together. For example, if a
112
hearing aid meets the M2 level rating and the wirelessmobile device meets the M3 level rating, the sum of the twovalues equals M5.
Under the standard, this should provide the hearing aid userwith normal use while using the hearing aid with theparticular wireless mobile device. A sum of 6 or more wouldindicate excellent performance.
However, these are not guarantees that all users will besatisfied. T ratings work similarly.
The HAC rating and measurement procedure are described inthe American National Standards Institute (ANSI) C63.19standard.
Restricting Children's Access to Your Mobile DeviceYour mobile device is not a toy. Do not allow children to playwith it because they could hurt themselves and others,damage the mobile device, or make calls that increase yourmobile device bill.
Keep the mobile device and all its parts and accessories outof the reach of small children.
FCC Notice and CautionsFCC NoticeThe mobile device may cause TV or radio interference if usedin close proximity to receiving equipment. The FCC canrequire you to stop using the mobile device if suchinterference cannot be eliminated. Vehicles using liquefiedpetroleum gas (such as propane or butane) must comply withthe National Fire Protection Standard (NFPA-58). For a copyof this standard, contact the National Fire ProtectionAssociation.
M3 + M2 = 5
T3 + T2 = 5
Health and Safety Information 113
CautionsAny changes or modifications to your mobile device notexpressly approved in this document could void yourwarranty for this equipment and void your authority tooperate this equipment. Only use approved batteries,antennas, and chargers. The use of any unauthorizedaccessories may be dangerous and void the mobile devicewarranty if said accessories cause damage or a defect to themobile device.
Although your mobile device is quite sturdy, it is a complexpiece of equipment and can be broken. Avoid dropping,hitting, bending, or sitting on it.
Other Important Safety Information• Only qualified personnel should service the mobile device or
install the mobile device in a vehicle. Faulty installation or servicemay be dangerous and may invalidate any warranty applicable tothe device.
• Ensure that any mobile devices or related equipment installed inyour vehicle are securely mounted.
• Check regularly that all wireless mobile device equipment in yourvehicle is mounted and operating properly.
• When using a headset in dry environments, static electricity canbuild up in the headset and cause a small quick static electricalshock. To minimize the risk of electrostatic discharge from theheadset avoid using the headset in extremely dry environments ortouch a grounded unpainted metal object to discharge staticelectricity before inserting the headset.
• Do not store or carry flammable liquids, gases, or explosivematerials in the same compartment as the mobile device, itsparts, or accessories.
• For vehicles equipped with an air bag, remember that an air baginflates with great force. Do not place objects, including installedor portable wireless equipment near or in the area over the airbag or in the air bag deployment area. If wireless equipment isimproperly installed and the air bag inflates, serious injury couldresult.
• Switch your mobile device off before boarding an aircraft. The useof wireless mobile devices in aircraft is illegal and may bedangerous to the aircraft's operation. Check with appropriateauthorities before using any function of a mobile device while onan aircraft.
114
• Failure to observe these instructions may lead to the suspensionor denial of cell phone services to the offender, or legal action, orboth.
• While using your device, leave some lights on in the room and donot hold the screen too close to your eyes.
• Seizures or blackouts can occur when you are exposed to flashinglights while watching videos or playing games for extendedperiods. If you feel any discomfort, stop using the deviceimmediately.
• Reduce risk of repetitive motion injuries. When you repetitivelyperform actions, such as pressing keys, drawing characters on atouch screen with your fingers, or playing games, you mayexperience occasional discomfort in your hands, neck, shoulders,or other parts of your body. When using your device for extendedperiods, hold the device with a relaxed grip, press the keys lightly,and take frequent breaks. If you continue to have discomfortduring or after such use, stop use and see a physician.
• If your device has a camera flash or light, do not use the flash orlight close to the eyes of people or pets. [122011]
Warranty Information 115
Section 12: Warranty Information
Standard Limited WarrantyWhat is covered and for how long?
SAMSUNG TELECOMMUNICATIONS AMERICA, LLC(“SAMSUNG”) warrants that SAMSUNG’s handsets andaccessories (“Products”) are free from defects in materialand workmanship under normal use and service for theperiod commencing upon the date of purchase by the firstconsumer purchaser and continuing for the followingspecified period of time after that date:
What is not covered?
This Limited Warranty is conditioned upon proper use of theProduct.
This Limited Warranty does not cover: (a) defects or damageresulting from accident, misuse, abnormal use, abnormalconditions, improper storage, exposure to liquid, moisture,dampness, sand or dirt, neglect, or unusual physical,electrical or electromechanical stress; (b) scratches, dentsand cosmetic damage, unless caused by SAMSUNG;(c) defects or damage resulting from excessive force or useof a metallic object when pressing on a touch screen;(d) equipment that has the serial number or theenhancement data code removed, defaced, damaged,altered or made illegible; (e) ordinary wear and tear;(f) defects or damage resulting from the use of Product inconjunction or connection with accessories, products, orancillary/peripheral equipment not furnished or approved bySAMSUNG; (g) defects or damage resulting from impropertesting, operation, maintenance, installation, service, oradjustment not furnished or approved by SAMSUNG;(h) defects or damage resulting from external causes such ascollision with an object, fire, flooding, dirt, windstorm,lightning, earthquake, exposure to weather conditions, theft,blown fuse, or improper use of any electrical source;(i) defects or damage resulting from cellular signal reception
Phone 1 Year
Batteries 1 Year
Case/Pouch/Holster 90 Days
Other PhoneAccessories
1 Year

116
or transmission, or viruses or other software problemsintroduced into the Product; or (j) Product used or purchasedoutside the United States. This Limited Warranty coversbatteries only if battery capacity falls below 80% of ratedcapacity or the battery leaks, and this Limited Warranty doesnot cover any battery if (i) the battery has been charged by abattery charger not specified or approved by SAMSUNG forcharging the battery; (ii) any of the seals on the battery arebroken or show evidence of tampering; or (iii) the battery hasbeen used in equipment other than the SAMSUNG phone forwhich it is specified.
What are SAMSUNG’s obligations?
During the applicable warranty period, provided the Productis returned in accordance with the terms of this LimitedWarranty, SAMSUNG will repair or replace the Product, atSAMSUNG’s sole option, without charge. SAMSUNG may, atSAMSUNG’s sole option, use rebuilt, reconditioned, or newparts or components when repairing any Product, or mayreplace the Product with a rebuilt, reconditioned or newProduct.
Repaired/replaced cases, pouches and holsters will bewarranted for a period of ninety (90) days. All other repaired/replaced Products will be warranted for a period equal to the
remainder of the original Limited Warranty on the originalProduct or for ninety (90) days, whichever is longer. Allreplaced Products, parts, components, boards andequipment shall become the property of SAMSUNG. Except toany extent expressly allowed by applicable law, transfer orassignment of this Limited Warranty is prohibited.
What must you do to obtain warranty service?
To obtain service under this Limited Warranty, you mustreturn the Product to an authorized phone service facility inan adequate container for shipping, accompanied by thesales receipt or comparable proof of sale showing theoriginal date of purchase, the serial number of the Productand the seller’s name and address.
To obtain assistance on where to deliver the Product, pleasecall SAMSUNG Customer Care at 1-888-987-4357. IfSAMSUNG determines that any Product is not covered by thisLimited Warranty, you must pay all parts, shipping, and laborcharges for the repair or return of such Product.
You should keep a separate backup copy of any contents ofthe Product before delivering the Product to SAMSUNG forwarranty service, as some or all of the contents may bedeleted or reformatted during the course of warranty service.
Warranty Information 117
What are the limits on SAMSUNG’s liability?
THIS LIMITED WARRANTY SETS OUT THE FULL EXTENT OFSAMSUNG’S RESPONSIBILITIES, AND THE EXCLUSIVEREMEDY REGARDING THE PRODUCTS.
ALL IMPLIED WARRANTIES, INCLUDING WITHOUTLIMITATION, IMPLIED WARRANTIES OF MERCHANTABILITYAND FITNESS FOR A PARTICULAR PURPOSE, ARE LIMITED TOTHE DURATION OF THIS LIMITED WARRANTY. IN NO EVENTSHALL SAMSUNG BE LIABLE FOR DAMAGES IN EXCESS OFTHE PURCHASE PRICE OF THE PRODUCT OR FOR, WITHOUTLIMITATION, COMMERCIAL LOSS OF ANY SORT; LOSS OFUSE, TIME, DATA, REPUTATION, OPPORTUNITY, GOODWILL,PROFITS OR SAVINGS; INCONVENIENCE; INCIDENTAL,SPECIAL, CONSEQUENTIAL OR PUNITIVE DAMAGES; ORDAMAGES ARISING FROM THE USE OR INABILITY TO USE THEPRODUCT. SOME STATES AND JURISDICTIONS DO NOTALLOW LIMITATIONS ON HOW LONG AN IMPLIED WARRANTYLASTS, OR THE DISCLAIMER OR LIMITATION OF INCIDENTALOR CONSEQUENTIAL DAMAGES, SO THE ABOVE LIMITATIONSAND DISCLAIMERS MAY NOT APPLY TO YOU.
SAMSUNG MAKES NO WARRANTIES OR REPRESENTATIONS,EXPRESS OR IMPLIED, STATUTORY OR OTHERWISE, AS TOTHE QUALITY, CAPABILITIES, OPERATIONS, PERFORMANCE
OR SUITABILITY OF ANY THIRD-PARTY SOFTWARE OREQUIPMENT USED IN CONJUNCTION WITH THE PRODUCT, ORTHE ABILITY TO INTEGRATE ANY SUCH SOFTWARE OREQUIPMENT WITH THE PRODUCT, WHETHER SUCHTHIRD-PARTY SOFTWARE OR EQUIPMENT IS INCLUDED WITHTHE PRODUCT DISTRIBUTED BY SAMSUNG OR OTHERWISE.RESPONSIBILITY FOR THE QUALITY, CAPABILITIES,OPERATIONS, PERFORMANCE AND SUITABILITY OF ANYSUCH THIRD-PARTY SOFTWARE OR EQUIPMENT RESTSSOLELY WITH THE USER AND THE DIRECT VENDOR, OWNEROR SUPPLIER OF SUCH THIRD-PARTY SOFTWARE OREQUIPMENT.
Nothing in the Product instructions or information shall beconstrued to create an express warranty of any kind withrespect to the Products. No agent, employee, dealer,representative or reseller is authorized to modify or extendthis Limited Warranty or to make binding representations orclaims, whether in advertising, presentations or otherwise,on behalf of SAMSUNG regarding the Products or this LimitedWarranty.
This Limited Warranty gives you specific legal rights, and youmay also have other rights that vary from state to state.
118
What is the procedure for resolving disputes?
ALL DISPUTES WITH SAMSUNG ARISING IN ANY WAY FROMTHIS LIMITED WARRANTY OR THE SALE, CONDITION ORPERFORMANCE OF THE PRODUCTS SHALL BE RESOLVEDEXCLUSIVELY THROUGH FINAL AND BINDING ARBITRATION,AND NOT BY A COURT OR JURY.
Any such dispute shall not be combined or consolidated witha dispute involving any other person’s or entity’s Product orclaim, and specifically, without limitation of the foregoing,shall not under any circumstances proceed as part of a classaction. The arbitration shall be conducted before a singlearbitrator, whose award may not exceed, in form or amount,the relief allowed by the applicable law. The arbitration shallbe conducted according to the American ArbitrationAssociation (AAA) Commercial Arbitration Rules applicable toconsumer disputes. This arbitration provision is enteredpursuant to the Federal Arbitration Act. The laws of the Stateof Texas, without reference to its choice of laws principles,shall govern the interpretation of the Limited Warranty and alldisputes that are subject to this arbitration provision. Thearbitrator shall decide all issues of interpretation andapplication of this arbitration provision and the LimitedWarranty.
For any arbitration in which your total damage claims,exclusive of attorney fees and expert witness fees, are$5,000.00 or less (“Small Claim”), the arbitrator may, if youprevail, award your reasonable attorney fees, expert witnessfees and costs as part of any award, but may not grantSAMSUNG its attorney fees, expert witness fees or costsunless it is determined that the claim was brought in badfaith. In a Small Claim case, you shall be required to pay nomore than half of the total administrative, facility andarbitrator fees, or $50.00 of such fees, whichever is less, andSAMSUNG shall pay the remainder of such fees.Administrative, facility and arbitrator fees for arbitrations inwhich your total damage claims, exclusive of attorney feesand expert witness fees, exceed $5,000.00 (“Large Claim”)shall be determined according to AAA rules. In a Large Claimcase, the arbitrator may grant to the prevailing party, orapportion among the parties, reasonable attorney fees,expert witness fees and costs. Judgment may be entered onthe arbitrator’s award in any court of competent jurisdiction.
This arbitration provision also applies to claims againstSAMSUNG’s employees, representatives and affiliates if anysuch claim arises from the Product’s sale, condition orperformance.
Warranty Information 119
You may opt out of this dispute resolution procedure byproviding notice to SAMSUNG no later than 30 calendar daysfrom the date of the first consumer purchaser’s purchase of theProduct. To opt out, you must send notice by e-mail [email protected], with the subject line: “ArbitrationOpt Out.” You must include in the opt out e-mail (a) your nameand address; (b) the date on which the Product was purchased;(c) the Product model name or model number; and (d) the IMEIor MEID or Serial Number, as applicable, if you have it (the IMEIor MEID or Serial Number can be found (i) on the Product box;(ii) on the Product information screen, which can be foundunder “Settings;” (iii) on a label on the back of the Productbeneath the battery, if the battery is removable; and (iv) on theoutside of the Product if the battery is not removable).Alternatively, you may opt out by calling 1-888-987-4357 nolater than 30 calendar days from the date of the first consumerpurchaser’s purchase of the Product and providing the sameinformation. These are the only two forms of notice that will beeffective to opt out of this dispute resolution procedure. Optingout of this dispute resolution procedure will not affect thecoverage of the Limited Warranty in any way, and you willcontinue to enjoy the benefits of the Limited Warranty.
Severability
If any portion of this Limited Warranty is held to be illegal orunenforceable, such partial illegality or unenforceability shallnot affect the enforceability of the remainder of the LimitedWarranty.
Precautions for Transfer and DisposalIf data stored on this device is deleted or reformatted usingthe standard methods, the data only appears to be removedon a superficial level, and it may be possible for someone toretrieve and reuse the data by means of special software.
To avoid unintended information leaks and other problems ofthis sort, it is recommended that the device be returned toSamsung’s Customer Care Center for an Extended FileSystem (EFS) Clear which will eliminate all user memory andreturn all settings to default settings. Please contact theSamsung Customer Care Center for details.
Important! Please provide warranty information (proof ofpurchase) to Samsung’s Customer Care Center inorder to provide this service at no charge. If thewarranty has expired on the device, charges mayapply.
120
Samsung Telecommunications America, LLC1301 E. Lookout DriveRichardson, Texas 75082
Phone: 1-800-SAMSUNGPhone: 1-888-987-HELP (4357)©2012 Samsung Telecommunications America, LLC. Allrights reserved.
No reproduction in whole or in part allowed without priorwritten approval. Specifications and availability subject tochange without notice. [111611]
End User License Agreement for SoftwareIMPORTANT. READ CAREFULLY: This End User LicenseAgreement ("EULA") is a legal agreement between you(either an individual or a single entity) and SamsungElectronics Co., Ltd. ("Samsung") for software, owned bySamsung and its affiliated companies and its third partysuppliers and licensors, that accompanies this EULA, whichincludes computer software and may include associatedmedia, printed materials, "online" or electronicdocumentation in connection with your use of this device("Software").
This device requires the use of preloaded software in itsnormal operation. BY USING THE DEVICE OR ITS PRELOADEDSOFTWARE, YOU ACCEPT THE TERMS OF THIS EULA. IF YOUDO NOT ACCEPT THESE TERMS, DO NOT USE THE DEVICE ORTHE SOFTWARE.
1. GRANT OF LICENSE. Samsung grants you the followingrights provided that you comply with all terms and conditionsof this EULA: You may install, use, access, display and runone copy of the Software on the local hard disk(s) or otherpermanent storage media of one computer and use theSoftware on a single computer or a mobile device at a time,and you may not make the Software available over a networkwhere it could be used by multiple computers at the sametime. You may make one copy of the Software in machinereadable form for backup purposes only; provided that thebackup copy must include all copyright or other proprietarynotices contained on the original.
Certain items of the Software may be subject to open sourcelicenses. The open source license provisions may overridesome of the terms of this EULA. We make the applicableopen source licenses available to you on the Legal Noticessection of the Settings menu of your device.
Warranty Information 121
2. RESERVATION OF RIGHTS AND OWNERSHIP. Samsungreserves all rights not expressly granted to you in this EULA.The Software is protected by copyright and other intellectualproperty laws and treaties. Samsung or its suppliers own thetitle, copyright and other intellectual property rights in theSoftware. The Software is licensed, not sold.
3. LIMITATIONS ON END USER RIGHTS. You may not reverseengineer, decompile, disassemble, or otherwise attempt todiscover the source code or algorithms of, the Software(except and only to the extent that such activity is expresslypermitted by applicable law not withstanding this limitation),or modify, or disable any features of, the Software, or createderivative works based on the Software. You may not rent,lease, lend, sublicense or provide commercial hostingservices with the Software.
4. CONSENT TO USE OF DATA. You agree that Samsung and itsaffiliates may collect and use technical information gatheredas part of the product support services related to theSoftware provided to you, if any, such as IMEI (your device’sunique identification number), device number, model name,customer code, access recording, your device’s current SWversion, MCC (Mobile Country Code), MNC (Mobile NetworkCode). Samsung and its affiliates may use this informationsolely to improve their products or to provide customized
services or technologies to you and will not disclose thisinformation in a form that personally identifies you. At alltimes your information will be treated in accordance withSamsung’s Privacy Policy, which can be viewed at:http://account.samsung.com/membership/pp.
5. SOFTWARE UPDATES. Samsung may provide to you ormake available to you updates, upgrades, supplements andadd-on components (if any) of the Software, including bugfixes, service upgrades (parts or whole), products or devices,and updates and enhancements to any software previouslyinstalled (including entirely new versions), (collectively“Update”) after the date you obtain your initial copy of theSoftware to improve the Software and ultimately enhanceyour user experience with your device. This EULA applies toall and any component of the Update that Samsung mayprovide to you or make available to you after the date youobtain your initial copy of the Software, unless we provideother terms along with such Update. To use Softwareprovided through Update, you must first be licensed for theSoftware identified by Samsung as eligible for the Update.After the Update, you may no longer use the Software thatformed the basis for your Update eligibility. The updatedSoftware version may add new functions and, in somelimited cases, may delete existing functions.
122
While the Update will be generally available, in some limitedcircumstances, the Software updates will only be offered byyour network carrier, and such Software updates will begoverned by your contractual relationship with your networkcarrier.
With the “Automatic Update” function enabled (as in thedefault setting in the System Update menu in the Setting),your device downloads some Updates automatically fromtime to time. Your device will, however, ask for your consentbefore installing any Update If you choose to disable the“Automatic Update” function, then you can check theavailability of new Updates by clicking on the “CheckUpdate” menu in the Setting. We recommend that you checkavailability of any new Updates periodically for optimal use ofyour device. If you want to avoid any use of network data forthe Update downloads, then you should choose the “Wi-FiOnly” option in the Setting. (Regardless of the option youchoose, the “Automatic Update” function downloads Updatesonly through Wi-Fi connection.)
6. Some features of the Software may require your device tohave access to the internet and may be subject torestrictions imposed by your network or internet provider.Unless your device is connected to the internet through Wi-Ficonnection, the Software will access through your mobile
network, which may result in additional charges dependingon your payment plan. In addition, your enjoyment of somefeatures of the Software may be affected by the suitabilityand performance of your device hardware or data access.
7. SOFTWARE TRANSFER. You may not transfer this EULA orthe rights to the Software granted herein to any third partyunless it is in connection with the sale of the mobile devicewhich the Software accompanied. In such event, the transfermust include all of the Software (including all componentparts, the media and printed materials, any upgrades, thisEULA) and you may not retain any copies of the Software.The transfer may not be an indirect transfer, such as aconsignment. Prior to the transfer, the end user receiving theSoftware must agree to all the EULA terms.
8. EXPORT RESTRICTIONS. You acknowledge that theSoftware is subject to export restrictions of various countries.You agree to comply with all applicable international andnational laws that apply to the Software, including all theapplicable export restriction laws and regulations.
9. TERMINATION. This EULA is effective until terminated. Yourrights under this License will terminate automatically withoutnotice from Samsung if you fail to comply with any of the
Warranty Information 123
terms and conditions of this EULA. Upon termination of thisEULA, you must cease all use of the Software and destroy allcopies, full or partial, of the Software.
10. DISCLAIMER OF WARRANTY. UNLESS SEPARATELY STATEDIN A WRITTEN EXPRESS LIMITED WARRANTYACCOMPANYING YOUR DEVICE, ALL SOFTWARE PROVIDEDBY SAMSUNG WITH THIS MOBILE DEVICE (WHETHERINCLUDED WITH THE DEVICE, DOWNLOADED, OROTHERWISE OBTAINED) IS PROVIDED "AS IS" AND ON AN"AS AVAILABLE" BASIS, WITHOUT WARRANTIES OF ANY KINDFROM SAMSUNG, EITHER EXPRESS OR IMPLIED. TO THEFULLEST EXTENT POSSIBLE PURSUANT TO APPLICABLELAW, SAMSUNG DISCLAIMS ALL WARRANTIES EXPRESS,IMPLIED, OR STATUTORY, INCLUDING, BUT NOT LIMITED TO,IMPLIED WARRANTIES OF MERCHANTABILITY, SATISFACTORYQUALITY OR WORKMANLIKE EFFORT, FITNESS FOR APARTICULAR PURPOSE, RELIABILITY OR AVAILABILITY,ACCURACY, LACK OF VIRUSES, QUIET ENJOYMENT, NONINFRINGEMENT OF THIRD PARTY RIGHTS OR OTHERVIOLATION OF RIGHTS. SOME JURISDICTIONS DO NOTALLOW EXCLUSIONS OR LIMITATIONS OF IMPLIEDWARRANTIES, SO THE ABOVE EXCLUSIONS OR LIMITATIONSMAY NOT APPLY TO YOU. NO ADVICE OR INFORMATION,WHETHER ORAL OR WRITTEN, OBTAINED BY YOU FROM
SAMSUNG OR ITS AFFILIATES SHALL BE DEEMED TO ALTERTHIS DISCLAIMER BY SAMSUNG OF WARRANTY REGARDINGTHE SOFTWARE, OR TO CREATE ANY WARRANTY OF ANYSORT FROM SAMSUNG.
11. THIRD-PARTY APPLICATIONS. Certain third partyapplications may be included with, or downloaded to thismobile device. Samsung makes no representationswhatsoever about any of these applications. Since Samsunghas no control over such applications, you acknowledge andagree that Samsung is not responsible for the availability ofsuch applications and is not responsible or liable for anycontent, advertising, products, services, or other materialson or available from such applications. You expresslyacknowledge and agree that use of third party applications isat your sole risk and that the entire risk of unsatisfactoryquality, performance, accuracy and effort is with you. It is upto you to take precautions to ensure that whatever you selectto use is free of such items as viruses, worms, Trojan horses,and other items of a destructive nature. References on thismobile device to any names, marks, products, or services ofany third-parties are provided solely as a convenience to you,and do not constitute or imply an endorsement, sponsorship,or recommendation of, or affiliation with the third party or itsproducts and services. You agree that Samsung shall not be
124
responsible or liable, directly or indirectly, for any damage orloss, including but not limited to any damage to the mobiledevice or loss of data, caused or alleged to be caused by, orin connection with, use of or reliance on any such third partycontent, products, or services available on or through anysuch application. You acknowledge and agree that the use ofany third-party application is governed by such third partyapplication provider's Terms of Use, License Agreement,Privacy Policy, or other such agreement and that anyinformation or personal data you provide, whether knowinglyor unknowingly, to such third-party application provider, willbe subject to such third party application provider's privacypolicy, if such a policy exists. SAMSUNG DISCLAIMS ANYRESPONSIBILITY FOR ANY DISCLOSURE OF INFORMATION ORANY OTHER PRACTICES OF ANY THIRD PARTY APPLICATIONPROVIDER. SAMSUNG EXPRESSLY DISCLAIMS ANYWARRANTY REGARDING WHETHER YOUR PERSONALINFORMATION IS CAPTURED BY ANY THIRD PARTYAPPLICATION PROVIDER OR THE USE TO WHICH SUCHPERSONAL INFORMATION MAY BE PUT BY SUCH THIRDPARTY APPLICATION PROVIDER.
12. SAMSUNG APPLICATIONS. Certain Samsung applicationsand services may be included with, or downloaded to, thismobile device. Many of them require Samsung Services
membership registration (“Samsung Account”), and yourrights and obligations will be set forth in separate SamsungAccount terms and conditions and privacy policies. There arenon-Samsung Account applications and services that requireyour consent to their separate terms and conditions andprivacy policies. You expressly acknowledge and agree thatyour use of such applications and services will be subject tothe applicable terms and conditions and privacy policies.
13. LIMITATION OF LIABILITY. SAMSUNG WILL NOT BE LIABLEFOR ANY DAMAGES OF ANY KIND ARISING OUT OF ORRELATING TO THE USE OR THE INABILITY TO USE THESOFTWARE OR ANY THIRD PARTY APPLICATION, ITSCONTENT OR FUNCTIONALITY, INCLUDING BUT NOT LIMITEDTO DAMAGES CAUSED BY OR RELATED TO ERRORS,OMISSIONS, INTERRUPTIONS, DEFECTS, DELAY INOPERATION OR TRANSMISSION, COMPUTER VIRUS, FAILURETO CONNECT, NETWORK CHARGES, IN-APP PURCHASES,AND ALL OTHER DIRECT, INDIRECT, SPECIAL, INCIDENTAL,EXEMPLARY, OR CONSEQUENTIAL DAMAGES EVEN IFSAMSUNG HAS BEEN ADVISED OF THE POSSIBILITY OF SUCHDAMAGES. SOME JURISDICTIONS DO NOT ALLOW THEEXCLUSION OR LIMITATION OF INCIDENTAL ORCONSEQUENTIAL DAMAGES, SO THE ABOVE EXCLUSIONS ORLIMITATIONS MAY NOT APPLY TO YOU. NOTWITHSTANDING
Warranty Information 125
THE FOREGOING, SAMSUNG ELECTRONIC CO.'S TOTALLIABILITY TO YOU FOR ALL LOSSES, DAMAGES, CAUSES OFACTION, INCLUDING BUT NOT LIMITED TO THOSE BASED ONCONTRACT, TORT, OR OTHERWISE, ARISING OUT OF YOURUSE OF THE SOFTWARE OR THIRD PARTY APPLICATIONS ONTHIS MOBILE DEVICE, OR ANY OTHER PROVISION OF THISEULA, SHALL NOT EXCEED THE AMOUNT PURCHASER PAIDSPECIFICALLY FOR THIS MOBILE DEVICE OR ANY SUCHTHIRD PARTY APPLICATION THAT WAS INCLUDED WITH THISMOBILE DEVICE. THE FOREGOING LIMITATIONS,EXCLUSIONS, AND DISCLAIMERS (INCLUDING SECTIONS 10,11, 12 AND 13) SHALL APPLY TO THE MAXIMUM EXTENTPERMITTED BY APPLICABLE LAW, EVEN IF ANY REMEDYFAILS ITS ESSENTIAL PURPOSE.
14. U.S. GOVERNMENT END USERS RESTRICTED RIGHTS. TheSoftware is licensed only with "restricted rights" and as"commercial items" consisting of "commercial software"and "commercial software documentation" with only thoserights as are granted to all other end users pursuant to theterms and conditions herein. All Products are provided onlywith "restricted rights" with only those rights as are grantedto all other end users pursuant to the terms and conditionsherein. All Software and Products are provided subject toFederal Acquisition Regulation (FAR) 52.227.19.
15. APPLICABLE LAW. This EULA is governed by the laws ofthe jurisdiction where you are a resident or, if a resident ofthe United States, by the laws of the state of Texas, withoutregard to its conflict of law provisions. This EULA shall not begoverned by the UN Convention on Contracts for theInternational Sale of Goods, the application of which isexpressly excluded.
16. DISPUTE RESOLUTION.
(a) Non-United States residents. If a dispute, controversy ordifference arising in any way from this EULA or your use ofthe Software is not amicably settled, it shall be subject to thenon-exclusive jurisdiction of the courts of the jurisdictionwhere you are a resident. Notwithstanding the foregoing,Samsung may apply for injunctive remedies (or an equivalenttype of urgent legal relief) in any jurisdiction.
(b) United States residents. ALL DISPUTES WITH SAMSUNGARISING IN ANY WAY FROM THIS EULA OR YOUR USE OF THESOFTWARE SHALL BE RESOLVED EXCLUSIVELY THROUGHFINAL AND BINDING ARBITRATION, AND NOT BY A COURT ORJURY. Any such dispute shall not be combined orconsolidated with any other person’s or entity’s claim ordispute, and specifically, without limitation of the foregoing,shall not under any circumstances proceed as part of a class
126
action. The arbitration shall be conducted before a singlearbitrator, whose award may not exceed, in form or amount,the relief allowed by the applicable law. The arbitration shallbe conducted according to the American ArbitrationAssociation (AAA) Commercial Arbitration Rules applicable toconsumer disputes. This arbitration provision is enteredpursuant to the Federal Arbitration Act. The laws of the Stateof Texas, without reference to its choice of laws principles,shall govern the interpretation of the EULA and all disputesthat are subject to this arbitration provision. The arbitratorshall decide all issues of interpretation and application of thisarbitration provision and the EULA. For any arbitration inwhich your total damage claims, exclusive of attorney feesand expert witness fees, are $5,000.00 or less ("SmallClaim"), the arbitrator may, if you prevail, award yourreasonable attorney fees, expert witness fees and costs aspart of any award, but may not grant Samsung its attorneyfees, expert witness fees or costs unless it is determined thatthe claim was brought in bad faith. In a Small Claim case,you shall be required to pay no more than half of the totaladministrative, facility and arbitrator fees, or $50.00 of suchfees, whichever is less, and Samsung shall pay theremainder of such fees. Administrative, facility and arbitratorfees for arbitrations in which your total damage claims,
exclusive of attorney fees and expert witness fees, exceed$5,000.00 ("Large Claim") shall be determined according toAAA rules. In a Large Claim case, the arbitrator may grant tothe prevailing party, or apportion among the parties,reasonable attorney fees, expert witness fees and costs.Judgment may be entered on the arbitrator's award in anycourt of competent jurisdiction. This arbitration provision alsoapplies to claims against Samsung’s employees,representatives and affiliates if any such claim arises fromthe licensing or use of the Software. You may opt out of thisdispute resolution procedure by providing notice to Samsungno later than 30 calendar days from the date of the firstconsumer purchaser’s purchase of this device. To opt out,you must send notice by e-mail [email protected], with the subject line: "ArbitrationOpt Out." You must include in the opt out e-mail (a) yourname and address; (b) the date on which the device waspurchased; (c) the device model name or model number; and(d) the IMEI or MEID or Serial Number, as applicable, if youhave it (the IMEI or MEID or Serial Number can be found (i) onthe device box; (ii) on the device information screen, whichcan be found under "Settings;" (iii) on a label on the back ofthe device beneath the battery, if the battery is removable;and (iv) on the outside of the device if the battery is not
Warranty Information 127
removable). Alternatively, you may opt out by calling1-888-987-4357 no later than 30 calendar days from thedate of the first consumer purchaser's purchase of thedevice and providing the same information. These are theonly two forms of notice that will be effective to opt out ofthis dispute resolution procedure. Opting out of this disputeresolution procedure will not affect your use of the device orits preloaded Software, and you will continue to enjoy thebenefits of this license.
17. ENTIRE AGREEMENT; SEVERABILITY. This EULA is theentire agreement between you and Samsung relating to theSoftware and supersedes all prior or contemporaneous oralor written communications, proposals and representationswith respect to the Software or any other subject mattercovered by this EULA. If any provision of this EULA is held tobe void, invalid, unenforceable or illegal, the other provisionsshall continue in full force and effect. [050113]
128
Index
AAccessing Contacts 47Activating Your Phone 9Alarm Clock 79Answering a Call 29Apps
downloading 73B
Back Key 19Backlight 82Battery 5
charging 8installing 7low battery indicator 9removing 7
Battery Use & Safety 100Bluetooth 76
add new device 76Options 77Paired List 77turning off and on 76
Browserlaunching 74links 75using 74using Browser keys 75using soft keys 74
CCalculator 78Calendar 78Calendar Key 20Call Functions 26
adding pauses when dialing 28answering a call 29answering call-waiting calls 29call in progress options 30international calls 26making a call 26reject call with text message 29restrictions 88sending calls to Voicemail 29speed dialing 28three-way calling 26
Voice Commands 30Call Settings
answer options 84auto answer 84auto retry 85DTMF Tones 86TTY Mode 85
Calls Logs 34accessing recent calls 34creating or updating contacts 34deleting records 35making calls using recent calls 34
Camcorder 63My Video player 73options 64playing videos 66recording videos 63sending videos 64video playback controls 66
129
Camera 60camcorder options 64My Image viewer 71options 61playing videos 66sending photos 61sending videos 64taking snap shots 60using the camcorder 63
Camera Key 19Camera Options 61Care and Maintenance 106Center-Select Key 17Children and Cell Phones 96Clock
alarm 79format 81
Command Keys 17Commercial Mobile Alert System 44Commercial Mobile Alerting System
(CMAS) 99Contacts
adding 47adding - dial method 47
adding - menu method 48adding call numbers 50deleting 52editing 49finding 49groups 52groups - add new group 55groups - adding contacts 53groups - delete 55groups - rename 54groups - send message to 54memory info 59Speed Dial 56
DDelete Key 19Dialog Boxes 23Display / Touch-Screen 104Display Settings 80
backlight 82clock format 81Display Themes 81fonts size 81Personal Banner 81wallpaper 80
Display Themes 81Do cell phones pose a health hazard?
92Draft Messages 42DTMF Tones 86
Eeasyedge 73Emergency Calls 105End Key 19Entering Text 24Erase All Data 88Exposure to Radio Frequency (RF)
Signals 92F
Favorites 57assigning 57removing 58using 58
FCC Hearing Aid Compatibility (HAC)Regulations for WirelessDevices 111
FCC Notice and Cautions 112
130
Fn (Function) Key 19Fonts
size 81G
Getting StartedUnderstanding this User Manual 4
GPS 104GPS Setting 80
HHealth and Safety Information 92
IInternational Calls 26Internet Browser 74
KKeys
Back Key 19Calendar Key 20Camera Key 19Center-Select Key 17Delete Key 19End Key 19Fn (Function) Key 19Left Soft Key 17
Lock/Symbol Key 21Message Key 20Navigation Key 20Right Soft Key 17Send Key 18settings 90Shift Key 19Spacebar/Voice Command Key 20Speakerphone Key 21Vibrate Mode Key 20Volume Key 18
LLanguage
settings 86Left Soft Key 17Locations Settings 80Lock Code, Changing 87Lock/Symbol Key 21
MMaster Volume 82Memo Pad 79
Memory Cardformatting 11installing 10removing 11
Memory Info 91Memory Management 91Menu
dialog boxes 23navigation 21using menu shortcuts 21
Message FolderDraft Box 42
Message FoldersErase Messages 45
Message Key 20Messages
accessing 36CMAS Folder 44creating multimedia messages 38creating text messages 36Drafts Folder 42Drafts Folder - creating drafts 42Drafts Folder - managing 43
131
Drafts Folder - viewingand editing 43
erase messages 45message folders 40Messages Folder 40Messages Folder - managing 42Messages Folder -
viewing options 41receiving 40settings 46Social Networks Folder 45Voicemail Folder 44
Messagingtypes of messages 36
ModeSpeakerphone 21
Multimediaaccessing 60
Music Player 67controls and settings 69downloading music files 70launching 67Library Menu 68playing music 69
My Images 71My Ringtones 72
assigning ringtones 72recording voice memos 72
My Videos 73N
NAM Select 89Navigation Key 20Notes and Tips 4Notes, Description 4
OOperating Environment 109Other Important Safety
Information 113P
Personal Banner 81Personal Localized Alerting Network
(PLAN) 99Phone
activating 9command keys 17device information 91dialog boxes 23
Display Screen 22Display Screen Icons 22features 12reset phone 88security settings 87settings menu 80turning off and on 9
Phone SettingsAirplane Mode 86auto key lock 91language 86NAM select 89quick search 90set directional keys 90Speed Dial 89system select 89USB Mode 90
Photoscamera options 61My Image viewer 71sending 61taking snap shots 60
132
RRecording Videos 63Reducing Exposure
Hands-Free Kits and OtherAccessories 95
Reset Your Phone 88Responsible Listening 106Restricting Children's Access to
Your Mobile Device 112Right Soft Key 17Ringtones
Tone Room Deluxe 73S
Samsung Mobile Products andRecycling 102
Securitysettings 87
Security Settingsedit codes 87factory data reset 88Lock Phone Now option 87phone lock setting 87reset phone 88restrictions 88
Send Key 18Settings 80
Display 80location 80memory info 91phone info 91TTY Mode 85
Shift Key 19Smart Practices While Driving 99Social Networks 45Sound Settings
master volume 82Spacebar/Voice Command Key 20Speakerphone Key 21Specific Absorption Rate (SAR)
Certification Information 97Speed Dial 56
assigning 56removing 57settings 89
Speed Dialing 28Standard Limited Warranty 115Stopwatch 79
TText
entering 24Text Conventions 5Three-Way Calling 26Tip, Description 4Tone Room Deluxe 73Tools
Voice Commands 30TTY Mode 85Turn Phone Off and On 9
UUL Certified Travel Charger 103USB Mass Storage 79USB Mode 90
133
VVibrate Mode Key 20Videos
camcorder options 64My Videos player 73playback controls 66playing 66recording 63sending 64
Voice Commands 30calling 31checking status 32Contacts 33opening menus or applications 32sending messages 32settings 33
Voice Memos 72Voice Service 78Voicemail
Checking 44listening to 10setting up voicemail 10
Volume Key 18
WWallpaper
settings 80Warranty Information 115World Clock 79