Embed Size (px)
Citation preview

Page 1
Proprietary and Confidential information of Innovative Card Scanning, Inc.
Innovative Card Scanning, Inc.
ScanSharp Plug-in for Centricity User Manual
Document version 2.7

Page 2
Proprietary and Confidential information of Innovative Card Scanning, Inc.
Table of Contents1. Getting Started .............................................................................................................................................3
2. ScanSharp Plug-in for Centricity Plug-in ......................................................................................................5
3. ICS Scan Service ........................................................................................................................................ 14
4. Troubleshooting Your Software And Scanner............................................................................................. 15
5. Appendix .................................................................................................................................................... 16

Page 3
Proprietary and Confidential information of Innovative Card Scanning, Inc.
1. Getting Started 1.1 Minimum Requirements The following are minimum requirements for ScanSharp Plug-in for Centricity:
• Centricity version 2004, Web version 7.0.3.394 • USB port (Refer to Appendix 5.1 for the scanner models supported) • Processor: Intel Pentium III 450 megahertz (MHz) or higher • RAM: 512 megabytes (MB) • Hard disk space: 200 megabytes (MB) • Video: 800 x 600, 256 colors • Internet connection (for software registration and activation and live update) • Operating Systems:
o Windows 2000 Professional o Windows 2000 Server Family o Windows XP Professional/ Home o Windows 2003 Server Family
1.2 Scanner Installation Before you install the ScanSharp Plug-in for Centricity, you will need to install the scanner first. Please disregard this section if you have already installed your scanner. Please follow the steps below to help you install your scanner on your computer.
1. Insert the software disk into your CD-ROM drive. 2. The ScanSharp Plug-in for Centricity product screen will appear. Click on “Install Scanner”. 3. Select the scanner from the list that corresponds to the scanner that you purchased. 4. Follow the instructions on the wizard to install the scanner.
1.3 Software Installation After you have installed the scanner successfully, you can now install the ScanSharp Plug-in for Centricity. Follow the steps below to help you install the software on your computer.
1. Insert the software disk into your CD-ROM drive. 2. The ScanSharp Plug-in for Centricity product screen will appear. Click on the product name of the software that
corresponds to the software that you purchased. 3. Follow the instructions on the wizard to install the software.
1.4 Software Registration and Activation After you have installed the software, you will be asked to register and activate your copy of ScanSharp Plug-in for Centricity. Activation Over the Internet: The First time that you launch ScanSharp Plug-in for centricity you will be presented with the following screen, where you will enter you license key. Your license key can be found on the sleeve that your CD came in.

Page 4
Proprietary and Confidential information of Innovative Card Scanning, Inc.
After you click Ok you will be presented with the following screen where you will enter your information.
The only required fields are First name, Last name, and Phone number. Once you click on Ok your software will be registered and ready to use.
1.5 Calibrating Your Scanner You will need to calibrate the scanner the first time you use the scanner. The calibration paper is included in the scanner package and is marked “Calibration Paper – This side up”. Refer to section 2.8 on how to calibrate scanner.

Page 5
Proprietary and Confidential information of Innovative Card Scanning, Inc.
2. ScanSharp Plug-in for Centricity Plug-in This section will cover adding or modifying a patient record along with adding images for the Patient Insurance, Patient Demographics, and Guarantor Demographics tabs. The ScanSharp Plug-in for Centricity Plug-in allows you to add or modify a patient’s or guarantor’s information. The ScanSharp Plug-in for Centricity Plug-in will load up when you click on Import in the Centricty Window to create a new patient’s account. When you retrieve a patient from the Centricity patient search function like normal, you will be given a popup that asks if you would like to edit the record using the ScanSharp Plug-in for Centricity Plug-in. You will see “Image List” appear in the patient insurance, patient demographics and guarantor demographics tabs. The “Image List” will display the title of each image scanned with an ascending numbering filename (i.e. PatientInsurance-0 for insurance card, PatientDemographics-0 for patient’s driver’s license and GuarantorDemographics-0 for guarantor’s driver’s license). The left and right arrows will shift the view of each image stored. The “Move” button, when pressed, will adjust the current image to a new tab (i.e. Image will be moved to either Patient or Guarantor Demographics). The “Delete” button will remove the current image from the list. 2.1 Adding A New Insurance Record
To add new patient insurance information, click on the “Patient Insurance” tab. This is the selected tab by default. The “Select Carrier” button will allow you to select an existing carrier’s information.

Page 6
Proprietary and Confidential information of Innovative Card Scanning, Inc.
The fields under “New Data” will be populated with data from the insurance card after the card has been scanned if the template of the scanned insurance card is known. You will need to verify the data captured and modify them when appropriate. A box is drawn around each word on the image. You may replace the text on a field by clicking on a word-box on the image. Text from multiple word-boxes may also replace text in an existing field. You can follow the following procedure to do that: Selecting a single word-box:
1. Left-click on the field textbox you wish to modify the text. You may also use the tab button to tab to the appropriate field.
2. Left-click on the appropriate word-box on the image and the data will transfer to the active field. Selecting multiple word-boxes:
1. If you wish to add multiple boxes to a field textbox, left click on the field textbox (or tab to it). 2. Right click on the appropriate word-boxes on the image, then left click anywhere on the screen and the data will
transfer to the active field. 2.2 Adding A New Patient
To add new patient demographics information, click on the “Patient Demographics” tab.
Page 7
Proprietary and Confidential information of Innovative Card Scanning, Inc.
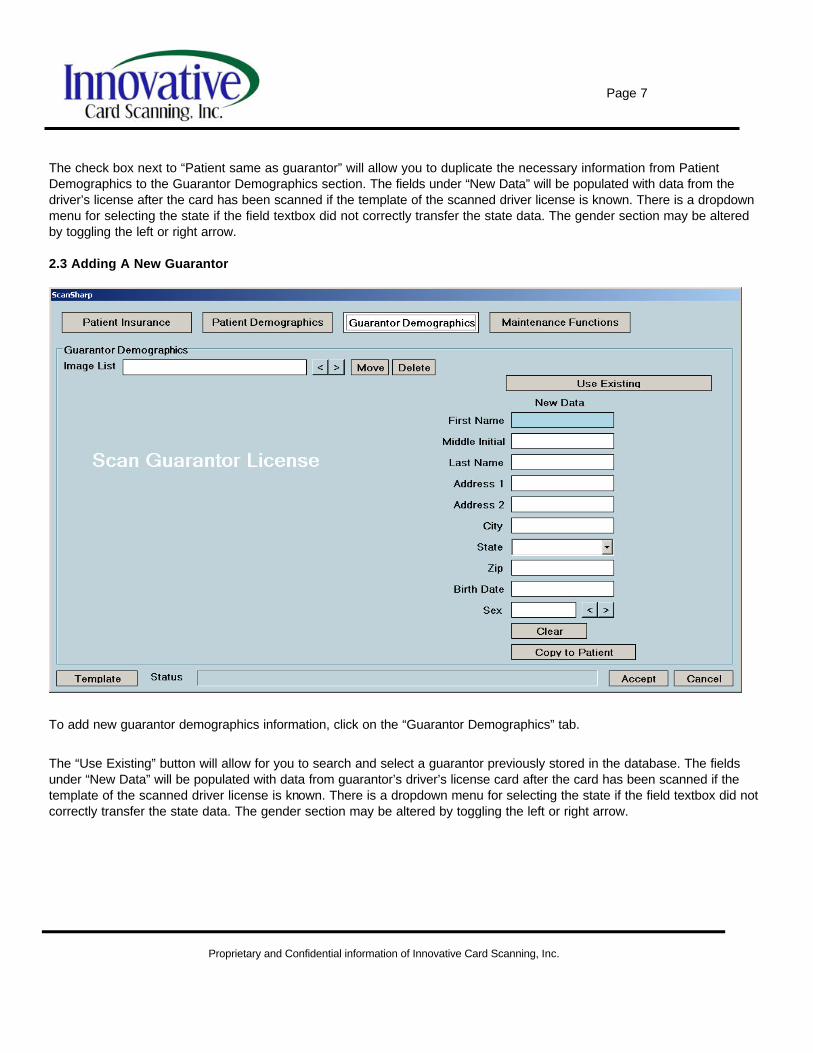
The check box next to “Patient same as guarantor” will allow you to duplicate the necessary information from Patient Demographics to the Guarantor Demographics section. The fields under “New Data” will be populated with data from the driver’s license after the card has been scanned if the template of the scanned driver license is known. There is a dropdown menu for selecting the state if the field textbox did not correctly transfer the state data. The gender section may be altered by toggling the left or right arrow. 2.3 Adding A New Guarantor
To add new guarantor demographics information, click on the “Guarantor Demographics” tab.
The “Use Existing” button will allow for you to search and select a guarantor previously stored in the database. The fields under “New Data” will be populated with data from guarantor’s driver’s license card after the card has been scanned if the template of the scanned driver license is known. There is a dropdown menu for selecting the state if the field textbox did not correctly transfer the state data. The gender section may be altered by toggling the left or right arrow.

Page 8
Proprietary and Confidential information of Innovative Card Scanning, Inc.
2.4 Modifying An Existing Patient’s Insurance
You can click on the “Patient Insurance” tab to be shown the patient insurance screen, with an additional column of fields. Fields on the right hold the patient’s current insurance information. These fields cannot be edited. The column to the left contain the fields that you can change. You can scan a new insurance card in and these fields will populate if the template is known for the scanned insurance card. When you are finished making all of the appropriate changes, you can then click the Accept button at the bottom of the window and all the changes will be made. 2.5 Modifying An Existing Patient
You can click on the “Patient Demographics”” tab to be shown the Patient Demographics information screen, with an additional column of fields. The fields on the right hold the patient’s current Demographic information. These fields cannot be edited. The column to the left contains the fields that you can change. You can scan a new driver license in and these fields will populate if the template is known for the scanned driver license. When you are finished making all of the appropriate changes, you can then click the Accept button at the bottom of the window and all the changes will be made.
Page 9
Proprietary and Confidential information of Innovative Card Scanning, Inc.
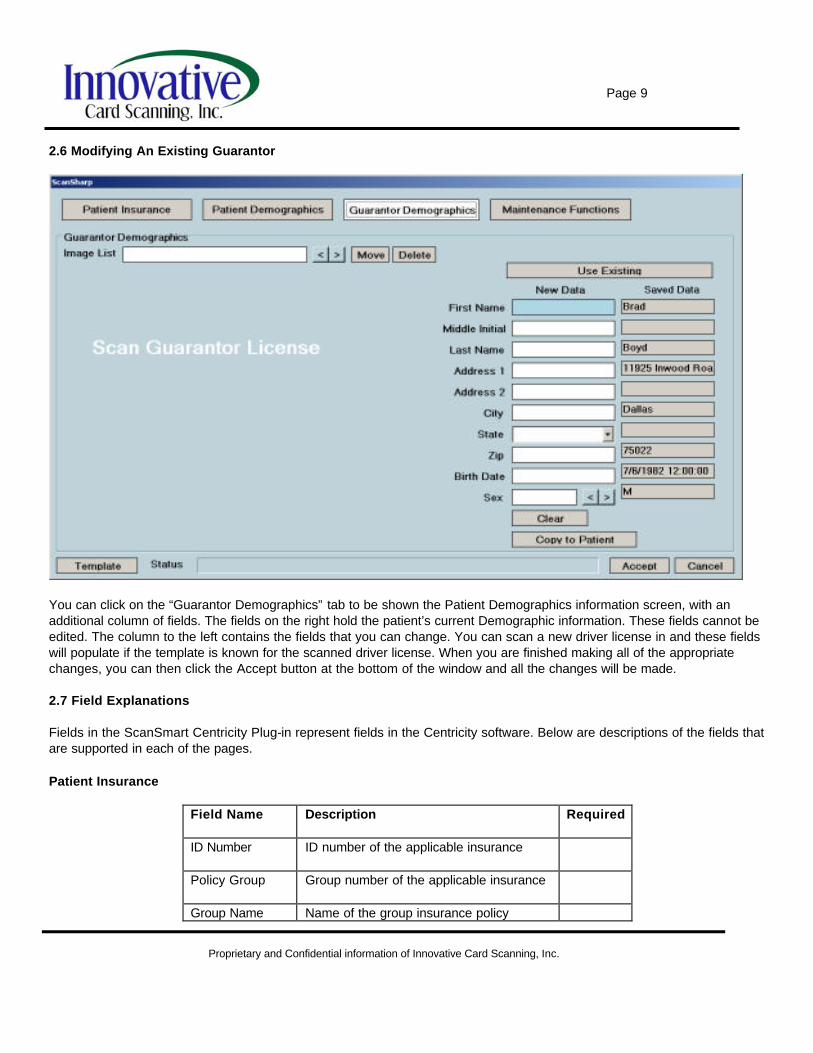
2.6 Modifying An Existing Guarantor
You can click on the “Guarantor Demographics” tab to be shown the Patient Demographics information screen, with an additional column of fields. The fields on the right hold the patient’s current Demographic information. These fields cannot be edited. The column to the left contains the fields that you can change. You can scan a new driver license in and these fields will populate if the template is known for the scanned driver license. When you are finished making all of the appropriate changes, you can then click the Accept button at the bottom of the window and all the changes will be made. 2.7 Field Explanations Fields in the ScanSmart Centricity Plug-in represent fields in the Centricity software. Below are descriptions of the fields that are supported in each of the pages. Patient Insurance
Field Name
Description Required
ID Number
ID number of the applicable insurance
Policy Group
Group number of the applicable insurance
Group Name Name of the group insurance policy

Page 10
Proprietary and Confidential information of Innovative Card Scanning, Inc.
Effective Date
Effective date of the applicable insurance
Deductible
Deductible of the applicable insurance
Allocation Set
Effective copay of the patient*
Financial Class
Policy type of the applicable insurance*
Insurance carrier Applicable insurance carrier*
X
*By right clicking on these fields, you can open your pick-list in Centricity Patient / Guarantor Demographics
Field Name
Description Required
First name
First name of patient/guarantor X
Middle initial
Middle initial of patient/guarantor
Last name
Last name of patient/guarantor X
Address 1
Address first line of patient/guarantor
Address 2
Address second line of patient/guarantor
City
City of patient/guarantor
State
State of patient/guarantor
Zip
Zip-code of patient/guarantor
Birth date
Birth date of patient/guarantor
Sex
Sex of patient/guarantor
2.8 Viewer Window Zoom In/Zoom Out The ScanSharp Plug-in for Centricity Plug-in viewer window supports a zoom feature that may be needed if there is any kind of text that is too small to read at your current resolution. To use the zoom feature, simply press the asterisk button (*) on your keyboard. Once this is done, you will see a prominent red line around your image – this means that the zoom feature is turned on. When you see this red border, you can use the plus (+) and minus (-) buttons to increase and decrease the size of your image accordingly. When you want to turn off the zoom feature, simply press the asterisk button one more time.
Page 11
Proprietary and Confidential information of Innovative Card Scanning, Inc.
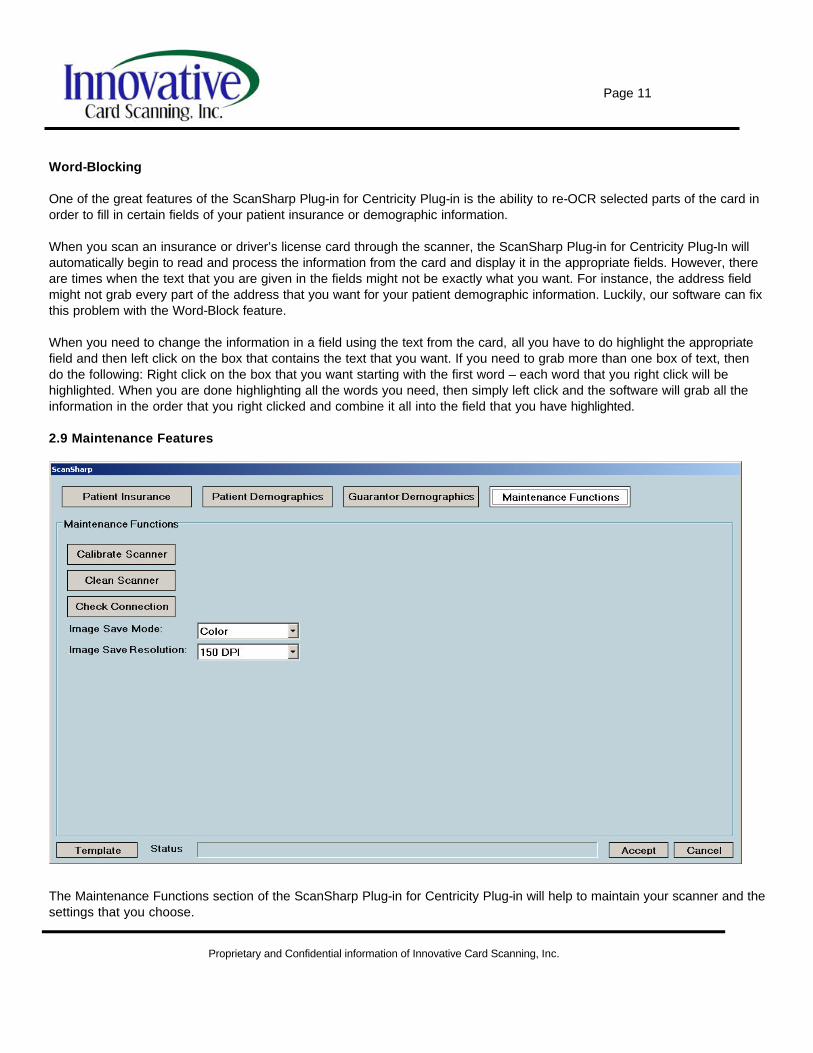
Word-Blocking One of the great features of the ScanSharp Plug-in for Centricity Plug-in is the ability to re-OCR selected parts of the card in order to fill in certain fields of your patient insurance or demographic information. When you scan an insurance or driver’s license card through the scanner, the ScanSharp Plug-in for Centricity Plug-In will automatically begin to read and process the information from the card and display it in the appropriate fields. However, there are times when the text that you are given in the fields might not be exactly what you want. For instance, the address field might not grab every part of the address that you want for your patient demographic information. Luckily, our software can fix this problem with the Word-Block feature. When you need to change the information in a field using the text from the card, all you have to do highlight the appropriate field and then left click on the box that contains the text that you want. If you need to grab more than one box of text, then do the following: Right click on the box that you want starting with the first word – each word that you right click will be highlighted. When you are done highlighting all the words you need, then simply left click and the software will grab all the information in the order that you right clicked and combine it all into the field that you have highlighted. 2.9 Maintenance Features
The Maintenance Functions section of the ScanSharp Plug-in for Centricity Plug-in will help to maintain your scanner and the settings that you choose.

Page 12
Proprietary and Confidential information of Innovative Card Scanning, Inc.
Calibrate The first option you see in the Maintenance Functions section of the ScanSharp Plug-in for Centricity Plug-in is the Calibrate Scanner button. This button will start the calibration process for your scanner. As explained earlier, scanner calibration is used to improve the quality of the image that is created when you scan in any type of document. Whenever your image seems to be a reddish color, has lines in the finished images, is dark or fuzzy to read, then we recommend that you re-calibrate. Usually only one calibration is needed every three months. To calibrate your scanner, simply click the Calibrate Scanner button, and then follow the steps. The ScanSharp Plug-in for Centricity Plug-in will ask you to insert your calibration sheet. This sheet is white with black boxes and will be located in the box that your scanner came in. There is also a PDF on the software disk that you can print out to replace any lost calibration sheets. The size of the sheet will take up most of the tray of your scanner. Just insert that sheet into your scanner, and finish the steps for the calibration process. When the calibration begins, the paper should be feeding through very slowly. When it has finished, the ScanSharp Plug-in for Centricity Plug-in will give you a message verifying your calibration has completed successfully. The quality of your images should be improved. Clean The Clean Scanner function also helps with your image. Sometimes the scanner will collect dust or dirt from the documents that are being scanned in and this substance will end up sticking to the scanning faceplate. Using the Clean Scanner button, located directly below the Calibrate Scanner button, you will be able to clean any extra substance off your scanner sensor. In order to clean your scanner sensor, just click on the Clean Scanner button and follow the steps. The ScanSharp Plug-in for Centricity Plug-in will ask you to insert your cleaning paper. This is the fibrous, white, opaque sheet that was included in your scanner box. Just place that in your scanner and finish the steps to clean your scanner. If that doesn’t work, you can also place a drop or two of rubbing alcohol on the bottom of the sheet and repeat the cleaning process again. Once the cleaning process has finished, your sensor should be free of any dust or dirt. If this process doesn’t work, it’s recommended that you try calibration – sometimes what appears to be a cleaning issue could just be a calibration issue. Check Connection The Check Connection function simply checks to see if you have a scanner connected to your computer. It’s a quick easy button to use if you accidentally knocked the cable from your scanner. It will give you a quick response if your scanner is either connected or disconnected. If you plug your scanner back in after it has been disconnected, then using the Check Connection button will verify that the ScanSharp Plug-in for Centricity Plug-in still recognizes your scanner and performs correctly with that scanner. Image-Save Mode The Image Save Mode function will change the type of scan you perform. You are given the following options: Color and Grey Scale. The color function will produce a clear accurate image with full color into the ScanSharp Plug-in for Centricity Plug-in. The Grey Scale option will convert all colors to grey scale and also increase the speed of the scan. Image-Save Resolution The Image Save Resolution will increase or decrease the size of the image being scanned in.You are given three choices: 75 DPI, 150 DPI, and 300 DPI; the default setting is 150 DPI. The higher you set the Image Save Resolution, the larger the

Page 13
Proprietary and Confidential information of Innovative Card Scanning, Inc.
image will be in your final scan for archiving. If you set it lower, you will get a smaller image. We recommend 150 DPI for an average image size of around 50-60KB.

Page 14
Proprietary and Confidential information of Innovative Card Scanning, Inc.
3. ICS Scan Service This section will cover the status icons of the ICS Scan Service and the live update feature for the ScanSharp Plug-in for Centricity Plug-in. 3.1 Service Status Message There are two states in which you will see the icon. The first icon appears as a clock. This will indicate which process is being started, such as the OCR engine.
The second icon appears as a check. This will indicate that Centricity may now operate the scanner and use the ScanSharp Plug-in for Centricity Plug-in. 3.2 Live Update The live update feature has been added to keep your software operating with the most current components necessary for operation. The update only takes a few moments and is very simple to perform. In the taskbar near the clock there will be an icon with a green “check mark.”
To access the menu as seen above, right click on the icon. Now just hold the mouse of “Check For Updates” and then left click. If you are certain you wish to perform an update, click “OK” when the next message appears. This will then take you to the “Live Update” dialog which will once more confirm your choice to update. Click “Check for Updates” to perform the update or click “Exit.” The update feature will search for any newly released software changes. Click “Ok” once completed.

Page 15
Proprietary and Confidential information of Innovative Card Scanning, Inc.
4. Troubleshooting Your Software And Scanner The section describes the most common problems associated with the scanner. For technical support assistance not described here, please use the contact information provided below to contact us. Technical Support Contact Information Phone: (214) 550-5995 E-Mail: [email protected] Hours of operation: Monday – Friday from 8:30 am to 5.00 pm Central Time Website: http://www.ScanSharp.com Please report any errors in this user manual to [email protected]. 4.1 Scanner Connection The following are some of the causes and resolutions if you are experiencing problems with scanner connectivity.
1. The scanner may not be properly attached. The USB cord may have come loose from the scanner or from the back of the computer. To resolve this issue, secure the connections and click on the top right scanner connection icon to check whether the scanner is connected.
2. The USB port the scanner is attached to may be in hibernation mode and is not supplying power to the scanner.
This is because Windows XP machines by default will turn off the USB device to save power when it goes into hibernation. When the machine goes out of hibernation mode, power sometimes does not get restored to the USB device. To resolve this issue, follow the instructions below:
a. Right click on “My Computer” on your desktop and select “Manage”. b. Click on “Device manager”. c. On the right, select “Universal Serial Bus Controllers” and select the first “USB Root Hub” node. d. Click on the “Power management” tab and uncheck “Allow the computer to turn off this device to save
power.” e. Continue this procedure for the rest of the “USB Root Hub”. f. Restart the computer.
4.2 Black Scans The most common cause for this problem is that the scanner is not calibrated or that the calibration files are corrupt. Calibrate the scanner by selecting the Maintenance Functions button. Then click “Calibrate Scanner.” Depending on the scanner model you have, go into “C:\Windows\TWAIN_32\[Scanner Model Folder]”. Delete the 4 files that start with “Pix” and end with “.dat” and the “trvlusb.ini” file. Empty the recycle bin after they have been deleted. Then calibrate the scanner once again.

Page 16
Proprietary and Confidential information of Innovative Card Scanning, Inc.
5. Appendix 5.1 Supported Scanners
Scanner-Model Duplex capability*
TravelScan 662
No
DocketPORT 465
No
DocketPORT 485
Yes
DocketPORT 665
No
*Duplex capability refers to the feature of the scanner hardware to scan both sides of a document in one scan