Embed Size (px)
Citation preview
TSM Edition User Guide
Version 8.2

Storix System Backup Administrator 2 Version 8.2 TSM Edition User Guide
Trademarks and Copyrights
© Copyright Storix, Inc. 1999-2016 USA Storix is a registered trademark of Storix, Inc. in the USA SBAdmin is a trademark of Storix, Inc in the USA and other countries Linux is a registered trademark of Linus Torvalds. Intel, Pentium, IA32, Itanium, Celeron and IA64 are registered trademarks of Intel Corporation. AMD, Opteron, and Athlon are registered trademarks of Advanced Micro Devices. HP Integrity servers are registered trademarks of Hewlett-Packard Development Company IBM, RS6000, AIX, Tivoli, AIX, pSeries, Micro Channel and RS/6000 Scalable POWERParallel Systems are registered trademarks of International Business Machines Corporation. Sun Microsystems and the Solaris™ operating system is a trademark of Sun Microsystems, Inc. SPARC is a trademark of SPARC International, Inc. Xwindows is a trademark of Massachusetts Institute of Technology. Microsoft and Windows are registered trademarks of Microsoft Corporation. Macintosh and Mac OS X are registered trademarks of Apple Computer, Inc. All other company/product names and service marks may be trademarks or registered trademarks of their respective companies.
Publicly Available Software This product either includes or is developed using source code that is publicly available:
AESCrypt* Rijndael and Cipher Block Feedback mode (CFB-128) encryption/decryption algorithms
Copyright 1999, 2000 Enhanced Software Technologies Inc. http://aescrypt.sourceforge.net/
BusyBox Single executable containing tiny versions of common UNIX utilities
Copyright 1989, 1991 Free Software Foundation, Inc. http://busybox.net/cgi-bin/cvsweb/busybox/
LILO LInux boot Loader Copyright 1999-2003 John Coffman. Copyright 1992-1998 Werner Almesberger. http://freshmeat.net/projects/lilo/
Tcl Open source scripting language Copyright Regents of the University of California, Sun Microsystems, Inc. http://tcl.sourceforge.net
Tk Tk graphics toolkit Copyright Regents of the University of California, Sun Microsystems, Inc. http://tcl.sourceforge.net
DropBear A Smallish SSH 2 Server and Client Copyright 2002, 2003 Matt Johnston http://www.matt.ucc.asn.au/dropbear/dropbear.html
GRUB Grand Unified Bootloader (GNU GRUB)
Copyright 1989, 1991 Free Software Foundation, Inc. http://www.gnu.org/software/grub/grub.html
Lighttpd Secure, fast, compliant and flexible web-server
Copyright 2004 Jan Kneschkle, incremental http://www.lighttpd.net
OpenSSL Toolkit implementing Secure Socket Layer
Copyright 1998-2008 The OpenSSL Project Copyright 1995-1998 Eric A. Young, Tim J. Hudson http://www.openssl.org
Xpdf PDF Document viewer (for AIX) Copyright 1996-2003 Glyph & Cog, LLC. http://www.foolabs.com/xpdf
bpgetfile RPC Bootparams client (for Solaris) Copyright 2000 Rensselaer Polytechnic Institute, Department of Computer Science
parted GNU parted Copyright 2007 Free Software Foundation, Inc. http://www.gnu.org/software/parted
ELILO Linux boot loader for EFI/x86_64 based systems
Copyright 2000-2003 Hewlett Packard Co. Copyright 2006-2010 Intel Co. ftp://ftp.hpl.hp.com/pub/linux-ia64
btrfs-progs Btrfs utilities programs Copyright 2007 Oracle Copyright 2012 STRATO AG http://www.btrfs.wiki.kernel.org

Storix System Backup Administrator 3 Version 8.2 TSM Edition User Guide
*Encryption Software
System Backup Administrator Backup Data Encryption Feature has a cryptographic component, using Advanced Encryption Standard (AES) "Rijndael" encryption algorithm in Cipher Block Feedback (stream) mode (CFB-128), supporting 128, 192 and 256-bit keys.
It is not for export or redistribution to any of what are called the "T-10 Terrorist States" as determined by the U.S. Department of State. System Backup Administrator Backup Data Encryption Feature has been registered with U.S. Bureau of Information and Security and is distributed under Export Control Classification Number (ECCN) 5D992. This encryption item is authorized for export and re-export under section 742.15 (B)(2) of the Export Administration Regulations (EAR).
Storix System Backup Administrator 4 Version 8.2 TSM Edition User Guide
Table of Contents
1. Getting Started .................................................................................................... 8 Supported Operating Systems & Hardware ................................................................................................. 8 Software and License Requirements ........................................................................................................... 8
Evaluation License Key .......................................................................................................................... 9 Software Installation and Configuration ....................................................................................................... 9
Downloading and Installing from the Web Site ....................................................................................... 9 Installing from CDROM ........................................................................................................................ 10 Updating the Software.......................................................................................................................... 10
Starting the Software................................................................................................................................. 11 Enabling Optional Features ....................................................................................................................... 11 Initial TSM Setup....................................................................................................................................... 11
TSM Server.......................................................................................................................................... 11 SBAdmin Management Class ............................................................................................................... 11 TSM API Client .................................................................................................................................... 12
2. Introduction....................................................................................................... 13 SBAdmin Terminology............................................................................................................................... 13 The SBAdmin System Backup................................................................................................................... 14 SBAdmin and TSM Integration .................................................................................................................. 14
TSM Backup Retention ........................................................................................................................ 15 Shared Versus Owner Access.............................................................................................................. 15 TSM Server Authentication .................................................................................................................. 15 Additional Notes................................................................................................................................... 16
3. The SBAdmin User Interface ............................................................................ 17 The Main Screen....................................................................................................................................... 17 Closing Windows....................................................................................................................................... 19
4. Users.................................................................................................................. 20 User Levels (Roles)................................................................................................................................... 20 Adding a User ........................................................................................................................................... 20 Removing a User ...................................................................................................................................... 21 Changing a User ....................................................................................................................................... 22 Changing your User Information................................................................................................................ 22
5. Groups............................................................................................................... 23 Adding a Group......................................................................................................................................... 23 Changing a Group..................................................................................................................................... 24 Removing a Group .................................................................................................................................... 24 Switching Groups ...................................................................................................................................... 24
6. Configuring Clients (Nodes)............................................................................. 25 Adding a Client ......................................................................................................................................... 25
TSM Node Name and Password .......................................................................................................... 26 Set or Reset the Node’s Password ....................................................................................................... 26 Enabling Backup Data Encryption for a Client ...................................................................................... 26 Tape for Local System Backups ........................................................................................................... 26 Sparse File Handling............................................................................................................................ 27
Removing a Client..................................................................................................................................... 27
7. Configuring TSM Servers ................................................................................. 28 Adding a TSM Server ................................................................................................................................ 28
TSM Server Name ............................................................................................................................... 28 TSM Admin User ID/Password ............................................................................................................. 29

Storix System Backup Administrator 5 Version 8.2 TSM Edition User Guide
PASSWORDAccess ............................................................................................................................. 29 COMMMethod...................................................................................................................................... 29 COMPRESSion.................................................................................................................................... 29
Changing a Server .................................................................................................................................... 29 Removing a Server ................................................................................................................................... 30
8. Configuring Boot Media Servers...................................................................... 31 Adding a Boot Media Server...................................................................................................................... 31 Changing a Boot Media Server.................................................................................................................. 31 Removing a Boot Media Server ................................................................................................................. 31
9. Backup Profile................................................................................................... 32 Adding a Backup Profile ............................................................................................................................ 32
Buffer Size ........................................................................................................................................... 33 Specifying the Data to Backup ............................................................................................................. 33 Compression Level .............................................................................................................................. 33 TSM Backup Read Permission ............................................................................................................. 34 Incremental Backup Level .................................................................................................................... 34 Backup Retention Policy ...................................................................................................................... 34
Pre-backup and Post-backup Programs .................................................................................................... 35 Pre & Post Backup Programs ............................................................................................................... 36 Pre & Post Snapshot Programs............................................................................................................ 36 Creating Pre & Post Backup Programs................................................................................................. 37
Incremental/Differential Backups ............................................................................................................... 37 Incremental Backup Examples ............................................................................................................. 37 Restoring from Incremental Backups.................................................................................................... 38
Changing a Backup Profile ........................................................................................................................ 39 Removing a Profile.................................................................................................................................... 39
10. Exclude Lists................................................................................................... 40 Using Wildcards ........................................................................................................................................ 40 Adding an Entry to the Exclude List........................................................................................................... 40 Removing Entries from the Exclude List .................................................................................................... 41
11. Backup Jobs.................................................................................................... 42 Creating a Backup Job .............................................................................................................................. 42
Selecting the Server or Device ............................................................................................................. 43 Selecting/Customizing the Backup Profile ............................................................................................ 43 Selecting Clients to Backup.................................................................................................................. 43 Additional Options................................................................................................................................ 43 Scheduling the Backup......................................................................................................................... 44
Creating a Local System Backup............................................................................................................... 45 Changing a Backup Job ............................................................................................................................ 45 Copying a Backup Job .............................................................................................................................. 46 Renaming a Backup Job ........................................................................................................................... 46 Removing a Backup Job ........................................................................................................................... 46 Running a Backup Job on Demand ........................................................................................................... 46
Adding a Job to the Queue from the Command Line ............................................................................ 47 Running a Backup Job from the Command Line ................................................................................... 47
12. Holidays........................................................................................................... 48
13. Snapshot Backups.......................................................................................... 50 Enabling Snapshot Backups...................................................................................................................... 50
14. Job Queues ..................................................................................................... 53 The Job Queue Display............................................................................................................................. 53 Icons on the Job Queue Display................................................................................................................ 54 Monitoring Backups................................................................................................................................... 54

Storix System Backup Administrator 6 Version 8.2 TSM Edition User Guide
The Backup Status Screen................................................................................................................... 54 The Backup Output Display.................................................................................................................. 55 The Job Message Screen..................................................................................................................... 57
Manipulating Backup Jobs ........................................................................................................................ 58 Kill a Running Job ................................................................................................................................ 58 Place a Job on Hold ............................................................................................................................. 58 Restart a Job ....................................................................................................................................... 59 Remove a Job from the Queue............................................................................................................. 59 Show Status/Output ............................................................................................................................. 59
15. Backup Labels................................................................................................. 60 Automatically Printing Backup Labels................................................................................................... 61
View Backup Labels .................................................................................................................................. 61 View by Backup ID ............................................................................................................................... 61 View by Tape Label ID ......................................................................................................................... 62 View by Server..................................................................................................................................... 62 View by Job ID ..................................................................................................................................... 63 View by Client ...................................................................................................................................... 63 Read from Server................................................................................................................................. 64
Expiring a Backup ..................................................................................................................................... 65 Manually Expiring a Backup ................................................................................................................. 66 Automatic Expiration of Backups .......................................................................................................... 66
16. Backup Job Status & Output History............................................................. 67 View by Server..................................................................................................................................... 68 View by Job ID ..................................................................................................................................... 68 View by Client ...................................................................................................................................... 69
17. Verify a Backup ............................................................................................... 70 Selecting The Data to Verify...................................................................................................................... 70 Displaying the Status and Output of the Verify .......................................................................................... 71
18. Recreate Volume Groups, Logical Volumes or Filesystems ........................ 74 When to Use These Options ..................................................................................................................... 74 Recreate Volume Groups .......................................................................................................................... 74 Recreate Logical Volumes or Filesystems ................................................................................................. 77
19. Restore Data from a Backup .......................................................................... 81 Selecting the Backup to Restore From ...................................................................................................... 81 Selecting Restore Options......................................................................................................................... 82 Selecting Data to Restore ......................................................................................................................... 83
Search/Select by Name........................................................................................................................ 83 Select Using File Tree.......................................................................................................................... 85 Restoring Files or Directories Using Wildcards..................................................................................... 86
Restoring Data to a New Destination......................................................................................................... 87 Displaying the Status and Output of the Restore ....................................................................................... 87
20. Preferences ..................................................................................................... 89 Software License ...................................................................................................................................... 89
Administrator License........................................................................................................................... 90 Backup Encryption Feature .................................................................................................................. 90
General Preferences ................................................................................................................................. 90 Operating Systems Support ................................................................................................................. 91 Sound On/Off ....................................................................................................................................... 91 Fonts & Colors ..................................................................................................................................... 91 Check for Updates ............................................................................................................................... 93 Report Preferences .............................................................................................................................. 93 Network Options .................................................................................................................................. 95 Backup Process Priority ....................................................................................................................... 95

Storix System Backup Administrator 7 Version 8.2 TSM Edition User Guide
Concurrent Backups............................................................................................................................. 96 Auto-Terminate Stalled Backups .......................................................................................................... 96
Backup Retention Policy ........................................................................................................................... 97 Tape Backups ...................................................................................................................................... 97 TSM Backups....................................................................................................................................... 98 Number of Backups to Retain............................................................................................................... 98
Backup Status Notifications....................................................................................................................... 98 Primary Notification.............................................................................................................................. 99 Alternate Notification............................................................................................................................ 99
21. Reports .......................................................................................................... 102 Backup Profiles ........................................................................................................................................103 Exclude Lists............................................................................................................................................103 Backup Jobs ............................................................................................................................................103 Backup History.........................................................................................................................................103 Restore History ........................................................................................................................................103 Backup Expiration Report.........................................................................................................................104 Network Install Clients..............................................................................................................................104
22. Utilities........................................................................................................... 105 Create/Manage Boot Media......................................................................................................................105 Remote Installation Manager (RIM) ..........................................................................................................105 Write a Tape Label ID to a Tape ..............................................................................................................106 Perform Tape Operations .........................................................................................................................107 Rebuild (unexpire) a Backup Label...........................................................................................................108
23. Network Security........................................................................................... 109 TCP/IP Ports ............................................................................................................................................109 Network Firewalls.....................................................................................................................................109 Remote Command Execution ...................................................................................................................109 Remote Installation Manager....................................................................................................................110 Encryption Keys .......................................................................................................................................111
24. Getting Help .................................................................................................. 112 QuickHelp ................................................................................................................................................112 User Guide...............................................................................................................................................112 Communications Errors ............................................................................................................................112 Storix Support ..........................................................................................................................................112
Index .................................................................................................................... 113

Storix System Backup Administrator 8 Version 8.2 TSM Edition User Guide
1. Getting Started Supported Operating Systems & Hardware As of the time of this publication, the TSM Edition software is supported on all AIX, Solaris, and Linux systems on which the TSM Backup/API Client software is supported. This includes, but is not necessarily limited to, the following systems:
AIX: All IBM RS/6000, System p, System i, OpenPower and JS/20 systems running AIX Version 5.1 and later (currently 7.1).
Solaris: x86 and x86_64: All Solaris 9 versions 9/05 and later (32 and 64-bit platforms), Solaris 10 versions 1/06 and later (32 and 64-bit platforms), Solaris 11 Express (64-bit platform), and Solaris 11 version 11/11 and later (64-bit platform).
SPARC: All Solaris 9 versions 9/05 and later, Solaris 10 versions 11/06 and later, Solaris 11 Express, and Solaris 11 version 11/11 and later. Includes sun4u and sun4v platforms.
Linux: x86 and x86_64: All distributions which run on Intel 32-bit based processors and 64-bit processors capable of running 32-bit software (includes AMD, Opteron and Athlon-based systems). Linux kernel levels 2.4 and glibc 2.2.5 and higher are required. Support is provided for Linux LVM Library version 1.0 and higher, and Software Raid Devices (meta-disks) when installed. UEFI is supported on x86_64 systems running 2.6.21 or later kernel levels, CONFIG_EFI enabled in the kernel, and support for creating VFAT filesystems.
PPC (IBM system P): All distributions supported 64-bit systems with PowerPC CHRP hardware. Linux kernel levels 2.6.16 and higher, and glibc 2.4.2 and higher are required. Support is provided for Linux LVM Library version 1.0 and higher, and Software Raid Devices (meta-disks) when installed.
Software and License Requirements Installation of the TSM Edition software provides the graphical user interface, web interface and application programs for administering the backups of the admin system itself. Administration of client (node) system backups may also be performed from the admin system. It is also necessary to install a subset of the software onto each system that will act as either a backup media server or client.
The following table describes license types related to TSM Edition:
TSM Edition This license is installed onto a system from which TSM (Tivoli Storage Manager) backups will be managed. This system must be an AIX, Solaris or Linux system and does not need to be a TSM Server. The TSM Edition license supports Full System Backups and backups are performed to any TSM server or to a local tape device on each client. Any number of TSM servers may be configured, but you must have a Client License for each additional client (node) to be backed up.
This integrates the Full System Backup and Adaptable System Recovery functionality of SBAdmin with the data file storage capabilities of TSM. A single license key is required for the TSM Admin system, which also defines the number of TSM clients (nodes) which may be managed by the administrator. Although no license key is requires for each of the clients, the client software must be installed and configured on each TSM node before they may be managed by the TSM Admin system.

TSM Client Must be installed on each system which will be a client or backup media server. A Client license for the local (administrator) system is included with the TSM Edition license.
This client must be managed by a TSM Admin system. No license key is required on the client since the number of supported clients and backup servers are defined by the TSM Edition license. Backup management features, such as scheduling and history reporting are provided only by the TSM Edition.
Backup Data Encryption Feature
This optional license may be added to a TSM Edition license to enable AES data encryption support for all backups. A license is purchased for the number of Clients for which backup data should be encrypted.
Other administrator license editions for Network, and Workstation are also available, which provide backups to local and remote (Network Edition) disk and tape devices. Those editions also support multiple backup types, from files and directories to volume groups and raw logical volumes. Since this TSM Edition supports only Full System Backups and TSM Servers as backup media, all other administrator licenses are documented in a separate user guide. Refer to the System Backup Administrator User Guide for details.
Evaluation License Key All license options and features above, except the TSM Client require a license key. The license keys are installed only onto the TSM Admin system, and must be obtained from Storix. For all licensed options, the user may type the word “trial” for a free 30-day evaluation of all features of the software.
Software Installation and Configuration The following instructions may be used to install the software from either installation images downloaded from the Storix Software web site (http://www.storix.com) or from a SBAdmin installation CDROM:
Downloading and Installing from the Web Site 1. Select the software package you wish to download from the web site based on your operating system
type, machine type and desired software configuration.
Be sure to download the file in BINARY. Some browsers will recognize the ".tar" extension of the file and ask you if it should open the file or expand it. You should NOT do so, but select to save it to disk instead.
2. Change to the /tmp directory: cd /tmp
3. Extract the contents of the file. Note that this does not extract the software, but only the installation program files and install image: tar -xvf IMAGEFILE.tar (where IMAGEFILE.tar is the name of the downloaded file)
4. Run the installation program by typing: ./stinstall
Storix System Backup Administrator 9 Version 8.2 TSM Edition User Guide

Installing from CDROM
1. Mount the cdrom by typing:
a. On AIX systems: mount -v cdrfs -r /dev/cd0 /mnt
b. On Linux systems: mount –t iso9660 –r /dev/cdrom /mnt
c. On Solaris systems: Normally, a CDROM will automatically be mounted to the /cdrom/cdrom directory when inserted. If this is the case, replace /mnt with /cdrom/cdrom in the following commands. If the cdrom is not auto-mounted, type: mount -F hsfs –o ro /dev/dsk/c1t0d0s0 /mnt (where c1t1d0s0 is an example of your cdrom drive name).
2. Run the installation program by typing the following, then follow the instructions provided: /mnt/stinstall
3. When complete, unmount the CDROM by typing: umount /mnt
Updating the Software To update the software connected to the internet, you can automatically check, download and apply updates directly from the Storix Web Server by selecting Help!Download Software Updates from the user interface. A screen similar to the following will appear:
You will have an option of checking for updates only and/or downloading and installing updates. You will have an additional option of automatically applying updates to configured clients.
If the system cannot contact the Storix Web Server directly, you may apply updates by re-installing the software using the same instructions used to initially install the software (shown above). When you re-install the software onto the Admin system using the "stinstall" command described above, you will be asked if you wish to install the new software level onto configured clients.
Re-installing the software will replace existing program files, but WILL NOT OVERWRITE current configuration or history files.
Storix System Backup Administrator 10 Version 8.2 TSM Edition User Guide

Storix System Backup Administrator 11 Version 8.2 TSM Edition User Guide
Starting the Software There are three user-interfaces available for performing SBAdmin operations:
1. Graphical-User (Xwindows) interface (GUI) - This is the interface described in this user guide.
To access the graphical user interface, also referred as the “backup administrator”, type:
sbadmin
from within an xterm window. If you wish to run the application on a display attached to a different host (perhaps even a PC running an Xwindows emulator), type:
sbadmin –display hostname:0 &
(where hostname is the host name of the remote system). It may also be necessary to provide access to the application to write to the display by first typing “xhost +” within an xterm window on the remote system. When starting the administrator software, the Main Screen will appear.
2. Web-based interface – This interface is accessed through a web browser and is designed to be similar in use and function to the GUI interface. You must have enabled the web interface when installing the software on the Administrator System. Refer to the SBAdmin Web Interface Install Guide for additional details on installing, configuring and starting this interface.
3. Command-line Interface (CLI) – This refers to running commands provided with this software at the shell prompt. Commands may only be run when logged on as the root user, or another user already configured using the GUI or Web interface. Various commands may be run on the administrator or client system. Refer to the SBAdmin Commands Reference for details.
Enabling Optional Features The optional feature, Backup Data Encryption, may be enabled after the TSM Edition has been installed. To enable this feature, select File!Preferences!Software License from the menu bar on the Main Screen. Refer to Software License in the Preferences section for details on viewing and changing the license options.
Initial TSM Setup
TSM Server The TSM Server software must be at level 5.2 or later. Refer to the TSM documentation for instructions on checking and updating the TSM server.
SBAdmin Management Class Before any backup may be performed to TSM, you must define a new management class on the TSM server called SBADMIN. All SBAdmin backups will be stored under this management class. The management class must be defined to disallow versioning of backup objects. The management class must be created using the TSM Integrated Solutions Console or using the following command within dsmadmc:
DEFINE MGMTCLASS domain_name policy_set SBADMIN
Storix System Backup Administrator 12 Version 8.2 TSM Edition User Guide
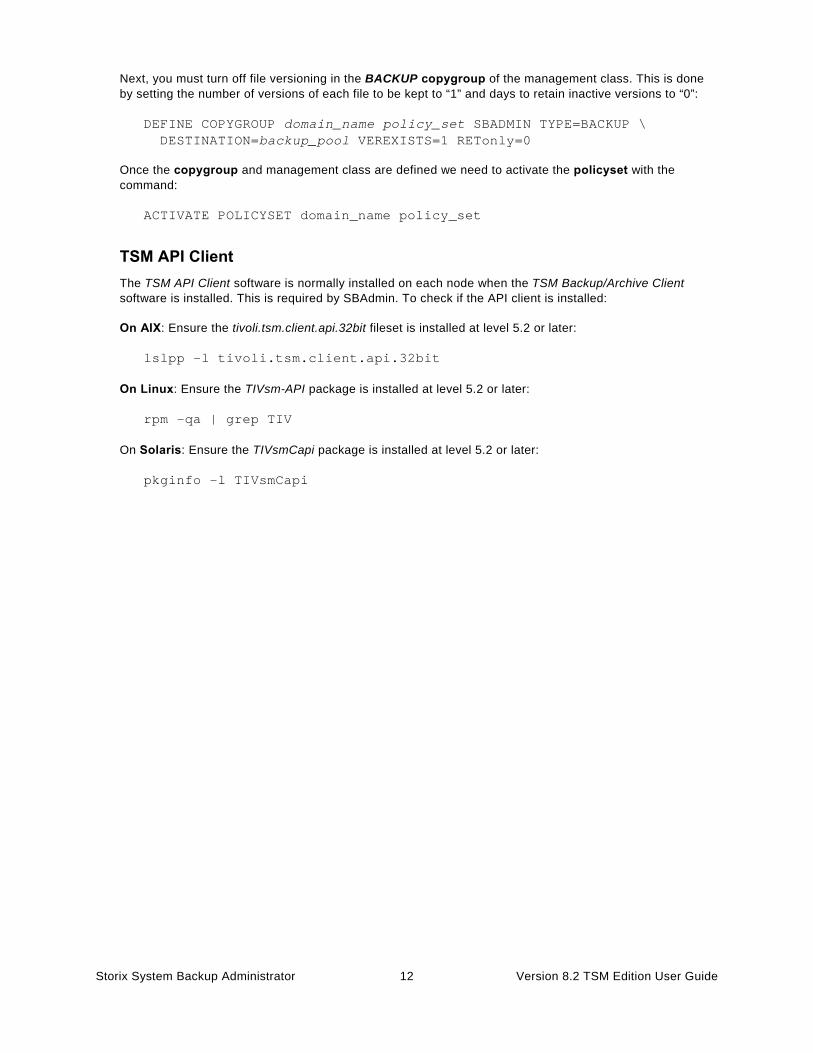
Next, you must turn off file versioning in the BACKUP copygroup of the management class. This is done by setting the number of versions of each file to be kept to “1” and days to retain inactive versions to “0”:
DEFINE COPYGROUP domain_name policy_set SBADMIN TYPE=BACKUP \ DESTINATION=backup_pool VEREXISTS=1 RETonly=0
Once the copygroup and management class are defined we need to activate the policyset with the command:
ACTIVATE POLICYSET domain_name policy_set
TSM API Client The TSM API Client software is normally installed on each node when the TSM Backup/Archive Client software is installed. This is required by SBAdmin. To check if the API client is installed:
On AIX: Ensure the tivoli.tsm.client.api.32bit fileset is installed at level 5.2 or later:
lslpp –l tivoli.tsm.client.api.32bit
On Linux: Ensure the TIVsm-API package is installed at level 5.2 or later:
rpm –qa | grep TIV
On Solaris: Ensure the TIVsmCapi package is installed at level 5.2 or later:
pkginfo –l TIVsmCapi

2. Introduction System Backup Administrator (SBAdmin) is designed to simplify the administration of backups on the local system as well as client backups in a networked environment. TSM Edition provides the ability to perform a Full System Backup of an AIX, Linux or Solaris TSM client to any TSM server. It does so by combining powerful backup tools with an easy-to-use graphical and web-based interface for administering backups of an unlimited number of client systems (nodes) from a central system (TSM Admin system). Full System Backups created by the System Backup Administrator may be used to reinstall the source system or another system with an entirely different disk configuration. Backups may be automated through the use of a backup scheduler and queuing system, and client systems may be booted from another client (configured as a network boot server) and installed from backups read directly from the TSM server.
In order to accommodate backups of the TSM server itself to alternate media, you may backup one TSM server to another TSM server or you may perform backups to local tape on each client (a configured SBTAPE device). This applies to both the TSM server and any TSM clients (in case the TSM server is unavailable).
This document will provide a description of all of the functions of the SBAdmin – TSM Edition, and will include instructions for performing common tasks. For additional detailed information on each option within the application, you may get on-screen help by simply clicking the right mouse button over the object in question.
This document is intended only to provide instructions on the use of the SBAdmin graphical user interface. Most tasks may be performed using the Web-based Interface, which is documented in the Storix System Backup Administrator Web Interface Install Guide.
The remainder of this document provides instructions on the use of the System Backup Administrator (SBAdmin) graphical user interface.
Most instructions shown here may also be performed using the web-based interface and any compatible web browser. The concepts are the same, but exact instructions differ from when using the GUI interface. When using the web-based interface, refer to the SBAdmin Web Interface Install Guide.
The SBAdmin Commands Reference Guide is also available for information on running commands at the command line, some of which may be used to perform backups, verifies and restores from clients without using the administrator interface. It also describes a number of commands which may be used to perform backup administrator-related functions.
SBAdmin Terminology It is important to understand the relationship between the different systems that will interact with the Backup Administrator software:
• Admin System - This is the system running the TSM Edition software. All clients (nodes) and backup options are configured and managed from the admin system, and the admin system will centrally perform all tasks for the clients, including scheduling and running the backup jobs, monitoring backups, performing verifies and restores, and even recreating volume groups and filesystems.
• Server - This is the TSM Server on which the backup media is attached and backups are stored. SBAdmin does not manage the TSM server, so the TSM server may be any type of system. Although there are some considerations on the TSM server, noted in the TSM Server section, the TSM server simply acts as a backup device for all SBAdmin backups, and is not managed by the Admin System. Select this link for more information on configuring the servers used by this application.
• Client - This is the TSM client (node) system from which backups will be made. The admin system must also be configured as a client (node). Select this link for detailed information on adding or
Storix System Backup Administrator 13 Version 8.2 TSM Edition User Guide
Storix System Backup Administrator 14 Version 8.2 TSM Edition User Guide
removing a client.
The clients and servers, as well as the client node information may be displayed on the main screen of the application. The application will constantly monitor the status of the clients and servers, and the icons on the screen will represent whether or not the system or device is available.
Additional terms are commonly used in this document and in the application:
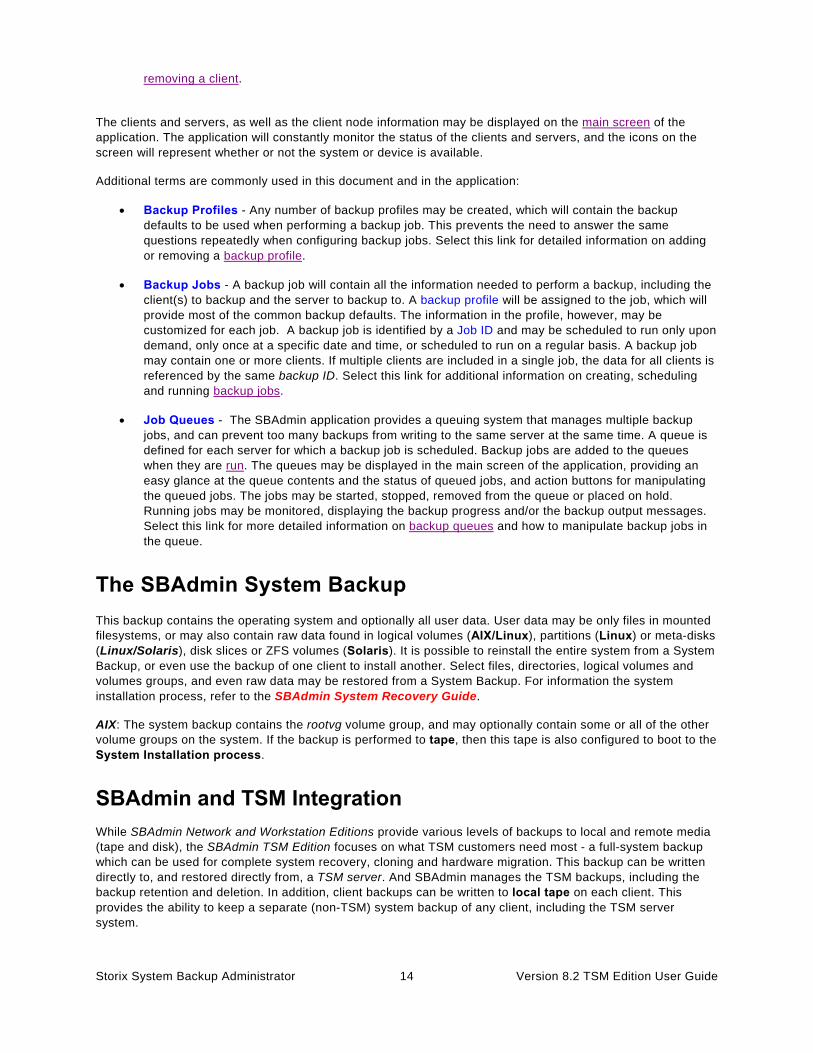
• Backup Profiles - Any number of backup profiles may be created, which will contain the backup defaults to be used when performing a backup job. This prevents the need to answer the same questions repeatedly when configuring backup jobs. Select this link for detailed information on adding or removing a backup profile.
• Backup Jobs - A backup job will contain all the information needed to perform a backup, including the client(s) to backup and the server to backup to. A backup profile will be assigned to the job, which will provide most of the common backup defaults. The information in the profile, however, may be customized for each job. A backup job is identified by a Job ID and may be scheduled to run only upon demand, only once at a specific date and time, or scheduled to run on a regular basis. A backup job may contain one or more clients. If multiple clients are included in a single job, the data for all clients is referenced by the same backup ID. Select this link for additional information on creating, scheduling and running backup jobs.
• Job Queues - The SBAdmin application provides a queuing system that manages multiple backup jobs, and can prevent too many backups from writing to the same server at the same time. A queue is defined for each server for which a backup job is scheduled. Backup jobs are added to the queues when they are run. The queues may be displayed in the main screen of the application, providing an easy glance at the queue contents and the status of queued jobs, and action buttons for manipulating the queued jobs. The jobs may be started, stopped, removed from the queue or placed on hold. Running jobs may be monitored, displaying the backup progress and/or the backup output messages. Select this link for more detailed information on backup queues and how to manipulate backup jobs in the queue.
The SBAdmin System Backup This backup contains the operating system and optionally all user data. User data may be only files in mounted filesystems, or may also contain raw data found in logical volumes (AIX/Linux), partitions (Linux) or meta-disks (Linux/Solaris), disk slices or ZFS volumes (Solaris). It is possible to reinstall the entire system from a System Backup, or even use the backup of one client to install another. Select files, directories, logical volumes and volumes groups, and even raw data may be restored from a System Backup. For information the system installation process, refer to the SBAdmin System Recovery Guide.
AIX: The system backup contains the rootvg volume group, and may optionally contain some or all of the other volume groups on the system. If the backup is performed to tape, then this tape is also configured to boot to the System Installation process.
SBAdmin and TSM Integration While SBAdmin Network and Workstation Editions provide various levels of backups to local and remote media (tape and disk), the SBAdmin TSM Edition focuses on what TSM customers need most - a full-system backup which can be used for complete system recovery, cloning and hardware migration. This backup can be written directly to, and restored directly from, a TSM server. And SBAdmin manages the TSM backups, including the backup retention and deletion. In addition, client backups can be written to local tape on each client. This provides the ability to keep a separate (non-TSM) system backup of any client, including the TSM server system.
Storix System Backup Administrator 15 Version 8.2 TSM Edition User Guide
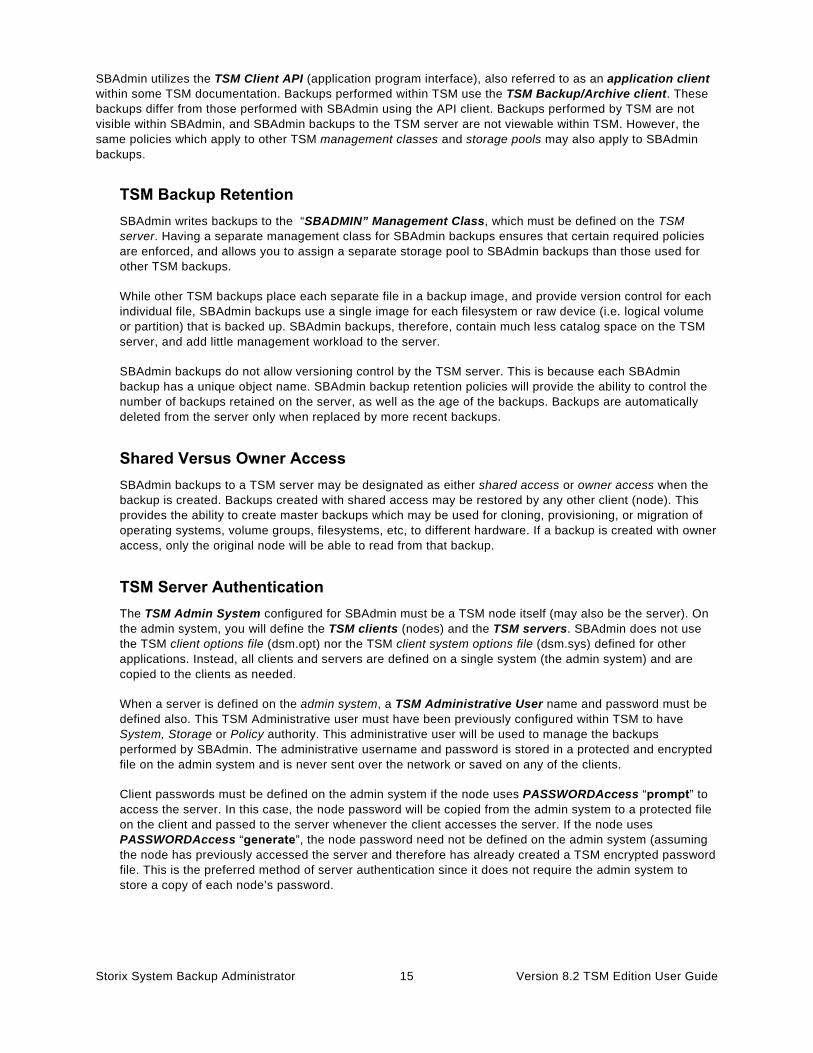
SBAdmin utilizes the TSM Client API (application program interface), also referred to as an application client within some TSM documentation. Backups performed within TSM use the TSM Backup/Archive client. These backups differ from those performed with SBAdmin using the API client. Backups performed by TSM are not visible within SBAdmin, and SBAdmin backups to the TSM server are not viewable within TSM. However, the same policies which apply to other TSM management classes and storage pools may also apply to SBAdmin backups.
TSM Backup Retention SBAdmin writes backups to the “SBADMIN” Management Class, which must be defined on the TSM server. Having a separate management class for SBAdmin backups ensures that certain required policies are enforced, and allows you to assign a separate storage pool to SBAdmin backups than those used for other TSM backups.
While other TSM backups place each separate file in a backup image, and provide version control for each individual file, SBAdmin backups use a single image for each filesystem or raw device (i.e. logical volume or partition) that is backed up. SBAdmin backups, therefore, contain much less catalog space on the TSM server, and add little management workload to the server.
SBAdmin backups do not allow versioning control by the TSM server. This is because each SBAdmin backup has a unique object name. SBAdmin backup retention policies will provide the ability to control the number of backups retained on the server, as well as the age of the backups. Backups are automatically deleted from the server only when replaced by more recent backups.
Shared Versus Owner Access SBAdmin backups to a TSM server may be designated as either shared access or owner access when the backup is created. Backups created with shared access may be restored by any other client (node). This provides the ability to create master backups which may be used for cloning, provisioning, or migration of operating systems, volume groups, filesystems, etc, to different hardware. If a backup is created with owner access, only the original node will be able to read from that backup.
TSM Server Authentication The TSM Admin System configured for SBAdmin must be a TSM node itself (may also be the server). On the admin system, you will define the TSM clients (nodes) and the TSM servers. SBAdmin does not use the TSM client options file (dsm.opt) nor the TSM client system options file (dsm.sys) defined for other applications. Instead, all clients and servers are defined on a single system (the admin system) and are copied to the clients as needed.
When a server is defined on the admin system, a TSM Administrative User name and password must be defined also. This TSM Administrative user must have been previously configured within TSM to have System, Storage or Policy authority. This administrative user will be used to manage the backups performed by SBAdmin. The administrative username and password is stored in a protected and encrypted file on the admin system and is never sent over the network or saved on any of the clients.
Client passwords must be defined on the admin system if the node uses PASSWORDAccess “prompt” to access the server. In this case, the node password will be copied from the admin system to a protected file on the client and passed to the server whenever the client accesses the server. If the node uses PASSWORDAccess “generate”, the node password need not be defined on the admin system (assuming the node has previously accessed the server and therefore has already created a TSM encrypted password file. This is the preferred method of server authentication since it does not require the admin system to store a copy of each node’s password.

Storix System Backup Administrator 16 Version 8.2 TSM Edition User Guide
Additional Notes 1. TSM exclude list processing does not affect SBAdmin backups. You must define your exclude lists
(files, directories, filesystems or devices to exclude) within SBAdmin.
2. The compression option in the TSM server options will be ignored if you have set a SBAdmin backup job to use compression. To use TSM compression, turn off SBAdmin compression and turn on the compression option in the server options.
3. LAN-free backups are not supported.
4. Communication method of “shared” (shared memory) is not supported. This option would only allow a backup of the TSM server to itself, which would be useless for full system recovery of the TSM server.
5. The Tivoli environment variables used by TSM and other API client applications are not used by SBAdmin. These include DSMI_CONFIG, DSMI_DIR and DSMI_LOG. Configuration files are generated on the admin system and transferred to each client automatically. SBAdmin uses its own TSM configuration files in the /storix/config/tsm directory (where /storix is the data directory defined when you initially installed the software). This prevents any conflicts with other software using the TSM API client.
3. The SBAdmin User Interface The SBAdmin User Interface is used for all configuration options, including servers, clients, jobs, profiles, etc. It is also used for the monitoring of job queues, displaying job status, backup output messages, and backup history.
After all backup jobs are configured and scheduled; they will continue to run even if the SBAdmin interface is not running. Backup jobs may also be manually started, monitored or controlled from the command line when the interface is not running, and can be monitored or controlled after the administrator is restarted.
Ordinarily, messages regarding the status of the backup jobs are reported on the screen. If, however, the SBAdmin interface is not running when a job is run, the status messages will be reported using an alternate notification method, which may be defined by the user.
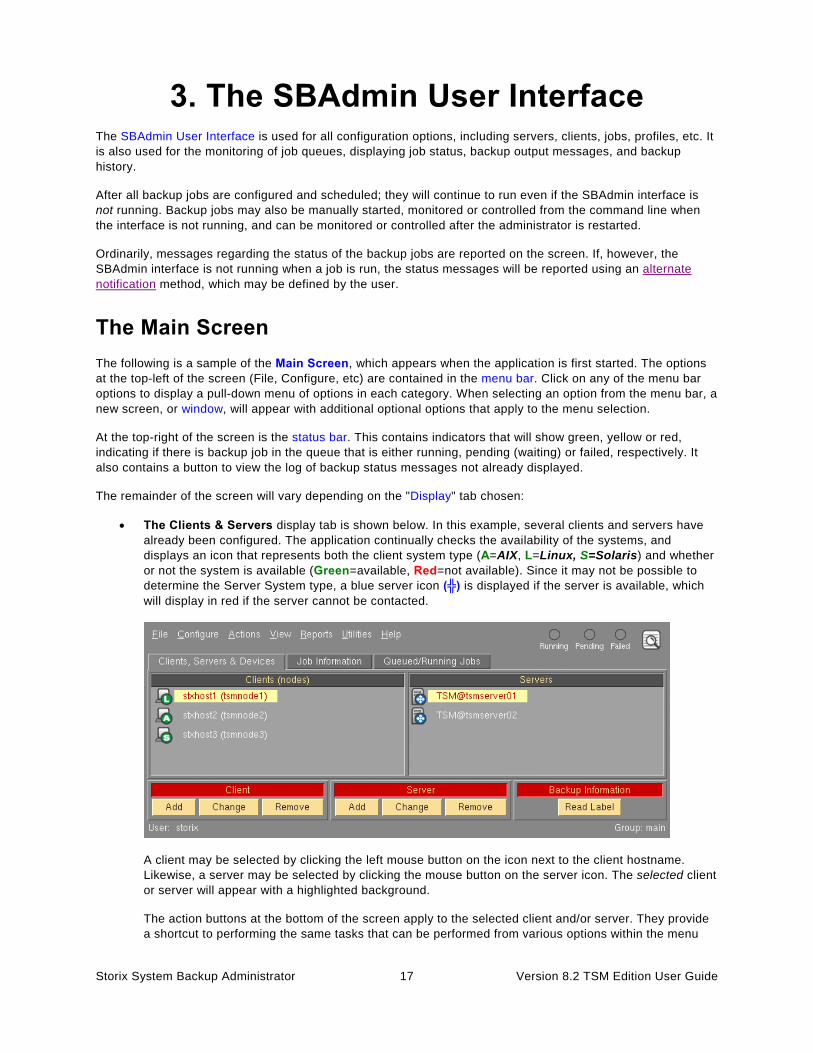
The Main Screen The following is a sample of the Main Screen, which appears when the application is first started. The options at the top-left of the screen (File, Configure, etc) are contained in the menu bar. Click on any of the menu bar options to display a pull-down menu of options in each category. When selecting an option from the menu bar, a new screen, or window, will appear with additional optional options that apply to the menu selection.
At the top-right of the screen is the status bar. This contains indicators that will show green, yellow or red, indicating if there is backup job in the queue that is either running, pending (waiting) or failed, respectively. It also contains a button to view the log of backup status messages not already displayed.
The remainder of the screen will vary depending on the "Display" tab chosen:
• The Clients & Servers display tab is shown below. In this example, several clients and servers have already been configured. The application continually checks the availability of the systems, and displays an icon that represents both the client system type (A=AIX, L=Linux, S=Solaris) and whether or not the system is available (Green=available, Red=not available). Since it may not be possible to determine the Server System type, a blue server icon (╬) is displayed if the server is available, which will display in red if the server cannot be contacted.
A client may be selected by clicking the left mouse button on the icon next to the client hostname. Likewise, a server may be selected by clicking the mouse button on the server icon. The selected client or server will appear with a highlighted background.
The action buttons at the bottom of the screen apply to the selected client and/or server. They provide a shortcut to performing the same tasks that can be performed from various options within the menu
Storix System Backup Administrator 17 Version 8.2 TSM Edition User Guide

bar. If you want to display the backup labels for all backups stored on the server, you must select a server and a client (original owner of backups to display), then press the “Read Label” button.
• The Job Information display tab provides a quick glance at the jobs that are configured. By clicking on a job icon, the job information and schedule information are displayed in the right two display areas and the job name is highlighted.
The represents a job that is not scheduled. The represents a job that is scheduled.
The action buttons at the bottom apply to the selected job. They are shortcuts for various job-related functions. The Job Actions buttons perform the same job operations available from the Action menu on the menu bar. The Run button will place the selected job in the queue (even if it is scheduled to run at another time), and it will be run as soon as the server and device assigned to the job are available. Each of these functions is described in detail in the section Schedule or Run Backup Jobs. The Job History buttons may be used to view backup labels, status/output messages or a history report for previously run jobs.
• The Job Queue display tab provides a look at the jobs that are currently in the queues. A queue is shown in the left-most display area, which consists of the backup server and the device name. When you click on a queue, the selected queue is highlighted, and the jobs in the selected queue are displayed in the middle display area.
You may then click on a particular job to display the job information, including the status of the job. Both the queue and job icons represent the status of the job. The Queue Actions buttons at the bottom of the screen may be used to manipulate the selected job. The Active Job buttons include the ability to kill a running job or display the status or output messages of a running or failed job. All of these
Storix System Backup Administrator 18 Version 8.2 TSM Edition User Guide

functions and a list of any possible icons or status messages are described in detail in the Job Queues section.
Closing Windows A common icon which appears at the bottom of each window is:
Cancel button
After making changes to information on any screen, use the cancel button to cancel the changes and close the window. Avoid using the window-manager button (usually at the top-left of the window) to close windows as this does not always perform the entire cleanup needed. The Cancel button does not appear on the Main Screen. From the Main Screen, you should always use the File"Exit option on the menu bar to exit the application, and you may use the icons in the title bar for other window manager functions, such as iconifying the window.
Storix System Backup Administrator 19 Version 8.2 TSM Edition User Guide

4. Users When you first installed SBAdmin, an “admin” user was created and you were prompted to provide a password for this user. The admin user is given authority to all (System Admin) functions within the SBAdmin application, including configuring other users.
If there is only one user configured, and you are logged onto the system as �root�, you are logged into the application under this user by default, and you will not need to provide a username or password at the command-line.
However, for the SBAdmin Web Interface, you must always provide a username and password.
You may configure one or more users, each with permission to perform different tasks. Each user will be assigned to a default group, but a user may be allowed access to different groups (see Configuring Groups).
User Levels (Roles) By configuring other users you will be able to limit their permissions and roles within the software. Configuring users at different level roles is useful if multiple people are accessing the administrator, and security policy dictates what access each person should be able to do. The following are the four types of users that may be configured within SBAdmin:
• Backup User - limited to monitoring backups and running backup jobs that are already configured by a privileged user.
• Backup Admin - allowed to configure backup settings and backup jobs. They are also able to monitor backups and run backup jobs.
• Group Admin - allowed all Backup Admin functions as well as configure application settings, clients and servers within their group.
• System Admin - allowed all access and may configure all backup functions as well as application settings, clients, servers and groups.
Adding a User To add a user, select Configure!Users from the menu bar. A screen such as the following example will appear:
Storix System Backup Administrator 20 Version 8.2 TSM Edition User Guide
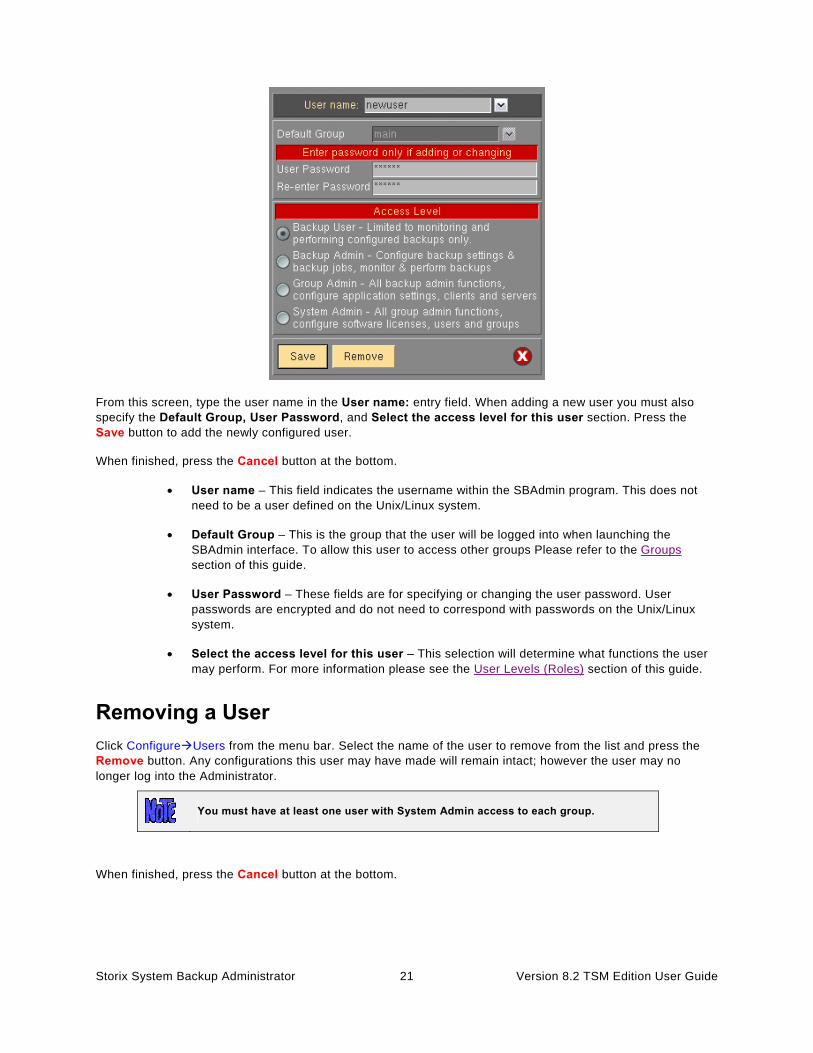
From this screen, type the user name in the User name: entry field. When adding a new user you must also specify the Default Group, User Password, and Select the access level for this user section. Press the Save button to add the newly configured user.
When finished, press the Cancel button at the bottom.
• User name – This field indicates the username within the SBAdmin program. This does not need to be a user defined on the Unix/Linux system.
• Default Group – This is the group that the user will be logged into when launching the SBAdmin interface. To allow this user to access other groups Please refer to the Groups section of this guide.
• User Password – These fields are for specifying or changing the user password. User passwords are encrypted and do not need to correspond with passwords on the Unix/Linux system.
• Select the access level for this user – This selection will determine what functions the user may perform. For more information please see the User Levels (Roles) section of this guide.
Removing a User Click Configure!Users from the menu bar. Select the name of the user to remove from the list and press the Remove button. Any configurations this user may have made will remain intact; however the user may no longer log into the Administrator.
You must have at least one user with System Admin access to each group.
When finished, press the Cancel button at the bottom.
Storix System Backup Administrator 21 Version 8.2 TSM Edition User Guide

Changing a User Click Configure!Users from the menu bar. Select the name of the user to change from the list. Here you may enter a new password into the User Password: and Re-enter Password fields and or Select the access level for this user. To change the user press the Save button.
Users with access lower than Group Admin will only have the ability to change their password. All other fields will be disabled.
When finished, press the Cancel button at the bottom.
Changing your User Information Only a user with System Admin access can add, change or remove other users. Other users can change their own information by selecting Configure!User Information or File!User Information (for users with only Backup User access).
You will see the same screen shown above, but will only be able to change your Default Group and your Password. Simply select a new default group (if more than one available), or enter a new password in the fields provided and press the Save button.
Storix System Backup Administrator 22 Version 8.2 TSM Edition User Guide

5. Groups To configure Groups you must be logged into SBAdmin as a User with “System Admin” privilege.
When SBAdmin was first installed the group “main” was created. “main” will function as the default group and no further group configuration is necessary. You may choose to configure groups to assist with organization or security in your backup environment.
Groups are used to allow a single SBAdmin to organize and manage Storix Clients and Servers; and may be configured to allow or restrict certain User access. Groups are also necessary when configuring servers that will share or limit client access based on group ID. For further examples of groups please see the Using Groups section of this guide.
Adding a Group To add a group, select Configure->Groups from the menu bar. A similar looking screen will appear:
From this screen, simply type the name of the group to add in the Group name: entry field and optionally a Description of the group. The Group ID field will be automatically populated with a unique value to be associated with the group. The New group name field is only used when changing a group. Select any users who should have access to this group from the Users who can access this group box. Then press the Save button.
When finished, press the Cancel button at the bottom.
• Group name: - This field defines the name of the group to be added.
• Description � This is an optional field, it is used to elaborate on and clarify what this group may be used for.
• Group ID � This field will be automatically populated when adding a group. It is a unique identifier and will not change if the group name is later changed.
• New group name � This field is only used when changing a group.
• Users who can access this group � This field allows you to specify one or more users that have permission to launch the SBAdmin interface under this group. For more information on users and user roles please see Configuring Users.
Storix System Backup Administrator 23 Version 8.2 TSM Edition User Guide
Changing a Group Click Configure!Groups. Select the name of the group you wish to change from the Group name: drop down arrow to the right. You may now edit the Description and New group name fields or select/deselect users from the Users who can access this group box. Once you have made the appropriate changes press the Save button to update the group.
The �Group ID� field will never change. Once a group has been configured this value will always be used to identify the group.
Removing a Group Click Configure!Groups from the menu bar. Select the name of the group to remove from the list and press the Remove button. When finished, press the Cancel button at the bottom.
A group may only be removed after all clients and servers have been
removed from the group.
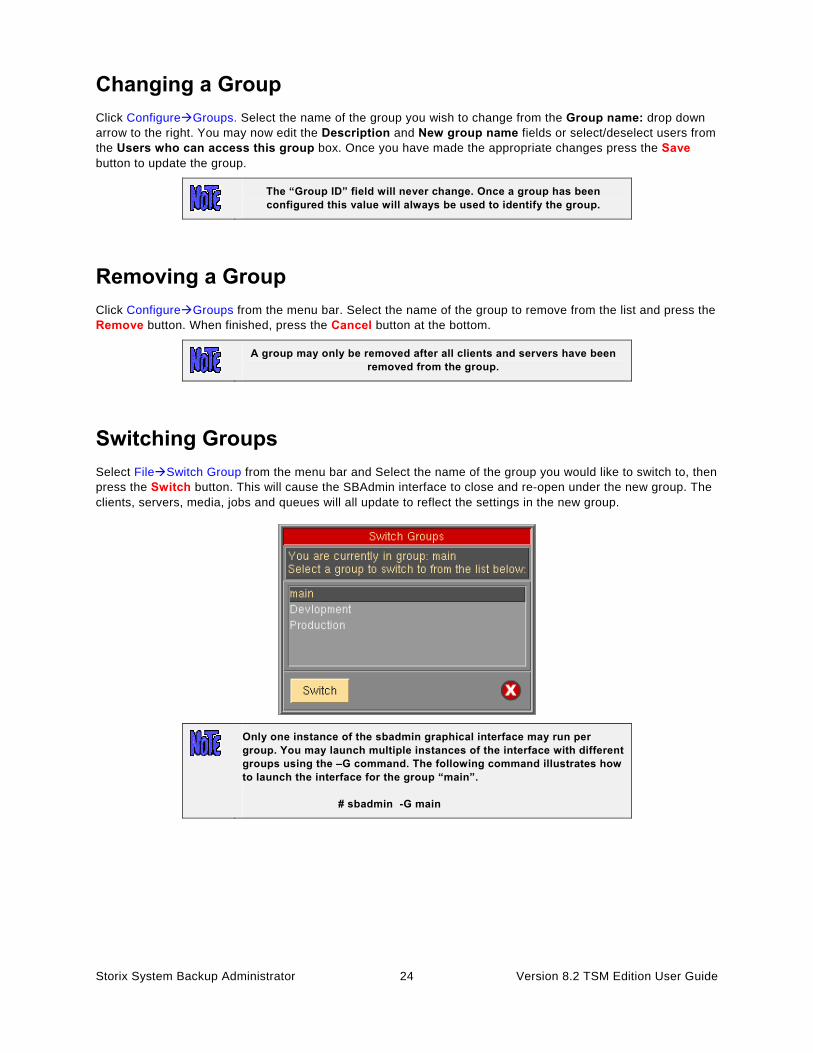
Switching Groups Select File!Switch Group from the menu bar and Select the name of the group you would like to switch to, then press the Switch button. This will cause the SBAdmin interface to close and re-open under the new group. The clients, servers, media, jobs and queues will all update to reflect the settings in the new group.
Only one instance of the sbadmin graphical interface may run per group. You may launch multiple instances of the interface with different groups using the �G command. The following command illustrates how to launch the interface for the group �main�.
# sbadmin -G main
Storix System Backup Administrator 24 Version 8.2 TSM Edition User Guide

6. Configuring Clients (Nodes) A client is defined as any TSM node that will be backed up using SBAdmin.
Any number of clients may be added to the administrator as long as the total number of clients does not exceed the number of clients licensed to SBAdmin. Note that the administrator itself also includes a client license, so it may be configured as a client or server without using one of your additional client licenses.
Adding a Client Any client may be added to the administrator by simply adding its hostname. However, the number of clients which may be added is dependent on the number of clients the administrator is licensed for. Also, any client hostname may be added, but the client is only accessible to the administrator after the software has been installed and configured onto the client system as well.
The following information is needed before configuring a TSM client:
Node Name (required) Password (required if using PASSWORDAccess “prompt” on the server)
To add a client, select one of the following form the menu bar:
• Configure!Clients
• Click the Add Client button at the bottom of the Main Screen when the Clients & Servers are displayed.
After selecting the appropriate option above, the following window will be displayed:
Storix System Backup Administrator 25 Version 8.2 TSM Edition User Guide

To add a new client, enter the hostname of the client in the entry field at the top. Note that the hostname you enter may be a simple hostname (i.e. ariel), a full domain name (goofy.storix.com) or IP Address and must be known to the admin system. Then select any optional features that apply to this client. When you’ve made your selections, select Save to save.
To change an existing client, you may type the client name, or use the arrow button to the left of the field to select from a list of configured clients. You may then select or deselect optional features, change other entries, change the TSM password of the client on the server, or remove the client.
TSM Node Name and Password You must enter the nodename of the client in the NODEname field. This is the name of the client system as known to the TSM server. The password of the client will be require if the PASSWORDAccess option of the TSM server is set to “prompt”, since the password must be provided with each command executed between the client and server. This password will be stored on the client in a protected file, and in non-textual form, for use by SBAdmin commands.
Set or Reset the Node�s Password This screen can also be used to set or reset the password of the node on the server by selecting the TSM Server in the drop-down list, and entering a new password in the New PASSWORD field. In this case, you must also enter the Current PASSWORD, regardless of the PASSWORDAccess option of the server.
Enabling Backup Data Encryption for a Client The Data Encryption option will be enabled only if the Backup Data Encryption Feature is installed. If so, you may select this button to indicate that data may be encrypted when backing up this client. Any type of data, for any client type, may be encrypted using 128, 192, or 256-bit AES encryption. Encryption is configured for specific clients according to the number of clients your encryption license supports. You may only select this button for the number of clients your encryption license supports.
Enabling data encryption for a client does not cause all backups to be encrypted automatically. It only designates which clients will support encryption. For clients that support encryption, the encryption option becomes available when configuring backup jobs.
To encrypt data for a client, each client must have at least one configured Encryption Key. The encryption key must be a 32, 48 or 64-byte hexadecimal number, depending on the number of bits of encryption used. An encryption key will be given a user-defined Encryption Key ID, and you may have as many Key IDs as you like. You will later select which Key ID to use when performing a particular backup.
To prevent encryption keys from ever being transmitted across the network, the encryption keys may not be configured from within the GUI interface, and client keys may not be configured from the admin system. Instead, you must run the stkeys command on each client for which encryption is to be used. Refer to stkeys in the Commands Reference Guide, and the Encrypt data field in the backup job configuration for additional information.
Tape for Local System Backups A client may perform a System Backup to its own direct-attached tape drive, if available. This allows any client with a tape drive to backup to itself without the use of a server or any network traffic. This tape may then be used to reinstall this client. You can move the tape or tape drive to a server to make the backup available to any client, or you can move the tape or tape drive to any other client to allow then to perform a local system recovery.
Storix System Backup Administrator 26 Version 8.2 TSM Edition User Guide

Since the tape drive names may differ for each client, you will select in this field the name of the tape drive to configure. Only tape drives that are configured and available on the client will be shown. Although multiple tape drives may exist, you may only select one drive per client for system backups.
Note that this option will create a special tape device with the name “SBTAPE”. This device will then be available when you configure a backup job and indicate the backup is to a local tape device. Refer to Creating a Local System Backup in the job configuration for more details.
Sparse File Handling A sparse file is a file in which blocks of data have been written non-sequentially, leaving unallocated blocks in the middle of a file. If the sparseness of a file is not preserved when restoring, the file will be expanded to include all blocks in the middle of the file, often causing a filesystem to inadvertently run out of space.
Preserving sparseness in files is usually desirable. This is sometimes a problem, however, if your files were pre-allocated using NULL characters. If a file is created and all blocks are allocated by writing nulls, or "0"s, throughout the file, the file appears identical to a sparse file on the backup. Since files containing null blocks are indistinguishable from sparse files, the blocks are not retained upon restore. The affect is that a file created at a large size could be restored to a very small size.
To resolves this issue, you may select the Preserve Sparse Files option so that all backups of this client will be created without preserving the sparseness of files. Therefore, if a file was pre-allocated using NULL blocks, the null blocks will also be restored. Note that, when using this option, a truly sparse file (created without pre-allocating blocks by writing nulls) will be interpreted as a large file of null blocks, and will be expanded upon restore in order to retain the null blocks. This will often cause the filesystem to run out of space since a file that was once very small is restored quite large.
If a backup is created by preserving sparseness, which is the default, then the backup files may not be restored to another system of a different operating system type. If you want to restore a backup to a different operating system type, then you should turn OFF sparse file handling BEFORE creating the backup.
Press the Save button to add or change the client settings. After adding a client, its icon will immediately appear on the Main Screen when Clients, Servers & Devices are displayed. If the software has not been configured on the client, or if the client was not configured using the correct hostname of the admin system, the client icon will appear in red. If the software is installed and configured properly on the client, the icon will appear green to indicate that the client is accessible to the admin system.
Removing a Client A client may be removed from the system only if it is not assigned to any backup jobs. If it is, you will be informed so, and you must remove or change the job to remove the client from the list of clients to backup.
To remove a client, either:
• Select a client on the Main Screen when Clients & Servers are displayed, then click the Remove Client button at the bottom of the screen, or
• Click Configure!Clients from the menu bar. Select the name of the client to remove and press the Remove button.
The client icon will be removed from the Main Screen when Clients & Servers are displayed.
Storix System Backup Administrator 27 Version 8.2 TSM Edition User Guide

7. Configuring TSM Servers Any TSM server, and any number of TSM servers may be configured for use by SBAdmin TSM Edition. This is not limited by the number of client licenses installed. In addition, a single physical TSM server may be accessed using different TSM server configurations. For example, one server (tsmserver-comp) may be configured to backup data using TSM compression, while the same server (tsmserver-nocomp) may be configured to backup without using data compression.
Adding a TSM Server A new server may be added to the system by either:
1. Selecting Configure!Servers from the menu bar, or
2. Pressing the Add Server button at the bottom of the Main Screen when Clients & Servers are displayed.
After doing so, a screen similar to the following will be displayed:
You should refer to your TSM documentation for information on the additional fields which are normally specified in your TSM system user options (dsm.sys) file. You may use the right-arrow button over any field to show the QuickHelp information on each field, so information is not detailed here. However, there are some special considerations:
TSM Server Name You can call the server anything you like, since it is the entry in the TCPServeraddress field, not the server name, which determines how the server will be contacted. You can also configure multiple servers, each with a different name, that use the same TCPServeraddress entry.
Storix System Backup Administrator 28 Version 8.2 TSM Edition User Guide

Storix System Backup Administrator 29 Version 8.2 TSM Edition User Guide
TSM Admin User ID/Password You must enter the name and password of a TSM administrative user already configured on the TSM server. This administrative must have been configured with either System or Policy authority. The administrative user ID entered will be used only by this SBAdmin application to perform management tasks on behalf of the clients. This information is never sent to or saved on the TSM client systems.
PASSWORDAccess If this field is set to “generate”, it is assumed that you have already set the password on the client using another TSM application (or have run another type of TSM backup from this client), and the server used had this option set to “generate”. In doing so, an encrypted password file was created on the TSM client, and will be used by this application also. In this case, you do not need to enter a Current PASSWORD when configuring the TSM clients.
If this field is set to “prompt”, the client password must be provided each time contact is made with the TSM server. The password is stored on this TSM Admin system for future use, and is also sent to the client and stored in an encrypted and protected file for use by SBAdmin commands. Normally, the password is contained in the client user options file (dsm.opt). However, SBAdmin does not use this file but supplies the password to the TSM server with each command. When using this option, you will need to enter a Current PASSWORD for each TSM client you configure.
COMMMethod This will be displayed as “TCPIP”, which is the only option supported. The only other TSM option is “shared” (shared memory), which can only be used when backing up the server itself. The shared memory option provides no significant performance increase and is not supported by SBAdmin.
COMPRESSion A selection of “yes” simply indicates that TSM will compress backup data on the client before sending to the server. SBAdmin provides its own compression options (see Configuring a Backup Profile). If you choose to use SBAdmin compression, then no TSM compression will be used regardless of your selection here. If you want to use TSM compression, you should select “yes” in this field, and do not indicate to use compression within your backup profile (default). Different compression schemes work best on different types of data and sizes of files. You should experiment with using both TSM and SBAdmin compression options to determine which provides the best compression with the least impact on the client system performance.
To add a new server, enter a name in the entry field at the top, add or change any of the fields on the screen, then click the Save button.
Changing a Server The information for an existing server may be changed by either:
1. Selecting Configure!Servers from the menu bar, or
2. Selecting a server icon from the Main Screen when the Clients & Servers are displayed, and pressing the Change Server button at the bottom of the screen.
If selected from the main screen, the server options screen will appear with the prior settings for the server. If not, select the server by typing the name at the top, or use the arrow button to the left of the entry field to select from a list of configured servers. Simply add or change any of the information on the screen, then press the Save button at the bottom to save the changes.

Storix System Backup Administrator 30 Version 8.2 TSM Edition User Guide
Removing a Server Removing a server, in this case, removes the configuration from the SBAdmin interface, but has no affect on the TSM server itself. A server may be removed only if there are no jobs currently assigned to it. If there are jobs assigned, you will be informed so, and you must remove or change the job to use a different server before the server may be removed.
To remove a server, either:
Select Configure!Servers from the menu bar, then select the server by typing the name at the top, or use the arrow button to the left of the entry field to select from a list of configured servers. Then press the Remove button at the bottom of the screen.
Select a server icon from the Main Screen when the Clients & Servers are displayed, then press the Remove Server button at the bottom of the main screen.

8. Configuring Boot Media Servers A boot media server is a system used to store client CDROM ISO and network boot images created by SBAdmin. When creating boot media, you will be given the option to store the images on a boot media server. When the images are successfully created, they will be copied to the specified directory on the boot media server. You will then burn the ISO to a CD/DVD and use the disc to boot a client into the system recovery process. If utilizing network boot images, then the images will be used to perform a network boot of the client into the system recovery process. Boot media is described in detail in the SBAdmin System Recovery Guide.
You may have multiple boot media servers. However, only a configured TSM client may be configured as a boot media server.
Adding a Boot Media Server A new backup media server may be added by selecting Configure!Servers!Boot Media Servers from the menu bar. The following window will appear:
To add a boot media server, enter the IP address or hostname of the boot media server in the entry field at the top of the window. Note, that the boot media server must already be configured as a TSM client within SBAdmin. Specify the directory on the boot media server you wish to store the images in the Directory for Client Network and CDROM Boot Images field and press the Add/Change button to save the configuration.
Changing a Boot Media Server You may view or change the current configuration of a boot media server by selecting Configure!Servers!Boot Media Servers from the menu bar. Enter the boot media server name in the entry box at the top of the window, or select the arrow button to the right of the entry field and select an existing server from the list.
The settings for the server will then be displayed. If you wish to make a change to the server configuration, simply add or change any of the information on the screen, then press the Add/Change button at the bottom to save the changes.
Removing a Boot Media Server You may remove a boot media server by selecting Configure!Servers!Boot Media Servers from the menu bar. Enter the boot media server name in the entry box at the top of the window, or select the arrow button to the right of the entry field and select an existing server from the list.
The settings for the server will be displayed. If you wish to remove the server, then press the Remove button at the bottom of the screen. Removing a boot media server will have no effect on its client configuration but you will no longer be able to perform a network boot using this server.
Storix System Backup Administrator 31 Version 8.2 TSM Edition User Guide

9. Backup Profile A backup profile is used to set default backup selections commonly used when performing backups. Assigning a backup profile to a backup job alleviates the need to repeatedly answer the same questions every time a new job is added.
At least one profile must be created. When the software is first installed, a pre-defined FULL_SYSTEM backup profile is automatically installed. This profiles is not required if you create others, and may be removed if desired.
After creating a single backup profile, any options selected for that profile may be customized for each backup job it is assigned to. You may want to create different profiles to prevent having to change the options for different jobs.
Adding a Backup Profile A new profile may be added by selecting Configure!Backup Profiles from the menu bar.
There is one pre-defined profile configured when the software is installed. You may choose to edit this profile, delete it, or add new ones of your own.
The options may vary depending on the operating system support and additional features enabled. Refer to Operating Systems Support and Enabling Optional Features for more information.
The following is an example of a System Backup profile when Linux, Solaris and AIX client support is enabled:
To add a new profile, enter a new Profile Name in the entry field at the top of the screen. A profile name may consist of any characters except a colon (:) or space (spaces will be changed to underscores).
Storix System Backup Administrator 32 Version 8.2 TSM Edition User Guide

Note that after assigning a profile to a backup job, you may customize the profile further for the specific job. Therefore, it is required that only one backup profile exists. Refer to Configure a Backup Job for more information.
Use QuickHelp at any time to display a description or instructions for a particular option. Most options are described in detail in the help information and are therefore not shown here. There are a few special considerations:
Buffer Size The buffer size represents the amount of data to accumulate in memory before writing that “buffer” to the backup device. In actuality, SBAdmin uses many buffers for best performance, but the amount of data written to any device at one time is set using the Buffer Size option.
Using a buffer size larger than the physical device can handle will result in an I/O error writing to the device, which generally varies by operating system or device driver. The default of 128K is adequate for most devices without exceeding their hardware limit. However, for best performance, especially when using high-speed tape drives, disk drives and RAID devices, you can increase this number. A value of 512 or 1024 is often best.
Note that, while not excessive, a larger buffer size will cause SBAdmin to use more memory during a backup. Also, if you use a large buffer size, you may see a backup slow down if the system is unable to write a large buffer to the device fast enough, or if there is limited memory on the system. For this reason, it’s best to experiment with different buffer sizes until you find the best backup performance for your device.
Specifying the Data to Backup The description of the first field in the General Options section will differ based on the backup type you selected for this profile. In this field, you may enter the data to backup. This information is not required at this time and may be filled in when configuring the backup job later. Because TSM Edition only supports “full system” backup types, the type of data in this field will be either volume groups (Linux/AIX) or ZFS pools (Solaris). You may also enter “all” to include all volume groups or ZFS pools. You may also enter a list of options to exclude. For example, to include all volume groups EXCEPT the “tempvg” volume group, type: all –tempvg
If you want to exclude all volume groups and ZFS pools you may leave this option blank. Leaving this option blank does have different effect depending on the type of client the backup is performed on. On an AIX system, leaving this option blank will still include the rootvg volume group (required on a base system). It will also include all volume group definitions of currently defined volume groups but will not backup the data within the excluded volume groups. On a Linux system, leaving this option blank will exclude all LVM data including their definitions and data. Likewise, leaving the field empty on a Solaris system will exclude all filesystems and volumes contained in ZFS pools.
If any items within the data list do not apply to a client, the item will simply be ignored. For example, using a data list containing the volume group �VolGroup00�, a client without a VolGroup00 volume group will simply skip this volume group.
Compression Level As noted in the Configure Servers section, there are two methods of compression which may be applied to backup data – TSM and SBAdmin compression. By default, no SBAdmin compression will be used (this field will be set to “None”).
A selection of “yes” simply indicates that TSM will compress backup data on the client before sending to the server. It is important to not, however, that SBAdmin provides its own compression options (see Configuring a Backup Profile). If you choose to use SBAdmin compression, then no TSM compression will be used regardless of your selection here. If you want to use TSM compression, you should select “yes” in
Storix System Backup Administrator 33 Version 8.2 TSM Edition User Guide

this field, and do not indicate to use compression within your backup profile (default). Different compression schemes work best on different types of data and sizes of files. You should therefore experiment with using both TSM and SBAdmin compression options to determine which provides the best compression with the least impact on the client system performance.
TSM Backup Read Permission It is important to note the TSM Backup Read Permission field in the backup profile because this will determine if the backup of this client (node) will be readable by another client (node). When a backup is created, it is stored in a TSM filespace that corresponds to whether the backup should be private (owner-access only) or shared (any node can access).
If node data should not be accessible between nodes, be sure to set this option to “Same client only”. Otherwise, select “Any client”.
Note that if you have created a backup that you wish to have installed onto different nodes, such as system replication (cloning), you must make that a shared backup. Otherwise, only the original node can access it.
Incremental Backup Level Using this field, you may create incremental (or differential) backups of the system. An incremental backup must be based on a level 0 (full) backup. Therefore, you must always perform a level 0 before any subsequent levels.
If you do not plan to perform incremental backups, it�s best to leave this field blank to avoid unnecessary time processing incremental information for the backup.
If you set this field to “0”, then a full system backup will be performed, from which you may base additional incremental backups. Any number (1-9) indicates that you will be performing a new incremental backup, which will be based on the previous backup level.
Note that you will not be able to perform any incremental backups (levels 1-9) until you have performed at least one level 0 backup.
A Level 0 incremental (or a system backup without an incremental level) is the only backup from which the system may be re-installed.
A system backup with no incremental level specification, or a system backup with incremental level 0, is required to re-install a system. Only after the system is restored from this full system backup can you restore additional incremental backup levels. Refer to Incremental/Differential Backups for more general information and examples.
Backup Retention Policy By default, all backups will be retained or overwritten according to Backup Retention Policy set in the Preferences section. However, certain backups or types of backups you may wish to retain for a longer period of time. For example, you may want to retain a full backup taken at year-end for several years, while a daily backup (replaced on a daily basis) may only need to be retained for a week. Rather than choosing to retain a backup for a certain number of days, you can also choose to retain a certain number of backups of the same job.
If you set a retention policy in the profile settings, it will override the policy set forth in the Preferences. If you choose to customize a profile for a specific job, it will apply only to backups created by that job and will override the policy for both the main profile and in the Preferences section.
Storix System Backup Administrator 34 Version 8.2 TSM Edition User Guide

For details on the use of the Retain backups field, refer to Backup Retention Policy set in the Preferences section.
After making all selections, save the profile by pressing the Save button at the bottom. The information will be saved and the window will be closed.
Pre-backup and Post-backup Programs Within the backup profile, you may configure a program to run on the client, before and/or after the backup command runs. You can also select to have programs execute before and after the creation of snapshots used for backups. This program, either a pre-backup program or post-backup program, is a custom program which exists on one or more clients, and may perform any operation, such as starting and stopping database programs, forcing users to log off the system, etc. To configure pre- or post-backup programs, press the Configure button next to the Pre & Post Backup Programs field. When doing so, the following screen will appear:
Note that the options for running programs prior to or after creation of snapshots are only available with backups of data contained in JFS2 filesystems (AIX), LVM logical volumes (Linux) and ZFS filesystems (Solaris).
Using the web interface is slightly different. You will notice the option to configure pre and post backup programs directly from the main profile configuration screen:
The pre-backup and post-backup programs will be executed with ROOT USER authority. Therefore, they must be placed in the DATADIR/custom directory by the root user on the client (where DATADIR is the directory you selected on each system when SBAdmin was configured - i.e. /storix). The custom directory is owned by the root user and only the root user on each system has the ability to add files to this directory. The commands placed in the custom directory may be shell scripts or binary programs and must have execute permission.
To configure a pre-backup or post-backup program, simply add the name of the program to the profile in either of the Pre-backup Program or Post-backup Program fields. Do not enter the full path name of the program, only the file name. The program is assumed to be in the DATADIR/custom directory. You may also add optional arguments to the command, separated by spaces.
Storix System Backup Administrator 35 Version 8.2 TSM Edition User Guide

Pre & Post Backup Programs
When a backup job using a profile containing client pre-backup or post-backup programs is run, the system will attempt to execute the specified program on each client before or after that client backup is performed. If the program does not exist on any client or is not executable, it will be ignored. Otherwise, it will be executed and one of the following actions will be taken depending on the exit code of the program:
Storix System Backup Administrator 36 Version 8.2 TSM Edition User Guide
Pre-backup Program Post-backup Program
Exit code 0 Client will be backed up and the job will continue normally. Job will continue normally.
Exit code 1 Client will not be backed up and the backup job will be terminated with an error message
Job will terminate with an error.
Exit code 2
Client will not be backed up. If there are other clients to backup, the job will continue normally. However the job will complete with warning messages.
Job will continue normally. However, the job will complete with warning messages.
Exit code 3 or higher
Client will be backed up and the job will continue normally. However, the job will complete with warning messages.
Job will continue normally. However, the job will complete with warning messages.
A post-backup program will be executed even if the backup command that precedes it fails. This is necessary in case the post-backup program must record information about the backup or restart processes that were stopped by the pre-backup program.
Pre & Post Snapshot Programs
When a backup job using a profile containing pre-snapshot and post-snapshot programs is run, the system will attempt to execute the specified program on each client before and/or after each snapshot is created.
The program will only be executed for the storage containers to be included in the backup, and if Snapshot Backups have been configured and the Backup Job is configured to perform snapshot backups.
The program names provided will be executed before a snapshot is created for each logical volume/filesystem. Therefore, the program must be intelligent enough to recognize the name of the logical volume or filesystem the snapshot is being created for at that time and act accordingly (or do nothing). Refer to Creating Pre and Post Backup Programs below for more information.
If the specified program does not exist on any client or is not executable, it will be ignored. Otherwise, it will be executed and one of the following actions will be taken depending on the exit code of the program:
Pre-snapshot Program Post-snapshot Program
Exit code 0 The snapshot of the logical volume will be created and the backup will continue.
Backup will continue normally.
Exit code 1 The snapshot will not be created for the logical volume and the backup will terminate.
The backup will terminate with an error.
Exit code 2 The snapshot will not be created for the logical volume, and the backup will continue using the active (online) data.
The backup will terminate with an error.
Exit code 3 or higher
A warning message will appear, but the snapshot will be created and the backup will continue normally.
The backup will terminate with an error.

Storix System Backup Administrator 37 Version 8.2 TSM Edition User Guide
Creating Pre & Post Backup Programs A customized program may perform any function on the system since it is run under root user authority. Any arguments or flags may be provided to the command. The same script may be called with arguments that tell the script how to proceed. For example: mypreprogram –kill may be used to log off users and mypreprogram –warn may warn users of the backup only, or mypreprogram –kill 60 may warn users, then log them off after 20 seconds, etc.
In many cases, it is desirable for the program to have certain information about the backup job. The program may want to display or save information about the backup job in another application or file, or a post-backup program may need to respond differently depending on whether the backup was successful or not. Every program will have access to the following environment variables:
STX_CLIENT The name of the client STX_SERVER The name of the TSM server STX_DEVICE The name of the device on the server (API if written to TSM server) STX_JOBID The Job ID STX_BACKUPID The Backup ID STX_EXITCODE The exit code of the backup command or job STX_SNAPLVNAME The logical volume/filesytem for which a snapshot is created. STX_SNAPFSNAME The filesystem name (mount point) of the snapshot This will show a dash "-" if the snapshot is not a filesystem
The STX_EXITCODE variable is only used in client post-backup/job programs. This indicates the success or failure of the backup.
The software is installed with sample script programs that may be used for any client or server pre-backup, post-backup or pre/post snapshot program. The programs are called “prepost.sample” and "prepostsnap.sample" and will simply display the values of all of the above variables when the backup job is run. You may edit or view the contents of this script file (contained in the DATADIR/custom directory), which contains additional details on the use of this option.
Incremental/Differential Backups An incremental backup is on in which the only data to be included in the backup is that which has changed since the prior incremental backup level. An incremental backup level can be from 0 to 9, where 0 is a “full incremental” backup from which all other levels are based. Levels 1 through 9 indicate that only data that has changed since the last prior-level backup should be included.
Differential backups are also incremental backups, except that backups include a cumulative list of files that have changed since a certain time. This is achieved by running the same incremental level backup repeatedly, backing up the same files that changed since the last prior-level (or level 0) backup, along with any additional files that have changed since the last time the same incremental level backup was run. The result is that the backup gets continually larger each time it is run, until a prior level (or level 0) backup is run again.
Raw devices such as logical volumes (AIX) and other partitions (slices or ZFS volumes on Solaris, meta-disks on Solaris & Linux, etc) that do NOT contain mounted filesystems will always be backed up in their entirety if they have been written to since the last backup of a prior level. This assumes that you selected to “Include as raw data” this information in the backup profile. If included, we assume in the examples below these raw devices will be included with the backups as well as the “files”.
Incremental Backup Examples 1. Consider the following backup schedule:
Monday Level 0 Tuesday Level 1

Storix System Backup Administrator 38 Version 8.2 TSM Edition User Guide
Wednesday Level 2 Thursday Level 3 Friday Level 4
a. On Monday, the entire system will be backed up. Note, however, that only the volume groups indicated in the backup profile will be included, if applicable.
b. On Tuesday, only the files that have changed since Monday’s backup will be included in the incremental level 1 backup.
c. On Wednesday, only files backed up since the last prior-level backup (level 1) will be included in this backup.
d. Likewise on Thursday and Friday.
e. On the following Monday, a new incremental level 0 is performed, backing up all data once again. This is the new backup from which all subsequent backups will be based. Any incremental backups performed prior to this level 0 will be considered obsolete.
2. In a second example, consider the following backup schedule, which is often referred to as differential backups since we’re effectively backing up the differences between the system as it is now versus a specific day in the past :
First day of the Month Level 0 Each Friday night Level 4 Each other weekday Level 7
a. On the first day of every month, regardless of the day of the week, a full incremental backup is performed.
b. The next day, an incremental level 4 will be performed (if Friday) or an incremental level 7 will be performed (if Monday through Thursday)
In this example, keep in mind that it is not necessary to perform a level 1 backup after a level 0, since each level (1-9) will backup the data from the last prior-level backup performed, even if it was several levels prior. Therefore, if your last level was 0 (full), then either a level 4 or a level 7 will backup the same data. However, if your last level was 4, a level 7 will always backup files changed only since the last level 4.
In addition, each weekday the same backup level will be performed. Since all data will be backed up since the last prior level, your previous day’s backup of the same level will become obsolete.
3. This example is a differential backup, where all backups are based on the most recent level 0 (full) backup that was performed:
Every Friday night Level 0 Monday through Thursday night Level 1
a. Every Friday night, a full backup level 0) is performed.
b. On every other night, a level 1 backup is performed. The result is that, each day, all files that have been created or changed since the Friday night backup will be backed up again. The size of the backup will grow each day until after the next Friday night backup is again performed.
Restoring from Incremental Backups If re-installing the system from the backup, you must always restore from a level 0 incremental backup (or one that did not use an incremental level). The system installation process will not allow you to select an

Storix System Backup Administrator 39 Version 8.2 TSM Edition User Guide
incremental level (1-9) to restore from. Only after the system has been reinstalled and rebooted will you be able to restore additional incremental levels using the SBAdmin interface.
From a full-system backup, you can restore files, directories, filesystems or specific volume groups onto a running system. If your system backup is an incremental backup and you choose to restore filesystems or volume groups, the backup will be restored as an incremental backup as described below:
There are a few things to remember when restoring from incremental backups in order to get your data back to the most recent state:
a. Always start by restoring from your most recent incremental level 0. This will remove and replace all files in each filesystem.
b. Always restore full Volume Groups/ZFS Pools or Filesystems from incremental backups. If you choose to restore a directory from a full-system backup, all files will be restored from the backup, but changes will not be re-applied, such as re-removing files which had been removed prior to that incremental backup level.
c. Restore incremental levels in the order they were performed ONLY if the next incremental level to restore is more recent than the last. For instance, if you performed a level 1 backup most recently, do not restore a level 2 backup which is older than your level 1.
d. When you perform the same incremental backup level multiple times without performing a lower-level, restore only the most recent backup of that level. Any prior versions of the same backup level are considered obsolete.
In the first backup example above, you must restore each backup, starting with level 0 in the order of each backup level, stopping when you encounter a backup level that is older than this predecessor. If your level 1 backup was most recent, then you will need to restore only level 0 and 1. If your level 4 was most recent, you will need to restore all levels 0 through 4.
In the second example, you are ensured never to have to restore more than three backups to get your data up-to-date. This convenience comes with some complication when restoring. First, you must of course always start by restoring your last level 0. Then, if there was a higher level backup performed after your level 0, restore it next (it could be a 4 or 7 depending on what day is the first day of the month). Lastly, if you restored a level 4 and there was a level 7 backup performed after your level 4, restore it next.
Changing a Backup Profile The information for an existing profile may be changed by selecting Configure!Backup Profiles from the menu bar. The profile options screen will then appear. Either enter the name of the profile in the field at the top of the screen, or select the arrow button to the left of the entry field and select an existing profile from the list.
The profile settings will then be displayed. Simply add or change any of the information on the screen, then press the Save button at the bottom to save the changes.
Removing a Profile A profile may be removed from the system only if it is not assigned to any backup jobs. If it is assigned to a job, you will be informed so, and you must remove or change the job to use a different backup profile before the current profile may be removed.
To remove a profile, select Configure!Backup Profiles from the menu bar, enter or select the profile to remove, then press the Remove button at the bottom of the screen.

10. Exclude Lists Exclude lists are used to exclude certain files, directories, or devices (such as partitions or logical volumes) from backup jobs. You may create any number of different exclude lists, and assign one or more exclude lists to a particular backup job. You may also select which clients the exclude list will apply to. This allows you to use an exclude list for a job, but still have it only apply to certain clients if multiple clients are backed up by the same job.
Note that you can specify the volume groups to include or exclude (i.e. “all –appvg”) in your backup job. It is therefore not necessary to exclude a volume group or its contents using an exclude list if it was not included on the job. Using an exclude list as described in this section, however, will provide the ability to exclude specific files or directories within the filesystems.
Exclude lists may be used to exclude files, directories, entire filesystems or device data (such as partitions or logical volumes) from your full-system backup. Wildcard characters (*) in exclude list entries may also be used to exclude may files or directories matching a certain pattern.
Device names may also be added to the exclude list. A device name may be an LVM logical volume, meta-disk (software RAID) device name, or disk partition. The data within the device will only be excluded if it is not used for a filesystem. To exclude a filesystem, you must exclude the filesystem mount point (directory).
Using Wildcards If you wish to exclude a directory, all files within the directory as well as any sub directories will also be excluded. A wildcard (*) may be used in an exclude list entry for files and directories. For instance, having /usr/local/*.old in the exclude list will exclude all files in the /usr/local directory with a “.old” extension. Wildcards in the exclude list work the same as at the command line. For example, typing “ls /usr/local/*.old” will yield the same list of files that will be excluded if /usr/local/*.old is in the exclude list. You may specify multiple wildcards in the same string. For example, “/*/local/x*.old” will exclude files starting with an “x” and ending with “.old” in the /usr/(anydir)/local directory.
You may not use other special characters in exclude list entries, even if they exist in the names of the files to exclude. Those characters are $, +, ? and ^, which have special meaning to the system.
Adding an Entry to the Exclude List Select Configure!Exclude Lists from the menu bar to display the following exclude list screen:
Storix System Backup Administrator 40 Version 8.2 TSM Edition User Guide

Storix System Backup Administrator 41 Version 8.2 TSM Edition User Guide
You may enter a new Exclude List name in the entry field at the top of the screen, or select an existing exclude list name using the arrow button to the left of the entry field. When doing so, the current settings for the selected exclude list, if any, are displayed.
In the first (Clients) listbox, you may select “all” to apply this exclude list to all clients (when assigned to a backup job), or select individual clients the exclude list should apply to. Note that, if this exclude list does not apply to a particular client, that exclude list will not appear as a selectable option when configuring a backup job. If, however, the exclude list is applied to a client, this does not automatically apply to all jobs. You must also select to use the exclude list (or lists) when configuring a backup job.
To exclude files or directories, type the file or directory name (or wildcard string) in the entry field under the Files and Directories heading. To add a logical volume, partition (Linux), slices and ZFS volumes (Solaris) or meta-disk (Linux/Solaris) to the exclude list, enter the device name (do not prefix with /dev) in the entry field under the appropriate heading. Note that the heading will only show the device types that are supported for the various client operating system types enabled.
Press Enter or select the Add button next to the corresponding entry field to add the item to the list.
When all selections have been made, press the Save button at the bottom of the screen to save the entries and clear the entries. To undo all changes made, press the cancel button at the bottom.
Removing Entries from the Exclude List To remove an entry from the exclude list, display the exclude list screen by selecting Configure!Exclude Lists from the menu bar and selecting the exclude list to change. Then, to remove a file or directory entry, select the item in the Files and Directories listbox and press the Remove button next to the file or directory entry field. Likewise, to remove a logical volume from the list, select the item in the Raw Devices listbox and press the Remove button next to the entry field. When you have removed all desired selections, press the Save button at the bottom of the screen to save the remaining entries and exit. To undo all changes made, press the cancel button at the bottom.
To remove an entire exclude list, select Configure!Exclude Lists from the menu bar, enter or select the exclude list at the top of the screen, then press the Remove button at the bottom of the screen. Note that, when removing an exclude list that is assigned to current backup jobs, the exclude list will be removed from the job configuration. You will be informed if the exclude list is assigned to any jobs before proceeding.

11. Backup Jobs A backup job must be created before any backup may be performed by the admin system. The job information will identify the TSM server and one or more clients to backup and the backup profile. If the backup is to be scheduled to run either at a later time or on a regular basis, the dates and times are also added to the backup job information. Temporary backup jobs which are run only once may also be set to be automatically deleted once the job has completed.
Before configuring a backup job, you must first have configured at least one TSM Client to backup and a TSM Server to backup to (even if the client and server are the same). There must also be at least one System backup profile (a default profile comes installed with the software). On the job configuration screen, you can customize the selected backup profile to apply changes which apply only to the job, if desired.
Creating a Backup Job To create a backup job, either
1. Select Configure!Backup Jobs from the menu bar, or
2. Press the Add button on the Main Screen when the Job Information is displayed.
The following Configure Backup Job will be displayed:
To create a new backup job, enter the Backup Job ID in the entry field at the top. The Job ID is used as unique identifier for this job, and may consist of any letters or numbers except for a colon (:) or space (spaces will be automatically replaced with an underscore).
Next, you must select an entry in the Server Name field (see below). Additional required fields include the Profile Name and the Clients to backup. All other settings will provide a default value. If you did not define the VG(s) or Zpools(s) to include (or all) in the backup profile, you may need to enter this information now.
Storix System Backup Administrator 42 Version 8.2 TSM Edition User Guide

Storix System Backup Administrator 43 Version 8.2 TSM Edition User Guide
More details on the various entries which follow are described below. Remember, you may use QuickHelp anywhere on this screen for specific instructions or information on a specific option.
When all selections are complete, press the Save button at the bottom of the screen to save the profile and clear the current selections.
Selecting the Server or Device Using the arrow button to the right of the Server Name field, you will get a pop-up list of all TSM servers and one addition entry “local (client tape)”. When selecting “local (client tape)” you may only select a single Client, and the Backup Device will be SBTAPE. Refer to Creating a Local System Backup below for more information.
If you select a TSM Server, you may select one or more clients to backup as part of the backup job, and the Device Name field will be disabled.
Selecting/Customizing the Backup Profile You must assign a backup profile to the job. The profile will determine the specific backup options which apply to the backup type. Refer to the Volume Groups to Include in the Backup Profiles section for additional information. After selecting a profile, the Volume Groups to Backup and User Backup Description fields will be filled in automatically from the profile information (if provided there). You may override the profile data by simply changing the information in those fields. This will not change the information in the original profile.
If you want to change any of the default backup settings from the profile, you may select the View/Customize button. This will display the profile options screen and allow you to make any changes that will apply only to this job. You may use this option, for instance, to turn on SBAdmin backup compression (thereby overriding the TSM compression) even though other jobs that use the same profile will be unaffected. You can also use this option, to change only the Incremental Backup Level so that all incremental backups, even those at different levels, can use a single backup profile.
Selecting Clients to Backup If you selected a TSM Server to backup to, you must make one or more selections from the Clients listbox. If you selected to backup to local tape, you may select only one client from the list. The selections will be displayed in the Name(s) entry field to indicate the order in which the client backups will be performed. If you want to change the order of the backups, just de-select and re-select the clients in the listbox until they appear in the desired order.
If you selected “local (disk/tape)” in the Server field, then you may only select one client from the list, since that client will be sending the backup to its own local tape drive.
Additional Options Answers to the following question buttons may be used to override the default actions taken during a backup:
• Delete job after running: This option is only available when a backup job has been configured to run “Later”, or once-only. If so, check this option to have the job configuration removed from the system upon completion of the backup job. This is useful if you are creating temporary backup jobs that are never to be used again.
• Perform snapshot backups: This option is only available if snapshot backups have been configured for one or more of the selected clients. By default, all backups are performed using the active (online) copy of a filesystem or logical volume (even when snapshot backups have been configured). To create snapshots of each logical volume before backing it up, check this button.

Storix System Backup Administrator 44 Version 8.2 TSM Edition User Guide
Refer to Snapshot Backups for details on the configuring filesystems and logical volumes to be backed up using offline mirror copies.
• Encrypt data: This option is only available if a Backup Data Encryption Feature license is installed and encryption support is enabled for all of the clients selected above. Refer to Enabling Encryption Support in the client configuration to add encryption support for a client. After selecting this button, the entry field to the right will become available. In this field, you must enter the encryption key ID which has been configured on the client. You may not save the job information with this option selected until you have entered the valid name of an encryption key for each selected client. For information on configuring encryption keys on the client, refer to Enabling Backup Data Encryption for a Client and the stkeys command.
• Use exclude list: This option is only available if there is at least one exclude list configured, which applies to at least one of the selected clients. If you select this button, indicating that you wish to use an exclude list, the arrow button to the right will be enabled. You may press the arrow button to select one or more exclude list name(s) to use, which will be shown in the box. Click outside the list to complete the selections. To perform the backup without excluding any data, simply un-check this button. Note that exclude lists are cumulative, meaning that you can select multiple lists, and the entries in all lists will be combined into a single list when the backup job is performed. Any entries (files, directories, or devices) that do not exist on one or more of the selected clients. If this is the case, that exclude list item will simply be ignored.
• Verify backup when complete: If you want to automatically verify a backup by re-reading the data from the TSM server once the backup completes, check this button.
Scheduling the Backup The Backup Schedule box to the right of the screen contains entry fields for backups that are to be scheduled. You need to indicate in the section when the backup should be performed:
1. Upon Demand - Selecting this option will save the job information but only run when you choose to do so manually. When selecting this option, all other options in this box will be disabled.
2. Later - The job will be run only once at a specified date and time. You will need to enter in the remaining fields a single date and time the backup should run.
3. Regularly - The job will be scheduled to run on a regular basis on specific days and times. You may enter multiple options in each of the date and time fields to have the backup run multiple days per week, only on certain days of the week, or even multiple times in a single day. When this option is selected, you may also press the Exceptions button to specify certain days, contrary to your backup schedule, on which the backup should NOT run. Refer to Configuring Backup Exceptions section for more details.
If you set the backup to run only "Upon Demand", all other fields in this section will be grayed out and no entries will be accepted. Otherwise, you must enter information into these fields indicating when the backup is to be run. The easiest way to enter the data into these fields is by pressing the arrow to the right of each field and selecting from the popup list.
If the backup is to run "Later", only one option may be selected from each list.
If the backup is to run "Regularly", more than one option may be selected in each field, and there will be an "all" option at the top of the Month and Day of Month fields, and an "any" option will appear for Days of Week field. Selecting "all" in both the month and day of month fields indicates the job should run on all days of all months. Select "any" for the day of week field to indicate that the job should run on any day of the week. Otherwise, the job will run only on the days of week indicated. Note that, if you make an entry in the

Days of Week field and the Days of Month field is not set to "all", then the job will be run on the specified days of the month only if they occur on the specified days of the week.
Creating a Local System Backup It’s possible to setup a backup job to perform a System Backup of a client to its own locally-attached tape drive. You must have previously configured a Tape for Local System Backup for the client before configuring a local System Backup Job.
To create a Local System Backup, select Configure->Backup Jobs. Enter a name in the Job ID field, then choose “local (client tape)� from the Server Name field.
After choosing “local (client tape)” you will Configure the Backup Job as usual, with the following exceptions:
1. Only System Backup profiles will be available for selection.
2. You may select only one client since the backup will be sent from the client to its own local media.
3. Only a device named SBTAPE (backup to local tape) will be available, and only if previously configured.
Refer to Tape for Local System Backup in the Client Configuration for more details on configuring local system backup media.
Changing a Backup Job To change information for an existing backup job, either:
1. Select Configure!Backup Jobs from the menu bar, then type or select the Job ID at the top of the screen.
Storix System Backup Administrator 45 Version 8.2 TSM Edition User Guide

Storix System Backup Administrator 46 Version 8.2 TSM Edition User Guide
2. If the Job Information is displayed on the Main Screen, select the icon for the job to change and press the Change button at the bottom of the screen.
The current job settings for the selected job will appear. Make all desired changes to the information on the screen, then press the Save button to save the changes clear the selections.
Copying a Backup Job To copy a configured backup job to a new job id, either:
1. Select Configure!Backup Jobs from the menu bar, then type or select the Job ID to copy at the top of the screen.
2. If the Job Information is displayed on the Main Screen, select the icon for the job to copy and press the Change button at the bottom of the screen.
The current job settings for the selected job will appear. Make all desired changes to the information on the screen and press the Copy button. You will be prompted with a new pop-up window for the job ID to copy the configuration to. After typing in the new job ID, press the Copy button and the job will be copied to the new job ID. Note that if you made changes to the options of the original job and did not save them, then these changes will only be applied to the new job ID.
Renaming a Backup Job To rename a configured backup job to a new job id, either:
1. Select Configure!Backup Jobs from the menu bar, then type or select the Job ID to rename at the top of the screen.
2. If the Job Information is displayed on the Main Screen, select the icon for the job to rename and press the Change button at the bottom of the screen.
The current job settings for the selected job will appear. Make all desired changes to the information on the screen and press the Rename button. You will be prompted with a new pop-up window for the job ID to rename the configuration as. After typing in the new job ID, press the Rename button and the job will be renamed as the new job ID. Note that if you made changes to the options of the original job and did not save them, then these changes will be applied to the new job ID.
Removing a Backup Job To remove a backup job, the job may not currently be in a job queue. A job will only be in a job queue if it is currently running, waiting to be run, has been placed on hold, or had previously failed.
To remove a backup job, either:
1. Select Configure!Backup Jobs from the menu bar, then type or select the Job ID at the top of the screen, then press the Remove button.
2. If the Job Information is displayed on the Main Screen, select the icon for the job to remove and press the Remove button at the bottom of the screen.
Running a Backup Job on Demand Any backup job, whether it is currently scheduled or not, may be run at any time. There are several ways to start a job running:

Storix System Backup Administrator 47 Version 8.2 TSM Edition User Guide
1. Select Configure!Backup Jobs or Actions!Run a Backup Job from the menu bar, then select the Job ID at the top o the screen and press the Run Now button.
2. If the Job Information is displayed on the Main Screen, select the icon for the job to run and press the Run button at the bottom of the screen.
3. If the job is currently at the top of a job queue but is not running because it had previously failed or was placed on hold, display the job queues on the Main Screen, select the queue in which the job is placed, and then press the Restart button.
For the first two options, "running" the job actually just places the job in the job queue. If there are no other jobs in the same queue, the job will start running immediately. If another job is running to the same device, this job will be placed in a “Pending” state until the prior job finishes. If a prior job had failed, it will remain in the queue and block other jobs from starting. The failed job must therefore be either restarted or removed from the queue to allow jobs behind it to start.
Adding a Job to the Queue from the Command Line Even if the SBAdmin Interface is not running, scheduled jobs will automatically be placed in the queue at their scheduled times, and the queues will be processed and jobs in each queue will be run on a first-come first-serve basis. It is also possible to manually add jobs to the queue without using the Backup Administrator interface. To add a job to the queue, refer to the stqueue command in the Commands Reference Guide.
Running a Backup Job from the Command Line It is possible to run a backup job from the command line, bypassing the job queues, by using the strunjob command (refer to the strunjob command in the Commands Reference Guide). The SBAdmin Interface need not be running. Note that the job will start immediately and may interfere with other jobs writing to the same devices since the queues are not used. If you wish to add the job to the queue from the command line, so that it will run only when the TSM server is available, refer to the section Adding a Job to the Queue from the Command Line.

12. Holidays There may be days of the year, even days of the month, that you don’t want any of your backup jobs to run. For instance, on holidays there may have been no activity on the system, and there may not be anyone available to insert new backup cartridges in the tape drive. You may schedule Backup Exceptions or “Holidays” from performing backups.
There are actually two ways to do this, on a job-by-job basis, or for all backup jobs. To set exceptions for all backup jobs, select Configure!Holidays from the menu bar. To set exceptions for a specific job, press the Exceptions button in the Backup Schedule section of the Job Configuration Screen. The respective screens will be displayed as follows:
In the first screen, you may enter one or more dates on which ALL backup jobs will be excluded from running. In the second screen, you may enter additional dates in the date fields that will be excluded for this job in addition to those excluded on global holidays. Since it may be cumbersome to enter the dates by hand, and since the dates may be dependent on the day of the week, it is useful to have a calendar handy. By pressing the calendar icon next to each date field, a calendar will appear such as the following:
If you press a specific date on the calendar, that date will be automatically inserted into the date field and this window will close. You may press either the <<PREV and NEXT>> buttons to change the calendar to the previous or next month and select a date from that calendar.
Storix System Backup Administrator 48 Version 8.2 TSM Edition User Guide

When using the SBAdmin Web Interface the screen presented will look slightly different. To add a holiday, simply click on the date from the calendar. The date will be added to the list on the right. Any dates appearing on the right are automatically saved. To remove a holiday, simply click the X next to the date.
In the Backup Schedule Exceptions (by job) window, the following options may also be selected:
1. Exclude GLOBAL holidays: This box is always checked by default, meaning that global holidays apply to this job as well. If you un-check this box, then the global holidays which apply to other jobs will not apply to this job, and the job will therefore run on those holidays if the job schedule permits. You may press the Define button next to this field to bring up the Global Holidays window and make changes to the global holidays if desired.
2. Exclude the fist day of every month: Since there may be a monthly backup set to run on the first day of the month, you may not need this job to run on the same day. If not, select this box, which is the same as adding the first day of every month in the date fields.
3. Exclude the last day of every month: Since there may be a monthly backup set to run on the last day of the month, you may not need this job to run on the same day. If not, select this box, which is the same as adding the last day of every month in the date fields.
When all selections and entries have been made, press the Save button to save the dates and options. The backup job (or jobs) will no longer run on the specified dates.
Storix System Backup Administrator 49 Version 8.2 TSM Edition User Guide

13. Snapshot Backups
Snapshot feature is available only for AIX systems running AIX 6.1 and later, for Linux data contained in LVM logical volumes, and Solaris data contained in ZFS datasets.
SBAdmin provides an option of creating a “point-in-time” backup of data contained in logical volumes and filesytems. This is typically referred to as a snapshot backup. Although the feature is available for AIX, Solaris and Linux systems, the internal process differs to some extent:
• For Linux, a LVM snapshot logical volume is created for each logical volume to be backed up. Snapshots may be created for any logical volume, whether or not it contains a filesystem. This snapshot LV is generally smaller than the original LV, but large enough to contain any changes which occur to the original logical volume for the duration of the backup.
• For AIX, snapshots are available only for logical volumes containing JFS2 (Extended JFS) filesystems. For AIX 6.1, only internal snapshots are supported (i.e. snapshots are recorded within the logical volume itself), and at AIX 6.2 and later, either internal or external snapshots may be used (external snapshots created a temporary snapshot logical volume similar to Linux snapshots described above).
• For Solaris, snapshots are available on ZFS filesystems and ZFS volumes. Snapshots may be created for any dataset, whether or not it contains a filesystem.
As the backup is performed, original data to be changed by another process is first copied to the snapshot device (or internal snapshot area for AIX 6.1), and the data from the snapshot device is backed up in place of the changed data. When the backup is complete, the snapshot is simply removed. Any process which reads or writes data to the original device (or filesystem within) during the backup will use the most up-to-date data, while the backup contains only the original data as it was when the backup began.
Enabling Snapshot Backups Snapshot backups are configured on each client a backup will be performed. On each client, you may specify each logical volume/ZFS dataset for which a snapshot is created, or you may indicate that all logical volumes/ZFS datasets will use snapshot backups, when possible.
Although logical volumes and filesystems may be configured to allow snapshot backups, a snapshot will not be created by default when a backup job is run. You must also select to Perform Snapshot Backup? from the job configuration screen before a snapshot backup will be performed.
To enable snapshot backups, select the following from the menu bar:
Configure!Snapshot Backups
The configuration screen will appear as in the following sample:
Storix System Backup Administrator 50 Version 8.2 TSM Edition User Guide

First, select the client for which to configure snapshots by pressing the arrow next to the Client name field. After doing so, a list of logical volumes/ZFS datasets on that system will be displayed in the second listbox.
You must either select the individual device for which snapshots may be created, or select “all”. If “all” is selected, snapshots will be permitted for all applicable devices.
Again, you must also select to Perform Snapshot Backup? from the job configuration screen before a snapshot of a logical volume or filesystem will be created.
The options which follow indicate the action the backup process should take when performing snapshot backups:
1. Size (%): For each logical volume (or for “all” if selected), indicate the size of the snapshot as a percentage of the original LV. The size needed will depend on the amount of data that is changed within the original LV while the backup is in progress. It is very important to create the snapshot large enough that it does not run out of space.
2. Chunk size (Kbytes): Use the arrow to the right of the entry field to list and select from a valid chunk size. Valid sizes are from 4 Kbytes to 1024 Kbytes (1 megabyte). A “chunk” is the unit in which the original logical volume will be divided when tracking changes to the LV when a snapshot is used. Each time a chunk is changed for the first time, the original chunk is copied to the snapshot LV in its entirety, then referred to instead of the original by the backup process. When determining the best chunk size to use, there is a trade-off: The larger the chunk, the fewer writes to the original LV it will take to fill up the snapshot LV (since larger chunks of data must be copied, even when only a small piece of data is changed). The smaller the chunk, the more individual copies must occur as the original data is changed, which may have a greater impact on system performance during the backup. The default of 64 Kbytes is sufficient for most purposes.
3. When backing up this client, create snapshots of filesystems:
Storix System Backup Administrator 51 Version 8.2 TSM Edition User Guide

Storix System Backup Administrator 52 Version 8.2 TSM Edition User Guide
a. One at a time (sequentially). Select this option if a snapshot should be created individually when the data in that logical volume (or filesystem) is to be backed up. When the backup of this LV completes, the snapshot is removed (resyncd). This option is recommended if there is no relational data between different logical volumes and filesystems that must be backed up at the same point-in-time.
Less disk space is required since only one snapshot LV is created at a time. For AIX 6.2 using internal snapshots, no separate logical volume is created, so the added space does not apply. But, in any case, when creating and removing snapshots one at a time, the snapshot exists for a lesser time, reducing the amount of data written to it, thereby decreasing the possibility of running out of space in the snapshot.
b. At the same time (concurrently). Select this option if a snapshot of all logical volumes to be included in a backup should be created at the same time. This is important if there is relational data between different logical volumes and filesystems that require that the data from all logical volumes be backed up from the same point-in-time. For the reasons described above, this option is not recommended if there is no relational data between different logical volumes.
4. If a snapshot cannot be created:
a. Use active filesystem. If this option is selected, then the failure to create a snapshot of the logical volume or filesystem will result in the backup using the original (online) copy without a snapshot. The result would be the same as if snapshot backups were not configured for this logical volume or filesystem.
b. Abort the backup. Select this option if the client backup should abort when a snapshot cannot be created. If concurrent snapshot backup is performed, all snapshots will be removed and the backup of the client will terminate, but the job will continue processing other client backups, if any. If sequential snapshot backups are performed, no snapshots will exist at this point, but there may have already been some data written to the backup media. Therefore, both the backup and job will terminate, preventing other backups from continuing to write to the backup media.
Possible issues preventing a logical volume or filesystem snapshot from being created include:
1 ) A snapshot LV already exists for the logical volume. Another snapshot backup may not have removed the snapshot due to a program failure, or another (non-SBAdmin) process may have created a snapshot LV.
2 ) There may not be enough space in the volume group to create the snapshot logical volume. If this is the case, you need to expand the volume group, remove other unused logical volumes, or select to create smaller snapshots using the Size (%) option.
When all selections have been made, press the Save button. The settings for the selected client will be saved and you may then select a different client for which to configure snapshot backups.
If you wish to remove prior settings for a client, select the Remove Settings button. If selected, the prior configuration will be removed and no backups performed on that client will use snapshot backups, even if the backup job configuration indicates that snapshots should be used.

14. Job Queues When jobs are run, they are actually placed in a job queue. A job queue will exist for each TSM Server. A queue will also appear for any client backups performed to local tape.
Jobs sent to a TSM server will run concurrently. However, the number of concurrent backups to a server may be limited by the maximum number of Concurrent Backups setting. If exceeded, remaining jobs will be placed in a “pending” state until other backup jobs complete.
Jobs sent to a local tape device will always run sequentially to prevent device conflicts. Although it would be unusual to have more than one system backup scheduled for a single client at the same time.
The Job Queue Display Job queues may only be displayed or manipulated from the Main Screen. The following is an example of the Job Queue Display, which may be shown by selecting Display!Job Queues from the menu bar or simply the View Queues button on the status bar:
The left-most display area contains the names of the job queues for which at least one job exists. If there are no jobs either running or stopped in a queue, the queue will not be displayed. The name of the queue is the same as the name of the TSM server with TSM@ prefix, and local client backups will show the client name followed by the tape device name (SBTAPE). To display the jobs within a queue, select the icon corresponding to the desired queue. When doing so, the selected queue will be highlighted in and the jobs in that queue will be listed in the center display area.
The center area contains the jobs currently in the queue. The jobs are placed, and will be run, in the order they were added to the queue. To show a summary of the job information for a job, click on the icon corresponding to the Job ID. The job information will appear in the display area to the right and the selected job icon will be highlighted.
The status bar at the bottom also shows the status of jobs in the queue. If the Running light is green, at least one backup job is currently running. The Pending light displays yellow if there are queued jobs that have not yet run because they are waiting on another job or for the server to become available. And the Failed (red) light aluminates if there is a failed job in the queue (usually preventing other jobs from running).
The action buttons at the bottom of the screen will apply to the selected queue or selected job.
Storix System Backup Administrator 53 Version 8.2 TSM Edition User Guide

Icons on the Job Queue Display The icons for the queues and jobs display a symbol representing the status of the queue or job. The following is a list of possible status icons that may appear:
A queue in which a job is currently running
A queue in which a job has failed (click on queue and job icons to see why)
A job that is currently running
A pending job (waiting for a prior job to complete)
A job that has failed (click on icon to display job information)
A job placed on hold by the user
Job is waiting for a server to become available before starting
The status of a queue or queued job is checked every few seconds and the icons are automatically updated with the new status, if changed. When a job has completed successfully, the icon for the job is removed from the screen. Once the last job in a queue has completed successfully, the queue icon is also removed from the screen.
Monitoring Backups By selecting a backup job on the Main Screen and then pressing the Show Status/Output button at the bottom of the screen, you can view the backup in progress, or information about a failed backup.
The Backup Status Screen A detailed status report of a job that is currently running, or one which has failed may be displayed at any time by pressing the Status Report button at the bottom of the Job Queue Display. The status screen for the currently selected job will be displayed such as the following example:
The Job ID and Server are shown at the top of the screen. The middle section will contain a set of boxes for each client in the job. The corresponding client is indicated in the button at the far left. The additional fields and buttons on the screen correspond to the client selected. Select a client button to display the progress bar, time and performance information, or backup output (using the additional button) for a particular client.
Next to each client button is a list of values, indicating the approximate progress of the backup. This shows the estimated time and size of the backup, the actual time elapsed and amount of data written so far, and
Storix System Backup Administrator 54 Version 8.2 TSM Edition User Guide

the remaining time and data to be written. Note that these values apply to each corresponding client. If a client backup has not yet started, its progress values will not be shown.
The progress bar is seen below the client information and shows a graphical representation of the percent of the backup that has completed. Again, this applies only to the selected client backup. To view the status bar for a different client backup, press the desired client button.
At the bottom of the status screen are more buttons for displaying additional information:
• The Show Output button is described in the Backup Output Display section below. This applies only to the backup of the selected client.
• The Show Label button will allow you to view the current contents of the media label, which will include only those client backups that have completed, as well as any prior jobs written to the same media, if any. Refer to the Backup Labels section for a sample and information on the label contents.
• The Print/Send button will allow you to send a report to the printer with the contents of this window as well as the Backup Output Display for all clients assigned to this job.
• The Show Verify Status button will only appear if you selected to automatically verify the backup data when the backup completed in the job settings. If the verify was performed, or is in progress, the verify progress is already shown, and the button will appear as Show Backup Status instead. When selected, the progress bar will change from Backup progress to Verify status, and vice-versa, and the corresponding progress values will be displayed in the section above. If the option to automatically verify the backup was not selected with configuring the backup job, this button will not be shown.
Use the cancel button on the lower right corner to close this window. The information will continue to be updated and may be redisplayed at any time, even after the backup job has completed.
The Backup Output Display The Show Output button on the bottom left corner of the status report screen will display the backup messages for the selected client. These might include status messages, warnings or error messages. Any time a backup job fails after the backup begins, this is the button you would use to find out why. The following is a sample output screen:
Storix System Backup Administrator 55 Version 8.2 TSM Edition User Guide

Scrollbars are provided to the right of each display panel in case the output exceeds the size of the panel. The Job ID, Server and Client are shown at the top of the screen. To view the backup output for a different client, select the desired client button on the status report screen. You may press the cancel button at the bottom to close this window. It may be redisplayed at any time, even after the backup has completed.
Using the SBAdmin Web Interface the Backup Status Screen and backup output messages are combined into a single screen as shown below:
Storix System Backup Administrator 56 Version 8.2 TSM Edition User Guide

The Job Message Screen Since many jobs run automatically after being scheduled to run at a certain date and time, there may not always be a person watching the screen when a job is started. Therefore, as jobs are run, the queuing system keeps an updated list of messages on the screen, showing which jobs have run, which have completed, and which jobs have failed (and why).
The Job Message screen will only appear if the SBAdmin user interface is running. If not, messages are logged and can be displayed the next time SBAdmin is started. Refer to the Backup Status Notification section for more information.
The following is an example of this job status message screen:
Storix System Backup Administrator 57 Version 8.2 TSM Edition User Guide

A scrollbar is provided to the right to scroll up and down the messages. This screen may only be displayed if the Backup Administrator application is running. When you Close this window, the messages will be removed from the log and cannot be displayed again.
If a job completes successfully, or if it fails after having begun the backup, a Label button will appear within the text of the message. By pressing this button, the media label will be displayed, which provides a summary of the contents of the media, both for the current job and any prior jobs, if any. Refer to the Backup Labels section for a sample and information on the label contents.
This window appears each time a new message is posted. Once the window is closed using the Cancel button, it will not be possible to view the previous message contents.
Manipulating Backup Jobs To change the status of a job in the queue, you must select the queue and job on the Job Queue Display screen. The action buttons at the bottom of the screen under the Queue Actions and Active Job headings then apply to the selected jobs. The following functions may be performed:
Kill a Running Job Jobs that are currently running may be killed, or canceled, by selecting the Kill Job button from the Main Screen when the Job Queues are displayed. A signal is sent to the job telling it to terminate. Depending on the current backup operation being performed, this may take a little time. Once the job has been killed, a message will appear on the Job Message Screen indicating that the backup has been terminated.
A backup job which was killed may have already created a Backup Label. If so, the label will indicate any client backups that have already completed, and will show the backup job status as failed. If no backup completed, you may want to remove the label at this time. To do so, display the label either by selecting the Label button in the Job Message Screen or the Backup Status Screen.
Place a Job on Hold A job which is currently in the pending state may be placed on hold by pressing the Hold Job button from the Main Screen when the Job Queues are displayed. When a job is placed on hold, it will not run when any prior backups complete, but will remain in the queue waiting to be manually started.
Storix System Backup Administrator 58 Version 8.2 TSM Edition User Guide

Restart a Job A job which is either on hold, had previously failed, or had been killed, may be started, or restarted, by pressing the Restart button from the Main Screen when the Job Queues are displayed. Jobs that are restarted after they have failed or had been killed will restart from the beginning of the job, even if one or more of the client backups had completed.
Remove a Job from the Queue Any job, except a running job, may be removed from the queue by pressing the Remove Job button from the Main Screen when the Job Queues are displayed. After doing so, the selected job is removed from the queue and its icon will disappear. If this was the last remaining job in the queue, the queue icon will disappear as well.
Removing a job from the queue does not delete the job itself. The job will remain on file and can be scheduled or run manually at another time.
Show Status/Output You can display the Backup Status Screen for the selected job by pressing the Show Status/Output button. Here you will see the progress indicator for the job. On that screen you can select a client to display, then press the Show Output button to display the Backup Output Display for the backup for the specified client.
Storix System Backup Administrator 59 Version 8.2 TSM Edition User Guide

15. Backup Labels A backup label is generated for each backup that is started at the beginning of a tape as well as for any backups stored to TSM servers. These labels are used to keep track of the contents of the backup for use when verifying or restoring data at a later time. The backup label contains a summary of the contents of the backup media, which may include multiple client backups within each job. Also, for each backup, status information is recorded, including the backup time, size of the backup and the output of the backup commands. This backup information is kept on file for as long as the backup label is also available.
Note that, for backups to local tape, the backup media may contain multiple tape volumes. If a new backup job is appended to an existing backup tape, that backup information is appended to the same backup label.
Backup labels are not the same as Tape Labels. A tape label is a unique identifier assigned to each individual tape, allowing the backup label information to be obtained given a tape label ID. The tape label IDs for tapes used within a backup are also shown in the backup label. Note, however, that tape labels must be placed on the tape before they are used in a backup. Refer to the option Write a Tape Label ID to a Tape in the Utilities section for details on tape labels
The following is an example of a backup label for a job written to a TSM Server containing multiple client backups:
The Backup ID appears at the top. This ID is a unique identifier generated automatically for each label and is also stored on the backup media itself. This way, it is possible to read the Backup ID from the backup media and reference its contents in the label information. Also at the top of the label is the date the label was first created, and the server the backups were written to.
If the backup was to local tape, the Tape Label ID for each volume is shown at the bottom of the label. The tape label IDs will only be shown in the backup label if a previous backup containing tape labels overwritten by this backup, or if the option Write a Tape Label ID to Tape was used prior to writing this set of backups.
Use the Print button to send a copy of the backup label to the printer. You will always know the contents of the tape without reading it if you have a copy of the label with each backup tape.
The Expire/Remove button is used to expire, or remove, the backup label from the system. This should be done only when the tape will be discarded or reused. Refer to Expiring a Backup Label below for details.
Storix System Backup Administrator 60 Version 8.2 TSM Edition User Guide
Automatically Printing Backup Labels After a backup job completes, the backup label created or associated with that job may be automatically sent to any printer queue configured on the admin system. This may be accomplished by setting an option in the Backup Profile configuration for the profile assigned to the job. Note that you must have configured the printer queue before using this option.
To print backup labels upon completion of a backup job, follow these steps:
1. Select Configure!Backup Profiles from the menu bar.
2. Select the profile name to change, then press the Save button.
3. For Print Backup Label upon completion, press the button to indicate “Yes”.
4. Next to the Print queue field, press the down-arrow button to list and select a printer queue.
If you want to print only the backup labels for certain backup jobs, you may also customize the backup profile for a job instead of setting a printer queue for all jobs using the profile. Refer to Selecting/Customizing a Backup Profile in the Job Configuration section for details.
View Backup Labels Because it is often desirable to view a backup label, there are many places within the application where the backup label may be displayed:
1. A label for any completed backup may be displayed at any time by selecting View!Backup Labels from the menu bar on the Main Screen. Since there are many ways to search for the desired label, this option is explained in detail below.
2. When a backup completes or fails, a message is displayed in the job message screen. If this screen is not already visible, it will be displayed automatically any time a job message is posted. If the backup job completed successfully or failed after the backup had started, a Label button will appear on the message screen. When pressed, the label is displayed on the screen.
3. When displaying status of a backup that has completed or is still in progress, a Show Label button is provided at the bottom of the status report screen. By pressing this button, the label for the media on which the backup is being placed is displayed. In this case, the label will not contain information for backups that are still running.
4. When displaying the status of a job that is being verified or a backup that is being restored, a Show Label button is provided at the bottom of the status report screen. By pressing this button, the label for the media being read is displayed.
A history of backup labels is stored on the admin system, and may be displayed by selecting View!Backup Labels from the main menu bar. Several options are available for finding the backup label you want to display:
View by Backup ID Select View!Backup Labels!By Backup ID from the menu bar. A list of all labels will be displayed as shown below:
Storix System Backup Administrator 61 Version 8.2 TSM Edition User Guide

This list could become very lengthy if there are a lot of labels on file. To display the detailed label information, click on the button to the left of the desired Backup ID.
View by Tape Label ID To display the backup label in which a physical tape was used, select View!Backup Labels!By Tape Label ID from the menu bar. A list of tape labels currently associated with backup labels is displayed. Only tape labels for which the tape ID was written to the tape prior to its use within a backup will be shown.
View by Server Select View!Backup Labels!By Server from the menu bar. A list of servers is displayed. Note that, if you performed a client backup to local tape, the client would be considered the server. Backups to TSM servers will be shown with the “TSM@” prefix. Select a server from the list to continue. Once you do so, a list of backups for the selected server is displayed, as shown below:
Note that the color of the button represents whether the backup was successful (green) or failed (red). A yellow button indicates that the job completed successfully, but with warning messages. The Job ID, date and time, and a list of clients on the media are displayed for each label in the list. To display a label, click the button next to the Backup ID. The label will be displayed (see above). If you want to return to the server and device display screen, press the Go Back button. Otherwise press the cancel button to close this window.
Storix System Backup Administrator 62 Version 8.2 TSM Edition User Guide

View by Job ID Select View!Backup Labels!By Job ID from the main menu bar if you want to select the label to display from a list of Job IDs. The following screen will be displayed:
Select the desired job. An additional list will display, showing the dates the job has been run:
Note that the color of the button represents whether the backup was successful (green) or failed (red). The Job ID, date and time, and a list of clients on the media are displayed for each label in the list. To display a label, select a specific run date from the list. The label will be displayed (see above). If you want to return to the job display screen to select a different job, press the Go Back button. Otherwise press the cancel button to close this window.
View by Client Select View!Backup Labels!By Client from the main menu bar if you want to select the label to display from a list of backups performed by client. This option is particularly useful if you want to know the last time a certain client or a certain volume group on the client was backed up. After selecting this option, a list of clients and each volume group backed up from the client is displayed similar to the following example:
Storix System Backup Administrator 63 Version 8.2 TSM Edition User Guide

Select the button next to the client and volume group you wish to display. An additional list of specific backup dates for the selected client and backup data (i.e., volume groups, zpools) will be shown:
Note that the color of the button represents whether the backup was successful (green) or failed (red). The Job ID, date and time, and a list of clients on the media are displayed for each label in the list. To display a label, select a specific run date from the list. The label will be displayed (see above). If you want to return to the client list to select a different client, press the Go Back. Otherwise press the cancel button to close this window.
Read from Server This option may also be used to view the backup label associated with a TSM backup on the server. Since it reads the backup label IDs from the server, it may also be used to rebuild the backup label on the admin system if it was previously expired (and the backup on the TSM server was not removed).
To do so, follow these steps:
1. Select View!Backup Labels!Read from Server from the menu bar. A window similar to the following will display:
Storix System Backup Administrator 64 Version 8.2 TSM Edition User Guide

2. Use the arrow button to select a Server name. If you want to read a backup label from a backup performed to a client’s local tape drive, select the “local (client tape)” option at the top of the list. In this case, the Original Client (owner) field will change to Client Name, and a new field, Device Name will appear.
3. If you selected a TSM Server, use the arrow button to select the Original Client (owner). All backups are stored on the server in a TSM filespace specific to each client, so you must know the original client (node) the backup was created for.
4. If you selected local (client tape) in the Server name field, you must select the Client Name and the Device Name (SBTAPE) from which to read the backup in the fields provided.
5. Press the Select button next to the Backup ID field to display a list of backup images on the server for the client. If the icon next to the label is yellow, this indicates that there is no backup Label ID on the admin system for that backup. Select a backup image from the list to read.
6. Select the Read Label button.
The backup is read and the label information will be displayed if it exists.
If the label information for the backup is not found on the admin system, an error message will appear. This indicates that the label was expired, so no detailed information on the tape contents is available. Normally, the backup is removed from the TSM server when a backup is expired. Sometimes, however, the label may have been accidentally deleted from the admin system. If this is the case, you will need to rebuild the backup label. Refer to Rebuild (unexpire) a Backup Label for more information.
Expiring a Backup TSM backups may become obsolete and need to be occasionally removed to free space on the server. This is referred to as "expiring" a backup. When backups are no longer valid it is necessary to get rid of the backup label and backup status information.
By default, the Backup Retention Policy prevents TSM backups and backup tapes associated with a current backup label from being overwritten by new backup jobs. When a backup is expired, the label information is destroyed and the backup is removed from the server. In the case of tapes, the tape is not affected, but may be overwritten by a new backup. For TSM server backups, the overwrite policy determines if backup jobs should overwrite an existing backup or create an additional backup on the server. For tape backups, the overwrite backup determines whether a tape containing a current backup label may be overwritten.
If a local tape backup has been expired or the label history has been inadvertently removed from the system, it is still possible to rebuild this information. Refer to Rebuild (unexpire) a Backup Label.
Very important note: If you expire a backup from the TSM server, the actual backup will be removed from the TSM server. You are given ample warning before the backup is removed, and once it has been remove it will no longer be possible to access that data.
Storix System Backup Administrator 65 Version 8.2 TSM Edition User Guide

Storix System Backup Administrator 66 Version 8.2 TSM Edition User Guide
Manually Expiring a Backup To manually expire a backup, first perform any one of the various methods to view the backup label. Then select the Expire/Remove button at the bottom of the screen.
Automatic Expiration of Backups The Backup Retention Policies determines if and when an old backup may be overwritten by a new backup. Any time an old backup is overwritten by a new one, the previous backup label must be expired as the data the label points to will no longer exist.
For tape backups, if the Tape Overwrite/Retention Policy has been set to allow current labels to be overwritten by new backup jobs, the backup being overwritten will be automatically expired, allowing the tape to be overwritten by a new backup.
For TSM backups, expiration of the backup label also means removing the actual backup image files from the server. The TSM Backup Retention Policy determines when a prior backup can be automatically expired.
The TSM retention policy only applies when writing a new backup using the same backup job. When this occurs, the policy may allow:
1. no backups to be expired, removed or overwritten without manual expiration.
2. automatic expiration of backups using the same job that are older than a certain number of days
3. expiration of a backup only if there are a minimum number of un-expired backups of the same job remaining.

16. Backup Job Status & Output History The job status and backup output, which may be displayed while a backup is running, is kept on file as long as the backup label for the job exists. Therefore, it is possible to view this information long after the backup has completed. The screens which appear are identical to those that may be displayed while the backup job is running, as shown in the following sample screens:
The following is the Backup Status Report Screen which may appear by selecting one of the following:
1. Select the Show Status/Output button on the Job Queues Display
2. Select the Status/Output button on the Job Information Display
3. Selecting View!Backup Status/Output from the menu bar (as described throughout this section)
The following is the Backup Output Display which is displayed when the Show Output button is pressed on the Backup Status Report screen above:
Storix System Backup Administrator 67 Version 8.2 TSM Edition User Guide

The desired job status for completed (or failed) jobs may be obtained in each of the following ways:
View by Server Select View!Backup Status/Output!By Server from the menu bar. A list of servers is displayed as with the same screen which appears when selecting to View Backup Labels by Server.
Select the server from the list by clicking on the button to the left. Once you do so, a list of backups performed to the selected server is displayed, as in the example View Backup labels by Server.
Note that the color of the button represents whether the backup was successful (green) or failed (red). The Job ID, date and time, and a list of clients on the media are displayed for each label in the list. To display the Backup Status Report, select a specific run date from the list. If you want to return to the server list to select a different server, press the Go Back. Otherwise press the cancel button to close this window.
To show the Backup Output Display, select the Show Output button on the status report screen.
View by Job ID Select View!Job Status/Output!By Job ID from the main menu bar if you want to select the backup status to display from a list of Job Ids. After selecting this option, a list of configured Jobs and corresponding job information is displayed similar to the screen shown when you select to View Backup Labels by Job ID.
Select the desired job. An additional list will display, showing the dates the job has been run, as seen in the display View Backup Labels by Job ID.
Note that the color of the button represents whether the backup was successful (green) or failed (red). The Job ID, date and time, and a list of clients on the media are displayed for each label in the list. To display
Storix System Backup Administrator 68 Version 8.2 TSM Edition User Guide

Storix System Backup Administrator 69 Version 8.2 TSM Edition User Guide
the Backup Status Report, select a specific run date from the list. If you want to return to the job display screen to select a different job, press the Go Back button. Otherwise press the cancel button to close this window.
To show the Backup Output Display, select the Show Output button on the status report screen.
View by Client Select View!Job Stauts/Output!By Client from the main menu bar if you want to select the job to display from a list of backups performed by client. After selecting this option, a list of clients and each backup type that the client has performed is displayed similar to the example when you select to View Backup labels by Client.
Select the button next to the client and backup type you wish to display. An additional list of specific backup dates for the selected client and backup data will be shown, as seen in View Backup Labels by Client.
Note that the color of the button represents whether the backup was successful (green) or failed (red). The Job ID, date and time, and a list of clients on the media are displayed for each label in the list. To display the Backup Status Report, select a specific run date from the list.
Note that the display will include all client backups in the job, not just the selected client. The selected client button on the status screen will be automatically selected, however, so you can show the Backup Output Display for the client by pressing the Show Output button.
If you want to return to the client list to select a different client, press the Go Back. Otherwise press the cancel button to close this window.

17. Verify a Backup After a backup job has complete, it is often a good precaution to verify the backup to ensure the data on the backup media is complete and readable. The verify process reads all of the data on the backups and verifies it is in the correct format. The backup job may have included multiple clients.
If you selected to automatically Verify Backups When Complete within the Backup Job configuration, then the backup data was verified at that time, and it is generally not necessary to verify again. However, if you do not auto-verify as part of the backup process, you may do so at a later time by following the steps in this section.
Selecting The Data to Verify To verify a backup job, perform the following steps:
1. Select Actions!Verify Backup Jobs from the menu bar. A window similar to the following will appear:
2. Use the arrow button to select a Server name. If you want to verify a backup performed to a client’s local tape drive, select the “local (client tape)” option at the top of the list. In this case, the Original Client (owner) field will change to Client Name, and a new field, Device Name will appear.
3. If you selected a TSM Server, use the arrow button to select the Original Client (owner). All backups are stored on the server in a TSM filespace specific to each client, so you must therefore know the original client (node) the backup was created for. In this case, any client that was part of the backup job to be verified will be sufficient, since we need to list the Backup IDs which that client is part of.
4. If you selected local (client tape) in the Server name field, you must select the Client Name and the Device Name (SBTAPE) from which to read the backup in the fields provided.
5. Press the Select button next to the Backup ID field. You will be provided a list of backup jobs on the server in which the client is included, similar to the following example:
Storix System Backup Administrator 70 Version 8.2 TSM Edition User Guide

Select the specific backup job to verify by clicking on the button to the left of the desired job.
5. Next, if there are multiple backups (clients) in the job, another screen will appear with a list of backups to select from. The information about the backup will be preceded by the backup sequence number, starting with 1 and ending with the last backup (client) on the media.
The following is a sample of this screen:
You may select any one or more backups to verify by clicking on the button to the left of the desired selection and a checkmark will appear in the button. If you wish to de-select an option, simply click the button again and the checkmark will disappear. When all selections have been made, click the Continue button at the bottom of the screen.
The selected Backup ID and Backup Seq#(s) will appear on the Verify Data from a Backup screen. From this screen, press the Begin Verify button to start reading the backups.
Displaying the Status and Output of the Verify After performing the steps above, the verify will begin and the verify status report screen, as shown below, will appear automatically. Listed on the screen will be a status line for each of the backup(s) previously selected. Information pertaining to the progress and performance of the verify will be updated for each line as the corresponding backup is being read.
Storix System Backup Administrator 71 Version 8.2 TSM Edition User Guide

Note that this screen may not be closed as long as the verify is running. It will remain on the screen after the verify completes until it is closed by the user. Once the screen is closed, the verify status and output messages may not be redisplayed.
To view the output of the verification of a particular backup, first select the Client button, then press the Show Output button at the bottom of the screen. An output screen similar to the following will then appear, showing the status of the verify:
A complete list of files on the backup will be displayed as each file is read. This screen may be closed and redisplayed at any time, even after the verify completes, as long as the Verify Status Report screen has not been closed.
In addition to the job output, summary information for the selected backup may be displayed by selecting the Client button, then pressing the Backup Info button. A screen similar to the following example will appear:
Storix System Backup Administrator 72 Version 8.2 TSM Edition User Guide

Simply press the Dismiss button to close this window.
Storix System Backup Administrator 73 Version 8.2 TSM Edition User Guide

18. Recreate Volume Groups, Logical Volumes or Filesystems
The options described in this chapter are supported for AIX systems only. Due to the complexity of Linux and Solaris configurations, allowing creation of devices onto other devices (i.e. meta-disks on logical volumes or ZFS volumes on slices, etc), this features is not available for Linux or Solaris at this time.
When to Use These Options Due to various system problems, it may be necessary to recreate a filesystem or even an entire volume group that had to be removed from the system due to a failed disk drive or other problem. Since changes frequently occur to the system configuration, such as the expansion of filesystems, and moving or striping of logical volumes across disks, it is often not known the proper sizes and locations of the logical volumes and filesystems needed to restore the data properly. However, this information is stored on the backup media and can provide an automated way of recreating the volume groups, logical volumes and filesystems exactly as they were previously without prior knowledge.
Use one of these options to recreate the volume groups, logical volumes and/or filesystems into which you will later restore the data using the option Restore Data from a Backup.
It is sometimes also desirable to replicate a volume group configuration from one system onto another. This option will allow you to use the information stored on a backup to create or recreate volume groups, filesystems or logical volumes on another system, while changing the locations and sizes of the filesystems and logical volumes to accommodate the new system.
In addition, a volume group or logical volume may be recreated on the same system from which it originated, even if the original volume group or logical volume still exists. This is handy for being able to restore prior data to the system and still keep the current copy available. This is accomplished by assigning a different volume group or logical volume name(s) to the new volume group or logical volumes created.
Important: This is the only option in the SBAdmin Interface that must run a user interface on the client (although the client system need not have a graphical display). In order to have the user interface (which is running on the client) display on the admin system, the client must have AIXwindows installed. If AIXwindows cannot be found on the client, an appropriate message will be displayed and you may not continue. You must either install AIXwindows on the client or rebuild the volume groups, logical volumes or filesystems manually on the client.
Recreate Volume Groups To recreate volume groups, you must have an accessible a System Backup containing the desired volume groups you wish to create.
To recreate a volume group, perform the following steps:
1. Select Actions"Recreate Volume Groups from the menu bar. A screen similar to the following will display:
Storix System Backup Administrator 74 Version 8.2 TSM Edition User Guide

2. Use the arrow button to select a Server name. If you want to use a backup performed to a client’s local tape drive, select the “local (client tape)” option at the top of the list. In this case, the Original Client (owner) field will change to Client Name, and a new field, Device Name will appear.
3. If you selected a TSM Server, use the arrow button to select the Original Client (owner). All backups are stored on the server in a TSM filespace specific to each client, so you must know the original client (node) the backup was created for.
4. If you selected local (client tape) in the Server name field, you must select the Client Name and the Device Name (SBTAPE) from which to read the backup in the fields provided.
5. Press the Select button next to the Backup ID field. You will be provided a list of backup jobs on the server in which the client is included, similar to the following example:
Select the specific backup job to read by clicking on the button to the left of the desired job.
6. Next, if there are multiple backup on the media, another screen will appear with a list of backups to select from. This list will contain all of the backups within the selected job. The information about the backup will be preceded by the backup sequence number, starting with 1 and ending with the last backup (client) on the media.
The following is a sample of this screen:
Storix System Backup Administrator 75 Version 8.2 TSM Edition User Guide

You may select the backup from which to recreate the VG by clicking on the button to the left of the desired selection and a checkmark will appear in the button. Only one selection may be made. If you select a different option, the checkmark will be removed from the previous selection. After making your selection, click the Continue button at the bottom of the screen.
6. You will be returned to the previous window, where you must select each of the following:
Client on which to create - This field will show the original client from which the backup was made. The backup information may be used to create the volume group(s) on a different client by selecting the arrow button to the right of this field and selecting a different client from the list.
Volume Group(s) to create - To list and select the volume group(s) that are defined on the backup and select one or more to create from the list, select the arrow next to this field. You must select at least one volume group to continue.
7. When all selections have been made, press the Begin Remake button at the bottom of the screen. A new screen similar to the following will appear and the LVM data on the media will be retrieved and checked for consistency with the current system configuration:
If there are changes required to make the selected volume group fit onto the current system, the Edit and Fix buttons will become available. If there are no problems found, the Create button will be available.
a. The Check button may be used to check the LVM information again. This is automatically performed when you initially display this screen and any time you change the volume group, logical volume or filesystem information.
b. The Edit button may be used to change any of the volume group, logical volume or filesystem information defined on the backup in order to make the volume group conform to the current
Storix System Backup Administrator 76 Version 8.2 TSM Edition User Guide

system configuration. This may include changing the volume group or logical volume names, selecting different disks on which to build the volume group, etc. This editing process is identical to that which is available during a system installation, and is described in detail in the section Change the Volume Group, Logical Volume and Filesystem Information in the SBAdmin AIX System Recovery Guide. After following the instructions in that section, press the ESC (escape) key on that screen to exit and save changes.
c. The Fix button may be used if there were non-fatal errors that can be automatically repaired. For instance, if there is only one physical volume available, and a logical volume is striped, the striping would need to be turned off to create the logical volume as this required at least two physical volumes. The errors described in the messages section of the window indicate if and what changes would automatically be made if the Fix button is selected.
d. The Create button will become available only after all errors, both fatal and non-fatal, have been fixed (either using the Fix button or by editing the volume group, logical volume or filesystem information using the Edit button). When you select this button, the volume group and all of its logical volumes and filesystems will be created as defined and the messages will be updated to reflect the progress and completion of the process as follows:
Recreate Logical Volumes or Filesystems To recreate logical volumes or filesystems, you must have accessible a System, Volume Group, Logical Volume or Filesystem Backup containing the desired logical volumes or filesystems you with to create.
To recreate a logical volume or filesystem, perform the following steps:
1. Select Actions!Recreate Logical Volumes or Filesystems from the menu bar. A screen similar to the following will display:
Storix System Backup Administrator 77 Version 8.2 TSM Edition User Guide

2. Use the arrow button to select a Server name. If you want to use a backup performed to a client’s local tape drive, select the “local (client tape)” option at the top of the list. In this case, the Original Client (owner) field will change to Client Name, and a new field, Device Name will appear.
3. If you selected a TSM Server, use the arrow button to select the Original Client (owner). All backups are stored on the server in a TSM filespace specific to each client, so you must know the original client (node) the backup was created for. In this case, any client that was part of the backup job to be verified will be sufficient, since we need to list the Backup IDs which that client is part of.
4. If you selected local (client tape) in the Server name field, you must select the Client Name and the Device Name (BTAPE) from which to read the backup in the fields provided.
5. Press the Select button next to the Backup ID field. You will be provided a list of backup jobs on the server in which the client is included, similar to the following example:
Select the specific backup job to read by clicking on the button to the left of the desired job.
6. Next, if there are multiple backup on the media, another screen will appear with a list of backups to select from. For TSM backups, this list will contain all of the backups within the selected job. For tape backups, there may be multiple jobs on the media. In this case, the list will contain all of the backups, even those from different jobs. The information about the backup will be preceded by the backup sequence number, starting with 1 and ending with the last backup on the media.
The following is a sample of this screen:
You may select the backup from which to recreate the LV or filesystem by clicking on the button to the left of the desired selection and a checkmark will appear in the button. Only one selection may be
Storix System Backup Administrator 78 Version 8.2 TSM Edition User Guide

made. If you select a different option, the checkmark will be removed from the previous selection. After making your selection, click the Continue button at the bottom of the screen.
7. You will be returned to the previous window, where you must select each of the following:
Client on which to create - This field will show the original client from which the backup was made. The backup information may be used to create the logical volumes and filesystems on a different client by selecting the arrow button to the right of this field and selecting a different client from the list.
Logical Volume(s) to create - To list and select the logical volume(s) (and filesystems) that are defined on the backup and select one or more to create from the list, select the arrow next to this field. You must select at least one logical volume to continue.
8. When all selections have been made, press the Continue button at the bottom of the screen. A new screen similar to the following will appear and the LVM data on the media will be retrieved and checked for consistency with the current system configuration:
If there are changes required to make the selected volume group fit onto the current system, the Edit and Fix buttons will become available. If there are no problems found, the Create button will be available.
a. The Check button may be used to check the LVM information again. This is automatically performed when you initially display this screen and any time you change the volume group, logical volume or filesystem information.
b. The Edit button may be used to change any of the volume group, logical volume or filesystem information defined on the backup in order to make the volume group conform to the current system configuration. This may include changing the volume group or logical volume names, selecting different disks on which to build the volume group, etc. This editing process is identical to that which is available during a system installation, and is described in detail in the section Change the Volume Group, Logical Volume and Filesystem Information in the SBAdmin AIX System Recovery Guide. After following the instructions in that section, press the ESC (escape) key on that screen to exit and save changes.
c. The Fix button may be used if there were non-fatal errors that can be automatically repaired. For instance, if there is only one physical volume available, and a logical volume is striped, the striping would need to be turned off to create the logical volume as this required at least two physical volumes. The errors described in the messages section of the window indicate if and what changes would automatically be made if the Fix button is selected.
d. The Create button will become available only after all errors, both fatal and non-fatal, have been fixed (either using the Fix button or by editing the volume group, logical volume or filesystem information using the Edit button). When you select this button, the volume group and all of its logical volumes and filesystems will be created as defined and the messages will be updated to reflect the progress and completion of the process as follows:
Storix System Backup Administrator 79 Version 8.2 TSM Edition User Guide

Storix System Backup Administrator 80 Version 8.2 TSM Edition User Guide

19. Restore Data from a Backup Data may be restored from a TSM server to any client using the SBAdmin Interface. A backup taken from one client may also be restored to another client, unless, for security reasons, you chose (in the backup profile) not to allow only the Original Client (owner) to read the backup in the TSM Backup Read Permission field.
Any type of data contained on a backup may be restored. A System Backup, for instance, may contain multiple volume groups, each of which may contain raw logical volumes and filesystems, each of which may contain various directories, which each contain multiple files. It is therefore possible to restore one or more files, directories, logical volumes, filesystems, volume groups, or the entire system from a System Backup!
Restoring data from a System Backup is not the same as reinstalling a client from a System Backup. This is a different process which is described in detail in the section Installing from a System Backup in the SBAdmin System Recovery Guide.
Selecting the Backup to Restore From To restore data from a backup, perform the following steps:
1. Select Actions"Restore Data from a Backup from the menu bar. A window similar to the following will appear:
2. Use the arrow button to select a Server name. If you want to restore from a backup performed to a client’s local tape drive, select the “local (client tape)” option at the top of the list. In this case, the Original Client (owner) field will change to Client Name, and a new field, Device Name will appear.
3. If you selected a TSM Server, use the arrow button to select the Original Client (owner). All backups are stored on the server in a TSM filespace specific to each client, so you must know the original client (node) the backup was created for. In this case, any client that was part of the backup job to be verified will be sufficient, since we need to list the Backup IDs which that client is part of.
4. If you selected local (client tape) in the Server name field, you must select the Client Name and the Device Name (SBTAPE) from which to read the backup in the fields provided.
5. Press the Select button next to the Backup ID field. You will be provided a list of backup jobs on the server in which the client is included, similar to the following example:
Storix System Backup Administrator 81 Version 8.2 TSM Edition User Guide

Select the specific backup job to restore from by clicking on the button to the left of the desired job.
6. Next, if there are multiple backup on the media, another screen will appear with a list of backups to select from. For TSM backups, this list will contain all of the backups within the selected job. The information about the backup will be preceded by the backup sequence number, starting with 1 and ending with the last backup on the media.
The following is a sample of this screen:
7. You may select any one or more backups to verify by clicking on the button to the left of the desired selection and a checkmark will appear in the button. If you wish to de-select an option, simply click the button again and the checkmark will disappear. When all selections have been made, click the Continue button at the bottom of the screen
The Backup ID and Backup Seq# selected will be displayed in the fields in the previous window...
Selecting Restore Options After selecting the backup media to restore from, you will be returned to the previous window, where you may enter or select the following restore options:
1. Client to restore data to: The client from which the backup originated will be displayed. If you wish to restore the data to a different client, press the arrow button to the right of the client name to display a list of clients and select from the list. If the backup profile did not allow a different client to read the data, the client may not be changed.
Storix System Backup Administrator 82 Version 8.2 TSM Edition User Guide

Storix System Backup Administrator 83 Version 8.2 TSM Edition User Guide
2. Type of data to restore: By default, the type of data to restore will be Volume Groups/ZFS Pools. However, it is possible to restore different types of data, including logical volumes, filesystems, directories or regular files. To restore a different type of data than that shown, select the arrow button to display a list of restore data types allowed for this type of backup and select from the list.
3. [Data] to restore: This label will indicate the restore data type selected in the previous field. You may type one or more options to restore (i.e. a list of volume groups if restoring volume groups), each option separated by spaces. You may also click on the arrow button to display a list of options to restore. If restoring files or directories, this list could be quite long, and new buttons will appear at the bottom of the screen from which you may select items to restore from a file tree or search the list for specific patterns. Refer to Selecting Data to Restore below for details.
4. Destination [option]: This label will show either directory or logical volume, depending on the restore data type. If restoring a logical volume (i.e. one not containing a filesystem), you may type the name of a different logical volume (which must already exist) to restore the data to. If restoring from any other backup type, you may select the directory into which the data will be restored. For more details on how the files will be restored to the new destination, refer to Restoring Data to a New Destination below.
When all desired selections have been made, press the Begin Restore button at the bottom of the screen to start the restore.
Selecting Data to Restore There are different ways of selecting the data to restore from the Restore Options Screen, depending on the type of data being restored:
1. If you have selected to restore Volume Groups, ZFS Pools, Filesystems, Logical Volumes, Meta-disks (Linux/Solaris), Partitions (Linux), Slices (Solaris), then an arrow button will appear to the right of the [Data] to Restore field. By pressing this button, the list of data items of the selected type will be read from the backup, and you can select one or more items from the list.
2. If you have selected to restore either Directories or Regular Files, the arrow button next to the [Data] to Restore field will disappear, and new buttons will appear at the bottom of the screen instead, labeled Search/Select by Name and Select Using File Tree. Those options are explained in the next sections below.
3. Lastly, you may simply enter the data to restore in the field. You can enter one or more items, separated by spaces. If an item, such as a filename, contains spaces, you must enter that filename surrounded by quotes to preserve the space in the filename. Note that you can use wildcards (*) to restore multiple files with similar names or locations. Refer to Restoring Files Using Wildcards below.
Search/Select by Name When restoring directories and regular files, you may press this button to view a complete list of files, select one or more files or directories from the list, select a group of files or directories, or search the list using a string or characters or wildcards (*). When pressing this button, a screen similar to the following will appear:

From this window, you may:
1. Click a specific entry to highlight and select that entry to restore.
2. Click and drag the mouse over a number of entries to highlight and select all those entries.
3. Click any highlighted entry to de-select that item to restore.
4. Enter a search pattern in the box at the lower-left corner of the window and press the Search button to find the next occurrence of that pattern. The next entry found that matches the search pattern will be highlighted in red. A search pattern can be any character string which may also include wildcard characters, or asterisks (*). An asterisk in a search pattern may match any number of other characters in the list item.
5. Press the Clear All button to de-select any highlighted entries.
6. Press the Select All button to select “all” entries and return to the previous screen.
7. When all specific entries have been selected, press the Done button. You will be returned to the Restore Options Screen, and the selected list of files will appear in the [Data] to Restore field.
When using the web interface it is recommended to use a wild card to limit the Search/Select by Name button. Due to limitations with javascript and the web browser, SBAdmin will by default only display up to 1000 files in the search result.
Storix System Backup Administrator 84 Version 8.2 TSM Edition User Guide

From this popup window you may select one or more files to restore. After selecting the Submit button you will be returned to the main screen and can begin the restore.
Select Using File Tree Also, when selecting to restore regular files or directories, you can press this button to view a drop-down file-tree list of files or directories, and select from the list. When pressing this button, the backup media will be read, and a list of directories will appear, which may or may not contain the regular files, depending on which you selected to restore (viewing only directories will save much time and memory).
Storix System Backup Administrator 85 Version 8.2 TSM Edition User Guide
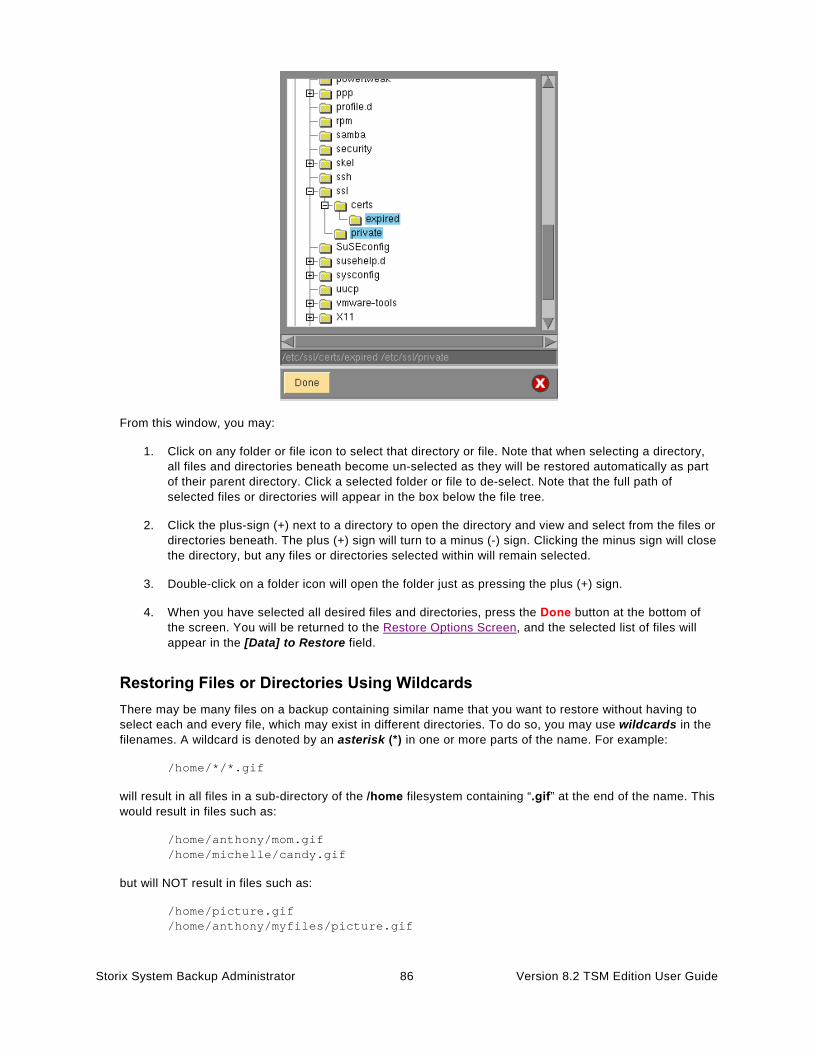
From this window, you may:
1. Click on any folder or file icon to select that directory or file. Note that when selecting a directory, all files and directories beneath become un-selected as they will be restored automatically as part of their parent directory. Click a selected folder or file to de-select. Note that the full path of selected files or directories will appear in the box below the file tree.
2. Click the plus-sign (+) next to a directory to open the directory and view and select from the files or directories beneath. The plus (+) sign will turn to a minus (-) sign. Clicking the minus sign will close the directory, but any files or directories selected within will remain selected.
3. Double-click on a folder icon will open the folder just as pressing the plus (+) sign.
4. When you have selected all desired files and directories, press the Done button at the bottom of the screen. You will be returned to the Restore Options Screen, and the selected list of files will appear in the [Data] to Restore field.
Restoring Files or Directories Using Wildcards There may be many files on a backup containing similar name that you want to restore without having to select each and every file, which may exist in different directories. To do so, you may use wildcards in the filenames. A wildcard is denoted by an asterisk (*) in one or more parts of the name. For example:
/home/*/*.gif
will result in all files in a sub-directory of the /home filesystem containing “.gif” at the end of the name. This would result in files such as:
/home/anthony/mom.gif /home/michelle/candy.gif
but will NOT result in files such as:
/home/picture.gif /home/anthony/myfiles/picture.gif
Storix System Backup Administrator 86 Version 8.2 TSM Edition User Guide
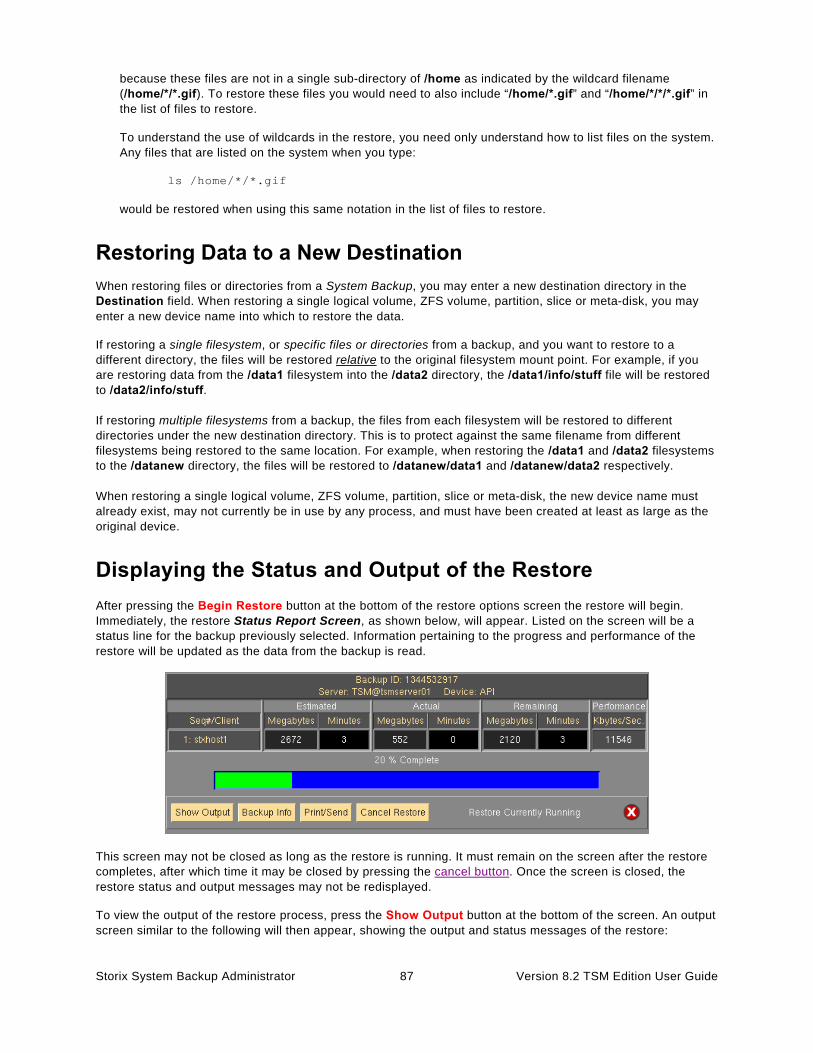
because these files are not in a single sub-directory of /home as indicated by the wildcard filename (/home/*/*.gif). To restore these files you would need to also include “/home/*.gif” and “/home/*/*/*.gif” in the list of files to restore.
To understand the use of wildcards in the restore, you need only understand how to list files on the system. Any files that are listed on the system when you type:
ls /home/*/*.gif
would be restored when using this same notation in the list of files to restore.
Restoring Data to a New Destination When restoring files or directories from a System Backup, you may enter a new destination directory in the Destination field. When restoring a single logical volume, ZFS volume, partition, slice or meta-disk, you may enter a new device name into which to restore the data.
If restoring a single filesystem, or specific files or directories from a backup, and you want to restore to a different directory, the files will be restored relative to the original filesystem mount point. For example, if you are restoring data from the /data1 filesystem into the /data2 directory, the /data1/info/stuff file will be restored to /data2/info/stuff. If restoring multiple filesystems from a backup, the files from each filesystem will be restored to different directories under the new destination directory. This is to protect against the same filename from different filesystems being restored to the same location. For example, when restoring the /data1 and /data2 filesystems to the /datanew directory, the files will be restored to /datanew/data1 and /datanew/data2 respectively. When restoring a single logical volume, ZFS volume, partition, slice or meta-disk, the new device name must already exist, may not currently be in use by any process, and must have been created at least as large as the original device.
Displaying the Status and Output of the Restore After pressing the Begin Restore button at the bottom of the restore options screen the restore will begin. Immediately, the restore Status Report Screen, as shown below, will appear. Listed on the screen will be a status line for the backup previously selected. Information pertaining to the progress and performance of the restore will be updated as the data from the backup is read.
This screen may not be closed as long as the restore is running. It must remain on the screen after the restore completes, after which time it may be closed by pressing the cancel button. Once the screen is closed, the restore status and output messages may not be redisplayed.
To view the output of the restore process, press the Show Output button at the bottom of the screen. An output screen similar to the following will then appear, showing the output and status messages of the restore:
Storix System Backup Administrator 87 Version 8.2 TSM Edition User Guide

If restoring filesystem data, the files will be listed on the screen as they are restored. This screen may be closed and redisplayed at any time, even after the restore completes, as long as the Restore Status Report screen has not been closed.
In addition to the restore output, summary information for the selected backup may be displayed by selecting the Backup Info button. A screen similar to the following example will appear.
Simply press the Dismiss button to close this window.
Storix System Backup Administrator 88 Version 8.2 TSM Edition User Guide

20. Preferences In this section, options that affect the overall operation or appearance of the application are discussed. To change the user preferences, select File"Preferences on the menu bar.
Software License This option may be used to display a screen used to reconfigure your Administrator license or add or change Optional Features. To view or change the license information, select File"Preferences"Software License from the menu bar. A screen similar to the following will appear:
When using the web interface:
If you’re reading this user guide, you probably installed a TSM Edition license, allowing for System Backups of TSM Clients (nodes) to one or more TSM Servers. It may be desirable to change the license for a number of reasons:
1. You have non-TSM clients or want to backup to a non-TSM server. This would require the Network Edition license. To enable all of the features of the Network Edition and keep all of the TSM Edition features also, you’ll need both the Network Edition and the TSM Client Backup feature.
2. You installed an evaluation (trial) license of the TSM Edition, and upon expiration, want to now install a permanent (purchased) license key.
Storix System Backup Administrator 89 Version 8.2 TSM Edition User Guide

Storix System Backup Administrator 90 Version 8.2 TSM Edition User Guide
3. You purchased a TSM Edition for 10 clients (nodes), and now want to add support for another 6 clients.
4. You wish to install a new optional feature. For the TSM Edition, only the Backup Encryption optional feature is available.
Administrator License When the software is initially installed, you indicated the type of administrator you would be installing. This was either Workstation, Network or TSM Edition. You also entered a license key, which matched the administrator license type, and also indicated the number of clients supported by a Network or TSM Edition and the expiration time (if any) of the license. If using a Network or Workstation Edition license, this user guide will be replaced by the System Backup Administrator User Guide.
Backup Encryption Feature Backup Encryption: The license key will indicate the number of clients that are to support backup data encryption. When installing this license, you will be able to apply data encryption to the number of clients the license supports.
When entering this function, your current Administrator License information is displayed. In the License Type section, you may select a different Administrator License Type (Workstation, Network or TSM), or you can select an optional feature (Encryption). When you select a different option in the License Type section, the current license information for that feature, if any, displayed.
Any Administrator License or optional feature may be installed for a one-time, 30-day trial period. After that, a permanent license key is required for the administrator and each optional feature.
After selecting either the Administrator License or the Optional Feature, you may add or change the license information. This includes changing from a trial to a permanent license (or vice-versa), entering a permanent license key, and the name of the person or company the product is registered to (also provided by Storix and must match the license key).
When you have completed all entries, press the Save/Exit button. The software will be reconfigured. In some cases, new options and features will automatically appear in the SBAdmin Interface.
General Preferences By selecting File!Preference!General Preferences, a screen similar to the following will be displayed, from which you may set or change numerous attributes defining the behavior of the SBAdmin application:
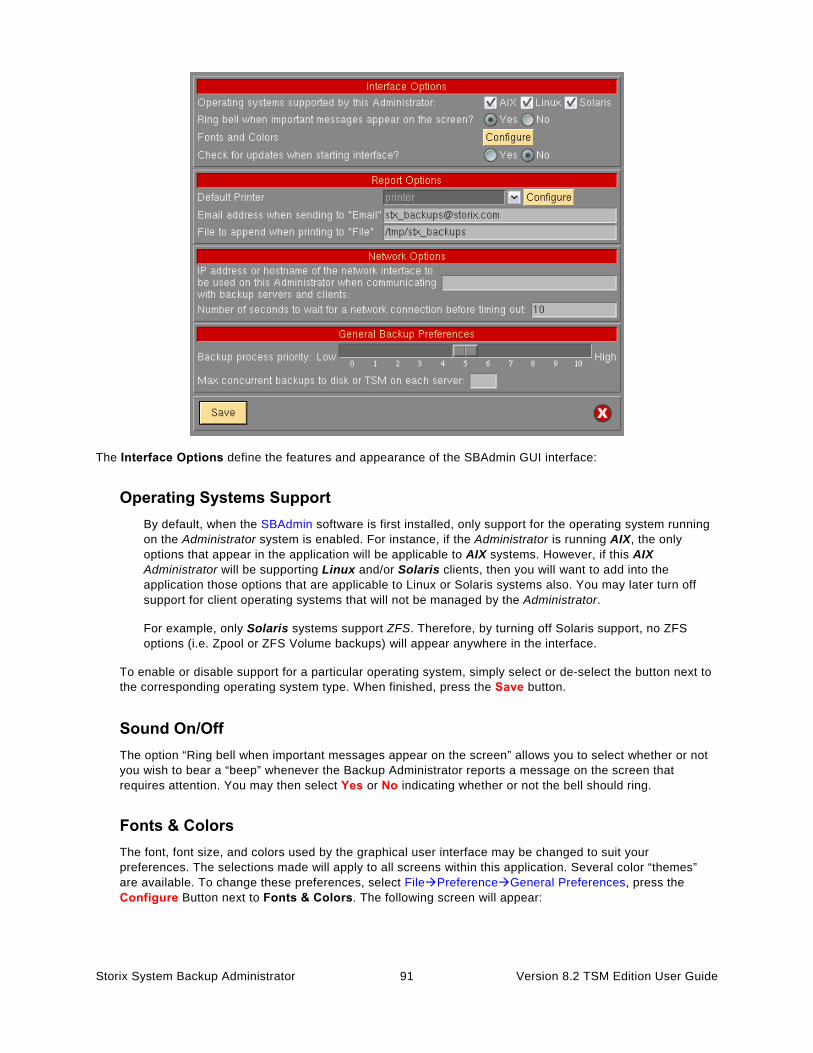
The Interface Options define the features and appearance of the SBAdmin GUI interface:
Operating Systems Support By default, when the SBAdmin software is first installed, only support for the operating system running on the Administrator system is enabled. For instance, if the Administrator is running AIX, the only options that appear in the application will be applicable to AIX systems. However, if this AIX Administrator will be supporting Linux and/or Solaris clients, then you will want to add into the application those options that are applicable to Linux or Solaris systems also. You may later turn off support for client operating systems that will not be managed by the Administrator.
For example, only Solaris systems support ZFS. Therefore, by turning off Solaris support, no ZFS options (i.e. Zpool or ZFS Volume backups) will appear anywhere in the interface.
To enable or disable support for a particular operating system, simply select or de-select the button next to the corresponding operating system type. When finished, press the Save button.
Sound On/Off The option “Ring bell when important messages appear on the screen” allows you to select whether or not you wish to bear a “beep” whenever the Backup Administrator reports a message on the screen that requires attention. You may then select Yes or No indicating whether or not the bell should ring.
Fonts & Colors The font, font size, and colors used by the graphical user interface may be changed to suit your preferences. The selections made will apply to all screens within this application. Several color “themes” are available. To change these preferences, select File!Preference!General Preferences, press the Configure Button next to Fonts & Colors. The following screen will appear:
Storix System Backup Administrator 91 Version 8.2 TSM Edition User Guide

This screen will always be displayed using the Storix color theme, even when another theme has been applied to other screens. To display a different color theme in the Sample section of the display, select one of the following from the Theme drop-down list:
Aquamarine Carnival GolfCourse
MardiGras PowderPuff SantaFe
Storix System Backup Administrator 92 Version 8.2 TSM Edition User Guide

Winter Classic (Version 5) Storix (default)
To change the Font Name, Size or Style, click the arrow button next to the desired selection, then select an option from the list. The sample box will be changed to show your selections.
To change the 3D Effect and the Width/Size of Borders, select the option or adjust the values to the desired settings. The sample box will be changed to show your selections.
Once you’re satisfied with your selections, press the Save button to save the changes. If, after having previously saved difference sections, you want to return the screen to the default (Classic) font and colors, press the Default button or select Classic from the Theme drop-down, then Save the settings again.
As soon as you save your settings, a confirmation dialog box will appear, and when selecting to continue, all windows except the Main Screen will be closed. The Main Screen will then be updated to reflect your selection. All windows opened from this point will display the selected settings.
Check for Updates When launching the Administrator, the application will contact the Storix website in order to compare the currently running version of SBAdmin with the latest version available. If you are not running the most current version, a note will be displayed at the bottom of the interface. You may prevent this communication from occurring by selecting “No” to this option.
Report Preferences Reports and backup notifications can be printed, sent to an email address, or appended to a text file. This option is used to set up preferences for each.
To edit configure or change these options, select File!Preference!General Preferences, and add or change the following options in the Report Options section.
Default Printer (AIX)
It is assumed that AIX systems will always have AIX printer queues already setup. This option is used to select the default printer queue which will be automatically selected when using any of the “Print/Send” options within the application. The printer queue must already have been set up on the system. To select the default printer to use, select the printer queue from the pull down.
Storix System Backup Administrator 93 Version 8.2 TSM Edition User Guide

Default Printer (Linux/Solaris)
Linux and Solaris systems provide a variety of ways to configure printers and supply numerous commands that may be used to submit files or jobs to the printers or queues. Therefore, this option will allow you to select a printer definition along with the command used to send data to the printer.
You should first configure your printer or printer queue using your Linux or Solaris system administration utilities. Be sure to test the command by typing it at the command line to send something to the printer before adding the command to the SBAdmin Preferences.
To select the default printer used for reports and notifications, select from the pull down menu next to the Default Printer entry field, and select a pre-configured printer from the list. If you’ve not yet configured the printers within SBAdmin, press Configure button, and a screen will appear like the example below:
To define a new printer, enter the name of your printer in the box at the top of the screen. To change an existing printer definition, either type its name, or select it using the arrow button to the right of the entry field.
If configuring a new printer, the name you enter may be any name you choose, not necessarily the name of the printer queue as defined to Linux or Solaris. The name you choose will be presented when you select a printer from any of the other SBAdmin printer list options.
In the Command box, enter the command used to submit a job to this printer. The name of the file (which is temporarily generated by SBAdmin) will be added to the END of this command.
Press Save to add this printer to the list.
To remove a currently defined printer, select it in the listbox, then press the Remove button.
Sending Reports to an Email Address
This option is used to designate the email address used when Email is chosen for the Print/Send options within the application. To set or change the email address, enter the email address into the text field labeled: Email address when sending to �Email�. After doing so, an Email option will appear when selecting to Print/Send any SBAdmin report.
Appending Reports to a File
This option is used to designate the path to the file that is appended to when File is chosen for the Print/Send options within the application. To change the file path, enter the fill pathname of the file into the text field labeled: File to append when printing to �File�. After doing so, a File option will appear when selecting to Print/Send any SBAdmin report. If the specified file does not exist when printing to the File option, the file will be automatically created. Any parent directories of the file must already exist.
Storix System Backup Administrator 94 Version 8.2 TSM Edition User Guide

Network Options
Network Interface
By default, the admin system will use the network adapter associated with the default hostname of the system when communicating with clients. If the system has multiple network adapters, you may choose a different network, which will only be used for communicating between this admin system and the clients. To do so, select File!Preferences!General Preferences from the menu bar, go to the Network Options section, and enter the IP address or hostname in the “IP address or hostname of the network interface…” field. If you want the system to go back to using the default adapter (according to the primary hostname of the system), simply remove the entry from this field.
The network adapter selected will be used to pass information between the admin system and clients, such as backup status messages, command output, and for polling the system availability. It is NOT used to pass the actual backup data, which is sent directly from the clients to the TSM servers.
Important! After setting this value, some or all of the clients servers may show as unavailable when the Clients, Servers and Devices are displayed on the Main Screen. If this should occur, it means that the client does not have the admin system defined using the alternate network adapter. To resolve this problem, edit the /storix/config/system_admin_hosts file on the client (where /storix is the data directory you chose when you installed the software), and either change the existing admin system hostname, or add the new admin system hostname on a line by itself.
Network Timeout
For SBAdmin to perform any operations on a client, from querying it’s availability to starting a backup job, it must execute a remote command. By default, if the admin system cannot contact the client within 10 seconds, it is assumed that the client is unavailable. This is adequate in most cases. However, if your network is slow to respond, perhaps due to slow hostname resolution, you may need to increase this value. To do so, select File!Preferences!General Preferences from the menu bar, then enter the new number of seconds in the in the field labeled “Number of seconds to wait for a network connection before timing out”.
When increasing the value, it will take longer to determine that a system is unavailable, so some processes used by the interface (most notably when displaying client, servers and devices from the Main Screen) may take longer to update if a client cannot be contacted. It is not advisable to increase this value to more than 30 seconds, depending on the total number of clients configured.
Changing this option will affect only the timeout value when the Administrator contacts the clients. It has no affect on the timeout TSM uses for the clients to contact the TSM server when running backups. To change the default timeout on the client, edit the /.stdefaults file on the client and change the SOCK_TIMEOUT value to the desired number of seconds.
Backup Process Priority You can change the default CPU process priority of all backup jobs run from the admin system by selecting File!Preferences!General Preferences, and moving the slider in the Backup Process Priority section to the desired number.
All backups will use the system default priority unless you set a different priority. The process is represented by the operating system using a scale of highest to lowest. You can view a process priority by typing “ps –ef” and referring to the NI column. For Linux, the number will be –19 (highest) to 20 (lowest), with a default of 0. For AIX and Solaris, the number will be from 0 (highest) to 39 (lowest), with a default of 20.
Storix System Backup Administrator 95 Version 8.2 TSM Edition User Guide

To make this simpler, SBAdmin represents this on a scale of 0 to 10, with 0 being lowest, 5 being normal (default), and 10 being highest. By default, this will bet set to 5, indicating that the normal operating system default priority should be used.
It is common to lower this value if you do not want your backups to run as the same priority as other applications. This will usually cause the backup process to have less affect on the performance of other applications, but the backup could run a bit slower. You might consider setting this value to 3 to give backup processes a lower priority, but not so low that the backup takes too much longer.
If you want the backup process to run in the shortest possible time, with no regard to how it might adversely affect the performance of other applications, you can increase this value. Note that doing so will have little or no affect if there are no other applications or processes requiring CPU processing, but those that require the CPU could run slower. In this case, you might consider a setting of 7 to give priority to the backup without bringing all other applications to a halt.
Setting this option to any value other than 5 will apply to all backup jobs unless you change the backup job process priority within the job settings.
Concurrent Backups SBAdmin has no control over where the backup data is actually stored on the TSM server. Therefore, all backups to the TSM server may be run concurrently, even if they are writing to the same tape library or disk drives. This may pose a problem on the server for a number of reasons:
1. This may cause degraded I/O performance on the server, affecting other applications.
2. A single large backup to a server’s disk could cause many smaller backups to take much longer since they must share the same I/O.
3. TSM may simultaneously write multiple backups to the same tape (interspersing the backup data), but all of the simultaneous backups will be limited by the speed of that single tape drive.
It would make more sense in any case to limit the number of concurrent backups to a manageable number. To limit the number of disk backups which may be written concurrently to the same server, select File!Preferences!General Preferences, and enter a number in the Limit concurrent backups to the TSM Server to: field.
By leaving this field blank, there will be no limit to the number of concurrent backups.
Auto-Terminate Stalled Backups You may specify the number of minutes to wait before considering a backup as stalled and have the backup job automatically killed. This preference does not apply to backups written to tape devices because the timeout could be related to waiting for a new tape when reaching end of media. The default is to wait forever and not automatically kill the backup job.
A backup is considered to have stalled once all backup pre-processing has completed and backup data begins to write, but no progress has been made for the length of the defined timeout. If the timeout has been reached, notification will be sent based on your notification settings, and a kill signal will be sent to the backup job.
To define stalled backups timeout select File!Preferences!General Preferences and enter the number of minutes in the Minutes to wait before killing a stalled backup to a non-tape device field.
Storix System Backup Administrator 96 Version 8.2 TSM Edition User Guide

Backup Retention Policy The backup retention policy (also referred to as the overwrite policy) determines whether or not a new backup should be allowed to write over (thereby destroying) a current backup. A current backup is defined as one with a label currently on record. The default policy regarding TSM backups is to keep all backups on file unless explicitly expired (and removed) by the user. The default policy for tape backups is to prevent accidental overwriting by requiring the user to manually expire a current backup before the same tape may be reused.
This option allows you to define the global backup retention policy. This will apply to all backup jobs unless you explicitly change the backup retention policy for a particular backup job. Refer to the Backup Retention Policy in the Backup Profile settings for more information on overriding the global backup retention policy.
To change the global backup retention policy, select File!Preferences!Backup Retention Policies from the menu bar. The following screen will appear:
Tape Backups Before any backup is performed to tape, the backup label is read. If a prior backup exists, a check is made to see if the backup label is still on file. If so, the setting applied here will determine the action that will be taken:
1. Never automatically expire or overwrite a backup tape. User must manually expire all tape backups. Select this option if no data will be written to the tape and the backup will fail with an error message. In order to overwrite the backup, the user must expire the backup manually. Refer to Expiring a Backup for the steps to expire a backup.
2. Automatically expire and OVERWRITE a prior tape backup that is at least: __ days or older. Select this option if the backup will proceed ONLY if the backup to be overwritten is at least the specified number of days old. You can always allow expiration and overwriting of a prior backup tape by setting this value to 0. If the backup currently on the tape is less than the specified number of days, the backup will not be overwritten and the user will be required to expire the backup manually before proceeding. Refer to Expiring a Backup for the steps to manually expire a backup.
Storix System Backup Administrator 97 Version 8.2 TSM Edition User Guide

These global retention policies may be overridden for specific jobs by changing the Retain option in the backup profile.
TSM Backups Backups written to TSM servers are never overwritten by a new backup since each backup has a different object name (constructed using the backup Label ID, job ID, etc). A new copy of a backup will be written to the server each time a job is re-run. This option is used to free space on the server by automatically removing old backups when new backups are started. Two options are available for backups to disk (directories):
1. Never automatically expire or remove prior backups of the same job. Select this option if no backups should ever be automatically expired when writing new backups. This will require that the user manually expire and remove each prior backup that is no longer needed. The user must take the steps to expire the older backups; else they will remain on the server indefinitely, using storage space which may be needed by newer backups. Refer to Expiring a Backup for the steps to manually expire a backup.
2. Automatically expire and REMOVE prior backups of the same job that are ___ days or older. By selecting this option, older backups of the same job that is being run will be automatically expired and removed from the server if they are over the specified number of days. If no backups are needed for more than 90 days, selecting this option will ensure that backups over 90 days old are removed and replaced by a newer backup created using the same backup job. If you enter “0” in this field, you are indicating that all prior backups of the same job will be removed and expired before the new backup is created.
Number of Backups to Retain In addition to, or in replacement of, the number of days that a backup must be retained, you may also specify the number of backups that must be retained for each job. To do so, select the checkbox next to the label Always retain a minimum number of ___ backups of the same job before automatically expiring, and enter a number in the corresponding field.
By entering a number in this field, you will ensure that a minimum number of backups are retained for each job before a prior backup may be automatically expired. If, however, you set your retention policy to never allow a backup to be automatically expired, this entry will have no affect.
If you have set the retention options to always expire backups, then this setting alone will ensure that you always retain a minimum number of backups of each job, regardless of how old they are.
These global retention policies may be overridden for specific jobs by changing the Retain option in the backup profile.
Press the Save button to save your selections and close this window, or press the Cancel button to cancel changes.
Backup Status Notifications Because scheduled backups may be running even when the SBAdmin Interface is not running, it is necessary to provide a method by which the system administrator is informed of the status of backups. These status messages include indications of when backup jobs are started and completed, as well as any errors or warning messages that occur prior to, during, or after the completion of a backup. The messages will also include notifications of the automatic expiration and overwriting of prior backups (as determined by the Backup Retention Policy).
Storix System Backup Administrator 98 Version 8.2 TSM Edition User Guide

By default, the messages will appear only on the screen, if available, and if the screen is not available (SBAdmin is not running), the messages will be sent to the root user’s mail. This option will allow you to change the default method of notification.
To change the settings, select File!Preferences!Backup Status Notifications on the menu bar. The following screen will appear:
Primary Notification One of the options in this section must be selected to determine where backup status messages should be reported:
1. Show on Screen if Administrator is running, else send to alternate notification. If this option is used, messages will be reported on the screen if the "sbadmin" program is running. If not, the messages will be reported using the alternate notification method indicated in the next section.
2. Show on screen if Administrator is running, and also send to alternate notification If you want messages always reported on the screen (when SBAdmin is running) and also sent using the alternate notification method, select this option.
3. Do not show on screen, always use alternate notification Select this if you do not want messages reported on the screen. In this case they will always be reported using the alternate notification method. Selecting this option is equivalent to using the first option when the SBAdmin is not running.
4. Do not show on screen, do not use alternate notification
If selected, the messages will not pop-up on the screen and will not be sent to the alternate notification. The messages are still logged for displaying on the screen at a later time. You will be asked if you want to display the messages whenever SBAdmin is started, when it is exited (in which case the log is cleared), and you may also press the View Log button on the main screen to display the log at any time.
Alternate Notification In this section, you will select how backup status messages should be handled when the alternate notification method is used. The alternate notification method will be used any time SBAdmin is not running
Storix System Backup Administrator 99 Version 8.2 TSM Edition User Guide
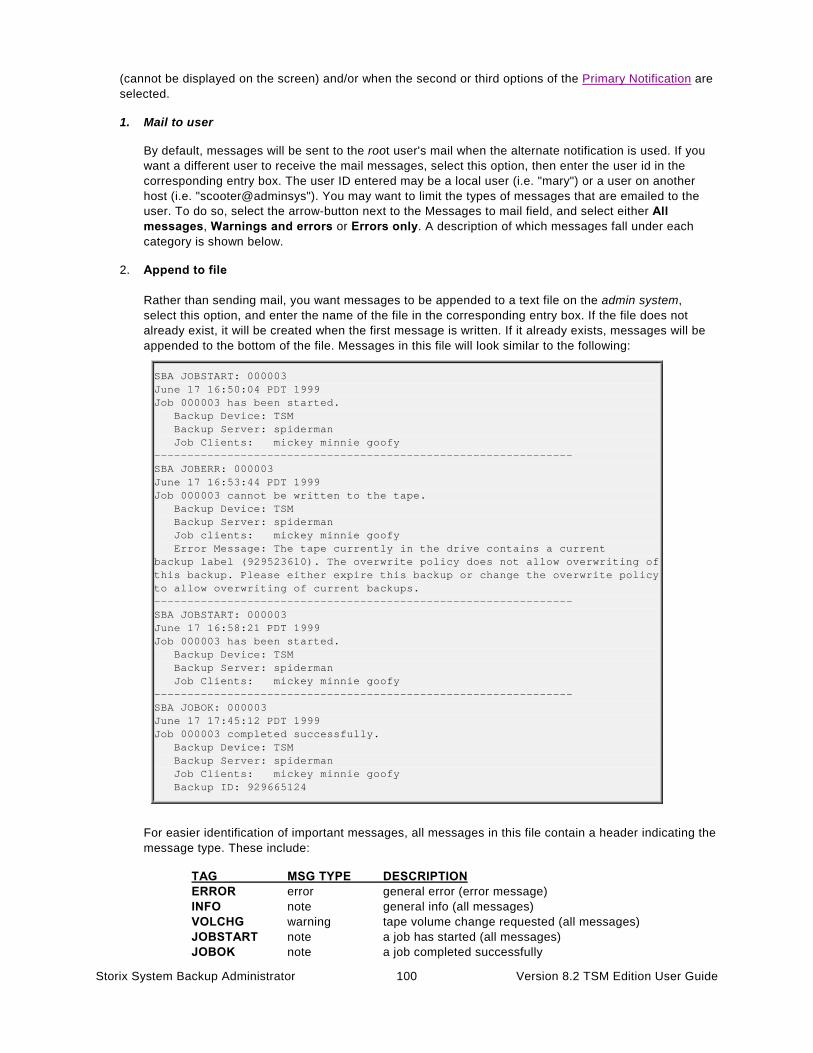
Storix System Backup Administrator 100 Version 8.2 TSM Edition User Guide
(cannot be displayed on the screen) and/or when the second or third options of the Primary Notification are selected.
1. Mail to user
By default, messages will be sent to the root user's mail when the alternate notification is used. If you want a different user to receive the mail messages, select this option, then enter the user id in the corresponding entry box. The user ID entered may be a local user (i.e. "mary") or a user on another host (i.e. "scooter@adminsys"). You may want to limit the types of messages that are emailed to the user. To do so, select the arrow-button next to the Messages to mail field, and select either All messages, Warnings and errors or Errors only. A description of which messages fall under each category is shown below.
2. Append to file Rather than sending mail, you want messages to be appended to a text file on the admin system, select this option, and enter the name of the file in the corresponding entry box. If the file does not already exist, it will be created when the first message is written. If it already exists, messages will be appended to the bottom of the file. Messages in this file will look similar to the following:
SBA JOBSTART: 000003 June 17 16:50:04 PDT 1999 Job 000003 has been started. Backup Device: TSM Backup Server: spiderman Job Clients: mickey minnie goofy --------------------------------------------------------------- SBA JOBERR: 000003 June 17 16:53:44 PDT 1999 Job 000003 cannot be written to the tape. Backup Device: TSM Backup Server: spiderman Job clients: mickey minnie goofy Error Message: The tape currently in the drive contains a current backup label (929523610). The overwrite policy does not allow overwriting of this backup. Please either expire this backup or change the overwrite policy to allow overwriting of current backups. --------------------------------------------------------------- SBA JOBSTART: 000003 June 17 16:58:21 PDT 1999 Job 000003 has been started. Backup Device: TSM Backup Server: spiderman Job Clients: mickey minnie goofy --------------------------------------------------------------- SBA JOBOK: 000003 June 17 17:45:12 PDT 1999 Job 000003 completed successfully. Backup Device: TSM Backup Server: spiderman Job Clients: mickey minnie goofy Backup ID: 929665124
For easier identification of important messages, all messages in this file contain a header indicating the message type. These include:
TAG MSG TYPE DESCRIPTION ERROR error general error (error message) INFO note general info (all messages) VOLCHG warning tape volume change requested (all messages) JOBSTART note a job has started (all messages) JOBOK note a job completed successfully

Storix System Backup Administrator 101 Version 8.2 TSM Edition User Guide
JOBWARN warning a job completed successfully with a warning message JOBERR error a job terminated with an error
If you set the Messages to append value to “All messages”, then you will see all messages in the file. If you set it to “Errors and warnings”, then all “note” messages will be omitted. Likewise, if you set it to “Errors only”, then only the messages of type “error” will be shown.
The message types indicated above (i.e. "JOBERR") will also appear in the subject line of mail messages if mail is used as the alternate notification method.

21. Reports When you select Reports from the menu bar, you may further select from a list of reports that may be viewed and/or printed. Refer to Report Preferences for information on configuring printers, files and email addresses for reporting. Each time a report option is selected, a screen similar to the following will be presented:
The above example is used when printing a “Backup Job History” report. The option at the top, Print/Send to, and the Print/Send and Preview buttons at the bottom of the screen are provided for all report options. The other options will vary for each report option selected.
You may select the Print/Send button to generate the report and send it directly to the specified printer, file or email address. You may use the Preview button to generate the report in a window such as the following example (Backup Job History report):
From the Preview window you may scroll up and down the report, then print or send the report by selecting the Print/Send button, or you may also edit the contents of the report in order to add your own comments. To edit the report, select the Edit button. The color of the text will change and you will be allowed to click-on and make changes to the text. The Edit button will change to Save which, when pressed, will save the changes and disable the editor.
In the remainder of this section, a brief description of each report option is provided.
Storix System Backup Administrator 102 Version 8.2 TSM Edition User Guide

Backup Profiles Select Reports!Backup Profiles to print a list of the profiles configured on the system. Refer to the main Reports section above for details on the Print and Preview options. When selecting this option, an additional option is provided:
• Include customized job profiles: Check this box if you want to print a list of the profiles that have been customized for particular jobs. If not checked, only the original job profiles will be included.
Exclude Lists Select Reports!Exclude Lists to display or print a list of configured exclude lists. Refer to the main Reports section above for details on the Print and Preview options. When selecting this option, no additional options are provided. The list will contain each exclude list name, along with a list of files, directories and devices which are excluded, and the list of clients (or “all) that the exclude list applies to.
Backup Jobs Select Reports!Backup Jobs to print a list of the backup jobs configured on the system. Refer to the main Reports section above for details on the Print and Preview options. When selecting this option, no additional options are provided. The list will contain all jobs in the system, whether set to run once, regularly or on-demand. If set to run at a certain time or times, the schedule will be included in the report.
Backup History To print a Backup History Report showing the dates, times and backup statistics for each client backup, select Reports!Backup History from the main menu bar. A further option is provided for running the report in the order of client or job ID.
Running the report by client: Select Reports!Backup History!By Client. You may select one or more clients for which to print the report or, by not specifying any clients, the report will be reported for all clients. The report may be printed even for clients that are no longer configured by manually typing the client name in the entry box. You may optionally select to print subtotals by Job ID, detailing the average megabytes, number of minutes, and Kbytes per second for each job under which the client bas been backed up. These averages will also be shown for each client in the list.
Running the report by Job ID: Select Reports!Backup History!By Job ID. You may select one or more Job IDs for which to print the report or, by not specifying any job IDs, the report will be reported for all Job IDs. The report may be printed even for jobs no longer configured by manually typing the job ID in the entry box. You may optionally select to print subtotals by client, detailing the average megabytes, number of minutes, and Kbytes per second for each client within the job. These averages will also be shown for each job in the list.
You may also select starting and ending dates for this report. If provided, the report will only include backups that occurred within that date range.
Restore History To print a Restore History Report showing details regarding the restore, select Reports!Restore History from the main menu bar. A further option is provided for running the report in the order of job or backup ID.
Restore history was introduced in SBAdmin v8.1. Therefore, only restores performed with SBAdmin v8.1 will be reported.
Storix System Backup Administrator 103 Version 8.2 TSM Edition User Guide

Storix System Backup Administrator 104 Version 8.2 TSM Edition User Guide
Running the report by Job ID: Select Reports!Restore History!By Job ID. You may select one or more Job IDs for which to print the report or, by not specifying any job IDs, the report will be reported for all job IDs.
Running the report by Backup ID: Select Reports!Restore History!By Backup ID. You may select one or more Backup IDs for which to print the report or, by not specifying any backup IDs, the report will be reported for all backup IDs.
You may also select starting and ending dates for this report. If provided, the report will only include restores that occurred within that date range.
Backup Expiration Report To print a report showing the backup labels past their expiration dates, select Reports!Backup Expiration Report from the main menu bar. You will have the option of showing all backups, even if they are not past their expiration date, backups past their expiration dates as of today’s date, or backups that will be past their expiration date as of a specified date.
This resulting report will tell you what backups are past their expiration date and may be expired. Of course, any backup may be expired manually (See expiring a backup), and if your overwrite policy is set to allow any overwriting of backups and you did not specify a , then the backups will always be expired when they are overwritten.
A backup will be shown on this report if any of the following are true:
1. You are listing all backups, regardless of their expiration date.
2. There is no backup retention period specified in the job settings.
3. The retention period in the job settings (number of days) has passed since the backup was performed.
4. You specify a reporting date in the future at which time the backup will have expired.
Note that the changing the backup retention period for a job will not change the retention period of backups that have already been performed.
Network Install Clients Select Reports!Network Install Clients to print a list of the clients that have been configured for network installation. Refer to the main Reports section above for details on the Print and Preview options. The report will contain all information pertaining to the network boot and network installation for each client. The process will also attempt to determine if the client is currently configured for network boot on the server system, and will include an appropriate message (client is ready to boot, boot server is unavailable, or client is not configured on the boot serer). When selecting this option, an additional option is provided:
Include only clients currently ready for network boot: Check this box if you want the list to include only those clients that are currently ready to be network booted from a boot server. If the boot server cannot be contacted to determine the status of the network boot configuration, the client information will be listed regardless.
After a client is configured for network boot (see Network Boot/Install Configuration in the SBAdmin System Recovery Guide), the boot configuration is updated on the boot server. If the network boot is disabled, the client network boot and install configuration is removed from the boot server but retained on the admin system for future use. If not checked, the list will include all network install client configurations, whether the client is currently ready for booting or not. If checked, the boot server assigned to the client will be checked to see if the client is currently configured for booting, and the client configuration will not be listed only if configured on the boot server.

22. Utilities This section provides instruction on the use of the utilities that are not typically used on a day-to-day basis but provide useful features or the ability to tailor the behavior of the application.
Create/Manage Boot Media System Installation media is bootable media which may be used to boot the system to the SBAdmin System Installation process. To create boot media, select the following:
Utilities!Creat/Manage Boot Media
The SBAdmin System Recovery Guide provides detailed instructions on using this option to create boot media. The instructions here provide for boot media options that are available only with TSM Edition, since other administrator licenses use local and remote disk and tape backup media also.
Two options are available for creating system boot media when using TSM Edition:
• CDROM image – A CDROM image is an ISO9660 format filesystem image, which may be burned to a CD writer using any number of third party applications. For most Linux systems, you can use the “cdrecord” command, on Solaris use the “cdrw” command, and on AIX systems you can use the “cdwrite” command. These software applications must be installed separately (not provided by SBAdmin), and you must refer to the instructions with the individual application for detailed instructions.
• Network – Network boot images allow a client system to be booted over the network from a Boot Media Server. This option will create the images and copy them to the boot media server. You can create a single boot image for compatible systems (i.e. same OS release and hardware type), or a separate boot image for each client. A separate option is used to Enable a Client for Network Boot, which is described in the SBAdmin System Recovery Guide.
For Linux, the network boot images are created and copied to the boot server, but some bootloader configuration must be manually performed by the user. This is automated on AIX and Solaris systems, but is more difficult for Linux due to the number of different boot loaders and configuration file formats that are available.
Creation of each of these media types is described in more detail in the respective sections of the Recovery Guide for each operating system. Refer to the SBAdmin System Recovery Guide for details.
Remote Installation Manager (RIM) After a client system is booted from the SBAdmin System Installation Media, the installation process may be performed remotely from any compatible “ssh” client program. SBAdmin includes an ssh client for this purpose, allowing you to display, manage and perform the system installation of the client directly from the SBAdmin Interface.
Before you can access the installation process on the client, the client must have started RIM, providing password required to log on. RIM and the associated password may have been setup and started within the client installation menus after booting from the media, or may have been configured when the boot media was created.
Storix System Backup Administrator 105 Version 8.2 TSM Edition User Guide

Only a user on a remote system (including this admin system) using a compatible ssh client program and the previously configured password can access the client�s installation process.
Once the client has enabled access, select the menu option Utilities!Start Remote Installation Manager. You will be asked for the client IP address and password. A new window will be displayed with the System Installation Menus. You may then change the settings or perform the installation for the client.
Details of the configuring and enabling Remote Install Manager access is described in detail in the SBAdmin System Recovery Guide.
Write a Tape Label ID to a Tape A Tape Label ID is a unique identifier for each tape that is used with SBAdmin. Tape labels are not required in order to use a tape for a backup, but having a tape label will make it easier to determine the contents of a tape and track which tapes belong together in a set.
For SBAdmin to track the contents by tape labels, the tape label id must be physically written to the tape before it is used for any backups. A physical adhesive tape label often comes with tapes that contain a unique tape identifier. You may use this tape id, if any, or you may create your own id. Tape IDs may contain up to 16 characters, but may not include colons (:) or spaces.
Two write a tape label id to a tape, select Utilities!Write a Tape Label ID to a Tape. A screen similar to the following will appear:
You must press the arrow keys next to each entry field to list and select Client Name and the Device Name in which the tape is inserted. Next, type the tape label id in the Tape Label ID field. When all entries have been made, press the Write Tape Label button.
First, the tape will be read to ensure that there is not already a current backup on the media. Because this process will write a new label, overwriting any previous backup contents, you may not overwrite a current backup. If a current backup is found on the tape, you will be given the option of automatically expiring this backup and overwriting the tape contents with the new tape label.
The process will then write the tape label to the tape, which usually takes only a few seconds. A message will appear when the process is complete.
Once a tape label ID has been written to a tape, it should never again be necessary to use this option again for the same tape, as the tape label id is always reused, even when overwriting a previous backup with a new backup.
If you ever need to read the tape label ID from the tape, you can use the option Perform a Tape Operation and select the Read Backup Header option. The tape label ID, as well as other backup information, if any, will be displayed on the screen.
Once a backup has been written onto a tape that has a tape label, the Backup Label will show the tape label IDs of each tape volume that makes up the entire backup.
Storix System Backup Administrator 106 Version 8.2 TSM Edition User Guide

Perform Tape Operations This option provides a number of useful features for performing tape operations, such as rewinding, ejecting, checking and reading information from a tape. To use these options, select Utilities!Perform a Tape Operation from the main menu bar. When doing so, a screen similar to the following will display:
You must press the arrow keys next to each entry field to list and select the Client Name and the Device Name in which the tape is inserted. To perform an operation, press the radio button next to the desired option and press the Continue button at the bottom of the screen. Each option is described below:
1. Rewind: Rewinds the tape in the device
2. Rewind/Eject: Rewinds, then ejects the tape from the device.
3. Check if Available: Displays a message indicating whether or not the device is available and a tape is inserted.
4. Check if Writable: Displays a message indicating whether or not the device is available, a tape is inserted and whether or not the write-protect tab on the tape has been set.
5. Check if Currently Rewound: Displays a message indicating whether or not the tape is currently rewound, or at beginning of media.
6. Forward to Backup: To use this option, you must also enter a backup sequence number in the field to the right, or you may enter the word “end” to forward to the end of the backup. You may insert any volume of the backup prior to or including the start of the backup you are forwarding to (or the last tape volume if forwarding to the end). After forwarding to the end of the last backup on the media, may append additional backups to the same tape and backup label.
7. Show Backup Header: Reads the backup header on the tape and displays the header information, which includes the backup id, tape label (if any), backup date, volume number, client, job id, backup type, etc. Note that this differs from showing the backup label since the output of this option pertains only to this tape. Included in the display will be information showing the current position of the tape within the backup.
8. Show Block Size: Displays the current physical block size setting for the tape drive. For SBAdmin backups, the tape block size will always be changed to 0 (variable) before a backup is performed, and it will remain set to 0 after the backup completes, since the block size must be set the same during a restore as it was during the backup.
9. Change Tape Block Size to: You must enter a block size in the field to the right when using this option. SBAdmin backups are always performed using a variable (0) physical block size setting. If the tape drive
Storix System Backup Administrator 107 Version 8.2 TSM Edition User Guide

block size was set to any other value by another application or when the drive was reconfigured, you will need to set the block size to 0 again before you can read an SBAdmin backup.
Rebuild (unexpire) a Backup Label Normally, when a TSM backup is expired within SBAdmin, the backup is actually removed from the TSM server. In this case, the backup is no longer accessible. For backups to tape, however, the backup label information still exists on the tape itself, even if a backup label bas been expired and removed, and can therefore be recovered.
As stated in the many warnings you received when you pushed that "expire" button, it is not possible to restore from a backup once the label has been removed. Should you find a SBAdmin tape backup that not known to this administrator; this option will read through the contents of the tape and rebuild the label. Once that is accomplished, you may restore from the backup normally.
To rebuild the backup label, select Utilities!Rebuild (unexpire) a Backup Label from the menu bar. A screen similar to the following will appear:
Use the arrow button to select the Client name from the drop-down list. After doing so, you must select the Device Name in the next field. You can also choose “local (client tape)” for the Server. By selecting this option, you indicate that you want to read the backup information from a tape drive attached to a client system (SBTAPE), rather than the TSM server. After doing so, a new Client Name field will appear, where you must select the client where the tape drive is attached.
Press the Select button next to the Backup ID field to list and select from backups that exist on the tape. Note that the list will contain yellow and green buttons, yellow indicating those backups for which there is no backup label currently. You can only select one of these backups when you want to rebuild a label.
Once you have selected the backup, press the Rebuild Label button to begin reading the backup and rebuilding the backup label. As this occurs, a screen similar to the following will appear:
When the process is complete, the completion status will be displayed and a Show Label button will appear, with which you can display the Backup Label or press the Cancel button to return.
Storix System Backup Administrator 108 Version 8.2 TSM Edition User Guide
23. Network Security SBAdmin was created with safeguards in place to prevent breaches in security without disrupting the security and integrity of the remaining network. This section outlines the flow of network traffic, the security measures that have been implemented, and what steps need to be taken by security personnel to insure that your software will function properly between network firewalls.
TCP/IP Ports SBAdmin configured with a TSM Edition license communicates via the Transmission Control Protocol/Internet Protocol (TCP/IP). This communication is handled through two different ports, the Dataport and the Statusport. By default, the SBAdmin uses port numbers 5026 and 5027 which are registered with the Internet Assigned Numbers Authority (previously used 8191 and 8192). These ports numbers are determined during the installation of the software and can be changed by the user at that time. If you need to change the port numbers used, simply reinstall the software and update the port numbers at that time. If you change your port numbers, previously made boot images on CDs will attempt to communicate through the old port numbers if installing from a remote server. It is advised to create your boot media/images after changing your port numbers.
It is very important that the Administrator and Clients using SBAdmin are configured to use the same port numbers. You can verify this by checking in the /.stdefaults file for the following entries:
DATAPORT=5026 STATPORT=5027
These two ports are listening ports and must be open to incoming TCP/IP traffic from other systems within your SBAdmin network. SBAdmin uses the ports specified above to transfer backup data, status messages, and to run remote commands. Only the SBAdmin network daemon process “strexecd” can properly answer requests on these ports. Any other process attempting to open these ports will receive a connection error.
Network Firewalls When a backup or restore is performed remotely, commands are initiated between the Admin and Client. The network communications on these ports are setup automatically when SBAdmin is installed on any system. If you have a network firewall between any of your systems utilizing SBAdmin, you will need to open the communication on these ports, or select other port numbers to use that are allowed by the firewall.
Some firewalls will close inactive ports after a certain period of time. It is advisable to turn off this timeout, if possible. Should a firewall timeout occur, SBAdmin will continue a backup, but no further messages will appear and SBAdmin will not receive the exit status of the command. Although the backup usually completes successfully, SBAdmin will appear to have hung.
Remote Command Execution SBAdmin is the only application that can communicate over the SBAdmin ports. In addition, only specific commands can be run remotely.
All remote commands are executed using the “strexec” executable, which may be executed only by the root user on the system.
All attempts to run remote commands are checked for authenticity as follows:
Storix System Backup Administrator 109 Version 8.2 TSM Edition User Guide

Storix System Backup Administrator 110 Version 8.2 TSM Edition User Guide
In the following, $STXPATH designates your SBAdmin data directory chosen when installing the software (default is /storix), and $STXINSTPATH is the SBAdmin application directory (/opt/storix for Linux & Solaris or /usr/lpp/storix for AIX).
1. The IP address of the sender is checked to see if it is a valid admin system. Valid admin systems are specified in the $STXPATH/config/admin_servers file when SBAdmin is installed onto a client system. If the caller is an administrator system, no further hostname or IP address checking is performed.
2. The groupid of the caller is checked that it is a member of the same group. The group of a client is identified by the $STXPATH/config/group file. This file is created by the SBAdmin administrator system and copied to each client when it is configured.
3. The IP address of the sender is checked to see if it is a valid client (if calling a server). The $STXPATH/config/serveraccess_groupid file determines the permitted hosts. This file is created by the SBAdmin administrator system and copied to each server when clients are added or removed from the server’s group.
4. The command to execute is checked to ensure it is not a wrapper. For instance, no commands containing sub-commands such as “command1; command2” or “command1 $(command2)” may be executed.
5. The command to execute is checked to ensure it does not contain an absolute pathname. Only the command name to execute must exist on the system in the $STXINSTPATH/bin directory.
6. The command to execute is checked to see if it a permitted remote command. Permitted commands are listed in the $STXINSTPATH/config/remote_cmds file. Programs listed here may not have a leading PATH, but the commands themselves must exist in the $STXINSTPATH/bin directory.
7. For user-customized pre and post-backup commands, the commands must exist in the $STXPATH/custom directory, must be writeable only by root and must be executable.
Note that all of the above configuration files and directories may only be written by the root user on the system.
Remote Installation Manager The Remote Installation Manager (RIM) provides a remote system anywhere on the network to connect to the system installation process of a client. This access is provided using a secure (ssh) connection. Since this access is only available when this option has been configured, a password has been set, and the client is booted to the system installation process. There is little security risk, but it is worth noting that the remote user will have access to all system installation process options and installation media available to the client system.
RIM access is only provided after booting from SBAdmin system installation boot media and either:
a. enabling RIM access within the system installation menus from the client
or
b. pre-configuring automatic enabling of RIM access when the installation media is configured.
In either case, a password is selected that the remote ssh program must use to connect to the client’s installation process.

Storix System Backup Administrator 111 Version 8.2 TSM Edition User Guide
Encryption Keys This section is applicable only if the Backup Encryption Optional Feature is installed.
Encryption keys are entered on the client system using the stkeys command. This prevents the encryption keys from being passed across the network in any form. The encryption keys are stored in a file on the client system, unreadable by any user other than “root”, and neither the file nor the information therein is ever sent over the network.

Storix System Backup Administrator 112 Version 8.2 TSM Edition User Guide
24. Getting Help QuickHelp If you are uncertain of the use of a particular button, listbox or entry field, you may at any time move the cursor over the object in question and press the right mouse button. A popup message will appear on top of the object with information on its use and any options, warnings or special instructions that might apply. Information is provided for every selectable object in the application. After reading the message provided, you may click any mouse button anywhere on the screen to remove the QuickHelp message and continue as usual.
Always use the QuickHelp as your first step in understanding or resolving a problem!
User Guide This user guide may be displayed at any time from the Backup Administrator user interface by selecting Help!User Guide from the menu bar. This user guide contains links so that clicking on any underlined text will move you immediately to the referenced section of the text.
When selecting this option, a PDF viewer application will be started in order to open the user guide file, which is in Portable Document Format (PDF format). The viewer provided with this application is a simple viewer to save space, and does not provide all the functions of some larger PDF viewers. If you prefer to use another PDF viewer, simply set the VIEWER environment variable to the name of the viewer application file before starting the SBAdmin. If the specified program exists, the user guide will be opened using this program.
Communications Errors A tool is available to help diagnose problems in communicating between the TSM Admin system and clients. If the client icon on the Main Screen shows a red symbol (indicating the client is unavailable), or if an error occurs such as “Client host may not be contacted”, run the stcheck command to help determine the cause. Refer to the stcheck command in the Commands Reference Guide for details.
Storix Support Should you encounter a problem using SBAdmin or have any questions, numerous support options are available. Select Help!Storix Support from the menubar to display current information on support options available to you. This will provide you with links to obtaining online and telephone support, hints and tips, etc.
Storix System Backup Administrator 113 Version 8.2 TSM Edition User Guide
Index A
Admin system, 8, 9, 10, 13, 15, 26, 29, 42, 61, 64, 100, 108, 110, 112 definition, 13
Administrative user TSM, 15
AES. See encryption AIX
backup process priority, 95 operating system support option, 91 setting default printer, 93 snapshot backups, 50, 52 supported software levels, 8
API client software, 12, 15, 16 software, 8
authentication TSM Server, 15
B
backup incremental, 37 jobs. See also jobs status reporting, 98
alternate notification, 99 primary notification, 99
backup devices display, 17
backup history report, 103 backup ID. See backup label backup job, 42
adding to queue from command line, 47 auto-verifying, 44 changing, 45 creating, 42 customizing backup profile, 43 definition, 14 delete automatically after running, 43 display, 18 enable snapshot backups, 43 exclude list, 44 job ID, 42 killing, 58 messages, 57 monitoring, 57 output display, 55 placing on hold, 58 removing, 46 removing from queue, 59 report, 103 restarting, 59 running
from command line, 47 on demand, 46
scheduling, 44 scheduling and running, 42 status and output history, 67
view by client, 69 by job ID, 68 by server, 68
status screen, 54 verify, 70
backup label, 60 backup ID, 60 backup retention policy, 96 expire, 60 expiring, 65, 66 print, 60 view, 61
by backup ID, 61 by client, 63 by job ID, 63 by server, 62 by tape label ID, 62 read from media, 64
backup profile, 32 adding, 32 changing, 39 customizing by job, 43 definition, 14 pre and post backup programs, 35 removing, 31, 39 report, 103
backup retention, 15 expiring a backup, 65, 66 policy, 66, 96
backup retention policy, 34 tape backups, 97
backup schedule exceptions, 48 backup job, 44 configuring, 48 global holidays, 49
backup sequence number, 71, 75, 78, 82 backup server
display, 17 boot media
system installation, 105 boot media server, 31 boot server, 104, 105 bootloader, 105 buffer size
backup profile, 33
C
chunk size snapshot backups, 51
client, 25, See TSM Client display, 17

Storix System Backup Administrator 114 Version 8.2 TSM Edition User Guide
exclude list, 41 icons, 27 license, 9 pre- and post-backup programs, 36 pre- and post-snapshot programs, 36 remove, 27
client options file, 15 color themes, 91 commands
remote execution, 109 sbadmin, 11 stqueue, 47 strunjob, 47
COMMMethod, 29 compression
SBAdmin, 33 TSM server, 16, 28, 29 TSM server, 43
configure backup job, 43 backup profile, 32 backup retention policy, 96 exclude lists, 40 job error handling, 101 menu, 17 pre- and post-backup programs, 35 report preferences, 93 snapshot backups, 50 TSM clients, 25
D
differential. See incremental backups differential backups, 38 display
job queue, 18 queues, 53
dsm.opt, 15, 29 dsm.sys, 15, 28
E
encryption backup jobs, 44 enabling, 26 feature, 9 optional features, 11, 90 software, 3
encryption keys security, 111
error handling backup job, 101 queues, 101
evaluation license, 9 exceptions. See backup schedule exceptions exclude
holidays, 49 specifying data to backup, 33
exclude list
removing entries, 41 exclude list, 40
adding, 40 menu, 41 wildcards, 40
exclude list applying to backup job, 44
exclude list report, 103
expire backup retention policy, 96
expire backup label. See backup label
F
filesystem recreate, 74
firewalls, 109 fonts
setting default, 91
G
groups, 20, 23 adding, 23 admin user, 20 changing, 24 group ID, 23 removing, 24 switching, 24 user default, 21
H
hardware supported hardware, 8
help network communication errors, 112 quickhelp, 112 technical support, 112 viewing the user guide, 112
holidays. See backup schedule exceptions
I
incremental backups, 34, 37 customizing jobs, 43 examples, 37 restoring from, 38
incremental backups, 34 install
software, 9
J
job. See also backup jobs job queue
display, 18 job queues, 53
definition, 14 display, 53

Storix System Backup Administrator 115 Version 8.2 TSM Edition User Guide
display icons, 54 messages, 57 removing a job, 59
jobs, 42
L
label. See backup label or tape label licensing. See software license options Linux
adding printers, 93 backup process priority, 95 operating system support option, 91 setting default printer, 93 snapshot backups, 50 supported software levels, 8
LinuxPPC supported software levels, 8
Local System Backup, 45 logical volume
exclude list, 40, 41 recreate, 74 snapshot backups, 50
M
management class, 11 retention, 15
meta-disk exclude list, 40
N
network communication errors, 112 default interface, 94
network boot images, 105 reports, 104
network install client report, 104
network security, 109 firewalls, 109 remote commands, 109 TCP/IP ports, 109
node. See TSM Client notification. See backup status reporting
O
operating system support option, 91
options file, 15, 28 Oracle Database Backup
optional features, 11
P
partition exclude list, 40, 41
permission
read permission, 34 printer
setting Linux default, 93 printer AIX default, 93 printer queue
report option, 102 printers (Linux), 93 profile. See backup profile
Q
queues. See job queues
R
recreate filesystem, 77 logical volumes, 77 LVM options, 74 volume groups, 74
remote installation manager, 105 security, 110
remove backup job, 46 client, 27 job from the queue, 59 profile, 31, 39 TSM server, 30
report preferences, 93 configure, 93 email, 94 printers, 93 send to file, 94
reports, 102 backup history, 103 backup jobs, 103 backup profiles, 103 exclude lists, 103 network install clients, 104 preview, 102 printer, 102 restore history, 103
restore incremental backups, 38
restore history report, 103 restoring a backup
destination, 87 options screen, 82 search pattern, 84 selecting backup to restore, 81 status and output, 87 using wildcards, 86
restoring a backup, 81 retention. See backup retention, See backup retention RIM, 105
security, 110 root user, 35, 37, 98, 99
Storix System Backup Administrator 116 Version 8.2 TSM Edition User Guide
S
SBTAPE client device, 27 job options, 43, 45
schedule backup jobs, 17, 44 jobs from the command line, 47
security. See network security server
adding, 28 changing, 29
server. See TSM server license, 9
server/device error handling, 39 shared memory, 29 slice
exclude list, 41 snapshot backups, 50
chunk size, 51 concurrent, 52 enabling, 50 enabling per job, 43 mirroring issues, 52 pre- and post-snapshot programs, 36 sequential, 52 snapshot LV size, 51
software installation, 9 license options, 8 operating system support, 8 starting, 11 updating, 10
Solaris backup process priority, 95 operating system support option, 91 supported software levels, 8
sound turning on/off, 91
SPARC supported software levels, 8
sparse file, 27 ssh, 105, 110 stalled backups, 96 system backup
to client tape, 26 system installation
boot media, 105
T
tape AIX system backup, 14 auto-expire backups, 66 backup jobs, 43 block size, 107 checking, 107 ejecting, 107 forwarding, 107
job queues, 53 label ID, 60 labels, 60
writing to tape, 106 local system backup, 26 overwrite/retention policy, 97 perform operations on, 107 read backup label, 65 reading backup header, 107 rebuild label, 108 recreate logical volumes and filesystems from, 78 recreate volume groups from, 75 restoring, 81 rewinding, 107 TSM server backup, 13, 14 verifying, 70
tape label, 107 TCP/IP
port numbers, 109 TCPServeraddress, 28 technical support, 112 themes
fonts and colors, 91 TSM Admin System. See Admin system TSM Administrative user, 15 TSM backup read permission, 34, 81 TSM Client, 13
adding, 25 authentication, 15 backup job, 42 definition, 13 license, 9 password, 29
TSM Server, 13, 14 administrative user, 29 authentication, 15 backup retention, 15 backup retention policy, 96 concurrent backups, 96 configuring, 28 definition, 13 job configuration, 42 job queue, 53 naming, 28 rebuild backup label, 108 removing, 30 setup, 11
U
user interface, 17 icons, 19 menu bar, 17
users, 20 access level, 21 adding, 20 changing, 22 levels, 20 removing, 21

Storix System Backup Administrator 117 Version 8.2 TSM Edition User Guide
utilities forward a tape, 107 show block size, 107 tape operations, 107 write a tape label, 106
V
verify auto-verifying backup job, 44 backup, 70
volume group AIX rootvg, 14 backup labels by, 63 exclude list, 40 recreate, 74 restoring, 83 restoring incremental, 39
volume group, 38 volume group, 42 volume group, 43 volume group, 81
W
wildcards in exclude lists, 40 restoring files or directories, 86
Z
ZFS operating system support option, 91 volume
exclude list, 41


![Tivoli Storage Manager - Universität · PDF fileTSM-Server für Linux/x86_64 - Version 6, Release 3, Level 4.200 5 TSM-Server (tsmsrv[abcde].rus.uni-stuttgart.de) für Backup von](https://img.dokumen.tips/doc/110x75/5a9df4577f8b9a29228b9a4f/tivoli-storage-manager-universitt-fr-linuxx8664-version-6-release-3-level.jpg)