Embed Size (px)
Citation preview

Educational & Administrative
Scheduling
(Learning & Meeting Events)
Version 6.7.7
TSM TELEMEDICINE SERVICE MANAGER

TSM Educational & Administrative Scheduling v6.7.7 ii
© Copyright Ontario Telemedicine Network (OTN) All rights reserved. Last update: Nov. 23, 2017 This document is the property of OTN. No part of this document may be reproduced or transmitted in any form or by any means, electronic or mechanical, including photocopying, recording, or information recording and retrieval systems, for any purpose other than the recipient's internal use, without the express written permission of OTN. OTN contact information: OTN Business Analysis 105 Moatfield Drive, Suite 1100 Toronto, ON M3B 0A2 Phone: (416) 446-4110 Fax: (416) 446-4139 Email: [email protected] Web site: www.otn.ca

TSM Educational & Administrative Scheduling v6.7.7 iii
Table of Contents
Using This Guide ................................................................................................................................................. 5 Document Updates ............................................................................................................................................... 6
About TSM .......................................................................................................................................................... 7 What is the Telemedicine Service Manager (TSM)? .................................................................................................. 7 TSM and Ncompass: What is the Difference? ........................................................................................................... 8
Security ................................................................................................................................................................. 9 Scheduling and Workflow Management ............................................................................................................ 10
Using TSM ......................................................................................................................................................... 11 Understanding Screen Components and Functions ................................................................................................ 11
Selecting Icons and Clicking Buttons ................................................................................................................... 11 Definition of terms .............................................................................................................................................. 11 Data Fields .......................................................................................................................................................... 12 Keyboard Shortcuts ............................................................................................................................................ 13 TSM Icons and Buttons ....................................................................................................................................... 14 Error Messages and Warnings ............................................................................................................................ 19 Conflict Errors and Resolving Conflicts ............................................................................................................... 20 Marked Time ....................................................................................................................................................... 21
Logging In and Getting Started ................................................................................................................................ 22 Home Page .......................................................................................................................................................... 23 Using the Calendar Link ...................................................................................................................................... 25
Using Quick Search .................................................................................................................................................. 26 Using Advanced Search ........................................................................................................................................... 27
Search All ............................................................................................................................................................ 27 Search Educational ............................................................................................................................................. 29 Search Administrative ......................................................................................................................................... 30
Managing Events ............................................................................................................................................... 31 Creating a New Event .............................................................................................................................................. 31 Scheduling an Event ................................................................................................................................................ 34
Header Tab ......................................................................................................................................................... 34 Sites Tab .............................................................................................................................................................. 39 Approval Tab ....................................................................................................................................................... 43 Confirmation Tab ................................................................................................................................................ 45
Managing Attachments ........................................................................................................................................... 47 Adding an Attachment ........................................................................................................................................ 47 Deleting an Attachment ...................................................................................................................................... 49 Opening or Downloading Attachments .............................................................................................................. 50
Publishing Multi-Point Events ................................................................................................................................. 51 Editing Publication Details .................................................................................................................................. 53 Un-publishing an Event ....................................................................................................................................... 54
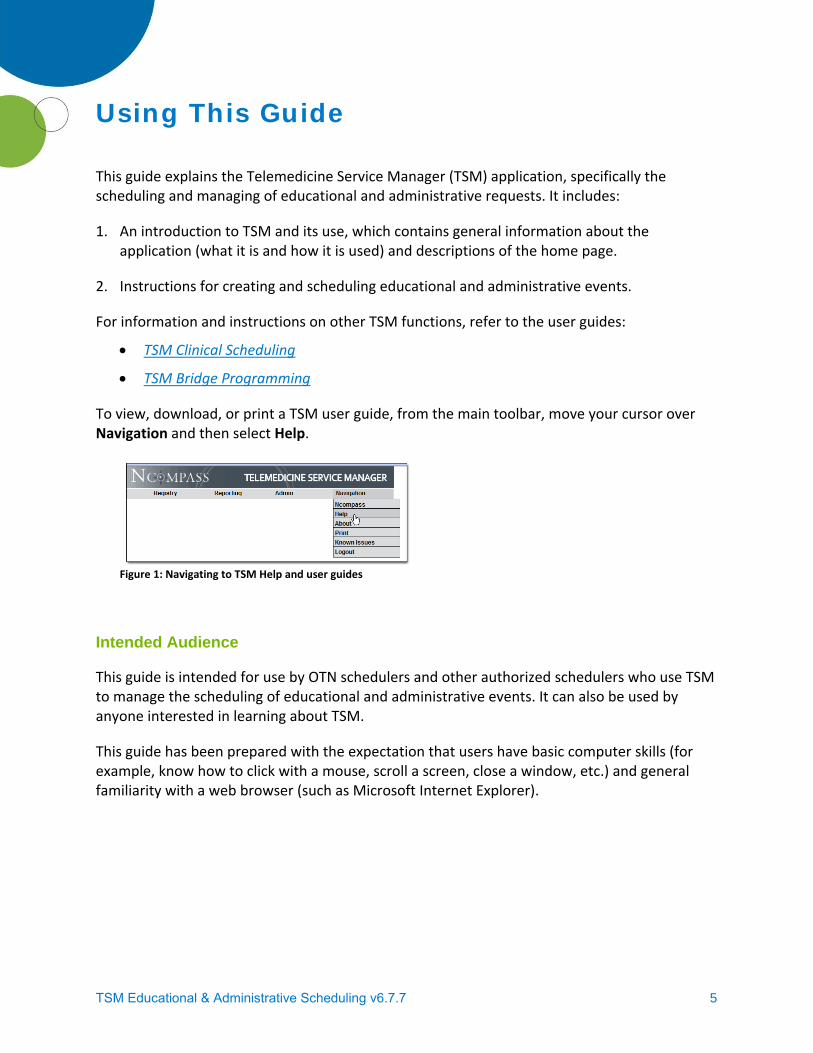
Requesting Webcasting ........................................................................................................................................... 56 Creating a Webcast Request ............................................................................................................................... 56 Webcasting Agreement Form (WAF) .................................................................................................................. 61 Editing a Webcast Request ................................................................................................................................. 62 Cancelling a Webcast Request ............................................................................................................................ 64
Modifying Scheduled Events ................................................................................................................................... 65 Editing Unscheduled Events .................................................................................................................................... 66 Managing Individual Systems for an Event ............................................................................................................. 67
Deleting a System ............................................................................................................................................... 67 Replacing a System ............................................................................................................................................. 68

Table of Contents
TSM Educational & Administrative Scheduling v6.7.7 iv
Cancelling Scheduled Events ................................................................................................................................... 69 ‘Un-cancelling’ Cancelled Events ............................................................................................................................. 70 Sending Event Notifications .................................................................................................................................... 71 Cloning an Event ...................................................................................................................................................... 74 Recurring an Event .................................................................................................................................................. 76
Sending Notifications for Recurring Events ........................................................................................................ 79 Deleting an Event .................................................................................................................................................... 80
Event Special Resources .................................................................................................................................... 81 Bridge and Gateway Resources ............................................................................................................................... 81 Bridge warning messages ........................................................................................................................................ 83 Booking Dial-in Phone Numbers ............................................................................................................................. 84
Audio/Video Phone Number Requirements ....................................................................................................... 86 Searching for Dial-in Numbers ............................................................................................................................ 89
Portal Calling: Click-to-Call and Auto-Initiating Events ............................................................................................ 90 Using Auto-Initiation ........................................................................................................................................... 91
Using TSM Registries ......................................................................................................................................... 92 Site/System Registry ................................................................................................................................................ 92
Searching the Site/System Search Registry ........................................................................................................ 93 Site/System Registry Search Fields ..................................................................................................................... 94 Using Site Finder ................................................................................................................................................. 98 Editing a Site ..................................................................................................................................................... 100 Editing a System ................................................................................................................................................ 101
Event Type Registry ............................................................................................................................................... 103 Searching the Event Type Registry .................................................................................................................... 103
Contact Registry .................................................................................................................................................... 104 Searching the Contact Registry ......................................................................................................................... 104 Contact Registry Search Fields .......................................................................................................................... 105 Creating a Contact ............................................................................................................................................ 108
Location Registry ................................................................................................................................................... 110 Searching the Location Registry ........................................................................................................................ 110 Location Registry Search Fields ......................................................................................................................... 111 Creating a Location ........................................................................................................................................... 112
Appendix A: Conference Modes (Video Layout)..................................................................................................... 114 Full Screen Layout ............................................................................................................................................. 114 Split Screen Layouts (Side by Side, 1+7, 1+21) .................................................................................................. 114
Sample Screen Layouts .......................................................................................................................................... 115
Index .............................................................................................................................................................. 116
TSM Educational & Administrative Scheduling v6.7.7 5
Using This Guide
This guide explains the Telemedicine Service Manager (TSM) application, specifically the scheduling and managing of educational and administrative requests. It includes:
1. An introduction to TSM and its use, which contains general information about the application (what it is and how it is used) and descriptions of the home page.
2. Instructions for creating and scheduling educational and administrative events.
For information and instructions on other TSM functions, refer to the user guides:
• TSM Clinical Scheduling
• TSM Bridge Programming
To view, download, or print a TSM user guide, from the main toolbar, move your cursor over Navigation and then select Help.
Figure 1: Navigating to TSM Help and user guides
Intended Audience
This guide is intended for use by OTN schedulers and other authorized schedulers who use TSM to manage the scheduling of educational and administrative events. It can also be used by anyone interested in learning about TSM.
This guide has been prepared with the expectation that users have basic computer skills (for example, know how to click with a mouse, scroll a screen, close a window, etc.) and general familiarity with a web browser (such as Microsoft Internet Explorer).

Using This Guide
TSM Educational & Administrative Scheduling v6.7.7 6
Document Updates
This is a high-level list of revisions to this manual. For full details about a TSM release refer to the Release Notes issued with each release.
Version Date Description of Change
6.7.7 Nov. 23, 2017 Updated user guide to latest release of TSM/Ncompass.
This includes, but is not limited to, the following:
• For multi-point events, the Conference Mode field offers a new set of video layouts.
o Creating an event
o Appendix B: Conference Mode (Video Layouts)
• The fields Video Recording, Permission, and Number of Callers were removed from the Header tab (educational events and administrative events)

TSM Educational & Administrative Scheduling v6.7.7 7
About TSM
What is the Telemedicine Service Manager (TSM)?
The Telemedicine Service Manager is a software application developed by OTN to support the scheduling of telemedicine events.
TSM helps you keep track of the telemedicine events you’re scheduling while reserving the systems involved, managing communications with participants, and handling arrangements for programming the bridge.
TSM provides:
• Scheduling workflow management for scheduling patient consultations, clinics, group therapies, educational and administrative meetings, and web-streamed events.
• Video system reservations to detect and help resolve conflicts.
• Multipoint and ISDN call detection and resource tracking.
• Registries of sites, systems, people, patients, places, and therapeutic areas of care.
• Reporting and data mining tools for tracking telemedicine activity and operations.
• Email, fax, and letter notifications to coordinators, consultants and patients.
• Self-service portals to support local telemedicine coordinators. (See TSM and Ncompass: What is the Difference? on page 8.)
• Password protection and role-based permissions to regulate access to application functions and patient information.

About TSM
TSM Educational & Administrative Scheduling v6.7.7 8
TSM and Ncompass: What is the Difference?
Both TSM and Ncompass enable users to schedule and manage telemedicine events. TSM and Ncompass share the same event and registry data and allow OTN customers and central schedulers to work hand-in-hand. However, there are a few differences.
• It is faster and easier to create events in Ncompass.
• Each application has a unique look and feel.
• Both Ncompass and TSM enable users to schedule events. However, Ncompass has a few restrictions. For example, Ncompass users can:
• Select only member sites and systems. (To schedule an ISDN system or a phone line into an event, they need to contact OTN Customer Care.)
• See patient information only if they have a clinical role and are associated with the patient system.
• Edit non-clinical events only if they are the creator or associated to the host site.
• TSM’s primary audience is OTN Customer Care - Scheduling Coordination. It enables us to fully support our customer base and assist in all their scheduling needs. Therefore, TSM offers have a few additional features. For example, TSM has:
• A more robust search engine.
• Admin and reporting functions different than Ncompass.
• Different restrictions for viewing events and searching registries.
• Fewer business rules around scheduling than Ncompass. For example, TSM users can:
• Select Off-Net and ISDN systems and Non-Member sites.
• Schedule bridges that belong to other organizations.
• Add phone lines to events.
• TSM users can access Ncompass, but Ncompass users cannot access TSM. For example, a TSM user might need to access Ncompass to run a specific report. However when accessing Ncompass, TSM users are limited to what they can do in Ncompass just like regular Ncompass users (with the exception of Admin Users).
For more information about Ncompass, see the user guides and reference material available from the Ncompass application on its Resources > Documents page.
Figure 2: TSM home page
Figure 3: Ncompass home page

About TSM
TSM Educational & Administrative Scheduling v6.7.7 9
Security
TSM is username and password protected.
What you can see and do once you login depends upon the administrative privileges granted to you. (For example, non-clinical schedulers cannot edit clinical events, see patient names, or search the Patient Registry).
After 15 minutes of inactivity you will be automatically logged out.
SAVE your data often to avoid losing it. Save your work if you need to step away from your computer, need to interrupt the scheduling process of a particular event and come back to it later, or if you want to backtrack during the scheduling process.
Detailed information about OTN’s privacy policies and procedures are available on the OTNhub website at otnhub.ca > Professional Development > Privacy Toolkit.

About TSM
TSM Educational & Administrative Scheduling v6.7.7 10
Scheduling and Workflow Management
TSM manages scheduling by splitting an event’s information into separate tabs that correspond to different stages of the scheduling process. As you complete a stage, you move onto the next tab. These tabs are arranged in a row:
Figure 4: TSM tabs correspond to the stages of scheduling an event
• Light blue tabs are complete and are active links to that tab.
• Dark blue tab indicates the tab you are currently working on.
• Light gray tabs are not yet complete and are not linked.
As you move through the stages of scheduling an event, its status changes to reflect where you are in the process and what information you still require. An event’s status is represented by graphical icons and colours for easy reference. (See Event status icons on page17.)
TSM guides you through the scheduling process prompting you with success and informational messages as well as warning and error messages.
• Success and informational messages appear in blue text proceeded by an icon
• Error messages appear in red text proceeded by an icon.
Figure 5: Sample informational message
Figure 6: Sample error message
.

TSM Educational & Administrative Scheduling v6.7.7 11
Using TSM
The following section describes some of the basic ways of using TSM and its components.
Understanding Screen Components and Functions
Selecting Icons and Clicking Buttons
To complete most tasks in TSM, move your cursor over a linked word, icon, or button. This causes your cursor to turn into a hand symbol ( ) indicating an active function.
• If you are instructed to select an item by clicking it, only a single click with your left mouse button is required.
• If a different way of clicking is required, the instructions will tell you.
Definition of terms
The following table explains some of the TSM terms used in scheduling educational and administrative events.
Term Definition
Requestor The person who asked you to schedule the event.
Received Date The day on which you received the request for the event you are scheduling.
Source The way in which the request came in.
• Events created in TSM have the default ‘Fax’.
• Events created in Ncompass have the default ‘Self scheduled’.
Speaker/Chair Affiliation
The organization that the presenter, speaker, or chair is affiliated with.
Actual Studio The site where the presenter, speaker, or chair will be located.
Virtual Studio The sites where the audience or other members of the group will be located.

Using TSM
TSM Educational & Administrative Scheduling v6.7.7 12
Data Fields
Data fields are the elements on TSM screens where you type or select information. They come in a few different flavours.
Field example Type Description
Grey or shaded text box
You can’t type data directly into these fields. TSM fills these fields based on your selection from a search results list.
White text box You can enter free text in these fields.
Drop-down list You select from a predefined list to enter data
in these fields. Click the drop-down arrow and then select the option you need.
Radio buttons You make one choice among a set of mutually
exclusive, related options. You can select one and only one option.
Checkbox A single checkbox allows you to choose an individual choice, either to toggle an option on or off, or to select or deselect an item.
A group of checkboxes allows you to select one or more items from the group.
Mandatory Fields (*)
Fields with an asterisk are mandatory. (In most cases this means that you cannot move on to the next tab until you complete the field. A few fields are mandatory only when the event is actually scheduled. That is, they don’t become mandatory until you are ready to finalize the event.)

Using TSM
TSM Educational & Administrative Scheduling v6.7.7 13
Keyboard Shortcuts
The following tables show TSM’s keyboard shortcuts. To use a keyboard shortcut, hold down the [ALT] key while pressing one of the following shortcut keys.
Navigating within event tabs
When creating or editing an event, you can move to the first or last fields in a tab or between tabs using these keyboard shortcuts.
Shortcut Description
[ALT] [1] Move your cursor to the first field on the tab.
[ALT] [2] Move your cursor to the last field on the tab.
[ALT] [S] Save the tab.
[ALT] [P] Go to the Previous tab. (TSM does not save the data in the current tab before moving to the previous tab.)
[ALT] [N] Go to the Next tab. (TSM saves the data in the current tab before moving to the next tab.)
Navigating an events summary list
When viewing a list of events you can move up and down the list or open a specific event using these keyboard shortcuts.
Shortcut Description
[ALT] [] Go up a row in the table.
[ALT] [] Go down a row in the table.
[ENTER] If a row is highlighted, hitting [ENTER] opens the edit window for that row.

Using TSM
TSM Educational & Administrative Scheduling v6.7.7 14
TSM Icons and Buttons
TSM uses various icons to give you quick visual cues about event statuses, warnings, and cautions. There are also navigation buttons offering quick access to TSM functions.
Event and registry icons and buttons
The images and buttons listed in the table below are used throughout TSM. For example, when you create a request, view search results, or search a registry.
Icon or button Description
Search for a registry item (e.g., a presenter, site, or videoconference system).
View a selected registry item’s details.
Select a date. Appears wherever you must select a date (Sometimes appears without the dd-mm-yyyy.) See Using the Calendar Link on page 25.
Delete () an item or () selected items. Usually works in conjunction with a checkbox in a column or row. Selecting a checkbox in a column/row with a delete icon deletes the selected item when you click Save, Next or Update.
You must save or update for the deletion to take effect.
View the details of the associated item. Appears when viewing search results.
Edit the details of the associated item. Appears when viewing search results.

Using TSM
TSM Educational & Administrative Scheduling v6.7.7 15
Actions panel icons
These buttons are used in the Actions panel. They affect the event as a whole and only appear when applicable.
Icon Action Description
View Complete Request. Replaces the screen with a summary panel that provides a one-page view of the request showing all individuals and systems involved.
Clone Request. Opens a dialog box asking you to confirm that you want to clone.
If yes, TSM creates a new request with the status of Requested. The new event has the same details as contained on the original event’s first three tabs. See Cloning an Event on page 74.
Schedule Recurring Request. Replaces the screen with a Recurrence panel allowing you to schedule an event that occurs daily, weekly, monthly, or yearly. See Recurring an Event on page 76.
View Fax and Email Notifications. Replaces the screen with a Notification History panel showing a record of the messages sent to event participants already, and allows you to send out new event updates to users.
View Confirmation. Opens a new window with a summary of the event, suitable for printing and faxing.
Edit Request. Viewable before an event has a scheduled status. (After the event is scheduled, the action becomes ‘modify request’.)
Replaces the screen with the Edit Event page allowing you to make changes. See Editing Unscheduled Events on page 66.
Cancel Request. Opens a dialog box asking you to confirm that you want to cancel.
If yes, TSM changes the event’s status to ‘Cancelled’ and releases its hold on the systems involved. You must select a reason for the Cancellation. See Cancelling Scheduled Events on page 69.
Modify Request. Viewable after an event has a scheduled status. Opens a dialog box asking you to confirm that you want to reschedule.
If yes, TSM changes the request status to ‘Pending’ and replaces the screen with the Edit Event page allowing you to make changes. See Modifying Scheduled Events on page 65.
Continued on next page…

Using TSM
TSM Educational & Administrative Scheduling v6.7.7 16
Icon Action Description
Publish and Manage Publication. Appears after an event has a scheduled status. Replaces the screen with a form that enables you to publish the event to the OTN Learning Centre and the Ncompass Public Events list.
Used only for non-clinical, multi-point events. See Publishing Multi-Point Events on page 51.
Manage Attachments. Appears after an event is ‘approved’. Replaces the screen with a form that enables you to attach document and graphic files to an event.
Used only for non-clinical, multi-point events. See Managing Attachments on page 47.
Request Webcast and Manage Webcast. Appears after an event has a scheduled status. Replaces the screen with a form that enables you to request webcasting for the event.
Used only for non-clinical, multi-point events. See Requesting Webcasting on page 56.
View Bridge Info Page. This page is used by OTN Technical Support.
It allows them to see if there are sufficient resources to support a bridged event. (E.g., a multipoint event or involves ISDN systems and/or audio participants.)
Undo Cancel. Opens a dialog box asking you to confirm that you want to reschedule the event.
If yes, TSM changes the event’s status from Cancelled to Unscheduled. The Header and Sites tabs have the data from the original request but are all pending approval and confirmation. See ‘Un-cancelling’ Cancelled Events on page 70.
Delete Request. Opens a dialog box asking you to confirm that you want to delete.
If yes, TSM deletes the request and returns you to the TSM home page.
Only an OTN Customer Care - Scheduling Coordination team lead or manager is authorized to delete an event.
It is much better to Cancel the request and record a reason for the cancellation. Cancelling ensures workload tracking and reconciliation of other reports.

Using TSM
TSM Educational & Administrative Scheduling v6.7.7 17
Event status icons
These icons give you a quick visual clue about an event’s status. As you move through the various stages of requesting an event status icon appears on the screen and changes to reflect the event’s status. These icons also appear in search result lists beside each listed event.
For more information on the stages of requesting an event, see Scheduling and Workflow Management on page 10.
Icon Description
New requests begin with a status of Unscheduled.
An event has an Unscheduled status until you complete the Approval and Confirmation tabs.
After you complete the Confirmation tab and confirm an event’s schedule, its status changes to Scheduled.
On the date and time of a request, throughout the duration of the event, its status is In Progress.
The event has been Completed.
The event is Cancelled and cannot be modified in this state.
Before you can modify a cancelled event, you must first Undo Cancel.

Using TSM
TSM Educational & Administrative Scheduling v6.7.7 18
Bridged event, error, and warning icons
When creating and scheduling your event, the following symbols appear in response to conflicts and other special conditions.
Icon Title Description
Gateway Required Indicates that the gateway is needed to complete the call. Gateways are required for audio participants and systems with Off-Net connection types. (See Event Special Resources on page 81.)
Bridge Required Indicates that the bridge is needed to complete the call. Bridges are required when more than two systems participate in an event. (See Event Special Resources on page 81.)
Conflict with a Tentative Hold
Indicates a conflict because another unscheduled event has a tentative hold on the system you are trying to schedule. (See Conflict Errors and Resolving Conflicts on page 20.)
Conflict with a Scheduled Hold
Indicates a conflict because another scheduled event has a hold on the system you are trying to schedule. (See Conflict Errors and Resolving Conflicts on page 20.)
Conflict with a period of Marked Time
Indicates a conflict because your event overlaps with a period of marked time on the system you are trying to schedule. (See Marked Time Warnings on page 21.)

Using TSM
TSM Educational & Administrative Scheduling v6.7.7 19
Error Messages and Warnings
When you save a tab or move to the next tab in the scheduling process TSM scans the event to ensure that you have entered valid data and there are no conflicts with existing events.
Error messages, warnings, and other alerts appear at the top of the screen under the top banner.
Data Entry Errors
When you click , TSM validates the current tab. It highlights mandatory fields that you
missed and fields where you entered invalid data.
If TSM finds one or more errors, it does the following:
A detailed list of error messages appear at the top of the screen, in red text within a red-outlined box.
In the tab form itself, each incorrect field is highlighted.
Figure 7: Sample data entry error messages
You must correct all errors before TSM allows you to proceed to the next tab.

Using TSM
TSM Educational & Administrative Scheduling v6.7.7 20
Conflict Errors and Resolving Conflicts
When one of the systems in your event conflicts with another event (e.g., another event has already reserved one of the systems you requested):
1. TSM identifies a conflict error and displays a generic error message appears at the top of the tab.
Figure 8: Sample conflict error message
2. In the sites tab, TSM displays an icon and additional error message directly below the conflicting item. A conflict with a scheduled event shows an icon. A conflict with an
unscheduled event (tentative) shows a icon.
Figure 9: Sample conflict error message - Sites tab
You must resolve the conflict before TSM can schedule the event.
3. To view the conflicting event’s details, click the error message associated with the conflicted item.
TSM opens a new window that displays the conflicting event in view mode.
4. To resolve the conflict, try the following:
• Remove or replace the conflicting system from your event.
• Move your event to a different day or time.
• Contact the requestor of the conflicting event and negotiate a resolution to the conflict.
If you attempt to schedule the event despite the conflict error, TSM re-issues the error and will not schedule the event.

Using TSM
TSM Educational & Administrative Scheduling v6.7.7 21
Marked Time
Marked time highlights specific time frames for a system. The marked time acts like a sticky note for a particular time, date, and system and appears as a colour-coded bar in the Ncompass calendar.
For example, a marked time period can indicate when:
• A video system is available for booking into only non-clinical events.
• A system is available but there are no human resources (e.g., nurse or TMC) to work with that system.
• A system is under repair and therefore marked as ‘system closed’.
These marked time warnings will not prevent you from scheduling your event (unless it’s marked as ‘system closed’). However, if the information contained in the marked time suggests that you should not schedule an event during that time, you should respect that request.
You can mark time for a system using Ncompass. For instructions about using marked time, refer to the Ncompass Getting Started guide (available from the Documents section in Ncompass).
Marked Time Warnings
If the date and time you request has been marked, TSM issues a warning as follows:
A warning message displays at the top of the screen. In the Sites tab, a Clock link ( ) appears beside the system/dates with
the marked time.
To view the marked time in Ncompass, click the Clock link ( ) or the associated warning message.
To view a pop-up box () with details about who marked the time, when it was marked, and its subject, move your cursor over the warning message.
Figure 10: Marked time warning with pop-up details showing

Using TSM
TSM Educational & Administrative Scheduling v6.7.7 22
Logging In and Getting Started
You log in to TSM using OTN’s single sign on screens.
If you are already signed in to the OTNhub (otnhub.ca), you don’t have to log in again to access TSM. You can click the ‘Schedule’ link in the top banner.
1. If you are not already logged in to the OTNhub, launch your Internet browser and go to schedule.otn.ca.
The Login selection screen appears.
Figure 11: OTN login screens
2. Select the appropriate login – ONE ID or OTN credentials.
3. Type your username and password and then click the Sign in button.
The TSM home page appears.
Figure 12: TSM home page

Using TSM
TSM Educational & Administrative Scheduling v6.7.7 23
Home Page
TSM’s home page provides you with quick access to all of the tasks you carry out most often and the events that you’re already working on. The home page contains six sections, as described below.
Figure 13: TSM home page
TSM main toolbar: These six menu categories provide access to TSM’s main functions. For detailed instructions about a function, click a link in the table below.
Home Request Registry Reporting Admin Navigation
Search Create
Site Event Type Contact Patient Location
SDU Bridge Reports* System Schedule*
Manage Security Manage Users Manage Groups
Ncompass Help About Print Known Issues Logout
*For more information about:
• Bridge Reports, see the user guide TSM Bridge Programming.
• System Schedule, see the user guide Ncompass Getting Started.

Using TSM
TSM Educational & Administrative Scheduling v6.7.7 24
System messages: TSM displays error messages, warnings, and success statements in this area. Errors appear as red text in a red-bordered box, success statements as blue text in a blue-bordered box.
Quick-search form: Search for event requests by ID number, consultant, or patient name (as individual search criteria or in combination). Select Advanced Search to search using additional criteria.
My last 10 events: This lists the last 10 events that you created or changed. Clicking an event opens it up for viewing or editing.
Quick-create a new event: These buttons provide one-click access to start creating a new event request.
Upcoming events list: You decide which upcoming events to display in the list. Use the checkboxes and drop-down list to personalize your list. For example, you can list only those events with the following characteristics:
• Events you were the last to modify.
• Only clinical events or only non-clinical events.
• Pending or unscheduled events within a specific time frame.
• Scheduled events within a specific time frame.
Whatever combination you choose, TSM remembers your preferences every time you return to your home page. You can easily change these preferences at any time.
Moving your cursor over an event title in the list highlights it (that is, it turns from blue to peach). To view the event details, click () the highlighted row or () an event’s status icon, or () the or links.
Figure 14: Upcoming events list

Using TSM
TSM Educational & Administrative Scheduling v6.7.7 25
Using the Calendar Link
The calendar link opens a graphic calendar, which allows you to select a specific date.
1. To open the calendar, click the Calendar link ( ).
An interactive calendar appears.
Figure 15: Calendar pop-up
2. To display a different year, click the arrow ( ) on the right of the Year field and select a
year from the drop-down list.
3. To display a different month, click the arrow ( ) on the right of the Month field and select
a month from the drop-down list.
To move forward or back one month at a time, click the back link ( ) or
the forward link ( ).
4. To select a specific date, click the desired calendar day.
When you click a specific date, the calendar closes and the selected date appears in the associated date field.

Using TSM
TSM Educational & Administrative Scheduling v6.7.7 26
Using Quick Search
The Quick Search panel allows you to search TSM’s database of existing events by Patient, Consultant and/or Event ID. Typing search criteria into one or more of these fields returns a list of search results from which you can locate the event(s) you’re looking for.
Figure 16: Quick Search panel
If you type data into more than one data field, TSM performs an ‘AND’ search.
For example, typing ‘Simon’ into the first Patient Name field and ‘Robert’ into the first Consultant Name field results in a search for events with a patient named Simon and a consultant named Robert.
If you type only partial names, the search results include all events where the name contains the specified character string anywhere in their First Name and Last Name respectively.
For example, if you search for First Name = ‘an’ and Last Name = ‘al’ the search results might include the following: Anu Alpha, Johane Allard, Sandra Dalziel, and Jian Balkhi.
Field Description
Patient Name • The two fields are for the patient’s First Name and Last Name respectively.
• Search results include only clinical events, not group or serial clinics.
Tip: Type only the first couple of letters for each name. In this way you avoid typos in your own search and can find existing typos that may be in the system.
Consultant Name • The search looks through all consultants assigned to clinical events and all presenters and chairs assigned to educational and administrative events.
• Search results include both clinics (group and serial) and clinical events.
• The two fields are for the consultant’s First Name and Last Name respectively.
Request/Event ID Use this field when you want to view a particular event. The search requires the full Request/Event ID number. Unlike the other two search fields, this returns only results that exactly match the Event ID you entered.

Using TSM
TSM Educational & Administrative Scheduling v6.7.7 27
Using Advanced Search
Advanced searching allows for much more complicated searches than the Quick Search. You can filter your search by category (e.g., administrative or educational events) and then further restrict the search by selecting a specific combination of criteria.
Search All
The Search All function searches through all event categories including both clinical and non-clinical events.
1. To perform an Advanced Search for all event categories, use one of the following options:
From the main toolbar, move the cursor over Request and then select Search>All.
Figure 17: Search all via TSM toolbar
From the TSM Quick Search panel on the
home page, click .
Figure 18: Search all via quick-search
A Search All Requests criteria screen appears.
Figure 19: Search All Requests criteria screen

Using TSM
TSM Educational & Administrative Scheduling v6.7.7 28
2. Select your search criteria. Different search criteria combine together as ‘AND’ searches. For example, searching for events with the Requestor ‘Simon’ and the Speaker ‘Robert’ will return only events with both a Requestor named Simon and a Speaker named Robert.
3. Click at the bottom of the screen.
A Search Results screen appears.
Using the Search Results Screen
If your search finds no matching events or clinics, you receive a No Results message.
• To return to the search form with your original search criteria, click () Display Search Form, modify your search, and try again.
If your search finds matching events and/or clinics, the search results appear with each event numbered on the left-hand side.
• Moving your cursor over an event/clinic title in the list highlights it (that is, it turns from grey to peach).
• To view an event’s details, click () the highlighted row or () an event’s status icon, or () the link.
• To edit an event’s details, click () the event link.
• To download an Excel file of the search results, click () the Export to Excel link ( ). You can export a maximum of 30,000 records to Excel. Additional records will not appear.
Figure 20: Advanced search results

Using TSM
TSM Educational & Administrative Scheduling v6.7.7 29
Search Educational
The Search Educational function searches for only educational events.
1. To perform an Advanced Search for only educational events, from the main toolbar move your cursor over Request and then select Search>Educational.
Figure 21: Search educational via TSM toolbar
A Search Educational Requests criteria screen appears.
Figure 22: Search educational Requests criteria screen
2. Select your search criteria. Different search criteria combine together as ‘AND’ searches. For example, searching for events with the Requestor ‘Simon’ and the Speaker ‘Robert’ will return only events with both a Requestor named Simon and a Speaker named Robert.
3. To submit your search request, click at the bottom of the screen.
For additional information, refer to Using the Search Results Screen on page 28.

Using TSM
TSM Educational & Administrative Scheduling v6.7.7 30
Search Administrative
The Search Admin function searches for only administrative events.
1. To perform an Advanced Search for only administrative events, from the main toolbar move your cursor over Request and then select Search>Admin.
Figure 23: Search admin via TSM toolbar
A Search Administrative Requests criteria screen appears.
Figure 24: Search Administrative Requests criteria screen
2. Select your search criteria. Different search criteria combine together as ‘AND’ searches. For example, searching for events with the Requestor ‘Simon’ and the Presenter ‘Robert’ will return only events with both a Requestor named Simon and a Presenter named Robert.
3. To submit your search request, click at the bottom of the screen.
For additional information, refer to Using the Search Results Screen on page 28.

TSM Educational & Administrative Scheduling v6.7.7 31
Managing Events
This section contains detailed instructions for using TSM to create an educational or administrative request and schedule it on a date when all the required sites are available.
Creating a New Event
When you receive an educational event request you need to schedule the event using TSM to ensure that sites, systems, and resources are available. These are the steps involved:
To create and schedule an educational event, there are two options:
From the main toolbar, move your cursor over Request and then select Create>Educational.
Figure 25: Create educational event via TSM toolbar
From the Create New Request/Event panel on
the home page, click
Figure 26: Create educational event via quick-create
To create and schedule an administrative event, there are two options:
From the main toolbar, move your cursor over Request and then select Create>Admin.
Figure 27: Create administrative event via TSM toolbar
From the Create New Request/Event panel on
the home page, click
Figure 28: Create administrative event via quick-create

Managing Events
TSM Educational & Administrative Scheduling v6.7.7 32
The Educational/Administrative Request Maintenance screen appears with the following:
Status is Unscheduled. Header tab is active (highlighted blue). Actions panel is empty. Event Summary panel is empty (information fills in as you enter and save data).
Figure 29: Header tab for educational events

Managing Events
TSM Educational & Administrative Scheduling v6.7.7 33
Figure 30: Header tab for administrative events

Managing Events
TSM Educational & Administrative Scheduling v6.7.7 34
Scheduling an Event
Pressing [ALT] [1] takes you to the 1st field of any tab.
Header Tab
1. To identify the person who requested the event, click beside the Requestor field.
(See Searching the Contact Registry on page 104.)
2. If you find the requestor’s name in the search results, click the name and it is automatically entered into the Requestor field.
If you do not find the requestor’s name, you must create a new contact. (See Creating a Contact on page 108.)
3. The Received Date defaults to the current date. To change the date, either type in the date (using the format dd-mm-yyyy) or select a date using the Calendar link ( ). (See Using the
Calendar Link on page 25.)
4. Events created in TSM have a default Source of ‘Fax’. Events that were created in Ncompass have a default of ‘Self scheduled’. To change from the default value, click the drop-down arrow and select the appropriate source.
5. Select the Event Type by clicking beside the Event Type field.
An Event Types pop-up window appears.
Figure 31: Event type pop-up
6. To select a type, click on the appropriate name in the list and TSM automatically enters it into the Event Type field.
If you cannot find a type that best fits your event, click ‘Other’ in the list and type a descriptive name in the Other Description field. Do not include patient health information (PHI) in this field.
7. Type the event’s name in the Event Title field. If the event does not have a formal title, provide a general description of the event.
Use a unique title. If this is a recurring event series, you’ll be better able to search for all of the events in the series.

Managing Events
TSM Educational & Administrative Scheduling v6.7.7 35
8. For educational events, indicate whether the event is Accredited by selecting either the ‘Yes’ or ‘No’ option.
9. Select the appropriate entry in the Access drop-down list to indicate whether the event offers ‘Open Participation’ or is available ‘By invitation only’. Open participation events enable Ncompass users to self-register for and de-register from the event.
10. Identify whether participant systems can have a late arrival and/or early departure time:
• By default, late arrivals and early departures are allowed.
• If participant systems should not have this ability, clear the box next to Participants can arrive late and depart early.
11. Type more details about the event in the Short Description field.
12. The Presenter field identifies the key speaker or person who will deliver the content during the event. Type the name of the presenter in the field – it is free format and not stored in TSM’s Contact Registry.
• If there will be more than one presenter, click and a new line appears where you can type the additional presenters’ names.
• Ideally, you should always use the Presenter field. However, it is possible to select a name from the Contact Registry if you use the button beside the Speaker1 field
(see Searching the Contact Registry on page 104).
• To schedule the event, you must identify a speaker. chair or a presenter.
13. Type the name(s) of any organizations or associations that the presenter belongs to in the Speaker Affiliation field.
14. Type the total number of participating actual and virtual systems in Number of Systems.
• The field defaults to the minimum number of systems – two (one host and one participant).
• The maximum number of systems is 60 (except for users with the role “CSO_Admin”, who can enter more).
• 'Actual' is the system used by the presenter, speaker, or chair. 'Virtual' are the systems used by the audience or other participants.
TSM uses this number to determine the number of system fields it displays on the Sites tab, one actual system plus however many virtual systems to equal the Number of Systems. For example, if you set Number of Systems to four, on the Sites tab TSM displays one actual system and three virtual systems.
If you need more than 60 systems, contact OTN Customer Care - Scheduling Coordination.
1 If you use the Speaker field and if the event has an archive webcast request, the Speaker name and email address will also need to be added in the webcast request Presenter panel.

Managing Events
TSM Educational & Administrative Scheduling v6.7.7 36
15. For educational events, to identify the event’s Sponsor, click the field’s drop-down arrow and select the appropriate entry. If you cannot find a suitable entry, select ‘Other’.
If you select ‘Other’ contact OTN Customer Care - Scheduling Coordination and request that they add a new entry to the available sponsors list.
16. For administrative events, the Purpose field is for use only by OTN Technical Support. Ignore this field.
17. The default Conference Mode for all participating systems is Full Screen Layout. For more details about screen layouts, see Appendix A: Conference Modes (Video Layout) on page 114.
• If the event is point-to-point, leave the default setting.
• If the event is multi-point leave the default setting – unless you have received a request for a specific layout.
Figure 32: Conference Mode field
To select a special layout use one of two options:
Select a layout from the drop-down list.
Figure 33: Conference mode drop-down list
Click the preview link. A dialog box opens. To select, click the desired layout image.
Figure 34: Conference mode layout selection
If you want the participants to always see the host in the largest area of their screen, select Lecture Mode.

Managing Events
TSM Educational & Administrative Scheduling v6.7.7 37
The Premium Service and Webcasting fields are for OTN internal use only.
If you are an external TSM user, ignore these fields and go to step #20.
18. If the event involves a Premium Service, select the appropriate entry from the drop-down list.
The following table describes some of the terms used for Premium Services.
Term Description
Affiliate An organization that has purchased an OTN Managed Videoconference discount bundle.
Inter-Network Connection
One or more non-OTN systems will connect to the event.
Managed Video Conference
OTN Customer Care - Scheduling Coordination will fully manage the videoconference.
Premium Service OTN offers a broad range of premium services, which can include:
• Dedicated Event Coordinator
• Preplanning
• Preparation of Presenter/Moderator
• Promotion: Events Calendar & Poster
• Studio Rentals
• OTN Technical Support (7:00 a.m. - 7:00 p.m.)
• Live Operator
• Dry Run Test
• Audio Line
19. Ignore the Webcasting and Webcasting Service fields. TSM automatically populates these
fields at a later time.
• When a webcast request is submitted for the event, TSM selects ‘Yes’ for Webcasting.
• TSM selects the type of Webcasting Service based on the Actual System identified in the Sites tab (for example, member or non-member).
After you schedule the event, you specify webcasting details in the Request Webcast form (see page 56).
20. Audio Participants defaults to ‘No’. If the event will have telephone participants select the
‘Yes’ option. (See Booking Dial-in Phone Numbers on page 84.)
21. Force Event On Bridge defaults to ‘No’. If you want the event to be programmed onto the Bridge, select ‘Yes’. For example, if the systems participating in a point-to-point event are not enabled for portal calling and thus cannot be auto-initiated. In this case, the event can be forced onto the bridge to have the event started automatically by the bridge.

Managing Events
TSM Educational & Administrative Scheduling v6.7.7 38
22. If the event does not require a bridge, leave the Bridge Location with its default setting.
If the event requires a Bridge, select the appropriate Bridge Location from the drop-down list. (See Bridge and Gateway Resources on page 81.)
23. If there are special details about any of the information you have entered so far that you want available only to OTN schedulers and advanced Ncompass organizers at the host site, type them in the Private Log field.
24. If there are extra details about the event that you want available to all event participants, type them in the Public Log field. TSM also uses the log field to record the date, time, and author of any changes made to the event request.
25. To save your data and move to the next tab (Sites), click .
TSM validates the data you entered and if there are errors it displays appropriate error messages or warnings.
If there are no errors TSM saves the data, assigns an Event ID and displays the Sites tab.
If you do not want to immediately move on to the next tab and will return to the request later, save the data you’ve entered so far by clicking .

Managing Events
TSM Educational & Administrative Scheduling v6.7.7 39
Sites Tab
The Sites tab is used to identify and schedule the various systems and other equipment that will be used during the event by the presenter and all participant sites.
After successfully completing the Header tab, the Sites tab appears with the following:
Status is Unscheduled. Sites tab is active (highlighted blue). Actions panel contains a list of possible actions. Event Summary panel contains a new Event ID and other information
you entered in the previous tab.
Figure 35: Sites tab
1. To identify the Date of Event, either type a date in the field or select a date using the Calendar link ( ) beside the field. (See Using the Calendar Link on page 25.) In the Time
field, type the start time in EST, 24-hour format (hhmm). For example, 1400 for 2:00 p.m.
If you enter a date more than one year in the past or more than one year in the future, TSM issues a warning but will allow you to save and schedule the event.

Managing Events
TSM Educational & Administrative Scheduling v6.7.7 40
2. In the Duration field, type the length of the event in minutes. (For example, type 2 hours as 120 minutes.)
3. If a Setup Time is required, type it in this field. Use the following setup times as a guideline when considering the number of sites.
The number of sites affects the setup time because a large roll call prior to the start time requires more time. However, there are other factors to consider as well. For example:
• A PowerPoint test will increase the setup time—even for an event with only 5 sites.
• An event that will be webcast requires at least 15 minutes setup time
Number of sites Minutes setup time
Less than 5 5
6 – 20 15
21 - 35 30
More than 35 45
4. The default for Initiating System is the ‘Host’ as initiator.
If the participant’s site will initiate the event, select the ‘Participant’ option.
5. For non-bridged events, the default for Start Call Auto is ‘No’. If you would like your event to automatically connect and disconnect, select the ‘Yes’ option. (See Portal Calling: Click-to-Call and Auto-Initiating Events on page 90.)
If the event requires a bridge, the Start Call Auto field does not display. Instead a message appears indicating that it is a bridge controlled event and will automatically connect.
Figure 36: Bridged event auto start message
6. To specify the Closing Registration Date, either type a date in the field or select a date using the Calendar link ( ) beside the field. (See Using the Calendar Link on page 25.)
7. The Actual System is the Presenter’s location for an educational or administrative event.
To identify this system, you use a similar search as that used in finding a requestor. The search accesses TSM’s Site/System Registry.
To search the Site/System Registry, click beside the Actual System field.
(See Searching the Site/System Search Registry on page 93.)
Some sites have more than one system. Contact the local Telemedicine Coordinator to determine which one to reserve for your event.

Managing Events
TSM Educational & Administrative Scheduling v6.7.7 41
8. If you find the required system in the search results, click the name and it is automatically entered into the Actual System field.
• If you do not find the system, contact OTN Technical Support. They can investigate and if necessary initiate the process of creating a new system. It might take 1-2 weeks before a new system is available for use because there is a strict certification process.
• If the system is an Off-Net system that requires a dynamic dialing alias, type its designated Prefix and/or DTMF/PIN in the associated fields.
9. To view details about a system, click beside the Actual System field.
10. If there are additional instructions or notes for the speaker/chair’s location, type them in the Equip./Other fields.
11. If there are instructions or notes for all Virtual Systems, type them into the Virtual Systems Common Info Equip./Other field.
The number of Virtual Systems fields listed depends on the total number of systems you requested in the Header tab.
If not enough virtual system fields are listed, return to the Header tab, change the Number of Systems, and click .
The Sites tab reloads with the additional Virtual Systems fields listed.
12. Virtual Systems are the videoconference systems reserved for all of the other event participants.
If the event allows open participation or is ‘by invitation only’ where participants can identify their own systems, leave the Virtual Systems fields blank.
If you know which systems will be participating, identify each one in the same way that you identified the Actual System. (See Searching the Site/System Search Registry on page 93.) When identifying a participating system:
• If a system cannot attend the event for its full duration, you can specify late arrival and/or early departure times.
• To specify a late arrival or early departure, type the time using EST, 24-hour format in the system’s associated Arriving and/or Departing fields (e.g. 0900 for 9:00 a.m. or 1500 for 3:00 p.m.)
• If a system is an Off-Net system that requires a dynamic dialing alias , type its designated Prefix and/or DTMF/PIN in the associated fields.
13. If there are special details about the event that you want available only to OTN schedulers and advanced Ncompass organizers at the host site, type them in the Private Log field.

Managing Events
TSM Educational & Administrative Scheduling v6.7.7 42
14. If there are extra details about the event that you want available to all event participants, type them in the Public Log field. TSM also uses the public log field to record the date, time, and author of any changes made to the event request.
15. To save your data and move to the next tab (Approval), click .
TSM validates the data you entered and if there are errors it displays appropriate error messages or warnings. (See Error Messages and Warnings on page 19.)
If there are no errors, TSM saves the data and displays the Approval tab.
If you do not want to immediately move on to the next tab and will return to the request later, save the data you’ve entered so far by clicking .
If you want to return to the previous tab, first click and then click .
TSM does not save the tab’s data when you click .
After you save or move on to the next tab, if the event is multi-point (more than 2 systems) you can add attachments to the event. For details, see Adding an Attachment on page 47.

Managing Events
TSM Educational & Administrative Scheduling v6.7.7 43
Approval Tab
The Approval tab is used to notify you about any issues with the requested systems so you can address the issues before approving the request.
After successfully completing the Sites tab, the Approval tab appears with the following:
Status is Unscheduled. Approval tab is active (highlighted blue). Actions panel contains a list of possible actions. Event Summary panel contains information you entered in previous tabs.
Figure 37: Approval tab
TSM issues any warnings or errors associated with the requested systems when it displays the Approval tab. For example if a system is not yet OTN certified or is reserved. Contact that site’s Telemedicine Coordinator to determine whether the system can be made available.
1. If you do not receive any error messages about system certification, to approve the request, select the ‘Yes’ option under the question Do you approve this request?
2. If you requested more than two systems, a Bridge is required. See Bridge and Gateway Resources on page 81.
3. If there are special details about the event that you want available only to OTN schedulers and advanced Ncompass organizers at the host site, type them in the Private Log field.

Managing Events
TSM Educational & Administrative Scheduling v6.7.7 44
4. If there are extra details about the event that you want available to all event participants, type them in the Public Log field. TSM also uses the public log field to record the date, time, and author of any changes made to the event request.
5. To save your data and move to the next tab (Confirmation), click .
TSM validates the event request and if there are errors it displays appropriate error messages or warnings.
If there are no errors, TSM saves the data and displays the Confirmation tab.
If you do not want to immediately move on to the next tab and will return to the request later, save the data you’ve entered so far by clicking .
If you want to return to the previous tab, first click and then click .
TSM does not save the tab’s data when you click .

Managing Events
TSM Educational & Administrative Scheduling v6.7.7 45
Confirmation Tab
The Confirmation tab is where your request becomes a fully scheduled event.
After successfully completing the Approval tab, the Confirmation tab appears with the following:
Status is Unscheduled pending confirmation. Confirmation tab is active (highlighted blue). Actions panel contains a list of possible actions. Event Summary panel contains information you entered in previous tabs.
(For example, Date of Event contains the date selected in the Sites tab.)
Figure 38: Confirmation tab
1. If the event involves a system with an Off-Net ISDN connection type, it defaults to Dial Out. If the system needs to dial-in, select the Dial In option. (See Audio/Video Phone Number Requirements on page 86.)
2. If the event has audio participants or if you selected ‘Dial In’ in the previous step, the Audio/Video Phone Number field appears with a TSM-assigned phone number and is read-only. (See Booking Dial-in Phone Numbers on page 84.)
If you need to replace the auto-selected phone number with a different one: i) Select the Manual Override checkbox.
ii) Click the Audio/Video Phone Number drop-down field and select a number.
iii) Click . (If you go back to a previous page/tab in TSM without saving first, you
may find that a different number is selected when you return.)
If there are no audio participants and no dial-in requirements, these fields do not appear.

Managing Events
TSM Educational & Administrative Scheduling v6.7.7 46
3. To confirm the event, click the Schedule Request ID button. (This button includes the Event ID number.)
TSM checks that all mandatory fields on all forms are complete.
If TSM finds an error (for example, a missing mandatory field such as Speaker’s Name), it issues an error message and directs you to the problem.
Warnings also appear if any of the systems you selected are not designated for educational or administrative use. However, these warnings will not prevent you from scheduling events.
If there are no errors, TSM schedules the event and displays a window showing the full details of the event, as well as a sincere message of congratulations.
A scheduled event places a hold on all participating systems for the duration of the event and they are no longer available for other event requests occurring on the same date and time.
Figure 39: Educational event confirmation screen
4. at the bottom of the Confirmation tab initiates the same feature as
View Confirmation in the Actions panel. It opens a new window with a formatted summary of the event.

Managing Events
TSM Educational & Administrative Scheduling v6.7.7 47
Managing Attachments
Attachments are document files or graphics uploaded to a non-clinical, multi-point event. Anyone viewing an event’s posting on the Ncompass Public Events list or the OTN Learning Centre can download or view its attachments.
When creating an event, after you successfully complete the Header and Sites tabs, a Manage Attachments link appears in the Actions panel.
You can manage attachments at any time—before, during, or after the event has taken place.
Adding an Attachment
1. Open the event and click Manage Attachments in the Actions panel.
Figure 40: Manage Attachments action panel
The Manage Attachments page appears.
Figure 41: Manage Attachments page
2. For each file you want to attach, click .
A new set of fields appear each time you click (one row for each attachment).
Figure 42: Add attachments – browse for files

Managing Events
TSM Educational & Administrative Scheduling v6.7.7 48
3. To locate and select a file, click , (or depending on which browser you use),
then navigate to the file location and click the file name.
4. To ensure that users understand the subject and purpose of the attachment, type a meaningful note in the Description field.
5. To validate the attachment and attach the file, click .
TSM validates the attachment as follows:
• Checks that the same file is not already attached.
• Checks that it is an acceptable file type2 (doc, docx, xls, xlsx, gif, jpg, jpeg, pdf, png, txt).
• Scans the file for viruses.
• Checks that the file does not exceed the maximum size.
• Calculates the remaining space available for the event.
If there are no errors, TSM attaches the file, displays a success message, and if the event is published, posts the attachments to the published locations. (See Publishing Multi-Point Events on page 51.)
Figure 43: File successfully attached
If there are errors, TSM does not attach the file and displays an error message.
6. If you change your mind and do not want to attach a file, click .
TSM reloads the View Complete Request page with no changes.
2 TSM does not accept ‘unsafe’ file types such as .exe, .vbs, .tmp, etc. For a full list of unsafe types, refer to Microsoft Office’s Outlook support web site.

Managing Events
TSM Educational & Administrative Scheduling v6.7.7 49
Deleting an Attachment
1. Open the event from which you want to delete a file and click Manage Attachments in the Actions panel.
Figure 44: Manage Attachments action panel
The Manage Attachments page appears.
Figure 45: Manage Attachments page
2. For each file that you want to delete, select the file by clicking its select box ( ) in the Remove column.
3. To delete the attachment(s), click .
TSM validates the request and if there are no errors:
• Removes the file(s) and re-calculates the remaining space available for the event.
• Displays a message confirming the successful deletion at the top of the screen.
• If the event is published, removes the attachment(s) from the public locations.

Managing Events
TSM Educational & Administrative Scheduling v6.7.7 50
Opening or Downloading Attachments
If an event has one or more attachments, a Supporting Materials section appears on the View Complete Request page.
The file name and its associated paperclip image are links to the file.
To open a file, use the standard process provided by your browser. For example, using Internet Explorer, click the linked file name or its associated paperclip image.
To download a file, use the standard process provided by your browser. For example, using Internet Explorer, right-click the link and select ‘Save Target As’.
Figure 46: Supporting Materials attachment on View Complete Request page

Managing Events
TSM Educational & Administrative Scheduling v6.7.7 51
Publishing Multi-Point Events
After you successfully schedule a multi-point event you can post the event details to the Ncompass Public Events list and the OTN Learning Centre.
1. Open the event you want to publish and click Publish in the Actions panel.
Figure 47: Publish action panel
The Publication Details page appears.
Figure 48: Publication Details page
2. Participant Fees defaults to ‘No. If the event requires that participants pay a fee to attend, select ‘Yes’.
The Participant Fees field is for informational purposes only and has no bearing on whether or not a participant actually pays a fee. An event with fees will not stop people from registering.
OTN recommends that if you want to publish an event with fees, you should set the event Access to ‘By invitation only’ so that users won't be able to self-register.
3. A published event is always posted on two locations:
• Ncompass Public Events list (available only to Ncompass users).
• The OTN Learning Centre (publicly visible on the Internet).
4. By default, the event Requestor's Contact Information is published to both the Learning Centre and the Ncompass Public Events list.
• This gives potential participants a point of contact if they have questions about the event.
• If the event requestor does not want their contact information published, select 'No'.

Managing Events
TSM Educational & Administrative Scheduling v6.7.7 52
5. To initiate the publication process, click .
TSM validates your submitted data and if there are no errors publishes the event to the designated locations and displays an updated View Complete Request page.
An informational message displays at the top of the screen. Actions panel contains a list of possible actions. Status changes to Scheduled (Published). A new section, Publication Details, appears with Fees and Location information.
Figure 49: Published event details and status
6. If you change your mind and do not want to publish the event, click .
TSM reloads the View Complete Request page with no changes.

Managing Events
TSM Educational & Administrative Scheduling v6.7.7 53
Editing Publication Details
You can change the publication details of a published event without needing to re-schedule the event.
While modifications are in progress:
• The Ncompass Public Events status changes to ‘Registration Suspended’.
• The OTN Learning Centre status changes to ‘Update in Progress’.
1. Open the event you want to edit and click Manage Publication in the Actions panel.
Figure 50: Publish action panel
The Publication Details page appears.
Figure 51: Manage publication page
2. To change the Participant Fees value or whether to Publish Requestor’s Contact Information, select the appropriate options and then click .
TSM updates the event and publishes to both the OTN Learning Centre and Ncompass Public Events list. (You do not need to re-publish the event.)
The View Complete Request page appears with a success message and the updated information.

Managing Events
TSM Educational & Administrative Scheduling v6.7.7 54
Un-publishing an Event
Un-publishing an event completely removes the event from public view—it will not appear on either the Ncompass Public Events list or the OTN Learning Centre. After un-publishing, potential participants will only be aware of the event if you send them an email using the Fax and Email Notification action.
If participants have already registered, do not un-publish the event, ‘cancel’ it instead. Cancelling leaves the event on the public listings and participants can see that the event was cancelled and why.
1. Open the event you want to un-publish and click Manage Publication in the Actions panel.
Figure 52: Publish action panel
The Publication Details page appears.
Figure 53: Manage publication page
2. To un-publish the event, click .
TSM removes the event from all its published locations and displays an updated View Complete Request page.

Managing Events
TSM Educational & Administrative Scheduling v6.7.7 55
An informational message displays at the top of the screen. Actions panel contains an updated list of possible actions. Status changes to Scheduled. The Publication Details section no longer appears.
Figure 54: Un-published event details and status
3. If you change your mind and do not want to un-publish the event, click .
TSM reloads the View Complete Request page with no changes.

Managing Events
TSM Educational & Administrative Scheduling v6.7.7 56
Requesting Webcasting
You can request to webcast your event if the following conditions are met:
• It is a non-clinical event.
• You have successfully scheduled the event.
• The event has a minimum of 15 minutes set-up time.
You must submit a Webcast Request for all types of webcasting: live only, archived only, or live and archived.
You can submit your webcast request up to and including the business day before the scheduled event date.
A webcast event must occur during standard business hours (Monday to Friday, between 7:00 a.m. and 7:00 p.m.) and within the next year.
All webcasts–live and archived–are accessible through OTN’s Webcasting Centre at webcast.otn.ca.
Creating a Webcast Request
1. Open the event you want to publish and click Request Webcast in the Actions panel.
Figure 55: Publish action panel
The Webcast Details form appears.
Figure 56: Webcast Details form

Managing Events
TSM Educational & Administrative Scheduling v6.7.7 57
The Date, Actual System and Event Type are set from the original event and you cannot change these fields from within the webcast request form.
2. The Event Title defaults to the title set by the requestor of the original event.
If you change the title here, the title also changes in the original event.
To ensure readability, use a title that contains less than 100 characters.
• Only the first 34 characters of a title appear in the Ncompass calendar event listing.
• TSM accepts more than 100 characters but an extremely long title is potentially confusing and hard to remember.
Figure 57: Webcast request form details
3. The Webcast Start and End Times default to the values set in the original event. You can change the webcast's start or end time, providing that the time frame is within the event's start and end times.
To identify a different webcast start or end time, type the time using EST, 24 hour format. For example, type 0900 for 9:00 a.m. or 1400 for 2:00 p.m.
4. If the Webcast Organizer is a different person than the event requestor, provide a name and email address. The webcast organizer is the individual responsible for organizing the webcast and is typically located at the ‘actual’ site (where the presenter is).
5. Type the Name of Organization that is hosting the webcast.

Managing Events
TSM Educational & Administrative Scheduling v6.7.7 58
Figure 58: Presenter Information
6. A Presenter is the key speaker or person who delivers the content during an event. If a presenter name was entered in the original event, it appears here.
If there will be more than one presenter, click and a new line appears where you can
type the additional presenters’ names.
If the original event included a ‘Speaker’ or ’Chair’ selected from the TSM database, you must still add their name and email address as a ‘Presenter’ in this section.
If the event will be archived, you must provide an email address for each presenter, because the agreement and confirmation process take place via email. See Webcasting Agreement Form (WAF) on page 61.
Figure 59: Additional webcast details
7. Identify the Type of Webcast by selecting the desired option.
Live Only
The event will be webcast during its scheduled date and time. Participants can attend the event via the Internet only during this time.
Archived Only
The event will not be webcast during its scheduled date and time but will be recorded and then stored on the OTN Webcasting Centre, allowing participants to access the session on-demand. All archived webcasts remain on the OTN Webcasting Centre for a period of one year, unless otherwise specified by the presenter.
Live and Archived
The event will be webcast and recorded during its scheduled date and then stored on the OTN Webcasting Centre. Participants can attend during the live webcast and also watch it on-demand at any time while it is archived.

Managing Events
TSM Educational & Administrative Scheduling v6.7.7 59
8. The Slide Presentation field identifies if you plan to include a slide presentation in your webcast.
• If you will have a slide presentation, leave the default selection ‘Yes’.
• If there is no slide presentation, select ‘No’.
9. If the webcast is to be a private or closed event (where only specific participants are invited), select 'Yes' for Password Protection Required.
10. If you selected ‘No’ for password protection, skip to step #11.
If you selected ‘Yes’ for password protection, you can set a Username and Password to restrict access.
If you have previously webcast an event with a user name and password, you can use the same credentials.
i) Leave the default selection ‘No”, for Create a new Username.
ii) Type your existing user name in the Username field.
If this is the first time you are requesting a password protected webcast, you can set a user name and password.
i) Select ‘Yes’ for Create a new Username. ii) In the Username field, type a 2-30 alpha-
numeric character name (one word) that will be used by all participants.
iii) In the Password field, type a 2-30 alpha-numeric set of characters (one word) that will be used by all participants.
The webcast organizer is responsible for distributing the user name and password to webcast participants. OTN will not distribute passwords.
After you submit the webcast request, you will not be able to change the webcast user name or password. (If you need to change these, first cancel the webcast request and then create a new webcast request.)
11. The Ask a Question Feature allows webcast participants to ask a question directly through the viewer interface - enabling the host site and the web audience to interact. Questions or comments submitted are sent to the email address specified here. To enable the feature:
i) Select 'Yes' for Enable "Ask A Question" Feature. ii) In the Email field, type the email address of the person who will receive the
questions during the live webcast. iii) To confirm the email address, type it again in the Validate Email field.
12. If you have specific requirements or notes about the webcast, type them in the Comments field.
However, keep in mind that these comments are viewable only within the webcast request itself – which is an automated process. Therefore, chances are no one will see your comments.
After you submit the webcast request, you can change existing comments or add new comments.

Managing Events
TSM Educational & Administrative Scheduling v6.7.7 60
13. To submit the webcast request, click at the bottom of the form.
TSM validates your submitted request.
If there are no errors TSM submits the request and displays an updated View Complete Request screen with a success message, an updated webcast status, and a webcast link.
• Beginning three hours before the event’s start time, participants can use the link3 to access the webcast. Before that, the link goes to OTN’s Webcasting Centre home page
• If the webcast is live only, it has a webcast status of ‘Approved’.
• If the webcast has an archived component, it has a webcast status of ‘Partially Approved’. Final approval happens after all presenters have confirmed their consent. See Webcasting Agreement Form (WAF) on the following page.
Figure 60: Event details with webcast request
If there is an error in the information you provided, the Manage Webcast page reloads with an error message at the top of the screen. Correct the error and resubmit.
What to do if there are no webcast recorders
If there are no media recorders available for the requested date and time, the Manage Webcast page reloads with the error message, ‘no webcast recorders… ’ (at the top of the screen) and the original event remains scheduled.
You need to select a different date and/or time, reschedule the event, and try submitting another webcast request.
3 The on-screen link is not active. To use the link, you can copy and paste it into an email or a browser’s address field.

Managing Events
TSM Educational & Administrative Scheduling v6.7.7 61
Webcasting Agreement Form (WAF)
If your webcast will be ‘live only’, you do not need a WAF and you can skip this section.
Archived webcasts require a ‘signed’ WAF agreement from each presenter. In this context, ‘signed’ means an online confirmation of agreement.
Any webcast with an archived component will not be posted or available for viewing on OTN's Webcasting Centre until all webcast presenter consents have been received via email.
When you submit a webcast request for ‘archived only’ or ‘live and archived’:
1. TSM flags the webcast request as partially approved.
2. TSM sends a WAF email to each presenter included in the event. The WAF email includes a copy of OTN’s webcasting agreement and a hyperlink to a web page where the presenter can provide their consent to have the webcast archived online.
3. When the presenter provides their consent, TSM adds a checkmark to the WAF Received field for that presenter.
4. A webcast request receives final approval after all presenters have submitted their consent.
Figure 61: Presenter Information - WAF Received field
To view the WAF status for a presenter:
1. Open the event and click in the Actions panel.
The Webcast Details form appears.
2. Scroll down to the Presenter Information panel.
After an event is approved, if you add a presenter to the event or change a presenter, TSM automatically sends a WAF email to the new or changed presenters’ email address.
To manually resend a WAF email to any presenter that has not confirmed their agreement:
1. Open the event and click in the Actions panel.
The Webcast Details form appears.
2. Click at the bottom of the form.
TSM sends a WAF email to any presenter who has not yet provided their consent.

Managing Events
TSM Educational & Administrative Scheduling v6.7.7 62
Editing a Webcast Request
After submitting a webcast request the only fields you can change within the webcast request are the Event Title, the Presenter Information, Webcast Type and the Comments. If you need to change other webcast information, first cancel the webcast request and then create a new webcast request.
The Webcast Link is automatically set when Ncompass successfully schedules your original webcast request. Beginning three hours before the event’s start time, participants can use the link to access the webcast. Before that, the link goes to OTN’s Webcasting Centre home page.
1. Open the event and click in the Actions panel.
The Webcast Details form appears.
Figure 62: Request Webcast page (edit mode)
2. You can edit fields as described in the following table.
Field Edit Conditions
Event Title You can edit at any time (before or after the event).
If you change the title here, it will also change in the original event.
Presenter Information
You can edit the Presenter Information at any time (before or after the event).
Any changes you make to Presenter will take effect after you click .
• To add a new line where you can type an additional presenter's name and email, click .
• To update a presenter name, first delete the name and then add the new/changed name and/or email. (This ensures that the presenter will be sent a WAF.)
• To delete a presenter, select the checkbox to the right of the name (underneath the trashcan icon ).
If the event will be archived, you must provide an email address for each presenter, because the agreement and confirmation process take place via email. (See Webcasting Agreement Form (WAF) on page 61.)
Managing Events
TSM Educational & Administrative Scheduling v6.7.7 63
Field Edit Conditions
Type of Webcast
You can edit at any time (before or after the event).
Comments You can edit at any time (before or after the event).
If you have specific requirements or notes about the webcast, type them in the Comments field. You can change existing comments or add new comments.
3. To submit the updates, click at the bottom of the screen.
TSM validates the request and if all is okay the View Complete Request screen appears with a success message.
If there is an error, the Webcast Details screen reloads with an error message. Correct the error and resubmit.
Figure 63: Successful webcast request update
Figure 64: Invalid webcast request update

Managing Events
TSM Educational & Administrative Scheduling v6.7.7 64
Cancelling a Webcast Request
1. Open the event and click in the Actions panel.
The Webcast Details form appears.
Figure 65: Request Webcast page
2. To cancel the webcast request, click at the bottom of the form.
A confirmation dialog box appears.
3. To confirm, click .
TSM does the following:
• Cancels the webcast request.
• Reloads the View Complete Request screen with a success message and an updated Webcast Status of ‘Cancelled’.
• Sends a cancellation notification email to the event requestor and webcast organizer (if different than the event organizer).
Figure 66: Event with cancelled webcast request

Managing Events
TSM Educational & Administrative Scheduling v6.7.7 65
Modifying Scheduled Events
If you need to change an event after it is scheduled (but don’t need to cancel it completely), follow these steps:
1. Open the event you want to modify and click the Modify Request link in the Actions panel.
Figure 67: Modify scheduled request action panel
A dialog box opens asking you to confirm the rescheduling.
2. To confirm, click .
The event status changes to Unscheduled with all of its former details present in all of the tabs. Edit your event as required and then schedule it using the Confirmation tab.

Managing Events
TSM Educational & Administrative Scheduling v6.7.7 66
Editing Unscheduled Events
If you need to change an event before it is scheduled, follow these steps:
1. Open the event you want to change and click the Edit Request link in the Actions panel.
Figure 68: Edit unscheduled request action panel
The event request loads in an editable state, with the Header tab active.
2. Navigate to the fields that require changes and enter the corrections.
3. To apply the changes, click .

Managing Events
TSM Educational & Administrative Scheduling v6.7.7 67
Managing Individual Systems for an Event
If an event is already scheduled, before you can delete or change a system you must first Modify the event to un-schedule it. (See Modifying Scheduled Events on page 65.)
After making the change, you must schedule the event again using the Confirmation tab.
Deleting a System
1. To view all the systems associated with an event, open the applicable event and click the Sites Tab.
The Sites Tab appears with all associated Actual Systems and Virtual Systems listed.
Figure 69: Sites tab with multiple systems
2. To remove a system, select the checkbox located to the left of the system’s Log field and then click .
TSM deletes the system from the event and reloads the Sites tab.

Managing Events
TSM Educational & Administrative Scheduling v6.7.7 68
Replacing a System
If an event is already scheduled, before you can change a system you must first Modify the event to un-schedule it. (See Modifying Scheduled Events on page 65.)
After making the change, you must schedule the event again using the Confirmation tab.
1. To view all the systems associated with an event, open the applicable event
and click the Sites Tab.
The Sites Tab appears with all associated Actual Systems and Virtual Systems listed.
Figure 70: Sites tab with multiple systems
2. To replace a system, click associated with the System Name to be replaced.
A Search Site/System window appears.
3. Search and select another system. (See Searching the Site/System Search Registry on page 93.)
The Sites tab reloads with the new system listed.
4. If the original system had customized arrival and departure times, these are cleared when you select a new system.
• If the new system cannot attend the event for its full duration, you can specify late arrival and/or early departure times for it.
• To specify a late arrival or early departure for the new system, type the time using 24 hour format in the system’s associated Arriving and/or Departing fields (e.g. 0900 for 9:00 a.m. or 1500 for 3:00 p.m.)
• If the new system is an Off-Net system that requires a dynamic dialing alias, type its designated Prefix and/or DTMF/PIN in the associated fields.
5. To save the event with the new system, click .

Managing Events
TSM Educational & Administrative Scheduling v6.7.7 69
Cancelling Scheduled Events
If a scheduled event will either not occur as planned, or if it did not occur for some reason, you must cancel it in TSM and record the reason for its cancellation. This is important to free up resources and to ensure accurate records for reporting purposes.
1. Open the event you want to Cancel and click the Cancel link in the Actions panel.
Figure 71: Cancel request action panel
A dialog box opens asking you to confirm the cancellation.
2. To confirm, click .
TSM cancels the event and displays a Status Reason screen.
Figure 72: Cancellation screen
3. To view a list of cancellation reasons, click the Reason field drop-down arrow.
4. Select a cancellation reason. (This is a required field and if you attempt to save without specifying a reason you will receive an error message stating that you must select a reason.)
5. Type any messages for the organizer in the Private Log field and any messages for the participants in the Public Log field. (If you search using the ‘Log Contains’ field, TSM searches both the Private Log and Public Log fields.)
6. To finalize the cancellation, click .
If the event was published when it was cancelled, it remains on the published locations (Ncompass Public Events list, OTN Learning Centre) but with a cancelled status and no one can register for the event or make changes to their registrations.

Managing Events
TSM Educational & Administrative Scheduling v6.7.7 70
‘Un-cancelling’ Cancelled Events
If you need to reschedule a cancelled event, you can undo the cancellation.
1. Open the event you want to uncancel and click the Undo Cancel link in the Actions panel.
Figure 73: Undo cancel request action panel
A dialog box opens asking you to confirm the rescheduling of the event.
2. To confirm, click .
TSM does the following:
• Changes the event’s status from ‘Cancelled’ to ‘Unscheduled’.
• Displays the Header tab.
• The Sites tab has the data from the original request but is pending approval and confirmation.

Managing Events
TSM Educational & Administrative Scheduling v6.7.7 71
Sending Event Notifications
You can have TSM communicate the details of an event directly to participants by using the Fax and Email Notifications action.
You can send a notification about an event with any status (e.g., Unscheduled or Scheduled).
1. To begin the notification process, open the applicable event and click the View Fax & Email Notifications4 link in the Actions panel.
Figure 74: View fax and email action
The Notification History screen appears.
• If this is the first notification sent for the event, the screen appears as shown below.
• If previous notifications have been sent, a record of each notification and who received it are displayed, stacked vertically, with the most recent at the top.
Figure 75: Notification history screen
2. To send a notification to one or more of the participants, click Send New Notification (See in Figure 75: Notification history screen above.)
The Send Notification screen appears with pre-populated fields using information from your event request and TSM’s Contact and Site registries.
• TSM includes all system contacts identified in each system’s Site/System registry entry.
• TSM sets the notification type for each contact as identified in the Contact registry.
4 When creating an event, this action first appears in the sites tab only after you have selected a host system.

Managing Events
TSM Educational & Administrative Scheduling v6.7.7 72
Figure 76: Send notification screen
3. To reset all contacts’ notifications to Don’t Notify, click the link.
4. Review the form and update or change the fields as necessary.
Field Description, Tips & Tricks
Sender Defaults to the person who scheduled the event. You cannot change the name.
For the Sender Email, use the email address of whomever you want the participants to contact if they have questions or comments about the event.
If you want to list more than one contact, include the additional contact name and email in the Message field.
Requestor, Speaker/Chair, System(s)
Indicate from each contact’s drop-down menu if and how you would like to notify the Requestor, Speaker/Chair, and System contacts for the event.
You don’t have to notify everyone.
From the drop-down list beside the contact’s name select your desired entry: Don’t Notify, Email, Fax, Pager or Phone.
If you select Email, when you click TSM attempts to send an
email message to the associated contact.
If you select Fax, Phone, or Pager, TSM does nothing. These settings just allow you to keep a record of how you contacted these people.
Message Contains the information that will be emailed or faxed to the people that you are notifying.
The message includes an OTN electronic ‘signature’, which includes all the standard OTN contact information such as web address, toll-free phone number, scheduling email address, etc.

Managing Events
TSM Educational & Administrative Scheduling v6.7.7 73
5. To send the notification to all contacts you’ve identified as email recipients, click .
The Notification History screen re-appears with updated details.
If TSM successfully generates an email, a new email window opens with the information from your request. If necessary, you can edit the email before sending it.
The email’s subject line includes the date of the event.
Figure 77: Event notification email subject line
If TSM cannot generate an email, the status shows as ‘Cannot send’ in the Recipients details section. (See in Figure 78: Notification History screen below.)
Figure 78: Notification History screen

Managing Events
TSM Educational & Administrative Scheduling v6.7.7 74
Cloning an Event
Cloning an event copies its details into a brand new request with the status of ‘unscheduled’. Copying request details in this manner can save you a great deal of time. For example, if the same long list of sites and systems are involved in an event.
You can clone an event with any status (e.g., unscheduled or scheduled).
Carefully review the cloned event to avoid accidentally including details from the original event that do not apply to the new event.
The new, cloned event will not automatically be published (even if the original event was published on the Ncompass Public Events list and the OTN Learning Centre).
The following fields are not copied to the cloned event:
• Received Date
• Closing Registration Date
• Webcasting and Webcasting Service5
• Published locations
• Attached files
• Prefix or DTMF/PIN assigned to an OFF-Net system
• Bridging Log
• Audio Phone Number (TSM selects a new audio line based on available resources)
• Each system’s Dialing Alias reverts to its default value
• Participating system customized start and end times (i.e., early arrival and late departure times are not copied – all participating systems in the cloned event inherit the original event’s start and end times)
If OTN Customer Care - Scheduling Coordination cloned the event, the new event’s Source is ‘Fax’. If an external TSM user cloned the event, the new event’s Source is ‘Self scheduled’.
Other fields within this and the other tabs contain data from the original event.
1. To begin the cloning process, open the applicable event and click the Clone Request link in the Actions panel.
Figure 79: Clone Request action
A dialog box opens asking you to confirm the clone request.
5 If your TSM user ID has the role TSM_CSO_Admin or TSM_Admin, webcast resources are copied to the cloned event.

Managing Events
TSM Educational & Administrative Scheduling v6.7.7 75
2. To confirm, click .
TSM clones the event and displays a new set of Educational/Administrative Request Maintenance tabs with the following:
A message box identifying the request as a clone. Status is Unscheduled. Header tab is active (highlighted blue). Actions panel contains a list of possible actions. Event Summary panel contains a newly assigned Request ID.
Figure 80: Cloned educational maintenance request
3. Review all the fields in the Header tab and change any that you need to for this new event.
4. Move through the first two tabs using , carefully reviewing the event details and
changing as required.
5. Schedule this event as you would normally. (See Scheduling an Event on page 34.)

Managing Events
TSM Educational & Administrative Scheduling v6.7.7 76
Recurring an Event
This feature is similar to the clone feature but allows you to make multiple copies and set them to occur daily, weekly, monthly, or annually. You can recur only scheduled events.
You can create a maximum of 50 recurring events at one time.
The new, recurring events will not automatically be published (even if the original event was published on the Ncompass Public Events list and the OTN Learning Centre).
The following fields are not copied to the recurred events:
• Received Date
• Closing Registration Date
• Webcasting and Webcasting Service6
• Published locations
• Attached files
• Prefix or DTMF/PIN assigned to an OFF-Net system
• Bridging Log
• Audio Phone Number (TSM selects a new audio line based on available resources)
• Each system’s Dialing Alias reverts to its default value
• Participating system customized start and end times (i.e., early arrival and late departure times are not copied – all participating systems in the copied event inherit the original event’s start and end times)
If OTN Customer Care - Scheduling Coordination cloned the event, the new event’s Source is ‘Fax’. If an external TSM user cloned the event, the new event’s Source is ‘Self scheduled’.
Other fields within this and the other tabs contain data from the original event.
1. To begin scheduling a recurrence, open the applicable event and click the Schedule Recurring Request link in the Actions panel.
Figure 81: Schedule Recurring Request action
The Recurrence screen appears.
6 If your TSM user ID has the role TSM_CSO_Admin or TSM_Admin, webcast resources are copied to the recurred events.

Managing Events
TSM Educational & Administrative Scheduling v6.7.7 77
Figure 82: Recurrence screen
2. To choose the Frequency of the recurrence, select the desired option.
3. The Starting On date defaults to the date of the base request you are working from. Edit if required and then enter the Ending On date. Check your dates to make sure they are correct. (Typos can lead to a lot of extra events!)
4. To create and schedule the recurring events, click .
If there are errors a new window opens with error messages. Click to return to
the Recurrence screen and correct the errors.
If there are no errors a new window opens listing the proposed scheduled events.
Figure 83: Recurrence Dates Confirmation window
5. Review the dates carefully before confirming the recurrence.
6. To confirm the scheduling, click . (Or click to return to the Recurrence screen
and change the start and/or end dates.)
The Recurrence screen appears with a list of scheduled or requested events.
Recurred events with conflicts are saved with a status of unscheduled.
Recurred events with no conflicts are saved with a status of scheduled.

Managing Events
TSM Educational & Administrative Scheduling v6.7.7 78
Figure 84: Recurrence screen with new events listed
Other fields within this and the other tabs contain data from the original event.
7. To view or edit a listed event, click the Request ID, or the associated View link ( )
or Edit link ( ).
You cannot use the browser’s back-button to return to this screen once you leave it.
If you want to systematically view all the events listed, open them each in a new window or new browser tab. When you’re finished viewing the event, close the window/tab to return to the Recurrence screen events list.
8. To open an event in a new window/tab, right-click the Request ID, or the associated
View link ( ) or Edit link ( ).
A browser link pop-up menu appears.
Figure 85: Browser link pop-up menu
Select the option Open in a New Window or Open in New Tab

Managing Events
TSM Educational & Administrative Scheduling v6.7.7 79
Sending Notifications for Recurring Events
Contacts may not wish to receive an individual notification for each recurring event.
A recommended alternative is to send out a notification for the first event in the series and in this notification’s Message field list all the future dates and times. (See in Figure 86 below.)
Figure 86: Notification message field used for recurring events
For detailed instructions about sending notifications, refer to Sending Event Notifications on page 71.

Managing Events
TSM Educational & Administrative Scheduling v6.7.7 80
Deleting an Event
Only an OTN Customer Care - Scheduling Coordination team lead or manager is authorized to delete an event.
TSM schedulers and other TSM users should cancel the request and record a reason. (See Cancelling Scheduled Events on page 69.)
If it is recommended that the event be deleted, contact an OTN Customer Care - Scheduling Coordination team lead or manager (who can delete using the following instructions).
Use the delete function with extreme caution. Deletion is permanent and cannot be undone.
It is much better to Cancel the request and record a reason for the cancellation for the following reasons:
• It ensures workload tracking and reconciliation of other reports.
• If the events are published, they remain on the Ncompass Public Events list and the OTN Learning Centre with a ‘cancelled’ status so people can see what happened.
1. To initiate the deletion, click the link.
A dialog box opens asking you to confirm the clone request.
2. To confirm, click .
TSM deletes the request and returns you to the TSM home page. A message () appears at the top of the screen confirming the deletion.
Figure 87: Deletion message on home page

TSM Educational & Administrative Scheduling v6.7.7 81
Event Special Resources
Most educational and administrative events do not require special technical resources. When it comes time to hold the event, one system simply calls another system just like making a phone call. However, there are events that require special handling.
• Multi-point events (events with more than two systems) require a ‘bridge’ to link all the sites.
• Systems that use an Off-Net connection type (ISDN or IP) require a ‘gateway’ and a ‘bridge’.
• Events that involve audio-only participants require a dial-in number.
TSM automatically detects bridge and gateway requirements and reserves the resources.
Bridged events start and end automatically.
Bridge and Gateway Resources
OTN can only handle a limited number of these events at any one time.
If TSM issues a warning message about bridge resources, contact OTN Technical Support to work out a solution.
TSM automatically indicates that a Bridge is required when the event involves:
• more than two systems (i.e., a multi-point event),
• a system identified as ‘bridge required’,
• a webcasting requirement,
• a ‘force event on bridge’ requirement.
TSM automatically indicates that a Bridge and a Gateway is required when the event involves:
• a system with an Off-Net ISDN or Off-Net IP connection type,
• one or more audio participants.
TSM indicates that an event requires bridge or gateway resources in several ways.
A. A Search Results Summary screen indicates bridge or gateway requirements with and icons respectively.
Figure 88: Search results bridge and gateway icons

Event Special Resources
TSM Educational & Administrative Scheduling v6.7.7 82
B. The Event Summary box reports when a gateway or bridge is required.
Figure 89: Event Summary panel bridge and gateway indicators
C. The View Event summary screen indicates bridge or gateway requirements in the Status and Flags section.
Figure 90: View Event Status and Flags
D. After you have completed the Sites tab, the Actions panel indicates bridge or gateway requirements with a View Bridge Info Page link.
Figure 91: View Bridge Info Page action
E. On the Sites tab, the phrase Call Management Auto Start/End (bridge controlled) appears.
Figure 92: Sites tab Call Management indicator

Event Special Resources
TSM Educational & Administrative Scheduling v6.7.7 83
Bridge warning messages
When you save an event request and the event requires a bridge, TSM validates that there are enough bridge resources available for the requested date and time.
If there are not enough bridge resources, TSM displays a warning message, similar to the following. However, the exact message and your response will differ depending on whether you are an internal or external TSM user7.
Figure 93: Bridge resources warning message – example only (actual message may differ slightly)
If you are an external TSM user, specify an alternate date and time for the event or contact OTN Customer Care - Scheduling Coordination for assistance.
7 Internal and external TSM users have different ‘roles’ and associated permissions assigned to their TSM user ID.

Event Special Resources
TSM Educational & Administrative Scheduling v6.7.7 84
Booking Dial-in Phone Numbers
Dial-in numbers are booked when a participant will use their telephone line to participate in an event. Dial-in numbers are reserved in the same sense that a video system is reserved: it can only be used for one event at a time. This section explains the process of booking a dial-in number for your event.
Examples of when an event would require a dial-in number include:
• There are people participating by telephone (audio-only).
• A participant will use a system with an Off-Net ISDN connection type and will dial-in to the event (not dial-out).
OTN has a limited number of dial-in numbers. If no dial-in numbers are available for selection, contact OTN Technical Support to work out a solution.
If your event has one or more people participating by phone, you need to specify this when creating or editing the event.
TSM includes reserved dial-in numbers in all event notifications and fax confirmations for events that have audio participants.
1. To access the event in edit mode, open the event and click the Modify Request or Edit Request link in the Actions panel
2. Go to the Sites tab and select ‘Yes’ for the Audio Participants field.
Figure 94: Audio Participants field
3. To apply the audio participation to the event, click or .

Event Special Resources
TSM Educational & Administrative Scheduling v6.7.7 85
After you complete the Sites and Approval forms, if there are audio participants, the Confirmation tab loads with a read-only TSM-assigned Audio/Video Phone Number.
Figure 95: Audio/Video Phone Number field
4. If you need to replace the auto-selected phone number with a different one, do the following:
i) Select the Manual Override8 checkbox.
ii) Click the Audio/Video Phone Number drop-down field and select a number.
iii) Click . (If you go back to a previous page/tab in TSM without saving first, you
may find that a different number is selected when you return.)
Figure 96: Audio/Video Phone Number drop-down field
Selected phone numbers are reserved for the duration of the event.
If another scheduler creates an event that overlaps with yours, they will not be able to select the same phone number (it simply won’t appear for them).
5. If there are no phone numbers to select, contact OTN Technical Support to determine a solution ([email protected] or 1-855-654-0888).
8 The manual override feature allows you to select any phone number that is not already in use.

Event Special Resources
TSM Educational & Administrative Scheduling v6.7.7 86
Audio/Video Phone Number Requirements
Your event may require an audio/video phone number if:
• Your event requires an audio line.
• Your event contains systems whose connection type is Off-Net ISDN.
Systems with a connection type of Off-Net ISDN require an audio/video phone number and can connect in one of two ways.
Dial Out • The phone number is provided by the member and certified by OTN.
• To connect to an event, TSM retrieves the number from its System registry and dials out to the participant.
• The phone number is not displayed to participants.
Dial In • The phone number is an internal OTN number.
• To connect to an event, participants dial in to OTN and they are responsible for the long-distance charges.
• TSM includes the phone number in all event notifications and fax confirmations.
Auto-selection of Audio/Video Phone Number
TSM’s auto-selection of audio/video phone number helps reduce privacy incidents by maximizing the time between the uses of each phone number.
TSM searches for a phone number that is not allocated 60 minutes prior to the start time and 60 minutes after the end time of the event. If there is no phone number available within a >= 60 minute buffer, it will attempt to select a phone number with a buffer >= 45 minutes.
If there is no phone number available within a >= 45 minute buffer, a red error message appears indicating that you need to select a phone number using manual override. (See Manual Override of Audio/Video Phone Number on page 88.)
1. If a participating system has an Off-Net ISDN connection type, after you complete the Sites and Approval tabs, the Confirmation tab loads with applicable Dial Out, Dial In, and Audio/Video Phone Number fields.
Figure 97: Dial-in with assigned phone number
Figure 98: Dial-out (no phone number required)

Event Special Resources
TSM Educational & Administrative Scheduling v6.7.7 87
2. If a participating system has an Off-Net ISDN connection type, TSM defaults to Dial Out.
Occasionally, a dial-out call is not allowed due to a firewall or for security reasons. In this case, select the Dial In option.
3. If a system is Dial Out, obtain a phone number for the contact at the participant’s site and record it in the Bridging Information Page’s Bridging Log field.
4. If a participant is another bridge, record its phone number in the event’s Log field.
5. If you select Dial In, the Audio/Video Phone Number field appears with a TSM-assigned phone number and is read-only.

Event Special Resources
TSM Educational & Administrative Scheduling v6.7.7 88
Manual Override of Audio/Video Phone Number
The manual override feature allows you to select a specific phone number when required.
Use the ISDN Resource Usage report to safely select the most appropriate phone number. For details about this report, refer to the TSM Bridge Programming user guide.
If you need to replace the auto-selected phone number with a different one, do the following:
1. Select the Manual Override9 checkbox.
2. Click the Audio/Video Phone Number drop-down field and select a number.
3. Click . (If you go back to a previous page/tab in TSM without saving first, you may find
that a different number is selected when you return.)
Figure 99: Audio/video phone numbers
4. If there are no phone numbers available to select, contact OTN Technical Support to determine a solution.
Selected phone numbers are reserved for the duration of the event.
If another scheduler creates an event that overlaps with yours, they will not be able to select the same phone number (it simply won’t appear for them).
9 The manual override feature allows you to select any phone number that is not already in use.

Event Special Resources
TSM Educational & Administrative Scheduling v6.7.7 89
Searching for Dial-in Numbers
To search for events by dial-in phone number, use the function.
For example, if you want to use a specific number and need to know when and which other events are using the same number. This is particularly useful if you are trying to schedule a recurring event and want to make certain that the same dial-in number is available for all upcoming dates.
Figure 100: Advanced search for dial-in phone number

Event Special Resources
TSM Educational & Administrative Scheduling v6.7.7 90
Portal Calling: Click-to-Call and Auto-Initiating Events
Portal calling is a TSM and Ncompass feature that refers to the two methods of initiating point-to-point events - either by an Auto Initiated start or using the Click-to-Call feature.
OTN Technical Support enables the portal calling feature for a system during the site certification process, if the system meets all required criteria. A system will not have portal calling enabled if it is used for Telestroke, Emergency videoconferences, uses an Off-Net IP or Off-Net ISDN connection type, or has connection issues.
Auto Initiate is one way of using the portal calling feature. It enables you to schedule an event to start and end automatically. For example, if you schedule an event to start at 8:00 am, all associated systems will automatically connect without a person’s intervention.
The auto initiate mode is available for both non-clinical and clinical events.
For the auto-initiate mode to work, the following is required:
• Events must have a ‘Scheduled’ status. (Events with an ‘Unscheduled’ status will not auto start.)
• All systems involved need to be enabled for Portal Calling.
At the event’s scheduled start time TSM sends a request to the Gatekeeper to connect the systems. At the event’s scheduled end time TSM sends a request to the Gatekeeper to disconnect.
The system will try to connect only once. If the connection is not successful (for example, if one of the systems is not online) it will not try to connect again and human intervention is required. However, the system will still attempt to auto-disconnect at the specified time.
TSM records all auto-initiated event connections and disconnections in the Event log field.

Event Special Resources
TSM Educational & Administrative Scheduling v6.7.7 91
Using Auto-Initiation
To turn on this feature, in the Sites tab select the ‘Yes’ option for the Start Call Auto field ().
Figure 101: Sites tab Start Call Auto field
If the event requires a bridge, the Start Call Auto field does not display. Instead a message appears () indicating that it is a bridge controlled event and therefore will automatically connect.
Figure 102: Bridged event auto start message
If any of the systems involved cannot use auto-initiation, when you save the event request TSM displays an error message.
Figure 103: Auto initiate error message
If you would like to enable a system for portal calling, contact OTN Technical Support. They can investigate and either enable portal calling for the system or explain the reasons why the system cannot have it enabled.
Changing an Event’s Duration
If you need to extend an auto-initiated event, open the event request, go to the Sites tab, and type a new time in the Duration field.
To manually end an auto-initiated event, log in to Ncompass and use the ‘Drop Call’ button. For detailed instructions, refer to the Ncompass Connecting to a Videoconference (Click-to-Call & Auto-Initiation) user guide (available from the Documents page in Ncompass).

TSM Educational & Administrative Scheduling v6.7.7 92
Using TSM Registries
Site/System Registry
The Site/System Registry contains information about the sites that can participate in an event and the video systems associated with that site.
Example sites include: academic health science centres, community hospitals, medical and nursing schools, professional organizations, Community Care Access Centres, LHIN offices, and long-term care homes.
Each site has a unique civic address belonging to an OTN member organization, is assigned a unique OTN ID (also known as OTN Site ID) and has its own connection type.
One site can have many systems.
Each system has a unique System Name that contains the OTN ID of its parent site and follows a naming standard:
System Naming Standard
Example of System Name
Community 3 letter
abbreviation for city/town of
system’s location
System number 2-3 digit number assigned to each
system, starting at 001, incremented by one
TOR_LHC_012345_ABCH_001
Toronto
Leaside Health Sciences Centre
OTN ID (also known
as OTN Site ID)
ABC Hospital
First system
CCC_MMMM_nnnn_SSSS_xxx
Member 2-4 letter
abbreviation or acronym of actual
member name
OTN ID 4-6 digit unique
site identifier
Site name 2-4 letter
abbreviation or acronym of actual
site name

Using TSM Registries
TSM Educational & Administrative Scheduling v6.7.7 93
Searching the Site/System Search Registry
The Site Registry contains information about both sites and the systems at those sites.
To search for a site or system, there are two ways to start.
From the main toolbar, move your cursor Registry and then select Site>Search.
Figure 104: Search site via TSM toolbar
From beside an active Actual System or Virtual System field, click the Search button.
Figure 105: Search site via field button
A Search Site/System window appears.
Figure 106: Search Site/System window
There are several search criteria available that you can use alone or in combination. Combining several search criteria can further narrow your search results.

Using TSM Registries
TSM Educational & Administrative Scheduling v6.7.7 94
Site/System Registry Search Fields
(Listed in alphabetical order, by field name.)
Field used in search Tips
Address If you know the street name or postal code, type the full or partial information in the relevant field.
Administrative Use Defaults to ‘Either’.
To confine your search to systems that are:
• Available for administrative events, select ‘Yes’.
• Not available for administrative events, select ‘No’.
Bridge Required Defaults to ‘Either’.
To confine your search to systems that:
• Always require a Bridge, select ‘Yes’.
• Do not require a Bridge, select ‘No’.
City If you want to find all the systems that reside in a specific city, type the full or partial name in the City field.
For example, to include North Bay in the search, type ‘Nor’ in the City field.
If you want to find a site that is close to a specific city, type the full city name and also select a range using the Within field. (See Using Site Finder on page 98.)
Clinical Use Defaults to ‘Either’.
To confine your search to systems that are:
• Available for clinical events, select ‘Yes’.
• Not available for clinical events, select ‘No’.
Connection Speed To search for only systems that connect at a specific speed, select the desired speed from the drop-down list.
Connection Type Connection types are assigned at the system level. One site can have multiple systems and each system has its own connection type. For example, system A uses an On-Net IP VPN-s, while system B uses an Off-Net ISDN connection type.
Continued on next page…

Using TSM Registries
TSM Educational & Administrative Scheduling v6.7.7 95
Field used in search Tips
Dialing Alias To search for a system’s H.323 ID, E.164/ISDN number, or IP address, type the full or partial number in this field.
Type only the numbers, do not include hyphens, dashes, or dots. For example, type 4165551224 (do not type 416-555-1234).
Educational Use Defaults to ‘Either’.
To confine your search to systems that are:
• Available for educational events, select ‘Yes’.
• Not available for educational events, select ‘No’.
Name TSM searches for a match within either the site name or system name.
The OTN ID is part of the system name, therefore you can search using the OTN ID in this field. (See Site/System Registry on page 92.)
Or type the full or partial text name of the site or system. For example, to include only sites and systems with the word ‘hospital’ in their name, type ‘hospital’ in the Name field.
Notes contain To search for specific words or phrases in a site/system Notes field, type the word or phrase in this field.
OTN ID (also known as Site ID)
If you know the system is part of OTN, search using the site’s OTN ID number (e.g., 0014 or 001234).
Consult your OTN Contact List for OTN ID numbers.
Portal Calling Activated
Defaults to ‘Either’. To confine your search to systems that are:
• Enabled for portal calling, select ‘Yes’.
• Not enabled for portal calling, select ‘No’.
Postal Code If you know the postal code, type the full or partial information.
If you want to find a site that is close to a specific postal code, also select a range using the Within field. (See Using Site Finder on page 98.)
Region If you know the region, select it from the Region drop-down list.
Site Class The field defaults to ‘All’.
To search for only members or only non-members, select the appropriate entry in the drop-down list.
Continued on next page…

Using TSM Registries
TSM Educational & Administrative Scheduling v6.7.7 96
Field used in search Tips
Special Handling Defaults to ‘Either’.
To confine your search to systems that:
• Must be manually programmed on the bridge, select ‘Yes’
• Have no special bridge handling requirements, select ‘No’.
Special Handling Notes contain
To search for specific words or phrases in a system’s Special Handling Notes field, type the word or phrase in this field.
This field operates independently of the Special Handling field. Any text in this field is displayed on the Bridge Console Report, whether the Special Handling field is set to ‘Yes’ or ‘No’.
System Status If you know that a system is in a specific phase of coming onboard, search using the System Status field.
Active System is ‘live’ and can be scheduled into events.
Not Certified System in development; specifically, it is in CRM and synchronized to TSM.
Being Tested System in development; specifically it is set to begin the certification process.
Certified System in development; specifically, it has passed OTN Technical Support certification.
Failed Certification System in development; specifically, it did not pass OTN Technical Support certification.
Inactive Temporary status; system was Active at some point but for various reasons it is temporarily unavailable.
Not In Use Permanent status; system previously might have had any status but it will not be used again (e.g., duplicate, mistake).
Decommissioned Permanent status; system was previously Active, but is no longer used and has gone through a formal decommissioning process (e.g., system move from one site to another, no longer a member).
System Type Allows you to search for specific system types. For example, to find:
• A Personal Computer user, select ‘PC Video Endpoint’.
• A room-based (legacy) system, select ‘Hardware Video Endpoint’.
• A system used for archiving a webcast event, select either the ‘Archived Only’ or ‘Live and Archived’ webcast recorder.

Using TSM Registries
TSM Educational & Administrative Scheduling v6.7.7 97
1. After selecting your search criteria, to begin the search click .
A search results list of sites and their associated systems replaces the search form.
Figure 107: Site/system search results list (via a field search)
2. If you searched for the site or system while filling in a field, to automatically fill the field with a specific system, click the system entry in the list ().
(Note: Search results from a Registry search do not have site/system names as active links.)
3. To view details about a site or system, click the View link ( ) beside a listed item.
A new window appears showing complete site or system details.
4. To edit a site or system, click the Edit link ( ) beside a listed item.
A new window appears fields you can edit for the site or system.
5. To view notes related to a site or system, click the Show Notes link ( ) beside a listed
item. When viewing notes, to hide the displayed notes, click the Hide Notes link ( ).
Notes about the system appear immediately below the system entry in the search results.
Figure 108: System notes displayed in search results
6. To view a map showing all the found sites/systems, click . (See Using Site Finder
on page 98.)

Using TSM Registries
TSM Educational & Administrative Scheduling v6.7.7 98
Using Site Finder
TSM’s Site Finder function allows you to find a site that is within range of a postal code or city. (For example, you want to identify a site that will minimize a patient’s travel to an appointment).
1. To access the Site Finder function, open a Search Site/System window (either via the Registry Search menu or via a System Search button beside a field)
2. To set the search parameters, type a full or partial Postal Code (or a complete City name) and select the Within distance (for example, within 25 km). The default range is within 5 km.
Figure 109: Site Finder field parameters
3. To initiate the search, click .
A Search Results page appears listing all sites and their associated systems that are within the designated range. The results are sorted in ascending distance – the closest site is listed first, followed by sites that are increasingly distant.
Figure 110: Search Site/System results list
4. To view a map of the area with sites highlighted, click .
A map of the area appears above the Search Results list and highlights all sites that are within the designated range.
• Green pins ( ) indicate found sites within the range – each pin identified with its
number from its order in the Search Results list.
• If you specified a full postal code, a red pin ( ) indicates the designated postal code.

Using TSM Registries
TSM Educational & Administrative Scheduling v6.7.7 99
Figure 111: Site Finder mapped sites within specified range
5. To view the name of a particular mapped site, move the cursor over the pin (Figure 112).
Figure 112: Site pin name pop-up
6. To view the full address of a particular mapped site, click the pin (Figure 116).
7. To open a new window with complete site details, click the Site Name in the map pop-up (Figure 117).
Figure 113: Site pin address pop-up
Figure 114: Site popup and full details in new window
8. To hide the map and view only the Search Results list, click .
9. To select a system for a field, go to the Search Results list and click the System Name.

Using TSM Registries
TSM Educational & Administrative Scheduling v6.7.7 100
Editing a Site
OTN schedulers can only edit site entries. (They cannot create a site entry.)
If a site does not exist, contact OTN Technical Support. They will investigate and if necessary initiate a request to create a site.
Only designated OTN staff can create new sites and systems in TSM. For members, the New Site team creates the registry entries. For non-members, OTN Technical Support creates site entries after completing the site’s certification.
1. To edit a site, click the Edit link ( ) beside the entry in a Search Results list.
Figure 115: Site search results list
An Edit Site screen appears.
Figure 116: Edit site screen
2. Review the screen and update or change the fields as necessary.
3. When you have completed the changes, click .
TSM checks that all mandatory fields are complete and updates the site in the Site Registry.
If there are errors, the Edit Site window reloads with error messages. Correct the errors and re-save.
TSM schedulers can edit only the Address, Notes, Directions, and Contact fields.
Only OTN Technical Support can update Name, OTN ID and Site Class.

Using TSM Registries
TSM Educational & Administrative Scheduling v6.7.7 101
Editing a System
OTN schedulers can only edit system entries. (They cannot create a system entry.)
If a system does not exist, contact OTN Technical Support. They will investigate and if necessary initiate a request to create a system. It might take 1-2 weeks before a new system is available for use, because there is a strict certification process to complete.
1. To edit a system, click the Edit link ( ) beside the entry in a Search Results list.
Figure 117: System search results list
An Edit System screen appears.
Figure 118: Edit system screen
Continued on next page…
TSM schedulers can edit only the address, room, fax, phone, and contact fields.

Using TSM Registries
TSM Educational & Administrative Scheduling v6.7.7 102
2. Review the screen and update or change the fields as necessary.
Do not edit the following fields.
Only OTN Technical Support can update these fields.
• Bridge Required
• Connection Speed
• Connection Type
• Date Testing was Completed
• Dialing Aliases* fields
• Portal Calling Activated*
• Site*
• Special Handling
• Special Handling Notes
• System Available For*
• System Name*
• System Protocol*
• System Status*
• System Type*
• Tested By
• Vidyo Email Address
3. When you have completed the changes, click .
TSM checks that all mandatory fields are complete and updates the system.
If there are errors, the Edit System window reloads with error messages. Correct the errors and re-save.

Using TSM Registries
TSM Educational & Administrative Scheduling v6.7.7 103
Event Type Registry
The Event Type Registry contains a predefined list of categories, sub-categories, and types.
You cannot create a new event type, but within an event you can specify ‘other’ and supply an associated description.
Searching the Event Type Registry
To search for an event type, there are two ways to start.
From the main toolbar From an Event Type field
Move the cursor over Registry and then select Event Type.
Figure 119: Search Event Type via TSM toolbar
An Event Type list replaces the TSM main content page. The list is read-only.
Figure 120: Search contact via TSM toolbar
The page lists two categories—clinical and non-clinical. Both categories have the same list of available types.
• To view sub-entries, click the plus sign (+) beside the category name.
• To hide sub entry lists, click the minus sign (-) beside the category name.
From beside an active Event Type field, click .
Figure 121: Search Event Type via field button
A pop-up window – Event Type – appears. The list is clickable for selecting the field’s content.
Figure 122: Search contact via TSM toolbar
The page lists the available event types.
To select an entry, click a list item.

Using TSM Registries
TSM Educational & Administrative Scheduling v6.7.7 104
Contact Registry
The Contact Registry contains information about the people who participate in events. When you select a Contact, a Consultant, or a Requestor, TSM accesses its Contact Registry.
A contact record includes the individual details associated with a person including their address, phone numbers, other contact information (e.g., email, fax), and an assigned contact type.
Example contact types include: Allied Health Professional, Chair, Local IS Support, OTN Support, Physician, Speaker, Specialist, and Telemedicine Coordinator. (Note: A contact can be assigned more than one type.)
To maximize the chance of finding a match, search only for a name.
Searching the Contact Registry
1. To search for a contact, there are two ways to start.
From the main toolbar, move the cursor over Registry and then select Contact>Search.
Figure 123: Search contact via TSM toolbar
From beside an active Requestor, Speaker/Chair, or Consultant field, click the Search button.
Figure 124: Search contact via field button
A Search Contact screen appears.
Figure 125: Requestor/Speaker search form
Figure 126: Consultant search form
2. To search the Contact Registry, there are several search criteria available, which can be used alone or in combination.

Using TSM Registries
TSM Educational & Administrative Scheduling v6.7.7 105
Use fewer search criteria instead of more. The more fields you add to a search, the less likely you are to find what you are looking for because TSM matches all search criteria before it will give you any results.
If you use more than one search criteria, keep it simple. For example, you can search for all physicians with a last name starting with ‘Sm’ that live in Belleville (instead of searching for all names in Belleville). With this search you can catch both ‘Smith’ and ‘Smythe’.
Contact Registry Search Fields
(in order of appearance)
Search criteria Instructions
Name If you know the name of the contact, enter the first few letters of their first name or middle name, and last name in the appropriate fields.
Last name is usually a better search criteria because first names often contain short forms or other name variations. (For example, a name might use Liz, Betty, or Beth instead of Elizabeth.)
If you use both names, to avoid spelling errors do not type the whole name. (For example, if the patient’s name is Kyoko Tanaka, type ‘Ky’ and ‘Ta’ in the first and last name fields.)
Contact Type To search for a requestor who is a specific ‘type’, select the appropriate checkbox(es).
You can select multiple contact types for one search. However, TSM treats the multiple criteria as an ‘OR’ search and returns contacts that have any of the types selected (i.e. not just the contacts that have all the types selected).
Note: In searches, use this field with caution because this field is not populated with 100% accuracy for all contacts. For example, consultants are also listed as allied health professionals and TMCs are usually listed as speakers/chairs but not always as TMCs.
Event Type To search for someone who has previously serviced a specific event
type, click beside the field and select the desired type.
Contact Status The default is ‘Active’ status selected.
To search for only contacts that have a specific status, select the appropriate checkbox(es).
You can select multiple contact types for one search.
Continued on next page…

Using TSM Registries
TSM Educational & Administrative Scheduling v6.7.7 106
Search criteria Instructions
IAM ID Identity and Access Management Identifier. This field is not available for searches, but does appear in the View or Edit Contact Details. This is unique number that identifies each OTN contact and is used for synchronizing information in TSM and OTN’s Customer Relationship Manager (CRM).
OHIP- TM Registered
To search only for contacts for which OTN has received OHIP information, click the ‘Yes’ option.
If you want to search only through contacts that have never sent OHIP information to OTN, click on the ‘No’ option.
Note: This field does not indicate whether or not the contact is covered by OHIP.
Region To search for a requestor who lives within a specific region, click your region choice in the drop-down list.
City, Phone, or Fax
If you know only the city, phone number, or fax number of the requestor, type the information in the applicable field.
Email To search for an email address, type the full address in this field.
Language To search for all languages, leave the field on its default setting (-).
To search for one specific language, select the appropriate entry in the drop-down list.
Notes If you know there are specific words in a contact’s note field, type them in this field.
3. After selecting your search criteria, click at the bottom of the screen.
A list of matching names appears below the Search Contact section.
Figure 127: Contact search results list
TSM lists a maximum of 100 contacts on screen.
If your search results contain more than 100 contacts, to view the all the contacts found, click the link at the top of the search results list and TSM will create
an Excel file that contains all contacts found.

Using TSM Registries
TSM Educational & Administrative Scheduling v6.7.7 107
4. If a contact entry includes a note, to view the full note, move the cursor over the Note field ().
A small pop-up displays the note’s complete contents.
5. If you searched for the contact while filling in a field, to automatically fill the field with a specific contact, click the contact entry in the list ().
6. To view or edit a contact, or the View link ( ) or the Edit link ( ) beside a listed item.
7. To create an Excel file of the search results contact list, click the link.
OTN makes every reasonable effort to ensure accurate TSM contact information. This depends on our members supplying us with up-to-date names, phone numbers, and addresses.
When working with clinical events, to reduce the potential for privacy breaches, before you send a fax contact the recipients to:
• Confirm the accuracy of their fax number.
• Advise them that you are about to send a fax containing personal information.

Using TSM Registries
TSM Educational & Administrative Scheduling v6.7.7 108
Creating a Contact
1. To create a contact, there are two ways to start.
From the main toolbar, move the cursor over Registry and then select Contact>Create.
Figure 128: Create contact via TSM toolbar
From the Search Contact window, click Create New Contact.
Figure 129: Create contact via search window
A Create Contact screen appears.
Figure 130: Create contact screen
2. Enter as much information as you can about the person and then click .
When creating a physician in the Contact Registry, use contact info listed on the College of Physicians and Surgeons’ website. This is a reliable and public database.

Using TSM Registries
TSM Educational & Administrative Scheduling v6.7.7 109
The Notes field is viewable by all TSM and Ncompass users when they search for contacts.
TSM checks that all mandatory fields are complete and adds the contact to the Contact Registry.
If there are errors, the Create Contact window reloads with error messages. Correct the errors and re-save.
If there are no errors, a View Contact summary appears.
Figure 131: View contact summary
3. Confirm that the information is correct.
4. To change something about the contact, click .
5. If you created the contact while filling in a field, to automatically fill the field with the new contact, click .
6. If you created the contact via the TSM toolbar, use the toolbar to navigate back to the home page (or another screen of your choice).

Using TSM Registries
TSM Educational & Administrative Scheduling v6.7.7 110
Location Registry
The Location Registry contains records of specific geographic locations (usually a city or town) within a region.
Each location has:
• An identified closest site.
• The time difference between the location and the OTN Toronto head office.
Searching the Location Registry
1. To search for a location, there are two ways to start.
From the main toolbar, move the cursor over Registry and then select Location>Search.
Figure 132: Search location via TSM toolbar
From beside an active City field, click .
Figure 133: Search location via field button
A Search Location window appears.
Figure 134: Search location window
2. To search for a location there are three search criteria available, which can be used alone or in combination. Combining more than one search criteria can help narrow the results.

Using TSM Registries
TSM Educational & Administrative Scheduling v6.7.7 111
Location Registry Search Fields
Search criteria Description
Region If you know that the location belongs to a specific region, select an entry from the drop-down list.
City To search for a specific city location, type in a partial or full name.
Closest Site If you know the name of a specific site, type its partial or full name.
For example, to find all sites with Hamilton in the site name type HAM
1. After selecting your search criteria, click .
A list of matching locations appears below the Search Location section.
Figure 135: Location search results list
2. If you searched for the location while filling in a field, to automatically fill the field with a specific location, click the location entry in the list ().
3. To view or edit a location, or the View link ( ) or the Edit link ( ) beside the listed item.

Using TSM Registries
TSM Educational & Administrative Scheduling v6.7.7 112
Creating a Location
1. To create a location, there are two ways to start.
From the main toolbar, move the cursor over Registry and then select Location>Create.
Figure 136: Create location via TSM toolbar
From the Search Location window, click Create New Location.
Figure 137: Create location via search window
A Search Location window appears.
Figure 138: Create location window
2. Enter as much information as you can about the location and then click .
TSM checks that all mandatory fields are complete and adds the location to the Location Registry.
• If there are errors, the Create Location window reloads with error messages. Correct the errors and re-save.
• If there are no errors, a View Location summary appears.

Using TSM Registries
TSM Educational & Administrative Scheduling v6.7.7 113
Figure 139: View location summary
3. Confirm that the information is correct.
4. To change something about the location, click .
5. If you created the location while filling in a field, to automatically fill the field with the new location, click .
6. If you created the location via the TSM toolbar, use the toolbar to navigate back to the home page (or another screen of your choice).

TSM Educational & Administrative Scheduling v6.7.7 114
Appendix A: Conference Modes (Video Layout)
Conference mode identifies the video layout that the host and participants will see during the event, which defaults to Full Screen Layout.
All point-to-point events use the full screen layout.
You can change the selected layout up until five minutes before the event start time. (However, OTN recommends you make changes at least 15 minutes prior to the event as a best practice). You cannot change the layout while an event is in progress.
The layout you select applies to all participant sites. (That is, you cannot choose different layouts for different sites.)
Lecture Mode has the following features:
• Participants always see the host (even if another person speaks, participants can hear that person but the video does not switch).
• The host sees the participants.
• If the host disconnects prior to the event’s scheduled end time, participants will see each other until the host rejoins the event.
Full Screen Layout
Full screen layout is recommended for when you select Lecture Mode or when a PowerPoint presentation will be broadcast.
• The host and participants see the person that last spoke.
• If the participant is the active speaker, their screen shows the previous speaker.
Split Screen Layouts (Side by Side, 1+7, 1+21)
• All participants see the same selected layout.
• The active speaker appears in the largest panel. (Initially the host, but when another person un-mutes their microphone and speaks, they appear.)
• If a participant is the active speaker, the previous speaker appears in their largest panel.
If there are more sites than there are panels available, then the ‘quietest’ sites are not shown.

Appendix A: Conference Modes
TSM Educational & Administrative Scheduling v6.7.7 115
Sample Screen Layouts
Full Screen
Full-screen main video plus an indicator showing the number of additional participants
Recommended for a two-site conference or for participant systems when:
• Lecture mode is selected.
• A PowerPoint presentation is being broadcast.
Side by side (or 2 + 21)
The top row contains both the main speaker and most recent speaker, side by side.
Recommended for a three-person conference, as each person always sees the other two participants in the larger panels.
A maximum of 21 participants can appear as thumbnails at the bottom of the screen. If there are additional participants, an indicator appears showing the number of additional participants.
1 + 7
One large video panel plus a single row of thumbnails.
A maximum of 7 participants can appear as thumbnails at the bottom of the screen. If there are additional participants, an indicator appears showing the number of additional participants.
1 + 21
One large video panel plus up to three rows of thumbnails.
A maximum of 21 participants can appear as thumbnails at the bottom of the screen. If there are additional participants, an indicator appears showing the number of additional participants.

Index
A
access, 35 accredited, 35 actions panel, 15 actual system, 40 admin event search, 30 advanced search, 27 affiliate, 37 affiliation, 35 alias, dialing, 95 approval tab, 43 arrive late, 35, 41, 68 asterisk, 12 attachment
download/open, 50 audi/video phone number, 45 audio event
booking, 84 gateway, 81
audio participants, 37 audio/video phone number, 85, 88 auto-initiate, 90
B
billable. See premium service blocked time. See marked time bridge, 81
force on, 38 location, 38 reports, 23 third-party, 86
buttons, TSM, 14
C
calendar icon/link, 25 Ncompass (system schedule), 23
cancel scheduled event, 69 webcast request, 64
clear all notifications, 72 clone event, 74 closing registration date, 40
common info equip./other, 41 conference mode, 36, 114 confirmation
tab, 45 view or print, 71
conflicts, 20 contact registry
create, 108 fields, 105 search, 104
continuous presence, 114 copy event. See clone event, See clone event create request, 31 create site. See edit, site
D
date of event, 39 date selection, 25 delete
event, 80 system, 67
depart early, 35, 41, 68 dial-in, 84, 86
gateway, 81 search, 89
dialing alias, 95 do you approve, 43 download attachment, 50 DTMF/PIN, 41, 68 duration
change, 91 event, 40
dynamic dialing alias, 41, 68
E
early departure, 35, 41, 68 edit
scheduled event, 65 site, 100 system, 101 unscheduled event, 66
end event early, 91 end time, 35, 41, 68 equip./other, 41

error message, 19 conflicts, 20 marked time, 21
event cancel scheduled, 69 clone, 74 create, 31 delete, 80 extend duration, 91 modify scheduled, 65 modify unscheduled, 66 notification, 71 publish, 51 recur, scheduled, 76 search, advanced, 27 status icon, 17 type registry, 103 undo cancel, 70 webcast, 56
event title, 34 event type, 34 Excel file, search results, 28 extend event duration, 91
F
faxing, confirmation page, 71 find. See search force event on bridge, 37 forms, 10
approval, 43 confirmation, 45 header, 32 sites, 39
full screen, 114
G
gatekeeper, 90 gateway, 81 google maps, 98
H
header tab, 32 history, event notification, 71 home page, 23 host system. See actual system
I
icons actions panel, 15 error & warning, 18 event status, 17 TSM, 14
initiating system, 40 invitation only, access, 35 ISDN event, dial-in phone, 45, 84, 86
K
keyboard shortcuts, 13
L
late arrival, 35, 41, 68 layout, video screen, 114 layout, webcast presentation, 59 learning centre, publish, 51 leave early, 35, 41, 68 lecture mode, 36, 114 link, webcast, 60, 62 location registry
search, 110 login, 22
M
mandatory fields, 12 manual override, 45, 85, 88 maps, google, 98 marked time, 21 mode, conference, 114 modify
scheduled event, 65 unscheduled event, 66
multi-point publish, 51 un-publish, 54 webcast, 56
multipoint event, 81
N
Ncompass, calendar, 23 new request, 31 non-OTN system, 37, 86 notification, event, 71 number of systems, 35, 41

O
open invitation, access, 35
P
participant systems. See virtual systems password, 22 phone number, dial-in, 45, 84, 86 PIN, DTMF, 41, 68 pin, site finder, 98 portal calling, 90 prefix (off-net system), 41, 68 premium service, 37 presenter, 35 printing confirmation, 71 privacy, 9 private log, 38, 41, 43 public events list, 51 public log, 38, 42, 44 purpose, 36
Q
quick create, 24 search, 26
R
recur scheduled event, 76 registry
contact, 104 event type, 103 location, 110 site, 92 system. See site registry
reporting, 23 request
cancel scheduled, 69 clone, 74 create, 31 delete, 80 modify scheduled, 65 modify unscheduled, 66 recur, scheduled, 76 search
advanced, 27 quick, 26
undo cancel, 70
requestor, 34 resolve conflict, 20
S
search admin event, 30 advanced, 27 contact registry, 104 dial-in, 89 educational event, 29 Excel file, 28 quick, 26 site finder, 98 site/system registry, 93
security, 9 setup time, 40 short description, 35 shortcuts, keyboard, 13 sign, 22 site registry
create. See edit, site edit, 100 fields, 94 search, 93 site finder, 98
sites tab, 39 slide presentation, webcast layout, 59 source, 34 speaker, 35 speaker affiliation, 35 special event types, 81 split screen, 114 sponsor, 36 start call auto, 40, 90 start time, 35, 41, 68 status icon, event, 17 system
registry. See site registry schedule (Ncompass calendar), 23
T
tabs, 10 approval, 43 confirmation, 45 header, 32 sites, 39
telephone number, dial in, 84 telephone number, dial-in, 45, 86

third-party bridge, 86 time, arrive late or depart early, 35, 41, 68 toolbar, 23 type, event, registry, 103
U
undo cancel, 16, 70 upcoming events, 24 URL, webcast, 60, 62 user name, 22
V
virtual system, 41 voice activated, 114
W
warning message, 19 auto-initiate, 91 bridge resources, 83 conflicts, 20 marked time, 21 portal calling, 91
webcast cancel request, 64 create request, 56 edit request, 62 slide presentation, 59 WAF, 61
webcasting, 37, 74, 76

Ontario Telemedicine Network 105 Moatfield Drive, Suite 1100
Toronto, ON M3B 0A2