Embed Size (px)
Citation preview
i
5 June 2014
SAS® University Edition: Installation Guide for OS X
ii
The correct bibliographic citation for this manual is as follows: SAS Institute Inc. 2018. SAS® University Edition:
Installation Guide for OS X. Cary, NC: SAS Institute Inc.
SAS® University Edition: Installation Guide for O S X
Copyright © 2018, SAS Institute Inc., Cary, NC, USA
All rights reserved. Produced in the United States of America.
For a hard-copy book: No part of this publication may be reproduced, stored in a retrieval system, or transmitted, in
any form or by any means, electronic, mechanical, photocopying, or otherwise, without the prior written permission of
the publisher, SAS Institute Inc.
For a web download or e -book: Your use of this publication shall be governed by the terms established by the vendor
at the time you acquire this publication. The scanning, uploading, and distribution of this book via the Internet or any
other means without the permission of the publisher is illegal and punishable by law. Please purchase only authorized
electronic editions and do not participate in or encourage electronic piracy of copyrighted materials. Your support of
others’ rights is appreciated.
U.S. Government License Rights; Restricted Rights: The Software and its documentation is commercial computer
software developed at private expense and is provided with RESTRICTED RIGHTS to the United States Government.
Use, duplication or disclosure of the Software by the United States Government is subject
to the license terms of this Agreement pursuant to, as applicable, FAR 12.212, DFAR 227.7202 -1(a), DFAR 227.7202-3(a) and DFAR 227.7202-4 and, to the extent required under U.S. federal law, the minimum restricted rights as set out
in FAR 52.227-19 (DEC 2007). If FAR 52.227-19 is applicable, this provision serves as notice under clause (c) thereof
and no other notice is required to be affixed to the Software or documentation. The Government's right s in Software
and documentation shall be only those set forth in this Agreement.
SAS Institute Inc., SAS Campus Drive, Cary, North Carolina 27513-2414.
Printing 1, April 2018
SAS provides a complete selection of books and electronic products to help customers use SAS® software
to its fullest potential. For more information about our offerings, visit support.sas.com/bookstore or call
1-800-727-3228.
SAS® and all other SAS Institute Inc. product or service names are registered trademarks or trademarks of SAS Institute
Inc. in the USA and other countries. ® indicates USA registration.
Other brand and product names are trademarks of their respective companies.
Certain third-party software, including open source software, is included in the vApp; Such software is licensed under
its applicable third party software license agreement, as described below:
iii
Third-party
software URL for source code Applicab
le
license(s)
URL for license(s)
CENTOS http://vault.centos.org/ CENTO
S EULA;
GNU
General
Public
License
version
2.0
http://mirror.centos.org/centos/6/os/x86_64/
EULA
http://www.opensource.org/licenses/gpl-2.0
open-vm-
tools
http://sourceforge.net/projects/open-
vm-tools/
GNU
General Public
License
(GPL)
version
2.0
http://www.opensource.org/licenses/gpl-2.0
VIRTUALB
OX http://www.virtualbox.org/
GNU
General
Public
License
(GPL)
version
2.0
http://www.opensource.org/licenses/gpl-2.0
Jupyter https://github.com/jupyter BSD https://opensource.org/licenses/BSD-3-
Clause
Prompt_toolk
it
https://github.com/jonathanslenders/py
thon-prompt-toolkit
BDF https://opensource.org/licenses/BSD-2-
Clause
Six https://pypi.python.org/pypi/six/
MIT https://opensource.org/licenses/MIT
Wcwidth https://github.com/jquast/wcwidth
MIT https://opensource.org/licenses/MIT
dateutil https://dateutil.readthedocs.io/en/stabl
e/
BSD https://opensource.org/licenses/BSD-2-
Clause
iv
Table of Contents
Chapter 1: Requirements ........................................................................................ 5
Chapter 2: Using Oracle VM VirtualBox ............................................................... 6
Overview ......................................................................................... 6
Download the SAS University Edition File ............................................. 6
Configure VirtualBox ......................................................................... 6
Configure Port Mapping for Jupyter Notebook in SAS University Edition in Oracle VM VirtualBox......................................................................... 7
Start SAS University Edition in Oracle VM VirtualBox ............................. 8
Shut Down SAS University Edition in VirtualBox .................................... 9
Start Jupyter Notebook in SAS University Edition in VirtualBox ..............10
Shut Down Jupyter Notebook in SAS University Edition in VirtualBox......11
Chapter 3: Using VMware Fusion ........................................................................ 12
Overview ........................................................................................12
Download the SAS University Edition File ............................................12
Configure VMware Fusion..................................................................12
Start SAS University Edition in VMware Fusion.....................................13
Shut Down SAS University Edition in VMware Fusion ............................16
Start Jupyter Notebook in SAS University Edition in VMware Fusion .......16
Shut Down Jupyter Notebook in SAS University Edition in VMware Fusion .....................................................................................................17
Chapter 4: Updating SAS University Edition ..................................................... 18
Chapter 5: Help and Troubleshooting ................................................................ 19
View the Installation Documentation..................................................19
Unable to Start SAS University Edition with an Unknown Status Code Error .....................................................................................................19
Unable to Start SAS University Edition in VirtualBox with “This kernel requires an x86-64 CPU” Error...........................................................20
Using DropBox with SAS University Edition .........................................20
Opening SAS Studio in a Different Browser Window .............................20
Files Missing on SAS Studio After the First Shared Folder Is Created ......20
Cannot Import SAS University Edition to VirtualBox .............................20
Error Messages Displayed When Running LIBNAME or FILENAME Statements in SAS Studio..................................................................21
"Path Invalid" Error Message When Accessing Data in SAS Studio..........21
PROC HTTP Returns Message “ERROR: Could not find extension: (tkessl)” .....................................................................................................21
Chapter 6: Guidelines for Writing SAS Code for Use with SAS University Edition...................................................................................................................... 22
Chapter 1: Requirements The following requirements are needed to run SAS University Edition:
• The SAS University Edition virtual image downloaded to your local system
• An Apple Macintosh OS X 10.8 or later system
• 64-bit hardware
• One of the following virtualization software programs:
• VMware Fusion for OS X 8.0 or later. You can download VMware Fusion from
https://my.vmware.com/web/vmware/info/slug/desktop_end_user_computing/v
mware_fusion/8_0.
Note: The SAS University Edition virtual image is configured to use 1GB of RAM
and two processors. You can increase the RAM that is assigned to the SAS
University Edition virtual image, but you should assign half (50%) or less of the
available physical RAM. You cannot launch SAS Studio if more than two
processors are assigned to the SAS University Edition virtual image in your
virtualization software.
• Oracle VM VirtualBox for OS X 4.3.16 or later. You can download the latest 5.2
version of VirtualBox from
https://www.virtualbox.org/wiki/Downloads.
• Virtual Network Configuration: Network Address Translation (NAT)
• One of the following web browsers:
• Apple Safari 6.0 or later
• Mozilla Firefox 21 or later
• Google Chrome 27 or later
Chapter 2: Using Oracle VM VirtualBox
Overview
To set up SAS University Edition:
1) Download the SAS University Edition File
2) Configure Oracle VM VirtualBox.
3) Start SAS University Edition in VirtualBox.
Download the SAS University Edition File
If you have not already downloaded the SAS University Edition file for VirtualBox:
1) Using a web browser, log in to http://www.sas.com.
Note: If you do not have a sas.com profile, you will be prompted to create one.
2) In a web browser, open the following page:
http://www.sas.com/en_us/software/university-edition/download-software.html
3) Below Download the SAS University Edition vApp, click Get SAS University Edition.
4) Click I agree to the Terms & Conditions, then click Continue. 5) On the next page, click Download.
Note: When downloading the SAS University Edition vApp, you might be prompted by
your browser to save or run the file. Click Save to save this file in your Downloads
directory.
Configure VirtualBox
You need to configure VirtualBox to create a shared folder for your data that is available to both
the SAS University Edition virtual image and to your local system.
Note: If you add a shared folder to the SAS University Edition virtual image while the SAS
University Edition virtual image is running, you must restart the SAS University Edition virtual
image.
To configure VirtualBox to work with SAS University Edition:
1) On your local computer, create the SASUniversityEdition folder (in a location that you will remember and that does not require administrative rights to access) and create
the myfolders subfolder. You will save all of your SAS University Edition files to this
location.
2) Launch VirtualBox.
3) Select File > Import Appliance.
4) In the Appliance to import pane, click the folder icon to the right of the field.
A file browser window appears.
5) Select the SAS University Edition .ova file.
6) Click Open.
7) Click Continue.
8) (Optional) In the Appliance settings window, edit the CPU and RAM settings.
Note: The SAS University Edition virtual image is configured to use 1GB of RAM and
two processors. You can increase the RAM that is assigned to the SAS University Edition
virtual image, but you should assign half (50%) or less of the available physical RAM.
You cannot increase the number of processors that are assigned to the SAS University
Edition virtual image.

7
9) In the Appliance settings window, click Import. The imported virtual machine is
displayed in the Oracle VM VirtualBox Manager window.
Note: If the message drives in use is displayed, click Ignore.
10) Select Machine > Settings.
11) Click Shared Folders.
12) In the upper right of the window, click +. The Add Share window appears.
13) In the Folder Path field, click the arrow and select Other.
A file browser window appears.
14) Select the myfolders folder that you created, and then click Open. This folder is
mapped to the My Folders folder in SAS Studio.
Note: The shared folder name is case sensitive.
15) In the Add Share window, confirm that Read-only is NOT selected.
16) In the Add Share window, click Auto-mount.
17) In the Add Share window, click Make Permanent, and then click OK.
Note: The Make Permanent check box might not be present. If it is present, select it. If it
is not present, you do not need to do anything.
18) (Optional) Create additional shared folders. Additional shared folders are displayed in
SAS Studio under Folder Shortcuts.
19) In the Settings window, click OK.
Configure Port Mapping for Jupyter Notebook in SAS University Edition in Oracle VM VirtualBox
In this section, you will check if your Jupyter Notebook in SAS University Edition virtual image
for Oracle VM VirtualBox has a required port map rule. If the port map rule is missing, you will
add it.
1) In the left pane of VirtualBox, select the SAS University Edition vApp. Then select
Machine > Settings.
2) In the SAS University Edition Settings dialog box, click Network.
3) Click Advanced to expand the Advanced options, if necessary. Then click Port
Forwarding.
4) In the Port Forwarding Rules dialog box, look for a rule with the following:
• Name - 8888 • Protocol - TCP
• Host IP - 127.0.0.1
• Host Port - 18888
• Guest IP - blank
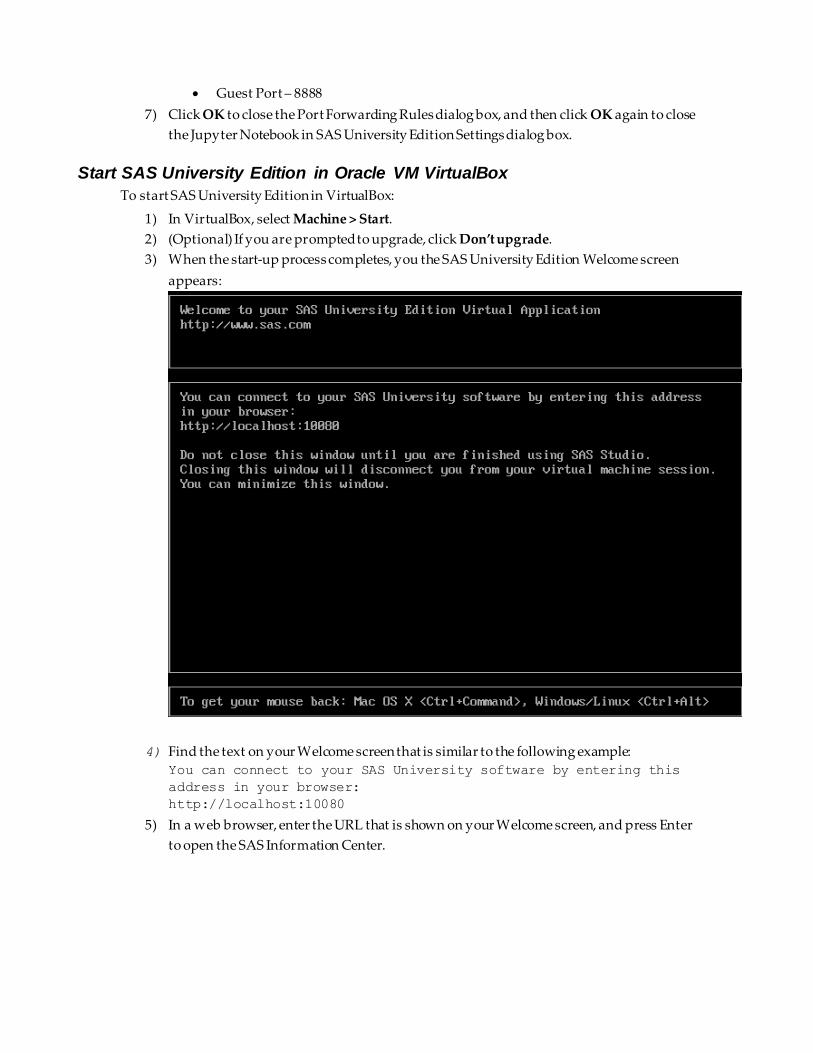
• Guest Port – 8888
5) If this rule is missing, click Adds new port forwarding rule button to add a new port.
6) Add the following information in the appropriate columns:
• Name - Jupyter (or another name of your choosing)
• Protocol – TCP
• Host IP - 127.0.0.1
• Host Port – 18888
• Guest IP - leave this value blank
• Guest Port – 8888
7) Click OK to close the Port Forwarding Rules dialog box, and then click OK again to close
the Jupyter Notebook in SAS University Edition Settings dialog box.
Start SAS University Edition in Oracle VM VirtualBox
To start SAS University Edition in VirtualBox:
1) In VirtualBox, select Machine > Start.
2) (Optional) If you are prompted to upgrade, click Don’t upgrade.
3) When the start-up process completes, you the SAS University Edition Welcome screen
appears:
4) Find the text on your Welcome screen that is similar to the following example:
You can connect to your SAS University software by entering this
address in your browser:
http://localhost:10080
5) In a web browser, enter the URL that is shown on your Welcome screen, and press Enter
to open the SAS Information Center.
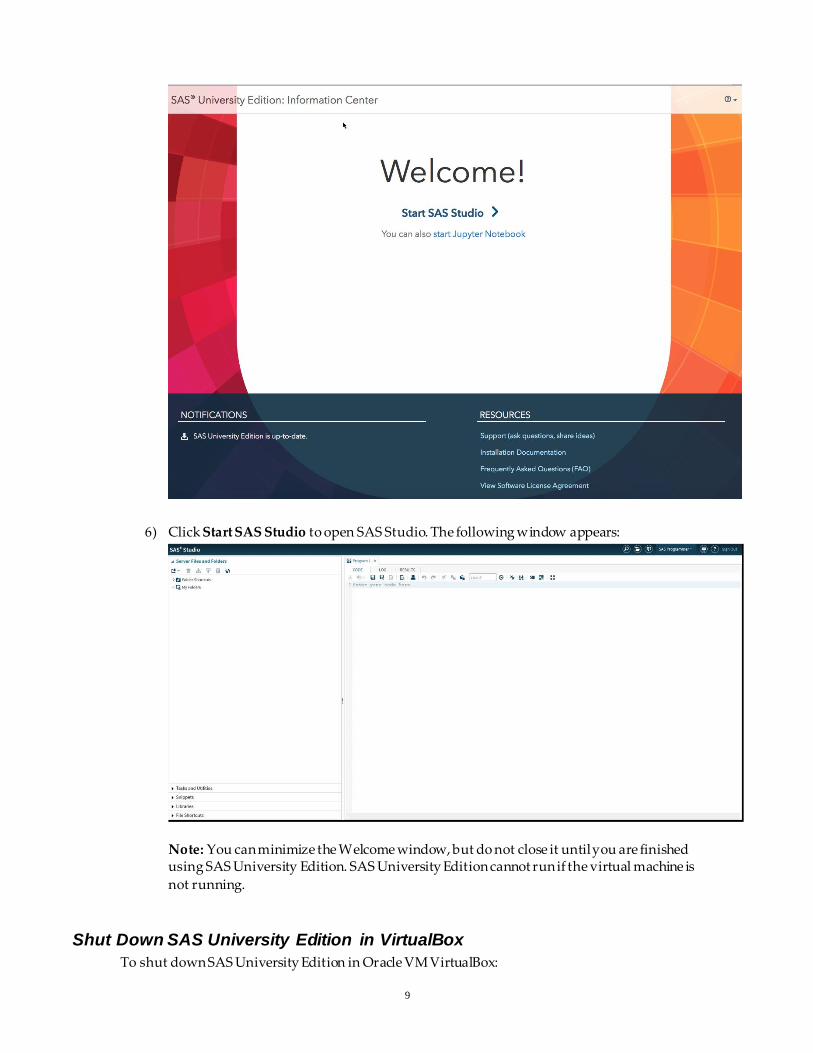
9
6) Click Start SAS Studio to open SAS Studio. The following window appears:
Note: You can minimize the Welcome window, but do not close it until you are finished using SAS University Edition. SAS University Edition cannot run if the virtual machine is
not running.
Shut Down SAS University Edition in VirtualBox
To shut down SAS University Edition in Oracle VM VirtualBox:
1) In the left column of VirtualBox, click the SAS University Edition virtual image.
2) Select Machine > Close > ACPI Shutdown.
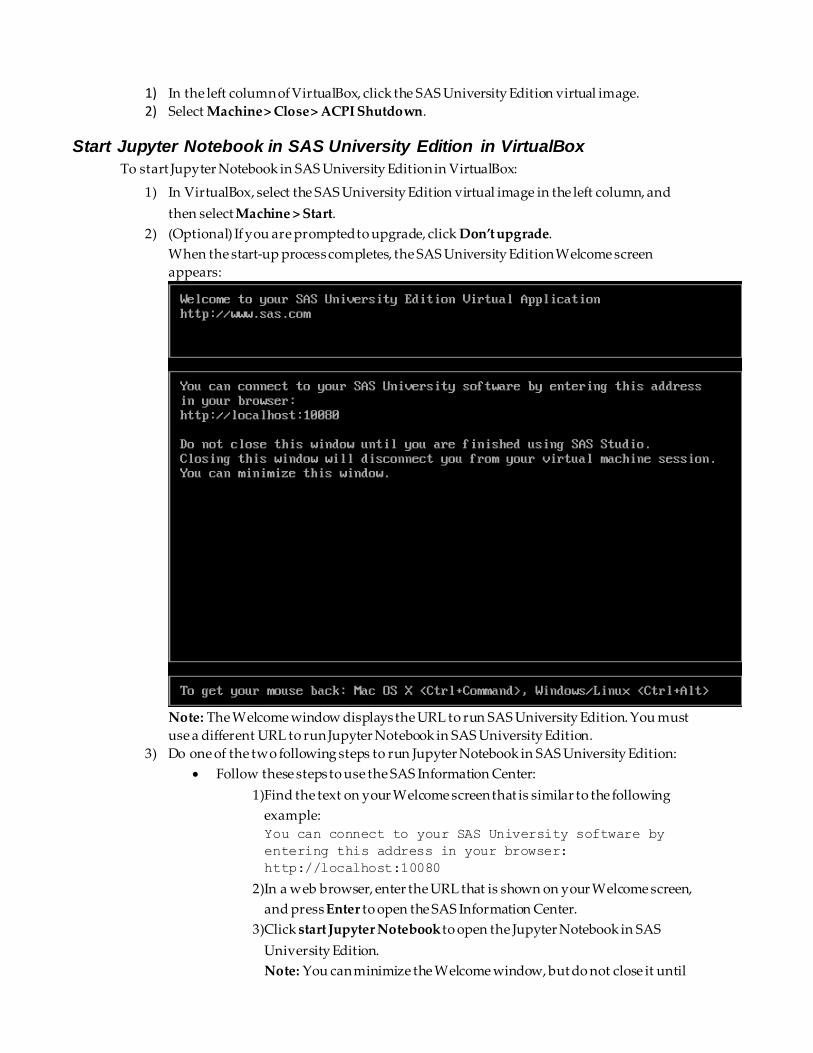
Start Jupyter Notebook in SAS University Edition in VirtualBox
To start Jupyter Notebook in SAS University Edition in VirtualBox:
1) In VirtualBox, select the SAS University Edition virtual image in the left column, and
then select Machine > Start.
2) (Optional) If you are prompted to upgrade, click Don’t upgrade.
When the start-up process completes, the SAS University Edition Welcome screen
appears:
Note: The Welcome window displays the URL to run SAS University Edition. You must
use a different URL to run Jupyter Notebook in SAS University Edition.
3) Do one of the two following steps to run Jupyter Notebook in SAS University Edition:
• Follow these steps to use the SAS Information Center:
1) Find the text on your Welcome screen that is similar to the following
example:
You can connect to your SAS University software by
entering this address in your browser:
http://localhost:10080
2) In a web browser, enter the URL that is shown on your Welcome screen,
and press Enter to open the SAS Information Center.
3) Click start Jupyter Notebook to open the Jupyter Notebook in SAS
University Edition.
Note: You can minimize the Welcome window, but do not close it until
11
you are finished using Jupyter Notebook in SAS University Edition.
Jupyter Notebook in SAS University Edition cannot run if the virtual
machine is not running.
• In a web browser on your local computer, enter
http://localhost:18888
The Jupyter Notebook in SAS University Edition is displayed in the browser
window.
Note: You can minimize the Welcome window, but do not close it until you are
finished using Jupyter Notebook in SAS University Edition. Jupyter Notebook in
SAS University Edition cannot run if the virtual machine is not running.
Shut Down Jupyter Notebook in SAS University Edition in VirtualBox
To shut down Jupyter Notebook in SAS University Edition in Oracle VM VirtualBox:
1) In the left column of VirtualBox, click the SAS University Edition virtual image.
2) Select Machine > Close > ACPI Shutdown.
Chapter 3: Using VMware Fusion
Overview
To set up SAS University Edition:
1) Download the SAS University Edition File
2) Configure VMware Fusion.
3) Start SAS University Edition in VMware Fusion.
Download the SAS University Edition File
If you have not already downloaded the SAS University Edition file for VMware Fusion:
1) Using a web browser, log in to http://www.sas.com.
Note: If you do not have a sas.com profile, you will be prompted to create one.
2) In a web browser, open the following page: http://www.sas.com/en_us/software/university-edition/download-software.html
3) Below Download the SAS University Edition vApp, click Get SAS University Edition.
4) Click I agree to the Terms & Conditions, then click Continue.
5) On the next page, click Download.
Note: When downloading the SAS University Edition vApp, you might be prompted by
your browser to save or run the file. Click Save to save this file in your Downloads
directory.
Configure VMware Fusion
You need to configure VMware Fusion in order to create a shared folder for your data that is
available to both the SAS University Edition virtual image and to your local system.
To configure VMware Fusion to work with SAS University Edition:
1) On your local computer, create the SASUniversityEdition folder (in a location that
you will remember and that does not require administrative rights to access) and create
the myfolders subfolder. You will save all of your SAS University Edition files to this
location.
2) Launch VMware Fusion.
3) Select File > Import.
A file browser window appears.
4) In the Choose an Existing Machine window, click Choose File…, then navigate to the
downloaded SAS University Edition virtual image that ends in .ova.
5) Select the SAS University Edition virtual image that ends in .ova, and then click Open,
then click Continue.
6) When prompted, enter SAS-University-Edition as the name of the new virtual
machine.
7) Click Save, then when the import completes, click Finish.
8) Share a folder from the SAS University Edition virtual image to the local system:
a. Select Virtual Machine > Sharing > Sharing Settings to open the University:
Sharing window.
b. In the University: Sharing window, check Enable Shared Folders.
13
c. In the lower left of the University: Sharing window, click +. A file browser
window appears.
d. Select the myfolders folder that you created, and then click Add. This folder is
mapped to the My Folders folder in SAS Studio.
Note: The shared folder name is case sensitive.
9) (Optional) Create additional shared folders. Additional shared folders are displayed in
SAS Studio under Folder Shortcuts.
Note: See Chapter 6: Guidelines for Writing SAS Code for Use with SAS University
Edition for requirements of names of shared folders.
10) Close the University: Sharing window.
11) By default, the SAS University Edition virtual image network adapter is set to NAT.
Confirm that the network adapter is set to NAT:
a. In VMware Fusion, select Virtual Machine > Settings to open the Settings
window.
b. Click Network Adapter to open the Network Adapter window.
c. Click Share with my Mac.
d. Close the Network Adapter window.
Start SAS University Edition in VMware Fusion
To start SAS University Edition in VMware Fusion:
1) In VMware Fusion, select Virtual Machine > Start Up.
2) Click Don’t upgrade.
3) When the start-up process completes, the SAS University Edition Welcome screen
appears:
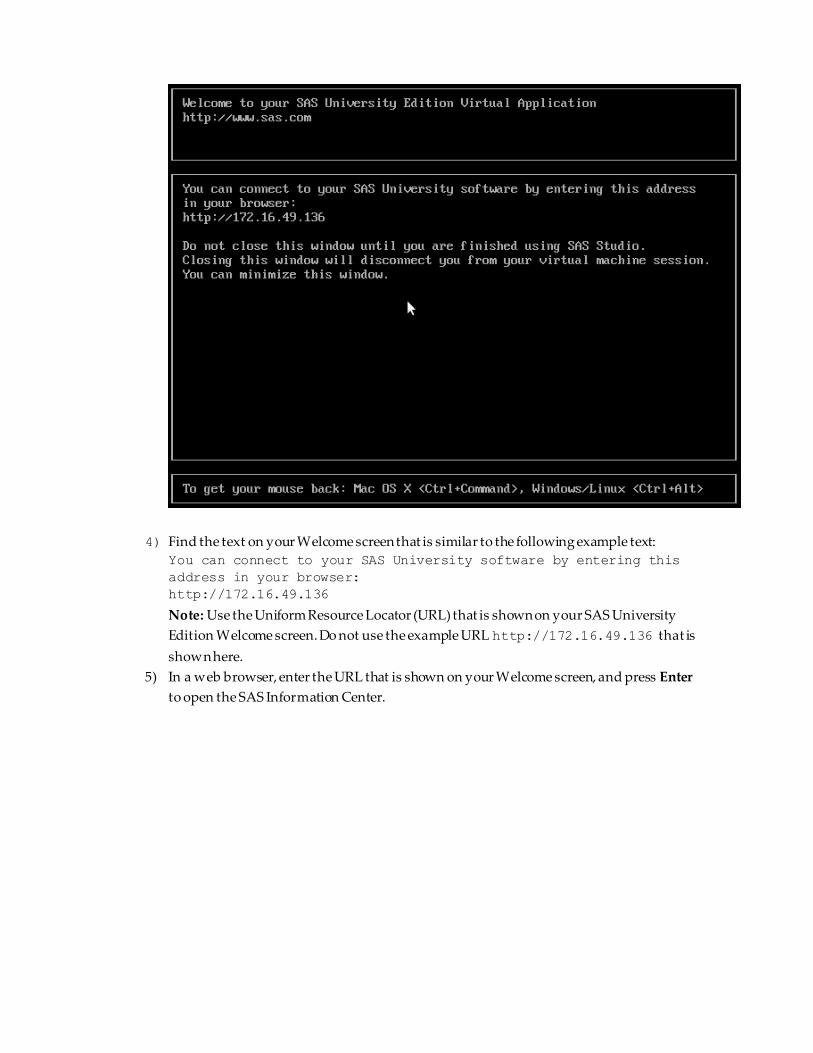
4) Find the text on your Welcome screen that is similar to the following example text:
You can connect to your SAS University software by entering this
address in your browser:
http://172.16.49.136
Note: Use the Uniform Resource Locator (URL) that is shown on your SAS University
Edition Welcome screen. Do not use the example URL http://172.16.49.136 that is
shown here.
5) In a web browser, enter the URL that is shown on your Welcome screen, and press Enter
to open the SAS Information Center.
15
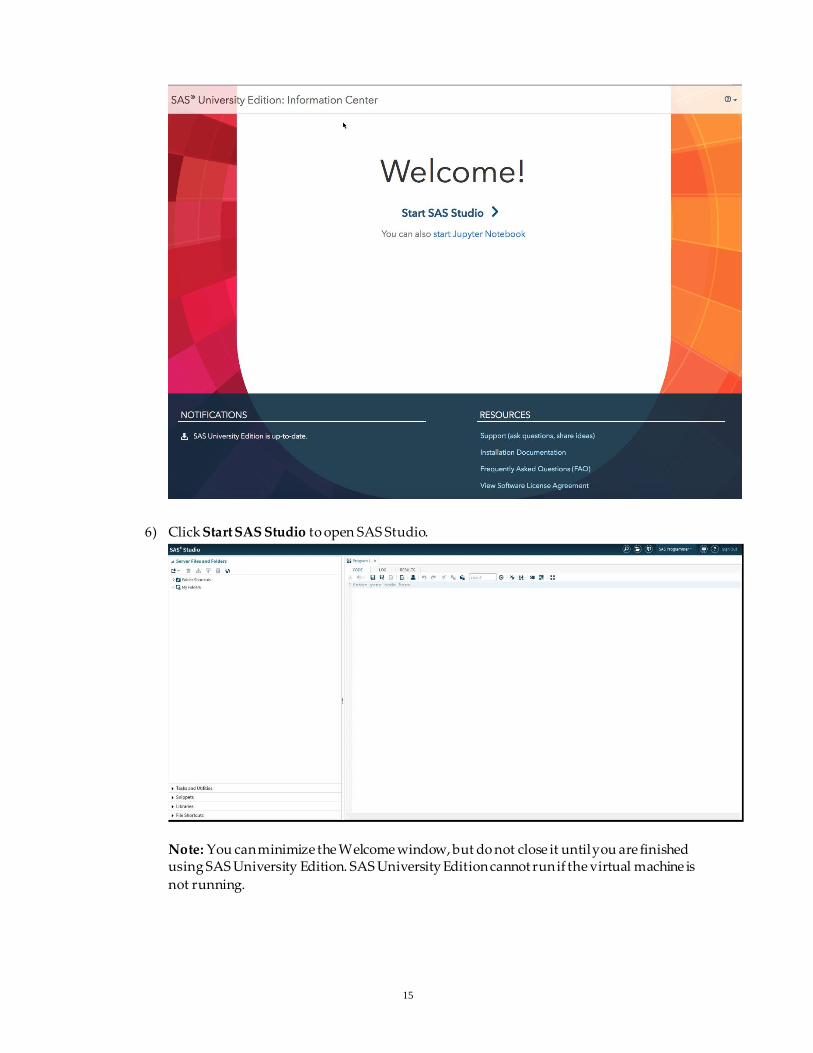
6) Click Start SAS Studio to open SAS Studio.
Note: You can minimize the Welcome window, but do not close it until you are finished using SAS University Edition. SAS University Edition cannot run if the virtual machine is
not running.
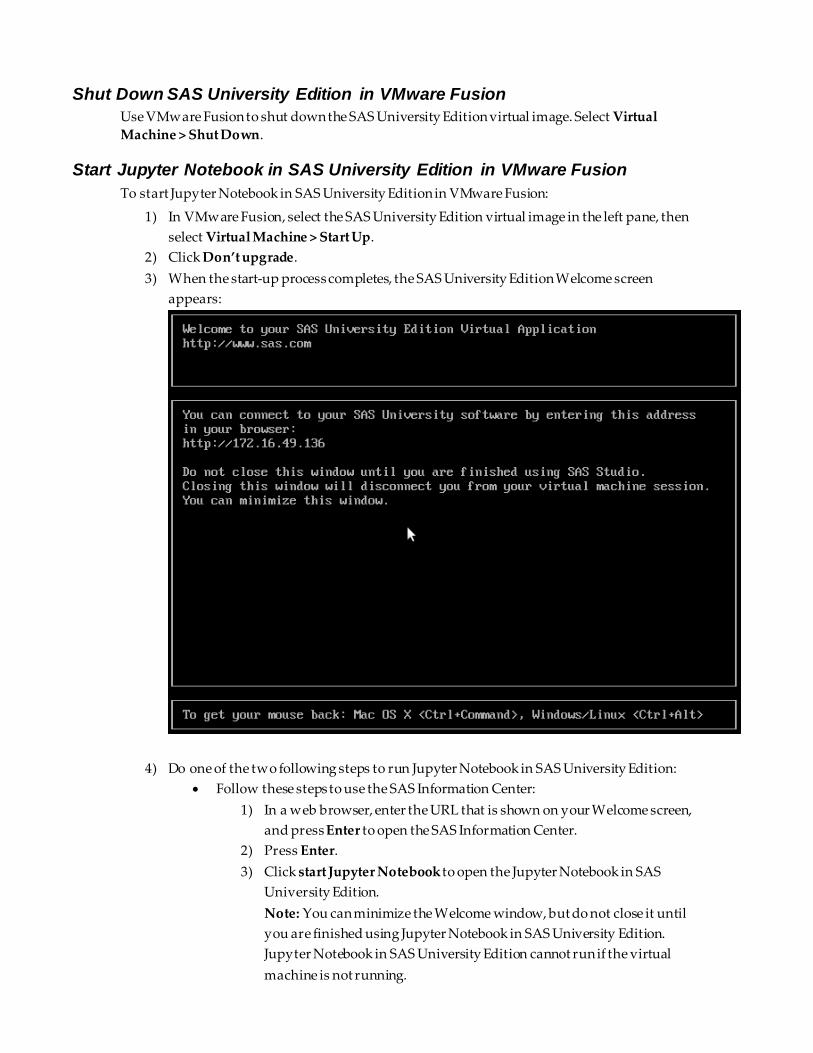
Shut Down SAS University Edition in VMware Fusion
Use VMware Fusion to shut down the SAS University Edition virtual image. Select Virtual
Machine > Shut Down.
Start Jupyter Notebook in SAS University Edition in VMware Fusion
To start Jupyter Notebook in SAS University Edition in VMware Fusion:
1) In VMware Fusion, select the SAS University Edition virtual image in the left pane, then
select Virtual Machine > Start Up.
2) Click Don’t upgrade.
3) When the start-up process completes, the SAS University Edition Welcome screen
appears:
4) Do one of the two following steps to run Jupyter Notebook in SAS University Edition:
• Follow these steps to use the SAS Information Center:
1) In a web browser, enter the URL that is shown on your Welcome screen,
and press Enter to open the SAS Information Center.
2) Press Enter.
3) Click start Jupyter Notebook to open the Jupyter Notebook in SAS
University Edition.
Note: You can minimize the Welcome window, but do not close it until
you are finished using Jupyter Notebook in SAS University Edition.
Jupyter Notebook in SAS University Edition cannot run if the virtual
machine is not running.
17
• Follow these steps to open the Jupyter Notebook in SAS University Edition:
1) In a web browser, enter the URL that is shown on your Welcome screen,
then add a colon followed by 8888. In this example, the URL would
appear as follows: http://172.16.49.136:8888
2) Press Enter.
The Jupyter Notebook in SAS University Edition is displayed in the
browser window.
Note: You can minimize the Welcome window, but do not close it until
you are finished using Jupyter Notebook in SAS University Edition.
Jupyter Notebook in SAS University Edition cannot run if the virtual
machine is not running.
Shut Down Jupyter Notebook in SAS University Edition in VMware Fusion
Use VMware Fusion to shut down the Jupyter Notebook in SAS University Edition virtual image.
Select Virtual Machine > Shut Down.
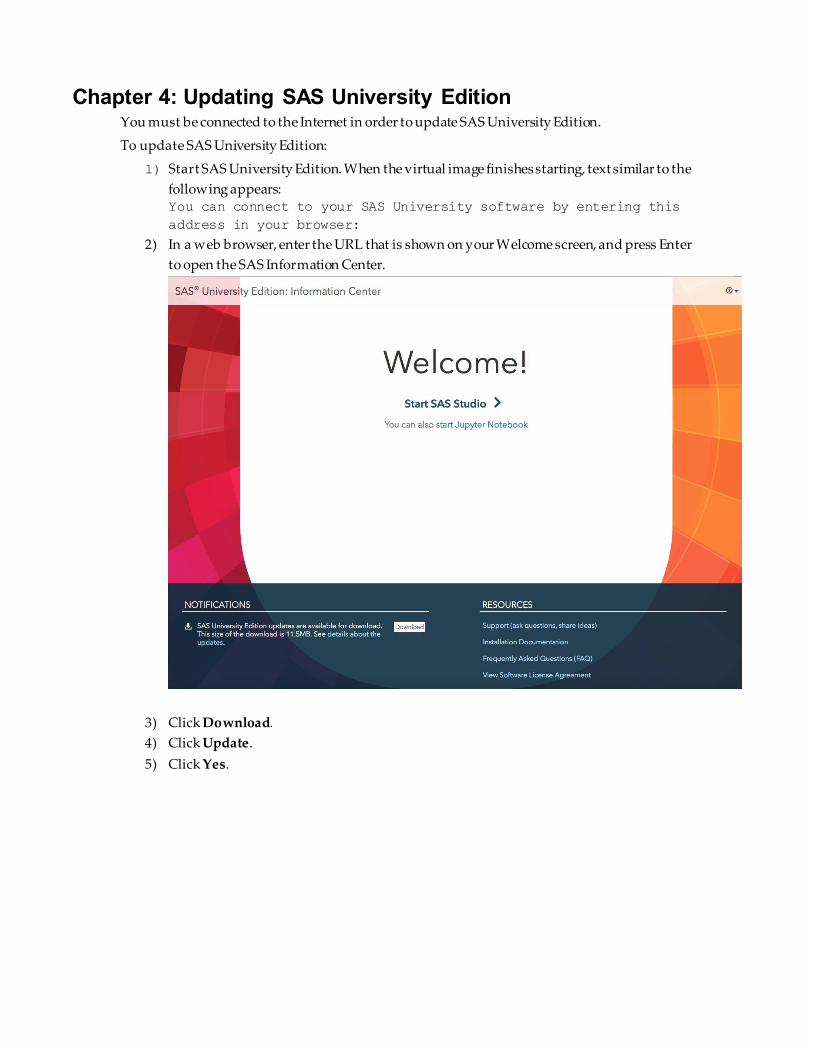
Chapter 4: Updating SAS University Edition You must be connected to the Internet in order to update SAS University Edition.
To update SAS University Edition:
1) Start SAS University Edition. When the virtual image finishes starting, text similar to the
following appears: You can connect to your SAS University software by entering this
address in your browser:
2) In a web browser, enter the URL that is shown on your Welcome screen, and press Enter
to open the SAS Information Center.
3) Click Download.
4) Click Update.
5) Click Yes.
19
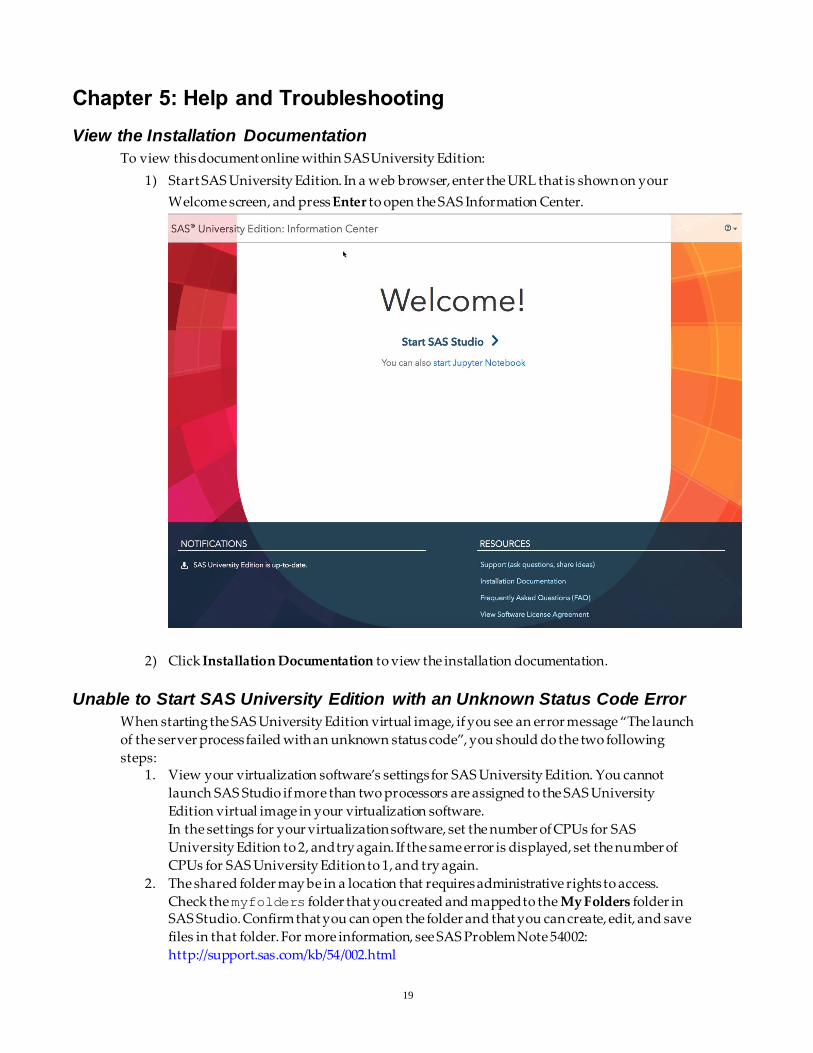
Chapter 5: Help and Troubleshooting
View the Installation Documentation
To view this document online within SAS University Edition:
1) Start SAS University Edition. In a web browser, enter the URL that is shown on your
Welcome screen, and press Enter to open the SAS Information Center.
2) Click Installation Documentation to view the installation documentation.
Unable to Start SAS University Edition with an Unknown Status Code Error
When starting the SAS University Edition virtual image, if you see an error message “The launch
of the server process failed with an unknown status code”, you should do the two following
steps: 1. View your virtualization software’s settings for SAS University Edition. You cannot
launch SAS Studio if more than two processors are assigned to the SAS University
Edition virtual image in your virtualization software.
In the settings for your virtualization software, set the number of CPUs for SAS
University Edition to 2, and try again. If the same error is displayed, set the number of
CPUs for SAS University Edition to 1, and try again.
2. The shared folder may be in a location that requires administrative rights to access.
Check the myfolders folder that you created and mapped to the My Folders folder in SAS Studio. Confirm that you can open the folder and that you can create, edit, and save
files in that folder. For more information, see SAS Problem Note 54002:
http://support.sas.com/kb/54/002.html
Unable to Start SAS University Edition in VirtualBox with “This kernel requires an x86-64 CPU” Error
When starting the SAS University Edition virtual image in VirtualBox, if you see an error
message “This kernel requires an x86-64 CPU, but only detected an i686 CPU”, this error
indicates that you are attempting to start the SAS University Edition virtual image on a 32-bit
guest operating system. Set the guest operating system to Red Hat (64-bit), then try again. For
more information, see SAS Installation Note 53263: http://support.sas.com/kb/53/263.html
Using DropBox with SAS University Edition
Configure the shared folders for your virtualization software in order to add the Dropbox folder
on your local system as a shared folder.
Opening SAS Studio in a Different Browser Window
If you open SAS Studio, open SAS Information Center in a new tab in the same web browser, and
then click Start SAS Studio , a window appears with the following message: A SAS Studio session is already running in this browser. Would you like
to close it and start a new session?
If you click Yes, your SAS Studio session opens in the current browser window. If you click No,
the window displays the message again. If you do not want to open SAS Studio in the current
browser window, close the current browser window.
Files Missing on SAS Studio After the First Shared Folder Is Created
If you start SAS Studio, create a file and save it in the default My Folders location in SAS Studio,
and then create a shared folder of the default myfolders name, the existing SAS Studio My
Folders is moved to the shared folder.
When the shared folder is created, existing files in the SAS University Edition virtual image’s
default folder are moved to the shared folder. If there is a name conflict when a file in the University virtual image is copied to the host operating system shared folder, then the file on the
host operating system is renamed.
Suppose you create Program 1 in SAS Studio, and then you create a shared folder in your
virtualization software to an existing folder on the host operating system. If the folder on the
host OS already contains a file named Program 1, then your SAS Studio Program 1 filename is
displayed as Program 1. The host operating system’s Program 1 is renamed as Program
1.~1~. Additional name collisions of the same file create Program 1.~2~ and so on.
Cannot Import SAS University Edition to VirtualBox
The downloaded SAS University Edition file name must use the file extension .ova so that you
can import the file to VirtualBox. If you cannot import the downloaded SAS University Edition
file to VirtualBox:
1) On the OS X desktop, find the downloaded SAS University Edition file.
2) If the file name ends with .ovf, edit the file name to end in .ova.
3) In VirtualBox, try to import SAS University Edition again.
For more information, see https://code.google.com/p/chromium/issues/detail?id=311218.
21
Error Messages Displayed When Running LIBNAME or FILENAME Statements in SAS Studio
When running a LIBNAME statement in SAS Studio, you may see the following error message:
NOTE: Library [name of library] does not exist.
When running a FILENAME statement in SAS Studio, you may see an error message similar to
the following example:
ERROR: Physical file does not exist,
/opt/sasinside/SASConfig/Lev1/SASApp/C:\SASUniversityEdition\myfolders\
Cheatsheet.xlsx.
If you see error messages similar to the above examples, you may be incorrectly referencing
shared folders. For more information, see SAS Installation Note 53333:
http://support.sas.com/kb/53/333.html
"Path Invalid" Error Message When Accessing Data in SAS Studio
When accessing your data from SAS Studio, you may see an error message similar to the
following example:
ERROR: The path /users/xxyyzz/Downloads/Cheatsheet.xlsx is invalid
because it is not in the list of accessible paths when SAS is in the
lockdown state.
If you see error messages similar to the above examples, you may have shared folders configured
incorrectly. For more information, see SAS Installation Note 53333:
http://support.sas.com/kb/53/333.html
PROC HTTP Returns Message “ERROR: Could not find extension: (tkessl)”
When using an HTTPS URL with PROC HTTP, the following error message is returned:
ERROR: Could not find extension: (tkessl)
HTTPS and SFTP access are not supported in SAS University Edition.
Chapter 6: Guidelines for Writing SAS Code for Use with SAS University Edition
SAS University Edition runs as a virtual image inside virtualization software such as VMware
Fusion or VirtualBox.
Note: You should store data in the shared folder on your local system. Do not store data in the
SAS University Edition virtual image.
Use the following guidelines when you store data on your local system and access your data
from SAS University Edition.
There are two categories of shared folders.
• myfolders — A special shared folder that maps to My Folders in SAS Studio. To save
your SAS Studio settings to the host filesystem, you must create this shared folder.
Any SAS scripts in My Folders in SAS Studio are moved to this shared folder when it is created.
Your SAS Studio settings are stored in the shared folder myfolders on the host
filesystem. If you detach the shared folder, then SAS Studio is unable to access the
settings file and starts with new default settings. Any changes that you made to the SAS
Studio settings will not be active until that shared folder is reconnected.
• <all other shared folders> — Any other shared folder that is configuredappears
under SAS Studio's Folder Shortcuts. You cannot save SAS Studio settings to these folders.
The following guidelines apply to referencing shared folders and files.
• When you reference files in your shared folder, you should always reference them in the
following way:
/folders/myfolders/filename
Replace filename with the name of the file that you are referencing.
• If you create additional shared folders in your virtualization software after the first
shared folder, those folders are created in the following locations:
/folders/myshortcuts/secondfolder
/folders/myshortcuts/thirdfolder
The names secondfolder and thirdfolder are replaced with the names of the
folders that you created in the virtualization software.
• Always use a forward slash (/) as the directory separator when you reference files in
your shared folders, even if your operating system is Windows.
/folders/myfolders/foldername (valid)
\folders\myfolders\foldername (not valid)
23
• File and directory references are case sensitive. For example, the following two paths
specify different directories:
/folders/myfolders/foldername
/folders/myfolders/FOLDERNAME
The case that you use must match the case of the name that you specified for the shared
folder when you defined it in your virtualization software.
• All files that you want to persist between sessions should be stored in the shared folder
that you created in the virtual manager:
/folders/myfolders/foldername
Note: Currently, the virtual image does not stop you from saving to other locations, but
those files might not be persisted.
• SASUSER is read-only and is not writeable, as in any SAS server-based environment. The
following code example will NOT run successfully: /** Import an XLS file. **/
PROC IMPORT DATAFILE="cars.xls"
OUT=SASUSER.CARSBW
SAS is the leader in business analytics software and services, and the largest independent vendor in the business intelligence market. Through innovative solutions, SAS helps customers at more
than 65,000 sites improve performance and deliver value by making better decisions faster. Since 1976 SAS has been giving customers around the w orld THE POWER TO KNOW®.