Embed Size (px)
Citation preview
Installation Guide
SAP® R/3 Enterprise
on Windows: Oracle
Using SAP R/3 Enterprise Core 4.70 Support Release 1, SAP R/3 Enterprise Extension Set 1.10 Document Version 1.10 - February 28, 2003
© Copyright 2003 SAP AG. All rights reserved. No part of this publication may be reproduced or transmitted in any form or for any purpose without the express permission of SAP AG. The information contained herein may be changed without prior notice. Some software products marketed by SAP AG and its distributors contain proprietary software components of other software vendors. Microsoft®, WINDOWS®, NT®, EXCEL®, Word®, PowerPoint® and SQL Server® are registered trademarks of Microsoft Corporation. IBM®, DB2®, DB2 Universal Database, OS/2®, Parallel Sysplex®, MVS/ESA, AIX®, S/390®, AS/400®, OS/390®, OS/400®, iSeries, pSeries, xSeries, zSeries, z/OS, AFP, Intelligent Miner, WebSphere®, Netfinity®, Tivoli®, Informix and Informix® Dynamic Server
TM are
trademarks of IBM Corp. in USA and/or other countries. ORACLE® is a registered trademark of ORACLE Corporation. UNIX®, X/Open®, OSF/1®, and Motif ® are registered trademarks of the Open Group. LINUX is a registered trademark of Linus Torvalds and others. Citrix®, the Citrix logo, ICA®, Program Neighborhood ®, MetaFrame®, WinFrame®, VideoFrame®, MultiWin® and other Citrix product names referenced herein are trademarks of Citrix Systems, Inc. HTML, DHTML, XML, XHTML are trademarks or registered trademarks of W3C®, World Wide Web Consortium, Massachusetts Institute of Technology.
JAVA® is a registered trademark of Sun Microsystems, Inc.
J2EE™ is a registered trademark of Sun Microsystems, Inc. JAVASCRIPT® is a registered trademark of Sun Microsystems, Inc., used under license for technology invented and implemented by Netscape.
MarketSet and Enterprise Buyer are jointly owned trademarks of SAP AG and Commerce One.
SAP, SAP Logo, R/2, R/3, mySAP, mySAP.com, xApps, mySAP Business Suite, and other SAP products and services mentioned herein as well as their respective logos are trademarks or registered trademarks of SAP AG in Germany and in several other countries all over the world. All other product and service names mentioned are the trademarks of their respective companies. Disclaimer Some components of this product are based on Java™. Any code change in these components may cause unpredictable and severe malfunctions and is therefore expressively prohibited, as is any decompilation of these components. Any Java™ Source Code delivered with this product is only to be used by SAP’s Support Services and may not be modified or altered in any way. Documentation in the SAP Service Marketplace You can find this documentation at the following address: http://service.sap.com/instguides
SAP AG Neurottstraße 16 69190 Walldorf Germany T +49/18 05/34 34 24 F +49/18 05/34 34 20 www.sap.com

Typographic Conventions
Type Style Represents
Example Text Words or characters that appear on the screen. These include field names, screen titles, pushbuttons as well as menu names, paths and options.
Cross-references to other documentation
Example text Emphasized words or phrases in body text, titles of graphics and tables
EXAMPLE TEXT Names of elements in the system. These include report names, program names, transaction codes, table names, and individual key words of a programming language, when surrounded by body text, for example, SELECT and INCLUDE.
Example text Screen output. This includes file and directory names and their paths, messages, names of variables and parameters, source code as well as names of installation, upgrade and database tools.
Example text Exact user entry. These are words or characters that you enter in the system exactly as they appear in the documentation.
<Example text>
Variable user entry. Pointed brackets indicate that you replace these words and characters with appropriate entries.
EXAMPLE TEXT Keys on the keyboard, for example, function keys (such as F2) or the Enter key.
Icons
Icon Meaning
Caution
Example
Note
Recommendation
Syntax
SAP R/3 Enterprise on Windows: Oracle
4 February 2003
Contents
SAP R/3 Enterprise Installation on Windows: Oracle ....................6 Part I Standard Installation....................................................................9
1 New Features........................................................................................... 10 2 How to Install Your SAP R/3 Enterprise System................................... 13
2.1 Installing a Central System ............................................................................................14 2.2 Installing a Central Instance ..........................................................................................18 2.3 Installing a Database Instance.......................................................................................21 2.4 Installing a Dialog Instance............................................................................................22 2.5 Installing a Gateway Instance........................................................................................23 2.6 Additional Information ....................................................................................................24
3 Installation Planning ............................................................................... 25 3.1 Required Documentation ...............................................................................................25 3.2 Installation of Multiple Components on One Database .................................................27 3.3 Integration of LDAP Directory Services .........................................................................30 3.4 System Configuration.....................................................................................................32 3.5 SAP Directories..............................................................................................................35 3.6 Hardware and Software Requirements Check ..............................................................38
3.6.1 Requirements Checklist for the Central Instance.....................................................40 3.6.2 Requirements Checklist for the Database Instance.................................................41 3.6.3 Requirements Checklist for a Dialog Instance .........................................................43
4 Installation Preparations ........................................................................ 45 4.1 Checking for the Windows File System .........................................................................45 4.2 Checking the Windows Domain Structure .....................................................................45 4.3 Reducing the Size of the File Cache .............................................................................46 4.4 Granting User Rights for the Installation........................................................................46 4.5 Performing a Domain Installation without Being a Domain Administrator .....................48 4.6 Choosing the SAP System ID and Host Name..............................................................50 4.7 Preparing the SAP System Transport Host ...................................................................51 4.8 Preparing the SAPinst Installation .................................................................................53 4.9 Preparing Required CDs................................................................................................54 4.10 Preparing the Active Directory for Use with the SAP System......................................56
5 Installation Procedures........................................................................... 58 5.1 Installation of the Oracle Database Software ................................................................58 5.2 Running SAPinst............................................................................................................61 5.3 Input for the Installation .................................................................................................65
6 Post-Installation Activities ..................................................................... 75 6.1 Starting and Stopping the SAP System.........................................................................75 6.2 Logging on to the SAP System......................................................................................76 6.3 Installing and Using the SAP License............................................................................77 6.4 Checking SAP System Services....................................................................................78 6.5 Installing the SAP Online Documentation......................................................................79 6.6 Checking the RFC Destination ......................................................................................79 6.7 Configuring SAProuter and SAPNet - R/3 Frontend......................................................80 6.8 Configuring the Transport Management System...........................................................81 6.9 Basic Operations............................................................................................................81 6.10 Configured Number of Work Processes ......................................................................82 6.11 Installation of Additional Languages............................................................................82
SAP R/3 Enterprise on Windows: Oracle
February 2003 5
6.12 Import of Support Packages ........................................................................................83 6.13 Secure Single Sign-On with Microsoft NT LAN Manager SSP....................................83
6.13.1 Preparing the Application Server for Single Sign-On.............................................85 6.13.2 Preparing SAP GUI and SAP Logon for Single Sign-On .......................................86 6.13.3 Mapping SAP System Users to Windows Users for Single Sign-On.....................87
6.14 Configuration of Kerberos Single Sign-On ..................................................................88 6.14.1 Preparing the Central Instance ..............................................................................89 6.14.2 Configuring the SAP Front End..............................................................................90 6.14.3 Activating Single Sign-On for the SAP Logon........................................................91 6.14.4 Mapping SAP Users to Windows 2000 Users........................................................91
6.15 Application-Specific Actions.........................................................................................92 6.16 Client Copy ..................................................................................................................92 6.17 Performing a Full Backup ............................................................................................93 6.18 Changing Passwords of Created Users.......................................................................94
7 Additional Information ............................................................................ 96 7.1 Performing a Remote Installation with SAPinst .............................................................96 7.2 Continuing an Interrupted Installation with SAPinst.......................................................99 7.3 Deletion of an SAP System Installation .......................................................................101
7.3.1 Deleting an SAP Instance ......................................................................................102 7.3.2 Deleting the Database............................................................................................103
7.4 SAP System Security on Windows ..............................................................................105 7.4.1 Automatic Creation of Accounts and Groups.........................................................106 7.4.2 Manually Granting User Rights for the Installation.................................................108
Part II Cluster Installation with MSCS ..............................................109 8 Installation Planning for MSCS ............................................................ 113
8.1 Checking Hardware Requirements for MSCS .............................................................113 8.2 Checking Software Requirements for MSCS ..............................................................115 8.3 Distribution of Components to Disks for MSCS...........................................................115 8.4 Directories in an MSCS Configuration .........................................................................117 8.5 Obtaining Adresses for MSCS.....................................................................................118
9 Installation Preparations for MSCS ..................................................... 121 9.1 Using Addresses in an MSCS Configuration...............................................................122 9.2 Mapping Host Names to IP Addresses........................................................................125 9.3 Checking the Mapping of Host Names for MSCS .......................................................126 9.4 Assigning Drive Letters................................................................................................127
10 Central and Database Instance Installation for MSCS ..................... 128 10.1 Rebooting During the Installation for MSCS..............................................................129 10.2 Moving MSCS Groups ...............................................................................................130 10.3 Installing the Oracle Fail Safe Software.....................................................................130
11 The Conversion to MSCS ................................................................... 132 11.1 Rebooting during the Conversion ..............................................................................133 11.2 Installing SAPinst for Cluster Conversion..................................................................134 11.3 Configuring Node A for MSCS...................................................................................134 11.4 Converting the DB to a Fail Safe DB .........................................................................135 11.5 Configuring Node B for MSCS...................................................................................137 11.6 Input for Configuring Node A and Node B for MSCS ................................................138
12 Post-Installation Activities for MSCS ................................................ 142 12.1 Starting and Stopping the SAP System in an MSCS Configuration ..........................143
1 New Features
2.1 Installing a Central System
6 February 2003
SAP R/3 Enterprise Installation on Windows: Oracle Purpose This documentation explains how to install both a Unicode and non-Unicode SAP system on Windows 2000 when your database is Oracle.
SAP R/3 Enterprise is based on the SAP Web Application Server 6.20 and latest SAP 6.20 downward compatible kernel.
The SAP Web Application Server (SAP Web AS) is the underlying technology of almost all mySAP.com solutions. This is the new name for what has been referred to up until SAP Release 4.6D as SAP Basis. The release number of the SAP Web Application Server reflects the independence of solutions and their underlying technology components provided by SAP.
For more information on the technology provided by the SAP Web AS, see at: http://service.sap.com/netweaver → SAP NetWeaver in Detail → SAP Web Application Server
A minimum SAP system consists of a central instance and a database instance. Optional dialog instances can be installed on different hosts once the installation of the central instance and the database instance has been completed.
When you set up an SAP system, you need to install the main components that enable the system to operate. These are the:
• Central instance
• Database instance
• Dialog instances, if required
• Gateway instance, if required
• Front ends
The installation of front ends for the SAP system is described separately in the documentation SAP Front End Installation Guide.
Implementation Considerations Before you can begin with the installation of the main SAP components, you have to plan the configuration of the system. This involves deciding which components you need and working out how these must be distributed to hosts. Normally an SAP hardware partner can assist you in this task. On the basis of information about the expected workload, set of applications that are to be deployed and number of users, the partner can recommend a feasible configuration.
As the system configuration fundamentally influences the installation procedure, it is important to have a clear configuration plan before you start the installation. There are the following basic configuration types:
• Central System The central instance and database instance are installed on a single host.
• Standalone Database System The central instance and database instance are installed on two different hosts.
1 New Features
2.1 Installing a Central System
February 2003 7
This type of configuration is often used when a large SAP system with a heavy workload and many concurrent users is set up.
The configuration plan must specify whether a central or standalone database system is to be installed and how many dialog instances are required. Once the plan is complete and the required hardware available, you can start with the installation process.
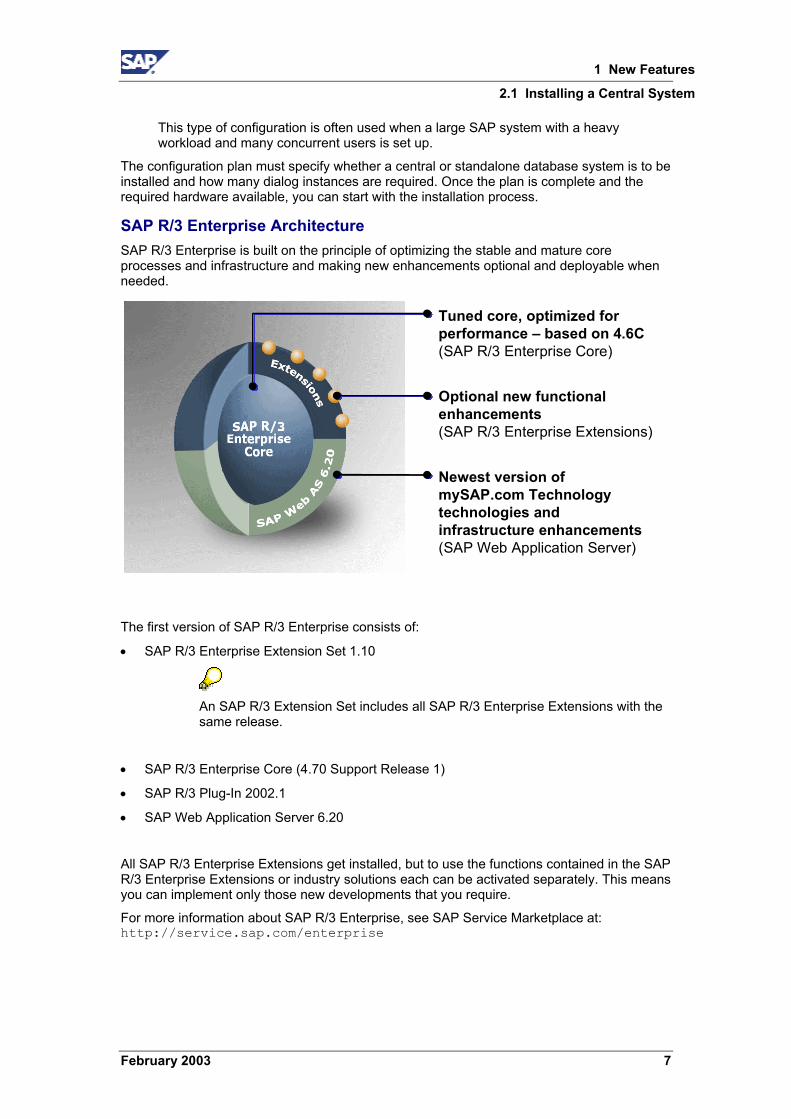
SAP R/3 Enterprise Architecture SAP R/3 Enterprise is built on the principle of optimizing the stable and mature core processes and infrastructure and making new enhancements optional and deployable when needed.
Optional new functionalenhancements(SAP R/3 Enterprise Extensions)
Tuned core, optimized forperformance – based on 4.6C(SAP R/3 Enterprise Core)
Newest version ofmySAP.com Technologytechnologies andinfrastructure enhancements(SAP Web Application Server)
The first version of SAP R/3 Enterprise consists of:
• SAP R/3 Enterprise Extension Set 1.10
An SAP R/3 Extension Set includes all SAP R/3 Enterprise Extensions with the same release.
• SAP R/3 Enterprise Core (4.70 Support Release 1)
• SAP R/3 Plug-In 2002.1
• SAP Web Application Server 6.20
All SAP R/3 Enterprise Extensions get installed, but to use the functions contained in the SAP R/3 Enterprise Extensions or industry solutions each can be activated separately. This means you can implement only those new developments that you require.
For more information about SAP R/3 Enterprise, see SAP Service Marketplace at: http://service.sap.com/enterprise
1 New Features
2.1 Installing a Central System
8 February 2003
SAP R/3 Enterprise and Support of Unicode Unicode unifies the encoding systems for characters in computer systems by unifying all characters of all character sets into a single encoding scheme.
Without Unicode, there are hundreds of conflicting encoding systems. For example, two encoding systems can use the same number for two different characters, or use different numbers for the same character. Any given computer needs to support many different encoding systems. Whenever data is passed between different encoding systems or platforms, data needs to be transformed from one encoding scheme to another, causing a risk of data loss or corruption.
Unicode removes this risk by providing a unique number for every character independent of platform, program or language.
SAP uses a single-source approach for transparent Unicode support. The ABAP coding is the same and runs identically on both non-Unicode and Unicode SAP systems. The SAP kernel and executables, however, are built differently for non-Unicode and Unicode SAP systems.
• Non-Unicode SAP system All characters are represented in binary with only one byte.
• Unicode SAP system All characters are represented in binary with two or four bytes.
This documentation describes the installation of both Unicode and non-Unicode SAP systems.
You can find more information on Unicode SAP systems and their availability in SAP Note 79991 and in the SAP Service Marketplace at: http://service.sap.com/unicode
Constraints The SAP installation tools must only be used in accordance with the instructions and for the purposes described in the SAP installation documentation. Improper use of the SAP installation tools can damage files and systems already installed.
SAP system installations should only be performed by SAP Technical Consultants who are certified for your operating system, your database, and the SAP system you are installing.
Downward-Compatible Releases of DB/OS platforms for SAP Products
SAP regularly plans to release the newest database (DB) and operating-system (OS) versions for mySAP.com products. These releases are downward-compatible with earlier SAP releases. Be aware that for already shipped mySAP.com components, we only support the installation for database versions proposed by the installation tool. Therefore, you must install a mySAP.com component or perform a system copy using a downward-compatible database as follows:
− Install the component with the old proposed database version.
− Upgrade the old database version to the downward-compatible new version.
1 New Features
2.1 Installing a Central System
February 2003 9
Part I Standard Installation This section describes how to perform a standard installation of the SAP R/3 Enterprise system.
For more information, if you want to adapt your standard installation for a cluster installation, see Cluster Installation with MSCS [Page 109].
1 New Features
2.1 Installing a Central System
10 February 2003
1 New Features The installation for SAP R/3 Enterprise using SAP R/3 Enterprise Core 4.70 has the following new features:
Area Description
Installation CDs As of SAP R/3 Enterprise using SAP R/3 Enterprise Core 4.70 SR 1, the installation is started from the SAPinst CD.
New Installation Procedure
The structure of the installation documentation and therefore the procedure to use it have changed significantly for SAP R/3 Enterprise.
New Installation Tool SAP provides a new installation tool called System Landscape Implementation Manager, known for short as SAPinst.
The main advantages compared with the previous installation tool R3SETUP are:
• SAPinst does not abort due to errors. Instead, it stops the installation and you can retry the installation after having solved the problem. Alternatively, you can abort the installation manually if you want.
• SAPinst records installation progress in a single log file, sapinst.log.
• SAPinst has a graphical user interface (GUI) called SAPinst GUI that allows you to watch the progress of the installation and see all messages issued by SAPinst. As SAPinst GUI is Java based, you need a Java Runtime Environment (JRE). A What's this? help is integrated in SAPinst GUI. To use this,
choose , then click on the field for which you want more information.
You can start SAPinst GUI on a remote computer if you want.
For more information on SAPinst, see the documentation SAPinst Troubleshooting Guide at: http://service.sap.com/sapinstfeedback
Support of Unicode With SAP R/3 Enterprise using SAP R/3 Enterprise Core 4.70, SAP supports Unicode. For more information on Unicode, see: SAP R/3 Installation on Windows: Oracle [Page 6]
Support of Multiple Components on One Database
With SAP R/3 Enterprise using SAP R/3 Enterprise Core 4.70, SAP offers the installation of Multiple Components on One Database (MCOD). That is, you can install an additional SAP system into an existing SAP system database.
For an MCOD installation, you can only combine systems for which the MCOD feature is released by SAP.
For more information on MCOD, see:
Installation of Multiple Components on One Database [Page 27] for general information on this feature.
1 New Features
2.1 Installing a Central System
February 2003 11
Area Description
Documentation Due to the above changes, especially the introduction of SAPinst, we have restructured and rewritten the documentation for SAP R/3 Enterprise using SAP R/3 Enterprise Core 4.70.
Oracle Database Installation Area Description
Oracle database version You can find information about the released database version for your installation in the SAP Service Marketplace at: http://service.sap.com/platforms
svrmgrl no longer exists
Server Manager svrmgrl has been replaced with sqlplus.
If you enter sqlplus you are asked to enter your user name and password. To avoid this and to have the same behavior as with the previous command svrmgrl, enter the following to start the database administration tool:
sqlplus /nolog
If you have your own scripts using svrmgrl that connect to the database, you need to rewrite these accordingly: Replace the previous command svrmgrl command=@<sql_file_name> with sqlplus /nolog @<sql_file_name>
Database user internal no longer exists
User internal no longer exists in Oracle9i. To connect to the database as database administrator use the command: connect / as sysdba
The previous command connect internal/<password>
is no longer available.
New Name for Oracle Failsafe Service
The Oracle Failsafe Service from previous Oracle releases is now called OracleMSCSServices. You might still see the old name in certain SAP Notes. Be sure to always use the new name OracleMSCSServices
Oracle sapdata File Systems
Only four sapdata file systems (sapdata1 to sapdata4) are required for the Oracle database.
New backup file system for Oracle offline redo logs
<drive>\oracle\<DBSID>\oraarch is the new standard file system for Oracle offline redo logs.
The file system \oracle\<SAPSID>\saparch still persists but now only contains brbackup log files.

1 New Features
2.1 Installing a Central System
12 February 2003
Oracle Tablespace Implement. Method
As of Oracle 8.1.7, a new, effective method of implementing tablespaces is used. With this new tablespace implementation, only the following three database tablespaces are created: PSAP<SAPSID>
PSAP<SAPSID><RELEASE>
PSAP<SAPSID>USR
All three tablespaces are created with AUTOEXTEND ON and EXTENT MANAGEMENT LOCAL AUTOALLOCATE.
Database System ID In an MCOD installation, there is an Oracle database system ID <DBSID> that can be different from the SAP system ID <SAPSID>. The database owner name (that is, the owner of tables) changed to sap<sapsid>.
Operating System Support Area Description
Windows 2000 Windows 2000 is the only supported operating system for the SAP system installation.
See also the SAP Service Marketplace at: http://service.sap.com/platforms
2 How to Install Your SAP R/3 Enterprise System
2.1 Installing a Central System
February 2003 13
2 How to Install Your SAP R/3 Enterprise System Purpose
The structure of the installation documentation has changed significantly. Therefore, you must read this chapter before starting the installation.
Use the tables referred to below as checklists for installing your SAP system.
Prerequisites Distinguish between the following types of installation:
• Central system The central instance and database instance are installed on the same host. This is commonly used for smaller SAP systems.
For the installation of SAP R/3 Enterprise using SAP R/3 Enterprise Core 4.70, there is no single-step procedure to install a central instance and a database instance on one host comparable to the former installation tool R3SETUP. Instead, you have to start the installation tool SAPinst more than once (see Running SAPinst [Page 61]).
• Standalone database system The central instance and database instance are installed on different hosts. This is
commonly used for larger SAP systems.
Procedure We recommend you to proceed as follows to install your SAP system:
1. Print out the required tables:
To install a central system, see Installing a Central System [Page 14].
To install a standalone database system, see Installing a Central Instance [Page 18] and Installing a Database Instance [Page 21]
To install a dialog instance, see Installing a Dialog Instance [Page 22].
To install a gateway instance, see Installing a Gateway Instance [Page 23].
You might need to refer to Additional Information [Page 96] for the installation.
2. Follow the installation sequence exactly as shown in the tables:
a. If a step is required for your installation, follow the link for that step to the corresponding section.
b. Perform the procedure described there.
c. After successfully completing the installation step, mark the corresponding entry in the printed table with ! to log the progress of your installation.
2 How to Install Your SAP R/3 Enterprise System
2.1 Installing a Central System
14 February 2003
d. Proceed with the next step listed in the table.
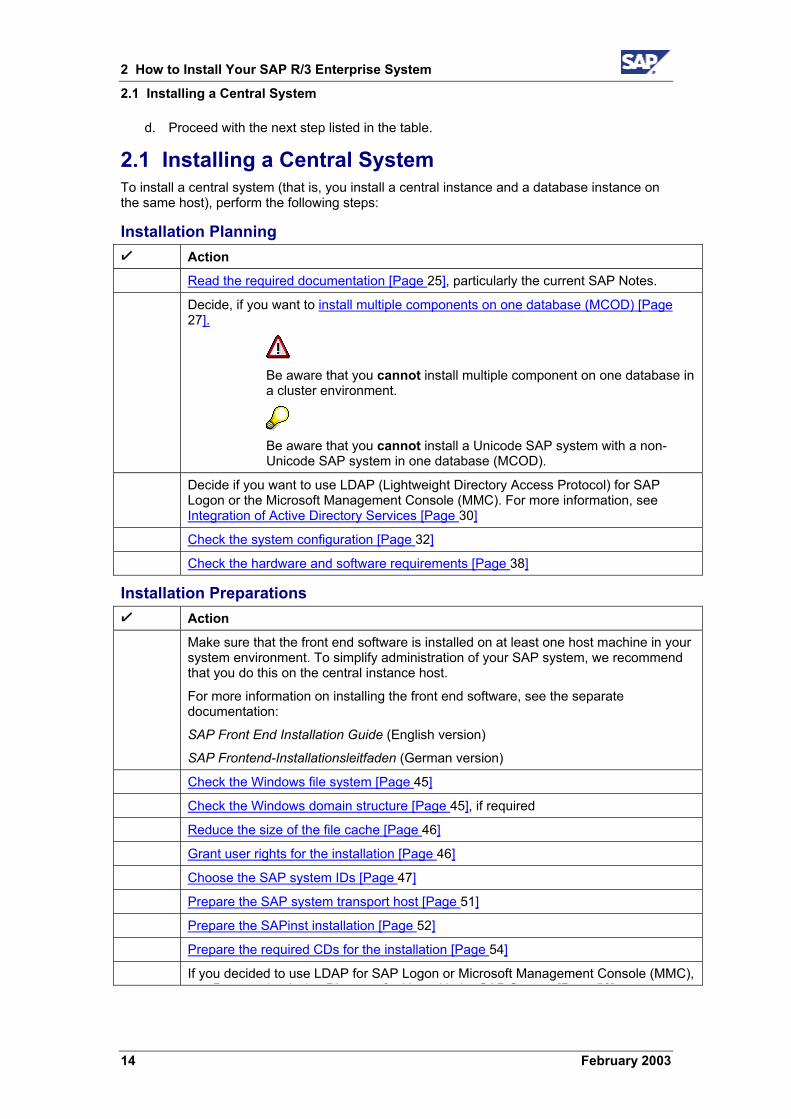
2.1 Installing a Central System To install a central system (that is, you install a central instance and a database instance on the same host), perform the following steps:
Installation Planning ! Action
Read the required documentation [Page 25], particularly the current SAP Notes.
Decide, if you want to install multiple components on one database (MCOD) [Page 27].
Be aware that you cannot install multiple component on one database in a cluster environment.
Be aware that you cannot install a Unicode SAP system with a non-Unicode SAP system in one database (MCOD).
Decide if you want to use LDAP (Lightweight Directory Access Protocol) for SAP Logon or the Microsoft Management Console (MMC). For more information, see Integration of Active Directory Services [Page 30]
Check the system configuration [Page 32]
Check the hardware and software requirements [Page 38]
Installation Preparations ! Action
Make sure that the front end software is installed on at least one host machine in your system environment. To simplify administration of your SAP system, we recommend that you do this on the central instance host.
For more information on installing the front end software, see the separate documentation:
SAP Front End Installation Guide (English version)
SAP Frontend-Installationsleitfaden (German version)
Check the Windows file system [Page 45]
Check the Windows domain structure [Page 45], if required
Reduce the size of the file cache [Page 46]
Grant user rights for the installation [Page 46]
Choose the SAP system IDs [Page 47]
Prepare the SAP system transport host [Page 51]
Prepare the SAPinst installation [Page 52]
Prepare the required CDs for the installation [Page 54]
If you decided to use LDAP for SAP Logon or Microsoft Management Console (MMC), P th A ti Di t f U ith th SAP S t [P 56]
2 How to Install Your SAP R/3 Enterprise System
2.1 Installing a Central System
February 2003 15
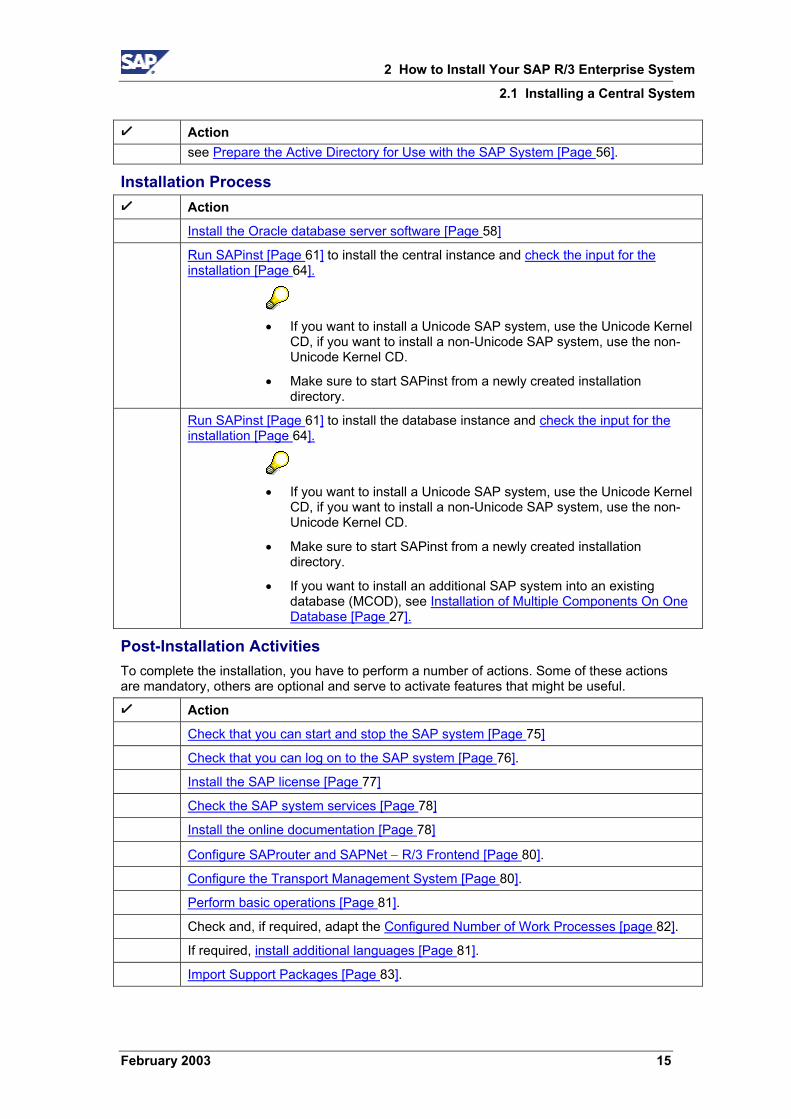
! Action see Prepare the Active Directory for Use with the SAP System [Page 56].
Installation Process ! Action
Install the Oracle database server software [Page 58]
Run SAPinst [Page 61] to install the central instance and check the input for the installation [Page 64].
• If you want to install a Unicode SAP system, use the Unicode Kernel
CD, if you want to install a non-Unicode SAP system, use the non-Unicode Kernel CD.
• Make sure to start SAPinst from a newly created installation directory.
Run SAPinst [Page 61] to install the database instance and check the input for the installation [Page 64].
• If you want to install a Unicode SAP system, use the Unicode Kernel
CD, if you want to install a non-Unicode SAP system, use the non-Unicode Kernel CD.
• Make sure to start SAPinst from a newly created installation directory.
• If you want to install an additional SAP system into an existing database (MCOD), see Installation of Multiple Components On One Database [Page 27].
Post-Installation Activities To complete the installation, you have to perform a number of actions. Some of these actions are mandatory, others are optional and serve to activate features that might be useful. ! Action
Check that you can start and stop the SAP system [Page 75]
Check that you can log on to the SAP system [Page 76].
Install the SAP license [Page 77]
Check the SAP system services [Page 78]
Install the online documentation [Page 78]
Configure SAProuter and SAPNet − R/3 Frontend [Page 80].
Configure the Transport Management System [Page 80].
Perform basic operations [Page 81].
Check and, if required, adapt the Configured Number of Work Processes [page 82].
If required, install additional languages [Page 81].
Import Support Packages [Page 83].
2 How to Install Your SAP R/3 Enterprise System
2.1 Installing a Central System
16 February 2003
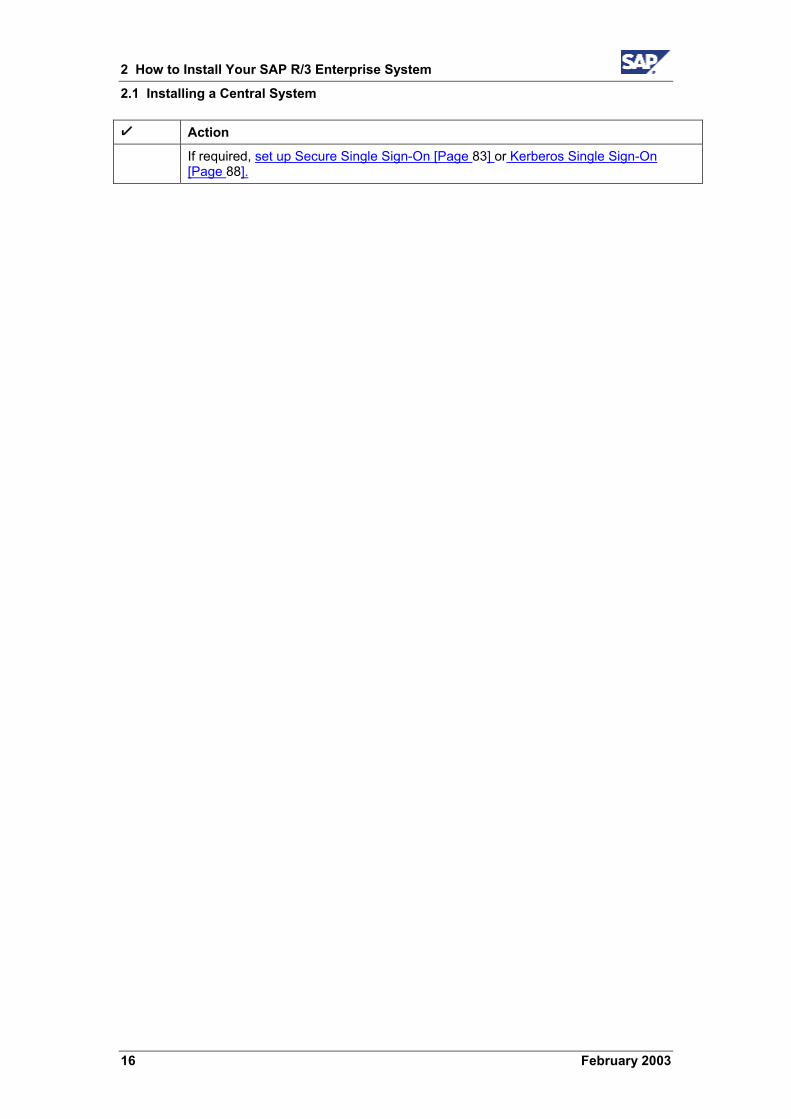
! Action
If required, set up Secure Single Sign-On [Page 83] or Kerberos Single Sign-On [Page 88].
2 How to Install Your SAP R/3 Enterprise System
2.1 Installing a Central System
February 2003 17
! Action
To activate the SAP R/3 Enterprise Extensions you want to use, see SAP Note 535003.
If required, perform application-specific actions [Page 92].
Unicode SAP system installation only:
1. Log on to your SAP system.
2. Call transaction SE38.
3. Enter program UMG_POOL_TABLE.
4. Choose Execute (F8).
5. Select Postprocessing (After Import).
6. Choose Execute (F9).
This is an optional post-installation step for Oracle 9.2.x only.
If you want to extend the backup functionality to include, for example, incremental backup, you must use one of the following backup libraries:
• SAP backup library
• Legato Storage Manager
• Backup tool of a third-party vendor that implements the backup interface of the Oracle Recovery Manager
The use of a backup library is optional. You can install a backup library any time after the Oracle installation.
For more information on how to install and use the SAP backup library and the Legato Storage Manager, see SAP Note 142635.
When installing third-party backup software, follow the vendor’s instructions.
Perform the client copy [Page 92]
If the Oracle security setup defined by the standard installation is not restrictive enough for your purposes, see SAP Note 186119 to configure the Oracle listener to accept only connections from specific hosts.
Perform a full installation backup [Page 93]
Once you have completed and checked the SAP system installation, you need to prepare the SAP system for using business applications. This process includes customizing the basis system and the various business components. For more information, see the SAP Library (choose Help SAP Library in your SAP system or access the SAP Library at: http://help.sap.com) and choose mySAP Technology Components → SAP Web Application Server → Customizing.
Change passwords of created users [Page 94].
2 How to Install Your SAP R/3 Enterprise System
2.2 Installing a Central Instance
18 February 2003
Additional Steps ! Action
Continuing after the central system installation
If you want to install a:
Dialog instance, proceed with Installing a Dialog Instance [Page 22]
Gateway instance, proceed with Installing a Gateway Instance [Page 23]
2.2 Installing a Central Instance To install a central instance, perform the following steps on the central instance host:
Installation Planning ! Action
Read the required documentation [Page 25], particularly the current SAP Notes.
Decide, if you want to install multiple components on one database (MCOD) [Page 27].
Be aware that you cannot install multiple component on one database in cluster.
Be aware that you cannot install a Unicode SAP system with a non-Unicode SAP system in one database (MCOD).
Decide if you want to use LDAP (Lightweight Directory Access Protocol) for SAP Logon or the Microsoft Management Console (MMC). For more information, see Integration of Active Directory Services [Page 30].
Check the system configuration [Page 27]
Check the hardware and software requirements [Page 38]
Installation Preparations ! Action
Make sure that the front end software is installed on at least one host machine in your system environment. To simplify administration of your SAP system, we recommend that you do this on the central instance host.
For more information on installing the front end software, see the separate documentation:
• SAP Front End Installation Guide (English version)
• SAP Frontend-Installationsleitfaden (German version)
Check the Windows file system [Page 45]
Check the Windows domain structure [Page 45], if required.
Reduce the size of the file cache [Page 46]
2 How to Install Your SAP R/3 Enterprise System
2.2 Installing a Central Instance
February 2003 19
! Action
Grant user rights for the installation [Page 46]
Choose the SAP system IDs [Page 47]
Prepare the SAP system transport host [Page 51]
Prepare the SAPinst installation [Page 52]
Prepare the required CDs for the installation [Page 54]
If you decided to use LDAP for SAP Logon or Microsoft Management Console (MMC) see, Prepare the Active Directory for Use with the SAP System [Page 56].
Installation Process ! Action
Install the Oracle database client software [Page 58]
Run SAPinst [Page 61] to install the central instance and check the input for the installation [Page 64].
• If you want to install a Unicode SAP system, use the Unicode Kernel
CD, if you want to install a non-Unicode SAP system, use the non-Unicode Kernel CD.
• Make sure to start SAPinst from a newly created installation directory.
Install the database instance on the database host as described in Installing a Database Instance [Page 21] and check the input for the installation [Page 64].
Make sure to start SAPinst from a newly created installation directory.
If you want to install an additional SAP system into an existing database (MCOD), see Installation of Multiple Components On One Database [Page 27].
Post-Installation Activities To complete the installation, you have to perform a number of actions. Some of these actions are mandatory, others are optional and serve to activate features that might be useful. ! Action
Check that you can start and stop the SAP system [Page 75]
Check that you can log on to the SAP system [Page 76]
Install the SAP license [Page 77]
Check the SAP system services [Page 78]
Install the online documentation [Page 78]
In a standalone database system, after you have installed the database instance, check the RFC destination [Page 79]
Configure SAProuter and SAPNet − R/3 Frontend [Page 80].
2 How to Install Your SAP R/3 Enterprise System
2.2 Installing a Central Instance
20 February 2003
! Action
Configure the Transport Management System [Page 80].
Check and, if required, adapt the Configured Number of Work Processes [page 82].
Perform basic operations [Page 81].
If required, install additional languages [Page 81].
Import Support Packages [Page 83].
If required, set up Secure Single Sign-On [Page 83] or Kerberos Single Sign-On [Page 88].
To activate the SAP R/3 Enterprise Extensions you want to use, see SAP Note 535003.
If required, perform application-specific actions [Page 92].
Unicode SAP system installation only:
1. Log on to your SAP system.
2. Call transaction SE38.
3. Enter program UMG_POOL_TABLE.
4. Choose Execute (F8).
5. Select Postprocessing (After Import).
6. Choose Execute (F9).
This is an optional post-installation step for Oracle 9.2.x only.
If you want to extend the backup functionality to include, for example, incremental backup, you must use one of the following backup libraries:
• SAP backup library
• Legato Storage Manager
• Backup tool of a third-party vendor that implements the backup interface of the Oracle Recovery Manager
The use of a backup library is optional. You can install a backup library any time after the Oracle installation.
For more information on how to install and use the SAP backup library and the Legato Storage Manager, see SAP Note 142635.
When installing third-party backup software, follow the vendor’s instructions.
Perform the client copy [Page 92]
Perform a full installation backup [Page 93]
Once you have completed and checked the SAP system installation, you need to prepare the SAP system for using business applications. This process includes customizing the basis system and the various business components. For more information, see the SAP Library (choose Help SAP Library in your SAP system or access the SAP Library at: http://help.sap.com) and choose SAP Web Application Server. Under mySAP Technology Components → SAP Web Application Server → Customizing.
2 How to Install Your SAP R/3 Enterprise System
2.3 Installing a Database Instance
February 2003 21
! Action
Change passwords of created users [Page 94].
Additional Steps ! Action
Continuing after the central instance installation.
If you want to install a:
• Dialog instance, proceed with Installing a Dialog Instance [Page 22]
• Gateway instance, proceed with Installing a Gateway Instance [Page 23]
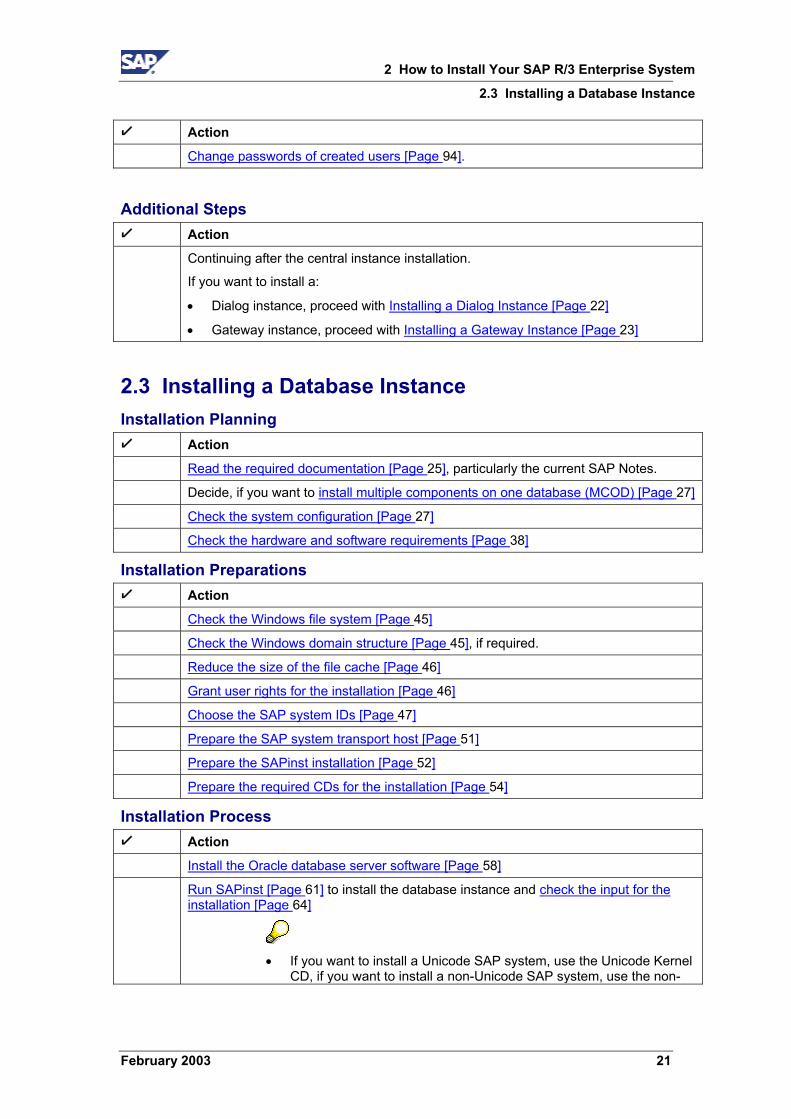
2.3 Installing a Database Instance Installation Planning ! Action
Read the required documentation [Page 25], particularly the current SAP Notes.
Decide, if you want to install multiple components on one database (MCOD) [Page 27]
Check the system configuration [Page 27]
Check the hardware and software requirements [Page 38]
Installation Preparations ! Action
Check the Windows file system [Page 45]
Check the Windows domain structure [Page 45], if required.
Reduce the size of the file cache [Page 46]
Grant user rights for the installation [Page 46]
Choose the SAP system IDs [Page 47]
Prepare the SAP system transport host [Page 51]
Prepare the SAPinst installation [Page 52]
Prepare the required CDs for the installation [Page 54]
Installation Process ! Action
Install the Oracle database server software [Page 58]
Run SAPinst [Page 61] to install the database instance and check the input for the installation [Page 64]
• If you want to install a Unicode SAP system, use the Unicode Kernel
CD, if you want to install a non-Unicode SAP system, use the non-
2 How to Install Your SAP R/3 Enterprise System
2.4 Installing a Dialog Instance
22 February 2003
Unicode Kernel CD.
• Make sure to start SAPinst from a newly created installation directory.
• If you want to install an SAP system into an existing database, see Installation of Multiple Components on One Database [Page 27].
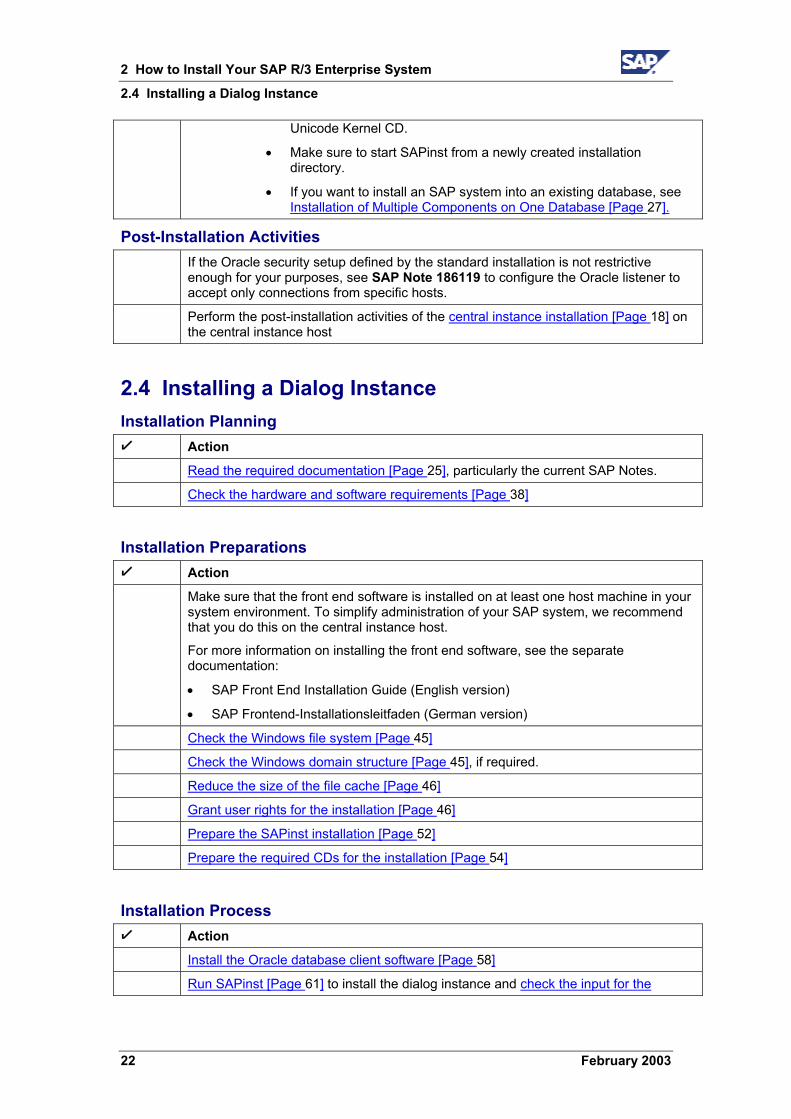
Post-Installation Activities If the Oracle security setup defined by the standard installation is not restrictive
enough for your purposes, see SAP Note 186119 to configure the Oracle listener to accept only connections from specific hosts.
Perform the post-installation activities of the central instance installation [Page 18] on the central instance host
2.4 Installing a Dialog Instance Installation Planning ! Action
Read the required documentation [Page 25], particularly the current SAP Notes.
Check the hardware and software requirements [Page 38]
Installation Preparations ! Action
Make sure that the front end software is installed on at least one host machine in your system environment. To simplify administration of your SAP system, we recommend that you do this on the central instance host.
For more information on installing the front end software, see the separate documentation:
• SAP Front End Installation Guide (English version)
• SAP Frontend-Installationsleitfaden (German version)
Check the Windows file system [Page 45]
Check the Windows domain structure [Page 45], if required.
Reduce the size of the file cache [Page 46]
Grant user rights for the installation [Page 46]
Prepare the SAPinst installation [Page 52]
Prepare the required CDs for the installation [Page 54]
Installation Process ! Action
Install the Oracle database client software [Page 58]
Run SAPinst [Page 61] to install the dialog instance and check the input for the i t ll ti [P 64]

2 How to Install Your SAP R/3 Enterprise System
2.5 Installing a Gateway Instance
February 2003 23
installation [Page 64].
• If you want to install a Unicode SAP system, use the Unicode Kernel
CD, if you want to install a non-Unicode SAP system, use the non-Unicode Kernel CD.
• Make sure to start SAPinst from a newly created installation directory.
Post-Installation Activities To complete the installation, you have to perform a number of actions. Some of these actions are mandatory, others are optional and serve to activate features that might be useful. ! Action
Check that you can start and stop the SAP system [Page 75]
Check that you can log on to the SAP system [Page 76].
If required, set up Secure Single Sign-On [Page 83] or Kerberos Single Sign-On [Page 88]
Perform a full installation backup [Page 93]
Change passwords of created users [Page 94].
Additional Steps ! Action
Continuing after the dialog instance installation
If you want to install a:
Dialog instance, repeat this procedure.
Gateway instance, proceed with Installing a Gateway Instance [Page 23]
2.5 Installing a Gateway Instance If required, install a standalone gateway instance:
Installation Planning ! Action
Read the required documentation [Page 25], particularly the current SAP Notes.
Check the hardware and software requirements [Page 38]
Installation Preparations ! Action
2 How to Install Your SAP R/3 Enterprise System
2.6 Additional Information
24 February 2003
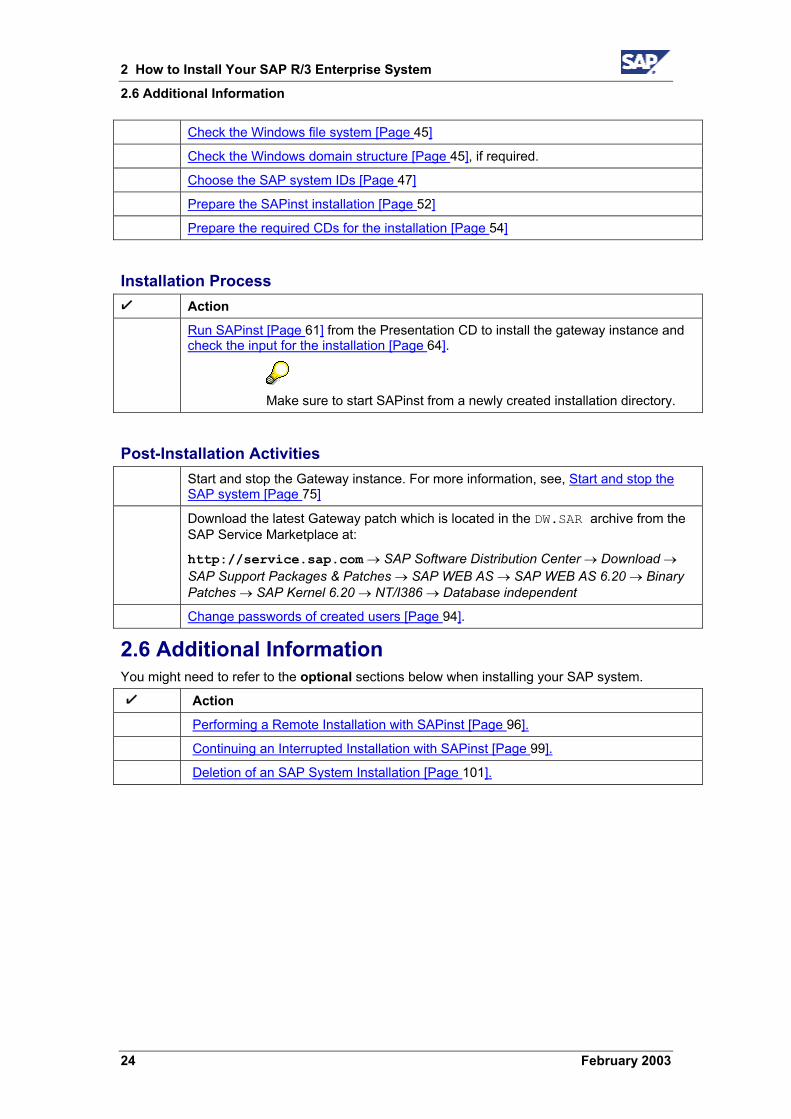
Check the Windows file system [Page 45]
Check the Windows domain structure [Page 45], if required.
Choose the SAP system IDs [Page 47]
Prepare the SAPinst installation [Page 52]
Prepare the required CDs for the installation [Page 54]
Installation Process ! Action
Run SAPinst [Page 61] from the Presentation CD to install the gateway instance and check the input for the installation [Page 64].
Make sure to start SAPinst from a newly created installation directory.
Post-Installation Activities Start and stop the Gateway instance. For more information, see, Start and stop the
SAP system [Page 75]
Download the latest Gateway patch which is located in the DW.SAR archive from the SAP Service Marketplace at:
http://service.sap.com → SAP Software Distribution Center → Download → SAP Support Packages & Patches → SAP WEB AS → SAP WEB AS 6.20 → Binary Patches → SAP Kernel 6.20 → NT/I386 → Database independent
Change passwords of created users [Page 94].
2.6 Additional Information You might need to refer to the optional sections below when installing your SAP system. ! Action
Performing a Remote Installation with SAPinst [Page 96].
Continuing an Interrupted Installation with SAPinst [Page 99].
Deletion of an SAP System Installation [Page 101].
3 Installation Planning
3.1 Required Documentation
February 2003 25
3 Installation Planning
The structure of the installation documentation has changed significantly. You must use the tables in section How to Install Your SAP R/3 Enterprise System [Page 13] for installing the system and to navigate through the installation procedures. All necessary installation phases (planning, preparation, installation and post-installation) are listed in these tables. This prevents you missing important information.
3.1 Required Documentation SAP Installation Notes Read the SAP installation notes before you begin the installation. These notes contain the most recent information regarding the installation, as well as corrections to the installation documentation.
Make sure that you have the most recent version of each SAP Note. You can find the SAP Notes in the SAP Service Marketplace at: http://service.sap.com/notes
Note Number Title
529151 INST: SAP R/3 Enterprise 4.70 on Windows – General
529076 INST: SAP R/3 Enterprise 4.70 on Windows – Oracle
42305 RSCPINST (NLS installation tool)
45619 R/3 with several languages or typefaces
534334 Composite SAP Note Installation/Upgrade SAP R/3 Enterprise
SAPinst Troubleshooting Guide Read the documentation SAPinst Troubleshooting Guide. It provides up-to-date information about how to avoid installation failure and what to do if a failure occurs.
You can find the SAPinst Troubleshooting Guide in the SAP Service Marketplace at: http://service.sap.com/sapinstfeedback
Additional Information Refer to the following documents if required:
Documents that are also part of delivered Installation/Upgrade Documentation CD-ROM are marked with "[CD]"
• Platforms released for mySAP.com, see the SAP Service Marketplace at: http://service.sap.com/platforms
3 Installation Planning
3.1 Required Documentation
26 February 2003
• Technical infrastructure (like configuration scenarios and related aspects such as security, load balancing, availability and caching), see SAP Service Marketplace at: http://service.sap.com/ti
• Unicode SAP systems and their availability, see SAP Note 79991 and the SAP Service Marketplace at: http://service.sap.com/unicode
• Installation of front ends for the SAP system, see the documentation Front End Installation Guide [Presentation CD] or the SAP Service Marketplace at: http://service.sap.com/instguides
• mySAP.com Workplace, see the SAP Service Marketplace at: http://service.sap.com/workplace
• SAP systems for high availability purposes, see:
SAP online documentation BC SAP High Availability in the SAP Library (choose Help → SAP Library in your SAP system) or access the SAP Library at:
http://help.sap.com
SAP Service Marketplace at: http://service.sap.com/ha
• Performing a Homogeneous System Copy, see the documentation SAP Web AS Homogeneous and Heterogeneous System Copy available in the SAP Service Marketplace at: http://service.sap.com/instguides SAP Web Application Server <Release>.
• Performing a Heterogeneous System Copy, see the SAP Service Marketplace at: http://service.sap.com/osdbmigration
• Information about SAP Web AS Security, see the SAP Service Marketplace at: http://service.sap.com/security
Naming Convention In this documentation, the following naming conventions apply:
Terminology The term SAP system stands for an SAP R/3 Enterprise (SAP R/3) system.
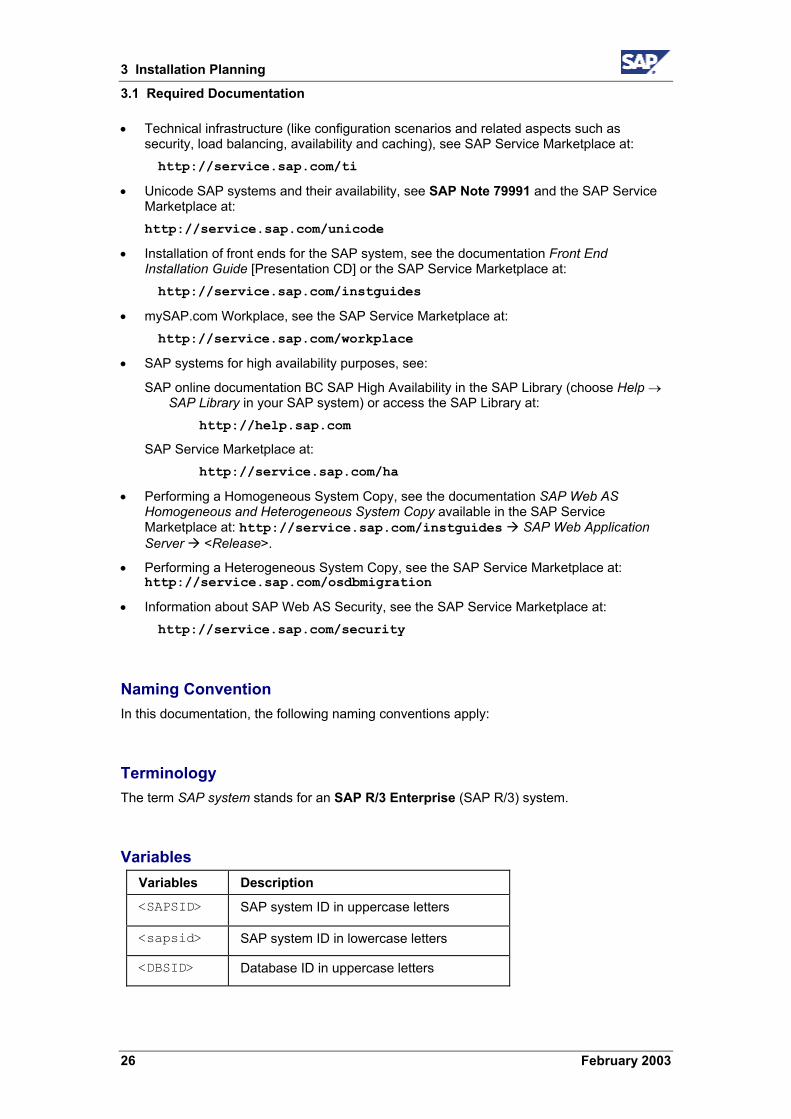
Variables Variables Description <SAPSID> SAP system ID in uppercase letters
<sapsid> SAP system ID in lowercase letters
<DBSID> Database ID in uppercase letters
3 Installation Planning
3.2 Installation of Multiple Components on One Database
February 2003 27
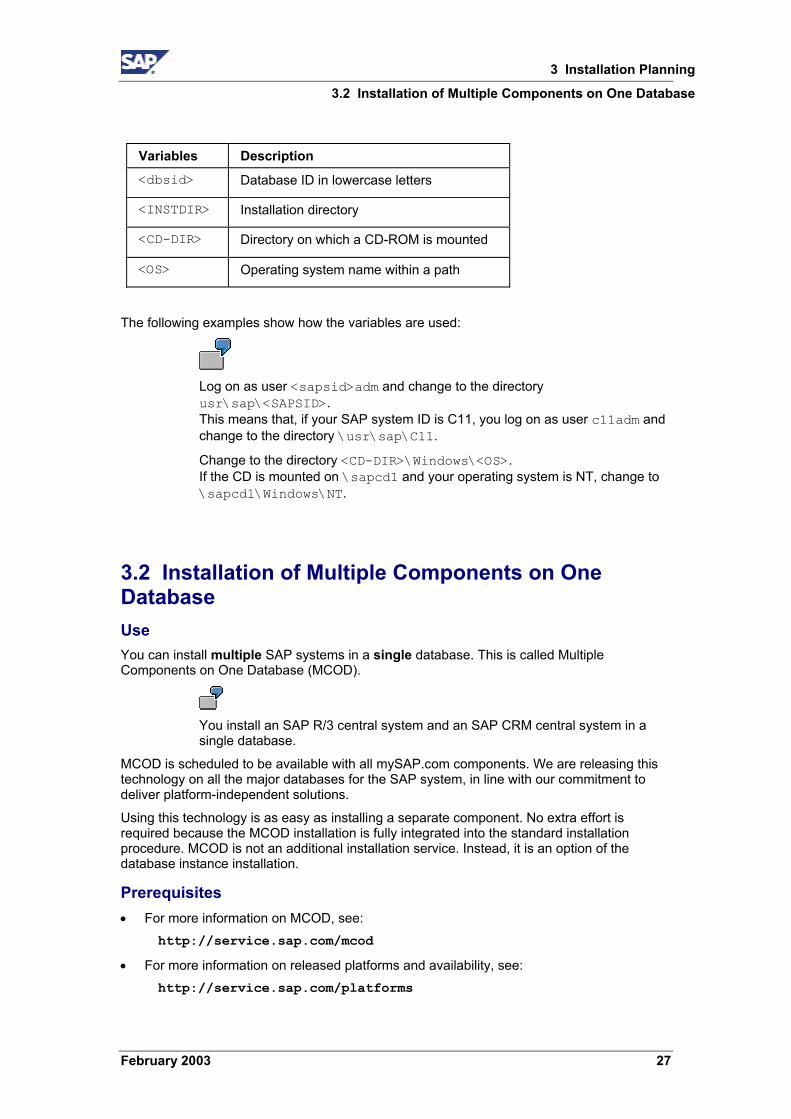
Variables Description <dbsid> Database ID in lowercase letters
<INSTDIR> Installation directory
<CD-DIR> Directory on which a CD-ROM is mounted
<OS> Operating system name within a path
The following examples show how the variables are used:
Log on as user <sapsid>adm and change to the directory usr\sap\<SAPSID>. This means that, if your SAP system ID is C11, you log on as user c11adm and change to the directory \usr\sap\C11.
Change to the directory <CD-DIR>\Windows\<OS>. If the CD is mounted on \sapcd1 and your operating system is NT, change to \sapcd1\Windows\NT.
3.2 Installation of Multiple Components on One Database Use You can install multiple SAP systems in a single database. This is called Multiple Components on One Database (MCOD).
You install an SAP R/3 central system and an SAP CRM central system in a single database.
MCOD is scheduled to be available with all mySAP.com components. We are releasing this technology on all the major databases for the SAP system, in line with our commitment to deliver platform-independent solutions.
Using this technology is as easy as installing a separate component. No extra effort is required because the MCOD installation is fully integrated into the standard installation procedure. MCOD is not an additional installation service. Instead, it is an option of the database instance installation.
Prerequisites • For more information on MCOD, see:
http://service.sap.com/mcod
• For more information on released platforms and availability, see: http://service.sap.com/platforms
3 Installation Planning
3.2 Installation of Multiple Components on One Database
28 February 2003
Choose Platform Availability for mySAP.com → Multiple Components on One Database (MCOD).
• Improved sizing required.
In general, you calculate the CPU usage for an MCOD database by adding up the CPU usage for each individual SAP system. The same applies to memory resources and disk space.
You can size multiple components on one database by sizing each individual component using the SAP Quick Sizer and then adding the requirements together. For more information on the SAP Quick Sizer, see: http://service.sap.com/quicksizer
Features
We strongly recommend you to test MCOD in a test or development system.
We recommend running MCOD systems in the same context. We do not recommend you to mix test, development, and productive systems in the same MCOD.
• Reduced administration effort.
• Consistent system landscape for backup, system copy, administration, and recovery.
• Increased security and reduced database failure for multiple SAP systems due to monitoring and administration of only one database.
• In an MCOD landscape you can upgrade a single component independently from the other components running in the same database, assuming that the upgraded component runs on the same database version. However, if you need to restore a backup, be aware that all other components are also affected.
• Special MCOD considerations and differences from the standard procedure are listed where relevant in the installation documentation.
Constraints • In the event of database failure, all SAP systems running on the single database are
affected.
• Automated support in an MCOD landscape for the following administrative tasks depends on your operating system and database:
− Copying a single component from an MCOD landscape to another database at database level.
− De-installing a single component from an MCOD landscape.
You can use SAPNet - R/3 Frontend to request help with these tasks.
• A Unicode SAP system cannot be installed with a non-Unicode SAP system in one database (MCOD).
• You cannot install multiple components on one database in a cluster.
3 Installation Planning
3.2 Installation of Multiple Components on One Database
February 2003 29
Activities
All differences in the installation procedure for MCOD are marked in the corresponding sections of this documentation.
Installing the first SAP System into a new database 1. Perform the central instance installation as usual.
You install the central instance with SAP system ID C11.
2. Start the database instance installation.
When you are prompted for Database Instance Type, choose Install (first) SAP System into a new database.
You install the database instance C11. On some platforms, you can choose a database instance ID that is different from the SAP system ID, for example D11.
3. Finish the installation.
Installing an additional SAP System into an existing database 1. Perform the central instance installation as usual.
You install the central instance with SAP system ID C12.
2. Start the database instance installation.
3. When you are prompted for Database Instance Type, choose Install (additional) SAP System into an existing database.
4. When SAPinst prompts you for the Name of the database instance, enter exactly the database instance <DBSID> of the existing database.
When SAPinst prompts for the database instance name, you enter C11.
5. Finish the installation.
Due to the MCOD installation, some installation steps are not required and therefore do not appear. These steps are marked in section "Input for the Installation."

3 Installation Planning
3.3 Integration of LDAP Directory Services
30 February 2003
3.3 Integration of LDAP Directory Services Purpose The Lightweight Directory Access Protocol (LDAP) is a feature of Windows 2000 that allows important information within a corporate network to be stored centrally on a server where it can be easily accessed and administered. Storing information centrally for the entire network has the advantage that data must be maintained only once and therefore will not be redundant or inconsistent.
If an LDAP directory is available in the corporate network, you can configure the SAP system so as to make the most of this feature. For example, a configured SAP system can read information from the directory and also store information there.
The following text explains the benefits of using the SAP system with the LDAP directory. In addition, the text also gives an overview of the configuration steps necessary before the SAP system can be used with the directory.
The SAP system is able to interact with the Active Directory using the LDAP protocol. This defines how communication between the SAP system and the directory is conducted and how data in the directory is structured, accessed, or modified. If a directory other than the Active directory also supports the LDAP protocol, the SAP system can take advantage of the information stored there. For example, if there is an LDAP directory on a UNIX or Windows server, the SAP system can be configured to use the information available there. In the following text, directories other than the Active Directory that implement the LDAP protocol are referred to as generic LDAP directories.
In the SAP environment, the information stored in an Active Directory or generic LDAP directory can be exploited by using:
• SAP Logon
• The Microsoft Management Console (MMC)
For more information on the automatic registration of SAP components in LDAP directories and the benefits of using it in SAP Logon and MMC, read the documentation R/3 System Information in Directory Services in the SAP Service Marketplace at: http://service.sap.com/msplatforms → Microsoft → Windows Server
The SAP Logon Instead of using a fixed list of systems and message servers, you can configure the SAP Logon in the sapmsg.ini configuration file to find SAP R/3 systems and their message servers from the directory. If you configure SAP Logon to use the LDAP directory, it will query the directory each time Server or Group selection is chosen as a means of getting up-to-date information on available SAP R/3 systems.
To use the LDAP operation mode, the sapmsg.ini file must contain the following Address section:
[Address]
Mode=LDAPdirectory
LDAPserver=
LDAPnode=
3 Installation Planning
3.3 Integration of LDAP Directory Services
February 2003 31
LDAPoptions=
If you use an Active Directory, you must set LDAPoptions=“DirType=NT5ADS” (see R/3 profile parameter ldap/options). If the client is not located in the same domain forest as the Active Directory, or the operating system does not have a directory service client (NT4.0 and Win9X without installed dsclient), you must specify the directory servers (for example, LDAPserver=pcintel6 p24709). For more information, refer to the R/3 profile parameter ldap/servers. For other directory services, you can use LDAPnode to specify the distinguished name of the SAP root node (see SAP R/3 system profile parameter ldap/saproot).
The MMC The MMC is a graphical user interface for administering and monitoring SAP systems from a central location. It presents and analyzes system information that is gathered from various sources, including the Active Directory, if the SAP system has been prepared appropriately. When the Active Directory is integrated as a source of information this has advantages for the MMC. It can read system information straight from the directory that automatically registers changes to the system landscape. As a result, up-to-date information about all SAP application servers, their status, and parameter settings is always available in the MMC.
The use of the MMC in combination with Active Directory services is particularly recommended for the administration of distributed systems. For example, in a distributed environment that implements the Workplace with the mySAP.com components BW, B2B, APO, and CRM, this simplifies administration. It is possible to keep track of significant events in all of the systems from a single MMC interface. Changes within the system configuration do not have to be registered manually; they are automatically updated in the directory and subsequently reflected in the MMC.
Prerequisites The SAP system can only be configured for Active Directory services or other LDAP directories if these are already available on the network. The Active Directory is a feature of Windows 2000 and is automatically available on all domain controllers. A generic LDAP directory is an additional component that must be installed separately on a UNIX or Windows server.
Process Flow
Active Directory To enable an SAP system to make use of the features offered by the Active Directory, you must configure both the Active Directory and the SAP system.
• In the first step, the Active Directory must be prepared so that it can store SAP data. This involves extending the schema for the SAP data types, creating a root container for the storage of SAP-specific information, and defining accounts that allow directory access. These tasks are all performed using the R3SETUP tool that offers the option Configure Active directory for SAP.
For more information, see Preparing the Active Directory for Use with the SAP System [Page 56].
• In the second step, the SAP system must be configured to enable interaction with the Active Directory. This is carried out during the installation of the SAP central instance using the SAPinst tool. The SAPinst tool prompts for information related to the Active Directory and then configures the system accordingly.
3 Installation Planning
3.4 System Configuration
32 February 2003
Generic LDAP Directories The process of preparing the SAP system for the use of generic LDAP services involves a number of manual steps. Again, both the LDAP directory and the SAP system must be configured appropriately:
• The LDAP directory must be configured to store SAP data. This involves extending the directory schema and creating a container for the SAP data.
• The SAP system must be configured to enable interaction with the LDAP directory. The configuration steps are carried out by the SAPinst tool during the installation of the SAP central instance. The SAPinst tool configures the system correctly using the directory information that must be entered before the installation procedure begins.
• A user with a password must be set up on the server where the SAP system is running to permit the system to access and modify the LDAP directory. This is carried out by running the script ldappasswd.
For more information on how to enable interaction between a generic LDAP directory and the SAP system, read the documentation R/3 System Information in Directory Services in the SAP Service Marketplace at:
http://service.sap.com/msplatforms → Microsoft → Windows Server
3.4 System Configuration System Configuration You and your hardware partner generally plan the system configuration before the
installation. Key aspects of the planning include:
• Central system or standalone database system
• Domain or local installation
• How many dialog instances and front ends are required
You and your hardware partner work out a high-performance configuration based on sizing information that reflects the system workload, such as:
• The set of applications to be deployed
• How intensively the applications are to be used
• The number of users
Domain or Local Installation The installation types differ as follows:
• Local Installation
You need to be Local Administrator of the machine involved. In a local installation, all Windows account and user information is stored locally on one host and is not visible to any other hosts in the system.
If the SAP system is to run on a single machine, you can perform a local installation.
Performing a local installation for a distributed system leads to authorization problems that have to be resolved.
3 Installation Planning
3.4 System Configuration
February 2003 33
• Domain installation
You need to be Domain Administrator of the domain involved, and all machines in the system must belong to the same domain. In a domain installation, the user information is stored centrally on the domain controller and is accessible to all hosts in the system.
If the system is to be distributed across more than one machine, we strongly recommend a domain installation.
If for any reason, you are not granted domain administration rights, you can perform the installation as a domain user who is a member of the local administrator group. However, the domain administrator has to prepare the system appropriately for you. For more information, see Performing a Domain Installation Without Being a Domain Administrator [Page 48].
For more information on user rights, see also:
Granting User Rights for the Installation [Page 46].
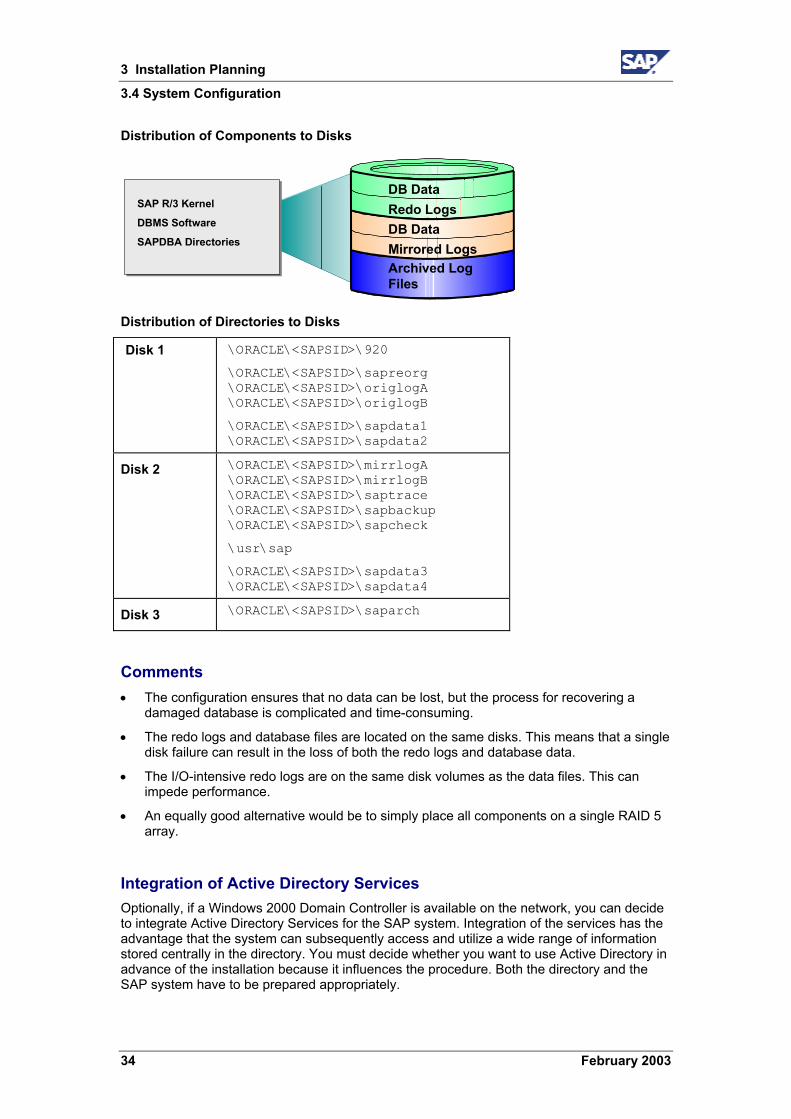
Distribution of Components to Disks When you install the SAP system, the installation tools prompt you to enter drive letters for the main components of the system. This gives you the opportunity to distribute components to disks in the system as you wish. The way in which you do this significantly affects system throughput and data security, and must therefore be carefully planned. The best distribution depends on your specific environment and must take into consideration factors such as the size of the components involved, security requirements and the expected workload.
When you work out the assignment of components to disks, you first need to get an overview of the main components and their corresponding directories. Then, on the basis of sample configurations and the recommendations provided in this documentation, you can decide which assignment is best for your particular system.
SAP systems are normally installed on RAID arrays that ensure data redundancy. This documentation therefore focuses on RAID subsystems and drives.
Minimal Configuration The following illustrates a disk configuration for a small test or demo system. As security and performance play a less crucial role in this type of system, many different configurations are feasible. The following shows one of the possible options.
Use the illustrated configuration exclusively for test or demo systems with a final database size of less than 10 GB. It is unsuitable for production systems because it only minimally satisfies security and performance requirements.
3 Installation Planning
3.4 System Configuration
34 February 2003
Distribution of Components to Disks
Archived LogFiles
DB Data
DB Data
SAP R/3 Kernel
DBMS Software
SAPDBA Directories Mirrored Logs
Redo Logs
Distribution of Directories to Disks
Disk 1 \ORACLE\<SAPSID>\920
\ORACLE\<SAPSID>\sapreorg \ORACLE\<SAPSID>\origlogA \ORACLE\<SAPSID>\origlogB
\ORACLE\<SAPSID>\sapdata1 \ORACLE\<SAPSID>\sapdata2
Disk 2 \ORACLE\<SAPSID>\mirrlogA \ORACLE\<SAPSID>\mirrlogB \ORACLE\<SAPSID>\saptrace \ORACLE\<SAPSID>\sapbackup \ORACLE\<SAPSID>\sapcheck
\usr\sap
\ORACLE\<SAPSID>\sapdata3 \ORACLE\<SAPSID>\sapdata4
Disk 3 \ORACLE\<SAPSID>\saparch
Comments • The configuration ensures that no data can be lost, but the process for recovering a
damaged database is complicated and time-consuming.
• The redo logs and database files are located on the same disks. This means that a single disk failure can result in the loss of both the redo logs and database data.
• The I/O-intensive redo logs are on the same disk volumes as the data files. This can impede performance.
• An equally good alternative would be to simply place all components on a single RAID 5 array.
Integration of Active Directory Services Optionally, if a Windows 2000 Domain Controller is available on the network, you can decide to integrate Active Directory Services for the SAP system. Integration of the services has the advantage that the system can subsequently access and utilize a wide range of information stored centrally in the directory. You must decide whether you want to use Active Directory in advance of the installation because it influences the procedure. Both the directory and the SAP system have to be prepared appropriately.

3 Installation Planning
3.5 SAP Directories
February 2003 35
For details on how the system can benefit from and be prepared for Active Directory see Integration of Active Directory Services [Page 30].
3.5 SAP Directories Definition This section describes the SAP directories created during the installation. The base directories required for the central instance are:
• \usr\sap
Created on the central instance and contains general SAP software
• \usr\sap\trans
Created on the transport host and contains SAP software for the transport of objects between SAP systems
Both the above directories are global, that is, they are accessed by all hosts in the SAP system. Therefore, they have names that follow the Universal Naming Convention (UNC).
We distinguish between a global, local, and database host:
• Global host Machine on which the central instance is running
• Local host Current machine on which an SAP instance is running
• DB host Machine on which the database server is running
Use
\usr\sap The SAP software is stored in the \usr\sap directory:
• On global hosts, the \usr\sap directory contains global and local (instance-specific) data.
• On local hosts, \usr\sap contains only instance-specific data and copies of the SAP executables. The executables on the local host are replicated from those on the global host each time the local instance is started.
The installation program creates the \usr\sap directory on the global host and shares it with the names sapmnt and saploc. The same directory on the local host is shared as saploc.
3 Installation Planning
3.5 SAP Directories
36 February 2003
Since SAP traces for the instance are created in \usr\sap, sufficient space must be available in this directory. Changes in SAP profiles can also affect the disk space.
If you create the subdirectory ......\SYS (global data) locally on application or front-end servers, you have to distribute the software for the SAP system manually when upgrading to a new SAP release. SAP does not provide support in this case.
\usr\sap\trans In an SAP system landscape there must be a global directory, called \usr\sap\trans, for the transport of objects between SAP systems. This directory is created on one SAP instance host in the SAP system landscape and is called the transport host. It must be accessible for every host on which an SAP instance is installed and which belongs to this SAP system landscape. The path on every host must be \\<SAPTRANSHOST>\usr\sap\trans.
If you want to use the Change and Transport System (CTS), you need additional space in directory \usr\sap\trans. Since the required storage size differs depending on the transport volume, we cannot exactly specify the required amount of free disk space. We recommend that you reserve 20 MB per user of the transport system, with a minimum of 200 MB.
With the SAP system you can make a transport host known to the Domain Name Server (DNS) for all Windows systems. For more information, see Preparing SAP System Transport Host [Page 51].
Structure The following graphics show how the physical directory \usr\sap is shared on the global host and in a distributed installation. In both cases, UNC names are used as follows:
• \\<SAPGLOBALHOST>\sapmnt to access global directories
• \\<SAPLOCALHOST>\saploc to access local instance-specific data

3 Installation Planning
3.5 SAP Directories
February 2003 37
Directory Structure on the Global Host
Instance Directories
\\<SAPLOCALHOST>\saploc
(UNC name)
log
Physical Directory Structure
Global Directories
\\<SAPGLOBALHOST>\sapmnt
(UNC name)
<instance name>
sap
usr
<SID>
opt
datawork
dbg
run
sys
globalprofileexe
refers torefers to
This graphic shows the directory structure on the global host. The global data is stored in the global directories on the global host and physically exists only once for each SAP system. Other computers access the data using the UNC name, \\<SAPGLOBALHOST>\sapmnt, where SAPGLOBALHOST is replaced by the SAP system with the name of the global host. The global host accesses its own instance-specific data using the UNC name \\<SAPLOCALHOST>\saploc. On the global host, the parameters SAPGLOBALHOST and SAPLOCALHOST have the same value.
3 Installation Planning
3.6 Hardware and Software Requirements Check
38 February 2003
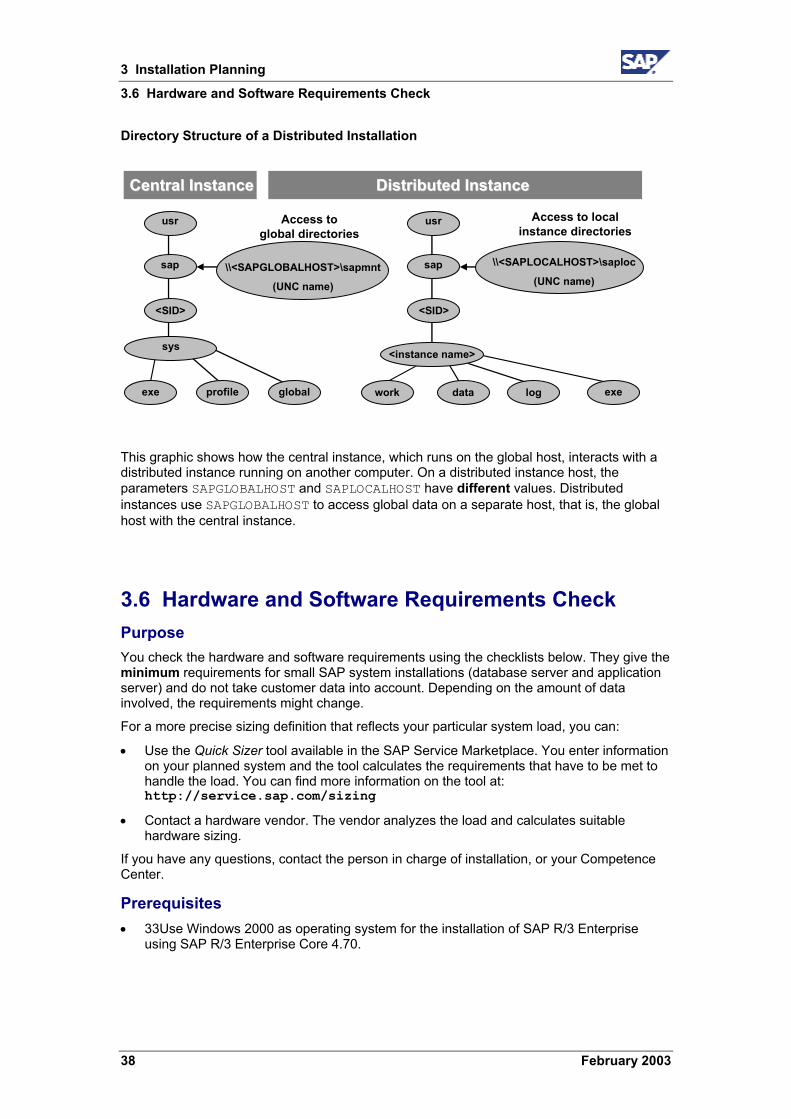
Directory Structure of a Distributed Installation
\\<SAPLOCALHOST>\saploc
(UNC name)
log
Access to localinstance directories
\\<SAPGLOBALHOST>\sapmnt
(UNC name)
<instance name>
datawork
Distributed InstanceDistributed InstanceCentral InstanceCentral Instance
Access toglobal directories
sap
usr
<SID>
sys
globalprofile exe
sap
usr
<SID>
exe
This graphic shows how the central instance, which runs on the global host, interacts with a distributed instance running on another computer. On a distributed instance host, the parameters SAPGLOBALHOST and SAPLOCALHOST have different values. Distributed instances use SAPGLOBALHOST to access global data on a separate host, that is, the global host with the central instance.
3.6 Hardware and Software Requirements Check Purpose You check the hardware and software requirements using the checklists below. They give the minimum requirements for small SAP system installations (database server and application server) and do not take customer data into account. Depending on the amount of data involved, the requirements might change.
For a more precise sizing definition that reflects your particular system load, you can:
• Use the Quick Sizer tool available in the SAP Service Marketplace. You enter information on your planned system and the tool calculates the requirements that have to be met to handle the load. You can find more information on the tool at: http://service.sap.com/sizing
• Contact a hardware vendor. The vendor analyzes the load and calculates suitable hardware sizing.
If you have any questions, contact the person in charge of installation, or your Competence Center.
Prerequisites • 33Use Windows 2000 as operating system for the installation of SAP R/3 Enterprise
using SAP R/3 Enterprise Core 4.70.
3 Installation Planning
3.6 Hardware and Software Requirements Check
February 2003 39
With Windows 2000, you must use the English (International) version of the operating system, but you can use a different language for the graphical user interface (GUI). For more information, see SAP Note 362379.
• For remote support, the remote connection specified in the contract agreement must be available before installation. The Internet address setup at SAP and registration are dealt with during the installation.
• You are only allowed to install an SAP system on certified hardware. AddOn Systemhaus GmbH certifies hardware platforms for SAP on Microsoft Windows 2000. It certifies a specified release of MS Windows 2000. SAP customers can then run the SAP system on the respective platform for all the combinations of the SAP system and databases released by SAP for the specified release of MS Windows 2000. You can find more information about certified platforms at: http://addon.saponwin.com
Process Flow 1. For a central system and standalone database system, see the following check lists:
− Central instance [Page 39]
− Database instance [Page 41]
− Dialog instance [Page 42], if you want to install additional instances
If you install multiple SAP system instances on one host, the requirements are cumulative.
For example, if you install a central system, you have to add the space and the RAM requirements of the central instance check list and the database instance check list.
Be aware that Unicode systems require additional hardware resources.
You can find more information about Unicode SAP systems in the SAP Service Marketplace at: http://service.sap.com/unicode
2. You check the network requirements. These are described in the documentation Network Integration of SAP Servers. You can find this documentation under Network Integration Guides in the SAP Service Marketplace at: http://service.sap.com/network
For more information on SAP software in PC networks, see SAP Note 5324.
If you do not fully meet the relevant requirements, you might experience problems when working with the SAP system.
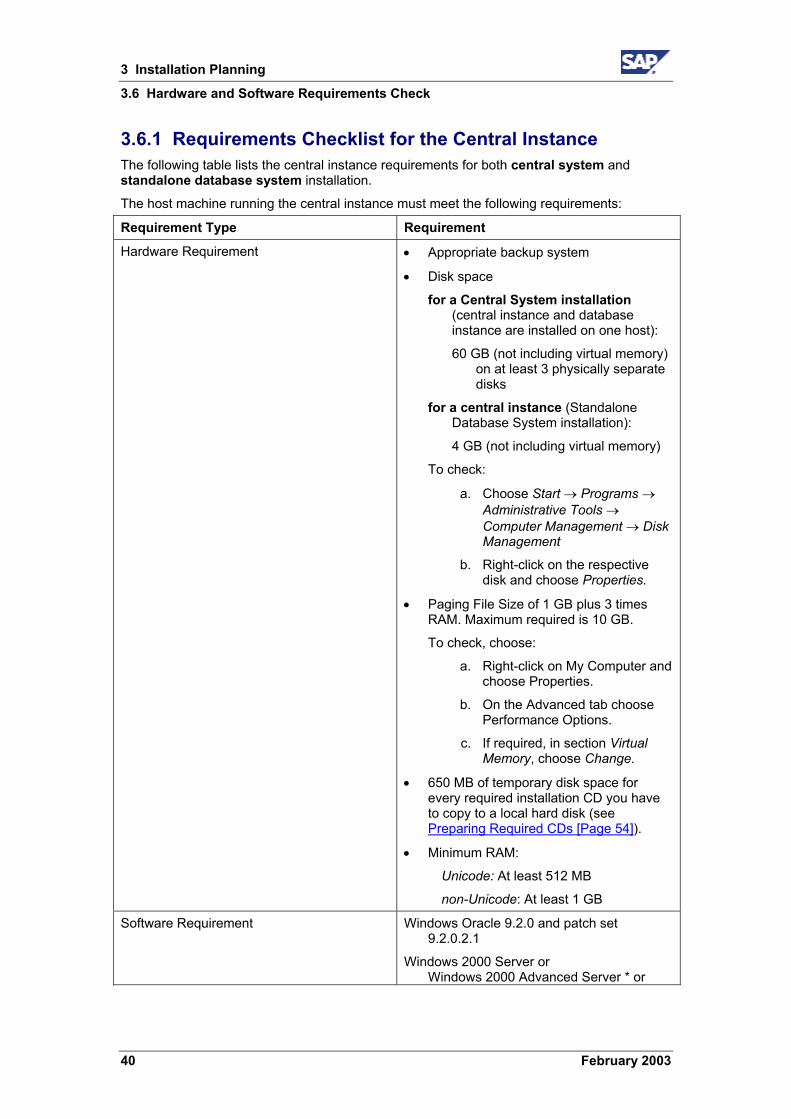
3 Installation Planning
3.6 Hardware and Software Requirements Check
40 February 2003
3.6.1 Requirements Checklist for the Central Instance The following table lists the central instance requirements for both central system and standalone database system installation.
The host machine running the central instance must meet the following requirements:
Requirement Type Requirement
Hardware Requirement • Appropriate backup system
• Disk space
for a Central System installation (central instance and database instance are installed on one host):
60 GB (not including virtual memory) on at least 3 physically separate disks
for a central instance (Standalone Database System installation):
4 GB (not including virtual memory)
To check:
a. Choose Start → Programs → Administrative Tools → Computer Management → Disk Management
b. Right-click on the respective disk and choose Properties.
• Paging File Size of 1 GB plus 3 times RAM. Maximum required is 10 GB.
To check, choose:
a. Right-click on My Computer and choose Properties.
b. On the Advanced tab choose Performance Options.
c. If required, in section Virtual Memory, choose Change.
• 650 MB of temporary disk space for every required installation CD you have to copy to a local hard disk (see Preparing Required CDs [Page 54]).
• Minimum RAM:
Unicode: At least 512 MB
non-Unicode: At least 1 GB
Software Requirement Windows Oracle 9.2.0 and patch set 9.2.0.2.1
Windows 2000 Server or Windows 2000 Advanced Server * or
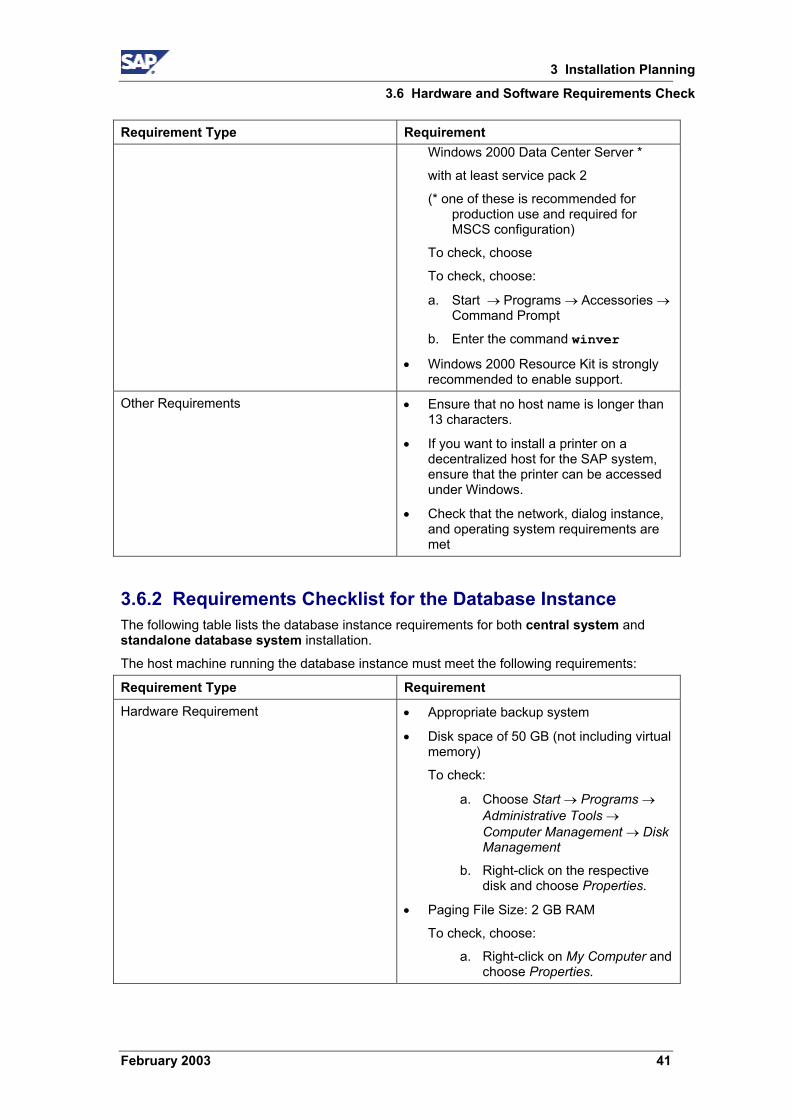
3 Installation Planning
3.6 Hardware and Software Requirements Check
February 2003 41
Requirement Type Requirement Windows 2000 Data Center Server *
with at least service pack 2
(* one of these is recommended for production use and required for MSCS configuration)
To check, choose
To check, choose:
a. Start → Programs → Accessories → Command Prompt
b. Enter the command winver
• Windows 2000 Resource Kit is strongly recommended to enable support.
Other Requirements • Ensure that no host name is longer than 13 characters.
• If you want to install a printer on a decentralized host for the SAP system, ensure that the printer can be accessed under Windows.
• Check that the network, dialog instance, and operating system requirements are met
3.6.2 Requirements Checklist for the Database Instance The following table lists the database instance requirements for both central system and standalone database system installation.
The host machine running the database instance must meet the following requirements:
Requirement Type Requirement
Hardware Requirement • Appropriate backup system
• Disk space of 50 GB (not including virtual memory)
To check:
a. Choose Start → Programs → Administrative Tools → Computer Management → Disk Management
b. Right-click on the respective disk and choose Properties.
• Paging File Size: 2 GB RAM
To check, choose:
a. Right-click on My Computer and choose Properties.
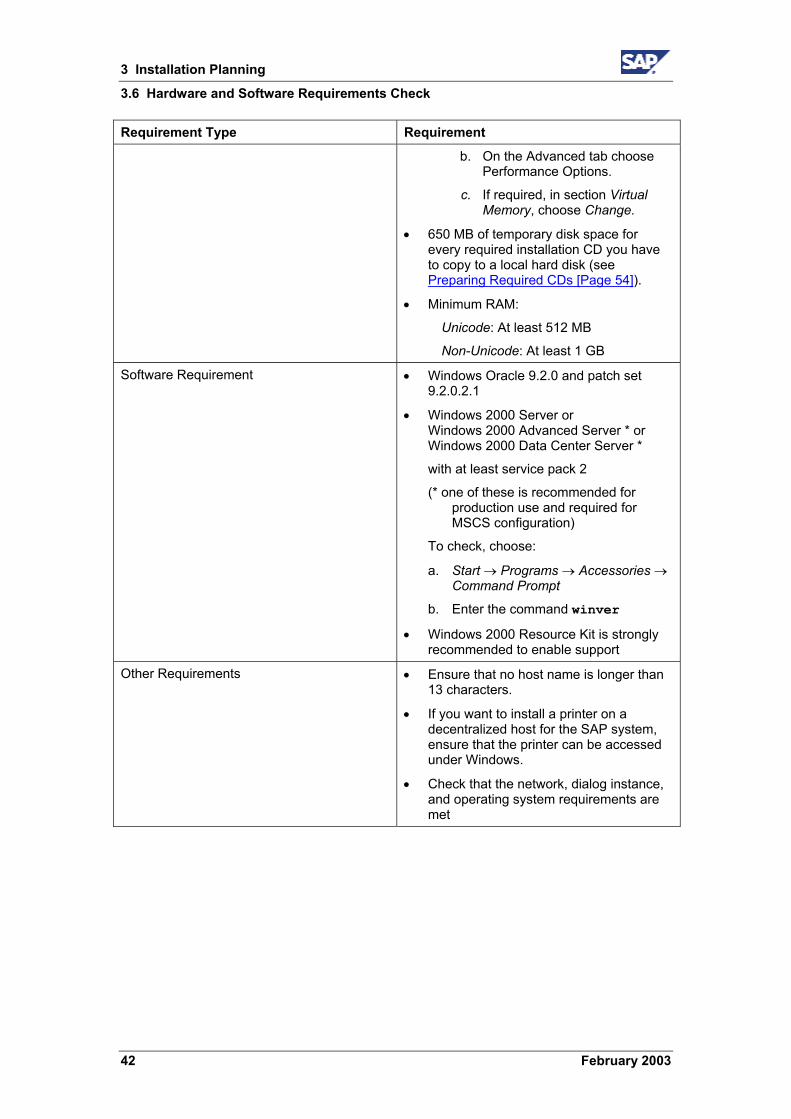
3 Installation Planning
3.6 Hardware and Software Requirements Check
42 February 2003
Requirement Type Requirement
b. On the Advanced tab choose Performance Options.
c. If required, in section Virtual Memory, choose Change.
• 650 MB of temporary disk space for every required installation CD you have to copy to a local hard disk (see Preparing Required CDs [Page 54]).
• Minimum RAM:
Unicode: At least 512 MB
Non-Unicode: At least 1 GB
Software Requirement • Windows Oracle 9.2.0 and patch set 9.2.0.2.1
• Windows 2000 Server or Windows 2000 Advanced Server * or Windows 2000 Data Center Server *
with at least service pack 2
(* one of these is recommended for production use and required for MSCS configuration)
To check, choose:
a. Start → Programs → Accessories → Command Prompt
b. Enter the command winver
• Windows 2000 Resource Kit is strongly recommended to enable support
Other Requirements • Ensure that no host name is longer than 13 characters.
• If you want to install a printer on a decentralized host for the SAP system, ensure that the printer can be accessed under Windows.
• Check that the network, dialog instance, and operating system requirements are met

3 Installation Planning
3.6 Hardware and Software Requirements Check
February 2003 43
3.6.3 Requirements Checklist for a Dialog Instance The host machine running the dialog instance must meet the requirements listed below.
Requirement Type Requirement
Hardware Requirement • Appropriate backup system
• Disk space
4 GB (not including virtual memory)
To check:
a. Choose Start → Programs → Administrative Tools → Computer Management → Disk Management
b. Right-click on the respective disk and choose Properties.
• Paging File Size of 1 GB plus 3 times RAM. Maximum required is 10 GB.
To check, choose:
a. Right-click on My Computer and choose Properties.
b. On the Advanced tab choose Performance Options.
c. If required, in section Virtual Memory, choose Change.
• 650 MB of temporary disk space for every required installation CD you have to copy to a local hard disk (see Preparing Required CDs [Page 54]).
• Minimum RAM:
Unicode: At least 512 MB
Non-Unicode: At least 1 GB.
Software Requirement • Windows Oracle 9.2.0 and patch set 9.2.0.2.1
• Windows 2000 Server or Windows 2000 Advanced Server * or Windows 2000 Data Center Server *
with at least service pack 2
(* one of these is recommended for production use and required for MSCS configuration)
To check, choose:
a. Start → Programs → Accessories→ Command Prompt.
b. Enter the command winver
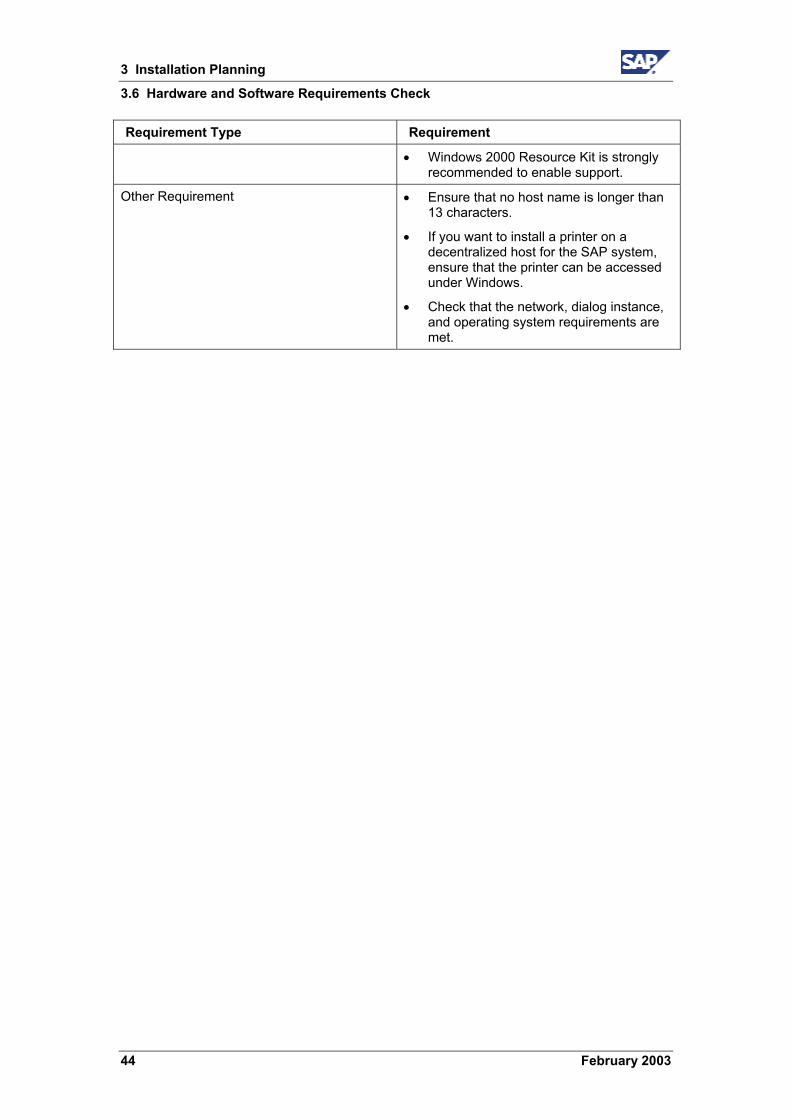
3 Installation Planning
3.6 Hardware and Software Requirements Check
44 February 2003
Requirement Type Requirement
• Windows 2000 Resource Kit is strongly recommended to enable support.
Other Requirement • Ensure that no host name is longer than 13 characters.
• If you want to install a printer on a decentralized host for the SAP system, ensure that the printer can be accessed under Windows.
• Check that the network, dialog instance, and operating system requirements are met.
4 Installation Preparations
4.1 Checking for the Windows File System
February 2003 45
4 Installation Preparations
The structure of the installation documentation has changed significantly. You must use the tables in section How to Install Your SAP R/3 Enterprise System [Page 13] for installing the system and to navigate through the installation procedures. All necessary installation phases (planning, preparation, installation and post-installation) are listed in these tables. This prevents you missing important information.
4.1 Checking for the Windows File System Use This section describes how to check that you are using the Windows File System (NTFS) on hosts where the SAP system and database are to be installed. NTFS supports full Windows security and long file names.
You must use NTFS for an SAP system installation. Do not install the SAP directories on an FAT partition.
Procedure 1. Open the Windows Explorer.
2. Select the root directory.
3. Choose File → Properties.
4. Switch to the General tab to see the type of file system that is in use.
4.2 Checking the Windows Domain Structure This section describes how to check that all SAP system and database hosts are members of a single Windows domain. We recommend this for all SAP system setups. This step is not required in a local installation.
In Windows 2000 there are two domain models that can be implemented for the SAP system; the extra domain model and the single domain model.
Extra Domain In this model, the SAP system is embedded in its own domain that is specially defined for SAP. A second domain exists for the user accounts.
In Windows 2000, the SAP domain and user domain must be incorporated in a domain tree. In this tree, the user accounts must form the root domain and the SAP domain must be a child domain of this.
Single Domain
4 Installation Preparations
4.3 Reducing the Size of the File Cache
46 February 2003
In this model, the SAP system and the user accounts are included in a single domain.
For performance and security reasons, no SAP instance (including the database instance) should run on the domain controller.
Prerequisites You are familiar with checking Windows domain structures. See the Windows documentation if you need more information.
Procedure 1. Check that all SAP system and database hosts are part of a single Windows domain.
2. If you want to use the Change and Transport System to move objects between different SAP systems (that is, SAP systems with different <SAPSIDs>), check that all these systems are either a member of one domain or members of different domains with a trust relationship established between them. Only SAP application and database servers should be members of this domain.
4.3 Reducing the Size of the File Cache Use You use this procedure to change the size of the file cache.
Procedure 1. Choose Start → Settings → Control Panel → Network and Dial-up Connections.
2. In the Network and Dial-up connections dialog box, double-click Local Area Connections.
3. In the Local Area Connection Status dialog box, choose Properties.
4. In the Local Area Connection Properties dialog box, double-click File and Printer Sharing for Microsoft Networks.
If you cannot select File and Printer Sharing for Microsoft Networks, this option has not yet been installed. To install it, you need the Windows 2000 Server CDs.
5. Select Maximize data throughput for network applications.
6. To confirm your entries, choose OK.
4.4 Granting User Rights for the Installation Use You need to make sure that you have the required rights and privileges that authorize you to install the SAPinst tool and the SAP system.
4 Installation Preparations
4.4 Granting User Rights for the Installation
February 2003 47
If you attempt the installation without the required authorization, the system aborts.
If necessary, you have to ask the system administrator to grant you the necessary authorization before you start the installation.
Prerequisites • The authorization required depends on whether you intend to perform a domain or
local installation. For more information, see the sections Installation Planning and System Configuration.
• A domain installation requires a domain controller to store user and account information centrally for the whole system.
For performance and security reasons, it is advisable not to run an SAP instance (including the database instance) on a domain controller.
Never perform a local installation on a domain controller.
Procedure
Local Installation To perform a local installation, you need to have Local Administration rights for the central instance host. In a local installation, all Windows account and user information is stored locally on one host and is not visible to any other hosts in the system.
To obtain these rights the system administrator must enter you as a member of the Local Admins group.
Domain Installation To perform a domain installation, you need to have Domain Administration rights. In a domain installation, the user information is stored centrally on the domain controller and is accessible to all hosts in the system.
To obtain these rights the system administrator must enter you as a member of the Domain Admins group.
If you are not granted domain administration rights, you can perform the installation as a domain user who is a member of the local administrator group. However, the domain administrator has to prepare the system appropriately for you. For more information, see Performing a Domain Installation without Being a Domain Administrator [Page 48].
4 Installation Preparations
4.5 Performing a Domain Installation without Being a Domain Administrator
48 February 2003
4.5 Performing a Domain Installation without Being a Domain Administrator Use The installation of the SAP system must be performed by a user with domain administration rights. If, for any reason, you are unable to grant a user domain administrator rights, you can perform the installation as a domain user who is a member of the local administrator group.
However, you must prepare the system appropriately.
The Domain Administrator has to create a new global group called SAP_<SAPSID>_GlobalAdmin, and the two user accounts, called <sapsid>adm and SAPService<SAPSID> (this user is not created for Informix installations). Once the accounts have been created, you have to add the users <sapsid>adm and SAPService<SAPSID> to the newly created group SAP_<SAPSID>_GlobalAdmin.
Prerequisites To create the SAP_<SAPSID>_GlobalAdmin group:
1. Log on as domain administrator.
2. To start the Active Directory Users and Computers Console, choose:
Start → Programs → Administrative Tools → Active Directory Users and Computers
If you cannot find Active Directory Users and Computers, start it as follows:
a. Choose Start → Run and enter mmc.
b. Choose Console → Add/Remove Snap-in... and choose Add.
c. Choose Active Directory Users and Computers.
d. Select Add.
e. When finished, select Close and then OK.
3. In the tree on the left, right-click on the Users folder and choose:
New → Group
4. Enter the following:
Group name: SAP_<SAPSID>_GlobalAdmin
Group name (pre-Windows 2000): SAP_<SAPSID>_GlobalAdmin
5. Select the following:
Group scope: Global
Group type: Security
6. Choose OK.
Creating the New Users To create the SAP System User <sapsid>adm and SAPService<SAPSID> proceed as follows:
1. In the Active Directory Users and Computers Console right-click on the Users folder in the tree on the left and choose:
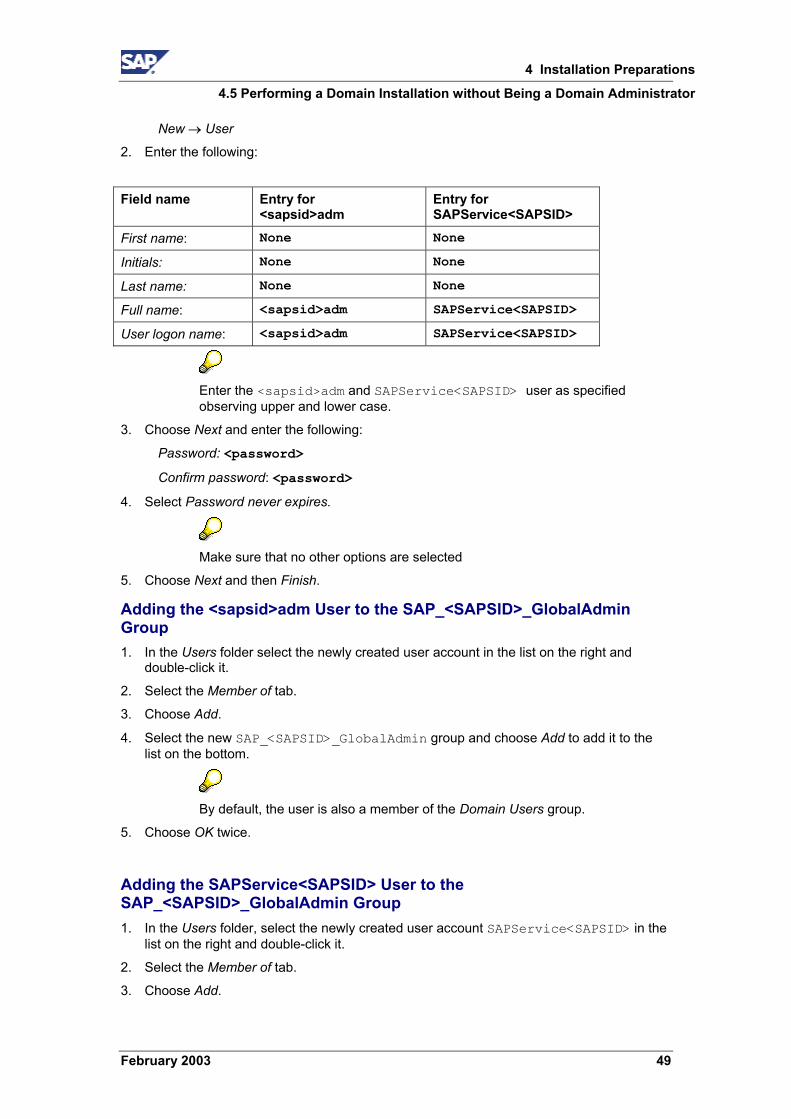
4 Installation Preparations
4.5 Performing a Domain Installation without Being a Domain Administrator
February 2003 49
New → User
2. Enter the following:
Field name Entry for <sapsid>adm
Entry for SAPService<SAPSID>
First name: None None
Initials: None None
Last name: None None
Full name: <sapsid>adm SAPService<SAPSID>
User logon name: <sapsid>adm SAPService<SAPSID>
Enter the <sapsid>adm and SAPService<SAPSID> user as specified observing upper and lower case.
3. Choose Next and enter the following:
Password: <password>
Confirm password: <password>
4. Select Password never expires.
Make sure that no other options are selected
5. Choose Next and then Finish.
Adding the <sapsid>adm User to the SAP_<SAPSID>_GlobalAdmin Group 1. In the Users folder select the newly created user account in the list on the right and
double-click it.
2. Select the Member of tab.
3. Choose Add.
4. Select the new SAP_<SAPSID>_GlobalAdmin group and choose Add to add it to the list on the bottom.
By default, the user is also a member of the Domain Users group.
5. Choose OK twice.
Adding the SAPService<SAPSID> User to the SAP_<SAPSID>_GlobalAdmin Group 1. In the Users folder, select the newly created user account SAPService<SAPSID> in the
list on the right and double-click it.
2. Select the Member of tab.
3. Choose Add.

4 Installation Preparations
4.6 Choosing the SAP System ID and Host Name
50 February 2003
4. Select the new SAP_<SAPSID>_GlobalAdmin group and choose Add to add it to the list on the bottom.
5. Choose OK.
The SAPService<SAPSID> user must not be a member of the Domain Users group.
To remove this group from the Member of list:
a. Select the SAP_<SAPSID>_GlobalAdmin group and choose Set Primary Group.
b. Select the Domain Users group and choose Remove to delete it from the Member of list.
6. Choose OK to close the SAPService<SAPSID> Properties dialog box.
7. Close the Active Directory Users and Computers Management Console.
4.6 Choosing the SAP System ID and Host Name Use You need to choose an SAP system ID that identifies the whole system. This ID has to be entered for the variable <SAPSID> when you install the central instance. You also need to check the host name for compatibility.
You cannot change the SAP system ID after the installation.
Procedure 1. The ID for your SAP system (<SAPSID>) as well as for your Database System
(<DBSID>) must be unique throughout your organization and must consist of exactly three alphanumeric characters. Only uppercase letters are allowed. The first character must be a letter (not a digit).
Since the following IDs are reserved, you cannot assign them to your SAP system: ADD ALL AND ANY ASC COM DBA END EPS FOR GID IBM INT KEY LOG MON NIX NOT OFF OMS RAW ROW SAP SET SGA SHG SID SQL SYS TMP UID USR VAR
Choose your SAP system ID carefully. Renaming is complicated and requires you to re-install the SAP system.
If you intend to install a dialog instance on the database host, make sure that the DBSID is different from the dialog name, otherwise the installation will not continue.
The dialog instance name is assembled as follows: letter D (system setting) and instance number (user setting), for example D01.

4 Installation Preparations
4.7 Preparing the SAP System Transport Host
February 2003 51
2. Make sure that the host name of your system does not contain any special character such as a hyphen or an underscore. In addition, the host name must not exceed 13 characters in length. Otherwise, unpredictable problems might arise using the SAP System, especially when using the Change and Transport System.
4.7 Preparing the SAP System Transport Host Use You need to prepare one host in the SAP system for the role of transport host. This host has the function of controlling the import or export of files between the current SAP system and other SAP systems (for example, a test or development system).
The transport host uses the usr\sap\trans directory to temporarily store files that have been exported from one system and are waiting to be imported into another system. Depending on your requirements, you can decide to use the central instance host, the dialog instance host, or any other host as the transport host.
If you are installing on Windows 2000, see SAP Note 360515 for more information on preparing the SAP system transport host.Procedure
1. Map the IP address of the transport host to the alias SAPTRANSHOST using one of the following methods:
− On the DNS server
If a DNS server is available for your system, ask your administrator to map the IP address of the transport host to the alias SAPTRANSHOST.
The DNS server is a database that contains a set of files with information about the TCP/IP network, including the mapping of host names or aliases to IP addresses.
− In the hosts files
If no DNS server is available, you can map the IP address to the alias SAPTRANSHOST in the hosts file. This is located in the Windows default directory: <Drive>:\WINNT\system32\drivers\etc
Open the hosts file with an editor and add the line: <IP_address> <hostname> SAPTRANSHOST
The result of this step is to assign the alias SAPTRANSHOST to the transport host.
Copy the newly edited hosts file to all hosts where an SAP instance is to run.
If the transport host has more than one network card, take special care when you determine the IP address that is entered in the hosts file or on the DNS server. Make sure you enter the main IP address and that the binding order is correctly defined. To check the binding order, choose: Start → Settings → Network and Dial-up Connections. Then choose from the Menue Bar Advanced → Advanced Settings.
2. If your transport host is not the central instance host, you have to create the transport directory as follows:
a. On the transport host, create the directory \usr\sap\trans.
4 Installation Preparations
4.7 Preparing the SAP System Transport Host
52 February 2003
b. Grant Everyone the permission Full Control for the directory.
These permissions are only necessary during the course of the SAPinst installation. After the installation, only the SAP_<SID>_GlobalAdmin groups of all the systems that are part of your transport infrastructure must be granted Full Control on the directory. SAPinst assigns the appropriate rights with the help of an additional SAP_LocalAdmin group. For more information, see Automatic Creation of Accounts and Groups [Page 106].
c. If no SAP instance is to be installed on the transport host, you have to share the usr\sap directory on the transport host as SAPMNT. This enables SAPinst to address the transport directory in the standard way as \\SAPTRANSHOST\SAPMNT\trans.
Result You have configured your system so that the installation tool SAPinst can recognize the transport host.
4 Installation Preparations
4.8 Preparing the SAPinst Installation
February 2003 53
4.8 Preparing the SAPinst Installation Use The Java-based SAPinst graphical user interface (GUI) called SAPinst GUI require a Java Development Kit (Java™ 2 SDK, Standard Edition). Therefore, you must install JDK on every host on which you want to install an instance, as described in this section.
Prerequisites • You can find the JDK versions that are released for SAP Web Application Server at the
SAP Service Marketplace at: http://service.sap.com/platforms Availability of SAP Components in Detail → SAP Web AS / Basis / SAP Kernel Planned OS / DB / JDK Releases for SAP Web AS 6.20.
SAPinst GUI requires the same JDK version as the SAP Web Application Server.
JDK is not part of the SAP shipment.
To check the version of an already installed JDK, enter java –version
SAPinst GUI requires the same JDK version as the SAP Web Application Server.
JDK is not part of the SAP shipment.
Make sure that your JAVA_HOME environment variable is set to <JAVA_HOME>.
Make sure that %JAVA_HOME%\bin is included in your system path.
• This section describes preparations for a normal, that is, a local installation with SAPinst. However, you can perform a remote installation [Page 96] using a standalone SAPinst GUI on a separate Windows or UNIX host. This enables you to perform the installation on a remote host while monitoring it with SAPinst GUI from a local host.
• To avoid an error when starting SAPinst GUI, you must make sure that there are no .jar files from an XML parser tool, such as, Xerces or Xalan, in the JDK ext directory, as described in the procedure below.
Procedure To check the JDK ext directory:
1. Log on to the host on which you intend to run the SAPinst GUI.
2. Check whether there are already <parser_name>.jar files, for example, xerces.jar in your ext directory. The default path is:
UNIX: <JAVA_HOME>/JRE/lib/ext
Windows: <JAVA_HOME>\JRE\lib\ext
3. If you find any .jar files, rename them to, for example, xerces.xxx.
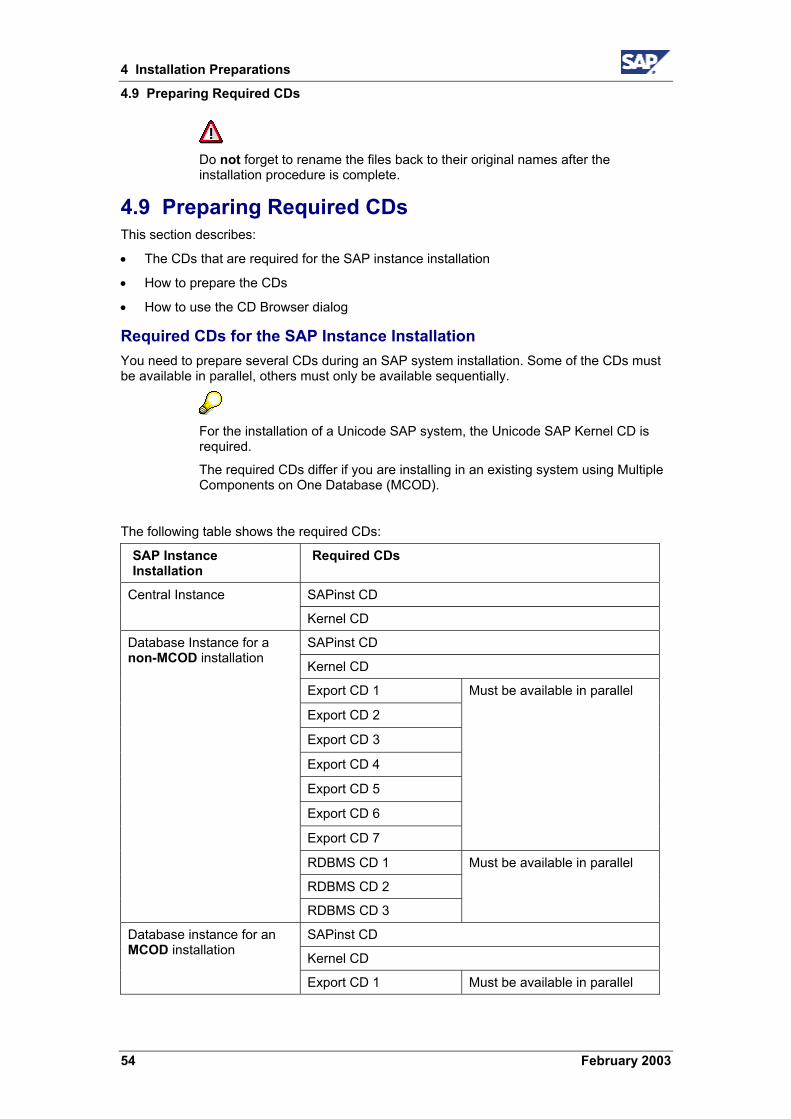
4 Installation Preparations
4.9 Preparing Required CDs
54 February 2003
Do not forget to rename the files back to their original names after the installation procedure is complete.
4.9 Preparing Required CDs This section describes:
• The CDs that are required for the SAP instance installation
• How to prepare the CDs
• How to use the CD Browser dialog
Required CDs for the SAP Instance Installation You need to prepare several CDs during an SAP system installation. Some of the CDs must be available in parallel, others must only be available sequentially.
For the installation of a Unicode SAP system, the Unicode SAP Kernel CD is required.
The required CDs differ if you are installing in an existing system using Multiple Components on One Database (MCOD).
The following table shows the required CDs:
SAP Instance Installation
Required CDs
SAPinst CD Central Instance
Kernel CD
SAPinst CD
Kernel CD
Export CD 1
Export CD 2
Export CD 3
Export CD 4
Export CD 5
Export CD 6
Export CD 7
Must be available in parallel
RDBMS CD 1
RDBMS CD 2
Database Instance for a non-MCOD installation
RDBMS CD 3
Must be available in parallel
SAPinst CD
Kernel CD
Database instance for an MCOD installation
Export CD 1 Must be available in parallel

4 Installation Preparations
4.9 Preparing Required CDs
February 2003 55
SAP Instance Installation
Required CDs
Export CD 2
Export CD 3
Export CD 4
Export CD 5
Export CD 6
Export CD 7
SAPinst CD Dialog Instance Installation
Kernel CD
Gateway Instance Presentation CD
Preparing the CDs As you need at least a central and database instance for an SAP system, we recommend you to make all required CDs (see table above) available in parallel.
The export CDs and the RDBMS CDs (if relevant) must be available in parallel anyway.
Use one of the following methods to make CDs available in parallel:
• Before the installation
− Have sufficient CD drives
− Copy CDs manually to local hard disks
• During the installation
Use the SAPinst dialog CD Browser, that is, you can check the entered location and then copy the entire CD to the path you entered in column Copy Package to.
Using the CD Browser Dialog During the installation procedure SAPinst first checks and finally verifies the availability and location of the required installation CDs. SAPinst does this by displaying a CD Browser dialog, asking for the file LABEL.ASC that contains the information of the software package to be installed.
SAPinst displays the CD Browser dialog in the following situations:
• SAPinst wants to check the availability of the software package.
You can recognize this situation by the flag Check Location displayed in the CD Browser window.
Choose one of the following actions:
Action Result
Do not enter any Package SAPinst skips the check and you can continue
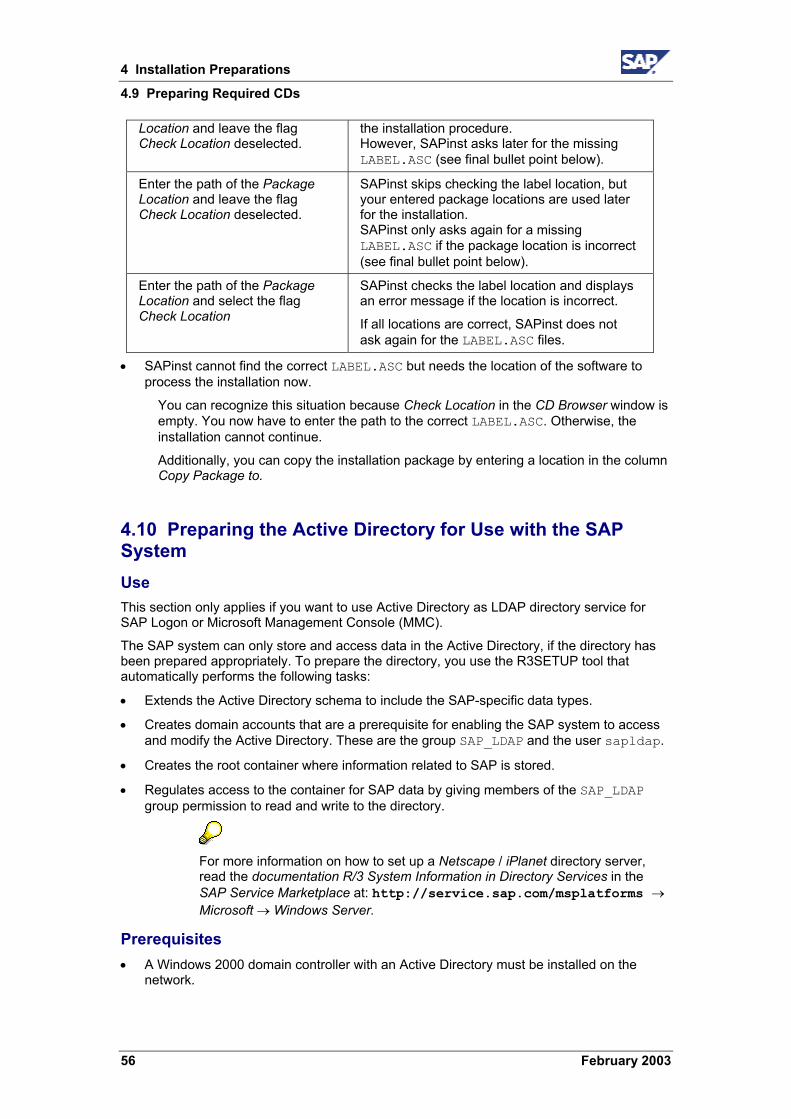
4 Installation Preparations
4.9 Preparing Required CDs
56 February 2003
Location and leave the flag Check Location deselected.
the installation procedure. However, SAPinst asks later for the missing LABEL.ASC (see final bullet point below).
Enter the path of the Package Location and leave the flag Check Location deselected.
SAPinst skips checking the label location, but your entered package locations are used later for the installation. SAPinst only asks again for a missing LABEL.ASC if the package location is incorrect (see final bullet point below).
Enter the path of the Package Location and select the flag Check Location
SAPinst checks the label location and displays an error message if the location is incorrect.
If all locations are correct, SAPinst does not ask again for the LABEL.ASC files.
• SAPinst cannot find the correct LABEL.ASC but needs the location of the software to process the installation now.
You can recognize this situation because Check Location in the CD Browser window is empty. You now have to enter the path to the correct LABEL.ASC. Otherwise, the installation cannot continue.
Additionally, you can copy the installation package by entering a location in the column Copy Package to.
4.10 Preparing the Active Directory for Use with the SAP System Use This section only applies if you want to use Active Directory as LDAP directory service for SAP Logon or Microsoft Management Console (MMC).
The SAP system can only store and access data in the Active Directory, if the directory has been prepared appropriately. To prepare the directory, you use the R3SETUP tool that automatically performs the following tasks:
• Extends the Active Directory schema to include the SAP-specific data types.
• Creates domain accounts that are a prerequisite for enabling the SAP system to access and modify the Active Directory. These are the group SAP_LDAP and the user sapldap.
• Creates the root container where information related to SAP is stored.
• Regulates access to the container for SAP data by giving members of the SAP_LDAP group permission to read and write to the directory.
For more information on how to set up a Netscape / iPlanet directory server, read the documentation R/3 System Information in Directory Services in the SAP Service Marketplace at: http://service.sap.com/msplatforms → Microsoft → Windows Server.
Prerequisites • A Windows 2000 domain controller with an Active Directory must be installed on the
network.
4 Installation Preparations
4.9 Preparing Required CDs
February 2003 57
• You must have an SAP Kernel CD of an SAP system installation that is based on SAP Web Application 6.10, SAP Basis 4.6D, or below and contains the previous installation tool R3SETUP.
If you do not have an R3SETUP Kernel CD, you can download one from the SAP Service Marketplace at: http://service.sap.com/installations → SAP Web AS. → SAP Web AS 6.10.
Procedure
Installing the R3SETUP Tool Use the R3SETUP tool to prepare the Active Directory for the SAP system. Install the R3SETUP tool on the domain controller where the Active Directory is located.
1. Log on to the domain controller as domain administrator.
2. Check that the TEMP environment variable has been set by right-clicking the My Computer icon and choosing Properties → Advanced → Environment Variables. TEMP is normally set to: %userprofile%\Local Settings\Temp
For more information, see SAP Note 387745.
3. Insert the Kernel CD.
4. Start the program R3SETUP.BAT from the directory <CD_DRIVE>:\NT\COMMON
The R3SETUP window opens.
5. When you are prompted, enter the following:
− The name of your SAP system <SAPSID>
− The directory on your hard disk that the R3SETUP files are to be copied to. The default directory is <DRIVE>:\USERS\<SAPSID>ADM\INSTALL
When you have made all the required entries, the R3SETUP tool is automatically installed.
6. Enter Yes when a dialog box appears prompting you to log off or reboot.
The R3SETUP tool now automatically logs off or reboots.
Configuring the Active Directory 1. Log on as the same user that installed the R3SETUP tool.
2. From the Windows Start menu choose Start → Programs → SAP system Setup for <SAPSID> → Configure Active Directory for SAP.
3. When you are prompted:
− Confirm the name of the domain where the SAP_LDAP group is to be created. This is the domain that you are logged on to.
− Enter the password of the sapldap user.
When you have made these entries, the R3SETUP tool automatically configures the Active Directory.
5 Installation Procedures
5.1 Installation of the Oracle Database Software
58 February 2003
5 Installation Procedures
The structure of the installation documentation has changed significantly. You must use the tables in section How to Install Your SAP R/3 Enterprise System [Page 13] for installing the system and to navigate through the installation procedures. All necessary installation phases (planning, preparation, installation and post-installation) are listed in these tables. This prevents you missing important information.
5.1 Installation of the Oracle Database Software Use First you install the Oracle 9.2.0 database software. Then you install patch set 9.2.0.2.1.
You must run different files to install the client and the server software.
There are three CDs for Oracle 9.2.0. You can do one of the following:
• Let the installation prompt you for the correct CD. This means you have to insert the correct CD during the installation.
• Copy the CDs to disk as follows before the installation:
a. Copy the contents of \NT\i386 on RDBMS CD1 to \disk1 on your hard disk.
b. Repeat this for the second and third CD. Copy their contents to \disk2 and \disk3.
\disk1 to \disk3 can be on a network drive if required.
MSCS only: Install the Oracle 9.2.0 software on both nodes. Ensure that you are logged on to Windows as user <DBSID>adm.
1. Start the Oracle Universal Installer as follows:
− If you have copied the CDs to disk, start from:
\disk1
− Otherwise, place the Oracle RDBMS CD1 in the CD drive and start from:
<CD_DRIVE>:\NT\I386
On the database server, double-click the file sapserver.cmd.
On the database client double-click the file sapclient.cmd.
2. Enter the information as shown in the table below.

5 Installation Procedures
5.1 Installation of the Oracle Database Software
February 2003 59
If the installer aborts and the error The exception unknown software exception ... is displayed in an Application Error window, make sure that the TMP and TEMP variables in the user environment of <DBSID>adm refer to existing files. If not, reset them.
If during the installation an error is reported when writing to a DLL file, the DLL has the read-only attribute. In this case, before you continue the installation, open a command prompt and remove the read-only attribute with the command: attrib –r <DRIVE>:\%windir%\system32\<DLL>
To view attributes enter: attrib <DRIVE>:\%windir%\system32\<DLL>
No. Window Entry
1. File Locations Under Source:
For Path:
Shows the path to the Oracle source software. Do not change the path.
Under Destination:
For Name: Enter the name of the new Oracle Home directory. SAP recommends the name <DBSID><ORACLE_VERSION>, for example, C11920
For Path: Enter the path of a new Oracle Home directory. SAP recommends: <DRIVE>:\ORACLE\<DBSID>\<ORA_VERS>, for example,
C:\ORACLE\C11\920
Do not specify an already existing Oracle Home directory. You must specify a new directory.
You need 2.2 GB disk space for the Oracle 9.2.0 server software and about 250 MB for the Oracle 9.2.0 client software
Choose Next.
2. Create Database Choose No and then Next.
3. Summary Choose Install.
5 Installation Procedures
5.1 Installation of the Oracle Database Software
60 February 2003
No. Window Entry
4. Oracle Net Configuration Assistant: Welcome
If this dialog appears, select Perform typical configuration and continue with Next.
5. File Locations / End of Installation
When you have installed the Oracle database software, choose Exit.
Installing Patch Set 9.2.0.2.1 Use When you have installed the Oracle 9.2.0 software, install patch set 9.2.0.2.1.
For more information on patch set 9.2.0.2.1 refer to the patch_note.htm file on the RDBMS CD3.
Procedure 1. Make sure that the Oracle services and the Distributed Transaction Coordinator Service
are stopped.
2. Make sure that the RDBMS CD3 is in the CD drive.
3. Switch to the directory <CD_DRIVE>:\NT\I386\PATCHES\9.2.0.2.1
4. Double-click the setup.exe file.
5. Enter the required information in the Oracle Universal Installer:
Window Entry
Welcome Choose Next.
File Locations Under Source:
Path
Shows the path to the Oracle source. Do not change the path.
Under Destination:
Name Select the name of the Oracle Home directory in which you want to install this patch set.
Path Shows the path to the selected Oracle Home directory.
Choose Next.
Summary Choose Install to install the patch set.
End of Installation When the patch set has been installed, choose Exit.
5 Installation Procedures
5.2 Running SAPinst
February 2003 61
5.2 Running SAPinst Use You use this procedure to run SAPinst to install an SAP instance.
Prerequisites • If you start the SAPinst GUI on your host, make sure that the JAVA_HOME environment
variable is set correctly.
• As the SAPinst installation directory contains important log and command files for the installation, make sure that you use a separate installation directory for every instance you are going to install. Otherwise, you might lose previous log and command files stored in the SAPinst installation directory.
Before you start the installation, be aware of the following:
− When you install an SAP instance with SAPinst for the very first time on your host, you have to start SAPinst from the SAPinst CD with the setup.cmd command. SAPinst is copied to the directory you have specified. This directory is also used as the installation directory for the instance you are installing.
− If you want to install an SAP instance on the host where a previous SAP instance has not been successfully installed, you must run SAPinst again from the SAPinst CD to create a new installation directory for the SAPinst log and command files.
− For every additional SAP instance that you want to install on the same host (after successful installation of another instance), we recommend that you start SAPinst from the SAPinst CD. By doing so, you make sure that every instance installation has its own log and command files. However, you can start the new installation by entering:
i. Start → Programs → <menu_entry> → Prepare New Installation
ii. Start → Programs → <menu_entry> → SAPinst server with GUI
Be aware that the installation directory of the previously installed instance on that host will be overwritten when you use the Start menu to start the new installation. For this reason, you should only use it if you are sure that you do not need the log and command files of the previously successfully installed instance.
• If you want to perform a remote installation – that is, the SAPinst GUI is started on another host to monitor the installation – you do not need to set the JAVA_HOME environment variable on your instance host. This section describes a standard, that is, a local installation.
• If you are installing a second or subsequent SAP system into an existing database, make sure that the database is up and running before starting the installation. For more information, see Installation of Multiple Components on One Database [Page 27].
Procedure 1. Log on to your host as a user who is a member of the local administration group.
2. Insert the SAPinst CD in your CD drive.

5 Installation Procedures
5.2 Running SAPinst
62 February 2003
If you want to install a Standalone SAP Gateway instance you have to use the Presentation CD. In this case, replace <SAPinst CD> with <Presentation CD> in this section.
3. Run Setup.cmd from the following path:
<CD drive>:\SAPinst\NT
SAPinst uses the ports 21212 and 21213 during the installation for communication with SAPinst GUI. You get an error message if one of these ports is already in use. In this case, you must do the following:
a. Copy directory SAPINST\NT from the SAPinst CD (or Presentation CD for the Gateway installation) to your local hard disk.
b. In file SAPINST\NT\Setup.cmd search for the following string: .\sapinst.exe SAPINST_CONTROL_URL=control_bootstrap.xml
c. Append SAPINST_DIALOG_PORT=<port> to this string: .\sapinst.exe SAPINST_CONTROL_URL=control_bootstrap.xml SAPINST_DIALOG_PORT=<port> where <port> is an unused port on your host. For example, if you enter 60000 as <port>, SAPinst uses the ports 60000 and 60001
d. Run Setup.cmd from your local hard disk.
SAPinst asks if you want to perform a Standard or Custom installation.
If you choose a Custom installation you can define:
− Installation directory for SAPinst
You can choose any name for the installation directory. In this documentation, <SAPinst_INSTDIR> refers to the installation directory.
− SAPinst folder in the Start menu
The Start menu entry is used to create unique Start menu entries.
For example, you enter the following for the Start menu during the installation: R3_Enterprise_471. Then SAPinst creates the following Start menu: Start → Programs → R3_Enterprise_471 → …
− Connection parameters (not relevant for a local installation)
Start Menu Entry
Start → Programs → <SAPinst_menu_entry> →
Description
Prepare New Installation Prepares SAPinst to install an additional instance on this host.
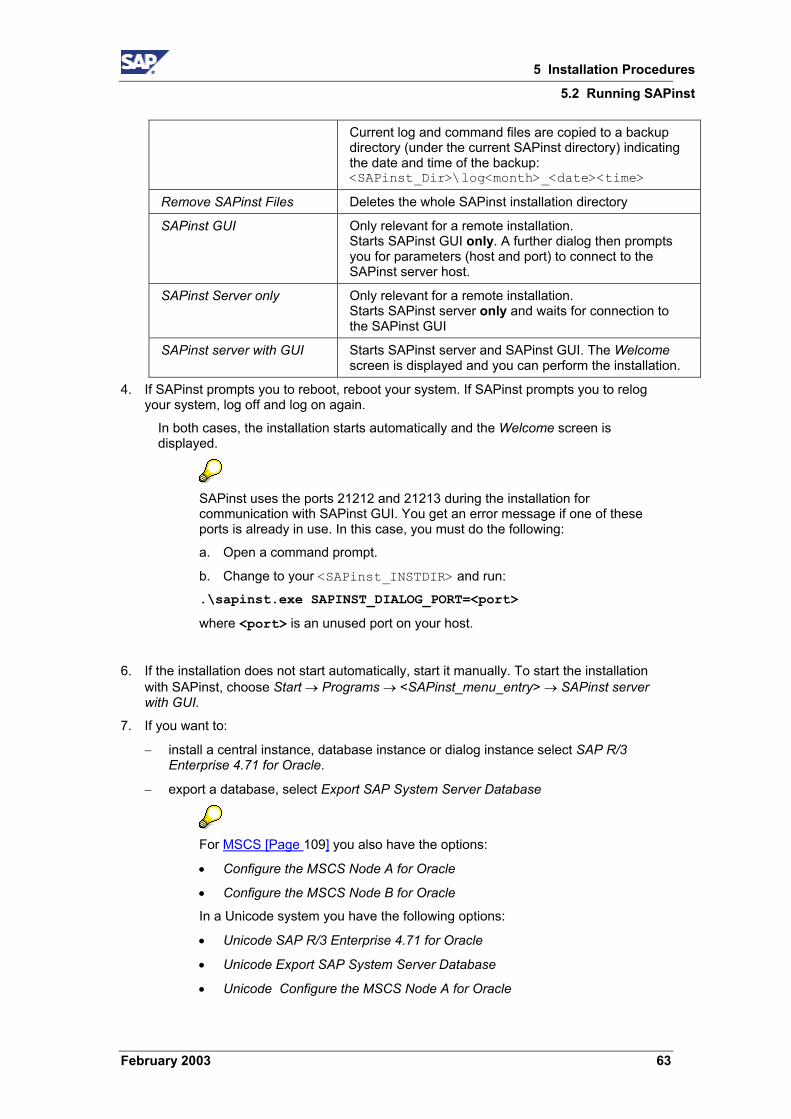
5 Installation Procedures
5.2 Running SAPinst
February 2003 63
Current log and command files are copied to a backup directory (under the current SAPinst directory) indicating the date and time of the backup: <SAPinst_Dir>\log<month>_<date><time>
Remove SAPinst Files Deletes the whole SAPinst installation directory
SAPinst GUI Only relevant for a remote installation. Starts SAPinst GUI only. A further dialog then prompts you for parameters (host and port) to connect to the SAPinst server host.
SAPinst Server only Only relevant for a remote installation. Starts SAPinst server only and waits for connection to the SAPinst GUI
SAPinst server with GUI Starts SAPinst server and SAPinst GUI. The Welcome screen is displayed and you can perform the installation.
4. If SAPinst prompts you to reboot, reboot your system. If SAPinst prompts you to relog your system, log off and log on again.
In both cases, the installation starts automatically and the Welcome screen is displayed.
SAPinst uses the ports 21212 and 21213 during the installation for communication with SAPinst GUI. You get an error message if one of these ports is already in use. In this case, you must do the following:
a. Open a command prompt.
b. Change to your <SAPinst_INSTDIR> and run:
.\sapinst.exe SAPINST_DIALOG_PORT=<port>
where <port> is an unused port on your host.
6. If the installation does not start automatically, start it manually. To start the installation with SAPinst, choose Start → Programs → <SAPinst_menu_entry> → SAPinst server with GUI.
7. If you want to:
− install a central instance, database instance or dialog instance select SAP R/3 Enterprise 4.71 for Oracle.
− export a database, select Export SAP System Server Database
For MSCS [Page 109] you also have the options:
• Configure the MSCS Node A for Oracle
• Configure the MSCS Node B for Oracle
In a Unicode system you have the following options:
• Unicode SAP R/3 Enterprise 4.71 for Oracle
• Unicode Export SAP System Server Database
• Unicode Configure the MSCS Node A for Oracle
5 Installation Procedures
5.2 Running SAPinst
64 February 2003
• Unicode Configure the MSCS Node B for Oracle
8. Choose Next.
8. Accept the License Agreement for STL port.
9. Follow the instructions in the SAPinst dialogs.
If you have entered all required information during the input phase, SAPinst starts the installation and displays installation progress during the processing phase.
Troubleshooting • If an error occurs during the input phase, SAPinst:
− Stops the installation.
− Displays a dialog informing you about the error.
You can now directly view the log file by choosing View Logs.
Finally you must abort the installation with O.K. and try to solve the problem.
• If an error occurs during the processing phase, SAPinst:
− Stops the installation.
− Displays a dialog informing you about the error.
You can now:
− Directly view the log file by choosing View Logs.
− Try to solve the problem
See SAPinst Troubleshooting Guide at: http://service.sap.com/sapinstfeedback
− Retry the installation by choosing Retry.
− Abort the installation by choosing O.K.
See also Continuing an Interrupted Installation with SAPinst [Page 99].
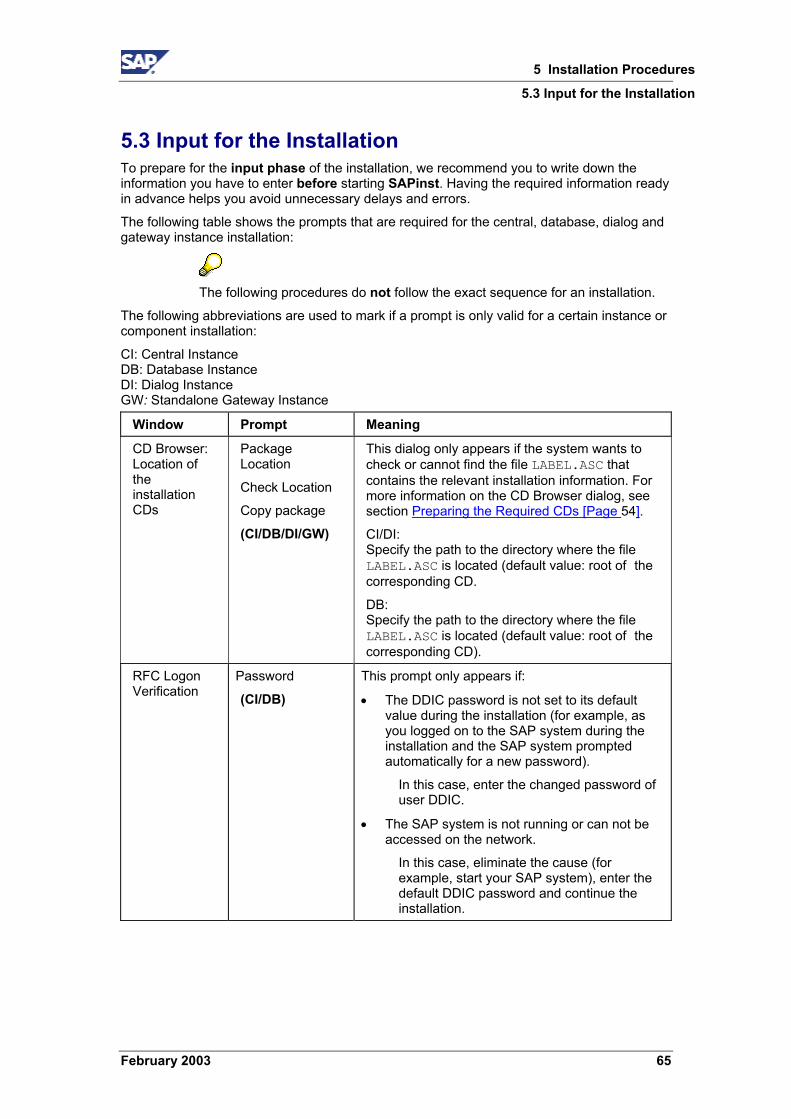
5 Installation Procedures
5.3 Input for the Installation
February 2003 65
5.3 Input for the Installation To prepare for the input phase of the installation, we recommend you to write down the information you have to enter before starting SAPinst. Having the required information ready in advance helps you avoid unnecessary delays and errors.
The following table shows the prompts that are required for the central, database, dialog and gateway instance installation:
The following procedures do not follow the exact sequence for an installation.
The following abbreviations are used to mark if a prompt is only valid for a certain instance or component installation:
CI: Central Instance DB: Database Instance DI: Dialog Instance GW: Standalone Gateway Instance
Window Prompt Meaning
CD Browser: Location of the installation CDs
Package Location
Check Location
Copy package
(CI/DB/DI/GW)
This dialog only appears if the system wants to check or cannot find the file LABEL.ASC that contains the relevant installation information. For more information on the CD Browser dialog, see section Preparing the Required CDs [Page 54].
CI/DI: Specify the path to the directory where the file LABEL.ASC is located (default value: root of the corresponding CD.
DB: Specify the path to the directory where the file LABEL.ASC is located (default value: root of the corresponding CD).
RFC Logon Verification
Password
(CI/DB) This prompt only appears if:
• The DDIC password is not set to its default value during the installation (for example, as you logged on to the SAP system during the installation and the SAP system prompted automatically for a new password).
In this case, enter the changed password of user DDIC.
• The SAP system is not running or can not be accessed on the network.
In this case, eliminate the cause (for example, start your SAP system), enter the default DDIC password and continue the installation.
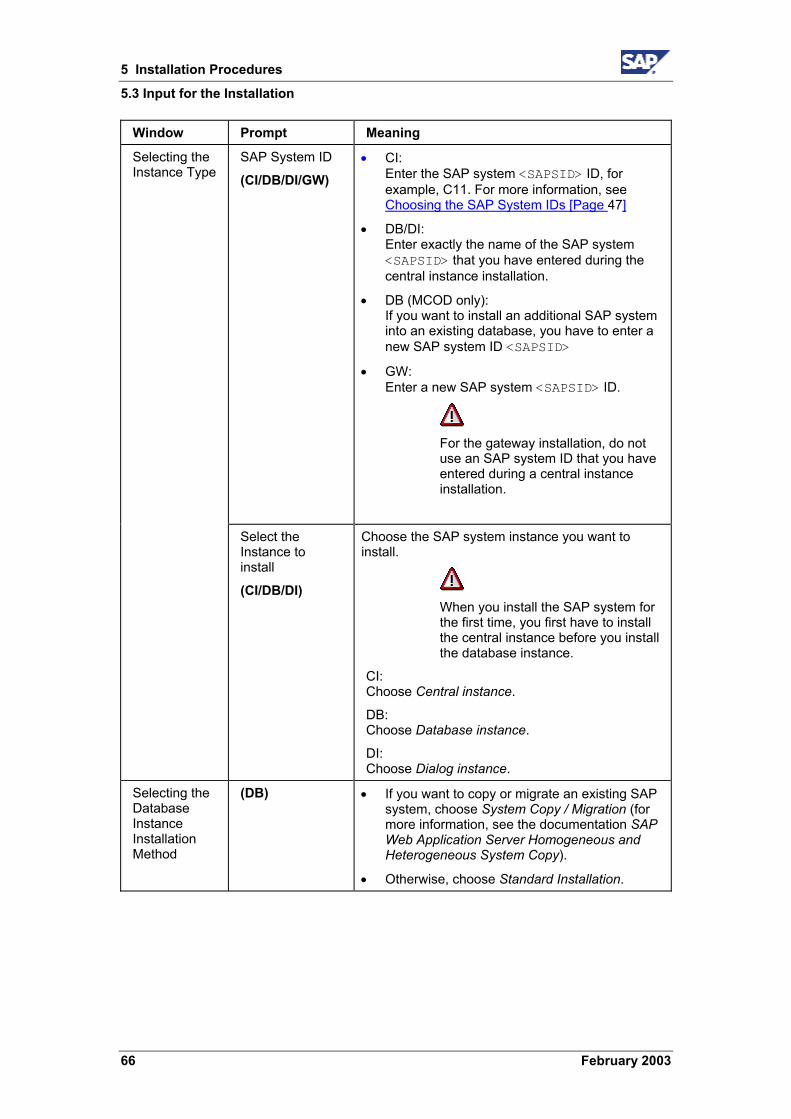
5 Installation Procedures
5.3 Input for the Installation
66 February 2003
Window Prompt Meaning
SAP System ID
(CI/DB/DI/GW) • CI:
Enter the SAP system <SAPSID> ID, for example, C11. For more information, see Choosing the SAP System IDs [Page 47]
• DB/DI: Enter exactly the name of the SAP system <SAPSID> that you have entered during the central instance installation.
• DB (MCOD only): If you want to install an additional SAP system into an existing database, you have to enter a new SAP system ID <SAPSID>
• GW: Enter a new SAP system <SAPSID> ID.
For the gateway installation, do not use an SAP system ID that you have entered during a central instance installation.
Selecting the Instance Type
Select the Instance to install
(CI/DB/DI)
Choose the SAP system instance you want to install.
When you install the SAP system for the first time, you first have to install the central instance before you install the database instance.
CI: Choose Central instance.
DB: Choose Database instance.
DI: Choose Dialog instance.
Selecting the Database Instance Installation Method
(DB) • If you want to copy or migrate an existing SAP system, choose System Copy / Migration (for more information, see the documentation SAP Web Application Server Homogeneous and Heterogeneous System Copy).
• Otherwise, choose Standard Installation.
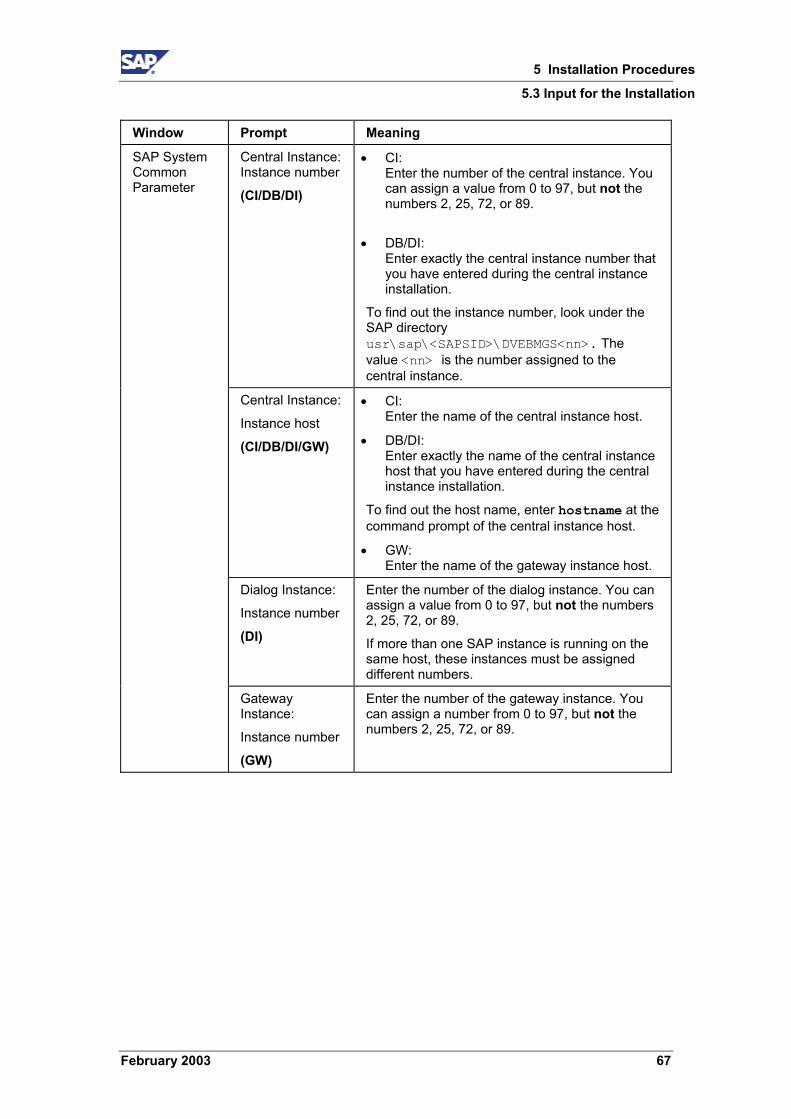
5 Installation Procedures
5.3 Input for the Installation
February 2003 67
Window Prompt Meaning
Central Instance: Instance number
(CI/DB/DI)
• CI: Enter the number of the central instance. You can assign a value from 0 to 97, but not the numbers 2, 25, 72, or 89.
• DB/DI: Enter exactly the central instance number that you have entered during the central instance installation.
To find out the instance number, look under the SAP directory usr\sap\<SAPSID>\DVEBMGS<nn>. The value <nn> is the number assigned to the central instance.
Central Instance:
Instance host
(CI/DB/DI/GW)
• CI: Enter the name of the central instance host.
• DB/DI: Enter exactly the name of the central instance host that you have entered during the central instance installation.
To find out the host name, enter hostname at the command prompt of the central instance host.
• GW: Enter the name of the gateway instance host.
Dialog Instance:
Instance number
(DI)
Enter the number of the dialog instance. You can assign a value from 0 to 97, but not the numbers 2, 25, 72, or 89.
If more than one SAP instance is running on the same host, these instances must be assigned different numbers.
SAP System Common Parameter
Gateway Instance:
Instance number
(GW)
Enter the number of the gateway instance. You can assign a number from 0 to 97, but not the numbers 2, 25, 72, or 89.
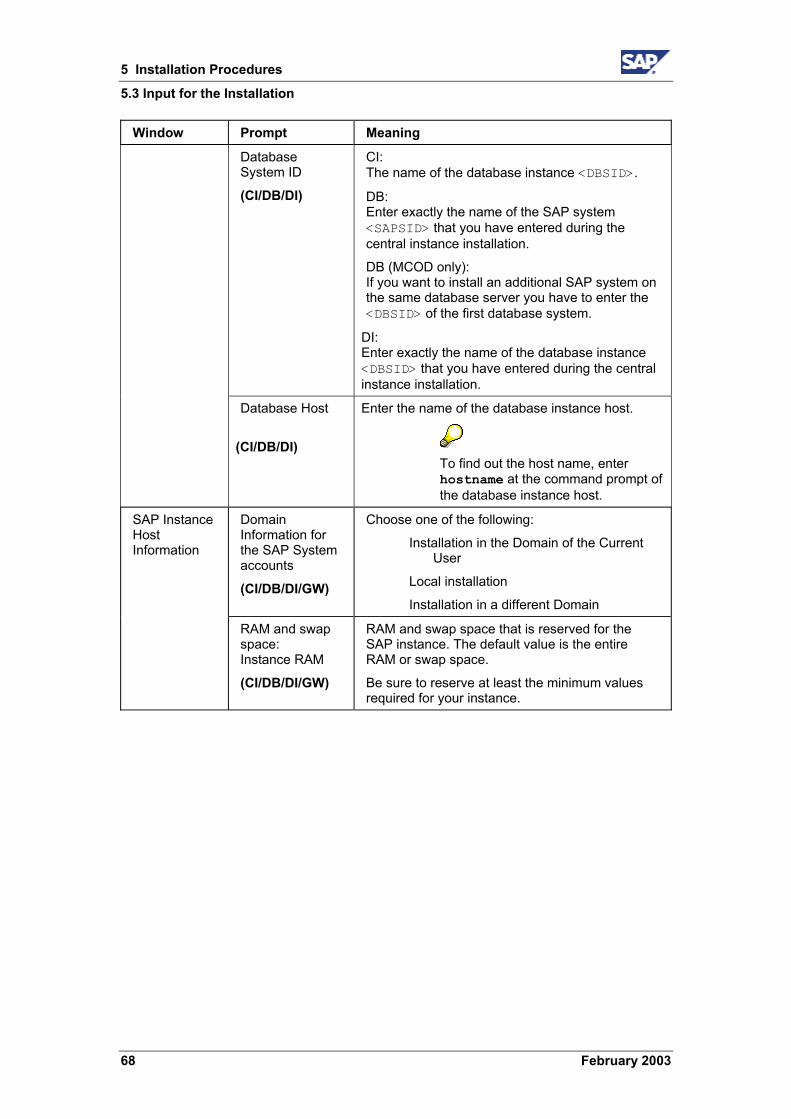
5 Installation Procedures
5.3 Input for the Installation
68 February 2003
Window Prompt Meaning
Database System ID
(CI/DB/DI)
CI: The name of the database instance <DBSID>.
DB: Enter exactly the name of the SAP system <SAPSID> that you have entered during the central instance installation.
DB (MCOD only): If you want to install an additional SAP system on the same database server you have to enter the <DBSID> of the first database system.
DI: Enter exactly the name of the database instance <DBSID> that you have entered during the central instance installation.
Database Host
(CI/DB/DI)
Enter the name of the database instance host.
To find out the host name, enter hostname at the command prompt of the database instance host.
Domain Information for the SAP System accounts
(CI/DB/DI/GW)
Choose one of the following:
Installation in the Domain of the Current User
Local installation
Installation in a different Domain
SAP Instance Host Information
RAM and swap space: Instance RAM
(CI/DB/DI/GW)
RAM and swap space that is reserved for the SAP instance. The default value is the entire RAM or swap space.
Be sure to reserve at least the minimum values required for your instance.

5 Installation Procedures
5.3 Input for the Installation
February 2003 69
Window Prompt Meaning
LDAP support
(CI/DI/GW) If you want to use LDAP for SAP Logon or the Microsoft Management Console (MMC), choose the type of LDAP integration you want to configure for the SAP system. Otherwise, choose No LDAP:
• Via Active Directory Service
Select this option to integrate Windows 2000 Active Directory services. An Active Directory must be available on the network. (Profile parameter ldap/options=DirType=NT5ADS)
• Via Generic LDAP Directory
Select this option to configure the system to support LDAP directories that are running on Windows or UNIX machines. A generic LDAP directory must be available on the network.
• No LDAP
Select this option if you do not want to use LDAP for SAP Logon and/or MMC or if you do not want to use LDAP at all.
Required Input Depending on your selection the information below is required. If you choose No LDAP, none of the LDAP parameters listed below has to be specified.
SAP System LDAP Parameters
Management Domain
Specifies a container in the Active Directory where information related to the new SAP system is to be stored. Use the distinguished name syntax. The name of the container (that is, management domain) can reflect the organizational structure of your company. For example, if the system is for corporate finance and located in Walldorf, the name can be: CN=Finance, CN=Walldorf.
Profile parameter: ldap/saprdn
You need not specify this.
However in a large system landscape, we recommend setting this parameter to reflect the structure of multiple SAP installations.
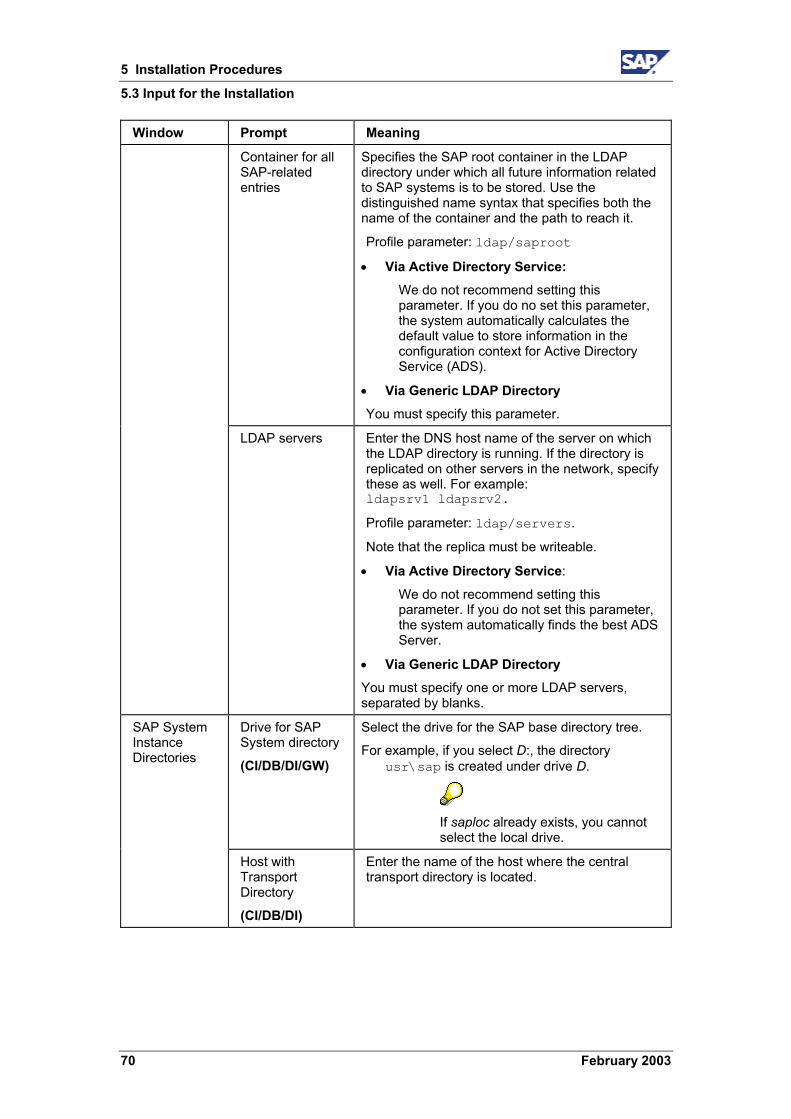
5 Installation Procedures
5.3 Input for the Installation
70 February 2003
Window Prompt Meaning
Container for all SAP-related entries
Specifies the SAP root container in the LDAP directory under which all future information related to SAP systems is to be stored. Use the distinguished name syntax that specifies both the name of the container and the path to reach it.
Profile parameter: ldap/saproot
• Via Active Directory Service: We do not recommend setting this parameter. If you do no set this parameter, the system automatically calculates the default value to store information in the configuration context for Active Directory Service (ADS).
• Via Generic LDAP Directory You must specify this parameter.
LDAP servers Enter the DNS host name of the server on which the LDAP directory is running. If the directory is replicated on other servers in the network, specify these as well. For example: ldapsrv1 ldapsrv2.
Profile parameter: ldap/servers.
Note that the replica must be writeable.
• Via Active Directory Service:
We do not recommend setting this parameter. If you do not set this parameter, the system automatically finds the best ADS Server.
• Via Generic LDAP Directory You must specify one or more LDAP servers, separated by blanks.
Drive for SAP System directory
(CI/DB/DI/GW)
Select the drive for the SAP base directory tree.
For example, if you select D:, the directory usr\sap is created under drive D.
If saploc already exists, you cannot select the local drive.
SAP System Instance Directories
Host with Transport Directory
(CI/DB/DI)
Enter the name of the host where the central transport directory is located.

5 Installation Procedures
5.3 Input for the Installation
February 2003 71
Window Prompt Meaning
Database Installation Type
Available InstallationTypes
(CI/DB/DI)
• If you install the first SAP system in a new database, choose Install (first) SAP System into a new database
• If you install an additional SAP system into an existing database (MCOD), choose Install (additional) SAP System into an existing database.
Entering Password for User
SAP System Administrator and SAP System Service Administrator Information (<sapsid>adm, SAPService <SAPSID>
(CI/DB/DI/GW)
CI: Enter and confirm the Password for the <sapsid>adm and SAPService<SAPSID> User ID.
DB/DI: Enter and confirm the same password that you used for the central instance.
GW: Enter and confirm the passwords for the <sapsid>adm and SAPService<SAPSID> User ID.
If the <sapsid>adm and SAPService<SAPSID> users already exist, use the same passwords that you used for these users.
SAP System Service Ports
Message Port
(CI/DI) CI/DB:
Enter the port number of the Message Servers.
DI: The port number of the Message Port must be the same as the one on the central instance host.
Database Instance Parameters:
Database character set
(CI/DB/DI)
Enter the information of your SAP system database:
• Database Schema (DI only):
Enter the name of the database schema (SAP<SAPSID>).
• Database character set:
For a non-Unicode system, the default value is WE8DEC.
For a Unicode system the default value is UTF8.
Database System Common Parameters:
Database Home Information:
DB Home
(CI/DB/DI)
Enter the name of the Oracle Home.
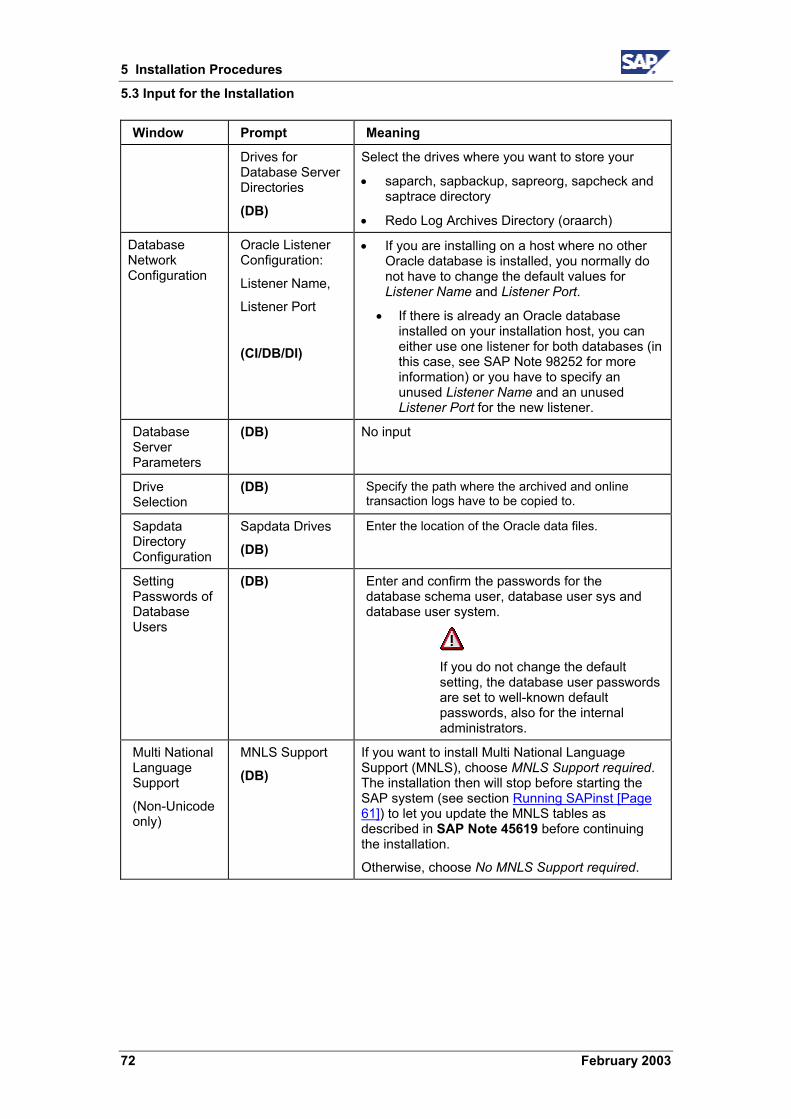
5 Installation Procedures
5.3 Input for the Installation
72 February 2003
Window Prompt Meaning
Drives for Database Server Directories
(DB)
Select the drives where you want to store your
• saparch, sapbackup, sapreorg, sapcheck and saptrace directory
• Redo Log Archives Directory (oraarch)
Database Network Configuration
Oracle Listener Configuration:
Listener Name,
Listener Port
(CI/DB/DI)
• If you are installing on a host where no other Oracle database is installed, you normally do not have to change the default values for Listener Name and Listener Port.
• If there is already an Oracle database installed on your installation host, you can either use one listener for both databases (in this case, see SAP Note 98252 for more information) or you have to specify an unused Listener Name and an unused Listener Port for the new listener.
Database Server Parameters
(DB) No input
Drive Selection
(DB) Specify the path where the archived and online transaction logs have to be copied to.
Sapdata Directory Configuration
Sapdata Drives
(DB)
Enter the location of the Oracle data files.
Setting Passwords of Database Users
(DB) Enter and confirm the passwords for the database schema user, database user sys and database user system.
If you do not change the default setting, the database user passwords are set to well-known default passwords, also for the internal administrators.
Multi National Language Support
(Non-Unicode only)
MNLS Support
(DB) If you want to install Multi National Language Support (MNLS), choose MNLS Support required. The installation then will stop before starting the SAP system (see section Running SAPinst [Page 61]) to let you update the MNLS tables as described in SAP Note 45619 before continuing the installation.
Otherwise, choose No MNLS Support required.
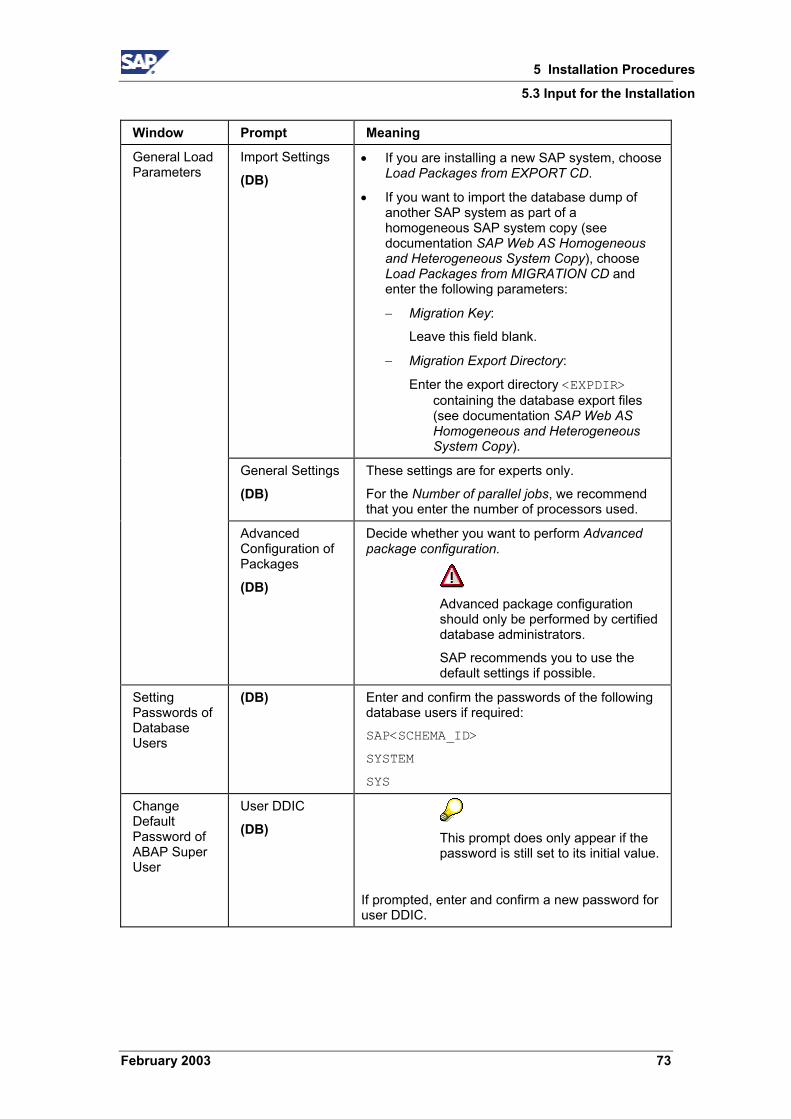
5 Installation Procedures
5.3 Input for the Installation
February 2003 73
Window Prompt Meaning
Import Settings
(DB) • If you are installing a new SAP system, choose
Load Packages from EXPORT CD.
• If you want to import the database dump of another SAP system as part of a homogeneous SAP system copy (see documentation SAP Web AS Homogeneous and Heterogeneous System Copy), choose Load Packages from MIGRATION CD and enter the following parameters:
− Migration Key:
Leave this field blank.
− Migration Export Directory:
Enter the export directory <EXPDIR> containing the database export files (see documentation SAP Web AS Homogeneous and Heterogeneous System Copy).
General Settings
(DB) These settings are for experts only.
For the Number of parallel jobs, we recommend that you enter the number of processors used.
General Load Parameters
Advanced Configuration of Packages
(DB)
Decide whether you want to perform Advanced package configuration.
Advanced package configuration should only be performed by certified database administrators.
SAP recommends you to use the default settings if possible.
Setting Passwords of Database Users
(DB) Enter and confirm the passwords of the following database users if required: SAP<SCHEMA_ID>
SYSTEM
SYS
Change Default Password of ABAP Super User
User DDIC
(DB)
This prompt does only appear if the password is still set to its initial value.
If prompted, enter and confirm a new password for user DDIC.

5 Installation Procedures
5.3 Input for the Installation
74 February 2003
Window Prompt Meaning
Change Default Password of ABAP User SAP*
User SAP*
(DB)
This prompt does only appear if the password is still set to its initial value.
If prompted, enter and confirm a new password for user SAP*.
6 Post-Installation Activities
6.1 Starting and Stopping the SAP System
February 2003 75
6 Post-Installation Activities
The structure of the installation documentation has changed significantly. You must use the tables in section How to Install Your SAP R/3 Enterprise System [Page 13] before performing the post-installation activities. All necessary steps are listed in these tables. This prevents you missing important information.
Purpose This section describes how you complete and check the installation of an SAP system.
Prerequisites You have completed the SAP system installation on all the hosts of your SAP system, including setting up at least one front end (for example, on the central instance host).
You install the front-end software on at least one host machine in your system environment. To simplify administration of your SAP system, we recommend that you do this on the central instance host.
For more information on installing the front-end software, see the separate documentation:
• SAP Front End Installation Guide (English version)
• SAP Frontend-Installationsleitfaden (German version)
6.1 Starting and Stopping the SAP System Use You use this procedure to check that you can start and stop the SAP system after the installation. You use the Microsoft Management Console (MMC) to start and stop the SAP system.
Prerequisites You have logged on to the SAP system host as user <sapsid>adm.
Procedure
The newly installed MMC only allows you to start or stop the SAP system locally on the host that you are logged on to. Later you can configure the MMC to enable central management of all hosts.
For more information, see the SAP Library:
a. Choose Help → SAP Library in your SAP system.
b. Choose mySAP Technology Components → SAP Web Application Server → Computing Center Management System → Monitoring in the CCMS → Microsoft Management Console: Windows
Alternatively you can access the SAP Library at http://help.sap.com:
a. Choose SAP Web Application Server → SAP Web Application Server 6.20.
6 Post-Installation Activities
6.2 Logging on to the SAP System
76 February 2003
b. Select the required language.
c. Choose mySAP Technology Components → SAP Web Application Server → Computing Center Management System → Monitoring in the CCMS → Microsoft Management Console: Windows
Starting the SAP System 1. On the central system host, choose Start → Programs → SAP System Management
Console.
2. In the tree, select the node representing the central instance.
3. Access the context menu by choosing the right mouse button.
4. Choose Start.
The SAP central instance and database start.
5. Repeat the above steps on the dialog instance hosts.
Stopping the SAP System On each host where there is a central instance or dialog instance of the SAP system that you want to stop:
1. Choose Start → Programs → SAP System Management Console.
2. In the tree, select the node representing the central instance.
3. Access the context menu by pressing the right mouse button.
4. Choose Stop.
Remember that the database is still running. Do not forget to stop the database.
6.2 Logging on to the SAP System Use This section describes how to log on to the SAP system after the installation. To start with, you log on using the front end of the host where the central instance is running.
Prerequisites You have already started the SAP system and installed a front end.
There are two standard users in the SAP system after the installation:
User Initial Password Clients where User Exists
SAP* 06071992 000, 066
DDIC 19920706 000
Procedure 1. Make sure that you are logged on to the operating system as <sapsid>adm.
2. To start SAP Logon:
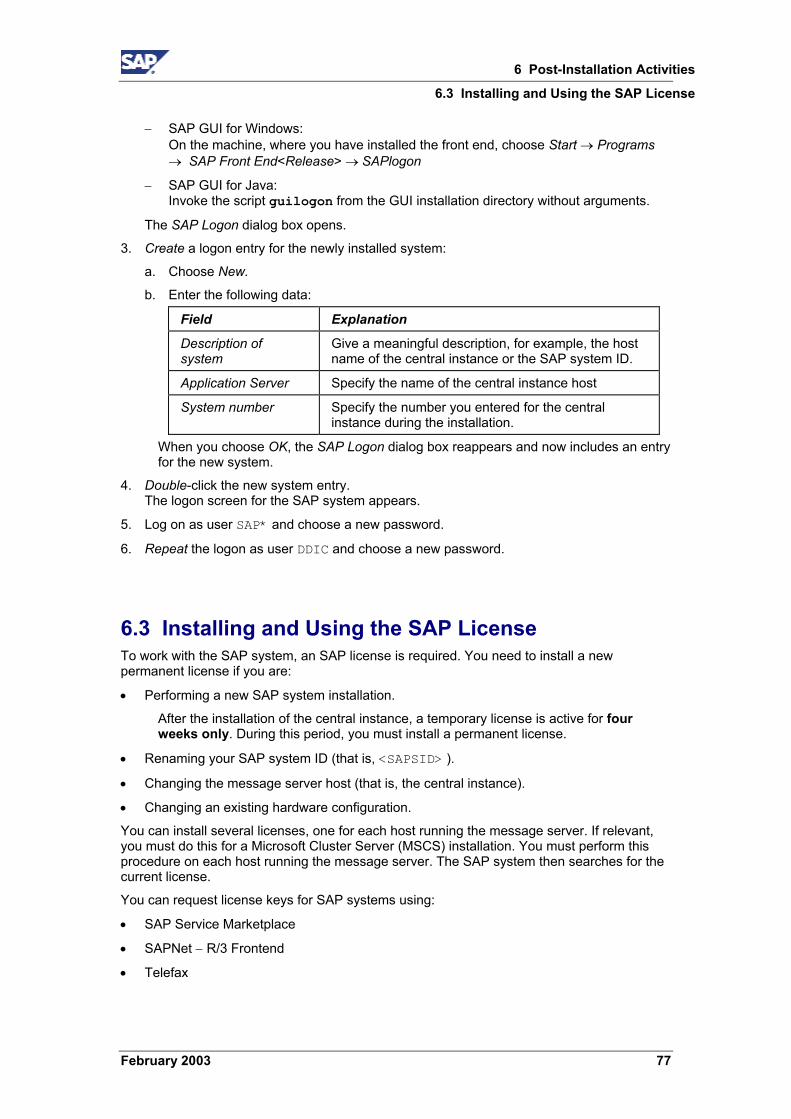
6 Post-Installation Activities
6.3 Installing and Using the SAP License
February 2003 77
− SAP GUI for Windows: On the machine, where you have installed the front end, choose Start → Programs → SAP Front End<Release> → SAPlogon
− SAP GUI for Java: Invoke the script guilogon from the GUI installation directory without arguments.
The SAP Logon dialog box opens.
3. Create a logon entry for the newly installed system:
a. Choose New.
b. Enter the following data:
Field Explanation
Description of system
Give a meaningful description, for example, the host name of the central instance or the SAP system ID.
Application Server Specify the name of the central instance host
System number Specify the number you entered for the central instance during the installation.
When you choose OK, the SAP Logon dialog box reappears and now includes an entry for the new system.
4. Double-click the new system entry. The logon screen for the SAP system appears.
5. Log on as user SAP* and choose a new password.
6. Repeat the logon as user DDIC and choose a new password.
6.3 Installing and Using the SAP License To work with the SAP system, an SAP license is required. You need to install a new permanent license if you are:
• Performing a new SAP system installation.
After the installation of the central instance, a temporary license is active for four weeks only. During this period, you must install a permanent license.
• Renaming your SAP system ID (that is, <SAPSID> ).
• Changing the message server host (that is, the central instance).
• Changing an existing hardware configuration.
You can install several licenses, one for each host running the message server. If relevant, you must do this for a Microsoft Cluster Server (MSCS) installation. You must perform this procedure on each host running the message server. The SAP system then searches for the current license.
You can request license keys for SAP systems using:
• SAP Service Marketplace
• SAPNet − R/3 Frontend
• Telefax
6 Post-Installation Activities
6.4 Checking SAP System Services
78 February 2003
For more information about the SAP license, see the SAP Library:
1. Choose Help → SAP Library in your SAP system.
2. Choose mySAP Technology Components → SAP Web Application Server → Client/Server Technology → SAP License.
Alternatively you can access the SAP Library at http://help.sap.com:
1. Choose SAP Web Application Server → SAP Web Application Server 6.20.
2. Select the required language.
3. Choose mySAP Technology Components → SAP Web Application Server → Client/Server Technology → SAP License.
See also SAP Note 94998.
To see the online help text for the license installation, enter the following command: saplicense -help
6.4 Checking SAP System Services Use This section describes how to check SAP system services. This helps you to solve initial problems that you might experience when trying to log on or run the system for the first time.
Procedure 1. Log on to the SAP System [Page 76]. If you have trouble logging on, or subsequently
experience problems trying to run the system, look at the following files located in the directory \usr\sap\<SAPSID>\DVEBMGS<no>\WORK\:
− dev_ms
− dev_disp
− dev_w0
− dev_rd
2. Call transaction SM50 to check services.
The services available for the instance are displayed, that is, dialog, update, enqueue, batch and spool. If the services are not displayed look at the files listed under no.1 to get more information.
3. Call transaction SM51 to check all available instances with their services.
A list of all available instances is displayed.
If the display is OK, double-click one instance to display the services available for that instance. If the display is empty, look at the files listed under no. 1 to get more information.
4. Call transaction SM21 to check the system log.
6 Post-Installation Activities
6.5 Installing the SAP Online Documentation
February 2003 79
6.5 Installing the SAP Online Documentation Use SAP currently provides an HTML-based solution for the SAP Online Documentation. The Application Help, Glossary, Implementation Guide (IMG) and Release Notes are delivered in HTML format. You can display the documentation with a Java-compatible Web browser on all front end platforms supported by SAP.
Procedure 1. Install the SAP Online Documentation as described in Installing the Online
Documentation contained in the root directory of the SAP Library - Online Documentation CD, delivered as part of the installation package.
2. Log on to your SAP system [Page 76].
3. Choose Help → SAP Library.
You can also directly access the help files on the Online Documentation CD without starting your SAP system. You need a PC running Microsoft Windows to install the HTMLHelp Viewer for the Online Documentation CD.
The SAP Library can also be accessed at: http://help.sap.com
6.6 Checking the RFC Destination Use In a system configuration where the central and database instance run on different hosts, you have to test whether the database host has been correctly set up as an RFC destination. The database host must be defined as an RFC destination to enable the system to access monitoring data that is collected for the database and operating system.
Procedure To check the RFC destination:
1. Choose Tools → Administration → Network → RFC destinations or enter transaction code SM59.
The initial screen of the transaction displays a tree with different RFC connection types.
2. In the tree, expand the TCP/IP connections node. Find the entry SAPOSCOL_<DB_hostname> and double-click on it.
A screen displaying information about the selected destination appears.
3. Choose Test Connection.
If you find out that the destination has not been set up correctly, you have to maintain it. To do so, follow the instructions in the following section:
SAP Web Application Server → Basis Services/Communication Interfaces → Remote Communications → RFC Programming in ABAP → Maintaining Remote Destinations
You can find this documentation in the SAP Library at http://help.sap.com.

6 Post-Installation Activities
6.7 Configuring SAProuter and SAPNet - R/3 Frontend
80 February 2003
6.7 Configuring SAProuter and SAPNet - R/3 Frontend Use SAProuter increases network security and simplifies network configuration. SAProuter allows you to make indirect network connections. The SAProuter software is included in the standard SAP system. No additional installation is required. The network administrator normally configures SAProuter.
You require SAProuter if you are using any of the following:
• SAPNet – R/3 Frontend
SAPNet – R/3 Frontend is the SAP-based service system and provides the technical link between SAP customers and SAP. SAPNet – R/3 Frontend was formerly known as the Online Service System (OSS).
For more information on setting up and using SAPNet – R/3 Frontend, see the documentation in the:
− SAP Service Marketplace at: http://service.sap.com/instguides
− SAP Library (choose Help SAP Library in your SAP system or access the SAP Library at: http://help.sap.com)
• EarlyWatch
For more information, see the SAP Service Marketplace at: http://service.sap.com/earlywatch
Procedure To get a complete list of SAProuter parameters, enter the following at the command line prompt:
saprouter
For more information, see the SAP Library:
1. Choose Help SAP Library in your SAP system.
2. Choose mySAP Technology Components SAP Web Application Server Client/Server Technology → SAProuter
Alternatively you can access the SAP Library at http://help.sap.com:
1. Choose SAP Web Application Server → SAP Web Application Server 6.20.
2. Select the required language.
3. Choose mySAP Technology Components SAP Web Application Server → Client/Server Technology → SAProuter
For information on installing SAProuter as a Microsoft Windows service, see SAP Note 41054.
6 Post-Installation Activities
6.8 Configuring the Transport Management System
February 2003 81
6.8 Configuring the Transport Management System Use You configure the domain controller in the Transport Management System (TMS) by calling transaction STMS.
Procedure 1. In your SAP system, call transaction STMS.
Enter the required information to configure the domain controller.
If you are not sure how to configure the domain controller, choose Save and configure the controller later or choose Information to display the TMS online documentation.
6.9 Basic Operations A number of operations that you need to perform are described in the SAP Online Documentation.
For instructions on how to set up the operations listed in the table below, see the SAP Library:
1. Choose Help SAP Library in your SAP system.
2. Choose mySAP Technology Components.
Alternatively you can access the SAP Library at http://help.sap.com:
1. Choose SAP Web Application Server → SAP Web Application Server 6.20.
2. Select the required language. 3. Choose mySAP Technology Components.
! Operation Location of the SAP Online Documentation
Set up operation modes (transaction RZ04)
mySAP Technology Components → SAP Web Application Server → Computing Center Management System → Configuration → Operation Modes
Set up logon groups (transaction SMLG)
mySAP Technology Components → SAP Web Application Server → Computing Center Management System → Configuration → Logon Load Balancing → The SAP Logon
Set up administrators mySAP Technology Components → SAP Web Application Server → Computing Center Management System → Users and Roles → First Installation Procedure
Plan background jobs mySAP Technology Components → SAP Web Application Server → Computing Center Management System → Configuration → Background Processing
Install a printer mySAP Technology Components → SAP Web Application Server → Computing Center Management System → SAP Printing Guide
6 Post-Installation Activities
6.10 Configured Number of Work Processes
82 February 2003
! Operation Location of the SAP Online Documentation
Configure the system log mySAP Technology Components → SAP Web Application Server → Client/Server Technology → System Services → Tools for Monitoring the System → System log → Configuring the System Log
6.10 Configured Number of Work Processes Definition SAPinst installs SAP systems with a minimum number of work processes calculated using the following formula: #dialog_WP = RAM / 256 (min 2, max 18)
#update_WP = RAM / 768 (min 1, max 6)
#update2_WP = RAM / 1024 (min 1, max 3)
#batch_WP = RAM / 1024 (min 2, max 3)
#enqueue_WP = 1
#spool_WP = 1
Use This is only an initial configuration to get you started after the installation. It is not detailed enough for a production system because the optimal number of each type of work process depends on the system resources and on the number of users working in each SAP system application.
Contact SAP Technical Consulting for a detailed configuration.
6.11 Installation of Additional Languages If you want to install an additional language, you need to perform the following steps:
• Classification of the language
• Scheduling of the language transport
• Scheduling of the language supplementation
For instructions on how to transport an additional language, see one of the following:
• SAP documentation Language Transport (English version) or Sprachentransport (German version)
• SAP Library
a. Choose Help → SAP Library in your SAP system.
b. Choose mySAP Technology Components → SAP Web Application Server → Change and Transport System → Language Transport
6 Post-Installation Activities
6.12 Import of Support Packages
February 2003 83
Alternatively you can access the SAP Library at http://help.sap.com:
a. Choose SAP Web Application Server → SAP Web Application Server 6.20.
b. Select the required language.
c. Choose mySAP Technology Components SAP Web Application Server → Change and Transport System → Language Transport.
6.12 Import of Support Packages Support Packages are available through in the SAP Service Marketplace and through SAPNet – R/3 Frontend. Support Package Collections are also shipped regularly on CD-ROM. Information on the availability of Support Packages is available in the SAP Service Marketplace at: http://service.sap.com/ocs-schedules
Support Packages are available for download in the SAP Service Marketplace at: http://service.sap.com/patches
The Support Package Manager (formerly called SAP Patch Manager, transaction SPAM) helps you apply Support Packages to your SAP system.
The SAP Note Assistant lets you load, implement and organize individual SAP Notes efficiently. It also recognizes dependencies between SAP Notes, Support Packages and modifications. You can find more information in the SAP Service Marketplace at: http://service.sap.com/noteassistant.
6.13 Secure Single Sign-On with Microsoft NT LAN Manager SSP Use Single Sign-On (SSO) is a method of logging on to the SAP system that simplifies the logon procedure without reducing security. When a system has been configured for Single Sign-On, an authorized user who has logged on to the operating system can access the SAP system simply by selecting it in the SAP logon window or clicking on the shortcut. Work in the application can begin immediately without first entering an SAP system user name and password. Single Sign-On is easy to administer because it significantly reduces the work associated with SAP system user management.
In this section, we describe the option that is the easiest to implement when using a complete Microsoft Win32 landscape (Windows 9x, Windows ME, Windows NT, Windows 2000). It is a tailored version for SSO using Secure Network Communications (SNC) that uses Microsoft’s NT domain authentication, NT LAN Manager Security Service Provider (NTLM SSP). For more information on using SNC, see the SNC User's Guide that is available on the SAP Service Marketplace at http://service.sap.com/security
Typically, SNC requires the use of an external security product that adheres to the Generic Security Service API V2 (GSS-API V2) interface and has been certified by the SAP Software Partner Program. However, in this scenario, we provide a library that adheres to the GSS-API V2 interface on one side that communicates with Microsoft’s NTLM SSP on the other. Since
6 Post-Installation Activities
6.13 Secure Single Sign-On with Microsoft NT LAN Manager SSP
84 February 2003
NTLM SSP is already an integral part of the Microsoft Windows 32-bit platforms, you do not need to purchase an additional security product to be able to use Single Sign-On.
The Microsoft NTLM SSP only provides authentication based on a challenge-response authentication scheme. It does not provide data integrity or data confidentiality protection for the authenticated network connection. All third-party BC-SNC certified security products do offer data integrity and privacy protection. If you want to use these security features, you will have to obtain a certified security product.
If your environment consists of only Windows 2000 we also offer an alternative library (gsskrb5.dll) that uses the Microsoft Kerberos SSP instead of the NTLM SSP for authentication. For details, see The Configuration of Kerberos Single Sign-On [Page 88].
We distribute two different versions of the wrapper library for Microsoft's NTLM SSP. The older version is called gssapi32.dll and the newer version is called gssntlm.dll. The newer gssntlm.dll is available for download on the sapserv<x>.
For additional security aspects involved with this scenario, see SAP Note 165485.
Prerequisites • A pure Microsoft Win32 environment is required (Windows 9x, Windows ME, Windows
NT, Windows 2000). The Microsoft NTLM SSP is not available for UNIX or any other operating system.
• When using separate Windows NT domains for users, for their frontend PCs and for the SAP application server machines, bi-directional trust is required between these Windows NT domains.
• The GSS-API V2 library wrapper (gssntlm.dll) must be installed on every application server.
• The GSS-API V2 library wrapper must also be installed on every frontend PC.
• We recommend to use for all Windows NT user IDs the 7-bit ASCII character set. It is not possible to enter Windows NT user IDs that contain 8-bit characters into the USRACL table (e.g. by using transaction SU01) when the code page of the SAP system is different from the code page on the Windows machines. The combination of Windows ANSI (=ISO Latin 1) and the default SAP code page 1100 provide the same encoding of 8-bit characters and permits the use of 8-bit characters with gssntlm.dll.
Integration For information on how to improve the security of your system with the help of third-party products, see the SAP online documentation on Secure Network Communications in the SAP Library:
1. Choose Help → SAP Library in your SAP system.
2. Choose mySAP Technology Components → SAP Web Application Server → Security → Secure Network Communications (SNC)
Alternatively you can access the SAP Library at http://help.sap.com:
1. Choose SAP Web Application Server → SAP Web Application Server 6.20.
6 Post-Installation Activities
6.13 Secure Single Sign-On with Microsoft NT LAN Manager SSP
February 2003 85
2. Select the required language.
3. Choose mySAP Technology Components → SAP Web Application Server → Security → Secure Network Communications (SNC).
Activities To enable the use of Single Sign-On you need to:
1. Prepare the application server [Page 85]
2. Prepare the SAP GUI and SAP Logon [Page 86]
3. Map SAP System Users to Windows Users [Page 87]
Before you begin this, you must first start the Service Windows LM Security Support Provider:
1. Choose Start → Programs → Administrative Tools → Services.
2. Select the service NT LM Security Support Provider.
3. On the General tab, change the startup type from manual to automatic.
6.13.1 Preparing the Application Server for Single Sign-On 1. Copy the gssntlm.dll file to the directory
<DRIVE>:\USR\SAP\<SAPSID>\SYS\EXE\RUN on the central instance of your system. The gssntlm.dll file is located on sapserv<x> in the directory general/misc/security/gssntlm
2. Set the environment variable SNC_LIB to the location of the library
3. In the profile of the central instance, enter the following SAP parameters: snc/data_protection/max =1
snc/data_protection/min =1
snc/data_protection/use =1
snc/enable =1
snc/gssapi_lib = (<DRIVE>:\USR\SAP\<SAPSID>\SYS\EXE\RUN\<gssntlm.dll>)
snc/identity/as =p:<DOMAIN_NAME>\<SAP_Service_User>
<SAP_Service_User> is the user who runs the SAP system.
<DOMAIN_NAME> is the Windows NT domain of this user.
Although you can freely choose the Windows NT account under which the SAP system runs, it is typically SAPService<SAPSID>.
If you use a local account for SAPService<SAPSID>, most operations are successful. However, any operations or communications where the SAP system is the initiator of an SNC-protected communication to a remote machine do not work with a local account for SAPService<SAPSID>. Therefore, use a domain account.
6 Post-Installation Activities
6.13 Secure Single Sign-On with Microsoft NT LAN Manager SSP
86 February 2003
Additional SNC Parameters The following profile parameters allow you to continue to have password-based access to the SAP system when SNC has been enabled. To log on to the SAP system as an administrator to maintain the mapping of Windows user accounts to SAP system user IDs (user and client), you have to use these additional parameters at least once after enabling SNC. Once the mapping (at least for the administrator) has been entered, you can disable further password-based logons by removing the respective profile parameters. snc/accept_insecure_cpic =1
snc/accept_insecure_gui =1
snc/accept_insecure_rfc =1
snc/permit_insecure_start =1
snc/permit_insecure_comm =1
4. Stop and restart the SAP system to activate the profile parameters. Changes to SNC profile parameters always require an application server restart to take effect.
6.13.2 Preparing SAP GUI and SAP Logon for Single Sign-On Use This procedure is required to set up Single Sign-On.
Prerequisites You have completed Preparing the Application Server for Single Sign-On [Page 85].
Procedure 1. Copy the gssntlm.dll file to the SAP GUI directory.
The gssntlm.dll file is located on sapserv<x> in the directory /general/misc/security/gssntlm
2. Set the Windows environment variable SNC_LIB on the PC where your SAP GUI runs.
The variable specifies the path to the gssntlm.dll file. To do this you have two alternatives:
a. Copy gssntlm.dll to a location of your choice and set the environment variable SNC_LIB to that location, for example, <DRIVE>:\<SAPGUI_PATH>\gssntlm.dll
i. Right-click on My Computer and choose Properties. On the Advanced tab click Environment Variables.
ii. In User Variables for <user> enter the following:
Variable: SNC_LIB
Value: <DRIVE>:\<SAPGUI_PATH>\gssntlm.dll
iii. Confirm your entries with OK.
iv. Log off and then log on to your Windows system again, as the same user, to activate the new environment variable setting
b. Copy gssntlm.dll to a directory of the default search path, for example, %SystemRoot%\system32 and rename the file to sncgss32.dll
6 Post-Installation Activities
6.13 Secure Single Sign-On with Microsoft NT LAN Manager SSP
February 2003 87
This is the default filename that SNC uses when SNC_LIB is neither passed on the command line nor available in the environment
3. Set the required logon options to activate Single Sign-On:
a. In the SAP logon window, choose Edit → Advanced
c. The Advanced Options dialog box appears.
b. In the SNC name field, enter: p:<DOMAIN_NAME>\<SAP_Service_User>
<DOMAIN_NAME> is the Windows domain the user SAPService<SAPSID> belongs to.
If the system HWA is running on account SAPServiceHWA of the DEC_NT domain, you would enter: P:DEC_NT\SAPServiceHWA
4. Select Enable Secure Network Communications and confirm the entries with OK.
Result The SAP Logon window now displays an icon with a small yellow key beside the system entry. This indicates that Single Sign-On is active. When the SAP administrator has entered the mapping between a user's Windows Account and that user’s SAP system user ID (see below), the next time this SAP system user logs on to the system, the application is opened without requiring the entry of a user name and password. If only one possible match exists between the Windows account and the SAP system user ID, the logon screen is skipped (unless the profile parameter snc/force_login_screen = 1 is present in the instance profile of the application server).
6.13.3 Mapping SAP System Users to Windows Users for Single Sign-On Use When you have configured your system, you can enable SAP system users to log on with Single Sign-On by assigning them to Windows users.
Prerequisites You have completed the following procedures:
• Preparing the Application Server for Single Sign-On [Page 85]
• Preparing SAP GUI and SAP Logon for Single Sign-On [Page 86]
Procedure 1. Log on to the SAP system.
2. Choose Tools → Administration → User Maintenance → Users. Alternatively, enter transaction code SU01.
The User Maintenance window appears.
3. Enter the name of the SAP system user and choose User names → Change.
6 Post-Installation Activities
6.14 Configuration of Kerberos Single Sign-On
88 February 2003
4. Choose the SNC tab. In the field SNC name, enter the name of the Windows user that is to be assigned to the SAP system user in uppercase: p:<DOMAIN_NAME>\<NT_USERNAME>
DOMAIN_NAME> is the Windows domain that the Windows user belongs to and <NT_USERNAME> the Logon ID of the Windows user.
p: is a prefix that all SNC names require
For the Windows user Kissnerj, belonging to the domain SAP_ALL, enter p:SAP_ALL\ Kissnerj
5. Select Insecure communication permitted. This permits the user to still access the system without using the Single Sign-On feature, to work in a different domain.
6. Save the entries.
6.14 Configuration of Kerberos Single Sign-On Use With Windows 2000, it is possible to implement Single Sign-On using the Kerberos security protocol. Single Sign-On is a method of logging on to the system that simplifies the authentication process for the user. It allows a user that has logged on to Windows 2000 to access other SAP systems without entering an additional user ID or password. The security context for authentication is made available with the Application Programming Interface (API) and Kerberos. The user simply has to select an SAP system in the SAP logon window, or click on its shortcut, to automatically start the authentication process in the background.
The advantage of the Single Sign-On solution based on Kerberos is that the security information which has to be exchanged between the SAP front end and the SAP application server is encrypted. This encryption is not implemented for the solution available for SAP on Windows that is based on the Generic Security Service API (GSS-API) interface
When using gsskrb5.dll, the Microsoft Kerberos Security Service Provider (SSP) is interoperable with Kerberos implementations from other vendors/suppliers. To use SSO with application servers on Unix and Windows 2000 front ends with gsskrb5.dll, you might have to purchase a Kerberos implementation for the Unix machine(s).
Prerequisites Single Sign-On based on Kerberos can only be set up for users that are members of a Windows 2000 domain.
Activities To prepare users and systems for the use of Single Sign-On, you have to:
1. Prepare the central instance [Page 89]
2. Configure the SAP front ends [Page 89]
3. Configure the SAP logon [Page 91]
6 Post-Installation Activities
6.14 Configuration of Kerberos Single Sign-On
February 2003 89
4. Map SAP users to Windows 2000 users [Page 91]
The sections that follow describe these steps in detail.
In the directory paths specified below, \%win%\ refers to the location of the Windows 2000 directory.
6.14.1 Preparing the Central Instance Use To prepare Single Sign-On, you must adapt the central instance profile and ensure that the necessary Dynamic Link Library (DLL) is located in the Windows 2000 directory.
Procedure 1. Copy the gsskrb5.dll file from the sapserv<x> to the following directory on the
central instance: Drive:\%windir%\system32.
On the sapserv<x> the gsskrb5.dll file is located in the directory:
general/misc/security/gssntlm
2. In the instance profile of the central instance, set the SAP parameters snc/enable = 1
snc/gssapi_lib =<DRIVE>:\%windir%\system32\gsskrb5.dll
snc/identity/as =p:<SAP_Service_User>@<DOMAIN_NAME>
<DOMAIN_NAME> is the Windows 2000 domain that the user <SAP_Service_User> belongs to, for example, NT5.SAP-AG.DE.
Although you can freely choose the Windows account under which the SAP system runs, it is typically SAPService<SAPSID>.
If you use a local account for SAPService<SAPSID>, most operations are successful. However, any operations or communications where the SAP system is the initiator of an SNC-protected communication to a remote machine do not work with a local account for SAPService<SAPSID>. Therefore, use a domain account.
3. Stop and restart the SAP system to enable the profile parameters to take effect.
The <DOMAIN_NAME> and the <SAP_Service_User> are case-sensitive. Make sure you enter upper and lowercase correctly, for example: p:[email protected].
6 Post-Installation Activities
6.14 Configuration of Kerberos Single Sign-On
90 February 2003
6.14.2 Configuring the SAP Front End Use To enable a logon with Single Sign-On, you have to configure each SAP front end that is in use.
Procedure When you prepare the SAP front end for Single Sign-On, you can choose between two approaches:
• Configure each front end individually
• Configure all front ends automatically
Configuring SAP Front Ends Individually 1. Perform the steps on the machine where the SAP front end is running.
2. Log on to the machine where the SAP front end is running.
3. Copy the SAPSSO.MSI program from the sapserv<x> directory general/R3Server/binaries/NT/W2K to a local directory or to a shared directory on the network.
4. Double-click the SAPSSO.MSI file.
The wizard SAP Single Sign-On Support for Windows 2000 is started and automatically configures the SAP front end.
Configuring SAP Front Ends Automatically In the following procedure, you define a Group Policy for a Windows 2000 domain. This policy causes the Wizard for configuring Single Sign-On to be started automatically in the background the next time any member of the domain logs on to an SAP fontend.
To define the Group Policy:
1. Log on to a front-end machine as domain administrator of the Windows 2000 domain.
2. Copy the program SAPSSO.MSI from the sapserv<x> directory general/R3Server/binaries/NT/W2K to a shared directory.
3. From the Windows 2000 menu choose Start → Programs → Administrative tools → Active Directory Users and Computers.
The dialog box Active Directory Users and Computers appears.
4. Select the domain for which you want to set up Single Sign-On. Right-click and choose Properties from the context menu.
The dialog box <Domain_Name> Properties appears.
5. On the Group Policy tab, choose New to access the dialog box for creating a new policy object.
6. Under Group Policy Object Links, enter a name for the new policy object, for example, SAPSSO. Choose Edit to define the contents of the policy.
7. In the Group Policy Editor choose User Configuration → Software Settings → Software Installation.
The Deploy Software dialog box opens.
8. Right-click and choose New → Package from the context menu.
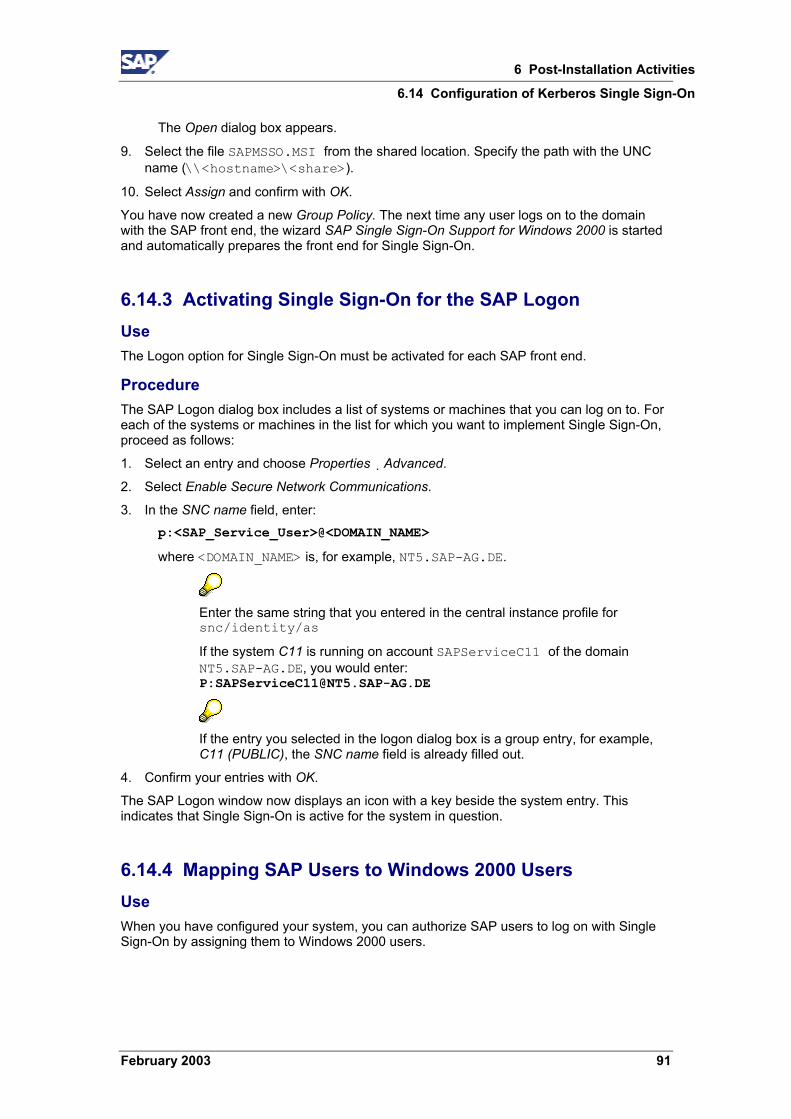
6 Post-Installation Activities
6.14 Configuration of Kerberos Single Sign-On
February 2003 91
The Open dialog box appears.
9. Select the file SAPMSSO.MSI from the shared location. Specify the path with the UNC name (\\<hostname>\<share>).
10. Select Assign and confirm with OK.
You have now created a new Group Policy. The next time any user logs on to the domain with the SAP front end, the wizard SAP Single Sign-On Support for Windows 2000 is started and automatically prepares the front end for Single Sign-On.
6.14.3 Activating Single Sign-On for the SAP Logon Use The Logon option for Single Sign-On must be activated for each SAP front end.
Procedure The SAP Logon dialog box includes a list of systems or machines that you can log on to. For each of the systems or machines in the list for which you want to implement Single Sign-On, proceed as follows:
1. Select an entry and choose Properties �Advanced.
2. Select Enable Secure Network Communications.
3. In the SNC name field, enter: p:<SAP_Service_User>@<DOMAIN_NAME>
where <DOMAIN_NAME> is, for example, NT5.SAP-AG.DE.
Enter the same string that you entered in the central instance profile for snc/identity/as
If the system C11 is running on account SAPServiceC11 of the domain NT5.SAP-AG.DE, you would enter: P:[email protected]
If the entry you selected in the logon dialog box is a group entry, for example, C11 (PUBLIC), the SNC name field is already filled out.
4. Confirm your entries with OK.
The SAP Logon window now displays an icon with a key beside the system entry. This indicates that Single Sign-On is active for the system in question.
6.14.4 Mapping SAP Users to Windows 2000 Users Use When you have configured your system, you can authorize SAP users to log on with Single Sign-On by assigning them to Windows 2000 users.
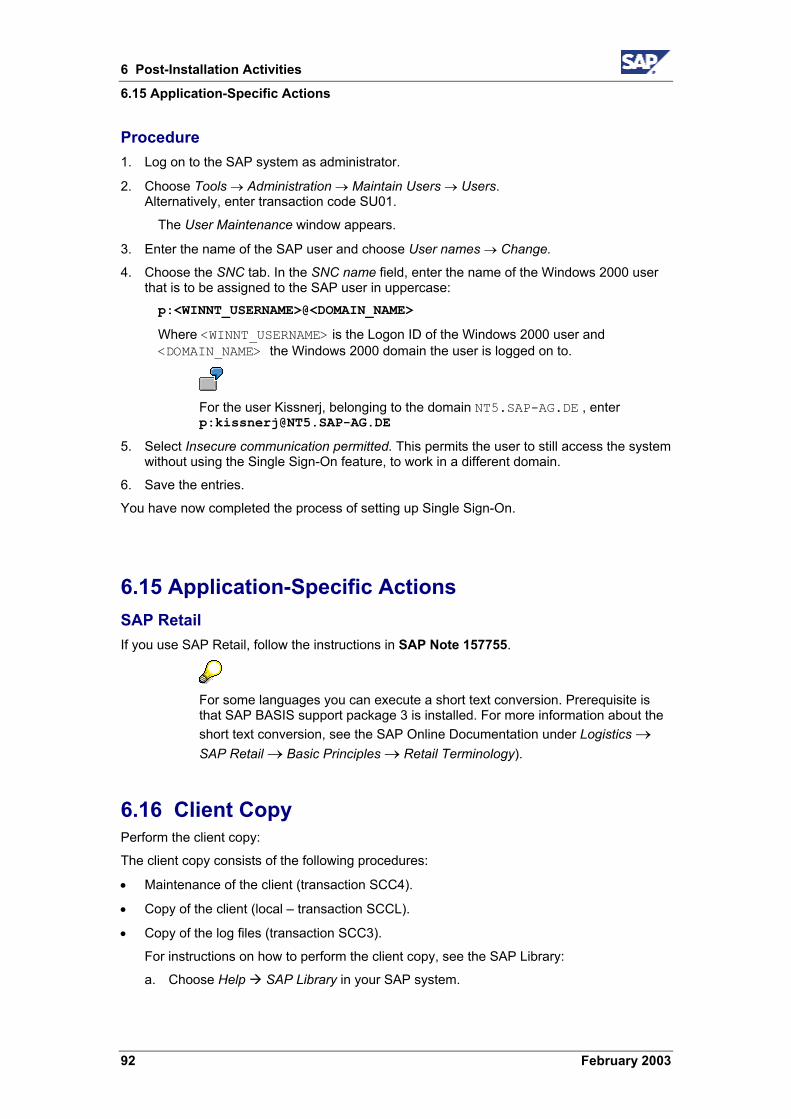
6 Post-Installation Activities
6.15 Application-Specific Actions
92 February 2003
Procedure 1. Log on to the SAP system as administrator.
2. Choose Tools → Administration → Maintain Users → Users. Alternatively, enter transaction code SU01.
The User Maintenance window appears.
3. Enter the name of the SAP user and choose User names → Change.
4. Choose the SNC tab. In the SNC name field, enter the name of the Windows 2000 user that is to be assigned to the SAP user in uppercase: p:<WINNT_USERNAME>@<DOMAIN_NAME>
Where <WINNT_USERNAME> is the Logon ID of the Windows 2000 user and <DOMAIN_NAME> the Windows 2000 domain the user is logged on to.
For the user Kissnerj, belonging to the domain NT5.SAP-AG.DE , enter p:[email protected]
5. Select Insecure communication permitted. This permits the user to still access the system without using the Single Sign-On feature, to work in a different domain.
6. Save the entries.
You have now completed the process of setting up Single Sign-On.
6.15 Application-Specific Actions SAP Retail If you use SAP Retail, follow the instructions in SAP Note 157755.
For some languages you can execute a short text conversion. Prerequisite is that SAP BASIS support package 3 is installed. For more information about the short text conversion, see the SAP Online Documentation under Logistics → SAP Retail → Basic Principles → Retail Terminology).
6.16 Client Copy Perform the client copy:
The client copy consists of the following procedures:
• Maintenance of the client (transaction SCC4).
• Copy of the client (local – transaction SCCL).
• Copy of the log files (transaction SCC3).
For instructions on how to perform the client copy, see the SAP Library:
a. Choose Help SAP Library in your SAP system.
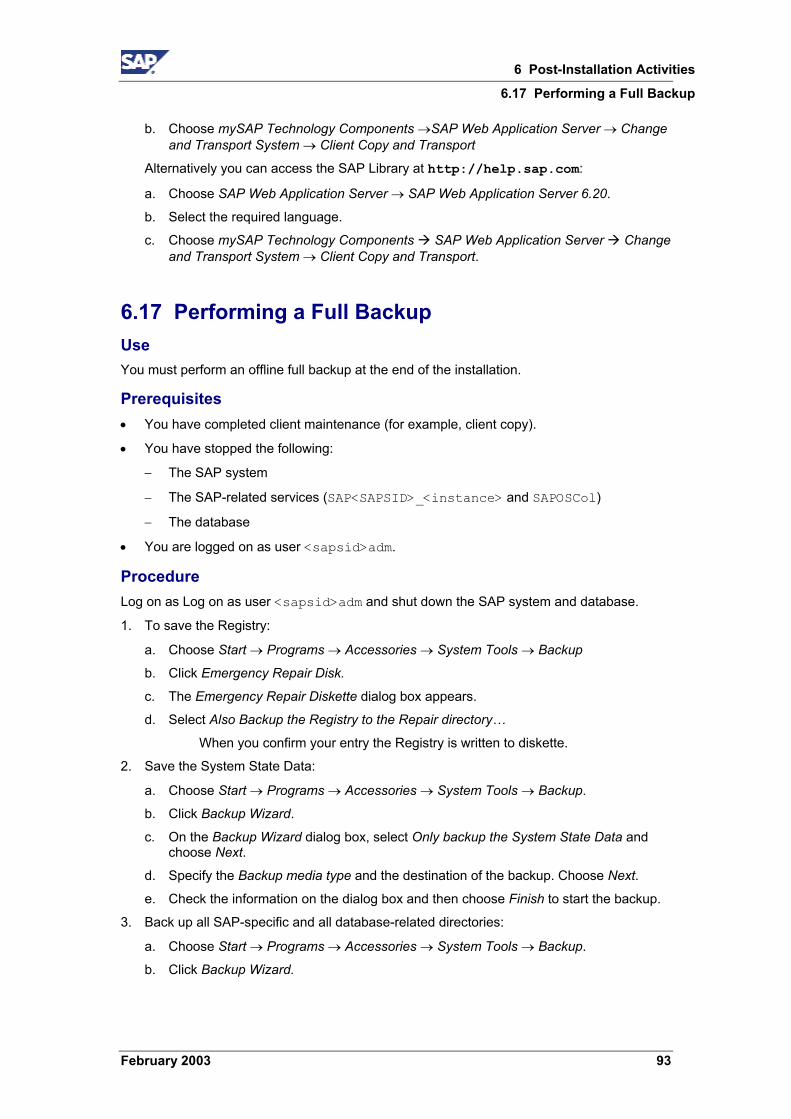
6 Post-Installation Activities
6.17 Performing a Full Backup
February 2003 93
b. Choose mySAP Technology Components →SAP Web Application Server → Change and Transport System → Client Copy and Transport
Alternatively you can access the SAP Library at http://help.sap.com:
a. Choose SAP Web Application Server → SAP Web Application Server 6.20.
b. Select the required language.
c. Choose mySAP Technology Components SAP Web Application Server Change and Transport System → Client Copy and Transport.
6.17 Performing a Full Backup Use You must perform an offline full backup at the end of the installation.
Prerequisites • You have completed client maintenance (for example, client copy).
• You have stopped the following:
− The SAP system
− The SAP-related services (SAP<SAPSID>_<instance> and SAPOSCol)
− The database
• You are logged on as user <sapsid>adm.
Procedure Log on as Log on as user <sapsid>adm and shut down the SAP system and database.
1. To save the Registry:
a. Choose Start → Programs → Accessories → System Tools → Backup
b. Click Emergency Repair Disk.
c. The Emergency Repair Diskette dialog box appears.
d. Select Also Backup the Registry to the Repair directory…
When you confirm your entry the Registry is written to diskette.
2. Save the System State Data:
a. Choose Start → Programs → Accessories → System Tools → Backup.
b. Click Backup Wizard.
c. On the Backup Wizard dialog box, select Only backup the System State Data and choose Next.
d. Specify the Backup media type and the destination of the backup. Choose Next.
e. Check the information on the dialog box and then choose Finish to start the backup.
3. Back up all SAP-specific and all database-related directories:
a. Choose Start → Programs → Accessories → System Tools → Backup.
b. Click Backup Wizard.

6 Post-Installation Activities
6.18 Changing Passwords of Created Users
94 February 2003
c. On the What to Back up dialog box, select Backup selected files, drives or network data and choose Next.
d. On the Items to Back Up dialog box, select the Windows directory and all SAP and database-related directories, including:
\USR\SAP
\USR\SAP\TRANS
<HOMEDIR> of <sapsid>adm
\WINNT
Choose Next.
e. On the Where to Store the Backup screen, specify the media type and destination for the backup.
f. Check the information displayed and then choose Finish to start the backup.
6.18 Changing Passwords of Created Users Use You need to change the passwords of the users that SAPinst creates during the installation. The table below lists these users. You also need to remove the contents of the installation directory and store them securely because otherwise they might represent a security risk.
Make sure that you perform this procedure before the newly installed SAP system goes into production.
Procedure 1. Change the passwords of these users according to the SAP Security Guide.
For more information, see the SAP Service Marketplace at the Internet address: service.sap.com/securityguide
• SAP system users might exist in more SAP system clients than listed below
(for example, if a user was copied as part of the client copy [Page 92]).
• We strongly recommend that you change the initial passwords even if SAPinst prompted for a new password during the installation procedure.
User Type User Comment SAP* User exists at least in SAP system client
00 SAP system user
DDIC User exists at least in SAP system clients 00 and 66
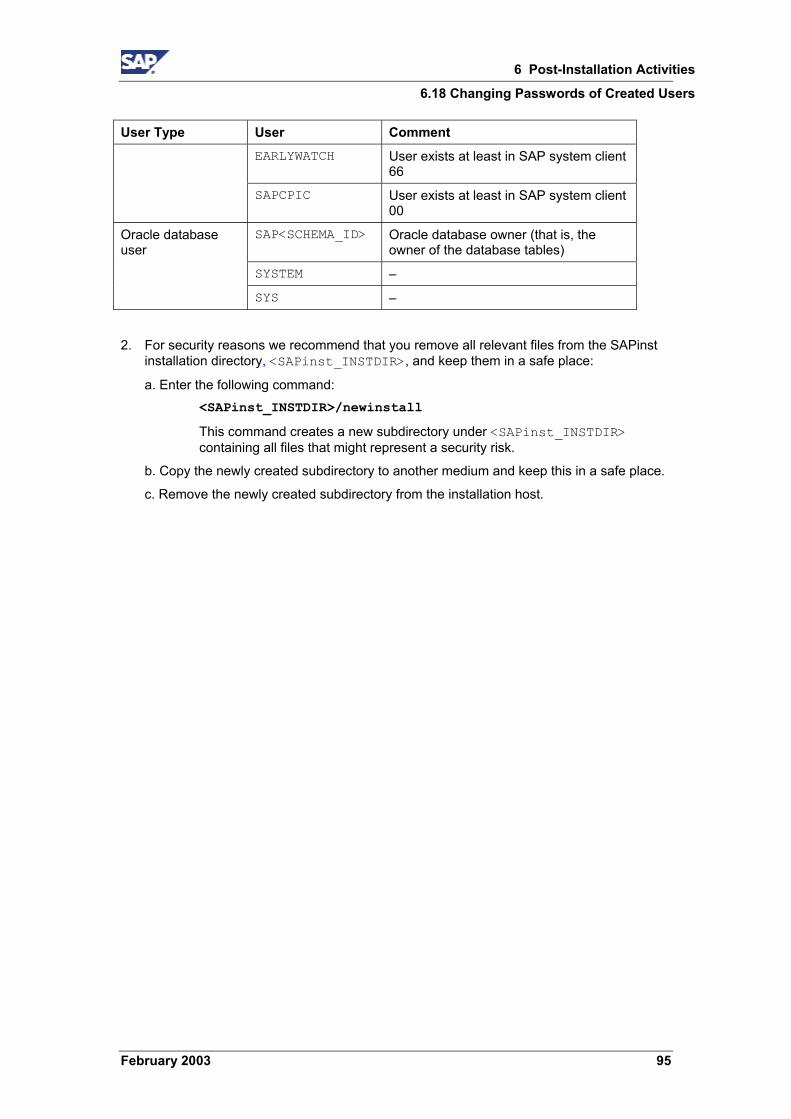
6 Post-Installation Activities
6.18 Changing Passwords of Created Users
February 2003 95
User Type User Comment EARLYWATCH User exists at least in SAP system client
66
SAPCPIC User exists at least in SAP system client 00
SAP<SCHEMA_ID> Oracle database owner (that is, the owner of the database tables)
SYSTEM –
Oracle database user
SYS –
2. For security reasons we recommend that you remove all relevant files from the SAPinst installation directory, <SAPinst_INSTDIR>, and keep them in a safe place:
a. Enter the following command: <SAPinst_INSTDIR>/newinstall
This command creates a new subdirectory under <SAPinst_INSTDIR> containing all files that might represent a security risk.
b. Copy the newly created subdirectory to another medium and keep this in a safe place.
c. Remove the newly created subdirectory from the installation host.
7 Additional Information
7.1 Performing a Remote Installation with SAPinst
96 February 2003
7 Additional Information For information on how to delete an SAP installation, see:
Deletion of an SAP Installation [Page 101]
For background information on the security concept implemented for SAP on Windows, see:
SAP Security on Windows [Page 104]
7.1 Performing a Remote Installation with SAPinst Use You can run SAPinst GUI in standalone mode.
This allows you to install a SAP system on another host (the remote host) while monitoring the installation with SAPinst GUI on your local Windows or UNIX computer (the local host).
The procedure consists of the following basic steps:
1. Install SAPinst on your remote host and SAPinst GUI on your local host.
2. Start SAPinst server on your remote host.
3. Start SAPinst GUI on your local host.
4. Perform the installation using SAPinst GUI.
For more information, see Procedure below.
Prerequisites • Make sure that you have performed the preparation activities for your local host (SAPinst
GUI host) and your remote host.
For more information, see "Installation Preparations" in this documentation.
• Both computers are on the LAN and can ping each other.
To test this, log on to your remote host and enter the command ping <local host> from the command prompt. on the local host On the local host, use the ping command ping <remote host>.
• SAPinst ports
SAPinst uses the ports 21212 and 21213 during the installation for communication with SAPinst GUI. If one of these ports is already used by another service, SAPinst aborts the installation with an appropriate error message.
In this case, you must start SAPinst or SAPinst GUI from the command prompt as follows:
− UNIX:
• SAPinst: ./sapinst SAPINST_DIALOG_PORT=<free_port_number>
• SAPinst GUI: ./sapinstgui.sh -port <free_port_number>
− Windows:
• SAPinst: sapinst SAPINST_DIALOG_PORT=<free_port_number>
• SAPinst GUI: sapinstgui.bat -port <free_port_number>
7 Additional Information
7.1 Performing a Remote Installation with SAPinst
February 2003 97
where <free_port_number> and <free_port_number> + 1 define unused port numbers. For example, if you enter 60000 as <free_port_number>, SAPinst uses the ports 60000 and 60001.
The same applies to the SAPinst GUI commands startinstgui.bat (Windows) and startinstgui.sh (UNIX).
Procedure
Activities on Your Remote Host (Where a SAP System is to be Installed) If your remote host runs on a Windows platform:
1. Log on to your remote host as a user who is a member of the local administration group.
2. Insert the SAPInst CD in your CD drive.
3. Run Setup.cmd from the following path:
<CD drive>:\SAPinst\NT
SAPinst now asks if you want to perform a Standard or Custom installation
If you choose a Custom installation you can define:
− Installation directory for SAPinst, <SAPinst_DIR>
− SAPinst folder in the Start menu
The Start menu entry is used to create unique Start menu entries.
For example, you enter the following for the Start menu during the installation: R3_Enterprise_47
Then SAPinst creates the following Start menu: Start → Programs → R3_Enterprise_47 → …
Connection parameters (not relevant here)
4. Select Standard or Custom and choose Next.
SAPinst is now copied to your <SAPinst_DIR> and the Start menu entries are created.
5. To start SAPinst choose Start → Programs → <menu_entry> → SAPinst Server only
SAPinst server now starts and waits to connect to SAPinst GUI
6. Start SAPinst GUI on the local host, as described in Activities on your local host.
If your remote host runs on a UNIX platform: 1. Log on to your remote host as user root.
2. Mount the SAPinst CD.
3. Create <SAPinst_INSTDIR> and change to this directory.
4. From <SAPinst CD>/SAPINST/UNIX/<platform> run:
./INSTALL --nogui
SAPinst is now copied to your <SAPinst_INSTDIR> without SAPinst GUI.
7 Additional Information
7.1 Performing a Remote Installation with SAPinst
98 February 2003
Activities on Your Remote Host (Where a SAP System is to be Installed)
5. Start SAPinst from your <SAPinst_INSTDIR> by entering: ./sapinst
SAPinst now starts and waits for the connection to the SAPinst GUI. That is, you see the following at the command prompt: guiengine: waiting for connect...
6. Start SAPinst GUI on your local host, as described below in Activities on your local host.
Activities on Your Local Host (Where SAPinst GUI Runs) If your local host runs on a Windows platform:
1. Log on to your local Windows host.
2. Insert the SAPinst CD into your CD drive.
3. Run Setup.cmd from the following path:
<CD drive>:\SAPinst\NT
SAPinst now asks you to perform a Standard or Custom installation
4. Select Custom installation.
You can define:
• Installation directory for SAPinst (that is, for the SAPinst GUI)
• SAPinst folder in the Start menu
• Connection parameters (host name and port number) to connect to your remote host(s). Use Add Row to enter all known remote hosts and their corresponding free port numbers. Be sure to enter the same port number as SAPinst uses on the corresponding remote computer. If you do not enter a port number, standard port 21212 is used.
The Start menu entry and the connection parameters are used to generate unique Start menu entries. For example, you enter the following during the installation:
• Start menu entry: SAPinst GUI
• Connection parameters (remote host / port): uwi005 / 8000
• Connection parameters (remote host / port): hs1101 / 5555
Then SAPinst creates the following Start menu entries:
Start → Programs → SAPinst GUI → SAPinst GUI uwi005 8000
Start → Programs → SAPinst GUI → SAPinst GUI hs1101 5555
5. Enter your data, select the flag Install SAPinst GUI only, and choose Start.
7 Additional Information
7.2 Continuing an Interrupted Installation with SAPinst
February 2003 99
Activities on Your Local Host (Where SAPinst GUI Runs) SAPinst GUI is now copied to your <SAPinst_DIR> and the Start menu entries are created.
6. Choose Start → Programs → <menu_entry> → SAPinst GUI <host><port>
SAPinst GUI automatically connects to the host, which is waiting to connect.
That is, SAPinst GUI now starts and the Welcome screen is displayed.
If you have not entered connection parameters before, a dialog now asks you for the following parameters:
Hostname : Enter the host name of the remote computer
Port: Enter the same port number as SAPinst uses on the remote host
7. You can now perform the installation from your local host.
If your local host runs on a UNIX platform: 1. Log on to your local UNIX host as user root.
2. Mount the SAPinst CD.
3. Create <SAPinst_INSTDIR> and change to this directory:
4. From <SAPinst CD>/SAPINST/UNIX/<platform> run
./startinstgui.sh
SAPinst GUI is now copied to your <SAPinst_INSTDIR>.
5. Start SAPinst GUI from your <SAPinst_INSTDIR> by entering: ./startinstgui.sh
SAPinst GUI automatically connects to the host, which is waiting for a connection.
6. You can now perform the installation from your local host.
7.2 Continuing an Interrupted Installation with SAPinst Use As SAPinst does not abort the installation in error situations, you can continue an interrupted installation in the following situations:
• You have not canceled the installation
• You have already canceled the installation
Prerequisites You solved the problem that caused the error situation.
7 Additional Information
7.2 Continuing an Interrupted Installation with SAPinst
100 February 2003
Procedure • You have not canceled the installation
That is, the error dialog box is still displayed and SAPinst is waiting for your input. Proceed as follows:
In the error dialog box, choose Retry.
SAPinst now retries the installation step.
• You have already canceled the installation
That is, the installation was aborted and now you want to continue it. Since SAPinst records the installation progress in the keydb.xml file, it can continue the installation from the failed step without repeating previous steps.
You have two alternatives:
o Continuing the installation
o Restarting from scratch, that is, starting the installation with the default keydb.xml file as delivered
These two alternatives are described in the tables below.
In some cases, you must uninstall already installed components, before repeating the installation from scratch. For example, this applies to an SAP system installation. For more information, see the uninstallation description in the corresponding installation guide.
How to Proceed on Windows
Continuing the Installation 1. Check if a SAPinst GUI Java process is still running, and if so, look for javaw.exe
under Processes in your Task Manager, and kill it.
2. Choose Start → Programs → <menu_entry> → SAPinst Server with GUI (or SAPinst GUI if you want to start the GUI only or SAPinst Server only if you want to start SAPinst without the GUI).
Restarting from the Beginning 1. Check if a SAPinst GUI Java process is still running, and if so, look for javaw.exe
under Processes in your Task Manager, and kill it.
2. Choose Start → Programs → <menu_entry>→ Prepare New Installation
Current log and command files are now copied to a backup directory that indicates the date and time of the backup: <SAPinst_Dir>\log<month>_<date><time>
3. Choose Start → Programs → <menu_entry> → SAPinst Server with GUI (or SAPinst GUI if you want to start the GUI only or SAPinst Server only if you want to start SAPinst without the GUI).
7 Additional Information
7.3 Deletion of an SAP System Installation
February 2003 101
How to Proceed on UNIX
Continuing the Installation 1. Check if a SAPinst GUI Java process named java is still running:
ps -efl | grep java
If so, kill it.
2. Make sure that all environment variables are set as described in the corresponding installation documentation.
3. Start SAPinst from your <SAPinst_INSTDIR> with: ./sapinst
Restarting from the Beginning You have the following alternatives
• Restart the installation from installation CD
Start SAPinst from CD again as described in the corresponding installation documentation.
SAPinst deletes all files in your installation directory and asks you if you want to overwrite any existing installation directory.
• Prepare the new installation manually (installation CD is not needed)
In your <SAPinst_INSTDIR> do the following:
a. Rename the keydb.1.xml file (original file delivered by SAP) to keydb.xml.
b. Delete all keydb.<no>.xml files, if there are any.
c. Start SAPinst from your <SAPinst_INSTDIR> with:
./sapinst
7.3 Deletion of an SAP System Installation Purpose The following describes how to delete an SAP system.
Process Flow 1. You delete the central instance.
2. You delete any dialog instances that might exist
3. You delete the database.
4. You delete the database software.
7 Additional Information
7.3 Deletion of an SAP System Installation
102 February 2003
7.3.1 Deleting an SAP Instance Use You can remove the SAP software with the help of a wizard.
Prerequisites The SAP system must be stopped and the database shut down.
Procedure 1. Log on as user with domain administration rights. If you only want to delete a dialog
instance, you can log on as <sapsid>adm.
2. Choose Start → Settings → Control Panel → Add/Remove Programs The Add/Remove Programs dialog box appears. Scroll to the SAP entries.
Each central or dialog instance that is installed on the computer is listed with an entry of the form: SAP Application Server for System <SAPSID>instance
3. Select the instance you want to delete from the list and choose Remove.
The welcome window of the SAP Uninstall Wizard opens.
4. Choose Next. A dialog box appears allowing you to select an uninstall method:
Uninstall Method Explanation
Typical Uninstalls the SAP instance that you selected in the Add/Remove Programs Properties dialog box.
Complete Select this to remove all the SAP instances that are installed on the local computer. Note that this includes all the SAP instances initially listed in the Add/Remove Programs Properties dialog box, regardless of the highlighted selection. Choose Finish to start the deletion.
Select Custom and choose Next to access the Select Components dialog box that allows you to mark the instances you want to remove.
In the Select Components dialog box, use the check box beside an instance to indicate whether only the instance involved or the entire system, with global accounts, is to be deleted.
Uninstall instance-independent components
Select this additional option, if there is no other SAP system on the local machine. In this case directories such as usr\sap and usr\sap\trans are also deleted.
Add
Choose to manually add instances you want to delete if they do not appear on the list.
Custom
Finish
Choose to start the deletion.
7 Additional Information
7.3 Deletion of an SAP System Installation
February 2003 103
The wizard informs you when the SAP system or selected instances have been deleted successfully.
Delete the following file if you want to remove a central instance installation:
\usr\sap\trans\bin\tpparam_inst<SAPSID>.
7.3.2 Deleting the Database Use When you delete an entire SAP system, you have to delete the database instance and the Oracle DBMS software.
Use the following procedure if there is only a single Oracle_Home in your system.
If the instance of a second SAP system is running on the same machine as the database, this means the database software still has to be accessed by the second system .
Prerequisites You have already deleted the central instance.
Procedure
Deleting the Database Instance To delete the database instance:
1. Log on as local administrator.
2. Delete the Oracle instance:
a. Open a command prompt and switch to the directory <DRIVE>:\ORACLE_HOME\bin
b. Enter: oradim -delete -sid <SAPSID>
3. Delete the ORACLE\<SAPSID> directories on all drives. This includes the directories containing the SAP data.
4. Delete the following files from the directory <DRIVE>:\ORACLE_HOME\database\
init<SAPSID>.dba
init<SAPSID>.ora
init<SAPSID>.sap
5. Delete the following files from the directory <DRIVE>:\ORACLE_HOME\Network\Admin
listener.ora
tnsnames.ora
sqlnet.ora
7 Additional Information
7.3 Deletion of an SAP System Installation
104 February 2003
If a second instance is installed on the host do not delete these files. Open the files listener.ora and tnsnames.ora in an editor and remove all references that include the name of the system <SAPSID> that is being removed.
6. Delete the groups ORA_<SAPSID>_DBA and ORA_<SAPSID>_OPER:
a. Choose:
Start → Programs → Administrative Tools → Computer Management
b. Choose Local Users and Groups → Groups.
Select and delete the local groups ORA_<SAPSID>_DBA and ORA_<SAPSID>_OPER with Action → Delete
Deleting the Oracle DBMS Software
The Oracle software is installed on all hosts where an SAP instance is running: on a central instance host, database host and dialog instance host. Do not delete the database software, if another SAP instance is running on the same host.
1. Stop all Oracle Services and the Microsoft Distributed Transaction Coordinator. To access the services choose Start → Programs → Administrative Tools → Services Select a service and then choose Action → All Tasks → Stop
2. Delete the Oracle home directory and all its subdirectories under <DRIVE>:\ORACLE_HOME
3. Edit the Oracle Registry entries as follows:
a. Choose Start → Run and enter REGEDIT
b. Delete the key HKEY_LOCAL_MACHINE → SOFTWARE→ ORACLE
c. Delete all Oracle references under HKEY_LOCAL_MACHINE→ SYSTEM→ CURRENTCONTROLSET → SERVICES
4. Delete all Oracle references from the Windows user and system environment. To access the environment choose Start → Settings→ Control Panel → System. Choose the Advanced tab and then click Environment Variables. For example, delete the variables: TNS_ADMIN, NLS_LANG, ORACLE_HOME Also delete Oracle from the PATH variable.
5. Delete the Oracle entries from the Start menu:
a. Choose Start → Settings→ Taskbar & Start Menu
b. On the Advanced tab, click Advanced.
c. On the Start Menu screen, look under All Users\Start Menu\Programs Select and delete the folders for Oracle with File → Delete
d. Delete the Oracle shortcut from the desktop.
7 Additional Information
7.4 SAP System Security on Windows
February 2003 105
7.4 SAP System Security on Windows In a standard SAP system installation, all steps relevant for security are automatically performed by SAPinst. Although SAPinst ensures that the system is protected against unauthorized access, it is nevertheless important for the system administrator to ensure that no breaches of security can occur.
Distributed SAP systems with multiple application servers have to be installed in a Windows domain to ensure central and straightforward administration of the SAP system. The following gives you an overview of the user accounts and groups that SAPinst creates during a domain installation.
User Accounts SAPinst creates two accounts for SAP System Administration:
• <sapsid>adm
SAP system administrator account that enables interactive administration of the system.
• SAPService<SID> (this user is not created for Informix installations)
Virtual user account that is required to start the SAP system. Nobody can log on to the system with this account. It has the local user right to log on as a service and is a member of the local administrator’s group.
The advantage of the additional SAPService<SAPSID> account is that it does not allow an interactive logon and thus prevents abuse of the account. It is therefore not necessary to define an expiration date for the password, and the option user must change password at next logon does not have to be set.
Groups SAPinst creates the following groups during a domain installation.
• SAP_<SAPSID>_GlobalAdmin
This global group is a domain-level SAP administration group for organizing SAP system administrators. The only function of a global group is to gather users together at the domain level so that they can be placed in the appropriate local groups.
• SAP_<SAPSID>_LocalAdmin
Only local groups are created and maintained on an application server. A local group can only be given permissions and rights to the system where it is located. The system is part of a particular domain, and the local group can contain users and global groups from this domain.
• SAP_LocalAdmin
This group is created on all hosts, but is particularly important for the transport host. Members of the group have Full Control over the transport directory (usr\sap\trans) that allows transports to take place between systems.
The SAP_<SAPSID>_GlobalAdmin groups of all the SAP systems that are part of the transport infrastructure are added to the SAP_LocalAdmin group. As a consequence, the users <sapsid>adm and SAPService<SAPSID> of all systems in the transport infrastructure are members of the SAP_LocalAdmin group and have the authorizations necessary to initiate and execute transports.
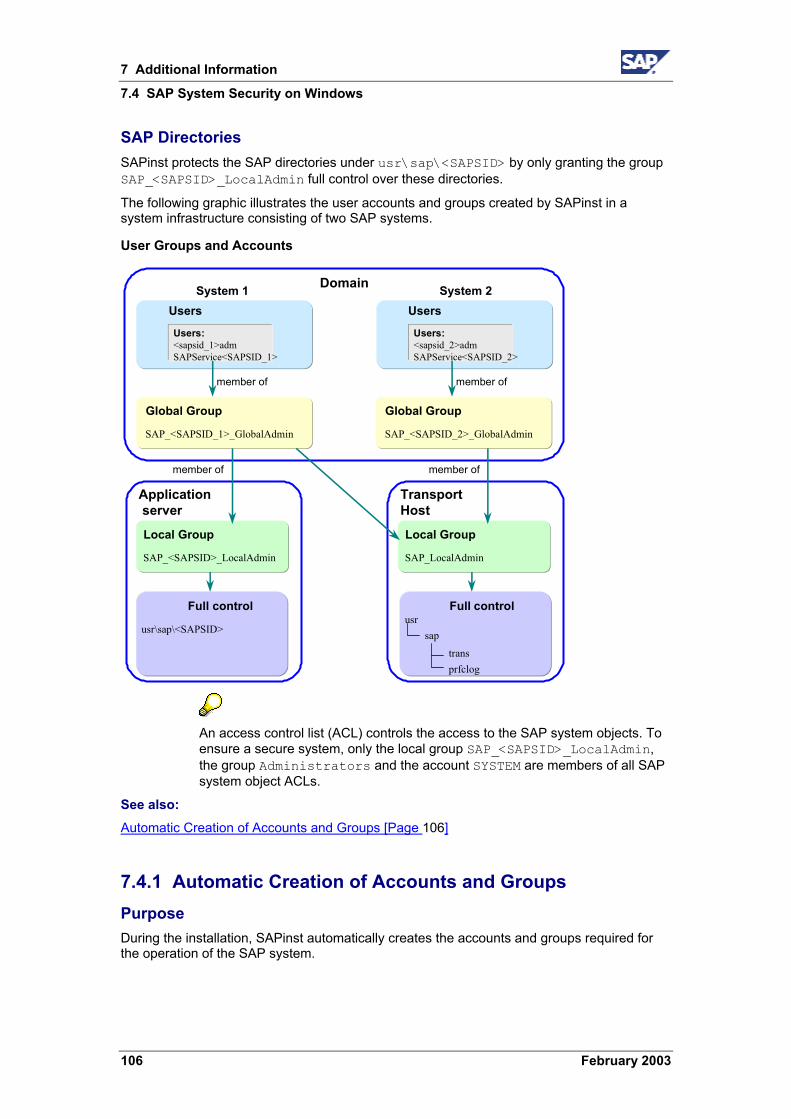
7 Additional Information
7.4 SAP System Security on Windows
106 February 2003
SAP Directories SAPinst protects the SAP directories under usr\sap\<SAPSID> by only granting the group SAP_<SAPSID>_LocalAdmin full control over these directories.
The following graphic illustrates the user accounts and groups created by SAPinst in a system infrastructure consisting of two SAP systems.
User Groups and Accounts
Application server
Full control
Local Group
member of
member of
Domain
Users
Users:<sapsid_1>admSAPService<SAPSID_1>
Global Group
SAP_<SAPSID_1>_GlobalAdmin
SAP_<SAPSID>_LocalAdmin
Users
Users:<sapsid_2>admSAPService<SAPSID_2>
member of
Global Group
SAP_<SAPSID_2>_GlobalAdmin
usr\sap\<SAPSID>
TransportHost
Full control
Local Group
SAP_LocalAdmin
usrsap
transprfclog
member of
System 1 System 2
An access control list (ACL) controls the access to the SAP system objects. To ensure a secure system, only the local group SAP_<SAPSID>_LocalAdmin, the group Administrators and the account SYSTEM are members of all SAP system object ACLs.
See also: Automatic Creation of Accounts and Groups [Page 106]
7.4.1 Automatic Creation of Accounts and Groups Purpose During the installation, SAPinst automatically creates the accounts and groups required for the operation of the SAP system.
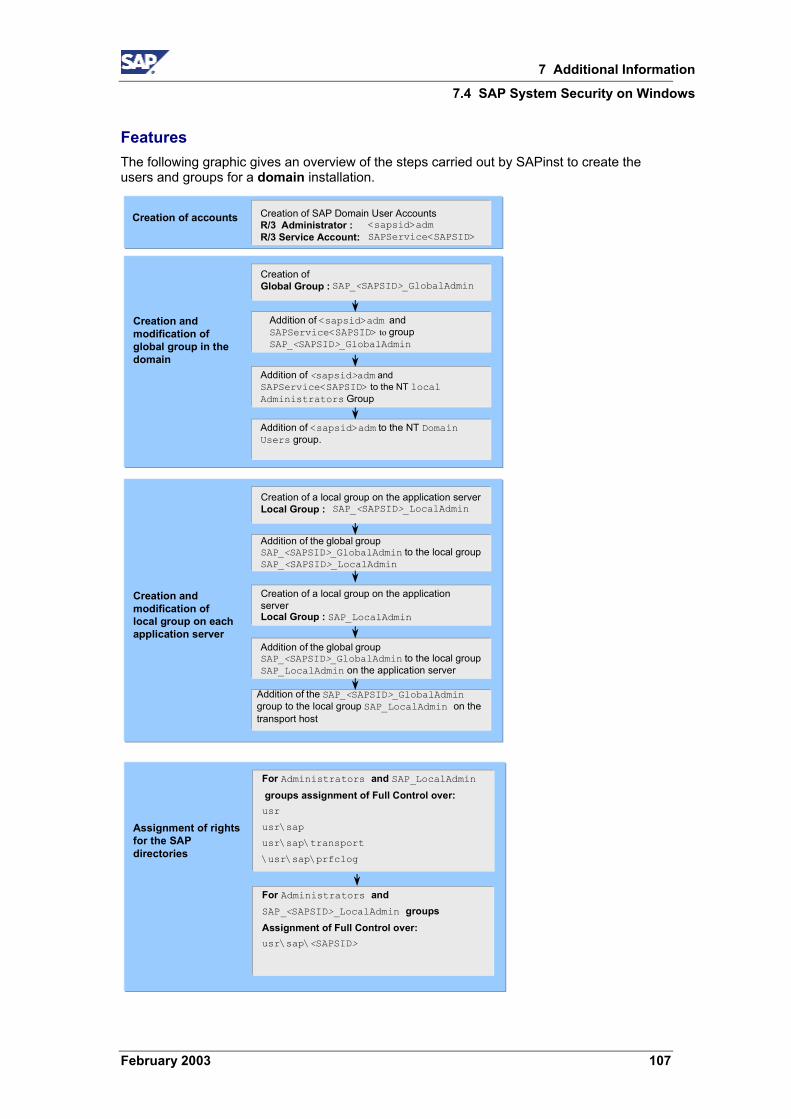
7 Additional Information
7.4 SAP System Security on Windows
February 2003 107
Features The following graphic gives an overview of the steps carried out by SAPinst to create the users and groups for a domain installation.
R/3 Administrator :R/3 Service Account:
Creation of SAP Domain User AccountsCreation of accounts<sapsid>admSAPService<SAPSID>
Creation andmodification ofglobal group in thedomain
Creation ofGlobal Group : SAP_<SAPSID>_GlobalAdmin
Addition of <sapsid>adm andSAPService<SAPSID> to groupSAP_<SAPSID>_GlobalAdmin
Addition of <sapsid>adm andSAPService<SAPSID> to the NT localAdministrators Group
Creation and modification of local group on each application server
Creation of a local group on the application serverLocal Group : SAP_<SAPSID>_LocalAdmin
Addition of the global groupSAP_<SAPSID>_GlobalAdmin to the local groupSAP_<SAPSID>_LocalAdmin
Creation of a local group on the applicationserverLocal Group : SAP_LocalAdmin
Addition of the global groupSAP_<SAPSID>_GlobalAdmin to the local groupSAP_LocalAdmin on the application server
Addition of <sapsid>adm to the NT DomainUsers group.
Addition of the SAP_<SAPSID>_GlobalAdmingroup to the local group SAP_LocalAdmin on thetransport host
Assignment of rightsfor the SAPdirectories
For Administrators and SAP_LocalAdmin groups assignment of Full Control over: usr
usr\sap
usr\sap\transport
\usr\sap\prfclog
For Administrators andSAP_<SAPSID>_LocalAdmin groupsAssignment of Full Control over:usr\sap\<SAPSID>
7 Additional Information
7.4 SAP System Security on Windows
108 February 2003
7.4.2 Manually Granting User Rights for the Installation Use The Windows user that performs the SAP system installation must be authorized to perform the actions necessary for the installation. More precisely, this means that for a domain installation the user must belong to the Domain Admins group and be authorized to:
• Act as part of the operating system
• Increase quotas
• Replace a process level token
If the installation aborts because of authorization problems, this might be because you are not using the same user that installed the SAPinst tool. The rights required for the installation are automatically assigned to the user who installs the SAPinst tool. You can grant another user the rights listed above manually, using the procedure described here.
Procedure To grant user rights:
1. Choose Start → Settings → Control Panel → Administrative Tools → Local Security Policy.
2. In the Local Security Settings window, choose Local Policies → User Rights Assignment.
3. On the right-hand pane, select the policy that is needed for the installation and then right-click. Choose Security and then click Add.
The Select Users and Groups window opens.
4. Select the user involved and click Add.
The selected user appears in the text box below.
5. Confirm your entry and then repeat the steps for each of the other policies the user requires for the installation.
7 Additional Information
7.4 SAP System Security on Windows
February 2003 109
Part II Cluster Installation with MSCS Purpose When you install an SAP system, you can decide to set up a Microsoft Cluster Server (MSCS) configuration. For this type of installation, you have to set up the system on two specially clustered machines and configure it so that it can take advantage of the MSCS software. The MSCS software offers features that can improve the availability of the system and safeguard it against failure and unpredictable downtime. Ideally it enables 24 - hour operation, 365 days a year.
As opposed to a standard installation, an MSCS installation sets up the database and central instance on two different, clustered machines with the aim of enabling critical system components to be automatically switched from one machine to the other if hardware problems arise. Under normal operating conditions, the central instance runs on one of the machines and the database on the other. When hardware fails, the critical resources located on the damaged machine are failed over to the healthy machine, in this way avoiding unplanned system downtime. With the help of this mechanism the system can continue functioning normally, even when a critical hardware error has occurred.
Apart from enabling failover when hardware problems occur, the cluster configuration also has the purpose of enabling system maintenance without causing downtime. For example, if maintenance of the database node is necessary, the database can be moved to the node where the central instance is running and can continue operating there. While maintenance is in progress, the central and database instance temporarily reside on the same node, but when maintenance work is finished the database can easily be moved back to its original node.
In this documentation the two machines in the cluster are referred to as node A and node B.
Prerequisites Read the installation notes before you begin the installation. These notes contain the most recent information regarding the installation, as well as corrections to the documentation.
Installation Notes
529118 INST: SAP R/3 Enterprise 4.70 on Windows – MS Cluster Server
529076 INST: R/3 Enterprise 4.70 on Windows – Oracle
529151 INST: R/3 Enterprise 4.70 on Windows – General
Process Flow The process of setting up an SAP system on an MSCS configuration differs, depending on whether you want to:
• Install a new SAP system
• Move an existing system to cluster hardware The following sections introduce both of these approaches.
7 Additional Information
7.4 SAP System Security on Windows
110 February 2003
Setting up a New SAP System If you intend to run a new SAP system on a cluster, the process of installing your system can be subdivided into two main parts:
• In the first part, the SAP installation, you perform a standard system installation, but perform a number of supplementary steps specially required for the cluster configuration.
• In the second part, the Conversion to MSCS, you configure the database and SAP system so that they can take advantage of the cluster functionality.
The following summarizes important aspects of the installation process and points out the differences between a standard and a MSCS SAP installation.
SAP Installation The task of installing a MSCS SAP system is essentially the same as the task of installing a standard SAP system which is described earlier in this documentation. However, you have to perform a number of supplementary steps and follow some special cluster-specific guidelines. In particular, because the cluster hardware has two nodes that have access to both local and shared storage devices, you have to install some components on both nodes and observe special rules for distributing components to local or shared disks. Also, because the correct configuration of the network addresses is absolutely essential to enable the cluster to function properly, you have to perform a number of additional steps that are necessary to set up and check addressing in the cluster.
Conversion to MSCS In the conversion part of the installation, you configure the database and SAP instances so that they can take advantage of the MSCS functionality. This involves running the SAPinst tool to configure the SAP central instance so that it can be administered as a switchable group within the cluster and setting up the database as an Oracle Fail Safe database to enable interaction with the cluster.
Comparison of an MSCS and Standard Installation When you follow the instructions to set up the SAP system in a MSCS configuration, it is important to keep in mind that the process is a combination of standard installation steps and supplementary steps specifically required for the cluster. Whenever steps correspond to those in the standard installation procedure, you are referred to earlier sections of this documentation. Whenever steps are only cluster-specific these are described in detail in this part of the documentation.
The following list gives you a quick overview of the aspects of the SAP installation that are different on a cluster. It is useful to keep these in mind when you try to get an overview of the procedure as a whole, before concentrating on the details.
As opposed to a standard installation, the installation on cluster hardware involves:
• Performing many of the normal installation steps on both nodes instead of only on a single machine.
• Observing rules that stipulate which software components must be stored on local disks and which on disks shared by both nodes.
• Correctly configuring host names and IP addresses
• Installing the MSCS software to provide the underlying functionality that enables the database and SAP system to fail over.
• Installing the Oracle Failsafe software, and on the basis of it, configuring the database as a group of resources that can be switched over from one machine to the other.
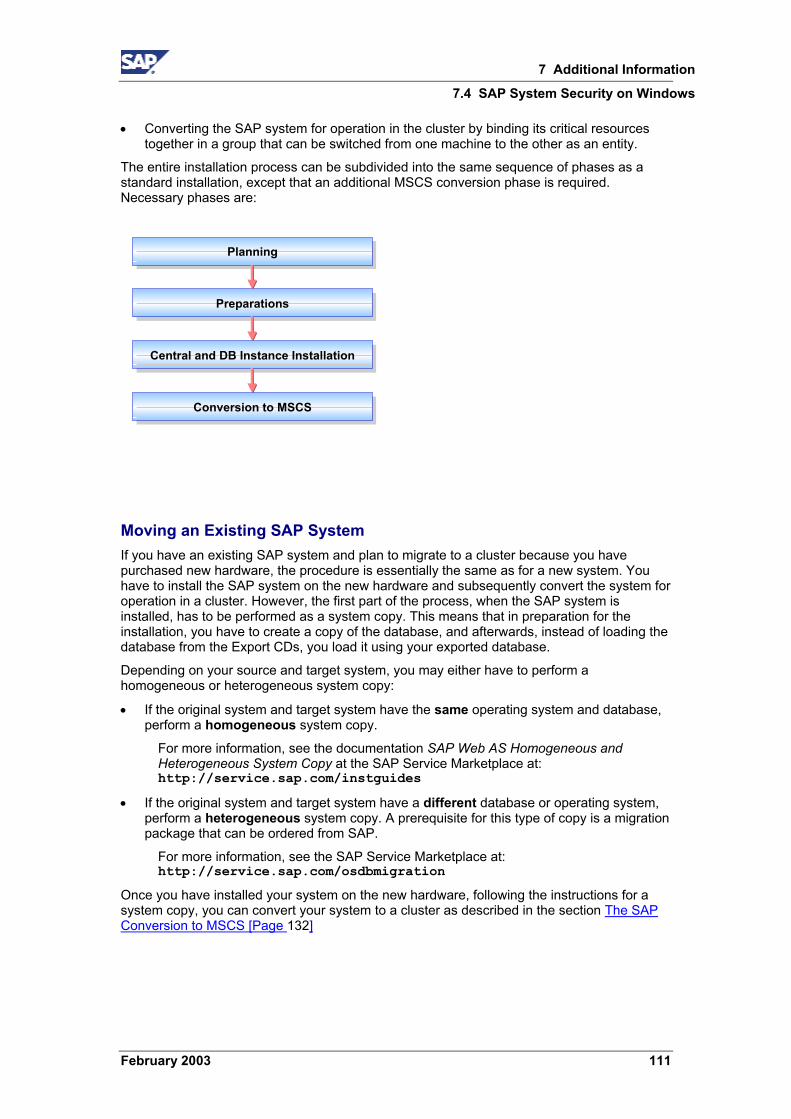
7 Additional Information
7.4 SAP System Security on Windows
February 2003 111
• Converting the SAP system for operation in the cluster by binding its critical resources together in a group that can be switched from one machine to the other as an entity.
The entire installation process can be subdivided into the same sequence of phases as a standard installation, except that an additional MSCS conversion phase is required. Necessary phases are:
PreparationsPreparations
Central and DB Instance InstallationCentral and DB Instance Installation
PlanningPlanning
Conversion to MSCSConversion to MSCS
Moving an Existing SAP System If you have an existing SAP system and plan to migrate to a cluster because you have purchased new hardware, the procedure is essentially the same as for a new system. You have to install the SAP system on the new hardware and subsequently convert the system for operation in a cluster. However, the first part of the process, when the SAP system is installed, has to be performed as a system copy. This means that in preparation for the installation, you have to create a copy of the database, and afterwards, instead of loading the database from the Export CDs, you load it using your exported database.
Depending on your source and target system, you may either have to perform a homogeneous or heterogeneous system copy:
• If the original system and target system have the same operating system and database, perform a homogeneous system copy.
For more information, see the documentation SAP Web AS Homogeneous and Heterogeneous System Copy at the SAP Service Marketplace at: http://service.sap.com/instguides
• If the original system and target system have a different database or operating system, perform a heterogeneous system copy. A prerequisite for this type of copy is a migration package that can be ordered from SAP.
For more information, see the SAP Service Marketplace at: http://service.sap.com/osdbmigration
Once you have installed your system on the new hardware, following the instructions for a system copy, you can convert your system to a cluster as described in the section The SAP Conversion to MSCS [Page 132]
7 Additional Information
7.4 SAP System Security on Windows
112 February 2003
The documentation for a homogeneous or heterogeneous system copy does not include the cluster-specific information you need for cluster hardware. It is therefore important to also carefully read this guide and follow all additional instructions given for the cluster.
8 Installation Planning for MSCS
8.1 Checking Hardware Requirements for MSCS
February 2003 113
8 Installation Planning for MSCS Purpose The installation of the SAP system on cluster hardware must begin with a planning phase in which you ensure that the prerequisites for the installation can be met. Careful planning ensures that the actual installation procedure runs smoothly and no time is lost solving avoidable problems.
Process Flow When you plan the installation, there are a number of points you need to focus on:
• Hardware and software requirements
You need to make sure that that you can meet the hardware and software requirements that are specified for an SAP MSCS installation. Both SAP and Microsoft specify minimal requirements that you have to fulfill to ensure that the newly installed system can be operated successfully.
• Distribution of components to storage devices
You need to work out how to distribute the software components to the storage devices of the cluster hardware in accordance with a set of rules and guidelines.
The cluster hardware is equipped with two sets of disks; local disks that are attached directly to one of the nodes and shared disks that can be accessed by both nodes via a shared interconnect. During the planning phase you must work out which components have to be stored on local disks, which on shared disks and which have to be separated to different disks for performance and security reasons.
• IP Addresses and host names
The operation of a cluster fundamentally depends on the correct configuration of addresses in the network. In the planning phase, you need to obtain a predefined set of IP addresses and host names from the system administrator so that these are available for the later installation process. Altogether you need at least 7 IP addresses and host names to set up the addressing as prescribed.
8.1 Checking Hardware Requirements for MSCS Use The hardware on which you install an SAP system for MSCS must meet certain minimal requirements. This ensures that the system can take advantage of the MSCS functionality and achieve acceptable levels of performance.
Procedure 1. Check that the hardware on which you intend to install the system is included in the
Microsoft list of certified hardware for cluster installations and that the hardware components are certified by AddOn Systemhaus GmbH. You can access lists of certified clusters and components on the Internet at: http://www.microsoft.com/hcl
http://addon.saponwin.com
2. Ensure that both nodes of the cluster are connected by a private and public network:
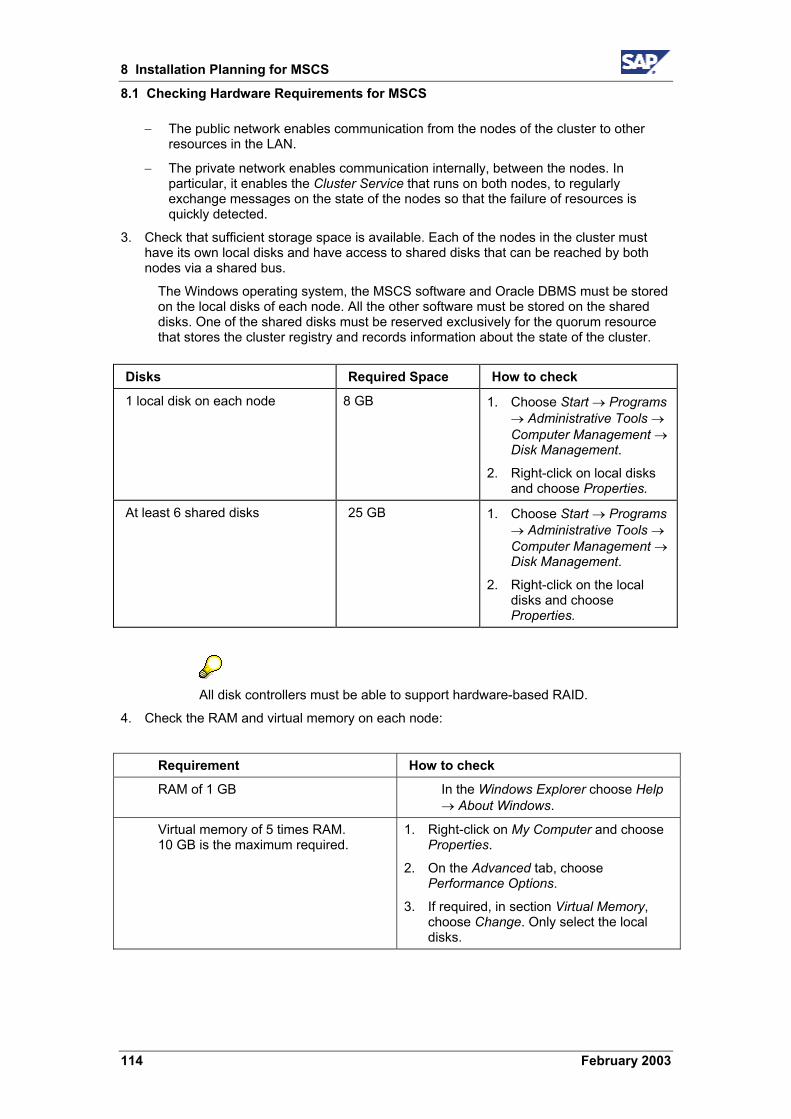
8 Installation Planning for MSCS
8.1 Checking Hardware Requirements for MSCS
114 February 2003
− The public network enables communication from the nodes of the cluster to other resources in the LAN.
− The private network enables communication internally, between the nodes. In particular, it enables the Cluster Service that runs on both nodes, to regularly exchange messages on the state of the nodes so that the failure of resources is quickly detected.
3. Check that sufficient storage space is available. Each of the nodes in the cluster must have its own local disks and have access to shared disks that can be reached by both nodes via a shared bus.
The Windows operating system, the MSCS software and Oracle DBMS must be stored on the local disks of each node. All the other software must be stored on the shared disks. One of the shared disks must be reserved exclusively for the quorum resource that stores the cluster registry and records information about the state of the cluster.
Disks Required Space How to check
1 local disk on each node 8 GB 1. Choose Start → Programs → Administrative Tools → Computer Management → Disk Management.
2. Right-click on local disks and choose Properties.
At least 6 shared disks 25 GB 1. Choose Start → Programs → Administrative Tools → Computer Management → Disk Management.
2. Right-click on the local disks and choose Properties.
All disk controllers must be able to support hardware-based RAID.
4. Check the RAM and virtual memory on each node:
Requirement How to check
RAM of 1 GB In the Windows Explorer choose Help → About Windows.
Virtual memory of 5 times RAM. 10 GB is the maximum required.
1. Right-click on My Computer and choose Properties.
2. On the Advanced tab, choose Performance Options.
3. If required, in section Virtual Memory, choose Change. Only select the local disks.
8 Installation Planning for MSCS
8.2 Checking Software Requirements for MSCS
February 2003 115
8.2 Checking Software Requirements for MSCS Use When you install the SAP system on cluster hardware, you have to use the software versions specified in the list below.
Procedure Check that the software you install on the cluster nodes meets the following requirements:
Software Requirement How to check
English international version with at least service pack 2 of Windows 2000 Advanced Server or Windows 2000 Data Center Server
1 hot fix (Service Pack 2 only)
1. Choose Start → Programs → Accessories → Command Prompt.
2. Enter the command winver
MSCS software –
Oracle Enterprise Edition Oracle 9.2.0 and patch set 9.2.0.2.1
–
Oracle Fail Safe software version 3.3.1 –
Windows 2000 Resource Kit is strongly recommended to enable support.
–
8.3 Distribution of Components to Disks for MSCS One of the central points to keep in mind, when planning the installation, is that the cluster has three different sets of disks:
• Disk arrays connected locally to node A
• Disk arrays connected locally to node B
• Disk arrays connected to both node A and B via a shared bus, providing shared storage for both nodes
Some system components have to be installed on both node A and B of the cluster using the local storage of each node, other components have to be installed once for both nodes on the shared storage. The following graphic illustrates how the software must be distributed to different volumes of a RAID disk system. Notice that the database files, the SAP system executables and the quorum resource have to be located on different RAID volumes. Only with this distribution of files to distinct volumes is it possible to move the SAP system and database as separate entities in a failover situation.
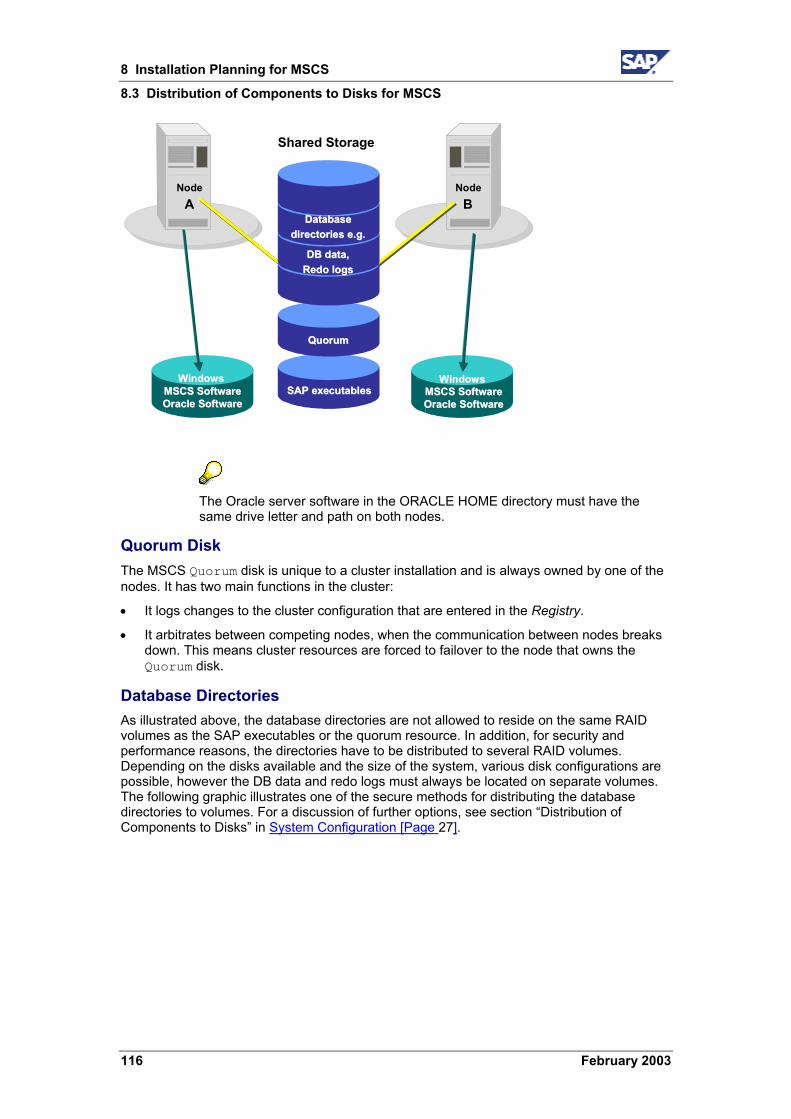
8 Installation Planning for MSCS
8.3 Distribution of Components to Disks for MSCS
116 February 2003
SAP SAP executablesexecutables
NodeNodeA B
Windows Windows MSCS SoftwareMSCS SoftwareOracle Oracle SoftwareSoftware
Windows Windows MSCS SoftwareMSCS SoftwareOracle Oracle SoftwareSoftware
Shared Storage
DatabaseDatabasedirectoriesdirectories e.g. e.g.
DBDB data data,,Redo logsRedo logs
QuorumQuorum
The Oracle server software in the ORACLE HOME directory must have the same drive letter and path on both nodes.
Quorum Disk The MSCS Quorum disk is unique to a cluster installation and is always owned by one of the nodes. It has two main functions in the cluster:
• It logs changes to the cluster configuration that are entered in the Registry.
• It arbitrates between competing nodes, when the communication between nodes breaks down. This means cluster resources are forced to failover to the node that owns the Quorum disk.
Database Directories As illustrated above, the database directories are not allowed to reside on the same RAID volumes as the SAP executables or the quorum resource. In addition, for security and performance reasons, the directories have to be distributed to several RAID volumes. Depending on the disks available and the size of the system, various disk configurations are possible, however the DB data and redo logs must always be located on separate volumes. The following graphic illustrates one of the secure methods for distributing the database directories to volumes. For a discussion of further options, see section “Distribution of Components to Disks” in System Configuration [Page 27].
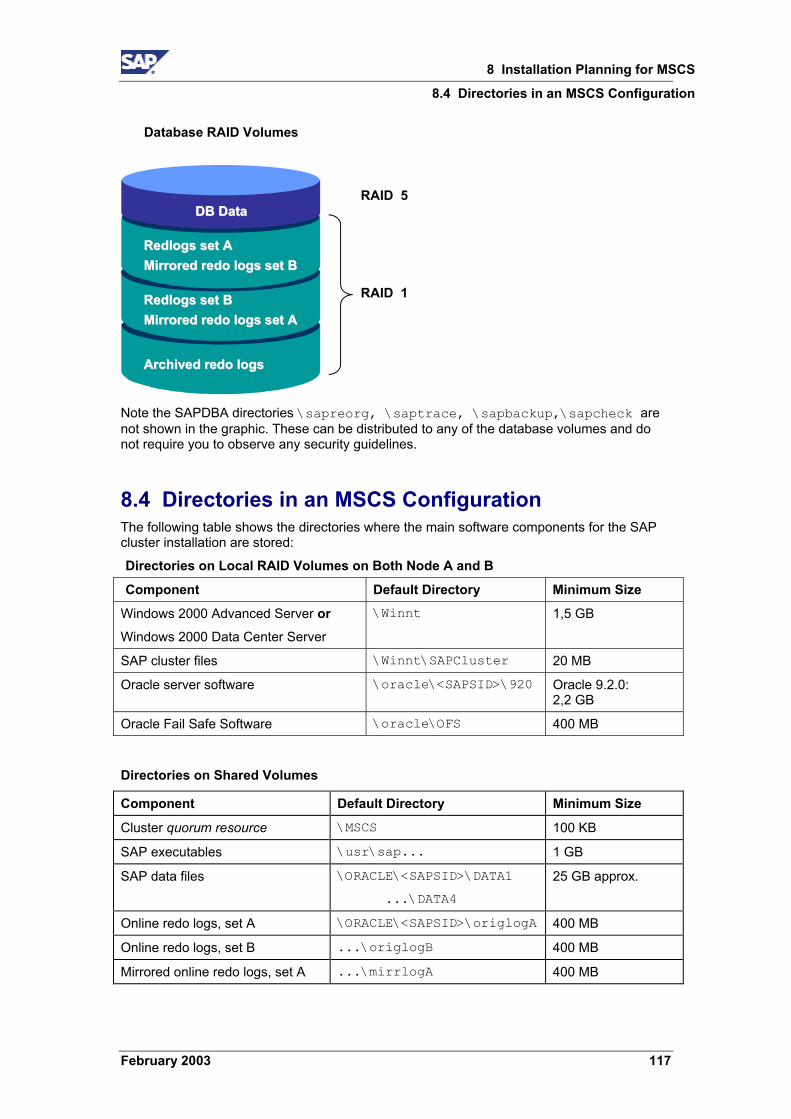
8 Installation Planning for MSCS
8.4 Directories in an MSCS Configuration
February 2003 117
Archived redo logsArchived redo logs
RedlogsRedlogs setset B BMirrored redo logsMirrored redo logs setset A A
Redlogs setRedlogs set A AMirrored redo logsMirrored redo logs setset B B
Database RAID Volumes
DBDB Data DataRAID 5
RAID 1
Note the SAPDBA directories \sapreorg, \saptrace, \sapbackup,\sapcheck are not shown in the graphic. These can be distributed to any of the database volumes and do not require you to observe any security guidelines.
8.4 Directories in an MSCS Configuration The following table shows the directories where the main software components for the SAP cluster installation are stored:
Directories on Local RAID Volumes on Both Node A and B
Component Default Directory Minimum Size
Windows 2000 Advanced Server or Windows 2000 Data Center Server
\Winnt 1,5 GB
SAP cluster files \Winnt\SAPCluster 20 MB
Oracle server software \oracle\<SAPSID>\920 Oracle 9.2.0: 2,2 GB
Oracle Fail Safe Software \oracle\OFS 400 MB
Directories on Shared Volumes
Component Default Directory Minimum Size
Cluster quorum resource \MSCS 100 KB
SAP executables \usr\sap... 1 GB
SAP data files \ORACLE\<SAPSID>\DATA1
...\DATA4
25 GB approx.
Online redo logs, set A \ORACLE\<SAPSID>\origlogA 400 MB
Online redo logs, set B ...\origlogB 400 MB
Mirrored online redo logs, set A ...\mirrlogA 400 MB
8 Installation Planning for MSCS
8.5 Obtaining Adresses for MSCS
118 February 2003
Mirrored online redo logs, set B ...\mirrlogB 400 MB
Backup of online redo logs ...\saparch 5 - 100 GB
SAPDBA directories ...\sapreorg,
...\saptrace,
...\sapbackup,
...\sapcheck
2 GB
In a live system with intense I/O activity, you must reserve at least 3 times the minimum amount of space specified above for the redo logs and mirrored redo logs.
SapCluster Directory In an SAP cluster installation, an additional directory is created under the Windows system directory: <DRIVE>:\<Windows_directory>\SapCluster This contains all the SAP files required by both cluster nodes, independently of the node the SAP instance is running on. The files are database utilities and executables used by the operating system monitor (saposcol). The directory is added to the path variable of the user <SAPSID>adm.
8.5 Obtaining Adresses for MSCS Use An important aspect of the installation on cluster hardware is the correct configuration of addresses. During the installation procedure 7 IP addresses and host names have to be assigned to the system. Therefore, before you can begin with any practical tasks, you have to obtain these names and addresses from the system administrator.
Procedure Ask the system administrator to give you the addresses and host names listed in the table below. It is helpful to enter your own addresses and names directly under the examples in the columns of the table so that they are available for reference during the course of the installation.
The column Defined during indicates at which stage of the installation the addresses are defined in the system.
Record the names exactly as specified by the system administrator, carefully observing upper and lowercase letters.
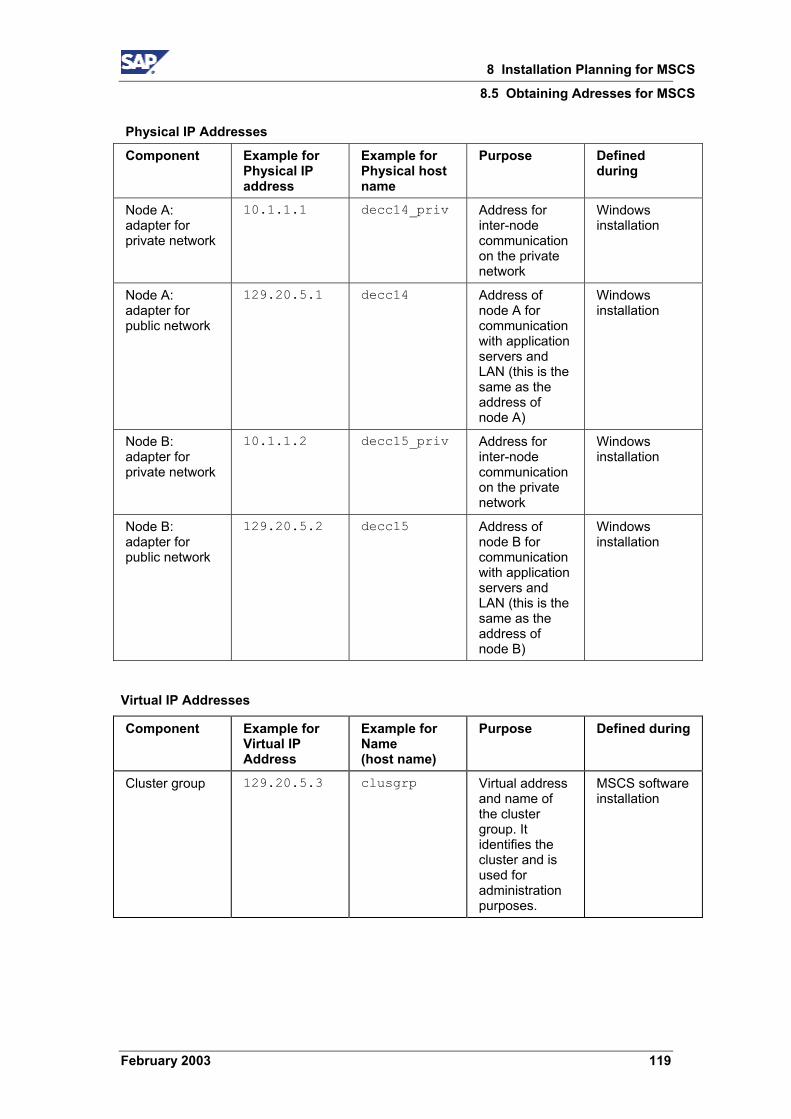
8 Installation Planning for MSCS
8.5 Obtaining Adresses for MSCS
February 2003 119
Physical IP Addresses
Component Example for Physical IP address
Example for Physical host name
Purpose Defined during
Node A: adapter for private network
10.1.1.1 decc14_priv Address for inter-node communication on the private network
Windows installation
Node A: adapter for public network
129.20.5.1 decc14 Address of node A for communication with application servers and LAN (this is the same as the address of node A)
Windows installation
Node B: adapter for private network
10.1.1.2 decc15_priv Address for inter-node communication on the private network
Windows installation
Node B: adapter for public network
129.20.5.2 decc15 Address of node B for communication with application servers and LAN (this is the same as the address of node B)
Windows installation
Virtual IP Addresses
Component Example for Virtual IP Address
Example for Name (host name)
Purpose Defined during
Cluster group 129.20.5.3 clusgrp Virtual address and name of the cluster group. It identifies the cluster and is used for administration purposes.
MSCS software installation
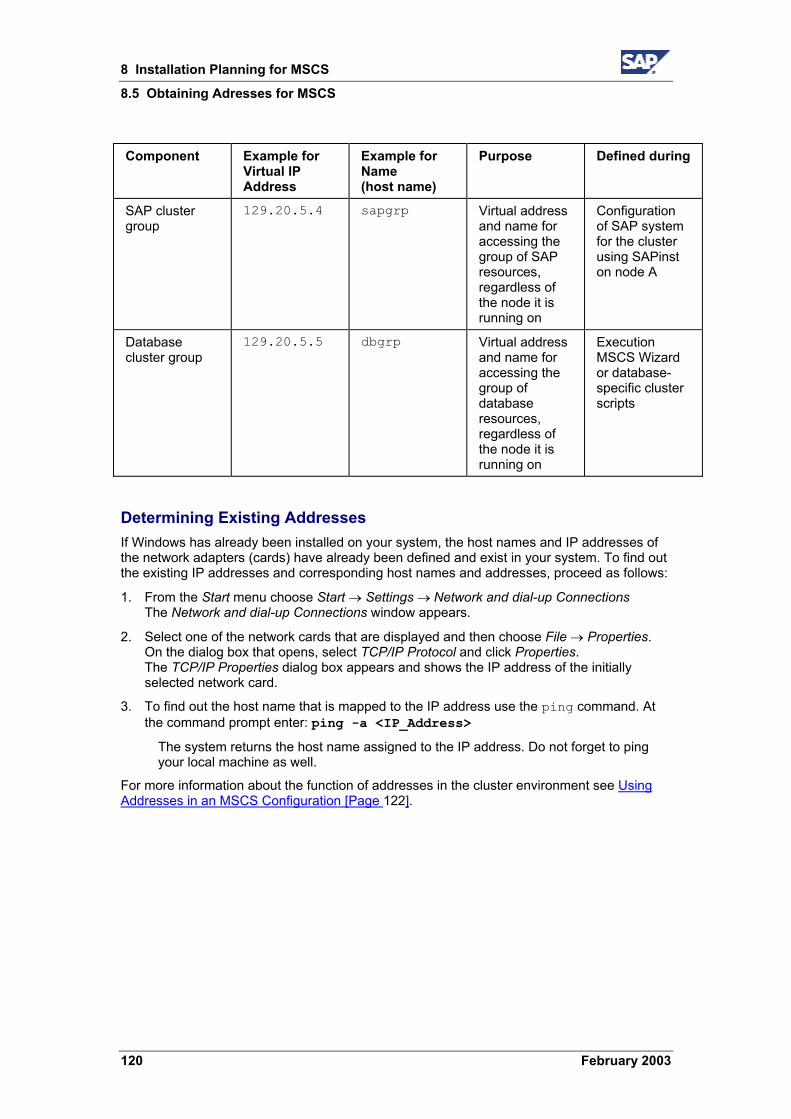
8 Installation Planning for MSCS
8.5 Obtaining Adresses for MSCS
120 February 2003
Component Example for Virtual IP Address
Example for Name (host name)
Purpose Defined during
SAP cluster group
129.20.5.4 sapgrp Virtual address and name for accessing the group of SAP resources, regardless of the node it is running on
Configuration of SAP system for the cluster using SAPinst on node A
Database cluster group
129.20.5.5 dbgrp Virtual address and name for accessing the group of database resources, regardless of the node it is running on
Execution MSCS Wizard or database-specific cluster scripts
Determining Existing Addresses If Windows has already been installed on your system, the host names and IP addresses of the network adapters (cards) have already been defined and exist in your system. To find out the existing IP addresses and corresponding host names and addresses, proceed as follows:
1. From the Start menu choose Start → Settings → Network and dial-up Connections The Network and dial-up Connections window appears.
2. Select one of the network cards that are displayed and then choose File → Properties. On the dialog box that opens, select TCP/IP Protocol and click Properties. The TCP/IP Properties dialog box appears and shows the IP address of the initially selected network card.
3. To find out the host name that is mapped to the IP address use the ping command. At the command prompt enter: ping -a <IP_Address>
The system returns the host name assigned to the IP address. Do not forget to ping your local machine as well.
For more information about the function of addresses in the cluster environment see Using Addresses in an MSCS Configuration [Page 122].
9 Installation Preparations for MSCS
8.5 Obtaining Adresses for MSCS
February 2003 121
9 Installation Preparations for MSCS Purpose In a preparatory phase, before you install the central instance and database of the SAP system, you need to perform a number of practical tasks to ensure that subsequent installation steps run smoothly and can be completed successfully. The following gives you an overview of the tasks involved and their sequence.
Prerequisites The hardware and software that is available for the installation must meet the requirements specified by SAP and Microsoft.
Process Flow The following table lists all the preparatory tasks you need to perform before beginning with the installation of the SAP system.
Some of the steps listed in the table are part of the standard SAP installation procedure, others are cluster-specific and are only necessary for the MSCS installation:
• Steps marked with ! in the Cluster-Specific column are supplementary steps that are only necessary for an installation on cluster hardware. These steps are explained in detail in the following sections.
• Steps that are not marked are part of the standard SAP installation procedure and are described in earlier sections of this documentation. Please refer to these sections whenever they are specified to find detailed instructions.
A machine with a domain controller may not be used as a cluster node.
Cluster-specific
Task Comment
1 ! On both nodes, install the English international version of Windows 2000 Advanced Server with at least service pack 2.
See the Windows documentation.
2 ! On both nodes, install the MSCS software. You have to specify the disk on which the quorum resource is to be located. It must reside on a shared disk, but not on the same disk as the SAP system or database files and data.
3 ! Service Pack 2 only: On both nodes, install the Windows 2000 hot fix
Follow the instructions in the Microsoft K l d B A i l

9 Installation Preparations for MSCS
9.1 Using Addresses in an MSCS Configuration
122 February 2003
Cluster-specific
Task Comment
Knowledge Base Article Q265017 to obtain the hot fix from Microsoft.
4 ! On both nodes, you adjust the size of the paging file and the file cache.
See Hardware and Software Requirements Check [Page 38] and Reducing the Size of the File Cache [Page 46]
5 ! You map the 7 IP addresses to host names on the Domain Name Server or in the hosts file.
See Mapping Host Names to IP Addresses [Page 124].
6 ! You check the IP address and corresponding host name assignment.
See Checking the Mapping of Host Names for MSCS [Page 125].
7 ! Only on node A, you manually assign meaningful drive letters to the shared disks using the Windows Disk Administrator.
Both nodes must access the shared disks with the same drive letters. The letters assigned on node A are copied to node B in the next step when the MSCS software is installed.
See the section below Assigning Drive Letters [Page 127].
9.1 Using Addresses in an MSCS Configuration A part of the installation process which is unique to a cluster is the configuration of host names and IP addresses in the network. This is a particularly important task because the addressing plays a key role in the switchover procedure. Only if addressing is set up correctly, can the system take advantage of the cluster functionality and switch between nodes when hardware problems arise.
The following briefly explains the different types of addresses and their function in the switchover mechanism of the cluster.
Types of Addresses In a correctly configured cluster, there are 7 IP addresses and corresponding host names. Some of the addresses are physical addresses that are assigned to the network adapters (cards), others are virtual addresses that are assigned to the cluster groups.
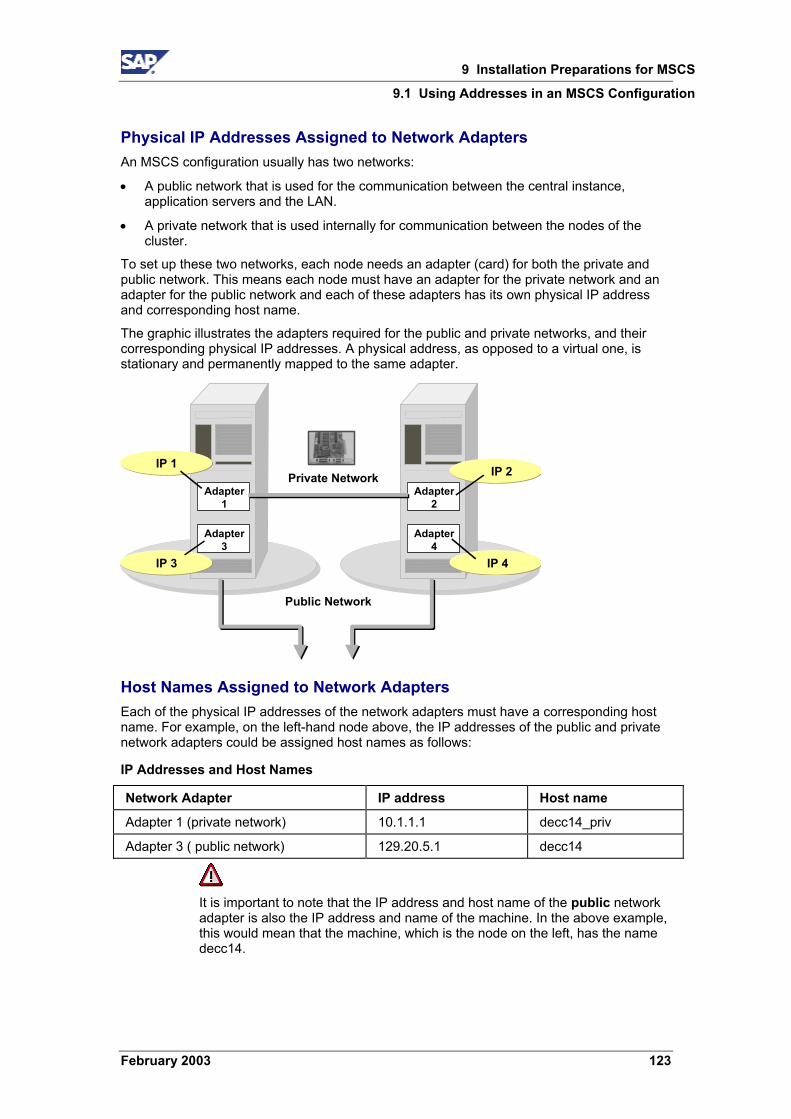
9 Installation Preparations for MSCS
9.1 Using Addresses in an MSCS Configuration
February 2003 123
Physical IP Addresses Assigned to Network Adapters An MSCS configuration usually has two networks:
• A public network that is used for the communication between the central instance, application servers and the LAN.
• A private network that is used internally for communication between the nodes of the cluster.
To set up these two networks, each node needs an adapter (card) for both the private and public network. This means each node must have an adapter for the private network and an adapter for the public network and each of these adapters has its own physical IP address and corresponding host name.
The graphic illustrates the adapters required for the public and private networks, and their corresponding physical IP addresses. A physical address, as opposed to a virtual one, is stationary and permanently mapped to the same adapter.
Adapter1
Adapter3
IP 1
Adapter2
Adapter4
Private Network
Public Network
IP 3
IP 2
IP 4
Host Names Assigned to Network Adapters Each of the physical IP addresses of the network adapters must have a corresponding host name. For example, on the left-hand node above, the IP addresses of the public and private network adapters could be assigned host names as follows:
IP Addresses and Host Names
Network Adapter IP address Host name
Adapter 1 (private network) 10.1.1.1 decc14_priv
Adapter 3 ( public network) 129.20.5.1 decc14
It is important to note that the IP address and host name of the public network adapter is also the IP address and name of the machine. In the above example, this would mean that the machine, which is the node on the left, has the name decc14.

9 Installation Preparations for MSCS
9.1 Using Addresses in an MSCS Configuration
124 February 2003
Avoiding Confusion
Do not confuse the host name with the so-called computer name. Each node also has a computer name which is often the same as the host name, but is written in uppercase. The computer name is displayed in the node column of the Fail Safe Manager and Cluster Administrator, however it is not required for the TCP/IP communication in the cluster. When you configure IP addresses and corresponding names, keep in mind that it is the host names that are important for the cluster and not the computer names.
Virtual IP Addresses Assigned to Cluster Groups When the SAP system has been installed and the cluster fully configured, the critical system resources are bound together in three different groups. Each of these groups requires a virtual IP address and host name that is permanently mapped to the group and not to a particular node. This has the advantage that whenever a group is moved between nodes its IP address and host name move together with it.
The three groups in a cluster configuration are the:
• SAP cluster group
• Database cluster group
• Cluster group
Each group comprises a set of related resources that work together to offer a service to the system. So, for example, the database cluster group comprises all the resources that enable the database server to fulfill the requests of a client. When the group is moved from one node to the other, due to node failure, the virtual IP address and host name move with it. Therefore, there is a failover not only of resources, but also of the virtual IP address and host name. As a result, all clients can still reach the database server, using the same address as previously.
The following graphic illustrates the ability of the virtual addresses of the database group and SAP group to move from one node to the other when failover occurs.
Virtual IP 1Cluster Group
Node
A
Node
B
Virtual IP 2R/3 Group
Virtual IP 3DB Group

9 Installation Preparations for MSCS
9.2 Mapping Host Names to IP Addresses
February 2003 125
9.2 Mapping Host Names to IP Addresses Use To enable correct operation of the failover mechanism, you have to map all IP addresses in the cluster to host names. You can do this on a DNS server or in the Windows hosts file. The purpose of the mapping is to enable the system to translate host names into IP addresses. Host names are normally used for administrative tasks because they are easier to use than the long, numeric IP addresses. However, the system can only respond to host names if they are translated into IP addresses on the basis of the information stored on a DNS Server or in the hosts file.
Prerequisites To map IP addresses to host names on the DNS Server or in the hosts file, you need the list of addresses [Page 118] you obtained from the system administrator during the planning phase of the installation. Map the host names to addresses after you have installed Windows.
Procedure
Enter each of the 7 IP addresses required for the cluster configuration! Missing entries or incorrect entries can lead to problems during later stages of the installation.
Take care when entering names. They are case-sensitive and have to be entered exactly as specified by the system administrator.
Two approaches are possible for the mapping:
• On the DNS Server
If your system infrastructure includes a DNS server, map the host names to IP addresses on this server.
This approach is recommended because it only requires a single entry. If the mapping is done in the hosts file, several versions of the same file have to be maintained because each machine in the system has its own hosts file.
• In the hosts file
If you do not have a DNS server in your system infrastructure, map the IP addresses to host names in the hosts file. This is located in the default directory for Windows:
<Drive>:\WINNT\system32\drivers\etc
The hosts file has to be identical on both nodes of the cluster, and on all application servers and front ends. The newly edited file therefore has to be copied to all these locations in the system.
9 Installation Preparations for MSCS
9.3 Checking the Mapping of Host Names for MSCS
126 February 2003
9.3 Checking the Mapping of Host Names for MSCS The mapping of host names to IP addresses is crucial for the operation of the cluster. Therefore, after making entries on the DNS Server or in the hosts file, you must perform a number of checks to ensure that the mapping has been set up correctly.
Under no circumstances should these checks be omitted. Errors are frequently discovered and if not corrected they cause problems later.
Prerequisites You have mapped IP addresses to host names on the DNS Server or in the hosts file.
Procedure
Checking Address Mapping Carry out the following check for each of the 7 IP addresses and compare the output with
your own record of addresses and host names.
1. Open a command prompt. For each IP address enter the following two commands: ping -a <IP_Address>
The system returns the host name that is assigned to the IP address. ping hostname
The system returns the IP address that is assigned to the host name.
Keep in mind that when you ping the IP address of the public network adapter on a specific node, the name returned is not only the name of the network adapter, but also the name of that specific node.
If the address you are checking already exists in the system, you will also receive a reply from the host. For example, after the installation of Windows and the configuration of the network, you get a reply when entering the IP addresses of the network adapters.
2. Look out for the following possible errors:
• If upper and lowercase are incorrect in the output, there is an error. Be sure to eliminate the error before proceeding with the installation.
• If you enter the name of the public network adapter, which is usually also the name of the local host, and the system returns the IP address of the private network, there is an error in the network bindings.
Correcting Network Bindings If you discover an error in the network bindings, you can correct it by doing the following on both nodes:
1. From the Start menu choose Start → Settings → Network and Dial-up Connections
2. The Network and Dial-up Connections window appears.
3. Choose Advanced → Advanced Settings
9 Installation Preparations for MSCS
9.4 Assigning Drive Letters
February 2003 127
4. On the Adapters and Bindings tab, the network cards of the private and public networks are displayed for the current node.
5. Change the order in which the cards are listed, if necessary. The card of the public network must be displayed before that of the private network. Use the Move Up and Move down arrows to change the order of entries.
6. Repeat the procedure for any other TCP/IP protocols that might be listed.
9.4 Assigning Drive Letters Use In a cluster, the shared disks that can be accessed by both nodes via a common bus must be addressed by both nodes with the same drive letters. During the installation of the MSCS software, the assignment of drive letters on node A is copied to node B. Therefore, to simplify disk administration, it is advisable to assign meaningful drive letters to the shared disks on node A before installing the MSCS software.
Procedure 1. Choose Start → Programs → Administrative Tools → Computer Management → Storage
→ Disk Management.
2. Select a disk and choose Action → All tasks → Change drive. In the dialog box that appears, enter a new drive letter.
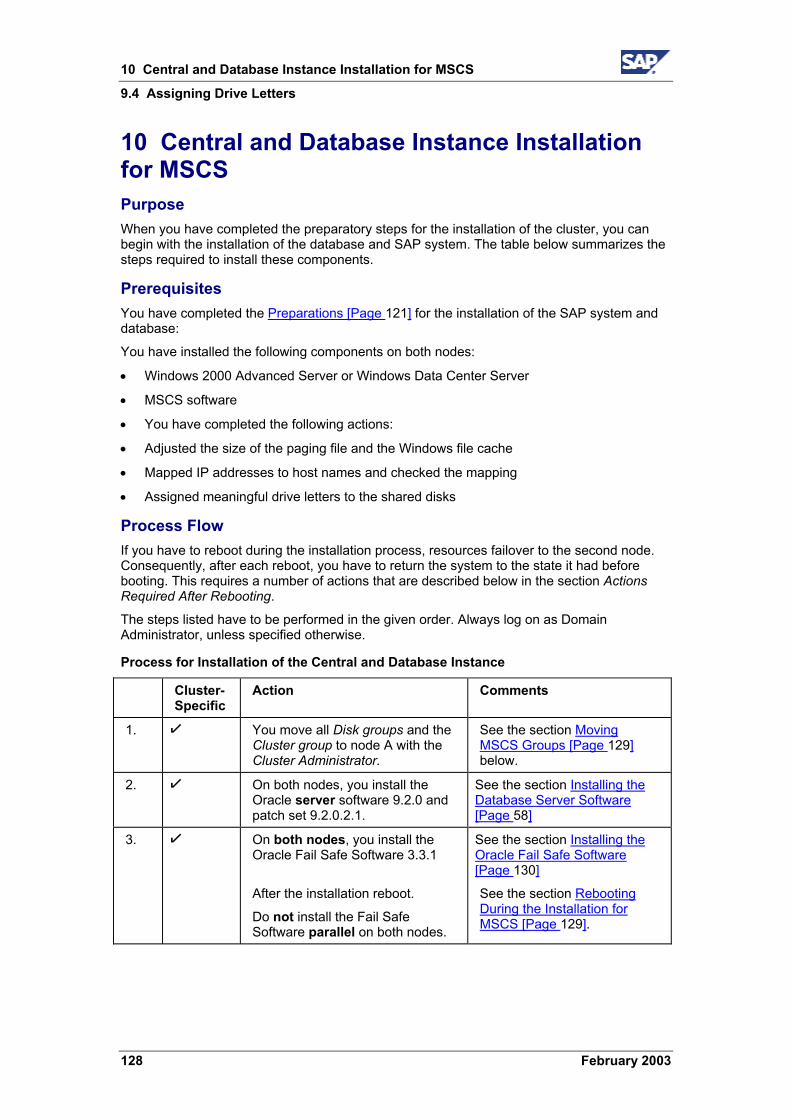
10 Central and Database Instance Installation for MSCS
9.4 Assigning Drive Letters
128 February 2003
10 Central and Database Instance Installation for MSCS Purpose When you have completed the preparatory steps for the installation of the cluster, you can begin with the installation of the database and SAP system. The table below summarizes the steps required to install these components.
Prerequisites You have completed the Preparations [Page 121] for the installation of the SAP system and database:
You have installed the following components on both nodes:
• Windows 2000 Advanced Server or Windows Data Center Server
• MSCS software
• You have completed the following actions:
• Adjusted the size of the paging file and the Windows file cache
• Mapped IP addresses to host names and checked the mapping
• Assigned meaningful drive letters to the shared disks
Process Flow If you have to reboot during the installation process, resources failover to the second node. Consequently, after each reboot, you have to return the system to the state it had before booting. This requires a number of actions that are described below in the section Actions Required After Rebooting.
The steps listed have to be performed in the given order. Always log on as Domain Administrator, unless specified otherwise.
Process for Installation of the Central and Database Instance
Cluster-Specific
Action Comments
1. ! You move all Disk groups and the Cluster group to node A with the Cluster Administrator.
See the section Moving MSCS Groups [Page 129] below.
2. ! On both nodes, you install the Oracle server software 9.2.0 and patch set 9.2.0.2.1.
See the section Installing the Database Server Software [Page 58]
3. ! On both nodes, you install the Oracle Fail Safe Software 3.3.1
After the installation reboot.
Do not install the Fail Safe Software parallel on both nodes.
See the section Installing the Oracle Fail Safe Software [Page 130]
See the section Rebooting During the Installation for MSCS [Page 129].
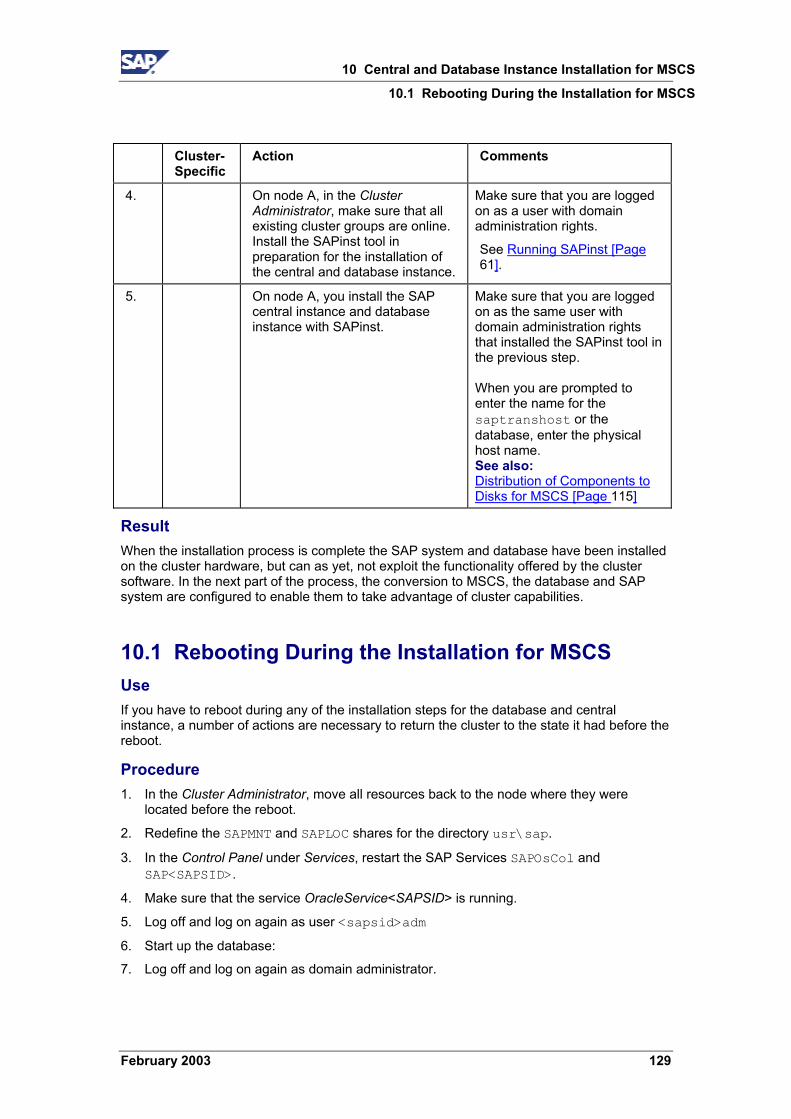
10 Central and Database Instance Installation for MSCS
10.1 Rebooting During the Installation for MSCS
February 2003 129
Cluster-Specific
Action Comments
4. On node A, in the Cluster Administrator, make sure that all existing cluster groups are online. Install the SAPinst tool in preparation for the installation of the central and database instance.
Make sure that you are logged on as a user with domain administration rights.
See Running SAPinst [Page 61].
5. On node A, you install the SAP central instance and database instance with SAPinst.
Make sure that you are logged on as the same user with domain administration rights that installed the SAPinst tool in the previous step. When you are prompted to enter the name for the saptranshost or the database, enter the physical host name. See also: Distribution of Components to Disks for MSCS [Page 115]
Result When the installation process is complete the SAP system and database have been installed on the cluster hardware, but can as yet, not exploit the functionality offered by the cluster software. In the next part of the process, the conversion to MSCS, the database and SAP system are configured to enable them to take advantage of cluster capabilities.
10.1 Rebooting During the Installation for MSCS Use If you have to reboot during any of the installation steps for the database and central instance, a number of actions are necessary to return the cluster to the state it had before the reboot.
Procedure 1. In the Cluster Administrator, move all resources back to the node where they were
located before the reboot.
2. Redefine the SAPMNT and SAPLOC shares for the directory usr\sap.
3. In the Control Panel under Services, restart the SAP Services SAPOsCol and SAP<SAPSID>.
4. Make sure that the service OracleService<SAPSID> is running.
5. Log off and log on again as user <sapsid>adm
6. Start up the database:
7. Log off and log on again as domain administrator.

10 Central and Database Instance Installation for MSCS
10.2 Moving MSCS Groups
130 February 2003
10.2 Moving MSCS Groups Use During various stages of the cluster installation, you have to move the database, SAP or disk cluster groups from one node to the other before you can continue.
Prerequisites The groups you want to move are configured and are visible in the Cluster Administrator.
Procedure 1. Start the Cluster Administrator from the Start menu with Programs → Administrative
Tools → Cluster Administrator
The Cluster Administrator opens.
2. In the Cluster Administrator, select a group, for example Disk Group 1, and then drag it to the required node on the left-hand pane. Repeat this procedure for each group you want to move.
10.3 Installing the Oracle Fail Safe Software Use To enable the database to take advantage of the cluster functionality, it is necessary to install an additional component, the Oracle Fail Safe software.
Prerequisites You have installed the Oracle database software locally on both nodes.
Procedure
Installing the Fail Safe Software Proceed as follows on both nodes:
1. Make sure that all Oracle Services have been stopped on the node where you are installing.
2. In the Cluster Administrator make sure that:
− The second cluster node is not set to Pause
− The SAP group is offline on the node where you are installing
3. Make sure that the Cluster Server service is started on both nodes.
4. Insert the CD Oracle Fail Safe in the CD drive.
5. Start the Oracle Universal Installer. To do this, double-click the file sapofs.cmd in the directory <CD_DRIVE>:\NT\I386\
The Installer opens and guides you through the installation process in a series of screens. Enter the required information as follows:
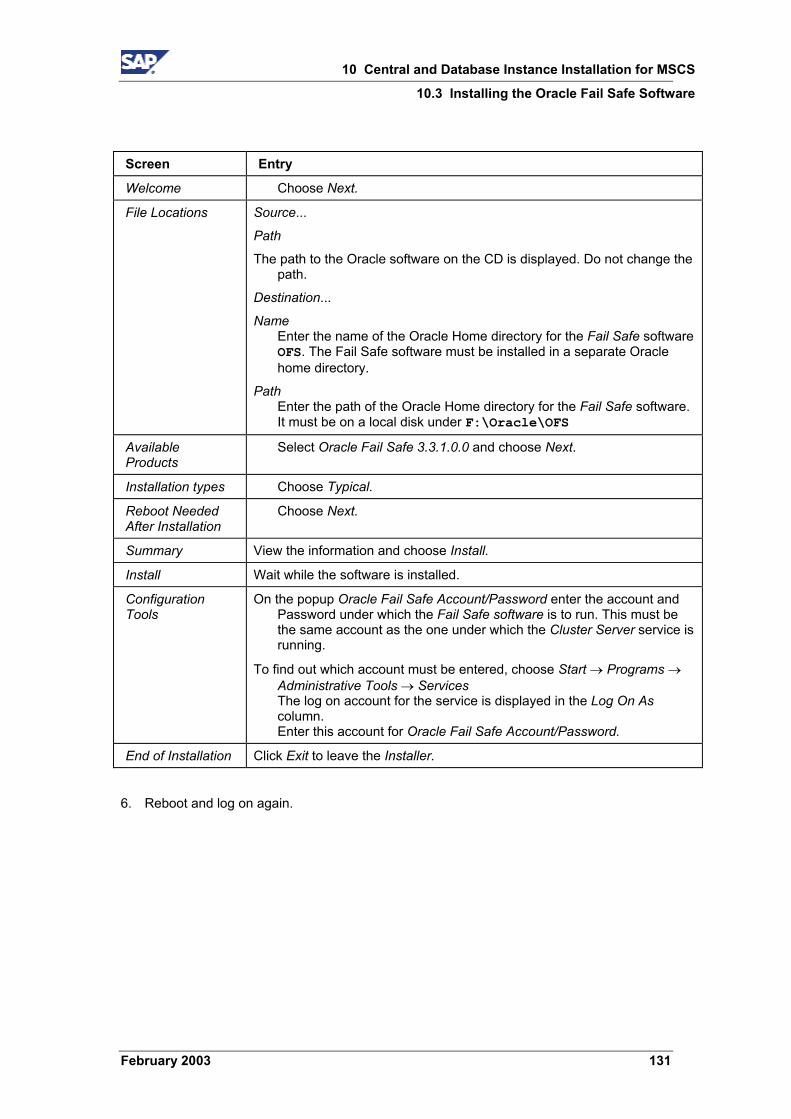
10 Central and Database Instance Installation for MSCS
10.3 Installing the Oracle Fail Safe Software
February 2003 131
Screen Entry
Welcome Choose Next.
File Locations Source...
Path
The path to the Oracle software on the CD is displayed. Do not change the path.
Destination...
Name Enter the name of the Oracle Home directory for the Fail Safe software OFS. The Fail Safe software must be installed in a separate Oracle home directory.
Path Enter the path of the Oracle Home directory for the Fail Safe software. It must be on a local disk under F:\Oracle\OFS
Available Products
Select Oracle Fail Safe 3.3.1.0.0 and choose Next.
Installation types Choose Typical.
Reboot Needed After Installation
Choose Next.
Summary View the information and choose Install.
Install Wait while the software is installed.
Configuration Tools
On the popup Oracle Fail Safe Account/Password enter the account and Password under which the Fail Safe software is to run. This must be the same account as the one under which the Cluster Server service is running.
To find out which account must be entered, choose Start → Programs → Administrative Tools → Services The log on account for the service is displayed in the Log On As column. Enter this account for Oracle Fail Safe Account/Password.
End of Installation Click Exit to leave the Installer.
6. Reboot and log on again.
11 The Conversion to MSCS
10.3 Installing the Oracle Fail Safe Software
132 February 2003
11 The Conversion to MSCS Purpose The conversion phase of the cluster installation configures the database and the SAP instances to enable them to interact with the cluster software and make use of the failover functionality.
Prerequisites The installation of the SAP central and database instance has been completed observing all special instructions for a cluster. The Oracle Fail Safe software has been installed on both nodes.
Process Flow The following table lists all the actions that are necessary during the conversion process and refers to the sections of the documentation where you can find detailed instructions. All actions are cluster-specific and are not part of the standard installation procedure for a SAP system.
Whenever you reboot during the installation process, resources failover to the second node. Consequently, after each reboot, you have to return the system to the state it had before booting. The actions required depend on the stage of the conversion procedure you have reached and are explained below in the section Actions Required after Rebooting.
Process of Converting the System to MSCS
Before you start the conversion to MSCS, make sure that you are logged on as domain administrator on node A and B. Add this user to the local administration group on both groups.
Cluster-Specific
Tasks Comments
1. ! On node A, make sure that the Oracle database group and SAP disk are online.
2. ! On node A, run setup.cmd to install the SAPinst files required for the cluster conversion.
On node A, make sure you are logged on as domain administrator and you are member of the local administration group
See Installing SAPinst for Cluster Conversion [Page 134].
3. ! On node A, you run the SAPinst option Configure the MSCS Node A for Oracle.
See the section Configuring Node A for MSCS [Page134].
11 The Conversion to MSCS
11.1 Rebooting during the Conversion
February 2003 133
Cluster-Specific
Tasks Comments
4. ! On node A, you convert the Oracle database to a Fail Safe database.
See the section Converting the DB to a Fail Safe Database [Page 135].
5. ! Check that the database group and SAP cluster group are available on node A. In the SAP cluster group, the resource SAP-R/3 <SAPSID> must be offline. All other resources of the SAP cluster group must be online.
6. ! On node B, run setup.cmd to install the SAPinst files required for the cluster conversion.
On node B, make sure you are logged on as the same domain administrator as of node A and you are member of the local administrator group.
See Installing SAPinst for Cluster Conversion [Page 134].
7. ! Configure node B for the cluster with SAPinst, using the option Configure the MSCS Node B for Oracle.
See the section Configuring Node B for MSCS [Page 137].
11.1 Rebooting during the Conversion Use If you have to reboot during any of the cluster conversion steps, a number of actions are necessary to return the cluster to the state it had before booting. Some of the actions depend on the stage of the conversion procedure you have reached, others are always necessary.
Procedure • After rebooting always:
− Move all resources back to the original node where they were located before the reboot, using the Cluster Administrator.
• If the SAP system is not yet cluster-enabled (Steps 1, 2 above):
− Redefine the SAPMNT and SAPLOC shares for the directory usr\sap
− Restart the SAP Services SAPOsCol and SAP<SAPSID>
• If the database is not yet cluster-enabled (Steps 1 to 3 above):
− Make sure that the service OracleService<SAPSID> is running
− Log off and log on again as user <sapsid>adm
− Start up the database.
− Log off and log on again as domain administrator
11 The Conversion to MSCS
134 February 2003
11.2 Installing SAPinst for Cluster Conversion Before you can use the SAPinst tool to convert node A and B for cluster operation, you must install the required SAPinst files on both nodes (local hard disks).
On node A, the SAPinst files were already installed when installing the central instance.
On node B, install the files by running setup.cmd from the directory <CD drive>: \SAPinst\NT. For more information, see Running SAPinst [Page 61].
11.3 Configuring Node A for MSCS Use To configure node A so that it functions properly in the cluster, you have to run the cluster configuration option offered by the SAPinst tool. When you run this option, amongst other things, it:
• Creates the SAP cluster group
• Copies tools to the SAPCluster directory
• Sets the SAPService to manual
• Ensures that the SAPOsCol service is started from the SAPCluster directory
Procedure 1. Make sure that you are logged on to node A as a user with domain and local
administration rights and as the same user that installed the SAP central and database instance.
2. Add this user to the local admininstration group on node A and B.
3. Run setup.cmd to install the SAPinst files required for the cluster conversion. For more information, refer to Running SAPinst [Page 61].
4. From the Start menu choose Programs → <SAPinst_menu_entry> → SAPinst server with GUI
The SAPinst window appears.
5. Choose Configure the MSCS Node A for Oracle.
6. Enter the parameter values that you are prompted for. For more information, refer to Input for Configuring Node A and Node B for MSCS [Page 138].
When all entries have been made, SAPinst begins processing. It converts the SAP instance on node A for operation in the cluster.
11 The Conversion to MSCS
11.4 Converting the DB to a Fail Safe DB
February 2003 135
11.4 Converting the DB to a Fail Safe DB Use The database must be cluster-enabled so that it can be switched between nodes as a group of resources. To do this, you create an Oracle Fail Safe group and then add the database of the SAP system to this group.
Prerequisites You have converted node A for operation in the cluster. See also Configuring Node A for MSCS [Page 134].
Procedure When you set up the Fail Safe database, you have to convert the database to a Fail Safe group and then add the database of the SAP system to this group.
Creating the Oracle Fail Safe Group On node A, create the Fail Safe database group as follows:
1. From the Windows menu choose Start � Programs � Oracle - <Home> � Oracle Fail Safe Manager. The window Add Cluster To Tree appears.
2. Insert your virtual cluster name.
3. Right-click on the cluster and choose Connect to cluster.
4. Enter the following and then confirm your entries with OK:
User name <user> (user with the account under which the service ClusterServer is running)
Password <password>
Cluster Alias <virtual_cluster_name> (name of the cluster you are installing)
Domain <domain_name>
5. Right-click on the cluster and choose Verify Cluster.
Both cluster nodes must be up and running for this step.
The window Clusterwide Operation:Verifying Fail Safe Cluster shows the steps that are executed to verify the cluster. When you are informed that the operation has completed successfully, close the window.
6. In the Oracle Fail Safe Manager, create the Fail Safe group ORACLE<SAPSID>.
Choose Groups → Create.
The window Create Group:... appears.
7. Enter the Group Name ORACLE<SAPSID>. In answer to the question Do you want to allow the group to failback to preferred node?, select Prevent failback.

11 The Conversion to MSCS
11.4 Converting the DB to a Fail Safe DB
136 February 2003
The window Finish Creating the Group appears and displays information about the group. Choose OK.
8. In the window Add Virtual Address, select Yes to indicate that you want to add a virtual address to the group.
The Add Resource to Group: - Virtual Address appears.
9. Select Show networks accessible by clients and enter the following information:
a. Under Network leave the entry public.
b. Under Virtual Address for Host Name enter <database_group_name> (the virtual name for the database group).
c. The IP Address is automatically recognized
d. Choose Finish.
The window Finish Adding the Virtual Address to the Group appears. Choose OK.
If the Fail Safe Manager cannot create the Fail Safe group, look at the Windows Event Logs on both nodes to find out the reason for the failure.
Adding the Database of the SAP System to the Fail Safe Group Perform the following steps in the Fail Safe Manager on the primary node A:
1. In the tree on the left, expand <Primary_Node> → Standalone Resources and then select the database <SAPSID>.world Choose Resources → Add to Group.
2. On the dialog box Add Resource to Group – Resources:
For Resource Type, select Oracle Database For Group name, select Oracle<SAPSID>
3. On the dialog box Add Resource to Group – Database Identity, enter the following and then choose Next. Note that if a warning appears about the location of init<sapsid>.ora, you can ignore it.
Service Name <SAPSID>.world
Instance Name <SAPSID>
Database Name <SAPSID>
Parameter File <DRIVE>:\<ORACLE_HOME>\database\init<SAPSID>.ora
4. On the dialog box Confirm Add Database to Group choose Yes to shutdown the database.
5. For each node a PopUp appears: The Oracle Net Listener uses a host name in the host address parameter. It must be converted to use an IP address.
Choose Yes to convert to an IP.
The R/3 database <SAPSID> is now added to the Fail Safe group.
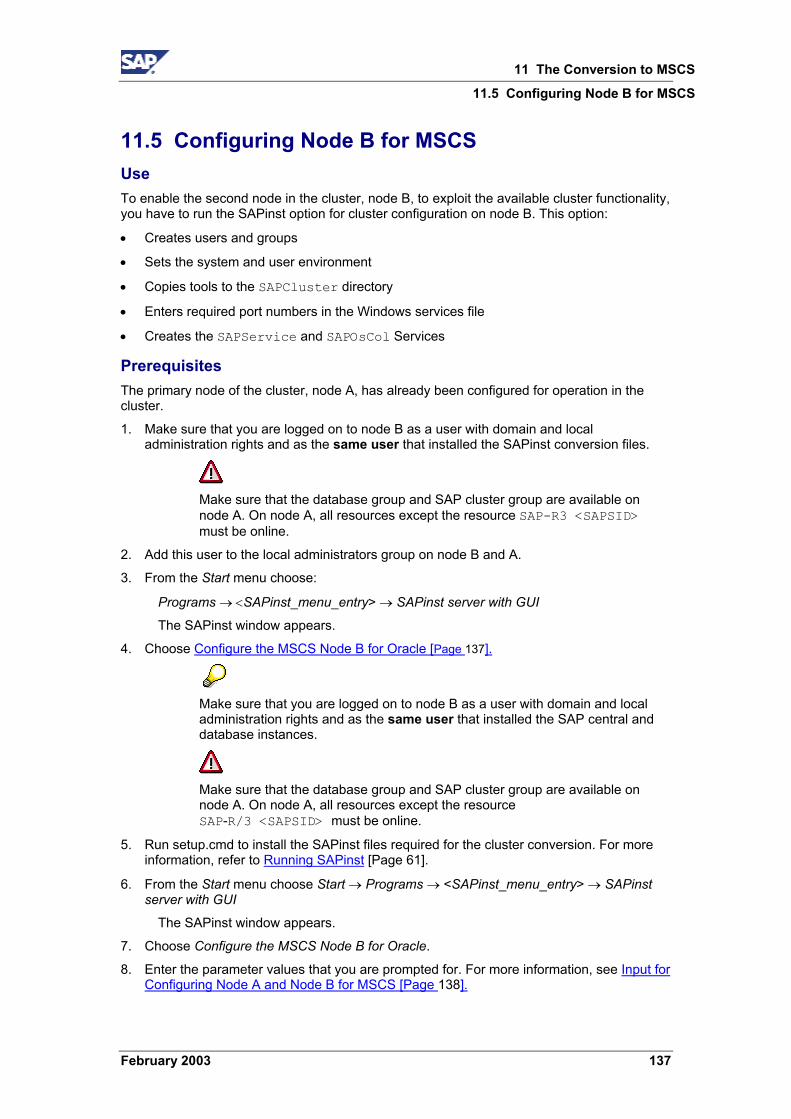
11 The Conversion to MSCS
11.5 Configuring Node B for MSCS
February 2003 137
11.5 Configuring Node B for MSCS Use To enable the second node in the cluster, node B, to exploit the available cluster functionality, you have to run the SAPinst option for cluster configuration on node B. This option:
• Creates users and groups
• Sets the system and user environment
• Copies tools to the SAPCluster directory
• Enters required port numbers in the Windows services file
• Creates the SAPService and SAPOsCol Services
Prerequisites The primary node of the cluster, node A, has already been configured for operation in the cluster.
1. Make sure that you are logged on to node B as a user with domain and local administration rights and as the same user that installed the SAPinst conversion files.
Make sure that the database group and SAP cluster group are available on node A. On node A, all resources except the resource SAP-R3 <SAPSID> must be online.
2. Add this user to the local administrators group on node B and A.
3. From the Start menu choose:
Programs → <SAPinst_menu_entry> → SAPinst server with GUI
The SAPinst window appears.
4. Choose Configure the MSCS Node B for Oracle [Page 137].
Make sure that you are logged on to node B as a user with domain and local administration rights and as the same user that installed the SAP central and database instances.
Make sure that the database group and SAP cluster group are available on node A. On node A, all resources except the resource SAP-R/3 <SAPSID> must be online.
5. Run setup.cmd to install the SAPinst files required for the cluster conversion. For more information, refer to Running SAPinst [Page 61].
6. From the Start menu choose Start → Programs → <SAPinst_menu_entry> → SAPinst server with GUI
The SAPinst window appears.
7. Choose Configure the MSCS Node B for Oracle.
8. Enter the parameter values that you are prompted for. For more information, see Input for Configuring Node A and Node B for MSCS [Page 138].
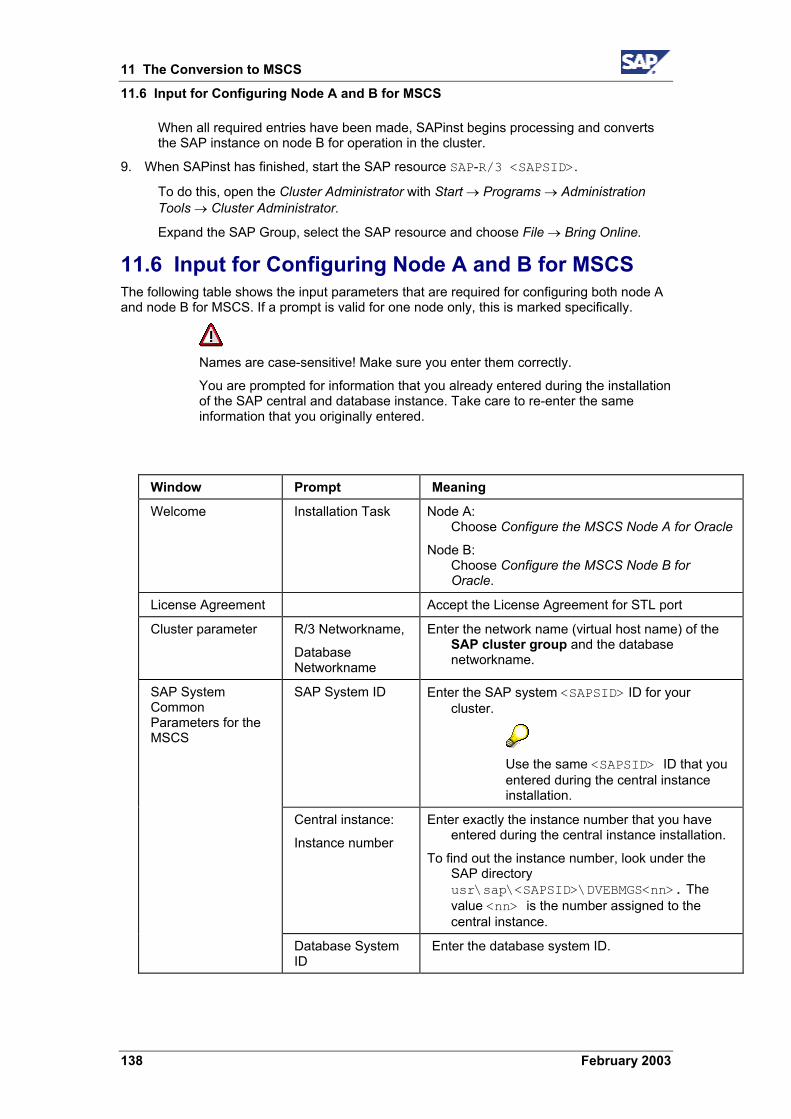
11 The Conversion to MSCS
11.6 Input for Configuring Node A and B for MSCS
138 February 2003
When all required entries have been made, SAPinst begins processing and converts the SAP instance on node B for operation in the cluster.
9. When SAPinst has finished, start the SAP resource SAP-R/3 <SAPSID>.
To do this, open the Cluster Administrator with Start → Programs → Administration Tools → Cluster Administrator.
Expand the SAP Group, select the SAP resource and choose File → Bring Online.
11.6 Input for Configuring Node A and B for MSCS The following table shows the input parameters that are required for configuring both node A and node B for MSCS. If a prompt is valid for one node only, this is marked specifically.
Names are case-sensitive! Make sure you enter them correctly.
You are prompted for information that you already entered during the installation of the SAP central and database instance. Take care to re-enter the same information that you originally entered.
Window Prompt Meaning
Welcome Installation Task Node A: Choose Configure the MSCS Node A for Oracle
Node B: Choose Configure the MSCS Node B for Oracle.
License Agreement Accept the License Agreement for STL port
Cluster parameter R/3 Networkname,
Database Networkname
Enter the network name (virtual host name) of the SAP cluster group and the database networkname.
SAP System ID Enter the SAP system <SAPSID> ID for your cluster.
Use the same <SAPSID> ID that you entered during the central instance installation.
Central instance:
Instance number
Enter exactly the instance number that you have entered during the central instance installation.
To find out the instance number, look under the SAP directory usr\sap\<SAPSID>\DVEBMGS<nn>. The value <nn> is the number assigned to the central instance.
SAP System Common Parameters for the MSCS
Database System ID
Enter the database system ID.
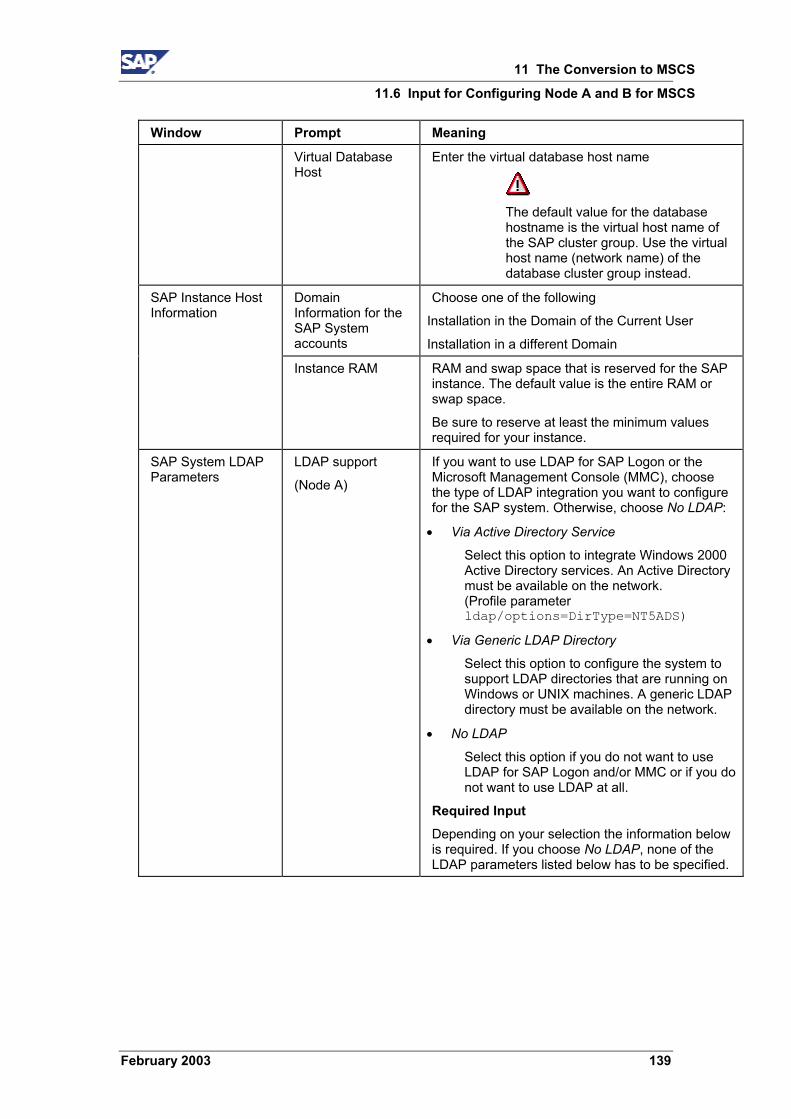
11 The Conversion to MSCS
11.6 Input for Configuring Node A and B for MSCS
February 2003 139
Window Prompt Meaning
Virtual Database Host
Enter the virtual database host name
The default value for the database hostname is the virtual host name of the SAP cluster group. Use the virtual host name (network name) of the database cluster group instead.
Domain Information for the SAP System accounts
Choose one of the following
Installation in the Domain of the Current User
Installation in a different Domain
SAP Instance Host Information
Instance RAM RAM and swap space that is reserved for the SAP instance. The default value is the entire RAM or swap space.
Be sure to reserve at least the minimum values required for your instance.
SAP System LDAP Parameters
LDAP support
(Node A)
If you want to use LDAP for SAP Logon or the Microsoft Management Console (MMC), choose the type of LDAP integration you want to configure for the SAP system. Otherwise, choose No LDAP:
• Via Active Directory Service
Select this option to integrate Windows 2000 Active Directory services. An Active Directory must be available on the network. (Profile parameter ldap/options=DirType=NT5ADS)
• Via Generic LDAP Directory
Select this option to configure the system to support LDAP directories that are running on Windows or UNIX machines. A generic LDAP directory must be available on the network.
• No LDAP
Select this option if you do not want to use LDAP for SAP Logon and/or MMC or if you do not want to use LDAP at all.
Required Input Depending on your selection the information below is required. If you choose No LDAP, none of the LDAP parameters listed below has to be specified.
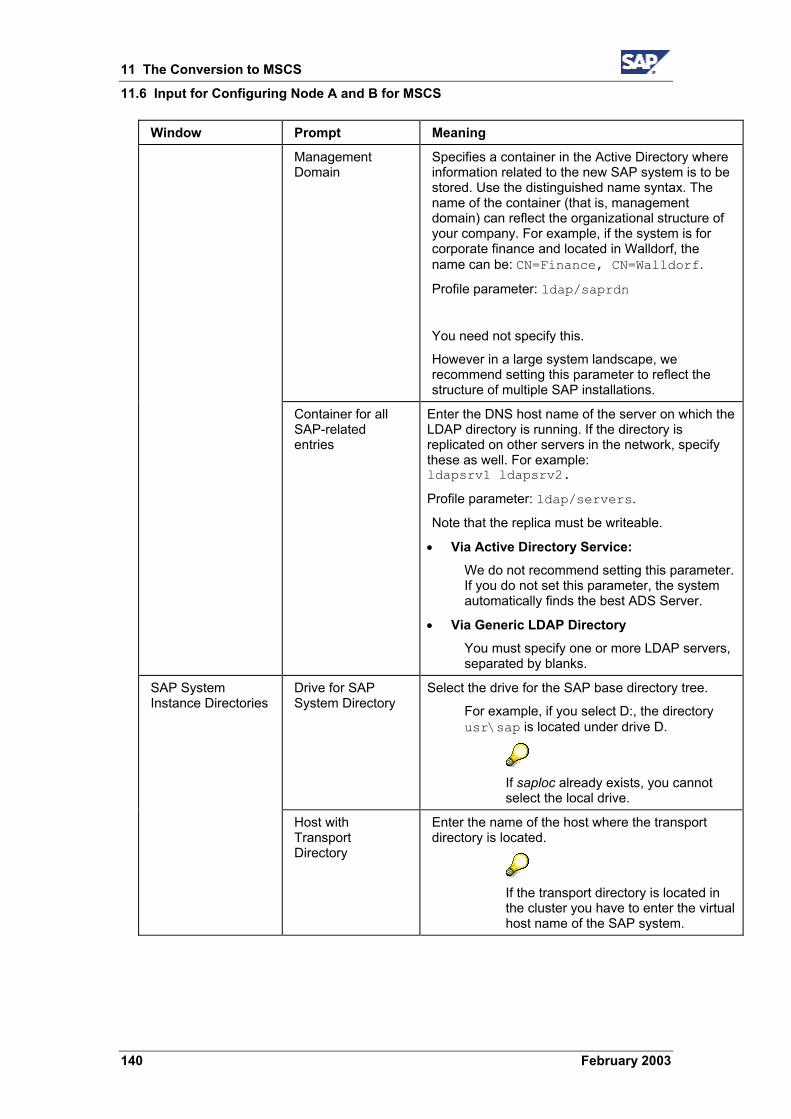
11 The Conversion to MSCS
11.6 Input for Configuring Node A and B for MSCS
140 February 2003
Window Prompt Meaning
Management Domain
Specifies a container in the Active Directory where information related to the new SAP system is to be stored. Use the distinguished name syntax. The name of the container (that is, management domain) can reflect the organizational structure of your company. For example, if the system is for corporate finance and located in Walldorf, the name can be: CN=Finance, CN=Walldorf.
Profile parameter: ldap/saprdn
You need not specify this.
However in a large system landscape, we recommend setting this parameter to reflect the structure of multiple SAP installations.
Container for all SAP-related entries
Enter the DNS host name of the server on which the LDAP directory is running. If the directory is replicated on other servers in the network, specify these as well. For example: ldapsrv1 ldapsrv2.
Profile parameter: ldap/servers.
Note that the replica must be writeable.
• Via Active Directory Service: We do not recommend setting this parameter. If you do not set this parameter, the system automatically finds the best ADS Server.
• Via Generic LDAP Directory You must specify one or more LDAP servers, separated by blanks.
Drive for SAP System Directory
Select the drive for the SAP base directory tree.
For example, if you select D:, the directory usr\sap is located under drive D.
If saploc already exists, you cannot select the local drive.
SAP System Instance Directories
Host with Transport Directory
Enter the name of the host where the transport directory is located.
If the transport directory is located in the cluster you have to enter the virtual host name of the SAP system.
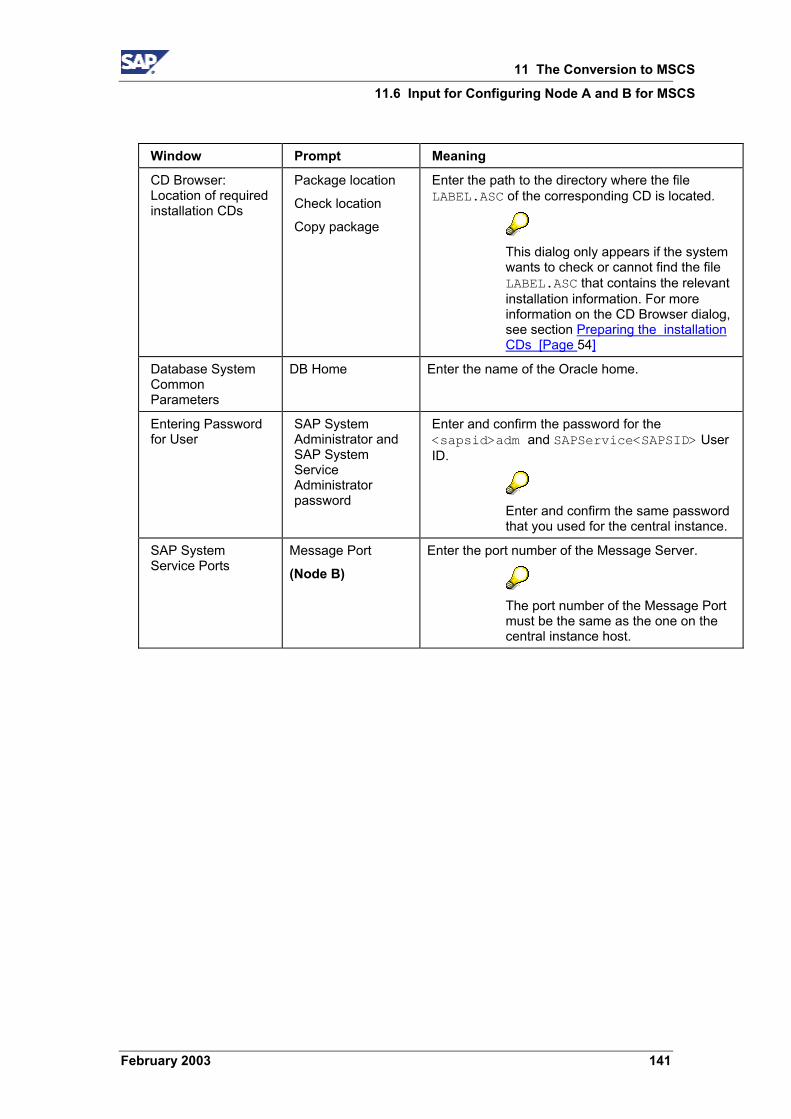
11 The Conversion to MSCS
11.6 Input for Configuring Node A and B for MSCS
February 2003 141
Window Prompt Meaning
CD Browser: Location of required installation CDs
Package location
Check location
Copy package
Enter the path to the directory where the file LABEL.ASC of the corresponding CD is located.
This dialog only appears if the system wants to check or cannot find the file LABEL.ASC that contains the relevant installation information. For more information on the CD Browser dialog, see section Preparing the installation CDs [Page 54]
Database System Common Parameters
DB Home Enter the name of the Oracle home.
Entering Password for User
SAP System Administrator and SAP System Service Administrator password
Enter and confirm the password for the <sapsid>adm and SAPService<SAPSID> User ID.
Enter and confirm the same password that you used for the central instance.
SAP System Service Ports
Message Port
(Node B) Enter the port number of the Message Server.
The port number of the Message Port must be the same as the one on the central instance host.

12 Post-Installation Activities for MSCS
11.6 Input for Configuring Node A and B for MSCS
142 February 2003
12 Post-Installation Activities for MSCS Purpose This section describes how to complete and check the installation of the SAP MSCS System.
Prerequisites You have completed the installation steps explained in previous sections of this documentation and you have installed at least one SAP front end.
For more information on how to install the front end, see the documentation SAP Front End Installation Guide at http://service.sap.com/instguides.
Process Flow The following table lists the tasks you have to perform after the installation and points out where you can find detailed instructions.
Task Comment
1. You check that you can start and stop the SAP System
See Starting and Stopping the SAP System in an MSCS Configuration [Page 143] below.
2. You check that you can log on See Logging on to the SAP System [Page 76]
When you create the logon entry, make sure you enter the virtual host name in the Application Server field.
3. You install the SAP License See Installing and Using the SAP License [Page 77]
4. On both nodes, you check the SAP System Services
See Checking SAP System Services [Page 78]
5. You install the SAP online documentation
See Installing the Online Documentation [Page 78]
6. You configure the SAProuter and the SAPNet R/3 Frontend
See Configuring SAProuter and SAPNet - R/3 Frontend [Page 80]
7. You configure the Transport Management System
Configure the Transport Management System [Page 80]
8. You perform basic operations in your SAP System.
See Basic Operations [Page 81].
9. Check and, if required, adapt the number of Work Processes.
See Configured Number of Work Processes [Page 82].
10. If required, you install additional languages.
See Installation of Additional Languages [Page 81].
11. You import support packages. See Import of Support Packages [Page 83]
12. If required, you set up secure single sign-on.
See Secure Single Sign On [Page 83] or Kerberos Single Sign-On [Page 88].
13. You perform client copy. See Client Copy [Page 92].

12 Post-Installation Activities for MSCS
12.1 Starting and Stopping the SAP System in an MSCS Configuration
February 2003 143
Task Comment
14. You perform a full installation backup.
See Performing a Full Backup [Page 93].
15. Once you have completed and checked the SAP system installation, you need to prepare the SAP system for using business applications. This process includes customizing the basis system and the various business components.
See the SAP Library (choose Help SAP Library in your SAP system or access the SAP Library at: http://help.sap.com) and choose SAP Web Application Server. Under mySAP Technology Components choose SAP Web Application Server → Customizing.
12.1 Starting and Stopping the SAP System in an MSCS Configuration Use If you want to start or stop the SAP System in an MSCS configuration, use the procedure described here.
Procedure
Starting the System Start the Cluster Administrator from the Start menu with Programs → Administrative Tools →
Cluster Administrator
The Cluster Administrator opens.
In the tree, select the SAP group SAP-R/3 <SAPSID> and press the right mouse-button to display the context menu. Choose Bring online.
The SAP system is started.
Stopping the System Start the Cluster Administrator from the Start menu with Programs → Administrative Tools →
Cluster Administrator
In the tree, double-click on the group SAP-R/3 <SAPSID> to display the resources belonging to the SAP group.
Select the resource SAP-R/3 <SAPSID>, press the right mouse button, and choose Take offline.
The SAP system is stopped.