Embed Size (px)
Citation preview
Informix Product FamilyInformixVersion 11.70
IBM Informix Migration Guide
GC27-3546-05
���

Informix Product FamilyInformixVersion 11.70
IBM Informix Migration Guide
GC27-3546-05
���
NoteBefore using this information and the product it supports, read the information in “Notices” on page H-1.
This edition replaces GC27-3546-04.
This document contains proprietary information of IBM. It is provided under a license agreement and is protectedby copyright law. The information contained in this publication does not include any product warranties, and anystatements provided in this manual should not be interpreted as such.
When you send information to IBM, you grant IBM a nonexclusive right to use or distribute the information in anyway it believes appropriate without incurring any obligation to you.
© Copyright IBM Corporation 1996, 2012.US Government Users Restricted Rights – Use, duplication or disclosure restricted by GSA ADP Schedule Contractwith IBM Corp.
Contents
Introduction . . . . . . . . . . . . . . . . . . . . . . . . . . . . . . . . . . ixAbout this publication . . . . . . . . . . . . . . . . . . . . . . . . . . . . . . . . ix
Assumptions about your locale . . . . . . . . . . . . . . . . . . . . . . . . . . . . ixWhat's new in migration for Informix, Version 11.70 . . . . . . . . . . . . . . . . . . . . . . xIBM Informix editions . . . . . . . . . . . . . . . . . . . . . . . . . . . . . . . . xiiExample code conventions . . . . . . . . . . . . . . . . . . . . . . . . . . . . . . xiiAdditional documentation . . . . . . . . . . . . . . . . . . . . . . . . . . . . . . xiiiCompliance with industry standards. . . . . . . . . . . . . . . . . . . . . . . . . . . xiiiSyntax diagrams . . . . . . . . . . . . . . . . . . . . . . . . . . . . . . . . . xiii
How to read a command-line syntax diagram . . . . . . . . . . . . . . . . . . . . . . xivKeywords and punctuation . . . . . . . . . . . . . . . . . . . . . . . . . . . . . xviIdentifiers and names. . . . . . . . . . . . . . . . . . . . . . . . . . . . . . . xvi
How to provide documentation feedback . . . . . . . . . . . . . . . . . . . . . . . . . xvi
Part 1. Overview of migration
Chapter 1. Overview of Informix migration . . . . . . . . . . . . . . . . . . . . 1-1The migration process . . . . . . . . . . . . . . . . . . . . . . . . . . . . . . . 1-1
Migration effort. . . . . . . . . . . . . . . . . . . . . . . . . . . . . . . . . 1-1Migration skills . . . . . . . . . . . . . . . . . . . . . . . . . . . . . . . . . 1-1Migration plans. . . . . . . . . . . . . . . . . . . . . . . . . . . . . . . . . 1-2Types of migration. . . . . . . . . . . . . . . . . . . . . . . . . . . . . . . . 1-2Migration tools . . . . . . . . . . . . . . . . . . . . . . . . . . . . . . . . . 1-3
Upgrading Informix (in-place migration) . . . . . . . . . . . . . . . . . . . . . . . . . 1-3Migrating Informix (non-in-place migration) . . . . . . . . . . . . . . . . . . . . . . . . 1-4Hardware prerequisites . . . . . . . . . . . . . . . . . . . . . . . . . . . . . . . 1-5Software prerequisites . . . . . . . . . . . . . . . . . . . . . . . . . . . . . . . 1-5Supported operating systems . . . . . . . . . . . . . . . . . . . . . . . . . . . . . 1-6Fix pack naming conventions . . . . . . . . . . . . . . . . . . . . . . . . . . . . . 1-6Paths for migration to the new version . . . . . . . . . . . . . . . . . . . . . . . . . . 1-6
Migration paths on UNIX, Linux, and Windows operating systems . . . . . . . . . . . . . . . 1-7Migration paths on Mac OS X operating systems . . . . . . . . . . . . . . . . . . . . . 1-8
Changes in the new version of Informix . . . . . . . . . . . . . . . . . . . . . . . . . 1-8
Chapter 2. Overview of moving data . . . . . . . . . . . . . . . . . . . . . . . 2-1Automatic data migration . . . . . . . . . . . . . . . . . . . . . . . . . . . . . . 2-1Prerequisites before moving data . . . . . . . . . . . . . . . . . . . . . . . . . . . . 2-1Data-migration tools . . . . . . . . . . . . . . . . . . . . . . . . . . . . . . . . 2-1
High-Performance Loader performance advantages for large databases . . . . . . . . . . . . . . 2-5Nonlogging raw tables that speed up data loading time . . . . . . . . . . . . . . . . . . . 2-6When TEXT and BYTE data is scanned, not compressed . . . . . . . . . . . . . . . . . . . 2-7
Moving non-Informix data between computers and dbspaces . . . . . . . . . . . . . . . . . . 2-7Importing data from a non-Informix source . . . . . . . . . . . . . . . . . . . . . . . 2-7Importing data with IBM Informix Enterprise Gateway products . . . . . . . . . . . . . . . . 2-7
Moving data by using distributed SQL . . . . . . . . . . . . . . . . . . . . . . . . . . 2-8
Part 2. Migration to and reversion from Version 11.70
Chapter 3. Preparing for migration to Version 11.70 . . . . . . . . . . . . . . . . 3-1Preparing for migration . . . . . . . . . . . . . . . . . . . . . . . . . . . . . . . 3-1
Checking and configuring available space . . . . . . . . . . . . . . . . . . . . . . . . 3-3Configuring for recovery of restore point data in case an upgrade fails . . . . . . . . . . . . . . 3-4Saving copies of the current configuration files . . . . . . . . . . . . . . . . . . . . . . 3-5Saving a copy of the storage manager sm_versions file . . . . . . . . . . . . . . . . . . . 3-6
© Copyright IBM Corp. 1996, 2012 iii
Closing all transactions and shutting down the source database server . . . . . . . . . . . . . . 3-6Initiating fast recovery to verify that no open transactions exist . . . . . . . . . . . . . . . . . 3-7Verifying the integrity of the data . . . . . . . . . . . . . . . . . . . . . . . . . . . 3-7Verifying that the database server is in quiescent mode . . . . . . . . . . . . . . . . . . . 3-8Making a final backup of the source database server . . . . . . . . . . . . . . . . . . . . 3-8Verifying that the source database server Is offline . . . . . . . . . . . . . . . . . . . . . 3-8Modifying kernel parameters (UNIX, Linux) . . . . . . . . . . . . . . . . . . . . . . . 3-9
Pre-migration checklist of diagnostic information . . . . . . . . . . . . . . . . . . . . . . 3-9Migrating from 32-bit to 64-bit database servers . . . . . . . . . . . . . . . . . . . . . . 3-10
Chapter 4. Enterprise Replication and migration . . . . . . . . . . . . . . . . . 4-1Preparing to migrate with Enterprise Replication . . . . . . . . . . . . . . . . . . . . . . 4-1Migrating with Enterprise Replication . . . . . . . . . . . . . . . . . . . . . . . . . . 4-1Converting replication of 9.21 user-defined data types . . . . . . . . . . . . . . . . . . . . . 4-2Reverting with Enterprise Replication . . . . . . . . . . . . . . . . . . . . . . . . . . 4-3
Chapter 5. High-availability cluster migration . . . . . . . . . . . . . . . . . . . 5-1Preparing to migrate, upgrade, or revert clusters. . . . . . . . . . . . . . . . . . . . . . . 5-1Upgrading clusters to a new PID or fix pack . . . . . . . . . . . . . . . . . . . . . . . . 5-1Migrating clusters to a new release . . . . . . . . . . . . . . . . . . . . . . . . . . . 5-2Upgrading a cluster while it is online . . . . . . . . . . . . . . . . . . . . . . . . . . 5-4
Errors and warnings generated by the sec2er command . . . . . . . . . . . . . . . . . . . 5-9Reverting clusters. . . . . . . . . . . . . . . . . . . . . . . . . . . . . . . . . 5-10Restoring clusters to a consistent point. . . . . . . . . . . . . . . . . . . . . . . . . . 5-11Restoring a cluster from a backup archive . . . . . . . . . . . . . . . . . . . . . . . . 5-11Restoring a cluster from the HDR secondary server . . . . . . . . . . . . . . . . . . . . . 5-12
Chapter 6. Migrating to Informix Version 11.70 . . . . . . . . . . . . . . . . . . 6-1Migrating to the new version of Informix . . . . . . . . . . . . . . . . . . . . . . . . . 6-1
Installing the new version of Informix . . . . . . . . . . . . . . . . . . . . . . . . . 6-2Setting environment variables . . . . . . . . . . . . . . . . . . . . . . . . . . . . 6-4Customizing configuration files . . . . . . . . . . . . . . . . . . . . . . . . . . . 6-5Adding Communications Support Modules . . . . . . . . . . . . . . . . . . . . . . . 6-5Installing or upgrading any DataBlade modules . . . . . . . . . . . . . . . . . . . . . . 6-5Starting the new version of Informix. . . . . . . . . . . . . . . . . . . . . . . . . . 6-6Upgrading the High-Performance Loader onpload database . . . . . . . . . . . . . . . . . . 6-6Restoring to a previous consistent state after a failed upgrade . . . . . . . . . . . . . . . . . 6-7
Completing required post-migration tasks . . . . . . . . . . . . . . . . . . . . . . . . . 6-8For ON-Bar, copy the sm_versions file . . . . . . . . . . . . . . . . . . . . . . . . . 6-9Optionally update statistics on your tables after migrating . . . . . . . . . . . . . . . . . . 6-9Update statistics on some system catalog tables after migrating . . . . . . . . . . . . . . . . . 6-9Review client applications and registry keys . . . . . . . . . . . . . . . . . . . . . . . 6-10Verify the integrity of migrated data . . . . . . . . . . . . . . . . . . . . . . . . . 6-10Back up Informix after migrating to the new version . . . . . . . . . . . . . . . . . . . . 6-11Tune the new version for performance and adjust queries . . . . . . . . . . . . . . . . . . 6-11Register DataBlade modules . . . . . . . . . . . . . . . . . . . . . . . . . . . . 6-11
Chapter 7. Reverting from Informix Version 11.70 . . . . . . . . . . . . . . . . . 7-1Preparing to revert. . . . . . . . . . . . . . . . . . . . . . . . . . . . . . . . . 7-1
Ascertain that reversion is possible and identify reversion requirements . . . . . . . . . . . . . . 7-2Check and configure available space for reversion . . . . . . . . . . . . . . . . . . . . . 7-9Save copies of the current configuration files . . . . . . . . . . . . . . . . . . . . . . 7-10Save system catalog information . . . . . . . . . . . . . . . . . . . . . . . . . . . 7-10Verify the integrity of the Version 11.70 data . . . . . . . . . . . . . . . . . . . . . . . 7-10Back up Informix Version 11.70 . . . . . . . . . . . . . . . . . . . . . . . . . . . 7-11Run dummy UPDATE statements . . . . . . . . . . . . . . . . . . . . . . . . . . 7-11Remove Version 11.70 features . . . . . . . . . . . . . . . . . . . . . . . . . . . 7-12Remove new BladeManager extensions . . . . . . . . . . . . . . . . . . . . . . . . 7-13
Reverting from Informix Version 11.70 . . . . . . . . . . . . . . . . . . . . . . . . . . 7-13Run the reversion utility . . . . . . . . . . . . . . . . . . . . . . . . . . . . . 7-14
iv IBM Informix Migration Guide

Restore original configuration parameters. . . . . . . . . . . . . . . . . . . . . . . . 7-14Restore original environment variables . . . . . . . . . . . . . . . . . . . . . . . . 7-15Remove any Communications Support Module settings . . . . . . . . . . . . . . . . . . . 7-15Recompile any Java UDRs that were compiled using JDK 5.0 . . . . . . . . . . . . . . . . . 7-15Reinstall and start the earlier database server . . . . . . . . . . . . . . . . . . . . . . 7-15Optionally update statistics on your tables after reverting . . . . . . . . . . . . . . . . . . 7-15Update statistics on some system catalog tables after reverting . . . . . . . . . . . . . . . . 7-16Verify the integrity of the reverted data . . . . . . . . . . . . . . . . . . . . . . . . 7-16Back up the database server after reversion . . . . . . . . . . . . . . . . . . . . . . . 7-16Return the database server to online mode . . . . . . . . . . . . . . . . . . . . . . . 7-16Register DataBlade modules . . . . . . . . . . . . . . . . . . . . . . . . . . . . 7-17Reverting clusters. . . . . . . . . . . . . . . . . . . . . . . . . . . . . . . . 7-17
Part 3. Migration of data between database servers
Chapter 8. Migrating database servers to a new operating system . . . . . . . . . . 8-1Choosing a tool for moving data before migrating between operating systems . . . . . . . . . . . . . 8-1Adjusting database tables for file-system variations . . . . . . . . . . . . . . . . . . . . . . 8-1Moving data to a database server on a different operating system . . . . . . . . . . . . . . . . . 8-2
Moving data between Informix and Workgroup Edition Version 7.24 on different operating systems . . . . 8-2Adapting your programs for a different operating system. . . . . . . . . . . . . . . . . . . . 8-3Ensuring the successful creation of system databases . . . . . . . . . . . . . . . . . . . . . 8-3
Part 4. Data migration utilities
Chapter 9. The dbexport and dbimport utilities . . . . . . . . . . . . . . . . . . 9-1Migration of a case-insensitive database to an NLSCASE SENSITIVE database. . . . . . . . . . . . . 9-2Syntax of the dbexport command . . . . . . . . . . . . . . . . . . . . . . . . . . . . 9-3
Termination of the dbexport utility . . . . . . . . . . . . . . . . . . . . . . . . . . 9-5dbexport errors . . . . . . . . . . . . . . . . . . . . . . . . . . . . . . . . . 9-5dbexport server-specific information . . . . . . . . . . . . . . . . . . . . . . . . . . 9-5dbexport destination options . . . . . . . . . . . . . . . . . . . . . . . . . . . . 9-5
Contents of the schema file that dbexport creates . . . . . . . . . . . . . . . . . . . . . . 9-7Syntax of the dbimport command . . . . . . . . . . . . . . . . . . . . . . . . . . . 9-7
Termination of the dbimport utility . . . . . . . . . . . . . . . . . . . . . . . . . . 9-9dbimport errors and warnings . . . . . . . . . . . . . . . . . . . . . . . . . . . . 9-9dbimport input-file location options . . . . . . . . . . . . . . . . . . . . . . . . . . 9-9dbimport create options. . . . . . . . . . . . . . . . . . . . . . . . . . . . . . 9-11Database-logging mode . . . . . . . . . . . . . . . . . . . . . . . . . . . . . . 9-12Database renaming . . . . . . . . . . . . . . . . . . . . . . . . . . . . . . . 9-12
Changing the database locale with dbimport . . . . . . . . . . . . . . . . . . . . . . . 9-13Simple large objects (Version 9.21 or later versions) . . . . . . . . . . . . . . . . . . . . . 9-13
Chapter 10. The dbload utility . . . . . . . . . . . . . . . . . . . . . . . . . 10-1Syntax of the dbload command . . . . . . . . . . . . . . . . . . . . . . . . . . . . 10-1
Table locking during a load operation . . . . . . . . . . . . . . . . . . . . . . . . . 10-3Rows to ignore during a load operation . . . . . . . . . . . . . . . . . . . . . . . . 10-4Bad-row limit during a load operation. . . . . . . . . . . . . . . . . . . . . . . . . 10-4Termination of the dbload utility . . . . . . . . . . . . . . . . . . . . . . . . . . 10-4Name and object guidelines for the dbload utility . . . . . . . . . . . . . . . . . . . . . 10-4
Command file for the dbload utility . . . . . . . . . . . . . . . . . . . . . . . . . . 10-5Delimiter form of the FILE and INSERT statements . . . . . . . . . . . . . . . . . . . . 10-5Character-position form of the FILE and INSERT statements . . . . . . . . . . . . . . . . . 10-9
Command file to load complex data types (Version 9.21 or later versions) . . . . . . . . . . . . . 10-13Using the dbload utility with named row types . . . . . . . . . . . . . . . . . . . . . 10-13Using the dbload utility with unnamed row types . . . . . . . . . . . . . . . . . . . . 10-14Using the dbload utility with collection data types . . . . . . . . . . . . . . . . . . . . 10-14
Chapter 11. The dbschema utility . . . . . . . . . . . . . . . . . . . . . . . 11-1
Contents v
Object modes and violation detection in dbschema output . . . . . . . . . . . . . . . . . . . 11-1Guidelines for using the dbschema utility. . . . . . . . . . . . . . . . . . . . . . . . . 11-2Syntax of the dbschema command . . . . . . . . . . . . . . . . . . . . . . . . . . . 11-2
Database schema creation . . . . . . . . . . . . . . . . . . . . . . . . . . . . . 11-5dbschema server-specific information . . . . . . . . . . . . . . . . . . . . . . . . . 11-6User-defined and complex data types (Version 9.21 or later versions) . . . . . . . . . . . . . . 11-6Sequence creation. . . . . . . . . . . . . . . . . . . . . . . . . . . . . . . . 11-7Synonym creation. . . . . . . . . . . . . . . . . . . . . . . . . . . . . . . . 11-8Table, view, or procedure creation . . . . . . . . . . . . . . . . . . . . . . . . . . 11-8Table information . . . . . . . . . . . . . . . . . . . . . . . . . . . . . . . . 11-9Storage space, chunk, and log creation . . . . . . . . . . . . . . . . . . . . . . . . . 11-9Role creation . . . . . . . . . . . . . . . . . . . . . . . . . . . . . . . . . 11-11Privileges . . . . . . . . . . . . . . . . . . . . . . . . . . . . . . . . . . 11-12Distribution information for tables in dbschema output . . . . . . . . . . . . . . . . . . . 11-13
Use dbschema output as DB-Access input . . . . . . . . . . . . . . . . . . . . . . . . 11-16Inserting a table into a dbschema output file . . . . . . . . . . . . . . . . . . . . . . 11-16Re-creating the schema of a database . . . . . . . . . . . . . . . . . . . . . . . . . 11-16
Chapter 12. The LOAD and UNLOAD statements . . . . . . . . . . . . . . . . . 12-1Syntax of the UNLOAD statement . . . . . . . . . . . . . . . . . . . . . . . . . . . 12-1Syntax of the LOAD statement . . . . . . . . . . . . . . . . . . . . . . . . . . . . 12-2Load and unload statements for locales that support multibyte code sets . . . . . . . . . . . . . . 12-2Load and unload statements for nondefault locales and GL_DATETIME environment variable . . . . . . . 12-2
Chapter 13. The onunload and onload utilities . . . . . . . . . . . . . . . . . . 13-1Guidelines for when to use the onunload and onload utilities . . . . . . . . . . . . . . . . . . 13-1Requirements for using the onload and onunload utilities . . . . . . . . . . . . . . . . . . . 13-2How the onunload and onload utilities work . . . . . . . . . . . . . . . . . . . . . . . 13-3Syntax of the onunload command . . . . . . . . . . . . . . . . . . . . . . . . . . . 13-3
onunload destination parameters . . . . . . . . . . . . . . . . . . . . . . . . . . 13-4Constraints that affect onunload . . . . . . . . . . . . . . . . . . . . . . . . . . . 13-5Privileges for database or table unloading . . . . . . . . . . . . . . . . . . . . . . . 13-5Tables that are unloaded with a database . . . . . . . . . . . . . . . . . . . . . . . . 13-5Data that is unloaded with a table . . . . . . . . . . . . . . . . . . . . . . . . . . 13-5Locking during unload operation . . . . . . . . . . . . . . . . . . . . . . . . . . 13-6
Logging mode . . . . . . . . . . . . . . . . . . . . . . . . . . . . . . . . . . 13-6Syntax of the onload command . . . . . . . . . . . . . . . . . . . . . . . . . . . . 13-6
onload source parameters . . . . . . . . . . . . . . . . . . . . . . . . . . . . . 13-7onload create options . . . . . . . . . . . . . . . . . . . . . . . . . . . . . . 13-8Constraints that affect onload. . . . . . . . . . . . . . . . . . . . . . . . . . . . 13-9Logging during loading . . . . . . . . . . . . . . . . . . . . . . . . . . . . . 13-10Movement of simple large objects to a blobspace . . . . . . . . . . . . . . . . . . . . . 13-10Ownership and privileges . . . . . . . . . . . . . . . . . . . . . . . . . . . . 13-10Exclusive locking during a load operation . . . . . . . . . . . . . . . . . . . . . . . 13-10
Moving a database between computers with the onunload and onload utilities . . . . . . . . . . . . 13-11Moving a table between computers with the onunload and onload utilities . . . . . . . . . . . . . 13-11Moving a table between dbspaces with the onunload and onload utilities . . . . . . . . . . . . . 13-12
Chapter 14. The onmode utility reversion option . . . . . . . . . . . . . . . . . 14-1What the onmode -b command does . . . . . . . . . . . . . . . . . . . . . . . . . . 14-1Preparation for using the onmode -b command . . . . . . . . . . . . . . . . . . . . . . 14-1Syntax of the onmode -b command. . . . . . . . . . . . . . . . . . . . . . . . . . . 14-1
Chapter 15. The onrestorept utility . . . . . . . . . . . . . . . . . . . . . . . 15-1Syntax of the onrestorept command . . . . . . . . . . . . . . . . . . . . . . . . . . 15-1
Part 5. Appendixes
Appendix A. New environment variables . . . . . . . . . . . . . . . . . . . . . A-1
vi IBM Informix Migration Guide

Appendix B. New configuration parameters . . . . . . . . . . . . . . . . . . . B-1
Appendix C. Configuration parameters that have been changed or removed . . . . . C-1Configuration parameter changes in the Version 11.70 . . . . . . . . . . . . . . . . . . . . . C-1Configuration parameter changes in the Version 11.50 onconfig.std File . . . . . . . . . . . . . . . C-2Configuration parameters that have been changed or removed in Versions 9.30 through 11.10 . . . . . . . C-7
Appendix D. New keywords of SQL . . . . . . . . . . . . . . . . . . . . . . . D-1
Appendix E. System catalog and system database changes . . . . . . . . . . . . E-1Changes for version 11.70 . . . . . . . . . . . . . . . . . . . . . . . . . . . . . . E-1Changes for version 11.50 . . . . . . . . . . . . . . . . . . . . . . . . . . . . . . E-1Changes for version 11.10 . . . . . . . . . . . . . . . . . . . . . . . . . . . . . . E-2Changes for version 10.0. . . . . . . . . . . . . . . . . . . . . . . . . . . . . . . E-3Changes for version 9.40. . . . . . . . . . . . . . . . . . . . . . . . . . . . . . . E-3Changes for version 9.30. . . . . . . . . . . . . . . . . . . . . . . . . . . . . . . E-3
Column-width changes in sysmaster tables in Version 9.20 and later versions . . . . . . . . . . . . E-4Data type changes in sysmaster tables in Version 9.20 and later versions . . . . . . . . . . . . . E-7Changes in treatment of null values in sysmaster tables in Version 9.30 . . . . . . . . . . . . . . E-8Other sysmaster database table and column changes in Version 9.30 . . . . . . . . . . . . . . . E-8
Remote queries on system catalog tables between Version 7.31 and later versions. . . . . . . . . . . . E-9Difference in sysindexes between Version 7.31 and later versions . . . . . . . . . . . . . . . . . E-9
Appendix F. New and changed features . . . . . . . . . . . . . . . . . . . . . F-1Server library name changes . . . . . . . . . . . . . . . . . . . . . . . . . . . . . F-1
Appendix G. Accessibility . . . . . . . . . . . . . . . . . . . . . . . . . . . G-1Accessibility features for IBM Informix products . . . . . . . . . . . . . . . . . . . . . . G-1
Accessibility features . . . . . . . . . . . . . . . . . . . . . . . . . . . . . . . G-1Keyboard navigation . . . . . . . . . . . . . . . . . . . . . . . . . . . . . . . G-1Related accessibility information . . . . . . . . . . . . . . . . . . . . . . . . . . . G-1IBM and accessibility. . . . . . . . . . . . . . . . . . . . . . . . . . . . . . . G-1
Dotted decimal syntax diagrams . . . . . . . . . . . . . . . . . . . . . . . . . . . . G-1
Notices . . . . . . . . . . . . . . . . . . . . . . . . . . . . . . . . . . . H-1Trademarks . . . . . . . . . . . . . . . . . . . . . . . . . . . . . . . . . . . H-3
Index . . . . . . . . . . . . . . . . . . . . . . . . . . . . . . . . . . . . X-1
Contents vii

viii IBM Informix Migration Guide
Introduction
About this publicationThis publication describes how to migrate to a new version of Informix®, how torevert to the database server that you migrated from, and how to move datamanually between databases, servers, and computers.
This publication includes information about how to use:v The dbexport, dbimport, dbload, dbschema, onload, and onunload
data-migration utilitiesv The LOAD and UNLOAD SQL statements.v The onrestorept utility, which you can use to restore data if an upgrade fails
This publication does not contain information about using the DSN (data sourcename) Migration Utility (dsnmigrate.exe) to migrate from one version of CSDK toanother. For information about migrating DSN, see the "DSN Migration Utility"section in the IBM Informix ODBC Driver Programmer's Manual.
For information about migrating to previous versions of IBM® Informix databaseservers, see the Migration Guide in the documentation set for that version of theserver.
Migration includes conversion (upgrading) to a later version of a database server,reversion to an earlier version of a database server, and movement of data betweendatabases, database servers on the same operating system, database servers ondifferent operating systems, and different kinds of database servers. Conversion orreversion often involves changing connectivity information in the sqlhosts file orregistry key, host environment variables, configuration parameters, and otherdatabase server features.
Assumptions about your localeIBM Informix products can support many languages, cultures, and code sets. Allthe information related to character set, collation and representation of numericdata, currency, date, and time that is used by a language within a given territoryand encoding is brought together in a single environment, called a GlobalLanguage Support (GLS) locale.
The IBM Informix OLE DB Provider follows the ISO string formats for date, time,and money, as defined by the Microsoft OLE DB standards. You can override thatdefault by setting an Informix environment variable or registry entry, such asDBDATE.
If you use Simple Network Management Protocol (SNMP) in your Informixenvironment, note that the protocols (SNMPv1 and SNMPv2) recognize onlyEnglish code sets. For more information, see the topic about GLS and SNMP in theIBM Informix SNMP Subagent Guide.
The examples in this publication are written with the assumption that you areusing one of these locales: en_us.8859-1 (ISO 8859-1) on UNIX platforms oren_us.1252 (Microsoft 1252) in Windows environments. These locales support U.S.English format conventions for displaying and entering date, time, number, and
© Copyright IBM Corp. 1996, 2012 ix
currency values. They also support the ISO 8859-1 code set (on UNIX and Linux)or the Microsoft 1252 code set (on Windows), which includes the ASCII code setplus many 8-bit characters such as é, è, and ñ.
You can specify another locale if you plan to use characters from other locales inyour data or your SQL identifiers, or if you want to conform to other collationrules for character data.
For instructions about how to specify locales, additional syntax, and otherconsiderations related to GLS locales, see the IBM Informix GLS User's Guide.
What's new in migration for Informix, Version 11.70This publication includes information about new features and changes in existingfunctionality.
The following changes and enhancements are relevant to this publication. For acomplete list of what's new in this release, see the release notes or the informationcenter at http://publib.boulder.ibm.com/infocenter/idshelp/v117/topic/com.ibm.po.doc/new_features.htm.
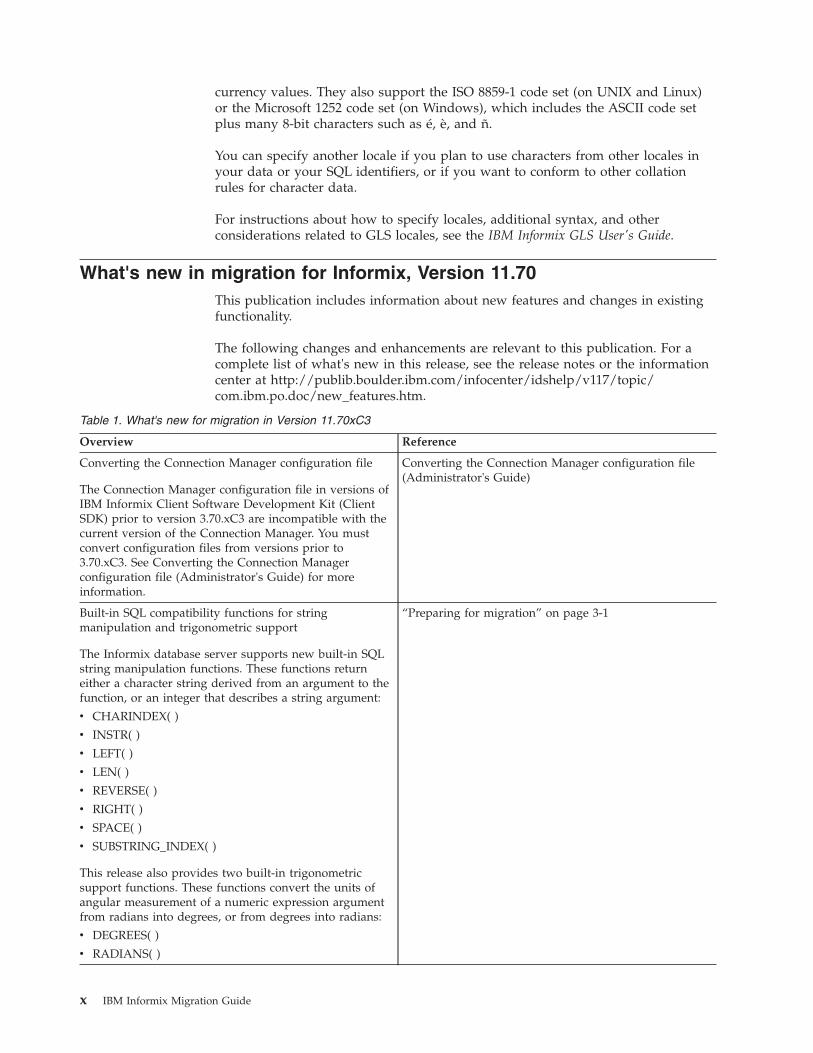
Table 1. What's new for migration in Version 11.70xC3
Overview Reference
Converting the Connection Manager configuration file
The Connection Manager configuration file in versions ofIBM Informix Client Software Development Kit (ClientSDK) prior to version 3.70.xC3 are incompatible with thecurrent version of the Connection Manager. You mustconvert configuration files from versions prior to3.70.xC3. See Converting the Connection Managerconfiguration file (Administrator's Guide) for moreinformation.
Converting the Connection Manager configuration file(Administrator's Guide)
Built-in SQL compatibility functions for stringmanipulation and trigonometric support
The Informix database server supports new built-in SQLstring manipulation functions. These functions returneither a character string derived from an argument to thefunction, or an integer that describes a string argument:
v CHARINDEX( )
v INSTR( )
v LEFT( )
v LEN( )
v REVERSE( )
v RIGHT( )
v SPACE( )
v SUBSTRING_INDEX( )
This release also provides two built-in trigonometricsupport functions. These functions convert the units ofangular measurement of a numeric expression argumentfrom radians into degrees, or from degrees into radians:
v DEGREES( )
v RADIANS( )
“Preparing for migration” on page 3-1
x IBM Informix Migration Guide
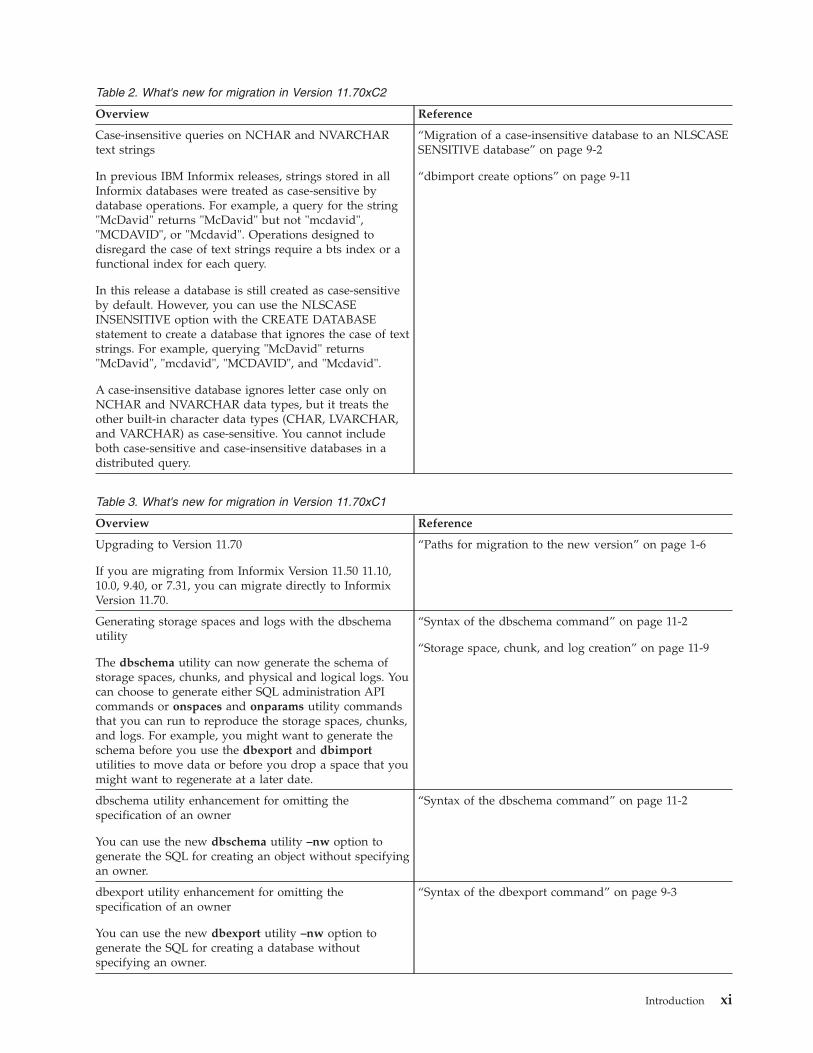
Table 2. What's new for migration in Version 11.70xC2
Overview Reference
Case-insensitive queries on NCHAR and NVARCHARtext strings
In previous IBM Informix releases, strings stored in allInformix databases were treated as case-sensitive bydatabase operations. For example, a query for the string"McDavid" returns "McDavid" but not "mcdavid","MCDAVID", or "Mcdavid". Operations designed todisregard the case of text strings require a bts index or afunctional index for each query.
In this release a database is still created as case-sensitiveby default. However, you can use the NLSCASEINSENSITIVE option with the CREATE DATABASEstatement to create a database that ignores the case of textstrings. For example, querying "McDavid" returns"McDavid", "mcdavid", "MCDAVID", and "Mcdavid".
A case-insensitive database ignores letter case only onNCHAR and NVARCHAR data types, but it treats theother built-in character data types (CHAR, LVARCHAR,and VARCHAR) as case-sensitive. You cannot includeboth case-sensitive and case-insensitive databases in adistributed query.
“Migration of a case-insensitive database to an NLSCASESENSITIVE database” on page 9-2
“dbimport create options” on page 9-11
Table 3. What's new for migration in Version 11.70xC1
Overview Reference
Upgrading to Version 11.70
If you are migrating from Informix Version 11.50 11.10,10.0, 9.40, or 7.31, you can migrate directly to InformixVersion 11.70.
“Paths for migration to the new version” on page 1-6
Generating storage spaces and logs with the dbschemautility
The dbschema utility can now generate the schema ofstorage spaces, chunks, and physical and logical logs. Youcan choose to generate either SQL administration APIcommands or onspaces and onparams utility commandsthat you can run to reproduce the storage spaces, chunks,and logs. For example, you might want to generate theschema before you use the dbexport and dbimportutilities to move data or before you drop a space that youmight want to regenerate at a later date.
“Syntax of the dbschema command” on page 11-2
“Storage space, chunk, and log creation” on page 11-9
dbschema utility enhancement for omitting thespecification of an owner
You can use the new dbschema utility –nw option togenerate the SQL for creating an object without specifyingan owner.
“Syntax of the dbschema command” on page 11-2
dbexport utility enhancement for omitting thespecification of an owner
You can use the new dbexport utility –nw option togenerate the SQL for creating a database withoutspecifying an owner.
“Syntax of the dbexport command” on page 9-3
Introduction xi
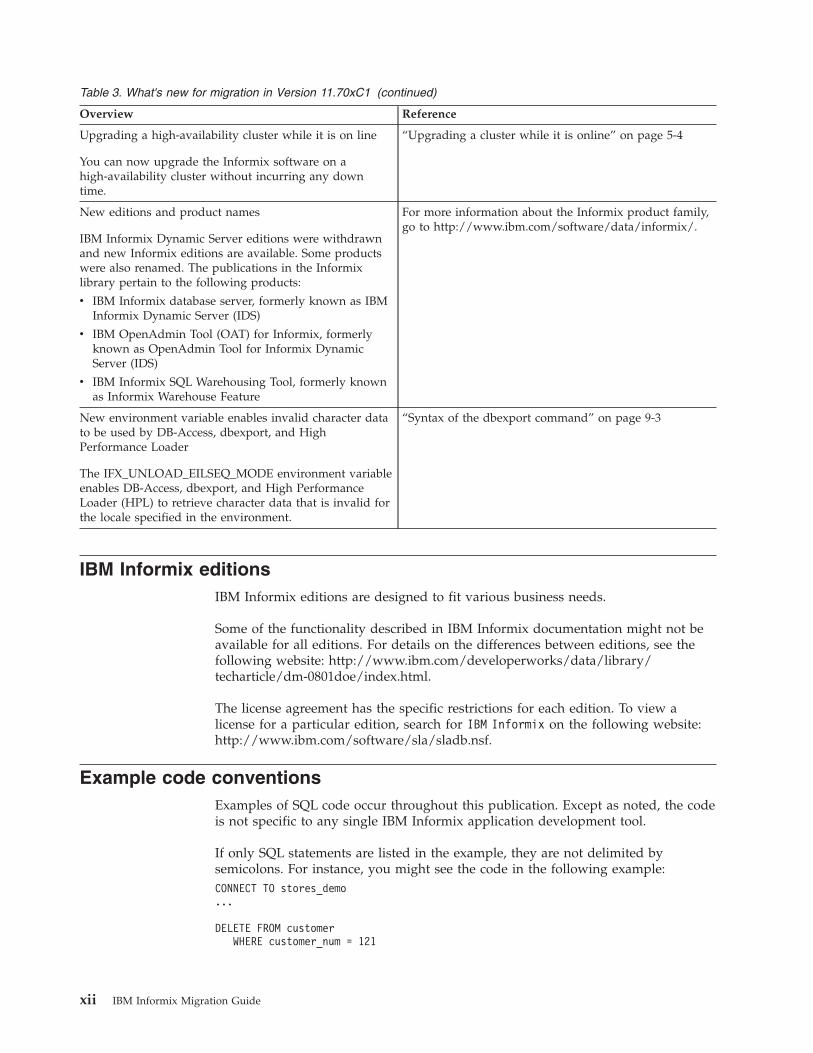
Table 3. What's new for migration in Version 11.70xC1 (continued)
Overview Reference
Upgrading a high-availability cluster while it is on line
You can now upgrade the Informix software on ahigh-availability cluster without incurring any downtime.
“Upgrading a cluster while it is online” on page 5-4
New editions and product names
IBM Informix Dynamic Server editions were withdrawnand new Informix editions are available. Some productswere also renamed. The publications in the Informixlibrary pertain to the following products:
v IBM Informix database server, formerly known as IBMInformix Dynamic Server (IDS)
v IBM OpenAdmin Tool (OAT) for Informix, formerlyknown as OpenAdmin Tool for Informix DynamicServer (IDS)
v IBM Informix SQL Warehousing Tool, formerly knownas Informix Warehouse Feature
For more information about the Informix product family,go to http://www.ibm.com/software/data/informix/.
New environment variable enables invalid character datato be used by DB-Access, dbexport, and HighPerformance Loader
The IFX_UNLOAD_EILSEQ_MODE environment variableenables DB-Access, dbexport, and High PerformanceLoader (HPL) to retrieve character data that is invalid forthe locale specified in the environment.
“Syntax of the dbexport command” on page 9-3
IBM Informix editionsIBM Informix editions are designed to fit various business needs.
Some of the functionality described in IBM Informix documentation might not beavailable for all editions. For details on the differences between editions, see thefollowing website: http://www.ibm.com/developerworks/data/library/techarticle/dm-0801doe/index.html.
The license agreement has the specific restrictions for each edition. To view alicense for a particular edition, search for IBM Informix on the following website:http://www.ibm.com/software/sla/sladb.nsf.
Example code conventionsExamples of SQL code occur throughout this publication. Except as noted, the codeis not specific to any single IBM Informix application development tool.
If only SQL statements are listed in the example, they are not delimited bysemicolons. For instance, you might see the code in the following example:CONNECT TO stores_demo...
DELETE FROM customerWHERE customer_num = 121
xii IBM Informix Migration Guide
...
COMMIT WORKDISCONNECT CURRENT
To use this SQL code for a specific product, you must apply the syntax rules forthat product. For example, if you are using an SQL API, you must use EXEC SQLat the start of each statement and a semicolon (or other appropriate delimiter) atthe end of the statement. If you are using DB–Access, you must delimit multiplestatements with semicolons.
Tip: Ellipsis points in a code example indicate that more code would be added ina full application, but it is not necessary to show it to describe the concept beingdiscussed.
For detailed directions on using SQL statements for a particular applicationdevelopment tool or SQL API, see the documentation for your product.
Additional documentationDocumentation about this release of IBM Informix products is available in variousformats.
You can access or install the product documentation from the Quick Start GuideCD that is shipped with Informix products. To get the most current information,see the Informix information centers at ibm.com®. You can access the informationcenters and other Informix technical information such as technotes, white papers,and IBM Redbooks® publications online at http://www.ibm.com/software/data/sw-library/.
Compliance with industry standardsIBM Informix products are compliant with various standards.
IBM Informix SQL-based products are fully compliant with SQL-92 Entry Level(published as ANSI X3.135-1992), which is identical to ISO 9075:1992. In addition,many features of IBM Informix database servers comply with the SQL-92Intermediate and Full Level and X/Open SQL Common Applications Environment(CAE) standards.
The IBM Informix Geodetic DataBlade® Module supports a subset of the data typesfrom the Spatial Data Transfer Standard (SDTS)—Federal Information ProcessingStandard 173, as referenced by the document Content Standard for GeospatialMetadata, Federal Geographic Data Committee, June 8, 1994 (FGDC MetadataStandard).
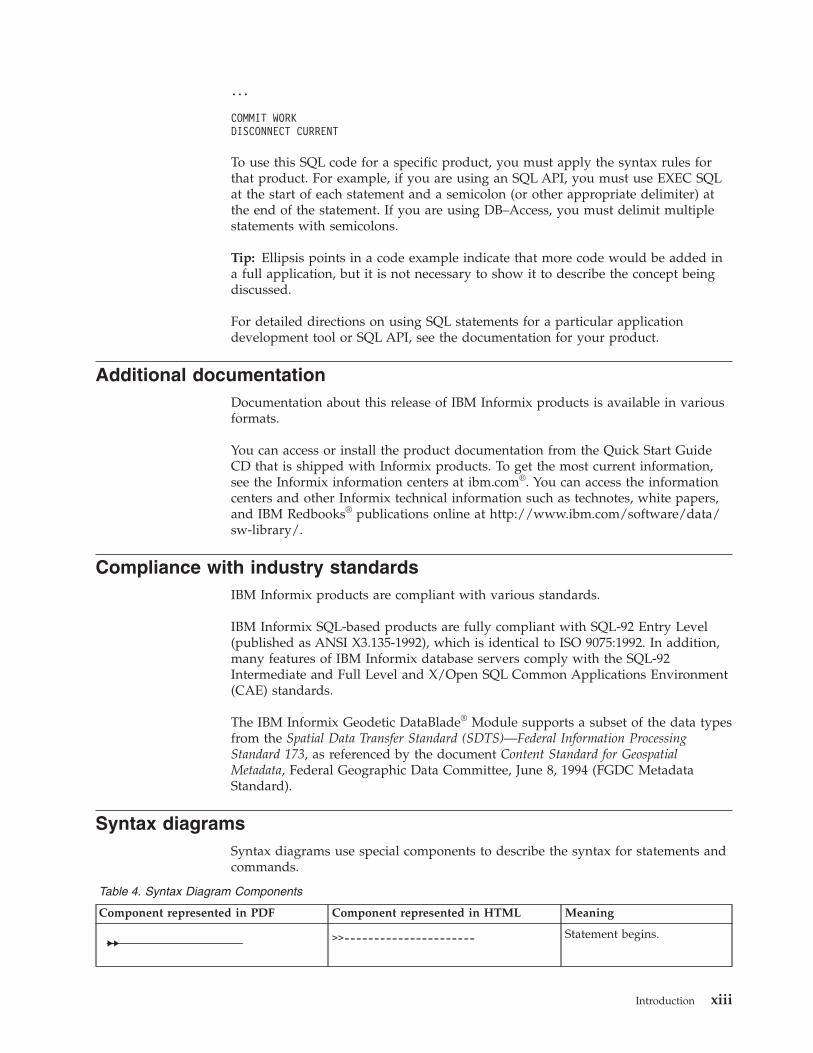
Syntax diagramsSyntax diagrams use special components to describe the syntax for statements andcommands.
Table 4. Syntax Diagram Components
Component represented in PDF Component represented in HTML Meaning
>>---------------------- Statement begins.
Introduction xiii
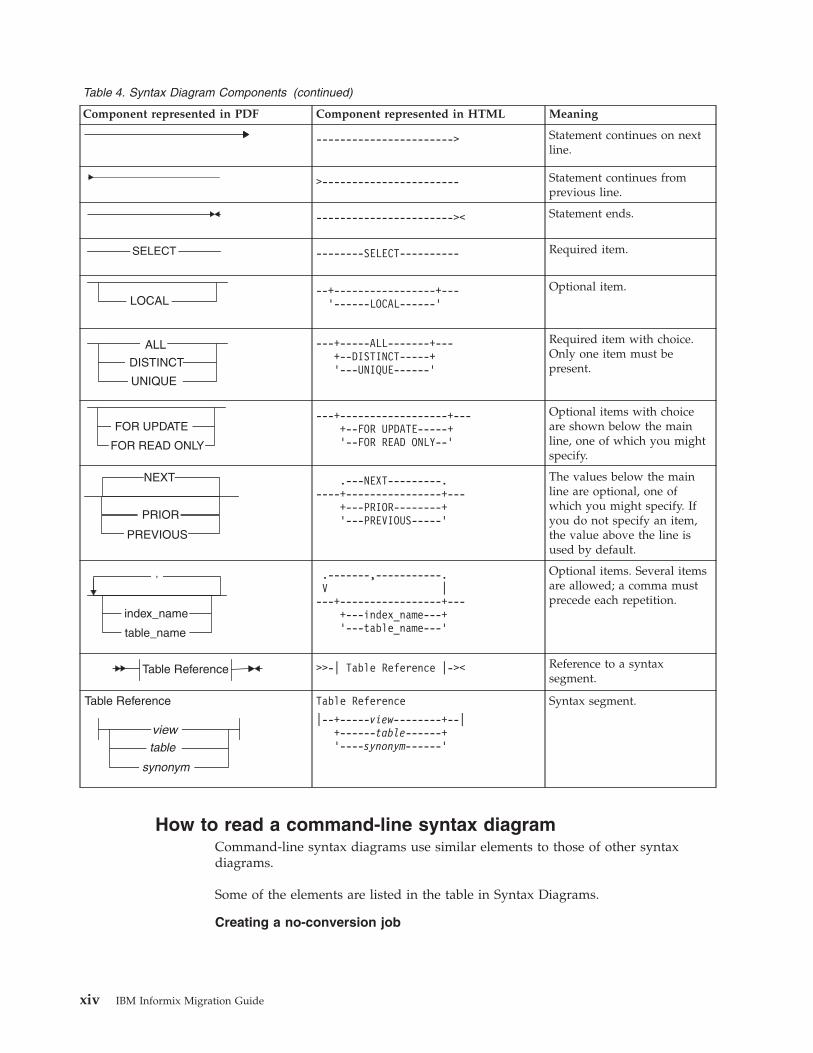
Table 4. Syntax Diagram Components (continued)
Component represented in PDF Component represented in HTML Meaning
-----------------------> Statement continues on nextline.
>----------------------- Statement continues fromprevious line.
----------------------->< Statement ends.
--------SELECT---------- Required item.
--+-----------------+---’------LOCAL------’
Optional item.
---+-----ALL-------+---+--DISTINCT-----+’---UNIQUE------’
Required item with choice.Only one item must bepresent.
---+------------------+---+--FOR UPDATE-----+’--FOR READ ONLY--’
Optional items with choiceare shown below the mainline, one of which you mightspecify.
.---NEXT---------.----+----------------+---
+---PRIOR--------+’---PREVIOUS-----’
The values below the mainline are optional, one ofwhich you might specify. Ifyou do not specify an item,the value above the line isused by default.
.-------,-----------.V |---+-----------------+---
+---index_name---+’---table_name---’
Optional items. Several itemsare allowed; a comma mustprecede each repetition.
>>-| Table Reference |->< Reference to a syntaxsegment.
Table Reference
|--+-----view--------+--|+------table------+’----synonym------’
Syntax segment.
How to read a command-line syntax diagramCommand-line syntax diagrams use similar elements to those of other syntaxdiagrams.
Some of the elements are listed in the table in Syntax Diagrams.
Creating a no-conversion job
xiv IBM Informix Migration Guide

�� onpladm create job job-p project
-n -d device -D database �
� -t table �
� �(1)
Setting the Run Mode-S server -T target
��
Notes:
1 See page Z-1
This diagram has a segment named “Setting the Run Mode,” which according tothe diagram footnote is on page Z-1. If this was an actual cross-reference, youwould find this segment on the first page of Appendix Z. Instead, this segment isshown in the following segment diagram. Notice that the diagram uses segmentstart and end components.
Setting the run mode:
-fdpa
lc
u n N
To see how to construct a command correctly, start at the upper left of the maindiagram. Follow the diagram to the right, including the elements that you want.The elements in this diagram are case-sensitive because they illustrate utilitysyntax. Other types of syntax, such as SQL, are not case-sensitive.
The Creating a No-Conversion Job diagram illustrates the following steps:1. Type onpladm create job and then the name of the job.2. Optionally, type -p and then the name of the project.3. Type the following required elements:
v -n
v -d and the name of the devicev -D and the name of the databasev -t and the name of the table
4. Optionally, you can choose one or more of the following elements and repeatthem an arbitrary number of times:v -S and the server namev -T and the target server namev The run mode. To set the run mode, follow the Setting the Run Mode
segment diagram to type -f, optionally type d, p, or a, and then optionallytype l or u.
Introduction xv
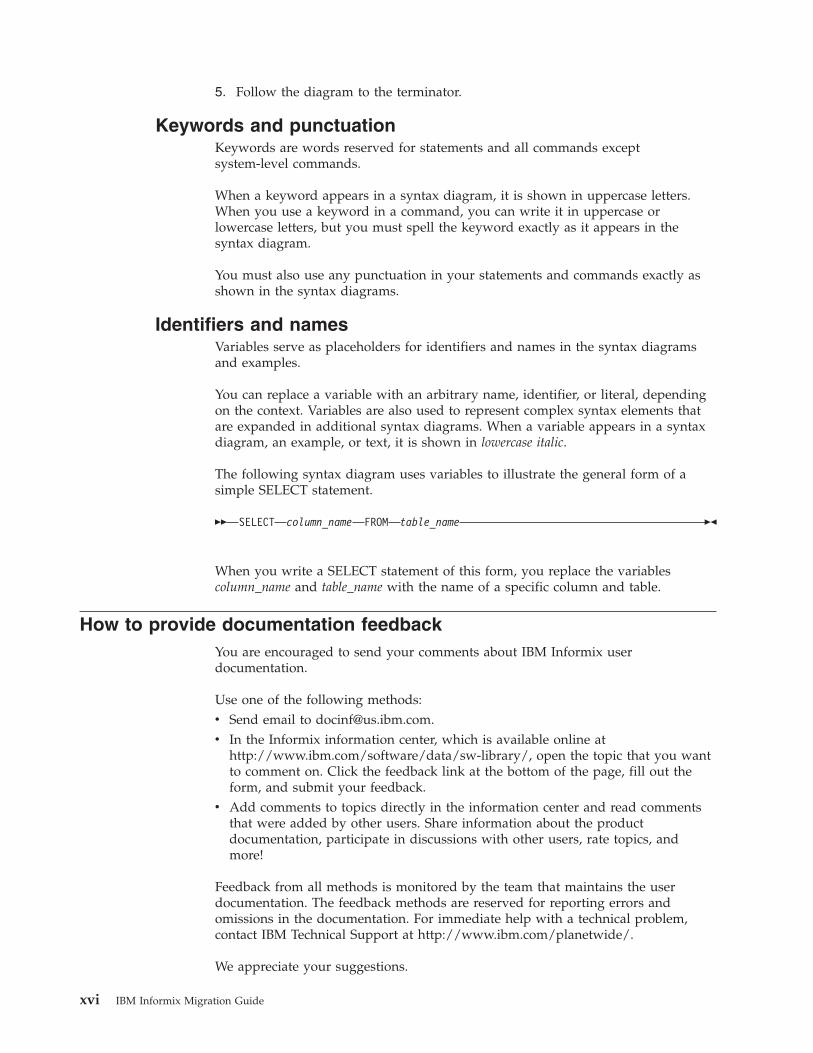
5. Follow the diagram to the terminator.
Keywords and punctuationKeywords are words reserved for statements and all commands exceptsystem-level commands.
When a keyword appears in a syntax diagram, it is shown in uppercase letters.When you use a keyword in a command, you can write it in uppercase orlowercase letters, but you must spell the keyword exactly as it appears in thesyntax diagram.
You must also use any punctuation in your statements and commands exactly asshown in the syntax diagrams.
Identifiers and namesVariables serve as placeholders for identifiers and names in the syntax diagramsand examples.
You can replace a variable with an arbitrary name, identifier, or literal, dependingon the context. Variables are also used to represent complex syntax elements thatare expanded in additional syntax diagrams. When a variable appears in a syntaxdiagram, an example, or text, it is shown in lowercase italic.
The following syntax diagram uses variables to illustrate the general form of asimple SELECT statement.
�� SELECT column_name FROM table_name ��
When you write a SELECT statement of this form, you replace the variablescolumn_name and table_name with the name of a specific column and table.
How to provide documentation feedbackYou are encouraged to send your comments about IBM Informix userdocumentation.
Use one of the following methods:v Send email to [email protected] In the Informix information center, which is available online at
http://www.ibm.com/software/data/sw-library/, open the topic that you wantto comment on. Click the feedback link at the bottom of the page, fill out theform, and submit your feedback.
v Add comments to topics directly in the information center and read commentsthat were added by other users. Share information about the productdocumentation, participate in discussions with other users, rate topics, andmore!
Feedback from all methods is monitored by the team that maintains the userdocumentation. The feedback methods are reserved for reporting errors andomissions in the documentation. For immediate help with a technical problem,contact IBM Technical Support at http://www.ibm.com/planetwide/.
We appreciate your suggestions.
xvi IBM Informix Migration Guide

Part 1. Overview of migration
© Copyright IBM Corp. 1996, 2012

IBM Informix Migration Guide
Chapter 1. Overview of Informix migration
Before you upgrade to the new version of Informix, ensure that you understandthe migration process, prerequisites, and reversion options.
If you have Informix Version 11.50, 11.10, 10.00, 9.40, or 7.31, you can migratedirectly to Informix Version 11.70.
If you have another version of Informix, you must first migrate to an interimversion of Informix. For more information, see “Paths for migration to the newversion” on page 1-6.
The migration processThis overview of the migration process describes what you need to know to planyour migration and the resources that you can use to assist you.
Careful planning will ensure minimal impact on your business.v “Migration effort”v “Migration skills”v “Migration plans” on page 1-2v “Types of migration” on page 1-2v “Migration tools” on page 1-3
Migration effortDepending on your environment, the migration process can take a few hours orseveral weeks.
The migration effort is determined by many factors:v Your current version of Informix. The older the version, the greater the effort.v The site architecture and configuration, before and after migration.v The level of site customization, before and after migration.v Integration of additional software products.v To some extent, the size of the database.
Migration skillsYour Informix migration team needs database administration skills, systemadministration skills, and application programming skills.
The migration team needs:v Database administration skills, to help migrate custom database extensions.v System administration skills, to perform various system tasks. These tasks
include operating system installation, configuration and maintenance and theinstallation and configuration of Informix and any additional software products.
v Application programming skills, to create and maintain scripts to evaluate andmodify application programs.
© Copyright IBM Corp. 1996, 2012 1-1

If you prefer, highly-skilled IBM Services personnel and business partners areavailable to assist you in migrating your environment. Contact your IBMrepresentative for further information.
Migration plansBefore you begin to migrate to a new version of the database server, you shouldplan for migration.
To plan your migration requirements, complete these tasks:1. Inventory the existing Informix environment assets, such as machines,
instances, databases, database customization, custom code, IBM software, andthird-party software.
2. Itemize the requirements for the post-migrated environment. New requirementscan include upgrading or adding hardware, using new features, or replacingcustom-code with new built-in function.
3. Plan the migration activities. Typical activities include:v Performing a level-0 backup of the database.v Quiescing the database server and preventing connections to the database
until migration completes.Important: Any connection attempts (for example, from cron jobs ormonitoring scripts) to the database after you quiesce the database server andduring migration will cause migration to fail.
v Installing the new version of Informix.v Migrating database data.v Reverting to the previous version.v Migrating applications before using them with the new database server.
Depending on your environment, you might need to perform some of theseactivities more than once. You might not need to restore the level-0 backup;however, if you encounter problems you can always restore the backup of yourcurrent server.
Types of migrationThere are three ways to migrate to Informix Version 11.70.
Upgrading (In-place migration)Upgrading is a special case of migration that uses your existing hardwareand operating system. You install a new or improved version of theproduct in a different location from your current version on the samemachine. You can copy your configuration file and add new parameters.When you start the new Informix instance, the database data isautomatically converted. For example, you can upgrade from Version 11.10to Version 11.70.
Migrating (Non-in-place migration)The process of “switching over” your environment from one computer toanother. This type of migration requires more planning and setup timecompared to upgrading on your existing computer. Non-in-place migrationrequires that you modify and copy the database schema, user data, anduser objects from one server to another server. Use this type of migration ifyou are moving to Informix Version 11.70 from an early version ofInformix that has a different architecture, page size, optimization ofdbspaces, and extent allocations.
1-2 IBM Informix Migration Guide
Migrating from a non-IBM databaseThe process of moving your data from another database managementsystem (DBMS) such as Oracle or Sybase SQL Anywhere to InformixVersion 11.70. This type of migration is especially useful if you arecurrently using various products. You can consolidate to take advantage ofthe Informix features and total cost of ownership.
Migration toolsYou can choose from various migration tools, depending on the task that you mustperform.v For in-place upgrades: You do not use any migration tools. Simply start the
server by using the oninit utility. The data from the source database server isconverted to the target database server automatically.
v For non-in-place migration: You can use distributed queries to move your data,or you can pick from a number of data transfer tools and utilities, such as:– dbexport and dbimport
– onload and onunload
– dbload
– High Performance Loader (HPL)– External tables
Each of these tools and utilities has specific advantages and limitations. Considerall of the variables and pick a tool or utility that is appropriate for yoursituation.
v For migrating your data from non-IBM products: To migrate from a variety ofsource databases to Informix, download the free, easy-to-usehttp://www.ibm.com/developerworks/data/downloads/migration/mtk/. Youcan also use the HPL to move your data from non-IBM products to Informix.
Upgrading Informix (in-place migration)In-place migration upgrades Informix directly to the current version by installingthe product in a new directory, copying a few configuration files, and starting thenew server to automatically convert your database data.
You can upgrade directly from any of the following products: Informix Version11.50, 11.10, 10.00, 9.40, or 7.31.
Upgrading is an in-place migration method that uses your existing test andproduction hardware. The operating system on those machines must be supportedby the new version of the server. Also, you must have enough space for the systemdatabase data conversion.
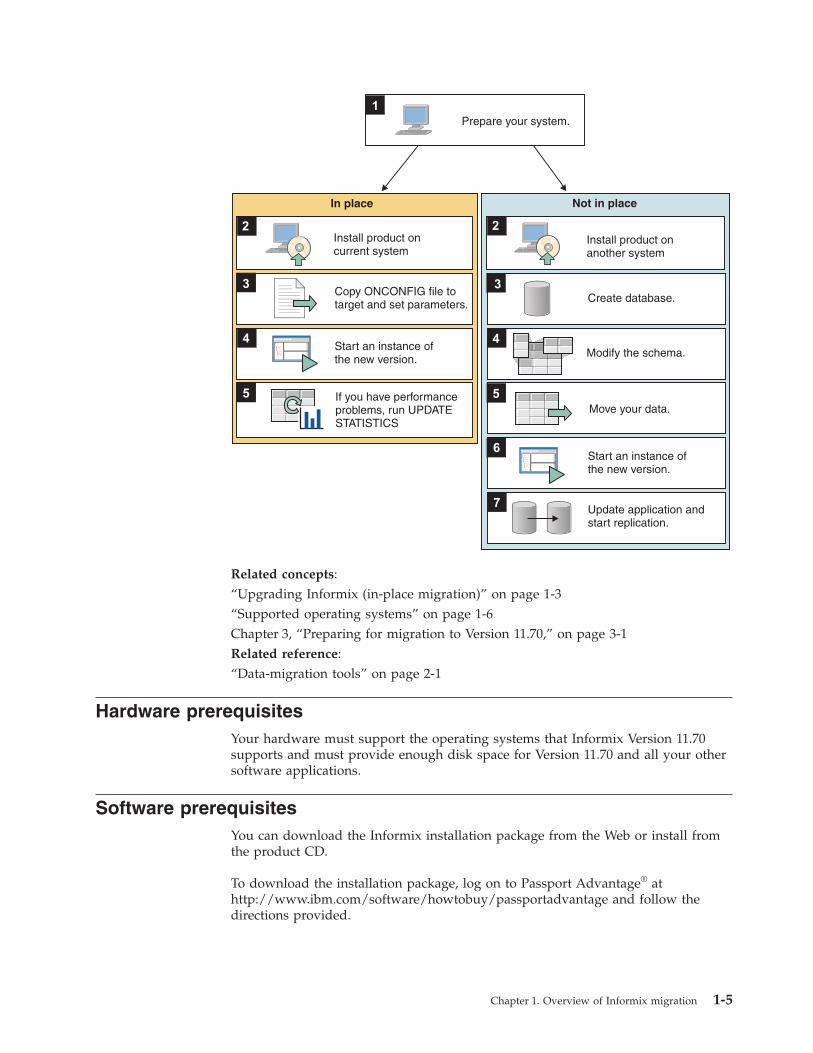
Upgrading consists of these steps:1. Prepare your system. That includes closing all transactions, verifying the
integrity of the data with the oncheck utility, and performing a level-0 backup.(If you are using Enterprise Replication or high-availability clusters, you muststop replication and perform required additional tasks.)While removing in-place alters is not required before upgrading, a best practiceis to remove all in-place alters before upgrading. (For information aboutmanually identifying outstanding In-Place ALTER statements using theoncheck utility, see this technical document: http://www.ibm.com/support/docview.wss?uid=swg21144602.)
Chapter 1. Overview of Informix migration 1-3
2. Install the new product on the machine.Important: The safest way to upgrade to a new version is to install the newversion in another directory. To save space, you can select the productcomponents that you want to install. After you test the database server instancewith the similar configuration settings and the client connection informationthat you use for your current database server, you can remove the old version.If you do not have space on your machine for two versions, install the newversion over the existing version. In this case, you cannot selectively installcomponents; you must install the whole product to block objects from theprevious version. Before you choose this approach, make sure that you havethe original installation media for the old version, because you will not be ableto automatically revert to it.
3. Copy the ONCONFIG file to the target and set parameters that are new for thecurrent release.
4. Start an instance of the new version of Informix. The database data isautomatically converted.
5. If you have performance problems run UPDATE STATISTICS and UPDATESTATISTICS FOR PROCEDURE.
This type of migration minimizes the risk of introducing errors. You can alwaysrevert from the new server to the old one. In the event of a problem duringreversion, you can restore the level-0 backup.Related concepts:“Migrating Informix (non-in-place migration)”“Supported operating systems” on page 1-6Chapter 3, “Preparing for migration to Version 11.70,” on page 3-1
Migrating Informix (non-in-place migration)Depending on your existing database server setup, you might need to move to anew architecture or a different server. This type of migration is more complicatedthan in-place migration. It requires more planning and it is more time consuming.
The non-in-place type of migration consists of these steps:1. Prepare your system. That includes closing all transactions, verifying the
integrity of the data with oncheck, and performing a level-0 backup. If you areusing Enterprise Replication or High-Availability Data Replication, stopreplication.
2. Install the new product on a new machine.3. Create a database with the current schema (dbschema -d dbname -ss).4. Modify the schema for new extent allocations and lock mode changes. If
applicable, modify schema for new dbspaces.5. Move data by using the appropriate utility or tool, or by using distributed
queries.6. Start the Informix Version 11.70 instance.7. After Informix migration, upgrade applications before running them. (Also, if
you use Enterprise Replication or high-availability clusters, you must performadditional tasks.)
The following illustration shows the differences between in-place and non-in-placemigration.
1-4 IBM Informix Migration Guide
Related concepts:“Upgrading Informix (in-place migration)” on page 1-3“Supported operating systems” on page 1-6Chapter 3, “Preparing for migration to Version 11.70,” on page 3-1Related reference:“Data-migration tools” on page 2-1
Hardware prerequisitesYour hardware must support the operating systems that Informix Version 11.70supports and must provide enough disk space for Version 11.70 and all your othersoftware applications.
Software prerequisitesYou can download the Informix installation package from the Web or install fromthe product CD.
To download the installation package, log on to Passport Advantage® athttp://www.ibm.com/software/howtobuy/passportadvantage and follow thedirections provided.
Prepare your system.
Copy ONCONFIG file totarget and set parameters.
Start an instance ofthe new version.
If you have performanceproblems, run UPDATESTATISTICS
Create database.
Modify the schema.
Move your data.
Start an instance ofthe new version.
Update application andstart replication.
In place Not in place
1
3
4
5
3
4
5
6
7
Install product oncurrent system
2
Install product onanother system
2
Chapter 1. Overview of Informix migration 1-5
Supported operating systemsThe current version of IBM Informix runs on UNIX, Linux, Windows, and Mac OSX operating systems.
For a detailed list of the operating systems supported by the current version ofInformix and by other IBM Informix products, download the platform availabilityspreadsheet from http://www.ibm.com/software/data/informix/pubs/roadmaps.html. Search for the product name, or sort the spreadsheet by name.
Prepare the operating system by completing any required machine or operatingsystem changes. See the machine notes, which are in a file on the installationmedia, for information about platform-specific actions that you must take toconfigure and use IBM Informix products.
Informix Version 11.70 does not run on the Windows 2000, Windows NT, orWindows 95 operating systems. If you are currently using a version of Informix onone of those operating systems, you must migrate to an operating system on whichVersion 11.70 runsRelated concepts:“Upgrading Informix (in-place migration)” on page 1-3“Migrating Informix (non-in-place migration)” on page 1-4
Fix pack naming conventionsInformix releases and fix packs contain version names that appear in the formataa.bb.xCn.
In this format:v aa = major release numberv bb = minor release numberv x = all operating system platforms, unless one of the following characters
appears in the position of x:– F = 64-bit on any UNIX, Linux, or Windows platform– H = 32-bit build on any HP 11.x platform; also runs on HP 11.x 64-bit– J = Java™
– T = 32-bit on Windows platforms– U = 32-bit on any UNIX or Linux platform
v C = GA releasev n = fix pack level
For example, in Version 11.50.xC6, 11 is the major release number, 50 is the minorrelease number, x means any platform, C means GA release, and 6 means fix pack6.
Paths for migration to the new versionThe new version of the database server is the superset of functions of all previousversions.
If you are migrating from:
1-6 IBM Informix Migration Guide
v Version 11.50 11.10, 10.0, 9.40, or 7.31, you can migrate directly to InformixVersion 11.70.
v Another database server version, you must migrate to an earlier, interim versionof the database server before you migrate to the new version.
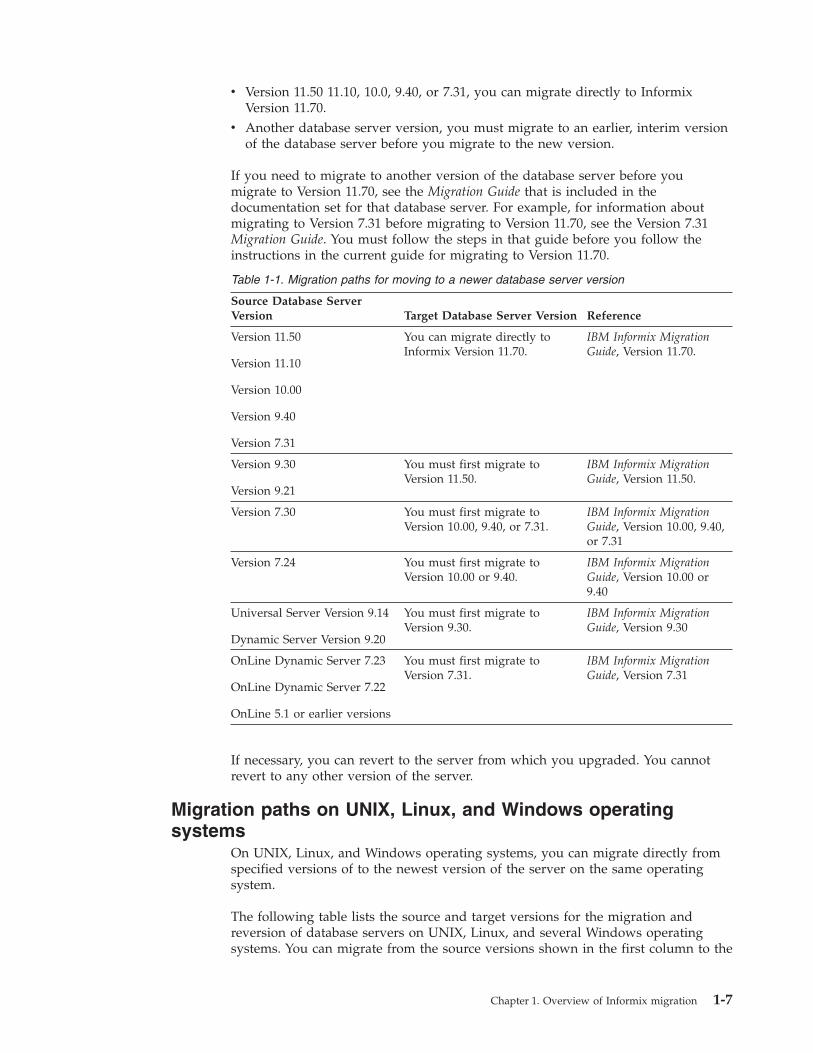
If you need to migrate to another version of the database server before youmigrate to Version 11.70, see the Migration Guide that is included in thedocumentation set for that database server. For example, for information aboutmigrating to Version 7.31 before migrating to Version 11.70, see the Version 7.31Migration Guide. You must follow the steps in that guide before you follow theinstructions in the current guide for migrating to Version 11.70.
Table 1-1. Migration paths for moving to a newer database server version
Source Database ServerVersion Target Database Server Version Reference
Version 11.50
Version 11.10
Version 10.00
Version 9.40
Version 7.31
You can migrate directly toInformix Version 11.70.
IBM Informix MigrationGuide, Version 11.70.
Version 9.30
Version 9.21
You must first migrate toVersion 11.50.
IBM Informix MigrationGuide, Version 11.50.
Version 7.30 You must first migrate toVersion 10.00, 9.40, or 7.31.
IBM Informix MigrationGuide, Version 10.00, 9.40,or 7.31
Version 7.24 You must first migrate toVersion 10.00 or 9.40.
IBM Informix MigrationGuide, Version 10.00 or9.40
Universal Server Version 9.14
Dynamic Server Version 9.20
You must first migrate toVersion 9.30.
IBM Informix MigrationGuide, Version 9.30
OnLine Dynamic Server 7.23
OnLine Dynamic Server 7.22
OnLine 5.1 or earlier versions
You must first migrate toVersion 7.31.
IBM Informix MigrationGuide, Version 7.31
If necessary, you can revert to the server from which you upgraded. You cannotrevert to any other version of the server.
Migration paths on UNIX, Linux, and Windows operatingsystems
On UNIX, Linux, and Windows operating systems, you can migrate directly fromspecified versions of to the newest version of the server on the same operatingsystem.
The following table lists the source and target versions for the migration andreversion of database servers on UNIX, Linux, and several Windows operatingsystems. You can migrate from the source versions shown in the first column to the
Chapter 1. Overview of Informix migration 1-7
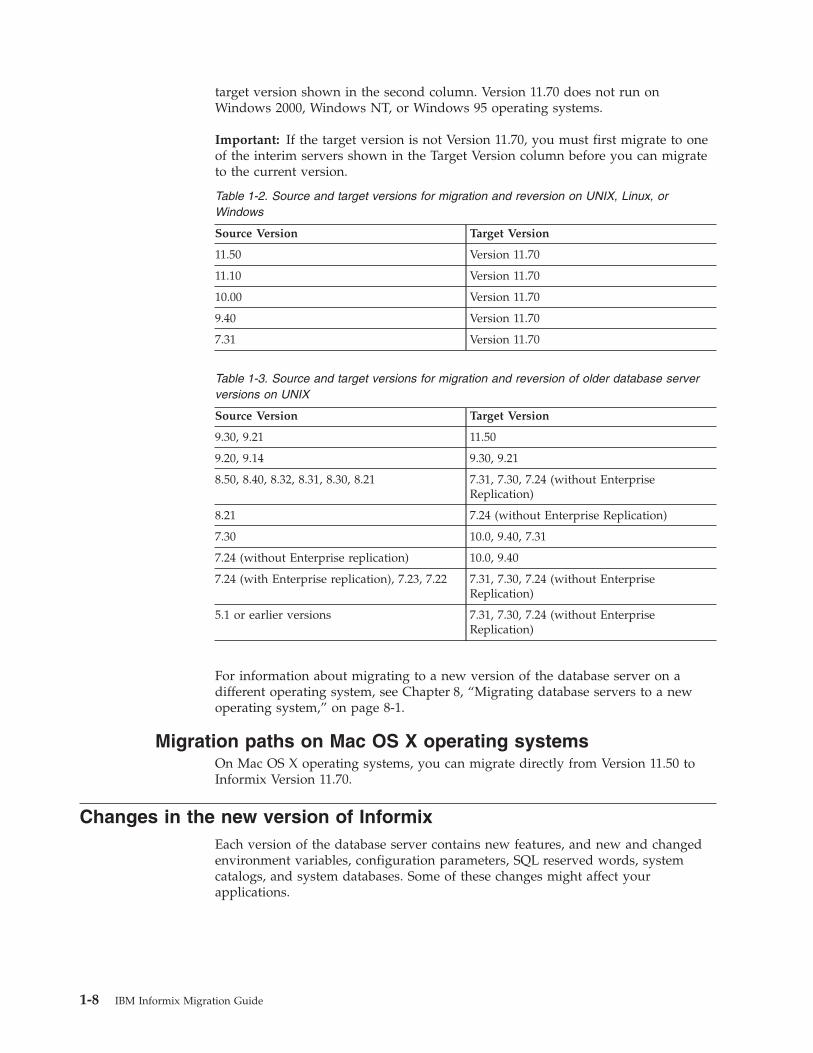
target version shown in the second column. Version 11.70 does not run onWindows 2000, Windows NT, or Windows 95 operating systems.
Important: If the target version is not Version 11.70, you must first migrate to oneof the interim servers shown in the Target Version column before you can migrateto the current version.
Table 1-2. Source and target versions for migration and reversion on UNIX, Linux, orWindows
Source Version Target Version
11.50 Version 11.70
11.10 Version 11.70
10.00 Version 11.70
9.40 Version 11.70
7.31 Version 11.70
Table 1-3. Source and target versions for migration and reversion of older database serverversions on UNIX
Source Version Target Version
9.30, 9.21 11.50
9.20, 9.14 9.30, 9.21
8.50, 8.40, 8.32, 8.31, 8.30, 8.21 7.31, 7.30, 7.24 (without EnterpriseReplication)
8.21 7.24 (without Enterprise Replication)
7.30 10.0, 9.40, 7.31
7.24 (without Enterprise replication) 10.0, 9.40
7.24 (with Enterprise replication), 7.23, 7.22 7.31, 7.30, 7.24 (without EnterpriseReplication)
5.1 or earlier versions 7.31, 7.30, 7.24 (without EnterpriseReplication)
For information about migrating to a new version of the database server on adifferent operating system, see Chapter 8, “Migrating database servers to a newoperating system,” on page 8-1.
Migration paths on Mac OS X operating systemsOn Mac OS X operating systems, you can migrate directly from Version 11.50 toInformix Version 11.70.
Changes in the new version of InformixEach version of the database server contains new features, and new and changedenvironment variables, configuration parameters, SQL reserved words, systemcatalogs, and system databases. Some of these changes might affect yourapplications.
1-8 IBM Informix Migration Guide
Related concepts:Appendix F, “New and changed features,” on page F-1Related reference:Appendix A, “New environment variables,” on page A-1Appendix B, “New configuration parameters,” on page B-1Appendix C, “Configuration parameters that have been changed or removed,” onpage C-1Appendix E, “System catalog and system database changes,” on page E-1
Chapter 1. Overview of Informix migration 1-9

1-10 IBM Informix Migration Guide
Chapter 2. Overview of moving data
If you are installing the new version of the database server on another computer oroperating system (non-in-place migration), you can use one of several tools andutilities to move data from your current database server.
For example, suppose you migrated to the current version of Informix and createda few new databases, but decide to revert to the previous version. Before yourevert, you can use one of the data-migration tools to save the data you added.After reverting, you can reload the data.
Before you move data, consider these issues:v Changes in the configuration parameters and environment variablesv Amount of memory and dbspace space that is requiredv Organization of the datav Whether you want to change the database schema to accommodate more
information, to provide for growth, or to enhance performance
For information about how to move data between database servers on differentoperating systems, also see Chapter 8, “Migrating database servers to a newoperating system,” on page 8-1.
For information about how to move to a different GLS locale, see the IBM InformixGLS User's Guide.
Automatic data migrationYou do not need to use data migration tools or utilities for in-place migration. Thedata is converted automatically from the source database server to the targetdatabase server after you start the target database server.
Prerequisites before moving dataBefore you use any data migration utility, you must set your PATH,INFORMIXDIR, and INFORMIXSERVER environment variables.
For information about environment variables, see the IBM Informix Guide to SQL:Reference.
Data-migration toolsInformix provides tools, utilities, and SQL statements that you can use to movedata from one IBM Informix database to another or from one operating system toanother.
You might want to use a data-migration tool when you have different page sizes orcode pages. For example, UNIX or Linux and Windows store data in different pagesizes.
When your migration involves migrating between different operating systems, youmust export data and its schema information from one database server and importthe exported data into the other database server.
© Copyright IBM Corp. 1996, 2012 2-1
Normally, if you are migrating on the same operating system, you do not need toload and unload data.
You can use the following tools to move data:v The dbexport and dbimport utilitiesv The dbload utilityv The onunload and onload utilitiesv UNLOAD and LOAD statementsv The High-Performance Loader (HPL)v Nonlogging raw tables
When you import data from non-Informix sources, you can use the following tools:v The dbimport and dbload utilitiesv The High-Performance Loader (HPL)v IBM Informix Enterprise Gateway productsv External tables that you create with the CREATE EXTERNAL TABLE statement
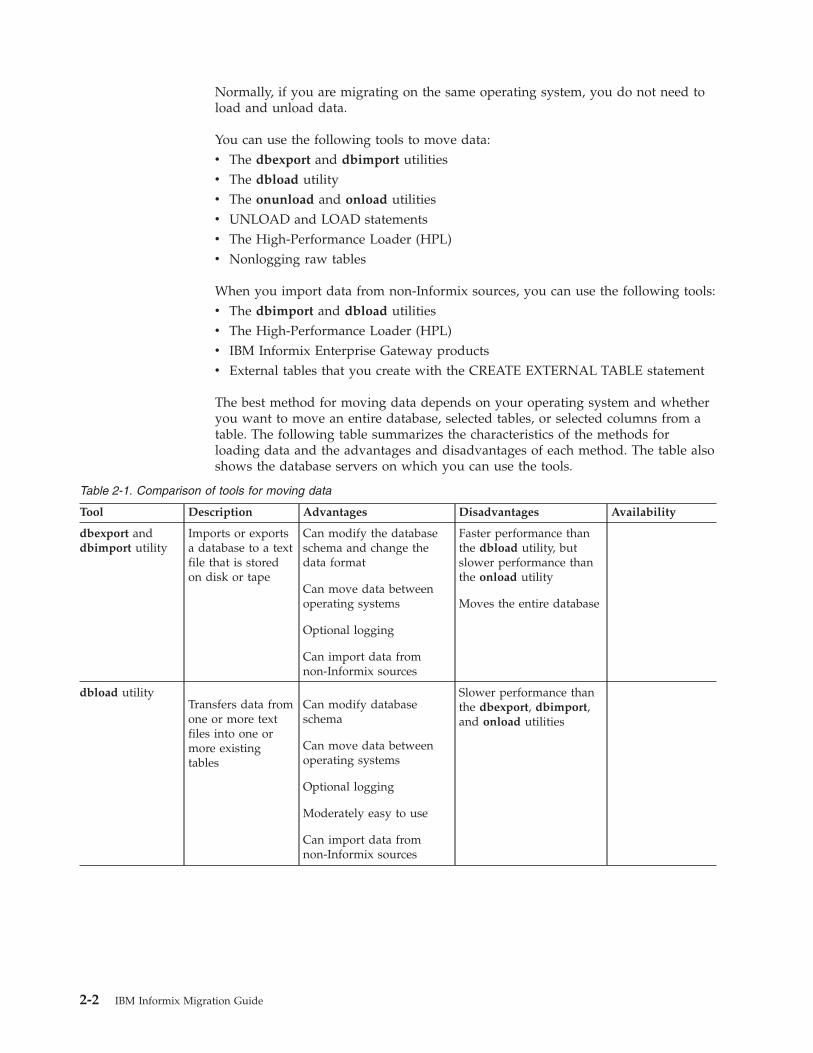
The best method for moving data depends on your operating system and whetheryou want to move an entire database, selected tables, or selected columns from atable. The following table summarizes the characteristics of the methods forloading data and the advantages and disadvantages of each method. The table alsoshows the database servers on which you can use the tools.
Table 2-1. Comparison of tools for moving data
Tool Description Advantages Disadvantages Availability
dbexport anddbimport utility
Imports or exportsa database to a textfile that is storedon disk or tape
Can modify the databaseschema and change thedata format
Can move data betweenoperating systems
Optional logging
Can import data fromnon-Informix sources
Faster performance thanthe dbload utility, butslower performance thanthe onload utility
Moves the entire database
dbload utilityTransfers data fromone or more textfiles into one ormore existingtables
Can modify databaseschema
Can move data betweenoperating systems
Optional logging
Moderately easy to use
Can import data fromnon-Informix sources
Slower performance thanthe dbexport, dbimport,and onload utilities
2-2 IBM Informix Migration Guide
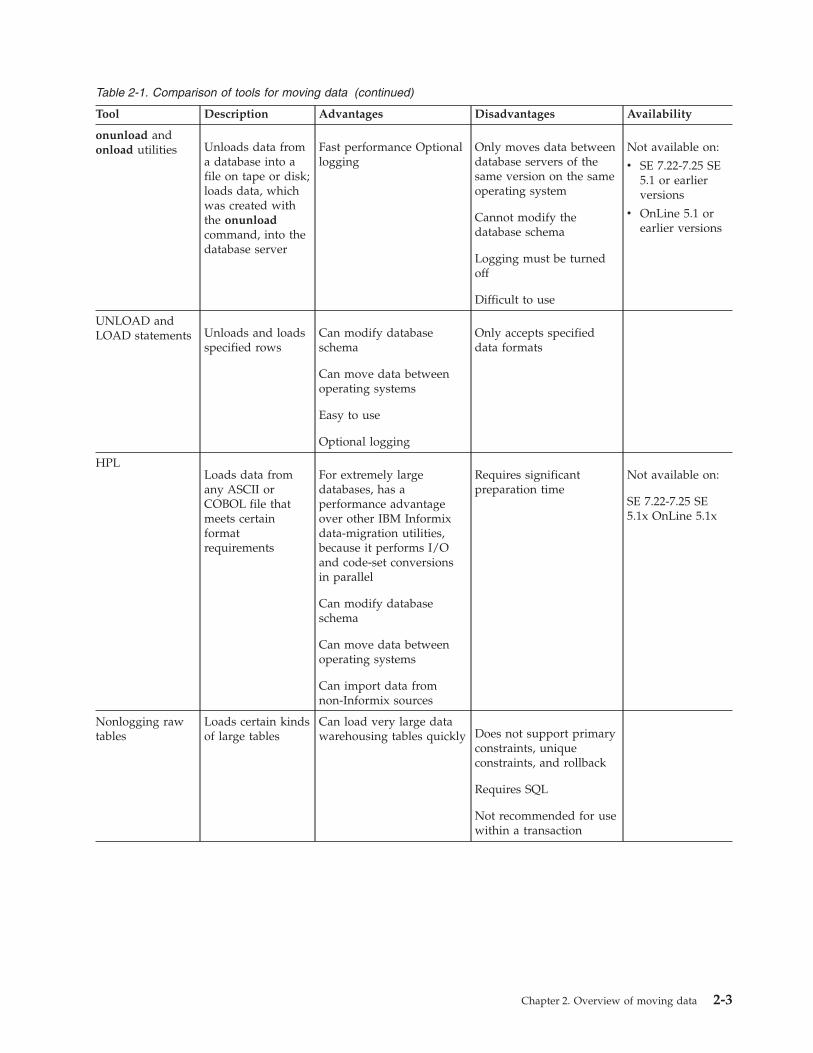
Table 2-1. Comparison of tools for moving data (continued)
Tool Description Advantages Disadvantages Availability
onunload andonload utilities Unloads data from
a database into afile on tape or disk;loads data, whichwas created withthe onunloadcommand, into thedatabase server
Fast performance Optionallogging
Only moves data betweendatabase servers of thesame version on the sameoperating system
Cannot modify thedatabase schema
Logging must be turnedoff
Difficult to use
Not available on:
v SE 7.22-7.25 SE5.1 or earlierversions
v OnLine 5.1 orearlier versions
UNLOAD andLOAD statements Unloads and loads
specified rowsCan modify databaseschema
Can move data betweenoperating systems
Easy to use
Optional logging
Only accepts specifieddata formats
HPLLoads data fromany ASCII orCOBOL file thatmeets certainformatrequirements
For extremely largedatabases, has aperformance advantageover other IBM Informixdata-migration utilities,because it performs I/Oand code-set conversionsin parallel
Can modify databaseschema
Can move data betweenoperating systems
Can import data fromnon-Informix sources
Requires significantpreparation time
Not available on:
SE 7.22-7.25 SE5.1x OnLine 5.1x
Nonlogging rawtables
Loads certain kindsof large tables
Can load very large datawarehousing tables quickly Does not support primary
constraints, uniqueconstraints, and rollback
Requires SQL
Not recommended for usewithin a transaction
Chapter 2. Overview of moving data 2-3
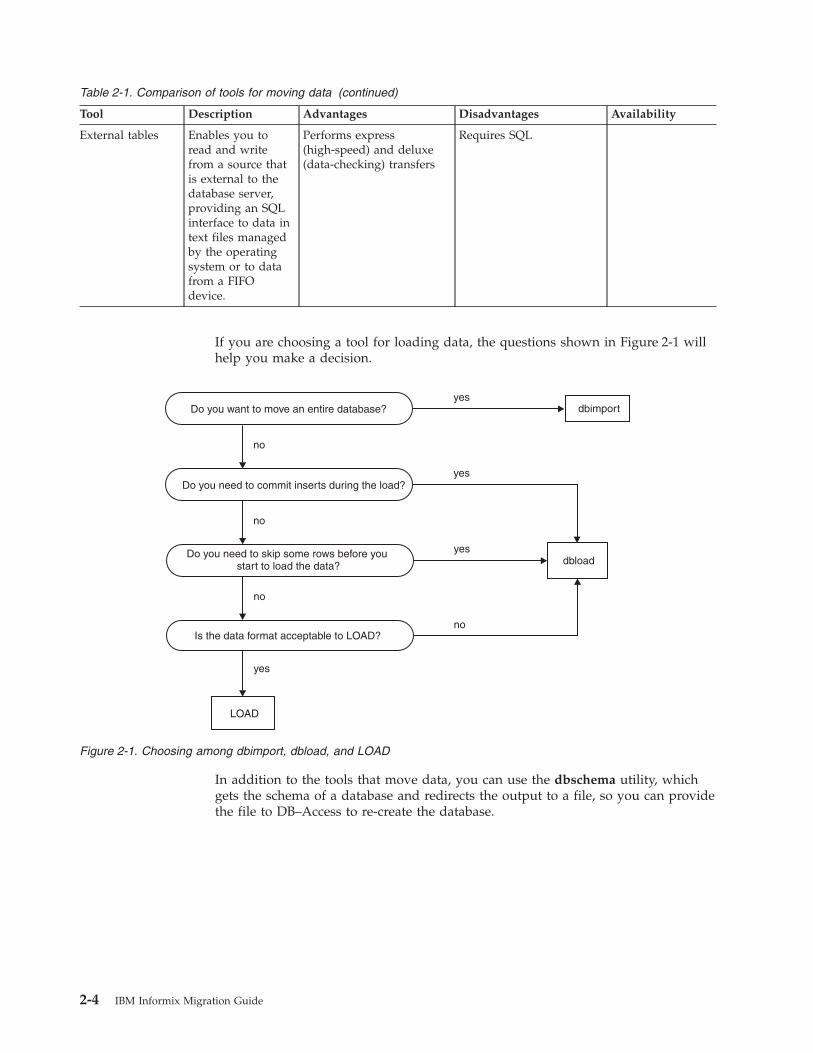
Table 2-1. Comparison of tools for moving data (continued)
Tool Description Advantages Disadvantages Availability
External tables Enables you toread and writefrom a source thatis external to thedatabase server,providing an SQLinterface to data intext files managedby the operatingsystem or to datafrom a FIFOdevice.
Performs express(high-speed) and deluxe(data-checking) transfers
Requires SQL
If you are choosing a tool for loading data, the questions shown in Figure 2-1 willhelp you make a decision.
In addition to the tools that move data, you can use the dbschema utility, whichgets the schema of a database and redirects the output to a file, so you can providethe file to DB–Access to re-create the database.
dbimportyes
no
yes
no
yes
no
dbload
no
yes
LOAD
Do you need to commit inserts during the load?
Do you want to move an entire database?
Do you need to skip some rows before youstart to load the data?
Is the data format acceptable to LOAD?
Figure 2-1. Choosing among dbimport, dbload, and LOAD
2-4 IBM Informix Migration Guide
Related concepts:“Migrating Informix (non-in-place migration)” on page 1-4Chapter 9, “The dbexport and dbimport utilities,” on page 9-1Chapter 13, “The onunload and onload utilities,” on page 13-1Chapter 10, “The dbload utility,” on page 10-1Chapter 11, “The dbschema utility,” on page 11-1Chapter 12, “The LOAD and UNLOAD statements,” on page 12-1“High-Performance Loader performance advantages for large databases”Related tasks:
Moving data with external tables (Administrator's Guide)Related reference:
CREATE EXTERNAL TABLE Statement (Guide to SQL: Syntax)
High-Performance Loader performance advantages for largedatabases
The High-Performance Loader (HPL) utility, which can load data from any ASCIIor COBOL file that meets certain format prerequisites, uses parallel processing toperform fast data loading and unloading. However, the HPL requires significantpreparation time.
For extremely large databases, the HPL has a performance advantage over otherIBM Informix data-migration utilities because it performs I/O and code-setconversions in parallel. Use the HPL only for large databases, for which the timesavings in the actual loading or unloading of data makes the preparation timeworthwhile.
The following HPL features provide powerful tools for handling data fromnon-Informix sources:v Drivers to handle different database typesv Filters and functions to manipulate datav Code-set conversionv The ipload GUI for UNIXv The onpladm command-line utility for UNIX and Windows
For more information about the HPL, refer to the IBM Informix High-PerformanceLoader User's Guide.
Chapter 2. Overview of moving data 2-5
Related concepts:“Choosing a tool for moving data before migrating between operating systems” onpage 8-1Related tasks:
Moving data with external tables (Administrator's Guide)Related reference:“Data-migration tools” on page 2-1
CREATE EXTERNAL TABLE Statement (Guide to SQL: Syntax)
Nonlogging raw tables that speed up data loading timeIf you use a database server utility to load data, you can use nonlogging rawtables in a logging database to speed up the initial loading and validation of dataif you are moving data to or from Version 9.21 or any later version.
Data warehousing and other applications can have very large tables that take along time to load. Nonlogging tables are faster to load than logging tables.
In a logged database, Informix creates standard tables that use logging by default.
To create a nonlogging table, use the CREATE RAW TABLE statement, or use theALTER TABLE statement to change the table type from STANDARD to RAW. Afterthe loading of a raw table is complete, you can change the table to a logging table(in a logging database) by changing the table type to STANDARD. Then you canuse ALTER TABLE statements to add referential constraints to the table andCREATE INDEX statements to add indexes. For more information about these SQLstatements, see the IBM Informix Guide to SQL: Syntax.
To load raw tables, you can use any data loading utility, such as dbimport or HPLin express mode. After you load data, perform a level-0 backup. Before you modifyany data in a raw table or use it in a transaction, change the table type toSTANDARD.
If an error or failure occurs during the loading of a raw table, the resulting data iswhatever was on the disk at the time of the failure.
The dbexport and dbschema utilities support the CREATE RAW TABLE andALTER TABLE...TYPE (RAW) statements.
For more information about nonlogging tables, see your IBM InformixAdministrator's Guide. For more information on how to improve the performance ofloading very large tables, see your IBM Informix Performance Guide. For moreinformation about the ALTER TABLE statement, see the IBM Informix Guide to SQL:Syntax.
Informix also supports external tables, which provide an SQL interface to data intext files managed by the operating system or to data from a FIFO device. Tocreate external tables, use the CREATE EXTERNAL TABLE statement. Use theDROP TABLE statement to drop an external table.
2-6 IBM Informix Migration Guide
Related tasks:
Moving data with external tables (Administrator's Guide)Related reference:
CREATE EXTERNAL TABLE Statement (Guide to SQL: Syntax)
When TEXT and BYTE data is scanned, not compressedAn Informix database server scans TEXT and BYTE data into an existing tablewhen you load data by using the SQL LOAD statement, the dbload utility, theInformix ESQL/C program, the HPL, or external tables.
Informix database servers do not have any mechanisms for compressing TEXT andBYTE data after the data has been scanned into a database.
Moving non-Informix data between computers and dbspacesYou can move data between different computers, and you can import data fromnon-Informix environments. Except when you use the High-Performance Loader(HPL) utility or external tables, you must unload your data to ASCII files beforeyou move the data to another computer.
If you are moving to an Informix database server on another computer, you canuse the dbimport and dbload utilities to load the data that you exported.
If you are moving data to a non-Informix application, you might need to use theUNLOAD statement because you can specify the delimiter that is used in the datafiles.
Importing data from a non-Informix sourceThe dbimport and dbload utilities can import data from any ASCII file that isproperly formatted.
Most applications that produce data can export the data into files that have asuitable format for dbimport. If the format of the data is not suitable, use UNIX,Linux, or Windows utilities to reformat the data before you import it.
In addition to dbimport and dbload, the IBM Informix Enterprise Gatewayproducts and the HPL provide ways to access information from non-Informixsources.
Importing data with IBM Informix Enterprise Gateway productsYou can use IBM Informix Enterprise Gateway with DRDA® to query a DRDAdatabase and then insert the results into an Informix database.
For example, to import data, run a SELECT statement to select data from thenon-Informix database and then run an INSERT statement to insert data into theInformix database. For more information, refer to the IBM Informix EnterpriseGateway with DRDA User Manual.
IBM Informix Enterprise Gateway provides a single, standards-based gateway tomultiple data sources. Gateway Manager connects the Informix environment withthat of any shared-library ODBC Level 2-compliant driver manager and driver onUNIX or Linux. For instance, you can use Gateway Manager with the IBM
Chapter 2. Overview of moving data 2-7
Informix Enterprise Gateway driver products to access UNIX or Linux databaseserver products. For more information, refer to the IBM Informix Enterprise Gatewaywith DRDA User Manual.
Moving data by using distributed SQLIf you want to move data with different binary pages and page sizes acrossplatforms and you have expertise in using distributed SQL, you can use INSERTand SELECT SQL statements to transfer the data.
Important: Do not use INSERT and SELECT statements to move data if thedatabase contains BLOB data types.
Prerequisites: A network connection must exist between database server instances.
To move data using INSERT and SELECT statements with fully qualified tablenames:
1. Capture the complete database schema from the source database server.2. Alter the extent sizing and, if necessary, the lock modes on tables from page
to row.3. Create and verify the schema on the target database server.4. Disable logging on both source and target servers where necessary.5. Create and run the following scripts:
a. Create and run separate scripts for:v Disabling select triggers on the source serverv Disabling indexes, triggers and constraints for each table on the target
database server.b. Create and run one script per table for the fully-qualified INSERT and
SELECT statements.For example:INSERT INTO dbname@target:owner.table SELECT *FROM dbname@source:owner.table
You can run the scripts in parallel. In addition, for larger tables, you cancreate multiple scripts that can partition the table to run in parallel.
c. Create and run separate scripts for enabling indexes, triggers andconstraints for each table
6. Run UPDATE STATISTICS on system catalog tables and stored proceduresand functions on the target database server.
7. Adjust starting values for all tables that have serial columns on the targetdatabase server.
8. Turn on transaction logging on the source and target database servers.9. Return the source and target database servers to multi-user mode.
10. Validate the data that was transferred to the target database server.
For information about INSERT and SELECT statements, refer to the IBM InformixGuide to SQL: Syntax. For information on distributed transactions, refer to the IBMInformix Administrator's Guide and the IBM Informix Administrator's Reference.
2-8 IBM Informix Migration Guide
Part 2. Migration to and reversion from Version 11.70
© Copyright IBM Corp. 1996, 2012

IBM Informix Migration Guide
Chapter 3. Preparing for migration to Version 11.70
Before you install the new version of Informix, you must prepare the databaseserver environment for migration by performing specified pre-migration tasks. Ifyou are also migrating from 32-bit to 64-Bit database servers, you must performadditional tasks.Related concepts:“Upgrading Informix (in-place migration)” on page 1-3“Migrating Informix (non-in-place migration)” on page 1-4
Preparing for migrationPreparing for migration includes gathering information about and backing up yourdata, so that you can reinstall the previous version of the server and restore yourdata if you have a migration problem. Preparing for migration is crucial forsuccessful migration.
Prerequisites:v Check the release notes for information about the new version of Informix. Also
refer to the following topics in this guide:– Appendix A, “New environment variables,” on page A-1– Appendix B, “New configuration parameters,” on page B-1– Appendix C, “Configuration parameters that have been changed or removed,”
on page C-1– Appendix D, “New keywords of SQL,” on page D-1– Appendix E, “System catalog and system database changes,” on page E-1
v IBM Informix Version 11.70xC3 supports new built-in SQL string manipulationfunctions: CHARINDEX() , LEFT(), RIGHT(), INSTR(), DEGREES(), RADIANS(),REVERSE(), SUBSTRING_INDEX(), LEN(), and SPACE(). If you haveuser-defined routines (UDRs) that have the same names as these new functions,you must rename your UDRs before migrating to the new server:
v Check the machine notes for information about the correct operating-systemrelease and any patches that you need for successful installation and operationof the database server.
v On UNIX or Linux, plan to retain both versions of the IBM Informix productsoftware on disk, if you have enough disk resources, so you can revert to thesource version. You cannot retain both servers.
v Check the setting of the GL_USEGLU environment variable. The setting ofGL_USEGLU must match between the source and target server duringmigration.
v If you use Enterprise Replication, perform Enterprise Replication additionalpreparation tasks before you complete the tasks in this topic. For moreinformation, see Chapter 4, “Enterprise Replication and migration,” on page 4-1.
v If the source version of the database server contains the IFX_EXTEND_ROLEconfiguration parameter, which controls authorization to register DataBlademodules or external user-defined routines (UDRs), disable the parameter bysetting it to 0 (off).
© Copyright IBM Corp. 1996, 2012 3-1
v If you are upgrading from Informix Version 9.21 or earlier versions and youhave columns for smart large objects (BLOB data types) that were defined with adefault value of an empty string, you must redefine the columns to have NULLas the default value.
v If you are upgrading from Informix Version 7.3, you must drop all storedprocedures that have embedded CREATE TRIGGER statements, CREATE TABLEstatements with fragmentation expressions, ALTER TABLE or CREATE TABLEstatements with constraint expressions, and nested CREATE PROCEDUREstatements. After migrating to the current database server, you must recreate allstored procedures that were dropped.
v If you are migrating from Informix 7.31, the number of columns of theVARCHAR or NVARCHAR data type per table for Version 11.50 or laterversions has been reduced from 231 to 195, within a row size of 32762 bytes andbased on a page size of 2K on UNIX or Linux. The same 195-column restrictionalso applies to BYTE and TEXT columns.On platforms where the page size is 4K (Windows and AIX®), the limit for thenumber of columns limit is approximately 450 columns.
Optionally, you can use the checklist in “Pre-migration checklist of diagnosticinformation” on page 3-9 for gathering additional performance information thatcan be useful if you have large or complex applications. This additionalinformation is also useful if you need to troubleshoot problems or issues aftermigration and need help from Technical Support.
To prepare for migration:
1. Check and configure available space to be sure you have enough space tomove data and for any other software and network tools that you use. See“Checking and configuring available space” on page 3-3.
2. Optionally, change information that Informix uses to capture information incase you need to restore files to a consistent state if an upgrade fails. See“Configuring for recovery of restore point data in case an upgrade fails” onpage 3-4
3. Save copies of the current configuration files. See “Saving copies of the currentconfiguration files” on page 3-5.
4. Save a copy of your current storage manager sm_versions file. See “Saving acopy of the storage manager sm_versions file” on page 3-6.
5. Close all transactions and shut down the source database server. See “Closingall transactions and shutting down the source database server” on page 3-6.
6. Start fast recovery to verify that no open transactions remain after you shutdown the source database server. See “Initiating fast recovery to verify that noopen transactions exist” on page 3-7.
7. Verify the integrity of the data. See “Verifying the integrity of the data” onpage 3-7.
8. Verify that the database server is in quiescent mode. See “Verifying that thedatabase server is in quiescent mode” on page 3-8.
9. If you use high-availability clusters, you must perform additional tasks. SeeChapter 5, “High-availability cluster migration,” on page 5-1.
10. Make a final level-0 backup of the source database server, including allstorage spaces, in case you need to revert to the source database server. See“Making a final backup of the source database server” on page 3-8.
11. Run the ontape -a command after the backup is complete.
3-2 IBM Informix Migration Guide
12. Verify that the source database server is offline. See “Verifying that the sourcedatabase server Is offline” on page 3-8.
13. On UNIX or Linux only, modify kernel parameters. See “Modifying kernelparameters (UNIX, Linux)” on page 3-9.
Checking and configuring available spaceBefore you migrate to the new version of Informix, you must make sure that youhave enough available space for the new server, your data, and any other networkand data tools that you use.
During migration, Informix drops and then recreates the sysmaster database.Depending on which version of Informix you migrate from, the sysmasterdatabase in the current version can be significantly larger.
When you migrate to Version 11.70, you need the following space for buildingsysmaster, sysutils, and sysadmin databases:v 21892 KB of logical-log spaces (or 10946 pages) for 2 K page platformsv 26468 KB of logical-log spaces (or 6617 pages) for 4 K page platforms
During migration, a second database, the sysadmin database, is created in the rootdbspace. As you work after migrating, the sysadmin database, could growdramatically. You can move the sysadmin database to a different dbspace.
You might need to increase the physical log size to accommodate new features,and you might consider adding a new chunk.
Partition header pages should not be full; key descriptors and other new featuresmight require more space after migration to the new version of Informix.
If your migration from an older version to version 11.70 fails because there isinsufficient space in the partition header page, you must unload your data beforeyou attempt to migrate again and then manually load the data into version 11.70.
The root chunk should contain at least ten percent free space when converting tothe new version of the server.
In some cases, even if the database server migration is successful, internalconversion of some databases might fail because of insufficient space for systemcatalog tables. For more information, see the release notes for this version ofInformix.
Add any additional free space to the system prior to the migration. If the dbspacesare nearly full, add space before you start the migration procedure. When you startthe new version of Informix on the same root dbspace of the earlier databaseserver, Informix automatically converts the sysmaster database and then eachdatabase individually.
For a successful conversion of each database, ensure that 2000 KB of free space perdatabase is available in each dbspace where a database resides.
To ensure enough free space is available:
1. Calculate the amount of free space that each dbspace requires.In the following equation, n is the number of databases in the dbspace and X isthe amount of free space they require:
Chapter 3. Preparing for migration to Version 11.70 3-3
X kilobytes free space = 2000 kilobytes * n
The minimum number of databases is 2 (for the sysmaster and sysadmindatabases).
2. Check the amount of free space in each dbspace to determine whether youneed to add more space.
You can run SQL statements to determine the free space that each dbspace requiresand the free space available. These statements return the free-space calculation inpage-size units. The free_space_req column value is the free-space requirement,and the free_space_avail column value is the free space available.
The following SQL statement shows how to determine the free space that eachdbspace requires:DATABASE sysmaster;SELECT partdbsnum(partnum) dbspace_num,
trunc(count(*) * 2000) free_space_reqFROM sysdatabases
GROUP BY 1ORDER BY 1;
The following SQL statement queries the syschunks table and displays the freespace available for each dbspace:SELECT dbsnum dbspace_num, sum(nfree) free_space_avail
FROM syschunksGROUP BY 1ORDER BY 1;
Important: If less free space is available than the dbspace requires, either move atable from the dbspace to another dbspace or add a chunk to the dbspace.
The dbspace estimates could be higher if you have an unusually large number ofSPL routines or indexes in the database.
Configuring for recovery of restore point data in case anupgrade fails
By default, the CONVERSION_GUARD configuration parameter is enabled and atemporary directory is specified in the RESTORE_POINT_DIR configurationparameter. These configuration parameters specify information that Informix canuse if an upgrade fails. You can change the default values of these configurationparameters before beginning an upgrade.
You can change the value of the CONVERSION_GUARD configuration parameteror the directory for restore point files before beginning an upgrade. The defaultvalue for the CONVERSION_GUARD configuration parameter in the ONCONFIGfile is (2), and the default directory where the server will store the restore pointdata is $INFORMIXDIR/tmp. You must change this information before beginning anupgrade. You cannot change it during an upgrade.
To change information:
1. If necessary for your environment, change the value of theCONVERSION_GUARD configuration parameter.When the CONVERSION_GUARD configuration parameter is set to 2 (thedefault value), the server will continue the upgrade even if an error related tocapturing restore point data occurs, for example, because the server hasinsufficient space to store the restore point data.
3-4 IBM Informix Migration Guide
However, if the CONVERSION_GUARD configuration parameter is set to 2and the upgrade to the new version of the server fails, you can use theonrestorept utility to restore your data.However, if you set the CONVERSION_GUARD configuration parameter to 2,conversion guard operations fail (for example, because the server hasinsufficient space to store restore point data), and the upgrade to the newversion fails, you cannot use the onrestorept utility to restore your data.
2. In the RESTORE_POINT_DIR configuration parameter, specify the completepath name for a directory that will store restore point files.The server will store restore point files in a subdirectory of the specifieddirectory, with the server number as the subdirectory name.
If the CONVERSION_GUARD configuration parameter is set to 1 and an upgradefails, you can run the onrestorept utility to restore the Informix instance back to itsoriginal state just before the start of the upgrade.
If the CONVERSION_GUARD configuration parameter is set to 1 and conversionguard operations fail (for example, because the server has insufficient space tostore restore point data), the upgrade to the new version will also fail.
If any restore point files from a previous upgrade exist, you must remove thembefore you begin an upgrade.
Even if you enable the CONVERSION_GUARD configuration parameter, youshould still make level 0 backup of your files in case you need to revert after asuccessful upgrade or in case a catastrophic error occurs and you cannot revert.
Saving copies of the current configuration filesSave copies of the configuration files that exist for each instance of your sourcedatabase server. Keep the copies available in case you decide to use the files aftermigrating or you need to revert to the source database server.
Although you can use an old ONCONFIG configuration file with Informix Version11.70, you should use the new Version 11.70 ONCONFIG file, or at least examinethe file for new parameters. For information about Version 11.70 changes to theONCONFIG file, see Appendix C, “Configuration parameters that have beenchanged or removed,” on page C-1.
Configuration files that you might have are listed in Table 3-1.
Table 3-1. Configuration files to save from the source database server
UNIX or Linux Windows
$INFORMIXDIR/etc/$ONCONFIG %INFORMIXDIR%\etc\%ONCONFIG%
$INFORMIXDIR/etc/onconfig.std %INFORMIXDIR%\etc\onconfig.std
$INFORMIXDIR/etc/oncfg* %INFORMIXDIR%\etc\oncfg*
$INFORMIXDIR/etc/sm_versions %INFORMIXDIR%\etc\sm_versions
$INFORMIXDIR/aaodir/adtcfg %INFORMIXDIR%\aaodir\adtcfg.*
$INFORMIXDIR/dbssodir/adtmasks %INFORMIXDIR%\dbssodir\adtmasks.*
$INFORMIXDIR/etc/sqlhosts
$INFORMIXDIR/etc/tctermcap
$INFORMIXDIR/etc/termcap
Chapter 3. Preparing for migration to Version 11.70 3-5
If you use ON-Bar to back up your source database server and the logical logs,you must also save a copy of any important storage manager files and thefollowing file:
UNIX or Linux:$INFORMIXDIR/etc/ixbar.servernum
Windows:%INFORMIXDIR%\etc\ixbar.servernum
Saving a copy of the storage manager sm_versions fileBefore you migrate to a later version of the database server, save a copy of yourcurrent sm_versions file, which should be in the $INFORMIXDIR/etc directory.
If you are using a different directory as INFORMIXDIR for the new databaseserver, copy sm_versions to the new $INFORMIXDIR/etc, or copysm_versions.std to sm_versions in the new directory, and then edit thesm_versions file with appropriate values before starting the migration.
For information about how to install and use the Informix Storage Manager, seethe IBM Informix Storage Manager Administrator's Guide.
Closing all transactions and shutting down the sourcedatabase server
Before migrating, terminate all database server processes and shut down yoursource database server. This lets users exit and shuts down the database servergracefully. If you have long running sessions, you must also shut those down.
Inform client users that migration time is typically five to ten minutes. However, ifmigration fails, you must restore from a level-0 backup, so ensure that you includethis possibility when you estimate how long the server will be offline.
Before you migrate from the original source database server, make sure that noopen transactions exist. Otherwise, fast recovery will fail when rolling back opentransactions during the migration.
To let users exit and shut down the database server gracefully
1. Run the onmode –sy command to put the database server in quiescent mode.2. Wait for all users to exit.3. Run the onmode –l command to move to the next logical log.4. Run the onmode -c to force a checkpoint.5. Make a level-0 backup of the database server.6. Run the ontape -a command after the level-0 backup is complete.7. Run the onmode –yuk command to shut down the system.
If you need to perform an immediate shutdown of the database server, run thesecommands:onmode -lonmode -conmode -ky
3-6 IBM Informix Migration Guide
Initiating fast recovery to verify that no open transactionsexist
A shutdown procedure does not guarantee a rollback of all open transactions. Toguarantee that the source database server has no open transactions, put the sourcedatabase server in quiescent mode and initiate fast recovery.
Run the following command to enter quiescent mode and initiate a fast recovery:oninit -s
UNIX/Linux OnlyOn UNIX or Linux, the oninit –s command rolls forward all committedtransactions and rolls back all incomplete transactions since the lastcheckpoint and then leaves a new checkpoint record in the log with noopen transactions pending.
You must run the oninit -s command before you initialize the new version ofInformix. If any transactions remain when you try to initialize the new databaseserver, the following error message appears when you try to initialize the newdatabase server, and the server goes offline:An open transaction was detected when the database server changed log versions.Start the previous version of the database server in quiescent mode and then shutdown the server gracefully, before migrating to this version of the server.
For more information about fast recovery, see your IBM Informix Administrator'sGuide.
After you put the database server in quiescent mode and initiate fast recovery,issue the onmode -yuk command to shut down the database server. Then reviewthe online.log file for any possible problems and fix them.
Only after proper shutdown can you bring the new database server (InformixVersion 11.70) through the migration path. Any transaction that is open during themigration causes an execution failure in fast recovery.
Verifying the integrity of the dataAfter verifying that no open transactions exist, verify the integrity of your data byrunning the oncheck utility. You can also verify the integrity of the reserve pages,extents, system catalog tables, data, and indexes. If you find any problems with thedata, fix the problems before you make a final backup of the source databaseserver.
To obtain the database names, use the following statements with DB-Access:DATABASE sysmaster;SELECT name FROM sysdatabases;
Alternatively, to obtain the database names, run the oncheck -cc command withoutany arguments and filter the result to remove unwanted lines, as shown in thisexample:oncheck –cc | grep "ting database"
Table 3-2 on page 3-8 lists the oncheck commands that verify the data integrity.
Chapter 3. Preparing for migration to Version 11.70 3-7
Table 3-2. Commands for verifying the data integrity
Action oncheck Command
Check reserve pages oncheck -cr
Check extents oncheck -ce
Check system catalog tables oncheck -cc database_name
Check data oncheck -cD database_name
Check indexes oncheck -cI database_name
Related concepts:
The oncheck Utility (Administrator's Reference)
Verifying that the database server is in quiescent modeBefore you make a final backup, verify that your source database server is inquiescent mode.
Run the onstat - command to verify that the database server is in quiescent mode.
The first line of the onstat output shows the status of your source database server.If the server is in quiescent mode, the status line includes this information:Quiescent -- Up
Making a final backup of the source database serverUse ON-Bar or ontape to make a level-0 backup of the source database server,including all storage spaces and all used logs. After you make a level-0 backup,also perform a complete backup of the logical log, including the current logical-logfile.
Be sure to retain and properly label the tape volume that contains the backup.
Important: You must also make a final backup of each source database serverinstance that you plan to convert.
For ON-Bar, remove the ixbar file, if any, from the $INFORMIXDIR%/etc or%INFORMIXDIR%\etc directory after the final backup. Removing the ixbar fileensures that backups for the original source database server are not confused withbackups about to be done for the new database server. Follow the instructionsregarding expiration in your storage manager documentation.
For more information about making backups, see the IBM Informix Backup andRestore Guide.
Verifying that the source database server Is offlineBefore you install the new database server, verify that the source database server isoffline. You must do this because the new database server uses the same files.
You cannot install the new database server if any of the files that it uses are active.
You can also use the onstat utility to determine that shared memory was notinitialized.
3-8 IBM Informix Migration Guide
Modifying kernel parameters (UNIX, Linux)You might need to change some of the kernel parameters for your UNIX or Linuxoperating system before you install Informix Version 11.70.
To reconfigure the operating system, follow the directions in both of theseresources:v Machine notes file included on your database server distribution mediav Kernel-configuration instructions for your operating system
Pre-migration checklist of diagnostic informationBefore you migrate to a newer version of Informix, gather diagnostic information,especially if you have large, complex applications. This information will be usefulto verify database server behavior after migration. This information will also beuseful if you need help from Technical Support.
If you have problems, you or Technical Support can compare the information thatyou gather with information obtained after migration.
The following Table 3-3 contains a list of the diagnostic information that you cangather. You can print the checklist. Then, after you get the information specified ineach row, check the second column of the row.
Table 3-3. Checklist of information to get before migrating
Information to Get Before Migrating Done
Get the SQL query plans for all regularly used queries, especiallycomplex queries, by using SET EXPLAIN ON.
Run the dbschema -d -hd command for all critical tables.
The output contains distribution information.
Get oncheck -pr output that dumps all of the root reserved pages.
Make a copy of the ONCONFIG configuration file.
A copy of the ONCONFIG file is essential if you need to revert toan earlier version of the database server. In addition, a copy ofthis file is useful because oncheck -pr does not dump all of theconfiguration parameters.
Prepare a list of all the environment variables that are set usingthe env command.
During times of peak usage:
v Obtain an online.log snippet, with some checkpoint durationsin it
v Run onstat -aF, -g all, and -g stk all.
Chapter 3. Preparing for migration to Version 11.70 3-9
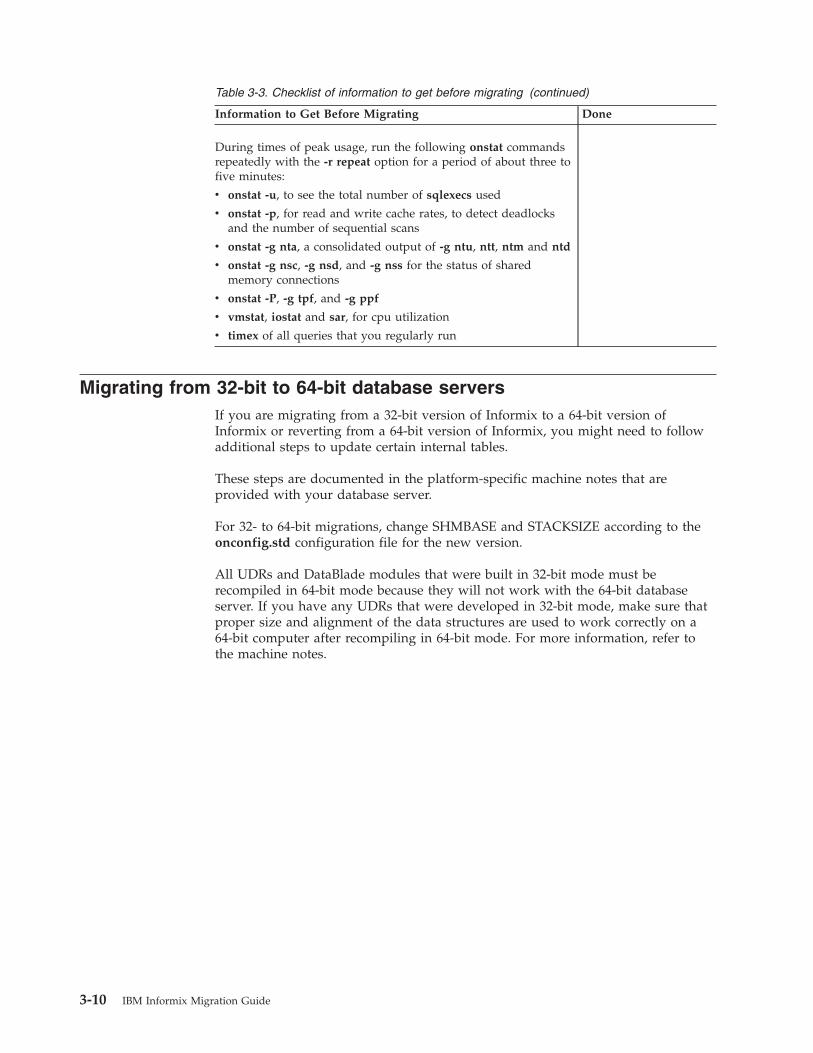
Table 3-3. Checklist of information to get before migrating (continued)
Information to Get Before Migrating Done
During times of peak usage, run the following onstat commandsrepeatedly with the -r repeat option for a period of about three tofive minutes:
v onstat -u, to see the total number of sqlexecs used
v onstat -p, for read and write cache rates, to detect deadlocksand the number of sequential scans
v onstat -g nta, a consolidated output of -g ntu, ntt, ntm and ntd
v onstat -g nsc, -g nsd, and -g nss for the status of sharedmemory connections
v onstat -P, -g tpf, and -g ppf
v vmstat, iostat and sar, for cpu utilization
v timex of all queries that you regularly run
Migrating from 32-bit to 64-bit database serversIf you are migrating from a 32-bit version of Informix to a 64-bit version ofInformix or reverting from a 64-bit version of Informix, you might need to followadditional steps to update certain internal tables.
These steps are documented in the platform-specific machine notes that areprovided with your database server.
For 32- to 64-bit migrations, change SHMBASE and STACKSIZE according to theonconfig.std configuration file for the new version.
All UDRs and DataBlade modules that were built in 32-bit mode must berecompiled in 64-bit mode because they will not work with the 64-bit databaseserver. If you have any UDRs that were developed in 32-bit mode, make sure thatproper size and alignment of the data structures are used to work correctly on a64-bit computer after recompiling in 64-bit mode. For more information, refer tothe machine notes.
3-10 IBM Informix Migration Guide
Chapter 4. Enterprise Replication and migration
You must coordinate the migration of all servers that are involved in datareplication.
These topics describe the additional tasks that you must perform when migratingto and reverting from Informix Version 11.70 if you are running EnterpriseReplication.
Preparing to migrate with Enterprise ReplicationIf you use Enterprise Replication, you must remove replicate groups and performother replication-related tasks before you prepare for migration.
Prerequisites: You must perform all migration operations as user informix.
To prepare for migration with Enterprise Replication:
1. If you are migrating from Version 7.31, remove all replicate groups.In Version 9.3, replicate groups were replaced by replicate set (replset)commands.
2. Stop applications that are performing replicable transactions.3. Make sure that control and TRG send queues are empty:
v Run onstat -g grp to ensure that the Enterprise Replication grouper does nothave any pending transactions. The grouper evaluates the log records,rebuilds the individual log records into the original transaction, packages thetransaction, and queues the transaction for transmission.
v Run onstat -g rqm to check for queued messages.4. Replace old event class identifiers (IDs) for Enterprise Replication used in your
alarm program with the new event class IDs. Event class IDs for EnterpriseReplication were changed in version 10.0 and new event alarms were added insubsequent releases. In version 11.70, event alarms have unique IDs in additionto event class IDs.
5. Shut down Enterprise Replication with the following command:cdr stop
Now you can complete the steps in “Preparing for migration” on page 3-1 and, ifnecessary, in “Migrating from 32-bit to 64-bit database servers” on page 3-10.Related reference:
Enterprise Replication Event Alarms (Enterprise Replication Guide)
Migrating with Enterprise ReplicationIf you use Enterprise Replication, you must complete additional replication-relatedtasks when you migrate to a new version of Informix.
Prerequisites:
v Complete the steps in “Preparing to migrate with Enterprise Replication.”v Complete the steps in “Preparing for migration” on page 3-1.v Perform all migration operations as user informix.
© Copyright IBM Corp. 1996, 2012 4-1
To migrate with Enterprise Replication:
1. Perform the tasks described in “Migrating to the new version of Informix” onpage 6-1, including starting the new version of the server.
2. If the CDR_QDATA_SBSPACE configuration parameter is not set, you must setit by specifying the sbspaces for Enterprise Replication to use for storingspooled row data.
3. For each node involved in Enterprise Replication, back up the syscdr databasesby using the dbexport -ss command or the dbschema -ss command and theUNLOAD statement, or by a combination of these methods. The -ss optionprevents backup tables from using default extent sizes and row-level locking,which is not an appropriate lock mode with Enterprise Replication.
4. Make sure that no replicable transactions occur before Enterprise Replicationstarts.
5. If you are not upgrading between fix packs of one release, run the conversionscript, named concdr.sh, in the $INFORMIXDIR/etc/conv directory on UNIX, orconcdr.bat, in the %INFORMIXDIR%\etc\conv directory on Windows.For example, specify:% sh concdr.sh from_version 11.70
The from_version values that you can use are:11.50, 11.10, 10.00, 9.40, and 7.31.You do not need to run concdr.sh between fix packs of the same release. So, ifyou are migrating from version 11.70.xC1 or 11.70.xC2 to a later version of11.70, you do not need to follow the additional Enterprise Replication migrationprocedures related to running that file.
6. Wait for one of the following messages:’syscdr’ conversion completed successfully.’syscdr’ conversion failed.
For details about the conversion, see either of the following files:v $INFORMIXDIR/etc/concdr.out
v %INFORMIXDIR%\etc\concdr.out
7. If conversion fails, resolve the problem reported in the concdr.out file, restorethe syscdr database from a backup, and then attempt conversion again.
8. After successful conversion, start Enterprise Replication:% cdr start
Important: After you convert to the new version of Informix with EnterpriseReplication, do not drop the syscdr database. If syscdr is dropped, you cannotrevert to the older database server with Enterprise Replication because the datarequired to carry out the reversion is stored in the syscdr database.
Converting replication of 9.21 user-defined data typesIf you are migrating from Informix Version 9.21 and use Enterprise Replication,you must complete additional tasks if you have user-defined data types (UDTs).
Additionally, if you are migration from Version 9.21, you must first migrate toVersion 11.50 before you migrate to Version 11.70.
Informix Version 9.21 has limited support for the replication of UDTs. To takeadvantage of the UDT replication that is available in newer versions of the server,the user-defined routines (UDRs) for a UDT must contain streamwrite() andstreamread() functions.
4-2 IBM Informix Migration Guide
Additionally, if you are migration from Version 9.21, you must first migrate toVersion 11.50 before you migrate to Version 11.70.
After you migrate to the new version of Informix, implement the streamwrite()and streamread() functions for any currently replicated UDTs on all databaseservers within the enterprise.
Reverting with Enterprise ReplicationIf you use Enterprise Replication, you must complete additional replication-relatedtasks when you revert from the new version of Informix.
During reversion to an earlier version of Informix with Enterprise Replication:v Master replicates become standard replicates and tables that were added to the
sysscdr database are removed.v Tables created with templates are dropped.v The table containing replicated table-version information, which was created
during conversion, is dropped.
If Enterprise Replication is defined on your server and you want to revert to aversion earlier than when Enterprise Replication was defined on this server, youmust remove Enterprise Replication from this server before reverting. For moreinformation, see Deleting a Replication Server (Enterprise Replication Guide).
Once Enterprise Replication is deleted, you can revert your server using theinstructions at Chapter 7, “Reverting from Informix Version 11.70,” on page 7-1. Ifthe Informix version when Enterprise Replication was defined on this server is thesame as or later than your targeted reversion version, use the steps below.
This procedure describes reverting to Informix 11.50, 11.10, or 10.00. To revert to anearlier version, first revert to and intermediate version, such as version 11.50 or10.0.
However, if you are reverting from version 11.70xC3 or a later version to version11.70.xC1 or 11.70.xC2, you do not need to follow the additional EnterpriseReplication migration procedures described in this topic.
Prerequisites:
Perform all reversion operations as user informix.
Enterprise Replication must be running, or you must delete the replication serverbefore you revert.
To revert to Version 11.50, 11.10, or 10.00 from Version 11.70 with EnterpriseReplication:
1. Stop applications doing replicable transactions.2. Remove Enterprise Replication features from the current release that cannot be
reverted. See “Reversion requirements and limitations” on page 7-3 for moreinformation.
3. You cannot revert if Enterprise Replication is in Alter mode, so make sureEnterprise Replication is not in Alter Mode. Use onstat -g cat repls to see ifEnterprise Replication is in Alter mode. If it is in Alter mode, change themode.
Chapter 4. Enterprise Replication and migration 4-3
4. Delete shadow replicates.5. Make sure that control and TRG send queues are empty:
v Run onstat -g grp to ensure that the Enterprise Replication grouper doesnot have any pending transactions.
v Run onstat -g rqm to check for queued messages.6. Shut down Enterprise Replication with the following command:
cdr stop
7. Back up the syscdr databases with dbschema or UNLOAD.8. If you are performing an in-place reversion, copy the revcdrintrepl.sql script
and the revcdrintrepl.sh or revcdrintrepl.bat script from the$INFORMIXDIR/etc/conv directory on UNIX or the %INFORMIXDIR%\etc\convdirectory on Windows, to a directory that is not under the INFORMIXDIRdirectory. These scripts are used to revert the internal replicates. You will runthem after reverting to the earlier version.
9. Run the reversion script, named revcdr.sh, in the $INFORMIXDIR/etc/convdirectory on UNIX, or revcdr.bat, in the %INFORMIXDIR%\etc\conv directory onWindows, as shown in this example:% sh revcdr.sh 11.70 11.50
Valid to_version values are 11.50, 11.10, and 10.00. This script does areversion test followed by the actual Enterprise Replication reversion.
10. If the reversion test or actual reversion fails, check the file$INFORMIXDIR/etc/revtestcdr.out or revcdr.out, respectively. Attemptreversion after resolving problems reported.
11. Perform database server reversion tasks, as described in “Reverting fromInformix Version 11.70” on page 7-13.
12. Run onmode -l and onmode -c. If you do not do this after reversion andbefore starting Enterprise Replication, the database server might fail when youstart Enterprise Replication.
13. Start Enterprise Replication:% cdr start
14. If you are performing an in-place reversion, copy the revcdrintrepl.sql scriptand the revcdrintrepl.sh or revcdrintrepl.bat script to the$INFORMIXDIR/etc/conv directory on UNIX or the %INFORMIXDIR%\etc\convdirectory on Windows.
15. Run the revcdrintrepl.sh script on UNIX, or the revcdrintrepl.bat script onWindows.
4-4 IBM Informix Migration Guide

Chapter 5. High-availability cluster migration
You must coordinate the migration and reversion of all servers that are involved inhigh-availability clusters.
High-availability clusters are based on technology that is sometimes referred to asMulti-node Active Clusters for High Availability (MACH).
Preparing to migrate, upgrade, or revert clustersIf you use high-availability clusters, you must coordinate the migration of all of theservers that are involved in a cluster, and you must perform additional steps whenpreparing to migrate.
Prerequisites:v You must perform all migration operations as user informix.v If you are migrating to a new version of the server, complete all steps in
“Preparing for migration” on page 3-1.
To prepare for migration or reversion with clusters:1. Install the target server (in a different location from where the source database
server is installed) on all of the servers in the cluster. Do not install the targetserver over the source server.
2. Copy the configuration files (the onconfig and sqlhosts files) to the targetinstallation directory (for example, $INFORMIXDIR/etc) on all of the servers inthe cluster.
3. Install any user-defined objects or DataBlade modules (that are used on thesource server) onto all of the servers in the cluster.
4. Back up your primary server. You can perform this step in either of thefollowing ways:v Back up all logs. Then use ON–Bar or ontape to make a level-0 backup on
the primary source server.v Alternatively, if you have a high-availability cluster with a High-availability
Data Replication (HDR) secondary server, you can use the HDR secondaryserver as a standby server for any contingencies that occur while youupgrade the primary server. However, if it is necessary to use an HDRsecondary server as a standby server for contingencies, do not performupdates on the standby server while migration or reversion is in progress,because the updates cannot be replicated and will be lost. Additionally,nonlogged objects on the primary server will not exist on the secondaryserver.Do not use RS secondary servers as backup servers, because transactionscould be lost.
Upgrading clusters to a new PID or fix packIf you are upgrading clusters from one PID or fix pack to a new PID or fix packand the migration does not involve actual conversion or reversion, you mustcomplete additional tasks when you upgrade.
© Copyright IBM Corp. 1996, 2012 5-1
However, you do not need to recreate the secondary servers after you upgrade theprimary database server.
Prerequisites:v Verify that you are upgrading to a new PID or fix pack in which standard
conversion procedures are not necessary. If you are upgrading to a new PID orfix pack that requires you to complete standard conversion procedures or if youare upgrading to a new release, instead of following the procedures in this topic,go to “Migrating clusters to a new release.”
v Complete the steps in “Preparing to migrate, upgrade, or revert clusters” onpage 5-1.
v Perform all migration operations as user informix.
To upgrade clusters to a new PID or fix pack:1. Stop the Connection Manager by issuing the oncmsm -k
connection_manager_name command.2. If you are using a High-availability Data Replication (HDR) secondary server as
a backup server in case of contingencies:a. Quiesce the primary server by issuing an onmode -sy command to prevent
user connections to the server.b. Force a checkpoint by issuing an onmode –c command on the primary
server.3. Stop secondary servers in the cluster in the following order:
a. If you have remote standalone (RS) servers, stop them by issuing theonmode -ky command.
b. If you have shared disk (SD) servers, stop them by issuing the onmode -kycommand.
c. If you have an HDR secondary server, stop it issuing the onmode -kycommand.
4. Stop the primary server by issuing the onmode -ky command.5. On each server, set the INFORMIXDIR environment variable to the full path
name for the target installation.6. Ensure that all of the necessary configuration files are available in the target
installation.7. Start the servers in the cluster and perform additional tasks in the following
order:a. Start the primary server by running an oninit command.b. Wait for primary server to be in online (multi-user) mode.c. Start the Connection Manager by running an oncmsm command.d. Start the HDR secondary server by running an oninit command.e. Start SD servers by running an oninit command.f. Start RS servers by running an oninit command.
Migrating clusters to a new releaseIf you have a high-availability cluster with one or more secondary database serversand are migrating to a new release or if you are upgrading to a new PID or fixpack that requires you to complete standard conversion procedures, you mustcomplete additional tasks when you migrate.
When you migrate clusters, you need to migrate only the primary database server.
5-2 IBM Informix Migration Guide

Beginning with Informix Version 11.50xC6, the server automatically removessecondary servers when you migrate or revert. After migration or reversion on theprimary server is complete, you must recreate all High-availability DataReplication (HDR), RS, and SD secondary servers in a high-availability cluster.
Prerequisites:
v Complete the steps in “Preparing for migration” on page 3-1.v Complete the steps in “Preparing to migrate, upgrade, or revert clusters” on
page 5-1.v Perform all migration operations as user informix.
When you migrate clusters, be sure to stop and start the servers in the cluster inthe order shown in the following procedure.
To migrate to a new release with high-availability clusters:1. Stop the Connection Manager by issuing the oncmsm -k
connection_manager_name command.2. If you are using a High-availability Data Replication (HDR) secondary server
as a backup server in case of contingencies:a. Quiesce the primary server by issuing an onmode -sy command to prevent
user connections to the server.b. Force a checkpoint by issuing an onmode –c command on the primary
server.3. Stop the secondary servers in the cluster in the following order:
a. If you have remote standalone (RS) secondary servers, stop them byissuing the onmode -ky command.
b. If you have shared disk (SD) servers, stop them by issuing the onmode-ky command.
c. If you have an HDR secondary server, stop it by issuing the onmode -kycommand.
4. Stop the primary server by issuing the onmode -ky command.5. On each server, set the INFORMIXDIR environment variable to the full path
name for the target installation.6. Ensure that all of the necessary configuration files are available in the target
installation.7. Optional: Enable quick reversion to a consistent restore point if the migration
fails. Do this by setting the CONVERSION_GUARD andRESTORE_POINT_DIR configuration parameters. (For more information, see“Configuring for recovery of restore point data in case an upgrade fails” onpage 3-4.)
8. Start the primary server by issuing an oninit command.9. Ensure that the conversion to the target server was successful and that the
server is in multi-user mode.10. Start the Connection Manager by issuing an oncmsm command.11. If you are migrating from pre-11.10 versions of Informix and need SD
secondary servers on the primary server in a shared-disk cluster, set theprimary server by issuing the onmode -d set SDS primaryprimary_server_name command.
12. Start SD secondary servers by issuing oninit commands.13. Start the servers in the cluster and perform additional tasks in the following
order:
Chapter 5. High-availability cluster migration 5-3
14. Back up all logs. Then use ON–Bar or ontape to make a level-0 backup on theprimary server to use to reestablish the RS and HDR secondary servers ifnecessary.
15. If you have RS secondary servers:a. Add RS entries on the primary server by issuing onmode –d add RSS
rss_server_name commands.b. Start RS secondary servers with level-0 restore operations from the level 0
backup that was made on the primary server after migration.c. On RS secondary servers, run the onmode -d RSS primary_server_name
command, and wait for the "RSS secondary server operational" messageto appear after each command.
16. If you have an HDR secondary server:a. Reestablish the pair on the primary server by issuing an onmode -d
primary hdr_secondary_server_name command.b. Start the HDR secondary server with level-0 restore operations from the
level 0 backup that was made on the primary server after migration.c. On the HDR secondary server, run the onmode -d secondary
primary_server_name command, and wait for the "HDR secondary serveroperational" message to appear after each command.
17. Perform any additional standard migration tasks described in “Migrating tothe new version of Informix” on page 6-1 and in “Completing requiredpost-migration tasks” on page 6-8.
The migration of all servers in the cluster is now complete.
Upgrading a cluster while it is onlineYou can upgrade the Informix software in a high-availability cluster withoutincurring any down time.
To upgrade Informix software on a high-availability cluster, you first convert theprimary server and the secondary to standalone Enterprise Replication (ER)servers. You then upgrade the software on the secondary server, stop ER, and thenclone the server using the ifxclone command. You can perform the upgrade whilethe servers are actively processing client requests because ER supports replicationbetween dissimilar versions of the server software.
See the following link for additional information about upgrading clusters:http://www.ibm.com/developerworks/data/library/techarticle/dm-1012rollingupgrade/index.html.
The following prerequisites apply when upgrading software on a cluster:v Non-logged databases are not supported.v Raw or unlogged tables are not supported.v Typed tables are not supported unless the typed table contains a primary key.v UDTs that do not support ER are not supported.v The CDR_QDATA_SBSPACE configuration parameter must be set on both the
primary and secondary servers.v The sqlhosts file must define a server group.v The primary and secondary servers must belong to different groups.
5-4 IBM Informix Migration Guide
v For versions of Informix software earlier than 11.50xC7, converting a primaryand secondary server pair to ER is not supported if a table does not have aprimary key.
v For versions of Informix software earlier than 11.10, the sec2er command is notsupported.
If you are upgrading Informix software version 11.50xC7 or later, the sec2ercommand adds a primary key to any table that does not already have one defined.For large tables, adding the primary key can take a long time, during which youwill not see any server activity. In addition, the sec2er command requires exclusiveaccess to the table while adding the primary key and user transactions will beblocked from accessing the table. You might want to manually create primary keyson any large table before running the sec2er command. If you have tables thatwere created with the DELIMIDENT environment variable set, and the tables donot have primary keys, then you must manually create the primary keys for thosetables before running the sec2er command.
There are different steps involved in the upgrade process depending on whetheryou are using the Connection Manager:v For high-availability clusters that use the Connection Manager to redirect user
connections:There are two options you can choose based on your requirements. You can:– Add a new Connection Manager instance to manage user connections while
the cluster is upgraded. This involves configuring a new 3.70 ConnectionManager instance that supports ER and has corresponding changes to thesqlhosts file or other connection mechanisms for user applications. If usersalready have a Connection Manager group support infrastructure to managetheir user connections, they can easily add the new Connection Manager forER to their existing Connection Manager group to ensure that no userconnection downtime occurs during the upgrade process.
– Use your existing cluster Connection Manager or Connection Manager groupsthroughout the upgrade process, without making any changes to theConnection Manager configuration, applications, or application connectionmechanisms. This option has a 10-second down time for user connections, butif that is acceptable, you can avoid the overhead of adding a new ConnectionManager instance and the configuration changes that go with it.
v For Clusters not using the Connection Manager to redirect user connections:Users must take steps to move user connections to the appropriate serversduring the upgrade process.
The version of the cdr command that contains the sec2er option is included only inInformix version 11.70.xC1 and later. Use the cdr command from the 11.70.xC1distribution if you intend to use the sec2er command. If the cdr start sec2ercommand fails or is interrupted, you might see the following error message:ERROR: Command cannot be run on pre-11.70 instance if ER is already running
If you receive this error, and you do not have the Connection Manager running,remove replication by running the cdr delete server command on both servers andthen run the cdr start sec2er command again. If you have the Connection Managerrunning, then perform the following steps:1. Shut down the Connection Manager.2. Shut down ER using one of the following commands:
v cdr delete server group
v cdr delete server server
Chapter 5. High-availability cluster migration 5-5

3. Start the Connection Manager.4. Restart the sec2er command as follows:
cdr start sec2er
Performing a server upgrade when the Connection Manager is not in use
In this example, the terms server1 and server2 refer to server names rather thanmachine names.
Some additional steps are required to upgrade Informix software. The followingare revised from what is currently shown in the documentation:1. On the primary server (server1), perform a check to see whether the servers
can be split into ER servers by running the following command:cdr check sec2er -c server1 --print server2
The command examines the primary and secondary servers and determines if itis possible to convert them to ER. The command displays warnings and errorsthat explain conditions that may prevent the servers from converting to ER.The –print option prints the commands that will be run when the cdr startcommand runs. You should fix any warnings or errors and then run thecommand again before performing the next step.
2. Run the following command from 11.70 distribution:cdr start sec2er -c server1 server2
The sec2er command converts the primary and secondary servers intostandalone servers and configures and starts Enterprise Replication. EnterpriseReplication keeps the data on the servers synchronized; however, any tablecreated after the sec2er command is run will not be replicated.
3. On the former secondary server (server2), upgrade the Informix software. Thesteps to upgrade the server are as follows:a. Stop replication by running the following command:
cdr stop
b. Back up the logical logs:ontape -a
c. Stop the server that contains the older version of the Informix software:onmode -kuy
d. Log on to the server with the newly installed Informix software.e. Start the server and let the conversion complete successfully :
oninit
f. Run the concdr.sh script to convert the syscdr database from the oldsoftware version to the new version:concdr.sh old_version new_version
g. Start replication on the former secondary server (server 2) after it has beenupgraded:cdr start
Because ER supports replication between dissimilar versions of the serversoftware, the upgraded secondary server (server2) replicates data with theformer primary server (server1), so that data updates are replicated on bothservers.
4. Move client application connections from the former primary server (server1)to the upgraded server (server2).
5-6 IBM Informix Migration Guide
5. On the primary server (server1) use the onmode -k command to take thedatabase server to offline mode.onmode -k
6. On the former secondary server (server2) run the following command to stopER:cdr stop
7. You can now clone the upgraded server to set up the other secondary serversin your cluster. Clone the newly upgraded server (server2) by running theifxclone utility on server1. Use the -d (disposition) parameter to create astandalone, RSS, or HDR secondary server. In the following examples, assumethat the TCP/IP address for server1 is 192.168.0.1 on port 123, and the addressfor server2 is 192.168.0.2 on port 456.v To create a standalone server:
ifxclone -T -S server2 -I 192.168.0.2 -P 456 -t server1-i 192.168.0.1 -p 123
v To create an RS secondary server specify the disposition using the -d option:ifxclone -T -S server2 -I 192.168.0.2 -P 456 -t server1
-i 192.168.0.1 -p 123 -d RSS
v To create an HDR secondary server, specify a disposition of RSS thenpromote the RSS server to HDR:ifxclone -T -S server2 -I 192.168.0.2 -P 456 -t server1
-i 192.168.0.1 -p 123 -d RSSonmode -d secondary primary_server_name
At this point, the cluster is running on the upgraded server. Clients can moveapplications from server2 if necessary.
Performing a server upgrade when the Connection Manager is in use
Refer to the following steps when clients are using the Connection Managerwithout a Connection Manager group defined in the existing setup.
For this example, assume that the following Connection Manager configuration fileis defined:NAME cm1LOG 1LOGFILE $INFORMIXDIR/tmp/cm1.log
CLUSTER cluster1{INFORMIXSERVER ids1,ids2SLA oltp DBSERVERS=primarySLA webapp DBSERVERS=HDRSLA report DBSERVERS=(primary,HDR)FOC ORDER=ENABLED TIMEOUT=10 RETRY=5}
1. On the primary server (server1), perform a check to see whether the serverscan be split into ER servers by running the following command:cdr check sec2er -c server1 --print server2
When the above command is run, the primary and secondary servers areexamined to determines whether it is possible to convert them to ER. Thecommand displays warnings and errors that explain conditions that mightprevent the servers from converting to ER. The –print option prints thecommands that will be run when the cdr start sec2er command runs. Youshould fix any warnings or errors and then run the command again beforeperforming the next step.
Chapter 5. High-availability cluster migration 5-7
2. Reload the Connection Manager so that it directs all client connections to theprimary server. Here is the revised Connection Manager configuration file:NAME cm1LOG 1LOGFILE $INFORMIXDIR/tmp/cm1.log
CLUSTER cluster1{
INFORMIXSERVER ids1,ids2SLA oltp DBSERVERS=primarySLA webapp DBSERVERS=primary,HDRSLA report DBSERVERS=primary,HDRFOC ORDER=ENABLED TIMEOUT=10 RETRY=5
}
3. Run the following command from 11.70 distribution:cdr start sec2er -c server1 server2
The sec2er command converts the primary and secondary servers intostandalone servers and configures and starts Enterprise Replication. EnterpriseReplication keeps the data on the servers synchronized; however, any tablecreated after the sec2er command is run will not be replicated.
4. On the former secondary server (server2), upgrade the Informix software.Because ER supports replication between dissimilar versions of the serversoftware, the upgraded secondary server (server2) replicates data with theformer primary server (server1), so that data updates are replicated to bothservers.
5. Move client application connections from the former primary server (server1)to the upgraded server (server2).a. Create a new Connection Manager configuration file for ER. The following
shows a sample ER Connection Manager configuration file. The SLA namesare same as for cm1:NAME cm2LOGFILE $INFORMIXDIR/tmp/cm2.logDEBUG 1LOG 1MACRO list=g_server2,g_server1
REPLSET replset_1{
INFORMIXSERVER g_server1,g_server2SLA oltp DBSERVERS=${list}SLA webapp DBSERVERS=${list}SLA report DBSERVERS=${list}
}
The ER Connection Manager must define a replicate set that includes allreplicates that are generated by the sec2er command. You can see the list ofreplicates by running the following command:cdr list repl
You create a replicate set by running the following command:cdr def replset replset_name repl1 repl2 ...
In the above example, repl1 and repl2 are replicates created by the sec2ercommand.
b. Halt the cm1 Connection Manager instance and load the cm2 instance.Performing the above step ensures that client connections are redirected togroup_2 (because server2 belongs to group_2).
5-8 IBM Informix Migration Guide
Here is a sample sqlhosts file:#dbservername nettype hostname servicename optionsg_server1 group - - i=10ids1 onsoctcp host1 port1 g=g_server1g_server2 group - - i=20ids2 onsoctcp host2 port2 g=g_server2
oltp onsoctcp host1 port3webapp onsoctcp host1 port4report onsoctcp host1 port5
6. On the primary server (server1) use the onmode -k command to take thedatabase server to offline mode.onmode -k
7. You can now clone the upgraded server to the other secondary servers in yourcluster.At this point in the upgrade process, the high-availability cluster is running onthe upgraded server.
8. Shut down the cm2 Connection Manager instance and start the cm1 instance.9. On the former secondary server (server2) run the following command to stop
ER:cdr stop
Errors and warnings generated by the sec2er commandThe sec2er command checks several conditions before converting a primary andsecondary server pair to an ER system. The following conditions are checked bythe sec2er command; ER conversion will only take place if the following conditionsare met:v The group definition must use the i= option.v The CDRID option must be the same on both the primary and secondary servers
(The CDRID is the unique identifier for the database server in the Options fieldof the sqlhosts file).
v The sqlhosts files on the primary server must match the sqlhosts file on thesecondary server. The sec2er command checks only the lines in the sqlhostsfiles that must to match to support ER.
v The database must not contain a typed table without a primary key.v User-defined types (UDT) must have ER support.v Tables must not be protected with label-based access control (LBAC).v A secondary server must be defined.v An sbspace for a stable queue must exist.v You must be running Informix version 11.00 or later.
The following warnings may also occur. Warnings do not always indicate aproblem but should be addressed. A warning is generated if any of the followingare true:v The CDR_SERIAL configuration parameter is not set.v The values for the CDR_SERIAL configuration parameter are the same on both
the primary and secondary servers. Identical values can cause conflicts.v The database has sequence generators. Because sequence generators are not
replicated, if you replicate tables using sequence objects for update, insert, ordelete operations, the same sequence values might be generated on differentservers at the same time, leading to conflicts.
v The database is not logged.
Chapter 5. High-availability cluster migration 5-9
v A table is not logged.v The DBSPACE is more than 70-percent full.
Reverting clustersIf you have a high-availability cluster, you must complete additional tasks whenyou revert from the new version of Informix. You must revert only the primarydatabase server.
Beginning with Informix Version 11.50xC6, the server automatically removessecondary servers during reversion. After reversion on the primary server iscomplete, you must recreate all HDR, RS, and SD secondary servers in ahigh-availability cluster.
Prerequisites:v Determine if you can revert. See information in “Ascertain that reversion is
possible and identify reversion requirements” on page 7-2.v Complete the steps in “Preparing to migrate, upgrade, or revert clusters” on
page 5-1.v Perform all reversion operations as user informix.
When you revert clusters, be sure to stop and start the servers in the cluster in theorder shown in the following procedure.
To revert high-availability clusters:1. Stop the Connection Manager by issuing the oncmsm -k
connection_manager_name command.2. If you are using a High-availability Data Replication (HDR) secondary server
as a backup server in case of contingencies:a. Quiesce the primary server by issuing an onmode -sy command to prevent
user connections to the server.b. Force a checkpoint by issuing an onmode –c command on the primary
server.3. Stop the servers in the cluster and perform the following tasks in the
following order:a. If you have remote standalone (RS) servers, stop them by issuing the
onmode -ky command.b. If you have shared disk (SD) servers, stop them by issuing the onmode
-ky command.c. If you have a High-availability Data Replication (HDR) secondary server,
stop it by issuing the onmode -ky command.d. Revert the standard server by issuing an onmode -b target_IDS_version
command.e. Verify that reversion was successful and the server was stopped. If the
reversion was not successful, check the message log for error messages,take appropriate action, and restart reversion.
4. On each server, set the INFORMIXDIR environment variable to the full pathname for the target installation.
5. Ensure that all of the necessary configuration files are available in the targetinstallation.
6. Perform any additional database server reversion tasks, as described in“Reverting from Informix Version 11.70” on page 7-13.
5-10 IBM Informix Migration Guide
7. Start the primary server by issuing an oninit command.8. Start the Connection Manager by issuing an oncmsm command9. Start SD secondary servers by issuing oninit commands.
10. Back up all logs. Then use ON–Bar or ontape to make a level-0 backup on theprimary server to use to reestablish the RS and HDR servers if necessary.
11. If you have RS secondary servers:a. Add RS entries on the primary server by issuing onmode –d add RSS
rss_server_name commands.b. Start the RS secondary servers with level-0 restore operations from the
level 0 backup that was made on the primary server after reversion.c. On the RS secondary servers, run the onmode -d RSS primary_server_name
command, and wait for the "RSS secondary server operational" messageto appear after each command.
12. If you have an HDR secondary server:a. Reestablish the HDR pair on the primary server by issuing an onmode –d
primary hdr_secondary_server_name command.b. Start the HDR secondary server with level-0 restore operations from the
level 0 backup that was made on the primary server after reversion.c. On the HDR secondary server, run the onmode -d secondary
primary_server_name command, and wait for the "HDR secondary serveroperational" message to appear after each command.
The reversion of all servers in the cluster is now complete.
Restoring clusters to a consistent pointYou can restore the primary server in a high-availability cluster to a consistentpoint after a failed upgrade.
Prerequisites:v Before you began the upgrade, you must have enabled quick reversion,
according to information in “Configuring for recovery of restore point data incase an upgrade fails” on page 3-4.
v The server must be offline.
To restore the primary server in a cluster to a consistent point after a failedupgrade:
Run the onrestorept utility. For more information, see “Restoring to a previousconsistent state after a failed upgrade” on page 6-7.
Alternatively, if you backed up your primary server or you prepared for using theHigh-availability Data Replication (HDR) secondary server as a backup serverbefore you upgraded and the upgrade fails, you can take other steps to restore thecluster. See “Restoring a cluster from a backup archive” or “Restoring a clusterfrom the HDR secondary server” on page 5-12.
Restoring a cluster from a backup archiveIf you backed up the primary server before you migrated or reverted the cluster,you can restore the primary server from the backup archive if migration orreversion fails. After you restore the primary server, you must recreate the otherservers in the high-availability cluster.
Chapter 5. High-availability cluster migration 5-11
Prerequisite: You made a level-0 backup archive of the primary server beforemigration or reversion.
To restore a cluster from a level-0 backup archive:
1. Point your INFORMIXDIR, PATH, and any other relevant environmentvariables to the directory in which the original version of Informix wasinstalled before you migrated or reverted.
2. Using the level-0 backup archive, perform a full restore of your primary server.3. Recreate the rest of your high-availability cluster.
Restoring a cluster from the HDR secondary serverYou can restore the primary server from the High-availability Data Replication(HDR) secondary server that you prepared to use as a backup server before youmigrated or reverted the cluster. After you restore the primary server, you mustrecreate the other servers in the high-availability cluster.
Prerequisite: You prepared the HDR secondary server to use as a contingencybackup server, according to information in “Preparing to migrate, upgrade, orrevert clusters” on page 5-1.
To restore a cluster from the HDR secondary server:
1. Start the HDR secondary server by running an oninit command.2. Change the secondary server to the primary server by running the onmode -d
make primary hdr_server_name command.3. If the server is in quiescent mode, change it to multi-user mode by running an
onmode -m command.4. Make a level-0 backup using the ON-Bar or ontape utility.5. Recreate the rest of the high-availability cluster.
5-12 IBM Informix Migration Guide
Chapter 6. Migrating to Informix Version 11.70
When you migrate to a new version of Informix, you must complete requiredmigration and post-migration tasks.
Migrating to the new version of InformixAfter you prepare your databases for migration, you can migrate to the newversion of Informix.
Recommendation: Install a new version of the database server in a new directoryand then copy the appropriate configuration files (such as the ONCONFIG andsqlhosts files) from the older version directory to the new directory, modifyingthem as necessary. If you do not have space on your machine to accommodate thenew copy of the Informix software, verify that you have the installation media forthe older version of Informix or back up your older directory. You can eitherremove the older software (but not the configuration files) from the Informixdirectory or install the new version over the older version. Older versions of filesmay not be cleaned up if you install over an older version of Informix.
You can also migrate on a database server dedicated to testing your migration toVersion 11.70 before you migrate on your production database server.
To upgrade a Informix non-root installation, you must run the installation programas the same user who installed the product being upgraded.
Prerequisites:
v Read the release notes and the machine notes for any new information.v Complete the steps in “Preparing for migration” on page 3-1.v Refer to your installation guide for detailed installation prerequisites, options,
and procedures.
Important: Do not connect applications to a database server instance untilmigration has successfully completed.
To migrate to the new version of Informix:
1. Install Informix Version 11.70 in a new directory. Do not install the newdatabase server over the old database server. If you are migrating from aversion that does not support the custom installation of components to aversion that does support it, you must choose the Typical installation option.After the typical components are installed, you can selectively remove thecomponents that you do not need. For more information, see “Installing thenew version of Informix” on page 6-2.
2. Set environment variables. For more information, see “Setting environmentvariables” on page 6-4.
3. Adjust configuration parameters as necessary. If the ALARMPROGRAMconfiguration parameter is set to the script alarmprogram.sh, set the value ofBACKUPLOGS in alarmprogram.sh to N. For more information, see“Customizing configuration files” on page 6-5.
4. Optionally add Communications Support Modules. See “AddingCommunications Support Modules” on page 6-5.
© Copyright IBM Corp. 1996, 2012 6-1
5. Optionally upgrade DataBlade modules to correspond to the newer server. See“Installing or upgrading any DataBlade modules” on page 6-5.
6. Switch to user informix and initialize Informix to trigger the migration. Formore information, see “Starting the new version of Informix” on page 6-6.When the migration starts, the online.log displays the message "Conversionfrom version <version number> Started." The log continues to display start andend messages for all components. When the migration of all components iscomplete, the message "Conversion Completed Successfully" appears. For moreinformation about this log, see “Migration status messages” on page 6-4.
7. If you successfully migrated to the new server, see “Completing requiredpost-migration tasks” on page 6-8 for information about preparing the newserver for use. If you successfully migrated, but the conversion of theHigh-Performance Loader onpload database failed, upgrade the onploaddatabase. For more information, see “Upgrading the High-Performance Loaderonpload database” on page 6-6.
8. If the log indicates that migration failed, you must either:v Install the old database server and restore your database from a level-0
backup.v Run the onrestorept utility to back out of the upgrade and restore files to a
consistent state without having to restore from a backup. You can run thisutility only if you set the configuration parameters that enable the utility. See“Restoring to a previous consistent state after a failed upgrade” on page 6-7.
If you are migrating the database server from a version that does not supportlabel-based access control, users who held the DBA privilege are automaticallygranted the SETSESSIONAUTH access privilege for PUBLIC during the migrationprocess. For more information about SETSESSIONAUTH, see the IBM InformixGuide to SQL: Syntax. For information about label-based access control, see the IBMInformix Security Guide.
Installing the new version of InformixInstall and configure the current version of Informix. For a Windows installation,you must be a member of the Administrators group. For a UNIX or Linuxadministrative installation, you must be logged on as root. For a Mac OS Xadministrative installation, you are prompted for administrator credentials. For aUNIX, Linux, or Mac OS X non-root installation, you must be logged on as theuser who is running informix.
Important: Do not install the new version over the existing product. If you do so,you will not be able to revert to the earlier product, and you will need to installthe earlier product from the original installation media.
When you change from the old server to the new server, change theINFORMIXDIR environment variable to ensure that it points to the location of theinstalled database server. If you do not do this, the older version of the databaseserver will start when you reboot.
If you install a new instance into a directory that already contains an instance andthere is insufficient free space, the install program will request that you confirmremoval of the older product before extracting the new one. Otherwise, if sufficientfree space exists, the install program will add or replace files without deleting theexisting instance.
6-2 IBM Informix Migration Guide
During subsequent installations, the behavior of the install program depends onthe target directory, as follows.v If you install from the media into the same install location, only the files chosen
for replacement or installation will be installed.v If you are installing into a different location on the hard disk, you must verify
that you have enough free disk space tests before file extraction.
After you install a new instance in a new directory, complete data migration andverification.
The installation script installs Informix into the INFORMIXDIR directory specifiedfor user root on UNIX or Linux.
On Windows, the install application suggests a default INFORMIXDIR directory,which you can change by typing a different path. You do not need to create thedirectory before installation.
Important: Monitor the database server message log, online.log, for any errormessages. If you see an error message, solve the problem before you continue themigration procedure.
For detailed installation prerequisites, options, and procedures, see your Informixinstallation guide.
If the installation program alerts you that the destination path is not secure, youhave several options for how to proceed. For more information, see Secure anonsecure Informix installation path in the IBM Informix Installation Guide for UNIX,Linux, and Mac OS X.
For information about configuring the new server, see configuration information inthe IBM Informix Administrator's Guide.
Tips for installing on the server on Windows
If you are installing on Windows:1. Be sure to choose to install to a different directory.2. Do not initialize the server when installing.3. Copy the ONCONFIG file to the target database server and set parameters that
are new for the current release.4. Start the new server without initializing it. See Initializing and starting the
database server in your IBM Informix Installation Guide for Windows.5. Monitor the online.log for the Conversion Successful message.6. Once the upgrade has completed successfully, you can remove the old instance.
When you run the uninstaller make sure that you select this option:Retains all databases, but removes server binaries.
Chapter 6. Migrating to Informix Version 11.70 6-3
Related concepts:
Installing Informix and client products on Windows (Installation Guide(Windows))Related tasks:
Installing Informix and client products quickly with defaults (UNIX and Linux)(Installation Guide for UNIX, Linux, and Mac OS X)
Installing Informix with selected features and client products (UNIX andLinux))
Installing Informix on Mac OS X (Installation Guide for UNIX, Linux, and MacOS X)
Migration status messagesWhen the migration starts, the online.log displays the message "Conversion fromversion <version number> Started." The log continues to display start and endmessages for all components.
When conversions of all components are complete, the message "ConversionCompleted Successfully" displays. This message indicates that the migrationprocess completed successfully, but it does not guarantee that each individualdatabase was converted successfully. The message log might contain moreinformation about the success or failure of the migration of each individualdatabase. If migration of a particular database fails, then try to connect to thedatabase to find out the exact cause of the failure.
At the end of the migration of each individual database, Informix runs a script toupdate some system catalog table entries. The message log includes messages thatare related to this script. The success or failure of the script does not prevent theusage of a database.
For information about any messages in the message log, see the IBM InformixAdministrator's Guide.
Setting environment variablesAfter you install the current version of Informix, verify that the INFORMIXDIR,INFORMIXSERVER, ONCONFIG, PATH, and INFORMIXSQLHOSTS (if used)environment variables are set to the correct values.
On UNIX or Linux, the client application looks for the sqlhosts file in the etcdirectory in the INFORMIXDIR directory. However, you can use theINFORMIXSQLHOSTS environment variable to change the location or name ofthe sqlhosts file.
The setting of the GL_USEGLU environment variable must match between thesource and target server during migration.
Important: Before you start the Version 11.70 database server, you must set theDBONPLOAD environment variable to the name of the pload database if the nameis not onpload, the default name.
For information about environment variables, see the IBM Informix Guide to SQL:Reference.
6-4 IBM Informix Migration Guide
Customizing configuration filesWhen you initialize the new version of Informix, which contains a newonconfig.std file, use the same configuration that the old database server used.After you observe the performance of new version, you can examine the new filefor new configuration parameters that you might want to use and can you start touse the new and changed configuration parameters.
Set the ALARMPROGRAM configuration parameter to either nothing or no_log.shto prevent the generation of errors if the logical log fills during the migration. Formore details, see “Starting the new version of Informix” on page 6-6. After themigration, change the value of ALARMPROGRAM to log_full.sh.
Important: To facilitate migration (and reversion), use the same values for yournew database server for ROOTOFFSET, ROOTSIZE, and ROOTPATH that you usedfor the old database server. Also, keep the same size for physical logs and logicallogs, including the same number of logical logs, and the same sqlhosts file.
If you use custom-code files with the High-Performance Loader, set theHPL_DYNAMIC_LIB_PATH configuration parameter in the plconfig file to thelocation of the shared library. For example, the location of the shared library mightbe $INFORMIXDIR/lib/ipldd11a.SOLIBSUFFIX, where SOLIBSUFFIX is theshared-library suffix for your operating system.
For information about how to configure Informix, see your IBM InformixAdministrator's Guide. For information about how to tune the configurationparameters, see the IBM Informix Performance Guide.Related reference:Appendix B, “New configuration parameters,” on page B-1Appendix C, “Configuration parameters that have been changed or removed,” onpage C-1
Adding Communications Support ModulesFor communications with clients, you can optionally use a CommunicationsSupport Module (CSM) with the current version of Informix. After you install theCSM components, create entries in the concsm.cfg file and in the options field ofthe sqlhosts file to configure the CSM.
Existing client applications do not need to be recompiled or relinked if yourdatabase server does not use CSMs. If your database server uses a CSM, clientapplications must relink with new Informix libraries. The client applications mustinstall and configure the CSM.
For information about how to set up the CSM, see the IBM Informix Administrator'sGuide.
Installing or upgrading any DataBlade modulesAfter you install the new version of Informix, you might need to install or upgradeany DataBlade modules that you want to add to the database server.
Register the DataBlade modules after you initialize the database server.
If you are using the IBM Informix Spatial DataBlade Module or the IBM InformixTimeSeries DataBlade Module, they are included in the server for version 11.70.
Chapter 6. Migrating to Informix Version 11.70 6-5
When you install Informix 11.70, the TimeSeries and Spatial extensions are installedand registered automatically. You do not need to perform any actions to upgradethese DataBlade modules, nor do you need to unload and load spatial or timeseries data during migration. The other built-in extensions (basic text search, nodedata type, binary data types, large object locator, MQ messaging, and Informix webfeature service) are also installed, upgraded, and registered automatically.
Starting the new version of InformixAfter installing the new database server, start the server. Do not performdisk-space initialization, which overwrites whatever is on the disk space.
Prerequisite: If you installed Informix as user root, you must switch to userinformix before starting the server.
Important: Informix writes to the logical logs with the transactions that result fromcreating the sysmaster database. If you run out of log space before the creation ofthe sysmaster database is complete, Informix stops and indicates that you mustback up the logical logs. After you back up the logical logs, the database server canfinish building the sysmaster database. You cannot use ON-Bar to back up thelogical logs because the database has not been converted yet. If you haveALARMPROGRAM set to log_full.sh in the ONCONFIG configuration file, errorsare generated as each log file fills during the migration. Set the value ofALARMPROGRAM to either nothing or no_log.sh so that these errors are notgenerated. If your logical log does fill up during the migration, you must back itup with ontape, the only backup tool you can use at this point. Issue the ontape -acommand.
Start the new version of Informix for the first time by running oninit command onUNIX or by using the Service control application on Windows. For moreinformation, see Starting the database server (Administrator's Guide).
As Informix starts for the first time, it modifies certain disk structures. Thisoperation should extend the initialization process by only a minute or two. If yourdisks cannot accommodate the growth in disk structures, you will find a messagein the message-log file that instructs you to run an oncheck command on a table.The oncheck utility will tell you that you need to rebuild an index. You mustrebuild the index as instructed.
Upgrading the High-Performance Loader onpload databaseIf onpload conversion failed during database server migration, you can manuallyupgrade the onpload database.
Starting with Version 9.40.xC3, Informix has a new version of the onploaddatabase with longer column lengths. The onpload database now requires slightlymore disk space than it did before Version 9.40.xC3.
When you migrate to a new version of Informix, you must also upgrade theonpload database.
To upgrade the onpload database:
1. If you are upgrading from a version of Informix that is prior to Version 9.40,run the conploadlegacy.sh script, as shown in this example:conploadlegacy.sh 7.31 9.40
6-6 IBM Informix Migration Guide
2. If you are upgrading from a version of the database server that is prior toVersion 9.40xC3 and, if necessary, have already run the conploadlegacy.shscript, you must also perform one of the following tasks:v Run the conpload.sh script, as shown in this example:
conpload.sh 9.40 11.50
v Set the new environment variable IFX_ONPLOAD_AUTO_UPGRADE to 1for the upgrade to happen automatically the first time you start an HPLutility using the ipload or onpladm command, after you migrate to a newdatabase server version. You cannot use theIFX_ONPLOAD_AUTO_UPGRADE environment variable with the onploadutility.
If you start an HPL utility before upgrading the onpload database, then youreceive an error stating that the onpload database must be converted.
Starting with Version 9.40.xC3, the ipload utility does not support object namesthat contain more than 18 characters. The utility will continue to operate properlyif legacy applications do not use long object names.
Restoring to a previous consistent state after a failed upgradeIf the CONVERSION_GUARD configuration parameter is enabled and an upgradefails, you can run the onrestorept command to undo the changes made during theupgrade and restore Informix to a consistent state.
Prerequisites:v The directory specified in the RESTORE_POINT_DIR configuration parameter
must be empty. If any restore point files from a previous upgrade exist, youmust remove them before you begin an upgrade.
v The server must be offline after a failed upgrade.
To restore the server to a previous consistent state after a failed upgrade:
1. Run the onrestorept command.Optionally, use the -y option if you want the utility to respond y (yes) to everyprompt that appears while the onrestorept command runs.If you do not specify -y, you must respond to every prompt that appears. Validresponses are y, Y, n, or N. For example, if you do not specify -y, you can decidewhether to proceed with the upgrade whenever the prompt OK to proceed(Y/N) appears.
-V
2. If the upgrade is successful, run the onrestorept -c command to remove thefiles in the directory specified in the RESTORE_POINT_DIR configurationparameter.
You can also run the onrestorept -V command to display the version of the currentserver and the software serial number.
Example
The following command restores files, displaying prompts while the commandruns:onrestorept -y
Chapter 6. Migrating to Informix Version 11.70 6-7
After you run the onrestorept command, you can resume work in the sourceversion of the server, find the problem that caused the failed upgrade, or begin theupgrade again.
For more information, see Chapter 15, “The onrestorept utility,” on page 15-1.
Completing required post-migration tasksAfter you migrate, you must complete a series of post-migration tasks to preparethe new version of the server for use.
To complete post-migration tasks:
1. For ON-Bar, copy the previoussm_versions file. For more information, see“For ON-Bar, copy the sm_versions file” on page 6-9.
2. Optionally run UPDATE STATISTICS on your tables (not system catalogtables) and on UDRs that perform queries, if you have performance problemsafter migrating. For more information, see “Optionally update statistics onyour tables after migrating” on page 6-9.
3. Run UPDATE STATISTICS on some system catalog tables4. Review client applications and registry keys. For more information, see
“Review client applications and registry keys” on page 6-10.5. Verify the integrity of the data. For more information, see “Verify the integrity
of migrated data” on page 6-10.6. Make an initial backup of the new version of Informix . For more information,
see “Back up Informix after migrating to the new version” on page 6-11.7. Tune the new version of Informix for performance and adjust queries as
necessary. For more information, see “Tune the new version for performanceand adjust queries” on page 6-11.
8. If you use Enterprise Replication, perform Enterprise Replication migrationtasks. For more information, see “Migrating with Enterprise Replication” onpage 4-1.
9. If you use high-availability clusters, perform additional migration tasks. Formore information, see Chapter 5, “High-availability cluster migration,” onpage 5-1.
10. Register any DataBlade modules that you installed. For more information, see“Register DataBlade modules” on page 6-11.
After you migrate and start using the new version, refer to Chapter 7, “Revertingfrom Informix Version 11.70,” on page 7-1 in case you need to revert.
Repeat the migration and post-migration procedures for each instance of InformixVersion 11.70 that you plan to run on the computer.
If a serious error occurs during the migration, you might need to return to theprevious version of the server, restore from a level-0 backup, and then correct theproblem before restarting the migration tasks.
Important: Do not connect applications to a database server instance until themigration has successfully completed.
After successful migration to Informix Version 11.70, you might want to modifyconfiguration files and environment variables to take advantage of InformixVersion 11.70 features.
6-8 IBM Informix Migration Guide
Related reference:Appendix B, “New configuration parameters,” on page B-1Appendix C, “Configuration parameters that have been changed or removed,” onpage C-1Appendix A, “New environment variables,” on page A-1
For ON-Bar, copy the sm_versions fileAfter migration, copy your previous sm_versions file for the ON-Bar backup andrestore system to run.
If you are using the same version of ISM, copy the same sm_versions file fromyour old database server to the new database server installation.
If you are using other storage managers, copy your previous sm_versions file fromthe old $INFORMIXDIR/etc directory to the new $INFORMIXDIR/etc directory.
If you are upgrading from Version 7.31, unload the contents of thesysutils:bar_version table.
Optionally update statistics on your tables after migratingOptionally run UPDATE STATISTICS on your tables (not system catalog tables)and on UDRs that perform queries, if you have performance problems aftermigrating to the new version of Informix.
An unqualified UPDATE STATISTICS statement that does not specify a table andcolumn scope clause and a resolution clause updates all tables and all UDRs thatare written in SPL.
You do not need to run UPDATE STATISTICS statements on C or Java UDRs.
Update statistics on some system catalog tables aftermigrating
After migrating successfully to Informix Version 11.70, run UPDATE STATISTICSon some of the system catalog tables in your databases.
If you are migrating from a Version 7.31 or 7.24 database server, be sure to runUPDATE STATISTICS on the following system catalog tables in Informix Version11.70:v sysblobs
v syscolauth
v syscolumns
v sysconstraints
v sysdefaults
v sysdistrib
v sysfragauth
v sysfragments
v sysindices
v sysobjstate
v sysopclstr
v sysprocauth
Chapter 6. Migrating to Informix Version 11.70 6-9
v sysproceduressysroleauth
v syssynonyms
v syssyntable
v systabauth
v systables
v systriggers
v sysusers
Review client applications and registry keysAfter you migrate a database server on the same operating system or move thedatabase server to another compatible computer, review the client applications andsqlhosts file or registry-key connections.
If necessary, recompile or modify client applications.
Verify that the client-application version you use is compatible with your databaseserver version. If necessary, update the sqlhosts file or registry key for the clientapplications with the new database server information.
For more information about interactions between client applications and differentdatabase servers, refer to a client manual.
Verify the integrity of migrated dataOpen each database with DB-Access and use oncheck to verify that data was notcorrupted during the migration process.
You can also verify the integrity of the reserve pages, extents, system catalogtables, data, indexes, and smart large objects, as Table 6-1 shows.
Table 6-1. Commands for verifying the data integrity
Action oncheck Command
Check reserve pages oncheck -cr
Check extents oncheck -ce
Check system catalog tables oncheck -cc database_name
Check data oncheck -cD database_name
Check indexes oncheck -cI database_name
Check smart large objects oncheck -cs sbspace_name
Check smart large objects plus extents oncheck -cS sbspace_name
If the oncheck utility finds any problems, the utility prompts you to respond tocorrective action that it can perform. If you respond Yes to the suggested correctiveaction, run the oncheck command again to make sure the problem has been fixed.
The oncheck utility cannot fix data that has become corrupt. If the oncheck utilityis unable to fix a corruption problem, you might need to contact Technical Supportbefore your proceed.
6-10 IBM Informix Migration Guide
Related concepts:
The oncheck Utility (Administrator's Reference)
Back up Informix after migrating to the new versionUse a backup and restore tool (ON-Bar or ontape) to make a level-0 backup of thenew database server. Do not overwrite the tapes that contain the final backup ofthe old database server.
For more information, see the IBM Informix Backup and Restore Guide.
Important: Do not restore the backed up logical-log files from your old databaseserver for your new database server.
Tune the new version for performance and adjust queriesAfter backing up the new server, you can tune the database server to maximizeperformance. If your queries are slower after the upgrade, there are steps you cantake to adjust your configuration and queries.
If your queries are slower after an upgrade, find out what changed that affectsyour configuration and adjust your configuration and queries as necessary:v Compare the default values in the new onconfig.std file to values in your
previous installation, and make any necessary adjustments (For informationabout new and changed configuration parameters, see New configurationparameters and Configuration parameters that have been changed or removed.
v If you created sample queries for comparison, use them to analyze theperformance differences between the old and new database servers and todetermine if you need to adjust any configuration parameters or the layout ofdatabases, tables, and chunks.
v If you changed your applications, check to see if the changes led to slowerperformance.
v If you changed your hardware, operating system, or network settings, determineif you need to adjust any related settings or environment variables.
v Make sure that you ran necessary update statistics after upgrade. (Forinformation, see Drop data distributions if necessary when upgrading,Optionally update statistics on your tables after migrating, and Update statisticson some system catalog tables after migrating.)
Related concepts:
Improving individual query performance (Performance Guide)
Register DataBlade modulesYou must register any DataBlade modules that you installed.
Registration is the process that makes the DataBlade module code available to usein a particular database. For more information on how to use DataBlade modules,see the IBM Informix DataBlade Module Installation and Registration Guide.Related concepts:
DataBlade Module Installation and Registration Guide (DataBlade ModuleInstallation and Registration Guide)
Chapter 6. Migrating to Informix Version 11.70 6-11

6-12 IBM Informix Migration Guide

Chapter 7. Reverting from Informix Version 11.70
You can revert to the version of the database server from which you migrated.When you run the reversion utility, you specify the target server for reversion andthen Informix checks your database. If necessary, Informix might tell you to dropnew objects, before automatically converting your data into the target server.
If Informix cannot revert a database, Informix prevents reversion.
Normally, reversion takes only a few minutes.
If you used the new features of Version 11.70, reversion time is longer, because youmust prepare your database and data for reversion, and you must remove thefeatures that are not supported in the earlier version of the server. The more workyou complete in the new version, the more time consuming the reversion. See“Preparing to revert” before you revert.
If you did not use any of the new features of Version 11.70 and you did notcomplete much work using the new server, you can run the reversion utility andmodify the values of the configuration parameters. See “Reverting from InformixVersion 11.70” on page 7-13.
Preparing to revertPreparing for reversion includes ascertaining that reversion is possible, backing upVersion 11.70, and removing new features and objects that are not supported inyour original database server.
Prerequisites: Before you revert:v Read the release notes and the machine notes for new information.
To prepare to revert to your source database server:
1. Review the database schema to ascertain that reversion is possible andidentify reversion requirements. See “Ascertain that reversion is possible andidentify reversion requirements” on page 7-2.
2. Check and configure available space. See “Check and configure availablespace for reversion” on page 7-9.
3. Save copies of the current configuration files. See “Save copies of the currentconfiguration files” on page 7-10.
4. Save system catalog information. See “Save system catalog information” onpage 7-10.
5. Verify the integrity of the data, if you did not do this after you migrated. See“Verify the integrity of the Version 11.70 data” on page 7-10.
6. Back up Informix Version 11.70. See “Back up Informix Version 11.70” on page7-11.
7. Export or save your data.8. Locate and run dummy update statements on outstanding in-place alter
operations.a. Run an oncheck -pT tablename command to display data-page versions
for outstanding in-place alter operations. An in-place alter is outstandingwhen data pages still exist with the prior definition.
© Copyright IBM Corp. 1996, 2012 7-1
b. If you have outstanding in-place alters, run dummy updates on thembefore you revert to a previous version of the database server. For moreinformation, see “Run dummy UPDATE statements” on page 7-11 andPerformance considerations for DDL operations (Performance Guide).
9. Remove any new in-place alters that were created using Version 11.70. See“Run dummy UPDATE statements” on page 7-11.
10. If you have empty tables with no extents, drop those tables.11. If you have insufficient space in a partition header page, defragment the
partition extents. For more information, see defragment argument:Dynamically defragment partition extents (Administrator's Reference).
12. Remove new features that were created using Version 11.70. See “RemoveVersion 11.70 features” on page 7-12.
13. Remove any new objects (such as triggers or stored procedures) that youcreated in the Version 11.70 database and that are not supported in the versionto which you are reverting. Do not remove objects that you did not create,such as the boot scripts (boot90.sql and boot901.sql) created in the systemcatalog, because the reversion utility uses them.
14. If you are reverting to the following versions, drop indexes if necessary:v Informix Version 7.3: You must drop any index with a key size that is
greater than 254.v Informix Version 9.4: You must drop any index whose key size is greater
than 390.
The maximum key size in Versions Version 11.70, 11.10, and 10.00 is 3200.15. If you ran BladeManager against a Version 11.70 database, remove any
BladeManager extensions. See “Remove new BladeManager extensions” onpage 7-13.
16. If you use high-availability clusters, you must perform additional tasks. See“Reverting clusters” on page 5-10.
17. If you use Enterprise Replication, perform additional Enterprise Replicationprerequisite reversion tasks. See “Reverting with Enterprise Replication” onpage 4-3.
After preparing to revert to your source database server, see “Reverting fromInformix Version 11.70” on page 7-13.
Ascertain that reversion is possible and identify reversionrequirements
You can revert from Informix Version 11.70 to the database server from which youmigrated, if you have not added any extensions to the Version 11.70 databaseserver and you are not reverting from a newly created instance. You must reviewyour database schema to determine if reversion is possible.
See “Reversion requirements and limitations” on page 7-3 for limitations onreversion to previous databases and prerequisite steps you must take before yourevert.
To review the database schema to determine if reversion is possible:
1. Run the dbschema utility command.For example, run the following command to display information about thedatabase db1:dbschema -d db1 -ss
7-2 IBM Informix Migration Guide
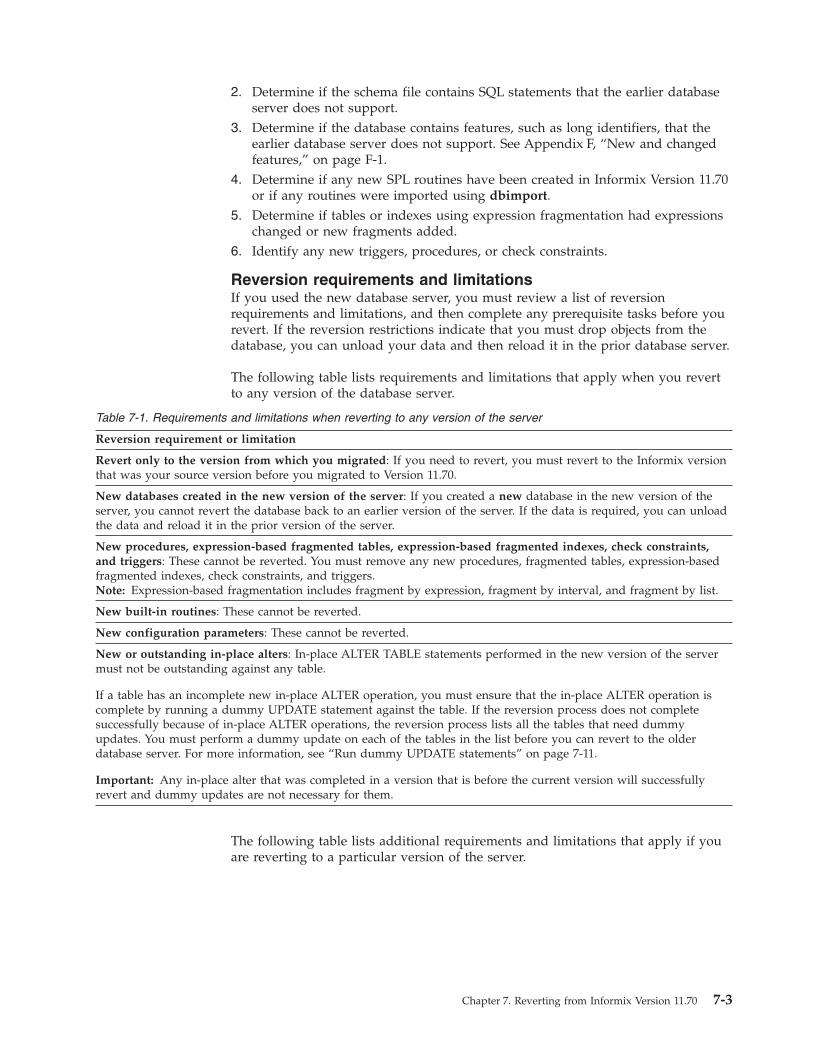
2. Determine if the schema file contains SQL statements that the earlier databaseserver does not support.
3. Determine if the database contains features, such as long identifiers, that theearlier database server does not support. See Appendix F, “New and changedfeatures,” on page F-1.
4. Determine if any new SPL routines have been created in Informix Version 11.70or if any routines were imported using dbimport.
5. Determine if tables or indexes using expression fragmentation had expressionschanged or new fragments added.
6. Identify any new triggers, procedures, or check constraints.
Reversion requirements and limitationsIf you used the new database server, you must review a list of reversionrequirements and limitations, and then complete any prerequisite tasks before yourevert. If the reversion restrictions indicate that you must drop objects from thedatabase, you can unload your data and then reload it in the prior database server.
The following table lists requirements and limitations that apply when you revertto any version of the database server.
Table 7-1. Requirements and limitations when reverting to any version of the server
Reversion requirement or limitation
Revert only to the version from which you migrated: If you need to revert, you must revert to the Informix versionthat was your source version before you migrated to Version 11.70.
New databases created in the new version of the server: If you created a new database in the new version of theserver, you cannot revert the database back to an earlier version of the server. If the data is required, you can unloadthe data and reload it in the prior version of the server.
New procedures, expression-based fragmented tables, expression-based fragmented indexes, check constraints,and triggers: These cannot be reverted. You must remove any new procedures, fragmented tables, expression-basedfragmented indexes, check constraints, and triggers.Note: Expression-based fragmentation includes fragment by expression, fragment by interval, and fragment by list.
New built-in routines: These cannot be reverted.
New configuration parameters: These cannot be reverted.
New or outstanding in-place alters: In-place ALTER TABLE statements performed in the new version of the servermust not be outstanding against any table.
If a table has an incomplete new in-place ALTER operation, you must ensure that the in-place ALTER operation iscomplete by running a dummy UPDATE statement against the table. If the reversion process does not completesuccessfully because of in-place ALTER operations, the reversion process lists all the tables that need dummyupdates. You must perform a dummy update on each of the tables in the list before you can revert to the olderdatabase server. For more information, see “Run dummy UPDATE statements” on page 7-11.
Important: Any in-place alter that was completed in a version that is before the current version will successfullyrevert and dummy updates are not necessary for them.
The following table lists additional requirements and limitations that apply if youare reverting to a particular version of the server.
Chapter 7. Reverting from Informix Version 11.70 7-3
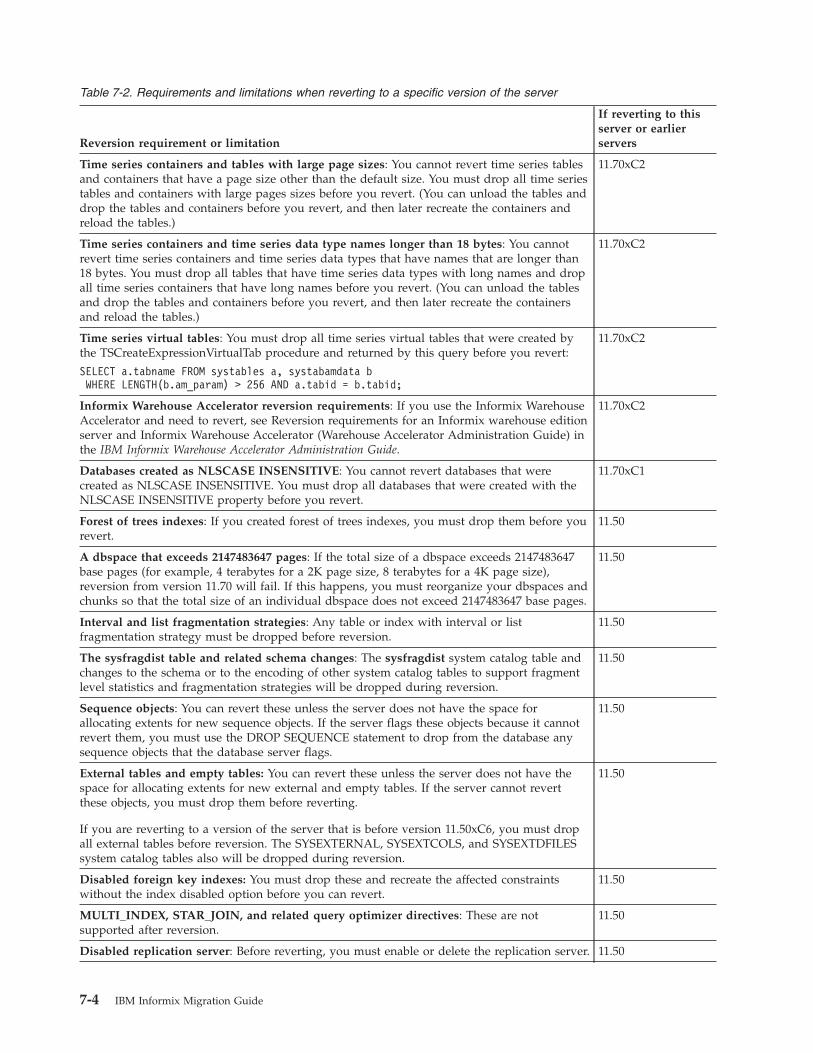
Table 7-2. Requirements and limitations when reverting to a specific version of the server
Reversion requirement or limitation
If reverting to thisserver or earlierservers
Time series containers and tables with large page sizes: You cannot revert time series tablesand containers that have a page size other than the default size. You must drop all time seriestables and containers with large pages sizes before you revert. (You can unload the tables anddrop the tables and containers before you revert, and then later recreate the containers andreload the tables.)
11.70xC2
Time series containers and time series data type names longer than 18 bytes: You cannotrevert time series containers and time series data types that have names that are longer than18 bytes. You must drop all tables that have time series data types with long names and dropall time series containers that have long names before you revert. (You can unload the tablesand drop the tables and containers before you revert, and then later recreate the containersand reload the tables.)
11.70xC2
Time series virtual tables: You must drop all time series virtual tables that were created bythe TSCreateExpressionVirtualTab procedure and returned by this query before you revert:
SELECT a.tabname FROM systables a, systabamdata bWHERE LENGTH(b.am_param) > 256 AND a.tabid = b.tabid;
11.70xC2
Informix Warehouse Accelerator reversion requirements: If you use the Informix WarehouseAccelerator and need to revert, see Reversion requirements for an Informix warehouse editionserver and Informix Warehouse Accelerator (Warehouse Accelerator Administration Guide) inthe IBM Informix Warehouse Accelerator Administration Guide.
11.70xC2
Databases created as NLSCASE INSENSITIVE: You cannot revert databases that werecreated as NLSCASE INSENSITIVE. You must drop all databases that were created with theNLSCASE INSENSITIVE property before you revert.
11.70xC1
Forest of trees indexes: If you created forest of trees indexes, you must drop them before yourevert.
11.50
A dbspace that exceeds 2147483647 pages: If the total size of a dbspace exceeds 2147483647base pages (for example, 4 terabytes for a 2K page size, 8 terabytes for a 4K page size),reversion from version 11.70 will fail. If this happens, you must reorganize your dbspaces andchunks so that the total size of an individual dbspace does not exceed 2147483647 base pages.
11.50
Interval and list fragmentation strategies: Any table or index with interval or listfragmentation strategy must be dropped before reversion.
11.50
The sysfragdist table and related schema changes: The sysfragdist system catalog table andchanges to the schema or to the encoding of other system catalog tables to support fragmentlevel statistics and fragmentation strategies will be dropped during reversion.
11.50
Sequence objects: You can revert these unless the server does not have the space forallocating extents for new sequence objects. If the server flags these objects because it cannotrevert them, you must use the DROP SEQUENCE statement to drop from the database anysequence objects that the database server flags.
11.50
External tables and empty tables: You can revert these unless the server does not have thespace for allocating extents for new external and empty tables. If the server cannot revertthese objects, you must drop them before reverting.
If you are reverting to a version of the server that is before version 11.50xC6, you must dropall external tables before reversion. The SYSEXTERNAL, SYSEXTCOLS, and SYSEXTDFILESsystem catalog tables also will be dropped during reversion.
11.50
Disabled foreign key indexes: You must drop these and recreate the affected constraintswithout the index disabled option before you can revert.
11.50
MULTI_INDEX, STAR_JOIN, and related query optimizer directives: These are notsupported after reversion.
11.50
Disabled replication server: Before reverting, you must enable or delete the replication server. 11.50
7-4 IBM Informix Migration Guide
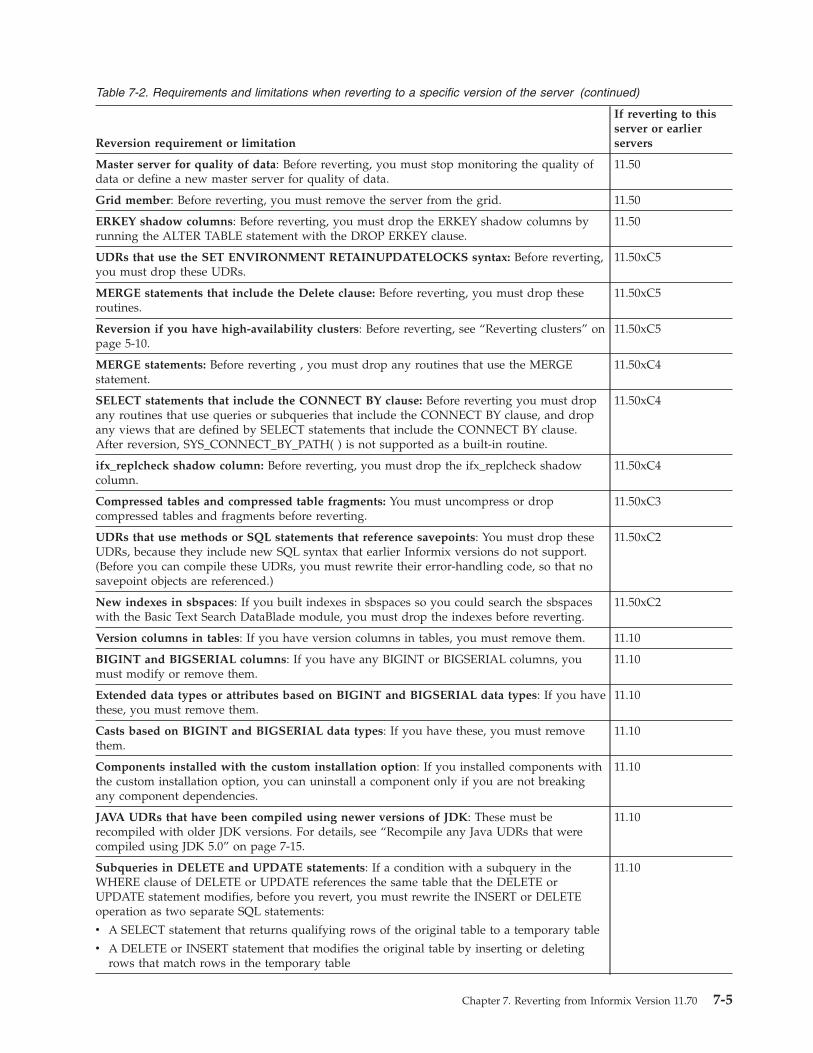
Table 7-2. Requirements and limitations when reverting to a specific version of the server (continued)
Reversion requirement or limitation
If reverting to thisserver or earlierservers
Master server for quality of data: Before reverting, you must stop monitoring the quality ofdata or define a new master server for quality of data.
11.50
Grid member: Before reverting, you must remove the server from the grid. 11.50
ERKEY shadow columns: Before reverting, you must drop the ERKEY shadow columns byrunning the ALTER TABLE statement with the DROP ERKEY clause.
11.50
UDRs that use the SET ENVIRONMENT RETAINUPDATELOCKS syntax: Before reverting,you must drop these UDRs.
11.50xC5
MERGE statements that include the Delete clause: Before reverting, you must drop theseroutines.
11.50xC5
Reversion if you have high-availability clusters: Before reverting, see “Reverting clusters” onpage 5-10.
11.50xC5
MERGE statements: Before reverting , you must drop any routines that use the MERGEstatement.
11.50xC4
SELECT statements that include the CONNECT BY clause: Before reverting you must dropany routines that use queries or subqueries that include the CONNECT BY clause, and dropany views that are defined by SELECT statements that include the CONNECT BY clause.After reversion, SYS_CONNECT_BY_PATH( ) is not supported as a built-in routine.
11.50xC4
ifx_replcheck shadow column: Before reverting, you must drop the ifx_replcheck shadowcolumn.
11.50xC4
Compressed tables and compressed table fragments: You must uncompress or dropcompressed tables and fragments before reverting.
11.50xC3
UDRs that use methods or SQL statements that reference savepoints: You must drop theseUDRs, because they include new SQL syntax that earlier Informix versions do not support.(Before you can compile these UDRs, you must rewrite their error-handling code, so that nosavepoint objects are referenced.)
11.50xC2
New indexes in sbspaces: If you built indexes in sbspaces so you could search the sbspaceswith the Basic Text Search DataBlade module, you must drop the indexes before reverting.
11.50xC2
Version columns in tables: If you have version columns in tables, you must remove them. 11.10
BIGINT and BIGSERIAL columns: If you have any BIGINT or BIGSERIAL columns, youmust modify or remove them.
11.10
Extended data types or attributes based on BIGINT and BIGSERIAL data types: If you havethese, you must remove them.
11.10
Casts based on BIGINT and BIGSERIAL data types: If you have these, you must removethem.
11.10
Components installed with the custom installation option: If you installed components withthe custom installation option, you can uninstall a component only if you are not breakingany component dependencies.
11.10
JAVA UDRs that have been compiled using newer versions of JDK: These must berecompiled with older JDK versions. For details, see “Recompile any Java UDRs that werecompiled using JDK 5.0” on page 7-15.
11.10
Subqueries in DELETE and UPDATE statements: If a condition with a subquery in theWHERE clause of DELETE or UPDATE references the same table that the DELETE orUPDATE statement modifies, before you revert, you must rewrite the INSERT or DELETEoperation as two separate SQL statements:
v A SELECT statement that returns qualifying rows of the original table to a temporary table
v A DELETE or INSERT statement that modifies the original table by inserting or deletingrows that match rows in the temporary table
11.10
Chapter 7. Reverting from Informix Version 11.70 7-5

Table 7-2. Requirements and limitations when reverting to a specific version of the server (continued)
Reversion requirement or limitation
If reverting to thisserver or earlierservers
Returned data type from CONCAT and other SQL string-manipulation functions: Becausethese built-in functions now support promotion of their return value to longer data types,some operations on VARCHAR or NVARCHAR values might fail with overflow error -881after reversion.
11.10
Automatic update statistics feature: Informix versions that are earlier than version 11.10.xC1do not support the Scheduler. Therefore, the functionality of the Automatic Update Statisticsfeature, which is implemented by the Scheduler, is not available after reversion. To enforceany Automatic Update Statistics policies that you intend to apply to your databases, you mustmanually issue the corresponding UPDATE STATISTICS statements after reversion to Version10.00 or to an earlier version.
10.00
ANSI joins in distributed queries: Distributed queries that use ANSI-compliant LEFTOUTER syntax for specifying joined tables and nested loop joins run more efficiently inVersion 10.00.UC4 than in earlier releases. This occurs through sending the query to eachparticipating database server for operations on local tables of those servers. If you revert fromVersion 10.00.UC4 or later to an earlier release that does not support this implementation ofthe ANSI-compliant syntax, such queries might show reduced performance, because thedatabase server instance from which the query originates will perform the joins locally.
10.00.xC4
The INDEX_SJ and AVOID_INDEX_SJ optimizer directives: When queries explicitly use thenew INDEX_SJ and AVOID_INDEX_SJ optimizer directives, these directives have no effectwhen the query runs. You must run UPDATE STATISTICS on stored procedures to forcere-compilation of stored procedures.
In addition, reversion removes the effect of these directives in SAVE EXTERNAL DIRECTIVESstatements and on output from the SET EXPLAIN statement. If you revert to a version of thedatabase server that supports the sysdirectives system catalog table, but does not support theAVOID_INDEX_SJ or INDEX_SJ directives, user informix must delete any active row ofsysdirectives that includes AVOID_INDEX_SJ or INDEX_SJ in the directives column.
10.00
sysdbopen( ) and sysdbclose( ) procedures: Earlier versions of the database server do notsupport these procedures, and any UDRs with these names are not automatically started.
10.00
UDRs include a collection-derived table in the FROM clause of a query: These will notwork correctly after reversion to an earlier release.
10.00
Multiple BEFORE, FOR EACH ROW and AFTER triggers for the same INSERT, UPDATE,DELETE, or SELECT event on a table or view, and trigger routine UDRs: Before reverting,you must drop any of the following triggers and UDRs, if they exist in the database:
v Delete triggers defined on the same table or defined on a view as another Delete trigger
v Insert triggers defined on the same table or defined on a view as another Insert trigger
v Update triggers defined on the same table or view (or on the same subset of columns) asanother Update trigger
v Select triggers defined on the same table or same subset of columns as another Selecttrigger
v Trigger routines defined with the FOR TRIGGER keywords
v Triggers that use the DELETING, INSERTING, SELECTING, or UPDATING operators intheir triggered action
10.00
Cross-server operations on BOOLEAN, LVARCHAR, or DISTINCT columns: If you revertto a database server version that does not support cross-server operations on BOOLEAN,LVARCHAR, or DISTINCT columns in databases, applications that use this feature will fail.
10.00
sysadmin database: This database is automatically dropped during reversion. 10.00
Queries that use SKIP and LIMIT: Version 10.00xc3 supports queries that use the keywordsSKIP and LIMIT. A query that uses either of these keywords will fail with an error afterreversion to any earlier version of the database server.
10.00
7-6 IBM Informix Migration Guide
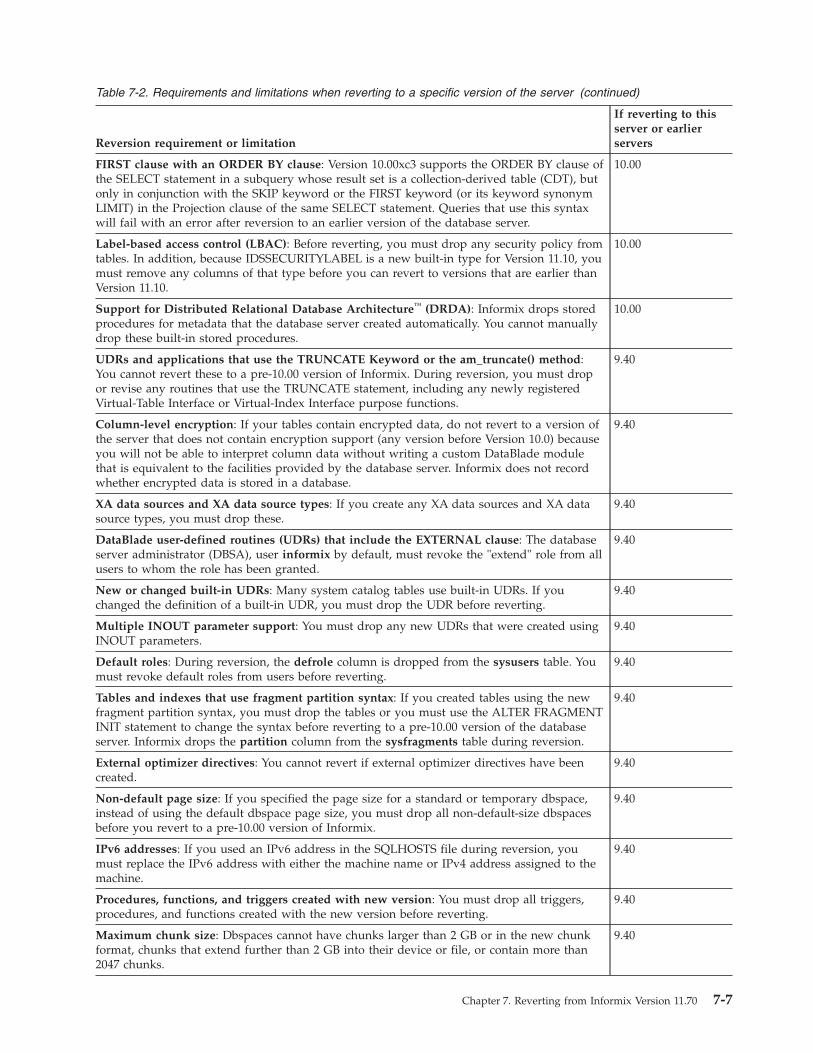
Table 7-2. Requirements and limitations when reverting to a specific version of the server (continued)
Reversion requirement or limitation
If reverting to thisserver or earlierservers
FIRST clause with an ORDER BY clause: Version 10.00xc3 supports the ORDER BY clause ofthe SELECT statement in a subquery whose result set is a collection-derived table (CDT), butonly in conjunction with the SKIP keyword or the FIRST keyword (or its keyword synonymLIMIT) in the Projection clause of the same SELECT statement. Queries that use this syntaxwill fail with an error after reversion to an earlier version of the database server.
10.00
Label-based access control (LBAC): Before reverting, you must drop any security policy fromtables. In addition, because IDSSECURITYLABEL is a new built-in type for Version 11.10, youmust remove any columns of that type before you can revert to versions that are earlier thanVersion 11.10.
10.00
Support for Distributed Relational Database Architecture™ (DRDA): Informix drops storedprocedures for metadata that the database server created automatically. You cannot manuallydrop these built-in stored procedures.
10.00
UDRs and applications that use the TRUNCATE Keyword or the am_truncate() method:You cannot revert these to a pre-10.00 version of Informix. During reversion, you must dropor revise any routines that use the TRUNCATE statement, including any newly registeredVirtual-Table Interface or Virtual-Index Interface purpose functions.
9.40
Column-level encryption: If your tables contain encrypted data, do not revert to a version ofthe server that does not contain encryption support (any version before Version 10.0) becauseyou will not be able to interpret column data without writing a custom DataBlade modulethat is equivalent to the facilities provided by the database server. Informix does not recordwhether encrypted data is stored in a database.
9.40
XA data sources and XA data source types: If you create any XA data sources and XA datasource types, you must drop these.
9.40
DataBlade user-defined routines (UDRs) that include the EXTERNAL clause: The databaseserver administrator (DBSA), user informix by default, must revoke the "extend" role from allusers to whom the role has been granted.
9.40
New or changed built-in UDRs: Many system catalog tables use built-in UDRs. If youchanged the definition of a built-in UDR, you must drop the UDR before reverting.
9.40
Multiple INOUT parameter support: You must drop any new UDRs that were created usingINOUT parameters.
9.40
Default roles: During reversion, the defrole column is dropped from the sysusers table. Youmust revoke default roles from users before reverting.
9.40
Tables and indexes that use fragment partition syntax: If you created tables using the newfragment partition syntax, you must drop the tables or you must use the ALTER FRAGMENTINIT statement to change the syntax before reverting to a pre-10.00 version of the databaseserver. Informix drops the partition column from the sysfragments table during reversion.
9.40
External optimizer directives: You cannot revert if external optimizer directives have beencreated.
9.40
Non-default page size: If you specified the page size for a standard or temporary dbspace,instead of using the default dbspace page size, you must drop all non-default-size dbspacesbefore you revert to a pre-10.00 version of Informix.
9.40
IPv6 addresses: If you used an IPv6 address in the SQLHOSTS file during reversion, youmust replace the IPv6 address with either the machine name or IPv4 address assigned to themachine.
9.40
Procedures, functions, and triggers created with new version: You must drop all triggers,procedures, and functions created with the new version before reverting.
9.40
Maximum chunk size: Dbspaces cannot have chunks larger than 2 GB or in the new chunkformat, chunks that extend further than 2 GB into their device or file, or contain more than2047 chunks.
9.40
Chapter 7. Reverting from Informix Version 11.70 7-7
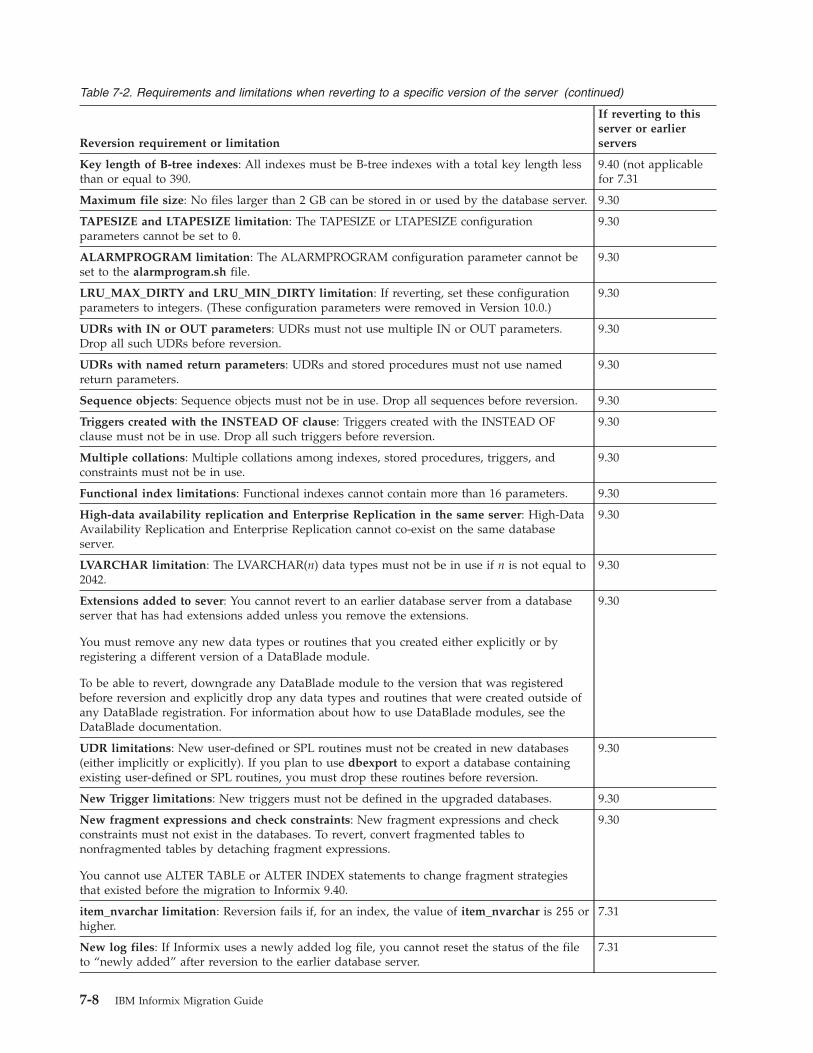
Table 7-2. Requirements and limitations when reverting to a specific version of the server (continued)
Reversion requirement or limitation
If reverting to thisserver or earlierservers
Key length of B-tree indexes: All indexes must be B-tree indexes with a total key length lessthan or equal to 390.
9.40 (not applicablefor 7.31
Maximum file size: No files larger than 2 GB can be stored in or used by the database server. 9.30
TAPESIZE and LTAPESIZE limitation: The TAPESIZE or LTAPESIZE configurationparameters cannot be set to 0.
9.30
ALARMPROGRAM limitation: The ALARMPROGRAM configuration parameter cannot beset to the alarmprogram.sh file.
9.30
LRU_MAX_DIRTY and LRU_MIN_DIRTY limitation: If reverting, set these configurationparameters to integers. (These configuration parameters were removed in Version 10.0.)
9.30
UDRs with IN or OUT parameters: UDRs must not use multiple IN or OUT parameters.Drop all such UDRs before reversion.
9.30
UDRs with named return parameters: UDRs and stored procedures must not use namedreturn parameters.
9.30
Sequence objects: Sequence objects must not be in use. Drop all sequences before reversion. 9.30
Triggers created with the INSTEAD OF clause: Triggers created with the INSTEAD OFclause must not be in use. Drop all such triggers before reversion.
9.30
Multiple collations: Multiple collations among indexes, stored procedures, triggers, andconstraints must not be in use.
9.30
Functional index limitations: Functional indexes cannot contain more than 16 parameters. 9.30
High-data availability replication and Enterprise Replication in the same server: High-DataAvailability Replication and Enterprise Replication cannot co-exist on the same databaseserver.
9.30
LVARCHAR limitation: The LVARCHAR(n) data types must not be in use if n is not equal to2042.
9.30
Extensions added to sever: You cannot revert to an earlier database server from a databaseserver that has had extensions added unless you remove the extensions.
You must remove any new data types or routines that you created either explicitly or byregistering a different version of a DataBlade module.
To be able to revert, downgrade any DataBlade module to the version that was registeredbefore reversion and explicitly drop any data types and routines that were created outside ofany DataBlade registration. For information about how to use DataBlade modules, see theDataBlade documentation.
9.30
UDR limitations: New user-defined or SPL routines must not be created in new databases(either implicitly or explicitly). If you plan to use dbexport to export a database containingexisting user-defined or SPL routines, you must drop these routines before reversion.
9.30
New Trigger limitations: New triggers must not be defined in the upgraded databases. 9.30
New fragment expressions and check constraints: New fragment expressions and checkconstraints must not exist in the databases. To revert, convert fragmented tables tononfragmented tables by detaching fragment expressions.
You cannot use ALTER TABLE or ALTER INDEX statements to change fragment strategiesthat existed before the migration to Informix 9.40.
9.30
item_nvarchar limitation: Reversion fails if, for an index, the value of item_nvarchar is 255 orhigher.
7.31
New log files: If Informix uses a newly added log file, you cannot reset the status of the fileto “newly added” after reversion to the earlier database server.
7.31
7-8 IBM Informix Migration Guide
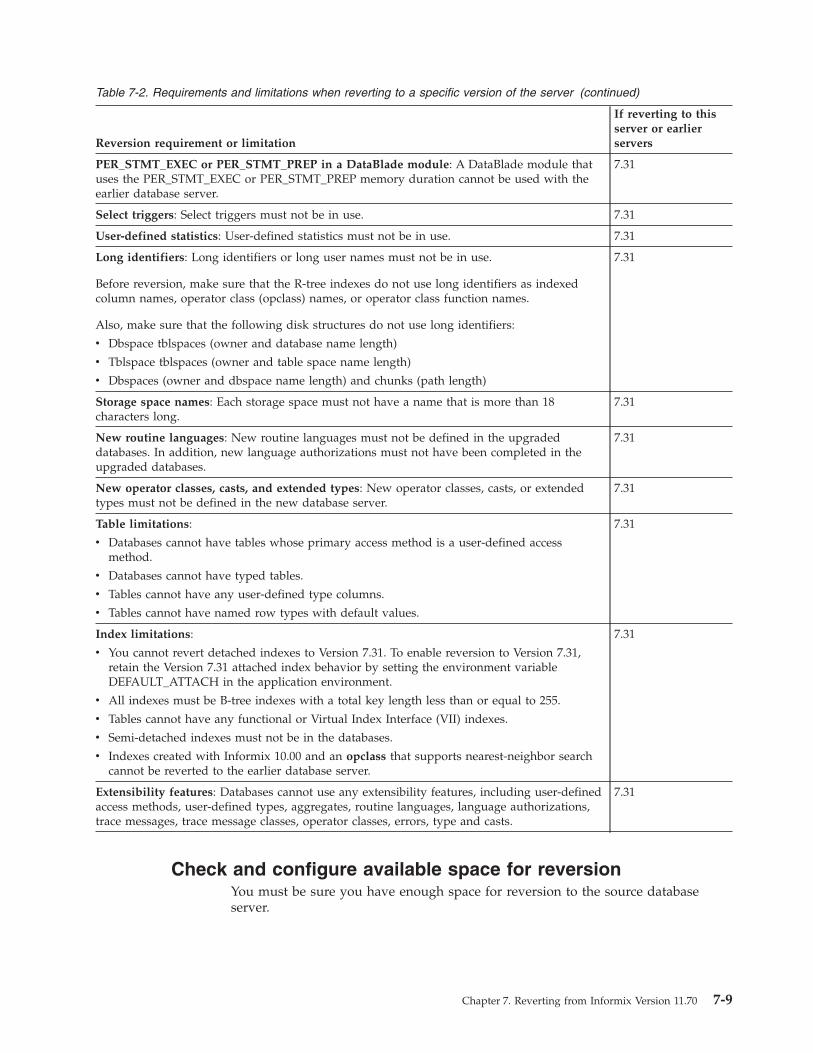
Table 7-2. Requirements and limitations when reverting to a specific version of the server (continued)
Reversion requirement or limitation
If reverting to thisserver or earlierservers
PER_STMT_EXEC or PER_STMT_PREP in a DataBlade module: A DataBlade module thatuses the PER_STMT_EXEC or PER_STMT_PREP memory duration cannot be used with theearlier database server.
7.31
Select triggers: Select triggers must not be in use. 7.31
User-defined statistics: User-defined statistics must not be in use. 7.31
Long identifiers: Long identifiers or long user names must not be in use.
Before reversion, make sure that the R-tree indexes do not use long identifiers as indexedcolumn names, operator class (opclass) names, or operator class function names.
Also, make sure that the following disk structures do not use long identifiers:
v Dbspace tblspaces (owner and database name length)
v Tblspace tblspaces (owner and table space name length)
v Dbspaces (owner and dbspace name length) and chunks (path length)
7.31
Storage space names: Each storage space must not have a name that is more than 18characters long.
7.31
New routine languages: New routine languages must not be defined in the upgradeddatabases. In addition, new language authorizations must not have been completed in theupgraded databases.
7.31
New operator classes, casts, and extended types: New operator classes, casts, or extendedtypes must not be defined in the new database server.
7.31
Table limitations:
v Databases cannot have tables whose primary access method is a user-defined accessmethod.
v Databases cannot have typed tables.
v Tables cannot have any user-defined type columns.
v Tables cannot have named row types with default values.
7.31
Index limitations:
v You cannot revert detached indexes to Version 7.31. To enable reversion to Version 7.31,retain the Version 7.31 attached index behavior by setting the environment variableDEFAULT_ATTACH in the application environment.
v All indexes must be B-tree indexes with a total key length less than or equal to 255.
v Tables cannot have any functional or Virtual Index Interface (VII) indexes.
v Semi-detached indexes must not be in the databases.
v Indexes created with Informix 10.00 and an opclass that supports nearest-neighbor searchcannot be reverted to the earlier database server.
7.31
Extensibility features: Databases cannot use any extensibility features, including user-definedaccess methods, user-defined types, aggregates, routine languages, language authorizations,trace messages, trace message classes, operator classes, errors, type and casts.
7.31
Check and configure available space for reversionYou must be sure you have enough space for reversion to the source databaseserver.
Chapter 7. Reverting from Informix Version 11.70 7-9
For Informix Versions 11.70, 11.50, 11.10, 10.00, and 9.40, tblspace tblspace pagescan be allocated in non-root chunks. If the root chunk is full and tblspace tblspacepages were allocated in non-root chunks, make sure you have enough space in theroot chunk of the target database server.
If the reversion is to a Version 9.30 or to an earlier database server, all tablespacetablespace reserved pages are written to the root chunk.
The default number of tblspace tblspace pages in Version 9.30 is 250 pages (with asize 2k or 4k each, depending on the operating system). To determined how manypages were allocated and where they were allocated, run oncheck -pe and look forthe word TBLSpace. This space must be available on the device where the rootchunk will be located.
For information about space requirements for Informix Version 11.70, see“Checking and configuring available space” on page 3-3.
Save copies of the current configuration filesSave copies of the ONCONFIG and concsm.cfg files for when you migrate toInformix Version 11.70 again.
Informix uses the concsm.cfg file to configure CSMs.
Save system catalog informationIf your current database server instance uses secure-auditing masks or externalspaces, and you want to preserve the associated catalog information, you mustunload these system catalog tables before you revert.
Run the following command to unload the system catalog tables:$INFORMIXDIR/etc/smi_unld
When the smi_unld utility finishes unloading the information, the utility displaysinstructions for reloading the information. Save these instructions. After youcomplete the reversion and bring up your database server, you can reload the datathat you preserved. Follow the instructions given with the smi_unld utility forreloading the information. Typically, you run the following command:$INFORMIXDIR/etc/smi_load $INFORMIXDIR/etc/
Verify the integrity of the Version 11.70 dataVerify the integrity of your Version 11.70 data, if you did not do this after youmigrated.
To verify the integrity of your data, run the following commands:oncheck -cI database_nameoncheck -cD database_nameoncheck -croncheck -cc database_name
If the oncheck utility finds any problems, the utility prompts you to respond tocorrective action that it can perform. If you respond Yes to the suggested correctiveaction, run the oncheck command again to make sure the problem has been fixed.
7-10 IBM Informix Migration Guide
The oncheck utility cannot fix data that has become corrupt. If the oncheck utilityis unable to fix a corruption problem, you might need to contact Technical Supportbefore your proceed.
You will also need to verify the integrity of your data after you revert.
Back up Informix Version 11.70Before you begin the reversion, make a complete level-0 backup of InformixVersion 11.70.
For more information, see the IBM Informix Backup and Restore Guide.
Run dummy UPDATE statementsIf you have outstanding in-place alters, run dummy UPDATE statements on thembefore you revert to a previous version of the database server. Then run anoncheck -pT tablename command to verify that there are no more outstandingin-place alters.
Dummy UPDATE statements force any outstanding in-place alters to complete byupdating the rows in the affected tables. To generate a dummy UPDATE statement,create an UPDATE statement in which a column in the table is set to its own value.This forces the row to be updated to the latest schema without actually changingcolumn values. Because the database server always alters rows to the latestschema, a single pass through the table that updates all rows completes alloutstanding in-place alters.
The dummy UPDATE statement differs from a standard UPDATE statementbecause it does not change the data. A standard UPDATE statement usuallychanges the value of the affected row .
For example, to create a dummy update, specify:UPDATE tab1 SET col1=col1 WHERE 1=1 ;
You must ensure that the column selected is a numeric data type (for example,INTEGER of SMALLINT) and not a character data type.
If a table is large, a single update of the whole table can cause a long transaction.To avoid this, update the table in pieces, by ranges of some column, using thisstatement:... WHERE {id_column} BETWEEN {low_value} AND {step_value}
For example, specify:UPDATE tab1 SET col1=col1 WHERE col1 BETWEEN 1 AND 100;UPDATE tab1 SET col1=col1 WHERE col1 BETWEEN 101 AND 200;
Ensure that the UPDATE statements include the entire data set.
If the table is replicated with Enterprise Replication, the database server willreplicate all updated rows unnecessarily. To avoid this, update the table as follows:BEGIN WORK WITHOUT REPLICATION;
...COMMIT WORK;
When all the pending in-place alters are removed , run the oncheck -pT tablenamecommand. In the output of the command, check information in the "Version"
Chapter 7. Reverting from Informix Version 11.70 7-11
section. The number of data pages should match with current version. Also allother table versions should have count=0 for the number of data pages that theversion is accessing.
For example, if you run oncheck -pT testdb:tab1 after a dummy update iscomplete, you might see information similar to the information in this segment ofsample output:TBLspace Report for testdb:root.tab1
Physical Address 1:860Creation date 06/23/2011 14:23:08TBLspace Flags 800801 Page Locking
TBLspace use 4 bit bit-mapsMaximum row size 29Number of special columns 0Number of keys 0Number of extents 1Current serial value 1Current SERIAL8 value 1Current BIGSERIAL value 1Current REFID value 1Pagesize (k) 2First extent size 8Next extent size 8Number of pages allocated 8Number of pages used 4Number of data pages 3<< Number of data pages used is 3 >>Number of rows 6Partition partnum 1048981Partition lockid 1048981
ExtentsLogical Page Physical Page Size Physical Pages
0 1:1895 8 8TBLspace Usage Report for testdb:root.tab1
Type Pages Empty Semi-Full Full Very-Full---------------- ---------- ---------- ---------- ---------- ----------Free 4Bit-Map 1Index 0Data (Home) 3
----------Total Pages 8
Unused Space Summary
Unused data slots 177
Home Data Page Version Summary
Version Count
3 (oldest) 0<< Other version should show data page count=0>>
4 0<< Other version should show data page count=0>>
5 (current) 3<< Current should always match the number of data pages>>
Remove Version 11.70 featuresBefore you revert, remove all features that your older database server does notsupport.
7-12 IBM Informix Migration Guide
For a list of features that you need to remove before reversion, see “Ascertain thatreversion is possible and identify reversion requirements” on page 7-2.
Remove new BladeManager extensionsWhen BladeManager or SQL Registration are used to register an extension in adatabase, the ifxmngr DataBlade module, which manages extensions, is registeredfirst. If you need to revert from Version 11.70, and you ran BladeManager against adatabase, you must remove all BladeManager extensions.
To remove the BladeManager extensions, you must use BladeManager to unregisterall DataBlade modules and then run the following BladeManager command:unprep database_name
Reverting from Informix Version 11.70After preparing to revert, run the reversion utility and prepare to use the originaldatabase server.
Prerequisites: Before you revert:v Complete the steps in “Preparing to revert” on page 7-1. This includes
determining if reversion is possible and preparing your database for reversion.
To revert from Informix Version 11.70, complete the following steps. Click the linksfor more information about each step.
To revert from Informix Version 11.70:
1. Run the reversion utility (onmode -b). See “Run the reversion utility” on page7-14.
2. Restore your original configuration parameters. See “Restore originalconfiguration parameters” on page 7-14.
3. Reset your environment variables. See “Restore original environmentvariables” on page 7-15.
4. If your Informix Version 11.70 instance used Communications Support Module(CSMs), remove any CSM settings. See “Remove any CommunicationsSupport Module settings” on page 7-15.
5. If any Java UDRs were compiled using Java Development Kit (JDK) Version5.0, recompile those UDRs with the earlier JDK version. For details, see“Recompile any Java UDRs that were compiled using JDK 5.0” on page 7-15.
6. Reinstall and start the target database server. See “Reinstall and start theearlier database server” on page 7-15.
7. Optionally run UPDATE STATISTICS on your tables (not system catalogtables) and on UDRs that perform queries, if you have performance problemsafter reverting. See “Optionally update statistics on your tables afterreverting” on page 7-15.
8. Verify the integrity of the reverted data. See “Verify the integrity of thereverted data” on page 7-16.
9. Back up the target database server. See “Back up the database server afterreversion” on page 7-16.
10. Return the target database server to online mode. See “Return the databaseserver to online mode” on page 7-16.
11. If you use high-availability clusters, perform additional tasks. See “Revertingclusters” on page 5-10.
Chapter 7. Reverting from Informix Version 11.70 7-13
If you are reverting to a version that is earlier than Version 11.10, the databaseserver automatically drops the sysadmin database.
Attention: When you revert to a previous version of the database server, do notreinitialize the database server by using the -i command-line parameter. Using the-i parameter for reversion would reinitialize the root dbspace, which woulddestroy your databases.
Run the reversion utilityAfter preparing to revert, run the reversion utility, using an onmode -b command.
To list the available options for your database server, type onmode -b -.
Important: You must revert to the version of Informix that was your sourcedatabase before you migrated. If you revert to a different version of the server, youwill corrupt data.
Informix Version 11.70 must be running when you run the reversion utility. If thereversion utility detects and lists any remaining features that are specific toInformix Version 11.70, you must remove those features before reversion cancomplete.
For example, run:v onmode -b 11.50.xC5 to revert to Version 11.50.xC5v onmode -b 11.50.xC4 to revert to Version 11.50.xC4v onmode -b 11.50.xC3 to revert to Version 11.50.xC3v onmode -b 11.50.xC2 to revert to Version 11.50.xC2v onmode -b 11.50.xC1 to revert to Version 11.50.xC1v onmode -b 11.10 to revert to Version 11.10.v onmode -b 10.00 to revert to Version 10.00.v onmode -b 9.4 to revert to Version 9.4.v onmode -b 7.3 to revert to Version 7.31.
When you revert to the older version, Informix displays messages that tell youwhen reversion begins and ends.
When the reversion is complete, Informix is offline. The reversion utility drops theInformix Version 11.70 system catalog tables and restores compatibility so that youcan access the data with the earlier database server. The reversion utility does notrevert changes made to the layout of the data that do not affect compatibility.Related reference:“Syntax of the onmode -b command” on page 14-1
Restore original configuration parametersReplace the Informix Version 11.70 ONCONFIG configuration file with theONCONFIG file that you saved before you migrated. Alternatively, you canremove configuration parameters that the earlier database server does not support.
You might also need to adjust the values of existing configuration parameters.
For a list of new configuration parameters by server version, see Appendix B,“New configuration parameters,” on page B-1.
7-14 IBM Informix Migration Guide
Restore original environment variablesReset the environment variables to values that are appropriate for the earlierdatabase server.
Remove any Communications Support Module settingsIf your Informix Version 11.70 instance used CSMs, edit the sqlhosts file to removeany csm option settings that are not supported in the older database server.
If you do not do this, the older database server will return an invalid sqlhostsoptions error.
You must also delete the concsm.cfg file if the older database server does notsupport CSMs.
Recompile any Java UDRs that were compiled using JDK 5.0After you revert and before you start the earlier sever, recompile JAVA UDRs thatwere compiled using Version 5.0 of the Java Development Kit (JDK) with a JDKversion that is earlier than or equal to the version included with the earlier server.
What you do depends on whether your application uses external JAR and classfiles or JAR files installed on the server:v If your application uses external JAR and class files (for example, JAR and class
files that are listed in JVPCLASSPATH), just recompile the files.v If your application uses JAR files installed in the server (for example, through
the install_jar() support function), then you must remove the old JAR file (usingremove_jar() support function) and re-install the re-compiled JAR file in thedatabase.
Reinstall and start the earlier database serverReinstall and configure the earlier database server.
Refer to the instructions in your IBM Informix Installation Guide and your IBMInformix Administrator's Guide.
Run the oninit -s command to start the earlier database server in quiescent mode.
Do not use the oninit -i command.
Optionally update statistics on your tables after revertingOptionally run UPDATE STATISTICS on your tables (not system catalog tables)and on UDRs that perform queries, if you have performance problems afterreverting to the previous version of the database server or to a database server ona different operating system.
An unqualified UPDATE STATISTICS statement that does not specify a table andcolumn scope clause and a resolution clause updates all tables and all UDRs thatare written in SPL.
You do not need to run UPDATE STATISTICS statements on C or Java UDRs.
Chapter 7. Reverting from Informix Version 11.70 7-15

Update statistics on some system catalog tables afterreverting
After a successful reversion, you must run UPDATE STATISTICS on some of thesystem catalog tables in your databases when the database server starts.
For reversion to a 7.31 database server from Informix Version 11.70, run UPDATESTATISTICS on the following system catalog tables in the 7.31 database server:v sysblobs
v syscolauth
v syscolumns
v sysconstraints
v sysdefaults
v sysdistrib
v sysfragauth
v sysfragments
v sysindices
v sysobjstate
v sysopclstr
v sysprocauth
v sysproceduressysroleauth
v syssynonyms
v syssyntable
v systabauth
v systables
v systriggers
v sysusers
Verify the integrity of the reverted dataBefore you allow users to access the databases, check the integrity of the reverteddata.
Follow the steps in “Verifying the integrity of the data” on page 3-7.
Back up the database server after reversionAfter you complete the reversion, use ON-Bar or ontape to make a level-0 backupof the database server to which you reverted.
For more information about making backups, see your IBM Informix Backup andRestore Guide.
Important: Do not overwrite the tapes that you used to back up your sourcedatabase server.
Return the database server to online modeTo bring the old database server online, run the onmode -m command.
Then users can access the data.
7-16 IBM Informix Migration Guide
Register DataBlade modulesYou must register any DataBlade modules and database extensions that yourdatabases require. Built-in database extensions automatically revert to the versionincluded in the database server to which you reverted.
If you are reverting to IBM Informix version 11.70.xC1 or earlier and using thebasic text search extension, you must run the following statement in eachapplicable database before you register or use basic text searching:UPDATE sysbldobjects SET drop_can_fail = "t" WHERE bld_id LIKE ’bts.%’;
If you are reverting to version 11.70.xC1 or later, you do not need to registerbuilt-in database extensions because they are registered automatically.
For information on registering DataBlade modules and database extensions, see theIBM Informix DataBlade Module Installation and Registration Guide.Related concepts:
DataBlade Module Installation and Registration Guide (DataBlade ModuleInstallation and Registration Guide)
Reverting clustersIf you have a high-availability cluster, you must complete additional tasks whenyou revert from the new version of Informix. You must revert only the primarydatabase server.
Beginning with Informix Version 11.50xC6, the server automatically removessecondary servers during reversion. After reversion on the primary server iscomplete, you must recreate all HDR, RS, and SD secondary servers in ahigh-availability cluster.
Prerequisites:v Determine if you can revert. See information in “Ascertain that reversion is
possible and identify reversion requirements” on page 7-2.v Complete the steps in “Preparing to migrate, upgrade, or revert clusters” on
page 5-1.v Perform all reversion operations as user informix.
When you revert clusters, be sure to stop and start the servers in the cluster in theorder shown in the following procedure.
To revert high-availability clusters:1. Stop the Connection Manager by issuing the oncmsm -k
connection_manager_name command.2. If you are using a High-availability Data Replication (HDR) secondary server
as a backup server in case of contingencies:a. Quiesce the primary server by issuing an onmode -sy command to prevent
user connections to the server.b. Force a checkpoint by issuing an onmode –c command on the primary
server.3. Stop the servers in the cluster and perform the following tasks in the
following order:a. If you have remote standalone (RS) servers, stop them by issuing the
onmode -ky command.
Chapter 7. Reverting from Informix Version 11.70 7-17
b. If you have shared disk (SD) servers, stop them by issuing the onmode-ky command.
c. If you have a High-availability Data Replication (HDR) secondary server,stop it by issuing the onmode -ky command.
d. Revert the standard server by issuing an onmode -b target_IDS_versioncommand.
e. Verify that reversion was successful and the server was stopped. If thereversion was not successful, check the message log for error messages,take appropriate action, and restart reversion.
4. On each server, set the INFORMIXDIR environment variable to the full pathname for the target installation.
5. Ensure that all of the necessary configuration files are available in the targetinstallation.
6. Perform any additional database server reversion tasks, as described in“Reverting from Informix Version 11.70” on page 7-13.
7. Start the primary server by issuing an oninit command.8. Start the Connection Manager by issuing an oncmsm command9. Start SD secondary servers by issuing oninit commands.
10. Back up all logs. Then use ON–Bar or ontape to make a level-0 backup on theprimary server to use to reestablish the RS and HDR servers if necessary.
11. If you have RS secondary servers:a. Add RS entries on the primary server by issuing onmode –d add RSS
rss_server_name commands.b. Start the RS secondary servers with level-0 restore operations from the
level 0 backup that was made on the primary server after reversion.c. On the RS secondary servers, run the onmode -d RSS primary_server_name
command, and wait for the "RSS secondary server operational" messageto appear after each command.
12. If you have an HDR secondary server:a. Reestablish the HDR pair on the primary server by issuing an onmode –d
primary hdr_secondary_server_name command.b. Start the HDR secondary server with level-0 restore operations from the
level 0 backup that was made on the primary server after reversion.c. On the HDR secondary server, run the onmode -d secondary
primary_server_name command, and wait for the "HDR secondary serveroperational" message to appear after each command.
The reversion of all servers in the cluster is now complete.
7-18 IBM Informix Migration Guide
Part 3. Migration of data between database servers
© Copyright IBM Corp. 1996, 2012

IBM Informix Migration Guide
Chapter 8. Migrating database servers to a new operatingsystem
When you migrate to a new operating system, you must choose a tool formigrating your data, you might need to make some adjustments to your tables,and you must review environment-dependent configuration parameters andenvironment variables.
Choosing a tool for moving data before migrating between operatingsystems
If you are migrating between different operating systems, you must choose amethod for exporting and importing data. The tool that you choose for exportingand importing data depends on how much data you plan to move.
All these methods deliver similar performance and enable you to modify theschema of the database. The tools that you can use include:v The dbexport and dbimport utilities, which you can use to move an entire
databasev The UNLOAD and LOAD statements, which move selected columns or tables
(The LOAD statement does not change the data format.)v The dbload utility, which you can use to change the data formatv The onunload utility, which unloads data in page-sized chunks, and the onload
utility, which moves data to an identical database server on a computer of thesame type
v The High-Performance Loader (HPL), which moves selected columns or tablesor an entire database
v Enterprise Replication, which you can use to transfer data between Informix onone operating system and Informix on a second operating system.
For an overview of all of these data-migration tools, a comparison of tools, andinformation about which versions of the database server do not support all of thetools, see “Data-migration tools” on page 2-1.Related concepts:Chapter 9, “The dbexport and dbimport utilities,” on page 9-1Chapter 13, “The onunload and onload utilities,” on page 13-1Chapter 10, “The dbload utility,” on page 10-1Chapter 11, “The dbschema utility,” on page 11-1Chapter 12, “The LOAD and UNLOAD statements,” on page 12-1“High-Performance Loader performance advantages for large databases” on page2-5Related tasks:
Moving data with external tables (Administrator's Guide)
Adjusting database tables for file-system variationsFile system limitations vary between NFS and non-NFS file systems. You mightneed to break up large tables when you migrate to a new operating system.
© Copyright IBM Corp. 1996, 2012 8-1
For example, if you have a 3 GB table, but your operating system allows only 2 GBfiles, break up your table into separate files before you migrate. For moreinformation, see your IBM Informix Administrator's Guide.
An Informix storage space can reside on an NFS-mounted file system using regularoperating-system files. For information about the NFS products you can use toNFS mount a storage space for an Informix database server, check productcompatibility information.
Moving data to a database server on a different operating systemYou can move data between Informix database servers on UNIX or Linux andWindows.
To move data to a database server on a different operating system:
1. Save a copy of the current configuration files.2. Use ON-Bar, ON-Archive, or ontape to make a final level-0 backup. For more
information, refer to your IBM Informix Backup and Restore Guide.3. Choose one of the following sets of migration utilities to unload the databases:
v dbexport and dbimport
v UNLOAD, dbschema, and LOADv UNLOAD, dbschema, and dbload
4. Bring the source database server offline.5. Install and configure the target database server. If you are migrating to
Windows, also install the administration tools.6. Bring the target database server online.7. Use dbimport, LOAD, or dbload, or external tables to load the databases into
the target database server, depending on which utility you used to export thedatabases.
8. Make an initial level-0 backup of the target database server.9. Run UPDATE STATISTICS to update the information that the target database
server uses to plan efficient queries.
Moving data between Informix and Workgroup Edition Version7.24 on different operating systems
The UNLOAD statement lets you retrieve selected rows from a database and writethose rows to a text file. If you want to move selected tables or columns instead ofan entire database between Informix and Workgroup Edition Version 7.24 andearlier versions, use the UNLOAD and LOAD statements in the DB-Access utilitywith the dbschema utility.
If you need to manipulate the data in the specified UNLOAD file before you loadit into a new table, use a combination of the UNLOAD statement and thedbschema and dbload utilities.
For information about UNLOAD, LOAD, dbload, and dbschema, see Chapter 10,“The dbload utility,” on page 10-1 and Chapter 11, “The dbschema utility,” onpage 11-1. For information about how to use DB-Access, see the IBM InformixDB-Access User's Guide.
For more information about using UNLOAD, dbschema, and LOAD to or fromVersion 7.31 or an earlier version or for information about moving data to or from
8-2 IBM Informix Migration Guide
Version 7.31 on a different operating system, see the Version 7.31 or earlierMigration Guide, installation information, and release notes.
Adapting your programs for a different operating systemWhen you change to a different operating system, you must review and, ifnecessary, adjust your environment-dependent configuration parameters andenvironment variables.
Certain database server configuration parameters and environment variables areenvironment-dependent. Additionally, some Informix versions, but not all versions,support features such as Enterprise Replication, GLS, and ON-Bar. For example:v Informix Versions 11.50 11.10, 10.00, 9.40, 9.30 and 9.21 support Enterprise
Replication.v Informix 7.31 and 7.30 supports Enterprise Replication.v Workgroup Edition 7.31 and 7.30 on Windows supports GLS, ON-Bar, Enterprise
Replication, and the Gateway products.
For details, see the information about configuration parameters in the IBM InformixAdministrator's Guide and the IBM Informix Administrator's Reference and theinformation about environment variables in the IBM Informix Administrator's Guideand the IBM Informix Guide to SQL: Reference.
Ensuring the successful creation of system databasesThe first time the database server is brought online, the sysmaster, sysutils,sysuser, and sysadmin databases are built. After moving to a database server on adifferent operating system, check the message log to ensure that the sysmaster andsysutils databases have been created successfully before you allow users to accessthe database server.
After you ensure that client users can access data on the database server, themigration process is complete.
Next you might want to seek ways to obtain maximum performance. For detailson topics related to performance, see your IBM Informix Performance Guide.
Chapter 8. Migrating database servers to a new operating system 8-3

8-4 IBM Informix Migration Guide
Part 4. Data migration utilities
© Copyright IBM Corp. 1996, 2012

IBM Informix Migration Guide
Chapter 9. The dbexport and dbimport utilities
The dbexport and dbimport utilities import and export a database to a text filethat is stored on disk or tape.
The dbexport utility unloads an entire database into text files and creates a schemafile. You can use the schema file with dbimport to re-create the database schema inanother IBM Informix environment, and you can edit the schema file to modify thedatabase that dbimport creates.
You might want to use the dbexport and dbimport utilities if you cannot use theonunload and onload utilities and you want to unload a database with or withoutits schema file to disk or tape.
The dbexport and dbimport utilities support Informix 11.70, 11.50, 11.10, 10.00,9.40, 9.30, and 9.21 data types.
The dbexport utility supports the following destination options:v Unload a database and its schema file to diskv Unload a database and its schema file to tapev Unload the schema file to disk and unload the data to tape.
By default, dbexport exports dates in four-digit years unless the environmentvariable DBDATE is set to “mdy2” or to some other value that specifies abbreviatedyears. Use four-digit years, because data imported back into the database dependson either the DBCENTURY environment variable, if set, or the current century ifDBCENTURY is not set.
Important: You must disable SELECT triggers before exporting a database withdbexport. The dbexport utility runs SELECT statements during export. TheSELECT statement triggers can modify the database content.
The dbimport utility creates a database and loads it with data from text files ontape or disk. The input files consist of a schema file that is used to re-create thedatabase and data files that contain the database data. Normally, you generate theinput files with the dbexport utility, but you can use any properly formatted inputfiles.
The dbimport utility supports the following options for a new IBM Informixdatabase server:v Create an ANSI-compliant database (includes unbuffered logging).v Establish transaction logging for a database (unbuffered or buffered logging).v Specify the dbspace where the database will reside.
Attention: When you import a database, use the same environment variablesettings that were used when the database was created or you might getunexpected results. If any fragmentation expressions, check constraints, triggers, oruser-defined routines were created with different settings than you use withdbimport, you cannot reproduce the database accurately with a single import.
© Copyright IBM Corp. 1996, 2012 9-1
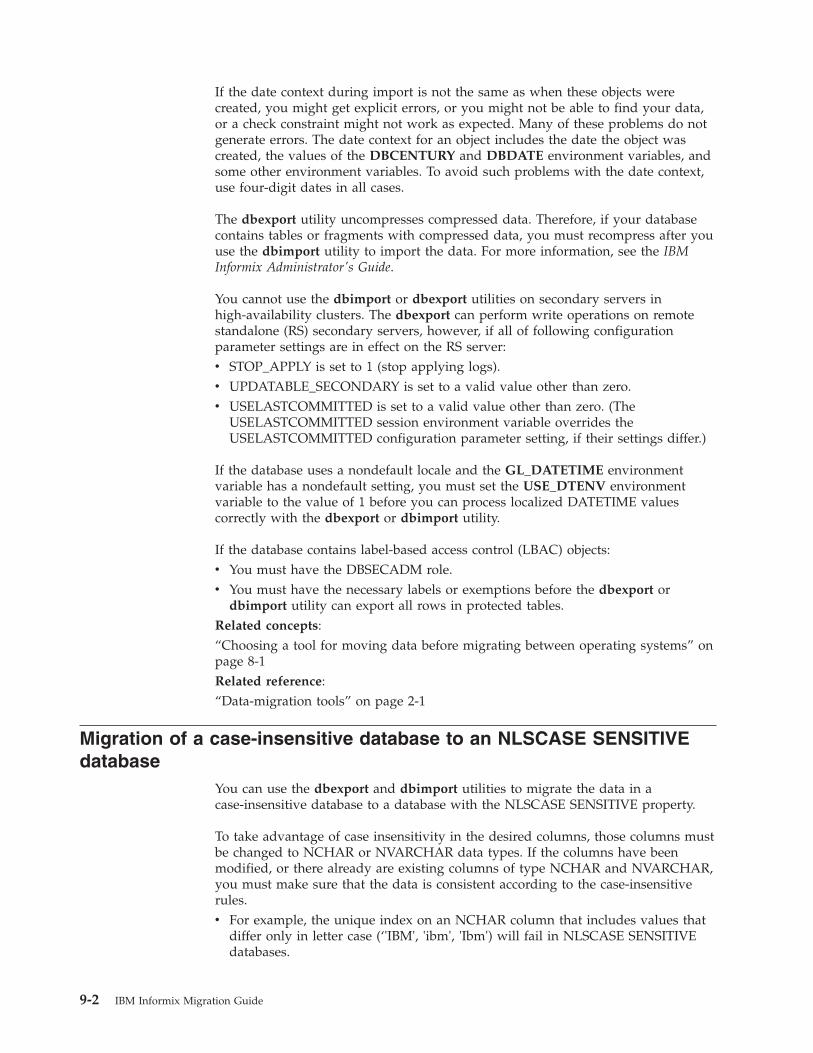
If the date context during import is not the same as when these objects werecreated, you might get explicit errors, or you might not be able to find your data,or a check constraint might not work as expected. Many of these problems do notgenerate errors. The date context for an object includes the date the object wascreated, the values of the DBCENTURY and DBDATE environment variables, andsome other environment variables. To avoid such problems with the date context,use four-digit dates in all cases.
The dbexport utility uncompresses compressed data. Therefore, if your databasecontains tables or fragments with compressed data, you must recompress after youuse the dbimport utility to import the data. For more information, see the IBMInformix Administrator's Guide.
You cannot use the dbimport or dbexport utilities on secondary servers inhigh-availability clusters. The dbexport can perform write operations on remotestandalone (RS) secondary servers, however, if all of following configurationparameter settings are in effect on the RS server:v STOP_APPLY is set to 1 (stop applying logs).v UPDATABLE_SECONDARY is set to a valid value other than zero.v USELASTCOMMITTED is set to a valid value other than zero. (The
USELASTCOMMITTED session environment variable overrides theUSELASTCOMMITTED configuration parameter setting, if their settings differ.)
If the database uses a nondefault locale and the GL_DATETIME environmentvariable has a nondefault setting, you must set the USE_DTENV environmentvariable to the value of 1 before you can process localized DATETIME valuescorrectly with the dbexport or dbimport utility.
If the database contains label-based access control (LBAC) objects:v You must have the DBSECADM role.v You must have the necessary labels or exemptions before the dbexport or
dbimport utility can export all rows in protected tables.Related concepts:“Choosing a tool for moving data before migrating between operating systems” onpage 8-1Related reference:“Data-migration tools” on page 2-1
Migration of a case-insensitive database to an NLSCASE SENSITIVEdatabase
You can use the dbexport and dbimport utilities to migrate the data in acase-insensitive database to a database with the NLSCASE SENSITIVE property.
To take advantage of case insensitivity in the desired columns, those columns mustbe changed to NCHAR or NVARCHAR data types. If the columns have beenmodified, or there already are existing columns of type NCHAR and NVARCHAR,you must make sure that the data is consistent according to the case-insensitiverules.v For example, the unique index on an NCHAR column that includes values that
differ only in letter case (‘'IBM', 'ibm', 'Ibm') will fail in NLSCASE SENSITIVEdatabases.
9-2 IBM Informix Migration Guide
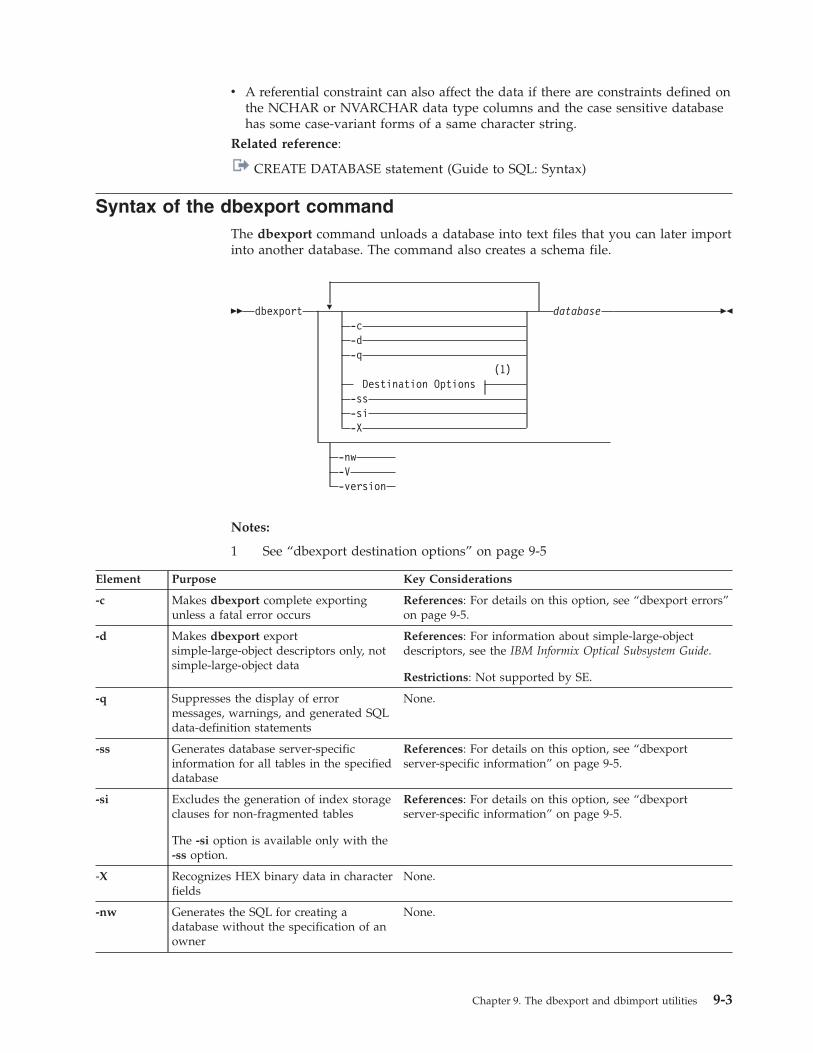
v A referential constraint can also affect the data if there are constraints defined onthe NCHAR or NVARCHAR data type columns and the case sensitive databasehas some case-variant forms of a same character string.
Related reference:
CREATE DATABASE statement (Guide to SQL: Syntax)
Syntax of the dbexport commandThe dbexport command unloads a database into text files that you can later importinto another database. The command also creates a schema file.
�� dbexport � database-c-d-q
(1)Destination Options
-ss-si-X
-nw-V-version
��
Notes:
1 See “dbexport destination options” on page 9-5
Element Purpose Key Considerations
-c Makes dbexport complete exportingunless a fatal error occurs
References: For details on this option, see “dbexport errors”on page 9-5.
-d Makes dbexport exportsimple-large-object descriptors only, notsimple-large-object data
References: For information about simple-large-objectdescriptors, see the IBM Informix Optical Subsystem Guide.
Restrictions: Not supported by SE.
-q Suppresses the display of errormessages, warnings, and generated SQLdata-definition statements
None.
-ss Generates database server-specificinformation for all tables in the specifieddatabase
References: For details on this option, see “dbexportserver-specific information” on page 9-5.
-si Excludes the generation of index storageclauses for non-fragmented tables
The -si option is available only with the-ss option.
References: For details on this option, see “dbexportserver-specific information” on page 9-5.
-X Recognizes HEX binary data in characterfields
None.
-nw Generates the SQL for creating adatabase without the specification of anowner
None.
Chapter 9. The dbexport and dbimport utilities 9-3
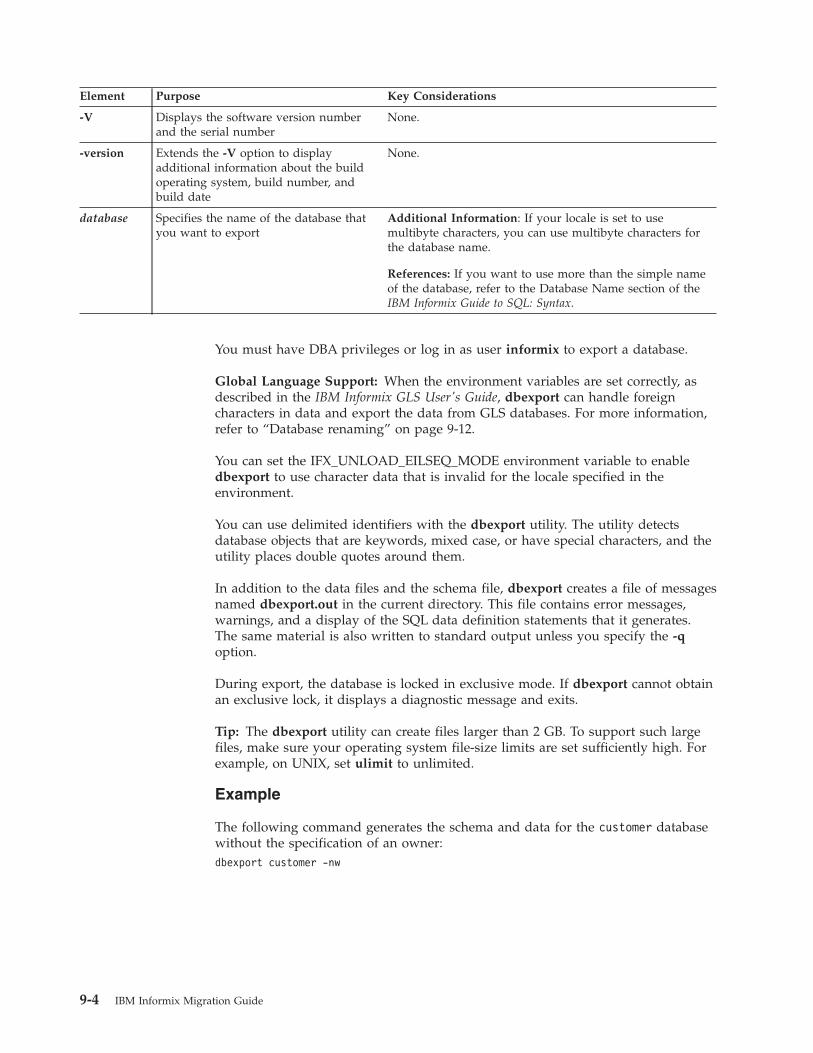
Element Purpose Key Considerations
-V Displays the software version numberand the serial number
None.
-version Extends the -V option to displayadditional information about the buildoperating system, build number, andbuild date
None.
database Specifies the name of the database thatyou want to export
Additional Information: If your locale is set to usemultibyte characters, you can use multibyte characters forthe database name.
References: If you want to use more than the simple nameof the database, refer to the Database Name section of theIBM Informix Guide to SQL: Syntax.
You must have DBA privileges or log in as user informix to export a database.
Global Language Support: When the environment variables are set correctly, asdescribed in the IBM Informix GLS User's Guide, dbexport can handle foreigncharacters in data and export the data from GLS databases. For more information,refer to “Database renaming” on page 9-12.
You can set the IFX_UNLOAD_EILSEQ_MODE environment variable to enabledbexport to use character data that is invalid for the locale specified in theenvironment.
You can use delimited identifiers with the dbexport utility. The utility detectsdatabase objects that are keywords, mixed case, or have special characters, and theutility places double quotes around them.
In addition to the data files and the schema file, dbexport creates a file of messagesnamed dbexport.out in the current directory. This file contains error messages,warnings, and a display of the SQL data definition statements that it generates.The same material is also written to standard output unless you specify the -qoption.
During export, the database is locked in exclusive mode. If dbexport cannot obtainan exclusive lock, it displays a diagnostic message and exits.
Tip: The dbexport utility can create files larger than 2 GB. To support such largefiles, make sure your operating system file-size limits are set sufficiently high. Forexample, on UNIX, set ulimit to unlimited.
Example
The following command generates the schema and data for the customer databasewithout the specification of an owner:dbexport customer -nw
9-4 IBM Informix Migration Guide
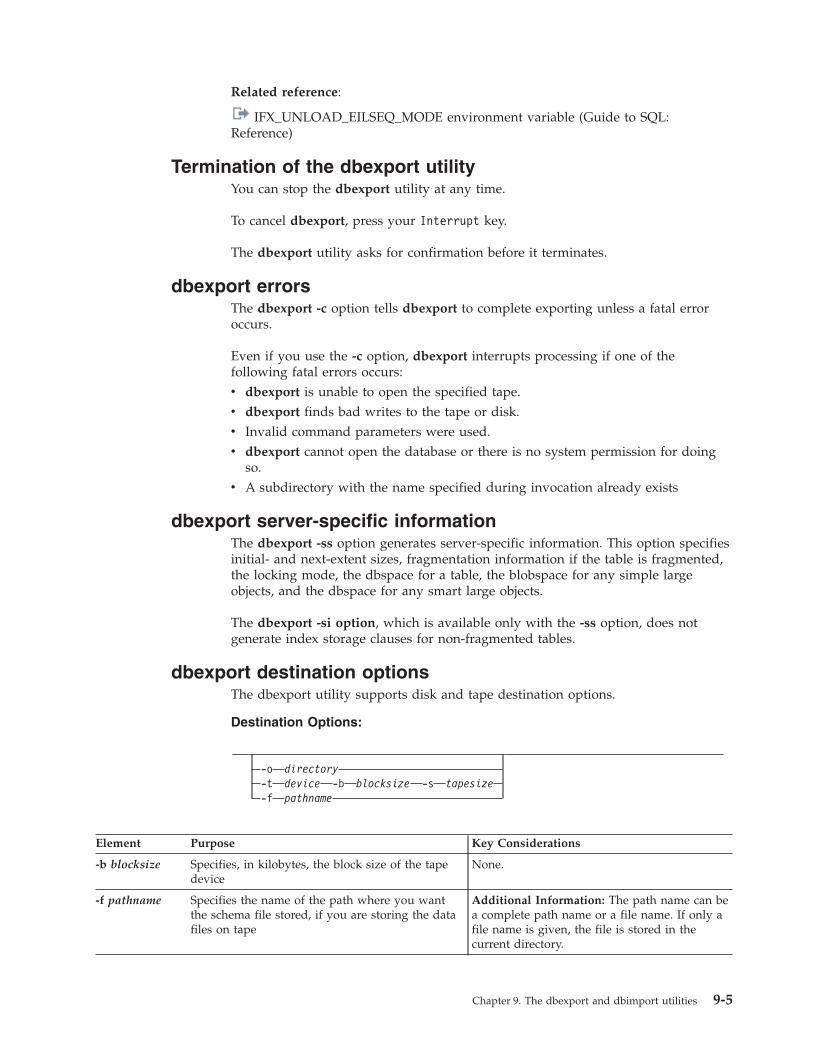
Related reference:
IFX_UNLOAD_EILSEQ_MODE environment variable (Guide to SQL:Reference)
Termination of the dbexport utilityYou can stop the dbexport utility at any time.
To cancel dbexport, press your Interrupt key.
The dbexport utility asks for confirmation before it terminates.
dbexport errorsThe dbexport -c option tells dbexport to complete exporting unless a fatal erroroccurs.
Even if you use the -c option, dbexport interrupts processing if one of thefollowing fatal errors occurs:v dbexport is unable to open the specified tape.v dbexport finds bad writes to the tape or disk.v Invalid command parameters were used.v dbexport cannot open the database or there is no system permission for doing
so.v A subdirectory with the name specified during invocation already exists
dbexport server-specific informationThe dbexport -ss option generates server-specific information. This option specifiesinitial- and next-extent sizes, fragmentation information if the table is fragmented,the locking mode, the dbspace for a table, the blobspace for any simple largeobjects, and the dbspace for any smart large objects.
The dbexport -si option, which is available only with the -ss option, does notgenerate index storage clauses for non-fragmented tables.
dbexport destination optionsThe dbexport utility supports disk and tape destination options.
Destination Options:
-o directory-t device -b blocksize -s tapesize-f pathname
Element Purpose Key Considerations
-b blocksize Specifies, in kilobytes, the block size of the tapedevice
None.
-f pathname Specifies the name of the path where you wantthe schema file stored, if you are storing the datafiles on tape
Additional Information: The path name can bea complete path name or a file name. If only afile name is given, the file is stored in thecurrent directory.
Chapter 9. The dbexport and dbimport utilities 9-5
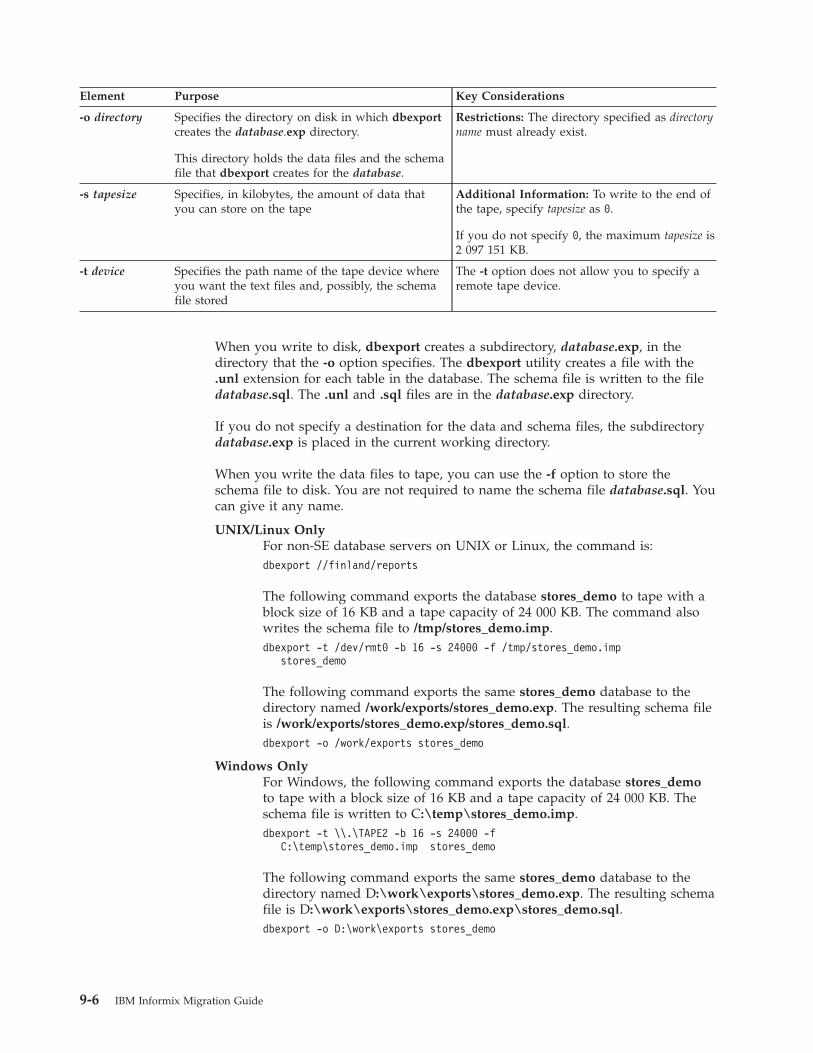
Element Purpose Key Considerations
-o directory Specifies the directory on disk in which dbexportcreates the database.exp directory.
This directory holds the data files and the schemafile that dbexport creates for the database.
Restrictions: The directory specified as directoryname must already exist.
-s tapesize Specifies, in kilobytes, the amount of data thatyou can store on the tape
Additional Information: To write to the end ofthe tape, specify tapesize as 0.
If you do not specify 0, the maximum tapesize is2 097 151 KB.
-t device Specifies the path name of the tape device whereyou want the text files and, possibly, the schemafile stored
The -t option does not allow you to specify aremote tape device.
When you write to disk, dbexport creates a subdirectory, database.exp, in thedirectory that the -o option specifies. The dbexport utility creates a file with the.unl extension for each table in the database. The schema file is written to the filedatabase.sql. The .unl and .sql files are in the database.exp directory.
If you do not specify a destination for the data and schema files, the subdirectorydatabase.exp is placed in the current working directory.
When you write the data files to tape, you can use the -f option to store theschema file to disk. You are not required to name the schema file database.sql. Youcan give it any name.
UNIX/Linux OnlyFor non-SE database servers on UNIX or Linux, the command is:dbexport //finland/reports
The following command exports the database stores_demo to tape with ablock size of 16 KB and a tape capacity of 24 000 KB. The command alsowrites the schema file to /tmp/stores_demo.imp.dbexport -t /dev/rmt0 -b 16 -s 24000 -f /tmp/stores_demo.imp
stores_demo
The following command exports the same stores_demo database to thedirectory named /work/exports/stores_demo.exp. The resulting schema fileis /work/exports/stores_demo.exp/stores_demo.sql.dbexport -o /work/exports stores_demo
Windows OnlyFor Windows, the following command exports the database stores_demoto tape with a block size of 16 KB and a tape capacity of 24 000 KB. Theschema file is written to C:\temp\stores_demo.imp.dbexport -t \\.\TAPE2 -b 16 -s 24000 -f
C:\temp\stores_demo.imp stores_demo
The following command exports the same stores_demo database to thedirectory named D:\work\exports\stores_demo.exp. The resulting schemafile is D:\work\exports\stores_demo.exp\stores_demo.sql.dbexport -o D:\work\exports stores_demo
9-6 IBM Informix Migration Guide
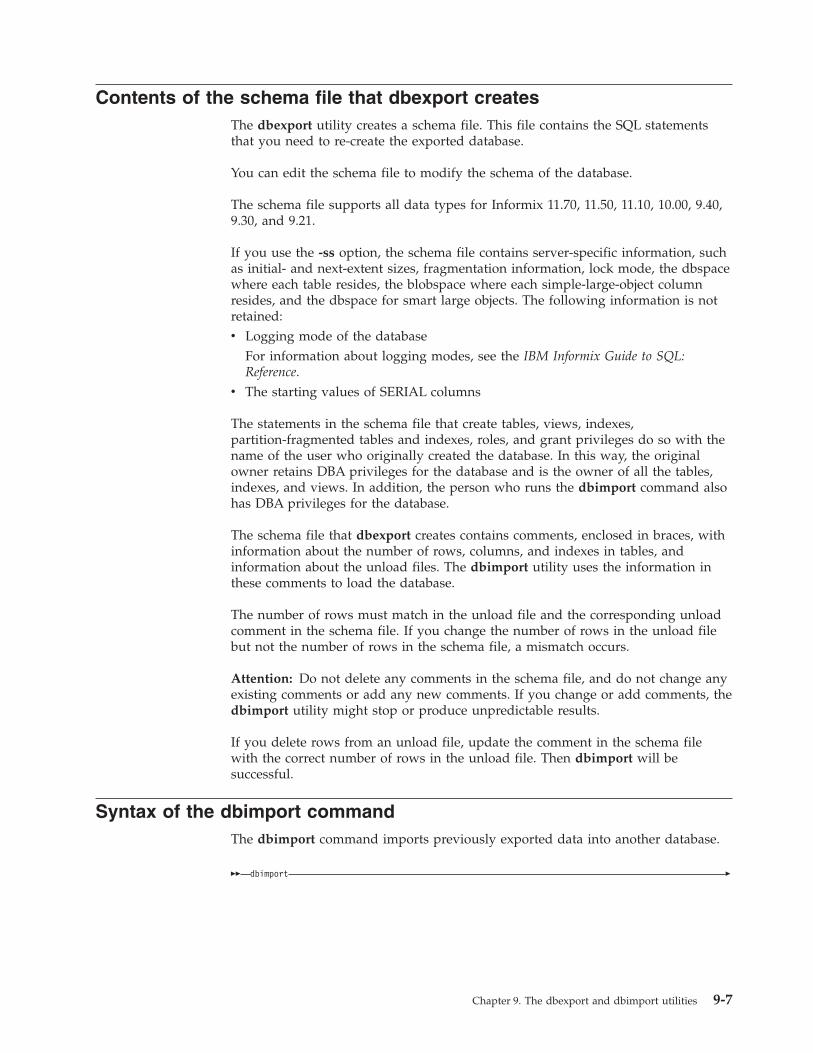
Contents of the schema file that dbexport createsThe dbexport utility creates a schema file. This file contains the SQL statementsthat you need to re-create the exported database.
You can edit the schema file to modify the schema of the database.
The schema file supports all data types for Informix 11.70, 11.50, 11.10, 10.00, 9.40,9.30, and 9.21.
If you use the -ss option, the schema file contains server-specific information, suchas initial- and next-extent sizes, fragmentation information, lock mode, the dbspacewhere each table resides, the blobspace where each simple-large-object columnresides, and the dbspace for smart large objects. The following information is notretained:v Logging mode of the database
For information about logging modes, see the IBM Informix Guide to SQL:Reference.
v The starting values of SERIAL columns
The statements in the schema file that create tables, views, indexes,partition-fragmented tables and indexes, roles, and grant privileges do so with thename of the user who originally created the database. In this way, the originalowner retains DBA privileges for the database and is the owner of all the tables,indexes, and views. In addition, the person who runs the dbimport command alsohas DBA privileges for the database.
The schema file that dbexport creates contains comments, enclosed in braces, withinformation about the number of rows, columns, and indexes in tables, andinformation about the unload files. The dbimport utility uses the information inthese comments to load the database.
The number of rows must match in the unload file and the corresponding unloadcomment in the schema file. If you change the number of rows in the unload filebut not the number of rows in the schema file, a mismatch occurs.
Attention: Do not delete any comments in the schema file, and do not change anyexisting comments or add any new comments. If you change or add comments, thedbimport utility might stop or produce unpredictable results.
If you delete rows from an unload file, update the comment in the schema filewith the correct number of rows in the unload file. Then dbimport will besuccessful.
Syntax of the dbimport commandThe dbimport command imports previously exported data into another database.
�� dbimport �
Chapter 9. The dbexport and dbimport utilities 9-7
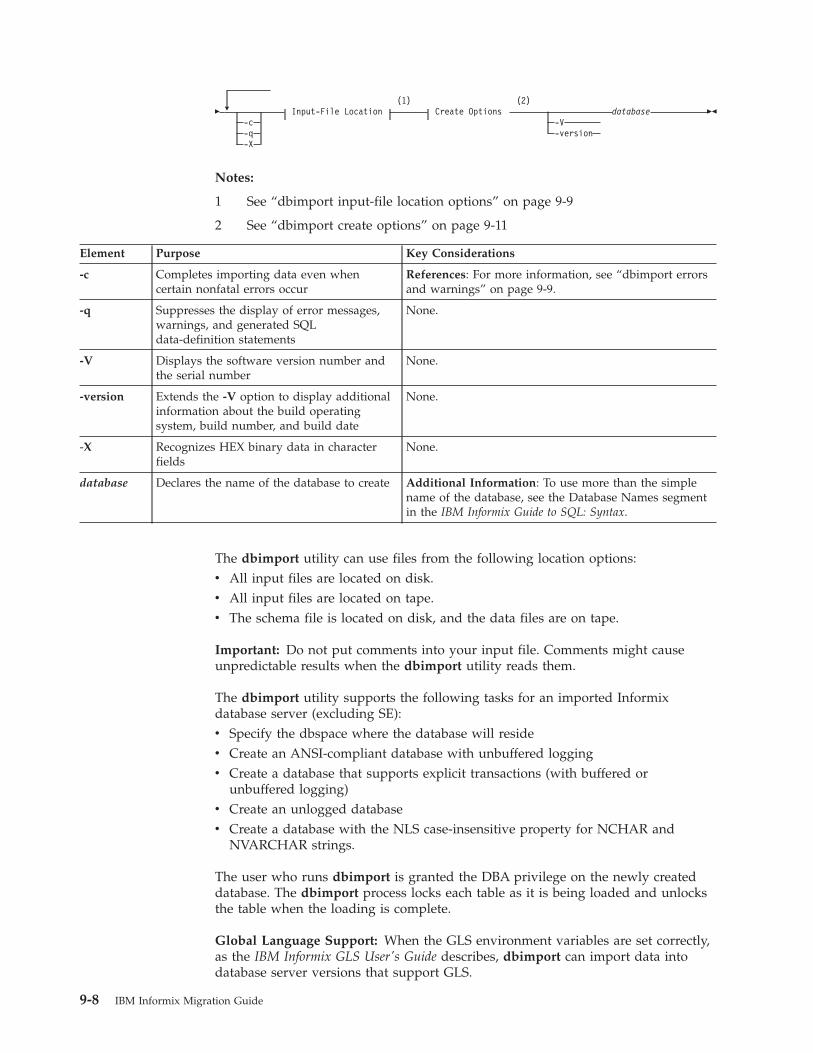
� �(1) (2)
Input-File Location Create Options database-c -V-q -version-X
��
Notes:
1 See “dbimport input-file location options” on page 9-9
2 See “dbimport create options” on page 9-11
Element Purpose Key Considerations
-c Completes importing data even whencertain nonfatal errors occur
References: For more information, see “dbimport errorsand warnings” on page 9-9.
-q Suppresses the display of error messages,warnings, and generated SQLdata-definition statements
None.
-V Displays the software version number andthe serial number
None.
-version Extends the -V option to display additionalinformation about the build operatingsystem, build number, and build date
None.
-X Recognizes HEX binary data in characterfields
None.
database Declares the name of the database to create Additional Information: To use more than the simplename of the database, see the Database Names segmentin the IBM Informix Guide to SQL: Syntax.
The dbimport utility can use files from the following location options:v All input files are located on disk.v All input files are located on tape.v The schema file is located on disk, and the data files are on tape.
Important: Do not put comments into your input file. Comments might causeunpredictable results when the dbimport utility reads them.
The dbimport utility supports the following tasks for an imported Informixdatabase server (excluding SE):v Specify the dbspace where the database will residev Create an ANSI-compliant database with unbuffered loggingv Create a database that supports explicit transactions (with buffered or
unbuffered logging)v Create an unlogged databasev Create a database with the NLS case-insensitive property for NCHAR and
NVARCHAR strings.
The user who runs dbimport is granted the DBA privilege on the newly createddatabase. The dbimport process locks each table as it is being loaded and unlocksthe table when the loading is complete.
Global Language Support: When the GLS environment variables are set correctly,as the IBM Informix GLS User's Guide describes, dbimport can import data intodatabase server versions that support GLS.
9-8 IBM Informix Migration Guide
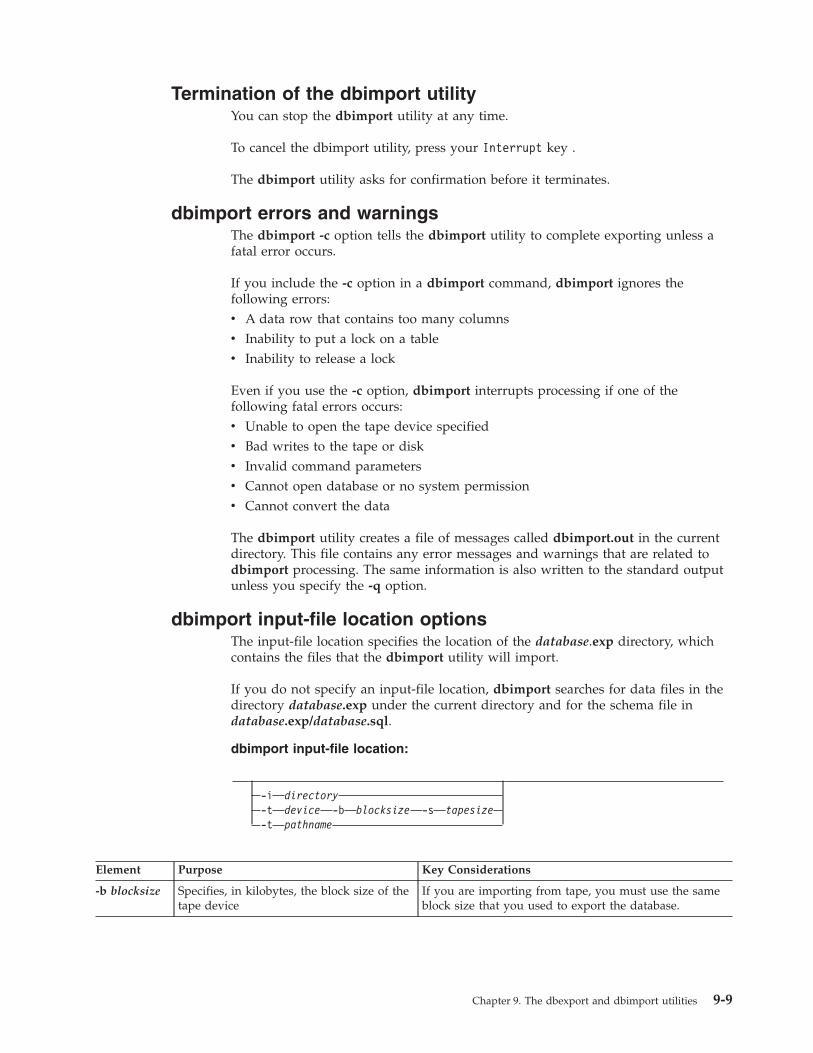
Termination of the dbimport utilityYou can stop the dbimport utility at any time.
To cancel the dbimport utility, press your Interrupt key .
The dbimport utility asks for confirmation before it terminates.
dbimport errors and warningsThe dbimport -c option tells the dbimport utility to complete exporting unless afatal error occurs.
If you include the -c option in a dbimport command, dbimport ignores thefollowing errors:v A data row that contains too many columnsv Inability to put a lock on a tablev Inability to release a lock
Even if you use the -c option, dbimport interrupts processing if one of thefollowing fatal errors occurs:v Unable to open the tape device specifiedv Bad writes to the tape or diskv Invalid command parametersv Cannot open database or no system permissionv Cannot convert the data
The dbimport utility creates a file of messages called dbimport.out in the currentdirectory. This file contains any error messages and warnings that are related todbimport processing. The same information is also written to the standard outputunless you specify the -q option.
dbimport input-file location optionsThe input-file location specifies the location of the database.exp directory, whichcontains the files that the dbimport utility will import.
If you do not specify an input-file location, dbimport searches for data files in thedirectory database.exp under the current directory and for the schema file indatabase.exp/database.sql.
dbimport input-file location:
-i directory-t device -b blocksize -s tapesize-t pathname
Element Purpose Key Considerations
-b blocksize Specifies, in kilobytes, the block size of thetape device
If you are importing from tape, you must use the sameblock size that you used to export the database.
Chapter 9. The dbexport and dbimport utilities 9-9
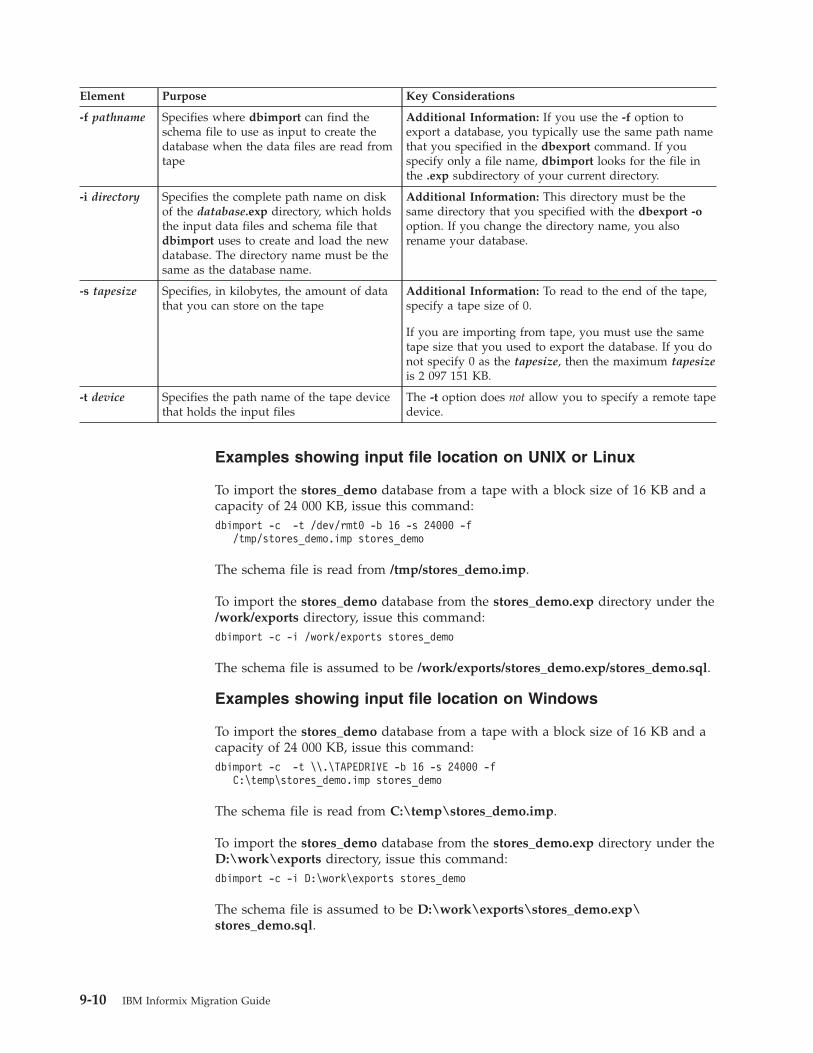
Element Purpose Key Considerations
-f pathname Specifies where dbimport can find theschema file to use as input to create thedatabase when the data files are read fromtape
Additional Information: If you use the -f option toexport a database, you typically use the same path namethat you specified in the dbexport command. If youspecify only a file name, dbimport looks for the file inthe .exp subdirectory of your current directory.
-i directory Specifies the complete path name on diskof the database.exp directory, which holdsthe input data files and schema file thatdbimport uses to create and load the newdatabase. The directory name must be thesame as the database name.
Additional Information: This directory must be thesame directory that you specified with the dbexport -ooption. If you change the directory name, you alsorename your database.
-s tapesize Specifies, in kilobytes, the amount of datathat you can store on the tape
Additional Information: To read to the end of the tape,specify a tape size of 0.
If you are importing from tape, you must use the sametape size that you used to export the database. If you donot specify 0 as the tapesize, then the maximum tapesizeis 2 097 151 KB.
-t device Specifies the path name of the tape devicethat holds the input files
The -t option does not allow you to specify a remote tapedevice.
Examples showing input file location on UNIX or Linux
To import the stores_demo database from a tape with a block size of 16 KB and acapacity of 24 000 KB, issue this command:dbimport -c -t /dev/rmt0 -b 16 -s 24000 -f
/tmp/stores_demo.imp stores_demo
The schema file is read from /tmp/stores_demo.imp.
To import the stores_demo database from the stores_demo.exp directory under the/work/exports directory, issue this command:dbimport -c -i /work/exports stores_demo
The schema file is assumed to be /work/exports/stores_demo.exp/stores_demo.sql.
Examples showing input file location on Windows
To import the stores_demo database from a tape with a block size of 16 KB and acapacity of 24 000 KB, issue this command:dbimport -c -t \\.\TAPEDRIVE -b 16 -s 24000 -f
C:\temp\stores_demo.imp stores_demo
The schema file is read from C:\temp\stores_demo.imp.
To import the stores_demo database from the stores_demo.exp directory under theD:\work\exports directory, issue this command:dbimport -c -i D:\work\exports stores_demo
The schema file is assumed to be D:\work\exports\stores_demo.exp\stores_demo.sql.
9-10 IBM Informix Migration Guide
dbimport create optionsThe dbimport utility supports options for creating a database, specifying a dbspacefor that database, defining logging options, and optionally specifyingANSI/ISO-compliance or NLS case-insensitivity (or both) as properties of thedatabase.
Create Options:
-d dbspace -l -cibuffered
-ansi
Element Purpose Key Considerations
-ansi Creates an ANSI/ISO-compliant databasein which the ANSI/ISO rules fortransaction logging are enabled.Otherwise, the database uses explicittransactions by default.
If you omit the -ansi option, the database uses explicittransactions.
Additional Information: For more information aboutANSI/ISO-compliant databases, see the IBM InformixGuide to SQL: Reference.
-ci Specifies the NLS case-insensitiveproperty. Otherwise, the database iscase-sensitive by default.
Additional Information: See the IBM Informix Guide toSQL: Syntax and IBM Informix Guide to SQL: Referencedescriptions of the NLS case-insensitive property.
-d dbspace Specifies the dbspace where the databaseis created. .
If this is omitted, the default location is the root dbspace
-l Establishes unbuffered transaction loggingfor the imported database. If the -l flag isomitted, the database is unlogged,
References: For more information, see “Database-loggingmode” on page 9-12.
-l buffered Establishes buffered transaction loggingfor the imported database. If -l is includedbut buffered is omitted, the database usesunbuffered logging.
References: For more information, see “Database-loggingmode” on page 9-12.
If you created a table or index fragment containing partitions in Informix Version10.00 or a later version of the Informix database server, you must use syntaxcontaining the partition name when importing a database that contains multiplepartitions within a single dbspace. See the IBM Informix Guide to SQL: Syntax forsyntax details.
Example showing dbimport create options (UNIX or Linux)
To import the stores_demo database from the /usr/informix/port/stores_demo.expdirectory, issue this command:dbimport -c stores_demo -i /usr/informix/port -l -ansi
The new database is ANSI/ISO-compliant.
The next example similarly imports the stores_demo database from the/usr/informix/port/stores_demo.exp directory. The imported database uses bufferedtransaction logging and explicit transactions. The -ci flag specifies case insensitivityin queries and in other operations on columns and character strings of the NCHARand NVARCHAR data types:dbimport -c stores_demo -i /usr/informix/port -l buffered -ci
Chapter 9. The dbexport and dbimport utilities 9-11

The -ansi and -ci options for database properties are not mutually exclusive. Youcan specify an ANSI/ISO-compliant database that is also NLS case-insensitive, asin the following example of the dbimport command:dbimport -c stores_demo -i /usr/informix/port -l -ansi -ci
Example showing dbimport create options (Windows)
To import the stores_demo database from the C:\USER\informix\port\stores_demo.exp directory, issue this command:dbimport -c stores_demo -i C:\USER\informix\port -l -ansi
The imported database is ANSI/ISO-compliant and is case-sensitive for all built-incharacter data types.
Database-logging modeBecause the logging mode is not retained in the schema file, you can specifylogging information when you use the dbimport utility to import a database.
You can specify any of the following logging options when you use dbimport:v ANSI-compliant database with unbuffered loggingv Unbuffered loggingv Buffered loggingv No logging
For more information, see “dbimport create options” on page 9-11.
The -l options are equivalent to the logging clauses of the CREATE DATABASEstatement, as follows:v Omitting any of the -l options is equivalent to omitting the WITH LOG clause.v The -l option is equivalent to the WITH LOG clause.v The -l buffered option is equivalent to the WITH BUFFERED LOG.v The -l -ansi option is equivalent to the WITH LOG MODE ANSI clause, and
implies unbuffered logging.Related reference:
CREATE DATABASE statement (Guide to SQL: Syntax)
Database renamingThe dbimport utility gives the new database the same name as the database thatyou exported. If you export a database to tape, you cannot change its name whenyou import it with dbimport. If you export a database to disk, you can change thedatabase name.
You can use the RENAME DATABASE statement to change the database name.
Alternative ways to change the database name
The following examples show alternative ways to change the database name. Inthis example, assume that dbexport unloaded the database stores_demo into thedirectory /work/exports/stores_demo.exp. Thus, the data files (the .unl files) arestored in /work/exports/stores_demo.exp, and the schema file is/work/exports/stores_demo.exp/stores_demo.sql.
9-12 IBM Informix Migration Guide
To change the database name to a new name on UNIX or Linux:
1. Change the name of the .exp directory. That is, change /work/exports/stores_demo.exp to /work/exports/newname.exp.
2. Change the name of the schema file. That is, change /work/exports/stores_demo.exp/stores_demo.sql to /work/exports/stores_demo.exp/newname.sql. Do not change the names of the .unl files.
3. Import the database with the following command:dbimport -i /work/exports newname
To change the database name to a new name on Windows:
In the following example, assume that dbexport unloaded the databasestores_demo into the directory D:\work\exports\stores_demo.exp. Thus, the datafiles (the .unl files) are stored in D:\work\exports\stores_demo.exp, and theschema file is D:\work\exports\stores_demo.exp\stores_demo.sql.1. Change the name of the .exp directory. That is, change D:\work\exports\
stores_demo.exp to D:\work\exports\newname.exp.2. Change the name of the schema file. That is, change D:\work\exports\
stores_demo.exp\stores_demo.sql to D:\work\exports\stores_demo.exp\newname.sql. Do not change the names of the .unl files.
3. Import the database with the following command:dbimport -i D:\work\exports
Changing the database locale with dbimportYou can use the dbimport utility to change the locale of a database.
To change the locale of a database:
1. Set the DB_LOCALE environment variable to the name of the current databaselocale.
2. Run dbexport on the database.3. Use the DROP DATABASE statement to drop the database that has the current
locale name.4. Set the DB_LOCALE environment variable to the desired database locale for
the database.5. Run dbimport to create a new database with the desired locale and import the
data into this database.
Simple large objects (Version 9.21 or later versions)When the dbimport, dbexport, and DB-Access utilities process simple-large-objectdata, they create temporary files for that data in a temporary directory.
Before you export or import data from tables that contain simple large objects, youmust have one of the following items:v A \tmp directory on your currently active drivev The DBTEMP environment variable set to point to a directory that is available
for temporary storage of the simple large objects
Windows OnlyWindows sets the TMP and TEMP environment variables in the commandprompt sessions, by default. However, if the TMP, TEMP, and DBTEMP
Chapter 9. The dbexport and dbimport utilities 9-13
environment variables are not set, dbimport places the temporary files forthe simple large objects in the \tmp directory.
Attention: If a table has a CLOB or BLOB in a column, you cannot use dbexportto export the table to a tape. If a table has a user-defined type in a column, usingdbexport to export the table to a tape might yield unpredictable results, dependingon the export function of the user-defined type. Exported CLOB sizes are stored inhex format in the unload file.
9-14 IBM Informix Migration Guide
Chapter 10. The dbload utility
The dbload utility loads data into databases or tables that IBM Informix productscreated. It transfers data from one or more text files into one or more existingtables.
This utility supports new data types in all versions of Informix since Version 9.21.
Prerequisites: If the database contains label-based access control (LBAC) objects,the dbload utility can load only those rows in which your security label dominatesthe column-security label or the row-security label. If the entire table is to beloaded, you must have the necessary LBAC credentials for writing all of thelabeled rows and columns. For more information about LBAC objects, see the IBMInformix Security Guide and the IBM Informix Guide to SQL: Syntax.
You cannot use the dbload utility on secondary servers in high-availability clusters.
When you use the dbload utility, you can manipulate a data file that you areloading or access a database while it is loading. When possible, use the LOADstatement, which is faster than dbload.
The dbload utility gives you a great deal of flexibility, but it is not as fast as theother methods, and you must prepare a command file to control the input. You canuse dbload with data in a variety of formats.
The dbload utility offers the following advantages over the LOAD statement:v You can use dbload to load data from input files that were created with a
variety of format arrangements. The dbload command file can accommodatedata from entirely different database management systems.
v You can specify a starting point in the load by directing dbload to read butignore x number of rows.
v You can specify a batch size so that after every x number of rows are inserted,the insert is committed.
v You can limit the number of bad rows read, beyond which dbload ends.
The cost of dbload flexibility is the time and effort spent creating the dbloadcommand file, which is required for dbload operation. The input files are notspecified as part of the dbload command line, and neither are the tables intowhich the data is inserted. This information is contained in the command file.Related concepts:“Choosing a tool for moving data before migrating between operating systems” onpage 8-1Related reference:“Data-migration tools” on page 2-1
Syntax of the dbload commandThe dbload command loads data into databases or tables.
© Copyright IBM Corp. 1996, 2012 10-1
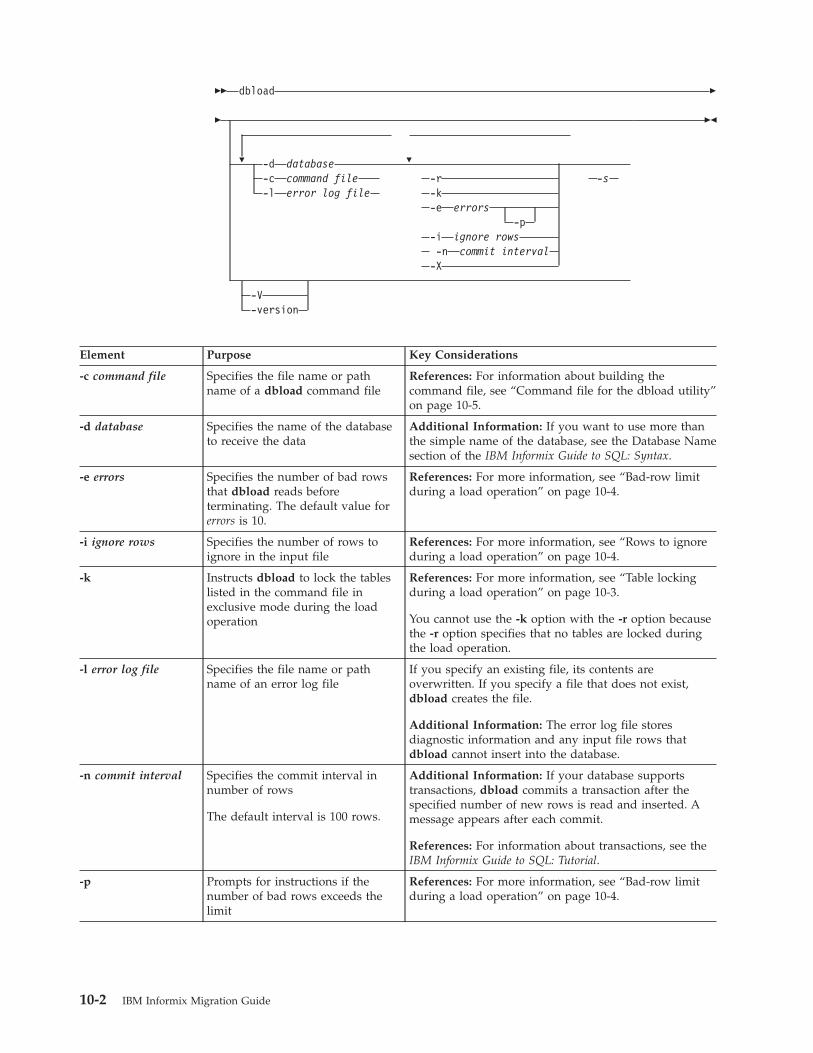
�� dbload �
�
� �-d database-c command file -r -s-l error log file -k
-e errors-p
-i ignore rows-n commit interval
-X
-V-version
��
Element Purpose Key Considerations
-c command file Specifies the file name or pathname of a dbload command file
References: For information about building thecommand file, see “Command file for the dbload utility”on page 10-5.
-d database Specifies the name of the databaseto receive the data
Additional Information: If you want to use more thanthe simple name of the database, see the Database Namesection of the IBM Informix Guide to SQL: Syntax.
-e errors Specifies the number of bad rowsthat dbload reads beforeterminating. The default value forerrors is 10.
References: For more information, see “Bad-row limitduring a load operation” on page 10-4.
-i ignore rows Specifies the number of rows toignore in the input file
References: For more information, see “Rows to ignoreduring a load operation” on page 10-4.
-k Instructs dbload to lock the tableslisted in the command file inexclusive mode during the loadoperation
References: For more information, see “Table lockingduring a load operation” on page 10-3.
You cannot use the -k option with the -r option becausethe -r option specifies that no tables are locked duringthe load operation.
-l error log file Specifies the file name or pathname of an error log file
If you specify an existing file, its contents areoverwritten. If you specify a file that does not exist,dbload creates the file.
Additional Information: The error log file storesdiagnostic information and any input file rows thatdbload cannot insert into the database.
-n commit interval Specifies the commit interval innumber of rows
The default interval is 100 rows.
Additional Information: If your database supportstransactions, dbload commits a transaction after thespecified number of new rows is read and inserted. Amessage appears after each commit.
References: For information about transactions, see theIBM Informix Guide to SQL: Tutorial.
-p Prompts for instructions if thenumber of bad rows exceeds thelimit
References: For more information, see “Bad-row limitduring a load operation” on page 10-4.
10-2 IBM Informix Migration Guide
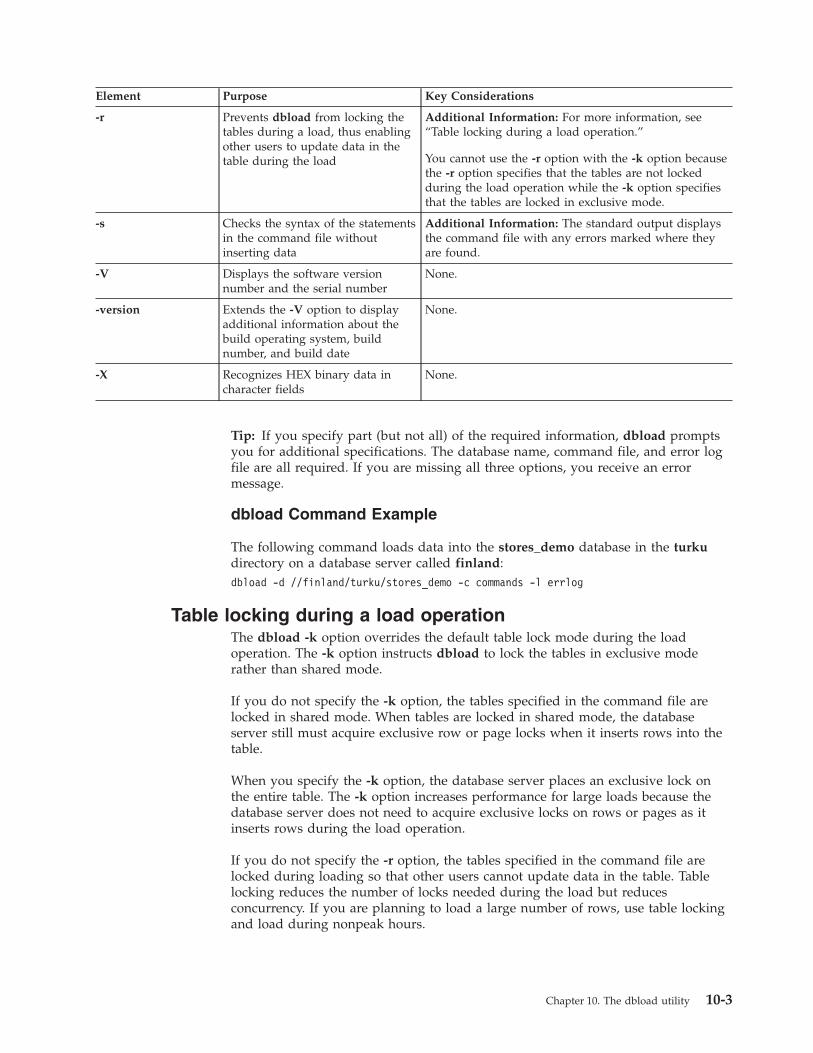
Element Purpose Key Considerations
-r Prevents dbload from locking thetables during a load, thus enablingother users to update data in thetable during the load
Additional Information: For more information, see“Table locking during a load operation.”
You cannot use the -r option with the -k option becausethe -r option specifies that the tables are not lockedduring the load operation while the -k option specifiesthat the tables are locked in exclusive mode.
-s Checks the syntax of the statementsin the command file withoutinserting data
Additional Information: The standard output displaysthe command file with any errors marked where theyare found.
-V Displays the software versionnumber and the serial number
None.
-version Extends the -V option to displayadditional information about thebuild operating system, buildnumber, and build date
None.
-X Recognizes HEX binary data incharacter fields
None.
Tip: If you specify part (but not all) of the required information, dbload promptsyou for additional specifications. The database name, command file, and error logfile are all required. If you are missing all three options, you receive an errormessage.
dbload Command Example
The following command loads data into the stores_demo database in the turkudirectory on a database server called finland:dbload -d //finland/turku/stores_demo -c commands -l errlog
Table locking during a load operationThe dbload -k option overrides the default table lock mode during the loadoperation. The -k option instructs dbload to lock the tables in exclusive moderather than shared mode.
If you do not specify the -k option, the tables specified in the command file arelocked in shared mode. When tables are locked in shared mode, the databaseserver still must acquire exclusive row or page locks when it inserts rows into thetable.
When you specify the -k option, the database server places an exclusive lock onthe entire table. The -k option increases performance for large loads because thedatabase server does not need to acquire exclusive locks on rows or pages as itinserts rows during the load operation.
If you do not specify the -r option, the tables specified in the command file arelocked during loading so that other users cannot update data in the table. Tablelocking reduces the number of locks needed during the load but reducesconcurrency. If you are planning to load a large number of rows, use table lockingand load during nonpeak hours.
Chapter 10. The dbload utility 10-3

Rows to ignore during a load operationThe dbload -i option specifies the number of new-line characters in the input filethat dbload ignores before dbload begins to process data.
This option is useful if your most recent dbload session ended prematurely.
For example, if dbload ends after it inserts 240 lines of input, you can begin toload again at line 241 if you set number rows ignore to 240.
The -i option is also useful if header information in the input file precedes the datarecords.
Bad-row limit during a load operationThe dbload -e option lets you specify how many bad rows to allow before dbloadterminates.
If you set errors to a positive integer, dbload terminates when it reads (errors + 1)bad rows. If you set errors to zero, dbload terminates when it reads the first badrow.
If dbload exceeds the bad-row limit and the -p option is specified, dbload promptsyou for instructions before it terminates. The prompt asks whether you want to rollback or to commit all rows that were inserted since the last transaction.
If dbload exceeds the bad-row limit and the -p option is not specified, dbloadcommits all rows that were inserted since the last transaction.
Termination of the dbload utilityIf you press your Interrupt key, dbload terminates and discards any new rowsthat were inserted but not yet committed to the database (if the database hastransactions).
Name and object guidelines for the dbload utilityYou must follow guidelines for specifying network names and handling simplelarge objects, indexes, and delimited identifiers when you use the dbload utility.
Table 10-1. Name and object guidelines for the dbload utility
Objects Guideline
Network names If you are on a network, include the databaseserver name and directory path with thedatabase name to specify a database onanother database server.
Simple large objects You can load simple large objects with thedbload utility as long as the simple largeobjects are in text files.
Indexes The presence of indexes greatly affects thespeed with which the dbload utility loadsdata. For best performance, drop any indexeson the tables that receive the data before yourun dbload. You can create new indexes afterdbload has finished.
10-4 IBM Informix Migration Guide
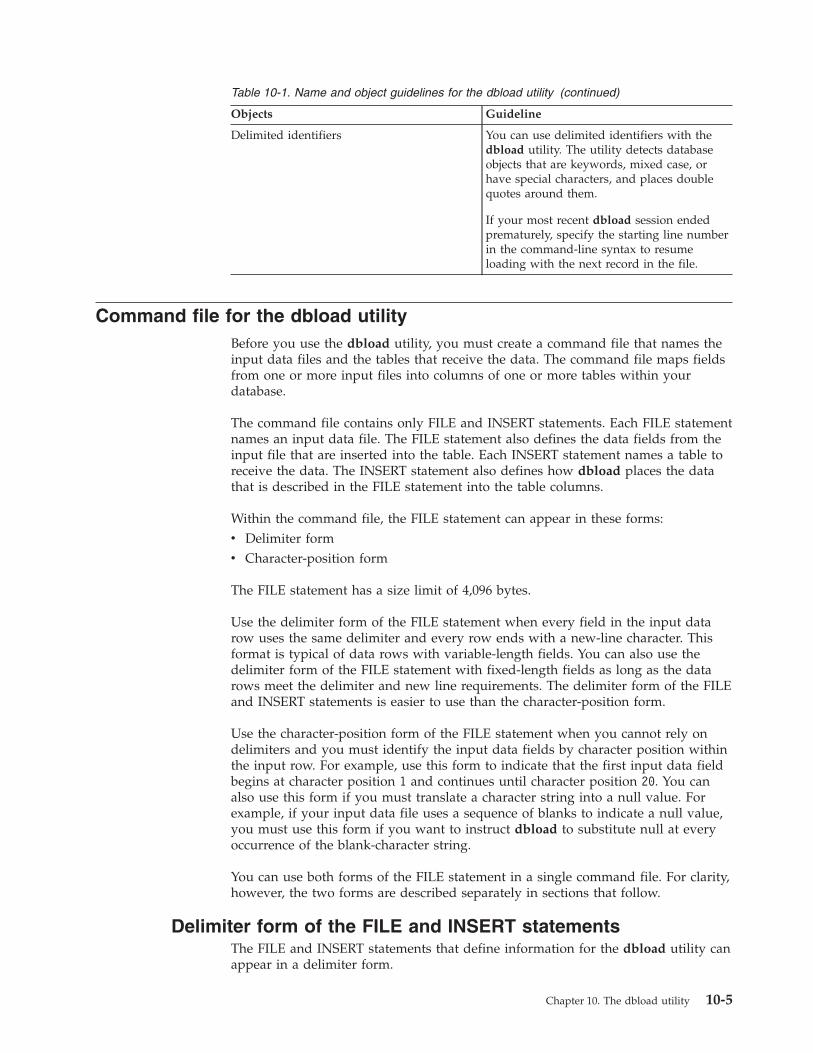
Table 10-1. Name and object guidelines for the dbload utility (continued)
Objects Guideline
Delimited identifiers You can use delimited identifiers with thedbload utility. The utility detects databaseobjects that are keywords, mixed case, orhave special characters, and places doublequotes around them.
If your most recent dbload session endedprematurely, specify the starting line numberin the command-line syntax to resumeloading with the next record in the file.
Command file for the dbload utilityBefore you use the dbload utility, you must create a command file that names theinput data files and the tables that receive the data. The command file maps fieldsfrom one or more input files into columns of one or more tables within yourdatabase.
The command file contains only FILE and INSERT statements. Each FILE statementnames an input data file. The FILE statement also defines the data fields from theinput file that are inserted into the table. Each INSERT statement names a table toreceive the data. The INSERT statement also defines how dbload places the datathat is described in the FILE statement into the table columns.
Within the command file, the FILE statement can appear in these forms:v Delimiter formv Character-position form
The FILE statement has a size limit of 4,096 bytes.
Use the delimiter form of the FILE statement when every field in the input datarow uses the same delimiter and every row ends with a new-line character. Thisformat is typical of data rows with variable-length fields. You can also use thedelimiter form of the FILE statement with fixed-length fields as long as the datarows meet the delimiter and new line requirements. The delimiter form of the FILEand INSERT statements is easier to use than the character-position form.
Use the character-position form of the FILE statement when you cannot rely ondelimiters and you must identify the input data fields by character position withinthe input row. For example, use this form to indicate that the first input data fieldbegins at character position 1 and continues until character position 20. You canalso use this form if you must translate a character string into a null value. Forexample, if your input data file uses a sequence of blanks to indicate a null value,you must use this form if you want to instruct dbload to substitute null at everyoccurrence of the blank-character string.
You can use both forms of the FILE statement in a single command file. For clarity,however, the two forms are described separately in sections that follow.
Delimiter form of the FILE and INSERT statementsThe FILE and INSERT statements that define information for the dbload utility canappear in a delimiter form.
Chapter 10. The dbload utility 10-5
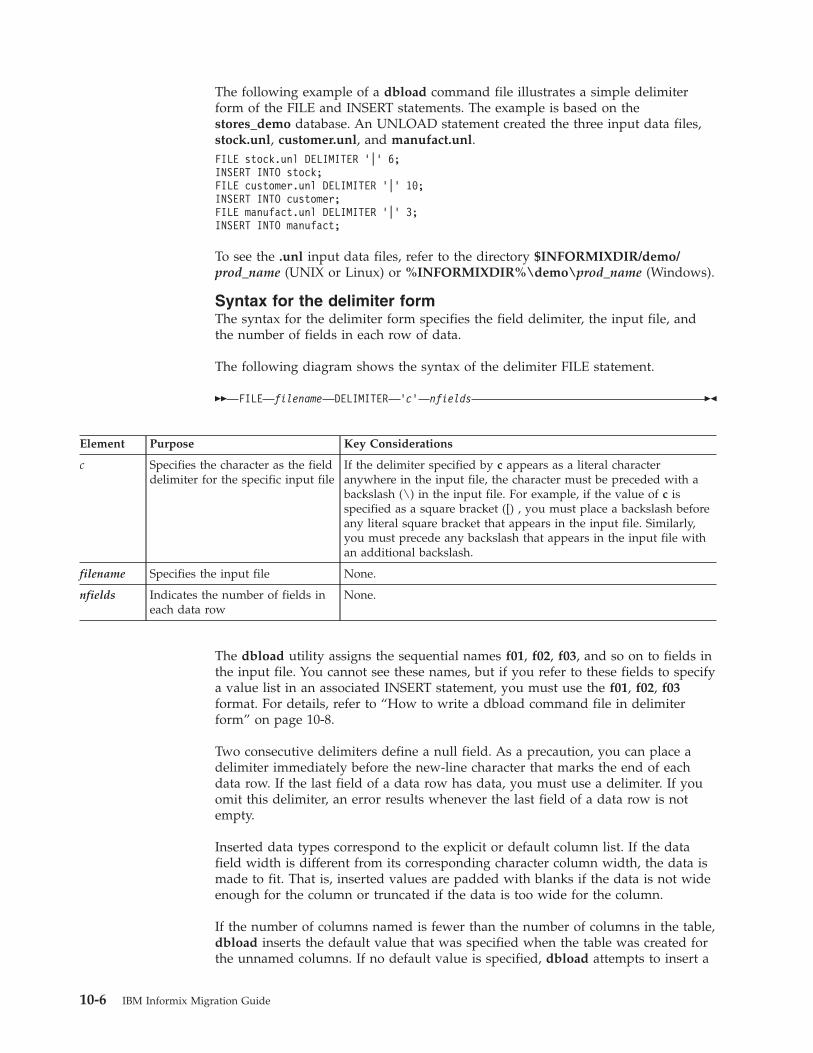
The following example of a dbload command file illustrates a simple delimiterform of the FILE and INSERT statements. The example is based on thestores_demo database. An UNLOAD statement created the three input data files,stock.unl, customer.unl, and manufact.unl.FILE stock.unl DELIMITER ’|’ 6;INSERT INTO stock;FILE customer.unl DELIMITER ’|’ 10;INSERT INTO customer;FILE manufact.unl DELIMITER ’|’ 3;INSERT INTO manufact;
To see the .unl input data files, refer to the directory $INFORMIXDIR/demo/prod_name (UNIX or Linux) or %INFORMIXDIR%\demo\prod_name (Windows).
Syntax for the delimiter formThe syntax for the delimiter form specifies the field delimiter, the input file, andthe number of fields in each row of data.
The following diagram shows the syntax of the delimiter FILE statement.
�� FILE filename DELIMITER ‘c‘ nfields ��
Element Purpose Key Considerations
c Specifies the character as the fielddelimiter for the specific input file
If the delimiter specified by c appears as a literal characteranywhere in the input file, the character must be preceded with abackslash (\) in the input file. For example, if the value of c isspecified as a square bracket ([) , you must place a backslash beforeany literal square bracket that appears in the input file. Similarly,you must precede any backslash that appears in the input file withan additional backslash.
filename Specifies the input file None.
nfields Indicates the number of fields ineach data row
None.
The dbload utility assigns the sequential names f01, f02, f03, and so on to fields inthe input file. You cannot see these names, but if you refer to these fields to specifya value list in an associated INSERT statement, you must use the f01, f02, f03format. For details, refer to “How to write a dbload command file in delimiterform” on page 10-8.
Two consecutive delimiters define a null field. As a precaution, you can place adelimiter immediately before the new-line character that marks the end of eachdata row. If the last field of a data row has data, you must use a delimiter. If youomit this delimiter, an error results whenever the last field of a data row is notempty.
Inserted data types correspond to the explicit or default column list. If the datafield width is different from its corresponding character column width, the data ismade to fit. That is, inserted values are padded with blanks if the data is not wideenough for the column or truncated if the data is too wide for the column.
If the number of columns named is fewer than the number of columns in the table,dbload inserts the default value that was specified when the table was created forthe unnamed columns. If no default value is specified, dbload attempts to insert a
10-6 IBM Informix Migration Guide
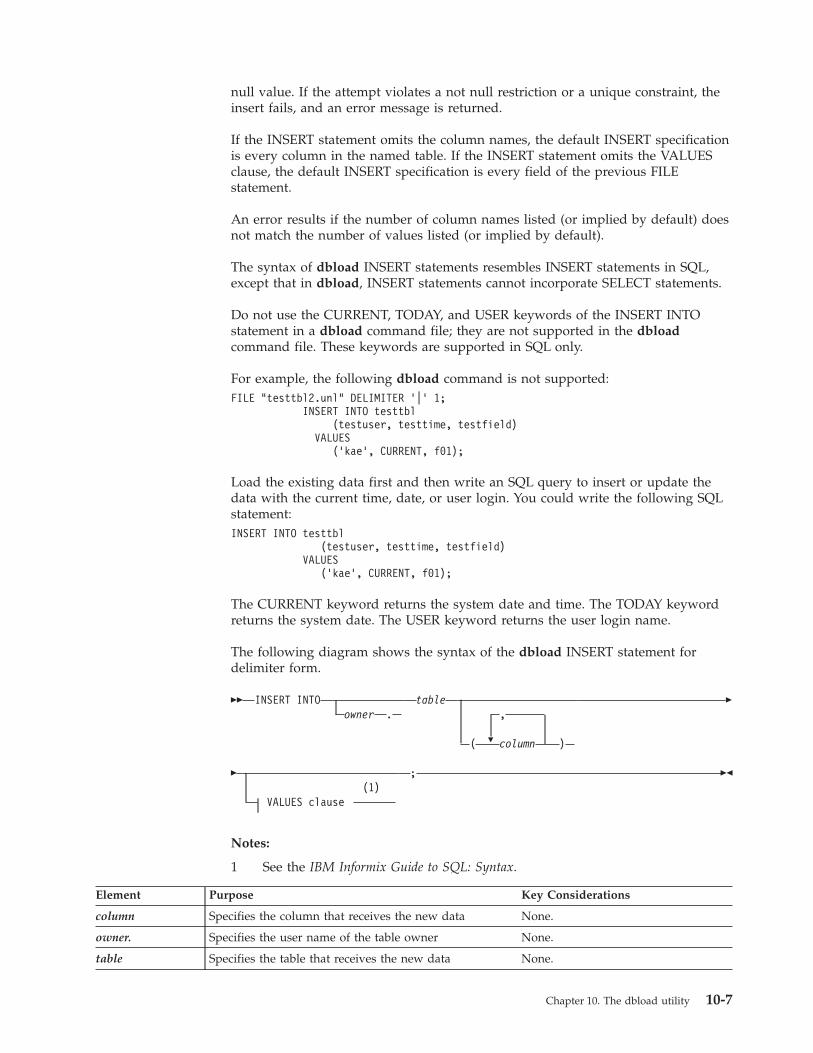
null value. If the attempt violates a not null restriction or a unique constraint, theinsert fails, and an error message is returned.
If the INSERT statement omits the column names, the default INSERT specificationis every column in the named table. If the INSERT statement omits the VALUESclause, the default INSERT specification is every field of the previous FILEstatement.
An error results if the number of column names listed (or implied by default) doesnot match the number of values listed (or implied by default).
The syntax of dbload INSERT statements resembles INSERT statements in SQL,except that in dbload, INSERT statements cannot incorporate SELECT statements.
Do not use the CURRENT, TODAY, and USER keywords of the INSERT INTOstatement in a dbload command file; they are not supported in the dbloadcommand file. These keywords are supported in SQL only.
For example, the following dbload command is not supported:FILE "testtbl2.unl" DELIMITER ’|’ 1;
INSERT INTO testtbl(testuser, testtime, testfield)
VALUES(’kae’, CURRENT, f01);
Load the existing data first and then write an SQL query to insert or update thedata with the current time, date, or user login. You could write the following SQLstatement:INSERT INTO testtbl
(testuser, testtime, testfield)VALUES
(’kae’, CURRENT, f01);
The CURRENT keyword returns the system date and time. The TODAY keywordreturns the system date. The USER keyword returns the user login name.
The following diagram shows the syntax of the dbload INSERT statement fordelimiter form.
�� INSERT INTOowner .
table
�
,
( column )
�
�(1)
VALUES clause
; ��
Notes:
1 See the IBM Informix Guide to SQL: Syntax.
Element Purpose Key Considerations
column Specifies the column that receives the new data None.
owner. Specifies the user name of the table owner None.
table Specifies the table that receives the new data None.
Chapter 10. The dbload utility 10-7
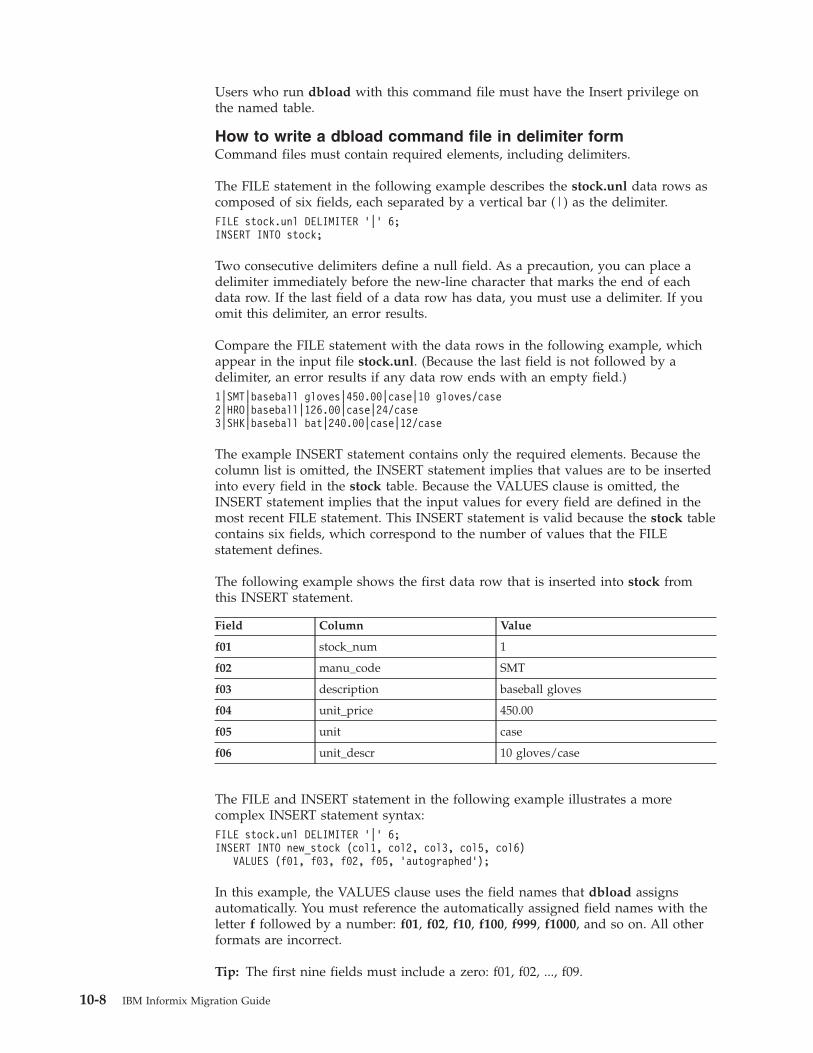
Users who run dbload with this command file must have the Insert privilege onthe named table.
How to write a dbload command file in delimiter formCommand files must contain required elements, including delimiters.
The FILE statement in the following example describes the stock.unl data rows ascomposed of six fields, each separated by a vertical bar (|) as the delimiter.FILE stock.unl DELIMITER ’|’ 6;INSERT INTO stock;
Two consecutive delimiters define a null field. As a precaution, you can place adelimiter immediately before the new-line character that marks the end of eachdata row. If the last field of a data row has data, you must use a delimiter. If youomit this delimiter, an error results.
Compare the FILE statement with the data rows in the following example, whichappear in the input file stock.unl. (Because the last field is not followed by adelimiter, an error results if any data row ends with an empty field.)1|SMT|baseball gloves|450.00|case|10 gloves/case2|HRO|baseball|126.00|case|24/case3|SHK|baseball bat|240.00|case|12/case
The example INSERT statement contains only the required elements. Because thecolumn list is omitted, the INSERT statement implies that values are to be insertedinto every field in the stock table. Because the VALUES clause is omitted, theINSERT statement implies that the input values for every field are defined in themost recent FILE statement. This INSERT statement is valid because the stock tablecontains six fields, which correspond to the number of values that the FILEstatement defines.
The following example shows the first data row that is inserted into stock fromthis INSERT statement.
Field Column Value
f01 stock_num 1
f02 manu_code SMT
f03 description baseball gloves
f04 unit_price 450.00
f05 unit case
f06 unit_descr 10 gloves/case
The FILE and INSERT statement in the following example illustrates a morecomplex INSERT statement syntax:FILE stock.unl DELIMITER ’|’ 6;INSERT INTO new_stock (col1, col2, col3, col5, col6)
VALUES (f01, f03, f02, f05, ’autographed’);
In this example, the VALUES clause uses the field names that dbload assignsautomatically. You must reference the automatically assigned field names with theletter f followed by a number: f01, f02, f10, f100, f999, f1000, and so on. All otherformats are incorrect.
Tip: The first nine fields must include a zero: f01, f02, ..., f09.
10-8 IBM Informix Migration Guide
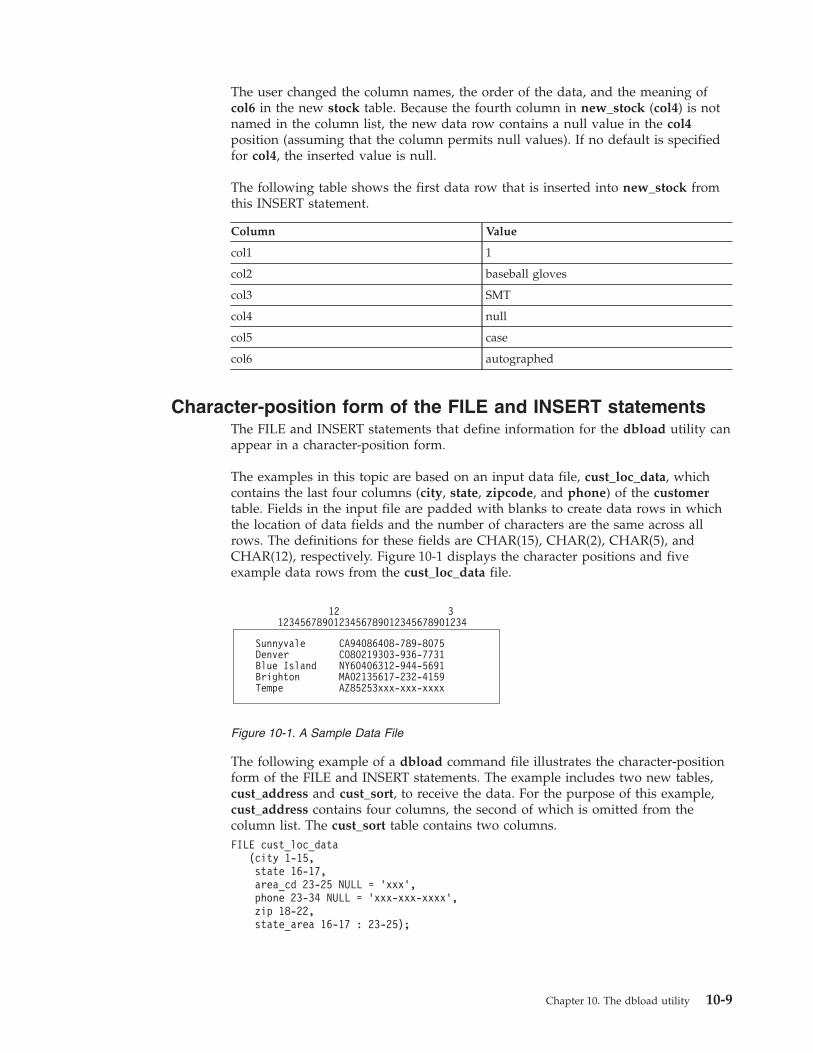
The user changed the column names, the order of the data, and the meaning ofcol6 in the new stock table. Because the fourth column in new_stock (col4) is notnamed in the column list, the new data row contains a null value in the col4position (assuming that the column permits null values). If no default is specifiedfor col4, the inserted value is null.
The following table shows the first data row that is inserted into new_stock fromthis INSERT statement.
Column Value
col1 1
col2 baseball gloves
col3 SMT
col4 null
col5 case
col6 autographed
Character-position form of the FILE and INSERT statementsThe FILE and INSERT statements that define information for the dbload utility canappear in a character-position form.
The examples in this topic are based on an input data file, cust_loc_data, whichcontains the last four columns (city, state, zipcode, and phone) of the customertable. Fields in the input file are padded with blanks to create data rows in whichthe location of data fields and the number of characters are the same across allrows. The definitions for these fields are CHAR(15), CHAR(2), CHAR(5), andCHAR(12), respectively. Figure 10-1 displays the character positions and fiveexample data rows from the cust_loc_data file.
The following example of a dbload command file illustrates the character-positionform of the FILE and INSERT statements. The example includes two new tables,cust_address and cust_sort, to receive the data. For the purpose of this example,cust_address contains four columns, the second of which is omitted from thecolumn list. The cust_sort table contains two columns.FILE cust_loc_data
(city 1-15,state 16-17,area_cd 23-25 NULL = ’xxx’,phone 23-34 NULL = ’xxx-xxx-xxxx’,zip 18-22,state_area 16-17 : 23-25);
12 31234567890123456789012345678901234
Sunnyvale CA94086408-789-8075Denver CO80219303-936-7731Blue Island NY60406312-944-5691Brighton MA02135617-232-4159Tempe AZ85253xxx-xxx-xxxx
Figure 10-1. A Sample Data File
Chapter 10. The dbload utility 10-9

INSERT INTO cust_address (col1, col3, col4)VALUES (city, state, zip);
INSERT INTO cust_sortVALUES (area_cd, zip);
Syntax for the character-position formThe syntax for the character-position form specifies information that includes thecharacter position within a data row that starts a range of character positions andthe character position that ends a range of character positions.
The following diagram shows the syntax of the character-position FILE statement.
�� � �
,:
FILE filename ( fieldn )start NULL = ‘ null string ‘
-end
��
Element Purpose Key Considerations
-end Indicates the character position within a data row thatends a range of character positions
A hyphen must precede the end value.
fieldn Assigns a name to the data field that you are definingwith the range of character positions
None.
filename Specifies the name of the input file None.
null string Specifies the data value for which dbload mustsubstitute a null value
Must be a quoted string.
start Indicates the character position within a data row thatstarts a range of character positions. If you specifystart without end, it represents a single character.
None.
You can repeat the same character position in a data-field definition or in differentfields.
The null string scope of reference is the data field for which you define it. You candefine an explicit null string for each field that allows null entries.
Inserted data types correspond to the explicit or default column list. If thedata-field width is different from its corresponding character column, insertedvalues are padded with blanks if the column is wider, or inserted values aretruncated if the field is wider.
If the number of columns named is fewer than the number of columns in the table,dbload inserts the default value that is specified for the unnamed columns. If nodefault value is specified, dbload attempts to insert a null value. If the attemptviolates a not-null restriction or a unique constraint, the insert fails, and an errormessage is returned.
If the INSERT statement omits the column names, the default INSERT specificationis every column in the named table. If the INSERT statement omits the VALUESclause, the default INSERT specification is every field of the previous FILEstatement.
An error results if the number of column names listed (or implied by default) doesnot match the number of values listed (or implied by default).
10-10 IBM Informix Migration Guide
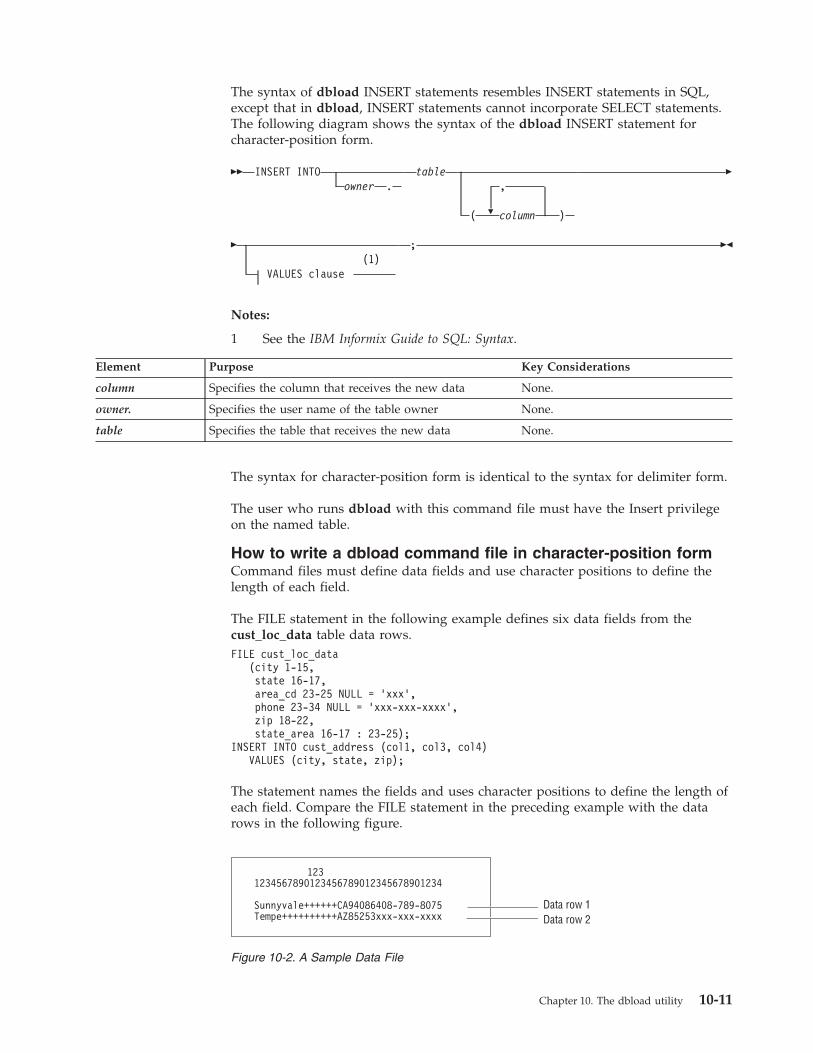
The syntax of dbload INSERT statements resembles INSERT statements in SQL,except that in dbload, INSERT statements cannot incorporate SELECT statements.The following diagram shows the syntax of the dbload INSERT statement forcharacter-position form.
�� INSERT INTOowner .
table
�
,
( column )
�
�(1)
VALUES clause
; ��
Notes:
1 See the IBM Informix Guide to SQL: Syntax.
Element Purpose Key Considerations
column Specifies the column that receives the new data None.
owner. Specifies the user name of the table owner None.
table Specifies the table that receives the new data None.
The syntax for character-position form is identical to the syntax for delimiter form.
The user who runs dbload with this command file must have the Insert privilegeon the named table.
How to write a dbload command file in character-position formCommand files must define data fields and use character positions to define thelength of each field.
The FILE statement in the following example defines six data fields from thecust_loc_data table data rows.FILE cust_loc_data
(city 1-15,state 16-17,area_cd 23-25 NULL = ’xxx’,phone 23-34 NULL = ’xxx-xxx-xxxx’,zip 18-22,state_area 16-17 : 23-25);
INSERT INTO cust_address (col1, col3, col4)VALUES (city, state, zip);
The statement names the fields and uses character positions to define the length ofeach field. Compare the FILE statement in the preceding example with the datarows in the following figure.
1231234567890123456789012345678901234
Sunnyvale++++++CA94086408-789-8075Tempe++++++++++AZ85253xxx-xxx-xxxx
Data row 1Data row 2
Figure 10-2. A Sample Data File
Chapter 10. The dbload utility 10-11

The FILE statement defines the following data fields, which are derived from thedata rows in the sample data file.
Column Values from Data Row 1 Values from Data Row 2
city Sunnyvale++++++ Tempe++++++++++
state CA AZ
area_cd 408 null
phone 408-789-8075 null
zip 94086 85253
state_area CA408 AZxxx
The null strings that are defined for the phone and area_cd fields generate the nullvalues in those columns, but they do not affect the values that are stored in thestate_area column.
The INSERT statement uses the field names and values that are derived from theFILE statement as the value-list input. Consider the following INSERT statement:INSERT INTO cust_address (col1, col3, col4)
VALUES (city, state, zip);
The INSERT statement uses the data in the sample data file and the FILE statementto put the following information into the cust_address table.
Column Values from Data Row 1 Values from Data Row 2
col1 Sunnyvale++++++ Tempe++++++++++
col2 null null
col3 CA AZ
col4 94086 85253
Because the second column (col2) in cust_address is not named, the new data rowcontains a null (assuming that the column permits nulls).
Consider the following INSERT statement:INSERT INTO cust_sort
VALUES (area_cd, zip);
This INSERT statement inserts the following data rows into the cust_sort table.
Column Values from Data Row 1 Values from Data Row 2
col1 408 null
col2 94086 85253
Because no column list is provided, dbload reads the names of all the columns incust_sort from the system catalog. (You cannot insert data into a temporary tablebecause temporary tables are not entered into the system catalog.) Field namesfrom the previous FILE statement specify the values to load into each column. Youdo not need one FILE statement for each INSERT statement.
10-12 IBM Informix Migration Guide
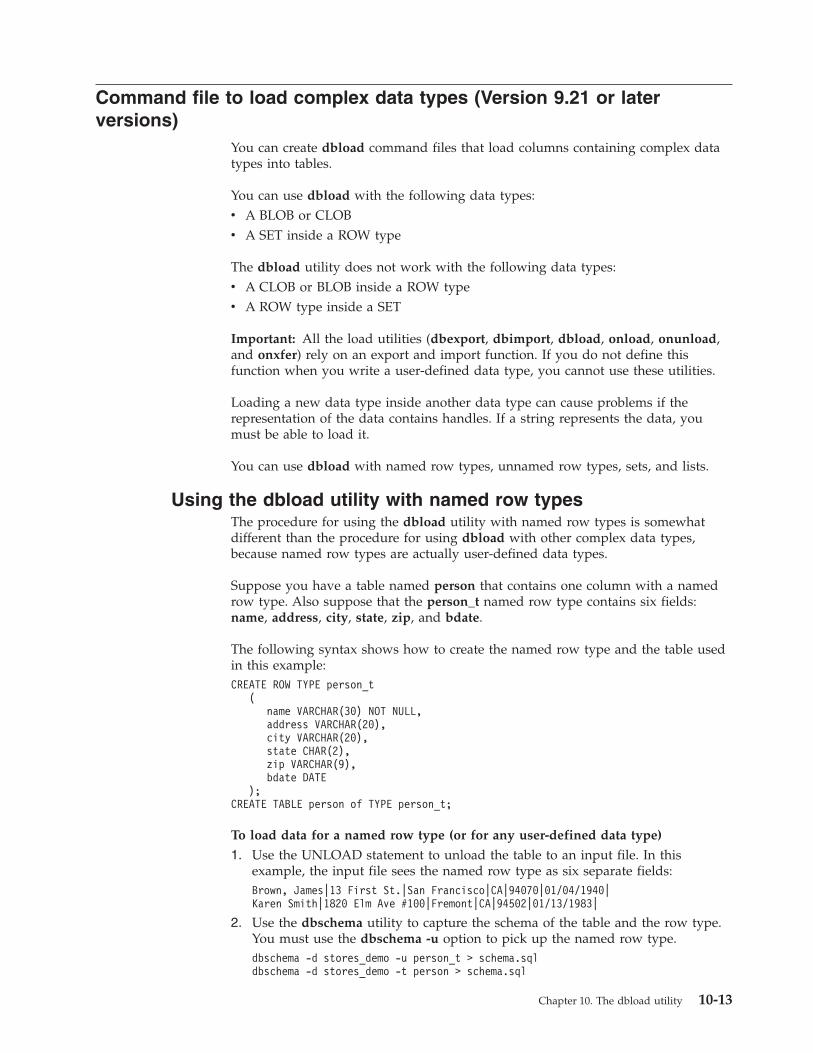
Command file to load complex data types (Version 9.21 or laterversions)
You can create dbload command files that load columns containing complex datatypes into tables.
You can use dbload with the following data types:v A BLOB or CLOBv A SET inside a ROW type
The dbload utility does not work with the following data types:v A CLOB or BLOB inside a ROW typev A ROW type inside a SET
Important: All the load utilities (dbexport, dbimport, dbload, onload, onunload,and onxfer) rely on an export and import function. If you do not define thisfunction when you write a user-defined data type, you cannot use these utilities.
Loading a new data type inside another data type can cause problems if therepresentation of the data contains handles. If a string represents the data, youmust be able to load it.
You can use dbload with named row types, unnamed row types, sets, and lists.
Using the dbload utility with named row typesThe procedure for using the dbload utility with named row types is somewhatdifferent than the procedure for using dbload with other complex data types,because named row types are actually user-defined data types.
Suppose you have a table named person that contains one column with a namedrow type. Also suppose that the person_t named row type contains six fields:name, address, city, state, zip, and bdate.
The following syntax shows how to create the named row type and the table usedin this example:CREATE ROW TYPE person_t
(name VARCHAR(30) NOT NULL,address VARCHAR(20),city VARCHAR(20),state CHAR(2),zip VARCHAR(9),bdate DATE
);CREATE TABLE person of TYPE person_t;
To load data for a named row type (or for any user-defined data type)
1. Use the UNLOAD statement to unload the table to an input file. In thisexample, the input file sees the named row type as six separate fields:Brown, James|13 First St.|San Francisco|CA|94070|01/04/1940|Karen Smith|1820 Elm Ave #100|Fremont|CA|94502|01/13/1983|
2. Use the dbschema utility to capture the schema of the table and the row type.You must use the dbschema -u option to pick up the named row type.dbschema -d stores_demo -u person_t > schema.sqldbschema -d stores_demo -t person > schema.sql
Chapter 10. The dbload utility 10-13
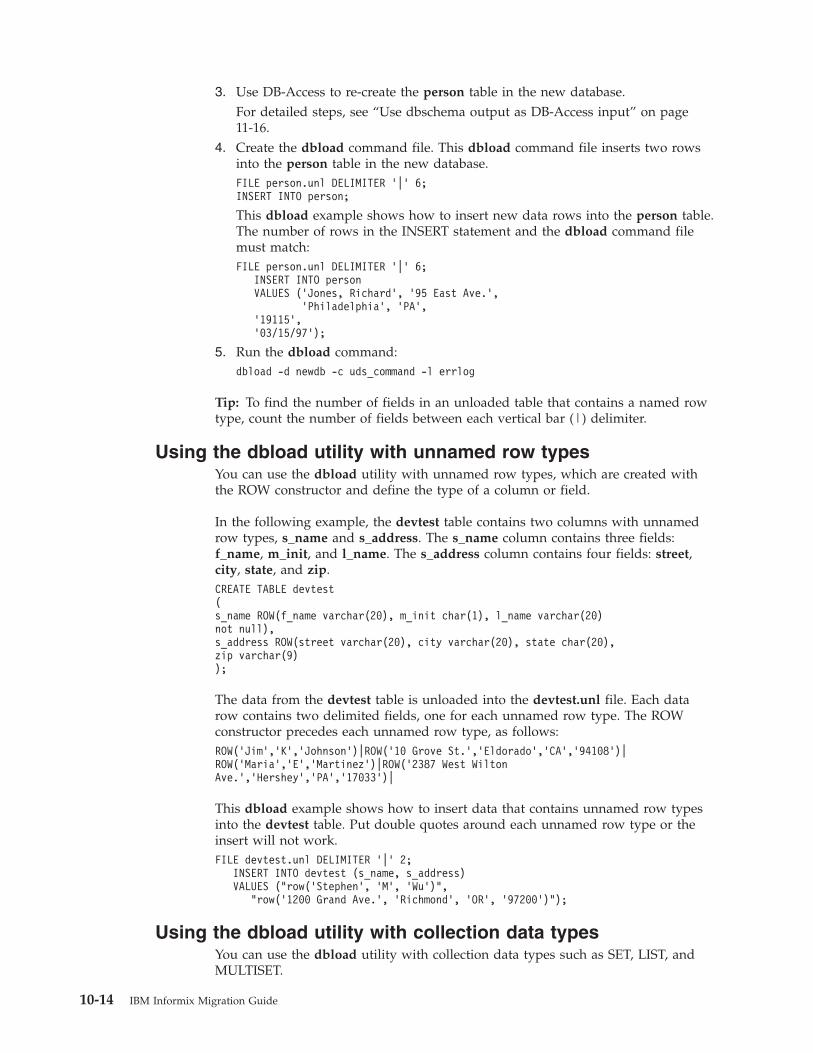
3. Use DB-Access to re-create the person table in the new database.For detailed steps, see “Use dbschema output as DB-Access input” on page11-16.
4. Create the dbload command file. This dbload command file inserts two rowsinto the person table in the new database.FILE person.unl DELIMITER ’|’ 6;INSERT INTO person;
This dbload example shows how to insert new data rows into the person table.The number of rows in the INSERT statement and the dbload command filemust match:FILE person.unl DELIMITER ’|’ 6;
INSERT INTO personVALUES (’Jones, Richard’, ’95 East Ave.’,
’Philadelphia’, ’PA’,’19115’,’03/15/97’);
5. Run the dbload command:dbload -d newdb -c uds_command -l errlog
Tip: To find the number of fields in an unloaded table that contains a named rowtype, count the number of fields between each vertical bar (|) delimiter.
Using the dbload utility with unnamed row typesYou can use the dbload utility with unnamed row types, which are created withthe ROW constructor and define the type of a column or field.
In the following example, the devtest table contains two columns with unnamedrow types, s_name and s_address. The s_name column contains three fields:f_name, m_init, and l_name. The s_address column contains four fields: street,city, state, and zip.CREATE TABLE devtest(s_name ROW(f_name varchar(20), m_init char(1), l_name varchar(20)not null),s_address ROW(street varchar(20), city varchar(20), state char(20),zip varchar(9));
The data from the devtest table is unloaded into the devtest.unl file. Each datarow contains two delimited fields, one for each unnamed row type. The ROWconstructor precedes each unnamed row type, as follows:ROW(’Jim’,’K’,’Johnson’)|ROW(’10 Grove St.’,’Eldorado’,’CA’,’94108’)|ROW(’Maria’,’E’,’Martinez’)|ROW(’2387 West WiltonAve.’,’Hershey’,’PA’,’17033’)|
This dbload example shows how to insert data that contains unnamed row typesinto the devtest table. Put double quotes around each unnamed row type or theinsert will not work.FILE devtest.unl DELIMITER ’|’ 2;
INSERT INTO devtest (s_name, s_address)VALUES ("row(’Stephen’, ’M’, ’Wu’)",
"row(’1200 Grand Ave.’, ’Richmond’, ’OR’, ’97200’)");
Using the dbload utility with collection data typesYou can use the dbload utility with collection data types such as SET, LIST, andMULTISET.
10-14 IBM Informix Migration Guide
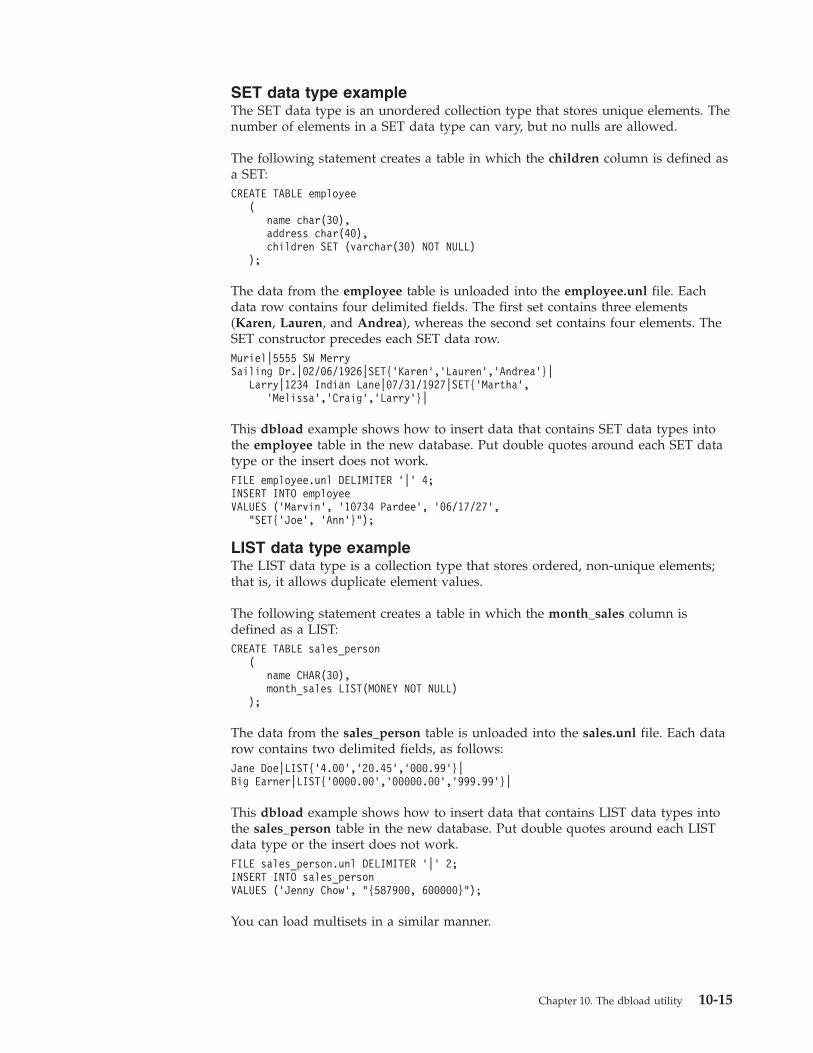
SET data type exampleThe SET data type is an unordered collection type that stores unique elements. Thenumber of elements in a SET data type can vary, but no nulls are allowed.
The following statement creates a table in which the children column is defined asa SET:CREATE TABLE employee
(name char(30),address char(40),children SET (varchar(30) NOT NULL)
);
The data from the employee table is unloaded into the employee.unl file. Eachdata row contains four delimited fields. The first set contains three elements(Karen, Lauren, and Andrea), whereas the second set contains four elements. TheSET constructor precedes each SET data row.Muriel|5555 SW MerrySailing Dr.|02/06/1926|SET{’Karen’,’Lauren’,’Andrea’}|
Larry|1234 Indian Lane|07/31/1927|SET{’Martha’,’Melissa’,’Craig’,’Larry’}|
This dbload example shows how to insert data that contains SET data types intothe employee table in the new database. Put double quotes around each SET datatype or the insert does not work.FILE employee.unl DELIMITER ’|’ 4;INSERT INTO employeeVALUES (’Marvin’, ’10734 Pardee’, ’06/17/27’,
"SET{’Joe’, ’Ann’}");
LIST data type exampleThe LIST data type is a collection type that stores ordered, non-unique elements;that is, it allows duplicate element values.
The following statement creates a table in which the month_sales column isdefined as a LIST:CREATE TABLE sales_person
(name CHAR(30),month_sales LIST(MONEY NOT NULL)
);
The data from the sales_person table is unloaded into the sales.unl file. Each datarow contains two delimited fields, as follows:Jane Doe|LIST{’4.00’,’20.45’,’000.99’}|Big Earner|LIST{’0000.00’,’00000.00’,’999.99’}|
This dbload example shows how to insert data that contains LIST data types intothe sales_person table in the new database. Put double quotes around each LISTdata type or the insert does not work.FILE sales_person.unl DELIMITER ’|’ 2;INSERT INTO sales_personVALUES (’Jenny Chow’, "{587900, 600000}");
You can load multisets in a similar manner.
Chapter 10. The dbload utility 10-15

10-16 IBM Informix Migration Guide
Chapter 11. The dbschema utility
The dbschema utility displays the SQL statements (the schema) that are necessaryto replicate database objects.
You can also use the dbschema utility for the following purposes:v To display the distributions that the UPDATE STATISTICS statement creates.v To display the schema for the Information Schema viewsv To display the schema for creating objects such as databases, tables, sequences,
synonyms, storage spaces, chunks, logs, roles, and privilegesv To display the distribution information that is stored for one or more tables in
the databasev To display information about user-defined data types and row types
After you obtain the schema of a database, you can redirect the dbschema outputto a file that you can use with DB-Access.
The dbschema utility is supported on all updatable secondary servers.
The dbschema utility is also supported on read-only secondary servers. However,the dbschema utility displays a warning message when running on these servers.
Attention: Use of the dbschema utility can increment sequence objects in thedatabase, creating gaps in the generated numbers that might not be expected inapplications that require serialized integers.Related concepts:“Choosing a tool for moving data before migrating between operating systems” onpage 8-1Related reference:“Data-migration tools” on page 2-1
Object modes and violation detection in dbschema outputThe output from the dbschema utility shows object modes and supports violationdetection.
The dbschema output shows:v The names of not-null constraints after the not-null specifications.
You can use the output of the utility as input to create another database. If thesame names were not used for not-null constraints in both databases, problemscould result.
v The object mode of objects that are in the disabled state. These objects can beconstraints, triggers, or indexes.
v The object mode of objects that are in the filtering state. These objects can beconstraints or unique indexes.
v The violations and diagnostics tables that are associated with a base table (ifviolations and diagnostics tables were started for the base table).
© Copyright IBM Corp. 1996, 2012 11-1
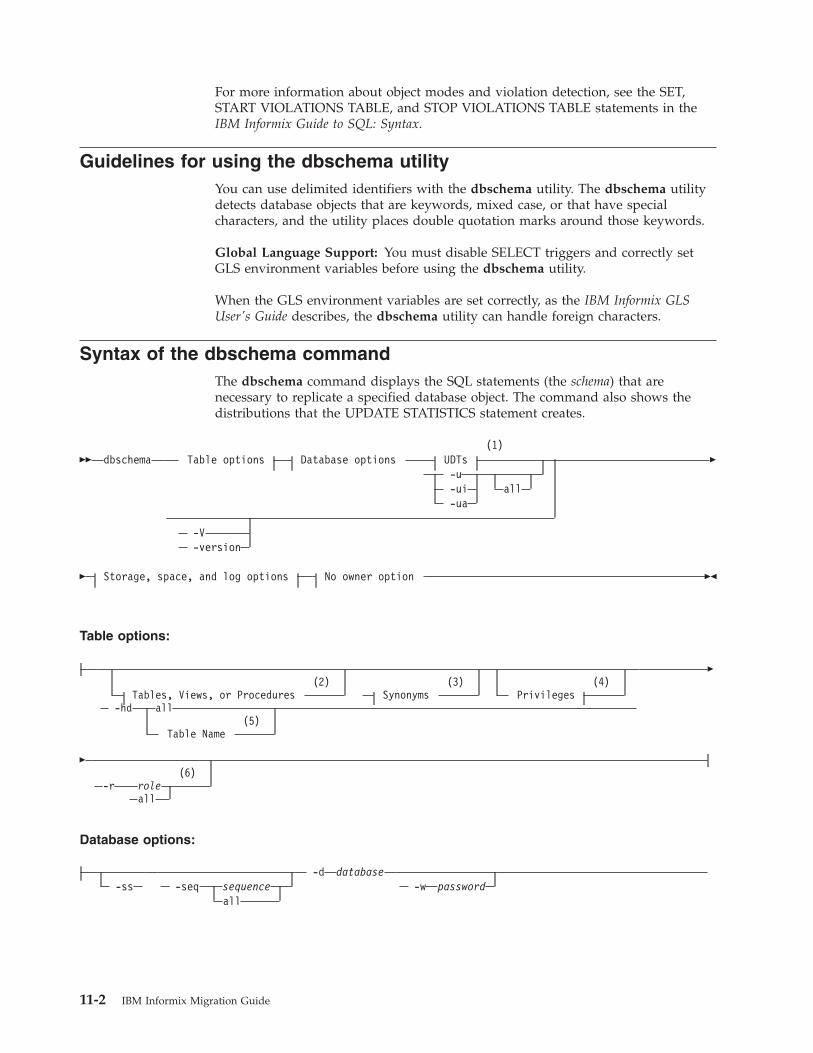
For more information about object modes and violation detection, see the SET,START VIOLATIONS TABLE, and STOP VIOLATIONS TABLE statements in theIBM Informix Guide to SQL: Syntax.
Guidelines for using the dbschema utilityYou can use delimited identifiers with the dbschema utility. The dbschema utilitydetects database objects that are keywords, mixed case, or that have specialcharacters, and the utility places double quotation marks around those keywords.
Global Language Support: You must disable SELECT triggers and correctly setGLS environment variables before using the dbschema utility.
When the GLS environment variables are set correctly, as the IBM Informix GLSUser's Guide describes, the dbschema utility can handle foreign characters.
Syntax of the dbschema commandThe dbschema command displays the SQL statements (the schema) that arenecessary to replicate a specified database object. The command also shows thedistributions that the UPDATE STATISTICS statement creates.
�� dbschema(1)
Table options Database options UDTs-u-ui all-ua
-V-version
�
� Storage, space, and log options No owner option ��
Table options:
(2) (3) (4)Tables, Views, or Procedures Synonyms Privileges
-hd all(5)
Table Name
�
�(6)
-r roleall
Database options:
-ss -seq sequenceall
-d database-w password
11-2 IBM Informix Migration Guide
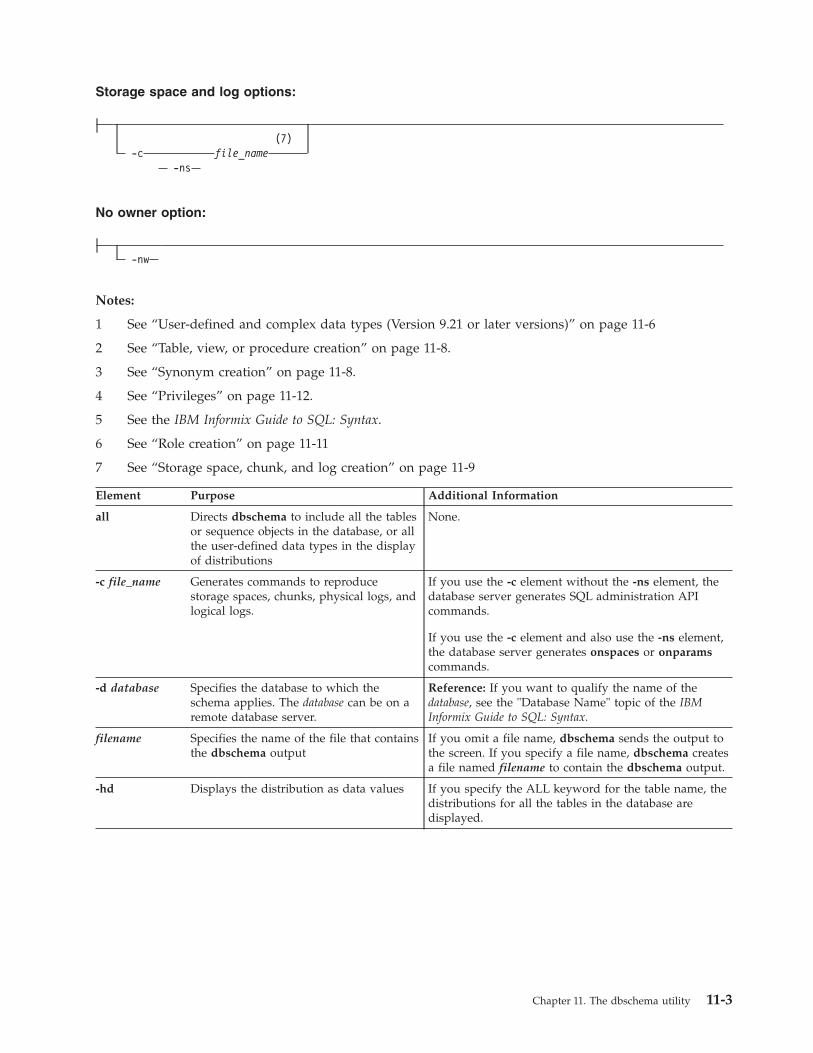
Storage space and log options:
(7)-c file_name
-ns
No owner option:
-nw
Notes:
1 See “User-defined and complex data types (Version 9.21 or later versions)” on page 11-6
2 See “Table, view, or procedure creation” on page 11-8.
3 See “Synonym creation” on page 11-8.
4 See “Privileges” on page 11-12.
5 See the IBM Informix Guide to SQL: Syntax.
6 See “Role creation” on page 11-11
7 See “Storage space, chunk, and log creation” on page 11-9
Element Purpose Additional Information
all Directs dbschema to include all the tablesor sequence objects in the database, or allthe user-defined data types in the displayof distributions
None.
-c file_name Generates commands to reproducestorage spaces, chunks, physical logs, andlogical logs.
If you use the -c element without the -ns element, thedatabase server generates SQL administration APIcommands.
If you use the -c element and also use the -ns element,the database server generates onspaces or onparamscommands.
-d database Specifies the database to which theschema applies. The database can be on aremote database server.
Reference: If you want to qualify the name of thedatabase, see the "Database Name" topic of the IBMInformix Guide to SQL: Syntax.
filename Specifies the name of the file that containsthe dbschema output
If you omit a file name, dbschema sends the output tothe screen. If you specify a file name, dbschema createsa file named filename to contain the dbschema output.
-hd Displays the distribution as data values If you specify the ALL keyword for the table name, thedistributions for all the tables in the database aredisplayed.
Chapter 11. The dbschema utility 11-3
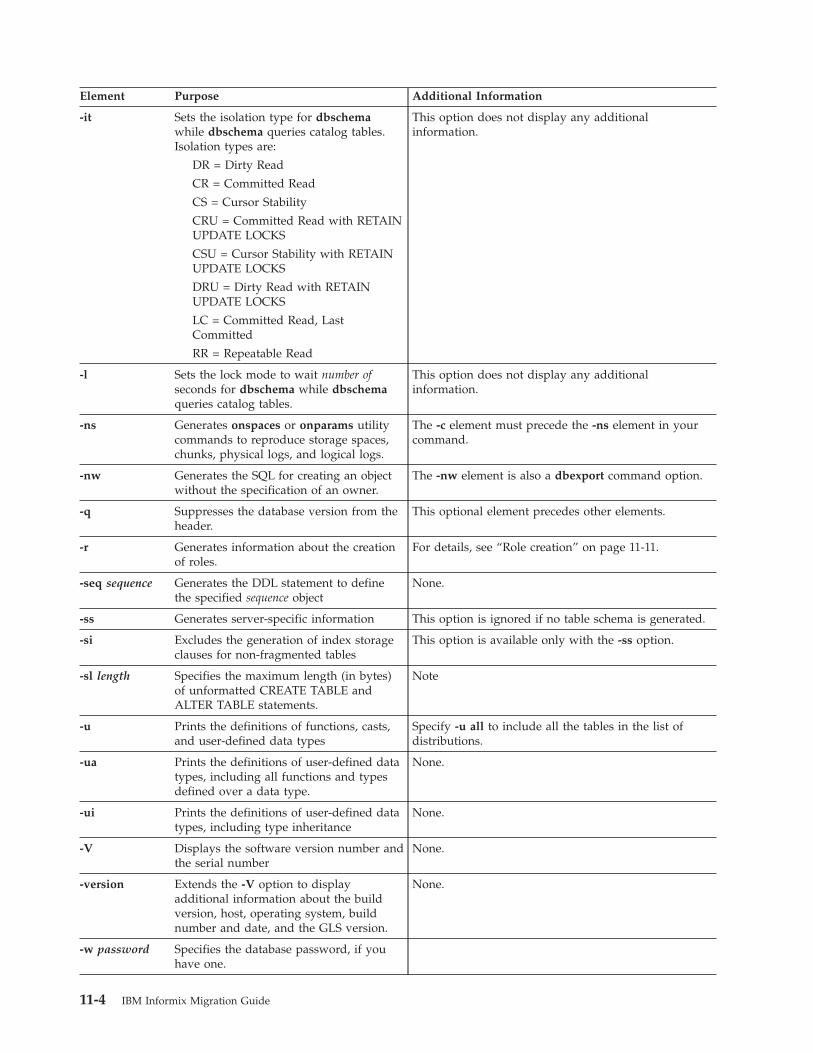
Element Purpose Additional Information
-it Sets the isolation type for dbschemawhile dbschema queries catalog tables.Isolation types are:
DR = Dirty Read
CR = Committed Read
CS = Cursor Stability
CRU = Committed Read with RETAINUPDATE LOCKS
CSU = Cursor Stability with RETAINUPDATE LOCKS
DRU = Dirty Read with RETAINUPDATE LOCKS
LC = Committed Read, LastCommitted
RR = Repeatable Read
This option does not display any additionalinformation.
-l Sets the lock mode to wait number ofseconds for dbschema while dbschemaqueries catalog tables.
This option does not display any additionalinformation.
-ns Generates onspaces or onparams utilitycommands to reproduce storage spaces,chunks, physical logs, and logical logs.
The -c element must precede the -ns element in yourcommand.
-nw Generates the SQL for creating an objectwithout the specification of an owner.
The -nw element is also a dbexport command option.
-q Suppresses the database version from theheader.
This optional element precedes other elements.
-r Generates information about the creationof roles.
For details, see “Role creation” on page 11-11.
-seq sequence Generates the DDL statement to definethe specified sequence object
None.
-ss Generates server-specific information This option is ignored if no table schema is generated.
-si Excludes the generation of index storageclauses for non-fragmented tables
This option is available only with the -ss option.
-sl length Specifies the maximum length (in bytes)of unformatted CREATE TABLE andALTER TABLE statements.
Note
-u Prints the definitions of functions, casts,and user-defined data types
Specify -u all to include all the tables in the list ofdistributions.
-ua Prints the definitions of user-defined datatypes, including all functions and typesdefined over a data type.
None.
-ui Prints the definitions of user-defined datatypes, including type inheritance
None.
-V Displays the software version number andthe serial number
None.
-version Extends the -V option to displayadditional information about the buildversion, host, operating system, buildnumber and date, and the GLS version.
None.
-w password Specifies the database password, if youhave one.
11-4 IBM Informix Migration Guide
You must be the DBA or have the Connect or Resource privilege for the databasebefore you can run dbschema on it.
Example
The following command generates the schema with all the tables or sequenceobjects in the customer database, but without the specification of an owner:dbschema –d customer all -nw
Database schema creationYou can create the schema for an entire database or for a portion of the database.
Use the dbschema utility options to perform the following actions:v Display CREATE SYNONYM statements by owner, for a specific table or for the
entire database.v Display the CREATE TABLE, CREATE VIEW, CREATE FUNCTION, or CREATE
PROCEDURE statement for a specific table or for the entire database.v Display all GRANT privilege statements that affect a specified user or that affect
all users for a database or a specific table. The user can be either a user name orrole name.
v Starting with Informix Version 9.20, display user-defined and row data typeswith or without type inheritance.
v Starting with Informix Version 9.20, display the CREATE SEQUENCE statementdefining the specified sequence object, or defining all sequence objects in thedatabase.
When you use dbschema and specify only the database name, it is equivalent tousing dbschema with all its options (except for the -hd and -ss options). Inaddition, if Information Schema views were created for the database, this schema isshown. For example, the following two commands are equivalent:dbschema -d stores_demodbschema -s all -p all -t all -f all -d stores_demo
SERIAL fields included in CREATE TABLE statements that dbschema displays donot specify a starting value. New SERIAL fields created with the schema file havea starting value of 1, regardless of their starting value in the original database. Ifthis value is not acceptable, you must modify the schema file.
Creating schemas for databases across a UNIX or Linux networkThe dbschema -d option creates and displays the schema for databases on a UNIXor Linux network.
You can specify a database on any accessible non-SE Informix database server.
The following command displays the schema for the stores_demo database on thefinland database server on the UNIX or Linux system console:dbschema -d //finland/stores_demo
Changing the owner of an objectYou can edit dbschema output to change the owner of a new object.
Chapter 11. The dbschema utility 11-5
The dbschema utility uses the owner.object convention when it generates anyCREATE TABLE, CREATE INDEX, CREATE SYNONYM, CREATE VIEW, CREATESEQUENCE, CREATE PROCEDURE, CREATE FUNCTION, or GRANT statement,and when it reproduces any unique, referential, or check constraint. As a result, ifyou use the dbschema output to create a new object (table, index, view, procedure,constraint, sequence, or synonym), the owner of the original object owns the newobject. If you want to change the owner of the new object, you must edit thedbschema output before you run it as an SQL script.
You can use the output of dbschema to create a new function if you also specifythe path name to a file in which compile-time warnings are stored. This path nameis displayed in the dbschema output.
For more information about the CREATE TABLE, CREATE INDEX, CREATESYNONYM, CREATE VIEW, CREATE SEQUENCE, CREATE PROCEDURE,CREATE FUNCTION, and GRANT statements, see the IBM Informix Guide to SQL:Syntax.
dbschema server-specific informationThe dbschema -ss option generates server-specific information. In all Informixdatabase servers except SE, the -ss option always generates the lock mode, extentsizes, and the dbspace name if the dbspace name is different from the databasedbspace. In addition, if tables are fragmented, the -ss option displays informationabout the fragmentation strategy.
When you specify the dbschema -ss option, the output also displays any GRANTFRAGMENT statements that are issued for a particular user or in the entireschema.
The -si option, which is available only with the -ss option, excludes the generationof index storage clauses for non-fragmented tables.
If the dbspace contains multiple partitions, dbspace partition names appear in theoutput.
For information about fragment-level authority, see the GRANT FRAGMENT andREVOKE FRAGMENT statements in the IBM Informix Guide to SQL: Syntax.
User-defined and complex data types (Version 9.21 or laterversions)
The dbschema -u option displays the definitions of any user-defined and complexdata types that the database contains. The suboption i adds the type inheritance tothe information that the dbschema -u option displays.
The following command displays all the user-defined and complex data types forthe stork database:dbschema -d stork -u all
Output from dbschema that ran with the specified option -u all might appear asthe following example shows:create row type ’informix’.person_t
(name varchar(30, 10) not null,address varchar(20, 10),city varchar(20, 10),
11-6 IBM Informix Migration Guide
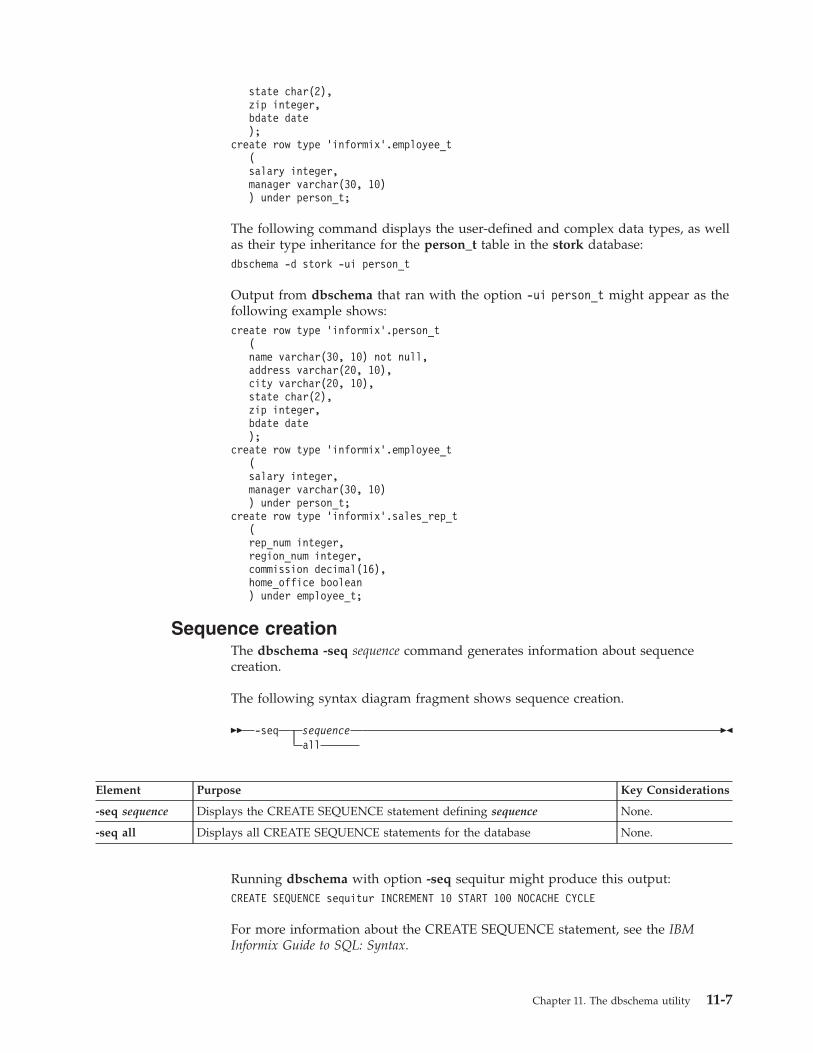
state char(2),zip integer,bdate date);
create row type ’informix’.employee_t(salary integer,manager varchar(30, 10)) under person_t;
The following command displays the user-defined and complex data types, as wellas their type inheritance for the person_t table in the stork database:dbschema -d stork -ui person_t
Output from dbschema that ran with the option -ui person_t might appear as thefollowing example shows:create row type ’informix’.person_t
(name varchar(30, 10) not null,address varchar(20, 10),city varchar(20, 10),state char(2),zip integer,bdate date);
create row type ’informix’.employee_t(salary integer,manager varchar(30, 10)) under person_t;
create row type ’informix’.sales_rep_t(rep_num integer,region_num integer,commission decimal(16),home_office boolean) under employee_t;
Sequence creationThe dbschema -seq sequence command generates information about sequencecreation.
The following syntax diagram fragment shows sequence creation.
�� -seq sequenceall
��
Element Purpose Key Considerations
-seq sequence Displays the CREATE SEQUENCE statement defining sequence None.
-seq all Displays all CREATE SEQUENCE statements for the database None.
Running dbschema with option -seq sequitur might produce this output:CREATE SEQUENCE sequitur INCREMENT 10 START 100 NOCACHE CYCLE
For more information about the CREATE SEQUENCE statement, see the IBMInformix Guide to SQL: Syntax.
Chapter 11. The dbschema utility 11-7
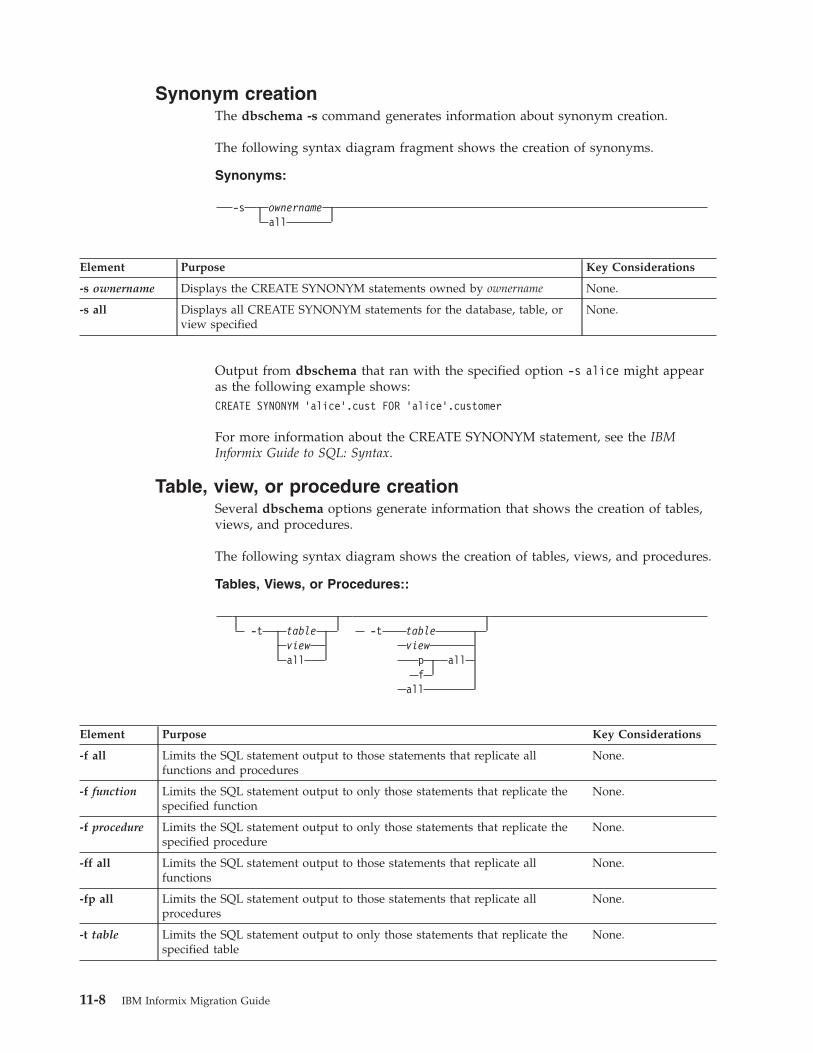
Synonym creationThe dbschema -s command generates information about synonym creation.
The following syntax diagram fragment shows the creation of synonyms.
Synonyms:
-s ownernameall
Element Purpose Key Considerations
-s ownername Displays the CREATE SYNONYM statements owned by ownername None.
-s all Displays all CREATE SYNONYM statements for the database, table, orview specified
None.
Output from dbschema that ran with the specified option -s alice might appearas the following example shows:CREATE SYNONYM ’alice’.cust FOR ’alice’.customer
For more information about the CREATE SYNONYM statement, see the IBMInformix Guide to SQL: Syntax.
Table, view, or procedure creationSeveral dbschema options generate information that shows the creation of tables,views, and procedures.
The following syntax diagram shows the creation of tables, views, and procedures.
Tables, Views, or Procedures::
-t tableviewall
-t tableview
p allf
all
Element Purpose Key Considerations
-f all Limits the SQL statement output to those statements that replicate allfunctions and procedures
None.
-f function Limits the SQL statement output to only those statements that replicate thespecified function
None.
-f procedure Limits the SQL statement output to only those statements that replicate thespecified procedure
None.
-ff all Limits the SQL statement output to those statements that replicate allfunctions
None.
-fp all Limits the SQL statement output to those statements that replicate allprocedures
None.
-t table Limits the SQL statement output to only those statements that replicate thespecified table
None.
11-8 IBM Informix Migration Guide
Element Purpose Key Considerations
-t view Limits the SQL statement output to only those statements that replicate thespecified view
None.
-t all Includes in the SQL statement output all statements that replicate all tablesand views
None.
For more information about the CREATE PROCEDURE and CREATE FUNCTIONstatements, see the IBM Informix Guide to SQL: Syntax.
Table informationThe dbschema -ss command retrieves information about fragmented tables, thelock mode, and extent sizes.
The following dbschema output shows the expressions specified for fragmentedtable.{ TABLE “sallyc”.t1 row size = 8 number of columns = 1 index size = 0 }create table “sallyc”.t1(c1 integer) fragment by expression(c1 < 100 ) in db1 ,((c1 >= 100 ) AND (c1 < 200 ) ) in db2 ,remainder in db4extent size 16 next size 16 lock mode page;revoke all on “sallyc”.t1 from “public”;
The following dbschema output shows information about partitions inpartition-fragmented tables.
DBSCHEMA Schema Utility grant dba to "sqlqa";
{ TABLE "sqlqa".t1 row size = 24 number of columns = 2 index size = 13 }create table "sqlqa".t1(c1 integer,c2 char(20))fragment by expressionpartition part_1 (c1 = 10 ) in dbs1 ,partition part_2 (c1 = 20 ) in dbs1 ,partition part_3 (c1 = 30 ) in dbs1 ,partition part_4 (c1 = 40 ) in dbs1 ,partition part_5 (c1 = 50 ) in dbs1extent size 16 next size 16 lock mode page;
Storage space, chunk, and log creationThe dbschema -c command generates SQL administration API commands forreproducing storage spaces, chunks, logical logs, and physical logs. If you use thedbschema -c -ns command, the database server generates onspaces or onparamsutility commands for reproducing storage spaces, chunks, physical logs, and logicallogs.
For example:v Run the following command to generate a file named dbschema1.out that
contains the commands for reproducing the storage spaces, chunks, physicallogs, and logical logs in SQL Admin API format:dbschema -c dbschema1.out
Chapter 11. The dbschema utility 11-9
v Run the following command to generate a file named dbschema2.out thatcontains the commands for reproducing the storage spaces, chunks, physicallogs, and logical logs in onspaces and onparams utility format:dbschema -c -ns dbschema2.out
Optionally, specify -q before you specify -c or -c -ns to suppress the databaseversion when you run the command. For example, specify:dbschema -q -c -ns dbschema3.out
Sample output for the creation of storage spaces, chunks, andlogsThe output of the dbschema -c or dbschema -c -ns commands contain all of theSQL administration API or onspaces and onparams utility commands that you canuse to reproduce storage spaces, chunks, and logs.
Example of output in SQL administration API format# Dbspace 1 -- Chunk 1EXECUTE FUNCTION TASK (’create dbspace’, ’rootdbs’,’/export/home/informix/data/rootdbs1150fc4’, ’200000’,’0’, ’2’, ’500’, ’100’)
# Dbspace 2 -- Chunk 2EXECUTE FUNCTION TASK (’create dbspace’, ’datadbs1’,’/export/home/informix/data/datadbs1150fc4’, ’5000000’,’0’, ’2’, ’100’, ’100’)
# Dbspace 3 -- Chunk 3EXECUTE FUNCTION TASK (’create dbspace’, ’datadbs2’,’/export/home/informix/data/datadbs2150fc4’, ’5000000’,’0’, ’2’, ’100’, ’100’)
# Dbspace 4 -- Chunk 4EXECUTE FUNCTION TASK (’create dbspace’, ’datadbs3’,’/export/home/informix/data/datadbs3_1150fc4’, ’80000’,’16’, ’8’, ’400’, ’400’)EXECUTE FUNCTION TASK (’start mirror’, ’datadbs3’,’/export/home/informix/data/datadbs3_1150fc4’, ’80000’,’16’, ’/export/home/informix/data/mdatadbs3_1150fc4’, ’16’)
# Dbspace 5 -- Chunk 5EXECUTE FUNCTION TASK (’create tempdbspace’, ’tempdbs’,’/export/home/informix/data/tempdbs_1150fc4’, ’1000’,’0’, ’2’, ’100’, ’100’)
# Dbspace 6 -- Chunk 6EXECUTE FUNCTION TASK (’create sbspace’, ’sbspace’,’/export/home/informix/data/sbspace_1150fc4’,’1000’, ’0’)
# Dbspace 6 -- Chunk 7EXECUTE FUNCTION TASK (’add chunk’, ’sbspace’,’/export/home/informix/data/sbspace_1_1150fc4’,’1000’, ’0’)
# Dbspace 7 -- Chunk 8EXECUTE FUNCTION TASK (’create blobspace’, ’blobdbs’,’/export/home/informix/data/blobdbs_1150fc4’,’1000’, ’0’, ’4’)
# External Space 1EXECUTE FUNCTION TASK (’create extspace’, ’extspace’,’/export/home/informix/data/extspac_1150fc4’)
11-10 IBM Informix Migration Guide
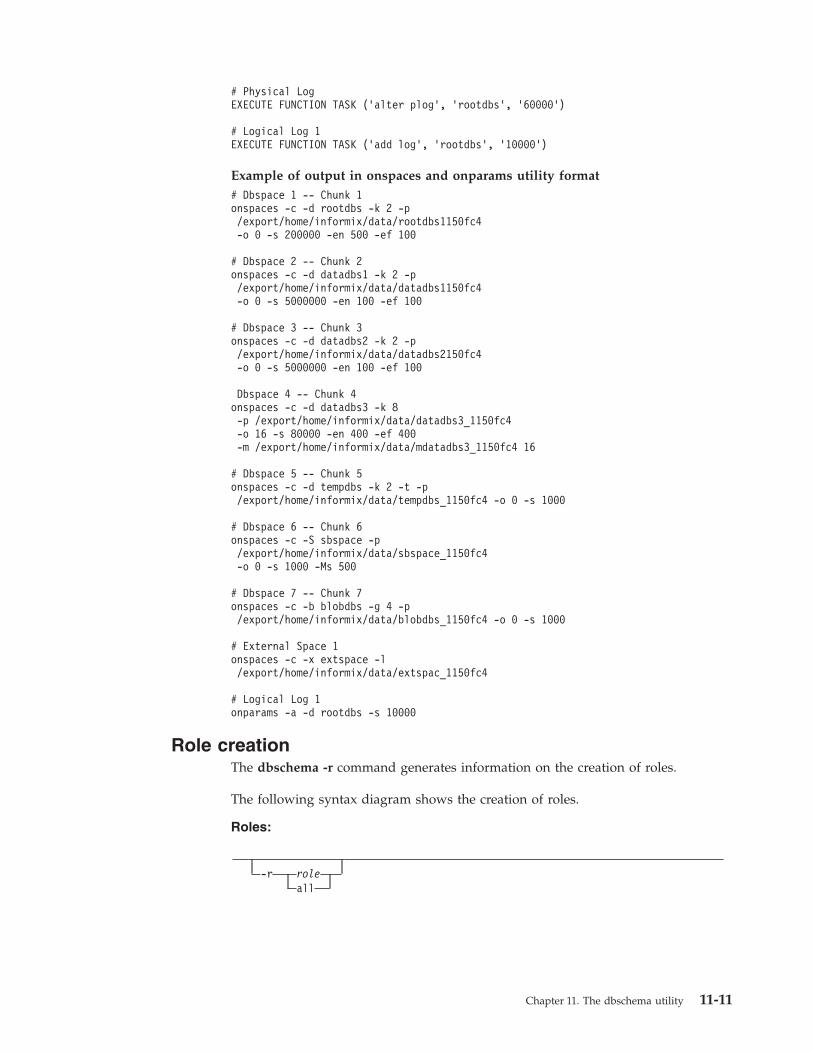
# Physical LogEXECUTE FUNCTION TASK (’alter plog’, ’rootdbs’, ’60000’)
# Logical Log 1EXECUTE FUNCTION TASK (’add log’, ’rootdbs’, ’10000’)
Example of output in onspaces and onparams utility format# Dbspace 1 -- Chunk 1onspaces -c -d rootdbs -k 2 -p/export/home/informix/data/rootdbs1150fc4-o 0 -s 200000 -en 500 -ef 100
# Dbspace 2 -- Chunk 2onspaces -c -d datadbs1 -k 2 -p/export/home/informix/data/datadbs1150fc4-o 0 -s 5000000 -en 100 -ef 100
# Dbspace 3 -- Chunk 3onspaces -c -d datadbs2 -k 2 -p/export/home/informix/data/datadbs2150fc4-o 0 -s 5000000 -en 100 -ef 100
Dbspace 4 -- Chunk 4onspaces -c -d datadbs3 -k 8-p /export/home/informix/data/datadbs3_1150fc4-o 16 -s 80000 -en 400 -ef 400-m /export/home/informix/data/mdatadbs3_1150fc4 16
# Dbspace 5 -- Chunk 5onspaces -c -d tempdbs -k 2 -t -p/export/home/informix/data/tempdbs_1150fc4 -o 0 -s 1000
# Dbspace 6 -- Chunk 6onspaces -c -S sbspace -p/export/home/informix/data/sbspace_1150fc4-o 0 -s 1000 -Ms 500
# Dbspace 7 -- Chunk 7onspaces -c -b blobdbs -g 4 -p/export/home/informix/data/blobdbs_1150fc4 -o 0 -s 1000
# External Space 1onspaces -c -x extspace -l/export/home/informix/data/extspac_1150fc4
# Logical Log 1onparams -a -d rootdbs -s 10000
Role creationThe dbschema -r command generates information on the creation of roles.
The following syntax diagram shows the creation of roles.
Roles:
-r roleall
Chapter 11. The dbschema utility 11-11
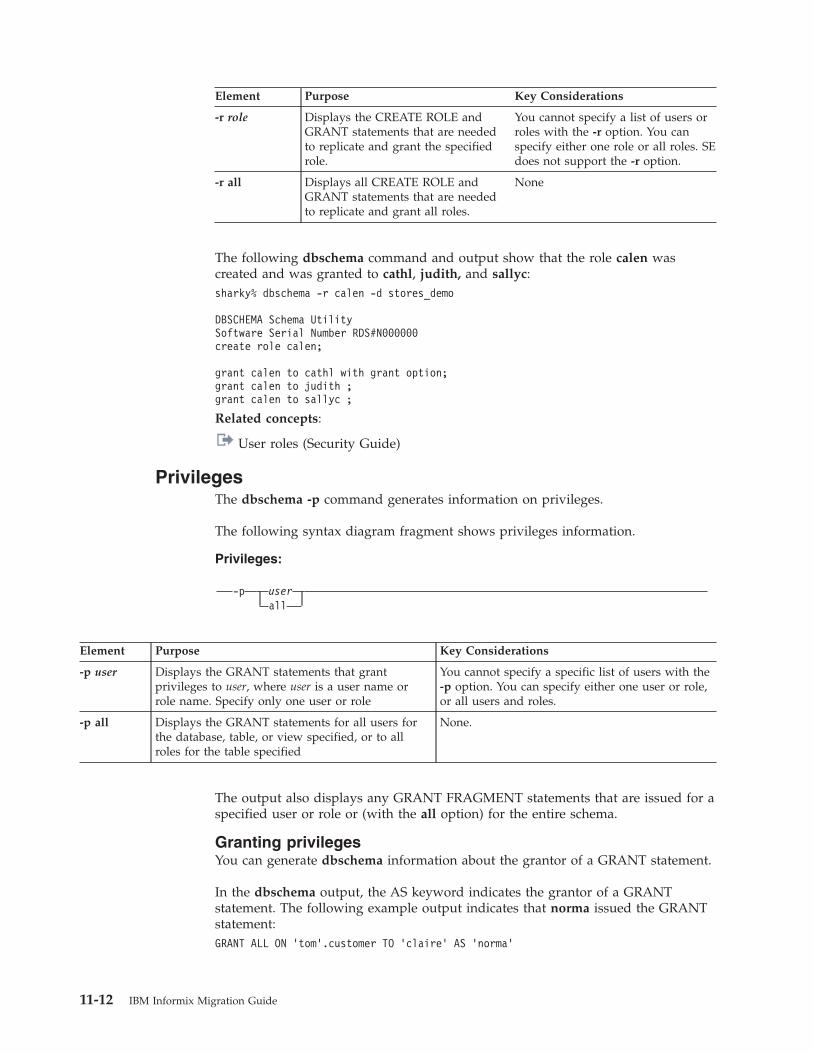
Element Purpose Key Considerations
-r role Displays the CREATE ROLE andGRANT statements that are neededto replicate and grant the specifiedrole.
You cannot specify a list of users orroles with the -r option. You canspecify either one role or all roles. SEdoes not support the -r option.
-r all Displays all CREATE ROLE andGRANT statements that are neededto replicate and grant all roles.
None
The following dbschema command and output show that the role calen wascreated and was granted to cathl, judith, and sallyc:sharky% dbschema -r calen -d stores_demo
DBSCHEMA Schema UtilitySoftware Serial Number RDS#N000000create role calen;
grant calen to cathl with grant option;grant calen to judith ;grant calen to sallyc ;
Related concepts:
User roles (Security Guide)
PrivilegesThe dbschema -p command generates information on privileges.
The following syntax diagram fragment shows privileges information.
Privileges:
-p userall
Element Purpose Key Considerations
-p user Displays the GRANT statements that grantprivileges to user, where user is a user name orrole name. Specify only one user or role
You cannot specify a specific list of users with the-p option. You can specify either one user or role,or all users and roles.
-p all Displays the GRANT statements for all users forthe database, table, or view specified, or to allroles for the table specified
None.
The output also displays any GRANT FRAGMENT statements that are issued for aspecified user or role or (with the all option) for the entire schema.
Granting privilegesYou can generate dbschema information about the grantor of a GRANT statement.
In the dbschema output, the AS keyword indicates the grantor of a GRANTstatement. The following example output indicates that norma issued the GRANTstatement:GRANT ALL ON ’tom’.customer TO ’claire’ AS ’norma’
11-12 IBM Informix Migration Guide
When the GRANT and AS keywords appear in the dbschema output, you mightneed to grant privileges before you run the dbschema output as an SQL script.Referring to the previous example output line, the following conditions must betrue before you can run the statement as part of a script:v User norma must have the Connect privilege to the database.v User norma must have all privileges WITH GRANT OPTION for the table
tom.customer.
For more information about the GRANT, GRANT FRAGMENT, and REVOKEFRAGMENT statements, see the IBM Informix Guide to SQL: Syntax.
Displaying privilege information for a roleYou can generate dbschema information about the privileges that were granted fora particular role.
A role is a classification with privileges on database objects granted to the role. TheDBA can assign the privileges of a related work task, such as an engineer, to a roleand then grant that role to users, instead of granting the same set of privileges toevery user. After a role is created, the DBA can use the GRANT statement to grantthe role to users or to other roles.
For example, issue the following dbschema command and to display privilegesthat were granted for the calen role.sharky% dbschema -p calen -d stores_demo
An example of information the dbschema utility displays is:grant alter on table1 to ’calen’
Distribution information for tables in dbschema outputThe dbschema -hd command with the name of the table retrieves the distributioninformation that is stored for a table in a database. If you specify the ALL keywordfor the table name, the distributions for all the tables in the database are displayed.
During the dbimport operation, distribution information is created automaticallyfor leading indexes on non-opaque columns. Run the UPDATE STATISTICSstatement in MEDIUM or HIGH mode to create distribution information abouttables that have the following types of indexes:v Virtual Index Interface (VII) or function indexesv Indexes on columns of user-defined data typesv Indexes on columns of built-in opaque data types (such as BOOLEAN or
LVARCHAR)
Output from the dbschema utility shows distribution information if you used theSAMPLING SIZE keywords when UPDATE STATISTICS in MEDIUM or HIGHmode ran on the table.
For information about using the UPDATE STATISTICS statement, see the IBMInformix Guide to SQL: Syntax.
The output of dbschema for distributions is provided in the following parts:v Distribution descriptionv Distribution informationv Overflow information
Chapter 11. The dbschema utility 11-13

Each section of dbschema output is explained in the following sections. As anexample, the discussion uses the following distribution for the fictional table calledinvoices. This table contains 165 rows, including duplicates.
You can generate the output for this discussion with a call to dbschema that issimilar to the following example:dbschema -hd invoices -d pubs_stores_demo
Example of dbschema output showing distribution informationThe dbschema output can show the data distributions that have been created forthe specified table and the date when the UPDATE STATISTICS statement thatgenerated the distributions ran.
The follow example of dbschema output shows distribution information.Distribution for cathl.invoices.invoice_num
High Mode, 10.000000 Resolution
--- DISTRIBUTION ---
( 5)1: ( 16, 7, 11)2: ( 16, 6, 17)3: ( 16, 8, 25)4: ( 16, 8, 38)5: ( 16, 7, 52)6: ( 16, 8, 73)7: ( 16, 12, 95)8: ( 16, 12, 139)9: ( 16, 11, 182)10: ( 10, 5, 200)
--- OVERFLOW ---
1: ( 5, 56)2: ( 6, 63)
}
Description of the distribution information in the example
The first part of the sample dbschema output describes which data distributionshave been created for the specified table. The name of the table is stated in thefollowing example:Distribution for cathl.invoices.invoice_num
The output is for the invoices table, which is owned by user cathl. This datadistribution describes the column invoice_num. If a table has distributions that arebuilt on more than one column, dbschema lists the distributions for each columnseparately.
The dbschema output also shows the date when the UPDATE STATISTICSstatement that generated the distributions ran. You can use this date to tell howoutdated your distributions are.
The last line of the description portion of the output describes the mode (MEDIUMor HIGH) in which the distributions were created, and the resolution. If you createthe distributions with medium mode, the confidence of the sample is also listed.For example, if the UPDATE STATISTICS statement runs in HIGH mode with aresolution of 10, the last line appears as the following example shows:
11-14 IBM Informix Migration Guide
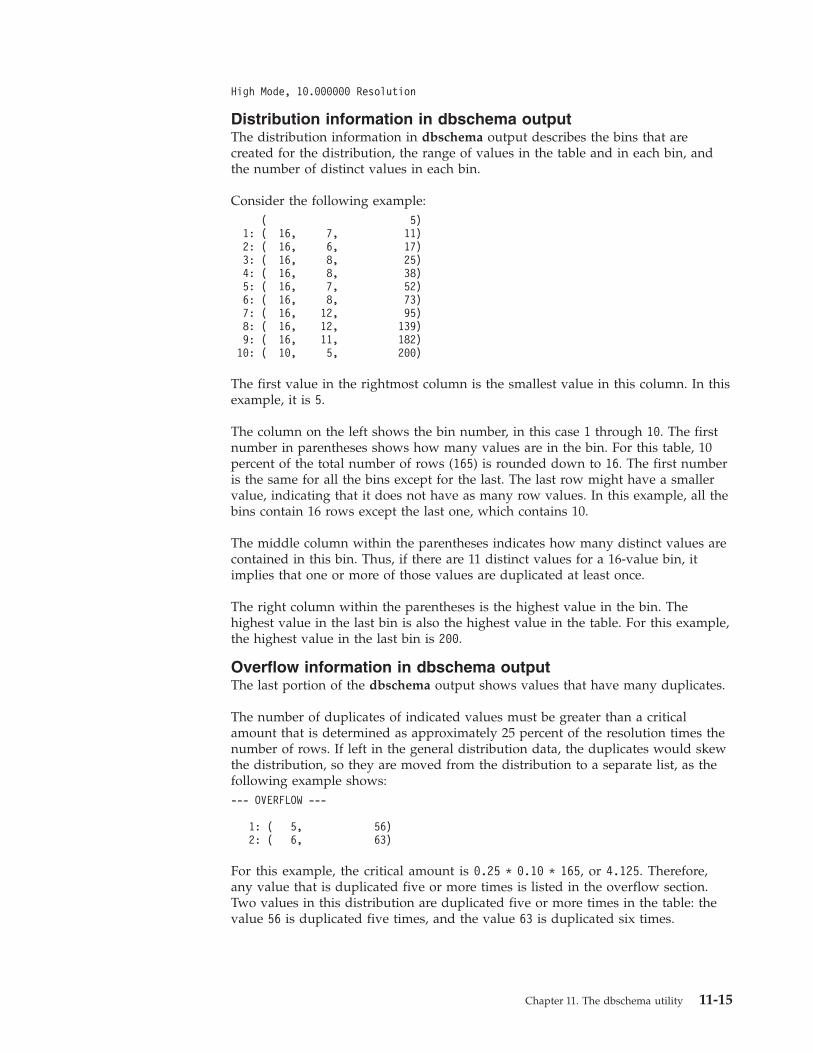
High Mode, 10.000000 Resolution
Distribution information in dbschema outputThe distribution information in dbschema output describes the bins that arecreated for the distribution, the range of values in the table and in each bin, andthe number of distinct values in each bin.
Consider the following example:( 5)
1: ( 16, 7, 11)2: ( 16, 6, 17)3: ( 16, 8, 25)4: ( 16, 8, 38)5: ( 16, 7, 52)6: ( 16, 8, 73)7: ( 16, 12, 95)8: ( 16, 12, 139)9: ( 16, 11, 182)10: ( 10, 5, 200)
The first value in the rightmost column is the smallest value in this column. In thisexample, it is 5.
The column on the left shows the bin number, in this case 1 through 10. The firstnumber in parentheses shows how many values are in the bin. For this table, 10percent of the total number of rows (165) is rounded down to 16. The first numberis the same for all the bins except for the last. The last row might have a smallervalue, indicating that it does not have as many row values. In this example, all thebins contain 16 rows except the last one, which contains 10.
The middle column within the parentheses indicates how many distinct values arecontained in this bin. Thus, if there are 11 distinct values for a 16-value bin, itimplies that one or more of those values are duplicated at least once.
The right column within the parentheses is the highest value in the bin. Thehighest value in the last bin is also the highest value in the table. For this example,the highest value in the last bin is 200.
Overflow information in dbschema outputThe last portion of the dbschema output shows values that have many duplicates.
The number of duplicates of indicated values must be greater than a criticalamount that is determined as approximately 25 percent of the resolution times thenumber of rows. If left in the general distribution data, the duplicates would skewthe distribution, so they are moved from the distribution to a separate list, as thefollowing example shows:--- OVERFLOW ---
1: ( 5, 56)2: ( 6, 63)
For this example, the critical amount is 0.25 * 0.10 * 165, or 4.125. Therefore,any value that is duplicated five or more times is listed in the overflow section.Two values in this distribution are duplicated five or more times in the table: thevalue 56 is duplicated five times, and the value 63 is duplicated six times.
Chapter 11. The dbschema utility 11-15
Use dbschema output as DB-Access inputYou can use the dbschema utility to get the schema of a database and redirect thedbschema output to a file. Later, you can import the file into DB-Access and useDB-Access to re-create the schema in a new database.
Inserting a table into a dbschema output fileYou can insert CREATE TABLE statements into the dbschema output file and usethis output as DB-Access input.
The following example copies the CREATE TABLE statements for the customertable into the dbschema output file, tab.sql:dbschema -d db -t customer > tab.sql
Remove the header information about dbschema from the output file, tab.sql, andthen use DB-Access to re-create the table in another database, as follows:dbaccess db1 tab.sql
Re-creating the schema of a databaseYou can use dbschema and DB-Access to save the schema from a database andthen re-create the schema in another database. A dbschema output file can containthe statements for creating an entire database.
To save a database schema and re-create the database:
1. Use dbschema to save the schema to an output file, such as db.sql:dbschema -d db > db.sql
You can also use the -ss option to generate server-specific information:dbschema -d db -ss > db.sql
2. Remove the header information about dbschema, if any, from the output file.3. Add a CREATE DATABASE statement at the beginning of the output file or use
DB-Access to create a new database.4. Use DB-Access to re-create the schema in a new database:
dbaccess - db.sql
When you use db.sql to create a database on a different database server,confirm that dbspaces exist.
The databases db and testdb differ in name but have the same schema.
11-16 IBM Informix Migration Guide
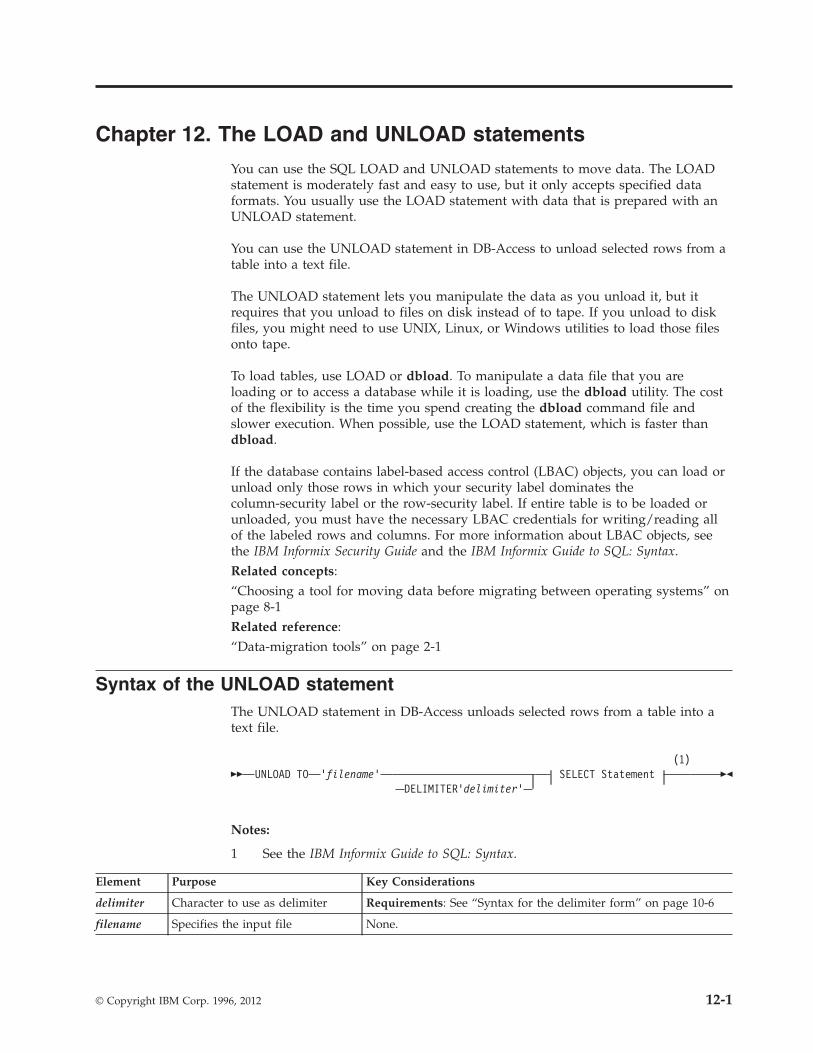
Chapter 12. The LOAD and UNLOAD statements
You can use the SQL LOAD and UNLOAD statements to move data. The LOADstatement is moderately fast and easy to use, but it only accepts specified dataformats. You usually use the LOAD statement with data that is prepared with anUNLOAD statement.
You can use the UNLOAD statement in DB-Access to unload selected rows from atable into a text file.
The UNLOAD statement lets you manipulate the data as you unload it, but itrequires that you unload to files on disk instead of to tape. If you unload to diskfiles, you might need to use UNIX, Linux, or Windows utilities to load those filesonto tape.
To load tables, use LOAD or dbload. To manipulate a data file that you areloading or to access a database while it is loading, use the dbload utility. The costof the flexibility is the time you spend creating the dbload command file andslower execution. When possible, use the LOAD statement, which is faster thandbload.
If the database contains label-based access control (LBAC) objects, you can load orunload only those rows in which your security label dominates thecolumn-security label or the row-security label. If entire table is to be loaded orunloaded, you must have the necessary LBAC credentials for writing/reading allof the labeled rows and columns. For more information about LBAC objects, seethe IBM Informix Security Guide and the IBM Informix Guide to SQL: Syntax.Related concepts:“Choosing a tool for moving data before migrating between operating systems” onpage 8-1Related reference:“Data-migration tools” on page 2-1
Syntax of the UNLOAD statementThe UNLOAD statement in DB-Access unloads selected rows from a table into atext file.
�� UNLOAD TO 'filename'DELIMITER'delimiter'
(1)SELECT Statement ��
Notes:
1 See the IBM Informix Guide to SQL: Syntax.
Element Purpose Key Considerations
delimiter Character to use as delimiter Requirements: See “Syntax for the delimiter form” on page 10-6
filename Specifies the input file None.
© Copyright IBM Corp. 1996, 2012 12-1
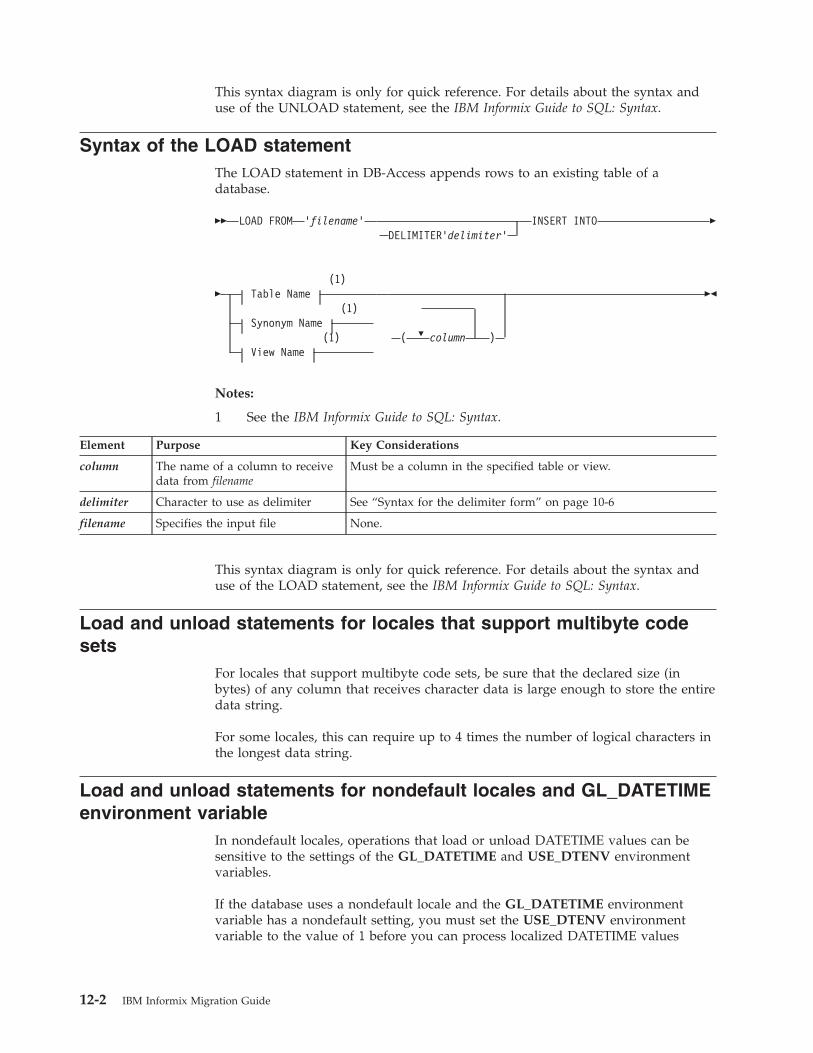
This syntax diagram is only for quick reference. For details about the syntax anduse of the UNLOAD statement, see the IBM Informix Guide to SQL: Syntax.
Syntax of the LOAD statementThe LOAD statement in DB-Access appends rows to an existing table of adatabase.
�� LOAD FROM 'filename'DELIMITER'delimiter'
INSERT INTO �
�(1)
Table Name(1)
Synonym Name(1)
View Name
�( column )
��
Notes:
1 See the IBM Informix Guide to SQL: Syntax.
Element Purpose Key Considerations
column The name of a column to receivedata from filename
Must be a column in the specified table or view.
delimiter Character to use as delimiter See “Syntax for the delimiter form” on page 10-6
filename Specifies the input file None.
This syntax diagram is only for quick reference. For details about the syntax anduse of the LOAD statement, see the IBM Informix Guide to SQL: Syntax.
Load and unload statements for locales that support multibyte codesets
For locales that support multibyte code sets, be sure that the declared size (inbytes) of any column that receives character data is large enough to store the entiredata string.
For some locales, this can require up to 4 times the number of logical characters inthe longest data string.
Load and unload statements for nondefault locales and GL_DATETIMEenvironment variable
In nondefault locales, operations that load or unload DATETIME values can besensitive to the settings of the GL_DATETIME and USE_DTENV environmentvariables.
If the database uses a nondefault locale and the GL_DATETIME environmentvariable has a nondefault setting, you must set the USE_DTENV environmentvariable to the value of 1 before you can process localized DATETIME values
12-2 IBM Informix Migration Guide
correctly with the LOAD or UNLOAD statements, or with the dbimport ordbexport utilities, or in DML operations on objects that the CREATE EXTERNALTABLE statement defined.
Chapter 12. The LOAD and UNLOAD statements 12-3

12-4 IBM Informix Migration Guide
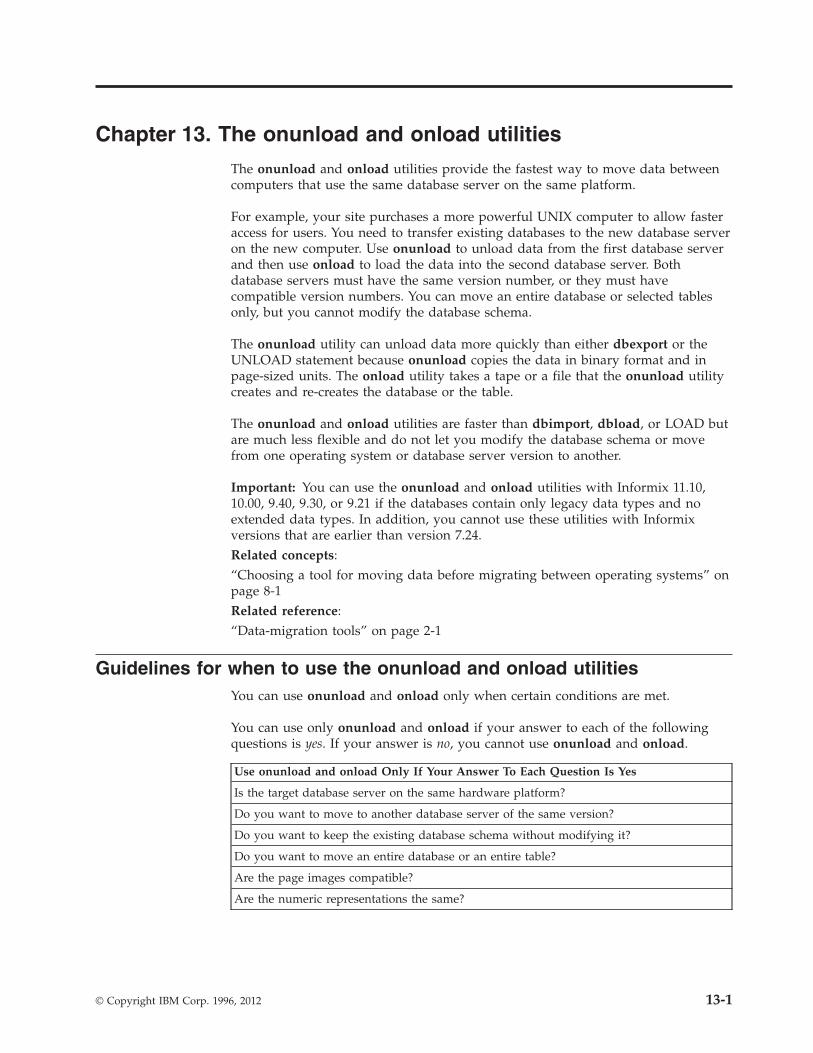
Chapter 13. The onunload and onload utilities
The onunload and onload utilities provide the fastest way to move data betweencomputers that use the same database server on the same platform.
For example, your site purchases a more powerful UNIX computer to allow fasteraccess for users. You need to transfer existing databases to the new database serveron the new computer. Use onunload to unload data from the first database serverand then use onload to load the data into the second database server. Bothdatabase servers must have the same version number, or they must havecompatible version numbers. You can move an entire database or selected tablesonly, but you cannot modify the database schema.
The onunload utility can unload data more quickly than either dbexport or theUNLOAD statement because onunload copies the data in binary format and inpage-sized units. The onload utility takes a tape or a file that the onunload utilitycreates and re-creates the database or the table.
The onunload and onload utilities are faster than dbimport, dbload, or LOAD butare much less flexible and do not let you modify the database schema or movefrom one operating system or database server version to another.
Important: You can use the onunload and onload utilities with Informix 11.10,10.00, 9.40, 9.30, or 9.21 if the databases contain only legacy data types and noextended data types. In addition, you cannot use these utilities with Informixversions that are earlier than version 7.24.Related concepts:“Choosing a tool for moving data before migrating between operating systems” onpage 8-1Related reference:“Data-migration tools” on page 2-1
Guidelines for when to use the onunload and onload utilitiesYou can use onunload and onload only when certain conditions are met.
You can use only onunload and onload if your answer to each of the followingquestions is yes. If your answer is no, you cannot use onunload and onload.
Use onunload and onload Only If Your Answer To Each Question Is Yes
Is the target database server on the same hardware platform?
Do you want to move to another database server of the same version?
Do you want to keep the existing database schema without modifying it?
Do you want to move an entire database or an entire table?
Are the page images compatible?
Are the numeric representations the same?
© Copyright IBM Corp. 1996, 2012 13-1
When you cannot use the onunload and onload utilities
Because the data is written in page-sized units, you cannot use onunload andonload to move data between UNIX or Linux and Windows because they usedifferent page sizes. For example, the page size is 2 KB on some UNIX systemsand 4 KB on Windows.
Additionally, you cannot use onunload and onload:v To move data between GLS and non-GLS databases.v To move compressed data from one database to another.
You must uncompress data in compressed tables and fragments before you usethe onload and onunload utilities.
v To move external tables or databases that contain external tables.You must drop all the external tables before you use the onunload utility.
v To move tables and databases that contain extended or smart-large-object datatypes
Requirements for using the onload and onunload utilitiesThe onload and onunload utilities have limitations. You can use these utilities onlyto move data between database servers of the same version on the same operatingsystem. You cannot modify the database schema, logging must be turned off, andthe utilities can be difficult to use.
The onload and onunload utilities have the following requirements:v The original database and the target database must be from the same version of
the database server. You cannot use the onload and onunload utilities to movedata from one version to another version.
v You cannot use onload and onunload to move data between different types ofdatabase servers.
v The onload command must have the same scope as the corresponding onunloadcommand that unloaded the same table or tables that onload references. Youcannot, for example, use onunload to unload an entire database, and then useonload to load only a subset of the tables from that database.
v Do not use onload and onunload to move data if the database containsextended or smart-large-object data types. (Use the HPL instead to move thedata.)
v Because the tape that onload reads contains binary data that is stored indisk-page-sized units, the computers where the original database resides (whereyou use onunload) and where the target database will reside (where you useonload) must have the same page size, the same representation of numeric data,the same byte alignment for structures and unions.
v You cannot use onload and onunload to move data between non-GLS and GLSlocales.
v You cannot use onload and onunload on servers in high-availability clusters.v You cannot use onload and onunload if you compressed tables or fragments.
You can use onunload and onload to move data between databases if the NLS andGLS locales are identical. For example, if both the NLS and GLS tables werecreated with the same French locale, onload and onunload can move data.However, if user A has a French locale NLS table on server A and tries to load datainto a German locale GLS table on server B, onload reports errors.
13-2 IBM Informix Migration Guide
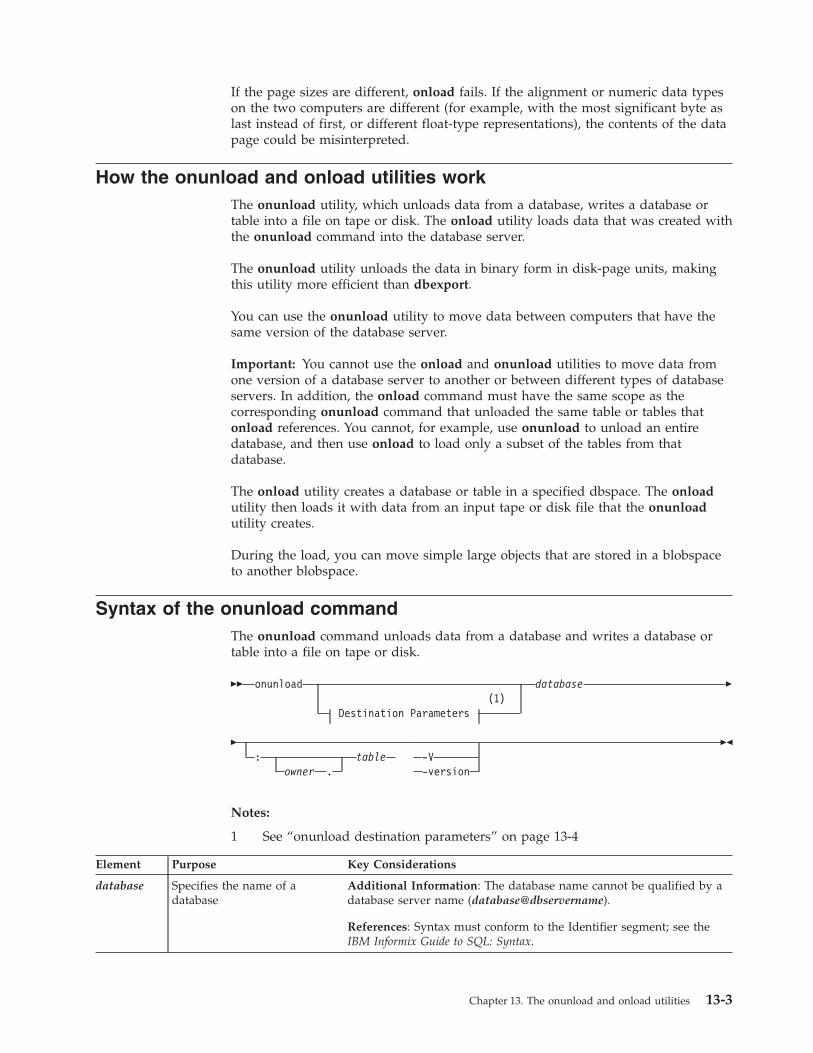
If the page sizes are different, onload fails. If the alignment or numeric data typeson the two computers are different (for example, with the most significant byte aslast instead of first, or different float-type representations), the contents of the datapage could be misinterpreted.
How the onunload and onload utilities workThe onunload utility, which unloads data from a database, writes a database ortable into a file on tape or disk. The onload utility loads data that was created withthe onunload command into the database server.
The onunload utility unloads the data in binary form in disk-page units, makingthis utility more efficient than dbexport.
You can use the onunload utility to move data between computers that have thesame version of the database server.
Important: You cannot use the onload and onunload utilities to move data fromone version of a database server to another or between different types of databaseservers. In addition, the onload command must have the same scope as thecorresponding onunload command that unloaded the same table or tables thatonload references. You cannot, for example, use onunload to unload an entiredatabase, and then use onload to load only a subset of the tables from thatdatabase.
The onload utility creates a database or table in a specified dbspace. The onloadutility then loads it with data from an input tape or disk file that the onunloadutility creates.
During the load, you can move simple large objects that are stored in a blobspaceto another blobspace.
Syntax of the onunload commandThe onunload command unloads data from a database and writes a database ortable into a file on tape or disk.
�� onunload(1)
Destination Parameters
database �
�: table
owner .-V-version
��
Notes:
1 See “onunload destination parameters” on page 13-4
Element Purpose Key Considerations
database Specifies the name of adatabase
Additional Information: The database name cannot be qualified by adatabase server name (database@dbservername).
References: Syntax must conform to the Identifier segment; see theIBM Informix Guide to SQL: Syntax.
Chapter 13. The onunload and onload utilities 13-3

Element Purpose Key Considerations
owner. Specifies the owner of thetable
Additional Information: The owner name must not include invalidcharacters.
References: For path name syntax, see your operating-systemdocumentation.
table Specifies the name of the table Requirement: The table must exist.
References: Syntax must conform to the Table Name segment; see theIBM Informix Guide to SQL: Syntax.
If you do not specify any destination parameter options, onunload uses the devicethat TAPEDEV specifies. The block size and tape size are the values specified asTAPEBLK and TAPESIZE, respectively. (For information about TAPEDEV,TAPEBLK, and TAPESIZE, see your IBM Informix Administrator's Reference.)
The -V option displays the software version number and the serial number. The-version option extends the -V option to display additional information about thebuild operating system, build number, and build date.
onunload destination parametersThe onunload utility supports tape or file destination options.
The following syntax diagram fragment shows onunload destination parameters
Destination parameters:
�(1)
-l-b blocksize-s tapesize-t source
Notes:
1 Only one occurrence of each option allowed. More than one option can occurin a single invocation.
Element Purpose Key Considerations
-b blocksize Specifies in kilobytes the block size of thetape device
Requirement: The blocksize must be an integer.
Additional Information: This option overrides thedefault value in TAPEBLK or LTAPEBLK.
-l Directs onunload to read the values fortape device, block size, and tape size fromLTAPEDEV, LTAPEBLK, and LTAPESIZE,respectively
None.
-s tapesize Specifies in kilobytes the amount of datathat can be stored on the tape
Requirement: The tapesize must be an integer. To writeto the end of the tape, specify a tape size of 0.
If you do not specify 0, then the maximum tapesize is 2097 151 KB.
Additional Information: This option overrides thedefault value in TAPESIZE or LTAPESIZE.
13-4 IBM Informix Migration Guide
Element Purpose Key Considerations
-t source Specifies the path name of the file on diskor of the tape device where the input tapeis mounted
Additional Information: This option overrides the tapedevice specified by TAPEDEV or LTAPEDEV. The pathname must be a valid path name.
Constraints that affect onunloadWhen you use the onunload utility, you must be aware of constraints that affecthow you load the data on the onunload tape.
The following constraints apply to onunload:v You must load the data on the onunload tape into a database or table that your
database server (excluding SE) manages.v You can use onunload and onload with Informix Version 11.70, 11.50, 11.10,
10.00, 9.40, 9.30, or 9.21 if the databases contain only legacy data types and noextended data types.
v You must load the tape that onunload writes onto a computer with the samepage size and the same representation of numeric data as the original computer.
v You must read the file that onunload creates with the onload utility of the sameversion of your database server. You cannot use onunload and onload to movedata from one version to another.
v When you unload a complete database, you cannot modify the ownership ofdatabase objects (such as tables, indexes, and views) until after you finishreloading the database.
v When you unload and load a table, onunload does not preserve accessprivileges, synonyms, views, constraints, triggers, or default values that wereassociated with the original tables. Before you run onunload, use the dbschemautility to obtain a listing of the access privileges, synonyms, views, constraints,triggers, and default values. After you finish loading the table, use dbschema tore-create the specific information for the table.
Privileges for database or table unloadingTo unload a database, you must have DBA privileges for the database or be userinformix. To unload a table, you must either own the table, have DBA privilegesfor the database in which the table resides, or be user informix.
User root does not have special privileges with respect to onunload and onload.
Tables that are unloaded with a databaseIf you unload a database, all of the tables in the database, including the systemcatalog tables, are unloaded.
All triggers, SPL routines, defaults, constraints, and synonyms for all of the tablesin the database are also unloaded.
Data that is unloaded with a tableIf you unload a table, onunload unloads the table data and information from thesystables, systables, syscolumns, sysindexes, and sysblobs system catalog tables.
When you unload a table, onunload does not unload information aboutconstraints, triggers, or default values that are associated with a table. In addition,
Chapter 13. The onunload and onload utilities 13-5
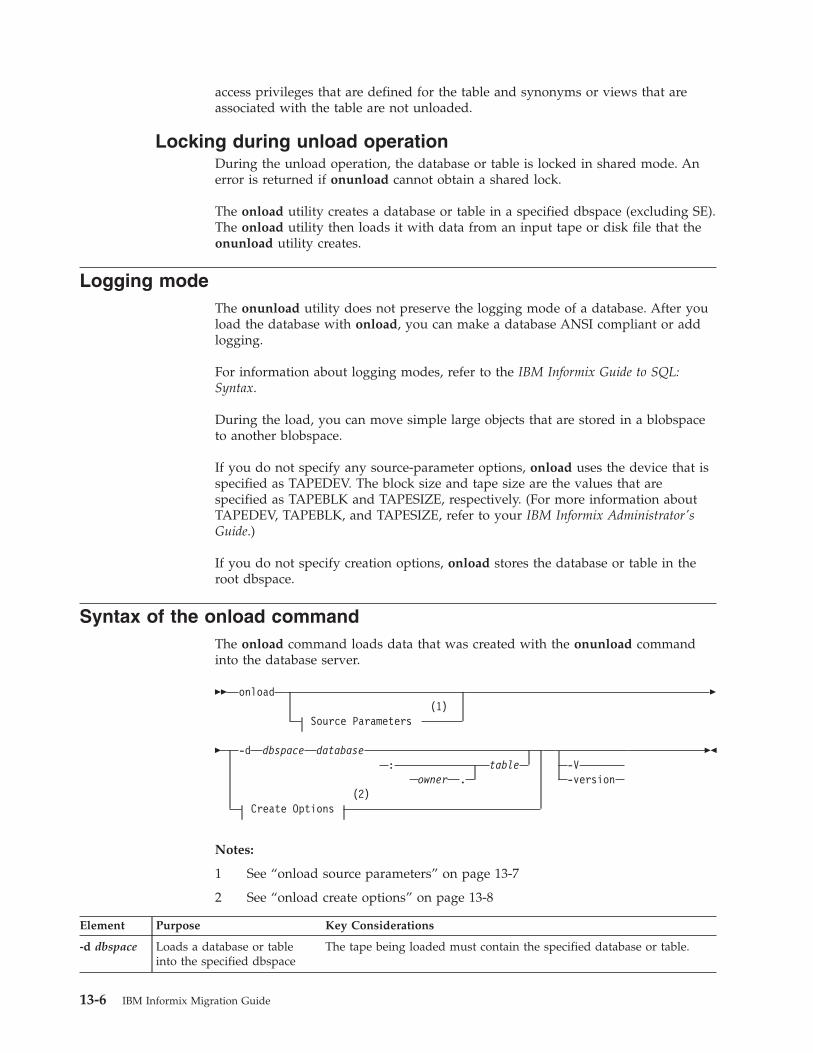
access privileges that are defined for the table and synonyms or views that areassociated with the table are not unloaded.
Locking during unload operationDuring the unload operation, the database or table is locked in shared mode. Anerror is returned if onunload cannot obtain a shared lock.
The onload utility creates a database or table in a specified dbspace (excluding SE).The onload utility then loads it with data from an input tape or disk file that theonunload utility creates.
Logging modeThe onunload utility does not preserve the logging mode of a database. After youload the database with onload, you can make a database ANSI compliant or addlogging.
For information about logging modes, refer to the IBM Informix Guide to SQL:Syntax.
During the load, you can move simple large objects that are stored in a blobspaceto another blobspace.
If you do not specify any source-parameter options, onload uses the device that isspecified as TAPEDEV. The block size and tape size are the values that arespecified as TAPEBLK and TAPESIZE, respectively. (For more information aboutTAPEDEV, TAPEBLK, and TAPESIZE, refer to your IBM Informix Administrator'sGuide.)
If you do not specify creation options, onload stores the database or table in theroot dbspace.
Syntax of the onload commandThe onload command loads data that was created with the onunload commandinto the database server.
�� onload(1)
Source Parameters
�
� -d dbspace database: table
owner .(2)
Create Options
-V-version
��
Notes:
1 See “onload source parameters” on page 13-7
2 See “onload create options” on page 13-8
Element Purpose Key Considerations
-d dbspace Loads a database or tableinto the specified dbspace
The tape being loaded must contain the specified database or table.
13-6 IBM Informix Migration Guide
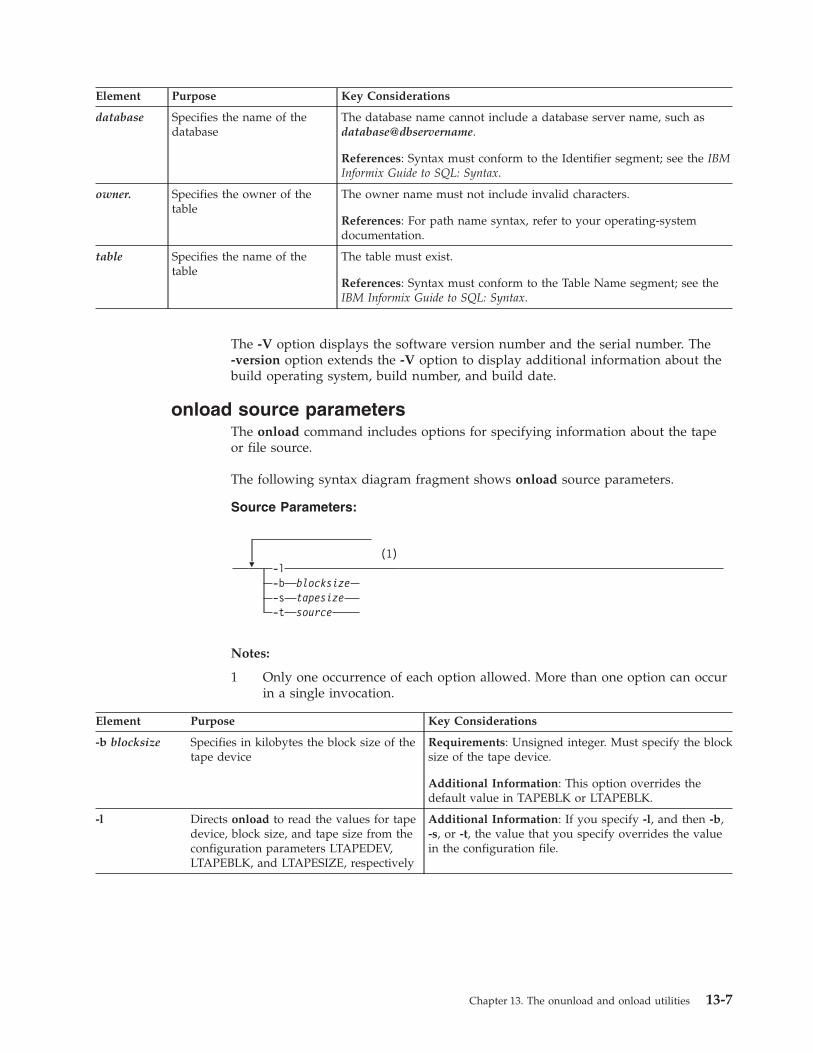
Element Purpose Key Considerations
database Specifies the name of thedatabase
The database name cannot include a database server name, such asdatabase@dbservername.
References: Syntax must conform to the Identifier segment; see the IBMInformix Guide to SQL: Syntax.
owner. Specifies the owner of thetable
The owner name must not include invalid characters.
References: For path name syntax, refer to your operating-systemdocumentation.
table Specifies the name of thetable
The table must exist.
References: Syntax must conform to the Table Name segment; see theIBM Informix Guide to SQL: Syntax.
The -V option displays the software version number and the serial number. The-version option extends the -V option to display additional information about thebuild operating system, build number, and build date.
onload source parametersThe onload command includes options for specifying information about the tapeor file source.
The following syntax diagram fragment shows onload source parameters.
Source Parameters:
�(1)
-l-b blocksize-s tapesize-t source
Notes:
1 Only one occurrence of each option allowed. More than one option can occurin a single invocation.
Element Purpose Key Considerations
-b blocksize Specifies in kilobytes the block size of thetape device
Requirements: Unsigned integer. Must specify the blocksize of the tape device.
Additional Information: This option overrides thedefault value in TAPEBLK or LTAPEBLK.
-l Directs onload to read the values for tapedevice, block size, and tape size from theconfiguration parameters LTAPEDEV,LTAPEBLK, and LTAPESIZE, respectively
Additional Information: If you specify -l, and then -b,-s, or -t, the value that you specify overrides the valuein the configuration file.
Chapter 13. The onunload and onload utilities 13-7

Element Purpose Key Considerations
-s tapesize Specifies in kilobytes the amount of datathat the database server can store on thetape
Requirements: Unsigned integer. To write to the end ofthe tape, specify a tape size of 0.
If you do not specify 0, then the maximum tapesize is 2097 151 KB.
Additional Information: This option overrides thedefault value in TAPESIZE or LTAPESIZE.
-t source Specifies the path name of the file on diskor of the tape device where the input tapeis mounted
Must be a legitimate path name.
Additional Information: This option overrides the tapedevice that TAPEDEV or LTAPEDEV specifies.
References: For path name syntax, see youroperating-system documentation.
onload create optionsThe onload command includes information that is used to recreate the database.
The following syntax diagram fragment shows onload create options.
Create Options:
� -c oldcnstrnt newcnstrnt-i oldindex newindex-fd oldbsp newdbsp-fi indexname olddbsp newdbsp
�
� database: table
owner .
Element Purpose Key Considerations
-c oldcnstrntnewcnstrnt
Directs onload to renamethe specified constraint.
None.
-i oldindexnewindex
Directs onload to renamethe table index when itstores the index on disk.
Additional Information: Use the -i option to rename indexes during theload to avoid conflict with existing index names.
References: Syntax must conform to the Identifier segment; see the IBMInformix Guide to SQL: Syntax.
-fd olddbspnewdbsp
Moves a data fragmentfrom one dbspace toanother.
The new dbspace must exist and must not already contain another datafragment for the table.
Additional Information: This option is used with parallel data query(PDQ) and table fragmentation.
-fi indexnameolddbs newdbsp
Moves index fragmentsfrom one dbspace toanother.
The new dbspace must exist and must not already contain anotherindex fragment for the table.
Additional Information: This option is used with PDQ and tablefragmentation.
13-8 IBM Informix Migration Guide
Element Purpose Key Considerations
database Specifies the name of thedatabase
Requirement: The database name cannot include a database servername, such as database@dbservername.
References: Syntax must conform to the Identifier segment; see the IBMInformix Guide to SQL: Syntax.
owner. Specifies the owner of thetable
Requirement: The owner name must not include invalid characters.
References: For path name syntax, refer to your operating-systemdocumentation.
table Specifies the name of thetable
Requirement: The table must not exist.
References: Syntax must conform to the Table Name segment; see theIBM Informix Guide to SQL: Syntax.
If you do not specify any create options for non-fragmented tables, the onloadutility stores the database or table in the root dbspace.
For fragmented tables, onunload preserves the fragmentation expression for lateruse by onload. Thus an imported table is fragmented in the same way as theoriginal table.
You can use the -c, -i, -fd, and -fi options in any order and as often as necessary aslong as you use unique pairs.
Constraints that affect onloadThe onload utility performs faster than the dbimport, dbload, or LOAD methods.In exchange for this higher performance, onload has certain constraints.
The onload utility has the following constraints:v The onload utility only creates a new database or table; you must drop or
rename an existing database or table of the same name before you run onload.During execution, the onload utility's prompt will ask you if you want torename blobspaces.
v The onload utility places a shared lock on each of the tables in the databaseduring the load. Although you cannot update a table row with the lock in place,the database is available for queries.
v When you load a complete database, the user who runs onload becomes theowner of the database.
v The onload utility creates a database without logging; you must initiate loggingafter onload loads the database.
v When you use onload to load a table into a logged database, you must turn offlogging for the database during the operation.
v For fragmented tables, the dbspace assignment is preserved, unless you overrideit using the -fn option.
v For non-fragmented tables, the onload utility attempts to store the table in rootdbspace if a target dbspace is not specified with the -d option. If storing thetable in root dbspace or in the dbspace specified with the -d option is notpossible due to difference in page sizes, the onload utility tries to use a dbspacethat has the same dbspace number as the dbspace number of the originallyunloaded table. If this dbspace still has a different page size, the load operationwill fail.
Chapter 13. The onunload and onload utilities 13-9
Logging during loadingWhen you use the onload utility to create tables from an onunload input tape,onload can load information only into a database without logging. Thus, beforeyou load a table into an existing, logged database, you must end logging for thedatabase.
You also might want to consider loading during off-peak hours. Otherwise, youmight fill the logical-log files or consume excessive shared-memory resources. Afteryou load the table, create a level-0 dbspace backup before you resume databaselogging.
When you use onload to create databases from an onunload input tape, thedatabases that result are not ANSI-compliant and do not use transaction logging.You can make a database ANSI compliant or add logging after you load thedatabase.
The onload utility performs all its loading within a transaction. This feature allowsthe changes to be rolled back if an error occurs.
Movement of simple large objects to a blobspaceIf you load a table that contains simple large objects stored in a blobspace, theonload utility asks you if you want to move them to another blobspace.
If you respond yes, onload displays the blobspace name where the simple largeobjects were stored when the tape was created. It then asks you to enter the nameof the blobspace where you want the simple large objects stored.
If you enter a valid blobspace name, onload moves all simple-large-object columnsin the table to the new blobspace. Otherwise, onload prompts you again for a validblobspace name.
Ownership and privilegesWhen you load a new database, the user who runs the onload utility becomes theowner. Ownership within the database (tables, views, and indexes) remains thesame as when the database was unloaded to tape with onunload.
To load a table, you must have the Resource privilege on the database. Whenonload loads a new table, the user who runs onload becomes the owner unlessyou specify an owner in the table name. (You need the DBA privilege for thedatabase to specify an owner in the table name.)
The onunload utility does not preserve synonyms or access privileges. To obtain alisting of defined synonyms or access privileges, use the dbschema utility, whichChapter 11, “The dbschema utility,” on page 11-1 describes, before you runonunload.
Exclusive locking during a load operationDuring a load operation, the onload utility places an exclusive lock on the newdatabase or table.
Loading proceeds as a single transaction, and onload drops the new database ortable if an error or system failure occurs.
13-10 IBM Informix Migration Guide
Moving a database between computers with the onunload and onloadutilities
You can use the onunload and onload utilities to move a complete database fromone computer to another.
To move a database from one computer to another:
1. Make sure that the page size, numeric representations, and byte alignment onstructures and unions are the same on both computers.The page size is 2 KB on certain UNIX systems and 4 KB on Windows NT. Thepage size is an Informix characteristic. For information about page size, seeyour IBM Informix Administrator's Guide. The numeric representation and thebyte alignment are characteristics of your operating system. For informationabout numeric representation and byte alignment, refer to the manuals for youroperating systems.
2. Decide where to store the unloaded data:v On disk. Create an empty file for onunload to hold the data. Make sure that
you have write permission for the file.v On tape. Use the tape device and characteristics specified in the ONCONFIG
configuration file by either the TAPEDEV or LTAPEDEV configurationparameter, or specify another tape device. Make sure that the tape devicethat you specify is available for onunload. However, if you set the TAPEDEVconfiguration parameter to STDIO,, the onunload utility will not be able tounload data.
3. Run the oncheck utility to make sure that your database is consistent.For information about oncheck, see your IBM Informix Administrator's Reference.
4. Run the onunload utility to unload the data from the database.For details on the syntax of the onunload command, see “Syntax of theonunload command” on page 13-3.
5. If necessary, transfer the storage medium (tape or disk) to the new computer. Ifthe two computers are on the same network, you can read or write the dataremotely.
6. Run the onload utility to load the data into the new database.For details on the syntax of the onload command, see “Syntax of the onloadcommand” on page 13-6.
7. Set the logging status for the new database.For information about logging status, see your IBM Informix Administrator'sGuide.
8. If necessary, change the DBA privileges of the database.9. Create a level-0 backup of the new database.
Moving a table between computers with the onunload and onloadutilities
You can use the onunload and onload utilities to move a table from one computerto another.
To move a table from one computer to another:
1. Make sure that the page size, numeric representations, and byte alignment onstructures and unions are the same on both computers. (The page size is 2 KBon certain UNIX systems and 4 KB on Windows NT.)
Chapter 13. The onunload and onload utilities 13-11
2. Decide where to store the unloaded data.3. Run the oncheck utility to make sure that your database is consistent.4. If you want to save the triggers, access privileges, SPL routines, defaults,
constraints, and synonyms for the table, run the dbschema utility.5. Run the onunload utility.
For details on the syntax of the onunload command, see “Syntax of theonunload command” on page 13-3.
6. If necessary, transfer the storage medium to the new computer.7. If the table includes simple large objects that are stored in blobspaces, decide
where to store the simple large objects. If necessary, create new blobspaces.8. Turn off logging.
When you are loading a table, logging on the target database must be turnedoff. (When you are creating and loading an entire database, the logging statusdoes not matter.)
9. Run the onload utility.For details on the syntax of the onload command, see “Syntax of the onloadcommand” on page 13-6.
10. Create a level-0 backup of the modified database.11. Turn logging back on, if you want logging.12. If you want to restore the triggers, access privileges, SPL routines, defaults,
constraints that are not preserved, and synonyms for the table, run thedbschema utility or recreate these objects manually.Constraints such as primary keys or default values are preserved, even for asingle table. Foreign keys, access privileges, SPL routines and synonyms arenot preserved.
Moving a table between dbspaces with the onunload and onloadutilities
You can use the onunload and onload utilities to move a table from one dbspaceto another dbspace on the same computer.
To move a table from one dbspace to another dbspace on the same computer:
1. Run the onunload utility to unload the table.For details on the syntax of the onunload command, see “Syntax of theonunload command” on page 13-3.
2. Turn off logging.When you are loading a table, logging on the target database must be turnedoff.
3. Run the onload utility.Specify a new table name and new dbspace name in the onload command.For details on the syntax of the onload command, see “Syntax of the onloadcommand” on page 13-6.
4. If the data loads successfully, delete the old table in the old dbspace andrename the new table to the old table name.
5. Create a level-0 backup of the modified database.6. Turn logging back on, if you want logging.
13-12 IBM Informix Migration Guide

Chapter 14. The onmode utility reversion option
You use the -b option of the onmode utility to revert to the older database serverfrom which you converted.
What the onmode -b command doesWhen you convert a database server, several modifications make the format of thedatabases incompatible with the older version. The onmode -b command modifiesdata so that the earlier version of the database server can access it.
When you convert a database server, several modifications make the format of thedatabases incompatible with the older version. The onmode -b command modifiesdata so that the earlier version of the database server can access it. In some casesthe format of the databases is compatible between versions and the onmode -bcommand is not needed. Type onmode -b to see the usage message for optionsthat are available for your database server.
The utility does not revert changes made to the layout of the data that do notaffect compatibility.
You must revert the databases before users can access the data with the earlierdatabase server version.
For information about other onmode options, see The onmode utility in your IBMInformix Administrator's Reference.
Preparation for using the onmode -b commandBefore you use the onmode -b command, notify users that you are going to bringthe database server offline. The reversion utility forcibly removes all users andshuts down the database server.
The onmode -b command includes an implicit -yuk command.
Make sure that the INFORMIXSERVER environment variable is set to the correctdatabase server.
UNIX/Linux OnlyYou must be user root or user informix to run onmode.
Windows OnlyYou must be a member of the Informix-Admin group to run onmode.
Syntax of the onmode -b commandThe onmode -b command restores your databases to the version of Informix fromwhich you converted. You cannot use this command to revert to any other versionof the server.
When you convert a database server, several modifications make the format of thedatabases incompatible with the older version. The onmode -b command modifiesdata so that the earlier version of the database server can access it. In some casesthe format of the databases is compatible between versions and the onmode -b
© Copyright IBM Corp. 1996, 2012 14-1
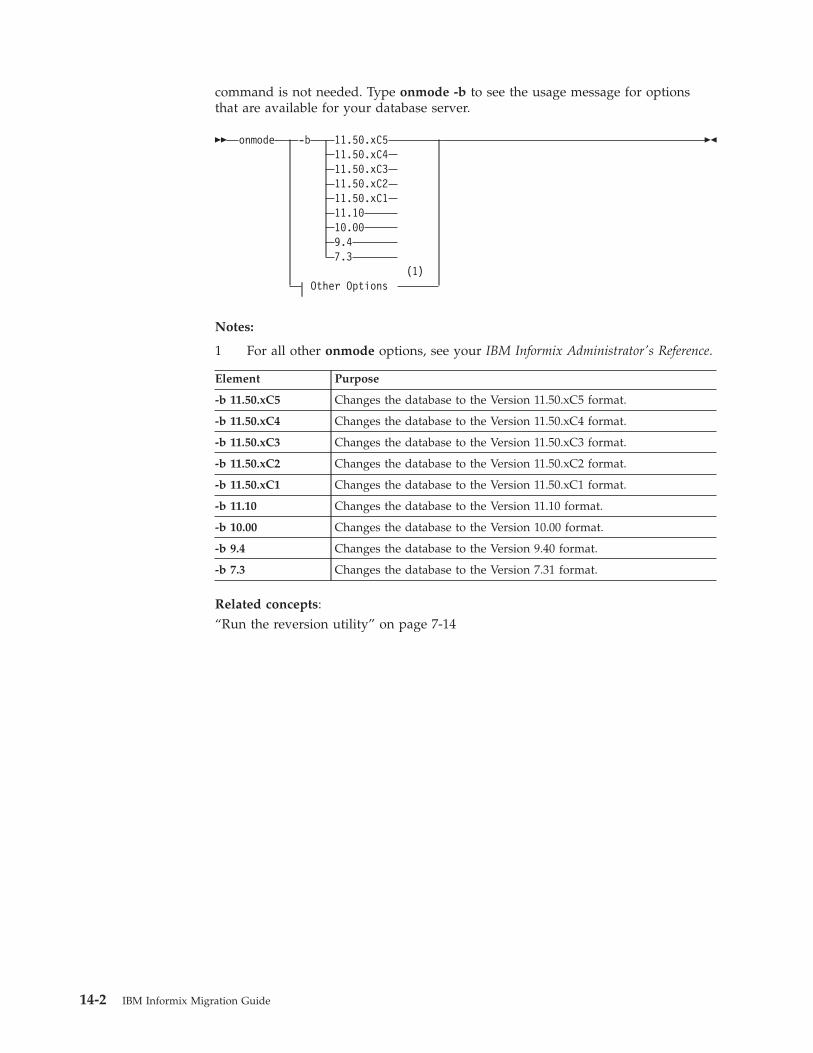
command is not needed. Type onmode -b to see the usage message for optionsthat are available for your database server.
�� onmode -b 11.50.xC511.50.xC411.50.xC311.50.xC211.50.xC111.1010.009.47.3
(1)Other Options
��
Notes:
1 For all other onmode options, see your IBM Informix Administrator's Reference.
Element Purpose
-b 11.50.xC5 Changes the database to the Version 11.50.xC5 format.
-b 11.50.xC4 Changes the database to the Version 11.50.xC4 format.
-b 11.50.xC3 Changes the database to the Version 11.50.xC3 format.
-b 11.50.xC2 Changes the database to the Version 11.50.xC2 format.
-b 11.50.xC1 Changes the database to the Version 11.50.xC1 format.
-b 11.10 Changes the database to the Version 11.10 format.
-b 10.00 Changes the database to the Version 10.00 format.
-b 9.4 Changes the database to the Version 9.40 format.
-b 7.3 Changes the database to the Version 7.31 format.
Related concepts:“Run the reversion utility” on page 7-14
14-2 IBM Informix Migration Guide
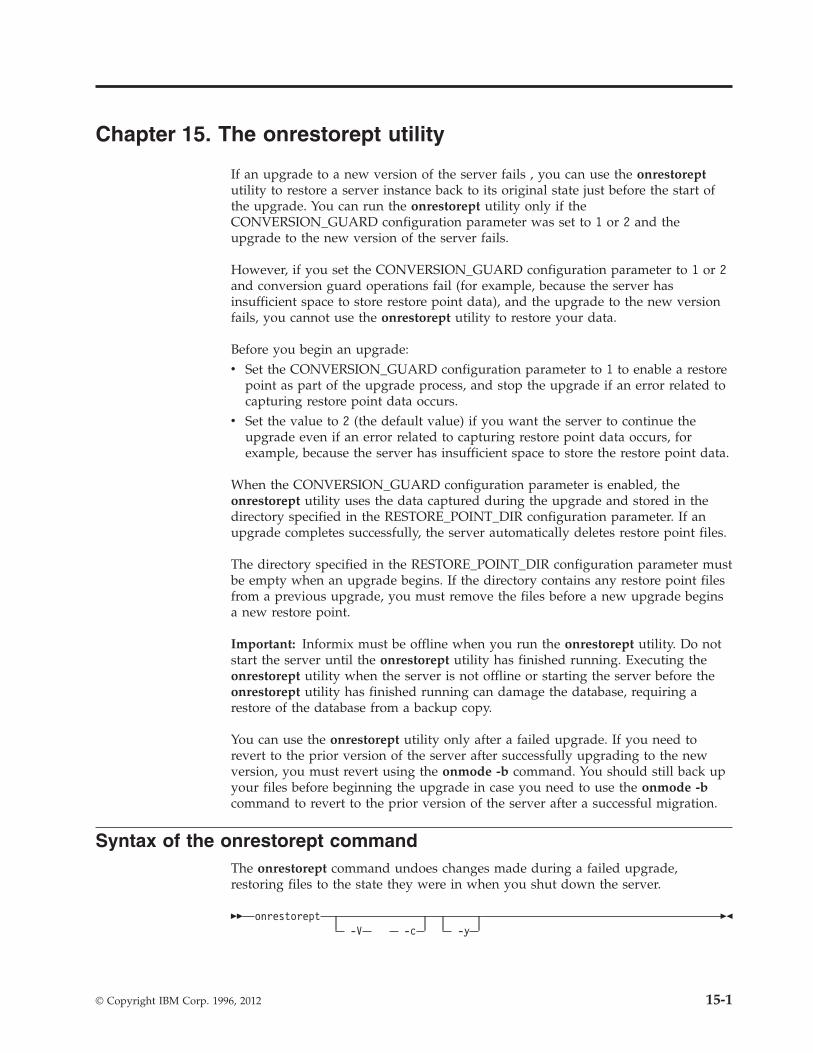
Chapter 15. The onrestorept utility
If an upgrade to a new version of the server fails , you can use the onrestoreptutility to restore a server instance back to its original state just before the start ofthe upgrade. You can run the onrestorept utility only if theCONVERSION_GUARD configuration parameter was set to 1 or 2 and theupgrade to the new version of the server fails.
However, if you set the CONVERSION_GUARD configuration parameter to 1 or 2and conversion guard operations fail (for example, because the server hasinsufficient space to store restore point data), and the upgrade to the new versionfails, you cannot use the onrestorept utility to restore your data.
Before you begin an upgrade:v Set the CONVERSION_GUARD configuration parameter to 1 to enable a restore
point as part of the upgrade process, and stop the upgrade if an error related tocapturing restore point data occurs.
v Set the value to 2 (the default value) if you want the server to continue theupgrade even if an error related to capturing restore point data occurs, forexample, because the server has insufficient space to store the restore point data.
When the CONVERSION_GUARD configuration parameter is enabled, theonrestorept utility uses the data captured during the upgrade and stored in thedirectory specified in the RESTORE_POINT_DIR configuration parameter. If anupgrade completes successfully, the server automatically deletes restore point files.
The directory specified in the RESTORE_POINT_DIR configuration parameter mustbe empty when an upgrade begins. If the directory contains any restore point filesfrom a previous upgrade, you must remove the files before a new upgrade beginsa new restore point.
Important: Informix must be offline when you run the onrestorept utility. Do notstart the server until the onrestorept utility has finished running. Executing theonrestorept utility when the server is not offline or starting the server before theonrestorept utility has finished running can damage the database, requiring arestore of the database from a backup copy.
You can use the onrestorept utility only after a failed upgrade. If you need torevert to the prior version of the server after successfully upgrading to the newversion, you must revert using the onmode -b command. You should still back upyour files before beginning the upgrade in case you need to use the onmode -bcommand to revert to the prior version of the server after a successful migration.
Syntax of the onrestorept commandThe onrestorept command undoes changes made during a failed upgrade,restoring files to the state they were in when you shut down the server.
�� onrestorept-V -c -y
��
© Copyright IBM Corp. 1996, 2012 15-1
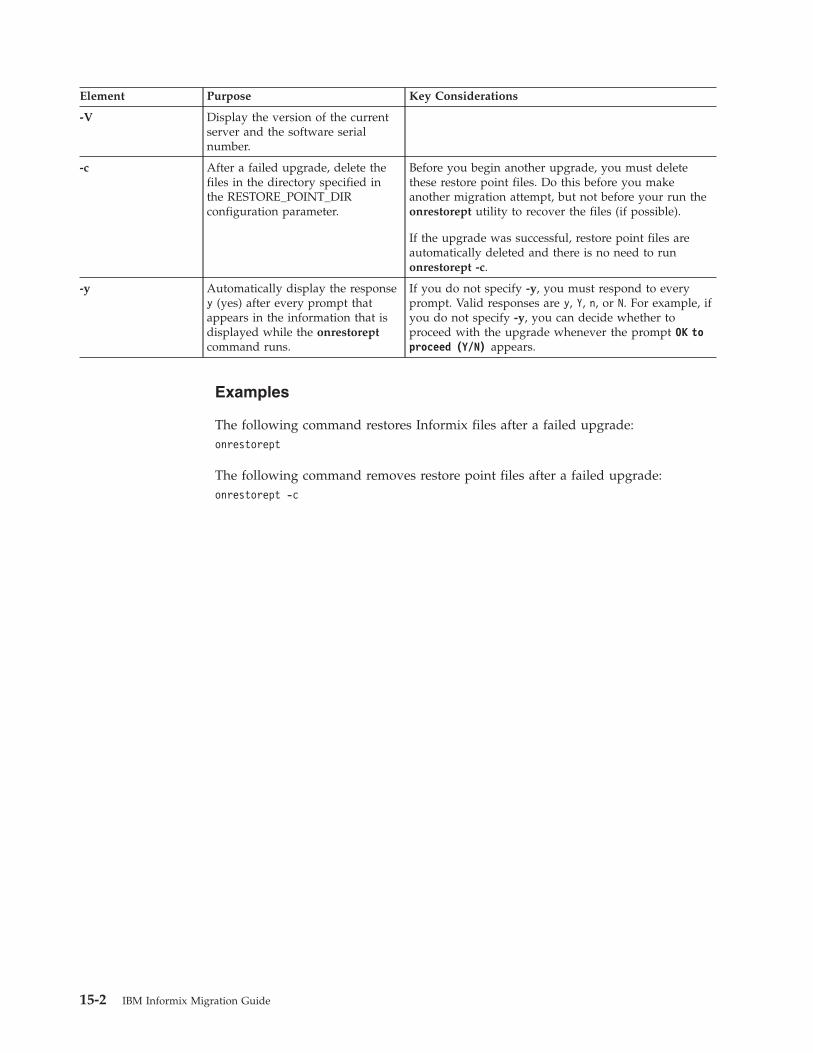
Element Purpose Key Considerations
-V Display the version of the currentserver and the software serialnumber.
-c After a failed upgrade, delete thefiles in the directory specified inthe RESTORE_POINT_DIRconfiguration parameter.
Before you begin another upgrade, you must deletethese restore point files. Do this before you makeanother migration attempt, but not before your run theonrestorept utility to recover the files (if possible).
If the upgrade was successful, restore point files areautomatically deleted and there is no need to runonrestorept -c.
-y Automatically display the responsey (yes) after every prompt thatappears in the information that isdisplayed while the onrestoreptcommand runs.
If you do not specify -y, you must respond to everyprompt. Valid responses are y, Y, n, or N. For example, ifyou do not specify -y, you can decide whether toproceed with the upgrade whenever the prompt OK toproceed (Y/N) appears.
Examples
The following command restores Informix files after a failed upgrade:onrestorept
The following command removes restore point files after a failed upgrade:onrestorept -c
15-2 IBM Informix Migration Guide

Part 5. Appendixes
© Copyright IBM Corp. 1996, 2012

IBM Informix Migration Guide
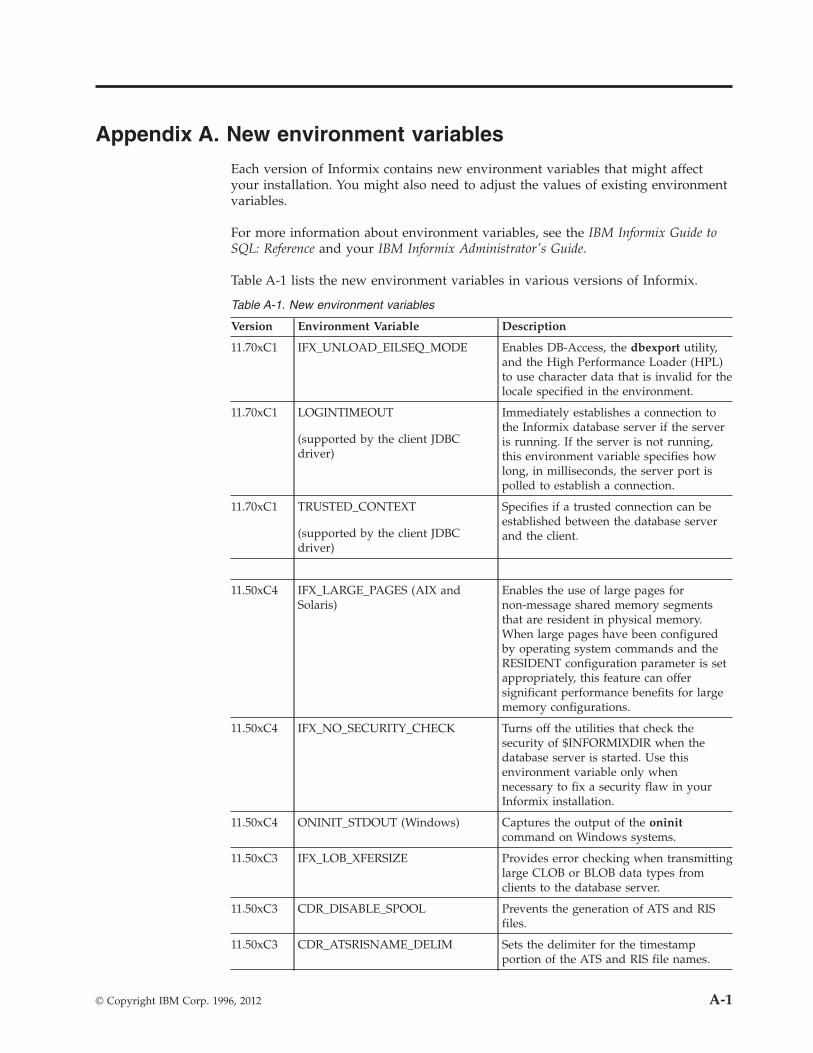
Appendix A. New environment variables
Each version of Informix contains new environment variables that might affectyour installation. You might also need to adjust the values of existing environmentvariables.
For more information about environment variables, see the IBM Informix Guide toSQL: Reference and your IBM Informix Administrator's Guide.
Table A-1 lists the new environment variables in various versions of Informix.
Table A-1. New environment variables
Version Environment Variable Description
11.70xC1 IFX_UNLOAD_EILSEQ_MODE Enables DB-Access, the dbexport utility,and the High Performance Loader (HPL)to use character data that is invalid for thelocale specified in the environment.
11.70xC1 LOGINTIMEOUT
(supported by the client JDBCdriver)
Immediately establishes a connection tothe Informix database server if the serveris running. If the server is not running,this environment variable specifies howlong, in milliseconds, the server port ispolled to establish a connection.
11.70xC1 TRUSTED_CONTEXT
(supported by the client JDBCdriver)
Specifies if a trusted connection can beestablished between the database serverand the client.
11.50xC4 IFX_LARGE_PAGES (AIX andSolaris)
Enables the use of large pages fornon-message shared memory segmentsthat are resident in physical memory.When large pages have been configuredby operating system commands and theRESIDENT configuration parameter is setappropriately, this feature can offersignificant performance benefits for largememory configurations.
11.50xC4 IFX_NO_SECURITY_CHECK Turns off the utilities that check thesecurity of $INFORMIXDIR when thedatabase server is started. Use thisenvironment variable only whennecessary to fix a security flaw in yourInformix installation.
11.50xC4 ONINIT_STDOUT (Windows) Captures the output of the oninitcommand on Windows systems.
11.50xC3 IFX_LOB_XFERSIZE Provides error checking when transmittinglarge CLOB or BLOB data types fromclients to the database server.
11.50xC3 CDR_DISABLE_SPOOL Prevents the generation of ATS and RISfiles.
11.50xC3 CDR_ATSRISNAME_DELIM Sets the delimiter for the timestampportion of the ATS and RIS file names.
© Copyright IBM Corp. 1996, 2012 A-1
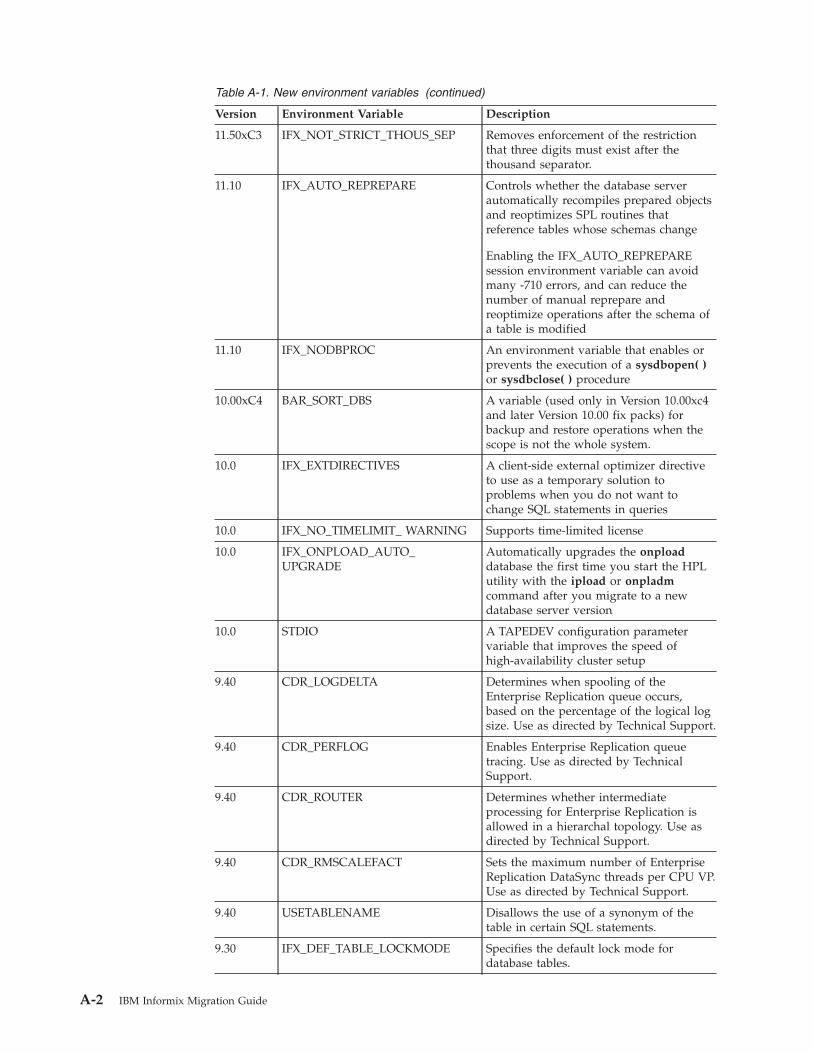
Table A-1. New environment variables (continued)
Version Environment Variable Description
11.50xC3 IFX_NOT_STRICT_THOUS_SEP Removes enforcement of the restrictionthat three digits must exist after thethousand separator.
11.10 IFX_AUTO_REPREPARE Controls whether the database serverautomatically recompiles prepared objectsand reoptimizes SPL routines thatreference tables whose schemas change
Enabling the IFX_AUTO_REPREPAREsession environment variable can avoidmany -710 errors, and can reduce thenumber of manual reprepare andreoptimize operations after the schema ofa table is modified
11.10 IFX_NODBPROC An environment variable that enables orprevents the execution of a sysdbopen( )or sysdbclose( ) procedure
10.00xC4 BAR_SORT_DBS A variable (used only in Version 10.00xc4and later Version 10.00 fix packs) forbackup and restore operations when thescope is not the whole system.
10.0 IFX_EXTDIRECTIVES A client-side external optimizer directiveto use as a temporary solution toproblems when you do not want tochange SQL statements in queries
10.0 IFX_NO_TIMELIMIT_ WARNING Supports time-limited license
10.0 IFX_ONPLOAD_AUTO_UPGRADE
Automatically upgrades the onploaddatabase the first time you start the HPLutility with the ipload or onpladmcommand after you migrate to a newdatabase server version
10.0 STDIO A TAPEDEV configuration parametervariable that improves the speed ofhigh-availability cluster setup
9.40 CDR_LOGDELTA Determines when spooling of theEnterprise Replication queue occurs,based on the percentage of the logical logsize. Use as directed by Technical Support.
9.40 CDR_PERFLOG Enables Enterprise Replication queuetracing. Use as directed by TechnicalSupport.
9.40 CDR_ROUTER Determines whether intermediateprocessing for Enterprise Replication isallowed in a hierarchal topology. Use asdirected by Technical Support.
9.40 CDR_RMSCALEFACT Sets the maximum number of EnterpriseReplication DataSync threads per CPU VP.Use as directed by Technical Support.
9.40 USETABLENAME Disallows the use of a synonym of thetable in certain SQL statements.
9.30 IFX_DEF_TABLE_LOCKMODE Specifies the default lock mode fordatabase tables.
A-2 IBM Informix Migration Guide
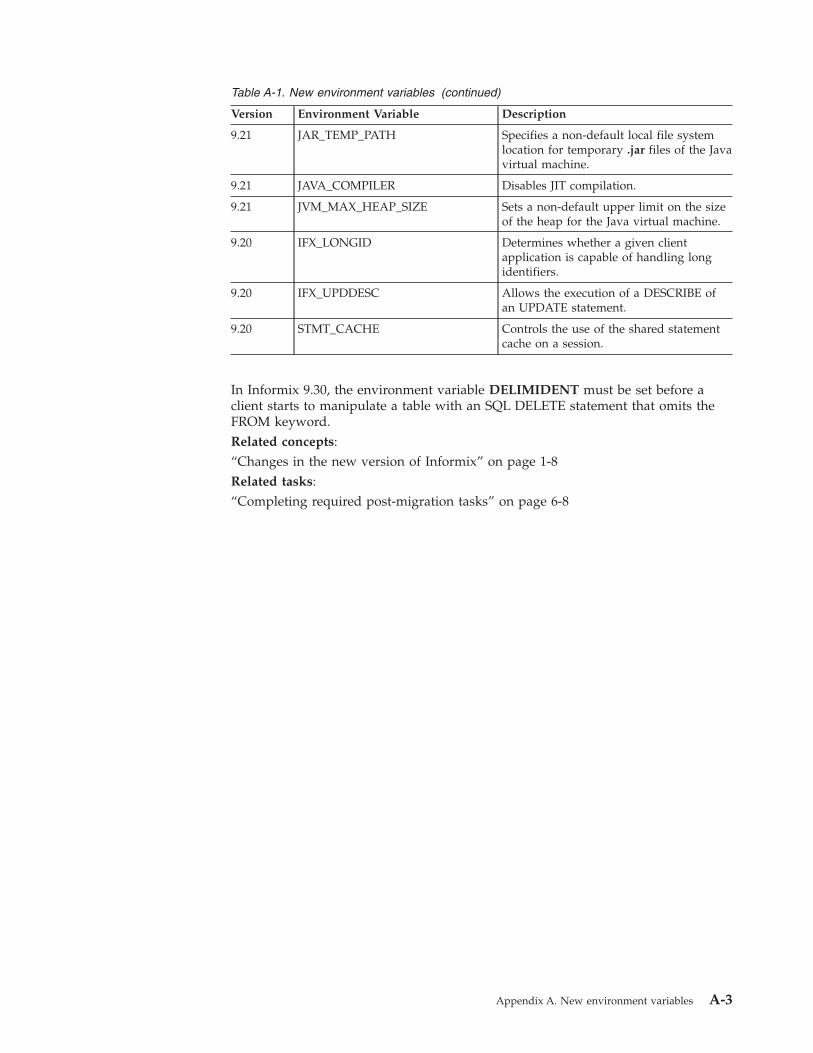
Table A-1. New environment variables (continued)
Version Environment Variable Description
9.21 JAR_TEMP_PATH Specifies a non-default local file systemlocation for temporary .jar files of the Javavirtual machine.
9.21 JAVA_COMPILER Disables JIT compilation.
9.21 JVM_MAX_HEAP_SIZE Sets a non-default upper limit on the sizeof the heap for the Java virtual machine.
9.20 IFX_LONGID Determines whether a given clientapplication is capable of handling longidentifiers.
9.20 IFX_UPDDESC Allows the execution of a DESCRIBE ofan UPDATE statement.
9.20 STMT_CACHE Controls the use of the shared statementcache on a session.
In Informix 9.30, the environment variable DELIMIDENT must be set before aclient starts to manipulate a table with an SQL DELETE statement that omits theFROM keyword.Related concepts:“Changes in the new version of Informix” on page 1-8Related tasks:“Completing required post-migration tasks” on page 6-8
Appendix A. New environment variables A-3

A-4 IBM Informix Migration Guide
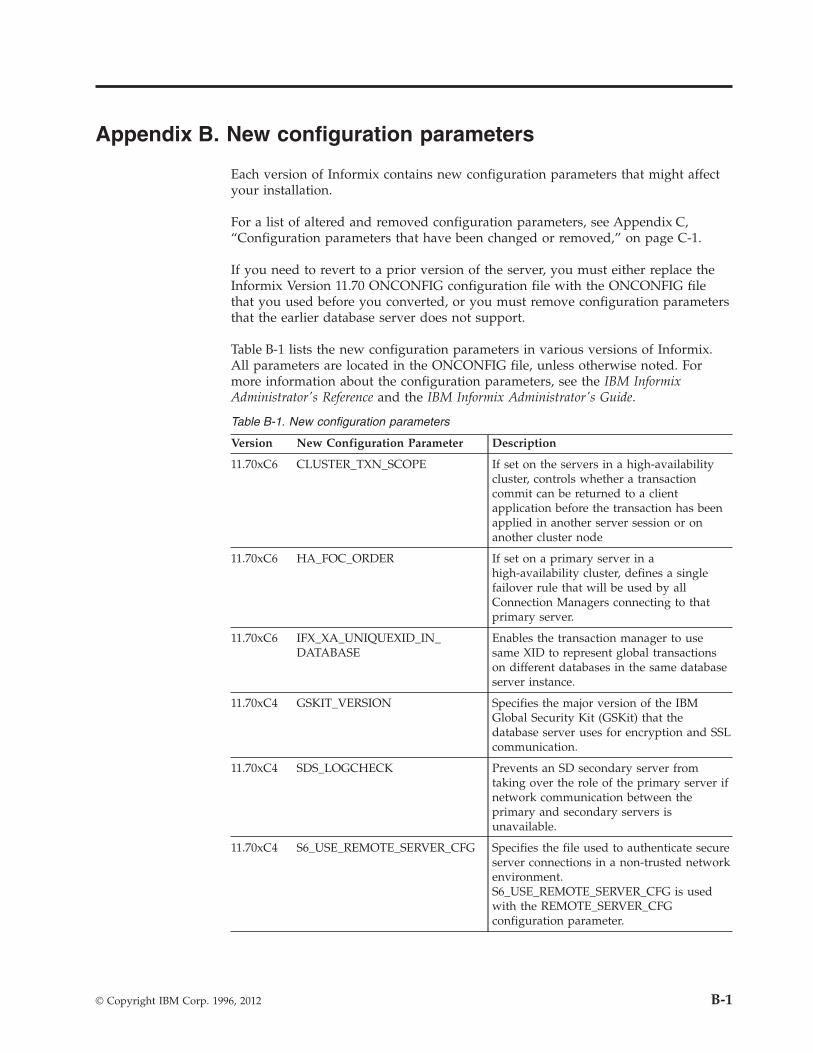
Appendix B. New configuration parameters
Each version of Informix contains new configuration parameters that might affectyour installation.
For a list of altered and removed configuration parameters, see Appendix C,“Configuration parameters that have been changed or removed,” on page C-1.
If you need to revert to a prior version of the server, you must either replace theInformix Version 11.70 ONCONFIG configuration file with the ONCONFIG filethat you used before you converted, or you must remove configuration parametersthat the earlier database server does not support.
Table B-1 lists the new configuration parameters in various versions of Informix.All parameters are located in the ONCONFIG file, unless otherwise noted. Formore information about the configuration parameters, see the IBM InformixAdministrator's Reference and the IBM Informix Administrator's Guide.
Table B-1. New configuration parameters
Version New Configuration Parameter Description
11.70xC6 CLUSTER_TXN_SCOPE If set on the servers in a high-availabilitycluster, controls whether a transactioncommit can be returned to a clientapplication before the transaction has beenapplied in another server session or onanother cluster node
11.70xC6 HA_FOC_ORDER If set on a primary server in ahigh-availability cluster, defines a singlefailover rule that will be used by allConnection Managers connecting to thatprimary server.
11.70xC6 IFX_XA_UNIQUEXID_IN_DATABASE
Enables the transaction manager to usesame XID to represent global transactionson different databases in the same databaseserver instance.
11.70xC4 GSKIT_VERSION Specifies the major version of the IBMGlobal Security Kit (GSKit) that thedatabase server uses for encryption and SSLcommunication.
11.70xC4 SDS_LOGCHECK Prevents an SD secondary server fromtaking over the role of the primary server ifnetwork communication between theprimary and secondary servers isunavailable.
11.70xC4 S6_USE_REMOTE_SERVER_CFG Specifies the file used to authenticate secureserver connections in a non-trusted networkenvironment.S6_USE_REMOTE_SERVER_CFG is usedwith the REMOTE_SERVER_CFGconfiguration parameter.
© Copyright IBM Corp. 1996, 2012 B-1

Table B-1. New configuration parameters (continued)
Version New Configuration Parameter Description
11.70xC4 USTLOW_SAMPLE Enables sampling during the gathering ofstatistics for UPDATE STATISTICS LOWoperations.
11.70xC3 AUTO_READAHEAD Changes the automatic read-ahead mode ordisables automatic read ahead.
11.70xC3 LOW_MEMORY_MGR Enables automatic low memorymanagement, which you can use to changethe default behavior of the server when itreaches its memory limit.
11.70xC3 LOW_MEMORY_RESERVE Reserves a specific amount of memory foruse when critical activities (such as rollbackactivities) are needed and the server haslimited free memory.
11.70xC3 PN_STAGEBLOB_THRESHOLD Reserves space for BYTE and TEXT data inround-robin fragments.
11.70xC2 REMOTE_SERVER_CFG Specifies the name of a file that lists theremote hosts that are trusted by thecomputer on which the database serverresides.
11.70xC2 REMOTE_USERS_CFG Specifies the name of a file that lists namesof trusted users that exist on remote hosts.
11.70xC1 AUTO_STAT_MODE Enables or disables the recalculation ofdistribution statistics.
11.70xC1 BATCHEDREAD_INDEX Enables the optimizer to automatically fetcha set of keys from an index buffer.
11.70xC1 BAR_CKPTSEC_TIMEOUT Sets the amount of time, in seconds, that anRS secondary server should wait for acheckpoint to arrive from the primaryserver while performing an external backup.
11.70xC1 CDR_LOG_LAG_ACTION Specifies how Enterprise Replicationresponds to a potential log wrap situation.
11.70xC1 CDR_LOG_STAGING_MAXSIZE Specifies the maximum amount of spacethat Enterprise Replication uses to stagecompressed log files in the directoryspecified by the LOG_STAGING_DIRconfiguration parameter.
11.70xC1 DEFAULTESCCHAR Specifies the default escape character.
11.70xC1 ENABLE_SNAPSHOT_COPY Enables or disables the ability to clone aserver using the ifxclone utility.
11.70xC1 FAILOVER_TX_TIMEOUT In high-availability cluster environments,enables transaction survival and indicatesthe maximum number of seconds afterfailover that the server should wait beforerolling back transactions.
11.70xC1 FULL_DISK_INIT Specifies whether or not the diskinitialization command (oninit -i) can runon your instance when a page zero exists atthe root path location.
B-2 IBM Informix Migration Guide
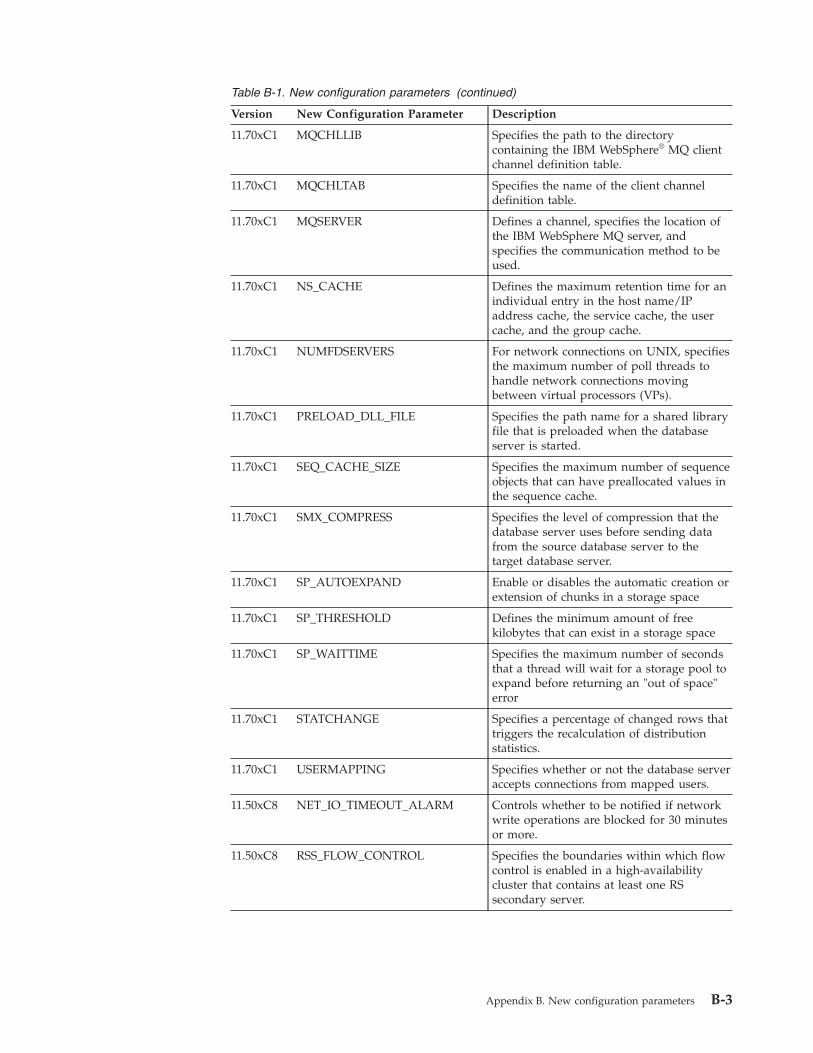
Table B-1. New configuration parameters (continued)
Version New Configuration Parameter Description
11.70xC1 MQCHLLIB Specifies the path to the directorycontaining the IBM WebSphere® MQ clientchannel definition table.
11.70xC1 MQCHLTAB Specifies the name of the client channeldefinition table.
11.70xC1 MQSERVER Defines a channel, specifies the location ofthe IBM WebSphere MQ server, andspecifies the communication method to beused.
11.70xC1 NS_CACHE Defines the maximum retention time for anindividual entry in the host name/IPaddress cache, the service cache, the usercache, and the group cache.
11.70xC1 NUMFDSERVERS For network connections on UNIX, specifiesthe maximum number of poll threads tohandle network connections movingbetween virtual processors (VPs).
11.70xC1 PRELOAD_DLL_FILE Specifies the path name for a shared libraryfile that is preloaded when the databaseserver is started.
11.70xC1 SEQ_CACHE_SIZE Specifies the maximum number of sequenceobjects that can have preallocated values inthe sequence cache.
11.70xC1 SMX_COMPRESS Specifies the level of compression that thedatabase server uses before sending datafrom the source database server to thetarget database server.
11.70xC1 SP_AUTOEXPAND Enable or disables the automatic creation orextension of chunks in a storage space
11.70xC1 SP_THRESHOLD Defines the minimum amount of freekilobytes that can exist in a storage space
11.70xC1 SP_WAITTIME Specifies the maximum number of secondsthat a thread will wait for a storage pool toexpand before returning an "out of space"error
11.70xC1 STATCHANGE Specifies a percentage of changed rows thattriggers the recalculation of distributionstatistics.
11.70xC1 USERMAPPING Specifies whether or not the database serveraccepts connections from mapped users.
11.50xC8 NET_IO_TIMEOUT_ALARM Controls whether to be notified if networkwrite operations are blocked for 30 minutesor more.
11.50xC8 RSS_FLOW_CONTROL Specifies the boundaries within which flowcontrol is enabled in a high-availabilitycluster that contains at least one RSsecondary server.
Appendix B. New configuration parameters B-3
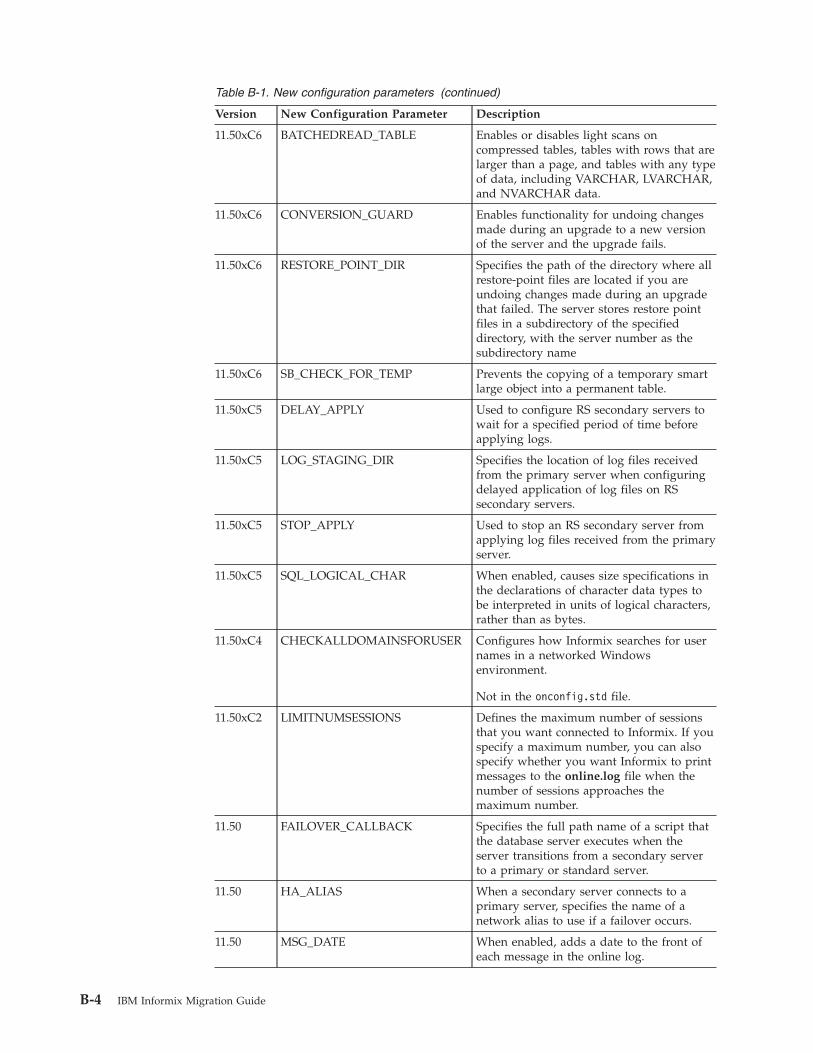
Table B-1. New configuration parameters (continued)
Version New Configuration Parameter Description
11.50xC6 BATCHEDREAD_TABLE Enables or disables light scans oncompressed tables, tables with rows that arelarger than a page, and tables with any typeof data, including VARCHAR, LVARCHAR,and NVARCHAR data.
11.50xC6 CONVERSION_GUARD Enables functionality for undoing changesmade during an upgrade to a new versionof the server and the upgrade fails.
11.50xC6 RESTORE_POINT_DIR Specifies the path of the directory where allrestore-point files are located if you areundoing changes made during an upgradethat failed. The server stores restore pointfiles in a subdirectory of the specifieddirectory, with the server number as thesubdirectory name
11.50xC6 SB_CHECK_FOR_TEMP Prevents the copying of a temporary smartlarge object into a permanent table.
11.50xC5 DELAY_APPLY Used to configure RS secondary servers towait for a specified period of time beforeapplying logs.
11.50xC5 LOG_STAGING_DIR Specifies the location of log files receivedfrom the primary server when configuringdelayed application of log files on RSsecondary servers.
11.50xC5 STOP_APPLY Used to stop an RS secondary server fromapplying log files received from the primaryserver.
11.50xC5 SQL_LOGICAL_CHAR When enabled, causes size specifications inthe declarations of character data types tobe interpreted in units of logical characters,rather than as bytes.
11.50xC4 CHECKALLDOMAINSFORUSER Configures how Informix searches for usernames in a networked Windowsenvironment.
Not in the onconfig.std file.
11.50xC2 LIMITNUMSESSIONS Defines the maximum number of sessionsthat you want connected to Informix. If youspecify a maximum number, you can alsospecify whether you want Informix to printmessages to the online.log file when thenumber of sessions approaches themaximum number.
11.50 FAILOVER_CALLBACK Specifies the full path name of a script thatthe database server executes when theserver transitions from a secondary serverto a primary or standard server.
11.50 HA_ALIAS When a secondary server connects to aprimary server, specifies the name of anetwork alias to use if a failover occurs.
11.50 MSG_DATE When enabled, adds a date to the front ofeach message in the online log.
B-4 IBM Informix Migration Guide
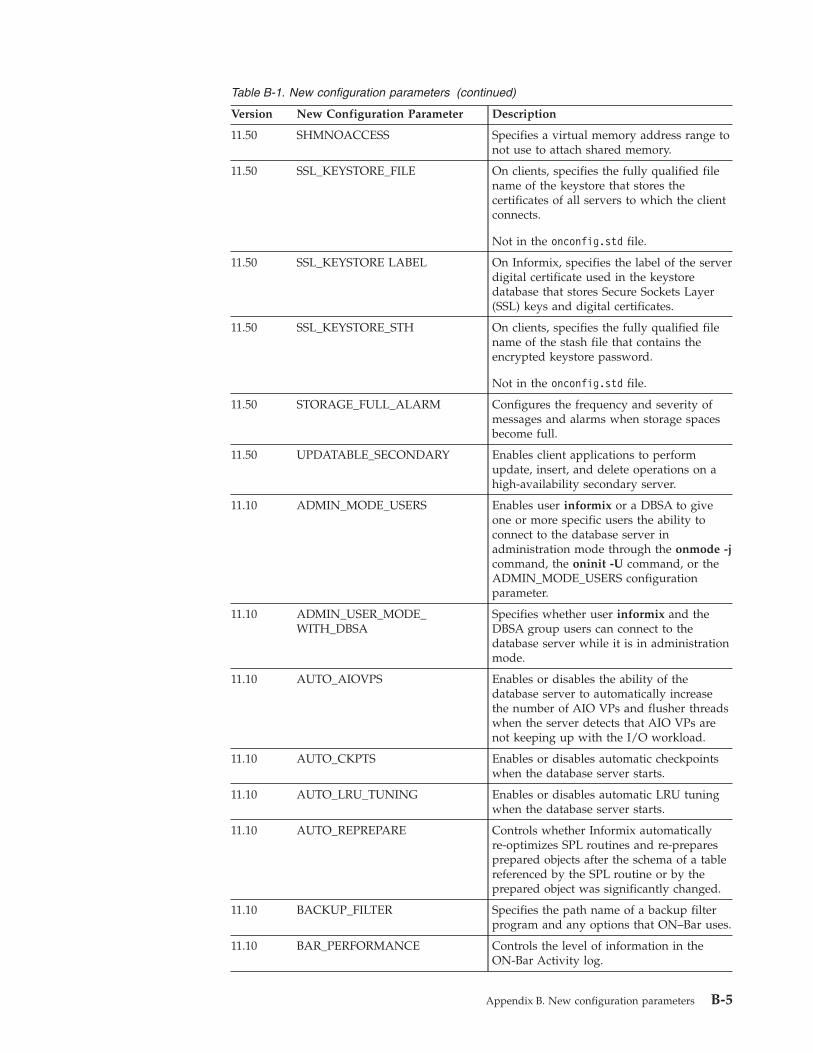
Table B-1. New configuration parameters (continued)
Version New Configuration Parameter Description
11.50 SHMNOACCESS Specifies a virtual memory address range tonot use to attach shared memory.
11.50 SSL_KEYSTORE_FILE On clients, specifies the fully qualified filename of the keystore that stores thecertificates of all servers to which the clientconnects.
Not in the onconfig.std file.
11.50 SSL_KEYSTORE LABEL On Informix, specifies the label of the serverdigital certificate used in the keystoredatabase that stores Secure Sockets Layer(SSL) keys and digital certificates.
11.50 SSL_KEYSTORE_STH On clients, specifies the fully qualified filename of the stash file that contains theencrypted keystore password.
Not in the onconfig.std file.
11.50 STORAGE_FULL_ALARM Configures the frequency and severity ofmessages and alarms when storage spacesbecome full.
11.50 UPDATABLE_SECONDARY Enables client applications to performupdate, insert, and delete operations on ahigh-availability secondary server.
11.10 ADMIN_MODE_USERS Enables user informix or a DBSA to giveone or more specific users the ability toconnect to the database server inadministration mode through the onmode -jcommand, the oninit -U command, or theADMIN_MODE_USERS configurationparameter.
11.10 ADMIN_USER_MODE_WITH_DBSA
Specifies whether user informix and theDBSA group users can connect to thedatabase server while it is in administrationmode.
11.10 AUTO_AIOVPS Enables or disables the ability of thedatabase server to automatically increasethe number of AIO VPs and flusher threadswhen the server detects that AIO VPs arenot keeping up with the I/O workload.
11.10 AUTO_CKPTS Enables or disables automatic checkpointswhen the database server starts.
11.10 AUTO_LRU_TUNING Enables or disables automatic LRU tuningwhen the database server starts.
11.10 AUTO_REPREPARE Controls whether Informix automaticallyre-optimizes SPL routines and re-preparesprepared objects after the schema of a tablereferenced by the SPL routine or by theprepared object was significantly changed.
11.10 BACKUP_FILTER Specifies the path name of a backup filterprogram and any options that ON–Bar uses.
11.10 BAR_PERFORMANCE Controls the level of information in theON-Bar Activity log.
Appendix B. New configuration parameters B-5
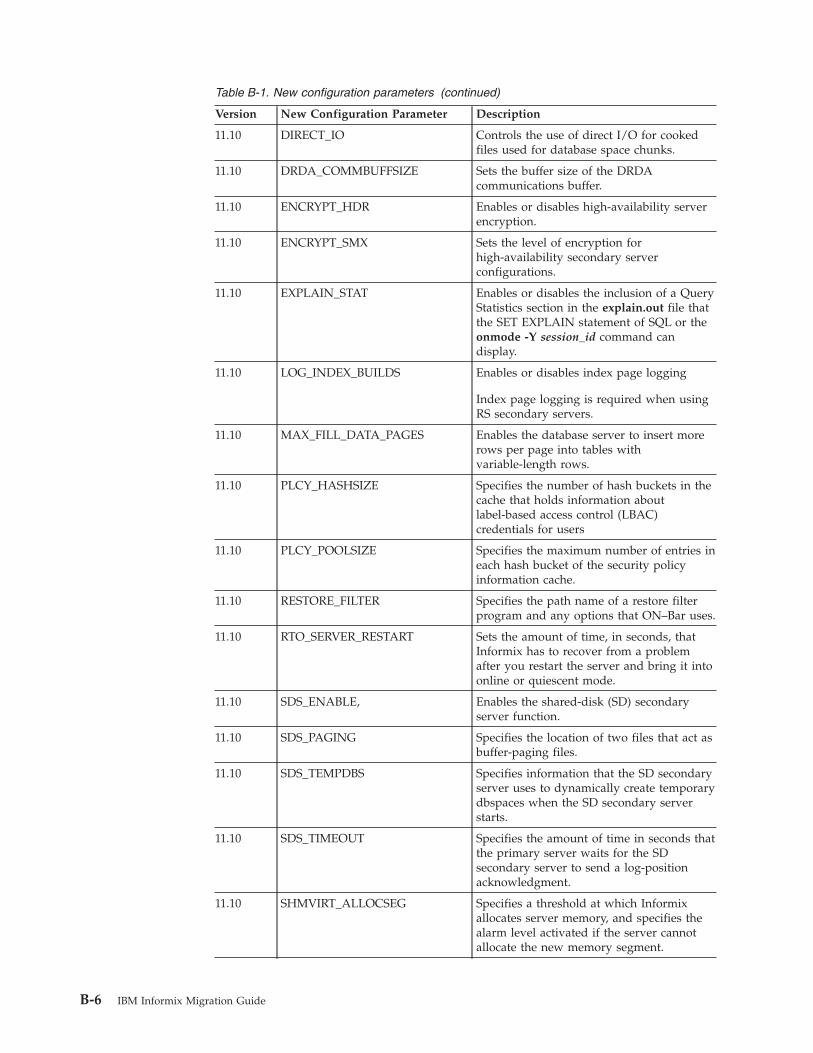
Table B-1. New configuration parameters (continued)
Version New Configuration Parameter Description
11.10 DIRECT_IO Controls the use of direct I/O for cookedfiles used for database space chunks.
11.10 DRDA_COMMBUFFSIZE Sets the buffer size of the DRDAcommunications buffer.
11.10 ENCRYPT_HDR Enables or disables high-availability serverencryption.
11.10 ENCRYPT_SMX Sets the level of encryption forhigh-availability secondary serverconfigurations.
11.10 EXPLAIN_STAT Enables or disables the inclusion of a QueryStatistics section in the explain.out file thatthe SET EXPLAIN statement of SQL or theonmode -Y session_id command candisplay.
11.10 LOG_INDEX_BUILDS Enables or disables index page logging
Index page logging is required when usingRS secondary servers.
11.10 MAX_FILL_DATA_PAGES Enables the database server to insert morerows per page into tables withvariable-length rows.
11.10 PLCY_HASHSIZE Specifies the number of hash buckets in thecache that holds information aboutlabel-based access control (LBAC)credentials for users
11.10 PLCY_POOLSIZE Specifies the maximum number of entries ineach hash bucket of the security policyinformation cache.
11.10 RESTORE_FILTER Specifies the path name of a restore filterprogram and any options that ON–Bar uses.
11.10 RTO_SERVER_RESTART Sets the amount of time, in seconds, thatInformix has to recover from a problemafter you restart the server and bring it intoonline or quiescent mode.
11.10 SDS_ENABLE, Enables the shared-disk (SD) secondaryserver function.
11.10 SDS_PAGING Specifies the location of two files that act asbuffer-paging files.
11.10 SDS_TEMPDBS Specifies information that the SD secondaryserver uses to dynamically create temporarydbspaces when the SD secondary serverstarts.
11.10 SDS_TIMEOUT Specifies the amount of time in seconds thatthe primary server waits for the SDsecondary server to send a log-positionacknowledgment.
11.10 SHMVIRT_ALLOCSEG Specifies a threshold at which Informixallocates server memory, and specifies thealarm level activated if the server cannotallocate the new memory segment.
B-6 IBM Informix Migration Guide
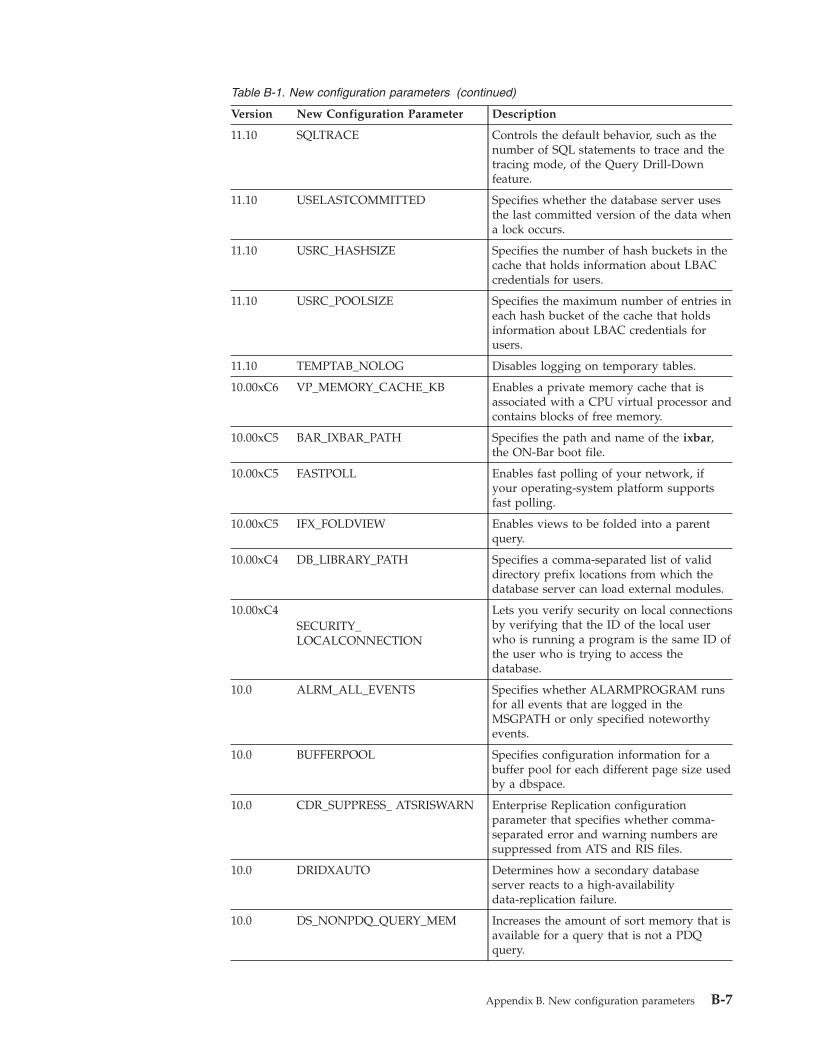
Table B-1. New configuration parameters (continued)
Version New Configuration Parameter Description
11.10 SQLTRACE Controls the default behavior, such as thenumber of SQL statements to trace and thetracing mode, of the Query Drill-Downfeature.
11.10 USELASTCOMMITTED Specifies whether the database server usesthe last committed version of the data whena lock occurs.
11.10 USRC_HASHSIZE Specifies the number of hash buckets in thecache that holds information about LBACcredentials for users.
11.10 USRC_POOLSIZE Specifies the maximum number of entries ineach hash bucket of the cache that holdsinformation about LBAC credentials forusers.
11.10 TEMPTAB_NOLOG Disables logging on temporary tables.
10.00xC6 VP_MEMORY_CACHE_KB Enables a private memory cache that isassociated with a CPU virtual processor andcontains blocks of free memory.
10.00xC5 BAR_IXBAR_PATH Specifies the path and name of the ixbar,the ON-Bar boot file.
10.00xC5 FASTPOLL Enables fast polling of your network, ifyour operating-system platform supportsfast polling.
10.00xC5 IFX_FOLDVIEW Enables views to be folded into a parentquery.
10.00xC4 DB_LIBRARY_PATH Specifies a comma-separated list of validdirectory prefix locations from which thedatabase server can load external modules.
10.00xC4SECURITY_LOCALCONNECTION
Lets you verify security on local connectionsby verifying that the ID of the local userwho is running a program is the same ID ofthe user who is trying to access thedatabase.
10.0 ALRM_ALL_EVENTS Specifies whether ALARMPROGRAM runsfor all events that are logged in theMSGPATH or only specified noteworthyevents.
10.0 BUFFERPOOL Specifies configuration information for abuffer pool for each different page size usedby a dbspace.
10.0 CDR_SUPPRESS_ ATSRISWARN Enterprise Replication configurationparameter that specifies whether comma-separated error and warning numbers aresuppressed from ATS and RIS files.
10.0 DRIDXAUTO Determines how a secondary databaseserver reacts to a high-availabilitydata-replication failure.
10.0 DS_NONPDQ_QUERY_MEM Increases the amount of sort memory that isavailable for a query that is not a PDQquery.
Appendix B. New configuration parameters B-7
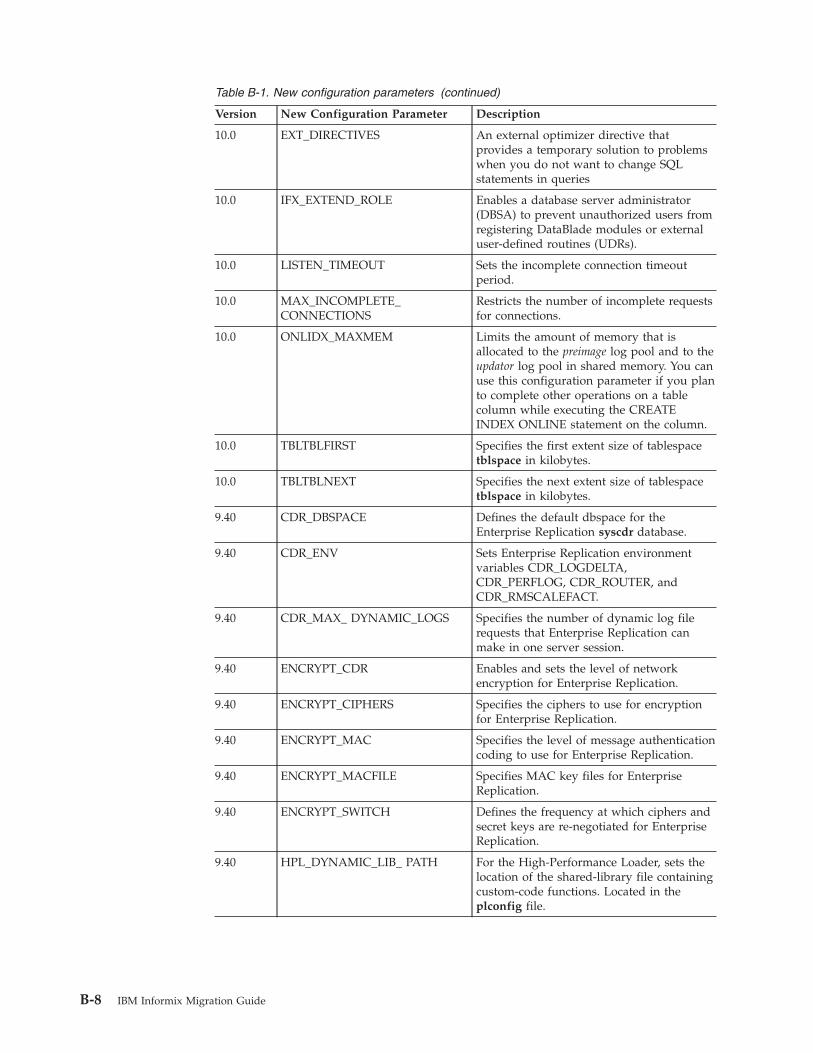
Table B-1. New configuration parameters (continued)
Version New Configuration Parameter Description
10.0 EXT_DIRECTIVES An external optimizer directive thatprovides a temporary solution to problemswhen you do not want to change SQLstatements in queries
10.0 IFX_EXTEND_ROLE Enables a database server administrator(DBSA) to prevent unauthorized users fromregistering DataBlade modules or externaluser-defined routines (UDRs).
10.0 LISTEN_TIMEOUT Sets the incomplete connection timeoutperiod.
10.0 MAX_INCOMPLETE_CONNECTIONS
Restricts the number of incomplete requestsfor connections.
10.0 ONLIDX_MAXMEM Limits the amount of memory that isallocated to the preimage log pool and to theupdator log pool in shared memory. You canuse this configuration parameter if you planto complete other operations on a tablecolumn while executing the CREATEINDEX ONLINE statement on the column.
10.0 TBLTBLFIRST Specifies the first extent size of tablespacetblspace in kilobytes.
10.0 TBLTBLNEXT Specifies the next extent size of tablespacetblspace in kilobytes.
9.40 CDR_DBSPACE Defines the default dbspace for theEnterprise Replication syscdr database.
9.40 CDR_ENV Sets Enterprise Replication environmentvariables CDR_LOGDELTA,CDR_PERFLOG, CDR_ROUTER, andCDR_RMSCALEFACT.
9.40 CDR_MAX_ DYNAMIC_LOGS Specifies the number of dynamic log filerequests that Enterprise Replication canmake in one server session.
9.40 ENCRYPT_CDR Enables and sets the level of networkencryption for Enterprise Replication.
9.40 ENCRYPT_CIPHERS Specifies the ciphers to use for encryptionfor Enterprise Replication.
9.40 ENCRYPT_MAC Specifies the level of message authenticationcoding to use for Enterprise Replication.
9.40 ENCRYPT_MACFILE Specifies MAC key files for EnterpriseReplication.
9.40 ENCRYPT_SWITCH Defines the frequency at which ciphers andsecret keys are re-negotiated for EnterpriseReplication.
9.40 HPL_DYNAMIC_LIB_ PATH For the High-Performance Loader, sets thelocation of the shared-library file containingcustom-code functions. Located in theplconfig file.
B-8 IBM Informix Migration Guide
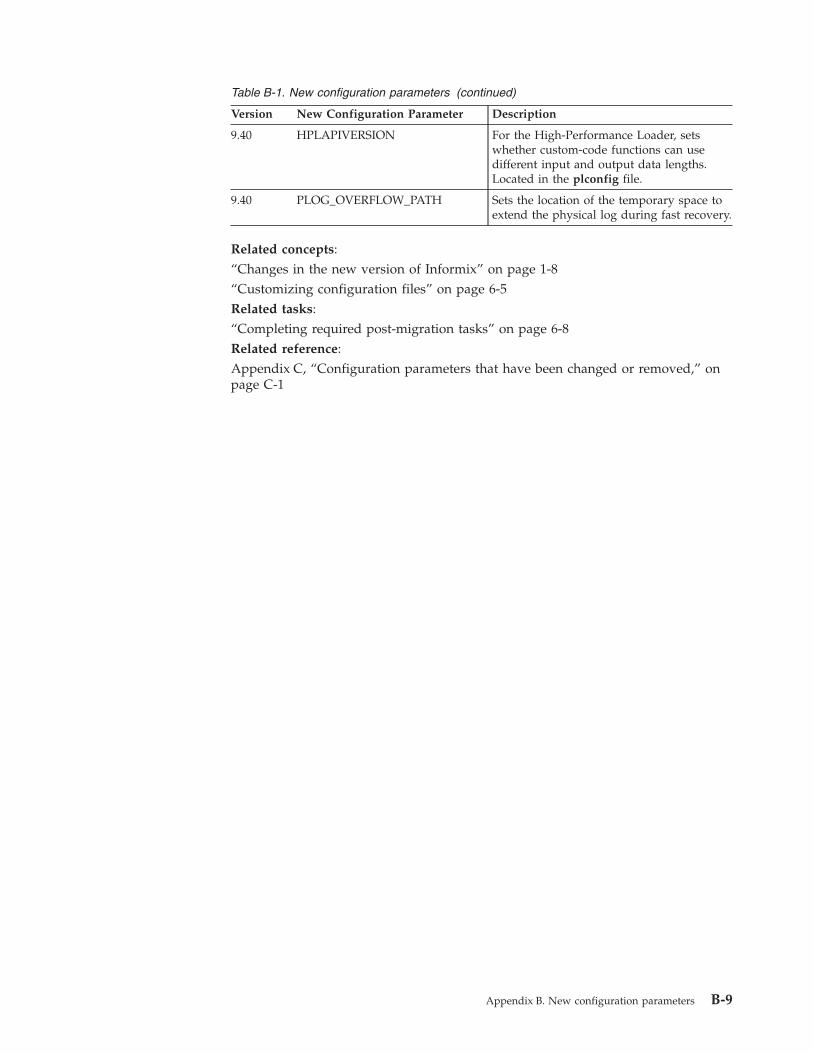
Table B-1. New configuration parameters (continued)
Version New Configuration Parameter Description
9.40 HPLAPIVERSION For the High-Performance Loader, setswhether custom-code functions can usedifferent input and output data lengths.Located in the plconfig file.
9.40 PLOG_OVERFLOW_PATH Sets the location of the temporary space toextend the physical log during fast recovery.
Related concepts:“Changes in the new version of Informix” on page 1-8“Customizing configuration files” on page 6-5Related tasks:“Completing required post-migration tasks” on page 6-8Related reference:Appendix C, “Configuration parameters that have been changed or removed,” onpage C-1
Appendix B. New configuration parameters B-9

B-10 IBM Informix Migration Guide
Appendix C. Configuration parameters that have beenchanged or removed
Informix Version 11.70 includes an improved onconfig.std template file, with newdefault values for configuration parameters. In addition, some configurationparameters, such as those used with earlier versions of the database server, havebeen removed.
After upgrading, use the new onconfig.std file. You can customize it as necessaryto match the configuration of the prior version of your database. Do not use theold onconfig.std file with the new version of the server.Related concepts:“Changes in the new version of Informix” on page 1-8“Customizing configuration files” on page 6-5Related tasks:“Completing required post-migration tasks” on page 6-8Related reference:
onconfig Portal: Configuration parameters by functional category(Administrator's Reference)Appendix B, “New configuration parameters,” on page B-1
Configuration parameter changes in the Version 11.70Informix Version 11.70 contains some configuration parameter changes, includingnew default values.
Configuration parameters that have new default values
The following table lists the configuration parameters that have new default valuesin the Version 11.70 onconfig.std file.
Table C-1. Configuration parameters with new default values in the onconfig.std file
Configuration Parameter Previous Value New Value
BATCHEDREAD_TABLE 0 1
Configuration parameters that have changed values
The following table lists the configuration parameters that have changed values inthe Version 11.70.
Table C-2. Configuration parameters that have changed values
Configuration Parameter Previous Values New Values
ALRM_ALL_EVENTS 1 and 2 0 (on) and 1 (off)
Configuration parameters that are deprecated
The following configuration parameters have been deprecated and are not requiredin IBM Informix Version 11.70xC1 and later versions:
© Copyright IBM Corp. 1996, 2012 C-1
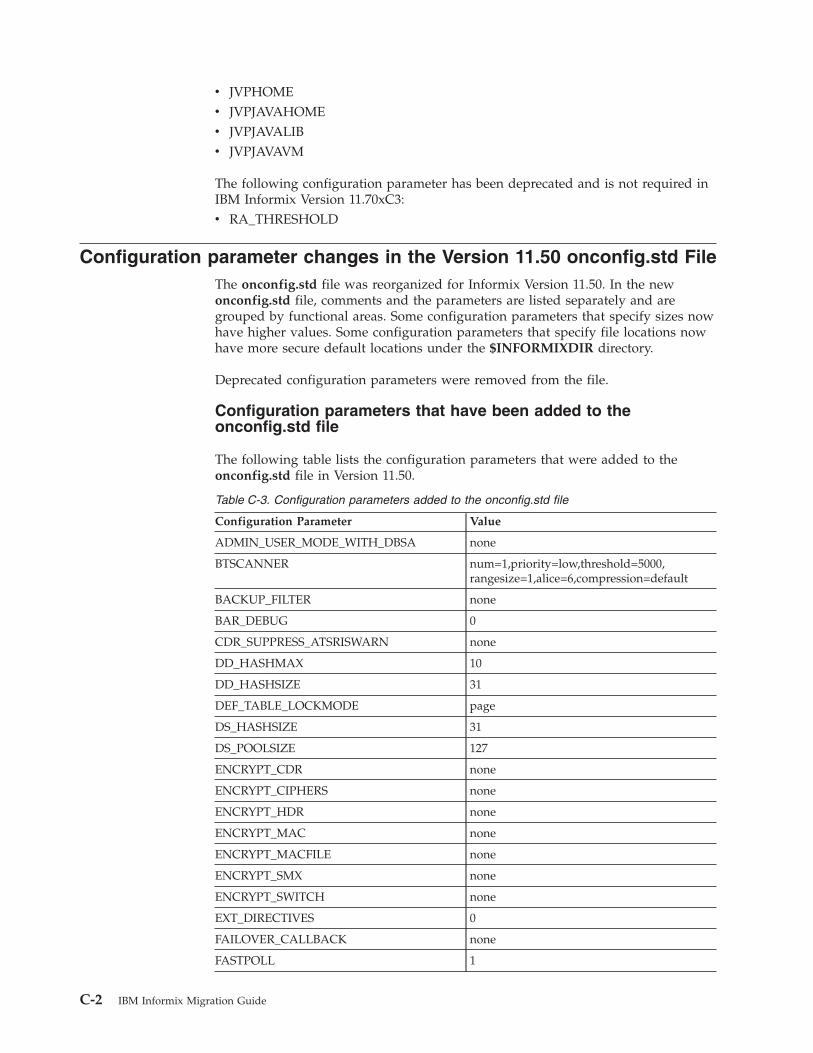
v JVPHOMEv JVPJAVAHOMEv JVPJAVALIBv JVPJAVAVM
The following configuration parameter has been deprecated and is not required inIBM Informix Version 11.70xC3:v RA_THRESHOLD
Configuration parameter changes in the Version 11.50 onconfig.std FileThe onconfig.std file was reorganized for Informix Version 11.50. In the newonconfig.std file, comments and the parameters are listed separately and aregrouped by functional areas. Some configuration parameters that specify sizes nowhave higher values. Some configuration parameters that specify file locations nowhave more secure default locations under the $INFORMIXDIR directory.
Deprecated configuration parameters were removed from the file.
Configuration parameters that have been added to theonconfig.std file
The following table lists the configuration parameters that were added to theonconfig.std file in Version 11.50.
Table C-3. Configuration parameters added to the onconfig.std file
Configuration Parameter Value
ADMIN_USER_MODE_WITH_DBSA none
BTSCANNER num=1,priority=low,threshold=5000,rangesize=1,alice=6,compression=default
BACKUP_FILTER none
BAR_DEBUG 0
CDR_SUPPRESS_ATSRISWARN none
DD_HASHMAX 10
DD_HASHSIZE 31
DEF_TABLE_LOCKMODE page
DS_HASHSIZE 31
DS_POOLSIZE 127
ENCRYPT_CDR none
ENCRYPT_CIPHERS none
ENCRYPT_HDR none
ENCRYPT_MAC none
ENCRYPT_MACFILE none
ENCRYPT_SMX none
ENCRYPT_SWITCH none
EXT_DIRECTIVES 0
FAILOVER_CALLBACK none
FASTPOLL 1
C-2 IBM Informix Migration Guide

Table C-3. Configuration parameters added to the onconfig.std file (continued)
Configuration Parameter Value
HA_ALIAS none
LOG_INDEX_BUILDS none
MAX_INCOMPLETE_CONNECTIONS 1024
PC_HASHSIZE 31
PC_POOLSIZE 127
PLCY_HASHSIZE 127
PLCY_POOLSIZE 31
PLOG_OVERFLOW_PATH UNIX: $INFORMIXDIR/tmp
Windows: none
UPDATABLE_SECONDARY 0
RESTORE_FILTER none
SBSPACETEMP none
SDS_ENABLE none
SDS_PAGING none
SDS_TEMPDBS none
SDS_TIMEOUT 20
SECURITY_LOCALCONNECTION none
SQLTRACE Commented out: # SQLTRACElevel=low,ntraces=1000,size=2,mode=global
SSL_KEYSTORE_LABEL none
STMT_CACHE 0
STMT_CACHE_HITS 0
STMT_CACHE_NOLIMIT 0
STMT_CACHE_NUMPOOL 1
STMT_CACHE_SIZE 512
UNSECURE_ONSTAT none
USRC_HASHSIZE 31
USRC_POOLSIZE 127
VPCLASS cpu,num=1,noage
Commented out: # VPCLASS aio,num=1
Commented out: #VPCLASS jvp,num=1
Configuration parameters that have new default values
The following table lists the configuration parameters that have new default valuesin the onconfig.std file.
Table C-4. Configuration Parameters with New Default Values in the onconfig.std File
Configuration parameter Previous value New value
ADMIN_MODE_USERS 1 None
Appendix C. Configuration parameters that have been changed or removed C-3
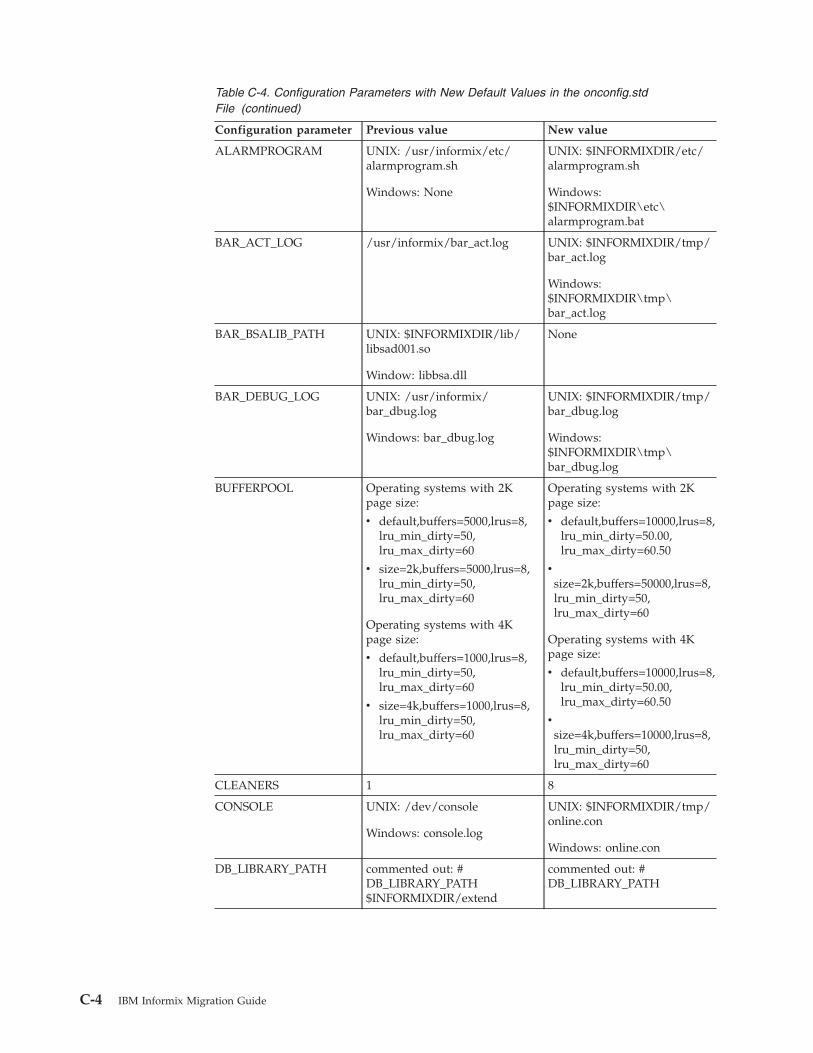
Table C-4. Configuration Parameters with New Default Values in the onconfig.stdFile (continued)
Configuration parameter Previous value New value
ALARMPROGRAM UNIX: /usr/informix/etc/alarmprogram.sh
Windows: None
UNIX: $INFORMIXDIR/etc/alarmprogram.sh
Windows:$INFORMIXDIR\etc\alarmprogram.bat
BAR_ACT_LOG /usr/informix/bar_act.log UNIX: $INFORMIXDIR/tmp/bar_act.log
Windows:$INFORMIXDIR\tmp\bar_act.log
BAR_BSALIB_PATH UNIX: $INFORMIXDIR/lib/libsad001.so
Window: libbsa.dll
None
BAR_DEBUG_LOG UNIX: /usr/informix/bar_dbug.log
Windows: bar_dbug.log
UNIX: $INFORMIXDIR/tmp/bar_dbug.log
Windows:$INFORMIXDIR\tmp\bar_dbug.log
BUFFERPOOL Operating systems with 2Kpage size:
v default,buffers=5000,lrus=8,lru_min_dirty=50,lru_max_dirty=60
v size=2k,buffers=5000,lrus=8,lru_min_dirty=50,lru_max_dirty=60
Operating systems with 4Kpage size:
v default,buffers=1000,lrus=8,lru_min_dirty=50,lru_max_dirty=60
v size=4k,buffers=1000,lrus=8,lru_min_dirty=50,lru_max_dirty=60
Operating systems with 2Kpage size:
v default,buffers=10000,lrus=8,lru_min_dirty=50.00,lru_max_dirty=60.50
v
size=2k,buffers=50000,lrus=8,lru_min_dirty=50,lru_max_dirty=60
Operating systems with 4Kpage size:
v default,buffers=10000,lrus=8,lru_min_dirty=50.00,lru_max_dirty=60.50
v
size=4k,buffers=10000,lrus=8,lru_min_dirty=50,lru_max_dirty=60
CLEANERS 1 8
CONSOLE UNIX: /dev/console
Windows: console.log
UNIX: $INFORMIXDIR/tmp/online.con
Windows: online.con
DB_LIBRARY_PATH commented out: #DB_LIBRARY_PATH$INFORMIXDIR/extend
commented out: #DB_LIBRARY_PATH
C-4 IBM Informix Migration Guide
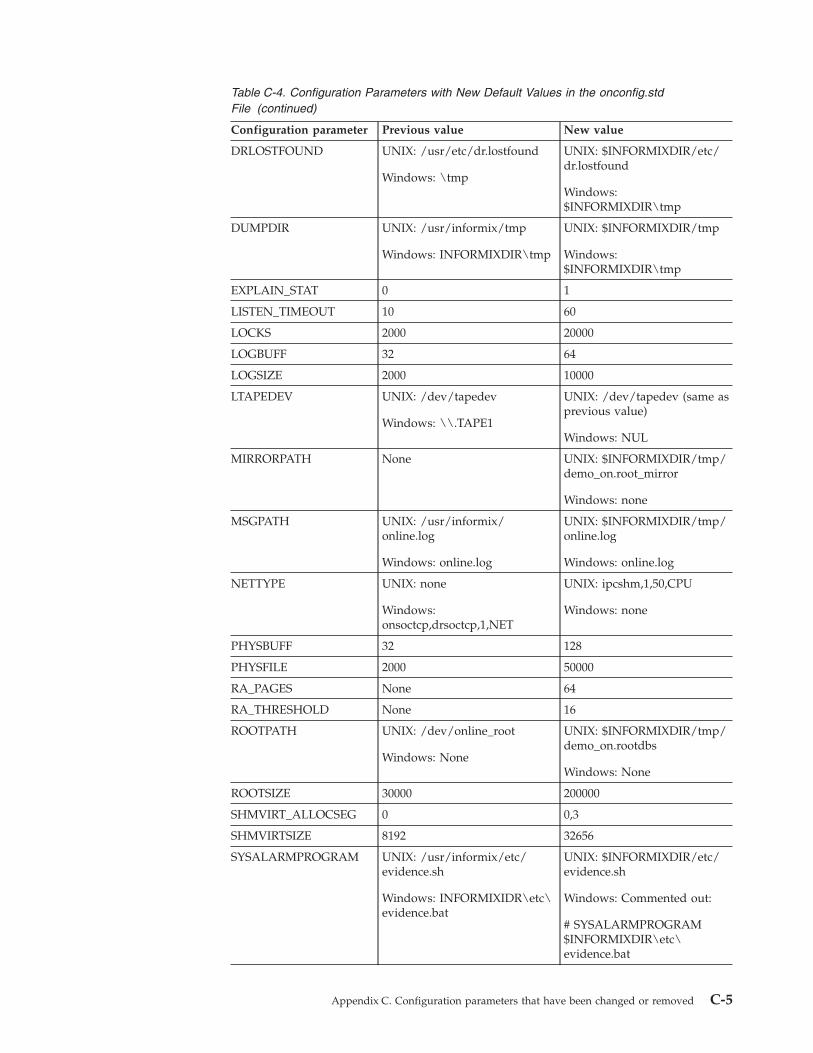
Table C-4. Configuration Parameters with New Default Values in the onconfig.stdFile (continued)
Configuration parameter Previous value New value
DRLOSTFOUND UNIX: /usr/etc/dr.lostfound
Windows: \tmp
UNIX: $INFORMIXDIR/etc/dr.lostfound
Windows:$INFORMIXDIR\tmp
DUMPDIR UNIX: /usr/informix/tmp
Windows: INFORMIXDIR\tmp
UNIX: $INFORMIXDIR/tmp
Windows:$INFORMIXDIR\tmp
EXPLAIN_STAT 0 1
LISTEN_TIMEOUT 10 60
LOCKS 2000 20000
LOGBUFF 32 64
LOGSIZE 2000 10000
LTAPEDEV UNIX: /dev/tapedev
Windows: \\.TAPE1
UNIX: /dev/tapedev (same asprevious value)
Windows: NUL
MIRRORPATH None UNIX: $INFORMIXDIR/tmp/demo_on.root_mirror
Windows: none
MSGPATH UNIX: /usr/informix/online.log
Windows: online.log
UNIX: $INFORMIXDIR/tmp/online.log
Windows: online.log
NETTYPE UNIX: none
Windows:onsoctcp,drsoctcp,1,NET
UNIX: ipcshm,1,50,CPU
Windows: none
PHYSBUFF 32 128
PHYSFILE 2000 50000
RA_PAGES None 64
RA_THRESHOLD None 16
ROOTPATH UNIX: /dev/online_root
Windows: None
UNIX: $INFORMIXDIR/tmp/demo_on.rootdbs
Windows: None
ROOTSIZE 30000 200000
SHMVIRT_ALLOCSEG 0 0,3
SHMVIRTSIZE 8192 32656
SYSALARMPROGRAM UNIX: /usr/informix/etc/evidence.sh
Windows: INFORMIXIDR\etc\evidence.bat
UNIX: $INFORMIXDIR/etc/evidence.sh
Windows: Commented out:
# SYSALARMPROGRAM$INFORMIXDIR\etc\evidence.bat
Appendix C. Configuration parameters that have been changed or removed C-5
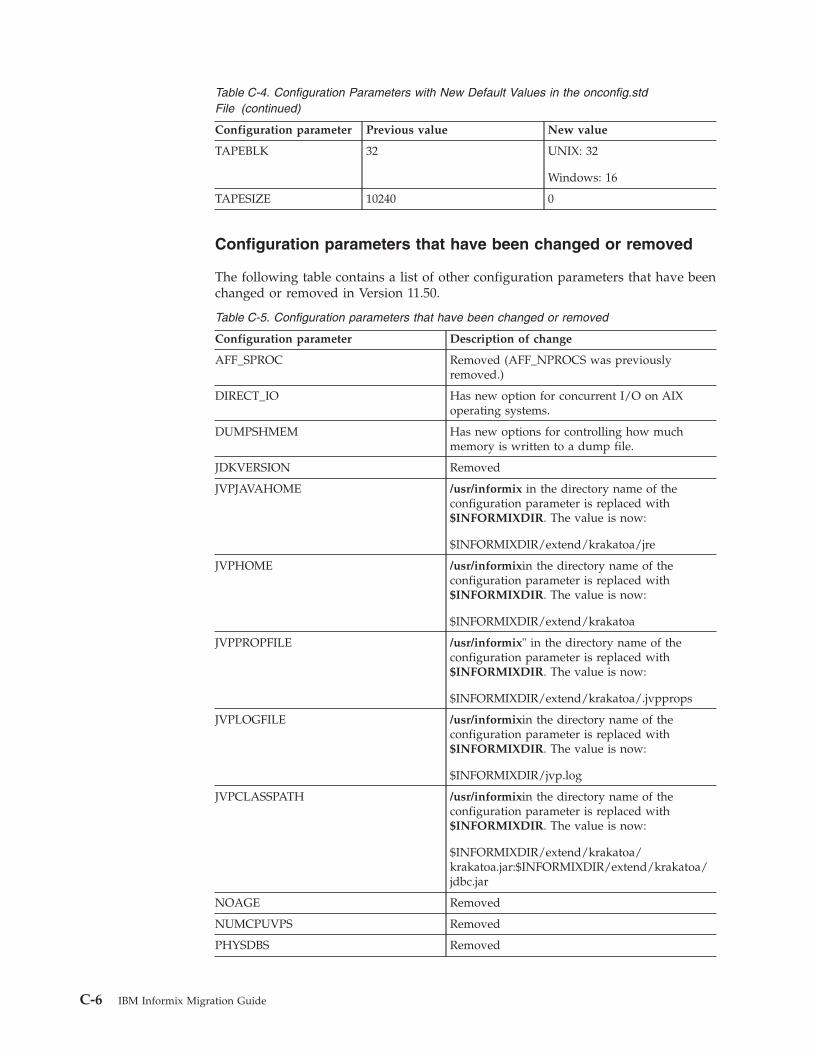
Table C-4. Configuration Parameters with New Default Values in the onconfig.stdFile (continued)
Configuration parameter Previous value New value
TAPEBLK 32 UNIX: 32
Windows: 16
TAPESIZE 10240 0
Configuration parameters that have been changed or removed
The following table contains a list of other configuration parameters that have beenchanged or removed in Version 11.50.
Table C-5. Configuration parameters that have been changed or removed
Configuration parameter Description of change
AFF_SPROC Removed (AFF_NPROCS was previouslyremoved.)
DIRECT_IO Has new option for concurrent I/O on AIXoperating systems.
DUMPSHMEM Has new options for controlling how muchmemory is written to a dump file.
JDKVERSION Removed
JVPJAVAHOME /usr/informix in the directory name of theconfiguration parameter is replaced with$INFORMIXDIR. The value is now:
$INFORMIXDIR/extend/krakatoa/jre
JVPHOME /usr/informixin the directory name of theconfiguration parameter is replaced with$INFORMIXDIR. The value is now:
$INFORMIXDIR/extend/krakatoa
JVPPROPFILE /usr/informix" in the directory name of theconfiguration parameter is replaced with$INFORMIXDIR. The value is now:
$INFORMIXDIR/extend/krakatoa/.jvpprops
JVPLOGFILE /usr/informixin the directory name of theconfiguration parameter is replaced with$INFORMIXDIR. The value is now:
$INFORMIXDIR/jvp.log
JVPCLASSPATH /usr/informixin the directory name of theconfiguration parameter is replaced with$INFORMIXDIR. The value is now:
$INFORMIXDIR/extend/krakatoa/krakatoa.jar:$INFORMIXDIR/extend/krakatoa/jdbc.jar
NOAGE Removed
NUMCPUVPS Removed
PHYSDBS Removed
C-6 IBM Informix Migration Guide
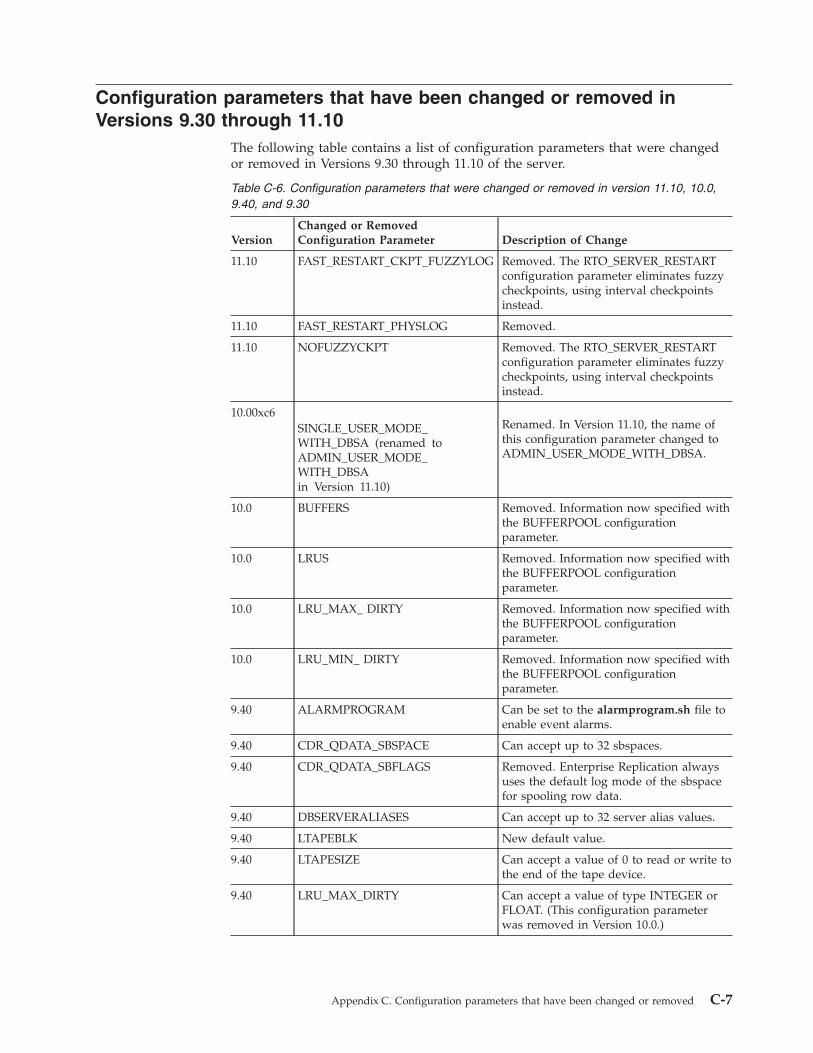
Configuration parameters that have been changed or removed inVersions 9.30 through 11.10
The following table contains a list of configuration parameters that were changedor removed in Versions 9.30 through 11.10 of the server.
Table C-6. Configuration parameters that were changed or removed in version 11.10, 10.0,9.40, and 9.30
VersionChanged or RemovedConfiguration Parameter Description of Change
11.10 FAST_RESTART_CKPT_FUZZYLOG Removed. The RTO_SERVER_RESTARTconfiguration parameter eliminates fuzzycheckpoints, using interval checkpointsinstead.
11.10 FAST_RESTART_PHYSLOG Removed.
11.10 NOFUZZYCKPT Removed. The RTO_SERVER_RESTARTconfiguration parameter eliminates fuzzycheckpoints, using interval checkpointsinstead.
10.00xc6SINGLE_USER_MODE_WITH_DBSA (renamed toADMIN_USER_MODE_WITH_DBSAin Version 11.10)
Renamed. In Version 11.10, the name ofthis configuration parameter changed toADMIN_USER_MODE_WITH_DBSA.
10.0 BUFFERS Removed. Information now specified withthe BUFFERPOOL configurationparameter.
10.0 LRUS Removed. Information now specified withthe BUFFERPOOL configurationparameter.
10.0 LRU_MAX_ DIRTY Removed. Information now specified withthe BUFFERPOOL configurationparameter.
10.0 LRU_MIN_ DIRTY Removed. Information now specified withthe BUFFERPOOL configurationparameter.
9.40 ALARMPROGRAM Can be set to the alarmprogram.sh file toenable event alarms.
9.40 CDR_QDATA_SBSPACE Can accept up to 32 sbspaces.
9.40 CDR_QDATA_SBFLAGS Removed. Enterprise Replication alwaysuses the default log mode of the sbspacefor spooling row data.
9.40 DBSERVERALIASES Can accept up to 32 server alias values.
9.40 LTAPEBLK New default value.
9.40 LTAPESIZE Can accept a value of 0 to read or write tothe end of the tape device.
9.40 LRU_MAX_DIRTY Can accept a value of type INTEGER orFLOAT. (This configuration parameterwas removed in Version 10.0.)
Appendix C. Configuration parameters that have been changed or removed C-7
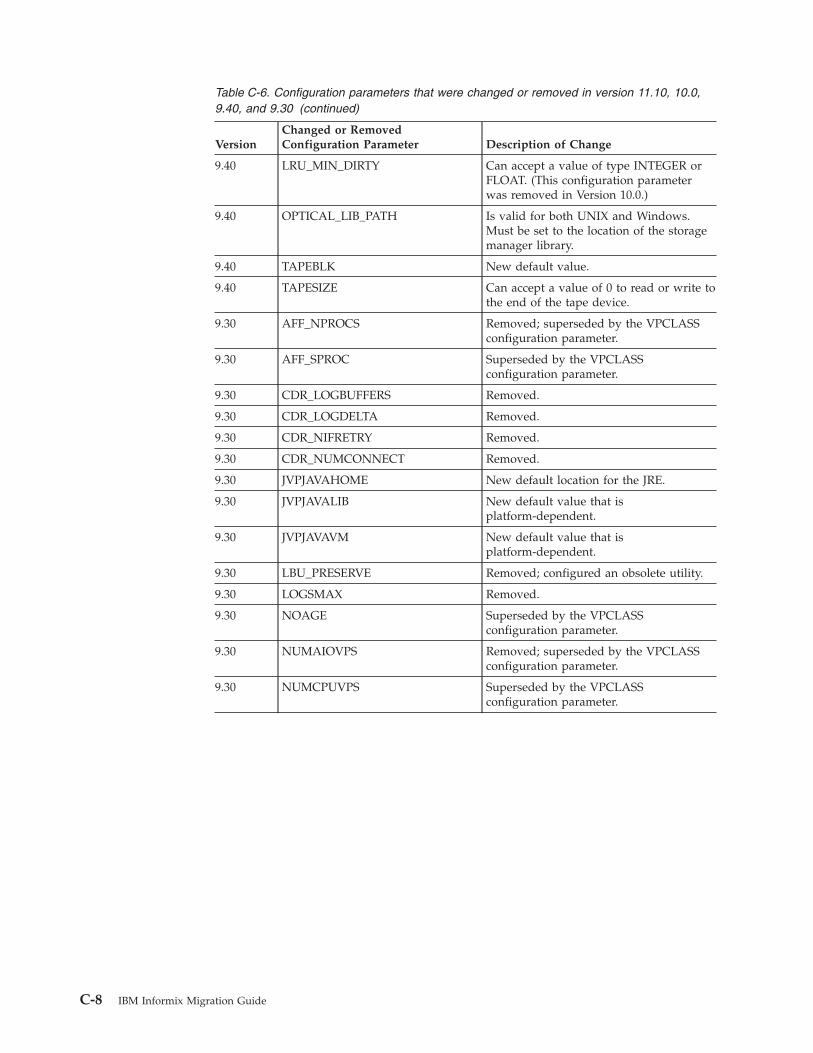
Table C-6. Configuration parameters that were changed or removed in version 11.10, 10.0,9.40, and 9.30 (continued)
VersionChanged or RemovedConfiguration Parameter Description of Change
9.40 LRU_MIN_DIRTY Can accept a value of type INTEGER orFLOAT. (This configuration parameterwas removed in Version 10.0.)
9.40 OPTICAL_LIB_PATH Is valid for both UNIX and Windows.Must be set to the location of the storagemanager library.
9.40 TAPEBLK New default value.
9.40 TAPESIZE Can accept a value of 0 to read or write tothe end of the tape device.
9.30 AFF_NPROCS Removed; superseded by the VPCLASSconfiguration parameter.
9.30 AFF_SPROC Superseded by the VPCLASSconfiguration parameter.
9.30 CDR_LOGBUFFERS Removed.
9.30 CDR_LOGDELTA Removed.
9.30 CDR_NIFRETRY Removed.
9.30 CDR_NUMCONNECT Removed.
9.30 JVPJAVAHOME New default location for the JRE.
9.30 JVPJAVALIB New default value that isplatform-dependent.
9.30 JVPJAVAVM New default value that isplatform-dependent.
9.30 LBU_PRESERVE Removed; configured an obsolete utility.
9.30 LOGSMAX Removed.
9.30 NOAGE Superseded by the VPCLASSconfiguration parameter.
9.30 NUMAIOVPS Removed; superseded by the VPCLASSconfiguration parameter.
9.30 NUMCPUVPS Superseded by the VPCLASSconfiguration parameter.
C-8 IBM Informix Migration Guide
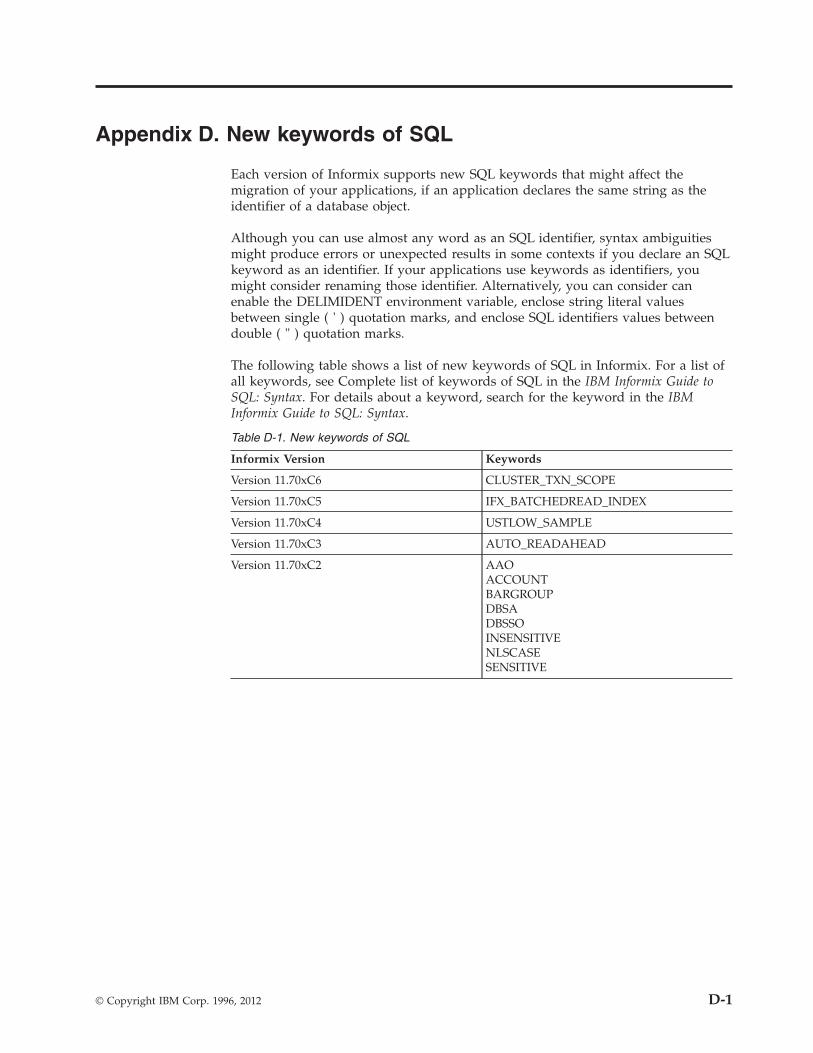
Appendix D. New keywords of SQL
Each version of Informix supports new SQL keywords that might affect themigration of your applications, if an application declares the same string as theidentifier of a database object.
Although you can use almost any word as an SQL identifier, syntax ambiguitiesmight produce errors or unexpected results in some contexts if you declare an SQLkeyword as an identifier. If your applications use keywords as identifiers, youmight consider renaming those identifier. Alternatively, you can consider canenable the DELIMIDENT environment variable, enclose string literal valuesbetween single ( ' ) quotation marks, and enclose SQL identifiers values betweendouble ( " ) quotation marks.
The following table shows a list of new keywords of SQL in Informix. For a list ofall keywords, see Complete list of keywords of SQL in the IBM Informix Guide toSQL: Syntax. For details about a keyword, search for the keyword in the IBMInformix Guide to SQL: Syntax.
Table D-1. New keywords of SQL
Informix Version Keywords
Version 11.70xC6 CLUSTER_TXN_SCOPE
Version 11.70xC5 IFX_BATCHEDREAD_INDEX
Version 11.70xC4 USTLOW_SAMPLE
Version 11.70xC3 AUTO_READAHEAD
Version 11.70xC2 AAOACCOUNTBARGROUPDBSADBSSOINSENSITIVENLSCASESENSITIVE
© Copyright IBM Corp. 1996, 2012 D-1
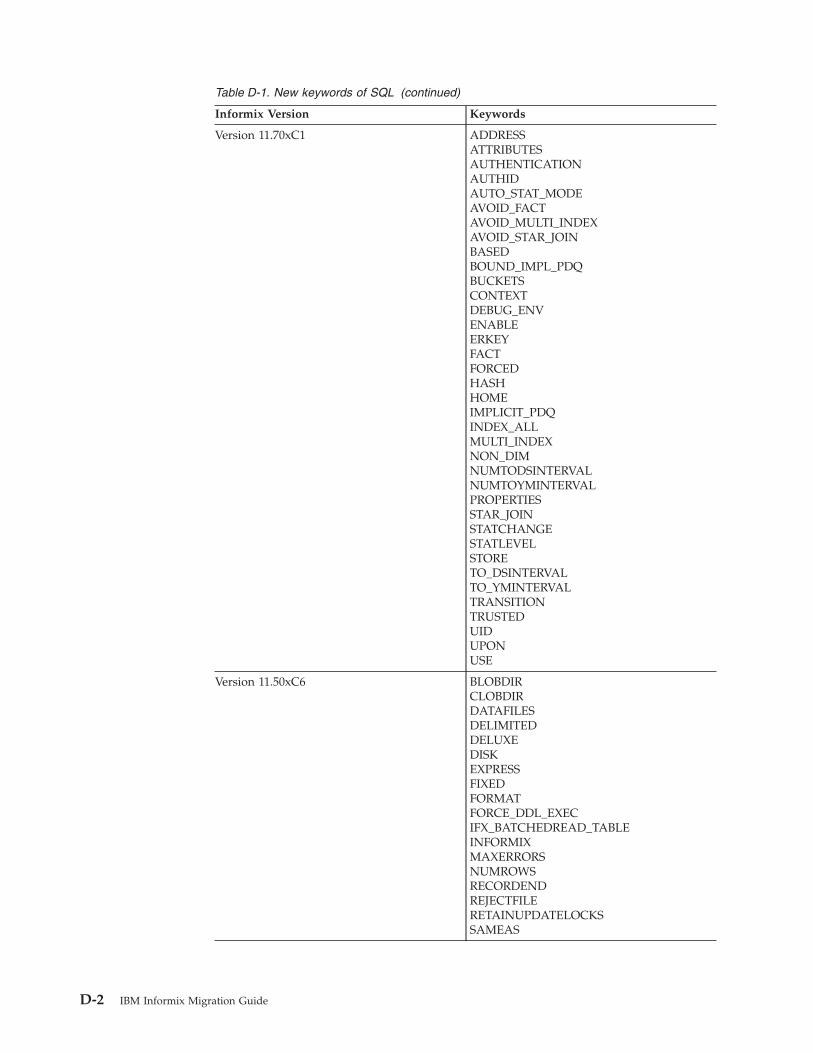
Table D-1. New keywords of SQL (continued)
Informix Version Keywords
Version 11.70xC1 ADDRESSATTRIBUTESAUTHENTICATIONAUTHIDAUTO_STAT_MODEAVOID_FACTAVOID_MULTI_INDEXAVOID_STAR_JOINBASEDBOUND_IMPL_PDQBUCKETSCONTEXTDEBUG_ENVENABLEERKEYFACTFORCEDHASHHOMEIMPLICIT_PDQINDEX_ALLMULTI_INDEXNON_DIMNUMTODSINTERVALNUMTOYMINTERVALPROPERTIESSTAR_JOINSTATCHANGESTATLEVELSTORETO_DSINTERVALTO_YMINTERVALTRANSITIONTRUSTEDUIDUPONUSE
Version 11.50xC6 BLOBDIRCLOBDIRDATAFILESDELIMITEDDELUXEDISKEXPRESSFIXEDFORMATFORCE_DDL_EXECIFX_BATCHEDREAD_TABLEINFORMIXMAXERRORSNUMROWSRECORDENDREJECTFILERETAINUPDATELOCKSSAMEAS
D-2 IBM Informix Migration Guide
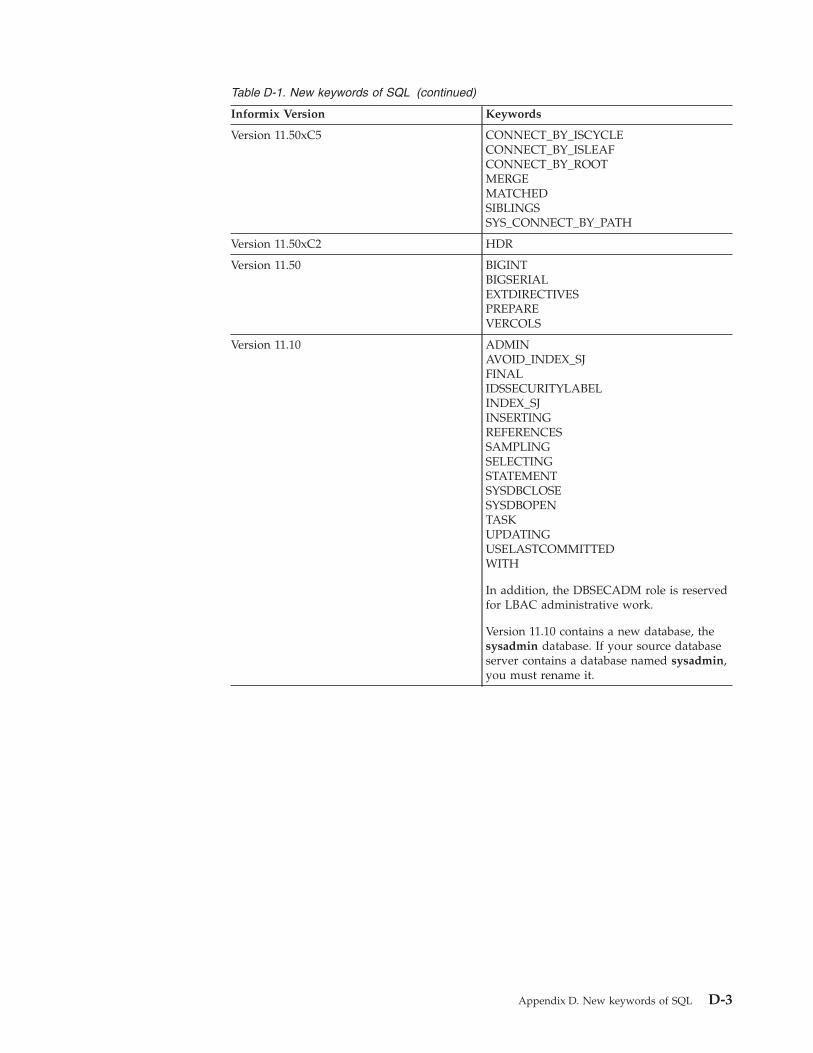
Table D-1. New keywords of SQL (continued)
Informix Version Keywords
Version 11.50xC5 CONNECT_BY_ISCYCLECONNECT_BY_ISLEAFCONNECT_BY_ROOTMERGEMATCHEDSIBLINGSSYS_CONNECT_BY_PATH
Version 11.50xC2 HDR
Version 11.50 BIGINTBIGSERIALEXTDIRECTIVESPREPAREVERCOLS
Version 11.10 ADMINAVOID_INDEX_SJFINALIDSSECURITYLABELINDEX_SJINSERTINGREFERENCESSAMPLINGSELECTINGSTATEMENTSYSDBCLOSESYSDBOPENTASKUPDATINGUSELASTCOMMITTEDWITH
In addition, the DBSECADM role is reservedfor LBAC administrative work.
Version 11.10 contains a new database, thesysadmin database. If your source databaseserver contains a database named sysadmin,you must rename it.
Appendix D. New keywords of SQL D-3
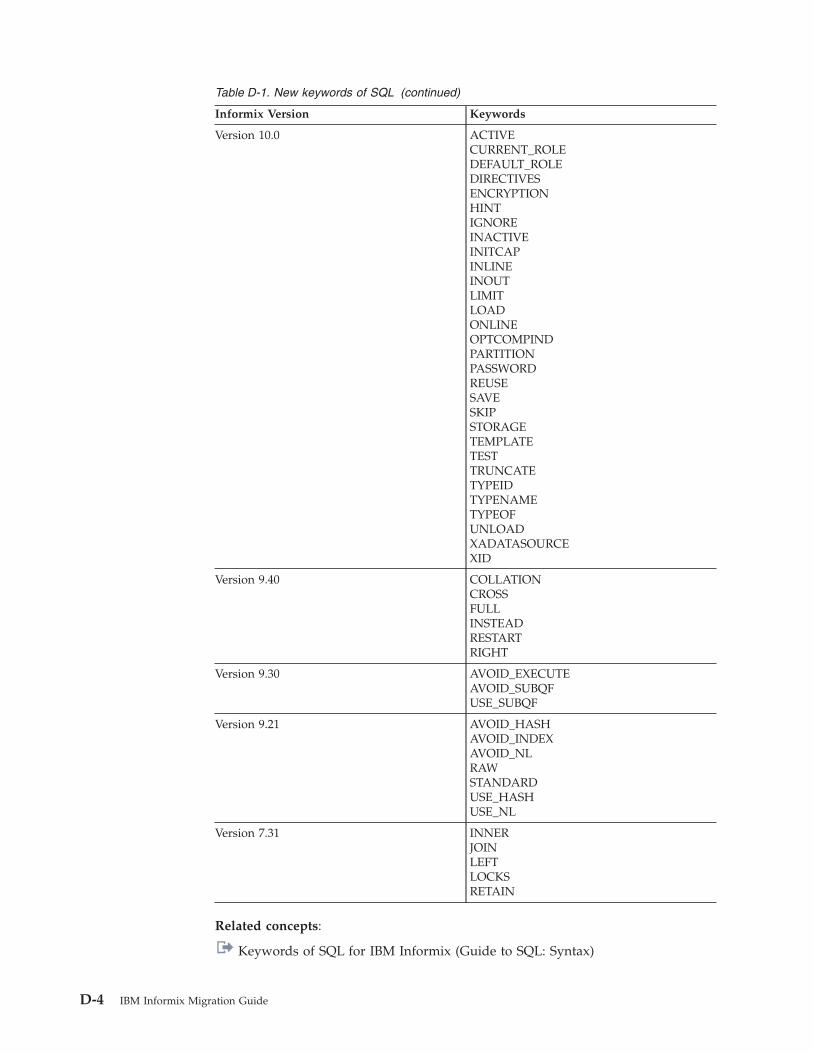
Table D-1. New keywords of SQL (continued)
Informix Version Keywords
Version 10.0 ACTIVECURRENT_ROLEDEFAULT_ROLEDIRECTIVESENCRYPTIONHINTIGNOREINACTIVEINITCAPINLINEINOUTLIMITLOADONLINEOPTCOMPINDPARTITIONPASSWORDREUSESAVESKIPSTORAGETEMPLATETESTTRUNCATETYPEIDTYPENAMETYPEOFUNLOADXADATASOURCEXID
Version 9.40 COLLATIONCROSSFULLINSTEADRESTARTRIGHT
Version 9.30 AVOID_EXECUTEAVOID_SUBQFUSE_SUBQF
Version 9.21 AVOID_HASHAVOID_INDEXAVOID_NLRAWSTANDARDUSE_HASHUSE_NL
Version 7.31 INNERJOINLEFTLOCKSRETAIN
Related concepts:
Keywords of SQL for IBM Informix (Guide to SQL: Syntax)
D-4 IBM Informix Migration Guide
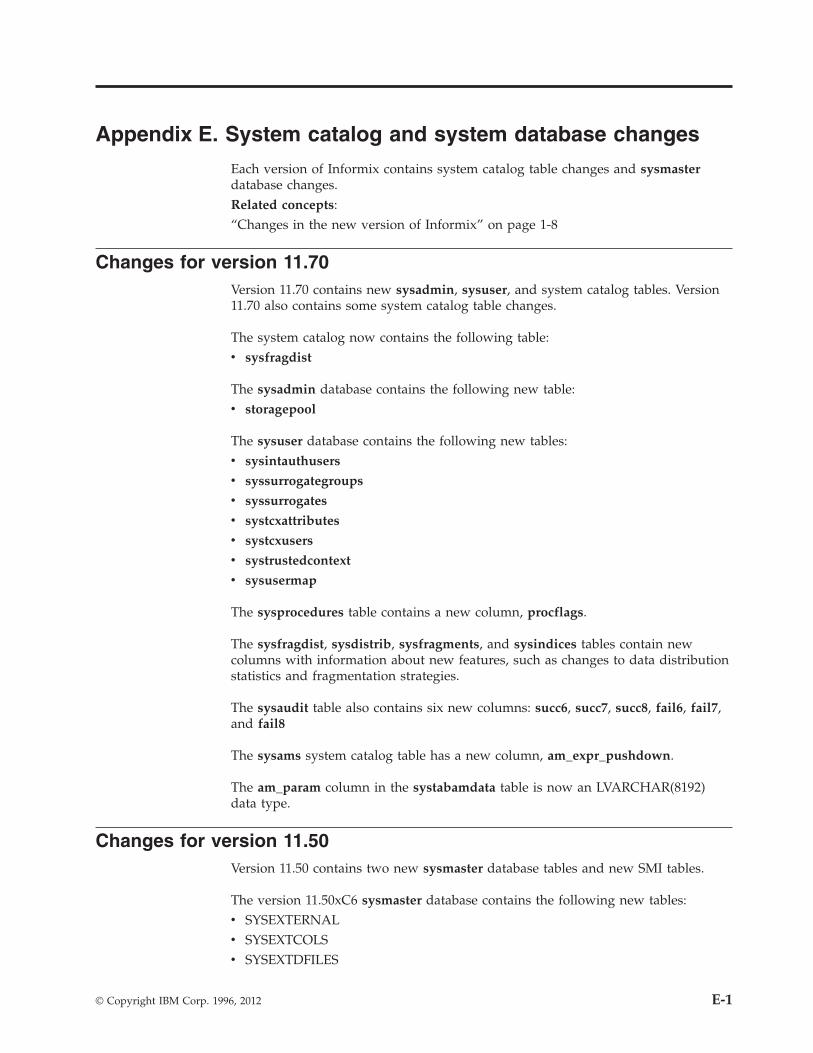
Appendix E. System catalog and system database changes
Each version of Informix contains system catalog table changes and sysmasterdatabase changes.Related concepts:“Changes in the new version of Informix” on page 1-8
Changes for version 11.70Version 11.70 contains new sysadmin, sysuser, and system catalog tables. Version11.70 also contains some system catalog table changes.
The system catalog now contains the following table:v sysfragdist
The sysadmin database contains the following new table:v storagepool
The sysuser database contains the following new tables:v sysintauthusers
v syssurrogategroups
v syssurrogates
v systcxattributes
v systcxusers
v systrustedcontext
v sysusermap
The sysprocedures table contains a new column, procflags.
The sysfragdist, sysdistrib, sysfragments, and sysindices tables contain newcolumns with information about new features, such as changes to data distributionstatistics and fragmentation strategies.
The sysaudit table also contains six new columns: succ6, succ7, succ8, fail6, fail7,and fail8
The sysams system catalog table has a new column, am_expr_pushdown.
The am_param column in the systabamdata table is now an LVARCHAR(8192)data type.
Changes for version 11.50Version 11.50 contains two new sysmaster database tables and new SMI tables.
The version 11.50xC6 sysmaster database contains the following new tables:v SYSEXTERNALv SYSEXTCOLSv SYSEXTDFILES
© Copyright IBM Corp. 1996, 2012 E-1

The version 11.50xC4 sysmaster database contains the new syscompdicts_full tableand the new syscompdicts view.
The version 11.50xC3 sysmaster database contains this new table for the ChangeData Capture API:
syscdc
The version 11.50 sysmaster database contains this new table:
syssesappinfo
The following new SMI tables contain information about Enterprise Replicationthat you can use to monitor status and diagnose problems:v The syscdr_state table contains information about whether Enterprise
Replication, data capture, data apply, and the network between servers is active.v The syscdr_ddr table contains information about the status of log capture and
the proximity or status of transaction blocking (DDRBLOCK) or transactionspooling.
v The syscdr_nif table contains information about network connections and theflow of data between Enterprise Replication servers.
v The syscdr_rcv table contains information about transactions being applied ontarget servers and acknowledgments being sent from target servers.
v The syscdr_atsdir table contains information about the contents of the ATSdirectory.
v The syscdr_risdir table contains information about the contents of the RISdirectory.
v The syscdr_ats table contains the first ten lines of content of each ATS file.v The syscdr_ris table contains the first ten lines of content of each RIS file.v The syscdr_rqmstamp table contains information about which transaction is
being added into each queue.v The syscdr_rqmhandle table contains information about which transaction is
being processed in each queue.
Changes for version 11.10Version 11.10 contains new sysmaster database tables and the new sysadmindatabase.
The version 11.10 sysmaster database contains these new tables:syscheckpoint
sysckptinfo
Schema changes were made to the systables, sysindices, and sysfragments tablesfor Version 11.10. For information about the current schema, see information onsystables, sysindices, and sysfragments in the IBM Informix Guide to SQL:Reference.
Version 11.10 also includes a new database, sysadmin, which contains tables thatstore task properties. This database is dropped when you revert to earlier versionsof the database server. If your source database server contains a sysadmindatabase, you must rename it.
E-2 IBM Informix Migration Guide
Changes for version 10.0Version 10.0 contains new sysmaster database tables and new SMI tables.
The version 10.0 sysmaster database contains these new tables:
sysdirectives sysbufpool, a system-monitoring interface (SMI)
The following changes were made to other SMI tables:v The sysfragments table contains a Partition column and the Flags column now
tells you if the fragmentation scheme has partitions.v The sysusers table contains a defrole column.v The sysams table contains an am_truncate column.v The sysprocedures table contains a rtnparameters column for information about
INOUT parameters.v The syspaghdr table has a pg_pagesize column.v The sysptnhdr table has a pagesize column.v The sysptnhdr table has a bpoolindx column that indicates which buffer pool
the buffer is in.v The sysbufhdr table has a bufsize column, which indicates the buffer page size.v The sysdbstab and syschktab tables have pagesize columns.v The views syschunks and sysdbspaces tables have a pagesize columns.v The views systabinfo table has a ti_pagesize column.v The views systabpaghdrs and sysphyspaghdrs tables have pg_pagesize
columns.
In addition, tables added to the sysscdr database are removed.
Changes for version 9.40Version 9.40 contains a new sysmaster database table. In addition, some tablescontain a new collation column.
The following new system catalog table was added:v syssequences
A new collation column has been added to the following system catalog tables:v sysconstraints sysindices
v sysprocplan
v systrigbody
Changes for version 9.30Some sysmaster database tables were removed from version 9.30.
The following tables were deleted from the sysmaster database in Version 9.30:v arc_ae_view arc_db_file_view
v arc_dbspace arc_dbspace_set
v arc_directory_view
v arc_file_view
Appendix E. System catalog and system database changes E-3
v arc_file_copy_view
v arc_pendreq_view
v arc_phys_dev
v arc_rep_table
v arc_replicate
v arc_req_vset_view
v arc_request_view
v arc_save_set_view
v arc_server
v arc_version
v arc_vol_lock_view
v arc_volume_view
v arc_vset
v arc_vset_user_view
v arc_vset_view
Column-width changes in sysmaster tables in Version 9.20and later versions
Version 9.20 and later versions of Informix provide long identifiers. All identifiersin the system catalog tables and the sysmaster database reflect these new limits onidentifier length.
The IBM Informix Guide to SQL: Syntax defines identifiers, which specify the namesof database objects.
The column widths for identifiers that refer to database objects and otheridentifiers changed from CHAR(18) to VARCHAR(128,0) in the following systemcatalog tables:v sysaggregatesv sysamsv sysattrtypesv sysblobsv syscastsv syscolattribsv syscolumnsv sysconstraintsv sysdomainsv sysfragauthv sysfragmentsv sysindexesv sysindicesv sysobjstatev sysopclassesv sysopclstrv sysproceduresv sysroutinelangsv syssynonyms
E-4 IBM Informix Migration Guide
v syssyntablev systabamdatav systablesv systracemsgsv systriggersv sysxtdtypes
Identifiers changed from CHAR(18) to CHAR(128) in the following sysmasterdatabase tables:v arc_dbspacev arc_dbspace_setv arc_phys_devv arc_rep_tablev arc_replicatev arc_serverv arc_versionv arc_vsetv arc_vset_viewv flags_text syscfgtabv sysconfigv syscrtadtv sysdatabasesv sysdbslocalev sysdbspacesv sysdbspartnv sysdbstabv sysdicv sysdiccachev sysdistcaEchev sysdscv sysextentsv sysextspacesv syslocksv sysopendbv sysprcv sysproccachev sysptprofv syssdblockv syssqlcurallv syssqlcursesv syssqlstatv systabnamesv systransv systxptab
Appendix E. System catalog and system database changes E-5
Column widths for user login identifiers changed from CHAR(8) to CHAR(32) insome system catalog tables and sysmaster database tables. The following systemcatalog tables changed:v sysaggregatesv sysamsv syscastsv syscolauthv sysconstraintsv sysdomainsv sysfragauthv sysindexesv sysindicesv syslangauthv sysobjstatev sysopclassesv sysopclstrv sysprocauthv sysproceduresv sysroleauthv syssynonymsv syssyntablev systabauthv systablesv systriggersv sysusersv sysxtdtypeauthv sysxtdtypes
The following sysmaster database tables changed:v sysauditv sysdatabasesv sysdbspacesv sysdbspartnv sysdbstabv sysdicv sysdiccachev sysdistcachev sysdscv sysextspacesv sysprcv sysproccachev sysrstcbv sysscblstv syssessionsv systabnamesv sysuserthreads
E-6 IBM Informix Migration Guide
Columns that include path names or other values changed from CHAR(128) toCHAR(256) in the following sysmaster database tables:v sysadtinfov syschktabv syschunksv syscrtadtv sysdrcbv sysdriv sysmchktab
The path for a physical device changed from CHAR(128) to CHAR(260) in thefollowing sysmaster database table:v arc_phys_dev
Columns widths changed from CHAR(20) to CHAR(128) for longer object names inthe following sysmaster database tables:v sysdrcbv sysdris
Column widths changed from CHAR(37) to CHAR(257) in the following sysmasterdatabase tables:v sysdistcachev sysdscv sysprcv sysproccache
Column widths changed from DECIMAL(16,0) to DECIMAL(32,0) in the followingsysmaster database table:v syssesprof
The tabauth column of the systabauth system catalog table is now CHAR(9)instead of CHAR(8). The 9th character indicates the Under privilege.
Data type changes in sysmaster tables in Version 9.20 andlater versions
The data type of some sysmaster database tables was changed in Informix Version9.20.
The “Column-width changes in sysmaster tables in Version 9.20 and later versions”on page E-4 topic lists columns that have changed from the CHAR data type to theVARCHAR data type. In addition, one or more columns changed from theSMALLINT data type to the integer data type in the following sysmaster databasetables:v sysdbspaces sysdbstab
v sysdic sysrstcb
v syssdblock
The CHAR data type changed to the STAT data type in the following systemcatalog table:v sysdistrib
Appendix E. System catalog and system database changes E-7
Changes in treatment of null values in sysmaster tables inVersion 9.30
Starting with Version 9.30, nulls are allowed in some sysmaster database tables, inwhich nulls were previously not allowed.
Nulls are allowed for some columns in the following sysmaster database tables:v arc_ae_view
v arc_db_file_view
v arc_directory_view
v arc_file_copy_view
v arc_file_view
v arc_pendreq_view
v arc_req_vset_view
v arc_request_view
v arc_save_set_view
v arc_vol_lock_view
v arc_volume_view
v arc_vset_user_view
v arc_vset_view
Other sysmaster database table and column changes inVersion 9.30
Informix Version 9.30 contains a new sysmaster database table. In addition, sometables were removed and new columns were added to a few tables.
The following tables have been added to the sysmaster database:v logmessage
v syscdrack_buf
v syscdrack_txn
v syscdrctrl_buf
v syscdrctrl_txn
v syscdrprog
v syscdrq
v syscdrrecv_buf
v syscdrrecv_txn
v syscdrtx
The arc_change_log table has been deleted from the sysmaster database:
One or more columns have been added to the following system catalog tables:v sysams
v sysdistrib
v sysprocedures
v sysroutinelangs
Several columns have been added to the sysdbstab system catalog table.
E-8 IBM Informix Migration Guide
Remote queries on system catalog tables between Version 7.31 andlater versions
Certain system catalog tables use data types that are not supported in InformixVersion 7.31. Remote queries that issue a SELECT * statement on these systemcatalog tables from Version 7.31 to later versions will fail.
For example, the following queries that originate on Version 7.31 fail if you try torun them on a later version of the server:SELECT * FROM dbname@remoteserver:sysindices;SELECT * FROM dbname@remoteserver:sysindexes;
Instead of using an asterisk as the Projection clause, specify the required columnnames explicitly. You cannot specify any columns that have user-defined types.
Difference in sysindexes between Version 7.31 and later versionsIn Version 7.31, sysindexes is a table. In Informix Version 11.50, 11.10, 10.0, 9.40,9.30, and 9.21, sysindexes is a view.
The ALTER TABLE statement fails for sysindexes because this statement is notvalid for altering a view.
Appendix E. System catalog and system database changes E-9

E-10 IBM Informix Migration Guide

Appendix F. New and changed features
Each version of Informix contains many new and changed features.
For descriptions of these changes, see the release notes for the new version of theserver, and, if applicable, for any versions between your source server and the newversion of the server.
For information about new and changed features that affect migration, see “What'snew in migration for Informix, Version 11.70” on page x.
If you are migrating from a version of Informix that is earlier than Version 11.10,you need to know that:v ADMIN_USER_MODE_WITH_DBSA is the new name for the
SINGLE_USER_MODE_WITH_DBSA configuration parameterv Informix supports including $INFORMIXDIR as the first path name value in path
name specifications in the ONCONFIG fileRelated concepts:“Changes in the new version of Informix” on page 1-8
Server library name changesInformix Version 11.70 contains some new server library names.
The following database server library names have new names. These library fileshave a .so or .dll extension.
LibraryName for 9.14, 9.21,9.30, or 9.40 Server
Name for 10.0Server
Name for 11.10,11.50, or 11.70 Server
Optical iosm09a iosm10a iosm11a
pload ipldd09a ipldd10a ipldd11a
Simple password CSM ispws09a ispws10a ispws11a
Encryption CSM iencs09a iencs10a iencs11a
© Copyright IBM Corp. 1996, 2012 F-1

F-2 IBM Informix Migration Guide
Appendix G. Accessibility
IBM strives to provide products with usable access for everyone, regardless of ageor ability.
Accessibility features for IBM Informix productsAccessibility features help a user who has a physical disability, such as restrictedmobility or limited vision, to use information technology products successfully.
Accessibility featuresThe following list includes the major accessibility features in IBM Informixproducts. These features support:v Keyboard-only operation.v Interfaces that are commonly used by screen readers.v The attachment of alternative input and output devices.
Keyboard navigationThis product uses standard Microsoft Windows navigation keys.
Related accessibility informationIBM is committed to making our documentation accessible to persons withdisabilities. Our publications are available in HTML format so that they can beaccessed with assistive technology such as screen reader software.
IBM and accessibilitySee the IBM Accessibility Center at http://www.ibm.com/able for more informationabout the IBM commitment to accessibility.
Dotted decimal syntax diagramsThe syntax diagrams in our publications are available in dotted decimal format,which is an accessible format that is available only if you are using a screen reader.
In dotted decimal format, each syntax element is written on a separate line. If twoor more syntax elements are always present together (or always absent together),the elements can appear on the same line, because they can be considered as asingle compound syntax element.
Each line starts with a dotted decimal number; for example, 3 or 3.1 or 3.1.1. Tohear these numbers correctly, make sure that your screen reader is set to readpunctuation. All syntax elements that have the same dotted decimal number (forexample, all syntax elements that have the number 3.1) are mutually exclusivealternatives. If you hear the lines 3.1 USERID and 3.1 SYSTEMID, your syntax caninclude either USERID or SYSTEMID, but not both.
The dotted decimal numbering level denotes the level of nesting. For example, if asyntax element with dotted decimal number 3 is followed by a series of syntaxelements with dotted decimal number 3.1, all the syntax elements numbered 3.1are subordinate to the syntax element numbered 3.
© Copyright IBM Corp. 1996, 2012 G-1
Certain words and symbols are used next to the dotted decimal numbers to addinformation about the syntax elements. Occasionally, these words and symbolsmight occur at the beginning of the element itself. For ease of identification, if theword or symbol is a part of the syntax element, the word or symbol is preceded bythe backslash (\) character. The * symbol can be used next to a dotted decimalnumber to indicate that the syntax element repeats. For example, syntax element*FILE with dotted decimal number 3 is read as 3 \* FILE. Format 3* FILEindicates that syntax element FILE repeats. Format 3* \* FILE indicates thatsyntax element * FILE repeats.
Characters such as commas, which are used to separate a string of syntaxelements, are shown in the syntax just before the items they separate. Thesecharacters can appear on the same line as each item, or on a separate line with thesame dotted decimal number as the relevant items. The line can also show anothersymbol that provides information about the syntax elements. For example, the lines5.1*, 5.1 LASTRUN, and 5.1 DELETE mean that if you use more than one of theLASTRUN and DELETE syntax elements, the elements must be separated by a comma.If no separator is given, assume that you use a blank to separate each syntaxelement.
If a syntax element is preceded by the % symbol, that element is defined elsewhere.The string following the % symbol is the name of a syntax fragment rather than aliteral. For example, the line 2.1 %OP1 refers to a separate syntax fragment OP1.
The following words and symbols are used next to the dotted decimal numbers:
? Specifies an optional syntax element. A dotted decimal number followedby the ? symbol indicates that all the syntax elements with acorresponding dotted decimal number, and any subordinate syntaxelements, are optional. If there is only one syntax element with a dotteddecimal number, the ? symbol is displayed on the same line as the syntaxelement (for example, 5? NOTIFY). If there is more than one syntax elementwith a dotted decimal number, the ? symbol is displayed on a line byitself, followed by the syntax elements that are optional. For example, ifyou hear the lines 5 ?, 5 NOTIFY, and 5 UPDATE, you know that syntaxelements NOTIFY and UPDATE are optional; that is, you can choose one ornone of them. The ? symbol is equivalent to a bypass line in a railroaddiagram.
! Specifies a default syntax element. A dotted decimal number followed bythe ! symbol and a syntax element indicates that the syntax element is thedefault option for all syntax elements that share the same dotted decimalnumber. Only one of the syntax elements that share the same dotteddecimal number can specify a ! symbol. For example, if you hear the lines2? FILE, 2.1! (KEEP), and 2.1 (DELETE), you know that (KEEP) is thedefault option for the FILE keyword. In this example, if you include theFILE keyword but do not specify an option, default option KEEP is applied.A default option also applies to the next higher dotted decimal number. Inthis example, if the FILE keyword is omitted, default FILE(KEEP) is used.However, if you hear the lines 2? FILE, 2.1, 2.1.1! (KEEP), and 2.1.1(DELETE), the default option KEEP only applies to the next higher dotteddecimal number, 2.1 (which does not have an associated keyword), anddoes not apply to 2? FILE. Nothing is used if the keyword FILE is omitted.
* Specifies a syntax element that can be repeated zero or more times. Adotted decimal number followed by the * symbol indicates that this syntaxelement can be used zero or more times; that is, it is optional and can be
G-2 IBM Informix Migration Guide
repeated. For example, if you hear the line 5.1* data-area, you know thatyou can include more than one data area or you can include none. If youhear the lines 3*, 3 HOST, and 3 STATE, you know that you can includeHOST, STATE, both together, or nothing.
Notes:
1. If a dotted decimal number has an asterisk (*) next to it and there isonly one item with that dotted decimal number, you can repeat thatsame item more than once.
2. If a dotted decimal number has an asterisk next to it and several itemshave that dotted decimal number, you can use more than one itemfrom the list, but you cannot use the items more than once each. In theprevious example, you can write HOST STATE, but you cannot write HOSTHOST.
3. The * symbol is equivalent to a loop-back line in a railroad syntaxdiagram.
+ Specifies a syntax element that must be included one or more times. Adotted decimal number followed by the + symbol indicates that this syntaxelement must be included one or more times. For example, if you hear theline 6.1+ data-area, you must include at least one data area. If you hearthe lines 2+, 2 HOST, and 2 STATE, you know that you must include HOST,STATE, or both. As for the * symbol, you can repeat a particular item if it isthe only item with that dotted decimal number. The + symbol, like the *symbol, is equivalent to a loop-back line in a railroad syntax diagram.
Appendix G. Accessibility G-3

G-4 IBM Informix Migration Guide
Notices
This information was developed for products and services offered in the U.S.A.
IBM may not offer the products, services, or features discussed in this document inother countries. Consult your local IBM representative for information on theproducts and services currently available in your area. Any reference to an IBMproduct, program, or service is not intended to state or imply that only that IBMproduct, program, or service may be used. Any functionally equivalent product,program, or service that does not infringe any IBM intellectual property right maybe used instead. However, it is the user's responsibility to evaluate and verify theoperation of any non-IBM product, program, or service.
IBM may have patents or pending patent applications covering subject matterdescribed in this document. The furnishing of this document does not grant youany license to these patents. You can send license inquiries, in writing, to:
IBM Director of LicensingIBM CorporationNorth Castle DriveArmonk, NY 10504-1785U.S.A.
For license inquiries regarding double-byte (DBCS) information, contact the IBMIntellectual Property Department in your country or send inquiries, in writing, to:
Intellectual Property LicensingLegal and Intellectual Property LawIBM Japan Ltd.1623-14, Shimotsuruma, Yamato-shiKanagawa 242-8502 Japan
The following paragraph does not apply to the United Kingdom or any othercountry where such provisions are inconsistent with local law: INTERNATIONALBUSINESS MACHINES CORPORATION PROVIDES THIS PUBLICATION "AS IS"WITHOUT WARRANTY OF ANY KIND, EITHER EXPRESS OR IMPLIED,INCLUDING, BUT NOT LIMITED TO, THE IMPLIED WARRANTIES OFNON-INFRINGEMENT, MERCHANTABILITY OR FITNESS FOR A PARTICULARPURPOSE. Some states do not allow disclaimer of express or implied warranties incertain transactions, therefore, this statement may not apply to you.
This information could include technical inaccuracies or typographical errors.Changes are periodically made to the information herein; these changes will beincorporated in new editions of the publication. IBM may make improvementsand/or changes in the product(s) and/or the program(s) described in thispublication at any time without notice.
Any references in this information to non-IBM websites are provided forconvenience only and do not in any manner serve as an endorsement of thosewebsites. The materials at those websites are not part of the materials for this IBMproduct and use of those websites is at your own risk.
© Copyright IBM Corp. 1996, 2012 H-1
IBM may use or distribute any of the information you supply in any way itbelieves appropriate without incurring any obligation to you.
Licensees of this program who wish to have information about it for the purposeof enabling: (i) the exchange of information between independently createdprograms and other programs (including this one) and (ii) the mutual use of theinformation which has been exchanged, should contact:
IBM CorporationJ46A/G4555 Bailey AvenueSan Jose, CA 95141-1003U.S.A.
Such information may be available, subject to appropriate terms and conditions,including in some cases, payment of a fee.
The licensed program described in this document and all licensed materialavailable for it are provided by IBM under terms of the IBM Customer Agreement,IBM International Program License Agreement or any equivalent agreementbetween us.
Any performance data contained herein was determined in a controlledenvironment. Therefore, the results obtained in other operating environments mayvary significantly. Some measurements may have been made on development-levelsystems and there is no guarantee that these measurements will be the same ongenerally available systems. Furthermore, some measurements may have beenestimated through extrapolation. Actual results may vary. Users of this documentshould verify the applicable data for their specific environment.
Information concerning non-IBM products was obtained from the suppliers ofthose products, their published announcements or other publicly available sources.IBM has not tested those products and cannot confirm the accuracy ofperformance, compatibility or any other claims related to non-IBM products.Questions on the capabilities of non-IBM products should be addressed to thesuppliers of those products.
All statements regarding IBM's future direction or intent are subject to change orwithdrawal without notice, and represent goals and objectives only.
All IBM prices shown are IBM's suggested retail prices, are current and are subjectto change without notice. Dealer prices may vary.
This information is for planning purposes only. The information herein is subject tochange before the products described become available.
This information contains examples of data and reports used in daily businessoperations. To illustrate them as completely as possible, the examples include thenames of individuals, companies, brands, and products. All of these names arefictitious and any similarity to the names and addresses used by an actual businessenterprise is entirely coincidental.
COPYRIGHT LICENSE:
This information contains sample application programs in source language, whichillustrate programming techniques on various operating platforms. You may copy,
H-2 IBM Informix Migration Guide
modify, and distribute these sample programs in any form without payment toIBM, for the purposes of developing, using, marketing or distributing applicationprograms conforming to the application programming interface for the operatingplatform for which the sample programs are written. These examples have notbeen thoroughly tested under all conditions. IBM, therefore, cannot guarantee orimply reliability, serviceability, or function of these programs. The sampleprograms are provided "AS IS", without warranty of any kind. IBM shall not beliable for any damages arising out of your use of the sample programs.
Each copy or any portion of these sample programs or any derivative work, mustinclude a copyright notice as follows:
© (your company name) (year). Portions of this code are derived from IBM Corp.Sample Programs.
© Copyright IBM Corp. _enter the year or years_. All rights reserved.
If you are viewing this information softcopy, the photographs and colorillustrations may not appear.
TrademarksIBM, the IBM logo, and ibm.com are trademarks or registered trademarks ofInternational Business Machines Corp., registered in many jurisdictions worldwide.Other product and service names might be trademarks of IBM or other companies.A current list of IBM trademarks is available on the web at "Copyright andtrademark information" at http://www.ibm.com/legal/copytrade.shtml.
Adobe, the Adobe logo, and PostScript are either registered trademarks ortrademarks of Adobe Systems Incorporated in the United States, and/or othercountries.
Intel, Itanium, and Pentium are trademarks or registered trademarks of IntelCorporation or its subsidiaries in the United States and other countries.
Java and all Java-based trademarks and logos are trademarks or registeredtrademarks of Oracle and/or its affiliates.
Linux is a registered trademark of Linus Torvalds in the United States, othercountries, or both.
Microsoft, Windows, and Windows NT are trademarks of Microsoft Corporation inthe United States, other countries, or both.
UNIX is a registered trademark of The Open Group in the United States and othercountries.
Other company, product, or service names may be trademarks or service marks ofothers.
Notices H-3

H-4 IBM Informix Migration Guide
Index
AAbbreviated years 9-1Accessibility G-1
dotted decimal format of syntax diagrams G-1keyboard G-1shortcut keys G-1syntax diagrams, reading in a screen reader G-1
ALARMPROGRAM configuration parameter 6-5, 6-6ANSI joins 7-3
BBackups
after upgrading 6-11before reverting 7-11before upgrading to a new version 3-8logical logs 6-6ON-Bar utility 3-8, 7-16ontape utility 3-8, 7-16source database 3-8
Binary files, loading 13-1, 13-2BladeManager
installing and registering DataBlade modules 6-11, 7-17removing new extensions before reversion 7-13
Blobspacesmoving, with onunload and onload 13-10, 13-11
boot90.sql and boot901.sql 7-1
CCharacter-position form of FILE and INSERT statements 10-9Checking available space
before migration 3-3Checking database integrity 6-10Chunks
reverting reserve pages 7-10Clusters
migrating to new release 5-1, 5-2restoring from a backup archive 5-12restoring from the HDR secondary server 5-12reverting 5-1, 5-10, 7-17upgrading to a new fix pack 5-2upgrading to a new PID 5-2
Code-set conversionHPL 2-5
Column-level encryption 7-3Command file
dbload 10-5Communications Support Module
configuring after migration 6-5removing if reverting 7-15saving before reverting 7-10
compliance with standards xiiiconcsm.cfg file
creating entries after migration 6-5removing if reverting 7-15saving before reverting 7-10
Configuration filecustomizing after migration 6-5replacing after reversion 7-14
Configuration file (continued)saving before migration 3-5saving before reverting 7-10
Configuration parametersadded in version 10.0 B-1added in version 11.10 B-1added in version 11.50 B-1added in version 11.70 B-1added in version 9.40 B-1ALARMPROGRAM 6-5, 6-6changed in Informix 11.70 C-1changed in the onconfig.std file C-1, C-2changed in Version 10.0 C-7changed in Version 11.10 C-7changed in Version 11.50 C-2changed in Version 9.30 C-7changed in Version 9.40 C-7changes in new server versions C-1CONVERSION_GUARD 6-7, 15-1HPL_DYNAMIC_LIB_PATH 6-5removed in Informix 11.70 C-1removed in new server versions C-1removed in Version 10.0 C-7removed in Version 11.10 C-7removed in Version 11.50 C-2removed in Version 9.30 C-7removed in Version 9.40 C-7RESTORE_POINT_DIR 6-7, 15-1ROOTOFFSET 6-5ROOTPATH 6-5ROOTSIZE 6-5STOP_APPLY 9-1UPDATABLE_SECONDARY 9-1USELASTCOMMITTED 9-1
conpload.sh script 6-6conploadlegacy.sh script 6-6CONVERSION_GUARD configuration parameter 6-7, 15-1
DData integrity 6-10Data migration
automatic 2-1constraints 2-1issues to consider 2-1overview 2-1prerequisites 2-1tools 2-1, 2-5, 2-6
Data typesuser defined
converting from version 9.21 4-2Database server
initializing after upgrading 6-6new version
performance tuning 6-11reverting from current version 7-1, 7-13starting after upgrading 6-6
Database serversmigrating 6-1, 6-8platforms and versions 1-6preparing for migration 3-1
© Copyright IBM Corp. 1996, 2012 X-1
Database servers (continued)upgrading 6-1, 6-8
Databasesownership, set by onload 13-10verifying integrity 6-10
DataBlade modulesinstalling after upgrading 6-5registering 6-11, 7-17
DB-Accessinput from the dbschema utility 11-16
dbexportSELECT triggers, disabling 9-1
dbexport utility 9-1-c option 9-3, 9-5-d option 9-3-nw option 9-3-q option 9-3-si option 9-3, 9-5-ss option 9-3, 9-5-V option 9-4-version option 9-4-X option 9-3destination options 9-5Interrupt key 9-5migration to an NLSCASE SENSITIVE database 9-2schema output 9-7syntax 9-3
dbimport utility 9-1-c option 9-8, 9-9-l option 9-12-q option 9-8-V option 9-8-version option 9-8-X option 9-8create options 9-11database logging mode 9-12importing from another computer 2-7input file location options 9-9Interrupt key 9-9locale, changing 9-13migration to an NLSCASE SENSITIVE database 9-2renaming a database 9-12syntax 9-7using with GLS 9-7using with NLS 9-13
dbload utility-c command file option 10-1-d database option 10-1-e errors option 10-1-e option 10-4-i ignore rows option 10-1-i option 10-4-k option 10-1-l error log file option 10-1-p option 10-1-r option 10-1, 10-3-s option 10-1-V option 10-1-version option 10-1-X option 10-1compared to LOAD 10-1creating a command file 10-5dbload utility
-n commit interval option 10-1FILE statement 10-5guidelines for handling objects 10-4ignoring rows 10-4
dbload utility (continued)importing from another computer 2-7INSERT statements 10-5
compared to SQL INSERT statement 10-10using 10-6
Interrupt key 10-4number errors to allow 10-4overview 10-1speed, increasing 10-4syntax 10-1table locking 10-3writing a command file
in character-position form 10-11in delimiter form 10-8
dbschema utility-ss option 11-6-u option 11-6chunk schema 11-9, 11-10create schema across a network 11-5create schema for a database 11-5distribution information 11-13example of file for DB-Access 11-16guidelines 11-2log schema 11-9, 11-10output example 11-14overview 11-1owner conventions 11-6privileges information 11-12privileges information for a role 11-13re-creating the schema 11-16sequence schema 11-7specifying a table, view, or procedure 11-8storage space schema 11-9, 11-10synonym schema 11-8syntax 11-2syntax for role schema 11-11table information 11-9
DBSECADM role 9-1dbspaces
moving tables to another dbspace 13-12Delimiter form of FILE and INSERT statements 10-6, 10-8Diagnostic information to gather 3-9Directories
installation 6-2Disabilities, visual
reading syntax diagrams G-1Disability G-1Distributed queries
with ANSI joins 7-3Dotted decimal format of syntax diagrams G-1Dummy updates 7-11
EEnterprise Gateway
using to import data 2-7Enterprise Gateway Manager 2-7Environment variables
DB_LOCALE 9-13DBCENTURY 9-1DBDATE 9-1DBTEMP 9-13Environment variables
new in version 9.20 A-1GL_DATETIME 12-2GL_USEGLU 6-4IFX_ONPLOAD_AUTO_UPGRADE 6-6
X-2 IBM Informix Migration Guide

Environment variables (continued)INFORMIXSERVER 6-4INFORMIXSQLHOSTS 6-4new in version 10.0 A-1new in version 11.10 A-1new in version 11.50 A-1new in version 11.70 A-1new in version 9.21 A-1new in version 9.30 A-1new in version 9.40 A-1ONCONFIG 6-4PATH 6-4resetting after reversion 7-15TEMP 9-13TMP 9-13USE_DTENV 12-2
Extents, checking 6-10Extracting schema information 8-1
FFast recovery
initiating 3-7FILE statement
character-position form 10-9delimiter form 10-6, 10-8syntax for
character-position form 10-10delimiter form 10-6
with dbload 10-5FIRST clause 7-3Fix packs
naming conventions 1-6
GGL_DATETIME environment variable 9-1, 12-2GL_USEGLU environment variable 6-4Global Language Support (GLS)
dbimport utility 9-7using onload and onunload 13-2
GRANT statementrole privileges 11-13
HHardware
prerequisites for migrating 1-5High-Performance Loader
ipload utility 2-5loading data 2-5onpladm utility 2-5
HPL_DYNAMIC_LIB_PATH configuration parameter 6-5
Iid_column 7-11IFX_ONPLOAD_AUTO_UPGRADE environment variable 6-6Importing
non-Informix data 2-7in dbschema output 11-12, 11-13In-place alters
dummy updates 7-11oncheck -pT command 7-11
In-place migration 1-2, 1-3, 2-1
Indexchecking 6-10rebuilding 6-6
industry standards xiiiInformix
fix packs 1-6installing 6-2naming conventions
releases 1-6INFORMIXDIR directory 6-2INFORMIXSERVER environment variable 6-4INFORMIXSQLHOSTS environment variable 6-4Initializing
after upgrading 6-6INSERT statements
character-position form 10-9delimiter form 10-6syntax for character-position form 10-10with dbload 10-5
Installation directory 6-2Installing Informix 6-2
JJava UDRs 7-15
KKernel parameters on UNIX or Linux 3-9Keywords of SQL
new D-1
LLabel-based access control (LBAC) 9-1Level-0 backup 3-8, 6-11, 7-16
after moving data 13-11LIMIT keyword 7-3Linux
migrating on 1-7LOAD SQL statement
for locales that support multibyte code sets 12-2overview 12-1syntax 12-2
LOAD statementfor non-default GL_DATETIME environment variable
settings 12-2for non-default locales 12-2
LoadingASCII files 2-7binary data 13-1, 13-2data 2-1, 2-5, 2-6, 2-7
Lockingset by onload 13-10
Logical logbackup 6-6out of space 6-6space required for migration 3-3
LTAPEDEV configuration parameteronunload/onload 13-11
MMac OS X
migrating on 1-8
Index X-3
Migratingbetween 32-bit and 64-bit database servers 3-10on the same computer 1-3overview 1-1to a different computer 1-4
Migrating a databaseconstraints 2-1issues to consider 2-1overview 2-1planning for 2-1prerequisites 2-1to a new operating system 8-1tools 2-1, 2-5, 2-6
Migrating with Enterprise Replication 4-1Migration
before you begin 3-1checklist 3-9diagnostic information that you need before
upgrading 3-9hardware prerequisites 1-5in-place 1-2, 1-3monitoring status with online.log 6-4Non-in-place 1-2, 1-4on Linux 1-7on Mac OS X 1-8on UNIX 1-7onload utility 13-3onunload utility 13-3paths 1-6planning 3-1planning for 1-2preparing for 3-1prerequisites 3-1process 1-1, 1-2skills you need 1-1software prerequisites 1-5space requirements 3-3time it takes 1-1tools 1-3with Enterprise Replication 4-1with HDR, RS, and SD servers 5-1, 5-2with high-availability clusters 5-1, 5-2
Modechecking 3-8
Monitoring migration status 6-4Moving data
automatically 2-1blobspaces 13-11constraints 2-1overview 2-1using dbexport and dbimport 9-1using dbload 10-1using distributed SQL 2-8using onload and onunload 13-1using onunload and onload 13-11, 13-12when changing operating systems 8-1, 8-2, 8-3
Multi-node Active Clusters for High Availability (MACH)Clusters
migrating to new release 5-1
NNative Language Support (NLS)
populating with dbimport 9-13Non-in-place migration 1-4Non-Informix data, importing 2-7
OON-Bar utility 6-9
backing upafter upgrading 6-11
backing up before upgrading 3-8oncheck utility
-cc database_name option 3-8, 6-10-cD database_name option 3-8, 6-10-ce option 3-8, 6-10-cI database_name option 3-8, 6-10-cr option 3-8, 6-10-cs sbspace_name option 6-10-cS sbspace_name option 6-10rebuilding table indexes 6-6verifying database integrity 3-7, 6-10
ONCONFIG environment variable 6-4ONCONFIG file
changes in new server versions C-1customizing after migration 6-5
onconfig.std filechanges in Informix 11.70 C-1changes in Version 11.50 C-2
oninit utility-s option 3-7
online.log 6-4onload and onunload utilities 13-11, 13-12onload utility
constraints 13-9constraints on use 13-2create options 13-8handling large objects in a blobspace 13-10how it works 13-3logging status 13-10moving a database 13-11moving a table 13-11, 13-12moving locales 13-2moving to another dbspace 13-12ownership and privileges 13-10specifying source parameters 13-7syntax 13-6using between computers 13-1
onmode -b command 14-1onmode utility
-b option 7-14-ky option 3-6-sy option 3-6reverting from the current version 7-14shutting down 3-6shutting down the server 3-6
onmode-b command 14-1syntax 14-1
onpload databaseupgrading 6-6
onrestorept utilityClusters
restoring primary server to a consistent point 5-11overview 15-1syntax 15-1undoing failed upgrade changes 5-11, 6-7
onstat utility 3-8ontape utility
-a option 6-6backing up
after upgrading 6-11before upgrading 3-8
onunload utilityconstraints on use 13-2, 13-5
X-4 IBM Informix Migration Guide
onunload utility (continued)destination parameters 13-4how it works 13-3locking 13-6logging mode 13-6moving a database 13-11moving a table 13-11, 13-12moving locales 13-2moving to another dbspace 13-12ownership and privileges 13-5syntax 13-3unloading tables 13-5using between computers 13-1what is included with a
database 13-5table 13-5
Operating systemadjusting tables after changing operating systems 8-2moving data to another one 8-1, 8-2, 8-3reconfiguring 3-9
Operating systemsnot supported 1-6the server runs on 1-6
ORDER BY clause 7-3Overview of migration process 1-1, 1-2, 1-3
PPATH environment variable 6-4Performance tuning
adjusting queries after upgrading 6-11after upgrading 6-11
Planningbefore moving data 2-1data migration 2-1for exporting and importing data 8-1for migration 1-1, 3-1for upgrading your server 3-1
Platforms, moving data betweencompatible computers 2-7
Privileges 11-12, 11-13required for onunload 13-5
QQueries
adjusting after upgrading 6-11Quiescent mode 3-8
RRecompiling Java UDRs 7-15Reconfiguring the operating system 3-9Registering DataBlade modules 6-11, 7-17Reserve pages, checking 6-10restore points 15-1RESTORE_POINT_DIR configuration parameter 6-7, 15-1Reversion utility 7-14Reverting
backing up before you start 7-11before using the onmode -b command 14-1chunk reserve pages 7-10determining if it is possible 7-2from the new version 7-1from Version 11.70 7-1, 7-13limitations 7-3
Reverting (continued)removing Version 11.70 features 7-13restrictions for 7-3restrictions for reverting to prior versions 7-2using the onmode -b command 14-1with Enterprise Replication 4-3with HDR, RS, and SD servers 5-1, 5-10, 7-17with high-availability clusters 5-1, 5-10, 7-17
ROOTOFFSET configuration parameter 6-5ROOTPATH configuration parameter 6-5ROOTSIZE configuration parameter 6-5Running the reversion utility 7-14
SSchema
create across a network 11-5create for a database 11-5display with dbschema 11-1
Screen readerreading syntax diagrams G-1
Scriptsconcdr.bat 4-1concdr.sh 4-1conpload.sh 6-6conploadlegacy.sh 6-6
SELECT triggers, disabling with dbexport 9-1Shortcut keys
keyboard G-1Simple large objects
moving with onload 13-10, 13-11SKIP keyword 7-3Slow queries
adjusting after upgrading 6-11sm_versions file 3-6, 6-9smi_unld utility 7-10Software
prerequisites for migrating 1-5Space
checking availability before migration 3-3for sysmaster database 3-3
SQL keywords D-1SQL statements
UPDATE STATISTICSdata distributions 11-13
sqlhosts file, UNIXchanging name or path 6-4csm option 6-5save a copy when migrating 3-5
standards xiiiStarting
after upgrading 6-6earlier database server after reversion 7-15
STOP_APPLY configuration parameter 9-1Syntax diagrams
reading in a screen reader G-1sysadmin database E-2sysbufpool table E-3syscdc database E-1sysdirectives table E-3sysindexes
changes to E-9sysmaster database
and logical logs 6-6changes to E-1space required for migration 3-3
syssesappinfo database E-1
Index X-5

System catalogsboot scripts 7-1changes to E-1, E-9checking tables 6-10
TTAPEDEV configuration parameter, with onunload and
onload 13-11Transactions
checking for open ones 3-7Truncate keyword 7-3
UUNIX
migrating on 1-7UNLOAD SQL statement
for locales that support multibyte code sets 12-2overview 12-1syntax 12-1
UNLOAD statementfor non-default GL_DATETIME environment variable
settings 12-2for non-default locales 12-2
UPDATABLE_SECONDARY configuration parameter 9-1UPDATE statements
dummy 7-11UPDATE STATISTICS statement 6-9
data distributions 11-13using after reversion 7-15
Upgrading 1-3migration paths 1-6
Upgrading your serveroverview of tasks 6-1planning 3-1preparing for 3-1preparing to undo changes 3-4prerequisites 3-1restoring files after a failure 6-7, 15-1
USE_DTENV environment variable 9-1, 12-2USELASTCOMMITTED configuration parameter 9-1USELASTCOMMITTED session environment variable 9-1User-defined data types
converting from version 9.21 4-2Utilities
dbexport 8-1, 9-1dbexport syntax 9-3dbimport 8-1, 9-1dbimport syntax 9-7dbload 10-1dbschema 11-1onload 8-1, 13-6onload and onunload 13-1, 13-11, 13-12onpladm 2-5onpload 2-5onunload 8-1, 13-3
VVerifying data integrity 6-10Visual disabilities
reading syntax diagrams G-1
X-6 IBM Informix Migration Guide


����
Printed in USA
GC27-3546-05

Spineinformation:
Info
rmix
Prod
uctF
amily
Info
rmix
Vers
ion
11.7
0IB
MIn
form
ixM
igra
tion
Guid
e��
�